

Page 1
Xerox Document Centre
r
dc02cc0304
September 20, 2002
Extended Features:
• Accounting
• Proof Print
• Staple
• Collation
• Duplex
• Cover Options
• Media Source,
Type, and Color
• Media Size
• Quantity
• Delay Print
… for the use
PDL Reference Guide for the
DC 555/545/535
Accessing Extended Features
Overview
This document enables you to access the extended features of the Document Centre in
environments that do not have a custom driver. This includes the following environments:
• Custom DOS packages
• Other platforms (including mainframes and minis)
NOTE: Some of the commands and syntax used in this document requires some familiarity
with either PostScript (PS) or Printer Command Language (PCL).
This document provides the Printer Description Language (PDL) commands and syntax for
each feature. The following items are also included:
• A table that describes features supported by the Document Centre.
• A PostScript table that describes the PostScript features the Document Centre supports
and the syntax to use the feature.
• A PCL table that describes the PCL features the Document Centre supports and the
syntax to use the feature.
This document is not intended to be a complete PS or PCL reference manual; it is a guide
This document
pertains to these
Xerox products:
x DC 555/545/535
DC 490/480/470/460
ST
DC 420/425/432/440
ST
DC 332/340 ST
DC 240/255/265
ST/LP
DC 220/230 ST/LP
DCCS 50
dc02cc0304
Document Centre Technical Support Operations Page 1
for using the PS and PCL commands with the Document Centre.
Refer to these additional reference materials PostScript Language Reference Manual, Third
Edition, ISBN 0-201-37922-8 and PCL 5 Printer Language Technical Reference Manual,
Hewlett-Packard Manual Part Number 5021-0377.
Using this Guide
1. Search the Feature Table to determine whether the feature you wish to use is
supported.
2. Verify that the feature is supported by the platform. For example, the Document Centre
must have the Finisher option installed to use stapling commands.
3. Follow across the table to find the syntax listed for the PDL examples shown. Read the
Dependencies/Caveats section.
Page 2
NOTE:
The Secure Print
feature is not
referenced in this
document. This
feature requires the
encryption scheme
that encodes the
secure print password
and is Xerox Private
Data.
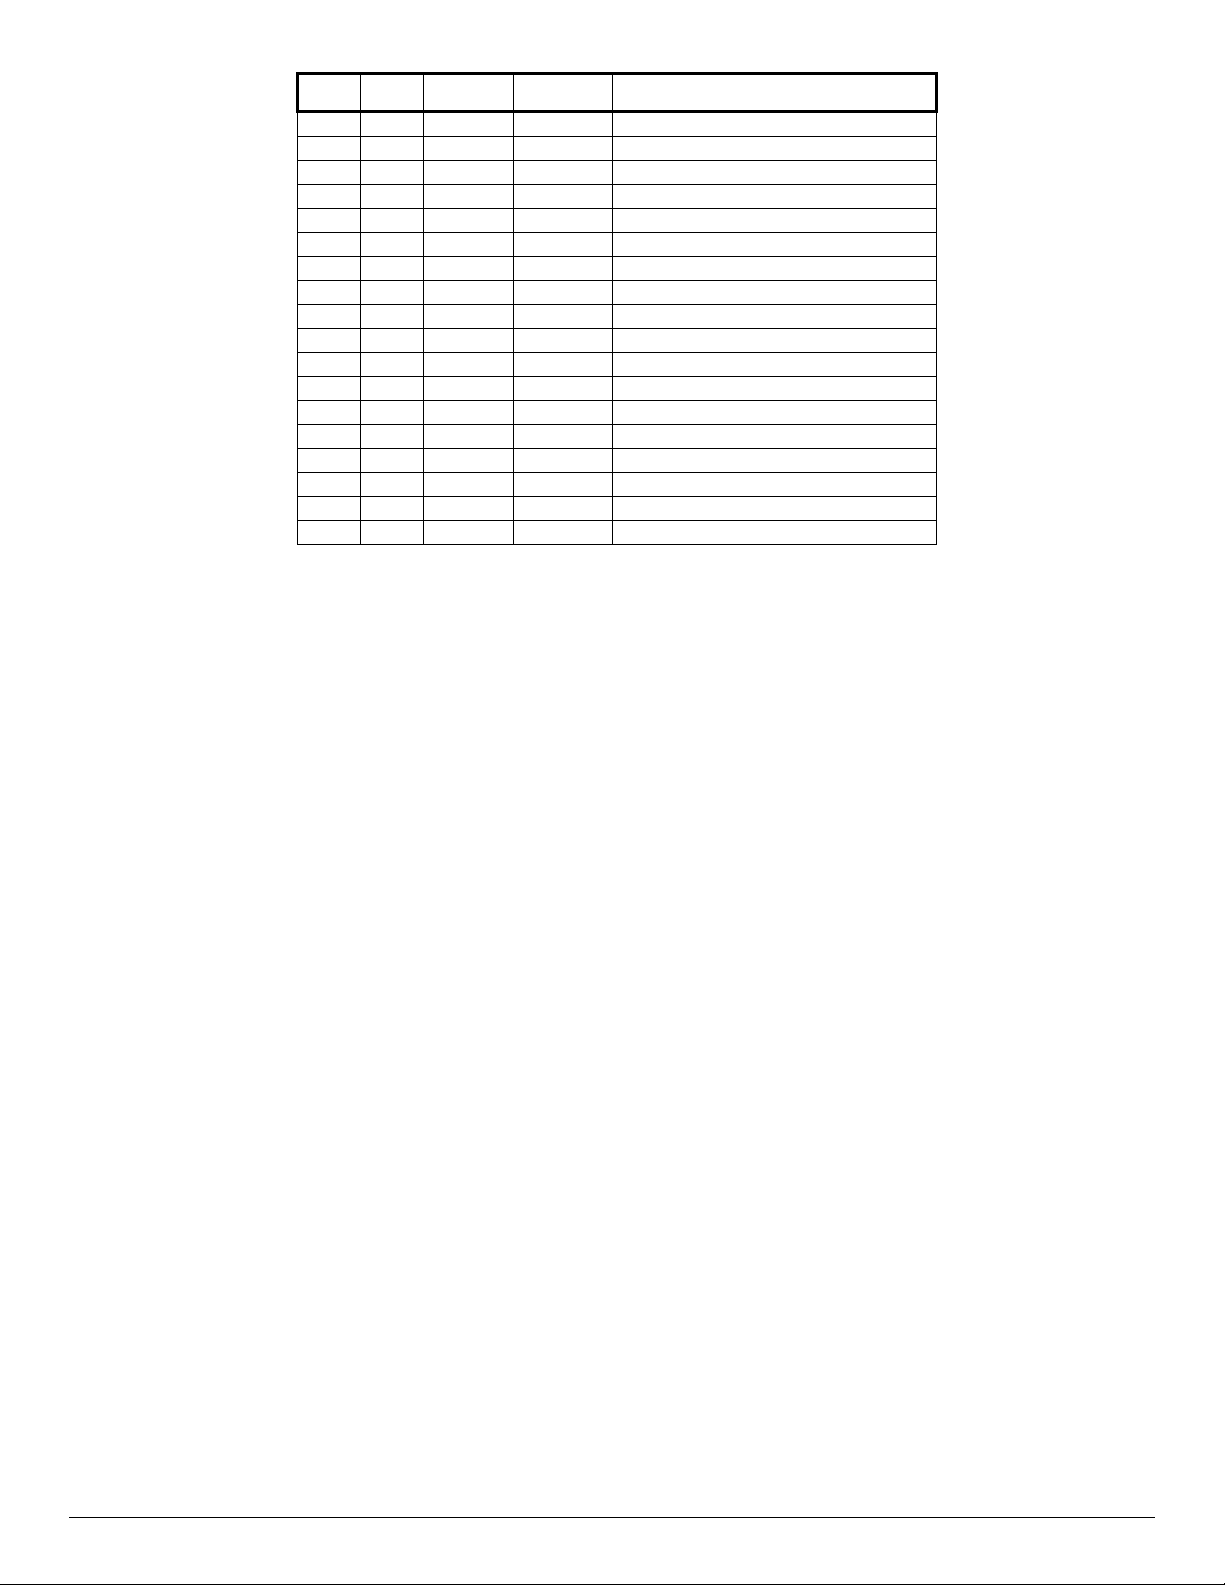
Print Features
The Document Centre supports PostScript level 2 and 3 commands or PCL5e and PCL6
escape sequences that enable the features listed in the following table.
Feature Description
Job Name Allows you to specify a job name.
Job Owner Allows you to specify a job owner.
Media Size Allows you to select media size.
Media Source Allows you to select the paper tray that feeds a print job.
Media Type Allows you to select type to media used to print a job.
Media Color Allows you to select the color of media used to print a job.
Output Location Allows you to select the output location where a job is delivered.
Stapling Indicates stapling for a print job.
Hole Punching Indicates hole drilling/punching after print job completes.
Collation Allows you to select the order of the output. Collated creates a set
that includes 1 copy of each page. Uncollated creates a stack of
multiple copies of the same page.
Resolution
Quantity Allows you to select the number of sets to print.
Simplex Delivers one-sided output.
Duplex Long Edge Binding Delivers two-sided output. Landscape documents read like a
Duplex Short Edge Binding Delivers two-sided output. Landscape documents read like a book
Orientation Allows you to select portrait or landscape orientation.
Forcing Short-Edge Feed Allow you to force some media sizes to print with the short-edge
Front Cover Imaged/Unimaged Allows you to select a blank or imaged front cover.
Front Cover Media Type Allows you to select media type for the front cover.
Front Cover Media Color Allows you to select media color for the front cover.
Front and Back Cover
Imaged/Unimaged
Front and Back Cover Media Type Allows you to select the media type for the front and back covers.
Front and Back Cover Media
Color
Accounting Allows you to enter an accounting code and UserID to track
Allows you to select the resolution used to image a job. Currently,
600 x 600 x 1 (600 dpi resolution with 2 gray levels), 600 x 600 x 2
(600 dpi resolution with 4 gray levels), 1200 x 1200, and 1800 x
1800 are available.
calendar, and Portrait documents read like a book.
and Portrait documents read like a calendar.
of the paper fed first.
Allows you to select blank or imaged front and back covers.
Allows you to select the media color for the front and back cover.
printer usage.
NOTE: This feature requires the optional Network Accounting kit.
Draft Mode Printing Allows you to select draft printing mode that conserves toner
when printing.
Image Quality Selection Allows you to increase or decrease the amount of toner used to
create an image. Image quality levels range from 1 (darkest) to 7
(lightest).
Job Type Allows you to select normal print, secure print, or proof print. Proof
print is the same as sample set.
dc02cc0304
Page 2 Document Centre Technical Support Operations
Page 3
Feature Description
Printer Banner Sheet Allows you to turn printer banner pages on or off based on
individual jobs.
Interleave Allows you to insert blank or imaged sheets between
transparencies.
Interleave Media Color Allows you to select media color for the interleaves. Only use this
feature in conjunction with the interleave feature.
Delay Print Allows you to specify a time up to 72 hours from the current
printer time, to print a job.
dc02cc0304
Document Centre Technical Support Operations Page 3
Page 4
PostScript
This section describes the PostScript commands required to access specific Document
Centre features. This table lists each feature and the PostScript syntax that is required to
use the feature. Following this table are some examples of how to use these commands and
what the PostScript file looks like.
For more information about PostScript commands, refer to the PostScript Language
Reference Manual, Third Edition, ISBN 0-201-37922-8.
Print Features
Feature Implementation Values
Job Owner
Job Name %%OID_ATT_JOB_NAME “string”
Media Size <</PageSize [width height]>>
%%OID_ATT_JOB_OWNER “string”
setpagedevice
Where string is a maximum of 40 characters
Where string is a maximum of 40 characters
[width x height] in 1/72 inch (points)
[612 792] = Letter (8.5 x 11 inches)
[612 1008 = Legal (8.5 x 14 inches)
[792 1224] = Ledger (11 x 17 inches)
[612 936] = Folio (8.5 x 13 inches)
[522 756] = Executive (7.25 x 10.5 inches)
[396 612] = 5.5 x 8.5 inches
[360 504] = 5 x 7 inches
[576 720] = 8 x 10 inches
[648 792] = Letter Cover (9 x 11 inches)
[324 432] = Postcard (4.5 x 6 inches)
[842 1191] = A3 (297 x 420 mm)
[595 842] = A4 (210 x 297 mm)
[632 842] = A4 Cover (223 x 297 mm)
[420 595] = A5 (148 x 210 mm)
[297 420] = A6 (105 x 148 mm)
[729 1032] = Jis b4 (257 x 364 mm)
[516 729] = JIS B5 (182 x 257 mm)
[363 516] = JIS B6 (128 x 182 mm)
[279 540] = Monarch Envelope
[297 684] = No. 10 Envelope (4.1 x 9.5")
[312 624] = DL Envelope (110 x 220 mm)
[459 649] = C5 Envelope (162 x 229 mm)
(3.9 x 7.5")
NOTE: Use this command in conjunction witth
the Media Type and Media Color commands
(see below in table)
Media Type <</MediaType (string)>> setpagedevice
Media Color <</MediaColor (string)>> setpagedevice
Where string is one of the following:
bond, letterhead, standard, transparency, labels,
drilled, recycled, preprinted, cardstock, other,
system-default, envelopes, tabs, Custom1 –
Custom7
NOTE: Use this command in conjunction with the
commands Media Size and Media Color.
Where string is one of the following:
buff, blue, clear, gray, green, ivory, orange, other,
pink, red, white, yellow, goldenrod, unspecified,
Custom1 - Custom 7.
NOTE: Use this command in conjunction with the
two commands Media Size and Media Type.
dc02cc0304
Page 4 Document Centre Technical Support Operations
Page 5
Feature Implementation Values
Media Source <</MediaPosition int>> setpagedevice
Output Location –
options supported
depend on output
device.
Stapling <</Staple int
<< /OutputType (string) >> setpagedevice
OR
%%OID_ATT_OUTPUT_BINS value
<</StapleDetails<</Type1/StapleLocation
(string)>>
>>
>>setpagedevice
Where int is one of the following:
0 = Auto Select
1=Tray 1
2=Tray 2
3 = Tray 3 (High Capacity)
4 = Tray 4 (High Capacity)
5 = Bypass Tray (SMH)
NOTE: See the media selection comments in
the Dependencies / Caveats section.
Where string can be one of the following:
When a catch tray is installed:
SideTray
When a 2000 Sheet Stapler Stacker (Office
Finisher) is installed:
TopTray
Stacker
Where value can one of the following:
OID_VAL_OUTPUT_BIN_TOP or
OID_VAL_OUTPUT_BIN_SIDE
OID_VAL_OUTPUT_BIN_STACKER
NOTE: You cannot use the finisher stacker tray
with envelopes and labels. Stapling or punching
requires use of the stacker tray. If you indicate an
invalid combination of commands, the output
location request is ignored.
Where int is one of the following:
0 = No Staple
3 = Staple at the end of set
Where string is one of the following three values:
SinglePortrait - for single staple in portrait
documents.
SingleLandscape - for single staple in Landscape
documents
Hole Punching << /Punch int
/PunchDetails << /Type 6
/NumHoles 1 >> >> setpagedevice
Collation <</Collate value>> setpagedevice
DualLandscape - two staples
NOTE: Refer to the "Single Staple Location" table
later in this document, for information about
staple location restrictions.
Where int is one of the following:
0 = No Punch
4 = Punch each page
NOTE: You can use the hole punching
command with 8.5 x 11", 11 x 17", 9 x 11", A4,
A3 and A4 cover size media only. Use the
"rotated landscape" orientation with 11 x 17"
and A3 pages.
Where value is one of the following:
true = Collated
false = Uncollated
dc02cc0304
Document Centre Technical Support Operations Page 5
Page 6
Feature Implementation Values
Resolution
600 x 600 x 1
1200 x 1200 x 1
1800 x 1800 x 1
<</DeviceRenderingInfo
<< /Type 4 /ValuesPerColorComponent 2
>>
/HWResolution [x y]>> setpagedevice
Where x and y are one of the following:
600 600
1200 1200
1800 1800
600 x 600 x 2
Quantity <</NumCopies int>>setpagedevice
Simplex <</Duplex value>> setpagedevice
Duplex Long Edge
Binding
Duplex Short Edge
Binding
Landscape
Orientation
<</DeviceRenderingInfo
<< /Type 4 /ValuesPerColorComponent 4
>>
/HWResolution [x y]>> setpagedevice
OR
%% OID_ATT_COPY_COUNT value
<</Duplex true /Tumble value>>
setpagedevice
<</Duplex true /Tumble value>>
setpagedevice
<</PageSize[height width]>>
setpagedevice
Where int or value is 1 to 9999
Where value is false
Where value is false
Where value is true
[height/width] in 1/72 inch (points)
To print landscape, use the Media Size
command with height and width reversed. For
example:
[792 612] = Letter, landscape
[842 595] = A4, landscape
For landscape documents printed on 11 x 17",
8.5 x13", 8.5 x 14" or A3, apply a 180° rotation to
landscape pages to ensure the correct location of
stapling or punching.
Use the PostScript command: "0 0 moveto 180
rotate -height -width translate" which should
appear after any "setpagedevice" commands.
The following example, for an A3 landscape page
illustrates this syntax.
<</PageSize [1191 843]>> setpagedevice
…any other "setpagedevice" commands.
0 0 moveto 180 rotate -1191 -842 translate
…rest of print commands for page.
Force short edge
feeding
%%OID_ATT_FEED_EDGE value;
or
<< /LeadingEdge int >> setpagedevice
Where value is one of the following:
For portrait documents use:
OID_VAL_FEED_EDGE_SHORT_TRAILING
For landscape documents use:
OID_VAL_FEED_EDGE_SHORT_LEADING
Where int is one of the following:
For portrait documents use: 2
For landscape documents use: 0
NOTE: The following media sizes default to printing
with the long-edge fed first: Letter, Letter Cover,
Statement, Executive, 8 x 10", A4, A4 Cover and
B5. It is possible to force these media sizes to print
with short-edge first.
dc02cc0304
Page 6 Document Centre Technical Support Operations
Page 7
Feature Implementation Values
Front Cover
Imaged Enable/
Disable
Front Cover Media
Type
Front Cover Media
Color
Front Cover Media
Size
Front & Back
Cover Imaged
Enable/
Disable
Front & Back
Cover Media Type
Front & Back
Cover Media Color
Front & Back
Cover Media Size
Draft Mode
Printing
%%OID_ATT_FIRST_PAGE_ IMAGED
“value”
%%OID_ATT_FIRST_PAGE_
MEDIA_TYPE “value”;
%%OID_ATT_FIRST_PAGE_
MEDIA_COLOR “value”;
%%OID_ATT_FIRST_PAGE_MEDIA_SIZ
E "xxx yyy"
%%OID_ATT_FIRSTLAST_PAGE_IMAG
ED “value”
%%OID_ATT_FIRSTLAST_PAGE_
MEDIA_TYPE “value”;
%%OID_ATT_FIRSTLAST_PAGE_
MEDIA_COLOR “value”;
%%OID_ATT_FIRSTLAST_PAGE_MEDI
A_SIZE "xxx yyy"
%%OID_ATT_PRINT_
QUALITY value;
Where value is
TRUE or FALSE
TRUE produces an imaged cover.
FALSE produces a blank cover.
NOTE: Use this command in conjunction with
these commands: Front Cover Media Type and
Front Cover Media Color.
Where value is one of the following:
standard, transparency, labels, drilled, recycled,
pre-printed, heavyweight, other
NOTE: Use this command in conjunction with
these commands: Front Cover Imaged Enable
and Front Cover Media Color.
Where value is one of the following:
yellow, green, buff, white, red, ivory, gray, clear,
pink, goldenrod, orange, blue, other
NOTE: Use this command in conjunction with
these commands: Front Cover Imaged Enable
and Front Cover Media Type.
Where xxx and yyy are the media size
expressed in mm.
NOTE: This command is optional. Use only
when printing blank front covers. Use this
command in conjunction with the Front Cover
Image Enable/Disable and the commends it
required, that is, Front Cover Media Type, Front
Cover Media Color, and Front Cover Imaged
Enable/Disable.
Where value is
TRUE = an imaged front and back cover.
or
FALSE = a blank front and back cover.
NOTE: Use this command in conjunction with
these commands: Front & Back Cover Media
Type and Front & Back Cover Media Color.
Where value is one of the following:
standard, transparency, labels, drilled, recycled,
pre-printed, heavyweight, other
NOTE: Use this command in conjunction with
these commands: Front & Back Cover Imaged
Enable and Front & Back Cover Media Color.
Where value is one of the following:
yellow, green, buff, white, red, ivory, gray, clear,
pink, goldenrod, orange, blue, other
NOTE: Use this command in conjunction with
these commands: Front & Back Cover Imaged
Enable and Front & Back Cover Media Type.
Where xxx and yyy are the media size
expressed in mm.
NOTE: This command is optional. Use only
when printing blank front and back covers. This
command must be used in conjunction with the
Front & Back Cover Image Enable/Disable and
the commands it requires, that is, Front & Back
Cover Media Type, Front & Back Cover Media
Color, and Front & Back Cover Imaged
Enable/Disable.
Where value is one of the following:
OID_VAL_PRINT_QUALITY_NORMAL
OID_VAL_PRINT_QUALITY_DRAFT
dc02cc0304
Document Centre Technical Support Operations Page 7
Page 8
Feature Implementation Values
Image Quality
Selection
%%OID_ATT_IMAGE_QUALITY n;
Job Type %%OID_ATT_JOB_TYPE value;
Printer Banner
Sheet
Interleave %%OID_ATT_INTERLEAVE value;
Interleave Media
Color
Accounting %%OID_ATT_ACCOUNTING_INFORMA
Delay Print %%OID_ATT_JOB_PRINT_AFTER
%%OID_ATT_START_SHEET value;
%%OID_ATT_INTERLEAVE_ COLOR
“value”;
TION "UserID|042AccountID";
"yyyymmddhhmmss”
Where value is one of the following:
False = Bold HP type output
True = Xerox High Accuracy output
Where n applies for Xerox High Accuracy Output
and is a number in the range:
-3 (lightest) to 0 (normal) to +3 (darkest)
Where value is one of the following:
OID_VAL_JOB_TYPE_PRINT
OID_VAL_JOB_TYPE_PROOF_PRINT
Where value is one of the following:
OID_VAL_JOB_SHEET_FULL (On)
OID_VAL_JOB_SHEET_NONE (Off)
Where value is one of the following:
OID_VAL_INTERLEAVE_NONE
OID_VAL_INTERLEAVE_BLANK
OID_VAL_INTERLEAVE_IMAGED
NOTE: Use this command in conjunction with the
command: Interleave Media Color.
Where value is one of the following:
yellow, green, buff, white, red, ivory, gray, clear,
pink, goldenrod, orange, blue, other.
NOTE: Use this command in conjunction with the
command: Interleave.
Where UserID is a value that the Printer
Administrator assigns to a user.
Where AccountID is a value that the Printer
Administrator assigns to the account.
NOTE: The User ID and the Account ID must
be delimited by a |042.
Allows you to specify the time a job prints. Yyou
can set this time up to 72 hours from the
current printer time.
Where yyyy is the year, mm is the month, dd is
the date, hh is the hour, mm is the minute of the
hour, and ss is the second of that minute.
NOTE: The hours are expressed in a 24-hour
clock. For example: July 29, 1999 at 3:25 PM is
expressed as: 19990729152500.
dc02cc0304
Page 8 Document Centre Technical Support Operations
Page 9
EURO Font
The Euro character is provided in all standard Latin fonts (letter fonts such as Helvetica and
Times) and the Symbol font included with the Adobe PostScript 3 interpreter. Special fonts
such as ZapfDingbats do not contain the Euro symbol. Although the Euro character’s “glyph”
is added to the PostScript fonts, standard font encoding (that is, the character set) does not
include the character.
To access the Euro character’s glyph directly, use the “glyphshow” command as shown in
the following example:
%!PS-Adobe-3.0
/Times-Roman findfont 12 scalefont setfont
120 735 moveto
(The price of this unit is: ) show /Euro glyphshow (200.00) show
showpage
Basic PostScript Template
This section illustrates a standard PostScript template used to access general print features,
as well as, unique features of the Document Centre products. This template lists each
feature and the syntax, both PostScript commands and DSC (Document Structuring
Conventions), required to use these features.
Section 1 (Adobe Reference Command)
%!PS
NOTE:
The print job specifies
the following items:
• Job owner
• Job name
• 11 x 17 paper size
• Drilled
• Ivory paper
• 1200 x 1200
resolution
• Staple off
• Landscape
• Sample set
• Draft mode
• Offset off
• Banner sheet off
• Duplex long edge
• One copy
The quotations in the
Job Name and Job
Owner lines are
required.
Section 2 (XRXbegin - Opening Comment Statement, Required)
%% XRXbegin
Section 3 (OID Commands)
%%OID_ATT_JOB_OWNER "John Smith";
%%OID_ATT_JOB_TYPE OID_VAL_JOB_TYPE_PRINT;
%%OID_ATT_START_SHEET OID_VAL_JOB_SHEET_NONE;
%%OID_ATT_JOB_NAME "Readme.txt";
%%OID_ATT_PRINT_QUALITY OID_VAL_PRINT_QUALITY_DRAFT;
Section 4 (XRXend - Closing statement for Comment Section, Required)
%% XRXend
Section 5 (Options Such as Selecting Different Fonts, Simplex, Duplex, etc.)
<< /PostRenderingEnhance false >> setpagedevice
<< /Staple 0 >> setpagedevice
<< /Jog 0 >> setpagedevice
<< /ManualFeed false >> setpagedevice
<< /MediaType (Drilled) >> setpagedevice
<< /MediaColor (Ivory) >> setpagedevice
<< /DeviceRenderingInfo << /Type 4 /ValuesPerColorComponent 2 >>
/HWResolution [1200 1200] >> setpagedevice
<< /PageSize [792 1224] /ImagingBBox null >> setpagedevice
dc02cc0304
Document Centre Technical Support Operations Page 9
Page 10

<< /Duplex true /Tumble false >> setpagedevice
<< /Collate false >> setpagedevice
Section 6 (Postscript Data Stream Inserted Here)
[PostScript]
Section 7 (EOF - Closing Statement for PostScript File, Required)
%%EOF
dc02cc0304
Page 10 Document Centre Technical Support Operations
Page 11

Sample PostScript Headers
j
NOTE:
The header for simple
print specifies the Job
Owner, Job Name,
and one copy.
The quotations in the
Job Owner and Job
Name lines are
required.
NOTE:
This is a proof print
ob header. This job
requests 6 copies.
NOTE:
This job header
specifies the following
items:
• 10 copies
• Duplex
• Collated
• Stapled
• Sent to the main
tray
• Job name
• Bold image quality
Example 1 Header for Simple Print
%!PS
%%XRXbegin
%%OID_ATT_JOB_OWNER “John Smith”
%%OID_ATT_JOB_NAME “Print Job”
%%OID_ATT_COPY_COUNT 1
%%XRXend
Example 2 Header for Proof Print
%!PS
%%XRXbegin
%%OID_ATT_JOB_TYPE OID_VAL_JOB_TYPE_PROOF_PRINT
%%OID_ATT_COPY_COUNT 6
%%XRXend
Example 3 Header for Finishing Options
%!PS
%%XRXbegin
%%OID_ATT_JOB_OWNER “John Smith”
%%XRXend
<</PageSize [612 792]>>setpagedevice
<</OutputType (
<</Staple 3>>setpagedevice
<</Duplex true /Tumble false>> setpagedevice
<</PostRenderingEnhance true>>setpagedevice
<</Collate true>>setpagedevice
<</NumCopies 10>>setpagedevice
MainTray)>>setpagedevice
To use the staple and
collate features, you
must send the output
to the stacker.
dc02cc0304
Document Centre Technical Support Operations Page 11
Page 12

PostScript Feature Dependencies/Caveats
• All %% commands (DSC comments) must be in the first 4096 bytes of the job.
• When using duplicate commands, the last command takes precedence. Since the
setpagedevice commands are normally after the %% commands (DSC comments), the
setpagedevice normally takes precedence.
• The Document Centre supports PostScript resolutions up to and including 1800 x 1800.
Some PostScript jobs may not print if you use this resolution. If printing stops, reprint the
same job at a lower resolution.
• Do not duplex or staple any job with media sizes A6, B6, 5 x 7" Postcard (4.5 x 6"),
envelopes or any custom sized media where the page width is less than 5.5". A request
to duplex or staple these media sizes is ignored.
• Do not duplex any job with transparencies, labels, envelopes or tab-stock. The duplex
print request is ignored when it includes any of these media types.
• To use the duplex front and back imaged covers option most effectively, remember
these items when you prepare the contents of the print file:
− The Document Centre uses the contents of the first two and last two pages of the file
as the front cover, inside front cover, back cover, and inside back cover.
− The remaining pages print on the document body media type and color.
− If a print file contains an odd number of pages, the Document Centre leaves the last
body page (that is, the page adjacent to the inside back cover) blank.
• When using the Blank Front or the Blank Front and Back Cover command, the Cover
Media Size command is optional. If the Cover Media Size command is not in the PDL,
the printer uses the media size from the document body.
• Use one of the following methods to specify media selection:
− Describe the media size, color, and type and allow the device to select the correct
source tray. If you describe the media, leave source tray information out of the
request or set to Auto. Otherwise, the tray selection defeats the auto tray selection
capabilities of the device.
− Indicate the media feed tray the device should use. In doing so, you allow the device
to select media feed trays based on the paper defined by SYSTEM DEFAULT,
unless specified otherwise. This method prevents inadvertent use of special paper
types. To override a paper type definition, include a paper type specification of
UNSPECIFIED in the job.
dc02cc0304
Page 12 Document Centre Technical Support Operations
Page 13

PCL
This section describes the PCL commands required for specific features. This table lists
each feature and the PCL syntax that is required to use the feature. Following this table are
examples of how to use these commands and what the PCL file looks like.
Refer to these reference materials: PCL 5 Printer Language Technical Reference Manual,
Hewlett-Packard Manual Part Number 5021-0377.
NOTE: Throughout this document, <esc> refers to the escape key. When you see <esc>,
substitute the escape character appropriate for your environment.
PCL Print Features
Feature Implementation Values
Job Name @PJL COMMENT OID_ATT_JOB_NAME
“string”;
Job Owner @PJL COMMENT
OID_ATT_JOB_OWNER “string”;
Custom Paper Size –
available only for PCL
@PJL COMMENT
OID_ATT_PCL_CUSTOM_DIMENSIONS
(x.0 y.0)
<esc>101A
Media Size <esc> & l int A
Where string is a maximum of 40 characters
Where string is a maximum of 40 characters
Where x and y are millimeters expressed as
integer.
NOTE: You must use both the PJL comment
and the escape code. The value 101 in the
escape code indicates custom sized job. The
PJL comment communicates the media size to
use.
Where int is one of the following:
2 = Letter ( 8.5 x 11 inches)
3 = Legal ( 8.5 x 14 inches)
6 = Ledger ( 11 x 17 inches )
44 = 8.5 x 13 inches (215 x 330 mm)
1 = 7.25 x 10.5 inches
41 = Statement (8.5 x 5.5 inches)
204 = 5 x 7 inches
208 = 8 x 10 inches
201 = 9 x 11 inches
211 = Postcard (4.5 x 6 inches)
27 = A3 ( 297 x 420 mm)
26 = A4 ( 210 x 297 mm)
200 = Oversized A4 (223 x 297 mm)
42 = A5 ( 148 x 210 mm)
203 = A6 ( 105 x 148 mm)
202 = B4 (257 x 364 mm)
45 = B5 (182 x 257 mm)
205 = B6 (128 x 182 mm)
80 = Monarch Envelope (3.9 x 7.5")
8 = No. 10 Envelope (4.1 x 9.5")
90 = DL Envelope (110 x 220 mm)
91 = C5 Envelope (162 x 229 mm)
NOTE: Use this command in conjunction with
these commands: Media Type and Media Color.
All paper sizes are supported by all products.
Please check the product documentation for
paper sizes it supports.
dc02cc0304
Document Centre Technical Support Operations Page 13
Page 14

Feature Implementation Values
Media Type
PJL COMMENT
ID_ATT_DEFAULT_MEDIUM_TYPE
“value”
Where value is one of the following:
bond, letterhead, standard, transparency, labels,
drilled, recycled, preprinted, cardstock, other,
system-default, envelopes, tabs, Custom1 –
Custom7
NOTE: Use this command in conjunction with
these commands: Media Size and Media Color.
Media Color
PJL COMMENT
ID_ATT_DEFAULT_MEDIUM_ COLOR
“value”
Where value is one of the following:
buff, blue, clear, gray, green, ivory, orange,
other, pink, red, white, yellow, goldenrod,
unspecified, Custom1 - Custom 7.
NOTE: Use this command in conjunction with
these commands Media Size and Media Type.
Media Source <esc> & l int H
Where int is one of the following:
0 = Auto Select
1 = Tray 1
4 = Tray 2
23 = Tray 3 (High Capacity)
24 = Tray 4 (High Capacity)
2 = Bypass Tray
NOTE: See the media selection comments in the
Dependencies / Caveats section.
Where value can be one of the following:
Output Location –
Options supported
depend on output device.
@PJL COMMENT
OID_ATT_OUTPUT_BINS value
With a catch tray:
OID_VAL_OUTPUT_BIN_SIDE
With a 2000 Sheet Stapler/Stacker (Office
Finisher)
OID_VAL_OUTPUT_BIN_TOP
OID_VAL_OUTPUT_BIN_STACKER
NOTE: You cannot use the finisher stacker tray
with envelopes and labels. Stapling or punching
requires use of the stacker tray. If you indicate an
invalid combination of commands, the output
location request is ignored.
Where value is one of the following:
Stapling @PJL COMMENT OID_ATT_FINISHING
OID_VAL_FINISHING_STAPLE;
@PJL COMMENT XRXSTAPLE = value
PORTRAIT
LANDSCAPE
DUAL
Refer to the "Single Staple Location" table later in
this document, for information about staple
location restrictions.
Hole Punching
@PJL COMMENT OID_ATT_PUNCH int;
Where int is one of the following:
0 = No Punch
1 = Punch each page
NOTE: You can only use the optional hole
punching command with 8.5 x 11", 11 x 17", 9 x
11", A4, A3 and A4 cover size media. Use the
"rotated landscape" orientation with 11 x 17" and
A3 pages.
Collation @PJL COMMENT OID_ATT_OUTPUT
value;
Where value is one of the following:
OID_VAL_OUTPUT_PAGE_COLLATE
OID_VAL_OUTPUT_NO_PAGE_COLLATE
Resolution
PJL SET RESOLUTION = value; Where value is the following:
600
dc02cc0304
Page 14 Document Centre Technical Support Operations
Page 15

Feature Implementation Values
Quantity <esc> & l int X
or
Where int is:
1 to 9999 (1 to 999 for DC2xx devices)
@PJL SET COPIES = int
Simplex
<esc> & l int S Where int is the following:
0 = Simplex
Duplex <esc> & l int S
Orientation <esc> & l int O
Where int is one of the following:
1 = Duplex Long Edge Binding
2 = Duplex Short Edge Binding
Where int is one of the following:
0 = Portrait
1 = Landscape
2 = Rotated Portrait
3 = Rotated Landscape
NOTE: To ensure the correct location of
stapling or punching, use 180°.rotated
landscape mode to print landscape documents
with media sizes of 11 x 17", 8.5 x13", 8.5 x 14"
or A3.
Force short edge feeding @PJL COMMENT
OID_ATT_FEED_EDGE value;
Where value is one of the following:
For portrait documents use:
OID_VAL_FEED_EDGE_SHORT_TRAILING
For landscape documents use:
OID_VAL_FEED_EDGE_SHORT_LEADING
NOTE: The following media sizes default to
printing with the long-edge fed first: letter, letter
cover, statement, executive, 8 x 10", a4, a4 cover
and B5. It is possible to force these media sizes to
print with short-edge first.
Front Cover Imaged
Enable/Disable
@PJL COMMENT
OID_ATT_FIRSTLAST_PAGE_ IMAGED
value;
Where value is one of the following:
TRUE = an imaged cover
or
FALSE = a blank cover
NOTE: Use this command in conjunction with
these commands: Front Cover Media Type and
Front Cover Media Color.
Front Cover Media Type @PJL COMMENT
OID_ATT_FIRST_PAGE_MEDIA_TYPE
“ value”
Where value is one of the following:
system-default, standard, transparency, labels,
drilled, recycled, preprinted, heavyweight, other.
NOTE: Use this command in conjunction with the
these commands: Front Cover Imaged Enable
and Front Cover Media Color.
Front Cover Media Color @PJL COMMENT
OID_ATT_FIRST_PAGE_MEDIA_
COLOR “value”
Where value is one of the following:
yellow, green, buff, white, red, ivory, gray, clear,
pink, goldenrod, orange, blue, other
NOTE: Use this command in conjunction with
these commands: Front Cover Imaged Enable
and Front Cover Media Type.
Front Cover Media Size @PJL COMMENT
OID_ATT_FIRST_PAGE_MEDIA_SIZE
"xxx yyy"
Front and Back Cover
Imaged/Unimaged
@PJL COMMENT
OID_ATT_FIRSTLAST_PAGE_ IMAGED
value
Where xxx and yyy are the media size
expressed in mm.
NOTE: Only use this optional command when
printing Blank Front Covers. Use this command
with Front Cover Imaged Enable/Disable and its
required commands, that is, Front Cover Media
Type, Front Cover Media Color, and Front Cover
Imaged Enable/Disable.
Where value is one of the following:
TRUE = an imaged front and back
or
FALSE = a blank front and back cover
NOTE: Use this command in conjunction with
these commands: Front & Back Cover Media
Type and Front & Back Cover Media Color.
dc02cc0304
Document Centre Technical Support Operations Page 15
Page 16
r
Feature Implementation Values
Front & Back Cover
Media Type
@PJL COMMENT
OID_ATT_FIRSTLAST_PAGE_MEDIA_TY
PE “value”
Where value is one of the following:
system-default, standard, transparency, labels,
drilled, recycled, pre-printed, heavyweight, and
other.
NOTE: Use this command in conjunction with the
previous and these commands: Front and Back
Cover Imaged Enable and Front and Back Cover
Media Color.
Front & Back Cover
Media Color
@PJL COMMENT
OID_ATT_FIRSTLAST_PAGE_MEDIA_
COLOR “value”
Where value is one of the following:
yellow, green, buff, white, red, ivory, gray, clear,
pink, goldenrod, orange, blue, other
NOTE: Use this command in conjunction with
these commands: Front & Back Cover Imaged
Enable and Front & Back Cover Media Type.
Front & Back Cove
Media Size
Image Quality Selection
@PJL COMMENT
OID_ATT_FIRSTLAST_PAGE_MEDIA_SIZ
E "xxx yyy"
@PJL SET DENSITY= value
Where xxx and yyy are the media size
expressed in mm.
NOTE: Only use this option when printing blank
front and back covers. Use this command in
conjunction with the Front/Back Cover Image
Enable/Disable command and its required
commands, that is, Front/Back Cover Media
Type, Front/Back Cover Media Color, and
Front/Back Cover Imaged Enable/Disable.
Where value is a number in the range:
1 (lightest) to 7 (darkest).
Draft Mode Printing @PJL COMMENT
OID_ATT_PRINT_QUALITY value
Where value is one of the following:
OID_VAL_PRINT_QUALITY_NORMAL
OID_VAL_PRINT_QUALITY_DRAFT
Job Type @PJL COMMENT OID_ATT_JOB_TYPE
value
Where value is one of the following:
OID_VAL_JOB_TYPE_PRINT
OID_VAL_JOB_TYPE_ PROOF_PRINT
Banner Sheet @PJL COMMENT
OID_ATT_START_SHEET value
Where value is one of the following:
OID_VAL_JOB_SHEET_FULL (On)
OID_VAL_JOB_SHEET_NONE (Off)
Interleave @PJL COMMENT
OID_ATT_INTERLEAVE value
Where value is one of the following:
OID_VAL_INTERLEAVE_NONE
OID_VAL_INTERLEAVE_BLANK
OID_VAL_INTERLEAVE_IMAGED
Interleave Media Color @PJL COMMENT
OID_ATT_INTERLEAVE_COLOR “value”
Accounting @PJL COMMENT
OID_ATT_ACCOUNTING_INFORMATION
"UserID|042AccountID";
Delay Print @PJL COMMENT
OID_ATT_JOB_PRINT_AFTER
"yyyymmddhhmmss”
Condensed Printing
<esc>&k2S
Where value is one of the following:
yellow, green, buff, white, red, ivory, gray, clear,
pink, goldenrod, orange, blue, other
Where UserID is a value the Printer
Administrator assigns to a user.
Where AccountID is a value the Printer
Administrator assigns to the account.
NOTE: Delimit the User ID and the Account ID
by a |042.
Where yyyy is the year, mm is the month, dd is
the date, hh is the hour, mm is the minute of
the hour, and ss is the second of that minute.
NOTE: The hours are expressed in a 24 hour
clock. For example: July 29, 1999 at 3:25 PM is
expressed as: 19990729152500.
See the DC Tip, Formatting Condensed Print
for Document Centre for examples and
additional information.
Stair-stepping <esc>k2G Helps to resolve stair-stepping in most
instances.
dc02cc0304
Page 16 Document Centre Technical Support Operations
Page 17
EURO Font
For the DC 555/545/535 the Euro character is provided in all of the standard Latin in the
following PCL symbol sets:
PCL Symbol Set Symbol Set Code Code Page Euro Sign Character Code
Windows 3.1 Latin 1 19U 1252 128
Windows 3.1 Latin 2 9E 1250 128
Windows 3.1 Latin 5 5T 1254 128
You can select these symbol sets as default from the Document Centre Web client and the
local user interface. The Euro character is not supported using other symbol sets including
“Win 3.0 Latin 1” (9U) or “ISO-Latin-9” (9N) symbol sets.
The following example selects the “Antique Olive” font, 12 point size and the “Windows 3.1
Latin 1” symbol set.
<esc>%12345X
<esc>(19U<esc>(s1p12v0s0b4168T
The price of this unit is: €100.00
<esc>%12345X
dc02cc0304
Document Centre Technical Support Operations Page 17
Page 18
Basic PCL Template
This section illustrates a standard PCL template that is used to access general print features
as well as Document Centre Product specific features. This template lists each feature and
the syntax, both PCL commands and PJL, required to use these features. The next section
of this document contains other examples of how to use these commands.
NOTE:
This print job specifies
the following items:
• Job owner
• Job name
• 11 x 17 paper size
• Heavyweight
• Green paper
• 1 staple
• Sample set
• Draft mode
The quotations in the
Job Name and Job
Owner lines are
required.
Section 1 (Opening Command, Required for all files)
<ESC>%-12345X@PJL JOB
Section 2 (PJL Set Commands)
@PJL SET RESOLUTION=600
@PJL SET COPIES=1
@PJL SET DENSITY=4
@PJL SET JOBOFFSET=ON
Section 3 (XRXbegin – Opening Comment Statement, Required)
@PJL COMMENT XRXbegin
Section 4 (PJL Comments)
@PJL COMMENT OID_ATT_JOB_NAME "Readme.txt";
@PJL COMMENT OID_ATT_START_SHEET OID_VAL_JOB_SHEET_NONE;
@PJL COMMENT OID_ATT_JOB_OWNER "John Smith";
@PJL COMMENT OID_ATT_JOB_TYPE OID_VAL_JOB_TYPE_PRINT;
@PJL COMMENT OID_ATT_DEFAULT_MEDIUM_TYPE "Cardstock";
@PJL COMMENT OID_ATT_DEFAULT_MEDIUM_COLOUR "Green";
@PJL COMMENT OID_ATT_PRINT_QUALITY OID_VAL_PRINT_QUALITY_DRAFT;
@PJL COMMENT OID_ATT_FINISHING OID_VAL_FINISHING_STAPLE;
@PJL COMMENT XRXSTAPLE=PORTRAIT;
"6.15.0.128.95.124.157.20.0.1.11.4";
Section 5 (XRXend - Closing Statement for Comment Section, Required)
@PJL COMMENT XRXend
Section 6 (PCL Code used to invoke PCL Language)
@PJL ENTER LANGUAGE=PCL
Section 7 (PCL Data Stream or ASCII Document inserted here for Options such as
Selecting Different Fonts, Simplex, Duplex, etc.)
[Document or Text to be printed out inserted here]
_%1BINWU0PW0,0PW0,1UL1,60,40UL2,12.5,12.5,12.5,12.5,12.5,12.5,12.5,12.5UL3,40,25,
10,25UL4,35,15,10,15,10,15LT0,10,1LTLA1,4,2,1SP1TR0CF2_%1A_&l1X_&l1S_&l0H_&l0o
6a4d1E_*t600R_*v1onT_*rF_*c7181x4609Y_*p162x555Y_*cT_*pxY_%1BIP0,0,1016,1016
SC0,600,0,600;_%1A_*v1O_*v1T_%0BFT10,0;_%0A_*p544x855Y_*c2160a3200b1P_(19U
_(s4099t0b0s20.00h0P_*vT_%0BFT;_%0A_*p544x883Y
Section 8 (Closing Command , Required at end of Document)
<ESC>%-12345X
dc02cc0304
Page 18 Document Centre Technical Support Operations
Page 19

NOTE:
q
This simple print job
header specifies the
Job Owner and Job
Name and one copy.
The quotations in the
Job Owner and Job
Name lines are
re
uired.
NOTE:
This proof print job
header requests 6
copies.
NOTE:
This proof print job
header requests the
staple option. You
must send the job to
the stacker using the
native PCL command.
Sample PCL Headers
Example 1 Header for Simple Print
<ESC>%-12345X@PJL JOB
@PJL SET COPIES= 1
@PJL COMMENT XRXbegin
@PJL COMMENT OID_ATT_JOB_OWNER “John Smith”;
@PJL COMMENT OID_ATT_JOB_NAME “Print Job”;
@PJL COMMENT XRXend
[Insert document or text to be printed here]
<ESC>%-12345X
Example 2 Header for Proof Print
<ESC>%-12345X@PJL JOB
@PJL SET COPIES= 6
@PJL COMMENT XRXbegin
@PJL COMMENT OID_ATT_JOB_TYPE OID_VAL_JOB_TYPE_ PROOF_PRINT
@PJL COMMENT XRXend
[Insert document or text to be printed here]
<ESC>%-12345X
Example 3 Header for Finishing Options
<ESC>%-12345X@PJL JOB
@PJL COMMENT XRXbegin
@PJL COMMENT OID_ATT_JOB_OWNER “John Smith”
@PJL COMMENT OID_ATT_JOB_TYPE OID_VAL_JOB_TYPE_PROOF_PRINT;
@PJL COMMENT OID_ATT_FINISHING OID_VAL_FINISHING_STAPLE;
@PJL COMMENT XRXSTAPLE=PORTRAIT;
@PJL COMMENT XRXend
<ESC>\027&l2G
[Insert document or text to be printed here]
<ESC>%-12345X
dc02cc0304
Document Centre Technical Support Operations Page 19
Page 20

PCL Feature Dependencies/Caveats
• All PJL commands must be in the first 4096 bytes of the job.
• To combine printer escape commands (not including PJL commands):
The first two characters after the <esc> MUST be the same.
All alpha characters MUST be lowercase, except the final terminating character.
The commands are read left to right. Combine commands in the order you wish them
to execute.
For example, combine print 5 copies (<ESC>&
<ESC>&
• In case of duplicate commands, the last one requested takes precedence.
• The @PJL SET COPIES takes precedence over the PCL Escape Command (<ESC> &
l5x2A.
l5X) and use letter size (<ESC>&l2A) as
l int X>) to set copies. In general, a PJL command takes precedence over a PCL
command.
• Do not duplex and/or staple any job with these media sizes: A6, B6, 5 x 7" Postcard (4.5
x 6"), envelopes and any custom sized media where the page width is less than 5.5". A
request to duplex or staple these media sizes is ignored.
• Do not duplex any job with transparencies, labels, envelopes or tab-stock The duplex print
request is ignored if you use any of these media types.
• To use the duplex front and back imaged covers option most effectively, remember
these items when you prepare the contents of the print file:
− The Document Centre uses the contents of the first two and last two pages of the file
as the front cover, inside front cover, back cover, and inside back cover.
− The remaining pages print on the document body media type and color.
− If a print file contains an odd number of pages, the Document Centre leaves the last
body page (that is, the page adjacent to the inside back cover) blank.
• When using the Blank Front or the Blank Front & Back Cover command the Cover Media
Size command is optional. If the cover size command is not in the PDL, the printer
assigns the media size of the document body to the cover.
• Use one of the methods described in the following list to specify media selection:
Describe the media attributes with size, color, and type and allow the device to select
the correct source tray. If you describe the media leave source tray information out of
the request or set to Auto. Otherwise, the tray selection defeats the auto tray
selection capabilities of the device.
Indicate the media feed tray to use. In doing so, you allow the device to select media
feed trays based on paper type defined by SYSTEM DEFAULT unless specified
otherwise. This method prevents inadvertent use of special paper types. To override
a paper type definition, include a paper type specification of UNSPECIFIED in the
job.
dc02cc0304
Page 20 Document Centre Technical Support Operations
Page 21

Single Staple Location
The following table indicates the location of single staples for different media sizes when
using the Document Centre 555/545/535 2000 Sheet Stapler/Stacker (Office Finisher).
Media Sizes Portrait Staple Position Landscape Staple Position
Legal ( 8.5 x 14 inches)
8.5 x 13 inches (215 x 330 mm)
Statement (8.5 x 5.5 inches)
A5 ( 148 x 210 mm)
Also the following media sizes
when short-edge feed printing is
forced:
Letter ( 8.5 x 11 inches)
A4 ( 210 x 297 mm)
Letter ( 8.5 x 11 inches)
7.25 x 10.5 inches
8 x 10 inches
9 x 11 inches
A4 ( 210 x 297 mm)
Oversized A4 (223 x 297 mm)
B5 (182 x 257 mm)
Ledger ( 11 x 17 inches )
A3 ( 297 x 420 mm)
B4 (257 x 364 mm)
┌──────────┐
│| │
││
││
│ Portrait │
││
││
││
└──────────┘
┌──────────┐
│/ │
││
││
│ Portrait │
││
││
││
└──────────┘
┌──────────┐
│ \│
││
││
│ Portrait │
││
││
││
└──────────┘
Note that stapling in the top-left
corner is not possible with these
media sizes.
┌───────────────┐
│/ │
││
│ Landscape │
││
││
└───────────────┘
Note that you should use "Rotated
Landscape" mode to ensure optimal
staple location.
┌───────────────┐
│ \│
││
│ Landscape │
││
││
└───────────────┘
Note that stapling in the top-left
corner is not possible with these
media sizes.
┌───────────────┐
│/ │
││
│ Landscape │
││
││
└───────────────┘
Note that you should use "Rotated
Landscape" mode to ensure optimal
staple location.
dc02cc0304
Document Centre Technical Support Operations Page 21
Page 22

PostScript Fonts
The following PostScript fonts are resident with the Adobe interpreter.
AdobeSansMM
AdobeSerifMM
AlbertusMT
AlbertusMT-Italic
AlbertusMT-Light
AntiqueOlive-Bold
AntiqueOlive-Compact
AntiqueOlive-Italic
AntiqueOlive-Roman
Apple-Chancery
Arial-BoldItalicMT
Arial-BoldMT
Arial-ItalicMT
ArialMT
AvantGarde-Book
AvantGarde-BookOblique
AvantGarde-Demi
AvantGarde-DemiOblique
Bodoni
Bodoni-Bold
Bodoni-BoldItalic
Bodoni-Italic
Bodoni-Poster
Bodoni-PosterCompressed
Bookman-Demi
Bookman-DemiItalic
Bookman-Light
Bookman-LightItalic
Carta
Chicago
Clarendon
Clarendon-Bold
Clarendon-Light
CooperBlack
CooperBlack-Italic
Copperplate-ThirtyThreeBC
Copperplate-ThirtyTwoBC
Coronet-Regular
Courier
Courier-Bold
Courier-BoldOblique
Courier-Oblique
Eurostile
Eurostile-Bold
Eurostile-BoldExtendedTwo
Eurostile-ExtendedTwo
Geneva
GillSans
GillSans-Bold
GillSans-BoldCondensed
GillSans-BoldItalic
GillSans-Condensed
GillSans-ExtraBold
GillSans-Italic
GillSans-Light
GillSans-LightItalic
Goudy
Goudy-Bold
Goudy-BoldItalic
Goudy-ExtraBold
Goudy-Italic
Helvetica
Helvetica-Bold
Helvetica-BoldOblique
Helvetica-Condensed
Helvetica-Condensed-Bold
Helvetica-Condensed-BoldObl
Helvetica-Condensed-Oblique
Helvetica-Narrow
Helvetica-Narrow-Bold
Helvetica-Narrow-BoldOblique
Helvetica-Narrow-Oblique
Helvetica-Oblique
HoeflerText-Black
HoeflerText-BlackItalic
HoeflerText-Italic
HoeflerText-Ornaments
HoeflerText-Regular
JoannaMT
JoannaMT-Bold
JoannaMT-BoldItalic
JoannaMT-Italic
LetterGothic
LetterGothic-Bold
LetterGothic-BoldSlanted
LetterGothic-Slanted
LubalinGraph-Book
LubalinGraph-BookOblique
LubalinGraph-Demi
LubalinGraph-DemiOblique
Marigold
MonaLisa-Recut
Monaco
NewCenturySchlbk-Bold
NewCenturySchlbk-BoldItalic
NewCenturySchlbk-Italic
NewCenturySchlbk-Roman
NewYork
Optima
Optima-Bold
Optima-BoldItalic
Optima-Italic
Oxford
Palatino-Bold
Palatino-BoldItalic
Palatino-Italic
Page 22 Document Centre Technical Support Operations
Palatino-Roman
StempelGaramond-Bold
StempelGaramond-BoldItalic
StempelGaramond-Italic
StempelGaramond-Roman
Symbol
Tekton
Times-Bold
Times-BoldItalic
Times-Italic
Times-Roman
TimesNewRomanPS-
BoldItalicMT
TimesNewRomanPS-BoldMT
TimesNewRomanPS-ItalicMT
TimesNewRomanPSMT
Univers
Univers-Bold
Univers-BoldExt
Univers-BoldExtObl
Univers-BoldOblique
Univers-Condensed
Univers-CondensedBold
Univers-CondensedBoldOblique
Univers-CondensedOblique
Univers-Extended
Univers-ExtendedObl
Univers-Light
Univers-LightOblique
Univers-Oblique
Wingdings-Regular
ZapfChancery-MediumItalic
ZapfDingbats
dc02cc0304
Page 23

PCL Fonts
The following PCL fonts are resident with the Phoenix interpreter.
Each of these commands references a 12-point font. If you wish to use any other point size,
change the 12v to the desired size (.25 - 999.75).
The commands listed use the default symbol set, Roman-8. To change the symbol set, you
include the alternate symbol set after the first <ESC> and before the second <ESC>. Use
the line printer examples as a reference.
Font Name PCL Escape Command
Albertus Medium <esc>(<esc>(s1p12v0s1b4362T
Albertus Extra Bold <esc>(<esc>(s1p12v0s4b4362T
Antique Olive <esc>(<esc>(s1p12v0s0b4168T
Antique Olive Bold <esc>(<esc>(s1p12v0s3b4168T
Antique Olive Italic <esc>(<esc>(s1p12v1s0b4168T
Arial <esc>(<esc>(s1p12v0s0b16602T
Arial Bold <esc>(<esc>(s1p12v0s3b16602T
Arial Italic <esc>(<esc>(s1p12v1s0b16602T
Arial Bold Italic <esc>(<esc>(s1p12v1s3b16602T
CG Times <esc>(<esc>(s1p12v0s0b4101T
CG Times Bold <esc>(<esc>(s1p12v0s3b4101T
CG Times Italic <esc>(<esc>(s1p12v1s0b4101T
CG Times Bold Italic <esc>(<esc>(s1p12v1s3b4101T
CG Omega <esc>(<esc>(s1p12v0s0b4113T
CG Omega Bold <esc>(<esc>(s1p12v0s3b4113T
CG Omega Italic <esc>(<esc>(s1p12v1s0b4113T
CG Omega Bold Italic <esc>(<esc>(s1p12v1s3b4113T
Clarendon Condensed <esc>(<esc>(s1p12v4s3b4140T
Coronet <esc>(<esc>(s1p12v1s0b4116T
Courier <esc>(<esc>(s0p12h0s0b4099T
Courier Bold <esc>(<esc>(s0p12h0s3b4099T
Courier Italic <esc>(<esc>(s0p12h1s0b4099T
Courier Bold Italic <esc>(<esc>(s0p12h1s3b4099T
Garamond Antiqua <esc>(<esc>(s1p12v0s0b4197T
Garamond Halbfett <esc>(<esc>(s1p12v0s3b4197T
Garamond Kursiv <esc>(<esc>(s1p12v1s0b4197T
Garamond Kursiv Halbfett <esc>(<esc>(s1p12v1s3b4197T
Line Printer (Roman-8) <esc>(8U<esc>(s0p16.67h8.5v0s0
b0T
Line Printer (Latin-1) <esc>(0N<esc>(s0p16.67h8.5v0s0
b0T
Line Printer (PC-8) <esc>(10U<esc>(s0p16.67h8.5v0s
0b0T
dc02cc0304
Document Centre Technical Support Operations Page 23
Page 24

Font Name PCL Escape Command
Line Printer (PC-8 D/N) <esc>(11U<esc>(s0p16.67h8.5v0s
0b0T
Line Printer (PC-850) <esc>(12U<esc>(s0p16.67h8.5v0s
0b0T
Line Printer (Legal) <esc>(1U<esc>(s0p16.67h8.5v0s0
b0T
Marigold <esc>(<esc>(s1p12v0s0b4297T
Times New <esc>(<esc>(s1p12v0s0b16901T
Times New Bold <esc>(<esc>(s1p12v0s3b16901T
Times New Italic <esc>(<esc>(s1p12v1s0b16901T
Times New Bold Italic <esc>(<esc>(s1p12v1s3b16901T
Symbol <esc>(19M<esc>(s1p12v0s0b166
86T
Wingdings <esc>(579L<esc>(s1p12v0s0b314
02T
Univers Bold <esc>(<esc>(s1p12v0s3b4148T
Univers Bold Italic <esc>(<esc>(s1p12v1s3b4148T
Univers Bold Condensed <esc>(<esc>(s1p12v4s3b4148T
Univers Bold Condensed Italic <esc>(<esc>(s1p12v5s3b4148T
dc02cc0304
Page 24 Document Centre Technical Support Operations
Page 25

ASCII Conversion Table
Hex Dec Alpha EBCDIC Description
00 000 Null 00 NULL
01 001 SOH 01 start-of-heading
02 002 STX 02 start-of-text
03 003 ETX 03 end-of-text
04 004 EOT 37 end-of-transmission
05 005 ENQ 2D enquiry
06 006 ACK 2E acknowledge
07 007 BEL 2F bell
08 008 BS 16 backspace
09 009 HT 05 tab
0A 010 LF 25 linefeed
0B 011 VT 0B vertical-tab
0C 012 FF 0C formfeed page
0D 013 CR 0D carriage-return
0E 014 SO 0E shift-out
0F 015 SI 0F shift-in
10 016 DLE 10 data-link-escape
11 017 DC1 11 XON
12 018 DC2 12 R
13 019 DC3 13 XOFF
14 020 DC4 3C DC4 DCL
15 021 NAK 3D negative-acknowledge
16 022 SYN 32 synchronous-idle
17 023 ETB 11 end-of-transmission
18 024 CAN 18 cancel
19 025 EM 19 end-of-medium
1A 026 SUB 3F substitute
1B 027 ESC 27 escape
1C 028 FS 22 field-separator
1D 029 GS - group-separator
1E 030 RS 35 record-separator
1F 031 US - unit-separator
20 032 Space 40 space
21 033 ! 5A exclamation-point
22 034 “ 7F " straight-double
23 035 # 7B # number-sign
24 036 $ 5B $ dollar-sign
25 037 % 6C % percent-sign
26 038 & 50 & ampersand
27 039 ’ 7D ' apostrophe
28 040 ( 4D ( left-parenthesis
29 041 ) 5D ) right-parenthesis
2A 042 * 5C * asterisk
2B 043 + 4E + addition-sign
2C 044 , 6B , comma
2D 045 - 60 - hyphen
2E 046 ” 4B . period
2F 047 / 61 / right-slash
30 048 0 F0 0
31 049 1 F1 1
32 050 2 F2 2
33 051 3 F3 3
34 052 4 F4 4
dc02cc0304
Document Centre Technical Support Operations Page 25
Page 26

Hex Dec Alpha EBCDIC Description
35 053 5 F5 5
36 054 6 F6 6
37 055 7 F7 7
38 056 8 F8 8
39 057 9 F9 9
3A 058 : 7A : colon
3B 059 ; 5E ; semicolon
3C 060 < 4C < less-than
3D 061 > 7E = equals
3E 062 = 6E > greater-than
3F 063 ? 6F ? question-mark
40 064 @ 7C @ at-symbol
41 065 A C1 A
42 066 B C2 B
43 067 C C3 C
44 068 D C4 D
45 069 E C5 E
46 070 F C6 F
47 071 G C7 G
48 072 H C8 H
49 073 I C9 I
4A 074 J D1 J
4B 075 K D2 K
4C 076 L D3 L
4D 077 M D4 M
4E 078 N D5 N
4F 079 O D6 O
50 080 P D7 P
51 081 Q D8 Q
52 082 R D9 R
53 083 S E2 S
54 084 T E3 T
55 085 U E4 U
56 086 V E5 V
57 087 W E6 W
58 088 X E7 X
59 089 Y E8 Y
5A 090 Z E9 Z
5B 091 [ - [ left-bracket
5C 092 \ E0 \ left-slash backslash
5D 093 ] - ] right-bracket
5E 094 ^ - ^ caret
5F 095 _ 6D _ underscore
60 096 ` - ` accent
61 097 a 81 a
62 098 b 82 b
63 099 c 83 c
64 100 d 84 d
65 101 e 85 e
66 102 f 86 f
67 103 g 87 g
68 104 h 88 h
69 105 i 89 i
6A 106 j 91 j
6B 107 k 92 k
6C 108 l 93 l
6D 109 m 94 m
dc02cc0304
Page 26 Document Centre Technical Support Operations
Page 27
Hex Dec Alpha EBCDIC Description
6E 110 n 95 n
6F 111 o 96 o
70 112 p 97 p
71 113 q 98 q
72 114 r 99 r
73 115 s A2 s
74 116 t A3 t
75 117 u A4 u
76 118 v A5 v
77 119 w A6 w
78 120 x A7 x
79 121 y A8 y
7A 122 z A9 z
7B 123 { C0 { left-brace
7C 124 | 6A | vertical-bar
7D 125 } D0 } right-brace
7E 126 ~ A1 ~ tilde
7F 127 DEL 07 ^? delete
dc02cc0304
Document Centre Technical Support Operations Page 27
Page 28

Additional Information
Xerox’s Document Centre Technical Support Operations welcomes feedback on all DC Tips
documentation - send feedback via e-mail to:
USA.DSSC.Doc.Feedback@mc.usa.xerox.com.
Other DC Tips are available at the following URL:
http://www.xerox.com/DocumentCentreFamily/Tips
XEROX ®, The Document Company ®, the digital X ®, and all Xerox product names are trademarks of XEROX
CORPORATION. Other trademarks belong to their respective owners.
Copyright © XEROX CORPORATION 2002. All Rights Reserved.
.
dc02cc0304
Page 28 Document Centre Technical Support Operations
 Loading...