

Xerox CopyCentre C65, CopyCentre C75, CopyCentre C90, WorkCentre Pro 65, WorkCentre Pro 75 Guide
...Page 1

Getting to Know Your WorkCentre Pro/CopyCentre
This package is designed to help the delivery team explain the
features available on the WorkCentre Pro
optional finisher. It is for demonstration purposes only and is not the
formal customer product training given by Xerox.
The delivery team demonstrates these exercises:
Page
3 EXERCISE 1 - Power Switch Locations
4 EXERCISE 2 - Major Components
5 EXERCISE 3 - Fill Trays 1, 5, 6
6 EXERCISE 4 - User Interface Components
7 EXERCISE 5 - The Document Glass
8 EXERCISE 6 - The Document Feeder
9 EXERCISE 7 - The Bypass Tray (Tray 5)
10 EXERCISE 8 - Customer Replaceable Units
11 EXERCISE 9 - Machine Status Pathway
These are self-instruction exercises for customers:
®
/CopyCentre™ with
13 EXERCISE 10 - Select Paper Orientation
14 EXERCISE 11 - Copy from the Document Glass
15 EXERCISE 12 - Copy Mixed Size Originals
16 EXERCISE 13 - Make a 2-1 Sided Copy
17 EXERCISE 14 - Enlarge An Image
18 EXERCISE 15 - Use Build Job
20 EXERCISE 16 - View Finisher Options
21 EXERCISE 17 - Finisher: Make a 1 sided Tri-Fold
23 EXERCISE 18 - Finisher: Make a 2 Sided Tri-Fold
25 EXERCISE 19 - Finisher: Make a Booklet
30 EXERCISE 20 - Send an E-mail or Internet Fax
If the customer has questions refer them to the Information CD. If that does not answer their
question have them contact the Xerox Welcome Centre.
May 2003 604E02400 1
Page 2
What the Delivery Team needs to know
This document serves two purposes.
• Providing the Xerox Installation team with information to share with the customer during installation.
• Provides initial getting started information for the customer.
Important customer information is indicated by an arrow icon.
Terms:
• CopyCentre
• WorkCentre Pro
to make copies, or (optionally) do a Network Scanning job.
How to place originals when using the copier functions of either the WorkCentre Pro
CopyCentre™.
• Place originals face side up when using the Document Feeder.
• Place originals face side down when using Document Glass.
• Paper orientation depends on which edge of the paper is fed into the machine first.
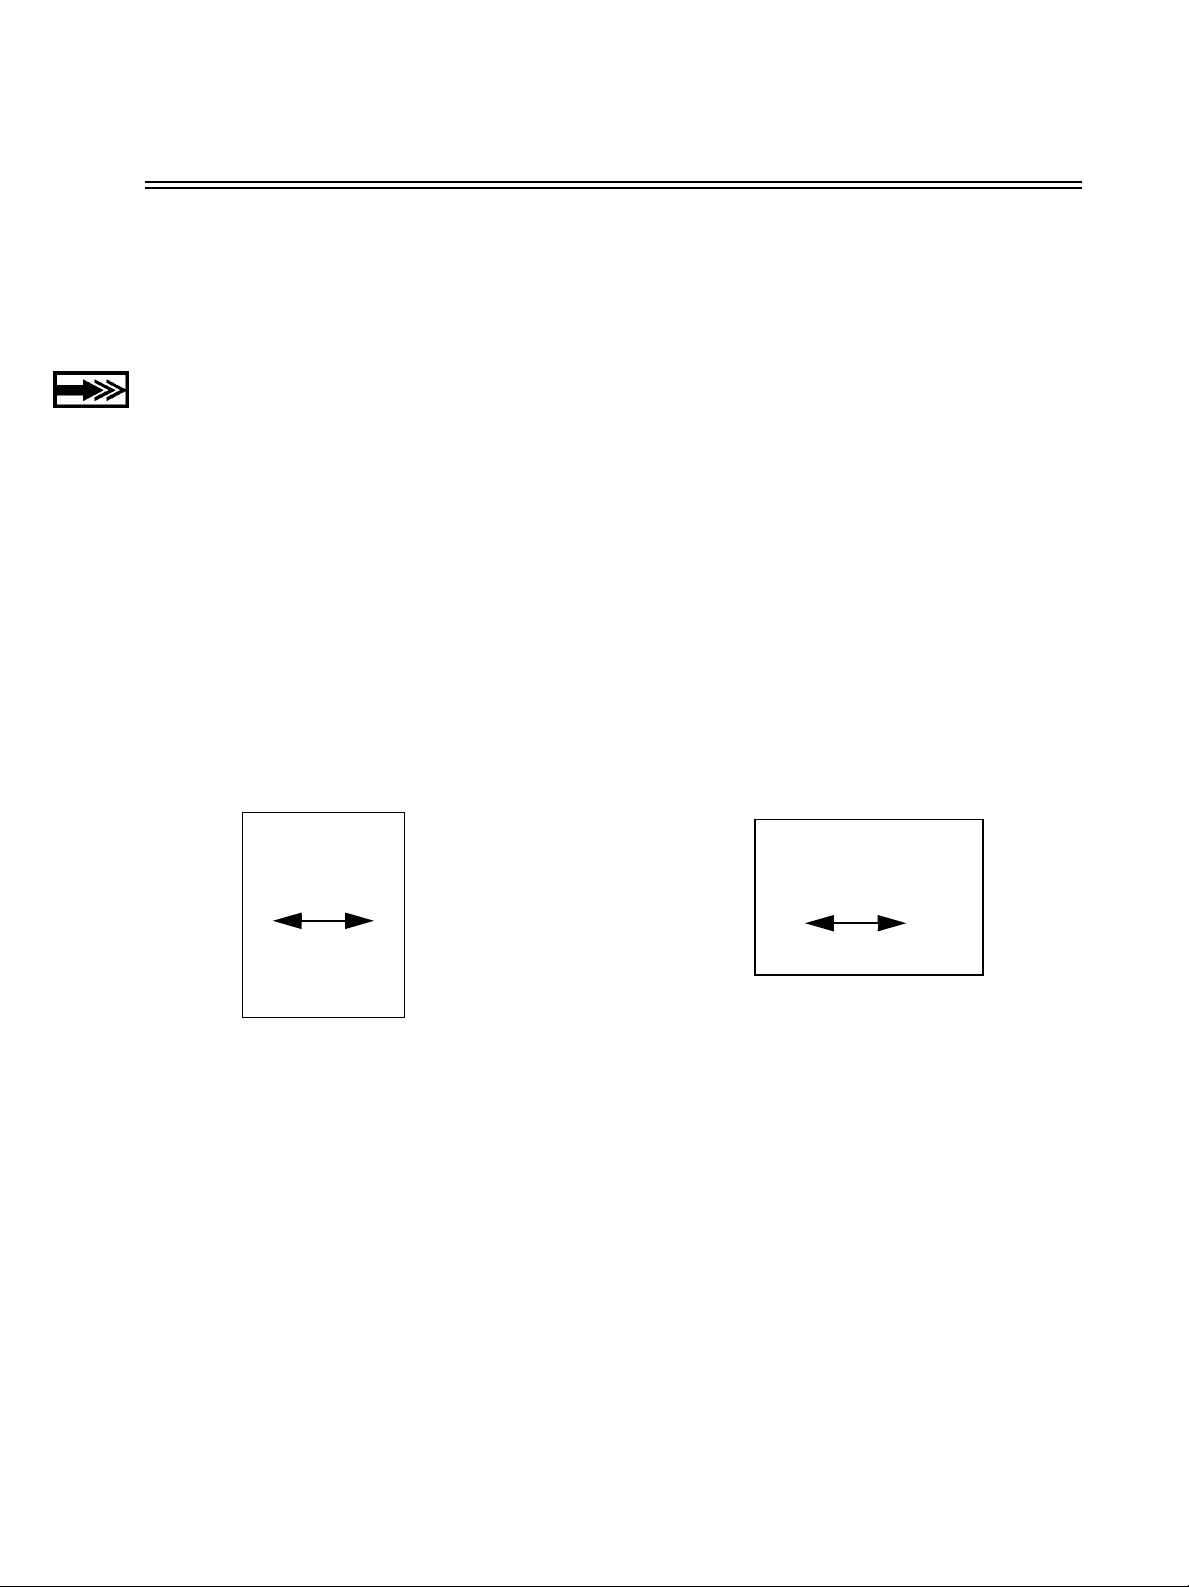
Remember: There are two ways of feeding originals and copy paper: Long Edge Feed (LEF) and
Short Edge Feed (SEF).
When you see LEF, position the
original or copy paper so that the long
edge is fed first.
™ is a Digital Copier which a user has to be at the machine to make copies.
®
is a System which a user can either print jobs from a computer or go to the machine
®
or
LEF
When you see SEF, position the
original or copy paper so that the short
edge is fed first.
SEF
May 2003 604E02400 2
Page 3
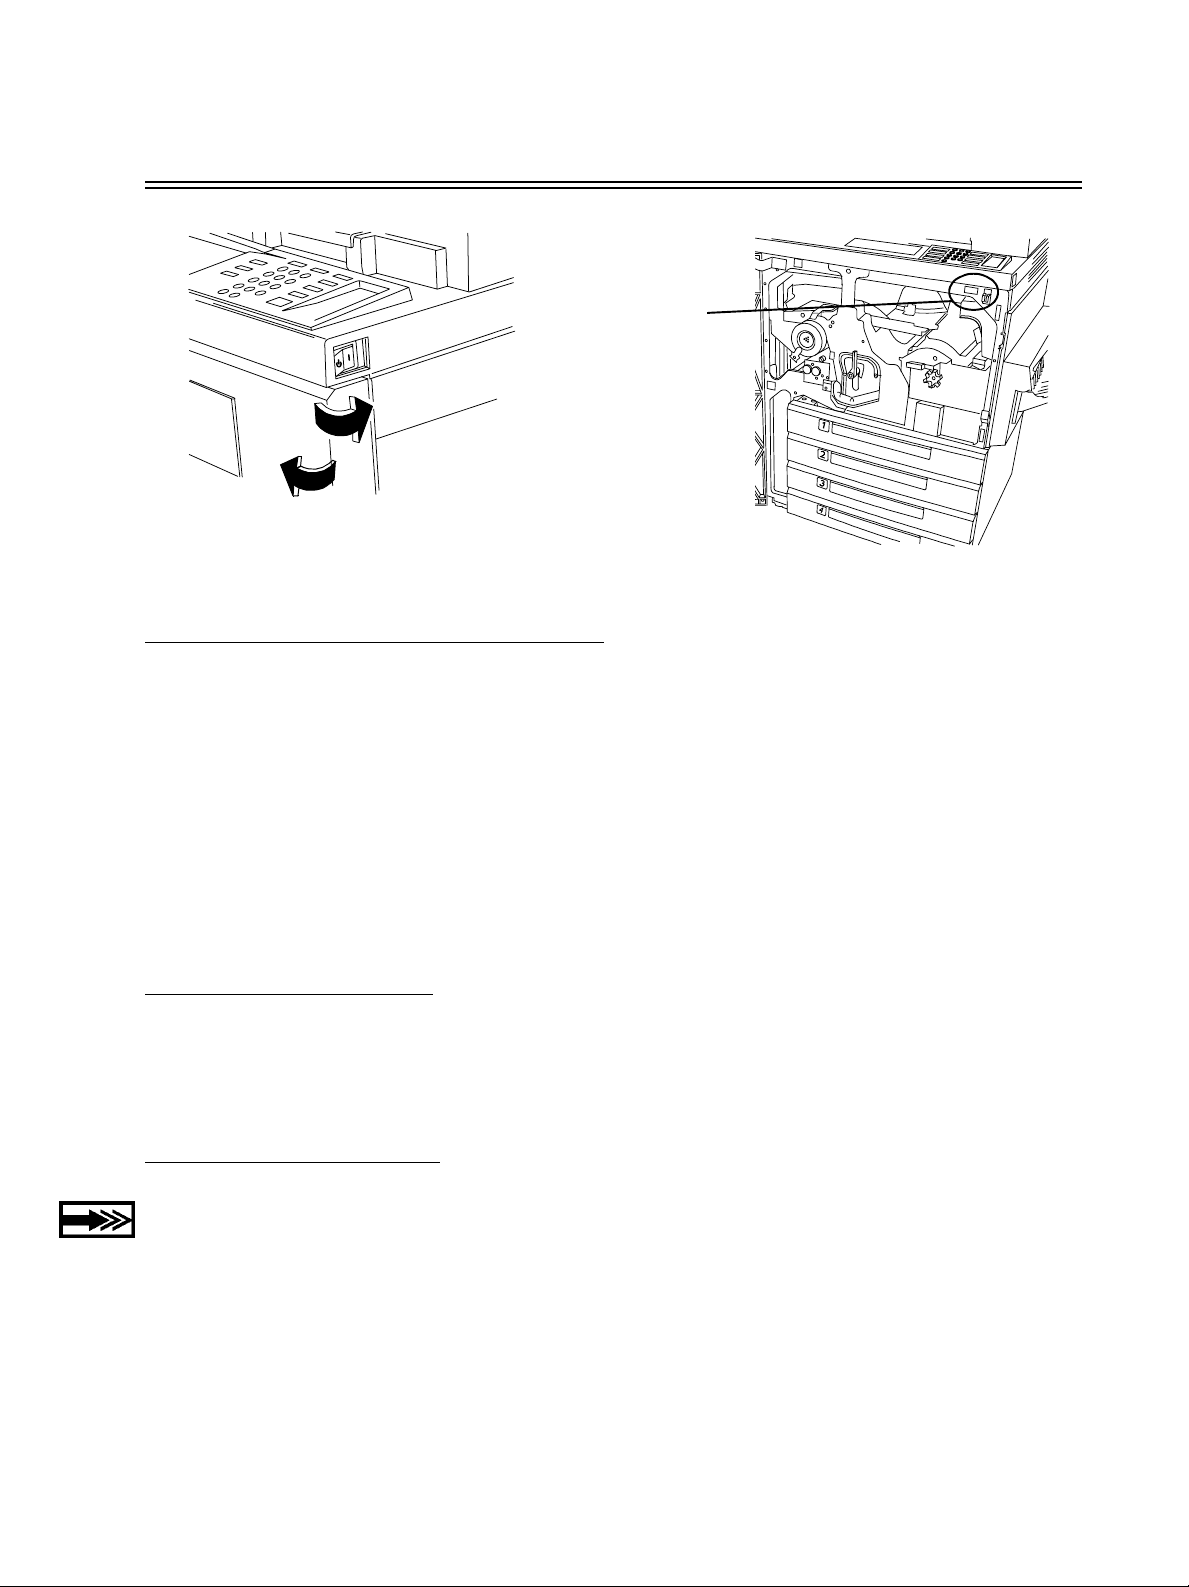
EXERCISE 1 - Power Switch Locations
Secondary Power
Switch
On
Off
Power Switch
Preferred Power Switch procedure
1. The Power switch is located on the right side of the machine. When the switch is pressed towards the
rear of the machine, the power is turned on. When the switch is pressed towards the front of the
machine, the power is turned off. This is the preferred power off/on procedure.
2. When powering off the machine, pop-up screens will appear asking you to select either power-off or
power-saver mode. Press your selection. There may be a short delay if a copy job or adjustment are in
process. If there are jobs in the queue, a second User Interface (UI) confirmation screen will appear,
warning that jobs will be lost if the power off confirmation is selected.
3. When the machine is in the Power Saver Mode, the User Interface Green Power Saver light is on and
the power switch is disabled. Press any button or touch the screen to activate the power-off switch and
then press it towards the front of the machine to turn off power.
Secondary procedure
The red button located inside the machine is a secondary option to power off the machine. Pressing this
button will immediately turn the power off. UNLESS OTHERWISE DIRECTED, DO NOT USE THE RED
SWITCH TO POWER OFF A NETWORK CONNECTED MACHINE. The processor may be damaged.
Emergency procedure
The only method to cut power to the machine COMPLETELY is to disconnect the power cord.
May 2003 604E02400 3
Page 4
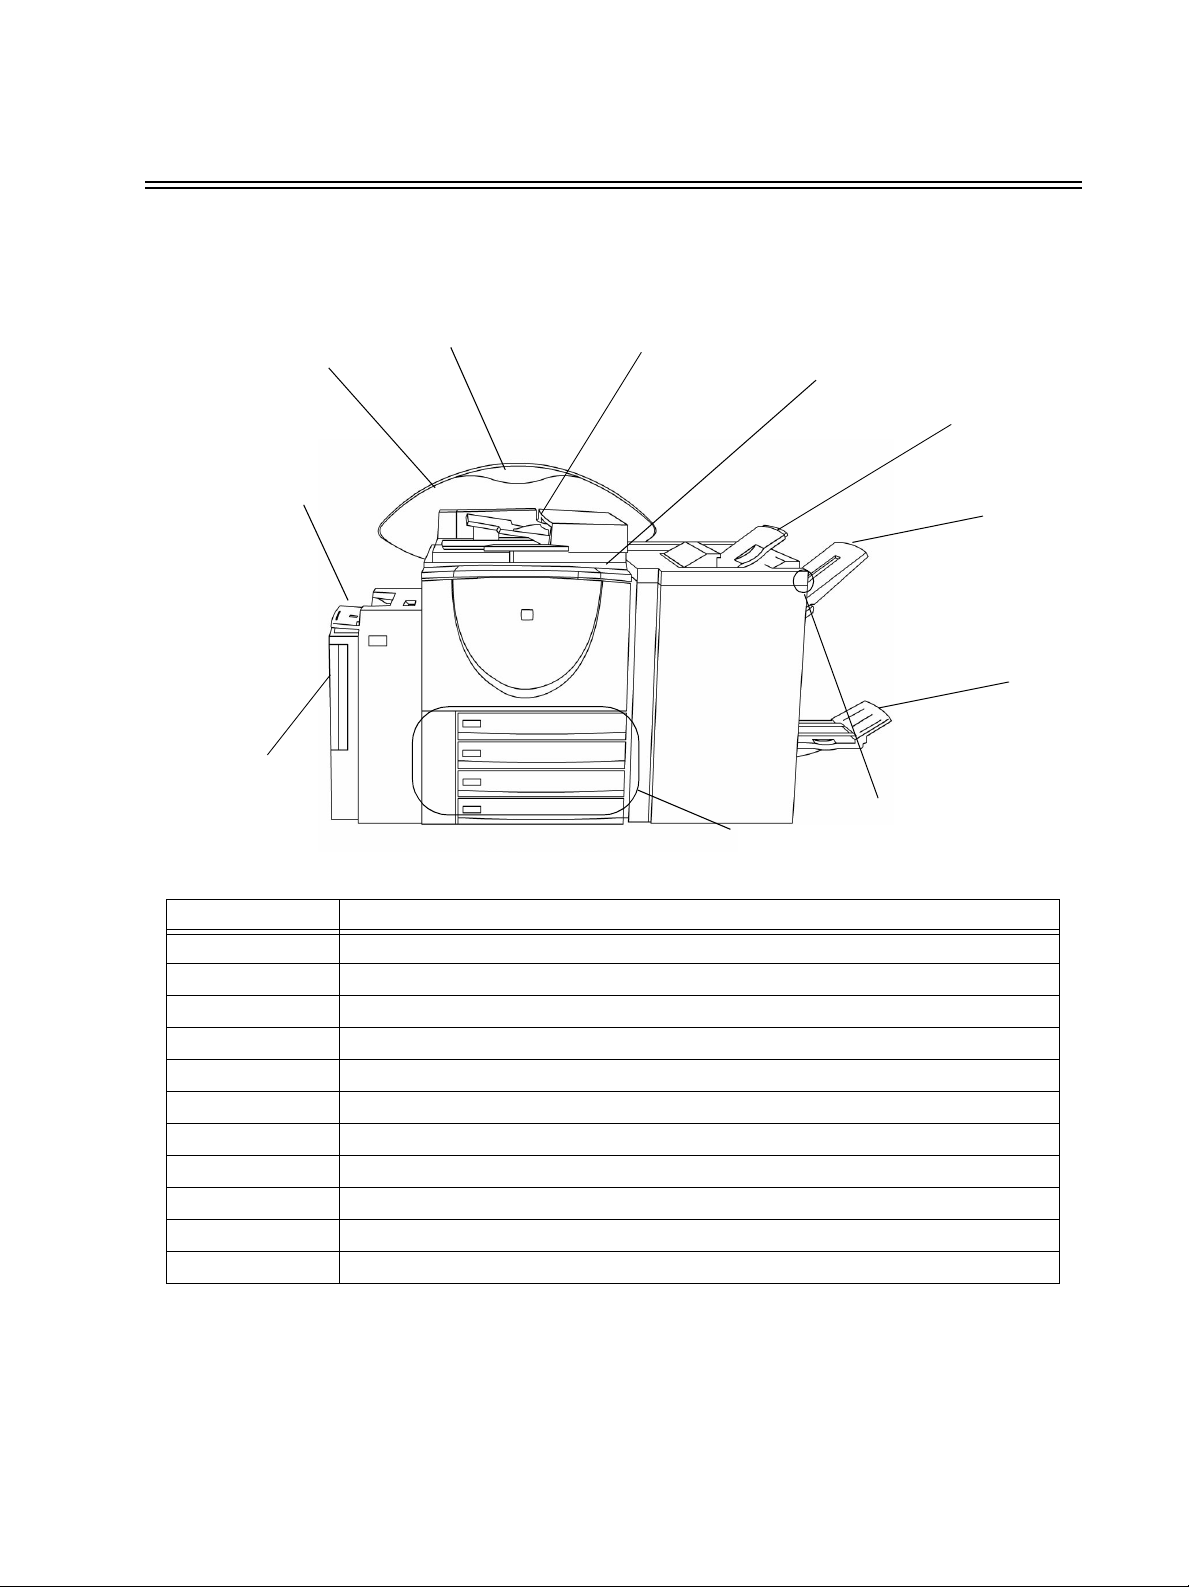
EXERCISE 2 - Major Components
The High Capacity Feeder, Convenience Stapler (not shown), Bypass Tray and Finisher are optional..
10
11
9
8
Number Description
1 Document Feeder
2 User Interface and Touch Screen
3 Top Tray - receives single sheets and unstapled jobs
4 Main Tray - receives purged sheets, stapled and unstapled jobs
5 Bottom Tray - receives fold jobs from the Booklet Maker
6 Finisher Pause Button - use to unload the Main Tray while printing
7 Trays 1 to 4
8 High Capacity Feeder (Tray 6)
9 Bypass Tray (Tray 5)
10 Functional Information Badge - identifies installed optional features
11 Rear Wa l l
1
2
3
4
5
6
7
May 2003 604E02400 4
Page 5
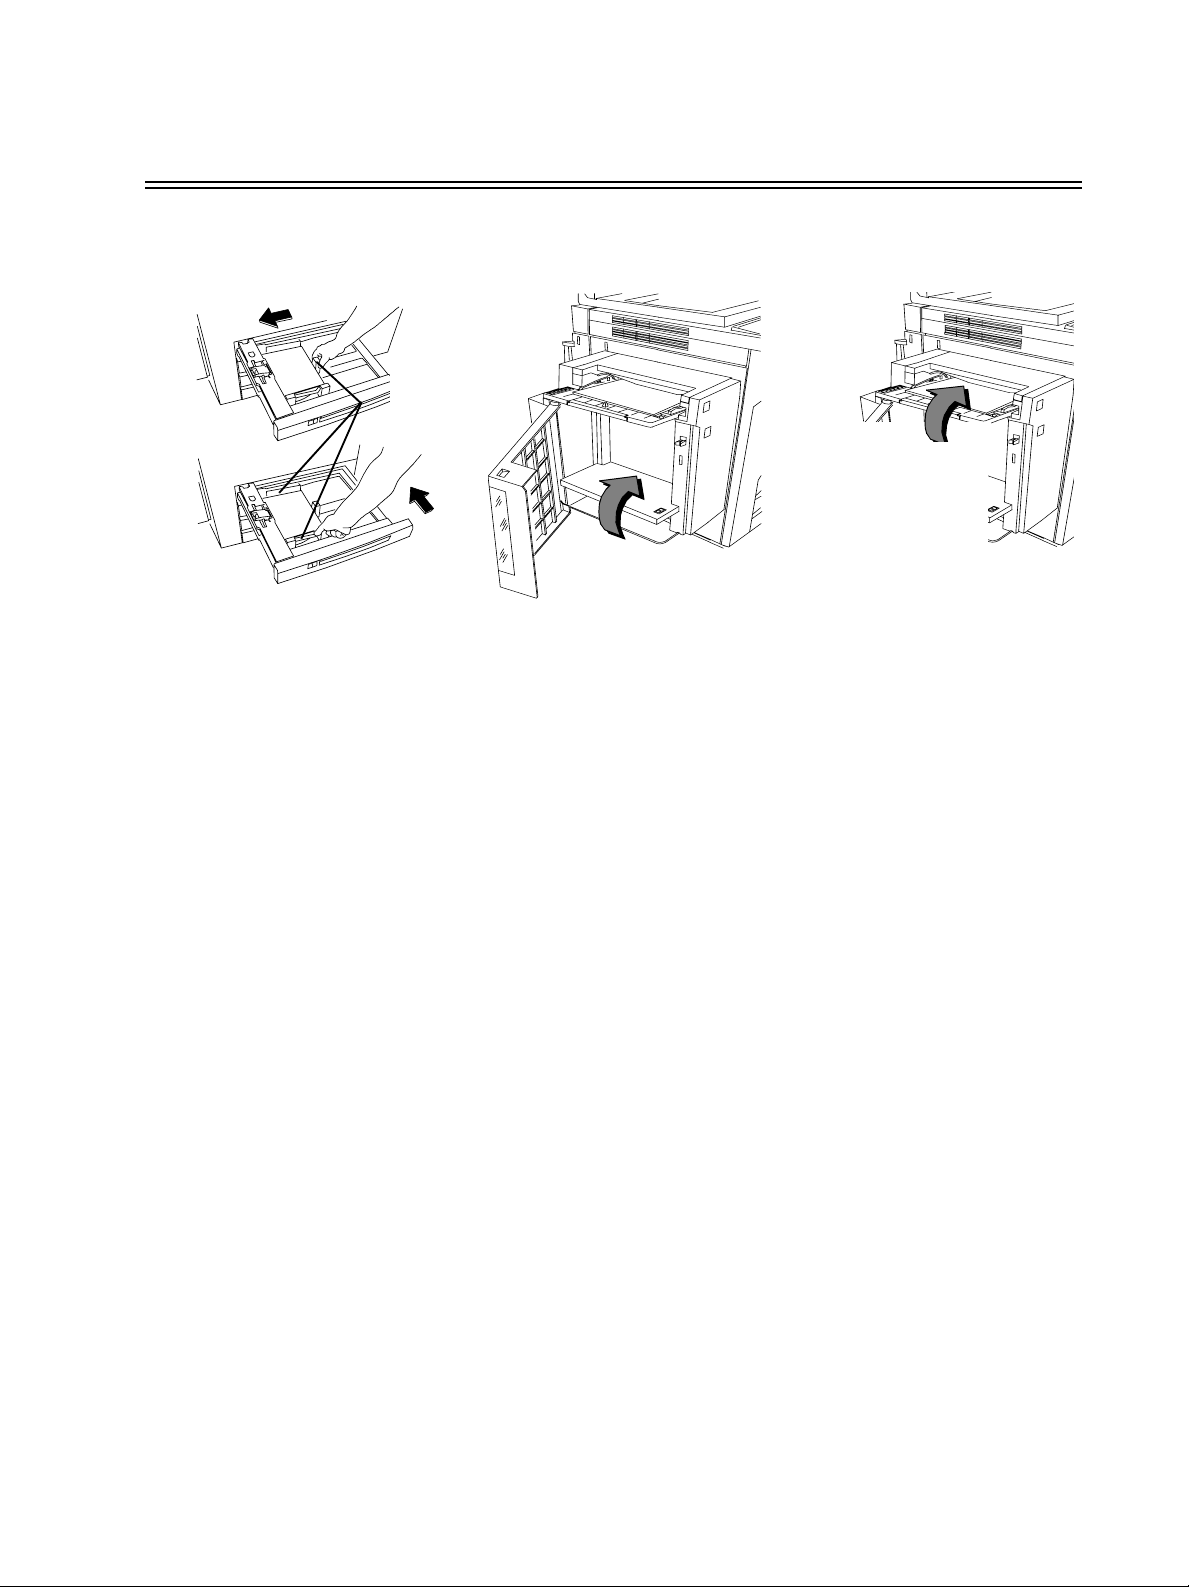
EXERCISE 3 - Fill Trays 1, 5, 6
L
Loading Tray 1 Loading Tray 6 Loading Tray 5
Paper
Guides
Insert Paper
Here
5
6
0
800086C-LKS
Insert Paper Here
5
6
0
800086C-
1. Pull out the paper tray.
2. Place the paper into the tray.
Do not load paper above the
maximum fill label (500
sheets) located on the back
paper guide.
3. Adjust the paper guides.
4. Slide the tray back into
place.
5. You may need to confirm the
paper stock and size. Touch
the screen to confirm or
change the selection.
Note: Follow the identical
procedure to fill trays 2, 3, 4.
1. Open the cover.
2. Wait for the tray to lower.
3. Fully insert LEF paper into the
tray.
4. Close the cover.
Note: Tray 6 can be dedicated
to either 8.5 x 11 or A4 LEF
paper. See directions for
adjusting the side guides in the
Reference Guide.
1. Insert paper as shown.
2. Adjust side guides as
necessary.
3. To use longer paper
simply extend the
extension bar.
4. You may need to confirm
the paper stock and size.
Touch the screen to
confirm or change the
selection.
May 2003 604E02400 5
Page 6
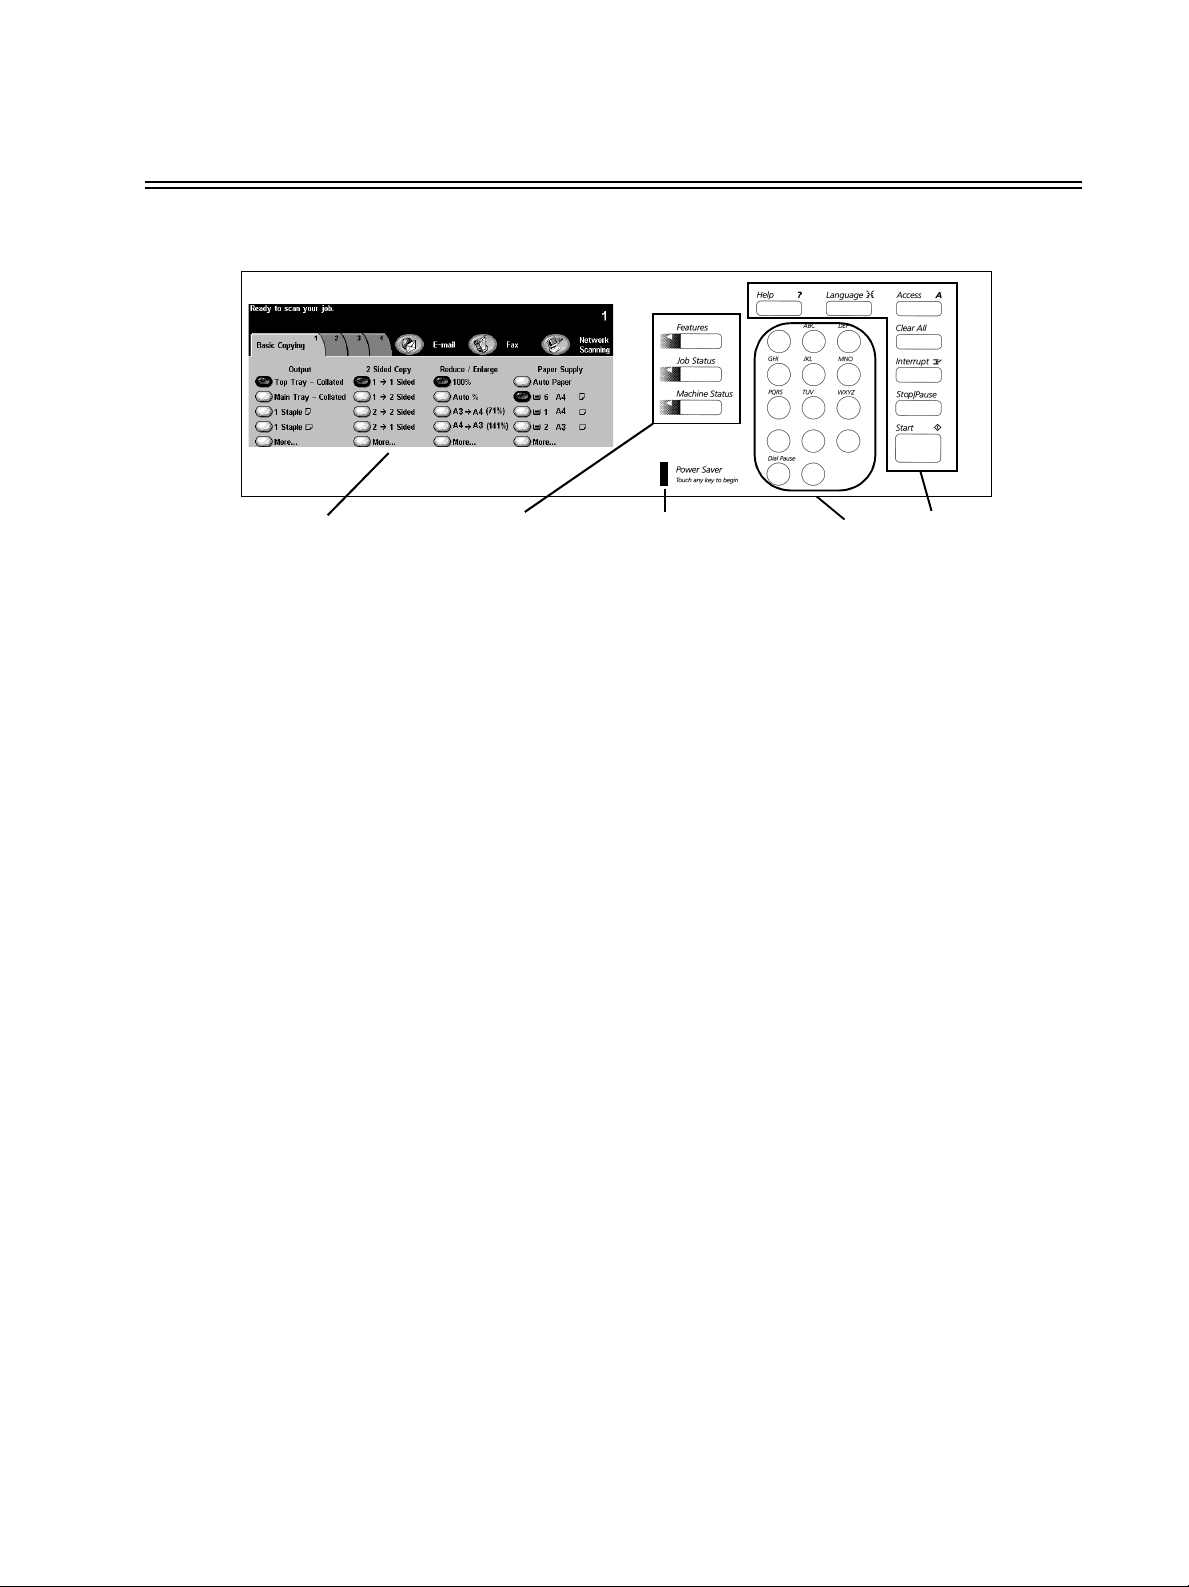
EXERCISE 4 - User Interface Components
Consists of a Touch Screen, Pathway Buttons, a Keypad, Feature Buttons.
Touc h
Screen
Touch Screen Pathway Buttons Keypad and
Where you
make job
selections.
Features - Contains the
programming screens used
to make copies.
Job Status - Displays job
information.
Machine Status - See
EXERCISE 9 - Machine
Status Pathway.
Pathway
Buttons
Power Saver Indicator Light
Power Saver
Indicator
Power Saver
Indicator light
Indicates the
machine is in
Power Saver
Mode when lit.
Touch any key to
active the
machine.
Use the Keypad to
enter number of
copies and
password.
Keypad
Feature Buttons
Help - Provides context
sensitive point of need
information.
Language - Displays text in the
installed languages.
Access - Provides entry into
System Tools and requires a
password. Refer to the
Reference Guide for additional
information.
Clear All - This clears the
current programming
selections.
Interrupt - Inserts a job at the
top of an existing queue.
Stop/Pause - Allows you to
temporarily stop a job.
Start - Initiates a job.
Feature
Buttons
May 2003 604E02400 6
Page 7
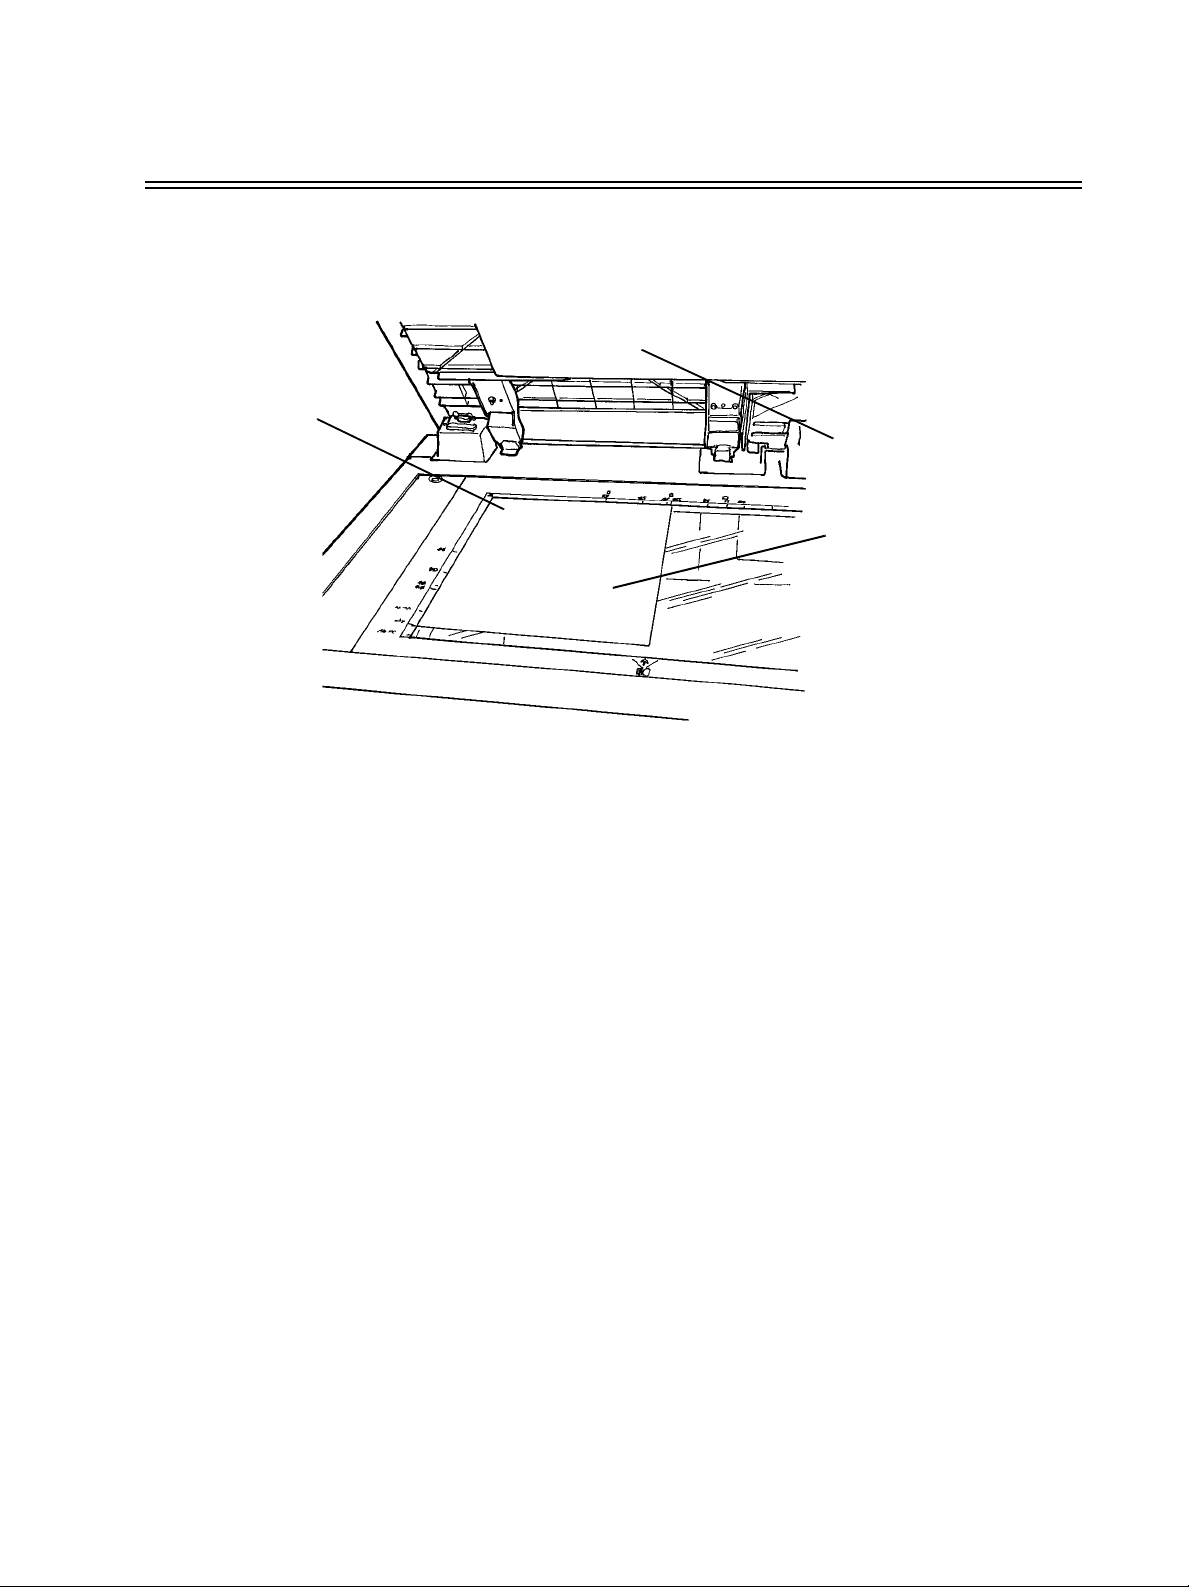
EXERCISE 5 - The Document Glass
OBJECTIVE: Demonstrate how to place originals and programme copies when using the Document Glass.
Registration
Corner
Document Glass
Cover
Original against the
glass
1. Raise the Document Glass cover.
2. Place the first page of the Getting to Know Your WorkCentre Pro/CopyCentre package face down and
flush against the upper left corner of the Document Glass. LEF against the left side of the glass. Close
the cover.
3. Under Paper Supply on the Touch Screen Select Tray 1.
4. Under 2 sided Copy Select 1-1 sided output.
5. Under Reduce/Enlarge select 100%.
6. Select 2 copies on the keypad.
7. Press the Start Button.
8. The Job Monitor window will pop-up after you press Start. This will show the status of the job you just
started. You can select Programme Next Job to close the window or wait until the job is completed
when it will close automatically.
9. Check the copy quality. Save these copies for use in the next copy job.
10. Remove the original from the Document Glass and lower the Cover.
11. Press Clear All.
RESULT: 2 copies delivered to the output tray.
May 2003 604E02400 7
Page 8
EXERCISE 6 - The Document Feeder
OBJECTIVE: Demonstrate how to place originals and reduce the image size when using the Document
Feeder.
Adjust the Paper
Registration Guides
1. Place the 2 copies from the previous exercise face up in the Document Feeder LEF orientation. Adjust
the paper registration guides if necessary.
2. Under Paper Supply on the Touch Screen select Tray 1.
3. Select 1-2 Sided.
4. Under Reduce/Enlarge select 71%.
5. Select 1 copy on the keypad.
6. Press the Start button.
7. Check that the copy produced is two-sided and the copy image is smaller than the original. Save this
copy for use in the next copy job.
8. Press Clear All.
RESULT: 1 copy with the image at 71% on both sides.
May 2003 604E02400 8
Page 9
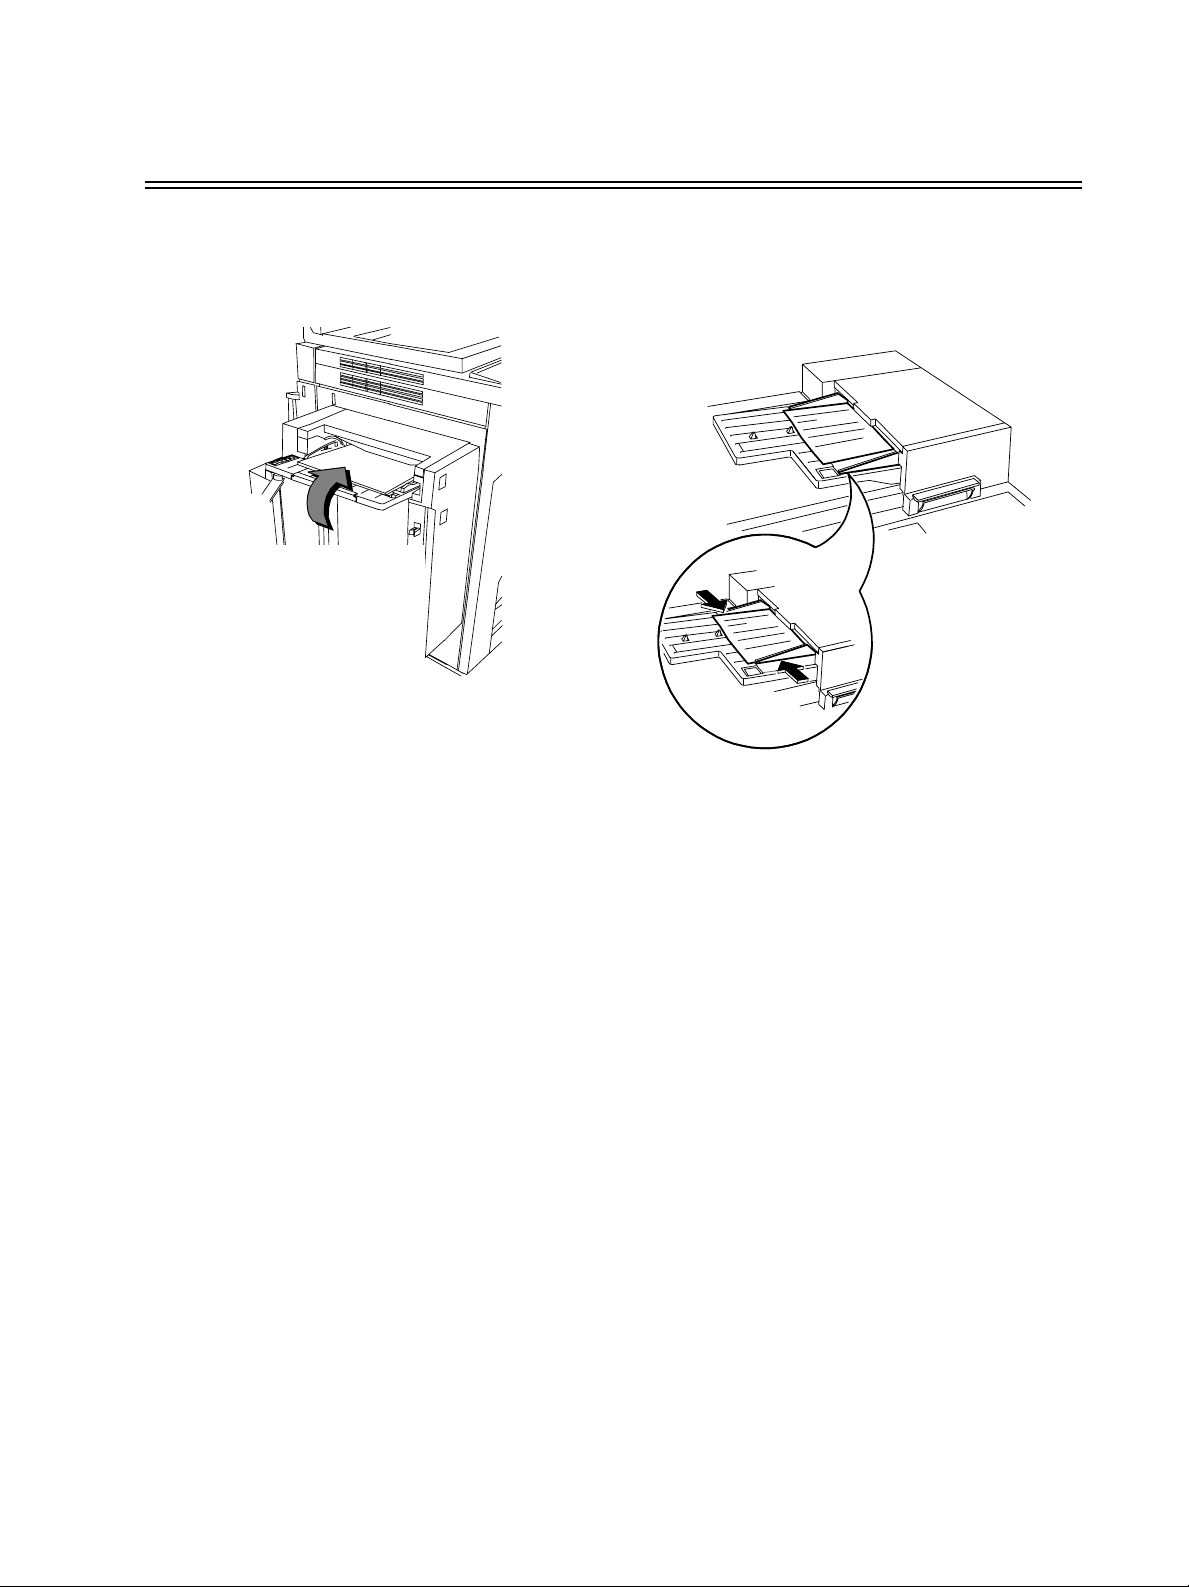
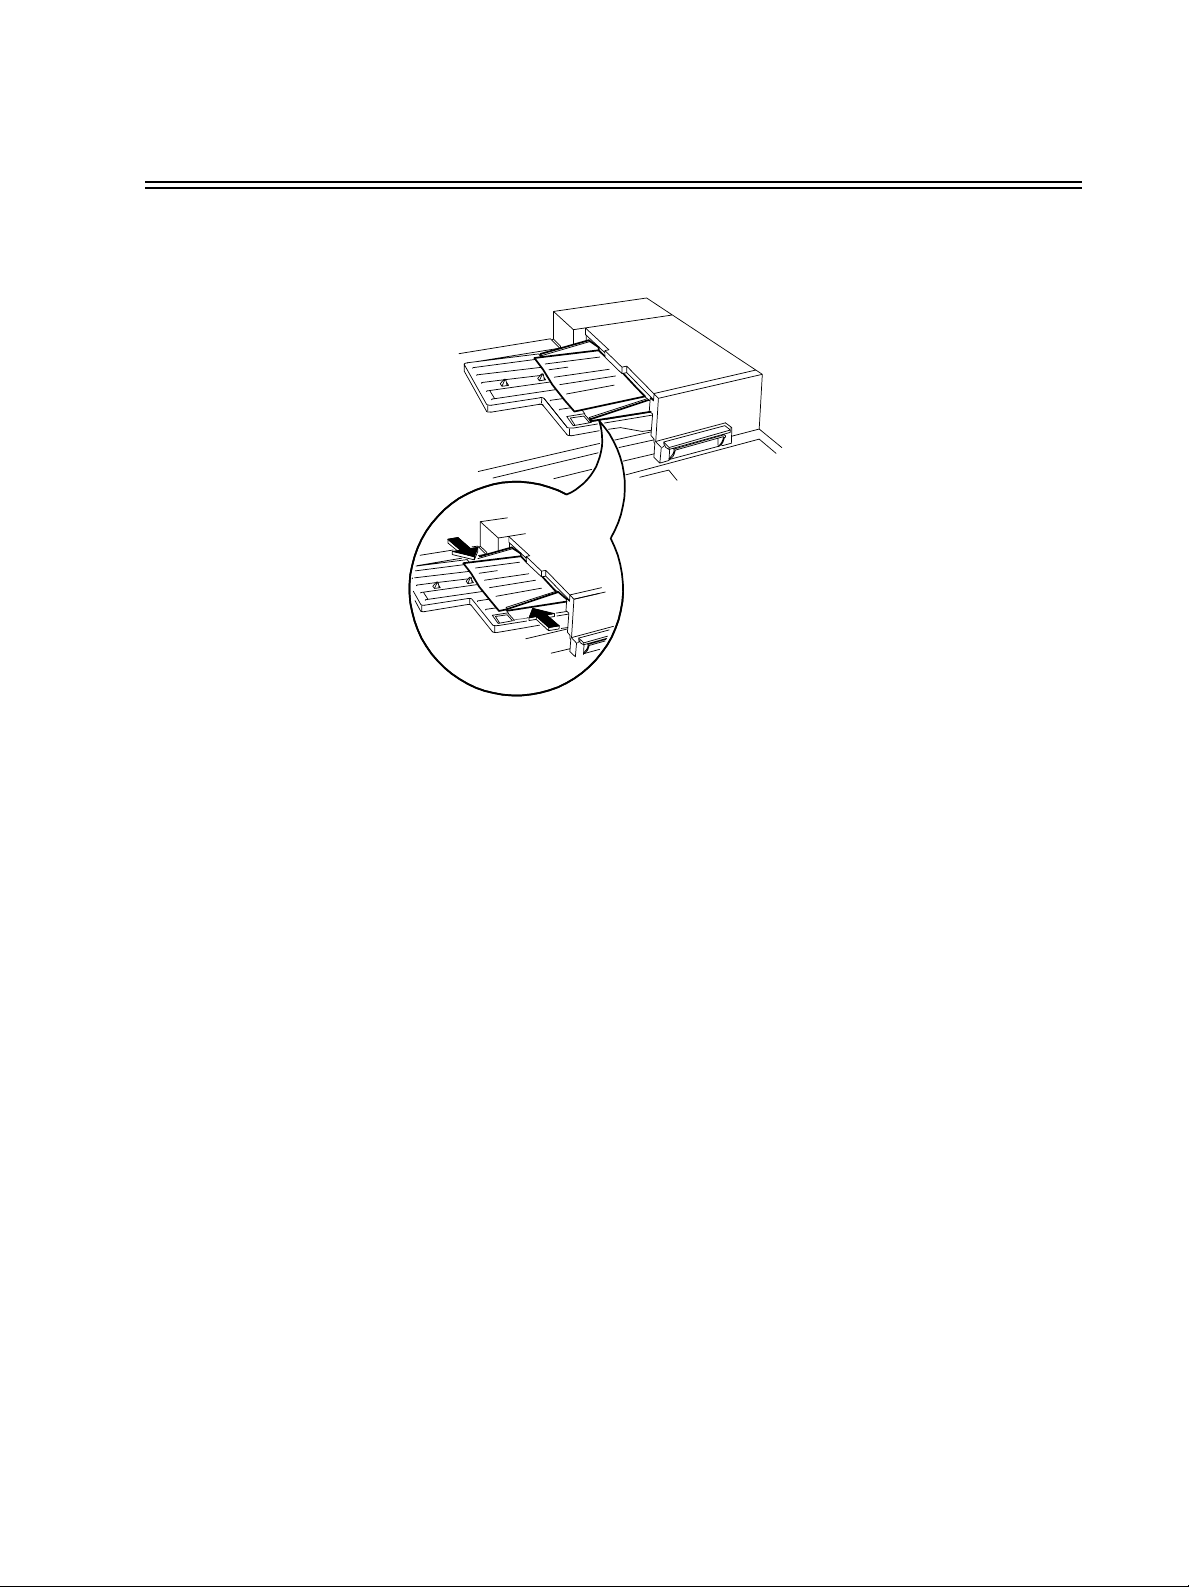
EXERCISE 7 - The Bypass Tray (Tray 5)
OBJECTIVE: Demonstrate how to make copies using the Bypass Tray paper supply.
5
6
Paper Loaded LEF
0
800086C-LKS
1. Place the original from the previous exercise face up, LEF in the Document Feeder. Adjust the guides
if necessary.
2. Select Tray 5 on the Touch screen.
3. Ensure 1-1 Sided is selected.
4. Ensure Reduce/Enlarge is 100%.
5. Select 1 copy on the keypad.
6. Press the Start button.
7. Check that the copy is 1 sided and the copy image is 100%.
8. Press Clear All.
RESULT: 1 copy with the image at 100% on 1 side only.
May 2003 604E02400 9
Page 10

EXERCISE 8 - Customer Replaceable Units
OBJECTIVE: Identify the position of the Customer Replaceable Units.
Note: Installation instructions accompany the new replaceable units.
Staple Cartridge
Dry Ink Cartridge
Fuser Module
Xerographic Module
Developer Collector Bottle included as
part of the Xerographic Module
May 2003 604E02400 10
Page 11

EXERCISE 9 - Machine Status Pathway
OBJECTIVE: Provide an overview of the Machine Status Pathway and Jam Clearance information.
The Machine Serial number is also located inside the front cover of the machine.
The system provides animated 3-D graphics and messages to lead you through fault and jam clearance
procedures. However, you may occasionally need to contact the Xerox Welcome Centre and provide them
with additional information.
The Machine Status Pathway
Provides access to information that can help
you describe the problem to the Welcome
Centre.
• The Machine Information Tab
Contains details specific to your system
configuration, tray and billing setup.
• The Faults Tab
Lists all the codes of the active faults,
messages, and recent fault history.
Jam Clearance Screen
Identifies the location of a jam or other fault
and how to clear it.
May 2003 604E02400 11
Page 12

This concludes the Delivery Crew instructions. Instruct the customer to complete the remaining exercises.
If you have any questions, please contact the Xerox Welcome Centre.
May 2003 604E02400 12
Page 13

EXERCISE 10 - Select Paper Orientation
OBJECTIVE: Practice selecting Paper Supply attributes.
When you press More... the Paper
Supply Selection screen will
open.
All letter and booklet folds require SEF stock. If you fill a Paper Tray in SEF orientation a message box
might appear. To clear the message, select Close > Confirm. After your job has finished you can reorient
the paper. To optimize your output, make paper selection the first step in job programming.
1. Place an original in the Document Feeder, SEF orientation (use the first page of this package if
necessary). Adjust the Document Feeder paper guides as required.
2. Select More... in the Paper Supply column.
3. Select a Paper Tray with, SEF paper > Save. You might have to fill the Paper Tray with the desired
paper.
4. Select 1>1 Sided > 100% Reduce/Enlarge.
5. Select 2 on the keypad > Start.
6. Check the copy quality. Save these copies for use in the next copy job.
7. Remove the original > Press Clear All.
RESULT: 2 copies of your 1-sided original on white, SEF paper.
May 2003 604E02400 13
Page 14

EXERCISE 11 - Copy from the Document Glass
OBJECTIVE: Use the 2 Sided Copy feature.
Registration
Corner
1. Raise the Document Glass Cover.
2. Place the copies from the previous exercise face down and flush against the upper left corner of the
Document Glass. Lower the Document Cover.
3. Select a Paper Tray with LEF paper > Save. You might have to fill the Paper Tray with the desired
paper.
4. Select 1>2 Sided in the 2 Sided Copy column.
5. Select 100% Reduce/Enlarge.
6. Select 2 copies on the keypad > Start.
7. Note: The Job Monitor window will pop-up after you press Start. This will show the status of the job you
just started. You can select Programme Next Job to close the window or wait until the job is completed
when it will close automatically.
8. Check the copy quality. Save these copies for use in the next copy job.
9. Remove the originals > Close the Document Glass Cover.
10. Press Clear All.
RESULT: 2-sided copies from your 1-sided original.
May 2003 604E02400 14
Page 15

EXERCISE 12 - Copy Mixed Size Originals
OBJECTIVE: Practice making mixed size copies.
Follow the directions on the screen regarding valid pairs of sizes which can be fed as Mixed Size Originals.
1. Place originals face up in the Document Feeder. The originals can be different sizes but must be the
same width.
2. Select tab 2, Image Adjustment.
3. Select Original Input > Mixed Size Originals > Save.
4. Select the Basic Copying tab.
5. Select Auto Paper, Paper Supply to produce the same size output as the original mixed sizes.
Note: to produce common size output you must select a Paper Supply, Auto% Reduce/Enlarge, Auto
Centre on tab 2, Image Adjustment. The system will determine the reduction%.
6. Enter a copy quantity on the keypad > Press the Start button.
7. Remove the originals > Press Clear All.
RESULT: Copies that are the same sizes as the originals.
May 2003 604E02400 15
Page 16

EXERCISE 13 - Make a 2-1 Sided Copy
OBJECTIVE: Practice programming a 1 sided copy from a 2 Sided original.
1. Place a 2 sided original into the Document Feeder in LEF orientation.
2. Select a Paper Tray with LEF paper > Save.
3. Select 2-1 Sided.
4. Select 100% Reduce/Enlarge.
5. Select 1 copy on the Keypad > Start.
6. Check that two 1 sided copies are produced.
7. If you have a Finisher, save the original to reuse later.
8. Remove the original > Press Clear All.
RESULT: 2 copies with images on 1 side.
May 2003 604E02400 16
Page 17

EXERCISE 14 - Enlarge An Image
OBJECTIVE: Practice programming a 2 Sided enlarge copy job.
Make this selection last because
it will change the screen
1. Place the output from the previous exercise in the Document Feeder in LEF orientation.
2. Select a Paper Tray with LEF paper > Save.
3. Select 2-2 sided.
4. Under Reduce/ Enlarge select More...and select 200%.
5. Select Save.
6. Select 1 copy on the keypad.
7. Press the Start button.
8. Ensure the copy is two sided and the copy image is larger than the original image. You may discard
this copy.
9. Remove the originals > Press Clear All.
RESULT: A 2-sided copy with enlarged images on each side.
May 2003 604E02400 17
Page 18

EXERCISE 15 - Use Build Job
OBJECTIVE: Practice programming job segments.
Build Job allows you to divide a job into individual segments, apply unique programming to each individual
segment then combine the segments and print them as a single job.
1. Place the originals face up in the Document Feeder for the first job segment.
2. Press tab 4, Job Assembly.
3. Select Build Job > On > Save.
4. Select Sample Set > On > Save.
5. Select the Basic Copying tab. Programme the appropriate features for the first segment of the job.
May 2003 604E02400 18
Page 19

6. Press the Start button.
7. Repeat this procedure for each remaining segment.
8. After the final segment has been scanned select Build Job Controls > End Build Job.
NOTE: A single review set will be produced because Sample Set was selected.
9. After you review the sample set, press the Job Status button to display a listing of queued jobs.
10. Touch your job to select it.
If you are satisfied with your initial set press Release. Otherwise, delete it and start again.
11. Remove the originals > Press Clear All.
RESULT: The number of complete sets programmed.
May 2003 604E02400 19
Page 20

EXERCISE 16 - View Finisher Options
OBJECTIVE: Identify the finisher that you have. If there is no finisher skip this exercise.
Office Finisher
Advanced Office Finisher
Professional Finisher
May 2003 604E02400 20
Page 21

EXERCISE 17 - Finisher: Make a 1 sided Tri-Fold
OBJECTIVE: Make a Z-configuration Tri-Fold from the Document Glass.
Note: Professional Finisher models only.
All letter and booklet folds require SEF stock. If you fill a Paper Tray in SEF orientation a message box might
appear. To clear the message, select Close > Confirm. After your job has finished you can reorient the
paper.
Use the Tri-Fold Z-Configuration feature to produce folded letters 8.5 x 11" or A4. The name and address
can be set up so it will show through on a standard window envelope.
1. Place an original face down on the Document Glass, in the SEF orientation (use the first page of this
package if necessary).
2. In the Paper Supply column, select a Paper Tray loaded with 8.5 x 11" or A4 SEF stock.
3. Select More... in the Output Column. The Output Options screen will appear.
4. Select Folding Options. The Folding Options screen will appear.
May 2003 604E02400 21
Page 22

5. Select Tri-Fold > Z-Configuration > Save. You return to the Output Options screen.
6. Notice that the Folding Options button is highlighted, indicating that Tri-fold Z-Configuration has been
selected. Select Save to confirm these settings. You return to the Basic Copying tab.
7. Select 1-1 sided from the 2 Sided Copy column.
8. Select 100% from the Reduce / Enlarge column.
9. Enter a quantity of 2 copies on the keypad then press the Start Button.
10. After the job has completed, remove the original from the Document Glass then press Clear All.
11. Remove your copy output from the finisher bottom tray.
RESULT: 2 copies of a Z -Configuration Letter Fold.
May 2003 604E02400 22
Page 23

EXERCISE 18 - Finisher: Make a 2 Sided Tri-Fold
OBJECTIVE: Make a C-configuration Tri-Fold from the Document Feeder.
Note: If there is no Professional Finisher, skip this task.
Use the Tri-Fold C-Configuration feature to produce folded 8.5 x 11" or A4 documents for inserting in
standard envelopes or handing out as a folded brochure.
1. Place 2 originals in the Document Feeder face up, in SEF orientation. Arrange the originals so that the
top edge of the first sheet feeds first and the top edge of the second sheet feeds into the Document
Feeder last (use the first 2 pages from this package if necessary).
2. In the Paper Supply column, select a Paper Tray loaded with 8.5 x 11" or A4 SEF stock.
3. Select More... in the Output Column. The Output Options screen will appear.
4. Select Folding Options. The Folding Options screen will appear.
May 2003 604E02400 23
Page 24

5. Select Tri-Fold > C-Configuration > Save. You return to the Output Options screen.
6. Notice that the Folding Options button is highlighted, indicating that Tri-fold C-Configuration has been
selected. Select Save to confirm these settings. You return to the Basic Copying tab.
7. Select 1-2 sided from the 2 Sided Copy column.
8. Select 100% from the Reduce / Enlarge column.
9. Enter a quantity of 2 copies on the keypad then press the Start Button.
10. After the job has completed, remove the originals from the Document Feeder. Press Clear All.
11. Remove your output from the finisher bottom tray.
RESULT: 2 copies of a C -Configuration Letter Fold with images on two sides.
May 2003 604E02400 24
Page 25

EXERCISE 19 - Finisher: Make a Booklet
OBJECTIVE: Make a stapled booklet with Front and Back covers.
Note: If there is no Professional Finisher, skip this task.
You can create Folded Only or Stapled and Folded booklets; sizes 8.5 x 11", 8.5 x 14”, 11 x 17”, A4, 215 x
330 mm, or A3. The fold capacity is 1-5 Folded Only sheets and 2-15 Folded and Stapled sheets.
Optional: You can use coloured paper for the booklet covers.
1. Place 12 originals face up, in LEF orientation, in the Document Feeder (use the first 12 pages of this
package if necessary).
2. Select a Paper Tray loaded with 8.5 x 11" or A4 SEF, white stock from the Paper Supply column. The
system will use this tray for the body of the booklet.
3. Fill a different Paper Tray with 8.5 x 11” or A4 SEF, stock. Change the Paper Description to match the
colour of your stock if necessary. Later, you will select this Paper Tray for the booklet covers.
NOTE: A message box might appear advising you that this is not the desired paper orientation for print
applications. To clear the message select Close.
4. Review the tray information. If it is correct, select Confirm to save the Paper Tray settings.
5. Touch tab 3. The Output Format tab will appear.
May 2003 604E02400 25
Page 26

6. Select Booklet Creation. The Booklet Creation screen will appear. Use this feature to programme the
system to format the scanned pages into a booklet.
7. This screen tells you how to place the originals and reinforces the need to use a paper tray with paper
oriented SEF. It also reminds you to select the booklet stapling option.
Select On to activate the Booklet Creation feature.
8. Select 1 Sided Originals > Save. You return to the Output Format tab.
9. Notice that the Booklet Creation button is highlighted, indicating that the Booklet Creation feature is
active and displays your selections. Select Covers. The Covers screen will appear.
May 2003 604E02400 26
Page 27

10. Select Front and Back > Cover Stock > Save. The Cover Stock Selections screen will appear.
11. Select the Paper Tray you filled with SEF, colored stock in Step 3. This selection instructs the system
to use this Paper Tray to print the covers for this job.
Select Save. You return to the Covers screen.
12. Select Output Cover Images. The Output Cover Images screen will appear.
13. Select 2 Sided. This selection programmes the system to place images on both sides of the front and
back covers.
Then select Save. You return to the Covers screen.
May 2003 604E02400 27
Page 28

14. Notice that the Output Cover Images
Paper Tray and paper attributes you selected for the covers. If the settings are correct, select Save to
confirm. You return to the Output Format tab.
15. Touch the Basic Copying tab. The Basic Copying tab will appear.
16. Select More... in the Output Column. The Output Options screen will appear.
option displays 2 Sided and the Cover Stock option displays the
17. Select Booklet Maker. The Booklet Maker screen will appear. Use this feature to programme the
system to send the output to the Booklet Maker for finishing.
May 2003 604E02400 28
Page 29

18. Select Folded and Stapled > Save. You return to the Output Options screen.
19. Notice that the Booklet Maker button is highlighted, indicating Folded and Stapled booklets are the
selected output.
Select Save to confirm the Output Options settings. You return to the Basic Copying tab.
20. Select a quantity of 1 copy on the keypad.
21. Press the Start button.
22. After the job has completed, remove the originals from the Document Feeder then press Clear All.
23. Remove your output from the finisher bottom tray.
RESULT: A folded and stapled booklet with printing on both sides of the front and back covers.
May 2003 604E02400 29
Page 30

EXERCISE 20 - Send an E-mail or Internet Fax
OBJECTIVE: Practice sending an attachment with an e-mail message.
Note: This is an optional feature, if there is no E-mail or Internet Fax, skip this task.
1. Place original face up in the Document Feeder. Adjust the guides.
2. Select the E-mail or Internet Fax button. If Authentication is active, you must complete a login
sequence. Remember to log out after you have completed your job to prevent unauthorised access.
3. Select tab 2, Image Adjustment.
4. Select the desired resolution and number of sides scanned. If the originals are 2 Sided, press 2 Sided
Originals.
5. Select the E-Mail tab > To...
6. Enter an SMTP-compliant recipient name. Example: Anyone@usa.xerox.com
You can choose an Address Book and enter the full name or a portion of the name of the recipient.
The system will search the Address Book and list all the names that match.
7. Repeat steps 4 through 6 until the last recipient has been added to the list (up to 128 recipients may be
entered).
8. Press the Start button.
9. Remove the originals > Press Clear All.
RESULT: An e-mail message with an attached document in the mailbox of your recipient(s).
May 2003 604E02400 30
 Loading...