

Page 1
®
Phaser
Color Laser Printer
7750
Reference Guide
Guide de référence
Guida di riferimento
Referenzhandbuch
Guía de referencia
Guia de referência
Naslaggids
Referensguiden
Page 2

Copyright © 2004, Xerox Corporation. All Rights Reserved. Unpublished rights reserved under the copyright laws of the United
States. Contents of this publication may not be reproduced in any form without permission of Xerox Corporation.
Copyright protection claimed includes all forms of matters of copyrightable materials and information now allowed by statutory
or judicial law or hereinafter granted, including without limitation, material generated from the software programs which are
displayed on the screen such as styles, templates, icons, screen displays, looks, etc.
®
XEROX
PhaserSMART
PhaserPort
Adobe
Quake
, The Document Company®, the stylized X®, CentreWare®, infoSMART®, Made For Each Other®, Phaser®,
®
, and the TekColor® icon are registered trademarks of Xerox Corporation. PhaserCal™, PhaserMatch™,
™
, PhaserTools™, and the TekColor™ name are trademarks of Xerox Corporation.
®
Reader®, Illustrator®, PageMaker®, Photoshop®, PostScript®, ATM®, Adobe Garamond®, Birch®, Carta®, Mythos®,
®
, and Tekton® are registered trademarks and Adobe Jenson™, Adobe Brilliant Screens™ technology, and IntelliSelect™
are trademarks of Adobe Systems Incorporated or its subsidiaries which may be registered in certain jurisdictions.
®
, LaserWriter®, LocalTalk®, Macintosh®, Mac® OS, AppleTalk®, TrueType2®, Apple Chancery®, Chicago®, Geneva®,
Apple
®
Monaco
Marigold
Avery
PCL
, and New York® are registered trademarks, and QuickDraw™ is a trademark of Apple Computer Incorporated.
™
and Oxford™ are trademarks of AlphaOmega Typography.
™
is a trademark of Avery Dennison Corporation.
®
and HP-GL® are registered trademarks of Hewlett-Packard Corporation.
Hoefler Text was designed by the Hoefler Type Foundry.
®
ITC Avant Guard Gothic
ITC Zapf Dingbats
Bernhard Modern
Garamond
Windows
Wingdings
™
, Times™, and Univers™ are trademarks of Linotype-Hell AG and/or its subsidiaries.
®
and Windows NT® are registered trademarks of Microsoft Corporation.
™
in TrueType® format is a product of Microsoft Corporation. W ingDin gs is a trademark of Microsoft Corpo ration and
, ITC Bookman®, ITC Lubalin Graph®, ITC Mona Lisa®, ITC Symbol®, ITC Zapf Chancery®, and
®
are registered trademarks of International Typeface Corporation.
™
, Clarendon™, Coronet™, Helvetica™, New Century Schoolbook™, Optima™, Palatino™, Stempel
TrueType is a registered trademark of Apple Computer, Inc.
™
Albertus
Antique Olive
Eurostile
Novell
Distributed Print Services
Sun
of SP ARC International, Incorporated. SPARCstation
, Arial™, Gill Sans™, Joanna™, and Times New Roman™ are trademarks of Monotype Corporation.
®
is a registered trademark of M. Olive.
™
is a trademark of Nebiolo.
®
, NetWare®, NDPS®, NDS®, and Novell Directory Services® are registered trademarks, and IPX™ and Novell
®
and Sun Microsystems® are registered trademarks of Sun Microsystems, Incorporated. SPARC® is a registered trademark
™
are trademarks of Novell, Incorporated.
™
is a trademark of SPARC International, Incorporated, licensed ex clusiv ely
to Sun Microsystems, Incorporated.
®
is a registered trademark of SWOP, Inc.
SWOP
®
UNIX
is a registered trademark in the US and other countries, licensed exclusively through X/Open Company Limited.
NERGY STAR
As an E
efficiency. The E
®
partner, Xerox Corporation has determined that this product meets th e ENERGY STAR guidelines for energy
NERGY STAR name and logo are registered U.S. marks.
This product uses code for SHA-1 written by John Halleck, which is being used with his permission.
This product includes an implementation of LZW licensed under U.S. Patent 4,558,302.
Other marks are trademarks or registered trademarks of the companies with which they are associated.
®
PANTONE
accurate color. PANTONE
Colors generated may not match PANTONE-identified standards. Consult current PANTONE Publications for
®
and other Pantone, Inc. trademarks are the property of Pantone, Inc. © Pantone, Inc., 2000.
Page 3

Contents
1 Features
Printer Tour . . . . . . . . . . . . . . . . . . . . . . . . . . . . . . . . . . . . . . . . . . . . . . . . . . . . . . . . . . . . . . 1-2
Printer Features . . . . . . . . . . . . . . . . . . . . . . . . . . . . . . . . . . . . . . . . . . . . . . . . . . . . . . 1-2
Available Configurations . . . . . . . . . . . . . . . . . . . . . . . . . . . . . . . . . . . . . . . . . . . . . . 1-3
Front View . . . . . . . . . . . . . . . . . . . . . . . . . . . . . . . . . . . . . . . . . . . . . . . . . . . . . . . . . 1-4
Rear View . . . . . . . . . . . . . . . . . . . . . . . . . . . . . . . . . . . . . . . . . . . . . . . . . . . . . . . . . . 1-4
Internal Components. . . . . . . . . . . . . . . . . . . . . . . . . . . . . . . . . . . . . . . . . . . . . . . . . . 1-4
Printer Options, Upgrades, and Accessories. . . . . . . . . . . . . . . . . . . . . . . . . . . . . . . . 1-5
Resources . . . . . . . . . . . . . . . . . . . . . . . . . . . . . . . . . . . . . . . . . . . . . . . . . . . . . . . . . . 1-6
Front Panel. . . . . . . . . . . . . . . . . . . . . . . . . . . . . . . . . . . . . . . . . . . . . . . . . . . . . . . . . . . . . . . 1-7
Front Panel Description . . . . . . . . . . . . . . . . . . . . . . . . . . . . . . . . . . . . . . . . . . . . . . . 1-7
Front Panel Layout . . . . . . . . . . . . . . . . . . . . . . . . . . . . . . . . . . . . . . . . . . . . . . . . . . . 1-7
Error and Warning Messages . . . . . . . . . . . . . . . . . . . . . . . . . . . . . . . . . . . . . . . . . . . 1-8
Print Icon. . . . . . . . . . . . . . . . . . . . . . . . . . . . . . . . . . . . . . . . . . . . . . . . . . . . . . . . . . . 1-9
Menu Map. . . . . . . . . . . . . . . . . . . . . . . . . . . . . . . . . . . . . . . . . . . . . . . . . . . . . . . . . . 1-9
Information Pages. . . . . . . . . . . . . . . . . . . . . . . . . . . . . . . . . . . . . . . . . . . . . . . . . . . . 1-9
Sample Pages . . . . . . . . . . . . . . . . . . . . . . . . . . . . . . . . . . . . . . . . . . . . . . . . . . . . . . . 1-9
Printer Drivers . . . . . . . . . . . . . . . . . . . . . . . . . . . . . . . . . . . . . . . . . . . . . . . . . . . . . . . . . . . 1-10
Available Printer Drivers . . . . . . . . . . . . . . . . . . . . . . . . . . . . . . . . . . . . . . . . . . . . . 1-10
Printer Driver Features . . . . . . . . . . . . . . . . . . . . . . . . . . . . . . . . . . . . . . . . . . . . . . . 1-11
Managing Your Printer . . . . . . . . . . . . . . . . . . . . . . . . . . . . . . . . . . . . . . . . . . . . . . . . . . . . 1-12
Printer’s IP Address . . . . . . . . . . . . . . . . . . . . . . . . . . . . . . . . . . . . . . . . . . . . . . . . . 1-12
CentreWare Internet Services (IS) . . . . . . . . . . . . . . . . . . . . . . . . . . . . . . . . . . . . . . 1-12
PhaserSMART . . . . . . . . . . . . . . . . . . . . . . . . . . . . . . . . . . . . . . . . . . . . . . . . . . . . . 1-13
PrintingScout. . . . . . . . . . . . . . . . . . . . . . . . . . . . . . . . . . . . . . . . . . . . . . . . . . . . . . . 1-13
Printer Settings . . . . . . . . . . . . . . . . . . . . . . . . . . . . . . . . . . . . . . . . . . . . . . . . . . . . . . . . . . 1-14
Accessing the Startup Page. . . . . . . . . . . . . . . . . . . . . . . . . . . . . . . . . . . . . . . . . . . . 1-14
Accessing Power Saver. . . . . . . . . . . . . . . . . . . . . . . . . . . . . . . . . . . . . . . . . . . . . . . 1-15
Accessing Intelligent Ready Mode . . . . . . . . . . . . . . . . . . . . . . . . . . . . . . . . . . . . . . 1-15
Preventing Access to Front Panel Settings . . . . . . . . . . . . . . . . . . . . . . . . . . . . . . . . 1-16
Accessing Load Paper Timeout . . . . . . . . . . . . . . . . . . . . . . . . . . . . . . . . . . . . . . . . 1-17
Selecting Tray Settings . . . . . . . . . . . . . . . . . . . . . . . . . . . . . . . . . . . . . . . . . . . . . . . 1-18
Selecting Output Options . . . . . . . . . . . . . . . . . . . . . . . . . . . . . . . . . . . . . . . . . . . . . 1-20
Adjusting Front Panel Brightness. . . . . . . . . . . . . . . . . . . . . . . . . . . . . . . . . . . . . . . 1-21
Adjusting Front Panel Contrast. . . . . . . . . . . . . . . . . . . . . . . . . . . . . . . . . . . . . . . . . 1-21
Adjusting Front Panel Sound Level . . . . . . . . . . . . . . . . . . . . . . . . . . . . . . . . . . . . . 1-22
Adjusting Printer Language . . . . . . . . . . . . . . . . . . . . . . . . . . . . . . . . . . . . . . . . . . . 1-22
Phaser® 7750 Color Laser Printer
i
Page 4

Contents
Fonts . . . . . . . . . . . . . . . . . . . . . . . . . . . . . . . . . . . . . . . . . . . . . . . . . . . . . . . . . . . . . . . . . . 1-23
Types of Fonts. . . . . . . . . . . . . . . . . . . . . . . . . . . . . . . . . . . . . . . . . . . . . . . . . . . . . . 1-23
Resident Printer Fonts. . . . . . . . . . . . . . . . . . . . . . . . . . . . . . . . . . . . . . . . . . . . . . . . 1-23
Viewing a List of Resident Fonts . . . . . . . . . . . . . . . . . . . . . . . . . . . . . . . . . . . . . . . 1-23
Printing a List of Resident Fonts. . . . . . . . . . . . . . . . . . . . . . . . . . . . . . . . . . . . . . . . 1-24
Downloading Fonts. . . . . . . . . . . . . . . . . . . . . . . . . . . . . . . . . . . . . . . . . . . . . . . . . . 1-25
Registering Your Printer . . . . . . . . . . . . . . . . . . . . . . . . . . . . . . . . . . . . . . . . . . . . . . . . . . . 1-27
2Printing
Changing Paper . . . . . . . . . . . . . . . . . . . . . . . . . . . . . . . . . . . . . . . . . . . . . . . . . . . . . . . . . . . 2-2
Guidelines . . . . . . . . . . . . . . . . . . . . . . . . . . . . . . . . . . . . . . . . . . . . . . . . . . . . . . . . . . 2-2
Supported Papers. . . . . . . . . . . . . . . . . . . . . . . . . . . . . . . . . . . . . . . . . . . . . . . . . . . . . . . . . . 2-5
Paper Usage Guidelines . . . . . . . . . . . . . . . . . . . . . . . . . . . . . . . . . . . . . . . . . . . . . . . 2-5
Paper Storage Guidelines . . . . . . . . . . . . . . . . . . . . . . . . . . . . . . . . . . . . . . . . . . . . . . 2-9
Paper that May Damage Your Printer. . . . . . . . . . . . . . . . . . . . . . . . . . . . . . . . . . . . 2-10
Basic Printing . . . . . . . . . . . . . . . . . . . . . . . . . . . . . . . . . . . . . . . . . . . . . . . . . . . . . . . . . . . 2-11
Loading Paper in Tray 1 (MPT) . . . . . . . . . . . . . . . . . . . . . . . . . . . . . . . . . . . . . . . . 2-11
Loading Paper in Trays 2-5. . . . . . . . . . . . . . . . . . . . . . . . . . . . . . . . . . . . . . . . . . . . 2-16
Using the Stapler. . . . . . . . . . . . . . . . . . . . . . . . . . . . . . . . . . . . . . . . . . . . . . . . . . . . 2-24
Factors Affecting Printer Performance . . . . . . . . . . . . . . . . . . . . . . . . . . . . . . . . . . . 2-29
Adjusting Printing Options . . . . . . . . . . . . . . . . . . . . . . . . . . . . . . . . . . . . . . . . . . . . . . . . . 2-30
Setting Printing Options . . . . . . . . . . . . . . . . . . . . . . . . . . . . . . . . . . . . . . . . . . . . . . 2-30
Selecting Print-Quality Modes . . . . . . . . . . . . . . . . . . . . . . . . . . . . . . . . . . . . . . . . . 2-33
Printing in Black & White . . . . . . . . . . . . . . . . . . . . . . . . . . . . . . . . . . . . . . . . . . . . 2-34
Using Color . . . . . . . . . . . . . . . . . . . . . . . . . . . . . . . . . . . . . . . . . . . . . . . . . . . . . . . . . . . . . 2-35
Printers and CMYK . . . . . . . . . . . . . . . . . . . . . . . . . . . . . . . . . . . . . . . . . . . . . . . . . 2-35
Monitors and RGB . . . . . . . . . . . . . . . . . . . . . . . . . . . . . . . . . . . . . . . . . . . . . . . . . . 2-35
Image Processing . . . . . . . . . . . . . . . . . . . . . . . . . . . . . . . . . . . . . . . . . . . . . . . . . . . 2-36
Adjusting Color Using TekColor Correction . . . . . . . . . . . . . . . . . . . . . . . . . . . . . . 2-36
Color Calibration. . . . . . . . . . . . . . . . . . . . . . . . . . . . . . . . . . . . . . . . . . . . . . . . . . . . 2-37
Paper Calibration. . . . . . . . . . . . . . . . . . . . . . . . . . . . . . . . . . . . . . . . . . . . . . . . . . . . 2-38
Color Sampler Pages. . . . . . . . . . . . . . . . . . . . . . . . . . . . . . . . . . . . . . . . . . . . . . . . . 2-38
2-Sided Printing. . . . . . . . . . . . . . . . . . . . . . . . . . . . . . . . . . . . . . . . . . . . . . . . . . . . . . . . . . 2-39
Automatic 2-Sided Printing . . . . . . . . . . . . . . . . . . . . . . . . . . . . . . . . . . . . . . . . . . . 2-39
Binding Preferences . . . . . . . . . . . . . . . . . . . . . . . . . . . . . . . . . . . . . . . . . . . . . . . . . 2-40
Manual 2-Sided Printing. . . . . . . . . . . . . . . . . . . . . . . . . . . . . . . . . . . . . . . . . . . . . . 2-42
Transparencies. . . . . . . . . . . . . . . . . . . . . . . . . . . . . . . . . . . . . . . . . . . . . . . . . . . . . . . . . . . 2-48
Guidelines . . . . . . . . . . . . . . . . . . . . . . . . . . . . . . . . . . . . . . . . . . . . . . . . . . . . . . . . . 2-48
Printing Transparencies from Tray 1 (MPT) . . . . . . . . . . . . . . . . . . . . . . . . . . . . . . 2-49
Printing Transparencies from Tray 2 . . . . . . . . . . . . . . . . . . . . . . . . . . . . . . . . . . . . 2-50
Phaser® 7750 Color Laser Printer
ii
Page 5

Contents
Envelopes. . . . . . . . . . . . . . . . . . . . . . . . . . . . . . . . . . . . . . . . . . . . . . . . . . . . . . . . . . . . . . . 2-51
Guidelines . . . . . . . . . . . . . . . . . . . . . . . . . . . . . . . . . . . . . . . . . . . . . . . . . . . . . . . . . 2-51
Printing Envelopes . . . . . . . . . . . . . . . . . . . . . . . . . . . . . . . . . . . . . . . . . . . . . . . . . . 2-52
Labels. . . . . . . . . . . . . . . . . . . . . . . . . . . . . . . . . . . . . . . . . . . . . . . . . . . . . . . . . . . . . . . . . . 2-53
Guidelines . . . . . . . . . . . . . . . . . . . . . . . . . . . . . . . . . . . . . . . . . . . . . . . . . . . . . . . . . 2-53
Printing Labels . . . . . . . . . . . . . . . . . . . . . . . . . . . . . . . . . . . . . . . . . . . . . . . . . . . . . 2-53
Specialty Paper . . . . . . . . . . . . . . . . . . . . . . . . . . . . . . . . . . . . . . . . . . . . . . . . . . . . . . . . . . 2-55
Printing Glossy Coated Paper . . . . . . . . . . . . . . . . . . . . . . . . . . . . . . . . . . . . . . . . . . 2-55
Printing Digital Photo Paper. . . . . . . . . . . . . . . . . . . . . . . . . . . . . . . . . . . . . . . . . . . 2-60
Printing Postcards and Trifold Brochures. . . . . . . . . . . . . . . . . . . . . . . . . . . . . . . . . 2-62
Printing Weatherproof Paper . . . . . . . . . . . . . . . . . . . . . . . . . . . . . . . . . . . . . . . . . . 2-65
Custom Size Paper. . . . . . . . . . . . . . . . . . . . . . . . . . . . . . . . . . . . . . . . . . . . . . . . . . . . . . . . 2-69
Guidelines . . . . . . . . . . . . . . . . . . . . . . . . . . . . . . . . . . . . . . . . . . . . . . . . . . . . . . . . . 2-69
Printing Custom Size Paper in Tray 1 (MPT) or Tray 2. . . . . . . . . . . . . . . . . . . . . . 2-70
Advanced Options . . . . . . . . . . . . . . . . . . . . . . . . . . . . . . . . . . . . . . . . . . . . . . . . . . . . . . . . 2-74
Printing Separation Pages . . . . . . . . . . . . . . . . . . . . . . . . . . . . . . . . . . . . . . . . . . . . . 2-74
Printing Multiple Pages to a Single Sheet (N-Up) . . . . . . . . . . . . . . . . . . . . . . . . . . 2-75
Printing Booklets. . . . . . . . . . . . . . . . . . . . . . . . . . . . . . . . . . . . . . . . . . . . . . . . . . . . 2-76
Printing Negative and Mirror Images . . . . . . . . . . . . . . . . . . . . . . . . . . . . . . . . . . . . 2-77
Scaling. . . . . . . . . . . . . . . . . . . . . . . . . . . . . . . . . . . . . . . . . . . . . . . . . . . . . . . . . . . . 2-79
Printing Watermarks . . . . . . . . . . . . . . . . . . . . . . . . . . . . . . . . . . . . . . . . . . . . . . . . . 2-80
Image Smoothing . . . . . . . . . . . . . . . . . . . . . . . . . . . . . . . . . . . . . . . . . . . . . . . . . . . 2-81
Printing Cover Pages. . . . . . . . . . . . . . . . . . . . . . . . . . . . . . . . . . . . . . . . . . . . . . . . . 2-82
Printing or Deleting Secure, Proof, and Saved Print Jobs . . . . . . . . . . . . . . . . . . . . 2-83
Supplies and Recycling . . . . . . . . . . . . . . . . . . . . . . . . . . . . . . . . . . . . . . . . . . . . . . . . . . . . 2-85
Supplies. . . . . . . . . . . . . . . . . . . . . . . . . . . . . . . . . . . . . . . . . . . . . . . . . . . . . . . . . . . 2-85
Recycling . . . . . . . . . . . . . . . . . . . . . . . . . . . . . . . . . . . . . . . . . . . . . . . . . . . . . . . . . 2-86
3 Connections and Networks
Connections and IP Address . . . . . . . . . . . . . . . . . . . . . . . . . . . . . . . . . . . . . . . . . . . . . . . . . 3-2
Printer Setup . . . . . . . . . . . . . . . . . . . . . . . . . . . . . . . . . . . . . . . . . . . . . . . . . . . . . . . . 3-2
Connection Setup . . . . . . . . . . . . . . . . . . . . . . . . . . . . . . . . . . . . . . . . . . . . . . . . . . . . 3-6
Printer Management Software. . . . . . . . . . . . . . . . . . . . . . . . . . . . . . . . . . . . . . . . . . . . . . . 3-10
Using CentreWare Software . . . . . . . . . . . . . . . . . . . . . . . . . . . . . . . . . . . . . . . . . . . 3-10
Using Printer Management Features. . . . . . . . . . . . . . . . . . . . . . . . . . . . . . . . . . . . . 3-12
Windows 2000, Windows XP, and Windows Server 2003. . . . . . . . . . . . . . . . . . . . . . . . . 3-15
Preliminary Steps . . . . . . . . . . . . . . . . . . . . . . . . . . . . . . . . . . . . . . . . . . . . . . . . . . . 3-15
Quick CD-ROM Install Steps. . . . . . . . . . . . . . . . . . . . . . . . . . . . . . . . . . . . . . . . . . 3-15
Other Methods of Installation. . . . . . . . . . . . . . . . . . . . . . . . . . . . . . . . . . . . . . . . . . 3-16
Windows 2000, Windows XP, Windows Server 2003 Troubleshooting (TCP/IP) . 3-19
Phaser® 7750 Color Laser Printer
iii
Page 6

Contents
Windows NT 4.x . . . . . . . . . . . . . . . . . . . . . . . . . . . . . . . . . . . . . . . . . . . . . . . . . . . . . . . . . 3-22
Preliminary Steps . . . . . . . . . . . . . . . . . . . . . . . . . . . . . . . . . . . . . . . . . . . . . . . . . . . 3-22
Quick CD-ROM Install Steps. . . . . . . . . . . . . . . . . . . . . . . . . . . . . . . . . . . . . . . . . . 3-22
Windows NT 4.x Troubleshooting (TCP/IP) . . . . . . . . . . . . . . . . . . . . . . . . . . . . . . 3-25
Windows 98 and Windows Me . . . . . . . . . . . . . . . . . . . . . . . . . . . . . . . . . . . . . . . . . . . . . . 3-27
Preliminary Steps . . . . . . . . . . . . . . . . . . . . . . . . . . . . . . . . . . . . . . . . . . . . . . . . . . . 3-27
Quick CD-ROM Install Steps. . . . . . . . . . . . . . . . . . . . . . . . . . . . . . . . . . . . . . . . . . 3-28
Other Methods of Installation. . . . . . . . . . . . . . . . . . . . . . . . . . . . . . . . . . . . . . . . . . 3-28
Windows 98 and Windows Me Troubleshooting . . . . . . . . . . . . . . . . . . . . . . . . . . . 3-30
Macintosh . . . . . . . . . . . . . . . . . . . . . . . . . . . . . . . . . . . . . . . . . . . . . . . . . . . . . . . . . . . . . . 3-32
Requirements . . . . . . . . . . . . . . . . . . . . . . . . . . . . . . . . . . . . . . . . . . . . . . . . . . . . . . 3-32
Quick CD-ROM Install Steps. . . . . . . . . . . . . . . . . . . . . . . . . . . . . . . . . . . . . . . . . . 3-32
Enabling and Using EtherTalk for Mac OS 9.x . . . . . . . . . . . . . . . . . . . . . . . . . . . . 3-32
Enabling and Using TCP/IP for Mac OS 9.x . . . . . . . . . . . . . . . . . . . . . . . . . . . . . . 3-33
Enabling and Using TCP/IP or AppleTalk for Mac OS X, Version 10.1 or Higher. 3-35
Macintosh Troubleshooting (Mac OS 9.x, Mac OS X, Versions 10.1 and 10.2) . . . 3-36
Novell NetWare. . . . . . . . . . . . . . . . . . . . . . . . . . . . . . . . . . . . . . . . . . . . . . . . . . . . . . . . . . 3-38
Configuration Software for NetWare Networks. . . . . . . . . . . . . . . . . . . . . . . . . . . . 3-38
Quick Setup. . . . . . . . . . . . . . . . . . . . . . . . . . . . . . . . . . . . . . . . . . . . . . . . . . . . . . . . 3-38
Advanced Setup . . . . . . . . . . . . . . . . . . . . . . . . . . . . . . . . . . . . . . . . . . . . . . . . . . . . 3-38
NetWare 4.x, NetWare 5.x, and NetWare 6.x Print Server Setup . . . . . . . . . . . . . . 3-39
Novell NetWare Troubleshooting. . . . . . . . . . . . . . . . . . . . . . . . . . . . . . . . . . . . . . . 3-39
UNIX (Linux) . . . . . . . . . . . . . . . . . . . . . . . . . . . . . . . . . . . . . . . . . . . . . . . . . . . . . . . . . . . 3-43
Quick Install Steps . . . . . . . . . . . . . . . . . . . . . . . . . . . . . . . . . . . . . . . . . . . . . . . . . . 3-43
Additional Resources . . . . . . . . . . . . . . . . . . . . . . . . . . . . . . . . . . . . . . . . . . . . . . . . 3-44
4 Troubleshooting
Automatic Diagnostic Tools . . . . . . . . . . . . . . . . . . . . . . . . . . . . . . . . . . . . . . . . . . . . . . . . . 4-2
PhaserSMART Technical Support . . . . . . . . . . . . . . . . . . . . . . . . . . . . . . . . . . . . . . . 4-2
Front Panel i Button . . . . . . . . . . . . . . . . . . . . . . . . . . . . . . . . . . . . . . . . . . . . . . . . . . 4-2
PrintingScout. . . . . . . . . . . . . . . . . . . . . . . . . . . . . . . . . . . . . . . . . . . . . . . . . . . . . . . . 4-2
Paper Jams. . . . . . . . . . . . . . . . . . . . . . . . . . . . . . . . . . . . . . . . . . . . . . . . . . . . . . . . . . . . . . . 4-3
Jam at Tray 1 (MPT). . . . . . . . . . . . . . . . . . . . . . . . . . . . . . . . . . . . . . . . . . . . . . . . . . 4-3
Jam at Tray 2. . . . . . . . . . . . . . . . . . . . . . . . . . . . . . . . . . . . . . . . . . . . . . . . . . . . . . . . 4-6
Jam at Tray 3, 4, or 5 . . . . . . . . . . . . . . . . . . . . . . . . . . . . . . . . . . . . . . . . . . . . . . . . . 4-8
Jam at the Fuser. . . . . . . . . . . . . . . . . . . . . . . . . . . . . . . . . . . . . . . . . . . . . . . . . . . . . 4-11
Jam at the Duplex Unit . . . . . . . . . . . . . . . . . . . . . . . . . . . . . . . . . . . . . . . . . . . . . . . 4-14
Jam at Finisher Entrance. . . . . . . . . . . . . . . . . . . . . . . . . . . . . . . . . . . . . . . . . . . . . . 4-16
Jam at Finisher-Bypass Door G . . . . . . . . . . . . . . . . . . . . . . . . . . . . . . . . . . . . . . . . 4-17
Jam at Finisher Door H. . . . . . . . . . . . . . . . . . . . . . . . . . . . . . . . . . . . . . . . . . . . . . . 4-18
Phaser® 7750 Color Laser Printer
iv
Page 7

Contents
Print-Quality Problems . . . . . . . . . . . . . . . . . . . . . . . . . . . . . . . . . . . . . . . . . . . . . . . . . . . . 4-20
Paper Type . . . . . . . . . . . . . . . . . . . . . . . . . . . . . . . . . . . . . . . . . . . . . . . . . . . . . . . . 4-20
Diagnosing Print-Quality Problems . . . . . . . . . . . . . . . . . . . . . . . . . . . . . . . . . . . . . 4-20
Color Settings . . . . . . . . . . . . . . . . . . . . . . . . . . . . . . . . . . . . . . . . . . . . . . . . . . . . . . 4-26
Color Calibration. . . . . . . . . . . . . . . . . . . . . . . . . . . . . . . . . . . . . . . . . . . . . . . . . . . . 4-26
Lighten/Darken Colors . . . . . . . . . . . . . . . . . . . . . . . . . . . . . . . . . . . . . . . . . . . . . . . 4-26
Balance Colors . . . . . . . . . . . . . . . . . . . . . . . . . . . . . . . . . . . . . . . . . . . . . . . . . . . . . 4-27
Calibrate Margins . . . . . . . . . . . . . . . . . . . . . . . . . . . . . . . . . . . . . . . . . . . . . . . . . . . 4-28
Maintenance. . . . . . . . . . . . . . . . . . . . . . . . . . . . . . . . . . . . . . . . . . . . . . . . . . . . . . . . . . . . . 4-32
Cleaning the Outside of the Printer. . . . . . . . . . . . . . . . . . . . . . . . . . . . . . . . . . . . . . 4-32
Front Panel Messages . . . . . . . . . . . . . . . . . . . . . . . . . . . . . . . . . . . . . . . . . . . . . . . . . . . . . 4-33
Status Messages . . . . . . . . . . . . . . . . . . . . . . . . . . . . . . . . . . . . . . . . . . . . . . . . . . . . 4-33
Errors and Warnings . . . . . . . . . . . . . . . . . . . . . . . . . . . . . . . . . . . . . . . . . . . . . . . . . 4-34
Moving and Repacking the Printer . . . . . . . . . . . . . . . . . . . . . . . . . . . . . . . . . . . . . . . . . . . 4-37
Precautions for Moving the Printer. . . . . . . . . . . . . . . . . . . . . . . . . . . . . . . . . . . . . . 4-37
Moving the Printer Within the Office. . . . . . . . . . . . . . . . . . . . . . . . . . . . . . . . . . . . 4-38
Additional Resources. . . . . . . . . . . . . . . . . . . . . . . . . . . . . . . . . . . . . . . . . . . . . . . . . . . . . . 4-39
Support . . . . . . . . . . . . . . . . . . . . . . . . . . . . . . . . . . . . . . . . . . . . . . . . . . . . . . . . . . . 4-39
infoSMART . . . . . . . . . . . . . . . . . . . . . . . . . . . . . . . . . . . . . . . . . . . . . . . . . . . . . . . 4-39
Web Links. . . . . . . . . . . . . . . . . . . . . . . . . . . . . . . . . . . . . . . . . . . . . . . . . . . . . . . . . 4-39
A User Safety
BWarranty
C Printer Specifications
D Regulatory Information
E Material Safety Data Sheet
F Product Recycling and Disposal
Phaser® 7750 Color Laser Printer
v
Page 8

Features
This section includes:
■ "Printer Tour" on page 1-2
■ "Front Panel" on page 1-7
■ "Sample Pages" on page 1-9
■ "Managing Your Printer" on page 1-12
■ "Printer Settings" on page 1-14
■ "Fonts" on page 1-23
■ "Registering Your Printer" on page 1-27
Phaser® 7750 Color Laser Printer
Copyright © 2004 Xerox Corporation. All Rights Reserved.
1-1
Page 9

Phaser® 7750 Color Laser Printer
Printer Tour
This topic includes:
■ "Printer Features" on page 1-2
■ "Available Configurations" on page 1-3
■ "Front View" on pag e 1-4
■ "Rear View" on page 1-4
■ "Internal Components" on page 1-4
■ "Printer Options, Upgrades, and Accessories" on page 1-5
■ "Resources" on page 1-6
Printer Features
The Phaser 7750 Color Laser Printer embodies many features to meet your print needs.
■ Great performance and superior print quality
■ 35 pages per minute (ppm) for both color and monochrome prints
■ Less than 11 seconds first-page-out for color prints
■ Less than 10 second first-page-out for mono prints
■ Customer-installable configuration upgrades
■ Flexible paper handling
■ Optional 1500-Sheet Lower Tray Deck
■ Optional 2500-Sheet High-Capacity Feeder
■ Optional Finisher with stapler (compatible with Phaser 7750DN, 7750GX, and
7750DXF configurations)
■ Automatic two-sided printing (available with Phaser 7750DN, 7750GX, and
7750DXF configurations only)
■ Manual two-sided printing (available for supported media types)
■ Wide variety of productivity features
■ Toner cartridges deliver excellent print quality and are easy to replace.
■ PhaserSMART provides online troubleshooting.
■ CentreWare Internet Services (an embedded web server) helps to manage, configure,
and troubleshoot the printer from your computer.
■ PrintingScout provides onscreen notification and guidance if the printer needs help.
■ MaiLinX email notifies a specific person when supplies or maintenance are needed.
■ MaiLinX prints to your network printer from anywhere you have email.
Copyright © 2004 Xerox Corporation. All Rights Reserved.
1-2
Page 10

Printer Tour
Available Configurations
The Phaser 7750 Color Laser Printer is available in four configurations.
Features Printer Configuration
7750B 7750DN 7750GX 7750DXF
Maximum Print Speed 35353535
Standard Memory (MB) 256 384 512 512
PostScript and PCL Fonts Yes Yes Yes Yes
Secure, Proof, and Saved Print Jobs NA* Y es Yes Yes
Automatic 2-Sided Printing NA* Yes Yes Yes
Photo Mode NA* Yes Yes Yes
Maximum Resolutions (dpi) 1200x1200 1200x1200 1200x1200 1200x1200
1500-Sheet Lower Tray Deck
2500-Sheet High-Capacity Feeder
Optional
Optional
†
Optional
†
Optional
†
†
Yes NA
NA Yes
Banner-Size Printing NA* Yes Yes Yes
USB Connection Yes Yes Yes Yes
10/100 Ethernet Connection NA* Yes Yes Yes
Internal Hard Drive Yes Yes Yes Yes
Finisher NA
Tray Switching
*Requires a Phaser 7750DN upgrade.
†
Requires a Feeder upgrade.
All configurations support two memory slots. The maximum memory is 1 Gigabyte (GB).
Optional
Optional
†
Optional
†
Optional Yes
†
Yes Yes
Phaser® 7750 Color Laser Printer
1-3
Page 11
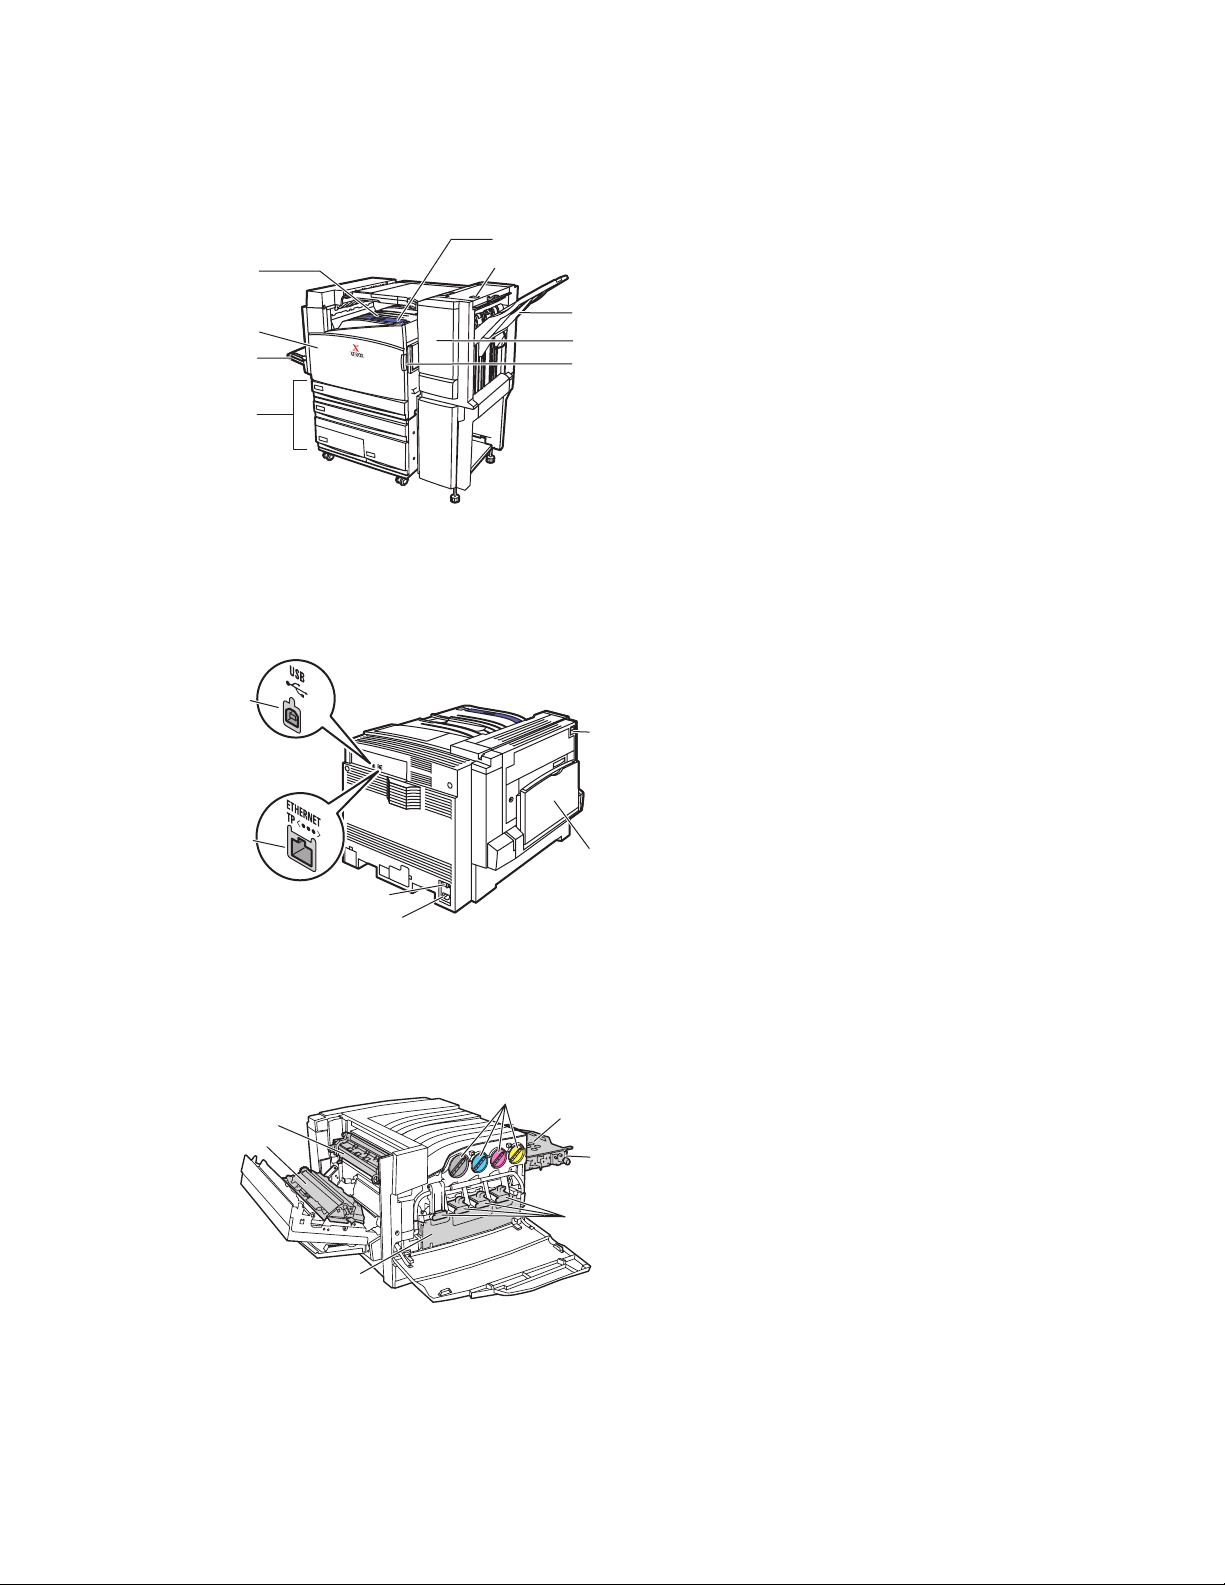
Front View
1
2
3
4
Rear View
1
5
6
7
8
9
7750-082
1. Top Output Tray
2. Front Door
3. Tray 1 (MPT) (Left side of printer)
4. 2500-Sheet High-Capacity Feeder
(1500-Sheet Lower Tray Deck not shown)
5. Power Switch
6. Finisher Top Door H release
7. Finisher Output Tray
8. Finisher Door J
9. Front Door right side release (Release on left
side not displayed.)
1. USB connection
2. Ethernet 10/100 Base-T connection
3. Ground Fault Interrupt (GFI) reset
4. Power cord connection
5
5. Latch to open Left Door A
6. Tray 1 (MPT) in closed position
Printer Tour
2
3
4
Internal Components
1
2
3
6
7750-120
1. Fuser
4
5
7
7750-083
2. Transfer roller
3. Waste cartridge
6
4. Toner cartridges
5. Accumulator belt
6. Accumulator belt cleaner
7. Imaging Units
Phaser® 7750 Color Laser Printer
1-4
Page 12

Printer Tour
Printer Options, Upgrades, and Accessories
Printer options, upgrades, and an accessory are available for the Phaser 7750 Color Laser
Printer.
Options
■ 128 MB RAM memory card
■ 256 MB RAM memory card
■ 512 MB RAM memory card
■ 1500-Sheet Lower Tray Deck
■ 2500-Sheet High-Capacity Feeder
■ Finisher output tray and stapler
■ PhaserMatch Software CD-ROM
Upgrades
■ Phaser 7750B to Phaser 7750DN upgrade kit
For more information on printer options and upgrades, go to www.xerox.com/office/
7750supplies.
Accessory
■ Printer Cart (for 7750B or 7750DN configuration)
Color
Xerox Phaser color printers embody 20 years of printing experience. While different models
are optimized for tasks, such as fast, easy, of f ice printing or complex, lar ge format graphic arts
applications, all Phaser color printers share important characteristics that contribute to the
Xerox reputation for color image quality.
Exceptional color quality starts with the controller. Xerox designs and b uilds the Phaser printer
controller. Working in unison with advanced printer driver software, your printer incorporates
capabilities, such as custom color tables for color accuracy. The proprietary TekColor
correction applies the best color correction mode to each element on the page. This results in
bright, vivid colors in solid fill areas, good detail in photographs, and crisp text.
Your printer also uses Adobe PostScript 3 for the most accurate page rendering and image
quality. Together, these features combine to give you consistently high-quality results for a
broad range of printing needs.
For more information about color and your printer, go to Reference/Printing/Using Color on
the User Documentation CD-ROM.
Phaser® 7750 Color Laser Printer
1-5
Page 13

Printer Tour
Resources
You can obtain information regarding your printer and its capabilities from the following
sources:
Information Source
Setup Guide
Quick Reference Guide
Warranty
Supplies Guide
Reference Guide Packaged with printer
Printer Management Tools www.xerox.com/office
infoSMART Kno wledge Base www.xerox.com/office/infoSMART
PhaserSMART www.phaserSMART
Technical Support www.xerox.com/office/support
Information Pages ■ Front panel
Packaged with printer
Packaged with printer
Packaged with printer
Packaged with printer
(User Documentation CD-ROM)
■ CentreWare IS
■ Printer Driver
Phaser® 7750 Color Laser Printer
1-6
Page 14

Phaser® 7750 Color Laser Printer
Front Panel
This topic includes:
■ "Front Panel Description" on page 1-7
■ "Front Panel Layout" on page 1-7
■ "Error and Warning Messages" on page 1-8
■ "Print Icon" on page 1-9
■ "Menu Map" on page 1-9
■ "Information Pages" on page 1-9
■ "Sample Pages" on page 1-9
Front Panel Description
The front panel:
■ Displays the printer’s operating status (for e xample, Printing, Ready to Print, printer errors
and warnings).
■ Prompts you to load paper, replace supplies, and clear jams.
■ Enables you to access tools and information pages to help resolve problems.
■ Enables you to change printer and network settings.
Go to Reference/Features/Printer Settings on the User Documentation CD-ROM for details
about front panel settings.
Note
The front panel prompts you to select the paper type when a tray is pulled out and
reinserted into the printer.
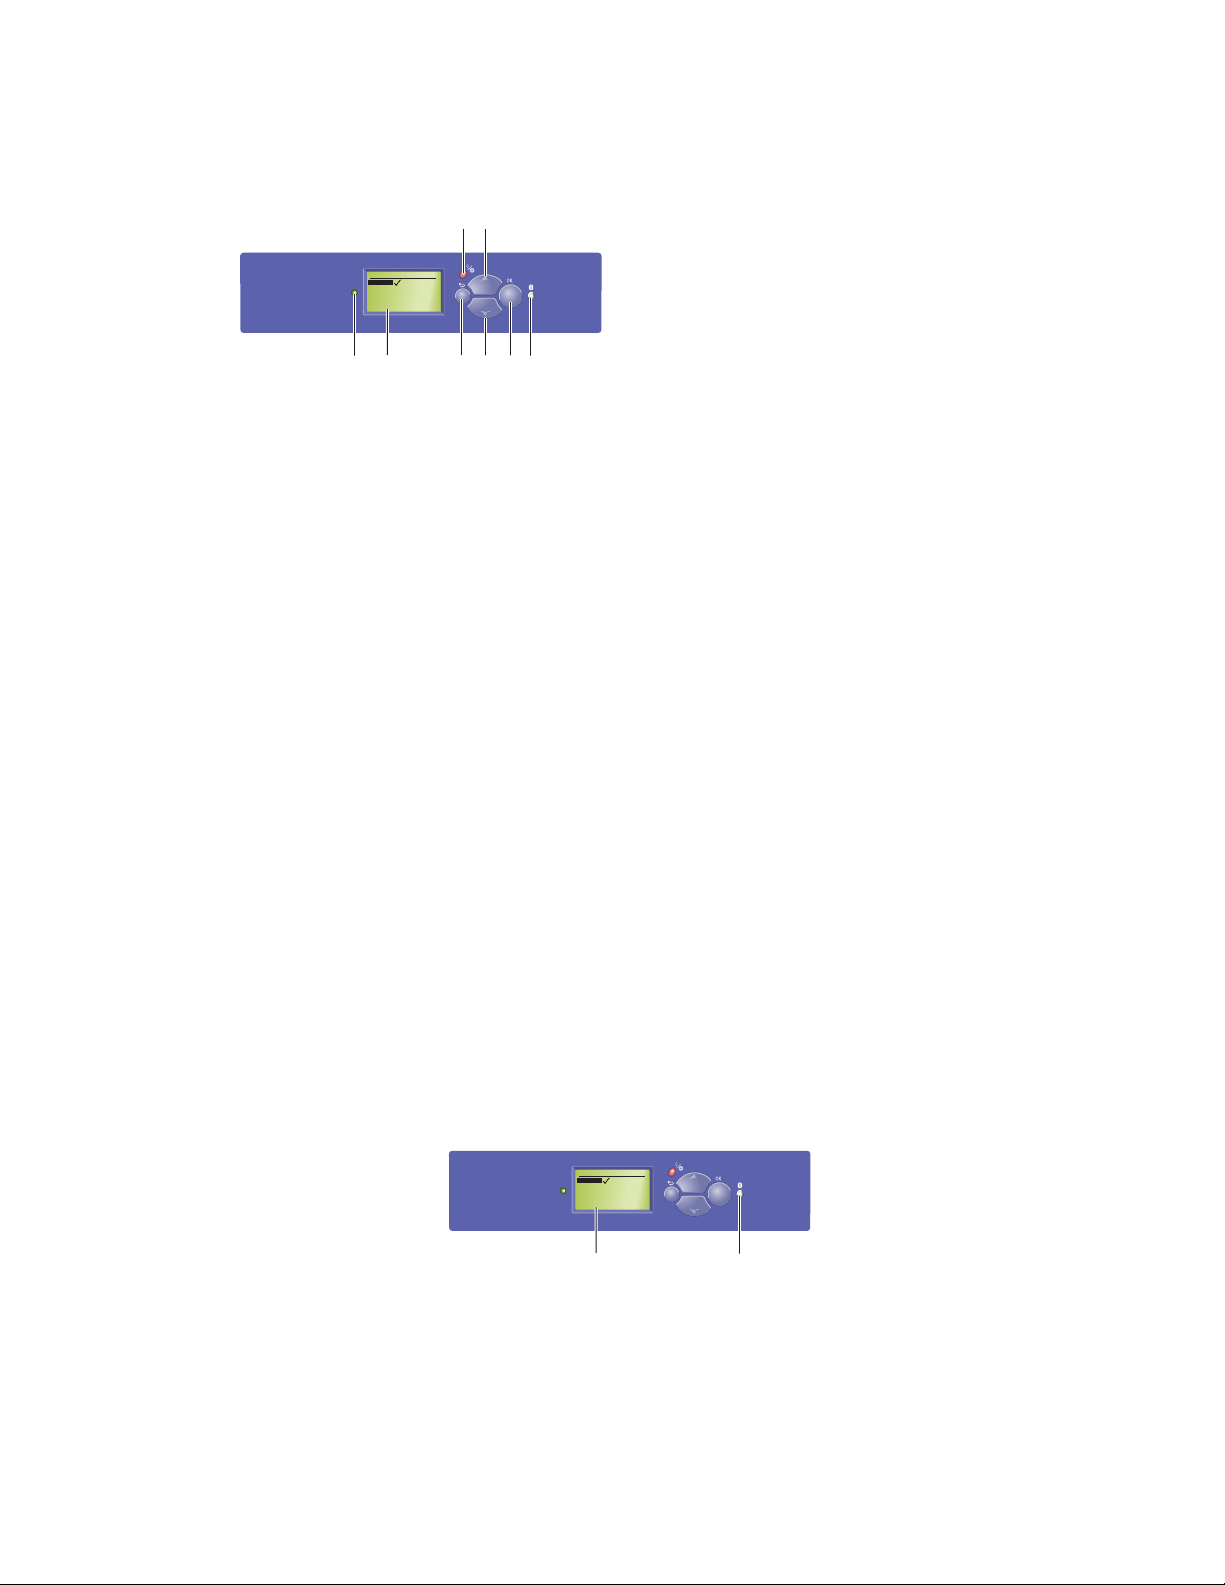
Front Panel Layout
The front panel on your printer has three components:
■ Multi-colored LED
■ Graphic display
■ Six button cluster
Copyright © 2004 Xerox Corporation. All Rights Reserved.
1-7
Page 15
Front Panel
Tray 2 Paper Type
Plain Paper
Heavy Plain Paper
Phaser Series-25 Premium
Transparency
Exit
1
Phaser 7750
2
3
5
Blinking green = Printer is busy or in Power
Saver mode
Steady green = Ready to print
Blinking yellow = Warning condition
Blinking red = Error condition
1. Status Indicator LED:
4
687
7750-086
Steady red = Startup sequence
2. Graphic display shows status messages and
menus.
3. Cancel button
Cancels the current print job.
4. Back button
Returns to the previous menu item.
5. Up Arrow button
Scrolls upward through the menus.
6. Down Arrow button
Scrolls downward through the menus.
7. OK button
Accepts the setting selected.
8. Information (i) button
Displays a help message with information
about the printer such as printer status, error
messages, and maintenance information.
The Graphic Display has two sections:
■ The top section displays status messages for the printer.
■ The bottom section displays the front panel menus.
Error and Warning Messages
When there is a problem with the printer, the front panel displays (1) an error or warning
message. Press the i button (2) for more information about the error or warning message and
ways to solve the problem.
Phaser 7750
Tray 2 Paper Type
Plain Paper
Heavy Plain Paper
Phaser Series-25 Premium
Transparency
Exit
1
2
7750-156
Phaser® 7750 Color Laser Printer
1-8
Page 16

Front Panel
Print Icon
There are a number of information pages accessible through the front panel.
When the print icon appears before a title on the front panel display, press
the OK button to print that page.
Menu Map
The “Menu Map” is a visual representation of the front panel settings and information pages.
To print the “Menu Map”:
1. At the printer’s front panel, select Information, then press the OK button.
2. Select Menu Map, then press the OK button to print.
Information Pages
Your printer comes with a set of information pages that helps you solve printing problems and
obtain the best results from your printer. Access these pages from the printer’s front panel.
To print information pages:
1. At the printer’s front panel, select Information, then press the OK button.
2. Select Information Pages, then press the OK button.
3. Select the appropriate information page, then press the OK button to print.
Note
Print the “Menu Map” to see other information pages available for printing.
Sample Pages
Your printer comes with a set of sample pages which demonstrate different printer functions.
To print sample pages:
1. At the printer’s front panel, select Information, then press the OK button.
2. Select Sample Pages, then press the OK button.
3. Select the desired sample page, then press the OK button to print.
Phaser® 7750 Color Laser Printer
1-9
Page 17

Phaser® 7750 Color Laser Printer
Printer Drivers
This topic includes:
■ "Available Printer Drivers" on page 1-10
■ "Printer Driver Features" on page 1-11
Printer drivers enable your computer and printer to communicate and provide access to your
printer features. Xerox makes driver installation easy with its Walk-Up Technology. For more
information about printer drivers, see the video at www.xerox.com/office/drivers
Available Printer Drivers
Xerox provides drivers for a variety of page description languages and operating systems. The
following drivers are available:
Driver Source* Description
.
Windows PostScript Driver CD-ROM and
Web
PCL Driver Web only The Printer Command Language driver can
Xerox Walk-Up Printing Driver
(Windows)
Macintosh OS Driver CD-ROM and
UNIX Driver (Linux, Solaris) Web only This driver enables printing from a UNIX
* You can access the printer drivers listed above on the Printer Installer and Utilities CD-ROM that
came with your printer or go to www.xerox.com/office/drivers
Web only This driver enables printing from a PC to any
Web
The PostScript driver is recommended to take
full advantage of your printer's custom
features and genuine Adobe® PostScript®.
(Default driver)
be used for applications requiring PCL.
NoteNoteNote
For Windows 2000 and Windows XP only.
Xerox PostScript-enabled printer. This is
especially helpful for mobile professionals
who travel to multiple locations and need to
print to different printers.
This driver enables printing from a Macintosh
OS 9.x or OS X, version10.1 or higher.
operating system.
as indicated.
For more information about driver features, go to Reference/Printing/Adjusting Printing
Options on the User Documentation CD-ROM.
Copyright © 2004 Xerox Corporation. All Rights Reserved.
1-10
Page 18

Printer Drivers
Printer Driver Features
The following table displays the Xerox driver features that are available with specific
operating systems.
Windows,
Feature
2-Sided Printing ■■■■■
Windows
98, Me
Windows
NT4
2000, XP,
Server
2003
Macintosh
OS 9.x
Macintosh
OS 10.x
N-Up
Booklet ■■■
Cover Pages
Separation Pages
Negative Images
Mirror Images
Scaling
Watermarks
Image Smoothing
Job Completion Notification
Secure Print ■■■■■
Proof Print ■■■■■
Saved Print ■■■■■
● = Supported feature
❍ = Only available when your printer is connected to your computer over a network
●●●●●
●●●●●
●●●●●
●● ●
●●●●
●●●
●●
●●●●●
❍❍
■ = Only available with a Phaser 7750DN, 7750GX, or 7750DXF printer.
Phaser® 7750 Color Laser Printer
1-11
Page 19

Phaser® 7750 Color Laser Printer
Managing Your Printer
This topic includes:
■ "Printer’s IP Address" on page 1-12
■ "CentreWare Internet Services (IS)" on page 1-12
■ "PhaserSMART" on page 1-13
■ "PrintingScout" on page 1-13
There are a number of resources available to help you get the best quality prints from your
printer.
Note
The information in this section applies only to network printers.
Printer’s IP Address
You need your printer’s IP address to change printer settings through CentreWare IS. Follow
these steps to identify your printer’s IP address:
1. At the printer’s front panel, select Information, then press the OK button.
2. Select Printer Identification, then press the OK button.
CentreWare Internet Services (IS)
CentreWare IS is a printer management tool that helps users and administrators accomplish
many tasks. It is available on all networked printers. With CentreWare IS you can:
■ Configure and manage multi-vendor printers.
■ Access remote diagnostics and troubleshooting information for printer problems.
■ Monitor printer and supply status.
■ Link to software updates and Technical Support.
CentreWare IS uses TCP/IP (your printer’s IP address) to communicate directly with an
embedded web server on the printer. CentreWare IS runs on any TCP/IP enabled computer
with a web browser.
Launching CentreWare IS
To launch CentreWare IS:
1. Launch your web browser.
2. Enter your printer's IP address in the browser’s Address field (http://xxx.xxx.xxx.xxx).
3. For detailed information about CentreWare IS software, click HELP on the upper right of
the CentreWare IS screen.
For more information about “CentreWare IS” go to Reference/Connections & Networks/
Printer Management Software on the User Documentation CD-ROM.
Copyright © 2004 Xerox Corporation. All Rights Reserved.
1-12
Page 20

Managing Your Printer
PhaserSMART
PhaserSMART Technical Support is an automated, Internet-based support system. Use your
default web browser to send diagnostic information from your printer to our web site for
analysis. PhaserSMART Technical Support examines the information, diagnoses the problem,
and proposes a solution. If the problem is not resolved with the solution, PhaserSMART
Technical Support assists you in opening a Service Request with Xerox Customer Support.
Launching PhaserSMART from CentreWare IS
To access PhaserSMART Technical Support through CentreWare IS:
1. Launch your web browser.
2. Enter your printer’s IP address in the browser’s Address field (http://xxx.xxx.xxx.xxx).
3. Select Support.
4. Click the PhaserSMART Diagnostic Tool link to access PhaserSMART technical
support.
PrintingScout
PrintingScout, installed with your printer driver and available only with Windows,
automatically checks the printer status and sends instant notification to your computer if the
printer needs attention.
Whenever the printer is unable to print your document, the printer automatically sends an onscreen message that provides helpful text and illustrations showing how to fix the printer.
Phaser® 7750 Color Laser Printer
1-13
Page 21

Phaser® 7750 Color Laser Printer
Printer Settings
This topic includes:
■ "Accessing the Startup Page" on page 1-14
■ "Accessing Power Saver" on page 1-15
■ "Accessing Intelligent Ready Mode" on page 1-15
■ "Preventing Access to Front Panel Settings" on page 1-16
■ "Accessing Load Paper Timeout" on page 1-17
■ "Selecting Tray Settings" on page 1-18
■ "Selecting Output Options" on page 1-20
■ "Adjusting Front Panel Brightness" on page 1-21
■ "Adjusting Front Panel Contrast" on page 1-21
■ "Adjusting Front Panel Sound Level" on page 1-22
■ "Adjusting Printer Language" on page 1-22
Accessing the Startup Page
The printer produces a “Startup Page” each time the printer is turned on or reset. The factory
default is “Off”. You can turn on automatic printing of the “Startup Page” or print it from the
information Pages menu.
To turn on/off the “Startup Page” use either:
■ The printer’s front panel
■ CentreWare IS
Using the Printer’s Front Panel
To turn on/off the Startup Page:
1. Select Printer Setup, then press the OK button.
2. Select Printer Controls, then press the OK button.
The Startup Page is highlighted. The end of the line displays the setting (On or Off).
3. Press the OK button to change the setting.
Using CentreWare IS
To turn on/off the automatic printing of the “Startup Page”:
1. Launch your web browser.
2. Enter your printer’s IP address in the browser’s Address field (http://xxx.xxx.xxx.xxx).
3. Select Properties.
4. Select the General folder on the left sidebar.
5. Select Printer Defaults.
6. Select Off or On from the Printer Startup Page drop-down list to change the setting.
7. Click Save Changes at the bottom of the page.
Copyright © 2004 Xerox Corporation. All Rights Reserved.
1-14
Page 22

Printer Settings
Printing the Startup Page
To print the “Startup Page”:
1. Select Information, then press the OK button.
2. Select Information Pages, then press the OK button.
3. Select Startup Page, then press the OK button to print.
Accessing Power Saver
To save energy, the printer enters a Power Saver, low-energy consumption mode after a predefined period of time since its last activity. In this mode, most printer electrical systems are
shut down. When a print job is sent to the printer, the printer enters Warmup Mode. You can
also warm up the printer by pressing the OK button on the front panel.
If you find that the printer is going into Power Saver mode too often and you do not want to
wait while the printer warms up, increase the length of time before the printer goes into Power
Saver mode. Change the timeout value as follows:
1. At the printer’s front panel, select Printer Setup, then press the OK button.
2. Select Printer Controls, then press the OK button.
3. Select Power Saver Timeout, then press the OK button.
4. Press the Down Arrow or Up Arrow button to scroll to a selected Power Saver timeout
value. Select a larger value if you want to e xtend the length of time before the printer goes
into Power Saver mode.
5. Press the OK button.
Accessing Intelligent Ready Mode
Intelligent Ready mode is an automated system that:
■ Monitors the printer’s usage.
■ Warms up the printer when you are most likely to need it based on past usage patterns.
■ Activates the Power Saver mode when the printer times out.
To turn on/off the Intelligent Ready mode, use either:
■ The printer’s front panel
■ CenterWare IS
Using the Printer’s Front Panel
To turn Intelligent Ready mode on/off:
1. Select Printer Setup, then press the OK button.
2. Select Printer Controls, then press the OK button.
3. Select Intelligent Ready.
4. Press the OK button to turn on/off Intelligent Ready.
5. Select Exit, then press the OK button to return to the main menu.
Phaser® 7750 Color Laser Printer
1-15
Page 23

Printer Settings
Using CentreWare IS
To select Intelligent Ready mode or to schedule warmup/standby settings:
1. Launch your web browser.
2. Enter your printer’s IP address in the browser’s Address field (http://xxx.xxx.xxx.xxx).
3. Select Properties.
4. Select the General folder on the left sidebar.
5. Select Warmup.
6. Select Intelligent Ready, Scheduled, or Job Activated from the Warmup Mode drop-
down list to change the setting.
7. If you select Scheduled in Step 5, make selections for each day’s warmup setting and
standby setting.
8. Click Save Changes at the bottom of the screen.
Note
Although the front panel selections only allow you to turn Intelligent Ready Mode on or
off, CentreWare IS allows you to specify particular printer Warmup Modes and settings.
Preventing Access to Front Panel Settings
To prevent access to front panel settings, you can lock the front panel
settings from CentreWare IS. A lock icon appears next to items in the front
panel that cannot be accessed by users.
Using CentereWare IS
To set front panel menu preferences:
1. Launch your web browser.
2. Enter your printer’s IP address in the browser’s Address field (http://xxx.xxx.xxx.xxx).
3. Select Properties.
4. Select the General folder on the left sidebar.
5. Select Printer Defaults.
6. Select On or Off from the Front Panel Menu drop-down list.
■ Select On to have all menus available.
■ Select Off to limit the printer setup items.
7. Click Save Changes at the bottom of the page.
Phaser® 7750 Color Laser Printer
1-16
Page 24

Printer Settings
Accessing Load Paper Timeout
When your print job is formatted for a type or size of paper that is not loaded in the printer, the
printer’s front panel displays a message requesting you to load the appropriate paper. The Load
Paper Timeou t controls the amount of time the printer w aits before printing on another type or
size of paper.
To change the load paper timeout, use either:
■ The printer’s front panel
■ CentreWare IS
Using the Printer’s Front Panel
To change the load paper timeout:
1. Select Printer Setup, then press the OK button.
2. Select Paper Handling Setup, then press the OK button.
3. Select Load Paper Timeout, then press the OK button.
4. Scroll to the desired timeout value. The values (None, 1, 3, 5, or 10 minutes, 1 hour or
24 hours) indicate the length of time you want the printer to wait for you to load paper
before printing. If you select a value of None, the printer does not wait for paper to be
inserted and immediately picks paper from the default tray.
5. Press the OK button to save the change.
Using CentreWare IS
To change the load paper timeout:
1. Launch your web browser.
2. Enter your printer’s IP address in the browser’s Address field (http://xxx.xxx.xxx.xxx).
3. Select Properties.
4. Select the General folder on the left sidebar.
5. Select Printer Defaults.
6. Scroll to the desired Load Paper T imeout value in Timeout Settings. The values (None,
1, 3, 5, or 10 minutes, 1 or 24 hours) indicate the length of time you want the printer to
wait for you to load paper before printing. If you select a value of None, the printer does
not wait for paper to be inserted and immediately picks paper from the default tray.
7. Click Save Changes at the bottom of the screen.
Phaser® 7750 Color Laser Printer
1-17
Page 25

Printer Settings
Selecting Tray Settings
Tray Switching
When a tray runs out of paper , tray switchi ng enables the printer to switch between trays when
the trays contain the same paper type and size. Tray switching is controlled by the printer
driver, front panel, or CentreWare IS. If a specific tray is selected, tray switching is turned off.
Select the Let printer select which tray to print from option in the printer driver to ha ve the
printer select the tray from which to draw paper.
Note
If you use the printer driver to specify a tray to use for your print job, tray switching is
disabled for that job. If the tray becomes empty during printing, the front panel prompts
you to load paper in that tray even if another tray contains the correct paper type and size
for the job.
Tray 1 (MPT) and Tray 2, a 500-she et adjustable tray, are standard with the Phaser 7750
printers. Additional paper feeders can be purchased:
■ 1500-Sheet Lower Tray Deck (Trays 3, 4, and 5)
■ 2500-Sheet High-Capacity Feeder (Trays 3, 4, and 5)
Tray Switching Settings
■ If tray switching is enabled, and a tray runs out of paper while printing, then the printer
selects another tray containing the same paper type, size, and orientation to continue
printing the job.
■ If tray switching is disabled, and a tray runs out of paper while printing, then the front
panel prompts you that the tray is empty and must be refilled.
Tray Sequence
You can specify the sequence the printer uses to select trays containing the correct paper type
and size for a print job. When a tray runs out of the correct paper during printing, the printer
selects the next tray in the sequence containing the correct paper type and size to continue
printing the job.
For example, if the tray sequence is set to 4-3-2, the printer selects paper from T ray 4 to print a
job. If Tray 4 does not contain the requested paper, or runs out of paper while printing, the
printer selects Tray 3. If neither Tray 4 nor Tray 3 contains the requested paper, or is out of
paper, then Tray 2 is selected.
You can specify the tray sequence by two different methods:
■ The printer’s front panel
■ CentreWare IS
Phaser® 7750 Color Laser Printer
1-18
Page 26

Printer Settings
Using the Front Panel
To spec ify the tray sequence:
1. At the printer’s front panel, select Printer Setup, then press the OK button.
2. Select Paper Handling Setup, then press the OK button.
3. Select Tray Sequence, then press the OK button.
4. Scroll to the desired tray sequence. (If you want to turn off tray switching, select Off.)
5. Press the OK button to save the changes.
Using CentreWare IS
To spec ify the tray sequence:
1. Launch your web browser.
2. Enter your printer’s IP address in the browser’s Address field (http://xxx.xxx.xxx.xxx).
3. Select Properties.
4. Select the General folder on the left sidebar.
5. Select Printer Defaults.
6. Select the desired tray sequence from the Tray Sequence drop-down list. (If you want to
turn off tray switching, select Off.)
7. Click the Save Changes button at the bottom of the screen.
Selecting the Default Tray
If you do not want to use tray switching, you can specify a default tray to use for printing jobs.
The default tray contains the paper type and size used for printing jobs. When the default tray
is empty , o r contains a different paper type, you are prompted to load the correct paper type in
the tray even if another tray contains the correct paper type and size for the job.
You can select the default tray by two different methods:
■ The printer’s front panel
■ CentreWare IS
Using the Front Panel
To select a default tray:
1. Select Printer Setup, then press the OK button.
2. Select Paper Handling Setup, then press the OK button.
3. Select Paper Source, then press the OK button.
4. Scroll to the desired tray to use as the default tray. (If you want tray switching enabled,
select Auto Select.)
5. Press the OK button to save the change.
Note
The driver overrides the front panel settings and CentreWare IS for tray selection.
Phaser® 7750 Color Laser Printer
1-19
Page 27

Printer Settings
Using CentreWare IS
To select a default tray:
1. Launch your web browser.
2. Enter your printer’s IP address in the browser’s Address field (http://xxx.xxx.xxx.xxx).
3. Select Properties.
4. Select the General folder on the left sidebar.
5. Select Printer Defaults.
6. Scroll to Print Mode Settings, then select the tray from the Paper Source drop-do wn list.
7. Click Save Changes at the bottom of the screen.
Selecting Output Options
The Phaser 7750 printer has two output trays:
■ Top Output Tray: Sends prints to the Top Output Tray on top of the printer.
■ Finisher Output Tray (for Phaser 7750DN, 7750GX, and 7750DXF configurations
only): Sends prints to the Finisher Output Tray on the right side of the printer. This tray is
only available when the printer has the optional Finisher.
To select the output tray you want to use:
1. At the printer’s front panel, select Printer Setup, select Paper Handling Setup, then
select Paper Destination.
2. Select either Top Output Tray or Finisher Output Tray, then press the OK button.
Note
The printer driver overrides the front panel settings for output tray selection.
Selecting Job Offset
The Finisher Output Tray and Top Output Tray can place sheets in alternate positions to
separate one print job from another. This is called job offsetting. There are several job
offsetting options from which to choose:
■ None: No job offsetting occurs and the output position is not changed for the output tray
selected.
■ With End of Job: The output position changes after the final sheet of the print job is
printed. The next print job is then offset to keep it separate from the previous print job.
■ With End of Set
■ With Collat ion Off: The job offset position changes after all copies of each sheet (one
page with single-sided printing, two pages with 2-sided printing) are printed.
■ With Collation On: The job offset position changes after each copy of all sheets in the
job is printed.
Note
When the stapling option is used for print jobs, job offsetting is activated.
Phaser® 7750 Color Laser Printer
1-20
Page 28

Printer Settings
To select the job offset option:
1. At the printer’s front panel, select Printer Setup, then press the OK button.
2. Select Paper Handling Setup, then press the OK button.
3. Select Job Offset, then press the OK button.
4. Select either On or Off, then press the OK button.
Adjusting Front Panel Brightness
To adjust the brightness of the front panel’s background lighting:
1. At the printer’s front panel, select Printer Setup, then press the OK button.
2. Select Front Panel Setup, then press the OK button.
3. Select Front Panel Brightness, then press the OK button.
4. Press the Down Arrow or Up Arrow button to increase or decrease the front panel
brightness value. The brightness values range from 0 (no background light) to 10
(brightest background light).
5. Press the OK button to save your change.
Adjusting Front Panel Contrast
To adjust the contrast between the text and the background to make the front panel text more
readable:
1. At the printer’s front panel, select Printer Setup, then press the OK button.
2. Select Front Panel Setup, then press the OK button.
3. Select Front Panel Contrast, then press the OK button.
4. Press the Down Arrow or Up Arrow button to increase or decrease the front panel
contrast value. The contrast values range from 1 (brightest background light) to 10 (no
background light).
5. Press the OK button to save your change.
Phaser® 7750 Color Laser Printer
1-21
Page 29

Printer Settings
Adjusting Front Panel Sound Level
The front panel emits a sound to prompt you to view a message displayed at the front panel.
For example, the front panel may prompt you to verify that the paper loaded in a paper tray is
correct. To change the sound level emitted by the front panel:
1. At the printer’s front panel, select Printer Setup, then press the OK button.
2. Select Front Panel Setup, then press the OK button.
3. Select Front Panel Sound, then press the OK button.
4. Press the Down Arrow or Up Arrow button to increase or decrease the sound level. The
sound values range from 0 (none) to 4 (loudest).
5. Press the OK button to save your selection.
Adjusting Printer Language
To change the language used for the text on the front panel, CentreWare IS, and some
information pages:
1. At the printer’s front panel, select Printer Setup, then press the OK button.
2. Select Front Panel Setup, then press the OK button.
3. Select Front Panel Language, then press the OK button.
4. Select the desired language, then press the OK button.
Phaser® 7750 Color Laser Printer
1-22
Page 30

Phaser® 7750 Color Laser Printer
Fonts
This topic includes:
■ "Resident Printer Fonts" on page 1-23
■ "Viewing a List of Resident Fonts" on pa ge 1-23
■ "Printing a List of Resident Fonts" on page 1-24
■ "Downloading Fonts" on page 1-25
Types of Fonts
Your printer uses the following types of fonts:
■ Resident fonts
■ Fronts downloaded into printer memory
■ Fonts downloaded with your print job from the application
Adobe Type Manager (ATM) software enables your computer to display these fonts on your
computer screen as they will appear in your prints.
If you do not have ATM on your computer:
1. Install it from the Printer Installer and Utilities CD-ROM.
2. Install the printer’s screen fonts for your computer from the ATM folder.
Resident Printer Fonts
Printer-resident PostScript and PCL fonts are always a vailable for printing. Japanese fonts are
provided for applicable countries per special licensing requirements. Screen versions are
available for countries using these fonts.
Viewing a List of Resident Fonts
To view a list of resident PCL or PostScript fonts, use CentreWare IS:
1. Launch your web browser.
2. Enter your printer’s IP address in the browser’s Address field (http://xxx.xxx.xxx.xxx).
3. Select Properties.
4. Select the Web Server folder on the left sidebar.
5. Select Font Files.
Copyright © 2004 Xerox Corporation. All Rights Reserved.
1-23
Page 31

Printing a List of Resident Fonts
To print a list of resident PostScript or PCL fonts, use:
■ The printer’s front panel
■ CenterWare IS
■ The printer driver
Using the Printer’s Front Panel
To print either a PostScript or PCL font list at the front panel:
1. Select Information, then press the OK button.
2. Select Information Pages, then press the OK button.
3. Select either PCL Font List or PostScript Font List, then press the OK button to
print.
Using CentreWare IS
To print either a PostScript or PCL font list from CenterWare IS:
Fonts
1. Launch your web browser.
2. Enter your printer’s IP address in the browser’s Address field (http://xxx.xxx.xxx.xxx).
3. Select Properties.
4. Select the Web Server folder on the left sidebar.
5. Select Font Files.
6. Click the Printer icon to print the list of fonts.
Using a PC Printer Driver
To print either a PostScript or PCL font list from your printer driver:
1. Select Start, select Settings, then select Printers.
2. Right-click the 7750 printer, then select Properties.
3. Select the Troubleshooting tab.
4. Click the drop-down arrow in the Printer Information field to view the list of options.
5. Select PostScript Font List or PCL Font List from the drop-down list.
6. Click Print.
Phaser® 7750 Color Laser Printer
1-24
Page 32

Fonts
Listing the Fonts from a Mac
Use the Apple Printer Utility to list the fonts available on your printer.
1. If you do not have the Apple Printer Utility on your computer, install it from the Printer
Installer and Utilities CD-ROM.
2. Double-click the Apple Printer Utility icon (in the PhaserTools folder on your
computer’s hard drive) to launch the utility.
3. In the Printer Selector dialog box:
a. Under AppleTalk Zones, select your printer’s zone.
b. Under Printers, select your printer.
c. Click Open Printer.
4. From the File menu, select Print Font Samples.
Downloading Fonts
T o supplement the resident fonts (which are always a v ailable for printing), do wnloadable fonts
can be sent from your computer and stored in the printer’s memory or on the printer’s hard
drive.
Note
If you turn the printer off, the fonts you download to memory are deleted. You must
download them again when you turn the printer on.
Before printing, verify that the fonts specified in your document are installed in the printer or
are set up to download correctly. If your document has a font not currently in your printer, or
downloaded with your print job, a different font will be used.
The printer accepts the following downloadable fonts:
■ PCL
■ Type 1
■ Type 3
■ TrueType (Scalable to any point size; looks the same on-screen and printed.)
Downloading Fonts from CentreWare Font Management Utility
The CentreW are F ont Management Utility (FMU) is a W indo ws application that helps manage
fonts, macros and forms on a printer’s hard drive. Downloading fonts to a printer can improve
printing performance and reduce network traffic. You can list, print, and download PostScript
and PCL fonts using the Font Management Utility. To download the F ont Management Utility,
go to www.xerox.com/office/drivers
and use the Key w ord search FMU.
Phaser® 7750 Color Laser Printer
1-25
Page 33

Fonts
Downloading Fonts from a Mac (9.x only)
Use the Apple Printer Utility to download fonts to the printer.
Note
If you do not have the Apple Printer Utility on your computer, install it from Printer
Installer and Utilities CD-ROM.
1. Double-click the Apple Printer Utility icon (in the PhaserTools folder on your
computer’s hard disk) to launch the utility.
2. In the Printer Selector dialog box:
a. Under AppleTalk Zones, select your printer’s zone.
b. Under Printers, select your printer.
c. Click Open Printer.
3. Click the arrow next to Printer Preferences.
4. Click the arrow next to Fonts to display the list of installed fonts and their locations, then
click Add.
5. Select the folder containing the font you want to download, select the font, then click Add.
The font is listed as ready to download.
Note
To add all of the fonts in the folder to the list of fonts to download, click the Add All
button. If you decide not to download a font, highlight the font in the list of fonts to
download, then click Remove.
6. Select either the printer’s memory or hard drive for Destination.
7. Click Send to download the fonts in the list.
Note
To remove downloaded fonts from the printer, follow Steps 2 through 4. Click the Fonts
drop-down list, select the font you want to remove, then click Remove.
Phaser® 7750 Color Laser Printer
1-26
Page 34

Phaser® 7750 Color Laser Printer
Registering Your Printer
Registering your printer is quick and easy. You can register your printer using one of the
following methods:
■ Registration card that came with your printer
■ Online form at www.xerox.com/office/7750support
■ Web link from the Printer Installer and Utilities CD-ROM
Registering your printer gives you access to Color Connection, a great source for the latest
printing hints and tips, and new ideas to promote your business. Color Connection has
everything you need to help you look great in print.
Registering your printer also provides you with updates and news about your printer.
Copyright © 2004 Xerox Corporation. All Rights Reserved.
1-27
Page 35

Printing
This section includes:
■ "Changing Paper" on page 2-2
■ "Supported Papers" on page 2-5
■ "Basic Printing" on page 2-11
■ "Adjusting Printing Options" on page 2-30
■ "Using Color" on page 2-35
■ "2-Sided Printing" on page 2-39
■ "Transparencies" on page 2-48
■ "Envelopes" on page 2-51
■ "Labels" on page 2-53
■ "Specialty Paper" on page 2-55
■ "Custom Size Paper" on page 2-69
■ "Advanced Options" on page 2-74
Phaser® 7750 Color Laser Printer
Copyright © 2004 Xerox Corporation. All Rights Reserved.
2-1
Page 36

Phaser® 7750 Color Laser Printer
Changing Paper
The paper trays adjust to accommodate most sizes and types of paper, transparencies, or other
specialty media. For best results, use only Xerox Phaser Color Printing Media specified for
this printer. They are guaranteed to produce excellent results on your Phaser 7750 Printer – the
Phaser 7750 and Phaser media are Made for Each Other. See “Basic Printing” later in this
section for instructions on how to load paper in the trays.
Caution
If you change the type or size of paper in a tray, you must change the paper type and size
on the front panel to match the paper that you loaded. If you fail to do this, print-quality
problems or jams can occur, and the fuser can be damaged.
Guidelines
After loading a tray and adjusting the paper guides, set the correct paper type and size at the
printer’s front panel.
■ Do not overload the paper tray. See the tray label for the fill line.
■ Fan paper, transparencies, or other specialty media before loading in the paper tray.
■ If excessive jams occur, use fresh paper, transparencies, or other specialty media from a
new package.
Caution
Damage caused by using unsupported paper, transparencies, and other specialty media is
not covered by the Xerox warranty, service agreement, or Total Satisfaction Guarantee.
The Total Satisfaction Guarantee is available in the United States and Canada. Coverage
may vary outside these areas; please contact your local representative for details.
Note
For optimal print quality and performance, set the correct paper type at the printer's front
panel after loading paper in any tray. When loading paper in Tray 1 (MPT) or Tray 2, also
set the correct paper size.
Load paper in the trays either long-edge feed or short-edge feed. See the Supported Papers,
Transparencies, and Other Specialty Media tables on the following pages to identify paper
feed directions for each paper size and paper tray.
Copyright © 2004 Xerox Corporation. All Rights Reserved.
2-2
Page 37

1. Load paper in the tray.
Tray 1 (MPT)
Changing Paper
Trays 2-5
MAX
7750-149
Tray 1 (MPT) Long-Edge Feed Tray 1 (MPT) Short-Edge Feed
7750-151
MAX
7750-150
7750-152
Trays 2-5 Long-Edge Feed Trays 2-5 Short-Edge Feed
Note
Do not load paper above the fill line inside the tray.
2. When prompted by the printer’s front panel, select one of the following options to conf irm
or change the paper type and size:
Tray 1 (MPT) and Tray 2
:
■ Press the OK button to confirm the paper type and size.
■ Select Change, then press the OK button. Press the Up Arrow or Down Arrow
button to select the appropriate paper type, then press the OK button. Press the Up
Arrow or Down Arrow button to select the appropriate paper size option, then press
the OK button.
Phaser® 7750 Color Laser Printer
2-3
Page 38

Changing Paper
Phaser 7750
Confirm Tray 1 (MPT) Paper
OK: Letter (8.5 x 11.0 in.) Plain
Paper
Change
7750-154
Phaser 7750
Confirm Tray 2 Paper
OK: Letter (8.5 x 11.0 in.) Plain
Paper
Change
Trays 3-5
■ Press the OK button to confirm the paper type.
■ Press the Up Arrow or Down Arrow b utton to select a different paper type, then press
the OK button.
Phaser 7750
Confirm Tray N Paper
Plain Paper
Heavy Plain Paper
Thin Card Stock
Letterhead
Exit
7750-153
For online support information, go to www.xerox.com/office/infoSMART
.
7750-170
Phaser® 7750 Color Laser Printer
2-4
Page 39

Phaser® 7750 Color Laser Printer
Supported Papers
This topic includes:
■ "Paper Usage Guidelines" on page 2-5
■ "Paper Storage Guidelines" on page 2-9
■ "Paper that May Damage Your Printer" on page 2-10
Follow the guidelines in these tables to ensure the best print qu ality and av oid printer jams. Fo r
best results, use only Xerox Phaser Color Printing Media specified for your printer; they are
guaranteed to produce excellent results with your Phaser 7750 Color Laser Printer.
Paper Usage Guidelines
■ Do not use inkjet paper; it can damage the fuser.
■ Do not overload the paper tray. See the tray label for the maximum amount fill line
indicator.
■ Fan paper, transparencies, or other specialty media before loading in the paper tray.
■ If excessive jams occur, use fresh paper, transparencies, or other specialty media from a
new package.
■ Use only Phaser
print-quality problems or damage the fuser.
■ Use only paper envelopes. Do not use envelopes with plastic windows or metal clasps.
®
45-Series Premium Transparency Film; other transparencies can cause
Copyright © 2004 Xerox Corporation. All Rights Reserved.
2-5
Page 40

Supported Papers
Follow the guidelines in these tables to ensure the best print qu ality and av oid printer jams. Fo r
best results, use only Xerox Phaser Color Printing Media specified for your printer; they are
guaranteed to produce excellent results with your Phaser 7750 Color Laser Printer.
American Standard Sizes–Supported Papers, Transparencies, and Other Specialty Media
=
=
Long-edge feed *
Short-edge feed *
Phaser 7750 Printer
Paper Type
Plain Paper
65–90 g/m2 (18-24 lb. Bond)
Heavy Plain Paper
91–105 g/m2 (24-28 lb. Bond)
Letterhead
91–105 g/m2 (24-28 lb. Bond)
†
†
†
Thin Card Stock
106–169 g/m2 (50-60 lb. Cover,
65-90 lb. Index, 32-40 lb. Bond)
Thick Card Stock
170-220 g/m2 (65-80 lb. Cover,
100-110 lb. Index)
Phaser Photo Paper
163 g/m2 (60 lb. Cover)
Labels
Tray
Tray 1 (MPT)
500-Sheet Tray 2
1500-Sheet Lower Tray
Deck, Trays 3-5
2500-Sheet High-Capacity
Feeder, Tray 3
2500-Sheet High-Capacity
Feeder, Trays 4-5
Tray 1 (MPT)
Tray 1 (MPT)
Tray 1 (MPT)
Statement (5.5 x 8.5 in.)
Executive (7.25 x 10.5 in.)
Letter (8.5 x 11 in.)
US Folio (8.5 x 13 in.)
●
● ●
▲
●
▲
●
▲
●
●
●●● ▲ ▲▲▲●▲
● ●▲
● ●▲
▲
▲
▲
▲
▲
▲
▲
▲
▲
▲
▲
Caution: Do not load sheets if labels
are removed
Phaser 45-Series Transparency
Caution:
Series Premium Transparency Film.
Other transparencies may damage
the printer.
Envelope
Caution:
Do not use envelopes with windows
or metal clasps. Always load
envelopes facedown in Tray 1 (MPT)
so that the flap is closed and enters
the printer first.
.
Use only Phaser® 45-
Use only paper envelopes.
Tray 1 (MPT)
500-Sheet Tray 2
Tray 1 (MPT)
●
●
▲
●
#10 Envelope (4.12 x 9.5 in.)
●
A7 (5.25 x 7.25 in.)
* For additional information about long-edge feed and short-edge feed, view the labels on
the printer’s tray or go to Reference/Printing on the User Documentation CD-ROM.
** For additional information about custom size paper, go to Reference/Printing/Custom Sizes
on the User Documentation CD-ROM.
† Papers marked with a dagger (†) can be used for automatic 2-sided printing. Automatic 2-
2
sided printing is only supported from Trays 2–5 on 65–105 g/m
(18–28 lb. Bond) media.
†† Tabloid Extra is available only on Phaser 7750DN, 7750GX, and 7750DXF printer
configurations.
Legal (8.5 x 14 in.)
Tabl oid (11 x 17 in.)
▲
▲
▲
▲
Tabl o i d E x t r a (12 x 18 in.) ††
Custom**
▲●●▲
●●▲
▲
▲
Phaser® 7750 Color Laser Printer
2-6
Page 41
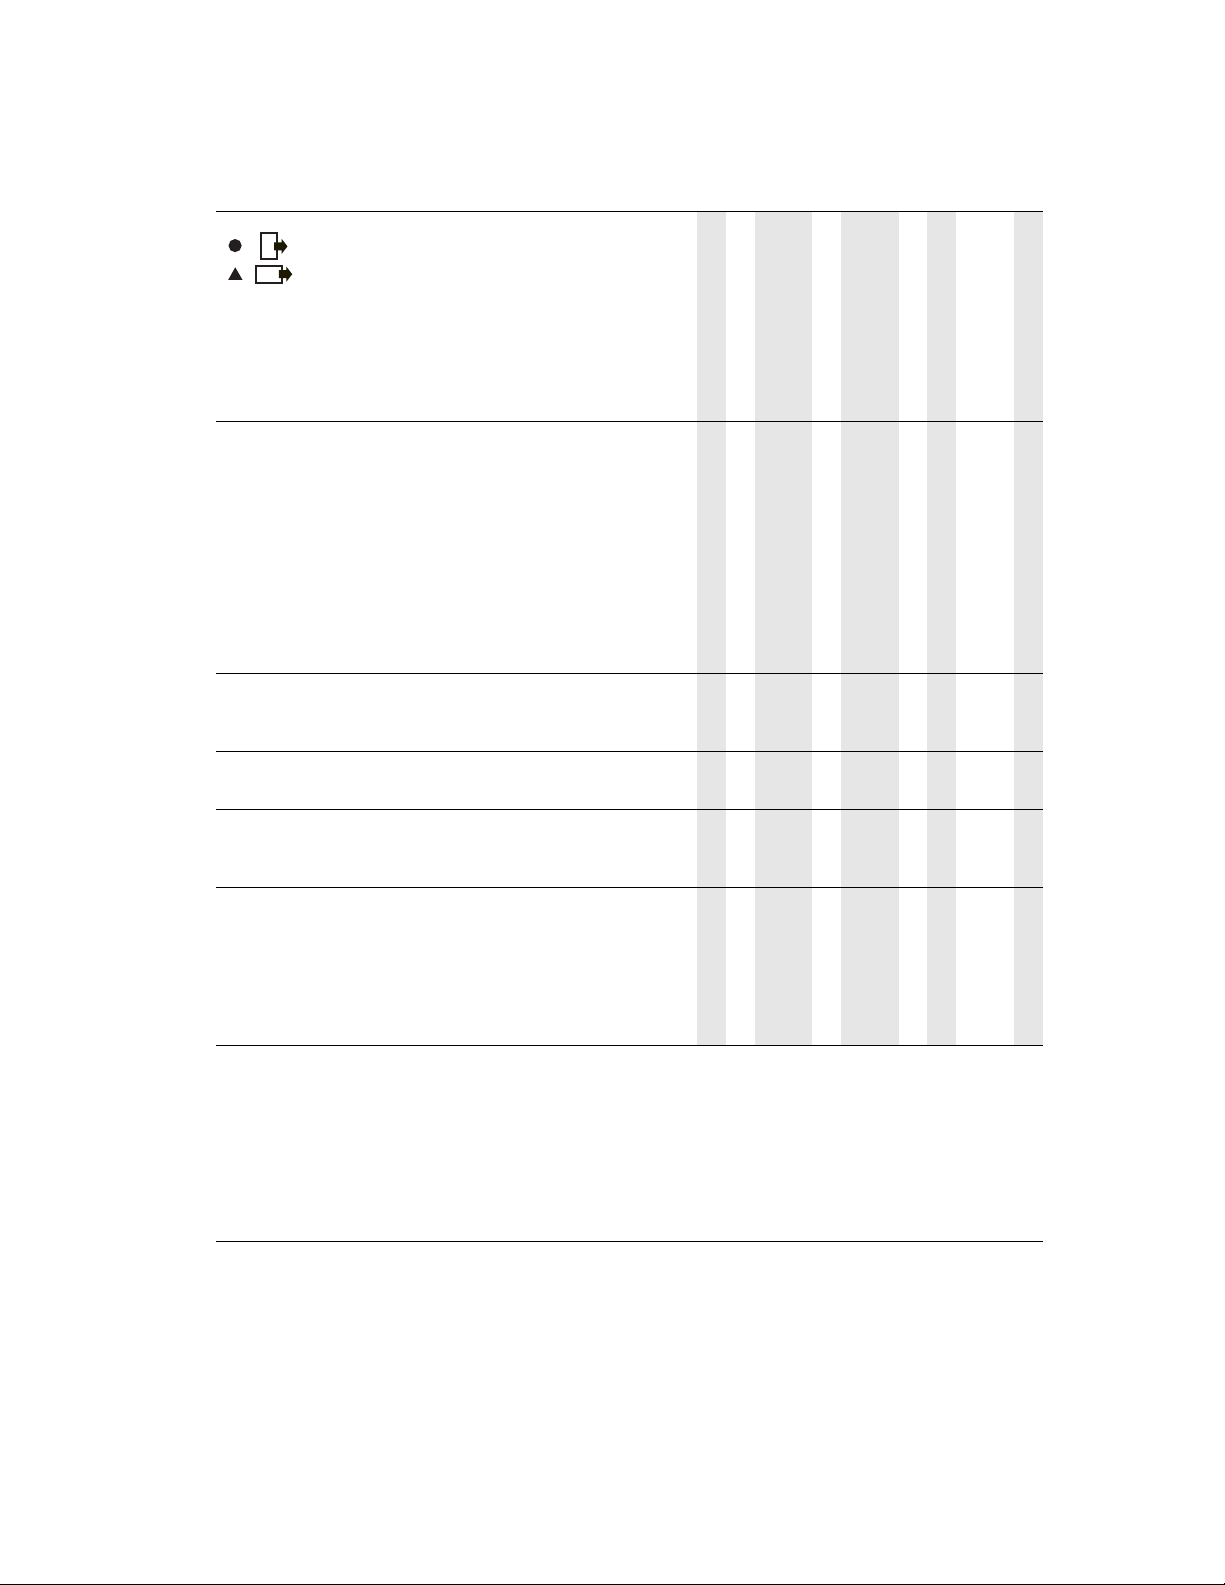
Metric Sizes–Supported Papers, Transparencies, and Other Specialty Media
Supported Papers
=
=
Long-edge feed *
Short-edge feed *
Phaser 7750 Printer
Paper Type Tray
Plain Paper
65-90 g/m2 (18-24 lb. Bond)
Heavy Plain Paper
91-105 g/m2 (24-28 lb. Bond)
Letterhead
91-105 g/m2 (24-28 lb. Bond)
†
†
†
Thin Card Stock
106-169 g/m2 (50-60 lb.
Cover, 65-90 lb. Index,
32-40 lb. Bond)
Thick Card Stock
170-220 g/m2 (65-80 lb.
Cover, 100-110 lb. Index)
Phaser Photo Paper
163 g/m2 (60 lb. Cover)
Labels
1500-Sheet Lower Tray
2500-Sheet High-Capacity
2500-Sheet High-Capacity
Tray 1 (MPT)
500-Sheet Tray 2
Deck, Trays 3-5
Feeder, Tray 3
Feeder, Trays 4–5
Tray 1 (MPT)
Tray 1 (MPT)
Tray 1 (MPT)
A6 (105 x 148 mm)
A5 (148 x 210 mm)
A4 (210 x 297 mm)
A3 (297 x 420 mm)
B5 JIS (182 x 257 mm)
● ▲
●
▲
●
▲
▲
▲
●
▲
▲
●
▲
▲
●
●
● ▲ ● ▲ ● ▲ ▲ ● ▲ ●
● ● ▲
● ● ▲
▲
▲
●
▲
▲
▲
●
▲
▲
▲
●
▲
●
Caution: Do not load sheets
if labels are removed
Phaser 45-Series
Transparency
.
Tray 1 (MPT)
500-Sheet Tray 2
●
●
▲
Caution: Use only Phaser®
45-Series Premium
Transparency Film. Other
transparencies may damage
the printer.
Envelope
Caution:
envelopes. Do not use
envelopes with windows or
metal clasps. Always load
envelopes facedown in
Tray 1 (MPT) so that the flap
is closed and enters the
printer first.
Use only paper
Tray 1 (MPT)
●
DL Envelope (110 x 220 mm)
●
B5 Envelope (176 x 250 mm)
●
C6 Envelope (114 x 162 mm)
●
C5 Envelope (162 x 229 mm)
▲
C4 Envelope (229 x 324 mm)
* For additional information about long-edge feed and short-edge feed, view the labels on
the printer’s tray or go to Reference/Printing on the User Documentation CD-ROM.
** For additional information about custom-sized paper, go to Reference/Printing/Custom
Sizes on the User Documentation CD-ROM.
† Papers marked with a dagger (†) can be used for automatic 2-sided printing. Automatic 2-
2
sided printing is supported only from T rays 2–5 on 65–105 g/m
(18–28 lb. Bond) media.
†† SRA3 is available only on Phaser 7750DN, 7750GX, and 7750DXF printer configurations.
B4 JIS (257 x 364 mm)
SRA3 (320 x 450 mm) ††
Custom**
▲ ●●▲▲●
●●▲
▲
ISO B5 (176 x 250 mm)
Phaser® 7750 Color Laser Printer
2-7
Page 42

Supported Papers
To order Phaser Color Printing Media, contact your local reseller or go to www.xerox.com/
office/7750supplies.
Phaser Color Printing Media
Phaser 7750
Phaser Media Size Part Number
Printer Paper Type
Plain Paper Phaser Premium Color Printing Paper,
500 Sheets
90 g/m2 (24 lb. Bond)
Phaser Newsprint Proofing Paper, 250
Sheets
75 g/m2 (50 lb. Text)
Heavy Plain Paper Phaser Weatherproof Paper, 150 Sheets
100 g/m2 (27 lb. Bond)
Phaser 45-Series
Transparency
Thin Card Stock Phaser Premium Cover Paper, 100
Phaser 45-Series Premium Transparency
Film, 50 Sheets
Sheets
160 g/m2 (60 lb. Cover)
Phaser Glossy Coated Paper, 100 Sheets
148 g/m2 (100 lb. Book)
Phaser Glossy Coated Paper, 50 Sheets
148 g/m2 (100 lb. Book)
Letter
Tabloid
Tabloid Extra
A4
A3
SRA3
Tabloid Extra 016-1960-00
Letter
A4
Letter
A4
Letter
A4
Letter
A4
Tabloid
Tabloid Extra
A3
SRA3
016-1368-00
016-1699-00
016-1900-00
016-1369-00
016-1700-00
016-1901-00
103R01020
103R01021
016-1798-00
016-1799-00
016-1823-00
016-1824-00
016-1704-00
016-1705-00
016-1718-00
016-1940-00
016-1719-00
016-1941-00
Thick Card Stock Phaser Premium Coated Cover
Paper-Matte, 100 Sheets
216 g/m2 (80 lb. Cover)
Phaser Premium Coated Cover
Paper-Glossy, 80 lb., 50 Sheets
216 g/m2 (80 lb. Cover)
Phaser Premium Postcards, 100 Sheets
176 g/m2 (65 lb. Cover)
Phaser Trifold Brochures, 150 Sheets
176 g/m2 (65 lb. Cover)
Phaser® 7750 Color Laser Printer
2-8
Tabloid
Tabloid Extra
A3
SRA3
Tabloid Extra
SRA3
Letter
A4
Letter
A4
103R01049
103R01051
103R01050
103R01005
016-1958-00
016-1959-00
103R01016
103R01017
103R01018
103R01019
Page 43

Phaser Color Printing Media (Continued)
Supported Papers
Phaser 7750
Phaser Media Size Part Number
Printer Paper Type
Labels Phaser Color Printing Labels, 30/Sheet,
100 Sheets
Phaser Color Printing Labels, 14/Sheet,
100 Sheets
Phaser Color Printing Labels, 6/Sheet,
100 Sheets
Phaser Color Printing Labels, 8/Sheet,
100 Sheets
Phaser Photo
Paper
Phaser Digital Photo Paper, 25 Sheets
163 g/m2 (60 lb. Cover)
For online support information, go to www.xerox.com/office/infoSMART
Letter 016-1812-00
A4 016-1814-00
Letter 016-1813-00
A4 016-1815-00
Letter
A4
016-2009-00
016-2010-00
.
Paper Storage Guidelines
Providing a good environment, and safe handling and storage conditions for your paper,
contributes to ultimate print quality.
■ Store paper in dark, cool, relatively dry locations. Most paper items are susceptible to
damage from ultraviolet (UV) and visible light. UV radiation, which is emitted by the sun
and fluorescent bulbs, is particularly damaging to paper items. The intensity and length of
exposure to visible light on paper items should be reduced as much as possible.
■ It is recommended that you maintain constant temperatures and relative humidity.
■ Avoid light, heat, and dampness.
■ A v oid attics, kitchens, garages, and basements for storing paper. Inside walls are drier th an
outside walls where moisture can collect.
■ Store paper flat. Paper should be stored on pallets, cartons, shelves, or in cabinets.
■ Avoid having food or drinks in the area where paper is stored or handled.
■ Do not open sealed packages of paper until you are ready to load them into the printer.
Leave paper in the original packaging, and leave the packages in the shipping carton. For
most commercial cut-size grades, the ream wrapper contains an inner lining that protects
the paper from moisture loss or gain.
Phaser media is sold with appropriate packaging to prevent transportation problems and to
promote positive cust omer results. Lea ve the media inside the packaging until you are ready to
use it; reinsert unused media in the original packaging and reseal it for protection.
Phaser® 7750 Color Laser Printer
2-9
Page 44

Supported Papers
Paper that May Damage Your Printer
Your printer is designed to be used with a variety of paper types. For more information about
supported papers, go to Reference/Printing/Supported Papers on the User Documentation CD-
ROM.
Other media types can cause poor print quality, increased paper jams, or damage to your
printer.
Following are examples of unacceptable paper:
■ Rough or porous media
■ Paper that has been photocopied
■ Multipart forms
■ Paper with cutouts or perforations
■ Paper with staples inserted
■ Embossed, coated, or pre-printed paper with heat tolerances below 210° C (322° F)
■ Media that melts, offsets or discolors at temperatures less than 210° C (322° F) for
0.2 seconds.
Phaser papers have better cut quality, thus reducing dust and preventing potential
contamination. Using paper free of contaminants helps guarantee longer component life and
better print quality. Paper with better cut quality will also reduce paper jams and misfeeds.
Phaser® 7750 Color Laser Printer
2-10
Page 45

Phaser® 7750 Color Laser Printer
Basic Printing
This topic includes:
■ "Loading Paper in Tray 1 (MPT)" on page 2-11
■ "Loading Paper in Trays 2-5" on page 2-16
■ "Using the Stapler" on page 2-24
■ "Factors Affecting Printer Performance" on page 2-29
Follow these steps to print jobs:
1. Load paper in the tray.
2. Adjust the tray guides.
3. If prompted by the front panel, confirm the paper type and/or size and change it as
required.
4. Select File/Print to adjust the printing options in the printer driver. For more information
go to Reference/Printing/Adjusting Printing Options on the User Documentation CDROM.
5. Send the job to the printer from the application’s Print dialog box.
Loading Paper in Tray 1 (MPT)
All paper types can be used in Tray 1 (MPT).
Caution
If you change the type of paper in a tray,
you must change the paper type on the
front panel to match the paper that you
loaded. If you fail to do this, print-
quality problems can occur and the
fuser can be damaged.
For more information on paper types, weights, and sizes, go to Reference/Printing/Supported
Papers on the User Documentation CD-ROM.
Phaser 7750
7750-037
Copyright © 2004 Xerox Corporation. All Rights Reserved.
2-11
Page 46

Basic Printing
1. Lower Tray 1 (MPT).
7750-041
2. Adjust the paper guides to the size of the paper.
The arrow on the width g uide, displayed in the follo wing grap hic, must line up with one of
three positions identified on the labeled area next to the width guide. Push firmly to move
the width guide so that the arrow points to the correct position for the paper size you are
using:
■ SRA3 (displayed in a black field): Do not use this setting for custom size printing.
■ 12” (displayed in a gray field): Use this setting for paper widths of 11.75 in. - 12 in.
(298 mm - 305 mm)
■ All other sizes (indicated by a black arrow)
7750-167
Phaser® 7750 Color Laser Printer
2-12
Page 47

Basic Printing
3. Fan the paper to release sheets that may stick together.
7750-087
4. Insert the paper or transparencies into the tray either long-edge feed or short-edge feed. If
necessary, adjust the paper guides to the size of the paper.
Long-Edge Feed
MAX
7750-149
■ Place Letter, A4, A6, B5 JIS, Statement, and Executive paper long-edge feed in
Tray 1 (MPT). Do not load paper above the fill line.
■ Place the side to be printed facedown.
■ Place pre-punched paper with the holes entering the printer last.
■ Place the letterhead (or top of the page) toward the front of the printer.
7750-102
Phaser® 7750 Color Laser Printer
2-13
Page 48
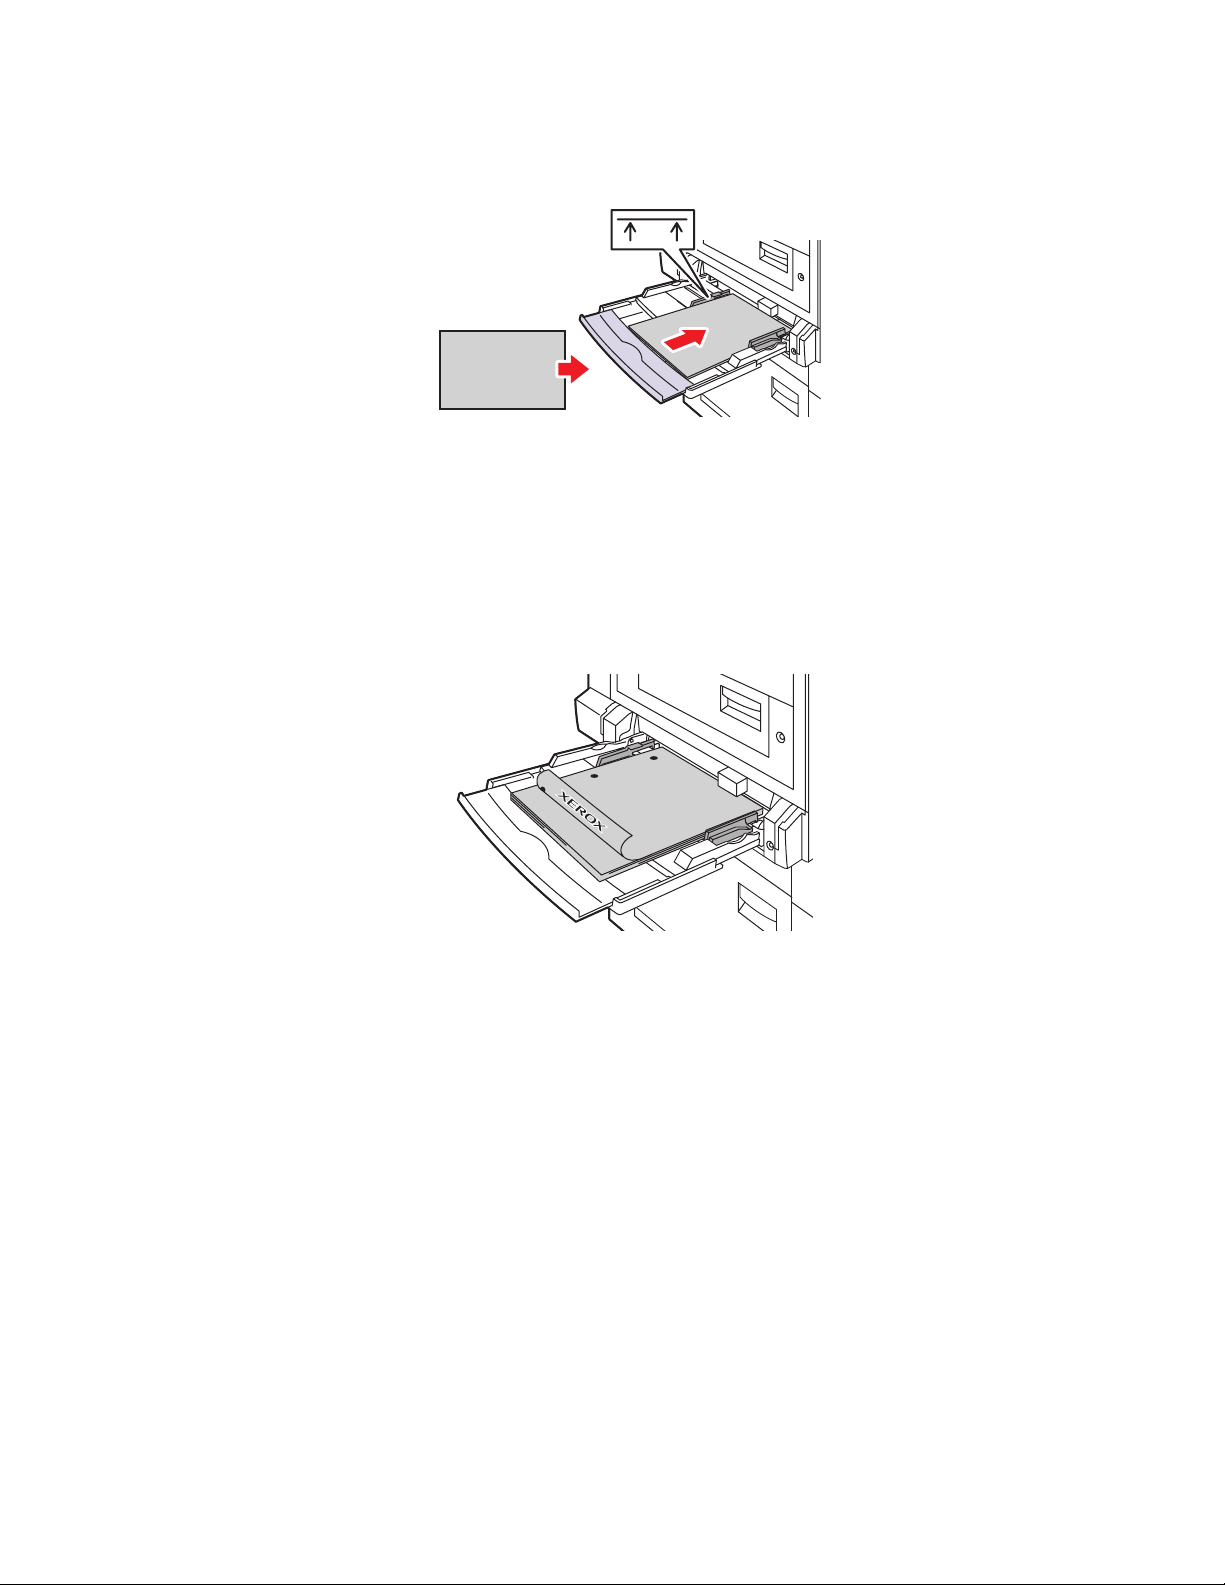
Basic Printing
Short-Edge Feed
MAX
7750-150
■ Place Legal, Tabloid, Tabloid Extra, A3, A5, US Folio, B4 JIS, and SRA3 paper
short-edge feed in Tray 1 (MPT). Do not load paper above the fill line.
■ Place the side to be printed facedown.
■ Place pre-punched paper with the holes toward the back of the printer.
■ Place letterhead (or the top of the page) to enter the printer last.
7750-101
Note
Do not load paper above the fill line inside the tray.
Selecting Front Panel Settings
1. At the printer’s front panel, do one of the following:
■ Press the OK button if both the paper type and size selected are correct. Go to Step 4.
■ Select Change if the paper type or size selected is not correct, then press the OK
button. Go to Step 2.
2. Select the paper type, then press the OK button.
3. Select the paper size, then press the OK button to save your selection.
4. In the printer driver, select either the paper type or Tray 1 (MPT) as the paper source.
Phaser® 7750 Color Laser Printer
2-14
Page 49

Tray 1 (MPT) Paper Path
The following graphic displays the printer’s paper path:
Basic Printing
7750-121
Phaser® 7750 Color Laser Printer
2-15
Page 50
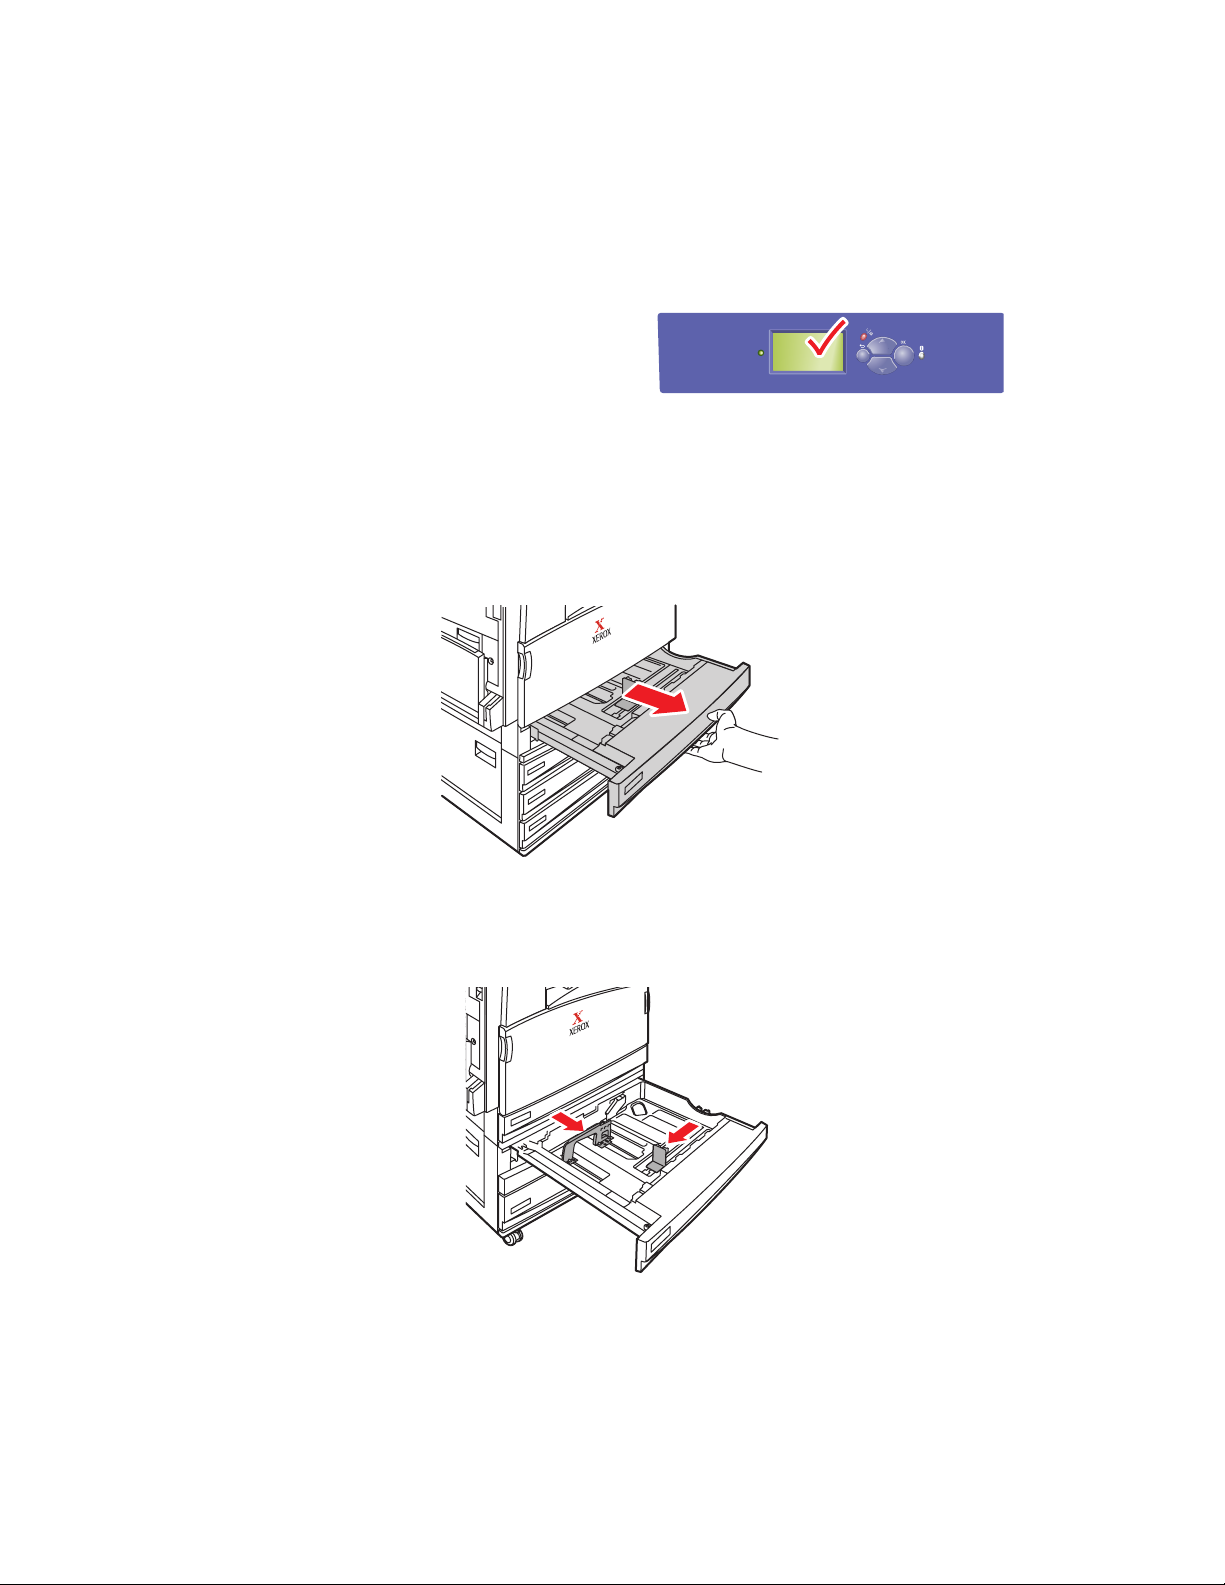
Basic Printing
Loading Paper in Trays 2-5
For more information on paper types, weights, and sizes, go to Reference/Printing/Supported
Papers on the User Documentation CD-ROM.
Caution
If you change the type of paper in a tray,
you must change the paper type on the
front panel to match the paper that you
loaded. If you fail to do this, print-
quality problems can occur and the
fuser can be damaged.
1. Pull out the tray.
Phaser 7750
7750-037
7750-035
2. If loading paper having a different width or length, adjust the width and length guides.
7750-106
Phaser® 7750 Color Laser Printer
2-16
Page 51

Basic Printing
3. Fan the paper to release sheets that may stick together.
7750-087
4. Insert paper or transparencies into the tray either long-edge feed or short-edge feed.
MAX
7750-044
Long-Edge Feed
7750-151
■ Place Letter, A4, and B5 JIS paper long-edge feed into the tray.
■ Place the side to be printed faceup.
Phaser® 7750 Color Laser Printer
2-17
Page 52

Basic Printing
■ Place pre-punched paper with the holes toward the right side of the tray.
■ Place letterhead (or the top of the page) toward the front of the tray.
7750-119
Short-Edge Feed
■ Place Legal, Tabloid, A3, A5, B4 JIS, US Folio, and Statement paper short-edge feed
into the tray.
■ Place the side to be printed faceup.
■ Place pre-punched paper with the holes toward the front of the tray.
■ Place letterhead (or top of the page) toward the left side of the tray.
Note
Do not load paper above the fill line inside the tray.
Phaser® 7750 Color Laser Printer
2-18
7750-091
Page 53

Basic Printing
5. If necessary, adjust the paper guides to the size of the paper.
Adjust the paper guides according the paper size and orientation (long-edge feed or shortedge feed). Labels inside the paper tray provide additional information for loading paper
according to size and orientation.
7750-092
6. Push the tray completely into the printer.
7750-014
Selecting Front Panel Settings for Tray 2
1. At the printer’s front panel, do one of the following:
■ Press the OK button if both the paper type and size selected are correct. Go to Step 4.
■ Select Change if the paper type or size selected is not correct, then press the OK
button. Go to Step 2.
2. Select the paper type, then press the OK button.
Phaser® 7750 Color Laser Printer
2-19
Page 54
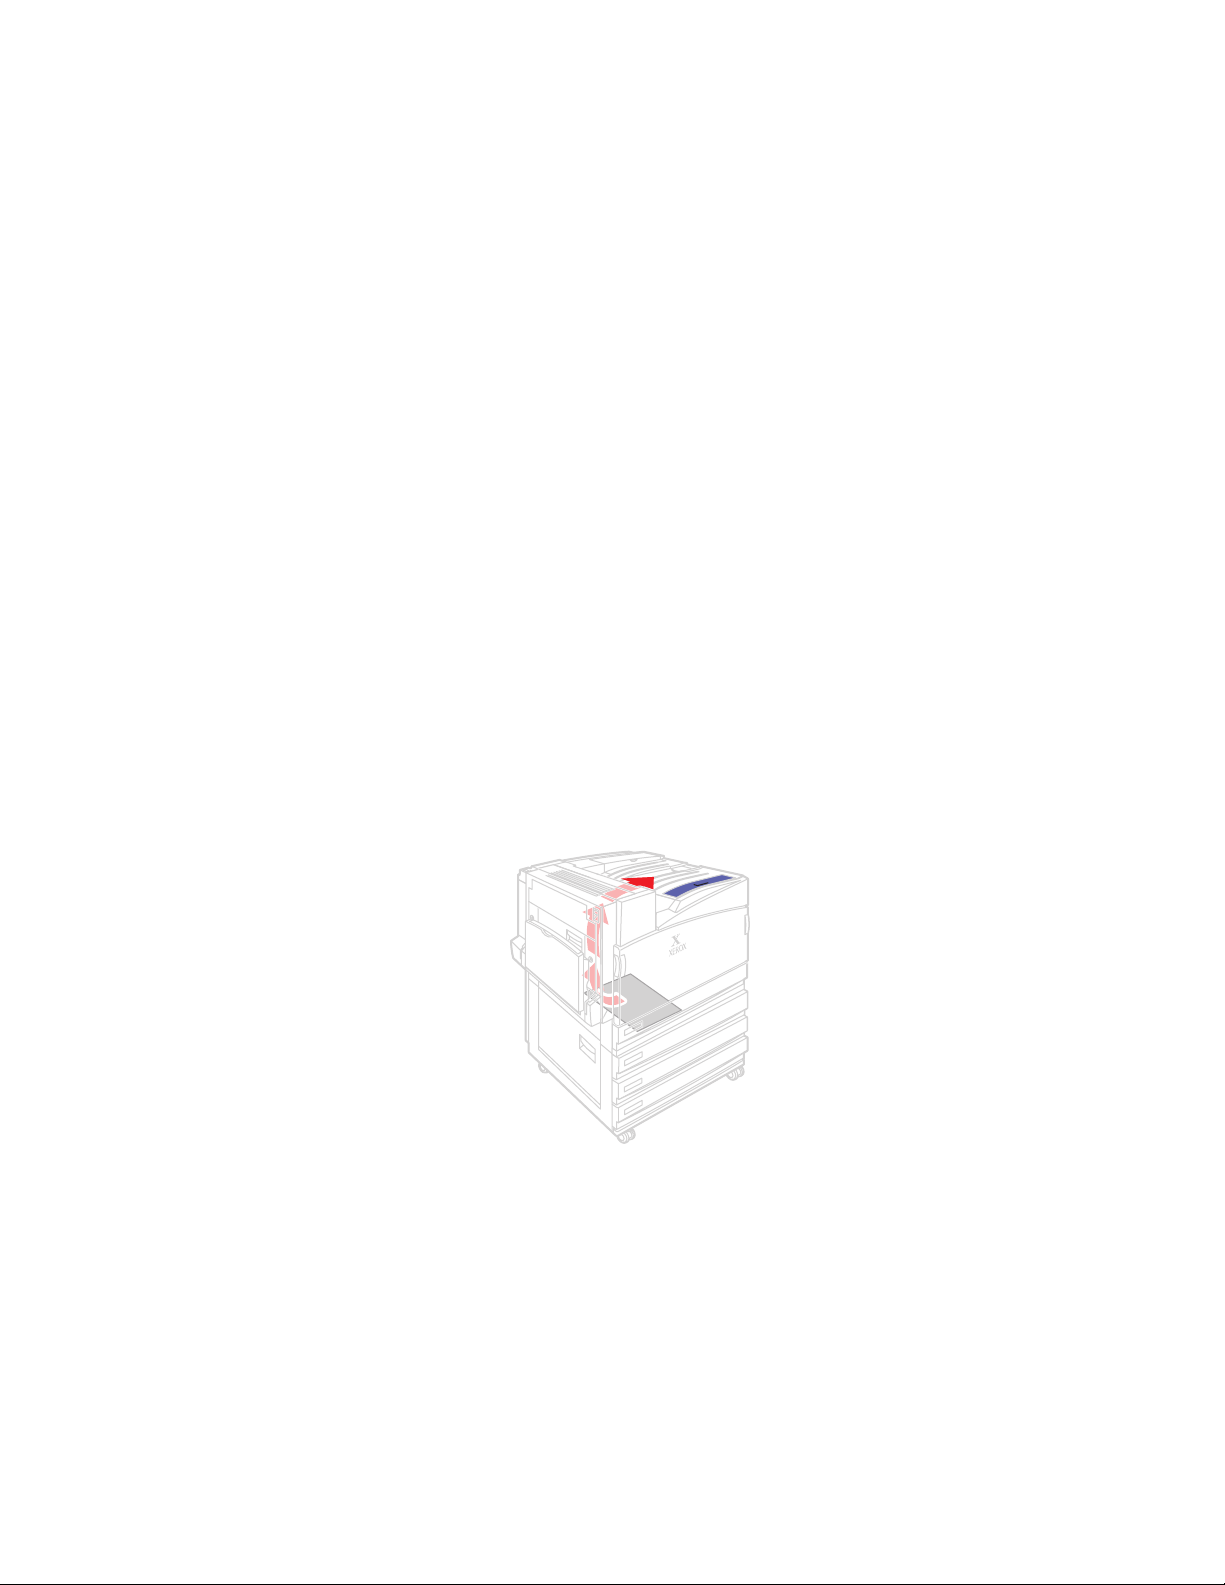
Basic Printing
3. Select one of the following paper size options:
■ The paper size displayed or Auto-Sensed
■ Custom: Requires you to select custom width and custom height values.
Note
For information on custom size printing, go to Reference/Printing/Custom Size Paper
on the User Documentation CD-ROM.
4. In the printer driver, select either the paper type or Tray 2.
Selecting Front Panel Settings for Trays 3-5
1. At the printer’s front panel, do one of the following:
■ Press the OK button if the paper type selected is correct.
■ Select the correct paper type, then press the OK button.
2. In the printer driver, select either the paper type or Tray 3, 4, or 5.
Note
For more information about printing options and other selections, click the Help button on
the printer driver tab to view the online help.
Trays 2-5 Paper Path
The following graphic displays the printer’s paper path:
7750-124
Phaser® 7750 Color Laser Printer
2-20
Page 55

Automatic 2-Sided Printing in Trays 2-5
1. Place paper in Trays 2, 3, 4, or 5.
Long-Edge Feed
■ Place Letter, A4, and B5 JIS paper long-edge feed into the tray.
■ Place the side to be printed facedown.
■ Place pre-punched paper with the holes toward the left side of the tray.
■ Place letterhead (or the top of the page) toward the front of the tray.
7750-141
Basic Printing
Short-Edge Feed
■ Place Legal, Tabloid, A3, A5, B4 JIS, US Folio, and Statement paper short-edge feed
into the tray.
■ Place the side to be printed facedown.
■ Place pre-punched paper with the holes toward the front of the tray.
■ Place letterhead (or the top of the page) toward the right side of the tray.
7750-142
Phaser® 7750 Color Laser Printer
2-21
Page 56

2. If necessary, adjust the paper guides to the size of the paper.
7750-016
3. Push the tray completely into the printer.
Basic Printing
7750-014
Selecting Front Panel Settings
Tray 2
1. At the printer’s front panel, do one of the following:
■ Press the OK button if both the paper type and size selected are correct. Go to Step 4.
■ Select Change if the paper type or size selected is not correct, then press the OK
button. Go to Step 2.
2. Select the paper type, then press the OK button.
Phaser® 7750 Color Laser Printer
2-22
Page 57
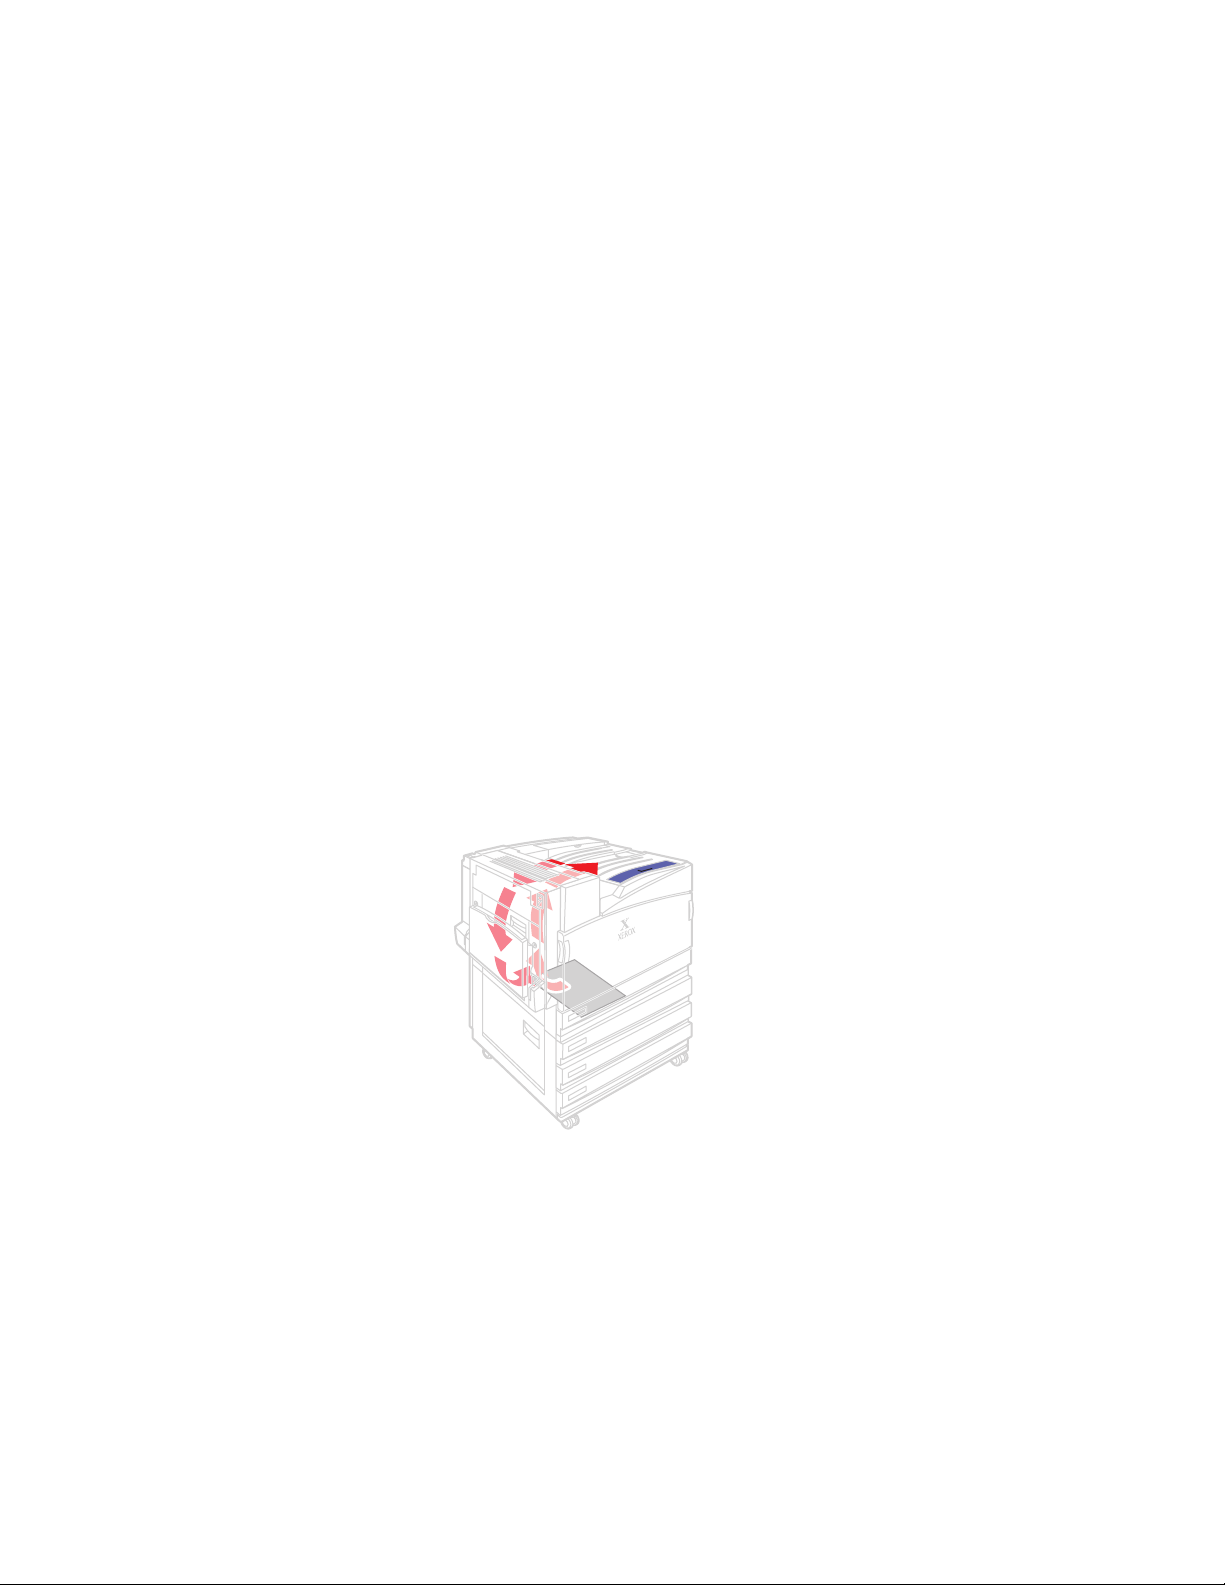
Basic Printing
3. Select one of the following paper size options:
■ The paper size displayed or Auto-Sensed
■ Custom: Requires you to select custom width and custom height values.
Note
For information on custom size printing, go to Reference/Printing/Custom Size Paper
on the User Documentation CD-ROM.
4. In the printer driver, select either the paper type or Tray 2.
Trays 3-5
1. At the printer’s front panel, do one of the following:
■ Press the OK button if the paper type selected is correct.
■ Select the correct paper type, then press the OK button.
2. In the printer driver, select either the paper type or Tray 3, 4, or 5.
Note
For more information about printing options and other selections, click the Help button on
the printer driver tab to view the online help.
Trays 2-5 Paper Path for 2-Sided Printing
The following graphic displays the printer’s paper path for 2-sided printing:
7750-125
Phaser® 7750 Color Laser Printer
2-23
Page 58

Basic Printing
Using the Stapler
The optional Finisher can staple up to 50 sheets of paper. Once the print job is stapled, it is
delivered to the Finisher Output Tray. The stapler holds 5000 staples.
Note
The printer cannot staple paper fed from Tray 1 (MPT).
■ If output sheets are sent to the stapler unit, but the sheet count exceeds 50, the sheets are
sent to the Finisher Output Tray without being stapled. Further sheets then bypass the
stapler unit, going directly into the Finisher Output Tray.
■ If output sheets are sent to the stapler unit and then the paper type changes during the job
to an unsupported paper type, stapling is turned off and any sheets in the stapler unit are
sent to the Finisher Output Tray. Unsupported paper types then bypass the stapler unit,
going directly into the Top Output Tray.
■ If stapling is on and you are printing multiple copies, check the Collate box, otherwise all
the copies of each page are stapled instead of each set of copies.
■ When the stapler is empty, the front panel notifies you that the staple cartridge is either
empty or missing. Printing continues with pages being delivered to the Finisher Output
Tray without being stapled.
■ If you select stapling in the printer driver, the output is always sent to the Finisher Output
Tray even if you select the Top Output Tray for paper destination.
Stapling Options
Several stapling options are available:
■ None: This is the default option. When selected, prints are not stapled.
■ Front: Inserts one staple in each set of copies. (See the following table.)
■ Rear: Inserts one staple in each set of copies. (See the following table.)
■ Dual: Inserts two staples in each set of copies. (See the following table.)
To select a stapling option in a supported driver:
■ Windows 98, Windows Me, Windows 2000, Windows XP, Windows Server 2003,
Windows NT PostScript driver:
On the Output/Options tab, select an option from the Stapling drop-down list, then select
Finisher Output Tray from the Paper Destination drop-down list.
■ Mac OS 9 driver:
In the Print dialog box, select Finishing Options from the drop-do wn list, then select one
of the stapling options displayed.
■ Mac OS X (version 10.1 and higher) driver:
In the Print dialog box, select Finishing Options from the drop-down list, then select a
stapling option from the Stapling drop-down list.
Phaser® 7750 Color Laser Printer
2-24
Page 59
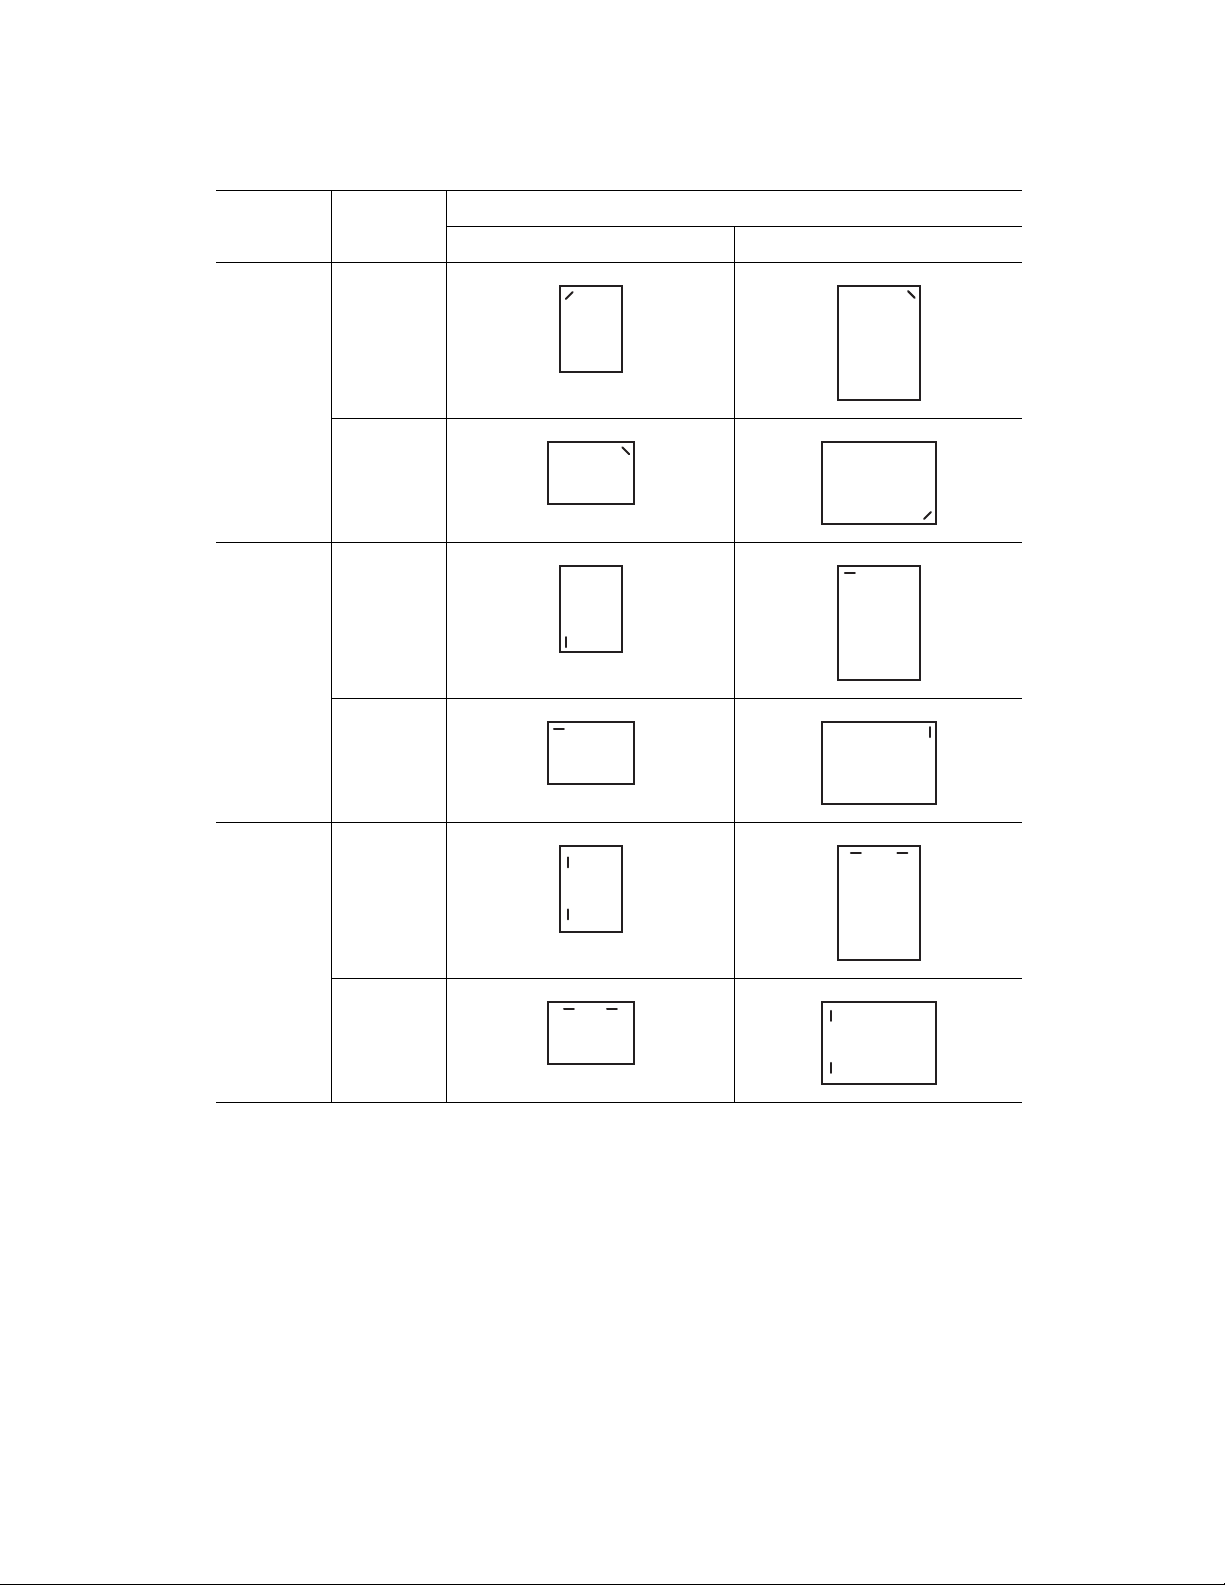
Use the following table to determine the position of the staples:
Basic Printing
Stapling Orientation
Front Portrait
Landscape
Rear Portrait
Landscape
Paper Feed Direction
Long-Edge Feed Short-Edge Feed
A
A
A
A
A
A
A
A
Dual * Portrait
A
Landscape
A
* Paper size must be Letter, A4, B4 JIS, B5 JIS, A3, or Tabloid.
A
A
Phaser® 7750 Color Laser Printer
2-25
Page 60

Adding Staples
1. Open Finisher Door J.
2. Pull the staple cartridge to the front of the finisher.
Basic Printing
7750-067
3. Remove the staple cartridge by lifting the gold handle.
7750-068
7750-069
Phaser® 7750 Color Laser Printer
2-26
Page 61
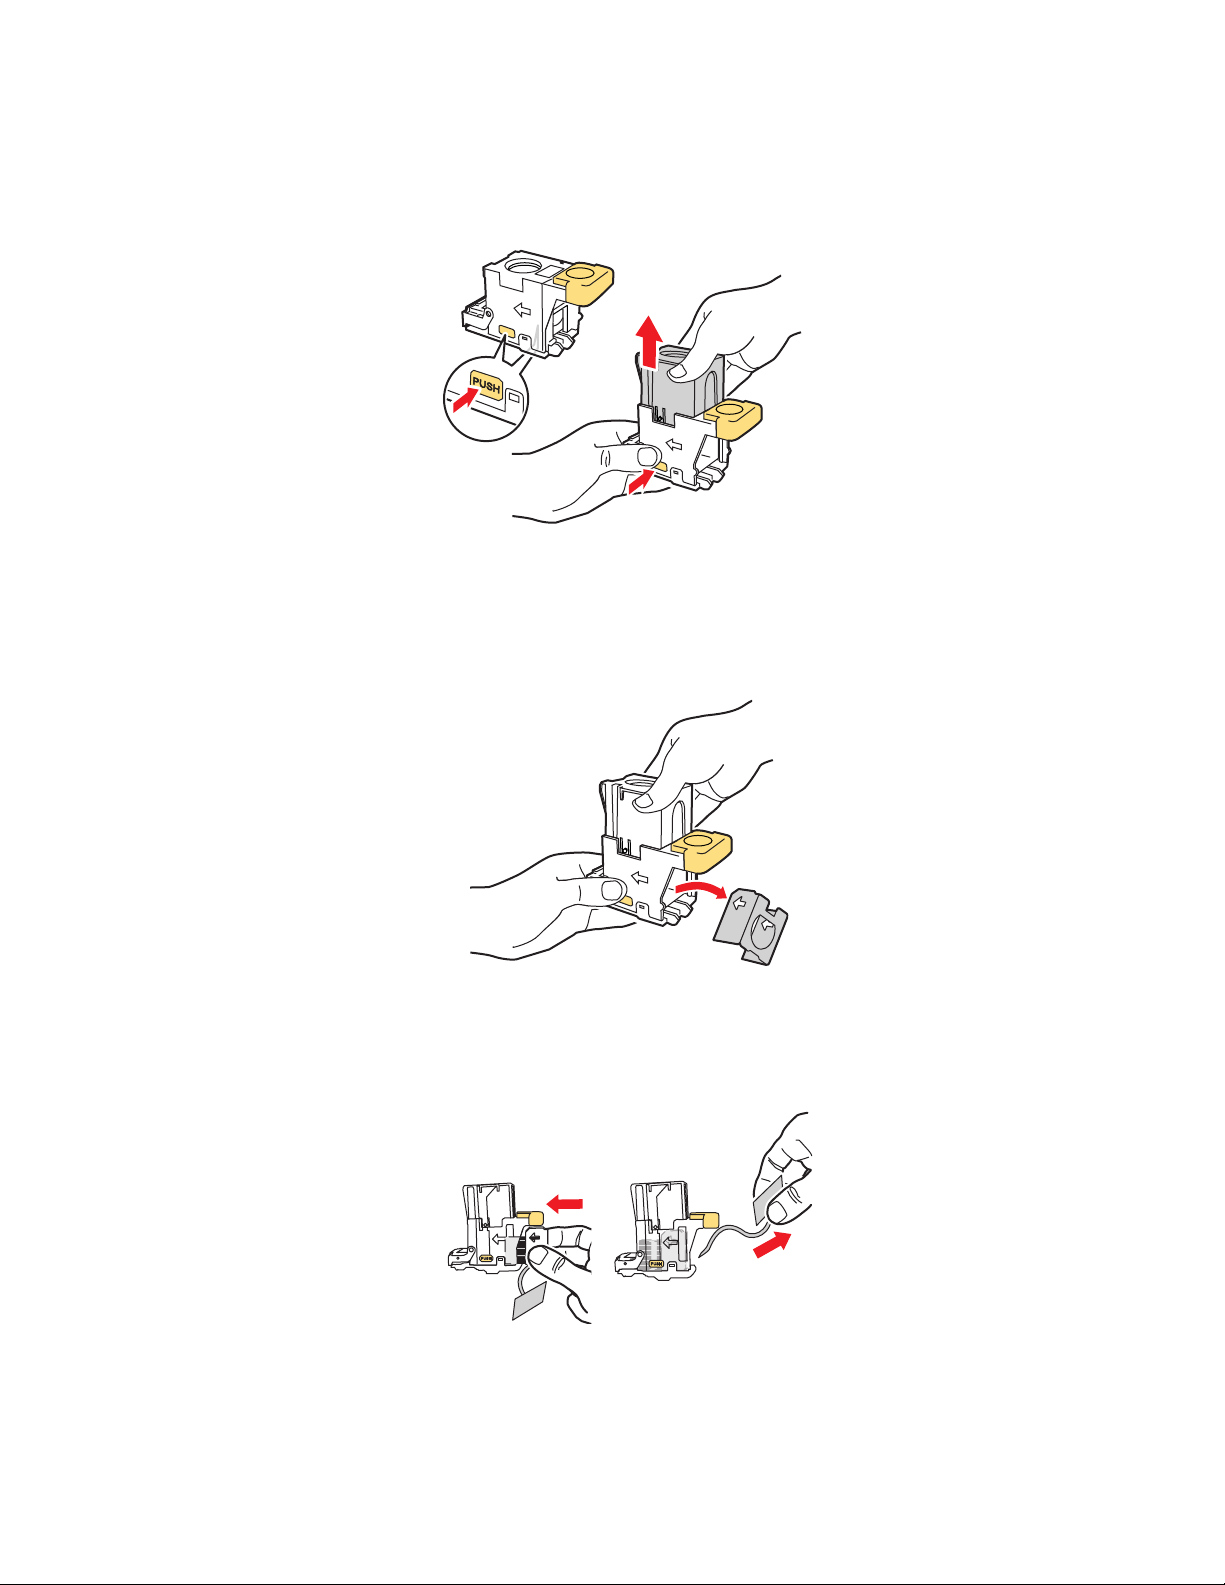
Basic Printing
4. Press the sides of the staple cartridge together where you see the word “Push” then lift the
part of the staple cartridge that is released.
PUSH
PUSH
7750-070
5. Remove the empty cartridge from the staple cartridge.
PUSH
7750-112
6. Slide a new set of staples into the cartridge and pull the tab to release the packaging.
7750-071
Phaser® 7750 Color Laser Printer
2-27
Page 62

7. Push down the top of the staple cartridge until it clicks into place.
PUSH
7750-072a
8. Replace the staple cartridge in the printer.
Basic Printing
9. Close Finisher Door J.
7750-073
7750-074
Phaser® 7750 Color Laser Printer
2-28
Page 63

Basic Printing
Factors Affecting Printer Performance
Many factors affect a print job. They include the print speed (stated in number of pages per
minute), the media used, download time, and printer processing time.
The computer download time and printer processing time are affected by several factors
including:
■ Printer memory
■ Connection type (network or USB)
■ Network operating system
■ Printer configuration
■ File size and type of graphics
■ Computer speed
Note
Additional printer memory (RAM) may improve ov er all printer functions, but will not
increase the pages per minute (ppm) ability of the printer.
Phaser® 7750 Color Laser Printer
2-29
Page 64

Phaser® 7750 Color Laser Printer
Adjusting Printing Options
This topic includes:
■ "Setting Printing Options" on page 2-30
■ "Selecting Print-Quality Modes" on page 2-33
■ "Printing in Black & White" on page 2-34
Setting Printing Options
Many printing options are available with the Xerox printer driver.
Selecting Printing Preferences in Windows
Printer preferences control all of your jobs, unless you override them specif ically for yo ur job.
For example, if you want to use automatic 2-sided printing for most jobs, set this option in
printer settings.
1. Click Start, select Settings, then click Printers.
2. In the Printers folder, right-click the icon for your printer.
3. From the popup menu, select Printer Preferences or Properties.
4. Make selections from the driver tabs. See the “Printing Options for Windows Operating
Systems” table for specific printing options.
5. Click the OK button to save your selections.
Selecting Properties for an Individual Job (Windows)
If you want to use special settings for a particular job, change the driver settings before
sending the job to the printer. For example, if you want to use Photo print-quality mode for a
particular graphic, select this setting in the driver before printing that job.
1. With the desired document or graphic open in your application, access the Print dialog
box.
2. Select the Phaser 7750 printer for use and click its Properties button to open the printer
driver.
3. Make selections from the driver tabs. See the following table for specific printing options.
4. Click the OK button to save your selections.
5. Print the job.
Copyright © 2004 Xerox Corporation. All Rights Reserved.
2-30
Page 65

Printing Options for Windows Operating Systems
Adjusting Printing Options
Operating
System
Windows 2000,
Driver Tab Printing Options
Layout tab ■ Orientation
Windows XP, or
Windows Server
2003
Paper/Quality tab
Output Options tab
TekColor tab
Troubleshooting tab
Windows NT Page Setup tab
■ Print on Both Sides (Duplex)
■ Pages Per Sheet
■ Paper size, type, or tray selection
■ Print Quality
■ Cover Pages
■ Stapling
■ Paper Destination
■ Walk-Up Features (Secure prints, proof prints,
and saved prints)
■ Separation Pages
■ Color Corrections
■ Black & White
■ PrintingScout
■ Printer Information Pages
■ Helpful Web Links
■ Orientation
■ Print on Both Sides (Duplex Printing)
Paper/Quality tab
Output Options tab
TekColor tab
Troubleshooting tab
■ Paper size, type, or tray selection
■ Print Quality
■ Cover Pages
■ Stapling
■ Paper Destination
■ Walk-Up Features (Secure prints, proof prints,
and saved prints)
■ Separation Pages
■ Color Corrections
■ Black & White
■ PrintingScout
■ Printer Information Pages
■ Helpful Web Links
Phaser® 7750 Color Laser Printer
2-31
Page 66

Printing Options for Windows Operating Systems (Continued)
Adjusting Printing Options
Operating
System
Windows 98 or
Windows Me
Driver Tab Printing Options
Setup tab ■ Paper size, type, or tray selection
■ Orientation
■ Print on 1 Side or Print on 2 Sides
■ Print Quality
Output Options tab
TekColor tab
Troubleshooting tab
■ Stapling
■ Paper Destination
■ Separation Pages
■ Cover Pages
■ Secure prints, proof prints, and saved prints
■ Color Corrections
■ Black & White
■ PrintingScout
■ Printer Information Pages
■ Helpful Web Links
Note
For more information about printing options and other selections, click the Help button on
the printer driver tab to view the online help.
Selecting Properties for an Individual Job (Mac)
To select print settings for a particular job, change the driver settings before sending the job to
the printer .
1. With the document open in your application, click File, then click Print.
2. Select the desired printing options from the menus and drop-down lists that are displayed.
Note
In Macintosh OS X, click Save Preset on the Print menu screen to save the current
printer settings. You can create multiple presets and save each with its own distinctiv e
name and printer settings. To print jobs using specific printer settings, click the
applicable saved preset in the Presets list.
3. Click Print to print the job.
Phaser® 7750 Color Laser Printer
2-32
Page 67

Adjusting Printing Options
Selecting Print-Quality Modes
To select the print-quality mode in a supported driver:
■ Windows 98, Windows Me PostScript driver:
On the Setup tab, select a print-quality mode.
■ Windows 2000, Windows XP, Windows Server 2003, Windows NT PostScript driver:
On the Paper/Quality tab, select a print-quality mode.
■ Mac OS 9 driver:
In the Print dialog box, click General, select Print Quality from the drop-down list, then
select the desired mode for Quality.
■ Mac OS X (version 10.1 and higher) driver:
In the Print dialog box, select Image Quality from the drop-down list, then select a print
quality mode from the Print Quality drop-down list.
Print-Quality Mode Description
Standard General-purpose mode for crisp, bright, color prints. Recommended for most
office use and quick prints.
Enhanced High-quality mode for fine lines and sharp text. Recommended for detailed
prints.
Photo Highest-quality mode for very smooth color shades. Recommended for printing
photographs or when using graphics arts applications and press matches.
Phaser® 7750 Color Laser Printer
2-33
Page 68

Adjusting Printing Options
Printing in Black & White
Select the black & white option in the printer driver to print pages in black and white only.
To select black & white in a supported driver:
■ Windows 98, Windows Me PostScript driver:
In the Print dialog box, select Print Properties, select TekColor, then select Black &
White.
■ Windows 2000, Windows XP, Windows Server 2003, W indows NT P ostScript dri ver:
In the Print dialog box, select Print Properties, select TekColor, then select Black &
White.
■ Mac OS 9 driver:
In the Print dialog box, select General, select TekColor from the drop-down list, then
select Black & White.
■ Mac OS X (version 10.1 and higher) driver:
In the Print dialog box, select Image Quality from the drop-down list, then select Black
and White from the Color Correction drop-down list.
Phaser® 7750 Color Laser Printer
2-34
Page 69

Phaser® 7750 Color Laser Printer
Using Color
This topic includes:
■ "Printers and CMYK" on page 2-35
■ "Monitors and RGB" on page 2-35
■ "Image Processing" on page 2-36
■ "Adjusting Color Using TekColor Correction" on page 2-36
■ "Color Calibration" on page 2-37
■ "Paper Calibration" on page 2-38
■ "Color Sampler Pages" on page 2-38
Printers and CMYK
Your printer and monitor generate color quite differently. Your printer produces prints using a
series of dots in three primary colors: cyan, magenta, and yellow. When equal amounts of
these three colors are overlaid, the resulting color is black.
The printer can overlay two colors to produce a third color. For example, magenta and yellow
produce red. Cyan and magenta produce blue. To produce less saturated colors the printer
“mixes” white by leaving some dots unprinted. Mixing magenta with unprinted dots p r odu ces
pink.
By overlaying two or more primaries, the printer generates a palette of eight colors. Although
equal portions of the three primary colors form black, your printer includes a separate black
toner cartridge to produce very dense black for images with a large amount of black text or
black backgrounds. These four colors—cyan, magenta, yellow, and black—represent the color
system known as CMYK.
Monitors and RGB
Your monitor projects color onto the screen. The three primary colors the monitor projects are
red, green, and blue. When equal portions of these three colors are projected, they produce
white. These three colors represent the color system known as RGB.
The surface of your monitor consists of thousands of phosphor dots. To produce red, the
monitor projects red phosphors. To produce a less saturated hue of red (pink) the monitor turns
on two out of three of the red phosphors. Printers add unprinted white dots to produce less
saturated colors, while monitors turn on fewer phosphors.
Another important difference between your printer and monitor is the way each one tran s lates
light. Paper reflects light, while monitors emit light. Because of these different methods,
printers have one range of colors and monitors have a different range of colors.
Copyright © 2004 Xerox Corporation. All Rights Reserved.
2-35
Page 70

Using Color
Image Processing
The differences between the way your printer and monitor produce color explain why your
printed document can look different from what you see on your screen. To compensate for
these differences, the colors are converted by your printer using image processing. Image
processing is the process of translating your computer file into printer toner. Your printer uses
TekColor Correction to translate color from your computer to your printer.
Adjusting Color Using TekColor Correction
The TekColor correction options provide simulations of different color devices. Automatic is
the default correction for general image processing. See the following table to determine what
option you want to use.
Category TekColor Correction Description
Automatic Applies the best color correction to each graphic
element: text, artwork, and photographs.
Office Color sRGB Display Approximates the colors on a computer display.
sRGB Vivid Produces brighter, more saturated colors than sRGB
Display.
Press Match SWOP Press Matches Specifications for Web Offset Publications.
Euroscale Matches FOGRA glossy paper specification.
Commercial Approximates U.S. commercial press target.
SNAP Press Matches Specifications for Newsprint Advertising
Production.
Japan Color Matches Japan Color 2001 specification.
Custom colors Uses a custom color correction developed for your
printer using PhaserMatch software.
None Applies no color correction. Use with other color
management tools, such as ICC (International Color
Consortium) profiles, ColorSync, or the Phaser 7750
PANTONE Color Chart.
Black and White Converts all colors to shades of gray.
User Printer Front
Panel Setting
For more information on color matching and ICC profiles, go to www.
Uses the color correction set in the printer. The color
correction can be set in the printer using either the
front panel or the CentreWare software (if available).
xerox.com/office/
infoSMART.
Phaser® 7750 Color Laser Printer
2-36
Page 71

Using Color
To select the color correction in a supported driver:
■ Windows 98, Windows Me PostScript driver:
On the TekColor tab, select the desired color corre ction. Some of the color corrections are
grouped under Office Color or Press Match.
■ Windows 2000, Windows XP, Windows Server 2003, W indows NT P ostScript dri ver:
On the TekColor tab, select the desired color corre ction. Some of the color corrections are
grouped under Office Color or Press Match.
■ Mac OS 9 driver:
In the Print dialog box, click General, select TekColor from the drop-down list, then
select the desired correction for Color.
■ Mac OS X (version 10.1 and higher) driver:
In the Print dialog box, select Image Quality from the drop-down list, then select the
desired color correction option from the Color Correction drop-down list.
Color Calibration
Overview
Color calibration procedures adjust the printer for optimal color output. Color settings may
need adjustment upon initial printer setup or when toners and imaging units are replaced.
There are two procedures: Balance Colors and Lighten/Darken Colors. If a finer adjustment of
the primary colors (cyan, magenta, and yellow) is needed, start with the Balance Colors
procedure. If the overall image appears either too light or dark, use the Lighten/Darken Colors
procedure. For more information on color calibration, print the “Color Calibration”
information page from your printer’s front panel.
For more information on color calibration, print the “Color Calibration” information page
from your printer’s front panel.
To print the “Color Calibration” pages:
1. At the printer’s front panel, select Printer Setup, then press the OK button.
2. Select Calibration Setup, then press the OK button.
3. Select Calibrate Colors, then press the OK button.
4. Select a color calibration option from the list displayed, then press the OK button.
5. Follow the front panel prompts to perform the calibration procedure.
Note
For more information on color matching and International Color Consortium (ICC)
profiles, go to www.xerox.com/office/infoSMART
.
Phaser® 7750 Color Laser Printer
2-37
Page 72

Using Color
Paper Calibration
Paper calibration adjusts the printer for various paper types and environmental conditions. If
you change brands, paper types, or the temperature or humidity changes significantly , then you
may need to readjust the printer.
For more information on paper calibration, print the “Calibrate for Paper” information page
from your printer’s front panel.
To print the “Calibrate for Paper” pages:
1. At the printer’s front panel, select Printer Setup, then press the OK button
2. Select Calibration Setup, then press the OK button.
3. Select Calibrate for Paper, then press the OK button.
4. Select Calibrate for Paper Pages, then press the OK button.
5. Follow the instructions for adjusting toner transfer settings at the printer’s front panel.
Color Sampler Pages
Sampler pages for CMYK and RGB color can be printed at the printer’s front panel. Before
printing the sampler pages, set the front panel settings to match the printer driver’s settings.
This ensures that the colors on the printed sampler pages are accurate.
To set print-quality and TekColor Correction settings at the printer’s front panel:
1. Select Printer Setup, then press the OK button.
2. Select PostScript Setup, then press the OK butto n
3. Select Print-Quality Mode, then select an option from the list displayed.
4. Select TekColor Correction, then select an option from the list displayed.
To print the “CMYK Sampler Page” or “RGB Sampler Page”:
1. Select Information, then press the OK button.
2. Select Sample Pages, then press the OK button.
3. Select either CMYK Sampler Pages or RGB Sampler Pages, then press the OK
button to print.
Phaser® 7750 Color Laser Printer
2-38
Page 73

Phaser® 7750 Color Laser Printer
2-Sided Printing
This topic includes:
■ "Automatic 2-Sided Printing" on page 2-39
■ "Binding Preferences" on page 2-40
■ "Manual 2-Sided Printing" on page 2-42
Automatic 2-Sided Printing
Your printer must be a Phaser 7750DN, 7750GX, or 7750DXF to perform automatic 2-sided
printing. Automatic 2-sided printing is available from Trays 2-5.
Note
Automatic 2-sided printing is not available from Tray 1 (MPT).
Videos are available with instructions for 2-sided printing. Videos are located on
the User Documentation CD-ROM and at www.xerox.com/office/7750support
.
Guidelines
Automatic 2-sided printing is supported for paper weights ranging from 65-105 g/m2. To print
a 2-sided document, verify that you are using the following weight ranges:
Weight Paper Type
65-90 g/m2 (18-24 lb. Bond)
2
91-105 g/m
(24-28 lb. Bond)
Plain Paper
Heavy Plain Paper
Letterhead
Copyright © 2004 Xerox Corporation. All Rights Reserved.
2-39
Page 74

2-Sided Printing
Trays 2-5 Paper Path for 2-Sided Printing
The following graphic displays the printer’s paper path for 2-sided printing.
7750-125
Binding Preferences
Use the printer driver to select Portrait or Landscape orientation for the images on the page.
When you print 2-sided jobs, select the binding preference which determines how the pages
turn.
Portrait
Bind on Side Edge
Flip on Long Edge
Portrait
Bind on Top Edge
Flip on Short Edge
Landscape
Bind on Side Edge
Flip on Short Edge
Landscape
Bind on Top Edge
Flip on Long Edge
To perform automatic 2-sided printing:
1. Insert paper into the tray.
Long-Edge Feed
■ Place Letter, A4, and B5 JIS long-edge feed into the tray.
■ Place the side to be printed (beginning with odd-numbered page numbers) facedown.
Phaser® 7750 Color Laser Printer
2-40
Page 75

2-Sided Printing
■ Place the top of the page (or the letterhead) toward the front of the tray.
■ Place pre-punched paper with the holes toward the left side of the tray.
7750-141
Short-Edge Feed
■ Place Legal, Tabloid, A3, A5, B4 JIS, US Folio, and Statement paper short-edge feed
into the tray.
■ Place the side to be printed (beginning with odd-numbered page numbers) facedown.
■ Place the top of the page (or the letterhead) toward the right side of the tray.
■ Place pre-punched paper with the holes toward the front of the tray.
7750-142
Caution
If you change the type of paper in a tray, you must change the paper type on the front
panel to match the paper that you loaded. If you fail to do this, print-quality
problems can occur and the fuser can be damaged.
2. Adjust the paper guides to the size of the paper.
3. In the printer driver:
■ Select the orientation.
■ Select 2-sided printing as described in the table below.
4. Click OK to accept the printer driver settings, then click OK to print.
Phaser® 7750 Color Laser Printer
2-41
Page 76

Operating System Steps
2-Sided Printing
Windows 98 or
Windows Me
Windows 2000,
Windows XP, or
Windows Server 2003
Windows NT 1. Select File, then select Print.
Mac OS 9 1. Select File, then select Print.
Mac OS X, version
10.1 (and higher)
1. Select File, then select Print.
2. Click Properties.
3. Select Setup, then select Print 2 Sides.
4. Select or deselect Bind On Top Edge.
1. Select File, then select Print.
2. Click Properties.
3. Select either Flip On Long Edge, or Flip On Short Edge in Print On
Both Sides (Duplex) on the Layout tab.
2. Click Properties.
3. Select either Long Edge, or Short Edge in Print On Both Sides
(duplex printing) on the Page Setup tab.
2. Select Layout.
3. Select Print on Both Sides.
4. Click the Binding icon that matches the edge to bind.
1. Select File, then select Print.
2. Select Duplex.
3. Select Print on Both Sides.
4. Click the Binding icon that matches the edge to bind.
Manual 2-Sided Printing
Guidelines
If the printer does not have automatic 2-sided printing capability, or you want to print on a
paper type that cannot be automatically printed on two sides, print manually on both sides of
the paper by following the procedures in this section.
■ Use any tray for manual 2-sided printing.
■ For best opacity and feed reliability, use Plain Paper that is 90 g/m
heavier paper.
■ You must print all the odd-numbered pages first. Reinsert the printed pages in the same
tray from which the odd-numbered pages were taken, then print the even-numbered pages.
■ Do not use heavy toner coverage on side 1 of a manual 2-sided print job.
■ 2-sided printing on specialty paper can shorten the life of printer components.
2
(24 lb. Bond) or
Phaser® 7750 Color Laser Printer
2-42
Page 77

2-Sided Printing
Manual 2-Sided Printing Using Tray 1 (MPT)
Printing Side 1
1. Insert paper into Tray 1 (MPT). For more information, see “Basic Printing” in this section.
Long-Edge Feed
■ Place Letter, A4, A6, B5 JIS, Executive, and Statement, long-edge feed into
Tray1(MPT).
■ Place the side to be printed facedown.
■ Place pre-punched paper with the holes entering the printer last.
■ Place the top of the page (or the letterhead) toward the front of the printer.
7750-102
Short-Edge Feed
■ Place Legal, Tabloid, Tabloid Extra, A3, A5, US F olio, B4 JIS, and SRA3 short-edge
feed in Tray 1 (MPT).
■ Place the side to be printed facedown.
■ Place pre-punched paper with the holes toward the back of the printer.
■ Place the top of the page (or the letterhead) to enter the printer last.
Phaser® 7750 Color Laser Printer
2-43
Page 78

2-Sided Printing
7750-101
Caution
If you change the type of paper in a tray, you must change the paper type on the front
panel to match the paper that you loaded. If you fail to do this, print-quality
problems can occur and the fuser can be damaged.
2. Adjust the paper guides to the size of the paper.
3. In the printer driver, select Tray 1 (MPT).
4. Send the job to the printer so that the odd-numbered pages (side 1) are printed.
Printing Side 2
1. Insert the printed paper into Tray 1 (MPT).
Long-Edge Feed
■ Place the side to be printed facedown (printed side is faceup).
■ Place pre-punched paper with the holes entering the printer first.
■ Place the letterhead (or the top of the page) toward the front of the printer.
7750-166
Phaser® 7750 Color Laser Printer
2-44
Page 79

Short-Edge Feed
XEROX
■ Place the side to be printed facedown (printed side is faceup).
■ Place pre-punched paper with the holes toward the front of the printer.
■ Place the top of the page (or letterhead) to enter the printer last.
XEROX
XEROX
7750-107
2-Sided Printing
2. Adjust the paper guides to the size of the paper.
3. In the printer driver, select Tray 1 (MPT) as the paper source.
4. Send the job to the printer so that the even-numbered pages (side 2) are printed.
Manual 2-Sided Printing Using Trays 2-5
Printing Side 1
1. Insert paper into the tray. For more information, see the “Basic Printing” topic in this
section.
Long-Edge Feed
■ Place Letter, A4, and B5 JIS paper long-edge feed in Trays 2, 3, 4, or 5.
■ Place the side to be printed faceup.
■ Place pre-punched paper with the holes toward the right side of the tray.
■ Place the top of the page (or the letterhead) toward the front of the tray.
7750-119
Phaser® 7750 Color Laser Printer
2-45
Page 80

2-Sided Printing
Short-Edge Feed
■ Place Legal, Tabloid, A3, A5, B4 JIS, US Folio, and Statement short-edge feed in
Trays 2, 3, 4, or 5.
■ Place the side to be printed faceup.
■ Place pre-punched paper with the holes toward the front of the tray.
■ Place the top of the page (or the letterhead) toward the left side of the tray.
7750-091
2. Adjust the paper guides to the size of the paper.
3. In the printer driver, select the tray containing the paper.
4. Send the job to the printer so that the odd-numbered pages (side 1) are printed.
Printing Side 2
1. Insert paper into the tray.
Long-Edge Feed
■ Place the side to be printed faceup (printed side is facedown).
■ Place pre-punched paper with the holes toward the left side of the tray.
■ Place the top of the page (or the letterhead) toward the front of the tray.
7750-088
Phaser® 7750 Color Laser Printer
2-46
Page 81

2-Sided Printing
Short-Edge Feed
■ Place the side to be printed faceup (printed side is facedown).
■ Place pre-punched paper with the holes toward the front of the tray.
■ Place the top of the page (or the letterhead) toward the right side of the tray.
7750-089
2. Adjust the paper guides to the size of the paper.
3. In the printer driver, select the tray containing the paper.
4. Send the job to the printer so that the even-numbered pages (side 2) are printed.
Phaser® 7750 Color Laser Printer
2-47
Page 82

Phaser® 7750 Color Laser Printer
Transparencies
This topic includes:
■ "Guidelines" on page 2-48
■ "Printing Transparencies from Tray 1 (MPT)" on page 2-49
■ "Printing Transparencies from Tray 2" on page 2-50
Transparencies can be printed from Tray 1 (MPT) or Tray 2. Handle transparencies by the
edges using both hands to avoid fingerprints and creases which can cause poor print quality.
Videos are available with instructions for loading transparencies. Videos are
located on the User Documentation CD-ROM and at www.xerox.com/office/
7750support.
Guidelines
■ Xerox recommends that you use only Xerox Phaser 45-Series Premium Transparency
Film, which has been specifically developed for use with this type of printer fuser.
■ Place no more than 150 transparencies at one time in the tray.
To order supplies, contact your local reseller or visit the Xerox web site at www.xerox.com/
office/7750supplies.
Caution
Damage caused by using unsupported paper, transparencies, and other specialty media is
not covered by the Xerox warranty, service agreement, or Total Satisfaction Guarantee.
The Total Satisfaction Guarantee is available in the United States and Canada. Coverage
may vary outside these areas; please contact your local representative for details.
Copyright © 2004 Xerox Corporation. All Rights Reserved.
2-48
Page 83

Printing Transparencies from Tray 1 (MPT)
1. Fan the transparencies to release sheets that may stick together.
7750-097
2. Insert the transparencies long-edge feed into Tray 1 (MPT).
MAX
Transparencies
7750-157
Note
Do not load paper above the fill line inside the tray.
3. Adjust the paper guides to the size of the transparencies.
Selecting Front Panel Settings to Print Transparencies
1. At the printer’s front panel, do one of the following:
■ Press the OK button if both Phaser 45-Series Transparency and the correct
paper size are selected. Go to Step 4.
■ Select Change if a different paper type or incorrect paper size is selected, then press
the OK button. Go to Step 2.
2. Select Phaser 45-Series Transparency, then press the OK button.
3. Select the paper size, then press the OK button to save your selection.
4. In the printer driver, select either the paper type or Tray 1 (MPT) as the paper source.
Phaser® 7750 Color Laser Printer
2-49
Page 84

Printing Transparencies from Tray 2
1. Fan the transparencies to release sheets that may stick together.
7750-097
2. Insert the transparencies long-edge feed into Tray 2.
Transparencies
7750-158
Note
Do not load paper above the fill line inside the tray.
3. Adjust the paper guides to the size of the transparencies.
Selecting Front Panel Settings to Print Transparencies
1. At the printer’s front panel, do one of the following:
■ Press the OK button if both Phaser 45-Series Transparency and the correct
paper size are selected. Go to Step 4.
■ Select Change if a different paper type or incorrect paper size is selected, then press
the OK button. Go to Step 2.
2. Select Phaser 45-Series Transparency, then press the OK button.
3. Select one of the following paper size options:
■ The paper size displayed or Auto-Sensed
■ Custom: Requires you to select custom width and custom height values.
4. In the printer driver, select either the paper type or Tray 2 as the paper source.
Phaser® 7750 Color Laser Printer
2-50
Page 85

Phaser® 7750 Color Laser Printer
Envelopes
This topic includes:
■ "Guidelines" on page 2-51
■ "Printing Envelopes" on page 2-52
Guidelines
Buying and Storing Envelopes
■ Use only paper envelopes specified in the Supported Papers table. Successful envelope
printing is highly dependent on the quality and construction of the envelopes. Use
envelopes made specifically for laser printers.
■ It is recommended that you maintain constant temperatures and relative humidity.
■ Store unused envelopes in their packaging to avoid the effects of moisture and dryness
which can affect print quality and cause wrinkling. Excessive moisture can cause the
envelopes to seal before or during printing.
■ Avoid padded envelopes; purchase envelopes that lie flat on a surface.
■ Remove air “b ubbles” from the envelopes before loading by setting a heavy boo k on top of
the envelopes.
■ If wrinkling or embossing problems occur, use a different brand of envelopes made
specifically for laser printers.
■ For more information, go to Reference/Printing/Supported P apers on the User
Documentation CD-ROM.
Preparing to Print
Follow these guidelines to prevent wrinkling problems:
■ Use only Tray 1 (MPT) to print envelopes.
■ Print only on the front of the envelope.
■ Perform these steps when using an application that includes a tool for creating an envelope
document:
■ Select facedown.
■ Select the feed method with the image centered.
■ Clear Clockwise Rotation.
■ Load a maximum of 10 envelopes at a time. This printer is not designed to handle
high-capacity production envelope printing.
■ Avoid printing over the area where the envelope seams meet.
■ When using commercial flap envelopes with side seams (vs. diagonal seams) verify that
the side seams are cut all the way to the corner of the envelope.
Copyright © 2004 Xerox Corporation. All Rights Reserved.
2-51
Page 86

Envelopes
Caution
Never use envelopes with windows or metal clasps; they can damage the printer. Damage
caused by using non-Xerox envelopes is not covered under the Xerox warranty, service
agreement, or Total Satisfaction Guarantee. The Total Satisfaction Guarantee is available
in the United States and Canada. Coverage may vary outside these areas, please contact
your local representative for details.
Printing Envelopes
1. Insert the envelopes in Tray 1 (MPT):
■ Place C4 envelopes short-edge feed in the tray.
■ Place #10, A7, B5, C5, C6, and DL envelopes long-edge feed in the tray.
■ Place the side to be printed facedown.
■ Place the envelope with the flap entering the printer first.
7750-161
2. Adjust the paper guides to the size of the envelopes.
Selecting Front Panel Settings to Print Envelopes
1. At the printer’s front panel, do one of the following:
■ Press the OK button if both Envelopes and the correct en v elope size are selected. Go
to Step 4.
■ Select Change if a different paper type or incorrect envelope size is selected, then
press the OK button. Go to Step 2.
2. Select Envelope, then press the OK button.
3. Select the correct envelope size, then press the OK button to save your selection.
4. In the printer driver, select either Envelopes as the paper type or Tray 1 (MPT) as the
paper source.
Phaser® 7750 Color Laser Printer
2-52
Page 87

Phaser® 7750 Color Laser Printer
Labels
This topic includes:
■ "Guidelines" on page 2-53
■ "Printing Labels" on page 2-53
Labels can be printed only from Tray 1 (MPT). The maximum number of sheets that can be
loaded in Tray 1 (MPT) is 30.
To order supplies, contact your local reseller or visit the Xerox web site at www.xerox.com/
office/7750supplies.
Guidelines
■ Do not use any sheet where labels are missing; it may damage the printer.
■ Store unused labels flat in their original packaging. Leave the sheets of labels inside the
original packaging until ready to use. Return any unused sheets of labels to the original
packaging and reseal it.
■ Do not store labels in extremely dry or humid conditions or extremely hot or cold
conditions. Storing them in extreme conditions may cause print quality problems or cause
them to jam in the printer.
■ Rotate stock frequently . Long periods of storage in extreme conditions can cause labels to
curl and jam the printer.
■ Print only on one side of the sheet of labels.
Printing Labels
If your application has a setting for labels, use it as a template.
1. Insert the label sheets long-edge feed and facedown into Tray 1 (MPT). Place the top of
the page toward the front of the printer.
7750-099
2. Adjust the paper guides to the size of the label sheets.
Copyright © 2004 Xerox Corporation. All Rights Reserved.
2-53
Page 88

Labels
Selecting Front Panel Settings to Print Labels
1. At the printer’s front panel, do one of the following:
■ Press the OK button if both Labels and the correct paper size are selected. Go to
Step 4.
■ Select Change if a different paper type or incorrect paper size is selected, then press
the OK button. Go to Step 2.
2. Select Labels, then press the OK button.
3. Select the paper size, then press the OK button to save your selection.
4. In the printer driver, select either the paper type or Tray 1 (MPT) as the paper source.
Phaser® 7750 Color Laser Printer
2-54
Page 89

Phaser® 7750 Color Laser Printer
Specialty Paper
This topic includes:
■ "Printing Glossy Coated Paper" on page 2-55
■ "Printing Digital Photo Paper" on page 2-60
■ "Printing Postcards and Trifold Brochures" on page 2-62
■ "Printing Weatherproof Paper" on page 2-65
Printing Glossy Coated Paper
Glossy coated paper can be printed from any tray. To order Phaser Glossy Coated Paper or
other supplies, contact your local reseller or visit the Xerox web site at www.xerox.com/office/
supplies.
Guidelines
■ Use only glossy coated paper designed for color laser printers that weighs between
2
106-169 g/m
cause damage to the fuser.
■ Do not open sealed packages of paper until you are ready to load them into the printer.
Leave paper in the original wrappe r, and leave the packages in the shipping carton until
ready to use.
■ Remove all other paper from the tray before loading glossy paper.
■ Load only the amount of paper you are planning to use. Reinsert u nu sed paper in the
original wrapper and seal. Rotate paper stock frequently.
■ For best results use Phaser Glossy Coated Paper. This paper is designed to give the best
performance with your Phaser 7750 printer.
(50-60 lb. Cover, 65-90 lb. Index, 32-40 lb. Bond). Thin coated paper can
Caution
Do not use coated papers designed for inkjet printers. The coatings on inkjet papers may
damage the fuser.
Copyright © 2004 Xerox Corporation. All Rights Reserved.
2-55
Page 90

Printing Glossy Coated Paper in Tray 1 (MPT)
1. Fan the glossy coated paper to release sheets that may be stuck together.
2. Insert glossy coated paper into Tray 1 (MPT).
Long-Edge Feed
Specialty Paper
■ Place Letter and A4 paper long-edge feed into Tray 1 (MPT).
■ Place the side the be printed facedown.
MAX
7750-162
Phaser® 7750 Color Laser Printer
2-56
Page 91

Specialty Paper
Short-Edge Feed
■ Place Tabloid, Tabloid Extra, A3, and SRA3 paper short-edge feed into
Tray1(MPT).
■ Place the side to be printed facedown.
MAX
7750-039
Note
Do not load paper above the fill line inside the tray.
3. Adjust the paper guides to the size of the paper.
Selecting Front Panel Settings to Print Glossy Coated Paper
1. At the printer’s front panel, do one of the following:
■ Press the OK button if both Thin Card Stock and the correct paper size are selected.
Go to Step 4.
■ Select Change if a different paper type or incorrect paper size is selected, then press
the OK button. Go to Step 2.
2. Select Thin Card Stock, then press the OK button.
3. Select the paper size, then press the OK button to save your selection.
4. In the printer driver, select either the paper type or Tray 1 (MPT) as the paper source.
Phaser® 7750 Color Laser Printer
2-57
Page 92
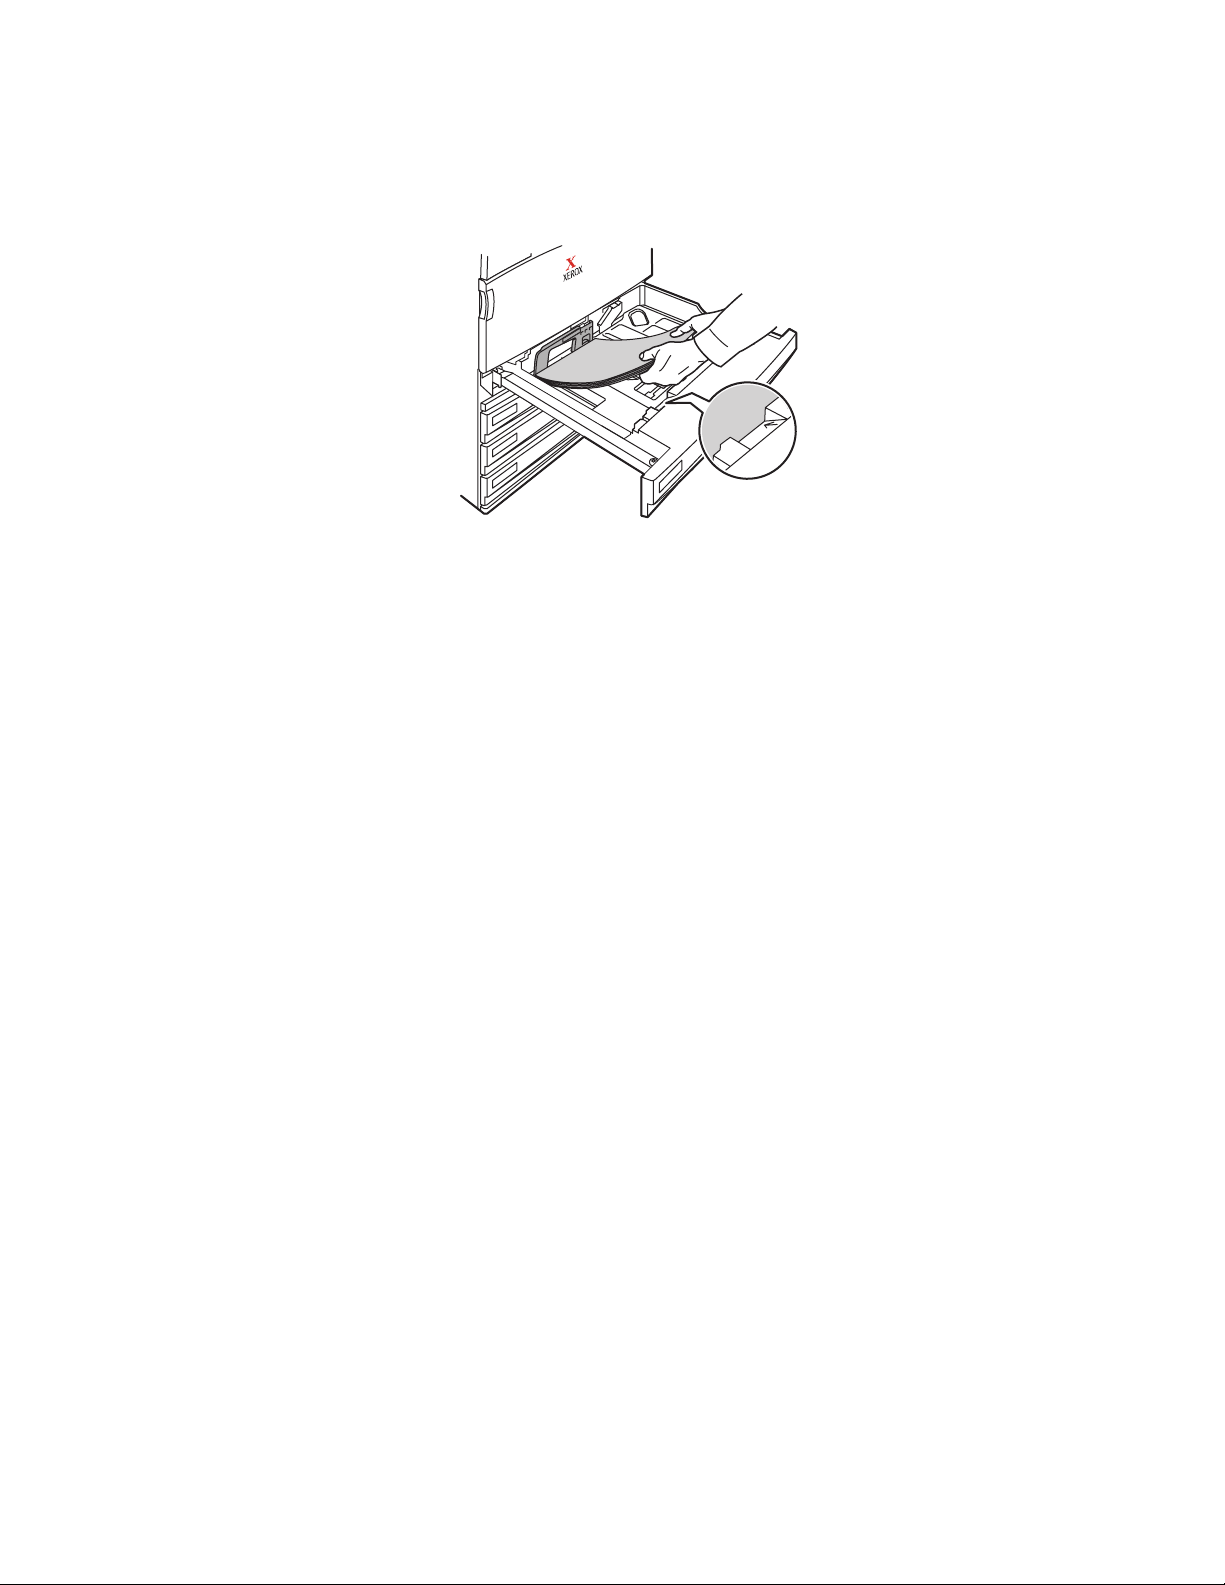
Printing Glossy Coated Paper in Tray 2
1. Insert glossy coated paper long-edge feed and faceup into the tray.
MAX
7750-044
Note
Do not load paper above the fill line inside the tray.
Specialty Paper
2. Adjust the paper guides to the size of the paper.
Selecting Front Panel Settings to Print Glossy Coated Paper
1. At the printer’s front panel, do one of the following:
■ Press the OK button if both Thin Card Stock and the correct paper size are selected.
Go to Step 4.
■ Select Change if a different paper type or incorrect paper size is selected, then press
the OK button. Go to Step 2.
2. Select Thin Card Stock, then press the OK button.
3. Select one of the following paper size options:
■ The paper size displayed or Auto-Sensed
■ Custom: Requires you to select custom width and custom height values.
4. In the printer driver, select either the paper type or Tray 2 as the paper source.
Phaser® 7750 Color Laser Printer
2-58
Page 93

Printing Glossy Coated Paper in Trays 3-5
1. Insert glossy coated paper long-edge feed and faceup into the tray.
MAX
7750-044
Note
Do not load paper above the fill line inside the tray.
Specialty Paper
2. Adjust the paper guides to the size of the paper.
Selecting Front Panel Settings to Print Glossy Coated Paper
1. At the printer’s front panel, do one of the following:
■ Press the OK button if Thin Card Stock is selected.
■ Select Thin Card Stock, then press the OK button.
2. In the printer driver, select either the paper type or Tray 3, 4, or 5 as the paper source.
Phaser® 7750 Color Laser Printer
2-59
Page 94

Specialty Paper
Printing Digital Photo Paper
Photo paper can be printed only from Tray 1 (MPT). It should be printed on one side only. To
order Phaser® Digital Photo Paper or other supplies, contact your local reseller or visit the
Xerox web site at www.xerox.com/office/supplies
Guidelines
■ Do not open sealed packages of paper until you are ready to load them into the printer.
Leave paper in the original wrappe r, and leave the packages in the shipping carton until
ready to use.
■ Remove all other paper from Tray 1 (MPT) before loading photo paper.
■ Load only the amount of paper you are planning to use. Reinsert u nu sed paper in the
original wrapper and seal. Rotate paper stock frequently.
■ For best results use Phaser Digital Photo Paper. This paper is designed to give the best
performance with the Phaser 7750 printer.
Caution
Do not use photo papers designed for inkjet printers. The coatings on these papers may
damage the fuser.
.
Printing Digital Photo Paper in Tray 1 (MPT)
1. Fan the photo paper to release sheets that may be stuck together.
Phaser® 7750 Color Laser Printer
2-60
Page 95

Specialty Paper
2. Insert photo paper long-edge feed into Tray 1 (MPT). Place the side to be printed
facedown.
MAX
7750-162
Note
Do not load paper above the fill line inside the tray.
3. Adjust the paper guides to the size of the paper.
Selecting Front Panel Settings to Print Photo Paper
1. At the printer’s front panel, do one of the following:
■ Press the OK button if both Phaser Photo Paper and the correct paper size are
selected. Go to Step 4.
■ Select Change if a different paper type or incorrect paper size is selected, then press
the OK button. Go to Step 2.
2. Select Phaser Photo Paper, then press the OK button.
3. Select Letter (8.5 x 11.0 in.), Custom, or A4 (210 x 297 mm), then press the OK
button to save your selection.
4. In the printer driver, select the paper type or Tray 1 (MPT) as the paper source.
Phaser® 7750 Color Laser Printer
2-61
Page 96
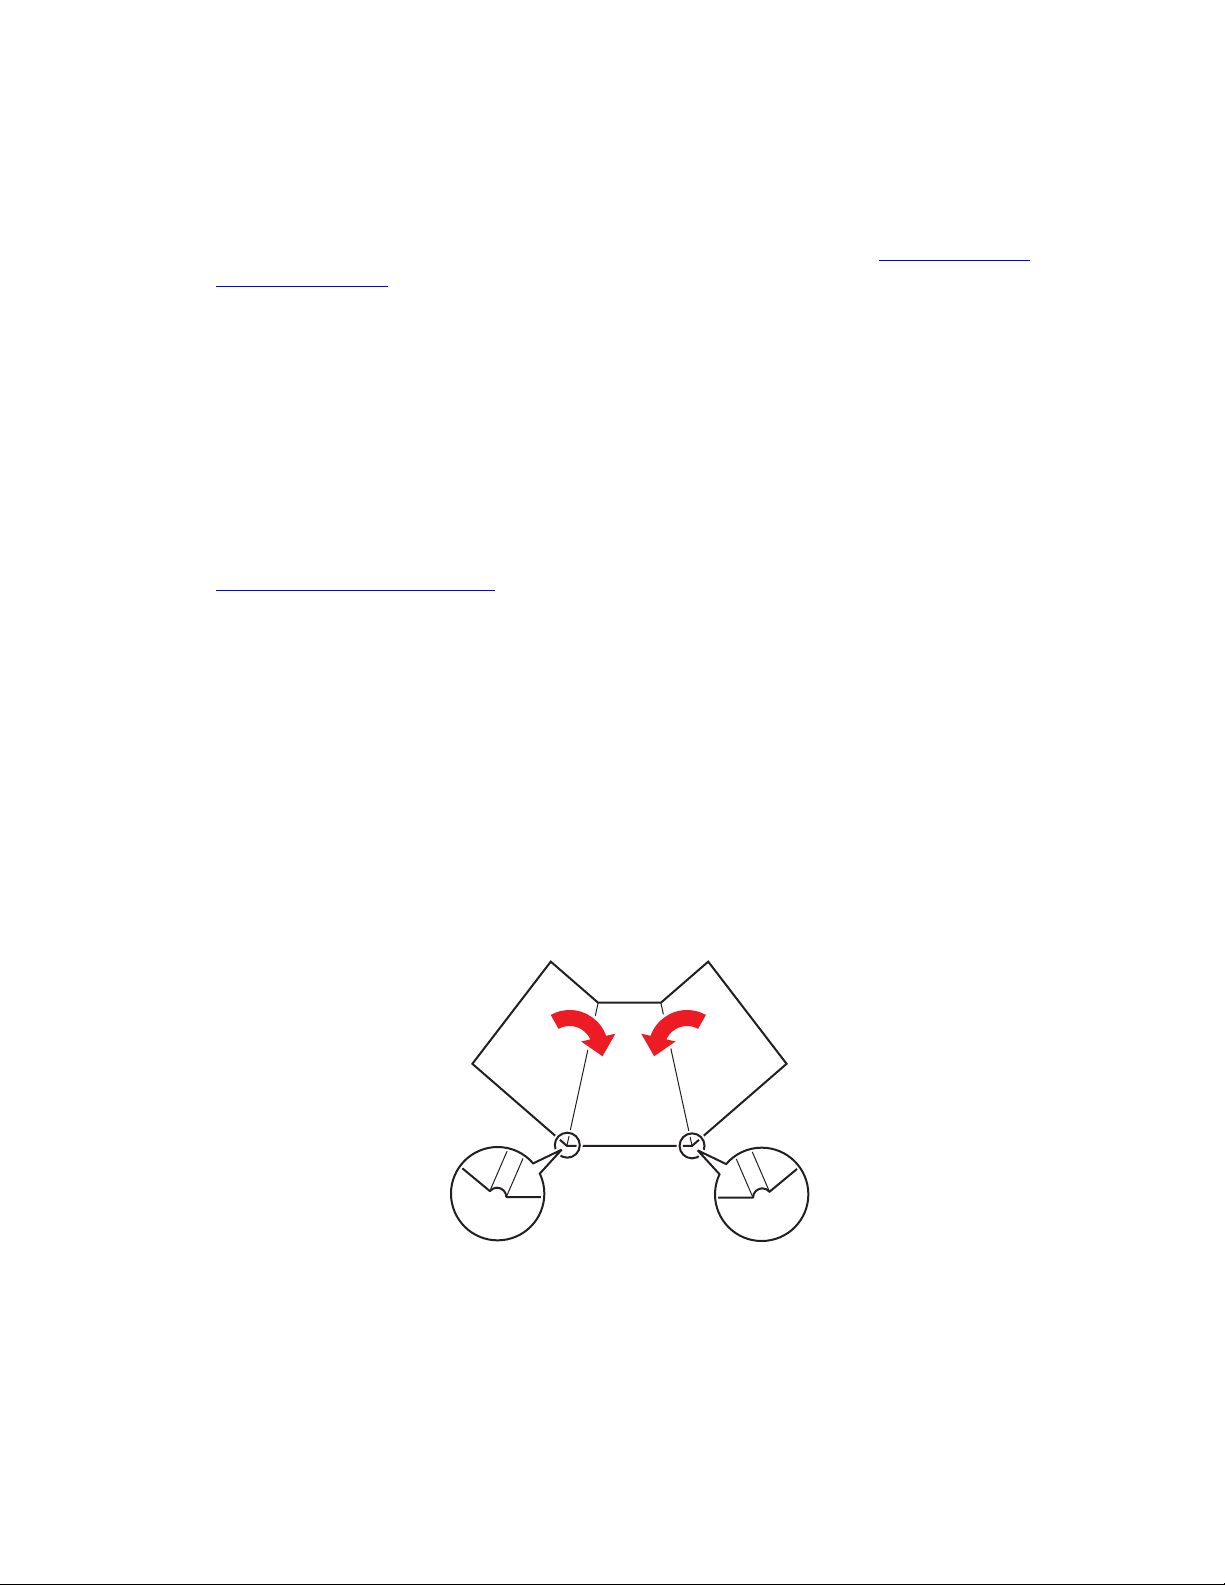
Specialty Paper
Printing Postcards and Trifold Brochures
Phaser Postcards and Phaser Trifold Brochures can be printed only from Tray 1 (MPT). They
can be printed on two sides. To order Phaser Premium Postcards, Phaser Trifold Brochures,
and other supplies, contact your local reseller or visit the Xerox web site at w
office/7750supplies.
Guidelines
■ Store postcards and trifold brochures in their original packaging.
■ Do not store postcards and trifold brochures in extremely dry or humid conditions or
extremely hot or cold conditions. Storing postcards and trifold brochures in extreme
conditions may cause them to jam in the printer or cause print quality problems.
■ Rotate stock frequently. Long periods of storage in extreme conditions can cause the
postcards and trifold brochures to curl and jam the printer.
Templates for postcards and trifold brochures are available on the Xerox web site at
www.xerox.com/office/supplies
for more information.
. Click one of the template links in the Printing Ideas section
ww.xerox.com/
Postcards
Print the information side of the postcard first, then print the address side. See Reference/
Printing/2-Sided Printing on the User Documentation CD-ROM for more information on 2-
sided printing.
Trifold Brochures
Trifold brochures have raised scores on the inside of the brochure. For best results, print the
outside of the brochure first, then print the inside.
Note
Do not print on the indented or raised scores on the trifold brochures. Trifold brochures
should be folded over the raised scores.
Phaser® 7750 Color Laser Printer
2-62
Page 97

Specialty Paper
Loading Postcards and Trifold Brochures in Tray 1 (MPT)
1. Fan the postcards or trifold brochures to release sheets that may be stuck together.
2. Insert the sheets long-edge feed and facedown into Tray 1 (MPT).
■ Postcards: Place the top of the page to enter the printer first.
■ Trifold brochures: Place the top of the page toward the front of the printer.
MAX
Note
Do not load paper above the fill line inside the tray.
3. Adjust the paper guides to the size of the paper.
7750-162
Phaser® 7750 Color Laser Printer
2-63
Page 98

Specialty Paper
Selecting Front Panel Settings to Print Phaser Postcards and Phaser Trifold
Brochures
Printing Side One or One-Sided Printing
1. At the printer’s front panel, do one of the following:
■ Press the OK button if both Thick Card Stock and the correct paper size are
selected. Go to Step 4.
■ Select Change if a different paper type or incorrect paper size is selected, then press
the OK button. Go to Step 2.
2. Select Thick Card Stock, then press the OK button.
3. Select the correct paper size, then press the OK button to save your selection.
4. In the printer driver, select the paper type or Tray 1 (MPT) as the paper source.
5. Adjust the paper guides to the size of the paper.
If you are manually printing two-sided pages, follow the instructions in “Printing Side Two.”
Printing Side Two
1. Insert the sheets long-edge feed into Tray 1 (MPT).
2. Place the side to be printed facedown (printed side is faceup).
3. Select one of these options:
■ Postcards: Place the top of the printed page to enter the printer first.
■ Trifold brochures: Place the top of the printed page toward the front of the printer.
4. Adjust the paper guides to the size of the paper.
5. Adjust the guide for the paper length and width.
Phaser® 7750 Color Laser Printer
2-64
Page 99

Specialty Paper
Printing Weatherproof Paper
Phaser Weatherproof Paper can be printed from any tray. You can also print on both sides of
the paper from Trays 2-5 using the automatic 2-sided printing option. Do not perform manual
2-sided printing on Phaser Weatherproof Paper. For more information on automatic 2-sided
printing, go to Reference/Printing/2-Sided Printing on the User Documentation CD-ROM.
To order Phaser Weatherproof Paper and other supplies, contact your local reseller or visit the
Xerox web site at www.xerox.com/office/7750supplies
Guidelines
■ Store Phaser Weatherproof Paper flat in the original packaging.
■ Leave the Phaser Weatherproof Paper in its original packaging until you are ready to use it.
■ Do not store Phaser Weatherproof Paper in extremely dry or humid conditions or
extremely hot or cold conditions. Storing Phaser Weatherproof Paper in extreme
conditions may cause it to jam in the printer or cause print quality problems.
■ Remove the Phaser Weatherproof Paper from the packaging and allow it to acclimate to
the room temperature and humidity prior to printing.
■ Do not leave the paper in the printer when you are finished printing. This may cause the
paper to curl and jam the printer.
■ Rotate stock frequently. Long periods of storage in extreme conditions can cause the
Phaser Weatherproof Paper to curl and jam the printer.
.
Printing Weatherproof Paper from Tray 1 (MPT)
1. Fan the Phaser Weatherproof Paper to release sheets that may be stuck together.
Phaser® 7750 Color Laser Printer
2-65
Page 100

Specialty Paper
2. Insert Phaser Weatherproof Paper long-edge feed into Tray 1 (MPT). Place the side to be
printed facedown.
MAX
7750-162
Note
Do not load paper above the fill line inside the tray.
3. Adjust the paper guides to the size of the paper.
Selecting Front Panel Settings to Print Weatherproof Paper
1. At the printer’s front panel, do one of the following:
■ Press the OK button if both Heavy Plain Paper and the correct paper size are
selected. Go to Step 4.
■ Select Change if a different paper type or incorrect paper size is selected, then press
the OK button. Go to Step 2.
2. Select Heavy Plain Paper, then press the OK button.
3. Select the correct paper size, then press the OK button to save your selection.
4. In the printer driver, select the paper type or Tray 1 (MPT) as the paper source.
Phaser® 7750 Color Laser Printer
2-66
 Loading...