


Xerox 6030/6050 Wide Format
Windows Driver
User Guide
701P41598
Version 1.5
May 2004

Xerox Corporation
Global Knowledge & Language Services
800 Phillips Road Bldg. 845-17S
Webster, NY 14580
Copyright © 2004 Xerox Corporation. All rights reserved.
Printed in the United States of America.
Copyright protection claimed includes all forms and matters of
copyrighted material and information now allowed by statutory
or judicial law or hereinafter granted, including without
limitation, material generated from the software programs that
are displayed on the screen such as styles, templates, icons,
screen displays, looks, etc.
Adobe® and the Adobe logo, InDesign®, Illustrator®,
PageMaker®, Photoshop®, Acrobat®, Distiller®, and the
Acrobat logo are either registered trademarks or trademarks of
Adobe Systems Incorporated in the United States and/or other
countries.
The Creo wordmark, Creo logo, and the names of Creo
products and services referred to this document are
trademarks of Creo, Inc.
Macintosh, Power Macintosh, and Mac are registered
trademarks of Apple Computer, Inc.
Microsoft® Windows NT® and Microsoft® Windows are
trademarks of Microsoft Corporation.
PANTONE® is a registered trademark of Pantone, Inc.
Sun Microsystems and Solaris are a trademarks, registered
trademarks, or service marks of Sun Microsystems, Inc. in the
U.S. and other countries.
SWOP® is a registered trademark of SWOP, Inc.
Quark and QuarkXPress are trademarks of Quark, Inc. and all
applicable affiliated companies, Reg. U.S. Pat. & Tm. Off. and
in many other countries.
Macromedia FreeHand® is a trademark of Macromedia, Inc.
This product includes software developed by the Apache
Software Foundation (http://www.apache.org).
This product includes software developed by the JDOM
Project (http://www.jdom.org).
This product includes software developed by the Jaxen
Project (http://www.jaxen.org).
XEROX®, The Document Company®, the digital X®, Xerox
6030/6050 Wide Format Windows Driver are the trademarks
of or licensed to XEROX CORPORATION.

Preface
Thank you for using the 6030/6050 Wide Format Windows Driver (hereinafter known as
Windows Driver).
This User Guide describes the procedures and precautions involved in installing and
setting up Windows Driver. Refer to the user manuals supplied with the Xerox 6030/
6050 Wide Format Copier/Printer for details on relevant operations.
The explanations provided in this User Guide assume that the user has a basic
knowledge of operating the computer and network configuration in use. Refer to the
manuals supplied with the computer, Windows related documentation and the manuals
supplied with the network system for details on computer and network operations.

Using This Guide
Organization
This guide consists of the following chapters.
Chapter 1. Installing Windows Driver
Explains how to install Windows Driver into your computer.
Chapter 2. Printing Setup
Explains how to print using Windows Driver and how to set up the various printing
conditions.
Chapter 3. System-Related Precautions and Limitations
Explains the precautions that must be observed for the system on which Windows Driver
is to be used.
Chapter 4. Uninstalling Windows Driver
Explains how to uninstall (delete) Windows Driver from the system.
Using This Guide

Conventions
This User Guide uses the following symbols and conventions:
< > key Indicates the keys on the keyboard.
Press the <Enter> key.
[ ] Indicates the menus and display items on the screens.
Select either the [On] or [Off] buttons to display [Job
Name], [Owner], and [Reason] in that order.
" " Indicates areas of reference within this User Guide.
Also indicates messages.
Refer to
A message stating
The Device could not be identified
Indicates important information which you should read.
"3.2 Print Services".
"Additional Port Information Required.
" appears.
Indicates additional information on operations or features.
Indicates reference sources.
Indicates examples.
Using This Guide

Preface
Using This Guide
Contents
Chapter 1 Installing Windows Driver
1.1 Installing Windows Driver
(Windows XP)2
Setting up Network Printer using a LPR port.............................................................................2
Setting the Printer's Spool ........................................................................................................12
Adding Network Printer (Windows 2000 or Windows XP)..................................................... 14
Installing Additional Windows Driver.....................................................................................18
1.2 Installing Windows Driver
(Windows 2000)21
Installing a Network Printer using a LPR port.........................................................................21
Contents
Setting the Printer's Spool ........................................................................................................31
Adding Network Printer (Windows 2000 or Windows XP)..................................................... 32
Installing Additional Windows Driver.....................................................................................36
1.3 Installing Windows Driver
(Windows 98/Windows Me)37
Setting the Printer's Spool ........................................................................................................42
Chapter 2 Printing Setup
2.1 Printing..........................................................................................................................................46
2.2 Windows Driver Settings..............................................................................................................48
Displaying the Windows Driver Setup Screen.........................................................................48
Windows Driver Settings .........................................................................................................50
[Paper] Tab ...............................................................................................................................50
[Tray/Output] Tab .....................................................................................................................56
[Graphics] Tab..........................................................................................................................59
Contents
[Header/Footer] Tab .................................................................................................................61
[Default Settings] Tab ..............................................................................................................63

Chapter 3 System-Related Precautions and Limitations
3.1 Operating System..........................................................................................................................68
Versions that support printer firmware .....................................................................................68
Computer Configuration...........................................................................................................68
3.2 Network Connections....................................................................................................................69
What are Logical Printers? .......................................................................................................69
3.3 Windows 98/Me Network Connections........................................................................................70
Connection Method ..................................................................................................................70
3.4 Precautions When Setting Up the Printer Parameters...................................................................73
Chapter 4 Uninstalling Windows Driver
4.1 Uninstallation Procedure...............................................................................................................76
Index.................................................................................................................................................................................77
Contents

Contents

Chapter
Chapter 0
1
Installing Windows Driver
This chapter explains how to install Windows Driver into your computer.
The method of installing Windows Driver is described separately for each operating
system for which there is no installation tool. Refer to the proper section for
installation instructions.
• Windows XP→ "1.1 Installing Windows Driver (Windows XP)" (page 2)
• Windows 2000 → "1.2 Installing Windows Driver (Windows 2000)" (page
21)
• Windows 98 → "1.3 Installing Windows Driver (Windows 98/Windows
Me)" (page 37)
• Windows Me → "1.3 Installing Windows Driver (Windows 98/Windows
Me)" (page 37)
When upgrading Windows Driver, ensure that the old version of the
Windows Driver has been uninstalled before attempting to install the
upgraded version of the Windows Driver. Refer to "Chapter 4 Uninstalling
Windows Driver" for details on the procedures for this (page 75).
Chapter 1
1.1
Installing Windows Driver (Windows XP)
This section explains how to install Windows Driver without an installation tool onto
Windows XP computer.
The installation procedure will differ in accordance with the printer
Proceed to the section that corresponds with the configuration in use.
• When connected to networks with TCP/IP protocol using LPR: Proceed to the
section on "Setting up Network Printer using a LPR port".
• When using FTP connections: Proceed to the section on "Setting up Network
Printer using a LPR port".
Data is output to a file and then transmitted for printing from the command prompt
with FTP connections.
• When connected to networks using Windows 2000 or Windows XP Systems:
Proceed to the section on "Adding Network Printer (Windows 2000 or
Windows XP)" (page 14).
's connection status.
Setting up Network Printer using a LPR port
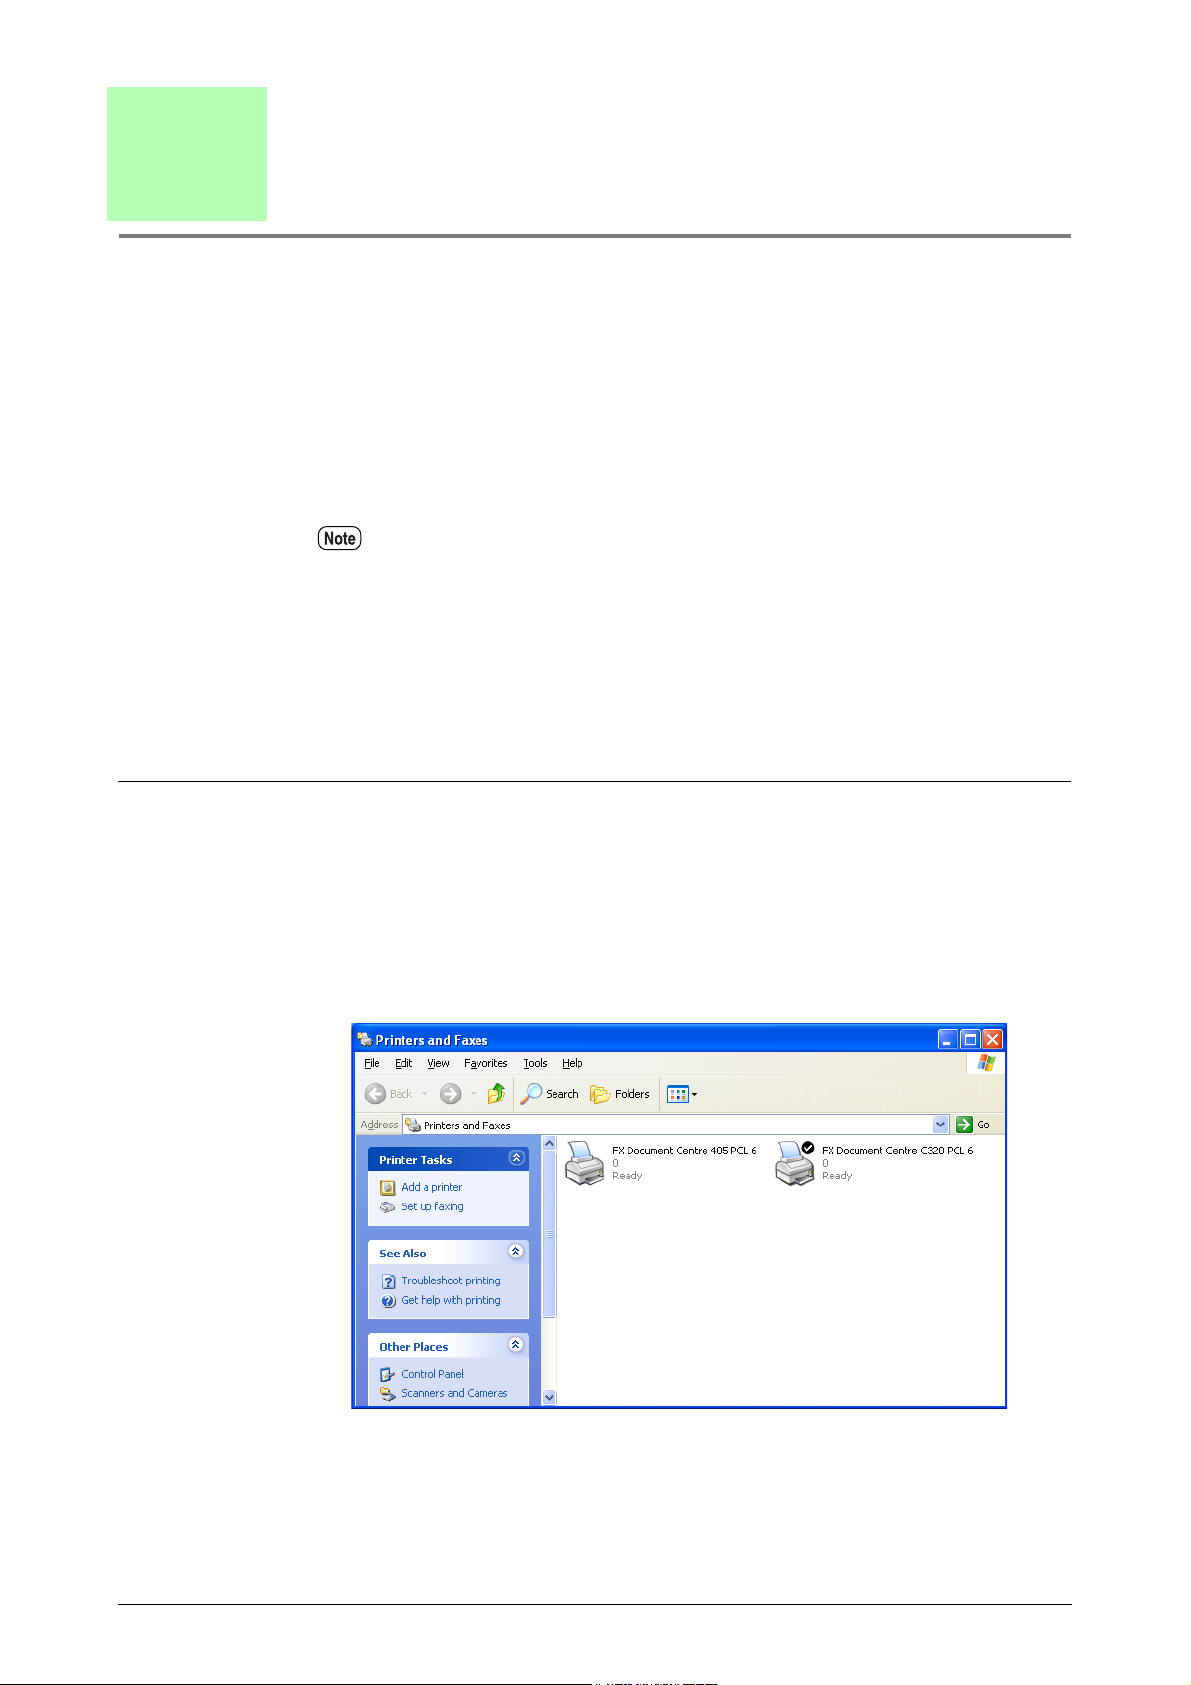
1 Click [Start] on the task bar, then select [Control Panel] > [Printers and Other
Hardware] > [Printers and Faxes].
The [Printers and Faxes] window appears.
2 Click [Add a printer].
[Add Printer Wizard] appears.
2
Chapter 1 Installing Windows Driver
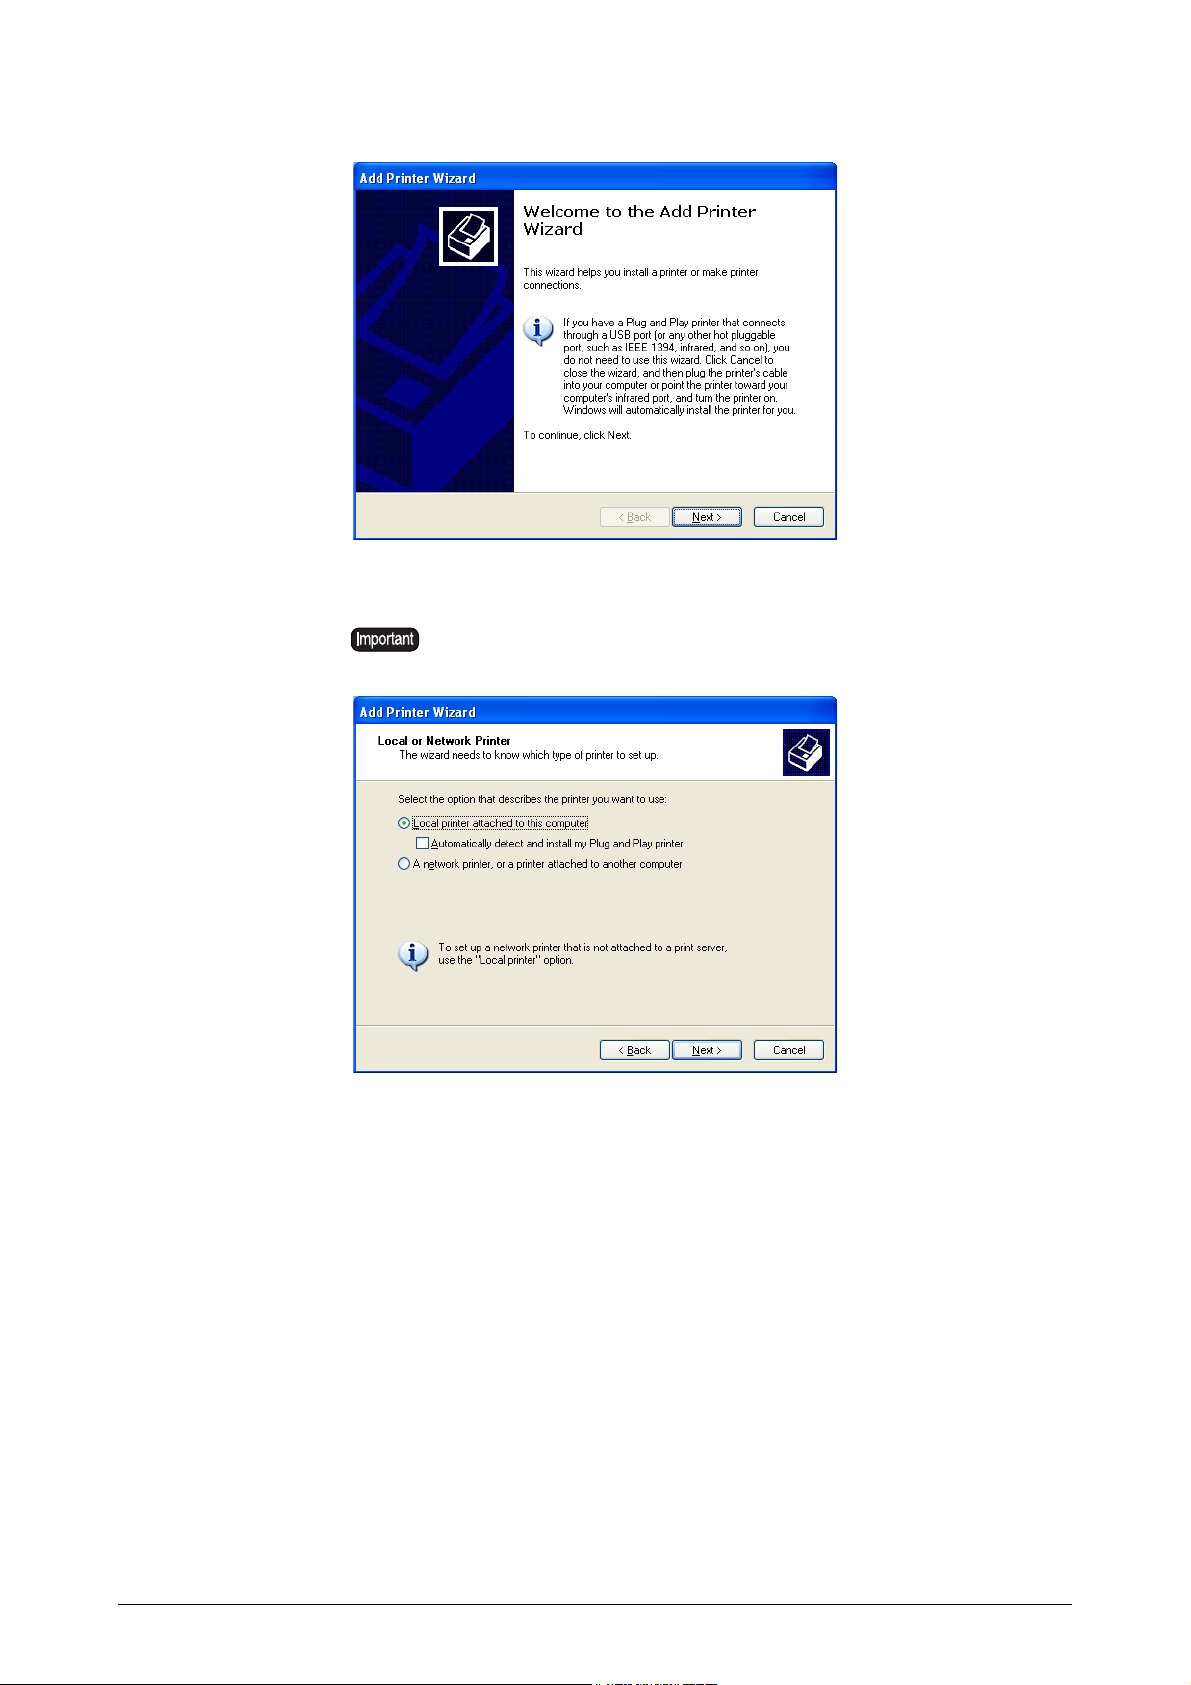
3 Click [Next].
4 Select [Local printer attached to this computer] and then click [Next].
Do not select [Automatically detect and install my Plug and Play
printer]. Plug and Play is not supported.
1.1 Installing Windows Driver (Windows XP)
3
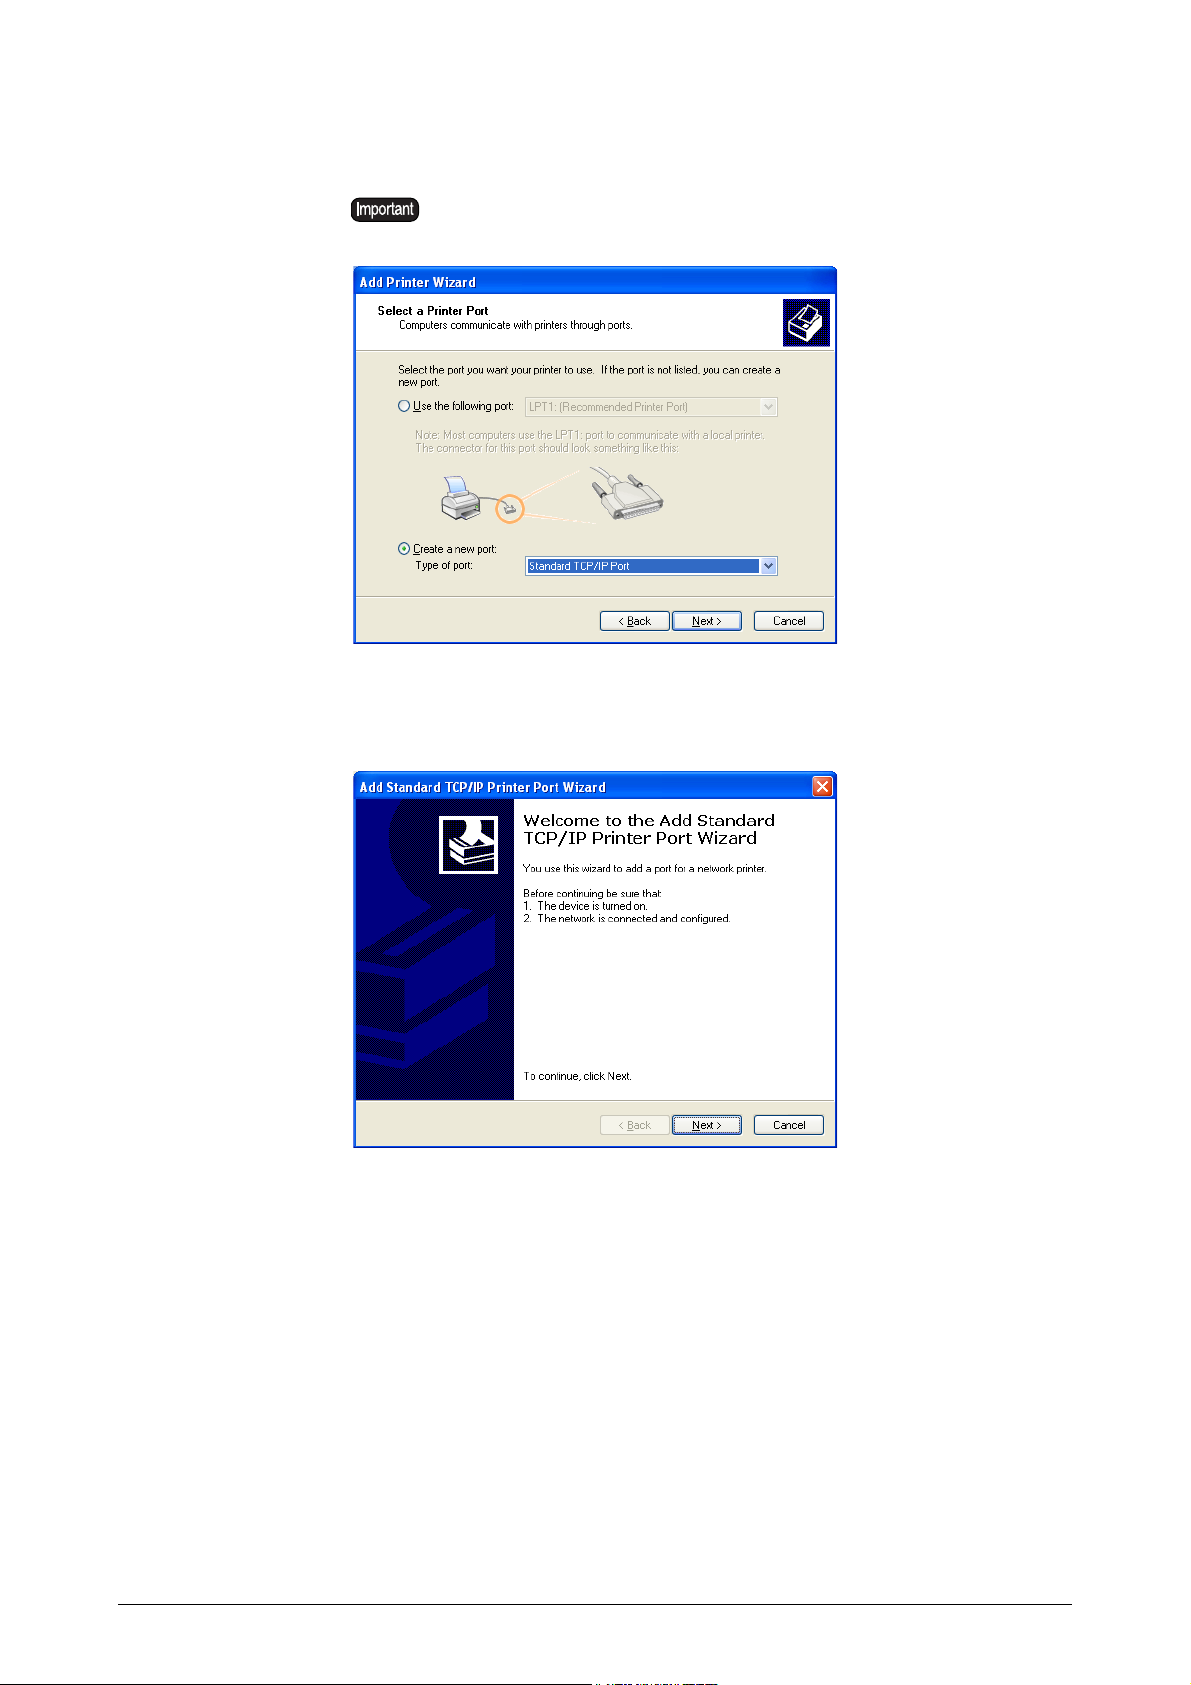
5 Select [Create a new port], then select [Standard TCP/IP Port] from [Type of
port], and click [Next].
If the LPR compatible printer port to be used is already listed, select that port,
click [Next] and go to Step
[Add Standard TCP/IP Printer Port Wizard] appears.
12.
6 Click [Next].
4
Chapter 1 Installing Windows Driver
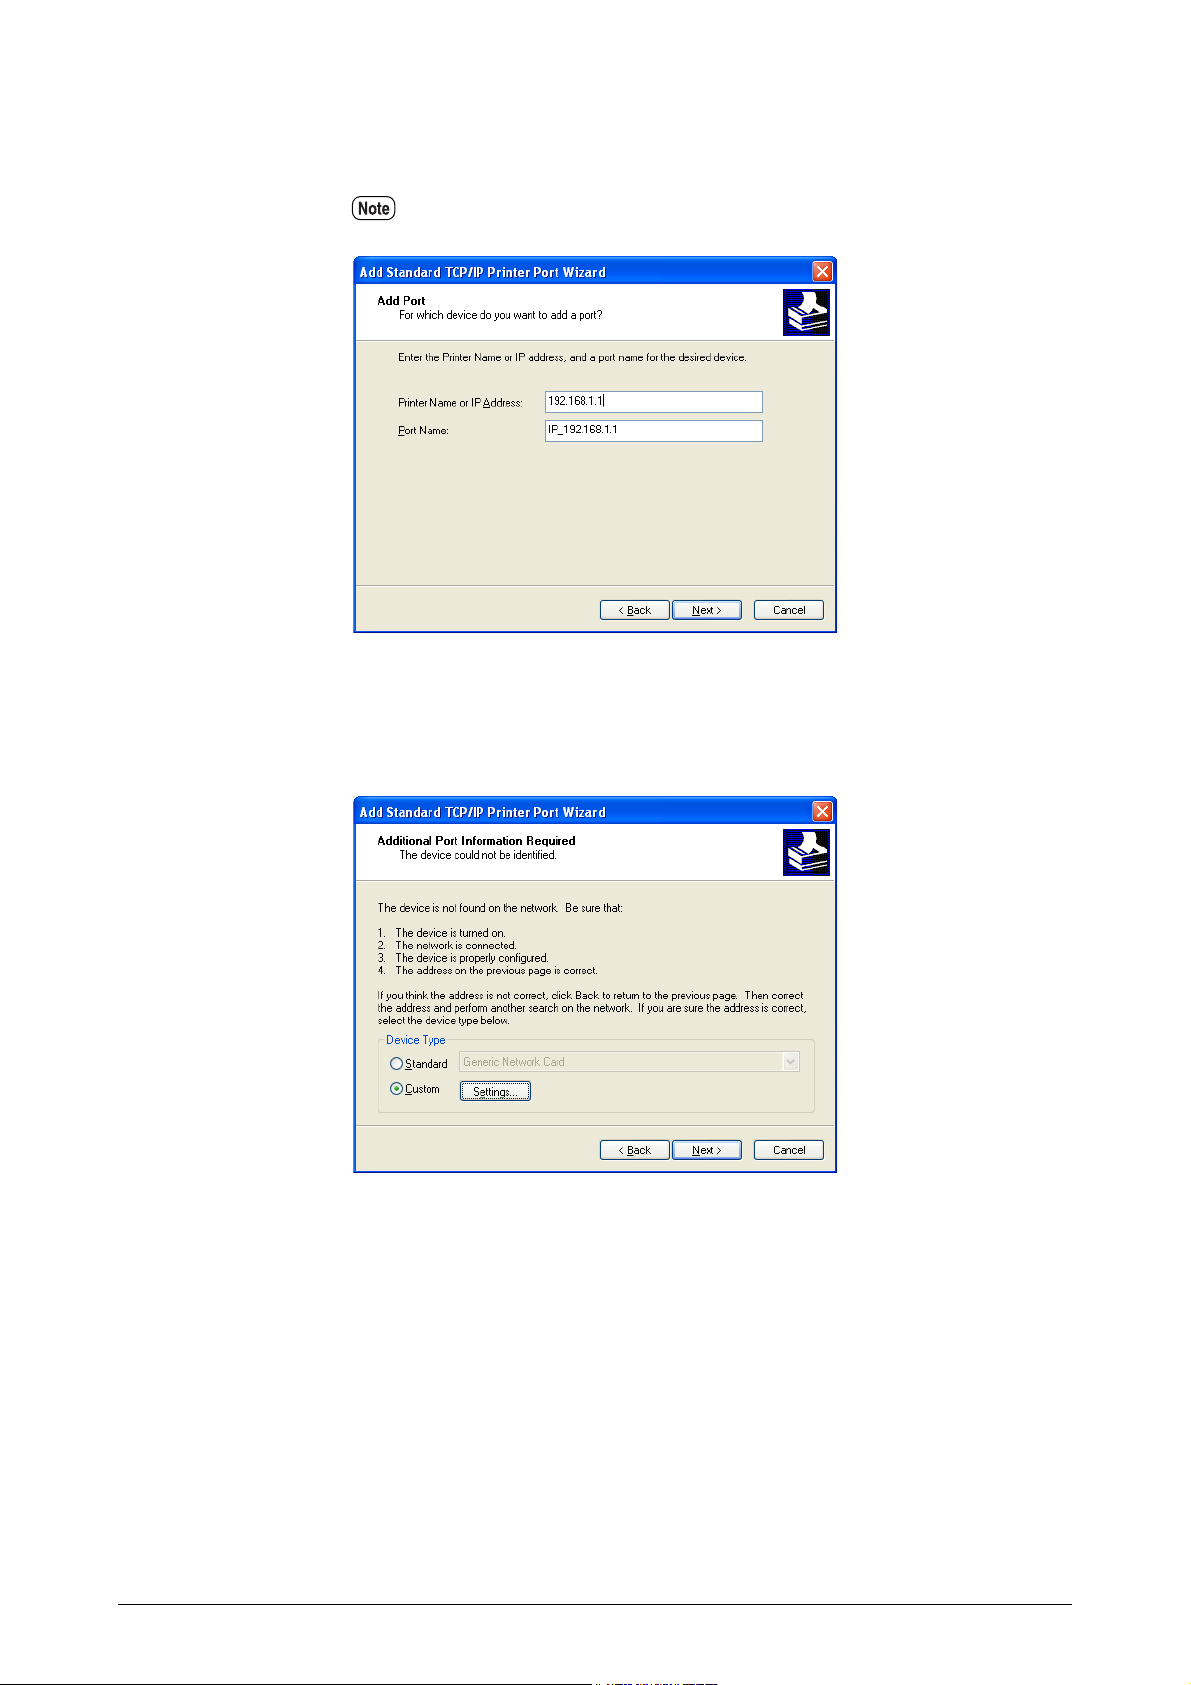
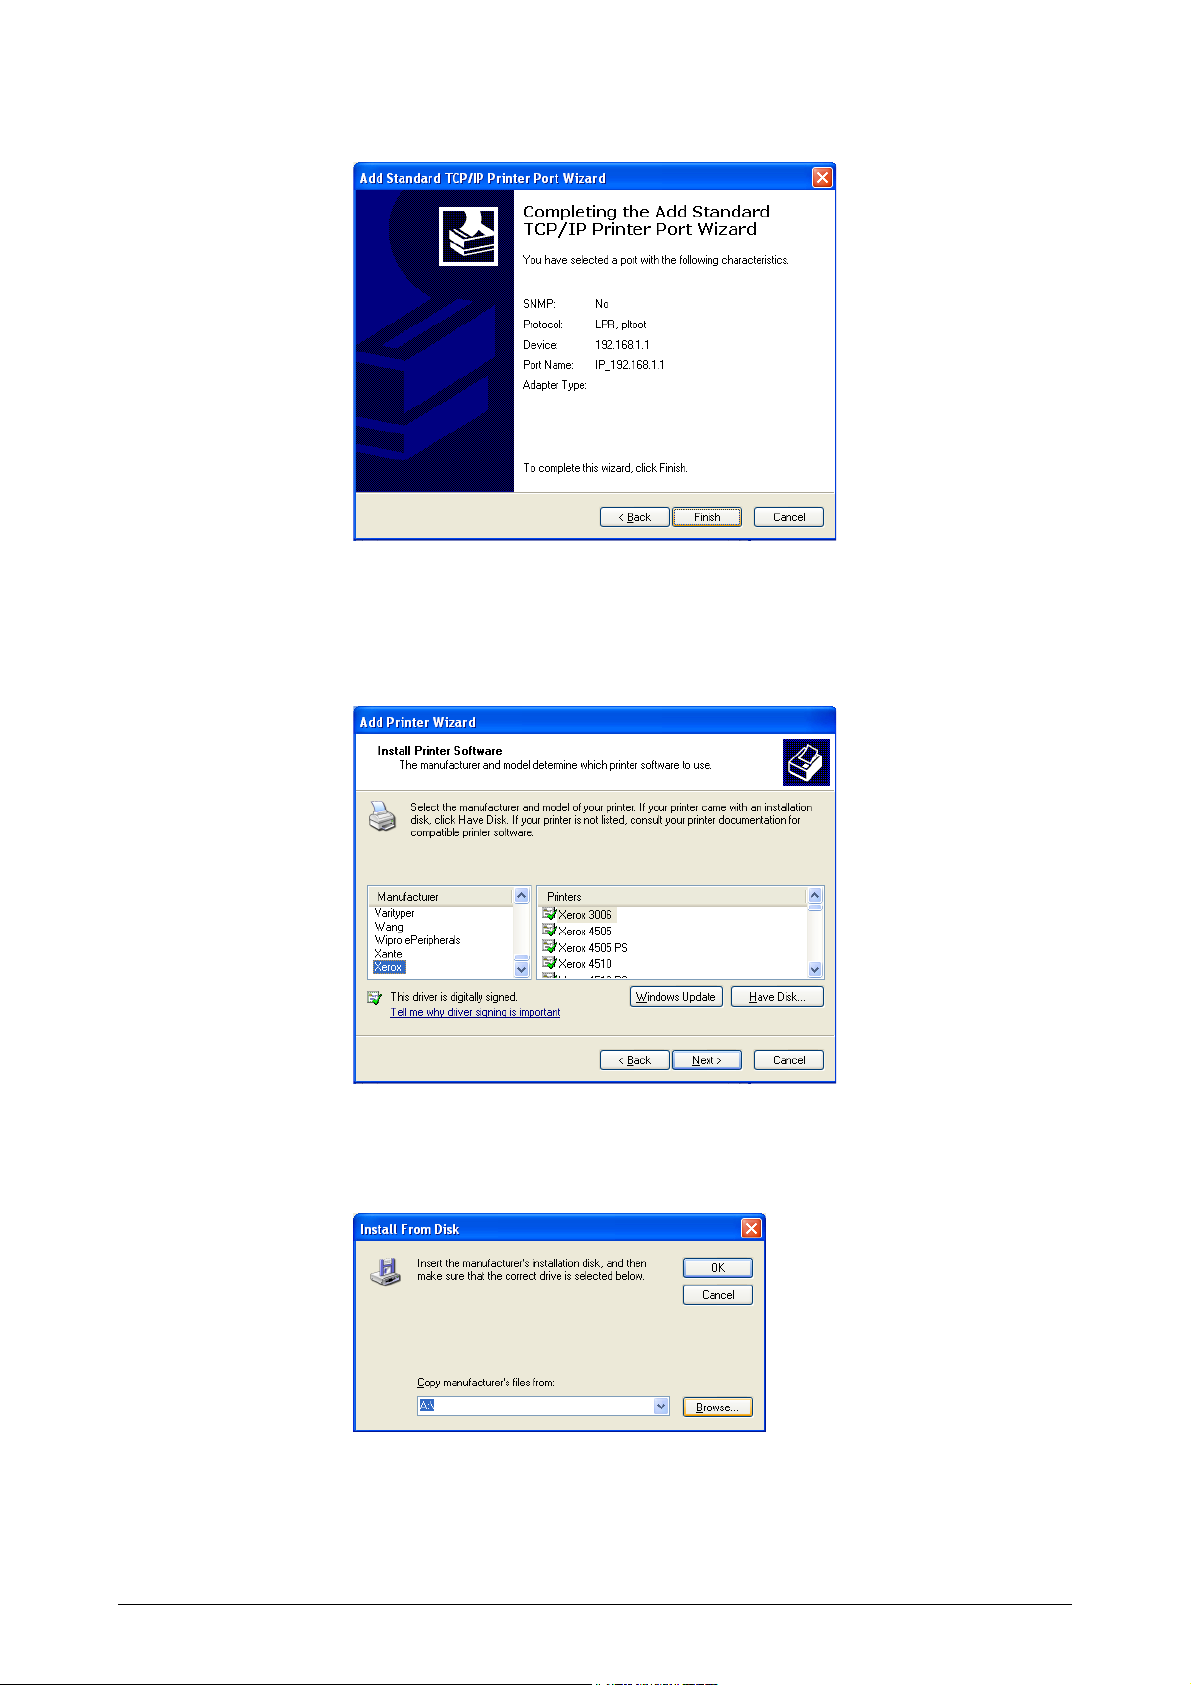
7 Enter the printer name or IP address in [Printer Name or IP Address], and then
click [Next].
The [Port Name] will be entered automatically. Change the entry if necessary.
A message stating "Additional Port Information Required. The device could
not be identified" appears.
8 Select [Custom], and then click [Settings].
The [Configure Standard TCP/IP Port Monitor] dialog box appears.
1.1 Installing Windows Driver (Windows XP)
5
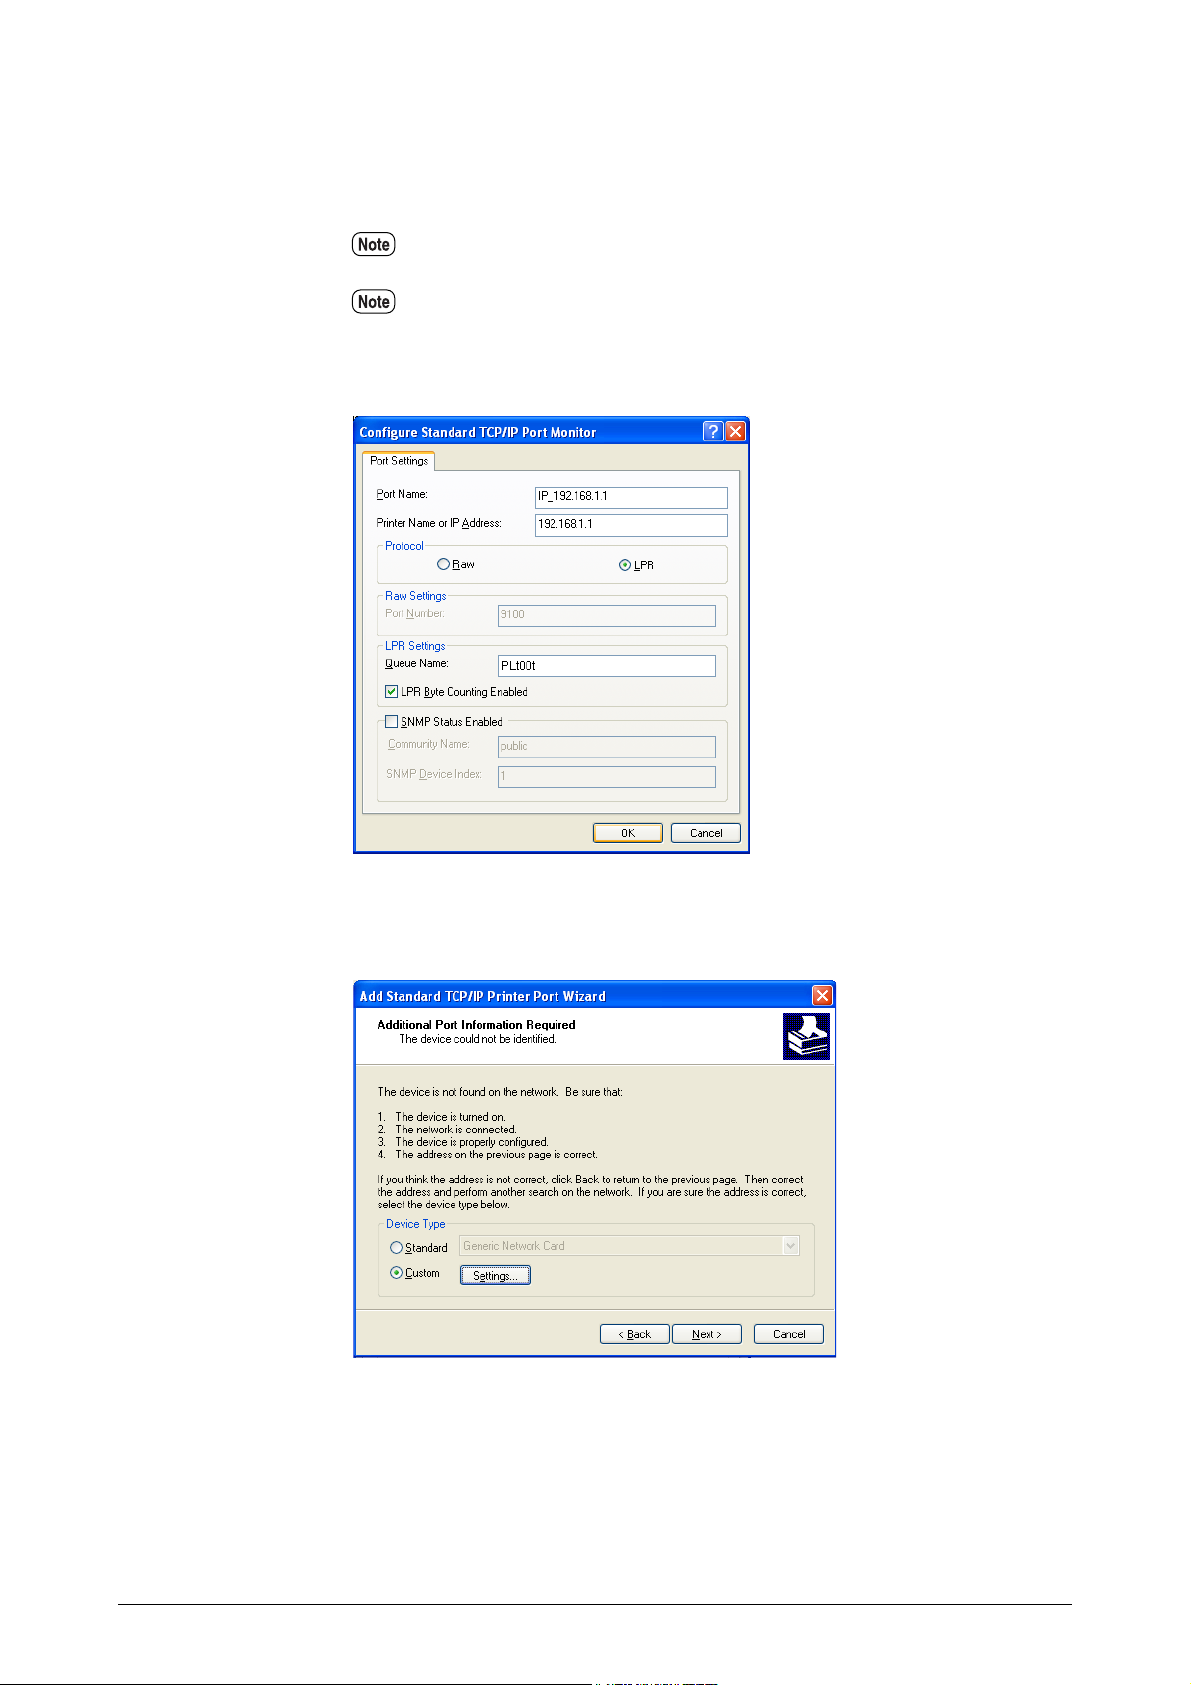
9 Select [LPR] for [Protocol].
Enter the logical printer name in [Queue Name] on [LPR Settings], check the
[LPR Byte Counting Enabled] check box, and then click [OK].
Do not check the [SNMP Status Enabled] check box.
Logical printers are one hundred different types of virtual printer settings
stored in the printer. Each of these one hundred settings can be assigned
different printer names (
[plt00t] to [plt99t]).
The screen will return to [Add Standard TCP/IP Printer Port Wizard].
10 Click [Next].
The installation details appear.
6
Chapter 1 Installing Windows Driver
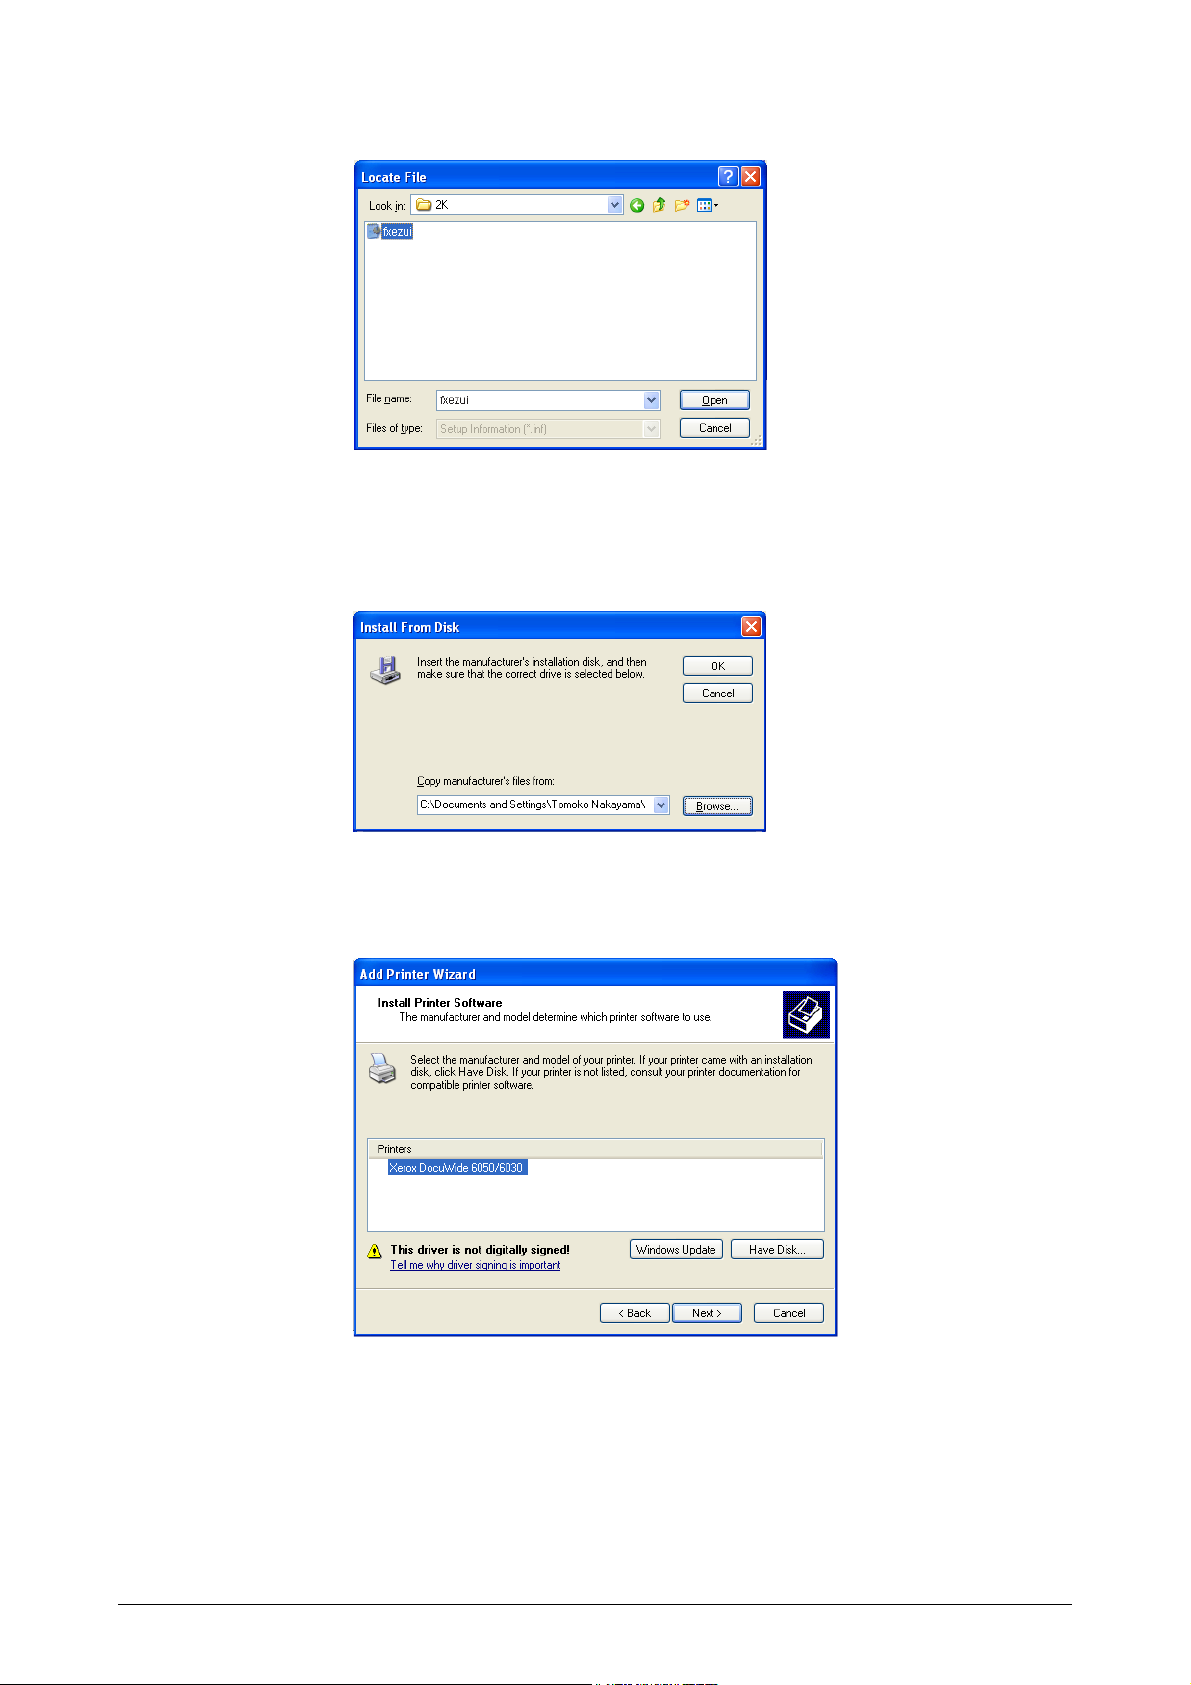
11 Click [Finish].
The dialog box from which to select the printer
name appear.
12 Click [Have Disk].
The [Install From Disk] dialog box appears.
's manufacturer and printer
13 Click [Browse].
The [Locate File] dialog box appears.
1.1 Installing Windows Driver (Windows XP)
7
14 Select the folder in which Windows Driver is stored, and then click [Open].
The selected folder appears in [Copy manufacturer
From Disk] dialog box.
15 Click [OK].
The screen will return to [Add Printer Wizard].
16 Select the model to be used, and then click [Next].
's files from] in the [Install
8
Chapter 1 Installing Windows Driver
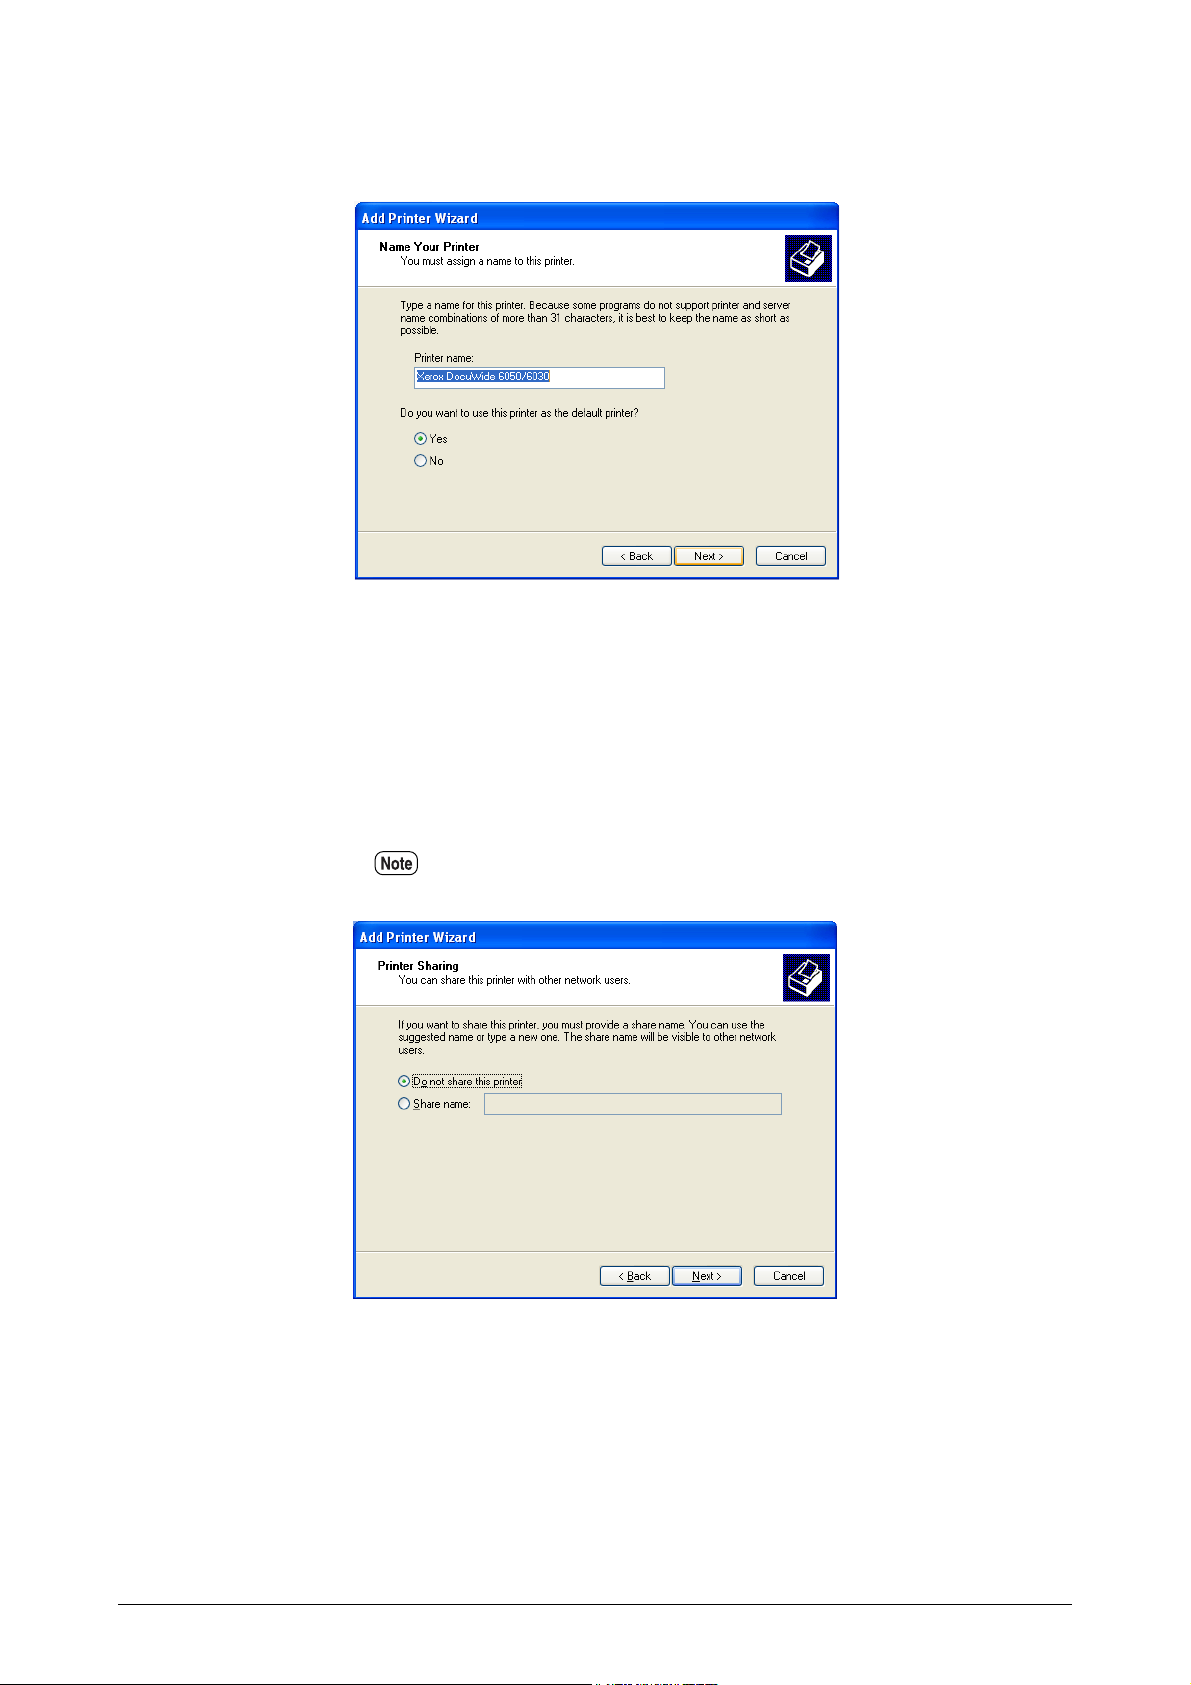
17 Enter any required name if the [Printer name] display needs to be changed. Set
whether the printer is to be used as the default printer, and then click [Next].
18 Select whether the printer is to be shared or not with other printers on the
network.
• If the printer is not to be shared, select [Do not share this printer], click
[Next], and then go to
20.
• If the printer is to be shared, select [Share name], enter the name that the
printer is to be shared under, click [Next], and then go to
The name that the printer is to be shared under must be a name that can be
recognized by other printers.
19.
1.1 Installing Windows Driver (Windows XP)
9
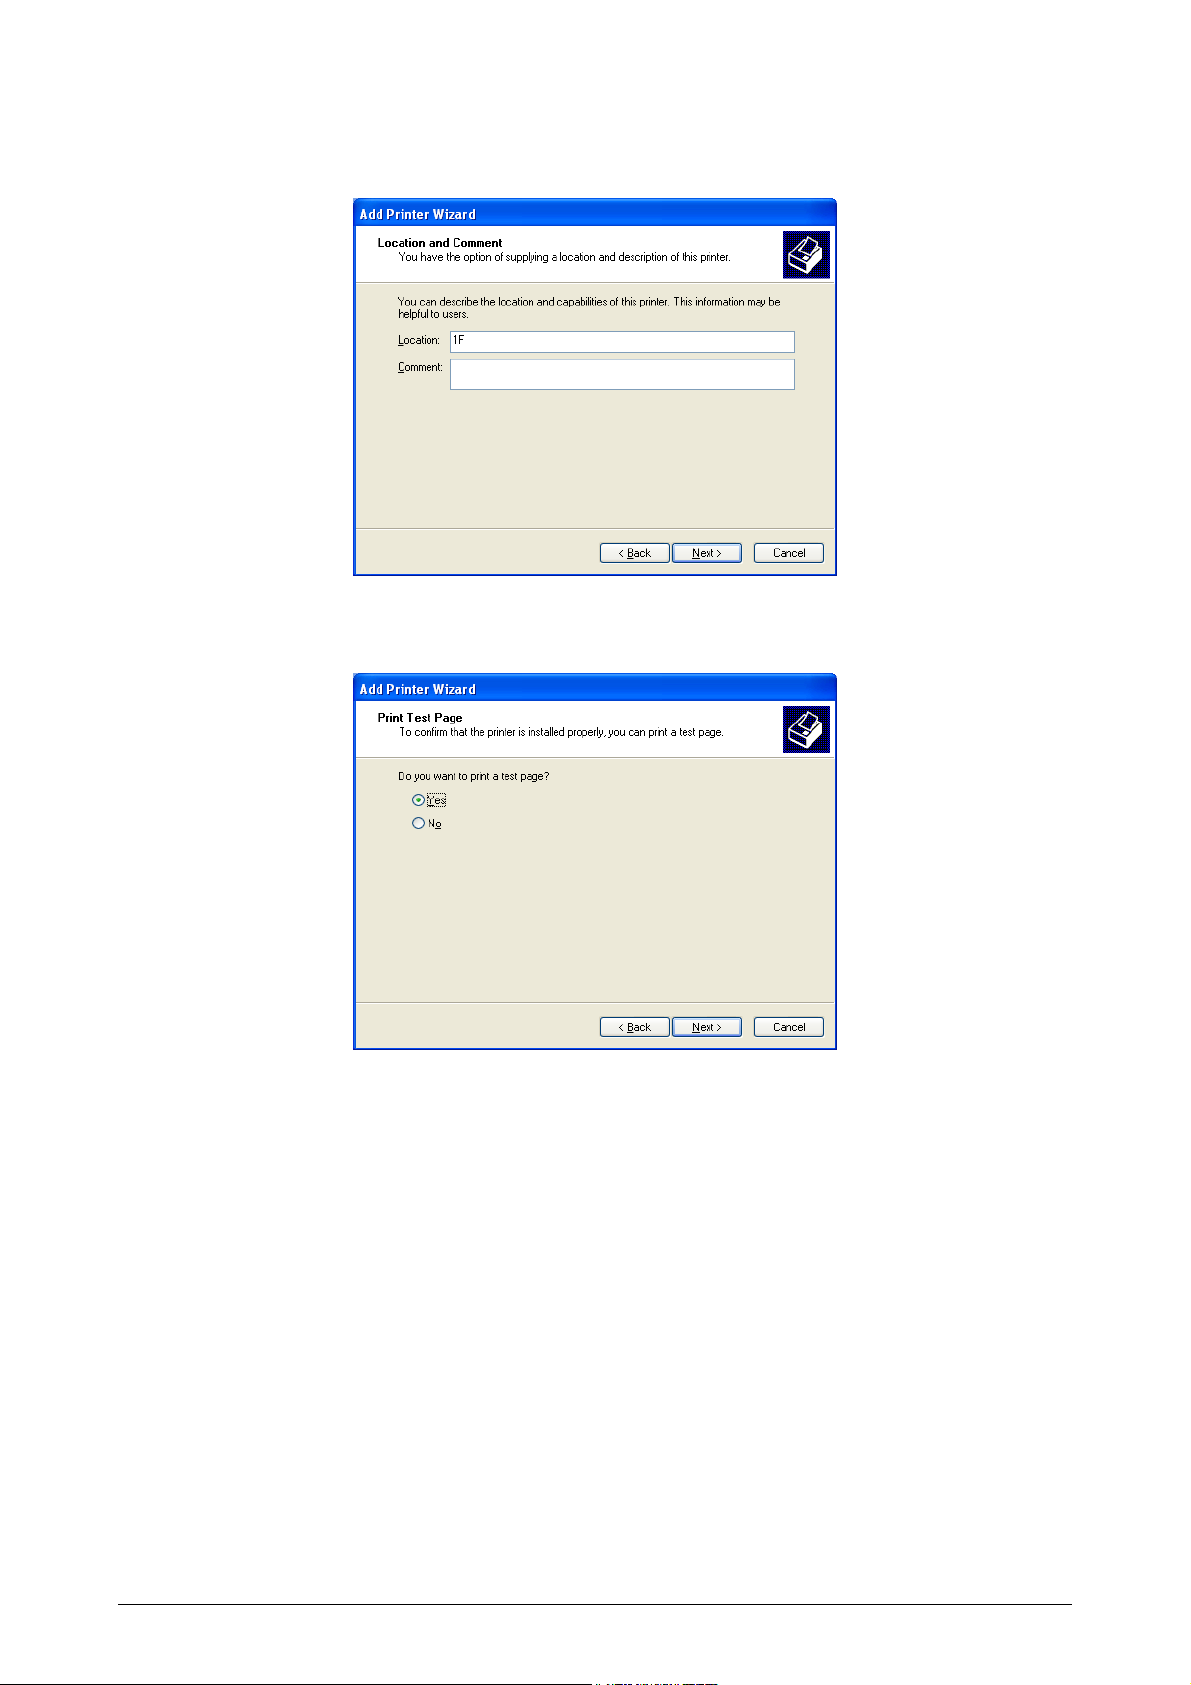
19 Enter the printer's location and a comment in [Location] and [Comment], and
then click [Next].
20 Select whether to print a test page or not.
10
21 Click [Next].
The installation details appear.
Chapter 1 Installing Windows Driver
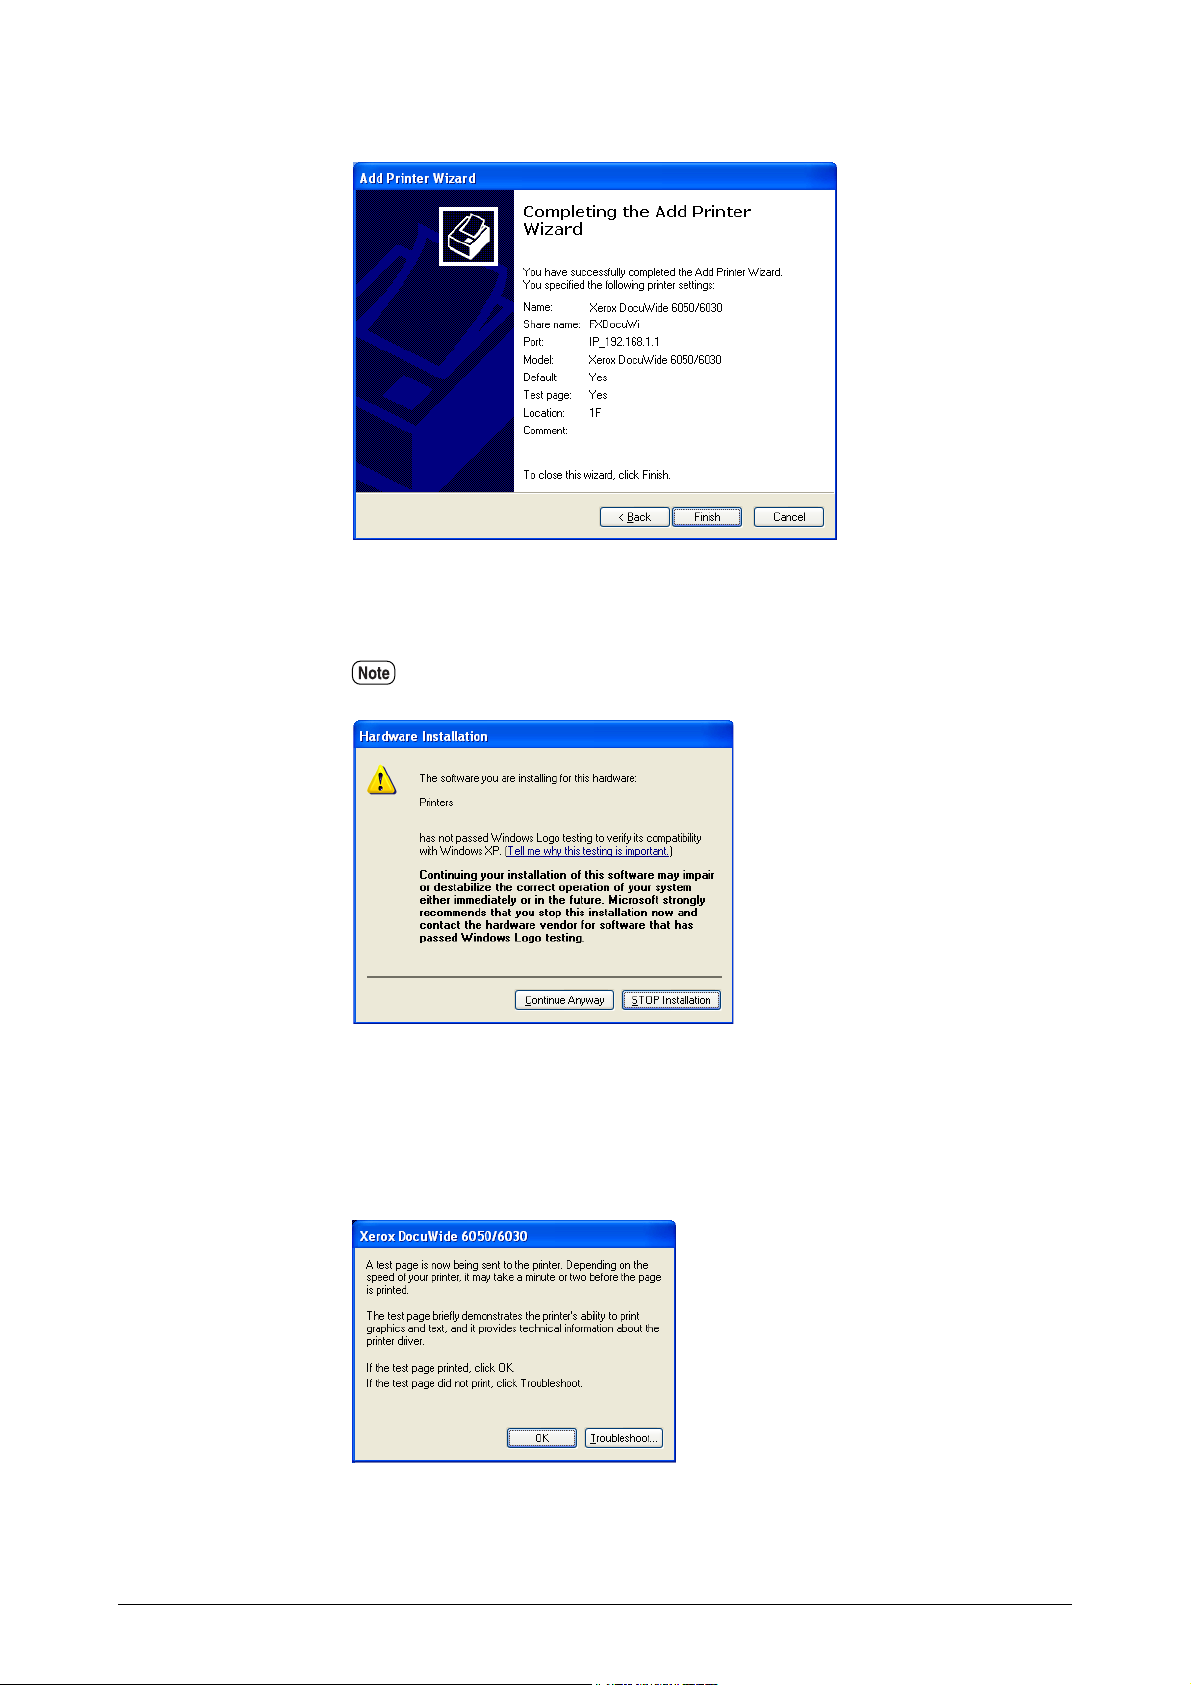
22 Click [Finish].
The [Hardware Installation] dialog box appears.
23 Click [Continue Anyway].
Installation can be continued without a problem.
Installation will be started.
• Go to Step 24 if [Yes] was selected in Step 20.
• Go to Step 25 if [No] was selected in Step 20.
24 Check the printed test page, and then click [OK].
1.1 Installing Windows Driver (Windows XP)
11
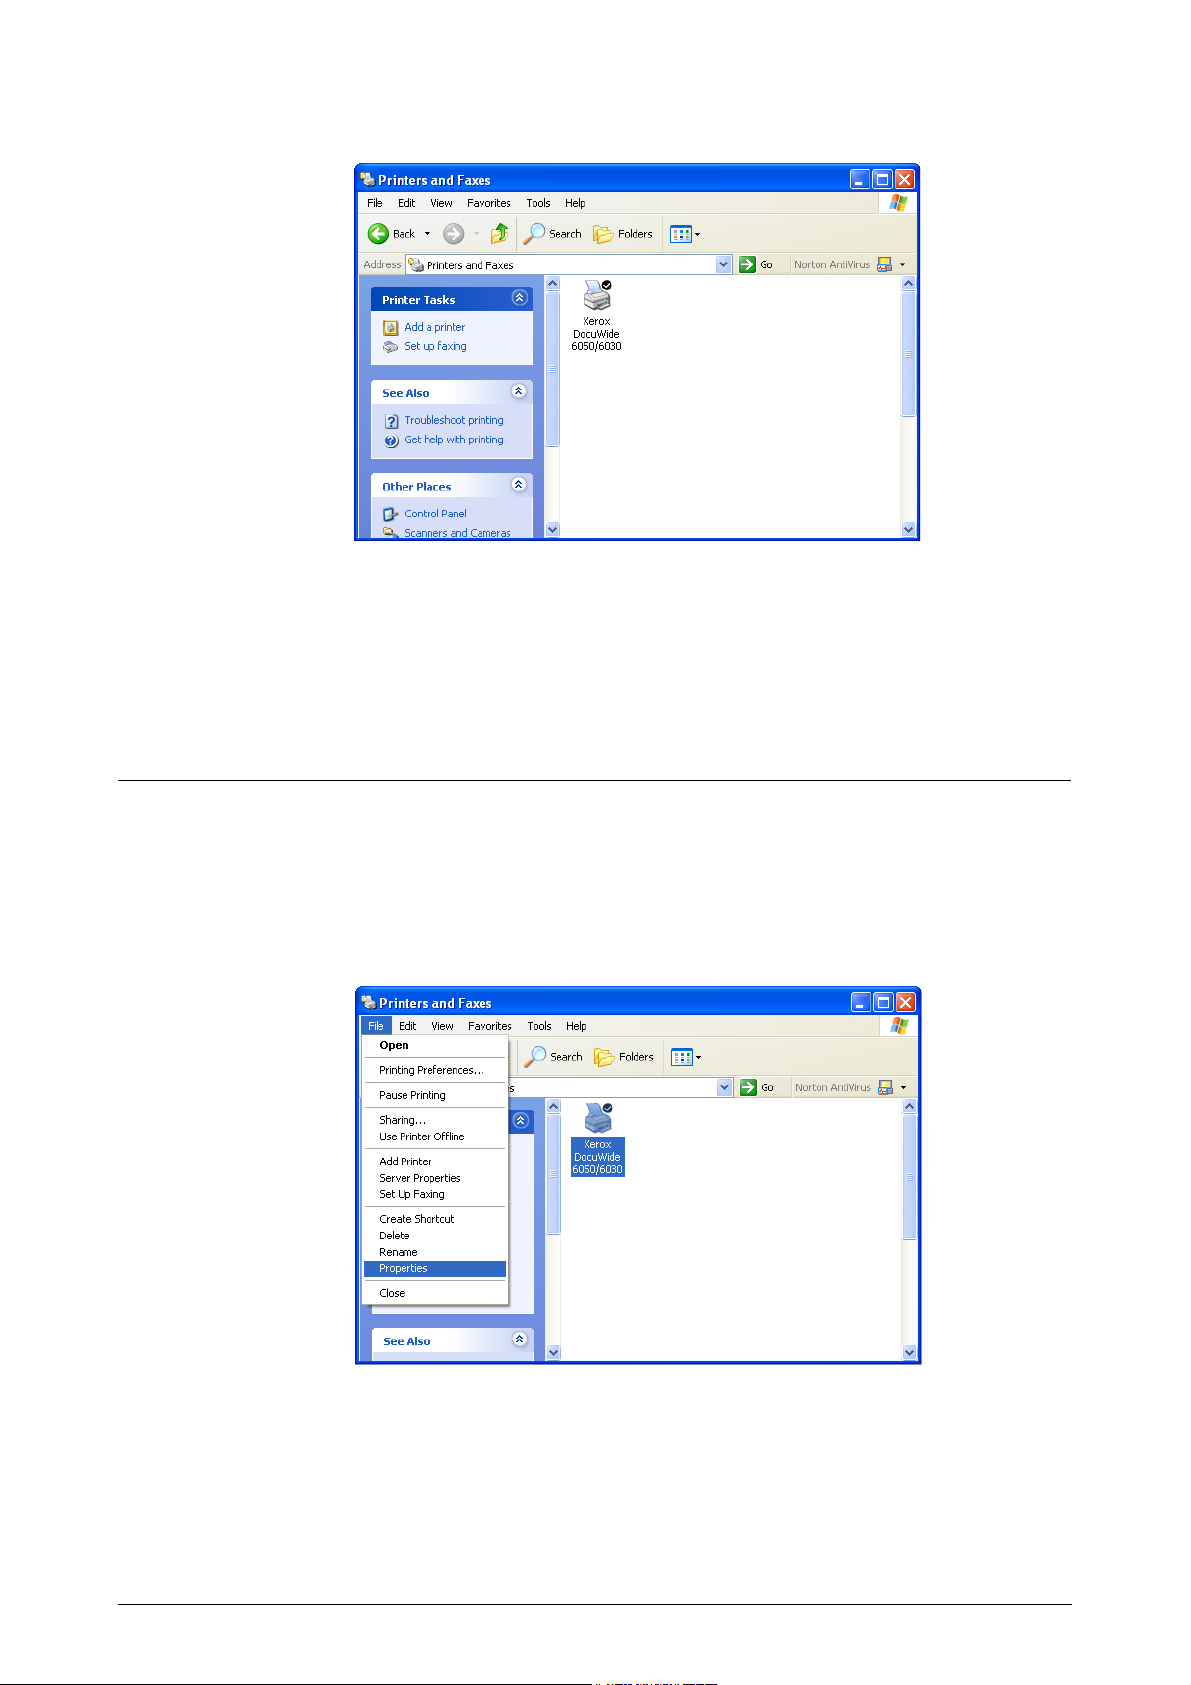
25 Check that the printer icon has been added to the [Printers and Faxes] window.
This completes the installation of the Windows Driver.
The method of changing the printer's spool setting for Windows Driver is
explained below.
Setting the Printer's Spool
After completing the installation, change the printer's spool setting in the printer's
[Properties] dialog box. Sufficient free disk space is required to perform this setting.
Refer to "2.2 Windows Driver Settings" (page 48) when changing the other settings.
1 Click the printer icon, and then select [Properties] from the [File] menu.
12
Chapter 1 Installing Windows Driver
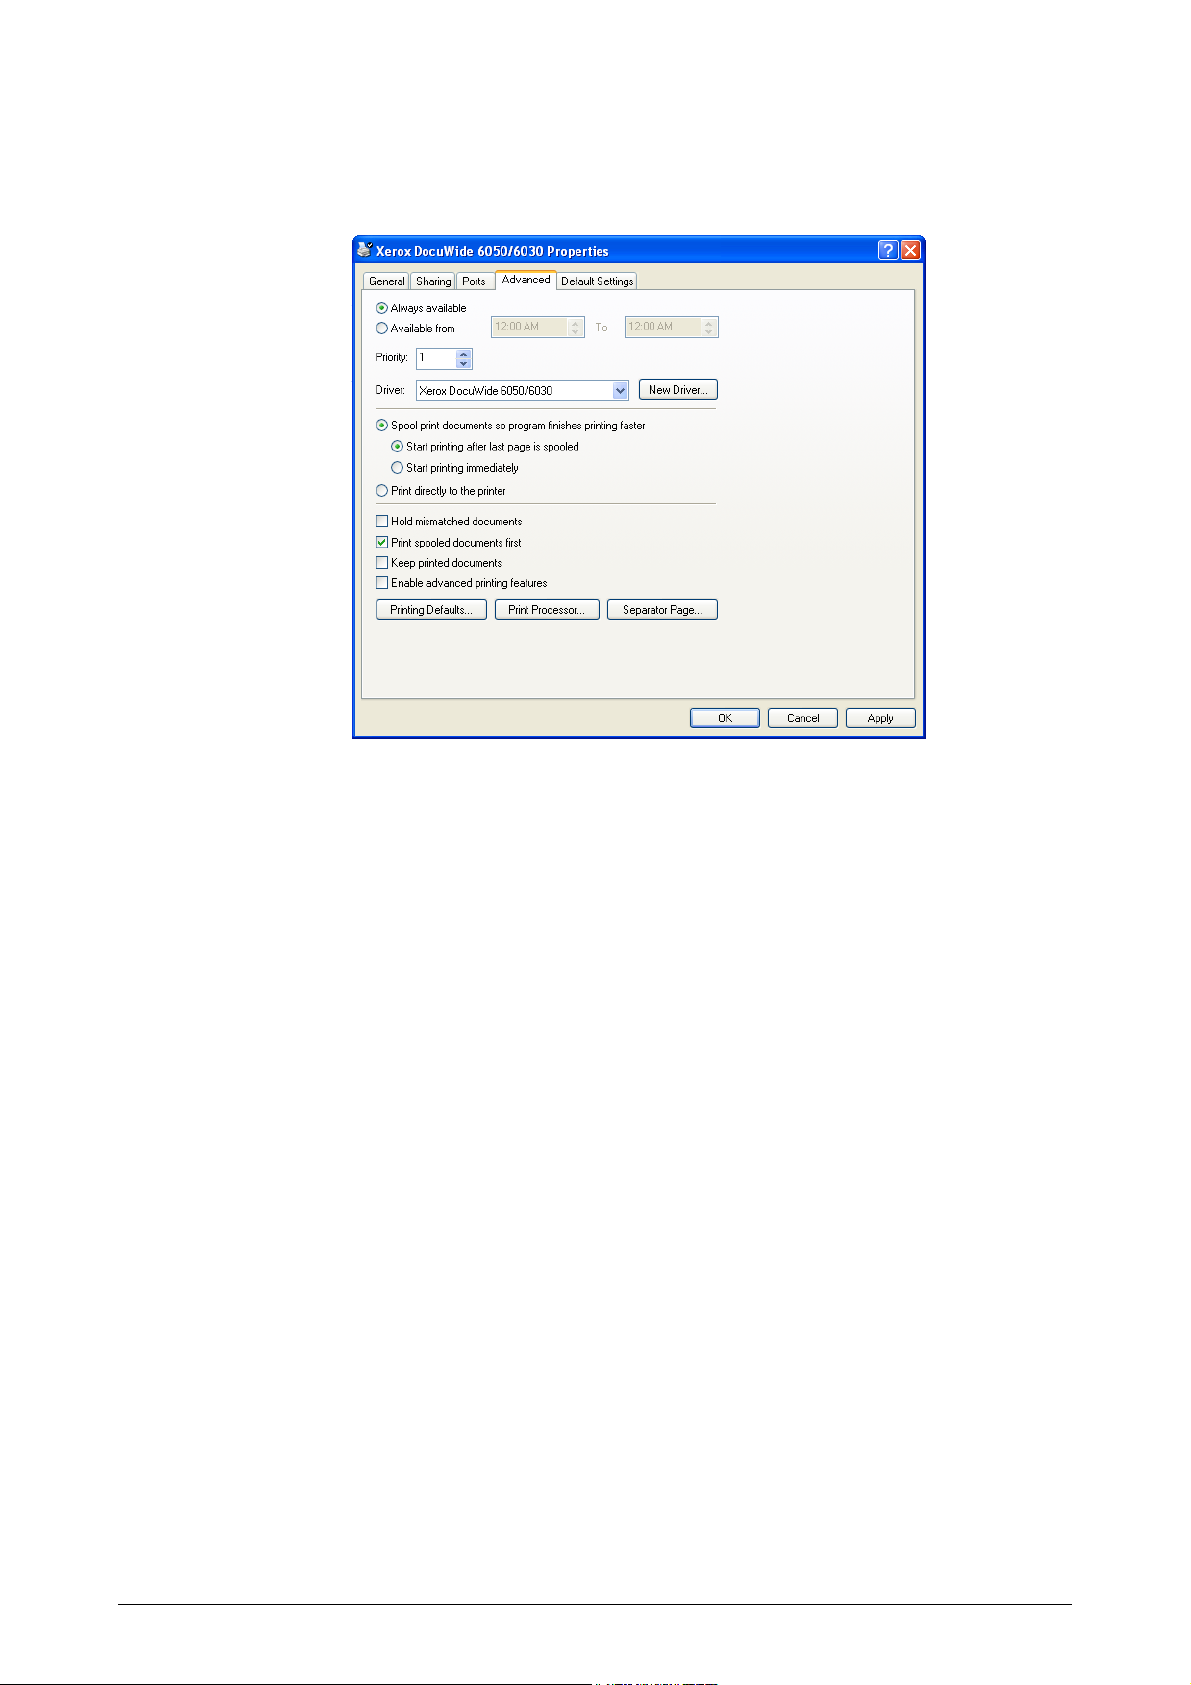
2 Select the [Advanced] tab and select [Start printing after last page is spooled].
Uncheck the [Enable advanced printing features] check box, and then click
[OK].
1.1 Installing Windows Driver (Windows XP)
13
Adding Network Printer (Windows 2000 or Windows XP)
If data is output to a printer using Windows 2000 or Windows XP, it is necessary to
select [Local Printer] on the computer to which the connection has been established and
install Windows Driver beforehand.It is also necessary for the user who installs
Windows Driver to be registered in order to access Windows 2000 or Windows XP.
Refer to the relevant Windows manuals for further details.
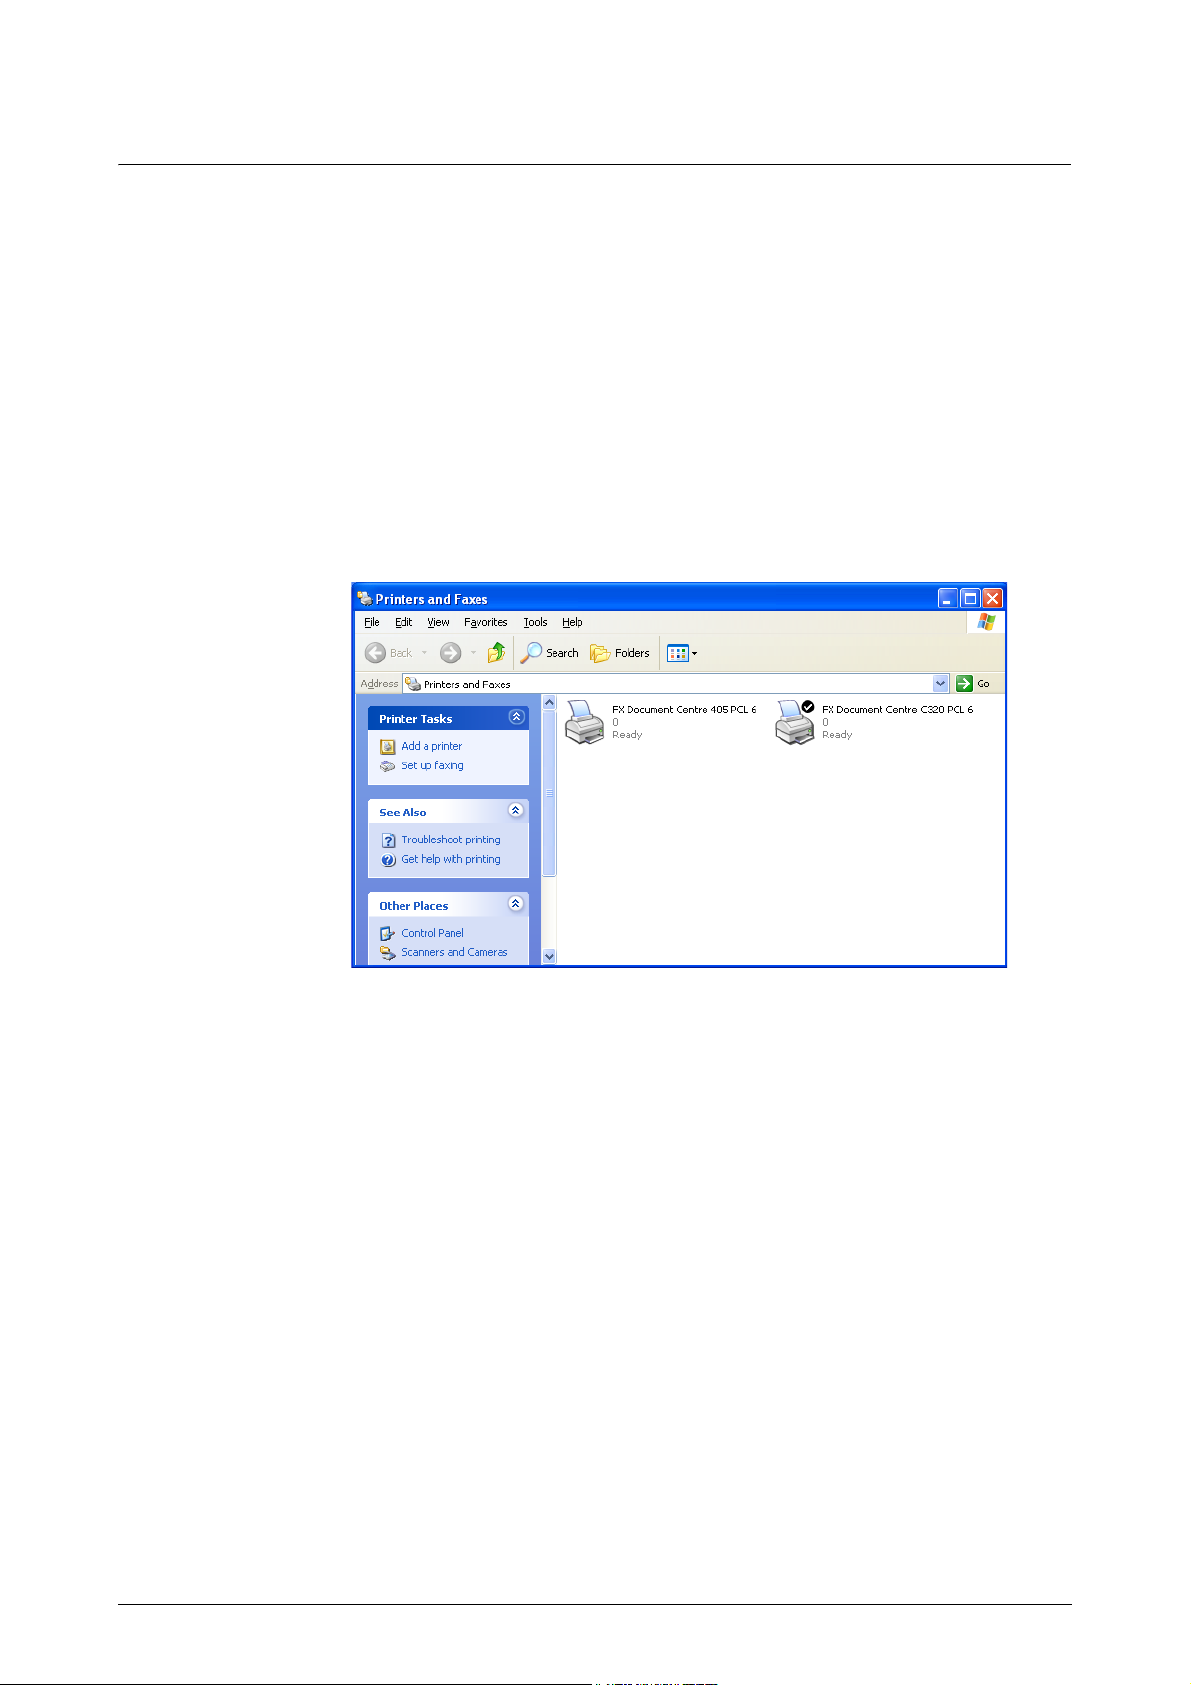
1 Click [Start] on the task bar, then select [Control Panel] > [Printers and Other
Hardware] > [Printers and Faxes].
The [Printers and Faxes] window appears.
2 Click [Add a printer].
[Add Printer Wizard] appears.
14
Chapter 1 Installing Windows Driver
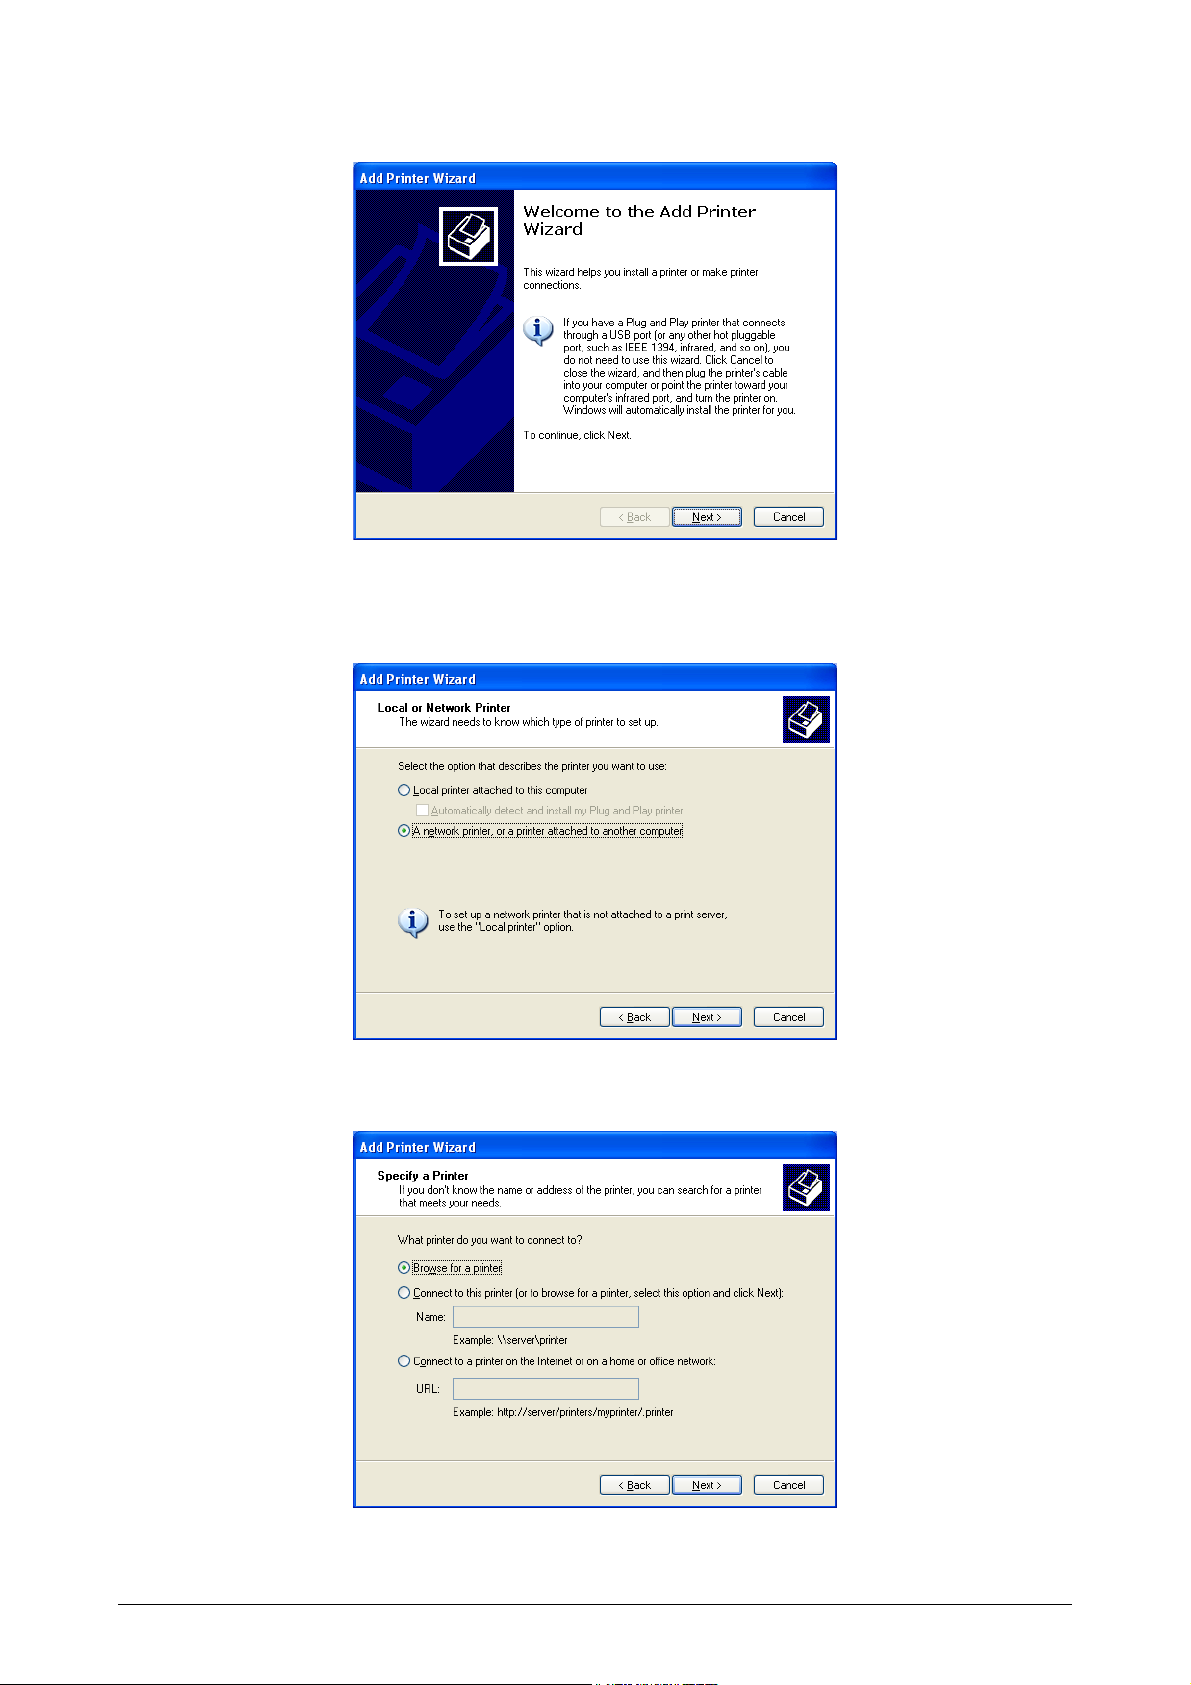
3 Click [Next].
4 Select [A network printer, or a printer attached to another computer] and then
click [Next].
5 Click [Next].
1.1 Installing Windows Driver (Windows XP)
15
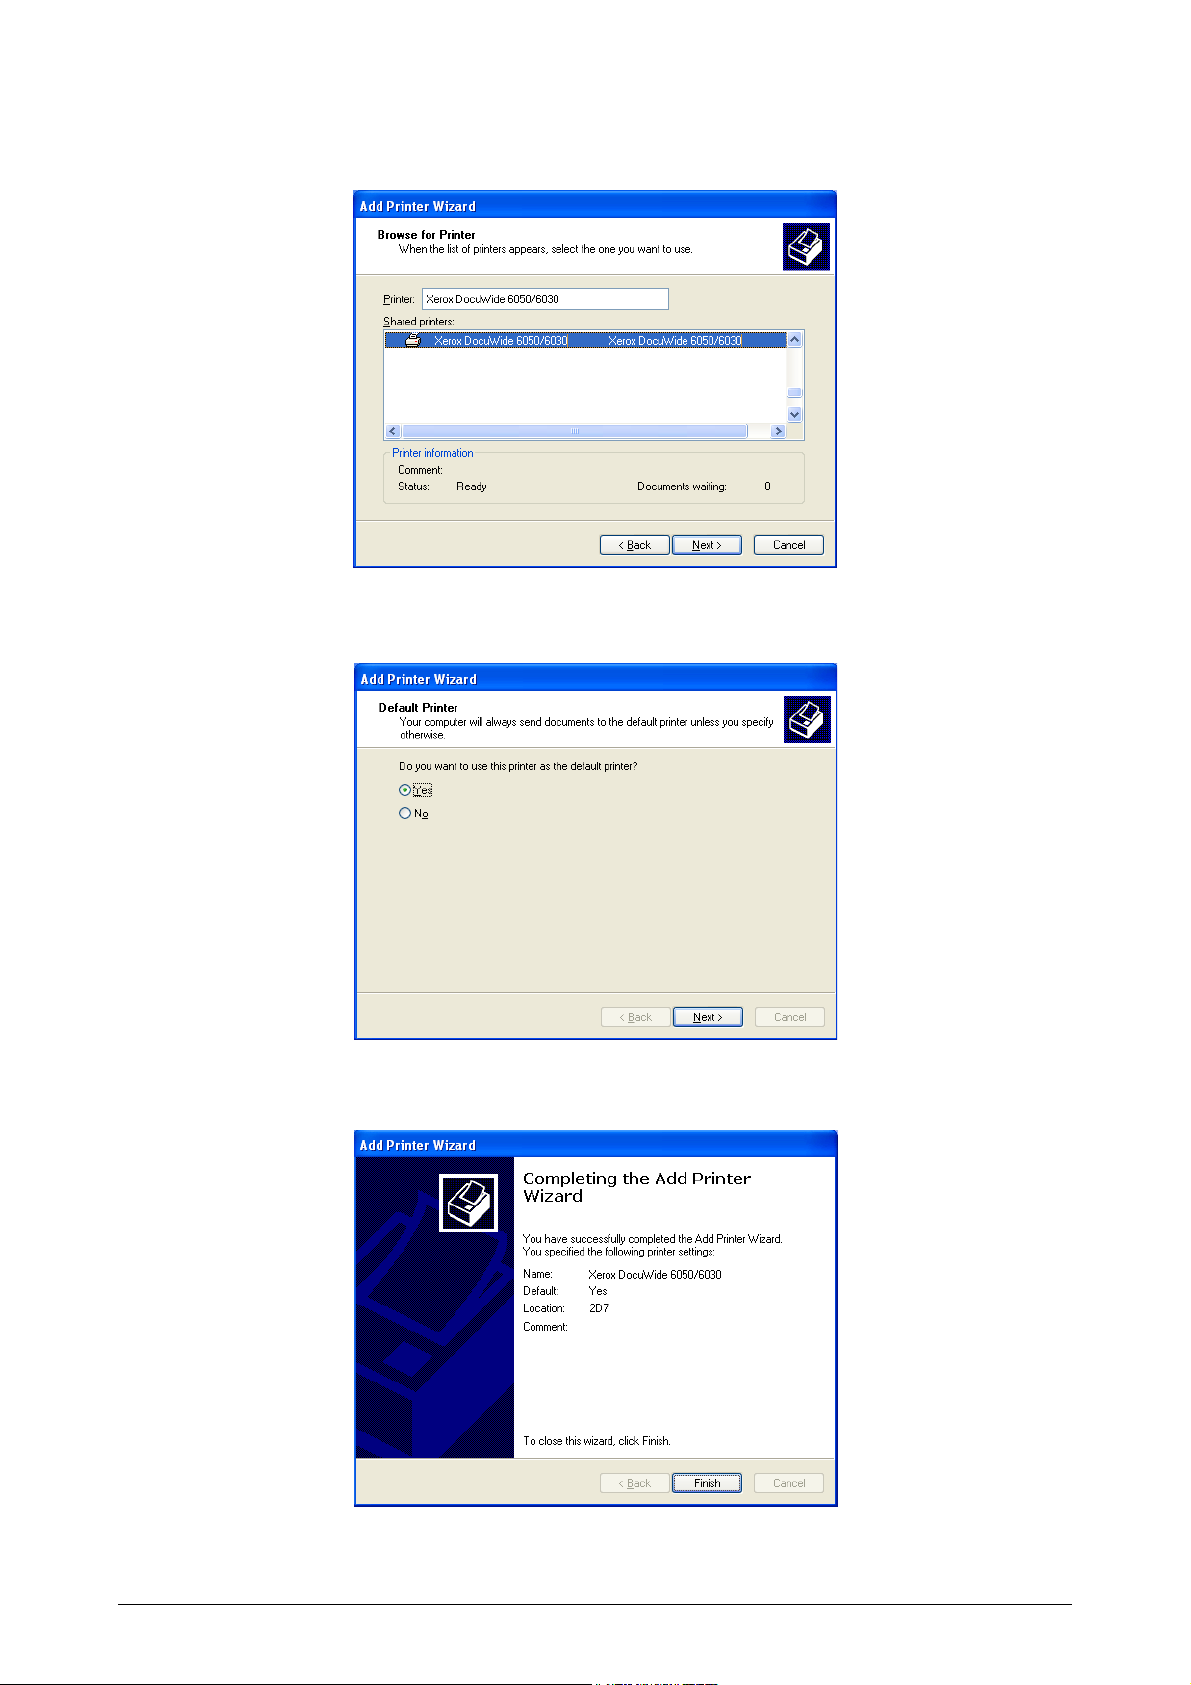
6 Select the printer to which the connection is to be established from the list, and
then click [Next].
7 Set whether the printer is to be used as the default printer, and then click
[Next].
16
The installation details appear.
8 Click [Finish].
Chapter 1 Installing Windows Driver
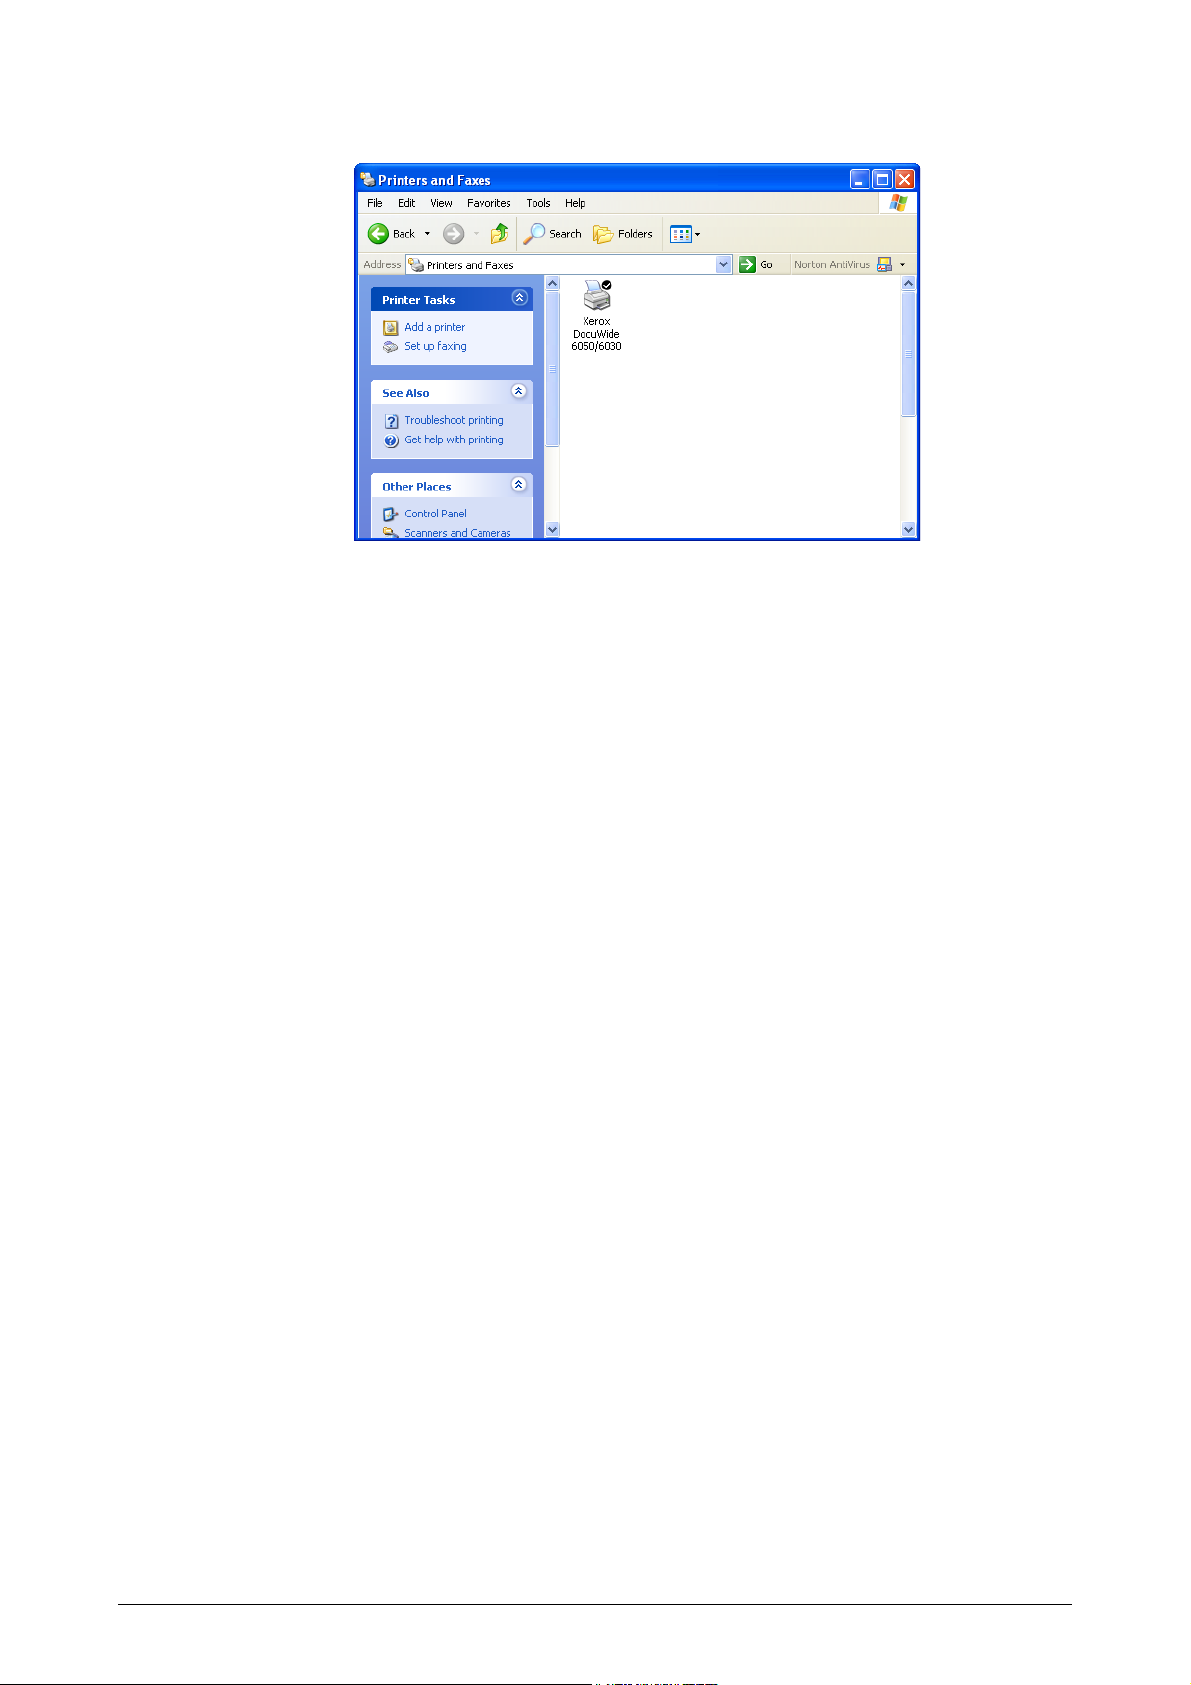
9 Check that the printer icon has been added to the [Printers] window.
This completes the installation of the Windows Driver.
Proceed to the next step to change the printer's spool setting. Refer to "Setting
the Printer's Spool" (page 12) for setting method.
1.1 Installing Windows Driver (Windows XP)
17
Installing Additional Windows Driver
If you share a printer with users running other versions of Windows (Windows 98, Me,
and 2000), you can install additional printer drivers on your computer so those users can
connect to your printer without being prompted to install the drivers missing from their
systems.
Xerox has one 6030/6050 Wide Format Windows Driver for Windows 2000/XP and
one for Windows 98/Me.
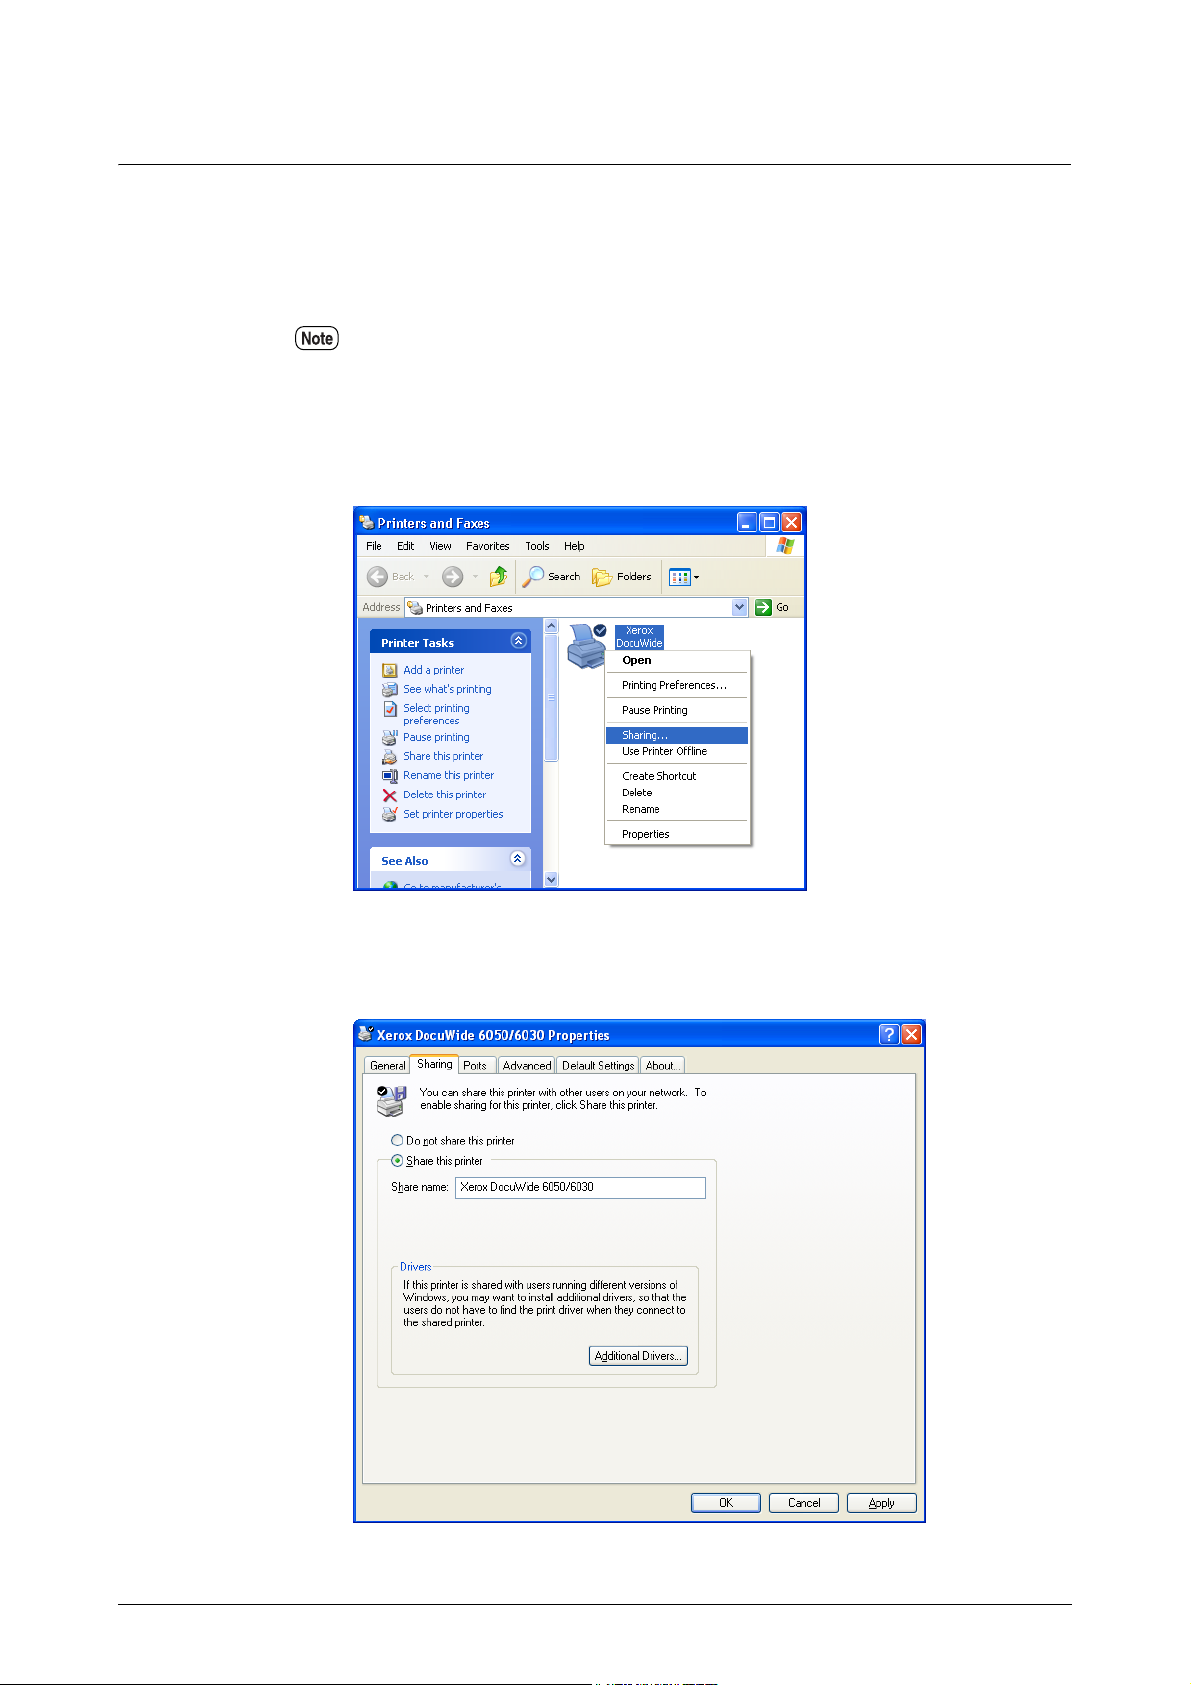
1 Right-click the printer icon on which sharing is enabled, and then select
[Sharing].
The printer's [Properties] dialog box appears.
2 Click [Additional Drivers] on the [Sharing] tab.
18
Chapter 1 Installing Windows Driver

The [Additional Drivers] dialog box appears.
3 Check the [Intel Windows 95, 98 and Me] check box, and then click [OK].
4 Click [Browse].
The [Locate File] dialog box appears.
5 Specify the location of the driver to be added, and then click [Open].
1.1 Installing Windows Driver (Windows XP)
19

6 Click [OK].
The printer's [Properties] dialog box reappears.
20
Chapter 1 Installing Windows Driver

1.2
Installing Windows Driver
(Windows 2000)
This section explains how to install Windows Driver onto Windows 2000 computers.
The installation procedure will differ in accordance with the printer
Proceed to the section that corresponds to the configuration in use.
Workstation install
• When connected to networks with TCP/IP protocol using LPR: Proceed to the
section on "Installing a Network Printer using a LPR port".
• When using FTP connections: Proceed to the section on "Installing a Network
Printer using a LPR port".
Data is output to a file and then transmitted for printing from the command prompt
with FTP connections.
Driver already installed on Workstation or Server
• When connected to networks using Windows 2000 or Windows XP Systems:
Proceed to the section on "Adding Network Printer (Windows 2000 or
Windows XP)" (page 32).
's connection status.
Installing a Network Printer using a LPR port
1 Click [Start] on the task bar, then select [Settings] > [Printers].
The [Printers] window appears.
2 Double-click [Add Printer].
[Add Printer Wizard] appears.
1.2 Installing Windows Driver (Windows 2000)
21

3 Click [Next].
4 Select [Local Printer] and then click [Next].
Do not select [Automatically detect and install my Plug and Play printer].
Plug and Play is not supported.
22
Chapter 1 Installing Windows Driver

5 Select [Create a new port], then select [Standard TCP/IP Port] from [Type],
and click [Next].
If the LPR compatible printer port to be used is already listed, select that port, click
[Next] and go to Step
[Add Standard TCP/IP Printer Port Wizard] appears.
12.
6 Click [Next].
1.2 Installing Windows Driver (Windows 2000)
23

7 Enter the printer name or IP address in [Printer Name or IP Address], and then
click [Next].
The [Port Name] will be entered automatically. Change the entry if necessary.
A message stating "Additional Port Information Required. The device could
not be identified" appears.
8 Select [Custom], and then click [Settings].
The [Configure Standard TCP/IP Port Monitor] dialog box appears.
24
Chapter 1 Installing Windows Driver

9 Select [LPR] for [Protocol].
Enter the logical printer name in [Queue Name] on [LPR Settings], check the
[LPR Byte Counting Enabled] check box, and then click [OK].
Do not check the [SNMP Status Enabled] check box.
Refer to "What are Logical Printers?" (page 69) in "3.2 Network Connections"
for details on logical printer.
The screen will return to [Add Standard TCP/IP Printer Port Wizard].
10 Click [Next].
The installation details appear.
1.2 Installing Windows Driver (Windows 2000)
25

11 Click [Finish].
The dialog box from which to select the printer
name appear.
12 Click [Have Disk].
The [Install From Disk] dialog box appears.
's manufacturers and printer
26
13 Click [Browse].
The [Locate File] dialog box appears.
Chapter 1 Installing Windows Driver

14 Select the folder in which Windows Driver is stored, and then click [Open].
The selected folder appears in [Copy manufacturer
From Disk] dialog box.
15 Click [OK].
The screen will return to [Add Printer Wizard].
16 Select the model to be used, and then click [Next].
's files from] in the [Install
1.2 Installing Windows Driver (Windows 2000)
27

17 Enter any required name if [Printer name] needs to be changed. Set whether
the printer is to be used as the default printer, and then click [Next].
18 Select whether the printer is to be shared or not with other computers on the
network.
• If the printer is not to be shared, select [Do not share this printer], click
[Next], and then go to Step
20.
• If the printer is to be shared, select [Share as], enter the name that the printer
is to be shared under, click [Next], and then go to Step
The name that the printer is to be shared under must be a name that can be
recognized by other computers.
19.
28
Chapter 1 Installing Windows Driver

19 Enter the printer's location and a comment in [Location] and [Comment], and
then click [Next].
20 Select whether to print out a test page or not, and then click [Next].
The installation details appear.
21 Click [Finish].
A screen stating [Digital Signature Not Found] appears.
1.2 Installing Windows Driver (Windows 2000)
29

22 Click [Yes].
Installation can be continued without problem.
Software installation will be started.
• Go to Step 23 if [Yes] was selected in Step 20.
• Go to Step 24 if [No] was selected in Step 20.
23 Check the printed test page, and then click [OK].
24 Check that the printer icon has been added to the [Printers] window.
This completes the installation of Windows Driver
Proceed to the next step to change the printer's spool setting of Windows
Driver.
30
Chapter 1 Installing Windows Driver

Setting the Printer's Spool
After completing the installation, change the printer's spool setting in the printer's
[Properties] dialog box. Sufficient free disk space is required to perform this setting.
Refer to "2.2 Windows Driver Settings" (page 48) when changing the other settings.
1 Click the printer icon, and then select [Properties] from the [File] menu.
2 Select the [Advanced] tab and select [Start printing after last page is spooled].
Uncheck the [Enable advanced printing features] check box, and then click
[OK].
1.2 Installing Windows Driver (Windows 2000)
31

Adding Network Printer (Windows 2000 or Windows XP)
If data is output to a printer using Windows 2000 or Windows XP, it is necessary to
select [Local Printer] on the computer to which the connection has been established and
install Windows Driver beforehand.It is also necessary for the user who installs
Windows Driver to be registered in order to access Windows 2000 or Windows XP.
Refer to the relevant Windows manuals for further details.
1 Click [Start] on the task bar, then select [Settings] > [Printers].
The [Printers] window appears.
2 Double-click [Add Printer].
[Add Printer Wizard] appears.
3 Click [Next].
32
Chapter 1 Installing Windows Driver

4 Select [Network Printer] and then click [Next].
5 Click [Next].
6 Select the printer to which the connection is to be established from the list, and
then click [Next].
1.2 Installing Windows Driver (Windows 2000)
33

7 Set whether the printer is to be used as the default printer, and then click
[Next].
The installation details appear.
8 Click [Finish].
34
Chapter 1 Installing Windows Driver

9
Check that the printer icon has been added to the [Printers] window.
This completes the installation of the Windows Driver.
Proceed to the next step to change the printer's spool setting. Refer to "Setting
the Printer's Spool" (page 12) for setting method.
1.2 Installing Windows Driver (Windows 2000)
35

Installing Additional Windows Driver
If you share a printer with users running other versions of Windows (Windows 98, Me,
and XP), you can install additional printer drivers on your computer so those users can
connect to your printer without being prompted to install the drivers missing from their
systems.
Xerox has one 6030/6050 Wide Format Windows Driver for Windows 2000/XP and
one for Windows 98/Me.
Refer to "Installing Additional Windows Driver" (page 18).
36
Chapter 1 Installing Windows Driver

1.3
Installing Windows Driver
(Windows 98/Windows Me)
This section explains how to install Windows Driver onto Windows 98 and
Windows Me computers.
1 Click [Start] on the task bar, then select [Settings] > [Printers].
The [Printers] window appears.
2 Double-click [Add Printer].
[Add Printer Wizard] appears.
3 Click [Next].
1.3 Installing Windows Driver (Windows 98/Windows Me)
37

4 Select [Local Printer] and then click [Next].
• The TCP/IP Direct Print Utility is available as software for transmitting and
printing data directly to printers on the network from computers without
connecting to a server. Contact Customer Support Center for availability of
the TCP/IP Direct Print Utility.
• Select [Local Printer] when the TCP/IP Direct Print Utility is to be used.
• Select [Network Printer] when connecting to a printer on another computer
over a network.
5 Click [Have Disk].
The [Install From Disk] dialog box appears.
38
Chapter 1 Installing Windows Driver

6 Click [Browse].
The [Open] dialog box appears.
7 Select the folder in which Windows Driver is stored, and then click [OK].
The selected folder appears in [Copy manufacturer
From Disk] dialog box.
8 Click [OK].
The screen will return to [Add Printer Wizard].
9 Select the model to be used, and then click [Next].
's files from] in the [Install
1.3 Installing Windows Driver (Windows 98/Windows Me)
39

10 Select the port to which the connection is to be established, and then click
[Next].
If [Available ports] is not displayed when the TCP/IP Direct Print Utility is to
be used, specify [FILE:] as the temporary port.
11 Enter any required name if [Printer name] needs to be changed. Set whether
the printer is to be used as the default printer, and then click [Next].
The system is not able to determine the printer name from the [Port name]
when the TCP/IP Direct Print Utility is to be used, so it is necessary to enter
the port name in [Printer name].
example: DocuWide 6030/6050 (plt00t)
40
Chapter 1 Installing Windows Driver

12 Select whether to print out a test page or not.
Test pages cannot be printed if a temporary port has been specified in Step
in order to use the TCP/IP Direct Print Utility. In this event, always select
[No].
Select [Yes (recommended)] to print out the test page in all other cases.
13 Click [Finish] to commence installation.
• Go to Step 14 if [Yes (recommended)] was selected in Step 12.
• Go to Step 15 if [No] was selected in Step 12.
10
14 Check the printed test page, and then click [Yes].
15 Check that the printer icon has been added to the [Printers] window.
This completes the installation of Windows Driver.
Proceed to the next step to change the printer's spool setting of Windows
Driver.
1.3 Installing Windows Driver (Windows 98/Windows Me)
41

Setting the Printer's Spool
After completing the installation, change the printer's spool setting in the printer's
[Properties] dialog box. Sufficient free disk space is required to perform this setting.
Refer to "2.2 Windows Driver Settings" (page 48) when changing the other settings.
1 Click the printer icon, and then select [Properties] from the [File] menu.
The printer's [Properties] dialog box appears.
2 Click the [Details] tab and click [Spool Settings].
42
The [Spool Settings] dialog box appears.
Chapter 1 Installing Windows Driver

3 Select [Start printing after last page is spooled] and then click [OK].
1.3 Installing Windows Driver (Windows 98/Windows Me)
43

44
Chapter 1 Installing Windows Driver

Chapter
Chapter 0
2
Printing Setup
Explains the basic printing operations, and how to set up Windows Driver.
Chapter 2

2.1
Printing
This section explains the basic procedures for printing, Windows XP is used for the
examples.
Printing procedures will differ depending on the application in use. Refer to the
instruction manuals supplied with the application for details.
1 Start up the application and open the document that is to be printed.
2 Click [Print] from the [File] menu.
3 Select the printer to be used from [Name].
The printer name that has been set as the default printer appears in [Name]. If
a different printer is to be used, select the relevant printer name accordingly.
46
Chapter 2 Printing Setup

4 Click [Properties] to display the Windows Driver setup screen.
• The screen displayed will differ depending on the model.
• An image of the printer will not appears in the case of DocuWide 2050.
5 Set up the various parameters for the [Paper] tab, the [Tray/Output] tab, the
[Graphics] tab, and the [Header/Footer] tab.
Refer to "2.2 Windows Driver Settings" (page 48) for details on the parameters
that can be set for each tab.
6 Click [OK].
7 Click [OK] in the printing dialog box to start printing.
2.1 Printing
47

2.2
Windows Driver Settings
This section explains how to set up the Windows Driver parameters using DocuWide
6050/6030 on Windows XP as an example.
Displaying the Windows Driver Setup Screen
The following two methods are available for displaying the Windows Driver setup
screen.
• From the application software. This method is used to temporarily change the printing
conditions.
• From the [Start] menu. This method is used to change the default printing settings and
the default settings for Windows Driver.
Displaying the Windows Driver Setup Screen from the Application Software
Refer to Steps 1 to 4 in "2.1 Printing" (page. 46) for details on displaying the Windows
Driver setup screen from the application software.
Displaying the Windows Driver Setup Screen from the [Start] Menu
Log into the system as a user belonging to the Administrator group or as an
administrator when using Windows 2000 and Windows XP.
1 Click [Start] on the task bar, then select [Control Panel] > [Printers and Other
Hardware] > [Printers and Faxes].
Click [Start] on the task bar, then select [Settings] > [Printers] with Windows
98, Me, and 2000.
The [Printers and Faxes] appears.
48
Chapter 2 Printing Setup

2 Select the icon for the printer that is to be set up, and then select [Properties]
from the [File] menu.
Select [Printing Preferences] from the [File] menu if the default printer
settings are to be changed.
Windows Driver setup screen appears.
The
Click the [Printing Preferences] to display the Windows Driver parameters.
Refer to "Windows Driver Settings" (page 50) for details.
2.2 Windows Driver Settings
49

Windows Driver Settings
The Windows Driver settings are split between several tabs (menus). This section
explains the parameters that can be set up on each of these tabs.
• Click the [Apply] button to confirm the settings for each tab.
• The following example uses DocuWide 6050/6030 on Windows XP as an example.
[Paper] Tab
This section explains the parameters available on the [Paper] tab.
50
Paper Size
Enables the size of the paper that has been specified with the application to be selected
from the drop-down list box.
• All of the paper sizes displayed in the list can be set to either be displayed or not
displayed with the [Edit [Paper/Output Size]] dialog box. Click [Edit [Paper/Output
Size]] on the [Default Settings] tab to display the relevant dialog box.
Refer to "Edit [Paper/Output Size]" (page 66).
Chapter 2 Printing Setup

Output Size
Enables the size of the paper for printing to be selected from the drop-down list box.
• The [Output Orientation] settings will be disabled if [According to Printer
Settings] is specified.
• Set up the paper group and size/paper mapping for the logical printer with Print
Services on Web or BT-PlotAssistant if [According to Printer Settings] has been
selected.
• All of the paper sizes displayed in the list can be set to either be displayed or not
displayed with the [Edit [Paper/Output Size]] dialog box. Click the [Edit [Paper/
Output Size]] on the [Default Settings] tab to display the relevant dialog box.
Refer to "Edit [Paper/Output Size]" (page 66).
• The image will be automatically enlarged or reduced in accordance with the [Output
Size] setting if a size that is different to the [Paper Size] has been selected.
• The image will be printed on the same size of paper specified with the [Paper Size]
setting if [Same as Paper Size] is selected.
• When [Fit to Image Size] is selected, the image will be output on the specified size of
paper set by the logical printer, in the same paper size series set by [Document Size].
[Fit to Image Size] is active only when [Image Area Only] check box has been set
at ON.
Image Area Only
Generates the part of data which actually be needed for printing.
• When [Image Area Only] check box has been set at ON
Creates print data with the data part only.
For example, when 10cmx20cm rectangle is drawn on a A4-sized document, print data
containing only the 10cmx20cm rectangle part is created.
Generated data is centered and output on the specified size of paper set by [Output
Size] menu.
Refer to the following table chart for output size and output result.
Output Size Output Result
Same as Paper Size Image is centered and output on a specified paper size.
A0 to Long Print A4 Image is output on the specified paper size.
Fit to Image Size Image is centered and output on a specified size series of
paper. Output paper size is in accordance with the printer
setting.
2.2 Windows Driver Settings
51

Output Size Output Result
According to Printer
Settings
• [2up] and [4up] in [Multi-up] menu cannot be specified.
• [Output Orientation] is automatically set to [Auto] when [Fit to Image Size] is
selected.
• There is a possibility that the output length is shorter than the specified
synchronized length, because the data is clipped after generating the image.
• When [Image Area Only] is specified to the blank page, blank print data is created
on the specified paper size.
• When reduction/enlargement is specified with [Image Area Only], the data is
generated after reduction/enlargement process is completed.
Transfer the generated data and output in accordance with the
logical printer setting.
• When [Image Area Only] check box is OFF.
Print data of a whole sheet is created. If the document is A3 size, the print data will
also be A3 size.
Zoom
Enlarges and reduces the image for printing.
The position of the margins and the clip point will differ depending on the
application in use.
• When the [Zoom] check box has been set at ON:
Enables the enlargement and reduction rates to be entered.The image will be enlarged
or reduced in accordance with the specified value, regardless of the combined [Paper
Size] and [Output Paper Size] settings.
• When the [Zoom] check box has been set at OFF:
Disables enlargement and reduction rate entry. The enlargement and reduction rates
automatically calculated from the [Paper Size] and [Output Size] settings appear in
gray.
Copies
Specifies the number of copies to be printed within a range of 1 to 99.
52
Chapter 2 Printing Setup

Synchronized Cut
Selects the method of specifying the length of long print paper.
There are cases where the image at the bottom of the paper will be lost if the data
exceeds the possible printing area of the printer. Set up a bottom margin on the
printer if the data exceeds the possible printing area.
• [Auto Length]
Automatically sets the length of long print paper in accordance with the paper size.
• [Custom Length]
Enables the length of long print paper to be entered.
Output Orientation
Selects the orientation in which the paper is to be output.
The roll paper to be used for printing is selected automatically when this parameter is
set.
• The orientation of the output is automatically set in accordance with the [Output Paper
Size] setting when [Auto] is selected.
• Select [Portrait] or [Landscape] if the orientation of the paper is to be changed when
using a folder or other equipment.
Image Orientation
Selects the orientation of the image specified with the application.
Multi-up
Pastes and prints two or four pages of a document onto a single sheet of paper specified
with [Output Size]. This function is known as [Multi-up], assigning two document pages
to one sheet of paper is known as [2 up], and assigning four document pages to one sheet
of paper is known as [4 up].
2 up
• The [Media Orientation] menu appears when [4 up] has been selected. This enables the
sequence in which the pages are to be laid out on the paper to be specified as [Portrait]
or [Landscape].
Rotate Image 180 degrees
Rotates the image 180 degrees and then prints it.
Preview
Enables the image size to be checked before printing. Check the [Displays output
preview] check box and click [OK] to display the [Output preview] window. To print the
image after checking its size, click the (Print) button.
2.2 Windows Driver Settings
53

The following operations can be performed in the [Output preview] window.
• Print
Enables printing by selecting the [Print] menu or clicking the button.
• Zoom
Images can be enlarged or reduced for viewing by using the [Display] menu or
. Scaling can be specified in the range from 10% to 200%.
For Windows 98/Me, scaling can be specified in the range from 10% to 100%.
• Navigation
For multi-page document, you can turn the page using .
The current page number is displayed at the bottom right of the window.
• Size display
The current image size is displayed at the bottom right of the window.
• Canceling the print
To cancel printing, click the [×] button on the title bar or select [Close output preview]
from the [Display] menu and close the [Output preview] window.
54
Chapter 2 Printing Setup

• The quality of the image displayed in the [Output preview] window differs from
the actual printing result.
• The [Output Orientation], [Rotate Image 180 degrees], or [Header/Footer]
settings are not reflected on the display.
• The paper sizes that can be displayed in the [Output preview] window are regular
sizes and long print paper of length 1,230 mm or less. If the paper size is other
than these sizes, a message "Cannot display the preview. Specified [Output size]
is larger than the maximum size to be previewed." appears and the image size is
displayed in the bottom right of the window.
• (Windows 2000 or Windows XP), if the [Output preview] window overlaps with
the application window used to perform printing, moving the [Output preview]
window will cause the application window to remain as a white blank. If this
happens, exit the [Output preview] window to properly display the application
window.
• If [File] is specified for the output port or the [Print to file] in the [Print] dialog
box is checked, an unnecessary file with the file name specified in the [Print to
file] dialog box will be generated even if the printing is canceled in the [Output
preview] window.
• Windows 98/Me has the following limitations.
• [Preview] cannot be specified together with [Print to file].
• [Print to file] in the [Print] dialog box is ignored even if it is selected.
• If [File] is specified for the output port, the [Print to File] dialog box appears
twice. In this case the file name specified in the second dialog box will be
valid.
Print to File
If you check the [Print to file] check box, a TIFF file is generated without printing the
document. You can check the [Print to file] check box if you have previously set the
[Print to file setting] on the [Default Settings] tab.
• Do not check the [Print to file] check box in the [Print] dialog box or specify
[File] for the output port if you have checked [Print to file]. Otherwise, the [Print
to File] dialog box will appear and an unnecessary file will be generated with the
file name specified in the dialog, even though [Print to file] is normally
performed.
• Under Windows 98/Me, [Print to file] cannot be specified together with
[Preview].
Refer to "Print to file setting" (page 64).
2.2 Windows Driver Settings
55

[Tray/Output] Tab
This section explains the parameters available on the [Tray/Output] tab.
Paper Source
Selects the tray from which the paper is to be fed.
• The source tray is selected automatically in accordance with the type and size of the
media when [Auto] is selected.
This setting is invalid with DocuWide 2050.
Media Type
Selects the type of media to be used for printing.
• The printer settings are given priority when [According to Printer Settings] is selected.
56
Chapter 2 Printing Setup

Collate
Selects whether to print by page or by group when multiple copies are to be printed.
• When [Collate] is set at ON
Prints the multiple copies in groups (1, 2, 3 ... 1, 2, 3).
• When [Collate] is set at OFF
Prints the multiple copies by page (1, 1, 1 ... 2, 2, 2... 3,3,3...).
Print by Reverse Order
Prints multi-page documents in the reverse order, with the last page being printed first.
This parameter cannot be set if [2 up] or [4 up] has been specified for [Multi-up]
in the [Paper] tab.
Folder
Selects the method that the finisher is to fold the paper.
• The printer settings are given priority when [According to Printer Settings] is selected.
• This will be displayed even if a folder has not been installed optionally.
• If the Simple Folder has been installed, only single direction folds will be carried out
regardless of the parameter set here.
• Select any parameter other than [Off] when folding has been specified with the
DocuWide 5070 stacker.
The logical printer settings will be enabled when [According to Printer Settings]
has been selected.
2.2 Windows Driver Settings
57

Fold Type
Selects the detailed folding settings.
• The printer settings are given priority when [According to Printer Settings] is selected.
• This will be displayed even if a folder has not been installed optionally.
• Selects the size of the binding margin with [Binding Margin].
• Selects the finished size with [Fold Adjustment].
• Add ticks to [Stack by 90º Rotation] and [Corner Fold] if necessary.
Stacker
Selects the output method for the stacker.
• The printer settings are given priority when [According to Printer Settings] is selected.
• This will be displayed even if a stacker has not been installed optionally.
• Stacked: Outputs the paper to the top bin.
•
Size Sorted: Sorts the output paper by width and changes the designated bin accordingly.
• Bin Designated: Specifies the number of the bin to which the paper is to be output with
[Select Bin Designation].
Baler
Selects the method that the finisher is to bale the paper.
• The printer settings are given priority when [According to Printer Settings] is selected.
• This will be displayed even if a baler has not been installed optionally.
Output Destination
Selects the destination of the output paper.
• This setting is enabled when optional Front Output Kit has been installed.
• The printer settings are given priority when [According to Printer Settings] is selected.
58
Chapter 2 Printing Setup

[Graphics] Tab
This section explains the parameters available on the [Graphics] tab.
Resolution
Selects the resolution to be used for printing.
• The default setting for 6030/6050 Wide Format, and DocuWide 5070 is [600dpi],
and [400dpi] for DocuWide 2050. Normally, use the default settings as they are.
• If you want to enhance the maximum output length under Windows 98/Me, reduce
the resolution. The resolution of [200 dpi] can be selected under Windows 98/Me.
• If a normal output result cannot be obtained depending on the application, you may
be able to obtain a normal output by reducing the resolution.
Print Mode
Specify the image processing method when outputting the reduced/enlarged image.
Default value is [High Speed (Text)].
Menu Description
High Speed (Text) Reduces/enlarges the image size by simple operation of
decreasing/increasing the line.
High Quality (Photos) Prevents the moire generation.
Drawings Prevents the fine line loss.
2.2 Windows Driver Settings
59

Convert all colors into Black
Prints all characters, drawings, tables and graphs that are not black or white as black
when a color image is to be printed in monotone. This prevents fine colored lines from
being difficult to see.
All areas that have been filled in with the dither process will also be converted to
black.
Contrast
Adjusts the contrast of photographs.
[Contrast] indicates the level of change in all tones between white and black. The higher
the contrast, the brighter the tone change.
• The contrast is adjusted within a range of –100 to 100 in single increments through key
entry or with the slide bar.
• The results of changes can be checked on the graphic image on the left-hand side.
60
Chapter 2 Printing Setup

[Header/Footer] Tab
This section explains the parameters available on the [Header/Footer] tab.
This is not supported with DocuWide 2050.
Position
Selects the position to print the header and footer.
• The parameter set here will be saved in Windows Driver, so the same settings will be
available for the next time Windows Driver is started up.
Enter Text
Characters can be typed into the text box when this check box is set at ON. The entered
characters will be printed in the header or footer.
• A maximum of 64 characters, including the date and time, can be entered in the text
box.
• The character string entered in the text box will be saved in Windows Driver, so the
same settings will be available the next time Windows Driver is started up.
Date[yy/MM/dd]
The date of processing by the plotter will be printed in the header or footer if this check
box is set to ON.
• The format is yy/mm/dd.
• The parameter set here will be saved in Windows Driver, so the same settings will be
available the next time Windows Driver is started up.
2.2 Windows Driver Settings
61

Time[HH:mm]
The time of processing by the plotter will be printed in the header or footer if this check
box is set to ON.
• The format is hh:mm.
• The parameter set here will be saved in Windows Driver, so the same settings will be
available the next time Windows Driver is started up.
Example
Displays an example of how the header or footer will be printed.
The current date and time are displayed in the example, so different data will be
output during actual printing.
62
Chapter 2 Printing Setup

[Default Settings] Tab
This section explains the parameters available on the [Default Settings] tab.
The [Default Settings] tab is displayed when the Windows Driver setup screen is
started up from the [Start] menu. Refer to the section on "Displaying the Windows
Driver Setup Screen from the [Start] Menu" (page 48) for details on the Windows
Driver setup screen.
Specify Job Owner
Selects the method of specifying the job owner.
• [Use Login Name]
Sets the name of the user who is logged into Windows as the job owner name.
• [Input Owner Name (For Administrator)]
Enables the job owner name to be input in a text box. A maximum of 31 bytes can be
used for entering the job owner name.
• [Enter Owner Name (For User)]
Enables the job owner name to be input in a text box. A maximum of 31 bytes can be
used for entering the job owner name.
[Enter Owner Name (For User)] does not appear in Windows 98.
2.2 Windows Driver Settings
63

Job Parameter Settings
Sets whether to control output from Windows Driver or not.
• The printing data will be output in the TIFF format when [Off] is selected. This
function facilitates to output the print data to file.
• The following parameters cannot be set when [Off] is selected:
Tab Parameter
[Paper] Tab Output Orientation
Copies
Rotate Image 180 degrees
[Tray/Output] Tab All parameters in the tab.
[Header/Footer] Tab All parameters in the tab.
Print to file setting
Specifies the [Print to file] settings on the [Paper] tab in the [Document Properties]
dialog box that appears by clicking the [Properties] in the [Print] dialog box.
Click [Print to file setting] to display the [Print to file setting] dialog box.
64
The following settings can be specified in the [Print to file setting] dialog box.
• [Folder]
Specify the location where the file is to be saved by entering up to 128 single-byte
characters (or up to 64 double-byte characters), or by using [Browse] to select the
location.
Specifying the [Folder] enables the [Print to file] check box to be checked.
Under Windows 98/Me, [FileDir] is displayed for the file name if you press
[Browse] to display the [Browse for Folder] dialog box. Simply ignore the file
name and specify the folder.
• [File name setting]
Select [Use application setting] or [Specify file name] for the file name setting.
Chapter 2 Printing Setup

If you select [Use application setting], a file name is specified based on the document
file name sent by the application to the printer driver.
The document file name that is sent by the application may differ from the actual file
name (which is displayed on the title bar). The maximum number of characters for the
file name that is sent by the application differs depending on the operating system:
For Windows 2000/XP, up to 32 single-byte characters (16 double-byte characters),
and for Windows 98/Me, up to 8 single-byte characters (4 double-byte characters).
The excess characters are automatically truncated. If a file name includes both the
single-byte and the double-byte characters, the file name may be illegal.
By selecting [Specify file name], you can specify the [File name].
• [File name]
Up to 32 single-byte characters (16 double-byte characters) can be entered for the file
name. For Windows 98, up to 8 single-byte characters (4 double-byte characters) can be
entered.
• [How to process existing file name]
Sets up the procedures in the event that a file with the same name exists in the folder.
You can select one of 3 options: [Open confirmation dialog], [Overwrite the existing
file], [Add a number to the file name and save it]. If you select [Open confirmation
dialog], the confirmation message "The same name file already exists. Do you want to
overwrite it?" appears. If you select [Overwrite the existing file], no confirmation
message appears and the file is overwritten and saved. If you select [Add a number to the
file name and save it], a hyphen and 3-digit serial number is suffixed. (Example: "aaa-
001")
If you select [Add a number to the file name and save it], and the number exceeds the
maximum of "-999", a message appears and the process is aborted. When the number
of characters including the 3-digit number exceeds the limit, the excess characters are
truncated from the end of the file name and the file is saved with a hyphen and the 3-
digit serial number.
• [Add controller command]
This option can be selected when [Job Parameter Settings] on the [Default Settings] tab
is set at [On]. If [No] is selected, the file identifier will be ".tif". If [Yes] is selected, the
file identifier will be ".pjl", in which case, the created file cannot be edited with image
editing software. This file cannot be output to other printers.
2.2 Windows Driver Settings
65

Edit [Paper/Output Size]
The Edit [Paper/Output Size] window allows you to select which paper size types to
display in the Paper Size and Output Size drop down lists on the Printing Preferences
and Printing Defaults windows.
• To change the display of a paper size type, highlight the paper size type in the Edit
[Paper/Output Size] window list.
• Then select either "Yes" or "No" in the Display on [Paper/Output Size](P) drop down
list. Selecting "Yes" will display the paper size type. Selecting "No" will not display
the paper size type.
The A4 paper size type display can not be turned off and will always be displayed in
the Paper Size and Output Size drop down lists on the Printing Preferences and
Printing Defaults windows.
• After making changes, click OK to close the Edit [Paper/Output Size] window and
save the settings.
• Click OK to close the Printer Properties windows. This allows any changes you made
in the Edit [Paper/Output Size] window to take effect.
The paper size types shown on the General Tab of the Printer Properties window are
not affected by the changes made at the Edit [Paper/Output Size] window. The list
here is for informational purposes only.
66
Chapter 2 Printing Setup

Chapter
Chapter 0
3
System-Related Precautions
and Limitations
This chapter explains the precautions that must be observed for the system on which
Windows Driver is to be used.
Chapter 3

3.1
Operating System
Versions that support printer firmware
Model Version
DW2050 All versions
DW6050/DW6030 All versions
DW5070 All versions
Computer Configuration
Computer
Supported OS Windows 98, Windows 98 SE English version
Intel Pentium III processor 850 MHz or higher,
256MB or more of memory.
Windows Me English version
Windows 2000 English version
(Service Pack 2 or higher)
Windows XP English version
68
Chapter 3 System-Related Precautions and Limitations

3.2
Network Connections
What are Logical Printers?
Logical printers are one hundred different types of virtual printer settings stored in the
printer. Each of these one hundred settings can be assigned different printer names.
[plt00t] to [plt99t]
3.2 Network Connections
69

3.3
Windows 98/Me Network Connections
Xerox printers use the TCP/IP protocol, and FTP and LPR for transmission purposes.
Windows 98 and Me assume that Xerox printers are UNIX network printers capable of
transmitting with FTP and LPR.
Although Windows 98 and Me are already equipped with networks* for this, Windows
Driver cannot be connected directly to the Unix network printer port. Owing to this, if
the system consists only of Windows 98 or Me, it is not possible to print directly onto
Unix network printers from normal applications simply by installing Windows Driver.
However, printing directly to UNIX network printers from Windows 98 and Me
applications is possible if the printing job is transmitted via the Netware Server or
Windows 2000 print spoolers, or UNIX network software is installed into Windows 98
and Me.
The following are detailed examples of printing from Xerox printers with the use of
these two methods.
The TCP/IP, NWLink and NETBEUI protocols are included, but LPR is not
*
installed as a component. However, FTP is installed so that files can be
transmitted to UNIX systems.
Connection Method
This section explains the "Connecting Via UNIX Print Spoolers" and "Installing UNIX
Network Software on Windows 98 and Me" connection methods.
70
Chapter 3 System-Related Precautions and Limitations

Connecting Via UNIX Print Spoolers
When Windows 2000 is available
Computers installed with Windows 2000 functioning as printing gateways to UNIX
network printers for Windows 98 and Me client computers.
The method of setting this up is explained below.
Windows 2000 Setup
Creating shared printers to retransmit printing jobs with LPR:
It is necessary to create a shared printer* that acts as the printer's LPR port for the
connection in order to connect Xerox printers that are connected to a network to
Windows 98 and Me computers.
In order to access shared printers on Windows 2000 from Windows 98 and Me,
*
it is necessary for the user to have an access authority for [Printing] or higher.
Check the access authority level if it is not possible to establish a connection
with the shared printer from Windows 98 and Me. Consult your Windows
system manager for details on access authority levels.
Select [Share as] in procedure 18 ("Select whether the printer is to be shared or
not with other computers on the network.") (Page 28) in section "1.2 Installing
Windows Driver (Windows 2000)", and then set the name under which the printer
is to be shared.
2000
Refer to "1.2 Installing Windows Driver (Windows 2000)" (page 21) for details on
creating shared printers.
Server service confirmation
It is necessary to execute the server service to enable Windows 2000 to provide
printing services for Windows 98 and Me client computers. The default setting on
Windows 2000 is to execute this automatically, but confirm that the [Server]
setting on the [Control Panel] > [Service] menu is set to the [Execute] status.
3.3 Windows 98/Me Network Connections
71

Windows 98 and Me Setup
Protocol installation
It is necessary to install the protocol that is installed in Windows 2000 into
Windows 98 and Me computers in order to enable these two systems to
communicate. Either of the TCP/IP, NWLink and NETBEUI protocols are
acceptable for this.
Microsoft Network Client installation
It is necessary to ensure that the [Microsoft Network Client] is installed in order
for Windows 98 and Me computers to use a shared printer on Windows 2000.
Follow the steps shown below: [Control Panel] > [Network] > [Add] > [Client] >
[Microsoft] > [Microsoft Network Client].
Printer creation
When installing
resides in the Windows 2000 computer on the network (the name of the shared
printer that transmits with LPR to the Xerox printer created previously in "
Windows Driver, specify the name of the shared printer that
Windows 2000 Setup") as the queue name to which a connection is to be
established.
Installing UNIX Network Software on Windows 98 and Me
Of the network software marketed by various software manufacturers, the software that
is to be used must integrate UNIX with personal computers, must allow the use of LPR,
and must enable Windows Driver to be connected to the LPR port.
The network software with which Xerox has confirmed connection capabilities is as
follows:
• TCP/IP Direct Print Utility for Windows 95/98/Me (manufactured by Xerox).
Supplementary Information
Xerox printers support ftp to enable data files to be transmitted from Windows 98 and
Me computers to our printers. It is consequently possible to enter the ftp command in the
MS-DOS prompt and transfer files after the Windows Driver destination has been
specified as [FILE], and the plot data has generated a file on the disk. However, note that
data cannot be printed directly from applications in this case, and the ftp command
operations must always be carried out.
72
Chapter 3 System-Related Precautions and Limitations

3.4
Precautions When Setting Up the
Printer Parameters
• The maximum printable lengths are listed below:
• Windows 98/Me: 2,070 mm at 400 dpi, and 1,386 mm at 600 dpi.
• Windows 2000/XP: 3,276 mm (with applications equipped with paper outlines) or
15,000 mm (with applications not equipped with paper outlines.)
Refer to the Release Note with the Windows Driver for other cautions and restrictions.
3.4 Precautions When Setting Up the Printer Parameters
73

74
Chapter 3 System-Related Precautions and Limitations

Chapter
Chapter 0
4
Uninstalling Windows Driver
This chapter explains how to uninstall (delete) Windows Driver from the system.
When upgrading Windows Driver, ensure that the old version has been
uninstalled before attempting to install the upgraded version.
Chapter 4

4.1
Uninstallation Procedure
This section explains how to uninstall Windows Driver, using Windows XP for the
examples.
1 Click [Start] on the task bar, then select [Control Panel] > [Printers and Other
Hardware] > [Printers and Faxes].
Click [Start] on the taskbar, then select [Settings] > [Printers] with Windows
98, Me, and 2000.
2 Select the icon for the printer that is to be deleted, and then select [Delete]
from the [File] menu.
3 Reboot the computer.
And this completes the
Windows Driver uninstallation procedure.
76
Chapter 4 Uninstalling Windows Driver

Index
D
[Default Settings] Tab......................................... 63
G
[Graphics] Tab .................................................. 59
H
[Header/Footer] Tab ...........................................61
I
Installing Plot Driver (Windows 2000) ...................21
Installing Plot Driver (Windows 98/Windows Me) ... 37
Installing Plot Driver (Windows XP) ....................... 2
N
Network Connections .........................................69
O
Operating Environment ....................................... 68
P
[Paper] Tab....................................................... 50
Precautions ....................................................... 73
T
[Tray/Output] Tab ..............................................56
U
Uninstallation.................................................... 76
Index
77

78
Index
 Loading...