

Page 1
Quick Use Guide
WorkCentre 7655/7665/7675
701P46067
2007
Page 2

Microsoft, MS-DOS, Windows, Windows NT, Microsoft Network, and Windows Server
Xerox is not liable for any problems resulting from unaut horized operation of the
Xerox and Ethernet are registered trademarks.
are either trademark s or r egistered trademarks of Microsof t Corporation in the United
States and/or other countries.
Novell, NetW ar e, IntranetWare and NDS are registered tradem ar ks of Novell, Inc. in
the United States and other countries.
Adobe, Acrobat, PostScript, PostScript 3, and Post Scr ipt Logo ar e trademarks of
Adobe Systems Incorporated.
Apple, AppleTalk, EtherTalk, LocalTalk, Macintosh, MacOS and TrueType are
trademarks of Apple Computer, Inc., register ed in t he U.S. and other countries.
HP, HPGL, HPGL/2, and HP-UX are registered trademarks of Hewlett-Packard
Corporation.
All product/brand names are trademarks or registered tr ademarks of the respective
holders.
The data saved in the hard disk of the m achine may be lost if there is any problem in
the hard disk. Xerox is not responsible for any direct and indirect damages arising from
or caused by such data loss.Xerox is not responsible for any breakdown of machines
due to infection of computer virus or computer hacking.
Important(1) This manual is copyrighted with all rights reserved. Under the copyright
laws, this manual may not be copied or modified in whole or part, without the written
consent of the publisher.(2) Parts of t his manual are subject to change without prior
notice.(3) We welcome any comments on ambiguit ies, er r or s , omissions, or missing
pages.(4) Never attempt any procedure on the machine that is not specifi cally
described in this manual. Unauthorized operation can cause fault s or accident s.
equipment.
An export of this product is strictly controlled in accordance with Laws concerning
Foreign Exchange and Foreign Trade of Japan and/or the export control regulat ions of
the United States.
NOTE: BLUE title is for IT administrator type personnel, GREEN for end users and
RED means machine needs attention. Depending on the configuration of the
machine, some User Interface screens may vary.
Page 3

Table of Contents
3579111315
17
19
21
23
25
Control Panel
Simple Copying
Simple Faxing - Embedded
Simple Internet Faxing
Simple Scan to E-mail
Simple Network Scanning
Printing a configurat ion report
Usage Counters
Tools Overview
Configuring the Auditron
Tray Settings
Replacing the Toner Cartridges
WorkCentre 7655/7665/7675
Quick Use Guide
WorkCentre 7655/7665/7675
Page 4
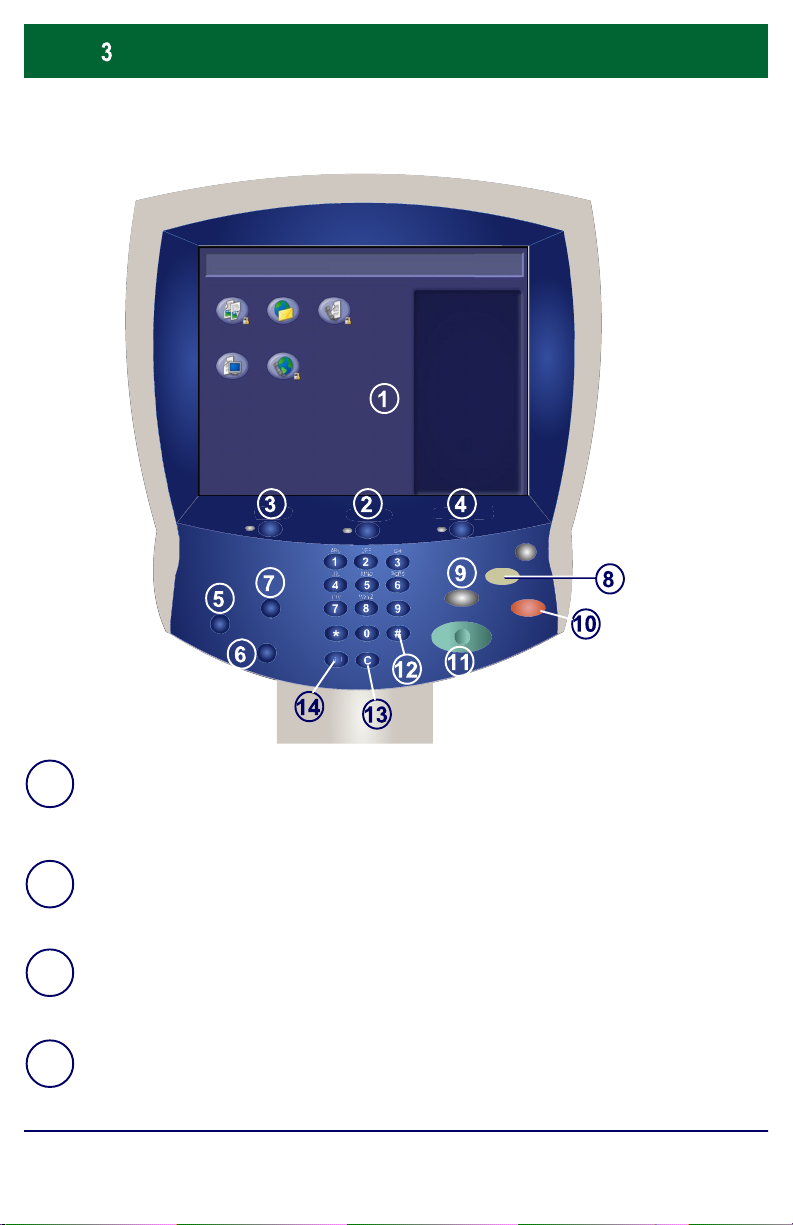
Control Panel
WORKCENTRE PRO
FaxE-MailCopy
Network
Scanning
Touch Screen
1.
The touch screen allows you to select all the available programing features. It
Internet
Fax
also displays fault clearance procedures and general machine information.
Job Status
2.
Displays job progress information on the touch screen.
Services button
3.
Displays the job features on the touch screen.
Machine Status
4.
Displays the current status of the machine on the touch screen.
WorkCentre 7655/7665/7675
Quick Use Guide
WorkCentre 7655/7665/7675
Page 5

Control Panel
Help
5.
Accesses additional online information about a specific task.
Language
6.
Changes text to an alternative language (when available).
Log In/Out
7.
Provides password protected access to the Setup Tools used to adjust the
defaults of the machine.
Clear All
8.
If pressed once, resets the default sett i ngs and displays the first screen for the
current pathway. If pressed twice, resets all the features to their machine
default settings.
Interrupt
9.
Temporarily stops the current copy job to allow a priority job to be run.
Stop
10.
Temporarily stops the current job. Follow the message to cancel or resume
your job.
Start
11.
Starts the job.
# (Hash)
12.
Indicates the dialing character or designates a group dial number.
Clear
13.
Deletes numeric values or the last digit entered.
Dial Pause
14.
Enters a pause in a telephone number when transmitting a fax.
WorkCentre 7655/7665/7675
Quick Use Guide
WorkCentre 7655/7665/7675
Page 6
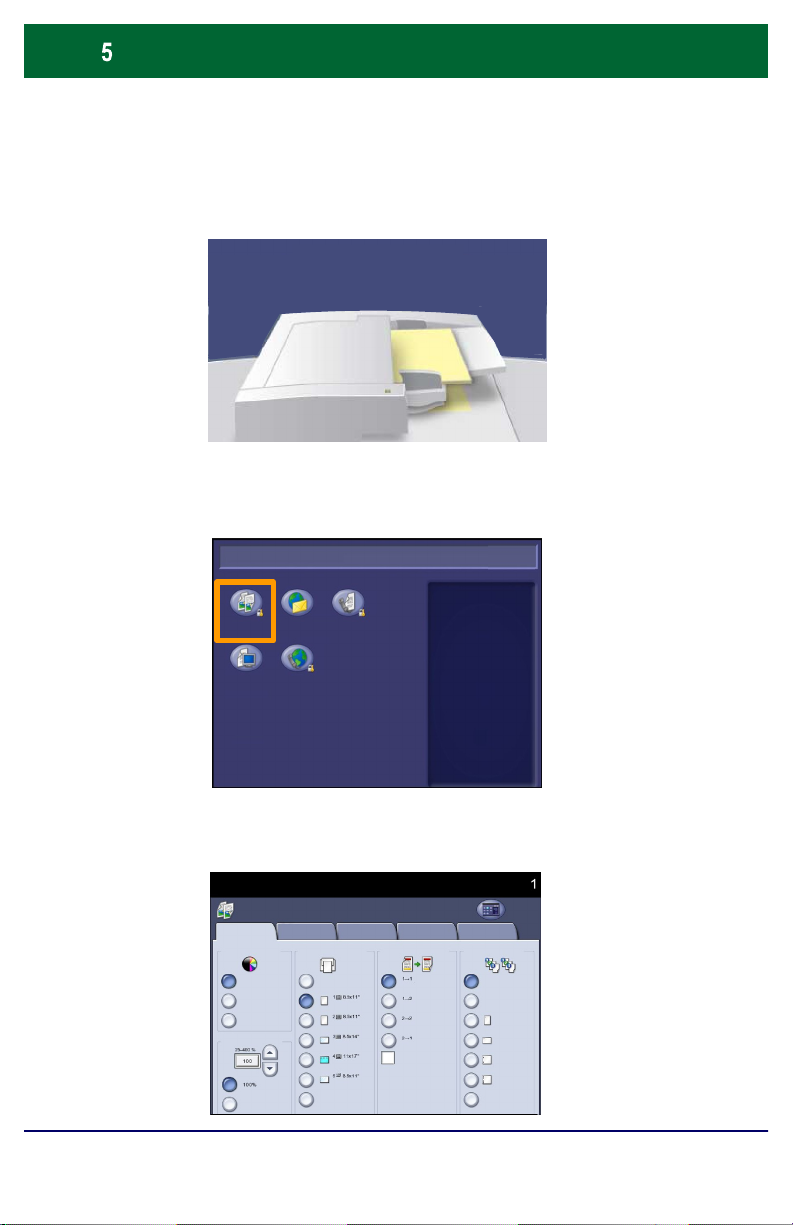
Simple Copying
1. Load the documents
2. Press the Copy icon
WORKCENTRE PRO
FaxE-MailCopy
Network
Scanning
3. Select the Features
WorkCentre 7655/7665/7675
Copy
Basic Copying
Output Color
Auto Detect
Color
Black
More...
Internet
Fax
Image Quality
Layout Adjustment Output Format Job Assembly
Output Color
Auto Paper
More... Hole Punch
2 Sided Copy Copy Output:
Quick Use Guide
Collated
All
Services
WorkCentre 7655/7665/7675
Page 7
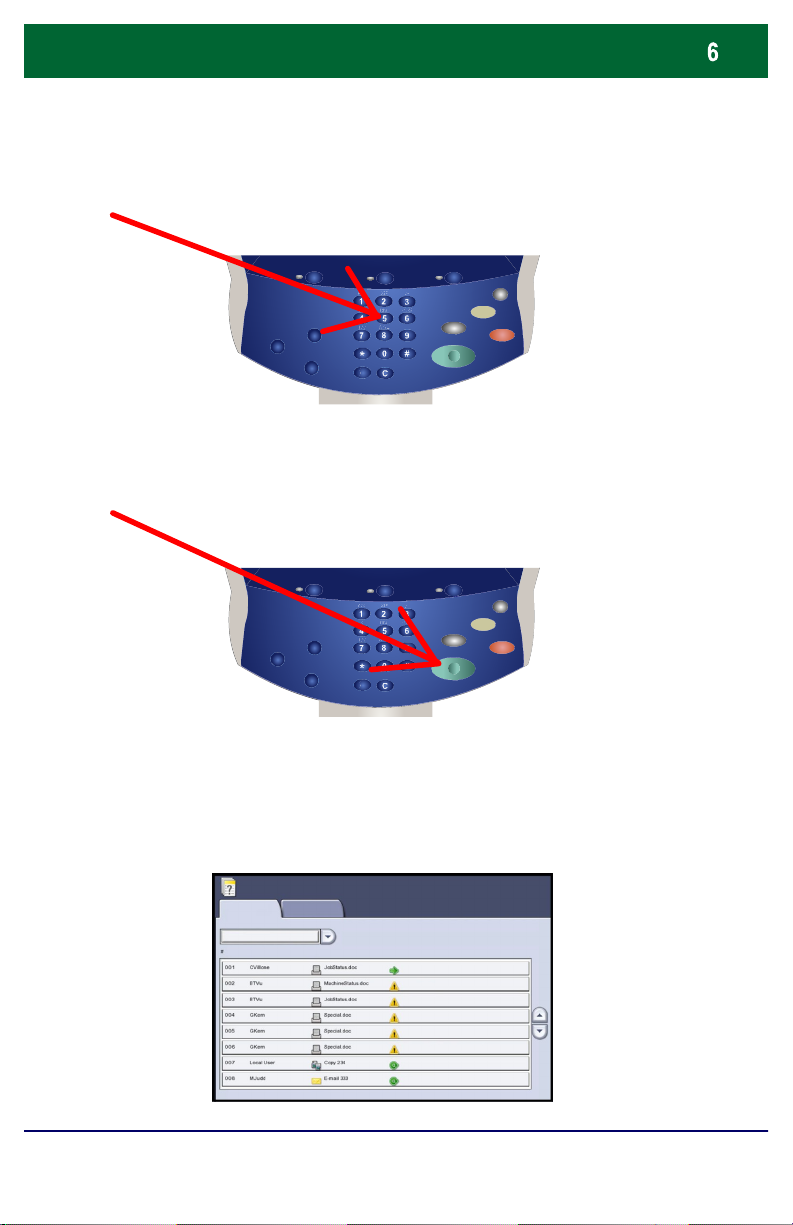
Simple Copying
4. Enter the Quantity
5. Press Start
6. Identify your job in Job Status mode.
Job Status
Active Jobs
WorkCentre 7655/7665/7675
Completed Jobs
Printing
Printing
Printing
Pending
Pending
Processing
Processing
Scanning
Quick Use Guide
WorkCentre 7655/7665/7675
Page 8
Simple Faxing - Embedded
1. Load the documents
2. Press the Fax icon
WORKCENTRE PRO
FaxE-MailCopy
Network
Scanning
3. Enter the Fax number
Fax
Fax
Fax Number:
Speed Dial
Dialing Chars /
Keypad...
Cover Page...
Off
2 Sided Sca nning
1 Sided
2 Sided
2 Sided, Rotate Side 2
WorkCentre 7655/7665/7675
Internet
Fax
Image Quality Fax OptionsLayout
Adjustment
Add --
Address
Book...
Original Typ e Resolution
Name: Fax Number:
Photo & Text
Photo & Text
Text
Quick Use Guide
All Services
Job Assembly
Standard
Fine
Super Fine
WorkCentre 7655/7665/7675
Page 9
Simple Faxing - Embedded
4. Change the Settings
Fax
Fax
Fax Number:
Cover Page...
2 Sided Sca nning
5. Press Start
Speed Dial
Dialing Chars /
Keypad...
Off
1 Sided
2 Sided
2 Sided, Rotate Side 2
Image Quality Fax OptionsLayout
Adjustment
Add --
Address
Book...
Original Typ e Resolution
Name: Fax Number:
Photo & Text
Photo & Text
Text
All Services
Job Assembly
Standard
Fine
Super Fine
6. Identify your job in Job Status mode.
Job Status
Active Jobs
WorkCentre 7655/7665/7675
Completed Jobs
Printing
Printing
Printing
Pending
Pending
Processing
Processing
Scanning
Quick Use Guide
WorkCentre 7655/7665/7675
Page 10

Simple Internet Faxing
1. Load the documents
2. Touch the Internet Fax icon
WORKCENTRE PRO
FaxE-MailCopy
Network
Scanning
Internet
Fax
3. Enter the Recipient Details
Internet Fax
Internet Fax
Output Color
WorkCentre 7655/7665/7675
New Recipient
Address Books:
Color
Black
Gray Scale
Advanced
Settings
Name: Rec ipient
Layout
Adjustment
2 Sided Scanning
1 Sided
2 Sided
2 Sided, Rotate Side 2
Quick Use Guide
Internet Fax
Options
From...
Subject
Message
Original Type
Photo & Text
Photo
Text
All Services
WorkCentre 7655/7665/7675
Page 11

Simple Internet Faxing
4. Change the Settings
Internet Fax
Internet Fax
New Recipient
Address Books:
Advanced
Settings
Name: Rec ipient
Layout
Adjustment
Internet Fax
Options
All Services
From...
Subject
Message
Output Color
Color
Black
Gray Scale
2 Sided Scanning
1 Sided
2 Sided
2 Sided, Rotate Side 2
Original Type
5. Press Start
6. Identify your job in Job Status mode.
Job Status
Active Jobs
Completed Jobs
Photo & Text
Photo
Text
WorkCentre 7655/7665/7675
Printing
Printing
Printing
Pending
Pending
Processing
Processing
Scanning
Quick Use Guide
WorkCentre 7655/7665/7675
Page 12

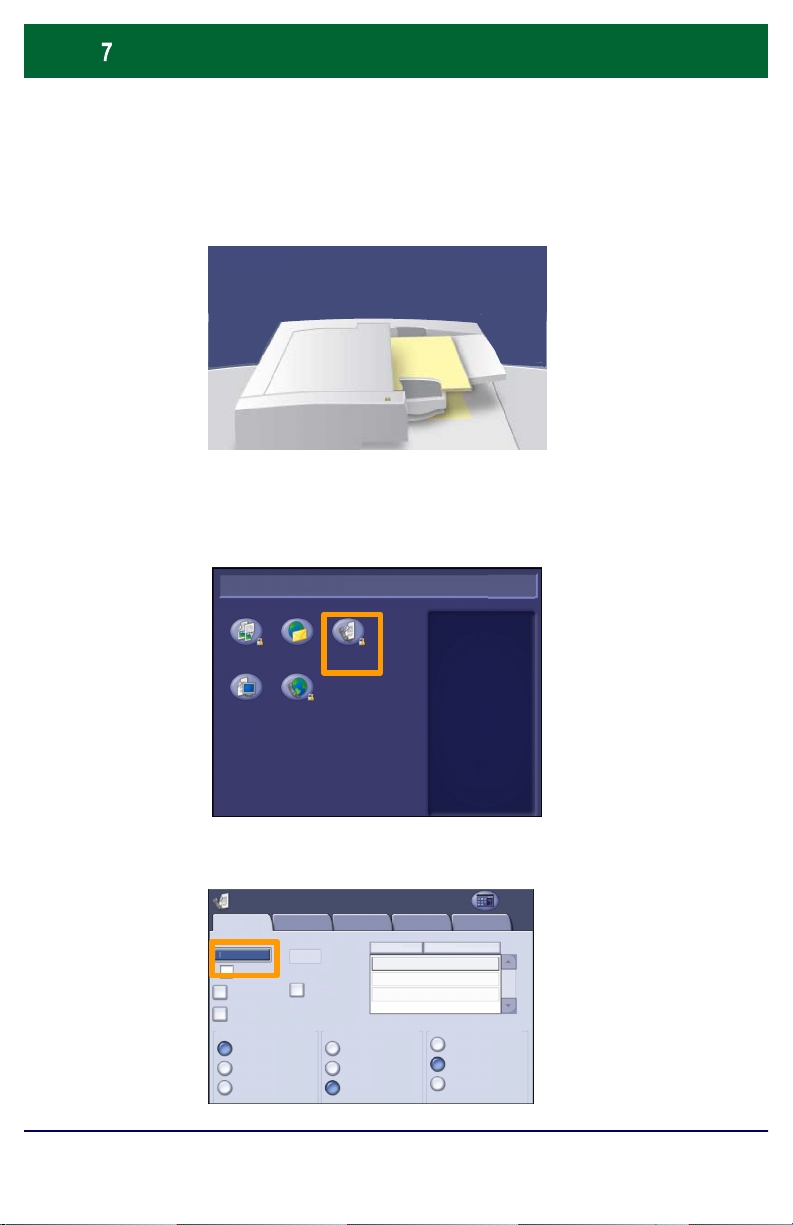
Simple Scan to E-mail
1. Load the documents
2. Touch the E-mail icon
WORKCENTRE PRO
FaxE-MailCopy
Network
Scanning
Internet
Fax
3. Enter the Recipient Details
E-mail
E-mail
Output Color
WorkCentre 7655/7665/7675
New Recipient
AddressBook...
Auto Detect
Color
Black
Gray Scale
Advanced
Settings
Name: Recipient(s)
2 Sided Scanning
Layout
Adjustment
1 Sided
2 Sided
2 Sided, Rotate
Side 2
Quick Use Guide
E-mail Options
Original Type
Photo & Text
Photo
Text
From...
Subject...
Message...
Scan Presets
All
Services
for Sharing and
for Archival Record
for OCR
More...
WorkCentre 7655/7665/7675
Page 13

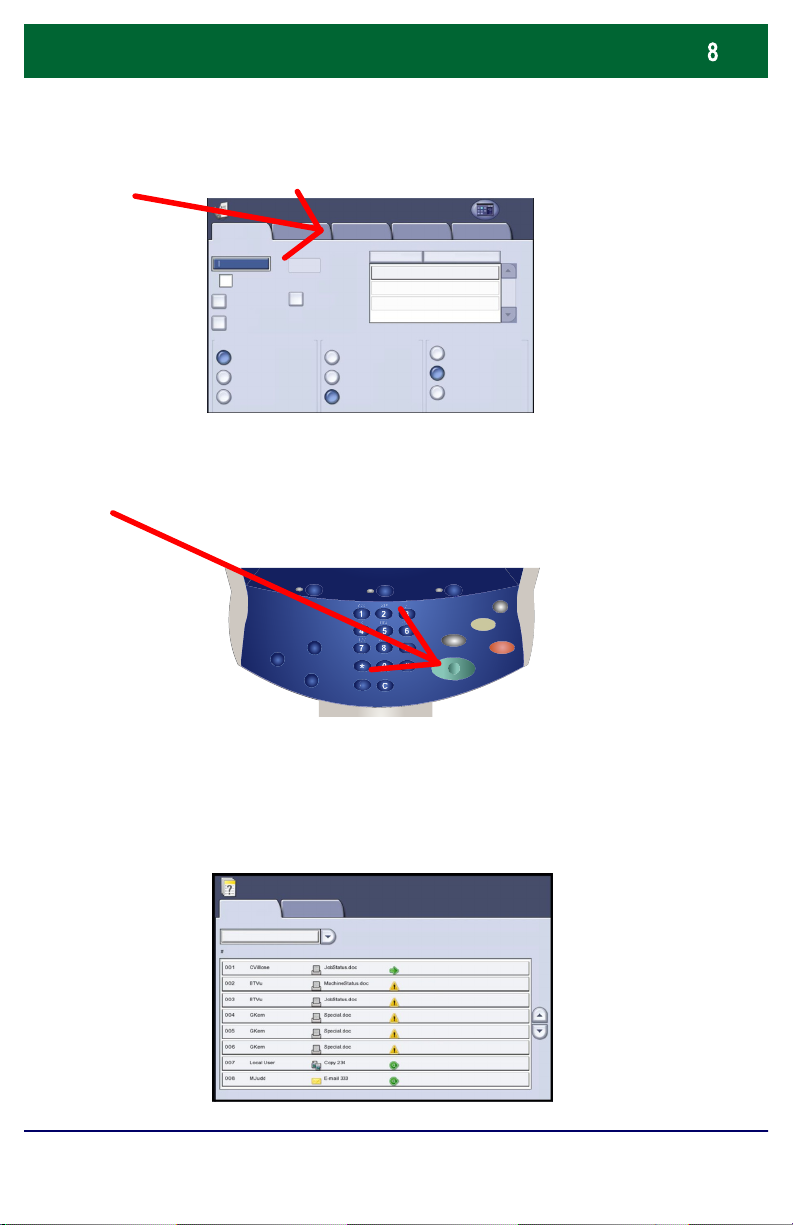
Simple Scan to E-mail
4. Change the Settings
E-mail
5. Press Start
E-mail
New Recipient
AddressBook...
Output Color
Auto Detect
Color
Black
Gray Scale
Advanced
Settings
Layout
Adjustment
Name: Recipient(s)
2 Sided Scanning
1 Sided
2 Sided
2 Sided, Rotate
Side 2
E-mail Options
Original Type
Photo & Text
Photo
Text
From...
Subject...
Message...
Scan Presets
All
Services
for Sharing and
for Archival Record
for OCR
More...
6. Identify your job in Job Status mode.
Job Status
Active Jobs
WorkCentre 7655/7665/7675
Completed Jobs
Printing
Printing
Printing
Pending
Pending
Processing
Processing
Scanning
Quick Use Guide
WorkCentre 7655/7665/7675
Page 14

Simple Network Scanning
1. Load the documents
2. Press the Network Scanning icon
WORKCENTRE PRO
FaxE-MailCopy
3. Select the template
Network
Scanning
Show:
Selected Template:
Output Color
WorkCentre 7655/7665/7675
Network
Scanning
Network Scanning
All Templates
Default
Auto Detect
Color
Black
Gray Scale
Internet
Fax
Advanced
Settings
2 Sided Scanning
Layout
Adjustment
1 Sided
2 Sided
2 Sided, Rotate
Side 2
Quick Use Guide
Filing
Options
Original Type
Photo & T e xt
Photo
Text
Job
Assembly
Scan Presets
for Sharing and
Printing
for Archival Record
for OCR
More...
All
Services
WorkCentre 7655/7665/7675
Page 15

Simple Network Scanning
4. Change the Settings
Network Scanning
Network
Scanning
Show:
All Templates
Selected Template:
Default
Advanced
Settings
Layout
Adjustment
Filing
Options
Job
Assembly
All
Services
Output Color
Auto Detect
Color
Black
Gray Scale
2 Sided Scanning
1 Sided
2 Sided
2 Sided, Rotate
Side 2
Original Type
Photo & T e xt
Photo
Text
5. Press Start
6. Identify your job in Job Status mode.
Job Status
Active Jobs
Completed Jobs
Scan Presets
for Sharing and
Printing
for Archival Record
for OCR
More...
WorkCentre 7655/7665/7675
Printing
Printing
Printing
Pending
Pending
Processing
Processing
Scanning
Quick Use Guide
WorkCentre 7655/7665/7675
Page 16

Printing a configuration report
button
To print a configuration
report select the Machine
Status button.
Network Scanning
Network
Advanced
Scanning
Settings
Image Options
Layout
Adjustme nt
Enhancement
Update TemplatesQuality File Size
From the Machine Information tab, select the Print Reports
to access the type of reports you can print.
All
Services
Filing
Job
Options
Assembly
ResolutionIm age
WorkCentre 7655/7665/7675
Machine Status
Information
General Information
Customer Support:
www.xerox.com
1234567890
Machine Serial Number:
KMM-000000505
Current System Software
001.000001.000001
IP Address
10.123.131.45
Faults SuppliesMachine
Quick Use Guide
Billing Information Tools
Paper Tray Status
Print Reports
WorkCentre 7655/7665/7675
Page 17

Configuration Report
Close
Report Name
A message will confirm that the report is being printed and the
Printing a configuration report
Touch the Configuration Report option, then select the Print
Selected Report button.
Print Reports
Print Selected Report
report will be delivered to the output tray.
WorkCentre 7655/7665/7675
Quick Use Guide
WorkCentre 7655/7665/7675
Page 18

Usage Counters
1.
Billing information can be accessed by touching the Machine
Status button, then touching the Billing Information tab.
All
Services
Filing
Job
Options
Assembly
ResolutionIm age
Machine Status
Network Scanning
Network
Advanced
Scanning
Settings
Image Options
Layout
Adjustme nt
Enhancement
Update TemplatesQuality File Size
2.
Billing Information
Black Impressions, Color Impressions, and Total Impressions
are shown on the Billing Information Tab.
WorkCentre 7655/7665/7675
Machine Status
Information
Machine Serial Num ber:
KMM-000000505
Black Impressions
Color Impre s s ions
Total Impressions
Faults SuppliesMachine
Quick Use Guide
Billing Information Tools
Usage Counters
WorkCentre 7655/7665/7675
Page 19

Usage Counters
Count
Counter
Total Impressions
Black Impressions
Black Copied Impressions
Black Print Impressions
Color Impressions
Color Copied Impressions
Color Printed Impressions
Large Impressions
The Usage Counters feature provides access to machine usage
information. This feature is accessed by touching the Machine
Status button, then touching the Usage Counters button on the
Billing Information tab.
Machine Status
Information
Machine Serial Num ber:
KMM-000000505
Faults SuppliesMachine
Black Impressions
Color Impre s s ions
Total Impressions
The Total Impressions counter is always displayed at the top of
the list.
Billing Information Tools
Usage Counters
WorkCentre 7655/7665/7675
Usage Counters
Impressio n Counters
Update
Quick Use Guide
Close
WorkCentre 7655/7665/7675
Page 20

Tools Overview
control panel (highlighted on the
Access to all of the options on
the Tools tab (within the
Machine Status window) is via
the Log In/Out button on the
control panel with a key symbol).
The Log In Window opens. Use
the keypad to enter a 4 digit
passcode in the Log In Window
and then press Enter on the
screen.
The factory preset passcode is
1111. It is strongly
recommended that you change
the passcode.
Refer to the System
Administration CD1 for
information on changing the
passcode.
Network Scanning
Network
Advanced
Scanning
Settings
Image Options
Login
Enter your Pass Code and touch Enter.
Layout
Adjustme nt
Pass Code:
Enhancement
Update TemplatesQuality File Size
All
Services
Filing
Job
Options
Assembly
ResolutionIm age
EnterCancel
WorkCentre 7655/7665/7675
Quick Use Guide
WorkCentre 7655/7665/7675
Page 21

Tools Overview
Activity Report Settings.
Access Settings, Immediate Overwrite Settings, and O n Demand Overwrite Settings.
Machine Status
Information
Faults SuppliesMachine
Billing Information Tools
Device Settings
Paper Tray
Management
User Interface
Settings
Connectivity
& Network Setup
Accounting
Security Settings
The Device Settings section includes ut ilities for Calibration Settings, General
1.
Settings, Input Settings, Output Settings, Test Settings, and Timer Settings.
The Paper Tray Management section includes utilities for Paper Type and Color
2.
Settings, Standard Size Required Settings, Paper Substitution Sett ings, Tr ay Settings,
and Tray Contents Settings.
The User Interface Settings section includes utilities for Gener al Settings, Common
3.
Service Settings, Copy Service Settings, Fax Service Settings, Service Enablements
Settings, and Job Sheet Settings.
Groups Features
Calibration
General
Input
Output
Tests & Resets
Timers
Copy Calibration
Reset Copy Calibration
The Connectivity and Network Setup section includes utilities for General Sett ings,
4.
HTTP Settings, Reports, and TCP/IP Settings.
The Accounting section includes utilities for Accounting Mode Settings and Copy
5.
The Security Settings section includes utilities for Tools Access Settings, Service
6.
WorkCentre 7655/7665/7675
Quick Use Guide
WorkCentre 7655/7665/7675
Page 22

Configuring the Auditron
The Auditron needs to be configured before users can access
the Auditron features.
Pathway
•Control Panel - Press the Log In/Out Button.
•Login Screen - Input Passcode and select Enter.
•Control Panel - Press the Machine Status button.
•Machine Status Screen - Select the Tools tab.
•Tools tab - Select Accounting.
•Groups Column - Select Accounting Enablement.
•Features Column - Select Accounting Mode.
Selecting the Auditron button, followed by the Save button enables
the auditron and allows you to proceed with the Auditron setup.
The Configure User Accounts... option allows the Auditron
Administrator to configure all of the User Accounts and set the
Accounting Priveleges for each account.
Cancel Save
WorkCentre 7655/7665/7675
Accounting Mode
None
Xerox Standard
Accounting
Auditron
Auxiliary
Access
Network
Accounting
Quick Use Guide
Configure User Ac counts
View Group Accounts
View General Accounts
WorkCentre 7655/7665/7675
Page 23

Configuring the Auditron
****
touching the required numeric display region and typing the new number
The User Account and Group Account boxes display information for
the currently selected User Account.
If the User Account selected is unused, the User Account field is blank
and the Group Account is 1.
The User Account and Group Account are entered, or amended, by
on the keypad.
Delete
Account
Color
Close
Save
Account
Configure User Accounts
User Account:
Pass Code:
Group Account: Copy Limits:
1
1-255
1
Accounting
Privileges...
View
Counters...
Black
9999 9999
Selecting the Accounting Privileges... button allows the Administrator
to set access levels for the account currently displayed.
The access levels available are General Account Access, Multiple
Group Account Access and Auditron Administrator Access.
Any combination of these access levels may be set.
Accounting Privileges: User Account
SaveCancel
Multiple Group Account Access
General Account Access
Auditron Administrator Access
WorkCentre 7655/7665/7675
Quick Use Guide
WorkCentre 7655/7665/7675
Page 24

Tray Settings
Pathway
•Control Panel - Press the Log In/Out Button.
•Login Screen - Input Passcode and select Enter.
•Control Panel - Press the Machine Status button.
•Machine Status Screen - Select the Tools tab.
•Tools tab - Select Paper Tray Management.
•Groups Column - Select Tray Settings.
•Features Column - Select Tray Settings.
The Tray Settings screen shows the properties of each tray in the
machine. To change the properties of a tray, touch the appropriate tray
line in the list and then select the Change Settings button.
Tray Settings
WorkCentre 7655/7665/7675
Priority Auto SelectionTray Type
Fully Adjustable Enabled
Fully Adjustable
Fully Adjustable
20
30
40
Quick Use Guide
Enabled
Enabled
Change Settings
Close
WorkCentre 7655/7665/7675
Page 25

Tray Settings
Change Settings - Tr a y 1
Tray Type
tray is set to contain one size and type of media. When the
what size and type of media to load.
within the specified range, into the tray. The machine will detect
from a tray that contains the best fit paper for the size of the image and the
trays that contain the default color and type to prevent special media being
3.
Cancel Save
Undo
Tray Priority Auto Selection
On
Off
A Dedicated
1.
Dedicated
1.
Fully Adjustable
2.
tray requires more media a pop-up message will appear telling the user
2.
Fully Adjustable allows the user to load any size and type of media,
standard sizes of paper but a pop-up screen will appear after the tray
has been closed asking the user to confirm the size, type and color of
the media loaded.
4.
The Priority setting:
3.
- Determines which tray is used when two trays are loaded with the
same paper and Auto Paper Select is chosen.
- Determines which paper trays are displayed on the Basic Copy tab.
The trays with the highest priority are displayed.
1 is the highest priority and 99 is the lowest.
With Auto Selection On the machine chooses which tray to feed from to
4.
best meet the users requirements.
If Auto Paper Select is chosen for a copy job the machine will feed paper
reduction/enlargement selected. However, auto selection only works with
used on ordinary copy jobs.
WorkCentre 7655/7665/7675
Quick Use Guide
WorkCentre 7655/7665/7675
Page 26

Replacing the Toner Cartridges
just above the machine front door.
toner to fall on the paper. Hold the handle of
1. Replace the toner cartridge while the
machine is on. Open the toner cover, located
CAUTION: Before you begin the procedure,
ensure that the machine has been allowed to
cool down. Failure to do so may result in
burns if certain parts of the machine are
touched.
2. Lay paper on the floor before removing
the cartridge. This will allow any excess
the color indicated in the message, and
gently pull it out.
3. Remove the toner cartridge by
holding the handle on the top of the
cartridge while gently pulling it straight
out. Be careful to not get toner on
clothing.
4. Dispose the toner cartridge as
normal office waste or recycle the
cartridge.
WorkCentre 7655/7665/7675
Quick Use Guide
WorkCentre 7655/7665/7675
Page 27

Replacing the Toner Cartridges
position and the toner cartridge is installed into the
5. Remove the new toner cartridge from its
packaging.
6. Gently tilt the new cartridge up and
down, and then left and right to redistribute
the toner.
7. Install the toner cartridge by aligning the
arrows on the cartridge evenly with the
printer until you hear a click.
8. Close the Front Door. If the door will not close
completely, make sure the cartridge is in the lock
appropriate toner location.
CAUTION:Never use a vacuum cleaner when you
clean spilled toner. It can cause explosion as the
toner fills the vacuum cleaner and gets sparks.
Use a broom or a cloth moistened with a neutral
detergent.
That completes the procedure for replacing the toner cartridge.
WorkCentre 7655/7665/7675
Quick Use Guide
WorkCentre 7655/7665/7675
Page 28

 Loading...