

Page 1

Xerox Corporation
701 S. Aviation Boulevard
El Segundo, CA 90245
© 1994 by Xerox Corporation. All rights
reserved
Copyright protection claimed includes all forms
and matters of copyrightable material and
information now allowed by statutory or
judicial law or hereinafter granted, including
without limitation, material generated from the
software programs which are displayed on the
screen, such as icons, screen displays, looks,
etc.
Printed in the United States of America
XEROX® and all Xerox products mentioned in this
publication are trademarks of XEROX
CORPORATION. Adobe ® and PostScript® are
trademarks of Adobe Systems, Incorporated.
AS/400 ® is a trademark of the IBM Corporation.
CS Triumvirate and CS Triumvirate Condensed are
trademarks of Agfa Division of Miles Inc. CS
Century Schoolbook, CS Courier, CS Letter
Gothic, CS Omega, CS Palacio, CS Times, are
licensed to Xerox Corporation by Agfa Division
of Miles Inc. ITC Avant Garde Gothic®, ITC
Bookman®, ITC Garamond®, ITC Korinna®, ITC New
Baskerville®, ITC Souvenir®, ITC Zapf
Chancery® and ITC Zapf Dingbats® are trademarks
licensed to Xerox Corporation by International
Typeface Corporation.
Helvetica®, Palatino®, Times, and Univers® are
trademarks of Linotype-Hell AG and/or its
subsidiaries. Monotype Bodoni is a trademark
of the Monotype Corporation plc. Other product
names used herein are trademarks of their
respective owners.
Page 2

Page 3

< cut top 2" cut 1">
DIIIIIIIIHHHHHHHHIIIIIIIIIIIII
Operator Guide iii
FEDERAL COMMUNICATIONS COMMISSION NOTICE
Part 15 of the Federal Communications
Commission (FCC) Rules and Regulations has
established Radio Frequency (RF) emission
limits to provide an interference-free radio
frequency spectrum. Many electronic devices,
including printers, generate RF energy
incidental to their intended function and are,
therefore, covered by these rules.
Class A Equipment
This equipment has been tested and found to
comply with the limits for a Class A digital
device, pursuant to Part 15 of the FCC Rules.
These limits are designed to provide reasonable
protection against harmful interference when
the equipment is operated in a commercial
environment. This equipment generates, uses,
XEROX 4219/MRP Mid Range Systems Printer
XEROX 4215/MRP Mid Range Systems Printer
Page 4

< cut top 2" cut 1">
DIIIIIIIIHHHHHHHHIIIIIIIIIIIII
iv Operator Guide
Modifications
The FCC requires the user to be notified that
any changes or modifications made to this
device that are not expressly approved by Xerox
Corporation may void the user’s authority to
operate the equipment.
Cables
Connections to this device must be shielded
cables with metallic RFI/EMI connector hoods in
order to maintain compliance with FCC Rules and
Regulations.
CANADIAN NOTICE
This digital apparatus does not exceed the
Class A limits for radio noise emissions from
digital apparatus set out in the Radio
interference regulations of the Canadian
Department of Communications.
AVIS CANADIEN
XEROX 4219/Mid Range Systems Printer
XEROX 4215/Mid Range Systems Printer
Page 5

< cut top 2" cut 1">
DIIIIIIIIHHHHHHHHIIIIIIIIIIIII
Operator Guide v
WARNING: The label shown above is
B
intended as a warning to persons
disassembling the Raster Laser Scanner
unit for internal alignment or repair
purposes. It does not apply to any of
XEROX 4219/Mid Range Systems Printer
XEROX 4215/Mid Range Systems Printer
Page 6

< cut top 2" cut 1">
DIIIIIIIIHHHHHHHHIIIIIIIIIIIII
vi Operator Guide
CLASS I LASER PRODUCT
The printer is certified to comply with laser
product performance standards set by the U.S.
Department of Health and Human Services as a
Class I laser product. This means that this is
a class of laser product that does not emit
hazardous laser radiation; this is possible
only because the laser beam is totally enclosed
during all modes of customer operation.
The laser and output of the Laser Scanner
produces a beam that, if looked into, could
CAUTION: When servicing the machine or
G
laser module, follow the procedures
specified in the manual and there will
WARNING: Use of controls, adjustments
B
or performance of procedures other
than those specified in this manual
XEROX 4219/Mid Range Systems Printer
XEROX 4215/Mid Range Systems Printer
Page 7

< cut top 2" cut 1">
DIIIIIIIIHHHHHHHHIIIIIIIIIIIII
Operator Guide vii
RELATED PUBLICATIONS
PostScript and PCL 5 references include:
F
PostScript Language Reference Manual
Edition 1990, Adobe Systems Incorporated,
Addison-Wesley Publishing Company, Inc.,
Third printing April, 1991.
, Second
F Hewlett-Packard
PCL 5 Printer Language
Technical Reference Manual
(Part number
XEROX 4219/Mid Range Systems Printer
XEROX 4215/Mid Range Systems Printer
Page 8

< cut top 2" cut 1">
DIIIIIIIIHHHHHHHHIIIIIIIIIIIII
viii Operator Guide
WHAT THIS GUIDE CONTAINS
The
Operator Guide
following chapters and appendices:
Chapter 1, Overview and Installation Presents
features, options, and additional
specifications. Laser safety information is
presented in this chapter. This chapter also
provides step by step instructions for
installing and setting up your printer.
Information on how to load special papers in
the Paper Trays or Manual Feed Tray is
included.
is divided into the
Chapter 2, Using the Control Panel Provides an
overview of the Control Panel Main Menu and
associated lower level menus, and provides a
detailed explanation of each menu item and its
associated option. The procedures for
accessing, navigating, and changing menu
settings are described.
Chapter 3, Configuring the Interface Card
Describes the twinax and coax interface cards,
and the IPDS module.
Chapter 4, Printing Explains how to print
reports and how to prepare and print a job.
Printing with the Manual Feed Tray is
explained.
Chapter 5, Care and Maintenance Explains how to
care and maintain your printer to ensure
optimum performance.
Appendix A, Printer Specifications Provides
XEROX 4219/Mid Range Systems Printer
XEROX 4215/Mid Range Systems Printer
Page 9

< cut top 2" cut 1">
DIIIIIIIIHHHHHHHHIIIIIIIIIIIII
Operator Guide ix
Appendix E, Options and Supplies: Ordering
Information Explains how to upgrade the printer
and order supplies and accessories.
Appendix F, Serial/Parallel Interface Support
Provides information on interface connections
and pin assignments.
Appendix G, Paper Facts Provides information on
paper and envelope types to use with the
printer.
Appendix H, PCL 5 Symbol Sets Provides tables
showing the available symbol sets and their
hexadecimal equivalents.
Appendix I, PCL 5 Command Set Provides a quick
XEROX 4219/Mid Range Systems Printer
XEROX 4215/Mid Range Systems Printer
Page 10

< cut top 2" cut 1">
DIIIIIIIIHHHHHHHHIIIIIIIIIIIII
x Operator Guide
CONVENTIONS
The following conventions are used in this
Convention Use
Control
Panel Keys
Factory Default
Settings
NOTE A note indicates information of
REMINDER A reminder is used to remind
The names of the control panel
keys appear in boldface. For
example, “Press the Menu key.”
Factory default settings appear
in italicized, boldface type.
interest that is related to the
you of previous information or
of existing conditions.
The following symbols are used in this guide:
IMPORTANT: The exclamation point
A
indicates information of importance.
CAUTION: A caution contains
G
information to prevent equipment
WARNING: A warning contains
B
XEROX 4219/Mid Range Systems Printer
XEROX 4215/Mid Range Systems Printer
information to prevent personal
Page 11

< cut top 2" cut 1">
DIIIIIIIIHHHHHHHHIIIIIIIIIIIII
xi
CONTENTS
Federal Communications
Commission Notice iii
Canadian Notice iv
Avis Canadien iv
Class 1 Laser Product vi
Related Publications vii
What This Guide Contains viii
Conventions x
Chapter 1
OVERVIEW AND INSTALLATION
Introduction 1-1
Features 1-1
Overview of the
Xerox Twinax/Coax Interface Card 1-3
Twinax Interface Features and Compatibilities 1-4
Coax Interface Features and Compatiblilities 1-5
The Xerox Interface Card with IPDS 1-6
Options 1-6
Laser Printer Safety Information 1-7
Laser Safety 1-8
CDRH Regulations 1-8
Ozone Emission 1-9
Health and Safety Standards for Ozone 1-9
Employer Responsibilities 1-9
Printer Components 1-10
Control Panel 1-14
Printer Setup 1-16
XEROX 4219/MRP Mid Range Systems Printer
XEROX 4215/MRP Mid Range Systems Printer
Page 12

< cut top 2" cut 1">
DIIIIIIIIHHHHHHHHIIIIIIIIIIIII
xii
Contents
Space Requirements 1-17
Installing the Memory Expansion Kit and
Interface Card 1-19
Installing the Manual Feed Tray 1-20
Installing the Paper Support Wire 1-23
Installing the High Capacity Paper Tray 1-24
Installing the Letter, A4, Legal,
Ledger, A3, A5, B4 Paper Trays 1-30
Tips on Paper Loading 1-35
Connecting the Interface Cable
and the Power Cord 1-38
Installing the Face-up Output Tray 1-46
Chapter 2
USING THE CONTROL PANEL
Overview of the
Control Panel Keys 2-2
Menus 2-5
Control Panel Main Menu 2-7
Printer Setup Menu 2-8
Interface Setup Menu 2-9
Printing the Menus 2-11
Printing All the Menus 2-11
Printing a Selected Menu 2-12
Printing Help Pages 2-13
Control Panel Main Menu
Item Descriptions 2-13
Language 2-14
Printout Menu 2-14
Tray Select 2-15
Print Reports 2-17
XEROX 4219/MRP Mid Range Systems Printer
XEROX 4215/MRP Mid Range Systems Printer
Page 13

< cut top 2" cut 1">
DIIIIIIIIHHHHHHHHIIIIIIIIIIIII
Operator Guide
xiii
Tests 2-18
Resets 2-19
Setup Printer Menu Item
Descriptions 2-20
PCL 5 Setup 2-20
PostScript (P S) Resolution 2-23
Notes on Other Resolutions 2-24
PET 2-25
Options 2-25
Panel Security 2-27
Setup Interface Menu Item
Descriptions 2-28
Parallel, Serial, and Other I/O (Twinax or Coax)
XEROX 4219/MRP Mid Range Systems Printer
XEROX 4215/MRP Mid Range Systems Printer
Page 14

< cut top 2" cut 1">
DIIIIIIIIHHHHHHHHIIIIIIIIIIIII
xiv
Contents
F. Setting the Serial Setup Configuration 2-51
Chapter 3
CONFIGURING THE INTERFACE CARD
Setting the Coax and
Twinax Defaults 3-1
Page Size 3-4
Print Language 3-5
Printer Language (twinax only) 3-5
Setting the Printer Emulation and
Device Address 3-7
Setting the Twinax Printer Emulation and Printer
Address 3-7
Setting the IPDS Printer Emulation 3-11
Setting the Printer Device Address 3-11
Printing the Other I/O Log 3-12
Dual Printer Lines 3-13
IPDS Hardware
Diagnostic Messages 3-13
Chapter 4
PRINTING
Image Area 4-1
Selecting Fonts 4-2
Default Font for PCL 5 Mode 4-2
Sending a Print Job 4-2
Last Page is not Ejected 4-3
When Using PCL 5 Command Set or
IBM SCS or IPDS emulations 4-3
When Using PostScript Printer Language 4-3
Printing from the Manual
Feed Tray 4-4
XEROX 4219/MRP Mid Range Systems Printer
XEROX 4215/MRP Mid Range Systems Printer
Page 15

< cut top 2" cut 1">
DIIIIIIIIHHHHHHHHIIIIIIIIIIIII
Operator Guide
xv
Selecting the Manual Feed Tray 4-4
Selecting a Paper Size for Manual Feed 4-5
Face-up Output Tray 4-7
Using the Manual Feed Tray 4-7
Feeding Paper through the Manual Feed Slot 4-7
When the Manual Print Job is Finished 4-10
Preventing Manual Feed Problems 4-12
Printing on Envelopes 4-13
Selecting Manual Feed and Envelope Size
at the Control Panel 4-13
Using the Manual Feed Tray for Envelopes 4-15
Preventing Manual Feed Problems 4-18
When the Envelope Print Job is Finished 4-19
Recommended Image Area for
Envelopes 4-19
Printing the Reports 4-21
Font Report 4-21
Printing the Font Report 4-35
Reading the Font Report 4-36
Font Characteristics 4-37
Resident Fonts (Typefaces) 4-38
Downloaded Fonts 4-40
IBM 3816 Equivalent Fonts 4-40
Storage Information 4-42
Hardware Status Report 4-43
Printing the Hardware Status Report 4-44
Error Log 4-45
Printing the Error Log 4-46
Reading the Error Log 4-47
XEROX 4219/MRP Mid Range Systems Printer
XEROX 4215/MRP Mid Range Systems Printer
Page 16

< cut top 2" cut 1">
DIIIIIIIIHHHHHHHHIIIIIIIIIIIII
xvi
Contents
Other I/O Log 4-48
Printing the Other I/O Log 4-57
The Xerox Twinax and Coax Interface
Configuration Reports 4-68
The Xerox IPDS - Settings Printout 4-68
The Xerox IPDS - IPDS Resident Fonts 4-60
The Xerox IPDS - IPDS Resident Codepages 4-61
The Xerox IPDS Resource List Printout 4-61
Chapter 5
CARE AND MAINTENANCE
Clearing a Paper Jam and
Resuming the Job 5-1
Paper Jam Error Codes 5-1
Paper Jam>Rear 5-3
Paper Jam>Fuser 5-16
Paper Jam>Exit 5-18
Toner Cartridge Replacement
Procedures 5-22
Recycling the Old Toner Cartridge Kit 5-24
Removing the Old Toner Cartridge 5-25
Replacing the Fuser Cleaning Felt 5-27
Replacing the Corotron 5-29
Replacing the Toner Cartridge 5-32
Adjusting the Print Density 5-38
Maintenance 5-41
Fuser Replacement 5-41
Before an Extended Shutdown 5-41
Cleaning the Printer 5-42
XEROX 4219/MRP Mid Range Systems Printer
XEROX 4215/MRP Mid Range Systems Printer
Page 17

< cut top 2" cut 1">
DIIIIIIIIHHHHHHHHIIIIIIIIIIIII
Operator Guide
xvii
Appendix A
Printer Specifications A-1
Appendix B
Power Cord Requirements B-1
Appendix C
Electrostatic Discharge C-1
Appendix D
Diagnostics and Troubleshooting D-1
Appendix E
Options and Supplies: Ordering Information E-1
Appendix F
Interface Support F-1
Appendix G
Paper Facts G-1
Appendix H
PCL 5 Symbol Sets H-1
Appendix I
PCL 5 Command Set I-1
Appendix J
Glossary J-1
Index Index-1
XEROX 4219/MRP Mid Range Systems Printer
XEROX 4215/MRP Mid Range Systems Printer
Page 18

Page 19

< cut top 2" cut 1">
DIIIIIIIIHHHHHHHHIIIIIIIIIIIII
Chapter 2
2-1
USING THE CONTROL PANEL
This chapter provides the following
information:
F An overview of the control panel keys
F Menus: Overview, examples, and the
procedures to print the menus
F A detailed explanation for each menu item
and associated options
F The procedures for entering the menus and
changing the printer configuration
F Maps detailing the path used to navigate the
menus
F Examples that show how to change the printer
configuration:
A. Setting the default paper tray and the
automatic tray swap setting.
B. Turning off the Start Page
C. Setting the default font for PCL 5
mode.
XEROX 4219/MRP Mid Range Systems Printer
XEROX 4215/MRP Mid Range Systems Printer
Page 20

< cut top 2" cut 1">
DIIIIIIIIHHHHHHHHIIIIIIIIIIIII
2-2
Using the Control Panel
OVERVIEW OF THE CONTROL PANEL KEYS
Table 2-1 is an overview of the keys on the
control panel and their functions when the
printer is Online, Offline or when one of the
Table 2-1
Overview of Keys
Printer Modes
KEY
Online Toggles the
Help Has no
ONLINE OFFLINE MENU
printer
status
between
function in
Toggles the
printer
status
between
Has no
function in
Exits the
control panel
menu mode.
Prints a menu
map of the
current
control panel
menu: Control
Panel Main
Menu, Printer
Setup Menu,
or Interface
Note: Factory default settings can be restored by
pressing Online and Help while switching the printer
XEROX 4219/MRP Mid Range Systems Printer
XEROX 4215/MRP Mid Range Systems Printer
Continued
Page 21

< cut top 2" cut 1">
DIIIIIIIIHHHHHHHHIIIIIIIIIIIII
Operator Guide
2-3
Table 2-1
Overview of Keys
Printer Modes
KEY
Menu Enters the
Reset Has no
ONLINE OFFLINE MENU
control panel
Enters the
control panel
Displays the
top level of
the control
function in
In SCS, IPDS,
or PCL 5
Has no
function in
mode, prints
any data
remaining in
the printer.
In PostScript
mode, stops
present job.
“Flushing
Job” displays
until end of
job is
reached.
Continued
XEROX 4219/MRP Mid Range Systems Printer
XEROX 4215/MRP Mid Range Systems Printer
Page 22

< cut top 2" cut 1">
DIIIIIIIIHHHHHHHHIIIIIIIIIIIII
2-4
Using the Control Panel
Table 2-1
Overview of Keys
Printer Modes
KEY
Enter Has no
ONLINE OFFLINE MENU
function in
Has no
function in
Selects the
displayed
menu option
if it is
selectable,
i.e.,
Note: If the menu item is a heading, i.e. leads into
another group of options, this button causes the
menu display to move to the next lower level
Esc Has no
function in
Has no
function in
Causes the
current menu
item to
change to the
previous menu
Note: If pressed at the top of the main menu, you
exit the control panel menu and the printer returns
to the previous mode, i.e. ONLINE or OFFLINE.
Continued
XEROX 4219/MRP Mid Range Systems Printer
XEROX 4215/MRP Mid Range Systems Printer
Page 23

< cut top 2" cut 1">
DIIIIIIIIHHHHHHHHIIIIIIIIIIIII
Operator Guide
2-5
Table 2-1
Overview of Keys
Printer Modes
KEY
Up Has no
Note: When pressed at the start of a menu level, the
message “Start of List” momentarily displays on the
second line of the panel display.
If the menu item requires a numeric response, such
ONLINE OFFLINE MENU
function in
Has no
function in
Scrolls the
menu upward.
MENUS
Down Has no
function in
Note: When pressed at the end of a menu level, the
message “End of List” momentarily displays on the
second line of the panel display.
If the menu item requires a numeric response, such
as point size, the value displayed decreases by one
Has no
function in
Scrolls the
menu
The printer is automatically placed in the menu
mode when the Menu key is pressed at the
control panel. This section provides examples
of the three menus that are accessed through
the control panel and the procedures for
printing a selected menu.
F Control Panel Main Menu
XEROX 4219/MRP Mid Range Systems Printer
XEROX 4215/MRP Mid Range Systems Printer
Page 24

< cut top 2" cut 1">
DIIIIIIIIHHHHHHHHIIIIIIIIIIIII
2-6
Using the Control Panel
The notations on the following menu maps
represent the following moves or actions:
A vertical arrow illustrates a move
made with the Up or Down arrows
A horizontal arrow illustrates a move
to a lower level heading.
An asterisk ‘*’ preceding the menu
option indicates that this setting is
the default. Default settings are
printed in italicized boldface type in
this guide.
Selecting the PRINTOUT MENU option
prints a selected menu map.
XEROX 4219/MRP Mid Range Systems Printer
XEROX 4215/MRP Mid Range Systems Printer
Page 25

< cut top 2" cut 1">
DIIIIIIIIHHHHHHHHIIIIIIIIIIIII
Operator Guide
2-7
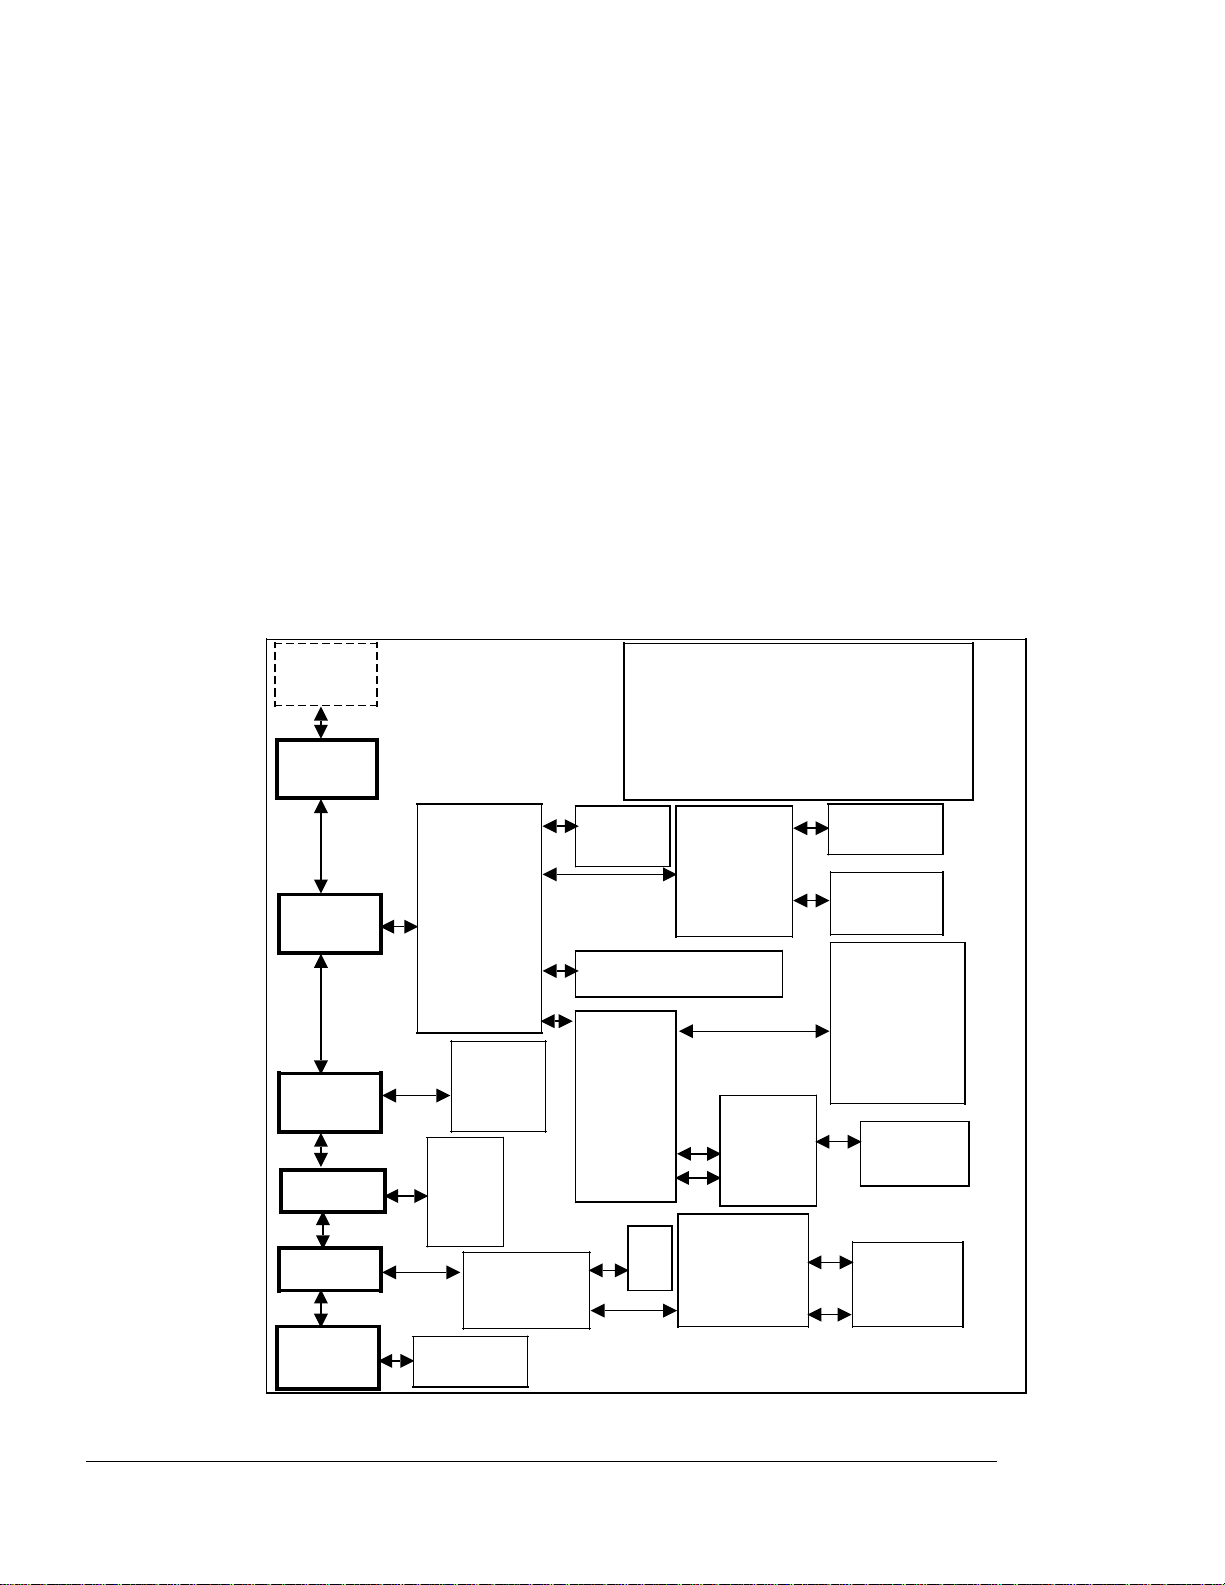
Control Panel Main Menu
Pressing the Menu key automatically takes the
printer offline and displays the first
*
LANGUAGE
=English
PRINTOUT
MENU
TRAY
SELECT
SETUP
PRINTER
Engli
sh
_Deuts
All Menus
Main Menu
ch
_Franc
Printer
Menu
*Upper[Le
Printer
Tray
tter]
_Middle
[Letter]
Enables you to change the
CONTROL PANEL MAIN MENU
Up/Down arrow keys move
vertically through the menu
Enter selects an item or goes to
the next menu sublevel
Esc backs up a level without
*
On
_Off
SET
INTERFAC
PRINT
REPORTS
Enables you to change the
configuration of the
Font
Report
H/W
Report
TESTS
Run All
Tests
Test
Reset All
RESETS
Reset
Printer
Figure 2-1. Control Panel Main Menu
XEROX 4219/MRP Mid Range Systems Printer
XEROX 4215/MRP Mid Range Systems Printer
Page 26
< cut top 2" cut 1">
DIIIIIIIIHHHHHHHHIIIIIIIIIIIII
2-8
Using the Control Panel
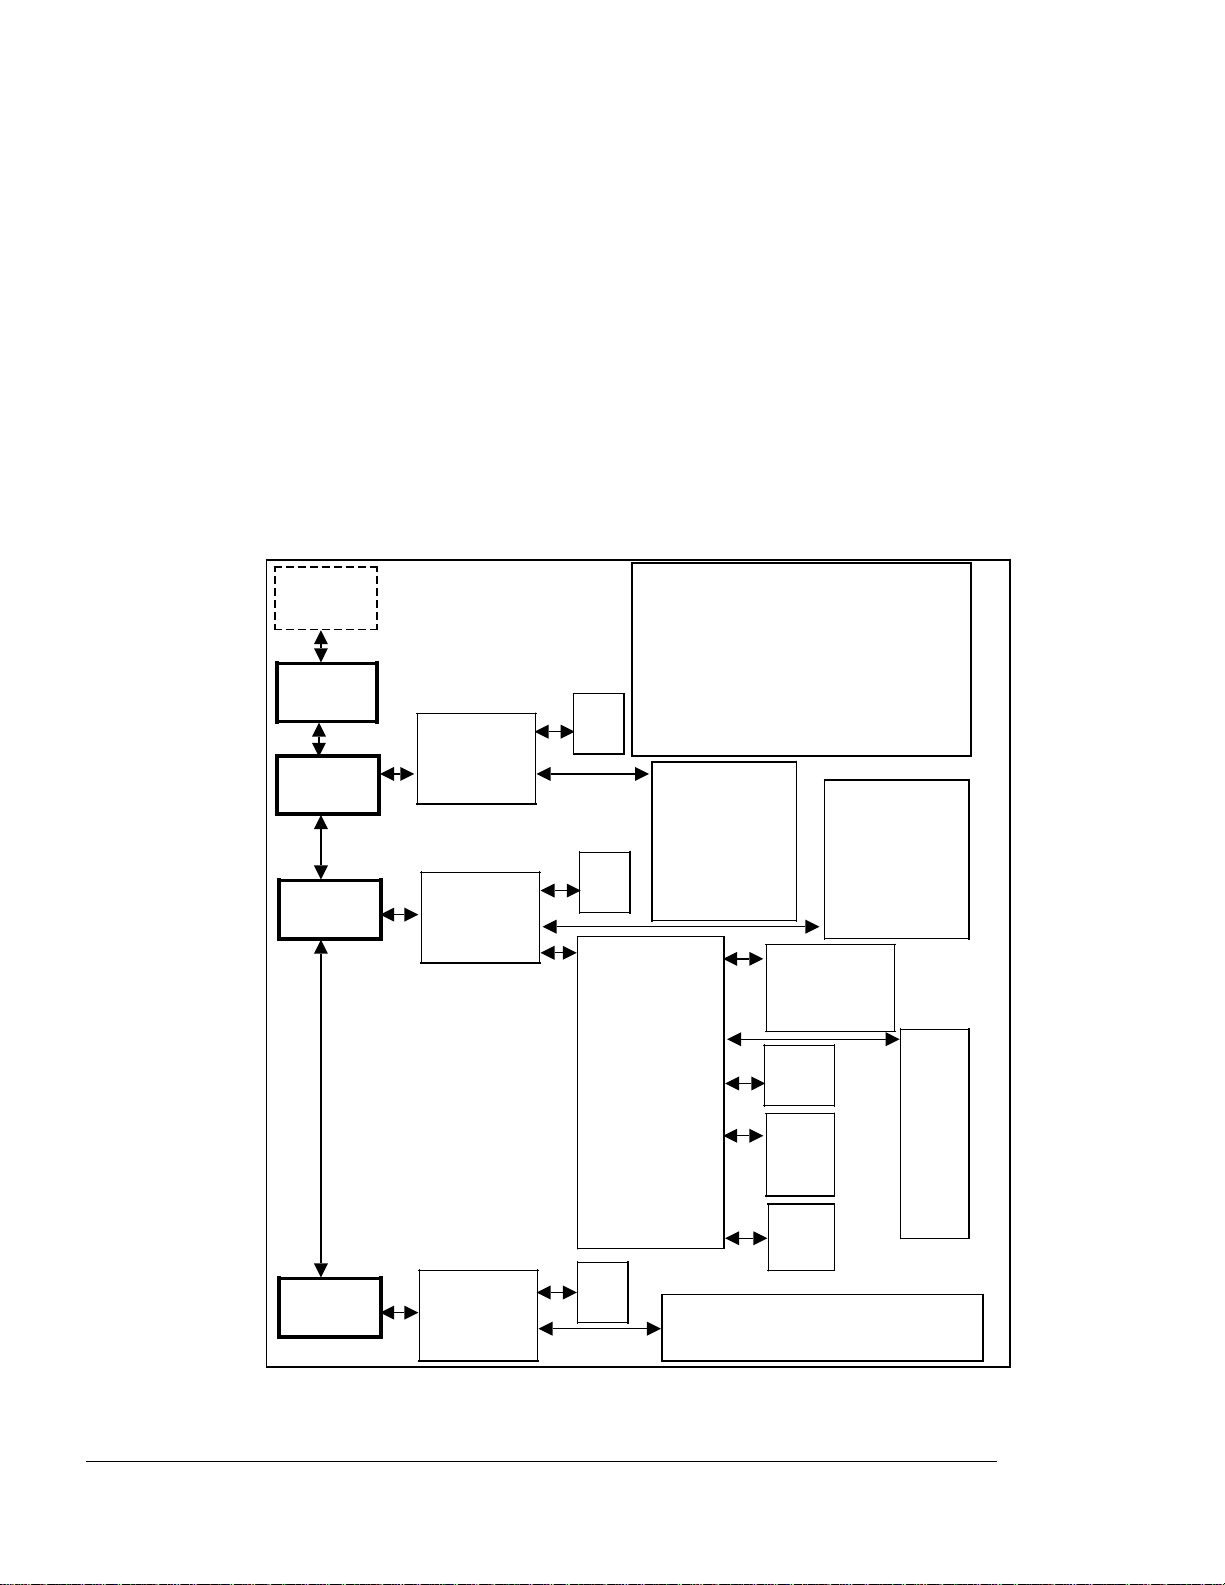
Printer Setup Menu
The Printer Setup Menu displays the current
printer configuration when the Enter key is
SETUP
PRINTER
PRINTOUT
MENU
PCL 5
SETUP
P S
RESOLUTI
PET
OPTIONS
Orientati
on
Page
Format
*
800 x
400
_400 x
_Dark
*
Mediu
m
_Light
PwrUpStar
t Page
PRINTER SETUP MENU
Up/Down arrow keys move
vertically through the menu
Enter selects an item or goes to
the next menu sublevel
Esc backs up a level without
*
Portr
ait
Lines
Per Page
All available
*Courie
r
_Line
Printer
_
Times
*
O
n
*
Medium
_Bold
_Italic
_Bold
*
Sequential
_Priority
_Sequential
Lock
Lines=60
_On
*Off
*
10 cpi/12
pt
_10 cpi/12
pt italic
_10 cpi/12
pt bold
Times
Medium
*Parallel
_Serial
_Other
PANEL
SECURITY
Enter
Figure 2-2. Printer Setup Menu
XEROX 4219/MRP Mid Range Systems Printer
XEROX 4215/MRP Mid Range Systems Printer
Page 27

< cut top 2" cut 1">
DIIIIIIIIHHHHHHHHIIIIIIIIIIIII
Operator Guide
2-9
Interface Setup Menu
The Interface Setup Menu (see Figure 2-3)
displays when the Enter key is pressed at the
SET INTERFACE heading at the Control Panel Main
Menu. The Interface Setup Menu reports the
XEROX 4219/MRP Mid Range Systems Printer
XEROX 4215/MRP Mid Range Systems Printer
Page 28
< cut top 2" cut 1">
DIIIIIIIIHHHHHHHHIIIIIIIIIIIII
2-10
Using the Control Panel
SET
INTERFAC
PRINTOUT
MENU
PARALLEL
SERIAL
Enable
I/F
Enable
I/F
Printer
INTERFACE SETUP MENU
Up/Down arrow keys move
vertically through the menu
Enter selects an item or goes to
the next menu sublevel
Esc backs up a level without
*
On
making a selection
_Of
*
PS/PCL
Sensing
_STD
PostScript
*
On
_Of
Flow Control
_PCL 5
_BCP
*
_Robust
Xon/Xoff
Baud Rate
_7
Data Bits
Parity
*
_Odd
_Even
*
DTR Polarity
*
_Low
Xon/Xoff
8
None
High
*
PS/PCL
Sensing
_STD
PostScript
_PCL 5
_BCP
_300
_600
_1200
_2400
_4800
*
_1920
0
9600
OTHER
Enable
I/F
Figure 2-3. Interface Setup Menu
XEROX 4219/MRP Mid Range Systems Printer
XEROX 4215/MRP Mid Range Systems Printer
*
On
_Of
*
PS/PCL Sensing
This setting must be used
Page 29

< cut top 2" cut 1">
DIIIIIIIIHHHHHHHHIIIIIIIIIIIII
Operator Guide
2-11
PRINTING THE MENUS
The menus contain information on the current
printer environment.
The menus that may be printed include the:
F Control Panel Main Menu
F Printer Setup Menu
F Interface Setup Menu
Printing All the Menus
Step 1. Press the Menu key. The printer is
automatically placed offline and in menu mode.
The display reads:
LANGUAGE
=English
Step 2. Press the Down arrow key. The display reads:
PRINTOUT MENU
Step 3. Press the Enter key. The display reads:
All Menus
Step 4. Press the Enter key. The menus print
automatically. The display reads:
All Menus
Printing...
When all the menus, Control Panel Main Menu,
XEROX 4219/MRP Mid Range Systems Printer
XEROX 4215/MRP Mid Range Systems Printer
Page 30

< cut top 2" cut 1">
DIIIIIIIIHHHHHHHHIIIIIIIIIIIII
2-12
Using the Control Panel
Printing a Selected Menu
Step 1. Press the Menu key. The printer is
automatically placed offline and in menu mode.
The display reads:
LANGUAGE
=English
Step 2. Press the Down arrow key. The display reads:
PRINTOUT MENU
Step 3. Press the Enter key. The display reads:
All Menus
Step 4. Press the Down arrow key until the name of the
setup menu you wish to print displays. The
following setup menus are available:
F Main Menu
F Printer Menu
F Interface Menu
Step 5. Press the Enter key. The menu prints
automatically. The display reads:
Printer Menu
Printing...
XEROX 4219/MRP Mid Range Systems Printer
XEROX 4215/MRP Mid Range Systems Printer
Page 31

< cut top 2" cut 1">
DIIIIIIIIHHHHHHHHIIIIIIIIIIIII
Operator Guide
2-13
Printing Help Pages
Pressing the Help key when you have one of the
menus (Control Panel Main Menu, Printer Setup
Menu, Interface Setup Menu) displayed at the
control panel, gives you an immediate printout
of the layout for the currently displayed menu.
This feature allows you to print the current
menu map without losing your place in the menu
setup. This Help feature can assist you as you
navigate the configuration menus.
It is recommended to use the Help key only when
the printer is not processing a job.
CONTROL PANEL MAIN MENU ITEM DESCRIPTIONS
The Control Panel Main Menu includes these
items:
F Language
F Printout Menu
F Tray Select
F Setup Printer (lower level menu allows you
to change the printer configuration)
F Set Interface (lower level menu allows you
to change the communication interfaces)
F Print Reports
F Tests
XEROX 4219/MRP Mid Range Systems Printer
XEROX 4215/MRP Mid Range Systems Printer
Page 32

< cut top 2" cut 1">
DIIIIIIIIHHHHHHHHIIIIIIIIIIIII
2-14
Using the Control Panel
Language
The language item selection determines which of
five languages is to be used for the message
display and the printer reports. The available
languages are *
English
, Deutsch, Francais,
Italiano, or Espanol.
Printout Menu
This item allows you to print the menu
structure and review the configuration settings
for any menu level. You can select from the
following options:
F All Menus--Prints out all menu structures
(Control Panel Main Menu, Printer Setup
Menu, and Interface Setup Menu). The
display reads:
All Menus
Printing...
F Control Panel Main Menu--Prints out the
Control Panel Main Menu structure and
configuration settings. The display reads:
Main Menu
Printing...
F Printer Menu--Prints out the Printer Setup
Menu structure and configuration settings.
The display reads:
XEROX 4219/MRP Mid Range Systems Printer
XEROX 4215/MRP Mid Range Systems Printer
Page 33

< cut top 2" cut 1">
DIIIIIIIIHHHHHHHHIIIIIIIIIIIII
Operator Guide
2-15
Tray Select
Standard paper trays are identified on the menu
by where the tray is located in the printer.
For the 4219/MRP, the three possible paper tray
locations are the Upper, Middle, and Lower tray
slots. For the 4215/MRP, the two possible
paper tray locations are the Upper and Lower
tray slots. The factory default is the *
tray.
Manual feed trays are identified on the menu as
Manual Feed.
Upper
The Tray Select menu item allows you to select
the following:
Printer Tray The Printer Tray menu item allows
you to select the default paper tray to use for
normal printing operations.
The size paper the tray holds is included in
the tray description.
XEROX 4219/MRP Mid Range Systems Printer
XEROX 4215/MRP Mid Range Systems Printer
Page 34

< cut top 2" cut 1">
DIIIIIIIIHHHHHHHHIIIIIIIIIIIII
2-16
Using the Control Panel
Possible paper sizes for the Manual Feed Tray
include:
F Letter (8.5 x 11 inches)
F Legal (8.5 x 14 inches)
F Exec (7.5 x 10.5 inches)
F Ledger (11 x 17 inches)
F Folio (8.5 x 13 inches)
F A3 (297 x 420 mm)
F A4 (210 x 297 mm)
F A5 (148 x 210 mm)
F B4 (257 x 364 mm)
F B5 (182 x 257 mm)
Possible envelope sizes for the Manual Feed
Tray include:
F COM10 (4.125 x 9.5 inches)
F DL (110 x 220 millimeters)
F C5 (162 x 229 millimeters)
NOTE: For directions on how to load paper and
XEROX 4219/MRP Mid Range Systems Printer
XEROX 4215/MRP Mid Range Systems Printer
Page 35

< cut top 2" cut 1">
DIIIIIIIIHHHHHHHHIIIIIIIIIIIII
Operator Guide
2-17
Auto Tray Swap The Auto Tray Swap menu item
allows you to switch automatically to another
tray, containing the same size paper, when the
active tray is empty. The Auto Tray Swap menu
item selects the order in which trays are used
as the paper source. For example:
F The Off selection means paper is fed from
one tray only.
F The On selection means when the paper tray
empties, the next paper tray with the
correct size paper becomes active.
*On
is
the factory default setting.
If you want Auto Tray Swap to utilize all
available paper trays, all trays should contain
the same size paper.
Print Reports
You can print several reports from the control
panel. This section briefly describes the
information contained in each report. The
reports you can print include:
F Font Report
F Hardware Status Report
F Error Log
XEROX 4219/MRP Mid Range Systems Printer
XEROX 4215/MRP Mid Range Systems Printer
Page 36

< cut top 2" cut 1">
DIIIIIIIIHHHHHHHHIIIIIIIIIIIII
2-18
Using the Control Panel
Hardware Status Report This report provides
information on the status of the printer and
all installed options. The report sections
include:
F Statistical data
F Printer status
Error Log Printing this report gives you a
listing of the latest errors and the
approximate page count of where the error
occurred.
Tests
Other I/O Log Printing this report gives you
the status of the twinax or coax interface.
The printer and twinax or coax interfaces may
be manually tested from the control panel. A
check is performed on each device requested:
Printer or interface or both. After all
requested tests are completed, the Hardware
Status Report prints. See Figure 4-13 in
Chapter 4, “Printing,” for an example of the
Hardware Status Report.
The Tests options include:
XEROX 4219/MRP Mid Range Systems Printer
XEROX 4215/MRP Mid Range Systems Printer
Page 37

< cut top 2" cut 1">
DIIIIIIIIHHHHHHHHIIIIIIIIIIIII
Operator Guide
2-19
Resets
The printer configuration settings and the
interface configuration settings may be reset
to power-on defaults from the control panel.
The following resets are possible:
F Reset All--Resets the printer and all
installed options, in turn, to the power-on
defaults. The message display indicates
that the resets are being performed.
F Reset Printer--Resets the printer to the
power-on defaults. The message display
XEROX 4219/MRP Mid Range Systems Printer
XEROX 4215/MRP Mid Range Systems Printer
Page 38

< cut top 2" cut 1">
DIIIIIIIIHHHHHHHHIIIIIIIIIIIII
2-20
Using the Control Panel
SETUP PRINTER MENU ITEM DESCRIPTIONS
The Setup Printer Menu includes these items:
F Printout menu option
F PCL 5 setup
F Print resolution settings
F Options settings
PCL 5 Setup
The options available through the PCL 5 SETUP
item affect the PCL 5 command set only. The
PCL 5 Setup allows you to select the following:
F Print orientation
F Page formatting
F Symbol set
F Fonts
Orientation Orientation refers to the direction
of print on a page. Portrait orientation
allows you to print lines parallel to the short
Portrait
Landscape
XEROX 4219/MRP Mid Range Systems Printer
XEROX 4215/MRP Mid Range Systems Printer
Page 39

< cut top 2" cut 1">
DIIIIIIIIHHHHHHHHIIIIIIIIIIIII
Operator Guide
2-21
Page Format The following page formatting
options can be set for PCL 5:
F The Lines Per Page formatting option
controls the distance between lines on the
page as well as the number of lines per
page, from 5 to 128. The factory default is
60
lines per page. When 60 lines per page
*
is used, line one of text is placed at the
top margin, line sixty of text is placed at
the bottom margin, and the remaining lines
are spaced equally between the first and
last lines.
F The Line Wrap page formatting option can be
set to On or Off. If the Line Wrap is
enabled, any character that would cause the
XEROX 4219/MRP Mid Range Systems Printer
XEROX 4215/MRP Mid Range Systems Printer
Page 40

< cut top 2" cut 1">
DIIIIIIIIHHHHHHHHIIIIIIIIIIIII
2-22
Using the Control Panel
Symbol Set When you select a symbol set for the
PCL 5 mode, you are selecting a subset of the
available alphabetic and numeric characters,
punctuation, and special-purpose symbols in a
font. *
ROMAN-8
is the factory default symbol
set. Table 2-2 lists the resident symbol sets
PCL 5 Resident Symbol Sets
Internal scalable fonts
and bit-mapped fonts
ROMAN-8 Ventura Math
ECMA94 Latin 1 Ventura US
PC8 PS Text
PC8DN PI Font
PC850 Windows
GERMAN Ventura Intl
Legal PS Math
ISOnn1* Math-8
Spanish Microsoft Pub
Table 2-2
Internal scalable fonts
Desktop
* nn1= 2, 4, 6 (US ASCII), 10, 11, 14, 15, 16,
17, 21, 25, 57, 60, 61, 69, 84, or 85.
Fonts The Fonts selection allows you to select
any of the following fonts as the default font
when using the PCL 5 mode:
F Standard scalable fonts available are Times
and Univers
XEROX 4219/MRP Mid Range Systems Printer
XEROX 4215/MRP Mid Range Systems Printer
Page 41

< cut top 2" cut 1">
DIIIIIIIIHHHHHHHHIIIIIIIIIIIII
Operator Guide
F Standard bit-mapped fonts are LinePrinter in
2-23
16.66cpi/8pt and Courier.
If you select Courier as your default font,
you can change the pitch (characters per
inch, cpi) and point size (measure of the
vertical height of a character) and stroke
weight from medium (no letter designation)
to bold (Bld) or italic (Itl).
Pitch and point sizes available with the
Courier font are:
E 10cpi/12pt (factory default)
E 10cpi/12pt Itl
E 10cpi/12pt Bld
E 12cpi/10pt
E 12cpi/10pt Itl
E 12cpi/10pt Bld
Refer to Chapter 4, “Printing,” for font
samples.
PostScript (P S) Resolution
The printer has high resolution mode PostScript
printing. The modes are:
F
*800 x 400
F 400 x 400
F 300 x 300
The printer uses an innovative compression
XEROX 4219/MRP Mid Range Systems Printer
XEROX 4215/MRP Mid Range Systems Printer
Page 42

< cut top 2" cut 1">
DIIIIIIIIHHHHHHHHIIIIIIIIIIIII
2-24
Using the Control Panel
Refer to Table 2-3 for memory requirements and
the resolutions available for the different
PostScript Print Resolution
Table 2-3
Paper Size 8MB 12MB 20MB
Executive 800x400 800x400 800x400
Folio 800x400 800x400 800x400
Letter 800x400 800x400 800x400
Legal 800x400 800x400 800x400
Ledger 800x400** 800x400 800x400
A5 800x400 800x400 800x400
A4 800x400 800x400 800x400
A3 800x400** 800x400 800x400
B5 800x400 800x400 800x400
B4 800x400** 800x400 800x400
COM10 800x400 800x400 800x400
DL 800x400 800x400 800x400
C5 800x400 800x400 800x400
*** The printer attempts to use 800x400
resolution. If the printer cannot successfully
print the page in 800x400 resolution, the
printer prints the page at 400x400 resolution.
If this occurs, some loss of print quality may
occur. The page may be reprinted at 400x400
resolution to obtain the best possible print
quality.
Notes on Other Resolutions
PCL 5 Resolution Pages generated with the PCL 5
XEROX 4219/MRP Mid Range Systems Printer
XEROX 4215/MRP Mid Range Systems Printer
Page 43

< cut top 2" cut 1">
DIIIIIIIIHHHHHHHHIIIIIIIIIIIII
Operator Guide
2-25
IPDS Resolution Pages generated with IPDS print
in 300 x 300 resolution in all memory
configurations.
PET
Xerox Print Enhancement Technology (PET)
enhances the quality of documents printed at
300 dots per inch (dpi). It is available in
SCS, IPDS, PostScript mode and PCL mode. The
printer is optimized for medium, but the dark
setting normally gives the best results when
printing text and graphics. If however, in
printing certain graphics or photographic
images, you want to change the results, you can
try a lighter PET setting, or turn PET off.
Your PET choices are:
Options
F Dark
F *
Medium
F Light
F Off
The Options Menu selection allows you to enable
or disable the Start Page and select your
communication priority scheme.
PwrUp Start Page If enabled, when you power on
your printer, the Start Page automatically
prints after the initial diagnostic tests are
performed.
XEROX 4219/MRP Mid Range Systems Printer
XEROX 4215/MRP Mid Range Systems Printer
Page 44

< cut top 2" cut 1">
DIIIIIIIIHHHHHHHHIIIIIIIIIIIII
2-26
Using the Control Panel
new characters. The execution of a print job
is determined by which port polling scheme is
selected. The four port polling schemes are:
F Sequential--this scheme assigns no priority
to any port and executes the first print job
received from any enabled port and then
advances to the next enabled port in the
sequence. The sequential polling is:
Parallel, Serial, AppleTalk, Other I/O, and
then back to Parallel. *
Sequential
is the
factory default.
F Priority--this scheme allows you to assign a
high priority to one enabled port (Parallel,
AppleTalk, Serial, or Other I/O). All other
ports have the same lower priority. If new
jobs are received from the priority port
before the jobs on the other ports have
begun executing, the port with the high
priority gets its print jobs printed first
and bumps other jobs with lower priority
ports down the queue.
XEROX 4219/MRP Mid Range Systems Printer
XEROX 4215/MRP Mid Range Systems Printer
Page 45

< cut top 2" cut 1">
DIIIIIIIIHHHHHHHHIIIIIIIIIIIII
Operator Guide
2-27
Panel Security
You can lock the printer control panel so
changes to the printer settings are disallowed
unless the printer is unlocked. Scrolling
through the selections and printing reports and
menu maps is still available.
You can access the lock feature from the printer
keypad. The printer is locked or unlocked by
pressing the Up and Down arrow keys in the
following sequence:
(down, down, up, up)
An asterisk ‘*’ appears each time you press an
arrow key. Press Enter after the sequence.
You can restore the factory defaults to unlock
the printer; however, all other original
XEROX 4219/MRP Mid Range Systems Printer
XEROX 4215/MRP Mid Range Systems Printer
Page 46

< cut top 2" cut 1">
DIIIIIIIIHHHHHHHHIIIIIIIIIIIII
2-28
Using the Control Panel
SET INTERFACE MENU ITEM DESCRIPTIONS
Your printer comes with twinax or coax,
parallel Centronics and serial (RS-232C)
interfaces enabled. Use this menu to configure
the interfaces to meet the needs of your
operation.
Serial and parallel Centronics communication
use special communication parameters. Refer to
your host computer software manuals for details
and make sure your computer and your printer
are using identical settings for each of the
serial and parallel Centronics parameters. In
most cases, you can use the factory default
settings because they are suitable for most
office situations.
Parallel, Serial, and Other I/O (Twinax or Coax)
The parallel, serial and Other I/O (twinax or
coax) interface menu items have two common
options:
F Enable Interface (I/F)
F Printer Type
The serial menu item has an additional option:
Serial Setup.
Enable Interface (I/F) All interfaces
(parallel, serial, and Other I/O) are enabled
(*
On
) when you receive your printer. If you
change this setting to Off, the selected
interface is disabled.
XEROX 4219/MRP Mid Range Systems Printer
XEROX 4215/MRP Mid Range Systems Printer
Page 47

< cut top 2" cut 1">
DIIIIIIIIHHHHHHHHIIIIIIIIIIIII
Operator Guide
2-29
without using the control panel or remote
software commands.
*PS/PCL Sensing
is the
factory default.
NOTE: The printer type for the Other I/O
must be set to
*PS/PCL Sensing
.
F Standard (STD) PostScript
--
with this
setting, the printer recognizes only the
standard PostScript page description
language to describe the appearance of a
printed page. Some of the 256 characters
used by PostScript are interpreted as
control functions only and cannot be
transmitted as data. The control functions
are:
— End of job
— Status (e.g., printer idle)
— Abort (e.g., cancel)
— Xon
— Xoff
F PCL 5
--
with this setting, the printer
recognizes only the PCL 5 command set for
defining a page, selecting fonts, etc.
F Binary Communications Protocol (BCP)
PostScript
--
allows any of the 256 possible
8-bit values to be transmitted as data and
allows certain characters to also specify
control functions, such as:
— End of job
— Status (e.g., printer idle)
— Abort (e.g., cancel)
— Xon
XEROX 4219/MRP Mid Range Systems Printer
XEROX 4215/MRP Mid Range Systems Printer
Page 48

< cut top 2" cut 1">
DIIIIIIIIHHHHHHHHIIIIIIIIIIIII
2-30
Using the Control Panel
F HexDumpMode
F Tagged Binary Communications Protocol
Serial Setup
The following serial interface parameters may
be configured to match the settings on your
host computer:
F Flow control
F Baud rate
F Data bits
--
this setting is a data analysis
tool that diagnoses application software
related problems and communication problems.
PostScript (TBCP PS)
--
allows individual
applications to enable or disable binary
communications on a per job basis with begin
and end protocol functions. All 256
characters can be interpreted as data and
some can also be interpreted as control
functions. TBCP PostScript has the same
control functions as BCP PostScript plus the
begin and end protocol functions.
F Parity
F Data Terminal Ready (DTR) Polarity
Flow Control The Flow Control menu item
regulates the flow of data to the printer for
the serial connection. The following
communication protocols can be selected:
F Xon/Xoff--this is a data stream handshake
where the printer sends an Xon (DC1; 11HEX)
XEROX 4219/MRP Mid Range Systems Printer
XEROX 4215/MRP Mid Range Systems Printer
Page 49

< cut top 2" cut 1">
DIIIIIIIIHHHHHHHHIIIIIIIIIIIII
Operator Guide
F Robust Xon/Xoff--this data stream handshake
2-31
is an extension of the Xon/Xoff data stream
handshake. If no data is received within
one second of the transmission of an Xon, it
sends additional Xon characters at one
second intervals.
F Data Terminal Ready (DTR)--the DTR line
indicates whether or not the printer can
receive data (READY) or not (BUSY). When
the printer is READY, the DTR signal
switches to a HIGH state (unless the DTR
line has been set to inverted operation, in
which it switches to a low state) as a
request for data.
The printer requests data when the print
buffer is near empty.
The printer switches DTR to BUSY when the
print buffer is near full. When the printer
is turned on, the DTR signal is held at BUSY
until the printer has completed SELF TEST
and WARM UP.
Baud Rate (Serial) The Baud Rate is the rate at
which the information is sent from the host
computer to the printer. Baud rate is measured
in bits per second (bps). The factory default
9600
setting is *
and this setting is normally
appropriate, but the setting must correspond to
the baud rate setting at the host computer.
The following baud rates are supported: 300,
600, 1200, 2400, 4800, 9600, 19200, and 38400.
Data Bits (Serial) The serial Data Bits menu
XEROX 4219/MRP Mid Range Systems Printer
XEROX 4215/MRP Mid Range Systems Printer
Page 50

< cut top 2" cut 1">
DIIIIIIIIHHHHHHHHIIIIIIIIIIIII
2-32
Using the Control Panel
The parity on the printer should match the
setting on your host computer. The settings
for parity are: Odd, Even, or None.
*None
is
the factory default.
DTR Polarity The Data Terminal Ready (DTR)
Polarity menu item allows you to select whether
the DTR line on the serial interface is high or
low when the printer is ready to receive data.
The host setting must match the printer
setting.
*High
is the factory default.
PRINTER CONFIGURATION
Once the physical components of the printer are
connected, the printer software may need to be
set up, or configured, to meet the needs of
your office. By configuring your printer, you
are establishing your own default settings.
These settings remain unchanged even through a
power off and on cycle.
Some of the printer configuration options deal
with the print functions, such as:
F Printer language
F Tray selection
F PCL 5 font and page format settings
F Print resolution
F Automatic printing of the Start Page at
XEROX 4219/MRP Mid Range Systems Printer
XEROX 4215/MRP Mid Range Systems Printer
Page 51

< cut top 2" cut 1">
DIIIIIIIIHHHHHHHHIIIIIIIIIIIII
Operator Guide
2-33
Changing the Printer Configuration at the Control Panel
This section shows which keys on the control
panel are used for accessing the menus,
advancing through the menu items, and, if
applicable, changing the configuration
settings.
If necessary, refer to “Control Panel,” in
Chapter 1, “Overview and Installation,” for a
diagram showing the location of the control
panel keys.
Accessing the menu Use the following keys at
the printer control panel to access the menu:
1. Press and release the Menu key. The
printer is automatically placed offline and
in the menu mode. The first item at the
Control Panel Main Menu is displayed. The
display reads:
LANGUAGE
=English
Selecting and Changing the Printer
Configuration Settings
2. When the Control Panel Main Menu is
displayed, the following keys on the
control panel are used to move through the
different menu levels:
Use the Up arrow key to move to the
previous menu item. An arrow pointing up
is displayed in the last position of the
XEROX 4219/MRP Mid Range Systems Printer
XEROX 4215/MRP Mid Range Systems Printer
Page 52

< cut top 2" cut 1">
DIIIIIIIIHHHHHHHHIIIIIIIIIIIII
2-34
Using the Control Panel
Use the Up arrow key to increase the value
of the active (flashing) number in a number
sequence by one when a numeric entry is
required (i.e., lines per page).
Use the Down arrow key to decrease the
value of the displayed number by one when a
numeric entry is required (i.e., lines per
page).
Use the Enter key to set a single numeric
entry in a number sequence and advance to
the next available number in the sequence.
When Enter is pressed after the last number
in the sequence, the numeric entry is set
and the previous menu item displays.
Use the Enter key to move forward to
another group of options associated with
the menu heading currently displayed. This
group is known as sub or lower level
options.
Use the Esc key to move backwards to
display the previous menu level.
Use the Menu key to move to the top menu
level heading.
Use the Enter key to select a displayed
option that is selectable (i.e., the option
is preceded by an underscore “_” or
asterisk “*”). When an option is selected,
XEROX 4219/MRP Mid Range Systems Printer
XEROX 4215/MRP Mid Range Systems Printer
Page 53

< cut top 2" cut 1">
DIIIIIIIIHHHHHHHHIIIIIIIIIIIII
Operator Guide
2-35
MENU MAPS SHOWING THE PATH THROUGH THE MENUS
The following maps illustrate the path you
take to navigate through the menu headings
and associated configuration options.
NOTE: The notations on the following menu
maps represent the following moves or
actions:
A vertical arrow illustrates a move made with
the Up or Down arrow keys.
A horizontal arrow illustrates a move with
the Enter key to a lower level heading.
An asterisk ‘*’ preceding te menu option
indicates that this setting is the default.
XEROX 4219/MRP Mid Range Systems Printer
XEROX 4215/MRP Mid Range Systems Printer
Page 54

< cut top 2" cut 1">
DIIIIIIIIHHHHHHHHIIIIIIIIIIIII
2-36
Using the Control Panel
Language, Printout Menu, Set Interface
*
LANGUAGE
=English
PRINTOUT
MENU
TRAY
English
_Deutsch
_Francais
_Italiano
_Espanol
All Menus
Main Menu
Printer
Menu
SETUP
PRINTER
SET
INTERFAC
PRINT
REPORTS
TESTS
RESETS
PRINTOUT
PARALLEL
SERIAL
OTHER I/O
XEROX 4219/MRP Mid Range Systems Printer
XEROX 4215/MRP Mid Range Systems Printer
Page 55

< cut top 2" cut 1">
DIIIIIIIIHHHHHHHHIIIIIIIIIIIII
Operator Guide
2-37
Tray Select, Printer Tray, Auto Swap
LANGUAGE
=English
PRINTOUT
MENU
TRAY
SETUP
PRINTER
SET
INTERFAC
PRINT
REPORTS
Printer
Tray
Auto Tray
Swap
NOTE: E Middle does not
*
Upper[Lett
er]
_Middle[Let
ter]
_Lower[Lett
*
On
_Off
_Exec
*
_Folio
_Legal
_Ledger
_A5
_B5
_A4
_B4
_A3
_COM10
_DL
_C5
Letter
TESTS
RESETS
XEROX 4219/MRP Mid Range Systems Printer
XEROX 4215/MRP Mid Range Systems Printer
Page 56

< cut top 2" cut 1">
DIIIIIIIIHHHHHHHHIIIIIIIIIIIII
2-38
Using the Control Panel
Setup Printer, PCL 5 Setup, PS Resolution, PET, Options
*
TRAY
SETUP
PRINTER
SET
INTERFAC
PRINT
REPORTS
PRINTOUT
PCL 5
P S
Orientatio
n
Page
Format
Symbol Set
*
800 x 400
_400 x 400
_300 x 300
Portrait
_Landscap
Lines Per
Page
All
available
*Courie
r
_Line
Printer
_Times
Lines
_
On
*Off
*10cpi/12p
t
_10cpi/12p
t Itl
_10cpi/12p
t Bld
*
Medium
_Bold
_Italic
_Bold
_Dark
Medium
*
_Light
_Off
PwrUp
StartPage
SetComPrio
rity
Panel
TESTS
RESETS
PET
OPTIONS
XEROX 4219/MRP Mid Range Systems Printer
XEROX 4215/MRP Mid Range Systems Printer
*
On
_Off
*
Sequenti
al
_Priority
_Sequenti
Enter
Times
Medium
*
Paral
lel
_Seria
*
Paral
lel
_Seria
Page 57

< cut top 2" cut 1">
DIIIIIIIIHHHHHHHHIIIIIIIIIIIII
Operator Guide
2-39
Parallel, Serial, Other I/O Interface
SETUP
PRINTER
PRINTOUT
SET
INTERFAC
PRINT
REPORTS
TESTS
RESETS
PARALLEL
SERIAL
OTHER I/O
Enable
I/F
Enable I/F
Printer
Type
Enable
I/F
*
On
_Off
*
On
_Off
Flow
Control
Baud
Rate
Data
Bits
*
On
_Off
*
PS/PCL
Sensing
_STD
PostScript
_PCL 5
_BCP
*
Xon/Xoff
_Robust
Xon/Xoff
_7
8
*
_Od
d
_Ev
*
Hi
gh
*
PS/PCL Sensing
Must be at this
setting for the
_300
_600
_120
0
_240
0
_480
0
XEROX 4219/MRP Mid Range Systems Printer
XEROX 4215/MRP Mid Range Systems Printer
Page 58

< cut top 2" cut 1">
DIIIIIIIIHHHHHHHHIIIIIIIIIIIII
2-40
Using the Control Panel
Print Reports, Tests, Resets
LANGUAGE
=English
PRINTOUT
MENU
TRAY
SETUP
PRINTER
SET
INTERFAC
PRINT
REPORTS
TESTS
RESETS
Font
Report
H/W
Report
Run All
Tests
Test
Reset All
Reset
Printer
XEROX 4219/MRP Mid Range Systems Printer
XEROX 4215/MRP Mid Range Systems Printer
Page 59

< cut top 2" cut 1">
DIIIIIIIIHHHHHHHHIIIIIIIIIIIII
Operator Guide
2-41
PRINTER CONFIGURATION EXAMPLES
The examples provided in this section
illustrate the step-by-step procedures for
changing the system configuration using the
control panel.
NOTE: For configuration of the twinax/coax
interfaces and IBM printer emulations, use the
Xerox Configuration and Resource and Utility
which is described in the Xerox Twinax Command
Reference and the Xerox Coax Command Reference.
NOTE: The following examples assume the printer
is currently set to factory default
configurations. Pressing Online and Help while
powering up the printer returns the printer to
its factory defaults.
F Printer configuration examples:
A. Settings for the default paper tray and
the automatic tray swap.
B. Turning off the Start Page
C. Setting the default font for PCL 5
mode.
D. Setting the communications port to
priority Other I/O.
F Interface configuration examples :
XEROX 4219/MRP Mid Range Systems Printer
XEROX 4215/MRP Mid Range Systems Printer
Page 60

< cut top 2" cut 1">
DIIIIIIIIHHHHHHHHIIIIIIIIIIIII
2-42
Using the Control Panel
A. Setting the Default Paper Tray and Automatic Tray Swap Setting
To change the paper tray default:
1. Press the Menu key to take the printer
offline and display the Control Panel Main
Menu. The display reads:
LANGUAGE
= English
2. Press the Down arrow key until the display
reads TRAY SELECT.
3. Press the Enter key. The display reads:
Printer Tray
=Upper[Letter] (or A4 for non North
American printers)
4. Press the Enter key. The display reads
*Upper[Letter].
5. Press the Down arrow key until the display
reads _Lower[Letter].
6. Press the Enter key to select the lower
paper tray. *Selected* appears briefly in
the second line of the display. The
display then reads:
XEROX 4219/MRP Mid Range Systems Printer
XEROX 4215/MRP Mid Range Systems Printer
Page 61

< cut top 2" cut 1">
DIIIIIIIIHHHHHHHHIIIIIIIIIIIII
Operator Guide
2-43
To change the Auto Tray Swap setting:
1. Press the Down arrow key until the display
reads:
Auto Tray Swap
=On
2. Press the Enter key. The display reads
*On.
3. Press the Down arrow key to display _Off.
4. Press the Enter key to disable the Auto
Tray Swap function. *Selected* appears
briefly in the second line of the display.
The display then reads:
Auto Tray Swap
=Off
5. Press the Online key to exit the menu and
return the printer ONLINE.
The configuration changes made and entered at
XEROX 4219/MRP Mid Range Systems Printer
XEROX 4215/MRP Mid Range Systems Printer
Page 62

< cut top 2" cut 1">
DIIIIIIIIHHHHHHHHIIIIIIIIIIIII
2-44
Using the Control Panel
B. Turning Off the Start Page
To turn off the Start Page:
1. Press the Menu key to take the printer
offline and display the Control Panel Main
Menu. The display reads:
LANGUAGE
= English
2. Press the Down arrow key until the display
reads SETUP PRINTER.
3. Press the Enter key. The display reads
PRINTOUT MENU.
4. Press the Down arrow key to display
OPTIONS.
5. Press the Enter key. The display reads:
PwrUpStartPage
=On
6. Press the Enter key. The display reads
*On.
7. Press the Down arrow key to display _Off.
8. Press the Enter key to stop the Start Page
from printing at power-up. *Selected*
appears briefly in the second line of the
message display. The display then reads:
XEROX 4219/MRP Mid Range Systems Printer
XEROX 4215/MRP Mid Range Systems Printer
Page 63

< cut top 2" cut 1">
DIIIIIIIIHHHHHHHHIIIIIIIIIIIII
Operator Guide
2-45
C. Setting the Default Font for PCL 5 Mode
This example shows you how to change the
default font from Times-Medium to Courier
12cpi/10pt for PCL 5 mode.
To change the default font for PCL 5 mode:
1. Press the Menu key to take the printer
offline and display the Control Panel Main
Menu. The display reads:
LANGUAGE
= English
2. Press the Down arrow key until the display
reads SETUP PRINTER.
3. Press the Enter key. The display reads
PRINTOUT MENU.
4. Press the Down arrow key to display PCL 5
SETUP.
5. Press the Enter key. The display reads:
Orientation
=Portrait
6. Press the Down arrow key until the display
reads:
Fonts
=Times
7. Press the Enter key. The display reads:
*Times
XEROX 4219/MRP Mid Range Systems Printer
XEROX 4215/MRP Mid Range Systems Printer
Page 64

< cut top 2" cut 1">
DIIIIIIIIHHHHHHHHIIIIIIIIIIIII
2-46
Using the Control Panel
10. Press the Down arrow key until the display
reads _12cpi/10pt.
11. Press the Enter key. *Selected* appears
briefly in the second line of the message
display. The display then reads:
*Courier
=12cpi/10pt
12. Press the Online key to exit the menu and
return the printer ONLINE.
The default font is in place for the PCL 5
mode, now and each time the printer is switched
XEROX 4219/MRP Mid Range Systems Printer
XEROX 4215/MRP Mid Range Systems Printer
Page 65

< cut top 2" cut 1">
DIIIIIIIIHHHHHHHHIIIIIIIIIIIII
Operator Guide
2-47
D. Setting the Communications Port to Priority Other I/O
To change the communications port scheme from
Sequential to Priority Other I/O (twinax or
coax):
1. Press the Menu key to take the printer
offline and display the Control Panel Main
Menu. The display reads:
LANGUAGE
= English
2. Press the Down arrow key until the display
reads SETUP PRINTER.
3. Press the Enter key. The display reads
PRINTOUT MENU.
4. Press the Down arrow key until the display
reads OPTIONS.
5. Press the Enter key. The display reads:
PwrUpStartPage
=On
6. Press the Down arrow key. The display
reads:
SetComPriority
=Sequential
XEROX 4219/MRP Mid Range Systems Printer
XEROX 4215/MRP Mid Range Systems Printer
Page 66

< cut top 2" cut 1">
DIIIIIIIIHHHHHHHHIIIIIIIIIIIII
2-48
Using the Control Panel
9. Press the Enter key. The display then
reads:
*Parallel
10. Press the Down arrow key two times. The
display reads:
_Other I/O
11. Press the Enter key. *Selected* appears
briefly in the second line of the message
display. The display then reads:
SetComPriority
=Priority
12. Press the Online key to exit the menu and
return the printer ONLINE.
XEROX 4219/MRP Mid Range Systems Printer
XEROX 4215/MRP Mid Range Systems Printer
Page 67

< cut top 2" cut 1">
DIIIIIIIIHHHHHHHHIIIIIIIIIIIII
Operator Guide
2-49
E. Specifying PCL 5 Mode for the Serial Interface
This example shows you how to designate the PCL
5 mode for the serial interface.
To specify the PCL 5 mode for serial interface:
1. Press the Menu key to take the printer
offline and display the Control Panel Main
Menu. The display reads:
LANGUAGE
= English
2. Press the Down arrow key until the display
reads SET INTERFACE.
3. Press the Enter key. The display reads
PRINTOUT MENU.
4. Press the Down arrow key until the display
reads SERIAL.
5. Press the Enter key. The display reads:
Enable I/F
= On
6. Press the Down arrow key to display:
Printer Type
=PS/PCL Sensing
7. Press the Enter key. The display reads
*PS/PCL Sensing.
8. Press the Down arrow key to display _PCL 5.
XEROX 4219/MRP Mid Range Systems Printer
XEROX 4215/MRP Mid Range Systems Printer
Page 68

< cut top 2" cut 1">
DIIIIIIIIHHHHHHHHIIIIIIIIIIIII
2-50
Using the Control Panel
10. Press the Online key to exit the menu and
return the printer ONLINE.
The serial interface is set to only recognize
the PCL 5 command language. This configuration
XEROX 4219/MRP Mid Range Systems Printer
XEROX 4215/MRP Mid Range Systems Printer
Page 69

< cut top 2" cut 1">
DIIIIIIIIHHHHHHHHIIIIIIIIIIIII
Operator Guide
2-51
F. Setting the Serial Setup Configuration
This example shows you how to change the data
bits and parity settings for the serial setup
configuration.
1. Press the Menu key to take the printer
offline and display the Control Panel Main
Menu. The display reads:
LANGUAGE
= English
2. Press the Down arrow key until the display
reads SET INTERFACE.
3. Press the Enter key. The display reads
PRINTOUT MENU.
4. Press the Down arrow key until the display
reads SERIAL
5. Press the Enter key. The display reads:
Enable I/F
= On
6. Press the Down arrow key to display Serial
Setup.
7. Press the Enter key. The display reads:
Flow Control
= Xon/Xoff
XEROX 4219/MRP Mid Range Systems Printer
XEROX 4215/MRP Mid Range Systems Printer
Page 70

< cut top 2" cut 1">
DIIIIIIIIHHHHHHHHIIIIIIIIIIIII
2-52
Using the Control Panel
11. Press the Enter key. *Selected* appears
briefly in the second line of the message
display. The display then reads:
Data Bits
= 7
12. Press the Down arrow key to display:
Parity
= None
13. Press the Enter key. The display reads
*None.
14. Press the Up arrow key until the display
reads _Odd.
15. Press the Enter key. *Selected* appears
briefly in the second line of the display.
The display then reads:
Parity
XEROX 4219/MRP Mid Range Systems Printer
XEROX 4215/MRP Mid Range Systems Printer
Page 71

< cut top 2" cut 1">
DIIIIIIIIHHHHHHHHIIIIIIIIIIIII
Chapter 3
3-1
CONFIGURING THE
INTERFACE CARD
This chapter describes:
F Configuring the coax interface card for
default page size and print language
settings
F Configuring the twinax interface card for
default printer language, page size, print
language, printer emulation, and device
address settings
F Configuring the twinax IPDS interface card
for the default printer emulation setting
F Printing the Other I/O Log
F Dual printer lines connected to the
interface card
The default settings described in this chapter
are used whenever a print request does not set
them.
For information on setting defaults through the
Function Selection via Line (FSL) commands,
refer to the
Xerox Coax Command Reference
SETTING THE COAX AND TWINAX DEFAULTS
Figure 3-1 illustrates the top view, and Figure
3-2 illustrates the side view of the coax
interface card. Figure 3-3 illustrates the top
view of the twinax interface card. Figure 3-4
Xerox Twinax Command Reference
.
and
XEROX 4219/MRP Mid Range Systems Printer
XEROX 4215/MRP Mid Ragne Systems Printer
Page 72

< cut top 2" cut 1">
DIIIIIIIIHHHHHHHHIIIIIIIIIIIII
3-2
Configuring the Interface Card
ST1 sets
the
default
paper size
ST2 sets
the
Figure 3-1. Coax Interface Card (top view)
Figure 3-2. Coax Interface Card (Side View)
XEROX 4219/MRP Mid Range Systems Printer
XEROX 4215/MRP Mid Range Systems Printer
1 Test
Button
2 CU LED
(If
light is
not on,
printer
is not
connecte
d)
3 Parallel
share
Page 73

< cut top 2" cut 1">
DIIIIIIIIHHHHHHHHIIIIIIIIIIIII
Operator Guide
3-3
ST1 sets
the default
paper size
ST2 sets
the default
print
language
SW1 sets
Figure 3-3. Twinax Interface Card (Top View)
1 Test
Button
2 Sync LED
3 Parallel
share
port
(reserved
for Xerox
use)
4 Device
Figure 3-4. Twinax Interface Card (Side View)
XEROX 4219/MRP Mid Range Systems Printer
XEROX 4215/MRP Mid Range Systems Printer
Page 74

< cut top 2" cut 1">
aaaaaaaaa
a
a
a
a
a
a
a
a
a
a
a
DIIIIIIIIHHHHHHHHIIIIIIIIIIIII
3-4
Configuring the Interface Card
Page Size
The default page size is set with a 2-pin
jumper (ST1). The jumper is turned OFF by
placing the jumper shunt over only one pin, as
shown in the illustration below. The jumper is
turned ON by covering both pins. Turning the
jumper OFF sets the page size default to U. S.
(8.5x11). Turning the jumper ON sets the page
size default to European A4 (8.27x11.69).
Figures 3-1 (coax) and 3-3 (twinax) show the
ST1
aaaaaaa
aaaaaaa
aaaaaaa
aaaaaaa
aaaaaaa
a
a
a
a
a
XEROX 4219/MRP Mid Range Systems Printer
XEROX 4215/MRP Mid Range Systems Printer
Page 75

< cut top 2" cut 1">
aaaaaaaaaaa
a
a
a
a
a
a
a
a
a
a
a
a
a
DIIIIIIIIHHHHHHHHIIIIIIIIIIIII
Operator Guide
3-5
Print Language
The default print language is determined by the
placement of a shunt over a 3-pin jumper (ST2).
The illustration below shows the jumper
configuration. The printer works properly only
with the jumper in the standard configuration.
The shunt should always be placed over the two
pins closest to the edge of the interface card.
DO NOT move the jumper shunt. The jumper
aaaaaaaaa
aaaaaaaaa
aaaaaaaaa
aaaaaaaaa
aaaaaaaaa
aaaaaaaaa
aaaaaaaaa
a
a
a
a
a
a
a
ST2
Printer Language (twinax only)
Figure 3-5 shows the printer language switch
settings. The default language setting is
configured by your Xerox service representative
XEROX 4219/MRP Mid Range Systems Printer
XEROX 4215/MRP Mid Range Systems Printer
Page 76

< cut top 2" cut 1">
DIIIIIIIIHHHHHHHHIIIIIIIIIIIII
3-6
Configuring the Interface Card
1
2
Ope
1
1
2
Ope
5 Brazil
1
2
Ope
9 France
3 4
3 4
3 4
1
2 US/Canada
1
6
1
10 Italy
2
Ope
2
Ope
Ope
3 4
3 4
2
3 4
1
2
Ope
3
1
2
Ope
7
1
2
Ope
11 Japan
3 4
3 4
3 4
1
4 Belgium
1
8
1
12 Portugal
2
Ope
2
Ope
2
Ope
3 4
3 4
3 4
1
2
Ope
13 Spain
3 4
1
2
Ope
14 Spanish
3 4
Figure 3-5. Printer Language Switch Settings
XEROX 4219/MRP Mid Range Systems Printer
XEROX 4215/MRP Mid Range Systems Printer
1
2
Ope
15 Great
3 4
1
2
Ope
16 Iceland
3 4
Page 77

< cut top 2" cut 1">
DIIIIIIIIHHHHHHHHIIIIIIIIIIIII
Operator Guide
3-7
SETTING THE PRINTER EMULATION AND DEVICE ADDRESS
You may need to change the printer emulation or
printer device address settings at a later
date. Changing the printer emulation and
device address does not require removing the
twinax interface card from the printer.
Procedures for changing the printer emulation
or device address are included in this section.
All other interface card configuration changes
require the removal of the card from the
printer and should be done only by your Xerox
service representative.
NOTE: The coaxial default settings for the
printer device address and printer emulation
can only be set through the FSL Function.
Refer to the
Xerox Coax Command Reference
for
instructions and a complete listing of coax
printers the 4219/MRP and 4215/MRP can emulate.
XEROX 4219/MRP Mid Range Systems Printer
XEROX 4215/MRP Mid Range Systems Printer
Page 78

< cut top 2" cut 1">
DIIIIIIIIHHHHHHHHIIIIIIIIIIIII
3-8
Configuring the Interface Card
Printer
(Model)
3812/16
(in 5219
Type Speed CPI LPI Character Sets
Laser ( 12/24 10, 12, 15
proportion
4, 5.33,
6, 8,
User
selectable
4234 (2, Dot-band 410 lpm 10, 15 3, 4, 6, Depends on
band mounted:
198 characters
4245 Band 2000 lpm 10 6, 8 Depends on
band mounted:
48-142
5219 (D01,
D02)
Daisywheel 24-38 cps 10, 12, 15
proportion
4, 5.33,
6, 8,
Depends on
daisy-wheel
5224 (1, Dot-matrix 60-240 lpm 10, 15 3, 4, 6, Various with
96 and 188
5225 (1, Dot-matrix 90-400 lpm 10, 15 3, 4, 6, Various with
96 and 188
5256 (1, Dot-matrix 120 cps 10 6, 8 Various with
96, 128, and
188 characters
6262 Band 1400 lpm 10 3, 4, 6, Depends on
Table 3-1. Xerox printer twinax emulations
XEROX 4219/MRP Mid Range Systems Printer
XEROX 4215/MRP Mid Range Systems Printer
band mounted:
48-192
Page 79

< cut top 2" cut 1">
DIIIIIIIIHHHHHHHHIIIIIIIIIIIII
Operator Guide
3-9
The address switch is used for setting both the
emulation and the printer address. If you
change the printer emulation, you must then
reset the printer device address. Use the two
part process described below to change the
printer emulation in a twinax environment.
In the first part of the process you set the
printer emulation. To have your printer
emulate one of the printers (listed in Table 3-
1), follow this procedure:
Step 1. Switch the printer off.
Step 2. Disconnect the twinaxial T-cable from the
printer.
Address Emulation
0 3812/5219/3816 (factory
1 5224 SCS printer
2 5225 SCS printer
3 5256 SCS printer
4 4234 SCS printer
5 3812/5219/3816
6 4245/6262 SCS printer
If, for example, you want to change the printer
to emulate a 5226, turn the address switch to
3.
Step 4. Gently Press in the test button (identified in
Figure 3-4), and keep the test button depressed
through step 6.
XEROX 4219/MRP Mid Range Systems Printer
XEROX 4215/MRP Mid Range Systems Printer
Page 80

< cut top 2" cut 1">
DIIIIIIIIHHHHHHHHIIIIIIIIIIIII
3-10
Configuring the Interface Card
Step 6. After the printer powers up, the green test
light flashes two times. Wait ten seconds
after the green light flashes and release the
test button.
The Start Page (see Figure 1-26) prints (if
enabled), followed by a page with the following
single line item:
CURRENT EMULATION IS 5256
The printer emulation is now stored in
nonvolatile memory.
Printer Address At this point the printer
emulation is set, but the printer address is
not. In the second part of the process you set
Step 9. Connect the twinaxial printer cable.
Step 10. Switch the printer on again.
The Start Page (see Figure 1-26) prints (if
enabled), followed by the Twinax Configuration
Report.
Step 11. Verify that the printer address has been set
correctly by checking the Line Set Up field on
the Twinax Configuration Report. For this
XEROX 4219/MRP Mid Range Systems Printer
XEROX 4215/MRP Mid Range Systems Printer
Page 81

< cut top 2" cut 1">
DIIIIIIIIHHHHHHHHIIIIIIIIIIIII
Operator Guide
3-11
Setting the IPDS Printer Emulation
If you have the IPDS module installed, the
printer emulation assignments change within the
twinaxial environment.
To set the printer emulation for an IPDS twinax
printer, follow the procedure in the “Setting
Address Emulation
0 3812/5219/3816
1 5224 SCS printer
2 5225 SCS printer
3 5256 SCS printer
4 4234 SCS printer
5 IPDS printer (factory
6 4245/6262 SCS printer
Setting the Printer Device Address
To set the printer device address, follow the
steps below:
Step 1. Switch the printer off.
Step 2. Disconnect all twinaxial cabling from the
printer.
XEROX 4219/MRP Mid Range Systems Printer
XEROX 4215/MRP Mid Range Systems Printer
Page 82

< cut top 2" cut 1">
DIIIIIIIIHHHHHHHHIIIIIIIIIIIII
3-12
Configuring the Interface Card
The device address switch set to device address
switch is set to address 5 in the illustration
Step 4. Connect all twinaxial cables.
Step 5. Switch on the printer.
PRINTING THE OTHER I/O LOG
To print the Other I/O Log, press the Test
button on the interface card (refer to Figure
3-6 for side views of the Twinax and Coax
1 Twinax Test
Figure 3-6. Twinax/Coax Interface Card Test
2 Coax Test
XEROX 4219/MRP Mid Range Systems Printer
XEROX 4215/MRP Mid Range Systems Printer
Page 83

< cut top 2" cut 1">
DIIIIIIIIHHHHHHHHIIIIIIIIIIIII
Operator Guide
3-13
Refer to the “Other I/O Log” section of Chapter
4, “Printing,” for examples of the following
Other I/O Log reports:
F Twinax Interface Configuration Report
F Coax Interface Configuration Report
F IPDS - Settings Printout
F IPDS - IPDS Resident Fonts
F IPDS - IPDS Resident Codepages
F IPDS - Resource List Printout
DUAL PRINTER LINES
The 4219/MRP and 4215/MRP offer dual printer
emulation capabilities in which a twinax
interface card can be configured to emulate an
IPDS and an SCS printer simultaneously.
Sharing the printer between IPDS and SCS
emulations requires the use of the FSL 37
command. Refer to the
for further information.
IPDS HARDWARE DIAGNOSTIC MESSAGES
IPDS Command Reference
XEROX 4219/MRP Mid Range Systems Printer
XEROX 4215/MRP Mid Range Systems Printer
Page 84

< cut top 2" cut 1">
DIIIIIIIIHHHHHHHHIIIIIIIIIIIII
3-14
Configuring the Interface Card
IPDS Hardware Diagnostic Messages
IPDS hardware
diagnostics
message
0x8020 :
IPDS module
0x8021 :
IPDS module
ROM checksum
0x8022 :
IPDS module
DRAM error.
0x8023 :
IPDS module
timer error.
0x8024 :
IPDS module
Flash
Table 3-2
Result/Reason Action
IPDS module has Call your Xerox
service
representative.
IPDS module has Call your Xerox
service
representative.
IPDS module has Call your Xerox
service
representative.
IPDS module has Call your Xerox
service
representative.
An error occurred
in the Flash PROM,
so it is not
possible to use
the contents of
the Flash. All
Flash PROM
settings revert to
factory defaults,
including fonts
and codepages. If
the power was
switched OFF while
1. Power OFF
the printer.
2. Power ON the
printer.
3. Reset
default
settings,
including
XEROX 4219/MRP Mid Range Systems Printer
XEROX 4215/MRP Mid Range Systems Printer
Page 85

< cut top 2" cut 1">
aaaaaaaaaaaaaaaaaaa
a
a
a
a
a
a
a
a
a
a
a
a
a
a
a
a
a
a
a
a
a
a
a
a
aaaaaaaaaaaaaaa
a
a
a
a
a
a
a
a
a
a
a
a
a
a
a
a
a
a
a
a
a
a
a
a
a
a
a
a
a
a
a
a
a
a
a
DIIIIIIIIHHHHHHHHIIIIIIIIIIIII
Chapter 4
4-1
PRINTING
This chapter discusses printing preparations
and procedures. The following information is
presented:
F Image area
F Selecting fonts
F Sending a print job
F Printing on envelopes, transparencies and
labels
IMAGE AREA
F Printing Reports
— Font Report
— Hardware Status Report
— Error Log
— Other I/O Log
There is an area of space on the outside edge
of the paper that is unavailable for printing.
aaaaaaaaaaaaa
aaaaaaaaaaaaa
aaaaaaaaaaaaa
aaaaaaaaaaaaa
aaaaaaaaaaaaa
aaaaaaaaaaaaa
aaaaaaaaaaaaa
aaaaaaaaaaaaa
aaaaaaaaaaaaa
aaaaaaaaaaaaa
aaaaaaaaaaaaa
aaaaaaaaaaaaa
aaaaaaaaaaaaa
aaaaaaaaaaaaa
aaaaaaaaaaaaa
aaaaaaaaaaaaa
aaaaaaaaaaaaa
a
a
a
a
a
aaaaaaaaaaaaaaaaa
a
aaaaaaaaaaaaaaaaa
a
aaaaaaaaaaaaaaaaa
a
aaaaaaaaaaaaaaaaa
a
aaaaaaaaaaaaaaaaa
a
aaaaaaaaaaaaaaaaa
a
aaaaaaaaaaaaaaaaa
a
aaaaaaaaaaaaaaaaa
a
aaaaaaaaaaaaaaaaa
a
aaaaaaaaaaaaaaaaa
a
aaaaaaaaaaaaaaaaa
a
aaaaaaaaaaaaaaaaa
a
aaaaaaaaaaaaaaaaa
XEROX 4219/MRP Mid Range Systems Printer
XEROX 4215/MRP Mid Range Systems Printer
Page 86

< cut top 2" cut 1">
DIIIIIIIIHHHHHHHHIIIIIIIIIIIII
4-2
Printing
SELECTING FONTS
Fonts are selected through your application
software, through printer commands to select a
font, or for PCL 5 at the control panel. The
font you select is used unless you change it.
Fonts are selected by the Xerox Configuration
and Resource Utility for Twinax and Coax
printing.
Default Font for the PCL 5 Mode
You may select a default font for the PCL 5
mode either through a PCL 5 command set,
through your application software, or by
accessing the PCL 5 SETUP option at the Printer
Setup Menu. The default font you select at the
menu is used unless you:
F Change your selection at the menu.
F Select a different font through your
application software.
F Send a printer command to select a font with
your document.
A factory default font has been established for
the PCL 5 mode and is listed on the Printer
Setup Menu for the PCL 5 SETUP.
SENDING A PRINT JOB
Before you begin to print, make sure that the
interface cable or cables between the host
XEROX 4219/MRP Mid Range Systems Printer
XEROX 4215/MRP Mid Range Systems Printer
Page 87

< cut top 2" cut 1">
DIIIIIIIIHHHHHHHHIIIIIIIIIIIII
Operator Guide
4-3
If the Xerox IPDS option is installed, then
IPDS data also is supported by the printer.
NOTE: The Other I/O (twinax or coax) interface
must always be set for “Emulation sensing” to
function for processing IBM SCS or IPDS data.
To dedicate a communications port to receive a
specific printer language, refer to Chapter 2,
“Using the Control Panel.” For an example of
how to do this, refer to “Printer Configuration
Examples” in Chapter 2.
Send a job from your host computer to be
printed. Refer to the manual provided with
your application software or host operating
system for specific instructions on printing.
LAST PAGE IS NOT EJECTED
If “Waiting...” still displays after the
printer activity has stopped and no more pages
are ejected, refer to the following.
When Using PCL 5 Command Set or IBM SCS or IPDS emulations
You must manually eject the remaining page of
the document or wait until the printer times
out. When the printer times out, the remaining
page prints. To manually eject the page,
follow these steps:
XEROX 4219/MRP Mid Range Systems Printer
XEROX 4215/MRP Mid Range Systems Printer
Page 88

< cut top 2" cut 1">
DIIIIIIIIHHHHHHHHIIIIIIIIIIIII
4-4
Printing
PRINTING FROM THE MANUAL FEED TRAY
The Manual Feed Tray is used for printing on
special papers such as labels, envelopes, and
transparencies.
To print on odd-sized or nonstandard weight (16
to 32 lb or 60 to 120 gsm) papers or special
materials, such as labels or transparencies,
you must use the Manual Feed Tray to manually
insert one sheet at a time.
To use the Manual Feed Tray, it is necessary to
either:
F Send a command from your host computer to
the printer requesting manual feed, or
F Select Manual Feed at the control panel, by
accessing the Control Panel Main Menu.
SELECTING THE MANUAL FEED TRAY
The Manual Feed Tray can be selected through
your software application or by using the
control panel. Refer to your software
application documentation; or to use the
control panel, follow these steps: (In the
following example, Tray means Upper, Middle, or
XEROX 4219/MRP Mid Range Systems Printer
XEROX 4215/MRP Mid Range Systems Printer
Page 89

< cut top 2" cut 1">
DIIIIIIIIHHHHHHHHIIIIIIIIIIIII
Operator Guide
4-5
Step 3. Press the Enter key. The display reads:
Printer Tray
=Tray[Paper Size]
Step 4. Press the Enter key. The display reads:
*Tray[Paper Size]
Step 5 Press the Down arrow key until the display
reads:
_Manual Feed
=Letter(8.5x11)
Step 6. Press the Enter key. The display reads:
*Letter(8.5x11)
NOTE: If Letter(8.5x11) is
not
the paper size
you are using with the Manual Feed Tray, skip
steps 7 and 8. Continue with step 2 in the
next section, “Selecting a Paper Size for
Manual Feed.”
Step 7. Press the Enter key. “*Selected*” appears
momentarily in the second line of the display,
and then the display reads:
Printer Tray
=Manual Feed
Step 8. Press the Online key to place the printer
online.
XEROX 4219/MRP Mid Range Systems Printer
XEROX 4215/MRP Mid Range Systems Printer
Page 90

< cut top 2" cut 1">
DIIIIIIIIHHHHHHHHIIIIIIIIIIIII
4-6
Printing
Manual Feed Paper Sizes
Table 4-1
Paper Size
Letter 8.5 x 11 inches
Legal 8.5 x 14 inches
Exec 7.25 x 10.5
Folio 8.5 x 13 inches
Ledger 11 x 17 inches
A3 297 x 420 mm
A4 210 x 297 mm
A5 148 x 210 mm
B4 257 x 364 mm
B5 182 x 257 mm
Step 1. Follow steps 1 through 6 in the previous
section, “Selecting Manual Feed at the
Printer.” The display reads:
*Letter(8.5x11)
Step 2. Press the Up or Down arrow keys until the
display reads the paper size or envelope name
you wish to use for manual feed. The display
reads:
_Paper Name (Paper Size)
Step 3. Press the Enter key. “*Selected*” appears
XEROX 4219/MRP Mid Range Systems Printer
XEROX 4215/MRP Mid Range Systems Printer
Page 91

< cut top 2" cut 1">
DIIIIIIIIHHHHHHHHIIIIIIIIIIIII
Operator Guide
4-7
Step 4. Press the Online key to place the printer
online.
Face-up Output Tray
When you use special materials, it is
recommended that you use the Face-up Output
Tray as the output tray. The paper path from
the manual feed slot to the Face-up Output Tray
is straighter and is less likely to jam on
special materials, i.e. transparencies.
Refer to “Installing the Face-up Output Tray,”
in Chapter 1, “Overview and Installation,” for
instructions on how to install and use the
Face-up Output Tray.
USING THE MANUAL FEED TRAY
When you send a job to the printer and manual
feed has been selected as the paper source, the
following message displays:
MANUAL[Paper Size]
NOTE: A paper jam can occur if paper is fed
into the manual feed slot before this message
appears. Paper jams and other errors are
accompanied by a beeper sound.
Feeding Paper through the Manual Feed Slot
Follow these steps when feeding a single sheet
of paper through the manual feed slot:
XEROX 4219/MRP Mid Range Systems Printer
XEROX 4215/MRP Mid Range Systems Printer
Page 92

< cut top 2" cut 1">
DIIIIIIIIHHHHHHHHIIIIIIIIIIIII
4-8
Printing
Step 4. Place a single sheet of paper, label stock,
transparency, etc., on the tray, between the
feed guides. The right and left feed guides
should be touching the edges of the paper.
NOTE: The paper should be inserted
first
to ensure proper portrait or landscape
short edge
orientation.
Step 5. Insert the sheet of paper into the manual feed
slot until it meets resistance. Keep the paper
straight (aligned and flush with the right and
Figure 4-1. Feeding Paper through the Manual
Feed Slot
If your manual feed print job is not completed,
continue at step 6.
Feeding Subsequent Sheets into the Manual Feed
XEROX 4219/MRP Mid Range Systems Printer
XEROX 4215/MRP Mid Range Systems Printer
Page 93

< cut top 2" cut 1">
DIIIIIIIIHHHHHHHHIIIIIIIIIIIII
Operator Guide
4-9
Step 6. Watch for the MANUAL[Paper Size] message. The
message indicates that the printer is ready to
accept the next sheet of paper.
NOTE: The previous sheet should have fallen
Figure 4-2. Feeding Subsequent Sheets of
Paper through the Manual Feed
Slot
Step 8. Maintain pressure on the sheet until it moves
XEROX 4219/MRP Mid Range Systems Printer
XEROX 4215/MRP Mid Range Systems Printer
Page 94

< cut top 2" cut 1">
DIIIIIIIIHHHHHHHHIIIIIIIIIIIII
4-10
Printing
When the Manual Print Job is Finished
Step 1. Return the manual feed tray to its original
position, as shown in Figure 4-3.
Figure 4-3. Closing the Manual Feed Tray
XEROX 4219/MRP Mid Range Systems Printer
XEROX 4215/MRP Mid Range Systems Printer
Page 95

< cut top 2" cut 1">
DIIIIIIIIHHHHHHHHIIIIIIIIIIIII
Operator Guide
4-11
Step 2. If you used the Control Panel Main Menu to
select manual feed and paper size, you need to
use the control panel to return the current
tray and paper size settings to their original
settings. Press the Menu key. The printer is
automatically placed offline and in menu mode.
The display reads:
LANGUAGE
=English
Step 3. Press the Down arrow key until the display
reads:
TRAY SELECT
Step 4. Press the Enter key. The display reads:
Printer Tray
=Manual Feed
Step 5. Press the Enter key. The display reads:
*Manual Feed
=Paper Name (Paper Size)
Step 6. Press the Down or Up arrow key until the
original tray and paper size displays:
_Tray[Paper Name]
Step 7. Press the Enter key. “*Selected*” displays
momentarily. Then the display reads:
Printer Tray
XEROX 4219/MRP Mid Range Systems Printer
XEROX 4215/MRP Mid Range Systems Printer
Page 96

< cut top 2" cut 1">
DIIIIIIIIHHHHHHHHIIIIIIIIIIIII
4-12
Printing
Preventing Manual Feed Problems
It is important to carefully follow the manual
feeding procedures to reduce the risk of paper
handling problems, such as paper jams and
skewed images (print appears on the sheet out
of alignment, slanted at an angle).
Paper jams are usually the result of early
feeds. The sheet is fed before the preceding
sheet has cleared the paper path by dropping
onto the output tray.
NOTE: If paper jams do occur, refer to the
“Clearing a Paper Jam and Resuming the Job,”
section in Chapter 5, “Care and Maintenance,”
for the correct way to clear the jammed paper.
A skewed image is usually the result of:
F The sheet not being flush against both the
XEROX 4219/MRP Mid Range Systems Printer
XEROX 4215/MRP Mid Range Systems Printer
Page 97

< cut top 2" cut 1">
DIIIIIIIIHHHHHHHHIIIIIIIIIIIII
Operator Guide
4-13
PRINTING ON ENVELOPES
Envelopes are fed one at a time through the
manual feed slot.
Addresses are formatted to print on standard
sized envelopes. You can select one of the
standard envelopes listed in Table 4-2 using
the TRAY SELECT menu item. To assure optimum
print quality, refer to “Recommended Image Area
for Envelopes,” later in this chapter.
Envelope Size Requests
Envelope Name Envelope Size
Business (Com 4.125 by 9.5 inches
International DL 110 by 220 millimeters
International C5 162 by 229 millimeters
Table 4-2
Selecting Manual Feed and Envelope Size
at the Control Panel
Single envelopes are printed using the Manual
Feed Tray. Follow these procedures to select
the Manual Feed Tray: (In the following
example, Tray means Upper, Middle, or Lower.)
Step 1. Press the Menu key. The printer is
automatically placed offline and in menu mode.
The display reads:
XEROX 4219/MRP Mid Range Systems Printer
XEROX 4215/MRP Mid Range Systems Printer
Page 98

< cut top 2" cut 1">
DIIIIIIIIHHHHHHHHIIIIIIIIIIIII
4-14
Printing
Step 2. Press the Down arrow key until the display
reads:
TRAY SELECT
Step 3. Press the Enter key. The display reads:
Printer Tray
=Tray[Paper Size]
Step 4. Press the Enter key. The display reads:
*Tray[Paper Size]
Step 5. Press the Down arrow key until the display
reads:
Manual Feed
=Letter[8.5x11]
Step 6. Press the Enter key. The display reads:
*Letter(8.5x11)
Follow these procedures to select the envelope
size:
Step 7. Press the Down arrow key until the display
reads the name of the envelope you wish to use
for manual feed. The display reads:
_Envelope Name
Step 8. Press the Enter key. “*Selected*” appears
momentarily in the second line of the display,
XEROX 4219/MRP Mid Range Systems Printer
XEROX 4215/MRP Mid Range Systems Printer
Page 99

< cut top 2" cut 1">
DIIIIIIIIHHHHHHHHIIIIIIIIIIIII
Operator Guide
4-15
Using the Manual Feed Tray for Envelopes
Standard envelopes are printed one at a time,
using the manual feed tray.
When you send an address to the printer and
manual feed has been selected as the paper
source, the beeper sounds and the following
message displays:
MANUAL[Paper Size]
NOTE: A paper jam can occur if an envelope is
fed into the manual feed slot before this
message appears. Paper jams and other errors
are accompanied by a beeper sound.
Feeding a Single Envelope through the Manual
Feed Slot Follow these instructions when
feeding a single envelope through the manual
feed slot:
NOTE: When you use the Manual Feed Tray, it is
recommended that you use the Face-up Output
Tray as the output tray. Refer to the section,
“Installing the Face-up Output Tray,” in
Chapter 1.
Step 1. Push down on the manual feed tray tab to open
the tray.
Step 2. Move the right and left adjustable feed guides
XEROX 4219/MRP Mid Range Systems Printer
XEROX 4215/MRP Mid Range Systems Printer
Page 100

< cut top 2" cut 1">
DIIIIIIIIHHHHHHHHIIIIIIIIIIIII
4-16
Printing
NOTE: Envelopes are fed right side up (flap
side down). If the envelope flap is on the
long edge of the envelope, place the closed
fold against the right feed guide. If the
envelope flap is on the short edge of the
Figure 4-4. Envelope Orientation Diagram
XEROX 4219/MRP Mid Range Systems Printer
XEROX 4215/MRP Mid Range Systems Printer
 Loading...