


Xerox 4219/MRP
Xerox 4215/MRP
Mid Range Systems Printers
Installation Planning Guide
XEROX
February 1994
720P13290

Xerox Corporation
701 S. Aviation Boulevard
El Segundo, CA 90245
© 1994 by Xerox Corporation. All rights reserved.
Copyright protection claimed includes all forms and matters of
copyrightable material and information now allowed by statutory
or judicial law or hereinafter granted, including without limitation,
material generated from the software programs which are
displayed on the screen, such as icons, screen displays, looks,
etc.
Printed in the United States of America
Xerox® and all Xerox products mentioned in this publication are
trademarks of XEROX CORPORATION. Adobe® and PostScript®
are trademarks of Adobe Systems, Incorporated. AS/400® is a
trademark of International Business Machines Corporation.
CS Triumvirate and CS Triumvirate Condensed are trademarks of
Agfa Corporation. CS Century Schoolbook, CS Courier, CS
Letter Gothic, CS Omega, CS Palacio, CS Times, are licensed to
Xerox Corporation by Agfa Corporation. ITC Avant Garde
Gothic®, ITC Bookman®, ITC Garamond®, ITC Korinna®, ITC New
Baskerville®, ITC Souvenir®, ITC Zapf Chancery® and ITC Zapf
Dingbats® are trademarks licensed to Xerox Corporation by
International Typeface Corporation.
Helvetica®, Palatino®, Times, and Univers® are trademarks of
Linotype-Hell AG and/or its subsidiaries. Monotype Bodoni is a
trademark of the Monotype Corporation plc. Other product
names used herein are trademarks of their respective owners.
Some excerpts from definitions and charts of Adobe Systems
Incorporated and Hewlett-Packard Company have been used
herein.
Changes are periodically made to this document. Changes,
technical inaccuracies, and typographic errors will be corrected in
subsequent editions.
This document was created on the Xerox 6085 Professional
Computer System using VP software. The typeface is Optima.
Installation caution
Safety
Notices
The Xerox 4219/MRP and 4215/MRP Mid Range Systems Printers
cannot be installed by customers. Only a Xerox service
representative should install the equipment.
CAUTION: This equipment generates, uses, and can radiate radio
frequency energy, and if not installed and used in accordance
with the installation requirements, may cause interference to
radio communications.
U.S.A.
This equipment has been tested and found to comply with the
limits for a Class A digital device pursuant Part 15 of the FCC
rules. These limits are designed to provide reasonable protection
against harmful interference when the equipment is operated in a
commercial environment. Operation of this equipment in a
residential area is likely to cause harmful interference, in which
case, the user is required to correct the interference at personal
expense.
Canada
This digital apparatus does not exceed the Class A limits for radio
noise emissions from digital apparatus as set out in the radio
interference regulations of the Canadian department of
communications.
Les present appareil numerique n’emet pas de bruits
radioelectriques depassant les limites applicables aux appareils de
Classe A prescitees dans le reglement sur le brouillage
radioelectrique edicte par les ministre des communications du
Canada.
Europe: 50 Hz, 220 to 240 V equipment
This equipment has been tested and certified in conformance
with European commission directive 82/499/ECC and VDE
0871/0875, Class A, relating to radio frequency interference.
XEROX 4219/MRP AND 4215/MRP INSTALLATION PLANNING GUIDE iii
NOTICES
Laser safety
The 4219/MRP and 4215/MRP comply with appropriate safety
standards.
Specifically regarding lasers, the equipment complies with laser
product performance standards set by governmental,
international and national agencies as a Class 1 laser product. It
does not emit hazardous light; the beam is totally enclosed
during all phases of customer operation and maintenance.
WARNING: Use of controls or adjustments or performance of
procedures other than those specified herein may result in
hazardous radiation exposure.
Warning labels
There are several user accessible Laser Safety Warning labels
located on the printer. An example is shown below.
iv XEROX 4219/MRP AND 4215/MRP SYSTEMS INSTALLATION PLANNING GUIDE

Operational safety
NOTICES
These laser warning labels are placed on panels that cover areas
that are not operator serviceable. These panels are not to be
removed.
Your Xerox equipment and supplies are designed and tested to
meet strict safety requirements. These include safety agency
examination, approval, and compliance with established
environmental standards.
Attention to the following notes ensures the continued safe
operation of your equipment.
Do this
Always connect equipment to a properly grounded power source
receptacle. If in doubt, have the receptacle checked by a
qualified electrician.
WARNING: Improper connection of the equipment grounding
conductor can result in electrical shock.
Always place equipment on a floor or table with adequate
strength for the weight of the machine.
Always have at least two people move or relocate the
equipment.
Always use materials and supplies specifically designed for your
Xerox equipment.
WARNING: Use of unsuitable materials may result in poor
performance and can possibly create a hazardous condition.
Do not do this
Never attempt any maintenance function that is not specifically
described in this document.
Never remove any covers or guards that are fastened with screws
unless otherwise instructed. You cannot service areas within
these covers.
Never override or “cheat” electrical or mechanical devices.
Never operate the equipment if you notice unusual noises or
odors. Disconnect the power cord from the power source
receptacle and call Xerox service to correct the problem.
U.S. only: If you need any additional safety information
concerning the equipment or Xerox supplied materials, call the
following toll-free number: 1-800-828-6571.
Approvals and certification
60 Hz, 115 V Listed by Underwriters Laboratories, UL1950 (UL). Meets CSA
standards, C22.2 NO 950 (CSA).
50 Hz, 220 to 240 V Meets the British Standards Institution, IEC950 (BSI).
XEROX 4219/MRP AND 4215/MRP INSTALLATION PLANNING GUIDE v


Table of contents
Notices iii
Installation caution iii
Safety iii
Laser safety iv
Operational safety v
Introduction ix
About this guide ix
Contents ix
Conventions x
Related publications x
Xerox 4219/MRP and 4215/MRP library x
PostScript and PCL references xi
1. Overview 1-1
Standard features 1-1
Coax interface features 1-3
Twinax interface features 1-4
Optional features 1-4
Printer components 1-5
2. Installation planning tasks 2-1
Xerox responsibilities 2-1
Your responsibilities 2-2
Installation countdown log 2-3
3. Preinstallation 3-1
Delivery requirements 3-1
4219/MRP 4215/MRP dimensions 3-1
Space requirements 3-2
Electrical requirements 3-2
Operating environment 3-3
Noise level 3-3
Special configurations 3-3
Coax interface configurations 3-4
Twinax interface configurations 3-4
Non-printable area 3-6
XEROX 4219/MRP AND 4215/MRP INSTALLATION PLANNING GUIDE vii

TABLE OF CONTENTS
4. Connectivity 4-1
Coax environment 4-1
Twinax environment 4-2
PC direct connect environment 4-3
5. Preparing the installation checklists 5-1
Completing Checklist 3: General setup 5-1
Completing Checklist 4: Setup Printer—PCL 5 Setup 5-2
Completing Checklist 5: Setup Printer— PostScript Resolution,
Print Enhancement, Communications Priority, Panel Security 5-3
Completing Checklist 6: Parallel, Serial, Other I/O 5-4
Appendices
A. Ordering fonts, options, and supplies A-1
B. Interface support B-1
C. Checklists C-1
Glossary GLOSSARY-1
Index INDEX-1
viii XEROX 4219/MRP 4215/MRP INSTALLATION PLANNING GUIDE

About this guide
Contents
Introduction
This guide helps you prepare for the installation of the Xerox
4219/MRP and 4215/MRP Mid Range Systems Printers.
Information is provided on each 4219/MRP and 4215/MRP
component and its installation requirements.
This guide directs the site planner in preinstallation procedures,
as well as ongoing activities after the printer has been installed.
This guide contains the following chapters:
Chapter 1 “Overview” presents a general overview of the printer and its
components.
Chapter 2 “Installation planning tasks” discusses preinstallation and
installation planning tasks. It identifies areas of responsibility and
the assignment of tasks. An installation countdown log is
included.
Chapter 3 “Preinstallation” explains tasks that must be performed prior to
installation to prepare the site. Electrical and environmental
specifications are included in this chapter.
Chapter 4 “Connectivity” gives an overview of the connectivity possibilities
by environment.
Chapter 5 “Preparing the installation checklists” guides you through the
options listed on the installation checklists which you must
complete prior to installation day.
Appendix A “Ordering fonts, options, and supplies” describes how to order
fonts, describes the available printer options, and explains how
to obtain Xerox service and supplies. A complete supplies and
accessories list is included.
Appendix B “Interface support” discusses the interface support available for
the printer.
Appendix C “Checklists” contains configuration checklists that help your
Xerox service representative configure your 4219/MRP or
4215/MRP on installation day.
A glossary is also included at the end of this guide.
XEROX 4219/MRP AND 4215/MRP INSTALLATION PLANNING GUIDE ix

INTRODUCTION
Conventions
This guide uses the following conventions throughout.
italics Italics are used for document and library names (for example, the
Xerox Coax Command Reference).
WARNING: Warnings are associated with the safety of people.


Standard features
1. Overview
The Xerox 4219/MRP and 4215/MRP Mid Range Systems Printers
connect directly to your IBM AS/400 mid range computer or IBM
host system. The paper handling features support shared printer
requirements.
Your printer accepts commands and data from an IBM coax or
twinax host, depending on the interface card installed on the
printer controller board.
This chapter describes standard and optional features, as well as
those features uniquely designed to support the coax or twinax
environments.
Standard features of the printer include:
• Support for twinaxial or coaxial environments, depending on
the interface card installed
• Emulation of IBM printers
• Support of popular industry standard print languages:
— IBM Standard SCS
— Hewlett-Packard Printer Control Language (PCL 5)
— Adobe PostScript Level 2
— Intelligent Printer Data Stream (optional)
• Xerox Configuration and Resource Utility that allows you to
configure the printer twinax or coax interface through a
menu-driven interface from your host system. This utility also
downloads fonts and forms from the host system to the
printer
• PS/PCL Sensing that allows the printer to switch automatically
among the print languages, based on the print language of
the incoming job in the data stream sent to the printer
• R-S232C serial interface
• Enhanced parallel port (Centronics)
• 105 fonts:
— 35 PostScript scalable fonts
— 8 scalable Hewlett-Packard IIISi fonts
— 7 bitmapped Hewlett-Packard IIISi fonts
— 55 IBM 3816 downloadable emulation fonts
• Multiple active ports, with sequential or priority servicing
• Connections for two optional I/O interfaces
XEROX 4219/MRP AND 4215/MRP INSTALLATION PLANNING GUIDE 1-1

OVERVIEW
• 300 x 300 dots per inch (dpi), 400 x 400 dpi, and high
resolution 400 x 800 dpi available in Adobe PostScript Level 2
page description language (PDL)
• 300 x 300 dpi in PCL 5 printer language
• 300 x 300 dpi in SCS
• Xerox Print Enhancement Technology (PET) available in 300 x
300 dpi
• High-capacity output tray (approximately 500 sheets) with
tray-full detection
• 4215/MRP only: one High Capacity Paper Tray (letter, 8.5 x
11 inches or A4 (210 x 297 millimeters) and one
nonmotorized Letter or A4 Paper Tray. The 4215/MRP holds
approximately 750 sheets in its standard configuration.
4219/MRP only: three High Capacity Paper Trays (letter, 8.5 x
11 inches or A4, 210 x 297 millimeters) holding
approximately 1,500 sheets in its standard configuration.
• 4215/MRP only: prints up to 15 letter or A4 pages per
minute (ppm)
4219/MRP only: prints up to 20 letter or A4 ppm
• Handles paper sizes from 8.5 by 5.5 inches up to 11 by 17
inches or A3.
• Prints on the following materials:
— 16 to 32 pound (60 to 120 GSM) paper in the main trays
— Transparencies
— Labels
— Letterheads
— Drilled paper
— Card stock (from Manual Feed slot)
— Envelopes (from Manual Feed slot).
• Eight MB of memory expandable to 20 MB
• Customer replaceable supplies help keep maintenance
simple.
1-2 XEROX 4219/MRP AND 4215/MRP INSTALLATION PLANNING GUIDE
Coax interface features
Printer (Model) Type Speed CPI LPI Character sets
OVERVIEW
Your Xerox coax printer supports the following:
• IBM 9370 and 4381 host systems
• Coax Function Selection through Line (FSL) setup commands
• Support of SCS, DSC, 3270 Data Stream (LU1), PCL 5,
PostScript Level 2 and Intelligent Printer Data Stream (option)
• Flash PROM downloading of new firmware from the Coax
connector or shareport
• Emulation of the IBM printers listed below.
Table 1-1. Xerox coax printer emulations
3287 (1,2) Dot-matrix 80/120 cps
(models1/2)
3268 (2, 2C) Dot-matrix Up to 340
cps
3262 (3, 13) Band printer Up to 650
lpm
3812/3816 (1, 2)
Model 2-IPDS
4028 (NS1) Laser (300
Laser (240
dpi)
dip)
Up to 12/24
ppm
Up to 10
ppm
4214 (1) Dot-matrix Up to 200
cps
4245 (D12, D20) Band printer 1,200/2,000
lpm
(D12/D20)
6262 (D12, D14,
D22)
Band printer 1,200/1,400/
2200 lpm
(D12/D14/
D22)
10 3, 4, 6, 8 Various
10, 16.7 3, 4, 6, 8 Various
10 3, 4, 6, 8 Depends on band
mounted: 48—128
characters
10, 12, 15,
17
3, 4, 6, 8 User selectable with
61 standard fonts
N/A N/A Various fixed pitch
and typographic
with 32 resident
5, 10, 12,
3, 4, 6, 8 Various
15, 16.7
10 3, 4, 6, 8 Depends on band
mounted: 48—142
characters
10 3, 4, 6, 8 Depends on band
mounted: 48—192
characters
XEROX 4219/MRP AND 4215/MRP INSTALLATION PLANNING GUIDE 1-3
OVERVIEW
Twinax interface features
Printer (Model) Type Speed CPI LPI Character sets
The Xerox twinax printer supports the following:
• IBM AS/400 mid-range computer, System/36, and System/38
host systems
• Operation in the EBCDIC mode and guarantees compatibility
with the AS/400 and host mainframe packages
• Twinax Function Selection via Line (FSL) setup commands
• Emulation of the IBM printers listed below.
Table 1-1. Xerox twinax printer emulations
3812/16 (in 5219
emulation mode)
Laser (240
spi)
12/24 ppm 10, 12, 15
proportional
4, 5.33, 6,
8, 9, 12
User selectable with
62 fonts
4028 (AS1)* Laser 10 ppm Various fixed pitch
and typographic
with 32 resident
4234 (2, 12, 13) Dot-band 410 lpm 10, 15 3, 4, 6, 8, 9
(n/288")
Depends on band
mounted: 198
characters
4245 (T12, T20) Band printer 2,000 lpm 10 6, 8 Depends on band
mounted: 48 to 142
characters
5219 (D01, D02) Daisywheel 24-38 cps 10, 12, 15
proportional
4, 5.33, 6,
8, 9, 12,
Depends on daisywheel mounted
24, 48
5224 (1, 2) Dot-matrix 60-240 lpm 10, 15 3, 4, 6, 8 Various with 96 and
188 characters
5225 (1, 2) Dot-matrix 90-400 lpm 10, 15 3, 4, 6, 8 Various with 96 and
188 characters
5256 (1, 3) Dot-matrix 120 cps 10 6, 8 Various with 96, 128,
and 188 characters
6262 (T12, T14) Band printer 1,400 lpm 10 3, 4, 6, 8 Depends on band
mounted: 48 to 192
characters
*The 4028 supports IPDS data stream only.
Optional features
Optional printer features include:
• Memory upgrades to 12 and 20 MB total.
1-4 XEROX 4219/MRP AND 4215/MRP INSTALLATION PLANNING GUIDE

Printer components
OVERVIEW
Figure 1-1 shows the front and left side exterior view of the
printer. The printer components are identified in the text below
the figure. Each component is identified by a number in the
figure.
Figure 1-1. Printer components—front view
1 Top cover/output tray
2 Front cover
3 Roller cover
4 Face-up Output tray
5 Paper trays
6 Power switch
7 Power cord connector
8 Power cord cover
9 Control panel
10 Top cover release latch
XEROX 4219/MRP AND 4215/MRP INSTALLATION PLANNING GUIDE 1-5

OVERVIEW
Figure 1-2 shows the rear view of the printer. The printer
components are identified in the text below the figure. Each
component is identified by a number in the figure.
Figure 1-2. Printer components—rear view
1 Manual feed tray
2 Rear paper access covers
3 Parallel port connector
4 Serial port connector
5 Paper support wire
6 Blank covers for printer interface connectors
7 Connector for future expansion
1-6 XEROX 4219/MRP AND 4215/MRP INSTALLATION PLANNING GUIDE

2. Installation planning tasks
Successful installation depends upon you and Xerox. This
chapter outlines responsibilities for the various Xerox 4219/MRP
and 4215/MRP Mid Range Systems Printers installation tasks.
Xerox responsibilities
Your Xerox sales representative, analyst and service representative
help you with the installation of your printer. This section lists
the responsibilities for Xerox representative.
Xerox sales representative or analyst The following is a list of responsibilities for your Xerox sales
representative or analyst, prior to, during, and after installation:
• Assists in printer site selection.
• Orders the proper configuration based on your requirements.
• Orders the 5.25" diskette (for twinax) or the 9-track reel-to-
reel tape (for coax) if you require them instead of the
standard media shipped with the printer for the Xerox
Configuration and Resource Utility.
• Identifies the necessary third-party connectivity hardware to
support your operating environment.
• Assists in determining the proper communication interface
for your host computer system.
• Assists in completing the default selection checklists
contained in this guide.
• Monitors the progress of your installation tasks to ensure a
successful installation.
• Arranges with Xerox administration to schedule a delivery
date for the printer.
• Assists in placing the initial order of supplies and accessories.
Xerox service representative The following is a list of responsibilities for your Xerox service
representative, during and after installation:
• Installs the printer and performs initial system configuration.
• Performs maintenance on the printer which is not part of
routine operator maintenance.
XEROX 4219/MRP AND 4215/MRP INSTALLATION PLANNING GUIDE 2-1

INSTALLATION PLANNING TASKS
Your responsibilities
Work with your Xerox sales representative or analyst to plan and
schedule the following installation activities:
• Establish a compatible operating environment for your host
computer system and printer:
— Ensure that all electrical and space requirements are met.
— Ensure that the correct interface cable is available.
— Order the necessary third-party connectivity hardware to
support your operating environment.
• Plan and schedule installation activities:
— Order paper, supplies, and accessories.
— Select, order, and load any optional fonts.
— Complete the preinstallation checklists, located in the
“Checklists” appendix, prior to printer installation. Your
Xerox service representative uses the checklists to
configure the printer to your operating environment.
— Arrange with Xerox administration to schedule a delivery
date for the printer.
The appropriate representative of your company also needs to
complete the following activities:
• Designate one or more persons in your organization as your
printer operator. Printer operators are trained by your Xerox
sales representative or analyst, and are responsible for the
care and maintenance of your printer.
• Designate one or more persons in your organization to
maintain printer supplies. This person may also be the
printer operator.
• Install and maintain the host operating system. Refer to the
Xerox Twinax Command Reference or the Xerox Coax
Command Reference (as appropriate) for information on
installation and operation procedures for the 4219/MRP or
4215/MRP within a twinaxial or coaxial environment.
2-2 XEROX 4219/MRP AND 4215/MRP INSTALLATION PLANNING GUIDE

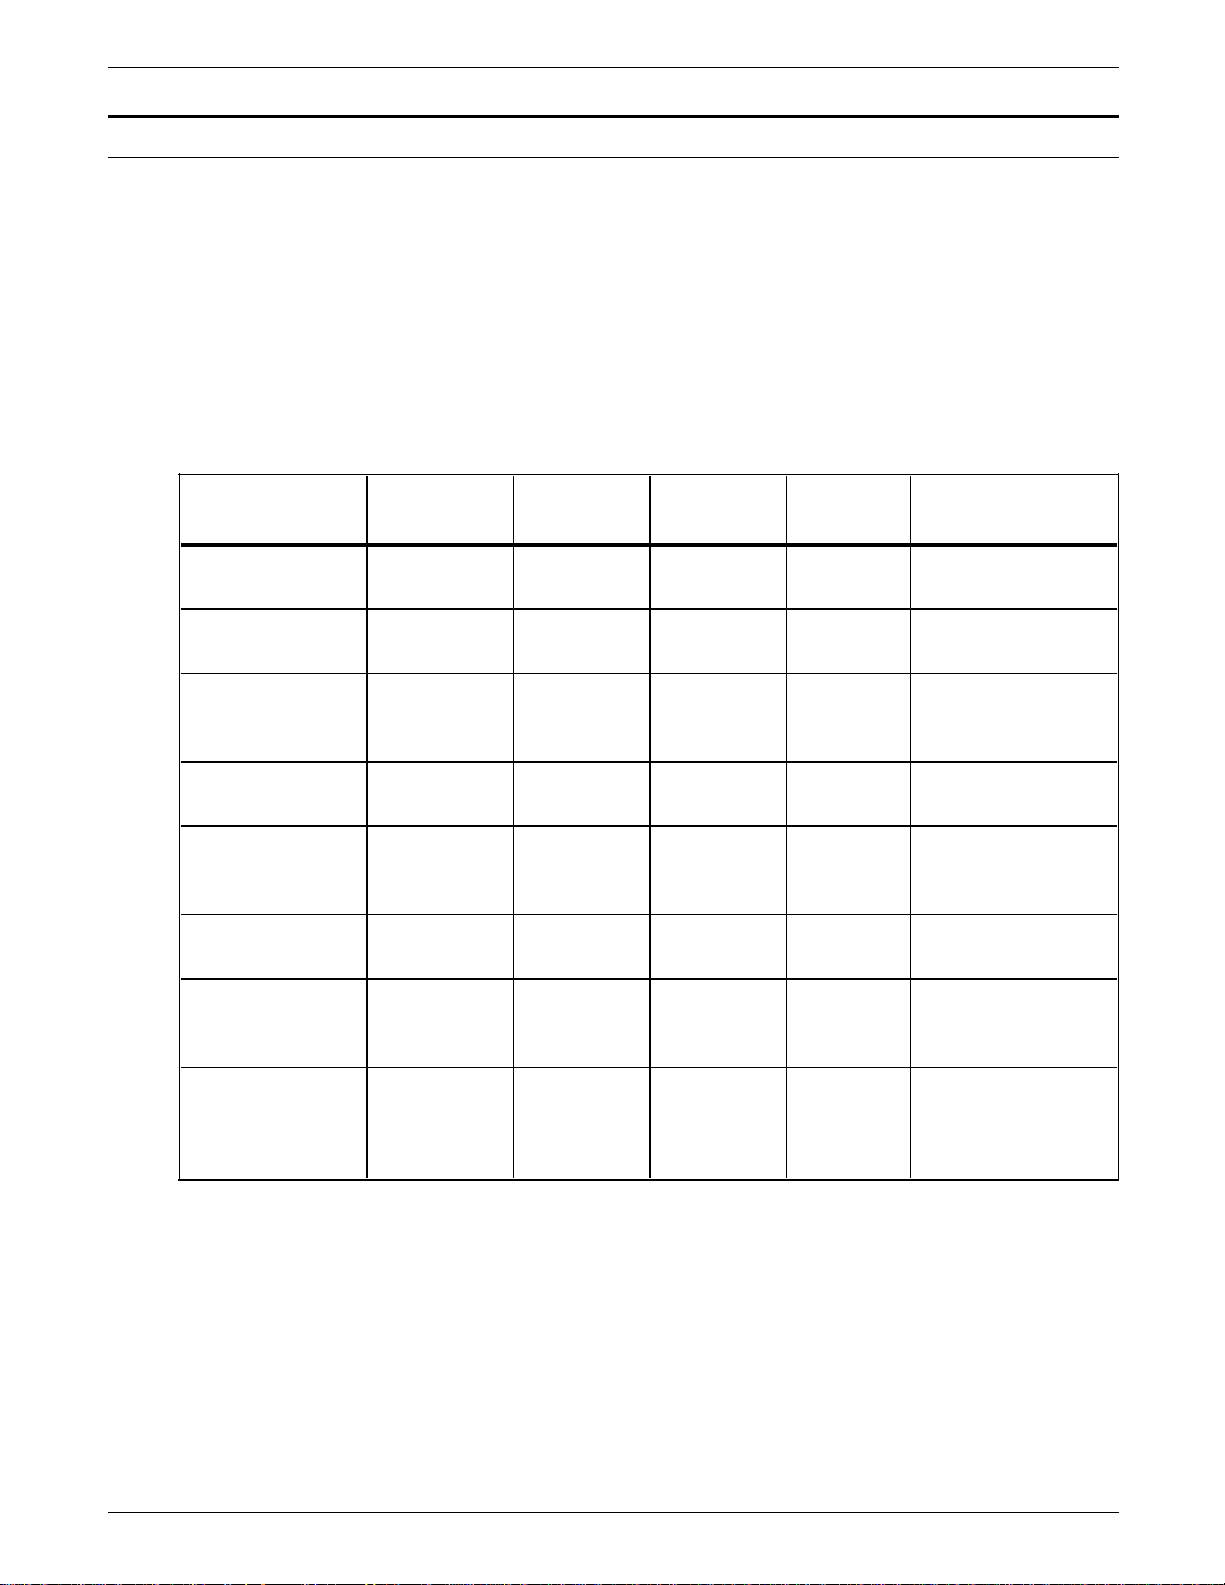
Installation countdown log
INSTALLATION PLANNING TASKS
To help you in planning for the installation of your printer, an
installation countdown log is provided. Refer to table 2-1 which
summarizes the tasks that must be performed, and when they
should occur in the four-week time period prior to installation
day.
Use the log as a guide to ensure a successful installation. If you
have any questions, please contact your Xerox sales
representative.
Table 2-1 follows the conventions listed below:
• The Week prior to installation column shows the
approximate time an activity should occur in relation to the
installation date. For example, “– 4” is four weeks prior to
installation.
• The Responsibility column identifies who should complete
the task.
• Date completed is the date the task was completed.
N Note: Indicated time frames are intended to serve as guidelines
only. Please consult your suppliers to determine exact lead
times.
XEROX 4219/MRP AND 4215/MRP INSTALLATION PLANNING GUIDE 2-3
INSTALLATION PLANNING TASKS
Table 2-1. Installation countdown log
Week
prior
to
installation Tasks Responsibility
– 4 Request 4219/MRP 4215/MRP font samples if required. Customer
Schedule the printer delivery date. Xerox
Date
completed
Order custom fonts and any modifications to existing fonts if
Customer
required. Depending on lead times, custom fonts may take
up to 6 weeks for delivery.
– 3 Select the site. Customer/Xerox
Prepare the site:
• Space requirements
• Electrical requirements
• Environmental requirements
Order interface accessories, cables, other media for utilities
Customer
Customer/Xerox
(if applicable):
• Gender changer
• Third-party network cables (such as twinaxial, coaxial,
parallel or serial interface cables)
• Special order media if required for Xerox Resource Utilities
Order the Xerox Customer Documentation Catalog Customer
Order licensed fonts Customer
– 2 Order consumable supplies:
• Paper
• Toner cartridges
Customer/Xerox
Select operator Customer
Order additional accessories and options Customer
– 1 Complete applicable checklists found in the “Checklists”
Customer/Xerox
appendix
– 0 Configure twinaxial or coaxial operating system to connect
Customer
the printer.
2-4 XEROX 4219/MRP AND 4215/MRP INSTALLATION PLANNING GUIDE

INSTALLATION PLANNING TASKS
XEROX 4219/MRP AND 4215/MRP INSTALLATION PLANNING GUIDE 2-5

Delivery requirements
3. Preinstallation
Although the Xerox 4219/MRP and 4215/MRP Mid Range Systems
Printers have interfaces that are not customer installable, the
following specifications help you plan for or change the location
of the printer.
Use the information in this chapter to complete Checklist 1: Site
preparation and Checklist 2: Twinax and Coax interface
configuration located in the “Checklists” appendix.
As you consider where to place the printer, do not forget to plan
for its delivery. Answer the questions listed below, and notify
your Xerox sales representative of any potential delivery
problems.
4219/MRP 4215/MRP dimensions
• Is the printer going to be upstairs?
• Is there an elevator large enough to accommodate the
printer?
• Do you have a loading dock or a specific door to which the
printer should be delivered?
The dimensions for the printer are shown in figure 3-1 to help
you plan for delivery and placement of the 4219/MRP or
4215/MRP.
You can also use figures 1-1 and 1-2 in the “Overview” chapter,
which show tray positions and cabling, as an additional visual aid
as you plan the placement of the printer.
Be sure the printer is placed on a level surface. A fully
configured printer weighs 83 pounds (40kg); therefore, you need
to place it on a surface that can support this weight.
XEROX 4219/MRP AND 4215/MRP INSTALLATION PLANNING GUIDE 3-1
PREINSTALLATION
Space requirements
The following space requirements should be considered when
planning a location for the printer.
Figure 3-1 is a top view of the printer. These are the minimum
space requirements needed for operation and maintenance.
Front and right area must provide standing room access to allow
for clearance of paper jams and servicing of the printer.
The height requirement from the floor to the nearest overhead
obstruction within the specified space is a minimum of 78 inches
(198 cm).
Figure 3-1. Space requirements for operation (top view)
Electrical requirements
Table 3-1. Electrical requirments
Location category Voltage Current/power
U.S. and Canada 115, 60Hz 8 Amps
International 220/240, 50Hz 4 Amps
Voltage to the printer should not vary by more than 10 percent.
N Note: Momentary loss of power causes loss of downloaded
fonts in random access memory (RAM) and places the printer in
standby mode.
3-2 XEROX 4219/MRP AND 4215/MRP INSTALLATION PLANNING GUIDE

Operating environment
Noise level
PREINSTALLATION
Table 3-1. Operating environment
Temperature Humidity Altitude
o
o
10
50
o
to 32
to 90o F
C
15 to 85% Up to 10,000 feet
or 3,000 meters
above sea level
If your site altitude differs from the requirements stated above,
your printer may need special adjustment by your Xerox service
representative. Contact your sales representative or analyst to
schedule any required adjustments.
Continuous printing: 53 dB
Standby: 40 dB
Special configurations
A Xerox service representative can configure your printer for the
following features on installation day:
• Twinax emulation
• Twinax address
• Twinax/coax default page size
• Twinax printer language
Use the descriptions in the following sections to complete
Checklist 2: Twinax and Coax interface configuration which is
included in the “Checklists” appendix.
XEROX 4219/MRP AND 4215/MRP INSTALLATION PLANNING GUIDE 3-3

PREINSTALLATION
Coax interface configurations
Use the information in this section to complete the “Coax
interface default settings” section of Checklist 2: Twinax and
Coax interface configuration.
Do not attempt to change the printer’s interface hardware
configuration after installation.
Unlike the twinax environment, the coaxial default printer
language and default printer emulation can only be set through
the Function Selection via Line (FSL) commands. Refer to the
Xerox Coax Command Reference for further information on FSL
commands.
Page size
The default page size is set by your Xerox service representative.
Your choices are:
• U.S. (8.5x11 inches)
• A4 (8.27x11.69 inches).
Twinax interface configurations
The twinax interface card requires four default configuration
settings:
• Printer emulation
• Printer language
• Page size
• Device address.
Each of these settings is described below.
Use the information in this section to complete the “Twinax
4219/MRP 4215/MRP interface default settings” section of
Checklist 2: Twinax and Coax interface configuration in the
“Checklists” appendix.
N Note: The printer emulation, printer language, and page size
settings described in this section can also be set through FSL
commands. Refer to the Twinax Command Reference for further
information.
3-4 XEROX 4219/MRP AND 4215/MRP INSTALLATION PLANNING GUIDE

PREINSTALLATION
Printer emulation setting
The printer’s interface card device address switch is used in
conjunction with the test button to set the required printer
emulation. The device address switch and test button are
located on the twinax interface card. Tables 3-1 and 3-2 list the
options for the twinax and twinax IPDS printer emulations,
respectively.
Table 3-1. Twinax printer emulation settings
Address Printer emulation
0* 3812/5219/3816 SCS printers
1 5224 SCS printer
2 5225 SCS printer
3 5256 SCS printer
4 4234 SCS printer
5 3812/5219/3816 SCS printers
6 4245/6262 SCS printer
* Default setting
Table 3-2. Twinax IPDS printer emulation settings
Address Printer emulation
0* 3812/5219/3816 SCS printers
1 5224 SCS printer
2 5225 SCS printer
3 5256 SCS printer
4 4234 SCS printer
5 IPDS printer
6 4245/6262 SCS printer
* Default setting
You can change the printer emulation setting at any time. Refer
to the “Configuring the interface card” chapter in the Xerox
4219/MRP and 4215/MRP Mid Range Systems Printers Operator
Guide for further information.
XEROX 4219/MRP AND 4215/MRP INSTALLATION PLANNING GUIDE 3-5

PREINSTALLATION
Printer language switch setting
The default language is set on the twinax interface board. The
twinax interface board can only be configured by your Xerox
service representative. The following twinax language options
are available for the twinax printer:
• Belgium • Iceland
• Brazil • International
• Canada/France • Italy
• Denmark/Norway • Japan (English)
• Finland/Sweden • Portugal
• France • Spain
• Germany/Austria • Spanish speaking
• Great Britain • United States/Canada.
DO NOT attempt to change the printer language switch after
installation.
Page size
The default page size is set by your Xerox service representative
when the printer language is set. Your choices are:
Non-printable area
• U. S. (8.5x11)
• European A4 (8.27x11.69)
Printer device address
The device address switch sets the printer device address. Your
Xerox service representative needs to know what device address
has been assigned to the printer within your operating
environment. Available options are device addresses 0 through
6.
The printer device address can be changed at any time after
installation. Refer to the “Configuring the interface card” chapter
in the Xerox 4219/MRP 4215/MRP Mid Range Systems Printer
Operator Guide for further information.
A border area on the outside edges of the paper is unavailable
for printing. This space is approximately .17 inch (4.2 mm) on
each side. Refer to the diagram below. The shaded area shows
the image area.
3-6 XEROX 4219/MRP AND 4215/MRP INSTALLATION PLANNING GUIDE

Coax environment
aaaaaaaaaaaaaaa
a
a
a
a
a
a
a
a
a
a
a
a
aaaaaaaaaaaaa
a
a
a
a
aaaaaaaaaaaaa
a
a
a
a
a
a
4. Connectivity
The Xerox 4219/MRP and 4215/MRP Mid Range Systems Printers
can be connected in several different environments, including the
following:
• Coaxial
• Twinaxial
• PC direct connect.
This chapter provides a visual overview of a typical configuration
within each of these environments.
Figure 4-1 represents 4219/MRP 4215/MRP connectivity in a
typical coax environment. Refer to the “Coax interface features”
section of the “Overview” chapter for a complete listing of IBM
printers that the printer can emulate with the coax interface.
aaaaaaaaaaa
aaaaaaaaaaa
aaaaaaaaaaa
Personal
Computer
aaaaaaaaaaa
aaaaaaaaaaa
aaaaaaaaaaa
System
Terminal
Comm Buffer
Figure 4-1. Coax connectivity
Communications
Controller
Coax Environment
Main Frame Computer
aaaaaaaaaaaaa
aaaaaaaaaaaaa
Coax
aaaaaaaaaaaaa
aaaaaaaaaaaaa
aaaaaaaaaaaaa
Network
aaaaaaaaaaaaa
4219/MRP
or 4215/MRP
Make sure the following items are available at the time of
installation:
• 4219/MRP or 4215/MRP
• Coax cables.
XEROX 4219/MRP AND 4215/MRP INSTALLATION PLANNING GUIDE 4-1

CONNECTIVITY
aaaaaaaaa
a
a
a
a
a
a
a
a
a
a
a
a
a
aaaaaaaaaaa
a
a
a
a
a
a
a
aaaaaaaaaaa
a
a
a
a
a
a
a
aaaaa
a
aaaaa
a
aaaaa
a
aaaaa
a
aaaaa
a
aaaaa
a
aaaaa
a
aaaaa
a
aaaaa
a
aaaaa
a
aaaaa
a
aaaaa
a
aaaaa
a
aaaaa
a
aaaaa
a
aaaaa
a
aaaaa
a
aaaaa
a
aaaaa
a
aaaaa
a
aaaaa
a
aaaaa
a
aaaaa
a
aaaaa
a
aaaaa
a
aaaaa
a
aaaaa
a
aaaaa
a
aaaaa
a
aaaaa
a
aaaaa
a
aaaaa
a
Twinax environment
Figure 4-2 represents 4219/MRP 4215/MRP connectivity in a
typical twinax environment. Refer to the “Twinax interface
features” section of the “Overview” chapter for a complete listing
of IBM printers that the twinax printer can emulate.
Figure 4-2. Twinax connectivity
Spooled Files
aaaaaaaaa
aaaaaaaaa
aaaaaaaaa
Personal Computer
aaaaaaaaa
aaaaaaaaa
aaaaaaaaa
a
a
a
System Terminal
a
a
a
aaaaaaa
a
aaaaaaa
a
Twinax
aaaaaaa
a
aaaaaaa
a
aaaaaaa
aaaaaaa
a
a
Network
Twinax Environment
AS/400
4219/MRP
or
4215/MRP
Make sure the following items are available at the time of
installation:
• 4219/MRP or 4215/MRP
• AS/400 twinax cables
• T-cable connector provided with the twinax interface.
4-2 XEROX 4219/MRP AND 4215/MRP INSTALLATION PLANNING GUIDE

PC direct connect environment
aaaaaaa
a
a
a
a
a
aaaaaaaaaaa
aaaaaaaaa
a
a
a
a
a
a
a
a
aaaaaaaaa
a
a
a
a
a
a
a
a
a
a
aaaaa
a
a
a
a
a
a
a
a
aaaaaaaaaaa
aaaaaaa
a
a
a
a
a
a
a
a
aaaaaaa
a
a
a
a
a
a
a
a
a
a
aaaaaaaaaaa
a
CONNECTIVITY
Figure 4-4 represents the 4219/MRP and 4215/MRP in a PC direct
connect environment.
Figure 4-4. PC direct connectivity
aaaaaaa
aaaaaaa
aaaaaaa
aaaaaaa
aaaaaaa
aaaaaaa
aaaaa
PC
aaaaa
Serial
a
a
a
or
Parallel
4219/MRP
4215/MRP
Make sure the following items are available at the time of
installation:
or
aaaaaaa
aaaaaaa
aaaaaaa
aaaaaaa
aaaaaaa
aaaaaaa
aaa
PC
aaa
• 4219/MRP or 4215/MRP
• Parallel or serial cable.
It is also possible to connect the 4219/MRP or 4215/MRP to a PC
network with an external interface controller.
Figure 4-5. PC network connectivity
Network


5. Preparing the installation checklists
This chapter explains the printing parameter options listed on the
installation checklists numbered 3 through 6 in the “Checklists”
appendix. Use this information as you complete the installation
checklists. Your Xerox sales representative will assist you as
needed. On installation day your Xerox service representative
uses the checklists to configure your 4215/MRP and 4219/MRP
Mid Range Systems Printers.
This chapter does not provide information on Checklists 1, 2, or
7. Refer to the “Preinstallation” chapter for information required
to complete Checklists 1 and 2, and the “Ordering fonts,
options, and supplies” chapter for information on checklist 7.
The printer options described in this chapter are configured
through the 4219/MRP and 4215/MRP control panel and interface
cards. Follow the procedures in the Xerox 4219/MRP and
4215/MRP Mid Range Systems Printers Operator Guide to
change initial printer settings, if necessary, at a later date.
To prepare the installation checklists, follow the steps below.
Your Xerox sales representative will assist you.
1. Match the checklist title to the sections within this chapter.
2. Use the descriptions provided in this chapter as guidelines
while you complete each checklist.
Completing Checklist 3: General setup
The printer setup options listed below allow you to define the
User Interface display language and the input and output features
of the 4219/MRP and 4215/MRP on Checklist 3: General setup.
Display Language Select one of the languages listed below as the default for the
user interface:
• English (default)
• Francais (French)
• Español (Spanish)
• Italiano (Italian)
• Deutsch (German).
Tray select Allows you to select the default input paper tray:
• Upper (default)
• Middle (4219 only)
• Lower.
XEROX 4219/MRP AND 4215/MRP INSTALLATION PLANNING GUIDE 5-1

PREPARING THE INSTALLATION CHECKLISTS
Automatic tray switching Allows you to enable or disable the automatic tray switching
feature. When the primary tray is empty, the printer switches to
another tray with the same size paper.
N Note: If the face up tray is installed all printer output will be
directed to that tray.
Completing Checklist 4: Setup Printer—PCL 5 Setup
Orientation Allows you to select the default page orientation.
Portrait (default)
Landscape
Lines per page This is the maximum number of lines of data that the 4219/MRP
and 4215/MRP will print on a page before moving to the top of a
new page. Most applications will override this value.
Line Wrap This parameter determines if the printer should wrap lines of data
which extend beyond the right margin.
Symbol set A symbol set is a unique subgrouping of all the available
characters in a font. Each symbol set is designed with a specific
application in mind. The default symbol set for PCL is Roman-8.
Font Allows you to select a default font for the HP LaserJet emulation.
The available fonts are:
• Courier
• LinePrinter
• Times
• Universe.
Courier—If you select Courier as your default font, you can
select from among these pitch, point size, and style
combinations:
• 10 Pitch, 12 Point, Medium(default)
• 10 Pitch, 12 Point, Bold
• 10 Pitch, 12 Point, Italic
• 12 Pitch, 10 Point, Medium
• 12 Pitch, 10 Point, Bold
• 12 Pitch, 10 Point, Italic
• 12 Pitch, 10 Point, Italic
LinePrinter—If you select LinePrinter as your default font it will
be 16.67 Pitch, 8.5 Point, Medium.
Times and Univers—If you select Times or Univers as your
default fonts you can select one style (Medium, Bold, Italic, or
Bold Italic) and a font size. The point size is entered from the
keypad, within a range of 4.00 to 999.75 in increments of 0.25.
(The default for Times and Univers is 12 point medium.)
5-2 XEROX 4219/MRP AND 4215/MRP INSTALLATION PLANNING GUIDE

PREPARING THE INSTALLATION CHECKLISTS
Completing Checklist 5: Setup Printer—PostScript Resolution, Print
Enhancement, Communications Priority, Panel Security
PostScript Resolution The 4219/MRP and 4215/MRP can print PostScript at one of three
resolutions. The available resolutions are:
• 800 x 400 dpi
• 400 x 400 dpi
• 300 x 600 dpi
Printing at a higher resolution will product sharper output but the
printer will print somewhat slower. Printing at 800 x 400
resolution will usually take 20 to 30% longer that the same
output at 300 x 300 resolution.
The PostScript Resolution setting has no effect on SCS, IPDS or
PCL printing, which is always set to 300 x 300 dpi.
Print enhancement Allows you to select smoothing (enhancement) of edges. Print
enhancement will affect output in any printer emulation. The
available options are:
• Dark
• Medium (default)
• Light
• Off.
Start-up page printing Allows you to enable or disable the printing of the Start-up page
at power up. This setting will not affect the printing of the
Twinax or Coax configuration page. The Configuration pages will
always be printed at power up until disabled using FSL 120.
Communications Priority When two or more interfaces are active, the Interface priority
feature selects the method the printer uses when checking the
communications interfaces for incoming jobs.
Sequential
If enabled, no priority is assigned to any interface. Each printer
interface (Serial, Parallel, and Other I/O {Twinax or Coax} is
polled in turn).
Priority
If enabled, a particular active interface has priority over the other
active interfaces when the system is checking for incoming jobs.
When Priority is selected one interface is selected as the priority
interface. This interface will get serviced first when two or more
interfaces are active.
Sequential Lock and Priority Lock
These options are similar to Sequential and Priority except that
upon completion of a print job the printer waits for seven
seconds for an additional job to appear on the last active port
before polling the other printer ports.
Panel Security You can lock the printer control panel so changes to the printer
settings are disallowed unless the printer is unlocked. Scrolling
through the selections and printing reports and menu maps is
still available.
XEROX 4219/MRP AND 4215/MRP INSTALLATION PLANNING GUIDE 5-3

PREPARING THE INSTALLATION CHECKLISTS
You can access the lock feature from the printer keypad. The
printer is locked or unlocked by pressing the Up and Down
arrow keys in the following sequence:
down down up down
An asterisk ‘*’ appears each time you press an arrow key. Press
Enter after the sequence.
You can restore the factory defaults to unlock the printer;
however, all other original settings are also restored. Use this
option only if you want to restore all factory defaults.
To restore factory defaults, press and hold Online and Help while
turning on the printer.
Completing Checklist 6: Set Interface—Parallel, Serial, Other I/O
Parallel Interface
Enable interface Allows you to enable or disable the parallel interface. When
disabled no jobs will be processed from the parallel interface.
Printer type Allows you to select the following settings:
• PS/PCL sensing (default)
• PostScript mode (Standard)
• HP LaserJet emulation mode
• PostScript mode (Binary)
• Hexadecimal dump mode
• PostScript mode (Tagged binary).
Serial asynchronous interface
Enable interface Allows you to enable or disable the serial interface. When
disabled no jobs will be processed from the serial interface.
Printer type Allows you to select the one of the following Print Languages:
• PS/PCL Sensing (default)
• PostScript mode (Standard)
• HP LaserJet emulation mode
• PostScript mode (Binary)
• Hexadecimal dump mode
• PostScript mode (Tagged binary).
5-4 XEROX 4219/MRP AND 4215/MRP INSTALLATION PLANNING GUIDE

PREPARING THE INSTALLATION CHECKLISTS
Flow control Allows you to set the communication protocol to one of the
following:
• XON/XOFF (default communication protocol)
• Robust XON/XOFF
• DTR
For Robust XON/XOFF the printer will send an XON every second
while waiting for data. Robust XON/XOFF is available only when
the printer interface is set for PostScript mode.
Baud rate Allows you to select the baud rate for the serial interface.
Data width Allows you to set the word length to one of the following:
• 7-bit
• 8-bit (default).
Parity Allows you to set the parity at to one of the following:
• None (default)
• Odd
• Even.
DTR Polarity If DTR is selected for flow control the DTR polarity can be set
either high or low.
Other I/O (Twinax or Coax) interface
Interface enablement Allows you to enable or disable the Twinax or Coax interface.
When it is disabled no jobs will be processed from the Twinax or
Coax interface.
Print language selection Allows you to select the following settings:
• PS/PCL Sensing (default)
• PostScript mode (Standard)
• HP LaserJet emulation mode
• PostScript mode (Binary)
• Hexadecimal dump mode
• PostScript mode (Tagged binary).
N Note: For 4215/MRP and 4219/MRP the Other I/O interface
must be enabled and set for PS/PCL sensing.
XEROX 4219/MRP AND 4215/MRP INSTALLATION PLANNING GUIDE 5-5


Ordering fonts
A. Ordering fonts, options,
and supplies
This appendix contains information relevant to ordering fonts,
options, and supplies for your Xerox 4219/MRP and 4215/MRP
Mid Range Systems Printers in the United States and in other
countries.
Numerous licensed fonts are available from Xerox. If you plan to
use a font that is not a 4219/MRP or 4215/MRP system font, place
your order so that the font diskettes arrive before your printer is
installed. Fonts can be ordered on magnetic tape or diskette for
downloading from your host computer system to the 4219/MRP
and 4215/MRP
Magnetic tape fonts The host computer system may transmit font data or digitized
graphic images to the 4219/MRP and 4215/MRP. This data is
stored in font data memory and invoked by job control
commands inserted in the data stream.
Fonts provided by Xerox Font Services for downloading from
your host computer system are contained on a standard 9-track,
1600 bits-per-inch, magnetic tape. One tape may contain several
fonts. Individual font files are separated by tape marks. The last
file on a tape is followed by a double tape mark.
Each tape package is accompanied by:
• Data sheets that list font names, record lengths, and the
actual byte count of each file
• Character code assignment sheets
• Character width specifications.
Font diskettes Fonts stored on diskettes can be downloaded from your PC to
the 4219/MRP or 4215/MRP. A font diskette may contain more
than one font.
Custom fonts Xerox Font Services can create custom typefaces, special
characters for existing fonts, and digitized artwork such as
signatures and company logos.
These custom graphic images are available on magnetic tape or
diskettes.
XEROX 4219/MRP AND 4215/MRP INSTALLATION PLANNING GUIDE A-1

ORDERING FONTS, OPTIONS, AND SUPPLIES
Ordering fonts in the United States
Call Xerox Font Services at 1-800-445-FONT (3668) to place an
order. The Xerox Font Services representative assists you in
completing the necessary forms. The representative also answers
your questions regarding literature, order status, or custom font
specifications.
When calling Xerox Font Services, be prepared to give your
customer order number (provided by your Xerox sales
representative).
Xerox customer order number:
Write to the following address to order fonts or to request
information:
Xerox Corporation
Font Services ESCP-126
701 South Aviation Boulevard
El Segundo, California 90245
The following chart shows the approximate time it takes to
receive your order. A Xerox Font Services representative can give
you a more precise delivery schedule.
Ordering fonts in other countries
Xerox Font Technical Support
Table A-1. Time to place orders before installation day
Time Fonts
6 weeks Custom fonts and alterations of existing
fonts (thinning, scaling, etc.)
5 business days Logos, signatures
3 business days Licensed standard fonts
Contact your local Xerox sales representative to place an order.
The Xerox representative assists you in completing the necessary
forms. The representative also answers your questions regarding
literature, order status, or custom font specifications.
In the United States, call the Xerox Font Technical Support
Hotline at 1-800-445-FONT (3668) to inquire about any technical
font difficulties you may be experiencing. Business hours are
5:00 a.m. to 5:00 p.m. (PST).
A-2 XEROX 4219/MRP AND 4215/MRP INSTALLATION PLANNING GUIDE

RAM upgrades
Ordering Xerox supplies
ORDERING FONTS, OPTIONS, AND SUPPLIES
The 4215/MRP and 4219/MRP are equipped with 4MB of base
memory and one memory option of 4, 8, or 16MB. This brings
the as-configured memory of a 4215/MRP or 4219/MRP to 8, 12,
or 20MB.
The minimum supported memory size for operation of the
4215/MRP and 4219/MRP is 8MB. Additional memory will allow
more space for the storage of resources such as fonts and forms.
The 4215/MRP and 4219/MRP use the following supplies:
• Paper
• Toner cartridge (also called a print cartridge)
The toner cartridge lasts 14,000 prints. The toner cartridge kit
contains a print corotron and fuser wick that are replaced at the
same time as the toner cartridge.
Use the part numbers listed in this appendix to complete
Checklist 7: Supplies.
To order Xerox supplies and accessories, call the appropriate
number from those listed in table A-2.
Table A-2. Ordering Xerox supplies
U.S. Canada
1-800-822-2200
Monday through Friday
8:15 a.m. to 5:00 p.m. (PST)
Be prepared to give your customer order number (provided by
your Xerox sales representative).
Toronto
416-733-9400
English-National
1-800-668-0199
French-National
1-800-668-0133
Fax
416-733-3086
Monday through Friday
8:30 a.m. to 5:00 p.m. (local time)
Xerox customer order number:
XEROX 4219/MRP AND 4215/MRP INSTALLATION PLANNING GUIDE A-3

ORDERING FONTS, OPTIONS, AND SUPPLIES
Supplies part number list
Item Description
Table A-3. Supplies part number list
Part
number
Paper (inches)
10 reams (5,000 sheets) per carton
unless noted below.
8.5 x 11 Image Series Dual Purpose Paper 3R2950
8.5 x 14 Image Series Dual Purpose Paper 3R2954
8.5 x 11 Image Series Dual Purpose Paper—3 hole 3R3016
8.5 x 11 Image Series Smooth Paper 3R54
8.5 x 14 Image Series Smooth Paper 3R83
8.5 x 11 4024 Dual Purpose Paper 3R721
8.27 x 11.69 4024 Dual Purpose Paper (A4) 3R2594
8.5 x 13 4024 Dual Purpose Paper 3R725
8.5x 14 4024 Dual Purpose Paper 3R727
8.5 x 11 4024 Dual Purpose Paper—3 hole 3R2193
8.5 x 11 4024 Dual Purpose Paper—4 hole 3R3008
8.5 x 11 4024 Dual Purpose Paper—7 hole 3R3010
8.5 x 11 4024 Dual Purpose Paper, 24-lb. 3R2531
8.5 x 11 4024 Smooth Paper 3R2675
8.5 x 14 4024 Smooth Paper 3R2677
8.5 x 11
Antique Parchment Paper—white (4000
3R2316
sheets per carton)
8.5 x 11
Antique Parchment Paper—gold (4000
3R790
sheets per carton)
8.5 x 11 Dual Purpose Colors—Blue 3R3052
8.5 x 11 Dual Purpose Colors—Blue, 3 hole 3R3068
8.5 x 14 Dual Purpose Colors—Blue 3R3084
8.5 x 11 Dual Purpose Colors—Green 3R3056
8.5 x 11 Dual Purpose Colors—Green, 3 hole 3R3072
8.5 x 14 Dual Purpose Colors—Green 3R3088
8.5 x 11 Dual Purpose Colors—Pink 3R3058
8.5 x 11 Dual Purpose Colors—Pink, 3 hole 3R3074
8.5 x 14 Dual Purpose Colors—Pink 3R3090
8.5 x 11 Dual Purpose Colors—Yellow 3R3054
8.5 x 11 Dual Purpose Colors—Yellow, 3 hole 3R3070
A-4 XEROX 4219/MRP AND 4215/MRP INSTALLATION PLANNING GUIDE

ORDERING FONTS, OPTIONS, AND SUPPLIES
Table A-3. Supplies part number list (continued)
Item Description
Part
number
Paper (inches)
8.5 x 14 Dual Purpose Colors—Yellow 3R3086
8.5 x 11 Dual Purpose Colors—Buff 3R3060
8.5 x 11 Dual Purpose Colors—Buff, 3 hole 3R3076
8.5 x 14 Dual Purpose Colors—Buff 3R3092
8.5 x 11 Dual Purpose Colors—Goldenrod 3R3062
8.5 x 11 Dual Purpose Colors—Goldenrod, 3 hole 3R3078
8.5 x 14 Dual Purpose Colors—Goldenrod 3R3094
8.5 x 11 Dual Purpose Colors—Ivory 3R3064
8.5 x 11 Dual Purpose Colors—Ivory, 3 hole 3R3080
8.5 x 14 Dual Purpose Colors—Ivory 3R3096
8.5 x 11 Dual Purpose Colors—Gray 3R3066
8.5 x 11 Dual Purpose Colors—Gray, 3 hole 3R3082
8.5 x 14 Dual Purpose Colors—Gray 3R3098
8.5 x 11
Dual Purpose Colors—Rainbow Pack *
3R3107
(3,500 Sheets per carton)
8.5 x 11
Ring Tuff 3 hole Reinforced Binder Paper
3R4299
(3,000 sheets per carton)
8.5 x 11 Never-tear Paper (100 sheets per box) 3R3118
8.5 x 11
Never-tear Paper, 3 hole (100 sheets per
3R3109
box)
8.5 x 11 Image Series Elite 3R1950
8.5 x 14 Image Series Elite 3R1952
11 x 17
4024 Dual Purpose Paper (2,500 Sheets
3R729
per carton)
210 mm x 297 mm 4024 Dual Purpose Paper (A4) 3R2594
5.5 x 8.5 Statement Paper 3R2072
8.5 x 11 Recycled Business Papers 3R3704
or
3R4535
8.5 x 11 Recycled Business Papers—3 hole 3R3706
or
3R4537
8.5 x 14 Recycled Business Papers 3R3708
or
3R4539
* Rainbow pack contains 750 sheets of 8.5" x 11" blue and yellow, 500 sheets each of green, and pink, and
250 sheets each of buff, goldenrod, gray, and ivory.
XEROX 4219/MRP AND 4215/MRP INSTALLATION PLANNING GUIDE A-5

ORDERING FONTS, OPTIONS, AND SUPPLIES
Table A-3. Supplies part number list (continued)
Item Description
Paper (inches)
8.5 x 11 65 lb. Cover Stock—White 3R3041
8.5 x 11 65 lb. Cover Stock—Blue 3R3044
8.5 x 11 65 lb. Cover Stock—Yellow 3R3045
8.5 x 11 65 lb. Cover Stock—Green 3R3046
8.5 x 11 65 lb. Cover Stock—Gray 3R3042
8.5 x 11 65 lb. Cover Stock—Ivory 3R3043
8.5 x 11 90 lb. Index—White 3R3004
Transparencies Xerox transparencies are packaged 100 to
a box. All transparencies are 8.5 x 11.
Paper backed
Clear 3R3028
Blue 3R3112
Rainbow 3R3115
Duplicator transparencies
Clear with white edge stripe
Part
number
3R2780
Labels, (self-adhesive)
Standard
High speed
Completely clear
(with no stripe or backing)
Removable paper stripe
Removable paper stripe—blue
Removable paper stripe—clear
All labels are on 8.5 x 11 sheets, 100
sheets to a box.
33 labels per sheet
24 labels per sheet
8 labels per sheet
Nonperforated sheet
33 labels per sheet
6 labels per sheet
3R3117
3R3108
3R3515
3R3516
3R4469
3R4471
3R4472
3R4473
3R3139
3R3146
A-6 XEROX 4219/MRP AND 4215/MRP INSTALLATION PLANNING GUIDE

4219/MRP and 4215/MRP options supplies list
Table A-4. Options supplies list
Item Description Part number
ORDERING FONTS, OPTIONS, AND SUPPLIES
Toner Cartridge Kit Contains Toner Cartridge (Also referred
Cables-Serial All RS232 serial cables are male to male,
RS232: 10-feet (3-meters)
RS232: 15-feet (4.5-meters)
RS232: 25-feet (7.5-meters)
Cables-Parallel
Centronics: 10-feet (3-meters)
Memory options
4MB Memory kit Expands the total printer memory to 8MB 97K13130
8MB Memory kit Expands the total printer memory to
16MB Memory kit Expands the total printer memory to
to as a Print cartridge), Corotron, and
Fuser wick.
25 pins at each end.
For connecting to an IBM PC 9R80970
For connecting to an IBM PC 9R80252
For connecting to an IBM PC 9R80254
Parallel cable for PC environments 9R89336
12MB
20MB
106R53*
97K13140
97K13150
* 106R53 will be available May,1994. 106R55 will be shipped as an alternate until then.
Table A-5. Installation/Documentation Kits
Item Description Part number
Xerox 42XX/MRP Twinax
Interface Installation Kit
Xerox 42XX/MRP Twinax Utility
Option Kit - 5.25“ HD (1.2MB)
Diskette
Xerox 42XX/MRP Twinax Utility
option Kit - 6150 1/4“ data
cartridge
Xerox 42XX/MRP Coax Interface
Installation Kit
Xerox 42XX/MRP Coax Utility
Option Kit - 9 track computer
tape on reel
AS/400 Resource Utility (3.5“ DS-HD)
AS/400 Font Set (3.5“ DS-HD)
Twinax Command Reference
(Standard supplied with your order)
AS/400 Resource Utility (5.25“ DS-HD)
AS/400 Font Set (5.25“ DS-HD) (Alternate
by special order)*
AS/400 Resource Utility and Font Set
(6150 1/4“ data cartridge)
(Alternate by special order)*
Host Resource Utility and Font Set (3480
1/2“ tape cartridge)
Coax Command Reference
(Standard supplied with your order)
Host Resource Utility and Font Set (9
track computer tape on reel)
(Alternate by special order)*
673S00005
673S00005A
673S00005B
673S00006
673S00006A
*See Checklist 1: Site Preparation
XEROX 4219/MRP AND 4215/MRP INSTALLATION PLANNING GUIDE A-7

ORDERING FONTS, OPTIONS, AND SUPPLIES
A-8 XEROX 4219/MRP AND 4215/MRP INSTALLATION PLANNING GUIDE

Coax interface
B. Interface support
The Xerox 4219/MRP and 4215/MRP Mid Range Systems Printers
are delivered standard with the following interfaces:
• IBM coax or twinax
• RS232C serial
• Centronics parallel.
The 4219/MRP or 4215/MRP supports simultaneous
communication; that is, the printer can receive data on all
interfaces simultaneously.
You must supply the interface cable to connect the printer to
your host computer system. Shielded signal cables must be used
with this equipment to maintain compliance with FCC
regulations.
If you select a coaxial interface, the coax interface card is
plugged in to the printer motherboard. The card is configured to
your specifications by your Xerox service representative when the
printer is installed. The side panel of the coax network interface
card includes a coaxial connector, a parallel port, a CU LED, and
a test button. Also located on the network interface card is a
connector for the installation of an optional IPDS (Intelligent
Printer Data Stream) module. Figure B-1 illustrates the rear view
of the coax card.
Figure B-1. Coax interface card—rear view
1 Test button
2 CU LED
3 Parallel share port (Reserved for Xerox use)
4 Coax connector
You should never attempt to remove the card from the printer
motherboard. The coax interface card also includes jumpers
that your Xerox service representative will use to set the default
page size and printer language you select.
XEROX 4219/MRP AND 4215/MRP INSTALLATION PLANNING GUIDE B-1

INTERFACE SUPPORT
Twinax interface
If you select a twinaxial interface, the twinax network interface
card is plugged in to the motherboard of the printer. The card is
configured to your specifications by your Xerox service
representative when the printer is installed. The side panel of the
twinax network interface card includes a twinaxial connector, a
parallel port, a SYNC LED, a seven-position address selection
switch, and a test button. Figure B-2 illustrates the rear view of
the twinax network interface card. The twinax connector on the
side panel of the card is smaller than conventional connectors.
An autoterminated T cable included with the printer connects the
card to conventional twinaxial cables. Also located on the
network interface card is a connector for the installation of an
optional IPDS (Intelligent Printer Data Stream) module.
Figure B-2. Twinax interface card—rear view
Ordering other media
1 Test button
2 SYNC LED
3 Parallel share port—reserved for Xerox use
4 Device address switch
5 Twinax connector
You should never attempt to remove the interface card from the
printer motherboard. Your Xerox service representative will
configure the 4219/MRP or 4215/MRP interface card according to
your specifications, including switch settings for the default page
size, print language, and printer address. The address switch
setting on the panel of the network interface card determines the
printer emulation. Refer to the “Configuring the interface card”
section of the Xerox 4219/MRP 4215/MRP Mid Range Systems
Printer Operator Guide for a list of printer emulations and
corresponding addresses.
If you select a coax interface, the Xerox Host Resource Utility
and Font Set are shipped with the printer on a cartridge tape. If
you prefer a 9-track reel-to-reel tape, your Xerox sales
representative can order it for you.
If you select a twinax interface, the Xerox AS/400 Resource Utility
and Font Set are shipped with the printer on 3.5" diskette. If
you prefer a 5.25" diskette, your Xerox sales representative can
order it for you.
B-2 XEROX 4219/MRP AND 4215/MRP INSTALLATION PLANNING GUIDE

Parallel interface
Parallel interface connector
INTERFACE SUPPORT
The parallel interface is a Centronics compatible interface capable
of running at speeds up to 150 kbytes per second with burst
speeds of up to 200 KB per second.
The Centronics parallel interface uses a standard 36-pin female
Centronics cable connector as shown in figure B-3. Xerox
recommends that you use the Xerox Centronics 10-foot parallel
cable, part number 9R89336, or the cable recommended by your
personal computer manufacturer.
Figure B-3. Centronics interface connector
XEROX 4219/MRP AND 4215/MRP INSTALLATION PLANNING GUIDE B-3

INTERFACE SUPPORT
Parallel interface connector pin assignments
The parallel interface signals and functions are listed in table B-1.
Table B-1. Parallel interface connector pin assignments
Pin Signal name Source Function
1 STROBE* Host Causes PD 0—7 to be loaded into the printer
2 PD 0 Host Parallel Data Bit 0
3 PD 1 Host Parallel Data Bit 1
4 PD 2 Host Parallel Data Bit 2
5 PD 3 Host Parallel Data Bit 3
6 PD 4 Host Parallel Data Bit 4
7 PD 5 Host Parallel Data Bit 5
8 PD 6 Host Parallel Data Bit 6
9 PD 7 Host Parallel Data Bit 7
10 ACK* Printer Acknowledgement of data received by printer
11 BUSY Printer Indicates printer not ready to receive data
12 PE Printer Indicates paper error
13 SLCT Printer Indicates printer is selected and online
14 AUTOFD* Host Instructs printer to auto feed 1 line of paper
after a Carriage Return
15 No connection
16 GND Signal Ground
17 Frame Frame Ground
18 No connection
19—30 GND Signal Grounds
31 INIT* Host Initializes printer and clears print buffer
32 ERROR* Printer Indicates a printer error condition
33 No connection
34 No connection
35 No connection
36 SLCTIN* Host Selects printer or host and enables to accept
data
* Signal is active low
B-4 XEROX 4219/MRP AND 4215/MRP INSTALLATION PLANNING GUIDE

Parallel interface timing diagram
INTERFACE SUPPORT
Figure B-4 illustrates the parallel interface timing. Refer to Table
B-2 for timing requirements.
Figure B-4. Parallel interface timing diagram
Table B-2. Timing requirements
Value
Parameter
Min Max
1 Data Setup Time before STROBE* True 1.0 µs
2 Data Hold Time after STROBE False 1.0 µs
3 STROBE* True pulse width 1.0 µs 500 µs
4 STROBE* True to BUSY True 0 1.5 µs
5 BUSY True duration when receiving data 2.6 µs 5.1 µs
6 ACKNOWLEDGE* False to BUSY False 0 10 µs
7 ACKNOWLEDGE* True pulse width 2.5 µs 5.0 µs
8 BUSY False to start of next cycle 0
9 BUSY True before:
1.0 µs
ERROR* set True
SELECT set False
PAPER ERROR set True
10 ACKNOWLEDGE True after:
1.0 µs
ERROR set False
SELECT set True
PAPER ERROR set False
* Signal is active low
XEROX 4219/MRP AND 4215/MRP INSTALLATION PLANNING GUIDE B-5

INTERFACE SUPPORT
Serial interface
Serial interface connector
The serial interface uses a standard female B-type 25-pin
connector as shown in figure B-5. Xerox recommends that you
use the Xerox RS232 25-foot serial cable, part number 9R80254.
Figure B-5. RS232C serial interface connector
Serial interface connector pin assignments
The serial interface signals and functions are listed in table B-3.
Null modem
Table B-3. Serial interface connector pin assignments
Pin Signal name Function
1 Frame GND Frame Ground
2 TXD Transmitted Data
3 RXD Received Data
4 RTS Request to Send
5 CTS Clear to Send
6 DSR Data Set Ready
7 GND Signal Ground
8—19 No connection
20 DTR Data Terminal Ready
21—25 No connection
Since both computers and printers are Data Terminal Equipment
(DTE) devices, you need a special cable or adapter called a null
modem to connect them together.
A null modem is a modem eliminator in which all of the control
signals are cross-wired so that the device on each side of the
interface “thinks” that it is receiving signals from a modem.
B-6 XEROX 4219/MRP AND 4215/MRP INSTALLATION PLANNING GUIDE

INTERFACE SUPPORT
Figure B-6 shows how the null modem cable switches several
signals.
Figure B-6. Null modem serial cable wiring
DTR
DSR
RTS
CTS
DCD
TXD
RXD
GND
DTR
DSR
RTS
CTS
DCD
TXD
RXD
GND
XEROX 4219/MRP AND 4215/MRP INSTALLATION PLANNING GUIDE B-7


C. Checklists
This appendix contains perforated checklists that help you plan
for the installation of your Xerox 4215/MRP or 4219/MRP Mid
Range Systems Printer.
Use the information in the following chapters and appendices to
complete the checklists as noted:
• “Preinstallation”—assists in the completion of checklists 1 and
2.
• “Preparing the installation checklists”—assists in the
completion of checklists 3 through 6.
• “Ordering fonts, options, and supplies”—assists in the
completion of checklist 7.
Your Xerox sales representative will help you as needed to
complete the checklists. Each checklist shows the 4215/MRP and
4219/MRP default settings in bold typeface.
On installation day, give the completed checklists to your Xerox
service representative so your printer can be configured to your
specifications.
Checklist 1 “Site preparation” helps you physically prepare the installation
site by helping you figure out your environment, space and
access requirements, electrical supply, and interface devices.
Checklist 2 “Twinax and Coax interface configuration” lists the possible
options that can be set for the 4215/MRP and 4219/MRP Twinax
and Coax interface cards.
Checklist 3 “General Setup” helps you decide on the input and output
features of the printer.
Checklist 4 “Setup printer—PCL 5 Setup” helps you establish the default
parameters for printing PCL jobs.
Checklist 5 “Setup Printer—PostScript Resolution, Print Enhancement,
Communications Priority, Panel Security” lists other options for
setting the print behavior of the 4215/MRP and 4219/MRP.
Checklist 6 “Setup Interface—Parallel, Serial, Other I/O” lists the default
parameters for the standard 4215/MRP and 4219/MRP interfaces.
Checklist 7 “Supplies” provides a record form to record the dates to order
the supplies required for your installation site.
XEROX 4219/MRP AND 4215/MRP INSTALLATION PLANNING GUIDE C-1


Checklist 1: Site preparation
Site requirements:
Environmental Temperature meets 50° to 95° F (10° to 35° C) requirement
Humidity
Altitude
Space and access Meets requirements for operation
Electrical Voltage (110-120 VAC, 60Hz or 220-240 VAC, 50Hz)
Ampere circuit (8 amp for 110-120 VAC, 4 amp for 220-240 VAC)
Distance from power
Communications requirements:
Interface device Twinax or Coax connection
Twinax or Coax cables available
Utility software media requirements:
Twinax interface Part number 673S00005 (Standard installation kit supplied with your order)
AS/400 Resource Utility (3.5“ DS-HD)
AS/400 Font Set (3.5“ DS-HD)
Twinax Command Reference
Note: PC support/400 and SAA RPG/400 programs are required for installation
of the AS/400 Configuration and Resource Utility and the Font Set from
diskette media (3.5“ DS-HD and 5.25“ DS-HD). If you do not have these
programs, and do not plan to purchase them, you must order the Utility
software on 6150 1/4“ tape cartridge, part number 673S00005B.
meets 15 to 85% requirement
meets sea level to 10,000 feet requirement
outlet (not more than 10 feet or 3 meters)
CHECKLISTS
Twinax interface Part number 673S00005A (Alternate media requiring special order from the
Software Library)
AS/400 Resource Utility (5.25“ DS-HD)
AS/400 Font Set (5.25“ DS-HD)
Note: PC support/400 and SAA RPG/400 programs are required for installation
of the AS/400 Configuration and Resource Utility and the Font Set from
diskette media (3.5“ DS-HD and 5.25“ DS-HD). If you do not have these
programs, and do not plan to purchase them, you must order the Utility
software on 6150 1/4“ tape cartridge, part number 673S00005B.
Twinax interface Part number 673S00005B (Alternate media requiring special order from the
Software Library)
AS/400 Resource Utility and Font Set (6150 1/4“ data cartridge)
Coax interface Part number 673S00006 (Standard installation kit supplied with your order)
Host Resource Utility and Font Set (3480 1/2“ tape cartridge)
Coax Command Reference
Coax interface Part number 673S00006A (Alternate media requiring special order from the
Software Library)
Host Resource Utility and Font Set (9 track computer tape on reel)
XEROX 4219/MRP AND 4215/MRP INSTALLATION PLANNING GUIDE C-3


Checklist 2: Twinax and Coax interface configuration
Coax 4215/MRP and 4219/MRP interface default settings:
Page size U. S. 8.5" x 11" European (A4: 8.27" x 11.69")
Printer emulation Must be set through FSL commands.
Printer language Must be set through FSL commands.
Twinax 4215/MRP and 4219/MRP interface default settings:
Page size U. S. (8.5" x 11") European (A4: 8.27" x 11.69")
Device address 0 1
2 3
4 5
6
CHECKLISTS
Printer emulation
(non-IPDS)
Printer emulation
(IPDS)
Printer language Austria/Germany Iceland
Default settings are shown in bold typeface.
0 (3812/5219/3816 SCS) 1 (5224 SCS printer)
2 (5225 SCS printer) 3 (5256 SCS printer)
4 (4234 SCS printer) 5 (3812/5219/3816 SCS)
6 (4245/6262 SCS printer)
0 (3812/5219/3816 SCS) 1 (5224 SCS printer)
2 (5225 SCS printer) 3 (5256 SCS printer)
4 (4234 SCS printer) 5 (IPDS printer)
6 (4245/6262 SCS printer)
Belgium International (5219 Emulation default)
Brazil Italy
Canada/France Japan (English)
Denmark/Norway Portugal
Finland/Sweden Spain
France Spanish speaking
Great Britain United States/Canada
XEROX 4219/MRP AND 4215/MRP INSTALLATION PLANNING GUIDE C-5


Checklist 3: General setup
Display language English
Francais
Español
Italiano
Deutsch
Tray select Upper
Middle (4219/MRP only)
Lower
CHECKLISTS
Manual feed
(If used as primary
input source)
7.25 x 10.5 (Executive) 8.5 x 11 (Letter)
8.5 x 13 (Folio) 8.5 x 14 (Legal)
11 x 17 (Ledger)
A5 B5
A4 B4
Envelope Commercial 10 Envelope DL
Envelope C5
Automatic tray swapping Enable Disable
Default settings are shown in bold typeface.
XEROX 4219/MRP AND 4215/MRP INSTALLATION PLANNING GUIDE C-7


Checklist 4: Setup Printer—PCL 5 Setup
PCL 5 Setup
Orientation Portrait Landscape
Lines Per Page ____ Enter a number between 5-128
If portrait, default is 60; if landscape, default is 45
Line Wrap Off On
Symbol set Roman-8 (ASCII and Roman) Math-8
PC-8 Microsoft Publishing
PC-8 Danish/Norwegian Windows
PC-850 Desk Top
Legal Pi Font
ISO:
8859 (ECMA-94 Latin1) 17 Spanish
2 International Reference Version 21 German
4 United Kingdom 25 French
6 ASCII 57 Chinese
10 Swedish/Finnish 60 Norwegian
11 Swedish: names 61 Norwegian2
14 JIS ASCII 69 French
15 Italian 84 Portuguese
16 Portuguese 85 Spanish
CHECKLISTS
Ventura:
PS:
Font Courier 10cpi/12pt 12cpi/12pt
Line Printer
Times Medium
Universe Bold
Default settings are shown in bold typeface.
Math International US
Math Text
10cpi/12pt Italic 12cpi/12pt Italic
10cpi/12pt Bold 12cpi/12pt Bold
Point Size
Italic
Bold Italic
XEROX 4219/MRP AND 4215/MRP INSTALLATION PLANNING GUIDE C-9


Checklist 5: Setup Printer—PostScript Resolution, Print Enhancement,
Communications Priority, Panel Security
PostScript Resolution
PS Resolution 800 x 400
400 x 400
300 x 300
Print Enhancement
Print Enhancement Dark
Medium
Light
Off
Options
Start-up page printing Enable Disable
Communications Priority Sequential * If priority, select primary interface:
Priority* Parallel
Sequential Lock Serial
Priority Lock* Other I/O
CHECKLISTS
Panel Security
Enter Code _ _ _ _ Security Code (if desired)
Default settings are shown in bold typeface.
XEROX 4219/MRP AND 4215/MRP INSTALLATION PLANNING GUIDE C-11


Checklist 6: Setup Interface—Parallel, Serial, Other I/O
Parallel Centronics
Enable Interface On Off
Print language selection PS/PCL Sensing
STD PostScript
PCL5
BCP PostScript
Hex Dump Mode
TBCP PS
Serial/asynchronous
Enable Interface On Off
Printer type PS/PCL Sensing
STD PostScript
PCL 5
BCP PostScript
Hex Dump Mode
TBCP PS
CHECKLISTS
Flow Control XON/XOFF
Robust XON/XOFF
DTR
Baud rate 300 600 1200 2400
4800 9600 19200 38400
Data bits 7-bit 8-bit
Parity Odd Even None
DTR Polarity High Low
Other I/O (Twinax/Coax interface)
Enable interface Enable (mandatory setting)
Printer type PS/PCL Sensing (mandatory setting)
Default settings are shown in bold typeface.
XEROX 4219/MRP AND 4215/MRP INSTALLATION PLANNING GUIDE C-13


Checklist 7: Supplies
Use this checklist to record the supplies you require, the quantity, the date the order should be placed,
and the actual date of the order.
CHECKLISTS
Item Description
Paper
Transparencies
Labels
Quantity
Date to
order
Date
ordered
Toner Cartridge
Cables
Other
XEROX 4219/MRP AND 4215/MRP INSTALLATION PLANNING GUIDE C-15


Glossary
access To find area of memory or auxiliary storage for retrieving or
storing information; ability or permission to use printer menus.
AppleTalk Refers to the Apple Macintosh standard communication protocol.
application A software program or group of programs for solving common
business tasks.
asynchronous Having a variable or random time interval between successive
characters, or events. Transmission in which each character,
work, or small block, is individually synchronized (timed), usually
by the use of start and stop bits. It is referred to as character
framed transmission.
baud Speed at which information is transferred, indicated by changes
in line condition. Baud is equivalent to bits per second (BPS),
which is the number of information (or data) bits that can be sent
through a channel in a second.
baud rate The data transfer rate between the computer and the printer set
only if the serial interace is used. The computer and the printer
must be configured at the same baud rate. The rate can be set
from between 300 and 38,400 baud depending on the type of
computer used.
binary Base 2 number system written with the digits “0” or “1.” See bit.
binding margin The margin along which a page is to be bound. See long-edge
binding and short-edge binding.
bit An acronym for binary digit. The bit is the most fundamental unit
of information that a computer can accept. It has two states
called “1” (one) and “0” (zero), or “on” and “off,” and can be
used to represent a yes/no type statement. Groups of bits are
used to represent more complex statements such as a character.
The most common grouping of bits is called a byte, consisting of
eight bits.
bitmapped fonts Bitmapped fonts have predefined sizes (fixed point size and pitch
attributes).
byte The name given to a group of eight bits. In ASCII, each
character is represented by one byte of data.
A kilobyte is equal to 1,024 bytes; a megabyte, to 1,024 kilobytes
or 1,048,576 (1024 x 1024) bytes.
XEROX 4219/MRP AND 4215/MRP INSTALLATION PLANNING GUIDE GLOSSARY-1

GLOSSARY
character set Collection of characters contained in a font. Each character set is
designed for a special purpose. Some sets include all printable
characters found on most standard computer keyboards, while
others are composed of special characters for such applications
as math, foreign language typesetting, and law.
coaxial cable PVC or teflon shielded RG62 cable.
configuration The process of selecting or changing certain printer settings to
allow your computer to communicate with the printer. The
printer is configured using one of the configuration menus that
are accessed from the printer control panel.
control panel A pressure-sensitive panel on the front of the printer used to
place the printer on and offline, access and change configuration
setup, reset the printer, manage the printer, and perform
diagnostics.
default A preset value programmed into a printer that is used unless
changed with the control panel or with print language
commands. Factory defaults are those values set at the factory
prior to shipping. Power-up defaults are those values that are in
effect when the printer is powered up.
diagnostics Software designed to verify the operation of the system hardware
and to identify failures.
document One or more recorded or printed pages forming a logical whole.
dot The smallest printable unit.
downloaded fonts Fonts loaded from the host system into the dynamic memory of
the printer. Downloaded fonts must be reloaded each time the
system is powered up.
dpi Dots per inch. A measure of the resolution of a printed image.
dry ink Dry ink is a fine powdered substance used in the printing
process. The dry ink supply for the system is contained inside
the toner cartridge.
duplex printing Double-sided printing in which a printed image is placed on both
surfaces of a sheet of paper. See simplex printing.
EBCDIC Extended Binary Coded Decimal Interchange Code — an 8-bit
code, standard for many IBM systems, providing 256 possible
combinations of characters.
emulation The state of a device when it is set up to behave like a different
device.
GLOSSARY-2 XEROX 4219/MRP AND 4215/MRP INSTALLATION PLANNING GUIDE

GLOSSARY
face-up output tray A special receptacle on the printer that receives the paper as it
exits the printer, printed side facing up. The face-up tray is
useful for printing on heavy stock or envelopes, since it is a
straight paper path from the manual feed tray to the face-up
output tray.
facsimile terminal (FAX) A telecommunication system that transmits and receives data
over analog telephone lines.
factory defaults The settings that are programmed into the printer before it is
shipped. These settings are in use unless you override them
using the printer control panel or by sending printer commands.
font A collection of characters with a consistent size and style.
Different fonts can be selected for printing. Fonts can refer to
the printer’s internal fonts or to fonts stored in optional diskettes
and downloaded to the printer.
fuser A device in the printer that is used to bond dry ink to the page.
grams per square meter (GSM) Universally accepted unit that expresses the weight in grams of
one square meter of paper.
host computer A computer that can be used to send data to a printer or other
peripheral devices, also called simply a host,
image The representation on the printed page of the data sent to the
printer. An image is composed of closely placed dots of dry ink
which are placed on the page electrostatically and then fused to
the paper.
input tray There are three on the 4219/MRP and two on the 4215/MRP.
Each tray can hold a range of paper sizes.
interface The connection between two devices. Interfaces are meant to
carry electronic impulses from one place to another. Hardware
interfaces, for instance, link a host computer to a printer.
interface cable A special cable used to connect the printer to the computer so
they can communicate.
IPDS Intelligent Printer Data Stream. All points addressable data
system that allows users to position text, images, and graphics at
any defined point on a printed page.
ISO International Standards Organization.
job A set of data, including programs, files, and instructions to a
computer.
KB Kilobyte. Unit of 1,024 bytes
XEROX 4219/MRP AND 4215/MRP INSTALLATION PLANNING GUIDE GLOSSARY-3

GLOSSARY
landscape A page orientation in which output is printed parallel to the
longer edge of the page.
long-edge binding In this style of binding, the binding margin is along the long
edge of the page, regardless of the orientation of the printed
image. See binding margin.
MB Megabyte. Unit of 1,048,576 bytes.
memory The part of a computer system that stores data, either
temporarily or permanently. See non-volatile memory.
menu A list of related configuration submenus or options. On the
4219/MRP and the 4215/MRP, all user-selectable configuration
options are organized into menus. These menus are accessible
through the user interface on the front of the printer.
mode One of several alternative conditions or states of a device, such
as print mode and configuration mode on the 4219/MRP and
4215/MRP.
modem Device that converts digital information into an analog signal
suitable for sending over analog phone lines. Derived from the
lengthier term modulator/demodulator.
moisture content A physical property of paper. High moisture content causes curl,
jams, and poor fusing; low moisture content causes static
problems, leading to increased jams and misfeeds.
network A series of points connected by communication channels. A
private network is a group of communications channels confined
to the use of one customer.
non-volatile memory That portion of memory in a device that remains unchanged
when the device is powered off, also called NVRAM.
offline When the printer is offline, it does not print pages. The printer is
taken offline by pressing the Online key when the printer is in
print mode.
online When the printer is online and in print mode, it is able to print
pages.
option One of the user-selectable printer features listed in a
configuration menu. Each controls a different printer default
condition.
output tray The principle paper output tray is located on the top of the
printer and is the place where printed material is delivered face
down. There is also a face-up output tray that can be installed
on the front of the printer.
GLOSSARY-4 XEROX 4219/MRP AND 4215/MRP INSTALLATION PLANNING GUIDE

page orientation The relationship of the printed data to the long or short edge of
the page. See landscape and portrait.
page set up How text is positioned on the page. Page set up variables
include the size of the paper to be printed, what margins are
used, and how many lines are printed per inch.
paper jam A condition where paper gets stuck somewhere along the paper
path in the printer.
parallel interface A type of interface in which data is transmitted and received in
bytes rather than bits. Used for local printing over short
distances (10 meters or less).
parallel/serial ports The printer comes with two interface connectors, serial and
parallel, located on the lower part of the back panel. The cable
that attaches your computer to your printer is connected here.
PCL HewLett-Packard’s Printer Control Language.
GLOSSARY
pitch The number of characters to the inch. (10 pitch is 10 characters
per inch; 12 pitch, 12 characters per inch, and so forth.)
point size A typographical term describing the height of a character set
from the top of its capitals to the bottom of its descenders in
points. One point is equal to 1/72 inch. 12 point type is roughly
equal in size to 10 pitch characters.
port A communications connection from a computer to the printer,
suitable for attaching a single line.
portrait Page orientation in which the output is printed parallel to the
shorter edge of the page.
power-up defaults Values that are in effect when the printer is powered up.
print To produce a paper document using data received from a host.
printer commands Printer commands are sent to the printer through application
software programs and are used to change printing variables such
as page orientation, margins and fonts.
RAM Random Access Memory. An area where data is stored
temporarily and can be altered.
ROM Read Only Memory. Permanent storage for data that cannot be
altered usually reserved for standard instructions for basic
activities.
resident fonts Fonts stored in the printer when it is shipped. The printer’s
resident fonts are also called internal fonts.
XEROX 4219/MRP AND 4215/MRP INSTALLATION PLANNING GUIDE GLOSSARY-5

GLOSSARY
RS232 Designation for the industry-standard interface for serial devices.
The RS232 ensures (1) that voltage and signal levels will be
compatible, (2) that interface connectors may be mated together
with identical pin wiring and corresponding pin connectors, and
(3) that certain control information supplied by one device must
be understood by the other device. See serial interface.
scalable font A font scaled within the printer to any point size.
serial interface A type of interface in which data is transmitted and received one
bit at a time over a communication line. It can function over
great distances.
short-edge binding In this style of binding, the binding margin is along the short
edge of the page, regardless of the orientation of the printed
image.
simplex printing Single-sided printing in which a printed image is placed only on
one surface of a sheet of paper. See duplex printing.
status message Control panel display messages that keep you informed of the
printer’s current operating condition.
symbol set The collection of characters usable at one time in a font. Each
symbol set has been designed for a special purpose. Some sets
include all printable characters found on most standard computer
keyboards, while others are comprised of special characters
intended for such applications as math, foreign language
typesetting, and law.
toner cartridge A device inside the printer that contains a photosensitive “print
drum” used in the printing process.
troubleshooting The process of pin-pointing the cause of a printer problem. The
method used here is to step through a list of symptoms and
suggested remedies until the solution is found.
twinax cable A special type of communications cable used to connect to IBM
AS400 systems.
typeface 1. All type of a single design. 2. Set of characters with design
features that make them similar to one another. Also referred to
as font.
utility pages Any page not generated from the data sent through an I/O port,
including Start-Up pages, printer configuration reports, font
reports, and error pages.
workstation Input/output equipment at which an operator works; you can
send data to or receive data from a computer workstation for the
purpose of printing a job.
GLOSSARY-6 XEROX 4219/MRP AND 4215/MRP INSTALLATION PLANNING GUIDE

XON/XOFF Transmitter on/transmitter off. A flow control method. A
communications protocol for use with the serial interface, in
which DC1 and DC3 codes are sent to the host to signal the
readiness or nonreadiness of the printer to receive data.
GLOSSARY
XEROX 4219/MRP AND 4215/MRP INSTALLATION PLANNING GUIDE GLOSSARY-7


B
borders, printing images, 3-6
C
caution description, xii
Centronics cable connector, B-3
Centronics parallel, B-1
chapter summaries, xi
Character code assignment sheets, A-1
Character width specifications, A-1
checklists, see preinstallation checklists
Coax
interface features, 1-3
configuration, B-1
configuration options, 4-1
control panel, 5-1
custom fonts, ordering, 2-4, A-1
D
data flow protocols, 5-5
data sheets, magnetic tape fonts, A-1
data width, 5-5
diskettes, fonts, A-1
downloading fonts, 1-1
E
electrical requirements, 3-2
emulation capabilities
coax printers, 1-3
twinax printers, 1-4
F
FCC rules, iii
Flash PROM, 1-3
fonts
diskettes, A-1
downloading, 1-1
magnetic tape, A-1
ordering, A-1
ordering custom, 2-4
ordering, outside U.S., A-2
ordering, United States, A-2
programmable modules, A-3
samples, 2-4
standard, 1-1
technical support hotline, A-2
Index
Function Selection via Line (FSL) command, 3-4
Function Selection via Line (FSL) setup commands,
1-3
G
GSM, usage, xii
H
height clearance, printer, 3-2
host system, your responsibilities, 2-2
host systems, 1-3
I
I/O interfaces, 1-2
IBM host systems, 1-3
IBM Standard SCS, 1-1
image area, 3-6
installation
control panel, 5-1
customer responsibilities, 2-2
electrical requirements, 3-2
environment requirements, 3-3
noise considerations, 3-3
PC direct connect requirements, 4-3
sales representative responsibilities, 2-1
service representative responsibilities, 2-1
space requirements, 3-1
installation countdown log, 2-3—2-4
interface configurations
coax environment
connectivity, 4-1
page size, 3-4
printer hardware configurations checklist
twinax environment, 3-4
connectivity, 4-2
page size, 3-6
printer device address, 3-6
printer language, 3-6
printer emulation settings, 3-5
interference, iii
IPDS printer emulations, 3-5
XEROX 4219/MRP AND 4215/MRP INSTALLATION PLANNING GUIDE INDEX-1

INDEX
K
KB, usage, xii
L
laser safety, iv
laser warning, v
line edge enhancement, 5-3
M
magnetic tape fonts, A-1
materials, printing, 1-2
MB, usage, xii
memory
standard, 1-2
N
noise level, printer, 3-3
non-printable area, 3-6
O
operating requirements, 3-3
operator training, 2-1
ordering supplies, 2-4
output destination, setting, 5-2
P
page orientation, setting, 5-2
page size, default
coax, 3-4
twinax, 3-6
paper sizes, setting, 5-1
parallel interface
connector, B-3
pin assignments, B-4
timing diagram, B-5
parity, 5-5
Parallel Centronics interface setup preinstallation
checklist, C-13
PC direct connect, 4-1
installation requirements, 4-3
PCL 5, xii, 1-1
PostScript Level 2, xii, 1-1
power source receptacle, v
preinstallation checklists, 2-2
completion time frame, 2-4
edge-to-edge printing, 3-6
print language setup, 5-2
print language setup, HP LaserJet, C-9
print language setup, PostScript, 5-3
printer setup, 5-1—5-2, C-7
site preparation, C-3
summaries, C-1
supplies, C-15
print language checklists
HP LaserJet emulation mode, C-9, C-11
printer
components, 1-5—1-6
control panel, 5-1
electrical requirements, 3-2
height clearance, 3-2
noise level, 3-3
operating requirements, 3-3
setup options, 5-1
weight, 3-1
printer device address, default, 3-6
printer emulations
coax, 1-3
twinax, 1-4, 3-5
printer hardware configurations /preinstallation
checklists, C-5
printer language setting, twinax, 3-6
printer operator, 2-2
printer setup checklist, 5-1, C-7
printing materials, 1-2
PS/PCL Sensing, 1-1, 5-4, 5-5
R
R-S232C serial interface., 1-1
related publications, xii
RS232C serial, B-1
S
sales analyst, see Xerox sales analyst
sales representative, see Xerox sales
representative
serial interface
connector, B-6
pin assignments, B-6
serial interface, enablement, 5-4—5-5
service representative, see Xerox service
representative
site preparation checklist, C-3
software, see applications supported, third-party
space requirements, printer, 3-1—3-2
supplies
customer replaceable, 1-2
list, A-5—A-6, A-8
ordering, 2-4, A-4
preinstallation checklist, C-15
symbol set, 5-2
T
toner cartridge, A-4
trays
auto-tray switching, enabling, 5-2
setting default, 5-1
setting output destination, 5-2
twinax features, 1-3—1-4
Twinax Function Selection via Line (FSL) setup
commands, 1-4
print language, default
print languages, xii, 1-1
INDEX-2 XEROX 4219/MRP AND 4215/MRP INSTALLATION PLANNING GUIDE

W
warning description, xii
weight, printer, 3-1
X
Xerox 4219/MRP 4215/MRP, see printer
Xerox Configuration and Resource Utility, 1-1
Xerox Documentation and Software Services, xii
Xerox Font Services, A-1
Xerox Font Technical Support Hotline, A-2
Xerox sales representative, responsibilities, 2-1
Xerox service representative, responsibilities, 2-1,
3-3, 3-6
Y
Your responsibilities, 2-2
INDEX
XEROX 4219/MRP AND 4215/MRP INSTALLATION PLANNING GUIDE INDEX-3

 Loading...