

Xerox 4215/MRP, 4219/MRP, 4220/MRP, 4230/MRP Intelligent Printer Data Stream (IPDS) Configuration and Reference Guide
Page 1
XEROX
Xerox MRP Family
4215/MRP, 4219/MRP, 4220/MRP, 4230/MRP
Intelligent Printer Data Stream (IPDS)
Configuration and Reference Guide
March 1995
720P12772
Page 2

Xerox Corporation
701 S. Aviation Boulevard
El Segundo, CA 90245
© 1994 and 1995 by Xerox Corporation. All rights reserved.
Copyright protection claimed includes all forms and matters of
copyrightable material and information now allowed by statutory
or judicial law or hereinafter granted, including without limitation,
material generated from the software programs which are
displayed on the screen, such as icons, screen displays, looks,
etc.
Printed in the United States of America
Publication number: 720P12772
Xerox® and all Xerox products mentioned in this publication are
trademarks of Xerox Corporation. Products and trademarks of
other companies are also acknowledged.
Changes are periodically made to this document. Changes,
technical inaccuracies, and typographic errors will be corrected in
subsequent editions.
This document was created on the Xerox 6085 Professional
Computer System using VP software. The typeface is Optima.
Page 3

Installation caution
Safety
Notices
Your Xerox Intelligent Printer Data Stream (IPDS) printer is not
customer installable. Only a qualified service representative
should install the equipment.
Before using your IPDS printer, become familiar with the
operating procedures contained in its operator guide.
CAUTION: This equipment generates, uses, and can radiate radio
frequency energy, and if not installed and used in accordance
with the installation requirements, may cause interference to
radio communications.
U.S.A.
Your printer has been tested and found to comply with the limits
for a Class A computing device pursuant to Subpart J of Part 15
of FCC rules, which are designed to provide reasonable
protection against such interference when operated in a
commercial environment. Operation of this equipment in a
residential area is likely to cause interference. In such cases, the
user at his or her own expense is required to correct the
interference.
U.S. regulations governing the use of facsimile devices
This equipment complies with Part 68 of the FCC rules. Located
on the fax board is a label that contains, among other
information, the FCC Registration Number and Ringer
Equivalence Number (REN) for this equipment. Upon request,
you must provide this information to your telephone company.
The REN is useful to determine the quantity of devices you may
connect to your telephone line and still have all of those devices
ring when your telephone number is called. In most, but not all,
areas, the sum of the RENs of all devices connected to one line
should not exceed five (5.0). To be certain of the number of
devices you may connect to your telephone line, as determined
by the REN, you should contact your local telephone company to
determine the maximum REN for your calling area. The REN for
this device is 0.8B.
XEROX MRP FAMILY INTELLIGENT PRINTER DATA STREAM (IPDS) iii
CONFIGURATION AND REFERENCE GUIDE
Page 4
NOTICES
Laser safety
Canada
This digital apparatus does not exceed the Class A limits for radio
noise emissions from digital apparatus as set out in the radio
interference regulations of the Canadian department of
communications.
Les present appareil numerique n’emet pas de bruits
radioelectriques depassant les limites applicables aux appareils de
Classe A prescitees dans le reglement sur le brouillage
radioelectrique edicte par le ministre des communications du
Canada.
Europe: 50 Hz, 220 to 240 V equipment
This equipment has been tested and certified in conformance
with European commission directive 82/499/ECC and VDE
0871/0875, Class A, relating to radio frequency interference.
Your printer complies with appropriate safety standards.
Specifically regarding lasers, the equipment complies with laser
product performance standards set by governmental,
international, and national agencies as a Class 1 laser product. It
does not emit hazardous light; the beam is totally enclosed
during all phases of customer operation and maintenance.
WARNING: Use of controls or adjustments or performance of
procedures other than those specified herein may result in
hazardous radiation exposure.
Warning labels
There are several user accessible Laser Safety Warning labels
located on the printer. These are shown on the next two pages.
iv XEROX MRP FAMILY INTELLIGENT PRINTER DATA STREAM (IPDS)
CONFIGURATION AND REFERENCE GUIDE
Page 5
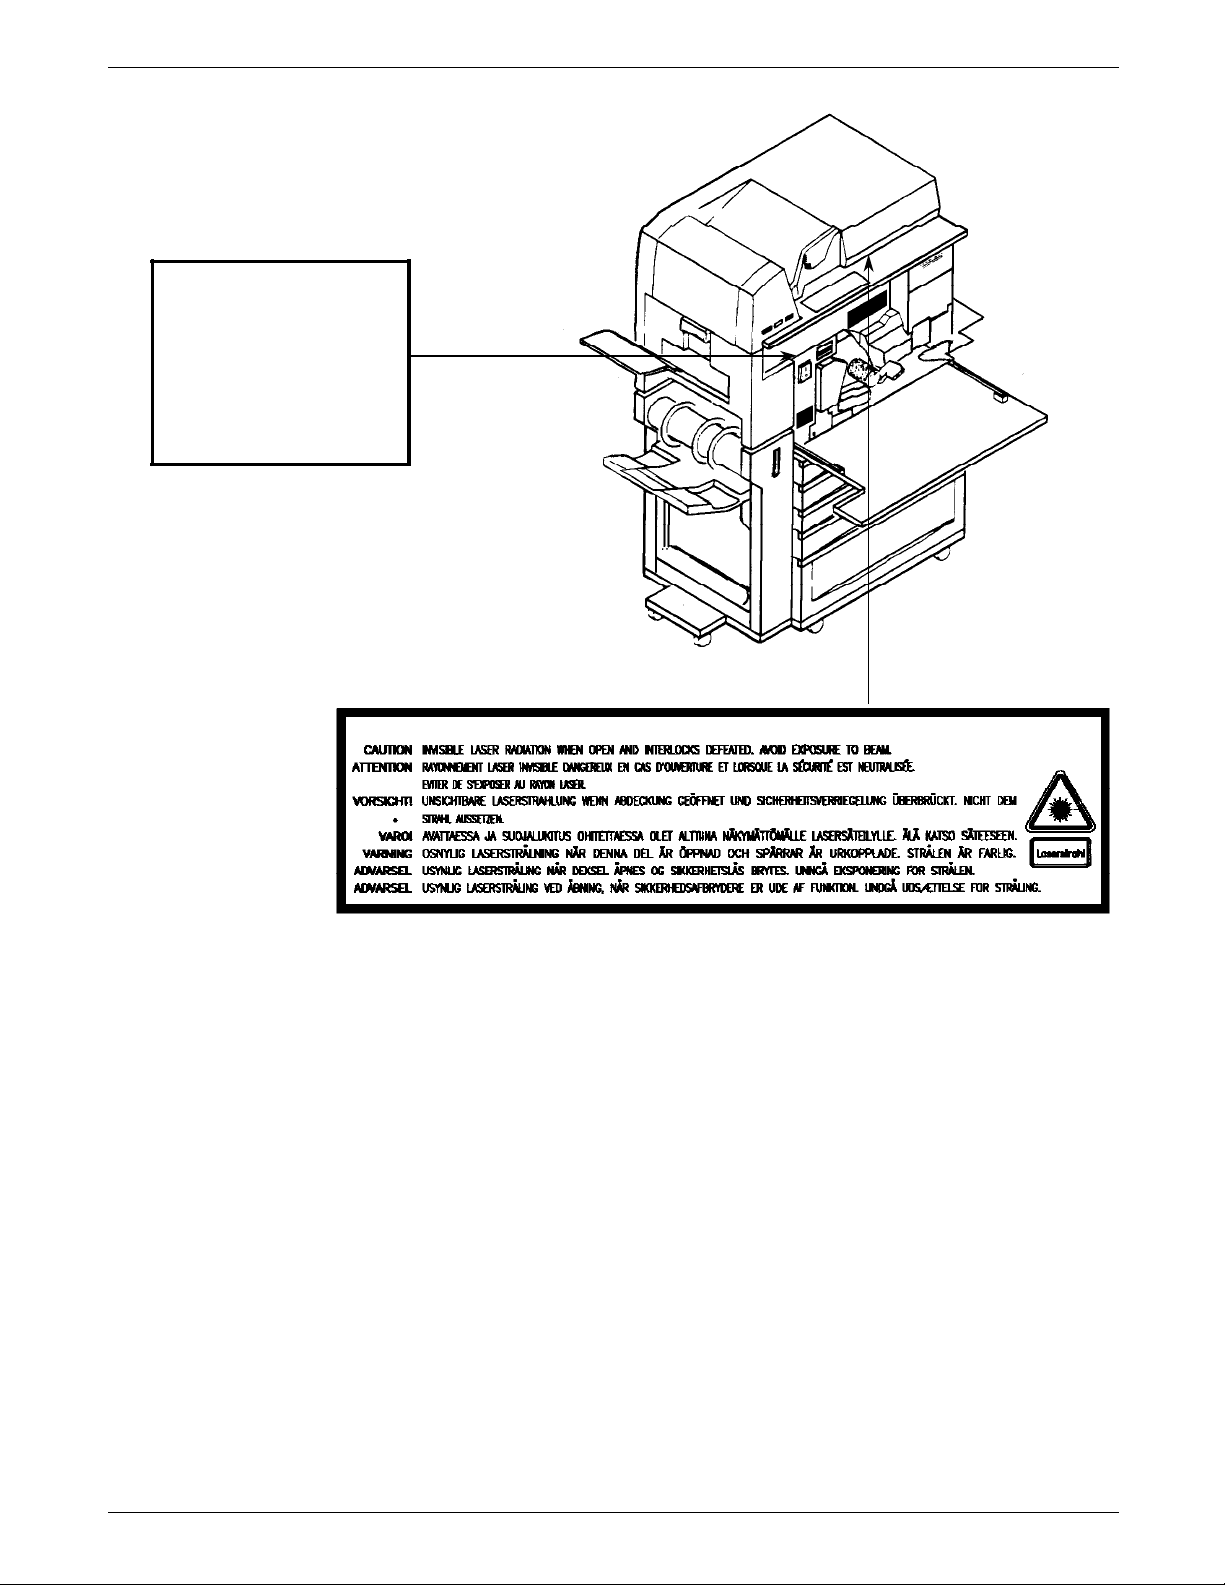
DANGER-invisible laser
radiation
when open and interlock
defeated for service.
AVOID DIRECT EXPOSURE TO
BEAM.
Instructions for safe service are
in SERVICE MANUAL.
NOTICES
XEROX MRP FAMILY INTELLIGENT PRINTER DATA STREAM (IPDS) v
CONFIGURATION AND REFERENCE GUIDE
Page 6
NOTICES
aaaaaaaaaaaaaaaaaaaaaaa
a
a
a
a
a
a
a
a
a
a
a
a
a
a
a
a
aaaaaaaaaaaaaaaaaaaaaaaaa
a
a
a
a
a
a
a
a
a
a
a
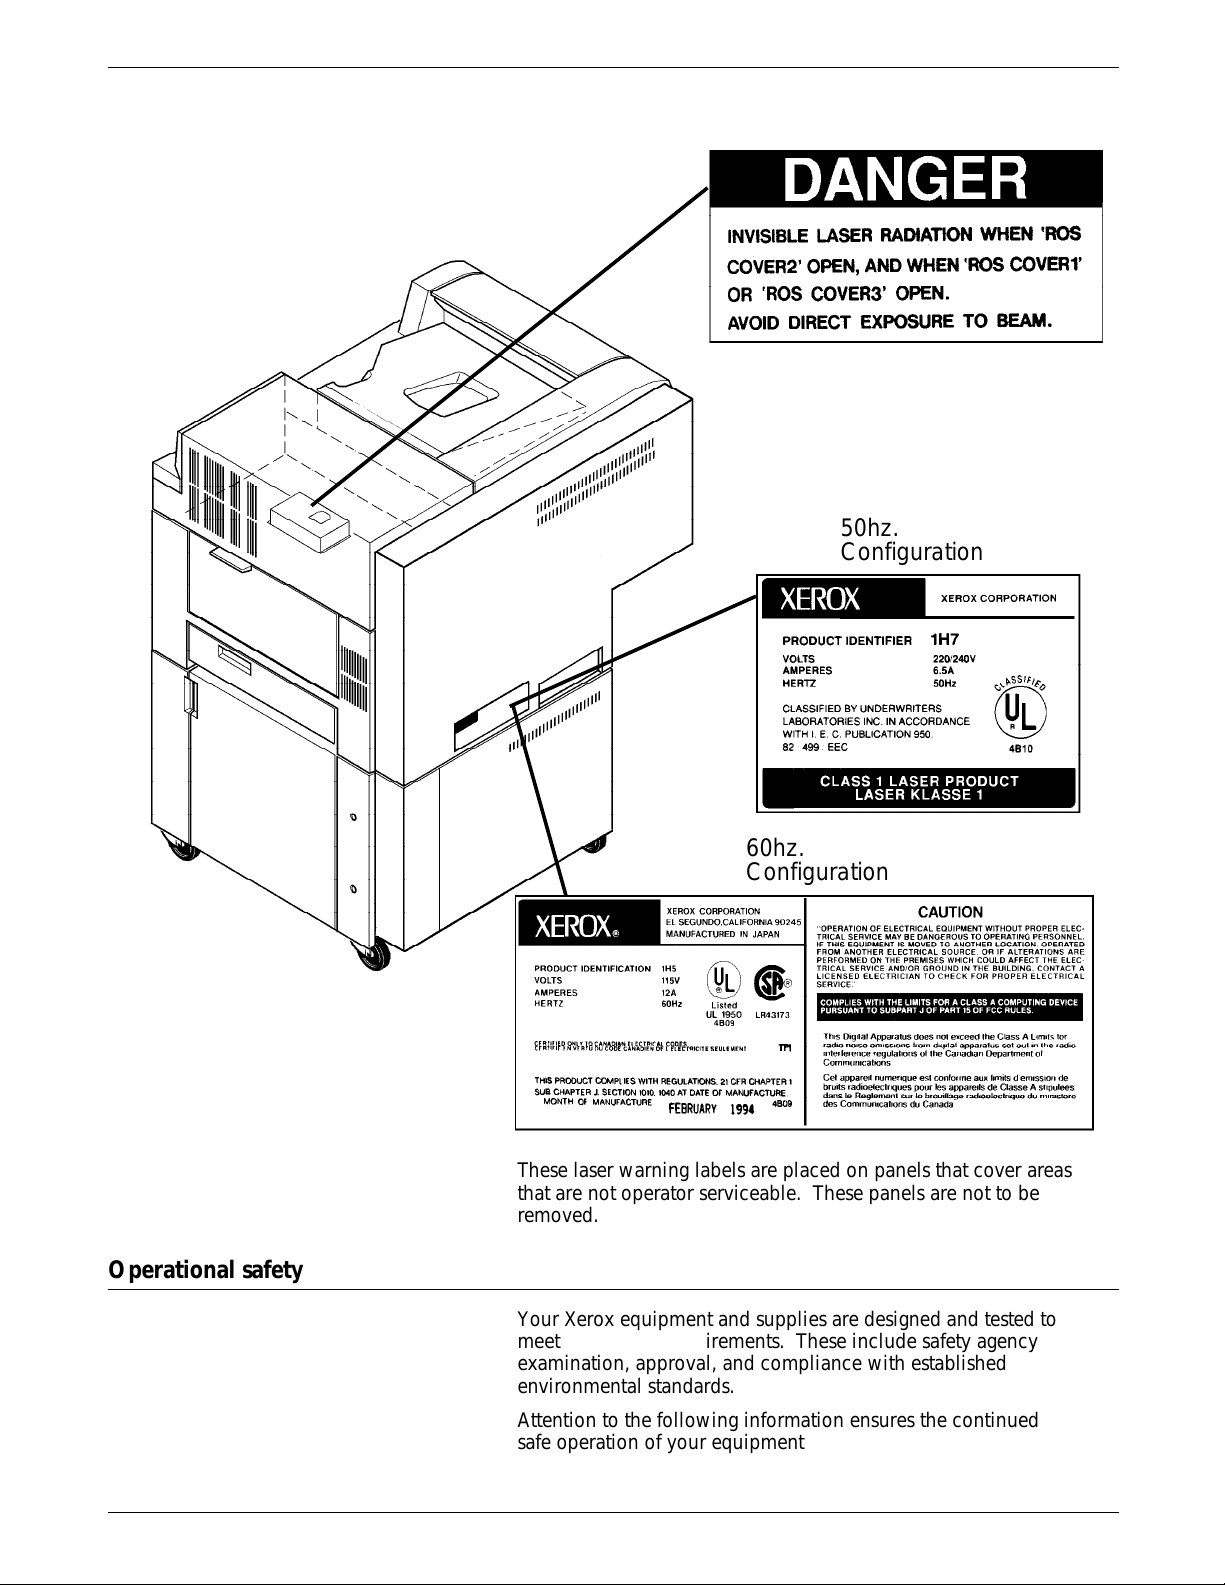
Laser labels on the rear of the machine are either:
aaaaaaaaaaaaaaaaaaaaaaa
aaaaaaaaaaaaaaaaaaaaaaa
50hz.
aaaaaaaaaaaaaaaaaaaaaaa
aaaaaaaaaaaaaaaaaaaaaaa
aaaaaaaaaaaaaaaaaaaaaaa
Configuration
aaaaaaaaaaaaaaaaaaaaaaa
aaaaaaaaaaaaaaaaaaaaa
aaaaaaaaaaaaaaaaaaaaa
60hz.
aaaaaaaaaaaaaaaaaaaaa
aaaaaaaaaaaaaaaaaaaaa
aaaaaaaaaaaaaaaaaaaaa
Configuration
aaaaaaaaaaaaaaaaaaaaa
aaaaaaaaaaaaaaaaaaaaa
aaaaaaaaaaaaaaaaaaaaa
aaaaaaaaaaaaaaaaaaaaa
a
a
a
a
a
a
Operational safety
vi XEROX 4220/MRP FAMILY INTELLIGENT PRINTER DATA STREAM (IPDS)
These laser warning labels are placed on panels that cover areas
that are not operator serviceable. These panels are not to be
removed.
Your Xerox equipment and supplies are designed and tested to
meet strict safety requirements. These include safety agency
examination, approval, and compliance with established
environmental standards.
Attention to the following information ensures the continued
safe operation of your equipment.
CONFIGURATION AND REFERENCE GUIDE
Page 7
NOTICES
Do this
Always connect equipment to a properly grounded power source
receptacle. If in doubt, have the receptacle checked by a
qualified electrician.
WARNING: Improper connection of the equipment grounding
conductor can result in electrical shock.
Always place equipment on a floor with adequate strength for
the weight of the machine.
Always have your service representative move or relocate the
equipment.
Always use materials and supplies specifically designed for your
Xerox equipment.
WARNING: Use of unsuitable materials may result in poor
performance and can possibly create a hazardous condition.
Always use a Xerox specified cordset with the Equipment Leakage
Current Interrupter (ELCI).
Do not do this
Never use an extension cord with the ELCI.
Never use the ELCI where water may enter the casing.
Never attempt any maintenance function that is not specifically
described in your Xerox printer documentation.
Never remove any covers or guards that are fastened with screws
unless otherwise instructed. There are no operator-serviceable
areas within these covers.
Never override or “cheat” electrical or mechanical devices.
Never operate the equipment if you notice unusual noises or
odors. Disconnect the power cord from the power source
receptacle and call service to correct the problem.
U.S. only: If you need any additional safety information
concerning the equipment or if you need Xerox supplied
materials, call the following toll-free number: 1-800-828-6571.
Approvals and certification
60 Hz, 115 V Listed by Underwriters Laboratories (UL), UL1950. Meets CSA
standards, C22.2 NO 950.
50 Hz, 220 to 240 V Meets the IEC950 as judged by UL.
Safety feature
Your printer is equipped with an Equipment Leakage Current
Interrupter (ELCI). This device protects the equipment in the
event of a malfunction.
XEROX 4220/MRP FAMILY INTELLIGENT PRINTER DATA STREAM (IPDS) vii
CONFIGURATION AND REFERENCE GUIDE
Page 8
NOTICES
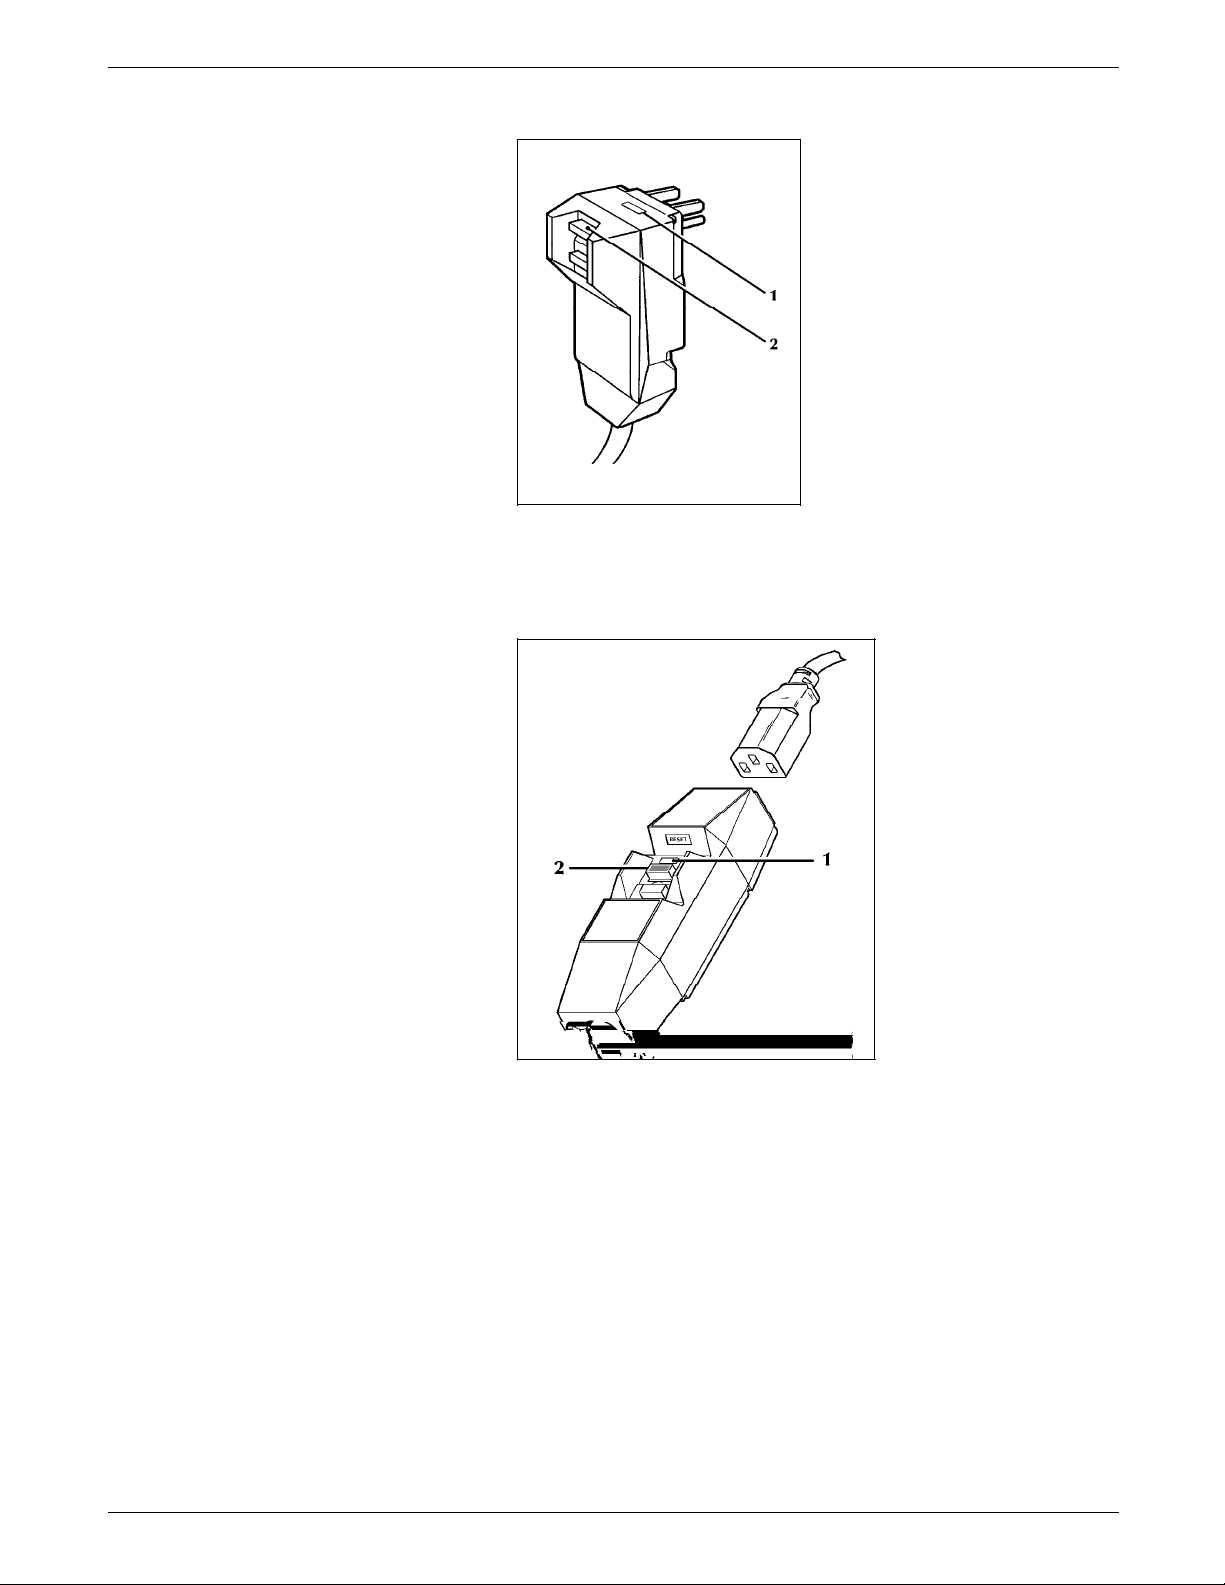
U.S. configuration of ELCI
1 Window
2 Reset button.
International configuration of ELCI
1 Window
2 Reset button.
If power to the printer is interrupted, follow these steps:
1. Locate the safety device, using the U.S. or International
Configuration (refer to the appropriate illustration).
2. Check to see if a red flag displays in the window of the
safety device.
3. If the red flag does not display, press and release the black
Reset button.
The red flag displays and power is restored to the system.
If power is not restored by this procedure or if the device
interrupts power to the machine again, call your service
representative.
viii XEROX 4220/MRP FAMILY INTELLIGENT PRINTER DATA STREAM (IPDS)
CONFIGURATION AND REFERENCE GUIDE
Page 9

Table of contents
Notices iii
Installation caution iii
Safety iii
Laser safety iv
Operational safety vi
Introduction xi
About this manual xi
Conventions xi
1. Overview 1–1
Using IPDS with your printer 1–1
Page environment 1–2
Valid printable area 1–4
Typical applications 1–5
Overlays 1–6
Page segments 1–7
Images and graphics 1–7
Bar codes 1–8
Fonts 1–8
Coordinate systems 1–9
2. Enabling IPDS 2–1
Upgrading the interface card 2–1
Setting up the printer for IPDS 2–2
Setting the printer emulation and address
for IPDS processing in twinax only 2
Setting the printer for dual emulation and addresses
in a twinax environment 2
–2
–4
3. Configuring IPDS 3–1
MakeITDS utility 3–1
Copying the MakeITDS utility files 3–2
Command parameters 3–2
Configuring your printer 3–3
Automatic configuration 3–18
Printing the Printer Configuration Report 3–19
XEROX MRP FAMILY INTELLIGENT PRINTER DATA STREAM (IPDS) ix
CONFIGURATION AND REFERENCE GUIDE
Page 10

TABLE OF CONTENTS
4. Command listing 4–1
Device Control command set 4–2
Text command 4–7
IM Image command set 4–7
IO Image command set 4–8
Graphics command set 4–8
Bar code command set 4–9
Overlay command set 4–9
Page Segment command set 4–10
Load Font command set 4–10
5. Accessing printer features from IPDS 5–1
Tray mapping 5–1
Checkpoint capability in the IBM host environment 5–3
Binding the IBM host to the Xerox IPDS printer 5–3
Defining the printer as a line printer and an IPDS printer 5–4
PSF font support 5–5
Converting 240 spi fonts for use in the 4028 emulation 5–5
Port timeouts 5–6
Content fidelity vs. absolute fidelity 5–6
Nonprintable area considerations 5–7
Default font and code page considerations 5–9
Font substitution 5–13
IPDS font and code page comparisons 5–16
Font comparison 5–16
Code page comparison 5–19
Appendices
A. Exception codes A–1
B. Resident code pages B–1
C. Reconfiguring BIN IDs C–1
D. Related publications D–1
Glossary GLOSSARY–1
Index INDEX–1
x XEROX MRP FAMILY INTELLIGENT PRINTER DATA STREAM (IPDS)
CONFIGURATION AND REFERENCE GUIDE
Page 11
About this manual
Introduction
The Xerox MRP Family Intelligent Printer Data Stream (IPDS)
Configuration and Reference Guide describes how IPDS is
supported on the following Xerox printers: 4215/MRP,
4219/MRP, 4220/MRP, and 4230/MRP.
This guide provides configuration information and describes how
the IBM IPDS command sets are supported on your Xerox
printer. It is intended to complement your IBM IPDS
documentation.
This guide is for system administrators as well as individuals who
are developing or adapting a program using the IPDS system
architecture. Before using this guide, become familiar with its
contents and conventions.
Conventions
This guide uses the following conventions to help you recognize
different types of information:
CAUTION: Cautions are associated with equipment safety.
WARNING: Warnings are associated with the safety of people.
N Notes are hints that help you perform a task or understand the
text.
italics Items are italicized for the following reasons:
• Document and library names (for example, the Xerox MRP
Family Intelligent Printer Data Stream (IPDS) Configuration
and Reference Guide)
• Variable information (for example, password).
X Represents hexadecimal (HEX) code. For example: X'05' or
X'25'.
MB Megabyte.
KB Kilobyte.
bold Bold text is used for characters you enter and screen options you
select (for example, md \MAKEITDS).
XEROX MRP FAMILY INTELLIGENT PRINTER DATA STREAM (IPDS) xi
CONFIGURATION AND REFERENCE GUIDE
Page 12

Page 13

Using IPDS with your printer
1. Overview
The Xerox Intelligent Printer Data Stream (IPDS) interface allows
your Xerox printer to receive and print using IPDS commands.
The IPDS interface allows your printer to emulate any of the
following IBM printers:
• IBM LaserPrinter 4028, a 300–pel relative metric (RIMA)
printer
• IBM LaserPrinter 3812, a 240–pel fixed metric printer
• IBM LaserPrinter 3816, a 240–pel fixed metric printer
Once the IPDS interface card is installed and the system is
configured, your printer has the ability to do the following:
• Receive and print IPDS data stream commands.
• Support the following IPDS towers:
— Device Control
— Text
— IM Image
— IO Image
— Graphics
— Bar code
— Overlay
— Page Segment
— Load Font
• Use all–points–addressable (APA) printing for text, graphics,
images, or bar codes. This means you can print at any
position within the printable area of the page.
• Change fonts within a printed page.
• Use images and vector graphics to produce line drawings,
pie and bar charts, graphics, logos, tables, and signatures.
• Create a composite document of text, images, and graphics
on each page.
• Electronically store forms and letterheads so they always
print in the same typestyle.
• Print the standard set of bar codes including Codabar, Code
128, and POSTNET.
• Process compressed images using one of the following:
— Modified Consultative Committee on International
Telephone and Telegraph (CCITT) Modified Read
(MMR) algorithm
XEROX MRP FAMILY INTELLIGENT PRINTER DATA STREAM (IPDS) 1-1
CONFIGURATION AND REFERENCE GUIDE
Page 14

OVERVIEW
Page environment
— CCITT T.4 G3 Facsimile Two–Dimensional Coding
Scheme (G3 MR)
— CCITT T.6 G4 Facsimile Two–Dimensional Coding
Scheme (G4 MMR).
IPDS creates composite pages (pages with data, graphics, and
images) within a hierarchy of presentation spaces:
• Physical page—the paper on which you print information.
• Physical printable page—the area of the paper that is
accessible by your Xerox printer. There is a 50–pixel
nonprintable area surrounding any IPDS page.
• Logical page—a rectangular area on the physical page.
Printing occurs only where the current logical page area
intersects the printable area of the physical page.
• Data blocks—rectangular areas placed on the logical page.
Data blocks include the following:
— Graphics data blocks
— Bar code data blocks
— IM and IO Image data blocks.
There are no text data blocks. You can position text at any
location inside the valid printable area (VPA).
IM images are image objects that are resolution–dependent,
bilevel, and cannot be scaled or compressed. IO images are
image objects containing Image Object Content Architecture
(IOCA) constructs. IO images are resolution–independent,
bilevel, and can be scaled or compressed.
You can use various applications to create the source data for
each data block and then merge them at the printer to produce
an integrated mixed–data page. This allows you to integrate
application output rather than use integrated applications.
Figure 1–1 provides an example of the page environment and its
presentation spaces.
1-2 XEROX MRP FAMILY INTELLIGENT PRINTER DATA STREAM (IPDS)
CONFIGURATION AND REFERENCE GUIDE
Page 15
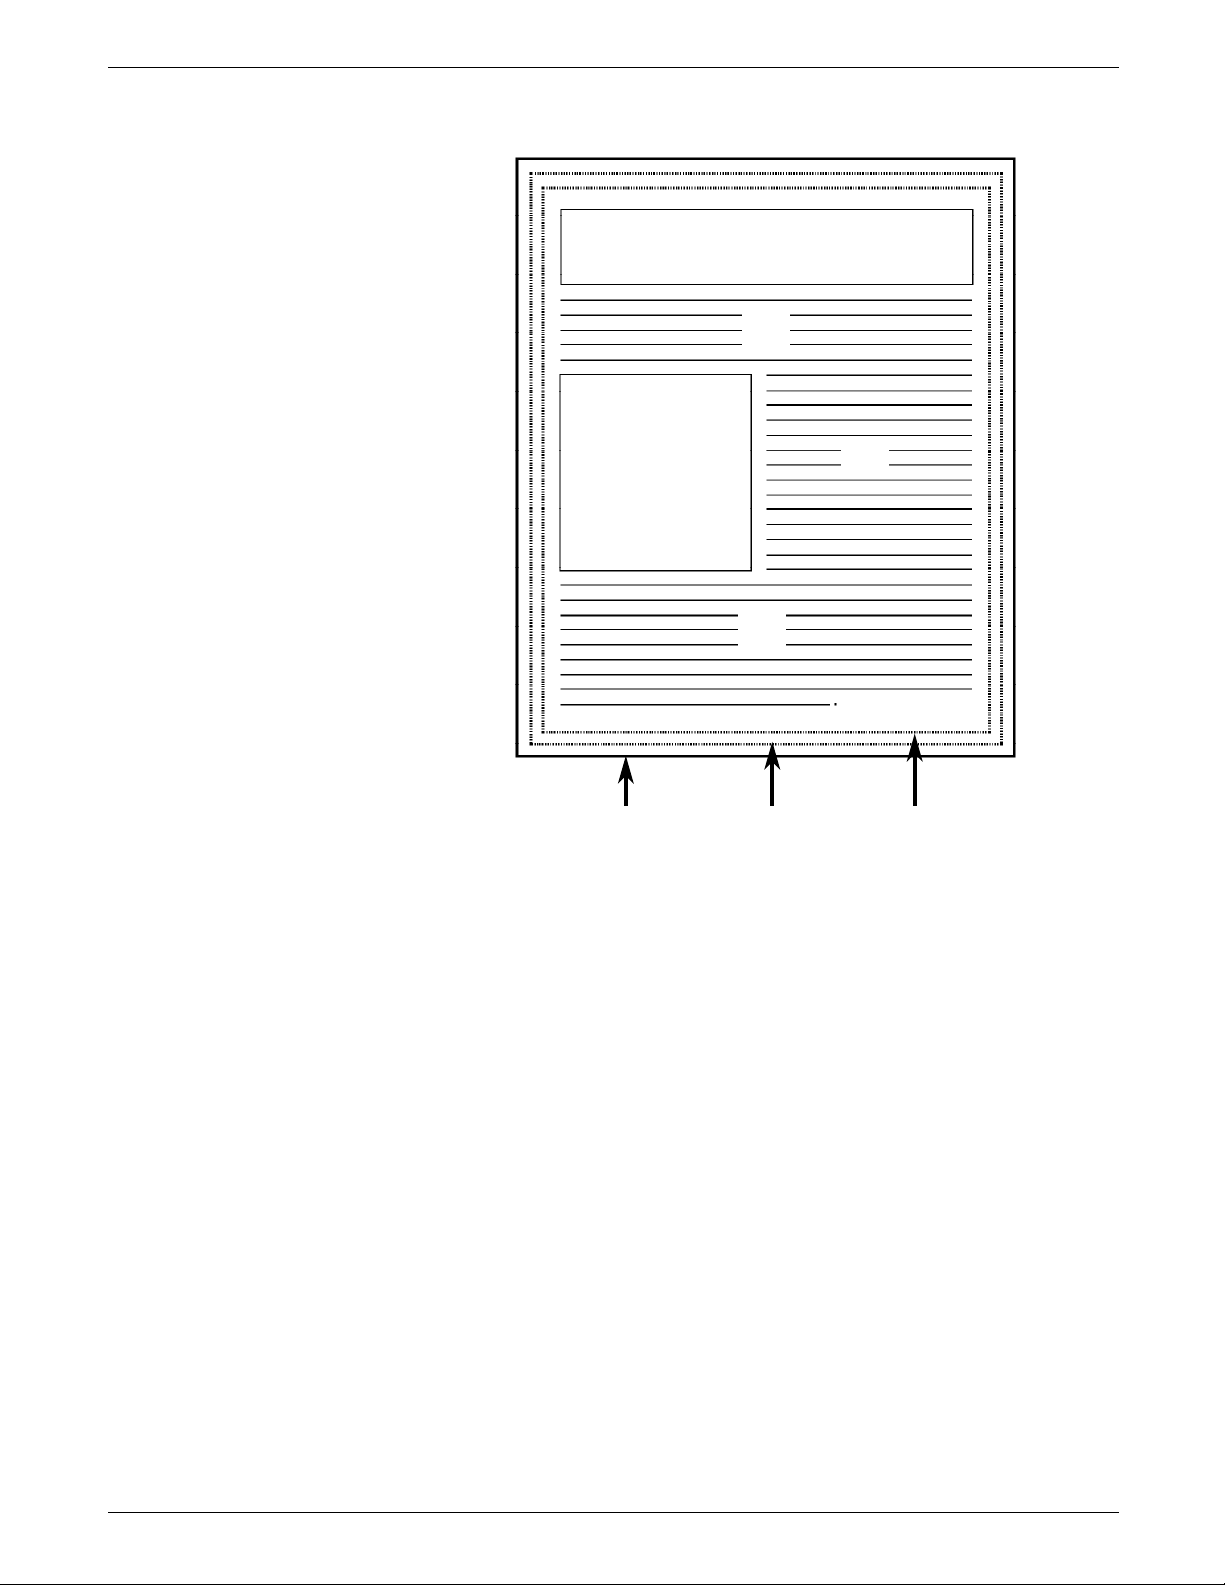
Figure 1–1. Page environment
Data Block
Text
OVERVIEW
Data Block
Physical
page
Text
Physical
Printable
page
Text
Logical
page
XEROX MRP FAMILY INTELLIGENT PRINTER DATA STREAM (IPDS) 1-3
CONFIGURATION AND REFERENCE GUIDE
Page 16
OVERVIEW
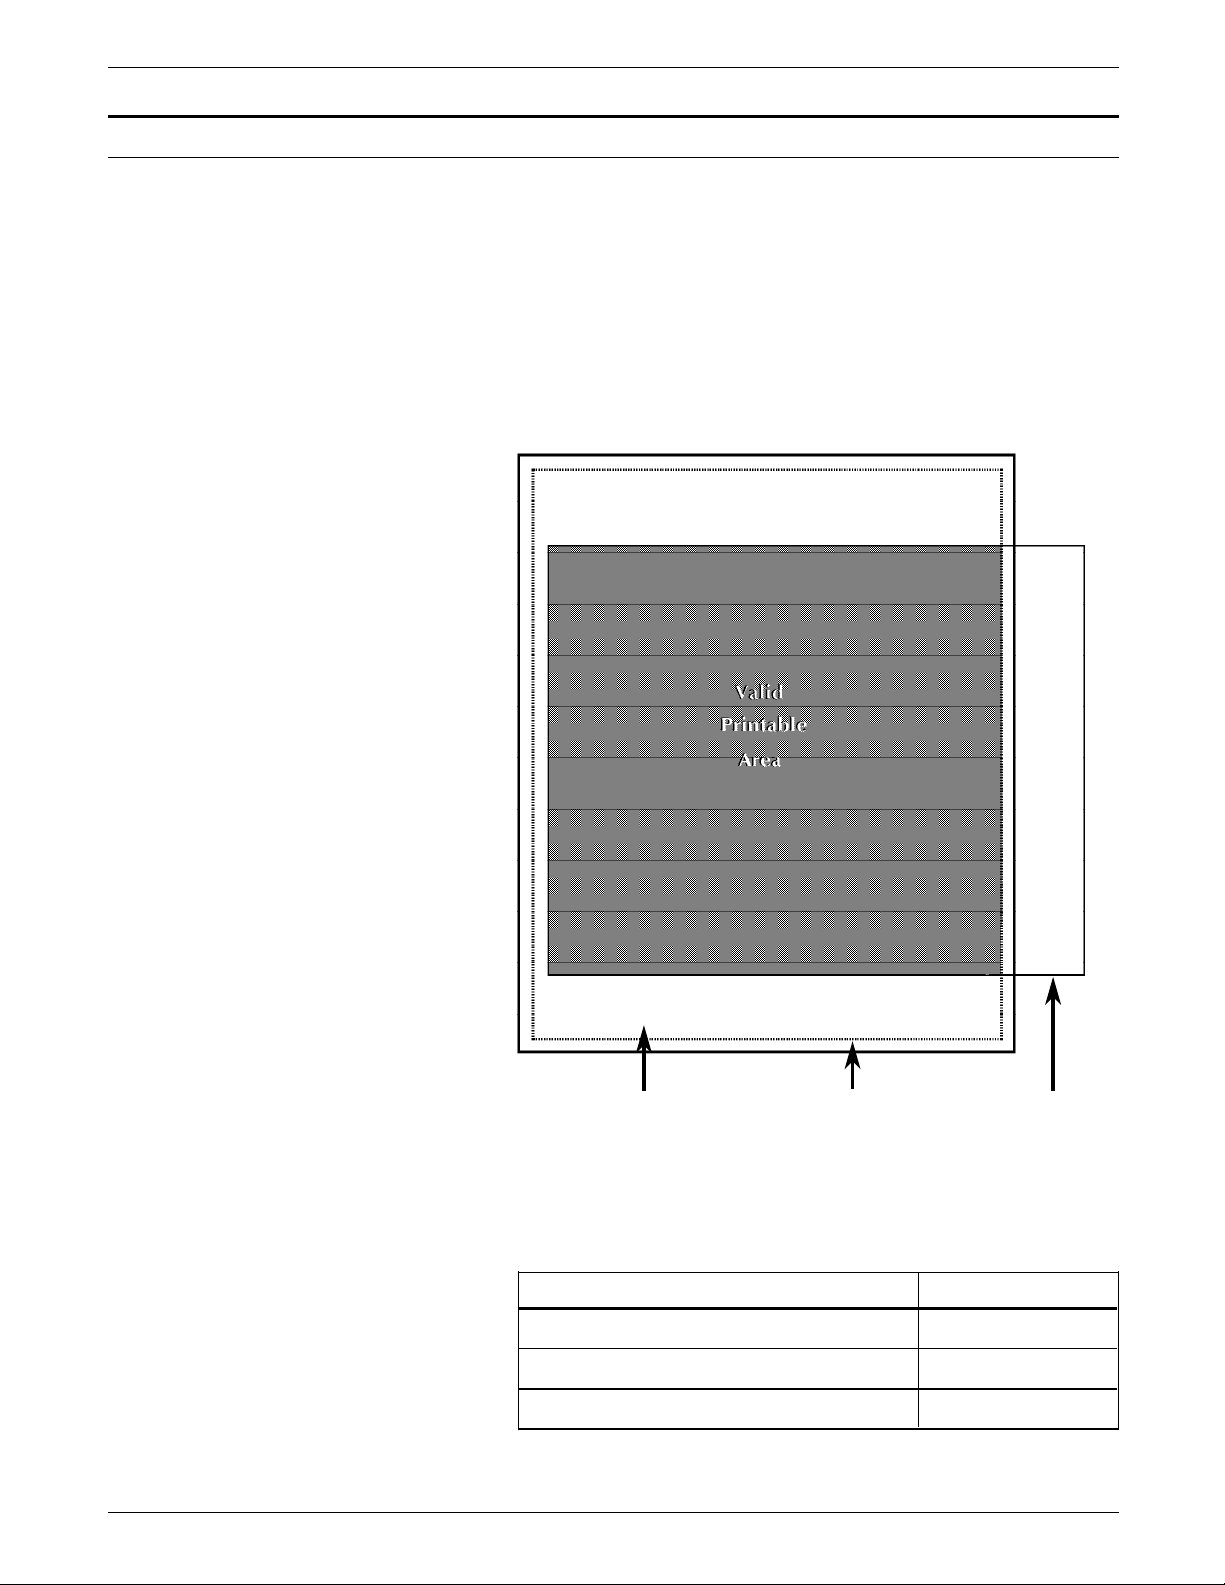
Valid printable area
The valid printable area (VPA) is the intersection of the current
logical page with the printable area of the physical page. Text
may be printed at any location in the valid printable area.
Printing cannot occur outside of the VPA. Positioning outside of
the VPA is possible but generates exceptions.
The host retrieves the printable area of the physical page through
the XOH Obtain Printer Characteristics command. The host
defines the logical page using the Load Page Descriptor (LPD)
command.
Figure 1–2. Valid printable area (VPA)
Physical
page
Physical
printable
area
Logical
page
Some printers have a nonprintable area on the page. Table 1–1
lists the nonprintable area by printer.
Table 1–1. Nonprintable area
Printer Nonprintable area
Xerox MRP Family printers 50 pixels
IBM 4028 48 pixels
IBM 3812/3816 None
1-4 XEROX MRP FAMILY INTELLIGENT PRINTER DATA STREAM (IPDS)
CONFIGURATION AND REFERENCE GUIDE
Page 17

Typical applications
OVERVIEW
When you use IPDS to produce a document or form, you can
incorporate the following elements:
• Text
• Overlays
• Page segments
• Images and graphics
• Bar codes
If you are producing many similar documents, such as a
marketing letter where only the customer name and address
change, you need to find a quick way to print on letterhead,
merge the variable information into the text of the letter, and
sign each one. You can use IPDS to do the following functions:
• Create and store the letterhead and signature block in
printer memory
• Merge the letterhead with the basic text of the letter
• Merge the signature block
• Use different typestyles for the letterhead and different
parts of the letter
• Add graphics, such as pie or bar charts, that are stored on
the host system
XEROX MRP FAMILY INTELLIGENT PRINTER DATA STREAM (IPDS) 1-5
CONFIGURATION AND REFERENCE GUIDE
Page 18
OVERVIEW
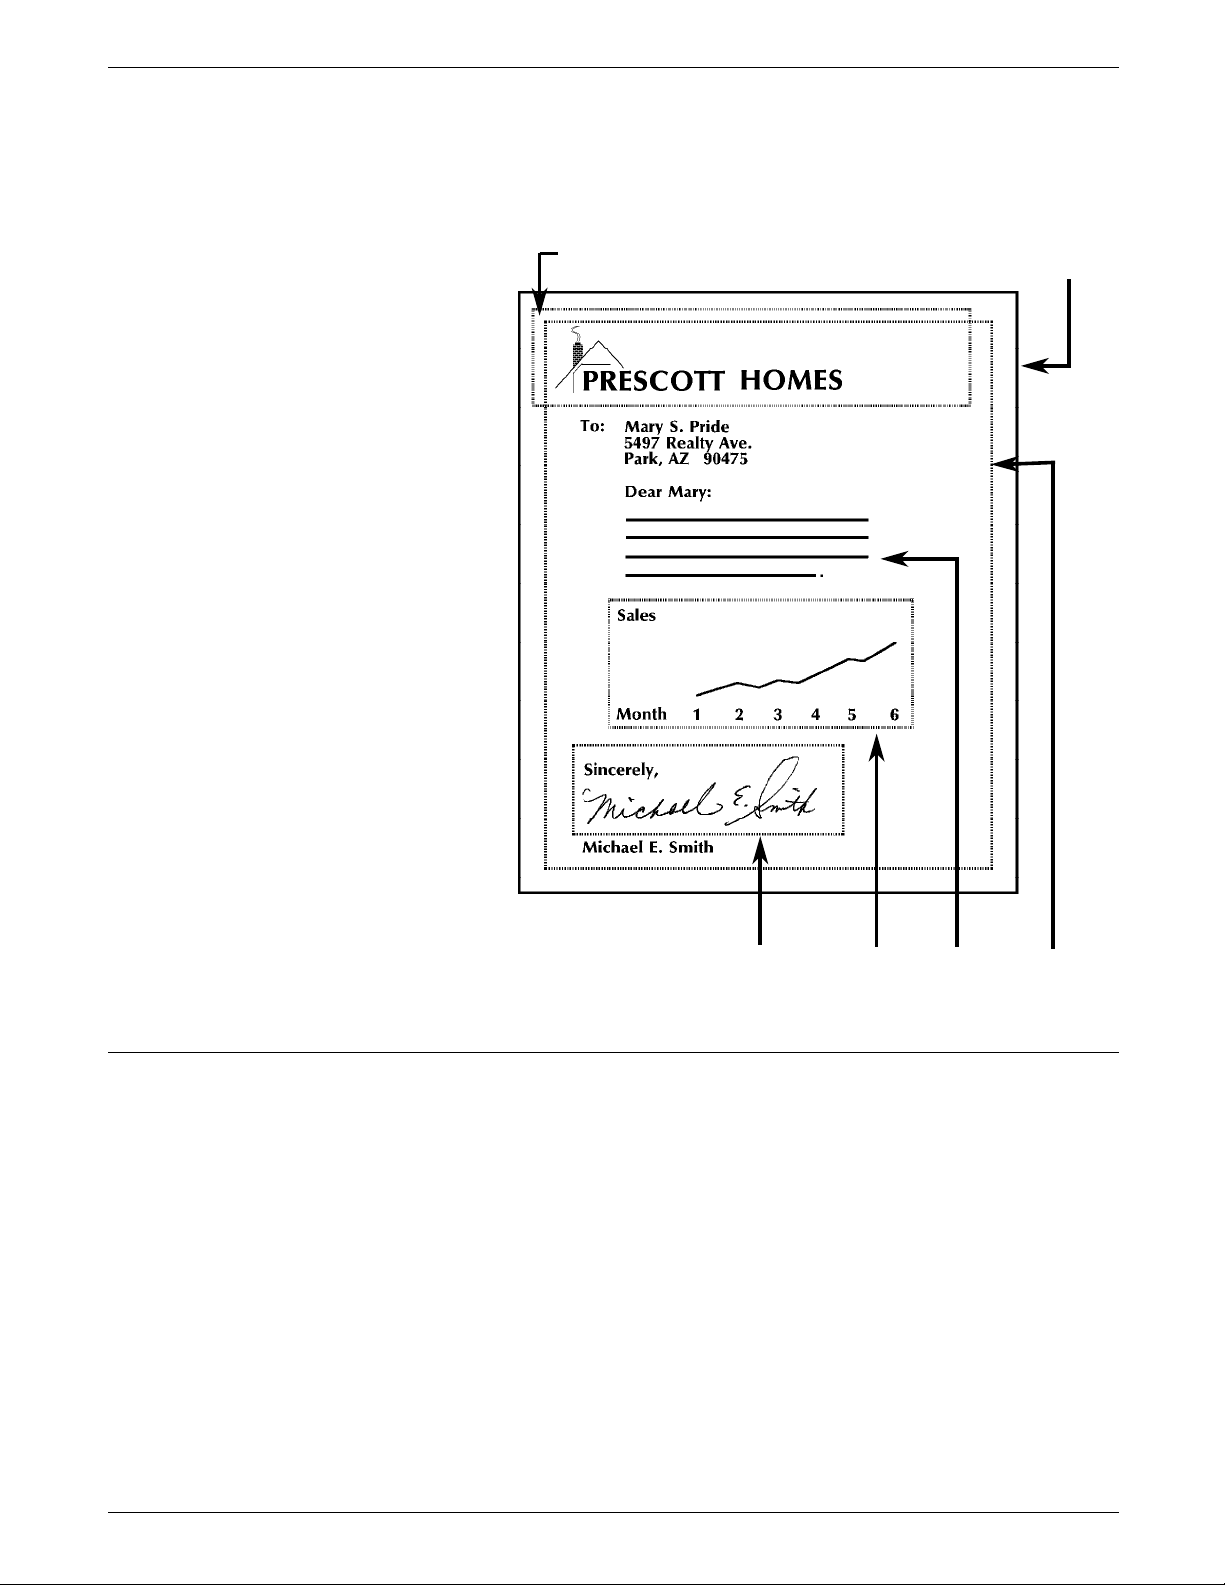
Figure 1–3 shows a letter containing an overlay, page segment,
graphics block, and text.
Figure 1–3. Sample letter layout elements
Physical
Overlay (image block and text)
page
Segment
Graphics
Block
TextPage
Logical
page
Overlays
Overlays are resources you can temporarily store in printer
memory. Overlays can consist of any combination of text data,
image block data, graphics block data, or bar code data. When
you define an overlay, it contains all printing instructions
including its position on the page and the typestyle to use. It is
independent of the logical page environment.
Letterheads and business forms are typical applications of
overlays. You can merge variable data, such as the customer’s
name and address, with the overlay during printing and you can
include other overlays and page segments within an overlay. You
can nest overlays, which means you can include several levels of
overlays within an overlay, depending on their size.
1-6 XEROX MRP FAMILY INTELLIGENT PRINTER DATA STREAM (IPDS)
CONFIGURATION AND REFERENCE GUIDE
Page 19

Page segments
Images and graphics
OVERVIEW
Page segments can consist of any combination of text data,
image block data, graphics block data, or bar code data. Page
segments are different from overlays in that you store them
without printing instructions regarding the typestyle and page
position.
Page segments are dependent on the page environment in that
they merge with the logical page acquiring its characteristics.
The typestyle for the page segment is the same one used when
printing occurs. You can place page segments at any position on
the page as long as all elements fall within the VPA.
N Note: You cannot include other page segments or overlays
within page segments.
You can send illustrations, such as charts, complex line drawings,
and schematics to the printer as graphics, IM images, or IO
images.
Images
You create images by specifying individual points on the page.
The points are called picture elements, or pels. Using an all–
points–addressable system, each square inch on the page
contains 300 by 300 points you can address. Because of the way
they are created, each figure or image can require a large
quantity of data.
IM images are based on Advanced Function Printing Data Stream
(AFPDS) image cells. IM images are uncompressed raster data
images, which are stored in your printer.
IO images are based on Image Object Content Architecture
(IOCA). IO images are raster data images you can compress.
Compressed images reduce the amount of data sent to the
printer to create them and speed up transmission time. You can
scale IO images to correct differences that may occur in the
resolution of the scanner as compared to the printer.
Graphics
You create vector graphics using individual lines, arcs, and
markers to identify a specific location in a graphic. You can
create complex graphics using a minimum of data because only
the control information, such as the end points of a line, are sent
to the printer.
XEROX MRP FAMILY INTELLIGENT PRINTER DATA STREAM (IPDS) 1-7
CONFIGURATION AND REFERENCE GUIDE
Page 20

OVERVIEW
Bar codes
A bar code is a set of patterns (bars and spaces) that represent
alphabetic, numeric, and special characters. The bars and spaces
are recognized by optical scanning devices. Many bar code
types also include data you can read as well.
You can position bar codes on a logical page, page segment, or
overlay. To ensure proper interpretation of the bar coded data,
position the entire bar code in the printable area.
The supported bar code types are as follows:
• 3 of 9 code
• MSI
• UPC/CGPC Version A
• UP/CGPC Version E
• UPC Two–Character Supplemental
• UPC Five–Character Supplemental
• EAN–8
• EAN–13
• 2 of 5 Industrial
• 2 of 5 Matrix
• 2 of 5 Interleaved
• Codabar
• Code 128
• EAN Two–Digit Add–on
• EAN Five–Digit Add–on
• Postal Barcode (POSTNET)
Fonts
A font is a set of characters in a specific typestyle and size. You
can download fonts to your printer or use the fonts that are
resident in printer storage.
N Note: Xerox IPDS emulation does not support all fonts and code
pages supported by the IBM systems. The typestyles in the
supported fonts may have slight differences as compared to the
IBM fonts.
The 4028 emulation provides 30 resident fonts and 53 resident
code pages. The 3812/3816 emulation provides 37 fonts and 48
resident code pages. The Printer Configuration Report lists all
resident fonts and code pages. Examples of the report are
shown in the “Configuring IPDS” chapter.
1-8 XEROX MRP FAMILY INTELLIGENT PRINTER DATA STREAM (IPDS)
CONFIGURATION AND REFERENCE GUIDE
Page 21

Coordinate systems
OVERVIEW
IPDS uses orthogonal coordinate systems to define any point on
a page. The distances within these systems are measured in
logical units (L–units) instead of physical picture elements. The
coordinate systems are listed in this section. For greater detail,
refer to the IBM Intelligent Printer Data Stream Reference,
publication number S544–3417–04.
• Xm, Ym coordinate system—the physical page (medium)
coordinate system.
• Xp, Yp coordinate system—the logical page presentation
space coordinate system for both a page’s logical page and
an overlay’s logical page.
• Inline, Baseline (I, B) coordinate system—describes the
placement and orientation of text characters and data
blocks on the logical page.
• Xg, Yg coordinate system—describes the placement of
graphics data within the graphics presentation space.
• Xio, Yio coordinate system—describes the placement of IO
image data within the IO image presentation space.
• Xbc, Ybc coordinate system—describes the placement of
bar code data within the bar code presentation space.
• Xbl, Ybl coordinate system—describes the placement of IO
image, graphics, and bar code presentation spaces within
data blocks that are positioned on a logical page.
All coordinate systems can be used to locate any point in relation
to the logical page and the medium space.
XEROX MRP FAMILY INTELLIGENT PRINTER DATA STREAM (IPDS) 1-9
CONFIGURATION AND REFERENCE GUIDE
Page 22

Page 23

Upgrading the interface card
2. Enabling IPDS
This chapter shows how to upgrade the interface card and set up
the printer for IPDS.
Follow these steps to upgrade the interface card prior to
configuring your printer for IPDS:
1. Turn off the printer.
2. Install a Centronics cable from the parallel port of the PC to
the mini
adaptor cable included in the option kit.
3. Power on the printer.
4. Perform one of the following steps:
–Centronics port on the interface card using the
• If you are updating a printer in a coax environment,
type the following and press Enter:
COPY <floppy drive letter>:*.XCX LPT1:/B
• If you are updating a printer in a twinax environment,
type the following and press Enter:
COPY <floppy drive letter>:*.XTX LPT1:/B
When the file has completed copying to the printer, the
LED on the interface board blinks for about 20 seconds.
5. Turn off the printer and turn it on again.
N Note: Ignore any error sheets printed on the first power
after loading new firmware. The system generates them when it
recognizes new software.
–on
XEROX MRP FAMILY INTELLIGENT PRINTER DATA STREAM (IPDS) 2-1
CONFIGURATION AND REFERENCE GUIDE
Page 24
ENABLING IPDS
Setting up the printer for IPDS
This section contains the following procedures:
• Setting the printer emulation and address for IPDS
processing only.
• Setting the printer for dual emulation and addresses in a
twinax environment if you want to process both IPDS and
SCS data streams on the same twinax printer.
• Copying the MakeITDS utility files to a directory on your
computer.
N Note: If you have installed the IPDS card in the coax
environment, you can skip to the “Copying the MakeITDS
utility files” section to install the MakeITDS files. Then
continue with the “Configuring your printer” section if you
need to change any settings in the configuration file.
• Configuring your printer’s IPDS interface card to change the
default font set and emulation from 4028 to 3812/3816.
N Note: If you have installed the IPDS option on a 4219/MRP or a
4215/MRP, you must make sure the PCL Line Wrap option is
turned off at the user interface. Refer to your printer’s operator
guide for the procedure.
Setting the printer emulation and address for IPDS processing in twinax only
If you are working in a twinax environment, you can set the
twinax interface to respond only as an IPDS printer. This
procedure may have been completed by your service
representative during the installation of the IPDS card. This
section provides the steps if you need to complete the process.
N Note: Perform the steps in this section if you want to set up
your printer to process IPDS only.
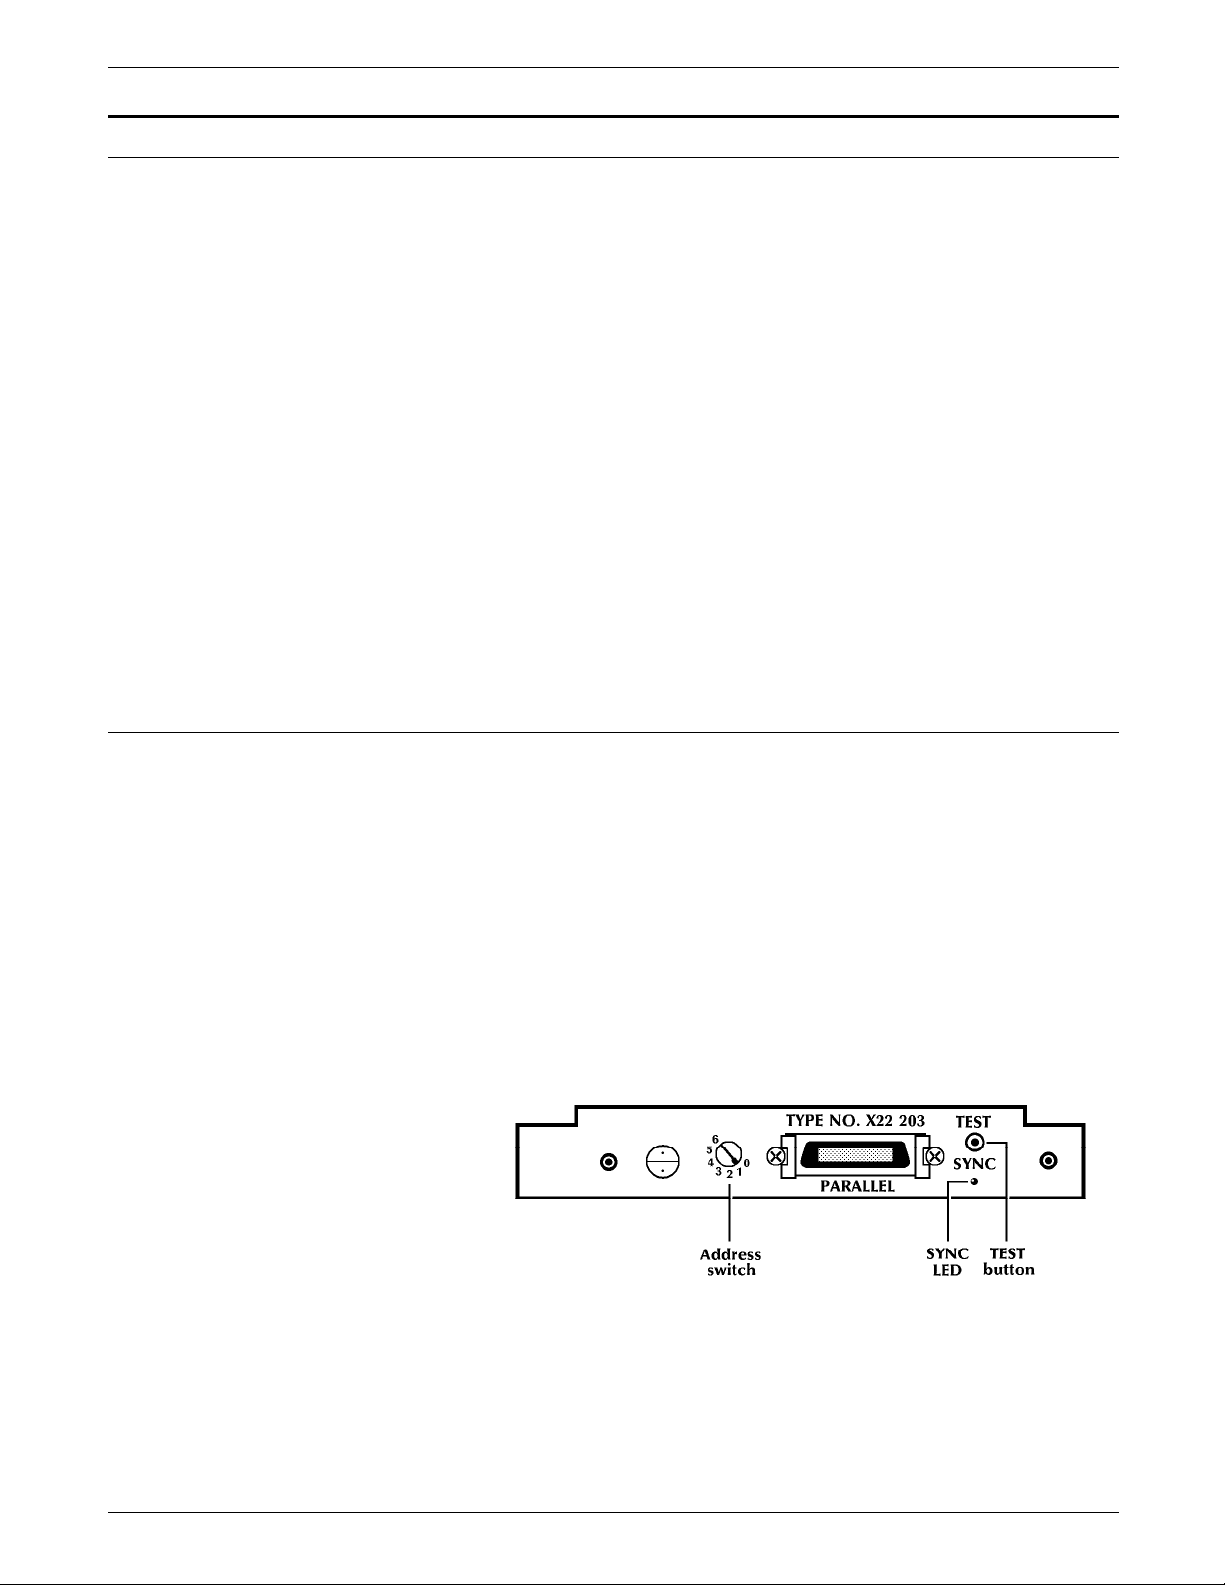
On the twinax interface card, use the address switch and the
TEST button to set the printer emulation and printer address.
Figure 2–1 shows the location of the address switch, SYNC LED,
and TEST button on the twinax interface card.
Figure 2–1. Twinax interface card
2-2 XEROX MRP FAMILY INTELLIGENT PRINTER DATA STREAM (IPDS)
CONFIGURATION AND REFERENCE GUIDE
Page 25

ENABLING IPDS
Setting the printer emulation
Follow these steps to set the printer emulation:
1. Turn off the printer.
N Note: For console printers, turn off the printer using the
rear power switch. Make sure the front main power switch
is left on.
2. Remove back panel from the console printer.
3. Disconnect the twinax T–cable.
4. Set the address switch to 5 to identify IPDS as the
emulation (see table 2
–1).
5. Hold down the TEST button.
6. While holding the TEST button down, turn on the printer.
The SYNC LED flashes twice.
7. Continue holding down the TEST button for an additional
10 seconds after the LED flashes the second time.
8. Release the TEST button.
The printer outputs a start–up page and a page identifying
the emulation settings. These settings remain during
power-off.
The interface card reads the address switch and stores the
corresponding printer emulation setting in permanent memory
on the interface card. This setting remains in permanent memory
until you change it.
N Note: After you set the emulation, you must set the printer
address or the interface card will not accept data from the twinax
port.
Setting the printer address
Follow these steps to set the printer address:
1. Turn off the printer.
2. Reconnect the twinax T–cable.
3. Set the address switch to the address you want to assign to
the printer (1, 2, 3, and so on). You cannot use an address
switch that is already assigned to another device.
4. Turn the printer on.
The printer outputs a start–up page and the Xerox Twinax
Configuration Report listing the printer emulation and address
settings.
XEROX MRP FAMILY INTELLIGENT PRINTER DATA STREAM (IPDS) 2-3
CONFIGURATION AND REFERENCE GUIDE
Page 26
ENABLING IPDS
Setting the printer for dual emulation and addresses in a twinax environment
This procedure may have been completed by your service
representative during the installation of the IPDS card. This
section provides the steps if you need to complete the process.
If you are using IPDS in a twinax environment, you can set the
twinax interface to respond as both an SCS printer (which must
be the primary device) and an IPDS printer (as the secondary
device).
After you set up the primary device as SCS, download a Function
Selection via Line (FSL) command to identify the IPDS printer as
the secondary device at a different address.
Refer to figure 2–1, which shows the location of the address
switch, SYNC LED, and TEST button on the twinax interface card.
Table 2–1 lists each address switch and its corresponding printer
emulation.
Table 2–1. Twinax printer emulations
Address IBM printer emulation
0 3812/5219/3816 (nonIPDS)
1 5224
2 5225
3 5256
4 4234
5 IPDS (if the card is installed)
6 4245/6262
Setting the printer emulation of the primary device
Follow these steps to set the printer emulation:
1. Turn off the printer.
N Note: For console printers, turn off the printer using the
rear power switch. Make sure the front main power switch
is left on.
2. Remove back panel from the console printer.
3. Disconnect the twinax T–cable.
4. Refer to table 2–1 to identify the address switch for the
emulation of the SCS primary device (5224=1, 5225=2,
and so on).
5. Set the address switch to the number from the table.
N Note: Do not set the primary device to IPDS if you are
setting the printer for dual emulation.
6. Hold down the TEST button.
7. While holding down the TEST button, turn on the printer.
The SYNC LED flashes twice.
2-4 XEROX MRP FAMILY INTELLIGENT PRINTER DATA STREAM (IPDS)
CONFIGURATION AND REFERENCE GUIDE
Page 27

ENABLING IPDS
8. Continue holding down the TEST button for an additional
10 seconds after the LED flashes the second time.
9. Release the TEST button.
The printer outputs a start–up page and a page identifying
the emulation settings. These settings remain during
power-off.
The interface card reads the address switch and stores the
corresponding printer emulation setting in permanent memory
on the interface card. This setting remains in permanent memory
until you change it.
N Note: After you set the emulation, you must set the printer
address or the interface card will not accept data from the twinax
port.
Setting the printer address for the primary device
Follow these steps to set the printer address:
1. Turn off the printer.
N Note: For console printers, turn off the printer using the
rear power switch. Make sure the front main power switch
is left on.
2. Reconnect the twinax T–cable.
3. Set the address switch to the address you want to assign to
the printer (1, 2, 3, and so on). You cannot use an address
switch that is already assigned to another device.
4. Turn the printer on.
The printer outputs a start–up page and the Xerox Twinax
Configuration Report listing the printer emulation and address
settings.
Identifying the IPDS printer as the secondary device
To specify a different address for the secondary IPDS device,
download the following FSL command from your host computer:
&&??@@Y37, *IPDS, <address number> @&&??[space]
N Note: Make sure you specify a different number from the one
you set for the SCS emulation using the address switch. The
address settings appear on the configuration report.
For more information about this FSL command, refer to your
Xerox MRP Family Twinax Command Reference.
If you want to return to a single emulation, follow the steps for
setting the printer emulation and address for the primary device
in the two preceding sections.
XEROX MRP FAMILY INTELLIGENT PRINTER DATA STREAM (IPDS) 2-5
CONFIGURATION AND REFERENCE GUIDE
Page 28

Page 29

3. Configuring IPDS
This chapter shows how to use the MakeITDS utility to generate
IPDS transparent data stream (ITDS) files and configure your
printer to receive files created with Intelligent Printer Data Stream
(IPDS) architecture.
The MakeITDS utility creates an Advanced Function Printing Data
Stream (AFPDS) document containing configuration and resource
information. This information is downloaded transparently to
the printer as part of an IPDS data stream.
ITDS provides a mechanism for communicating actions and
resident resources between a host and the Xerox MRP family of
printers. You can download the generated AFPDS/ITDS output
file to any Xerox MRP family IPDS printer using a personal
computer (PC), an IBM AS/400 system, or an IBM host.
N Note: You may not need to run the MakeITDS utility. The
default settings provided accommodate the requirements of
most working environments. The default emulation is set to IBM
4028.
MakeITDS utility
The MakeITDS utility is supplied on a 3.5–inch disk for use on a
personal computer running any version of DOS or OS/2. The
disk contains the following files in a compressed format:
• Utility and program files
— README.1ST—brief installation instructions and an
overview of using the MakeITDS utility
— MAKEITDS.EXE—MakeITDS utility to allow ITDS to
create an AFPDS document containing ITDS
commands
— MAKEITDS.INI—initialization file, which is used by the
MAKEITDS.EXE program
• Resource specification files
— SETPRN.IRS—resource specification for a configuration
— 028FNT20.B92—factory default font set you need to
download to emulate an IBM 4028 IPDS printer
— 812FNT20.B92—factory default font set you need to
download to emulate an IBM 3812 or 3816 IPDS
printer.
• ASCII configuration files for default emulation
— SET4028.ITX—configuration file to emulate the IBM
4028
— SET3816.ITX—configuration file to emulate the IBM
3816
XEROX MRP FAMILY INTELLIGENT PRINTER DATA STREAM (IPDS) 3-1
CONFIGURATION AND REFERENCE GUIDE
Page 30

CONFIGURING IPDS
Copying the MakeITDS utility files
Prerequisites Print and review the README.1ST file located on the MakeITDS
— SET3812.ITX—configuration file to emulate the IBM
3812
• BINARY ITDS configuration files for default emulation
— SET4028.IDA—configuration file to emulate the IBM
4028
— SET3816.IDA—configuration file to emulate the IBM
3816
— SET3812.IDA—configuration file to emulate the IBM
3812
MAKEVB.EXE—IBM mainframe utility and sample JCL that
•
allows you to upload the IPDS font set and configuration
files from a PC to the host, and then send them from the
host to the printer.
utility disk. This file contains the latest information on the
MakeITDS utility.
Follow these steps to install the MakeITDS utility:
1. From the DOS root directory, create a directory called
MAKEITDS to contain the MakeITDS utility files by typing
the following and pressing Enter:
MD MAKEITDS
2. Change to the MAKEITDS directory by typing the following
and pressing Enter:
CD MAKEITDS
3. Insert the MakeITDS utility disk into the floppy disk drive.
4. From the MAKEITDS directory, type the following and press
Enter:
COPY <floppy drive letter>:*.*
You have copied the compressed program files to the
MAKEITDS directory.
5. To expand the files, type the following and press Enter:
ITDSINST
You have installed the utility files in the MakeITDS directory. The
files are listed in the “MakeITDS utility” section earlier in this
chapter.
N Note: The instructions for loading and using MAKEVB.EXE are
described in the “Configuring IPDS from an IBM VM or MVS host
computer” later in this chapter.
Command parameters
You run the MakeITDS utility by executing the MAKEITDS
command. The command has the following syntax:
MAKEITDS [/P] /R infile [/O outfile] [/L logfile] [/H]
Table 3–1 describes the parameters of the MAKEITDS command.
3-2 XEROX MRP FAMILY INTELLIGENT PRINTER DATA STREAM (IPDS)
CONFIGURATION AND REFERENCE GUIDE
Page 31

CONFIGURING IPDS
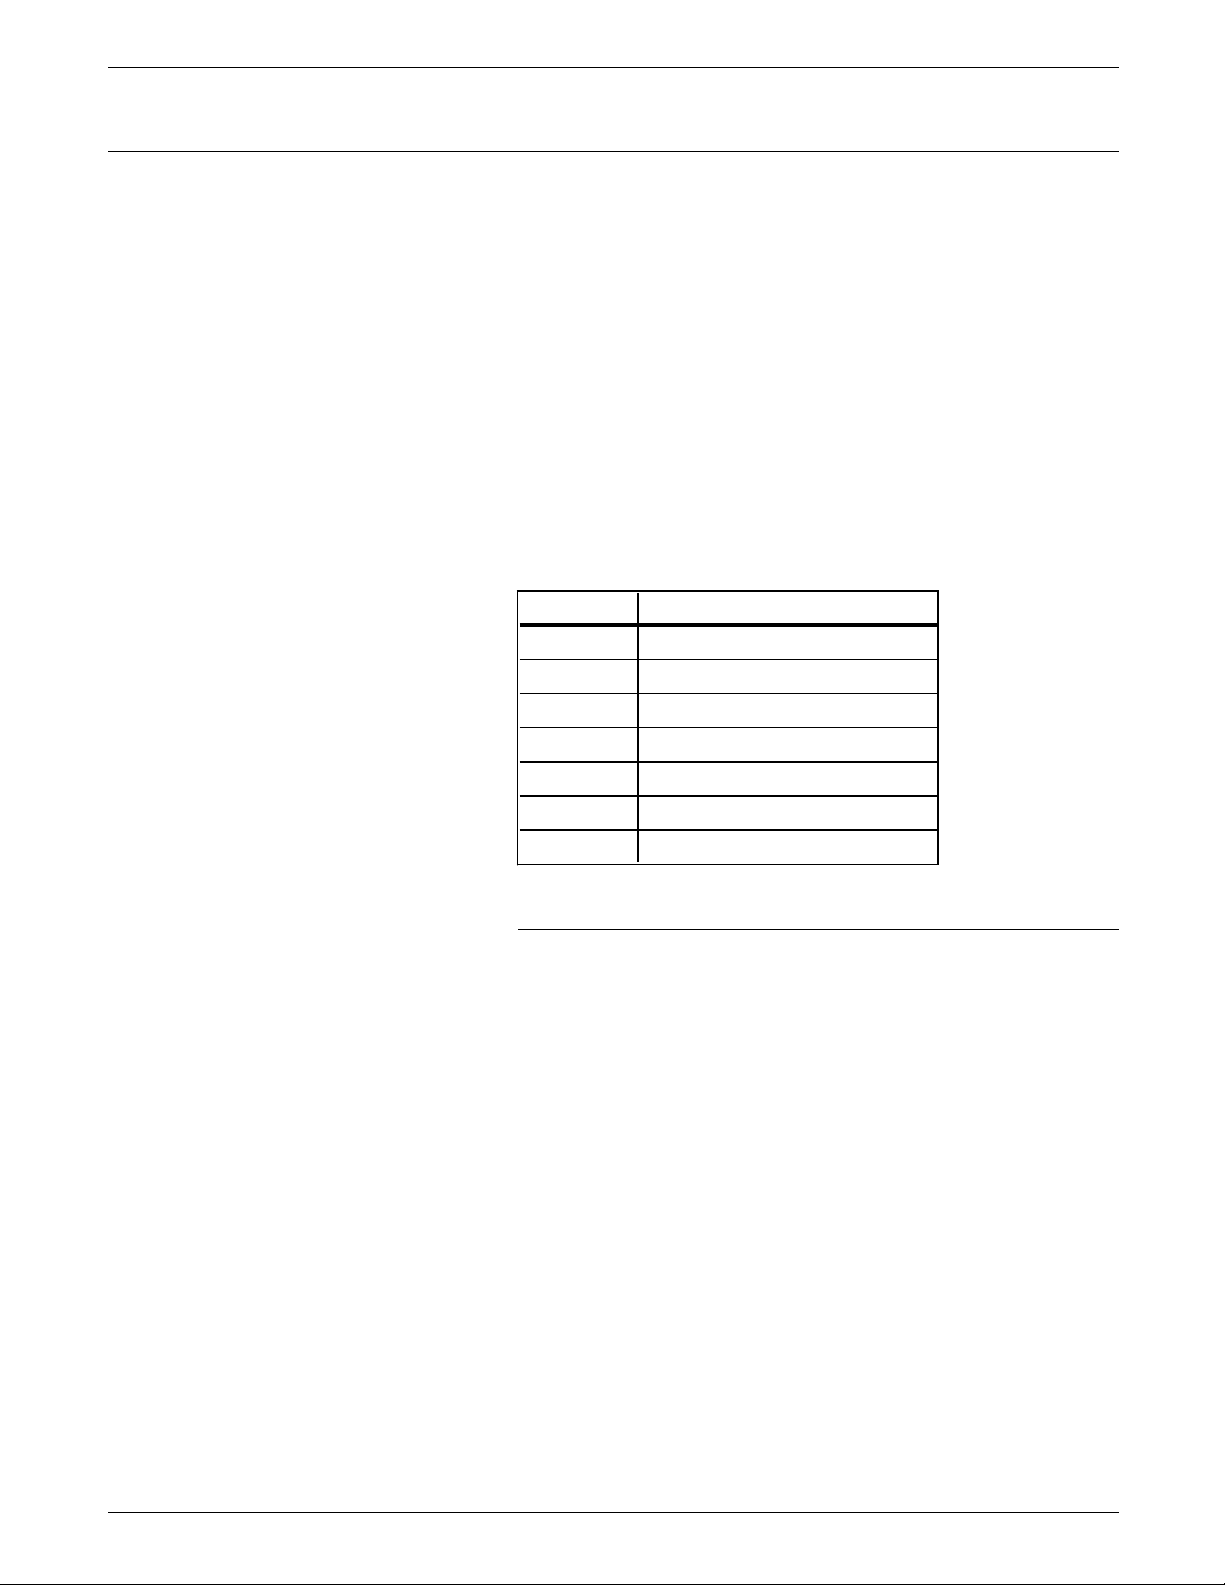
Table 3–1. MAKEITDS command parameter description
Parameter Description
/P Pause. Instructs the program to wait for operator intervention. The pause occurs after the
conversion results display on the screen.
/R Resource Specification File. The filename may include the drive, pathname, filename, and
extension. The default drive and pathname is the current directory. The default extension is
.IRS. This parameter indicates the translation is from ASCII to binary. It is used with the
Xerox–provided .ITX files.
/O Output Filename for the ASCII or binary output file. The filename may include the drive,
pathname, filename, and extension. The default drive and pathname is the current directory.
The default extension is .ITX for the ASCII output file and .IDA for the binary output file. If you
do not specify /O, the input filename and default extension is used.
/L Log Filename. The filename may include the drive, pathname, filename, and extension. The
default drive and pathname is the current directory. The default extension is .LOG. If you do
not specify this parameter, the input filename and the default extension is used.
/H Help option. Displays brief program information about the command parameters.
Configuring your printer
The IPDS interface card is preloaded with the 4028 default font
set.
N Note: Perform the steps in this section only if you are changing
the default font set and emulation from 4028 to 3812/3816 or
you need to change any settings in the configuration file.
Reconfiguring your IPDS emulation consists of the following
steps, which you must perform in the order shown:
• Download the default font set
• Download the emulation file
• Modify, convert, and download the configuration file if
necessary.
CAUTION: Before you begin these procedures, make sure your
computer is connected to the parallel port on the coax or twinax
interface card using the mini
–Centronics adapter supplied with
the printer. The PC Centronics parallel cable should be no
longer than 10 feet/3 meters.
N Note: Some older PCs do not recognize the parallel port when
you turn the printer off and on. If this should occur during these
procedures, disconnect and reconnect the parallel cable from the
port.
XEROX MRP FAMILY INTELLIGENT PRINTER DATA STREAM (IPDS) 3-3
CONFIGURATION AND REFERENCE GUIDE
Page 32

CONFIGURING IPDS
Downloading the default font set
Follow these steps to download the default font set to match the
printer you want to emulate:
1. Turn the printer off and on again. Wait until all
configuration sheets print and the user interface indicates
the printer is idle before continuing.
2. Determine the font set you want to use:
• The 028FNT20.B92 file consists of 30 resident fonts
matching the 4028 emulation. This is the default font
set.
• The 812FNT20.B92 file consists of 37 resident fonts
matching the 3812/3816 emulation.
3. Depending on the printer you are emulating, type one of
the following (substituting the name of your printer port for
LPT1) and press Enter:
• COPY 028FNT20.B92 LPT1: /B
• COPY 812FNT20.B92 LPT1: /B
The printer outputs the IPDS – ITDS LOG PRINTOUT. The
first sheet of the log indicates the ITDS download is in
progress. The second sheet indicates the number of
resources received and defined, any resources that were
deleted, and the number of errors or warnings that
occurred during the download. The download process
takes a few minutes.
4. Turn the printer off and on again before continuing.
Downloading the emulation file
There are several predefined emulation files you can use. The
SET3812.IDA, SET3816.IDA, and SET4028.IDA set the printer
emulation to 3812, 3816, and 4028 respectively and provide the
default configuration settings. To change the default settings,
you can modify and convert a configuration file, such as
SET4028.ITX.
Follow these steps to change the printer emulation:
1. Depending on the printer you are emulating, type one of
the following (substituting the name of your printer port for
LPT1) and press Enter:
• COPY SET3812.IDA LPT1: /B
• COPY SET3816.IDA LPT1: /B
• COPY SET4028.IDA LPT1: /B
The printer outputs the IPDS – ITDS LOG PRINTOUT. The
first sheet of the log indicates the ITDS download is in
progress. The second sheet indicates the number of
resources received and defined, any resources that were
deleted, and the number of errors or warnings that
occurred during the download.
2. Turn the printer off and on again for the configuration
changes to take effect.
3-4 XEROX MRP FAMILY INTELLIGENT PRINTER DATA STREAM (IPDS)
CONFIGURATION AND REFERENCE GUIDE
Page 33

CONFIGURING IPDS
Modifying the configuration file
The predefined emulation files contain the default configuration
settings for each emulation. To change any of the settings, you
need to modify and convert a configuration file. You can select
any of the ASCII configuration files listed in the “MakeITDS
utility” section earlier in this chapter.
Follow these steps to modify and convert a configuration file:
1. From the MAKEITDS directory, make a copy of one of the
.ITX files:
COPY SET4028.ITX SETPRN.ITX
Make sure you specify SETPRN.ITX as the name of the
copied file.
2. Using a text editor, such as the MS–DOS Editor program,
scroll through the configuration file.
3. Make sure the settings match the configuration of your
printer. Refer to table 3-3, which describes the fields you
can modify. Most of the defaults shown in the table reflect
the settings in the Xerox–supplied .ITX files.
4. Save the file and exit the text editor program.
5. Type the following and press Enter:
MAKEITDS /R SETPRN
Do not include the .ITX extension when typing the
command.
The MakeITDS utility converts the SETPRN.ITX configuration
file to a binary output file, called SETPRN.IDA, and a log file,
called SETPRN.LOG.
You can send the files to the printer in the following ways:
• From the PC directly over the parallel port
• From the PC using PC Support
• From the PC and store them on the AS/400
Sending the file from your PC via the parallel port
1. Turn the printer off and on again. Wait until all
configuration sheets print and the user interface indicates
the printer is idle before continuing.
2. Plug your parallel cable into the supplied adaptor cable and
connect it to the IPDS card.
3. Type the following (substituting the name of your printer
port for LPT1) and press Enter:
COPY SETPRN.IDA LPT1: /B
The printer outputs the IPDS – ITDS LOG PRINTOUT. The
first sheet of the log indicates the ITDS download is in
progress. The second sheet indicates the number of
resources received and defined, any resources that were
deleted, and the number of errors or warnings that
occurred during the download.
N Note: Do not send another configuration file until the
printer has output the second sheet and the printer is idle.
XEROX MRP FAMILY INTELLIGENT PRINTER DATA STREAM (IPDS) 3-5
CONFIGURATION AND REFERENCE GUIDE
Page 34

CONFIGURING IPDS
Sending a MakeITDS file while one is still being processed
causes the download to fail. The printer will not respond to
further downloads until you turn it off and on again.
4. Turn the printer off and on again for the configuration
changes to take effect.
Sending the file from the PC via PC Support
You can transfer the resource file from OS/2 or DOS to an IBM
AS/400 system through shared folders.
N Note: In the AS/400 environment, you must have AFP set to yes
for the printer device description.
1. Turn the printer off and on again. Wait until all
configuration sheets print and the user interface indicates
the printer is idle before continuing.
2. Open the PC Support/400 main menu.
3. Select Use Printers on host system.
4. Select Assign or change virtual printers.
5. Using the Choose a Virtual Printer screen, specify the
following information:
a. Select PC printer and enter the name of the required
LPT port, for example, LPT1. The System name field is
filled in automatically.
b. In the Printer device field, enter the name of the
AS/400 printer.
c. In the Printer file library field, enter the appropriate
library, which is specific to your system.
d. In the Printer file field, specify the printer file, which is
specific to your system.
e. In the Printer data type field, select 5 AFPDS data.
6. Exit to the main menu.
7. At the OS/2 or DOS command line, enter the pathname of
the library containing the setup file.
8. Type the following (substituting the name of your printer
port for LPT1) and press Enter to copy the setup file to the
assigned LPT port:
COPY /B SETPRN.IDA LPT1:
N Note: Once you configure the printer, whether you have AFP set
to yes for the printer device description depends on the
requirements of your other applications. Check with your AS/400
system administrator.
You must generate resource files each time you change the
resource specifications, but you only need to upload the file to
the host once. The next time you want to upload a SETPRN.IDA
file to the host, just copy the file to the assigned LPT port.
3-6 XEROX MRP FAMILY INTELLIGENT PRINTER DATA STREAM (IPDS)
CONFIGURATION AND REFERENCE GUIDE
Page 35

CONFIGURING IPDS
Sending the file from the PC to store on the AS/400
You can transfer the file from the PC to the AS/400 for storage.
From the AS/400, they can be sent to the printer when needed.
N Note: In the AS/400 environment, you must have AFP set to yes
for the printer device description.
1. Create a physical file on the AS/400 using this AS/400
command:
CRTPF FILE (libraryname/filename) RCDLEN(80)
MAXMBRS(*NOMAX) LVLCHK(*NO)
2. Copy the files from the PC to a shared folder on the AS/400
using this DOS command:
COPY filename.ext I:foldername
The I: drive designation is a default drive assigned as a
system drive by PC Support. You should use the drive
letter assigned to the shared folder on your system.
3. Enter these commands to move the file from the shared
folder to the physical file you created in step 1:
CPYFRMPCD FROMFLR(foldername)
TOFILE(libraryname/filename) FROMDOC(filename.IDA)
TOMBR(membername) MBROPT(*REPLACE)
TRNTBL(*NONE) TRNFMT(*NOTEXT)
4. Enter this command to move the file to the printer:
PRTAFPDTA FILE(libraryname/filename)
MBR(membername) DEV(printername)
N Note: Once you configure the printer, whether you have AFP set
to yes for the printer device description depends on the
requirements of your other applications. Check with your AS/400
system administrator.
Configuring IPDS from an IBM VM or MVS host computer
You can download any configuration file or fontset file (such as
an .IDA or .B92 file) from an IBM host computer to the printer,
as long as your PC is configured to upload files to the host
computer (such as IRMA, EXTRA, 3270 emulation). However,
these files must be transferred to the host into a variable blocked
machine (VBM) dataset and then reblocked using the MakeVB
Utility. Since the file is an AFPDS file, it can be submitted as a
job to PSF with the output being routed to your Xerox MRP
family IPDS printer.
Follow these steps to load the MakeVB Utility:
1. From the DOS root directory, create a directory called
MAKEVB to contain the MakeVB utility files you need to
upload to the host by typing the following and pressing
Enter:
MD MAKEVB
2. Change to the MAKEVB directory by typing the following
and pressing Enter:
CD MAKEVB
XEROX MRP FAMILY INTELLIGENT PRINTER DATA STREAM (IPDS) 3-7
CONFIGURATION AND REFERENCE GUIDE
Page 36

CONFIGURING IPDS
3. Insert the MakeITDS utility disk into the floppy disk drive.
4. From the MakeVB directory, type the following and press
Enter:
COPY <floppy drive letter>:MAKEVB.EXE
The system copies the compressed files to the MAKEVB
directory.
5. To expand the files, type the following and press Enter:
MAKEVB
The following files are created in the MAKEVB directory
(instructions as to the types of datasets these files need to
be uploaded to are given in later steps):
• MAKEVB.TXT is the program object file that is
executed on the IBM Host Computer.
• LNKMVB.JCL is the linkage JCL for the MakeVB
program.
• MAKEVB.JCL is the sample execution JCL for MakeVB.
This uses an IEBGENER. In the first job step, it
transfers the target file to a temporary dataset, which
permits the reuse of the same dataset for input and
output.
6. Transfer MAKEVB.TXT to the host computer. This file must
be transferred in BINARY format, with a fixed record length
of 80 characters. Transfer it to an existing MVS (or VM)
object library.
7. Transfer LNKMVB.JCL and MAKEVB.JCL to the host. These
files should be transferred in ASCII format. Transfer these
files to any dataset where you would normally store JCL for
a job that is commonly used.
8. Create a load library and object library where MakeVB is
linked and the object file is stored (refer to
BS36919.XEROX.LOADLIB and BS36919.XEROX.OBJ in figure
3–1). These libraries should have PO Organization, FB
blocking, logical record length (LRECL) of 80, and a block
size of 3120.
Figure 3–1. Sample LNKMBV JCL
//BS36919L JOB (D478), ’LINKAGE2’,CLASS=A,MSGCLASS=X,NOTIFY=BS36919
//*
//LKED EXEC PGM=IEWL,PARM=’MAP,LIST,XREF’,REGION=2048K
//SYSLIB DD DSN=SYS1.LINKLIB,DISP=SHR
//OBJLIB DD DSN=BS36919.XEROX.OBJ,DISP=SHR
//SYSUT1 DD SPACE=(1024,(120,120),,,ROUND),UNIT=VIO
//SYSPRINT DD SYSOUT=*
//SYSLMOD DD DISP=SHR,DSN=BS36919.XEROX.LOADLIB,
// VOL=SER=IRCU06,UNIT=DISK,SPACE=(CYL,(1,2,1)),
// DCB=(DSORG=PO,RECFM=U,LRECL=0,BLKSIZE=23200)
//SYSLIN DD *
INCLUDE OBJLIB(MAKEVB)
NAME MAKEVB(R)
//*
3-8 XEROX MRP FAMILY INTELLIGENT PRINTER DATA STREAM (IPDS)
CONFIGURATION AND REFERENCE GUIDE
Page 37

CONFIGURING IPDS
9. Modify the LNKMVB.JCL file. Insert your standard Job
header and the relevant datasets you created in step 6.
Refer to figure 3–1 for a listing of the supplied JCL.
10. Execute the LNKMVB.JCL. You only need to run LNKMVB
one time to create the executable object file.
11. Create a variable blocked dataset into which your .IDA and
.B92 files can be transferred. Be sure to set the record
format to VBM (variable blocking with machine carriage
control). The record length should be 255 with a block size
of 25249.
12. Transfer your .IDA or .B92 file to the host using your PC.
This file should be uploaded in binary format.
13. Modify the MAKEVB.JCL substituting your standard job
header, the object library dataset you created in step 6 for
the MakeVB Object file, the variable blocked datasets where
your .IDA files are stored (BS36919.XEROX.ITDSFSL in figure
3–2), and the dataset you want to place the reblocked files.
These datasets must have a variable blocked record format
(VBM) as described in step 11. The input and output
datasets may be the same if the input member is initially
copied to a temporary dataset. Refer to figure 3–3 for a
listing of the supplied JCL.
Figure 3–2. Sample MAKEVB JCL
//BS36919L JOB (D478), ’MAKEVB’,CLASS=A,MSGCLASS=X,NOTIFY=BS36919
//*
//DOIT PROC
//S1 EXEC PGM=IEBGENER,REGION=2048K
//*
//SYSUT1 DD DSN=BS36919.XEROX.ITDSFLS(FONT812),DISP=SHR
//SYSUT2 DD DSN=&&TEMP,DISP=(NE,PASS),UNIT=VIO
//SYSIN DD DUMMY
//SYSOUT DD SYSOUT=*
//SYSPRINT DD SYSOUT=*
//*
S2 EXEC PGM=MAKEVB,REGION=4096K
//STEPLIB DD DISP=SHR,DSN=BS36919.XEROX.LOADLIB
//SYSIN DD DSN=&&TEMP,DISP=(OLD,DELETE)
//SYSOUT DD DISP=SHR,DSN=BS36919.XEROX.ITDSFLS(FONT812)
//SYSPRINT DD SYSOUT=*
// PEND
//*
//BS36919 EXEC PROC=DOIT
//*
14. Execute the MakeVB against your .IDA or .B92 file.
15. Power the printer off and then on again. Wait until all
configuration sheets have printed and the UI shows that the
printer is idle.
XEROX MRP FAMILY INTELLIGENT PRINTER DATA STREAM (IPDS) 3-9
CONFIGURATION AND REFERENCE GUIDE
Page 38

CONFIGURING IPDS
16. Execute your IEBGENER program to send the job to your
printer via PSF. Refer figure 3–3 for an example of the
required JCL to print to your IPDS printer.
Figure 3–3. Sample FILE DOWNLOAD JCL
//BS36919L JOB (D478), ’IPDS’,MSGLEVEL=(1,1),CLASS=A,
// MSGCLASS=R,NOTIFY=BS36919
//*
/*JOBPARM LINECT=0,ROOM=3456
//*
//* THE IPDS PRINTER IS MSGCLASS ’R’ AND PRINTER 194
//*
// EXEC PGM=IEBGENER
//SYSPRINT DD SYSOUT=*
//SYSIN DD DUMMY
//SYSUT2 DD SYSOUT=*,DEST=PRNTR194
//*
//SYSUT1 DD DSN=BS36919.XEROX.ITDSFLS(FONT812),DISP=SHR
//*
17. Repeat steps 11 through 16 to send additional files as
necessary.
N Note: You only need to run MAKEVB one time on a file.
Once MAKEVB is executed on a configuration or font file, it
can stay in the dataset and be sent to the printer only when
required.
3-10 XEROX MRP FAMILY INTELLIGENT PRINTER DATA STREAM (IPDS)
CONFIGURATION AND REFERENCE GUIDE
Page 39

CONFIGURING IPDS
Resource specification files
MakeITDS uses resource specification files to define resources to
the IPDS interface. SETPRN.IRS uses the configuration file
(SETPRN.ITX) to define the resource.
The capabilities of resource specification files allow you to do the
following:
• Provide configuration parameters
• Define, load, and delete resources, such as fonts, code
pages, font substitution, and so on
• Print settings, store settings permanently, or restore factory
defaults.
Figure 3
sample changes the IPDS settings according to the commands
listed SETPRN.ITX, creates a substitution for FGID 27 (substituting
FGID 19), saves the settings, and prints the new resource list.
Table 3
Figure 3–4. Sample resource specification file
CONFIGURATION_START
FILE SETPRN.ITX
END
DEFINE_SUBSTITUTION
NAME SUBST27
FGID 27
SUBST_FGID 19
REPORT YES
END
ACTION_START
SAVE_SETTINGS
PRINT_RESOURCE_LIST
END
–4 shows a sample resource specification file. This
–2 provides a list of the available resource commands.
XEROX MRP FAMILY INTELLIGENT PRINTER DATA STREAM (IPDS) 3-11
CONFIGURATION AND REFERENCE GUIDE
Page 40

CONFIGURING IPDS
Table 3–2. Resource commands
Resource specification
field name
Description
DEFINE_CONFIGURATION Beginning of a configuration description resource.
NAME The name of the configuration description file.
END End of a configuration description resource.
DEFINE_SUBSTITUTION Beginning of a font substitution resource description.
NAME The name of the font substitution resource.
FGID The FGID of the font for which you want to define a substitution.
Valid range is 0-65534.
WIDTH Defines the width of the FGID. The value is defined in 1440th of an
inch whose valid range is 1-32766. The value should match a valid
font width for the given FGID. You may omit this parameter if the
FGID is less than 300. The font width is taken from the FGID.
WEIGHT Optional parameter that defines the weight of the FGID. Valid range
is as follows:
NORMAL (1)
BOLD (2)
LIGHT (8)
The weight of the FGID is used if not specified otherwise in this
command. If a font substitution with a weight of BOLD is defined to
use a weight of NORMAL or LIGHT, then algorithmic bolding is used,
which may impact throughput.
STYLE Optional parameter that defines the style of a font resource. The
style information will be part of the resource identification, but has
no other effect. Valid range is as follows:
ROMAN (1)
ITALIC (4)
The style information of the FGID is used if this parameter is omitted.
SUBST_FGID
Defines the FGID of the font resource to use to replace the resource
specified in the FGID parameter. Valid range is 0-65534.
SUBST_WIDTH
Defines the width of the substitution font. The value is defined in
1440th of an inch whose valid range is 1-32766. The value should
match a valid font width for the given FGID. You may omit this
parameter if the FGID is less than 300. The font width is taken from
the FGID.
REPORT Marks the substitution to be reported back to the system when the
printer is queried. Valid settings are YES or NO.
END End of the DEFINE_SUBSTITUTION resource.
3-12 XEROX MRP FAMILY INTELLIGENT PRINTER DATA STREAM (IPDS)
CONFIGURATION AND REFERENCE GUIDE
Page 41

Table 3–2. Resource commands (continued)
CONFIGURING IPDS
Resource specification
field name
Description
DEFINE_FONT Allows you to store an AFP font in the Printer’s nonvolatile memory.
NAME The name of the font as you want it to appear on the IPDS Font
Report.
FILE The name of the AFP font file to store at the printer. Include the
pathname to the file, for example, C:\MAKEITDS MYAFPFNT.XRX.
FGID The FGID number the application uses to select the font.
WIDTH Defines the width of the font used to format text on a page. This
value should be in 1440th of an inch resolution. For FGID values
below 300, the width is determined from the font; you do not need
to supply it.
WEIGHT Optional parameter that defines the weight of the FGID. Valid
options are NORMAL, BOLD, or LIGHT.
STYLE Optional parameter that defines the style of a font resource. Valid
options are ROMAN or ITALIC.
CODEPAGE_GROUP
Optional parameter that indicates the codepage group with which
the font resource is associated. Valid parameters are any codepage
group described in table 4-5.
END End of the DEFINE_FONT resource.
DEFINE_CODEPAGE Allows you to store a new code page in the printer’s nonvolatile memory.
NAME The name of the code page as you want it to appear on the IPDS
Codepage Report.
FILE The name of the codepage file to store at the printer. Include the
pathname to the file, for example, C:\MAKEITDS MYCODPAG.XRX.
CPGID The codepage ID number that is being stored in the printer.
CODEPAGE_GROUP
Optional parameter that indicates the codepage group. Refer to
table 4-5 for more information.
CODEPAGE_VERSION
Optional parameter that indicates the codepage version. Valid
parameters are 0 or 1.
END End of the DEFINE_CODEPAGE resource.
DELETE_FONT Allows you to delete a font that was stored in the printer’s nonvolatile
memory.
FGID The FGID number of the font to delete.
WIDTH Defines the width of the font to delete. This value should be in
1440th of an inch resolution and must match the width of the
specified FGID. Optionally, you can use the asterisk (*) as a
wildcard.
END End of the DELETE_FONT resource.
XEROX MRP FAMILY INTELLIGENT PRINTER DATA STREAM (IPDS) 3-13
CONFIGURATION AND REFERENCE GUIDE
Page 42

CONFIGURING IPDS
Table 3–2. Resource commands (continued)
Resource specification
field name
Description
DELETE_CODEPAGE Allows you to delete a codepage that was stored in the printer’s nonvolatile
memory.
CPGID The ID number of the codepage to delete.
CODEPAGE_VERSION
The version of codepage to delete. This is an optional parameter.
You can use the asterisk (*) as a wildcard to delete all versions of the
codepage.
END End of the DELETE_CODEPAGE resource.
DELETE_SUBSTITUTION Allows you to delete a font’s substitution resource.
NAME The name of the font substitution resource to delete.
WIDTH Defines the width of the font substitution to delete. This value
should be in 1440th of an inch resolution and must match the width
of the specified FGID. Optionally, you can use the asterisk (*) as a
wildcard.
END End of the DELETE_SUBSTITUTION resource.
DEFINE_IPDS_SHARE Allows you to specify an ASCII string to be sent to the printer at the
beginning of each IPDS job.
STRING The string to be sent to the printer at the start of the job.
END End of the DEFINE_IPDS_SHARE resource.
ACTION_START Start of an Action resource command.
RESTORE_FACTORY_SETTINGS
Causes the IPDS Interface to restore the factory default settings as
the current user settings.
RESTORE_SETTINGS
Restores the saved current settings as the user settings.
SAVE_SETTINGS
Stores the user settings as the current settings.
PRINT_SETTINGS
Prints the IPDS Settings Printout.
PRINT_FONT_LIST
Prints the IPDS Resident Font report.
PRINT_CODEPAGE_LIST
Prints the IPDS Resident Codepages report.
PRINT_RESOURCE_LIST
Prints the IPDS Resource List report.
END End of the ACTION_START command.
3-14 XEROX MRP FAMILY INTELLIGENT PRINTER DATA STREAM (IPDS)
CONFIGURATION AND REFERENCE GUIDE
Page 43

CONFIGURING IPDS
Configuration settings
Configuration files (.ITX files) define the options that appear in
the IPDS Setup section of the IPDS – Settings Printout (figure 3-
8). An example of a configuration file (figure 3
–5) is a copy of
the SET4028.ITX file provided on the MakeITDS floppy disk. The
Resource Specification (.IRS) file calls out the .ITX file to create a
configuration (.IDA) file, which is downloaded to the printer.
Figure 3–5. Sample configuration file
;| Set the Emulation.
IBMEMULATION IBM4028
;| Emulation and related parameters.
IMSMOOTHING NO
DRSMOOTHINGLEVEL 10
RESOURCETIME 10
;| Margin and offset handling parameters.
MARGINSTOSYSTEM NO
VPACHECK VPAPHYSICAL
ADDMARGINS NO
PRINTX 0
PRINTY 0
;| Font and codepage parameters.
DEFAULTFONTID 11
DEFAULTFONTWIDTH 144
DEFAULTCODEPAGEID 500
CODEPAGEVERSION 1
;| End of SET4028.ITX
XEROX MRP FAMILY INTELLIGENT PRINTER DATA STREAM (IPDS) 3-15
CONFIGURATION AND REFERENCE GUIDE
Page 44

CONFIGURING IPDS
Table 3–3 describes the IPDS settings you can modify with the
configuration file. All other settings that appear on the IPDS
Settings printout are set automatically by the printer. Refer to
this table to modify the configuration file. The default settings
shown in table 3–3 are used if you do not change them through
the configuration file.
Table 3–3. IPDS settings
Settings Printout
listing
Configuration file
field name
Description
IBM Emulation IBMEMULATION Defines the type of IBM IPDS printer support. Do not
use a space when specifying this parameter.
IBM3812
IBM3816
IBM4028
Default: IBM4028
Default Codepage
(CPGID)
DEFAULTCODEPAGEID Defines the default code page global identifier (CPGID).
Range: 1 through 65534 (decimal). All resident code
pages are listed on the Printer Configuration
Report.
Default: 500 (International #5)
Codepage Version CODEPAGEVERSION Defines the code page to use when more than one is
defined.
Range: 0, 1
Default: 1
Default Font FGID DEFAULTFONTID Defines the resident default Font Global Identifier (FGID).
If you select an FGID that does not support the default
code page, the system lists the FGID on the IPDS
SETTINGS PRINTOUT, but ignores it.
Range: 1 through 65534 (decimal). All resident fonts
are listed on the Printer Configuration Report.
Default: 11 (Courier 10)
Default Font Width DEFAULTFONTWIDTH Defines the default font width. The value you specify is
defined as 1/1440 of an inch; a value of 144 defines a 10–
pitch font. The value must match a valid font width for
the default font.
Range: 1 through 32766 (decimal)
Default: 144 (10 pitch)
Report Margins to
System
MARGINSTOSYSTEM Determines how the size of the unprintable area is
reported to the host.
YES = Reports the actual unprintable area of the printer
you are using for the current paper size.
NO = Reports the unprintable area of the emulated
printer (IBM 4028, 3812, or 3816) for the current paper
size.
Default: NO
3-16 XEROX MRP FAMILY INTELLIGENT PRINTER DATA STREAM (IPDS)
CONFIGURATION AND REFERENCE GUIDE
Page 45

Table 3–3. IPDS settings (continued)
CONFIGURING IPDS
Settings Printout
listing
Configuration file
field name
Description
VPA Check VPACHECK Indicates how the printer checks for picture elements
(pels) that are outside of the defined valid printable area
(VPA). Each setting defines a specific area or boundary
the printer uses to check incoming data. If pels appear
outside the defined area, the printer sends an error to the
host.
VPAMARGINS = Use margins for VPA check. The VPA
equals the area where the IPDS logical page and the
printable area of the selected paper size overlap. You
cannot select this value if MARGINSTOSYSTEM is OFF.
VPAPHYSICAL = Use entire page for VPA check. The
VPA equals the area where the physical page and the
IPDS logical page overlap. Data loss may occur in the
unprintable area.
VPALOGICAL = Use IPDS logical page for VPA check.
The valid printable area is the area of the IPDS logical
page. The printer returns an error if you try to print
outside of the logical page. The printer does not return
an error if you try to print within the logical page when
the logical page extends beyond the printable area.
NOVPA = No VPA check is performed.
Default: VPAPHYSICAL
IM Smoothing IMSMOOTHING Indicates whether to use the IM smoothing function for
the 3812/3816 emulations. This function makes fine
adjustments to IM scaling in the range 240 to 300 pel.
YES = Uses 240 to 300 pel scaling in 3812/3816 mode.
This setting results in smoother lines, but the shading of
images may appear dark.
NO = Uses a simple scaling in the range 240 to 300 pel.
This setting allows for a closer representation of shading
characteristics, but slanted lines may appear jagged.
Default: YES
DR Smoothing level DRSMOOTHINGLEVEL Defines the lower limit from which DR uses vector
smoothing of scaled characters. The default level of 10
provides smoothing for characters with a scaling ratio of
1:1. If you specify 20, the system smooths characters that
are scaled up two times or more.
0 = Smoothing is always on. If you change the value to
0, characters appear bolder than the actual IBM fonts and
the accurate positioning of scaled characters is
guaranteed.
1000 = Smoothing is always off.
Default: 10 (scaling 1:1)
XEROX MRP FAMILY INTELLIGENT PRINTER DATA STREAM (IPDS) 3-17
CONFIGURATION AND REFERENCE GUIDE
Page 46

CONFIGURING IPDS
Table 3–3. IPDS settings (continued)
Settings Printout
listing
Configuration file
field name
Description
Add margins ADDMARGINS Determines how the printer places data on the page.
YES = Adds margins to the printable area. The printer
starts positioning text from the inside edge of the left
unprintable area and the bottom edge of the top
unprintable area.
NO = Does not add margins. The printer starts
positioning text from the top left corner of the paper. If
text or any object is placed within the nonprintable area,
the data will be lost.
Default: NO
Print offset (X) PRINTX Defines in pels the X–offset value, which shifts the starting
point for printing in the X direction. You can use PRINTX
with either setting of ADDMARGINS. It shifts the
starting point for printing from the position determined
by ADDMARGINS. Positive values move the starting
point to the right; negative values move it to the left.
Range: –999 to 999 pels
Default: 0 pels
Print offset (Y) PRINTY Defines in pels the Y–offset value, which shifts the
starting point for printing in the Y direction. You can use
PRINTY with either setting of ADDMARGINS. It shifts the
starting point for printing from the position determined
by ADDMARGINS. Positive values move the starting
point to the right; negative values move it to the left.
Range: –999 to 999 pels
Default: 0 pels
Resource Time Out RESOURCETIME Defines in seconds the timeout for downloading ASCII
resources.
Range: 0 indicates timeout not active
1 through 255 timeout active
Default: 10
Automatic configuration
Your IPDS printer will perform an automatic configuration to
indicate the Printer Select and Printer Setup parameters of the
printer. These parameters identify the model of the printer, how
much memory is available on the controller for resources, and
whether a stacker and duplex printing are available. In addition,
the IPDS interface will recognize the number of trays that are
present and the size of paper loaded in each tray. These
parameters are listed on the IPDS – Settings Printout (figure 3–8).
The interface will assign a BIN ID to each paper tray. You may
want to override the BIN IDs that the printer assigns. To do this,
you must first disable the Autoconfiguration feature and then
send a MakeITDS file to redefine the BIN ID for each paper tray.
You also need to define the size of paper, its printable area, and
the size of the logical page.
3-18 XEROX MRP FAMILY INTELLIGENT PRINTER DATA STREAM (IPDS)
CONFIGURATION AND REFERENCE GUIDE
Page 47

CONFIGURING IPDS
Refer to tables 5-1 through 5-4 in the “Accessing printer features
from IPDS” chapter for a listing of the default BIN IDs that the
printer assigns. The “Reconfiguring BIN IDs” appendix provides
values for all supported paper sizes.
To disable the Autoconfiguration feature, send the following FSL
to the printer:
&&??@@Y119,0@
If you send this from the mini-Centronics interface, you must
precede it with the following FSL:
&&??@@Y249,FOREST@
N Note: When you disable the Autoconfiguration feature, you
must send a new MakeITDS file to reconfigure the IPDS interface
each time you change the size of paper in a paper tray or change
the BIN ID. Failure to correctly define the paper size will
produce unpredictable results when auto configuration is
disabled.
To override the Autoconfiguration data, you must add the
following to your configuration specification (.itx) file:
TRAY—the beginning of a tray definition. Valid parameter is
number from 1 to 5.
PRESENT—Indicates whether this tray is present. Valid
parameters are YES or NO.
ID—Specifies the IPDS BIN ID in decimal. Valid values are 0
to 255.
PRINTER ID—Indicates the PCL paper tray command
parameter used to select this paper tray. Printer IDs are
unique. Refer to the Xerox MRP Family PCL5 and PostScript
Printer Language Reference for the specific PCL commands
required.
PAPERSIZE—Indicates the size of paper loaded in the paper
tray. Valid parameters are LETTER, LEGAL, LEDGER, A3, A4,
A5, B4, B5, EXECUTIVE, INVOICE, FOLIO, QUARTO,
ENV_MONARCH, ENV_9, ENV_COM_10, ENV_DL,
ENV_C5, and ENV_B5. Paper size must be defined as
described in the “Reconfiguring BIN IDs” appendix.
DUPLEX—Indicates whether duplex printing is available from
this tray. Valid parameters are Yes or No.
ENDTRAY—Indicates the end of the paper tray definition.
Printing the Printer Configuration Report
The first page of the configuration report prints each time you
power on the printer. For the 4220/MRP and 4230/MRP, you can
also print the report from the user interface (refer to the Xerox
MRP Family System Administrator Guide).
For the 4219/MRP and the 4215/MRP, you can generate the
report by printing the Other I/O log report (refer to the operator
guide for your printer).
XEROX MRP FAMILY INTELLIGENT PRINTER DATA STREAM (IPDS) 3-19
CONFIGURATION AND REFERENCE GUIDE
Page 48

CONFIGURING IPDS
You can print the report on any of the Xerox IPDS printers by
pressing the TEST button located on the coax or twinax interface
card.
Figure 3–6 shows a sample of the first page of the report, which
describes the functions and parameters of the coax interface.
Figure 3–6. Xerox Coax Interface Configuration Report—
Example
Page 49

CONFIGURING IPDS
Figure 3–7 shows a sample of the first page of the report. This
sample describes the functions and parameters of the twinax
interface.
Figure 3–7. Xerox Twinax Interface Configuration Report—
Example
XEROX MRP FAMILY INTELLIGENT PRINTER DATA STREAM (IPDS) 3-21
CONFIGURATION AND REFERENCE GUIDE
Page 50

CONFIGURING IPDS
The following example of the IPDS – Settings Printout describes
the installed memory and interface, the defined settings for IPDS
and the printer, and the type of printer in use.
Figure 3–8. IPDS – Settings Printout—Example
3-22 XEROX MRP FAMILY INTELLIGENT PRINTER DATA STREAM (IPDS)
CONFIGURATION AND REFERENCE GUIDE
Page 51

CONFIGURING IPDS
The following listings of IPDS Resident Fonts for the 4028
emulation lists the FGID, with attribute, name, and a print sample
for all fonts resident on the printer.
Figure 3–9. IPDS Resident Fonts for the 4028 emulation—
Example
XEROX MRP FAMILY INTELLIGENT PRINTER DATA STREAM (IPDS) 3-23
CONFIGURATION AND REFERENCE GUIDE
Page 52

CONFIGURING IPDS
Figure 3–10 shows the IPDS Resident Codepages for the 4028
emulation, which lists all code pages resident on the printer.
Figure 3–10. IPDS Resident Codepages for the 4028
emulation—Example
3-24 XEROX MRP FAMILY INTELLIGENT PRINTER DATA STREAM (IPDS)
CONFIGURATION AND REFERENCE GUIDE
Page 53

CONFIGURING IPDS
Figure 3–10. IPDS Resident Codepages for the 4028
emulation—Example (continued)
XEROX MRP FAMILY INTELLIGENT PRINTER DATA STREAM (IPDS) 3-25
CONFIGURATION AND REFERENCE GUIDE
Page 54

CONFIGURING IPDS
The following example shows the IPDS Resource List Printout for
the 4028 emulation listing the available storage devices and
amount of available memory. The printout also lists the current
resources, such as fonts, code pages, and the code page version
number. The amount of memory each resource uses is
displayed.
Figure 3–11. IPDS Resource List Printout for the 4028
emulation—Example
3-26 XEROX MRP FAMILY INTELLIGENT PRINTER DATA STREAM (IPDS)
CONFIGURATION AND REFERENCE GUIDE
Page 55

CONFIGURING IPDS
Figure 3–11. IPDS Resource List Printout for the 4028
emulation—Example (continued)
XEROX MRP FAMILY INTELLIGENT PRINTER DATA STREAM (IPDS) 3-27
CONFIGURATION AND REFERENCE GUIDE
Page 56

CONFIGURING IPDS
Figure 3–11. IPDS Resource List Printout for the 4028
emulation—Example (continued)
3-28 XEROX MRP FAMILY INTELLIGENT PRINTER DATA STREAM (IPDS)
CONFIGURATION AND REFERENCE GUIDE
Page 57

4. Command listing
aaaaa
a
a
a
a
a
aaaaaaa
a
a
a
a
a
a
aaaaaaa
a
a
a
a
a
a
a
a
aaaaaaaaa
a
a
a
a
a
aaaaaaa
a
a
a
a
a
a
aaaaaaaaa
a
a
a
a
a
a
a
aaaaaaaaa
a
a
a
a
aaaaaaa
a
a
a
a
a
a
a
a
a
This chapter describes how the IBM Intelligent Printer Data
Stream (IPDS) is supported on your Xerox MRP printer. The
command sets include the following:
• Device Control
• Text
• IM Image
• IO Image
• Graphics
• Bar code
• Overlay
• Page Segment
• Load Font
The command sets, shown in Figure 4–1, are based on the IBM
IPDS system architecture.
Figure 4–1. IPDS command sets
aaaaaaa
a
aaaaaaa
aaaaaaa
a
a
Bar
Code
aaaaa
aaaaa
aaaaa
Page
aaaaaaa
aaaaaaa
Segment
aaaaaaa
aaaaaaa
Overlay
aaaaaaa
a
a
a
aaaaa
Loaded
aaaaa
aaaaa
Font
aaaaa
aaa
Text
aaa
Graphics
a
a
aaaaa
IO
aaaaa
aaaaa
Image
aaaaa
IM
aaaaa
aaaaa
Image
aaaaa
For more information on the IPDS command sets, refer to the
IBM Intelligent Printer Data Stream Reference, publication
number S544–3417–04.
a
a
a
a
XEROX MRP FAMILY INTELLIGENT PRINTER DATA STREAM (IPDS) 4-1
CONFIGURATION AND REFERENCE GUIDE
Page 58

COMMAND LISTING
Device Control command set
The Device Control command set defines the logical page
environment and communicates device controls. Table 4–1
shows how these commands are supported on your Xerox
printer.
Table 4–1. Device Control commands
Hex value Command Comments
X‘D62E‘ Activate Resource
(previously called Load
Resource Equivalence)
X‘01‘ and X‘08‘ are supported for Resource Type (RT).
X‘03‘, X‘04‘, and X‘06‘ are supported for Resource ID Format
(RIDF).
X‘0000‘ is supported for Font Inline Sequence (FIS).
Resource class flags are not supported.
X‘D6AF‘ Begin Page Supported.
X‘D6CE‘ Define User Area Not supported.
X‘D65D‘ End Supported.
X‘D6BF‘ End Page Supported.
X‘D69F‘ Load Copy Control 255 copy groups are supported. The maximum number of overlays
and suppression IDs (in combination) cannot exceed 126.
X‘D63F‘ Load Font Equivalence X‘01‘ through X‘FF‘ are supported for Font Local ID (LID).
X‘000‘, X‘2D00‘, X‘5A00‘, and X‘8700‘ are supported for
downloaded fonts. Only ‘0000‘ is supported for resident fonts.
Bits 5 and 6 are supported for flags.
X‘D6CF‘ Logical Page Descriptor
(previously called Load
Page Descriptor)
X‘00‘ (ten inches) is supported for Unitbase.
X‘0001 through X7FFF‘ are supported for XUPUB and YUPUB.
Ordered data flags are ignored.
Bytes 24 through 42 (Initial Text Conditions) are supported.
X‘D66D‘ Logical Page Position
(previously called Load
Page Position)
Supported. The logical page position can be extended by
changing the value of PRINTX, PRINTY, or ADDMARGINS in the
configuration file.
X‘D603‘ No Operation Supported.
X‘D697‘ Set Home State Supported.
X‘D6E4‘ Sense Type and Model This command instructs the printer to report information identifying
its printer type and model and its capabilities in the form command
set vectors. The command set vectors consist of general
information about the command set followed by two–byte pairs
identifying individual properties.
The coax printer model number is reported as IBM model X‘02‘.
The twinax printer model number is reported as IBM model X‘01‘.
If a printer supports duplex, the printer model number is reported
as IBM model X‘12‘.
4-2 XEROX MRP FAMILY INTELLIGENT PRINTER DATA STREAM (IPDS)
CONFIGURATION AND REFERENCE GUIDE
Page 59

Table 4–1. Device Control commands (continued)
Hex value Command Comments
COMMAND LISTING
X‘D6E4‘ Sense Type and Model
(continued)
The two–byte pairs corresponding to a command are only sent
back if the command is supported by the printer.
The two–byte pairs identifying the printer’s properties for the
Device Control command set vector are as follows:
X’002C’ Length <variable>
X’C4C3’ Device Control Function Set
X’FF10’ Device Control/1 subset
X’6001’ Multiple Copies support
X’702E’ Load Resource Equivalence
X’F001’ End persistent NACK without leaving IPDS
X’8008’ Mark Form support
X’800A’ Alternate Offset Stacker
X’80F2’ Discard Buffered Data support
X’80F4’ Request Resource List support
X’80F6’ Exception Handling Control support
X’9001’ Print Buffered Data support
X’9003’ Specify Group Operation
X’9005’ Erase Residual Print Data support
X’9007’ Erase Residual Font Data support
X’90F3’ Obtain Printer Characteristics support
X’90F5’ Page Counters Control support
X’9015’ Select Input Media Source support
X’9016’ Set Media Origin
X’9017’ Set Media Size
X’9004’ Define Group boundary
X’9013’ Eject to Front Facing
The two–byte pairs identifying the printer’s properties for the
Text command set vector are as follows:
X’000A’ Length <variable>
X’D7E3’ Text Function Set
X’FF20’ Text/2 subset
X’1001’ Unordered text support
X’50FF’ Eight text orientations supported
The two–byte pairs identifying the printer’s properties for the
IM Image command set vector are as follows:
X’000A’ Length <variable>
X’C9D4 IM Image Function Set
X’FF10’ Image/1 subset
X’1001’ Unordered image support
X’A004’ Four pattern rotations supported
The two–byte pairs identifying the printer’s properties for the
Overlay command set vector are as follows:
X’0008’ Length <variable>
X’D6D3’ Overlay Function Set
X’FF10’ Overlay/1 subset
X’15FF’ Nested overlays more than 255 levels supported.
The two–byte pairs identifying the printer’s properties for the
Page Segment command set vector are as follows:
X’0006’ Length <variable>
X’D7E2’ Page Segment Function Set
X’FF10’ Page Segment/1 subset
XEROX MRP FAMILY INTELLIGENT PRINTER DATA STREAM (IPDS) 4-3
CONFIGURATION AND REFERENCE GUIDE
Page 60

COMMAND LISTING
Table 4–1. Device Control commands (continued)
Hex value Command Comments
X‘D6E4‘ Sense Type and Model
(continued)
the two–byte pairs identifying the printer’s properties for the
Load Font command set vector (4028 emulation) are as follows:
X’000C’ Length <variable>
X’C3C6’ Loaded Font Function Set (4028)
X’FF10’ Coded fonts only
X’A004’ Four pattern rotations supported
X’C005’ Bounded box pattern technology
X’C101’ Relative metrics
The two–byte pairs identifying the printer’s properties for the
Load Font command set vector (3812/3816 emulation) are as
follows:
X’000A’ Length <variable>
X’C3C6’ Loaded Font Function Set (3812/3816)
X’FF10’ Coded fonts only
X’A004’ Four pattern rotations supported
X’C005’ Bounded box pattern technology
The two–byte pairs identifying the printer’s properties for the
IO Image command set vector are as follows:
X’0014’ Length <variable>
X’C9D6’ IO Image Function Set (optional vector)
X’FF10’ Image/1 subset
X’1001’ Unordered image support
X’5001’ MMR Compression algorithm supported
X’5003’ Uncompressed image support
X’5081’ G3 Facsimile Coding Scheme
X’5082’ G4 Facsimile Coding Scheme
X’5101’ Bit allocation algorithm
X’A004’ Four orthogonal image rotation support
The two–byte pairs identifying the printer’s properties for the
Graphics command set vector are as follows:
X’000A’ Length <variable>
X’E5C7’ Graphics Function Set
X’FF20’ DR/2 level subset
X’1001’ Unordered graphics blocks support
X’A004’ Four orientations supported
The two–byte pairs identifying the printer’s properties for the
Bar Code command set vector are as follows:
X’000A’ Length <variable>
X’C2C3’ Bar Code Function Set
X’FF10’ Bar Code Bar Code/1 level subset
X’1001’ Unordered bar code blocks support
X’A004’ Four orientations supported
4-4 XEROX MRP FAMILY INTELLIGENT PRINTER DATA STREAM (IPDS)
CONFIGURATION AND REFERENCE GUIDE
Page 61

Table 4–1. Device Control commands (continued)
Hex value Command Comments
X‘D633‘ Execute Order Anystate X‘0A00‘ (Alternate Offset Stacker) Supported.
X‘0C00‘ (Control Edge Marks) Not supported.
X‘F200‘ (Discard Buffered Data) Supported. This command returns
the printer to the home state regardless of its current position.
The IBM 3812/3816 printers flush the buffer (printing the
information) before returning to the home state; the IBM 4028
does not. The Xerox IPDS emulation performs as the IBM 4028
does even if you are using the 3812/3816 emulation. When the
system encounters the Discard Buffered Data command, the Mark
Form is carried forward to the next page.
X‘F600‘ (Exception Handling Control) Bits 0, 1, and 6 are supported
for offset location 2. Bit 6 only supports the value 0, which means
exception highlighting is not supported. Bit 7 is supported for
offset location 3. Bits 6 and 7 are supported for offset location 4.
X‘0800‘ (Mark Form) The printer marks the current or next sheet at
the top and bottom margins with a 1/2–inch (approximate) form.
The actual size depends on the current paper size. Even if you are
using the 3812/3816 emulation, the mark is identical to the IBM
4028. Under some circumstances, IBM printers discard the Mark
Form sequence when an exception occurs on the page. The Xerox
IPDS printer will print it.
X‘F800‘ (Print Quality Control) Not supported.
X‘F400‘ (Request Resource List) Resource Types X‘01‘, X‘04‘
through X‘08‘, and X‘10‘ are supported.
COMMAND LISTING
X‘D68F‘ Execute Order Home
State
X‘0400‘ (Define Group Boundary). Group Level fields are not
supported.
X‘F300‘ (Obtain Printer Characteristics) The following responses
are sent from the printer to the host on receipt of the Obtain
Printer Characteristics order:
X‘0001‘ (Printable Area self-defining field) Supported.
If you set PAPERSIZE to any envelope in the configuration file,
bit 5 is set.
If the tray ID for the current tray is manual, bit 6 is set.
X‘0002‘ (Symbol Set) Not supported.
X‘0003‘ (Image/Coded Font Resolution) Offset locations 4 and
6 through 9 are supported.
X‘0004‘ (Storage Pools) Offset locations 2 through 6 are
supported.
X‘0005‘ (Color Support) Offset locations 4 through n are
reported if the printer supports color; otherwise, this field is
not reported.
X‘0006‘ (Installed Features) Offset locations 4 through n are
reported as defined in the configuration file for DUPLEX. If you
specify YES for DUPLEX in the configuration file and duplex is
available, the duplex bit 0 will be set to B‘1‘ of the X‘0001‘ field
for at least one bin.
XEROX MRP FAMILY INTELLIGENT PRINTER DATA STREAM (IPDS) 4-5
CONFIGURATION AND REFERENCE GUIDE
Page 62

COMMAND LISTING
Table 4–1. Device Control commands (continued)
Hex value Command Comments
X‘D68F‘ Execute Order Home
State (continued)
X‘0007‘ (Available Features) Offset locations 4 through n are
reported as defined in the configuration file for DUPLEX and
OFFSETSTACKER. If you specify YES for DUPLEX in the
configuration file and duplex is available, the duplex bit 0 will
be set to B‘1‘ in bytes 22, 23 of the X‘0001‘ field response for
at least one bin.
X‘0009‘ (Print Quality Support) Not supported.
X‘000A‘ (RT and RIDF Support) The printer responds with a
nonzero Resource Type reply for query combinations with
Host–Assigned Resource ID or IBM Global Resource ID.
X‘000B‘ (Remote Resource RT and RIDF Support) Supports the
Resource Types (X‘01‘ and X‘08‘) and ID formats (X‘03‘ and
X‘06‘) as described in the Activate Resource command.
X‘000E‘ (Bar Code Type) Supports the common bar code set
plus the Codabar, Code 128, and POSTNET combinations.
X‘0012‘ (Specify Group Operation) Supported.
X‘F500‘ (Page Counters Control) The Received Page Counter,
Committed Page Counter, and Committed Copy Counter are
directly implemented. The other counters are simulated.
X‘0100‘ (Print Buffered Data) The End Page command always sends
all data for that page to the printer and updates the Committed,
Operator, Jam, and Stacked counters.
X‘1500‘ (Select Input Media Source) Bin selection is determined by
the configuration file.
X‘1600‘ (Set Media Origin) Supported. The effective media origin
is the selected corner of the physical paper.
X‘1700‘ (Set Media Size) This order specifies the size of the media.
If the printer can determine the dimensions, it may ignore one or
both of the physical dimensions specified in this order if a conflict
is encountered. If both the SMS and the valid sensor and operator
input exist, the printer determines the media size by using the
smaller of the SMS and valid sensor or operator input in each
dimension. An exception exists if you try to print outside of the
valid printable area (VPA).
X‘0300‘ (Specify Group Operation) Treated as a No Operation
(NOP) command.
X‘0D00‘ (Stack Received Pages) Not supported.
4-6 XEROX MRP FAMILY INTELLIGENT PRINTER DATA STREAM (IPDS)
CONFIGURATION AND REFERENCE GUIDE
Page 63

Text command
COMMAND LISTING
The Write Text command controls the presentation of text
information on a page, page segment, or overlay. The command
supports the PTOCA PT1 and PTOCA PT2 subsets of PTOCA data
with the following restrictions or differences:
• Overstrike is done using the current font. The increment
between two overstrike characters is accomplished by using
the character increment and the intercharacter adjustment
value of the currently selected font.
• The underscore position is always six dots below the
baseline regardless of the font in use.
• IBM printers substitute a hyphen (-) if you try to print a
character that is not defined in the current font. Xerox
printers substitute a space.
The Load Equivalence command is not supported.
For more information, refer to the IBM Data Stream and Object
Architecture Presentation Text Object Content Architecture
(PTOCA) Reference, publication number SC31–6803–0.
IM Image command set
The IM Image command set contains the following commands:
• Write Image Control (WIC)
• Write Image (WI)
The command set controls the presentation of image raster data
on a page, page segment, or overlay. The Xerox IPDS emulation
supports this command set as follows:
• 240 and 300 picture elements (pel) are supported. When
the printer receives a 240–pel image, the image is scaled to
300 pel. This may result in slight differences in the shading
characteristics.
• Changing IMSMOOTHING in the configuration file allows
you to choose between a rough and a smoothing
algorithm.
— Setting IMSMOOTHING to YES in 3812 or 3816
emulation mode results in smoother lines, but the
shading of images may appear dark.
— Setting IMSMOOTHING to NO allows for closer
shading characteristics, but some slanted lines may
appear jagged.
• Optimized IM replication is supported using the PCL5 data
stream. This replication uses HP–GL2 graphics to replicate
an IMAGE block.
XEROX MRP FAMILY INTELLIGENT PRINTER DATA STREAM (IPDS) 4-7
CONFIGURATION AND REFERENCE GUIDE
Page 64

COMMAND LISTING
IO Image command set
The IO Image command set contains the following commands:
• Write Image Control 2 (WIC2)
• Write Image 2 (WI2)
The command set controls the presentation of image data on a
page, page segment, or overlay. Table 4–2 shows how these
commands are supported on your Xerox printer.
Table 4–2. IO Image commands
Hex value Command Comments
X‘D63E‘ Write Image Control 2 Supported.
X‘D65E‘ Write Image 2 Support for X‘95‘ (Image Encoding Parameter) is limited to X‘01‘
(IBM Modified CCITT Modified Read algorithm), X‘03 ‘(no
compression), X‘81‘ (CCITT T.4 G3 facsimile two–dimensional
coding scheme), and X‘82‘ (CCITT T.6 G4 facsimile two–
dimensional coding scheme).
Support for X‘96‘ (Image Data Element Size Parameter) is limited to
1 or 8 bits per image data point.
Support for X‘97‘ (Image Look–Up Table ID Parameter) is limited to
the standard look–up table.
Graphics command set
The Graphics command set contains the following commands:
• Write Graphics Control (WGC)
• Write Graphics (WG)
The command set controls the presentation of graphics on a
page, page segment, or overlay. Color printing is simulated.
The printer reports color as a capability and handles it by using
shaded files.
The Write Graphics command carries GOCA level DR/2 graphics
data to the printer. The Xerox IPDS emulation deviates from this
architecture in the following ways:
• Validation of the valid printable area (VPA) is performed
only on graphic blocks.
• Chaining graphic blocks is not supported.
• The scaling algorithm for DR characters differs depending
on the scaling factor.
— Character outline scaling algorithm (including
smoothing) is used if the scaling factor in both the I
and b direction is equal or greater than the value set
for DRSMOOTHING.
— Dot–to–dot scaling algorithm is used if the scaling
factor is greater than the value set for
DRSMOOTHING; this algorithm produces a lighter
character.
4-8 XEROX MRP FAMILY INTELLIGENT PRINTER DATA STREAM (IPDS)
CONFIGURATION AND REFERENCE GUIDE
Page 65

Bar code command set
COMMAND LISTING
• Only X‘02‘ (overpaint) is supported for the Set Mix drawing
order.
• Only X‘05‘ (leavealone) is supported for the Set Background
Mix drawing order.
• Only X‘00‘ and X‘FF‘ are supported for the Set Pattern Set
drawing order.
• Only X‘00‘–X‘10‘ and X‘40‘ are supported for the Set Pattern
Symbol drawing order.
• Layering of graphics objects is not supported. The objects
will be opaque.
For complete information regarding GOCA level DR/2, refer to
the IBM Data Stream and Object Architecture Graphics Object
Content Architecture (GOCA) Reference, publication number
SC31–6804–0.
The Bar code command set contains the following commands:
Overlay command set
• Write Bar Code Control (WBCC)
• Write Bar Code (WBC)
The command set controls the presentation of bar code data on
a page, page segment, or overlay. It supports the common bar
code set plus the Codabar, Code 128, and POSTNET
combinations as described in the “Device Control command set”
section.
Bar and space widths are printed in multiples of one dot (dot
width 1/300”). In some situations, the printer adds an extra dot
to the narrow space to improve the readability of the bar code.
N Note: If you are emulating an IBM 3812 or 3816, the resources
associated with the bar codes need to be converted to 300SPI to
print on your Xerox 4220/MRP or 4230/MRP IPDS printer. This
conversion may cause the length of the bar code to be 80%
shorter than the length of the intended bar code.
The Overlay command set contains the following commands:
• Begin Overlay (BO)
• Deactivate Overlay (DO)
• Include Overlay (IO)
The command set allows you to store and name data on the
printer for repeated use. An overlay is a resource object
containing text, image, graphics, or bar code data. Because
overlays define their own environment, they are typically used as
forms. During printing, IPDS merges the overlay with the logical
page.
XEROX MRP FAMILY INTELLIGENT PRINTER DATA STREAM (IPDS) 4-9
CONFIGURATION AND REFERENCE GUIDE
Page 66

COMMAND LISTING
Page Segment command set
Load Font command set
The Page Segment command set contains the following fully
supported commands:
• Begin Page Segment (BPS)
• Deactivate Page Segment (DPS), previously called Delete
Page Segment
• Include Page Segment (IPS)
The command set allows you to store and name data on the
printer for repeated use. An page segment is a resource object
containing text, image, graphics, or bar code data that is
processed in the existing page environment. During printing,
IPDS merges the page segment with the logical page.
The Load Font command set contains the following commands:
• Deactivate Font (DF), previously called Delete Font
• Load Font (LF)
• Load Font Control (LFC)
• Load Font Index (LFI)
• Load Symbol Set (LSS)
The command set controls how coded font resources are
downloaded and managed at the printer. The 4028 algorithm is
the supported font substitution algorithm.
Table 4–3 shows how these commands are supported on your
Xerox printer.
Table 4–3. Load Font commands
Hex value Command Comments
X‘D64F‘ Deactivate Font Supported.
X‘D62F‘ Load Font Supported.
X‘D61F‘ Load Font Control Only single–byte coded fonts are supported for offset location 2.
Only single–byte coded fonts are supported for bits 2–3 of offset
location 5.
Only 3000 units per unit base are supported for offset locations
12–13 and 14–15.
Offset location 21 is not used.
Only X‘00‘ (ten inches) is supported for offset location 26.
Only 3000 pel units per unit base are supported for offset locations
28–29 and 30–31.
X‘D60F‘ Load Font Index Supported.
X‘D61E‘ Load Symbol Set Not supported.
N Note: Scaling fonts vertically or horizontally may produce
characters with rough edges.
4-10 XEROX MRP FAMILY INTELLIGENT PRINTER DATA STREAM (IPDS)
CONFIGURATION AND REFERENCE GUIDE
Page 67

Tray mapping
5. Accessing printer features
from IPDS
This chapter describes how to access the features of your Xerox
printer in an IPDS environment. It contains the following
sections:
• Tray mapping
• Checkpoint capability in the IBM host environment
• Port timeouts
• Content fidelity vs. absolute fidelity
• Nonprintable area considerations
• IPDS font and code page comparisons
• PSF font support
• Converting 240 spi fonts for use in the 4028 emulation
Tables 5–1 through 5–4 show the values you should use at your
IBM host to access source paper trays on your Xerox printer.
These values will appear on the IPDS Settings Printout for your
Xerox printer.
The printer has predetermined defaults mapping the Input Media
Source ID to the paper trays. The ID parameter of the tray
information on the Settings Printout corresponds to the IPDS
Input Media Source ID. The PRINTERID parameter defines the
PCL5 tray command that is generated for the input media source.
If an Input Media Source ID is received but not defined on the
Settings Printout, it is ignored.
In the IBM mainframe environment, the Input Media Source ID is
determined by the BIN number provided in the COPYGROUP,
FORMDEF, and SUBGROUP commands in PPFA/370. The Input
Media Source ID generated by PSF is the BIN number minus 1.
For example, a BIN number of 100 generates an Input Media
Source ID of 99. This always selects the manual tray on your
printer.
In the IBM AS/400 environment, you can choose any of the
following six input sources from Office Vision:
• Tray 1 selects Input Media Source ID 0
• Tray 2 selects Input Media Source ID 1
• Tray 3 selects Input Media Source ID 2
• Manual selects Input Media Source ID 99
• Envelope selects Input Media Source ID 64
• Continuous selects Input Media Source ID 2
XEROX MRP FAMILY INTELLIGENT PRINTER DATA STREAM (IPDS) 5-1
CONFIGURATION AND REFERENCE GUIDE
Page 68

ACCESSING PRINTER FEATURES FROM IPDS
When selecting the input source from the AS/400, you can select
one of four source drawers:
• Drawer 1 selects Input Media Source ID 0
• Drawer 2 selects Input Media Source ID 1
• Drawer 3 selects Input Media Source ID 2
• *E1 selects Input Media Source ID 64
Note that Input Media Source ID 64 is not defined on the 4215
and 4219 printers. If you want to pull from the manual feed tray
by selecting *E1 from the printer file, you must create an
additional tray definition as described in the “Reconfiguring BIN
IDs” appendix. This is done by creating a tray definition with an
ID of 64 and a PRINTERID of 2. You must also define the size of
paper to be fed from the manual feed tray as described in the
appendix.
Tables 5–1 through 5–4 show the values you should use at your
IBM host to access source paper trays on your Xerox MRP
printer.
Table 5–1. 4220/MRP without the high–capacity feeder
AFPDS BinIDInput Media
Source ID
PCL tray command 4220/MRP tray
1 0 1 (Paper Tray) Tray 1
2 1 3 (Manual–Envelope) Tray 2
65 64 4 (Lower) Tray 3
100 99 2 (Manual) Tray 5
Table 5–2. 4220/MRP and 4230/MRP with the high–
capacity feeder
AFPDS BinIDInput Media
Source ID
PCL tray command
4220/MRP tray
4230/MRP tray
2 1 1 (Paper Tray) Tray 1
3 2 3 (Manual–Envelope) Tray 2
65 64 4 (Lower) Tray 3
1 0 5 (Paper Deck) Tray 4
100 99 2 (Manual) Tray 5
Table 5–3. 4219/MRP
AFPDS BinIDInput Media
Source ID
PCL tray command 4219/MRP tray
1 0 1 (Paper Tray) Upper
2 1 7 (Undefined) Middle
65 64 4 (Lower) Lower
100 99 2 (Manual) Manual
5-2 XEROX MRP FAMILY INTELLIGENT PRINTER DATA STREAM (IPDS)
CONFIGURATION AND REFERENCE GUIDE
Page 69

Table 5–4. 4215/MRP
ACCESSING PRINTER FEATURES FROM IPDS
AFPDS BinIDInput Media
Source ID
1 0 1 (Paper Tray) Upper
2 1 4 (Lower) Lower
100 99 2 (Manual) Manual
PCL tray command 4215/MRP tray
Checkpoint capability in the IBM host environment
The IBM host environment has the capability of checkpointing
the printer at certain page intervals. Checkpointing is turned on
with a TSO command. If the printer is powered off or fails while
a job is printing, the host resends pages from the last page
acknowledged by the printer. Your Xerox IPDS printer
acknowledges pages as they are received and formatted at the
interface, not when they are actually printed.
If a power failure occurs, there may be pages in the controller
that were not imaged. There may also be pages in the paper
path being printed that were acknowledged to the host, but not
actually printed. The number of pages depends on the
complexity of the job, as well as the speed of the line sending
the job. It is recommended that you run with page
checkpointing turned off or set to a high number (such as 100).
This causes the host to resend the whole job or a large number
of pages, which should guarantee that no pages are lost.
Binding the IBM host to the Xerox IPDS printer
For your IBM host to bind properly with your Xerox IPDS printer,
use the logmode table shown in figure 5
contains parameters used by the host to start the bind process.
Supply this information to your system programmer to define the
printer at the host. Although the table shown refers to the IBM
3812, you can use it for all three emulations.
Figure 5–1. Logmode table
IBM3812
LOGMODE=IBM3812,FMPROF=X’03’,TSPROF=X’03’,X00539838
PRIPROT=X’B1’,SECPROT=X’B0’,COMPROT=X’7080’,X00539938
SSNDPAC=X’00’,SRCVPAC=X’03’,RUSIZES=X’8585’,X00540038
PSNDPAC=X’03’,PSERVIC=X’014000010000000001000000
–1. The logmode table
XEROX MRP FAMILY INTELLIGENT PRINTER DATA STREAM (IPDS) 5-3
CONFIGURATION AND REFERENCE GUIDE
Page 70

ACCESSING PRINTER FEATURES FROM IPDS
Defining the printer as a line printer and an IPDS printer
You can define the 42XX/MRP printer as a line printer and as an
IPDS printer using the same LU. You cannot send data to both
printers simultaneously; only one of the printers can be active.
Figure 5–2 provides an example of the Functional SubSystem
(FSS) for emulating an IBM 4028. This information can be found
under SYS1.JESPARMS.
Figure 5–2. FSS for emulating an IBM 4028
FSSDEF(FSS8) PROC=APSW428A /* FUNC. SubSys. 4028 emulation */
Figure 5–3 provides an example of the FSSfor emulating an IBM
3812/3816.
Figure 5–3. FSS for emulating an IBM 3812/3816
FSSDEF(FSSE) PROC=APSW316B /* Func. SubSys. 3812/3816 emulation */
Figure 5–4 provides an example of a printer definiton to JES
defining the printer as a PSF printer. PRT 194 is emulating an
IBM 4028 and PRT 220 is emulating an IBM 3812/16.
Figure 5–4. Defining the printer as a PSF printer
PRT(194) CLASS=R, /* IPDS printer simulates a */
MODE=FSS,FSS=FSS8, /* 4028 , A&E rm. 3456 */
ROUTECDE=U194, /* Vtam LU:N15018LV */
PRMODE=(PAGE,LINE,SOSI1), /* Applid: PSFFSB5
UCS=0,SEP=YES,SEPDS=YES,MARK=YES,
FCB=STD1,START=NO,CKPTPAGE=100,FLASH=FL
PRT(220) CLASS=R, /* IPDS printer simulates a 3812/16*/
MODE=FSS,FSS=FSSE,
3812/3816, A&E rm. 3541 */
ROUTECDE=U220, /* Vtam LU: N15018LO */
PRMODE=(PAGE,LINE,SOSI1),Applid: PSFFSB9 */
UCS=0,SEP=YES,SEPDS=YES,MARK=YES,
FCB=STD1,START=NO,CKPTPAGE=100,FLASH=FL
5-4 XEROX MRP FAMILY INTELLIGENT PRINTER DATA STREAM (IPDS)
CONFIGURATION AND REFERENCE GUIDE
Page 71

RMT(14) DEVVTYPE=LUTYPE1,BUFSIZE=256,NUMRDR=0,NUMPRT=1,NUMPUN=1,
PSF font support
ACCESSING PRINTER FEATURES FROM IPDS
Figure 5–5 provides an example of a printer definiton to JES
defining the printer as a line printer or remote or channel–
attached printer.
Figure 5–5. Defining the printer as a PSF printer
COMPRESS=NO,COMPACT=NO,LINE=14
R(14).PR(1) CLASS=AJ,PRWIDTH=132,FCBLOAD=YES,START
R(14).PU(1)LASS=BK,START,CCTL=NO,CMPCT=NO,NOCOMP,SEP=NO,
LRECL=80,NOSUSPND,SELECT=BASIC
/* REMOTE 3770 DEFINITION FOR */
/* JES/328X PRINT FACILITY - */
Your Xerox IPDS printer supports 30 resident fonts for the 4028
emulation and 37 resident fonts for the 3812/3816 emulation. In
the IBM mainframe environment, you need to indicate to the
Printer Services Facility (PSF) the specific fonts that are resident at
the printer before you print in IPDS. If you do not do so, PSF
downloads fonts that are already stored at the printer. This
seriously impacts performance.
PSF provides a utility called APSRMARK. The utility marks the
fonts on the host that are resident at the printer to prevent PSF
from downloading them again. Although your Xerox printer
includes many of the more popular IPDS fonts, it does not
include them all. To correctly mark your fonts, use APSRMARK to
generate a report showing the marked resources. The procedure
to generate this report as well as to mark resident fonts is in the
IBM Print Services Facility/MVS 2.1.0 System Programmer Guide,
publication number S544–3672–00.
Once you generate the IBM report, refer to Appendix B of the
IBM manual to determine the FGID associated with the font file
in the report. PSF font files have names, such as COL00B0A, that
must be looked up in the font table to determine the FGID.
Next, obtain an IPDS Settings printout and match the FGIDs
listed in the Resident Fonts section to the ones that match the
fonts in the report generated by ASPRMARK. This allows you to
determine whether you have marked the correct fonts at the
host. Fonts marked PUBLIC in the ASPRMARK report have been
marked properly as printer resident fonts.
If you are replacing an IBM 4028 or 3816 system, you may leave
the fonts marked the same as they were for the IBM printers,
assuming they were marked.
Converting 240 spi fonts for use in the 4028 emulation
If you have replaced an IBM 3812 or 3816 printer or you need to
switch to the 4028 emulation, you may want to convert the fonts
on the host from 240 spi to 300 spi to match the resolution of
the printer. PSF provides a utility that performs this function for
you. It is called APSRCF30 and instructions on its use are located
XEROX MRP FAMILY INTELLIGENT PRINTER DATA STREAM (IPDS) 5-5
CONFIGURATION AND REFERENCE GUIDE
Page 72

ACCESSING PRINTER FEATURES FROM IPDS
Port timeouts
in Appendix G of the PSF/MVS 2.1.0 Systems Programmer Guide
from IBM.
If you do not convert these resources at the host to 300 spi
fonts, they will have to be converted at the printer, which causes
a performance degradation. Using this utility, you only need to
convert the fonts on the host once. Without the utility, you
need to convert them each time they are downloaded.
Due to the complexity of some IPDS documents, delays may
occur at the host during the transmission of a job to the printer
while the page is being processed at the host. This delay could
cause a timeout at the printer, which causes differences in the
output.
The default timeout on the coax and twinax ports is 20 seconds.
If you notice differences in output, increase the timeout value
until the problem no longer exists. The timeout value is
increased by sending FSL 100 as described in the Xerox MRP
Family Twinax Command Reference and the Xerox MRP Family
Coax Command Reference.
Keep the following in mind when sending FSL commands:
• If you are working in the twinax environment and have
• If you have configured the printer for dual processing (SCS
Content fidelity vs. absolute fidelity
When operating in the AS/400 environment, you can set up your
IPDS printer for either content fidelity or absolute fidelity:
• Content fidelity indicates the host should allow the printer
• Absolute fidelity indicates a page should print only if the
If the AS/400 is set up for absolute fidelity, blank pages may be
produced when an exception has occurred. If blank pages are
encountered, change the fidelity setting at the AS/400 from
absolute fidelity to content fidelity.
Content fidelity enables the printer to print as much of the
document as possible and to highlight the offending portions of
the job by entering a description of the problem in the error log
on the operator’s screen at the AS/400. These exceptions are
normally caused because the printer does not implement the
IPDS ColorOfMedium commands, but the exceptions do not
have any noticeable impact on your output.
configured the printer for IPDS processing only, FSL
commands must be sent via the mini-Centronics port.
and IPDS), FSL commands may be sent to the SCS port or
the mini-Centronics port.
to print the job even if exceptions occur
printer does not respond with any exceptions.
5-6 XEROX MRP FAMILY INTELLIGENT PRINTER DATA STREAM (IPDS)
CONFIGURATION AND REFERENCE GUIDE
Page 73

Nonprintable area considerations
MARGINSTOSYSTEM parameter Use the MARGINSTOSYSTEM parameter to select the size of the
VPACHECK parameter Use the VPACHECK parameter to define how the printer checks
ACCESSING PRINTER FEATURES FROM IPDS
Your Xerox IPDS printer has a 50–pixel nonprintable area
surrounding the IPDS page. This requires that you consider the
types of applications you are running on the printer and the valid
printable area (VPA) of the page.
This section describes the configuration settings that relate to the
printable area of the page. For more information about the
configuration settings, refer to the “Configuring IPDS” chapter.
nonprintable area that the printer reports to the host:
• YES reports the actual nonprintable area of the printer you
are using for the current paper size.
• NO reports the nonprintable area of the emulated printer
(IBM 4028, 3812, or 3816) for the current paper size.
for picture elements (pels) that are not within the defined
printable area.
Figure 5–6 shows the defined areas for the VPAMARGINS and
VPAPHYSICAL settings you can select with the VPACHECK
parameter.
Figure 5–6. VPACHECK (VPAMARGINS and VPAPHYSICAL
settings)
Physical
page
VPA
Check
Area
Physical
printable
area
Logical
page
Physical
page
VPA
Check
Area
Physical
printable
area
Logical
page
VPA Check = Physical Page
XEROX MRP FAMILY INTELLIGENT PRINTER DATA STREAM (IPDS) 5-7
CONFIGURATION AND REFERENCE GUIDE
VPA Check = Margins
Page 74

ACCESSING PRINTER FEATURES FROM IPDS
ADDMARGINS parameter Use the ADDMARGINS parameter to indicate how you want the
The settings for the VPACHECK parameter are as follows:
• VPAMARGINS indicates you want to use the margins for
VPA check. The VPA equals the area where the IPDS logical
page and the printable area of the selected paper size
overlap. You cannot select this value if
MARGINSTOSYSTEM is OFF.
• VPAPHYSICAL indicates you want to use the entire page for
VPA check. The VPA equals the area where the physical
page and the IPDS logical page overlap. Data loss may
occur in the unprintable area.
• VPALOGICAL indicates you want to use the IPDS logical
page for VPA check. The valid printable area is the area of
the IPDS logical page. The printer returns an error if you try
to print outside of the logical page. The printer does not
return an error if you try to print within the logical page
when the logical page extends beyond the printable area.
• NOVPA indicates you do not want to use VPA check.
printer to place data on the page.
• YES adds margins to the printable area. The printer starts
positioning text from the inside edge of the left unprintable
area and the bottom edge of the top unprintable area.
• NO does not add margins. The printer starts positioning
text from the top left corner of the paper.
If your applications print edge
–to–edge on the IBM 3812 or
3816 printer, set the ADDMARGINS parameter to YES. This
causes your Xerox printer to move the page origin into the
printable area, however, data may be lost at the bottom and right
side of the page.
PRINTX and PRINTY parameters The PRINTX and PRINTY parameters define in pels the X
offset values, which shift the starting point for printing in the X
and Y directions. You can use these parameters with either
setting of ADDMARGINS. Each parameter shifts the starting
point for printing from the position determined by
ADDMARGINS. Positive values move the starting point to the
right; negative values move it to the left.
– and Y–
5-8 XEROX MRP FAMILY INTELLIGENT PRINTER DATA STREAM (IPDS)
CONFIGURATION AND REFERENCE GUIDE
Page 75

Default font and code page considerations
Your Xerox IPDS printer uses the FGID 11 font and code page
500 as default settings. You can change the default code page
and font by using the following commands:
DEFAULTCODEPAGEID, CODEPAGEVERSION, DEFAULTFONTID,
and DEFAULTFONTWIDTH. Refer to the “Configuring IPDS”
chapter for the process.
When defining a new default font, make sure all parameters are
programmed with values that the selected FGID supports. If you
select the wrong font width or code page, the selection is
ignored. Only a resident font can be selected as the default
font.
ACCESSING PRINTER FEATURES FROM IPDS
Table 5
In the 4028 emulation, some values for CODEPAGEID are not
valid for all fonts. CODEPAGEIDs in 4028 emulation are divided
into code page groups defined at the bottom of the table. Refer
to the “Resident code pages” appendix for a description of the
code points available for each code page.
Table 5–5. 4028 font and code page parameters
Typeface Pitch FGID
OCR B 10 3 144 F, K C0E0OCRB
Courier B 10 11 144 A, B, C, G, L C0E0OCR10
Prestige Pica 10 12 144 A, B, C, G, L C0E0OPR10
Courier Italic 10 18 144 A, B, G, L C0E0OC110
OCR A 10 19 144 E, K C0E0OCRA
Courier Bold 10 46 144 A, B, G, L C0E0OCB10
APL 12 76 120 D C0E0AP12
Courier 12 85 120 A, B, C, G, L C0E0OCR12
Prestige Elite 12 86 120 A, B, C, G, L C0E0OPR12
Courier Italic 12 92 120 A, B, G, L C0E0OC112
Prestige Elite Bold 12 111 120 A, B, G, L C0E0OPB12
Prestige Elite Italic 12 112 120 A, B, G, L C0E0P112
Boldface PS 159 120 A, B, G, L C0E0OBRTR
Prestige PS 164 120 A, B, G, L C0E0OPRTR
Courier 15 223 96 A, B, L C0E0OCR15
Courier 17.1 254 84 A, B, L C0E0OCR17
Letter Gothic 20 281 72 A, B, L C0E0OLR20
–5 shows the values to program for the 4028 emulation.
Font
width
Code page
groups
Font ID
XEROX MRP FAMILY INTELLIGENT PRINTER DATA STREAM (IPDS) 5-9
CONFIGURATION AND REFERENCE GUIDE
Page 76

ACCESSING PRINTER FEATURES FROM IPDS
Table 5–5. 4028 font and code page parameters
(continued)
Typeface Pitch FGID
Font
width
Code page
groups
Font ID
Times Roman 6* 5687 40 A C0E20T60
Times Roman 8* 5687 53 A C0E20T80
Times Roman 10* 5687 67 A C0E20T00
Times Roman 12* 5687 80 A C0E20TB0
Times Roman Bold 10* 5707 67 A C0E40T00
Times Roman Bold 12* 5707 80 A C0E40TB0
Times Roman Bold 14* 5707 93 A C0E40TD0
Times Roman Bold 18* 5707 120 A C0E40TH0
Times Roman Bold 24* 5707 160 A C0E40TN0
Times Roman Italic 10* 5815 67 A C0E30T00
Times Roman Italic 12* 5815 80 A C0E30TB0
Times Roman Bold Italic 10* 5835 67 A C0E50T00
Times Roman Bold Italic 12* 5835 80 A C0E50TB0
*Indicates proportional spaced font.
Code page Group A consists of Version 0 code page 37, 38, 260, 273, 274, 275,
276, 277, 278, 280, 281, 282, 284, 285, 286, 287, 288, 297, 361, 367, 382, 383, 384,
385, 386, 387, 388, 389, 390, 391, 392, 393, 394, 395, 500, 831, 870, 871, 1003.
Group A also contains Version 1 of code page 37, 273, 274, 277, 278, 280, 281,
284, 285, 297, 500, and 871.
Code page Group B consists of Version 0 code page 256 and 289.
Code page Group C consists of Version 0 code page 259.
Code page Group D consists of Version 0 code page 293 and 310.
Code page Group E consists of Version 0 code page 892.
Code page Group F consists of Version 0 code page 893.
Code page Group G consists of Version 0 code page 1002.
Code page Group H consists of Version 0 code page 424.
Code page Group I consists of Version 0 code page 420.
Code page Group J consists of Version 0 code page 290.
Code page Group K consists of Version 0 code page 340.
Code page Group L consists of Version 0 code page 437.
5-10 XEROX MRP FAMILY INTELLIGENT PRINTER DATA STREAM (IPDS)
CONFIGURATION AND REFERENCE GUIDE
Page 77

ACCESSING PRINTER FEATURES FROM IPDS
Table 5–6 shows the values for the 3816/3812 emulation. There
are no restrictions regarding code page groups in the 3816/3812
emulation. Although all assignments are recognized, some
assignments cause problems, such as assigning an OCR code
page to an APL font. No error checking is done in 3816/3812
mode to prevent the user from making these assignments. Refer
to the “Resident code pages” appendix for a description of the
code points available for each code page.
Table 5–6. 3812/3816 font and code page parameters
Typeface Pitch FGID
Font
width
Font ID
OCR B 10 3 144 C0L00BOA
Orator 10 5 144 C0S0OR10
Courier 10 11 144 C0S0CR10
Prestige Pica 10 12 144 C0S0PR10
Courier Italic 10 18 144 C0S0C110
OCR A 10 19 144 C0L00AOA
Gothic Text 10 40 144 C0D0GT10
Serif Text Italic 10 43 144 C0D0S110
APL 10 45 144 C0S0AE10
Gothic Text 12 66 120 C0D0GT12
Gothic Text Italic 12 68 120 C0D0G112
Script 12 84 120 C0S0SR12
Courier 12 85 120 C0S0CR12
Prestige Elite 12 86 120 C0S0PR12
Letter Gothic 12 87 120 C0S0LT12
Prestige Elite Italic 12 112 120 C0S0P112
Boldface Italic PS 155 120 C0S0BITR
Essay PS 160 120 C0S0ESTR
Essay Italic PS 162 120 C0S0EITR
Essay Light PS 173 120 C0S0ELTR
Document PS 175 120 C0S0DOTR
XEROX MRP FAMILY INTELLIGENT PRINTER DATA STREAM (IPDS) 5-11
CONFIGURATION AND REFERENCE GUIDE
Page 78

ACCESSING PRINTER FEATURES FROM IPDS
Table 5–6. 3812/3816 font and code page parameters
(continued)
Typeface Pitch FGID
Font
width
Font ID
Gothic Text 13 204 108 C0D0D224
Serif Text 15 229 96 C0D0ST15
Gothic Text 15 230 96 C0D0GT15
Courier 5 244 288 C0E0CR15
Courier 17.1 252 84 C0S0CR17
Courier Sub/Sup 17.1 254 84 C0E0CR17
APL 20 280 72 C0S0AE20
Gothic Text 20 281 72 C0D0GT20
Gothic Text 26.7 290 54 C0D0GT24
Sonoran Serif 8* 4407 54 C0T05580
Sonoran Serif 10* 4407 66 C0T05500
Sonoran Serif 12* 4407 78 C0T055BO
Sonoran Serif Bold 10* 4427 66 C0T07500
Sonoran Serif Bold 16* 4427 108 C0T075FO
Sonoran Serif Bold 24* 4427 162 C0T075NO
Sonoran Serif Italic 10* 4535 66 C0T15500
Page 79

Font substitution
ACCESSING PRINTER FEATURES FROM IPDS
Your Xerox printer is configured to provide a predetermined set
of font substitutions. You may change any of these substitutions
or add to them by using the resource commands described in
the “Configuring IPDS” chapter.
The following table describes the set of default font substitutions
that are provided with the 4028 font set.
Table 5–7. 4028 emulation font substitutions
Typeface Pitch FGID
Font
width
Pica 10 20 144 11
Substitution
FGID
144
Math Symbol 10 30 144 11 144
Roman Text 10 41 144 12 144
Serif Text 10 42 144 11 144
Serif Text Italic 10 43 144 18 144
Prestige Pica Bold (AB) 10 60 144 12 144
Serif Text 12 70 120 85 120
Serif Italic 12 71 120 92 120
Serif Bold (AB) 12 72 120 85 120
Math Symbol 12 80 120 86 120
Elite 12 107 120 85 120
Courier Bold (AB) 12 108 120 85 120
Bold PS 176 120 159 120
Prestige 15 221 96 223 96
Serif 15 229 96 223 96
Courier Bold (AB) 17.1 253 84 254 84
Prestige 17.1 256 84 254 84
Sonoran Serif 8* 751 54 5687 53
Times Roman 6* 760 40 5687 40
Times Roman Bold 12* 761 80 5707 80
Times Roman Bold 14* 762 93 5707 93
Times Roman Italic 12* 763 80 5815 80
Times Roman Bold Italic 10* 764 67 5835 67
Times Roman Bold Italic 12* 765 80 5835 80
Sonoran Serif 10* 1051 66 5687 67
Sonoran Serif Bold 10* 1053 66 5707 67
Sonoran Serif Italic 10* 1056 66 5815 67
Sonoran Serif 12* 1351 78 5687 80
Sonoran Serif Bold 16* 1653 108
Sonoran Serif Bold 18* 1803 120
* Indicates proportional spaced font.
5707 93
5707 120
Substitution
fontwidth
XEROX MRP FAMILY INTELLIGENT PRINTER DATA STREAM (IPDS) 5-13
CONFIGURATION AND REFERENCE GUIDE
Page 80

ACCESSING PRINTER FEATURES FROM IPDS
The following table lists the default font substitutions that are
provided with the 3816/3812 font set.
Table 5–8. 3812/3816 emulation font substitutions
Typeface Pitch FGID
Font
width
Substitution
FGID
Artesan 10 13 144 11 144
Pica 10 20 144 12 144
Matrix Gothic 10 26 144 40 144
Math Symbol 10 30 144 11 144
Orator Bold (AB) 10 38 144 5 144
Gothic Text Bold (AB) 10 39 144 40 144
Roman Text 10 41 144 40 144
Serif Text 10 42 144 40 144
Courier Bold (AB) 10 46 144 11 144
Shalom Bold (AB) 10 50 144 11 144
Prestige
Bold (AB) 10 60 144 12 144
Gothic Text Bold (AB) 12 69 144 66 120
Serif Text 12 70 120 66 120
Serif Text Italic 12 71 120 68 120
Serif Text Bold (AB) 12 72 120 66 120
Math Symbol 12 80 120 86 120
Light Italic 12 91 120 112 120
Shalom Bold (AB) 12 101 120 86 120
Courier 12 107 120 85 120
Courier Bold (AB) 12 108 120 85 120
Letter Gothic Bold (AB) 12 110 120 87 120
Prestige
Bold (AB) 12 111 120 86 120
Modern PS 158 120 175 120
Boldface (AB) PS 159 120 175 120
Essay Bold (AB) PS 163 120 160 120
Barak Bold (AB) PS 168 120 175 120
Boldface (AB) PS 176 120 175 120
Bold Italic PS 177 120 155 120
Math Symbol 12 193 120 86 120
Math Symbol 10 198 144 11 144
Substitution
fontwidth
* Indicates proportional spaced font.
5-14 XEROX MRP FAMILY INTELLIGENT PRINTER DATA STREAM (IPDS)
CONFIGURATION AND REFERENCE GUIDE
Page 81

ACCESSING PRINTER FEATURES FROM IPDS
Table 5–8. 3812/3816 emulation font substitutions
(continued)
Typeface Pitch FGID
Font
width
Substitution
FGID
Gothic Text Bold (AB) 15 212 96 230 96
Prestige 15 221 96 230 96
Letter Gothic 15 222 96 230 96
Courier 15 223 96 230 96
Math Symbols 15 225 96 86 120
Shalom Bold Condensed (AB) 15 234 96 230 96
Courier Bold (AB) 5 245 288 244 288
Courier Bold (AB) 17.1 253 84 252 84
Sonoran Serif 8* 751 54 4407 54
Sonoran Serif 10* 1051 66 4407 66
Sonoran Serif Bold 10* 1053 66 4427 66
Sonoran Serif Italic 10* 1056 66 4535 66
Sonoran Serif 12 1351 78 4407 78
Sonoran Bold 16* 1653 108 4427 108
Sonoran Bold 24* 2103 162 4427 162
* Indicates proportional spaced font.
Substitution
fontwidth
XEROX MRP FAMILY INTELLIGENT PRINTER DATA STREAM (IPDS) 5-15
CONFIGURATION AND REFERENCE GUIDE
Page 82

ACCESSING PRINTER FEATURES FROM IPDS
IPDS font and code page comparisons
This section compares the Xerox font sets and code pages
provided for your Xerox printer to those provided for the IBM
4028, IBM 3812, and 3816 printers.
Font comparison
The Xerox MRP Family IPDS interface option uses two font sets
to emulate the three IBM IPDS printers:
• The IBM 3812 and 3816 printers have identical font sets,
• The IBM 4028 font set is emulated by the Xerox MRP Family
The 3812/16 font set has 37 standard fonts. The following IBM
fonts are not included:
• Roman Text 10 pitch (FGID 41)
• Serif Text 10 pitch (FGID 42)
• Katakana (FGID 44)
• Serif Text 12 pitch (FGID 70)
• Serif Text Italic 12 pitch (FGID 71)
which are emulated in the Xerox MRP Family 3812/16 font
set.
4028 font set.
There are a number of font substitutions available on the IBM
printers that are not present in the 3812/16 font set. IBM has a
number of alternative font sets available for the IBM 3812 and
3816 printers to meet special requirements.
The Xerox MRP Family 4028 font set has 30 standard fonts. The
following IBM fonts are not included:
• Prestige 15 pitch (FGID 221)
• Prestige 17.1 pitch (FGID 256)
Table 5
the table, the following notation is used:
• Y The font is supported as a standard font.
• — The font is not supported as a standard font
• Bold number The font is a bold version of the FGID
• Sub number The font is supported only as a substitution
–9 provides a comparison of the IBM and Xerox fonts. In
or as a substitution font.
number.
font. If the font is selected, FGID number is
used in its place.
5-16 XEROX MRP FAMILY INTELLIGENT PRINTER DATA STREAM (IPDS)
CONFIGURATION AND REFERENCE GUIDE
Page 83

ACCESSING PRINTER FEATURES FROM IPDS
Table 5–9. IPDS font comparison
Font
IBM
3812/16
Xerox
3812/16
emulation
IBM
4028
Xerox
4028
emulation
3 — OCR B YYYY
5 — Orator 10 Y Y — —
11 — Courier.10 Y
YYY
12 — Prestige.10 YYYY
13 — Artisan.10 Sub 11
18 — Courier Italic.10
Sub 11 — —
Y YYY
19 — OCR A YYYY
20 — Pica.10 Sub 12 Sub 12 Sub 11 Sub 11
26 — Matrix Gothic.10 Sub 40
30 — Math Symbol.10 Sub 11
Sub 40 — —
Sub 11 Sub 11 Sub 11
38 — Orator Bold.10 Bold 5 Bold 5 — —
39 — Gothic Text Bold.10 Bold 40 Bold 40 — —
40 — Gothic Text.10 Y Y — —
41 — Roman Text.10 Y Sub 40 Sub 12
Sub 12
42 — Serif Text.10 Y Sub 40 Sub 11 Sub 11
43 — Serif Text Italic.10 Y Y Sub 18 Sub 18
44 — Katakana Y — — —
45 — APL.10 Y Y — —
46 — Courier Bold.10 Bold 11 Bold 11 Y Y
60 — Prestige Bold.10 Bold 12 Bold 12 — Bold 12
66 — Gothic Text.12 Y Y — —
68 — Gothic Text Italic.12
YY——
69 — Gothic Text Bold.12 Bold 66 Bold 66 — —
70 — Serif Text.12 Y Sub 66 Sub 85
Sub 85
71 — Serif Text Italic.12 Y Sub 68 Sub 92 Sub 92
72 — Serif Text Bold.12 Bold 70 Bold 66 — Bold 85
76 — APL.12 — — Y Y
80 — Math Symbol.12 Sub 86 Sub 86 Sub 86 Sub 86
84 — Script Y Y — —
85 — Courier.12 YYYY
86 — Prestige.12 YYYY
87 — Letter Gothic.12 Y Y — —
91 — Light Italic.12 Sub 112 Sub 112 — —
92 — Courier Italic.12 — — Y Y
XEROX MRP FAMILY INTELLIGENT PRINTER DATA STREAM (IPDS) 5-17
CONFIGURATION AND REFERENCE GUIDE
Page 84

ACCESSING PRINTER FEATURES FROM IPDS
Table 5–9. IPDS font comparison (continued)
Font
IBM
3812/16
107
— 12 Pitch Sub 85 — Sub 85 Sub 85
— Courier Bold.12 Bold 85 Bold 85 — Bold 85
108
Xerox
3812/16
emulation
IBM
4028
Xerox
4028
emulation
110 — Letter Gothic Bold.12 Bold 87 Bold 87 ——
111 — Prestige Bold.12 Bold 86 Bold 86 YY
— Prestige Italic.12 Y Y Y Y
112
— Boldface Italic Y Y ——
155
158 — Modern Sub 175 Sub 175 ——
159 — Boldface Bold 175 Bold 175 Y Y
— Essay Y Y ——
160
162 — Essay Italic Y Y ——
163 — Essay Bold Bold 160 Bold 160 ——
164 — Prestige.12 —— YY
— Essay Light Y Y ——
173
175 — Document Y Y ——
176 — Bold Sub 159 — Sub 159 Sub 159
— Bold Italic Sub 155 Sub 155 ——
177
204 — Gothic Text.13 Y Y ——
221 — Prestige.15 Sub 230 Sub 230 Y Sub 223
— Gothic.15 Sub 230 Sub 230 ——
222
223 — Courier.15 Sub 230 Sub 230 Y Y
— Math Symbol.15 Sub 86 Sub 86 ——
225
229 — Serif Text.15 Y Y Sub 223 Sub 223
— Gothic Text.15 Y Y ——
230
244 — Courier.5 Y Y ——
245 — Courier Bold.5 Bold 244 Bold 244 ——
252 — Courier.17 Y Y ——
253 — Courier Bold.17 Bold 252 Bold 252 — Bold 254
— Courier.17ss Y Y Y Y
254
— Prestige.17.1 —— Y Sub 254
256
— APL.20 Y Y ——
280
281 — Gothic Text.20 Y Y Y Y
— Gothic Text.27 Y Y ——
290
5-18 XEROX MRP FAMILY INTELLIGENT PRINTER DATA STREAM (IPDS)
CONFIGURATION AND REFERENCE GUIDE
Page 85

ACCESSING PRINTER FEATURES FROM IPDS
Table 5–9. IPDS font comparison (continued)
Font
IBM
3812/16
Xerox
3812/16
emulation
IBM
4028
Xerox
4028
emulation
751 — Sonoran Serif 8pt Y Y Sub 5687 Sub 5687
1051 — Sonoran Serif 10pt Y Y Sub 5687 Sub 5687
1053 — Sonoran Serif Bold 10pt Y Y Sub 5707 Sub 5707
1056 — Sonoran Serif Italic 10pt Y Y Sub 5815 Sub 5815
1351 — Sonoran Serif 12pt Y Y Sub 5687 Sub 5687
1653 — Sonoran Serif Bold 16pt Y Y Sub 5707 Sub 5707
2103 — Sonoran Serif Bold 24pt Y Y Sub 5707 Sub 5707
5687 — Times Roman 6pt — — Y Y
5687 — Times Roman 8pt —
—YY
5687 — Times Roman 10pt — — Y Y
5687 — Times Roman 12pt — — Y Y
5707 — Times Roman Bold 10pt — — Y Y
5707 — Times Roman Bold 12pt — — Y Y
5707 — Times Roman Bold 14pt — — Y Y
5707 — Times Roman Bold 18pt — — Y Y
5707 — Times Roman Bold 24pt — — Y Y
5815 — Times Roman Italic 10pt — — Y Y
5815 — Times Roman Italic 12pt — — Y Y
5835 — Times Roman Bold Italic 10pt — — Y Y
5835 — Times Roman Bold Italic 12pt — — Y Y
Code page comparison
The two font sets, 3812/16 and 4028, contain a number of code
pages, matching those available in the standard IBM printers.
The 3812/16 font set contains 48 code pages, which is more than
available on the IBM 3812 or 3816 printer. In addition, all code
pages supported by the two IBM printers operating in a coax
environment are present in the font set.
There are 53 code pages present in the 4028 font set, which is
more than available on the IBM 4028 printer. The 53 code pages
include those in the 3812/16 font set plus five additional pages.
Table 5–10 lists the code pages available for both emulations of
the Xerox IPDS printer. The table uses the following notation:
• Y The code page is supported as a standard code page.
• — The code page is not supported.
XEROX MRP FAMILY INTELLIGENT PRINTER DATA STREAM (IPDS) 5-19
CONFIGURATION AND REFERENCE GUIDE
Page 86

ACCESSING PRINTER FEATURES FROM IPDS
Table 5–10. IPDS code page characteristics
Code page
IBM
3812/16
Xerox
3812/16
emulation
IBM
4028
Xerox
4028
emulation
37 — USA / Canada YYYY
38 — US ASCII — — Y Y
256 — International 1 YYYY
259 — Symbol Set YYYY
260 — Canadian French YYYY
273 — Germany Austria YYYY
274 — Belgium YYYY
275 — Brazil Y Y — Y
276 — Canada (French) —
—YY
277 — Denmark / Norway YYYY
278 — Finland Sweden YYYY
280 — Italy YYYY
281 — Japan (English) YYYY
282 — Portugal Y Y — Y
283 — Spanish — — — Y
284 — Spain / Latin America YYYY
285 — UK YYYY
286 — Austria / Germany (alt) YYYY
287 — Denmark / Norway (alt) YYYY
288 — Finland Sweden (alt) YYYY
289 — Spain (alt) YYYY
290 — Japan (Katakana) Y Y
293 — APL Y
1
—
Y —
3
Y
Y
3
297 — France YYYY
310 — Graphic Escape APL Y
340 — OCR
—
1
2
YYY
Y —
2
Y
361 — International Typographic Y Y — Y
367 — EBCDIC ASCII — — Y Y
382 — Austria Germany Y
383 — Belgium Y
384 -—Brazil Y
385 — Canadian French Y
386 — Denmark Norway Y
387 — Finland Sweden Y
1
1
1
1
1
1
Y—Y
Y—Y
Y—Y
Y—Y
Y—Y
Y—Y
5-20 XEROX MRP FAMILY INTELLIGENT PRINTER DATA STREAM (IPDS)
CONFIGURATION AND REFERENCE GUIDE
Page 87

ACCESSING PRINTER FEATURES FROM IPDS
Table 5–10. IPDS code page characteristics (continued)
Xerox
Code page
IBM
3812/16
388 — France Luxemburg Y
389 — Italy Y
390 — Japan Latin Y
391 — Portugal Y
392 — Spain Philippines Y
393 — Spanish Speaking Y
394 — UK Y
395 — US Y
420 — Arabic —
1
1
1
1
1
1
1
1
Y —
3812/16
emulation
424 — Hebrew — Y
IBM
4028
Y—Y
Y—Y
Y—Y
Y—Y
Y—Y
Y—Y
Y—Y
Y—Y
3
3
—
Xerox
4028
emulation
Y
Y
437 — PC Y Y — Y
500 — International 5 YYYY
831 — Portugal (alt) — Y Y Y
870 — Latin 2 Multilingual — — —
3
Y
871 — Iceland YYYY
892 — OCR A YYYY
893 — OCR B YYYY
1002 — DCF Rel 2 Compatibility Y
1003 — US Text Subset Y
1
1
YYY
Y—Y
1
Only available with the COAX IBM 3812/16.
2
Code page 340 is classified as obsolete on the IBM systems. Selecting the code
page with OCR A or OCR B selects either Code page 892 or 893, respectively.
3
Only available on a font card for the IBM 4028.
XEROX MRP FAMILY INTELLIGENT PRINTER DATA STREAM (IPDS) 5-21
CONFIGURATION AND REFERENCE GUIDE
Page 88

Page 89

Command reject exceptions
A. Exception codes
This appendix lists the supported exception IDs by exception
class. The Xerox IPDS may not report the same exceptions in the
same order or at the same time as the IBM printers it is
emulating.
For detailed information about exception reporting, refer to the
IBM Intelligent Printer Data Stream Reference, publication
number S544–3417–04.
A command reject exception indicates the printer rejected an
IPDS command without examining the data within the command.
There are no alternate exception actions (AEAs) for command
reject exceptions. Table A–1 lists the supported exceptions IDs
for this exception class.
Table A–1. Equipment check with intervention required
ID code Description
0x800100 Invalid IPDS command code
0x800200 Invalid IPDS command sequence
0x800400 Data received after ARQ
0x80E000 Invalid IPDS command length
Intervention required exceptions
An intervention required exception indicates the printer detected
a condition requiring manual intervention at the printer. There are
no AEAs for intervention required exceptions. Table A–2 lists the
supported exceptions IDs for this exception class.
Table A–2. Intervention required exception IDs
ID code Description
0x400000 Printer not ready
0x400100 Printer out of paper (end of forms)
XEROX MRP FAMILY INTELLIGENT PRINTER DATA STREAM (IPDS) A-1
CONFIGURATION AND REFERENCE GUIDE
Page 90

EXCEPTION CODES
Data check exceptions
A data check exception indicates the printer detected an
undefined character or position check. Table A–3 lists the
supported exceptions IDs for this exception class.
Table A–3. Data check exception IDs
ID code Description
0x082100 Undefined character
0x08C100 Position check
Specification check-IO image exceptions
A specification check–IO image exceptions indicated the printer
received an IO image command containing an invalid data
parameter or value. For more information, refer to the IBM Data
Stream and Object Architecture Image Object Content
Architecture (IOCA) Reference, publication number SC31–6805.
Table A–4 lists the supported exceptions IDs for this exception
class.
Table A–4. Specification check–IO image exception IDs
ID code Description
0x050001 Invalid IO image self–defining field code
0x050003 Invalid IO image self–defining field length
0x050004 Invalid IO image self–defining field value
0x05700F IO – Begin Segment out of sequence
0x05910F IO – Begin Image Content out of sequence
0x05920F Image Data self–defining field out of sequence
0x05930F End Image Content out of sequence
0x05940F Image Size Parameter missing
0x059410 Image Size Parameter value unsupported
0x059411 Image Size cannot be determined
0x05950F Image Encoding Parameter out of sequence
0x059510 Image Encoding Parameter value unsupported
0x059511 IO image decompression error
0x05960F Image Data Element Size Parameter out of sequence
0x059610 Image Data Element Size Parameter value unsupported
0x05970F Image Look Up Table ID out of sequence
0x059710 Image Look Up Table ID parameter unsupported
0x05A902 IO data outside the Image Presentation Space
A-2 XEROX MRP FAMILY INTELLIGENT PRINTER DATA STREAM (IPDS)
CONFIGURATION AND REFERENCE GUIDE
Page 91

Specification check-bar code exceptions
A specification check–bar code exception indicates the printer
received a bar code command with an invalid data parameter or
value. For more information, refer to the IBM Data Stream and
Object Architecture Bar Code Object Content Architecture
(BCOCA) Reference, publication number S544–3766. Table A–5
lists the supported exceptions IDs for this exception class.
Table A–5. Specification check–bar code exception IDs
ID code Description
0x040300 Invalid bar code type
0x040600 Invalid module width
0x040700 Invalid element height
0x040800 Invalid height multiplier
0x040900 Invalid wide–to–narrow ratio
0x040A00 Invalid symbol reference point
0x040B00 Invalid bar code modifier
EXCEPTION CODES
0x040C00 Invalid bar code data length
0x040E00 Check digit calculation exception
0x041000 Invalid HRI location
0x041100 Attempt to print outside block
XEROX MRP FAMILY INTELLIGENT PRINTER DATA STREAM (IPDS) A-3
CONFIGURATION AND REFERENCE GUIDE
Page 92

EXCEPTION CODES
Specification check-graphics data exceptions
A specification check–graphics data exception indicates the
printer received a graphics command with an invalid data
parameter or value. For more information, refer to the IBM Data
Stream and Object Architecture Graphics Object Content
Architecture (GOCA) Reference, publication number SC31–6804.
Table A–6 lists the supported exceptions IDs for this exception
class.
Table A–6. Specification check–graphics data exception
ID code Description
0x030001 Unsupported graphics command code
0x030002 Reserved byte or invalid attribute set
0x030003 Incorrect drawing order length
0x03000C Segment prolog exception
0x03000E Unsupported attribute value
IDs
0x030021 Invalid or unsupported default
0x033400 Character angle value not supported
0x033E00 Invalid End Prolog
0x036000 Area bracket exception
0x036800 Begin Area received incorrectly
0x036801 Area truncated exception
0x036802 Supported order invalid in area
0x037001 Unsupported Begin Segment Introducer (BSI) segment flag
0x037082 Invalid BSI segment flag
0x0370C1 Invalid BSI length
0x0370C5 Insufficient segment data
0x039200 Graphics image order sequence error
0x039300 Graphics image bracket exception
0x039301 Incorrect number of Image Data orders
0x03C300 Font not available
0x03C301 Undefined graphics character code
0x03D100 Truncated graphics image exception
0x03D101 Invalid order in graphics image
0x03D102 Graphics image format not supported
0x03D103 Image width greater than maximum supported
0x3E100 Relative line outside coordinate space
A-4 XEROX MRP FAMILY INTELLIGENT PRINTER DATA STREAM (IPDS)
CONFIGURATION AND REFERENCE GUIDE
Page 93

Specification check-general exceptions
A specification check–general exception indicates the printer
received a command with an invalid parameter or value. Table
A–7 lists the supported exceptions IDs for this exception class.
Table A–7. Specification check–general exception IDs
ID code Description
0x020001 Embedded control sequence code exception
0x020201 End Suppression control sequence exception
0x020202 Invalid IPDS command length
0x020205 Invalid data self–defining field length
0x020302 IPDS command header length too small
0x020305 Invalid or unsupported block orientation
0x020401 End Page encountered during suppression
0x020402 Invalid use of ARQ Continuation Bit
EXCEPTION CODES
0x020405 Area position reference system not supported
0x020501 Invalid spanning sequence
0x020505 Invalid self–defining field unit base
0x020601 Invalid Begin Supress (BSU)
0x020605 Invalid self–defining field L–units
0x020705 Invalid self–defining field extents
0x020805 Invalid or unsupported mapping option
0x020A05 Data in a block might be outside the valid printable area (VPA)
0x020B05 Invalid self–defining field identifier
0x020C01 Invalid or unsupported font local ID
0x020F01 Invalid Set Text Orientation (STO)
0x021001 Invalid Set Inline Margin (SIM)
0x021101 Invalid Set Baseline Increment (SBI)
0x021201 Invalid intercharacter adjustment
0x021202 Font storage is full
0x021301 Invalid Absolute Move Baseline (AMB)
0x021401 Invalid Absolute Move Inline (AMI)
0x021501 Invalid Relative Move Inline (RMI)
0x021502 Invalid DF command font or font ID
0x021601 Invalid Relative Move Baseline (RMB)
0x021701 Invalid Set Variable Space Increment (SVI)
0x021702 Invalid deletion type in DF command
0x021802 Invalid font ID
0x021901 Invalid repeat length for RPS
XEROX MRP FAMILY INTELLIGENT PRINTER DATA STREAM (IPDS) A-5
CONFIGURATION AND REFERENCE GUIDE
Page 94

EXCEPTION CODES
Table A–7. Specification check–general exception IDs
(continued)
ID code Description
0x021902 Multiple occurrences of the same LFE
0x021B02 Invalid Load Font Control unit base
0x021C01 Invalid escape sequence
0x021E01 Invalid WT control sequence length
0x021F01 Repeat String (RPS) length exception
0x022002 Invalid Load Font Control (LFC) font stageability byte
0x022202 Invalid LFC data pattern format
0x022302 Invalid value for LFC font type bits
0x022602 Invalid Load Symbol Set (LSS) or LFC X–box size
0x022702 Invalid LSS or LFC Y–box size
0x022A02 Invalid value for LFC X–density
0x022B02 Invalid value for LFC Y–density
0x022E02 Insufficient font data received
0x023001 Insufficient storage for Load Copy Control (LCC) record
0x023101 Invalid LCC number of copies
0x023201 Invalid LCC keyword in copy group entry
0x023202 Excess font data received
0x023401 Invalid LCC entry type count
0x023601 Invalid LCC simplex/duplex parameter
0x023902 LCC font for Host–Assigned ID (HAID) already assigned
0x023C02 Invalid value within a Load Font Index (LFI) command
0x023E02 Invalid LFC character pattern address
0x023F02 STO–SCFL–LFE mismatch
0x024002 Invalid value for font inline sequence
0x024201 WIC (Write Image Control) pel count is less than minimum required
0x024301 WIC pel count is greater than maximum supported
0x024401 WIC scan count is less than minimum required
0x024501 WIC scan count is greater than maximum supported
0x024601 Invalid WIC source image format
0x024602 Invalid parameter in an LFI command
0x024701 Invalid WIC magnification factor
0x024702 Invalid Load Font Equivalence (LFE) font inline sequence
0x024801 Invalid WIC scan line direction
A-6 XEROX MRP FAMILY INTELLIGENT PRINTER DATA STREAM (IPDS)
CONFIGURATION AND REFERENCE GUIDE
Page 95

Table A–7. Specification check–general exception IDs
(continued)
ID code Description
0x024A01 Invalid WIC image block location
0x024D02 Insufficient storage for LFC and LFI
0x025803 Invalid or unsupported value for Text Color
0x026002 Invalid Logical Page Descriptor (LPD) L–units per unit base (Xp +I)
0x026102 Invalid LPD L–units per unit base (Yp +B)
0x026202 Invalid LPD Xp–extent
0x026301 Insufficient pattern storage
0x026302 Invalid LPD Yp–extent
0x026402 Invalid LPD unit base
0x026802 Invalid LPD inline sequence direction
0x026902 Invalid LPD baseline sequence direction
0x026A01 Insufficient source image data
EXCEPTION CODES
0x026A02 Invalid LPD initial I print coordinate
0x026B01 Excess source image data received
0x026B02 Invalid LPD initial B print coordinate
0x026F02 Invalid Media Origin parameter in XOH–SMO
0x027202 Invalid XOH–SMS XmExtent
0x027302 Invalid XOH–SMS YmExtent
0x027701 Group termination exception
0x027801 Invalid order type
0x028501 Invalid Deactivate Overlay (DO) command overlay ID
0x028702 Invalid LFC (Load Font Control) unit base for pel units
0x028802 Invalid LFC X pel units per unit base
0x028902 Invalid LFC Y pel units per unit base
0x028A02 Invalid LFC Relative Metric Multiplying Factor (RMMF) value
0x029001 Invalid or unsupported overlay ID
0x029101 Begin Overlay (BO) overlay ID already loaded
0x029102 Invalid XOA Request Resource List (RRL) entry
0x029201 Overlay ID not loaded
0x029301 Recursive overlay invocation
0x029401 Invalid page segment Host–Assigned ID (HAID)
XEROX MRP FAMILY INTELLIGENT PRINTER DATA STREAM (IPDS) A-7
CONFIGURATION AND REFERENCE GUIDE
Page 96

EXCEPTION CODES
Table A–7. Specification check–general exception IDs
(continued)
ID code Description
0x029501 Page segment HAID already loaded
0x029502 Invalid XOH Page Counters Control (PCC) command page counter update
0x029601 Page segment HAID not loaded
0x029801 Invalid or unsupported supression number
0x029803 Invalid Temporary Baseline Move (TBM) control sequence
0x02A401 Page boundary in X direction cannot be represented
0x02A501 Page boundary in Y direction cannot be represented
0x02AD01 Invalid Logical Page Position (LPP) command
0x02AE01 Invalid IO command parameter
0x02AF01 Insufficient storage to print the sheet
0x02C001 Mixture of Xm–axis and Ym–axis duplex copy groups
0x02C101 Maximum simplex/duplex keywords in LCC
0x02C201 Odd number of duplex copy groups in LCC
0x02C301 Mixture of simplex/duplex parameters in LCC
0x02C401 Unusual copy counts in LCC
0x02FF02 Exceptions detected but not queued
Conditions requiring host notification
A condition requiring host notification indicates the printer
detected a condition that should be reported to the host. There
are no AEAs for conditions requiring host notification. Table A–8
lists the supported exceptions IDs for this exception class.
Table A–8. Conditions requiring host notification
exception IDs
ID code Description
0x010100 Physical Media Size or Input Media Source ID changed
0x01E400 Cancel key pressed
A-8 XEROX MRP FAMILY INTELLIGENT PRINTER DATA STREAM (IPDS)
CONFIGURATION AND REFERENCE GUIDE
Page 97

B. Resident code pages
This appendix provides examples of the resident code pages.
Within each illustration, the top row indicates the high nibble of
the code to be looked up and the vertical column on the left
indicates the low nibble of the code to be looked up.
Figure B–1. USA/Canada resident code page 37
XEROX MRP FAMILY INTELLIGENT PRINTER DATA STREAM (IPDS) B-1
CONFIGURATION AND REFERENCE GUIDE
Page 98

RESIDENT CODE PAGES
Figure B–2. US ASCII–L resident code page 38
(4028 emulation only)
B-2 XEROX MRP FAMILY INTELLIGENT PRINTER DATA STREAM (IPDS)
CONFIGURATION AND REFERENCE GUIDE
Page 99

RESIDENT CODE PAGES
Figure B–3. International #1 resident code page 256
XEROX MRP FAMILY INTELLIGENT PRINTER DATA STREAM (IPDS) B-3
CONFIGURATION AND REFERENCE GUIDE
Page 100

RESIDENT CODE PAGES
Figure B–4. Symbol Set 7 resident code page 259
B-4 XEROX MRP FAMILY INTELLIGENT PRINTER DATA STREAM (IPDS)
CONFIGURATION AND REFERENCE GUIDE
 Loading...