


XEROX
Xerox MRP Family
4215/MRP, 4219/MRP, 4220/MRP, 4230/MRP
AppleTalk Interface
Operator Guide
March 1995
720P12313

Xerox Corporation
701 S. Aviation Boulevard
El Segundo, CA 90245
© 1995 by Xerox Corporation. All rights reserved.
Copyright protection claimed includes all forms and matters of
copyrightable material and information now allowed by statutory
or judicial law or hereinafter granted, including without limitation,
material generated from the software programs which are
displayed on the screen, such as icons, screen displays, looks,
etc.
Printed in the United States of America
Publication number: 720P12313
Xerox® and all Xerox products mentioned in this publication are
trademarks of Xerox Corporation. Products and trademarks of
other companies are also acknowledged.
Changes are periodically made to this document. Changes,
technical inaccuracies, and typographic errors will be corrected in
subsequent editions.
This document was created on the Xerox 6085 Professional
Computer System using VP software. The typeface is Optima.

Safety
Notices
The information in this document is subject to change without
notice.
Xerox Corporation shall not be liable for technical or editorial
errors or omissions contained herein; nor for incidental or
consequential damages resulting from the furnishings,
performance, or use of this material.
CAUTION: This equipment generates, uses, and can radiate radio
frequency energy, and if not installed and used in accordance
with the installation requirements, may cause radio interference
to radio communications.
U.S.A.
Your Xerox printer has been tested and found to comply with the
limits for a Class A computing device pursuant to Subpart J of
Part 15 of FCC rules, which are designed to provide reasonable
protection against such interference when operated in a
commercial environment. Operation of this equipment in a
residential area is likely to cause interference. In such cases, the
user at his or her own expense is required to correct the
interference.
Canada
This digital apparatus does not exceed the Class A limits for radio
noise emissions from digital apparatus as set out in the radio
interference regulations of the Canadian department of
communications.
Les present appareil numerique n’emet pas de bruits
radioelectriques depassant les limites applicables aux appareils de
Classe A prescitees dans le reglement sur le brouillage
radioelectrique edicte par les ministre des communications du
Canada.
XEROX MRP FAMILY APPLETALK INTERFACE OPERATOR GUIDE iii

NOTICES
Laser safety
Europe: 50 Hz, 220 to 240 V equipment
This equipment has been tested and certified in conformance
with European commission directive 82/499/ECC and VDE
0871/0875, Class A, relating to radio frequency interference.
Your Xerox printer complies with appropriate safety standards.
Specifically regarding lasers, the equipment complies with laser
product performance standards set by governmental,
international and national agencies as a Class 1 laser product. It
does not emit hazardous light; the beam is totally enclosed
during all phases of customer operation and maintenance.
WARNING: Use of controls or adjustments or performance of
procedures other than those specified herein may result in
hazardous radiation exposure.
Warning labels
There are several user accessible Laser Safety Warning labels
located on the printer. These are as shown on the next two
pages.
iv XEROX MRP FAMILY APPLETALK INTERFACE OPERATOR GUIDE

DANGER-invisible laser
radiation
when open and interlock
defeated for service.
AVOID DIRECT EXPOSURE TO
BEAM.
instructions for safe service are
in SERVICE MANUAL.
NOTICES
Laser labels on the back of the printer are either:
These laser warning labels are placed on panels that cover areas
that are not operator serviceable. These panels are not to be
removed.
XEROX MRP FAMILY APPLETALK INTERFACE OPERATOR GUIDE v

NOTICES
aaaaaaaaaaaaaaaaaaaaaaa
a
a
a
a
a
a
a
a
a
a
a
a
a
a
a
a
aaaaaaaaaaaaaaaaaaaaaaaaa
a
a
a
a
a
a
a
a
a
a
a
aaaaaaaaaaaaaaaaaaaaaaa
aaaaaaaaaaaaaaaaaaaaaaa
50hz.
aaaaaaaaaaaaaaaaaaaaaaa
aaaaaaaaaaaaaaaaaaaaaaa
aaaaaaaaaaaaaaaaaaaaaaa
Configuration
aaaaaaaaaaaaaaaaaaaaaaa
aaaaaaaaaaaaaaaaaaaaa
aaaaaaaaaaaaaaaaaaaaa
60hz.
aaaaaaaaaaaaaaaaaaaaa
aaaaaaaaaaaaaaaaaaaaa
aaaaaaaaaaaaaaaaaaaaa
Configuration
aaaaaaaaaaaaaaaaaaaaa
aaaaaaaaaaaaaaaaaaaaa
aaaaaaaaaaaaaaaaaaaaa
aaaaaaaaaaaaaaaaaaaaa
a
a
a
a
a
a
Operational safety
vi XEROX MRP FAMILY APPLETALK INTERFACE OPERATOR GUIDE
Your Xerox equipment and supplies are designed and tested to
meet strict safety requirements. These include safety agency
examination, approval, and compliance with established
environmental standards.
Attention to the following notes ensures the continued safe
operation of your equipment.

NOTICES
Do this
Always connect equipment to a properly grounded power source
receptacle. If in doubt, have the receptacle checked by a
qualified electrician.
Always place equipment on a floor with adequate strength for
the weight of the machine.
Always have your service representative move or relocate the
equipment.
Always use materials and supplies specifically designed for your
Xerox equipment.
WARNING: Use of unsuitable materials may result in poor
performance and can possibly create a hazardous condition.
Always use a Xerox specified cordset with the Equipment Leakage
Current Interrupter/Residual Current Device (ELCI/RCD).
Do not do this
Never use an extension cord with the ELCI/RCD.
Never use the ELCI/RCD where water may enter the casing.
Never attempt any maintenance function that is not specifically
described in this document.
Never remove any covers or guards that are fastened with screws
unless otherwise instructed. There are no operator-serviceable
areas within these covers.
Never override or “cheat” electrical or mechanical devices.
Never operate the equipment if you notice unusual noises or
odors. Disconnect the power cord from the power source
receptacle and call service to correct the problem.
U.S. only: If you need any additional safety information
concerning the equipment or Xerox supplied materials, call the
following toll-free number: 1-800-828-6571.
Approvals and certification
60 Hz, 115 V Listed by Underwriters Laboratories, UL1950 (UL). Meets CSA
standards, C22.2 NO 950 (CSA).
50 Hz, 220 to 240 V Meets the British Standards Institution, IEC950 (BSI).
Safety feature
Your Xerox printer is equipped with an Equipment Leakage
Current Interrupter/Residual Current Device (ELCI/RCD). This
safety device protects you if an electric outlet supplying power
to the printer is improperly wired.
XEROX MRP FAMILY APPLETALK INTERFACE OPERATOR GUIDE vii

NOTICES
U.S. configuration of ELCI/RCD
1 Window
2 Reset button
International configuration of ELCI/RCD
1 Window
2 Reset button
If power is interrupted to the printer, follow these steps:
1. Locate the safety device, using the U.S. or International
Configuration (above).
2. Check to see if a red flag displays in the window of the
safety device.
3. If the red flag does not display, press and release the black
Reset button.
The red flag displays and power is restored to the system.
If power is not restored by this procedure or if the device
interrupts power to the machine again, call your service
representative.
viii XEROX MRP FAMILY APPLETALK INTERFACE OPERATOR GUIDE

Table of contents
Notices iii
Safety iii
Laser safety iv
Operational safety vi
Introduction xi
About this manual xi
Conventions xi
1. Installing the Xerox AppleTalk software 1-1
Before you begin 1-1
Xerox AppleTalk software 1-2
Xerox Support Software for Macintosh 1-2
PSPrinter User Guide 1-3
Installing PSPrinter 1-3
Installing the Xerox Driver Builder 1-4
Installing the Font Downloader 1-5
Setting up the Xerox driver to work with the printer 1-5
Selecting a printer 1-5
Selecting the Xerox PPD file 1-5
Printing documents 1-8
Page Setup 1-8
Print options 1-11
Configuration dialog 1-13
2. Selecting and using the Xerox driver 2-1
Selecting a printer 2-1
Renaming a printer 2-1
Printing documents 2-1
Page Setup 2-2
Printing 2-4
Print options 2-5
3. Using the Font Downloader 3-1
Available fonts 3-1
Downloading fonts 3-2
Changing passwords 3-3
XEROX MRP FAMILY APPLETALK INTERFACE OPERATOR GUIDE ix

TABLE OF CONTENTS
Managing fonts on your printer 3-4
Listing downloaded fonts 3-4
Deleting downloaded fonts 3-4
Checking the printer status 3-6
Clearing the font cache 3-6
Downloading PostScript programs to the printer 3-6
AppleTalk Print Language setup for the Font Downloader 3-7
4. AppleTalk configuration 4-1
Printer Configuration Report 4-1
Reading the Printer Configuration Report 4-1
Troubleshooting 4-2
Configuring the AppleTalk network interface at the printer control panel 4-2
AppleTalk interface configuration 4-2
Interface Setup menu item descriptions 4-4
AppleTalk settings 4-4
Interface Priority menu item descriptions 4-6
Sequential 4-6
Priority 4-6
Interface Lock 4-6
AppleTalk network configuration examples 4-7
Specifying standard or tagged binary PostScript mode
for the AppleTalk interface 4-7
Assigning a high priority to the AppleTalk interface 4-8
Appendices
A. Envelopes A-1
B. Related publications B-1
Index INDEX-1
x XEROX MRP FAMILY APPLETALK INTERFACE OPERATOR GUIDE

About this manual
Conventions
Introduction
The Xerox MRP Family AppleTalk Interface Operator Guide
provides information for installing and maintaining the AppleTalk
interface.
The procedures in this guide are written with the assumption that
you are a network administrator familiar with installing printers on
networks, and are familiar with AppleTalk software utilities.
Before using this guide, you should become familiar with its
contents and conventions.
This guide uses the following conventions in text and
procedures.
Text conventions
italics Italics are used for document and library names (for example, the
Xerox MRP Family 4220/MRP, 4230/MRP Operator Guide).
CAUTION: Cautions are associated with equipment safety.
WARNING: Warnings are associated with the safety of people.
N Notes are hints that help you perform a task or understand the
text.
MB Megabyte.
K-byte Kilobyte.
gsm Grams per one square meter of paper.
XEROX MRP FAMILY APPLETALK INTERFACE OPERATOR GUIDE xi

INTRODUCTION
Procedure conventions—printer control panel
This guide uses the following conventions in printer control
panel procedures.
Function key When referred to in the text, the function key is identified by its
name followed by the icon representing the key:
• Off-Line/O
• Main Menu/
M
• Last Page/L
• Enter/L
• Clear/
C
• Pause/P
• Reset/R
• Test Mode/T
When specified in a step-by-step control panel procedure
example, the function key is identified by the icon in the left
margin and the associated key name in the text of the numbered
step, for example:
L 1. Press the Enter key.
Messages References to messages displayed at the control panel appear in
text similar to the following:
READY TO PRINT
DRY INK IS LOW--REPLACE SOON.
Procedure conventions—Macintosh personal computer
This guide uses the following conventions within computer
procedures.
Menu buttons Menu buttons displayed on the terminal screen are identified by
their name in square brackets, for example:
Click on the [OK] button.
Keyboard keys Computer keyboard keys are identified by their name in boldface
type, for example:
Press the Tab key.
xii XEROX MRP FAMILY APPLETALK INTERFACE OPERATOR GUIDE

1. Installing the Xerox AppleTalk option
The Xerox AppleTalk option allows you to connect your printer
directly to a Macintosh system, or to an AppleTalk-compatible
network through LocalTalk. The optional AppleTalk interface
board provides support for this interface.
This chapter describes the new features of the Xerox printer
AppleTalk software, including the changes incorporated in the
Xerox Driver Builder (Xerox driver) version 2.01 (v2.01) or later,
the enhanced version with PSPrinter and LaserWriter v8 printer
drivers support.
PSPrinter is the new Macintosh driver developed by Adobe
Systems, Inc. It can be used instead of the Apple LaserWriter
printer driver that comes with the Macintosh computer. To build
a Xerox driver with Macintosh PostScript driver v8 support,
PSPrinter v8.1.1 or later is required.
N Note: Your printer is not supported by PSPrinter v8.0 and v8.1,
or LaserWriter v8.0. The Xerox driver v2.01 gives access to the
new version 8 features, and provides backward compatibility. If
the new Xerox driver is built from LaserWriter driver v7.x or
earlier, all selections and options are similar to those provided by
Xerox driver v1.0.
Before you begin
You need the following materials to begin using the AppleTalk
interface board:
• LocalTalk or PhoneNet cables with DIN-8 or DB-9 connectors
• Xerox Support Software for Macintosh diskette
• Documentation that came with your Macintosh computer
N Note: DIN-8 cables are generally used for Macintosh systems,
except for models produced before 1986. Most PC AppleTalk
cards require DB-9 connectors. Contact your network
administrator or authorized Apple dealer for assistance in
purchasing the appropriate cables and connections for your
Macintosh computer or AppleTalk network.
XEROX MRP FAMILY APPLETALK INTERFACE OPERATOR GUIDE 1-1

INSTALLING THE XEROX APPLETALK OPTION
Xerox AppleTalk software
Xerox Support Software for Macintosh
Both the PSPrinter for Macintosh v8.1.1 or later and Xerox
Support Software v2.01 or later for Macintosh are packaged
together as three diskettes.
The PSPrinter v8.1.1 or later includes the following three
diskettes:
• Disk 1: PSPrinter for Macintosh 1 (Program file)
• Disk 2: PSPrinter for Macintosh 2 (Program file)
• Disk 3: Xerox Support Software and PSPrinter User Guide
The Xerox Support Software for Macintosh diskette is included
with the AppleTalk interface option. The software on this
diskette provides access to such printer features as selecting
input and output trays.
The Xerox Support Software includes the following files:
• Xerox Driver Builder (v2.01 or later)
• Font Downloader folder (v5.0.4 or later)
• README (Release Notes)
• PSPrinter User Guide
Xerox Driver Builder v2.01 or later
The Xerox Driver Builder v2.01 or later (Xerox driver) contains the
programs that enable the PSPrinter driver or the LaserWriter
driver to customize the paper handling and print options for your
printer. It also contains the configuration used by the enhanced
driver.
Before building the Xerox driver, make sure you have the
PSPrinter driver or LaserWriter driver installed.
Font Downloader folder
The Font Downloader folder contains the following files:
• Downloader v5.0.4 or later
• CLEAR PFM
• CLEAR XXXX DISK
Downloader v5.0.4 Use this utility to download font and PostScript files. You can
download fonts to the printer memory, the optional hard disk, or

PSPrinter User Guide
Installing PSPrinter
INSTALLING THE XEROX APPLETALK OPTION
to reinitialize it when necessary. It is recommended that your
system administrator perform this task.
README file
The README file contains information about the software release,
as well as descriptions of any software changes and limitations.
The PSPrinter User Guide is included as a compressed PostScript
file “PSPrinter User Guide.sea” in Disk 3. You should copy this
file to the hard disk. Double-click the file icon to uncompress
the file and load it to the location you want.
To print the document, download the uncompressed file, called
“Mac.Prnt.Drivr.8.1.1.ps,” to the printer, and load letter size
paper in the default tray.
If you prefer not to update your printer driver to the latest
version, skip this section and continue with the “Installing the
Xerox Driver Builder v2.01 or later” section, next.
N If you install PSPrinter v8.1.1 on a Macintosh running System 6,
the installer automatically overwrites the System 6.0.x versions of
the PrintMonitor, Backgrounder, LaserWriter, and LaserPrep
utilities with the System 7 versions. You should make copies of
the older versions of these utilities if you need to reuse them
with the LaserWriter printer driver.
Start the installation by double clicking the installer in Disk 1.
The installer places the following new files in the System Folder
(version numbers may vary):
• PSPrinter (v8.1.1)
• Print Monitor (v7.0)
• Backgrounder (v1.3)
• LaserPrep (v7.2)
• Xerox XXXX PPD file (in the Printer Descriptions folder)
If you are running System 7, the installer places the following
files in the Extensions folder (version numbers may vary):
• PSPrinter (v8.1.1)
• Xerox XXXX PPD file (in the Printer Descriptions folder)
The installer removes earlier versions of the PSPrinter driver (for
example, v8.0) and all PostScript Printer Description (PPD) files.
When the installer detects a newer version of the same file, for
example TeachText, click the [Newer] button to keep the more
recent file. For a description of other PSPrinter driver functions,
refer to the PSPrinter User Guide, provided in the disk package.
N Note: This installation description also applies to the Apple
LaserWriter 8 printer driver v8.1.1, with several exceptions. The
LaserWriter v8.1.1 installer does not replace LaserWriter driver
versions that are older than version 8.0, and it does not install
the Xerox PPD file.
XEROX MRP FAMILY APPLETALK INTERFACE OPERATOR GUIDE 1-3

INSTALLING THE XEROX APPLETALK OPTION
Installing the Xerox Driver Builder
The Xerox Driver Builder v2.01 or later (Xerox driver) can be built
from the following (version numbers may vary):
• PSPrinter printer driver (v8.1.1)
• LaserWriter 8 printer driver (v8.1.1)
• Fax Printer Driver (v8.1.1)
• LaserWriter printer driver (v5.2 through v7.2)
CAUTION: Make sure that the same version of the printer driver
is installed on all Macintosh systems on a network. If printer
drivers are not compatible, error messages may occur.
Follow these steps to build the Xerox driver:
1. Turn on your Macintosh computer.
2. Insert the Xerox Support Software for Macintosh diskette into
the diskette drive.
3. Double-click on the Driver Builder icon. You see the
following message:
“This application builds the Xerox driver from the printer
driver which you select.”
4. Click on the [Build] button. You see the following prompt:
“Next, select the driver that you want to build from.”
5. Click [OK] to respond to the message.
The user menu appears with a list of drivers you can select
from the Extension folder. Printer drivers not supported by
this builder are not shown.
If you have Fax Printer driver v8.1.1 installed, you can select
Fax Printer instead of PSPrinter to include all of the fax
functions in the new Xerox printer driver.
N Note: Except for fax-related functions, Fax Printer is identical
to PSPrinter.
6. Click on [OPEN] to start the building process. You see the
following message:
“Now building the Xerox printer driver.”
When the task is complete, the following message displays:
“The Xerox printer driver has been successfully built, and may
be selected using the Chooser.”
7. Click [OK] to clear the message.
N Note: For System 7 users, the Xerox printer driver is built
and stored in the Extension folder. For System 6 users, the
driver is stored in the System folder. If you need to keep
more than one version of the printer driver in the Chooser,
you can rename the Xerox icon or icons in the Extension
folder to indicate the different versions.
1-4 XEROX MRP FAMILY APPLETALK INTERFACE OPERATOR GUIDE

Installing the Font Downloader
Copy the Font Downloader folder by dragging it to any location
on the hard disk.
Setting up the Xerox driver to work with the printer
You should perform the procedures in this section in the
following order to set up the Xerox driver to work with your
printer:
• Selecting a printer
• Selecting the Xerox PPD file
Selecting a printer
Follow these steps to select a printer:
1. Select Chooser from the Apple Menu.
2. Click on the Xerox printer icon in the Chooser.
INSTALLING THE XEROX APPLETALK OPTION
Selecting the Xerox PPD file
Automatic selection You can select a PPD file automatically by clicking the [Auto
3. If you see a list of AppleTalk zones, click the zone where the
printer is located.
4. Click the name of the printer you want to use.
5. If Active is not selected, click the [Active] button to activate
the AppleTalk network.
6. Close the Chooser.
The Xerox PPD file is only required for a printer software v8.x
configuration. You do not need to install this file if your printer
driver is built from LaserWriter printer driver v7.x or earlier.
If your Xerox printer driver is configured from PSPrinter, the
PSPrinter Installer places the Xerox printer PPD file in the Printer
Descriptions folder inside the Extensions folder if you are using
System 7.x, or in the System folder if you are using System 6.x.
The Xerox printer PPD uses PPD format v4.1.
PPD file selection and configuration is part of the PSPrinter v8.x
functions. This file contains information about the specific
printer features. Click the [Setup] button after you select a
printer in the Chooser to display the file selection.
Setup] button in the Setup dialog.
With Auto Setup and proper connection to your printer, the PPD
“Xerox printer v2013.112” or later file should be selected. After
the driver is installed, you can copy additional PPD files obtained
from other sources to the Printer Descriptions folder. If the
expected PPD cannot be found, the driver displays a warning
message. You should choose the Generic PPD or manually
select a PPD file.
XEROX MRP FAMILY APPLETALK INTERFACE OPERATOR GUIDE 1-5

INSTALLING THE XEROX APPLETALK OPTION
Manual selection Follow these steps to manually select the Xerox PPD:
1. Click [More Choices] in the Setup dialog box.
2. Click [Select PPD].
The driver displays a dialog box where you can select the
PPD “Xerox printer v2013.112” or later version in the Printer
Descriptions folder, as shown in the following illustrations.
The following shows a setup dialog box with fewer choices:
The following shows a setup dialog box with more choices:
1-6 XEROX MRP FAMILY APPLETALK INTERFACE OPERATOR GUIDE

INSTALLING THE XEROX APPLETALK OPTION
The following shows an example manual PPD file selection
dialog box:
4. Click the [Configuration] button in the expanded Setup
dialog box.
The Installable Options dialog box displays, listing the
installable features and options in their default setups.
5. Select [OK] to confirm the settings (changed or unchanged)
and return to the Setup dialog.
XEROX MRP FAMILY APPLETALK INTERFACE OPERATOR GUIDE 1-7

INSTALLING THE XEROX APPLETALK OPTION
6. Select [Printer Info] to display the Printer Info dialog box.
Printer information is shown as a result of either the Auto
Setup query or Printer Info Update.
Printing documents
Page Setup
Once the Xerox driver is built, you can open a document in an
application and specify the following features:
• Page Setup
• Print options
The Xerox Driver Builder v2.01 supports all of the PSPrinter v8.1.1
and LaserWriter v8.1.1 Page Setup features, including the
following:
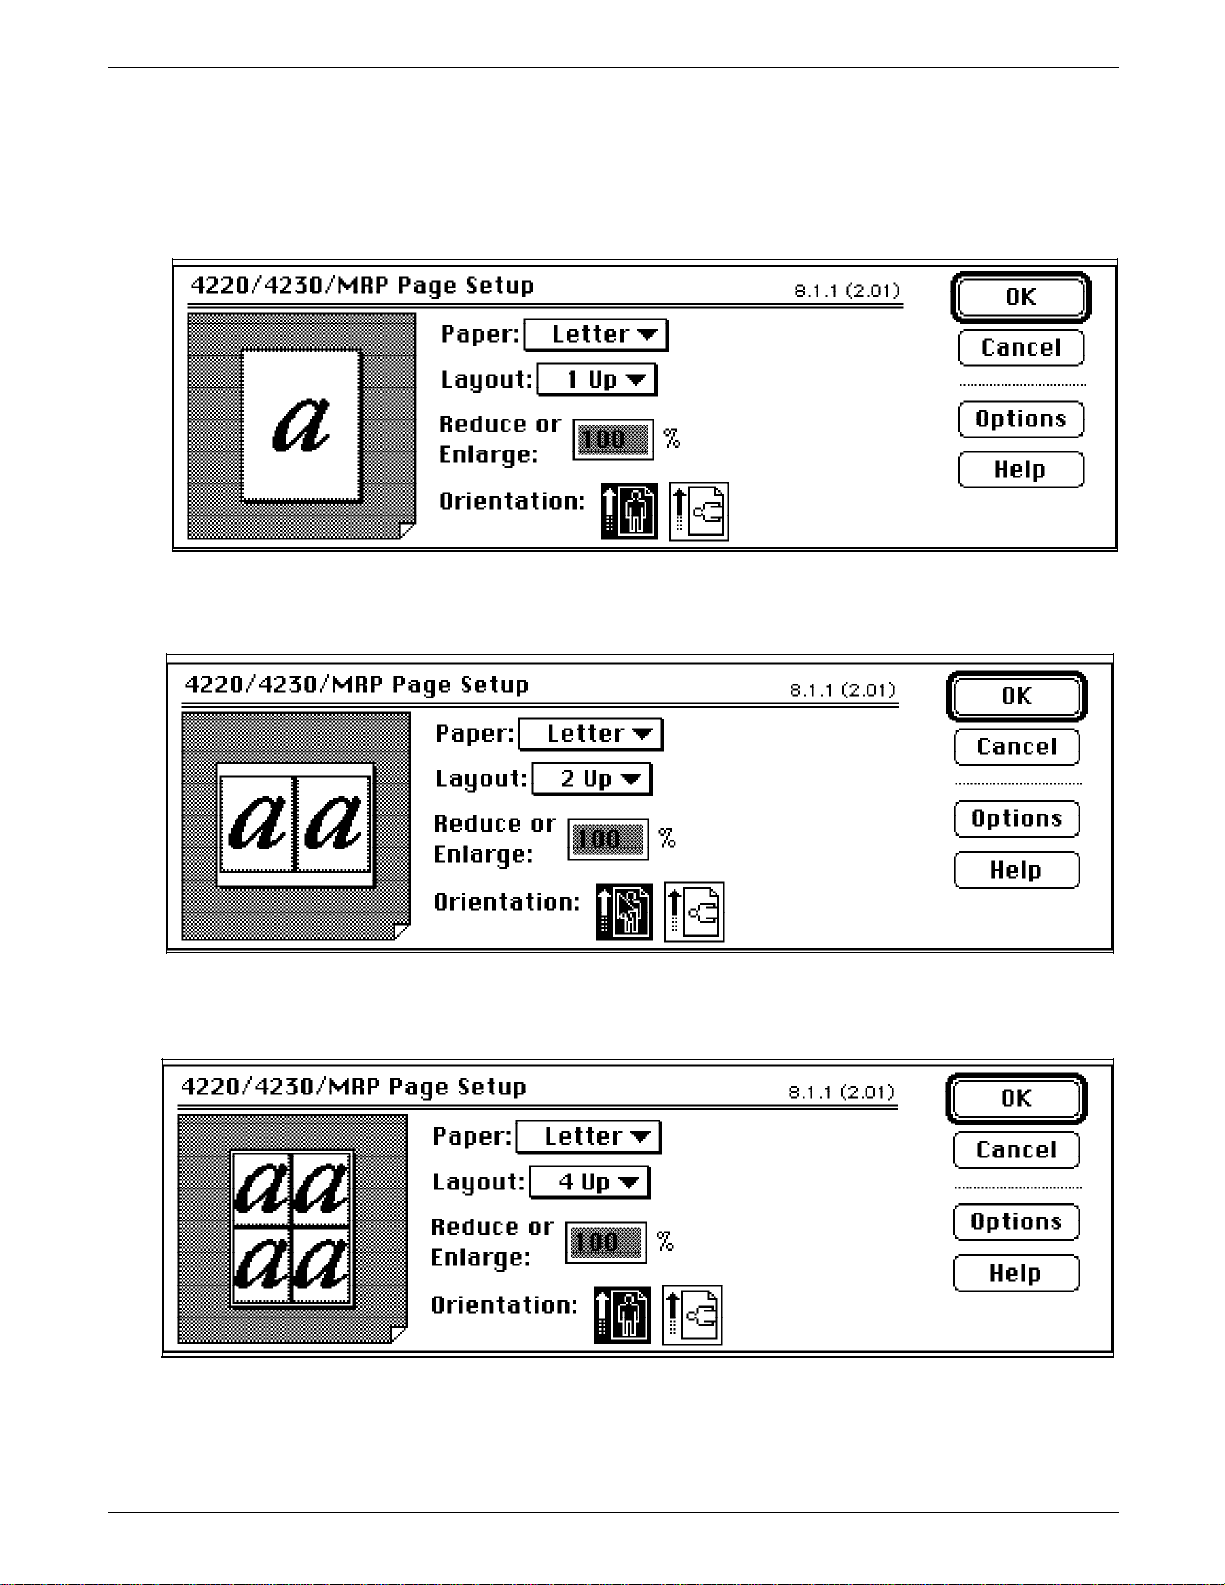
Print image The print image shows the current size, arrangement, and
appearance of the printed results. The outer solid rectangle
represents the edge of the physical paper. The inner dotted
rectangle shows the boundaries of the imageable areas. Click
within the page image box to display the numerical dimensions
of the page. Refer to figure 1-1.
1-8 XEROX MRP FAMILY APPLETALK INTERFACE OPERATOR GUIDE
INSTALLING THE XEROX APPLETALK OPTION
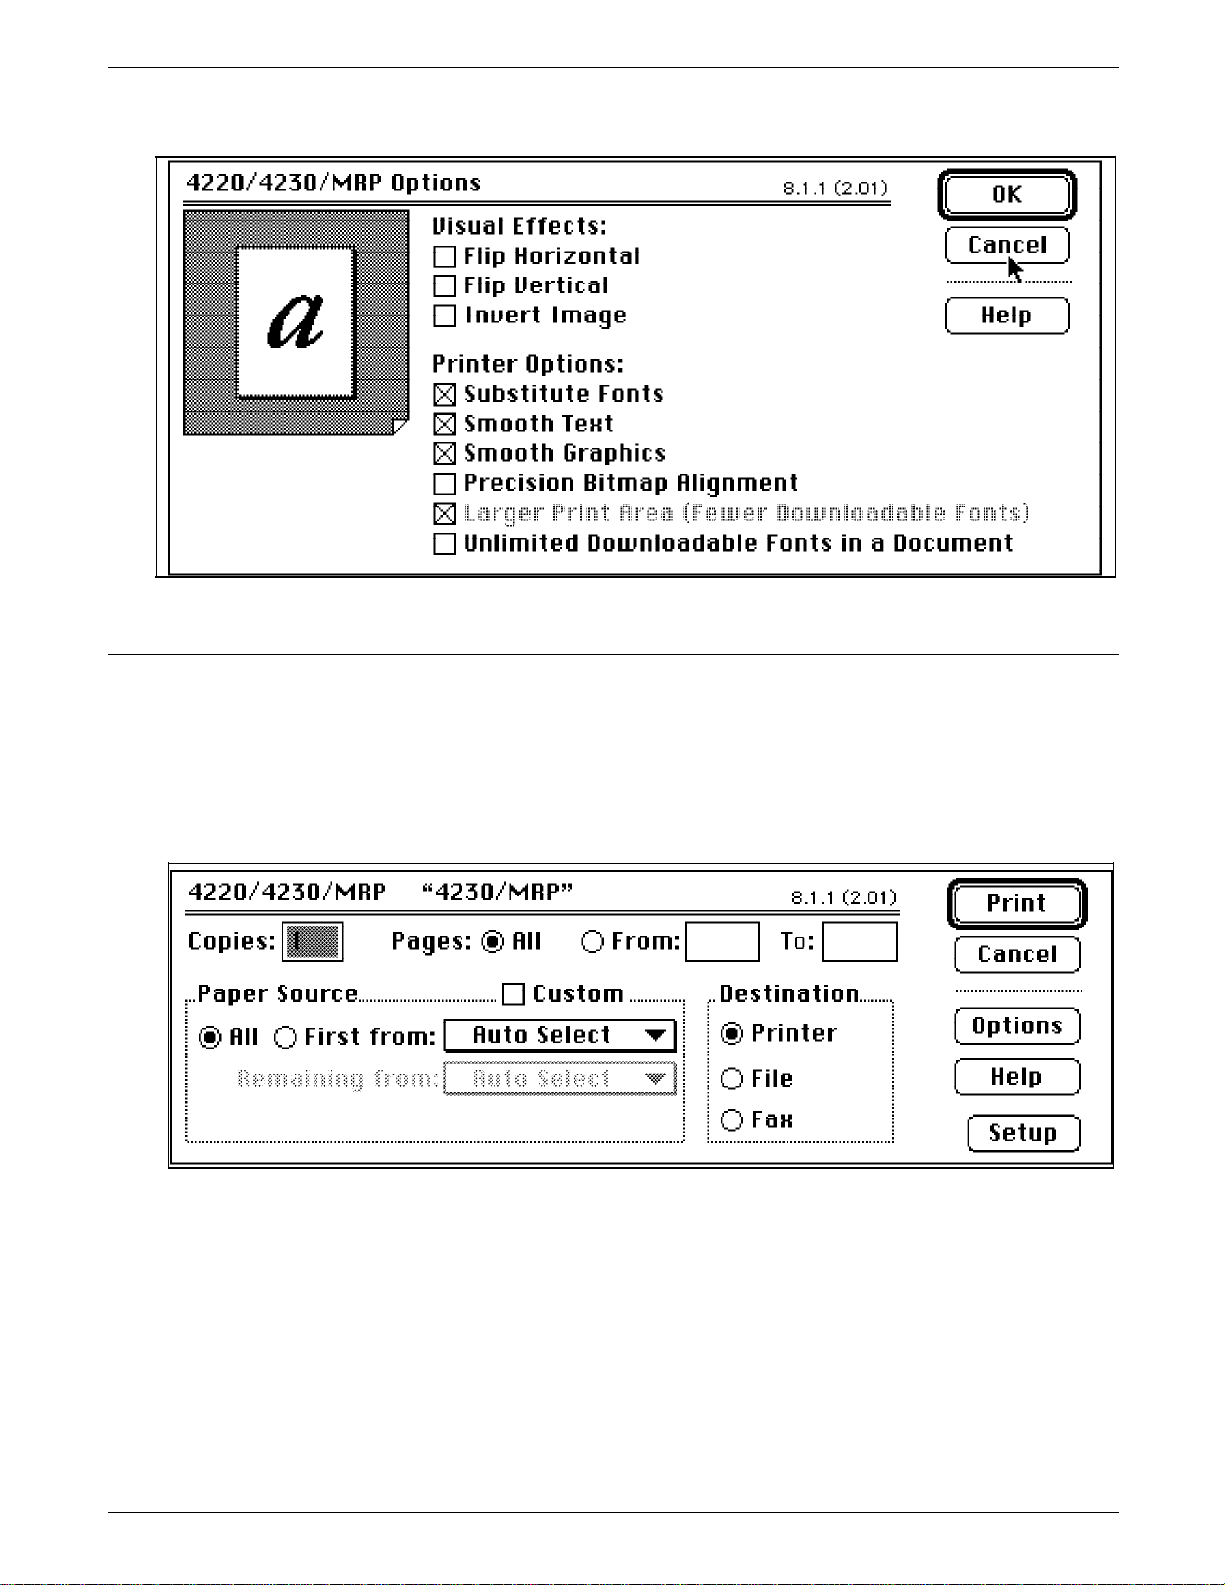
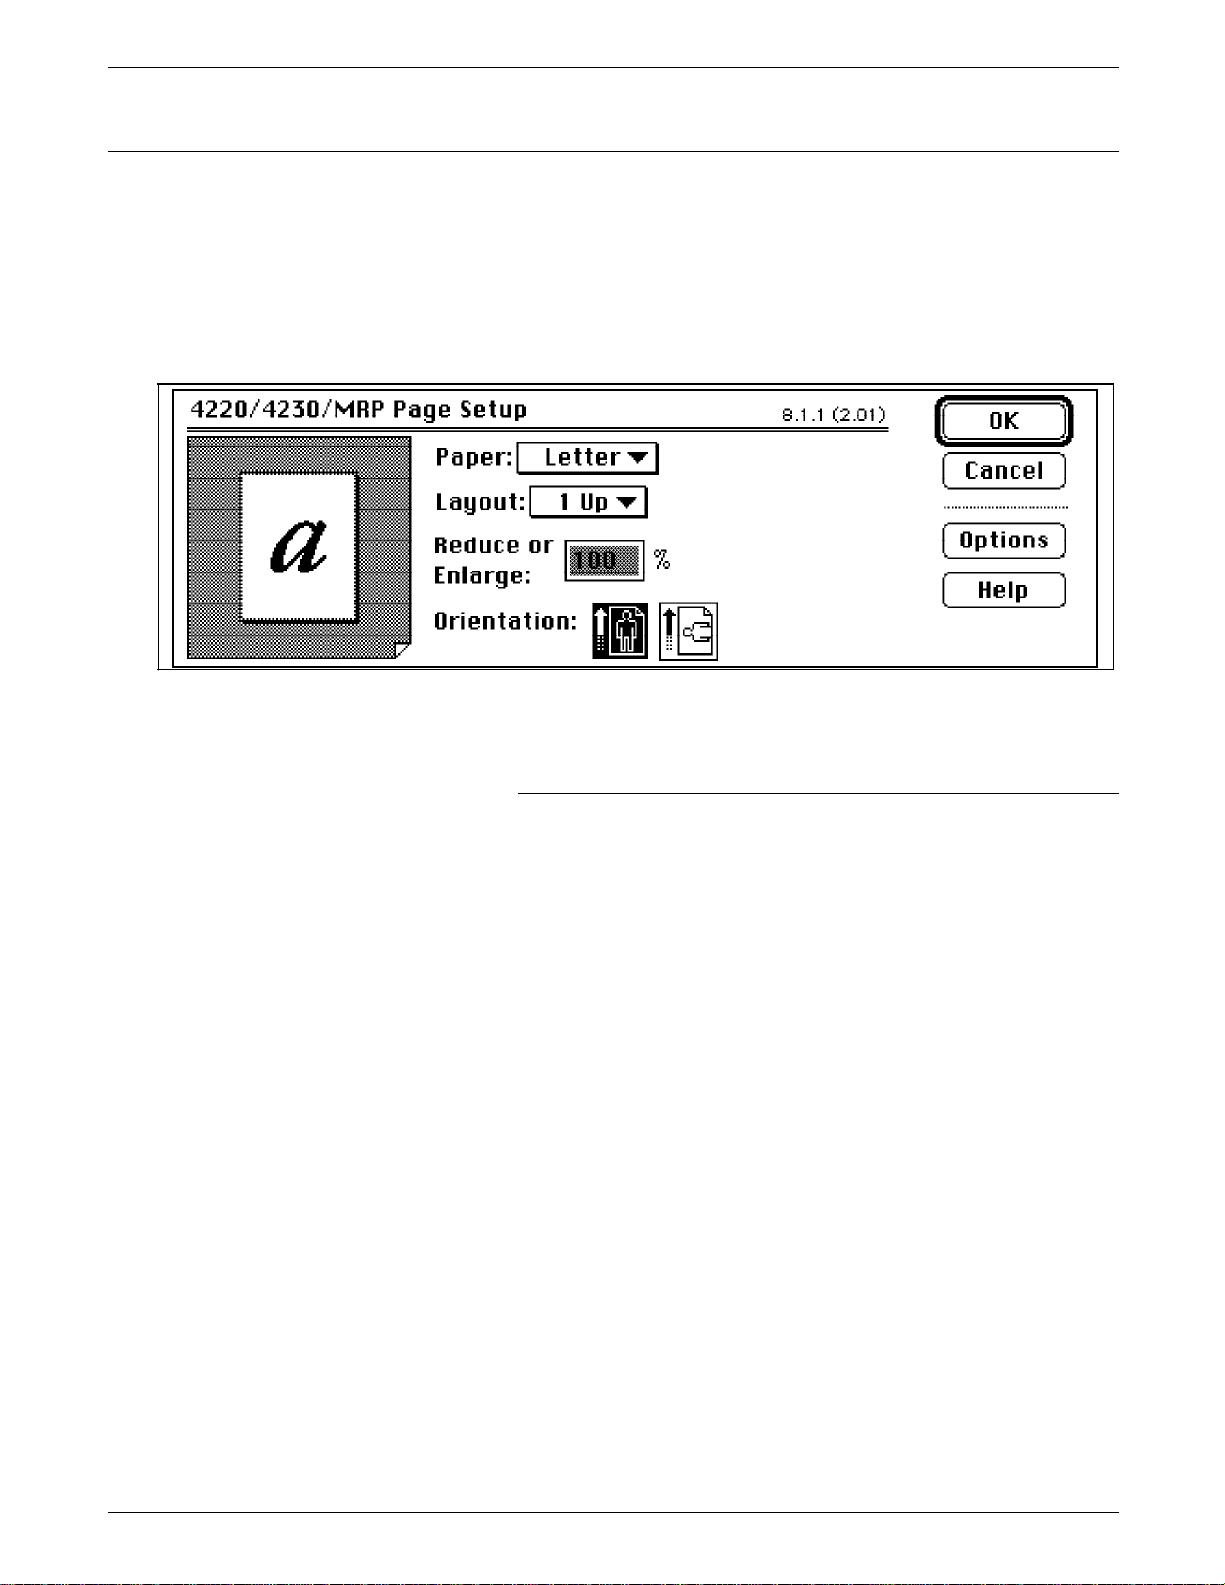
Layout You can select 1-up, 2-up, and 4-up options, as shown in figures
1-1 through 1-3.
Figure 1-1. Page Setup dialog box with page image, layout
and orientation example (portrait, 1-up)
Figure 1-2. Page layout and orientation example (portrait,
2-up)
Figure 1-3. Page layout and orientation example (portrait,
4-up)
Reduce or enlarge Scale factors range from 25 percent to 400 percent. Default
scaling is 100 percent.
XEROX MRP FAMILY APPLETALK INTERFACE OPERATOR GUIDE 1-9

INSTALLING THE XEROX APPLETALK OPTION
Orientation Select from portrait and landscape.
Options Other layout and formatting features include the following:
Paper The available paper sizes are the same as defined in the Xerox
PPD. These include the 16 standard Xerox sizes in the smaller
imageable area set, and the 16 standard Xerox sizes in the larger
imageable area set. When the Engine Margin in the PPD
configuration is set to two millimetres (the default), the smaller
size set is used. When the Engine Margin is set to zero
millimetres (mm), the larger size set is used. The larger sizes
produce the “Edge to Edge” imageable areas, while the smaller
sizes leave nonimageable areas of two mm along the edges.
N Note: The printer’s internal configuration for edge deletion
(2mm or 0mm) should map the driver selection. Any edge
deletion change on the printer should be done only by your
service representative.
If the printer driver is built from LaserWriter v7.x or earlier, you
can select only 6 LaserWriter sizes and 16 Xerox sizes (marked by
an *). The Xerox sizes are equivalent to the larger imageable
areas built for version 8.1.1.
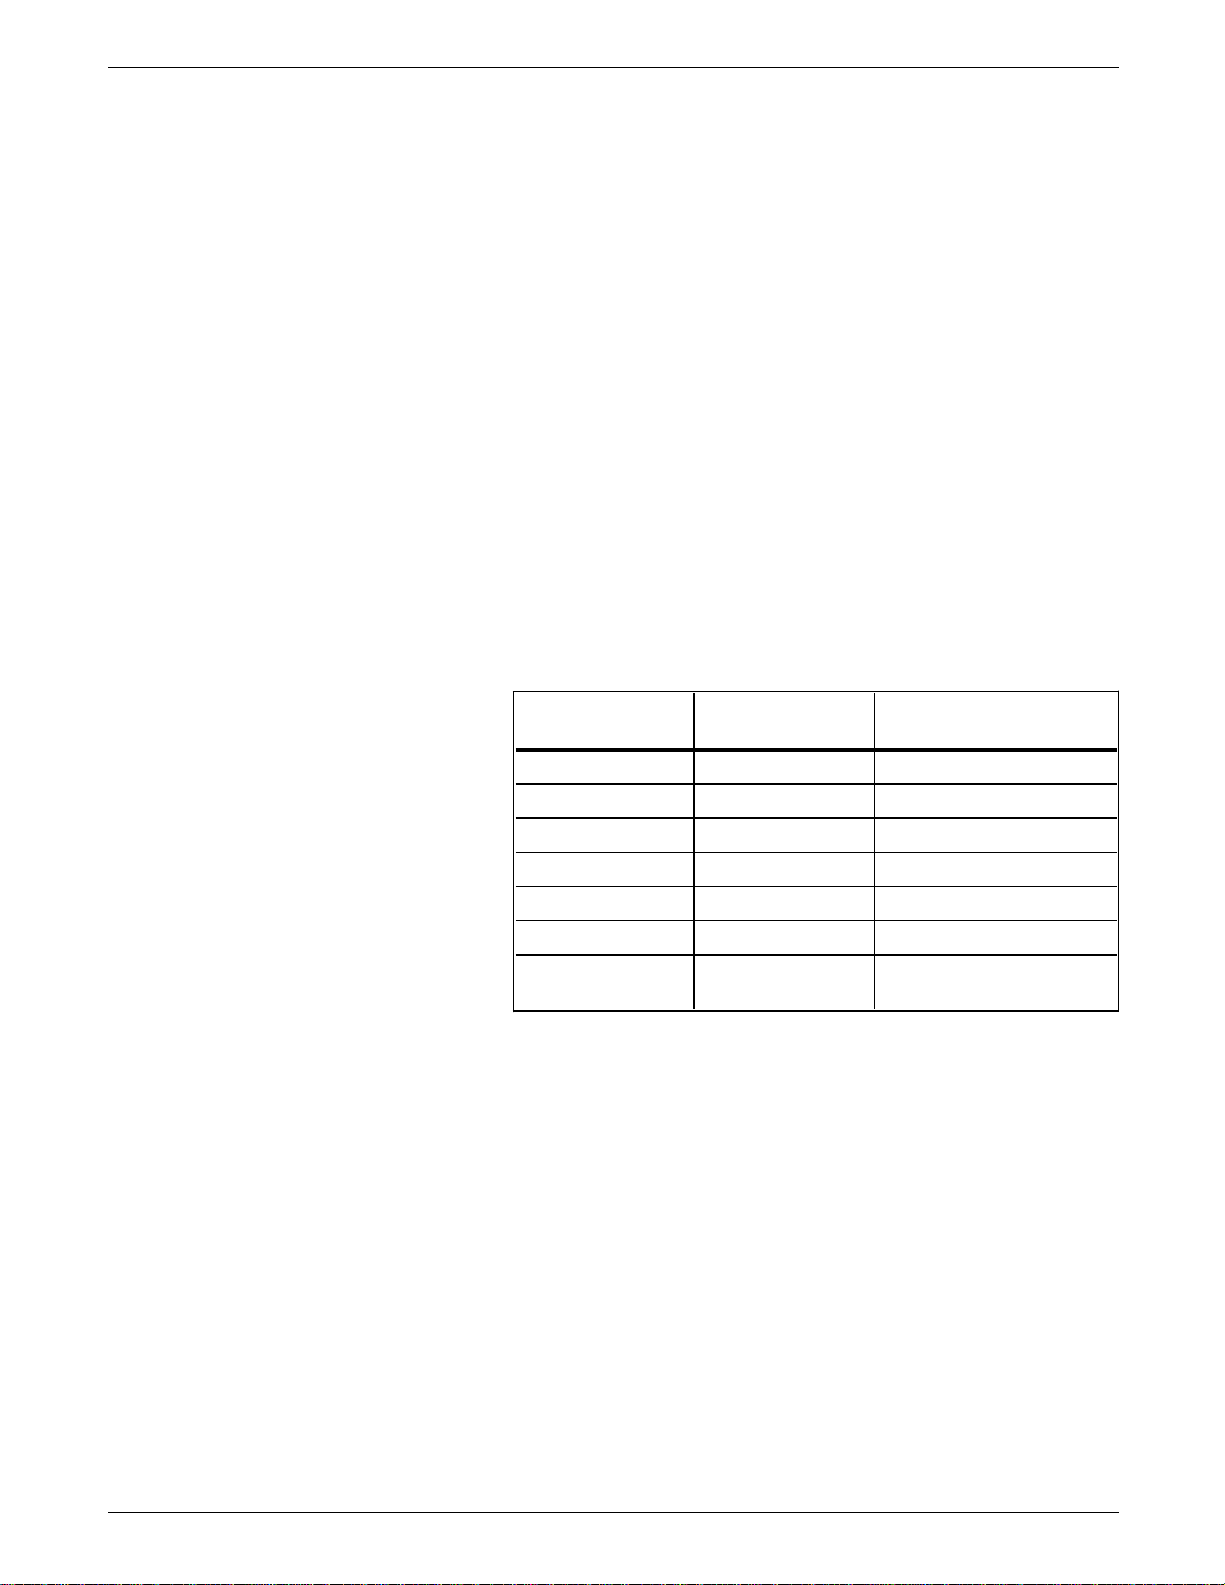
• Visual effects
— Flip Horizontal
— Flip Vertical
— Invert Image.
• Printer options:
— Substitute Fonts
— Smooth Text
— Smooth Graphics
— Precision Bitmap Alignment
— Larger Print Areas
— Unlimited Downloadable Fonts in a Document.
These features are shown in figure 1-4.
1-10 XEROX MRP FAMILY APPLETALK INTERFACE OPERATOR GUIDE
INSTALLING THE XEROX APPLETALK OPTION
Figure 1-4. Page Setup Options dialog box
Print options
The selections in the Print dialog box define how the job should
print, as shown in figure 1-5. You can select one of the
following:
• Standard options used by PSPrinter or LaserWriter 8
• Xerox printer custom print options.
Figure 1-5. Example Print dialog box
Standard options are used when the Custom checkbox is not
selected. Click the [Options] button to display additional
standard features. These features include the standard Print
dialog box functions, and the options provided by the selected
PPD, as shown in figure 1-6. Refer to the online help facility
when selecting the standard features.
XEROX MRP FAMILY APPLETALK INTERFACE OPERATOR GUIDE 1-11

INSTALLING THE XEROX APPLETALK OPTION
Figure 1-6. Example Print Options dialog box
The custom print options provide more flexible input/output
manipulation, selection by size, custom size configuration, saving
and reuse of setup files, and so on. Click the Custom box to the
right of Paper Source in the Print dialog box to disable the
standard Paper Source selections and enable the custom print
options, as shown in figure 1-7. Then click the [Setup] button to
display the Custom Print Options dialog box, as shown in figure
1-8.
You can select the following features:
• Multiple Input and Single Output
• Paper Source selectable by Tray or By Size
• File Settings
• Duplex Options
• Line Edge Enhancement
• Tray 5 Page Size.
Figure 1-7. Selecting Custom print options
1-12 XEROX MRP FAMILY APPLETALK INTERFACE OPERATOR GUIDE

INSTALLING THE XEROX APPLETALK OPTION
Figure 1-8. Custom Print Options dialog box
Configuration dialog
Refer to the “Selecting and using the Xerox driver” chapter for a
description of each function.
When switching from standard to custom print options, make
sure that the paper source default is Auto Select. The custom
checkbox is not selectable when one of Trays 1 through 5 is
selected.
N Note: You should leave all of the standard PPD features in the
Print Options dialog box as “Printer’s default” when you are
using Xerox custom print options.
Refer to the “Selecting and using the Xerox driver” chapter for
configuration details.
XEROX MRP FAMILY APPLETALK INTERFACE OPERATOR GUIDE 1-13


Selecting a printer
2. Selecting and using the
Xerox driver
This chapter describes selecting a printer, and the required
parameters for printing a document.
You must select the Xerox printer icon in the Chooser panel
before you send a document to the printer for the first time.
Follow these steps to select the Xerox printer:
1. Select the Chooser from the Apple menu.
2. Click on the Xerox printer icon in the Chooser panel.
N Note: You may have to scroll down to see this icon, since
printer icons are listed alphabetically in the Chooser.
Renaming a printer
Printing documents
3. If you see a list of AppleTalk zones, click on the zone where
the Xerox printer is located.
4. Select the appropriate printer by clicking on its name.
5. If you see a message stating that AppleTalk is required, click
[OK], then click the [Active] button in the Chooser.
This ensures that AppleTalk is active, so that the driver can
identify the printer.
6. Close the Chooser by clicking the small box in the upper left
corner of the window.
The factory default is the name of the printer, for example,
“Xerox MRP.” You should rename your printer to avoid having
printers with the same name on the AppleTalk network. You can
use Macintosh utilities to rename a printer, for example, The
Namer or the LaserWriter Utility.
Once the Xerox Driver Builder (Xerox driver) is built, you can
open a document in an application and select the Xerox page
setup and print options. You can also select these features from
the Finder by choosing Print Window, Print Desktop, or Print.
Refer to the Macintosh User’s Guide for detailed instructions on
printing.
XEROX MRP FAMILY APPLETALK INTERFACE OPERATOR GUIDE 2-1
SELECTING AND USING THE XEROX DRIVER
Page Setup
Before you print a job, you can access the Page Setup dialog box
in your application software and set up the paper size formats
and page orientation and layout of your document.
To access the Page Setup dialog box, select Page Setup from the
File menu. The Page Setup dialog box for your printer appears,
as shown in figure 2-1.
Figure 2-1. Printer dialog box example
To exit this dialog box without saving your selections, click
[Cancel]. To save all selections, click [OK].
Page Size Setup
Your printer Page Setup options are the same as in the
LaserWriter Page Setup. However, if you are using a Xerox MRP,
the paper size selection in this dialog is unique. Six of the
LaserWriter sizes are selectable. This allows documents created
by the LaserWriter driver to be ported easily.
All of the standard MRP paper sizes shown in the Paper Size popup menu are identified by asterisks to the left of the paper size
descriptions. Each MRP paper size provides a larger printable
area than the corresponding LaserWriter sizes. Sixteen MRP sizes
(including envelopes) are available from the menu. Table 2-1
shows the exact dimensions for each size.
When custom sizes are defined for the print job, select the next
larger available size format in Page Setup to maximize the page
length (usually defined by page breaks in an application
software). For more information, refer to the section “Bringing
up the Configuration dialog box,” later in this chapter.
When setting up envelopes, use one of the following options:
• When printing envelopes alone—Select landscape and the
required envelope size to create the exact printable area and
page break suitable for the specified envelope size.
• When printing letters and envelopes in the same job—Select
portrait and a paper size larger than the required envelope
(such as letter size) to provide the maximum printable area
and page length for the letter. At the same time, select Tray
5 Page Size from the print dialog box for the required
envelope size, as shown in figure 2-4.
2-2 XEROX MRP FAMILY APPLETALK INTERFACE OPERATOR GUIDE

SELECTING AND USING THE XEROX DRIVER
N Note: In both cases, efficient envelope printing requires the
correct printer setup. To guarantee the correct envelope size
and tray selection, and avoid any unnecessary jamming that may
be caused by using the wrong media in tray 5, use the control
panel to enable the Paper Loading Pause option at the Printer
Setup menu. This displays an operator message in case of media
mismatch, and you are prompted to feed tray 5 with the right
size. When the Paper Loading Pause is disabled (the default),
enter tray 5 input as the correct envelope size at the control
panel.
Refer to the “Envelopes” appendix for helpful hints on setting up
and printing envelope sizes.
Table 2-1. Xerox printer standard and custom page sizes
Page name
Page size in
inches
Page size in
millimetres
Postcard 3.5 x 5.5 88.9 x 139.7
Statement 5.5 x 8.5 139.7 x 215.9
Executive/
7.25 x 10.5 184.2 x 266.7
Monarch
Letter 8.5 x 11 215.9 x 279.4
Legal 8.5 x 14 215.9 x 355.6
Ledger 11 x 17 279.4 x 431.8
A6 4.13 x 5.83 105 x 148
A5 5.83 x 8.27 148 x 210
ISO B5 6.93 x 9.84 176 x 250
A4 8.27 x 11.69 210 x 297
Folio 8.5 x 13 215.9 x 330.2
A3 11.69 x 16.54 297 x 420
Custom paper 3.25 x 4.5 to
11.70 x 17
Envelope
3.875 x 7.5 98.4 x 190.5
82.6 x 114.3 to
297.2 x 431.8
Monarch
Envelope
4.125 x 9.5 104.8 x 241.3
Commercial 10
Envelope DL 4.33 x 8.66 110 x 220
Envelope C5 6.38 x 9.02 162 x 229
Custom envelope 3.85 x 3.85 to
7.00 x 10.20
XEROX MRP FAMILY APPLETALK INTERFACE OPERATOR GUIDE 2-3
97.8 x 97.8 to
177.8 x 259.8

SELECTING AND USING THE XEROX DRIVER
Page Setup options
Click on [Options] in the Page Setup dialog box to display the
Options menu, as shown in figure 2-2. Check the appropriate
number of items and click [OK] to save the selections.
Figure 2-2. Page Setup Options dialog box
Printing
You can access the Print dialog from within any application
software. The selections you make in this dialog define how the
job will print. General features are provided in the top level
dialog box, as shown in figure 2-3. When you use the MRP print
options, always select Custom as the paper source.
N Note: If you are using printer driver v7.2, a Custom checkbox is
shown instead of a Custom radio button, as shown in figure 2-4.
To display the Print dialog box, select Print from the File menu.
When the Print dialog box appears, make sure that all required
options for the document are selected.
2-4 XEROX MRP FAMILY APPLETALK INTERFACE OPERATOR GUIDE

SELECTING AND USING THE XEROX DRIVER
Figure 2-3. Print dialog box example
N Note: Some software application programs add their own special
features to the Print dialog box.
Figure 2-4. Print dialog box example
Print options
Click on [Setup] in the Print dialog box to display the Options
dialog box, as shown in figure 2-5. You can do the following
from the Options dialog box:
• Select multiple input trays and one output tray
— Select input paper trays for different portions of the job
— Select one output tray for the job
— Specify up to four tray changes, which may optionally
repeat
— Paper change is determined by tray selection or paper
size
• Select the setup options
• Specify the duplex option
• Specify the line edge enhancement
• Set tray 5 size options
• Display the Configuration menu
XEROX MRP FAMILY APPLETALK INTERFACE OPERATOR GUIDE 2-5

SELECTING AND USING THE XEROX DRIVER
Figure 2-5. Options dialog box example
Selecting multiple input trays and one output tray
You use the Options menu to set the number of pages to be
printed from each input tray. When the insertion point is in a
page count field, the picture of the printer at the top of the
menu shows the tray selected for that field.
For example, you can edit the page count fields to print the first
four pages from tray 1, the next three pages from tray 2, and the
final page (an envelope) from tray 5.
You can select both input trays and output trays by clicking on
any of the trays in the picture of the printer. You can select
multiple input trays for the same job, but only one output
destination is allowed for the job. The text in the box to the
right of the page count field reflects your input selection.
Clicking any of the input selection boxes displays a pop-up
menu, from which you can select the input source by tray or by
size. The selectable trays are tray 1 through tray 5. The
selectable sizes include the 16 standard sizes and the four
custom sizes, as shown in table 2-1. The four custom sizes,
defined in the configuration menu, are listed at the end of the
input source pop-up menu. These are equivalent to the “other”
paper and envelope sizes entered at the control panel for trays 1,
2, 3, and 5.
Page changes not marked with an “X” are inactive; clicking on
their page count field does nothing. Press the Tab key to skip
them.
2-6 XEROX MRP FAMILY APPLETALK INTERFACE OPERATOR GUIDE
SELECTING AND USING THE XEROX DRIVER
You can specify up to four paper changes, which may repeat if
you select the Repeat radio button (optional). When you select
“Print remainder from last group checked,” the final page count
changes to 9999.
Some conflicts may arise when selecting paper trays and sizes.
However, all conflicting selections are corrected by the driver
before a print job is sent.
Consider the following when selecting input trays and an output
tray:
• Paper feed capabilities can be restricted by paper size. Refer
to tables 2-3 through 2-5 for details.
• Tray 5 can only output to the face-up tray. Any illegal output
selection for tray 5 input defaults to the face-up tray.
• Table 2-2 lists the page size restrictions for the high-capacity
stacker. When the high-capacity stacker is selected, the job
can output to this location only when all sizes selected in the
same job belong to size group A. If any paper size in the job
belongs to size group B and no group C size is selected, the
entire job is redirected to the top tray. If the job contains
any size that falls in the group C category, the entire job is
redirected to the face-up tray.
Table 2-2. High capacity stacker size restrictions
Group A Group B Group C
Letter Folio Postcard
A4 Legal A6
A5 A3 Envelope Monarch
Executive Ledger Envelope Com 10
ISO B5 Envelope DL
Statement Envelope C5
*Custom sizes which
have to use tray 5
XEROX MRP FAMILY APPLETALK INTERFACE OPERATOR GUIDE 2-7

SELECTING AND USING THE XEROX DRIVER
Table 2-3. Paper output destinations
*SEF = Short-edge feed LEF = Long-edge feed HCS = High-capacity stacker
SELECTING AND USING THE XEROX DRIVER
Table 2-4. Paper input sources
Paper size in inches Trays 1 to 3 Tray 4 (HCF)* Tray 5 (MSB)*
Statement 5.5 x 8.5 X X
Letter 8.5 x 11 X X X
Executive 7.25 x 10.5 X X
Legal 8.5 x 14 X X X
Ledger 11 x 17 X X
A5 5.83 x 8.27 X X
A4 8.27 x 11.69 X X X
ISO B5 6.93 x 9.84 X X
Folio 8.5 x 13 X X
A3 11.69 x 16.54 X X
Postcard 3.5 x 5.5 X
A6 Postcard 4.13 x 5.83 X
Custom paper size X X
Envelope/Custom envelope size X
*HCF = High capacity feeder MSB = Multi-sheet bypass tray
N Note: Paper from tray 5 cannot be fed through the duplex path
and can only be output to the face-up tray.
XEROX MRP FAMILY APPLETALK INTERFACE OPERATOR GUIDE 2-9

SELECTING AND USING THE XEROX DRIVER
Table 2-5. Input source capabilities
Input supply Capacity Paper size range in inches Paper weight range
Tray 1 250 sheets 5.35 min. short edge
5.95 min. long edge
11. 70 max. short edge
17.00 max. long edge
Tray 2 250 sheets 5.35 min. short edge
5.95 min. long edge
11. 70 max. short edge
17.00 max. long edge
Tray 3 250 sheets 5.35 min. short edge
5.95 min. long edge
11. 70 max. short edge
17.00 max. long edge
Tray 5 50 sheets
paper
3.25 min. short edge
4.50 min. long edge
11. 70 max. short edge
17.00 max. long edge
No duplex from this tray
Tray 5 50 mm
envelope
stack
3.85 min. short edge
3,85 min. long edge
7. 00 max. short edge
10.20 max. long edge
Tray 4
(option)
1,000 sheets 8.5 x 11 long edge feed
8.27 x 11.69 long edge feed
8.5 x 14 short edge feed
16 pound/60 gsm to 24 pound/90 gsm
16 pound/60 gsm to 24 pound/90 gsm
16 pound/60 gsm to 24 pound/90 gsm
16 pound/60 gsm to 110 pound Ind/
200 gsm and special materials
16 pound/60 gsm to 110 pound Ind/
200 gsm and special materials
16 pound/60 gsm to 24 pound/90 gsm
N Note: Capacity is based on Baseline Papers: 4024 DP 20 pound
bond (U.S. and Canada)/A4 80 gsm (international).
Selecting the setup options
The Settings pop-up menu contains the following options:
• Save Setup—Displays the standard file saving dialog, showing
only the previously-saved setups, and allows you to save the
current setup. If you save the setup to the same name as an
existing setup, you are prompted to replace the existing
setup.
• Use A Setup—Displays the standard file opening dialog,
showing only the previously-saved setups. Selecting a setup
causes the current settings to reflect those of the selected
setup.
• Delete Setup—Lets you select a previously-saved setup and
delete it.
2-10 XEROX MRP FAMILY APPLETALK INTERFACE OPERATOR GUIDE

SELECTING AND USING THE XEROX DRIVER
Selecting the duplex option
The duplex selection dialog box provides a pop-up menu for
duplex options, which include the following:
• Regular Duplex—Produces output that is suitable for binding
on the left or right.
• Tumble Duplex—Produces output that is suitable for binding
on the top or bottom.
• Duplex Disabled—Prints on only one side of a physical page.
Tray 5 does not support duplex printing. When selecting duplex
and tray 5, the duplex selection changes to Duplex Disabled.
When selecting any size with a slow scan dimension shorter than
the duplex slow scan limit (151 mm), duplex selections default to
Duplex Disabled.
N Note: Slow scan is the paper feed movement from right to left.
Slow scan dimension can be long edge or short edge.
Selecting the line edge enhancement
The line edge enhancement improves the document quality
through the resizing and repositioning of pixels, which smoothes
the jagged edges of text and graphics. The following options are
available:
• Dark
• Medium
• Light
• Off
Tray 5 size setup
Tray 5 page size options provide the correct format for the job
printed from tray 5. The available sizes in the pop-up menu
include all the standard sizes, equivalent to those marked by
asterisks in the Page Setup dialog, and four custom sizes defined
in the Configuration dialog.
When printing postcard, A6, or any of the envelope sizes, make
sure you set up tray 5 to the required size. This is because tray 5
is the only input source available for these paper and envelope
sizes.
N Note: To efficiently use tray 5 for envelopes, A6, and postcard
sizes, use the printer control panel to enable the Paper Loading
Pause option at the Printer Setup menu. When Paper Loading
Pause is disabled (the default), and tray 5 is not set up to the
required size, you are not prompted if a size mismatch occurs.
The printer may draw any paper available in tray 5 when tray 5 is
selected, or search for the closest size (usually the next larger
available size) in some other tray when the requested size is not
found. If Paper Loading Pause cannot be enabled for system
administration, make sure that the requested size is selected at
the control panel as tray 5 input.
XEROX MRP FAMILY APPLETALK INTERFACE OPERATOR GUIDE 2-11

SELECTING AND USING THE XEROX DRIVER
Displaying the Configuration dialog box
Click on the [Configure] button to display the Configuration
dialog box, as shown in figure 2-6. This dialog box provides
options that are not configured with the Setup dialog box. You
can define four custom page and envelope sizes. If you make
your selection and click on the [OK] button and the selected
page size is larger or smaller than that allowed, the closest
allowable size is substituted. The following ranges are available:
• For paper: 3.25 x 4.5 inches to 11.7 x 17 inches (82 x 114
mm to 297.2 x 431.8 mm)
• For envelopes: 3.85 x 3.85 inches to 7.0 x 10.2 inches (97.8
x 97.8 mm to 177.8 x 259.8 mm)
• For custom paper sizes that are supported by tray 5, the
following restrictions also apply:
— Paper narrower than 4.5 inches in the short dimension
cannot be longer than 8.5 inches.
— Paper between 4.5 inches and 5.35 inches in the short
dimension cannot be longer than 11.7 inches.
N Note: When a paper size larger than 11 x 17 inches is entered,
for example, 11.7 x 17 inches, the only available input source is
tray 5, since sizes larger than 11 x 17 inches do not physically fit
into trays 1 through 3. Duplex selection for these sizes is also
disabled because tray 5 does not support duplex.
Page size entries in both inches and millimetres are accepted.
Select the inches or mm radio button to set your preference.
Selecting tray 4 (high-capacity feeder) and the high-capacity
stacker determines the availability of either or both of these
features in the Options dialog box. When you turn on tray 4 or
the high-capacity stacker, the status remains across jobs and
upon system restart until you turn the option off.
When tray 4 is enabled but is not physically installed, the
selected pages print from tray 1.
When the high-capacity stacker is enabled but is not installed,
the output is redirected to the top tray.
2-12 XEROX MRP FAMILY APPLETALK INTERFACE OPERATOR GUIDE

SELECTING AND USING THE XEROX DRIVER
Figure 2-6. Configuration dialog box example
XEROX MRP FAMILY APPLETALK INTERFACE OPERATOR GUIDE 2-13


Available fonts
3. Using the Font Downloader
This chapter contains information about using the Font
Downloader to download fonts.
The following fonts are internal:
• AvantGarde-Book, AvantGarde-BookOblique, AvantGarde-
Demi, AvantGarde-DemiOblique
• Bookman-Demi, Bookman-DemiItalic, Bookman-Light,
Bookman-LightItalic
• Courier, Courier-Bold, Courier-Oblique, Courier-BoldOblique
• Helvetica, Helvetica-Bold, Helvetica-Oblique, Helvetica-
BoldOblique
• Helvetica-Narrow, Helvetica-Narrow-Bold, Helvetica-Narrow-
Oblique, Helvetica-Narrow-BoldOblique
• NewCenturySchlbk-Roman, NewCenturySchlbk-Bold,
NewCenturySchlbk-Italic, NewCenturySchlbk-BoldItalic
• Palatino-Roman, Palatino-Bold, Palatino-Italic, Palatino-
BoldItalic
• Symbol
• Times-Roman, Times-Bold, Times-Italic, Times-BoldItalic
• ZapfChancery-MediumItalic
• ZapfDingbats
To use outline fonts that are not internal, you must download the
fonts to the printer you have selected from the Chooser.
Your system usually automatically transfers fonts to the printer
each time you print. If you want to speed up the printing
process, you can download fonts manually to one of the
following:
• The optional high-capacity hard drive (permanent until
deleted)
• RAM (permanent until the printer is switched off)
• The optional programmable font module (permanent until
cleared or erased)
You can download as many fonts as the printer memory,
programmable font module, or hard drive space allows.
If you need to change your printer password to download fonts
manually, refer to the “Changing passwords” section, later in this
chapter.
XEROX MRP FAMILY APPLETALK INTERFACE OPERATOR GUIDE 3-1
USING THE FONT DOWNLOADER
Downloading fonts
Once you have installed the files from the Xerox Support
Software for Macintosh diskettes to your system, additional
selections are available on the dialog boxes in the Font
Downloader program. For example, to display a list of storage
devices for your printer, click on Device. Devices that are not
installed are not listed in the pop-up menu.
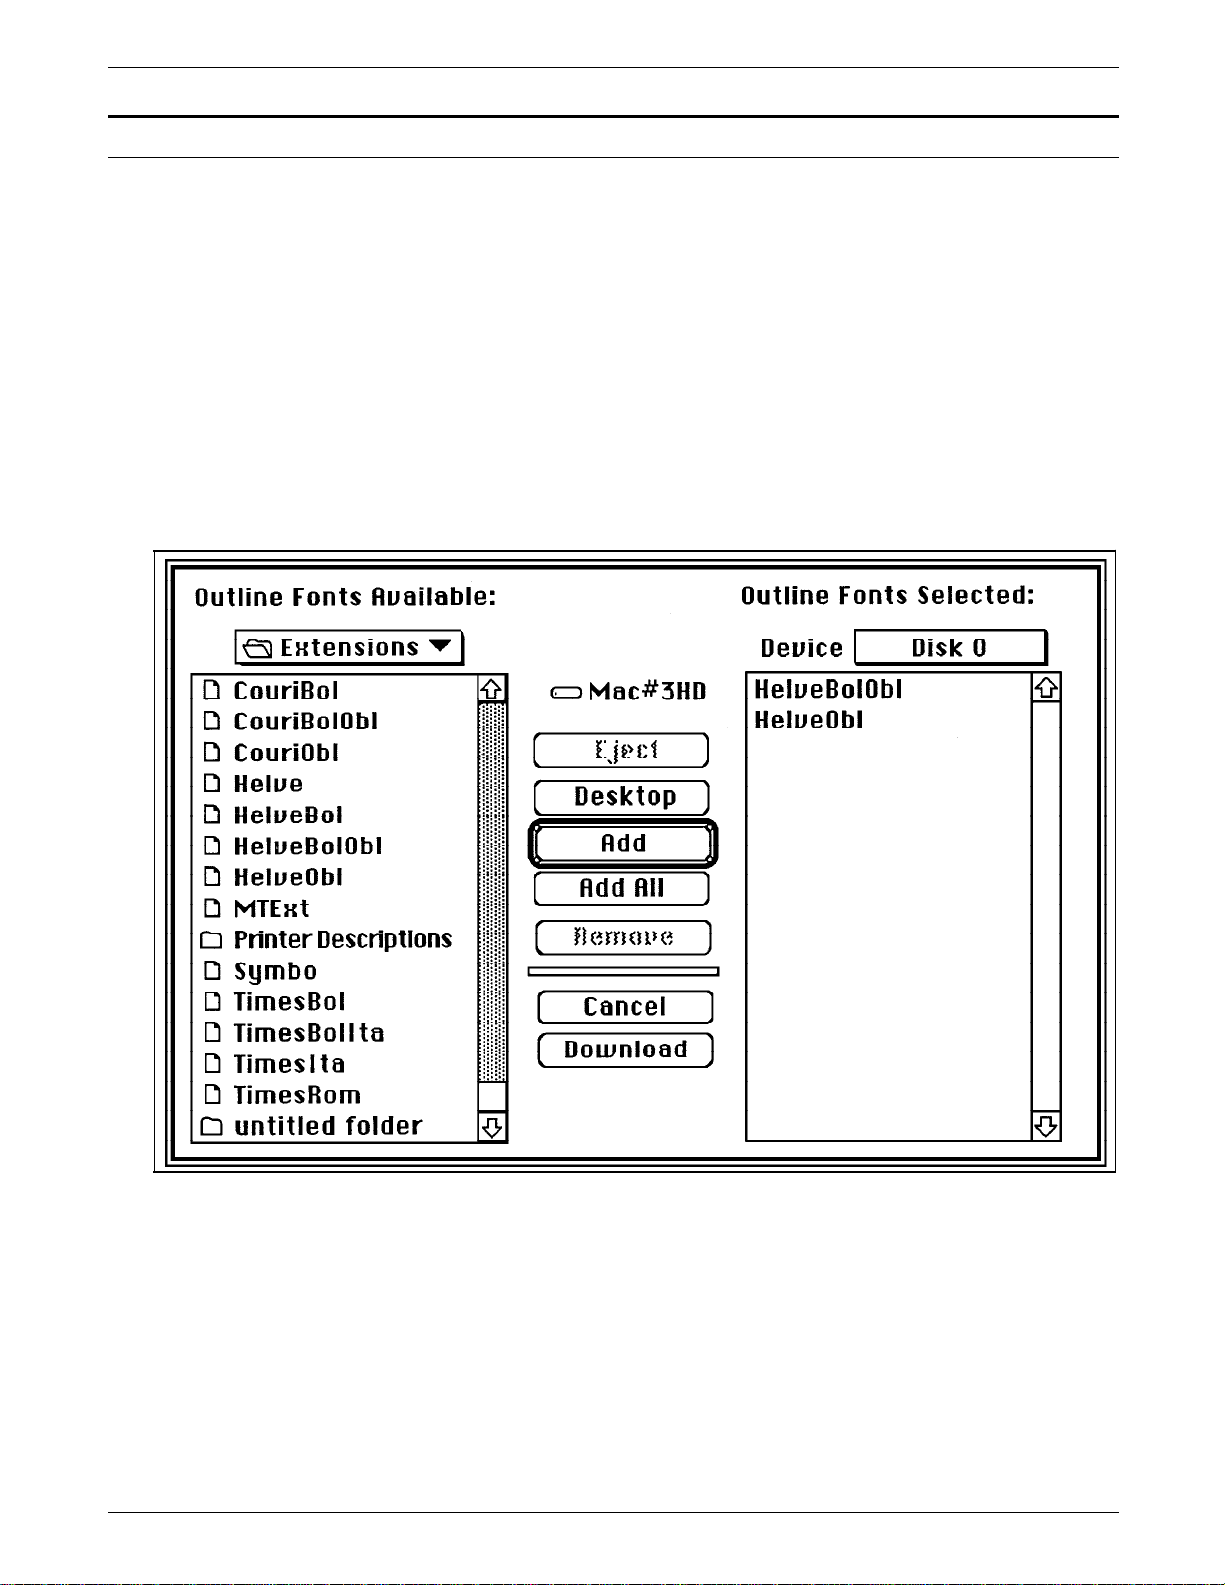
Follow these steps to download fonts to a printer storage device:
1. Open the Font Downloader folder.
2. Double-click on the Font Downloader Application icon to
open the application.
3. From the File menu, select Download Font.
A dialog box appears. If you have font folders in the current
folder, one or more font folders display in the left scroll box.
If your font folders are located elsewhere, open the folder
where your fonts are stored by clicking on the correct folder
in the folder pop-up list box.
4. Open the font folder that contains the fonts.
5. Select a font to download, and click the [Add] button.
To select more fonts, repeat steps 4 and 5. To select all the
font files in the folder, click the [Add All] button. The
selected fonts appear in the right scroll box.
3-2 XEROX MRP FAMILY APPLETALK INTERFACE OPERATOR GUIDE

USING THE FONT DOWNLOADER
N Note: To remove a font from the right scroll box, click the
font (or hold down the Shift key and click to select several
fonts), and click the [Remove] button.
6. Select an available storage device. The Device pop-up menu
above the right scroll box lists all available printer storage
devices.
7. To download the fonts manually to a storage device, select
one of the following:
• Memory—Downloads to RAM.
• Cartridge 1—Downloads to the programmable font
module.
• Disk 0—Downloads to the hard drive.
8. Click the [Download] button.
A message appears indicating that the fonts are being
downloaded to the printer.
9. Select Quit from the File menu when the download is
complete.
Changing passwords
When your network administrator changes your network printer
password, the Font Downloader cannot download fonts or
PostScript files to that printer. If this happens, you need to use
the Use Different Password command to tell the Font
Downloader the new password.
Follow these steps to enter your printer password:
1. Open the Font Downloader.
2. Choose Use Different Password from the Special menu.
A dialog box displays the function of the printer password
and refers you to the PostScript Language Reference Manual
for details.
3. Click [OK].
The New Password dialog box appears.
4. Enter the new password in the text box and click [OK].
XEROX MRP FAMILY APPLETALK INTERFACE OPERATOR GUIDE 3-3

USING THE FONT DOWNLOADER
Managing fonts on your printer
Listing downloaded fonts
The Font Downloader provides printer management features that
allow you to perform the following tasks:
• List downloaded fonts
• Delete downloaded fonts
• Check the printer status
• Download PostScript programs to the printer
Follow these steps to view the fonts that were downloaded to
your printer before downloading additional fonts:
1. Open the Font Downloader.
2. Select Printer Font Directory from the Special menu.
The Printer Font Folder dialog box appears with the [Screen
Radio] button selected.
3. To view the fonts on-screen, click [OK]. To print the list,
click the Printer radio button, then click [OK].
Deleting downloaded fonts
There are three methods of deleting (erasing) downloaded fonts.
Follow the procedure that is appropriate for your printer
configuration.
Fonts stored in printer memory (RAM)
Do one of the following to delete all of the fonts stored in RAM:
• Restart the printer by turning the printer power switch off,
then on again.
• Select Restart Printer from the Special menu in the Font
Downloader.
Fonts stored on the printer hard drive
Follow these steps to delete fonts from the printer hard drive:
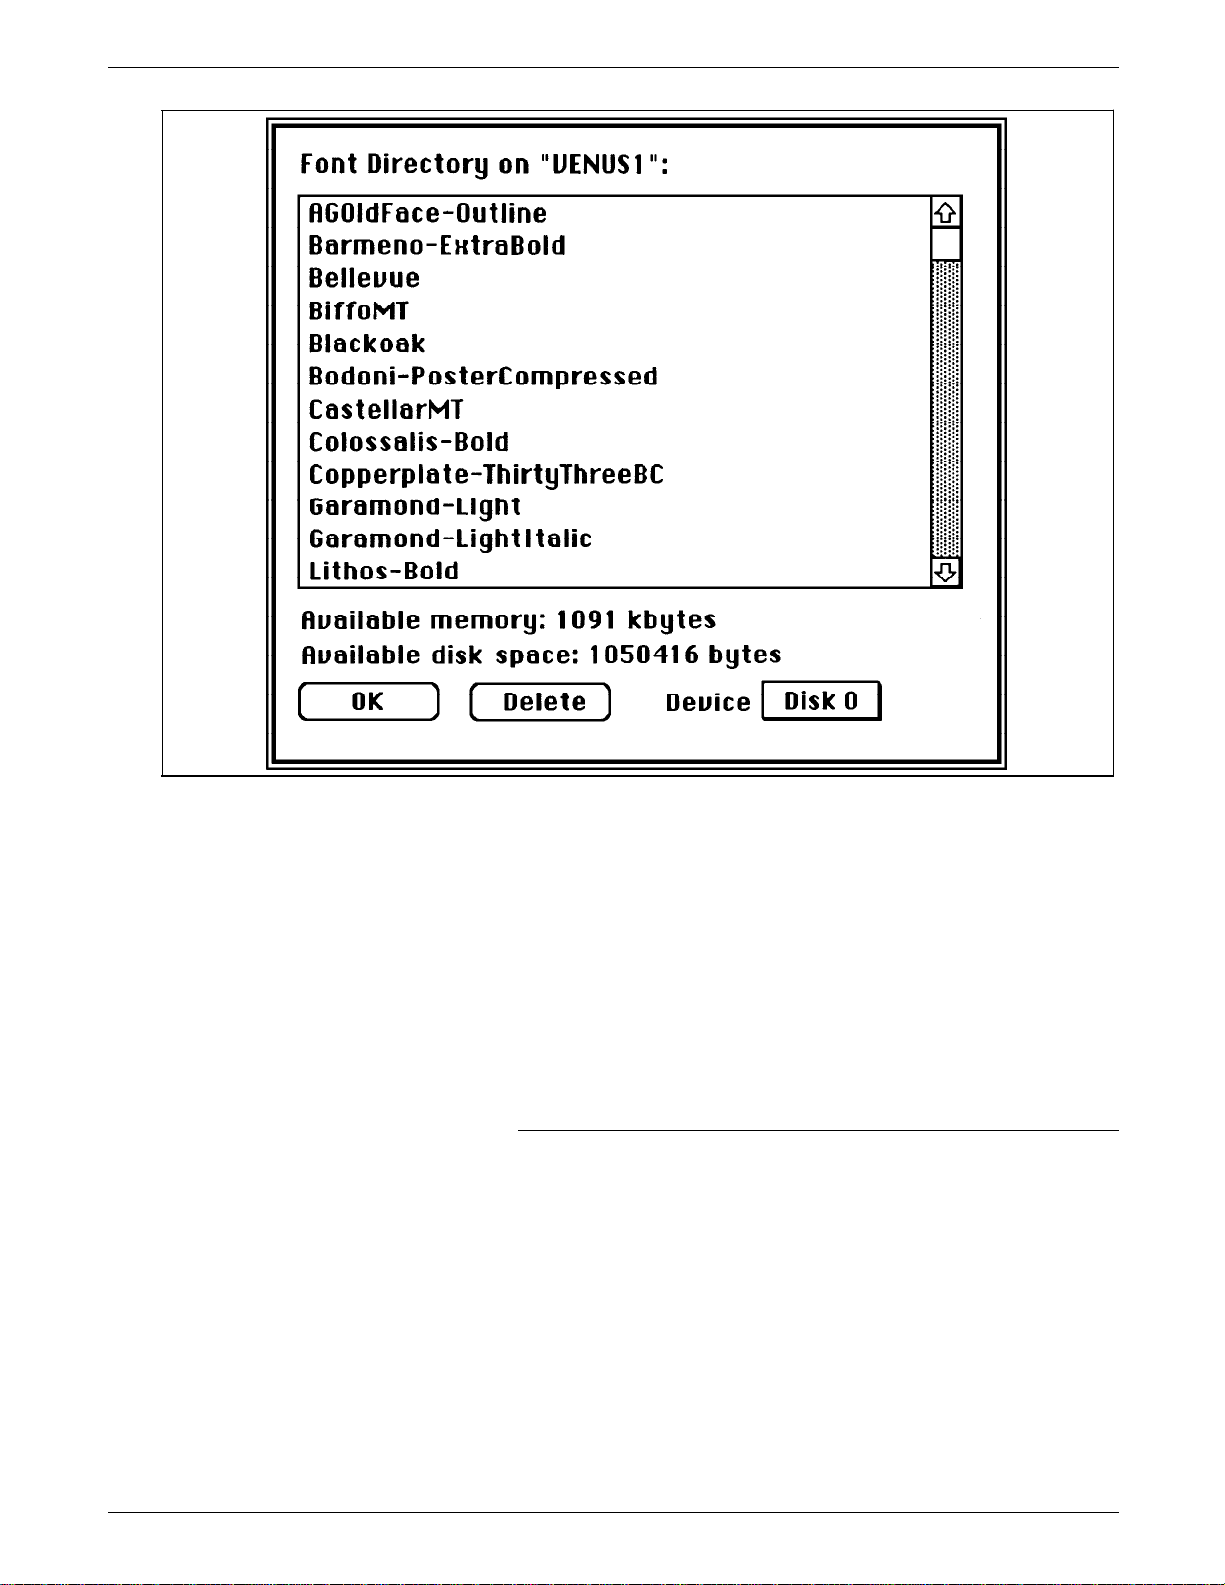
1. Open the Font Downloader.
2. Select Printer Font Directory from the Special menu.
3. Click [OK] to display the Font Directory dialog box.
The scroll box displays all the fonts installed in the currently
selected printer device.
3-4 XEROX MRP FAMILY APPLETALK INTERFACE OPERATOR GUIDE
USING THE FONT DOWNLOADER
4. Select Disk 0 from the device pop-up menu, if it is not the
default selection.
The amount of available RAM and hard drive space is
displayed below the scroll box in K-bytes.
5. Select the fonts you want to delete from the list in the scroll
box and click the [Delete] button.
N Note: To select multiple contiguous fonts, hold down the
Shift key and click. To select multiple non-contiguous fonts,
hold down the command key and click.
6. Click [OK] when you are finished.
Fonts stored on the programmable font module
You should not delete fonts from the programmable font
module. This removes access to the font file but does not
reclaim the memory space from the font module. When clearing
fonts in the font module, download the PostScript CLEAR PFM
file to reinitialize the font module and create a new file system.
N Note: Delete has no effect if fonts are not installed.
XEROX MRP FAMILY APPLETALK INTERFACE OPERATOR GUIDE 3-5

USING THE FONT DOWNLOADER
Checking the printer status
Clearing the font cache
Follow these steps to check the availability of the printer you are
using:
1. Select Printer Status from the Special menu in the Font
Downloader.
The Printer Status dialog box reports the printer status.
“Idle” indicates that the printer is available to print or accept
a new font. “Busy,” “Printing,” or “Initializing” indicates that
the printer is processing a job.
2. Click [OK] when you are done.
The font cache in the RAM stores the rasterized sizes. This
feature enables your document to be printed faster because it
does not need to recreate rasterized fonts. If too many fonts are
downloaded and the font cache becomes full, the older, leastused rasterized fonts are removed automatically.
Not enough space for the font cache affects your printer
performance. Your document may take an unusually long time
to print. To improve your printer performance, use the Clear
Font Cache command from the Special menu. Clearing the font
cache deletes all instances of previously cached fonts. This
results in the need to cache the font again, and invokes a printer
restart.
Downloading PostScript programs to the printer
The following PostScript programs can be downloaded to the
printer:
• A custom application or file
• A file that clears the programmable font module.
Downloading a PostScript file
You can use the Font Downloader application to download the
following to the interpreter for processing and printing:
• A custom application
• A file written in the PostScript language that contains
PostScript language fonts
You must download the outline fonts manually before you
download the PostScript language file. The PostScript language
file is saved as a text-only file before it is printed.
Clearing the programmable font module
Follow these steps to clear (erase) the programmable font
module in the printer:
1. Open the Font Downloader application.
2. Select Download PostScript File from the File menu.
3-6 XEROX MRP FAMILY APPLETALK INTERFACE OPERATOR GUIDE

The Download PostScript File dialog box lists the text files on
the current drive.
3. Select the CLEAR PFM file from the Font Downloader folder.
4. Click the [Download] button.
After a few minutes, a message displays indicating that the
file was downloaded successfully.
5. Click [OK].
6. Select Quit from the File menu.
AppleTalk Print Language setup for the Font Downloader
To use the Font Downloader on a Macintosh system, you need
to set the AppleTalk Print Language to PostScript mode
(AppleTalk) from the printer control panel. The Font Downloader
does not function correctly in any other setting, because this
utility sends PostScript queries to the printer and feedback is
returned only in the AppleTalk PostScript mode.
USING THE FONT DOWNLOADER
XEROX MRP FAMILY APPLETALK INTERFACE OPERATOR GUIDE 3-7


Printer Configuration Report
4. AppleTalk configuration
This chapter describes configuring the AppleTalk interface option.
You may want to print the Printer Configuration Report to verify
that the AppleTalk interface option is installed correctly.
The report contains the following information:
• Hardware Status—Displays the AppleTalk interface status.
• Printer Default Settings System Configuration—Displays
AppleTalk interface configuration settings.
Refer to the “Utilities menu” chapter in the Xerox MRP Family
System Administrator Guide for the procedures to print the
Printer Configuration Report.
Reading the Printer Configuration Report
The Printer Configuration Report provides information on the
hardware status and the default printer configuration settings for
the AppleTalk interface.
Hardware Status report
The Hardware Status section of the Printer Configuration Report
contains the following information for AppleTalk:
• Installed—The AppleTalk interface is installed and working
• Not Installed—The AppleTalk interface is not installed.
• Failed—The AppleTalk interface has failed.
System Configuration report
The System Configuration section of the Printer Configuration
Report contains the following default AppleTalk interface setup
settings:
• AppleTalk interface settings (if this interface is not installed,
properly.
“Not Installed” is reported and the following fields are blank):
— Interface enablement—Specifies if the AppleTalk interface
is enabled or disabled.
— Print language selection—Specifies the current print
language selection setting.
• Interface priority—Specifies if the interface priority is
sequential or priority, and the interface that is high priority:
XEROX MRP FAMILY APPLETALK INTERFACE OPERATOR GUIDE 4-1

APPLETALK CONFIGURATION
Troubleshooting
serial, parallel, AppleTalk, Token Ring, Ethernet, or MRP
interface.
• Interface lock—Specifies if the interface lock setting is
enabled or disabled.
• User access—Specifies if the user access is set to level 1
(access to print mode only, without password) or level 2
(access to all Main Menu options).
If the AppleTalk Interface appears as “Not Installed” on the
Hardware Status section of the Printer Configuration Report, the
board is not installed properly. Report the problem to your
service representative.
If the AppleTalk configuration settings listed on the Printer
Default Settings System Configuration section of the report do
not meet your requirements, refer to the “Configuring the
AppleTalk network interface at the printer control panel” section
of this document for information on how to change the default
settings.
Configuring the AppleTalk network interface at the printer control panel
This section contains the following information:
• System configuration menu map and AppleTalk interface
configuration item descriptions
• AppleTalk configuration examples.
For instructions on making menu selections, refer to the “Using
the control panel” chapter in the Xerox MRP Family System
Administrator Guide.
AppleTalk interface configuration
You configure the AppleTalk interface at the System
Configuration menu. The menu offers lower level menu
headings with associated headings and options that you use to
define network parameters, enable interfaces and printer
languages, and define other network configuration parameters.
The menu map shown in figure 4-1 uses these conventions:
• Headings and options are shown in the order in which they
appear when the printer is set to factory defaults.
Vertical arrows illustrate moves made with the Scroll
Previous/1 or Scroll Next/2 keys.
Horizontal arrows illustrate moves made with the Enter/L
key to a lower level heading or option.
An asterisk (*) after the menu option indicates that this setting is
the factory default. Factory default settings appear in bold italics
in this chapter.
4-2 XEROX MRP FAMILY APPLETALK INTERFACE OPERATOR GUIDE

Figure 4-1. System Configuration menu
APPLETALK CONFIGURATION
6. SYSTEM
CONFIGURATION
INTERFACE SETUP
SERIAL/ASYNCHRONOUS SETTINGS
USER ACCESS

APPLETALK CONFIGURATION
Interface Setup menu item descriptions
You use the Interface Setup menu to configure the AppleTalk
interface to meet your needs. The factory default settings are
suitable for most office situations.
The following options are available for the AppleTalk interface:
• Interface Enablement
• Print Language Selection
AppleTalk settings
The AppleTalk network interface may be enabled or disabled and
set up for a specific print language.
The AppleTalk interface is Enabled* as the factory default
configuration. If you change this setting to disabled, the
interface cannot receive data.
Print Language Selection
The AppleTalk interface is initially set up to recognize and
interpret the PostScript printer language. You may set up the
AppleTalk interface to other options.
The following Print Language Selection options are available for
the AppleTalk interface:
• Automatic Print Language Switching
Specifies that the command interpreter is automatically
selected from incoming data as PostScript or PCL 5. This
allows the printer to invoke the appropriate interpreter to
process the current print job. You do not need to
reconfigure the communication interface by using the control
panel or remote software commands between print jobs that
require different command interpreters.
This setting is used primarily in a mixed network environment
where gateways from typical DOS networks (for example,
Novell) are connected to AppleTalk. This setting also enables
PC AppleTalk cards to access printing and file services
through AppleTalk.
• HP LaserJet Emulation Mode
With this setting, the printer recognizes only the PCL 5 page
description language for defining a page, selecting fonts, and
so on. This setting is used in a mixed network environment.
4-4 XEROX MRP FAMILY APPLETALK INTERFACE OPERATOR GUIDE

APPLETALK CONFIGURATION
• PostScript Mode (Standard or Tagged Binary)
In this mode, you send data using the standard (STD)
protocol PostScript page description language, or using the
tagged binary communications protocol (TBCP). The STD
PostScript language sends and receives data in ASCII. Some
of the 256 characters used by the PostScript language are
interpreted as control functions only and cannot be
transmitted as data. The control functions are as follows:
— End of job Xon
— Status (for example, printer idle) Xoff
— Abort (for example, cancel)
The TBCP protocol allows individual applications to enable or
disable binary communications on a per-job basis with begin
and end protocol functions. All 256 characters can be
interpreted as data, and some can also be interpreted as
control functions. The TBCP protocol PostScript language
uses the control functions listed for the STD protocol
PostScript language, as well as the following:
— Ctrl A (control functions are interpreted as data)
— Begin protocol
— End protocol
When AppleTalk is set up in STD/TBCP protocol PostScript,
the printer detects standard protocol PostScript and
processes the files accordingly. Data sent in binary can be
image data, PostScript language objects and numbers, and
strings. This setting is used primarily in a mixed network
environment with gateways from DOS networks (for
example, Novell) to AppleTalk. This setting is also used
where PC AppleTalk cards are used. AppleTalk network
architecture alone has no need for TBCP, because it carries
control functions out of band (as separate packet types) and
arbitrary 8-bit binary data can be sent directly without any
additional encoding.
• PostScript Mode (AppleTalk)*
This setting is used primarily for AppleTalk if the printing
environment is not a mixed network. In this mode, all 256
(8-bit) characters are sent to the printer as data. PostScript
control functions are handled by the AppleTalk protocol
independently from the data.
• Hexadecimal Dump mode
This setting is not supported by the current MRP Macintosh
software, including the MRP driver and the Font Downloader.
Host queries sent by the above software cannot be
interpreted by the printer in hexadecimal dump mode and
data cannot be dumped accordingly.
XEROX MRP FAMILY APPLETALK INTERFACE OPERATOR GUIDE 4-5

APPLETALK CONFIGURATION
Interface Priority menu item descriptions
You can select from one of the following communication priority
schemes from the control panel:
• Sequential*
• Priority
All enabled ports can receive incoming data simultaneously until
the communications buffer for that port cannot accept new
characters. The execution of a print job is determined by the
selected port polling scheme.
Sequential
This scheme does not assign a priority to any port. It executes
the first print job received from any enabled port, then advances
to the next enabled port in the sequence. The sequential polling
sequence is: Serial, Parallel, AppleTalk, Network (Token Ring,
Ethernet), or MRP interface, then back to Serial.
Priority
Interface Lock
This scheme allows you to assign a high priority to one enabled
port: Serial, Parallel*, AppleTalk, Network, or MRP interface. All
other ports have the same lower priority. If new jobs are
received on the priority port before the jobs on the other ports
are processed, the jobs from the high priority port are printed
first.
Interface Lock determines if a lock is placed on the last active
used interface. The following settings are available:
• Enable*—This scheme is identical to the non-locked polling
scheme with the exception that the active port retains
priority (continues to process print jobs) until no more data
is available on the active port.
• Disable—There is no lock on the active port.
4-6 XEROX MRP FAMILY APPLETALK INTERFACE OPERATOR GUIDE

APPLETALK CONFIGURATION
AppleTalk network configuration examples
This section contains examples that show step-by-step
procedures for changing the AppleTalk interface configuration
using the control panel.
The following examples assume that the printer is set to the
factory default configurations.
Only one setting is changed in each example to demonstrate the
procedures for changing a specific default setting. When you
use the Main Menu to make printer configuration changes, you
can make one or more changes to the default settings before
you exit the menu.
Specifying standard or tagged binary PostScript mode for the AppleTalk interface
The following example shows designating standard or tagged
binary PostScript for the AppleTalk interface.
M 1. Press the Main Menu key to enter the Main Menu.
MAIN MENU
1. PRINT MODE
6 2. Press the 6 key on the numeric keypad to direct scroll.
MAIN MENU
6. SYSTEM CONFIGURATION
L 3. Press the Enter key. A warning displays.
CHANGING SETTINGS MAY DELETE JOBS:
1. CONTINUE TO SYSTEM CONFIGURATION
L 4. Press the Enter key to enter the System Configuration Menu.
SYSTEM CONFIGURATION
1. INTERFACE SETUP
L 5. Press the Enter key to enter Interface Setup.
INTERFACE SETUP
1. SERIAL - ASYNCHRONOUS SETTINGS
22 6. Press the Scroll Next key twice.
INTERFACE SETUP
3. APPLETALK SETTINGS
L 7. Press the Enter key.
APPLETALK SETTINGS
1. INTERFACE ENABLEMENT
2 8. Press the Scroll Next key.
APPLETALK SETTINGS
2. PRINT LANGUAGE SELECTION
XEROX MRP FAMILY APPLETALK INTERFACE OPERATOR GUIDE 4-7

APPLETALK CONFIGURATION
L 9. Press the Enter key.
APPLETALK / PRINT LANGUAGE SELECTION:
4. POSTSCRIPT MODE (APPLETALK)*
1 10. Press the Scroll Previous key.
APPLETALK / PRINT LANGUAGE SELECTION:
3. POSTSCRIPT MODE (STD OR TAG BINARY)
L 11. Press the Enter key to select standard or tagged binary
PostScript.
APPLETALK SETTINGS
2. PRINT LANGUAGE SELECTION
MM 12. Press the Main Menu key twice to return to the top of the
Main Menu.
MAIN MENU
1. PRINT MODE
L 13. Press the Enter key to reenter print mode to begin printing.
This setting takes effect immediately, and remains in effect until
you change it, even if you power off and on.
Assigning a high priority to the AppleTalk interface
The following example shows assigning a high port priority to the
AppleTalk interface.
M 1. Press the Main Menu key to enter the Main Menu.
MAIN MENU
1. PRINT MODE
6 2. Press the 6 key on the numeric keypad to direct scroll.
MAIN MENU
6. SYSTEM CONFIGURATION
L 3. Press the Enter key. A warning displays.
CHANGING SETTINGS MAY DELETE JOBS:
1. CONTINUE TO SYSTEM CONFIGURATION
L 4. Press the Enter key to enter the System Configuration Menu.
SYSTEM CONFIGURATION
1. INTERFACE SETUP
2 5. Press the Scroll Next key.
SYSTEM CONFIGURATION
2. INTERFACE PRIORITY
L 6. Press the Enter key.
INTERFACE PRIORITY:
1. SEQUENTIAL*
4-8 XEROX MRP FAMILY APPLETALK INTERFACE OPERATOR GUIDE

APPLETALK CONFIGURATION
2 7. Press the Scroll Next key.
INTERFACE PRIORITY:
2. PRIORITY
L 8. Press the Enter key.
INTERFACE PRIORITY / PRIORITY:
2. PARALLEL*
2 9. Press the Scroll Next key.
INTERFACE PRIORITY / PRIORITY:
3. APPLETALK
L 10. Press the Enter key to select AppleTalk and advance to the
interface lock option.
INTERFACE PRIORITY / INTERFACE LOCK:
1. ENABLE*
L 11. Press the Enter key to retain enabled interface lock.
INTERFACE PRIORITY:
2. PRIORITY
MM 12. Press the Main Menu key twice to return to the top of the
Main Menu.
MAIN MENU
1. PRINT MODE
L 13. Press the Enter key to reenter print mode to begin printing.
This setting takes effect immediately, and remains in effect until
you change it, even if you power off and on.
XEROX MRP FAMILY APPLETALK INTERFACE OPERATOR GUIDE 4-9


A. Envelopes
Many printers support envelope printing in a limited fashion. A
typical PostScript printer feeds envelopes from a manual feed or
envelope feed tray with the short edge of the envelope
positioned at either the center or side edge of the tray.
By contrast, your printer feeds envelopes long edge at the side
of the multi-sheet bypass tray (tray 5). This lets you feed the
envelope with the sealing edge extended to avoid crinkling and
heat treatment of the adhesive, which can sometimes seal the
envelope.
You perform envelope feeding by placing the envelope on tray 5
when prompted at the printer control panel (assuming that Paper
Loading Pause is enabled).
Software applications supported for envelope printing
Your printer has been tested to work with envelopes generated
from the following programs:
• WordPerfect 2.1
• Microsoft Word 5.0
Xerox does not guarantee envelope printing with future releases
of these applications. Some applications may require using the
Xerox printer page description (PPD) file.
How to set up a file for envelope printing
Because the your printer handles envelopes differently from
other printers, use the envelope sample or formats indicated in
the following sections. These examples were developed using
standard Helvetica 10- or 12-point fonts.
N Note: Avoid applications that include samples for center-fed or
edge-fed envelopes, or a letter-envelope combination macro.
XEROX MRP FAMILY APPLETALK INTERFACE OPERATOR GUIDE A-1
ENVELOPES
WordPerfect 2.1 sample envelope file
With this application package, you can use the sample file
“envelope” located in the Stationary folder to obtain optimum
print results for Commercial 10, DL, C5, and Monarch envelopes.
You can manually adjust any necessary shifting of text (left or
right) on the screen.
Table A-1 shows the adjustments that apply to the setup for the
different envelopes.
Table A-1. Envelope adjustments with WordPerfect 2.1
Envelope Set top margin to Press the Return key*
Commercial 10 0.5 inches 2 times
DL 0.5 inches 2 times
Monarch 0.5 inches ----C5 0.75 inches 6 times
* At the beginning of the addressee line. This may vary with
the font characteristics used.
If you want to include a graphic or “place stamp here” box on
the envelope, some trial and error may be required to position
the text properly. This also applies to a bar coding option.
Microsoft Word 5.0 sample envelope file
With this application package, you can use the sample file
“envelope,” located in the Envelopes folder, for envelope
printing with the modifications shown in table A-2.
Table A-2. Envelope adjustments with Microsoft Word 5.0
Select addressee data,
Envelope
Commercial 10 3.0 inches 0.5 inches ----DL 3.5 inches 0.5 inches ----Monarch 3.0 inches 0.5 inches ----C5 3.5 inches 1.0 inches 5 times
move left margin to Set top margin to Press the Return key*
* At the beginning of the addressee line.
If you want to include a graphic or “place stamp here” box on
the envelope, some trial and error may be required to position
the text properly. This also applies to a bar coding option.
Once your envelope form is set up correctly, save your envelope
as a template.
A-2 XEROX MRP FAMILY APPLETALK INTERFACE OPERATOR GUIDE

Self-styled envelope
You can create a self-styled envelope with any application that
supports letter size paper. Follow the guidelines shown in tables
A-1 and A-2 for a custom designed envelope. Once you have
developed a satisfactory form, you can save it as a template.
Table 2-1 shows the dimensions for the four MRP-supported
envelopes.
Setting up the envelope form for printing
Once the envelope form is acceptable on screen, select the Print
option from File and set up the printer to print the page from
tray 5 (or by envelope size), and set Tray 5 Page Size to the same
envelope size. If Paper Loading Pause is enabled, the display
prompts you to load the specified envelope size. All envelopes
are fed long edge.
ENVELOPES
XEROX MRP FAMILY APPLETALK INTERFACE OPERATOR GUIDE A-3


Related publications
Xerox MRP Family publications
B. Related publications
The following publications, as well as this manual, are available
through the Xerox Documentation and Software Services (XDSS)
(U.S. only).
N Note: Xerox Canada, Ltd. and Rank Xerox Ltd. publications are
available through your local sales representative or analyst.
The Xerox 4230/MRP and 4220/MRP library sets include the
following manuals.
Publication U.S. Number
4220/MRP, 4230/MRP
Operator Guide
4220/MRP, 4230/MRP
System Administrator Guide
4215/MRP, 4219/MRP, 4220/MRP, 4230/MRP
Twinax Command Reference*
4215/MRP, 4219/MRP, 4220/MRP, 4230/MRP
Coax Command Reference*
4215/MRP, 4219/MRP, 4220/MRP, 4230/MRP
Intelligent Printer Data Stream (IPDS)
Configuration and Reference Guide*
4215/MRP, 4219/MRP, 4220/MRP, 4230/MRP
PCL 5 and PostScript
Printer Language Reference**
* Manuals are shipped with the options.
** In the U.S., the Printer Language Reference for PCL 5 and
PostScript is not shipped with the printer. To order this
document, fill out and mail the Printer Language Reference
Order Card found at the back of the System Administrator
Guide. The manual is shipped at no charge to you.
720P13940 French
720P13950 French
720P12751
720P12761
720P12771
721P81071
International
Language Number
Spanish
German
Italian
In RX, this manual is shipped with the printer.
XEROX MRP FAMILY APPLETALK INTERFACE OPERATOR GUIDE B-1

RELATED PUBLICATIONS
Publication U.S. Number
4220/MRP, 4230/MRP
720P12302
Network Interface for Novell
Operator Guide*
International
Language Number
4215/MRP, 4219/MRP, 4220/MRP, 4230/MRP
Fax Modem for Macintosh
Operator Guide*
4215/MRP, 4219/MRP, 4220/MRP, 4230/MRP
Fax Modem for MS-DOS
Operator Guide*
4220/MRP, 4230/MRP
AppleTalk Interface
Operator Guide*
4220/MRP, 4230/MRP
TCP/IP
Operator Guide*
4220/MRP, 4230/MRP
EtherTalk
Operator Guide*
4220/MRP, 4230/MRP
LAN Manager/LAN Server
Operator Guide*
4220/MRP, 4230/MRP
Windows NT
Operator Guide*
720P12321
720P12331
720P12312
720P13721
720P13731
720P13701
720P13711
* Manuals are shipped with the options.
For information about current Xerox training classes and
workshops, refer to the Xerox Customer Education: Printing
Systems Catalog, 610P30238 (U.S. only). In other locations, see
your local representative for details.
B-2 XEROX MRP FAMILY APPLETALK INTERFACE OPERATOR GUIDE

Index
Numerals
82/499/ECC, iv
A
Apple menu, 2-1
AppleTalk
interface, configuring, 4-1 to 4-9
Print Language setup, 3-7
software, 1-2 to 1-3
approvals, vii
Auto Setup button, 1-5
Automatic Print Language Switching, 4-4
automatic selection, PPD, 1-5
B
Backgrounder, 1-3
British Standards Institution, vii
buttons
Auto Setup, 1-5
Configure, 2-12
Custom radio, 2-4
Repeat radio, 2-7
Reset, viii
Setup, 1-12
C
C22.2 NO 950 (CSA), vii
Canadian department of communications, iii
Chooser panel, 2-1
Class 1 laser, iv
Class A device, iii
Clear Font Cache command, 3-6
CLEAR PFM, 1-2, 3-5
CLEAR XXXX DISK, 1-2
Configuration dialog, 1-13, 2-11
Configuration dialog box, 2-12 to 2-13
Configure button, 2-12
configuring AppleTalk interface, 4-1 to 4-9
CSA standard, vii
Custom print options, 1-12 to 1-13
Custom Print Options dialog box, 1-13
D
DB-9 connectors, 1-1
dialog boxes
Configuration, 2-12 to 2-13
Custom Print Options, 1-13
duplex selection dialog box, 2-11
Installable Options, 1-7
Options, 2-5 to 2-6, 2-12
Page Setup, 1-9, 2-2, 2-4
Page Setup Options, 1-11, 2-4
PPD file selection, 1-7
Print, 1-11, 2-4 to 2-5
Print Options, 1-12
Printer Status, 3-6
Setup, 1-6
DIN-8 connectors, 1-1
documentation, other, B-1 to B-2
Downloader, 1-2
downloading
fonts, 3-2 to 3-3
PostScript files, 3-6
duplex, 2-5, 2-11
Duplex Disabled, 2-11
duplex options pop-up menu, 2-11
duplex selection dialog box, 2-11
E
edge deletion, 1-10
ELCI/RCD, vii to viii
Engine Margin, 1-10
enlarging, 1-9
envelopes, 2-2 to 2-3, 2-11 to 2-12, A-1 to A-3
Equipment Leakage Current Interrupter, see
ELCI/RCD
F
face-up tray, 2-7
Fax Printer Driver, 1-4
FCC rules, iii
File menu, 2-2
Finder, 2-1
Font Downloader
folder, 1-2
using, 3-1 to 3-7
font cache, clearing, 3-6
fonts
available, 3-1
deleting, 3-4 to 3-5
downloading, 3-2 to 3-3
listing, 3-4
XEROX MRP FAMILY APPLETALK INTERFACE OPERATOR GUIDE INDEX–1

INDEX
H
hard disk
fonts, stored, 3-4 to 3-5
high-capacity, 3-1
initializing, 1-2
Hardware Status report, 4-1
hexadecimal dump mode, 4-5
high-capacity
feeder, 2-12
stacker
restrictions, 2-7 to 2-8
selecting, 2-12
HP LaserJet Emulation Mode, 4-4
I
IEC950 (BSI), vii
imageable areas, 1-8, 1-10
input
capabilities, 2-10
sources, 2-9
trays, 2-5 to 2-10
insertion point, 2-6
Installable Options dialog box, 1-7
installing
Font Downloader, 1-5
PSPrinter driver, 1-3
Xerox Driver Builder, 1-4
Interface Lock, 4-6
Interface Priority menu, 4-6
Interface Setup menu, 4-4 to 4-5
L
landscape, 1-10
laser safety, iv to vi
LaserPrep, 1-3
LaserWriter driver, 1-1 to 1-2, 1-4
LaserWriter Page Setup, 2-2
layout, 1-9
line edge enhancement, 2-5, 2-11
LocalTalk cables, 1-1
M
Macintosh system
connecting, 1-1
conventions, xii
PostScript driver support, 1-1
manual selection, PPD, 1-6 to 1-8
menus
Configuration, 2-5
Interface Priority, 4-6
Interface Setup, 4-4 to 4-5
File, 2-2
Printer Setup, 2-3, 2-11
Special, 3-6
System Configuration, 4-2 to 4-3
messages, printer control panel, xii
Microsoft Word, envelopes, A-1 to A-2
ministre des communications du Canada, iii
O
operational safety, vi to viii
Options dialog box, 2-5 to 2-6, 2-12
orientation, 1-9 to 1-10
outline fonts, 3-1
output
destinations, 2-8
trays, 2-5 to 2-10
P
page
count field, 2-6
custom sizes, 2-12
length, maximizing, 2-2
Page Setup, 1-8 to 1-11, 2-2 to 2-4
Page Setup dialog box, 1-9, 2-2, 2-4, 2-11
Page Setup Options dialog box, 1-11, 2-4
Paper Size pop-up menu, 2-2
Page Size Setup, 2-2
Paper Loading Pause option, 2-3, 2-11
paper
changes, 2-7
sizes, 1-10
passwords, changing, 3-3
PCL 5, 4-4 to 4-5
PhoneNet cables, 1-1
pop-up menus
duplex options, 2-11
input source, 2-6
Paper Size, 2-2
Settings, 2-10
port polling, 4-6
portrait, 1-10
postcard, printing, 2-11
PostScript
AppleTalk, 3-7
Automatic Print Language Switching, 4-4
CLEAR PFM, 1-2
CLEAR XXXX DISK, 1-2
Macintosh driver support, 1-1
Mode, 4-5, 4-7 to 4-8
programs, downloading, 3-6
PostScript Printer Description, see PPD
power, resetting, viii
PPD
see also Xerox PPD
files, 1-3
selecting, 1-5 to 1-8
Print, 2-1
Print Desktop, 2-1
Print dialog box, 1-11, 2-4 to 2-5
print image, 1-8
Print Language Selection, 4-4 to 4-5
Print Monitor, 1-3, 1-5
Print Options dialog box, 1-12
Print Window, 2-1
N
nonimageable areas, 1-10
INDEX–2 XEROX MRP FAMILY APPLETALK INTERFACE OPERATOR GUIDE

INDEX
printer
control panel
configuring AppleTalk interface, 4-2 to 4-3
procedures, xii
descriptions folder, 1-5
drivers, support, 1-1
hard drive, 3-4 to 3-5
memory, 3-4
renaming, 2-1
passwords, changing, 3-3
selecting, 1-5, 2-1
status, checking, 3-6
Printer Configuration Report, 4-1 to 4-2
Printer Setup menu, 2-3, 2-11
Printer Status dialog box, 3-6
printing
documents, 1-8, 2-1
envelopes, 2-2 to 2-3, 2-11 to 2-12, A-1 to A-3
options, 1-11 to 1-13
Page Setup, 1-8 to 1-11, 2-2 to 2-4
priority polling, 4-6, 4-8 to 4-9
procedures
fonts
deleting, 3-4 to 3-5
downloading, 3-2 to 3-3
listing, 3-4
passwords, changing, 3-3
PostScript
Mode, specifying 4-7 to 4-8
programs, downloading, 3-6
power, resetting, viii
printer
selecting, 1-5, 2-1
status, checking, 3-6
priority polling, assigning, 4-8 to 4-9
programmable font module, clearing, 3-6 to 3-7
Xerox Driver Builder, installing, 1-4
programmable font module, 1-2, 3-1, 3-5 to 3-7
PSPrinter driver
software, 1-1 to 1-2, 1-4
installing, 1-3
User Guide, 1-3
publications, related, B-1 to B-2
System Configuration menu, 4-2 to 4-3
System Configuration report, 4-1 to 4-2
T
tagged binary communications protocol (TBCP), 4-5
tray 4, 2-12
tray 5, 2-3, 2-5 to 2-11, A-3
Tray 5 Page Size, 2-2
trays, 2-5 to 2-10
troubleshooting, 4-2
Tumble Duplex, 2-11
U
UL1950 (UL), vii
Underwriters Laboratories, vii
V
VDE 0871/0875, Class A, iii
W
WordPerfect, envelopes, A-1 to A-2
X
Xerox driver, using, 2-1 to 2-13
Xerox Driver Builder
installing, 1-4
setting up, 1-5 to 1-8
software, 1-1 to 1-2
Xerox PPD
see also PPD
paper, 1-10
selecting, 1-5 to 1-8;
Xerox printer icon, 2-1
Xerox Support Software for Macintosh, 1-2 to 1-3
Xerox XXXX PPD file, 1-3
R
radio frequency interference, iv
RAM, 3-1, 3-4, 3-6
rasterized fonts, 3-6
reducing, 1-9
Repeat radio button, 2-7
Reset button, viii
Residual Current Device, see ELCI/RCD
S
safety information, additional, vii
sequential polling, 4-5
Settings pop-up menu, 2-10
Setup button, 1-12
Setup dialog box, 1-6
setup options, selecting, 2-5
STD protocol, 4-5
System 6 computers, 1-3 to 1-4
System 7 computers, 1-3 to 1-4
XEROX MRP FAMILY APPLETALK INTERFACE OPERATOR GUIDE INDEX–3

 Loading...