

Page 1

WorkCentre Pro 421
User Guide
604P10712
Page 2

Prepared by:
The Document Company Xerox
GKLS European Operations
Bessemer Road
Welwyn Garden City
Hertfordshire
AL7 1HE
ENGLAND
©2002 by Xerox Corporation. All rights reserved.
Copyright protection claimed includes all forms and matters of copyrighted material and information
now allowed by statutory or judicial law or hereinafter granted, including without limitations, material
generated from the software programs which are displayed on the screen, such as icons, screen
displays, loo k s etc.
®
Xerox
, The Document Company
publication are trademarks of Xerox Corporation. Product names and trademarks of other
companies are hereby acknowled
Changes are periodically made to this document. Changes, technical inaccuracies, and
typographical errors will be corrected in subsequent editions.
®
, the digital X® and all Xerox products mentioned in this
ged.
Page 3

Table of Contents
1 About This Guide.............................................................. 1-1
Finding Information in the User Guide................................................1-2
Customer Support.................................................................................1-4
Conventions ..........................................................................................1-5
Orientation...............................................................................................1-5
Bracket Text Typeface ............................................................................1-7
Italic Typeface.........................................................................................1-7
Quick Pathway ........................................................................................1-7
Notes.......................................................................................................1-8
Hints........................................................................................................1-8
Cautions..................................................................................................1-8
Warnings.................................................................................................1-8
Related Information Sources ...............................................................1-9
2 Product Overview............................................................. 2-1
System Overview ..................................................................................2-2
Using Department Codes........................................................................2-2
Identifying the Machine Configurations and Components ...............2-4
WorkCentre Pro 421E.............................................................................2-4
WorkCentre Pro 421DE ..........................................................................2-5
WorkCentre Pro 421DEi - European Product .........................................2-6
WorkCentre Pro 421DEi - North American Product................................2-7
WorkCentre Pro 421Pi ............................................................................2-8
Components............................................................................................2-9
Control Panel Components and Function Keys...............................2-11
Power ON/OFF.....................................................................................2-14
Powering On .........................................................................................2-14
Powering Off .........................................................................................2-14
Power Save..........................................................................................2-15
Standby Mode................................. ....... ...... ....... ...... ...... ......................2-16
Sleep Mode (Energy Saver)..................................................................2-16
Xerox WorkCentre Pro 421 User Guide T able of Contents-iii
Page 4

Modes...................................................................................................2-17
Features Key...................... ....... ...... ....... ...... ....... ...... ...... ....... ...... ....... ..2-18
Machine Status Key ..............................................................................2-18
3 Copy...................................................................................3-1
Standard Features ..................................................................................3-1
Copying Procedure...............................................................................3-2
1. Load the Originals...............................................................................3-2
2. Press the Features Key.......................................................................3-5
3. Select the Copy Features....................................................................3-6
4. Enter the Quantity................. ...... ....... ...... ....... ...... ...... ....... ...... ...........3-7
5. Press Start .........................................................................................3-8
Using Job Interrupt...............................................................................3-9
Standard Copy Features.....................................................................3-10
Lighten/Darken......................................................................................3-10
Reduce/Enlarge ....................................................................................3-11
Paper Supply.........................................................................................3-13
Original Type.........................................................................................3-14
Added Features...................................................................................3-15
Output ...................................................................................................3-16
2-Sided..................................................................................................3-18
Bound Original ......................................................................................3-19
Image Shift............................................................................................3-21
Edge Erase ...........................................................................................3-22
2-Up ......................................................................................................3-23
Booklet..................................................................................................3-24
Annotation.............................................................................................3-26
Build Job ...............................................................................................3-27
Stored Job.............................................................................................3-30
Paper Type (Bypass Tray Only)............................................................3-32
Menu Map .............................................................................................3-33
Changing Copy Defaults ....................................................................3-34
4 Print.................................................................................... 4-1
Printing Procedure.................. ...... ....... ...... ....... ...... ...... ....... ...... ....... ....4-2
Print Drivers ............................................................................................4-2
1. Create the Document..........................................................................4-4
2. Select Print..........................................................................................4-4
Table of Contents-iv Xerox WorkCentre Pro 421 User Guide
Page 5

3. Select the Printer Driver Features.......................................................4-5
4. Print the Job........................................................................................4-6
5. Retrieve the Print Job..........................................................................4-7
6. Managing Print Jobs ...........................................................................4-8
Using Job Interrupt.............................................................................4-12
Printer Driver Features .......................................................................4-13
Control Options .....................................................................................4-13
Printer Configuration .............................................................................4-15
Paper/Output.........................................................................................4-17
Layout ...................................................................................................4-22
Image Options.......................................................................................4-24
Overlays................................................................................................4-28
Fonts.....................................................................................................4-31
Watermarks...........................................................................................4-33
About.....................................................................................................4-35
Changing Printer Defaults..................................................................4-36
5 Maintaining the Product................................................... 5-1
Cleaning.................................................................................................5-2
Cleaning the WorkCentre Pro 421 .. ....... ...... ....... ....................................5-2
Document Glass and Constant Velocity Transpor t Glas s................... ....5-3
Control Panel, Keyboard, LCD Display...................................................5-3
Document Feeder and Output Tray ................................ ....... ...... ....... ....5-3
Transfer Corotron Wire ...........................................................................5-4
Ordering Supplies.................................................................................5-8
Customer Replaceable Units ...............................................................5-9
Replacing the Toner Cartridge................................................................5-9
Replacing the Drum Cartridge...............................................................5-14
Replacing the Ozone Filter....................................................................5-23
Loading Paper .....................................................................................5-24
Loading the Paper Trays.......................................................................5-24
Loading the Bypass Tray ......................................................................5-30
6 Basic Troubleshooting..................................................... 6-1
Jam Clearance......................... ...... ....... ...... ....... ...... .............................. 6-2
Access Areas ..........................................................................................6-2
Example of Paper Jam............................................................................6-3
Example of Document Feeder (ADF/DADF) Jam ...................................6-5
Xerox WorkCentre Pro 421 User Guide Table of Contents-v
Page 6

Calling for Service............ ....... ...... ....... ...... ....... ...... ...... ........................6-6
Displaying Error Codes ...........................................................................6-6
Customer Support Telephone Number ...................................................6-6
Error Messages and Codes..................................................................6-7
Error Messages.......................................................................................6-7
Error Codes.............................................................................................6-9
Image Quality Problems .....................................................................6-12
7 Machine Defaults & Setups..............................................7-1
Changing Machine Defaults.................................................................7-2
Paper Trays.............................................................................................7-3
Timers.....................................................................................................7-5
Interrupt Key............................................................................................7-9
Speaker Volume....................................................................................7-10
Department Codes................................................................................7-11
Printing Reports................................................ ...... ...... ....... ...... ....... .. 7 -1 9
Department Code Report......................................................................7-20
Settings Report .....................................................................................7-21
Changing the Initial Setup..................................................................7-23
Date & Time ..........................................................................................7-24
Localization ...........................................................................................7-28
Language ..............................................................................................7-29
Machine Serial Number.........................................................................7-30
Customer Support.................................................................................7-31
Network.................................................................................................7-33
Menu Map.............................................................................................7-34
Self Test ...............................................................................................7-35
Automatic Test ......................................................................................7-35
Individual Test.......................................................................................7-36
Print Test Result....................................................................................7-37
Customer Support Number................................................................7-38
Machine Serial Number ......................................................................7-39
Xerox Supply Number.........................................................................7-40
Total Print Counter..............................................................................7-41
Machine Revisions..............................................................................7-42
Table of Contents-vi Xerox WorkCentre Pro 421 User Guide
Page 7

8 Appendix A - Safety Notes...............................................A-1
Safety Standards....................................................................................A-3
Regulatory Information........................................................................A-4
Laser Safety...........................................................................................A-6
The Electricity at Work Regulations - UK ONLY .................................... A-6
Certification to 1999/5/EC .. ....... ...... ....................................... ...... ....... ... A-9
FCC Regulations.................................................................................. A-10
Canadian Certification..........................................................................A-13
Environmental Compliance...............................................................A-14
Energy Star®........................................................................................A-14
9 Appendix B - Specifications............................................B-1
Machine Specifications .......................................................................B-2
Hardware Configuration ......................................................................... B-2
Machine Weight ..................................................................................... B-2
Accessibility............................................................................................B-2
Space Requirements..............................................................................B-2
Copy Speed ...........................................................................................B-3
Copy Magnifications...............................................................................B-3
Warm-up Time .......................................................................................B-3
Automatic Document Feeder and
Duplex Automatic Document Feeder.....................................................B-4
Paper Supply..........................................................................................B-4
Centre Tray............................................................................................B-5
Electrical Specifications ......................................................................... B-5
GDI Print Driver...................................................................................... B-6
10 Index ............................................................................Index-i
Xerox WorkCentre Pro 421 User Guide T able of Contents-vii
Page 8

Table of Contents-viii Xerox WorkCentre Pro 421 User Guide
Page 9

1 About This Guide
Thank you for purchasing the WorkCentre Pro 421. The
WorkCentre Pro 421 is designed for ease of use, but to use
your machine to its fullest potential, take some time to read the
User Documentation.
About This Guide
WorkCentre Pro 421 User Guide 1-1
Page 10

Finding Information in the User Guide
The User Guide contains the following sections:
- Table of Contents
Use the Table of Contents to find topics easily.
- About this Guide - Chapter 1
Describes the information in this User Guide.
- Product Overview - C hapter 2
Describes the system and hardware features of the
machine and provides an overview of how the machine
operates. Each key on the Control Panel is also
described.
- Copy - Chapter 3
Describes the procedures for loading and copying
originals. It also includes instructions for using the copy
features available.
- Print - Chapter 4
Describes the procedure for printing from a PC and an
overview of the printer driver features.
- Maintaining the Product - Chapter 5
Provides maintenance and cleaning procedures
necessary to ensure optimum product performance.
Includes instruction s for orderi ng and replacing
consumables.
- Basic Troubleshooting - Chapter 6
Guides the user through problem solving and provides a
list of error codes, messages and recommended
corrective actions.
- Machine Defaults and Setups - Chapter 7
Gives step by step instructions on how to access
machine setups and change the machine defaults.
- Safety Notes - Appendix A
Provides safety procedures and approval certification
information for the product.
1-2 WorkCentre Pro 421 User Guide
Page 11

- Specifications - Appendix B
Provides information on the machine specifications. Use
this chapter to ensure all materials being used are within
specification.
- Index
Refer to the Index to locate specific information.
About This Guide
WorkCentre Pro 421 User Guide 1-3
Page 12
Customer Support
If after product installation further assistance is required,
please call our experts at the Xerox Welcome Centre or your
local representative. When telephoning please quote the
machine serial number. Use the space below to make a note
of the machine serial number:
# _______________________________________
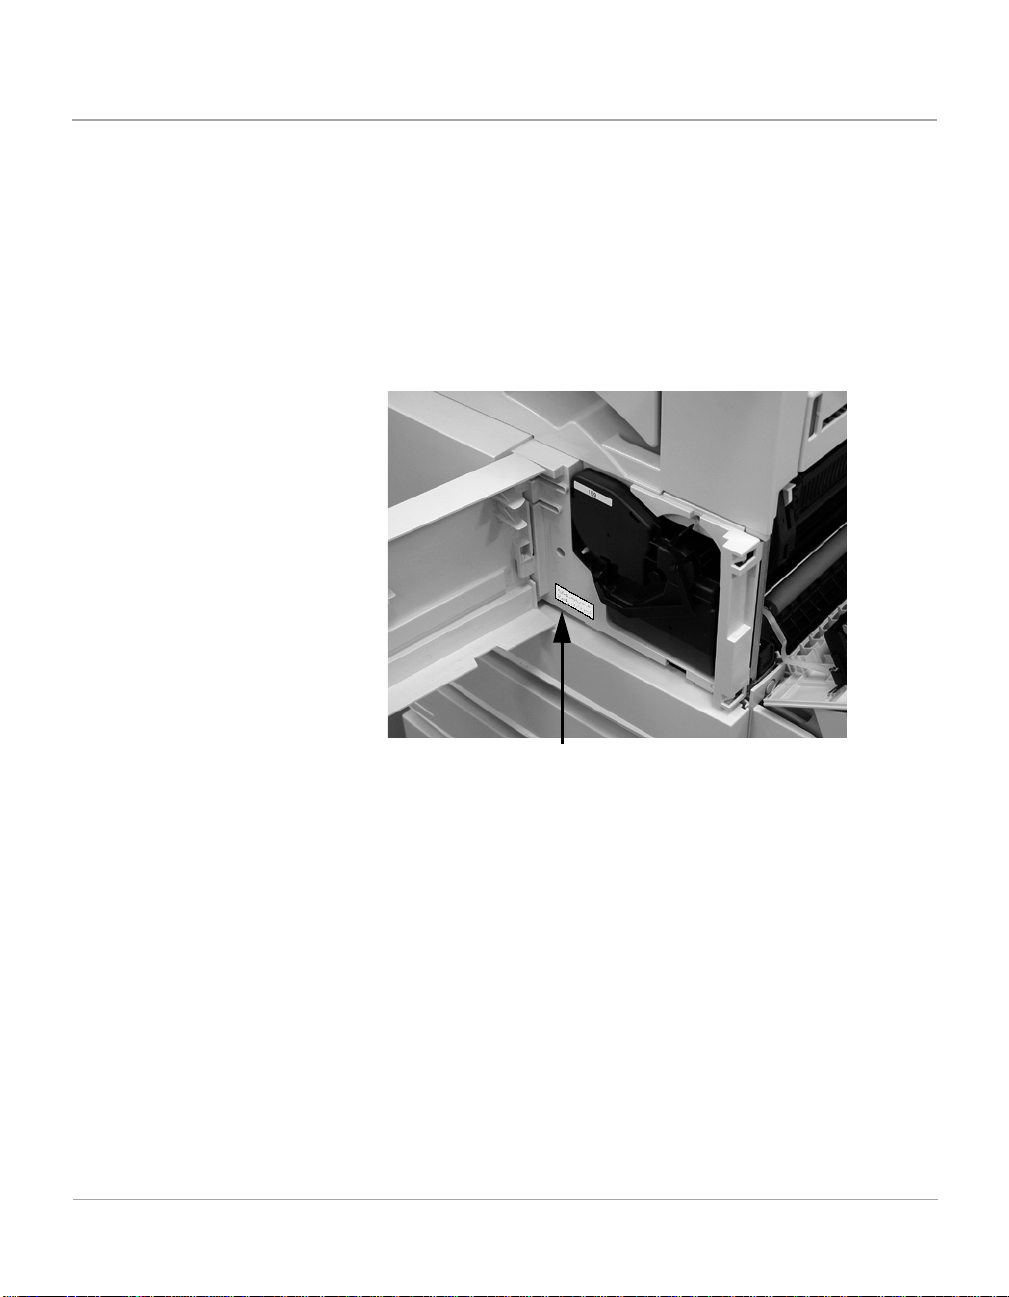
The serial number is located inside the front door.
Serial Number Plate
You will be provided with the Xerox Welcome Centre or local
representative telephone number when the WorkCentre Pro
421 is installed. For convenience and future reference, please
record the telephone number in the space below:
Welcome Centre or local representative Telephone Number:
# _______________________________________
1-4 WorkCentre Pro 421 User Guide
Page 13
Conventions
Orientation
Throughout this User Guide, there are some terms that are
used interchangeably:
½
Document is synonymous with original.
½
Button is synonymous with key.
½
Page is synonymous with sheet.
½
WorkCentre Pro 421 is synonymous with the machine.
There are two types of orientation referred to in this guide,
Image Orientation and Feed Orientation.
Image Orientation
Image Orientation describes the direction of the image on the
page. There are two types of image orientation:
Portrait
About This Guide
The image is portrait when vertically aligned with the longest
A
A
WorkCentre Pro 421 User Guide 1-5
edge of the paper.
Landscape
The image is landscape when vertically aligned with the
shortest edge of the paper.
Page 14
Feed Orientation
Feed Orientation describes the direction the originals and the
media is fed through the machine. It is recommended the feed
orientation of the originals matches that of the media.
There are two types of feed orientation:
Long Edge Feed (LEF)
When observed from the front of the machine, originals or
media with the long edges to the left and right of the document
feeder or paper tray.
LEF Orientation
A
Original / Media Feed Direction
Short Edge Feed (SEF)
When observed from the front of the machine, originals or
media with the short edges to the left and right of the document
feeder or paper tray.
SEF Orientation
A
Original / Media Feed Direction
A
A
1-6 WorkCentre Pro 421 User Guide
Page 15
Bracket Text Typeface
Italic Typeface
The [Bracket Text] typeface is used to emphasize the selection
of a feature or key. For example:
½
Select [Reduce/Enlarge].
½
Select the required setting.
½
Press [Enter].
The Italic typeface is used to emphasize a word or phrase. In
addition, references to other chapters and publications are
displayed in Italic typeface. For example:
- Always follow safety procedures when operating the
equipment.
- Refer to “Document Glass and Constant Velocity
Transport Glass” on page 5-3, for information about
cleaning the document glass.
- For more information about the network options
available, refer to the System Administrator Guide.
About This Guide
Quick Pathway
In addition to the step by step instructions available throughout
Quick Pathway
½
Load ori g in a l s .
½
Press [Features].
½
Select the Copy features
required.
½
Press [Start].
WorkCentre Pro 421 User Guide 1-7
this User Guide, a summary of the steps is contained in the
Quick Pathway at the beginning of a chapter or section. After
becoming familiar with the procedures for a particular feature,
the Quick Pathway is a useful reminder of the steps required to
access a particular feature.
Page 16
Notes
Hints
Cautions
Notes are statements that provide additional information. For
example:
NOTE: Under normal conditions the machine should be
powered on 24 hours a day.
Hints help users perform a task. For example:
HINT: Before loading paper into the paper tray fan the edges.
This separates any sheets of paper that may be stuck together
and reduces the possibility of paper jams.
Cautions are statements that suggest mechanical damage
may be the result of an action. For example:
CAUTION:When cleaning the WorkCentre Pro 421, do not
use organic solvents or aerosol cleaners.
Warnings
Warnings are statements that alert users to the possibility of
personal injury. For example:
WARNING:This product must be connected to a
protective earthing circuit.
1-8 WorkCentre Pro 421 User Guide
Page 17

Related Information Sources
Information available for the WorkCentre Pro 421 consists of:
-This User Guide
-The Quick Start Guide
-The Customer Training CD
-The System Administrator Guide
About This Guide
WorkCentre Pro 421 User Guide 1-9
Page 18

1-10 WorkCentre Pro 421 User Guide
Page 19

2 Product Overview
This chapter provides an overview of the WorkCentre Pro
421’s hardware features and operation. The Control Panel is
discussed and each key is defined.
Product Overview
WorkCentre Pro 421 User Guide 2-1
Page 20
System Overview
The WorkCe ntre Pro 4 21 is a digital device capable of copying
and printing.
When you switch on the power and the system has warmed up,
the machine is in the Ready mode and is ready to use.
Ready mode is where the LCD screen is visible and ready to
be programmed for a job. The message displays “Ready to
copy”:
Copy Walk-up Screen
When an action completes successfully, the machine returns
to Ready mode.
You can change the default settings of the machine by
pressing the Machine Status key.
HINT: Refer to “Machine Defaults & Setups” on page 7-1 for
detailed instructions on how to change these setups.
NOTE: Depending on your machine configuration some
features and functions may not be available. The following
pages give specific configuration information.
Using Department Codes
If the Department Code function has been enabled and
individual Department Codes have been setup, the Ready
mode screens prompt users to enter a Department Code
before access to the machine is allowed.
Ready to copy
Paper : Auto
Output : Collated
Added Features
1
L/D : Auto
R/E : 100%
2-2 WorkCentre Pro 421 User Guide
Page 21
½
Press the [Features] key.
½
Using the numeric keypad,
enter your Department Code.
Enter department code
Paper : Auto
Output : Collated
Added Features
1
L/D : Auto
R/E : 100%
Product Overview
Each digit entered is
displayed as an asterisk on
the screen.
½
Press [Enter].
If the code is correct access
to the function is provided. If
the code is incorrect the
“Enter department code”
message returns.
½
Select the Copy key.
*****
Paper : Auto
Output : Collated
Added Features
1
L/D : Auto
R/E : 100%
WorkCentre Pro 421 User Guide 2-3
Page 22
Identifying the Machine Configurations and Components
The following pages provide illustrations and descriptions of
the WorkCentre Pro 421 configurations and components.
Use the illustrations to identify your WorkCentre Pro 421
configuration and the functions available for your machine.
Not all configurations are available in all markets. The
configurations shown may change following the publication of
this document.
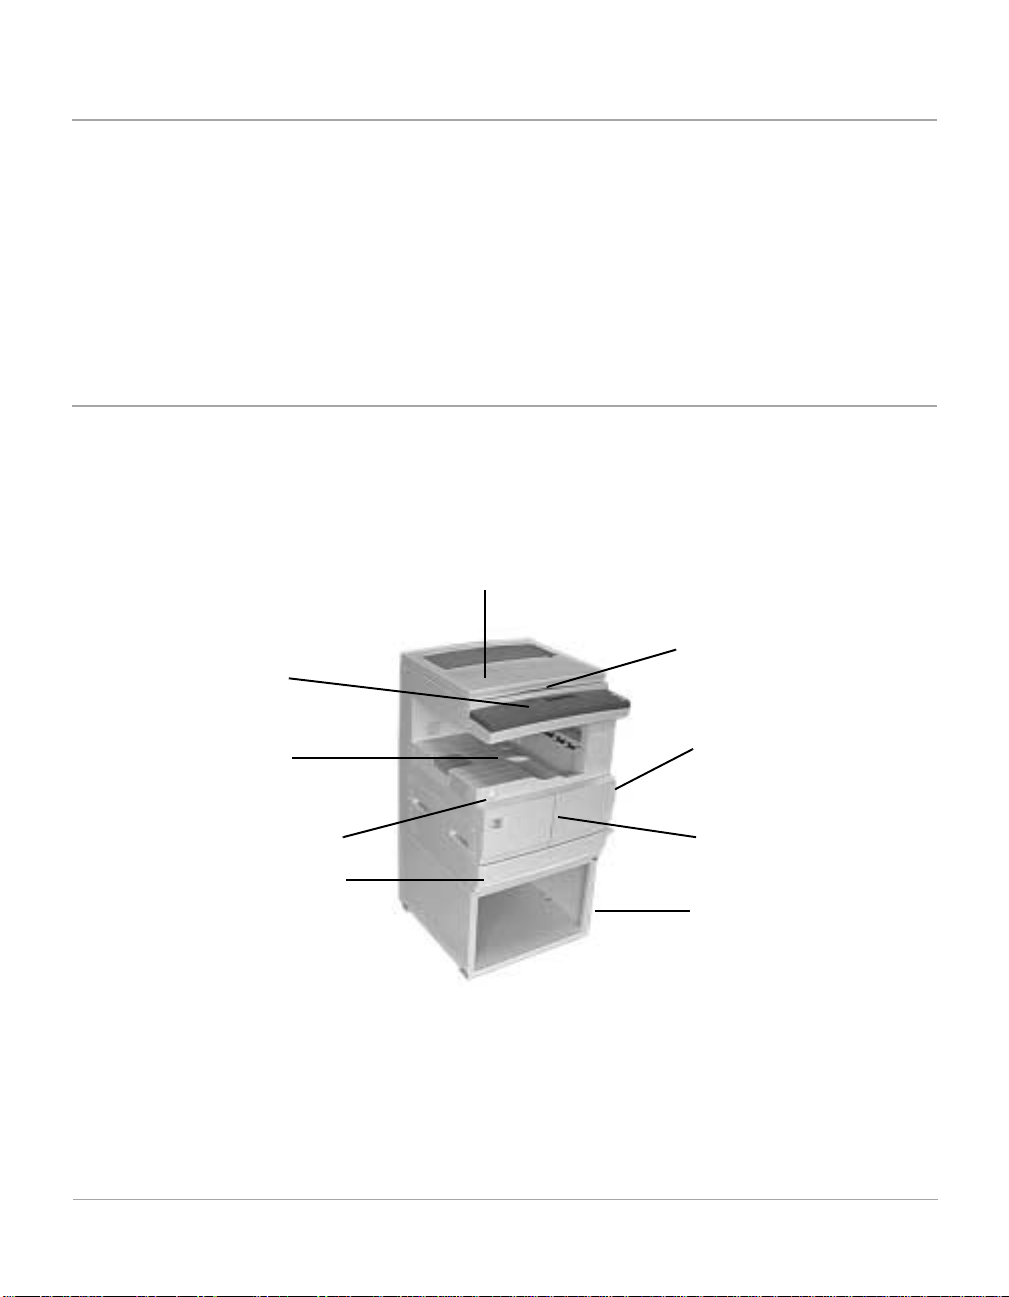
WorkCentre Pro 421E
This is a basic simplex digital copier with a document glass, a
single paper tray, a bypass tray and a stand.
Additional Memory can be purchased as an option.
Document Glass
Cover
Document Glass
(under the cover)
Control
Panel
Bypass
Output
Tray
Tray
On/Off Switch
Paper Tray 1
Figure 1
2-4 WorkCentre Pro 421 User Guide
Front Cover
Stand
Page 23
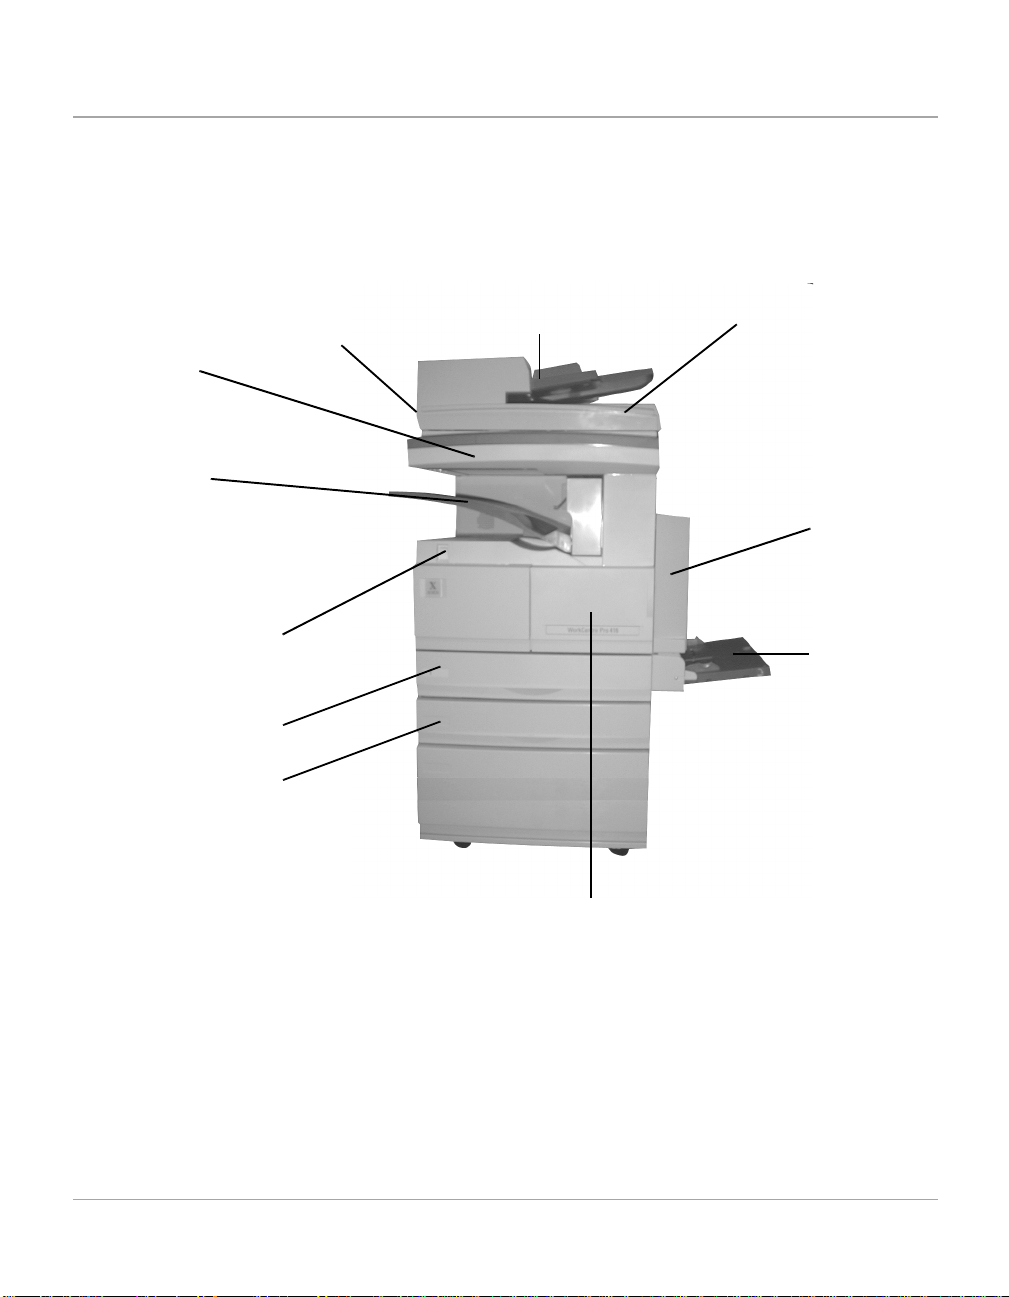
WorkCentre Pro 421DE
This is a basic simplex digital copier with an automatic
document feeder, a single paper tray, a bypass tray and a
stand.
Additional Memory can be purchased as an option.
Constant Velocity
Transport Glass
(under ADF)
Output
Tray
On/Off Switch
Paper Tray 1
Control
Panel
Automatic Document
Feeder (ADF)
Product Overview
Document Glass
(under ADF)
Bypass
Tray
Front Cover
Figure 2
WorkCentre Pro 421 User Guide 2-5
Page 24
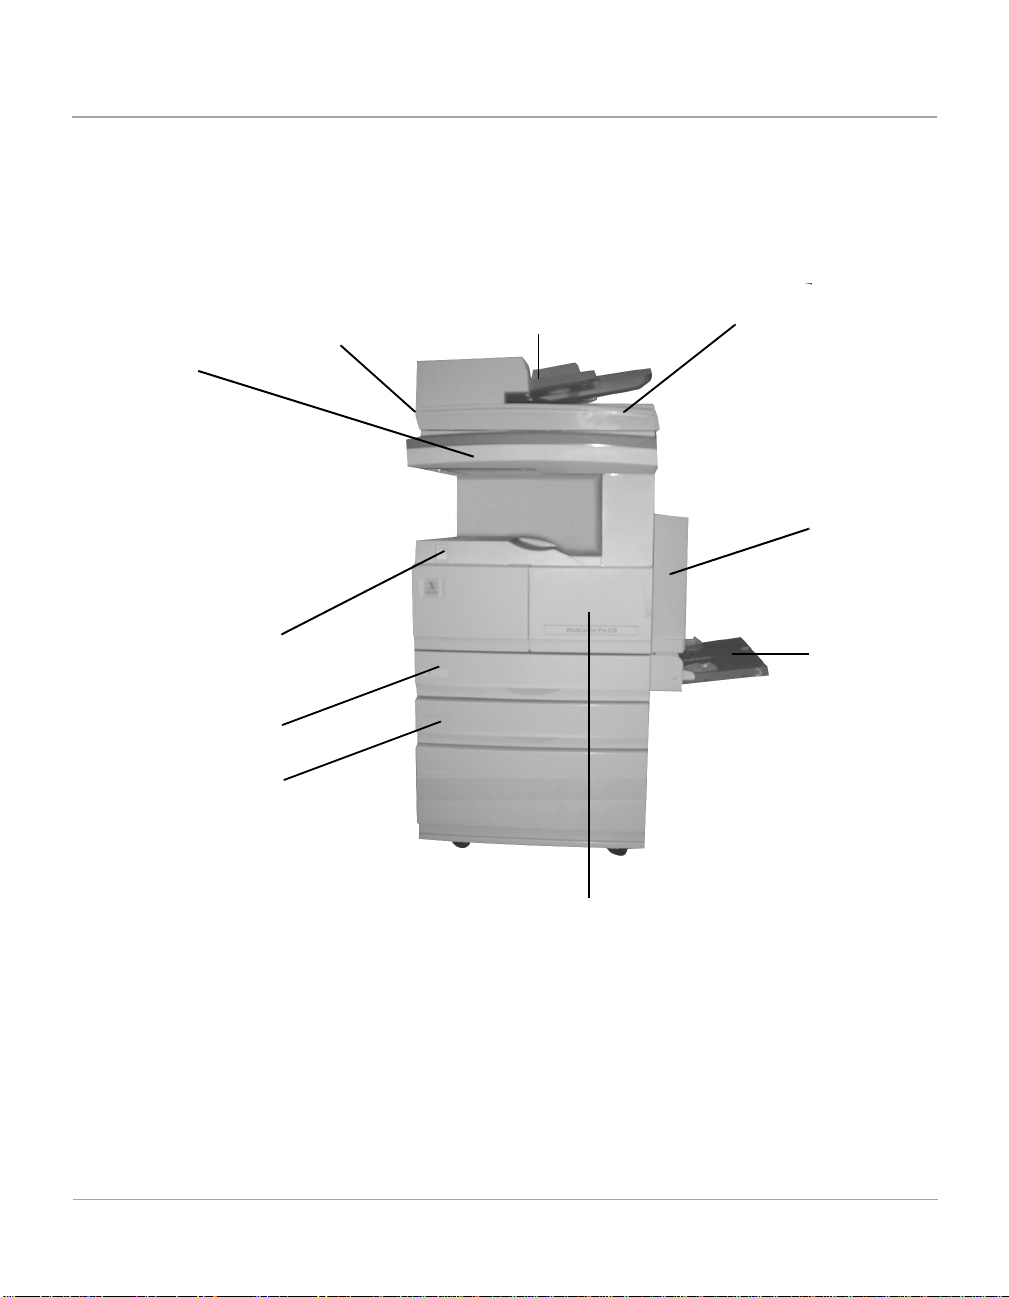
WorkCentre Pro 421DEi - European Product
This is a digital copier with an automatic duplex unit, a duplex
automatic document feeder, a single paper tray, a bypass tray
and a stand.
Additional Memory can be purchased as an option.
Duplex Automatic
Document Feeder (DADF)
Control
Panel
Constant Velocity
Transport Glass
(under DADF)
Document Glass
(under DADF)
Auto
Duplex
Unit
On/Off Switch
Paper Tray 1
Front Cover
Figure 3
2-6 WorkCentre Pro 421 User Guide
Bypass
Tray
Page 25
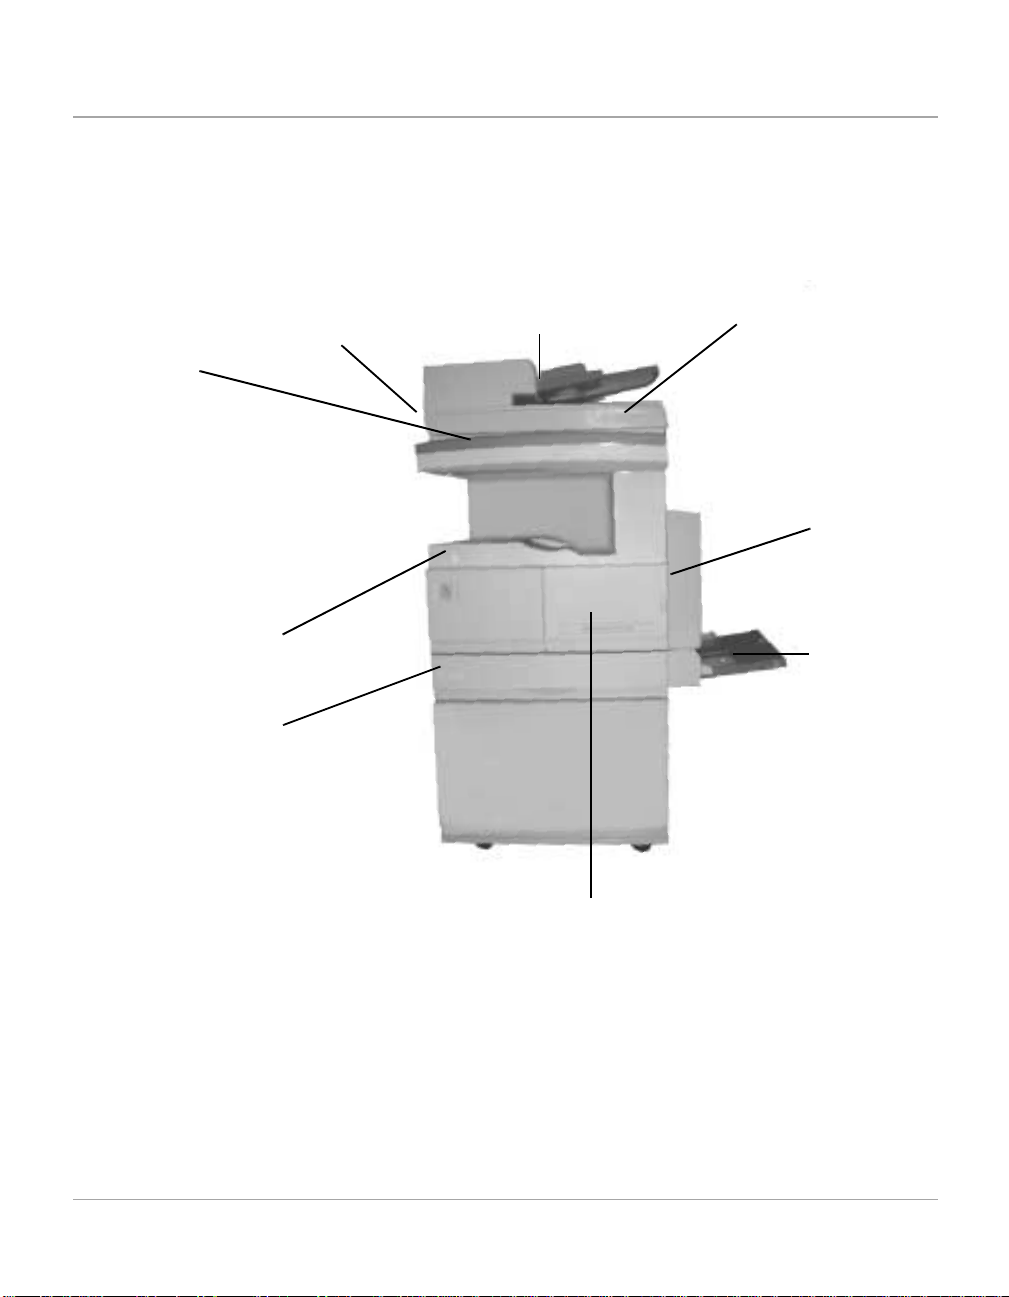
WorkCentre Pro 421DEi - North American Product
This is a digital copier with an automatic duplex unit, a duplex
automatic document feeder, two paper trays, a bypass tray and
a stand.
Additional Memory can be purchased as an option.
Duplex Automatic
Document Feeder (DADF)
Document Glass
(under DADF)
Auto
Duplex
Unit
Bypass
Tray
Control
Panel
On/Off Switch
Paper Tray 1
Paper Tray 2
Constant Velocity
Transport Glass
(under DADF)
Product Overview
Front Cover
Figure 3
WorkCentre Pro 421 User Guide 2-7
Page 26
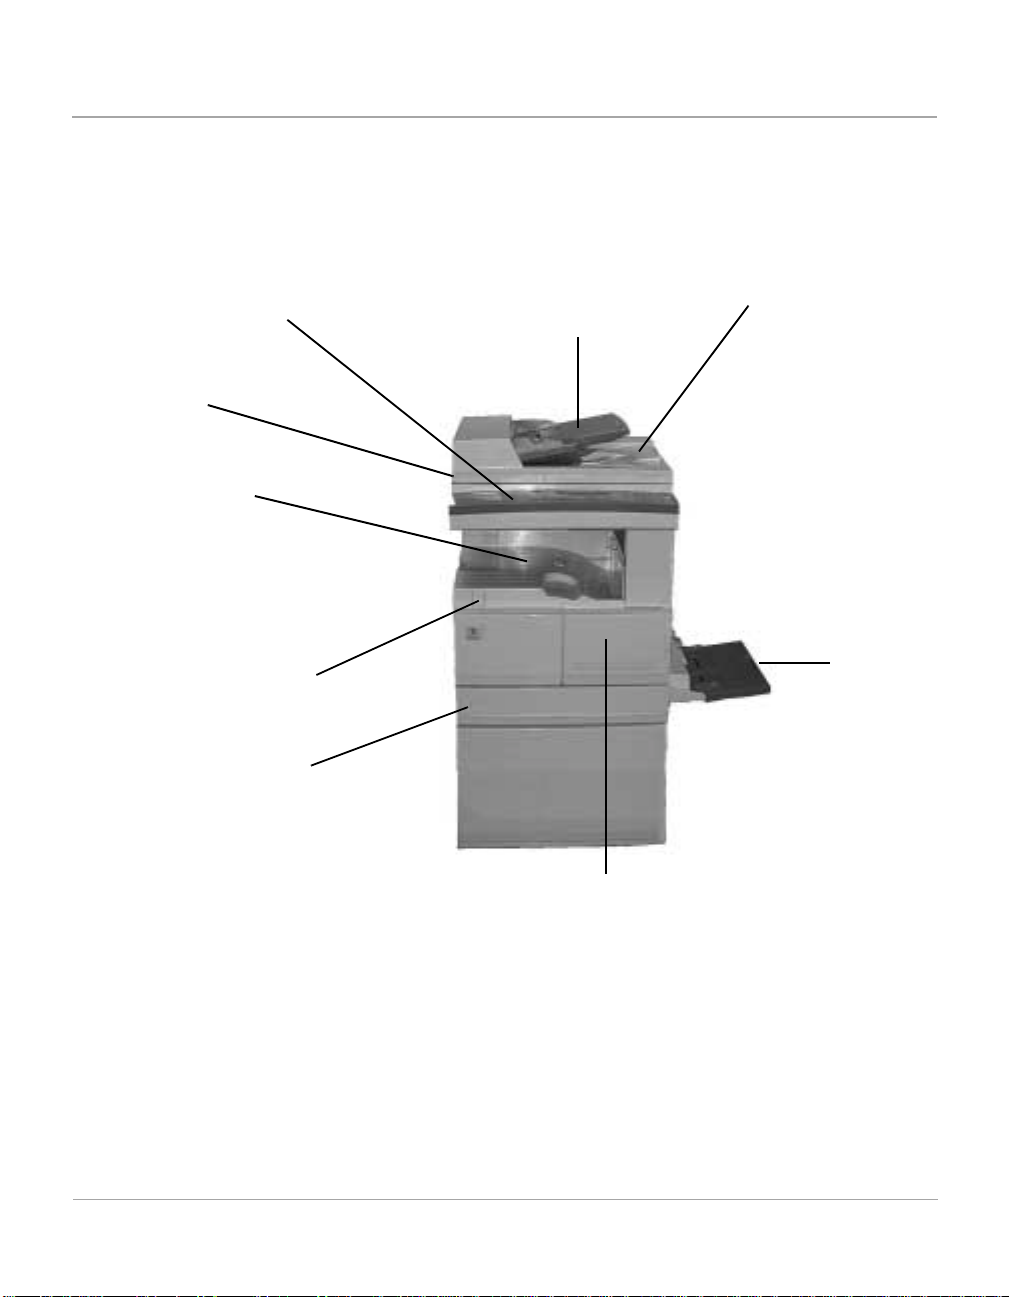
WorkCentre Pro 421Pi
Constant Velocity
Transport Glass
Control
Panel
Offset
Catch Tray
(under DADF)
This is a digital copier and printer, with an automatic duplex
unit, an offset catch tray, a duplex automatic document feeder,
two paper trays and a bypass tray.
Additional Memory can be purchased as an option.
Duplex Automatic
Document Feeder (DADF)
Document Glass
(under DADF)
Auto
Duplex
Unit
On/Off Switch
Paper Tray 1
Paper Tray 2
Front Cover
Figure 4
2-8 WorkCentre Pro 421 User Guide
Bypass
Tray
Page 27

Components
Automatic Document Feeder (ADF)
The ADF automatically separates and feeds originals from the
input tray.
Product Overview
Duplex Automatic Document Feeder (DADF)
The DADF automatically separates and feeds originals from its
input tray. When scanning two-sided originals, after scanning
the first side, the original is inverted to enable the second side
to be scanned.
Constant Velocity Transport (CVT) Glass
The Constant Velocity Transport (CVT) glass is the narrow
strip of glass located at the left side of the document glass.
When originals are fed from the document feeder (ADF or
DADF), the CVT glass automatically scans the images into
memory. This does not apply to originals placed on the
document glass.
Auto Duplex Unit (ADU)
Makes two-sided copies from one-sided and/or two-sided
originals.
Offset Catch Tray (OCT)
The Offset Catch Tray separates jobs for easy retrieval. The
tray holds a maximum of 250 sheets of 80 g/m
2
(20lb) paper.
Paper Trays 1 and 2
Located at the front of the machine these trays can each hold
a maximum of 550 sheets of 80 g/m
HINT: Refer to Appendix B - Specifications for more
information about approved media.
WorkCentre Pro 421 User Guide 2-9
2
(20lb) paper.
Page 28
Bypass Tray
The Bypass Tray is for loading special paper, transparencies,
labels and cardstock. There is an extension tray that can be
pulled out to enable larger size paper to be fed.
HINT: Refer to Appendix B - Specifications for more
information about approved media.
Optional Additional Memory
Two extra memory cards are avail able with 64mb on each.
There is a door on the back of the machine that provides
access to the memory card slots.
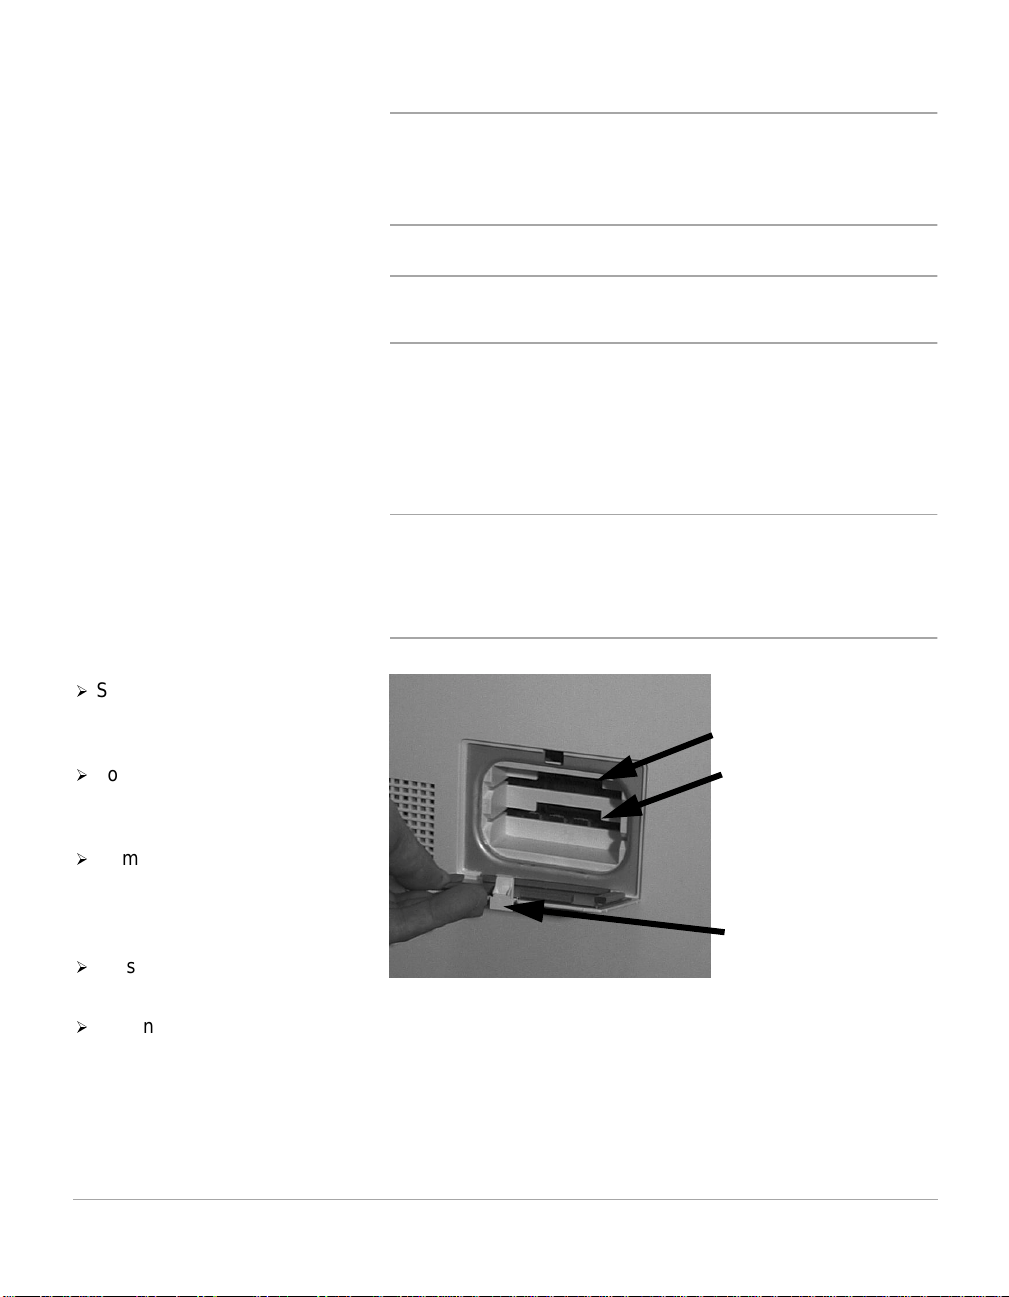
Use the following procedure to insert additional memory cards
into the memory slots:
CAUTION:Switch off the power and disconnect the power
cord from the outlet prior to inst alling additional memory.
These components may be susceptible to Electro-Static
Discharge (ESD). Observe all ESD procedures to avoid
damage.
½
Switch off the power and
disconnect the power cord
from the outlet.
½
Locate the Memory Card slot
Memory cards are
inserted in to these
slots
cover at the rear of the
machine and open the cover.
½
Remove any protective
packaging from the memory
cards and slide eac h card into
a Memory Card slot.
½
Close the Memory Card slot
Memory Card slots
cover
cover.
½
Reconnect the power cord
and switch on the machine.
2-10 WorkCentre Pro 421 User Guide
Page 29
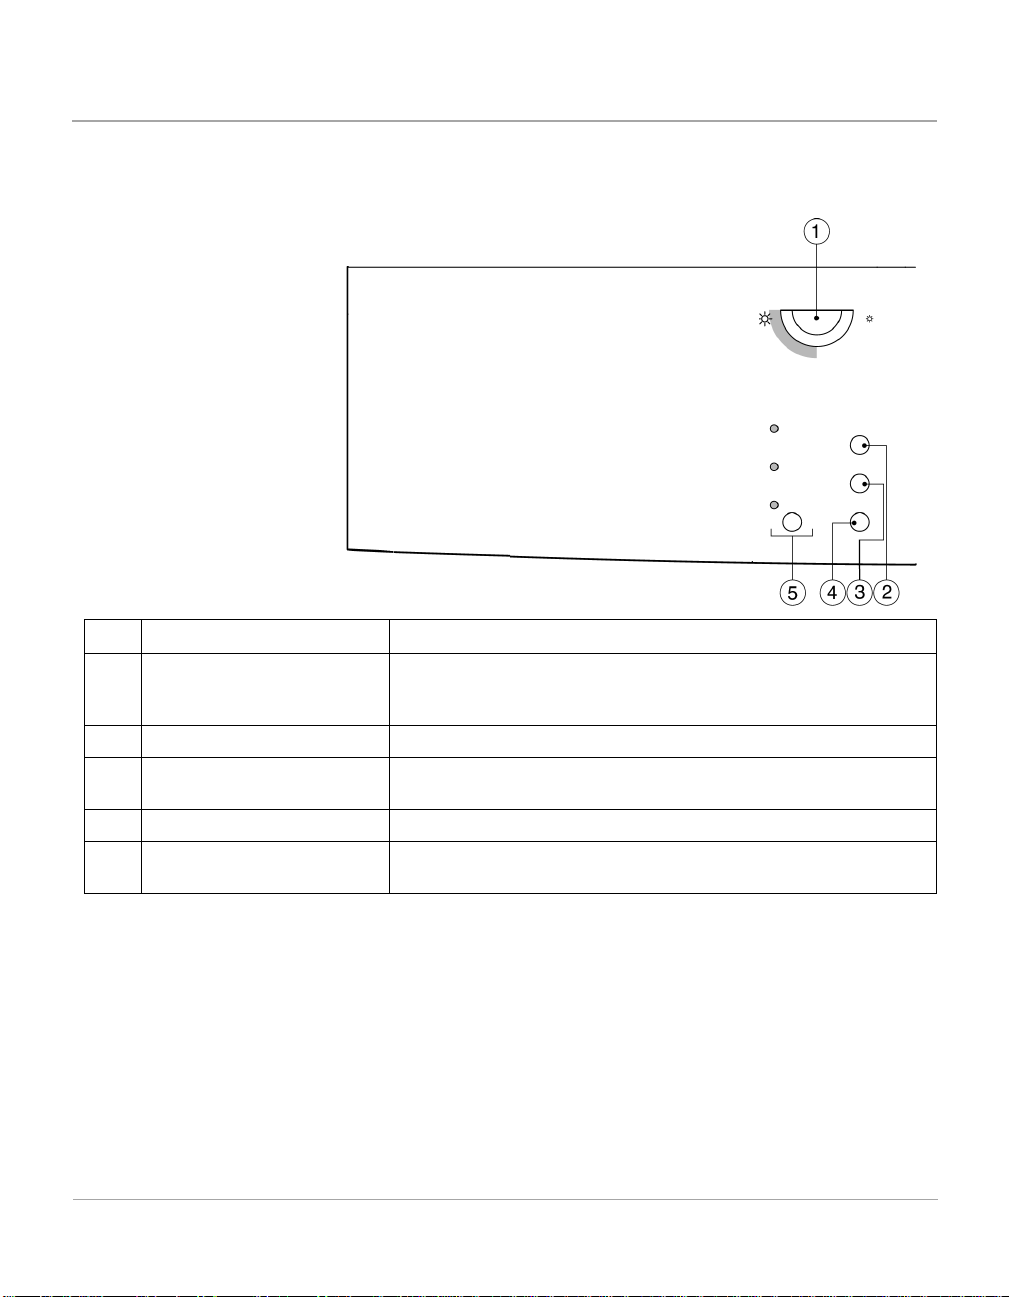
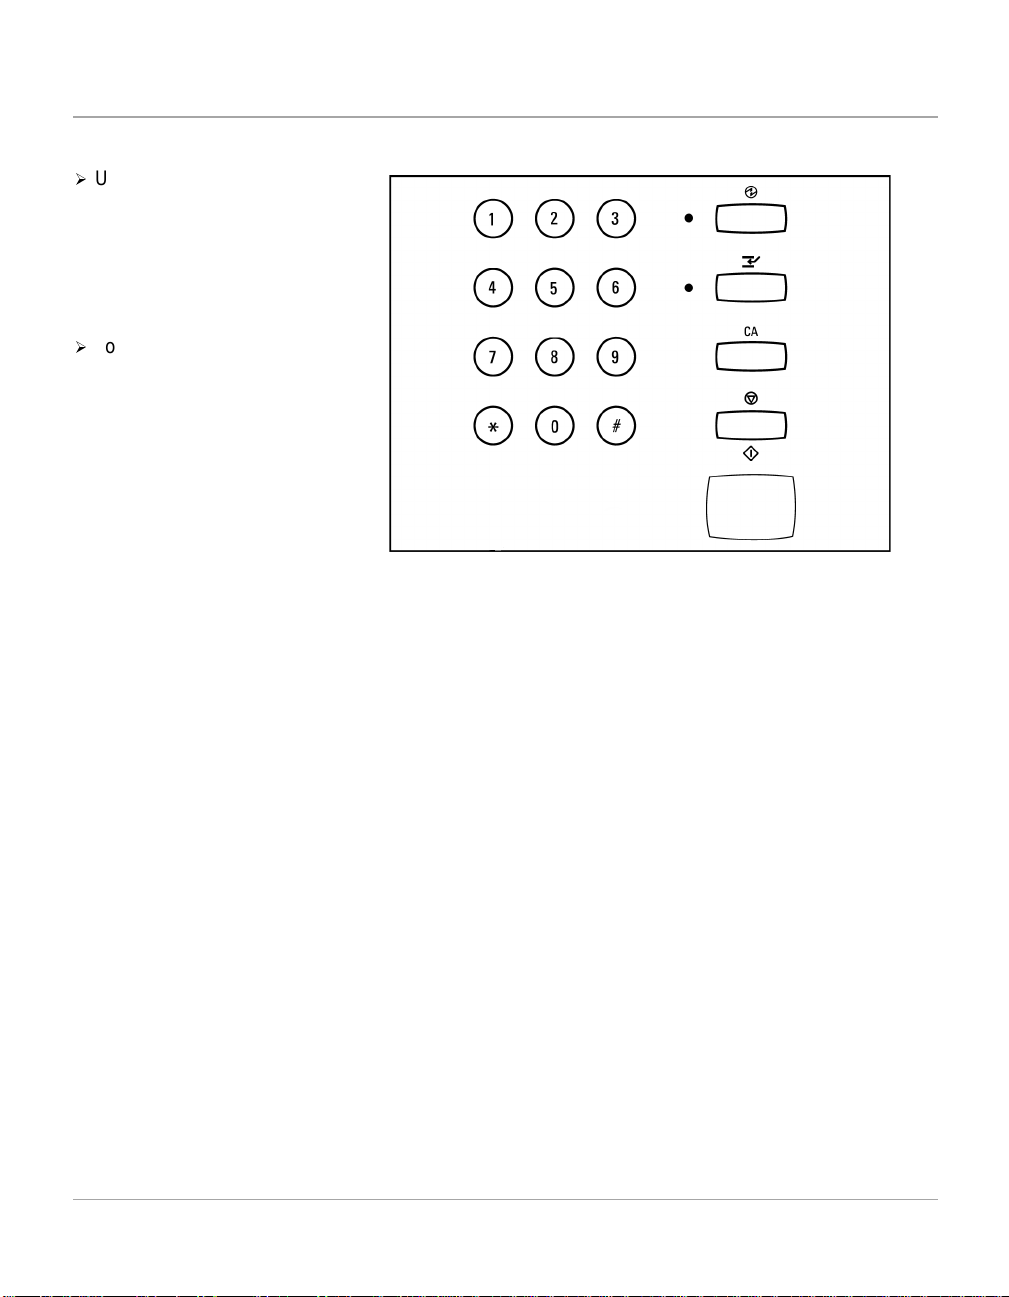
Control Panel Components and Function Keys
The Control Panel keys and functions available depend on
your WorkCentre Pro 421 configuration.
Item Description Function
1 Contrast Adjuster Adjusts the brightness and darkness of the LCD display.
When it is turned clockwise, the LCD becomes lighter and
turned anticlockwise, the LCD becomes darker.
2 Lighten/Darken Select to adjust the image contrast.
3 Reduce/Enlarge Select to reduce or enlarge the original image on the copy
paper.
4 Paper Supply Select to change the paper tray you want to use.
5 Original Type Select the type of original to be scanned to improve image
quality.
Product Overview
WorkCentre Pro 421 User Guide 2-11
Page 30
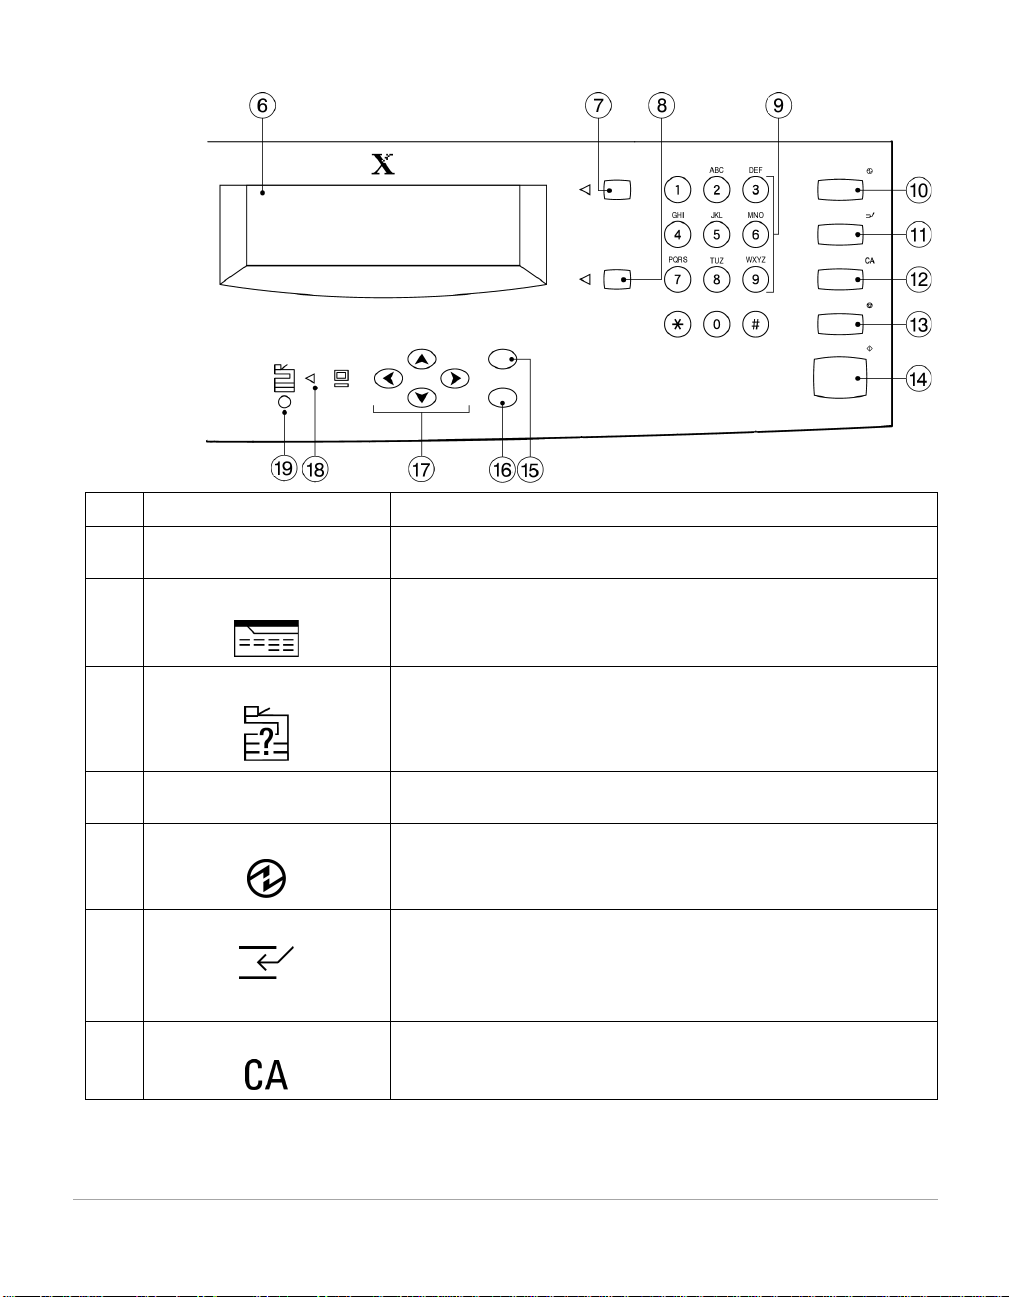
Item Description Function
6 LCD Display Displays the status of the machine, operation process,
various instructions and messages.
7 Features This key gives access to the screens which enable you to
program features.
8 Machine Status Select to change or view the various default settings of the
machine and paper trays. Printer defaults are also accessible
via Machine Status. To exit Machine Status press Features.
9Numeric Keys
(0 to 9, *, #)
Use these keys to enter numeric values when programming
features and settings.
10 Energy Saver Press to enter the Sleep Mode. Once selected, the light next
to the key is illuminated. To exit Sleep Mode press the key
again.
11 Interrupt Press to suspend the current job so that another job can be
performed. During the job interruption, the light next to the
key is illuminated. When the key is pressed again, the
interrupted job proceeds. If this key is pressed again during a
print job, the print job will pause to allow a copy job to be run.
12 Clear All Press once to clear the number of copies entered.
Press twice to clear all features selected in the Copy function.
2-12 WorkCentre Pro 421 User Guide
Page 31

Item Description Function
13 Stop This key affects any active job displayed on the LCD. When
pressed during copying the job is paused. Press [Start] to
resume or [CA] to cancel.
14 Start Press this key to commence a job and start scanning the
originals.
15 Enter key Enters or saves the selected value displayed on the LCD
screen.
16 Exit Exits to the previous screen without saving any changes
made to the current screen.
17 Scroll Keys Use these keys to scroll through the selectable choices and
features on the LCD.
18 PC LED Illuminates when data received from a PC is being
processed.
19 Alarm LED Illuminates when the machine has an error, jam or needs
consumables.
Product Overview
WorkCentre Pro 421 User Guide 2-13
Page 32

Power ON/OFF
Powering On
½
Locate the ON/OFF switch.
½
Press l to power on the
machine.
Ensure that the machine is connected to a suitable power
supply and that the power cord is fully plugged into the
electrical outlet.
NOTE: For voltage information refer to Appendix B Specifications.
The machine will begin to warm up when the switch is powered
on. The power switch is located on the front of the machine.
Power Switch
Powering Off
The power is switched off as soon as the on/off switch is
pressed to off.
For optimum performance the machine should be powered on
24 hours a day.
2-14 WorkCentre Pro 421 User Guide
Page 33

Power Save
The machine has a Power Save feature which significantly
reduces the power consumption during periods of inactivity.
The Power Save feature operates in two modes:
- Standby Mode
- Sleep Mode (Energy Saver)
The Energy Saver light illuminates when the Sleep Mode
(Energy Saver) has been selected.
Product Overview
Energy Saver Light
WorkCentre Pro 421 User Guide 2-15
Energy
Saver Key
Page 34

Standby Mode
As delivered, the machine automatically switches into Standby
Mode 15 minutes after the last activity. In this mode, the LCD
screen is visible and the message “Standby mode” is shown on
the LCD screen when the WorkCentre Pro 421 is in Features
Mode. To activate the machine, press any key on the control
panel or open the document glass cover or document feeder.
The machine responds within 1 second and all the features are
available within 30 seconds.
HINT: The factory default setting of 15 minutes is customer
changeable within the range of 1 to 240 minutes. For more
information refer to “Changing the Default Time Setting” on
page 7-5.
Sleep Mode (Energy Saver)
As delivered, the machine automatically switches into Sleep
Mode 15 minutes after the machine enters the Standby Mode.
HINT: The factory default setting is cu sto mer cha ngea bl e
within the range of 3 to 240 minutes, for more information refer
to “Changing the Default Time Setting” on page 7-5.
Alternatively, pressing the Energy Saver key on the control
panel, also puts the machine into Sleep Mode (Energy Saver).
To reactivate the machine, press the Energy Saver key again.
NOTE: Energy Saver is not selectable if a job has not been
completed or if there is a fault such as a paper jam on the
machine.
2-16 WorkCentre Pro 421 User Guide
Page 35

Modes
There are two modes available on the machine:
Features
This key gives access to the screens which enable users to
programme features.
Machine Status
This key gives access to information such as paper tray size
settings, machine defaults, printer defaults and machine
information about the WorkCentre Pro 421.
Features key
Machine Status key
Product Overview
WorkCentre Pro 421 User Guide 2-17
Page 36

Features Key
½
Press [Features] on the
control panel to display
Ready screen.
Machine Status Key
Use the Features key to select programmable features in the
Copy func tion.
NOTE: The functions available depend on the configuration of
your machine.
Ready to copy
Paper : Auto
Output : Collated
L/D : Auto
R/E : 100%
1
Added Features
NOTE: This screen is the default setting on delivery.
Displays information about the WorkCentre Pro 421. Machine
default values and various setups may be changed.
Machine status
01. Default settings
½
Press the [Machine Status]
key to access the settings
available.
½
To exit [Machine Status],
press the [Features] key.
2-18 WorkCentre Pro 421 User Guide
02. Print report
03. Initial setup
04. Menu map
05. Self test
06. Customer support number
07. Machine serial number
08. Xerox supply number
09. Total print counter
10. Machine revisions
Page 37

Machine Status Options
The options available in Machine Status are:
NOTE: The options available may vary depending on your
machine configuration.
Default settings Contains the default values of the machine. Changeable
options available are:
- Machine defaults
- Copy defaults
- Printer defaults
Print Report Allows reports to be printed. Report options are:
- Department code
- Settings report
Initial setup Contains the default options which should be setup when the
machine is first installed:
-Date & Time
- Localization
- Language
- Machine serial number
- Customer support
-Network
Product Overview
Menu map Use to print a list of all the options available in Machine Status.
HINT: For easy reference print out a Menu Map and keep it
next to the machine.
Self test Allows access to machine tests which can be run to identify
problem areas of the machine. Test results can printed.
- Auto test
- Individual test
- Print test result
WorkCentre Pro 421 User Guide 2-19
Page 38

Customer support number Call this telephone number if you have any questions or
problems with your WorkCentre Pro 421.
Machine serial number This is where you find the serial number of the machine. It can
also be found inside the front right cover. You will need this
number when ordering supplies and calling for service.
Xerox supply number Displays the telephone number you should call to order
supplies for your WorkCentre Pro 421.
Total print counter Displays the total number of prints made by the WorkCentre
Pro 421.
Machine revisions Displays the revisions which are included on your machine.
You may be asked for these if you have to call for service.
HINT: For detailed instructions on how to change these setups
please refer to Chapter 7 - Machine Defaults and Setups.
2-20 WorkCentre Pro 421 User Guide
Page 39

3 Copy
Copy
Standard Features
This chapter contains information about the Copy function and
the features available. It provides step by step instructions for
programming and running a copy job.
As delivered the machine will have the factory default copy
settings. These copy settings are customer changeable. This
chapter also gives step by step instructions on how to change
the default copy settings.
Lighten/Darken
-Auto
- Manual
- Toner Saver
Reduce/Enlarge
- 100%
-Auto%
-Preset%
- Variable%
- Whole image
Paper Supply
- Trays 1 and 2
- Bypass tray
- Auto Paper
Original type
-Photo
- Text/Photo
-Text
WorkCentre Pro 421 User Guide 3-1
Page 40

Copying Procedure
Quick Pathway
½
Load originals.
½
Select quantity required.
½
Choose the Copy features
required.
½
Press [Start].
1. Load the Originals
Before making copies identify what is to be copied, the number
of copies required and any special programming requirements.
Use the following steps to make a copy.
NOTE: Press [CA] twice to clear or cancel any previous
programming selections before starting.
A choice of document input areas is available. These are:
- An automatic document feeder (ADF) for multiple single
sided originals.
- A duplex automatic document feeder (DADF) for
multiple single or double sided originals.
- A document glass for single originals or bound originals.
Automatic Document Feeder (ADF) and
Duplex Automatic Document Feeder (DADF)
Up to 50 originals can be scanned at one time using the
document feeder. Ensure the originals are of the same size, in
good condition and all staples or paper clips removed.
Originals should be 60 - 120g/m
inch) long edge feed or A5 to A3 (5.5 x 8.5 to 11 x 17 inch) short
edge feed.
3-2 WorkCentre Pro 421 User Guide
2
(16 - 32 lb) and A4 (8.5 x 11
Page 41

½
Remove all staples and paper
clips before placing the
originals into the document
feeder.
½
If necessary, adjust the sliding
guides to the paper size
required.
½
Insert the originals neatly into
the document feeder, face up.
The first page should be on
top with the headings towards
the back or left of the
machine.
½
Align the stack with the left
and rear edges of the
document feeder tray and
adjust the guides to just touch
the front and rear edges of
the originals.
Copy
Sliding
guides
When Auto Pa per is selected, the document feeder senses the
size and orientation of the originals, it then checks the paper
trays to find one that corresponds.
NOTE: Auto Paper is used with standard original sizes. For
non-standard sizes, manual ly sele ct the paper tray requi red.
WorkCentre Pro 421 User Guide 3-3
Page 42

½
Raise the document feeder or
the document glass cover if
fitted.
½
Position the original face down
on the document glass. Align it
with the registration arrow in
the rear left corner.
Document Glass
The document glass should be used for single pages or bound
originals up to a maximum size of A3 (11 x 17 inch).
½
Lower the document feeder or
document glass cover.
NOTE: On completion of a copy
job ensure the document glass
cover is fully closed.
Registration
Corner
See page 3-17 if you are
making collated copies from the
document glass.
3-4 WorkCentre Pro 421 User Guide
Page 43

2. Press the Features Key
Press [Features].
½
Ensure that the Ready to
Copy screen is displayed.
Ready to copy
Paper : Auto
Output : Collated
Copy
Features Key
1
L/D : Auto
R/E : 100%
Added Features
WorkCentre Pro 421 User Guide 3-5
Page 44

3. Select the Copy Features
There are four standard features available. The keys are
located to the left of the LCD screen.
For most of the standard features, when the keys are pressed
the LCD screen displays the choices which apply to each
feature. Using the scroll keys, select the option required and
press [Enter]. The initial Copy screen displays the new
selection.
For the Or iginal Type feature, the options available are
displayed on the Control Panel with an illuminated LED
identifying which option is selected.
NOTE: Only those features relevant to the machine
configuration will be available. The features not available in
the menu are grayed-out.
For a more detailed explanation of the standard Copy features
available, please refer to the following pages:
- Lighten/Darken - page 3-10
- Reduce/Enlarge - page 3-11
- Paper Supply - page 3-13
- Original Type - page 3-14
3-6 WorkCentre Pro 421 User Guide
Page 45
4. Enter the Quantity
½
Use the numeric keypad to
enter the number of copies
required. The quantity entered
is displayed in the top right
corner of the LCD screen.
The default copy quantity is 1.
½
To cancel an incorrect entry,
press [CA] once and enter the
correct quantity.
Up to 999 copies can be entered using the numeric keypad.
Copy
WorkCentre Pro 421 User Guide 3-7
Page 46

5. Press Start
½
Press [Start]. Each original is
scanned once only.
NOTE: See page 3-17 if you are
making collated copies from the
document glass.
If a resource problem or
programming conflict prevents
the job completing, a message
will be displayed. Follow the
message to resolve the
problem.
Start key
If the original is not a standard
size the machine may not be
able to detect the size
automatically and the “Select
original size” screen displays.
½
If required, use the scroll key
to select the original size
and press [Start].
½
On completion, remove the
scanned originals from under
the document feeder or from
the document glass.
3-8 WorkCentre Pro 421 User Guide
Select original size
A3
A4
A5
1
Page 47

Using Job Interrupt
½
Press [Job interrupt].The
light next to the Job interrupt
key will illuminate. All the
current job settings will be
stored.
The Ready to Copy screen will
display.
½
Remove any existing originals
from the document glass or the
document feeder.
½
Place your new original(s) on
the document glass or in the
document feeder.
½
Select the quantity and program
any features you may require
from the following: Lighten/
Darken, Reduce/Enlarge, Paper
Supply, Output, Original Type,
Image Shift and Edge Erase.
If the machine is in the process of copying it is possible to
pause the current job to make a convenience copy.
Ready to copy
Paper : Auto
Output : Collated
Added Features
L/D : Auto
R/E : 100%
Copy
1
½
When your convenience copy
job has finished press [Job
interrupt] again. The previous
job settings will be redisplayed
on the LCD.
½
Reload the previous originals in
the document feeder or place
on the document glass and
press [Start] to resume the
previous copy job.
WorkCentre Pro 421 User Guide 3-9
Page 48

Standard Copy Features
The standard Copy features are selected by using the keys
located on the control panel.
NOTE: Some options are not available in all Markets and for
every machine configur ati on.
Lighten/Darken
Quick Pathway
½
Lighten/Darken
½
Auto
½
Manual
½
Toner Saver
½
Load originals.
½
Press the [Lighten/Darken]
key.
½
Select the Lighten/Darken
option required for the job
using the scroll keys.
½
Press [Start].
Use the lighten/darken settings to adjust the contrast of the
output.
Ready to copy
Lighten/
Darken:
Lighten/Darken Options
Auto The machine automatically adjusts the image quality of the
output.
Auto
Manual
Toner Saver
1
Manual Allows manual adjustment to be made to the image quality of
the output. There are 7 levels of lightness and darkness that
can be set, press [<] or [>] to change these levels.
Toner Saver Produces a lower standard of image quality output which uses
less toner. Ideal for draft and plain text documents.
3-10 WorkCentre Pro 421 User Guide
Page 49

Reduce/Enlarge
Quick Pathway
½
Reduce/Enlarge
½
100%
½
Auto%
½
Preset%
½
Variable%
½
Whole Image
½
Load originals.
½
Press the [Reduce/Enlarge]
key.
½
Select the Reduce/Enlarge
option required for the job
using the scroll keys.
½
Press [Start].
In addition to 100% size for size copies, reduced or
enlarged copies can be produced by choosing one of the
Reduce/Enlarge options.
Ready to copy
Reduce/
Enlarge:
Reduce/Enlarge Options
100%
Auto%
Preset%
Variable%
Whole Image
Copy
1
100% Size for size copies.
Auto% Automatically reduces/enlarges an image to fit on the paper
size selected.
Preset% Displays the most frequently used preset reduce/enlarge
settings.
The preset Reduce/Enlarge settings for Europe are:
71% - A3 to A4
94% - A4 to 8.5 x 11 inch
97% - 8.5 x 11 inch to A4
141% - A4 to A3
200%
WorkCentre Pro 421 User Guide 3-11
Page 50

For the Americas and Canada, the preset Reduce/Enlarge
settings are:
65% - 11x17” to 8.5x11” and 8.5x11” to 5.5x8.5”
78% - 8.5x14” to 8.5x11”
97% - 8.5 x 11 inch to A4
129% - 8.5x11” to 11x17” and 5.5x8.5” to 8.5x11”
154% - 5.5x8.5” to 8.5x14”
Variable% When the original is scanned using the document glass, the
reproduction ratio of 25% to 400% can be specified.
When the original is scanned using the ADF or DADF, the
reproduction ratio of 50% to 200% can be specified.
Use the scroll key to choose a specific reduction or
enlargement in 1% increments. If you keep the scroll key
pressed down you can select 10% increments at a time.
Whole Image Reduces the whole image by 97% so that the entire image fits
on the copy paper.
NOTE: When using the Whole Image feature always select
the same size paper as your original using the Pape r Suppl y
option. Do not select [Auto] in the Paper Supply menu. The
reduced image needs to be copied onto paper the same size
as the original and is copied onto the centre of the page.
3-12 WorkCentre Pro 421 User Guide
Page 51

Paper Supply
Quick Pathway
½
Paper Supply
½
Tray 1
½
Tray 2
½
Bypass tray
½
Auto Paper
½
Load originals.
½
Press the [Paper Supply] key.
½
Select the Paper Supply
option required for the job
using the scroll keys.
½
Press [Start].
Use the Paper Supply options to select the paper tray
required for the j ob. Usin g Auto Paper al lows t he machi ne
to select the paper tray based on the default setting or the
size of original being copied.
The machine does not automatically detect the size of the
paper in the trays. The user must program the size of
paper in each tray using the Paper Trays option in Machine
Defaults.
HINT: For information about loading paper, refer to
“Loading Paper” on page 5-24. Paper size and orientation
assigned to each paper tray (also bypass tray), should be
setup in using Machine Status, refer to page 7-3 for
instructions.
Ready to copy
Paper
Supply:
1 :8.5x11”
2 :11x17”
:A4
Auto Paper
Copy
1
Paper Supply Options
Use to select an individual paper tray. Paper size and
orientation is displayed on the right side of the illustration.
Use to select the bypass tray. Paper size and orientation is
displayed on the right side of the illustration.
Auto Paper Accepts the default setting for the paper supply. If a specific
paper size is not selected, the WorkCentre Pro 421 defaults to
the size it senses from the original and selects the appropriate
tray.
WorkCentre Pro 421 User Guide 3-13
Page 52

Original Type
Quick Pathway
½
Original Type
½
Text
½
Text/Photo
½
Photo
½
Load originals.
½
Press the [Original Type] key
until the selection appropriate
for your originals is
illuminated.
½
Press [Start].
Use the Original Type settings to define the type of images
being scanned to enable the machine to produce the best
image quality output available.
Original Type Key
Original Type Options
Text Used for scanning text, solids, line art and halftones.
Text/Photo Automatically adjusts the image quality based on the attributes
of the original. Text/Photo can also be used to make copies of
originals that contain halftones and different images.
Photo Used for scanning continuous-tone photographs and high-
quality, high-frequency halftones.
3-14 WorkCentre Pro 421 User Guide
Page 53

Added Features
Quick Pathway
½
Select [Added Features].
½
Select the feature required
and press [Enter].
½
Select the option required
and press [Enter].
½
To view the Copy Added
Features menu select [Copy]
if available, and press the
scroll key .
Added Features contains features appropriate for your
more advanced copy jobs.
Use the instructions below to access and program the
Added Features.
NOTE: When certain features are selected other features
may become unavailable and will appear on the screen
lighter or “grayed out”. Some options are not available in
all Markets and for every machine configuration.
Ready to copy
Paper : Auto
Output : Collated
L/D : Auto
R/E : 100%
Copy
1
The Added Features menu
displays each feature and its
current setting.
½
To program a feature, use the
scroll keys to
select the required feature
and press [Enter].
Use the scroll key to
select your preferred choice
e.g. [1>2 sided].
Press [Enter] to save the
selection and return to the
previous screen.
Press [Start] to initiate the
copying process.
Added Features
Ready to copy
2-sided
Bound Original
Image Shift
2-sided
Original > Copy
1 > 1 sided
1 > 2 sided
2 > 2 sided
2 > 1 sided
1
: 1 > 1 sided
: Off
: Off
1
WorkCentre Pro 421 User Guide 3-15
Page 54

Output
Load originals.
Use this feature to produce the copied output as collated or
uncollated sets. The machine default setting is collated.
Use the scroll key to
select [Added features].
Use the scroll key to
select [Output] and press
[Enter].
Use the scroll key to
select the option required and
press [Enter].
Press [Start] to initiate the
copying process.
Collated This option delivers the specified number of copy sets to the
Output
1
Collated
Collated/Offset
Uncollated
Uncollated
/Offset
Output Options
NOTE: Only Network connected machines have the offset
feature.
tray in the same order as the originals. If selecting two copies
of a three-page document, the order of the output will be pages
1-2-3, 1-2-3.
Collated/offset This option collates the copy sets (see above), and separates
them from each other for easy retrieval.
Uncollated This option delivers the copies to the tray in the order based on
the total number of copies for each original. The order of the
output for two copies of a three-page document will be 1-1, 22, 3-3.
Uncollated/offset This option delivers the copies uncollated (see above), and
separates the copy sets from each other for easy retrieval.
3-16 WorkCentre Pro 421 User Guide
Page 55

Making Collated Sets from the Document Glass
½
Program the features
required.
½
Use the scroll key to
select [Added features].
½
Use the scroll key to
select [Output] and press
[Enter].
½
Use the scroll key to
select [Collated].
½
Place the first original on the
document glass and press
[Start].
½
Remove the original and
place the second original on
the document glass.
½
Ensure [Scan next original] is
selected and press [Start].
When you make copies from the document glass, the machine
will scan each original. When you select Done the machine
then prints the number of collated sets requested.
Press start to resume
3
Scan next original
Done
Copy
½
Repeat this for each original.
.
½
After the last original has
been scanned, use the scroll
key to select [Done] and
press [Start].
Your job will be printed and
delivered collated to the
output tray.
WorkCentre Pro 421 User Guide 3-17
Press start to resume
Scan next original
Done
3
Page 56

2-Sided
Load originals.
Use the scroll key to
select [Added features].
Use the scroll key to
select [2-sided] and press
[Enter].
If your WorkCentre Pro 421 is configured with a duplex unit, up
to 50 double-sided copies ranging in size from A5 to A3 (8.5 x
5.5 to 11 x 17 inch) can be made automatically from one or twosided originals.
2-sided
1
Original > Copy
1 > 1 sided
1 > 2 sided
Use the scroll key to
select the option required and
press [Enter].
Press [Start] to initiate the
copying process.
1>1 Sided Single-sided copies from single-sided originals.
1>2 Sided Double-sided copies from single - sided orig ina ls .
2>2 Sided Double-sided copies from double-s ide d origi nal s.
2>1 Sided Single-sided copies from double-sided originals.
2 > 2 sided
2 > 1 sided
2-Sided Options
3-18 WorkCentre Pro 421 User Guide
Page 57

Bound Original
½
Place the bound original face
down on to the document
glass.
½
Close the cover until it rests on
the bound original. Do not
force it shut.
½
Use the scroll key to
select [Added features].
½
Ensure [Bound Original] is
selected and press [Enter].
½
Use the scroll key to
select the option required and
press [Enter].
Select Bound Original to make copies of pages from bound
originals or magazines using the Document Glass.
NOTE: There are a number of features which are not
available with Bound Original. Any features not available will
be grayed-out.
Bound Original
Off
On (Both pages)
On (Binder Erase)
Copy
1
½
Press [Start] to initiate the
copying process.
NOTE: On completion of copying a bound original ensure the
document glass cover is fully closed.
WorkCentre Pro 421 User Guide 3-19
Page 58

Bound Original Options
Off The feature is unavailable.
On (Both Pages) Copies both pages of an open bound document and places
each page on a separate sheet of paper.
On (Binder Erase) Erases between 4 and 30 mm (0.16 and 1.2 inches) from the
centre (binder area) of a bound document. Default is 15 mm
(0.60 inches).
3-20 WorkCentre Pro 421 User Guide
Page 59

Image Shift
NOTE: Ensure that the
originals are in the same
orientation as the media loaded
in the paper tray.
½
Load originals.
½
Use the scroll key to
select [Added features].
½
Use the scroll key to
select [Image Shift] and press
[Enter].
½
Select the option required
and press [Enter].
½
Press [Start] to initiate the
copying process.
Use this feature to change the position of the image on a page.
Image Shift
1
Off
Left Margin
Right Margin
Image Shift Options
Copy
Off The feature is unavailable.
Left Margin Shifts the image to the right. The image can be shifted between
4 and 15 mm (0.16 and 0.6 inches), default is 7mm (0.28
inches).
Right Margin Shifts the image to the left. The image can be shifted between
4 and 15 mm (0.16 and 0.6 inches), default is 7mm (0.28
inches).
WorkCentre Pro 421 User Guide 3-21
Page 60

Edge Erase
NOTE: Ensure that the originals
are in the same orientation as
the media loaded in the paper
tray.
½
Load originals.
½
Use the scroll key to
select [Added Features].
½
Use the scroll key to
select [Edge Erase] and
press [Enter].
½
Select the option required
and press [Enter].
Use this feature to erase unwanted marks such as hole punch
impressions from the edge of the copy.
NOTE: There are a number of features which are not
available with Edge Erase. Any features not available will be
grayed-out.
Edge Erase
1
Off
On
½
Press [Start] to initiate the
copying process.
Edge Erase Options
Off The feature is unavailable.
On Erases a specific amount from each edge of the copy. Erases
between 4 and 20 mm (0.16 and 0.8 inches) from each edge.
Default is 10 mm (0.4 inches).
3-22 WorkCentre Pro 421 User Guide
Page 61

2-Up
NOTE: Originals must be
loaded long edge feed in the
document feeder.
½
Load originals.
½
Select [Paper Supply] and the
paper size required and press
[Enter].
½
Use the scroll key to
select [Added features].
½
Use the scroll key to
select [2-Up] and press
[Enter].
½
Select the option required
and press [Enter].
½
Press [Start] to initiate the
copying process.
This feature prints the images from two independent originals
onto one sheet of paper. The WorkCentre Pro 421 reduces/
enlarges the images as needed to print them in landscape
orientation on one page based on the paper supply selected.
2-Up
1
Off
On
Copy
2-Up Options
Off The feature is unavailable.
On With this option the 2-Up feature is enabled. Select 1>1 for
single-sided output or 1>2 for double-sided output.
WorkCentre Pro 421 User Guide 3-23
Page 62

Booklet
If your WorkCentre Pr o 42 1 is configured with a duplex unit, it
can be used to produce booklets from both A3 and A4 (11 x 17
and 8.5 x 11 inch) originals.
A3 (11 x 17 inch) or iginals are au tomatical ly reduced to A5 (8.5
x 5.5 inch) image size and placed 2-up on both sides of A4 (8.5
x 11 inch) copy paper.
A4 (8.5 x 11 inch) originals are automatically reduced to A5 or
A6 (8.5 x 5.5 or 5.5 x 4.25 inch) size according to the size of
the paper in the selected paper tray. Using A4 (8.5 x 11 inch)
copy paper will reduce the images to A5 (8.5 x 5.5 inch) size
and using A5 (8.5 x 5.5 inch) copy paper will reduce the images
to A6 size (5.5 x 4.25 inch).
The images are automatically placed on the paper in the
correct order to produce a booklet.
NOTE: There are a number of features which are not
available with Booklet. Any features not available will be
grayed-out.
3-24 WorkCentre Pro 421 User Guide
Page 63

To Produce a Booklet
½
A3 (11 x 17 inch) portrait
originals should be placed
with the bottom edge to the
left of the machine.
A4 (8.5 x 11 inch) portrait
originals should be placed
with the bottom edge to the
front of the machine.
½
Use the scroll key to
select [Added features].
½
Use the scroll key to
select [Booklet] and press
[Enter].
½
Use the scroll key to
select [On] and press [Enter].
½
Press [Start] to initiate the
copying process.
NOTE: You can place the originals directly on the glass. A3
(11 x 17 inch) portrait originals should be placed face down
with the bottom edge to the left of the machine.
Ready to copy
2-sided
Bound Original
Image Shift
Edge Erase
2-Up
Booklet
: 1 > 1 sided
: Off
: Off
: Off
: Off
: Off
Booklet
Off
On
Copy
1
1
NOTE: For originals copied directly from the glass, you will
need to select [Done] when you have finished scanning.
WorkCentre Pro 421 User Guide 3-25
Page 64

Annotation
½
Load originals.
½
Use the scroll key to
select [Added features].
½
Use the scroll key to
select [Annotation] and press
[Enter].
½
Select the option required
and press [Enter].
½
Press [Start].
Use this feature to add the date, time and page numbers to the
copy output.
NOTE: There are a number of features which are not
available with Annotation. Any features not available will be
grayed-out.
Annotation
1
Off
Page number (#)
Page # + Date & Time
NOTE: If using this feature with reduce or enlarge settings
other than 100% size for size copying, you may experience
some edge deletion on the page number and date & time text.
Annotation Options
Off The feature is unavailable.
Page number (#) Prints page numbers on the feed edge of the paper on the right.
Page # Date & Time Prints the page number, current date and the time based on the
machine settings. The date and time is printed on the left and
the page number is printed on the right.
HINT: Date and Time can be set up in using Machine Status,
refer to page 7-24 for instructions.
3-26 WorkCentre Pro 421 User Guide
Page 65

Build Job
½
Load only the first page/section
into the document feeder or
place the original on the glass.
½
Use the scroll key to select
[Added Features].
½
Use the scroll key to select
[Build Job] and press [Enter].
½
Use the scroll key to select
[On] and press [Start].
Use this feature to build a job that has mixed type originals,
different settings may be required for different pages. For
example, if a set of originals consists of some pages with text
and some with photos, you can select appropriate settings to
be applied to individual pages or sections of a complete job.
This feature is also useful for scanning jobs with more than 50
originals.
By default, Build Job is set to Off.
NOTE: There are a number of features which are not
available with Build Job. Any features not available will be
grayed-out.
Build Job
Off
On
IMPORTANT: On document glass configuration
machines a job can consist of up to five pages.
IMPORT ANT: Depending on the machine memory , ADF or
DADF configuration machines can build jobs of up to five
sets of multiple page originals (maximum 50 pages in
each set).
Copy
1
WorkCentre Pro 421 User Guide 3-27
Page 66

If the original is not a standard
size the machine may not be
able to detect the size
automatically and the “Select
original size” screen displays.
½
If required, use the scroll key
to select the original size
and press [Start].
½
This message will appear
when the first page or section
of the document is being
scanned.
½
When the first page or section
of the document has finished
scanning remove the
original(s).
Select original size
8.5x11”
A4
A5
NOTE: If more than one set of each section has been
selected, depending on the features programmed, the
machine will copy just one set of each section. At the end of
the job the remaining sets will be copied.
Scanning into memory
Scanning page :001
1
1
½
Load the next page/section.
Build Job
½
Use the scroll key to
select [Change current
settings] if necessary and
press [Enter].
3-28 WorkCentre Pro 421 User Guide
Scan next page
End build job
Change current settings
1
Page 67

½
Use the scroll key to
select the setting you wish to
change and press [Enter].
½
Select the changes required
and press [Enter].
½
The [Setting] screen is
displayed again. Use the
scroll key to select
[Done] and press [Enter].
½
Repeat the steps above for
each section of the job.
½
After the last page/section
has been scanned, use the
scroll key to select [End
build job] and press [Enter].
½
Enter the quantity required
and press [Start].
The machine will complete the
quantity selected.
Setting
Done
Lighten/Darken : Auto
Edge Erase : Off
Build Job
Scan next page
End build job
Change current setti ngs
Copy
1
1
WorkCentre Pro 421 User Guide 3-29
Page 68

Stored Job
½
Program the job features
which require storing.
½
Use the scroll key to
select [Added Features].
½
Use the scroll key to
select [Stored Job] and press
[Enter].
½
Use the scroll key to select
[Store] and press [Enter].
Up to four combinations of feature selections can be retained
in the machine’s memory as stored jobs. The machine stores
only the programming for the job, not the image. Each time a
stored job is retrieved, the image must be scanned. The Stored
Job screen displays a list of all stored jobs.
NOTE: There are a number of features which are not
available with Stored Job. Any features not available will be
grayed-out.
To Store a Job
Stored Job
1
Retrieve
Store
½
Use the scroll key to select
[Store] and press [Enter].
½
Use the scroll key to
select the job number you
want to use and press [Enter].
½
Press the [Exit] key to return
to the Ready to Copy screen.
3-30 WorkCentre Pro 421 User Guide
Store
Job1
Job2
Job3
1
Page 69

To Retrieve a Stored Job
½
Use the scroll key to
select [Added Fe atu res].
½
Ensure [Stored Job] is
selected and press [Enter].
½
Ensure [Retrieve] is selected
and press [Enter].
½
Select the required job in the
list and press [Enter].
½
Press the [Exit] key to return
to the Ready to Copy screen.
½
Load your originals and press
[Start].
Stored Job
Retrieve
Store
Retrieve
Job1
Job2
Job3
Copy
1
1
WorkCentre Pro 421 User Guide 3-31
Page 70

Paper Type (Bypass Tray Only)
This feature enables copying information onto transparencies
and heavyweight stock such as labels or cardstock.
½
Load the media in the bypass
tray.
½
Use the scroll key to
select [Added Features].
Paper Type
½
Use the scroll key to
select [Paper Type] and press
[Enter].
½
Select the required option
and press [Enter].
½
Program additional options,
load originals and press
[Start].
Off Select for feeding standard 80g/m2 (20 lb) paper through the
Off
Transparency
Heavyweight
Paper Type Options
Bypass Tray (100 sheets maximum).
1
Transparency Select for feeding transparencies through the Bypass Tray (20
maximum).
Heavyweight Select for feeding cardstock or labels through the Bypass Tray
(maximum 1 sheet).
NOTE: To avoid overheated or distorted transparencies do not
copy onto transparencies without selecting T ransparency as
the Paper Type.
NOTE: When copying labels ensure the sheet is loaded face
down in the Bypass tray and that Heavyweight is selected as
the Paper Type.
3-32 WorkCentre Pro 421 User Guide
Page 71

Menu Map
½
Use the scroll key to
select [Added Features].
½
Use the scroll key to
select [Menu map] and press
[Enter].
The machine prints the menu
map.
The Menu Map is a list of all machine features and settings in
a report format.
Ready to copy
2-sided
Bound Original
Image Shift
Edge Erase
2-Up
Booklet
Annotation
Build Job
: 1 > 1 sided
: Off
: Off
: Off
: Off
: Off
: Off
: Off
1
Stored Job
Paper Type
: Off
Menu map
Menu map
Printing accepted
Copy
WorkCentre Pro 421 User Guide 3-33
Page 72

Changing Copy Defaults
Quick Pathway
½
Press [Machine Status].
½
Select [Default set tings]
and press [Enter].
½
Select [Copy defaults] and
press [Enter].
½
Select the required setting
and customize to meet
your requirements.
½
To access the Copy defaults
menu while in the Ready
mode, press the [Machine
Status] key located to the
right of the LCD.
The Machine Status menu
displays the default options.
½
Ensure [Default settings] is
selected and press [Enter].
During manufacture, certain settings for features and
functions of the WorkCentre Pro 421 are program med into
the machine. Once the machine is installed, Machine
Status can be used to change these settings to meet your
individual requirements.
Using the instructions below and the Copy Defaults table
provided on the following pages, customize the Copy
default settings to meet your copying needs.
NOTE: Some options are not available in all Markets and
for every machine configuration.
Machine status
01. Default settings
02. Print report
03. Initial setup
Machine status
01. Default settings
02. Print report
03. Initial setup
½
Use the scroll key to
select [Copy defaults] and
press [Enter].
Default settings
01. Machine defaults
02. Copy defaults
03. Printer defaults
3-34 WorkCentre Pro 421 User Guide
Page 73

½
Use the scroll key to
select the option required
and press [Enter].
½
Use the Copy Defaults table
below to identify the settings
available, select the setting
required and press [Enter].
The setting selected will
become the default setting.
½
When you have finished
customizing the settings,
press the [Features] key to
return to Ready mode.
Copy defaults
Copy
01. Reduce/Enlarge
02. Original type
03. Lighten/Darken
04. Output
05. Sides imaged
Default settings
01. Machine defaults
02. Copy defaults
03. Printer defaults
Copy Defaults
The following table lists each Copy default option, the settings
available for each option and a description of each setting.
Copy Default Option Settings Description
Reduce/Enlarge 1. 100% Size for size copies.
2. Auto% Automatically reduces/enlarges a
document to fit on the paper size
selected.
3. Whole image Reduces the whole image by 97%
so that the entire image fits onto the
copy paper.
WorkCentre Pro 421 User Guide 3-35
Page 74

Copy Default Option Settings Description
Sides Imaged 1. 1>1 Produces one-sided copies from
one-sided originals.
2. 1>2 Produces two-sided copies from
one-sided originals.
3. 2>2 Produces two-sided copies from
two-sided originals.
4. 2>1 Produces one-sided output from
two-sided originals.
3-36 WorkCentre Pro 421 User Guide
Page 75

4Print
Print
The WorkCentre Pro 421 can be connected to your workstation
using the parallel port on the workstation or through the
network. When the WorkCentre Pro 421 is connected,
electronic jobs that require printing can be sent from your
workstation directly to the machine.
Xerox network printer drivers enable printing from a
workstation to a WorkCentre Pro 421 on a network. The drivers
contain a variety of feature options which enable you to
customize your print jobs.
A GDI (Graphics Device Interface) printer driver is available for
the WorkCentre Pro 421 copier products. Customers wishing
to use this printer driver should download it from the ’Drivers’
area of www.xerox.com. Installation instructions are included
within the downloaded printer driver software.
This chapter provides instructions for printing to the
WorkCentre Pro 421 and an overview of the features and
functions available for printing.
The WorkCentre Pro 421 has the ability to allow copying
without corrupting a print job.
WorkCentre Pro 421 User Guide 4-1
Page 76

Printing Procedure
Quick Pathway
½
Create the document.
½
Select [Print] and
[Properties].
½
Choose the Printer driver
features required.
½
Select OK.
Print Drivers
Before the printing function can be used on the WorkCentre
Pro 421 the machine must be configured and setup on your
network or attached to your workstation via the parallel port.
NOTE: If you require your PC or Workstation configuring to
print to the WorkCentre Pro 421 or experience any difficulties
printing, please contact your System Administrator for
assistance.
NOTE: You cannot have the 421 PCL driver installed on the
same PC as the GDI driver.
Xerox Network Print Drivers
Once the WorkCentre Pro 421 is configured and connected to
the network, your PC or Workstation can be set up to print
using the customized Xerox Network Printer Drivers which are
provided with the machine.
Xerox GDI Print Driver
A GDI (Grap hics Devic e Interfac e) print er driver is availab le for
the WorkCentre Pro 421 copier products.
The GDI printer driver can be downloaded from the ’Drivers’
area of www.xerox.com. and can be used when the
WorkCentre Pro 421 is connected directly to your PC or
Workstation via the parallel port. Installation instructions are
provided within the GDI Printer Driver User Guide which is
contained within the printer driver software.
4-2 WorkCentre Pro 421 User Guide
Page 77

The PC requirements are shown below:
Windows 95 98 2000 NT4 XP
Processor (MHz)
Print
- Minimum
- Recommended
RAM (Mb)
- Minimum
- Recommended3264
Disk Space (Mb)
- Minimum44484
150
450
150
450
64
128
150
450
64
128
150
450
64
128
233
450
64
128
Parallel port on the PC must be set to ‘bi-directional’.
IEEE 1284 Parallel Cable (10 metres or 30 feet maximum).
NOTE: Depending on the specific driver being used, the
graphics shown in the following instructions may not exactly
match those in your driver. Available features are dependant
on machine configuration and the driver being used. Please
refer to the information provided with the specific driver.
WorkCentre Pro 421 User Guide 4-3
Page 78

1. Create the Document
2. Select Print
½
Select [Print] from the [File]
menu in your application.
The application Print window
displays.
½
Select the WorkCentre Pro
421 as your printer.
Documents for printing are created on your PC or Workstation
using a software application. For example, MicroSoft Word and
MicroSoft PowerPoint are widely used document creation
applications.
NOTE: If your print requirements involve printing particularly
large print jobs you may need to purchase additional memory
cards for your WorkCentr e Pr o 421.
4-4 WorkCentre Pro 421 User Guide
Page 79

3. Select the Printer Driver Features
½
Select [Properties] from the
application Print window.
NOTE: In some applications, the
Printer Driver features may be
accessed via a Setup option.
½
The printe r d riv er features ar e
displayed in the Properties
window.
Print
½
Select the features required
for the print job using the pull
down options and check
boxes provided in each
tabbed folder.
HINT: An overview of the
features available is provided in
the next section.
WorkCentre Pro 421 User Guide 4-5
Page 80

4. Print the Job
½
When all the required features
have been programmed,
select [OK].
The Properties window closes
and the application Print
window disp lays.
½
To send the job for printing,
select [OK] in the application
Print window.
To exit the Print option without
sending the job for printing,
select [Close].
½
When OK is selected, the job
is processed, a print file is
created and sent via the
network to the WorkCentre
Pro 421.
4-6 WorkCentre Pro 421 User Guide
Page 81

5. Retrieve the Print Job
½
If this message is displayed it
is necessary t o wai t f or th e jo b
to finish processing and be
printed before you can use the
WorkCentr e Pro 421 again.
½
If this message is displayed
your job is too large to print all
at once. The job will be
divided into smaller sections
and printed one section at a
time.
The print file is received by the WorkCentre Pro 421,
processed and interpreted and then printed. Your print job will
be delivered to the output area selected on the printer driver
when the job was sent.
At the Printer the LC D may, on occa sion , di splay t he f ollow ing
messages:
Job processing...wait
Paper : Auto
Output : Collated
L/D : Auto
R/E : 100%
1
Added Features
Job exceeds memory...wait
Paper : Auto
Output : Collated
L/D : Auto
R/E : 100%
1
Added Features
Print
NOTE: If you have this
message and you have selected
two or more sets, only one set
will print out. You will need to
resend the job for another set or
make copies.
WorkCentre Pro 421 User Guide 4-7
Page 82

6. Managing Print Jobs
½
Press the [Machine Status]
key located to the right of the
LCD.
If a problem occurs with your print job, or if you need to cancel
your print job use the Printer Default settings accessed via the
Machine Status key.
Accessing Printer Defaults
Use the instructions provided below to access the Print Default
settings:
The Machine Status menu
displays the settings options.
½
Ensure [Default settings] is
selected and press [Enter].
½
Use the scroll key to
select [Printer defaults] and
press [Enter].
Machine status
01. Default settings
02. Print report
03. Initial setup
Default settings
01. Machine defaults
02. Copy defaults
03. Printer defaults
4-8 WorkCentre Pro 421 User Guide
Page 83

½
Select [Cancel current job]
and press [Enter].
½
Select [Yes] to cancel the job
or [No] to retain the job and
press the [Enter] key.
½
Press the [Features] key to
return to Ready mode.
Cancelling a Print job
If the print job has been sent in error or if there is a problem with
the job, use the Cancel Current Job printer default setting to
cancel the job.
NOTE: You must only delete your own jobs from the Print
Queue. If there is a problem with another user’s job, contact
your System Administrator for assistance.
Printer defaults
01. Cancel current job
02. Force feed
03. Form feed
Cancel current job?
1. Yes
2. No
Print
WorkCentre Pro 421 User Guide 4-9
Page 84

½
Select [Force feed] and press
[Enter].
½
Press the [Features] key to
return to Ready mode.
Setting up Force Feed
The Force Feed printer default setting is used to forcibly print a
print job which is suspended due to the paper size mismatch
when Detect Paper Mismatch is Enabled. If your print job is
suspended due to paper size mismatch, use these instructions
to clear it from the machine.
Printer defaults
01. Cancel current job
02. Force feed
03. Form feed
4-10 WorkCentre Pro 421 User Guide
Page 85

½
Select [Form feed] and press
[Enter].
½
Select [Yes] to force a form
feed or [No] and press the
[Enter] key.
½
Press the [Features] key to
return to Ready mode.
Forcing a Form Feed
If a job is cancelled from the PC, data may remain in the
WorkCentre Pro 421 memory and will require clearing using
the Form Feed printer default setting.
Use the instructions below to forcibly print the data remaining
in the memory of the printer when a job has been cancelled
from the PC.
Printer defaults
01. Cancel current job
02. Force feed
03. Form feed
Forced form feed?
1. Yes
2. No
Print
WorkCentre Pro 421 User Guide 4-11
Page 86

Using Job Interrupt
½
Press [Job interrupt].The
light next to the Job interrupt
button will illuminate.
½
Place your original/s on the
document glass or in the
document feeder.
½
Select the quantity and choose
any programming features you
may require from the following:
Lighten/Darken, Reduce/
Enlarge, Paper Supply,
Original Type, Image Shift and
Edge Erase.
½
Press [Start]. The Ready to
Copy screen will display Auto
Start and show any features
you have selected.
When the print job has finished
your copy job wil l automatical ly
start.
If the machine is in the process of printing a job it is possible to
programme features for a copy job which will then
automatically start when the print job has finished.
Auto Start
Paper : Auto
Output : Collated
L/D : Auto
R/E : 100%
1
Added Features
½
When your copy job has
finished press [Job
interrupt] again to return the
machine to the Ready mode.
4-12 WorkCentre Pro 421 User Guide
Page 87

Printer Driver Features
There are a number of Printer Drivers available for the
WorkCentre Pro 421. The features available depends on the
printer driver being used. The following feature descriptions
are an overview of the typical features provided by the
WorkCentre Pro 421 Printer Drivers.
For information about a specific Printer Driver feature, please
refer to the online Help facility provided as part of the Printer
Driver software.
Control Options
There are a number of options which appear on all of the
printer driver screens:
OK Saves all the new settings and closes the driver or dialog.
These new settings remain in effect until you change them.
Cancel Closes the dialog and returns all settings in the tabs to the
values that were in place before you opened the dialog. Any
changes you have made are lost.
Print
Apply Saves all the changes you have made without closing the
driver.
Defaults Resets the current tab and all its settings to the system default
values. The action of this button applies only to the current tab.
All other tabs remain unchanged.
Default A ll Resets options to default system values on the Paper Output,
Layout, and Image Options tabs. Other features and tabs may
not have specific default settings and will not be affected by this
button.
Help Select the [Help] button in the bottom right of the printer driver
screen or [F1] on the PC keyboard for information on the
displayed printer driver screen.
WorkCentre Pro 421 User Guide 4-13
Page 88

If you rest the mouse pointer on top of a control, Microsoft
Windows will show you a brief Help Tip about that control. If
you select the right mouse button on a control, the Help system
will give you more detailed information.
The following buttons are available on all Help screens:
- Contents
Displays the main Table of Contents for the Help
System.
- Search
Lets you enter a word or phrase for which to search.
- Back
Takes you back to the previous topic screen.
- File-Exit
The Exit item under the File menu closes the Help
window.
4-14 WorkCentre Pro 421 User Guide
Page 89

Printer Configuration
Quick Pathway
½
Print Configuration
½
Installable Options
½
Memory (MB)
The Printer Configuration dialog allows you to update the
printer driver to interact with the optional attachments installed
on your printer.
Once you have installed an optional printer device, select the
relevant checkbox in the Installable Options list to update the
printer driver. Selecting these options enables various features
and options on other printer driver tabs. The printer graphic and
the relevant drop-down lists on the Paper/Output tab change to
show the new options.
Print
Installable Options
Optional Tray 2 An additional paper tray that can be installed under the main
printer.
Bypass Tray A paper feed unit which is typically used for one-time or
intermittent jobs requiring non-standard paper sizes.
Duplex (2 Sided Printing)
Module
WorkCentre Pro 421 User Guide 4-15
An optional attachment which gives you the ability to print on
both sides of the paper.
Page 90

Offset Catch Tray A unit that can be added on to the printer to so that each print
job will be slightly offset from one another in the catch tray. This
is standard with Network connected printers.
Job Separator Tray An optional tray that which divides the output tray into two
sections, upper and lower.
NOTE: The Offset Catch Tray and Job Separator Tray cannot
be installed at the same time.
Memory (MB)
Memory If you have installed additional memory in the printer, specify
the total amount installed.
4-16 WorkCentre Pro 421 User Guide
Page 91

Paper/Output
Quick Pathway
½
Paper/Output
½
Offset Function
½
Copies
½
Select Paper
½
2 Sided Printing
½
Collation
½
Image Orientation
½
Output Destination
Allows the selection of Paper Size, Paper Orientation, Paper
Source, Media Type and the number of copies for the job (1-
999).
Print
Offset Function
Select ’Offset Function On’ if you want each set of a multiple
copy print job to be slightly offset from one another in the Offset
Catch Tray. Enabling this option often makes it easier to sort
and handle documents when you are printing several copies.
Copies
Use the Copies box to indicate how many document sets you
want to print.
NOTE: This setting is independent of the Copies selection
within your software application’s print menu. Do not use the
driver’s Copies setting and the application’s Copies setting
WorkCentre Pro 421 User Guide 4-17
Page 92

simultaneously. It is best to set the number of copies in the
driver to ’1’ and set the number of copies you want to print in
the application.
Select Paper
Select Paper lets you specify the paper to use for your print job.
Any paper specifications appear in the paper summary box on
the Paper/Output tab.
The Select Paper dialog contains three tabs: Document Body,
Front Cover, and Separators.
By selecting each tab, you can set the paper size, type of
paper, and paper source to be used for each part of the
document:
Document Body Enables you to specify the size and source of paper to use for
your overall print job.
- Size
Size enables you to set the paper size for your job. The
Size list box includes all the paper sizes supported by
the printer. The default paper size is ’Letter’ or ’A4’
depending on locale.
NOTE: Your Windows application software may override this
setting. Check the paper size you have selected in the
application.
- Type
Type enables you to select paper for your print job by
media type rather than by paper tray. You must first use
the Tray Menu feature on the printer console to program
a paper type for each paper tray. Then, in the driver,
select the paper type to be used for the print job and the
printer automatically uses the correct paper tray.
4-18 WorkCentre Pro 421 User Guide
Page 93

- Paper Tray
Select the paper tray containing the type of paper you
want to use for the document cover, body, and
separators, if any. Not all paper trays accept all paper
sizes. Only source locations which accept the specified
paper size are shown. Auto Tray Select is the default
option.
If you select a paper tray and then select a paper size
not supported by that tray, the paper tray option will
default to ’Auto Select Tray’.
NOTE: Paper Tray settings selected i n the application will
override those selected in the printer driver.
Front Cover The Front Cover tab enables you to use different paper (such
as letterhead) for the first sheet of paper in your print job.
To enable the media type and paper tray settings, select Front
Cover Different. The settings you specify appear in the Paper
Summary Box on the Paper/Output dialog.
The settings you select on this tab will override any front cover
settings in the application.
You cannot change Paper Size on this tab. To do so, select the
Document Body tab.
Print
NOTE: This feature is not available with 2 sided printing.
Separators Separators enable you to put a page divider between each
printed page of a document and after the final page. This is
useful when you print items such as transparencies and want
a blank sheet of plain paper between each transparency sheet.
To use separators, you must enable collation and single-sided
printing on the Paper/Output tab.
To modify any of the settings, select Use Separators. Doing so
will enable the media Type and Paper Tray drop-down boxes.
The settings you choose appear in the Paper Summary Box on
the Paper/Output dialog.
NOTE: The Separators driver settings will override the
Separators settings in the applic ation.
WorkCentre Pro 421 User Guide 4-19
Page 94

2 Sided Printing
HINT: If your machine configuration supports this feature you
must select the duplex option on the Printer Configuration
dialog to activate 2 Sided printing.
Two-sided Printing enables you to print on both sides of a
page.
1 Sided Single sided printing. (This is the default.)
2 Sided, Flip on Short Edge Double sided printing aligned to the shortest edge of the paper.
2 Sided, Flip on Long Edge Double sided printing aligned to the longest edge of the paper.
If duplex hardware is installed on your printer, you must
activate duplex printing in the driver by selecting Duplex on the
Printer Configuration tab. Only then will you be able to select 2
Sided Printing in the Paper/Output dialog.
Collation
The Collation field enables you to specify whether multi-page
documents should be printed collated or uncollated.
Uncollated Two or more copies of a document are printed in separate sets
of each page.
Collated Two or more copies of a document are printed in sequential
page order and delivered as separate document sets.
Collated output may vary based on the amount of memory in
the printer, the optional equipment installed on the printer, and
the complexity of your print jobs.
The Collate setting in some applications may conflict with the
Collate setting in your Xerox printer drivers. To avoid conflicts,
turn collation ON in your printer driver and OFF in your
application print dialog. Do NOT select collation in both the
application and the printer driver.
NOTE: If Collated is selected in the Printer Driver, ensure it is
not selected in the application print window.
4-20 WorkCentre Pro 421 User Guide
Page 95

Image Orientation
Orientation refers to the relative directions of the long and short
edges of the paper. Your printer can print in either portrait or
landscape orientation.
Portrait orientation Prints an image that is taller than it is wide.
Landscape orientation Prints an image that is wider than it is tall.
Output Destination
Select the printer output location to which you wish to print your
document. The list box shows all of the valid options for your
printer. You can make a selection from the drop-down list or by
selecting the printer.
The names of any output devices installed on the printer must
be selected on the Printer Configuration tab before they will
appear in the Output Destination list.
NOTE: The Offset Catch Tray and Job Separator Tray cannot
be installed at the same time.
Print
WorkCentre Pro 421 User Guide 4-21
Page 96

Layout
Quick Pathway
½
Layout
½
Normal
½
Multiple-up
The Document Options dialog enables you to print documents
in booklet form or to print multiple page images on one side of
a page. Each page can be printed with or without a page
border.
Choose between Normal and Multiple-up page formats.
Normal
Prints a standard page. Normal is the default.
4-22 WorkCentre Pro 421 User Guide
Page 97

Multiple-up
Prints more than one page image on a single sheet of paper.
Indicate the required number of page images per side in the
Multiple-up list box.
Print
Multiple-up
½
1 Page up
½
2 Pages up
½
4 Pages up
½
6 Pages up
½
8 Pages up
½
16 Pages up
Draw Outlines Prints black borders around each page image.
Right to Left Prints pages from right to left.
WorkCentre Pro 421 User Guide 4-23
Page 98

Image Options
Quick Pathway
½
Image Options
½
Grayscale
½
Truetype Fonts
½
Graphics
½
Resolution
½
Print Quality
The Image Options dialog enables you to set different visual
and graphic characteristics for your print job. It also lets you
choose whether to download your application TrueType or
bitmap fonts to the printer or to print them as graphics and
device fonts.
Grayscale
Photographic Images Choose this setting for images that you want to have a smooth,
realistic and photographic appearance. The Photographic
Images setting provides soft contrasts between various shades
of gray. This setting also works well for images originally
designed with color.
Changes made will be reflected in the graphic of an eye on the
dialog.
Scanned Images The scanned images setting is specially tuned to provide
exceptional quality and clarity to printed images originally
scanned with a scanner.
4-24 WorkCentre Pro 421 User Guide
Page 99

Line Art Choose this setting for graphic images with intricate lines and
fine detail, for example clip art. This setting provides solid lines
and sharp contrasts between shaded areas.
Print Colored Text in Black This setting prints all colored text as black instead of gray.
True Type Fonts
These selections allow you to choose whether to download
your fonts to the printer as True Type or Bitmap fonts or
whether to use the printer fonts resident on the printer.
Download As TrueType Use this option if you have a small number of TrueType fonts
on your page and you want to optimize text-printing
performance.
Download as Bitmap This option sends each TrueType character to the printer as an
individual bitmap. Use this option if you have a large number of
TrueType fonts on a printed page.
Print as Graphics This option enables you to print graphic images over TrueType
text. As TrueType text is always sent to the printer last, it
usually appears on top of graphics. Selecting this option sends
your TrueType images to the printer as graphics.
Print
NOTE: This option is only available when ’Raster’ is sel ected
as the graphics mode.
Use Printer True Type Fonts Select this option to use the TrueType fonts residing in the
printer. If you do not wish to use printer-resident fonts, leave
the box unchecked. When the box is unchecked, all required
fonts will be downloaded to the printer for each print job.
WorkCentre Pro 421 User Guide 4-25
Page 100

Graphics
This selection specifies how graphics are sent to the printer.
The options available are:
Vector This option allows you to send graphics to the printer as a
mixture of vector and raster images. Vector graphics typically
print more quickly than rasterized graphics.
Vector graphics are composed of distinct shapes (lines, circles,
ellipses, and boxes) that can be scaled and edited
independently. V ector graphics do not become distorted when
they are re sized.
Raster This option sends graphics to the printer as bitmap images.
Bitmaps typically print more slowly than vector images and
become distorted when scaled.
Resolution
The resolution setting affects the amount of detail that is
reproduced on graphic images. Graphics resolution is
measured in dots per inch (dpi). Therefore, a 600 dpi setting
renders images using 600 dots (pixels) per every inch of the
image.
The image quality of printed documents typically increases
with higher resolution (dpi) and bits per pixel settings, but it
often results in slower print speed and increased toner
consumption.
600 dpi The images will be printed using 600 x 600 dots per inch (dpi).
Use this option if quality is more important than speed.
300 dpi The images will be printed using 300 x 300 dots per inch (dpi).
Use this option for text only jobs or where speed is more
important than quality.
4-26 WorkCentre Pro 421 User Guide
 Loading...