

Page 1

Support
If you experience any problems with your software, please contact our support team:
Support website: http://support.magix.net
This website takes you to the MAGIX user service page; the following free offers are also featured
there:
FAQs (frequently asked questions) and general tricks and tips. In most cases, you'll find the
solution to your problem here. If not, use the email support form.
Email support form: Use the special form to inform our support staff about your system. This
information is used to solve your problems quickly and competently. Simply fill it out and send it
with a mouse click!
Support forum: You are not alone. Perhaps other users had a similar problem and can help you
solve yours. Our support staff are also regular contributors.
Download section: Updates, improvements, and patches are likewise offered free of charge via
download. Many problems you may experience are already familiar to us, and they can often be
solved by downloading the latest patch. Besides patches, there are also wizards for checking and
optimizing your system.
Links: The links list contains the contact addresses for all of the most important hardware
manufacturers.
Please note:
To be able to use the support, you have to register your product using the serial number provided. This
number can be found on the CD case of your installation CD or on the inside of the DVD box.
Europe
Sales Department:
Monday - Friday, 09:00-16:00 GMT
U.K.:
0203 3189218
Denmark:
699 18149
Sweden:
0852500858
Finland:
09 31581630
Norway:
0210 30665
Support request via email: http://support.magix.net/contact/uk
Here you can find a summary of our technical support telephone numbers:
http://support.magix.net/phone/uk
Mail:
MAGIX Development Support, P.O. Box 20 09 14, 01194 Dresden, Germany
North America
Sales Department:
9 am to 4 pm EST Mon-Fri
Phone:
1-305-722-5810
Support request via email: http://support.magix.net/contact/us
Page 1
Page 2

Here you can find a summary of our technical support telephone numbers:
In this chapter
MAGIX Sales
http://support.magix.net/phone/us
Mail:
MAGIX Customer Service, 1105 Terminal Way #302, Reno, NV 89502, USA
Please have the following information at hand:
Program version
Configuration details (operating system, processor, memory, hard drive, etc.), sound card
configuration (type, driver)
Information regarding other audio software installed
Page 2
Page 3

MAGIX Sales
Tel.:
0180-48 99 999 (0.20 EURO/per call from German land
lines)
Monday ? Thursday: 9:00 am ? 12:30 pm and 1:15 pm ?
6:00 pm
Friday: 9:00 am ? 12:30 pm and 1:15 pm ? 5:30 pm
Email
infoservice@magix.net
Post:
MAGIX AG
Borsigstr.24
32312 Lübbecke
You can reach MAGIX Sales Department workdays for help with the following questions and
problems:
Orders
Product consulting (pre-purchase)
Upgrade requests
Returns
Page 3
Page 4

Serial number
A serial number is included with each product, and although it is not required for the installation of the
software, it does enable access to additional bonus services. Please store this number in a safe place.
What can a serial number do?
A serial number ensures that your copy of MAGIX Photo Manager 10 Deluxe is clearly assigned to you
and only you, and it makes improved and more targeted customer service possible. Abuse of the
software can be prevented with a serial number, since it ensures that the optimum price/performance ratio
continues to be offered by MAGIX.
Where can the serial number be found?
The serial number can be found on the reverse side of your CD/DVD case. If your product, for
example, is packed in a DVD box, then you'll find the serial number on the inside.
For versions that have been especially optimized for the Internet (download versions), you'll receive your
serial number for activating the software directly after purchasing the product via email.
When will you need the serial number?
The serial number is required when you start or register MAGIX Photo Manager 10 Deluxe for the first
time.
Note: We explicitly recommend registering your product, since only then are you entitled to get program
updates and contact MAGIX Support
. Entering the serial number is also required for activating codecs.
Page 4
Page 5

More about MAGIX
In this chapter
MAGIX Online World
MAGIX News Center
Page 5
Page 6

MAGIX Online World
You can go to magix.info
in the "Online" menu, or via this button.
Discover the possibilities of MAGIX Online World. Whether it's for your photos, videos, or music, we
have just the right solution for you.
MAGIX Online Album
MAGIX Online Album
lets you publish your photos and videos directly on the Internet. You can also play your music as MP3s
in the Online Album. Create your personal album website in no time with your own Internet address, and
showcase everything that's fun about multimedia to the world.
For example, you can upload especially impressive photos or entire slideshows as videos straight from
your MAGIX program. Pictures you put on your website can be downloaded with ease from the comfort
of your own home and integrated into your slideshow.
MAGIX Website Maker
MAGIX Website Maker helps you create a personal Internet showcase with a professional design in
just a few mouse clicks ? without prior knowledge, including your own chosen domain and email
address. Publish slideshows and videos and accessorize your site with music and various effects ?
anything from a simple business card to a fireworks display of effects, professional or private ? show
your best side!
More about this topic can be found under MAGIX Website Maker.
magix.info
Help and get help - Directly from within the program, you'll be able to access magix.info, the new
MAGIX Multimedia Knowledge Community
. In the Multimedia Knowledge Community, you'll find answers to all of the most frequently asked
questions about MAGIX products and multimedia in general. Couldn't find an answer to your particular
question? No problem, just ask the question yourself.
MAGIX Blog Service
With MAGIX Blog Service, YOU make the news! Share your thoughts, experiences, and news with a
worldwide audience in no time using your own interactive online multimedia journal. Invite family, friends,
and acquaintances to join in and enter their comments! A free MAGIX Online Album belongs to the
MAGIX Blog Service
so that you always have full control over your contributions.
You can also read the FAQ (frequently asked questions) on the Internet.
MAGIX Online Print Service
MAGIX Online Print Service is perfect for getting your pictures processed online or printed as photo
gifts on mugs, t-shirts, or calendars.
Catooh
If your project is missing pictures, videos, DVD menus, sounds, or samples, then you should have a look
at the huge selection available at Catooh. There you'll be able to buy media in excellent quality for low
prices: DVD menus, Slideshow Maker styles, decorative elements, 3D power effects, 3D transition
Page 6
Page 7

series, MAGIX Soundpools, songs, ringtones... Perfectly suited to all MAGIX photo, video, and music
projects.
Page 7
Page 8

MAGIX News Center
MAGIX can supply you with all of the latest information about
your software. In the MAGIX News Center, you will find all of
the links to current online tutorials as well as tips & tricks on
individual topics or software application examples.
You will also be informed of the availability of brand new updates and patches for your program as well
as special offers, contests, and surveys.
The news is split into three color-coded sections:
Green for practical tips & tricks for your software
Yellow reports the availability of new patches and updates for your product
Red for special offers, contests, and surveys
And if there are no new messages, then the button will be grey
All available information is shown as soon as you click on MAGIX News Center. If you click on one of
the news items you will be forwarded to the corresponding website.
Page 8
Page 9

Introduction
In this chapter
What is MAGIX Photo Manager 10 Deluxe?
What’s new in MAGIX Photo Manager 10 Deluxe?
Supported formats
Overview of the program screen
Page 9
Page 10

What is MAGIX Photo Manager 10 Deluxe?
MAGIX Photo Manager 10 Deluxe is the perfect tool for digital photographers and collectors of digital
photos. It is a photo album, photo optimizer, photo manager and photo viewer in one.
Is your computer full of unorganized photos from your digital camera? Masses of photographs lying
around in envelopes or photo albums waiting to be scanned while your digital camera keeps on delivering
new pictures that will have to be saved somewhere. Masses of photographs lying around in envelopes or
photo albums waiting to be scanned while your digital camera keeps on delivering new pictures that will
have to be saved somewhere.
MAGIX Photo Manager 10 Deluxe can display, restore, organize, enhance, and perfectly print all those
photos, present them in a slideshow and even burn them all onto a CD or DVD.
There are lots of ways to use it:
Arrange photos: A sophisticated database lets you find and gather photos from anywhere on
your computer.
Import photos: Simply connect your digital camera or scanner to your computer and transfer the
photos to your hard drive.
Sort photos: (Categories, Create categories)Move specific photo collections as one group and
move them to the relevant category (vacation photos to "Vacation", family photos to "Family",
and so on).
Select photos: Choose, for example, all images showing a certain person or let MAGIX Photo
Manager 10 Deluxe pick the pictures that are really worth showing.
Retouch & restore photos: Retouch and restore your photo collection quickly. You can
straighten out crooked photos by drawing a line with the mouse. Red eyes can be removed with
a click. The original photo file is never changed, allowing you to experiment without any worries.
Present photos: (Export, Present your photos) All photos can be collected in a playable photo
album and presented in full-screen. Photo albums, posters, and individual photos may be printed
out immediately or archived on CDs or DVD.
Page 10
Page 11

What’s new in MAGIX Photo Manager 10 Deluxe?
Assistant for quickly finding the best shots
With the help of the new assistant for finding and compiling the best shots, you will quickly find the
photos to show others in MAGIX Photo Manager 10 Deluxe. The assistant will analyze all images on
your computer and list the images that fit your selection criteria. This function can be accessed via the
"Selection" under the "Select best shots"
option.
Crisp presentations
Would you like to show your photos in perfect focus? Even slightly unfocused photos will become a
pleasure to look at with the "Sharpen" presentation fucntion. Two settings are availabel for improvement
in MAGIX Photo Manager 10 Deluxe ? thsi way, your images will always be optimally presented.
Nothing will change in the original image file; this effect will be applied only during viewing in MAGIX
Photo Manager 10 Deluxe. You can find the sharpen function in image preview in the tool bar.
Upload to Facebook
Facebook
is one of the most popular Internet communities. This is partially due to the fact that it offers users an
easy way of sharing news, links or photos and videos. Thanks to the useful upload function of MAGIX
Photo Manager 10 Deluxe, you can select the photos to be uploaded to your Facebook profile and then
transfer them using the "Online -> Uploaded media to other web services -> Upload media to
"Facebook".
TM
Improved travel route animation
Now, you can even animate travel routes in MAGIX Photo Manager 10 Deluxe. Go to travel route
animation via "Edit > Create map". After entering a travel route, click on the "Animation" button and
select a mode of trabsportation from the appearing drop-down menu. At the end, you can export the
route as a video clip, which you can embed into a slideshow, for example.
MAGIX Rescue Your Notebook Data
As a bonus, MAGIX Photo Manager 10 Deluxe contains the MAGIX Rescue Your Notebook Data
program. This program allows you to quickly and easily make backups of all data on your computer or a
certain folder (e.g. all photos). You can read about how the program works in the program help of
MAGIX Rescue Your Notebook Data.
Other Enhancements
ImprovedPanorama image montage for even better panoramas, especially with complex
motifs.
Improved presentation mode with automatic pans and zooms, music and "laser pointer".
Now with the image editing program MAGIX Photo Designer, which lets you quickly optimize
photos.
New order assistant for ordering photo prints, books, calendars and photo gifts.
Improved camera import, especially for videos and audio files.
Page 11
Page 12

Supported formats
Photo import
: JPEG (*.jpg; *.jfif; *.jpeg; *.jpe), Windows Bitmap Formats(*.bmp; *.dib; *.rle), Tagged Image File
Format (*.tif; *.tiff), Kodak Photo CD (*.pcd), Targa (*.tga), Adobe Photoshop PSD (*.psd, not all
features), Portable Network Graphic (*.png), Portable Graymap PGM (*.pgm), Portable Pixelmap
PPM (*.ppm), Sun Raster File (*.RAS), PCX format (*.pcx) and RAW formats from many different
camera models.
Photo export
: JPEG (*.jpg; *.jfif; *.jpeg; *.jpe), Windows Bitmap Formats (*.bmp; *.dib; *.rle, nur 24Bit RGB),
Tagged Image File Format (*.tif; *.tiff, uncompressed/with JPEG compression), Targa (*.tga), Adobe
Photoshop PSD (*.psd, not all features), Portable Network Graphic (*.png), Portable Pixelmap PPM
(*.ppm), Sun Raster File (*.RAS), PCX format (*.pcx) and RAW formats from many different camera
models.
Video import: DirectShow
compatible standard formats with installed codecs (AVI, MOV, MJPEG, MPEG etc.) and WMV9
Video export: DirectShow® compatible standard formats with installed codecs (AVI, MOV, MJPEG,
MPEG etc.), WMV9, RealHelix
, MXV, WMV HD
Audio import:
Wave, MP3, OGG VORBIS
The integrated image processing program, MAGIX Photo Designer, can import the following image
formats: JPEG, TIFF, GIF, BMP, RLE, DIB, PNG, TGA, PCX, EMF, WMF, PPM, PGM, PBM,
PSD, RAS, IFF, LBM and Photo CD. Export of following files is possible: JPEG, TIFF, BMP, PNG,
TGA, PPM, PGM, PSD, RAS, IFF, LBM and PCX.
Note:
If you want to use other image formats in MAGIX Photo Manager 10 Deluxe, you must convert them
first. Load the image into MAGIX Photo Designer, export it in the desired format, then load it into
MAGIX Photo Manager 10 Deluxe.
Audio export:
Wave, MP3, OGG VORBIS.
®
TM
Sound in picture support
Some digital cameras have an audio recording function so that you can save an audio file with each
photo. The audio file is automatically included in the database overview when you import the photo from
the camera.
Page 12
Page 13
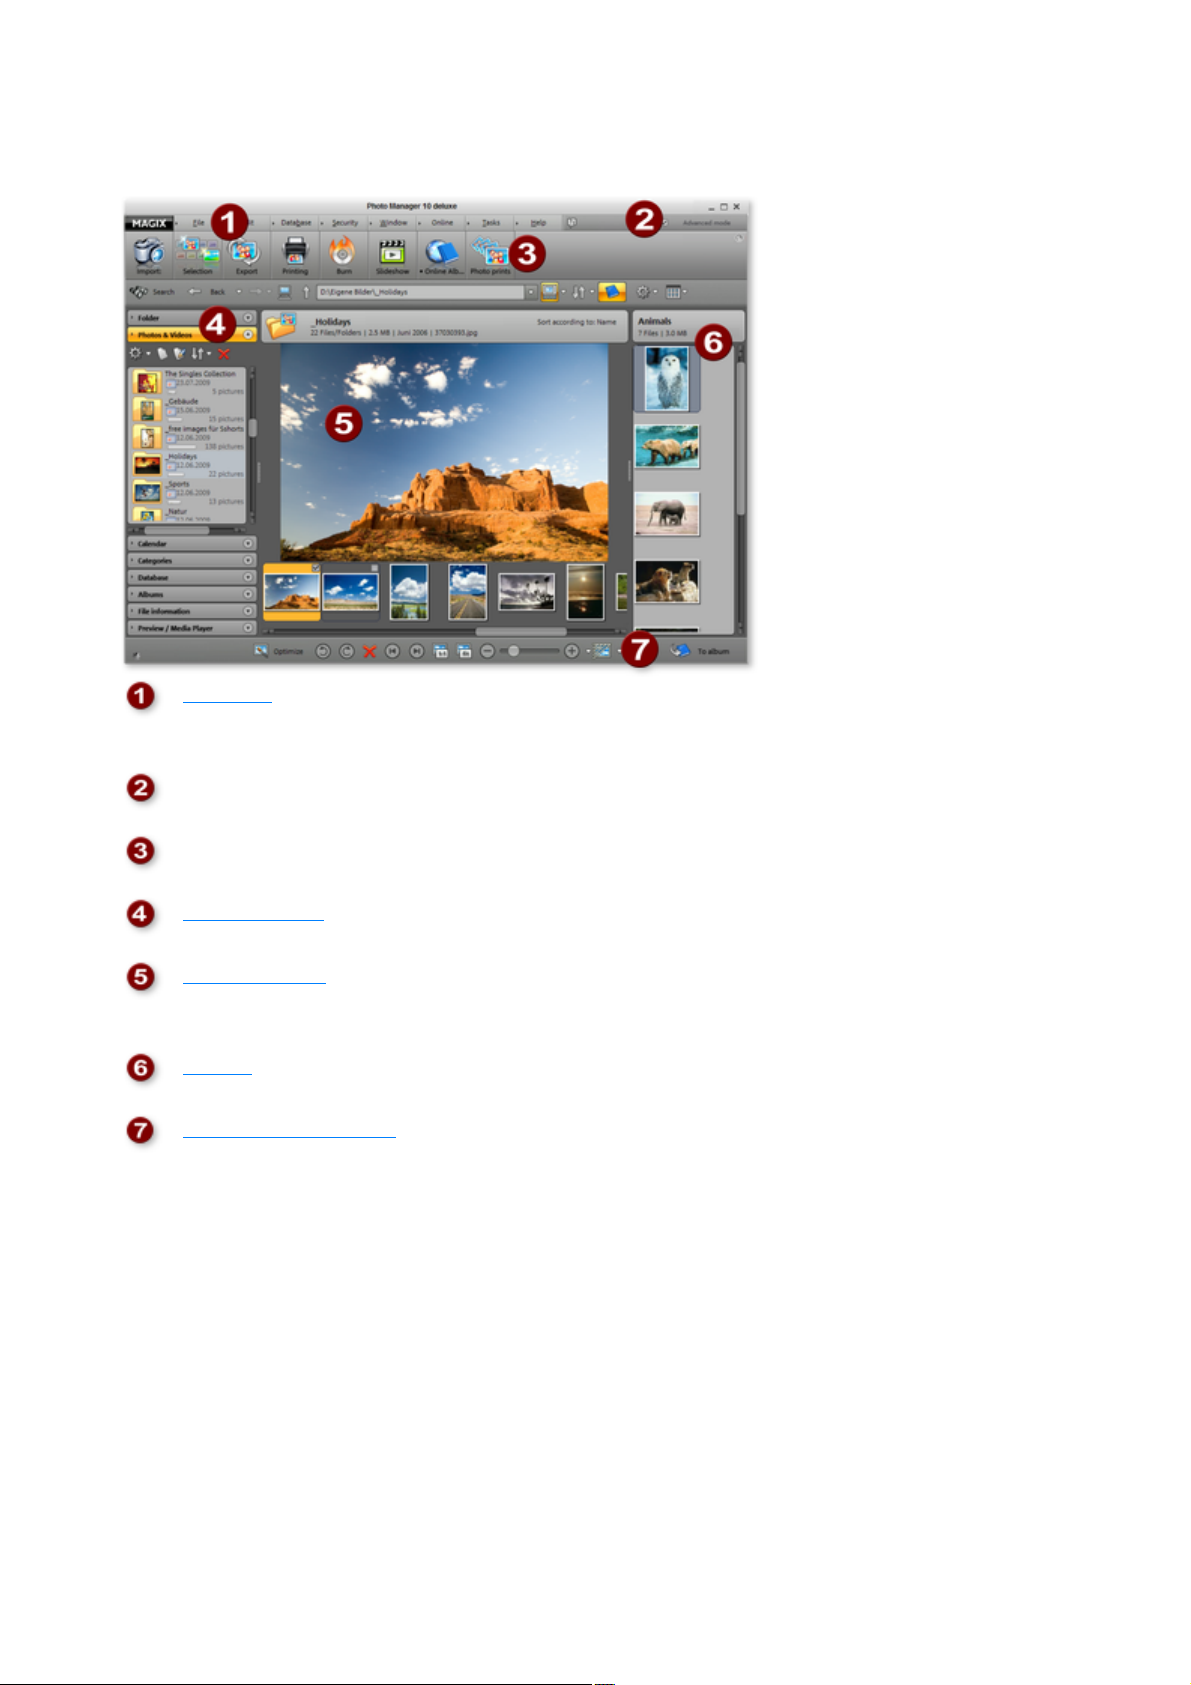
Overview of the program screen
Menu bar
: Opens all possible functions and services in MAGIX Photo
Manager 10 Deluxe.
Activate/deactivate advanced mode in MAGIX Photo Manager
10 Deluxe.
Toolbar: Provides access to the most important functions in
MAGIX Photo Manager 10 Deluxe.
Photo Manager
in the form of folders and a database for organizing your files.
Photo overview
to display the contents of your folders, albums, and
slideshows.
Albums
: Area for creating and editing photo albums.
Photo overview toolbar
.
Tip regarding special program versions:
This documentation describes the full functionality of MAGIX Photo Manager 10 Deluxe. However, you
may be using a restricted version of MAGIX Photo Manager 10 Deluxe, and full functionality may not be
available.
Page 13
Page 14

Tutorial videos
Video
Help topic
Program interface
Program interface
Quick Start
Optimize and manage photos
Optimize photos
Manage
Print and present
Presenting on your PC
Present online
Print
Import pictures
Import
Burn files on CD & DVD
Burn
Export and convert files
Export
Working with categories
Create categories
MAGIX Online Album
MAGIX Online Album
Optimize photos
Optimize photos
Panoramas and photo montages
Create panoramas
MAGIX Online Print Service
Print and order pictures
MAGIX Photo Manager 10 Deluxe contains a series of tutorial videos which descriptively show how
the program is used. In the following, you will find a list of all of the tutorial videos and a corresponding
help topic which will provide you with additional information about the associated topic.
Note
: In certain versions of MAGIX Photo Manager 10 Deluxe, e.g. the download version, the tutorials are
not included.
Page 14
Page 15

Quick start
In this chapter
Manage photos
Importing photos
Scan photos
Viewing photos
Finding photos
Create categories
Select pictures according to criteria
Optimize Photo
Create slideshows and photo albums
Print photos
Present your photos
Page 15
Page 16
Manage photos
Every folder can be
opened with a
mouse-click. The
contents will be listed in
the preview window.
By clicking on the
"New" symbol you can
create a new folder.
With the red cross you
can move foders or files
into the recycling bin.
To change the name of a
folder, click "Rename
selected folder".
With MAGIX Photo Manager 10 Deluxe there are several ways to get your pictures onto your
computer. You can either import photos directly from your digital camera, or scan previously developed
pictures. You can access any graphic, audio and video files found on your hard drive using the folder
function.
Clicking on the yellow star ("Add selected folder to Favorites") adds a folder to your "Favorites"
folder. This list can be opened via the "Favorites" button.
You can have your photos filed into the database and search for them later on according to their creation
date, keywords, or genre. Everything takes place in the intelligent virtual MAGIX Photo Manager 10
Deluxe database ? without time-wasting file shifting or copying.
It is recommended that you add folders with photos to the database. This function can be
initiated at any time directly from the "Database" > "Add folders" menu.
Photos imported from the camera are detected automatically and displayed in the photo
overview. The same applies to every photo that you search for in Explorer.
If you change certain folders outside of MAGIX Photo Manager 10 Deluxe, e.g. you copy new photos
into your photo folder, you should check if the new or changed photos are also present in the MAGIX
Photo Manager 10 Deluxe folders. Select the option "Monitor folder" in the "Database" menu.
Page 16
Page 17
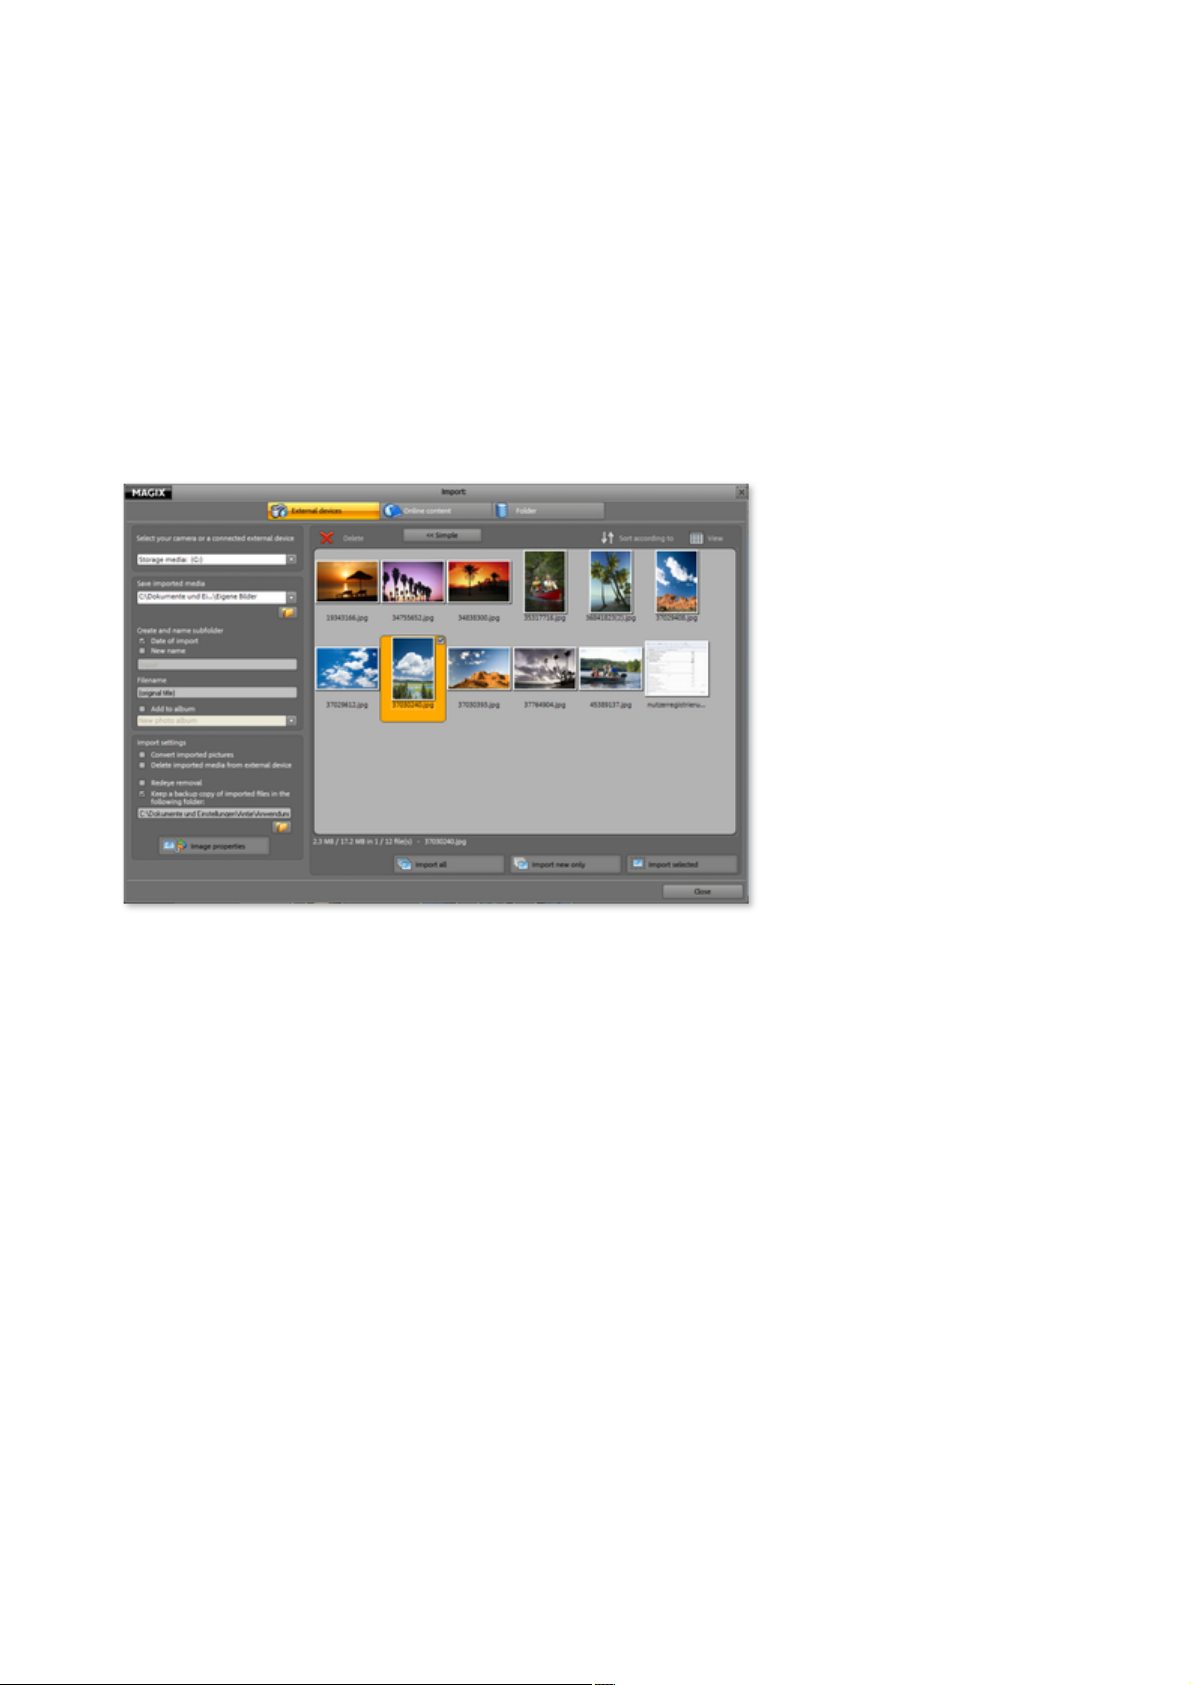
Importing photos
MAGIX Photo Manager 10 Deluxe directly accesses digital cameras and their storage media, and then
copies the image files to your hard disk. Select the file format you wish to save the photos in during this
process. Most cameras identify themselves automatically as so-called "removable storage devices", and
therefore appear as separate drives in Windows™ Explorer.
If the import dialog doesn't open automatically after connecting your digital camera, click "Import".
MAGIX Photo Manager 10 Deluxe will scan your PC for connected digital cameras or for storage
media (e.g. compact flash cards). This will take a moment. As soon as the interfaces have been checked,
the "Photo import
" dialog will open. You will be able to see all of the photos saved on your camera (or the selected storage
medium).
You have the option of setting the save location for your new pictures under "Target folder
".
"Import settings" lets you erase photos from your camera after they have been imported, convert file
formats into a certain format during transfer, and specify the author and category with "Image
properties
".
Page 17
Page 18

Scan photos
You need a TWAIN-compatible scanner connected to your PC to scan physical photos. "Twain" is the
designation of the universal interface between image editing devices (digital cameras and scanners) and
image editing programs.
Follow these instructions to scan your first picture:
Step 1:
Before you start scanning, make sure that your scanner's TWAIN software is installed. If this is not the
case, install the software and reboot your computer.
Step 2:
If your scanner is connected, switched on, and ready to operate, then place your picture in the scanner.
Step 3:
Open MAGIX Photo Manager 10 Deluxe and select "File > Scan > Select source".
Step 4:
Choose the device you would like to use in the dialog. This step will no longer be necessary if you
continue using the same device.
Step 5:
The scan window of your scan software will appear. Specify the resolution and color depth in this
window.
When the scan is complete, the TWAIN software should close automatically and MAGIX Photo
Manager 10 Deluxe should now display the newly created image file.
The newly acquired pictures will be saved in the "My Photos" folder under C:\ in MAGIX\MAGIX
Photo Manager 10 Deluxe, which was created during installation.
Page 18
Page 19
Viewing photos
These can be accessed easily via the
small menu above the second arrow
button above and to the right next to
the path information.
There are many practical options for viewing your pictures with MAGIX Photo Manager 10 Deluxe.
You can switch between miniature view and filmstrip view or you can navigate through the file list like in
Windows Explorer.
Below the preview window you will find arrow buttons for turning pages. The 1:1 button for viewing the
pictures in the original size, and the fader for increasing or reducing the size of your preview pictures. You
can use the "Optimize" button to switch into the optimize mode for your photos.
Page 19
Page 20

Finding photos
Click the "search" function button.
The search function helps you find photos on the hard drive or in the database.
You can search the entire hard disk or limit the search to a certain drive or directory. After a search, all
found objects will be represented with a preview picture in the overview.
Hard disk quick search:
You can enter the file name, approximate size and creation date into the search dialog.
Expert search in the database:
Here you can control the search using characteristics. Up to three details can be searched for at the
same time by using the "AND" or "OR" logical operators.
"AND" means: Only those files will be listed that match all criteria.
"OR" means: Only those files will be listed that match at least one of the criteria.
You can also set "conditions" and "comparison elements".
Search for EXIF contents:
EXIF files are information about the digital image files: This includes creation date, file size, format, as
well as photo-specific details like shutter speed, diaphragm and exposure.
Search for similar photos: This function is explained in "Select images according to criteria"
.
Page 20
Page 21

Create categories
Alternatively, you can also open the stamp first, select the
category, and then stamp every picture that should be
assigned to a specific category.
You can also create individual categories. To do so, click on
the "New category" button and name the category.
You can also rename existing categories. Click on the
"Rename" symbol to do this.
Select "Categories" to arrange your photos according to theme. You will find that some categories have
already been suggested ? hobby, friends, animals, nature, etc. You can add new categories and edit or
delete the available categories. Please note: The categories are not "actual" file folders that you create on
your hard disk, but rather individual links to files that could be found anywhere on your system.
This is how you file your pictures under categories:
Step 1: Open the folder containing the photos you would like to sort into categories.
Step 2: Next, click the "Categories" tab and drag the selected images to the desired category via
drag & drop. You can even sort photos into several categories simultaneously.
Open categories
: The images belonging to a category will be displayed as soon as one category is selected. The ability to
select more than one category is very useful: For example, you can select the categories "Vacation" +
"Summer" + "Friends", and only pictures that have been sorted under all these categories, or photos of
friends with whom you have been on holidays together will show up. Multiple marking of photos takes
place like this: while holding the "Ctrl" key down, click all desired categories with the mouse.
Add a rating
: Every picture can be rated with 1 to 5 stars which you will then see in the miniature view of the image.
The stars in "My Ratings" each form a special category, and these can all be assigned just like the other
categories.
Page 21
Page 22
Select pictures according to criteria
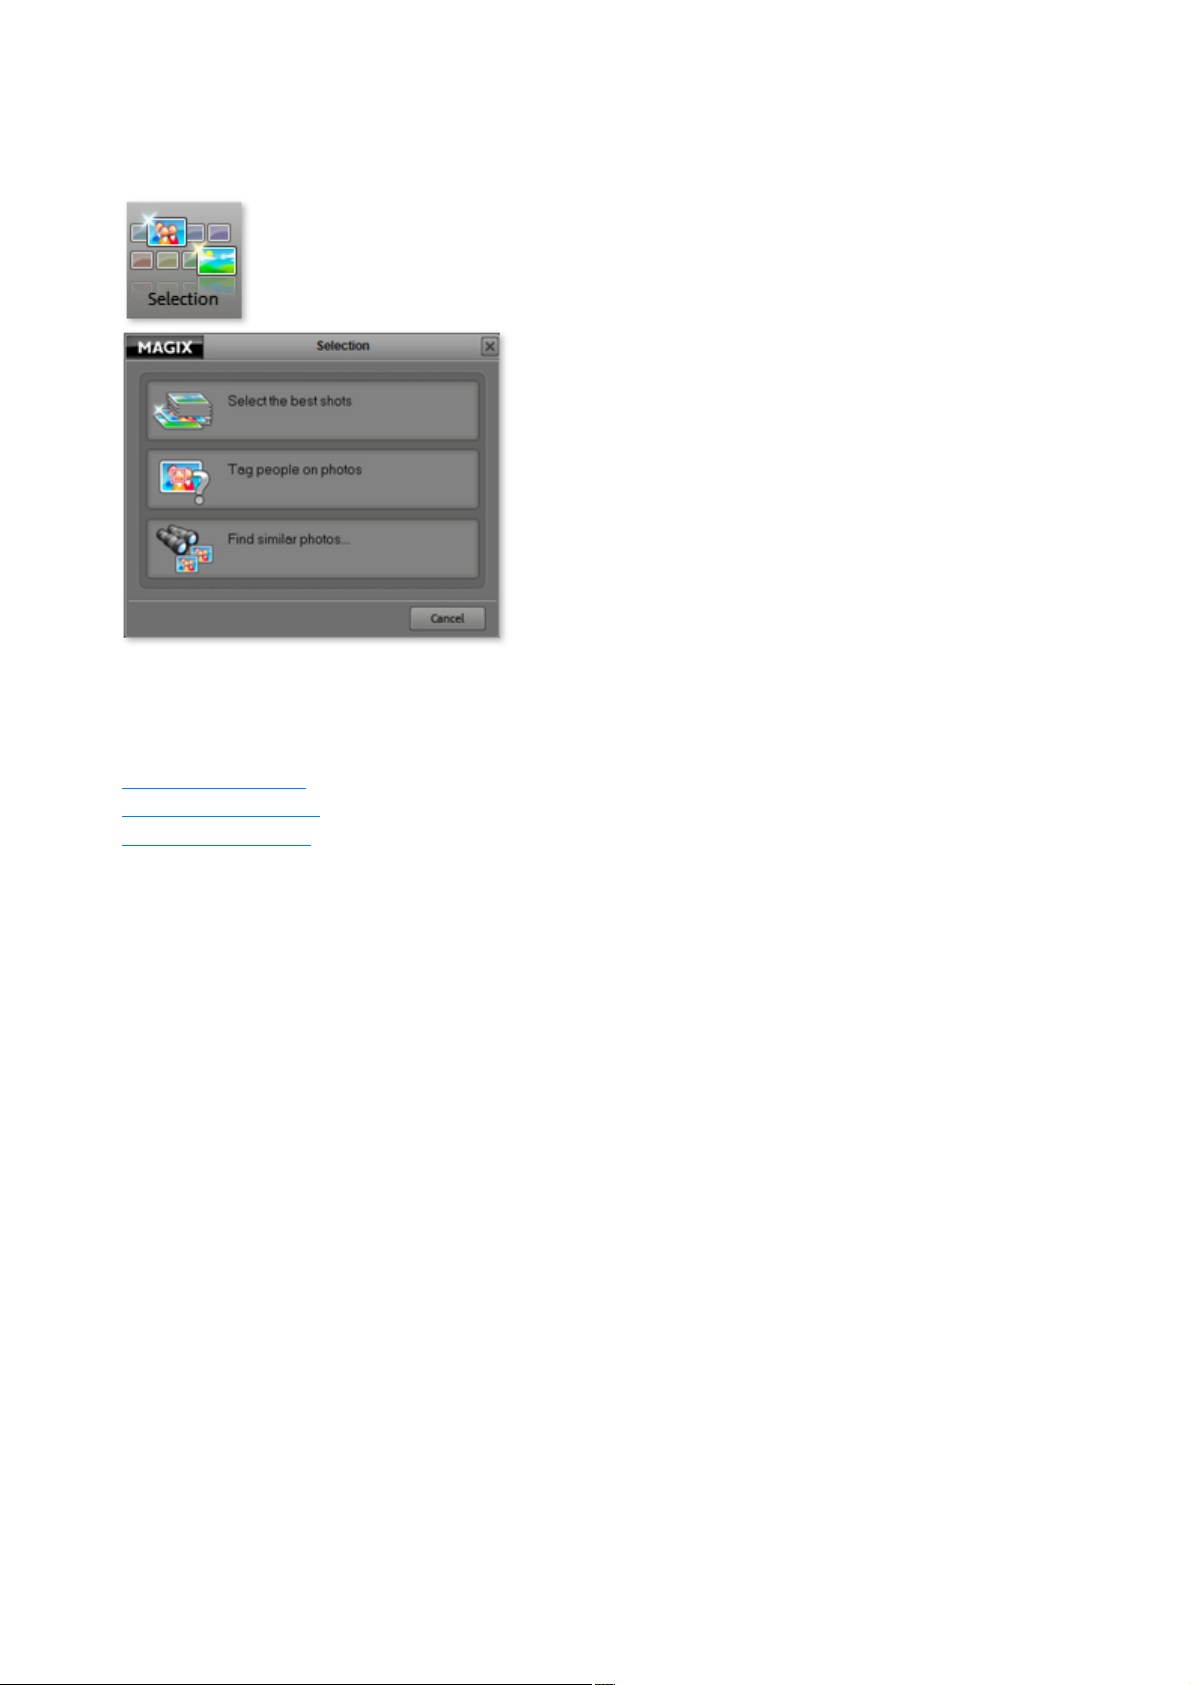
Click on "Selection" in order to open the various
options for selecting images:
In this section:
Select the best shots
Tag people on photos
Find similar photos...
Select the best shots
Tag people on pictures
Search for similar photos
Page 22
Page 23

Select the best shots
Here you can select the criteria, according to which MAGIX Photo Manager 10 Deluxe will
automatically create a folder with photos. This way you can create a selection of the best shots, for
example, or avoid images with a certain motif, or pick pictures with a certain person, etc. MAGIX Photo
Manager 10 Deluxe serches the photos or folders you indicated and creates the selection, relieving you
of the time-costly sorting by hand.
Page 23
Page 24

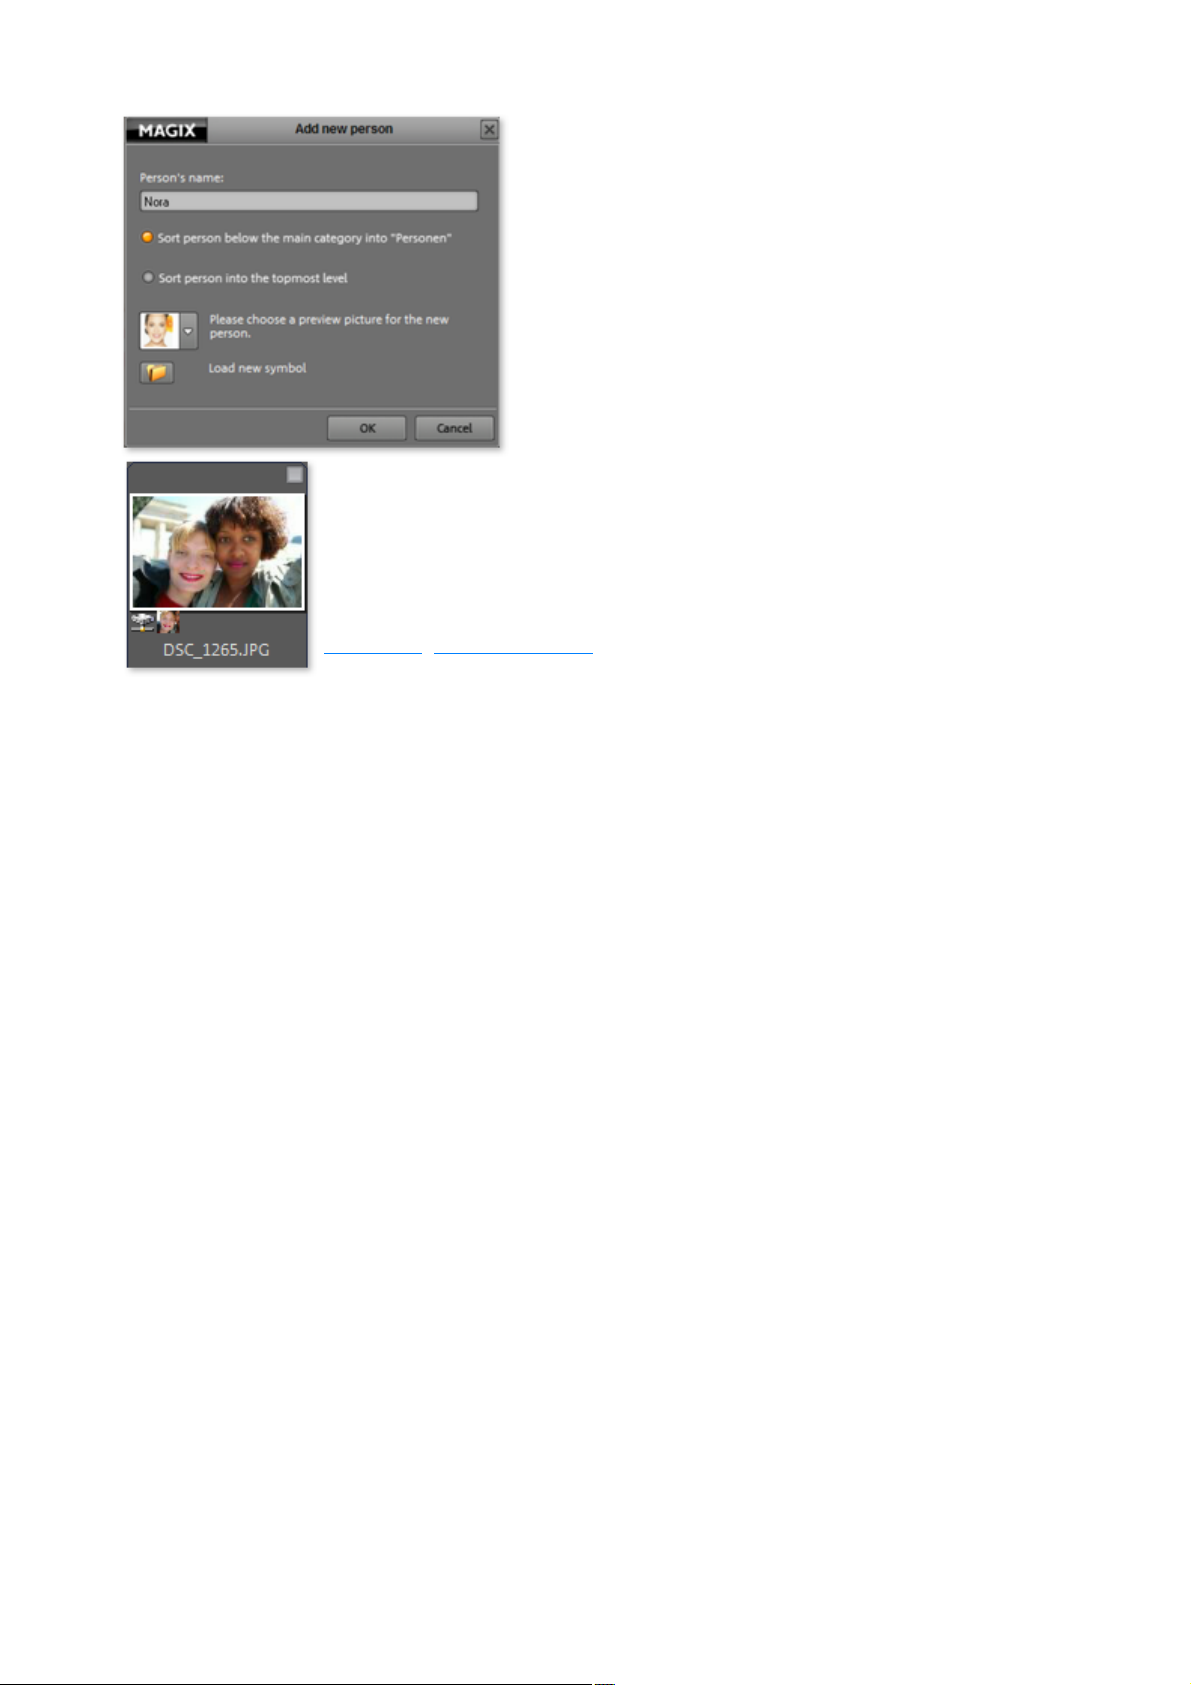
Tag people on photos
MAGIX Photo Manager 10 Deluxe can automatically search your photos for faces and assign them to
persons whom you have identified earlier.
Identify persons and create a category for them:
First select an image, where faces are easily recognizable.
Now, click on "Selection" and choose "Tag persons on photos".
The "Identify persons" dialog now opens.
Make a rectangular selection around the first face if <Programmanme> does not recognize it on
its own: The face will open in a magnified view, where you have to first select both eyes and then
the mouth using the mouse.
Then click on the right on "New person" and enter the person's name.
Page 24
Page 25
MAGIX Photo Manager 10 Deluxe will then
analize the entire database. Every photo,
where the face has been found will receive a
little symbol with the face. In addition, you will
find all persons selected by you and the
photos, where they are found in "Categories" (
Categories, Create categories
).
Note
: If an already identified person has not been found on a different photo, you can tag him or her manually
via the "Identify persons" dialog.
Page 25
Page 26

Find similar photos...
With this function you can quickly find the images, similar to your selected photo.
First, select a starting image.
Then on "Select" and choose "Search for similar photos".
A tab will open "Search for similar photos" in the Search dialog.
Under "Search in the database" specify where MAGIX Photo Manager 10 Deluxe should search
for similar photos. Under "Results", specify how the result should be displayed.
Depending on the number of photos, the search can take some time. At the end, you will see a list of
similar photos in the format selected by you.
Page 26
Page 27
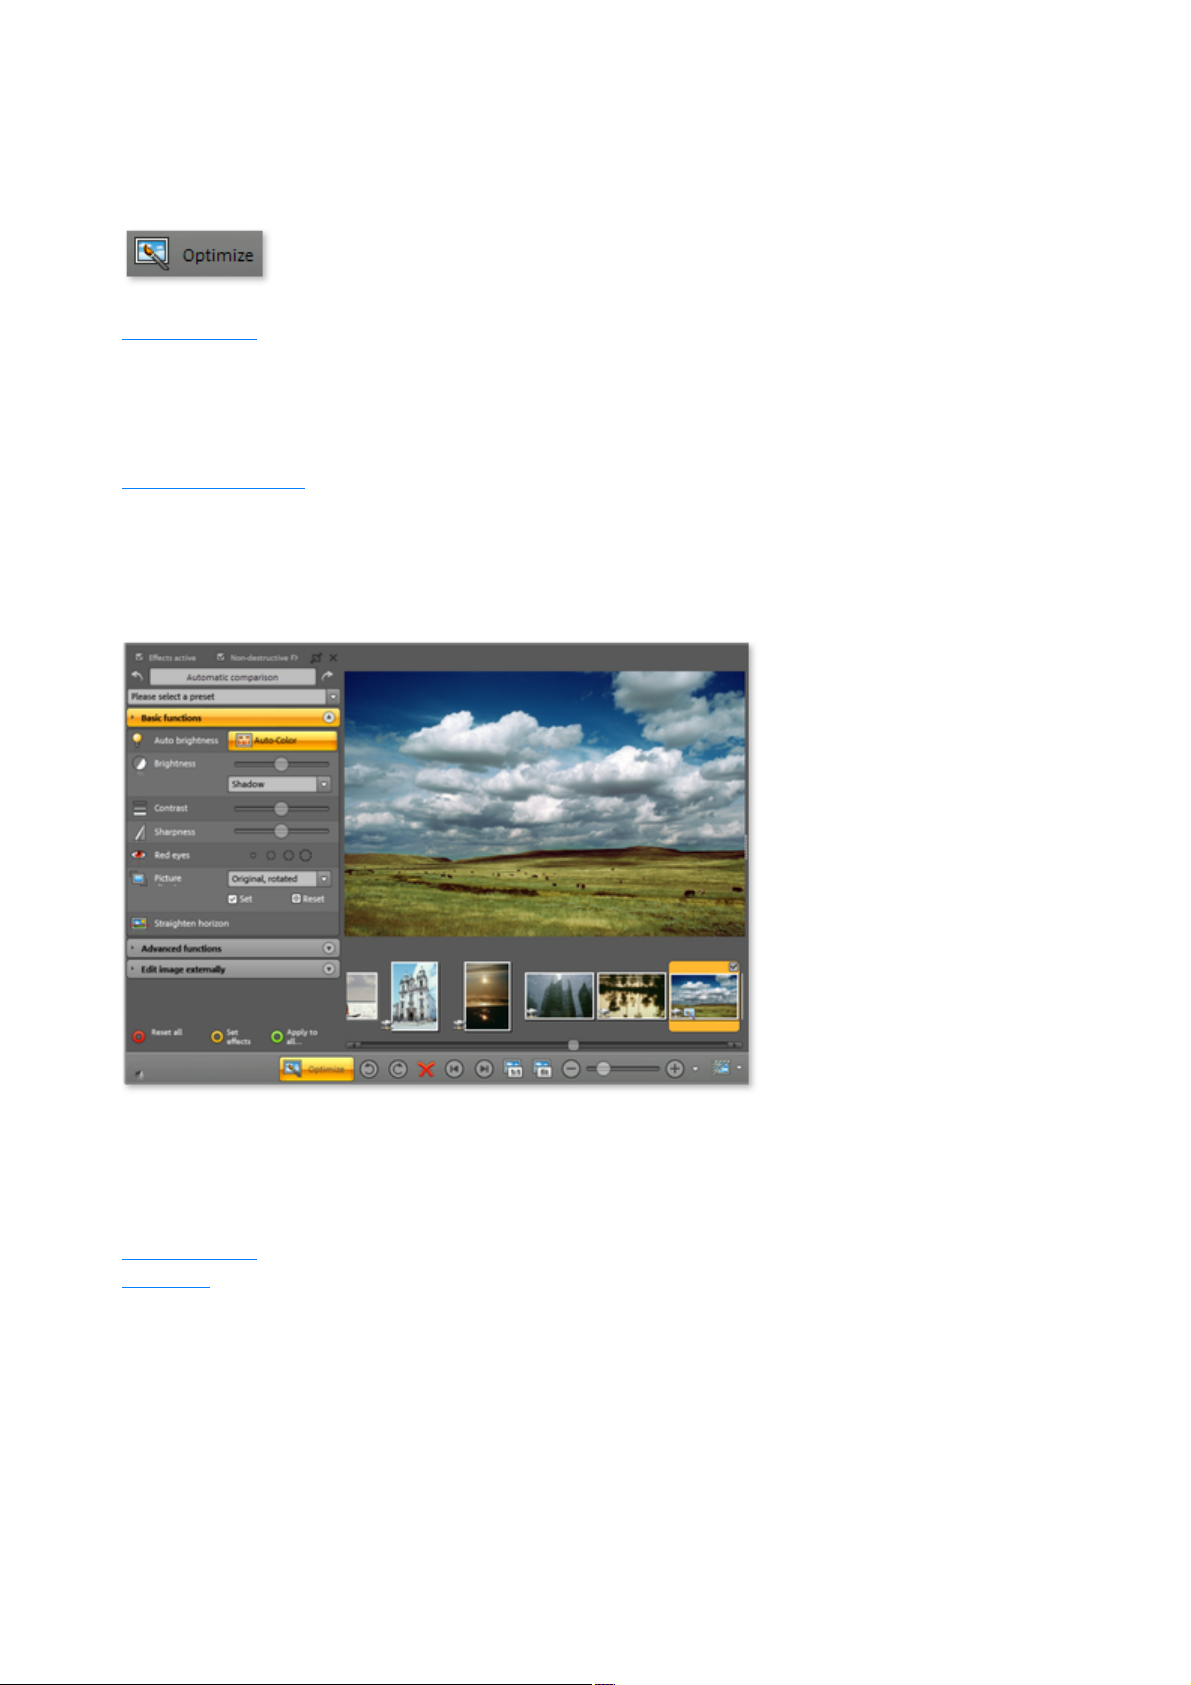
Optimize Photo
To do so, click on "Optimize".
You can access the picture editing functions on the
left-hand side.
In this section:
Basic functions
Paste text
You can optimizing all photos from a folder while viewing them and compile them into a photo album.
Basic functions
Exposure: Brightness, contrast, focus
Color: Auto color, red eye correction
Image section
Straighten horizon
Advanced functions:
(click the "Advanced mode" selection box in the top right):
Advanced color modulation: White balance, coloration, black/white, sepia, saturation, color
temperature
Text in picture
Special functions: Remove curved lines, camera panorama
With the help of the arrow keys you can select the large view of all the photos in the current folder one
after the other. To sort the best photos into a photo album, press the "S" key after optimization (or click
on the "To album" button). The selected photo will then be sorted into the existing photo album or into a
new one.
Page 27
Page 28

Basic functions
If your pictures don't have enough light or contrast, or you have cloudy colors because of fog, then use
the "Auto color" and "Auto brightness".
"Adjust brightness" and the "Gamma" setting sets an even brightness if a dark lighting at dusk or nighttime
snapshots has robbed your shots of color. Additionally, shadows, mid-tones, and light as well as the
entire image may be linearly adjusted in terms of their brightness.
"Contrast" and "Image sharpness" offers additional options to edit the contours of your photos
afterwards.
Click on the "Redeye" tool and let MAGIX Photo Manager 10 Deluxe automatically search for redeye
on all faces. Or, select the eye with the existing tool sizes. You don't have to worry about marking
individual pixles. Using the mouse, you can change the size of the tool: With the left mouse key held
down, you can drag the perimeter of the tool to expand it.
"Cropping" can be done either freehand or using a template for aspect ratio. First, click on the "Crop"
button and drag the desired area over the image with the mouse button depressed. Then confirm the
selection with "Apply".
If your landscape photo is a little crooked, then you can use the "Straighten horizon" function to simply
level it out - the horizon will be shifted so that it is exactly straight.
Page 28
Page 29

Paste text
To create a caption for an image, enter your text in "Advanced functions" into the "Image text" field.
Drag the text in the preview window to the desired position.
Specify style, color, and shadow via "Options" for the font. You can also change the color of the
background behind the text. If you choose a low transparency, you will get an unobtrusive, but readable
title.
Page 29
Page 30
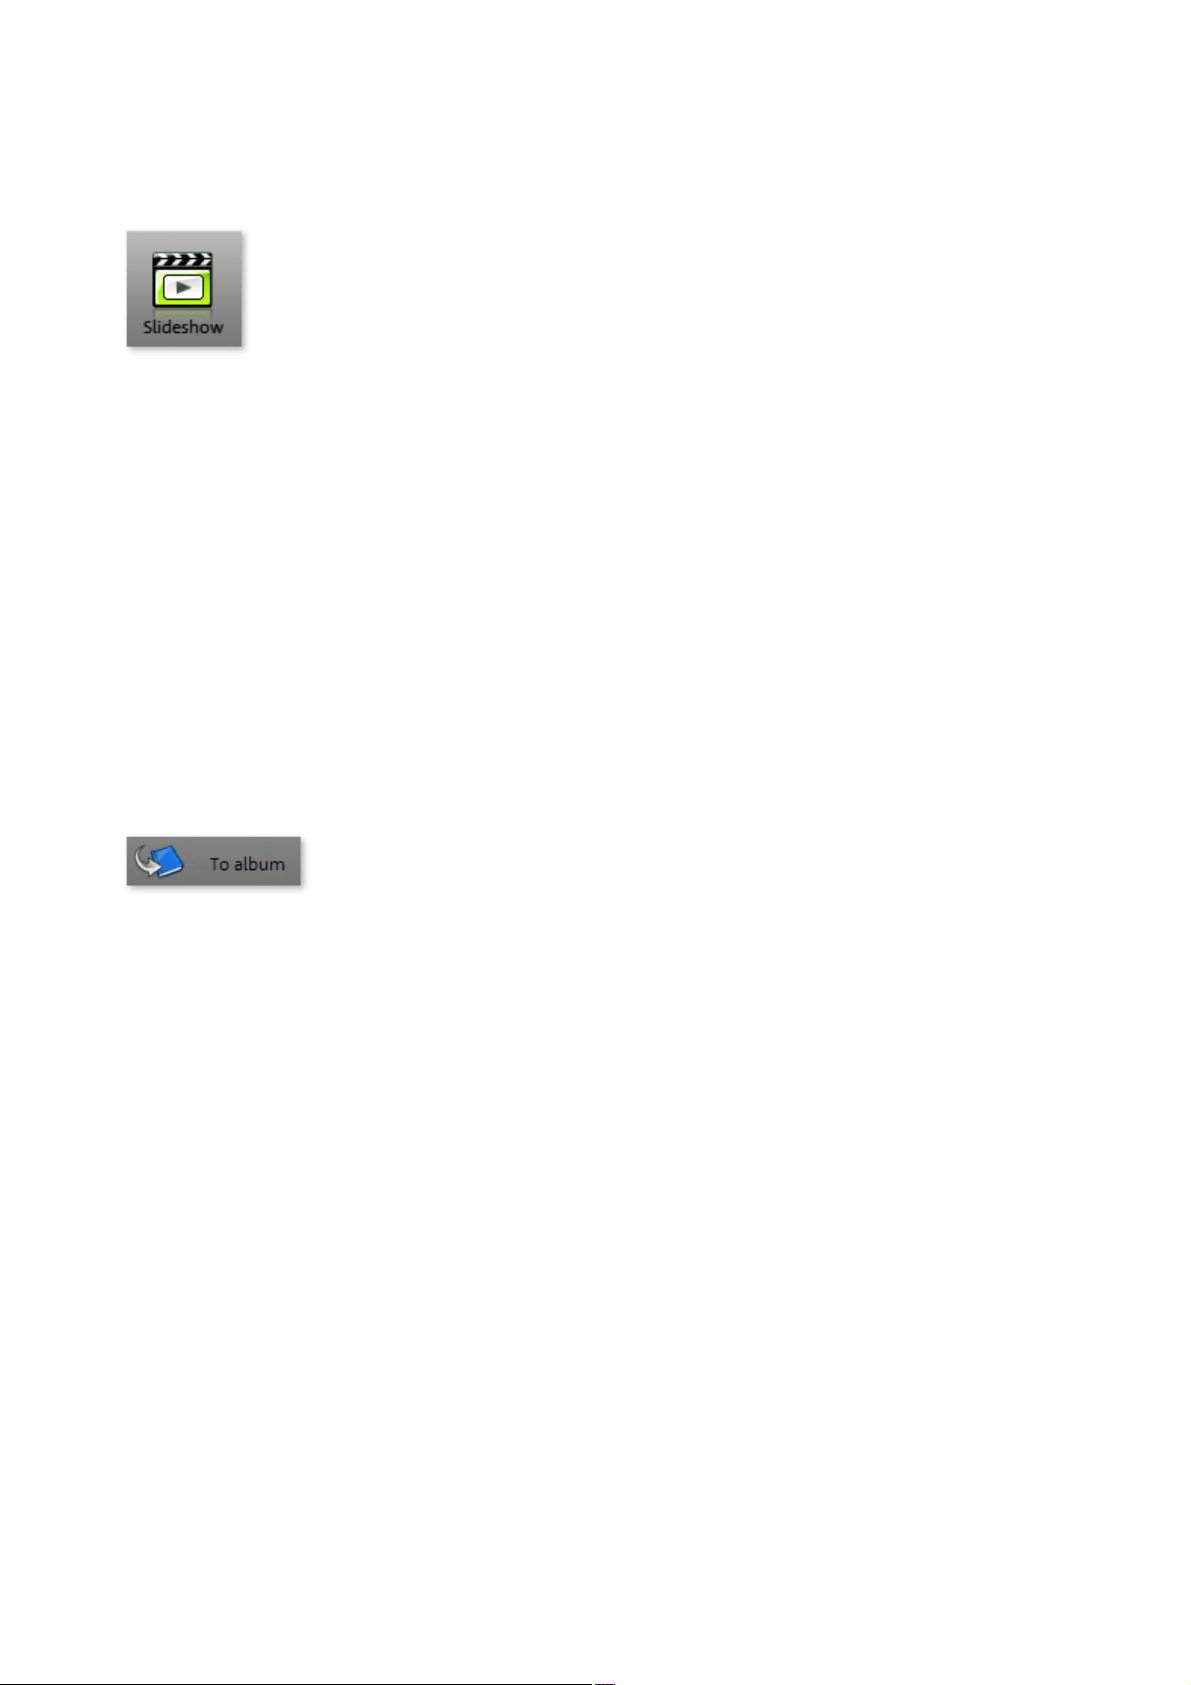
Create slideshows and photo albums
Select an image and click the Slideshow
button.
The album area to the right will become visible
and the image will be sorted into the album
section. This way, you can always keep an eye
on the contents of your current album.
All images in a folder can also be played back as a slideshow.
MAGIX Media Viewer will open and the slideshow will play back automatically in full-screen mode.
To activate the navigation buttons, move the mouse to the top or bottom edge of the image.
There is a default display setting of 7 seconds for each photo before the next one appears after
an automatic fade. You can also change these settings later (gear symbol).
You can manually flip forward and backward between images as you like by clicking on the
arrows.
To leave slideshow mode, press the "Esc" button and close the program.
Note:
A help file for all of the functions of Media Viewer may be accessed via "F1" on your keyboard.
Play album as slideshow
Different photos can be compiled in a single album and then be viewed comfortably in sequence,
regardless of which folder they are in.
Step 1: In the overview window, you can select as many individual images as you like from any folder,
and then click on "To album
".
Step 2:
In addition to photos, you can also add music you like to the album by clicking it or dragging it. The
tracks are played in the order in which they are listed. You can move the links created in your album
anywhere you like in the list until the picture and music order looks the way you want it to. The storage
location of your original files is not affected by this in any way.
Step 3:
After you have added all of the media you want to the album and arranged it, click on the first photo in
the album and then on the "Slideshow" button to play back the slideshow.
Page 30
Page 31

Print photos
1.
Select all images which you would like to print.
2. To open the dialog, click the "Print
" button.
Click "Print" to start the print process.
Tip
: Use "Optimize" on MAGIX Photo Manager 10 Deluxe's main screen to adjust images with redeye or
color problems in order to get the best possible results.
Layout
: You can set how many pictures should be printed per page. You can choose from between 1 and 8
pictures per page. The more pictures found on any page, the smaller they will appear. With "Contact
sheet" you can have a type of index for all pictures printed. All pictures are ordered in mini format on one
page. Of course, you can also print your pictures in standard formats (9x13 and 10x15).
Options
: Activate options by checking them off (and leave those unchecked which you don't want to activate).
For example, if you've saved comments on an image and want them to be visible on the printed page,
then activate "Print comments". If you've optimized several images or added effects, place a check next
to "Print optimization effects" so that the adjusted photos appear as you want them to. Click on "Default
settings" to reset things to their standard values.
Quick settings
: This displays several typical settings for print jobs like posters and postcard puzzles, etc. Use one of
these settings and you will have to make sure that there are no adjustments to the settings under
"Options".
Copies
: Set how many copies are to be created for the current print job.
Landscape format
: Activate this button to print the image in a landscape (horizontal) format.
Setting
: Open your printer's settings and customize them to meet your requirements.
Page 31
Page 32

Present your photos
In the disc selection dialog, you can burn selected
images like normal to CD or DVD ("CD/DVD
" option), or you can select a special presentation
method.
Depending on whether or not you have selected
individual photos or an album, the export dialog offers
different options (you can select an album by clicking on
one of the displayed photos in the album display to the
right). A couple of examples:
Use the "Online album
" button to access your online album at any time if you
want to provide it with new content.
Digital photos on the PC should not be the goal in itself. For this reason, MAGIX Photo Manager 10
Deluxe offers an entire range of possibilities of what to do with your photos:
Burn
You will often want to burn your photos to disc, e.g. to present them on a friend's PC. Click the "Burn
" button to get started.
Slideshow: This enables automatic playback of individual photos on a PC.MAGIX Media
Viewer will be burned to the disc for this purpose.
WMVHD: This converts your media into a high-resolution video file for optimum playback
quality on a PC.
JPEG disc: This feature enables automatic playback of individual photos on TV via a compatible
DVD player.
Export
Other presentation options can be accessed via the "Export
" button.
Screensaver: To do this select individual photos, click on the "Export" button, and then select "
Create and install screensaver" ? and voilá! ? your slideshow will be flickering on your
monitor while your computer idles.
Desktop background: You can create your own desktop show in the same way. The photos
will be displayed in a slideshow as a desktop background. A great function if you just can't
decide which one is your favorite picture!
Mobile devices: If you want to add new pictures to your portable player, select "Mobile
devices" in the export dialog for albums, or for individual images the option "Transfer to
mobile device".
Online Album
You can also put your pictures from MAGIX Photo Manager 10 Deluxe directly onto your own photo
website and then present them to friends with a link.
Step 1: Select the media which you would like to upload (photos, music, videos, or even a
complete album).
Step 2: Sign up using your email address and a password for MAGIX Online Album. If you
Page 32
Page 33

haven't registered yet, then you can do so directly in a few steps.
Click the "Photo prints
" button. Single photos or whole albums can be
easily uploaded for printing. For more information
and current prices and offers, please visit
www.magix-prints.com
Step 3: Enter which resolution the pictures placed online should have.
Step 4: You can customize your personal web page individually. By sending an email link, an
e-card, or a photo gift, you can send messages to your friends and invite them to visit your Online
Photo Album.
Further information and help can be found at www.magix.com
Photo prints
Digital is good, but holding something in your hands is even better. For this reason, you should be able to
quickly get your hands on high-quality prints when you want them. To do this, use the integrated MAGIX
Online Print Service.
Page 33
Page 34

Burn
In the disc selection dialog, you can burn selected
images like normal to CD or DVD ("CD/DVD
" option), or you can select a special presentation
method.
Depending on whether or not you have selected
individual photos or an album, the export dialog offers
different options (you can select an album by clicking on
one of the displayed photos in the album display to the
right). A couple of examples:
Use the "Online album
" button to access your online album at any time if you
want to provide it with new content.
You will often want to burn your photos to disc, e.g. to present them on a friend's PC. Click the "Burn
" button to get started.
Slideshow: This enables automatic playback of individual photos on a PC.MAGIX Media
Viewer will be burned to the disc for this purpose.
WMVHD: This converts your media into a high-resolution video file for optimum playback
quality on a PC.
JPEG disc: This feature enables automatic playback of individual photos on TV via a compatible
DVD player.
Export
Other presentation options can be accessed via the "Export
" button.
Screensaver: To do this select individual photos, click on the "Export" button, and then select "
Create and install screensaver" ? and voilá! ? your slideshow will be flickering on your
monitor while your computer idles.
Desktop background: You can create your own desktop show in the same way. The photos
will be displayed in a slideshow as a desktop background. A great function if you just can't
decide which one is your favorite picture!
Mobile devices: If you want to add new pictures to your portable player, select "Mobile
devices" in the export dialog for albums, or for individual images the option "Transfer to
mobile device".
Online Album
You can also put your pictures from MAGIX Photo Manager 10 Deluxe directly onto your own photo
website and then present them to friends with a link.
Step 1: Select the media which you would like to upload (photos, music, videos, or even a
complete album).
Step 2: Sign up using your email address and a password for MAGIX Online Album. If you
haven't registered yet, then you can do so directly in a few steps.
Step 3: Enter which resolution the pictures placed online should have.
Step 4: You can customize your personal web page individually. By sending an email link, an
e-card, or a photo gift, you can send messages to your friends and invite them to visit your Online
Page 34
Page 35

Photo Album.
Click the "Photo prints
" button. Single photos or whole albums can be
easily uploaded for printing. For more information
and current prices and offers, please visit
www.magix-prints.com
Further information and help can be found at www.magix.com
Photo prints
Digital is good, but holding something in your hands is even better. For this reason, you should be able to
quickly get your hands on high-quality prints when you want them. To do this, use the integrated MAGIX
Online Print Service.
Page 35
Page 36

Export
Depending on whether or not you have selected
individual photos or an album, the export dialog offers
different options (you can select an album by clicking on
one of the displayed photos in the album display to the
right). A couple of examples:
Use the "Online album
" button to access your online album at any time if you
want to provide it with new content.
Click the "Photo prints
" button. Single photos or whole albums can be
easily uploaded for printing. For more information
and current prices and offers, please visit
www.magix-prints.com
Other presentation options can be accessed via the "Export
" button.
Screensaver: To do this select individual photos, click on the "Export" button, and then select "
Create and install screensaver" ? and voilá! ? your slideshow will be flickering on your
monitor while your computer idles.
Desktop background: You can create your own desktop show in the same way. The photos
will be displayed in a slideshow as a desktop background. A great function if you just can't
decide which one is your favorite picture!
Mobile devices: If you want to add new pictures to your portable player, select "Mobile
devices" in the export dialog for albums, or for individual images the option "Transfer to
mobile device".
Online Album
You can also put your pictures from MAGIX Photo Manager 10 Deluxe directly onto your own photo
website and then present them to friends with a link.
Step 1: Select the media which you would like to upload (photos, music, videos, or even a
complete album).
Step 2: Sign up using your email address and a password for MAGIX Online Album. If you
haven't registered yet, then you can do so directly in a few steps.
Step 3: Enter which resolution the pictures placed online should have.
Step 4: You can customize your personal web page individually. By sending an email link, an
e-card, or a photo gift, you can send messages to your friends and invite them to visit your Online
Photo Album.
Further information and help can be found at www.magix.com
Photo prints
Digital is good, but holding something in your hands is even better. For this reason, you should be able to
quickly get your hands on high-quality prints when you want them. To do this, use the integrated MAGIX
Online Print Service.
Page 36
Page 37

Online Album
Use the "Online album
" button to access your online album at any time if you
want to provide it with new content.
Click the "Photo prints
" button. Single photos or whole albums can be
easily uploaded for printing. For more information
and current prices and offers, please visit
www.magix-prints.com
You can also put your pictures from MAGIX Photo Manager 10 Deluxe directly onto your own photo
website and then present them to friends with a link.
Step 1: Select the media which you would like to upload (photos, music, videos, or even a
complete album).
Step 2: Sign up using your email address and a password for MAGIX Online Album. If you
haven't registered yet, then you can do so directly in a few steps.
Step 3: Enter which resolution the pictures placed online should have.
Step 4: You can customize your personal web page individually. By sending an email link, an
e-card, or a photo gift, you can send messages to your friends and invite them to visit your Online
Photo Album.
Further information and help can be found at www.magix.com
Photo prints
Digital is good, but holding something in your hands is even better. For this reason, you should be able to
quickly get your hands on high-quality prints when you want them. To do this, use the integrated MAGIX
Online Print Service.
Page 37
Page 38

Photo prints
Click the "Photo prints
" button. Single photos or whole albums can be
easily uploaded for printing. For more information
and current prices and offers, please visit
www.magix-prints.com
Digital is good, but holding something in your hands is even better. For this reason, you should be able to
quickly get your hands on high-quality prints when you want them. To do this, use the integrated MAGIX
Online Print Service.
Page 38
Page 39

Interface and functionality
In this chapter
Advanced mode & Easy mode
Toolbars
Navigation and info tabs
Photo overview
Album view
Optimize view
Slideshow monitor
Keyboard shortcuts
This chapter will provide you with an overview of the functions available in MAGIX Photo Manager 10
Deluxe and where to find them.
Page 39
Page 40

Advanced mode & Easy mode
All advanced mode functions will be
hidden in Easy mode, but to use them
they can always be shown again with a
simple click.
Many advanced mode functions will not be necessary for every process in MAGIX Photo Manager 10
Deluxe. For this reason, you can choose to limit the program to basic functionality.
Easy mode screen
Additional functions in advanced mode
which can be hidden in easy mode:
Database menu and Database tab
The Security, Services, and Tasks menus
Categories (Categories, Create categories) tab
File information tab
"1:1" and "fit" in the Photo overview buttons
In the "Optimze" area: Advanced functions for image editing and Edit image externally
Page 40
Page 41

Toolbars
Import: Opens the import dialog. Once you have
connected your external device
(e.g. digital camera), all pictures will appear here
automatically and, if desired, they can be copied into
the corresponding folder.
Or switch to the Online media
area and download images from your online album.
In the Folders
area, you can enter a folder to be added to MAGIX
Photo Manager 10 Deluxe's database.
Selection: MAGIX Photo Manager 10 Deluxe finds
suitable pictures for you. Choose between "Create
representative selection", "Recognize faces on
pictures", and "Find similar pictures
". This saves you from having to take the time to sort
manually.
Export: Exports
the album or one or more selected photos as videos,
desktop backgrounds, screensavers, and more.
Or load your media into your Online Album
to make it available to everyone.
Print: Print images
gives you the option of printing your images at home
with your own printer.
Switch to Order photo prints
to order your photos for delivery to your home with
a few clicks.
Or create a photo album with your images for special
occasions.
Burn:
This button opens the burn dialog. Select which
format you want to use to burn your files to CD or
DVD.
Slideshow: Opens MAGIX Media Viewer
and starts the slideshow with the selected photos.
Online Album: Don't just upload your media to your
Online Album via Send media, manage it too in
MAGIX Photo Manager 10 Deluxe via Manage
media
.
Page 41
Page 42

Order your photos
to your home with just a few clicks via the Internet.
You can order photos, posters, printed t-shirts, photo
albums, or other great gift ideas.
Page 42
Page 43

Navigation and info tabs
The navigation and info tabs in the Photo
Manager allow you to organize the data in
the form of folders and database entries.
In this section:
Folder
Photos and videos
Calendar
Categories
Database
Albums
File information
Preview / Media Player
Page 43
Page 44

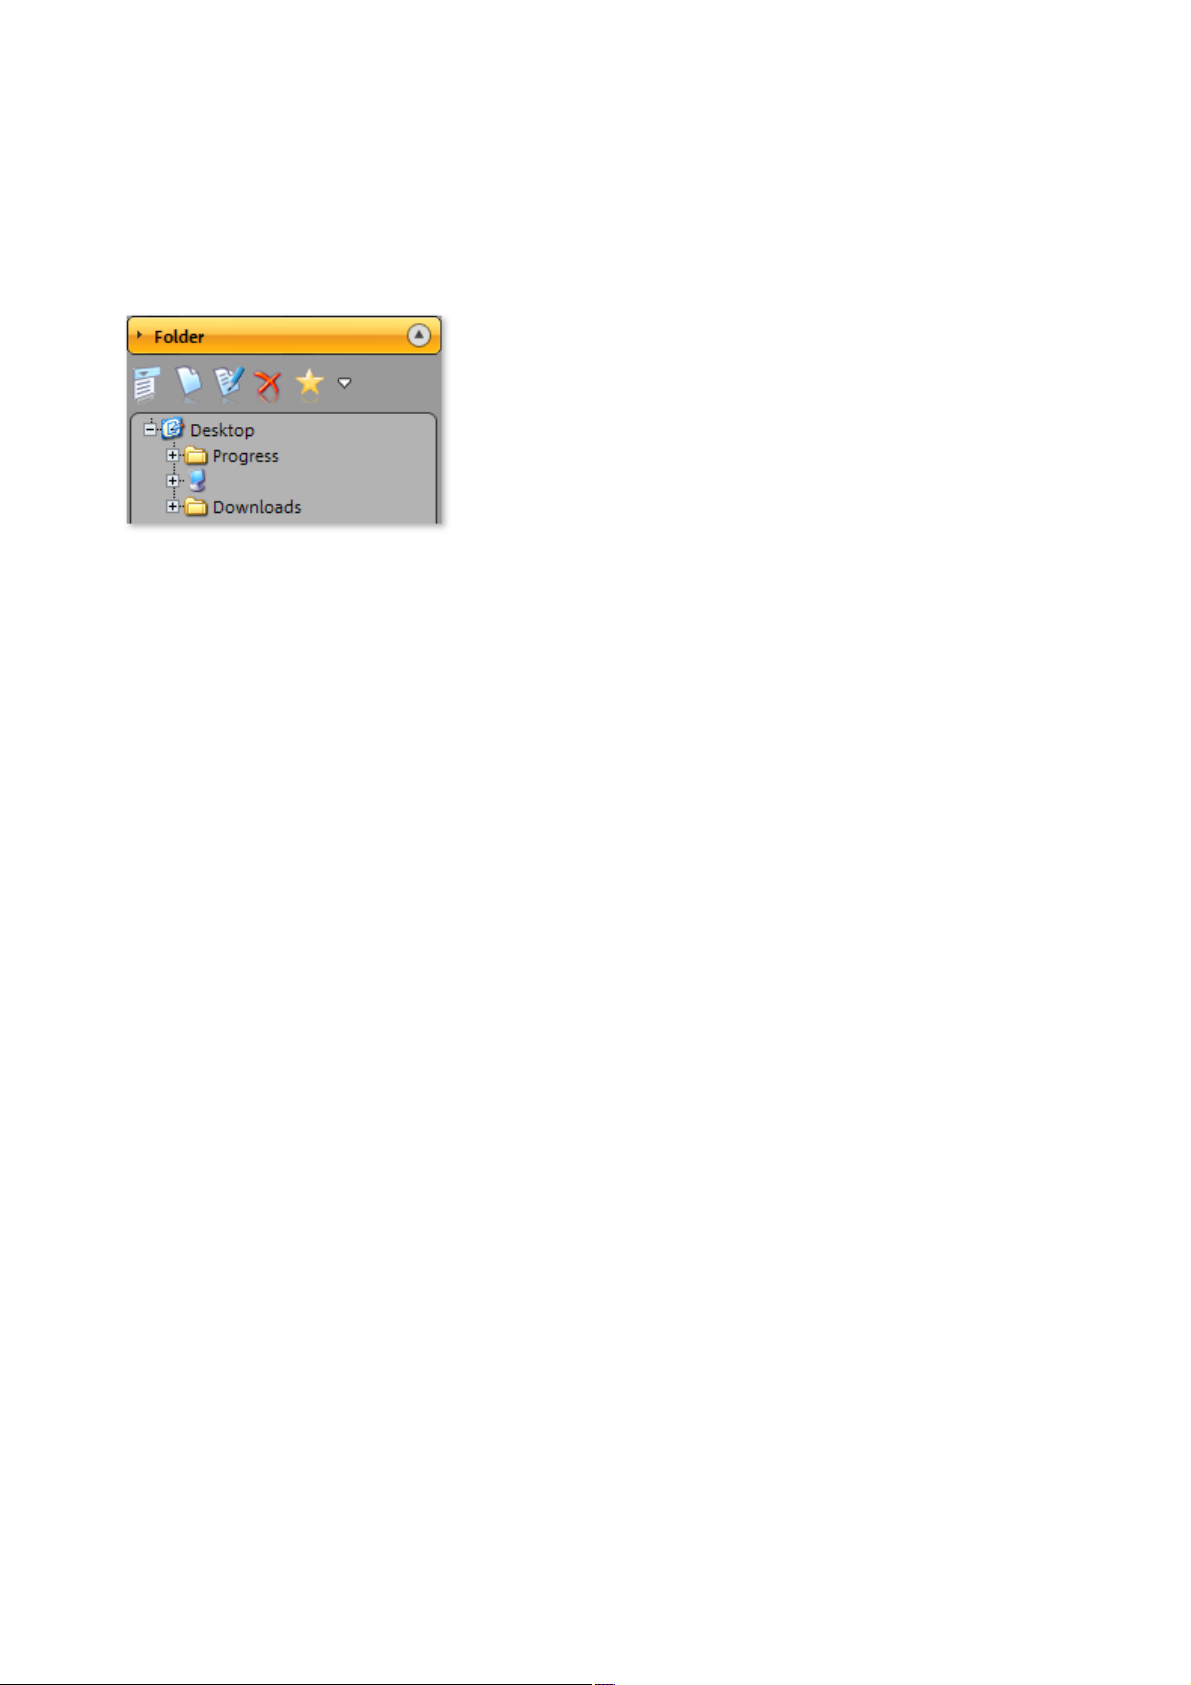
Folder
New folder
: Creates a new subfolder in the selected folder.
Rename selected folder
: Use this button to open a small dialog where you can
change the name of the selected folder.
Delete
: Deletes the selected folder.
Add to favorites
: Pressing this button adds a folder to your "Favorites"
folder. The list can be launched via the little arrow.
Launch the Explorer's functions: Besides the above-named
functions, there are also:
Copy into folder
: The previously selected photos will be copied into the
chosen folder, and you can either specify this directly or
select it using the folder symbol.
Open Windows Explorer
: The selected folder will be opened with the Windows
Explorer.
"Folder" displays the actual existing file system of your PC. You can open every folder and show its
contents to navigate through the structure of your PC. Every folder can be opened with a mouse click.
Button
Page 44
Page 45

Photos and videos
Adding a new folder is fast and easy.
Rename the selected folder.
Arrange the folder according to specific characteristics like
name, size, date, etc.
Delete the selected folder from the database and from your
computer.
Launch any of the functions which are available to you for
folder management. Besides the functions named above, you
can also:
Change the date of creation
: This is most important for sorting according to date.
Correct information about the folder if it is not correct.
Set preview images for folders
: Specify preview images here which make the contents of a
folder clear.
Hide folders
: You can hide folders if you do not want them to be
displayed. They won't be deleted from the computer.
Hide all music folders
: Many music folders contain 1 or 2 images for the album's
cover. For this reason, these folders are normally listed here.
If this option is activated, then all folders which contain more
music than image files will be hidden.
Show hidden files
: If you have hidden folders, then you can display them again
later. Maybe you're looking for a certain image which may
This tab contains a list of all folders with photos and/or videos which were read by MAGIX Photo
Manager 10 Deluxe (also using its search function).
Important!
It is not the listed folders, but rather the actual file folders that display the connections to the file folders,
as is the case with categories. Changes are not related to the entries in the list, but rather the folders
themselves! If you delete a folder here, then it will also be deleted from your computer...
Buttons
Page 45
Page 46

be hidden, or you would like to show a folder again. The
"Show folder" option will appear in the folder's options
menu.
Page 46
Page 47

Calendar
Expand all:
Clicking this button expands the display to all levels:
years, months, and days.
Collapse all:
Clicking this button reduces the levels displayed to
only the top level (years).
The "Calendar" folder organizes photos by date. Clicking on a specific date in the calendar, displays all
photos from anywhere on your system that contain the selected date information.
You can also click on the year or the month. Then all the entries for the selected year or month will be
shown.
Functionality:
For photos from digital cameras meta information, including the date of creation, is recorded in the file
when a photo is taken. This information is the basis of the calendar function. Picture files that don't have
any such meta information will be ordered according to the date they were copied to the hard disk.
The ordering of the calendar is based on when the photos were taken.
Hierarchical order of the calendar:
As the top-most level only the years are listed out at first. By clicking on the plus in front of the
corresponding years, months can be opened. Now click on the plus again to see the days.
Page 47
Page 48

Categories
Add new categories simply and easily.
Give existing categories a new name.
Delete categories. The images which are assigned to this
category will not be deleted.
Activate this function and click on the images which should
be assigned to the active category.
Activate the eraser tool and delete the category assignments
by clicking on them. The images will not be displayed any
longer in the category.
Launch any of the functions which are available to you for
category management. Besides the functions named above,
you can also:
Large icons
: Display the icons for categories either large or small.
Summarize multiple selection
: Select multiple selections to determine whether or not all
images in the respective category should be displayed (large
selection), or only the images which were assigned to each
of the selected categories (small selection).
In the "Categories" tab, you will find themes for sorting your files.
Categories have been submitted in MAGIX Photo Manager 10 Deluxe for you. These may be deleted or
renamed as you see fit. A picture may also be assigned to several categories.
Please note
: The categories are not "actual" file folders that you create on your hard disk, but rather individual links
to files that could be found anywhere on your system.
Buttons
Automatic categories
MAGIX Photo Manager 10 Deluxe can automatically assign your photos to specific categories. Select a
folder or different images and activate the "Automatically assign images to categories" in the "Edit" menu.
Images will then be analyzed for certain image content and sorted into corresponding categories (e.g.
night, sunset).
Page 48
Page 49

This function should be understood as a rough presorting feature. Not all images are always correctly
sorted, and sometimes they appear in two completely different categories. This depends on the diversity
of the photo's subject, which may be interpreted differently.
Page 49
Page 50

Database
The "Database" area opens the MAGIX program-compatible media database. This shows all (used)
folders in which you can find your files like photos, music and videos and can also be used with future
MAGIX products.
These folders are "Virtual database folders" with which you can manage your photos and the categories.
They display the properties according to which photos and other media files are sorted.
Change properties
Using Drag & Drop
You can move complete folders by "Drag & Drop". The properties of the photos and files contained are
changed automatically. For example, you can move the folder under "Year > 2003" into the folder "Year
> 2005". This way every file's year will be changed to 2005 in the moved folder.
Change properties
You also have another option: Select the folder where you want to change the photo and file properties.
Select the corresponding photos or files from the photo overview.
Right-click on one of the selected entries to open the context menu and select "Properties".
In the dialog displayed you can change the properties.
After closing the dialog with "OK", the tree structure in the database is updated accordingly.
Note:
All changes relate solely to the "virtual database folder" and the properties of the files. The folders on the
hard disc remain unchanged!
Page 50
Page 51

Albums
New
: A new, empty photo album.
Save as...
: The current photo album will be saved.
Sort
: Depending on whether your albums should be sorted
according to name, creation date, date last modified or
length, you can determine these details here.
Delete...
: If you no longer require an album (maybe you have placed
all of the photos in another album), then you can use this
function to delete it.
Note
: If you delete an album, only the link to photos in the album
will be deleted. The actual photos still remain in the folders
of your PC.
This button opens the menu, which not only contains the
functions of the buttons, but also further commands for
photo albums.
Open...
: Opens a previously saved photo album. A file window is
opened for this purpose with which you can control the
memory folder of the photo album.
Rename
: If you would like to give the currently selected photo album
a new name, then click here and enter a more accurate
name.
Properties
: Here you can open a dialog which lists all of the
characteristics of the album. You can always customize these
according to your wishes.
"Albums" contains all of your playable photo albums and those which you created. If you haven't opened
this view, then a mouse click on an album will load it in the center of the screen (Photo overview).
Settings
Photo album settings can be changed via the context menu (right mouse click) or via the "File ->
Options" menu. You can open this dialog via the keyboard shortcut "Y".
Page 51
Page 52

File information
Here all available information on the selected files is shown. This information is also at your disposal in
the database view under "File information".
Page 52
Page 53

Preview / Media Player
Use the preview (Media Player) to view pictures, videos, etc. in mini format. To do so, click on the
picture in the photo overview or in the album view. Now you'll see it in the preview. You can also listen
to music files or watch videos here. Simply select them in the same way and click on the playback button
in the preview.
If you want the view to be larger so that you can see the details of a picture, simply click on the symbol
to the far left. This opens the Slideshow Monitor
.
Page 53
Page 54

Photo overview
In this section:
Buttons in general
Buttons below the overview
Show photos
Selecting photos
Files in a selected folder display are shown with preview images in the photo overview window.
You can select the photos and other media files in the overview window, move them to the database
folders, assign categories to them, use them in albums, and so on.
Page 54
Page 55

Buttons in general
Search
opens a comprehensive selection dialog box with
options for finding specific media files on your hard
drive or from within the database.
Backwards/Forwards
: These buttons include the "Database",
"Category", "Calendar" and "My photo
albums" - This way, you can always get
back to the last view.
Use this button to change to My Computer
and navigate the folder structure on your PC.
Upwards
: This button accesses the parent folder.
Several functions that make it easier to operate MAGIX
Photo Manager 10 Deluxe are hidden here.
Selection aid (check boxes):
If this function is activated, small check boxes will be
displayed to the left of the music tracks which can be used
to select the tracks. This makes multiple selections easy.
Audio commentary
: If you have a microphone connected to your PC, then
you can record and save commentary for each of your
images. In "Display", you can set whether comments
should be shown or hidden and when they should play.
This function can be found in an images context menu and
via the "Edit" menu.
Background color
: Do you prefer more colors? Then simply change the
design of the background in MAGIX Photo Manager 10
Deluxe to suit your tastes. Just enter whatever color you
would like for the album and photo display.
Sort by
: This button sorts the song order. In the "detailed
information" view you can also do this by clicking on the
corresponding category at the top of the window.
Here you can display or hide the photo album
. If you would like to have more room available for the
photo overview, then close the album view.
Page 55
Page 56

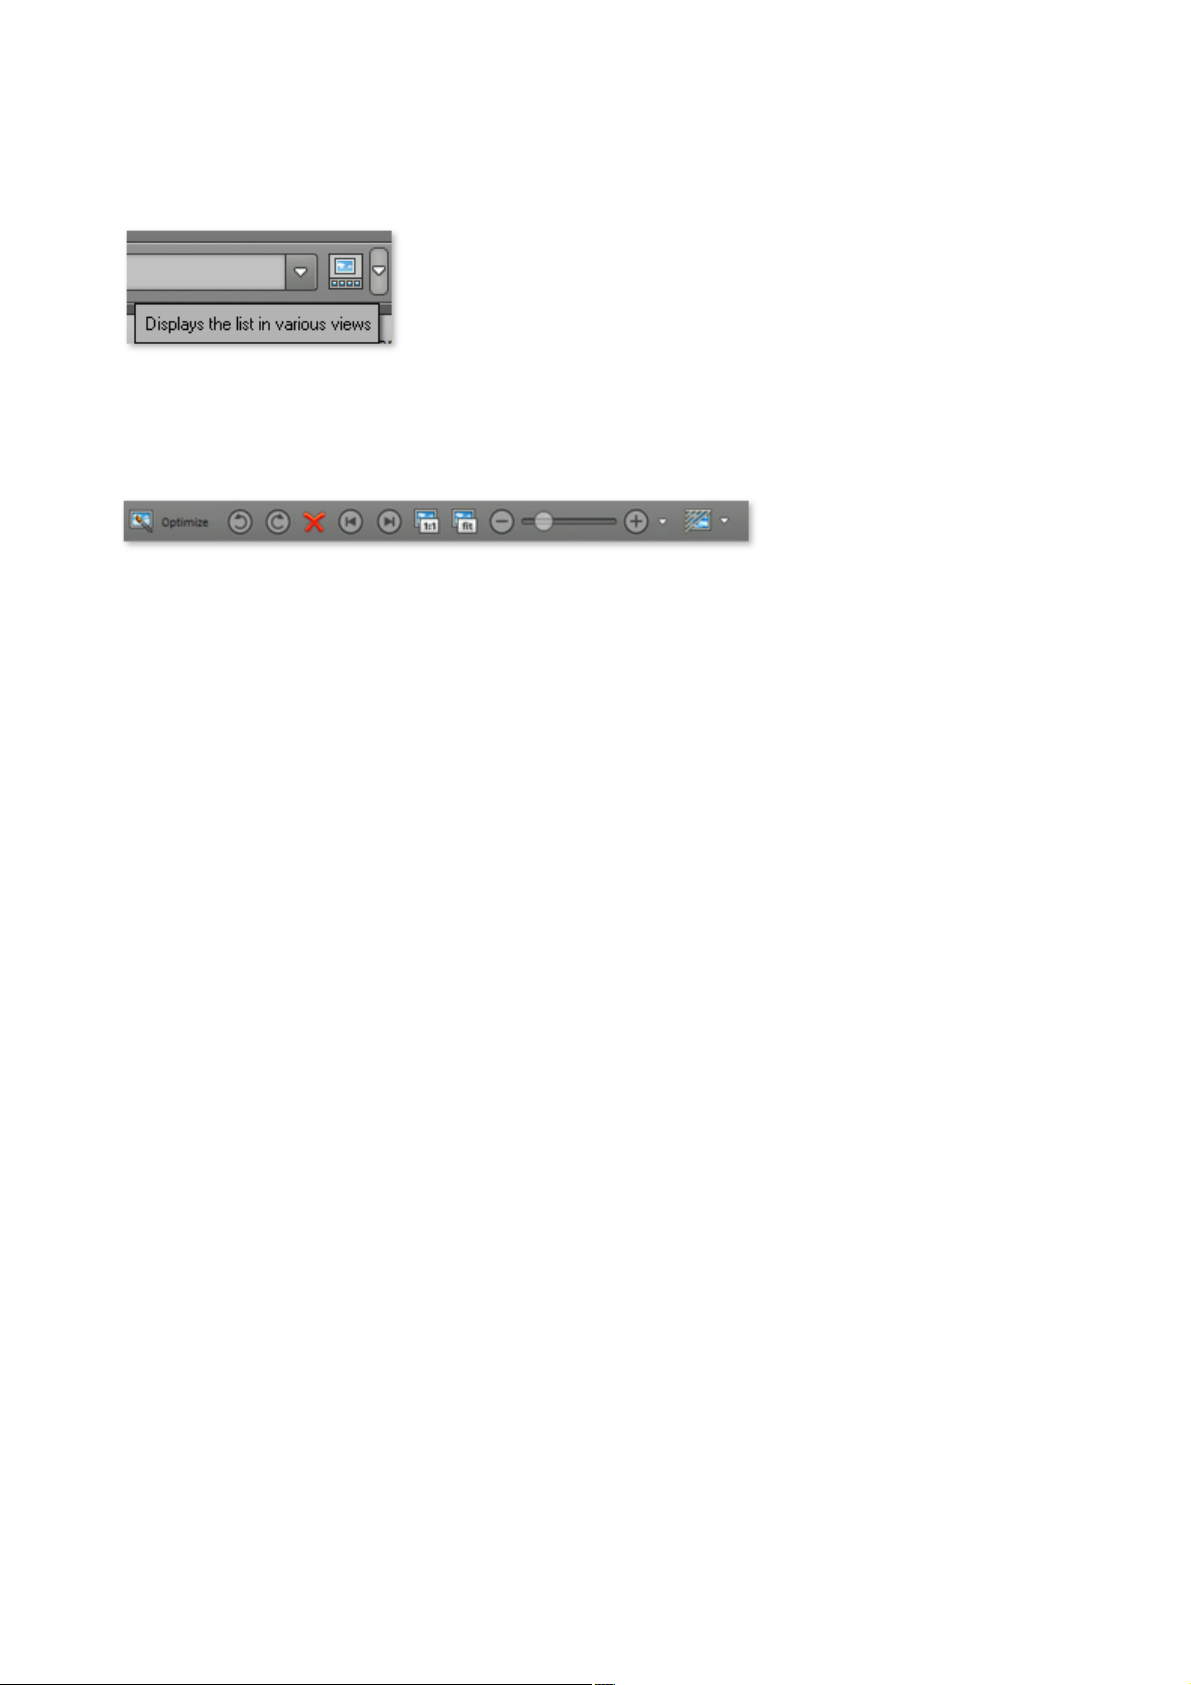
Buttons below the overview
Optimize:
Opens the image optimization dialog box. Read
more on this topic in the "Optimize view" chapter.
Rotation:
The bottom of the window features two buttons for
adjusting the horizon in an image. Photos may be
rotated in either direction.
Delete:
Deletes the selected photos from your computer.
The arrow buttons enable you to browse forwards or
backwards
in the current folder. These buttons can also be used
during playback of a slideshow.
1:1
The current photo is shown in original size.
Fit (image to window size):
This option enlarges the image so that it completely
fills the slideshow monitor.
Sharpen display: present your pictures with MAGIX
Photo Manager 10 Deluxe and even sharpen the
contrast; the original picture will not be changed in the
process. If you would like to optimize the original
picture in general, then additional functions are
available via "Optimize"
.
Zoom:
You can zoom into and out of the image to view details by adjusting the controller.
Page 56
Page 57

Show photos
Sort by:
You can sort your albums here according to name, date of
creation, date of modification or length.
All the photos in a folder are shown as thumbnails in the overview window.
Managing the view and additional functions of the photo view
Here you can specify what should be shown in the photo view: Only the thumbnail view of the pictures,
all details of the pictures or with extra film strips, i.e. select the view you find the easiest to read.
In addition, you'll also find the "Marker help" function, which simplifies the selection of files. When this
function is active the files can be selected by ticking the box at the top right of the corresponding file.
File category:
If you assign categories to your pictures as well, you can activate the function here so that the
corresponding symbol will appear beside all pictures to which a category has been assigned. This way
you always have the complete overview in MAGIX Photo Manager 10 Deluxe of which picture can be
found in which category.
Page 57
Page 58

Selecting photos
Selecting all photos:
You can select all the photos in the overview window using the Ctrl + A keys.
Select multiple photos that are not directly behind one another:
In MAGIX Photo Manager 10 Deluxe multiple files can be selected with a click of your mouse without
having to use your keyboard: To do so, click on the small box to the top right that appears when you
place your mouse over a picture. When you tick this, the picture will remain selected, even if you click on
another picture.
To select multiple photos that are not positioned after one another, hold down the Ctrl key on your
keyboard click on each file you want.
Note: It may be useful to sort the photos differently so that the desired photos are displayed one after
the other and can be selected quickly. You can find more information about this topic in the Show photos
chapter.
Selecting multiple photos (one after the other):
Click on the first photo, press the Shift key on your keyboard and select the last photo while keeping the
key pressed.
Page 58
Page 59

Album view
In the program section to the right, you
can open the album view at any time if
you require it to create or edit albums.
Here, pictures can be quickly and clearly
sorted, ideal for specifying the order of
pictures.
In this section:
Album view buttons
Create, fill, and save a new album
Change the order of the photos
Use music
Page 59
Page 60

Album view buttons
Open and close this section via the album view button.
Press this button to open a menu to set up and save new
albums or open previously created albums.
You may also specify how you would like to show your
pictures via the album view.
If you save an created album you've just
made, it will be displayed as the current album
in the album view. If you select the pictures
while in photo view and click the "Add to
album" button, they will be assigned to this
album.
You can open the album view on the right side of the screen at any time if you want to create or edit
albums.
Page 60
Page 61

Create, fill, and save a new album
Click this button first to open the album view (in case it isn't
open yet). A new, empty album will be created.
C)
The currently selected photos can be assigned
to the open album by clicking this button.
To save the album, click this button again and then select
"Save album..."
Step 1: Open a new album
Step 2: Fill the album with pictures
There are 3 options for assigning images to an album:
A)
Simply select the pictures from the photo overview that you want to add to the album, and then drag
them into the album view.
B)
Select an image and press "S" on the keyboard.
Step 3: Save the album
Specify where you wish to save your slideshow on your PC and what it should be named.
Page 61
Page 62

Change the order of the photos
You can easily change the order of the slideshow via drag & drop. You can choose multiple photos by
pressing down the Shift or Ctrl keys on the keyboard so as to move photos together.
Page 62
Page 63

Use music
Should you need a soundtrack for your slideshow you can drag an audio file, just like a photo, from the
overview window into the slideshow. Depending on the length of your slideshow, you can add a number
of different music tracks as a slideshow soundtrack. The first music track will be played first.
Page 63
Page 64

Optimize view
The easiest way to open the optimize view is via
the "Optimize" button (in the bottom portion of
the photo overview
) or in the "Edit" menu
In this section:
Buttons
Non-destructive and destructive work
Basic functions
Advanced functions
Edit image externally
All changes will be displayed in real time, and the original image will not be overwritten, provided you
have the "Non-destructive" button active. So go ahead and experiment until you have results that are
pleasing - your precious original will remain the same. All effect settings are saved as separate files with
the extension *.jpx.
If you would like to calculate your changes into the original image, then click on "Fix effects". This will
overwrite the original image and these optimization steps will not be able to be undone.
Note
: Edit a digital photo which contains a EXIF image information and this information will be preserved if
you save the optimization effects.
Page 64
Page 65

Buttons
Effects active:
Switch global optimizations on or off here. This
way you can compare the result with the initial
state.
Non-destructive FX:
Deactivate this function, if you would like your
optimizations to be applied immediately. If it
remains, then you can always undo the effects
of your work.
Clicking on this button opens the slideshow
monitor for viewing your pictures.
To leave the optimization view, either click on
the optimize button a second time or simply on
the X.
Undo/Restore:
These buttons allow you to undo or redo
individual effects. Even if a different photo has
been selected in the mean time, MAGIX Photo
Manager 10 Deluxe remembers the order in
which the effects were used.
Undo all:
This button allows you to set all previous
settings in the optimize view to neutral values.
Set effects:
The effects that are set up are saved in the
photo and cannot be undone at a later stage.
Apply to all:
With this button you can apply the current
settings to all pictures in the current folder.
After clicking on this button a preview window
with all the picture files of the folder opens.
You can choose if each picture file should use
the current settings that are in use in the
optimize view.
Here you can use the presets for
editing your pictures. These are
included as part of the program and
are perfect for typical image errors,
but they can also be created
individually.
Page 65
Page 66

Non-destructive and destructive work
Besides the purely non-destructive application of effects, it is now possible to switch between
non-destructive and destructive mode for image files. In destructive mode, all changes made will be
applied directly to the original image file. This often makes it easier to use such files in other programs or
to transfer them to third-party programs.
1:
Check this filed to activate non-destructive editing. This allows effects to be undone.
2.
Remove the check for "Effects active" to view the original image. This makes a fast comparison between
the original and the edited images possible.
3:
If you would like to fix the effects to burn edited images, etc., then click here. The original file will be
overwritten and cannot be restored.
Page 66
Page 67

Basic functions
Auto-exposure
These options use automatic exposure correction.
Auto-color
These options use automatic correction of the color ratios, that is, all color channels (red/green/blue) are
brought to optimal brightness. You can achieve the best results with photos that have lots of colors.
Photos with intended discolorations (for example, sunsets) become grey very quickly. In these cases you
should use "White balance" or "Auto exposure".
Tip:
These settings can be used well in conjunction with the "Picture view" option. At best you should select a
section with a relatively homogeneous coloring, for example, the sky. Then select the option "Auto color"
and click on "Reset picture clip". If you don't like the result, you can always revert to the previous state
using "Reset". This method leads to amazingly creative results.
Brightness
You can select various types of brightness settings with the fader. However, only one is possible at a
time.
Gamma: This method sets the brightness of the areas that can be discerned by the human eye.
This is advantageous insofar as shadows remain dark (as opposed to turning gray) when
brightening up photos, and that very bright areas are not influenced when darkening an area.
Shadows/Mid tones/Lights: This brightens up/darkens shadows, mid tones and lights. If, for
example, you wish to darken shadows, but want to leave the other bright areas as they are
(unedited), moving the "Shadow" fader to the left offers the best results.
Linear: This is the "normal" brightness setting. The photo is brightened/darkened uniformly.
Tip:
Nearly all photos can be improved by a minor gamma correction. Low values create darker, warmer
colors; higher values lighten up shadows.
Contrast
Low contrast values whiten photos and remove exaggerated contrasts in brightness. Higher values
increase the brightness contrasts and can, if overused, distort the photo.
Focus
You can set the focus of the picture using the sliders. If the focus is increased, basically an enhancement
of the edges or structures will result. When lowered, a blurring effect is used.
Red eyes
Page 67
Page 68

Use this button to automatically correct red eyes with a click of your mouse.
You can also adjust red eyes manually. There are various paintbrush sizes available for this: Move the
mouse pointer to the middle of the red eye. Move the paintbrush into the desired size by holding down
the left mouse button.
Now you can retouch red eyes at the relevant points. At this point a preview is helpful. Should the effect
be too weak, you can click on the eye repeatedly to increase the effect.
Tip:
Using the mouse wheel you can zoom in and out of the photo. Here, you can zoom into the area where
the cursor is. This way, you can make corrections much more precisely.
Crop image
You can use this option to crop the image by holding down the left mouse button. To use the cropped
image (instead of the whole picture), click on "Set". You can revert the setting to its original state using
the "Reset" button, that is, you can view the complete picture once again.
Straighten horizon
This button lets you straighten crooked pictures. Simply draw a line using the mouse along the crooked
horizon. The picture will be rotated automatically so the horizon line runs horizontally. The sides will be
clipped.
Page 68
Page 69

Advanced functions
White balance
Pictures, for example, of clouds or snow, often contain color faults. You can use this option to carry out
manual white balance. This means that white areas become really white. After activation, use your mouse
to select a small area in the picture that should be completely white in reality. All areas in the picture will
then be adapted to the color automatically.
Color in...
:
Click "Color in..." to open a small dialog: In the color field, you can adjust the complete coloration of the
picture, e.g. to remove a blue tint. "Reset" reverts the point in the color field back to its neutral setting.
Black/White
Click to make color pictures black & white.
Sepia tone
Transforms color photos into black and white photos and adds yellow to the picture to give the
impression that it's on old paper.
Saturation
With saturation you can shift the intensity of the colors. If a picture is particularly color-intense in
comparison to the original, you can correct this effect with the saturation fader.
Color temperature
This slider may be used to correct the color effect to make the subject appear in real color, i.e. without
any color distortion. Use the slider to shift the portions.
Text in picture
Enter a caption for the image here. If the text exceeds the image's borders, then the font size will adjust
so that the amount of text will fit on a single line.
Click on the text with the mouse cursor and move it by clicking it with the left mouse button to the
position you want on the image.
Text commentary options
Page 69
Page 70

:
Font name, size, color: With this button you can access the selection dialog for the font size and
style. The "Color" button accesses the selection dialog for the font's color.
Shadow: In this section you can insert shadowing on the lettering and set the size of the shadow
(offset). Use "Color" to adjust the color of the shadow.
Background: In order to make the text more easily readable, it may be necessary to place a
color-filled frame behind the text. This makes it easier to see.
Scrolling text: Activate this option and the text will be shown as scrolling text (if it is long
enough). In any case, the text will not be present during exporting or printing.
Image comments: Enter the desired text here.
Curved lines
This function may be used to correct curved lines in pictures resulting from perspective distortions.
"Curved lines" are lines and edges, which run together in an image, although they are parallel to each
other in reality.
Select the corresponding image and click "Curved lines". Calculation will begin and a copy of the image
will be produced without curved lines.
Pan
Click here if a panorama should run from left to right in fullscreen. The panorama will no longer be
shown in full width, but rather panning from the left to the right. This feature must be set for each
panorama individually.
If a particular panorama should not be played back in this manner, then remove the check mark from
"Options -> Camera pan" again.
Page 70
Page 71

Edit image externally
You can select different tasks in the "Edit image externally" tab. The "Photo Clinic" button opens the
current image in MAGIX Photo Designer, which then performs the selected tasks.
Page 71
Page 72

Slideshow monitor
In this section:
Menus in the slideshow monitor
Keyboard shortcuts
Slideshow context menu
Slideshow monitor buttons
The slideshow monitor can be opened in the overview by double-clicking on a photo. Here you can run
your slideshow in "large format" and it's possible to make further adjustments using the "Edit menu".
Page 72
Page 73

Menus in the slideshow monitor
File
Save photo as...:
The photo will be saved under the name you enter.
Export photo...:
The photo will be exported. You can find out more about the export dialog in the "Export: Export photo
album" chapter.
Keyboard shortcut: Ctrl + E
Copy photo:
The displayed photo will be saved as a graphic into the clipboard. This way you can use it in every
program that can import (via "Insert") from the clipboard.
Close slideshow monitor:
Close the large view of your images and return to MAGIX Photo Manager 10 Deluxe's main interface.
Keyboard shortcut: V
Edit
Here you'll find lots of commands from the optimize view that can be used to spice up your photos.
Note:
None of the available effects change the original photo on your hard disk. They are calculated again each
time the files are accessed so that the settings can be undone every time.
View
Here you can access various settings for the slideshow view sizes. If you are not satisfied with the
dimensions provided, then select "user defined" and enter the measurements you desire.
Slideshow options:
You can specify how long the selected photo is displayed and what the transition to the next photo
should be, if you so desire.
Page 73
Page 74

Keyboard shortcuts
Export photo
Ctrl + E
Close slideshow monitor
V
Reset all effects
Shift + F
Rotate 90° clockwise
#
Increase contrast
P
Reduce contrast
O
Increase brightness
=
Sharpen picture
Ctrl + H
Soften picture
Ctrl + G
Increase saturation
Ctrl + W
Reduce saturation
Ctrl + Q
Increase color temperature
Ctrl + =
Reduce color temperature
Ctrl + +
Sepia tone
Shift + S
Black & White
Ctrl + B
White balance
Shift + W
Straighten horizon
H
Remove red eye
R
Crop current selection
W
Optimize
Shift + V
File menu
Edit menu / Context menu
Page 74
Page 75

Slideshow context menu
Close slideshow monitor:
Close the large view of your images and return to MAGIX Photo Manager 10 Deluxe's main interface.
Keyboard shortcut: V
Next/Previous image:
Change to the next or previous image in your slideshow or open folder.
Leaf per mouseclick:
If this function is active (check mark displayed to the left), then you can change to the next image by
clicking the left mouse button or change to the previous with the right mouse button. If you would like to
deactivate this function, then hold the right mouse button down, circle over the function with the mouse
cursor and release the mouse button.
Page 75
Page 76

Slideshow monitor buttons
Rotation: Use these buttons to turn your images.
Portrait images may also be set properly with this
function.
Arrow buttons:
Flip forwards and backwards within the selected
folder using these buttons. These functions can also be
used during playback of a slideshow.
Start/Stop:
Starts/stops playback of the slideshow.
1:1:
The current photo is shown in original size.
Fit:
(Fit image to window) This option enlarges the image so
that it completely fills the monitor.
Display options:
Open this menu to adjust settings like the display time and
duration of transitions. The type of transition can also be set.
Present your pictures with MAGIX Photo Manager 10
Deluxe and even sharpen the contrast; the original picture
will not be changed in the process. If you would like to
optimize the original picture in general, then additional
functions are available via "Optimize".
View duration
Use the slider to adjust the display time of a photo during slideshow playback without having to open the
dialog.
Zoom
Use these buttons and the slider to zoom in and out of the picture. If your mouse has a scroll wheel, this
can also be used to zoom.
You can move the picture with your mouse in a zoomed-in picture. To do so, click on the picture and
simply move the picture while holding down the left mouse button. The buttons on the edges can be used
to access a small menu featuring different zoom stages (1:1, 1:2, etc.).
Sharpen display
Fullscreen mode
You can display the picture in fullscreen by clicking the "Maximize" button in the top right. Move the
mouse between the upper or lower borders of the screen in fullscreen mode; this will make the buttons
reappear.
Flip through the photos in the folder using the arrow keys. Clicking the fullscreen symbol takes you back
to the normal view.
Page 76
Page 77

Keyboard shortcuts
Open photo album
Ctrl (right) + O
Save photo album
Ctrl+S
New folder
F7
Options
Y
Quit
Alt+F4
Select all
Ctrl+A
Cut
Ctrl+X
Copy
Ctrl+C
Insert
Ctrl+V
Move to Recycle Bin
Del
Delete permanently
Shift + Del
Rename
N
Copy into folder
Ctrl+M
Optimize Photo
Shift + V
Hide
Alt+Delete
Clear
Shift + Del / Del
Start slideshow
B
Slideshow monitor
V
Help
F1
File menu
Edit menu / Context menu
Windows menu
Help menu
Page 77
Page 78

More useful functions
In this chapter
Database
Import
Create slideshow
Export
Secure data: Burn
Find pictures and make a selection
Print and order pictures
Create map
Create panorama image
MAGIX Media Viewer
Adjust properties
Equalizer
Page 78
Page 79

Database
With MAGIX Photo Manager 10 Deluxe, you can create a Database of all of your data. In this way,
you can quickly and easily access all of your target files and edit them as you wish, arrange your photo
albums, and much, much more.
To add a Database
, proceed as follows:
Either press the "Import" button and select "Folder", or
Proceed to the menu item "Database -> Add folder".
Note! The Database is actually composed of paths to the original files. The files remain at their original
positions, and no copies are produced. If you launch a file via the Database, then you are not opening a
copy, but rather the original
file via the link!
If you want to search a very large Database for a specific file
, then this is also possible.
Press either the "Search" button or
search via the menu item "Database -> Search Database..."
If you work a lot with MAGIX Photo Manager 10 Deluxe and frequently add to or delete data in the
Database, then it is possible that the Database contains old data links, causing it to become outdated. To
update it, simply use the "Optimize database "function in the "Database" menu.
Additional database functions can be found in the "Database
" chapter.
Page 79
Page 80

Import
In this section:
Import from external devices
Import from your MAGIX Online Album
Add folder to the database
There are multiple options available to you for importing your data into MAGIX Photo Manager 10
Deluxe. Select the correct button for the desired import method.
Page 80
Page 81

Import from external devices
You can also open this dialog
via the "Import" button.
You can switch between
advanced and beginner modes
with this button (nr. 1 in the
diagram).
If you would like to delete the images from the
connected device, then select them and click
"delete".
Determine what the display sequence of the
files should be: name, type, date of creation,
etc.
Define which files should be displayed. For
example, if you are looking for all of the files
from a specific day, then the list view is often
enough.
In MAGIX Photo Manager 10 Deluxe you will find an easy to operate dialog for transferring your data
over to your computer.
Connect the device to your computer, and MAGIX Photo Manager 10 Deluxe will recognise it and ask
you if you would like to open the import dialog, since you probably want to import files.
Note
: When connecting external devices (e.g. mobile telephones, USB sticks, etc.), it's possible that these
devices must first be recognized by your computer. Once your computer recognizes the device, MAGIX
Photo Manager 10 Deluxe can access it. If display of the device is problematic, then please refer to the
product's manual or contact the manufacturer.
Additional import functions
Click on "advanced" and the following additional functions are made available:
View buttons (nr. 3
in the diagram)
Page 81
Page 82

Additional saving and importing functions (nr. 2
in the diagram)
New name:
If you would like to save your files in a subfolder when you import, you can define it here.
File name:
Define how imported files should be titled. If you do not apply any changes, then they will remain titled
as they are on the connected device.
Add to photo album:
Imported files can be assigned directly to existing photos albums. Enter the respective album here, if this
is the case. This can save you time.
Import settings
Delete imported photos from the camera:
All the files that you have imported with MAGIX Photo Manager 10 Deluxe can be deleted from the
connected device. Just bear in mind that they cannot be recovered from the device once they have been
deleted...
Convert photos on import:
You can edit photos as you import them.
Image qualities
: Click here and a small dialog will open for you to add information such as author and category (new
categories can be added). In addition, you can choose whether the EXIF creation date should be
ignored, or if the photos should show the original EXIF date. If this is ignored, then the date of import will
be defined as the creation date.
Page 82
Page 83

Import from your MAGIX Online Album
Step 1:
Click the "Online Album" button.
If you only want to copy a few files
from the Online Album, then select
these and click "Download selected".
If you want to copy all of the media,
then select "Download all".
If you would like to load media from your MAGIX Online Album to your computer, then proceed as
follows:
Step 2: Switch to the "Manage" screen and log in.
The dialog for managing your MAGIX Online Album will open.
Step 3: Go the album/folder which contains the media that you want to copy to your hard disk.
All media in the album will be displayed.
Step 4:
Under "Save downloaded media in", enter the folder on your hard drive where the media should be
copied.
Page 83
Page 84

Add folder to the database
C)
Click the "Import" button and switch to the "Folder"
screen.
The import dialog will open.
In this section:
Database import dialog
MAGIX Photo Manager 10 Deluxe can add a specific folder on your computer to the database via the
following options:
A)
Click "My Computer" and navigate to the folder and MAGIX Photo Manager 10 Deluxe will
automatically add the files to the database.
B)
Use the "Add folder" function in the "Database" menu. The import dialog will open.
Note!
The database is only composed of paths to the original files. The files remain at their original positions,
and no copies are produced. If you launch a file via the database, then you are not opening a copy, but
rather the original file!
Page 84
Page 85

Database import dialog
1.
Enter the folder which contains the data which should be
added to the Database.
2.
"Close subfolders" is normally active (checked off) so that all
folders included which contain images will also be transferred
to the Database .
3.
"Permanently monitor" is also normally active. So that a
folder is always in the most up-to-date condition, it can be
monitored permanently by MAGIX Photo Manager 10
Deluxe, and changes to the folder will be reflected within the
Database.
4.
Click "Add folder to the database" to start the import
process.
Page 85
Page 86

Create slideshow
In this section:
Start
Load files
Style
Music
Presto!
Export dialog
Select the picture and video files (if applicable) that you would like to use to create the
1.
slideshow, and then click "Export" on the toolbar.
In the dialog which opens, select "Create slideshows and videos from file(s) (YouTube upload,
2.
etc.)" in "Photos & videos", and then press "OK".
Activate the desired format. The dialog for creating the slideshow will open.
3.
Possible formats
:
WMV
MXV
AVI
RM
MOV
Page 86
Page 87

Start
You can enter the
name of your
slideshow here. This
name will be used as
a preset title for the
slideshow to be
created.
Specify the aspect
ratio for the
slideshow.
Cut to fill monitor automatically: This determines how MAGIX Photo Manager 10 Deluxe behaves with
photos that do not match the slideshow's format. Images that do not correspond to the slideshow's
aspect ratio are adjusted automatically. The zoom factor is set in such a way that there are no black bars
to the left or right or top to bottom.
Page 87
Page 88

Load files
"Load file(s)..."
allows you to select
photos and videos
for integration in the
slideshow.
"Delete selection"
removes the selected
photos and videos
from the list.
The sequence of
photos can be
specified via drag &
drop.
Turn images 90°
: The selected photos can be rotated 90° clockwise with this function. To turn a photo 90° to the left, this
button must be clicked three times.
Display time for each photo (seconds)
: By default, photos are displayed for the time entered here.
Total length of slideshow
: The approximate total length of the slideshow created is shown here. It adjusts to reflect any changes
that are made.
Page 88
Page 89

Style
Simply select one of
the styles that best
suits the theme of
your slideshow. If
you don't want any
effects, then select
the entry marked
"No effects".
Page 89
Page 90

Music
You can select
between the
suggested pieces of
music or one of your
own by importing it
into the list via "Load
file(s)". If the
slideshow is long
enough, then all of
the pieces contained
in the list will be
loaded into the photo
one after the other.
The sequence of songs can be specified via drag & drop.
Preview
: This button provides a preview of the selected song.
Remove selection
: This deletes the selected song from the list.
To the right in the dialog, you can see the total length of the background music and of the slideshow. This
enables you to see if other music tracks need to be loaded, e.g. the slideshow is longer than the music,
and you don't want to repeat the music.
Page 90
Page 91

Presto!
Exports the arrangement in the
corresponding format and
adds it to your video folder.
You can upload the slideshow
you created to YouTube™
directly from within MAGIX
Photo Manager 10 Deluxe.
In case you select WMV, MXV, etc., you will see the following options for exporting
:
In case you select YouTube upload, you will see the following options for exporting
:
The command opens a dialog for you to set the name of the slideshow for YouTube (default is the same
as in MAGIX Photo Manager 10 Deluxe), description, keywords (so-called "tags"), and the category for
the video. You may also indicate whether the video should be private or public.
After confirming your entry by pressing "OK", the slideshow will be exported and uploaded to
YouTube™. This is why you have to enter your YouTube™ account access data (username, etc.) to
connect to YouTube™. If you don't have an account, open your browser and go to YouTube™ to sign
up for an account first.
If uploading was successful, your browser will open the info page for the video you just uploaded to
YouTube™ to double check your description and tags. If everything looks correct, just leave this page
and the new video is already listed under your videos. YouTube™ takes some time to process the video
for online presentation, but after this period, the target group you have specified will be able to watch it.
Page 91
Page 92

Export dialog
You can save your settings by pressing the "Save"
button and remove them by pressing "Delete".
You can export your slideshow in various video formats. The options available vary according to the
selected format.
Export settings
Presets: These are the typical settings for the selected format and the most important applications.
This includes general export parameters like resolution, page proportions, and frame rate. Select the most
frequently used values from the list fields; to set your own values click on the "..." button.
The "Advanced" button opens the specific settings for the selected video format.
"File" enables you to export your file to another folder than the preset one. "Overwrite file without
confirmation" enables you to execute multiple exports of the same file.
Page 92
Page 93

Export
In this section:
Export files one by one
Create slideshows and videos from file(s)
MAGIX Online Album
Creative
Forwarding
Additional export functions
In the export dialog you can choose from four different areas: "Photos & videos", "MAGIX Online
Album", "Creative", and "Forward".
Once you have customized your export settings in one of the areas, MAGIX Photo Manager 10 Deluxe
will remember these settings and will load them again the next time the program is restarted in a specific
area. You can, of course, make modifications at any time to meet your requirements. The saving function
is there to make your life easier, e.g. if you want to create the same video formats while using the same
settings.
A general introduction is available in "Present photos
".
Page 93
Page 94

Export files one by one
In this section:
Export dialog for individual files
This option provides different ways of saving images or videos as files.
Advanced settings
Adjust size:
This option converts the photos into the selected target format defined in "Export options".
Shrink/stretch all photos to target size:
This option converts all photos to the defined "target size".
Only shrink large images to the target size:
This option reduces larger images as set in "target format"; smaller images remain small. This way no
artifacts are created by enlarging smaller images.
Target format
This lets you choose a format for conversion. "More options" opens the quality settings of the respective
format.
More options ? Quality:
This defines the size of the exported photos.
Effects
No picture effects:
This option deactivates the optimize view settings.
Copy effect description file:
All effect settings are saved from the optimize view as separate files with the extension *.jpx. When using
this option, the file will also be copied to the target folder.
Render effects into pictures:
If this setting is activated, the effects from the optimize view are included in the files. "Master Gamma"
also includes the global brightness setting; "Write comment into image" includes the subtitles.
Page 94
Page 95

Export dialog for individual files
Target folder
: Enter the folder where you would like to store your photos.
Change/Don't change file name
: Lets you keep the original title names or assign a new name. All photos in a photo album are given the
same name and numbered consecutively.
Overwrite existing files in target folder
: If you have copied certain files into the same target folder and then repeat this process, then this process
will overwrite the old file versions with the new ones.
Export options
Select how you would like to export. Depending on the method, the quality of the saved file will be
adjusted accordingly (small = poor quality, large = improved quality). To the right of the export options,
you can see the info text and the selected image size.
Copy originals
: This option only copies the photos in the folder specified without editing them.
Additional profiles
: Besides the main export options, you can see other options are available for exporting your files and
adjusting their size.
Page 95
Page 96

Create slideshows and videos from file(s)
If you want to create a slideshow from a number of files and have selected which type of video (video
format) you want to create, open the "Create slideshow
" dialog. You can apply settings step-by-step for professionally transforming your images into a
slideshow.
The convenient YouTube
upload feature is also located here. Select "YouTube upload" in the format dialog.
Page 96
Page 97

MAGIX Online Album
Send selected media to your Online Album
: Log in to the MAGIX Online Album service and load your images into the album you want to show
them to your friends and acquaintances in the Internet. The assistant will lead you step-by-step through
the uploading process. After the process is finished, you can access your updated album online.
Page 97
Page 98

Creative
In this section:
Create and install screensaver
Create and install desktop background
Create calendar-based desktop background
Create a self-executing slideshow
Page 98
Page 99

Create and install screensaver
So, you really enjoyed your slideshow? Then why not set up the arrangement as a screensaver? To do
this, click on the "Export" button and select "Export slideshow as screensaver" ? and voilá! ? your
slideshow is flickering away on your monitor during rest pauses. Any audio material in the slideshow will
not be considered for export.
For a screensaver that you can actually watch, most pictures have to be adapted to a format suitable for
screensavers. The following dialog opens in this case:
As standard, the size is set to 800 x 600, an aspect ratio of 4:3 is set. You can customize the sizes if you
like.
By clicking on "OK" the export process will start. Once the screensaver is complete it will be installed on
your system automatically.
Page 99
Page 100

Create and install desktop background
This option exports the images as a desktop background. Helpful, if you just can't decide on a favorite
picture.
Audio material from the slideshow that may be available will not be considered. The desktop background
is then installed in the system and played back as an endless loop.
The pictures usually have to be adapted for export : As standard, the size is set to 800 x 600, an aspect
ratio of 4:3 is set. You can customize the sizes if you like. By clicking on "OK" the export process will
start.
After setting up the desktop background it will be installed on the system when you place a tick beside
the "Install on this computer" option in the dialog that appears.
Under "Effects" you can set which effects should be used and if the change should always occur as a
transition or with a random effect.
Page 100
 Loading...