

Page 1
Page 2

2 Copyright
Copyright
This documentation is protected by law. All rights, especially the right of
duplication, circulation, and translation, are reserved.
No part of this publication may be reproduced in the form of copies, microfilms
or other processes, or transmitted into a language used for machines,
especially data processing machines, without the express written consent of
the publisher.
All copyrights reserved.
All other product names are trademarks of the corresponding manufacturers.
Errors in and changes to the contents as well as program modifications
reserved.
Copyright © MAGIX AG, 2006 - 2011. All rights reserved.
MAGIX is a registered trademark of MAGIX AG.
Other mentioned product names may be registered trademarks of the
respective manufacturer.
www.magix.com
Page 3

Table of Contents 3
Table of Contents
Copyright 2
Support 5
Preface 7
Before You Start 8
System requirements 8
Serial Number 9
Tips for program help 10
Uninstalling the program 10
More about MAGIX 11
MAGIX Online World - The services 11
MAGIX Magazine 12
MAGIX News Center 12
Introduction 13
What is MAGIX PC Backup MX? 13
Features 14
Program interface 16
Quick start 17
What is a backup? 17
First start 18
Activate automatic backup 19
Monitor files and folders 20
Recover data 23
Restore drive 24
Back up and restore system drive 24
MAGIX PC Backup MX Overview 27
Automatic backup 27
Manual backup 32
Restore 39
Back up live & online 41
Additional Features 48
Restore drive with rescue medium 54
Transfer service 55
www.magix.com
Page 4

4 Table of Contents
Additional features and settings 57
Help menu 57
Advanced burning options 59
File filter 62
Recorder and media information 63
Tips & tricks - Problems & solutions 66
Check drive for errors 66
Set up free space as drive 67
Show instruction dialog again 68
MAGIX services in detail 68
magix.info 68
MAGIX Online Album 69
MAGIX Website Maker 70
Glossary 72
Index 80
www.magix.com
Page 5

Support 5
Support
Dear MAGIX customer,
Our aim is to provide fast, convenient, solution-focused support at all times. To
this end, we offer a wide range of services:
Unlimited web support:
As a registered MAGIX customer, you have unlimited access to web support
offered via the convenient MAGIX service portal on http://support.magix.net,
including an intelligent help assistant, high-quality FAQs, patches and user
reports that are constantly updated.
The only requirement for use is product registration at www.magix.com
The online community, on-the-spot support and a platform for exchange:
MAGIX customers have free and unlimited access to the online community at
www.magix.info, which includes approx. 120,000 members and offers the
opportunity to ask members questions concerning MAGIX products as well as
use the search function to search for specific topics or answers. In addition to
questions & answers, the knowledge pool includes a glossary, video tutorials
and a discussion forum. The multiple experts, found round-the-clock at
www.magix.info guarantee quick answers, which sometimes come within
minutes of a question being posted.
Email support for MAGIX products:
For every new MAGIX product you will receive, as of date purchase, 12
months of email based customer service.
Premium email support:
For priority support, or if you want the MAGIX support team to help with
non-MAGIX related hardware problems you can purchase a Premium email
support ticket. Log in at http://support.magix.net and click on "Purchase
access code", the ticket is for a specific problem, and is valid until it is solved,
it is not restricted to an email.
Please note: To be able to use the Premium email support and free product
email support via the Internet, you have to register your MAGIX product using
the serial number provided. This can be found on the CD case of your
installation CD or on the inside of the DVD box.
Additional telephone service:
Besides the large number of free customer service offers, we also offer a
fee-based telephone customer service.
Here you can find a summary of our technical support telephone numbers:
http://support.magix.net/
www.magix.com
Page 6

6 Support
Mail (Europe): MAGIX Development Support, P.O. Box 20 09 14, 01194
Dresden, Germany
Mail (North America): MAGIX Customer Service, 1105 Terminal Way #302,
Reno, NV 89502, USA
Please make sure you have the following information at hand:
Program version
Configuration details (operating system, processor, memory, hard drive, etc.),
sound card configuration (type, driver)
Information regarding other audio software installed
MAGIX Sales Department
You can reach the MAGIX Sales Department workdays for help with the
following questions and problems:
Orders
Product consulting (pre-purchase)
Upgrade requests
Returns
Europe
Monday -
Friday, 09:00-16:00 GMT
U.K.: 0203 3189218
Denmark: 45 699 18763
Sweden: 46 852 500713
Finland: 35 89 42419023
Norway: 47 210 35843
North America
to 4 pm EST Mon-Fri
9 am
Phone: 1-305-722-5810
www.magix.com
Page 7

Preface 7
Preface
Welcome to MAGIX PC Backup MX!
Although backing up data is very important, it is a topic that tends to be
neglected. Only when an important file is lost irrevocably as a result of a hard
drive crash, do we realize that we should have been more careful. But it's too
late then.
MAGIX PC Backup MX finally puts an end to that! It's an all-in-one backup
solution for notebook computers, PCs, and netbooks.
Simply specify once at the beginning which files and folders you want to back
up and the program automatically takes care of the rest. And should you really
ever lose your files, you can use MAGIX PC Backup MX to restore them.
You can store your backups either on an (external) hard drive, a backup disc or
online. In the latter case, your backups are stored directly on a MAGIX
WebDisk, a kind of online hard drive with free registration.
Have fun backing up with your MAGIX software!
Your MAGIX Team
www.magix.com
Page 8

8 Before You Start
Before You Start
System requirements
Operating system: Microsoft Windows XP | Vista | 7
Processor: min. Intel Pentium 400 MHz or equivalent
Min. 512 MB RAM
Min. 200 MB free hard disk space
Graphics card with a screen resolution of at least 1024 x 600
CD or DVD drive for program installation
Also suitable for netbooks
www.magix.com
Page 9

Before You Start 9
Serial Number
A serial number is included with each product. This serial number is required
for the installation of the software and enables usage of additional bonus
services.
What can a serial number do?
A serial number ensures that your copy of MAGIX PC Backup MX is clearly
assigned to you and only you, and it makes improved and more targeted
customer service possible. Abuse of the software can be prevented with a
serial number, since it ensures that the optimum price/performance ratio
continues to be offered by MAGIX.
Where can the serial number be found?
The serial number can be found on the reverse side of your CD/DVD case. If
your product, for example, is packed in a DVD box, then you'll find the serial
number on the inside.
For versions that have been especially optimized for the Internet (download
versions), directly following the transaction you'll receive a serial number by
email to activate the software.
When will you need the serial number?
The serial number is required when you start or register MAGIX PC Backup MX
for the first time.
Note: We explicitly recommend registering your product, since only then are
you entitled to get program updates and contact MAGIX Support. Entering the
serial number is also required for activating codecs.
www.magix.com
Page 10

10 Before You Start
Tips for program help
The "Help" file features hints on how to use the program and additional
information. Many important terms are indicated in the text in italics and an
explanation to them is reached by clicking on them.
Context help: Press the "F1" key at any point in the opened program and the
help file will open with the matching topic (context help).
Search function: Use the search function to find out information about specific
words. Enter either the individual word or use logical operators (OR, AND,
NEAR) to refine your search if you have several search words.
"OR" (between two words): All topics which contain both words or one of the
words will be listed.
"AND" (between two words): Only those topics will be listed which contain
both words.
"NEAR" (between two words): Only those topics will be listed which contain
both words. A maximum of six other words may be added between the search
terms.
"NOT" (before a word): Topics which contain this word will not be listed.
Print: Use the help program's print function to make a printout of individual
topics or entire sections. The print button is located at the top of the help
window in the toolbar.
Uninstalling the program
If you would like to uninstall MAGIX PC Backup MX, you can do so via the
control panel under "Software". Or go to "Programs > MAGIX > MAGIX PC
Backup MX > Service and Support > Uninstall MAGIX PC Backup MX".
www.magix.com
Page 11

More about MAGIX 11
More about MAGIX
MAGIX Online World - The services
Discover the possibilities of MAGIX Online World quickly and easily from the
comfort of your home!
MAGIX Online Album
MAGIX Onlin
Internet. You can also play your music as MP3s in the Online Album. Create
your personal album website in no time with your own Internet address, and
showcase everything that's fun about multimedia to the world.
For example, you can upload especially impressive photos or entire slideshows
as videos straight from your MAGIX program. Pictures you put on your website
can be downloaded with ease from the comfort of your own home and
integrated into your slideshow.
MAGIX Website Maker
MAGIX
professional design in just a few mouse clicks – without prior knowledge,
including your own chosen domain and email address. Publish slideshows and
videos and accessorize your site with music and various effects – anything
from a simple business card to a fireworks display of effects, professional or
private – show your best side!
More about this topic can be found under MAGIX Website Maker. (view page
70)
magix.info
Help and get help - Directly
magix.info http://www.magix.info/de/, the new MAGIX Knowledge Database
(view page
about MAGIX products and multimedia in general. Couldn't find an answer to
your particular question? No problem, just ask the question yourself.
e Album lets you publish your photos and videos directly on the
Website Maker helps you create a personal Internet showcase with a
from within the program, you'll be able to access
68). You'll find answers to all the
most frequently asked questions
www.magix.com
Page 12

12 More about MAGIX
Catooh
your project is missing pictures, videos, DVD menus, sounds, or samples,
If
then you should have a look at the huge selection available at Catooh. There
you'll be able to buy media in excellent quality for low prices: DVD menus,
Slideshow Maker styles, decorative elements, 3D power effects, 3D transition
series, MAGIX Soundpools, songs, ringtones... Perfectly suited to all MAGIX
photo, video, and music projects.
MAGIX Magazine
The MAGIX Magazine – stay well-informed & keep up-to-date on:
Digital trends
Interesting websites
Useful information about MAGIX products
You can find the MAGIX Magazine at www.magix-magazine.com.
MAGIX News Center
The MAGIX News Center features links to current online tutorials and tips &
tricks on the software application examples. The "News" is indicated by color
according to content:
Green indicates practical tips & tricks for the software
Yellow reports the availability of new patches and updates
Red for special offers, contests and questionnaires
If no new messages are present, the button will appear gray. When the MAGIX
News Center is clicked, all of the available information will be displayed. Click
the messages to reach the corresponding website.
www.magix.com
Page 13

Introduction 13
Introduction
What is MAGIX PC Backup MX?
MAGIX PC Backup MX is the perfect program for anyone who wants to back
up their data regularly. It allows you to archive all of your important data in
different ways. You can adjust whether you want MAGIX PC Backup MX to
automatically select the files that are to be backed up (preset: all drives) or
whether you want to select certain files and folders manually.
MAGIX PC Backup MX provides three different data backup methods.
By default, MAGIX PC Backup MX searches for external hard drives to create
backups on them.
However, you can also burn backups on CD/DVD if you wish.
A special feature in MAGIX PC Backup MX allows you to back up files and
folders in real time, either to a storage medium that you specify, such as an
external hard drive, or online with the MAGIX WebDisk: Files and folders which
you selected are monitored and automatically backed up to the storage
medium or to your MAGIX online storage whenever they are changed.
MAGIX PC Backup MX thus offers many ways to protect your data from being
lost.
Restrictions
Tip regarding special program versions: This documentation describes the full
functionality of MAGIX PC Backup MX. However, you may be using a restricted
version of MAGIX PC Backup MX, and full functionality may not be available.
www.magix.com
Page 14

14 Introduction
Features
Automatic backup
The automatic backup function (view page 27) provides optimal security for
your data
up every week. Regular work stages are saved and can be restored later if
required.
After the first full backup only data that has been changed since the last
backup will be backed up in order to save storage space.
Restore function
No backup program is complete unless it includes a restore function in order to
be prepared for the worst case scenario of data loss. MAGIX PC Backup MX
offers a convenient way of browsing through different backup stages and
comparing them. The backed up files are listed in the menu item "Restore"
(view page 39) and can be restored directly.
Real-time backup
Irrespective of the weekly backups, you can monitor certain folders and/or
files. MAGIX PC Backup MX automatically saves the latest version of these
folders/files after each change, without you having to do anything.
. By default all drives integrated into the computer system are backed
Under "Live & Online backup" > go to "Live backup" (view page 47) and specify
which folders/files are to be monitored; then selec
t the storage location for the
additional backup and start monitoring. The current version of these
folders/files will be saved to the storage medium automatically after each
change.
MAGIX WebDisk
Play it safe and save your most important files online to be independent of
vulnerable hardware. You can access MAGIX WebDisk straight from MAGIX PC
Backup MX. 2 GB of storage space where you can save your files are included
for free. If this is not enough, you can expand it. You'll find all important
functions related to this topic in the "Live & Online backup" (view page 41)
section.
Your monitoring list will continue to be
updated online, even if MAGIX PC
Backup MX has not been started. The symbol (tray) is displayed in the taskbar
of your screen if it is active. In case of transfer activity, a small info window will
www.magix.com
Page 15

Introduction 15
pop up. It also displays when an automatic backup is started and finished on
the hard drive.
Backup with password protection
To guarantee that the data can only be restored by you or authorized persons,
you can assign a password (view page 29). This function can be found in
"Settings"
under "Automatic backup".
Note: You have to set the password before you activate the automatic backup.
Data Shredder
The normal method of deleting data, i.e. deleting data via the delete key (and
then emptying the Windows Recycle Bin) is not sufficient for completely
deleting data so that it can't be restored with special data recovery software.
Delete selected data from your hard drive irrevocably using the Data Shredder
(view page 50) (also for external storage media) so that it cannot
be restored.
Sensitive files, which may still be on accessible hard drives and may still not be
overwritten are also deleted.
Undelete
With this function, you can restore files that you deleted using the standard
Windows deletion process: Delete file/folder & empty the recycling bin. You
may rescue files (view page 52) here before they are overwritten by other new
files for
good.
Note: Only those files may be restored whose original file has not been
overwritten, even in part.
MAGIX PC Check & Tuning
MAGIX PC Backup MX includes the computer optimization program MAGIX PC
Check & Tuning. This program allows you to free your notebook or PC from
unnecessary data such as superfluous registry entries or temporary files that
are taking up storage space. Please read the program's help file to find out
how to use MAGIX PC Check & Tuning most effectively.
www.magix.com
Page 16
16 Introduction
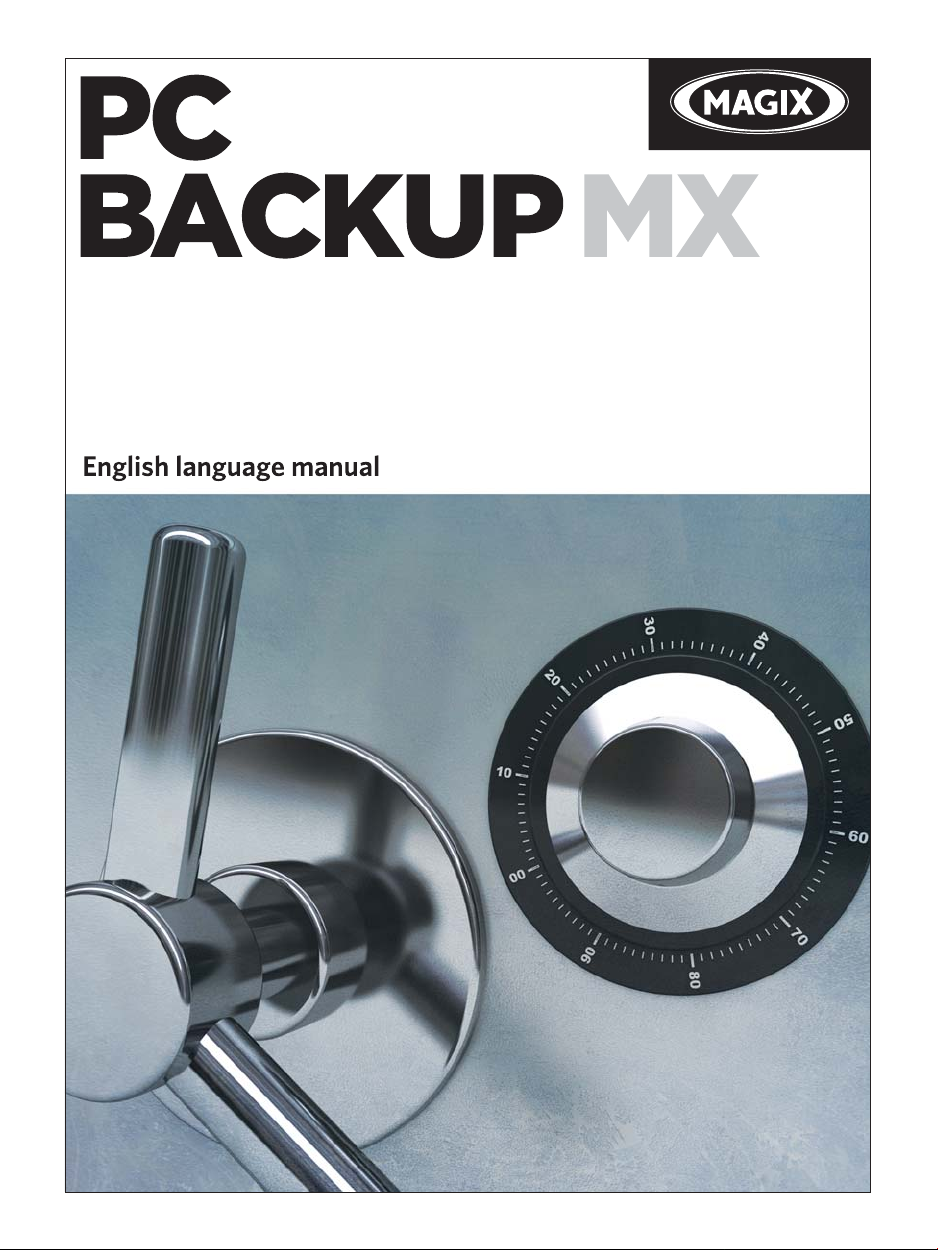
Program interface
Help menu: (view page 57) Important options for MAGIX PC Backup MX
are available in this menu
Automatic backup: (view page 27) The automatic backup feature backs
up all drives that are in
basis (preset).
Manual backup: (view page 32) MAGIX PC Backup MX also allows you to
manually bac
Restore: (view page 39) This is where
and drives which were created using MAGIX PC Backup MX.
Live & Online backup: (view page 41) Here you can back up files or entire
folders
Additional Features: (view page 48) Here you'll
functions to restore system backups, recover data or delete data for
good.
Program window: Displays the functions of the corresponding areas.
k up data ranging from single files to the entire system.
in your MAGIX WebDisk or to another storage medium.
.
tegrated into the computer system on a weekly
you can restore backups of files
find additional useful
Status display: If the light is not on, the automatic backup function is not
activated. If you click on "Activate", the light turns green: From now on,
automatic backups (view page 27) will be created at regular intervals.
www.magix.com
Page 17

estrictions R
Tip regarding special program versions: This documentation describes the full
functionality of MAGIX PC Backup MX. However, you may be using a restricted
version of MAGIX PC Backup MX, and full functionality may not be available.
Quick start 17
Quick start
What is a backup?
Copying data to a different storage medium to secure this data is called a data
backup.
There are three different types of data backups:
Full backup: All selected files will be compressed and saved in one file.
Incremental backup: Only files that have changed since the last backup or
are new will be compressed and saved.
Differential backup: Only files that have changed since the last full backup
are new will be compressed and saved.
or
If you activate the automatic backup function, the program will create a full
backup first. After that, only incremental backups are created every time a
backup is launched. This saves storage space, while ensuring that the most
current versions of the files are backed up and can be restored.
www.magix.com
Page 18
18 Quick start
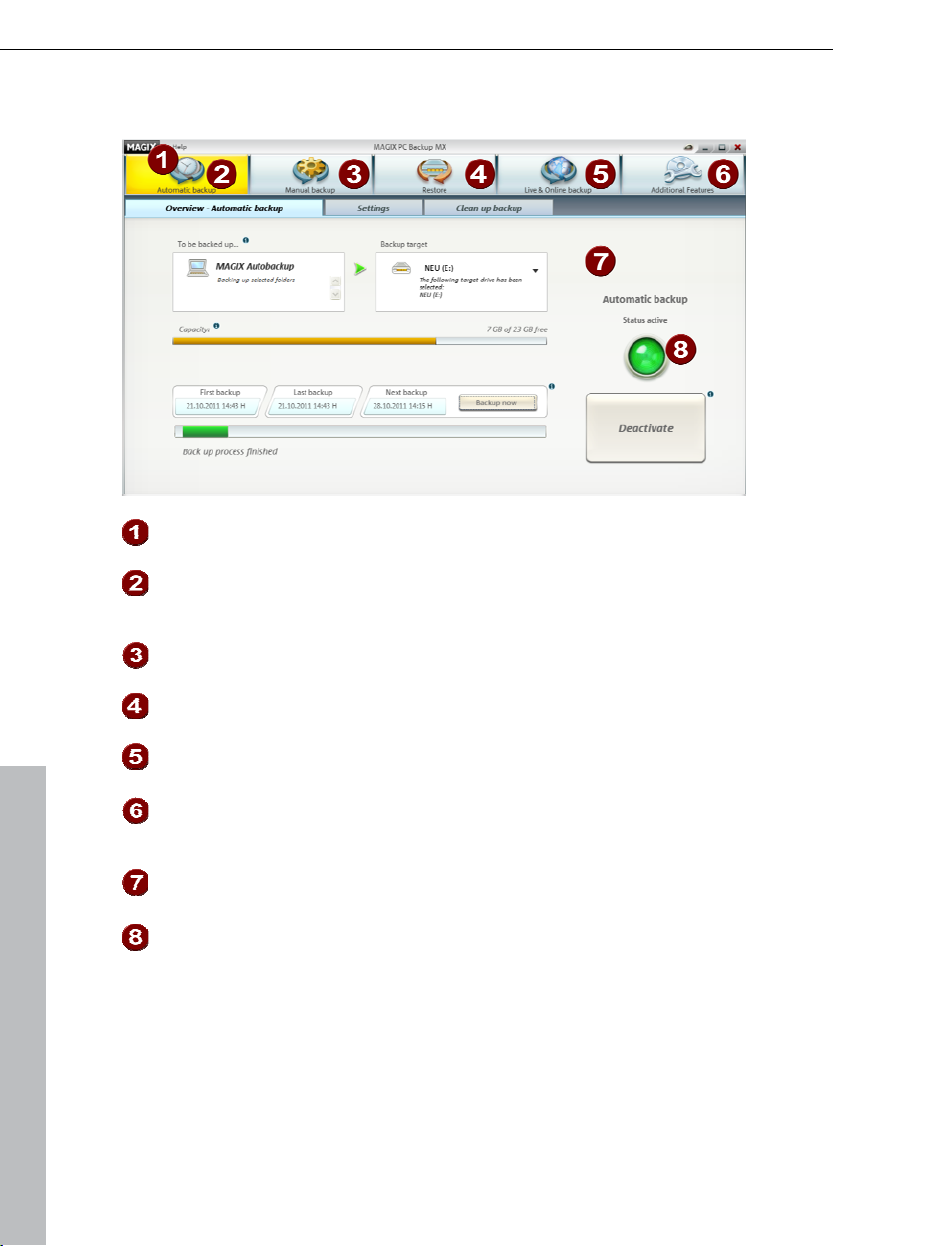
First start
When you start MAGIX PC Backup MX for the first time, a welcome dialog will
appear. Click on "OK" to close it and switch into the program.
The "Automatic backup" section will open.
The indicator light (1 in the illustration) is not on, which means that the
automatic backup feature is not activated.
You can create and activate an automatic backup (view page 19) in just a few
.
steps
www.magix.com
Page 19
Quick start 19
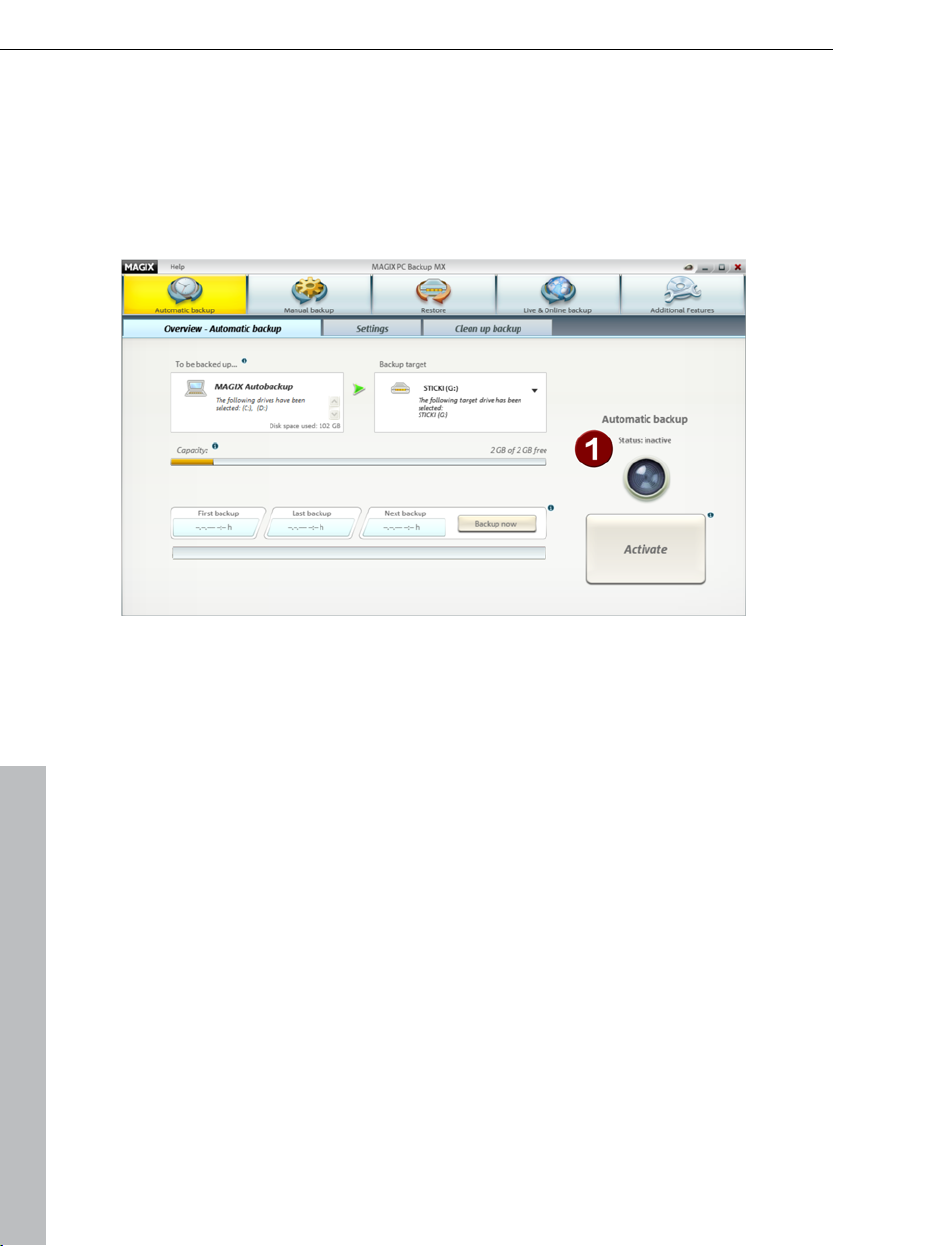
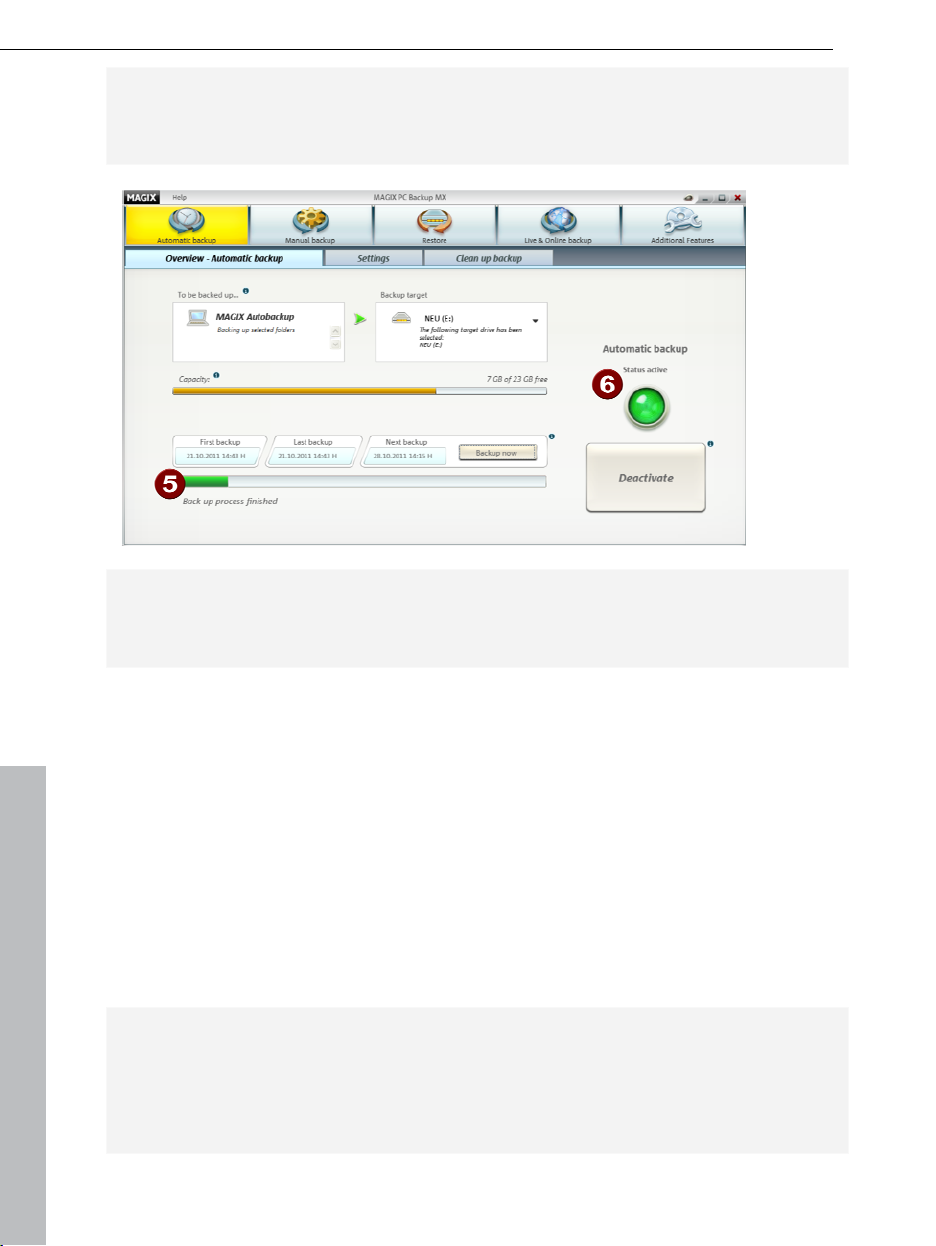
Activate automatic backup
The backup name (1 in the illustration) is set automatically by MAGIX PC
Backup MX. You can adjust it in "Settings" as long as this backup set has not
been started yet.
Step 1: MAGIX PC Backup MX suggests a drive as storage destination for your
backups (2). You may select a different drive if you wish. To do so, select the
hard drive where you wish to store the automatic backups via the
corresponding drive letter. "Capacity" displays the total size and the occupied
storage space of the selected hard drive.
Note: We recommend selecting an external hard drive (transportable). This
allows you to store your backups at a location that is different from your PC,
which increases security. However, you have to connect your transportable
hard drive for the regular backups.
Step 2: Click on the "Activate" button (3).
The first full backup of your data is launched; a progress bar is displayed (5 in
the bottom illustration) and the indicator light is green (6). This means that the
automatic backup function is activated and will be executed once a week by
default.
www.magix.com
Page 20
20 Quick start
Note: During a full backup, all data on all drives is backed up. This is necessary
in order to subsequently be able to back up only those files that have been
changed. This process may take some time.
Warning!Please make sure that the PC is turned on for the next scheduled
data backup. The selected storage destination also has to be accessible. If
you've selected an external hard drive, it has to be connected.
In "Settings" (view page 29) you can adjust which data should be backed up
during the automatic backups. By default, all built-in drives are backed up; if
desired, however, you can back up only individual folders and/or files, too. The
storage destination can also be changed.
Monitor files and folders
Saving your data in real time provides double protection. During real-time
backups, individual files or folders (entire drives are not suited because of their
data volume) are monitored and saved either online (view page 41) or to a
second location on a hard
Note: The data in the monitoring lists continues to be saved immediately even
if MAGIX PC Backup MX has not been started. The symbol (tray) is displayed in
the taskbar of your screen if it is active. If there is any transfer activity, a small
info window will pop up, i.e. it displays when an automatic backup is started
and finished on the hard drive.
drive (view page 47) whenever they are changed.
www.magix.com
Page 21
Quick start 21
Online backup
The online backup feature backs up the files and/or folders being monitored to
the MAGIX WebDisk after each change. This way, the latest versions will
always be backed up.
How to proceed if you do not have a MAGIX online storage yet:
Step 1: Select the "Live & Online backup" section in MAGIX PC Backup MX.
The welcome dialog will open.
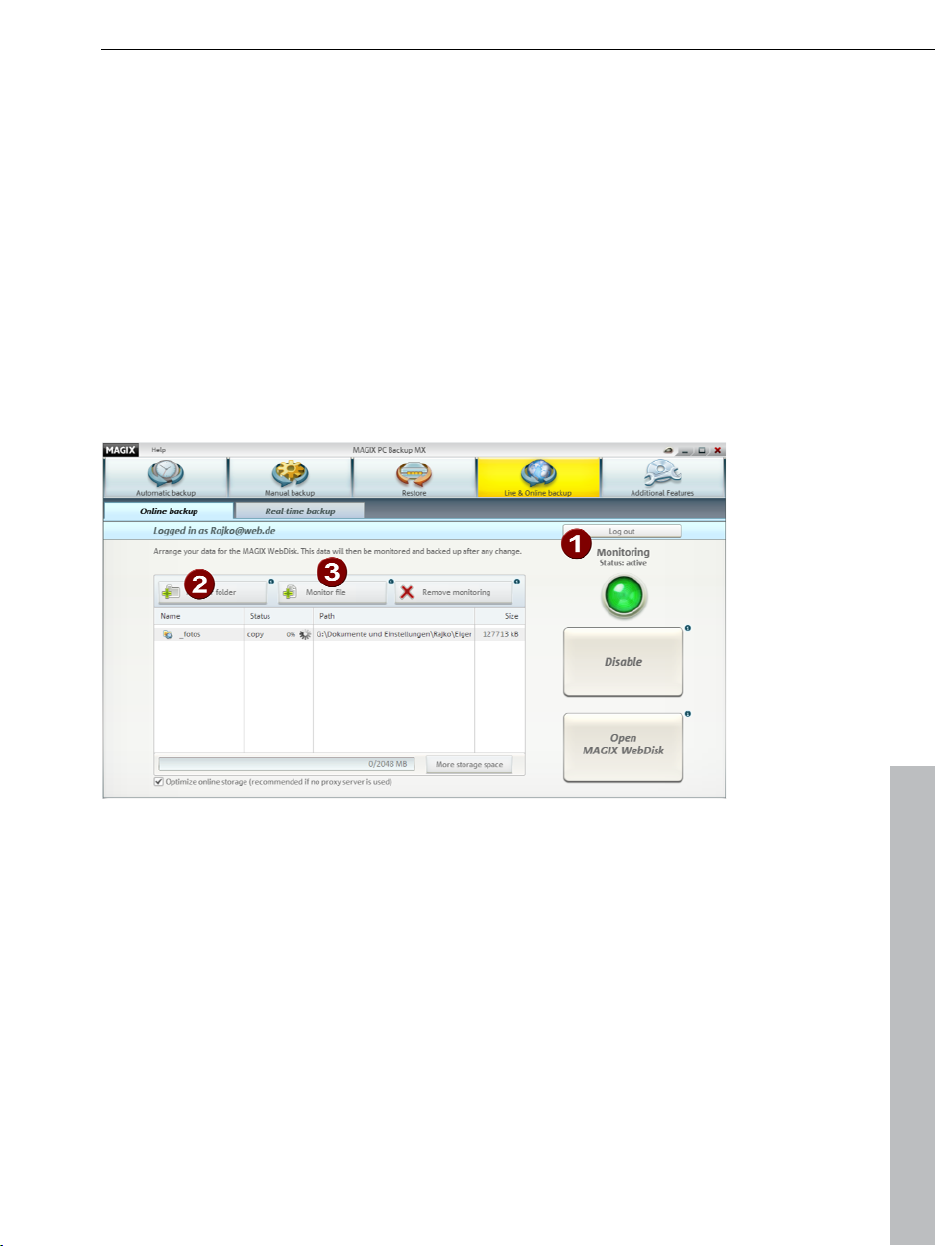
Step 2: To activate the feature, register for free via the MAGIX registration form
by clicking on the "Register now for free" button. Once you have already
registered, log in by clicking on the "Log in" button (1 in the illustration). The
interface and the buttons in the "Online backup" area are displayed afterwards.
Step 3:
Add a folder to the monitoring list by clicking on "Monitor folder" (2 in the
illustration). Navigate to the desired folder in the dialog that appears. Individual
files in the folders are not displayed.
Add a file to the monitoring list by clicking on "Monitor file" (3). Navigate to the
desired file in the dialog that appears.
Folders and files are displayed immediately in the monitoring list and are
copied to your MAGIX WebDisk. Whenever folder content and files are
changed, the changes will be updated online.
www.magix.com
Page 22
22 Quick start
Real-time backup
The real-time backup feature backs up the files and/or folders being monitored
to a specified storage medium. This way, the latest versions will always be
backed up.
How to set up monitoring for the data:
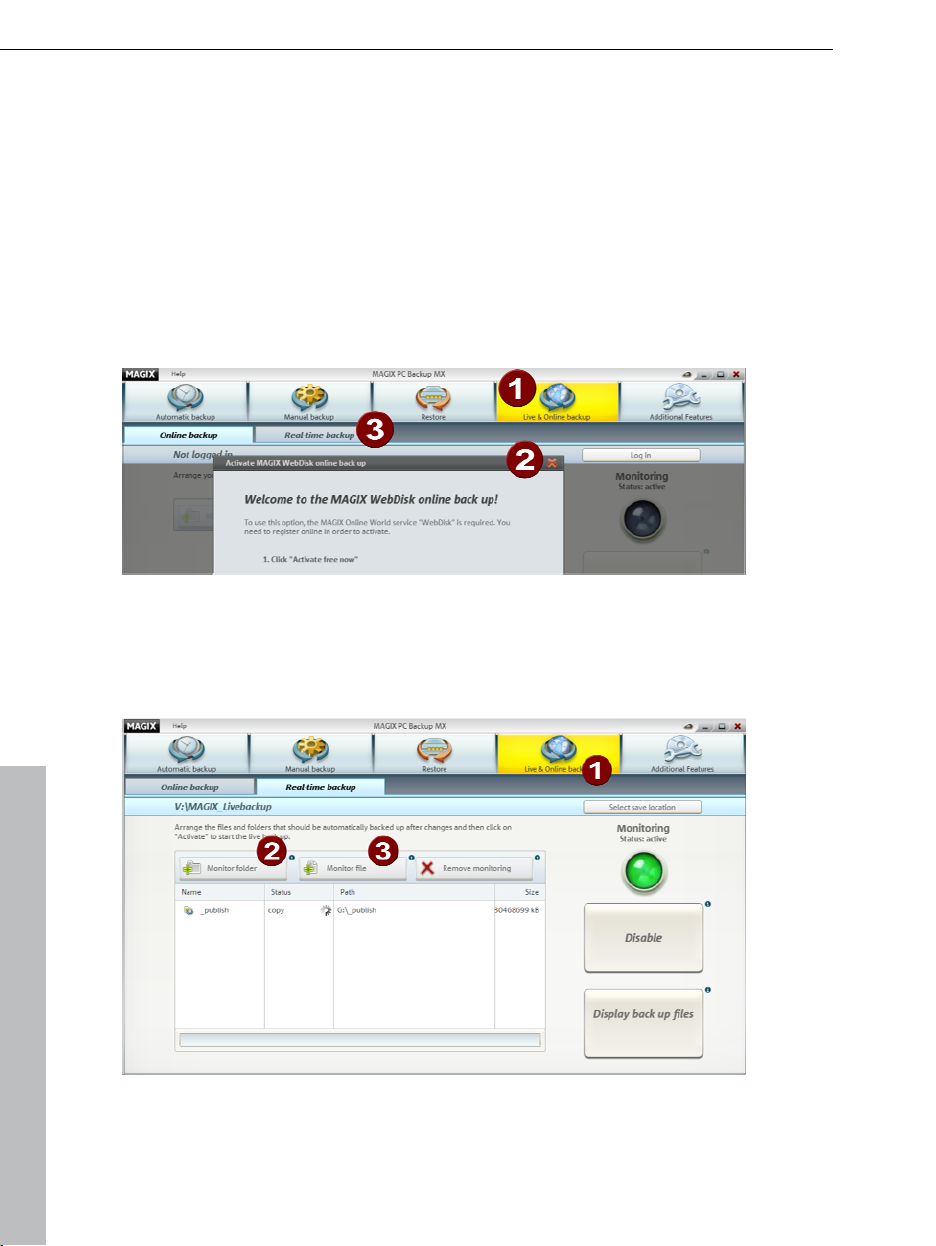
Step 1: Select the "Live & Online backup" section in MAGIX PC Backup MX, (1
in the following picture). The welcome dialog for online backup will open. Close
this dialog by clicking on the cross in the top right. (2). Next click on "Live
backup" in the program interface (3).
Step 2: Specify the storage location for monitoring of your data by clicking
"Select storage location (1 in following the illustration). Preferably you should
use an external hard drive or a USB stick. This way, you are independent of the
original PC in an emergency situation and can easily transport your saved data.
www.magix.com
Page 23

Quick start 23
Step 3:
Ad
d a folder to the monitoring list by clicking on "Monitor folder" (2). Navigate
to the desired folder in the dialog that appears. Individual files in the folders are
not displayed.
Add a file to the monitoring list by clicking on "Monitor file" (3). Navigate to the
desired file in the dialog that appears.
Folders and files are displayed immediately in the monitoring list and are saved
to the storage location of the real-time backups. Whenever folder content and
files are changed, the changes will be updated immediately.
Recover data
With MAGIX PC Backup MX, you can restore deleted and changed files.
Step 1: Go to the "Restore" area of MAGIX PC Backup MX and select
"Recover data".
Step 2: Select the desired backup via its name.
Step 3: Select
the desired backup time to restore the files to that point in time.
All files/folders that were saved during this backup are listed here.
The color of the data that appears indicates what has been changed compared
to the current date. All the files that are listed can be restored.
Files that are highlighted in red were deleted after the set backup time.
Files that are highlighted in yellow were changed.
Files that are highlighted in black were not changed.
Step 4: Select the files that you want to restore and click on "Restore". The
selected file or folder will be restored to the original storage location.
Note: If you want to restore the file to a different location, click on "Save as".
www.magix.com
Page 24

24 Quick start
Restore drive
With MAGIX PC Backup MX, drives can be restored easily.
Step 1: Go to the "Restore" area of MAGIX PC Backup MX and select "Restore
drive".
Step 2: Select the desired backup via its name.
Step 3: Select the desired backup time to restore the drive to this point in time.
Step 4: Select a storage location for restoring the file.
Step 5: Select the drive that you want to restore and click on "Restore drive".
The restore process is started; this may take some time.
Back up and restore system drive
Back up system drive
Automatic: If you haven't changed the default settings of MAGIX PC Backup
MX with respect to the data to be backed up during the automatic backups, all
of your PC's drives, including the system, will be backed up. You can use this
backup to restore the system.
All you need is a rescue medium (view page 49) on a USB stick or CD/DVD.
Manual: To back up a func
follows:
Step 1: In MAGIX PC Backup MX, select "Manual backup > "Drive backup".
Select the system drive in the dialog that opens and burn a backup to
CD/DVD. Give the finished discs clear names.
Step 2: Create a rescue medium for restoring the system drive by selecting
"Additional Features" > "Create rescue medium" in MAGIX PC Backup MX.
Give the rescue medium a clear name.
tioning system to CD/DVD, please proceed as
www.magix.com
Page 25

Restore system drive
If you want to restore your system because it isn't working smoothly anymore,
please proceed as follows:
Step 1: Start your PC and insert the rescue medium while the PC boots: Insert
the CD/DVD or connect the USB stick.
MAGIX Restore, a program used for restoring backups, will open.
Possible sources of error:
If the PC starts up as usual, you may have connected/inserted the rescue
medium too late. Restart your PC.
If you are using a USB stick as rescue medium, your PC might not search for
boot functions on USB sticks. You will have to customize the startup
sequence (boot sequence) in the BIOS. Please consult the user manual of your
mainboard to find out more.
Notebook and netbook computers without an integrated CD/DVD drive are
normally set to scan USB sticks for boot functions.
Some USB sticks do not support boot functions at all. If this is the case, burn
a CD/DVD as rescue medium.
Tip: To avoid sources of errors, you should test whether you can start the
rescue medium and MAGIX Restore starts with a restore function and transfer
service before an emergency occurs.
Quick start 25
Step 2:
With rescue medium on CD/DVD and backup on disc
If you used a rescue medium on CD/DVD, remove it from the CD/DVD drive
once you see MAGIX Restore.
Insert the disc with the backup of your system drive. MAGIX Restore scans all
media for backup files and should also find those on the disc and display them
under "Source".
With rescue medium on USB stick and backup on hard drive
If your backup is stored on an external hard drive, please make sure that it is
connected correctly.
The name of the backup and the hard disk where you saved the backup
should now appear under "Source".
www.magix.com
Page 26

26 Quick start
Step 3: Should the backup of your choice not be displayed automatically, use
the arrow keys in "Source" to select the backup that you want to restore.
Step 4: In "Destination", select the correct hard drive among the ones listed as
well as the drive of your choice. New hard drives are displayed without drive
letters.
Step 5: Start the restore process by clicking on "Restore".
The data of the system backup is restored to the destination and you can
restart your PC. The files are restored to the point in time when the backup
was created.
Warning!After recovering the data, the rescue medium must be removed so
that it is not detected again automatically when the computer is restarted!
www.magix.com
Page 27

MAGIX PC Backup MX Overview 27
MAGIX PC Backup MX Overview
This chapter will give you an overview of all windows and functions of MAGIX
PC Backup MX so that you will be able to find your way around.
Automatic backup
MAGIX PC Backup MX automatically backs up your data at fixed intervals. This
way, your data can be restored in emergency situations and you can continue
working.
The automatic backup feature requires
once first. By default, all built-in drives are backed up; if desired, however, you
can back up only individual folders and/or files, too. This can be adjusted in the
Settings (view page 29).
Note: Creating a full backup can take several hours. During the next automatic
backup, only data that has been changed will be backed up. This reduces the
time required for the backup.
www.magix.com
you to do a full backup of your data
Page 28

28 MAGIX PC Backup MX Overview
Comments on the different function areas
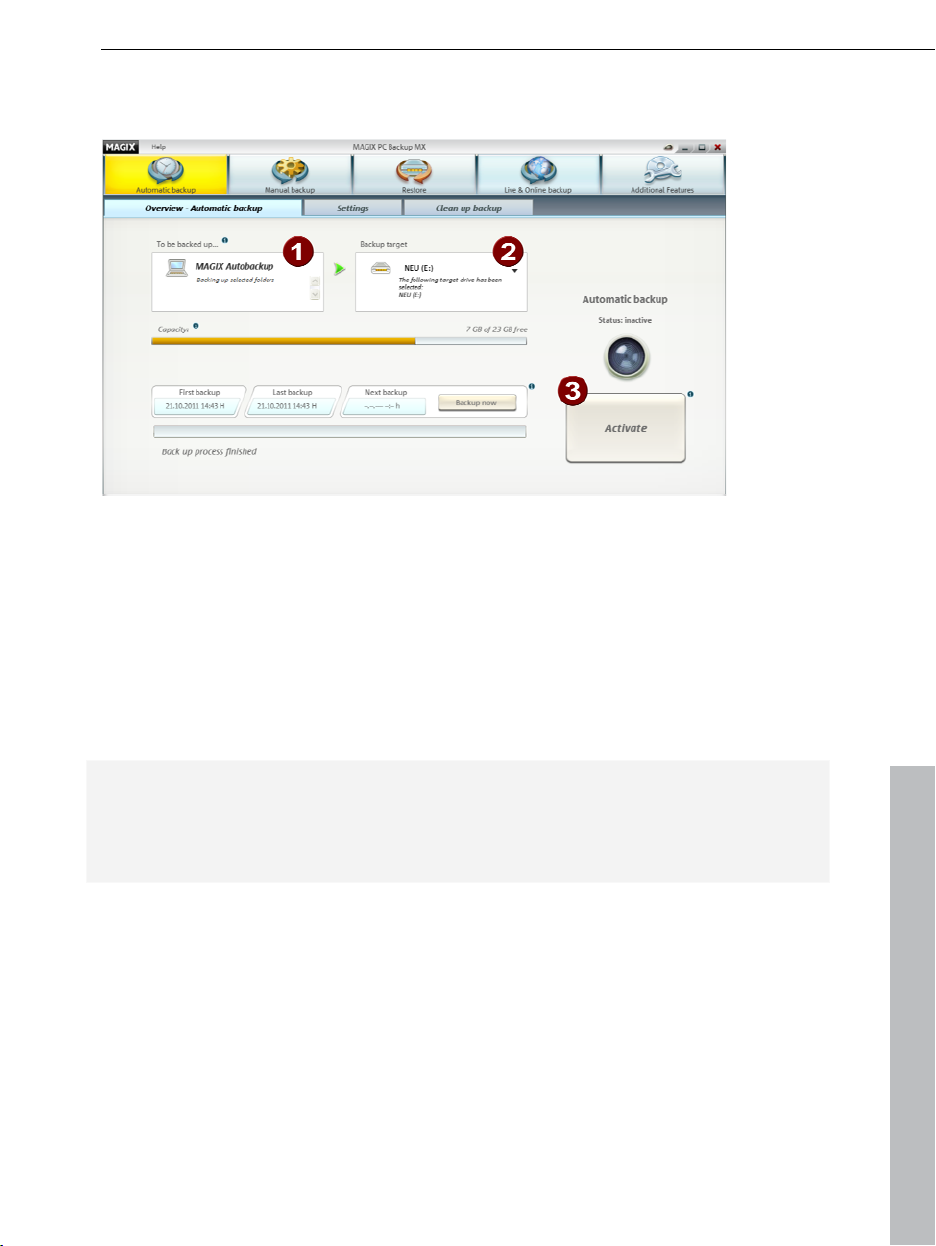
To back up: The name of the backup is displayed. You can change it in the
settings.
Backup target: MAGIX PC Backup MX suggests a drive for storing the
backups, but you may also specify a different drive. Select the hard drive
where you want to store the automatic backup via its drive letter.
Note: We recommend selecting an external hard drive (transportable). This
allows you to store your backups at a location that is different from your PC.
You have to connect your transportable hard drive for the regular backups.
In "Settings", you can add more storage media to the automatic backups like
USB sticks, for example.
Capacity of the backup target: The total size and occupied space of the
selected backup destination is indicated here.
First backup: Displays the day on which the full backup was created.
Last backup: Displays the date of the last backup.
Next backup: Displays the date of the next scheduled backup.
Back up now: If you wish to back up your data before the next scheduled
automatic backup, please click on "Back up now".
Automatic backup > Activate: This activates the automatic backup feature and
the first full backup of your data is started. By default, your data will be backed
up automatically every week. Please make sure that the PC is turned on for the
next scheduled data backup. The selected storage destination also has to be
accessible. If you've selected an external hard drive, it has to be connected
and switched on (in case it doesn't do so automatically).
www.magix.com
Page 29

Automatic backup settings
In "Settings", you can adjust the automatic backup presets.
Backup name: If you haven't created a backup with the current backup name
yet, you can change it here. After a backup has been created, however, the
name can't be changed, because subsequent backups will always be assigned
to this name and backup set.
MAGIX PC Backup MX Overview 29
If you want to assign a new name, you will have to create a new backup set.
As described above, it will be started with a full backup.
Create new backup set
Click on this button to create a new backup set that has a new
name and backs up other drives and folders.
Backup target: Enter your backup destination of choice here if the path
suggested by the program doesn't meet your requirements.
Note: The destination can be adjusted after the first backup has been created
if you are using an external hard drive for storing your backups and it receives
a new drive letter when it is connected to the PC again.
Password protection: To guarantee that your data backups can only be
restored by you or authorized persons, you can assign a password.
www.magix.com
Page 30

30 MAGIX PC Backup MX Overview
Note: You cannot undo password protection for a backup. In the same way, it
is not possible to change the password once the first backup has been
created. If you wish to continue to create automatic backups without password
protection, you will have to create a new automatic backup with a new name
and without a password. As described above, it will be started with a full
backup.
Data to be backed up: By default, all of the data on all drives is backed up.
If you want to exclude all of the data stored on a specific drive, uncheck this
drive.
If you want to exclude only certain data from the backup, click on the drive
where this data is stored to display all the folders. Navigate to the
corresponding folder and remove the check.
Note: You can adjust which drives or files/folders should be backed up at any
time, even if backups were created already. The changes will be applied to the
next backup: new files/folders are added to the backup and files/folders not be
backed up are excluded.
Schedule: By default your data will be backed up automatically every week.
You can adjust the schedule, if you wish. The following options are available:
daily, weekly, monthly.
Start: Enter on which day of the week and at what time you want the backup
to be executed. On these days, the PC has to be turned on and the hard drive
connected (if external), otherwise a backup cannot be executed.
Apply: Once you have made your desired changes, click on "Apply" to save
the changes.
Backup destination in NTFS format
For automatic backups, the drive for the backup destination has to be based
on the NTFS file system.
This is due to the maximum file size of the alternative file system FAT32 which
amounts to 4 GB. Backups, especially system backups, however, are larger
than 4GB. With a NTFS-based file system, backups can be processed in one
file, which speeds up the entire process.
If the storage destination you selected is not available in NTFS format, a dialog
will appear where you can launch conversion into this format. All data will
www.magix.com
Page 31

MAGIX PC Backup MX Overview 31
remain intact
and can be accessed and used after.
A file system "merely" determines which system the storage medium (e.g. hard
disk/drive) uses to internally store/organize files and folders. Operation doesn't
change.
Clean up backup
Save valuable disk space by combining incremental backups (intermediate
stages).
Note: When incremental backups are combined, only the latest version of a file
is saved. All other file versions are deleted and may not be restored!
1. Select
the source, where your backups should be saved.
2. Using the date, select the latest incremental backup up until which all older
backups should be combined.
3. Click on "Compile backups" to start the process.
Delete backup: You can completely delete all backup files for a specific
backup project. All backups, no matter if it is a full backup or an incremental
backup, will be deleted permanently. This may become necessary if you begin
a new backup project and no longer require the files from the old backup
series.
www.magix.com
Page 32

32 MAGIX PC Backup MX Overview
A more detailed explanation:
The first full backup of a set will not be affected by the backup summation and
may be restored at all times.
With respect to incremental backups that should be combined, only the latest
file versions will be combined and can be restored later. Older files will be
deleted permanently.
Incremental backups that should not be combined will not be affected by the
combination and may be restored at any time.
Files from the last incremental backup will remain untouched, just like the full
backup.
Manual backup
MAGIX PC Backup MX also allows you to manually back up data, ranging from
single files to the entire system. Your data is backed up for all occasions and
can be restored if desired.
Drive backup: Not only can you back up individual files or folders, but also
entire drives like system drives, for example. By backing up the drive on which
your system is installed, you can make the system restorable in an emergency
situation without having to set up the system again.
Backup to hard disk: To protect individual files that are important from
unwanted data loss, you can back them up and store them on the hard drive;
this way, they are readily available at all times. This type of backup can also be
useful if you want to continue working with an older version of the data.
File backup to CD/DVD: To protect individual files that are important from
unwanted data loss, you can back them up and burn them to CD/DVD.
www.magix.com
Page 33

Create file backup on hard disk
Use these two arrows to navigate through the file browser by flipping
through the folders.
The file browser displays all drives and folders with their included data.
Click the "Insert" button to add a selected file or folder to the backup
list. If you wish to remove data from the list, click on "Remove".
The backup list that displays all of the folders and files that are to be
backed up.
The future title of the backup. Click into the entry field and adjust the title
if desired.
MAGIX PC Backup MX Overview 33
Tip: You
but also via drag & drop: Select the desired files, hold down the left mouse
button and drag the selected files into the window on the right-hand side. Now
let go of the mouse button to add the files.
The backup created will be smaller, but the amount of time required to create it
will increase. If the compression rate is decreased, the time to create it is
reduced, but the size of the backup will increase.
www.magix.com
can add files and folders to the burn list not only by pressing "Insert",
In the file filter (view page 62) you can exclude files from the backup or
limit
the backup to file types.
If you would like to back up a lot of data, but don't want the backup file
to become too large, you can increase the compression rate:
Page 34

34 MAGIX PC Backup MX Overview
Create backup: Click on this button once you
have compiled all data for which you wish to
create a backup. Now you can select the backup
type (view page 34).
Quit: This button will cancel the backup process. This may be
necessary if you wish to add something to the backup list, for
example.
Backup type
Three backup types are available:
Full backup: All selected files will be compressed and saved in one file.
Incremental backup: Only files that have changed since the last backup (of
any type) or are new will be compressed and saved.
Differential backup: Only files that have changed since the last full backup or
are new will be compressed and saved.
Once you have selected the desired backup type, you can adjust the storage
location if the preset path doesn't meet your requirements. Click on "Save" to
start the backup process.
Drive backup
The file browser displays all drives and folders with their included data.
Click on "Insert" to add the selected drive to the backup list.
www.magix.com
Page 35

The backup list that displays all of the drives that are to be backed up.
The future title of the backup. Click into the entry field and adjust the
MAGIX PC Backup MX Overview 35
title.
The format description of the medium you inserted appears once it is
detected in the burning drive.
This display lets you check how much free space is left on the disc. You
can also see how many files are currently in the burn list.
Tip: You can add files and folders to the burn list not only by pressing "Insert",
but also via drag & drop: Select the desired files, hold down the left mouse
button and drag the selected files into the window on the right-hand side. Now
let go of the mouse button to add the files.
In the file filter (view page 62) you can exclude files from the backup or
limit
the backup to file types.
If you would like to back up a lot of data, but don't want the backup to
become too large, you can increase the compression rate:
The backup file will be smaller, but the amount of time required to create it will
increase. If the compression rate is decreased, the time to create it is reduced,
but the size of the backup file will increase.
Create backup: Click on this button if the backup list is
complete. Select whether the backup is to be burned to
disc ("Continue to burn") or saved to your hard drive.
If you
click on "Save to hard disk", you can change the storage location of the
backup if the default path doesn't meet your requirements. Click on "Save" to
start the backup.
Click on "Continue to burn" to open the adjusted burn dialog (view page 37).
www.magix.com
Page 36

36 MAGIX PC Backup MX Overview
File backup to CD/DVD
Use these two arrows to navigate through the file browser by flipping
through the folders.
The file browser displays all drives and folders with their included data.
Click the "Insert" button to add the selected file or folder to the burn list
(4). If you wish to remove a file from the list, click on "Remove".
The burn list that displays all folders and files that are to be burned to
disc.
The future title of the medium. Click into the entry field and adjust the
title.
The format description of the medium you inserted appears once it is
detected in the burning drive.
This display lets you check how much free space is left on the disc. You
can also see how many files are currently in the burn list.
Tip: You can add files and folders to the burn list not only by pressing "Insert",
but also via drag & drop: Select the desired files, hold down the left mouse
button and drag the selected files into the window on the right-hand side. Now
let go of the mouse button to add the files.
In the file filter (view page 62) you can exclude files from the backup or
limit
the backup to file types.
Continue to the burning process: Click here to start the
burning process. The "Burn media" dialog will open.
www.magix.com
Page 37

Burn media
Once you ha
following window opens:
Settings
Select CD/DVD burner: Should you have more than one burner set up on your
computer, select the one that you want to use to burn your disc here.
ve finished compiling data for burning and wish to start, the
MAGIX PC Backup MX Overview 37
Number of copies: Specify the number of discs you wish to create. Should
you, for example, wish to burn your compilation three times onto disc, enter
"3" here. The finished disc is ejected automatically and MAGIX PC Backup MX
asks you to insert a new blank disc.
Writ
e speed: Select at which speed you want the burner to write. The
maximum speed possible will be displayed by the corresponding burner.
Recorder
The properties of the inserted disc will be displayed here.
Clicking on the small i opens the "Recorder and media information" (view page
62) dialog where you can do a disc check, for
check how secure your data on the disc really is.
Eject: "Eject" automatically opens the respective drive to remove the medium.
Load disc: Updates the capacity display.
www.magix.com
example. This allows you to
Page 38

38 MAGIX PC Backup MX Overview
Finalize di
burning. This way, no additional data can be burned to this medium.
Delete disc: If you are using an RW medium (re-writable), i.e. a disc from which
all data can be deleted so it can be overwritten again, then you can click on
"Delete disc" here to reformat it for burning.
Status
Here you can see how far along the current burning process is.
Burning options
Simulate burn: If you want to make sure that the burn will be successful, you
can simulate burning. Simulation means that the burner behaves exactly as if it
was burning without actually writing to your blank disc. This way you can test if
the burn process will destroy your CD should it not be successful.
Verify disc after burning: With this setting you can check that your medium
has been burned correctly or if there are problems reading. This way you won't
experience any unpleasant surprises the next time you need your CD or DVD
and their files.
sc: Click on this button if you wish your medium to be finalized after
Quick: Use this setting to verify that the disc is readable and that all files are
available.
Comple
respective source file.
Multi-session CD/DVD: If there's still a lot of space left on your disc and you
may wish to use it later, select this setting.
Overburn disc: With this setting you can exceed the actual capacity of your
disc by a few kilobytes.
Shutdown PC after burning: In case you've started burning and you don't
want to have to wait around until it has finished, activate this setting and the
computer will automatically shut down after the process has been completed,
along with all other applications.
te: Here, each file on the disc is compared individually with its
www.magix.com
Page 39

MAGIX PC Backup MX Overview 39
Click on this button if you wish to cancel the process.
This brings you back to the start view from where you
can reselect a work and burn method.
Once you have adjusted the burn settings to meet
your requirements, click this button. The burn session
will now start.
Restore
Restore backups of files and drives that you created with MAGIX PC Backup
MX.
Restore file
Backup name: Use the backup name to select the backup set which contains
the desired data.
Backup time: Use the date to select the desired "intermediate" backup.
Find: Enter the name of the file or folder that you are searching for. All
"intermediate" backups which contain this search term are displayed in the
date field. Select the desired backup to display the search results.
Status: The color of the data that appears indicates what has been changed
compared to the current date. All the files that are listed can be restored.
Files that are highlighted in red were deleted after the set backup time.
www.magix.com
Page 40

40 MAGIX PC Backup MX Overview
F
iles that are highlighted in yellow were changed.
Files that are highlighted in black were not changed.
Restore: Once you have checked the data that you wish to restore, please
click on "Restore". The data will be restored to the original storage location.
If a more recent version of this data exists, a dialog will pop up and you can
decide how to proceed.
Save as: Click here to restore the files/folder to a new storage location.
Restore drive
Only one drive can be restored at a time. Multiple drives have to restored one
after the other.
System drive
s as a special case: The system drive cannot be restored via this
function because it is in use. A rescue medium is required that enables a
specific restore function. You can create it in MAGIX PC Backup MX via
"Additional Features" (view page 49). You'll find a detailed description in
"Restore
drive with rescue medium".
Backup time: To limit the list of backups, you can enter a period of time.
Destination: Determine the drive where you want to restore the backup data.
Note: If the selected target drive contains any data, it will be overwritten and
cannot be saved.
www.magix.com
Page 41

MAGIX PC Backup MX Overview 41
Restore drive: The selected drive is restored by clicking. This process may
take some time.
Transfer service
To use the transfer service for hard drives, you must create a rescue medium.
This allows you to start the restore program with transfer function. Please
proceed as described under "Transfer service" (view page 55).
Back up live & online
Saving your data in real time provides double protection. In addition to the
automatic backups on a daily, weekly, or monthly basis, you can also use the
real-time backup feature to protect yourself against losing valuable data.
During real-time backups, individual files or folders (entire drives are not suited
because of their data volume) are monitored and saved either online (view
page 41) or to a second location on a hard drive (view page 47) whenever they
are changed.
Online backup
Register with MAGIX Online World http://www.magix-online.com and take
advantage of
selected files or entire folders with all included data can be monitored so that
they will be backed up online after each change.
your personal MAGIX WebDisk. With MAGIX PC Backup MX,
Note: The data in the monitoring lists continues to be saved immediately even
if MAGIX PC Backup MX has not been started. The symbol (tray) is displayed in
the taskbar of your screen if it is active. If there is any transfer activity, a small
info window will pop up, i.e. it displays when an automatic backup is started
and finished on the hard drive.
www.magix.com
Page 42

42 MAGIX PC Backup MX Overview
After you have registered and logged in, you can create a monitoring list.
Monitor folder: Select the folders that should be monitored. If you click on
"Monitor folder", a dialog where you can navigate to the folder that should be
monitored will open. The folders' content is not displayed until they are
selected in the monitoring list. The transfer to your MAGIX WebDisk starts
immediately.
Monitor file: Select the files that should be monitored. If you click on "Monitor
file", a dialog where you can navigate to the file that should be monitored will
open. After selecting it, it will be displayed in the monitoring list. The transfer to
your MAGIX WebDisk starts immediately.
Remove monitoring: Individual folders and files can be selected and deleted
from the monitoring list, in which case they won't be monitored any longer. The
version of the file or folder when it was last saved will not be deleted from your
MAGIX WebDisk.
Monitorin
You can deactivate monitoring for all files and folders in the monitoring list for a
set period of time. The versions of the files and folders when they were last
saved are stored on your MAGIX WebDisk.
If the indicator light is green, monitoring is activated. Changes made to the
folders and files being monitored are saved online immediately.
You can deactivate monitoring for all files and folders in the monitoring list with
a single click. The list remains intact, the current versions on the MAGIX
WebDisk are not deleted and monitoring can be re-activated at any time.
g > Activate/deactivate:
www.magix.com
Page 43

MAGIX PC Backup MX Overview 43
If the indicator light is not on, monitoring is deactivated. Changes are not
saved online.
If you re-activate monitoring, the current version of the folders and files is
saved online immediately.
Log out: If you log out, the connection to your MAGIX WebDisk is interrupted
and monitoring is stopped. The monitoring list and the current online version of
the folders and files are stored. To re-activate monitoring or make changes to
the list, you have to log in again.
Open MAGIX WebDisk: This open the explorer and displays the files on your
MAGIX WebDisk.
Note: If you are using Windows XP or older versions of Windows, this function
will not work. You will have to integrate the WebDisk manually as a network
drive.
More storage space: You can purchase additional storage space if the free
MAGIX WebDisk space included is used up.
MAGIX WebDisk as a network drive on XP
You can set up your MAGIX WebDisk as a network drive.
Note: All data that is saved on the MAGIX WebDisk this way, will not be
monitored by MAGIX PC Backup MX.
www.magix.com
Page 44

44 MAGIX PC Backup MX Overview
Set up link to
an Internet resource under Windows XP:
1. Open Windows Explorer and select "Extras" > "Connect network drive" (1 in
the illustration). The corresponding dialog opens (2).
2. Select "Request online storage or connect to a network server" (2 in the
illustration). The "assistant for adding network resources" will open.
3. Follow the instructions of the assistant:
Please enter the following in the respective fields:
...as
"Internet or network address": https://webdav.magix-online.com/backup
... as "User name" your email address that you used to register for the MAGIX
WebDisk
...as "Password" the password you used for the MAGIX WebDisk
Your MAGIX WebDisk is located in Windows Explorer as network drive under
network environment with the name you assigned to it.
MAGIX WebDisk as a network drive on Vista
You can set up your MAGIX WebDisk as a network drive.
Note: All data that is saved on the MAGIX WebDisk this way, will not be
monitored by MAGIX PC Backup MX.
www.magix.com
Page 45

MAGIX PC Backup MX Overview 45
Set up link to
an Internet resource under Windows Vista:
1. Click on "Start", select "Computer" and maximize the window that appears.
2. Click on "Assign network drive" (1 in the illustration). The "Connect network
drive" dialog will open.
3. Connect network drive:
Select the desired drive letter in the dialog in "Drive".
nter the following in "Folder" (2): https://webdav.magix-online.com/backup
E
Click on "Finish" (3).
4 Enter your login details:
As your "User name" enter your email address that you used to register for the
MAGIX WebDisk
As "Password" enter the password you used for the MAGIX WebDisk
Your MAGIX WebDisk will now be listed as drive under Start > Computer:
network address.
www.magix.com
Page 46

46 MAGIX PC Backup MX Overview
MAGIX WebDisk as a network drive on Windows 7
You can se
Note: All data that is saved on the MAGIX WebDisk this way, will not be
monitored by MAGIX PC Backup MX.
Set up link to an Internet resource under Windows 7:
1. Click on "Start", select "Computer" and maximize the window that appears.
t up your MAGIX WebDisk as a network drive.
2. Click on "Connect network drive" (1 in the illustration). The "Connect
network drive" dialog will open.
3. Connect n
Select the desired drive letter in the dialog in "Drive".
Enter the following in "Folder" (2): https://webdav.magix-online.com/backup
Click on "Finish" (3).
4 Enter your login details:
As your "User name" enter your email address that you used to register for the
MAGIX WebDisk
As "Password" enter the password you used for the MAGIX WebDisk
Your MAGIX WebDisk will now be listed as drive under Start > Computer:
network address.
etwork drive:
www.magix.com
Page 47

MAGIX PC Backup MX Overview 47
Real-time backup
With MAGIX PC Backup MX, selected files or entire folders with all included
files can be monitored, so that they will be backed up to a specified storage
medium after each change. Preferably you should use an external hard drive or
a USB stick. This way, you are independent of the original PC in an emergency
situation and can easily transport your saved data.
Note: The data in the monitoring lists continues to be saved immediately even
if MAGIX PC Backup MX has not been started. The symbol (tray) is displayed in
the taskbar of your screen if it is active. If there is any transfer activity, a small
info window will pop up, i.e. it displays when an automatic backup is started
and finished on the hard drive.
Select a storage location: Specify the storage location for monitoring your data.
Then you can create a monitoring list.
Monitor folder: Select the folders that should be monitored. If you click on
"Monitor folder", a dialog where you can navigate to the folder that should be
monitored will open. The folders' content is not displayed until they are
selected in the monitoring list. Transfer to the specified storage location starts
immediately.
Monitor file: Select the files that should be monitored. If you click on "Monitor
file", a dialog where you can navigate to the file that should be monitored will
open. After selecting it, it will be displayed in the monitoring list. Transfer to the
specified storage location starts immediately.
www.magix.com
Page 48

48 MAGIX PC Backup MX Overview
Remove monitoring: Individual folders and files can be selected and deleted
from the monitoring list, in which case they won't be monitored any longer. The
version of this file or folder when it was last saved is stored at the location
specified for monitoring.
Monitoring > Activate/deactivate:
You can deactivate monitoring for all files and folders in the monitoring list for a
set period of time. The versions of the files and folders when they were last
saved are stored at the location specified for monitoring.
If the indicator light is green, monitoring is activated. Changes made to the
folders and files being monitored are saved immediately.
You can deactivate monitoring for all files and folders in the monitoring list with
a single click. The list remains intact, the current versions at the storage
location are not deleted and monitoring can be re-activated at any time.
If the indicator light is not on, monitoring is deactivated. Changes are not
saved.
If you re-activate monitoring, the current version of the folders and files is
saved immediately at the storage location.
Display backup data: Opens Windows Explorer and displays the content of
the storage location.
Additional Features
MAGIX PC Backup MX provides additional useful functions for managing your
data; you can restore system backups, recover data or delete data for good.
Create rescue medium: Create a bootable disc or USB stick as rescue
medium that you can use to restore the old system after a PC crash, for
example. The previously created backup of the drive can then be restored with
the help of this rescue medium.
Data shredder: The data shredder allows you to delete any files, so that they
cannot be restored (not even with data recovery programs such as the
"Undelete" function in MAGIX PC Backup MX).
Undelete: With this function, you can restore files that you deleted using the
standard Windows deletion process before they are overwritten irrevocably by
other new files. However, only those files may be restored whose original file
has not been overwritten, even in part.
www.magix.com
Page 49

MAGIX PC Backup MX Overview 49
Create rescue medium
The rescue medium is especially important for backing up system drives.
System backups that were created using MAGIX PC Backup MX can only be
restored by using a rescue medium.
Drive backups that don't have a restore function can also be restored with this
rescue medium.
Backups of other drives that were created with MAGIX PC Backup MX can be
restored easily in the program via "Restore" > "Restore drive" (view page 40).
Note: A created rescue medium can be used for all restores of drives.
Burn rescue medium
Step 1: In MAGIX PC Backup MX, click on "Additional Features" >"Burn
bootable file". The following interface will appear:
Step 2: Insert a blank disc and click on "OK" in the information dialog (1 in the
illustration). You can adjust the settings for the burning process in "Burn
options" (2).
Step 3: Click on "Start burning" (3) to create the rescue medium.
Tip: Clearly label the disc as a boot disc so you can identify it easily at any
time.
www.magix.com
Page 50

50 MAGIX PC Backup MX Overview
If a
drive has to be restored, this disc has to be inserted first when the PC
boots.
Create rescue medium on removable storage device
Note: The USB stick that you intend to use as a rescue medium cannot be
used for other data. Now it is exclusively a rescue medium with an automatic
boot function for restoring data.
Step 1: In MAGIX PC Backup MX, click on "Additional Features" >"Create
rescue medium on removable storage device". The following interface will
appear:
Step 2: Select the USB stick on which you want to create a rescue medium (1
in the illustration).
Step 3: Click on the "Create on USB stick" (2) button to start the process.
Tip: Label the USB stick on its handle or something similar so you can identify
its function easily at any time.
If you have to use the rescue medium, plug in the USB stick and start the PC.
Then you can restore the drive.
www.magix.com
Page 51

MAGIX PC Backup MX Overview 51
Data shredder
Here's how to delete data securely:
Step 1: In MAGIX PC Backup MX, select "Additional Features -> Data
Shredder".
The following dialog opens:
Step 2:Select the data in the file browser (1 in the illustration), which you would
like to erase.
Step 3: Click "Insert" (2) to transfer the data to the deletion list (3) (or drag &
drop them). Everything in this list will be deleted.
Step 4: Select
the method of deletion (4) that should be applied.
Step 5: Click "Delete files" (5) and the data will be deleted.
Note: To delete the free space on a drive, the "Free drive space" entry in the
file browser (which is present for every drive) must be added to the deletion list.
This way you can be sure that the space that is freed and which may still
contain data, will be securely deleted.
Quit: This button will cancel the deletion process.
www.magix.com
Page 52

52 MAGIX PC Backup MX Overview
Two deletion methods
The following deletion
methods are available:
Gutmann: This deletion method requires a lot of time, but it qualifies as the
most secure method, as 35 passes are carried out, and data to be erased is
overwritten with random sequences of numbers before it is erased again.
Pseudo-random: With this deletion method, you can securely delete your
data, but it doesn't require as much time as the Gutmann method, since less
passes are made to overwrite data.
Undelete in detail
Have you deleted files from your Windows recycling bin by accident, and would
like to restore these again? You can try it with this function. The sooner
undelete will be attempted after deletion, the more probable it is that the file
may be rescued.
Warning!It is recommended that you restore files not to the same drive, but to
a different one. Otherwise file rescue could overwrite disk space, which
contains part of the original file. As a result, the file can't be fully restored.
Step 1: In MAGIX PC Backup MX, select "Additional Features -> Undelete".
The following dialog will open:
The file browser where all files which were deleted are displayed. The
colors indicate the chances for restoring the data (view page 53).
Note: Deleted files may have strange symbols and numbers in front of
their original names in the file browser. These are created by the system
during the deletion process and will no longer appear after successful
www.magix.com
Page 53

MAGIX PC Backup MX Overview 53
undeletion.
Using "Insert" or drag & drop, you may transfer a deleted file to the
restore list.
The restore list that contains all files which should be restored.
Step 2: Add all files to be restored from the file browser into the restore list.
Step 3: After creating the restore list, start the
process by clicking on "Restore files".
A dialog opens where you can select where the
file(s) are to be restored.
Step 4: Select a drive that is different from the original one, so that no
required file parts are overwritten.
Quit: This button will cancel the restore process.
Chances of successful undeletion
Not every file may be completely restored, and some cannot be restored at all.
To help you approximate what kind of chances certain files have to be
successfully undeleted, the restore process is divided into 3 levels:
Good (yellow): The chances are good that the file may be restored and
continue to be used if you restore it to a different drive.
orange): In this case, only parts of the file can be rescued. This means
Bad (
that, for example, parts are missing from a text file. For image files, this means
that the image will be lost, since image files have to be complete to be
displayed.
Impossible (red): The file cannot be restored because too many parts of the
file have been overwritten with new data.
www.magix.com
Page 54

54 Restore drive with rescue medium
Restore drive with rescue medium
Drives that are bootable are scanned by default for corresponding media with a
boot function when the computer is restarted. If a CD/DVD or a USB stick with
a start function (like a rescue medium) is inserted during PC start-up, it will be
started.
Note: If you are using a USB stick as a rescue medium, you should test
whether your PC searches for boot functions on USB sticks before an
emergency occurs. If booting using the USB stick works and MAGIX Restore
starts, simply close the program again and restart your PC to continue
working.
If booting does not work, you will have to customize the start sequence in the
BIOS.
Step 1: Restart your PC and insert the rescue medium while the PC boots.
MAGIX Restore will start and a welcome dialog pops up. Click on "Restore" in
the dialog. The following dialog opens:
Step 2:
If yo
u saved the backup on a hard drive, make sure that the hard drive is
connected properly.
www.magix.com
Page 55

If you saved the backup on a CD/DVD, remove the rescue medium from the
CD/DVD drive once you see this interface and insert the medium with the
(system) drive backup.
The program automatically searches for all backup files and displays them
under "Source". Correspondingly, only those targets will be displayed that are
suitable for restoring.
Step 3: Should the backup of your choice not be displayed automatically, use
the arrow keys in "Source" to select the backup that you want to restore.
Step 4: In "Destination", select the correct hard drive among the ones listed as
well as the drive of your choice. New hard drives are displayed without drive
letters.
Step 5: Start the restore process by clicking on "Restore".
The data of the system backup is restored to the destination and you can
restart your PC. The files are restored to the point in time when the backup
was created.
Warning! After recovering the data, the rescue medium must be removed so
that it is not detected again automatically when the computer is restarted!
Transfer service 55
Transfer service
You can use the transfer service to transfer your files and programs from the
old, smaller hard drive to the new, larger one. A transfer can also become
necessary, if you suspect that your old hard drive is about to stop working
properly.
For a hard drive transfer, please proceed as follows:
Step 1: Create a rescue medium in the "Additional Features" area of MAGIX PC
Backup MX. It includes the program for the transfer service as well as for
restoring the drive.
Step 2: Connect the new hard drive (target hard drive) to your PC.
www.magix.com
Page 56

56 Transfer service
Step 3: (Re)start your
Restore will start and a welcome dialog pops up. Click on "Transfer service" in
the dialog. The following dialog appears:
Source: Displays all of the hard drives under "Source".
Target: Depending on the "Source", only those hard drives will be displayed
under "Target" that are large enough for the source. The target thus has to be
at least as large as the source hard drive.
Options: If the target hard drive is larger than the source hard drive, you have
3 options how to proceed with the rest of the memory:
PC and insert the boot disc while the PC boots. MAGIX
Create a 1:1 copy and do not use the free disk space: The free disk space
remains on the hard drive and is not used. You can set it up as a drive (view
page 66) later via Windows, so it can be used.
Set up free d
will not remain unused and you have more space for saving your data.
Use free disk space to enlarge a specific drive of the target hard drive: If
you do not want to set up another drive, but do not want to leave the free
space unused either, you can enlarge a drive during transfer to the target hard
drive to make more disk space available there.
Step 4: Select a source and target, specify the option of your choice in case
free disk space is created and start the transfer by clicking on "Transfer".
The data of the source hard drive is transferred to the target. A message will
pop up when the transfer has been completed. You can restart your PC.
Warning!After the transfer, the rescue medium must be removed so that it is
not detected again automatically when the PC is restarted!
isk space immediately as a new drive: This way, the disk space
www.magix.com
Page 57

Additional features and settings 57
Additional features and settings
In addition to the main functions, MAGIX PC Backup MX also offers additional
functions and settings, which make working in it easier.
Help menu
Click on "Help" in the main screen to open MAGIX PC Backup MX's help file.
Help
This entry opens the start page of the program's help file. You can work
through the help file step-by-step and jump to specific chapters via the tree
structure (table of contents) on the left-hand side.
Tutorial video...
MAGIX PC Backup MX comes with several tutorial videos for fast access. You
can play them via this sub menu.
Find knowledge & workshops...
You can find interesting workshops and useful tips on the topic of simple
workflow with MAGIX PC Backup MX.
Hint: This function requires an Internet connection.
Open magix.info
Directly from within the program you'll be able to access magix.info, the
Multimedia Community from MAGIX (view page 68). You'll find answers to all
the most frequently a
sked questions about MAGIX products and multimedia in
general. Were you unable to find a solution to your particular problem? No
problem, just ask the question yourself.
MAGIX Screenshare
This function makes it possible for you to offer assistance to other users
directly via the Internet, or to get help from others. To do this, you have to
register MAGIX PC Backup MX first.
www.magix.com
Page 58

58 Additional features and settings
Hint: To inform the screensharing guests of exactly what is being shown, it is
also a good idea to telephone or chat simultaneously.
Register as host for a screen transfer
1. If you want to start a screenshare instance yourself, then you have to
register as a host first. To do this, open the menu "Share" and then select
"Screen transfer as host...".
2. In the dialog you can enter a name for the screen session. Your user
account name is used here by default.
3. Now click on "Start session". A small window will now open in the bottom
right corner which displays the status of your screen session. A number will
also be displayed (session ID) which serves as a password for your guests.
4. Start the screenshare instance.
Register as guest of a screen session
1. You have to register as a guest to view a screensharing instance. To do
this, open the menu "Share" and then select "Screen transfer as guest...".
2. Enter the password you received from your host (8-digit session ID).
3. Now click on "Start session". A window will open displaying a smaller
version of your host's screen.
Online Update
Connects directly to the online update page where you can get the latest
version of your program.
Reactivation support for MAGIX programs
After transferring a hard drive or changing the size of a partition on your PC,
error messages may pop up when starting MAGIX programs that are installed
on your computer. This function allows you to re-activate the programs;
registration is set back, so you can reactivate the program with a valid serial
number.
About MAGIX PC Backup MX
Displays copyright info and version number of MAGIX PC Backup MX.
www.magix.com
Page 59
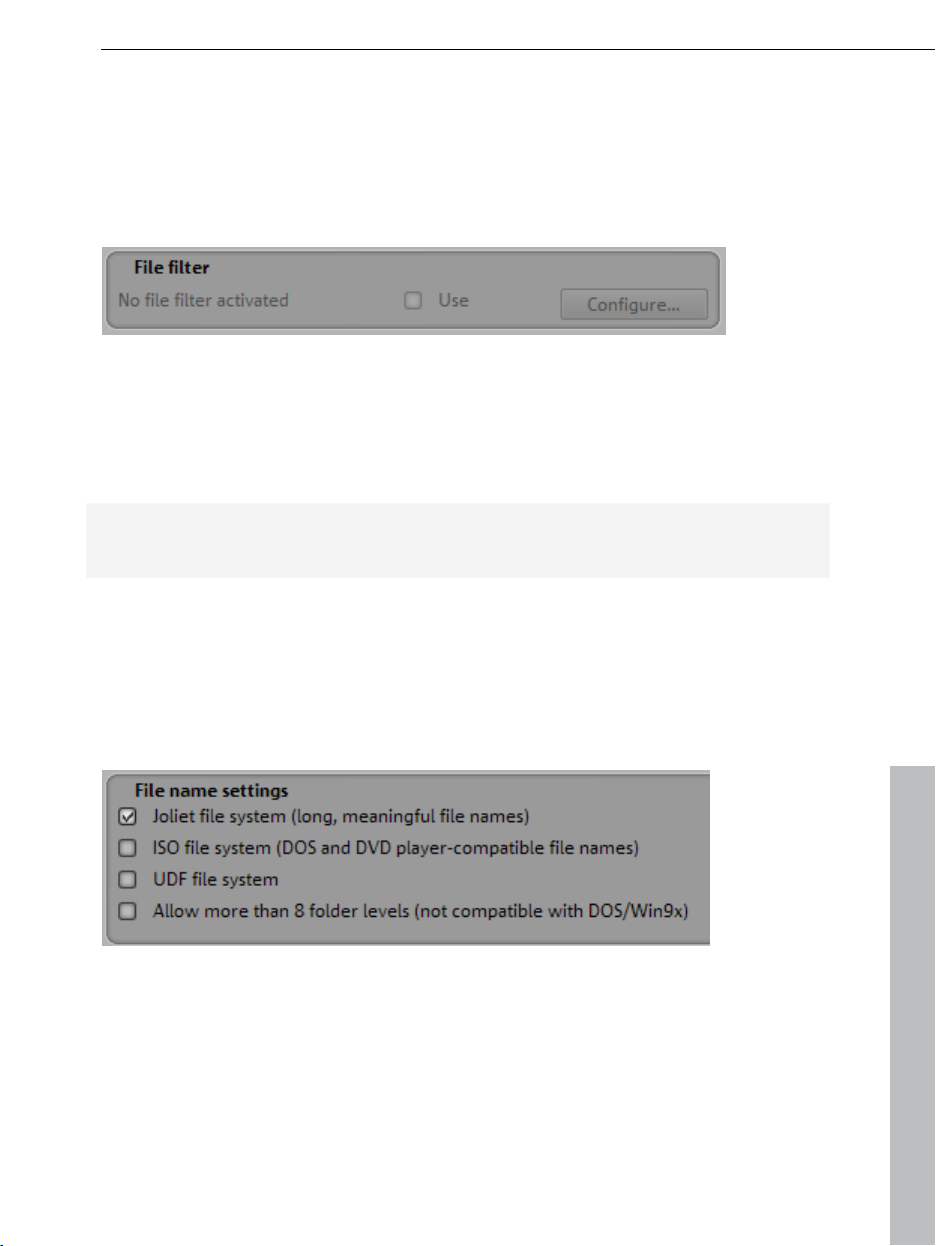
Additional features and settings 59
Advanced burning options
There are some advanced settings which depend on the disc type chosen. Not
all chosen objects are suitable or available for all disc modes.
File filter:
The file list can also be filtered, e.g. to exclude unwanted temporary files from
the burning process.
"Use" switches on the filter. The applicable filter options are now displayed.
"Configure..." lets you edit the filter options (view page 62).
Note: The ";" symbol allows multiple file types to be selected. Use the form
"*.(file extension)".
The filter can be positively edited, i.e. only the file types entered will be burned,
or it can be used negatively. i.e. file types entered will be ignored. You can also
include/exclude from the burn session by specifying a minimum/maximum
allowable file size.
File name settings:
Joliet file system: Uses long file names. This can lead to incompatibilities when
using the disc, meaning that some MP3 or CD/DVD players won't play them.
ISO file system: Short file names are used (8 + 3 characters). This makes the
disc compatible with all MP3 CD and DVD players.
www.magix.com
Page 60

60 Additional features and settings
UD
F file system: UDF is a platform-independent file system. With this setting,
the file names can be up to 255 characters in length, and there are no
limitations to the path depth.
Allow more than 8 folder levels: If your files are saved in folders more than 8
levels deep, then you can use this function to burn them without changing the
structure.
Folder options:
Choose how the paths (folder depths) to your data should behave while
burning. This option controls the creation of subfolders on the disc should you
wish to compile data manually and burn it to disc.
Burn files like in burning list (default): All files and folders will be burned onto
CD/DVD as they are selected in the file browser. Subfolders will be kept.
Folders at higher levels will not be burned.
The files/folders will be burned with their complete path: The files and folders
will be burned with their complete path meaning that all parent folders of the
files you wish to burn will also be created on the disc. Please note that differing
source drives will not be treated differently. If the list contains files with the
same name and path (with the exception of drive letters), an error message will
be displayed!
Group comm
match, only the parts of the folder structure whose paths differ will be
generated on the CD. The source drive is not considered!
Burn files without subdirectories: The files are saved without original paths
and only with their file names without subfolders in the root folder of the CD.
on folders (relative): If parts of the paths of the source files
www.magix.com
Page 61

Additional features and settings 61
Burn method:
Discs-at-once: During this process, the laser does not "pause" to readjust
during burning. The disadvantage of this process is that the medium cannot be
used again during another burning session.
Track-at-once: This burning process allows another burning session to be
added to a previously burned medium (if enough space is available).
Switch on burn proof: This setting guarantees continual writing of the medium
and ensures successful burning.
Switch on compatibility mode: Activate this function to be sure that the
CD/DVD will be able to be played by older drives and players, too. An older file
system will be burned. However, many limitations must be considered: No files
larger than 4 GB can be burned, files may not be present in more than 8 folder
levels, and the file names may not be longer than 64 characters/no special
characters permitted.
www.magix.com
To make sure that the burning options are set
properly, you should switch on this feature
before each burn session.
Page 62

62 Additional features and settings
File filter
With the help of the file filter you can search for selected file types or exclude
them, and you can also limit the search according to file size. Just click a
check box in the desired filter and then enter the criteria (file type, exact
size(s)).
You can also include files according to their archiving information: Place a
check if only those files should be included which were changed since the last
backup.
www.magix.com
Page 63

Additional features and settings 63
Recorder and media information
Use the recorder and media information to inform yourself about your burner,
the supported formats, and the current medium inserted in the burner.
Drive
If you have different recording devices installed on your PC, you can select
them here to learn more about them. This function can also be used to find out
the complete name of the burner, i.e. the manufacturer and version, etc.
Supported media
This displays
burner. Not all burners support every type of medium. This will save you errors
before you begin the burning process, since you will be aware of what medium
types are suitable for your burner.
The chapter "Media types" explains the differences between medium types.
www.magix.com
which media (CD/DVD blanks) can be used in the selected
Page 64

64 Additional features and settings
Loade
d disc
If you have already inserted a medium into the burner, this will display
information about it, i.e. which type of medium, how much free space is
available, how much free space is available for burning, whether or not the
medium can be deleted/overwritten, which read/write speeds are possible, and
so on.
If you have changed the medium in the drive and want to
refresh the view, click here.
To eject the medium from the burner, press "Eject" and the
burner will open.
Data on a rewritable CD or DVD can be deleted so that you
can start again at full capacity.
Caution: All data will be deleted forever!
Click here if you want to finish the media after the burn
session is completed. This ensures that the medium will be
playable by most DVD players.
Notes: New editing or burning processes will not be
possible on this CD/DVD if the sessions are closed!
www.magix.com
Page 65

Additional features and settings 65
Safety check
Checks the quality of a CD/DVD in order to determine how secure your data is.
After a certain amount of time, CDs and DVDs can no longer be read properly.
The data cannot be accessed if the medium cannot be read.
www.magix.com
Page 66

66 Tips & tricks - Problems & solutions
Tips & tricks - Problems & solutions
Here you will not only find useful tips & tricks which may help you with your
computer, but also some background information.
Check drive for errors
When transferring data from a source hard drive to a new hard drive, the
source hard drive is scanned and checked for errors. If an error message
appears, you will have to check the source hard drive for errors. After you have
completed the error check, you can open and execute the transfer service
again.
How to proceed to check the source hard drive for errors and to fix them if
necessary:
Note: All files must be closed for the error check.
More information on this topic can be found in the manual of your operating
system.
Hard drive error checking in Windows XP
1. Open "My Computer" and select Properties from the "File" menu.
2. Open the "Extras" tab in the dialog. Click on "Check now" under error
checking. The "Check disc" dialog opens.
3. Check the "Scan for and attempt recovery of bad sectors" option and click
"Start".
Hard drive error checking in Windows Vista/7
1. Open "My Computer" and then open the menu bar using the keyboard
shortcut Alt + D. Select Properties from the "File" menu.
2. Open the "Tools" tab in the dialog. Click on "Check now" under error
checking. The "Check disc" dialog opens.
3. Check the "Scan for and attempt recovery of bad sectors" option and click
"Start".
www.magix.com
Page 67

Tips & tricks - Problems & solutions 67
Set up free space as drive
When transferring data from a source hard drive to a larger hard drive, you can
determine what you want to do with the newly acquired disk space. You can
use it to enlarge a drive or to set up a new one. Errors may occur, however, so
that the free disk space cannot be assigned or set up as a drive.
How to proceed to set up free disk space as a new drive after the transfer,
so that is does not remain unused:
Note: More information on this topic can be found in the manual of your
operating system.
Step 1:
Set up free space as drive in Windows XP:
Select "Start > Settings > Control Panel > Administrative tools > Computer
management". The "Computer Management" dialog opens.
Set up free space as drive in Windows Vista
Select "Start > Control Panel > System & Maintenance" > "Management:
Create and format hard drive partition". The "Computer Management" dialog
opens.
Set up free space as drive in Windows 7
Select "Start > Control Panel > System & Security" > "Management: Create
and format hard drive partition". The "Computer Management" dialog opens.
Step 2:
Select "Disk Management" to the left. All hard drives (disks) and their partitions
are displayed to the right. On the new, larger hard drive there should also be a
section that is labeled as unassigned space. Right-clicking on this memory
section opens a context menu where you can start setting up a new volume.
Then you can open and use the memory under the drive letter you specified.
www.magix.com
Page 68

68 MAGIX services in detail
Show instruction dialog again
Once installed, MAGIX PC Backup MX displays a number of security queries
and instructions in various parts of the program. Each of them can be switched
off by clicking the small box at the bottom that says, "Don't show this message
again". If you would like to see all these dialogs again, click on "Show all
instructional dialogs again".
MAGIX services in detail
magix.info
Share your knowledge & get answers This MAGIX service offers you and the
MAGIX Community at large a central platform for exchanging knowledge,
photos, videos, and music, for discussing and evaluating, for communicating
with one another, for presenting yourself, and networking with other members.
You will find the sections "Questions & Answers", "Show & Discuss", "Online
Training", and "Chat" where you can play an active or passive role in the
MAGIX Community. For this there's not only the www.magix.info portal, but
magix.info directly in your product.
Ask questions online
If you have questions or problems with your MAGIX program or you're looking
for tips & tricks concerning multimedia, then you're at the right place.
Display all questions & answers...
Use the questions which other community members have asked and the
collective knowledge of the answers to improve your own working methods, to
solve problems, and to get to know the details of MAGIX PC Backup MX.
Launch the online training center
Learn not only theoretically, but also practically what the program is capable
of: "learning by doing", quickly and uncomplicated.
www.magix.com
Page 69

MAGIX services in detail 69
Let your friends view the contents of your MAGIX.info screen over the
Internet on their PCs.
Ideal for viewing photos and videos together or for receiving support for
questions arising during your creative workflow while using the program (a
licensed client will be installed for this purpose).
MAGIX Online Album
In the MAGIX Online Album you can post your favorite photos online and then
send the link to your friends. All photos are immediately available from
anywhere in the world on a professionally-designed photo website, in
well-organized photo galleries, as full-screen slideshows, or in the form of a
personal photo e-card.
Personalized photo website in many designs.
Unique Internet address (URL).
Upload your pictures directly from a camera phone, send the link, and share
the picture with other camera phone users.
Full-screen online slideshows with fade effects and music.
Send custom designed e-cards with your own photos.
Share your photos with friends, including Internet management and password
access to private albums.
Your photos online
MAGIX Online Album is available in three versions, of which the smallest (the
FREE album with 500 MB webspace for your photos) is entirely free.
The larger versions (CLASSIC or PREMIUM) are available for a monthly charge,
but also come with many handy features, such as a faster website, 5,000 MB
or 10,000 MB storage space, more website designs or access by mobile
phone/PDA.
More information about prices and services is available at the MAGIX
WEBSITE.
Using your MAGIX Online Media Manager, you can quickly manage your
photo website, upload photos and music, create new albums, add designs and
text, and much more. All online without even having to download any extra
software! Worldwide, easy and quick in just a few clicks. At
http://www.magix-photos.com
www.magix.com
Page 70

70 MAGIX services in detail
The following option
s are also available:
Send e-cards and photo emails
Send your photos as unique ecards with great designs or as a photo email to
your friends and family.
Order photo prints and gifts
Order paper prints or great photo gifts from your MAGIX Online Album and
have them delivered directly to your home, or pick them up from a photo lab in
your area. Delivery time is usually just 2 - 3 days.
MAGIX Website Maker
Not only is Internet surfing easy! Thanks to MAGIX Website Maker creating
websites also becomes child's play!
This service offers:
Your desired domain (www.desiredname.com) and a subdomain
(http://your-name.magix.net/website).
250 MB
memory space with 5 email accounts, 1 GB each.
Website Maker with website templates, intros. Also animations, text effects,
form and design objects, picture and graphic templates, and buttons. And
everything without any ad banners!
Photo (*.jpeg), video (*.wmv) & music (*.mp3) options.
Additional software: MAGIX web mail for managing your email inbox.
MAGIX Website Maker offers 3 months of free, non-binding service. This way,
you have enough time to find out everything about MAGIX Website Maker and
all existing possibilities for editing and managing your homepage.
www.magix.com
Page 71

MAGIX Website Maker offers everything for the perfect Flash website:
Design templates: Numerous high-quality website templates in the latest
professional Flash design with pre-finished, customizable subpages, start
pages, profile pages, photo pages, video pages, and much more.
Text & text effects: Freely positionable text fields with fantastic fonts and
animated text effects can be added and individually formatted with ease.
Multimedia content: Select your favorite photos, spectacular slideshows,
videos and an online video player with your own background music, or
integrate it all as an online music player with playlists.
Decorative elements: Attractive design objects, plenty of vector shapes,
background images, buttons, and much more offer more possibilities for
designing unique websites than ever.
Animation objects: Large selection of dynamic, impressive animation objects
for breathtaking, moving websites.
Links: Easily add links to your own or external websites.
Top extras: Enhance your website with a visitor counter, guest book, contact
form, and many other useful extras.
Export function: Conveniently add individual components of your website
(e.g. video player, slideshow, online music player) or even the entire website to
external sites as an embedded website.
Proceed as follows:
MAGIX services in detail 71
After registering your desired domain, you can start creating your website right
away.
1. First, select a design for your website in MAGIX Website Maker
2. If you would like to place an intro (start animation) at the start of your
domain, select your intro as a next step.
3. Now you can replace the mock text with your own text as you see fit. All
free-standing elements on all webpages can also be moved as you please.
To do so, click to select the element and move it using your mouse.
4. Once everything is just how you want it, you can put your page online, so
that your domain can be accessed.
www.magix.com
Page 72

72 Glossary
Glossary
A
Autostart
"Autostart" is a Microsoft Windows function which allows an automatic
program start along with system boot. A folder exists, where a list of programs
or processes is found, which are executed when Windows is started or a login
takes place. Some of the processes and programs are necessary for Windows,
while others are optional.
B
Backup
Copying data to a different storage medium to secure this data is called
backing up, or creating a backup. If necessary, these backups can be restored
using special programs/functions.
Backup disc
Copying of files to a different file storage medium to secure these files is called
backing up, or creating a backup.
Blue screen
The blue screen is a critical Windows error message. It is issued only when
significant errors for the computer's function are found in the core, drivers or
hardware. Because the errors are not caused by programs, which may be
simply shut down, the computer has to be restarted.
Blu-ray
Since early 2008, Blu-ray discs are viewed as successors to DVDs and offer
especially high storage capacity of up to 27 GB in a single layer (double-layer
up to 54 GB) with very few write errors. The high storage capacity of the
Blu-ray disc suits high definition videos and slideshows in high quality perfectly,
since these are characterized by large file sizes (depending on material
approximately 40 MB/sec) and very high memory use.
The term Blu-ray Disc comes from the blue color of the laser. Because a color
cannot be registered as a trademark, the letter "e" was removed from the word
"blue".
boot-capable
Storage devices are boot-capable if they feature a sector that helps load an
operating system.
www.magix.com
Page 73

Browser
Glossary 73
A browser (also known as web browser, or Internet browser) is a computer
program that displays websites. The best-known browsers are Internet
Explorer, Firefox, Safari, and Opera.
Button
Refers to an element of the graphic user interface of a program. The button
initiates an action in the program via left mouse click.
Button
Refers to an element of the graphic user interface of a program. The button
initiates an action in the program via left mouse click.
C
Clipboard
The clipboard is used to temporarily store objects during execution of
commands like "copy" and "cut".
Clipboard
The clipboard is used to temporarily store objects during execution of
commands like "copy" and "cut".
Copyright
Protection of intellectual and creative property against unauthorized copying.
Copyright
Protection of intellectual and creative property against unauthorized copying.
D
Dialog
A dialog opens in a new window and lets the user interact with the program.
This means that the dialog can present information to the user and/or expects
to receive input from the user.
A dialog can contain various user elements which can be manipulated by a
simple mouse click. Keyboard entries are also possible.
Disc types
The disc types determines the format and medium (CD, DVD, Blu-ray disc,
etc.) to which the current project will be burned.
www.magix.com
Page 74

74 Glossary
Double-layer
DVDs can consist of one or two storage layers, and both of these can be
written to. Video DVDs increase the capacity up to 4.5 or 8.5 GB.
During the write and read process, each layer can be accessed without
damaging data on the other layer. One of the biggest challenges of
development of this medium was making normal DVD players able to playback
these discs.
Drag & drop
Enables files and objects to be moved freely between various applications (or
within an application) by dragging the object and letting it drop using the
mouse cursor.
F
Firewall
A firewall is a technical system for protection against unwanted external access
or hacker attacks.
There are hardware and software firewalls. Hardware firewalls are mostly
technical devices with network interfaces (for example, router or proxy), and
are therefore sometimes called network firewalls. Software firewalls run as a
program on an operating system and control outgoing file traffic as well as
attacks from the web. They also protect against unwanted secret sending of
data from the computer by other programs.
Note: It may come to a blockade of communication between programs or
processes in your own system if your security level is set too high.
H
Hard disk
Storage medium with the largest storage capacity where the operating
system(s), programs, and files are saved. A hard disk can be built into the
computer, but there are also external hard disks which can be used with
different computers via a USB connection (portable drives or external hard
disk).
Hard disk drive
Storage medium with the largest storage capacity where the operating
system(s), programs, and files are saved. A hard disk can be built into the
computer, but there are also external hard disks which can be used with
www.magix.com
Page 75

Glossary 75
different computers via a USB connection (portable drives or external hard
disk).
Hardware
The all-encompassing name for all internal components of a computer. For
example hard disk, graphics card, mainboard, etc. External peripheral devices
are also considered hardware, i.e. printer, scanner, monitor, etc. The
synchronization of single hardware components is coordinated by the
software.
HD DVD
The HD-DVD is intended for playback on HD-DVD players and cannot be
played on normal DVD players. By default it is created in "1080i" (1920 x 1080
pixels) format. The amount of data is four-times that of normal DVD formats.
Advice: Toshiba declared at the beginning of 2008 that the manufacture and
further development of the technology (including devices) would be stopped.
This makes Blu-ray the official successor to the DVD.
HDD
Storage medium with the largest storage capacity where the operating
system(s), programs, and files are saved. A hard disk can be built into the
computer, but there are also external hard disks which can be used with
different computers via a USB connection (portable drives or external hard
disk).
I
Image
An image is a representation of a CD, DVD, hard drive, or another storage
medium that is saved as a file.
The difference from a copy or backup is that an image contains information
about the structure of the original storage medium, and not just individual files.
This enables 01:01 copies of complete storage media to be created.
Caution! Copyright laws forbid copying of commercial CDs/DVDs, and for this
reason, this process can be prohibited by copy protection.
www.magix.com
Page 76

76 Glossary
M
Menu
Menus contain practically all function of a program. They can be opened using
a simple mouse click on the corresponding menu. Keyboard shortcuts, if
available, are also found at the end of menu entries.
The graphical surface of a CD/DVD will also be represented as a menu.
Menu bar
Almost every program has a menu bar. It can normally be found underneath
the title line of the program. A simple mouse click opens a corresponding
menu.
Motherboard
This is the centerpiece of hardware components of a computer. All other
hardware components like CPU, RAM, hard disk, additional drives, graphics
cards, as well as other cards for specialized uses are connected to the
motherboard.
O
Operating system
After the computer is turned on, the operating system will be loaded. Without
this software, you would not be able to work on the computer. It executes the
most important functions and allows other programs to start. Microsoft
Windows is the most commonly used operating system. Other systems
besides Windows exist, one example being Linux.
P
Partition
A hard drive's storage space can be divided up into several areas which can
be used as separate, independent hard drives. These areas are called
partitions. Every partition in Windows receives its own drive letter.
Hard drives may only be partitioned after being re-formatted, or cleaned of all
data.
Note: There are special programs, which can partition unformatted hard drives.
However, they do not guarantee that this happens without any data loss!
www.magix.com
Page 77

Plug-in
Glossary 77
Plug-ins are additional programs that expand the functionality of the main
program. They are inserted into the main program.
Process
A process is a running program. You may view all programs being run at the
time in the Task Manager. You will see many processes, even if no windows
are open. This is because a program may be active without letting it be known.
These programs are called "running in the background".
R
RAM (Random Access Memory)
This is a hardware component of a computer. RAM is needed to temporarily
save files. This type of storage is erased when the computer is shut down or
reset. The larger this storage is, the faster you can work with programs to
change and save files.
Reset
"Reset" signifies the reset button located on the PC encasing. It returns the PC
to the start position and forces a reboot of the operating system. A reset (cold
start) is often necessary if a PC no longer responds after a system crash.
Unsaved data will be lost.
In contrast to resetting, a so-called "warm start", which is started by pressing
"Ctrl + Alt + Del", will skip the majority of the test and initialization procedure of
the BIOS.
Restore
Restoration of files originating from a backup will be called "Restoring".
S
Screenshot
A screenshot is an image composed of all visible screen elements (messages,
open dialogs, etc.) at a certain time. By pressing the "Print screen" key on the
keyboard, this image is saved into the clipboard. Next, open a program which
can edit images and select "Insert" (shortcut "Ctrl+V") in a new document to
add the screenshot for editing and saving.
Note: Press "Alt + Print screen" on the keyboard to capture the active window
only.
www.magix.com
Page 78

78 Glossary
Setup
In computer jargon, the word "setup" is often applied to different concepts.
"Setup", above all in the Microsoft Windows environment, usually indicates the
installation and setting up of new programs on the system. That's why the
installation file is often named "setup.exe". Once the product is installed,
"setup" often translates into a window or dialog that provides the basic
settings for the program.
Software
The name for all non-physical functional components of a computer. This
primarily includes computer programs and files that are meant to be used by
computer programs.
Submenu
Besides normal entries, a menu can contain submenus that offer additional
functions. This makes menus more comprehensive.
T
Taskbar
The taskbar is a part of the user interface (desktop). In Windows and other
operating systems that utilize graphical user interfaces, this bar is usually on
the bottom edge of the screen. The task bar, sometimes also called the start
bar, provides a better overview of currently running programs and makes
different functions like program selection menus, quick-start program icons,
clock display, and so on available.
U
Update
An update or software update changes an existing program version to the
most current published version.
Updates make sure that a software application is up-to-date. This affects
programs with security functions above all, for example anti-virus or firewall
programs, to seal any security leaks. Updates are usually offered by the
software's manufacturer via the Internet.
USB
USB stands for "Universal Serial Bus", which is a system for connecting an
external device with the computer.
www.magix.com
Page 79

These devices (storage devices, printers, scanners, etc.) may be connected
and recognized while the computer is running. The system is a serial bus
system, where individual bits of a data package are transmitted one after the
other and not in parallel. A USB controller with USB ports on the computer is
required. Data transfer speed is based on the system clock of the USB speed.
USB 1.0, for example, has a data rate of 1.5 MBits/s, or up to 12 MBits/s.
There are various USB connectors with DIN IEC norms which are differentiated
by type. The most common connector is the USB type A, which is used for
USB sticks, for example.
Glossary 79
www.magix.com
Page 80

80 Index
Index
A
About MAGIX PC Backup MX 58
Activate automatic backup 18, 19
Additional Features 16, 48
Additional features and settings 57
Advanced burning options 59
Automatic backup 14, 16, 27
Automatic backup settings 15, 20, 27, 29
Autostart 72
B
Back up and restore system drive 24
Back up live & online 41
Backup 72
Backup destination in NTFS format 30
Backup disc 72
Backup type 34
Backup with password protection 15
Before You Start 8
Blue screen 72
Blu-ray 72
boot-capable 72
Browser 73
Burn media 35, 37
Burn rescue medium 49
Button 73
C
Chances of successful undeletion 52, 53
Check drive for errors 66
Clean up backup 31
Clipboard 73
Copyright 2, 73
Create file backup on hard disk 33
Create rescue medium 24, 40, 49
Create rescue medium on removable storage device 50
www.magix.com
Page 81

D
Data shredder 15, 51
Data Shredder 15
Dialog 73
Disc types 73
Double-layer 74
Drag & drop 74
Drive backup 34
F
Features 14
File backup to CD/DVD 36
File filter 33, 35, 36, 59, 62
Find knowledge & workshops... 57
Firewall 74
First start 18
H
Hard disk 74
Hard disk drive 74
Hardware 75
HD DVD 75
HDD 75
Help 57
Help menu 16, 57
I
Index 81
Image 75
Introduction 13
M
MAGIX Magazine 12
MAGIX News Center 12
MAGIX Online Album 69
MAGIX Online World - The services 11
MAGIX PC Backup MX Overview 27
MAGIX PC Check & Tuning 15
MAGIX Screenshare 57
MAGIX services in detail 68
www.magix.com
Page 82

82 Index
MAGIX WebDisk 14
MAGIX WebDisk as a network drive on Vista 44
MAGIX WebDisk as a network drive on Windows 7 46
MAGIX WebDisk as a network drive on XP 43
MAGIX Website Maker 11, 70
magix.info 11, 57, 68
Manual backup 16, 32
Menu 76
Menu bar 76
Monitor files and folders 20
More about MAGIX 11
Motherboard 76
O
Online backup 14, 16, 20, 21, 41
Online Update 58
Open magix.info 57
Operating system 76
P
Partition 76
Plug-in 77
Preface 7
Process 77
Program interface 16
Q
Quick start 17
R
RAM (Random Access Memory) 77
Reactivation support for MAGIX programs 58
Real-time backup 14, 20, 22, 41, 47
Recorder and media information 37, 63
Recover data 23
Register as guest of a screen session 58
Register as host for a screen transfer 58
Reset 77
Restore 14, 16, 39, 77
Restore drive 24, 40, 49
Restore drive with rescue medium 54
www.magix.com
Page 83

Restore file 39
Restore function 14
Restrictions 13, 17
S
Screenshot 77
Serial Number 9
Set up free space as drive 56, 67
Setup 78
Show instruction dialog again 68
Software 78
Submenu 78
Support 5
System requirements 8
T
Taskbar 78
Tips & tricks - Problems & solutions 66
Tips for program help 10
Transfer service 41, 55
Tutorial video... 57
Two deletion methods 52
Index 83
U
Undelete 15
Undelete in detail 15, 52
Uninstalling the program 10
Update 78
USB 78
W
What is a backup? 17
What is MAGIX PC Backup MX? 13
www.magix.com
 Loading...