

Page 1

Manual
Page 2

The present documentation is protected by law. All rights, especially the right of duplication,
circulation and translation is reserved.
No part of this publication may be reproduced in form of copies, microfilms or other processes, or transmitted into a language used for machines, especially data processing machines,
without the express written consent of the publisher.
All copyrights reserved.
MAGIX is a registered trademark of MAGIX Entertainment Corp. All other product names
are trademarks of their respective owners.
Errors and changes to the contents as well as program modifications are reserved.
© 1994 —2000 Copyright by MAGIX Entertainment Products GmbH
VST™ is a Registered Trademark of Steinberg® Soft- und Hardware GmbH.
All other trademarks are property of their respective owners. Technical specifications subject
to change without notice. Correct as of July 2000.
Page 3
Table of Contents
Preface 9
Contents of packaging 10
System Requirements 12
Installation 13
Our copy protection for your safety 15
Notes on the electronic manual 15
Introduction 16
What is MAGIX music studio generation 6? 16
Sound Cards 17
Testing the Sound Card 18
The MIDI Interface 18
Reading the Manual 19
Digital Audio Basics 19
CD Sound 20
Direct-to-disk Recording 20
Setting up Your Equipment 20
Setting up Your Audio Devices 21
PART 1 - MIDI STUDIO: TUTORIAL 25
Audio Cabling 26
Just Like a Multitrack 26
Mixing Desk without Sub Groups 26
Mixing Desk with Sub Groups 27
MIDI Installation 28
Interface Connection 28
MIDI Cable Connections 28
Tape Synchronization 30
Audio: Recording and Playback 31
Concept: Tracks, Audio Files, and Regions 31
Audio Recording 35
Sample Editor and Digital Factory 38
The Sample Editor Window 38
Digital Factory 39
The Waveplayer 40
The Waveplayer Window 40
Mixdown with MAGIX midi studio generation 6 44
The Mixer and HyperDraw 44
The Track Mixer 44
Audio Channel Strips 45
MIDI Channel Strips 46
Table of Contents
3
Page 4
Table of Contents
Automated Mixing 48
Graphical Mixdown with HyperDraw 49
Audio Instruments 51
MIDI: Recording and Playback 53
Flow of MIDI Signals 53
Recording Notes and Playing Them Back with Sound Generators 55
… if there still is no sound… 56
Recording, Playing Back, and Deleting Sequences 57
Fine or Rough Copying and Shifting of Sequences 58
Sequence Play-Back Parameters 58
The Autoload Song 60
Event Editor 61
The Event Float Window 63
Transport Functions 64
Score Editing and Printout 67
Interactive Score Editor 67
Editing Sequences in the Score Editor 67
Matrix Editor 69
Preparing files for CD burning 71
File Format 71
Mixdown by Track Bouncing 71
Post-Production 72
Troubleshooting 74
PCI Faults 75
SCSI and IDE Faults 76
Faulty Cables 76
Hardware Conflicts 77
Sound Cards 78
Viruses 79
Graphic Cards 79
Re-installing the Operating System 79
Updating the Operating System 80
Formatting the Hard Disk 80
ART 2 - MIDI STUDIO: REFERENCE 81
P
Using MAGIX midi studio generation 6 82
Conventions of this Manual 82
The Mouse 82
Window Functions 86
Selection Techniques 93
Edit Operations 95
General Functions of the Editors 96
Key Commands 100
Global Functions 103
4
Page 5
Song Administration 103
Transport Functions 106
The Transport Window 106
Bar Ruler 111
Cycle Mode 112
Recording 114
Chase Events 117
Arrange Window 119
Overview 119
Tracks 120
The Patch Name Editor 122
The Track Parameters 124
Sequences 126
Sequence Playback Parameters 131
Quantization 135
Groove 137
Hyper Draw in the Arrange window 137
Altering the Display 140
Reset Functions 141
Using Audio in the Arrange Window 142
Regions in the Arrange Window 142
Audio Recording 149
Functions 153
Mixers and Audio Objects 155
The basics 155
The Track Mixer 156
EQ’s, Effects and Plug-Ins 157
Audio Instruments 165
The Synthesizers—Audio Instruments 166
Faders and Level Adjustment 175
Routing 176
Automation 178
The Audio Window 180
Layout 182
Display 183
Operation 185
File Administration 189
Other Functions 195
Audio Driver 196
EASI/ASIO 196
The Sample Edit Window 197
Layout 198
Display 198
The Sample Edit Window In Use 201
Table of Contents
5
Page 6

Table of Contents
Functions 205
The WavePlayer 211
The WavePlayer window 211
The Event List 216
Display 217
Operation 217
Event List Structure 220
Event Type Structure 222
Event Float Window 225
The Drum Editor 227
Event Definitions 228
Event Definition Parameter Box 229
Operation 232
The Matrix Editor 236
Display 236
Editing Notes 237
Functions 240
Score Edit Window 241
Opening the Score Editor 241
Layout and Printing 244
Tempo 260
Tempo List Editor 260
The Graphic Tempo Editor 262
Tempo Functions 262
Synchronization 263
Synchronization Window 263
Special Functions 267
Synchronizing Video Files 269
The Basics 270
Song Settings and Preferences 278
Song Settings 278
Preferences 283
Standard MIDI Files 288
Basics 288
Glossary 290
6
Page 7
ART 3 - AUDIO STUDIO: TUTORIAL 299
P
New features in the generation 6 version 300
Quickstart 301
The first recording 301
The first arrangement 304
Terminology 307
Overview 307
Clip 307
Handle 308
Marker 308
Objects 308
Range 309
Section 309
Virtual Projects (VIPs) 310
Wave projects 311
Virtual Editing Concepts 313
Working with Objects 313
Working with Ranges 316
Volume 319
Output modus 320
Tips & Tricks 321
Working in Projects 321
Mixer 323
Performance 323
Recording/Playback 324
The Effects 325
Effects in the VIP 325
Mixer-Effects 326
Effect Calculations and Signal Manipulations 326
Internet-Functions 328
Web Publishing (Upload) 328
FTP Download 329
Burning of CDs (deluxe version only) 330
RedBook 330
Data Transfer 330
Burning CDs in MAGIX Audio Studio 330
DSP Display 332
The Individual Mouse Modes 334
Universal Mode 334
Range Mode (Secure Mode) 335
Draw Volume Mode 335
Draw Panorama Mode 335
Curve Mode 336
Table of Contents
7
Page 8
Table of Contents
Context Help mode 336
Cut mode 336
Zoom mode 336
Object separator mode 337
Pitch-shift/Time stretch mode 337
Draw wave mode (only wave projects) 337
Shortcuts 338
General 338
Range 339
Function keys 339
Mouse 340
Button overview 341
Upper Toolkit bar 341
Lower toolbars 342
Range bar 343
Problems & Solutions 344
ART 4 - AUDIO STUDIO: REFERENCE 349
P
Menu File 350
Menu Edit 363
Menu View 371
Menu Object 378
Menu Effects 387
Menu Range 404
Menu CD (deLuxe-Version) 410
Menu Tools 416
Menu Playback 420
Menu Options 431
Menu Window 447
Menu Help 455
INDE
X - MIDI STUDIO 457
INDEX - AUDIO STUDIO 479
8
Page 9

Preface
Congratulations on your purchase of MAGIX music studio generation 6!
Creating your own music or video soundtracks in a home
studio has become more and more popular. But the wide
variety of available equipment and software often confuses beginner and professional musicians alike. MAGIX
music studio generation 6 offers the perfect solution by allowing you to create high quality productions in a quick
and easy manner.
MAGIX music studio generation 6 transforms your PC
into a complete, virtual sound studio. It allows you to arrange and produce on the highest level—with any 16bit
sound card. Of course, you can also integrate other studio
equipment without any problems. This program ensures
professional production results which can be integrated
with existing and future musical studio equipment. The
following pages will introduce you in detail to the various
functions and possibilities of MAGIX music studio generation 6. Experience music like never before—turn your
PC into your own home studio.
Preface
Enjoy!
Your MAGIX Entertainment Team
9
Page 10
Contents of packaging
Contents of packaging
Please make sure that the objects indicated
here are included in your packaging.
Program-CD
This CD contains the MAGIX Music World with the installation program of MAGIX music studio generation 6.
Manual
For a quick intro with MAGIX music studio generation 6
or to learn in-depth about the program, we recommend
that you take a look at the manual.
10
Registration card
Please send us your registration card today! MAGIX provides e-mail and phone support to its registered users. We
will also keep you up-dated on new products, up-grades,
etc.
MAGIX music network
Become a MAGIX networker! Your avantages:
– the Mega-NetWork items on offer on the MAGIX
Homepage
– The latest info and demos will be sent to you free of
charge.
– There is a Sound and Song Exchange for all
NetWorkers on the MAGIX Homepage. Here you can
swap sounds, songs and experiences and chat with
other NetWorkers.
Page 11
– You can participate in MAGIX soundpool raffles.
Simply fill in the enclosed Winnings Card and send it
back to us as quickly as possible! Or join in online:
http://www.magix.com/network/
– Charts to join in on: MAGIX music studio generation 6
is not only multimedia software, but also the key to
participating in the MAGIX music network charts on
the Internet. Send in your masterpieces! You can
upload them directly from the program via the new web
publishing wizard!
Support
If you are unable to correct your problem with MAGIX
midi studio generation 6 contact MAGIX support:
U.S.A. Europe
Info info-usa@magix.net info@magix.net
Webpage http://www.magix.com/
Fax (310) 656-0234 ++49 - (0)89-7691041
Telephone — 0181 968 1554
Contents of packaging
Please supply the following information:
– Configuration of your system (Processor, RAM, hard
disk, etc.)
– Sound card configuration (Type, Driver)
– Information on whether other audio components are
operating properly
Legal Notice
Most chart hits and whole CDs can be downloaded from
the Internet as MP3 files. However, many of these downloads are illegal. Works protected by copyright may not be
downloaded or presented on your own homepage without
the express knowledge and consent of the copyright
owner. Free transfer and trade with such music files is
punishable by law.
There are, however, many sites offering free MP3 for
downloading. A selection of them can be accessed directly
via the MAGIX homepage (http://www.magix.com/).
Your own compositions can be presented as you wish on
homepages and in the network.
11
Page 12

System Requirements
System Requirements
To run MAGIX music studio generation 6 you require the
following:
– Pentium PC running at a minimum speed of 200
MHz, preferably faster. A Pentium II or III is strongly
recommended. General rule of thumb: The faster the
machine, the more number of Audio tracks and virtual
instruments are obtainable.
– Windows 95/98/2000, 64 MB of RAM (recommended
128 MB RAM).
– 16 bit sound card
– A minimum of 100 MB of hard disk space for the
program plus additional hard disk space to store digital
audio files. CD-quality stereo sound (16 Bit, 44.1 kHz)
uses ≈10MB of hard disk space per stereo minute’s
worth of recording.
– A Super-VGA resolution monitor or better with a
minimum resolution of 800 × 600 pixel and 16 Bit
High Color.
– A CD-ROM drive and a MS-compatible mouse.
– A MIDI interface or PC sound card with a MIDI inter-
face. If you want to use MAGIX music studio genera-
tion 6’s digital audio playback facilities, you will also
need a sound card which supports digital audio. See the
sound card section for more information.
12
Page 13
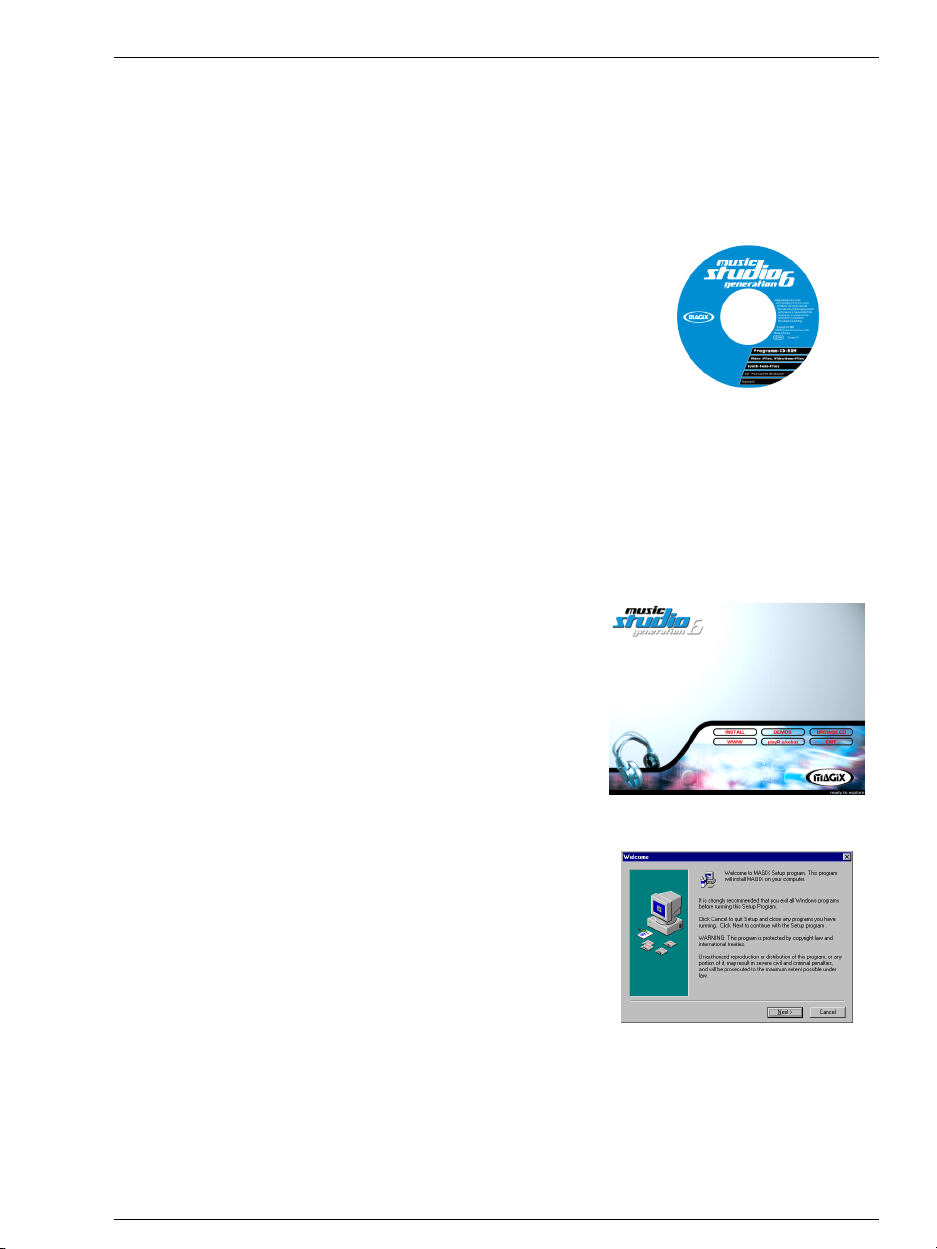
Installation
1
Put the Installation CD in your CD-ROM drive.
2
With Windows 95/98/2000 the installation manager
starts automatically. If it doesn’t, open the Explorer and
click on the letter corresponding to your CD ROM drive
and double click on Mworld.exe.
3
To start the installation process, click on Install MAGIX
music studio generation 6.
Installation
Put the Installation CD in
your CD ROM drive
Autostart of the installation
or
Activation of the CD-ROM
and
double click on Mworld.exe
4
The Installation Wizard appears. Simply follow the instructions and click on “NEXT” to continue. When all files
are copied on the hard disk, a program group will be established and the installation is completed. Confirm with
“Finish”. The program automatically starts with a Demo
Project. Later you can start the program with the icon in
the Windows start menu.
13
Page 14
Installation
STA
OS
IN
LL
Click here to install
MAGIX music studio generation 6
The MAGIX Music World is the starting point for everything that you’ll find on the Installation CD such as information about other MAGIX products and our website.
You will always find the latest & greatest about MAGIX
music studio generation 6.
DEM
Get demo versions and information about other MAGIX
programs.
BROWSE CD
Browse through the file
structure of the CD ROM.
WWW
Visit our website at www.magix.net to get
updated information about MAGIX and to
order additional products and sound or
videopools on-line.
playR jukebox
To install the MAGIX
playR jukebox, click
on this button.
EXIT
Click here to exit
the MAGIX Music
World.
14
Page 15

Our copy protection for your safety
MAGIX music studio generation 6 is copy protected in order to stop software piracy. For your convenience, the copy
protection is very simple to use: just make sure that the
original program CD is in its drive while booting MAGIX
music studio generation 6 for the very first time that’s all.
Please remember that you will have to insert the original
CD as described above whenever you launch the program
for the first time after a reinstall.
Notes on the electronic manual
The manual in the packaging only contains an introduction into the elementary functions of MAGIX music studio generation 6. If you wish to learn more about the program, please refer to the complete user manual in the
form of an electronic document. Please make sure that the
objects indicated here are included in your packaging!
Before you can start using the electronic manual you must
first install Adobes ACROBAT READER. To do so, simply
click on the “Install Manual” icon in the MAGIX music
studio generation 6 program group. If ACROBAT
READER is installed on your system already, then you
dont need to install it again, of course.
The ACROBAT READER installation program requires
you to Restart Windows! We therefore recommend you
close all Windows applications before you install ACROBAT READER. After installation, you launch ACROBAT
READER by simply clicking on its program icon.
The complete electronic manual file is stored in the
MAGIX music studio generation 6 program root directory! In the folder that contains the MAGIX music studio
generation 6 programs, you’ll find the electronic manual
file with the ending .PDF. Open this file in Acrobat Reader
and you’ll have access to the complete manual.
Installation
15
Page 16

Introduction
16
Introduction
What is MAGIX music studio generation 6?
MAGIX music studio generation 6 uses your PC as a complete, virtual sound studio. Your hard drive becomes a
highly sensitive recording tool. The sound chip of your
sound card, a microphone, your instruments or the
soundtrack of your video become the sound sources. You
have access to two highly optimized programs that are
compatible with each other: MAGIX music studio generation 6 combines a hard disk recording program with a
MIDI Sequencer.
Harddisk-Recording means digital recording of audio signals directly to the hard drive. Through the analog/digital
transformer, analog audio signals are transformed into
digital information that are saved to the hard drive as
WAV files.
MIDI means “Musical Instruments Digital Interface” and
controls the sound sources such as synthesizers or sound
cards. A MIDI file only contains information which note is
played when and how whereas WAV files are digital representation of real audio signals. That’s why MIDI files are
much smaller than WAV files.
MAGIX audio studio generation 6 allows the perfect recording and editing of sounds in WAV format. On 24 audio tracks (48 with MAGIX audio studio generation 6 deluxe), you can work with professional effects and editing
tools—even for real-time editing of video sound tracks.
Per FTP connection you can use the internet as a boundless image and sample pool and load the multimedia
building blocks from the World Wide Web directly into
your arrangement. The MAGIX web publishing area is
there for the publishing of your work—one mouse click
takes you into the charts. Every surfer is entitled to vote,
the best songs and videos will receive attractive prices…
MAGIX midi studio generation 6 controls the synthesizer-chip on your sound card (or of external MIDI instruments). In addition you get a polyphonic Waveplayer with
filter and envelope capabilities, allowing you to play your
WAV files as if you were using them in an external sampler. Furthermore the MAGIX midi studio generation 6
features 256 MIDI tracks (1.000 with MAGIX midi studio
generation 6 deLuxe) on which you can simultaneously
record and playback. And finally you get 4 (6 with MAGIX
midi studio generation 6 deLuxe) audio instrument
tracks, on which you can play and record the built-in two
(three with MAGIX midi studio generation 6 deLuxe) syn-
Page 17

thesizers. As an alternative to the MAGIX synthesizers,
you can also use VST™2.0-instruments.
You can record WAV files both in MAGIX audio studio
generation 6 and MAGIX midi studio generation 6, and
soon you’ll appreciate both possibilities. You can, for instance, draft a song in MAGIX midi studio generation 6,
play it back and simultaneously record sounds with a microphone. You can transform the MIDI files into WAV
files by using the recording function.
Both studios are only a mouse click apart! Take your audio
tracks from MAGIX midi studio generation 6 to MAGIX
audio studio generation 6 and vice versa. MAGIX music
studio generation 6 lets you do all this and more with a
very user-friendly interface. Right after the first steps,
you’ll be able to use the programs intuitively.
Sound Cards
There are dozens different PC sound cards on the market.
MAGIX music studio generation 6 works with all Windows compatible sound cards, i. e. with all that have a
driver for Windows 32 Bit Operating Systems. These drivers are listed in “Multimedia” of the Windows Control
Panel. It’s safe to assume that all modern sound cards are
Windows compatible.
Most sound cards have a synthesizer-chip for the playback
of MIDI. Additionally, most sound cards support the play
back of digital audio data. If you work with MAGIX music
studio generation 6, your sound card must have separate
drivers for MIDI and Audio playback (which most modern
sound cards do).
MAGIX music studio generation 6 supports all sound
cards that can be addressed via an ASIO or EASI driver.
The available options depend on the specific ASIO or
EASI driver you will be using. Please refer to the instructions that came with your driver. MME and DirectSound
drivers are supported via so-called MME-to-EASI respectively DirectSound-to-EASI wrapper.
Please note: If you want to use the Waveplayer, you must
use a DirectSound driver. And only DirectSound drivers
allow the simultaneous use of the Waveplayer and digital
audio tracks.
MAGIX music studio generation 6 supports sound cards
with a stereo output. Digital interfaces such as S/PDIF or
AES-EBU are also supported. MAGIX music studio generation 6 deluxe supports sound cards with up to four audio
outputs.
Introduction
17
Page 18

Introduction
But please note: Some older sound cards cannot play back
digital audio data. As long as you have Windows drivers,
you can use such sound cards with MAGIX music studio
generation 6; however not for playing back audio data.
Some other older sound cards use only one driver for both
Audio and MIDI. In that case, you can you MAGIX music
studio generation 6 only for MIDI or Audio but not for
MIDI and Audio simultaneously.
Testing the Sound Card
Make sure your sound card is installed correctly and the
drivers are set up properly before using MAGIX midi studio generation 6. The software which comes with the
sound card should include routines to test the card. You
must make sure it is running correctly under Windows,
not just DOS. An easy way to test the card is with the Media Player which you will find in Windows’ Accessories
Program Group. Look in the Device menu and you should
see MIDI Sequencer… and, if your card supports digital
audio, Sound…
Try playing the CANYON.MID file which Windows installs automatically in the Windows directory. Then try
playing a .WAV file. Again, there should be some in the
Windows directory. If either of these items is missing
from the Device menu it means the drivers have not been
loaded. Go back to the Drivers Control Panel and install
the correct drivers. Refer to your sound card’s manual and
the Windows Users’ Guide for more information.
18
The MIDI Interface
Many sound cards have a built-in MIDI interface which is
accessed from a joystick connector on the back of the card.
To use it you need a MIDI adapter. One end plugs into the
joystick socket and the other terminates in MIDI plugs or
sockets which you connect to your MIDI equipment.
Some sound card packs include the adapter but many of
the cheaper ones do not. There are also several dedicated
MIDI interfaces available. Many are on plug-in cards
which are fitted and installed into the PC just like a sound
card. There are also external MIDI interfaces which connect to the PC’s printer port or serial port. You can install
them without opening up your PC and they are ideal for
use on portable PCs. You still have to install driver software for them. Some have a Thru socket which enables
you to plug in your printer and use it without removing
the interface. Other’s don’t.
Page 19

Reading the Manual
Few people like reading manuals. Many software users
prefer to point and click their way around a program to
discover what it does and how it works. MAGIX midi studio generation 6 has an intuitive interface so if you know
a little about sequencers you will probably be able to learn
how most of the program works by this approach. You can
dip into the manual to look up any features you require
more information about. If you are a newcomer to sequencing we strongly recommend working through the
Tutorial. It uses a practical, hands-on approach to explain
all of MAGIX midi studio generation 6’s main functions
and by the end you should be well on the way to becoming
a sequencing expert. We recommended even the more experienced user read the Tutorial in order to become familiar with how the various parts of the program work. Finally, do at least flip through the Reference section. It not
only contains detailed information about every menu,
window and function in MAGIX midi studio generation 6
but it also includes examples of how many functions can
be used in a practical way.
Digital Audio Basics
If you’re familiar with the principles of digital audio you
can skip this section. This is a brief introduction to the
subject to help you get the most out of MAGIX midi studio
generation 6’s digital audio playback facilities. Digital audio recording is the process of converting audio data—
sound—into digital data which can be stored on a computer. The device which does this is built into most sound
cards and is known, quite helpfully, as an Audio-to-Digital
converter. This is often abbreviated as A-to-D, ATD or just
AD.
To convert the digital data back into sound, the card uses a
DA (Digital to Audio) converter. To capture sound, the AD
converter takes a sample of a sound source a specific number of times per second. This is known as the sample rate
and is measured in kHz or so-many thousand samples per
second. The higher the rate, the more samples the AD
converter takes and the more accurate the digital representation of the sound will be. The sampling resolution is the
accuracy or fineness of the measuring scale used to store
the numbers and is measured in bits. Currently there are
two resolutions commonly in use: 8 bits and 16 bits. To
give you an idea of the relevance of the sampling resolution, imagine two people are building a house. One is using a measuring stick marked to the nearest foot. The
Introduction
19
Page 20

Introduction
other has a stick marked to the nearest inch. Although the
house built with the stick measuring to the nearest foot
may not fall down, the one using the finer scale will build
a more accurate house.
New Audio Engine:
now works with a new, significantly improved audio engine. It offers shorter latency times, faster fader response,
improved VST™ support and overall better performance.
Monitoring, that is, listening to the input signal at the audio output, is now available. You will find these new driver
settings on the pages “Audio Drivers” and “Audio Drivers
2” in the Audio menu.
MAGIX music studio generation 6
CD Sound
CD quality audio is recorded at a sample rate of 44.1 kHz
with 16 bit resolution. Many Multimedia programs use a
lower rate such as 22.05 kHz or 11.025 kHz, and many use
8 bits. This is often quite adequate if the sound is played
through inexpensive PC speakers but you would certainly
be able to tell the difference if it played through a good hifi system.
Direct-to-disk Recording
One minute of CD-quality sound requires 10 MB of storage space. Clearly it’s impractical to store this in RAM. It is
more practical to store your samples on disk. During playback this data has to be read on the fly so you need a reasonably fast hard disk if the data is to be played back accurately. Most modern disks are capable of this but some
older ones may have problems, especially if they are running in a slow PC. With MAGIX midi studio generation 6
you can playback digital audio which has previously been
saved to disk.
20
Setting up Your Equipment
Make sure the MIDI interface or sound card and MAGIX
midi studio generation 6 are correctly installed. If you are
using an external MIDI keyboard connect its MIDI Out to
the interface’s MIDI In. If you are also using the sounds
on the keyboard, connect its MIDI In to the interface’s
MIDI Out. If you are using the sounds on a sound card
this is not necessary. If you want to use a keyboard for recording but a MIDI sound module for playback, connect
the module’s MIDI In to the interface’s MIDI Out. If you
want to use MAGIX midi studio generation 6’s digital au-
Page 21
dio playback facility, make sure the sound card’s audio
output is connected to a pair of speakers.
Setting up Your Audio Devices
MAGIX midi studio generation 6 handles two different
hardware type categories: PC AV and ASIO.
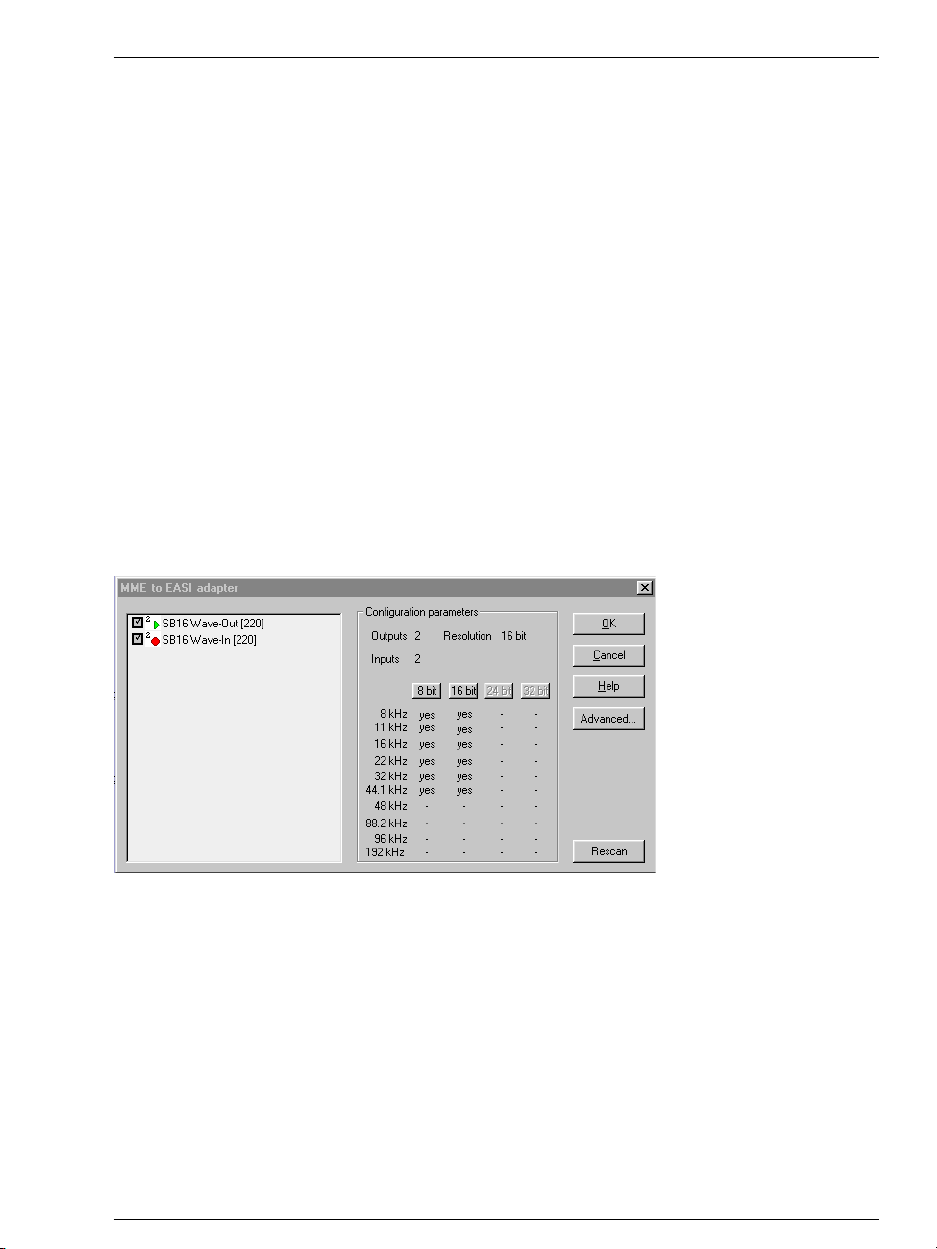
The PC AV driver communicates with the audio hardware
using the EASI protocol (Emagic Audio Streaming Interface). There are two dedicated EASI drivers called EASI
MME and EASI DS. These so-called wrappers (MME to
EASI respectively DS to EASI) are accessible in the Driver
parameter field in the PC AV area of the Audio > Audio
Hardware & Drivers > Audio Driver menu page.
Sound cards that only have an MME driver can be used
utilizing the EASI MME driver. In order to use the desired
configuration, select the EASI MME driver under PC AV
in the Audio > Audio Hardware & Drivers > Audio Drivers. In order to configure it, press the switch “Control
Panel” or start the file EASIMME.exe in the Magix folder.
More information about this is supplied by the EASI
MME HELP file.
Introduction
If you want to use a DirectSound driver for your sound
card, please select the driver EASI DirectSound under PC
AV in the Audio > Audio Hardware & Drivers > Audio
Drivers. In order to configure it, please press the switch
“Control Panel” and create a virtual device containing the
appropriate DirectSound driver. More information about
this is supplied by the Help file.
ASIO drivers are a separate category, accessible on the Audio > Audio Hardware & Drivers > Audio Driver 2 menu
page.
Please select the option that suits the drivers supplied with
your audio card. Now on to the audio engine parameters
21
Page 22

Introduction
22
as displayed in the Audio Driver/Audio Driver 2 menu
pages.
Monitoring
This option allows you to switch monitoring (i.e. listening
to the actual input signal) on or off. Please note that monitoring is processed only via software—a certain delay is
inevitable. If you are listening to the recorded signal
through your mixing desk, you should switch this option
off.
Volume Smoothing [ms]
This parameter defines the length of the fade between two
consecutive volume values for an audio track. When setting this value to 0 you might hear zipper noise when
moving a volume fader during playback. Higher values
soften the volume changes and eliminate the zipper noise.
Max. Number of Audiotracks
The Audio Engine requires free system memory. The
amount of memory needed depends on the maximum
number of tracks to be played, and on the number of I/O
channels supplied by the driver. This setting allows you to
reduce the amount of memory used by the driver, by reducing the number of tracks. This may be sensible when
you want to run other applications or audio hardware
types simultaneously.
Larger Disk Buffer
This option influences the amount of audio data that is
read from the disk in advance. This option is switched off
by default, matching the demands of fast hard drives and
powerful computers. If you get frequent error messages
while running your MAGIX midi studio generation 6 in
this mode, you should switch this setting on, so that you
can play back more tracks, achieving higher reliability.
However, more RAM is needed in this case.
Larger Process Buffer
This parameter determines the size of the native buffer
used to compute mixers and effects. Do not activate this
option if you own a fast computer. This shortens response
times to operations such as volume changes or Solo. Experiment to find the setting that coaxes the best performance from your system.
Only available for ASIO are the following parameters.
Clock Source
This let’s you choose between the internal synchronization via MAGIX midi studio generation 6’s internal clock
and external synchronization received via the digital input
of the sound card.
Page 23

ASIO Buffer Delay
Some drivers do not communicate their input/output delay settings correctly to MAGIX midi studio generation 6.
If you experience irregularities, try correcting them with
these settings. Refer to the manual of your ASIO audio
card.
Max. I/O streams
Here you set the number of input signal streams coming
from your ASIO-compliant card and the number of output
streams going to your ASIO-compliant card. These are
limited to 2 input streams and 2 output streams (MAGIX
midi studio generation 6) respectively 4 output streams
(MAGIX midi studio generation 6 deLuxe).
Introduction
23
Page 24

Introduction
24
Page 25

Part1
Tutorial
midi
studio
25
Page 26
Audio Cabling
for the
outputs
Mic
Line
Insert
Mic
Line
Insert
Mic
Line
Insert
Mic
Line
Insert
Mic
Line
Insert
Mic
Line
Insert
Mic
Line
Insert
Mic
Line
Insert
Mic
Line
Insert
Mic
Line
Insert
Mic
Line
Insert
Mic
Line
Insert
R Aux Return 2 L
Aux Send 2
R Aux Return 3 L
R Tape In L
Aux Send 3
R Aux Return 1 L
Aux Send 1
To the
recording inputs
26
R Aux Return 4 L
Send / Return
R Tape Out L
Aux Send 4
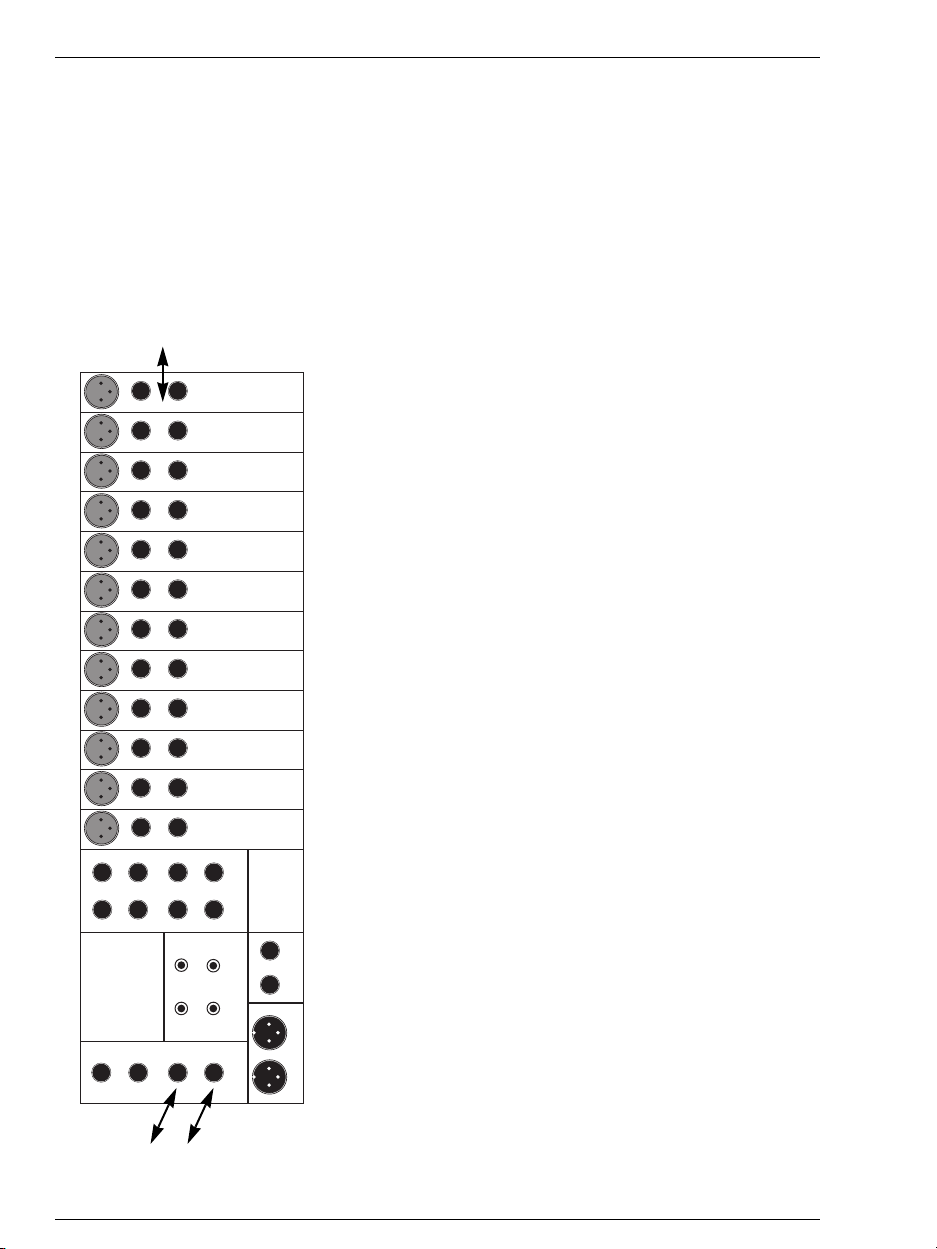
Audio Cabling
Just Like a Multitrack
The audio cabling between the various components in
your system depends largely on your setup. Generally, the
audio hardware is connected just like a conventional multitrack machine. This applies even though the audio hardware usually has fewer inputs than outputs and has its
own internal virtual mixing desks. Hardware that has only
two analog inputs, is connected the same way you would
connect a multi-track’s track 1 and 2 inputs, that is, to the
mixing desk sub group outputs 1 & 2. These two inputs are
not exclusively assigned to MAGIX midi studio generation
1
6’s track 1 and 2. For example, to record on track 8, you
might use input 1, while recording tracks 7 and 8 would
2
use both inputs 1 and 2.
The playback outputs will in turn be wired to your mixer’s
3
tape or line inputs. You should try to avoid the use of aux-
4
iliary inputs (Effect Returns, Aux Returns) as these would
limit your effects, tone control, and routing options.
5
Two wiring examples for different mixing desks will illustrate this further. The MAGIX midi studio generation 6’s
6
inputs and outputs refer to the in/outputs of the audio
7
hardware as well as the audio in/outputs of the sound
card. This chapter deals only with analog connections to
8
mixing desks.
9
Mixing Desk without Sub Groups
10
If your analog mixing desk does not offer sub groups, proceed as follows:
11
Connect the audio hardware outputs to the first of your
desk channels’ Line or Tape inputs. Use as many channels
12
as your audio hardware will output. Use the remaining
channels for your other sound sources, effect processors,
and microphones.
If you find yourself short on channels, you can wire
MAGIX midi studio generation 6’s outputs to your desk’s
Aux Returns (or “Effect Returns”). This really cannot be
avoided with smaller mixers, but it is no big deal, since
MAGIX midi studio generation 6 offers extensive EQ and
processing power, anyway.
Your mixing desk will most likely offer at least two Aux
Right - Main Out - Left R Main Insert L
Sends (not to be confused with Aux Returns)—they are
usually “pre-fader”, or can be switched to such, with a dedicated button. “Pre-fader” means that the signal is taken
before it enters the channel fader (volume slider). This
means that the pre-fader Aux Send will output that chan-
Page 27
Tape Input
Aux Send 1
Aux Send 2
Aux Send 3
Aux Send 4
Right - Main Out - Left R Main Insert L R Control Room L
R Tape In L
R Tape Out L
R Aux Return 1 L
R Aux Return 2 L
Bus
Outputs
(Sub
Groups)
1
5
2
6
3
78
4
Mic
Line
Insert
DirectOut
Mic
Line
Insert
DirectOut
Mic
Line
Insert
DirectOut
Mic
Line
Insert
DirectOut
Mic
Line
Insert
DirectOut
Mic
Line
Insert
DirectOut
Mic
Line
Insert
DirectOut
Mic
Line
Insert
DirectOut
Mic
Line
Insert
DirectOut
Mic
Line
Insert
DirectOut
Mic
Line
Insert
DirectOut
Mic
Line
Insert
DirectOut
Send / Return Studio Monitor Out
12
Tape Input
11
Tape Input
10
Tape Input
9
Tape Input
8
Tape Input
7
Tape Input
6
Tape Input
5
Tape Input
4
Tape Input
3
Tape Input
2
Tape Input
1
to the
from the
outputs
recording inputs
nel’s signal, even if its fader is all the way down. This kind
of output is usually referred to as a monitor output, and
may actually be labelled as such. So, each channel has two
knobs that are used to create a mix which is sent to the
desk’s corresponding auxiliary (or monitor) output. Connect these two outputs to the audio hardware’s two inputs.
For example, if the two pre-fader Aux Sends are labelled
“Aux 3” and “Aux 4”, you would connect a cable from the
desk’s “Aux 3 Output” to the first audio hardware input
and another from Aux4 to the second.
You can now control MAGIX midi studio generation 6’s
inputs with the Aux Send controls (and their master
sends).
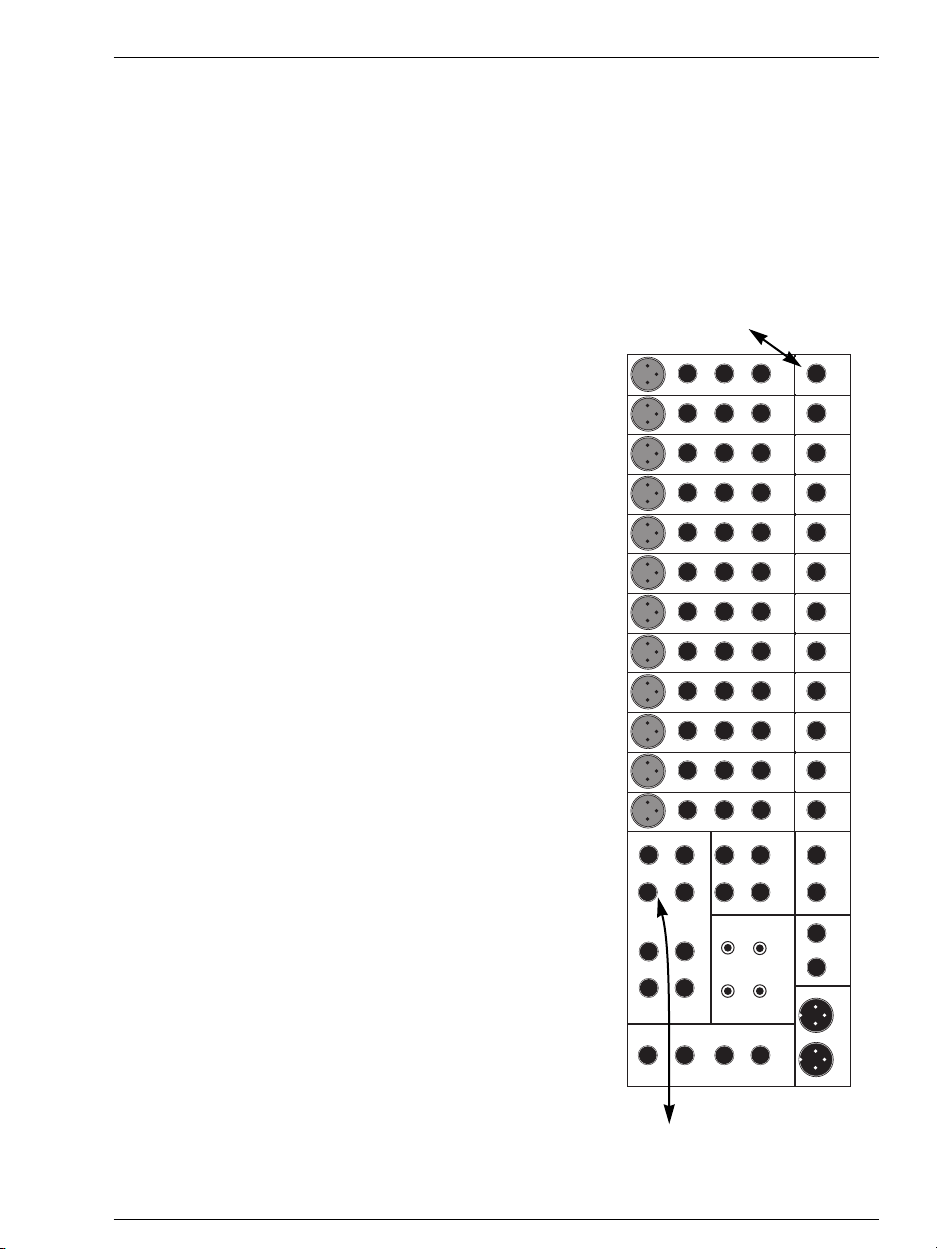
Mixing Desk with Sub Groups
If your mixing desks has sub groups, use them for recording. Connect the first sub group output to MAGIX midi
studio generation 6 input 1, and the second to MAGIX
midi studio generation 6 input 2. The recording level is
now controlled with the sub group faders.
Connect the outputs to the first few channels’ Line or Tape
inputs. Connect the rest of your sound sources (effect processors, microphones etc.) to the remaining channel inputs.
During recording, route the channels that are to be recorded, or the sub groups to your desk’s stereo (master)
outputs. If your audio hardware supports more audio inputs, connect more sub group outputs to them as needed.
Avoid connecting the MAGIX midi studio generation 6 recording inputs to your desk’s main output (Main Out)—
these, as well as the Control Room output that usually carries the same signal, are meant for your monitoring equipment and your stereo or two track tape machine. This output includes a mix of MAGIX midi studio generation 6’s
output signal, which you do not want to re-record.
A DAT mastering machine is not required, as MAGIX
midi studio generation 6 can master CD-Rs, in conjunction with a CD burner. If you choose to use a conventional
mastering machine, a DAT or MiniDisc recorder or an analog tape deck, connect it directly to the mixing desk’s
main output.
Audio Cabling
27
Page 28

MIDI Installation
MIDI Installation
Interface Connection
Please consult your sound card or MIDI interface manual
for the correct connection of a MIDI interface. The most
common ways to add MIDI functionality to computers
are:
– Multiport MIDI interfaces, including separate devices
like Emagic’s Unitor8 MkII.
– Sound card with MIDI interface
– via a General MIDI module or keyboards’ integrated
interface, usually labeled “To Host” interface.
Connecting Emagic Unitor8 MkII
These short instructions may suffice for the Unitor8 MkII
multiport interface: connect the Unitor8 MkII supplied
cable from your PC’s COM2 port to the RS-232 connector
on the Unitor8 MkII. Then install the driver under Windows.
If you wish to use a modem or other device on the COM2
port however, you will need to use an RS-232 switch box,
which can be purchased from most computer shops.
Any MIDI interface that supports the Windows MME
standard will work with MAGIX midi studio generation 6.
See the manufacturer’s instructions for information on
the proper installation of any needed drivers.
28
MIDI Cable Connections
MIDI Local Off
If your keyboard has an internal sound source, it is important that you stop the keyboard from generating sounds directly from its own keyboard. If you buy a new keyboard
that is to be used without a sequencer, and connect it
straight to an amplifier, you would expect the device to
make a sound when you press its keys—in other words the
keyboard is connected to the sound generator. However,
this is exactly what you do not want when using the keyboard with a sequencer. In this scenario, the keyboard is
used as the computer’s input device, while the computer
will play the various connected tone generators, be they
the keyboard’s own sound generator, or any other connected sound modules. If you wanted to control and
record another sound module with your keyboard, its own
sounds would get in the way—that is why the keyboard
must be separated from its own internal sound generator.
This function is known as “Local Off”, and can be set directly at your keyboard. The sequencer will speak to your
Page 29

keyboard’s tone generator just like any other connected,
keyboardless sound module.
If you cannot find the “Local” function under your keyboard’s MIDI menu, consult its manual as how best to
proceed for sequencer use. Some keyboards allow you to
select from among “Local”, “MIDI” or “Both” for each of
their so-called “Parts”—in this case, the “MIDI” setting is
equivalent to “Local Off”.
MIDI Inputs/outputs
If your computer has an internal or external MIDI port, or
has a MIDI capable sound card connected, hook the keyboard “MIDI Out” to the computer’s “MIDI In” (on the interface, sound card etc.). If the keyboard can generate its
own sounds, connect the computer’s “MIDI Out” to the
keyboard’s “MIDI In”. If your computer (or the MIDI device) offers more than one MIDI output, connect any
other tone generators to these. If the computer only has
one MIDI output, you need to connect the second tone
generator’s MIDI In to the keyboard’s MIDI Thru port. A
third device can be connected to the second’s MIDI Thru,
and so on. The MIDI Thru port always delivers a copy of
the signals coming into the device’s MIDI In. It is preferable, however, to use a direct connection from a computer’s MIDI Out to a device, rather than chaining too
many devices, one after another. This is because timing
problems may occur in the chain, if many MIDI commands are sent in a short time, due to the slight delays introduced by each MIDI In to MIDI Thru transaction. If
your computer also has several MIDI inputs, you can connect the MIDI outputs of other MIDI expanders there.
Keyboards and Expanders with “To Host” Interface
The “To Host” interface, which allows a direct connection
to the computer, can be found on many of the more costeffective MIDI sound modules, as well as on many entrylevel keyboards. This in effect is a simple integrated MIDI
interface, with one MIDI In, and one MIDI Out for the
computer. An instrument with a “To Host” interface is
controlled directly; the MIDI In and Out serve as MIDI
connections for the computer, to allow further instruments,
such as another keyboard to be connected. This proves
very cost-effective for entry level setups, which may include only one keyboard and another sound module. The
expense of a dedicated computer MIDI interface, or card is
not initially required.
If you are working with such a module, first install the
driver software supplied by the manufacturer.
MIDI Installation
29
Page 30

MIDI Installation
Connect the keyboard MIDI Out to the sound module’s
MIDI In, and the module’s MIDI Out to the keyboard’s
MIDI In (assuming it can generate sounds). Connect the
“To Host” interface to the computer, usually to a serial
port.
Tape Synchronization
Details on how to synchronize MAGIX midi studio generation 6 with digital or analog tape machines, multitrackers, or video editing systems and their wiring requirements can be found in the reference manual.
30
Page 31

Audio: Recording and Playback
Audio: Recording and Playback
Concept: Tracks, Audio Files, and Regions
MAGIX midi studio generation 6 combines a MIDI Sequencer with a Hard Disk Recorder. A Hard Disk Recorder is similar to a DAT Recorder or a Sampler: it allows
digital recording and playback of audio signals. The hard
disk recording medium provides many advantages over
the magnetic tape medium; no rewinding is required, and
the data is read from and written to various sectors of the
hard disk almost simultaneously. The recordings to be
played back simultaneously may be located at any position
on the hard disk. The Hard Disk Recorder perceives sound
recording edits as play instructions—i. e., an actual edit or
cut does not occur. Subsequently, any edits of the material
can be revoked and the original condition restored. This is
generally referred to as non-destructive editing. CD players with programmable title sequences are based on a
comparable principle: if you choose to listen to the titles
on the CD in reverse order, the CD player will not change
the data (the actual sequence) on the CD—which would be
destructive. The program merely plays the titles in the
changed sequence—which is non-destructive.
Number of Audio Tracks
On a multi-track tape recorder, the number of tracks that
can be recorded simultaneously, the total number of
tracks on the tape, the number of tracks that can be played
back simultaneously, and the number of outputs for the
playback of the tracks are the same. So, for example, with
an 8-track device, you may simultaneously record 8 tracks,
store 8 tracks on the tape, and play back these 8 tracks
through 8 outputs.
A Hard Disk Recorder like MAGIX midi studio generation
6 operates differently. In its case, the number of tracks
and outputs depend on the audio and computer hardware
being used. The following applies, for example, to the
MAGIX midi studio generation 6 with a sound card with
two in- and outputs:
– You may simultaneously record two mono signals (or
one stereo).
– There is an almost unlimited number of virtual tracks,
i. e., recordings that may be located on the hard disk
under MAGIX midi studio generation 6. The number
of tracks is only limited by the hard disk capacity.
– The number of tracks that MAGIX midi studio genera-
tion 6 can play back simultaneously—the so-called
physical tracks—depends mostly on the hard disk and
31
Page 32

Audio: Recording and Playback
on the computer. But 24 (respectively 48 tracks with
MAGIX midi studio generation 6 deLuxe) tracks are
the maximum with MAGIX midi studio generation 6.
– The sound card has two outputs for simultaneous play-
back of the physical tracks. Since MAGIX midi studio
generation 6 provides a digital mixer with sound
controls and sound effects, the fact that there are fewer
outputs than simultaneously played-back tracks does
not present the same limitation it would with a tape
based system.
Depending on the available hardware, MAGIX midi studio generation 6 acts virtually like a polyphonic sampler
with at least one stereo input and one stereo output, with
hundreds of different samples loaded on the hard disk. The
number of tracks that can be recorded simultaneously, the
number of tracks that can be played back simultaneously,
and the number of audio outputs depend on the hardware.
The hardware play-back tracks are represented in the audio mixer by channels, which are similar to the channels
of a conventional mixer. The MAGIX midi studio generation 6’s mixer mixes all tracks, including effects, together
on one or more stereo outputs.
The channels of the mixer also represent the hardware on
the software display level. The number of tracks displayed
by MAGIX midi studio generation 6 upon start-up is hardware-dependent, i. e. it depends on the computer and the
available audio hardware.
Audio Files and Regions in the Audio Window
Select Audio > Audio Window to open the Audio window.
In the Audio window, you can display and manage all Au-
dio Files. Audio Files are the actual samples, i. e., the actual
sound recordings. To load an Audio File select the local
command > Add Audio File in the Audio Window.
A dialog box appears, in which you can select the file from
a hard disk or from a folder. To record a new audio file, see
instructions below.
MAGIX midi studio generation 6 can be used to continuously play back sound tracks just like a tape recorder.
However, this is not necessary.
The Arrange window displays audio tracks horizontally.
Rectangular bars visually represent the location and
length of the audio phrases within the song.
These sections are called Regions and may include a small
portion of the audio file or the entire audio file.
32
Page 33

Audio: Recording and Playback
In the Arrange window the regions on the audio tracks
and the sequences on the MIDI tracks look the same. Operation and editing are identical, for the most part (top).
The audio window shown above displays all logged audio
files and their regions—however, without the timing reference in the song.
The Arrange window shows the audio track regions on a
time axis, whereas the Audio window shows the available
audio files in a non-chronological sequence. On the left
side, the audio file names are listed in bold. The region
33
Page 34

Audio: Recording and Playback
names are indented, in regular type, and displayed with a
padlock. The regions are only visible if the arrow to the left
of the audio file name is pointing downward (click on the
arrow to toggle). The audio file regions are shown in a
dark shade inside the rectangles. The areas outside the regions are shown in a light shade. You may move the region boundaries by dragging them with the mouse
pointer. To prevent accidental adjustments, click on the
padlock to secure the region settings.
Moving the beginnings and ends of regions provides an
easy, non-destructive editing method for the audio material. Nothing will be deleted. You may, for example, cut off
the last syllable of a song line—and then restore this syllable by defining it in another region of the audio file, or by
extending the region!
It is often very useful to open one Audio window and one
Arrange window at the same time. You then can grab regions with the mouse pointer in the Audio window and
drag them onto the desired track in the Arrange window.
If you are using the Windows version, you must first select the respective track in the Arrange window and set the
song position line to the position at which you want the region to be triggered.
In this context you should note that MAGIX midi studio
generation 6 automatically remembers the various window configurations as Screen Sets. Just press the respective
key, from 1 to 9, to recall the windows that were open
when you last selected this screen set. The screen set number is shown on the main menu display (on top) at the
right side of the Window entry.
Summary: Within Audio Files you define Regions. These
regions are displayed in the Arrange window, where they
are arranged on a Track. This track is then played back
through a channel of the integrated Track mixer.
In the Audio window, you can play back a region, by pointing at it and holding the mouse button depressed. Playback will start at the position of your cursor. Alternatively,
you can click the loudspeaker icon at the left and the selected region will be played back from its beginning. If the
Cycle symbol is enabled, the region will loop continuously, which is very useful, for example, when adjusting
the length of a drum loop. The lower button defines the
play-back channel. If you are using multiple audio hardware systems, a similar button for the selection of audio
hardware will be available.
The small, black arrowbelow the waveform display of the
regions is the anchor. It serves as the region’s timing ref-
34
Page 35

Audio: Recording and Playback
erence point, i. e., if a region is assigned to the beat position 14 1 1 1, this anchor will be positioned on the 14 1 1 1
beat. Although this point will always be at the beginning of
newly recorded regions, it does not necessarily have to be
placed there. An up-beat syllable, or the breathing-in of the
singer prior to the first syllable can sound before the anchor, which is quantized on a time grid. Caution: moving
the anchor will also change the arrangement’s timing reference.
Audio Recording
Setting the Recording Path
Prior to the first recording, you must define a hard disk
and a folder for storing the audio files created during recording. In the Audio window, select Audio File > Set Audio Record Path. Use the File Selection box to create a
folder with the name of the song. This folder will hold the
created audio files.
1
2
It is generally best to preselect the maximum recording
time as it allows MAGIX midi studio generation 6 to premap the location on the hard drive to which the files will
be recorded 1. If the final recording is shorter than the selected time, the reserved storage space will automatically
be freed up again. However, for various reasons it is not
advisable to preselect a significantly longer recording time
than necessary. Click on the Set button to define a hard
disk and a folder in which the audio files shall be stored 2.
Recording in the Arrange Window
The Default Song, which opens when MAGIX midi studio
generation 6 starts, contains some audio tracks. “Audio
tracks” are simply tracks on which an Audio Object has
been assigned. To assign an audio object to a new track,
point to a track name and hold the mouse button depressed. In the flip-down menu select an Audio Object.
The audio object symbolizes a channel of the track mixer
with the same number.
35
Page 36

Audio: Recording and Playback
Whenever an audio track is activated for recording
(record-ready), an audio file will be created during recording with a region spanning the entire audio file length.
Just as on a multi-track device, several tracks can be activated at once. The region will appear in the Arrange window exactly at the location that you recorded; i. e., you can
record just as you would with a conventional tape recorder. The only difference compared to a MIDI recording
is that the audio track must be activated (record ready);
however, it does not have to be selected.
In the Arrange window, there are two buttons between the
numbers and names of the tracks. The left button (M)
mutes the track (Mute), the right button (R) activates the
track for recording (REC). Similar buttons can be found in
the audio objects underneath the fader: these buttons are
also used to mute a track or to enable or disable recording
of a track (M and REC).
While both record-ready buttons for a track (in the Arrange window or in the Audio Object) are always coupled,
the effect of the mute button may be different under certain circumstances: in the Arrange window, muting always affects the respective track. The mute button at the
audio object, however, is used to mute the respective playback channel of the audio hardware—this way, all tracks
played back through this channel are muted. Please note
that in the Arrange window several tracks can be played
back through the same audio object (play-back channel),
however, with the limitation that only one of these tracks
can be heard at a time (the track with the region started
last).
The recorded regions in the Arrange window look the
same as the MIDI tracks. Using View > Object Colours
you can, however, select different colors. During the recording of an audio track, a waveform will be displayed.
With a larger, vertical display, the waveform display will
appear under the regions, whereas the MIDI sequences
will show small notes. The largest display can be selected
next to the scroll bars at the lower right edge of the window.
This display cannot be enabled, if HyperDraw is activated.
HyperDraw is a function allowing the graphical input of
level and panning processes, which will be displayed instead of the notes and waveforms. HyperDraw is described in the chapter section titled
with HyperDraw on page 49.
Graphical Mixdown
36
Page 37

Audio: Recording and Playback
Copying and Moving Regions
In the Arrange window, regions (and MIDI sequences)
can be shifted by dragging them with the mouse. If you
hold ctrl while dragging, a copy is created. To select several
regions or sequences hold shift while clicking or select
them by collecting them in a rubber band. During shifting, the selected regions or sequences will always jump to
a grid position. The grid corresponds to the divisions visible on the bar ruler. It can be changed all the way down to
the nominator of the beat type using the horizontal telescope.
If you want to use the format value as grid, hold alt while
shifting. The format value is displayed in the Transport
bar, in a field just under where the Time Signature is displayed. If you don’t want to use any grid, hold alt-shift
while shifting. This way, the regions and sequences are
shifted by single ticks, which is useful to correct rhythmic
irregularities in single song syllables.
Recording the Input
Just as with professional multi-track devices, MAGIX midi
studio generation 6 does not provide a Record Level. The
analog recording must be adjusted using the source device. Typically, this would be the sub-group fader of an analog mixer. However, the channel of the on-screen mixer
provides a record level display which you can use to monitor the recording level. To display this record level, double-click on the audio track name. Digital inputs cannot be
adjusted during recording—which is not necessary under
that circumstance anyway.
37
Page 38

Sample Editor and Digital Factory
Sample Editor and Digital Factory
The Sample Editor Window
Open the Sample Editor by double-clicking on a region—
in the Arrange window or in the Audio window or by
choosing Audio > Sample Editor.
In addition to non-destructive editing, MAGIX midi studio generation 6 audio files can also be edited destructively in many different ways. The Sample Editor provides
a detailed display of the audio file and all of the tools required for editing. It selects the exact region within the audio file—this is very practical, since all functions for
changing data always affect the selection.
With MAGIX midi studio generation 6 deLuxe you can
avoid major errors, i. e., accidental deletions, by first creating a backup copy of the entire audio file (Audio File >
Create Backup). If needed, you can restore your original
copy at any time by selecting Audio File > Revert to
Backup. This backup functionality is not provided by
MAGIX midi studio generation 6, so you have to be careful.
The Functions allow modification of the level or the amplitude (of the level control). For example, Normalize will
raise the overall level of an audio file until the loudest
peaks are at full amplitude. Fade in and fade out, the insertion of digital silence or the playback in reverse are
more, but not all, functions available in the Functions
menu. See for yourself what they can do for you—experiment and have fun!
With MAGIX midi studio generation 6 deLuxe you can
ensure that the selection boundaries are always positioned
38
at zero crossings, by selecting Edit > Search Zero Cross-
Page 39

Sample Editor and Digital Factory
ings. This is desirable because non-zero cross points will
cause small ‘snaps’ or ‘pops’ to occur.
The ruler along the top of the waveform display defaults to
using Samples as the unit of measurement. If you wish to
see the waveform in relation to bars and beats simply select View > Show Length as... > Bars&Beats (MAGIX midi
studio generation 6 deLuxe only). Please note that the
measurement will not relate to the regions actual position
in the song unless you enter the Sample Editor by double
clicking on the region in the Arrange Window. The reason
for this should be somewhat self-evident—regions in the
Audio window have no musical beat reference.
Digital Factory
Only with MAGIX midi studio generation 6 deLuxe you
get even more breathtaking destructive editing features—
collectively referred to as the Digital Factory. Here, we’ll
briefly introduce you to two of them: the Time Machine
and the Audio Energizer.
If you playback a record, a tape, or a sample at a speed
other than the original, you will not change just the duration but also the sound and pitch of the output. The Digital
Factory’s Time Machine allows you to modify the fre-
quency spectrum (or “pitch”) and the duration of a sample
independently from each other! The calculation for this
task is extremely complex and with extreme values may
cause a degradation of the sound quality. However, the
Time Machine is ideal for correcting a badly intonated
note or even transposing an entire mix within a reasonable range (say ±2 or 3 semitones). It is also perfect for
changing the tempo of a drum loop, without affecting the
pitch.
Similar to a compressor, the Audio Energizer will increase
the loudness of an audio file, even if the digital level
boundary has been reached (not exceeded!).
39
Page 40

The Waveplayer
40
The Waveplayer
The Waveplayer Window
MAGIX midi studio generation 6’s built-in WavePlayer
lets you play back any WAV-files you like—polyphonically,
with filter and envelope treatments. If that sounds like
owning a real sampler, you’re right, but you don’t have to
buy an expensive piece of hardware. So how do you use the
WavePlayer? Easy—just follow our small tour, and
chances are that you’ll never have to read the WavePlayer
section in the reference manual. The only real precondition is that after you fasten your seatbelt and load MAGIX
midi studio generation 6, you must select a DirectSound
driver for the WavePlayer under Audio > Audio-Hardware
& Drivers. This is because the WavePlayer works only with
a DirectSound driver and only DirectSound drivers allow
you to use the WavePlayer and the audio features of
MAGIX midi studio generation 6 simultaneously. Got a
few WAV-files at hand? Fine, let’s start.
What you really got to know
Click on the Wave track in the Arrange window. Open the
WavePlayer window via Options > WavePlayer. On the left
side of the WavePlayer window you can see a horizontal
keyboard. To the right of each key you can see the name of
each note. To the right of each note name you can see the
File Name box. Left-clicking on such a box opens the standard Windows File Selector. Select and open a WAV-file.
You have now assigned this WAV-file to the key associated
to the File Name box. Don’t like the WAV you assigned?
No problem: simply right-click on the File Name box to
erase the key/WAV-assignment, then repeat the above
procedure to assign a new WAV-file.
Now that you have assigned a WAV to a key, it will only
play when you press this specific key. So let’s define a keyboard zone in which you can play this WAV-file. Right beside the File Name box you see the controls for each WAVfile, arranged on a kind of grey crossbeam. Grab the upper
or lower edge of the crossbeam without touching any
other controls, and a double-arrow will appear, allowing
you to stretch the crossbeam into a vertical rectangle. This
rectangle defines the keyboard zone in which you can play
the WAV-file.
There is only one limitation in doing this: you can extend
the keyboard zone down all the way you like, but you can
only extend it one octave (twelve semitones) upwards. This
means that playing on your keyboard allows you to transpose down as far as you like, but an upward transposition
Page 41

is limited to twelve semitones. It is important to be aware
of the interdependence between the upper keyboard zone
and the Tune parameter at this point. If Tune is set to
+1200, you won’t be able to transpose the WAV-file any
further upwards because it is already transposed an octave
up via Tune because Tune is measured in cents, and one
cent equals 1/100 of a semitone.
Now that we have introduced Tune, we can also get right
into the other parameters of the crossbar. You can determine which parameters you would like to see via View.
The active default settings are: Parameters, Keyboard, Filter
Parameter and Filter Parameters as Knobs. To start with, we
suggest that you just leave them on.
Let’s have a look at the parameters from left to right. Tune
is already familiar to you. Next come Start and Length: here
you can adjust from which point (in samples) the WAVfile is played back when you start it, and how long (in samples) the part played back will be.
Trigger defines the playback mode: set Trigger to Gate and
the WAV-file will only play back as long as you hold the
key. When set to Freerun, the WAV-file will play back for
its whole length, regardless of whether you release or hold
the key. Hint: Freerun is especially suitable for drum
sounds.
The Waveplayer
Soundshaping via the VCA: We’ll leave out the Lnk
checkbox for the moment and move to the On checkbox.
Check it to activate the sound shaping section of the WavePlayer. Uncheck it to save computing power that could
otherwise increase the polyphony of the WavePlayer, but
then you won’t be able to tweak those nice parameters
we’ll now describe.
The sound shaping parameters are divided into two
groups: VCF and VCA. We will start with the VCA. The
VCA group lets you alter the volume of your WAV-file over
time. Attack (Atk) allows you to automatically fade in your
WAV-file from zero level to full level. The smaller the At-
tack value, the faster you will hear the WAV-file at full
level. Increase the Attack value and it will take more time
for the WAV-file to gradually fade in. Decay (Dcy) allows
you to fade out your WAV-file from full level to zero level.
Small Decay values will give you rapid fade-outs, large values will correspondingly lengthen the fade out time. At
maximum Decay value there will be no fade out at all; you
will hear the WAV-file for its full length (or not, if Trigger
is set to Gate and you release the key before the WAV-file
has reached its end).
41
Page 42

The Waveplayer
42
It is important to know that the Decay phase follows the
Attack phase: first you can fade in a WAV-file, then you
can fade it out. It is not possible to first fade it out and then
fade it in.
The last parameter in the VCA group is Vel. With Vel you
set how much the level of the WAV-file depends on the velocity (how fast you hit a key on your velocity-sensitive keyboard). The higher the Vel value, the faster you have to hit
your keys to reach full level. Experiment with these three
parameters to get to know them.
Soundshaping via the VCF: Let’s now go to the VCF
group. Here you can give your WAV-file a new tone colour
and a new tone colour curve. This is accomplished via two
basic parameters: Frq and Res. With Frq, you can make
your WAV-file sound “darker”: the smaller the value for
Frq, the darker your sound. With Res, you can make your
WAV-file sound “sharper”: the higher the value for Res,
the sharper your sound. Experiment with these two parameters and you will very quickly get the idea of how to use
them.
The VCF group also features the parameters Atk, Dcy and
Vel, expanded with the parameter Env. With these para-
meters you can control Frq automatically. Try this example: turn Frq all the way down, Env all the way up and set
Vel to 0. Now play with the Atk parameter: with small Atk
values the sound becomes bright almost immediately.
With large Atk values the sound starts very dull and it
takes quite a long time before it becomes bright. Dcy
works as you’d expect the other way around: with small
values the bright-dark progression will take almost no
time, while large Dcy values increase the amount of time
required for the bright-dark progression. With Dcy at maximum, there will be no bright-dark progression at all. To
put it briefly: Atk determines how long it takes for the
dark-bright progression and afterwards Dcy determines
how long it takes for the bright-dark progression.
With Env you determine how big the difference is between
dark and bright of the dark-bright-dark-progression produced with Atk and Dcy. With small Env values you will be
almost unable to hear the dark-bright-dark progression
produced with Atk and Dcy, while large Env values will let
your hear this progression very clearly. Don’t be afraid to
experiment in order to become familiar with the possibilities.
Lastly, Vel controls how hard you have to hit the keys to
reach the value specified with Env. With small Vel values
Page 43

the specified Env value will be reached even with soft
touches of the keys. But with large Vel values you will have
to hit the keys very hard in order to reach the specified Env
values. Take your time to get familiar with these interdependencies.
Altogether now: Now that you’ve learned about the
parameters associated to a single WAV-file, let’s move on
to that mysterious Lnk checkbox. The explanation is quite
simple. Assume you’ve got two WAV-files loaded, one on
C4 and one on C5. Check the Lnk box for the WAV-file on
C4. Its VCF, VCA and Trigger parameters will disappear
and are replaced with the corresponding parameters of the
WAV-File on C5. To indicate this, its parameter crossbeam gets linked to that of the WAV-File on C5. In other
words, checking a Lnk box on a WAV-file replaces its parameter settings with those of the next WAV-File above. If a
WAV-file has no WAV-file above itself, it will have no Lnk
checkbox, because there is nothing it can be linked to.
What is Lnk good for? Here is an example: imagine you
have ten WAV-files, different recordings of a piano at different pitches. You have them beautifully laid out across
the keyboard and then you want to make them all a little
darker. Without Lnk, you could spend quite a lot of time
with this task because you have to change the parameters
of each and every WAV-file. But with Lnk activated in all
but the topmost WAV-file, all you have to do is to change
the parameters for the topmost WAV-file in order to apply
the same a parameters to them all.
The Waveplayer
Lost your way? That’s it. Your WavePlayer crash-course
ends here. Just two more things: if you lost track while experimenting, you can easily set all parameters back to
their default values via Initialize > Default Parameters.
And if you really want to start all over again, you can clear
all WAV key assignments at once via Initialize > Delete All
Assignments. So go ahead, experiment and have fun!
43
Page 44

Mixdown with MAGIX midi studio generation 6
Mixdown with MAGIX midi studio generation 6
The Mixer and HyperDraw
The music you produce with MAGIX midi studio generation 6 can be mixed down within the program. For this, a
fully automated mixer and a graphical editing view are
available:
– The Track mixer
– HyperDraw.
The Track mixer allows you to mix both audio tracks and
MIDI tracks at the same time. It always displays all of the
tracks you are working with. The mixer can be fully automated. Data that you input from other editors will directly
affect the mixer’s display and vice versa.
Hyper Draw provides another option for mixing and editing . This view provides an easy way to view your mix in
the Arrange window.
The Track Mixer
The Track mixer can be opened in the Arrange window by
selecting Window > Open Mixer. MAGIX midi studio
generation 6 will automatically create a mixer which offers a channel for every audio and MIDI track. The channel sequence corresponds to the sequence of the audio objects and the midi tracks in the track list of the Arrange
window.
44
There is one thing that MAGIX midi studio generation 6
inherently cannot do: The audio outputs of all connected
external MIDI sound generators must be mixed down as
audio signals to a stereo recording, since the CD will require a stereo mix in the end. This is usually accomplished
together with the computer’s audio outputs or your audio
hardware. Therefore, a separate, physical mixer still will
Page 45

Mixdown with MAGIX midi studio generation 6
be required in order to merge the signals, to control the
level during recording, and also to accommodate the microphone amplifiers. This mixer, however, can be considerably smaller than a mixer used in a comparable studio
with a multi-track tape recorder. Additionally, you can mix
together all audio signals with a uniform level, while
MAGIX midi studio generation 6 will control the volume
, pan, and any other effects that your MIDI device(s) may
have.
Audio Channel Strips
Stereo- and Mono Channel Strips
You can recognize the stereo channels by the two overlapping circles on the button in the lower left corner of the
channel strip. Click on this Stereo Link button to change
the stereo channel to two mono channels with individual
controls for each channel. The master section sends the
mix to the stereo output
By clicking on the Stereo Link button, two adjacent objects
will be merged to one stereo object, creating a stereo channel. To the left of the fader, there is a level control display
showing the channel’s (the track’s) level after the fader.
Above the fader, there is a pan control (stereo: balance
control), and below the fader you will find a button (S) for
soloing (post fader listening) and muting (M) of the track.
The Record Ready button arms the track for recording
(REC) (Record Ready). One difference between audio recordings and MIDI recordings is that for audio recordings
the tracks will have to be armed just as with a multi-track
tape recorder.
Each channel provides inserts for assigning effects directly to the track, and busses for sending to returns.
Effects: The number of real-time effects MAGIX midi
studio generation 6 can calculate simultaneously depends
on the computer’s CPU power, speed, and the amount of
RAM available.
Equalizer: On each audio channel EQ’s can be used.
MAGIX midi studio generation 6 uses fixed built-in EQs,
while MAGIX midi studio generation 6 deLuxe allows you
flexible insertion of EQs: click-hold on the Thru field labeled EQ and select the EQ you need out of the flipmenu.
The effects: Additional audio objects represent so-called
busses, which are typically used as effect sends. Each
channel-strip has a knob for controlling the amount of sig-
45
Page 46

Mixdown with MAGIX midi studio generation 6
nal sent to the assigned effect. In the return channels
click-hold one of the fields labeled Insert assign effects,
like Reverb, Chorus or Delay for the effect. If you turn Eff1
up on a channel, then signal from that track will be sent to
whatever effects you have inserted on the Effect 1 return
object. If you assign Effect 2 to a track, then turning up the
send knob will send signal from that track to the effect(s)
assigned to the Effect 2 return object.
The effects are assigned as post Fader; i. e., the relation between original signal and effect signal remains constant,
even if the fader is moved.
To access edit parameters for the assigned effects, doubleclick the effect name in the green insert field.
The number of realtime-effects that MAGIX midi studio
generation 6 can compute simultaneously depends on the
computing power of your computer. The maximum is
four effect busses with three effect-inserts each (with
MAGIX midi studio generation 6 deLuxe) or two effect
busses with three effect-inserts each (with MAGIX midi
studio generation 6).
MIDI Channel Strips
General MIDI
General MIDI is not a deviation from the MIDI standard.
If an instrument bears the GM logo, this merely means
that the following minimum features are included:
– 16x Multi Mode (16 different sound on 16 different
MIDI channels, the so-called parts); all of them can be
played polyphonically with dynamic part assignment (it
is not necessary to set the number of parts for each
sound);
– at least 24 voices (parts) (24 notes can sound simulta-
neously);
– 128 standardized sound programs (program number 1
is always the piano…);
– 26 Drum and percussion sounds with standardized
keyboard layout on channel 10;
– Chorus and Hall Effects;
– Certain MIDI commands can be recognized (velocity,
pitch bender, modulation wheel, and others).
Most General MIDI instruments provide more minimum
features. The above list is by no means complete. General
MIDI instruments offer two advantages: 1) song files can
easily be exchanged between different systems with different instruments, since sounds and keyboard layout are
somewhat standardized. Solo entertainers, for example,
46
can purchase song files from third parties and use them
Page 47

Mixdown with MAGIX midi studio generation 6
without any problems, regardless of the sound generator
brand used. 2) The low-cost General MIDI sound modules
can be used to design complete arrangements, allowing
you to create a good pre-production at a very low cost. Professional productions, however, will require the transfer
of many sounds to instruments, which sound better and
more distinct.
Roland has developed a General MIDI standard called
General Standard (GS), which is fully forward compatible
with General MIDI. If you are working with a Roland GS
sound generator, you can adapt the GM/GS/XG Mixer to
its configuration. Yamaha has developed a General MIDI
standard called Extended General MIDI (XG), which is
fully backwards compatible not only with General MIDI,
but also with GS. If you are working with a Yamaha XG
sound generator, you adapt the GM/GS/XG Mixer to its
configuration. Some Yamaha instruments bear the XG
logo, although they are not compatible with General
MIDI. These are merely designed for interplay with other
XG instruments (Yamaha P-50m, Yamaha VL 70m). To
adapt your system touch the button shown on the right
and select the appropriate setting.
The MIDI Channel Strips are merely a remote control.
A mixer is used to mix audio signals. This is not the case
with this part of the Mixer. It is rather a remote control for
a sound generator in the shape of an on-screen mixer.
Why? Here is an example:
On your sound module (or on the sound generator of your
keyboard) you can adjust how loud the sound coming in
on MIDI channel 3 should be. This volume parameter can
also be set through MIDI without ever touching the sound
module. To set the volume of the sound on channel 3 to a
value of 65 “MIDI units” (value range 0—127) you will
send a MIDI volume command with the channel ID 3 and
the value 65. MIDI Volume is a controller command, to be
exact: a controller 7 command. In the Event Editor, this
command would look like this:
MAGIX midi studio generation 6 will send exactly this
command, if you set the fader (volume slider control) of
channel 3 in the GM/GS/XG Mixer to a value of 65. The
faders will send controller 7, the pan control will send controller 10, the reverb control will send controller 91—and
so on. It is not necessary to remember all of these controller numbers. Just use the GM/GS/XG Mixer as remote
47
Page 48

Mixdown with MAGIX midi studio generation 6
control for the sound generator. Watch the display to see
how the settings change while operating the GM/GS/XG
Mixer.
Please note that the sound generator will actually work in
Multi Mode (“General MIDI“), not in Performance Mode.
Also make sure that the GM sound generator is connected
to the proper port (MIDI output).
All volume adjustments and the selection of sound programs must always be carried out in MAGIX midi studio
generation 6—never adjust the sound generator! Otherwise your mixdown will not be saved with the song. It is
not necessary to separately save mix parameters at the
sound generator. You only have to open the MAGIX midi
studio generation 6 song with the settings made under
MAGIX midi studio generation 6. Rule of Thumb: Never
touch your sound module, except to turn it on or off, or to
save new sound programs. Comparable situation: Any
corrections you make on a printout using White-Out have
no effect on the text file saved on your hard disk.
Effect Paths of the GM/GS/XG Mixer
The GM/GS/XG Mixer provides knobs to control two effects on each channel. With these controls you can define
for each part, how much Hall effect (Reverb) and how
much Chorus effect should be applied to the respective
sound. Not all General MIDI sound modules support this
feature—however, most of them do. With GM and XG instruments you can also recall various effect typesand edit
them. The cutoff frequency of the low-pass filter is the major deciding factor for the harmonic content of the sound.
This parameter could have been called “Brilliance“. Technically, this effect is not comparable to an equalizer in
form of a “Treble“ control. But in real-life applications, it
usually serves as an effective sound control. This feature
may not be supported by some of the older General MIDI
sound generators. The effects settings and the cutoff controls work for all GS and XG instruments.
48
Automated Mixing
The mixer in MAGIX midi studio generation 6 is fully automated. Full automation means: Every control movement can be recorded, edited and played-back. For example, if the trumpet on track 12 initially is supposed to be
loud, then become a little softer, and finally pan more to
the right, you will operate the channel (channel 12 on the
Track mixer) only once—during the recording! For every
subsequent play-back, the trumpet will automatically repeat your mixdown.
Page 49

Mixdown with MAGIX midi studio generation 6
Any time you save a song, all of the adjustments made on
the mixer will be saved also.
Mixing Automation with the Track mixer
The mixing automation of the Track mixer is easy to explain: Record, operate the Track mixer, finish.
The automation data of the Track mixer will be recorded
as MIDI sequences on the track for which you moved the
fader or knob. The same applies to audio tracks, which will
also be mixed down as MIDI commands.
The audio channel controls send MIDI controller commands just like MIDI channels; the Volume Fader (volume slider control) sends Controller No. 7 (MIDI Volume). The meaning of the controller numbers is defined
in the MIDI Standard. The sound generator will respond
with a volume adjustment for the sound on the respective
MIDI channel. If you open the Event Editor for the sequence created due to your mixing movements during recording, you can view the MIDI Controller data—and also
edit them just like any other MIDI data.
In the NUM column you will find Controller Number 7.
The Info column shows “Volume”. Controller 10 is Pan.
You can edit the mixing process by deleting command or
changing values (VAL).
The same data is visible in HyperDraw and can also be edited. The next sections describes Hyper Draw (bottom
graphic).
Graphical Mixdown with HyperDraw
Volume and Pan can be graphically input, edited, and
viewed using HyperDraw. Following is an example of a
mix displayed in the Arrange window with HyperDraw enabled:
Volume events (MIDI Volume, Controller 7) appear as yellow lines, pan events (Controller 10) as orange lines on a
blue background.
To enable HyperDraw in the Arrange window:
– Select the desired sequence(s).
49
Page 50

Mixdown with MAGIX midi studio generation 6
– Using the Zoom Tool, select a large, vertical view
(important!)
– Select View > HyperDraw > Volume.
Click in the left half of the blue field in the lower range of
a sequence. At that location, a yellow, horizontal line will
start. It represents a volume command (Controller 7).
Click to the right at another height. Now you have created
a series of volume commands, which are spaced between
the two volume commands you have entered. You can
grab the points and move them anyway you want: changing the time or the value. To delete a point, grab it and
drag it beyond the right border of the sequence, i. e., outside the region. You can view your data in the Event Editor. Or you may open the Track mixer and watch how the
mixer’s fader will move during play-back like it is being
moved by an invisible hand (in the main menu select:
Window > Open Mixer). Using View > Hyper Draw > Pan
you can enter Pan events in the same way. The applicable
controller number (7 for Volume) is very small and shown
at the left side.
When working with HyperDraw, you will frequently need
an enlarged display of a sequence. For this purpose, the
magnifying glass function is readily available: Press and
hold the alt key and draw a frame around the respective sequence (group). Make sure to always start the frame in the
background of the Arrange window. The selected section
will be enlarged immediately. Now you can continue your
HyperDraw edits comfortably. To restore the original size,
click alt in the background.
Please note that in MIDI is a serial protocol meaning that
all events are sent to each port sequentially, which may
negatively affect the timing. If you are working with only a
few MIDI ports, where each of the ports includes many
channels, complex mixes, with a lot of controller data, may
cause timing problems.
50
Page 51

Audio Instruments
MAGIX midi studio generation 6 supports the new, included Magix synthesizers M-TB 6 (MAGIX midi studio
generation 6 deLuxe only), Carpet Sweeper and Percusor.
Outfitted with an innovative user interface, the units provide subtractive synthesis that meets the classic analog
ideals. They offer everything that made the analog synthesizer so famous: rich basic sound, punchy filters, flexible
modulation possibilities and extremely fast envelopes.
The synthesizer instruments integrate seamlessly within
MAGIX midi studio generation 6’s internal digital mixer;
all plug-ins effects can be used and all parameters can be
automated. The direct connection with the sequencing engine of MAGIX midi studio generation 6 guarantees unsurpassed precision through sample-accurate timing that
is superior to any external MIDI synthesizer. Beside these
built-in synthesizers MAGIX midi studio generation 6
supports VST™2.0 instruments as well.
To use the new instruments, MAGIX midi studio generation 6 features a new category of audio objects in MAGIX
midi studio generation 6, called “audio instruments”.
These can have the synthesizers or VST™2.0 plug-in in
their top insert slot. The default song—the song that
opens if you move your Autoload away from the Magix
music studio folder—has readily configured audio instruments.
An audio instrument is an audio track with the track parameter “Cha” switched to one of the “Instruments (1-4)”
(with MAGIX midi studio generation 6) or “Instruments
(1-6)” (with MAGIX midi studio generation 6 deLuxe). So
each audio track can be made an audio instrument by setting its “Cha” parameter in its object parameter box to an
instrument channel. But it is more convenient to create a
new audio instrument by simply selecting Functions >
Track > Create Audio Instrument Track.
Please make sure that you have inserted the desired synthesizer in the Audio Instrument mixer channel in the
Mixer window, and that you have selected the track of this
Audio Instrument mixer channel in the Arrange window.
Now double-click on the inserted synthesizer plug-in to
see and access all those lovely knobs. As synthesizers are
all about creating and playing new sounds, we will just tell
you how to set up these instruments for usage, and encourage you to experiment with them. They come with
plenty of pre-programmed settings that serve as starting
points for your own, unique sound creations. You can load
Audio Instruments
51
Page 52

Audio Instruments
these presets by clicking on the small triangle in the head
of the plug-in window. What more can we say—go ahead
and have fun!
52
Page 53

MIDI: Recording and Playback
MIDI: Recording and Playback
Flow of MIDI Signals
Typically, a keyboard is used to play in MIDI data; however
Guitar-to-MIDI and Drum-to-MIDI controllers are also
available. Your keyboard probably has an integrated sound
generator, or perhaps you are using a master keyboard
controller without an internal sound generator in connection with one or more MIDI sound generators. The MIDI
sequencer will record the notes you are playing on the keyboard. During recording and playback, the sequencer will
trigger the connected MIDI sound generators. Unlike audio recordings, MIDI tracks do not record any sounds.
They record information, such as the time at which keys
on the keyboard were hit, the strike speed and the release
speed. Using the sequencer, this information can be edited in any way desired, or played back as is. Even though
MIDI tracks can only be played back on MIDI instruments, the MIDI sequencer offers a multitude of advantages over an audio recorder. There is one thing about
MIDI recording that should always be kept in mind:
The sequencer always plays the instruments live, so the instruments always need to be present. For example, if a
synthesizer voice is required by the bass, it cannot play
anything else. By contrast, audio recorders use multiple
tracks to record entire choirs, or to record multiple parts
with one synthesizer voice. Consequently, MIDI recording requires many voices. It is quite typical to have 64
voices in one sound module. If you are working with several MIDI sound generators, the significance of the number of voices will become apparent very quickly.
An exception are the new “audio instruments”, accessed
via the new, correspondingly named track objects. Seen
from the “input aspect”, these are MIDI instruments, as
they are “played” via MIDI commands from the sequencer. Seen from the “output aspect”, they are audio instruments, as their output signal is directly generated and
played back by the computer, just as the audio tracks.
Advantages of MIDI Recordings over Audio Recordings:
– You may change the sound, either of the sound gener-
ator’s sound program or the sound generator itself,
anytime after recording.
– You may insert, delete, or change notes, even if the
notes are sounding on the same track. From a
sustained C-major seventh chord you can create a C
53
Page 54

MIDI: Recording and Playback
minor chord by deleting the B Natural, and changing
the E to an Es. Re-recording is not required.
– The timing of the notes can be changed or quantized
(optimized on a time grid) any way you like.
– The tempo and pitch of the notes can be handled totally
independently of each other—without complex calcula-
tions or loss of sound quality.
– During recording, you could select a slow tempo and
then choose an unplayable high tempo during play-
back without affecting the pitch.
– 1.000 tracks (MAGIX midi studio generation 6 deLuxe)
respectively 256 (MAGIX midi studio generation 6) are
available.
– Only a small storage space is required. Data handling is
extremely fast, even with less powerful computers.
– Well arranged note displays (note print-out, note
editor), Matrix Editor and Event Editor (listing) allow
for very organized editing. Sound sequences can be
input at the computer “virtually“ without playing an
instrument.
Advantages of Audio Recordings over MIDI Recordings:
– You can record any instruments without MIDI connec-
tion—such as vocals or acoustic guitar.
– No instruments are required for play-back. Individual
voices can be used several times (e. g., choir recordings
using only one voice).
– The time resolution is very precise and always consis-
tent. There is no deviation of phase relations between
individual notes. The play-back level for mixdowns is
always exactly the same.
The above points indicate the following: all MIDI instruments should be recorded on MIDI tracks. The MIDI level
production should be carried as far as possible, before
starting the first audio recording. Prior to the first audio
recording, the tempo of the song should be clearly defined. Subsequent tempo changes are possible, however,
they involve time and a loss in quality.
Naturally, all non MIDI instruments have to be recorded
on audio tracks. MIDI instruments have to be recorded on
audio tracks only if the number of voices in MIDI is insufficient, if the instruments will not be available for playback, or if a mixdown is required.
54
Page 55

MIDI: Recording and Playback
Advantages of Audio Instruments: With the virtual
Audio Instruments, the advantages and disadvantages of
both MIDI and Audio Recordings are “equalized”:
– You can play as many tracks as the audio engine is able
to produce audio material on your computer.
– No external instruments are needed for play-back.
– One audio instrument can be called up several times.
– High consumption of computing power.
– Precise and consistent time resolution.
Recording Notes and Playing Them Back with Sound Generators
You use the keyboard to play notes into your computer.
The computer will forward the notes in real-time to a
sound generator so you can hear what you are playing.
This always applies, even if the output is stopped (Stop),
paused (Pause), recording (Record) or playing back (Play).
Very important: If you are working with a keyboard with
an integrated sound generator, you must set Local Off!
Recording always takes place on the currently highlighted
track in the Arrange window. Every track will be assigned
to a MIDI output (MIDI Out) and a MIDI channel (Channel).
If you are working with only one General MIDI Instrument…
…and your MIDI interface has only one MIDI output, you
may use the empty default song, which is opened upon
start-up of MAGIX midi studio generation 6, and immediately record and play-back MIDI notes. The same applies for sound generators with a GS logo (Roland) or XG
logo (Yamaha) as well as for any other sound generator
with up to 16x multi-mode.
Creating a new Track
To create a new track in the Arrange window:
– Select Functions > Track > Create MIDI Track.
– At the left side of the screen, just below the box with
those nice little tools like scissors etc. in it, you find the
track parameter box. Here you can select an icon for the
new track: Just click-hold on the icon and select one out
of the appearing flipmenu.
– In the parameter-field below the icon you can select the
MIDI channel for the track. This setting has to match
the MIDI channel on which your sound generator
receives MIDI data.
– Again a parameter-field below you can select the MIDI
port of your interface, to which your sound generator is
connected.
55
Page 56

MIDI: Recording and Playback
– Click on the Prg field, so it is checked. Move two field to
the right to select the number of the sound program.
Watch the sound generator display to see how the
sound programs change after you select and change the
program number. The number of the sound module
may deviate by 1, since some devices count from 1 to
128, whereas MIDI counts from 0 to 127. The same
applies to program numbers with the octal system (8 x
8 sound programs, typical for Roland).
– If your sound generator provides several banks with
128 sound programs per bank, also select the bank (left
to the program number in the track parameter box,
where initially “÷” is displayed). Unfortunately, the
toggle commands for sound banks are not uniform for
all instruments. Refer to the manual of your sound
generator to find out which bank select command your
sound generator needs. Select that command in the
flip-menu Bank Select Command under Options >
Settings > Record Options.
– Play on your keyboard: Now you should hear the sound
module with the selected sound!
… if there still is no sound …
– At the far right of the Transport window, there is a
display for incoming MIDI signals (In) and outgoing
MIDI signals (Out). Little note symbols should appear
here while you are playing (see arrow; when releasing
keys, the note symbols appear with strike-through
markings).
56
– If you cannot hear anything, check the cable connection
between the keyboard’s MIDI Out and the MIDI In of
the computer interface. Check that everything is
plugged in. Go to Options > Settings > MIDI options…
and make sure that the input filter does not filter out
the incoming sounds (The note symbol should not be
marked).
– If signals are displayed at the In display of the Trans-
port window but none appear in the Out window,
ensure that you still have selected the same track for the
set up instrument, and that it is not muted. The button
right next to the track number in the Arrange window
(see left illustration) mutes the track (Mute). If the
Mute button is hidden through the View menu, the
Page 57

MIDI: Recording and Playback
muted track will have a period to the left of its number
(see right illustration).
– Does the MIDI instrument provide a MIDI In display?
If yes, it must light up while playing. Is there a direct
cable connection between the MIDI Out of your inter-
face, and MIDI In of the sound generator? Are the
audio connections correct? Does the sound generator
have several stereo outputs? Perhaps Part 1 of the sound
generator is routed to an unamplified stereo output.
Double-check by connecting a headphone directly to
the sound generator.
– Is the sound generator really set to Multi Mode, or did
you select “Performance” or “Single Sound” instead of
“Multi”, receiving on only one (different) MIDI
channel? It is recommended that you always work in
multi mode, even if layered sounds will initially be
unavailable. Such sound layers can be organized more
logically and clearly on the MAGIX midi studio genera-
tion 6 level with its various tracks than in the sound
module.
– If sound generation is integrated into the keyboard,
each part must be set individually for receiving
incoming MIDI notes (Local Off, just called “MIDI” by
some manufacturers). All parts must be set to “Local
Off”!
Recording, Playing Back, and Deleting Sequences
In the Arrange window, set the song position line (the vertical line which shows the beat position during play-back)
to the desired position. You may grab and drag the line, or
you can click on the bottom half of the beat ruler to directly
position the line.
– Start the recording by pressing * (RECORD) and play a
few sounds. To repeat the recording, press * again
while the recording is still running.
– Stop the recording by pressing enter (STOP). Press
enter again to return to Beat 1 (or, in the Cycle mode, to
the left Locator).
– Play back your recording by pressing 0 (PLAY). Press 0
again during the play-back to start over at the same
position.
57
Page 58

MIDI: Recording and Playback
– The recorded sequence is still selected and, therefore,
shown in black. Press Backspace to delete everything
that is selected—in this case the sequence you just
recorded.
– Press strg-z (Undo) to undo the last action. In this case
you can undo the deletion.
Fine or Rough Copying and Shifting of Sequences
Sequences are handled in the Arrange window the same
way as regions: If you want to use the format value as grid,
hold alt, if you want to use single ticks, hold alt-shift while
shifting. If you hold (additionally) strg while shifting, a
copy is created.
Sequence Play-Back Parameters
The play-back parameters of each sequence can be
changed. Play-back parameters include Transposition,
Quantization, and Velocity.
The play-back parameters do not affect the data in the sequences. They merely define how the sequences should be
played back. This means that you may make changes at
any time to these parameters, and at any time you may go
back to your original performance. If you do wish to actually change the underlying data, there is a function to do
so. This function is called Normalize and is accessed
through Functions > Sequence Parameters > Normalize
Sequence Parameters. This will apply all the play-back parameter settings you have made to the data. The settings
in the parameter box will be reset to zero, since the actual
MIDI data now will reflect the settings you have chosen.
Normally you would only use this function when exporting your song as a Standard MIDI file. The only parameter
not affected by “Normalize“ is Quantization. If you wish to
permanently set the quantization, the use Functions > Sequence Parameters > Fix Quantize. Again, you normally
would only do this when exporting the song as a Standard
MIDI file. When working within MAGIX midi studio generation 6, it’s a real advantage to keep your options open,
by leaving these settings as play-back parameters. This
way, you are free to change your mind at any time.
As long as no object is selected—you can do this by clicking once on the background in the Arrange window—the
play-back parameters automatically apply to all of the objects currently being recorded. However, if objects are selected, the play-back parameters will apply only to them. If
58
Page 59

MIDI: Recording and Playback
nothing is selected, then “MIDI Thru“will be shown in the
sequence parameter box instead of the sequence name.
Name
Double-click to enter a name for the sequence in the top
line.
Quantization
Quantization allows you to correct the timing of a sequence with extreme precision. Quantization corrects the
timing of the note-ons, while maintaining the original
length of each note. If you wish to retain the original timing of your performance, set the Quantization to “Off
(3840)“. There are many quantization options, including
several odd tuplet and swing settings.
Loop
If you enable “Loop”, the selected object will be repeated
until it encounters another object in the same track, or until the end of the song is reached. Loops can be very useful
for providing the correct beat with a played Hihat track instead of with a metronome. For this, just record one, two,
or four beats of Hihat and quantize to a sixteenth or an
eighth. Loop the sequence (Loop: On), and a perfectly
timed Hihat will accompany you. Later the loops can be
converted to real copies for further editing by selecting
Functions > Sequence Parameters > Turn Loops to Real
Copies.
Transpose
This function allows you to transpose sequences in halftone steps. An octave has 12 half-tone steps. You can,
therefore, transpose a sound by one octave upward or
downward with +12 or −12!
Velocity
MIDI differentiates 127 speeds with which a note can be
struck—from the softest pianissimo (1) up to the hardest
fortissimo (127). If you enter the value +18, the original velocity will increased by 18 points, i. e., it will be movedtowards “forte”.
Dynamics
A form of “MIDI compression“ can be achieved with Dynamics, i. e., the differences between piano and forte, can
be compressed (levelled). For this you select a value below
100%. Values over 100% emphasize the differences be-
tween the strike velocity of individual notes (Expansion). If
you want a constantly stronger and more uniform strike
velocity for your keyboard play, try the following setting:
Velocity = +20 and Dynamics = 50%!
59
Page 60

MIDI: Recording and Playback
Gate Time
This parameter allows you to shorten or lengthen the duration of the notes in a selected sequence by a percentage.
This can be useful to create staccato or legato effects very
quickly. It can also be used to compensate for the differing
attack/release characteristics that you may encounter
when assigning a sequence to ply with different sounds.
Percentages lower than 100 will shorten the notes, above
100 will lengthen them.
Delay
This function allows you to move up the play-back of a
track (negative values) or to delay it (positive values). The
Delay function is not only used for rhythmic effects, but
also to compensate for sounds with slow attack times. By
advancing the track a few milliseconds, even slowly fading
in string sounds will sync with other sounds with faster attack times.
The Autoload Song
A Song named “Autoload”
After you have become familiar with the basics of MAGIX
midi studio generation 6, you should create a default song
which includes all settings so you can start a recording at
any time. You can also record a drum track with kick,
snare, and eights from Hihat, which will then accompany
you like a sophisticated metronome. You can also prepare
a standard arrangement including a track for piano, bass
and strings. Further, you can prepare Screen Sets for the
window combinations which suit your work method and
your monitor size. Put the Autoload Song on your desktop, and start it by double-clicking it. You should always
save your songs with a different name: File > Save As…).
With the autoload file, the basic setup of tracks and other
major settings needs to be done only once. It can be modified occasionally, if you add a new instrument to your collection, for example, or if you get rid of one.
60
Page 61

Event Editor
Open the Event Editor by selecting Window> Open Event
List.
NOTE: If you wish for the Event Editor to be the editor that
is opened when you double-click on a sequence in the Arrange window, open the Options > Settings > Global Preferences menu and select Double-click to open Event Edit in
Arrange from the flip menu at the bottom of the window.
The Event Editor displays all data chronologically in a text
format within a table. The Event Editor has no graphical
features, and its arrangement and display of notes is not
comparable to the easy overview provided by the Score and
Matrix Editors. However, it is by nature the most efficient
editor, showing you every MIDI event, with its type and its
values (data bytes) in plain text. All of these parameters are
accessible for editing. In fact, you could do a complete production without ever leaving the Event Editor. The MIDI
event type is shown in one of the middle columns of the
display. This makes it easy to quickly discern between
Note, Volume (controller 7), Modulation wheel or any
other type of data. Below is an Event window with a collection of MIDI events of all types. (thought not necessarily a
real life collection of events, it is useful for this demonstration.
Event Editor
With the buttons on the left side you can determine which
data types should be visible. You can also use the buttons
61
Page 62

Event Editor
to add events directly from the Event Editor. You do this by
simply clicking on the desired button with the pen tool.
You may select events by rubberbanding them within the
Status column. (the column under the word Status at the
top portion of the window.) Be careful not to grab the timing positions or the data lines, as you may change their values without wanting to.
Identity of buttons, starting at top left and moving down in
criss-cross fashion: Notes, Program Commands, Pitch
Bender, Any Type of Controllers, Channel Pressure (Aftertouch, Pressure Dynamics), Poly Pressure (polyphonic
pressure dynamics), System Exclusive Data, Contents of
System Exclusive Data.
Note-Off Events, i. e., commands to end notes, are not displayed separately. Instead the length of the notes is shown
on the information line for Note-On Commands.
Application Example: Deleting unwanted Controller data
Let’s assume that an otherwise perfect keyboard performance is flawed because of too much modulation wheel
data. The Event Editor makes it very easy to delete only this
unwanted data. You could then re-record just the modulation wheel performance and merge it back into the sequence containing the note data. Here is how you might
proceed with such a task. Open the Event Editor and select
a modulation wheel command (controller 1). Select Edit >
Select > Select Similar Objects.
All modulation wheel commands are now selected.
Delete them by pressing Backspace. Close the Event Editor. In the Arrange window, select Functions > Track >
Create MIDI Track to create a new, identical track on
which you will re-record the modulation wheel commands
only. Using the Merge Tool you can then merge these
commands anytime with the currently edited note sequence.
You should also take note that the same value can be
changed simultaneously for all selected events in the
Event Editor. For example, once all the modulation wheel
events were selected above, you could have reduced the
amount of modulation wheel effect for one of the events
and the values for all the other events would have changed
simultaneously by the same amount. You could also use a
similar procedure to alter the time position of any selection of events.
62
Page 63

The Event Float Window
The Event window may not be as intuitively designed as
the Score Editor or Matrix Editor. However, its detailed information and direct access to all Events parameters are
invaluable. The Event Float window, a relative of the Event
Editor, allows you to access this same information easily
and compactly from within any other edit window. The
Event Float is like a single ‘slice’ of the Event editor and
will always display the currently selected event (if more
than one event is selected, the first event is shown). Just as
with the Transportation window, the float window always
floats, i. e., is never covered by another window. To open
an Event Float window select Options > Event Float in the
main menu.
Event Editor
63
Page 64

Transport Functions
Transport Functions
To open the Transport bar select Window> Open Transport. (NOTE: A Transport bar will already be open if you in
the first screen set of the default song.) The Transport bar
includes all buttons for playback, recording, pause, fast
forward and rewind, as well as the locator and a field for
selecting the tempo. The Transport bar is a floating window; i. e., it is always on top and will never be covered by
another window.
Click on the flip menu switch and select larger to increase
the size of the Transport window. You may also choose enable Legend. which will provide descriptive labels for each
of the Transport bar functions. This can be helpful while
you are becoming familiar with them. Once you know
these functions, you can disable the legend in order to
save space on the screen.
We recommend that you move away from using the
mouse to operate the basic transport functions as soon as
possible. If you get used to the keyboard shortcuts right
from the beginning, at least for the most commonly used
commands, you can increase your work speed drastically.
The illustration shows the default keys of the computer
keyboard that correspond to the Transport field buttons.
,
0 enter
*
64
alt-c
Please note that the keyboard layout can be completely defined by the user. If you are using the supplied “PowerKeys” keyboard layout, Stop is 0, Play is enter, and Solo is
s.
The Position Slider helps indicating and editing the current song position.
alt-s
Page 65

Punch, Cycle, Skip Cycle
Press “Stop” twice to set the song position line back to the
beginning of the song (or, if Cycle is enabled, to the next locator to the left). This double-hit of the Stop key is very
useful, if you want to start playing back or recording from
the beginning of the song. With this function no rewinding is required. Record Toggle (preset to space bar) allows
you to manually drop (or: punch); i. e., enter or exit a recording while the sequence is already playing. (drop in /
drop out).
Cycle will continuously repeat the playback or recording
between the left and right locator. You can directly click
and drag on the beat position of each locator to change
their value. If you double-click them, a text field opens in
which you can type in an exact value. Type in a “space” or
“.” to separate between the data positions of location, i. e.,
type “5.3.1.1” to set the locator to bar 5, beat 3. (NOTE:
MAGIX midi studio generation 6 will also “round off” the
values of positions not entered so typing “5.3” would render the same result as typing “5.3.1.1”) The illustration on
the left shows the input of 14 in the left locator (seen
graphically it actually is on top), by double-clicking Backspace, 1, 4, and enter. The “right“ (lower) locator is set to a
beat of 20.
For intensive editing of a song section, you can repeat it
continuously using the Cycle function. To enable this
function, press and hold your mouse button and move
over the respective area in the upper half of the bar ruler.
In the Cycle mode, playback and recording will be repeated only between the two locator positions.
This Cycle range is highlighted with a thick, orange bar on
the bar ruler. As an alternative to the previous described
method, you can change the locator positions by grabbing
the lower corners of this bar and dragging them with the
mouse.
To skip a section, press and hold the mouse button and
move over the section from right to left. The Skip Cycle
range is shown as a very thin bar at the top of the bar ruler.
Under Skip Cycle, the left locator will have a later position
than the right locator.
Count-In and Metronome
The count-in and metronome settings are set as follows:
Transport Functions
65
Page 66

Transport Functions
– Select Options > Settings > Recording Options. In the
bottom flip-down menu you can choose None, One,
Two, Three, or Four beat count-in. You can also select
the option Wait for Note, which will repeat a quarter
note count-in, until you play the first note and the
recording starts.
– In the Recording Options you can choose if the
computer loudspeaker should click during recording
and/or playback.
– Select Options > Settings > Metronome Settings to
define a MIDI channel and MIDI notes to be used as
metronome. You might, for example, use the Rim Shot
of your sound module as metronome click.
Auto Drop
The Auto Drop function is used to automate the process of
dropping in and out of record. When it is enabled, MAGIX
midi studio generation 6 will drop in and out of record at
the designated left and right locator points, i. e., at the left
locator recording will start, at the right locator MAGIX
midi studio generation 6 will switch back to playback. You
can also use Drop mode in conjunction with Cycle, in
which case a total of four locator points are displayed.
66
In the example below playback will start at beat 2. At beat
4, MAGIX midi studio generation 6 enters the recording
(drop in). At beat 8, playback is re-activated (drop out). At
beat 9, playback starts over beginning with beat 2.
If you want MAGIX midi studio generation 6 to act and
feel like a real tape player for MIDI recordings; i. e., that
the range within the drop locators will actually be erased
and replaced instead of just recording an additional sequence, select Replace.
If Solo is selected, you can listen only to the selected track.
All other tracks will be muted.
Page 67

Score Editing and Printout
Score Editing and Printout
Interactive Score Editor
Open the Score Editor by selecting Window > Open Score.
In the Options > Settings > Global Preferences menu you
can choose which Editor window will open when you double-click on MIDI sequences.
If one of the Editor windows such as the Score Editor is
open, you can watch during the performance how MAGIX
midi studio generation 6 displays your play as notation on
the screen. The notation serves two major purposes: 1)
MAGIX midi studio generation 6 allows you to print out
your score. The program also provides many graphical elements, display options, and smart text functions, as well
as chord and stop symbols. 2) The Score Editor is a very
practical tool for corrections, amendments and other edits
of your recording.
Please read the operating manual to learn about the extensive options for typesetting camera-ready music sheets
with MAGIX midi studio generation 6.
Editing Sequences in the Score Editor
To practice editing in the Score Editor, record a short sequence and purposefully perform some ‘bad’ notes in the
key of C. In a melody accidentally slide over an unwanted
67
Page 68

Score Editing and Printout
f sharp down to the actually intended g, and play a C-Minor
chord where a C-Major chord should be played. Then correct these errors as follows:
– Double-click the recorded track. The Note Editor will
open with a display of the Score.
– Grab the f sharp with your mouse. The f sharp will
sound and be selected: it will blink. Press Backspace to
delete. The f sharp is deleted.
– Grab the e flat of the incorrect C-Minor chord and drag
it one half-tone step upwards. The e flat changes to an e,
and the C-Minor changes to a C-Major chord.
– Try using the pen tool to add notes.
Please notice the Score Tutorial on the separate Tutorial
CD. It consists of a .pdf file and a few example songs.
68
Page 69

Matrix Editor
Open the Matrix Editor by selecting Window > Open Matrix.
NOTE: If you wish for the Matrix Editor to be the editor
that is opened when you double-click on a sequence in the
Arrange window, open the Options > Settings > Global
Preferences menu and select Double-click Sequence to open
Matrix Edit in Arrange from the flip menu at the bottom of
the window.
The Matrix Editor is perhaps the best editor for editing
Note length. It is also useful for those who are unfamiliar
with classical notations and who will therefore not feel at
home in the Score Editor. The Matrix Editor displays the
individual notes as bar diagrams—similar to the sequences in the Arrange window.
Matrix Editor
Note durations are an important element in musical expression and precise play. With conventional notation,
phrasing is left for the most part to the performer. The
Matrix Editor not only displays very exact note beginnings
and ends, it also indicates the strike dynamics with little
beams within the bars.
Sometimes notes are accentuated not by their dynamics
but by playing them very short or staccato. This is especially typical with organ parts, since organ sounds are not
generally velocity sensitive. In these situations, it is also
very important that the notes of a chord end at precisely
the same time. The Matrix Editor is the ideal tool for this
type of editing.
69
Page 70

Matrix Editor
Now the note beginnings are aligned exactly on the grid.
You can shorten the notes by grabbing them at their right
lower corner. If you simultaneously hold ctrl-shift, all of
the selected notes will receive the same length.
In some editors, the Q buttoncan be used to quantize the
selected notes.
70
If you touch the Q button, a selection box appears. In this
box you define the grid on which the notes should be
quantized. The selection of a quantizing grid activates the
quantization. Subsequent quantizations can be activated
by clicking on the Q button.
Above the quantize button there is a field which shows the
current resolution of the grid lines to which the notes will
snap when moved. To move the notes without any grid
lines, hold down shift-alt while moving the notes.
You may use the Velocity tool to change the dynamics of a
selection of notes. With the tool selected, just click and
drag up or down on a note or selection of notes. The length
of the “velocity bar(s)” will change to reflect the change.
Page 71

Preparing files for CD burning
Preparing files for CD burning
File Format
Special software like MAGIX audio studio is required for
the burning of CDs. This software accepts single songs in
the form of single stereo files. The sequence and numbering of the titles will be organized by the CD software. The
CD burner software requires the file format WAV. WAV
files with the following characteristics:
– stereo,
– 16 bit
– 44.1 kHz sampling rate
These type of files can be created with MAGIX midi studio
generation 6. This chapter describes the procedure used
to create these files.
Mixdown by Track Bouncing
Recording MIDI Instruments as Intermediate Audio
Mixdowns: MAGIX midi studio generation 6 allows you
to digitally merge various audio tracks without playing
back the song (digital mixdown). But only MAGIX midi
studio generation 6 deLuxe allows you to record the final
mixdown in real-time, for using internal plug-in effects
and external real-time effects processors (like reverb and
multi-effect devices) during the final mixdown and manual intervention. This technique is called Track Bouncing
and is described in the following. To accomplish this, you
might first record the signals of all MIDI instruments to
be played back by MAGIX midi studio generation 6 deLuxe in their entirety on to a single stereo audio track and
then mute all MIDI tracks.
Only mix the signals that you will actually need on the recording input of MAGIX midi studio generation 6 deLuxe. Do not turn them louder than necessary, to avoid
unwanted noise.
For automatic mixing, see chapter “Mixdown with
MAGIX midi studio generation 6“.
Track Bouncing: It is not necessary to re-record the total
of all audio tracks through the analog inputs, or to use another master device. MAGIX midi studio generation 6 deLuxe provides a Track Bounce function, which allows you
to master the mixdown in real-time on the hard disk—using a file format that the CD burner will recognize. Open
the Audio Mixer or the Track Mixer (open the Track Mixer
in the Arrange window by selecting: Window > Open
71
Page 72

Preparing files for CD burning
Mixer…). Press the Bounce button on the track object
which plays back all tracks, i. e., the Master fader. The
Bounce dialog box appears. In this dialog box you can set
the beat range across which the mixdown should span.
This dialog also displays the required storage space.
Click on the Bounce button, or confirm by pressing re-
turn. In the displayed dialog box enter the hard drive and
the folder to which you want to write the mixdown of your
song as an WAVE file.
Post-Production
Final editing of the stereo recording will take place in the
Audio window and in the Sample Editor. At first you may
have to cutany remaining unwanted material at the beginning and/or end of the mixdowns.
72
Grab the regions in the Audio window next to their lower
corners, and shorten them.
Open the Sample Editor by double-clicking the region,
and check the region’s starting and ending point (Anything important cut off? Any unnecessary pauses?). Once
you’ve made the desired selection, choose Functions >
Trim.
With MAGIX midi studio generation 6 deLuxe you can
perform a composite compression for that powerful hit
sound—select Factory > Audio Energizer.
Page 73

Preparing files for CD burning
With MAGIX midi studio generation 6 you have to be satisfied with putting your original sound with maximum
volume onto the CD: enable Functions > Normalize. If a
very loud CD is desired, one of these options must be selected.
If a sampling rate other than 44.1 kHz was used, you must
also use the Sample Rate Converter. Under Factory >
Sample Rate Converter (MAGIX midi studio generation 6
deLuxe) or Functions > Sample Rate Converter (MAGIX
midi studio generation 6) you can convert the sampling
rate after the fact from 48000 to 44100 Hertz. It is recommended that you record the production for the CD right
from the start with 44.1 kHz.
73
Page 74

Troubleshooting
74
Troubleshooting
Possible Symptoms
They may be rare, but every computer user inevitably experiences seemingly severe computer problems at some
point, whether they be crashes where the mouse freezes,
the screen locks up, or the display becomes plastered with
error messages. Even mature, well written operating systems cannot protect you completely from hardware conflicts, bugs , or other problems.
Experience has shown that such system problems are
rarely caused by a defect in our programs or hardware
products, since they are rigorously tested by a diverse
range of musicians and studio users in a variety of applications, looking for any faults or problems.
This does not mean that the possibility of errors can be
completely ruled out; problems can crop up especially as
the various applications, operating systems and drivers
are all developed and improved in parallel by unrelated
teams, leading to occasional compatibility problems. We
do, however provide fixes in the form of software updates,
as soon as we become aware of such problems, and are
grateful to any users who make us aware of them.
If you suffer from system crashes or errors, you may well
find the tips in this chapter helpful, even if the problems
are ultimately unrelated to our products. In most cases,
these problems, once identified, can be rectified with a
minimum of effort, although tracing the cause of such
problems can be time consuming. You will be able to overcome most of these problems without needing to consult
an expert—this chapter will guide you on how to proceed.
It is best to eliminate the classic causes of problems before
you suspect a hardware defect, or another fault, especially
before you send your machine for repair, or your software
for a refund! Take care, though: some of these suggestions
may only cure the symptoms, and could therefore complicate the identification of the actual cause of the problem.
Persistent problems will require the advice of an expert.
If you have bought the computer together with the sound
card and other hardware, it is a good idea to test that the
computer is functioning as expected, with just a mouse,
keyboard, and display attached, before installing the card
and additional hardware (hard disks, printers etc.). Most
new computers come with pre-installed software, which
should allow you to test to see that everything is working
correctly. Once you have switched off everything, you can
proceed to install any hard disks, modems, scanners etc.
Page 75

Now check that everything is still working as it should. If
so, you can unplug all cables from the back of the computer and begin to install the sound card.
If disaster strikes…
… your first priority should be to make a backup of your
most important documents. Attempt to copy your files
(lyrics, songs, tax declarations) to diskettes, hard, or removable drives, without launching their associated applications. While you are at it, you should also make timely
backup copies of your software’s installation diskettes.
You can skip this step for CD-ROMs, but even CDs require extra care: neither of its two sides should be
scratched. Once you have made backups of your private
files, and programs, the chances of a true disaster are all
but eliminated. Never skip making regular backups, even
if everything is working perfectly—eventually, any hard
disk may crash. A system crash can be caused by:
– operator error,
– a software conflict (e. g. incompatibility between two
programs),
– overloading of the system’s resources,
– faulty cable connections (or missing termination), or
– a hardware defect.
Eliminate the first two causes before deciding to have your
hardware repaired.
If the problem persists, make precise note of the following:
– what you were doing at the time of the error (which
program, which function, which applications were
open);
– the exact text of any error messages and/or error
numbers (if applicable);
– the version of the operating system, as well as of the
program where the error occurred;
– your system configuration.
– After each crash: Check the files and file structure of
your system hard disk with a suitable program like
Scandisk. If necessary, repair the files and file structure
of your system hard disk. We highly recommend
checking your hard disks with the Scandisk program
regularly, so as to rule out any hard disk related prob-
lems in the first place.
Troubleshooting
PCI Faults
PCI technology relies on highly accurate timing synchronization in your computer’s data stream. Unfortunately,
there are certain PCI card combinations that will cause
75
Page 76

Troubleshooting
conflicts with each other, despite the fact that each on its
own is working perfectly, and within the PCI specifications. PCI problems like this can cause seemingly random
system crashes.
– Check whether the same problem persists after you
have removed the PCI card. Of course, you need this
card to work, but try to work on the machine for several
hours without the card—if the problems have gone
away, you have found the culprit. If the problems
persists however, you can safely rule out PCI problems
as being the cause.
– Try to use the PCI card in another slot. It is quite
possible to solve conflicts by simply swapping slots.
SCSI and IDE Faults
Faults in the SCSI or IDE chain can have a variety of consequences. SCSI, SCSI2 and IDE are parallel interfaces,
and can be used to connect hard and removable drives, CD
burners, and other drives, as well as scanners to your computer. Always take care with the following:
– The total length of all cables must be as short as
humanly possible, and the cables should be of the best
quality.
– The connectors must sit securely in their sockets, i. e.
securely screwed or clipped into place.
– Each SCSI ID (a number from 0—7) must be allocated
only once per SCSI bus.
– The last device in a SCSI chain must usually be termi-
nated with a resistor block. Some devices have internal
termination, that can be switched in/out. If no termination is available, you will need an external terminator
(which looks like a single connector). This will be
connected to the last device’s output. Although this
may seem to contradict with the previous statements, it
has been known for a SCSI chain to work better without
termination. If you suffer from seemingly random
system failures, without an obvious cause, you may well
experiment with different device order combinations.
Also experiment with, and without termination for the
last device in the chain.
76
Faulty Cables
Cable faults are a common problem, which can cause all
manner of problems.
The use of the right monitor cable is important—simply
having the correct connector at either end is not sufficient.
Before you assume an unrelated hardware fault, please
Page 77

test whether the cable may be at fault by swapping it for a
new one. Another common problem is loose internal
computer connections, which especially can occur after
computer transport. With awareness of the warranty requirements, as well as all safety precautions, our more
technically minded readers may wish to fasten the internal
connectors, with all due care. Be careful though: disconnect the power cable first, and wait for the high voltage to
drop. Ground yourself with the computer. This can prevent many visits to the repair man (or the hospital). However, we cannot be held responsible for any computer manipulation of this kind.
Hardware Conflicts
The installation of various PCI cards and the use of external devices (like MIDI interfaces) can cause hardware
problems—these sound more intimidating than they actually are. If Windows does not respond the way it used to
after having installed new hardware, it will be useful to begin to localize the problem. Start Windows in Safe Mode.
– Restart the computer.
– During startup (while still in DOS mode) the message
“Windows is starting” will appear—press F8 as soon as
it does.
– Choose Safe Mode by selecting 3 and confirm your
choice with return. Windows will now launch in Safe
Mode. Your video and audio card features will not be
available—for example, the screen resolution will be
lower than usual.
You can, at this point call up the Windows Help file, which
can help you in many cases. Choose Start > Help. The
“Contents” section has an entry for “Troubleshooting”.
Now, right-click the “My Computer” icon on your desktop,
and choose “Properties”, then select “Device Manager”.
Troubleshooting
77
Page 78

Troubleshooting
– If you see any small yellow exclamation mark warning
symbols (click on any plus signs to check all the
entries), you have found the root of your problem.
– Select the hardware entry that is causing the hardware
conflict, and click the “Properties” button.
– Pay close attention to the notes Windows gives about
the hardware, for example about resource conflicts.
Hardware resources such as IRQ numbers cannot be
changed in Safe Mode. Instead remove the device from
the Device Manager and restart your machine. You can
now re-install the hardware. On a related topic, please
note that IRQ conflicts can be avoided by setting your
BIOS parameters correctly. However, BIOS settings
should only be changed by experienced users. Consult
your computer or music dealer for advice in this area.
78
Sound Cards
If MAGIX midi studio generation 6 complains with the
error “PCAV Error xx : padUnprimeFailed (xx is a number) on start up, one of three causes could be the culprit:
1. There is no sound card installed in your computer;
2. The sound card or its drivers are not stereo or 16bit capable (this applies to older sound cards);
3. The sound card is currently in use by another program—the Windows CD Player, a wave editor, or the like;
If the first instance, uncheck the ‘PC AV’ checkbox in Audio > Audio Hardware & Drivers. Exit MAGIX midi studio
Page 79

generation 6, and start it again—everything should now
work.
If the second case applies, you will need to install more recent drivers, or change the sound card altogether. Please
ask your sound card’s manufacturer.
In the third instance you simply need to close down the
other programs and start MAGIX midi studio generation
6 again.
Advanced users can use the settings accessible via the
“Control Panel” switches in Audio > Audio Hardware &
Drivers > Audio Drivers to manually control MAGIX midi
studio generation 6’s sound card use.
Viruses
Regrettably, there are some malicious people, who program and distribute virus solely to cause damage. Check
your drives regularly for viruses, especially if you are in
regular contact with other people’s data carriers, or download from the Internet. Not all virus programs are able to
detect the tricky macro viruses, and others which are as yet
unknown to virus protection software developers.
Graphic Cards
Graphic cards and graphic drivers can cause many problems. Always ensure that you have the latest drivers for
your graphic card installed.
If you are confronted with inexplicable problems, install
the Standard VGA graphics driver. This is sensible even if
the actual symptom appears unrelated to graphics use. If
the graphic card or its driver is responsible for the problem, the use of the Standard VGA driver should cure it.
Troubleshooting
Re-installing the Operating System
Sometimes parts of your computer’s Operating System
get corrupted. There are dozens of reasons for this. Then
re-installing the operating system (Windows 95/98/
2000) from your installation CD-ROM is a good idea.
To prevent such time-consuming actions, you should
make sure that you only install software that you really
need and use. Do not mess too much with installing each
and every piece of software that comes across your way.
And stay away from cracked software, not only for legal
reasons, but also for cracks are likely to play havoc with
your computer’s operating system in order to avoid the
cracked software’s copy protection. Please remember: Realtime audio processing as carried out by Magix music studio generation 6 is a “Formula One” race for your com-
79
Page 80

Troubleshooting
puter, so make sure your system is in VERY good shape.
Learn about this in internet news groups or computer music magazines.
Updating the Operating System
Sometimes the faults simply come down to the operating
system. You can usually find updates to your operating
system, free of charge. Operating system upgrades can be
conveniently download from the Internet. The Internet is
a gold mine for solutions to problems, and a great meeting
place for solution seekers. Many computer magazine websites have links from their home pages, to pages that offer
solutions to many common problems.
If all else fails, there is only one thing left to do:
Formatting the Hard Disk
Formatting the hard disk is the last resort you should attempt before sending the computer for repair. This will
erase all files on your hard disk, and most probably also
any garbage data that may be causing your problems. The
formatting process will erase all files, so make backups of
all your files and programs first, and make sure to verify
those backups to ensure that they have been successful.
Note that all invisible authorization files will also be lost,
so uninstall your authorizations of other software first. On
a related note, consider the importance of sending us your
registration card so that you can get help when a hard disk
disaster strikes.
In order to allow formatting of the internal hard drive you
need to start your computer from another, either from the
CD-ROM or an external hard disk. To rule out a Virus
problem however, it is advised that your reformat all your
hard drives in the same session—after all, a CD-ROM cannot be infected with a virus (unless it was infected to begin
with.). Install MAGIX midi studio generation 6 again. If
the problem still persists, a hardware conflict or conflict
between the program and the operating system is most
likely. If the problem only occurs with a specific program,
you will need to get in touch with the software manufacturer. If the problem occurs with several applications, you
will need to get in touch with your computer dealer.
80
Page 81

Part2
Reference
midi
studio
81
Page 82

Using MAGIX midi studio generation 6
Using MAGIX midi studio generation 6
This chapter summarizes MAGIX midi studio generation
6’s general operating functions.
But first, a quick word about this manual.
Conventions of this Manual
Menu Functions: If the text is dealing with functions which
can be reached via hierarchical menus, the different menu
levels are described as follows: Menu > Menu entry >
Function.
Key Commands: When a function can be operated by a key
command of the same name, you will see this symbol at
the side of the text. If names differ, or if a function is only
available as a key command, its name will be printed like
this: Key Command.
Options and Parameters: The options you can set from the
Preferences or Song Settings, and the parameters in dialog boxes are printed like this: Parameters.
Different parameter values are printed like this: Parameter
value.
Graphics: Sometimes this manual uses graphics from
other MAGIX programs. This is due to technical reasons
and does not influence the usability of this manual. However we apologize for this inconvenience.
82
The Mouse
Basic functions
Unless stated otherwise, the left mouse button is the one
you should use whenever “the mouse button” is mentioned.
Clicking: Place the mouse pointer on the object (button, input field, etc.) and press the mouse button once.
Double-clicking: The same as clicking on an object, but you
press the mouse button twice, in quick succession. You
can set the appropriate time-span for this in the System
Controls.
Grabbing or Clicking and Holding: The same as clicking on
an object, but you keep the mouse button held down.
Moving or Dragging: Grab the object and move the mouse
(keeping the mouse button held down) to the desired position.
Mouse Input
Checkboxes: Checkboxes are square boxes which become “checked” when you click them to activate an option
Page 83

Using MAGIX midi studio generation 6
(or function). Click them again to remove the “check” and
deactivate the option.
Pull-down Menus: Pull-down menus open when you
grab certain input fields or buttons. You choose a command by moving the mouse onto the desired item. If you
want to choose an item which is outside the visible section,
– move the mouse over the top or bottom edge of the
menu; the further you move it, the faster you will scroll
through the menu.
– now click using the right mouse button. You can then
let go of both mouse buttons.
Mouse as Slider: You can set practically all the numerical parameters, (even note values or names) by grabbing
the parameter value and moving the mouse up or down. If
the parameter is made up of several separate numbers
(e.g. song position), you can adjust each number individually.
Using the Mouse for In/Decrementing: All the parameter values which can be set using the mouse as a slider
may also be increased or decreased in single units by
clicking on the top or bottom half of the value with the left
or right mouse buttons while holding down the alt.
Numerical Input: Double-clicking on a numerical parameter value opens an input field. The previous value appears pre-selected, (i.e. highlighted) to allow it to be overwritten by a new entry. You can also use the mouse to
make a partial selection in an input field so that only the
highlighted part is overwritten (for more on this, see the
section Numerical Value Input from page 220 onwards).
As long as the input field is open, all the keys may be used
for inputting data only, and may not be used for key commands (the exceptions are the main menu functions).
… by arithmetic: At any time, you can enter numbers by
typing in an arithmetical operation, e.g. “+2” or “−5”,
which then simply changes the current value by that
amount.
… as ASCII-symbols: You can also input numbers as
ASCII symbols: just put a ` or " in front of it, and the
ASCII code will be input as a number. For example:
"! gives 33
"a gives 97
83
Page 84

Using MAGIX midi studio generation 6
This function is particularly useful for entering text in SysEx strings.
Text Input: You input text names in the same way as
numbers, but you only have to click the name fields once
to allow input.
Numbered Names: As you might expect, you can give any
number of selected objects the same name. If the name
ends in a number, the number will automatically be incremented by 1 for each object. This allows you to name all
the sequences on one track quickly.
Disabling automatic numbering: To turn off the automatic
numbering, place a space after the number at the end of
the name. All the selected objects will then end in the
same number.
Tools and the Toolbox
MAGIX midi studio generation 6 allows recorded data to
be handled graphically. This means that you don’t have to
carry out operations by inputting commands via number
tables, but rather by manipulating graphic “objects”.
When editing objects graphically, you always have two
tools available at the mouse pointer position: one is already active, the other is activated by the right mouse button.
You change the currently active tool by clicking on the
toolbox. The mouse pointer then adopts the shape of the
tool you click on, so that you can tell what its function is by
looking at the symbol: the Eraser is used for deleting, the
scissors for cutting and the glue tool for merging objects.
To assign a tool to the right mouse button, click on the desired tool in the Toolbox, with the right mouse button.
84
Effective Range of the Tools:
– Tools are effective only in the working area of the
window they were selected from (you can define individual tools for each opened window).
Page 85

Using MAGIX midi studio generation 6
– A tool basically affects the objects you click on. If the
clicked object is already selected, the tool operates on all
other selected objects, as well.
Selecting Tools: You select the tool you want to use by
clicking on it in the toolbox (or clicking while holding
down the right mouse button for the alternate tool).
If a toolbox is opened at the mouse position you can also
use one of the number keys to choose a tool at the corresponding position. The tools are always numbered from
left to right and top to bottom. Press the Show Tools key
again to switch to the pointer, and close the box.
Opening the Toolbox at the Mouse Position: Use Show Tools
(default: esc) to open a toolbox at the mouse position. This
window will disappear as soon as
– you choose a tool by mouse click,
– you choose a tool bypressing a number key,
– you click anywhere outside the tool window or
– press any key.
Info Line: When operating many of the tools an info line
appears at the edge of the window for as long as the mouse
button is held down. The info line replaces the local
menus in the window. This info line provides useful feedback about the type of operation you are performing.
The Tools: Pointer: The pointer is the default tool. The
mouse also takes on this shape outside the working area
when you are choosing from a menu or inputting a value.
Within the working area the pointer is used for selecting
(by clicking on objects), moving (by grabbing and dragging), copying (by holding down ctrl and dragging) and editing lengths (by grabbing the bottom right corner and
dragging). Grabbing and dragging anywhere in the background opens a rubber band (see page 94).
Pencil: The pencil is used to add new objects. You can also
select, drag, and alter the length of objects.
Eraser: The Eraser deletes clicked objects. When you click
on a selected object all of the currently selected objects are
deleted (as if you had used delete).
Text Tool: The text tool is used to name arrange objects or
add text to a musical score.
Scissors: The scissors are used to split arrange objects, e.g.
before copying or moving individual sections (see page
129).
Glue Tool: The glue tool is the opposite of the scissors: all
selected objects are merged into a single object, which is
85
Page 86

Using MAGIX midi studio generation 6
given the name and track position of the first of the objects
on the time axis (more on this on page 129).
Solo Tool: Grabbing with the solo tool allows you to listen
to only selected objects during playback. Moving the
mouse vertically also outputs any events the cursor
touches, even when the sequencer is stopped (please refer
also to section Soloing sequences from page 130 onwards).
Mute Tool: Clicking on an object with the mute tool stops
it from playing and places a dot in front of its name, to indicate that it is muted. You can unmute it by clicking it
again with the tool. If multiple objects are selected, the setting of the object you’ve clicked on applies to all selected
objects (see also section Muting sequences from page 130
onwards).
Magnifying Glass: The magnifying glass allows you to
zoom in on a “rubber-banded” section, right up to full
window size. You revert to normal size by clicking on the
background with the tool(for more on this, see the section
Zooming Selectively from page 88 onwards). You can also
access this function via other tools by holding down alt.
Finger: The finger is used in the Matrix Editor to alter note
lengths.
Crosshair: The Crosshair is used in the Drum Editor to input a linear series of parameter values.
Layout tool: The layout tool is used for graphically moving
objects in the Score Editor to optimize the display (e.g.
bars to lines: “Local Formatting”) without altering the timing of actual MIDI events.
Size Tool: The size tool is used to adjust the size of graphic
elements in the score.
Velocity Tool: In the note (i.e. Matrix and Score) editors),
you can use the V tool to change the velocity of notes.
86
Window Functions
The basic functions of the MAGIX midi studio generation
6 windows are the same as those in other Windows application programs. However, the display options in MAGIX
midi studio generation 6’s windows are far more extensive.
In MAGIX midi studio generation 6, you can open different combinations of windows (even several of the same
type) and adjust each one individually. All open windows
in a song are constantly updated. This means that the windows update to follow the song position, and any alterations that you make in one window immediately update
the display of all the other windows you are working with.
It is also easy to save different window arrangements
Page 87

Using MAGIX midi studio generation 6
(called “screen sets”), and recall them at the push of a button.
Working with windows
Opening windows: All MAGIX midi studio generation 6
windows can be opened via the Window main menu. You
can open as many of the same type of window as you like.
Closing windows: You close windows (alt f4) by clicking
on the close symbol in the top right of the windows.
Setting window size: As is usual for Windows, you can
change window size by positioning the mouse over a Window edge, or corner and pulling.
Maximizing window size: The windows maximize button,
in the upper right corner of the window, toggles the window between its maximum size, and the size it was before
you clicked on the button .
Minimizing window size: Clicking on the minimize button
reduces the window to its minimum size. Double-clicking
on a minimized window restores it to its original size.
Selecting the Working Area: Scroll Bars: The scroll
bars are situated at the right and bottom edges of a window, if you can only see one section of the working area in
either the vertical or horizontal dimension.
You can move the visible section by clicking the arrows or
grabbing and dragging the scroll slider. There are two
points of note:
– The size of the scroll slider in relation to the size of the
entire scroll bar corresponds to the size of the visible
section in relation to the overall size of the window,
– the visible section changes as you move the scroll
slider.
X/Y Element: The X/Y element is situated in the bottom
left corner of the window. By grabbing and dragging it you
can move the horizontal and vertical window section, as if
you were dragging both scroll bars simultaneously.
Page Scrolling: Use the key commands Page Up, -Down,
-Left and -Right to scroll one page up, down, left or right, as
if you had clicked in the grey region above / below the vertical scroll bar, or to the left / right of the horizontal scroll
bar. The key commands Page Top, -Bottom, -Left most and Right most take the visible section of the working area to
the top, bottom, left or right, just as if you had grabbed one
X
X
87
Page 88

Using MAGIX midi studio generation 6
of the scroll sliders, and moved it to one of its extreme positions.
Zooming: Below the vertical scrollbar and right beside
the horizontal scrollbar you find two hatched fields. These
fields are used for vertical respectively horizontal zooming
and are therefore referred to as telescopes. Clicking the
left, smaller side of the telescope symbol reduces the size
of the objects in the display, allowing you to see more objects in the same space (zoom out) and clicking the right,
larger side enlarges the objects in the display (zoom in).
X
X
The vertical telescope is for vertical zooming (Zoom Vertical In/Out, default assignment: ctrl page up/ctrl page
down), while the one with the horizontal arrow handles
horizontal enlargement (Zoom Horizontal In/Out, default
assignment page up/page down). In some windows, only
one telescope is available, and this then handles both horizontal and vertical zooming at once.
Whike “zooming”, the top left selected object is kept in the
visible region, whenever possible.
Zooming Selectively: Zooming In On One Section of the
Screen: To enlarge a section of the screen to the size of the
whole window use the magnifying glass tool to drag a
“rubber band” over the section you want. You can do this
more than once.
Reverting to the Previous Zoom Setting: Click on the background with the magnifying glass. This will return the
zoom to the original setting, by backtracking through the
previous steps.
You can call up the magnifying glass functions with any
other tool (apart from the pencil) by holding down alt. The
pointer will still look like the previous tool, but if you “rubberband” with it, it will behave like the magnifying glass.
88
Window Elements: Adjusting the Size of the Window Elements: If you move the mouse over the top left corner of
the arrange area the mouse pointer turns into a crosshair.
By dragging it, you can now adjust the size of the bar ruler,
arrange area, track list, and transport buttons. You can
also adjust the window elements in the Score, Drum and
Matrix Editors using the same method.
Concealing/Revealing the Transport Functions: Use View >
Transport to display or remove the transport panel buttons from the top left corner of the Drum, Matrix or Arrange windows. The number of buttons and indicators depends on the amount of space available (see the section
Page 89

X
Using MAGIX midi studio generation 6
Adjusting the Size of the Window Elements from page 88 onwards).
Concealing/Revealing the Parameters: The function View >
Parameters (Hide/Show Parameters) allows you to display
or remove the entire area to the left of the Arrange and Editor windows, which contains the sequence parameters,
track parameters, and the toolbox. Hiding these parameters gives you more space for the editor window itself.
In many windows, you can hide and/or reveal further
screen elements, such as the toolbox. These display options are always available from the View menu.
Menus
Because of MAGIX midi studio generation 6’s great range
of functions, most of them are not found in the main
menus, but appear as local menus. These are always in the
menu bars of the MAGIX midi studio generation 6 windows where they are required.
Hierarchical Menus: You use the menus (whether
main or local) in the same way as in other application programs: grab the menu title, move the mouse over the desired item , and release the mouse button. In hierarchical
menus, there is a right-pointing arrow after the item. If
you highlight this item, a sub-menu drops down to the
right. To choose an item from this sub-menu, move the
mouse to the right, into the sub-menu, and then vertically
over the desired item. Releasing the mouse button will activate the selected function.
Using a keyboard: You can also select the active window’s
menu using alt, and step through the menus in the usual
way using cursor left and cursor right (or by hitting the
typewriter keys for the underlined letters) to select the one
you want. You then use cursor down and cursor up to select the menu entry you want (or carry out the menu function immediately by hitting the key for the letter underlined in the menu function’s name).
If you encounter a hierarchical entry (which has a triangle
at the end of the entry line), you can use cursor right to access the sub-entries (cursor left closes the sub-menu
again) and, again, use cursor down/up to make your selection.
When you have chosen your function, hit return to activate it.
Fixed key commands: Some menu functions can be accessed via fixed keystrokes or combinations of keystrokes.
The keys (or combinations thereof) are shown on-screen
89
Page 90

Using MAGIX midi studio generation 6
next to the menu entries and operate globally. For example, you can open a song with ctrl o, or copydata to the
Clipboard (=Copy) via ctrl c.
Please note that you may assign practically any other function to any key you like using the Key Commands window.
Menu options with “…” in their title: Three periods,
like this: …, next to the menu function title indicate that
the entry does not activate a function immediately, but instead opens a dialog box.
Dialog Boxes
In Dialog boxes, you can hit the thick-bordered button by
pressing return, or by clicking with the mouse.
As per usual for Windows, you can toggle the thick border
from button to button with cursor left/right.
Window Types
There are two different types of window in MAGIX midi
studio generation 6: normal windows and float windows.
The contents of all the windows belonging to the current
song are always updated, no matter what the type of window.
Normal Windows: You can open as many normal windows as you want, including several of the same type. Even
though the contents of all the windows is constantly updated, only one of the windows ever has the status of being
the “top”, or “active” window. This is the window which is
in the foreground when several normal windows are overlapping.
Top or Active Window: This window can be recognized by
its fully-shaded title list. The main distinguishing characteristic of this window is that key commands only affect
this window, and not any of the others. Windows > Next
Window (ctrl+tab) brings the next window forward if it is
fully covered up by others.
Background Windows: Background windows are identified
by the color of their title bar. This color is determined by
your “Appearance settings in Windows. You bring the
window to the foreground by clicking on it, clicking on the
title bar, or calling up one of the local menu functions.
90
Float Windows: MAGIX midi studio generation 6
knows two float windows: the Transport window and the
Event Float window. Float windows are so called because
they always “float” in the foreground, even above the top
normal window (if there are too many open float windows,
they will inevitably cover each other up—just click on
Page 91

Using MAGIX midi studio generation 6
them to bring them to the front). Float windows are recognizable by their narrower title bar, which contains no
name. Mouse operations can be carried out in the same
way as in normal windows.
Main Menu Window: MAGIX midi studio generation 6
Main Menu window is the main window of the program.
You will find all menu items here. There are:
– Global Menus, which are always visible (e.g. File);
– Window related menus: they belong to a certain
window type (e.g. Score Window) and are only visible
when this window type is the active window. It only
contains functions relevant for the corresponding
window type.
As is common on Windows computers, you can address a
menu using using the alt key. Keep this window at its preset maximized size, there isn’t much point in making it
smaller.
The “Minimize Window” button can be used to switch between MAGIX midi studio generation 6 and other applications. You can get back to MAGIX midi studio generation 6 at any time by clicking the MAGIX midi studio
generation 6 symbol in the Task Bar.
Press alt tab to toggle directly between MAGIX midi studio generation 6 and any other application.
Relationships between Windows
The two buttons at the top left of a window (shown here),
determine its relationship to the song position (Catch), or
to other windows (Link, Show Contents, or Contents
Catch).
Catch: The Catch function means that the visible section
of a window follows the song position as the song plays.
If the button with the walking man on it is lit (i.e. if it is
green), the window’s display follows the song position as
the song plays. If the button is not lit, the display does not
update, even when the song position line moves past the
right edge of the visible portion of the window(Catch Clock
Position).
Automatic Catch Disabling: If you move the visible section
manually, Catch is automatically switched off, so that the
new section you have chosen doesn’t then disappear, as
the display is updated to the song position line.
Autocatch: The function Enable Catch when Sequencer starts
(Options > Settings > Global Preferences…) always enables Catch mode whenever you press play or pause.
X
91
Page 92

Using MAGIX midi studio generation 6
Link, Show Contents, and Contents Catch: You can
define these display options to control how information is
displayed when working with related editor windows.
Link: When the button with the chain link icon is activated
(i.e. when it is this window always displays the same contents as the top window. The display is adjusted whenever
the selection in the top window is altered.
Here’s an example: imagine the top window is an editor.
In Link mode, the other editor windows can display the
same data in another form (though please remember: you
cannot have any event display as the background window
of an Arrange window while in Link mode).
Contents Link: Double-clicking on the link button (dark
blue) activates Contents Catch mode. This means that the
window always shows the contents of the object selected
in the top window. The display is therefore always one
level below that of the top window.
Here’s an example: if the top window is an Arrange window, in Contents Link mode the editor windows can show
the events of a selected sequence. Selecting a different sequence in the Arrange window will cause the display of
the linked editor to switch to that sequence, as well.
92
Contents Catch: By simultaneously switching on Catch
and Contents Link, you activate Contents Catch mode. Initially, this is equivalent to Contents Link mode, but when
the song position reaches the next object on the same
track, the contents of this object are then displayed.
You could use this mode in an Arrange window, much as
you would in Contents Link mode. The editor windows
would then show the events of the sequence which is currently being played on a track.
Screensets
Normally you will lay out your windows on the screen in a
way that suits your way of working. This layout with various windows, with all their different parameters (display,
zoom, position of each window) is called a screenset, and
can be stored. You can then swap between different
screensets, much as you might swap between different
computer monitors.
Storing Screensets: Screensets are numbered from 1—
99 using only the numbers 1—9. You can see the number
of the current screenset in the main menu next to the
word Window.
Page 93

Using MAGIX midi studio generation 6
You don’t have to save screensets with an explicit command. It happens automatically as soon as you switch to
another screenset. Thus, without any effort, your current
working view is always stored on the current screenset.
Switching Screensets: Just input the number of the desired screenset (1—9). For two-digit screensets hold down
alt while inputting the first digit.
Protecting Screensets: Use the key command Lock/un-
lock current screenset to protect the current screenset from
being altered. A # then appears in front of the screenset
number. Repeat the key command to unlock the
screenset.
The New Song command deactivates all Screenset locks.
Copying Screensets: To copy the current screenset to a
destination screenset, hold down shift when you switch
screensets.
Copying Screensets between Songs: Close all the windows
you want to copy in the screenset, switch to the other song,
and reopen the editors. They will have retained their sizes
and shapes in the new song.
The reason for this is that the preset values for window position, size, and all other pertinent parameters are stored
in memory when you manually close a window, so that the
settings remain the same the next time windows of the
same type are opened again.
Sequencer-controlled Switching: You can automatically switch screensets using meta event # 49—just add it
to a sequence in the Event Editor.
– Set the song position to the point where you’d like the
screenset to change.
– Right mouseclick in the Event Editor on the button
shown. The inserted meta event has the default value
50 (Song Select).
– Alter the number in the NUM column from 50 to 49.
This changes the name to Screenset.
– Input the desired screenset number in the data bythe
column (VAL).
You can stop the switching by muting the sequence that
contains the Meta 49 event.
X
Selection Techniques
Whenever you want to carry out a function on one or more
objects, you have to select the object(s) first. This applies to
93
Page 94

Using MAGIX midi studio generation 6
arrange objects and individual events alike. Selected objects are either displayed in inverse color, or will flash (the
latter in the Score editor).
The selection status of an object applies to all windows. An
object selected in one window will also be selected in all
other windows that display that object. Changing the top
window doesn’t affect the selection (as long as you don’t
click on the background, which deselects everything. Be
sure to click on the window’s title bar).
Selecting Individual Objects: Individual objects may
be selected by clicking on them, and deselected by clicking
in the background, or by selecting another object.
X
X
X
You can also use the key commands Select next/previous
Object (default: K/ J, in the Event List: M/ I).
Selecting Alphabetically: tab selects the next alphabetical
object. In the Arrange window pressing any letter key selects the first object whose name begins with this letter
providing there is no key command assigned to this key.
Selecting Several Objects: To select several non-contiguous objects , hold down S as you click them. As subsequent objects are selected this way, the previous selections
are retained. This also works with horizontal or rubber
band selection.
Horizontal Selection: To select all objects on a track, click
on the track name in the track list. In the same way, you
can select all events with a certain event definition in the
Drum Editor, by clicking on the event definition name, or
all notes of a certain pitch in the Matrix Editor by clicking
the relevant key on the screen keyboard.
In Cycle mode, the above selects only the events within the
Cycle zone.
“Rubber-Banding”: To select objects which are close together, click on the background and drag a “rubber band”
over them.
All objects touched, or enclosed by the rubber band will be
selected.
Toggling the Selection Status: When you make any selection (including by rubber band or horizontal selection),
holding down shift at the same time will reverse the selection status of the objects.
You can reverse the selection status of all objects using
Edit > Select > Toggle Selection. For example: if you want
to select all objects except for a few, first select these few
and then choose Toggle Selection.
94
Page 95

Using MAGIX midi studio generation 6
Selecting Following Objects: To select all objects after the
current one (or, if no object is currently selected, to select
all objects after the song position), choose Edit > Select >
Select All Following.
Selecting Objects within the Locators (Vertical selection):
Edit > Select > Select inside Locators selects all objects lying wholly or partly within the locators.
Selecting all Objects: To select all objects, select Edit >
Select All or press ctrl a.
Deselecting All Objects: You can deselect all objects by clicking on the background or using the key command Deselect
All.
Edit Operations
The local edit menus in MAGIX midi studio generation
6’s various windows all take the same form. The first item
is Undo. Below Undo are the typical clipboard functions
and at the bottom of each are the main selection commands.
Undo: Undo allows you to reverse the previous edit. Under Options > Settings > Global Preferences…, you can
disable the warning message that normally appears when
you activate Undo, by checking the Disable safety alert for
Undo box.
The key command for Undo is always ctrl z.
The Clipboard
The clipboard is an invisible area of memory into which
you cut or copy selected objects so that you can paste them
into a different position.
The clipboard spans all songs, which means you can use it
to exchange objects between songs.
X
X
X
X
X
Cut: All selected objects are removed from their current
position and placed on the clipboard. The previous contents of the clipboard are overwritten in the process (key
command ctrl x).
Copy: A copy of all selected objects is placed on the clipboard. The selected objects are also left in place. Here too,
the previous contents of the clipboard are overwritten (key
command ctrl c).
Paste: All objects from the clipboard are copied into the
top window. The clipboard is not erased in the process
(key command ctrl v).
X
X
X
95
Page 96

Using MAGIX midi studio generation 6
The contents of the clipboard are added at the current
song position (if they are events or arrange objects). The
song position is incremented by the length of the pasted
objects.
In the Arrange window, the contents of the clipboard are
pasted to the selected track. If events are pasted in the Arrange window, either a new sequence is created for them,
or the events are added to a selected sequence.
Any objects that existed previously are unchanged.
X
Delete: Any selected objects are erased. Delete has no effect on the clipboard and is the same as pressing back-
space or delete.
General Functions of the Editors
Control output via MIDI: Switching on the MIDI Out
button causes MIDI events to be output when they are
added, selected, or edited. This allows you to audibly monitor every editing stage, whether you are scrolling through
the Event List (automatic selection) or transposing a note.
Automatic Scroll Functions: … scrolling to the Song position: The button with the walking man on it activates the
Catch function, which means that the window view will always show the current song position.
Contents Link: Clicking on the button with the chain
symbol on it activates the link function, and double-clicking it activates the “show contents” function. In “show
contents” mode, the window always displays the contents
of an object selected in the top window; in link mode the
window shows the same objects as the window where you
are making the selections.
For a full description of the catch and link functions see
page 91
In Editor windows, contents link is usually active. You can
then, for example, select some sequences in an arrange
window, and when you switch to a screenset with an open
editor window, you will see the contents of the selected sequence(s).
.
Selection Commands and Editing Functions
96
X
Setting Locators by Objects: The Functions > Objects
> Set Locators by Objects command allows you to set the
locators in all the Editors (just as in the Arrange window)
so that they just encompass the currently-selected events.
Page 97

Using MAGIX midi studio generation 6
Edit Functions: For a description of the undo and clipboard functions (particularly adding events at the Arrange
level), refer to page 95.
Altering Note Lengths: While changing the lengths of
multiple objects you can make all lengths equal by holding
shift ctrl.
Repeating or Copying Events: To repeat selected events
once or several times (with adjustable rounding of the position of the first repeated event), you can use the function
Functions > Object > Repeat Objects.
Deleting Events: The basic techniques are the same as
for deleting sequences:
– delete deletes all selected events,
– the Eraser also deletes all selected events, and any
events that you click with it (whether previously
selected or not).
Step-time Recording
Step-time recording allows you to enter notes via the keyboard, but not at any defined tempo as in real-time recording. After each note is inserted, the sequencer “steps”
ahead by an increment which is determined by the division setting in the Transport window. Every note or chord
you enter automatically receives the note value of the display format, or a multiple of it. MIDI Step-time input is activated in the Score, Event List and Matrix Editors by
pressing the MIDI In button.
Here’s how to do it. Select an existing sequence, or create
one in the Arrange with the Pencil tool. Open one of the
note editors (Score, Event List or Matrix).
– Switch on MIDI In.
– Play and hold a note or chord. You may even hit the
notes for the chord one after another, if you like. The
important thing is that at least one note remain pressed
from the beginning.
– Release the last note. This moves the song position by
one step (the format value on the transport), and you
may enter a new note.
– Rests are entered with the sustain pedal. Each time you
press this, you step through the song by the format
value, without entering a new note.
– You may enter longer notes or chords by pressing the
sustain pedal while holding down the note(s).
You may change the format value on the Transport at any
time, even while you are holding down notes.
X
X
97
Page 98

Using MAGIX midi studio generation 6
Step-time input is also possible from the score display.
However, the quantize value Default should be avoided, as
the note display will then change every time the step size
is altered.
If you are step-time recording in the Score Editor you can
also define the note value by clicking notes in the part box
(but only if step-time recording is switched on.)
Keyboard Control: When employing step-time input,
there are a few special, non-editable key commands that
can only be used if the keys in question have not been redefined for another purpose (see the section Key Com-
mands Window from page 101 onwards).
tab or space bar: as the sustain pedal. (please note that
space bar is the default key for Record Toggle. If you wish to
use space bar to move along in steps, you will first have to
delete this key assignment; see the section Deleting Assign-
ments from page 102 onwards).
n jumps to the next bar division position; so in 4⁄4 time,
to the next quarter note.
m jumps to the next bar.
b moves back a step and erases the event there.
a sets the division value to 1⁄4.
s sets the division value to 1⁄8.
d sets the division value to 1⁄16.
q sets the division value to 1⁄32.
w sets the division value to 1⁄64.
e the current division value is set to the next highest trip-
let value: for example from 1⁄16 to 1⁄24.
e the current division value is set to the next lowest triplet value: for example from 1⁄16 to 1⁄12.
The key commands will continue adding these values, as
long as the MIDI controller key is held down.
98
X
Editing via MIDI input: By double-clicking on the
MIDI In button, you switch on “Edit by MIDI In Mode”.
The values of the MIDI data being input are then used to
edit the “Pitch” and “Velocity” of the currently-selected
note. The note length remains unchanged. In contrast to
MIDI step-time input, no new data is created; what exists
already is merely changed. The key commands Next / Pre-
vious Event allow you to move one note further forward or
back.
Event Quantization
The Event Editor has a separate quantization function
which can be applied to all selected events. Unlike quantization for arrange objects the event quantization applies to
Page 99

Using MAGIX midi studio generation 6
all events, not just notes. It irreversibly alters their positions ( only notes can be returned to their original recorded positions).
Quantizing Events: Select the events that you want to
quantize.
You open the pull-down Quantization menu by grabbing
the “Q” button shown here.
This is identical to the matching pull-down menu for the
playback parameters, and contains its own quantization
grid (for details see the section Quantization from page 135
onwards). As soon as you choose an item from the menu,
all the selected events are quantized.
Please remember that you can only reverse note quantization. All other events are permanently shifted.
To apply the same quantization grid to another series of
selected events (even in other Editor windows), select
Functions > Quantize again, or click quickly on the “Q”
button again.
Note Quantization
Normally, all notes in a sequence are quantized according
to the Quantization parameter in the sequence parameter
box and the extended sequence parameter box (explained
in greater detail in the section Quantization from page 135
onwards).
To quantize single notes in either of the Note Editors (the
Matrix or Score Editors) you can use the Q tool, as well as
event quantize.
If you click on a single note (or a selected group ) with the
Quantize tool, and hold down the mouse button, the quantize menu should open and you can choose the quantization you want.
If you click quickly on notes, the last quantize value will be
used again, just as with the Quantize Again command.
If you click on the background with the Q tool you get the
usual rubber band for selection of several objects at once.
Special note for working in the Score window: the display
quantize setting will have an effect on how this works.
Unquantizing Notes: Note events can be returned to their
original record positions, or moved by hand, by selecting
the setting Qua off (3840),or by clicking on the Q button
while holding down ctrl.
You can also unquantize all the currentlyselected notes by
clicking on them with the Q tool while holding down ctrl.
You achieve the same result by selecting Functions > DeQuantize.
X
X
99
Page 100

Using MAGIX midi studio generation 6
Display Functions
The section Window Functions from page 86 onwards de-
scribes the basic window functions, including how to lay
out the window elements to make more space for the
event display in the graphic editors, and how to operate
the zoom functions.
Many of the display options in the editor windows correspond to those in the Arrange window:
By choosing View > Parameters you can hide or show the
parameter fields to enlarge the window’s working area.
The key command is Hide/Show Parameters.
In the Matrix and Drum Editors you can conceal or reveal
the transport panel in the top left corner by choosing View
> Transport.
Key Commands
You can activate many MAGIX midi studio generation 6’s
functions via key commands. The Key Commands window is where you assign key commands to the keys.
Whenever this manual mentions a key command, this refers to a command which can be called up by a keystroke.
This allows you to completely customize MAGIX midi studio generation 6 to suit your own working style.
X
If any function described in this manual is also available
via a key command with the same name you will see this
symbol.
Your personal key assignments are stored (together with
the settings of the Preferences pages) in a file called
“MAGIX midi studio g6.prf” in your PC’s Windows
folder. You should:
– make a backup of this file at another location on your
hard disk;
– make a floppy disk backup of it in case you need to use
a MAGIX midi studio generation 6 system on another
computer.
When you install updates to your version of MAGIX midi
studio generation 6, your personal key commands will remain unaltered.
100
Special Keys: Some keys have special functions:
– The modifier keys shift, ctrl, and alt can only be used in
conjunction with other keys.
– The backspace key has the fixed function “delete
selected objects”. It can only be assigned a function in
conjunction with the modifier keys shift, ctrl, and alt .
– The ctrl+f4 key (close window) and ctrl+alt+f4 key
combination (close application) cannot be reassigned.
 Loading...