

Page 1
Page 2

2
Copyright
This documentation is protected by law. All rights, especially the right to duplicate,
circulate, and translate, are reserved.
No part of this publication may be reproduced in the form of copies, microfilms or
other processes, or transmitted into a language used for machines, especially data
processing machines, without the express written consent of the publisher.
All copyrights reserved.
All other product names are trademarks of the corresponding manufacturers. Errors in
and changes to the contents as well as program modifications reserved.
Copyright © MAGIX Software GmbH, 1994-2012. All rights reserved.
MAGIX, Samplitude, Hybrid Audio Engine are registered trademarks of MAGIX
Software GmbH.
This product uses MAGIX patented technology (USP 6,518,492).
VST and ASIO are registered trademarks of Steinberg Media Technologies GmbH.
Other mentioned product names may be registered trademarks of the respective
manufacturer.
www.magix.com
Page 3

Preface 3
Preface
Congratulations on your purchase of Samplitude Music Studio 2013!
Creating your own music or video soundtracks in a home studio has become more
and more popular. But the wide variety of available equipment and software often
confuses both beginner and professional musicians alike. You may find yourself
asking questions like "What do I really need?", or "What's the best value for my
money?"
Samplitude Music Studio 2013 is the perfect solution: Fast and easy-to-handle music
production on your PC, from recording to mastering. Transform your PC into a
complete sound studio.
All you need to produce and arrange in high-quality is a conventional sound card, but
additional studio equipment can easily be added.
The following pages will introduce to you in detail the various functions and
possibilities offered by Samplitude Music Studio 2013.
Have fun with Samplitude Music Studio 2013.
Your MAGIX team
Restrictions to this version
Note: MAGIX Music Studio is a restricted version of "Samplitude Music Studio".
The following information refers to the full feature set in Samplitude Music Studio.
The following features are either limited or not available in MAGIX Music Studio:
• Fewer tracks: 64 maximum
• No submix/AUX busses
• Lower sample rates: up to 48 kHz
• Fewer plugins per object (2), track (2) and master (2)
• Input/Output limited to 2
• Only 2 essentialFX (VocalStrip + Compressor)
• No MR-64 multitrack recorder
• No print function in the Score editor
• Limited number of export formats
• No sample content
• Only one Vita Solo Instrument ("Century Keys")
Page 4

4
Table of Contents
Copyright 2
Preface 3
Support 14
Introduction 16
What is Samplitude Music Studio 2013? 16
What’s new in Samplitude Music Studio 2013? 17
The features 18
Tutorial 21
Step-by-step mode 21
Switch workspace 31
Recording in the Arranger 31
Integrate audio material 33
VIP and wave projects 34
Arranging MAGIX Soundpool loops 35
Add synthesizers 38
Edit objects 38
MIDI recordings 40
Edit MIDI 42
Effects 46
Burn CD 48
Program desktop overview 49
VIP window 49
Managers/Docker 50
Docking 51
Transport control 53
Track Editor 55
Track box 58
Symbol bars 59
Workspaces 64
Functional overview 65
Objects 65
Ranges 75
Wave projects 78
Marker 79
www.magix.com
Page 5

Table of Contents 5
Volume 80
Output mode 80
Record 81
Folder tracks 84
Tips & tricks 85
Mouse functions and mouse modes 88
Universal mode 88
Range mode (safe mode) 90
Curve mode 90
Curves / Object mode 91
Cut mode 91
Pitchshift / Timestretch mode 91
Draw volume mode 92
Draw panorama mode 92
Wave edit mode (only wave projects) 92
Scrub mouse mode 92
Color mode 93
Zoom mode 94
Effects and effect plug-ins 95
What effects are there, and how are they used? 95
Saving effect parameters (preset mechanism) 96
"Sound FX" (object editor, mixer channels, Mixmaster) 97
Parametric equalizer (track effects, mixer channels, Mixmaster) 101
MAGIX Mastering Suite 102
Vintage Effects Suite (track effects, mixer channels, mix master) 107
essential FX 120
Vandal SE 131
Analogue Modelling Suite: AM-Track SE 136
Track dynamics 142
Track delay/reverb (track effects) 144
Elastic Audio Easy 144
Automation 153
Automation – context menu 153
Automation modes 155
VST plug-in/VST parameters dialog 156
Recording automation in "Read" mode 156
"Draw" mode 157
Edit automation curves 157
Page 6

6
Move automation curve with audio/MIDI data 158
Mixer 159
Overview 159
Operating the mixer 160
Channel strips 162
Master section 164
Global settings 165
Buses and routing 167
Embedding external effects devices 168
Tips and tricks 168
MIDI in Samplitude Music Studio 2013 169
What is MIDI? 169
Connect external equipment 169
Convert MIDI objects into audio files 170
MIDI settings 171
MIDI: Import, record, edit 171
MIDI object editor 174
Step recording via keyboard or controller keyboard 176
MIDI editor 177
Software / VST instruments 211
Installing VST plug-ins 211
Load instruments 213
Loading routing settings with software instruments 214
Load effects plug-ins 215
Route MIDI instrument inputs 217
Instruments with multi-channel outputs 218
Adjust instrument parameters 218
Play and monitor instruments live 220
Routing VST instruments using the VSTi manager 222
Preset management 223
Freezing instruments (freeze) 223
Tips on handling virtual instruments 224
ReWire 225
Tempo editing 227
Tempo and time signature changes in the tempo map... 227
Tempo markers 228
Tempo Map Modes: BPM Mode / Grid Fit Mode 229
www.magix.com
Page 7

Table of Contents 7
Tempo Change: BPM Marker 230
Time Signature Marker 230
Grid Position Marker 231
Grid Tapping 231
Tempo Map Dialog 232
Tempo and Time Signature Dialog 234
Manipulating the Tempo Marker in Timestretch Mouse Mode 234
Synth objects 236
Working method 236
Note for users of older versions of MAGIX Music Studio 237
Atmos 238
BeatBox 2 plus 238
Loop Designer 250
LiViD - Little Virtual Drummer 254
Robota 255
Vita 263
Revolta 2 265
Additional Vita Solo synthesizers 267
Surround sound 269
Surround panorama module 269
Stereo and mono signal processing with twin-channel Surround 271
Automation of twin-channel Surround 272
Synchronization 274
Synchronization formats 274
Synchronization / Synchronization settings 276
Burning CDs 279
Writing 279
Burning CDs in Samplitude Music Studio 2013 279
DSP display 281
Tools and wizards 282
Load audio CD track(s) 282
Crossfade Editor 284
Waveform generator 285
Remix Agent 287
Harmony Agent 293
Track settings 295
Managers 297
Page 8

8
SMPTE Generator 306
Solo JamSession 307
Timestretch patcher 311
File menu 313
New Virtual Project (VIP) 313
Open 315
Load / Import 316
Save 318
Save project as 319
Save project as template 319
Save object 319
Save session 319
Export 319
Internet 323
Trackbouncing (internal mixdown) 326
Range trackbouncing 328
MIDI bouncing 328
Rename project 329
Clean up 329
Close project 331
Project properties 332
Program Preferences 336
Exit 339
Recently opened files 339
Edit Menu 340
Undo 340
Redo 340
Undo List 341
Mouse mode 341
Object mode 342
Copy 342
Cut 342
Split 343
Insert 344
Delete 345
Silence 345
Tempo 346
Range 346
www.magix.com
Page 9

Table of Contents 9
Crossfade 351
Track menu 353
Insert new tracks 353
Copy track(s) 354
Insert track(s) 354
Delete track(s) 355
Track type 355
Input 355
Track size 355
Track Freeze 355
Track effect settings 357
Track information 357
More 357
Object menu 362
Object editor 362
MIDI editor 362
Wave editing 362
New MIDI object 363
New MIDI object in the range 363
New synth object 363
Edit 363
Quantization 366
Object effects 368
Select objects 378
Groups 379
Move object 379
Snap point (Hotspot) 381
Object color / name 381
Tempo and beat recognition 381
Harmony Agent 381
Harmony display 382
audioid 382
Time Stretch/Pitch Shift Patcher... 382
Playback / Record menu 384
Play once 384
Play loop 384
Play in range 384
Play with preload 384
Page 10

10
Play only selected objects 384
Restart playback 385
Stop 385
Stop and go to current position 385
Playback mode 385
Playback options 386
Record 387
Record mode / Punch in 388
Record options 389
Monitoring 392
Move Play Cursor 393
Marker 394
Solo JamSession 396
MIDI record modes 396
MIDI panic – All notes off 397
Automation menu 397
First entries in the automation context menu 397
Editing curves 397
Delete all curves 398
Automation mode 398
Do not display automation 399
Display track automation (default setting) 399
Display selected curves only 399
Display unselected curves (cannot be activated) (Default setting) 399
Display unselected curves (can be activated) 399
Effects menu 400
Amplitude / Normalize 401
Dynamics 403
Frequency/Filter 405
Delay / Reverb 406
Time / Pitch 408
Distortion 411
Restoration 412
Stereo / Phase 413
Modulation / Special 415
Sample manipulation 418
Plug-ins 420
essential FX 421
www.magix.com
Page 11

Table of Contents 11
MAGIX Plug-Ins 422
Waveform Generator 423
SMPTE Generator 423
Process only left (right) stereo channel 423
Process Effects Offline 423
CD menu 424
Load audio CD tracks 424
Make CD 424
Indices (Track markers) 424
CD track/index manager 426
CD disc options 427
Set pause time 427
CD arrange mode 427
Get CD info (freeDB Internet) 428
freeDB options 428
Show CD-R drive information 428
Show CD-R disc information 428
audioid 429
Menu view 430
Mixer 430
Multitrack recorder MR-64 430
Mastering Suite 430
Transport control 430
Time display 432
Visualization 433
Export tool 434
Managers/Docker 435
Manager 435
Track editor 435
Rebuild graphic data 435
Sections 436
Hide submix / AUX buses 436
Grid view 436
VIP display 437
Overview mode 438
Horizontal 438
Vertical 438
Cascade 438
Page 12

12
Tile 438
Untile 439
Window 439
Toolbars 439
The "Share" menu 441
Community upload 441
Use as background music 442
Add to music collection 442
Help menu 443
Help 443
Help index 443
Context help 443
Open PDF manual 443
Watch the introductory video 443
Online tutorials 443
About Samplitude Music Studio 2013 443
MAGIX auto-update 444
Open magix.info 444
Product registration 445
Download more instruments/Sounds/Soundpools 445
Screen transfer - MAGIX Screenshare 445
Restore original program settings 447
MP3 Encoder activation 447
Preset keyboard shortcuts 449
Mouse 449
General settings 449
System / Audio 449
Program 462
Edit keyboard shortcuts and menus 465
Design 469
Easy setup 472
Project options 473
General 473
Project Auto Save… 476
Mixer setup 477
Synchronization 477
Recording options 478
www.magix.com
Page 13

Table of Contents 13
Varipitch/practice mode 480
If you still have questions 481
Tips for program help 481
System requirements 482
Uninstalling the program 482
Serial number 482
More about MAGIX 484
MAGIX Online World 484
magix.info 484
Soundpool DVD Collection 485
Index 486
Page 14

14
Support
Dear MAGIX customer,
Our aim is to provide fast, convenient, solution-focused support at all times. To this
end, we offer a wide range of services:
• Unlimited web support:
As a registered MAGIX customer, you have unlimited access to web support
offered via the convenient MAGIX service portal on http://support.magix.net,
including an intelligent help assistant, high-quality FAQs, patches and user
reports that are constantly updated.
The only requirement for use is product registration at www.magix.com
• The online community, on-the-spot support and a platform for exchange:
MAGIX customers have free and unlimited access to the online community at
www.magix.info, which includes approx. 150,000 members and offers the
opportunity to ask members questions concerning MAGIX products as well as
use the search function to search for specific topics or answers. In addition to
questions & answers, the knowledge pool includes a glossary, video tutorials and
a discussion forum. The multiple experts, found round-the-clock at
www.magix.info guarantee quick answers, which sometimes come within
minutes of a question being posted.
• Email support for MAGIX products:
For every new MAGIX product you will receive, as of date purchase, 12 months of
email based customer service.
Premium email support:
For priority support, or if you want the MAGIX support team to help with nonMAGIX related hardware problems you can purchase a Premium email support
ticket. Log in at http://support.magix.net and click on "Purchase access code",
the ticket is for a specific problem, and is valid until it is solved, it is not restricted
to an email.
Please note: To be able to use the Premium email support and free product email
support via the Internet, you have to register your MAGIX product using the serial
number provided. This can be found on the CD case of your installation CD or on the
inside of the DVD box.
• Additional telephone service:
Besides the large number of free customer service offers, we also offer a feebased telephone customer service.
Here you can find a summary of our technical support telephone numbers:
http://support.magix.net/
Mail (Europe): MAGIX Development Support, P.O. Box 20 09 14, 01194 Dresden,
Germany
www.magix.com
Page 15

Mail (North America): MAGIX Customer Service, 1105 Terminal Way #302, Reno,
NV 89502, USA
Please make sure you have the following information at hand:
• Program version
• Configuration details (operating system, processor, memory, hard drive, etc.),
sound card configuration (type, driver)
• Information regarding other audio software installed
MAGIX Sales Department
You can reach the MAGIX Sales Department workdays for help with the following
questions and problems:
• Orders
• Product consulting (pre-purchase)
• Upgrade requests
• Returns
Support 15
Europe
Monday - Friday, 09:00-16:00 GMT
U.K.: 0203 3189218
Denmark: 45 699 18763
Sweden: 46 852 500713
Finland: 35 89 42419023
Norway: 47 210 35843
North America
9 am to 4 pm EST Mon-Fri
Phone: 1-305-722-5810
Page 16

16
Introduction
What is Samplitude Music Studio 2013?
Samplitude Music Studio 2013 is a multitrack recording and editing application for all
types of audio material featuring unlimited editing options. It's easy to use and follows
three simple steps:
1. Download and record
You can download CD tracks, MP3 songs, wave files, video soundtracks, or sounds &
samples from the hard disk, the CD-ROM drive, or the Internet. You can even make
your own recordings from a stereo system or with a microphone. Everything you
download or record is displayed as an object on the Arranger's tracks.
2. Arrange and edit
Basically, all tracks stacked virtually above each other will be played simultaneously,
and everything that follows horizontally will be played in subsequent order. However,
you can mute the objects stacked above each other.
Every object – that is, every sound, every song – can be cut up or have effects added.
For example, if you want to shorten a song, move the object with your mouse to the
length at which you would like the song to be – done! Want to freshen up your
sound? Then open the equalizer and either select a preset that fits, or modify your
sound "by hand”.
Arranging and editing is essentially all about cutting, blending, adding, mixing effects,
and placing audio material into the right positions and into the right tracks. But it’s
also about play and experimentation. If it fits, throw it in! Without experimentation
there is no innovation. Samplitude Music Studio 2013 allows you to experiment, and
experiment wildly. There’s no risk of your audio material being damaged. All editing
functions are "non-destructive”.
Export and use
Regardless what you're experimenting with, in the end something usable should come
out of it. Samplitude Music Studio 2013 has everything you need to be productive:
• Homemade audio CDs which can be played by any standard CD player
• Unique MP3 collections, e.g. as a source of material for your MP3 player
• Podcasts: Simply export the project as a podcast and - if you want - publish it
online using MAGIX Podcast Service online (the MAGIX Podcast Service can be
reached via the "Online" menu.)
• And much more. The export principle is simply "what you hear is what you get".
That is, what you export sounds exactly as it sounded in the arrangement during
playback in Samplitude Music Studio 2013.
www.magix.com
Page 17

Introduction 17
What’s new in Samplitude Music Studio 2013?
96 kHz
Thanks to the high, 96 kHz, sample rate, the signal is now measured 96000 times a
second, instead of 48000, like earlier. Together with the 32-bit rate, a much more
precise digitalization takes place, resulting in a high sound quality like in professional
productions.
128 tracks
With ambitious projects that works with track doubling, aux tracks, plug-ins, etc.,
track number sky-rockets pretty fast. The new version lets you arrange on 128 tracks
(instead of the 64 earlier) - enough space for the most complex multi-track projects.
4 Vita Solo instruments
The four new Vita Instruments, rock drums, string ensemble, bass machine and world
percussion, can be found as before via the "Synth"> "Vita" buttons.
Vita 2 sample player
In its 2nd version, Vita Sample Player has a new "Tube distortion" function, a new
user interface as well as more sounds:
• Rhodes: Rhodes clean / Rhodes Phaser / Rhodes smooth / Rhodes wah
• Ethno Percussion: DunDun / Framedrum / Gamelan Chimes / Sourdo / Tablas /
Drums / Udu African / Talking Drums
• More orchestral woodwinds: Piccolo / English Horn (each in two variations)
Additional improvements
• 5 essentialFX in a new skin (ChorusFlanger, Phaser, StereoDelay, Compressor,
VocalStrip)
• Guitar tuner
• Music Maker compatibility: Project files (*.mmm) from the latest MAGIX Music
Maker generation can be loaded without any problems.
• New Soundpool user interface
• Mastering Suite 4.0 with an integrated 6-band equalizer
• MIDI learn (in the mixer)
• Various detail improvements
Page 18

18
The features
The best possible sound quality
This feature is especially important to every music lover: Samplitude Music Studio
2013 offers unique sound quality for digital music editing.
• 100% sound neutrality: Benefit from Samplitude, professional audio software
that's been used for years in sound studios and radio & TV stations around the
world. Samplitude's unique feature is that the original sound of audio files is not
diminished by any specific audio discoloration, as is often the case with other
programs.
• 24-bit/48 kHz recordings: Your own recordings can be made with the correct
hardware in professional, high-quality, high-resolution 24-bit/48 kHz format.
• 32-bit floating point: Internal sound processing is executed via the 32-bit floating
point process for especially differentiated and high-quality calculation. This way,
the audio picture can be created with especially high dynamics. Digital distortion
and clipping is virtually impossible.
Formats and interfaces
Import: MIDI standard formats (MID, GM, GS, XG), WAV (24- & 32-bit), WAV with
codec, MP3, CD-A, OGG Vorbis, AIFF, FLAC, MOV.
Export: MIDI standard formats (MID), WAV (24-bit), WAV with codec, MP3, CD-A,
OGG Vorbis, AIFF, WMA, FLAC.
Synthesizers
Samplitude Music Studio 2013 comes with the following synthesizers that you can
play directly on your PC keyboard, via your mouse or with a MIDI keyboard:
• Vita: A sampler with incredibly realistic-sounding, "classical" instrumental
sounds like different guitars (Power chords, clean electric guitar, acoustic guitar,
bass guitar), different pianos, percussion, strings, brass, woodwinds (each as an
individual set & as an ensemble set), and much more.
• Beatbox 2: For computer beats and computer sounds
• LiVid (Little Virtual Drummer): For "real" acoustic drum tracks
• Drum Engine: Perfect drum sounds
• Robota: For "mean" electronic sounds
• Revolta 2: An analog, varied, and powerful-sounding 12-voice synthesizer
featuring a sound matrix, noise generator, and nine effect types. With this
synthesizer, you can create any electronic music you can imagine. The sound
presets were created by the sound designer for Access Virus and Rob Papen's
Albino.
• Lead Synth: "Analog modular" synthesizer
• Century Guitars: Authentic guitar sounds.
www.magix.com
Page 19

Introduction 19
• Loop Designer: Cut loops yourself
• Atmos: For nature sounds or atmospheres like rain, thunder, or wind
Effects and effect plug-ins
Samplitude Music Studio 2013 offers the following effects and effect plug-ins:
• Equalizers: 10-band graphic and 4-band parametric
• Echo/Reverb + Room Simulator
• Vocoder
• Vandal SE: Authentic simulation of classic guitar effects, tube amplifiers, and
speakers.
• essentialFX: Basic effects for unique sounds (Stereo delay, chorus/flanger,
phaser)
• Vintage Effects Suite, consisting of chorus, flanger, analog delay, distortion,
filters, and the low-fi effect BitMachine.
• Mastering Suite 3.0, consisting of equalizer, vitalizer (stereo enhancer),
multiband compressor, and audio meter + limiter.
• Compressor with many presets such as limiter, Deesser, noise gate, expander, or
leveler and in different models, e.g. as the multiband compressor Multimax.
• Tape simulation: High-quality simulation of analog tape compression
• Stereo FX: For editing the stereo bandwidth
• Declipping: For eliminating digital clipping
• Timestretching/Resampling/Pitchshifting: For correcting pitch and length
• Elastic Audio easy: Dynamic pitch correction with harmonization (creates up to
four choir voices)
• AM-Track SE: High-quality tape machine sound emulation makes typical aspects
of the large, saturated sound characteristics of magnetic recordings a digitalquality reality.
Audio & MIDI
The MIDI format is extremely important in modern music production. You can use
MIDI files to control external devices such as synthesizers and samplers and internal
software audio generators such as VST plug-ins from your computer.
With Samplitude Music Studio 2013 you can arrange, load, record, edit, and play
MIDI data just as easily as audio data. For MIDI recordings and editing you can use
the specialized MIDI Editor with Piano Roll, Drum Editor, Velocity/Controller Editor
and Event List. Recording can be started directly from the arranger by setting the
recording mode in the track header to "MIDI record" or "Audio record".
Page 20

20
Multitrack recorder (MR-64)
The multitrack recorder (MR-64) looks like a hardware mixer and can also be
operated in the same way. In contrast to earlier mixers, now it can be opened using
the "View" menu in order to conduct multi-track recordings just like with a real mixing
board. The MR-64 unites the advantages of the analog look with digital technology:
realistic appearance, direct workflows, and familiar functionality.
Soundpool
A collection of loops is included, and many more can be found at Catooh. The loops
are categorized into "styles" (e.g. ambient, dance, hip hop, rock, etc.) and
"instruments" (e.g. drums, bass, guitars, etc.). The name of the loop file also informs
you about the kind of sound you can expect. Every loop can be previewed by clicking
it. Monitoring is adjusted to the loops in the arranger. For example, you can create and
play back a framework of bass and drums first, while the Soundpool manager
searches for suitable guitar sounds which are automatically adjusted to the rhythm of
the drum track and the pitch of the bass track during previewing. Every loop can be
loaded into the arranger by dragging it or by double clicking.
You can find the Soundpool Manager in the docker (or in the "View" menu >
"Manager").
Jam Session
The JamSession lets you create complete songs single-handedly. The program
simulates working with hardware "Looping delays", like, for example, the Gibson
Echoplex. The difference is that Samplitude Music Studio 2013 creates an
arrangement during "looping" which can later be edited and compiled into a
complete song. During a Jam Session, everything you do is recorded. The most
important thing with the Jam Session is the fun factor – there can never be too much
of it!
Activate "Solo Jam Session" via the "Playback" menu.
www.magix.com
Page 21
Tutorial 21
Tutorial
In this chapter we will introduce the most important features of Samplitude Music
Studio 2013. You will learn how to create an arrangement with audio and MIDI as well
as the powers of both formats. You will also receive information about essential parts
of the program so that you can take advantage of all possibilities of Samplitude Music
Studio 2013.
Step-by-step mode
Samplitude Music Studio 2013 offers a step-by-step mode for beginners and users
who want to achieve results quickly. All major tasks when producing music in a virtual
recording studio are solved in five, clearly defined steps.
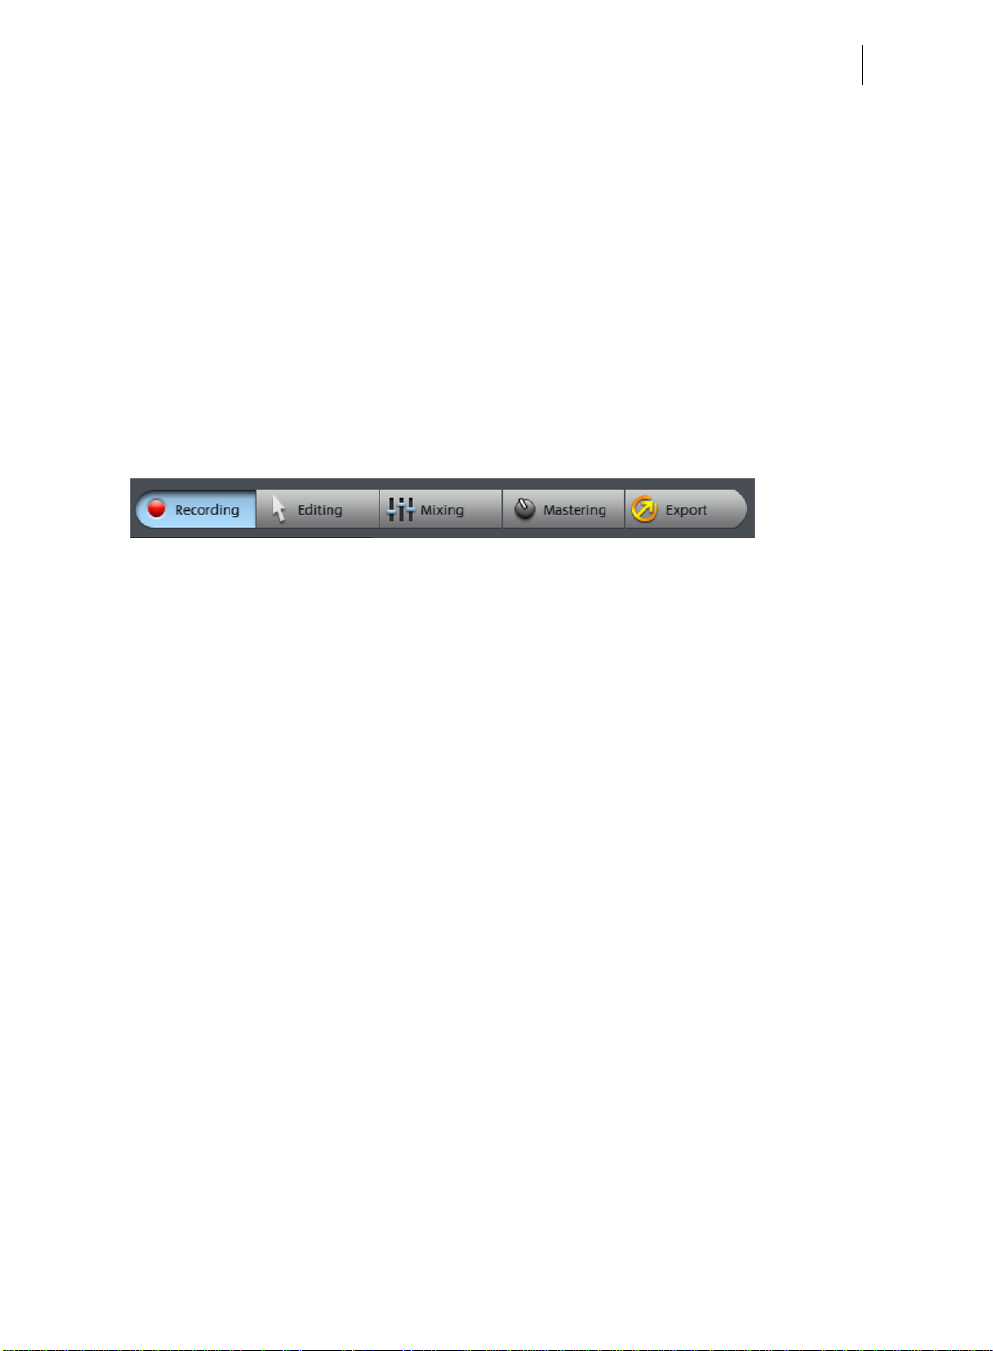
Recording: First, vocals and instruments are recorded on multiple tracks.
Editing: The recorded material is then edited, with a focus on cutting and arranging.
Mixing: The tracks are mixed, i.e. positioned within the volume and stereo panorama.
Mastering: In the end, the entire sound is edited with effects.
Export: After you have completed all stages, the next step is to "output" your
material, either as a classic audio CD or as a song file in MP3 or WAV format. Or you
can upload and publish your song directly on the Internet.
In what follows, we will present these five steps in more detail, because "Easy Mode"
offers the fastest start into the program.
Page 22
22
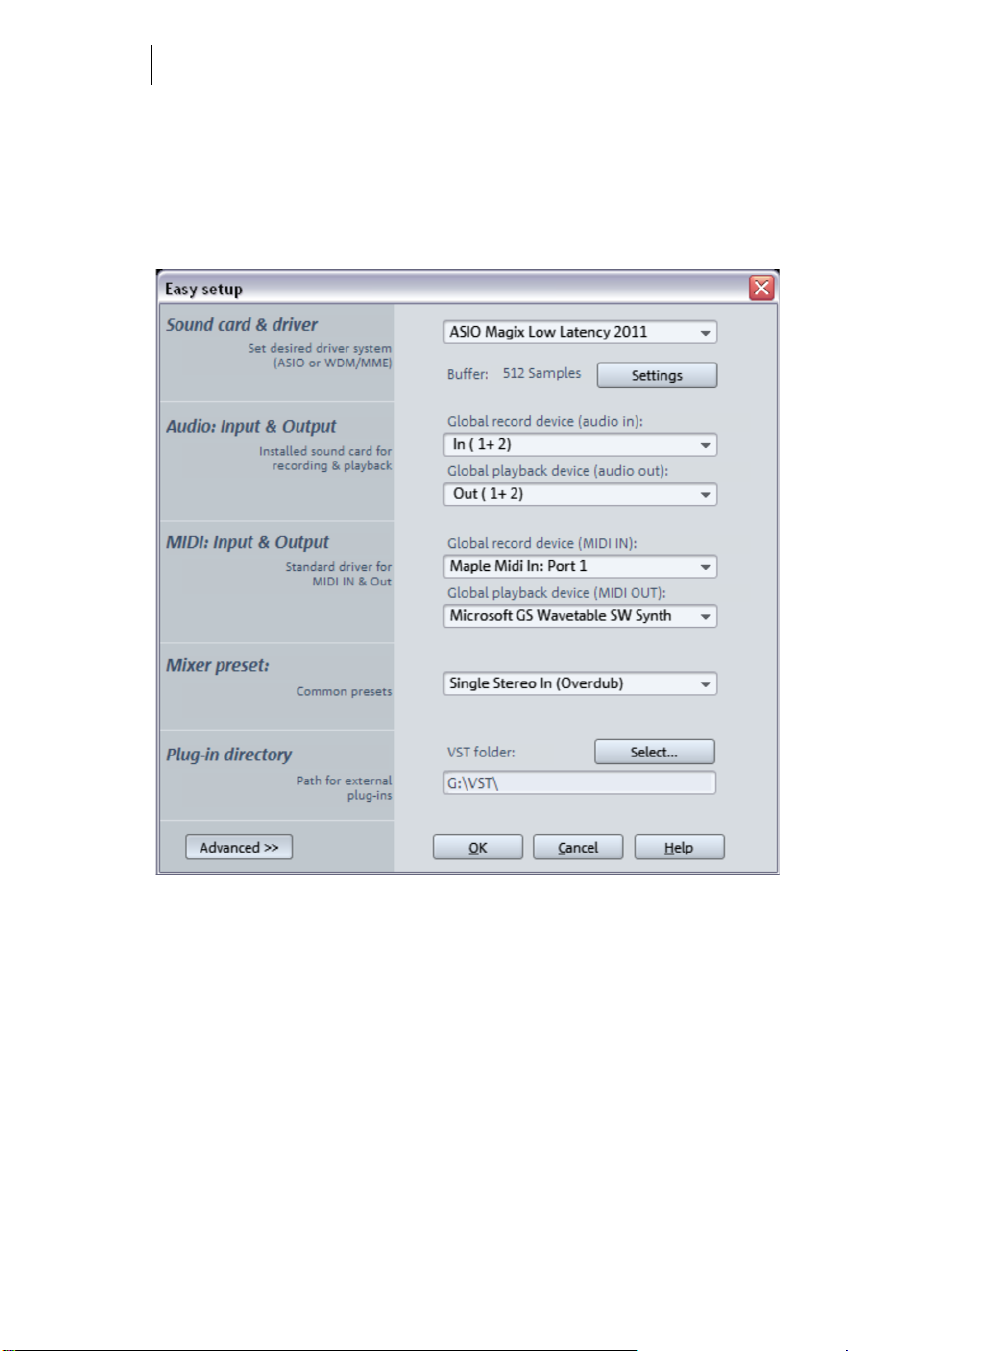
Quick setup
After starting the program for the first time, the "Easy Setup" dialog appears. In this
dialog, you can specify which sound card configurations you would like to use. Usually
you will not have to change anything, because Samplitude Music Studio 2013
automatically selects the correct settings. If you are using several sound cards,
however, you can select the one you want to work with from the menu.
You can also set your plug-in directory for VST plug-ins and other elements.
The settings dialog appears only once when you start the program for the first time,
giving you the chance to check and adjust the settings of Samplitude Music Studio
2013. After that, you can open the dialog by pressing "y" on your keyboard (or via
"File" > "Program settings" > "System/Options").
• Beginners should not change the settings at all and simply click "OK".
www.magix.com
Page 23
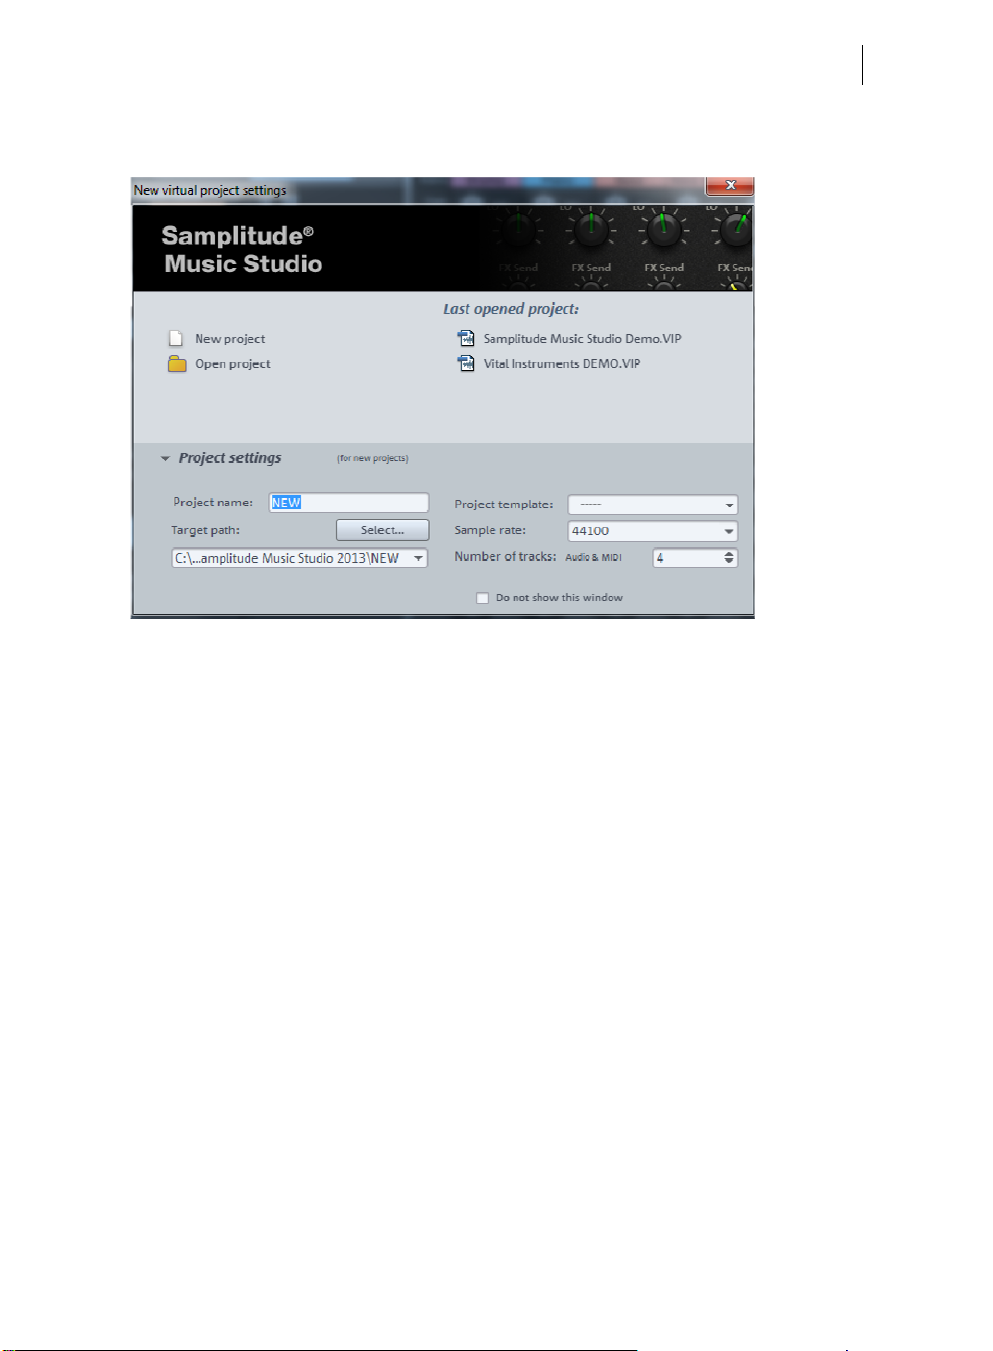
Start selection
The start dialog, which appears after every program start, opens:
Tutorial 23
In "Project settings", you can give your project a name (for example, the name of the
song you want to record) and specify the number of tracks and a track directory.
Everything can be changed at a later stage.
The main purpose of this dialog is to open a new or an existing project that was saved
previously. Since we are still at the beginning, we don't have any existing projects yet.
Therefore, we will create a new project:
• Click on "New project".
The interface will open in step-by-step mode with the "Recording" setting.
Page 24
24
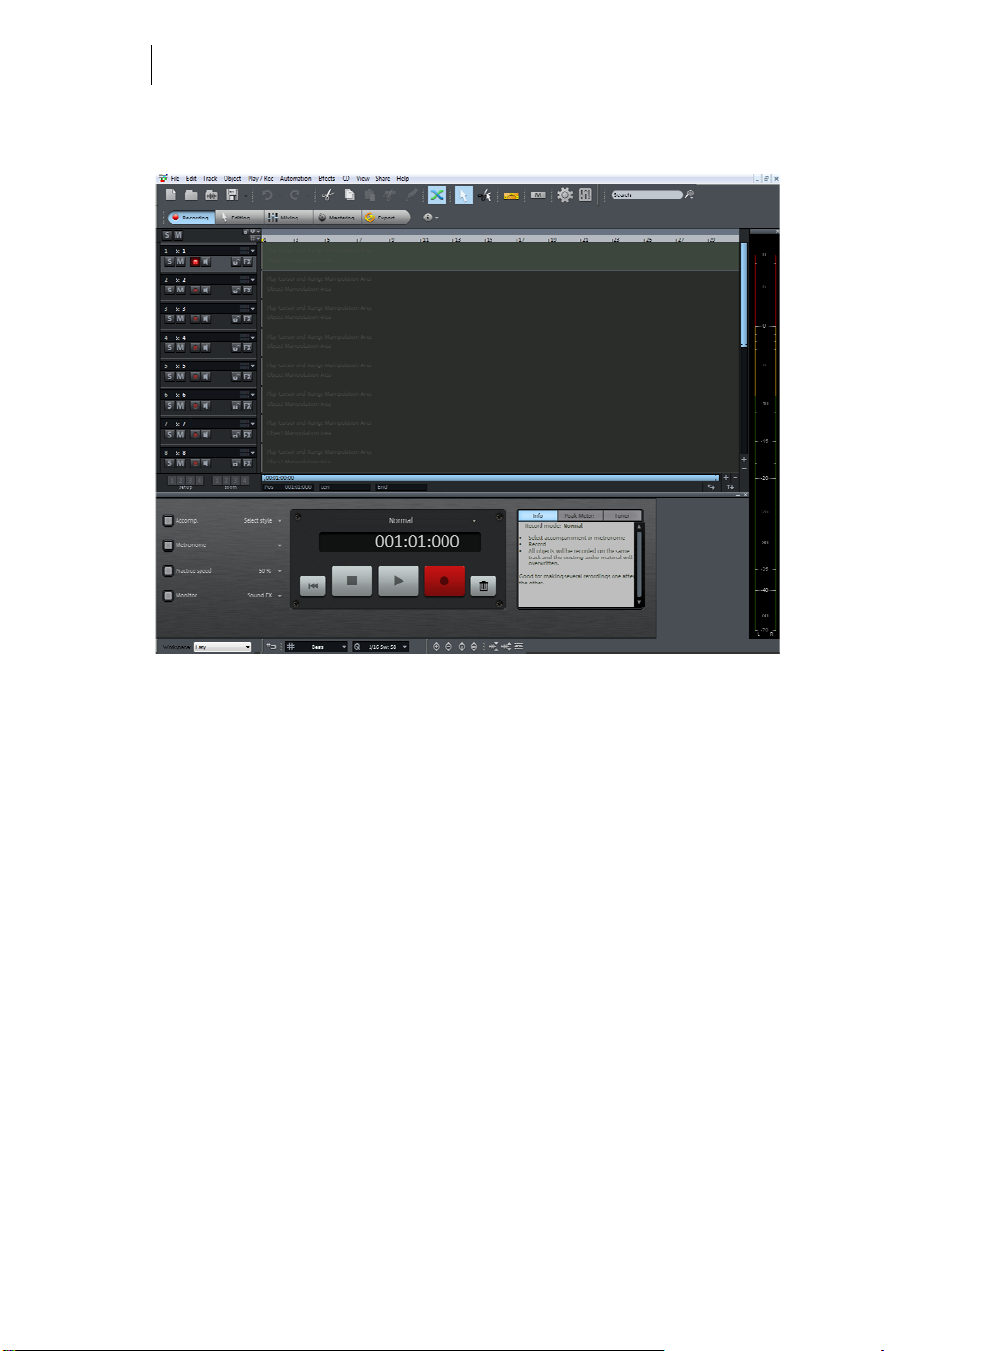
Recording
In this view, you can do recordings via a connected microphone, for example.
It is recommended not to record an entire song at once, but to record the different
instruments and voices one after another on different tracks. For example, if you
wrote a song that you usually accompany with the guitar, you should record the guitar
without vocals first and then add the vocals later, in a second step. This has the
advantage of being able to entirely focus on one aspect, i.e. the instrument or vocals,
thereby improving recording quality.
The top area displays multiple empty tracks of your project, which are arranged one
below the other. The control panel for the recording is located below the tracks. The
large display, especially of the time display, enables better control of the recording.
This is useful, because as a singer or pianist, you do not want to have to look at the
screen continuously in order to follow the progress of the recording. Thanks to the
large display, a side glance from the distance is sufficient to see where the recording
stands.
www.magix.com
Page 25
Tutorial 25
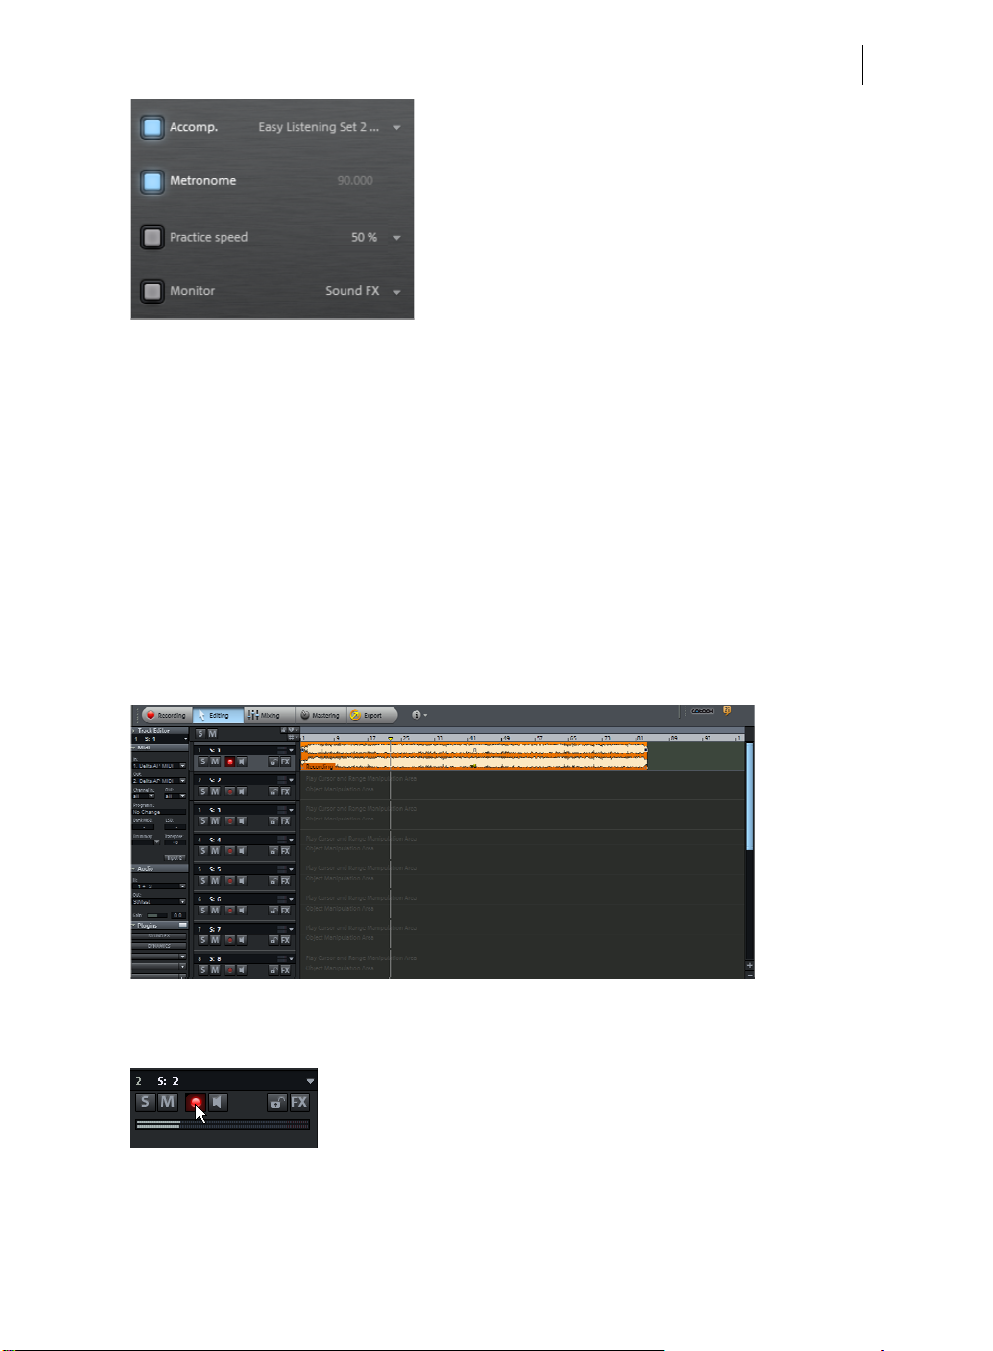
• You can activate background music via
Accompaniment. This function is more of a
gimmick and allows you to experiment! Let
yourself be inspired by the different
accompaniments to create your own
melodies.
• Metronome adds a regular clicking sound, which serves as a rhythmic orientation.
The sound should be output via headphones to ensure that it is not recorded. You
can select different speeds via the arrow keys.
• Practice Speed allows regular playback speed to be reduced. This way, you can
record at half speed and use the result with normal speed.
• Monitor lets you preview audio material and monitor it while recording. The level
displays what enters the sound card inputs. If it reaches the upper red range, the
input level is too high. In this case, you should reduce the input volume.
If you are ready to start your first test recording, click on the red "Record" button.
Samplitude Music Studio 2013 now starts recording and indicates this in the record
window by displaying a counter with the passed record time.
After recording is complete, an audio file with the recording appears in the top track.
Now you can record on other tracks. The red button to the left of every track displays
which track is currently being recorded. In the top picture this is track 2.
You can enable any track for recording by clicking with the mouse and then record on
any track.
Page 26

26
Editing
In the "Editing" view, the record field is deactivated and only the Arranger is visible.
Samplitude Music Studio 2013 offers almost unlimited possibilities for audio editing.
In step-by-step mode, the focus is one removing slight irregularities from the audio
material.
Let's just say you accidentally knocked the microphone against something while you
were singing and now your otherwise good recording is ruined because of the cracks.
Instead of using the cleaning effects from the effects menu, we can simply cut out the
crackling. This is the easiest and most effective method for removing isolated cracks.
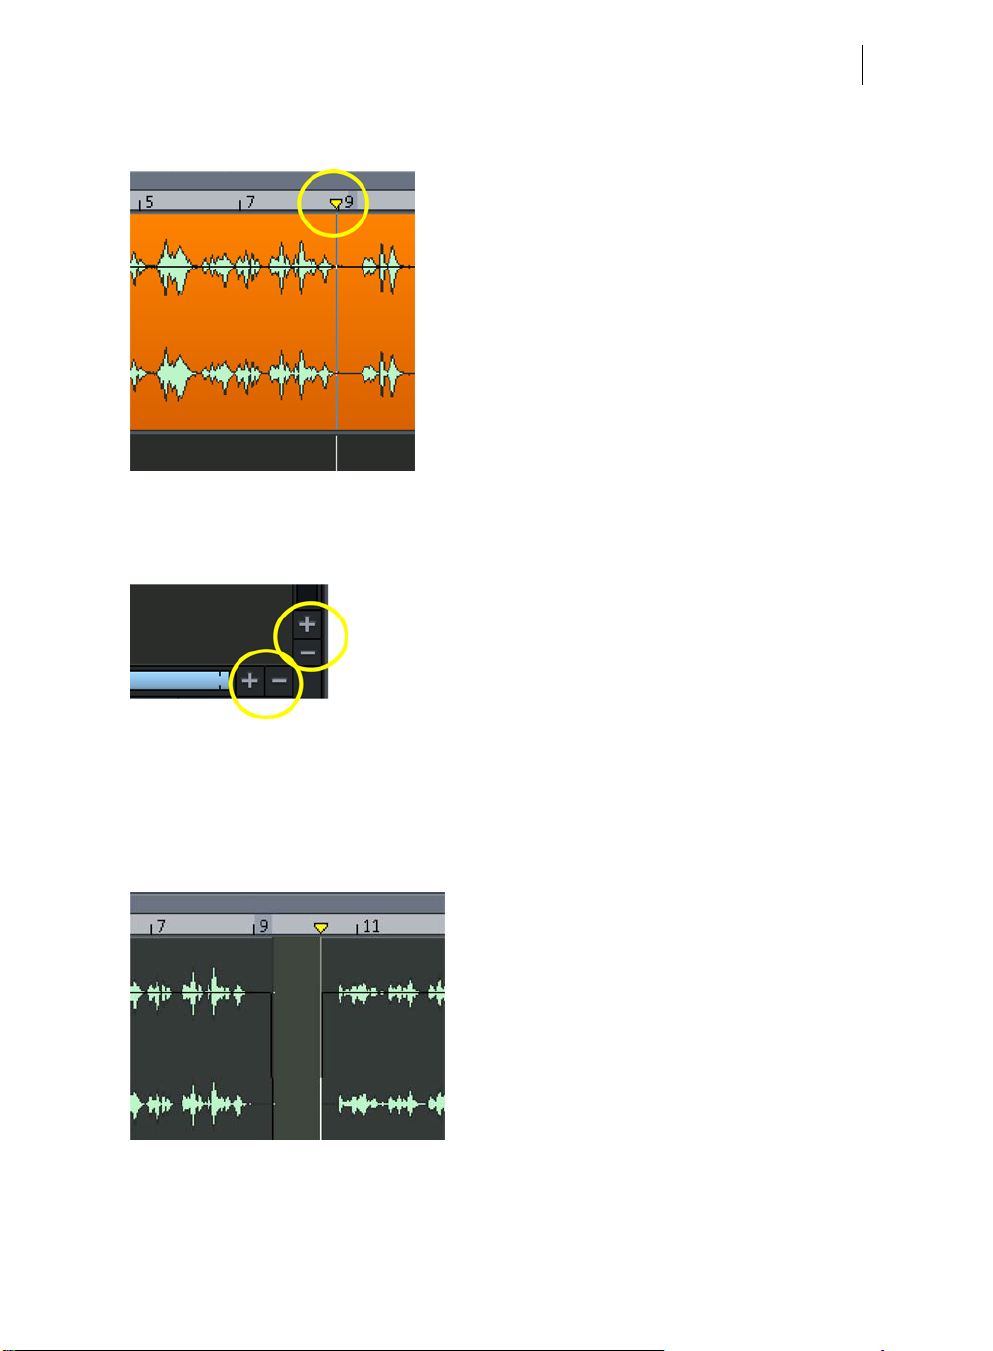
• Play back your recording (the easiest way to do so is by using the spacebar on
your keyboard) and search for the section that you want to cut out.
www.magix.com
Page 27
Tutorial 27
• You can move the playback marker in the bar ruler above the first track at any
time by clicking.
• If necessary, zoom into the display to get a better view of the waveform display.
To do so, use the horizontal and vertical zoom buttons located in the bottom
right-hand corner:
• Place the playback marker just before the crackling and press the "t" key on your
keyboard (or click on the "Scissors" symbol in the toolbar).
• Now place the playback marker just after the crackling and press the "t" key
again.
• Click on the isolated piece containing the crackling and delete it from the track.
Did you cut out too much by mistake? No problem: The object handles located at the
edges can be used to recover deleted material and vice versa, to remove bothersome
rests.
Page 28
28
• To do so, select the section you want to edit with the mouse.
• Move the mouse pointer exactly on top of the handle. After it has turned into a
double-arrow, you can move the front part to the right or to the left with the
mouse button held down – ideal for fine-tuning your cuts.
As mentioned before, Samplitude Music Studio 2013 offers many more editing
possibilities. We will discuss more options later. For now, we will leave it at this
simple editing exercise.
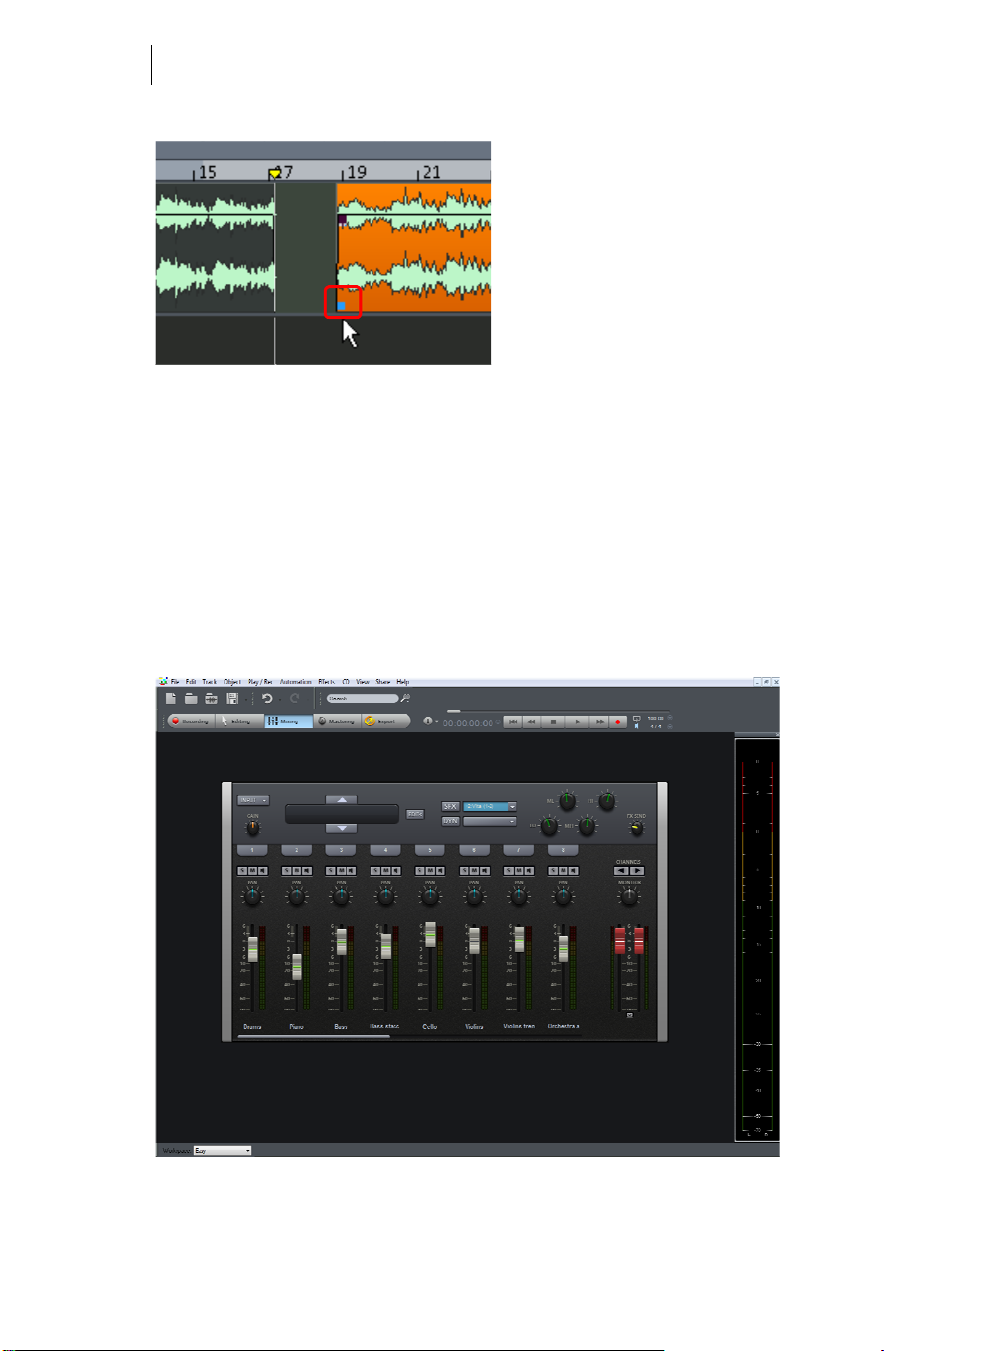
Mixing
The next area of the step-by-step mode opens the mixer. All other elements are
hidden to provide a better overview.
With the Mixer you can adjust and even automate the volume and panorama of the
recorded tracks. Furthermore, you can add effects and much more.
www.magix.com
Page 29
Tutorial 29
• Adjust the volume of the individual tracks with the sliders in the lower part of the
mixer until you have a balanced result and every instrument in the song is
sufficiently accounted for.
• Take some time and experiment with the effects (Aux, Inserts, Sound FX,
Dynamics, EQ) on the individual tracks.
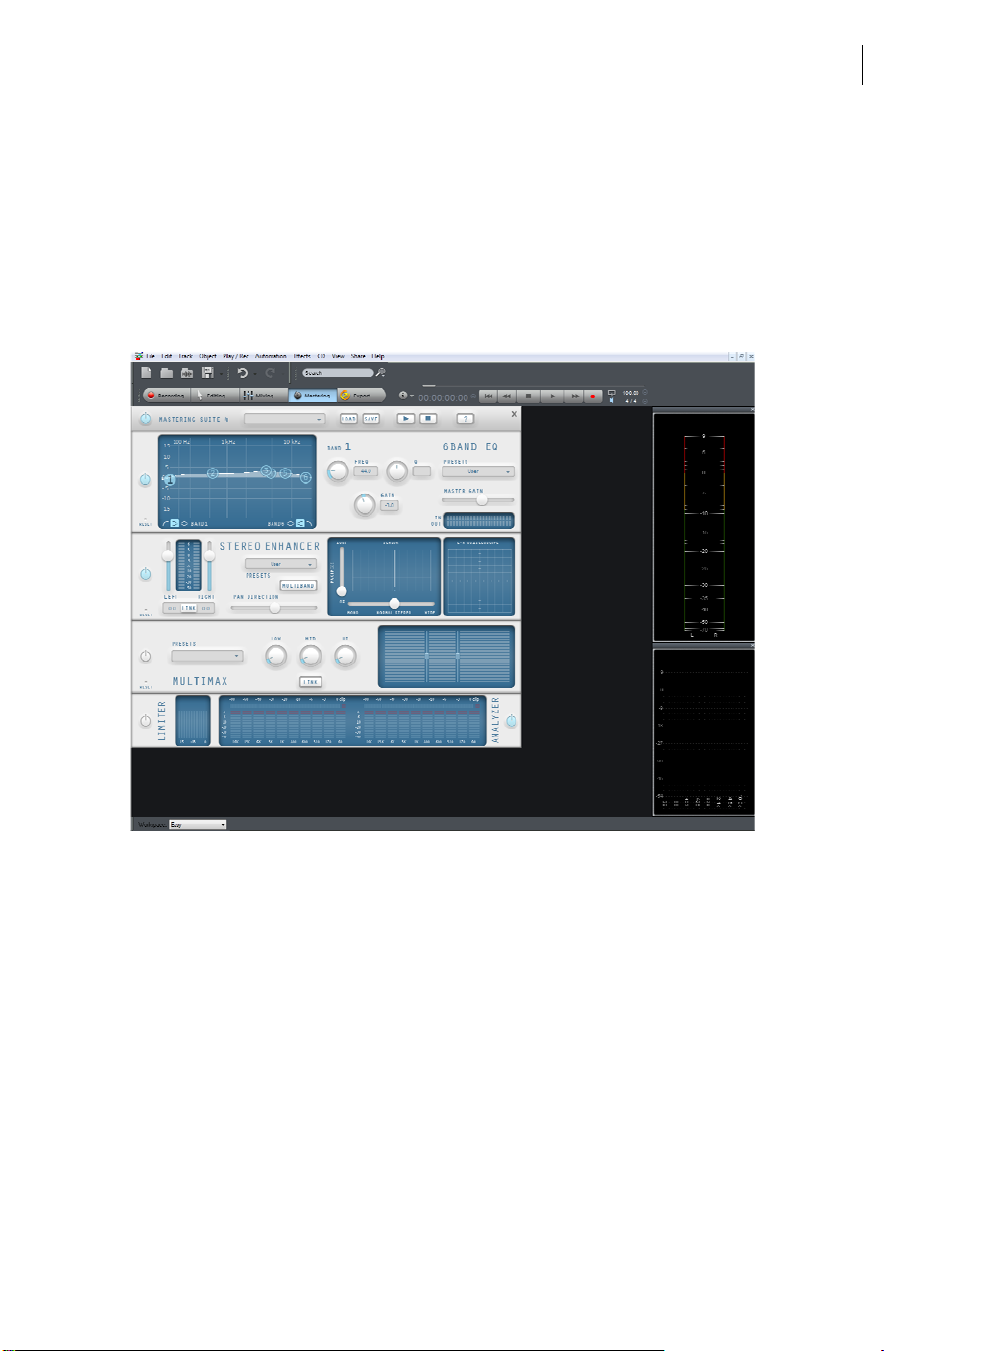
Mastering
The "Mastering" area of the step-by-step mode opens the Mastering Suite, which is
used to optimize the overall sound.
The Mastering Suite includes four devices, which are organized on top of each other
in an effects rack. Which device is used for what purpose?
Equalizer: For regulating the sound characteristics. You can set four frequency bands
separately in the graphical control panel.
Vitalizer: A stereo effects processor that allows you to change the stereo width. In
"Multiband mode" only the mids are edited.
Multimax: A multiband compressor for editing the volume and the sound impression.
Limiter: To prevent overmodulation.
Page 30
30
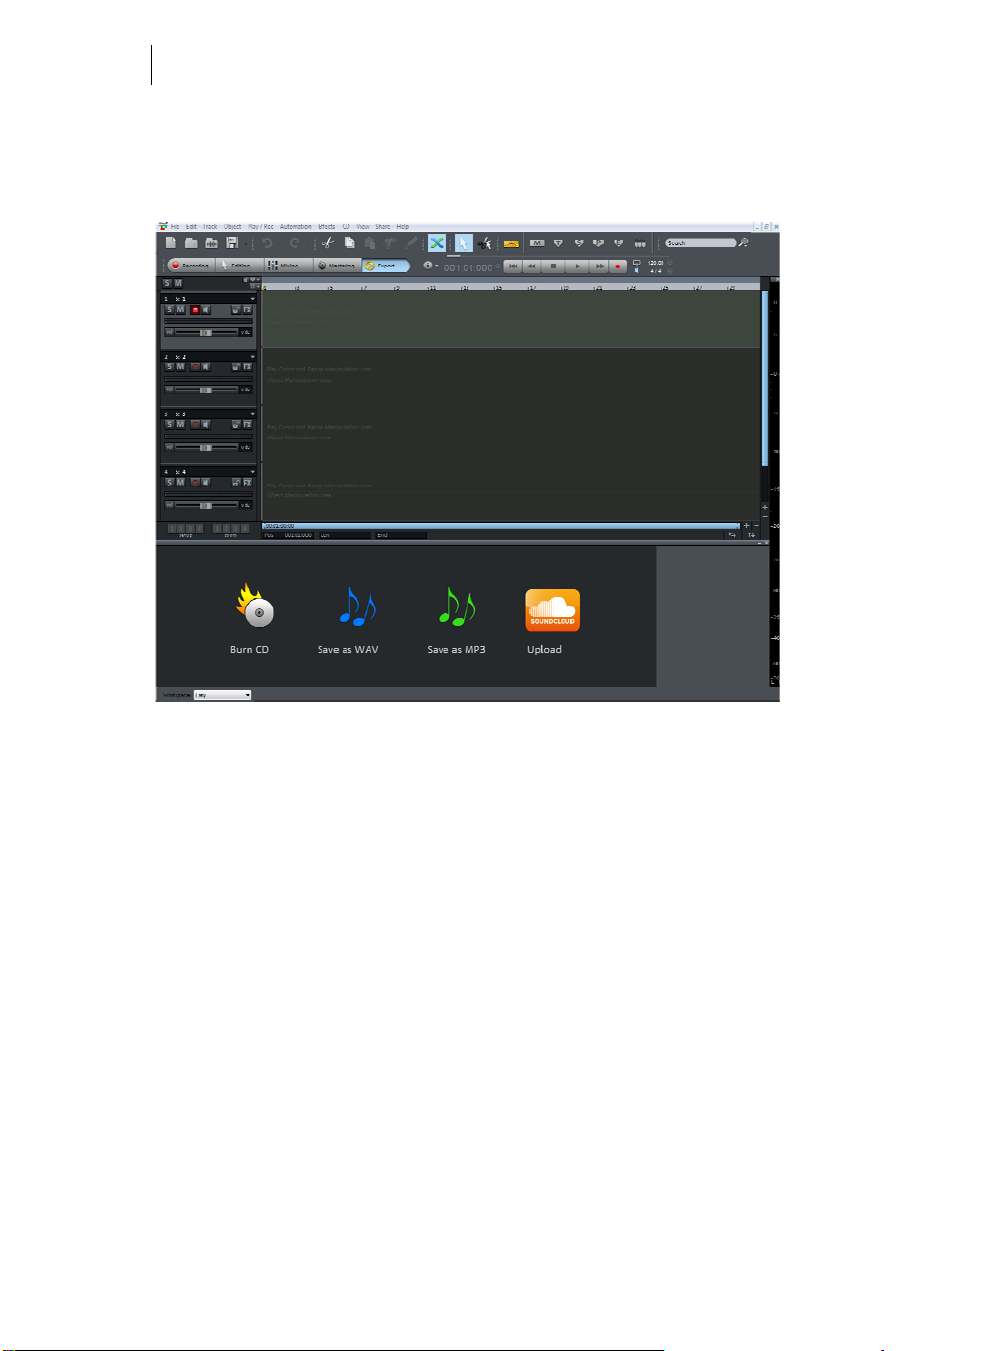
Export
After successfully passing through the four stages of the step-by-step mode, the
result is a first, perfect song. The last stage, "Export", is where you decide what you
want to do with your song.
There are four options to choose from:
Burn CD: An audio CD that can be played back on any CD player is the typical way of
exporting your song.
Save as WAV: An audio file in WAV format is the standard format for audio
productions. It can be played back with different software and on multiple devices and
features crystal-clear sound.
Save as MP3: MP3 is a space-saving alternative to WAV that can be played back
directly in the player.
Upload: This uploads the song directly to the Soundcloud or Facebook community.
This was intended as a first, quick overview of the step-by-step mode!
www.magix.com
Page 31

Tutorial 31
Switch workspace
Now that you have a rough idea of what digital music production is about, lets take a
look at the advanced options. Let's go to the "Workspace" box at the bottom of the
screen and switch to "Power User" mode, the mode for ambitious users.
Recording in the Arranger
You can also record directly in the Arranger, i.e. outside of the step-by-step mode.
Here's how it works:
• If necessary, activate the transport control via "View" > "Transport Control".
Recording the first track
• Right-click on the red record button on the transport control.
This opens the recording dialog. You can change all recording settings here.
• The "Monitor" button is activated as a default. The monitor function allows you
to preview the recording material or to listen to it during recording. The level
displays what enters the sound card inputs. If it reaches upper red range, the
input level is too high. In this case, lower the input levels.
Page 32

32
• Click on the "Record" button. Samplitude Music Studio 2013 now starts recording
and indicates this in the record window by displaying a counter with the passed
record time.
• Now stop the recording at a suitable position by pressing the "Stop" button.
Samplitude Music Studio 2013 then stops recording. You can now either use the
recording or delete it. You can repeat the recording without saving the first attempt
on your hard drive. If you want to use your recording, Samplitude Music Studio 2013
will add the audio material to the first track as an object.
You can listen to the result anytime by clicking on the "Play" button in the transport
console or by pressing the space bar.
Record another track
Now we will record a second track. If the record dialog is still open, please close it.
• Activate the "Record" button in a second track by clicking on the red "Record"
button to the left in the second track. The track is now ready for recording.
• Right-click on the "Record" button in the transport control. You can now enter
further settings for recording. As we want to play the first track while the second
is being recorded, you will have to activate "Playback while recording".
• Click on the "Record" button.
• Now stop the recording at a suitable position by pressing the "Stop" button.
Note: "Playback while recording" mode requires that your sound card can play audio
material while recording new material (full duplex mode). Some sound cards can
www.magix.com
Page 33

Tutorial 33
either record or play, but can't do both at once. In such a case you should deactivate
"Playback while recording".
Integrate audio material
Now add new, already available audio material. Audio material can be added to your
virtual project (VIP) from different sources and in different file formats. You can add
audio CDs, WAV files, MP3 files, sample CDs (such as the MAGIX Soundpool
series), as well as other audio files. There are various options available for loading
audio material:
• In the menu bar, click on "File > Import > Load audio file..." and select an audio
file via the import dialog.
• Activate the integrated file browser via the "Files" button at the lower edge of the
screen (or via the menu "View > Manager > File manager"). This accesses all
drives and folders on your computer. Any audio file can be dragged to the track
by pressing down the left mouse button (drag & drop).
• You can also drag audio files directly from Windows Explorer into the Samplitude
Music Studio 2013 arrangement.
• Audio tracks first have to be copied onto the hard drive separately. To do this,
click in the top menu bar of Samplitude Music Studio 2013 on "File > Import >
Load audio CD track(s)...".
Page 34

34
VIP and wave projects
A wave object is created for each audio object that you can see in the arranger. You
can generally work on two project types:
• Virtual project (VIP): This is an arrangement made up of different objects. The
tracks in the virtual project are for recording or loading audio material onto
several tracks. You can conveniently record and create sound on different tracks.
• Wave project: This is the audio material of one object.
Hint: If you delete an object in a virtual project, the audio material and the
corresponding wave project on your hard drive will be retained.
Switch to a wave project (your first recording, for instance), mark the corresponding
object in the VIP by clicking on it, click into the top menu bar of Samplitude Music
Studio 2013 on "Object", and select the option "Edit wave project...".
If you have opened a wave project, then you will see the wave display of the audio
material in enlarged view. The acoustic properties are directly visible in wave form,
and where there's something to see, there's something to hear, and the higher the
www.magix.com
Page 35

Tutorial 35
peak of the wave form, the higher the volume will be. Press the space bar on your
keyboard to play back the wave project.
In wave projects you can directly edit your audio material. Direct editing of the
material is particularly useful: Mark a range in the wave project with the mouse and
then press "Del". After editing the audio material you can close the wave project. You
now have to decide whether you want to accept the changes or discard them. If you
want to accept the changes, then click on "Save project". The original audio file will
now be overwritten.
Arranging MAGIX Soundpool loops
Up until now, you have only been working with your own material. Next, we would
like to show you how to build your own songs using the included Soundpool loops.
MAGIX Soundpools offer professionally produced, short audio files - so-called
"samples". They have been produced to be perfectly combined with each other and
looped. "Looping" means creating an entire instrument track from a single audio
sample. This entails replaying the sample sequentially to provide the impression of a
repeating musical leitmotif. This process is used today in almost every area of modern
pop music.
• It's best to create a new, empty arrangement first. Click on "File" and select the
option "New virtual project (VIP)".
• Select the "Soundpool" tab in the docker (or "View" > "Manager" > "Soundpool
Manager"), to view the included soundpool samples.
• The "styles" are displayed on the left side of the Soundpool manager. If you have
inserted, for example, a MAGIX Soundpool DVD, you can select a style here.
Samplitude Music Studio 2013 shows "Rock" because this style is included.
• Next, you can select the instruments that you would like to use. At the start, we
recommend choosing a drum sample to create the initial percussive structure.
Open the "Drums" directory in the "Instruments" section.
• To preview, click once on a file in the file list. To load it, drag the desired file to
the track.
Page 36

36
• Every object can be moved with the mouse in the Arranger - horizontally along a
track or vertically between tracks. Drag the drum loop onto the first track all the
way to the left to the beginning of the track.
• Next, the sample is looped, and the short object is turned into a repeating loop.
To do so, click on the bottom right handle of the audio object and drag the mouse
to the right the amount that you need for your first song part. Circa 8 beats
should be enough at first. The object will be properly placed on the first 8 bars of
the first track.
• Make sure that the playback range is as long as the extended sample - 8 bars in
our example. To do so, click above and to the right in the timeline and drag out
the playback range to match the length of the looped object.
• Now press the play button (spacebar is faster). The drum sample will loop for 8
bars.
This means that the playback cursor starts right at the front, moves across the
playback range, and then transfers to the start again once the end is reached without
any interruptions. You can also move the playback marker independently of the
playback range by clicking on the lower section of the timeline.
Note: All additional loops can be previewed during playback and inserted. This way
you can listen to the "candidates" when testing new samples in combination with
the arrangement. If continuous playback gets on your nerves after a while, then you
can always interrupt it by pressing the spacebar again.
• Next, load a fitting bass. Open up the bass folder, test some of the bass samples
there, and then drag a bass loop you like onto the second arranger track
www.magix.com
Page 37

Tutorial 37
Note: Melody-creating instruments are ordered according to pitch, meaning that
you can choose between several variations for each sample that was produced in
several pitches. By combining different variations of a pitch, you can produce chords.
• Add new instruments to your drum and bass loops. This way, any number of files
can be dragged from any folder into the arranger and positioned on top of one
another, on multiple tracks, or behind one another.
This way you can create complete songs or professional bases for own recordings.
• Because not all instruments are normally looped for the entire arrangement, gaps
should be built into the architecture of your song to provide musical variation. To
do this, looped objects can be cut or loaded multiple times to create the required
empty spaces.
Page 38

38
Add synthesizers
The track editor does not only manage synthesizers. It can also be used to adjust all
settings that affect the selected track. You can open the track editor via the "View"
menu. To open the software synthesizer folder of Samplitude Music Studio 2013, click
the "Plug-ins" button in the track editor.
After selecting a synthesizer, the corresponding control console will appear where
you can program the rhythms, melodies, chords, and sounds of the synthesizer.
Synthesizers become independent objects after they are programmed, and then they
can be moved around just like other objects on the arranger.
Exception: Vita (and all associated Vita instruments) and Revolta 2 remain coupled in
the track where they are placed. They are controlled via MIDI objects. For MIDI
objects, the played sound is defined by the track.
Experiment with the various synthesizers in Samplitude Music Studio 2013 to
discover the possibilities.
Edit objects
Editing objects is the same for all object types. The following options are equally
available for audio objects, synth objects, and MIDI objects
• Many object edits require that the object is already selected. Individual objects
can be selected with a mouse click. Multiple objects can be selected with a helddown Ctrl key. If you click on the track next to an object, you can draw a
rectangular frame by holding down the mouse key. All objects found inside the
frame will be selected ("rubber band selection").
• All objects in VIP can be shortened by dragging one of the lower object handles
using the mouse until it turns into a double arrow. Now, the object can be
shortened. This way, bothersome regions at the beginning or at the end of a
recording can be cut off by simply displacing the ends inward.
• If "Create looped object" is activated under "Edit" in the "Object" menu, you can
stretch the object as you wish with the right handle. Use this feature to create
www.magix.com
Page 39

Tutorial 39
entire rhythm tracks from short drum samples by simply stretching the object
apart.
• Two fade handles are found on both top corners, which can be dragged inwards
in order to fade the object in and out. The handle at the center can be used to
adjust the volume of objects.
• Several objects can be combined with others to make up a group, to avoid the
objects being unintentionally moved out of relation to each other. To do so, first
select the individual objects. Then select "Object" > "Group" > "Create group" (or
click in the tool bar on the "Group" symbol).
• All objects can be split into multiple objects. To do so, select the "Split objects" in
"Edit" menu under "Split" (or use the "T" key on your keyboard). The selected
object will be split at the position where the playback marker is.
• By right-clicking an object you can open a context menu where you can select the
object editor. The object editor is also integrated in the docker and constantly
available. It can be used to make all important settings for the corresponding
object. You can add effects to audio objects or change quantization of MIDI
objects.
The object editor is always open in the docker for easy access. It changes its settings
depending on which object is selected.
Page 40

40
MIDI recordings
MIDI recordings are created for operating VST instruments or external synthesizers
with the help of a MIDI keyboard. The instruments will not be recorded as audio data,
but rather remote controlled via the MIDI data format. Every detail of this remote
control - i.e. every button press, every note, every velocity level - can be corrected and
edited retroactively via the MIDI editor. Please read more on this in the section
"Editing MIDI (view page 42)".
What is MIDI?
A few words about MIDI: MIDI files do not contain the actual sound like audio files,
but only the note control information. This data is interpreted and played back by the
VST instrument or synthesizer. MIDI is thus a kind of remote control for synthesizers.
This has some advantages:
• MIDI files need a lot less memory than wave files.
• MIDI files can be adapted to any tempo (BPM) without affecting the sound. The
playback tempo is simply changed.
• Transposition of MIDI files to other pitches is also easy. As a result, a section in a
song does not have to be saved in several different keys. The version in C major is
perfectly sufficient. It can then be transposed to any key easily.
The disadvantage of MIDI files: The audio is not yet determined and is only produced
during playback.
Preparing a MIDI recording
Prepare an empty track in your VIP for recording.
• To do so, click on the red "Record" button in the track head.
• Then open the "Track Editor" if necessary via the "View" menu to be able to make
adjustments for the track.
www.magix.com
Page 41

Tutorial 41
• Use the small triangle to open up the MIDI section.
Here you can now define the in- and outputs for your MIDI data on the selected track.
• Input (In): This could be a MIDI keyboard which you use to enter MIDI notes and
which are then recorded by Samplitude Music Studio 2013.
• Output (Out): This could be a virtual instrument (VST instrument) that plays
back the MIDI notes entered via the MIDI keyboard as sounds. To select a VST
instrument, click the small triangle next to "Out" in the Track Editor and select
"New instrument".
Note: All global MIDI settings can be found in the "System" dialog ("Y" key),
submenu "MIDI".
"In" and "Out" in the Track Editor allow you to assign a special "Receive" and "Send"
channel to every track for MIDI data. This is important if you want to control an
external synthesizer via a MIDI keyboard, for example.
For instance, if your MIDI keyboard is transmitting on MIDI channel 1, you should
enter the value "1" in the "In" menu. During recording, Samplitude Music Studio 2013
will receive all MIDI notes transmitted on channel 1 by a MIDI keyboard.
You can generally assign a specific MIDI channel to external MIDI synthesizers. For
instance, if your external synthesizer is addressed via MIDI channel 4, you should also
enter the value 4 under "Channel Out" in the Track Editor in order to be able to
address the external synthesizer via this track.
Page 42

42
MIDI record modes
There are several methods of recording MIDI, and you can set the MIDI record mode
in the transport control.
• Normal: This recording mode corresponds to that of audio recording, i.e. a new
MIDI object is created over the existing object for each recording process. The
old object remains intact. This way you can record multiple takes of a passage
and then compare them in the Take Manager later on.
• Overdub: The data is recorded into an already existing object, and available and
newly recorded MIDI data is mixed together.
• Multi-overdub: The data is recorded into an already existing object, available, and
newly recorded MIDI data are mixed together. However, existing objects remain
the same.
• Replace: The data is recorded to an existing object and any MIDI data is
overwritten.
After you have selected MIDI record mode, you can prepare the corresponding track
by clicking on the "R" button for recording. Now start recording by clicking on the
"Record" button in the transport control.
Edit MIDI
MIDI Editor
Use the MIDI Editor to edit MIDI files. You can open it by double-clicking on a MIDI
file (or via the "Object" menu > "MIDI Editor").
You can also use the MIDI Editor to program melodies. To do so, create an empty
new MIDI file (Object menu > New MIDI file) and then open the MIDI Editor to input
notes.
The MIDI editor displays the MIDI data of the selected MIDI object. You can click the
MIDI objects in the arranger one after the other and get direct access to the
corresponding MIDI events.
MIDI files can be displayed and edited in the MIDI Editor in five main areas.
List Editor (Event List)
Matrix Editor (Piano Roll)
www.magix.com
Page 43

Tutorial 43
Drum Editor (toggle between the Drum Editor and Piano Roll possible)
Controller Editor (for example, velocity, MIDI volume…)
Score Editor (Note display)
Ever areas offers corresponding tools: pencils or eraser-tools.
Fundamentally, changes, for example, moving or deleting notes, refer to all selected
MIDI events (red) with just a few exceptions. You can, for example, select a group of
notes in the Piano Roll and then change the attack velocity for this group of notes in
the Controller Editor, modifying all selected notes simultaneously.
Note: The MIDI Editor has a menu of its own. When it is integrated in the docker, at
first it remains invisible, but can be accessed with a right-click on the grey area
between two tools as a context menu. If the MIDI Editor is dragged and dropped
form the title bar docker, the menu will appear as usual with an own menu bar.
Working with the matrix editor
The matrix editor is particularly useful for conveniently arranging MIDI notes (piano
roll).
In the matrix editor, you can edit MIDI notes for controlling sound generators like
synthesizers, drum machines, and virtual instruments (VST instruments). If a MIDI
instrument is activated, you can play it via the keyboard at the left of the screen.
Clicking on a key makes the synthesizer create the corresponding sound.
Page 44

44
Now select the pencil tool and paint the notes into the score
sheet. MIDI notes can also be sustained by holding the left
mouse button or double-clicking.
The "Eraser" tool deletes notes from the note field.
The "Step recording" button enables step-by-step audio
recording.
Tip: The tool for drawing the pattern is particularly interesting. Use the selection tool
to select specific notes and press the key combination "Ctrl + P". The selected notes
are played as a sound pattern. Switch to the pattern drawing tool. You can now
easily sketch the sound pattern with only one click.
Tip: Pressing the "left" and "right" arrow keys on your keyboard moves
forwards/backwards in the notation, respectively. The cursor up/down keys adjust
the note pitch in stages.
Using the Controller Editor
In the Controller Editor your can adjust MIDI parameters such as velocity. A simple
click on the Controller button of the MIDI Editor opens or closes the Controller Editor.
It appears below the Piano Roll.
Tip: If you can't see all buttons, you can enlarge the view by clicking on the scroll bar
between the piano Roll and the Controller area and dragging the Controller Editor.
www.magix.com
Page 45

Tutorial 45
On the left you can choose from various drawing tools as well as determine the MIDI
parameter to be controlled (such as velocity, foot pedal, vibrato, filter cutoff). By
clicking on the small arrow button you can open a context menu with further options.
The Controller Editor can simultaneously control up to four different parameters that
can be selected using the four small arrow buttons.
Multi-object editing
You can edit several MIDI objects together in the MIDI editor. In an opened MIDI
editor, you can include additional MIDI objects by clicking on them while holding
down the "Shift" key. The MIDI events of these objects are displayed together.
In the MIDI editor, you can access the
displayed MIDI objects via the flip menu next
to the name.
The current object range can be highlighted by clicking the button behind the name.
Areas lying outside the current object will be grayed-out and the notes of other
objects will be paler, but still selectable. For more information on this, please consult
the MIDI chapter in the PDF manual.
Page 46

46
From MIDI to audio
If you are controlling an external MIDI synthesizer in your arrangement, you can
convert its sounds into audio tracks with the Samplitude Music Studio 2013 record
function. This is particularly recommended if you want to enrich sounds created with
your external MIDI synthesizer with audio effects, convert your project into MP3, or
burn it onto disc.
• Connect the audio output of your external MIDI synthesizer to the audio input of
your sound card.
• Set an audio track to "armed" by pressing "R".
• Start audio recording as usual. The MIDI data will be played and recorded
simultaneously via the record function. The result is an audio file that can be
edited and exported together with other multimedia files.
Tip: Do not delete MIDI tracks in the arrangement after you have generated audio
files from them, simply mute them with the "Mute" button. You can then later
change melodies and beats composed via MIDI and record them as audio files
again.
Note: If you prefer VST instruments as synthesizers, it makes more sense to use the
Track freeze (view page 355) function from the "Track" menu.
Effects
You can considerably enhance your music productions with effects. Clever use of
effects adds depth to your song and simply sounds better. Samplitude Music Studio
2013 has plenty of effects. Experiment with the various effects in Samplitude Music
Studio 2013 and learn how to use them.
Calculating audio effects
You can add audio effects in three different levels: audio objects, tracks, and in the
master. When played, effects are first calculated in the audio objects. Track effects
are then added. The master effects are added last.
First, start with the object effects to distort individual objects while other objects in
the same track remain the same. For instance, if you have saved a groove consisting
of several audio objects on one track, you can edit the last object of the groove with a
distorter.
Use track effects like reverb, etc. on any objects located on a single track. Finish off
your song with powerful master effects that have an effect on the entire song.
Effects in audio objects: Right-click on an object to open the context menu and add
an object effect. You can access the object effects directly via the context menu.
Object effects can be selected and subsequently edited via the object editor.
www.magix.com
Page 47

Tutorial 47
Effects in tracks: To adjust track effects in the
mixer, open the mixer by clicking on "Mixer" in
the lower part of Samplitude Music Studio 2013.
In the "Ins" section, click on the arrow symbol of
an effect slot in the corresponding channel.
Effects in the master: Open the mixer to add
master effects. You will find the master section at
the right edge of the mixer. Here you can install
the desired master effects.
Hint: Track effects and master effects are
always real-time effects.
Page 48

48
Burn CD
Once your VIP is finished, you can burn it onto disc. Click on the button with the CD
symbol. The CD burning dialog now opens.
Now click on the "Burn CD" button...
www.magix.com
Page 49

Program desktop overview
VIP window
Program desktop overview 49
1 Menu bar: You can find the menus in the Samplitude Music Studio 2013 main
window, directly below the title bar. A keyboard shortcut can be assigned to each
menu entry.
2 Toolbar: Toolbars are made up of buttons which carry out specific commands with
a mouse click. They can be found above and below the project window. More
information on the individual button bars can be found in the button overview.
More information on the individual toolbars can be found in the keyboard shortcut
overview.
3 Grid/Marker bar: The grid/marker bar is positioned above the first track in the
VIP. In the upper half, you will find the marker bar where markers and playback
markers can be positioned. The lower half displays the grid list which displays the
project time depending on the selected unit of measurement. You can also open
various ranges.
4 Project window/Section: "Section" refers to the visible part of a project in the
project window. Which part of the project is displayed, depends on the position of
the section and the zoom level.
There are many commands for moving (scrolling) the visible section and
customizing its size (zooming). These can be opened via the menu view, the
grid/marker bar, and the shortcut keys.
Page 50

50
5 Track box: The track box is the front section of a VIP track. It contains various
controls which range from mixer functions and monitoring commands to other
track parameters. More information on the individual controls of the track box can
be found in the Track box overview.
6 Track editor: The track editor enables access to all important parameters of the
selected track. Record and monitoring status, volume, panorama, MIDI/audio inand outputs, plug-ins, AUX sends and EQ settings are displayed in well-arranged
sections and can also be edited directly in this view.
7 Setup/Zoom/Position buttons: This part of the workspace helps manage each of
the four different setup and zoom settings project section displayed in the VIP
window. Similarly, the "Pos", "Len", "End", "Mouse", and "Mixer" fields can be
configured with a right-click.
8 Docker: Here you will find different manager windows and the visualization, time
display, transport console, object editor and MIDI editor windows. You can take
each of the windows from the title bar in the docker and position or dock them
elsewhere. Click on "+" (far right) to open or close the displayed windows.
Managers/Docker
In "View" menu you can open the so-called "Docker", which offers a useful
combination of various editing windows. In addition to various Manager windows, the
docker also unites visualization, time display, transport console, Soundpool, object
editor and MIDI editor in a tab window.
The docker can be minimized by clicking on the "minimize" symbol in its top bar or
into the tab that is already open. If you click a tab again, the docker will be maximized
again.
Using the "+" key, you can open a new tab in the docker. The editing windows can be
individually turned on or off in the "View" menu.
To remove a listed tab window again, just drag this out of the Docker lead or doubleclick on the appropriate tab window. The corresponding dialog window will now
appear in its own window.
You can return the window to the docker through repeated double clicks on the
individual window or by dragging the window onto the tab bar.
www.magix.com
Page 51

Program desktop overview 51
Docking
In Samplitude Music Studio 2013 you can couple certain dialog and display windows
to pre-determined areas on the VIP window or the docker, or use them as freelyfloating windows.
In an undocked state, the corresponding dialog appears with a conventional title bar.
If you move the title bar of such a window into the docker area, the docker will turn
light green, indicating that the window has been docked.
Page 52

52
After releasing, the window will appear integrated into the docker.
The window can also be docked in other VIP areas. Moving is always accomplished
by drag & dropping the title bar.
During moving, the arrow symbols appear on the surface, to show the area where the
window may be docked. The area above the dockable range will become light green to
indicate that the window may be docked here.
www.magix.com
Page 53

Program desktop overview 53
Transport control
Keyboard shortcut: Ctrl + Shift + T
The transport console window contains the most important commands for playback,
recording, and positioning.
Play / Stop / Forward / Rewind: These buttons let you control position, just like with
a tape.
Right clicking the "Play" button: This opens the "Stereo master" mode's playback
parameters window. You can specify the sample rate, playback device,
scrubbing/varipitch options here.
Right click the "Record" button: Opens the recording parameters window. Adjust
recording settings like "Play while recording" here. You can also start a mono or
stereo recording straight from this window.
Record button: Starts the recording for all activated tracks, i.e. tracks with a red "R"
button in the track info to the left. The recording devices must be set to "R" with a
right click.
Time display: Displays the current playback position. The units can be selected by
clicking on the small triangle.
Area buttons: Using the "1" and "2" you can save areas. You can re-open previously
used areas using the arrow symbol.
L/E time display: Displays the length and end position of an area and can be edited by
double clicking.
Marker button: Opens the Marker Manager for detailed marker editing. You can find
more information in the "Managers" chapter.
Marker buttons 1...12: The current playback position can be saved on each of the 12
marker buttons. If one position has been saved, the marker will appear bright. Another
click on the same marker moves the play position to the corresponding marker. The
marker bank can be reset with right-click, after which it can be re-assigned anew.
Audio flip menu: Here you can set the appropriate recording mode.
Standard mode (playback during recording): This is the typical recording mode
during multi-track productions: Additional tracks will be recorded in addition to
already existing audio material.
Page 54

54
Recording without playback (background tape control): If you have selected this
option, playback of already existing objects is deactivated and the recording marker
will remain at the recording start position. Playback may be started manually, for
example in case "read after write" is required. Set the play cursor at a different
position and start playback by pressing the "Play" button. The recording will not be
interrupted by doing so. This way you can make changes to already recorded material
without interfering with the recording process.
Punch marker mode: In this mode recording takes place only between punch start
markers and punch end markers. This setting corresponds to the "Punch" button (see
below).
Auto Jam Session: Opens the "Auto Jam Session" window.
Mon: Activates Record Monitoring from Samplitude Music Studio 2013, whereby all
tracks with activated "R" display the incoming signal on the peakmeter. Right clicking
the "Moni" button lets you select from the various monitoring modes.
Note: Detailed information about monitoring can be found in Samplitude Music
Studio 2013's help chapter "System settings -> Global audio options -> Monitoring
settings".
Sync: Open the dialog with the synchronization settings. Further information can be
found in the help chapter "MIDI in Samplitude Music Studio 2013 > Synchronization".
Punch: sets Samplitude Music Studio 2013 into the Punch mode. In this mode, only
the range between the punch starter marker and the punch end marker is recorded.
If you haven't created any punch markers, these will be set automatically when the
recording button is pressed. If the recording is started when punch markers already
exist, the recording button will flash until the start marker has been reached as well as
once the end marker has been passed. It will be continuously lit during the recording
between the markers. End the punch recording by pressing the record button again;
playback will not be interrupted. Playback will stop if you press the "Stop" button.
In: sets the starting point for a punch recording.
Out: sets the out point for a punch recording.
When the Alt key is held down, you can set additional punch in/out markers.
Loop: Switch into the Loop Mode, where playback will replay a specific section in a
loop.
MIDI record modes: The following MIDI record modes are available: normal, overdub,
multi-overdub, and replace. This decides whether newly recorded MIDI files are
inserted into the VIP.
www.magix.com
Page 55

Program desktop overview 55
Tempo section: You can adjust playback speed and tempo of the entire arrangement
in the tempo section of the transport control. All objects in the VIP will be adjusted in
their speed using timestretching.
The "Beat grid/snap (view page 60)" button enables you to activate and
display the beat grid.
Use the "CLICK" button to switch on the metronome click. Right clicking the
"CLICK" button opens the metronome options window to configure the precounter and click volume.
Scrub Control: Using the Scrub Control wheel you can variably set playback speed.
This helps when searching for various audio passages. The buttons beneath it can be
used to start playback forwards and backwards at a slower speed.
Track Editor
1 Track number display and track name: A right-click
on the track name opens the "Track settings" dialog.
2 S: mutes all except the selected track.
3 M: mutes the selected track.
4 Record symbol: activates the track for recording.
5 Lock: prevents the objects in the track from being
accidentally moved or deleted.
6 Volume symbol: enables the input signal to be
previewed.
7 Volume entry field and volume control
8 Level control display: Both LED rows display the
input and output signal for the track.
9 Panorama: controls stereo position in the mix.
10 FX: opens the track effects settings of the activated track.
11 MIDI: sets the track to MIDI recording and opens the MIDI section in the Track
Editor.
12 Automation: is for Automation of MIDI controllers, VST parameters and certain
effects in the track.
Page 56

56
Automation
1 Right-clicking opens the context menu
2 Select the plug-in you would like to automate here.
3 Select the parameter you would like to automate
here.
The slider controls the selected parameter while automation is drawn.
MIDI
1 Arrow: Opens and closes the respective dialog box.
2 In device: Opens the MIDI input device menu.
3 Out device: Opens the MIDI output device menu.
4 Channel in: Set the MIDI input channel here.
5 Channel out: Set the MIDI output channel here.
6 Program: This slot is responsible for selecting the
program for the MIDI instrument.
7 Bank MSB: Set the device-specific control change
messages for controlling your external instrument
here.
8 LSB: Set the device-specific control change messages for fine-tuning your
external instrument here.
9 Drum map: Select a drum map for allocating MIDI notes to the device-specific
sound here.
10 Transpose: Transpose the notes of the respective MIDI input or output up or
down here.
Audio
"In" slot: Specifies the audio input device, i.e. a
sound card.
"Out" slot: Specifies the audio output device. This
may be a sound card output or (in "MIDI" mode) a
VST instrument, for example.
Gain: Set the sensitivity of the input here.
www.magix.com
Page 57

Plug-ins
AUX
EQ
Program desktop overview 57
Activates the sound effects rack containing various
track effects, plus a compressor.
In the first slot, you can also select a MAGIX synth
to be controlled via the track. Clicking on the button
to the right of the field beside "Plug-ins" activates
and opens the "DirectX/VST plug-ins" dialog to put
together a plug-in setup for this track.
Here you can specify the AUX send feed for which
you can then select the desired effects in the AUX
return channel in the Mixer view.
Contains the parametric EQ for this track. Rightclicking opens a convenient input window.
Comments
Track info section for quickly adding notes on
tracks.
Page 58

58
Track box
The track box of each track offers a roundup of Track Editor settings.
1 Track number display and Track name: By right-clicking the track name you can
open the "Track settings" dialog.
2 S: mutes all except the selected track.
3 M: mutes the selected track.
4 Record symbol: activates the track for recording.
5 Volume symbol: enables the input signal to be previewed.
6 Lock: prevents the objects in the track from being accidentally moved or deleted.
7 FX: opens the track effects settings of the activated track.
8 Level control display: Both LED rows display the input and output signal for the
track.
9 Volume control slider: controls the track volume.
10 Panorama- slider: controls position in the mix.
Both the "Vol" and "Pan" buttons activate curves that allow the volume and panorama
in the track to be automated.
www.magix.com
Page 59

Program desktop overview 59
Symbol bars
Symbol bars, also known as tool bars, offer quick access to important Samplitude
Music Studio 2013 functions. All symbol bars (toolbars) can be moved freely on the
monitor. To do so, click on the separator at the left edge of the group of icons and
drag the toolbar to the desired location. These will snap in at different positions in the
window. You can also switch, for example, position bar and tool bar.
Additionally, toolbars can also be adjusted according to your own needs. To do so,
select the "Adjust toolbar" button in the context menu.
To quickly sort a toolbar's individual buttons, click on the corresponding icon and drag
it to the desired position while holding down the "Alt" key. You can use the same
method to remove icons from the toolbar by holding the "Alt" key, dragging the icon
outside the boundaries of the toolbar, and then releasing it.
Note: The visibility of certain toolbars depends on the selected workspace (view
page 64), with some toolbars being hidden in some workspaces. Every toolbar can
be hidden and displayed independently from the selected workspace in the "View" >
"Toolbars" menu.
Toolbar 1
New Virtual Project
Load VIP
Load audio file
Export/save
Undo (Undo)
Restore (Redo)
Remove
Copy
Paste
Split object
Glue object together
Auto crossfade on/off
Crossfade Editor
Group
Dissolve group
List field Mouse mode (view page 88)
List field Object mode (view page 66)
Page 60

60
Toolbar 2
Note: Toolbar 2 is normally hidden
Set marker
Set CD track
Set subindex
Set pause
Set CD end
Set track markers at object ends
Make CD
Play
Play as loop
Play section
End playback (stop)
Recording options [R]
Record
Solo Jam Session
Mixer
Tempo tab/tempo buttons
The tempo tab is found in the tool bar. Here you can change important beat settings
(view page 473) without having to always open proj
ect options. Click the magnet
button to activate the snap grid. Below the button next to it you will find a menu for
the following beat settings:
Object grid: This option activates the object grid. This lets objects snap exactly to the
edges of other objects.
Area grid: This option activates the area grid and lets you use the current area as a
grid basis.
Time grid: This option activates a grid, which uses beat settings as its basis.
Time grid (relative): This option also activates a grid, which takes beat subdivisions
as its base. The selected object will maintain a relative distance to the snap markings
when moved.
Frame grid: This option activates a frame-based grid.
www.magix.com
Page 61

Program desktop overview 61
Specify the snap length (for beat snapping only). Values range from every 4 beats,
every 2 beats, every beat, musical measure and same as quantization.
The setting Musical measure means that, signatures based on quarter notes serve as
a quarter snap unit, and time signatures based on eighth notes serve as a eighth snap
unit. The snap therefore follows the time signature and observes any time signature
changes.
Warning: When the grid is active, the playback cursor jumps according to the set
grid value when forward and rewind buttons are used in the transport console. If you
would like to temporarily shut off the transport controls, press the "Alt" key
simultaneously.
Activate grid: Here you can globally turn the grid on or off.
Keyboard shortcut: Ctrl + #
Grid and snap settings: This option brings you to the Project options - General (view
page 473) dialog, where you can change additional grid and snap settings.
In the field labeled wit
h Q you can set the quantization value, which will be used for
MIDI Quantization (view page 207) and can serve as the grid if the corresponding
grid setting "like quantization" is selected. Right click
ing the field opens the MIDI
quantize settings.
Note on "Input Q": In the button skins (e. g. "Camo") you can also find the button
"Input Q" in the MIDI area of the Track Editor. If this function is active, then
recorded MIDI notes will be quantized according to the current settings
immediately. The original position may be restored at any time via the menu item
"Object -> Quantize -> Reset Quantization".
Position bar (left side)
To beginning
One section left
Half section left
Half section right
One section right
until the end
To previous object edge
To next object edge
To previous marker
To next marker
Page 62

62
Enlarge range (zoom in)
Reduce range (zoom out)
Zoom extents
Zoom to range
1 pixel = 1 sample
Zoom range 1 second
Zoom range 10 seconds
Zoom range 60 seconds
Zoom range 10 minutes
Position bar 2
Reduce range vertically (zoom out)
Increase range vertically (zoom in)
Show all vertically
Show range vertically
Zoom into waveform
Zoom out of waveform
Overview mode
Mouse mode bar
Note: Mouse modes and object modes can also be set in the corresponding list
fields on the toolbar. For this reason, this bar is normally hidden. For a complete
description of mouse modes, go to mouse functions and mouse modes (view page
88))
Universal mode
Area mode
Object mode
Curve edit mode
Object/curve mode
Object cut mode
Pitchshift/timestretch mouse mode
Panorama draw mode
Volume draw mode
Curve edit mode
Waveform draw (only in wav projects)
www.magix.com
Page 63

Scrubbing Mode
Zoom mode
Object mode (view page 66) "Hold all objects"
"Normal object mode"
"Connect curves to objects" mode
"Connect objects until pause" mode
"Connect objects on one track" mode
"Connect objects on all tracks" mode
CD special mode
Color mode
Range bar
Play cursor back to range start
Play cursor to range end
Fold range to left
Flip Range right
Range start to previous zero crossover
Range start to next zero crossover
Range end to previous zero stage
Range end to next zero stage
Range editor
Move object start left
Move object start right
Move object(s) left
Move object(s) right
Move object end left
Move object end right
Step size for moving objects
Program desktop overview 63
Page 64

64
Workspaces
Working spaces serve to bundle menus and symbol bars for certain tasks such as
mastering, editing or recording. The available work spaces can be selected in a
separate selection menu.
You can create and save your own work spaces. First, set the program screen as you
see fit. You can hide certain menu options (menu "File" > "Program settings" >
"Keyboard shortcuts and Edit menu") and change symbol bars (right click on symbol
bar). Finally, save the changed settings in one of the presets.
Creating a new work space: To create a new work space, right-click of the selection
menu, select in the context menu "New work space" and give it a fitting name. The
new work space contains all settings of the previously activated work space as well as
your later changes. All further changes will be automatically saved in the work space,
explicit saving of the work space isn't necessary.
Adjusting the workspace: Open the context menu and click on "Edit Workspace".
Here you can select which symbol bars should be displayed and edited. You can
activate or deactivate each bar individually, or add/remove individual symbols.
Additionally, you can hid individual menu options under "Edit menu". To do so, select
the corresponding menu option using keyboard shortcuts and then press the "Show
menu option" or "Hide menu option" button.
www.magix.com
Page 65

Functional overview 65
Functional overview
Objects
Audio objects contain references to the audio files that form their base. You can also
speak of referencing an audio file with an object. An audio object references audio
files and calculates parameter settings such as volume, panorama, object length,
sound changes, effects or fades in realtime. Pitch changes, timestretching, AUX send
routing and plug-ins can be calculated this way.
MIDI objects reference a corresponding MIDI file. In contrast to audio, where audio
files are saved to the hard disk, MIDI files are saved together with objects, and are
directly coupled to the corresponding objects.
Loading an audio file into a VIP object
Method 1: Loading a file into a VIP
Mark a range in the VIP and load the wave file with "File -> Open project -> Audio
file". The file is inserted at the beginning of the selected range as an object. The range
also denotes the track into which the wave file is inserted.
Method 2: Drag & drop from Windows Explorer
Open Windows Explorer and arrange the Explorer and Samplitude Music Studio 2013
windows so that both are at hand. Access the audio file in Explorer that you would like
to use, and then simply drag it over into Samplitude Music Studio 2013 while holding
down the mouse button.
Load ranges from wave projects into the VIP
• Open a wave project.
• Mark the range which is to be incorporated into a virtual project.
• Create a new virtual project with "File -> New multitrack project" ("E") or with
the corresponding button in the toolbar.
• Tile the open windows by pressing enter.
• Drag the selected range in the wave project into the virtual project by clicking the
left mouse button into the range and then dragging it into a VIP track.
• A new object is created in the VIP at the position the mouse button was released.
Page 66

66
Accessing audio material in an object
• Select any object.
• In the object menu, select ”Destructive editing”. The same menu option is
available from the context sensitive menu by right clicking on the object.
• This opens the corresponding wave project window. The marked range
represents the audio material that is used in the VIP object.
Moving and duplicating objects
Once one or several objects have been selected, they can be shifted vertically (by
track number) and horizontally (in the timeline) while holding the left mouse button.
As soon as you let go of the left mouse button, the object will be placed at the current
position.
If several objects have been selected in different tracks, the selected group can be
moved vertically only so far that all objects remain within the tracks.
If "Shift" is pressed when moving the objects, the time position is retained and you
can only change the track.
If "Ctrl" is pressed while moving the object selection, then a copy of the object
selection is created. In this case, the copy of the original object selection is placed at
the destination. The original objects maintain their position.
Object modes:
Normal Object Mode
In this mode you can move objects and edit the end and start positions, fade in and
out phases, and object volume.
"Lock all audio in time"
This mode locks all objects to stop them from being moved accidentally. Object mode
"Lock all audio in time": Holding down the "Alt" key at the same time temporarily
deactivates the mode for the selected objects.
www.magix.com
Page 67

Functional overview 67
Link curves with objects
In this mode you can shift track automation curves together with the objects that are
being moved.
Link objects until pause
The means that the chosen object is selected and moved together with all subsequent
objects on this track. This ensures that the pauses between the objects remain intact
when moving a particular project range.
This function also applies to multiple selected objects arranged along various tracks.
Link objects on active track
In this mode, all objects on the current track are selected and moved together.
Link objects on all tracks
In this mode, all objects appearing in the arrangement are selected and moved
together from the mouse position.
Note: By using the object modes "Connect objects until pause" and "Connect
objects on a track" together, the markers in the top arranger track may also be
moved when objects are moved. Moving objects in the object mode "Group objects"
simultaneously moves the marker independent of the selected track.
Changing object borders in virtual projects
The lower object handles of a selected object can be used to alter the object borders.
The mouse can be used to change the object beginning or end. The object length can
only be changed within the confines of the physical wave project window.
This means that the beginning of the object can not be extended beyond the
beginning or end of the corresponding wave project. Conversely, the end of the object
cannot be extended beyond the beginning or end of the corresponding wave project.
Fade in / Fade out and object volume
The object handle in the top center can be used to set the object volume. The exact
volume level in dB during the change is visible in the pop up window at the object.
The top left and right-hand handles of the object change the fade in and fade out
settings of the object.
Since these changes are applied in real time during playback of the project, then the
original audio material is left intact. This allows easy set up of fades and volume levels
without having to fear data loss.
The curve types when fading in and out can be set in the crossfade editor.
Page 68

68
Overlapping objects
A track (channel) can only play back one object at a time.
If one object is moved over another object, then the previous object is partially or
completely taken out of the playback list (much like one sheet of paper covers
another partially or completely). The invisible part of a covered object will not be
audible. By moving the covering object out of the way, the covered section or the
complete object can be made audible again. To create a crossfade between two
objects that are intersecting each other, the crossfade editor in the "Edit" menu can be
used.
Looping objects
Looping repeatedly plays an object or object range. You can change the length of
objects by dragging out the length handles.
An object is normally played back between the object start and end. A loop object
also starts from the beginning of the object, once the loop starting point has been
reached only the set loop range will be repeated until the object end.
The easiest option to loop is to open the object's context menu and choose the option
"Create looped object" (shortcut: Ctrl + L). The entire object is treated as a loop. If
you now drag the length handle at the back to the right, you will see a vertical dash at
the previous object end. For this marking onwards the object will be played back
again, it is looped and can be stretched out to the right.
An object loop may be edited in far more detail by using the object editor. In Loop
Mode you can set and customize the loop start, loop length as well as the loop end
within the object. Skilled looping omits time-consuming cutting.
www.magix.com
Page 69

Functional overview 69
Object Editor
The centerpiece of object-oriented working is the object editor, which can function as
a tool for a single object as well as multiple ones.
Note: There is an object editor for MIDI objects as well. Detailed information can be
found in the chapter "MIDI in Samplitude Music Studio 2013 -> Working with the
MIDI object editor (view page 173)"
The object editor is divided in three sections "FX", "Fades", and "Time/Pitch". The
object editor may be left open to edit objects - the view automatically adjusts to the
selected object.
To open the object editor, select an object and press "Ctrl + O" or double click on the
object. The Object Editor opens in the Docking bay.
The Object Editor can also be opened for an unselected object by positioning the play
cursor over the object you want to edit and pressing Ctrl + O. The track containing the
object must be activated.
To select all objects at a certain play cursor position, activate a track with no object at
that position. Press "Ctrl + O" and all objects located at the cursor position will be
selected, the object editor will open for the topmost object in the track list, which also
features the lowest track number.
Page 70

70
Object editor: Basic functions
The selection options for the three different dialog windows of the object
editor are displayed to the left.
FX: Here you can set the gain, plug-ins, sound FX rack, EQ, panorama and
volume.
Position: Here you can set the wave position and object position.
Time/Pitch: Here you can set timestretch/pitchshift algorithms.
The section on the far right is the same for all three dialog windows:
The object name is displayed in the upper text field and this may also be edited. In the
square field to the side, you can select the object color.
Using the arrow keys you can "jump" up or down to the object of a neighboring track.
Use the double arrow buttons to jump to the previous or next object. If multiple
objects are selected, these buttons will not be active.
1-4: You can save the various object editor settings in 4 snapshots. These snapshots
apply to the entire project, so that you can easily transfer the effect settings of an
object to another (or multiple) object(s).
This can be done by left clicking on the corresponding button. If a snapshot has been
saved in the respective button, you can overwrite it by holding down the "Shift" key +
left clicking. Clicking the number keys loads the snapshot. You can quickly compare
the various object editor settings by switching between the snapshots.
You can also access these functions via the context menu of the snapshots. You can
also delete snapshots there.
To all: If the "To all" option is active all selected objects are updated when the object
editor is opened. No matter in which of the three object editor windows, all recently
www.magix.com
Page 71

Functional overview 71
applied settings that have been made in a selected object, will be applied to all other
selected objects.
Note:
- Volume changes are transferred relatively in an object, i. e. they are increased or
decreased relative to the volume of other selected objects.
- The EQ settings are always completely transferred, in contrast to previous
versions where only the edited bands were transferred.
Bypass FX: This deactivates all object effects, EQ/panorama settings, and AUX sends.
Play/stop: This button corresponds to the normal playback function (shortcut: space
bar).
Phi: The Phi button causes a 180 degree phase rotation. By right clicking on the Phi
button you can invert the left and right channels individually.
Lock: The activated "Lock" button corresponds to the key button's switch in the
object. The object is then protected against any inadvertent horizontal movement.
Additional locks against vertical moving, volume adjustment, fades, length
adjustments, ripples or deletion can be set in the system settings (shortcut: "Y")
under "Program > Object lock definitions". Locking can be temporarily cancelled by
pressing the "Alt" key.
Solo: This button moves the play cursor, during playback, to the start of the selected
object and plays that only. Track-dependent busses and AUX paths are also observed
at playback.
Mute: This button mutes the selected object. By right clicking you can also mute the
left and right channels individually, too.
Commentary: You can type comments relevant to the selected object in this field.
Page 72

72
Object effects
In addition to the numerous effects available for individual tracks and the master area
of the mixer, audio objects may also feature effects. All settings are retained when
moving or copying objects.
By crossfading between objects of different settings, you can also fade between the
different effect settings. CPU-intensive effects may therefore be used more
efficiently, since they are only processed as required (unlike a track effect set up as an
AUX send effect).
The "Effects" or context menu also makes it possible to access the object effects.
Plug-ins/Sound FX
The plug-in section provides you with quick access to installed effect plug-ins on the
object level.
Here, plug-ins and insert effects can be selected by clicking the arrow symbols of
each plug-in slot.
Just by clicking you can switch the sought plug-ins on or off. Right clicking opens the
interface of the respective plug-in.
The button to the right next to Plug-ins disables all plug-ins. Right clicking on this
button opens the Plug-in (view page 359) dialog. Here you can load even more plugins than are visibl
e in the slots. You can also save and load plug-in effect settings in
this dialog.
Sound FX opens the SoundFX rack (view page 97) with the internal effects provided
Music Studio, Vocoder opens the Vocoder (view page 374).
by
Using the butt
on "Offline FX", you can apply all effects as offline effects to an object.
Select the effect in the corresponding effect dialog and confirm using the "OK" button.
It is also possible to edit either the left or right channels individually.
To remove a plug-in or an effect, select "No effect" from the corresponding plug-in
slot in the menu.
www.magix.com
Page 73

Functional overview 73
Under "EQ" you can set four frequency bands. The blue button in the header switches
the equalizer on and off. By right clicking on the controller/blue button, you can
access the dialog window for the fully parametric 4-band equalizer (view page 101).
Gain
Use gain to control the level of the object at the beginning of the processing chain,
before all other effects.
PAN
Here you can edit the panorama as well as the stereo width of the active object.
Vol
Vol: The volume is controlled using this fader.
Double clicking on the fader sets it to 0 dB.
Norm.: The Norm. button normalizes the maximum level of the object to 0 dB
Position
Use this dialog to set object-related time positions (start, length, end) for the selected
object. In the entry field "Step size" the measurement unit can be changed on the far
right just by clicking. The following units are available: samples, milliseconds,
hours/mins/secs, SMPTE (24, 25, 29.97 non drop, 29,97 drop, 30),
SMPTE/milliseconds, CD-MSF, feet and frames 16 mm (40fpf) and feet and frames
35 mm (16fpf), noise reduction (meter).
Content
Audio file: Here the referenced wave project can be exchanged, copied and renamed
directly in the object editor. Open the file exchange dialog by clicking the folder
symbol beside the name of the audio file. If the audio file is used by multiple objects,
you can indicate whether it should be switched for the currently selected object or for
all referenced objects.
Wave position: The arrow buttons do not affect the position of the object or its
length, they move the audio material in the object left or right.
Page 74

74
With the option Reverse playback an object will be played backwards. The audio files
are not changed.
Hint: Please note that there are some limitations when using additional effects on a
backwards-playing object. This refers to wave editing or using timestretching
effects, especially Elastic Audio. Furthermore, reverse playback requires more
resources as track speed cannot be used here.
Position
The starting time of the object on the timeline, object length, and object end can be
set here by entering a number or using the arrow buttons.
Using the arrow buttons beside object start / position the object can be moved
forward to the start of the project or towards the end of the project.
The arrow buttons beside object length move the start of the object, they work just
like the front lower object handle.
The arrow buttons beside object end shorten or lengthen the object, they work just
like the back lower handle.
The step size shows the position/length adjustment made upon clicking on the arrow
button. The unit of measurement to the right beside the input value can be changed in
the context menu (right-mouse click to open).
The lower part of the menu features corresponding presets for each selected
measurement, e.g. for the unit of measurement "Bar/beats", the following step sizes
are used: 1/64, 1/32, 1/16, 1/8, 1/4, 1/2, 1Beat, 2Beats, 1Bar, 2Bars, 4Bars.
Pitchshifting/Timestretching
Pitchshifting and timestretching can be used in parallel independently of each other,
except for in the Resampling mode.
Pitchshift: You can shift pitch either in half tones (mouse wheel + Ctrl) or per cent
(mouse wheel + Shift) or enter it as a pitch factor of the original value.
www.magix.com
Page 75

Functional overview 75
Timestretching: Speed correction can be made either as new object length/stretch
length or as stretch factor of the original value or you can indicate the desired tempo
as BPM (Beats Per Minute).
The button "<< from loop or range" makes it possible to extract the BPM value from
one selected range or the object length and enter it as the "Original BPM". Enter the
number of quarter notes in the dialog that opens and then confirm with "OK". This is
important if the object tempo is not entered correctly and another tempo needs to be
compensated.
The values can also be adjusted in stages using the knob.
If you wish to change the original speed ("Original BPM"), you will see that the speed
of the object you wish to correct adapts to that of the set stretch factor. The modes to
be selected are Resample, Standard, Smooth, Beat Marker Slicing, Beat Marker
Stretching, Monophonic Voice.
"Edit" opens a clear display of the already named parameters. If you move through the
individual modes with the mouse, a detailed explanation will appear for each mode.
You can learn more about individual algorithms in the menu reference under "Menu
Effects > Time/Pitch > Resampling / Timestretching / Pitchshifting (view page
371)".
"Reset" restores all pitchshifting and timestretching settings.
Elastic Audio provides a high-quality tool for pitch customization. The "Elastic Audio"
button opens the activated object in the Elastic Audio Editor.
The Use Elastic Audio (Pitch Automation), changes the pitch using Elastic Audio.
Ranges
Ranges are selected parts of an arrangement which are defined for editing or
accessing later on.
Example 1: A certain section of a song is to be completely removed from the
arrangement. To do so, first define a range that contains the material to be removed.
Next, activate the defined range for all tracks by double-clicking twice in the beat bar
of the range. If you press the Del key now, the material will be deleted from the
arrangement. Parts located behind the range will be automatically moved forward,
closing the gap.
In a similar fashion you can also copy the material inside the range to the clipboard in
order to insert it at a different location. First, create a range for all tracks as described
above and press Ctrl + C ("Edit" > "Copy"). Now, set the playback cursor at the
Page 76

76
position where the material should be inserted. Select the first track and press Ctrl +
V ("Edit" > "Insert" > "Insert from clip"). Now the material will be added to the track
as new objects.
Example 2: A selected range can be played back in a loop, in order to create loopable
sequences. Activate the "Loop" button in the transport console. During playback the
range borders can be moved in order to find the optimal loop.
Selecting a range
To select a range, move the mouse pointer to the top half of an object and press the
left mouse button. Move the mouse pointer within the object while holding down the
mouse button. An inverted rectangle appears between the starting point and the
current mouse position. Once you let go of the mouse button, the range will be
selected.
The play cursor always automatically remains at the beginning of the range, even if
you can't see it at this moment in time. To expand the range to other tracks, click on
the top half of the selected object again and drag the mouse down vertically while
keeping the mouse button held. Now click the section with the "Shift" key held down,
and every object featuring a middle point within the selection rectangle will be
selected.
A range may also be selected by dragging the mouse across the timeline. This will
then be indicated by a different color. Double clicking this range in the timeline selects
a range in the selected track; double clicking again selects the range over all tracks,
and double clicking once more restores the simple timeline selection.
The timeline selection enables the play cursor to be positioned outside the range. The
range will remain in loop mode. This way, playback may be started in front of or
within a loop. In this case, the range edges may also be modified during playback. The
playback range may be deleted by dragging to size 0. . Click the range borders in the
timeline to position the play cursor at the playback borders. Double clicking the
timeline outside of the range removes the playback range.
www.magix.com
Page 77

Functional overview 77
Leaving a range
To select a different range, click somewhere in the project other than the current
range, and simply draw a new range.
Reactivate range
To reactivate an earlier range, use key combination "Shift- + Back arrow" (or "Edit" >
"Range" > "Reactivate last range"). By clicking on this command repeatedly you can
restore the last five ranges. You can execute the same function by clicking on the
button with the left arrow in the transport control.
Change range borders
You can change range borders by placing the mouse on the edge of a range in the grid
bar until the cursor turns into a double arrow. Now you can reset the range borders by
dragging in the horizontal direction.
If you want to change only one border of an existing track range such as beginning,
top edge or bottom edge, left-click on the existing range and hold down the mouse
key. Now you can drag the mouse with the held down key in the direction that you
want tot change the range. As soon as the edge of the existing range has been
crossed, the range edge will follow the movements of the mouse pointer. After you
have redefined the range, you can release the mouse.
You can also change a range using the Shift + arrow keys.
Horizontal movement of a range
Click with the left mouse key while holding down the Shift key inside an existing range
on the grid bar, hold the mouse key and move the range in the horizontal direction.
Save/recall range
Selected ranges can be saved and recalled using "Edit" > "Range" > "Remember
range" or with Alt + Function key F2-F10 and reopened with "Edit" > "Range" > "Get
range" or Ctrl + F2 to F10.
Note: Alt+ F4 is excluded since it is a Windows shortcut for closing windows.
Using Alt + F11 you can save unlimited ranges and assign them names.
Additional special functions for defining, changing and using ranges can be found in
"Edit" > "Range".
Page 78

78
All saved ranges are displayed In the Range Manager, where they can be numerically
edited and recalled. The manager is found in the docker or can be opened via "Edit" >
"Range" > "Range editor".
Tip: All menu commands for range editing can be found in the menu reference "Edit"
> Range" (view page 346).
Wave projects
Wave projects include audio files. VIP objects reference to corresponding wave
projects open in the background. The reference solely the audio files and receive
working instructions as to what the computer is to do with these files.
All audio edits take place normally directly in the VIP and are "virtual" or "nondestructive". This means that they are saved to the hard drive as a file only during
export In some cases it might be desirable to edit audio material directly already
during editing. In such cases you can find the associated audio file for each object via
the command menu "Object" > "Edit wave object".
Wave projects are for direct editing of data saved to the hard drive. This art of audio
editing is called "destructive", although editing steps can be reversed with Ctrl+Z (or
"Edit" > "Undo").
When a VIP is opened, you normally cannot see the individual wave windows. To
make them visible as icons, activate the "Wave projects to icons" options in "View" >
"Window". To make them disappear again, select "Hide wave projects".
In the title bar of the wave window you will find the project name, bit resolution,
sample length and the resulting disk space.
You can also load audio files without VIP and edit them in a virtual Wave Editing
Mode. For this the "Open wave projects in destructive mode" option must be
deactivated in Program Settings (Y). Files loaded via "File" > "Load audio file" will be
opened in a wave project, which works virtually, similar to a VIP.
www.magix.com
Page 79

Functional overview 79
Marker
Position marker
Position markers serve to "remember" position points. They are visible as in a special
line at the top edge of a project as named orange bars. Markers can be placed during
playback as well as during recording.
• Markers in wave projects are saved in the audio file (*.wav) as so-called audio
markers and are available in this form in other applications as well.
• Wave project markers can also be displayed in VIP objects (VIP display options).
• A project can contain any number of markers. The first ten can be called up
directly using the number keys and are assigned names "1" to "10". You can save
them using the "Shift + Number Key" key combination. By pressing the
corresponding number key you can jump back to the marker once again.
• By going to "Playback" > "Marker" > "Marker by the name..." you can define and
name additional markers.
• To delete a marker, click on it and press the Del key. You can move markers by
grabbing and dragging them. The mouse cursor will turn into a double arrow.
• If you right-click within a marker line, a context menu will appear from which you
have access to all important commands.
• Manage and name markers in the Maker Manager ("View" menu or in the marker
context menu).
• To stretch a range between any two markers, click on the first marker. Then, click
on the second marker while holding down the Shift key. This selects a new range.
• To move quickly between marker positions, use the keyboard shortcut
("Playback" menu > "Move play cursor" > "Marker left/right".
CD Markers
CD markers are triangular markers for various CD burn functions. They can be set in
the "CD" menu. There are
• CD Title Markers
• CD Subindex Markers
• CD Pause Markers
You can find additional information on tempo markers in the Burning CDs" (view page
279) chapter.
s
Tempo marke
Tempo markers serve to change the arrangement's tempo.
• Tempo markers for tempo change at a certain position.
r
Page 80

80
• Tempo markers for changing the tempo type starting from the marker position
(e.g. from 4/4 to 3/4 beat)
• Grid position markers assign a musical position to a certain position on the grid.
This way, the bar frame/grid and MIDI events can be easily synchronized with
existing audio material.
You can find out more about beat markers in the "Changing the beat" (view page
226).
Volume
The volume levels of objects and tracks/channels can be changed at various stages.
Wave Project Level
The volume level changes are applied to the audio material with "Effects -> Normalize
-> Normalize file", or with "Fade in/out".
The audio data is changed. The computer usage is not affected during playback.
Object level
Every object can have an independent setting for its volume level. This can be
performed by changing the upper handles of the object or with "Effects ->
Amplitude/Normalize -> Normalize object".
The audio data is not changed. The calculations are performed in real-time during
playback.
Track level
The volume of every track can be changed dynamically with the volume automation
curve and the volume fader in the mixer or the VIP.
The audio data is not changed. The calculations are performed in real-time during
playback.
Output mode
You can setup the output mode in the playback parameter dialog ("P").
With the "Sample rate" option you can choose a different sample rate as playback.
"Device" allows you to select the desired playback device (if you have more then one
active sound card).
Please note that some sound cards are not be able to playback all sample rates.
www.magix.com
Page 81

Functional overview 81
Note: Different recording and replay devices for individual tracks can be selected in
the track information dialog rather than the play parameter window. Track
information opens by clicking on the track number.
Record
Hard drive recording
The device used to digitize audio signals is already included on the sound card and is
called an analog/digital converter (A-to-D, ATD or A/D). In order to record, the A/D
Converter gathers samples of the signal to be digitized in determined time lapses and
measures its frequency. The rate is called ”sample rate” and normally lies in the kHz
ranges. KHz means a vibrating frequency of several thousand times per second. The
higher the rate, the more samples are taken by the A/D converter and the more
natural the digital transformation of the sound will be.
The precision with which the A/D converter measures the analog signal is
determined by the sample resolution. The finer the resolution, the better the digital
transformation.
CD-quality audio recordings are recorded with a sample rate of 44.1 kHz and 16-bit
resolution.
Recording source
First of all, the recording source must be connected to the sound card. There are
several ways to do this, depending on your equipment.
Microphone: Microphone signals must first be amplified before the sound card
modifier can record them. Most sound cards have separate microphone inputs that
pre-amplify signals, but the results are rarely professional.
Quality: Connection to an external mixer or external microphone amplifier produces
far better results.
Amplifier: If, for example, you possess a guitar amplifier that has a line-out output,
you can connect it with the line-in input on the sound card.
Stereo system: The stereo system’s amplifier usually has a separate line-out. If
instead, you see ”Aux. out sockets,” then you should use these. Connect them with
the input on the sound card (usually shown in red). Normally, a high-fidelity (hi-fi)
amplifier has cinch sockets and sound card mini-stereo catch sockets. You must have
the corresponding cable to connect these properly.
If the amplifier doesn’t have separate outputs (other than the loud speakers), then
you can use the headphones socket for recording. In this case, you need a cable with
two mini-stereo headphone connectors. This process has an advantage: you can
control the signal level through the phones input. The disadvantage is that phones
outputs are normally not very good. With cassette recordings, always use the
Page 82

82
cassette deck line out. Record transfers often leave you no other choice... Never
connect a record player’s outputs directly to the sound card, because the phono signal
must be pre-amplified first. If you don’t have a pre-amplifier, the only way to do this is
via the phones output or an external amplifier
Adjusting the signal
Digital recordings through the sound card need optimal control in order to obtain the
best sound quality.
Once the recording source is connected to the sound card, open the recording dialog
with the "Record" button and start the recording source.
You can check the control on the LED displays in the recording dialog.
If the level is too high, reduce the incoming signal. If the recording source is connected
through the amplifier or tape deck’s line out connectors, then you can reduce the
incoming signal only by using the sound card’s mixer window. This is located in the
recording dialog under the "Level control" tab.
If you reduce the input sensibility with the sliding regulator (fader), then you also
reduce (with many sound cards) the precision of the resolution of the digitized analog
signal. This is why these controls should be kept at the loudest possible setting!
The standard for optimal adjusting is naturally the loudest section of the material. This
should be turned to the maximum setting
Digital transfer
With the recording function, digital audio data can be transferred to the hard drive
through a digital interface (e.g. S/PDIF or ADAT).
ADAT or DAT recorders normally produce data with a sampling rate of 48 kHz. For a
CD project with 44.1 kHz you must convert the sampling rate. This is carried out in
real time by Samplitude Music Studio 2013. The digital signal is read at 48 kHz, but is
automatically converted and inserted into the project as an audio file at 44.1 kHz.
For this to occur correctly, you must first set the sample rate of the incoming signal in
the recording dialog. Click on the "Dev." button in the recording dialog. In the
following dialog (sound card characteristics), set the audio recording formats
supported by the sound card.
Now, connect the digital output of your recorder to the digital input of your sound
card, and now start recording!
24-bit audio support
Audio files in Samplitude Music Studio 2013 can not only be recorded in 16-bit
quality, but also in far superior 24-bit resolution. Simply click the ”device” button in
the recording dialog, and select the ”24-bit” option under ”sound card properties”. 24-
www.magix.com
Page 83

Functional overview 83
bit recordings require a high-quality audio card with 20 or 24-bit converters, as well
as a 24-bit-compatible NME drive. 24-bit audio material can also be transmitted via
audio cards with SPDIF digital interfaces.
We have had positive experiences with the 24-bit audio cards produced by Marian,
RME, SEKD and Terratec.
The high resolution audio files are stored and edited in the 32-bit ”floating point” file
format by Samplitude Music Studio 2013. This ensures the full 24-bit quality
independent of the gauge. The dynamics may increase to over 140 dB, while the
recording’s jamming transmission sinks (depending on the type of audio card) to 110
dB and more. Thanks to floating point processing, there is no need to worry about
internal editing being distorted. Floating point processing only starts to distort at
around 1,500 dB above zero, in contrast to a 16-bit signal which distorts immediately
once the zero dB line has been crossed.
Even in cases whereby audio material is intended for burning onto a 16-bit CD, it is
worth selecting 24-bit recording, since all effects calculations are made in a higher
quality and therefore no ”rounding” mistakes can be detected in the audible 16-bit
range.
24-bit recordings (via storage as 32-bit float files) take up twice as much storage
space on the hard disk as 16-bit recordings. But with current hard disk storage
capacities, it works out as a good compromise when one considers the increase in
quality.
High resolution audio files can be imported and exported as 24-bit wave files,
enabling trouble-free file exchange with other high-quality audio systems.
Further recording dialog possibilities
The recording dialog also offers:
• A string instrument tuner for creating the best sound possible before recording.
Deviations from the standard pitch are graphically displayed.
• The option of laying track markers (either manually or automatically) while
recording a CD.
• The option to directly incorporate a variety of audio formats, e.g. to save hard
disk space.
Please read the “Recording options” section of the “Playback menu” chapter to learn
about all of the recording dialog options.
Page 84

84
Folder tracks
Multiple tracks that belong together can be combined in a folder track in order to
bring more order to your multitrack arrangement.
You can add a new folder track via "Track" > "Add new tracks" > "New folder track".
Now you can drag and drop other tracks into the folder track. The contained tracks
will be displayed inside a frame.
A folder track can be recognized by a folder symbol in its track box.
The folder track can be opened and closed by clicking on the folder symbol.
Individual tracks can be gotten out of the opened folder track via drag & drop. A "(F)"
is attached to the folder track number in the Track Manager. If you would like to
delete a folder track, you will be asked in a dialog window whether all tracks contained
in the folder should be deleted as well.
Mute, Lock and Solo of the folder track affect all tracks contained therein.. Volume
regulation of the folder track scales the individual faders relative to each other.
www.magix.com
Page 85

Functional overview 85
Tips & tricks
A few tricks that help make working with Samplitude Music Studio 2013 easy:
Working with projects
• The "A" key will select the complete sample as a range.
• "Home" and "End" set the play cursor to the beginning or end; all selected ranges
will disappear.
• A range can be selected from one exact marker position to the next by clicking on
the marker above the wave. Next, hold "Shift" and click on the second marker.
• Using the "Shift + mouse click" a range can be moved horizontally.
• "Shift + Ctrl + arrow keys" will flip a range to the right or left. This is a great way
of testing a loop at a different position.
• Objects in Virtual projects can be displayed in two different modes. By pressing
"Tab" you alternate between the modes. Pressing "Shift + Tab" will open a dialog
window in which you can set the parameters of the display modes.
• Using "Ctrl + mouse click" on an object copies the object.
• Double clicking the mouse button on the volume curve creates and deletes
volume handles. Activate the volume automation curve with "V" in each track of
the VIP!
• Change the function of the mouse buttons in VIPs with "Preferences -> Mouse
mode", or use one of the mouse mode buttons in the mouse mode toolbar!
• The function "Lock objects" allows you to lock objects to prevent accidental
movement. This is especially useful for multitrack recording when the individual
tracks need to stay in sync with each other.
• To determine the tempo of a selected range (BPM), open the snap definition
dialog ("Shift + R") and select the number of beats the selected range represents
(for example: 4) in the "Free bar snap" section. Next, click on the "Get range"
button in the "Free bar snap" section to retrieve the length of the selected range.
The BPM display in the "Fixed bar snap" section now displays the BPM of the
audio section.
• Try the right mouse button on various components of the VIP window! A
context-sensitive popup menu is displayed which features useful functions
depending on the window component you clicked on. Among them are objects,
"Record" and "Mute" buttons, and the scrollbars.
• "Delete" deletes markers when the play cursor (real-time cursor) is located
exactly on the marker. The same key deletes any selected objects and deletes
ranges that are selected.
• "T" separates a selected object at the position of the play cursor. If a range is
selected within the object, the object is separated on the range borders, which
results in three objects. If auto crossfade mode is active while the separation
takes place, Samplitude Music Studio 2013 adds smooth crossfades at the
Page 86

86
separation points. These crossfades can later be edited for further refinement.
Use the crossfade editor to change the crossfade aspects.
• Multiple zoom levels can be saved to the four "Z" buttons in the lower left-hand
corner of the virtual project window. Use "Shift + left mouse click" to store a
zoom level to a specific preset button. When clicking on a previously assigned
preset button, the zoom level is recalled. The "S" preset buttons can be used with
"Shift + left mouse click" to store a complete window configuration set. This
includes the scroll position of the window and the mute/solo assignments for the
tracks. This offers four mute/solo groups that can be quickly recalled.
• Multiple objects can be selected by holding "Ctrl" and individually clicking on the
desired object.
• Holding "Shift" and clicking the mouse button behind the last object you want to
select will select objects between the two points.
• wave, HDP, and RAP projects, as well as stored objects, can be opened with
Windows Explorer by dragging them from the Explorer window to the Samplitude
Music Studio 2013 window. A special menu option is available to open Explorer
from within Samplitude Music Studio 2013 with "Tools -> Explore the HDP
directory". The default folder opened in Explorer is the same as the HD project
settings in the system dialog ("Y").
• "Shift + Tab" can be used to display the VIP display mode dialog. This dialog
allows you to change VIP display aspects like the VIP window behavior when an
object or range is moved toward the currently displayed window borders (VIP
border scroll).
• Press "Enter" and all open windows are tiled on the Samplitude Music Studio
2013 screen. This is a good starting point when using drag & drop functionality to
move ranges and objects between individual project windows.
• Use the menu option "Edit -> Edit tracks" to manipulate complete tracks. This
includes adding new tracks, inserting tracks and rearranging tracks.
Mixer
• Clicking the right mouse button on a mixer effect control knob or element opens
the associated effects dialog.
• A double click on the middle of a control knob or element returns it to the passive
default setting. Another double click resets the element to the previous position.
• Clicking on the left or right outer limits of a control knob changes the setting in
individual increments.
• In the mixer window, multiple channels can be soloed simultaneously. When
holding "Shift" and clicking on "Solo", all previously soloed channels are unsoloed and the single channel is soloed.
• The "Master normalization" function in the mixer window can be used to
instantaneously adjust the output level to 0 dB, no matter how loud or soft the
master output signal is.
www.magix.com
Page 87

Functional overview 87
Performance
If errors occur during playback, you have the following options:
• Increase the VIP and HD buffer in the system dialog ("Y").
• Zoom out to project full view ("A" button at position bar)
• Deactivate the "Autoscroll" function in the playback parameters dialog ("P").
• Reduce the number of displayed image elements of the VIP window in the object
display in virtual projects dialog ("Shift + Tab").
• Bounce several tracks by mixdown and mute the original tracks.
• Reduce the used real-time effects in the object editor or mixer.
• Do not use plug-ins, since they increase the CPU load.
• In Windows NT, the playback performance of the hard disk system is particularly
good if the corresponding files are played for the first time. So, if a VIP with many
tracks is not played perfectly, save it, close all windows ("H") and open the VIP
again. Now the NT file system performance is optimum again.
• It often helps to run two copies of Samplitude Music Studio 2013 at the same
time (simply start it twice from the desktop). This allows you to work on an
extensive effect processing, a longer recording, the creation of a CD, or any other
unattended procedure, while working on another aspect of a second VIP or
project. When working on dual processor systems in Windows NT, both
instances use the full capacity of one of the processors. Even under Windows 95
this technique can be used to work more effectively. Make sure you disable the
option "Check space bar for playback…" in the system dialog ("Y") to prevent the
program in the background to stop any process.
Recording / Playback
• The recording window can be displayed by pressing "R". The recording can be
started with "R" and stopped with "S" when the recording window is displayed
and active.
• Playback can be started and stopped with the space bar. When stopping, the play
cursor returns to the original position. If the playback is stopped with "0" on the
numeric keypad, the cursor will stop at the current playback position. Continuing
to hold "0", while moving the mouse (scrubbing) can alter the exact position.
Page 88

88
Mouse functions and mouse modes
Universal mode
Right mouse button: Displays context sensitive pop-up menu.
Left mouse button: In universal mode a distinction is made
between the upper and lower half of a track
in the VIP. More mouse functions are
available for the left mouse button.
Mouse functions for the upper half of the track:
• Stretch and move ranges (with "Shift")
• Set the start position of the play cursor by clicking next to the object
• Reduce the horizontal zoom level by double clicking next to a range
• Increase of the horizontal zoom level by clicking on a range
Select objects
Single click selects objects (or group of objects).
Single click + Ctrl selects multiple single objects.
Single click + Shift selects multiple objects, including all objects between the two
clicks.
If you click left next to an object, you can sketch a rectangle with the mouse button
pressed down by dragging the mouse the right. All objects contained therein are
selected (lasso function).
Moving objects
Objects (or a group of objects) are moved if you click into their lower half and drag
them to the desired position while holding the mouse key.
Dragging + Shift moves objects or object groups up or down the track list without
changing the time position.
Dragging + key "k" move the object under the mouse pointer, plus all objects behind
on the same track.
Duplicating objects
Dragging + Ctrl duplicates one or more objects. To do this you also have to click the
lower half of the object.
Dragging + Shift + Ctrl duplicates one or more objects and allows the objects to be
moved up or down the track list without changing the time position.
www.magix.com
Page 89

Mouse functions and mouse modes 89
Lasso function
Object lasso: If you click left next to an object in the lower half of the track, you can
sketch a rectangle with the mouse button pressed down by dragging the mouse the
right. All included objects are selected.
Volume and panorama lasso: If you click left next to an object in the lower half of the
track, you can sketch a rectangle with the mouse button pressed down by dragging
the mouse the right. All contained volume and panorama points are selected.
Volume and length of individual objects
You can individually adjust the volume and length with the five object handles.
Object handles: The upper handle changes the object volume. The changed level is
shown in dB in the upper left-hand corner of the VIP.
Side handles: Fade-in or fade-out. The fade curves used here can be set in the
crossfade editor.
Lower handle: Adjusts the length of an object.
Volume and panorama automation curves
The volume and panorama curves can be used to graphically adjust the volume and
stereo panorama curves of the tracks. Movable handle points are created on the
curve.
Double clicking on the automation curve creates a new curve event. Another double
click on the same curve event deletes the event. Selected handles can also be deleted
by selecting "Delete curve handles" from the edit menu.
A volume or panorama handle is selected simply by clicking it. Several handles are
selected by holding "Ctrl" while clicking.
If you click right next to an object, you can sketch a rectangle with the mouse button
by dragging the mouse to the right. All volume and panorama points contained are
selected (lasso function).
Selected volume and panorama points can be moved with the mouse. To move
several points, you have to hold "Ctrl" while dragging.
Page 90

90
Range mode (safe mode)
Right mouse button: Displays context sensitive popup menu.
Left mouse button: Selecting ranges and moving ranges ("Shift"). Objects or
automation curves cannot be changed by accident (i.e. "Safe mode").
Create ranges
In range mode, ranges are sketched by clicking and dragging the mouse pointer while
holding the mouse button.
The range mode is a "safe" mode, since objects or curves cannot be moved
accidentally.
Play cursor
Single clicks place the play cursor anywhere in the track.
Zoom
Double clicks outside of a selected range (or no range) zoom out. Double clicks inside
a selected range zoom in.
Quick switch to other mouse modes
Using the "." (period key) temporarily switches to the object mode to allow objects to
be moved.
Using the "–" (minus key) temporarily switches to curve mode to allow automation
curve events to be moved and manipulated.
Curve mode
Right mouse button: Context menu
Left mouse button: Offers a range of functions. I.e.:
Volume and panorama rubber band
When you click on the track near an object, you can, by pulling the mouse to the left
or right, spread a rectangle by holding down the mouse key. This will select all volume
and panorama points contained in the selection box.
Volume and panorama gradients for the whole track
Using the panorama and volume curves, volume and stereo panorama graduations
can be graphically recorded. For this purpose sizing handles which are moved are
created on the curve.
www.magix.com
Page 91

Mouse functions and mouse modes 91
A double click on the volume or panorama curve creates a new handle, and another
double click clears it. Selected handles may also be cleared by selecting the option
”clear handles” in menu ”edit”.
You may select a volume or panorama handle by a single click. You will select further
handles by holding "Ctrl" while clicking.
When you click the track on the right beside an object, you can spread a rectangle
with the mouse held down. This selects all volume and panorama points contained
within (rubber band function).
You may move selected volume and panorama handles with the mouse. To move
several handles, "Ctrl" must be kept depressed.
Curves / Object mode
This mode differs from the universal mode only in that the track is not split in two
halves.
Play cursor, fields, and zooming are not set in the upper part of the track, but rather in
the beat line above the first track. All other functions are handled by the universal
mode (tracks are split).
The curves/object mode is less complicated to use and is therefore a default setting.
Cut mode
Right mouse button: Context menu
Left mouse button: You can use the mouse cursor like a pair of scissors to crop
objects.
Pitchshift / Timestretch mode
Right mouse button: Context menu
Left mouse button:The lower right tab allows an object to be compressed or
stretched. A timestretching effect is created: The object is not played as a loop or
shorter version, but simply in a different play tempo.
Using the center tab, the pitch can be altered via pitchshifting.
Page 92

92
Draw volume mode
Right mouse button: Displays context sensitive popup menu.
Left mouse button: Draws volume automation curves into VIP tracks. "V" needs to be
active for a respective track prior to drawing the volume curve.
Draw panorama mode
Right mouse button: Displays context sensitive popup menu.
Left mouse button: Draws volume automation curves into VIP tracks. "P" needs to be
active for a respective track prior to drawing the panorama curve.
Wave edit mode (only wave projects)
Right mouse button: Context menu
Left mouse button: Freehand drawing function for wave format.
Scrub mouse mode
Right mouse button: Context menu
Left mouse button: Scrub function. Click project to pre-listen with control over play
tempo. The project will be played forward and back controlled by the distance of the
mouse pointer from the actual play cursor position. The larger the distance the faster
the play tempo. You can set 3 individual scrub modes in the play parameter window .
www.magix.com
Page 93

Mouse functions and mouse modes 93
Color mode
In Color Mode you can color objects or entire tracks. Click on the arrow next to the
brush symbol first. Next, select the desired color. Now move the mouse over the
objects and tracks in the arranger: the pointer turns into to a paint bucket. Click on the
object or track box you would like to color.
You may also apply color to multiple objects across different tracks by dragging the
lasso over the desired objects (the lasso appears when you drag the paint bucket).
Release to color all selected objects.
If you hold down the "Shift" key while doing this, you will color the wave form instead
of the object.
Page 94

94
If you hold down the "Ctrl" key while doing this, you will color the object background
instead of the object itself.
If the preset color selection is not sufficient, you can also select your own color or
even create your own personal color palette.
You also have the option of accessing the color palette for each track by clicking the
color selector on the right edge of the track header. This also allows a new color to be
assigned to a track. If multiple tracks are selected beforehand, the color selection will
apply to all of these.
Left mouse button: Changes the background color of the object
Right mouse button: Changes the wave form color of the object.
Zoom mode
Right mouse button: Zooms out of the project.
Left mouse button: Zooms into the project.
www.magix.com
Page 95

Effects and effect plug-ins 95
Effects and effect plug-ins
Samplitude Music Studio 2013 contains many high-quality effects and effects plug-ins
(MAGIX plug-ins) as well as interfaces for external VST plug-ins and DirectX plugins.
What effects are there, and how are they used?
There is generally a difference between the effects types. The following effects occur
in Samplitude Music Studio 2013:
Real-time effects: These effects are also referred to as "non-destructive" or "virtual"
effects, and they are added to the original sound while it is played. This means that
the original file remains unchanged on the hard drive.
Offline effects: These effects are also called "destructive effects", and they are added
to the audio file before it is played; either the original file is changed, or a copy is
created on the hard drive for working with.
These effects are independent effects modules, i.e. they are provided by third party
vendors or programmers. In Samplitude Music Studio 2013 we distinguish between
three types of effects plug-ins: "MAGIX plug-ins", "DirectX plug-ins", and "VST plugins".
The area of application is a further criteria for effects. The following are integrated into
Samplitude Music Studio 2013:
• Object effects (can be accessed via the object editor or the "Real-time effects"
menu)
• wave effects (can be accessed via the "Offline effects" menu)
• Track effects (can be accessed via the trackbox plug-in selection button or the
trackbox plug-in)
• Mixer channel effects (can be accessed via the "Insert" section of the mixer):
These real-time effects affect track effects the same way as complete tracks.
• AUX effects: (accessible via the track editor and trackbox): These effects can be
installed identically for several tracks, or individually.
• Surround effects (accessible via the insert selection box of the corresponding
Surround bus channel, track editor, and trackbox): These effects serve for editing
surround material.
• Master effects (can be accessed via the "Master" section of the mixer): These
effects are for editing the master sound.
Most of the effects modules, i.e. equalizers, compressors, reverb, echo, etc., can be
used in several of the above versions. However, they are only described at one
position within this documentation. All effects and effect plug-ins that are NOT offline
Page 96

96
effects and can be activated via the "Offline effects menu" are explained in the
following sections of this chapter. The other effects which can also be activated via
the "Offline effects" menu, are described in more detail in the "Offline effects menu"
chapter.
Saving effect parameters (preset mechanism)
The effect dialogs contain preset selection boxes. These presets are saved and
recalled to/from the "FX preset" directory (a subdirectory of the main Samplitude
Music Studio 2013 program directory).
If a preset is not located in this directory, it still can be loaded via the "Load setup"
function, but it will not automatically appear in the selection box, so you'll need to
browse for it.
Effects that are added/launched from within the mixer or object editor are preconfigured with the values assigned to the virtual project. If the virtual project is to
adopt particular changes made to the settings in the effects dialog, then you will need
to click on "OK" to transfer them to the VIP.
You also have the possibility to apply the settings of the last destructive effect; a
corresponding entry can be found in the "Options" box. If there is no destructive
application of the effect, then the parameters selected in the list entries will be applied
to the default parameters for destructive editing.
www.magix.com
Page 97

Effects and effect plug-ins 97
"Sound FX" (object editor, mixer channels, Mixmaster)
Sound FX features an effects rack with the following virtual effects devices:
Equalizer
The 10-track equalizer divides the frequency spectrum into 10 areas (tracks) and
supplies them with separated volume controls, which allows you to achieve many
impressive effects, from the simple rising of the bass, to total sound transformation. If
you raise the low frequencies too much throughout the whole level, it can cause
distortions. In this case, lower the master volume using the master volume control on
the main screen.
Thumb controls: Each of the 10 frequency areas can be raised or decreased
separately by the 10 volume controls.
Link bands: Using this switch you can match the frequency areas in a flexible way to
avoid overemphasizing single frequency areas that sound artificial.
A/B: If you have selected a preset for the effect and later you change it manually, you
can compare the original preset sound with the new adjustments using the A/B
switch.
Reset: Reset inserts the sound effect into the neutral starting position where no
processing power is used and where no effect is calculated in the sound.
Page 98

98
Touchscreen (right EQ section): This is the ”sensor field” of the EQ: Use your mouse
to draw a curve that will be transferred immediately into the corresponding EQ
control adjustment.
Compressor
The compressor is essentially an automated dynamic volume control. Tune dynamics
are limited; loud passages stay loud, and low-passages become louder. Compression
is often used to make the material more powerful. The degree of compression is
adjusted by the ratio control, and ”Threshold” determines the entry threshold. Rise
and decrease of time can be influenced by attack and release.
The processing is realized ”in advance”, as often occurs in high-quality studio
equipment. This means that there won’t be any overdriven peaks or other artifacts, as
the algorithm can never be ”surprised” by the peak levels.
Sensor field: The sensor field of the compressor can be intuitively altered with mouse
movement.
Ratio: This parameter controls compression intensity.
Threshold: Adjusts the entry threshold of the compression.
Attack: Adjusts the time in which the algorithm responds on the rising level. Short
attack times can produce a ”pumping” sound as the volume is reduced or raised.
Release: Adjusts the time in which the algorithm responds to decreasing levels.
A/B: If you have selected a preset for the effect and later you change it manually, you
can compare the original-preset-sound with the new adjustments using the A/Bswitch.
Reset: Reset places the sound effect to the neutral starting position where no
processing power is used and where no effect is calculated in the sound.
Load/Save: Stores the current adjustments as an effect file in order to use them for
other projects.
www.magix.com
Page 99

Effects and effect plug-ins 99
Enhancer
The Enhancer enables the justification of the audio material in the stereo panorama to
be adjusted. If the stereo recordings sound unfocused and undifferentiated, an
extension of the stereo base-width can often provide better transparency.
Use the maximize function to move the echo and improve the stereo picture, for
example, into the foreground.
Volume controller: Adjusts the volume of every single channel to adjust the complete
panorama. The reduction of left and right levels is displayed under the control
buttons.
Pan-direction: Use this controller to move the sound source from the middle into
stereo panorama. The signals at the outer edges of the sound picture remain
unchanged.
Multiband: This option switches from "Stereo FX" to "Multiband" mode. Stereo
editing only applies to the middle frequency, the bass and highs remain unchanged.
Bandwidth/maximize sensor field: Adjusts the base width between mono (extreme
left), unchanged base width (normal stereo), and maximum base width (wide,
extreme right). Raising the bandwidth (values over 100) diminishes the mono
compatibility. This means that recordings edited this way sound hollow when listened
to in mono.
Maximize strengthens the spatial component of the recording, which also increases
the stereo transparency without influencing the mono compatibility.
Stereo meter (correlation gauge): This provides a graphical display of the phase
relation of the audio signal. You can use it to review the orientation of the signal in the
stereo balance and the effect of the stereo enhancer. To maintain mono-compatibility,
the "cloud" shown should always be higher than it is wide.
Page 100

100
Echo / Reverb
Reverb
"Reverb" gives you a high-quality reverb which can be specified further using "Room
Size", "Time" and "Color" and mixed into the original sound with "Mix". You can
choose between various reverb styles in the presets.
Room size: This controller controls a room simulator, which calculates the reverb
effect according to the room size. If the controller is turned all the way to the left, then
it sounds as if the audio object was recorded in a very small room. If it is turned all the
way to the right, it sounds as if the audio object was recorded in a cathedral.
Time: This is where you set the reverb tail's length, i.e. the sound's "sustain" level.
Color: Control the sound of the reverb here, dampen or brighten it.
Mix: This controller determines how much of the unprocessed original sound (dry
signal) is subjected to reverb (wet signal).
Echo
The echo effect is further refined with "Delay" and "Feedback" amounts and
calculated into the original sound by means of "Mix".
Delay: This sets the period of time between the individual echoes. The more the
control is turned to the left, the faster the echoes will follow each other.
Feedback: This adjusts the number of echoes. Turn the dial completely to the left,
there is no echo at all; turn it completely to the right and there are seemingly endless
repetitions.
www.magix.com
 Loading...