

Page 1
Page 2

2 Copyright
Copyright
This documentation is protected by law. All rights, especially the right of
duplication, circulation, and translation, are reserved.
No part of this publication may be reproduced in the form of copies, microfilms
or other processes, or transmitted into a language used for machines,
especially data processing machines, without the express written consent of
the publisher.
All copyrights reserved.
All other product names are trademarks of the corresponding manufacturers.
Errors in and changes to the contents as well as program modifications
reserved.
Copyright © MAGIX AG, 1994 - 2011. All rights reserved.
MAGIX and Music Maker are registered trademarks of MAGIX AG.
VST and ASIO are registered trademarks of Steinberg Media Technologies
GmbH.
This product uses MAGIX patented technology (USP 6,518,492; USP
6,888,999) and MAGIX patent pending technology.
Other named product names may be registered trademarks of their respective
owners.
www.magix.com
Page 3

Preface 3
Preface
MAGIX Music Maker MX offers an easy start and the option to dive deeper into
the world of music production. A giant, high-quality sound archive, an
especially intuitive approach to creating original music, plus many useful
functions result in an unbeatable complete package for making your own
songs.
The program is particularly easy to use, the included sound files can be
combined with the software synthesizers easily. MP3 songs can be used with
audio CD tracks, your own music recordings and even videos, photos or
graphics. Even VST and DirectX plug-ins or MIDI files can be added easily.
This turns your computer into a universal production studio for music and all
other kinds of multimedia files. The music building blocks supplied in CD
quality can be combined very easily as they are all categorized according to
tempo and harmony. And for those of you who want to start making songs
effortlessly and straight away, the integrated "Song Maker" will take care of
almost everything for you.
The print manual explains all of the basic functions of the program. In addition,
you get a PDF manual which describes each function in detail. If you prefer to
discover the many possibilities of the program by yourself, you can also use
the PDF manual simply as a reference. An alphabetical index is included at the
very end.
Have fun with MAGIX Music Maker MX.
Your MAGIX team.
www.magix.com
Page 4

4 Table of Contents
Table of Contents
Copyright 2
Preface 3
Support 10
Uninstalling the program 12
Before You Start 13
Package Contents 13
System requirements 13
Installation 15
Serial Number 16
More about MAGIX 17
MAGIX Online World 17
magix.info 18
Soundpool DVD Collection 18
Introduction 19
What is MAGIX Music Maker MX? 19
What’s new in MAGIX Music Maker MX? 19
The Features 21
Additional features of the Premium version 25
Overview of the Program Interface 28
Quick start 30
Play Demo Project 30
Preview and Load Audio Files 31
Position Audio Objects 32
Add Videos or Images 33
Edit Objects 33
Effects 34
Export Arrangement 34
Burn audio CD 36
Arranger 37
Normal mode/Easy mode 37
Tracks 37
Trackboxes and Instrument icons 38
www.magix.com
Page 5

Table of Contents 5
Zooming 39
Move/Zoom with the mouse wheel 40
Grid 40
Playback area, Start and end markers 41
Moving the playback marker 42
Transport bar (playback functions) 43
Arranger, Video Monitor, and Media Pool 45
Arranger buttons 45
Media Pool 46
Preview function 46
Positioning the Media Pool 47
Soundpool settings 47
File manager settings 49
Synthesizer 53
Template settings 53
Keyboard settings 54
Object Inspector settings 55
Setting Catooh 56
Videoscreen 57
Audio peakmeter 57
Overview 58
Infobox 58
Mouse modes 59
Automation 59
Move to track 60
Move all 60
Move selection 60
Draw 60
Split 61
Stretch 61
Preview audio 61
Scrubbing 62
Replace 62
Context help 62
Arranging Objects 63
Loading and saving arrangements 63
Multimedia files and objects 63
Select objects 64
Mute objects 64
Build or split object groups 64
Split objects 64
Exact object positioning 65
www.magix.com
Page 6

6 Table of Contents
Duplicate objects 65
Object handles 66
"Draw in" loops 67
Takes 67
Object properties 68
Mixdown audio 68
Mouse gestures 69
Audio Objects 71
Audio formats 71
Load and process audio files 71
Smart Preview for the incorporated samples 71
Audio recording 72
Import audio CD 75
Change the playback tempo or pitch 79
Remix agent - Tempo and beat assignment 82
Remix Maker 88
Harmony Agent 90
Text to speech 92
MIDI Objects 93
Arrange MIDI objects 93
Load MIDI files 93
Connect external equipment 94
Playing and recording MIDI synthesizer 96
MIDI Editor 97
Synthesizer objects 120
Opening the synthesizers 120
Note for users of older Music Maker versions: 121
Synth objects 121
Automation of Vita Solo instruments. 122
BeatBox 2 123
Atmos 130
Loop Designer 131
Robota 135
LiViD - Little Virtual Drummer 144
MAGIX Vita 145
Additional Vita Solo synthesizers 147
Audio effects 148
Effects 148
Using audio effects 149
Object and master effects rack 151
Equalizer 152
Sketchable filter 153
www.magix.com
Page 7

Table of Contents 7
Compressor 154
Invert phase 155
Reverb 155
Sound Warper 159
Gater 160
Backwards 161
Timestretch and pitchshift 161
Essential FX 163
Vintage Effects Suite 166
Vandal SE 180
Video and Bitmap Objects 186
Video and bitmap formats 186
Adjusting the video screen 186
Loading and editing videos and bitmaps 186
Simplify object presentation 187
Visualizer objects 187
Video scrubbing 187
Extract sound from videos 188
Video effects 188
Title Editor 188
Video Compression 191
Choppy or uneven playback 191
General notes on AVI videos 192
Create a video project for the Internet 192
Video export via TV-out 193
Mixer 194
Fader 195
Control groups 195
Track effects 196
FX tracks 196
Live monitoring 197
Master track 197
Reprocess arrangement 199
Export assistant 199
Export as E-Mail attachment 201
Export as ringtone 201
Community upload 204
Burn audio CD 206
File Menu 207
New arrangement 207
Load arrangement 207
Save arrangement 207
www.magix.com
Page 8

8 Table of Contents
Save arrangement as... 207
Import 208
Export 208
Backup 217
Settings 218
Exit 225
Edit Menu 226
Undo 226
Redo 226
Object 226
Track 229
Range 230
Navigation 231
Select all objects 232
Menu effects 233
Song Maker 233
Audio 234
Video 239
Title 240
View menu 241
Easy mode 241
Arranger 241
Media Pool 242
Video monitor 242
Mix 243
Standard layout 244
"Share" menu 244
Community upload 244
Use as background music 245
Add to music collection 246
Edit with an external editor 246
Burn song as an audio CD 246
Save on CD or DVD 246
More online services 247
Tasks menu 249
Help Menu 249
Show welcome dialog 249
Documentation 249
Update program / Upgrade functions 250
magix.info - Multimedia Knowledge Community 253
www.magix.com
Page 9

Table of Contents 9
MAGIX Screenshare 254
About MAGIX Music Maker MX 254
Buttons overview and keyboard shortcuts 255
Toolbar 255
Keyboard shortcuts 255
Index 263
www.magix.com
Page 10

10 Support
Support
Dear MAGIX customer,
Our aim is to provide convenient, fast and solution-focused support at all
times. To this end, we offer a wide range of services:
Unlimited web support:
As a registered MAGIX customer, you have unlimited access to web support
offered via the convenient MAGIX service portal on http://support.magix.net,
including an intelligent help assistant, high-quality FAQs, patches and user
reports that are constantly updated.
The only requirement for use is product registration at www.magix.com
The online community - on-the-spot support and a platform for exchange:
MAGIX customers have free and unlimited access to the online community at
www.magix.info, which includes approx. 120,000 members and offers the
opportunity to ask members questions concerning MAGIX products as well as
use the search function to search for specific topics or answers. In addition to
questions & answers, the knowledge pool includes a glossary, video tutorials
and a discussion forum. The multiple experts, found round-the-clock at
www.magix.info guarantee quick answers, which sometimes come within
minutes of a question being posted.
Email support for MAGIX products:
For every new MAGIX product you will receive, as of date purchase, 12
months of email based customer service.
Premium email support:
For priority support, or if you want the MAGIX support team to help with nonMAGIX related hardware problems you can purchase a Premium email
support ticket for USD 12.99 | CAD 13.99 | GBP 9.99 | AUD 18.99 | ZAR
120.00 | EUR 12.99 | SEK 119.00 | NOK 99.00 | DKK 99.00. Log in at
http://support.magix.net and click on "Purchase access code", the ticket is for
a specific problem, and is valid until it is solved, it is not restricted to an email.
Please note: To be able to use the Premium email support and free product
email support via the Internet, you have to register your MAGIX product using
the serial number provided. This can be found on the CD case of your
installation CD or on the inside of the DVD box.
Additional telephone service:
Besides the large number of free customer service offers, we also offer a feebased telephone customer service.
www.magix.com
Page 11

Here you can find a summary of our technical support telephone numbers:
http://support.magix.net/
Mail (Europe): MAGIX Development Support, P.O. Box 20 09 14, 01194
Dresden, Germany
Mail (North America): MAGIX Customer Service, 1105 Terminal Way #302,
Reno, NV 89502, USA
Please make sure you have the following information at hand:
Program version
Configuration details (operating system, processor, memory, hard drive, etc.),
sound card configuration (type, driver)
Information regarding other audio software installed
MAGIX Sales Department
You can reach the MAGIX Sales Department workdays for help with the
following questions and problems:
Orders
Product consulting (pre-purchase)
Upgrade requests
Returns
Support 11
Europe
Monday -
U.K.: 0203 3189218
Denmark: 699 18149
Sweden: 0852500858
Finland: 09 31581630
Norway: 0210 30665
North America
9 am
Phone: 1-305-722-5810
www.magix.com
Friday, 09:00-16:00 GMT
to 4 pm EST Mon-Fri
Page 12

12 Uninstalling the program
Uninstalling the program
If you would like to uninstall MAGIX Music Maker MX, you can do so via the
control panel under "Software". Or go to "Programs > MAGIX > MAGIX Music
Maker MX > Service and Support > Uninstall MAGIX Music Maker MX".
www.magix.com
Page 13

Before You Start 13
Before You Start
Package Contents
DVD
On this DVD you will find the installation manager for MAGIX Music Maker MX,
as well as the multimedia library with sound and video files in various genres.
The Terms and Conditions for usage of MAGIX sound and video files when
releasing your work to the public can be found in the "MAGIX Creation
Logo.pdf" file in the installation folder.
Manual
printed manual only contains the basic functions of both program versions
The
MAGIX Music Maker MX and MAGIX Music Maker MX Premium. Additional
features of the Premium version are marked accordingly.
The PDF manual contains comprehensive documentation. It is copied to your
hard drive during program installations and describes all program functions in
detail. You can open it from the program group in the start menu.
System requirements
Computer:
®
Intel
Min. free hard disk space: 900 MB
SVGA graphics card with min. 4 MB RAM, min. resolution 1024 x 768 at 16-
16-bit sound card
DVD-ROM drive
Microsoft
Operating system: Microsoft
www.magix.com
Pentium® or AMD® Athlon® 700 MHz or higher, 256 MB RAM (512 MB
recommended)
bit high-color
®
-compatible mouse (mouse wheel recommended)
®
Windows® 2000 | XP | Vista™
Page 14

14 Before You Start
Optional:
Burn CDs/DVDs with CD/DVD±R(W) recorder.
Access to and publication on www.magix.com and in MAGIX Online Services
only with Internet connection and Microsoft
Sending video emails with available standard email software Microsoft
Outlook
TM
or Microsoft® Outlook ExpressTM.
®
Internet ExplorerTM 6.0, or higher.
®
www.magix.com
Page 15

Before You Start 15
Installation
Step 1: Insert the program disc into the drive. The installation program starts
up automatically in Windows. If the disc doesn't run automatically,
open the Windows Explorer and click the letter of the CD/DVD drive.
Now double-click on "Start.exe" to start the installer.
Step 2: To begin the installation of MAGIX Music Maker MX, click on "MAGIX
Music Maker MX". The MAGIX Music Maker MX installation program will
appear.
Simply follow the instructions on screen to complete the installation process
and then click on "Continue". All files are copied onto the hard drive.
Step 3: Once the installation is complete, confirm the message by pressing
"Finish". You will then be able to start the program at any time from the
Windows "Start" menu.
If you would like to uninstall MAGIX Music Maker MX, you can do so via the
control panel under "Software". Or go to "Programs > MAGIX > MAGIX Music
Maker MX > Service and Support > Uninstall MAGIX Music Maker MX".
www.magix.com
Page 16

16 Serial Number
Serial Number
A serial number is included with each product, and although it is not required
for the installation of the software, it does enable access to additional bonus
services. Please store this number in a safe place.
What can a serial number do?
A serial number ensures that your copy of MAGIX Music Maker MX is clearly
assigned to you and only you, and it makes improved and more targeted
customer service possible. Abuse of the software can be prevented with a
serial number, since it ensures that the optimum price/performance ratio
continues to be offered by MAGIX.
Where can the serial number be found?
The serial number can be found on the reverse side of your CD/DVD case. If
your product, for example, is packed in a DVD box, then you'll find the serial
number on the inside.
For versions that have been especially optimized for the Internet (download
versions), directly following the transaction you'll receive a serial number by
email to activate the software.
When will you need the serial number?
The serial number is required when you start or register MAGIX Music Maker
MX for the first time.
Note: We explicitly recommend registering your product, since only then are
you entitled to get program updates and contact MAGIX Support. Entering the
serial number is also required for activating codecs.
www.magix.com
Page 17

More about MAGIX 17
More about MAGIX
MAGIX Online World
MAGIX Online World from MAGIX offers you a range of new services for your
photos, videos, and music that are accessible directly from the "Online" menu
in MAGIX Music Maker MX:
MAGIX Online Album
MAGIX Onlin
want to present slideshows or videos online, then MAGIX Online Album is the
perfect service.
MAGIX Blog Service
ith MAGIX
experiences, and news with a worldwide audience in no time using your own
interactive online multimedia journal. Invite family, friends, and acquaintances
to join in and enter their comments! A free MAGIX Online Album belongs to the
MAGIX Blog Service so that you always have full control over your
contributions.
MAGIX Website Maker
MAGIX
professional design in just a few mouse clicks – without prior knowledge,
including your own chosen domain and email address. Publish slideshows and
videos and accessorize your site with music and various effects – anything
from a simple business card to a fireworks display of effects, professional or
private – show your best side!
More about this topic can be found under MAGIX Website Maker. (view page
247)
Catooh – the Online Content Library
e Album is your personal multimedia album on the Internet. If you
Blog Service, YOU make the news! Share your thoughts,
Website Maker helps you create a personal Internet showcase with a
your project is missing pictures, videos, DVD menus, sounds, or samples,
If
then you should have a look at the huge selection available at Catooh. There
you'll be able to buy media in excellent quality for low prices: DVD menus,
Slideshow Maker styles, decorative elements, 3D power effects, 3D transition
series, MAGIX Soundpools, songs, ringtones... Perfectly suited to all MAGIX
photo, video, and music projects.
www.magix.com
Page 18
18 More about MAGIX
MAGIX Community
MAGIX Community is the place to exchange photos, videos, and music with
friends and the world. As soon as you have registered for free, you can use all
of its great features.
You can also read the FAQ (frequently asked questions) online
http://rdir.magix.net/?page=EBCVJGJAFZHV.
magix.info
Do you have questions, need help, or are looking for expert tips and tutorial
videos on your MAGIX product? At magix.info you will find answers and
solutions as well as workshops and a comprehensive user forum for software
and multimedia queries.
You can access magix.info online at www.magix.info
Soundpool DVD Collection
MAGIX Music Maker MX includes thousands of sound and video building
blocks. Other media can be ordered later. MAGIX Sound Essentials includes
professionally produced loops and samples in impressive quality – the ideal
enhancement for the most varying of music styles, including:
Ambient
Big Beat
Easy listening
Dance / Electro
Disco / House
Soundtrack
Hip hop
Rock/Pop
Techno / trance
Special effects
upper menu bar under "Tasks" > "Discover more", you can order the
In the
MAGIX Sound Essentials directly.
Tip: At www.magix.com you'll always find the latest soundpool offers.
www.magix.com
Page 19

Introduction 19
Introduction
What is MAGIX Music Maker MX?
MAGIX Music Maker MX is the new generation of multimedia software. From
your private collection of love songs to entirely homemade video clips –
everything's possible! You can upload your own songs and music videos
directly to Internet services such as Facebook, YouTube and Soundcloud.
Lots of professionally produced sound and video samples come supplied. In
the Arranger, samples and videos can simply be dragged onto the track,
looped, enhanced with effects, and modified for export.
Additionally there are various synthesizer plug-ins for creating your own
sounds. Audio CDs and MP3s can be integrated, remixed, or used as sound
material. Even DirectX or VST plug-ins as well as MIDI files for remote control
of the sound card or external synthesizers can be integrated into the
arrangement perfectly. All multimedia formats can be combined with one
another in any way on all tracks.
If you need even more sounds and samples, Catooh offers a rich selection of
audio, video, images and professionally created sound effects, which can add
even more variety to your project. MAGIX Music Maker MX has a direct
connection to the Internet for publishing straight to your personal MAGIX
Online Album. Your own work can also be published directly from within the
program to the MAGIX Community.
What’s new in MAGIX Music Maker MX?
New Sound Library
MAGIX Music Maker MX is the original for loop-based music production on
PCs. No other software offers as much experience. In the new version the
sound library that comes included has been completely revised with lots of
new audio and MIDI loops.
An additional 2,000 sounds can be found in the online archive
In addition
downloaded for free from the Internet. The total number of freely available
sound building blocks is thereby increased to more than 3,500 loops (5,500 in
the Premium version).
www.magix.com
to the included sound loops, an additional 2,000 loops can be
Page 20

20 Introduction
To download sounds, click on the "Catooh" button after installing the software
and follow the instructions.
New menu structure
It's even ea
the "Prepare" menu. You can additionally "pass on" your project directly for
further work in other MAGIX programs.
Lead Synth
The Lead Synth is a
but it sounds like it's analog. Just like famous analog modular synthesizers,
e.g. by Moog. It can be accessed in the Media Pool via the "Synthesizers"
button.
Drum Engine
New sound synthesis
Media Pool via the "Synthesizers" button.
Loop Designer
With
the new Loop Designer, new loops can be created from existing material
and then used as supplement to the included sound loops, as self-defined
building blocks for your arrangements. It can also be accessed in the Media
Pool via the "Synthesizers" button.
Upload to Facebook
In addition
present your own songs on the Internet. It can be reached via the "File >
Export > Common export options" menu.
sier to find the export options for YouTube and Soundcloud using
new "analog" top-class synthesizer. Of course, it is digital,
for perfect drum sounds. It can also be accessed in the
to Soundcloud and YouTube, you can also go to Facebook to
VST Support
Now it is possible
Music Maker MX versions. A wide range of DirectX and VST plug-ins are
offered in retail stores or directly on the Internet, greatly expanding the
possibilities of MAGIX Music Maker MX.
VST instruments and effects are external programs, which must first be
installed before being used in MAGIX Music Maker MX. You can then find them
in the mixer plug-in slots and in the track boxes at the start of every track. VST
effects are applied to an entire track. VST instruments are controlled by MIDI
objects.
to use external VST instruments and effects in all MAGIX
www.magix.com
Page 21

Additional new features in the Premium version
Introduction 21
Larg
Century Guitars: Clean, authentic guitar melodies and accompaniments.
Electric Bass creates the bass line in the song. Whether curious bass
er sound archive: Over 3,500 new sounds and MIDI loops from all
genres can be accessed via the "Soundpools" button in the Media Pool.
Especially in combination with Vandal SE, the virtual guitar and bass amplifier
from the "Effects" menu, varied guitar sounds can be readily created. They are
found by pressing the "Synth" button in the Media Pool.
sequences or subtle accompaniments, this bass convinces users with its
sound and easy operation. They are found by pressing the "Synth" button in
the Media Pool.
The Features
64-track Arranger (Premium: 96)
MAGIX Music Maker MX provides 64 tracks (96 in the Premium version) for
multimedia arrangements – enough space to create multiple polyphonic
pieces, but most importantly, so that you don't lose track of your project at
any point.
Multimedia Library
The included
("samples") for combining on the Arranger tracks, furthermore, loads of
melodies, effect templates, and graphical animations come supplied for
inclusion in new songs & video clips. In short: just about anything can be
combined with anything else. The sky's the limit to your creativity.
multimedia library supplies audio and video building blocks
BeatBox 2
BeatBox 2, the new groove syn
can be accessed in the Media Pool via the "Synthesizers" button. Easy mode
must be switched off to access it.
Audio Effects
MAGIX Mu
overview:
You can correct tempo and pitch in real time using Resampling,
Timestretching or Pitchshifting.
The Audio Effect Rack supplies Reverb, Echo, Equalizer, Compressor,
Time Processor, Distortion, Filter - all classic effects which can be used to
produce almost any sound. The reverb effect, for example, provides
professional, realistic reverb algorithms to add depth and spaciousness to
your material.
www.magix.com
sic Maker MX provides lots of different audio effects. A short
thesizer, lets you make great beats with ease. It
Page 22

22 Introduction
The Gater enables rhythmic splitting of surface sounds
Vandal SE is a guitar amplifier from MAGIX. You can adjust all the typical
settings on its realistic user interface.
essentialFX: important bread-and-butter effects that are embedded like VST
plug-ins.
The Vintage Effects Suite covers "good old" guitar effects that were activated
using a foot pedal in Jimi Hendrix's era: more warmth and fullness with
Chorus, jet-like special effects with the Flanger or ping-pong effects with
Delay. The Filter enables tempo-synchronous frequency filtering.
In general, there are three ways of implementing filters:
Object effects: Effects for selected objects. These effects can be found in
"Effects > Audio > Audio effects" or in the context menu (right mouse click).
Track effects: Effects for complete tracks. These effects can be found in the
track box or in the mixer channels.
Master effects: Effects for the overall sound. These effects can be found in
the mastering area of the mixer ( or in the "Effects" menu).
Note: In the track box, you will only find pre-configured track effects, while the
mixer channels contain editable effect devices.
Media database
Find your recordings, sounds, pictures, and videos quicker and faster with the
MAGIX media database. An existing MAGIX database from the MAGIX Photo
Manager or MAGIX Media Manager is integrated in the Media Pool and can be
updated directly from MAGIX Music Maker MX. Use the simple search function
to find suitable pictures or MP3 files for your arrangement.
Import
You have
Audio files in a wide range of formats. You can also use MIDI, video and
bitmaps. The files can be dragged to a track from the Media Pool with a helddown mouse key (drag & drop). You can find a list of supported formats below
(view page 24).
Audio CDs can
the drive and press "CD/DVD" and all the tracks are ready to be dragged &
dropped into the Arranger. Whether for remixes or as sound material for your
own compositions - your personal CD collection has a whole new meaning.
Use the recording function to record vocals, noises, or instruments and
integrate them into the arrangement.
the following options for using your own material:
be imported directly in the program. Simply place the CD into
www.magix.com
Page 23

Software Synthesizers
Introduction 23
MAGIX Mu
Robota is a complete drum computer with four independent instruments
which can be played live. Several faders enable all kinds of sound
experimentation.
Vita is a sampler with more than one hundred realistic instrument sounds from
Yellow Tools, specialists in samples.
LiViD, our "little virtual drummer", provides realistic acoustic drum tracks. Just
a few instructions are enough for "LiviD" to play a complete drum track with
introduction, chorus, bridge, fill-ins, etc.
BeatBox 2, the new groove synthesizer, lets you make great beats with ease.
Atmos for nature sounds or atmospheres like rain, thunder, or wind.
New arrivals are Loop Designer, Lead Synth and Drum Engine (see above).
The synthesizers may be accessed in the Media Pool via the "Synthesizers"
button. Easy mode must be switched off to access it.
High-end 32-bit floating point
sound changes are executed using 32-bit floating point calculation for
All
especially differentiated and high-quality sounds. This technology is also used
in professional studios. This way, an audio picture with especially high
dynamics can be created. Digital overmodulation and clipping become virtually
impossible.
sic Maker MX includes the following synthesizers:
Own recordings
this recording function from MAGIX Music Maker MX to record vocals,
Use
noises, or instruments and integrate them into the arrangement.
Audio & MIDI
The MIDI
control external devices such as synthesizers and samplers and internal
software audio generators such as VST plug-ins from your computer.
With MAGIX Music Maker MX you can arrange, load, record, edit, and play
MIDI data just as easily as audio data. For MIDI recordings and editing you can
use the specialized MIDI Editor with Piano Roll, Drum Editor, Velocity/Controller
Editor and Event List.
Recording can be started directly from the Arranger by setting the recording
mode in the track box to "MIDI record" or "Audio record".
www.magix.com
format remains crucial in music production. Using MIDI files, you can
Page 24

24 Introduction
Mixer
MAGIX Mu
Rack and two Insert Effects per channel and for the Master, as well as
additional Mastering Effects. You can group a number of faders of a specific
type (for example, volume or panorama) and use them all together by holding
down the Ctrl key. The quickest way to open and close the mixer is by using
the M key.
Harmony Agent
The Harmony Agent provides harmony recognition au
determines the key and chord of any music title. See the guitar tablature of
your favorite song in real time for the arrangement!
Formats and Interfaces
Import: WAV, MP3
protection), BMP, JPG, AVI, MXV, WMV
Export: WAV, MP3, OGG Vorbis, WMA, QuickTime, MIDI, BMP, JPG, AVI,
MXV, WMV, CD-A (Premium version)
Song Maker
The Song Ma
complement existing arrangements by automating the complicated steps such
as sample selection and combination. The Song Maker takes over arranging
whole sections such as intro and refrain. Therefore, you do not have to do
everything yourself – you can omit the arranging and process your selection
from the suggestions.
sic Maker MX contains a professional real-time mixer with an Effect
tomatically and
, OGG Vorbis, WMA, QuickTime, MIDI, CD-A (without copy
ker lets you create new arrangements quickly and easily and
Easy mode
The new Easy mode
beginners – no time is required for breaking in, and no previous knowledge is
necessary! Extended functions for advanced users, which are confusing to
beginners, are hidden. Easy mode can be switched on and off via the buttons
to the top left.
InfoBox
Thanks to th
as they are applied. Just hold the mouse over a button that you would like to
learn about and read the info text in the preview monitor.
e new info box, all important functions can be easily understood
makes creating radio-ready hits possible even for
www.magix.com
Page 25

Live Sessions
Introduction 25
While the virtual
new track can be recorded simultaneously in realtime. What's more, you can
also add realtime effects.
SoundVision
SoundVision
glance in the form of a musical galaxy. Similar sounds are clustered close
together; different sounds are organized further apart. SoundVision can be
activated in the Media Pool via the corresponding button. Easy mode must be
switched off to access it.
Internet upload to many platforms
When the
preferably the whole world. This is achieved, naturally, with the help of the
web. Under "File > Export > Community upload" you will find the most
impotant communities, where you can upload your songs.
song is finished, it should be heard not just by your friends, but
instruments and sounds are played on the available tracks, a
is a new way of visualizing music which shows audio material at a
Additional features of the Premium version
Additional Audio Effects
Elastic Audio for total control over vocals. Voice samples or melodies you sing
yourself can be "tuned" to match automatically. With the "Harmonizer" in the
Elastic Audio Editor, you can add a suitable second vocal or a whole choir to a
specified melody.
Vocoder: Produces distorted vocals from synthesized sounds.
Mastering Suite: A special effect rack for "Mastering". In this process, the
mixed-down music track is "polished" using parametric equalizer, multimax,
limiter and stereo enhancers. All this can be found in the mixer (M key).
Am-Track SE: This analog vintage compressor produces an especially warm,
pumping sound. Launch it via the effects menu for selected audio objects or
via the plug-in slot in the mixer.
Additional Styles & Samples
More content: The
additional samples.
Additional Instruments
Re
volta 2: An analog, especially variable and "professional" sounding, 12-tone
synthesizer. With sound matrix, noise generator and nine effect types.
BeatBox 2 plus: The ultimate groove tool with even more drum kits,
automations and an even more flexible effects section.
www.magix.com
Premium version comes with more styles and ca. 2,000
Page 26

26 Introduction
New features: Century Guitars & Electric Bass.
Additional tracks
The Premium edition
most complex arrangements.
Object and track curve automation
Effect and
– for individual objects as well as for complete tracks. In addition, you can fade
an echo in or out at a specific position in the song by drawing in a curve peak
at the corresponding position.
Video recording
In addition
function for video from analog video sources for your own video clips.
DirectX and VST plug-ins
MAGIX Mu
large variety of which is available in retail stores or directly online. Such plugins (audio effects or synthesizers from third party manufacturers) can
significantly increase the functionality of MAGIX Music Maker MX.
MAGIX Mastering Suite 2.0
Impressi
Mastering Suite is a special effects rack for use with the mixer master channel.
The included effects help you with so-called "mastering"; put the final touch on
your completed and mixed music piece using parametric equalizers, MultiMax,
limiter, and stereo enhancers.
volume progressions can be controlled using freely drawable curves
to audio recording, MAGIX Music Maker MX provides a recording
sic Maker MX enables the direct use of DirectX and VST plug-ins, a
ve studio sound just like you hear on store-bought CDs! MAGIX
has 96 tracks (instead of 64) – even more space for your
Real 5.1 Surround Sound
AGIX Music Maker MX deluxe provides real 5.1 Surround Sound. 5.1
M
Surround is the preferred home cinema sound format, which is also supported
in the Premium version when importing, editing, and exporting. With the 5.1
Surround Editor you can move your sound around the room.
MAGIX Music Editor
Detailed audio editing in
restoration, sampling and audio editing.
real time and specialist for CD burning, sound
www.magix.com
Page 27

Revolta 2
Introduction 27
Revolta 2 is a
highly advanced functions, sound matrix, noise generator, and a complete
effects section featuring nine effect types.
This synthesizer can create any electronic music you can imagine. The sound
presets were created by sound designers for Access Virus and Rob Papens
Albino, which makes Revolta 2 the number 1 choice for beginners and
professionals alike.
Also in the Premium version
Additional tr
space for even more complex arrangements.
Timecode sync: For creating songs in teams on multiple PCs. Simply connect
two notebooks to each other via MIDI and jam together.
MIDI step recording: Provided for composers unsure of their keyboard
playing skills who want to play perfect melodies. The MIDI editor can be
opened by double-clicking on a MIDI object.
ReWire: For embedding of other music programs. Programs such as
Propellerhead Reason or Ableton Live can be controlled in MAGIX Music
Maker MX like a software synthesizer using MIDI objects.
Video recoding: In addition to audio recording, MAGIX Music Maker MX
Premium provides a recording function for video from analog video sources –
for your own video clips. It can be found in the "File" menu under "Import >
Video recording".
Curve automation: Effect and volume progressions can be controlled using
freely drawable curves – for individual objects as well as for complete tracks.
In addition, you can fade in or out an echo at a specific position in the song by
drawing in a curve peak at the corresponding position.
MAGIX Music Editor: Detailed audio editing in real time and specialist for CD
burning, sound restoration, sampling and audio editing.
MAGIX Xtreme Print Center for quickly creating CD covers, inlays and labels.
powerful-sounding, varied 12-voice analog synthesizer with
acks: The Premium version offers 96 tracks (instead of 64) - more
www.magix.com
Page 28
28 Overview of the Program Interface
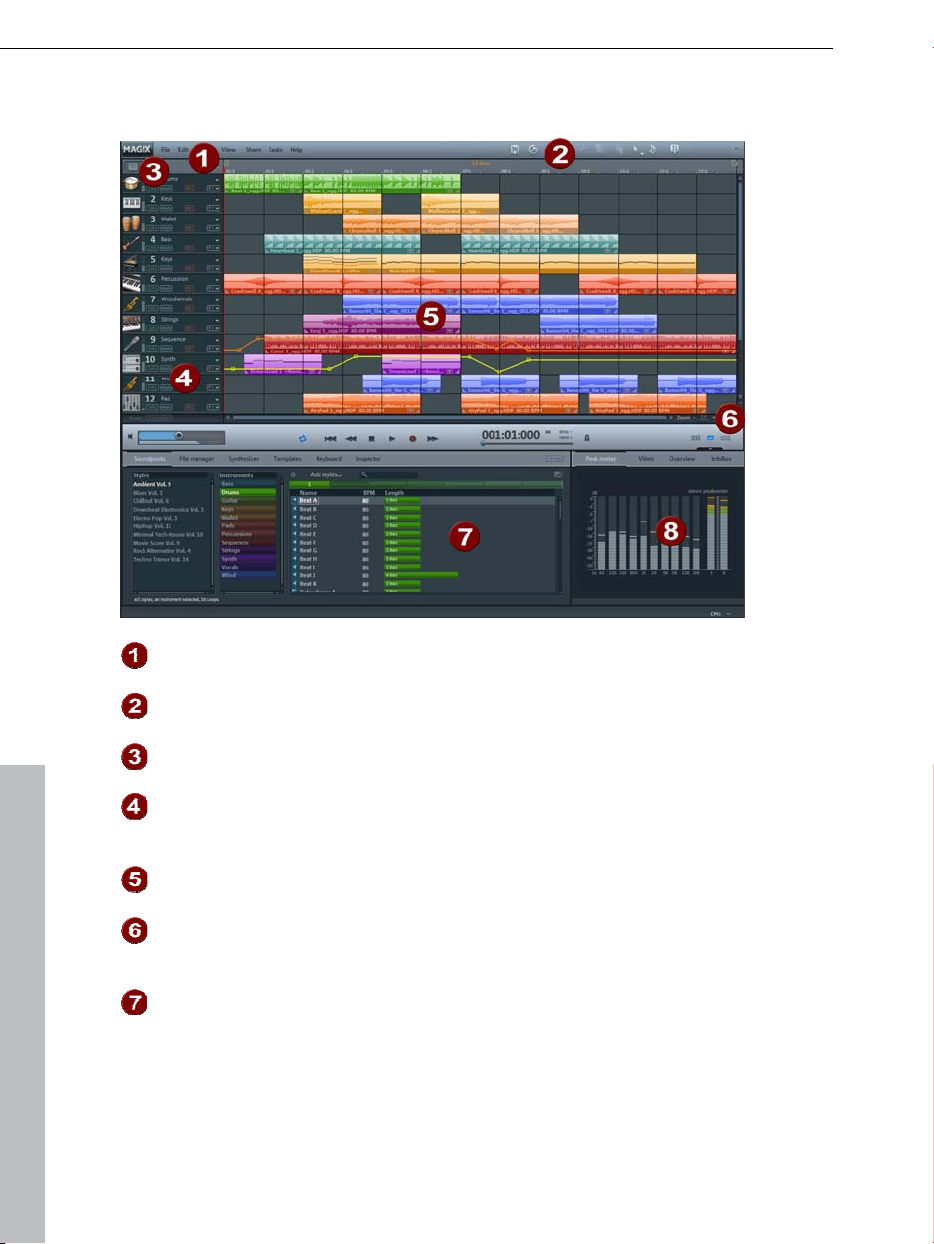
Overview of the Program Interface
Menu bar This bar provides the most important editing
Toolbar (view page
255)
Easy Mode (view
page 37)
Track boxes (view
page 38)
Arranger (view
page 36)
Zoom functions
(view page 39)
Media Pool (view
page 46)
commands.
This contain
as the different mouse modes.
This turns the
off.
Complete
played separately (solo). Use the FX buttons to
apply track effects.
You can freely position an
all of the Arranger's tracks.
Here you can enlarge or re
horizontal scrollbar can be stretched and
compressed for zooming.
files listed here can be added to the Arranger via
All
drag & drop.
s the buttons for quick editing as well
clearly laid-out beginner mode on or
tracks can be turned on or off (muted) or
y multimedia material on
duce the view. The
www.magix.com
Page 29

Overview of the Program Interface 29
Monitor (view page
56)
Previews of graphics or
in the Media Pool are displayed here. All visual
material for the arrangement is also shown here on
playback. Alternatively, a peak meter, the
arrangement overview, or the Info Box can be
shown.
video files that are selected
www.magix.com
Page 30
30 Quick start
Quick start
This chapter explains the basic functions of MAGIX Music Maker MX with a
step-by-step introduction. A systematic description of the program functions
can be found in the PDF manual.
Tip: Open the tutorial video and the "Quick start" tutorial by clicking on the
"Help" menu. A good introduction to the program is also available via the
interactive tutorial that may be opened via the welcome dialog.
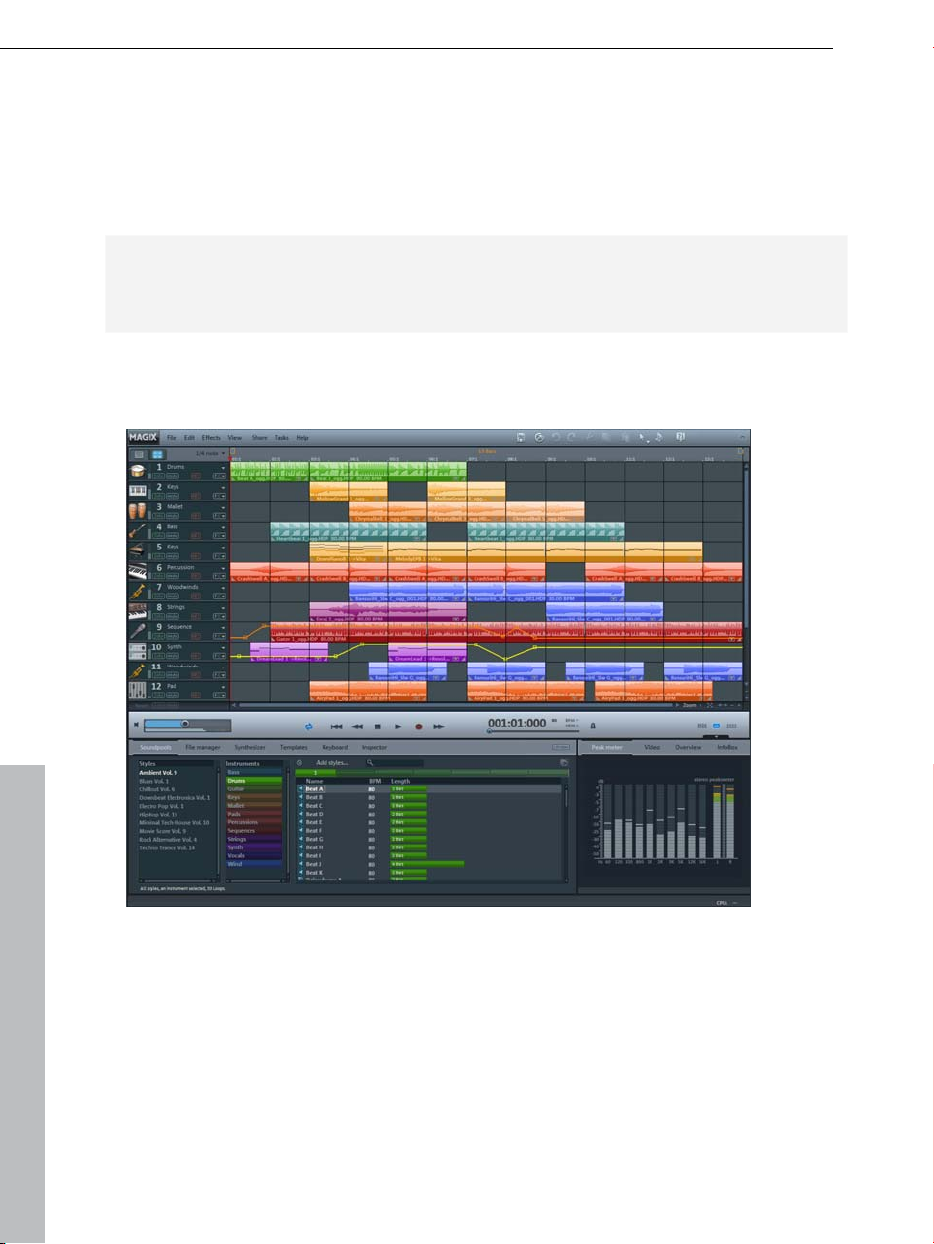
Play Demo Project
The large area with
make changes to the positions of multimedia objects.
In the lower section of the program interface you can find the Media Pool. You
can switch between the different areas. In Soundpools you will find the
included loops that you can load into the arrangement by drag & drop while
holding the mouse key or by double-clicking. The File Manager works similarly
to Windows
produced sounds can be downloaded from the Catooh and integrated directly.
®
the horizontal tracks is the Arranger. Here you can edit and
Explorer with some additional features. Here, professionally
www.magix.com
Page 31

In the
File Manager you can find some demo songs in the "My projects" folder.
Double-click on a demo and find the individual tracks of the song in the
Arranger: In MAGIX Music Maker MX, you can create a complete song by
compiling objects. Click on the vertical scroll bar on the right-hand side of the
screen and drag it down (hold down the left mouse button) in order to be able
to see each track.
To play the demo, click on the Play button with the mouse or press the space
bar on your keyboard. A vertical red line (the playback marker) runs across the
screen and music will play from the speakers.
Note: If you do not hear anything, check if the correct sound card is active for
playback in the Setup window (P key). Of course, the output of the sound card
has to be connected to the speakers.
Quick start 31
Preview and Load Audio Files
In the next step, load sound files into the Arranger for positioning and editing.
Create another new, empty arrangement. To do so, click on "File" and select
the "New arrangement" option.
Now click on "Soundpools" (1) in the Media Pool.
Various "Styles" (2) are shown on the left-hand side of the Media Pool. Click
on one of the styles to open a sub-folder.
Now, select which instrument you would like to use under instruments (3).
Some instruments are categorized according to pitch. Right-click (4) on any
entry here to have the sound play automatically.
Other files in the Media Pool can also be previewed this way. Use the arrow
keys of your keyboard to select the various pitches. Other instruments, like
drums, are not categorized according to pitch.
www.magix.com
Page 32

32 Quick start
To l
oad a file into the Arranger, simply press the Enter key.
You can also drag the file from a table onto a track in the Arranger. Once you
let go of the mouse button, the file will appear as an audio object at that
position.
If you own an older version of MAGIX Music Maker MX, a Soundpool Collection
or have purchased soundpools from other sources, you can add these to your
Media Pool via Add styles... (5).
Position Audio Objects
Each object can be moved in any way in the Arranger with the mouse,
horizontally on a track as well as vertically between tracks.
Add new instruments to your first song in the Arranger. For example, take a
drum sample and drag it underneath the object in a lower track which was
added beforehand.
This way, any number of files can be dragged from any folder into the Arranger
and placed on top of one another, on multiple tracks, or behind one another.
Play the arrangement in the meantime. Take note of the two markers at the top
of the bar ruler – they represent the start and end points of the range to be
played. If you wish to change the playback range, the start and end markers
can be dragged (while holding down the mouse button) to any position on the
bar ruler.
Tip: You can also move the playback marker independently of the left start
marker by clicking on the lower section of the bar ruler.
You do not need to interrupt playback to load new samples into the Arranger.
MAGIX Music Maker MX has a "Smart Preview" function: You can
simultaneously preview new samples in the Media Pool – they always run
synchronous to the song in the Arranger. This function considerably simplifies
the search for suitable samples for a song you wish to create.
www.magix.com
Page 33

Quick start 33
Add Videos or Images
Perhaps you would like to make a video clip? To do so, open a folder with
video or photo files in the Media Pool under File Manager and select the ones
you want to use in your project.
You can activate a video monitor using the middle button located to the right
below the Arranger.
On the video monitor a preview of the selected video file can be shown.
Once you have found the video material
you want, use the mouse button to drag it
onto any track (like previously with the
audio files). You can add as many video
and photo files as you like to your music.
You can adjust the length of the individual
image objects with the help of Object
handles (view page 33).
Edit Objects
To get an impression of the object-based work method of MAGIX Music Maker
MX, you should become more familiar with the "Objects" on the tracks of the
Arranger.
All objects can be shortened or looped by moving the mouse to one of the
lower corners of the object until it turns into a stretch symbol. You can now
stretch or compress the object length as much as you like. This way you can
create rhythm tracks from short drum samples simply by stretching them.
www.magix.com
Page 34

34 Quick start
At the
top corners of every object there are two fade handles that can be
adjusted to fade an object in or out.
The handle at the top center can be used to adjust the volume of audio objects
and the brightness of video objects.
All objects can be split into multiple objects. To do so, select "Split objects"
from the "Edit" menu. The selected object will be split at the position where the
playback marker is.
This can be done even faster using the special splitting mouse mode,
found in the mouse mode button in the tool bar, or by pressing Ctrl + 6.
Right-clicking on an object opens the context menu with the options available
for that specific object in the Timeline mode.
Effects
You should take time to experiment with the effects. In the context menu you
can select the effects for the objects. Here, effect modules are opened with
which each effect can be set up to meet your exact requirements.
Effects can also be dragged onto objects by holding the left mouse button or
double-clicking. Simply open the "Templates" folder in the Media Pool and try
each of the effects listed one after the other with a mouse click. Like with all
other entries in the Media Pool, effects in this folder always have a preview as
well. If you like an effect and wish to apply it to an object in the Arranger,
simply click on it, drag it onto the object, and release the mouse button.
Tip: Use the Object Inspector in the Media Pool in order to display all important
Object effects.
Export Arrangement
When your arrangement is ready, you would normally want to do something
with it "out in the real world". For example, show it to friends. To do so, you
must first export your work from MAGIX Music Maker MX.
You can find the most important functions in "File > Export > Common export
functions".
www.magix.com
Page 35

Export as MP3: You can transfer
your arrangement in MP3 format to
a portable player.
Burn onto CD or DVD: The classic
way to present music. You can burn
single songs or complete albums
directly to CDs.
Tip: In the Premium version, you can
use the integrated CD mastering and
burn program to do this. Click on
"File" and select the "Export
arrangement -> Burn audio CD-R(W)"
option to export your arrangement.
The arrangement will be loaded into
the CD mastering program MAGIX
Music Editor and can be burned
straight to disc from there.
Quick start 35
Upload to the MAGIX Online Album: When the song is finished, it should be
heard not just by your friends, but preferably the whole world. The easiest way
to do this is with a MAGIX Online Album of your own.
Publish on Facebook (YouTube/SoundCloud): With these options you can
publish directly on the popular online platforms.
Expor
Note: The export calculations don't affect playback performance. Even if
playback on your computer begins to stutter because too much RAM is being
used for videos and effects, the export file will still be calculated correctly. We
recommend placing already finished passages of complex arrangements via
the export or mixdown function into a single file to free up some processing
power (and tracks). This kind of file can be reloaded into the arrangement and
edited further with the other parts.
www.magix.com
t in various formats: In the "File > Export" menu you will also find all
supported export formats for creating an audio or video file (for music videos)
from your arrangement.
Page 36

36 Quick start
Burn audio CD
To burn an audio CD, first export your arrangement as a WAV file:
Click "File" and select the "Export arrangement -> Audio as wave..." option.
The WAV file created can be burned as an audio CD with the included burn
program MAGIX Speed burnR.
Tip: You can use an integrated CD mastering tool in the Premium version and
a burn program to do this. Click on "File" and select the option "Export
arrangement -> Burn audio CD-R(W)" to export your arrangement. The
arrangement will be loaded into the CD mastering program MAGIX Music
Editor and can be burned straight to disc from there.
www.magix.com
Page 37

Arranger 37
Arranger
Normal mode/Easy mode
MAGIX Music Maker MX can be operated in two different views, and these can
be activated by clicking on the button in the top right. If the MAGIX Music
Maker MX interface confuses you at first, then switch the program to "Easy"
mode!
Easy mode active
Normal mode active
In the beginner mode, the program presents a clearly laid-out version which
only displays the most important buttons and switches. Functional elements for
advanced users are hidden.
This documentation describes MAGIX Music Maker MX in normal mode. If you
can't find one of the functions while reading, make sure that you don't have
"Easy" mode turned on.
Tracks
The arranger offers tracks for positioning and editing multimedia material.
Additional tra
menu. In total, 96 tracks can be used for an arrangement.
Fundamentally, all object types can be placed on all tracks. You can also
combine videos with MIDI and audio objects one track.
www.magix.com
cks can be added by selecting the "Add track" option in "Edit"
Page 38

38 Arranger
If
the tracks in the arranger are not long enough, you can increase the length
by pressing the minus button (-) to the right. The size of the arrangement
adapts itself automatically when objects exceed the space for them on the
right-hand side or when new objects are loaded.
Mute a single audio track by clicking on the “Mute” button or play individual
tracks separately (“Solo”) to emphasize a particular scene.
Trackboxes and Instrument icons
At the start of each track there is a track box where you can switch each track
to "mute" or "solo". In the lower half of the arranger below the track boxes are
two buttons, "Reset" and "Solo/Mute", which you can use to reset all track
solo/mute settings.
Each track box contains an instrument
icon box. If you drag a MAGIX Soundpool
sample onto an empty track, a suitable
icon is automatically displayed. You can
also exchange the icon by clicking on it
an select another one.
The peak meter can be seen beside the icons. This allows you to control the
volume of the track and to see if the track produces any audio sound at all.
Beside the tr
rename the track by double clicking this field.
ack number to the top, you'll find the track name field. You can
The small arrow beside the name of the track opens a menu with
which you can load a software instrument (VSTi plug-in) into the
track. This will then be used by all MIDI objects of the track. Here
you also have access to the individual sounds of the VST
instruments VITA and REVOLTA which come supplied.
With REC you can activate the track for an audio or MIDI recording.
www.magix.com
Page 39

A simple click puts the track into "Audio recording" mode.
Furthermore, monitoring is now activated, i.e you can hear the input
signal of your sound card on playback (learn more in the "Mixer"
chapter, "Recording/Live Monitoring" (view page 197))
you start recording now ("R"), the audio recording dialog will
If
open. The recorded audio material is added to this track. If there is
already an object on the same position of the track, the next empty
track will be used.
Clicking this button again puts the track into "MIDI recording"
mode. If a software instrument is loaded, you can play it with a
hooked-up MIDI keyboard (monitoring). If you start recording now,
a new MIDI object will be created in the track and the MIDI editor
will open. From there you will be able to start the MIDI recording
(view page 100).
Here you can open the "Track effects" menu where you will find
presets for track effects (view page 150) sorted according to the
instrument
With the "Move track up/down" commands you can sort your
tracks.
Zooming
Arranger 39
type.
The vertical zoom function sets the number
of visible tracks. For a lot of tracks, enlarging
the view (zooming) is sensible for editing a
single track or object.
Use the
horizontal zoom functions to set up the visible section of the
arrangement on the timeline.
Move/Zoom with the scroll bar
If you move
the mouse to the edge of the scroll bar, the cursor will turn into a
double-arrow symbol which can be used to select and compress/stretch the
scroll bar. This way, you can zoom in and out quickly. Dragging the middle of
the scroll bar moves the visible section.
You can tell which part of the entire arrangement is being played by the size
and position of the scroll bar. If the whole arrangement is displayed, then the
scroll bar will fill out the bar. Complete view may be set by doublke clicking the
scroll bar.
www.magix.com
Page 40

40 Arranger
A
track may not be diminished without any limit, and the number of maximum
displayable tracks is also limited, meaning not all tracks may be able to be
viewed at once.
Zoom buttons
Zoom menu: Certain zoom levels may be selected by right clicking
the horizontal scroll bar or by clicking the zoom menu. You can also
jump to certain positions in the arrangement here.
Move/Zoom with the mouse wheel
The visible section can be moved, reduced, and increased in size by using the
scroll bars. These functions can also be executed without having to click
anywhere by using the mouse to move the scroll bars or zoom buttons or by
using the mouse wheel.
Enlarge objects: Vertical and horizontal zoom stages are enlarged
so that all of the selected objects are displayed at maximum size. If
the function is switched off, the regular zoom stage will be restored.
Optimize view (view page 241)
Zoom buttons: Buttons for zooming in and out
Move/Zoom with the mouse wheel
The visible section can be moved, reduced, and increased in size by using the
scroll bars. These functions can also be executed without having to click
anywhere by using the mouse to move the scroll bars or zoom buttons or by
using the mouse wheel.
Grid
Timestretching in the arrangement is displayed by the vertical progress of the
tracks. To structure this progression, a timeline displaying time units has been
positioned at the top of the first track.
Two consecutive objects will seamlessly snap together even if they are on
different tracks. This avoids undesired gaps or overlaps.
The bar grid makes sure that the objects and the start, end & play markers
only snap into place at specific positions so that they can be positioned
precisely according to the beat.
www.magix.com
Page 41

The grid width can be set using the button to the top left.
,
If, for example, "1/2 beat" has been set, then the objects and markers snap
into position at all half beat positions when moved. This way there won't be
any gaps between the objects and precisely beat-matched cuts are possible.
The selection ranges from full beats to 1/16 grid sizes. Triplet values are also
possible.
The "Frame" setting allows fine positioning using the time code. The time
display in the timeline and transport control automatically changes from
bars:beats:ticks to hours:minutes:seconds:frames.
"Objects" deactivates the beat grid and the grid will now only affect the object
edges. You can also deactivate the grind entirely by selecting "No grid" or by
pressing "F4".
"Select beat type" switches the timeline to irregular bars like ¾ beat.
Arranger 41
Playback area, Start and end markers
In the upper area of the timeline, there are two markers between which
playback area is displayed, and this area can be played back as a loop
(endless).
The length of the
indicates the number of bars, the number following it indicates the number of
fragments corresponding to the selected grid, e.g. 3.3 on a 1/16 grid = 3 bars
and 3/16. A tilde (~) in the display means that the playback area doesn’t have
the exact raster length and the loop is therefore "non-circular". Double clicking
on the playback area sets it to cover the whole arrangement; double clicking
again sets it between the start of the arrangement and the last object.
This area also determines which positions are copied or inserted into the
clipboard’s memory by the the edit menu commands "Edit range" or the
keyboard shortcuts "Ctrl + Alt + C" for "copy", "Ctrl + Alt + V" for "paste" or
"Ctrl + Alt + X" for "cut".
The right end marker is always moved together with the start marker so that
the length of the looped playback area remains constant as the start marker is
moved. So always move the start marker first and then the end marker.
www.magix.com
playback area is shown in blue. The number before the point
Page 42

42 Arranger
The start and end markers can be moved in different ways with the mouse.
You can move them to any position via drag & drop or directly with a mouse
click: a left mouse click in the timeline moves the start marker; right clicking
moves the end marker.
It’s even easier with the keyboard: The cursor keys move the playback area
forward or backward by a whole playback area’s length. Press "Ctrl" as well to
move the playback area by a quarter of its length. "Shift" + cursor keys halves
or doubles the playback area’s length.
"Ctrl + Shift" +cursor keys enables you to lengthen or shorten the playback
area by a bar. Use this function as well to quickly move the playback area onto
a smooth bar length.
When you move the playback area while a playback is running, the old area is
always played to the end and smoothly changed into the new one after. In this
way you can remix your tracks in real-time with the keyboard!
Note: If the starting marker does not move to the right with a left click or via
the keyboard, it is because the end marker would then have to be shifted
beyond the end of the arrangement. In this case, move the start marker via
drag & drop or position the end marker!
Moving the playback marker
The playback marker can be moved independent of the start marker. To do
this, click on the lower part of the timeline. If you hold "Ctrl", the playback
marker and start marker are moved simultaneously.
Once the playback marker reaches the end marker, playback is continued at
the position of the start marker. If the playback marker was positioned outside
of the playback range, the arrangement is played to the end. The selected play
area is then played as a loop.
www.magix.com
Page 43

Arranger 43
Transport bar (playback functions)
The transport bar's functions enable you to control the playback behavior of
the arrangement using the mouse.
Tip: The space bar on your computer's keyboard may be used to start and
stop playback much more easily. You will find an overview of all keyboard
shortcuts at the end of this manual.
Back to start: This button quickly moves the start marker to the
beginning of the arrangement. Clicking "Back to start" displays both
the start marker and play range at the beginning of the arrangement.
Rewind: This function rewinds the arrangement back to the start. This
means that the play marker in the timeline is reset.
Stop: Stop ends playback. The playback marker is reset to its initial
position.
Play/pause: This button starts continuous playback of the
arrangement; if the playback marker reaches the end marker, the
range between the start and end marker will be played back as a loop.
Clicking 'Play' again stops it at the current position of the playback
marker ('Pause').
Fast-forward: Use this function to move along the arrangement much
faster. The start marker moves forward along the timeline.
Record: Depending on whether a track in the track box (view page 38)
tivated for MIDI or audio recording, this will start either audio (view
is ac
page 74) or MIDI recording (view page 100).
This deactivates loop playback. The playback stops when the end
marker is reached.
www.magix.com
Page 44

44 Arranger
Time display
The current playback position is displayed here. The unit can be switched
between beats, hours:minutes:seconds, or frames by right clicking on the time
format. Switching to remaining time display (distance to project end) is
possible.
Display harmonies
If this symbol is activated, harmony symbols will be displayed during playback.
Harmonies can be detected with the Harmony Agent (view page 90).
Volume regulation
The time display is beside the
transport controller.
The volume control is to the left of the transport controller. Use it to quickly
control the overall volume of your arrangement. To regulate the volume of
individual tracks, use the mixer (view page 194).
Tempo
The song's
arrangement tempo is set automatically by the first sample used in the
arrangement. One click on the small arrow shows the tempo fader. You can
use this to smoothly change the master tempo during playback. The objects in
the arrangement are adapted using timestretching.
By clicking "Tap", you can open the tap tempo dialog to "tap" in the tempo.
Simply click the "Tap" button at the desired tempo or press the "T" key; the
tempo is measured and displayed in the dialog. Pressing "OK" accepts the
tempo.
tempo is displayed here in BPM (Beats Per Minute). The
www.magix.com
Page 45

Track position slider
The position slider quickly moves the play cursor within the visible range.
Arranger 45
Arranger, Video Monitor, and Media Pool
If the video screen is re-opened and the Media Pool is closed, the video screen
can be freely repositioned.
The "View" menu allows a standard setting to be switched on. If the option
"Standard layout" is deactivated, the entire screen can be filled by the arranger
in order to simplify positioning and editing objects.
In case of very large arrangements, the video monitor can be used as an
overview display ("Menu -> Video monitor -> Arrangement overview (view page
242)").
Arranger buttons
The arranger buttons for quickly opening and closing all the most important
windows can be found underneath the last track in the arranger.
Mixer
This button opens the real-time mixer.
You can modify the
panorama here, and this is also where both master effects and plug-ins can be
integrated.
Video
Opens/Closes the video monitor in "Peak meter" mode.
www.magix.com
tracks relating to volume and the position in the stereo
Page 46

46 Media Pool
Media Pool
MAGIX Music Maker MX's Media Pool lets you access, preview, and load all
supported media types, online and offline, e.g. with included sound and video
loops, audio CDs, MP3 songs, synthesizers, or effects.
All media types are loaded into an arrangement from local drives or directly
from the Internet via double-click or drag & drop.
The upper edge of the Media Pool contains seven buttons which operate the
Media pool in different ways:
The setting Soundpools offers a database view of all Soundpools.
The File manager is very similar to Windows Explorer. It controls and loads
media files of all types located on the hard drive.
The Keyboard enables software synthesizers to be played and recorded
directly via the on-screen keyboard.
The object Inspector offers quick access to properties of objects, e.g. audio
effects for audio objects. For MIDI objects (view page 92), a smaller version of
e MIDI Editor is shown, which allows you to edit the selected object.
th
The Synthesizer setting displays a list of the available synthesizers (view page
119).
Templates (v
eo, and titling effects.
vid
Catooh connects you directly to Catooh.
iew page 53) provides effects presets for all kinds of audio,
Preview function
There is a preview function for all files: By simply clicking an audio object, the
pre-listening function starts via the sound card. Video, graphics and text
objects are shown on the video screen.
As the arrangement plays on, you can experiment with sounds from the Media
Pool (see Smart Preview (view page 71)).
Note: Even while previewing, audio files are adapted to the current tempo
using timestretching (you can deactivate this in the "Audio/Video options"
menu).
www.magix.com
Page 47

Media Pool 47
Positioning the Media Pool
The Media Pool appears when on start up in the lower third of the screen. It
can be turned off or loaded into a stand-alone screen. Also the View-Menu
offers various options, for example a "arranger full view" which allows you to
view multiple tracks at the same time
Using the small button at the top edge of the Media Pool, you can
tun the Media Pool display on or off.
Soundpool settings
This setting can be used to access Soundpool media. Access to the supplied
Soundpools is via a new, more clearly laid out database overview that enables
the display of loops, multiple styles and instrument categories, e.g. all bass
loops of every installed style or every loop of a style.
If you did not install the Soundpools on your hard drive during installation, then
insert the MAGIX Music Maker MX installation DVD into the DVD drive. The
contents of the Soundpools will now be imported into the database. Other
Soundpool media are automatically recognized and added to the database.
Note: Under program settings -> General (view page 219), you will find
different options for maintaining and displaying the Soundpool database.
Soundpools already present on the hard disk can
be imported via "Add styles" into the database.
www.magix.com
Page 48

48 Media Pool
A Soundpool
consists of one or more Styles. Styles are sound libraries that
belong together and cover a certain musical style. The sounds (sample or MIDI
loops) of one style all have a certain tempo. You can mix loops from different
styles, and the tempos will be adjusted accordingly. Within a style, loops are
ordered according to instruments, and one instrument folder contains different
sounds. Each sound can have a different pitch (except for drums and effects
sounds).
The Soundpool display consists of several columns: First, all styles available in
the database are shown. The second column lists the instruments. The third
column, "Name", contains the list of the sounds found. These are displayed
according to the length of the beats (1,2, or 4 beats).
Sample loop
MIDI loop
The different pitches are displayed above that (if available). An entry field for full
text search is located under the match list.
The list of sa
mples found is created based on the entry selection in the first
two columns. With "Ctrl + click" you can reduce or expand selection. No
selection ("Ctrl + click" on a single selected element) shows all entries from this
category.
If you select an instrument, e.g. "Drums" and "Percussion" and no style, then
all drums and percussion samples in the whole database will be displayed.
In the search field, you can search the list of the sounds
found for a certain sound file name.
Sound Vision view: This button displays all Soundpools
as galaxies.
www.magix.com
Page 49

SoundVision
This alternative display of the Soundpool library shows all available sounds
graphically. No matter how large the Soundpool collection is, you can view the
entire library using this 2-dimensional display. This "galaxy" can now be
accessed via the mouse to collect all of the sounds you want.
The large clusters of "stars" are the styles, and these are arranged from inside
to outside with increasing tempo. Eventually they form a center - the styles
furthest out have the highest tempo.
Within a style are the individual instruments (e.g. keys, pads, sequence)
formed in a circle, and the drums are in the middle. Every instrument group has
a certain color assigned to it which is the same in every style. The individual
sounds are points encircled by the individual pitches, if available.
Media Pool 49
You navigate
displayed with the mouse; the mouse wheel enlarges or diminishes the view.
The points (which symbolize the sound loops) can be manipulated exactly as in
the Media Pool list view, i.e. select by double clicking and load by double
clicking or via drag & drop.
throughout the Sound Vision view by moving the selection
File manager settings
MAGIX Music Maker MX's file manager works very similarly to Windows
Explorer. It can be used to access and load media files of all kinds, e.g. videos,
bitmaps, MP3 audio files, audio CD tracks, RTF text files for titles.
The Media Pool consists of a file list to the right (the actual “Media Pool”), in
which all loadable media types (and, if required, further subfolders) are listed,
and the navigation area on the left-hand side.
www.magix.com
Page 50

50 Media Pool
In the
file list, all supported multimedia files and subdirectories of the currently
chosen directory are displayed. All entries can be loaded into the arranger
tracks by double clicking or via drag & drop.
In the navigation area, you can find different buttons for directly accessing
preset subfolders.
You can right click in the file list to define further buttons ("links"). Switch to the
folder which you would like to create a link to and select the option "Link to
folder" from the context menu.
Navigation buttons
Forwards/Back
Up
Drive menu
The "Back" button always returns you to the
folder where you were previously.
The "Up" button takes you up to the next
highest folder level.
You can access all available drives via the
"Drive" menu button.
Path information The current folder's path is
Browse history list
Use the arrow button to open the menu to
displayed in the top center.
find the folders you previously visited.
View
These buttons switch the file view list
between icons, lists, or details.
Various file list view modes
The file list displays all supported multimedia files and subfolders of the
currently selected folder. Three different views (list, detail, large symbols) can
be set by right clicking on the options or Media Pool's context menu.
List: Only file names are listed.
This view mode displays the most
files simultaneously.
www.magix.com
Page 51

Media Pool 51
Details: The details section
displays the type, size, and date
of modification for every media file
beside the name. The list can be
sorted by clicking on any of these
details.
Large symbols: These can be
quite useful, since they show a
preview frame for each movie and
picture file. This allows you to sort
through the material quicker. The
disadvantage is that it takes
longer for the file list to be
displayed.
Deleting, copying, and moving files
All files listed in the media window can be selected, deleted, or moved into
other folders via drag & drop, just like via Windows Explorer. This way, all
objects desired for placement in an arrangement can be collected in a
separate folder beforehand.
Additional functions can be accessed via the context menu, i.e. by right
clicking an entry.
CD/DVD
Clicking this
button once reads the CD that is currently in the CD-ROM drive.
In the case of data CDs, all directory and file formats supported by MAGIX
Music Maker MX are displayed in the file manager. In the case of audio CDs, all
tracks appear in the file list.
My Projects
This bu
tton opens the "My Projects" folder. This is a subfolder of "My Projects"
that is named after the program (i.e. MAGIX Music Maker MX, only featuring "_"
instead of empty spaces). This is created automatically when the program is
installed. All new recordings and arrangements are saved here automatically as
a preset, and finished arrangements are exported here. You may change the
save location as you see fit via Program settings > Folders (view page 219,
view page 218).
www.magix.com
Page 52

52 Media Pool
My Files: This displays
the save location of videos, pictures, music, etc. (in the corresponding
subfolders).
My MP3s
This provides quick access
pressed for the first time, you can select the folder where your MP3 files are
saved. You may also change this path later via "Program settings", the "Folder"
tab (Y key or "File" menu > "Settings" > "Program settings").
Database
This button displays the media files on your computer in a wellstructured database view.
This means the files are no longer displayed according to where they are
stored in the different folders but are grouped according to general
characteristics. The top "folder level" is the difference in audio, video or image
files; subfolders would be, for instance, the date for photos or the artist for
MP3 files.
In order to present media data on your PC in a database view, you first have to
add them to the MAGIX database. To do this, click on the database button to
the right and select the option Start media manager for photos and music.
the contents of the "My Files" folder. This is normally
to your own MP3 collection. When this button is
This opens the corresponding MAGIX program and the database scan function
of the program.
MAGIX Music Maker MX comes with the free photo and music management
programs MAGIX Photo Manager and MAGIX Music Manager. If you have the
corresponding free versions, MAGIX MP3 Maker or MAGIX Digital Photo
Maker, they will be used instead.
By right clicking on "Da
open a special search dialog in which you can carry out a targeted search for
media.
Search the database
Quick sea
audio, video). All available Database columns are searched for the keyword.
Expert search: Here you can restrict your search by stating search criteria in
the following way:
rch: Simply enter a keyword and highlight the data type (photo,
tabase" and clicking on "Database search", you can
www.magix.com
Page 53

Media Pool 53
Da
e.g. dimensions greater than 800
You can search up to three database columns that are connected via "and" or
"or" simultaneously.
"AND" means only those files will be listed that match all criteria.
"OR" means only those files will be listed that match at least one of the criteria.
tabase column Condition Comparison item
Synthesizer
This button opens the folder containing your synthesizers. Read more on this
in the Software synthesizers (view page 119) chapter.
Template settings
This opens the folders for installed effects presets. Saved audio and video
effects presets as well as title templates also land in these folders, so that over
time a complete library of your own presets will develop.
The buttons to the left open the folders for audio effects ("Audio FX"), presets
for the Vintage Effects Suite ("Vintage FX"), presets for the Live Performer
("Live Pads"), the LiViD drums synthesizer, title templates ("Titles"), video
effects ("Video FX", "Video Mix FX"), and automatic animations ("Visuals").
You can also add effects via drag & drop. Simply drag these onto the
corresponding object using the mouse.
The context menu for audio objects enables you to to set audio effects in the
effects rack (view page 148) precisely!
www.magix.com
Page 54

54 Media Pool
Keyboard settings
The keyboard enables software synthesizers to be played and recorded
directly via the on-screen keyboard.
If a track synthesizer is not present, then a new track will be added and a new
synthesizer plug-in will be added when the view is switched to "Keyboard" (Vita
with Sound Acoustic Bar Piano).
The keyboard always controls the synthesizer in the track for which MIDI
recording has been activated.
You can click the keyboard with the mouse to play the instrument. The closer
to the bottom edge you click on the "virtual keys", the louder the sound will
play. Of course, you can't seriously play music by clicking with the mouse (this
function is more suitable for testing out sounds quickly). That's why you can
also play the keyboard with the keys on your computer's own keyboard.
Note: This works only after you first click once on the keyboard using your
mouse. Otherwise, pressing the computer keys will function as key shortcuts
(view page 255) for the different features in Music Maker. If the computer keys
control the program's keyboard, then the piano keys feature the corresponding
characters on your keyboard.
A sound program for the synthesizer may be selected
from this list.
This button opens the editor window for the
synthesizer for fine tuning the sound.
www.magix.com
Page 55

Media Pool 55
Object Inspector settings
The Object Inspector offers quick access to properties of objects, e.g. audio
effects for audio objects. For MIDI objects (view page 92), a smaller version of
the MIDI Editor is shown,
Audio objects
audio object is selected the object inspector will open featuring the audio
If an
object view
which allows you to edit the selected object.
This displays the available object effects (view page 149) in a clearly laid out
list.
This button switches effects on
and off.
www.magix.com
The settings dialog for an effect is opened
via this button.
Page 56

56 Media Pool
MIDI objects
If a MIDI object is selected, then the Object Inspector shows a smaller version
of the MIDI Editor. The MIDI Editor in the Object Inspector operates in the
same way as the "bigger" version in its own window, but the menu and several
playback and recording settings are not available.
For more information, please read the section MIDI Editor in the chapter "MIDI
objects"!
Setting Catooh
You can preview multimedia files from the Online Content Library Catooh, load
them into the arrangement, and edit them further .
Please read the chapter entitled Catooh!
www.magix.com
Page 57

Videoscreen 57
Videoscreen
The video monitor can be positioned
anywhere on the screen. The size is
variable. To set the size, right click on the
video monitor and select the desired size
from the context menu or adjust it yourself
("user-defined"). Please note that larger
video screens require more CPU power.
To detach the video monitor from the arranger and Media Pool, deactivate the
default layout in the "Window" menu. You can then position the screen
anywhere you like.
The video monitor can be increased to full size by double clicking on it or
pressing "Alt + Enter". Press "Esc" to leave maximized screen mode.
You can also include a large time display in the video monitor. "Display play
time" shows the current play marker position in the video monitor. You can
choose the screen & background colors and transparency.
The video monitor is transformed into an analyzer which displays the sound as
a graphic.
"Overview" mode enables
object you are looking for in a split second - you can zoom in directly to the
video monitor or move around the clip displayed in the arranger.
you to view the whole arrangement and access the
Audio peakmeter
The video monitor is transformed into an analyzer which displays
the sound as a graphic.
Shortcut: Shift + F4
www.magix.com
Page 58

58 Videoscreen
Overview
In the Overview mode, you can view the whole arrangement and
you are also able to access any object you want in a split
second; zoom in directly to the video monitor or move around
Shortcut: Shift + F2
the clip displayed in the arranger.
Infobox
The InfoBox mode shows help text in the preview monitor if you
hold the mouse pointer over a button on the screen.
Shortcut: Shift + F1
www.magix.com
Page 59

Mouse modes 59
Mouse modes
MAGIX Music Maker MX offers special mouse modes for arranging and editing
objects.
A small arrow next to the mouse pointer symbol allows different modes
to be set.
Automation
This mouse mode is used for drawing the volume and effect curves.
When active, a new curve can be drawn on an object or track using the left
mouse button.
Activate the corresponding effects curve in the "Effects" menu in the
track box to enable track automation.
For the object, use the "Automation of this object" command form the "Effects
> Automation" menu (Key: Ctrl + H) and select the corresponding curve in the
dialog. Clicking on an object without an activated effects curve activates the
volume object curve for this object.
Note: In this mode, the object curves will always be edited, even if a track
curve is also displayed. If you would like to edit the track curve at this position,
then you will need to temporarily move the object somewhere else.
Individual automation points on a curve may also be created in the normal
"Move" mouse mode (see above) by double clicking the corresponding curve.
For more information about automation curves, please read the chapter
Automation curves!
Shortkey: Ctrl + 4, number key 4
www.magix.com
Page 60

60 Mouse modes
Move to track
This mouse mode behaves basically like the mouse mode for individual
objects, but moving objects
results in all other objects behind the object moving in sync on the track. This
is practical if space is needed at the start of a track, since all objects can be
moved together without moving them underneath each other.
Shortcut: Ctrl + 2, number key 2
Move all
This mouse mode behaves in principal just like the "Single object mouse
mode",
but during moving, all objects on all tracks will be moved together from the
mouse position.
Shortcut: Ctrl + 3, number key 3
Move selection
This is the preset mouse mode in which most changes are made.
Select objects with a left click. When the "Shift" or "Control" keys are pressed,
multiple objects can be selected.
Hold down th
In this mode the objects can be faded in or out or their lengths can be
changed using any of the five handles. Please refer to the section "Arranging
objects (view page 62)". Right clicking on an object opens the context menu
the most important effects and settings available for that specific object.
with
e mouse button to move selected objects.
Draw
In this mode you can insert further similar objects behind an already
loaded object.
Starting from the first object, the following objects are always inserted
synchronously so that you can also think of this mode as the insertion of a
www.magix.com
Page 61

Mouse modes 61
"Mute"
the section "Drawing in loops (view page 67)" in the chapter "Arranging
objects"
Shortcut: Ctrl + 5, number key 5
automation from a continuous loop. You can read more about this in
.
Split
You can split objects quickly with this mouse mode in order to remove
unwanted parts or attach various effects to parts
of objects.
Shortcut: Ctrl + 6, number key 6
Stretch
This special mode is for customizing the length of objects.
Objects can be on the lower handles stretched or compressed. Audio material
is therefore lengthened via timestretching without changing the pitch itself The
middle object handles allow the object's pitch to be changed using
pitchshifting in the range of -7... +7.
Shortcut: Ctrl + 7, number key 7
Preview audio
This mode allows you to preview audio objects (as long as the mouse
button is held down)
for the entire duration and independent of the start and end markers in the
timeline. Other object types are protected against unwanted moving.
Shortcut: Ctrl 8, number key 8
www.magix.com
Page 62

62 Mouse modes
Scrubbing
By holding down the mouse button, the arrangement can be previewed
at the point where the cursor is positioned.
The playback marker follows the mouse movements. This mode is especially
suited to searching for specific parts of an arrangement.
Shortcut: Ctrl + 9, number key 9
Replace
This mouse mode simplifies searching for suitable samples: Left mouse
click on a MAGIX
Soundpool object to switch the object automatically with another from the
same instrument category. Shift + left mouse click keeps the object but
changes the pitch. Ideal for quick experimentation!
Shortcut: Ctrl + 0, number key 0
Context help
This mouse mode allows you to open the corresponding "Help" section
by clicking on any area of the MAGIX Music Maker MX screen.
Shortcut:
Alt + F1
www.magix.com
Page 63

Arranging Objects 63
Arranging Objects
In MAGIX Music Maker MX you can jointly and uniformly load, arrange, edit,
and export different multimedia file formats. This chapter describes the basic
way of working with multimedia objects. This includes audio objects, video
objects, graphics, midi objects, and synth objects. Later chapters will describe
the particulars of the respective formats.
All object editing is virtual, non-destructive, and is calculated in real time during
play. The multimedia material is thus not destroyed (non-destructive editing)
and any change can be cancelled with the multi-stage undo function ("Ctrl +
Z"). You can experiment to your heart’s content without having to fear that you
will change or damage the original material.
Loading and saving arrangements
"Arrangement" refers to the objects found in the arranger (Audio, Video, MIDI,
songs, graphics, synthesizers) along with all its positions, fades, length,
volume, brightness settings and effects.
Arrangements can be saved via the menu "File"as an MMM file and loaded
again.
When loading arrangements you must ensure that all the used objects are
available in their respective folders. Often is it advisable to "Save Arrangement
and Used Media" from the menu "File" > "Backup". Then the entire
arrangement with all objects and effects are saved to a configurable folder on
the hard disk and can be easily downloaded from there.
Multimedia files and objects
All multimedia files supported by MAGIX Music Maker MX can be previewed or
listened to in the File Manager by clicking and dragging into the arranger via
drag & drop. The files are displayed as objects in the tracks after the mouse is
released.
Using the "Tab" button, you can switch between two object display views.
In alternative display modes, the objects are not represented frame by frame,
but simplified. This is useful for quicker representations of video objects: RAM
is saved and the overall performance improved. Audio objects will be shown
using one or two (for stereo) waveform representations.
www.magix.com
Page 64

64 Arranging Objects
Right clicking on an object opens the context menu with the most important
editing options available for that specific object.
Select objects
To edit or delete objects using the menus, you must first select them. To do
so, simply click on the object you wish to select. When the "Shift" key is
pressed, multiple objects are selected. Object modifications like cutting,
moving, effects assignment and so on, apply to all selected objects together.
The handles of selected objects light up to show that the accompanying object
has been selected and can be edited using the menu functions.
Several objects can be selected quickly by clicking on the first object in the
first track with the mouse and dragging out a square for selection. All objects
entirely or partially within the square will be selected (rubberband selection).
Mute objects
Each object can be muted individually. To do so, select the objects you wish to
mute and press "F6" (or use the corresponding command from the context
menu).
Build or split object groups
Several objects can be combined to make up a group, to avoid the objects
being unintentionally moved out of relation to each other.
Once they are combined, clicking on one object of a group will select the entire
group.
To group or separate groups, use the buttons in the toolbar or the
corresponding commands in the "edit" menu.
Split objects
Any object can be split up. Every one of these object parts becomes an
independent object in itself. To cut an object, select the object, move the start
marker to the edit point, and select the "Split object" command from the "Edit"
menu or press the "T" key. It’s even easier with the "Split objects (view page
61)" mouse mode.
www.magix.com
Page 65

To rejoin the separate objects afterwards, select each of the objects and
choose "Group". This command joins all of the selected objects into a single
object group.
Arranging Objects 65
Exact object positioning
It is often necessary to position objects very exactly in order to maintain the
beat or avoid creating clicking during transitions or small pauses between
objects.
In MAGIX Music Maker MX every object is snapped to the edges of other
objects, resulting in cleaner transitions. In addition, objects are placed on
defined positions on the grid of the arranger track. You can read more about
the grid in the arranger chapter "Grid (view page 40)".
Duplicate objects
Objects can be duplicated very easily in order to create larger arrangements.
First, the objects that need to be duplicated must be selected.
Then select the command "Edit menu -> Duplicate objects"
A copy of the object appears right beside the original which can be moved to
any position with the mouse.
It’s even faster if you click on the object that has to be copied and hold down
"Ctrl" at the same time. An object is then created which can be dragged to the
desired position. Furthermore, object copies require virtually no additional
memory!
Another way to duplicate is by using the copy/edit commands from the "Edit"
menu.
www.magix.com
Page 66

66 Arranging Objects
Object handles
With the help of the object handles, fine positioning, volume and brightness
settings, fading in and fading out as well as loops can be carried out directly in
the arranger.
All editing is carried out in real time and is already calculated during playing.
The multimedia material is not destroyed in the process (non-destructive
editing); any change can be cancelled with the multi-stage undo function ("Ctrl
+ Z").
Object fades
the handles on the top left and right to fade an object in or out. By fading
Use
objects in and out onto different tracks, it is possible to produce crossfades
between different objects. The length of the crossfading can be directly
regulated with the handles.
Shortening or looping objects
Objects are
them to the right will stretch them, which results in the object being played as
a loop until the play cursor reaches the end of the object representation. In this
way it is possible to very quickly create an entire drum track from one single
drum loop or to create a long video from a short video sequence.
Guide the mouse to one of the
pointer turns into a stretch symbol. Now you can stretch or compress the
object until it has reached the desired length.
Normally an object is always looped over the full length of the underlying data
material (audio or video file). To set a clip from a file as a loop, shorten the
object at the front and the back with the handles and choose the command
"Edit menu -> Insert user-defined loop". This function is very useful for setting
your own recording as a loop, as the silence at the beginning of a recording
can be cut away.
"cut" virtually by "compressing" them with the mouse. "Pulling"
bottom corners of the object until the mouse
www.magix.com
Page 67

Adjusting volume/brightness
With the volume/brightness handle in the top center of the object, you can
change the volume of audio and MIDI objects or adjust the brightness of video
and bitmap objects.
If several objects are played in parallel, it is possible to individually adjust the
volume or brightness ratios between objects in this manner.
The volume and brightness ratios between tracks are adjusted in the mixer.
Arranging Objects 67
"Draw in" loops
Audio loops can be drawn into the arranger tracks with the mouse.
For this you have to set the mouse mode to "Draw objects" by clicking
on the corresponding icon in the mouse modes menu. Now an audio
sample has to be loaded which will serve as a template and which will
then be drawn into the following area of the track as a loop in the track.
This works as follows:
1. Load any loop from the Media Pool into the arranger.
2. Click on an area further back on the same track and hold down the mouse
button to draw in the loop.
Starting from
with the beat. This means that the drawn-in loop is not played from the
beginning, but rather starts from the position where the original loop would be
if you had continued to this position. Or, to put it differently, a running loop can
be found on the track and you can draw in at which position you can hear it
("Mute automation").
The synchronous start of the object in this mode has another consequence: If
an object is moved, then only object borders are moved, but the underlying
loop, however, always remains intact.
the first object, the drawn-in loop area is always synchronous
Takes
Every object can be saves as a "take". Takes save all editing done on an object
like object length, fade settings, and all object effects. MIDI takes save the
instrument controlled by them (MIDI output or VST instrument).
www.magix.com
Page 68

68 Arranging Objects
Takes are sa
hard disk. So you can cut a sample, add various effects to it, and save it as
various takes in order to use these together with all their editing in other MAGIX
Music Maker MX arrangements.
The original sample will not be changed, only object and effect settings will be
saved.
You can also save Synth objects as takes to create your own preset libraries
for the synthesizer.
MAGIX Music Maker MX supplies many takes on content CDs.
Warning! On loading the takes, the audio or video file, for which the take was
added, must be in the original folder.
ved as "TAK" (*.tak) files and take up virtually no space on the
Takes can be identified by their symbol in the Media Pool.
Object properties
This function displays all the information about the currently selected objects,
such as file name, position on the hard disk, tempo, etc. The object editor also
defines the foreground and background color of every object in the
arrangement.
In the "Tempo/Pitch" tab, information on the patched/determined tempo and
pitch of the audio object is shown. Furthermore, there is an overview of how
the various timestretching/pitchshifting operations affect the entire audio
object. The tempo/pitch adjustment when loading the sample, the effect of the
master tempo fader, and the time processor as object effect tracks are offset
against one another, but they may not mesh properly. For this reason, there
are two buttons which can be used to double/halve the object speed. Try
using these buttons if the tempo of some loops is incorrectly interpreted as
twice or half the speed.
Mixdown audio
If the arranger becomes too full to manage, the system is out of RAM, or you
just want to ”summarize” your production, use the mix down function to
convert the entire audio arrangement into a single audio and/or video file.
www.magix.com
Page 69

To do so, choose the "Mixdown" function from the "Edit" menu. You can
choose a name and a destination for storing the mix down object. The default
directory is ”My Projects”. If only audio objects are in the tracks, a wave file will
be created. If audio and video objects are combined, you can choose whether
an audio or a video file will be created.
The objects of the arranger or the area will be replaced by the new object.
MAGIX Music Maker MX automatically normalizes the audio file, i.e. the loudest
part of the wave audio object is identical with the highest figure of the 16-bit
resolution ceiling. This guarantees the same sound quality, even if you repeat
the mix down procedure or you combine the mix down file with other wave
audio objects again and again.
Tip:The mix down function is very helpful if you want to go on working with the
mix-down object. To create the finished end version of the song or video it is
recommended to select the "Export arrangement" function in the "File" menu
instead of the "Mixdown" function.
Shortcut: Ctrl + Shift + G
Arranging Objects 69
Mouse gestures
Sometimes, specific menu commands that are located deep in the MAGIX
Music Maker MX's menu structure may be needed multiple times in sequence,
e.g. if you want to edit effects for multiple objects.
Mouse gestures help you access these menu commands quickly without
having to dig them out of the menu structure every time.
www.magix.com
Page 70

70 Arranging Objects
Every object in Music
right clicking.
The upper section of this context menu always features the most recently used
commands for this object type. These four commands may also be opened
having to open the main menu.
To do this, right click on the object and drag the object quickly to the right, to
the left, or upwards in order to access one of the four commands (the object
will not be moved as long as you use the right mouse button!)
Maker features a context menu that may be opened by
The commands display in
that are available in a context menu's submenus may be accessed via Mouse
gestures
the menu here are only examples. All commands
www.magix.com
Page 71

Audio Objects 71
Audio Objects
Audio formats
MAGIX Music Maker MX loads and edits audio files in the formats Wave (.wav),
OGG Vorbis (.ogg), Windows Media Audio (.wma), MPEG (.mpg), MP3 (.mp3),
and CDA (audio CD tracks). The stereo or mono data of a file are displayed as
an object in the arranger of the MAGIX Music Maker MX. The material will be
displayed as a waveform, optically representing the sound to make editing
easier.
Along with wave files, MP3 files, OGG Vorbis (.ogg), and ringtones can also be
exported.
Load and process audio files
All importable audio files can be accessed via the File Manager and previewed
(audio) by clicking the file name. Tracks from audio CDs can also be integrated
by dragging & dropping them into the arrangement.
Editing, fine positioning, volume adjustment, fading in and out, is all processed
using the "Object" tab directly in the arranger.
Please see the chapter "Arranging objects"
Smart Preview for the incorporated samples
The incorporated samples can be listened to while the arrangement is playing.
They always run synchronized to the current song that is playing.
You can load samples while putting together a song in real time and search for
appropriate new "building blocks" simultaneously.
You can add the loop to the arrangement by simply clicking with the mouse or
pressing "Enter" or remove it by pressing "Del". The subsequent loop can also
be selected quickly by pressing a key (arrow down) or you can switch to the
next instrument ("1"..."0") or the next bar ("Num +"), or by clicking on the
button.
www.magix.com
Page 72

72 Audio Objects
Audio recording
Your own sounds like vocals, speech, noises, or instruments can be easily
recorded in MAGIX Music Maker MX using the audio recording function.
Click the REC button in the track box to specify the track for the
recording.
The display in the track box will change
Assuming you have everything connected properly (see below), the input signal
will be played back featuring all track effects (if there are any) (live monitoring
(view page 197)).
Live monitoring requires the use of ASIO drivers (view page 221).
Click the red button on the transport bar to start the actual recording.
Connecting the source for recording
First of all,
the source of the audio material must be connected to the sound
card input. Again, there are several possibilities which primarily depend on the
type of equipment you have.
If you are recording from a microphone, then please connect the microphone
to the microphone jack on your sound card (usually red).
If
you want to record material from a stereo system, then you can use the lineout or AUX out jacks on the back of your amplifier or tape deck. This involves
connecting them to the sound card input (usually red).
If your amplifier has no separate output (other than for the speakers), then you
can use the connection intended for headphones for your recordings. In most
cases, you will need a cable with two mini-stereo jacks. This type of
connection has the advantage of being able to set the headphone input signal
level with a separate volume. As headphone connections generally are not the
best, it is advised that you use the line outputs if possible.
When recording cassettes from a tape deck, you can connect the tape deck's
line out directly to the sound card input.
www.magix.com
Page 73

When recording from vinyl records, you should not connect the record player's
output directly with the sound card because the phono signal needs to be preamplified. A more suitable method would be to use the headphone connection
or an external pre-amp.
Adjusting the Signal Level
Audio Objects 73
Adjusting
best sound quality during digital recording.
Once a recording source is connected to the sound card, the "Record" button
opens the recording dialog and starts the recording source.
You can now adjust the recording level with the help of the LED display in the
recording dialog. For this, you must first check off "Show Levels".
If the adjustment is set too high, distortion occurs and the incoming signal
must be reduced. If you have connected the source through either an amplifier
or tape deck output to the sound card, you can only reduce the signal level in
your sound card’s software mixer interface. You can access the mixer directly
from within the recording dialog via the “Recording Level” button.
If you reduce input sensitivity by using the input fader, the resolution at which
the analog signal is digitized is also reduced. Try to set these automatic
controllers to the loudest sound level possible.
The maximum setting for an optimal level is the loudest part of the material.
The loudest part should be adjusted to be the maximum. The actual recording
begins when you press the "Record" button. At the end of the the recording
you will be asked if you want to use the recording. Upon confirmation, the
newly-recorded material will be placed at the next free position of the start
maker in the arrangement.
the signal level to the sound card is also recommended to get the
www.magix.com
Page 74

74 Audio Objects
Audio recording dialog
Normalize after recording: This option raises your material to the correct
volume level after recording is completed. In order to achieve good audio
results, you should try to record the source as loud as possible without
overmodulating it. The Peak Meter display helps in the recording dialog.
Audio driver: This selects the sound card for recording.
Save a
file you wish to record. You can also select the folder where you wish to store
the file.
Recording quality: Sets the sound quality of the recording. The preset menu
allows you to choose between AM tuner, FM Radio, DAT (Digital Audio Tape),
and CD quality.
Display volume control (monitor): The peak meter allows you to monitor the
level of the incoming signal. Please read more on this in the section 'Adjusting
levels (view page 73)'.
Rec
recording the audio material.
udio file as/save in the following folder: This select the title of the audio
ord: This button begins recording. The next free track will be used for
www.magix.com
Page 75

Stop: Click this button to stop recording
Play during recording: If this option is active, then the arrangement will play
back during recording. This allows you to add recordings to the existing
arrangement.
Advanced: Use this button to open a window containing a selection of three
special functions.
Advanced options
ono" creates a mono recording and requires half of the hard drive space
"M
required for stereo.
"Real-time sample rate adjustment" automatically matches the sample rate of
a new file to be recorded with the sample rate of the selected movie sound
track.
"Ducking" (reducing the sound volume): To add narration or other sound
material to a video that already has sound volume levels set, activate the
option "Automatic reduction of sound volume of remaining audio tracks". This
automatically reduces the volume of audio objects in the arranger during the
recording session ("ducking"). A volume curve controls the whole process,
produces the fading in and out of effects automatically and guarantees
consistent overall volume.
Audio Objects 75
Import audio CD
The steps are similar to transferring Wave files into an arrangement:
Insert an audio CD into the CD/DVD drive of the PC
Go to your CD/DVD drive in the Media Pool. The individual CD titles appear in
the file list.
A simple mouse-click starts the playback of the CD title for sampling purposes
Drag & Drop the CD title into a track of the current arrangement, and it will be
digitally scanned and copied to the hard-drive. The files will be saved in the
import folder (may be specified under File > Settings > Program > Folder).
The audio object appears in the track and can be played back or edited
immediately.
CD Manager
This option opens the
partially or fully import them into the arrangement. You can also select and
configure the used drive if you have more than one drive.
www.magix.com
CD manager to select tracks from audio CDs and
Page 76

76 Audio Objects
The CD man
You may have to contact your technical support to find out which drive is
suitable. The data is imported digitally, thus eliminating loss in sound quality.
Audio tracks are imported into the arrangement as Wave files. The files are
saved in the import folder ("File -> Properties > Program settings -> System ->
Path settings").
To import audio tracks via the CD manager you should proceed as follows:
1. Insert an audio CD into the drive and select "Import audio CD track(s)" from
the "File" menu. A dialog with a list of the CD tracks will open. If you have
more than one drive, you may have to first select the drive containing the
CD. You can do this in CD drive options.
2. Select the desired tracks (multiple selection by "Ctrl" + mouse-click).
3. Click on "Copy selected track(s)...".
4. The "Import project" dialog will now appear. Here you can enter the file
name and select the target directory.
5. The audio material is then copied from the drive onto the hard disk. A
progress bar is displayed.
6. Once copying is complete, the dialog will be closed and the tracks are
inserted into the arrangement as individual objects.
The track list dialog
ager lets you import audio data using most CD and DVD drives.
On the le
to import from the CD. Several subsequent tracks can also be selected by
holding "Shift" and left-clicking; "Ctrl" + clicking selects several tracks; "Copy
ft-hand side in the list you can choose which track(s)/title(s) you wish
www.magix.com
Page 77

s
elected track(s)" starts the audio copying process. A new object is created
for every track in the arrangement and the corresponding track marker is
created.
Transport control: This lets you start and stop
playback just like on a real CD player and skip
forward and backward in the playlist.
Use the small faders to control the preview volume. With the faders at the
bottom you can go to a specific position in a track. To import just one section
of a CD track, choose "Start selection" at the beginning of the section and
"End selection" at the end.
Below the transport control details on the total length and the memory
capacity of the selected track/section are displayed.
Select all tracks: All tracks are selected, for instance, to copy the entire CD.
In the right selection box you can select the read speed, and in the left one you
can select the export mode (see Configuring the CD-ROM).
Audio Objects 77
CD drive options: Here you can change the settings and select the drive for
grabbing the CD if you have installed several CD drives (see also CD-ROM
drive dialog).
"Import project" dialog: Th
selected the option "Copy selected tracks". Here you can specify name and
target address of the audio files. The audio files are subsequently numbered
(name -> name_1.wav, name_1.wav).
Copy-protected audio CDs
According to the copyright act, it is forbidden to copy a CD with copy
protection. However, an owner of a CD may create a backup copy for himself.
The problem is, however, that you cannot create a copy from copy-protected
CDs because they cannot be read using a conventional PC drive. In order to
create a backup of such a copy-protected CD, you have to play it on an audio
CD player and record it as a regular analog recording via the sound card.
Drive list dialog
Tracklist: This bu
tracks.
www.magix.com
tton opens the track list dialog for copying one or multiple
e "Import project" dialog appears after you have
Page 78

78 Audio Objects
Configuration: This button opens the configuration dialog where you can make
various special settings, SCSI IDs, etc.
Reset: Restores the default settings of the drive.
Add drive: Creates a new drive entry in the list, which you may wish to adjust.
Delete drive: Deletes a selected drive from the list.
Save setup: Saves the current drive list and all configuration data in a *.cfg file.
Load setup: Loads the current drive list and all configuration data from a *.cfg
file.
The CD-ROM configuration dialog
Driv
e name: Lets you edit the name of the drive in the list. This is useful if you
create more than one entry accessing the same physical drive.
Host adapter number: Lets you specify the number of your SCSI adapter normally "0".
SCSI-ID: Lets you set the ID of your CD-ROM drive. Be sure to set the correct
ID; there is no error checking!
SCSI-LUN: Select the SCSI-LUN parameter, normally "0".
Alias: Lets you select the manufacturer type of your CD-ROM drive.
Normal copy mode: Copies the audio data without any software correction.
Sector synchronization copy mode: Copies the audio data using a correction
algorithm. This is especially useful, since many CD drives have problems
finding an exact position again and gaps can occur.
Burst copy mode: Optimizes the speed of the copy process; no software
corrections made.
Sectors per cycle: Defines the number of audio sectors that should be read
from the audio CD in a read cycle. The higher the number of sectors, the faster
the copying process. Many SCSI systems have problems with more than 27
sectors.
www.magix.com
Page 79

Sync sectors: Sets the number of audio sectors that will be used for software
correction. A higher number results in a better synchronization but also in a
slower copying process.
Recording Audio CDs
Audio Objects 79
In some
played on the CD/DVD-ROM drive and recorded by the sound card. You
should note that the digital track data from the digital analog converters of the
CD-ROM drive have to be converted into analog signals and then into digital
data by the analog/digital converters. Depending on the quality of the
converter used, this can lead to losses in quality.
Before beginning this, the "Load tracks via record dialog" option under "File ->
Properties -> Program settings -> Audio" has to be activated. The audio
output of the CD-R drive must also be connected with the input of the sound
card. This is already the case with most multimedia PCs (if not, then it can be
accomplished with a small cable inside the computer).
When "Load CD tracks via record dialog" is active, song parts can also be
added to the arrangement without having to load the entire track.
cases the CD can be copied during recording. The CD track is simply
Change the playback tempo or pitch
If you want to combine audio material you have recorded yourself from
different sources, samples from Soundpools, or songs from CD with each
other, then you will often need to adjust the tempo or pitch of audio objects to
match each other. There's an automatic function which automatically adjusts
the tempo of audio objects when they are loaded to the arrangement's tempo,
plus advanced tools like the Remix Agent and the Loop Finder (view page
237).
Automatic tempo adjustment when loading
In general,
arrangement tempo. In normal cases, you won't need to worry about the
different tempo of audio files and Soundpool samples, since these are
automatically matched. But since automatic processes can fail too, the
following process explains when you may need to "manually" adjust things.
www.magix.com
MAGIX Music Maker MX automatically adjusts audio files to the
Page 80

80 Audio Objects
In the new arrangement (empty), the tempo will be determined by the first
samples loaded into it. All additional audio files will then be automatically
adjusted to this tempo. If you are planning a remix which is composed of
different samples with different tempo, then try to add the most important
sample first. This minimizes sound distortions compared to the other samples
via timestretching.
In order to be able to correctly adjust an audio object to the tempo, its output
tempo must first be detected. If the sound is a Soundpool sample, then the
tempo saved therein ("patched") will be used, and the tempo adjustment will
always work.
For all other (short) samples, an attempt will be made to automatically provide
the tempo. If the sample is not cut exactly, i.e. it does not contain an exact
number of beats or is incorrectly interpreted by the automatic detection
process, then this may not work. The sample will then be incorrectly stretched
or an incorrect arrangement tempo will be set.
In this case, use the Loop Finder to specify the tempo semi-automatically
(more about this under the chapter "Menu effects -> Audio -> Loop Finder
(view page 237)"). This allows the sample to be cut to an even loop and the
arrangement will adjust to
the detected tempo or vice versa.
The Remix Agent launches optionally for longer samples ( >15 seconds), e.g.
entire songs from CD or MP3s. This also gives you the option of either
adjusting the sample to match the arrangement or the arrangement to the
sample.
MIDI objects for controlling synth objects always have the correct tempo
because they are always aligned with the arrangement tempo.
In the dialog "Program settings (view page 220) -> Import" ("Y" key), you can
deactivate
Change tempo or pitch of individual objects manually
"Resampling"
for you to change the pitch and tempo of selected audio objects dependent on
or independent from each other. You can access these tools via the "Effects"
menu or the object FX effects tracks.
These functions can be used for all audio files, i.e. for the included samples as
well as your own recordings, CD tracks, CD tracks, or sounds from the
Internet.
the automatic tempo adjustment or limit it to patched samples.
, "timestretching", and "pitchshifting" provide high-quality effects
www.magix.com
Page 81

The playback tempo can be quickly changed via "Timestrech" mouse mode,
i.e. by compressing/stretching the audio object's lower handles, in which case
the tempo will change but the pitch will not be influenced (compare with
chapter "Mouse mode"). The middle handles can also be used to change the
pitch.
Detailed access can be accessed via the time processor effect (see chapter
"Audio effects -> Timestretch/Resample"). This allows you to specify different
timestretch algorithms for the corresponding object, since the best results
often depend on the respective audio material and the different algorithms.
The tempo setting on the transport controller allow the arrangement's tempo
to be changed retroactively. This affects all objects contained in the
arrangement, and in some circumstances this can lead to an increased
demand on the system and dropping out during playback. If this occurs, use
Apply function in the effects rack (view page 151) or the Combine audio (view
page 229) function.
Audio Objects 81
www.magix.com
Page 82

82 Audio Objects
Remix agent - Tempo and beat assignment
The Remix Agent is a
beats per minute, or BPM) as well as the timing of the beats for a song’s
quarter notes. This is important if an audio CD title is imported into MAGIX
Music Maker MX, and you want to mix in sounds like drum loops, effects, or
synthesizer voices.
When to use the Auto Remix Assistant:
When the tempo of the arrangement must be adapted to the tempo of the
song.
When the tempo of the song must be adapted to the tempo of an existing
arrangement.
powerful tool that determines the tempo (measured in
www.magix.com
Page 83

When the song is to be cut up precisely to create a remix object which can
then be rearranged as desired.
Requirements for using the Remix Agent
Audio Objects 83
Songs mu
Songs must be "rhythmic" (i.e. they can be danced to)
Songs must be in stereo format
Note: For analysis, it is presumed that the song is recorded in 4/4 time. If one
of the above requirements is not fulfilled, the Loop Finder can be used.
If songs longer than 15 seconds are dragged into the arrangement, the Remix
Agent is started automatically. When loading short samples (< 15 sec) the
tempo is specified automatically and some loops are similarly automatically
customized to the tempo of the arrangement. This also applies to previewing in
the Media Pool (Smart Preview).
This method can be deactivated individually in the audio/video options ("A"
key). You can find out more in the "File -> Properties -> Program settings"
section.
Preparation - Setting the start marker and object end
Before opening the
the position in the song object in the arranger where you want detection to
start. If the song contains a long intro without beats, set the start marker after
the intro. As a rule of thumb, the Auto Remix Assistant should always be "fed"
dance music.
The start marker should be set before a quarter note beat or, better still, briefly
before a beat at the start of a bar.
If the start marker lies before the song object, the object is examined from the
beginning.
If detection is not performed by the end of the song, the object can be
shortened accordingly with the object handle at the end of the object.
st be longer than 15 seconds
Auto Remix Assistant, you should set the start marker at
Automatic Tempo Recognition
When the
analyzed and played back. A metronome begins to click according to the result
and lines visualize the positions of the quarter notes found in the wave-shaped
display.
www.magix.com
Auto Remix Assistant is launched, the selected song object is
Page 84

84 Audio Objects
The following cases are differentiated:
Position of the start of a measure (the one): red line.
Position of the other quarter notes (the two, three, and four): green lines.
Reliably recognized positions: thick lines.
Unreliably recognized positions: thin lines.
When tapped, blue lines appear.
If the tact and tempo information is already present, points are indicated above
the display at the appropriate positions. The metronome volume can be
regulated below and to the left of the wave-shaped display. To the right, the
BPM value is indicated. If a valid BPM value was found, it is displayed in green.
If the metronome clicks in time with the music, the measure start is correct. If
not, you can correct the tempo manually.
Setting the manual and Onbeat/Offbeat
the result is incorrect, you can help the Auto Remix Assistant with a few
If
mouse clicks on the correction buttons.
There are two possibilities:
On the one hand, the "Tempo correction" list offers alternative BPM numbers
which could also fit with the music. The adjustable BPM values are detected
automatically – the total BPM can therefore deviate from song to song.
For more difficult audio material, we recommend using the "Tapping input"
mode. Either the "T" key must be pressed or the "Tap tempo" button must be
clicked with the mouse in time with the music. With repeated tapping of the
tempo correction button, one should keep an eye on the color in the BPM
display. In the "unlocked" condition (red), the tapping is not in time with the
music. One should tap until the "locked" condition is displayed. After a short
time, you will hear if the result is correct via the metronome.
Subsequently, offbeat correction takes place as required. If the detected
quarter note beats lie around the length of an eighth note (transferred behind
the real positions of the quarter note beats), one or more alternatives can be
selected from the onbeat/offbeat correction list.
Determining the start of a measure
the starting point of the measure is corrected. The beat at the start of the
Next,
measure must always agree with the high tone of the metronome and/or the
red line in the wave-shaped display.
www.magix.com
Page 85

Corrections can be made by tapping; If the start of the measure can be be
heard, tap with the mouse or press the "T" key. Alternatively, you can also
select how many quarter notes the "one" is to be pushed to back.
If the starting marker was set briefly before the first beat of a measure, this
correction is not necessary.
Note: With all corrections, the metronome and visualization react to the lines in
the wave-shaped display only after a short delay.
Using BPM and beat detection
Now you may select one of the actions to be adapted to the arrangement song
(or vice versa) or cut up the songs at the ends of a measure.
Save only Tempo & Beat information
Audio Objects 85
Only wave
is required for determining beat/tempo.
When the data is stored, tempo & beat regulation can be released for future
tempo adjustments or to create object remixes.
Tempo adjustment
Setting the object tempo to the arrangement tempo
This
procedures are possible: timestretching, resampling, or audio quantization.
Timestretching keeps the pitch of the song constant, but sometimes the
sound quality can suffer.
Resampling changes the pitch (similar to changing the speed of a record
player), and retains the sound quality of the song as much as is possible.
During audio quantization, the audio file takes the tempo adjustments into
consideration as if the first remix object (see below) were created and
combined immediately into a new audio file. If the recognition is uncertain,
extreme tempo fluctuation may result. It is particularly important to set the
starting marker so that the tempo is recognized definitely. The advantage of
audio quantization is that small tempo fluctuations in the music balance out.
The start of the measure always agrees with the start of the arrangement
measure and never plays out of time.
file data is stored. This makes sense if some manual post-correction
fits the object length to the existing arrangement. Three different
www.magix.com
Page 86

86 Audio Objects
Setting the arrangement tempo to the object tempo
The arrange
cut-up song as the basis for a new composition (e.g. for remixes), then this
option should be active.
Creating remix objects
The song is cut by bea
To produce loops from complete songs which can then be used with other
material. Most importantly, not all remix objects are suitable as loops. Ideally,
less complex material should be used, e.g. drums from an intro.
To remix songs, thus changing the sequence of the objects, cutting or
doubling beats or to enrich the song with other loops or synth objects.
To mix two songs: If percussion and tempo fit perfectly, can you blend the
songs without "side effects"?
This option can be activated later from the "Object" menu, provided that the
tempo data is stored.
The "Audio quantization" option: Audio quantization fits new objects exactly in
time with the arrangement.
With homemade music, tempo fluctuations are common, and therefore
different measure lengths may result. Nevertheless, so that the objects fit into
the rigid timing pattern of the VIPs, the time processor is activated
automatically and object timestretching is used to correct the different lengths.
ment adopts the detected BPM value. If you would like to use the
t into individual objects. Some applications may include:
Setting resampling for small corrections: If the necessary corrections are very
small, better quality resampling can be used instead of timestretching.
Afterwards, you should not change the master tempo any longer, since definite
pitch changes may arise.
Remix objects in "Loop" mode: New objects are set in "Loop" mode. When
extending the object with the right object mouse handle, the original length of
the object is played again and again.
Setting the arrangement tempo to the object tempo: (see above)
Note: Time correction assigned to objects can be subsequently cancelled if the
time processor is called up and edited ("Timestretch/Resample object", or
double click on the object to open the FX racks associated with the time
processor).
www.magix.com
Page 87

Cancel: The dialog is closed.
Audio Objects 87
Problems and Remedies regarding the
Problem: The playback stutters, the metronome is suspended, the computer is
overloaded... (on older computers.)
Remedy: We recommend changing to wave drivers ("P" key, "Playback
parameter" dialog) instead of DirectSound.
Problem: The metronome does not work and there are no lines on the the
wave-shaped display.
Probable cause: The material does not contain beats or the song contains a
passage without beats.
Remedy: The song should be limited in such a way that only rhythmic
passages are contained.
Possible 2nd reason: Inaccurate tapping or a false BPM value has been
entered.
Remedy: Try the tempo correction buttons or tap until the "locked" condition is
attained.
Problem: The metronome sounds inaccurately or is jerky, the lines in the waveshaped display are irregular and thinly drawn.
Auto Remix Assistant
www.magix.com
Page 88

88 Audio Objects
Remix Maker
The Remix Maker is connected directly to the Remix Agent.
Use it to automatically generate remixes. The loop objects sliced by the Remix
Agent are regrouped according to defined criteria. Simply choose one of the
four "virtual DJs", each of which represents a different remix style, and set the
remix length and structure.
Opening the Remix Maker
1. New
Load the new song you want to remix. This should contain clearly defined
When the song is loaded, the Remix Agent pops up to give you the option of
Select the option "Open Remix Maker" from the Remix Agent dialog box.
Once the Remix Agent has sliced your song, the Remix Maker is started
2. Existing, edited song (in the arranger)
Load a
Select one of the loop objects.
Select "Remix Maker" from the shortcut menu (right mouse click).
3. Long, unedited audio object (in the arranger)
Load an arrangement containing a long, unedited audio object.
Select "Remix Maker" from the shortcut menu (right mouse click).
You are then given the option of generating remix objects.
Presets
Choose
recommend you try them all out and see which results you like best!
song
rhythms.
dividing the song into its structural segments (see "Remix Agent" above).
automatically.
song arrangement that is made up of loop objects.
one of four virtual DJs with different remix characteristics. We
www.magix.com
Page 89

Remix length
Very short: around 20 seconds
Short: half the length of the original song
Normal: regular length of the original song
Double: twice the length of the original song
Shuffle mode
Audio Objects 89
This de
Do not change: The order of the objects are not changed.
Change slightly: A "pattern" (sequence of objects) is either repeated or the
next pattern inserted.
Distant: Objects that are far apart in the original song are placed close to each
other.
Random: The objects are ordered randomly.
Fill mode
A "fill"
again to produce very short objects that are looped or played in rapid
succession. Fills are used to liven up the regular beat.
None: No fills are included.
Use slightly: A few simple fills are included.
Strong accentuation: Many complex fills are included.
Use randomly: Different kinds of fills are used in a random order.
termines the selection and order of the objects.
or "fill-in" is created when the loop object sliced by the Remix Agent
Loop Finder
The Loop Fin
passages, to integrate short loops in an existing arrangement, or to yield drum
loops from short rhythmic passages. Otherwise, the BPM Finder helps in this
regard.
www.magix.com
der has been developed to find the BPM in short rhythmic
Page 90

90 Audio Objects
More information under “Effects” menu.
Harmony Agent
The Harmony Agent is de
The music track is analyzed first when you open the Harmony Agent. The
Harmony Agent tries to automatically identify the harmonies for each beat of
the music. Thus the right beat information is an important prerequisite for a
properly-functioning Harmony Agent.
During subsequent playback, the detected harmony is played by an internal
generator for verification purposes. You can adjust the volume with "Volume
Generator". "Mute" deactivates the generator.
The transport control controls playback of the music track. The position slider
below lets you quickly move to a certain passage.
signed to analyze harmonies.
www.magix.com
Page 91

Check and correct the automatic harmony recognition
the analysis, you can manually correct harmonies which were not
After
correctly identified. Note that major chords are written with capital letters and
minor chords with lower-case letters.
Left click on the respective harmony symbol in the wave display. Hold the key
if you want to mark several subsequent harmonies. If you right-click on
selected harmony symbols, a menu containing alternatives will be displayed.
The initially recognized harmony is marked with an *.
If there are no alternatives, you can select the correct "Keytone" or "Chord"
from the "Correction" section of the menus. Use the option "Replace selected
harmony in the entire song" if you are sure that the incorrectly recognized
harmony is not included in the entire song. A mix-up between major and minor
is typical in this case.
Once you are sure that all harmonies are set correctly, click on "Continue".
Use harmony recognition
you can use the information from the Harmony Agent. There are different
Here
possibilities to output harmonies.
Audio Objects 91
You can create picture objects in the arrangement that display harmonies
graphically in the video monitor and in sync with the music.
You can save the information in the audio file. This also ensures that the
harmonies are available later. For instance, if you want to display the harmony
information in the timeline ("Edit -> Display Object Marker -> Harmony
Marker").
You can choose between different displays of the harmony symbols. You can
use German, English or Roman symbols to name the tones. Furthermore, you
can set the "preceding symbol" to force single harmony interpretation. With #,
all notes are shown as "sharps" (C#, D#, F#), with B they are displayed as
flats.
www.magix.com
Page 92

92 Audio Objects
Text to speech
In this dialog reached in the Effects > Audio dialog, you can get speech from
typed text. You can choose from a range of different types of voices. You can
change the speed and volume of the spoken passages. Once you've settled
on a suitable voice a WAV file will be created. This can of course be used in
the arranger like any other audio object.
Load text: Here you can load any text file (formats: *.txt or *.rtf).
Save text: Your entered text can be saved.
Test: After entering your text, you can preview the result.
Voice: You can choose from various voice types.
Speed: Playback speed can be regulated with this controller.
Volume: Output volume is regulated with this control.
Format: Here you can determine the quality of the created wave file (.wav).
File: Path selection for the wave file to be created.
www.magix.com
Page 93

MIDI Objects 93
MIDI Objects
Arrange MIDI objects
MIDI objects may be moved, the volume may be modified (middle handle), or
fades (in/out) may be added (top right and left handles) in the same way as
audio, video, or synthesizer objects. Use the lower handles to "stretch out"
individual MIDI loops so that they easily fit onto a whole track.
Pay attention to the following:
Volume changes in MIDI objects (central handle or fades in/out) are controlled
by adjusting the velocity level (MIDI velocity). Many synthesizers do not change
the volume, but rather the sound in relation to the velocity level. In this case,
use the effects curve automation function.
MIDI objects always control a single synthesizer per track. If you move a MIDI
object onto another track, then a different synthesizer will be controlled and
the sound of the arrangement changes accordingly.
Transpose MIDI
function in the the context-menu is used to change the pitch of a MIDI
This
object. Simply enter the number of half tone steps by which the playback is to
be transposed up or down! The transposition is shown in the MIDI Object in
the arranger with "+n" and "-n" (n is the number of halftones).
Load MIDI files
Proceed as follows to integrate MIDI files into an arrangement:
1. Open a directory containing MIDI files using the Media Pool.
2. Click a MIDI file and it will be played back immediately; this makes it easy to
load audio files without guessing.
3. Now drag the desired file into the arrangement and that's it!
4. An MIDI object will appear in which the MIDI notes are shown by dots; the
high notes are dots in the upper section, and the lower notes are the dots
further down in the lower section. You can even see the velocity of the
notes: the louder the note is played, the darker it appears on the screen.
MAGIX Music Maker MX uses the external MIDI device (view page 96) to
preview a MIDI
can't hear the MIDI file, then there may be different reasons for this:
www.magix.com
file in the Media Pool without using software instruments. If you
Page 94

94 MIDI Objects
Check the MIDI output device in the "Program settings" window via the
"Audio/MIDI" tab (P key or "File > Settings > Program settings"). "Microsoft CD
Wavetable SW synth", a standard software synthesizer included in Windows
as an OS component, should be set as the default. If sound cards with their
own synthesizer are used or in case MIDI hardware synthesizers are
connected, set the sound card's MIDI driver or a MIDI interface!
The sound car synthesizer's volume is set via the the sound card mixer.
Double click the small loudspeaker icon in the tray and find the controller for
the SW synthesizer.
Several sound cards cannot use the SW synth simultaneously with ASIO
drivers.
The "Microsoft GS Wavetable SW-Synth" is treated as an external MIDI device,
which means that even while it produces sounds in the computer, it is still not
a component of MAGIX Music Maker MX. If you want to export a sound from
the arrangement, then you will have to record it beforehand (see Converting
MIDI objects to audio files (view page 96)). The sound quality of the device is
rather modest compared
Revolta.
It's easier if you assign different software synthesizers to the MIDI object after
you load it. MIDI files of complete songs, for example like you might find on the
Internet, often contain multiple tracks that control different instruments. MAGIX
Music Maker MX is able to use one software synthesizer per track. For this
reason, duplicate your MIDI one beneath the other as often as there are
different instruments involved and set the corresponding Channel filters (view
page 102) in the MIDI objects ("Options" menu in
object only plays the notes for a single channel. Next, assign software
instruments for the individual channels via the Track (view page 38) menu.
to "proper" software synthesizers like MAGIX Vita or
the MIDI Editor) so that each
®
Connect external equipment
USB-MIDI keyboards
Over the last few years, controls for software synthesizers have produced a
new class of devices: USB-MIDI keyboards. These devices usually do not
contain separate sound generators, but rather consist of just a keyboard,
different controls, and a MIDI interface that is connected via USB cable to the
computer.
These keyboards usually do not need special drivers - they only need to be
connected. Make sure that the device is switched on and is able to be
detected prior to starting MAGIX Music Maker MX, since the available MIDI
ports are only able to be discovered during program launch!
www.magix.com
Page 95

Under some circumstances, you may have to select the MIDI input device via
the Program settings ("Audio" tab) (view page 221). This is usually called "USB
audio device"
Note: Some older devices do not function in some cases in Windows XP.
Even though the device has been detected, the corresponding MIDI drivers do
not appear in the list. In this case, please contact MAGIX customer support!
MIDI cabling
MIDI inputs/outputs: If your computer has an internal or external MIDI port, or
has a MIDI-capable sound card installed, connect your MIDI keyboard’s “MIDI
out” to the computer’s “MIDI in” (on the interface, sound card, and so on).
If your MIDI keyboard can generate its own sounds, connect the computer’s
“MIDI out” to the keyboard’s “MIDI in”. If your computer (or the MIDI device)
offers more than one MIDI output, connect any other sound synthesizers to
these. If the computer only has one MIDI output, you need to connect the
second sound synthesizer’s "MIDI in" to the keyboard’s "MIDI thru" port. A
third device can be connected to the second’s "MIDI thru", and so on. The
"MIDI thru" port always delivers a copy of the signals coming into the device’s
"MIDI in". It is preferable, however, to use a direct connection from a
computer’s "MIDI out" to a device, rather than chaining too many devices one
after the other. Timing problems may occur in the chain if a lot of MIDI
commands are sent in a short space of time. This is due to the slight delays
introduced by each "MIDI in" to "MIDI thru" transaction. If your computer also
features several MIDI inputs, they can be used for the connection of MIDI
expanders.
MIDI local off: If your keyboard features an internal sound source, it is
important that you stop the keyboard from generating sounds directly from its
own keyboard. If you buy a new keyboard that is to be used without a
sequencer and connect it straight to an amplifier, you would expect the device
to make a sound when you press its keys. In other words, the keyboard is
internally connected to the sound synthesizer. This behavior, however, is not
what you want to happen when using your keyboard with MAGIX Music Maker
MX. In this scenario, the keyboard is used as the computer’s input device, and
MAGIX Music Maker MX is sending (i.e. playing) MIDI information to any
connected sound synthesizer, be they the keyboard’s own sound generator, a
sound card, or any other connected sound module.
MIDI Objects 95
If you wanted to control and record another sound module using your
keyboard as the input device, its own sounds would play alongside those of
the other sound synthesizer, which is why the keyboard must be separated
from its own internal synthesizer. This function is known as “Local OFF”, and is
www.magix.com
Page 96

96 MIDI Objects
set directly on your keyboard. Refer to your keyboard’s manual for information
on how to do this. Don’t worry about “breaking” the link between the keyboard
and its internal sound generator – MAGIX Music Maker MX will act as the
“missing link” in this scenario.
External synthesizers
Naturally, MIDI objects ca
external synthesizers, sound modules, etc. "Pure" MIDI output takes place (i.e.
without using software synthesizer plug-ins) assuming that the MIDI output
device has been properly set (see previous sections); in this way, any MIDI
object may be sent to an external synthesizer.
Note: If a MIDI object is on a track which features a software synthesizer, then
this will be controlled first. To play the object on an external sound synthesizer
via MIDI output, select "no VSTi" from the list of software synthesizer.
Convert MIDI objects into audio files
If you use VST instruments, you won't have to convert these MIDI objects into
audio data before exporting your entire arrangement, since the sound is
created on your computer and can be processed there. If you wish to do this
nevertheless (e.g. to provide some relief to your PC), then use the function
'Combine audio (view page 68)'
All MIDI obje
page 96) will have to be converted in
exported as well. They only contain control information for sound generation.
In order to do this, the output of the MIDI synthesizer (e.g., the sound card)
must be connected to the input of the sound card. The MIDI data can then be
played and recorded simultaneously via the record function. This produces an
audio file that can be edited and exported together with the multimedia files as
usual.
cts that control external synthesizers via a MIDI interface (view
n also be played back over a MIDI interface onto
to audio objects if you want them to be
Playing and recording MIDI synthesizer
MAGIX Music Maker MX allows you to play and record software synthesizers
or external MIDI devices from the arranger. The MIDI Editor does not need to
be opened for this, which was previously the case in the former version.
www.magix.com
Page 97

MIDI Objects 97
Presuming
that the MIDI input and output devices are set correctly (see above),
then you should be able to play any synthesizer that is loaded via the MIDI
keyboard.
MIDI recording mode must be activated in the corresponding track
by clicking "Rec" twice in the track box. Now, all of the notes that
you play via the keyboard will be played back through the
synthesizer.
If a software instrument is loaded via the track box or opened via the MIDI
Editor, then MIDI recording mode is activated automatically.
Tip: You can also play a synthesizer live without an external MIDI keyboard.
The Media Pool features an On-screen keyboard that may also be operated via
the computer keyboard.
In order to record a new MIDI object, simply click the red "Record"
button in the transport bar
MIDI Editor
The MIDI Editor makes it possible for you to edit MIDI objects. The MIDI Editor
provides different sub-editors, views, areas, and aids to do this.
Double clicking a MIDI object opens the MIDI Piano Roll Editor for advanced
recording/editing of MIDI objects.
www.magix.com
Page 98

98 MIDI Objects
Tip: The Media Pool features a smaller version of the MIDI Editor. Select the
MIDI object you would like to edit and then click the Settings Object Inspector
button. This MIDI Editor may be operated identically to the "bigger" version
that features its own window; of course, the menu and different play and
recording settings will not be available.
In the center you'll find the Piano Roll Editor in which the notes are displayed
as bars and from which they can be edited using the mouse. There are various
buttons located just above the Piano Roll.
Clicking on this button opens the Event list (view page 108). In this
you can view all MIDI data of a MIDI object, including those that
list
cannot be edited in the piano roll or controller editor. You can use
the Event List to remove unwanted commands included with
imported MIDI files.
Use this button to switch to Drum Editor (view page 114) mode.
You can use this to leave the Drum Editor and return to the Piano
Roll section.
Clicking on this button opens the Controller Editor (view page 106)
bottom area. This allows you to edit features such as the
in the
note velocity, pitchwheel, and controller data.
www.magix.com
Page 99

Deletes all MIDI data from the object. Now you can begin from the
start again...
Of course, "Undo/Redo" is also available for all changes you make
in the MIDI Editor.
Along the top edge, you will also find the buttons for selecting the editing tools
(view page 103), for quantization (More information
"Quantization settings" on page 110), and for the output (view page 99) used
the MIDI object (MIDI out or VST instrument).
by
Select sounds
MIDI Objects 99
can be found in the section
The sound of vir
chip of the sound card or by external MIDI synthesizers. Each MIDI object can
produce as many sounds as the corresponding synthesizer offers. The sounds
themselves can be specified in the instrument – regardless whether its a virtual
VST Instrument or a hardware device.
If there is no VST instrument loaded, the MIDI object uses the MIDI output for
the external synthesizer or for the Microsoft™ Windows® supplied synthesizer.
The MIDI output can be adjusted in the "Program settings" window in the
"Audio/MIDI" tab (P key or via "File" menu > Settings > Program settings"
Select
object with various VST synthesizers. You can set the sound of VST
instruments in the VST instrument editor. You can open the instrument editor
with a right-click on the VSTi name or a left mouse click on the cogwheel
symbol.
You can set up the MIDI output channel under MIDI channel. This is important
for VST instruments which can receive MIDI notes on multiple channels and
play several different sounds simultaneously (multi-timbral).
Play/ PlaySolo
the desired VST instrument from the menu. You can test the same MIDI
tual instruments (VST plug-ins), is produced by the synthesizer
Play solo only pla
(corresponding with the filter settings of the options menu).
Play all plays the entire arrangement.
www.magix.com
ys the MIDI object for which the MIDI editor is opened
Page 100

100 MIDI Objects
Playing instruments with the keyboard
Open the MIDI editor to be able to play software instruments directly via the
computer keyboard. The assignment of the notes to the computer keyboard is
displayed in the following graphic.
"Page up" and "Page down" move the octave up or down.
MIDI Record options
You may also begin MIDI r
click the red "REC" button. Compared to the simple "Record" featured directly
in the "Arranger", this version features several additional options for you to
select
Overdub: No
"Overdub" simply adds new MIDI notes to the existing MIDI recording.
"Overdub" allows you to create a completely new MIDI song step-by-step (or
take-for-take).
Cycle: This plays the MIDI object in a loop during recording. This enables you
to let the object play through a few times before you get started recording your
own melody.
Metronome: In order to play back the proper tempo, you can activate the MIDI
metronome to provide the beats. This is only for orientation while you play and
is not recorded.
rmally, existing notes are deleted with each new recording.
ecording directly in the MIDI Editor. To do so, simply
www.magix.com
 Loading...