

Page 1

Online Help Contents
Getting Started
Quickstart
MAGIX music editor 2 Terminology
MAGIX music editor 2 Reference
Menu Reference
Screen Elements
Virtual Project Components
Toolbars
Shortcuts
Working with MAGIX music editor 2
Virtual Editing Concepts
Working with the Mixer
Support
Page 1
Page 2

Obtaining help
You can get help on the program on different levels and different methods:
In dialogs: Pressing F1
or clicking the help button (if provided) will call the appropriate Menu reference page with
descriptions on the dialogs elements. In the most cases you’ll get also a screenshot of the dialog,
where you can click on a specific control element to get help on it.
In the menu and toolbars: Click on a menu item and pressing F1 while
holding down the mouse button will also call the help page for the command. This works
adequately for toolbar icons.
Context help: by selecting Menu Helpà
Context Help the mouse will change into a question mark. Click on every screen element you
wants to obtain help about.
You can also read systematically in the Online help (you can say, it is an online manual, too). There are
several sections:
Getting Started
: That’s where you actually reading, here are the quickstart tutorials
What’s new ?: This is for owners of older versions of MAGIX music editor 2
Menu Reference:
All menu items in one view
Working with MAGIX music editor 2 : In the online help section "Working with MAGIX music
editor 2
" there are several chapters on general function of the program (e.g. the VIP working, mixer,
effects). To quickly getting started, read the Quickstart chapters in the "Getting started" book.
MAGIX music editor 2 Reference
: Here you will find reference tables on every keyboard shortcut, mouse mode, toolbar icon and
on all graphical elements of the program.
Page 2
Page 3

Quickstart - Overview
Recording
Mixing
Real-time effects
Mixing To A Stereo File
Editing
Object editing
Burning an audio CD
Page 3
Page 4

Recording made easy
The first track
1. Start MAGIX music editor 2
by double clicking on its icon.
2. Click on the New VIP
icon in the upper toolbar (or Key E).
3. The dialogue Setup for new VIP appears. Key Backspace
to delete the "New" title, then name the project.
4. Click on the folder icon and explore to the audio recording location – this will set where the file is
stored. We suggest you create a new folder for the project by typing the name of the folder in the
Browse For Folde
r dialog. This will ensure all files are placed in the same folder.
5. Select 4 Tracks, then the appropriate Sample Rate. Click the Advanced
button to display the entire dialog, then uncheck the Auto Crossfade Mode box. Set the Units Of
Measurement to SMPTE.
A new VIP
is now ready to use.
Ready to record?
then click the OPT icon in the upper toolbar. A window will open showing various Record Parameters.
Experienced MAGIX music editor 2
users will notice the enhanced dialog and new peak meters based on the Visualization metering system!
7
. Check that all settings are correct as entered.
8. Make sure your soundcard driver is displayed in the Rec. Dev drop-down list and click on (enable)
Monitor
. The Visualization and track slot meters will now respond to your input signal.
9. Using the LED meters, adjust the input signal’s level so that the loudest peak doesn’t quite reach 0db.
(The Input signal’s level must be adjusted at the source, mixer, or soundcard fader). If a level of 0db or
higher is reached, a red marker line will appear in the Visualization meter - you should lower your input
gain if this occurs. The red ‘over’ marker will reset automatically after a few seconds, or you can click
the Reset Pk
button to reset the marker.
Note: You can adjust the display of the Record dialog Visualization meter to show input above 0db by
clicking on Setup (at the top of the meter) and selecting 6db Max in the Value Range/Display category.
This may make it easier to set levels in some cases.
10
. The Record Mode can be set to 16 bit, mono or stereo etc. If your input is mono, set the Mode to
mono. If it is stereo, set the mode accordingly.
Note: Don’t make the mistake of recording a mono file as a stereo track, as the recorded track will
become a stereo file with silence on one side.
11
. When ready, click the Record button to start recording.
An Object representing the recorded Wave file will immediately commence to be drawn in the track
slot.
12. To stop recording, click the Stop
button on the Record dialog. A dialog will pop up asking if you want to keep the track.
Page 4
Page 5

13. Click Yes to keep the track. The dialog will close and your track will remain as an object in the VIP
.
Note : If you make a mistake and decide not to keep the recording, click Delete. Another dialog will
open asking for confirmation of the deletion. This instantly deletes the Object and the actual Wave file, so
you can easily redo the recording as many times as you like without cluttering up the VIP or your hard
disk!
14. Click OK to close the Record Parameter window. You’ve just completed recording your first record
in MAGIX music editor 2
! Well, almost - you should save it first!
15. Save your VIP project by pressing Ctrl + S - this is a good habit to begin now. Once it is saved, key
Home
to return the playback cursor to the start and press the spacebar to play back the track.
Page 5
Page 6
Mixing Projects
Controlling Volume and Pan in Real-time
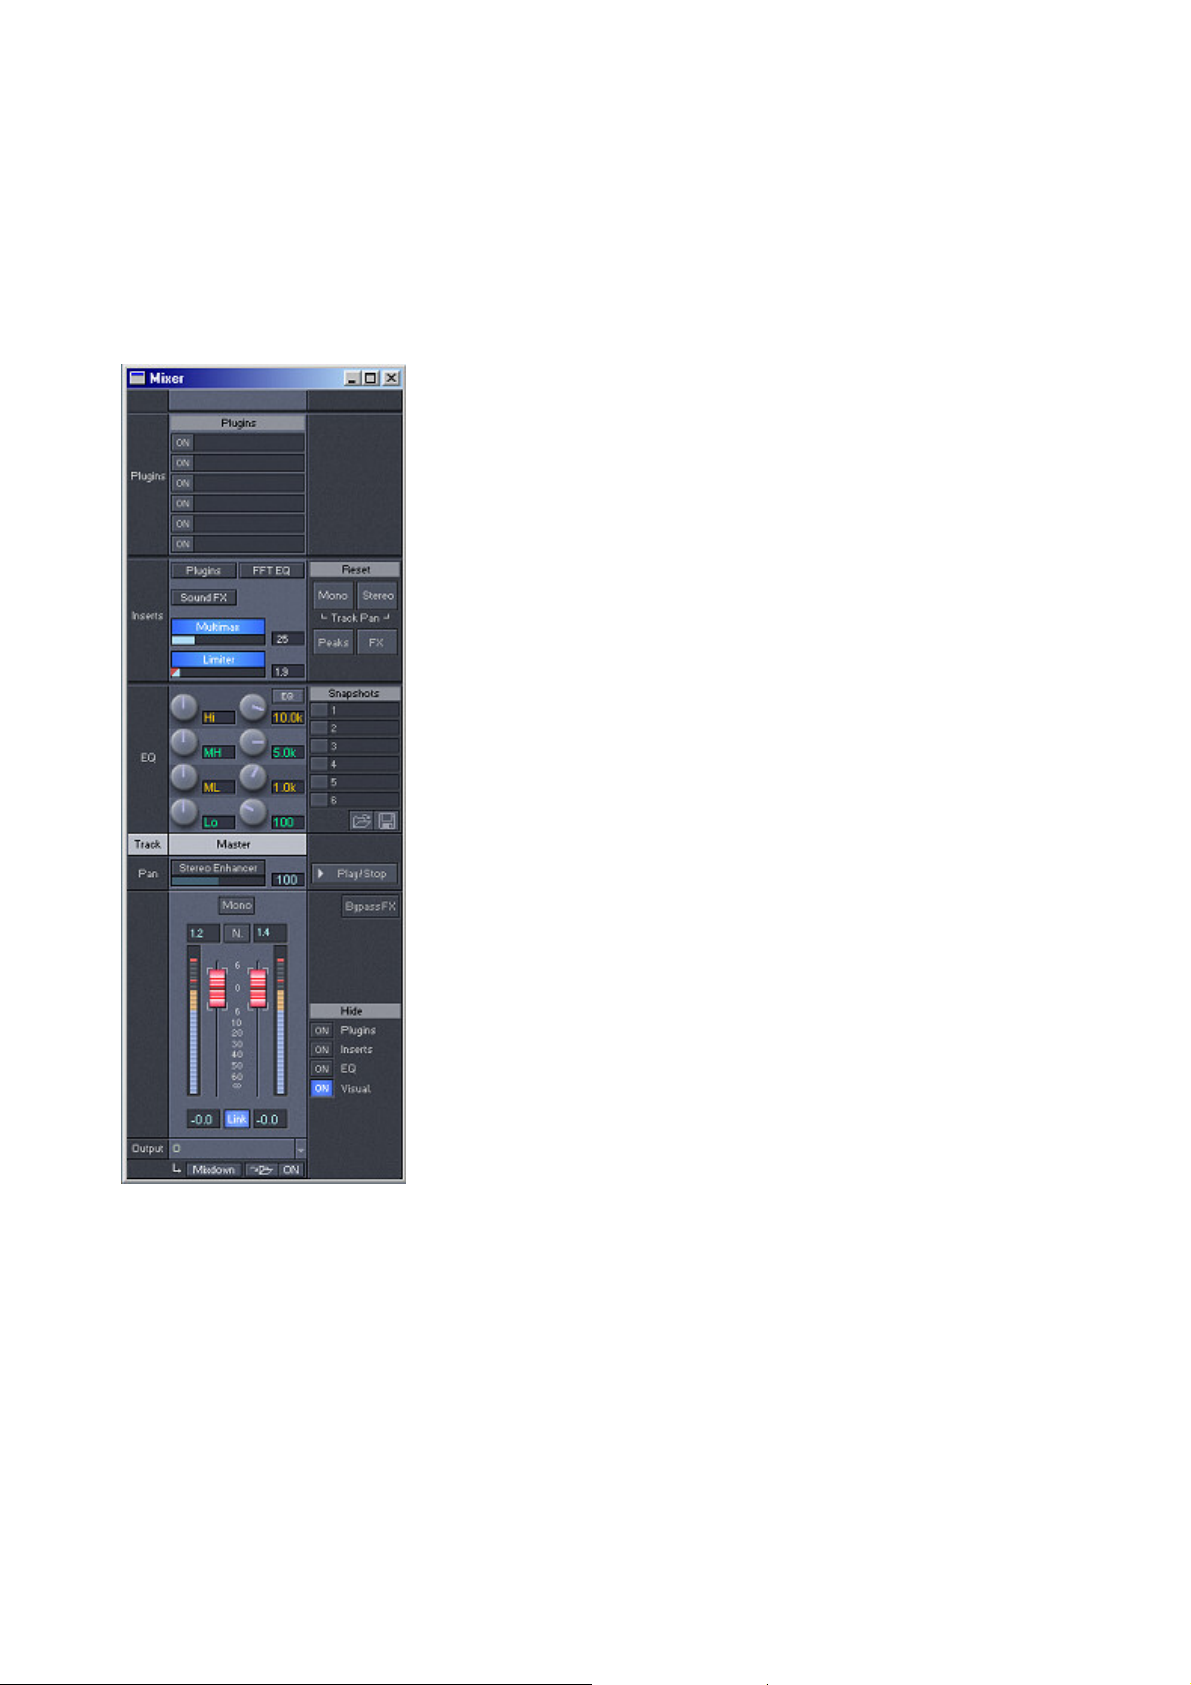
1. Click on the Mixer button in the Workspace section or key M and MAGIX music editor 2
’s Mixer window will open.
If you have a dual monitor setup, you can drag the Mixer to the second monitor. The Mixer is also
scalable, but for now leave it at the default setting.
For this Quick Start Guide, we will only examine very basic use of this extremely powerful interface. As
with all of MAGIX music editor 2
’s interfaces, the Mixer includes helpful ToolTips which indicate the function and current numerical
parameter settings for all controls. If you aren’t sure what a control does, just hover the mouse cursor
over the control and the ToolTip will tell you. So let’s dive in and start mixing.....
2. Press the Spacebar
to listen to your record. Do it sound too loud or too soft?
3. To adjust the volume, click and drag the Faders either up (louder) or down (softer). By all means,
make these changes while
you listen to the audio.
4. Double click on the Faders
Page 6
Page 7

to quickly return it to default (0db) position.
5. When you have finished making volume adjustments, press the Spacebar
to stop audio playback.
Tip: To control playback, you can also use the floating Transport control
palette (key Shift+T), or the Play arrow button near the top right corner of
the Mixer to control playback. Clicking the Opt button next to the Play arrow
button will open the Play Parameter dialog, which provides further
configuration flexibility. You can also open the Play Parameter dialog by
pressing the P key. Various processor dialogs also include playback buttons.
Of course, there are also all the Playback menu items, or you can even
program your own hotkey shortcuts - MAGIX music editor 2 always offers
you many command choices so you can choose a method which suits the way
you like to work!
8. To adjust the pan position or your record, click on the Pan fader (the horizontal blue fader directly
above the word ‘Pan’) and drag the mouse left or right. Again, use your ears and make these
adjustments while
the audio is playing.
9. Double click on a Pan fader
to quickly return it to center default position
10. When you have finished making pan adjustments, press the Spacebar
to stop audio playback.
11. Save the changes you’ve made. (Ctrl + S)
Tip: You can use the spacebar to start and stop playback as often as
necessary.
Page 7
Page 8
Make your record really shine
using real-time effects
Equalization
1. With the Mixer window still open, notice the four light blue knobs. These knobs control the 4-band
fully parametric EQ. Press the Spacebar
to start audio playback.
2. Listening to your record, do you notice that it's lack low-end? Click on the LF (LOW EQ)
knob and drag the mouse left to cut or right to increase.
3. Using the same methods as in step 2, adjust the MF1(Mid), MF2(Mid) and HF(Hi EQ). Use the
Spacebar
to stop and restart playback as often as necessary.
4
. Double click on the center of an EQ knob to quickly return it to center default (off) position.
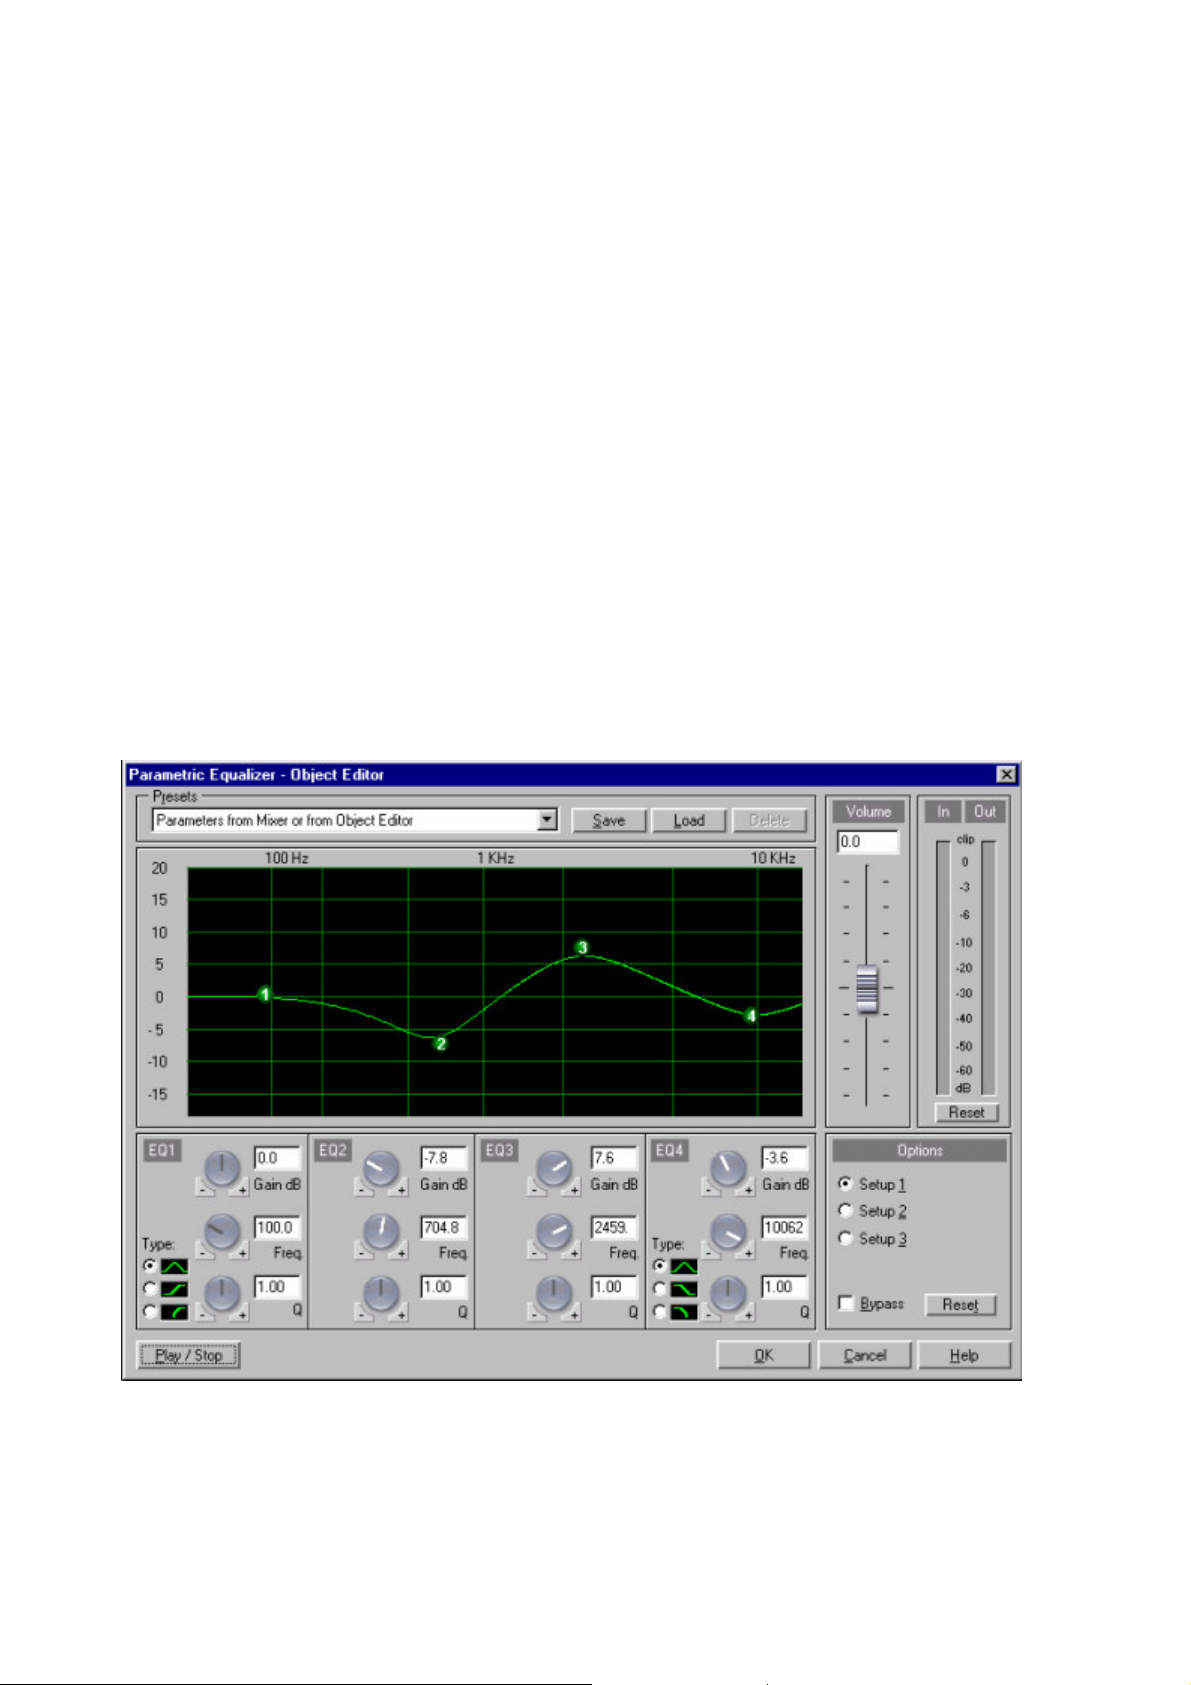
5
. Now try right clicking on any of the EQ knobs. This will invoke the 4 band parametric equalizer shown
below:
6. You can now adjust the EQ in real time using the 12 adjustment knobs, or by entering settings into the
settings boxes. The screen shows the EQ curve of your settings. Shelving and Pass Filter settings are also
available by selecting the appropriate Type radio button. In the shot above, EQ1 is set as a pass filter,
EQ4 is set as a shelving filter.
7
. Once you have selected your settings, you can switch back to the mixer – the settings you have selected
Page 8
Page 9
are automatically applied to the mixer knobs and the gain of each band can be subsequently adjusted
from the mixer by using the knobs.
Compression
8. Directly above the four EQ knobs, you’ll see a gray multimax fader. This fader is used to apply
dynamics processing (compression) to your record. Press the Spacebar
to start audio playback.
9. Listen again to your record. Do it sound like it is too loud at times and too soft at others? Click in the
multimax fader and drag the mouse right to increase or left to decrease compression.
10. To quickly disable the compressor, double click on the center of the multimax fader.
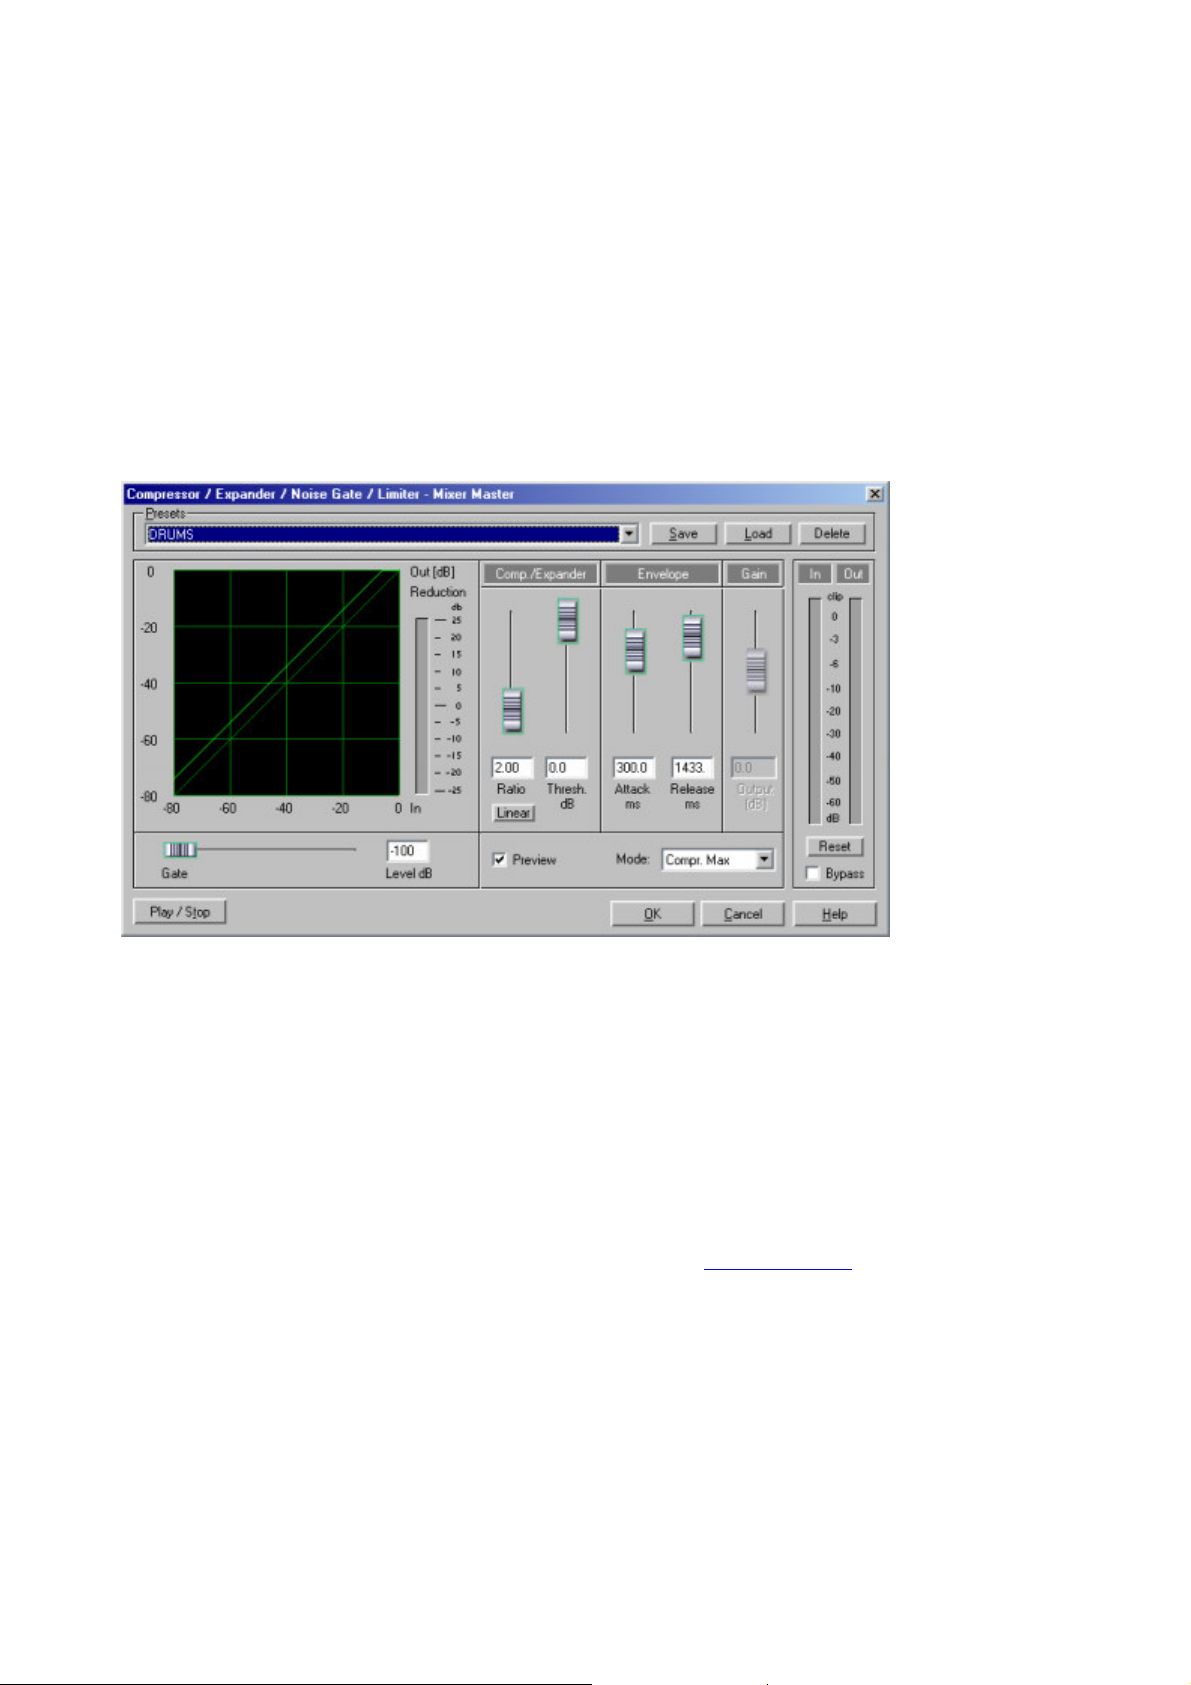
11. Now right click on the Limiter
fader below – this will invoke the compressor dialog shown below:
You can now adjust your compression settings by using the five adjustment Faders in this dialog. The
graph shows the gain reduction applied to the audio in real time. The Gain fader controls makeup gain.
Note that you can set the compressor into various modes using the mode box. The Gate fader under the
graph is used when the compressor is set to Noise Gate mode.
Delay and reverb
12. Directly above the compression section, you’ll see the sound FX button. This button is used to apply
some effects of to your tracks. Press the Spacebar
to start audio playback.
13. Listen again to your record. Might it benefit from a delay (echo) or reverb effect? Click on the sound
FX button - the MAGIX FX RACK with some effects from the "Effects"-Menue will open. Use the
MAGIX DUAL FX PROCESSOR with REVERB and DELAY
effects.
14. To quickly disable sound FX effects, click on the sound FX button and use the Power button of the
MAGIX DUAL FX PROCESSOR
.
Page 9
Page 10

Mixing To A Stereo File
You will generally want to mix your virtual projects (VIP) incl. all mixer effects to a stereo file. There are
a few ways to do this in MAGIX music editor 2 , but in the Quick Start Guide we will cover only two:
Output To File and Mixdown by Bouncing.
Output to File
Once you have adjusted your chosen mixer settings for your record, you are ready to mix to stereo. At
the bottom of the Fader section in the mixer window, switch on Output To File by clicking the ON
button.
2. Select the location of the mixed file by clicking Mix (adjacent to the ON
button), browsing to the location and naming the Mixdown.
3
. Save your project! Start playback by your preferred method – the project will mix down to the file in
real time while you listen to the playback.
4. Close the Mixer by keying M
, then save and close your VIP by keying H.
5
. Key W to open the Open Audio File dialog and browse to the mixed file. Open the file to playback the
mix.
Bouncing Down
Often it is preferable to Bounce Down rather than Mix In File
, as more options are available for immediate use of the stereo mix file.
Track bouncing is an industry term for mixing selected tracks to a stereo buss. This can be done to gain
additional tracks by freeing up existing tracks, or as a mixdown technique for the entire project.
MAGIX music editor 2 bounces down ‘offline’. In other words, once the bounce down command is
issued, MAGIX music editor 2
shuts all interface functionality and concentrates purely on creating the mixed file. This can be very useful
if your mix contains intensive processing which overloads your system in real time.
With your record open, open the menue "Tools" and select "Track Bouncing".
1
. Note that various options are now available. In this case, select:
– From VIP Start to last Object End
– New VIP
– Save in 16 bit Format, Stereo
.
then click OK
.
2. Choose a name and location for the Bounce Down file. Click OK
.
3
. The Bounce Down is now performed "offline".
4. A new VIP
containing the Bounce Down file is automatically opened.
Page 10
Page 11

You are now ready to edit or master the mixed stereo file!
Page 11
Page 12

Editing
In the next section of this document, we will have a look at a new method for stereo editing which
includes virtual editing, but does not require a VIP.
1. Open the stereo mix VIP
from the previous page.
2
. Set the Snap function on by clicking on the Snap toolbar button (top of workspace)
3. Place the cursor at the beginning of the waveform by pressing the Home
key.
4. Now we will use an excellent MAGIX music editor 2 feature for zooming. Zoom horizontally into the
waveform by click/hold on the Grid And Marker Bar
at the location of the play cursor (i.e. the start of the file), then drag the cursor down.
Cutting
5. Our task is to delete the section of empty space (silence) at the beginning of the mix. First we must
select the silence as a Range by clicking on the small shaded area (actually a short Range) in the Grid
And Marker Bar at the start. Click and then hold/drag the Range to the left as shown below. The range
will show as the shaded area in the Grid And Marker Bar. Now playback will focus on the Range. To
select the Range section of the Object for editing, extend the Range over the Object by double clicking
the shaded area in the Grid And Marker Bar
.
6. Press the Delete key to delete the Range section of the Object. The selected area of the Object is
instantly deleted. This edit affects the VIP
only – the original wave file is untouched! We have now removed the dead space from the start.
7. You can adjust the position of the remaining Object by clicking and dragging to the start of the track
slot (as shown above), or you can press Home to return the playback cursor to the start, click on the
Object to select it, then select the Object>Object To Play cursor Position
menu item.
8. View the entire waveform by clicking the red All toolbar or the Zoom Out Horizontally
button.
Fades and Volume Curves
Fades and Volume changes in the VIP are virtual and can be implemented in various ways - following are
two methods :
9.
To create a Fade Out at the end of the mix, we will use the Object Handle method. While viewing the
entire waveform, click on the Object to select it - note that 4 small squares (Object Handles) appear at
either end of the Object.
10.
Hover the mouse cursor over the upper handle at the end of the Object. A bi-directional arrow appears,
indicating the Handle can be used to create a Fade.
11.
Drag the Handle to the left, creating a Fade Out as shown below. The waveform display adjusts
automatically to show the Fade.
12. Place the play cursor before the Fade by clicking on the Grid And Marker Bar,
then play the Fade. Voila - instant virtual Fade!
Page 12
Page 13

13. Let’s assume we want to lower the volume of a section of the Object in the middle of the mix. One
way to do this (with MAGIX music editor 2 , there is always more than one way!) is by using the
Volume Curves. To activate the Volume Curves, click the VOL
button in the Track Properties section at the start of the track. The button will turn yellow and a yellow
Volume Curve will appear across the top of the Object.
14.
In the middle of the Object, create 4 Volume Handles by double clicking 4 times on the Volume Curve
(each double click slightly to the side of the previous)
15.
Volume Curve Handles are moved by clicking and dragging with the mouse. Select the second handle
from the left and drag it down to -15db (watch the ToolTip!), then select the third handle and drag it
down to -11db. Note that the waveform adjusts automatically to reflect the new gain changes.
Note : By selecting a Range which includes the Volume handles and starting playback, you can easily
adjust the handles in real time while listening to the changes. Selecting Loop Mode playback by clicking
the LOOP button on the Transport Control, Play Loop on the Play Parameter dialog or clicking the Play
Loop toolbar button will loop the playback.
Page 13
Page 14

Object editing
Any waveform shown in a VIP track slot is an Object. Each Object references to the whole or part of a
Wave file, but the Object itself does not contain audio. Instead, the Object contains a drawing of the
audio and implements real time editing and processing as the audio is read by MAGIX music editor 2
. In other words, the referenced audio remains unchanged. This ‘virtual’ process is sometimes called
Non-Destructive Editing or Virtual Editing.
Your project can contain an unlimited number of Objects and each Object can be duplicated multiple
times throughout the VIP project.
Objects can be split, cut, copied, pasted, stretched and moved in many ways, all without affecting the
original audio files.
Page 14
Page 15

Burning an audio CD
Burning Red Book compatible audio CDs is easy with MAGIX music editor 2 . In any multi track
project (VIP) you only need to add track markers (with the T
button in the toolbar) and the burning process can be started immediately!
1. Close the Mixer by keying M
and set the Workspace to CD Mastering mode.
2. Under the CD menu, select Set Track Indices On Object Edges. A red Track Index will appear at the
beginning of the track.
3. Save your project! (Ctrl + S)
4. Insert a new (blank) CD-R into your CD burner and click on the Make CD icon in the upper toolbar.
A dialog will open with several options.
5. For Mode, click on Burn on the fly. This uses MAGIX music editor 2
’s built in CD burning routines. All effects (fades, EQs, etc...) are calculated in real-time while burning.
6. In the next dialog CDR Recording Options select the recording speed (e.g. 2 * depending on the
capabilities of your CD recorder) and disable the Simulate Recording option to enable the CD writing
process.
7. Click OK to start the burning process.
You will also find a step-by-step explanation of the CD-Burning process here
!
Page 15
Page 16

Virtual Wave Editing
MAGIX music editor 2
includes a new virtual mode for Wave Editing. In simple terms, edits to Wave projects are compiled in
the virtual domain until being saved at the completion of the particular editing session.
The new mode will be instantly familiar to experienced users as it is very similar to working in a VIP. An
‘object’ is transparently created representing the Wave project, allowing cut edits to be instantly
implemented and retained as virtual Undo files. This saves considerable time and hard disk space, as
each cut edit no longer has to be written to the hard disk. Once you are happy with the cut edits, you
simply save the changes (at some point, you have to commit!)
Volume and Pan edits are also virtual in this mode by using the Draw Volume or Pan Mouse Mode
toolbar buttons .
Processing edits are implemented by using the Mixer when in this mode. A special ‘Mixer’ is available,
providing all real time virtual effects which are normally available in the Mixer.
Processing edits via the Effects menus (such as EQ, compression, time stretching etc.) may still require
creation of a temporary Wave file and are therefore ‘destructive edits’ (although there are undo's, of
course). For all effects available in real-time we recommend using of the Mixer rather than the Effects
menu items.
The original ‘Destructive Editing’ mode is still the default mode when selecting Wave Editing (previously
Destructive Editing) from the Object menu. This is due to restrictions which cannot be bypassed when
editing files currently open in a VIP.
To use Virtual Wave Editing, open Wave projects directly instead of opening into a VIP.
Page 16
Page 17

Menu Reference
Menu File
Menu Edit
Menu View
Menu Object
Menu Effects
Menu Range
Menu CD
Menu Tools
Menu Playback
Menu Options
Menu Window
Menu Help
Page 17
Page 18

Menu File
New Virtual Project
A new virtual project is opened.
Open Project
A new project is loaded, which was created by
MAGIX music editor 2 .
Save Project
The actual project is saved.
Save Project as...
The actual project is saved with a new name.
Save Complete VIP in...
The actual VIP with all needed files is saved to a
new directory.
Rename Project
The actual project gets a new name.
Delete Wave project(s) (HDP)
Deletes a HD Wave project from the hard disk
Delete Virtual project
Deletes a VIP and the wave projects used in this
VIP
Import Audio
The following file formats can be imported:
WAV, AIFF, MPEG Sample-Dump (PCM or
RAW Format).
Convert Audio
Converts several audio project formats.
Export Audio
A MAGIX music editor 2 project can exported
to the following file formats: WAV, MPEG,
Sample-Dump (PCM or RAW Format).
Close Project
This menu item in menu ‘File’ closes the selected
project window
Exit
Exits MAGIX music editor 2 .
Menu Reference
The project menu contains wide-range functions for generating, managing, loading and saving projects.
Page 18
Page 19

New Virtual Project
Menu: File
Opens a new virtual project.
Shortcuts:
Toolbar:
Keys: e
Page 19
Page 20

Open Project
Menu: File
This command opens various file types in MAGIX music editor 2
.
Here is a short explanation of the file types:
Virtual Project: Project in MAGIX music editor 2
, which makes use of Wave projects.
When loading a virtual project, all associated Wave projects (RAM and HD Wave projects) are opened
if they were not open prior to loading the VIP. The windows of the individual Wave projects remain
minimized to prevent cluttering of the screen. They are initially only visible as icons.
Once the Wave projects are loaded, the VIP project window is displayed.
Loading audio files
You can listen to every listed file before loading them You can change that in the Options for loading
audio files .
You can load several files at once. In the same way as in the Windows Explorer, you can extend your
selection by pressing the Ctrl-Key and select a range of files with the Shift-key.
If on the other hand you want to select an area in the explorer (with shift +
click), e.g. a whole directory, highlight the last title of the list, then press shift
and then highlight the first title on the list. Then click "open", and the tracks
appear in the correct order in the VIP.
RAM Wave (RAP): RAM Wave project.
RAM Wave projects contain audio data in MAGIX music editor 2 ’s proprietary format. These files are
loaded into the RAM memory of your computer, including their associated graphic files, marker
position information, etc.
HD Wave (HDP): HD Wave project.
HD Wave projects contain audio data, which is directly loaded from the hard disk, together with the
graphical information, marker position information, etc. The audio format used for these files is the WAV
format.
WAV (*.wave): WAV Files (Windows Standard Audio Format).
When opening a WAV file, MAGIX music editor 2 automatically creates an associated HD Wave
project. The HD Wave project file contains additional information about the audio file, such as marker
positions. Once the WAV file has been opened once in MAGIX music editor 2
, it can be loaded as a HDP from that point on.
Note: If a VIP is the active window, all loaded WAV projects are immediately turned into objects in the
VIP. Any selected range (range beginning) determines the position and track where the object is created.
An exception is, when the CD Arrange Mode from the Menu CD is set.
The objects are placed completely independent from any selected range. Instead, the objects are placed
in sequence (one after the other) with a pre-determined gap between them. The gap can be set with
CD->Set Pause Time. The gap represents the space between individual tracks on a CD.
AVI - Video for Windows video files
You can open a AVI file to edit the audio track of the video directly (without importing the audio data
from the video file). After finishing edit, replace the audio in the Video with Export Video Sound
Object:
Contains playback instructions (link to a Wave project, time position, parameters, etc.) for audio data.
Objects are used in virtual projects.
Shortcuts:
Toolbar:
Page 20
Page 21

Keys: l
for RAM projects
Keys: SHIFT+l
for HD Wave projects
Keys: o
for virtual projects
Keys: w
for WAV files
Toolbar:
Page 21
Page 22
Load CD Tracks
Menu: CD
Import entire audio CDs or single CD tracks in a project. However, as opposed to normal data, Audio
CDs have to be read first (grabbed or ripped). The data import is 100% digital, so there are no losses in
the sound quality.
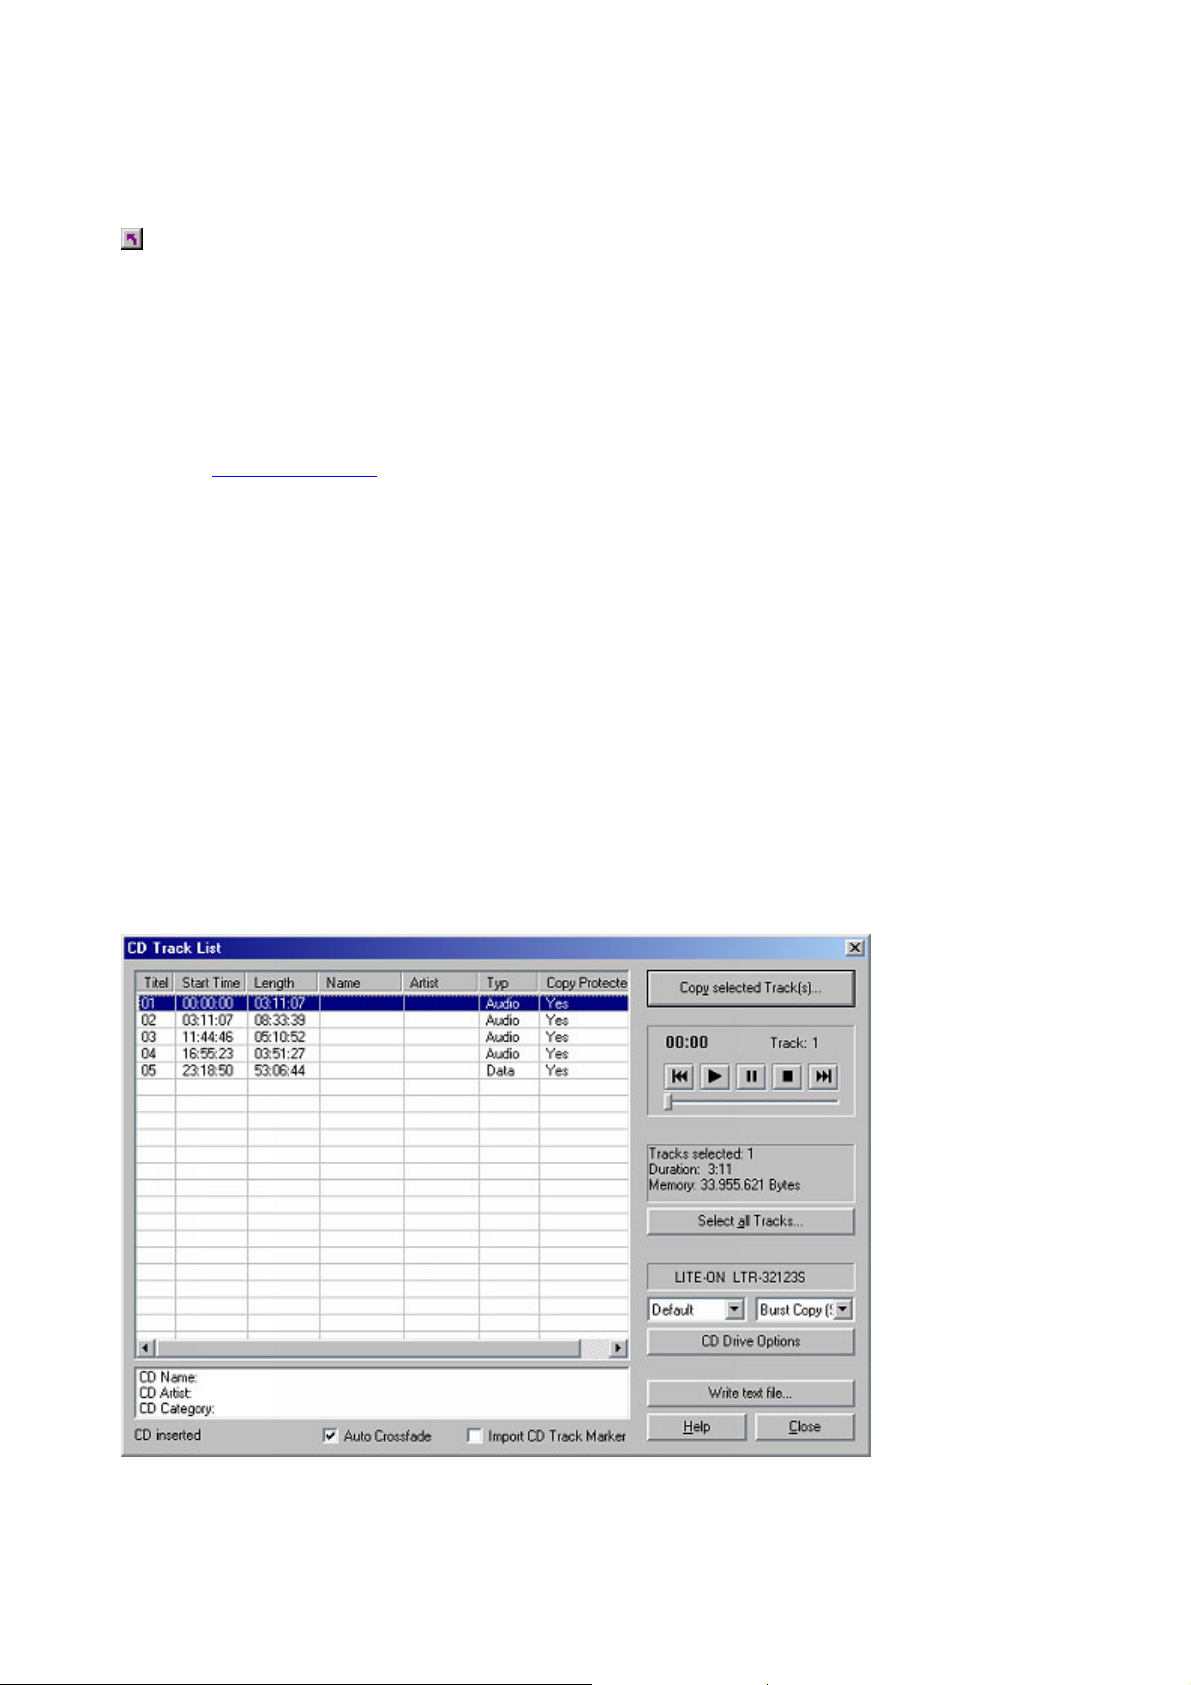
If you want to import audio CD tracks, just follow these easy steps:
1. Insert an audio CD into your CD-ROM-drive and select "Load CD audio track" from the CD menu.
A dialogue with a list of the CD tracks will appear. If you have more than one CD-drive (or for example
an additional CD-writer) you will first have to choose the drive from which the CD is loaded. You can do
this in the CD-drive options
2
. Select the desired title(s) (pressing Shift + mouse button or Alt + arrow keys).
3
. Click on "Copy selected track(s)..."
4
. The "Project import" dialogue will appear. Here you can choose a file name and the target directory.
5
. Now, the audio material will be copied from the CD-drive to the hard disk. A state display informs you
of the current transfer state.
6
. Once the audio data has been transferred, all dialogues will be closed and the tracks will be added to
your master track as single objects.
The Track List Dialogue
All CD tracks are shown including start time and length. In the name column the track name is shown,
this is derived from the CD Text information, if the CD provides this information and the CD drive is able
to read it. Select a track by clicking it with the left mouse button, select a range of tracks with SHIFT +
mouse click, select several tracks with CTRL + mouse click.
Page 22
Page 23
Copy selected track(s):
This button starts the audio copy process. For each track, a new object and the corresponding track
marker will be created in the arrangement.
Play:
Starts the audio-playback of the first selected track in the list (for testing).
Stop:
Stops playback.
Pause:
Stops playback that can subsequently be re-started with Play or with a renewed click on Pause
Skip:
Allows you to skip from song to song.
Auto Crossfade:
Turns on the automatic crossfade mode as you import audio tracks and automatically employs
crossfades.
Transfer CD Markers:
Markers already set on the CD are transferred to the VIP.
Select all tracks:
All audio tracks are selected (for example, if you want to copy all tracks of a CD). Pressing Ctrl and
clicking on the mouse button you can select more than one track.
CD-drive options: Here you can adjust some of the settings of the CD drive settings you are using and
choose the drive for "Ripping" CDs if you have more than one CD-drive installed in your system (see The
CD-drive dialogue
)
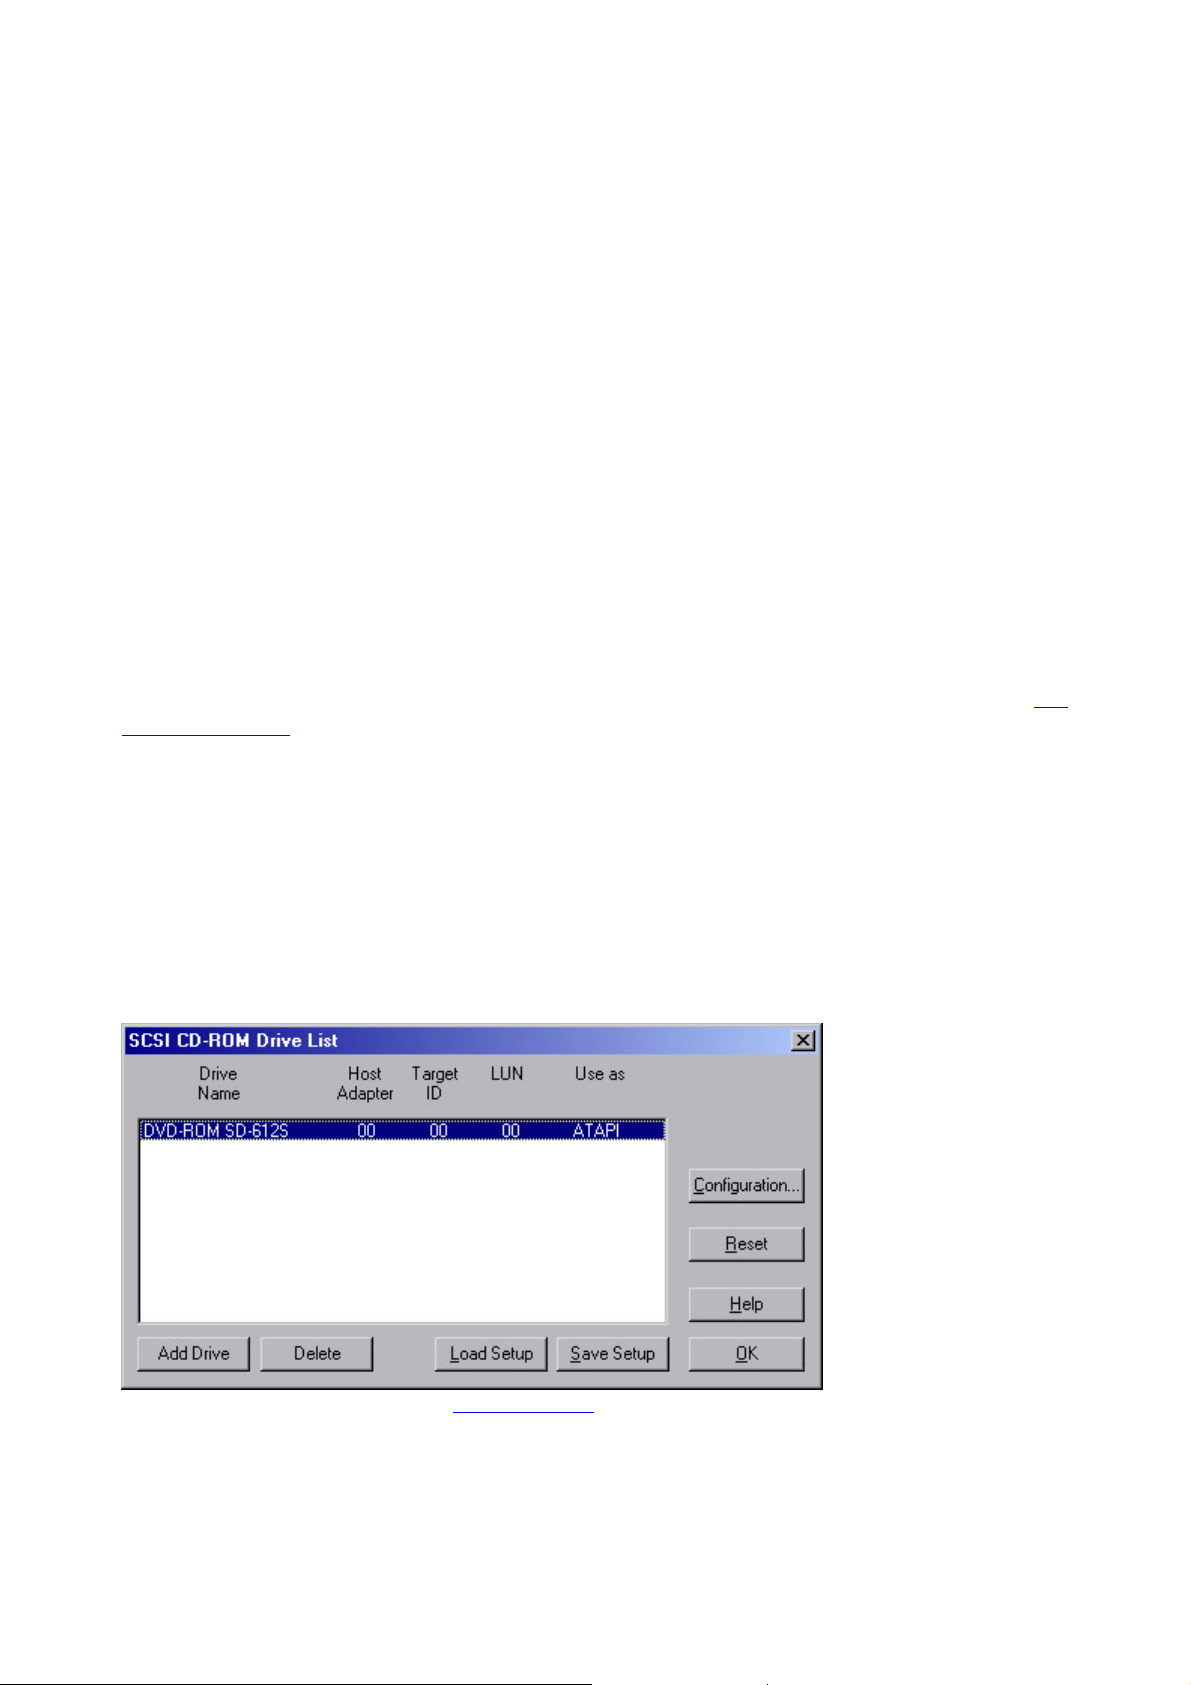
The CD-drive dialogue
Choose and configure your CD-drive. The CD manager permits the import of audio data using most
SCSI- and ATAPI-CD-ROM drives and CD writers. In case of doubt, ask our technical support which
drives are compatible. If you experience problems while reading audio tracks, you can choose between
several reading processes in the Configuration dialogue, which differ in the way the data is read or
"ripped".
Configuration: This button opens the Config dialogue
, in which you can set different special features, SCSI-IDs etc.
Reset:
Restores the initial drive configuration.
Add Drive:
Adds a new entry to the drive list. However, you will have to adjust the specific settings.
Page 23
Page 24
Delete:
Deletes a selected drive from the list.
Save setup:
Saves the current drive list with all configuration-data in a *.cfg file.
Load setup:
Loads the current drive list and all configuration-data from a *.cfg file.
The "Import project" dialogue
The "Import project" dialogue appears after selecting the "Copy selected tracks" option. Type in a name
and a target directory for the new audio files. The audio files will receive a number in addition to the name
you chose ("name" -> name_1.wav, name_1.wav...).
The preset format for audio tracks (CDA files) is the WAV format. You are however free to convert
them into a compressed format, like MP3 while still reading the data. Just choose your audio format in
the "Import project" dialogue and click on the "Format settings" button to make your changes (More
information concerning the audio formats under Import sample
)
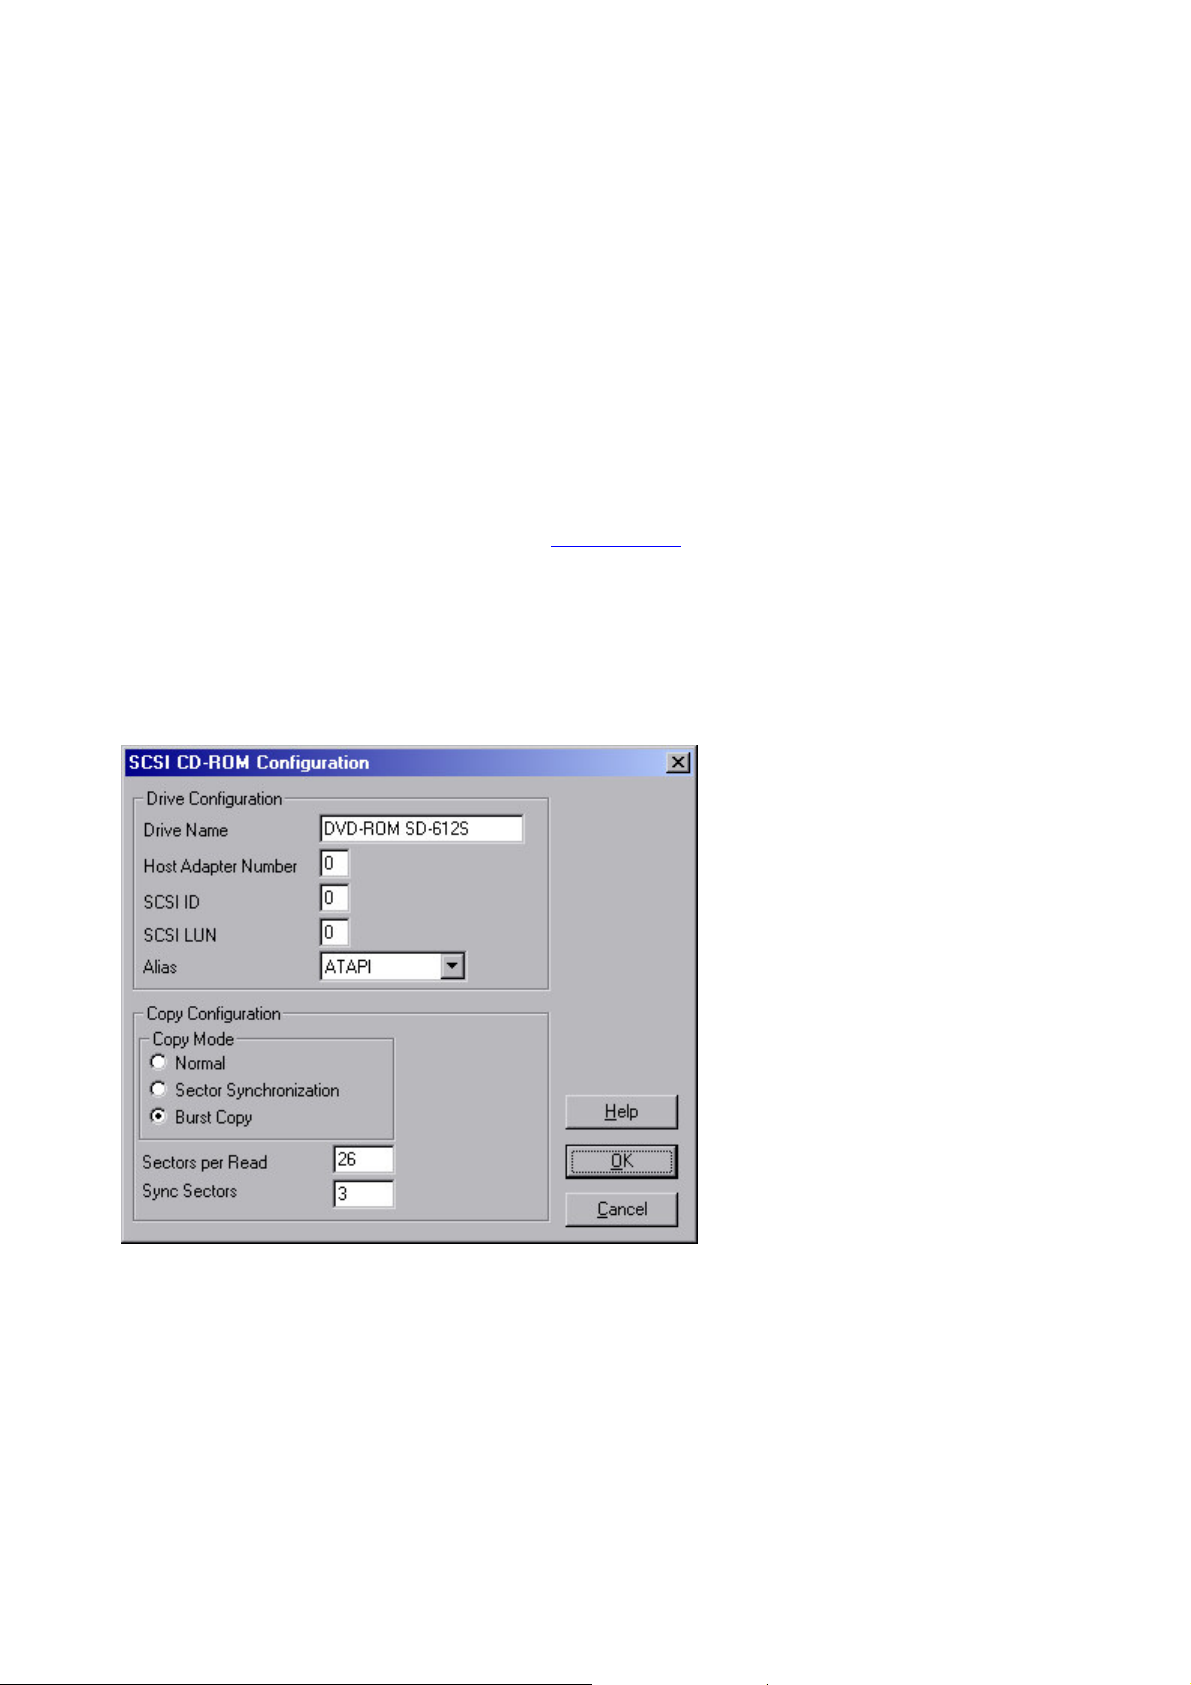
CD-ROM Configuration - Drive
Configuration:
Drive Name - Lets you edit the name of the drive in the list. This is useful if you create more than one
entry accessing the same physical drive.
Host Adapter Number - Lets you specify the number of your SCSI adapter - normally 0.
SCSI-ID - Lets you set the ID of your CD ROM drive. Be sure to set the correct ID, there is no error
checking!
SCSI-LUN - Select the SCSI LUN parameter, normally 0.
Alias - Lets you select a manufacturer type of your CD ROM drive.
CD-ROM Configuration - Copy Configuration:
Copy Mode Normal - Copies the audio data without any software correction.
Copy Mode Sector Synchronization - Copies the audio data using a software correction algorithm. This
is useful, because some CD ROM drives cannot seek exactly to the same position between two read
Page 24
Page 25

accesses but MAGIX music editor 2 can correct these differences using this algorithm.
Copy Mode Burst - Optimizes the speed of the copy process, no software correction is done.
Sectors per Read - Defines the number of audio sectors per read cycle, the higher the number the faster
the copy process will be. Not all SCSI adapters support more than 27 sectors!
Sync Sectors - Defines the number of audio sectors used for the Sector Synchronization. A higher
number results in a better synchronization but also in a slower copy process.
Page 25
Page 26

Save Projects
Menu: File
The current project is saved with the name displayed in the project window. If you previously have not
specified a name for your project, MAGIX music editor 2
will ask you to do so.
Shortcuts:
Toolbar:
Keys: s
Page 26
Page 27

Save Project As
Menu: File
You can define the path and name of the new project you want to save your work under. RAM
projects and virtual projects will be saved with the new names (the source file remains untouched). HD
Wave projects are renamed on the hard disk. MAGIX music editor 2
will not generate a copy of it for reasons of conserving space on your hard drive.
Shortcuts:
Keys: SHIFT + s
Page 27
Page 28

Save complete VIP To
Menu: File
This function in menu ‘Project’
allows saving a VIP with all needed Wave projects (*.RAP. *.HDP) into a specified directory. This
makes it easy to copy all files of a VIP to a backup disk etc.
Page 28
Page 29

Rename Project
Menu: File
The ‘Rename Project’
command will let you rename a project file rather than save it to a different file. For RAM Wave
projects, only the internal names are changed (without being saved). But all corresponding files are
renamed immediately in the case of HD Wave projects.
RAM Wave projects need to be saved after renaming the project.
Page 29
Page 30

Delete HD Wave Project
Menu: File
HD Wave projects are deleted from the hard disk. Use this command with caution
, as all corresponding files are lost.
(If you wanted to delete a HD Wave project (HDP) from a file manager such as Windows Explorer, it
would also be necessary to delete the graphic files related to the project files.)
Page 30
Page 31

Delete Virtual Project
Menu: File
With the command Delete Virtual Projects you can comfortably delete VIPs and all wave projects used
in the VIP.
Click on the picture!
To delete a project, it has to be closed first.
Page 31
Page 32

Import Audio
Menu: File
MAGIX music editor 2 gives you the option of importing Wave, AIFF, MPEG, MP3 , MS audio
(.wma), audio from .avi files or Sample Dump files into a MAGIX music editor 2
project. You will need to specify which type the project is going to be, a RAM Wave Project, or a HD
Wave project. MPEG files need to conform to the Layer 2 format. Any bit rate can be imported.
Difference between Open->WAV and Import Sample->WAV:
The command Open->WAV opens an already existing WAV file and edits the file as a HD Wave
project. MAGIX music editor 2
automatically creates a HDP file and the corresponding graphic file in the source folder.
When importing a WAV file, the complete file is copied. Additional hard disk space is needed and the
process takes much more time, since the audio file has to be copied with Open Project->WAV. Import
Sample->WAV has to be used when intending to use the WAV file as a RAM Wave project.
Page 32
Page 33

Export Audio
Menu: File
The command ‘Export Sample’
will let you export HD Wave project or RAM Wave project files into Wave, MP3, MP3 with external
Encoder, MPEG, Windows Media, Real Audio, AIFF with Quicktime and dump files. You can save it
both in Mono or Stereo format.
When choosing compressed audio formats various compression options can be set.
A Note about Export Audio
:
The audio data files for HD Wave projects can be directly loaded or imported as WAV files by other
audio applications. The command Export Sample is only necessary if you want to copy the audio file.
Keep in mind that the hard disk requirement increases and that the copy process takes additional time.
This command has to be use to convert RAM Wave projects into WAV files.
Please note that direct editing of WAV files from CD-ROMs is not possible. Please use Import Sample
instead.
Page 33
Page 34

Export Video Sound
You can load video files like audio files to work on the video soundtrack. This is used, when you dont
want to edit the audio, and just want to process the whole audio track with effects, like normalizing or
noise reduction. If you prefer a visual feedback, use the "Link Media" function instead.
After editing the video sound track, you can re-write sound track back into the video file. You also have
the possibility of replacing either the original video sound track or of producing a new video file. But
don’t worry, a new time-consuming compression of the video is unnecessary. No matter what, you can
change the audio format, for example, into compressed formats such as ADPCM. However, the
appropriate compression codecs must be installed.
Create AVI / Audio Copy: This option performs a track bouncing of the current VIP into a WAV file.
The AVI file is copied to a new file, which contains the new audio track. This option keeps the original
AVI.
Replace Audio in Video: This option performs a track bouncing of the current VIP into a WAV file. This
file is merged into the selected AVI file, so the AVI gets a new audio track.
Note: If the length of the video file and the audio are different, a warning is given. After exporting, the
longer one is truncated, no automatic synchronization is done. If you obtain such a warning, try to
resample your audio soundtrack to the appropriate length.
Page 34
Page 35

Batchprocessing
Menu file
Batch processing automatically applies a single WAV project task to any number of other files (the
"batch") in exactly the same way – for large volumes, usually overnight.
Possible processings may include:
normalization
lineal fading (in and out)
real-time effects in the mixer master
Format conversion: Bit resolution(16/24/32), Sample rate, stereo/mono/left/right
Storage in all available export formats
For example, you can normalize a whole list full of 24bit WAV files to 96%, apply 5 ms fades at the
beginning and the end of each file, compress them with the multi-band compressor, change them all to
16bit mono, resample them on 22kHz and then saved them all as mp3s.
Source files
Here you can create a list of the files to be edited by selecting "Add file". Multiple selection is possible.
Select "Load directory" to add all of the audio files within a directory (including all sublists). All
importable audio formats are loadable in Samplitude. "Save list" creates a Playlist (in the common *.m3u
format) for using your selection of files later. "Remove" deletes all selected list entries. " Remove all"
deletes the complete list.
Effects
1. Normalization
You can normalize using percentages (%), decibels (dB) or manually by using the levels. For more
details, please read the Effects Menu chapter -> Amplitude/Normalize
2. Fades at the start and end of projects
Linear fades of any given length can be added to your files.
2. Master Effects
To avoid repetition in the batch processing dialogue, effects settings have been integrated with the mixer
preset files.
In the Samplitude mixer, you can export all mixer settings to the mixer preset (* mix). Simply press the
"Save mixer preset" button in the mixer (see illustration).
By loading these *.mix files into the batch processor ("Load preset"), all mixer effect settingsare
included (all other mixer preset data e.g. channel properties, groups, etc. are ignored). Mixer presets are
stored in the /fxpresets/batch directory and can be selected directly from the Listbox.
Page 35
Page 36

Further effects
Besides mixer preset master effects, you can use the non-real-time effects Resampling/Timestretching,
DC removal and De-Clipping. Settings opens the applicable effects dialog.
Target format
You may select the bit resolution(16/24/32 bit), the sample rate, stereo/mono/left/right and format with
the applicable format option.
For more about the sample rate: Effects menu ( modify sample rate .
For more about export formats: Effects menu ( export audio.
Target files
There are several ways to save edited files:
"Replace file": Replaces the original file with the edited file. Should the file be used in the VIP, the VIP
must first be closed.
"Save and rename file in the source directory"/ "Save file in the following directory". The processed file
will be saved into the source directory or into another selectable directory, the file name will be expanded
by the given prefix/suffix. Additionally you can check "Delete source file after editing".
"Save with source directory path". The file is saved along with the path to its source, allowing you, for
example, to retain the sample CD structure.
Page 36
Page 37

Close Projects
Menu: File
This menu item in menu ‘File’ closes all audio devices to give other audio software a chance to use them
for playback and recording in multitasking with MAGIX music editor 2
.
Page 37
Page 38

Exit
Menu: File
This command will exit MAGIX music editor 2
.
Shortcut: Alt + F4
Page 38
Page 39

Convert Audio
Menu: File
This submenu contains items for converting several audio project formats.
Page 39
Page 40

Save in Format
Menu: File
With this function, you have the possibility to convert projects between the different MAGIX music
editor 2
Wave project formats. This is useful if, for example, a RAM Wave project is to be converted into a HD
Wave project or a L&R Wave project (two linked mono files). Another option is the conversion to and
from stereo Wave projects to mono Wave projects.
Page 40
Page 41

Stereo Wave à 2 Mono
Menu: File
This function can be used to divide a stereo wave project into two independent mono projects. This way
you can resolve the rigid combination of the samples and edit them individually. To edit them together
simply select the function 2 Mono -> L&R-Wave.
Page 41
Page 42

2 Mono à Stereo/LR Wave
Menu: File
Two mono projects are linked to one L&R Wave project. This is a convenient way of editing joined
mono samples with the same operations.
Make sure that the windows of the two projects to be linked are open. Select one of the objects as the
current object (click on the lower half with the left mouse button) and call up the ‘Link Projects’ menu
option. Next, click on the project you want to join. MAGIX music editor 2
will link the two projects.
MAGIX music editor 2
will automatically match the sample length of the two projects but not the bit resolution.
Page 42
Page 43

Menu Edit
Undo
Undo last operation(s) (VIP).
Redo
Undo last Undo-operation(s) (VIP).
Undo History
Displays a list of recent editing steps for easy undo.
Cut
Cuts the selected range into the Clip (VIP, WAVE
PROJECTS).
Works dependent from chosen Object mode
Delete
Deletes the selected range. (VIP, WAVE
PROJECTS)
Works dependent from chosen Object mode
Copy
Copies the selected range into the Clip. (VIP,
WAVE PROJECTS)
Paste/Insert
Inserts sample data from the Clip at the play cursor
position. (VIP, WAVE PROJECTS)
Works dependent from chosen Object mode
Extract
Deletes sample data before and after the selected
range. (VIP, WAVE PROJECTS)
Insert Silence
Inserts memory in the length of the range. (WAVE
PROJECTS)
More....
All edit Commands here are working independent
from the chosen Object Mode
Clear
Replaces the selected range with silence. (VIP)
Copy and Clear
Copies the selected range into the Clip and clears it in
the project. (VIP)
Copy As
Copies the selected range into a new file. (WAVE
PROJECTS)
Overwrite with Clip
Overwrites sample data with the Clip.. (VIP, WAVE
PROJECTS)
Mix with Clip
Mix sample data with the Clip. (WAVE PROJECTS)
Crossfade Editor
Opens the Crossfade Editor
Auto Crossfade active
Activates the Auto Crossfade, which is applied after
each edit process to make smooth cuts.
Delete Undo Levels
Clears the Undo History to free Wave projects for
destructive Editing or Delete.
Menu Reference
This menu contains all functions, which are similar to cutting on a tape machine.
In virtual projects, you can select track sensitive , so only the selected tracks are manipulated.
When working with a virtual project (VIP) a selected range
is always required for the cut functions. The beginning and end of the selected range determine the start
and ends of a cut. The vertical position indicates which tracks are affected by the edit.
It is recommended to use the Auto-crossfade function to achieve smooth transitions between the edit
points. This will automatically create fades at the object edges.
Please note that these functions are processed for both channels when working with stereo and L&R
Wave projects. (If only one channel is to be edited, you will need to convert the Wave project into two
mono Wave projects. After editing the two mono Wave projects can be merged again.)
Page 43
Page 44

Undo
Menu: Edit
MAGIX music editor 2
offers you a comfortable way of tracking your changes in virtual and wave projects. Up to 100 changes
can be kept in memory and traced backwards
That means, virtual processes and physical processes (such as normalize, reverb, filter with activated
Create Copy option etc.) can be reversed (undone).
Range and marker manipulations can also be undone using the ‘Undo’
feature.
Thanks to this extremely efficient feature, critical operations can simply be tried and then reversed to
return to the original status if the results are not satisfactory.
MAGIX music editor 2
offers a convenient undo option for VIP objects. A maximum of 100 undo steps can be retraced. This
number can be configured in File/Preferences/Undo Definition.
When adding effects to audio material (menu option Effects), the undo option only works when the
selection 'Create Copy' has been chosen in the effect dialog.
Shortcuts:
Keys: CTRL+Z or Alt + Back
Page 44
Page 45

Redo
Menu: Edit
Redo revokes the latest undo command.
Shortcuts:
Keys: CTRL+A
Page 45
Page 46

Undo History
Menu: Edit
Displays the Undo History dialog. This dialog can be used to undo specific editing steps. By clicking on
an entry in the dialog, MAGIX music editor 2
returns the project to the state just prior to the editing step listed. To return to another state, simply click
on a different entry. This can be repeated unlimited times.
Page 46
Page 47

Cut
Menu: Edit
Wave Projects:
The audio data in the selected range are copied from the current Wave project into the Clip. The
material behind the removed range is merged with the material in front of the removed range to close the
gap. The complete Wave project becomes shorter.
Please keep in mind that the Clip always contains the same attributes as the Wave project the material
was copied or removed from.
If you cut material from a mono Wave project, the Clip becomes a mono Wave project. If material from
a stereo Wave project is cut or copied to the Clip, the Clip becomes a stereo Wave project. Another
attribute adopted is the bit resolution and the sample rate of the originating Wave project. The previous
contents of the Clip are deleted.
After a successful removal of the selected material, MAGIX music editor 2 drops a marker at the
position the removed range previously started. This allows you to insert the contents of the Clip into the
Wave project at the exact same spot if you accidentally removed the material. Use the function Edit
>Paste/Insert Clip
to insert the Clip contents.
Virtual Projects (VIP):
In virtual projects the selected range is copied to the VirtClip and is removed from the current VIP
project. The VirtClip does not contain actual audio information, only the links to the audio files. The
VirtClip also contains as many tracks as the removed range.
The material behind the removed range is appended to the material in front of the removed range. The
VIP project becomes shorter if the selected range did cover all tracks. This way you can shorten Vips
which contain empty space behind the last object.
As with the Wave projects, a successful removal of the selected range drops a marker at the position the
removed range previously started. This allows you to insert the removed material with Edit >Paste/Insert
Clip
.
Shortcuts:
Toolbar:
Keys: Shift + Delete or X
Page 47
Page 48

Delete
Menu: Edit
The data of the current range is deleted. The sample data after the deleted range is added at the position
the deleted range started. The sample length becomes shorter.
Please note that this command will not save the deleted data to the Clip. If you want to preserve the
deleted sample data, use the ‘Cut’ command. Using this the ‘Delete’ command will delete the data from
the current sample and preserve the contents of the Clip.
Shortcuts:
Keys: Delete
Page 48
Page 49

Copy
Menu: Edit
The current range is copied into the Clip
but not deleted in the project. The sample length is not varied. Please note that the former Clip contents
are deleted. The Clip again has the same attributes as the project.
Shortcuts:
Toolbar:
Keys: CTRL + C or C or Ctrl + Insert
Page 49
Page 50

Insert/Paste
Menu: Edit
The contents of the Clip are inserted into the current project behind the position of the play cursor or
the beginning of the currently selected range. The data or objects that are located behind the insert
position are moved out of the way to make room for the Clip contents. The samples or audio tracks
become longer. The Clip remains unchanged during the procedure. If the Clip was empty, an error
message is displayed.
After inserting the contents, the program selects a range over the inserted area. If you select Edit >Delete
, the inserted contents are removed and the project is returned to the original state.
In virtual projects
using selected ranges, the program utilizes the beginning position and relative track position as the insert
point for the VirtClip or Clip contents.
The following table shows how MAGIX music editor 2 responds in the case the clip and the project have
different channel numbers:
Clip Project Clip Channel Project Channel
Mono Mono Channel 1 Channel 1
Stereo Stereo Channel 1 Channel 1
Channel 2 Channel 2
Mono Stereo Channel 1 Channel 1
Channel 1 Channel 2
Stereo Mono Channel 1 Channel 1
Shortcuts:
Toolbar:
Keys: Shift + Insert or V
Page 50
Page 51

Extract
Menu: Edit
This function is the counter part of the ‘Cut’
function.
Wave Projects:
The current range remains unchanged only the sections before and after the selected range are
permanently deleted. The audio file becomes shorter. The contents of the Clip
are unchanged.
Virtual Projects (VIP):
The objects before and after the selected range are deleted from the project. The contents of the
VirtClip remain unchanged.
Page 51
Page 52

Insert Silence
Menu: Edit
The ‘Insert Silence’ option will insert ‘blank’ data at the current play cursor position or the starting
position of the currently selected range
.
If a range is selected, the length of this range is predefined in the dialog to insert.
The blank space will actually contain data with zero value. The data following the insertion point will be
added to the end of the blank space. The defined range is maintained, the length of the inserted space
extends the overall sample.
If you do not have sufficient memory to insert the workspace (i.e. with RAM projects), MAGIX music
editor 2
will display an error message.
Page 52
Page 53

Delete Undo Levels
Menu: Edit
This feature will delete the Undo levels of a virtual project. This is useful, if for example certain Wave
projects are left in the Undo chain, but do not exist in the VIP anymore. You won't be able to process or
delete the Wave project if the Undo chain still contains a reference. After deleting the Undo levels, these
projects are available again.
Page 53
Page 54

Append Projects
Menu: Edit
With this function a project can be appended with another project, i.e. the material of one project is
copied directly behind the material of the first.
You need to first select the object you want to append. Then you activate the menu and click on the
project you want to add to the first.
A particular use of this option is the 'cleaning up' of VIP's that contain numerous physical samples.
You can:
append a VIP with a VIP
This is good for bigger projects, you can edit parts of it in different files and finally put them
together
append a wave project with a wave project
A particular use of this option is the"cleaning up' of VIP's that contain numerous physical
samples.
append a wave project with a VIP
This is a smart method to transfer markers from a wave project to the VIP. Normally, when a
hdp is loaded into a VIP, the markers stay inside the audio file as "audio markers". Often it is
necessary to have these markers in the VIP. When you append a wave project with the VIP, the
wave data will be inserted as an object at the end of the VIP at the active track and the markers
from the hdp will be inserted in the VIP.
Page 54
Page 55

The Crossfade Editor
Menu: Edit
To apply a crossfade between two overlapping objects on a track, you have two methods:
With the normal fade in/out handles:
Activate the Auto crossfade mode
and fade in the second object. The first object will be faded out and mixed with the second, a crossfade
will be applied. The object remembers, if a crossfade was once applied. If you use this object (or a copy
of it) at another place in the VIP, you don’t have to activate Auto crossfade again to have this behavior.
Fade in the overlapping object will cause a crossfade again. You can reset this object quality by selecting
"Crossfade off" in the Crossfade editor.
With the Crossfade Editor
Select the second object and call the Crossfade editor.
The Crossfade parameters can be specified in the crossfade editor.
Crossfade Length
The length of the crossfade can be specified in different length units. Clicking "+ / -" expands / shortens
the crossfade by a minor step width, "++ / --" by a major step width. With "-?+" you can define these
step widths. The Crossfade length can also be transferred from the selected range (if there is one) with
Page 55
Page 56

the "Get marked range
" button
Curve types
Available fade-in and fade-out curve types are Linear (0), Logarithmic/Exponential(-100..100), and
Sine/Cosine (-100..100). With the fader you can adjust the curve form continuously between these
extremes. Linear crossfades do not take as much processing power as non-linear crossfade curves.
Global Set
The currently selected settings for the crossfade can be used as default setting for newly created
crossfades. This mainly concerns the crossfades created after applying a "Split Object" command
(Keyboard: "t"), which are small symmetric, linear crossfades of 35 ms, fade offset 0%. So use it wisely,
if you set any other value here for new default, it has to be a reasonable one.
Global Get
Restores the global crossfade settings as parameters for the Editor configuration.
Get Range
The length of the currently selected range is used for the length of the crossfade.
Crossfade off
The button "Crossfade Off" deactivates the crossfade for the selected Object. The first object’s fade out
time is set to zero, the second preceding objects independent from its fade in / out settings
Play/Stop button
If a range is selected over the crossfade section, the crossfade can be pre-viewed with the Play/Stop
button. This also works while making adjustments in the editor dialog and allows you to audition the
crossfade parameters in real-time.
Move Crossfade
The object borders of both object will be moved simultaneously, this results in moving the whole
crossfade. Use the +/-/++/-- buttons like above.
Shortcut:
Key: Ctrl + F
Page 56
Page 57

Auto Crossfade Active
Menu: Edit
If this option is turned on, all newly recorded or cut material in a VIP or material that is dragged from a
Wave project into a VIP track has an automatic fade in /out applied to it. If you perform a "split object
" command, the resulting two objects are crossfaded too. This is to avoid clicks at the beginning and end
of the object.
Global settings for Fade In and Fade Out parameters are assigned to the object. These settings can be
changed in the Edit->Crossfade Editor
. This can be necessary, when the audio material is already clean cut and the fade is impairing the attack
of the sample.
If two objects are overlapped that had an automatic crossfade applied to them a real-time crossfade is
the result. If an Object with a fade in is moved over a preceding object, a crossfade will be applied over
the two object, when auto crossfade is active.
The auto crossfade mode is an excellent tool to easily perform a linear cut of a spoken voice track, jingle
track etc., which requires a soft passage without the unwanted 'pops'. If needed, each crossfade can be
edited in the editor or by manually manipulating the handles.
Toolbar
Page 57
Page 58

Set Silence
Menu: Edit
The data of the current range is replaced with silence.
Please note that this command will not save the deleted data to the Clip. If you want to preserve the
deleted data, use the Cut or Copy command. Using the Delete command will delete the data from the
current project and preserve the contents of the Clip.
Shortcuts:
Keys: Alt + Delete
Page 58
Page 59

Copy + Silence
Menu: Edit
The current range is copied into the Clip
and cleared in the project. The project length is not changed. Please note that the previous Clip contents
are deleted.
Shortcuts:
Keys: Alt + C
Page 59
Page 60

Copy As
Menu: Edit
The current range of a Wave project (HDP or RAP) is copied into a new file. A file requester appears
to select the name of the new project.
Shortcuts:
Keys: Shift + C
Page 60
Page 61

Overwrite with Clip
Menu: Edit
The current range is replaced with the Clip contents. The overall sample length remains unchanged. The
data that occupied this position before cannot be recalled. The Clip contents are not changed. The
assignment of the Clip channels follows the table mentioned above
.
In virtual projects
using selected ranges, the program utilizes the beginning position and relative track position as the insert
point for the Clip contents.
Shortcut:
Keys: Alt +V or Insert
Page 61
Page 62

Mix with Clip
Menu: Edit
The range contents and the Clip contents are mixed. Channel assignment between project and Clip
follows the table above (See ‘Insert’
function). The contents of the Clip are not altered.
Since either component is combined with their full sample values, make sure that no over-modulation
takes place. This function is performed by way of addition. This assures on one hand, that the project
sample remains free of a sudden volume decrease. On the other hand, modification of the amplitude
might need to be performed before the mix to keep the resulting sample from clipping and distorting. For
information on amplitude modification, see ‘Editing Menu.’
Page 62
Page 63

Delete Volume Handle
Menu: Edit
This function deletes volume curve events, which have been previously selected. Individual volume
events can be deleted by selecting the Object and Curve Mode mouse mode and double clicking the left
mouse button on a volume curve event. However, when deleting several curve events, the 'Delete
Volume Handle' function is the best tool. Use the Curve Mode and Grab Tool
to select multiple curve events.
Page 63
Page 64

Delete Panorama Handle
Menu: Edit
This function deletes panorama curve events, which have been previously selected. Individual events
can be deleted by selecting the Object and Curve Mode mouse mode and double clicking the left mouse
button on a volume curve event. However, when deleting several curve events, the 'Delete Panorama
Handle' function is the best tool. Use the Curve Mode and Grab Tool
to select multiple curve events.
Page 64
Page 65

View Menu
Rebuild Graphic Data
Calculates new graphic data of a project.
Sections
Select number of views.
Fix vertically
Selects ranges always with full height.
Show Grid
Switch grid on or off.
Grid Lines
Select kind of grid.
Units of Measurement
Selects several units of measurement for the time
display.
Snap to Grid
Switches the snapping functions on and off.
Snap and Grid Setup
Chooses the kind of the snapping and gridding.
VIP Display Mode
Select and toggle Display Preferences in VIPs.
Horizontally
This sub menu contains all functions for horizontal
zooming and scrolling.
Vertically
This sub menu contains all functions for vertical
zooming and scrolling.
Menu Reference
This menu contains tools for manipulating the display of MAGIX music editor 2
.
Page 65
Page 66

Rebuild Graphic Data
Menu: View
Display inaccuracies after complicated sample processing can be fixed by using this menu option. The
screen (window) will be cleared and redrawn to display the project properly.
Page 66
Page 67

Sections
Menu: View
MAGIX music editor 2
allows the optional display of one, two or three of the samples belonging to one Wave project or the VIP
itself. Other audio editing applications usually show only one window of a sample.
If you select ‘2’, MAGIX music editor 2 will display the same sample in two window . Each section can
be handled separately. It is possible, for example, to represent the complete sample in one section and a
zoomed in version of a certain range
in the other.
The mode ‘3 sections’
is especially useful for searching for loop points in Wave projects.
The whole sample can be shown in the upper section, while the section on the lower left displays the
beginning of the loop range and the section on the lower right the end of the range. Use the split range
function for this purpose (key b).
Go back to 1 view with Shift b!
This is only an example of the mode ‘3’
view. All sections can be handled independently.
You can also drag ranges over the section bounds. Establish the starting point of a range by clicking, then
keep the mouse button pressed, and change over to another section. MAGIX music editor 2
will show you the size of the range and at the desired location release the left mouse button to determine
the end of this range.
Page 67
Page 68

Fix Vertically
Menu: View
Ranges can be dragged (pulled) in MAGIX music editor 2
horizontally and vertically as well. If this option seems too strange to you, you can fix the upper edge of a
range(s) to the maximum value and the lower end to the minimum value. Thus, you get the usual
representation in range dragging. However, a trade-off is, that you will not be able to define the vertical
extension of a section by choosing the vertical range button.
Page 68
Page 69

Show Grid
Menu: View
This menu function will display the grid on the project window. The units of measurement defined in
‘Units of Measurement’
will appear in the upper sections of the grid.
Shortcuts:
Keys: #
Page 69
Page 70

Grid Lines
Menu: Options
With this option, you can define the type of grid that is used for the Show Grid option. Select between
several line styles.
Page 70
Page 71

Units of Measurement
Menu: Options
‘Units of Measurement’
is used to specify the grid dimensions. Several display options are available which will appear at the
upper section of the grid.
The units supplied with MAGIX music editor 2 are ‘Samples’, ‘Milliseconds’, three SMPTE Frame
options, the MSF format for red book CDs (SMPTE with 75 frames), SMPTE + Milliseconds (instead
frames), ‘Bars’
for BPM display and feets and frames for 16/36 mm film..
Page 71
Page 72

Snap to Grid
Menu: View
This function switches the Grid on and off.
When working with virtual objects the Virtual Grid becomes available. Objects can only be shifted to the
beginning, the end, or the hot spot
of another object. The reference point is usually the beginning of the object to be shifted to. A hot spot
when defined will be used as a reference point as well.
If several objects have been selected, the move is performed in lining up the beginning of the last selected
object in the sequence with the reference object or Grid point. All selected objects remain their position
to each other.
This option can be used to easily rearrange objects with their audio patterns and gain sample-exact
connections.
Shortcuts:
Toolbar:
Keys: Ctrl + r
Page 72
Page 73

Store Position and Zoom Level
Menu: View
Stores positions and zoom factors. They can be called up using the 8 buttons below the Section track,
the "Get position and zoom factor" menu item and the NUM pad (to the right of the cursor keys). To
delete them again click the right mouse on the buttons.
Page 73
Page 74

Store Zoom Level
Menu: View
Stores the current zoom factor only. Please also refer to: Store Position and Zoom Factor
.
Page 74
Page 75

Get Position and Zoom Level
Menu: View
Loads one of the 4 possible setups for position and zoom factor, which have been stored before using
"Store Position and Zoom Factor". After they have been stored they can be called up by clicking the
mouse on the buttons below the track boxes or by using the Num pad (to the right of the keyboard).
Page 75
Page 76

Get Zoom Level
Menu: View
Loads one of the 4 possible zoom factors which have been stored before. Please also refer to: Get
Position and Zoom Factor
.
Page 76
Page 77

Horizontally
Menu: View
This menu contains all the functions of the horizontal (red) position bar.
Page 77
Page 78

Section to Beginning
Menu: View
Page 78
Page 79

Section Left
Menu: View
Page 79
Page 80

Half Section Left
Menu: View
Page 80
Page 81

Half Section Right
Menu: View
Page 81
Page 82

Section Right
Menu: View
Page 82
Page 83

Section to End
Menu: View
Page 83
Page 84

Section to Play Cursor/Stop Position
Menu: View
Page 84
Page 85

Object border Left
Menu: View
Page 85
Page 86

Object border Right
Menu: View
Page 86
Page 87

Marker Left
Menu: View
Page 87
Page 88

Marker Right
Menu: View
Page 88
Page 89

Zoom In
Menu: View
Page 89
Page 90

Zoom Out
Menu: View
Page 90
Page 91

Show All
Menu: View
Page 91
Page 92

Range to Section
Menu: View
Page 92
Page 93

1 Pixel - 1 Sample
Menu: View
Page 93
Page 94

Zoom Level from 1s to 10 min
Menu: View
Page 94
Page 95

Vertically
Menu: View
This menu contains all the functions of the vertical (blue) position bar.
Page 95
Page 96

Section to Upper End
Menu: View
Page 96
Page 97

Section Up
Menu: View
Page 97
Page 98

Half Section Up
Menu: View
Page 98
Page 99

Half Section Down
Menu: View
Page 99
Page 100

Section Down
Menu: View
Page 100
 Loading...