


2 Copyright
Copyright
This documentation is protected by law. All rights, especially the right of
duplication, circulation, and translation, are reserved.
No part of this publication may be reproduced in the form of copies, microfilms
or other processes, or transmitted into a language used for machines,
especially data processing machines, without the express written consent of
the publisher.
All copyrights reserved.
All other product names are trademarks of the corresponding manufacturers.
Errors in and changes to the contents as well as program modifications
reserved.
All rights reserved.
MAGIX and MP3 Maker are registered trademarks of MAGIX AG.
This product uses MAGIX patented technology (USP 6,518,492).
mufin is a trademark of mufin GmbH
VST is a registered trademark of Steinberg Media Technologies GmbH.
Other named product names may be registered trademarks of their respective
owners.
Copyright © MAGIX AG, 1999 - 2012.
www.magix.com

Preface 3
Preface
MAGIX MP3 deluxe MX is the universal music switchboard for your PC and is
the perfect piece of equipment for your music collection.
Faster import, best overview and organization, even with large music archives,
individualized playlists, effective filters, direct recording of Internet radio, easy
transfer to MP3 player, conversion of music, option to download MP3s for free
and many other handy functions all transform your PC into a premium music
system.
With MAGIX MP3 deluxe MX, you are just a few clicks away from well-ordered
music collections, web radio recordings and automatic discovery of new
music. And this manual describes just what you have to do, quickly and easily.
The print manual provides an introduction and tutorial that explains all the most
important features with step-by-step instructions.
Plus, an electronic manual in PDF format is supplied, which systematically
explains all of the program's components in detail. If you prefer to discover the
many possibilities of the program by yourself, you can also use the PDF
manual simply as a reference. An alphabetical index is included at the very
end.
Have fun with your MP3s and MAGIX MP3 deluxe MX.
The MAGIX team
Legal disclaimer
Copying of music files obtained from illegal public sources is not allowed.
Placement on websites, selling in stores, or free propagation of such files is
punishable by law. Artist rights and ancillary publisher copyrights are to be
respected. Only non-copy-protected Audio CDs can be imported. An
appropriate license is needed for DRM-protected titles.
www.magix.com

4 Table of Contents
Table of Contents
Copyright 2
Preface 3
Legal disclaimer 3
Support 7
Uninstalling the program 8
Serial number 9
Tips for program help 10
Introduction 11
What is MAGIX MP3 deluxe MX? 11
What’s new in MAGIX MP3 deluxe MX? 12
Features 13
Overview of the program interface 16
Restrictions 17
More about MAGIX 18
MAGIX Online World 18
MAGIX Magazine 18
MAGIX News Center 18
Quick Start 19
First start 19
Import music 21
Play, navigate, arrange 22
Sort according to similarity 23
Import music CDs 24
Playlists 25
Recommendations 29
Webradio 31
Export and burn functions 34
Interface – The layout of MAGIX MP3 deluxe MX 37
Navigation area 37
Vision 47
Transport console 52
Mini mode 53
www.magix.com

Table of Contents 5
Video monitor/visualizer 54
Keyboard shortcuts 55
More useful functions 56
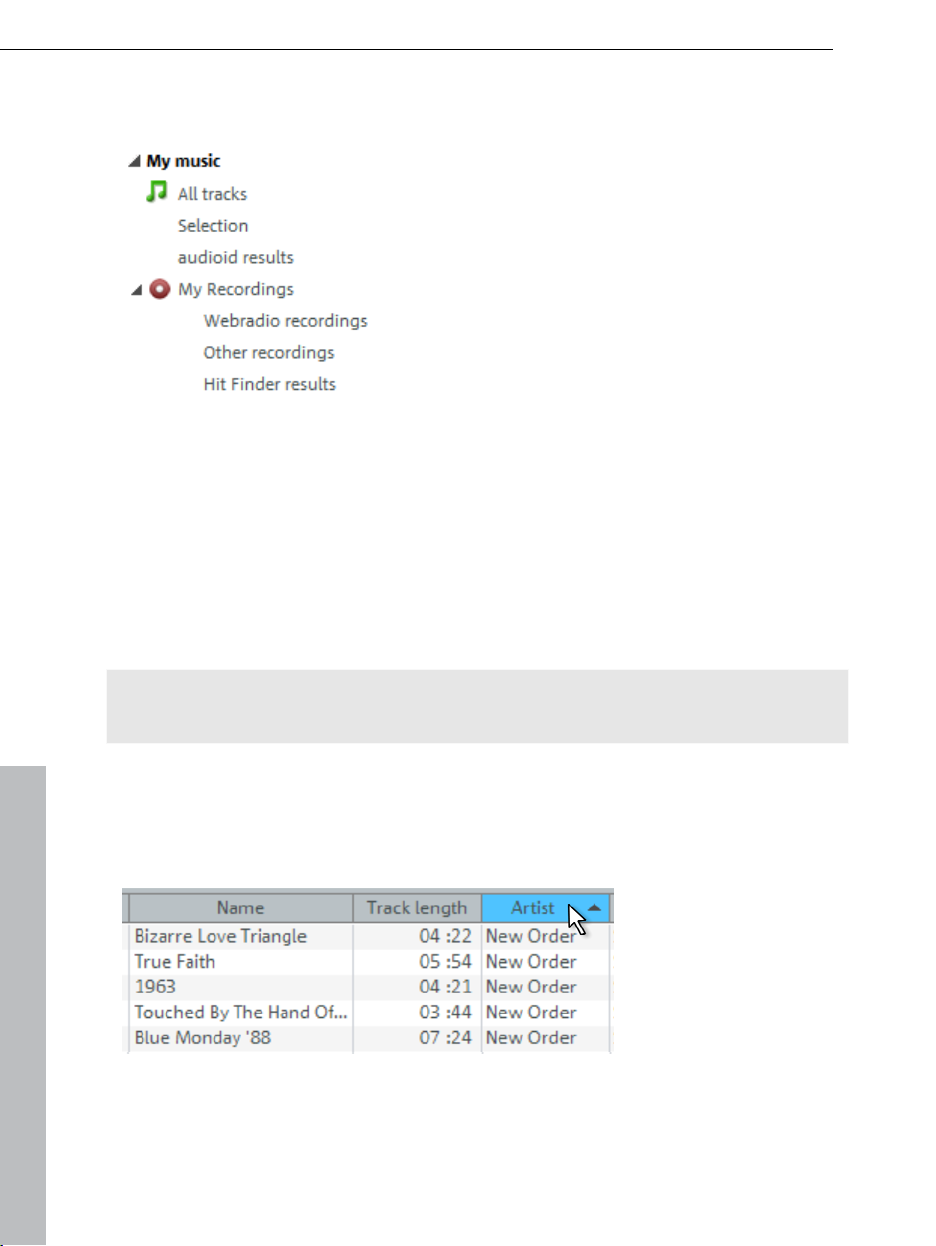
Import music into the database 56
Listen to "My music" 60
Filter tracks 60
Compare tracks 61
Playlists in detail 64
Burner in detail 67
Portable devices in detail 73
Webradio in detail 74
Cut tracks 80
Sound effects 83
Files and their meta data 85
Adjust track information with audioid and freeDB 86
Adjust file properties manually 89
Functions in detail 99
Copy and convert music on the hard drive 99
Working with MAGIX Online Album 101
Analog recording - Record what you hear 103
Automatically number titles 105
Search for and delete duplicate tracks 106
Optimize database... 107
Work in networks 108
Menus 109
File menu 109
Edit menu / Context menu 118
My music menu 124
Windows menu 127
"Share" menu 128
Tasks menu 128
Help menu 128
Tips, tricks & info 131
Database not up to date 131
The compression rate 131
Audio book tracks always in the correct order 131
Connecting the stereo system to the computer 132
Insert original audio CD 132
www.magix.com

6 Table of Contents
Activate additional functions 133
Activation (MP3, AAC) 133
Information for MAGIX support 134
MAGIX services in detail 135
MAGIX Online Album 135
magix.info 137
Catooh – the Online Content Library 138
MAGIX Website Maker 138
If you still have questions 140
Task assistant 140
Tips for program help 140
PDF Manual 141
Restrictions 141
Legal disclaimer 141
Index 142
www.magix.com

Support 7
Support
Dear MAGIX customer,
Our aim is to provide fast, convenient, solution-focused support at all times. To
this end, we offer a wide range of services:
Unlimited web support:
As a registered MAGIX customer, you have unlimited access to web support
offered via the convenient MAGIX service portal on http://support.magix.net,
including an intelligent help assistant, high-quality FAQs, patches and user
reports that are constantly updated.
The only requirement for use is product registration at www.magix.com
The online community, on-the-spot support and a platform for exchange:
MAGIX customers have free and unlimited access to the online community at
www.magix.info, which includes approx. 120,000 members and offers the
opportunity to ask members questions concerning MAGIX products as well as
use the search function to search for specific topics or answers. In addition to
questions & answers, the knowledge pool includes a glossary, video tutorials
and a discussion forum. The multiple experts, found round-the-clock at
www.magix.info guarantee quick answers, which sometimes come within
minutes of a question being posted.
Email support for MAGIX products:
For every new MAGIX product you will receive, as of date purchase, 12
months of email based customer service.
Premium email support:
For priority support, or if you want the MAGIX support team to help with nonMAGIX related hardware problems you can purchase a Premium email support
ticket. Log in at http://support.magix.net and click on "Purchase access
code", the ticket is for a specific problem, and is valid until it is solved, it is not
restricted to an email.
Please note: To be able to use the Premium email support and free product
email support via the Internet, you have to register your MAGIX product using
the serial number provided. This can be found on the CD case of your
installation CD or on the inside of the DVD box.
Additional telephone service:
Besides the large number of free customer service offers, we also offer a feebased telephone customer service.
Here you can find a summary of our technical support telephone numbers:
http://support.magix.net/
www.magix.com

8 Uninstalling the program
Mail (Europe): MAGIX Development Support, P.O. Box 20 09 14, 01194
Dresden, Germany
Mail (North America): MAGIX Customer Service, 1105 Terminal Way #302,
Reno, NV 89502, USA
Please make sure you have the following information at hand:
Program version
Configuration details (operating system, processor, memory, hard drive, etc.),
sound card configuration (type, driver)
Information regarding other audio software installed
MAGIX Sales Department
You can reach the MAGIX Sales Department workdays for help with the
following questions and problems:
Orders
Product consulting (pre-purchase)
Upgrade requests
Returns
Europe
Monday - Friday, 09:00-16:00 GMT
U.K.: 0203 3189218
Denmark: 45 699 18763
Sweden: 46 852 500713
Finland: 35 89 42419023
Norway: 47 210 35843
North America
9 am to 4 pm EST Mon-Fri
Phone: 1-305-722-5810
Uninstalling the program
If you would like to uninstall MAGIX MP3 deluxe MX, you can do so via the
control panel under "Software". Or go to "Programs > MAGIX > MAGIX MP3
deluxe MX > Service and Support > Uninstall MAGIX MP3 deluxe MX".
www.magix.com

Serial number 9
Serial number
A serial number is included with each product. This serial number is required
for the installation of the software and enables usage of additional bonus
services.
What can a serial number do?
A serial number ensures that your copy of MAGIX MP3 deluxe MX is clearly
assigned to you and only you, and it makes improved and more targeted
customer service possible. Abuse of the software can be prevented with a
serial number, since it ensures that the optimum price/performance ratio
continues to be offered by MAGIX.
Where can the serial number be found?
The serial number can be found on the reverse side of your CD/DVD case. If
your product, for example, is packed in a DVD box, then you'll find the serial
number on the inside.
For versions that have been especially optimized for the Internet (download
versions), directly following the transaction you'll receive a serial number by
email to activate the software.
When will you need the serial number?
The serial number is required when you start or register MAGIX MP3 deluxe MX
for the first time.
Note: We explicitly recommend registering your product, since only then are
you entitled to get program updates and contact MAGIX Support. Entering the
serial number is also required for activating codecs.
www.magix.com

10 Tips for program help
Tips for program help
The "Help" file features hints on how to use the program and additional
information. Many important terms are indicated in the text in italics and an
explanation to them is reached by clicking on them.
Context help: Press the "F1" key at any point in the opened program and the
help file will open with the matching topic (context help).
Search function: Use the search function to find out information about specific
words. Enter either the individual word or use logical operators (OR, AND,
NEAR) to refine your search if you have several search words.
"OR" (between two words): All topics which contain both words or one of the
words will be listed.
"AND" (between two words): Only those topics will be listed which contain
both words.
"NEAR" (between two words): Only those topics will be listed which contain
both words. A maximum of six other words may be added between the search
terms.
"NOT" (before a word): Topics which contain this word will not be listed.
Print: Use the help program's print function to make a printout of individual
topics or entire sections. The print button is located at the top of the help
window in the toolbar.
www.magix.com

Introduction 11
Introduction
What is MAGIX MP3 deluxe MX?
MAGIX MP3 deluxe MX is the universal software for the MP3 universe. All
standard audio formats can be loaded from the hard disk, the Internet, or from
audio CDs and converted (view page 56) into MP3, OGG VORBIS, WAV, WMA
(MS audio) as well a
All songs and playlists can be burned (view page 67) directly onto CD (data CD
or audio CD)
Internet da
most important information on the artist, the title, year of release, etc. at the
touch of a button. To connect with freeDB, you will need an Internet
connection.
Due to the flood of MP3s in the digital age, it's easy to lose track. To help out,
MAGIX MP3 deluxe MX has an intelligent song database (view page 56) that
has been developed to quickly find and
the hard drive, retrieves long lost songs, and organizes them in such a way
that makes the next search (with a click of a button) quick and easy.
or downloaded (view page 73) to a portable MP3 player. The
tabase “freeDB” provides the audio CD in your drive with all the
s AAC (following fee-based activation).
archive all songs. This database scans
In addition to the standard search for artists or title names, MAGIX MP3 deluxe
MX can also search for music that goes well together. Using the integrated
mufin audioID technology, MAGIX MP3 deluxe MX examines music according
to its structure, i.e. according to vocals, instrument density, or speed to
discover similarities that form the basis for music recommendations (view page
61).
For your own
use recording and editing tool: MAGIX Music Editor. The fully equipped effect
arsenal is a never-ending source of fun and makes the MP3 experience
creative and interactive.
www.magix.com
recordings and sound editing, there’s an efficient and easy-to-

12 Introduction
What’s new in MAGIX MP3 deluxe MX?
Start dialog + Music import
In the new start dialog that appears when you start the program for the first
time, you'll not only be welcomed, but can also initialize your music database
that will manage your music in MAGIX MP3 deluxe MX.
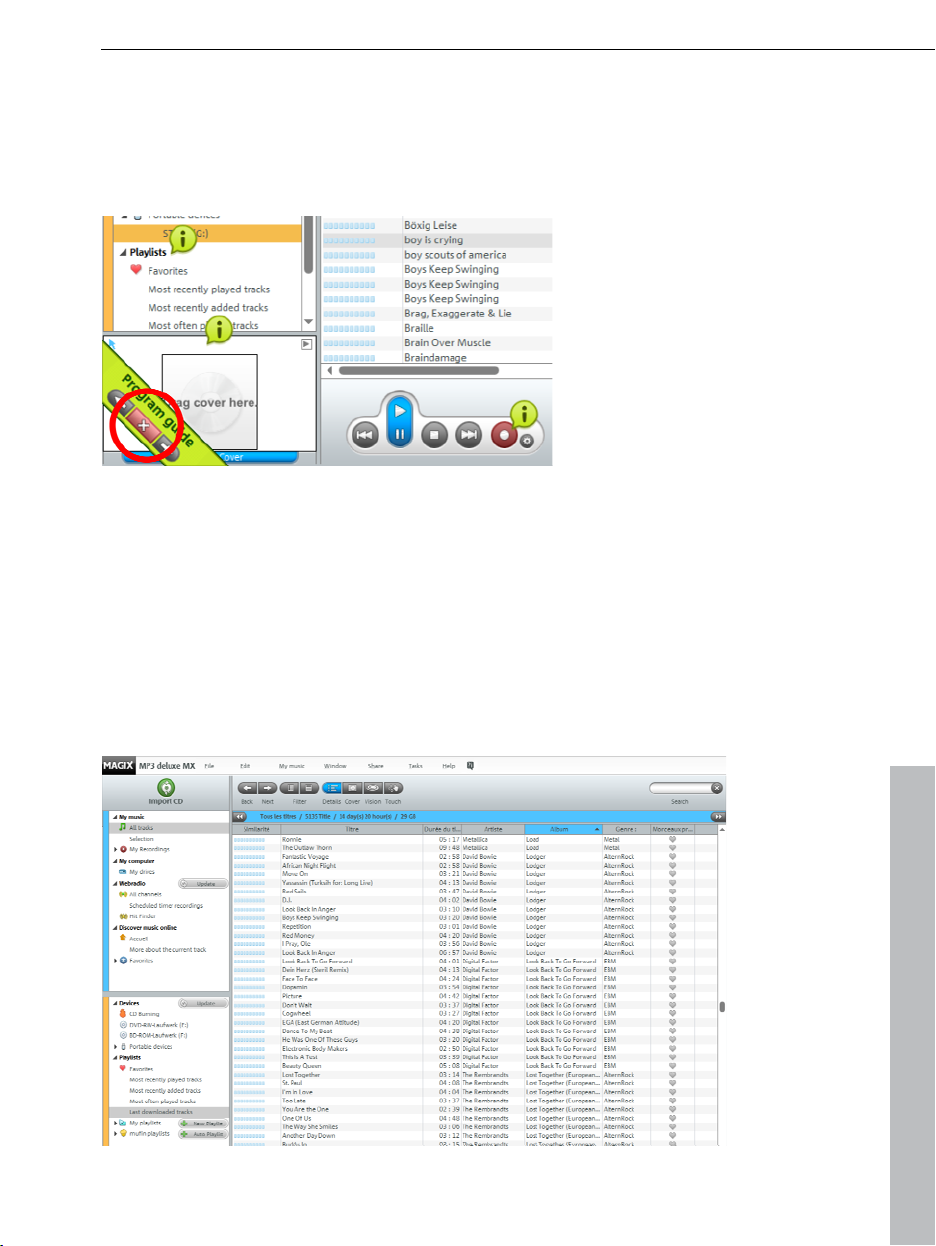
Program guide
Once the program is started, small info symbols indicating the various buttons
will appear on the interface. You can also read through the program guide step
by step to get a better understanding of the program directly on the program
interface. The info feature can also be turned off through the menu under
"Help" and reactivated later.
Tip of the Day
When you start the program for the second time, informative tips will appear.
Every time you start the program you will find out more ways to get the most
from your music collection with MAGIX MP3 deluxe MX.
Create track info from file names.
Track info can be created from file names for tracks that don't have any real
information (ID3 tags). You can decide what parts of the file name will be
applied to the ID3 tag categories. This can all be done with a mouseover effect
on tracks that don't have complete information.
Media X-change (MX)
The "MX" in the title refers to the new media exchange function ("Media-Xchange). All programs in the MAGIX MX Series enable data exchange between
MX programs and are connected to cloud services and social networks. The
"Share" menu is the central hub for these exchanges. You can transfer music
files to other programs for editing, burn them to CD or DVD or post them
online.
More innovations
Search for duplicate tracks: This feature now has an improved dialog and
more refined multiple selection.
Vertical filter display: Along with the existing filters for your music collection
you can now display results as vertical columns.
Galaxy View: You can now view the results of a mufin similarity analyses as a
galaxy.
www.magix.com

Introduction 13
Mood Playlists: Create playlists to match any mood. Even a single song can
be used as the basis for a playlist. You can activate this feature with the Mood
Playlist button on the transport console.
Loudness adjustment: The improved loudness regulation ensures that all of
the songs in a playlist will be played back at the same volume. You can
activate this feature with the "Play all tracks at same volume" button on the
transport console.
More performance + better stability
Loop function: You can automatically play the same song over and over
again.
Improved CD import: Automatic transfer of meta data (ID3 tags) during CD
import is just one example.
Improved recording dialog: With convenient level regulation.
and many more improvements of the fine details.
Features
Manage music collection
The trend is unmistakable: More and more people have increasing digital music
collections. By digitizing CDs, vinyl or tapes, by downloading from the Internet
or recording from the web radio or YouTube and Co., the number of songs
stored on your hard drive may reach several thousands. MAGIX MP3 deluxe
MX displays all tracks in a clearly arranged interface. You can add information,
so-called tags, to each song individually or in groups and then sort them
according to different criteria.
Import CDs
CDs are still the most important media within the music business. You can
comfortably import (view page 24) new and old CDs in MAGIX MP3 deluxe MX
as long as th
mufin similarity analysis
e CDs don't have a copy protection.
MAGIX MP3 deluxe MX is able to analyze numerous sound properties of songs
in your music collections (e.g. tempo, music style and mood analysis). As soon
as the analysis has finished, all songs of your music collection that are similar
(view page 23) to the selected one are displayed. On top of that you can create
playlists
that will combine songs matching your current mood. This is especially
useful for creating party playlists to prevent large track jumps which may
disturb guests.
www.magix.com

14 Introduction
Vision
Your music collection as 3D world in "Vision". Similar tracks are close to each
other, less similar ones, further apart. You can display "Vision" according to
various criteria and choose from different displays. On top of that you can
navigate "Vision" using touch-enabled devices.
Listen to and record web radio
In order to possess a diverse and enjoyable music collection, you don't have to
invest too much money. MAGIX MP3 deluxe MX links you with many different
web radio stations, of which you can directly record the program (view page
32). A very helpful assistant when filling your da
assistant supports you by searching for available radio channels according to
your music taste and adds them straight away into your database.
Export & burn playlists
tabase, is the Hit Finder. This
You can also burn (view page 34) automatic or individually created
playlists
(view page 26) or export them to external devices (view page 35).
Supported formats
Import: MP3, AAC (+), WAV, CD audio, WMA (incl. DRM), OGG Vorbis, FLAC
Export: MP3
1
) Activate MP3 encoder for free
2
) Fee-based activation
1
, AAC (+) (optional)2, WAV, CD audio, WMA, OGG Vorbis, FLAC
Drag & Drop support
Drag & Drop can be used almost everywhere in MAGIX MP3 deluxe MX:
Start a new playlist by dragging and dropping a song onto the "New Playlist"
button.
Add files to playlists and burning lists.
Play a song using drag & drop in combination with the play console. This also
works with tracks that are not yet in the database. The new track will
automatically be imported to the database, scanned and played back.
Or add new songs from Explorer to the database using Drag & Drop via "All
tracks" in MAGIX MP3 deluxe MX You'll then be able to find these songs via
"My Music > All Songs ". Storage space remains unaffected.
In the cover view you can highlight all tracks from an album by clicking on it.
You can then drag & drop these tracks into a list.
www.magix.com

Introduction 15
Advanced functions
Info tour with the program guide: The most important features of MAGIX MP3
deluxe MX are explained. Click on i in the program interface. You can move
through the explanations by using the arrow keys in the dialog. You will see a
banner in the lower left part of the program interface. You can close the
program guide by clicking on the cross. You can reactivate this feature through
the Help menu.
Tip of the day: After starting MAGIX MP3 deluxe MX for the second time tips
on how to use the program will appear. This helps you to get to know the
program faster. If you don't want tips to be displayed any more, uncheck the
box "Show tips on start up". You can reactivate this feature through the Help
menu.
Display AAC file info and artwork: When you import your iTunes database to
the mufin player, covers and metadata are displayed if available.
Columns can be moved:The order of the columns that display track info can
be moved. You can move the column header to a new position using drag &
drop.
Use autocompletion: Suggestions matching your entries will appear in the
search fields and in the properties dialog under artist, album and genre
information. This function can be deactivated via "Options > General".
Show cover and title information: The cover art will pop up if you hover the
mouse pointer over a song in the "Album" column. You can make song info
appear if you go to "Options > General".
Cover search on Amazon: If there is cover artwork missing you can search for
and download album covers on Amazon. This function can be accessed from
the menu via "Edit -> Search cover on Amazon..." Click on "Save Cover" and it
will be saved to your library. The option "Into audio file(s)" is also preset. The
cover will be added to the ID3 tags of the respective song(s), too.
Transfer playlists to portable players: You can use "Drag & Drop" to transfer a
playlist to your portable device. A folder containing the audio files and playlist
info in m3u format will be created.
Multimedia keyboards supported: You can control MAGIX MP3 deluxe MX
with a multimedia keyboard if you have one, for example, to adjust the volume
or to rewind/fast-forward a song.
www.magix.com
16 Introduction
Overview of the program interface
Menu bar: All program functions are contained in „File“ (view page 109),
(view page 118), „My Music“ (view page 124), „Window“ (view page
„Edit“
127), „Online“, „Tasks“ und „Help“ (view page 128).
Media: Here you will find various options for opening music titles. Under
"My music" you will find the database of all music files on your PC. Under
"My Computer" in the integrated MAGIX MP3 deluxe MX Explorer you can
browse your drives. Finally, under "Web radio" you can find thousands of
radio stations, which you can listen to, browse for hits and record.
"Discover music online" leads you directly to the MAGIX website page or
to any website via the music browser.
Media overview: Here you can see all the files in your database or on
your PC. You can sort them according to several criteria and play them
by double-clicking your mouse.
Devices and playlists: Under "Devices" you can view your CD/DVD
drives, burners, USB sticks, etc. Automatically generated or manually
created playlists can be found to the left under "Playlists".
Playlist (view page 64), burners (view page 67) or portable (view page
72)display: Here you can
you can create under 4, as well as burn lists or the contents of your
portable players. Simply drag a title from the media overview to the list
area to add it.
view the contents of individual playlists which
www.magix.com

Album cover: (view page 97) Shows the corresponding cover for the
selected or
currently playing song if it has been added. If no cover is
Introduction 17
available, you can also drag a graphics file from the Explorer to the cover
display.
Recommendations: (view page 61) Display similar music to a song, either
your own music collection or directly from the Internet at mufin.com.
from
Go to the menu on "File" > "Similar tracks" > "Analyze music collection
according to similarity".
Playback console: (view page 51) Control playback of tracks, volume,
etc. Directly
below this, you will also see a progress meter with different
functions, e.g. the loading progress of HTML pages.
Restrictions
Tip regarding special program versions: This documentation describes the full
functionality of MAGIX MP3 deluxe MX. However, you may be using a
restricted version of MAGIX MP3 deluxe MX, and full functionality may not be
available.
www.magix.com

18 More about MAGIX
More about MAGIX
MAGIX Online World
Everything you need for your website
Create your own website with MAGIX website
software
Publish your website for free with the MAGIX free web hosting service
Register your domain name of choice for your website at a great price
Discover MAGIX Online World at www.magix-online.com
MAGIX Magazine
The MAGIX Magazine – stay well-informed & keep up-to-date on:
Digital trends
Interesting websites
Useful information about MAGIX products
You can find the MAGIX Magazine at www.magix-magazine.com.
MAGIX News Center
The MAGIX News Center features links to current online tutorials and tips &
tricks on the software application examples. The "News" is indicated by color
according to content:
Green indicates practical tips & tricks for the software
Yellow reports the availability of new patches and updates
Red for special offers, contests and questionnaires
If no new messages are present, the button will appear gray. When the MAGIX
News Center is clicked, all of the available information will be displayed. Click
the messages to reach the corresponding website.
www.magix.com
Quick Start 19
Quick Start
This chapter explains the basic functions of MAGIX MP3 deluxe MX with a
step-by-step introduction. A systematic description of the program functions
can be found in the chapters and in the extensive PDF manual.
Tip: Take advantage of the introductory video and tutorials, which can be
opened with the help of the Task Assistant.
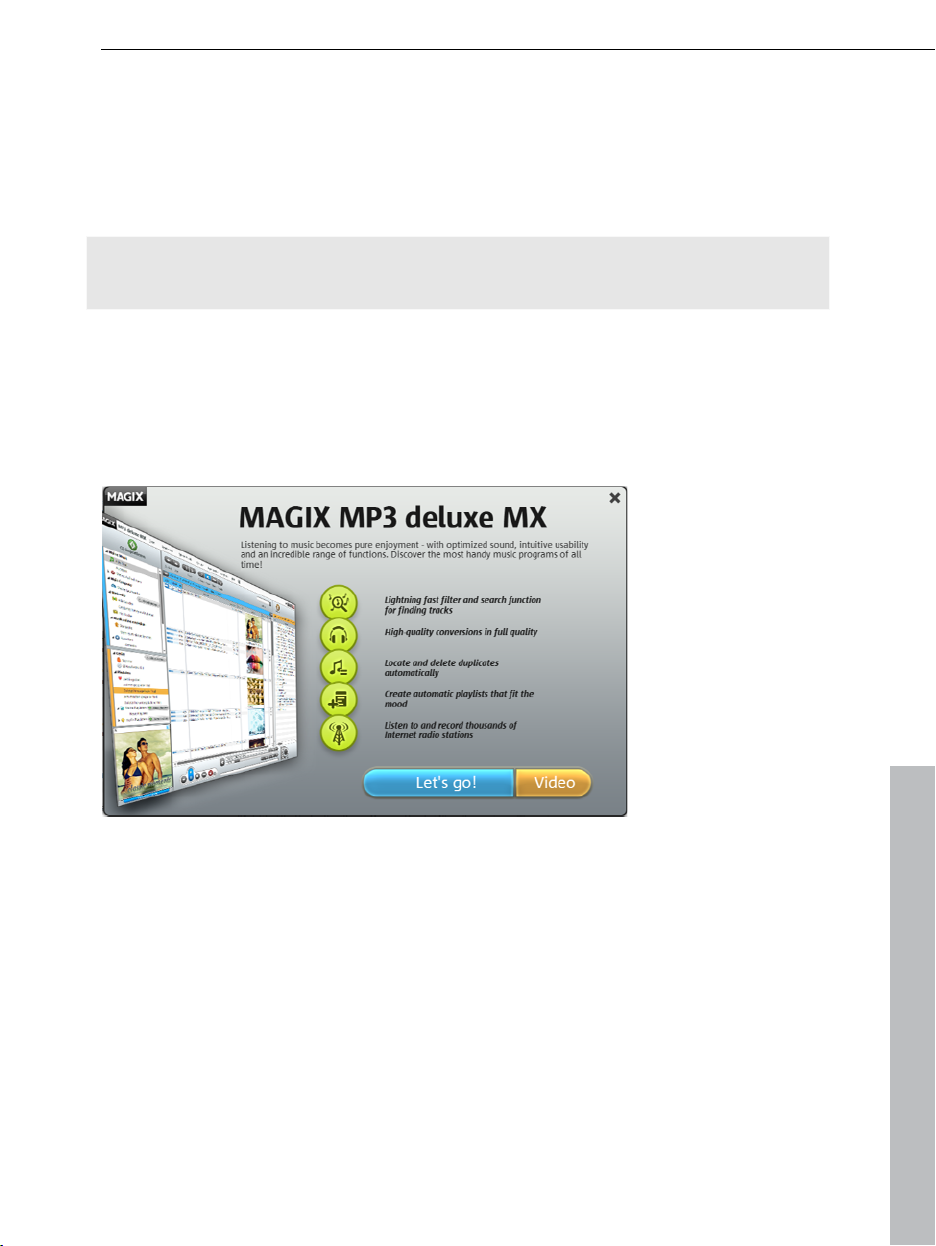
First start
When you start MAGIX MP3 deluxe MX for the first time, a welcome dialog will
appear.
We recommend watching the video to get a good introduction to the program.
Once you have watched it, click on "Get started!" The "Import local music"
dialog will now open.
www.magix.com
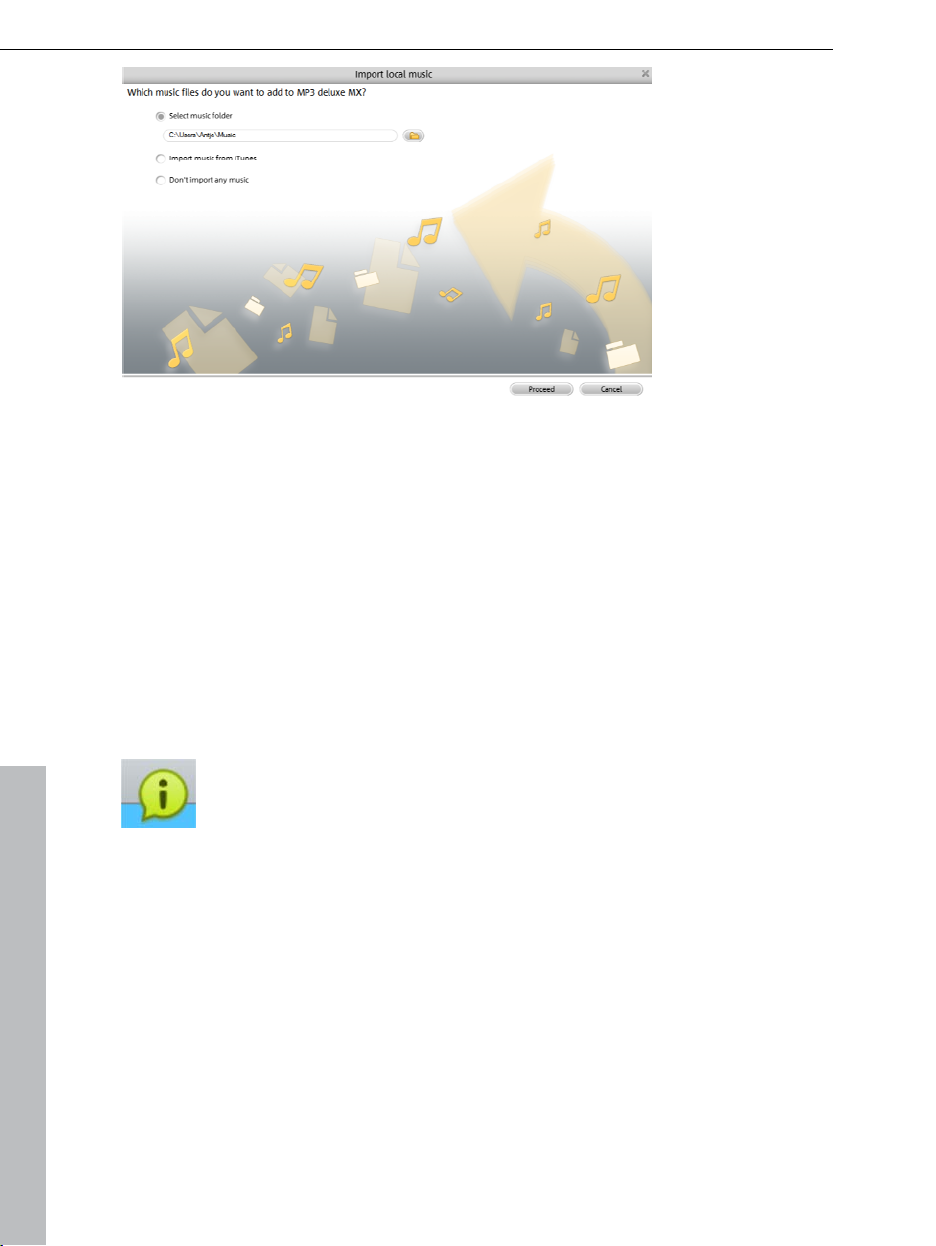
20 Quick Start
When you import music, MAGIX MP3 deluxe MX sets up a database so you
can control all of your songs regardless of where they are saved.
In "Select folder with music" you can choose the folder containing the songs
to be imported. This can also be a whole hard drive, which will obviously take
longer. Or you can import an iTunes database by selecting the option "Import
music from iTunes".
Click on "Continue" to start the import process. Depending on the number of
songs, it can take a while for the scanning process to come to an end. When
the process is complete, an info dialog will appear.
Click on "OK" to open MAGIX MP3 deluxe MX.
In „My music“ > „All tracks“ you can view all the imported songs.
The interface will display many info symbols from the program guide.
When you click on a symbol you will get a short explanation of the
function of the corresponding button. You can move through the
explanations by using the arrow keys in the dialog.
www.magix.com
Quick Start 21
Import music
For the following quick guide, close the program guide with the "X" button on
the bottom left.
Once you have set up a folder in the database the first time you start the
program, you can import music through the file menu any time.
Individual song files can be controlled via "File" > Open file".
If you go to "File" > "Import folder", you can import complete music files.
You can load audio CDs over "File" > "Import CD".
Portable players can be controlled through "File" > "Import file form MP3
player".
All tracks can be viewed in the media overview after program start.
www.magix.com
22 Quick Start
Play, navigate, arrange
Your song list is found in the large window at the center. All songs from your
music collection are shown here.
A selected song may be played back by pressing the play button below, by
double clicking on the song name or by pressing the space bar on the
computer keyboard.
The next song on the list will be automatically played at the end of a song.
You can switch to another song by double-clicking another title in the list.
Adjust the overall volume with the knob in the bottom right-hand corner.
In the "All titles" selection in the "My music"
section you have access to all songs in your
database. This selection is activated at
program start.
Tip: Alternatively you can also use the "+" on the number block (more volume)
or the "-" key (less volume).
You can change the grouping of the songs on the list in the following ways:
Click on "Artist", "Album" or "Genre" to sort the songs according to these
criteria. This works equally for all other column names.
www.magix.com
Quick Start 23
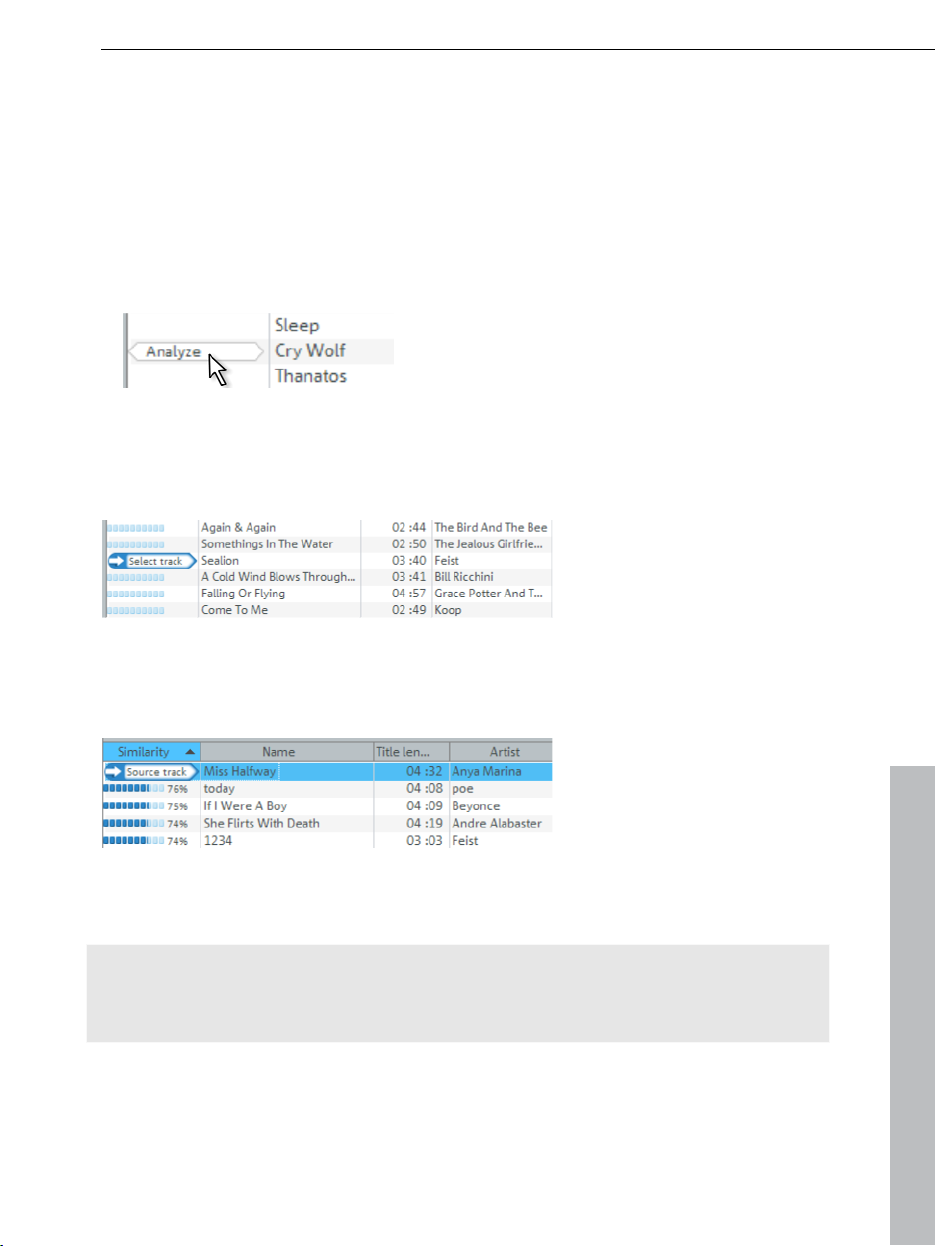
Sort according to similarity
The "Similarity" sorting criterion allows songs to be compared to a source track
in your music collection. You first have to analyze the tracks in your collection.
The easiest way to do this is through the menu "Edit > Similar tracks > Analyze
collection". All the tracks from your collection that do not have any similarity
information yet will be analyzed.
Alternatively, you can also analyze each song
individually by clicking on "Analyze" at the
beginning of a line before the song title.
First, select the song which is to serve as a starting point for the similarity
sorting. Place the mouse cursor for this song on "Similarity". A small "Select
song" window will appear.
When you click here, this source track will be placed at the top and will serve
as the starting point for similarity sorting. The songs that follow will be sorted
in such a way, that their similarity will decrease down the list.
The degree of similarity will be indicated in percentage: the more percent
appear, the more similarity exists between the track and the original title.
Tip: You can exclude single tracks from the analysis process via the menu
"Edit" > "Exclude track from the similarity analysis". This is useful for audio
book tracks.
www.magix.com
24 Quick Start
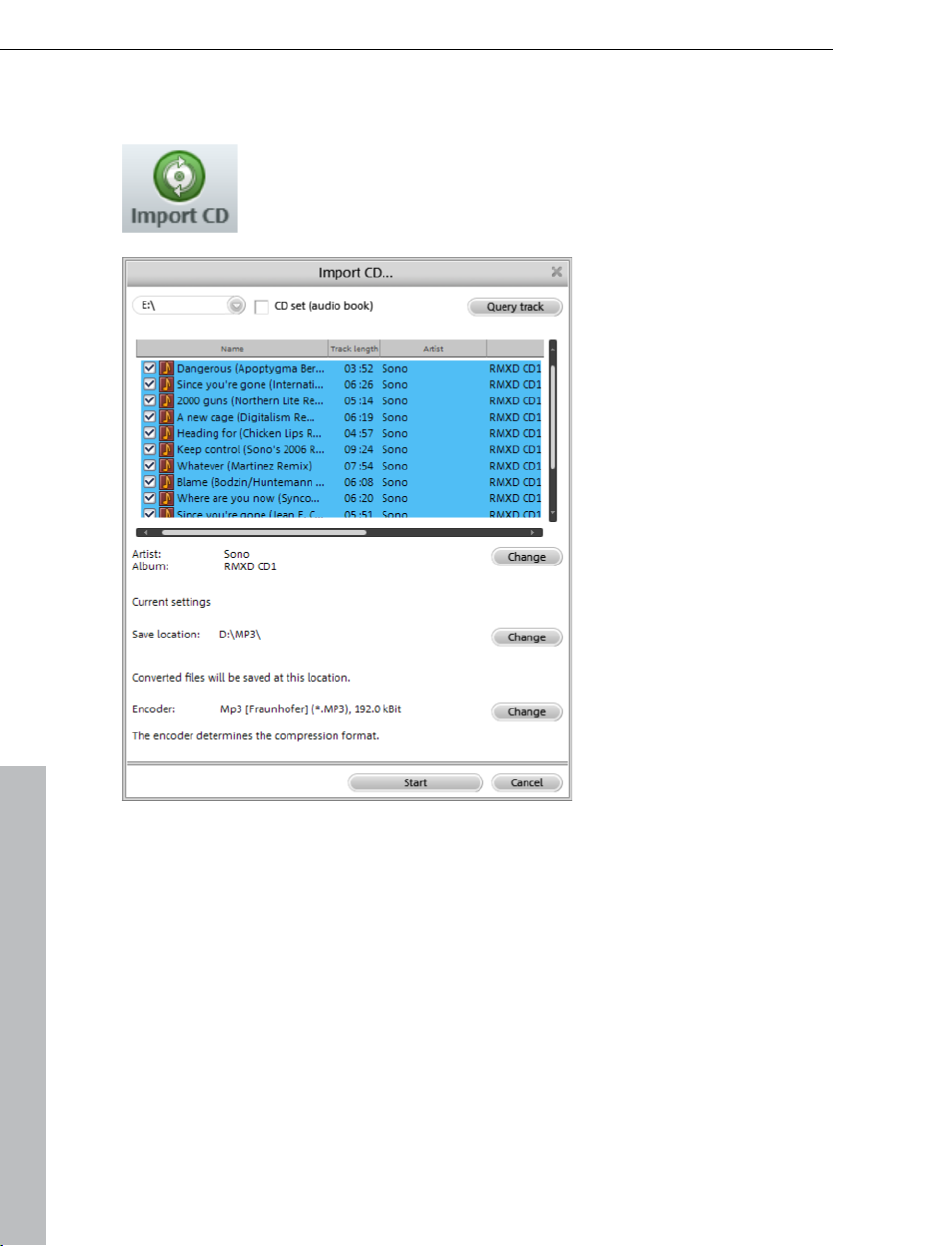
Import music CDs
To import a music CD into your database, put the CD into your
drive and select the "Import CD" button. The "Import CD..."
dialog opens.
CD set
that consists of multiple CDs (also double albums, etc.). All of the CD's titles
will be named so that they are played back in the correct sequence from the
first title of the first CD up to the last title of the last CD. During the copying
process, you will be asked if the CDs belong together as a set. All CDs that
you insert during the copying process will be titled sequentially and assigned,
depending on their relation, to the database.
Online query to complete track info:
Query track info: If the content of your CD isn't automatically recognized
(audio book): Activate this option if you want to copy an audio book
(such as artist, track name, etc.), then you can query important information
about the CD online. If you can't find your CD in the database, then you can
www.magix.com
en
ter it yourself and then upload it to the database so that other users can
Quick Start 25
access it.
Enter track info manually:
Change artist/album: If all the songs in a list are marked and you click on
"Change" you can complete the information such as artist, album, genre and
year for all tracks.
If only one track is marked, you will open the properties dialog for that track
only. Here you can complete the info such as track name and rating. Or for a
multiple selection you can choose "Single track" in the properties dialog.
Save location: Select the location where you want to save your music.
Encoder: (view page 99) Select the quality of the imported files and which
encoder
you would like to use. In general, the higher the kBit number, the
better the quality, but also the more memory required for storage.
Start import process:
Start: Starts the import process. The songs will be copied according to your
settings onto your hard drive and in the folder with your music collection.
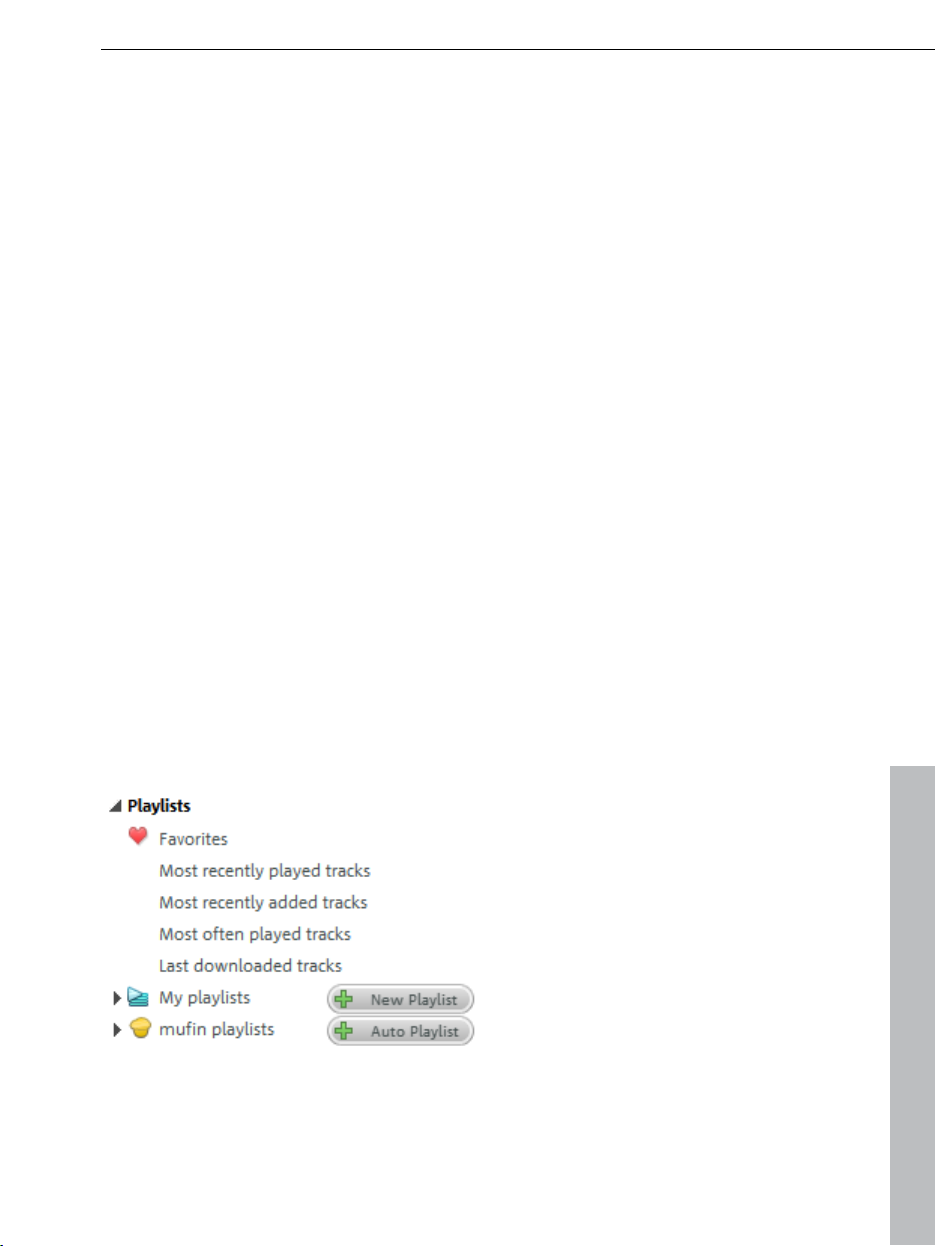
Playlists
Until now, we have only looked in the
back the titles one after the other and rearrange and filter them as you like, but
you cannot freely compile them. For this, there is the "Playlists" menu.
Playlists may be used in various ways. They serve to:
www.magix.com
"My Music" menu. There you can play
In the "Playlists" menu you can
compile various titles,
independently of their database
properties, which means you can
arrange them independently of
their genre/artist/album
assignment.
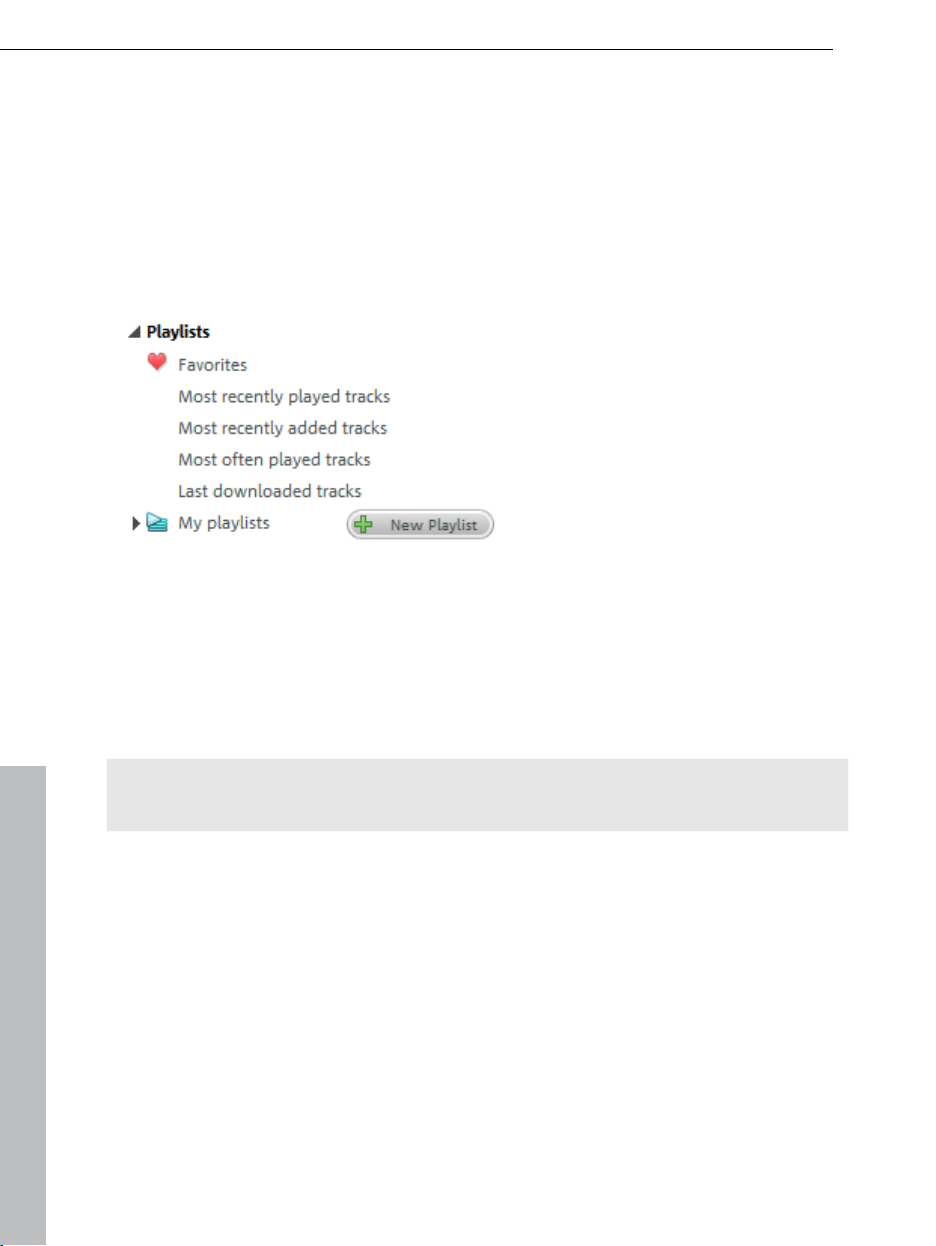
26 Quick Start
Play mus
ic from your PC, which is turning more and more into the central
playback station for music. Select your playlist and click "Play" on the
transport control or simply press the space bar on the keyboard.
Burn audio or data CDs
Convert into a common format (e.g. MP3)
Send to iTunes
Create and name a new playlist
To create a new playlist, click on "New Playlist".
A new, empty playlist named "New Playlist" will be added to "My Playlists".
Next to the database view on the right side of the screen, an empty playlist will
appear. Give the new playlist an appropriate title - e.g. "Party music" if the
playlist is intended for your next party. Click with the right mouse button on
"New Playlist" and select the option "Rename" and enter the name you have
chosen.
This playlist will then appear under the new name in "My Playlists".
Note: If songs are deleted from a playlist or added again, then the playlist will
be saved automatically.
www.magix.com
Quick Start 27
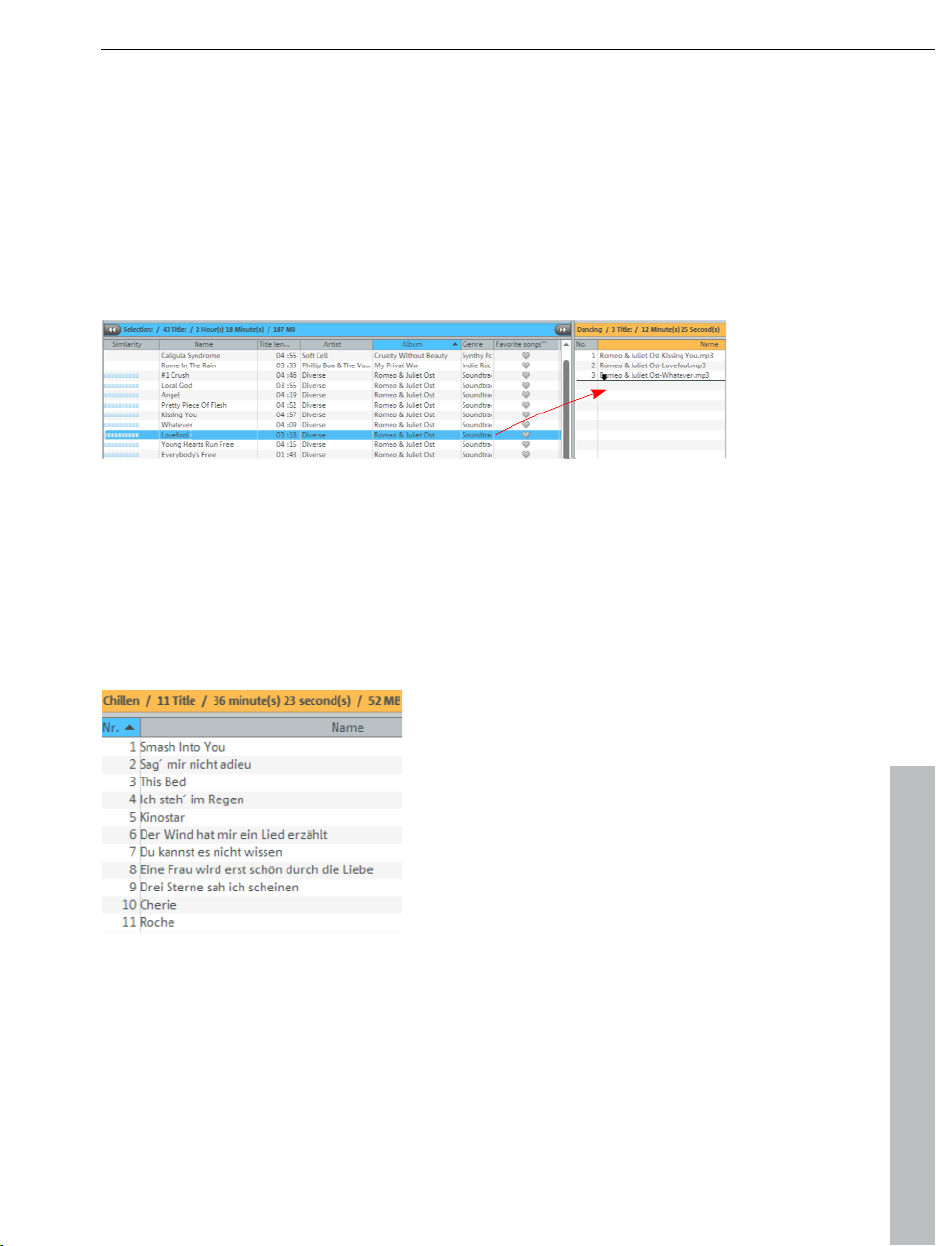
Fill the pl
aylist with songs
The new playlist is at first empty and must be filled with fitting songs. Click on
the database view of the song of your choice and drag it down into the playlist
with the mouse key held down.
With the Alt key you can select multiple titles one after the other, with the Ctrl
key multiple titles, which are not necessarily listed one after the other. In this
way, you can select, for example, a complete album which you can add to the
playlist.
Each song will remain exactly where you have left it.
Arrange songs in the playlist
Even a playlist is crying out to have perfect order. As you have already seen
during adding, each song may be located between any songs on the list.
The playback order of the songs is always from top to bottom.
Each song can be moved by holding down the mouse button and dragging it
to the desired position.
Delete songs by pressing the Del key on your keyboard.
www.magix.com

28 Quick Start
Dynamic play
lists
"Dynamic playlists" are automatic playlists, which you can select in the
"Playlists" menu. Such lists continuously change and therefore are called
"dynamic".
Favorites: You can give every title a heart by simply clicking on the heart
symbol in the "Favorite Tracks" column. All titles that please your heart will be
found in this playlist.
Titles last played: Titles played last will be placed in one playlist together.
Titles last added: Titles last added to the music collection will be placed into
one playlist.
Titles most played: Most-played titles will be placed in a playlist together.
Titles last downloaded: Titles downloaded last will be placed in one playlist
together.
Auto playlists
Note: You can only use the auto playlists if you have already analyzed your
music collection (view page 23).
Auto playlists are automatically created playlists that contain songs which
share a certain mood.
To create such a list, click on the button "Auto Playlist" under "mufin playlists".
Individually design your auto playlist in the dialog that will appear.
www.magix.com
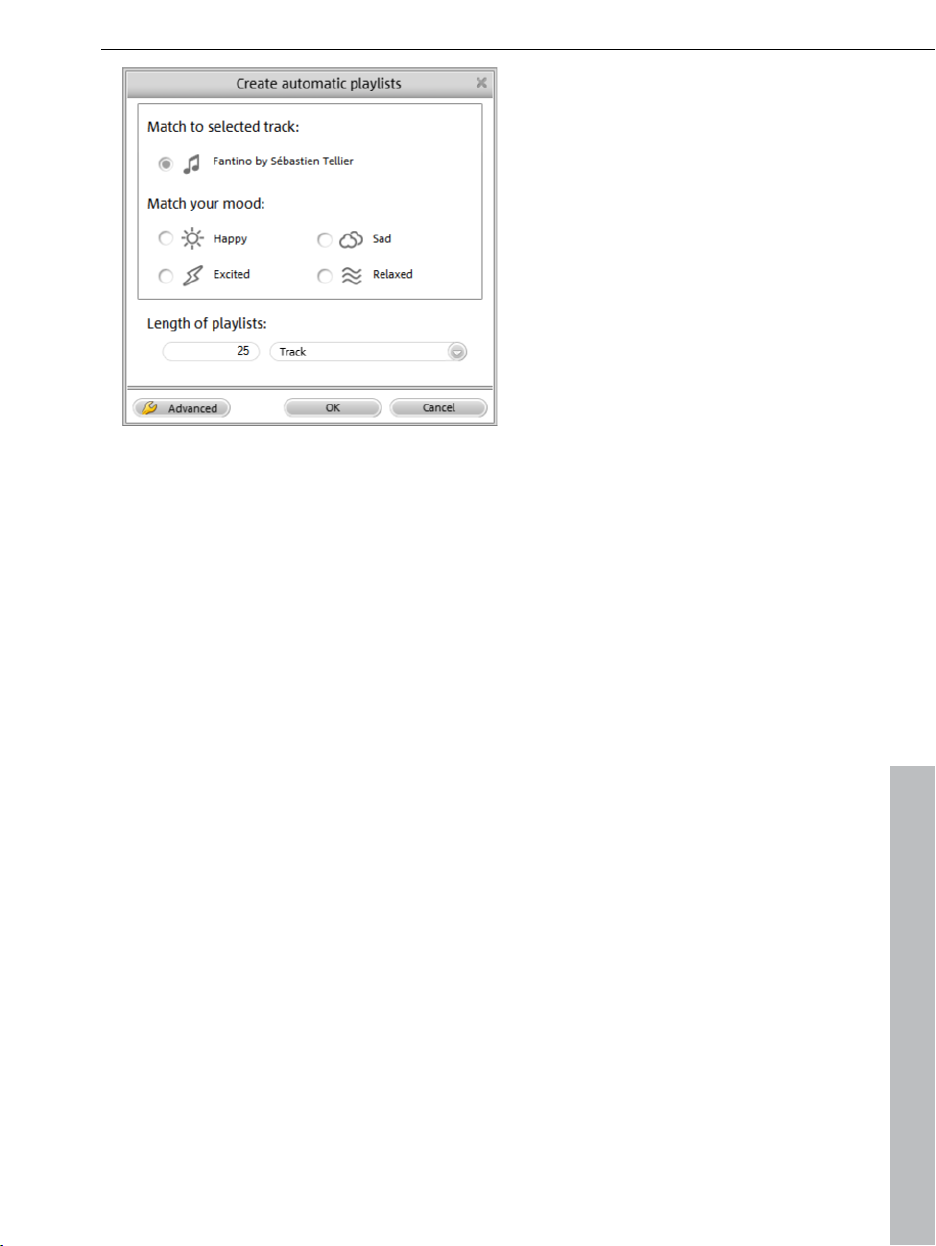
First, adjust the length of your
Then choose a mood by
Or choose the currently
MAGIX MP3 deluxe MX automatically creates an auto playlist according to your
wishes.
Quick Start 29
playlist under playlist length.
clicking on the respective
button
selected title as starting point
for your playlist by clicking on
the title button above.
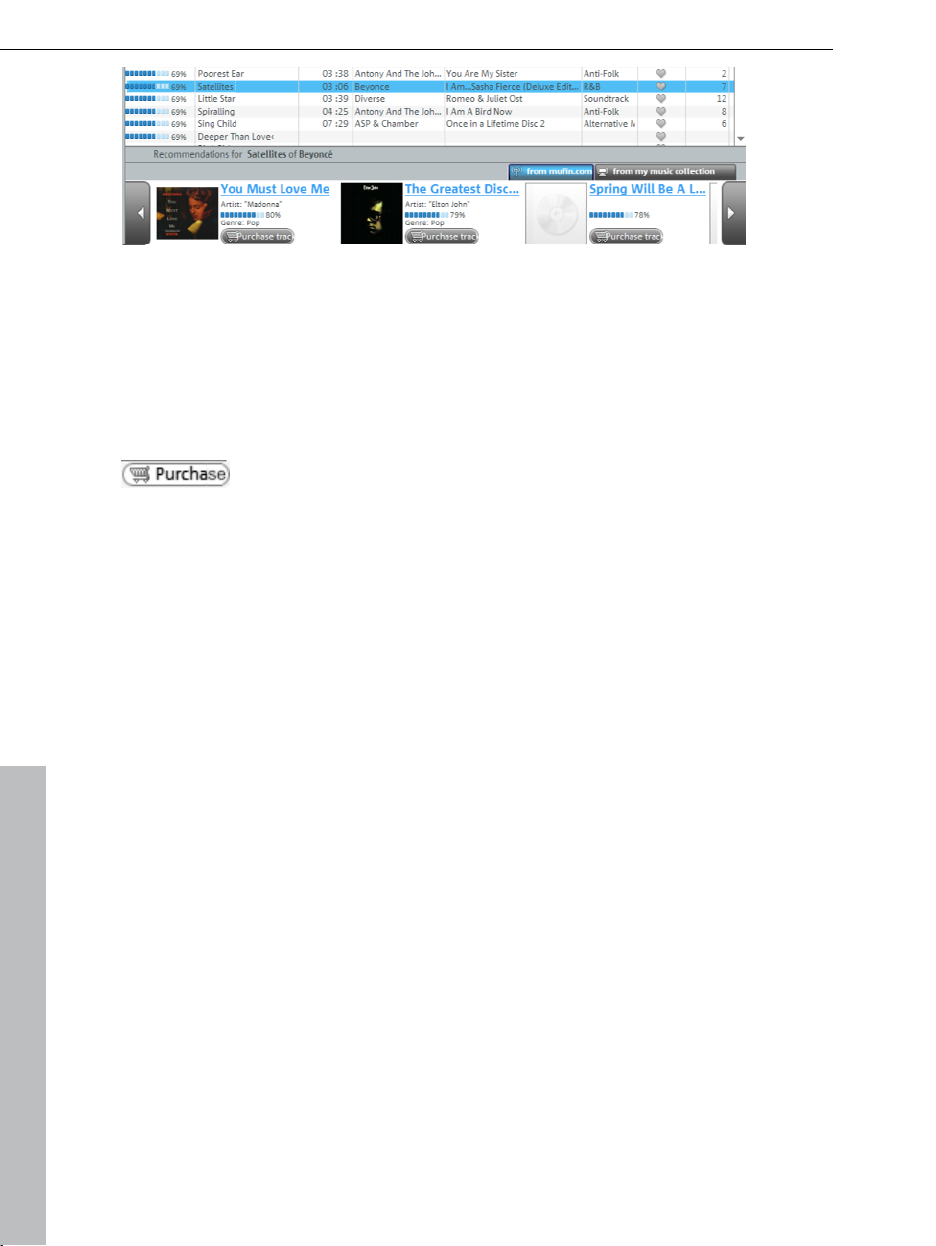
Recommendations
MAGIX MP3 deluxe MX can analyze the structure of each song in the music
collection and present matching recommendations (via the menu "File" >
"Show similar tracks" > "Analyze music collection according to similarity"). This
means that other tracks will be searched and found that have structural
similarities to the original title, which leads one to assume that the tracks are
musically related.
To put i
recommendation as well.
In addition to filtering according to similarity (view page 23) shown above, there
are two more
using the two switches above the recommendation areas: offline, from your
own music collection, and online, from mufin.com. mufin.com is an Internet
address, where you can search for similar music on the web. As with the offline
search in your own collection, similarity also lays the foundation for song
recommendations. However, this search engine is different from all other
Internet search engines, which use ID3 tags alone: it is more objective.
www.magix.com
t differently: Those who like the original track are likely to enjoy the
possibilities to get recommendations, which may be selected
30 Quick Start
A series of recommendations is given to each analyzed song in the bar below.
If a cover is available, it will also be shown. Each track may be played back via
the appropriate play button. In case of online recommendations from
mufin.com, songs may be only played for a few seconds due to copyright
reasons.
You can buy many recommendations from mufin.com directly.
Songs with the "Purchase track" button may be purchased
via the online shop. Simply click on the shopping cart for
more information and prices.
www.magix.com

Quick Start 31
Webradio
In the "Webradio" area you can listen to
webradio stations, record them, and
more.
Play and navigate
Click on "All stations" in order to open the pre-configured station list.
The stations are sorted according to country and genre. You can navigate like
in a folder tree and play each station by double clicking on it.
In the webradio station list you can see the most important details listed one
after the other: Title, genre file type, and bit rate. The higher a station's bit rate,
the better the quality of the stream being broadcast.
Note: If you don't have any reception, don't worry! Webradio stations don't
always broadcast 24-hours a day. In the evenings there are usually more
stations available than during the day. Reception may also be impeded by the
computer's security settings, such as a firewall.
www.magix.com

32 Quick Start
You can sele
ct your stations easily by right-clicking in the list and selecting the
"New Station" option.
The entire list of all stations is very large. To get a better overview, there are
three helpful folders at the very top of the station list.
Favorites: You can add your favorite stations to a list of your radio stations.
Click with the right mouse button on the station and select the option "Add to
favorites". You can find the favorites list in the "My radio stations" folder, at the
very top of the list.
Most frequently listened to station: Creates an automatic favorites list from
your listening habits.
Last station listened to: Contains last-opened stations.
Record & edit
Using the timer function, you can control web radio recordings: Open the
Timer Dialog via the "Planned recordings" menu and enter the time of
recording.
A continuous file is created with each web
radio recording. Click in the "My Music" menu
on "Web radio recordings" to find it.
Often,
the recording will contain several songs, which must be separated into
individual tracks.
www.magix.com

Quick Start 33
Open the title-cutting editor (view page 80)via the "Edit" button.
You can cut
your recordings in the Title Editor. Here you can check track
transitions, and correct and edit them if needed. If the transition markers are
located on the right positions, you can save selected tracks to the hard drive
by selecting "Save selected tracks".
Hit Finder
The Hit Finder can be found in the
"Webradio" section.
Select your favorite genre and click "Start Hit Finder".
All found hits are then listed in the result list. You can search for specific titles
via the wish list.
www.magix.com

34 Quick Start
Export and burn functions
Your musical world is not limited to the PC. You can do the following with your
songs and playlists:
Burn them to an audio CD or as a data CD/DVD
Transfer them to a portable player
Export as a file
Send to iTunes
Burn as a disc
You can burn any playlist as a disc directly from MAGIX MP3 deluxe MX.
Click the "Burn" button in the playlist to get started.
The "Burn CD/DVD" dialog will open, where you can choose the disc format.
Da
ta CD: Choose this format if you would like to burn many files to a CD to be
played back on PC or a DVD player. Circa 700 MB fit on a data CD.
www.magix.com

Da
ta DVD: Select to burn a data DVD when you would like to burn so many
Quick Start 35
files that they no longer fit on to a CD. The capacity of a DVD is most often
limited to 4.7 GB.
Audio CD: The classic. You can play an audio CD in all regular CD and DVD
players as well as on PC. Approx. 80 minutes of music will fit on an audio CD.
Tip: You can copy audio CDs via "File>Copy audio CD"
Transfer to a portable player
Transfer to portable players works almost exactly like creating playlists:
Connect your portable device (such as an MP3 player, mobile phone or a USB
stick) to your PC.
Note: Your device must show up as its own drive. If your device requires
special software, please install it.
Select your portable device under "Device > Portable devices".
www.magix.com

36 Quick Start
To the
right, you will now see a list of all files and folders on your portable
devices.
Drag music from your database as usual into the list and onto your portable
device.
Convert files
Often, it is desirable to have files in a different format than the one they are
present in. This is how file conversion works:
Select songs that you would like to convert, or go to the folder or playlist if you
would like to export all songs in it.
In the "Edit" menu, select "Convert from" and click on "Convert selected..." or
"Convert all".
In
the export dialog, select the desired format (e.g. MP3), set the necessary
settings for file names and target paths and click on "Start".
www.magix.com

Interface – The layout of MAGIX MP3 deluxe MX 37
Interface – The layout of MAGIX MP3 deluxe MX
This chapter will provide you with an overview of the areas and key functions
available in MAGIX MP3 deluxe MX and where to find them.
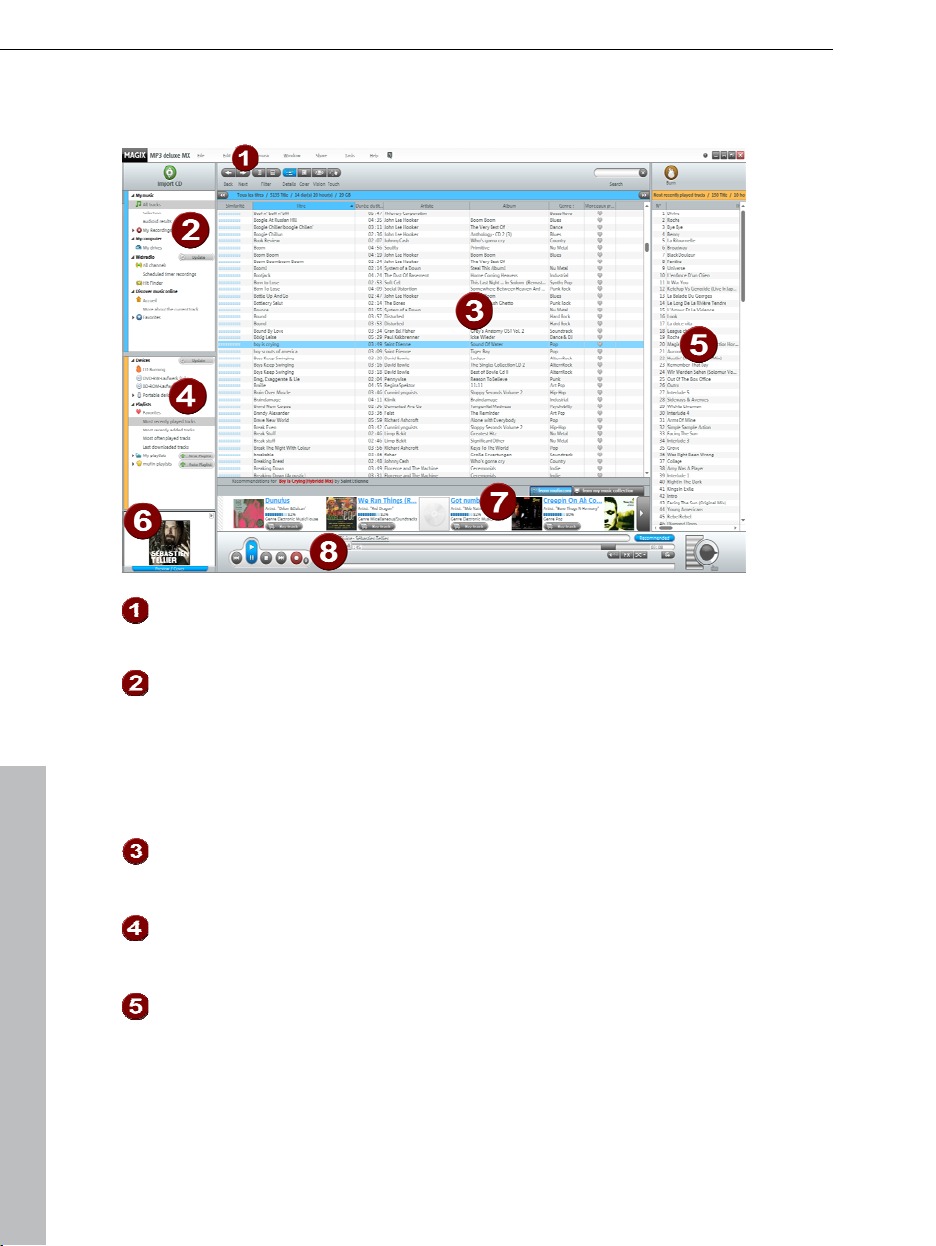
Navigation area
The navigator provides you with an overview. The following shortly explains all
work areas and the tools provided.
Note on the toolbar:
MAGIX MP3 deluxe MX adjusts the toolbar according to the current
workspace. This means that the "My Music" area contains different functions
than the "Webradio" workspace, etc.
Each toolbar possesses the functions "Back" and "Forward".
These allow you to retrace your last steps with the navigator.
More overview:
To make mor
navigation as well as the devices/playlists areas to the right. To do this, click
on the little buttons with a double arrow. If you would like to display the
navigation again, click on these buttons again.
You can also freely enlarge or reduce the size of these areas by clicking on the
separator bars and displacing them by dragging.
www.magix.com
e space for the main area - your music collection - you can hide

38 Interface – The layout of MAGIX MP3 deluxe MX
My music
All tracks: If you have imported (view page 56) tracks into the database, then
you can access your
sort the
list according to similarity (view page 23), to compile playlists (view
music collection here to listen (view page 59) to songs, to
page 64), and much more.
Selectio
n: Activate the filter in the toolbar and search for specific songs;
"Selection" will appear in the navigation. Click this and only the filter list tracks
will be listed.
audioid results: If you choose a search for several tracks, a search is carried
out for track info (track info online search (mufin audioid)) and the tracks are
listed here until the program is closed.
My Recordings: Here you will find all recordings you have made using MAGIX
MP3 deluxe MX: "Web radio recordings", "Hit Finder results" and analog
recordings (view page 102) under "Other recordings".
Note: All music files which you have imported into your Database (view page
85) are shown under "My Music", independent of where they are saved.
www.magix.com

Interface – The layout of MAGIX MP3 deluxe MX 39
My Music t
oolbar
With "Back" and "Forward" you can retrace your last steps with the
navigator.
Filter: (view page 60) Activate the filter for your music collection to narrow
your search
by "genre" (left), "artist" (center), and "album" (right) (see 5 in
the illustration).
You will see a list of tracks corresponding to your search criteria in the
display below (see 6)
A repeat click on "Filter" closes this section again.
Details: Clicking this will display the album names only.
Cover: Shows all existing CD covers in the albums column.
Vision (view page 47): Displays your music collection as a
star chart in 3D
space. Depending on the characteristics assigned to the 3D axes, the
positioning of the tracks will change accordingly. Titles with similar sound
details are assigned close to one another clusters.
Real-time search: Enter a keyword into the field and then click the
magnifying glass to start the search. All songs that contain the keyword in
the track info or comment will appear in the display.
The filter area is separated into "Genre", "Artist", and "Album". One click
on the arrow of a filter area opens the selection menu for the filter that
should be applied. The minus button closes the filter area. The plus
button creates a new filter area.
Display: Shows either all of the music tracks in the database or only the
filter results.
www.magix.com

40 Interface – The layout of MAGIX MP3 deluxe MX
My comput
er
Here you can browse folders on your hard drive(s) just like in Windows
Explorer. If you have an external hard drive connected, it will appear here. CD/DVD drive contents may also be viewed here.
My Computer Tool Bar
Folder: Displays an additional browser area for better orientation.
Up: A click switches into a view in the higher folder level.
List: Clicking this will display the folder, or the file names only.
Details: Columns with detail information on files will be displayed.
Cover: Shows all existing CD covers in the albums column.
Search: Here you can search for songs on your hard
drive. Only the selected folder and its subfolders will be
browsed.
Webradio
MAGIX MP3
Internet radio station
deluxe MX can now also play, record and cut (view page 77)
s. The streaming stations are treated just like songs,
which means that you can edit the streams with effects like "echo", or pause
and continue to listen later via the play console (view page 51).
All stations: Opens a list
of all radio stations saved at the time.
Planned timer recordings: The Hit Finder timer as well as custom-created web
radio timers are listed here and can be edited.
www.magix.com

Interface – The layout of MAGIX MP3 deluxe MX 41
Hit Find
er: Use the Hit Finder to browse the newest hits in different genres.
The 5 best stations (stations that are always able to be received well and which
send clean ID3 tags) for the selected genre are recorded for 2 hours. You can
also create a wish list, which will be gone through. The hits that are recorded
during this period are listed directly under "My Music -> My Recordings -> Hit
Finder results" and added automatically to the database.
Note: Update the webradio stations list from time to time so that stations for
the Hit Finder are always updated and able to provide you with the best results
possible. Once in a while, you will be asked if you want to download an
update. Please confirm this.
Webradio toolbar
All channels
Up: A click switches into a view in the higher folder level.
New radio channel: In addition to automatic channel updates (you
will always be asked if these should be downloaded) you can also
add a channel manually.
Delete radio channel: To delete a channel from the list, select the
list entry and click this button.
Create time: To add a channel (whether it is currently playing or not),
select the list entry and click this button. The dialog for starting a
timer-controlled recording will appear.
Search: If you can't find a channel or would like to
search for keywords you should enter either the name
of the station or the keyword and then click on the
magnifying glass. A dialog will open and list the result
or further search options.
Scheduled timer recordings
Create timer: Create a timer for the target web radio recording.
Delete timer: Delete the selected timer from the list.
Start: Here you can start the selected timer before the planned
recording time.
www.magix.com

42 Interface – The layout of MAGIX MP3 deluxe MX
Stop: End recording of the selected timer before the planned
recording time.
Properties: Click to edit the selected timer.
Hit Finder
The wish list for certain songs may be activated and
deactivated.
Edit wish list: Select the artists and songs which you'd like Hit Finder
to record.
Click here to start Hit Finder. The found
tracks will be listed under "My Music > My
recordings".
Music online
The Internet is at your hand with MAGIX MP3 deluxe MX – the integrated
Internet browser enables music discovery in a special way. Not just similar
titles from the web may listed together. Open your favorite music pages on the
Internet!
Start page: By default, the MAGIX page will open with just one click. You
can also set another page as your homepage. Right click the house
symbol and select "Change homepage".
More about the current track: After you have selected a song from you
music collection, you can see additional information about it at mufin.com.
The history lists the last 10 visited Internet pages (1 link per domain) so
that they may be quickly opened again.
Favorites: All websites marked as favorites are listed here and may be
opened with a click.
www.magix.com

Interface – The layout of MAGIX MP3 deluxe MX 43
Online Musi
c toolbar
Reload: The current page will be reloaded and displayed again.
Stop: The entered page will stop being loaded. Individual images and parts of
the page may not be displayed.
Homepage: One click is enough to open the homepage that is set as the
default.
Web address entry field
URL: Entry field for the Internet address (URL). "http://" is added automatically
and does not need to be entered by you.
search mufin.com
Here you can enter a
search term, for example a band name, for mufin.com,
independent of your current Internet address. The result will be displayed as a
mufin.com page after you have clicked on the magnifying glass.
Download music tracks
If MP3 files are immediately integrated into a website, these will be displayed
under "title list" and may be downloaded.
Click on the "track list" button (to the right beside the
playback console), to open the area for downloadable
music files or to preview and buy songs.
Please click here to start the download if there are tracks
on the website that can be downloaded free of charge.
Select the save location and click "OK".
www.magix.com

44 Interface – The layout of MAGIX MP3 deluxe MX
Dev
ices
The "Devices" navigation areas, with burn function and portable devices, as
well as the "Playlist" area open in their own area on the interface (to the right in
the program window).
Under "Devices > Burner", open the Burn list (view page 67) (burner) as well as
contents of portable devic
es (view page 72) such as MP3 players.
Note: External hard drives and CD/DVD drives are displayed under "My
computer" > "My drives" (in the Explorer).
If you have connected new devices that are not displayed by the program
immediately, "refresh" the screen.
Burner
This opens the burn dialog.
You can select between audio CD, data CD or DVD, double layer
DVD (DVD DL) and Blu-ray in the used space display (view page
68). More info can be found under "Burner in detail (view page 67)".
The used space indicator (view page 68) supports you in
determining the size of the burn list. Depending on what is
active, you can see how much space is available on the
blank disc.
www.magix.com

Interface – The layout of MAGIX MP3 deluxe MX 45
Portabl
e devices
Settings: In this dialog you may specify the default action after attaching a
portable device. Convert (view page 99) all files before they are copied to the
portable player? If yes, which codec should be used? Do you
want to change
the file names while copying?
Up: A click switches into a view in the higher folder level.
New folder: Create a new folder in the portable area in order to be
able to sort files.
www.magix.com

46 Interface – The layout of MAGIX MP3 deluxe MX
Playli
sts
Playlists: Besides the dynamic
playlists (view page 64) that can be
created automatically usin
g MAGIX
MP3 deluxe MX, you can add,
listen to, and burn your own
playlists with "Create playlists"
(view page 64) under "My playlists".
of the songs that you have
All
marked as your favorites are
collected in the "Favorite songs"
playlist.
The "Devices" navigation areas, with burn function and portable devices, as
well as the "Playlist" area open in their own area on the interface (to the right in
the program window).
Click here and a new, empty playlist will be added to "My
playlists". Please enter a unique name and add content via
drag & drop.
Opens the "Create automatic playlists..." dialog (view page
65).
www.magix.com

Interface – The layout of MAGIX MP3 deluxe MX 47
Bur
n function
This opens the burn selection dialog when clicking on the "Burn"
button. You can choose between audio CD, file CD or DVD. More
info can be found under "Burner in detail (view page 67)".
Vision
Would you like to experience your music collection in a new way? Display it as
a 3D galaxy of sound and open "Vision" in "My Music" area. All of the tracks in
your music collection will now be shown as individual points in the galaxy. It
uses the track title information (meta data) (view page 85) of the songs.
Note: Activate the similarity analysis to sort your music collection in Vision
according to sound properties. To do this, activate "Analyze track directly after
import" in Options (view page 115) (Strg + ,). All songs then will be scanned
and new aspects then may be selected in Vision.
Vision: Your songs as stars in a galaxy you can rearrange. Use filters to
hide unwanted songs and adjust the axes according to your
www.magix.com

48 Interface – The layout of MAGIX MP3 deluxe MX
preferences.
Legend: Specify aspects/sound properties for the axes to sort through
the galaxy.
You can also adjust the size and background of the songs to improve
the track recognition.
Choose between 2 viewing modes - either circle or galaxy.
Position in the galaxy: If you zoom into the galaxy and move the visible
section, you can see exactly where you are in the galaxy via the small
rectangle.
The overview elements in Vision may be hidden. The button will then be
displayed gray. Clicking again will make the elements visible again.
Using vision
Play track: Double clicking a point (music track) in the galaxy plays back the
song.
Design galaxy: The criteria used to "build" the galaxy can be specified in the
legend (2 in the illustration). You can also specify different sound properties
(aspects) the x, y and z axes:
X axis: The aspect specified is stronger from left to right
Y axis: The aspect specified is stronger from bottom to top
Z axis: The aspect specified becomes stronger when the galaxy is enlarged
(zoom)
The titles in the galaxy are sorted and displayed according to the aspects
selected. Similar titles are displayed closer together according to the aspects
defined. "Reset" resets the axes to their standard aspects and sorts the galaxy
accordingly.
www.magix.com

Interface – The layout of MAGIX MP3 deluxe MX 49
Track info
s:
If you hover the mouse over a star that is also a song the info flag will appear
indicating the title of the song and the artist.
Click on a song to select it and display a flag with different functions.
Playback: Clicking on the playlist stops playback of the currently
highlighted track.
Display similar album: Selects 10 tracks similar to the selected track
and connects them with a yellow line to play them subsequently.
Display album tracks: Highlights 10 tracks of the corresponding
album and connects them with a green line to play them later.
Display track by this artists: Only tracks by this artist are displayed in
Vision, all others are hidden.
Fill list: Since vision "only" provides an alternative view of your music
collection, drag & drop may be used to add titles from the galaxy into a list to
be burned to CD, a portable player, or a playlist.
Filter: The filter function
from the tools list may be used to display only certain
songs in the galaxy.
Operation - Mouse and multi-touch
You don't have to rely on the mouse to control Vision - you can even use a
touchscreen!
Mouse Multi-Touch (Gesture) Action
Moving the mouse
without clicking
Moving your finger across
the screen
Info flag for the song directly
below or closest to your
finger
www.magix.com

50 Interface – The layout of MAGIX MP3 deluxe MX
Simple left-click Tap finger on screen once Selecting or unselecting
song
Info flag of song appears
upon selection
Use left mouse
button to doubleclick
Double tap with finger
Select and play song;
Crosslines and info flag of
song appear and are fixed
as long as a song is playing
Click on the
selected song using
the left mouse
button and move
Tap and hold your finger
on the selected track and
move it across the screen
Move selection;
Display info flag of song
currently located under the
mouse pointer
the mouse while
holding the left
button
Left-click into an
empty space of the
version, hold and
Press empty space in
vision with finger and
move
Moving card
move
Mouse-wheel
forwards/backwards
(+ and - on the mini
Move two fingers away
from or towards each
other on screen
Zoom in or out of vision
map)
Click the info flag of
the selected song
and drag it into a
playlist, for instance
Single-click with
right mouse-key
Click the info flag of the
selected song, hold it and
drag it into a playlist, such
as Burner, for instance
Tap finger on screen, hold
for several seconds and
Drag & Drop the selected
songs in burner, portable
player or play lists
Opens context menu
let go
Ctrl + single rightclick on a song
Ctrl + short tap with finger
on song
Clicked song will be added
to the selection
www.magix.com

Interface – The layout of MAGIX MP3 deluxe MX 51
To
uch mode
In touch mode, vision and all its most important features that function on a
touch screen are displayed. (Mouse and keyboard can also be used.)
www.magix.com

52 Interface – The layout of MAGIX MP3 deluxe MX
Transport console
Play previous title: If you would like to jump to a previous title in
the playlist, click on the double arrow pointing to the left.
Play/Pause: Start playback either by a double click on a song or by
clicking on the play button.
To interrupt playback, click "Pause". Click again to restart
playback.
Stop: Stops playback of music tracks or radio stations.
Play next track: If you would like to jump to the next track in the
playlist, click on the double arrow pointing to the right.
Record: The section "My music" and "Discover music online" opens
the dialog for analog recording (view page 102). This will allow you
to record e
You can start recording web radio in the "Webradio" section.
Note: You should use the Timer function in the web radio section.
Automatic Playlists: The dialog „Create Automatic Playlists“ (view
page 65) will open.
Show current tracks in the music collection: Click on the track
currently being played in the player console and it will be
displayed in the music collection.
verything you can listen to over your PC.
www.magix.com

Interface – The layout of MAGIX MP3 deluxe MX 53
Progress
bars (below)
Displa
songs. If multiple processes are running, you can use the arrows
on the status bar to switch between them. Click the X behind
the progress bar to end the corresponding process.
Play all songs at the same volume: Activate this feature to
adjust all songs to the same volume and increase your listening
pleasure. Clicking again removes the setting.
Audio effects will be opened following a click.
With auto crossfade you can insert transitions between songs.
Repeat play of single songs or an entire list: Mark a track from
the list and click on this button to have it play over and over
again. If you click on this button again, the entire playlist will play
through on a loop. To deactivate the repeat function, simply
click on the button again.
Random play: Press with button to activate random playback.
This way, the tracks will no longer be played one after the other,
but mixed for variation.
Volume
Using the round volume controller, you can move the fader to
adjust volume the way you please.
Mini mode
ys the progress of processes like import and scanning of
If you would like MAGIX MP3 deluxe MX to be
displayed as a small window, please change to Mini
mode.
The most important functions for playing songs are found here.
If you would like to see MAGIX MP3 deluxe MX again in full view, please
click on the small square between the "Exit" and "Minimize" buttons.
www.magix.com

54 Interface – The layout of MAGIX MP3 deluxe MX
Video monitor/visualizer
The monitor can be increased to full-screen size and offers different options for
visualization (e.g. visual effects selection).
Visual effects: Automatically generated animations produced from the
frequency information of each song.
Use the "+/-" buttons on the video monitor to select different types of
animation (algorithms).
Slideshow: This button opens directories containing photos or slides. The
images are shown one after the other as the song is played. The crossfade
times can be set in the dialog.
3 info: This option enables viewing of title information (ID3 tags) for the
ID
current songs in the video monitor.
Go to track: This button links the currently used visualization (slideshow or
visuals) to the track being played. This means that the visuals will be played
back the next time the track is heard.
Start/Stop slideshow: This option enables playback of photo files on the video
monitor or in the playlist as a slideshow.
www.magix.com

Interface – The layout of MAGIX MP3 deluxe MX 55
Keyboard shortcuts
File menu
Open options dialog Ctrl + ,
Print covers and lists Ctrl+P
Edit menu
Exclude title from the similarity analysis Strg + E
renaming F2
Delete Del
Select all Ctrl + A
Copy Ctrl+C
Ctrl + Ins
Cut Ctrl+X
Insert Ctrl+V
Shift + Ins
Copy into folder Ctrl + M
Create automatic playlists Ctrl+Shift+N
Create ID3 tags from file names Ctrl+I
Automatically number titles Ctrl+K
Search and replace ID3 tag Ctrl+R
Search Ctrl+F
Windows menu
Open video monitor Strg + F4
Help menu
Open program help F1
Program guide Strg + F1
www.magix.com

56 More useful functions
More useful functions
Import music into the database
Under "My Music" > "All Titles" is your MAGIX MP3 deluxe MX's Database. It
manages all music files saved on your computer in one clear and easy-to-use
archive. This means that songs will NOT be displayed in the database
according to their save locations, but rather according to what their ID3 tags
(view page 85) contain (e.g. title, author or album).
Tip: This information can be viewed and adjusted via the "Settings (view page
89)" dialog.
Click in the navigation bar on "All titles" under "My music" to display all songs
according to their track info. Let it be sorted by clicking on "Artist", for
example. All songs in the database will be listed according to artist.
Import from PC
1. To import all songs on your PC into the database, select "My music" ->
Import music..." (Alternative: Menu "File > Import folder"). The "Import" dialog is
opened.
2. Click the yellow folder symbol to navigate to the folder which contains the
song about to be imported. Select the corresponding folder and click "Open".
3. Set a checkmark next to "Include subfolders", "Monitor folder continuously",
"Display volume information" and/or "Share with all users" according to what
you want.
4. Next, click "Start" to add the songs to the database.
After this process is completed, these songs can be accessed via "My music".
Note: For larger music collections, adding the database entries and scanning
songs can take some time. The progress bar on the playback console
indicates how far along the process is at any given moment. Click the cross to
the right of the progress bar to stop importing as required.
www.magix.com

More useful functions 57
Import from portable device
1. Connect your portable device (e.g. an MP3 player or USB stick) to the PC
and click "Portable devices" in "Devices". Normally, MAGIX MP3 deluxe MX will
detect that a player has been connected and displays it here. If this doesn't
happen, click "Refresh".
Note: External hard drives are displayed under "My computer" > "My drives" (in
the Explorer).
2. Click on the device, and the contents will be listed in the device/play list
view.
3. Navigate to the folder with the music tracks that you would like to copy to
your PC and import into your MAGIX MP3 deluxe MX library.
4. Via drag & drop, you can place them into the database area or to "My
Music" or select in the context menu of the music folder "Import in music
collection". An import dialog will open.
5. Specify the folder in the dialog where the files should be copied on the PC.
Click "OK" to start the process.
Tip: You may also playback and listen to songs on your portable player directly
from here.
www.magix.com

58 More useful functions
Import m
usic CDs
To import a music CD into your database, put the CD into your
drive and select the "Import CD" button. The "Import CD..."
dialog opens.
CD set
that consists of multiple CDs (also double albums, etc.). All of the CD's titles
will be named so that they are played back in the correct sequence from the
first title of the first CD up to the last title of the last CD. During the copying
process, you will be asked if the CDs belong together as a set. All CDs that
you insert during the copying process will be titled sequentially and assigned,
depending on their relation, to the database.
Online query to complete track info:
Query track info: If the content of your CD isn't automatically recognized
(audio book): Activate this option if you want to copy an audio book
(such as artist, track name, etc.), then you can query important information
about the CD online. If you can't find your CD in the database, then you can
enter it yourself and then upload it to the database so that other users can
access it.
www.magix.com

More useful functions 59
Enter track info manually:
Change artist/album: If all the songs in a list are marked and you click on
"Change" you can complete the information such as artist, album, genre and
year for all tracks.
If only one track is marked, you will open the properties dialog for that track
only. Here you can complete the info such as track name and rating. Or for a
multiple selection you can choose "Single track" in the properties dialog.
Save location: Select the location where you want to save your music.
Encoder: (view page 99) Select the quality of the imported files and which
encoder
you would like to use. In general, the higher the kBit number, the
better the quality, but also the more memory required for storage.
Start import process:
Start: Starts the import process. The songs will be copied according to your
settings onto your hard drive and in the folder with your music collection.
Import data CD
1. Insert the data CD into the drive. This will then be displayed in "Devices" and
all folders will appear when the device is viewed.
2. Select "Import" in the context menu. The dialog "Select destination folder"
will open. Specify the folder where the files should be copied.
If not all folders on the CD are to be copied (preset), then select the particular
folder you would like to transfer to the hard drive. Next, click with the right
mouse button to open the context menu, and then select "Import". The dialog
"Select destination folder" will open.
3. Click "OK" to begin copying.
Note: If more than one drive is present and multiple CD/DVDs have been
inserted, then a selection dialog will appear for you to select the drive for
importing.
www.magix.com

60 More useful functions
Listen to "My music"
Once you have imported (view page 56) songs into the database, then they are
ready to be enjoyed.
1. Click in the navigator under "My music" on "All titles" and the display will
show all songs in the database.
2. Double clicking on the corresponding song starts playback. The songs will
be played in sequence until the end of the list.
Press with button to activate the random playlist. This way, the songs
will no longer be played one after the other, but mixed.
If you only click this button once, the song currently playing will be
repeated continuously.
If you would like this entire playlist to continue on repeat, click the
button twice. Now the list will continue to be played until playback is
stopped manually.
Tip: If a portable player such as an MP3 player is connected, you may play
back the songs it contains here.
Filter tracks
With MAGIX MP3 deluxe MX you can keep track of your collection even in large
databases with the help of the search functions and the filters enabling you to
find the songs you want to hear.
h through "My Music" in realtime
Searc
Enter a search query in the navigation area under "My Music" and MAGIX MP3
deluxe MX will scan all of your imported tracks. All songs that contain the
keyword in the track info or comment will appear in the display.
www.magix.com

Searc
h your hard drive through "My Computer"
More useful functions 61
You can also search for tracks on your hard drive under "My Computer" in the
navigation area. Only the selected folder and its subfolders will be browsed.
Filter
You can choose between two filter views - vertical and horizontal. There are no
differences in the functions.
Filter according to genre, artist and album
One click on the arrow of a filter area opens the selection menu for the filter
that should be applied. The minus button closes the filter area. The plus button
creates a new filter area.
Compare tracks
MAGIX MP3 deluxe MX is able to analyze numerous sound properties of songs
in your music collections (e.g. tempo, music style and mood analysis).
It uses
the mufin similarity analysis which you can activate for new songs in
options (view page 115). Songs that are already included in the music
collection are
scanned for similarities via the menu "Edit > Similar tracks >
Music collection.
You can also view the recommendations (view page 61) for a track.
Search
W
for similarities (view page 63) in your track list.
ith vision (view page 47) you can sort your music
collection according to
audio characteristics.
On top of that you can create auto playlists (view page 65) that will combine
gs matching the initial track and thus your current mood.
son
www.magix.com

62 More useful functions
Re
commendations
Rediscover your music collection and get to know new music with mufin.
Songs that are similar to a starting track can be displayed from your music
collection or via mufin.com.
Display similar songs: Click this button to open the
window with similar music tracks. It appears below your
music collection.
Similar music found in your collection
1. In the display, select the song which should act as a starting point for the
similarity search.
2. Activate this button to receive
recommendations from your own collection.
Similar titles will be listed below.
The percentage value below the song description shows you how similar a
song is to the starting title.
Click on the title of a recommended tune to display and select it in the
complete list. From here, the songs may be added via drag & drop onto the
burner, portable player, or into a desired playlist.
By clicking on the song it will start to play.
Similar music from mufin.com
1. In the display, select the song which should act as a starting point for the
similarity search.
2. Click the "from mufin.com" button, to receive
recommendations from the mufin.com page
Similar titles will be listed and can be played and purchased (view page 62).
Hint: To play similar songs, simply click on the cover or their placeholder.
www.magix.com

Bu
y songs
More useful functions 63
When you find titles similar to the starting song from mufin.com, you can also
buy some tracks right away.
Songs with this button may be purchased via the online
shop.
Click to open the browser area in MAGIX MP3 deluxe MX
with the Internet page for the selected track.
Note: All prices and instructions about how to buy from the respective online
shop are available from the site's respective help/FAQ.
Sort list according to similarity
The "Similarity" sorting criterion allows songs to be compared to a starting
song in your music collection.
Here's how it works:
1. Click in the navigator under "My Music" on "All titles" and the display to the
right will show all songs in the database.
2. Click the song in the "Similarity" column to be use as the starting song. All
titles now are listed after the starting song according to similarity to the original
title.
If you would like to display the music collection again without similarity
relations, click the initial title in the "Similarity" list again.
Repeat step 2 if you would like a different song to be the initial track.
www.magix.com

64 More useful functions
Playlists in detail
If you would like to compile a list of certain songs for playback from your music
collection, then create a playlist. This can be accessed again at any time,
played, or burned. Or you can use dynamic playlists, which display certain
songs according to specific criteria and which may also be burned.
Dynamic playlists
In addition to the playlists you create yourself, MAGIX MP3 deluxe MX creates
dynamic playlists automatically:
Most recently played tracks
Most recently added tracks
Most often played tracks
Last downloaded tracks
The dynamic playlists are created according to your listening behavior,
according to new songs that have been added to the music collection, etc.
You can directly influence the "My favorite tracks" playlist as all favorite songs
of your database are listed here.
Create and name a new playlist
1. Crea
te playlist: In the navigation under "Playlist", add a new, empty playlist
by clicking "New playlist" or by dragging & dropping selected songs onto this
button.
A new, empty playlist named "New Playlist" will be added to "My Playlists". If
you right click on this playlist you can select "Rename" in the context menu.
Please type in a suitable name and press "Enter/Return" on the keyboard.
www.magix.com

More useful functions 65
2. Fill playlist: You
can always display all of the songs in the database via "My
music", and a playlist of desired titles can be compiled by dragging &
dropping onto the name of the playlist or into the playlist displayed on the right.
Note: If songs in a playlist are deleted or added, the playlist will be saved
automatically.
The sequence in which the songs were added to the playlist will be reflected by
their positions (positions are shown to the left). The position display is shown in
the first line on the far left. If you would like to change the sequence of the
songs in the playlist, simply move the song via drag & drop to the desired
position.
Create automatic playlists
You can also create playlists via "Edit > Playlists > Create playlists
automatically" that are filled automatically.
You can also open the dialog with these buttons in the
"Playlist" area as well as the player console.
Step 1 - Playlist length: Choose the length of the playlist before creating it.
Step 2:
Similar to track: A playlist with songs that sound similar to the initially selected
track can be created. To do this you first need to select a track and then click
on "Auto-Playlists". This track will appear in the dialog under "Match to
selected track". Click on this button to create a playlist under "mufin Playlists".
www.magix.com

66 More useful functions
Match moo
d: Click here to select the mood that should be used for
automatically creating the playlist. A playlist under "mufin Playlists" will be
created based on this.
Advanced: Click on "Advanced" to open the further option settings.
Match track: Enter the scheme for the playlist; "Similar to first track" will
attempt to make all of the songs a similar style. "Similar to previous song"
makes the playlist a little more diverse. "Similar to previous song with change"
makes a very diverse playlist.
Match mood: Check here if you would like to create a new playlist with
different songs every time you click.
Exclude track: Selects songs that are too short or long or that have been
played recently and should be excluded.
Step 3: Click "OK" and the created playlist will appear under "Playlists > mufin
playlists". Right click on a playlist to open the context menu. You can change
the name by selecting "Rename".
You can playback your playlists any time you want, or adjust them and burn
them as an audio CD (view page 33, view page 69).
Favorite songs
Enter a song as a favorite - this may be several songs of
course - so that these are listed in the "Favorite Tracks"
playlist. These may be played back here and burned to an
audio CD (view page 33, view page 69).
Note: If the column with "Favorites" is not displayed, right click on the track in
the list and select "Favorites".
Select the desired song and click the heart in the "Favorites" column to select
a song as a favorite song. Or drag & drop the songs onto your list of favorites.
Go to the navigation and click on "Playlists > Favorite tracks". The playlist will
open on the right.
www.magix.com

More useful functions 67
Burn play
lists
If you want to burn a playlist, then proceed as follows:
1. Open the corresponding playlist so that the songs are displayed in the list.
Right-Clicking opens the play list section.
2. Click the "Burn" button above the tracks in the playlist to get started. Click
on "Burn" to open the selection dialog (view page 67) where you can choose
what kind of
media you want to burn.
3. Put a blank disk in the burner and choose the type of data:
4. Choose the options you would like and start the burn process.
Warning!If the playlist contains more than 74 minutes, only so many songs will
be burned onto the CD until this maximum has been reached.
Burner in detail
Here you can learn all about the burn dialogs and functions of the program to
create audio CDs.
Selection dialog
The following dialog will open when you click on "Burn":
www.magix.com

68 More useful functions
Tip: If you hover over buttons with the mouse, an explanation of the functions
will appear.
Put a blank disk in the burner and choose the type of data:
Data CD: Click here if you would like to back up your songs on a CD. The file
formats will not be changed. The MAGIX Speed burnR burning program will
open.
Data DVD: Click here if you would like to secure large amounts of data on a
DVD. The file formats will not be changed. The MAGIX Speed burnR burning
program will open.
Audio CD: You can create an audio CD directly in MAGIX MP3 deluxe MX. To
find out more, read "Burning audio CDs (view page 69)".
Note: For detailed instructions regarding burning with MAGIX Speed burnR
simply access the program's help file by pressing "F1".
Choose the options you would like and start the burn process.
Used space indicator in the burner
You can find the used space indicator under "Burner" in device/playlist area.
The used space indicator supports you in determining the
size of the burn list. Depending on what is active, you can
see how much space is available on the blank disc.
A
ctivate "Audio CD" if you would like to burn a CD for playback in a CD player
later. You can burn the fewest titles here: audio CDs can contain 74 minutes
of music.
If you would like to burn a data CD, activate "Data CD". If you've made a list
for an audio CD and then switch to a data CD, you'll see that the display goes
back to zero, meaning you can add many more songs.
If you would like to burn a data DVD, activate "DVD". Most songs fit on a DVD.
A DVD with MP3 songs can hold up to 80 hours of music, depending on data
compression.
Hint: You can determine which burn process you would like to start in the
dialog appearing after you have clicked on "Burn".
www.magix.com

More useful functions 69
Burn audio CD
To compile songs for an audio CD and to burn them to disc, please proceed
as follows:
1. Select songs in your collection and place them into the "Burner" in "Devices"
via drag & drop. A burn list will appear in the background.
2. You can open the burn list by clicking on "Burner". The burn list will show up
in the display to the right.
You may switch to "My Music" and add more songs.
If you want to delete a song from the burn list, select it with your mouse and
press "Del".
3. To the right of the burn screen, set the settings for an audio-CD to be
created by selecting it in the flip menu. Used space indicator will appear in the
display under the medium.
Note: Because you are burning an audio CD, playback length is limited to 74
minutes. The playback length is displayed in the burn list: Number of titles,
current playback duration, space remaining.
4. If the burn list is complete, insert a blank CD into the burner.
5. Click "Burn" to open the burning dialog.
6. Select the audio CD burning settings from the dialog and start the burning
process by clicking on "Burn".
www.magix.com

70 More useful functions
Burn dialog
Write speed: Depending on your CD-R drive, you can burn at different speeds.
The higher the speed, the higher the risk of an error such as "buffer underrun". However, most modern CD-R drives burn CDs at quadruple speed
without any problems.
Write options:
Simulation writing: If you want to avoid possible problems, then let the
software run a simulation of the burning process. This allows you to examine
problems or system errors without wasting blank discs. If the simulation was
successful, then just go ahead and start burning!
tivate "Burn Proof": This process hinders buffer under-run errors. Leave this
Ac
option active to make sure that errors don't occur due to an empty buffer.
Note! Once the burning process has been started, it cannot be interrupted. If
the writing process is interrupted because the system is not fast enough, the
CD will become unusable.
Closes the dialog without burning.
www.magix.com

More useful functions 71
Start burn process:
Clicking on this button starts the burning
process.
MAGIX MP3 deluxe MX first scans all available CD-R drives. If more than one
burner is connected to your system, you will be prompted to select one of
them for the burn process.
Create a data CD/DVD & Blu-ray
To compile songs for a data CD/DVD or Blu-ray and to burn them to disc,
please proceed as follows:
1. Select songs in your library or from the Explorer view in MAGIX MP3 deluxe
MX (MP3s, WMAs, etc) and place them into the "Burner" via drag & drop. A
burn list will appear in the background.
2. You can open the burn list by clicking on "Burner". The burn list will show up
in the display to the right.
If required, you can add further files.
If you want to delete a song from the burn list, select it with your mouse and
press "Del".
3. To the right of the burn screen, set the settings for the burning process by
selecting it in the flip menu. Used space indicator will appear in the display
under the medium.
the burn list is complete, insert a blank medium into the burner.
4. If
5. Click "Burn" to open the burning dialog.
Note for next steps: The burning process for simple data CDs or DVDs opens
the MAGIX MAGIX Speed burnR burning dialog. For detailed information about
the burning program, please refer to the program's help file by pressing "F1".
www.magix.com

72 More useful functions
Short description MAGIX Speed burnR
The first step always opens the MAGIX MAGIX Speed burnR burning program.
On the left side of the burn dialog, you can navigate through your computer's
folders, while on the right side of the dialog, you can view the current burn
configuration.
If you have changed your mind about burning the files, select the ones you
want to remove and press "Del".
You can also add files by selecting the corresponding files in the left window
and adding them to the burn list via drag & drop.
When you have compiled the contents of your future disc, click "Next".
This dialog specifies the burn speed and sets burn options to be included in
the process. When selecting the burn speed, please remember that older
burners can sometimes cause problems if a faster burning speed is selected;
media burned at a higher speed can fail to be read properly on drives that do
not support higher speeds.
Begin the burn process here by clicking "Start burning".
Copy CD
If you would like to copy a non copy-protected CD, then proceed as follows:
1. Place the original CD (source) into the drive.
2. In the "File" menu select "File" > "Copy audio CD".
The scanning process of the CD will start. As soon as it is over, you will be
asked to place a blank CD into the burning drive.
3. Place a blank disc in your burner and click on the "OK" button.
The burning dialog will open.
4. Adjust the write speed and write options if needed.
5. Start the burn process here by clicking on "Burn".
An appropriate message will appear once the burning process is over.
www.magix.com

More useful functions 73
Portable devices in detail
With MAGIX MP3 deluxe MX you can transfer songs and playlists to your
portable MP3 player. You can also transfer files from a portable player onto
your hard drive.
The contents of a portable device will be shown to the right in the program
window in devices/playlists area.
Copy to portable
Copy individual tracks:
1. Connect the portable device. If it is not automatically shown under "Device
> Portable devices", click on "Refresh".
2. Now you can transfer songs from your database as well as files in the
Explorer view to your portable player by selecting and drag & dropping
them. The data is transferred immediately.
Copy playlists:
You also can use "Drag & Drop" to transfer a playlist to your portable device in
"My playlists". A folder named Playlists is created at the upper level (Route)
which also contains the corresponding music tracks. The file name is extended
by a number which ensures the sequence of the songs is retained.
Settings for portable devices
By right-clicking on the portable devices you can change the Settings of these
devices:
Activate/deactivate converting (songs can be converted to a pre-set format
during transfer to the PC.)
Determine encoder settings (in which format and in which quality should the
songs be created?)
Settings for copy processes in relation to names and playback order
By using the folder and file context menus in the devices/playlists to the right,
you can:
Import selected songs
Refresh the view if you have transferred to or deleted data from a different
location
Select all folders or files in the current view
www.magix.com

74 More useful functions
Insert files from the clipboard
Delete or rename folders and files
Create new folder
Webradio in detail
The "Web radio" area allows you to listen to web radio stations, record them,
and more.
Play web radio stations
Tip: In order to listen to web radio, you must have an Internet connection. The
connection should be fast enough to be able to transfer the data rate,
otherwise reception errors may occur
1. To play a web radio station, simply click on "All stations" in the "Webradio"
area. In the main window, the list of radio stations assigned to various
categories now opens.
2. By double-clicking this folder, you'll see a list of all web radio stations that
have been assigned to this category.
3. By double-clicking on the station of your choice, a connection is established
and you'll be able to hear the current radio program.
Tip: Thanks to the useful pause function you don't have to miss anything
played on a radio station. If you would like to pause a radio station when you
have to leave your desk, then simply click "Play/Pause" on the play console
and playback will be paused, but the radio station will be recorded in the
background.
Click on "Play/pause" again to restart playback exactly where you paused
playback.
Using a timer to record web radio stations
MAGIX MP3 deluxe MX includes a feature that enables you to record web radio
stations.
Note: Some web radio stations only broadcast at certain times. This means
that before recording you should check if and when a station can be received.
Furthermore, it could also happen that the URL of the station (the address from
where the radio stream is accessed) changes. This should also be checked to
ensure that the recording is successful.
www.magix.com

More useful functions 75
1. Switch
record.
to the web radio section and select the station you would like to
2. Click on the "Record" button. A dialog will open allowing you to
record from web radio stations.
3. Enter all of the required settings for the timer:
Star
t of recording: Enter the desired start time and the duration of the
recording.
Time Control: If you want to record using a timer, then this check box must
be activated.
Repeat: Set different criteria for recording regular broadcasts here.
Use recording list (request list/exclude list): In the record list, you can set
different requests or exclude criteria which will be applied to the timed
recording. For example, you could choose to record only certain songs or
artists.
4. Once all of the settings are adjusted correctly, click "OK" to add the timer.
The corresponding timer is displayed under "Planned recording timer" and may
be adjusted or stopped at any time. Active recording is indicated by the red
click in front of the timer. If the recording is not activated, then the clock will
remain gray.
www.magix.com

76 More useful functions
5. The finishe
d recording appears in "My Music -> My Recordings -> Web
radio recordings". Double clicking the entire recording enables the individual
sections of the recording to be viewed.
Note: The entire recording is located in the database, but individual sections
are not. Individual titles may be added to the database via drag & drop onto
"All Titles". The "Cut titles" dialog (view page 80) will open beforehand for you
to edit the start and end of individual titles.
Advanced
Click the "Advanced" button if you want to adjust the following settings:
Save location: Specify the location where the copies should be saved on the
hard drive.
Cut songs: If you activate "Cut at ID3 tags", then the recording will be cut if
the station broadcasts ID3 tags. This reduces the amount of work you need to
do and splits up your webradio recordings. Activate "Place title markers at ID3
tags" and only markers will be placed at the locations of the ID tags to make it
easier to cut them later. It is possible that the ID tags are not regularly
broadcast, and the result is that material is missing from the beginning and end
of a program. IF only markers are set, then you can adjust these before
cutting.
Transfer limit:
Set a data volume limit in case you use Internet access which
has a certain data limit. When the specified limit is reached, the recording will
be interrupted.
Tip: If you deactivate this option, you can set up timer lists to record irregular
or sporadic broadcasts without having to reconfigure the timers every time.
www.magix.com

If
you wish to change the timer settings, simply click on the corresponding
More useful functions 77
timer and then on the "Properties" button. The configuration dialog for timecontrolled webradio recordings opens, where you can enter your new details.
Commands
Show log: The log lists all the songs that have already been recorded.
Change existing radio stations
To change the settings of an already existing station (URL, etc.), right-click on
the station and choose the option Settings from the context menu.
Use this dialog to adjust the settings which have changed and confirm by
pressing "OK". Using "Scan", you can check if the station is ready to be
received and if the data entered is correct.
Save radio station as favorite
To save your favorite radio station as a favorite in order to be able to find it
faster, proceed as follows:
1. Select the corresponding station.
2. Choose the option "Add to favorites" from the context menu with a right-
click. The station will now be listed in the main radio stations view in the "My
favorites" folder.
Mark station as important
station at the top of the list. This way, you mark it as important and it will
Add a
always appear at the top of the current list. This function can be used as an
additional way of creating a preference list in order to be able to find a station
quickly.
If you want to undo this status, simply click on the symbol again.
Note: If you want to make update of the web radio stations, this property of
the station will remain, and you will not have to mark the station again.
www.magix.com

78 More useful functions
Edit menu / Context menu web radio
Right-clicking on a folder or a radio station opens a context menu with various
options.
Properties: You can access a station's settings dialog here.
Title: This is where the name of the station appears. You can also give it your
own name.
Genre/Type/Transfer rate: Here, the music style (genre), the transfer format
(e.g. MP3 or WMA) and the transfer rate of the station are specified. The
higher the transfer rate, the better the quality and the higher the demand on
your data line.
URL: The address, from which the web radio stream is opened, can be
entered here.
Scan: The program checks if the set stations can be received. If this is not the
case, check the file type first (MP3, WMA, OGG Vorbis), then the transfer rate
and, lastly, the URL of the station. The name of the station and the genre are
automatically added with this function.
Add to your favorites: The station will be added to your favorites so that you
can choose it from your "favorites" list.
Open website: Click here to open the Internet page of the selected radio
station.
New station: To add new stations, open this dialog and enter the Internet
address of the web radio station to start scanning it.
New file: Create a new file for your radio channels.
Forward station to MAGIX: If you cannot find a web radio station via the
"Update" function from the ones that exist, you can send it to MAGIX. If you
find this station via "New station..." function and update it into your list, activate
"Forward station to MAGIX".
Load station list: Here you can load station lists already saved on your
computer back into the station list of your web radio, so that it can show up
and be heard here in the future.
Save station list/Save station list as...: If you have searched for some web
radio stations by yourself, you can save them as lists in order to be able to
categorize and reopen them at any time.
www.magix.com

Searc
h: A search window will open, where you can search for stations or
More useful functions 79
specific station properties. If several properties are selected, then MAGIX MP3
deluxe MX will list only stations, which contain both properties.
Web radio recording without timer
When you want things to go quickly and you want
to start recording the selected web radio station
immediately, you can use the transport console to
start recording. Clicking it again stops it. You can
then find the recording in "My Music > My
Recordings >Web radio recordings".
The following dialog will open for the record options:
In "Duration of recording" please choose whether you would like to stop the
recording manually or whether you would like it to be stopped automatically at
a specific time.
Save location: Specify the location where the recorded file should be saved on
the hard drive. (You can then find the recording in MAGIX MP3 deluxe MX in
"My Music > My Recordings >Web radio recordings".)
Track editing:
www.magix.com

80 More useful functions
If yo
u select "Split track at ID tag", the ID tags are used as a separation point
and a new track is started after each broadcast ID tag. We only recommend
this setting if you are sure that the radio station positions its ID3 tags precisely.
If they are not precise, there may be parts of the track missing or the end of a
track may be at the start of another.
We recommend the feature "Set title marker at ID tag" This way markers are
only set at the locations where ID tags are broadcast by radio stations.
Markers are now set in the entire recording which may then be moved
manually if a track start or end accidentally has been cut. This allows you to
save individual songs.
Hint: You can close the "Webradio recording" dialog by clicking on "OK"
without stopping the recording.
Click here to create a timer-controlled recording. A
dialog will open for the timer settings.
Cut tracks
You can edit recordings (for example webradio recordings or songs) in the "Cut
track" dialog. Using ID3 tags you can, for example, let all song titles from the
recording be recognized and then individually saved.
You can open the "Cut tracks" dialog either by clicking on the "Edit" button, or
through the context menu (right click) of a song.
www.magix.com

In the
Overview, depending on how much you zoom in, you can look at the
entire recording with all objects in. By clicking on an object, the playback
marker in the Editor will jump exactly to this object. This way you can avoid
annoying zooming in and out and long searching from one object to another.
In the Editor you can actually take to work on the song – everything from
listening to editing the object, to saving it.
Adjust object borders using object handles
In web radio, it can happen that the ID3 tags do not correspond to the start or
end of the title, and object boundaries do not match song boundaries. Such an
object (it will appear orange in the view) can be activated/selected and
corrected.
Every object has handles. By using them you can
move the boundaries individually. For example, if a
song begins a few seconds after the object start,
just move the corresponding handles to the right.
More useful functions 81
If you change the object boundaries using the handles, only the object
boundaries of the selected object will be changed. The previous or next object
will keep its original object boundaries. This correction method produces small
objects (appearing in gray), which will be displayed as deleted.
Correcting object boundaries using the playback marker
If
the object boundaries are adjusted using the playback marker, not only the
boundaries of the selected object will change, but also the boundaries of the
objects surrounding it.
Move object boundaries by the same value
If you notice that all markers have to be moved by the exact same value,
simply click on "Apply to all the following titles" and all markers are then moved
by the corresponding value. All markers will be moved by this value. This will
save you some time.
www.magix.com

82 More useful functions
Save trac
k as audio file in MP3 format
After your object has been edited precisely, beginning and ending the way you
want it to, then you can save it as an MP3 anywhere on your hard drive by
clicking on "Save selected track".
Recognize all tracks automatically
Under the option "Advanced >>" you will find "Recognize all tracks
automatically". This function will recognize all titles in the recording using ID3
tags and marked as single tracks. You can then save these by pressing
"Export" in the context menu. This method of saving tracks lets you select the
format: MP3, OGG Vorbis, Wave, etc.
Buttons
Split objects: If you would like to split an object at a certain point,
you can do so by placing the playback marker at this point in the
track, and clicking this button.
Delete objects: If you would like to delete an object, click on this
button.
Merge objects: Using this function you can merge two objects
together: Select the object that should be last and click on this
button. The selected object will be merged with the previous object.
Move object boundaries: Using this function you can adjust object
borders with the help of the playback cursor. Start playback and
click on this button when you have reached the position where the
object boundary should be. This work mode produces no new
(interspersed) objects. The object boundaries for both neighboring
objects will be moved.
Determine track details using audioID: Using this button, the
Internet audioID database can be accessed to get track information
for the selected object. In the case of web radio recordings, track
information is available right away thanks to the ID3 tags broadcast
along with songs.
Change playback mode: Usually, the playback cursor moves along
the length of the track from left to right. Clicking this button will
result in the cursor remaining in place, while the track will slide from
right to left.
www.magix.com

More useful functions 83
Sound effects
Audio FX
MAGIX MP3 deluxe MX's sound effects are found on a separate dialog. Effect
settings in the audio FX dialog are also written to the CD during burning or are
included during conversion.
Hint: If you don't want to include the audio effects in the music when
encoding, you can select the ignore audio effects option from the Encoder
settings dialog.
10 Band EQ (Equalizer)
The 10-band equalizer subdivides the frequency spectrum into ten areas
(‘bands’) and equips them with separate volume controls. This way it is
possible to create many impressive effects, from a simple boosting of the bass
on through to complete distortion. If low frequencies are boosted too much,
the overall sound level is heavily increased which may lead to distortion. In
such a case you should use the volume controller at the center to reduce the
total volume.
Slider: Each of the 10 frequency bands can be adjusted using the 10 volume
faders.
Presets: The EQ has a selection of defaulted presets which can be chosen
from a flip menu.
Master level
Here you can control the master volume after all effects have been included.
Limiter: Activating the “Limiter” function prevents overmodulation.
MAGIX Virtual Headphone Surround
This effect simulates the three-dimensional Surround effect on any set of
stereo headphones. Realistic sound diversity and cinematic effects put you
right at the center of it all, even if you don't own a 5.1 surround system.
You can move around the ball in the graphic in order to adjust the position of
the listener in the room.
With „Room size“ you can set three different room sizes.
“3D on/off” switches the surround effect on/off for comparisons.
www.magix.com

84 More useful functions
Output Maximizer (Compressor)
The output maximizer is a compressor, i.e. an automatic, dynamic volume
controller: Volume of a loud section will be lowered and volume of muffled
sections will be raised. Processing is carried out using a “look-ahead” method,
similar to high-quality studio appliances. There are no peak over-modulations
or other artifacts, as the algorithm can never be ‘surprised’ by sudden level
peaks. The effectiveness of the compressor can be adjusted by using the
slider.
Presets: This preset setting automatically sets the entire material to an
identical volume level. The volume control knob is no longer required. You can
use this function to equalize greater volume differences within a song. The
Leveler presets adjust the volume within a music track. The Maximizer presets
increase the volume of the music track further.
Note: To balance volume differences between different songs, use the "Volume
adjustment " function in the effects menu.
Stereo FX
The Stereo FX Processor allows you to reposition the audio material in the
stereo tracks. If stereo recordings sound unfocused and undifferentiated, an
extension of the stereo base-width can often provide better transparency. This
can be achieved using the slider from the leftmost position (mono) to the
rightmost (enhancing) position. To restore the original stereo width, reset the
controller to the center position.
Brilliance enhancer
This high-end audio tool can, for example, reinstate losses that have happened
to high frequencies during MP3 compression or on old records. As opposed to
the Equalizer, which only raises the available frequencies, the Brilliance
Enhancer generates new overtones from the material available and really
refreshes the sound.
DirectX plug-in insert
With the help of this module you can use Microsoft's DirectX-compatible plugins for processing effects in MAGIX MP3 deluxe MX. This allows you to use, in
addition to the effects integrated in the program, almost any effect algorithm
from other producers.
www.magix.com

Re
verb/Echo
Files and their meta data 85
The strength and sound characteristics of reverb/echo can easily be set by
adjusting the sensor field using the mouse. The presets provide a preconfigured selection of reverb/echo variations.
Automatic Volume Adjustment
This function raises or lowers the volume of all objects to the maximum
level. The total volume of the titles is normalized, i.e. "leveled".
Tip: Volume fluctuations within a song can only be removed with the leveler
setting of the output maximizer in "sound effects".
Files and their meta data
Additional information can be saved for each file, such as music and image
files. This extra information is called meta data. Referring to MP3 files they are
called ID3 tags. Here you can enter the name of the artist, the album, year of
publication, music genre, etc.
As MAGIX MP3 deluxe MX uses a database where all music files are listed
according to their ID3 tags (fig. 1) it is imporant that all ID3 tags are correct
and complete.
In addition to manual adjustment (view page 89), MAGIX MP3 deluxe MX
comes with
two automatic functions (view page 85) for changing ID3 tags -
audioid and freeDB.
www.magix.com

86 Files and their meta data
Adjust track information with audioid and freeDB
audioid and freeDB are two methods for completing the meta data of music
tracks (ID3 tags for MP3).
audioid is suitable for unknown single songs that have to be checked for
fingerprints one after the other and are compared to fingerprints stored in the
audioid database. If two fingerprints correspond, the missing meta data of the
song is completed.
freeDB is intended for complete albums. If you convert an audio CD using
MAGIX MP3 deluxe MX, the track information of the album is acquired from the
freeDB database. If the album cannot be found in the freeDB database you can
also add the data yourself to compete the database (view page 88).
Search track info (with audioid)
If the track information for one or more tracks is incomplete or totally missing,
then you can use MAGIX MP3 deluxe MX to search for it in the
audioid database.
Select a song and click "Search track info (with audioid)" in the "Edit" menu.
The properties dialog will open and the corresponding information will be
determined and listed as a recommendation (No. 1 in illustration).
Use both nav
igation buttons to move through the suggestions.
www.magix.com

C
lick on "OK" to confirm a suggestion. This saves the new ID3 tags for the
Files and their meta data 87
song and MAGIX MP3 deluxe MX will display the track correctly in the window.
The songs and their new ID3 tags are displayed in "My music > audioid
results" under program start.
If you've selected several tracks and have searched for data, you can use the
arrow buttons to toggle between them (No. 2 in illustration) to select the
correct result from the proposals.
Checking the box searches alternatives for all affected ID3 tags.
Uncheck an ID3 tag to exempt this data and not display the
recommendations. This setting applies to all songs in the database
(global).
The option "Online database" specifies that, while searching, the first
recommendation on the list is selected and the missing data added. Please
activate "Automatic selection while searching". However, we don't necessarily
recommend this setting as there may be a few "exceptions" among the "finger
prints" which may lead to unprecise data.
Find album or CD track info online (freedb)
If you copy an audio CD on to the PC (view page 24) you will find the "Request
track" button in
the "Import CD" dialog. Clicking completes the missing meta
data and you can convert the meta data into the new format.
www.magix.com

88 Files and their meta data
You can also
you use this feature to check the track info of the MP3s in your
collection.
1. Right click on a marked song to open the context menu.
2. Select "Album online query/send > Search for album or CD track info online
(freedb)" The freedb dialog will open. All albums saved in freedb that contain
this track will be listed.
3. Clicking on the album will show a list of all the tracks on the album.
4. If you have chosen the right album, all of the track info for the album will be
transferred to your music collection. Click on "Transfer".
Send CD track info to freedb
With MAGIX MP3 deluxe MX you can participate in FreeDB database's
expansion. You can transfer the metadata of your CDs to the FreeDB
database.
Hint: This process is only possible with audio CDs! The music tracks must be
in CDA format (*.cda) on the CD.
In this dialog
you must enter all the track information. Then click on "Submit" to
start transfer. From this point on the information will be available on the FreeDB
www.magix.com

Files and their meta data 89
database an
d every user of this service can find the correct files for these ID3
tags.
Adjust file properties manually
There are some possibilities to set ID3 tags manually.
Properties of... (ID3)
If you want to check a music track for its properties or make changes, you can
view the already available information and add more via the "Properties" dialog.
Open the dialog by right clicking on an audio track. Select "Properties" from
the context menu.
You can use the function "Search for track info online (mufin audioid)" (view
page 86) to complete the ID3 tags automatically. This option opens the
properties di
alog.
Contents: In this tab you can find the most important file properties. You can
change ID3 tag information simply by entering it here.
www.magix.com

90 Files and their meta data
Especially in
teresting is the ratings system for your songs: 1 star = not so
great, 5 stars = fantastic. This information can also be displayed in a further
list. Right click on the list header and then place a check next to "Rating".
Each MP3 file can also feature an image by adding an „image as cover“. (view
page 97) Since the picture (JPEG image) is saved directly in the MP3 file, it
ldn't be too big (1 MB max.). "Insert Storage Space" adds the picture
shou
from the clipboard if there is one available there. You can select an image from
a folder via "Load Image". "From album" adds the cover from the clipboard,
that was stored there e. g. after an Amazon cover search.
The button "Replace in all files" makes sure that changes are applied to all
selected files to correct the artist or album name.
General: Further general properties of the file are displayed here, i.e. size,
modification date, etc. These details cannot be changed.
Advanced ID3 functionality provides further input fields for ID3V2 standards.
Use this button to switch to the next/previous file in the list. If you are
searching for track info for several tracks, you get to the next track, by
selecting the right track from the suggestions.
Tip: You can also select multiple songs and open this dialog. Use it to edit
genres etc.
If you have selected multiple tracks from an album and then open the
properties dialog, only the properties which are valid for all the songs on an
album will be displayed : Artist, Album, Genre, Year and Comment. If you make
changes here they will be applied to all tracks.
If
there are multiple album covers they will be displayed one after another, if
you drag the mouse over the cover view. Select a cover for all tracks by
clicking on the desired cover and then clicking "OK".
www.magix.com

Files and their meta data 91
Change ID3 tags via the database
Hint: This function only is available in MAGIX MP3 deluxe MX.
It's also possible that many titles in the database feature incorrect ID3 Tags,
e.g. artist, album, year, etc. These properties may be adjusted by dragging and
dropping the tracks into the correct database entries.
Proceed as follows if you would like to change an entry, e.g. the artist name:
1. Go to "My Music" and then "All Tracks" via the navigation.
2. Activate the "filter" in the toolbar to the right.
3. In the filter section, in the central column "Artist" go to the desired name.
For example "Alanis Morissett" and "Alanis Morissette".
4. Now drag the incorrect entry "Alanis Morissett" via drag & drop to "Alanis
Morissette" (spelled correctly).
The incorrect entry in the list will disappear and the songs will be located
under the correct name.
Note: All changes relate solely to the "virtual database entries" and the ID3
tags of the files. The folders on the hard disk remain unchanged!
Create track info from file names
Not all songs have track info saved in the ID3 tags. The file name itself and/or
the folder where the track is saved can often provide the right information. With
the help of the "ID3 tags from file names" function, you can complete this info
for the ID3 tags so you don't have to search for them every time using the
"Search for track information online" function.
How to open this dialog:
You can access the dialog through the context menu of a track or the main
menu under "Edit > Clear track info > Create track info from file name...".
Or:
If you import tracks for which there is no track info, a small symbol will appear
beside the name column of the track. Click on this symbol and select "Create
track info from file name". The dialog will then be opened. All of the tracks
saved in the same folder will automatically be displayed and matched
according to your specifications.
www.magix.com

92 Files and their meta data
Note: If the name of a track does not fit the standard pattern, e.g. has one
extra space where the others don't, the result will be incomplete. You can
remove these tracks from the list by right-clicking on the track and choosing
"Remove marked selections from list".
Configure track info
MAGIX MP3 deluxe MX detects possible track info automatically and transfers
it to the ID3 tags.
If information is not detected, mark it by moving the mouse over the info area
while holding down the button. Right click on this area to open a menu where
you can select the type of information.
Confirm your entries with "OK". The dialog will then be closed. The tracks will
now be displayed with the corresponding track info.
www.magix.com

Se
arch and replace ID3 tags
Files and their meta data 93
Hint: This function only is available in MAGIX MP3 deluxe MX.
Quite often, one finds the track information written incorrectly, and therefore
tracks are not placed in the correct folders in your database. So that you don't
need to correct the same error with every track, just use this function to search
by specific words and then replace them in step 2.
1. Once the dialog is open, enter which ID3 tags contain this keyword: Artist,
album, etc.
2. Enter the keyword in "Search for".
3. Enter the new name in "Replace with".
Example: You would like to change "Who, The" to "The Who", so you enter
"Who, The" in the artist ID3 tag and replace it with "The Who".
e "Continue" search button in MAGIX MP3 deluxe MX lists the respective
Th
songs individually.
Click "Replace" for the selected song or "Replace all" for all of the songs listed
to use the new keyword. Click on "Continue search" instead and the info for
the song will remain unchanged (you can continue searching for the keyword).
www.magix.com

94 Files and their meta data
C
lean up artist names...
With the help of this function you can quickly and easily adjust and unify artist
names in your music files. The days of multiple different spellings of artist
names and missing files are over!
One after the other, MAGIX MP3 deluxe MX will list the different spellings of an
artist's name that exist in the database.
Remove the check marks from the artist names which are written correctly
and do not need to be changed.
Select the spelling in the list which you would like to use. This will then be
displayed at the bottom of the list.
Th
is spelling will be transferred to all of the files with check marks by clicking
Apply.
Using the double arrow buttons, you can
view all artists which MAGIX MP3 deluxe MX
supposes might be the same artist with
differently spelled names.
This way, you can also skip a list with
spellings that you do not wish to change.
www.magix.com

Mu
ltiple rename
The Multiple rename function provides a great opportunity to title (if desired)
your files. This way you can save multiple files all at once.
Note: To select multiple files/folders, hold down "Shift" and click on the first
and last files that you wish to rename. Multiple individual files can be selected
by clicking on them while holding down the "Ctrl" key.
Files and their meta data 95
Presets: Click on the preset button to load various preset masks for
summarizing the new file names.
reate presets: You may also save customized templates by selecting "Edit".
C
Please don't forget to name your new mask logically. These personal masks
then appear in the lower half of the preset list.
Create new folder: If you insert a backslash into the mask (\, or Alt Gr + ?), the
corresponding subfolders that you entered as variables are created. For
example, the mask "[A]\[B]\[C]-[T]" creates the corresponding folders for
"Artists" and then the additional folder for "Albums", into which all
correspondingly renamed files are moved.
www.magix.com

96 Files and their meta data
Hint
s for using templates: You can use the template for creating file names in
more instances than in the "Multiple rename" dialog. When you are converting
audio CDs, i.e. transferring them to your PC, you can access and use these
templates from the conventional dialog so the files are saved instantly using the
same name.
Additional editing options
Enter only certain aspects of a variable: You can tell variable B (Album) to use
only the first 3 letters of the album name. To do this, you have to write the
number 3 in along with variable B, i.e. [B3]
Variable content upper/lower case: To have variables written either only in
upper or lower case, add the corresponding variable at the end written in either
upper or lower case. For example, use [TT] to have the complete title written in
uppercase.
Variable sep
arators hms and YMD: A hyphen behind the hms or YMD variable
will result in time entry being written separated by a dash. You can also enter
other characters instead of the hyphen (space, underscore, etc.). The order of
either variable can also be adjusted to change the time measurement.
Use abbreviations with [K]: If you would like to shorten an artist name or the
name of an album, etc. you can use [K] to do this automatically. Insert [K] at a
random position of the template. A dialog will open where you can enter the
desired abbreviation and enter the full name or title for the text "to be replaced"
so it can be found and replaced correctly. Please choose the desired
abbreviation and click on "Select". The long version now will be replaced with
the abbreviation in the main dialog.
www.magix.com

Files and their meta data 97
Add images as cover
You can save your own image for any song in its ID3 tags. For example, these
images will be displayed in the cover view or lower left in the main screen, and
may be also be used if you create a CD/DVD case.
Note: You can only add images less than 1 MB, since the song's file size
shouldn't be unnecessarily increased by the ID3 tags.
There are several options for adding an image as a cover:
Insert pictures from the hard disk
either: insert the album cover using drag & drop:
Directly below the navigation to the left in MAGIX MP3 deluxe MX, you can see
a small rectangular field, where the cover for the selected song or album will be
displayed (provided this has been indicated). If the right cover is available on
your hard drive but it has not been assigned yet, then drag & drop the image
onto the cover field. MAGIX MP3 deluxe MX will now save this image
automatically for each of this album's songs into their ID3 tags.
or: in the properties dialog:
To insert the image as the cover, click "Load" in the "Properties (view page
89)" dialog and find the folder that contains
the image. Select it and click
"Open". Select it and click "Open".
Cover search on Amazon: You can search and download album covers on
Amazon. This function can be accessed from the menu via "Edit -> Search
cover on Amazon..." Click on "Save Cover" and it will be saved to your library.
Add by pressing "Print" and creating a screenshot
You can add an image of the current screen as a cover. Press "Print" to save
an image of the screen to the Windows clipboard. This may be saved for the
track via "Insert" in the "Image" area of the "Properties" dialog.
Note: Press "Alt + Print" simultaneously on your keyboard to make a copy of
the active window.
Add image from the Internet
Most Internet sites allow a certain image to be accessed by right clicking it to
save it via "Copy graphic" or a similar context command. This function saves
www.magix.com

98 Files and their meta data
the corresponding image from the website into the PC's clipboard. Click
"Insert" in the "Image" section of the "Properties" dialog, and the image from
the website will be added.
Note: Only one piece of information (e.g. an image) can be stored in the
computer's clipboard at once. As soon as you copy something new to the
clipboard, e.g. via "Print", "Copy", or "Cut", the last piece of information will be
replaced.
www.magix.com

Functions in detail 99
Functions in detail
For advanced functions, you will find detailed explanations and instructions for
correct operation in this chapter.
Copy and convert music on the hard drive
Whether to preserve original CDs or to compile your own playlists with your
own favorite songs, there are many reasons for copying music CDs to your
computer (view page 24). You also can use this function to expor
a different format to an external storage device. You can also use different
encoders for converting the output material.
Various encoders
Note: The mp3, AAC and AAC Plus encoders have to be activated for a fee
before you can use them. If you already have Microsoft Media Player 10 (or
higher) installed on your drive, then you can use the MP3 encoder immediately.
mp3 [Frauenhofer] (*.mp3)
t the song in
The MP3 format is the most popular format for saving and transferring audio
files onto a PC and for online use. Compared to the original file an MP3 file only
requires approx. 10 percent of storage space.
Select the bitrate for converting to MP3. Most people won't hear any difference
to the original above 160 kBit/s. If the bitrate is lower the coding noise is no
longer suppressed sufficiently and may affect the sound quality. 192 kBit/s is a
good compromise between compression efficiency on the one hand and good
sound quality on the other. 256 kBit/s or higher is considered CD quality.
AAC (*.MP4;*.AAC)
DRM (digital rights management) can be embedded into the AAC format
(advanced audio coding) to control music distribution, and is therefore also
used by Apple. Its programs for playing, managing, and buying (iTunes) music
use AAC as the standard format.
If you would like to convert other titles for use with iTunes, then use this
encoder.
www.magix.com

100 Functions in detail
AAC PLUS encoder
The AAC PLUS format provides the normal AAC encoder including spectral
band replication (SBR). This doesn't simply delete high frequencies (like other
standard audio encoders), but actually saves their structure for reconstruction
during a song's playback. For lower bitrates especially, the AAC PLUS format
delivers a very good sound quality compared to MP3.
MS Audio options...
This area includes a music file format developed by Microsoft. It allows higher
compression rates and has a smaller file size than MP3, but has a slightly
poorer sound quality.
This conversion method opens Digital Rights Management (DRM) to you. It
allows you directly to permit or block playback, transfer to portable devices, or
copying of certain tracks.
Ogg Vorbis encoder
"OGG Vorbis" is a license-free open source audio codec with very good sound
characteristics for comparably small files. It is similar to the MP3 file format.
In these settings you can choose from three various encoder modes to adjust
bit rate and quality.
Constant bit rate enables streaming and maximum compatibility. Variable bit
rate achieves a better audio quality with the same size files.
Microsoft ACM (*.WAV)
This encoder addresses Windows' built-in audio compression manager.
1. Under "Codec", select the codec you require. "Format" will display the
available formats with this codec. "Description" provides more detailed
information about the selected codec.
2. Select the desired format.
3. Confirm your selection with "OK".
Wavefile (*.WAV)
The audio material is exported as a standard wave file: 44100 Hz, 16-bit,
stereo. This is the conventional format for further use on Windows PCs. These
files are not compressed and retain their full sound quality.
www.magix.com
 Loading...