Xara Movie Edit Pro - 2013 Instruction Manual


2
Copyright
This documentation is protected by law. All rights, especially the right to duplicate,
circulate, and translate, are reserved.
No part of this publication may be reproduced in the form of copies, microfilms or
other processes, or transmitted into a language used for machines, especially data
processing machines, without the express written consent of the publisher.
All copyrights reserved.
All other product names are trademarks of the corresponding manufacturers. Errors in
and changes to the contents as well as program modifications reserved.
Copyright © MAGIX Software GmbH, 2001 - 2012. All rights reserved.
MAGIX is a registered trademark of MAGIX AG.
Created under license from Dolby Laboratories
Dolby and the double D symbol are trademarks of the Dolby Laboratories.
© 1992 - 2012 Dolby Laboratories. All rights reserved.
Other named product names may be registered trademarks of their respective
owners.
This product uses MAGIX patented technology (USP 6,518,492) and MAGIX patent
pending technology.
www.magix.com

Preface 3
Preface
Congratulations! You have purchased a complete, fully-equipped, yet easy-to-use
video studio!
The possibilities are endless - from quick holiday video editing to demanding and
detailed advanced film editing. MAGIX Movie Edit Pro 2013 also offers:
• Recording and import of all standard video formats
• Video and audio content optimization
• Possibility of adding fades, titles and effects
• Disc menu creation for DVD, Blu-ray Disc and others
• Upload videos to the Internet, e.g. to YouTube or Facebook
The printed manual contains the basic functions of both program versions MAGIX
Movie Edit Pro 2013 and MAGIX Movie Edit Pro 2013. Additional features of the
Plus/Premium version are marked accordingly.
In addition to the printed manual, there is also more detailed documentation which is
copied to the program folder on your hard drive during installation. This electronic
PDF manual describes all program functions in detail.
This information will get you started on your way to making your first movie
masterpiece. The reference chapter later on and the index can also be used to help
quickly when you need it.
Enjoy!
Your MAGIX Team

4
Table of Contents
Copyright 2
Preface 3
Support 10
Uninstalling the program 11
Serial number 12
Introduction 13
What is MAGIX Movie Edit Pro 2013? 13
What's new in MAGIX Movie Edit Pro 2013? 13
Additional features new in the Plus/Premium version 14
Additional programs 14
Features 14
Quick start 17
Program start 17
Import video 18
Insert AVCHD material 19
Play movie 21
Media Pool 22
Display modes 23
Removing unusable scenes 26
Regroup scenes 30
Burn DVDs with interactive menus 31
Workspaces 33
Projects, movies and scenes 33
"Edit" screen 34
The "Burn" screen 36
Toolbars 37
Media Pool 44
Transport console 51
Arranger 52
Adjusting the workspace 54
Settings 55
Project and movie settings 55
Program settings 56
www.magix.com

Table of Contents 5
Preview rendering 64
Video recording 65
Select the recording method 65
Recording AVCHD 66
HDV camera 69
DV camera 69
Analog video recording 75
Audio 78
Single frame 81
Screen Capturing 83
Edit after recording 84
Import a non-copy-protected DVD 85
Objects 86
Insert object into the project 86
Select and group objects 88
Move Objects 88
Cutting objects 89
Duplicate objects 89
Object handles 90
Trim Objects 90
Extract sound from videos 93
Transitions (fades) 93
Overview mode 96
Snap 96
Zoom 97
Markers 98
Playback marker 98
Project markers 99
Area marker (in and out points) 99
Chapter markers 100
Scene markers 102
Multi-cam editing (Plus/Premium version) 103
Preparation 103
Source tracks and preview images 104
Multicam edit functions 105
Title 107
Creating titles using a template 107

6
Create titles without a template 107
Edit titles retroactively 108
Position titles 109
Advanced settings 109
3D text 110
Fade in date as title 110
Effects 111
Apply effects to objects 111
Video effects in the Media Pool 112
Movement effects in the Media Pool 119
Stereo3D in the Media Pool 125
Audio effects in the Media Pool 125
Design elements in the Media Pool 126
My Presets in the Media Pool 127
Effects masks (Plus/Premium version) 127
Additional effects in the Media Pool 133
Animate objects, effect curves 135
Attach to picture position in the video 141
Image stabilization 142
Image improvements for the entire movie 144
Image improvements for individual objects 146
Audio editing 147
Load and edit audio files 147
Edit volume curve 147
Import audio CD 148
Audio effects 151
Dubbing with MIDI songs. 165
Mixer 167
5.1 Surround 170
Scrubbing 175
MAGIX Soundtrack Maker 176
Mixdown of audio objects 177
Stereo3D (Plus/Premium version) 178
3D basics 178
Record 3D 179
Prepare 3D editing 180
Set playback mode for 3D 181
Align videos and pictures for 3D 182
www.magix.com

Table of Contents 7
Turn camera movements into 3D videos 183
Create titles for 3D videos 183
Export and burn 3D videos 183
Special functions and wizards 185
Use movie templates 185
Preview rendering 186
Automatic scene recognition 189
Travel route animation 190
Produce panorama pictures 198
Slideshow Maker 199
Musical cut adjustment 202
Batch conversion 208
Backup copy 210
Load backup project... 212
Clean-up wizard 212
Burning 213
Preview and editing 213
Menu 214
Templates 214
Edit disc menu 216
Burning wizard 223
Export 229
Export 3D movie 229
Output as video file 230
Upload to Internet 231
Add to the Telekom Media Center 232
Upload to Internet (MAGIX Online Album) 232
Export to device 233
Export as Media Player 233
Menus 234
File Menu 234
Edit Menu 248
Effects Menu 256
Windows Menu 261
Share Menu 263
Help Menu 264
Context menu (right click) 266

8
Problems and solutions 278
File will not load 278
Choppy or uneven playback 278
Problems and Remedies regarding the Auto Remix Assistant 278
Activation problems 279
Keyboard shortcuts 280
Playback functions 280
Monitore 280
Arranger view 281
Move view 281
Transport control in the Media Pool 282
Mouse modes 282
File menu 282
Edit menu 283
Effects menu 284
Windows menu 285
Help menu 286
Edit keyboard shortcut 286
Integrated browser 288
Open browser 288
Navigation in the browser 288
Loading Internet media 289
Define the path for saving Internet media. 289
Activate codecs 290
Free activation of codecs 290
Fee-based activation of MVC codec 291
Annex: Digital Video and Data Storage 292
Video Editing on the PC 292
MPEG Compression 292
General notes on AVI videos 293
Overview of the different disc types 293
MPEG-4 encoder 299
Video codec 300
Audio codec 307
Multiplexer 309
Appendix: MPEG Encoder Settings 310
www.magix.com

Table of Contents 9
General settings 310
Video settings 311
Advanced video settings 312
Audio settings 313
MPEG glossary 315
Motion estimation 315
Bit rate 315
Block 316
Chroma format 316
Field 316
Frame 316
GOP 317
I frames 317
Interlace 317
P frames and B frames 319
Prediction 319
Quantization scaling 320
Glossary 321
If you still have questions 336
Tips for program help 336
Index 337

10
Support
Dear MAGIX customer,
Our aim is to provide fast, convenient, solution-focused support at all times. To this
end, we offer a wide range of services:
• Unlimited web support:
As a registered MAGIX customer, you have unlimited access to web support
offered via the convenient MAGIX service portal on http://support.magix.net,
including an intelligent help assistant, high-quality FAQs, patches and user
reports that are constantly updated.
The only requirement for use is product registration at www.magix.com
• The online community, on-the-spot support and a platform for exchange:
MAGIX customers have free and unlimited access to the online community at
www.magix.info, which includes approx. 150,000 members and offers the
opportunity to ask members questions concerning MAGIX products as well as
use the search function to search for specific topics or answers. In addition to
questions & answers, the knowledge pool includes a glossary, video tutorials and
a discussion forum. The multiple experts, found round-the-clock at
www.magix.info guarantee quick answers, which sometimes come within
minutes of a question being posted.
• Email support for MAGIX products:
For every new MAGIX product you will receive, as of date purchase, 12 months of
email based customer service.
Premium email support:
For priority support, or if you want the MAGIX support team to help with nonMAGIX related hardware problems you can purchase a Premium email support
ticket. Log in at http://support.magix.net and click on "Purchase access code",
the ticket is for a specific problem, and is valid until it is solved, it is not restricted
to an email.
Please note: To be able to use the Premium email support and free product email
support via the Internet, you have to register your MAGIX product using the serial
number provided. This can be found on the CD case of your installation CD or on the
inside of the DVD box.
• Additional telephone service:
Besides the large number of free customer service offers, we also offer a feebased telephone customer service.
Here you can find a summary of our technical support telephone numbers:
http://support.magix.net/
Mail (Europe): MAGIX Development Support, P.O. Box 20 09 14, 01194 Dresden,
Germany
www.magix.com

Uninstalling the program 11
Mail (North America): MAGIX Customer Service, 1105 Terminal Way #302, Reno,
NV 89502, USA
Please make sure you have the following information at hand:
• Program version
• Configuration details (operating system, processor, memory, hard drive, etc.),
sound card configuration (type, driver)
• Information regarding other audio software installed
MAGIX Sales Department
You can reach the MAGIX Sales Department workdays for help with the following
questions and problems:
• Orders
• Product consulting (pre-purchase)
• Upgrade requests
• Returns
Europe
Monday - Friday, 09:00-16:00 GMT
U.K.: 0203 3189218
Denmark: 45 699 18763
Sweden: 46 852 500713
Finland: 35 89 42419023
Norway: 47 210 35843
North America
9 am to 4 pm EST Mon-Fri
Phone: 1-305-722-5810
Uninstalling the program
If you would like to uninstall MAGIX Movie Edit Pro 2013, you can do this in the
control panel under "Software" or go to "Programs > MAGIX > MAGIX Movie Edit
Pro 2013 > Service and Support > Uninstall MAGIX Movie Edit Pro 2013".

12
Serial number
A serial number is included in each product. This serial number is required for the
installation of the software and enables usage of additional bonus services. Please
store this number in a safe place.
What can a serial number do?
With a serial number your program is clearly assigned to you and only you. This will
allow you take advantage of the free email support service. Serial numbers also help
to protect against software piracy which ensures that we are able to continually
provide our customers with an optimal price/performance ratio.
Where can the serial number be found?
The serial number can be found on the reverse side of your CD/DVD case. If your
product is packed in a DVD box, you'll find the serial number on the inside.
If you have purchased the download version, you will receive a confirmation email
with the serial number.
When will you need the serial number?
The serial number is required when you start or register the program for the first time.
Note: We explicitly recommend registering your product (free), since only then are
you entitled to download updates and to use MAGIX support services (view page
10) or activate codecs (view page 289).
www.magix.com

Introduction 13
Introduction
What is MAGIX Movie Edit Pro 2013?
MAGIX Movie Edit Pro 2013 is a complete all-in-one movie studio for your PC. With
MAGIX Movie Edit Pro 2013 you can easily transfer your recordings to your computer
and then, once you have improved and enriched them, burn them onto DVD, AVCHD
or Blu-ray™ – perfect for theater-quality presentation on TV, screen, or monitor.
Videos, photos, as well as additional audio and video material can be transferred from
various devices to the PC. Long movies can be separated into chapters or scenes
automatically. You can also do the opposite and automatically combine individual
recordings to make a single movie.
Add music, theater-quality transitions, text and selected effects to your own movies
with a mouse-click. The easy-to-use interface, advanced technology and handy
wizards guarantee perfect results at lightning speed!
Once your video is finished, you can use it in different ways: transfer it back onto the
tape or to your camcorder. You can burn it to disc and watch it, for example, on TV.
Or, you can upload your video to Internet platforms such as YouTube, Facebook or
your own personal MAGIX Online Album.
What's new in MAGIX Movie Edit Pro 2013?
• Improved timeline display with video and audio in one track.
• Support of the new video standard AVCHD Progressive (50p)
• Accelerated AVCHD export with automatic graphics card recognition (NVIDIA
GeForce 8000 series and better (CUDA) or AMD Radeon 5000 series and
better (OpenCL) or integrated graphics with Intel Quick Sync Video)
• Improved user interface with quick access features.
• High-quality decorative elements and intro/outro templates.
• Fast and direct GPU calculation of all essential video effects.
• New Chroma Key Engine for perfect object extraction.
• Import of QuickTime interlaced footage. To use this feature open the "Object
properties > Intermediate image calculation" and activate "Automatic interlace
processing" and then "Interlace top field first" or "...bottom field first".

14
Additional features new in the Plus/Premium version
• New templates for professional movie trailers including music.
• Preview rendering for stereo 3D and multicam projects.
• Automatic synchronization of multicam projects using the audio track.
Additional programs
On the MAGIX website you'll find many additional programs you can use with
MAGIX Movie Edit Pro 2013. Have a look at the sections "Video > Additional
Products" and "Free Downloads".
In the "Free Downloads" section you'll find the Videorekorder, a PC TV with video
recorder. You can use it to watch and record TV programs on your computer. A
functional TV card/TV tuner box or DVB-T/S card is required to use Videorekorder.
Features
Recording
MAGIX Movie Edit Pro 2013 features the following recording options:
• AVCHD camera
• HDV cameras: HDV1 and HDV2 camcorders
• DV cameras: Mini DV camcorders or DV video recorders
• Video: Analog TV, video input, VHS recorders, webcams
• Audio: Microphones, cassette recorders, MiniDisc players, turntables
• Screen (Plus/Premium version): PC monitor.
• Single frame: Single and series images from webcams, video recorders, video
cameras, or TV cards
Analog capture requires capture cards compatible with DirectShow. DV recording
take place via FireWire.
Import and export formats
Supported import formats
Video: AVI, DV-AVI, MPEG-1, MPEG-2, MPEG-4, MTS, M2TS, MXV, MKV, MJPEG,
QuickTimeTM, WMV(HD), VOB, MKV
Audio: WAV, MP3, OGG, WMA, MIDI, Dolby Digital Stereo/5.1 (Classic version:
downmix to stereo)
www.magix.com

Introduction 15
Images: JPEG, BMP, GIF, TIF, TGA
Supported export formats
Video: AVI, DV-AVI, MPEG-1, MPEG-2, MPEG-4, MXV, MJPEG, Quicktime,
WMV(HD)
Audio: WAV, MP3, Dolby Digital Stereo/5.1 (only Plus/Premium version)
Images: JPEG, BMP
Note: For copy protection reasons, MPEG-4, MPEG-2, and Dolby Digital Stereo
must first be activated. Initial activation is free of charge. MP3 export requires
installation of Windows Media Player version 10 or higher. Online Services offered
inside the program as well as the Online Update require an Internet connection.
Editing
• Picture optimization: Color improvement (RGB,saturation), sharpness (focus and
feathering), brightness regulator (brightness, contrast), anti-flicker filter.
• Sound optimization: The equalizer allows you to manipulate the frequency
spectrum – perfect for cleaning-up muffled dialog. The compressor is a dynamic
volume regulator. The StereoFX processor controls the position of the sound
within the stereo panorama. The denoiser and dehisser are professional noise
reduction tools for removing noise and hisses.
• Video effects: For example, creative filters, distortion, video mix (Chromakey),
movement effects (e.g. camera/zoom or rotation), cropping, picture-in-picture
collages, video effect plug-in support.
• Automatic scene detection
• Slideshow Maker turns drab photo collages into spectacular multimedia shows.
• MAGIX Soundtrack Maker offers a huge selection of fitting sounds for your
background music.
Burnable disc formats
• DVD
• Blu-Ray disc
• AVCHD disc (on DVD and Blu-ray Discs)
• MultiDisc (DVD + WMV HD)
• Project backups, backup copies, and 1:1 copies of DVDs
Multimedia editable disc menus
Included are many disc menu templates which offer selection options for movies and
chapters on the screen. Many of these are also available in 16:9 format. They can be
included during burning and give the disc a professional appearance.

16
Every menu template may be customized with personal photos, thematic animations,
3D captions, sound, intro videos, etc.
Also in the Plus/Premium version
Professional video editing
• 99 tracks, editing & effects automation
• Live preview, MultiCam editing
Unique effects creation
• Chroma keying with alpha channel
• Movie templates, fades with sound, title editor
Perfect audio dubbing
• Create Dolby
®
Digital 5.1 Sound yourself, restore audio tracks
• Audio Mastering Suite, Soundtrack Maker
DVD / Blu-ray design
• Professional menu design, ISO output
Full stereo3D support
• Full support for stereoscopic footage
• Full import functions for many 3D camera models
• Editing of own 3D recordings made, for example, with two cameras
• Real 3D fades and titles for 3D video projects
• Preview and output to all standard 3D display devices
• Output in all formats (DVD, Blu-ray, file, YouTube, etc.)
www.magix.com
Quick start 17
Quick start
This chapter explains the basic functions of MAGIX Movie Edit Pro 2013 with a stepby-step introduction. A systematic description of all program functions can be found
in the following chapters.
Tip: Use the online tutorial videos that can be accessed in the "Help" menu. This
feature requires an Internet connection.
The program keyboard shortcuts (view page 279) for commonly used processes
and functions are also very helpful.
Program start
Once you have installed MAGIX Movie Edit Pro 2013, start the program from the
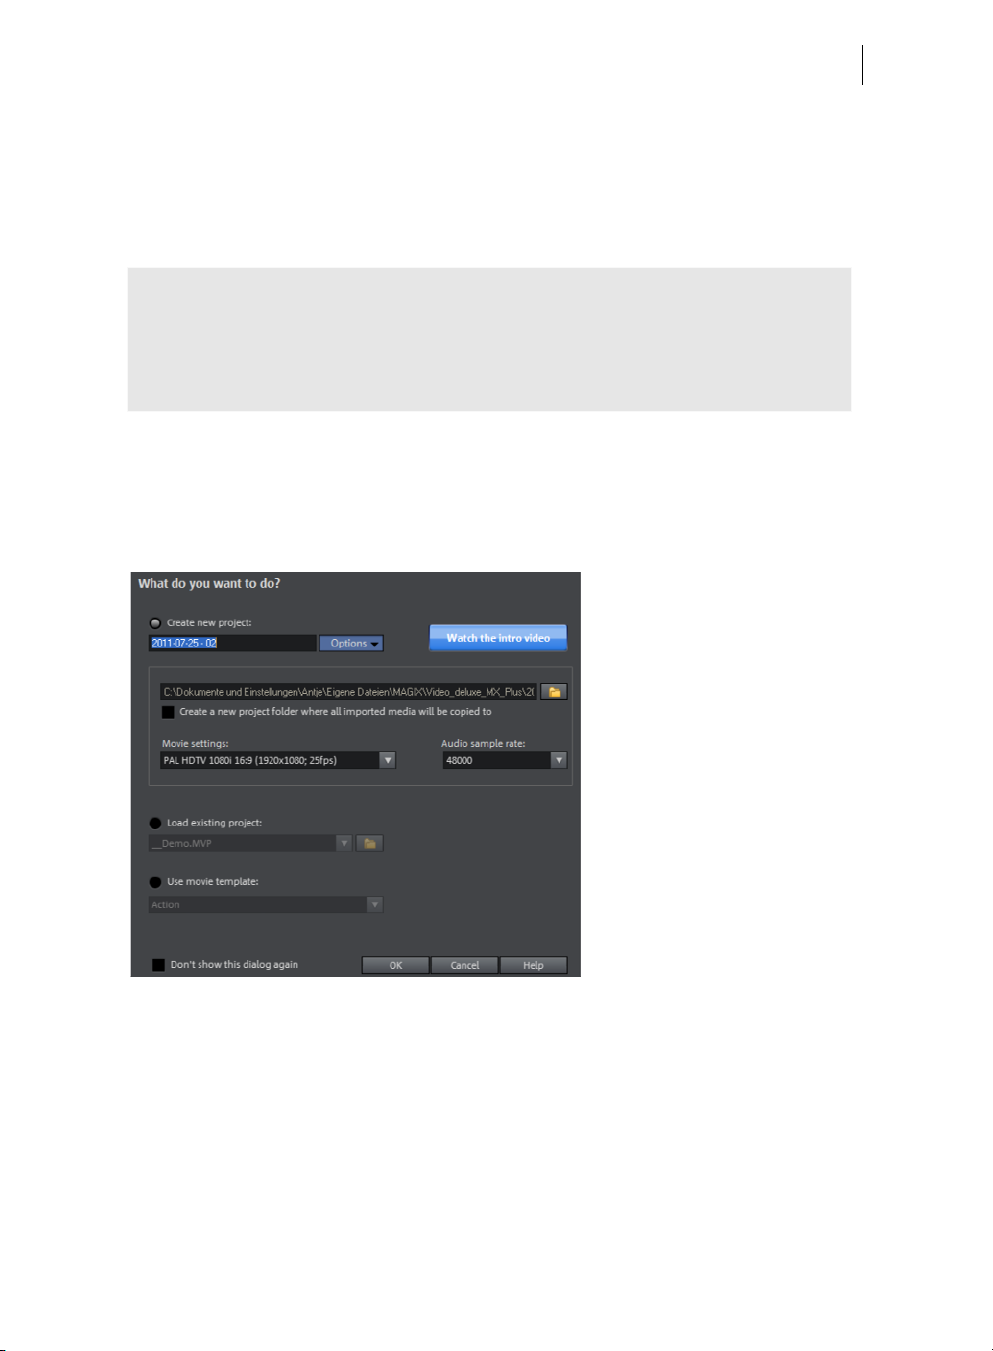
Windows start menu. The following dialog opens:
Here you can decide if you want to "Load an existing project" for further editing and
burning to disc or if you want to "Create a new project".
In „Options“ you can „Create a new project folder“. All of the files for that film will be
saved as copies in this folder and used for editing. This option is meant to keep things
centralized when files from various media, e.g. hard drives, USB flash drives, SD cards,
are being used in one project. The internal hard drive is the best option for working on
projects in MAGIX Movie Edit Pro 2013 because it allows faster access to files
compared to external storage devices. If files stored on external devices are used it

18
can lead to delays and stutters during project editing. You can create a backup of the
project folder at a later time.
In „Movie settings" you can set up the target format for your movie you want to
create (display norm, resolution, frame rate). This setting has no effect on the internal
processing quality and can be changed at any time by going to "File > Settings >
Movie" (view page 55).
Note: If your hard drive is partitioned, you should not save your project folder in C,
i.e. where Windows is installed. MAGIX Movie Edit Pro 2013 requires a lot of space
and there may not be enough room on C for it to function properly.
In MAGIX Movie Edit Pro 2013 you can also use movie templates (view page 185).
Movie templates are have preset placeholders and elements that are very helpful for
creating stories in various themes.
You can watch the introductory video to get a general idea of how MAGIX Movie Edit
Pro 2013 works.
Import video
In the following we assume that you want to import an AVCHD recording into the
program.
Tip: Pay close attention to which folders you use to save your files and footage so
you can find them again easily to import and edit them in MAGIX Movie Edit Pro
2013. Do not save files in C:\Windows\ or in program folders. Give your files and
folders short, concise names.
If you don't have such a recording at hand now, you can load material form the hard
disk in order to try out the MAGIX Movie Edit Pro 2013 workflow. Here the included
demo project is recommended.
www.magix.com
Quick start 19
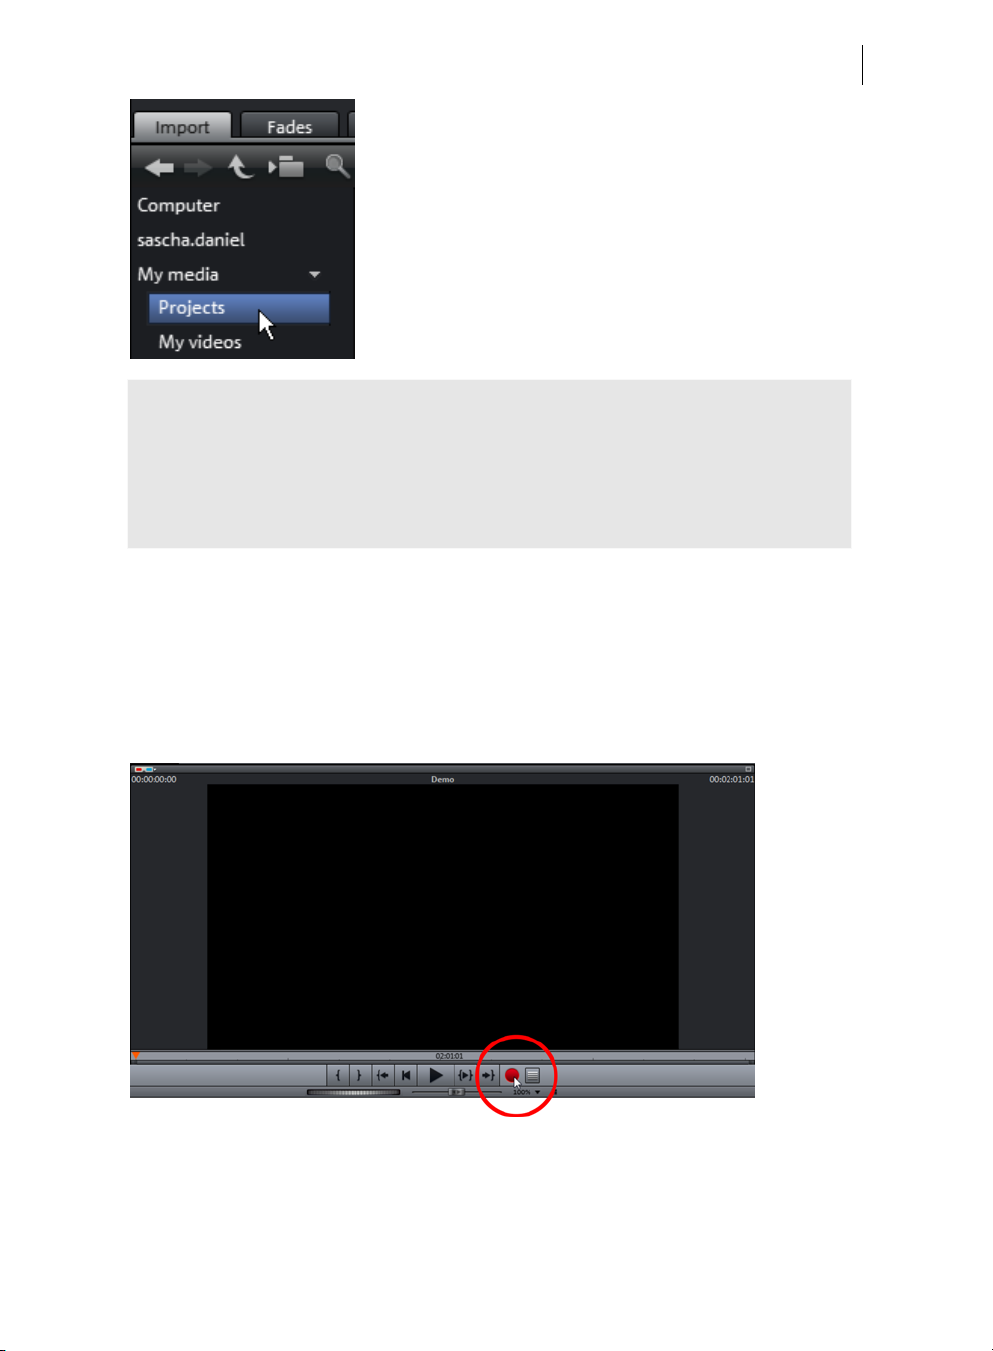
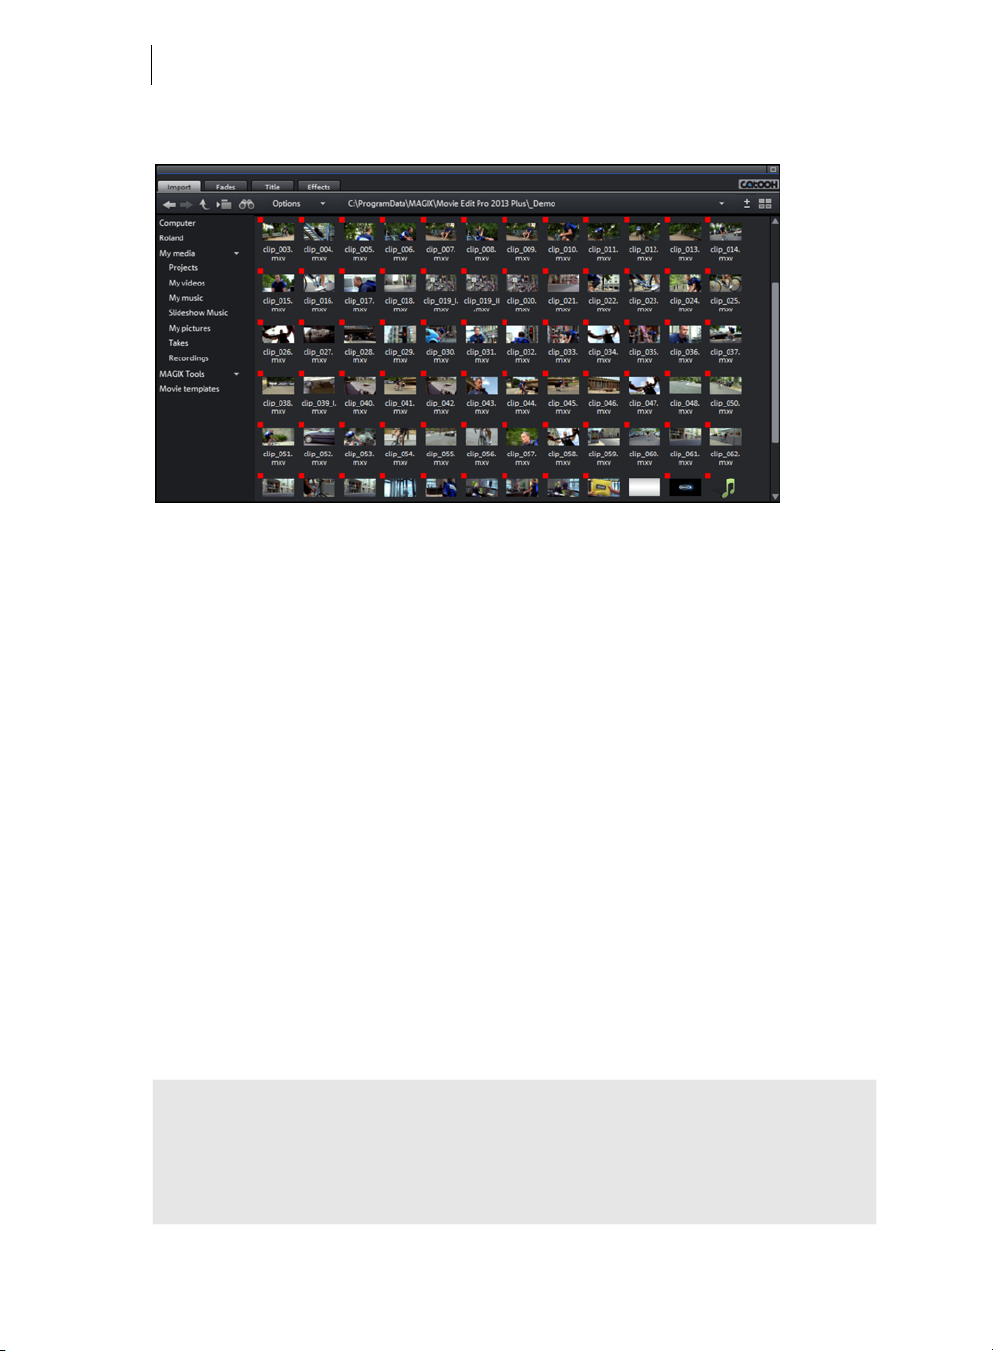
• In the Media Pool, click the button "My Media >
Projects".
• Next, open the "_Demo" folder by double clicking
and then load the MVP movie files.
( „_Demo.MVP“) by double clicking.
Note: If you import media to a project, MAGIX Movie Edit Pro 2013 must always
have access to these files. This means that you cannot rename these files, e. g. in
Windows Explorer or Media Pool, if they have already been imported because
MAGIX Movie Edit Pro 2013 won't be able to find them. Renaming or relocating files
can lead to error messages and you will have to indicate the files and folders again.
For larger projects this can be a very complicated and time-consuming process.
Insert AVCHD material
• Connect your AVCHD storage devices (camera, USB stick, SD card and others)
to your PC. You may have to first turn your camera on.
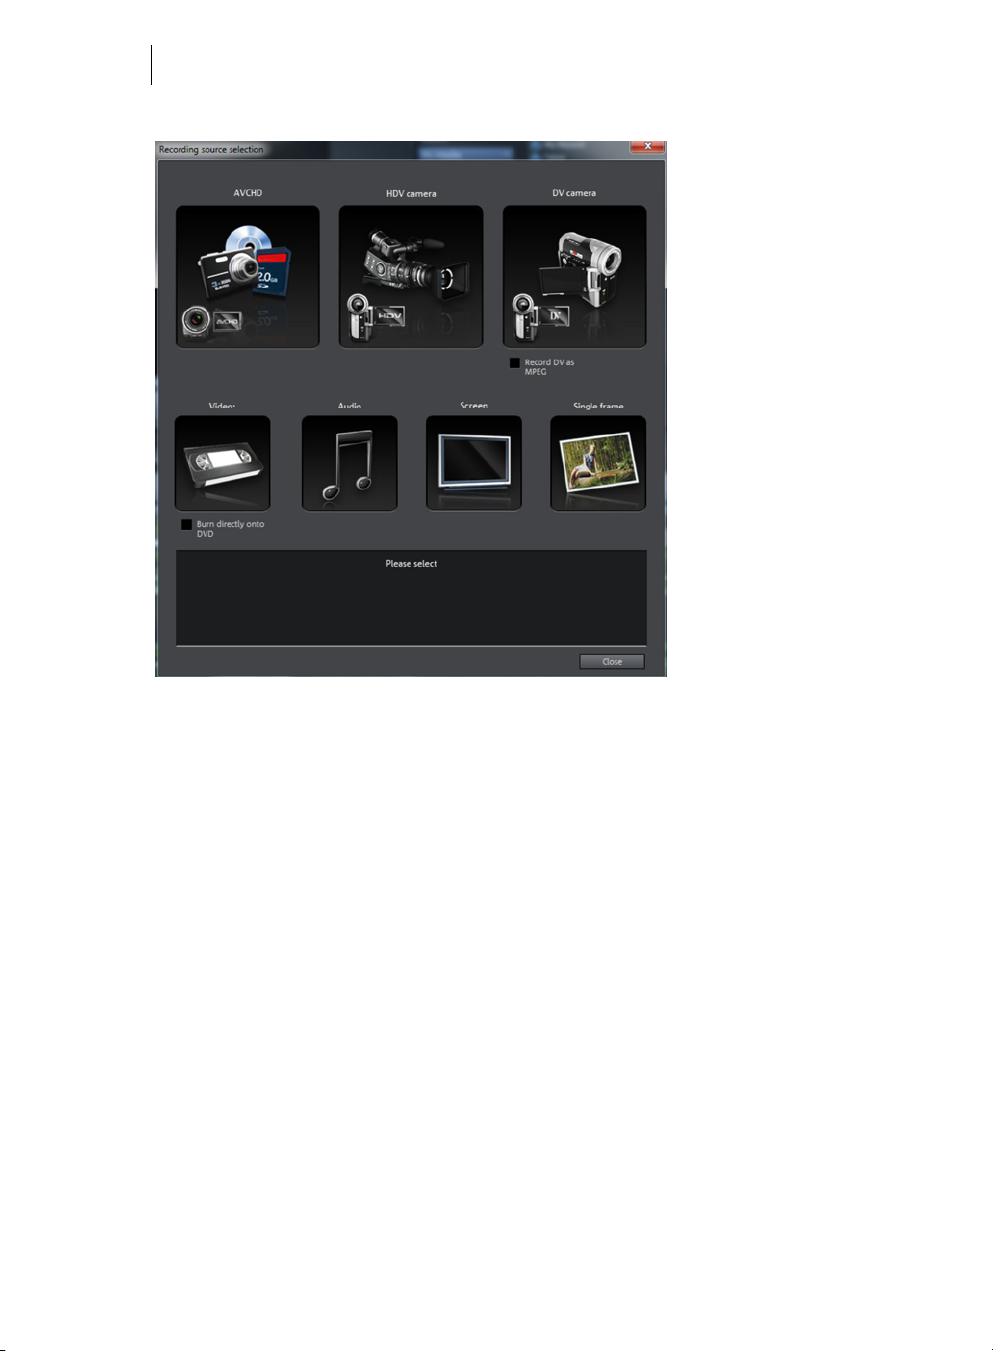
• To open the recording dialog, click on the red "Record" button below the preview
monitor.
20
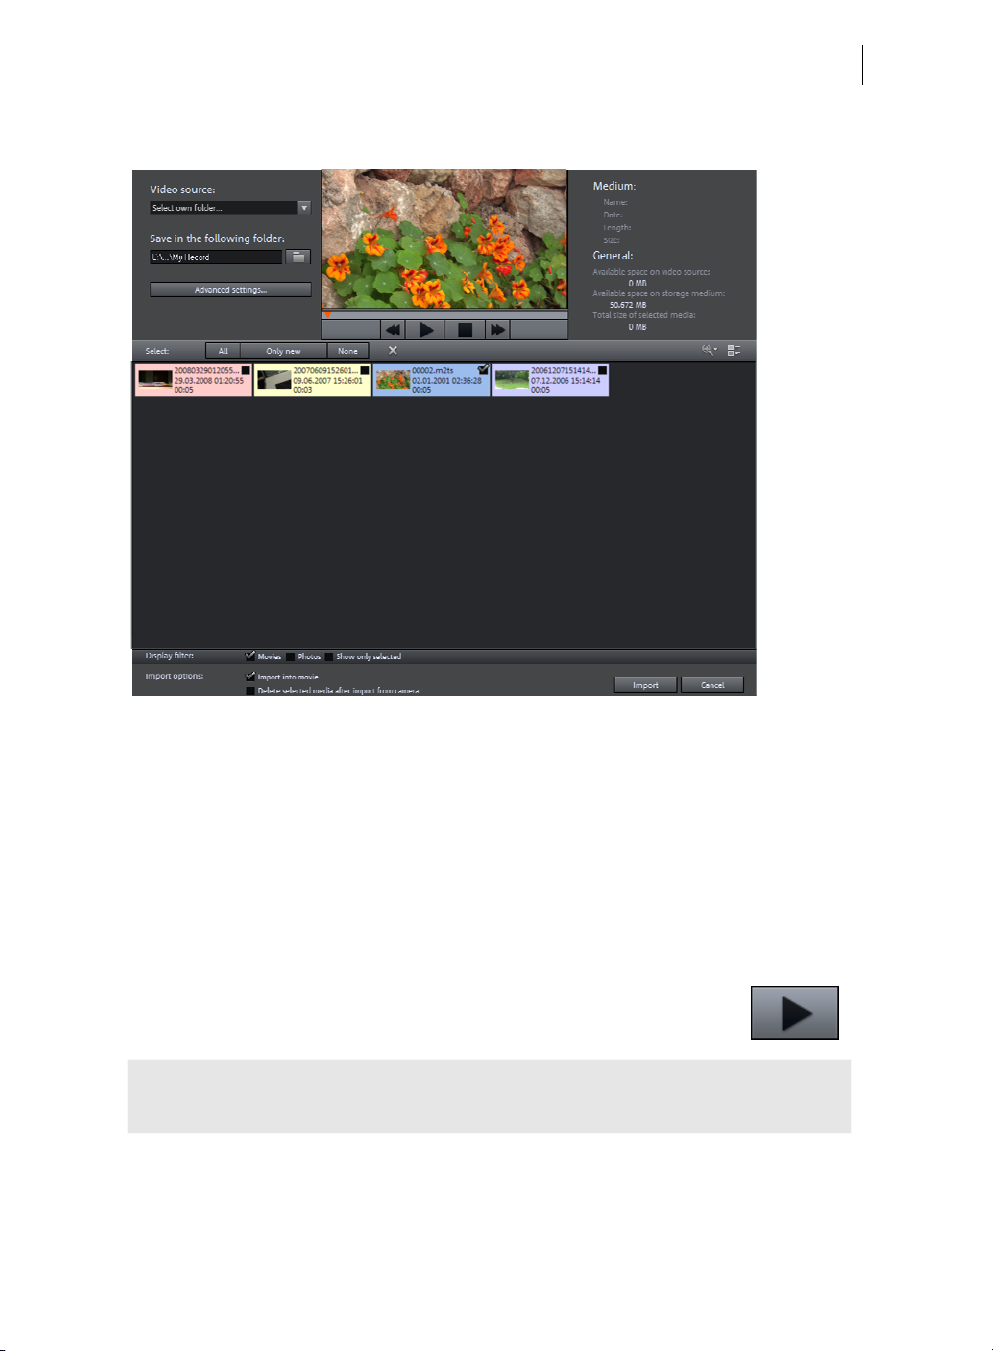
• Select "AVCHD" from the recording dialog.
www.magix.com
Quick start 21
• The AVCHD import assistant will then open. Select your connected storage
devices as "Video source". A file list will appear.
• In the file list, select all the recordings that you've imported from the device.
• You can preview all your recordings using the preview monitor in the middle of
the dialog in order to decide if they are suitable for your movie.
• After selecting all videos, in "Import options" you can select whether the
recordings should be directly placed into your movie project or simply copied to
your computer's hard drive (you can select the location in the next dialog). You
can also automatically delete your recordings after import.
Play movie
• To play the recording ( or the demo project), click on the play button
on the transport control below the preview monitor.
Tip: An even easier way to control playback is by pressing the space bar on your
keyboard.
During playback, a vertical line will move across the arranger, i.e. the playback marker
that displays the current position. You can reposition it by clicking at different
locations as desired.
22
Media Pool
The Media Pool can be used to access and load media files of all kinds: videos, photos,
MP3 files, audio CD tracks, fades, effects and Internet media, e t c.
• Search your computer for media you would like to use. The navigation buttons for
the various drives and folders are located in "Import" above the main display area.
If you hover the cursor over a media file, three icons for the options (Preview, Trim,
Import) will appear.
• Preview: All media files can be played back using this function. If you click on the
playback icon, the file will be played back in the preview monitor. Video and
image files are displayed and audio files are played back through the sound card.
There are previews for the templates and effects included to make it clear how
they will function.
• Trim: If you want to include only certain part of a video clip in your project, you
can click on the Trim icon with the curved brackets. The video clip will then
appear in the preview monitor. Use the brackets to mark the area you want to
import on the timeline. Drag & drop the video from the preview monitor into the
project by clicking on it and holding down the mouse button. Only the area
marked by the brackets will be imported as a video object.
• Import: All media files from local drives or the Internet can be dragged and
dropped into the project or loaded through the Import icon.
Tip: Improve access to your media folder by creating a link in the "Import" area of
the Media Pool. You can do this by right-clicking on one of the entries and selecting
"Create link". Select the media folder and click "OK" to confirm.
Note: All links are automatically deleted if the function "Reset standard program
settings" is used.
www.magix.com
Quick start 23
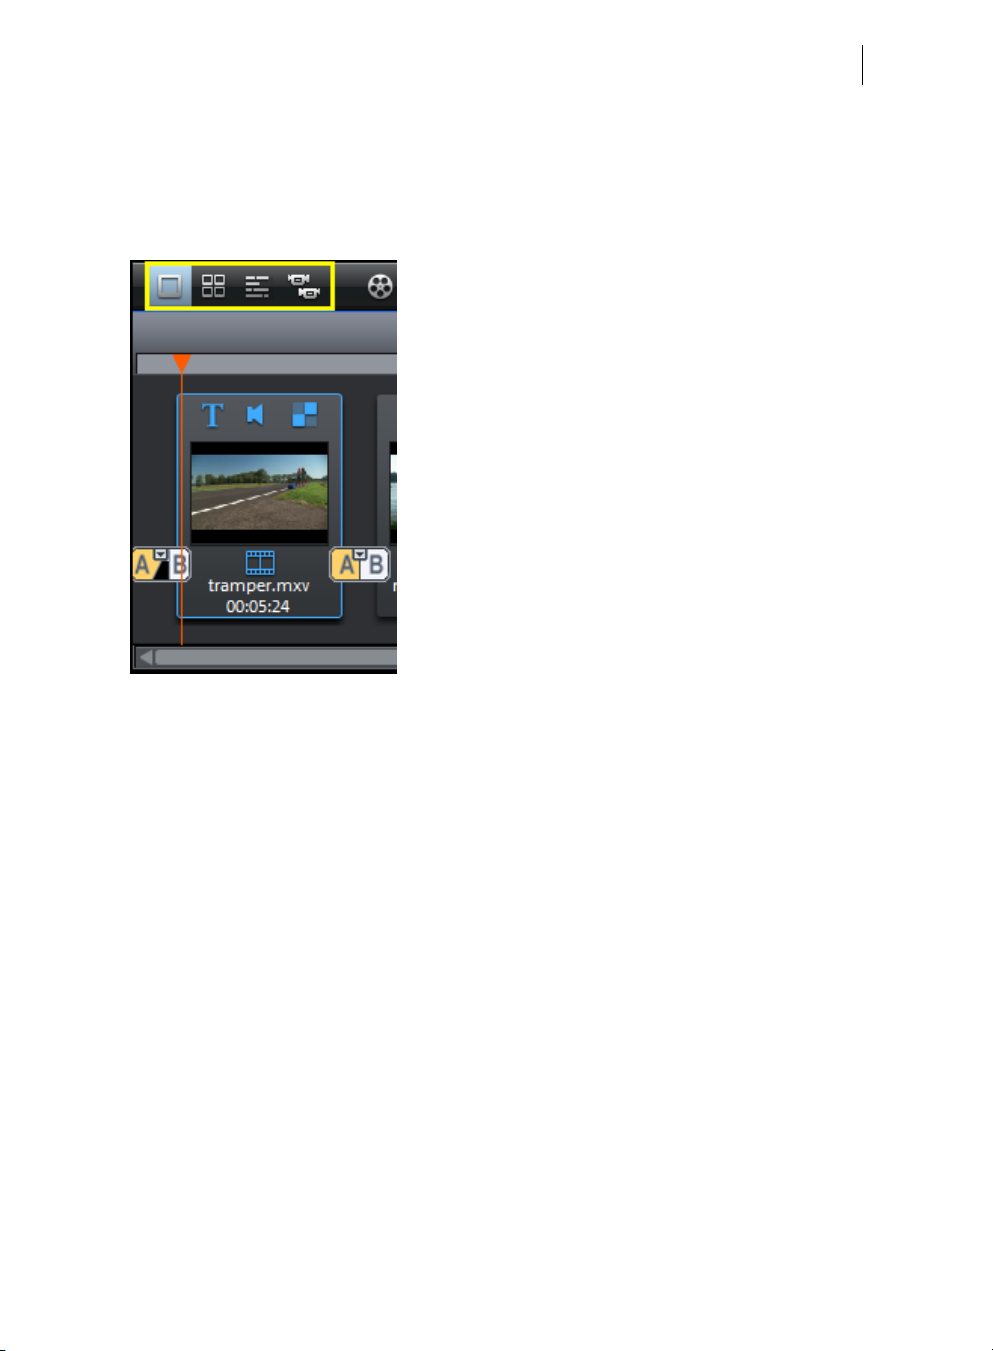
Display modes
The three switches on the toolbar in the center activate the "Timeline", "Storyboard",
and "Scene overview" modes (there are 4 switches and 4 modes available in the
Plus/Premium version).
Storyboard mode (first button) is the preset view.
This view offers an easy, streamlined interface to
simplify the editing process. All scenes from your
film are listed sequentially in the "Storyboard"
mode. Every scene is displayed with a preview
picture in the storyboard.
The scene overview (second button) provides a
scaleable overview of the scenes. You can use
this to comfortably view, sort, and delete
unnecessary scenes.
In the Timeline mode (third button) your films are displayed as "Objects" in the
"Timeline". This means: The longer the object, the longer the corresponding film.
Especially practical: you can display all modes in full screen using the button at the
top right.
Multicam mode is found under the fourth button in the Plus/Premium version of
MAGIX Movie Edit Pro 2013. Multi-cam editing enables easy cutting of various
recordings of the same scene from different camera perspectives.
24
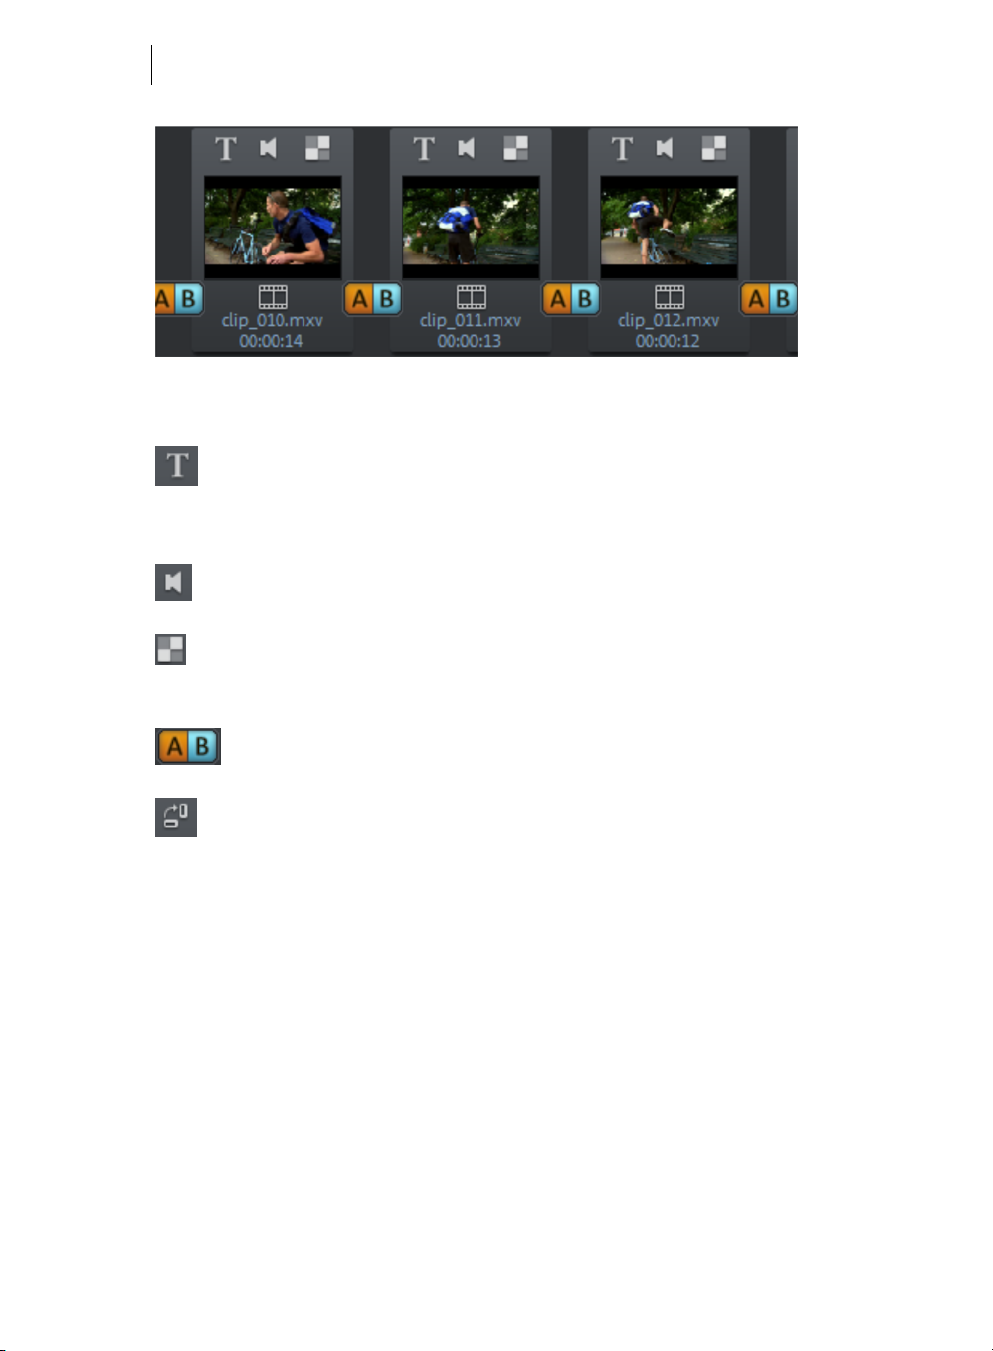
Storyboard mode
"Storyboard" mode represents all scenes in linear sequence on the storyboard. Each
scene offers the following editing options:
Add title and text: Titles and text can be added to any film. Click on the "T"
button, enter your text directly in the program monitor and select from
different animations (try movement from bottom to top for a classic end
credits effect).
Set volume: The volume in each scene can be set via the loudspeaker
button.
Effects menu: This switch accesses a menu with different editing functions
like scene recognition, image stabilization, or the trimmer dialogs. The
hissing on the track can be minimized by selecting "Audio cleaning".
Transitions/Fades: Click on the large button between the scenes and select
a scene transition (or "Fade").
Rotate image (only with image files): If an image or photo is on its side or
upside down, click on this button. The photo will rotate 90 degrees.
www.magix.com
Quick start 25
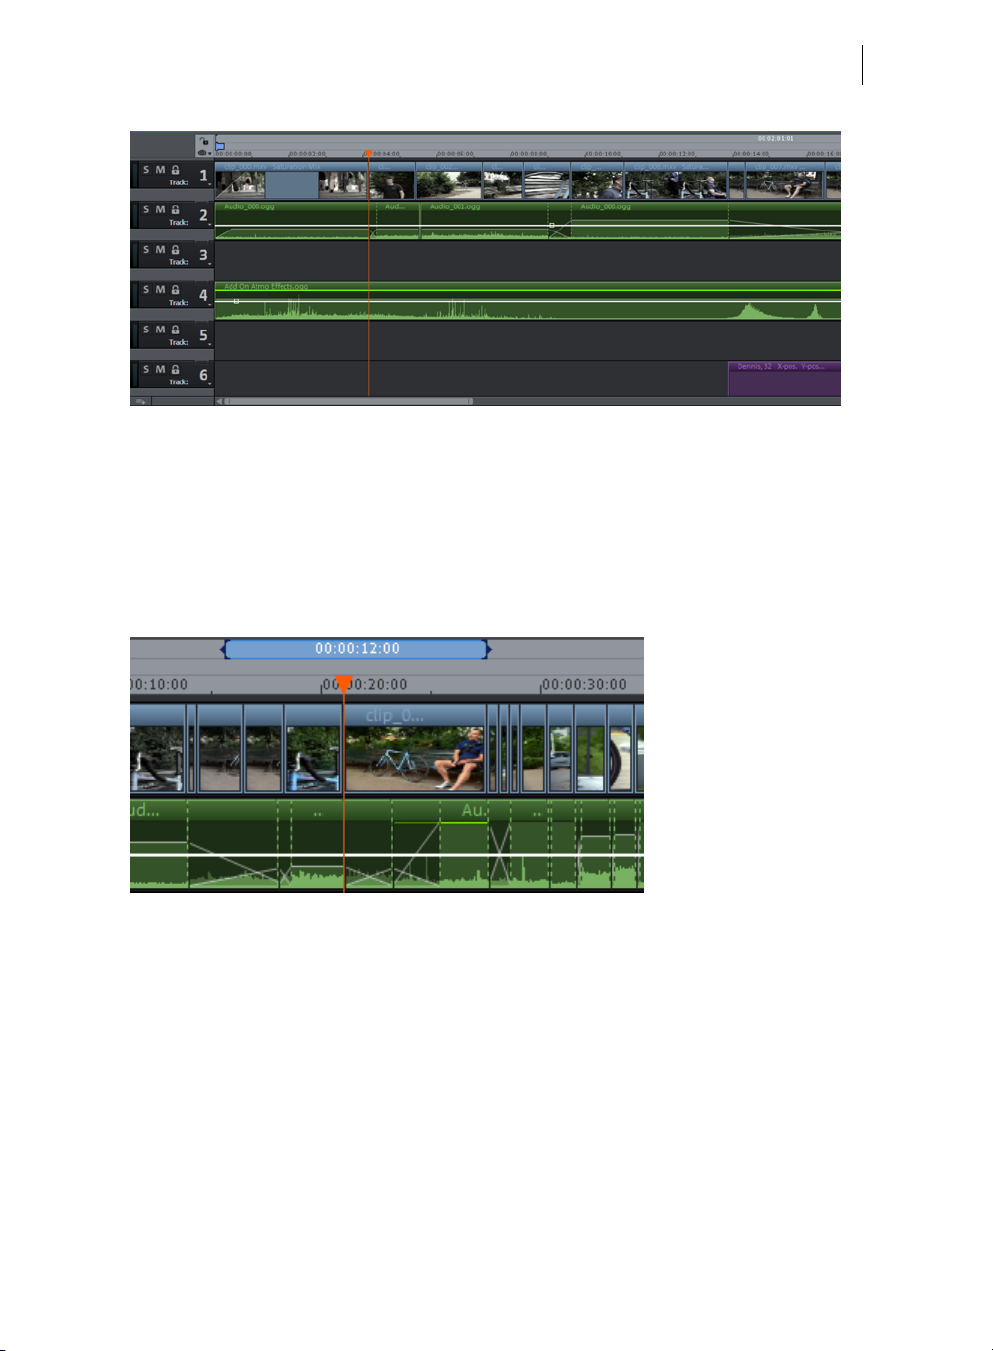
Timeline mode
All advanced editing functions should be undertaken in "Timeline" mode. Your movies
and scenes are shown here: The longer the object in the track, the longer the
corresponding movie.
Playback range: Clicking in the range bar above the first track lets you define start
markers, i.e. the starting point of the playback range. If you right click further on, the
end marker will appear to indicate the end point of the playback range. The length of
the playback area is shown in the center of the section display.
• When the end marker has been reached, the playback cursor jumps back to the
start marker and begins playing everything again as a loop.
• The entire playback range can be moved using the mouse by clicking on the bar
in the middle and dragging it. The in and out points can be moved with the
mouse. Left clicking positions the in point, and the right mouse button sets the
out point. The playback range above the first track is linked to the playback range
of the preview monitor. Both can only be changed simultaneously
• To move the start and end markers to the beginning and the end of the film again,
click "Optimize movie view" in the "Window" menu.
Handles: All objects can be shortened by moving the mouse to one of the lower
corners of the object until it turns into a stretch symbol. Move the mouse over one of
the lower corners of the object until the mouse pointer becomes a stretch symbol. At
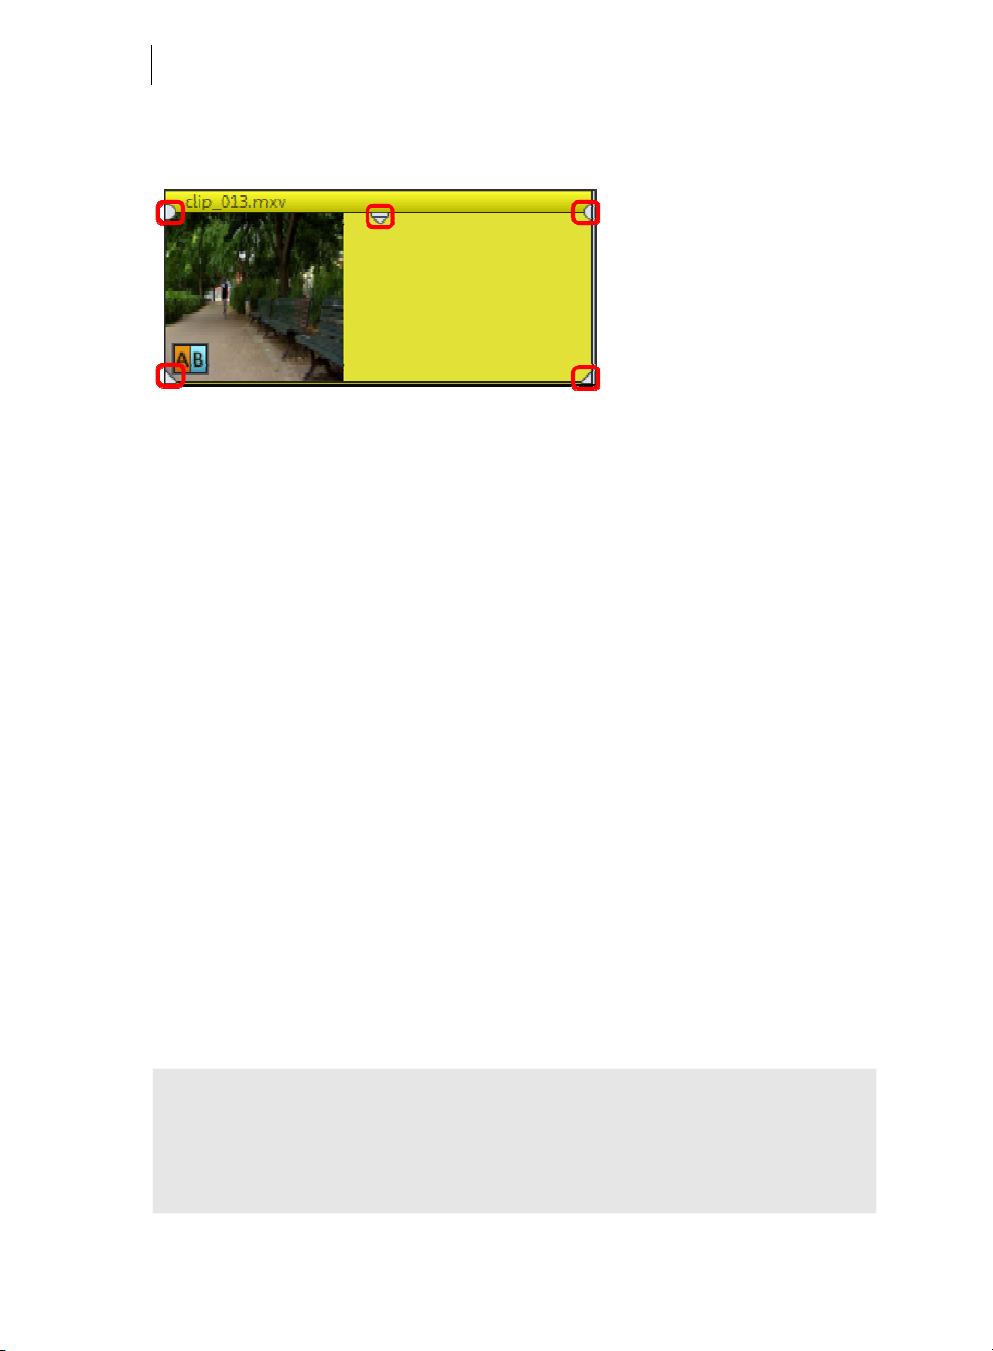
26
the top corners of every object, you’ll find two fade handles that can be adjusted to
fade an object in or out. The handle at the top center can be used to adjust the volume
of audio objects and the brightness of video objects.
Object selection: For advanced effects editing, the objects must be selected first.
Each object can be selected by clicking it. Objects will change color to show that they
have been selected. Multiple objects can be selected by holding down "Shift". You can
also click and drag out a rectangle to select multiple objects. All objects included in
the rectangle will be selected.
Removing unusable scenes
One of the most important steps during import of your footage is cutting out unusable
scenes from the material. There are two options in this case:
• Option 1: First, the complete material is loaded into your project and the unusable
scenes are cut out.
• Option 2: You can cut the material already in the Media Pool, i.e. BEFORE you
import it, and then proceed to import only the scenes you need. This process is
recommended for long movies with a lot of editing.
Cut videos in the project
Let's assume that you have already imported your film material into a project and
would now like to edit it.
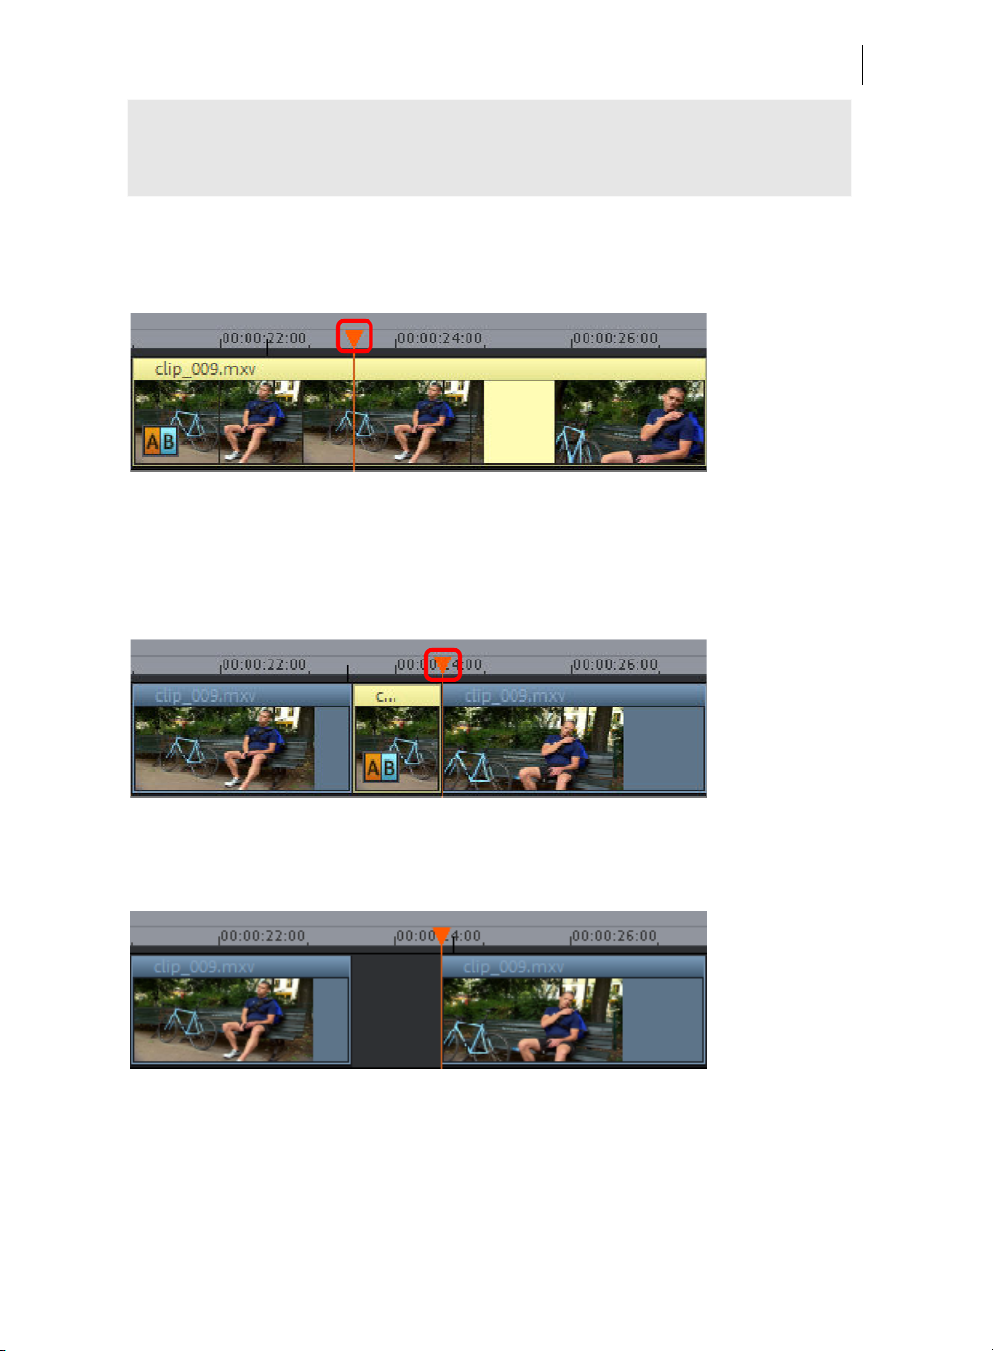
• Play your video by clicking on the up arrow on your keyboard.
• Pause playback at the position where the scene is located by pressing the
downward arrow. The playback marker stays near the start of the scene to be
removed.
Note: You can also use the space bar or the play button on the transport bar to start
and stop playback. However, in order to move the playback marker to the position
where you stop the playback, you must first go to program settings (File > Settings >
Program) in the "Playback" tab under "Space bar behavior" and select the "Space bar
stops at current playback position" function.
www.magix.com
Quick start 27
Tip: In case of long films or to speed up search, you can also fast forward the video
following the action on the preview monitor. To do so, pull the playback marker
across the timeline (but not too fast!) while holding down the mouse key.
• Set the playback marker exactly at the start of the unusable material. The zoom
function is recommended to get a better view of longer videos (the +/- buttons in
the bottom right corner).
• Press "T" on the keyboard. This will split the current scene into two sections at
the position of the playback marker.
• Repeat these steps for the end of the unusable scene. Find the end of the
unusable scene, place the play marker as close as possible to the end point, and
then press the "T" key on the keyboard again.
• Now you have "isolated" the unusable scene and may delete it from the movie
using the "Del" key on the keyboard. Before this, the scene must be selected by
clicking it with the mouse.
28
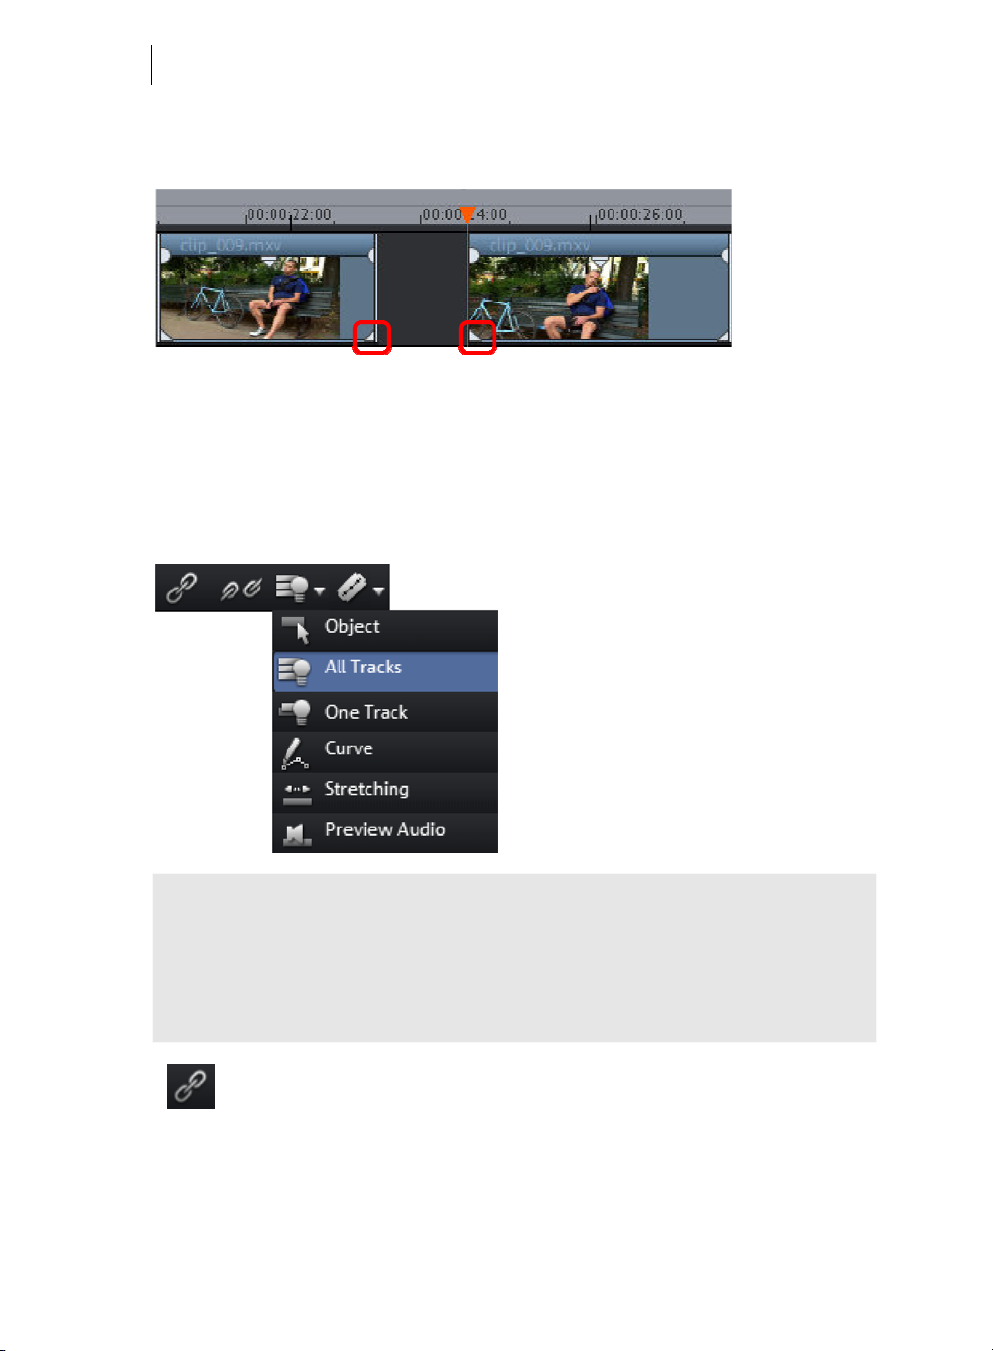
• If you didn't work accurately during cutting, then don't worry; you can use the
lower object handles to stretch or shorten the remaining objects to recover or
exclude material from the deleted section.
• After deletion a gap will appear in the film sequence at the position of the
removed material. How do you remove gaps out of the film? Easy: Pull the later
scenes up to the earlier scenes until they "dock" with each other. Remember to
"take" all objects that are further behind, otherwise the gap will just be "passed"
to the end. To pull up later objects, use the "All tracks" mouse mode, since this
automatically takes all the objects found later on the timeline along with the
object being pulled.
Note: If your project has a sound track next to the image track, it is usually
necessary to cut audio and video tracks in synchronization. After import from the
camera, video and sound tracks are automatically grouped, which is why all cutting
and moving actions have an effect on video and sound tracks simultaneously.
However, if you have added a separate soundtrack which has not yet been grouped
with the image sequence, then you should group them before starting to edit.
To do so, select the video object and the audio object via "Ctrl" + click, and in
the "Edit" menu select the "Group" option (or click the group tool).
Go ahead and experiment with the editing functions in all processes (and all other
editing operations in MAGIX Movie Edit Pro 2013), the original material on your hard
disk is not changed.
www.magix.com
Quick start 29
Importing individual scenes from longer movies
If you have saved a longer video as a file on your hard disk and only want to use a
section of it for your project, you can proceed as follows:
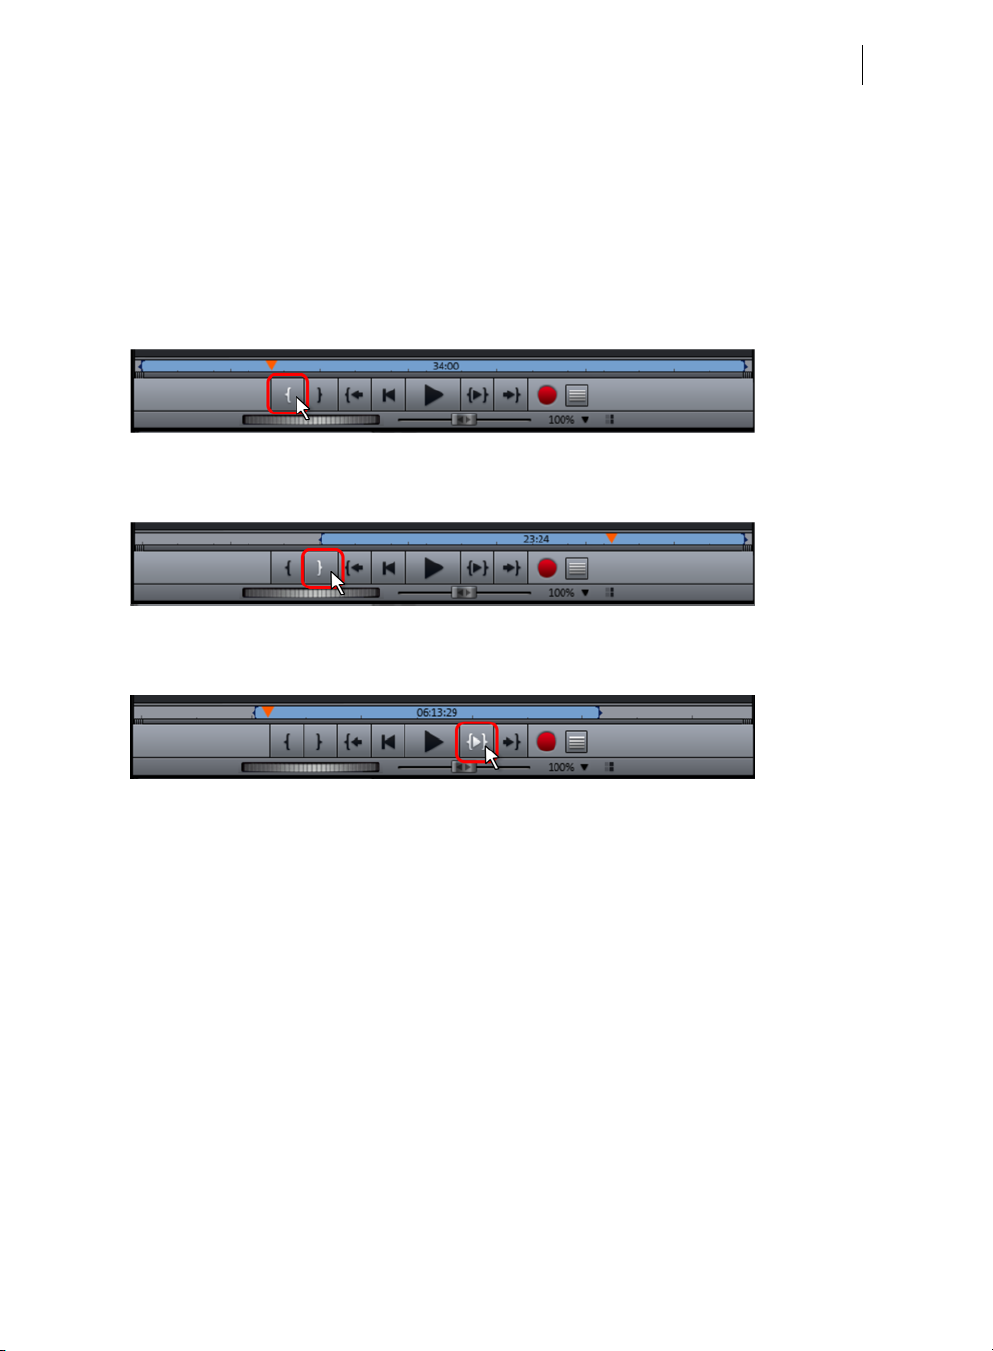
• Select the file in the Media Pool and click on the Trim icon in the middle of the
features that appear above the file.
• Now you can play the selected file in the Media Pool using the transport control.
Find the area you want to import. Position the play marker above the transport
control at the start position of the range and click the "Set in point" button.
• Next, position the playback marker at the end of the section and click the "Set
out-point" button.
• The currently selected range appears as a blue bar in the range display. You can
play back this range separately with the "Range playback" button.
• All range limits can be moved by holding down the mouse button and dragging.
Once the range matches the section that you want to import, click on the preview
image in the monitor and drag it onto the track. An object will appear,
corresponding to the selected area.

30
Regroup scenes
It will often be the case that you will want to move whole scenes or even groups of
scenes to a different place within a film. This happens completely intuitively: Single
scenes can be selected in any view ("Timeline", "Storyboard" or "Overview" modes)
using just a mouse-click, and then moved to the desired spot with the mouse button
held down. In the "Timeline" and "Overview" modes you can also create scene groups
which can be moved together: "Ctrl + mouse-click" lets you select more than one
scene, "Shift + mouse-click" selects the scenes that lie in between.
Three final tips for advanced video arranging:
• Using "Intelligent mouse" mode, which is available in the "Timeline" mode, you
can move not just the selected scene, but also all elements directly bordering it
(e.g. transitions, fades, and scenes following the selected scene and those on
neighboring tracks).
• The commands "Group (view page 251)" and "Ungroup (view page 252)" let you
oin any scene into groups which can then be moved together as a block.
j
• If editing and moving scenes left your project looking like a junkyard, then you
can also work in the opposite direction by selecting the scenes you want to use
and saving them to the Media Pool directory. Collect scenes that you want to use,
place them into the "Takes" folder, start a new project, take scenes from that
folder, then place them in the second project in the order you want them. The
"Takes" folder can be accessed in the Media Pool via the "Import -> My Media"
button.
www.magix.com
 Loading...