

Page 1
Manual
Page 2

The present documentation is protected by law. All rights, especially the right of duplication,
circulation and translation is reserved.
No part of this publication may be reproduced in form of copies, microfilms or other
processes, or transmits in a language used for machines, especially data processing
machines, without the express written consent of the publisher.
All copyrights reserved.
MAGIX® and Movie Edit Pro 2004® are registered trademarks of MAGIX Computer Products International Corp.
All other product names are trademarks of their respective owners.
Errors and changes to the contents as well as program modifications reserved.
© 2001-2004 Copyright by MAGIX Computer Products International Corp.
Page 3

Foreword
Thank you for purchasing MAGIX Movie Edit Pro 2004!
Now you can make impressive movies by bringing the
power of a production studio into your home. MAGIX
Movie Edit Pro is a user-friendly desktop video editor that
offers top-quality professional tools, amazing visual and
sound effects, studio-style scene transitions and even DVD
authoring and recording, to ensure that you produce simply stunning results.
The creative possibilities are endless:
– DVD Movie memories of vacations, parties, sports or
special family events
– Video web pages
– CD or DVD movies and slideshows
– Email greetings or Streaming Movies
– Enhanced Presentations (MS PowerPoint®-compatible)
– Ad spots or TV trailers
– Music videos, karaoke shows, Animation
– Plus much more
Inside this package you will find a printed manual explaining the features and functions of MAGIX Movie Edit Pro
2004, a complete video tutorial full of useful tips and tricks,
and an electronic PDF manual for convenient reference.
To get started, we recommend taking a moment to play
the video tutorial and read through the quick course on
filmmaking included in the manual, and then browse the
first few chapters of the manual to get a good overview of
the powerful features included in MAGIX Movie Edit Pro
2004. This information will get you started on your way to
making your first movie masterpiece.
Have fun and enjoy creating and sharing your movies with
MAGIX Movie Edit Pro 2004, the Ultimate Desktop Video
Editor.
The MAGIX Team
3
Page 4

Table of Contents
Foreword 3
Package contents 12
System requirements 13
Support 14
Installation 15
MAGIX on the Internet 15
Connecting your equipment 16
How do I connect my digital video camera to my
computer? 16
How do I connect my camcorder to my analog capture
card? 17
How do I connect my audio equipment to use the audio
capture function of this program? 18
Introduction 19
What is MAGIX Movie Edit Pro 2004 ? 19
Feature Highlights 19
Function Overview 21
Tutorial 26
Program start and orientation 26
Video-Capturing 28
DV-Capture 30
Video Editing 31
Video Output Options 33
Program Desktop Overview 43
Storyboard mode 44
What is the Storyboard mode? 44
Scenes 44
Scene Recognition 46
4
Page 5

Time-line mode 47
What is the Time-line mode? 47
Tracks 47
Navigating the Timeline Window 47
Bars and Grids 47
Playback 48
Organizing the arranger view 48
Organizing the video screen 48
Playback/Transport control 48
Set play markers 49
Selecting objects 49
Moving Objects 50
Splitting objects 50
Scissors 50
Duplicating/Copying objects 51
Object Handles 51
Media Pool 53
Function 53
Directory and file list 53
Preview function 53
Deleting, copying and moving files 54
Integrating videos, takes or audio files into your arrangement 54
Media-Pool buttons 55
Table of Contents
Tools 57
Undo 57
Redo 57
Copy (Storyboard mode) 57
Paste (Storyboard mode) 57
Duplicating objects (Timeline mode) 57
Delete 57
Group 58
Ungroup 58
Optimize View 58
Song Maker 58
5
Page 6

Table of Contents
Mouse modes 59
Intelligent mouse mode 59
Mouse mode for single objects 59
Curves Mouse Mode 59
Object stretch mode 59
Audio pre-listening mode 60
Scrub mode 60
Context help mode 60
Videos and Pictures 61
Load videos and images 61
Digital video capturing (DV capturing) 61
Video capture from analog sources 63
Snapshots 67
Scene Recognition 68
Take s 6 9
Separate audio from video material 70
Transitions 70
Trimming or Fine-tuning videos 72
Minimizing Videos or Nestling One video inside another 75
Image Stabilization 75
Video effects 77
Video mix 77
Borders 78
“Text”: Subtitles and credits 78
Create a video project for the Internet 79
Video export via video or graphics card 80
Showing videos with the TV output 81
Playing videos on digital devices 82
Audio 83
Load and edit audio files 83
Scanning an audio CD 83
Audio recording 84
Adding background music using the Wizard (Song
Maker) 86
6
Page 7

Arranging MAGIX sound files 88
Effects for adding music 88
Mix down of audio objects 89
Adding a sound track using MIDI songs 89
Video effects 91
Using video effects 91
Video controller 91
Video cleaning 95
Scene Recognition/ Creating subtitles/Anti-Shake Filter/Trimmer 98
Movement 98
Crop 98
Section 99
Controlling Effects with Curves 99
Audio effects 103
Using audio effects 103
Audio Cleaning 103
Effect devices and Master FX 109
EQ (Master FX) 110
Compressor (Master FX) 111
Stereo FX (Master FX) 111
Digital audiometer (Master FX) 112
Echo / Reverb (Master FX, FX menu) 112
Time Processor (FX menu) 113
Normalize/Reduce volume/Set volume 114
Controlling Effects with Curves 114
Table of Contents
Mixer 115
Faders & buttons 115
DirectX audio Plug-Ins 116
Internet Functions 117
Web Upload onto “MAGIX.TV” 117
Save and send as e-mail 118
Loading multimedia files from the Internet 118
Website Creation 119
7
Page 8

Table of Contents
8
Make CD/DVD-Screen 123
Functionality 123
Selection Menu 123
Animated Selection Menus (only for DVD and MiniDVD) 125
Remote control 126
Burn Disc 126
Memory 128
Disc Spanning 129
Burn Media CD 130
Menu File 131
New Movie 131
Load Movie 131
Save Movie 131
Save Movie as 131
Load/ Save disc project> Load disc project 131
Load/ Save disc project> Save disc project 131
Load/ Save disc project> Save disc project as 132
Export Movie > Video as AVI 132
Export Movie > Video as DV-AVI 132
Export Movie > Video as MPEG Video 132
Export Movie > Video as MAGIX Video 132
Export Movie > Video as QuickTime Movie 133
Export Film > Video uncompressed 133
Export movie > video as sequence of single frames 133
Export Movie > Windows Media Export 133
Export Movie > Real Media Export 133
Export Movie > Audio as Wave 134
Export Movie > Audio as Wave with Codec 134
Export Movie > Single frame as BMP (JPEG) 135
Internet 135
Write files to CD-ROM 135
Capture audio/picture/video 135
TWAIN Scanner/Camera > Select Source 135
TWAIN Scanner/Camera > Scanning 135
Page 9

Song Wizard 136
Transfer back audio/video 136
Backup copy > Save film and media in directory 136
Backup copy > Burn film and media onto CD / DVD 137
Backup copy > Recall disc project from CD / DVD 137
Movie > Load backup movie 137
Movie properties 137
Playback parameters 138
Ssettings 140
CD-ROM Configuration 144
Menu Edit 149
Undo/restore/duplicate objects/delete objects 149
Undo 149
Redo 149
Duplicate objects 149
Delete objects 149
Select all objects 149
Cut Objects 149
Save objects as takes 150
Edit Range > Cut 150
Edit Range > Copy 150
Edit Range > Delete 150
Edit Range > Insert 150
Edit Range > Extract 150
Build group / Ungroup 150
Mix down audio 151
Set Marker > Marker 1/2/3 151
Set Marker > Chapter Marker 151
Set Marker > Automatic Chapter Marker 151
Set Marker > Delete All Chapter Markers 152
Go To Marker 152
Table of Contents
Menu Effects 153
Object Properties 153
Effect settings movie 153
Video object effects > Video Cleaning 155
9
Page 10

Table of Contents
Video object effects > Video Effects 155
Video object effects > Scene recognition 155
Video object effects >Motion stabilizer 156
Video object effects >Object Effects Curves 156
Video object effects >Section 156
Video object effects > Load/Save/Reset video objects 156
Video object effects > Edit bitmap externally 156
Audio object effects 156
Load/Save/Reset Audio effects 156
Audio object effects> Volume Curve 157
Title object effects> Title Editor 157
Title object effects> Load Title Effects/Save Title
Effects 157
Effect Libraries > Audio effects/Video effects/Slide effects/
Title effects 157
Menu Window 158
Mixer 158
Cut Trimmer 158
Object Trimmer 158
Master audio effect rack 158
Arranger full size 158
Dual-screen layout (with or without controls) 159
Video monitor 159
Media Pool 159
Show film overview 159
Optimize view 159
Storyboard / Time-line mode 159
10
Menu Help 160
Content 160
Context help 160
Using help 160
Display tool tips 160
About MAGIX Movie Edit Pro 2004 160
Online registration 160
Page 11

MAGIX.TV 160
Settings/Information > System information 160
Keyboard Shortcuts 162
MAGIX CD-R 165
The burn dialog 165
The Normal Mode 167
The Backup Mode 167
Audio CD Mode 168
MAGIX Media Manager 169
Appendix: Quick film course 170
Idea 170
Synopsis and screenplay 170
Cinematic means 170
Continuity 171
Camera Operation 171
Field sizes 172
Scenes & Cuts 174
Sound 176
Captions 176
Lighting 177
Suggestions 178
Table of Contents
Appendix: Video and Data media 182
Editing video on the PC 182
MPEG Compression 182
Specification (RedBook, WhiteBook...) 183
Video CD (VCD) 183
Super Video CD (SVCD) 184
Digital Versatile Disc (DVD) 184
Mini-DVD 186
Appendix: Problems and Solutions 187
Index 189
11
Page 12
Package contents
2 CDs for installation & multi-media content
You will find MAGIX music world and the audio and video
media library files on the MAGIX Movie Edit Pro 2004
installation manager. Note: The multimedia content (images, videos, titles, sounds)on the installation CDis “royalty-free”.and may be used for all projects without additional license.
Manual
The printed manual explains the functions of MAGIX
Movie Edit Pro 2004 and includes a quick filmmaking
course that is full of tips and tricks for budding filmmakers. Note: The printed manual contains only an introduction to the basic functions of MAGIX Movie Edit Pro 2004.
For more detailed information, please refer to the PDF
manual found on your hard drive after installation
The complete documentation is also found as a .pdf file on
your hard drive after the program is installed. This electronic manual describes program functions and provides a
helpful explanation of the various types of discs you can
create with the program such as video CDs, super video
CDs and DVDs.
The PDF manual will require Adobe Acrobat Reader. If
you do not have Acrobat already installed on your system,
you can install it from the program directory or the installation CD from the „Add-ons“ folder.
12
Page 13

System requirements
– Microsoft® Windows® 98 / 98 SE / ME / 2000 / XP
– 450 MHz Processor
– 128 MB RAM (256 MB recommended)
– Min. 1 GB free hard disk space for video files (5 GB rec-
ommended).
– Hard drive with data access rate min. 4 MB/s recom-
mended
– 800x600 display resolution
– 16-bit SVGA graphic card with min. 4 MB RAM
– 16 bit soundcard
– CD-ROM drive for installation
– Microsoft-compatible mouse
– Optional: Microphone for recording
Video Capture Card:
– Digital: OHCI-compatible IEEE-1394 DV capture card
(FireWireTM) with Microsoft® DirectX8a-compatible
driver
– Analog: Video capture card compatible with Video For
Windows or DirectShow
– TV Recording: TV tuner cards or graphic card with video
input compatible with Windows Direct Media drivers.
Note: WDM drivers are required for virtual VCR function.
Disc Burning:
– SCSI or IDE CD or DVD Recorder [CD-R, DVD-R(W),
DVD+R(W)] recorder.
Playback/Display:
– VCD, SVCD, DVD-R(W), DVD+R(W) and miniDVD
playback requires compatible home DVD player or ap-
propriate Windows-compatible drive.
– Import/Export of DivXTM and MPEG-4 file formats re-
quire installed codecs.
– Video Emails are sent using standard Email software
(Microsoft® OutlookTM or Microsoft® Outlook
ExpressTM).
– Video Websites can be displayed on Microsoft® Internet
ExplorerTM 4.0 and higher. Online publishing with in-
dividual web account.
13
Page 14

Support
If you experience any problems with your software, please
get in touch with our support team:
Support website: http://support.magix.net
This website will lead you to the MAGIX user service page,
which, among other things, contains the following free
offers:
– FAQs (frequently asked questions) and general tricks and
tips. In most cases you’ll find the solution to your problem here. If not, use the Email support form.
– E-mail support form: Via the special form you inform
our support staff about your system. This information
is used to solve your problems quickly and competently.
Simply fill out and send with a mouse-click!
– Support forum: You are not alone. Perhaps other users
had a similar problem and can help you solve yours. Our
support staff is also a regular contributor.
– Download section: Updates, improvements and patches
are likewise offered free of charge via download. Many
problems you may experience are well-known to us, and
can be solved by downloading the latest patch. Besides
patches, there are also wizards for checking and optimizing your system.
– Links: In the links list you will find the contact addresses
of all the most important hardware manufacturers.
14
You can also reach our support team either by telephone
or by fax.
Phone: For upgrades: 1-305-695-6363
Fax: 1-305-695-6330
Please have the following information at hand:
– Program version
– Configuration details (operating system, processor,
memory, hard drive...)
– Soundcard configuration (type, driver)
– Information regarding other audio software installed
Page 15

Installation
1
Place the installation CD into the CD-ROM drive.
2
The installation program will start up automatically. If it
does not, simply open the File Manager/Explorer and click
on the drive letter representing the CD-ROM drive (generally D:\.) Double-click on mworld.exe.
3
MAGIX music world will now start up automatically. To
begin t installation of MAGIX Movie Edit Pro 2004, click
on INSTALL
4
The MAGIX Movie Edit Pro 2004 installation program will
start up. Simply follow the onscreen instructions to complete the installation process. Once all the files have been
copied to the hard-drive, a program group will be created.
The installation is now complete. Confirm the installation
by clicking ‚Finish’. You may now launch the program at
any time from the Windows Start menu.
MAGIX on the Internet
Visit our website at:
www.magix.com
Here you’ll find:
– “MAGIX.TV“ and “MAGIX web publishing area“: New
entertainment and direct online publishing resources
– Contests
– Online shop with regular special offers
– Events and news
– User forums and Support sites
– Plus much more that you can explore.
15
Page 16
Connecting your equipment
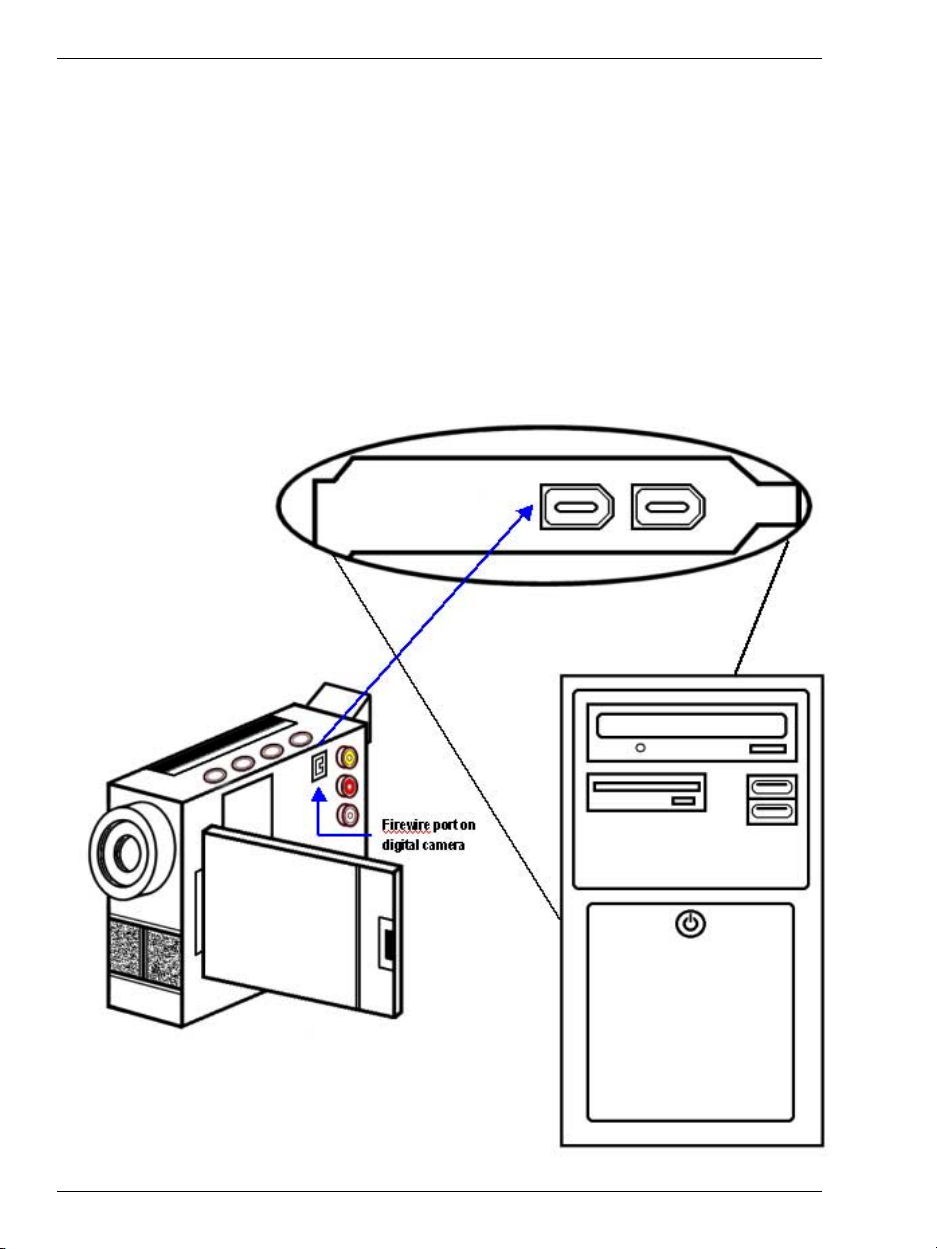
How do I connect my digital video camera to my computer?
The best way to capture Digital Video into your computer
is via “Firewire”. FireWire is a fast peripheral interconnect
standard capable of transfer speeds up to 400 Mbs. It works
well for multimedia peripherals such as DV (Digital Video)
cameras and other high-speed devices like the latest hard
disk drives, CD/DVD burners and printers. To connect your
DV camera to your computer through firewire, connect
your cable from the firewire port on your camera to an IEEE
1394 compliant firewire jack on your computer.
16
Page 17

Connecting your equipment
How do I connect my camcorder to my analog capture card?
To connect your camcorder to your capture device simply
connect the composite or SVHS cable out of the camera to
the composite or SVHS in of the capture card.
17
Page 18

Connecting your equipment
How do I connect my audio equipment to use the audio capture function of this program?
Check the system requirements section of this manual to
ensure you have the appropriate hardware to perform this
function. Most connections required for this program are
to your computer’s graphics and sound card as shown in
the diagram below. When you are connecting a microphone
directly to the computer, you will connect to the usually
red “Mic” jack of your sound card. Anything else that is
not a microphone will be connected to the usually blue “Line
In” jack of your sound card. Consult your hardware manual
for more details.
18
Page 19

Introduction
What is MAGIX Movie Edit Pro 2004 ?
MAGIX Movie Edit Pro 2004 is a production studio for
the PC, Edit videos, movies, photos and audio from a wide
range of sources Divide long movies into different chapters and/or scenes automatically, or do the opposite by automatically incorporating short takes into a movie. A choice
of edit screen views and professional, yet easy-to-use features make it a snap for anyone to transform raw video
footage into impressive movies. The Storyboard edit mode
represents all scenes in linear sequence on the storyboard.
They can be arranged and re-ordered by dragging them
with the mouse, or adding text, transitions, effects and a
new soundtrack with a simple mouse click.
The time-line edit mode is recommended for more detailed
editing. Files are displayed as objects on different tracks.
Objects positioned on tracks stacked on top of each other
are played simultaneously, while objects positioned next
to each other are played chronologically. Import additional
material such as video, photos, graphics, subtitles, narration, sounds, songs, .rtf text files or a MIDI music file from
the Media Pool by dragging and dropping it into a track or
by double-clicking on the file. When you have completed
your video, share it! Record it back to videotape or your
camcorder for playback. Archive it on CD-ROM, burn it
onto Video CD, Super VideoCD or DVD and enjoy watching it on TV, or present your work on the Internet – as a
streaming video off your website, as a Video email to
friends, or as a creative contribution to Web TV on
www.magix.com. If you need help creating a web page,
choose from the templates included in Movie Edit Pro 2004
to help you build it.
Feature Highlights
MAGIX Movie Edit Pro 2004 is the ultimate desktop video
editor. Make sensational cuts, build special effects and 3D
transitions, and create your own soundtracks. Here’s just
a few of the powerful features you’ll use to create professional-quality projects:
Animated DVD menus with background music
Integrate videos into DVD menus. The videos play back in
infinite loops while the menu is displayed on your TV
screen. Background sounds or images in various formats
can also be integrated into the menu.
19
Page 20

Introduction
Image Resizing for Optimum Television Display
This option ensures that the image size is adapted to fit
your television screen without cropping the display image.
Re-edit mode
Archive your movie project, together with the corresponding project data, and store it on VCD, Scrod DVD. With
this feature, your project and the source files are always
available for editing.
Automatic disc spanning
Automatically split longer film sequences onto several CDs
or DVDs without quality loss.
VCR/PVR function
If you have a compatible TV card and Windows Direct
Media driver you can record any TV channel automatically
at any time. MAGIX Movie Edit Pro 2004 provides this
virtual TV tuner through both remote control and programmable timing.
Direct TWAIN connection
MAGIX movie edit pro supports import from scanners and
digital cameras using the TWAIN interface. MAGIX Movie
Edit Pro 2004 accesses the scanner or camera then imports the image into the program.
20
Image-with-Sound support
Some digital cameras feature an audio recording function
that attaches a WAV file to the image file upon capture.
MAGIX movie edit pro 2004 imports both the image file
and the audio file separately to enable easy editing. The
sound file will appear as a small WAV display below the
image preview in the storyboard mode.
Professional Real-time Effects
3D transitions, and amazing Video Controller help you
design pro-quality movies.
Intuitive Scene Arrangement
The added choice of a thumbnail scene overview mode helps
simplify changes in scene arrangement and can sort up to
400 scenes in one overview.
Page 21

Introduction
Streaming Video Format Support
The latest Microsoft® Windows® Media 9 and Real Helix
file formats are supported.
TM
Function Overview
Import and Export
Video and image formats: AVI (also non-compressed), MPEG-1/-2 (Ligos Motion Encoder), MPEG-4, DivX, Windows MediaTM, MOV (Quicktime Movie), MXV, MJPEG, BMP, JPG as well as MAGIX Movie Edit Pro 2004 project files (for integrating into a new project).
Note: Video files in DivX and MPEG 4 formats can be imported
only with the appropriate installed codecs! DivX codecs can be
downloaded from www.divx.com. Mpeg-4 codecs should have
been installed with Windows. Visit www.windows.com for more
information.
Audio formats: WAV, Audio CDs (Ripping), MP3 and MIDI files.
Additional Export formats: Real MediaTM, rendered DV- AVIs, Stills Capture/Snapshot function (unlimited export of film motifs as BMP or JPG files).
Possible Applications
From MAGIX Movie Edit Pro 2004, all movies and videos
can be directly...
– burned onto an autoplay-capable CD-ROM, Video CD,
Super Video CD or DVD
– played back on a video recorder or on a digicam
– integrated into a presentation program (such as MS
PowerPoint)
– uploaded to the web and placed on your own website or
on www.magix.com
– sent to friends via E-mail
– exported using high-quality compression in various file
formats
Capturing
MAGIX Movie Edit Pro 2004 supports most analog and
digital source devices such as digital video recorders, VCRs,
digicams, TV cards, graphic cards or USB-connected cameras.
– Analog capture requires capture cards compatible with
Video for Windows or DirectShow. DV capture may be
performed through an OHCI-compatible IEEE 1394 host
21
Page 22

Introduction
adapter (Firewire or iLink) and MicrosoftÒ DirectX8acompatible driver.
– MAGIX Movie Edit Pro 2004 also supports remote con-
trol of most digital camcorders.
– A TV tuner card or graphic card with video input and
compatible Windows Direct Media drivers are required
to record TV programs and use your computer as a personal video recorder or VCR. For convenience, there is a
programmable timer with this feature so you can record
programs at any time.
MAGIX Movie Edit Pro has overcome the Windows 4 GB
file limitation. Now you may record video as long as there
is available space on your hard drive. Using real-time compression during capture creates smaller file sizes and more
available space.
Media library
Included in this package is a comprehensive, license-free
media library. These music, video and graphics files are
stored on the two CDs and make it easy to find the right
sounds for your videos or the right videos for your sound
material. Use just the sounds and videos from the MAGIX
Movie Edit Pro 2004 media library exclusively to create a
movie without creating any new content.
22
Storyboard-Mode
All of the movie’s scenes are listed consecutively the
Storyboard mode, and are represented as a preview image.
Simply drag and drop the scenes in the Storyboard to arrange them in the desired sequence, and then choose from
10 different types of fades to blend the scenes together and
quickly make a professional-looking movie.
Time-line Mode
Videos, sounds, music, photos, graphics, text or logos can
be edited and cut in the 16-track time-line mode To add
content, select files from the Media Pool and ”drag & drop”
them into the arranger, then edit and add transitions and
effects. The files will be depicted as objects that may be
freely arranged and edited.
Create custom soundtracks, mute any track, select one for
solo playback to emphasize a sound at a particular scene,
or add an effect an individual track. This allows you to control the intensity of effects at any particular moment. Important functions also work during playback: you can move
Page 23

objects and cut and add effects and see or hear the results
in real-time while playing back the video or soundtrack.
Media Pool with Multi-scene overview mode
Preview any format to choose video, bitmap, audio or MIDI
files from the Media Pool overview mode and ”drag & drop”
them into the arranger.
A series of special buttons lets you open files or complete
scenes with subtitles, audio, video and cross fading effects,
border presets and takes. You can also preview special functions such as subtitles, effect configuration, borders and
scenes. Finding content has never been simpler. Just explore the directories and click on the files to immediately
preview the content.
Effects with previews
Any video or bitmap object can be modified individually
with a variety of individual or combined effects. If they are
frequently used effect combinations, save the combinations
separately as presets for use later on different objects. Effect curves may be drawn to dynamically control the impact of the effect and vary its intensity. Determine the specific configuration and application of these effects by using the video controller or by selecting an effect from the
effects menu and dragging it onto the object. The effects
mixer (”Slide FX”) combines or interweaves an assortment
of recordings to create a complex visual arrangement. To
execute this effect, simply drag the ‚Slide FX’ to the space
between two videos. Each video effect may be previewed to
see the final result.
Introduction
Credits, Subtitles and Texts
Import .rtf text files to create subtitles for your videos, or
use the integrated title generator. The title generator allows you to write and design your own titles and title templates that can then be positioned anywhere “on” the video.
The title templates provided are in the special “Title” directory and have preview & drag & drop functionality.
Wizard for adding sound tracks
This Wizard creates background music or an instant music clip. Simply choose the length, the style and the instruments and let the Wizard create the music.
Multimedia- Mixer with DirectX support
MAGIX Movie Edit Pro 2004 also features a real-time 2way mixer for DirectX Plug-In effects, which may be used
23
Page 24

Introduction
to mix the tracks in your arrangement. This utility also controls the brightness of visual objects and the volume and
stereo panorama of audio objects.
MIDI integration
With MAGIX Movie Edit Pro 2004 you can load, arrange
and play MIDI files. The MIDI remote controls the sound
chip of your sound card, external samplers or synthesizers. You can combine and arrange sound files with video
and MIDI files.
Note: If you want to export your videos with integrated MIDI
files, you must first record the MIDI files as an audio file using
your sound card.
Disk Selection/DVD Menus
A menu is automatically applied to all movies and chapters
for easy navigation and numerous menu templates have
been included. Create your menu by choosing one complete layout, or by combining of templates for background
pictures, fonts, frames and composition.
Burning CDs & DVDs
After completing your video project you can choose to burn
a Video CD, Super Video CD, DVD or Mini-DVD that can
be played on compatible devices. The movie will be automatically compressed (usually in encoding in MPEG-2 format). Use the virtual remote control interface, to preview
the disc you are about to burn prior to the encoding to see
how it will look in finished form.
24
Internet functions: Your own web page downloads and web
publishing
Create your own web page to share your projects with our
quick and easy web page design templates. Simply select
the layout, insert text, songs, videos or slide shows, load it
up, and you’re done! Using FTP connect, you can use the
Internet as a resource for countless images or samples,
and also integrate additional multimedia building blocks
into your arrangement from the web. The ”MAGIX.TV“
publishing area is there for you to present your work to a
worldwide audience.
MAGIX CD-R
This utility allows you to make backups of your projects
and archive all of the files used in the project by burning
them onto a CD-ROM. You can also launch “mxcdr.exe” as
Page 25

a standalone CD-burning software suite for any data backup
tasks (you will find the program file in the “mxcdr”
subdirectory in your applications directory).
MAGIX Media Manager silver
MAGIX Media Manager silver MAGIX Media Manager
silver is a multimedia console that combines browser, converter, viewer, editor, player, and even Internet radio into
one powerful application.
Launch MAGIX Media Manager separately from the
MAGIX program group.
Introduction
25
Page 26
Tutorial
This chapter addresses the basic functions of MAGIX Movie
Edit Pro 2004 through step-by-step explanations. More
detailed descriptions of the program functions appear later
in this manual.
Program start and orientation
Install MAGIX Movie Edit Pro 2004 and launch the program from the Windows® start menu.
Viewing the Demo Tutorials
MAGIX Movie Edit Pro 2004 offers several instructional
videos to illustrate many of the important program functions. To select and view a video tutorial:
1) Double-click on the “Own“ file, in the upper right part of
the media pool.
2) Double-click on “Demo project”.
3) Double-click any of the listed MVD project files to select
the desired video.
4) Click the play button in the transport control below the
video screen, or use your keyboard space bar for the
”play” and ”stop” functions.
26
A vertical line, called the play cursor, moves across the arranger when a video plays. This indicates the current position.
Page 27

Playback markers:
Look for the red markers in the time-line at the top of the
tracks. These markers indicate the start and the end of the
part that will be played. When an end-marker is reached,
the play cursor will jump back to the beginning and play
the arrangement again (a never-ending loop). Both start
and end-markers may be moved with you mouse to change
the section that will be played.
Setting playback markers: Left-click your mouse on the timeline to set the start-marker and right click to set the end-marker.
Two Production Screens
MAGIX Movie Edit Pro 2004 offers two production screens
for the two most important production processes: The video
editor screen, which is displayed when the program starts,
and the Make CD/DVD screen, which is used when burning your movie onto CD or DVD.
Tutorial
Two Editing Modes
The Video Editor screen operates in one of two modes:
Storyboard mode or Timeline mode. Switch between them
at any time using the Tab key.
Storyboard Mode
In Storyboard mode, all scenes are listed consecutively in a
series. Each scene is represented by a preview image on
the storyboard. You can choose from 10 fades to blend
scenes together.
Timeline Mode
The 16-track timeline mode displays your film chronologically. The movie is as long as the representative “object(s)”
in the track. The Timeline mode offers everything you need
for detailed, extensive video editing: adding & editing a
soundtrack, custom effects & transitions, and precise cuts
and fades.
Media Pool
The buttons above the Media Pool open special directories
containing samples, effects and fade. Try opening a directory, such as ”Video FX”, ”Audio FX”, ”Slide FX”, ”Titles”
and ”Borders” and clicking on a file within one of these
folders. This will show you previews and descriptions on
the video screen that explain the function of the file.
Playback markers:
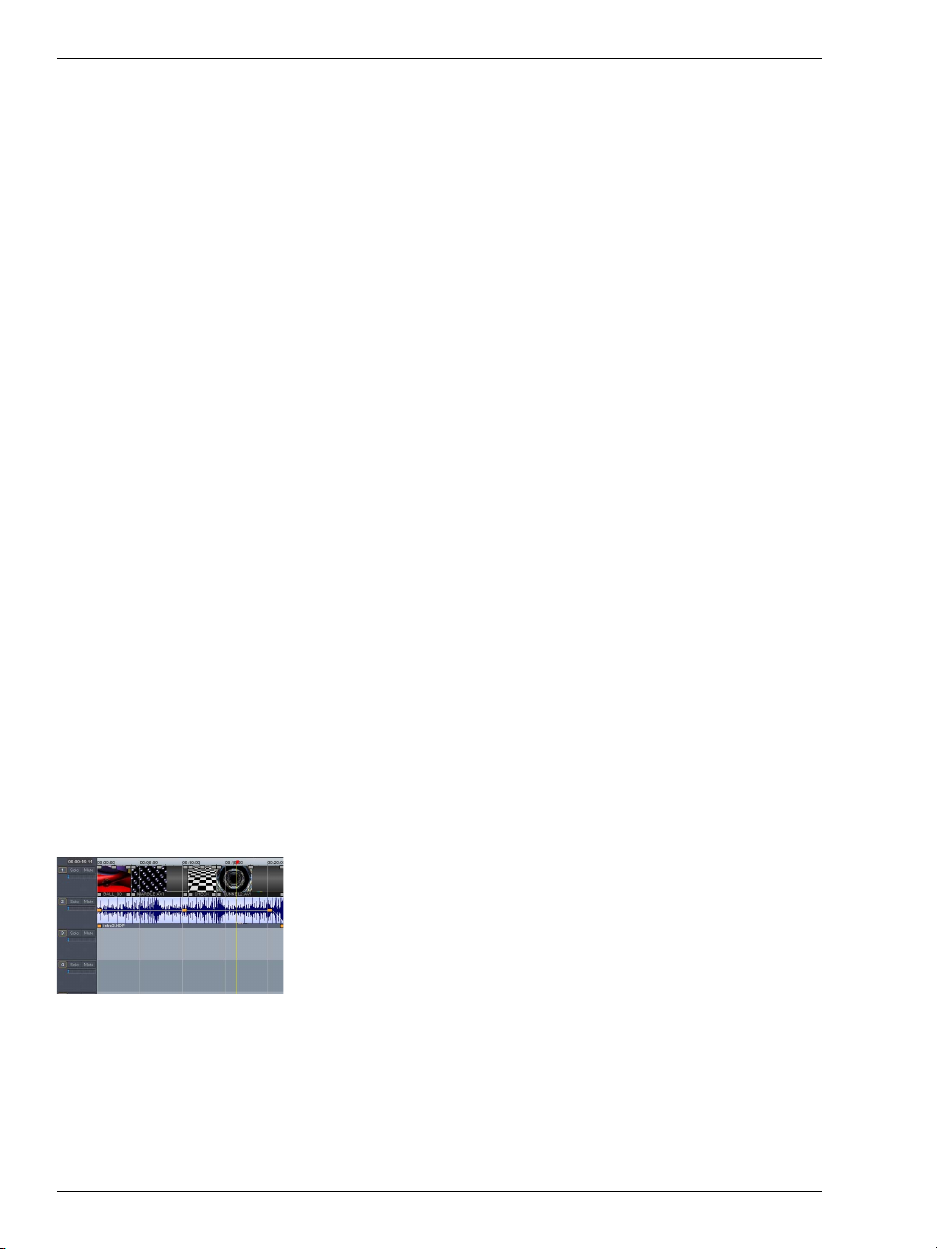
Make CD/DVD screen
Video Editor: Timeline-Mode
Media Pool
27
Page 28

Tutorial
FX and Context menus
A right mouse-click on an object opens the context (effects)
menu containing effects available for the selected object in
the Timeline mode. You may also reach this menu through
the ’FX’ menu in the Storyboard mode.
The FX/context menu for audio objects offers effects and
options different from those in the FX/context menu for
video objects. In many cases, if you right-click on other
areas of the MAGIX Movie Edit Pro 2004 interface additional context menus with additional options will become
available.
Starting a Project
If you want to immediately begin a video project, select the
“New Movie” option in the File menu, then read the following sections on digital and analog video capturing.
If you’d like to continue with this tutorial and work with
the demo project, skip to “Video Editing“ later in the Tutorial section of this manual.
Video-Capturing
1. Connection
Connect the video output of the source device (VHS
camcorder or digital camcorder) to the video input of your
PC and the audio output to your soundcard’s line input.
(Refer to the installation section of this manual)
28
Tip: Many VHS recorders have RCA outputs: two for the stereo
sound track, and one for the picture. In this a case, you’ll require
a cable with 3 RCA jacks at each end. Most soundcard inputs
are 1/8” mini stereo jacks. You will then require a stereo RCA
to mini stereo jack adapter to connect the VHS recorder audio
output to the soundcard’s stereo input. However, source device
configurations can vary significantly. Please refer to your recorder, video card or graphic card user manuals to determine proper
configuration.
2. Analog Capturing
How to capture video from analog sources
1. Connect your analog source device (camera, VCR, etc.)
to your analog capture device.
2. Click on the Record button at the bottom of the video
screen and select “Video capturing”.
3. Choose the center button called “analog video capture”.Record button
Page 29

This will open the video capture dialog:
1. Choose drivers – Select the correct video card and audio
card driver (in the event you have several installed) on
your PC. A video preview window is immediately displayed.
2. Name the capture: Name your file and choose the file
path it will be stored to so you can find it later,
3. Set the quality – this drop-down menu lets you set the
video quality you desire.
Tutorial
Note: setting this too high may result in dropped frames, making
your video look jerky. This is due to a lack of computer resources.
Set this only as high as your system can handle. The quality
slider ranges from ‘low’ quality to ‘best’ quality. There is an
‘uncompressed checkbox, which sets quality to the highest possible, but requires the most resources!
Advance Settings: Set frame rate, image size or streaming bit rate.
Start automatically: Capture with a built-in timer like your VCR.
Record Start & Stop: Initiates Video and Audio capture
Video preview screen: Preview your capture
Volume control: Opens the Windows Recording mixer
controls for setting input levels
29
Page 30

Tutorial
30
Record statistics: This provides information on your capture, including dropped frames. (If you see any dropped frames, lower your capture quality. If, for example, more than 10 frames are dropped per minute, the quality of your video will be compromised, and indicates that your computer may be overburdened)
Preview options: the Video and Audio checkboxes must be checked so that you will capture video and audio
L & R volume meters: these show you the signal strength of your incoming audio, provided you have the proper Windows Mixer settings Once you have finished your capture by pressing the ‘Stop’ button (white button next to the big red record button), close the capture dialog by pressing OK. You can now view your capture using the film bar in the lower third of your screen. To check the footage, start the playback by pressing the space key. The video you capture will be accessible from the media pool in the folder you captured to. Simply drag and drop the file onto the arranger and start editing!
DV-Capture
Please check the system requirements section of this
manual to ensure that your PC meets the hardware requirements for DV capturing. You will need a Firewire or iLink
interface and Microsoft “DirectX8a” or higher installed on
your PC.
– Turn off the camcorder and connect it to the computer
with your computer Firewire card.
– Switch the camcorder to the “Video recorder” or “Play-
back” mode.
– Click on the Record button at the bottom of the video
screen and select “DV Capturing”.
– Select the appropriate DV camera driver.
– Name the file and path so you can find it later.
– Using the virtual remote control buttons, locate the ap-
propriate location of the desired scenes. Fast-forward,
reverse and playback controls provide optimal control.
– Start capturing by pressing the “Record” button. Be sure
to track the available hard-drive space. DV captures re-
quire approximately 220 MB of space per minute of
video!
– Stop the capture by clicking the “Stop” button and exit-
ing the capture dialog.
Page 31

– You can now see your footage in a file form the film bar
below. For a playback, simply press the space key.
Tip: You can batch-capture, or choose sections throughout the
source digital videotape for sequential recording, within the
Digital Video recording dialog. A list of possible passages, from
which you can capture in sequence, is provided to choose from.
Batch capturing saves time and hard drive space by only
capturing the desired content. .
Video Editing
Storyboard Mode Editing:
In Storyboard mode, all scenes are listed consecutively in a
series. Each scene is represented by a preview image on
the storyboard.
Adjusting soundtrack volume: The overall soundtrack volume can be modified by selecting the loudspeaker symbol on the Filmbox.
Improving picture or sound quality: Click the “FX” symbol on the Filmbox and select “Video Cleaning” for the appropriate film track. , You can also adjust “Color”, “Brightness” and “Contrast”. Minimize unwanted background noise on the soundtrack by selecting “Audio Cleaning”, then “Denoiser”.
Adding a title or other text: You can add titles, subtitles or credits to your movie. Simply click on the “Text” symbol, enter your text into the editor, then select an “effect”, a “design”, or a “movement” (such as “downwards”) from the “Template” menu.
Tutorial
Volume FX
Text Transitions
Transitions: You can also select the type of transition used to connect scenes together. Simply activate the large button between scenes and select a transition of your choice.
Rotate Photos (only with photo files): If a photo is on its side or upside down, click on the Rotate button. The photo then rotates 90 degrees. You can control the effect directly on the video screen.
Media Pool: In the upper right corner of the screen is the
Media Pool (file explorer). From the Media Pool you can
access your computer’s drives and directories, load multimedia files in a variety of formats – either with a double
click or by drag & drop. Media Pool
Rotation
31
Page 32
Tutorial
Cutting: There are many different ways to cut longer videos into shorter scenes or individual takes. Cutting with Movie Edit Pro 2004 is non-destructive. Making cuts does not destroy the original video. You are simply setting scene markers, or playback instructions. .
1. The easiest way to cut is by selecting the automatic ”Scene
recognition” in the context menu. The editor searches
the video content for prominent movements or color
changes. Based on this search, a variety of takes will be
automatically inserted according to the sensitivity adjust-
ment.
2. Alternatively, you can cut the video by placing the ”S”
marker at the start and the “E” marker at the end of the
desired scene, then press the “Cut“ button. This process
creates individual objects that can be copied, if you
choose, by dragging and dropping them into the ”Takes”
directory.
3. If you want to use only a particular take from a file with-
out loading the complete file, you can cut up a longer
video from within the Media Pool. Select the video file
in the explorer and click on the ”Expl.” button below the
video screen. The transport control functions are now
valid for the selected video file in the explorer, instead of
the objects in the arranger.
32
Timeline-Mode
Note: The ”Extra” button allows you to set in and out markers
for copying takes into the ”Takes” directory. The takes directory
is a special directory for administering scenes with complex
storyboards can be created. Simply cut up the individual scenes,
pull them onto the storyboard from the takes directory using
drag & drop, then arrange them.
Timeline Mode Editing
Extensive editing should be made in the Timeline mode.
In the Timeline mode, your movies and scenes are displayed according to the duration of the file. The length of
an active object in the track is reflects by its length in the
overall movie project. Simply use the Tab key to switch to
the Timeline mode.
Object handles: The length of objects can be stretched by moving the mouse cursor to one of the lower corners of an object. This mouse-over action will display a stretch symbol that lets you change the object to any length. The top corners of every object have two fade handles, which may be pulled towards the object’s center for creating fade-
Page 33

ins and fade-outs. The handle in the top center of the object adjusts the volume of audio objects and the brightness
of video objects.
Object Selection/Marking: For any other modifications, such as applying effects, you must choose and “mark” the object first. Click on an object to select it. When an object is selected, the three handles on top change to a different color. If you want to select several objects, simply hold the Shift key down while selecting other objects. You can open up a rectangle positioning the mouse over the object, then holding down the mouse button and marking all objects within the rectangle (”elastic band selection”) by left-clickdragging).
Video mix/Chroma Key Effect: Video mix effects are also known as Bluescreen/Greenscreen/Whitescreen or White screen compositing or Chroma-key. With this effect you can choose a foreground and background video and overlay on the other. Video mix effects are placed adjacent to the video objects on tracks to enable foreground and background videos to be grouped or combined in different ways. The difference between foreground and background videos is the motif. Background videos are landscapes or animations and foreground videos are subjects on a singlecolored field. For example, if you want to use a “dancer on a blue screen” clip in the foreground and a lake picture clip in the background, then place one of these objects right below the other on the tracks. Next, go to the ”Video FX” directory, select the ”Blue Box” effect and drag and drop it onto the foreground video. Play the arrangement and the dancer will now appear to dance on the lake. This effect can also be performed with subjects shot on green, white or black backgrounds.
Tutorial
5 “handles”: length, fade,
brightness / volume
Video Output Options
Export video as a file (AVI)
Exporting the video arrangement converts the project to a
single file, which may be stored anywhere on your harddrive, copied to the Windows® clipboard. If you want to
use a MAGIX Movie Edit Pro 2004 arrangement in
Powerpoint® you must first export the arrangement as an
AVI file first. Then open Powerpoint® and insert the AVI
file into the PowerPoint slide with the option ”Insert”.
1. From the FILE menu, choose EXPORT MOVIE...VIDEO
as AVI. This will open the following dialog:
33
Page 34

Tutorial
2. Choose your VIDEO SIZE
3. Choose your FRAME RATE
4. Choose the CODEC you wish to create the AVI
file from the list provided
Each codec in the list may have individual settings
you can access and set by clicking on the CONFIGURATION button. The INFO button will show
you the version number and manufacturer of the
CODEC selected. REMEMBER — Different codecs
have different quality results!
34
Note: you can use an external compressor program as
well, if you check the box to CALL EXTERNAL
PROGRAM, and provide a FILE PATH to that
program in the command line provided
5. FRAME TYPE –allows you to choose interlaced
frames or deinterlaced A or B frames
6. KEYFRAME amount –lets you set how often to
place a keyframe. These special frames act o
track the playback position in a movie. More
keyframes allow you to locate around to more
points in a movie, but these also add to the overall file size, so the default setting is best.
7. QUALITY slider – lets you choose a quality versus file size compromise
8. DO NOT WRITE AUDIO DATA INTO VIDEO
FILE —this checkbox prevents audio tracks from
being embedded in the AVI file
9. Press OK to start the AVI creation process with
the settings chosen.
Page 35

Export Video as a Streaming Video File
If you wish to send the video by email or stream it from a
website, simply choose the appropriate compression format, such as RealVideo or QuickTime for the export.
To export as a QuickTime (MOV) File:
1. From the FILE menu, choose EXPORT MOVIE...VIDEO
as QUICKTIME.
This will open the following dialog:
Tutorial
2. Choose your VIDEO SIZE from the selections, or enter
a USER-DEFINED value
3. Choose your FRAME RATE from the selections, or enter a USER-DEFINED value
5. FRAME TYPE –allows you to choose interlaced frames
or deinterlaced A or B frame
4. Choose the CODEC SETTINGS you wish to create the
Video and Audio tracks. Each available codec may have
individual settings you can access from the SET button:
REMEMBER —Different codecs have different quality
results!
5. In this dialog, you can choose the CODEC COMPRESSOR, any color options, the QUALITY and also MOTION
parameters such as FRAMES PER SECOND (FPS), the
amount of KEYFRAMES to use, and also set
DATALIMITS to constrain streaming file size
35
Page 36

Tutorial
6. Press OK to start the AVI creation process with the settings chosen.
To Export as a Real Media (.RM) File:
1. From the FILE menu, choose EXPORT MOVIE...REAL
MEDIA EXPORT.
This will open the following dialog:
36
2. Choose your AUDIO CONTENT & VIDEO CONTENT
3. Choose your VIDEO PRE-PROCESSING OPTIONS &
VIDEO SIZE
4. Enter your CLIP INFO & CLIP META INFORMATION
5. Choose the TARGET AUDIENCE bit-rate to accommodate different modem speeds REMEMBER: Real Media
is an Internet streaming format!
6. The three tabs of the dialog allow settings for AUDIO,
VIDEO and TARGET BITRATE.
7. Press OK to start the AVI creation process with the settings chosen.
Export as a Windows Media File (.WMV or .WMA)
1.From the FILE menu, choose EXPORT MOVIE... WINDOWS MEDIA EXPORT.
This will open the following dialog:
Page 37

Tutorial
2. Choose your PROFILE for the WINDOWS MEDIA FILE
streaming quality. There are a very wide variety of choices
here for various qualities and accommodations. NOTE
THAT some of the selections in the list are for AUDIO,
and not VIDEO!!! Windows Media is an Internet streaming format
3. Enter your TITLE, AUTHOR, DESCRIPTION, and
COPYRIGHT information
4. Press OK to start the AVI creation process with the settings chosen.
Export Video as an Uncompressed File
1. From the FILE menu, choose EXPORT MOVIE...VIDEO
as UNCOMPRESSED VIDEO. This will open the following dialog:
37
Page 38

Tutorial
2. Choose your VIDEO SIZE from the selections, or enter
a USER-DEFINED size
3. Choose your FRAME RATE from the selections, or enter a USER-DEFINED size
4. FRAME TYPE –allows you to choose interlaced frames
or de-interlaced A or B frames
5. Press OK to start the AVI creation process with the settings chosen.
38
Note: Uncompressed video files can be extremely large!
When working with digital video, you must often work with
AVI files that are many gigabytes in size. Until recently,
however, many computers were not designed to support
files of such a large size. Because of this, people often have
trouble when creating large AVI videos. The two most common limits are the 2 GB and 4 GB barriers. These barriers
are caused by two factors: the limits of the standard AVI
file format and the file system of your operating system. In
order to store files on a hard drive, your computer uses a
file system. Depending on your operating system, there
are many different file systems that you may be using.
Here is a table that lists the maximum file sizes for different operating systems and file systems:
Windows 95 (pre-OSR2) Windows 95 OSR2+,
Windows 98/SE/ME
FAT16 2 GB 2 GB
FAT32 N/A 4 GB
NTFS N/A N/A
Page 39

Windows NT 4.0 Windows 2000/XP
FAT16 4 GB 4 GB
FAT32 N/A 4 GB
NTFS Nearly unlimited Nearly unlimited
The underlined values represent the most common file
systems and limits for each respective operating system.
Here is a quick list of common computer setups and their
limitations: A) If you are running an early version of Windows 95 (before OEM Service Release 2), your AVI files
are limited to 2 GB. B) If you are running Windows 95
(after OEM Service Release 2), Windows 98, Windows 98
SE, or Windows ME with the FAT32 file system (as most
people are), your AVI files are limited to 4 GB. C) If you
are running Windows NT 4.0 or Windows 2000/XP with
the NTFS file system, your AVI files can be of virtually
unlimited size. D) If you are running Windows 2000/XP
with the FAT32 file system (this is less common), your AVI
files are limited to 4 GB.
Export video through TV output connection
Video and graphics cards with a TV-out connection can
transmit video signals to an external video recorder when
connected by a cable, enabling you to record your video
with a VCR. Note: Your video must be played back in fullscreen mode to record properly. Playing the arrangement
back in full screen mode may cause image interruptions if
the system processor cannot process all the information
necessary for real-time calculation of video effects or cross
fades. If you are uncertain of your processor’s capabilities
or a slower processor, we recommend that you render the
video first, then play the rendered movie in full screen mode
to record it to VCR.
To record video to your VCR or other external device:
1) Make sure that the TV-out option in your Windows sys-
tem control panel (look for ”Display”) is activated
2) Select the option ”Output audio/video to device” from
the file menu. The first option in the video export dialog will play the arrangement in full-screen mode. The
second option (“Render changes“) will render the movie
and process all of the effects and transitions first, to reduce the demand on your processor (see Note above).
Choose the third option for digital export to digital devices. This will give you no problems as the data is then
transferred digitally.
Tutorial
39
Page 40

Tutorial
Export video through video or graphics card
To save your MAGIX Movie Edit Pro 2004 video onto digital videocassette, you must first export it as an AVI file,
typically DV-AVI, which uses a special codec for compression. Please check your video card’s user manual for more
information. Your video card utilities may offer tools to
save the file onto videocassette. To export your movie as a
DV-AVI:
1. From the FILE menu, choose EXPORT MOVIE...VIDEO
as DV-AVI. This will open the following dialog:
40
2. VIDEO STANDARD —you may choose PAL or NTSC
3. WRITE AUDIO DATA —gives the option to not include
audio in the AVI
4. SMART RENDER OPTIONS —three different options
are provided, including the ability to
transfer the DV-AVI created back into your DV device
(DV camera)
5. Clicking OK will begin the process with the settings chosen
Burning CDs or DVDs
Switch to the “Make CD/DVD” screen.
Assembling movies: You may burn several movies at a time onto CD or DVD. Simply open all the movies you’d like to burn to disc, one after the other. Use the Window menu to access all of the opened movies.
Selecting the file format: On the right are two buttons for burning different data formats: CD-ROMs, (S) Video
Page 41

CDs or DVDs. The CD-ROM option burns all image files
as well as the MAGIX Media Manager playing program
onto a disc.The original image files on your hard-drive
remain unchanged. All effects and settings made in the
“edit slide show” screen are calculated in real-time when
the MAGIX Media Manager player program plays the CDROM. This CD-ROM option may also be used for archiving
files on disc.
Tutorial
Selection menu (Only for Video CDs, Super Video CDs
and DVDs): In the center of the Make CD/DVD screen
you will see a preview of the selection menu. All movies
appear as the upper entries, and chapters appear as subordinate entries.
To achieve accurate chapter partitioning within the DVD
selection menu, each video must first be divided into chapters. This is done in the video editor screen with the Edit
menu. Place the start marker where you want to set a new
chapter, and then select the “chapter marker” option. The
blue chapter markers appear in the time-line above the
tracks and are movable by drag & drop or can be deleted
from the “Delete (all) chapter markers” menu option.
With the “Open disc navigation structure” button, you are
presented with the overall structure of the selection menu.
Here you can cut out redundant chapters by deactivating
the appropriate checkmark. Of course, only the entry is
taken out of the menu, not the associated scene from the
movie. Once you are happy with the way the movie and
chapters are organized, you can move on to designing the
layout of the Selection menu:
At the bottom of the screen is a row of menu layout templates to choose from. View them by using the scroll bar.
41
Page 42

Tutorial
– To select a complete template, choose Layout and then
double-click the layout of your choice.
– To combine elements of different templates, such as the
text format from one template and the background from
another, simply select “Text” and double-click the template containing the text you wish to use. Then select
“Background” and double-click the applicable template.
The preview in the middle of the screen displays the result immediately.
– Double-clicks the preview picture or an entry within the
menu, to open a title editor. This editor enables you to
change the name of a movie or a chapter – or even select
a new preview.
Once the movie is organized and the disc menu has been
designed, you are ready to move to disc burning. First, test
the look of the final disc using the virtual remote control,
then proceed to the section on Making CDs/DVDs later in
this manual, or proceed to the next section, Desktop Overview.
42
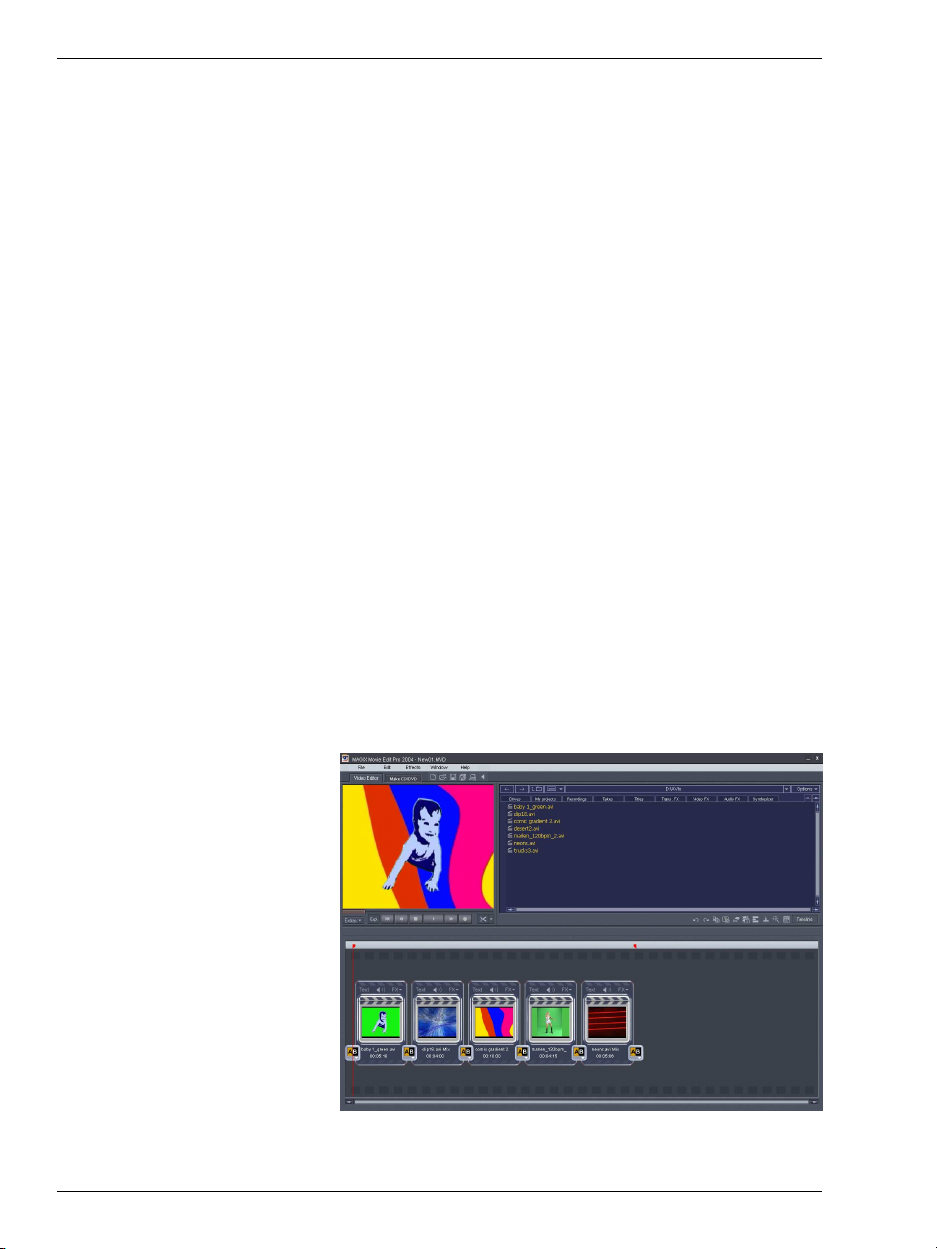
Page 43

Program Desktop Overview
Videoscreen: Displays video and picture objects and previews
Arranger (Time-line mode): Drag & drop
files from the Media
pool, then arrange and
edit files in detail here.
Timeline with range markers: Defines the
range that will be
played. The timeline
mode includes a time
scale.
Objects (Timeline Mode): Graphic ob-
jects represent audio,
video or image files and
special effects.
Menu Bar: Contains important editing commands
Tool Bar: Contains the quick access tool buttons.
Mouse mode bar (Time-line mode): Selects
mouse modes
for different editing tasks.
Scrollbars: The lower scroll bar controls horizonal scrolling through the timeline. The right-hand scroll bar controls scrolling vertically through the tracks.
Media Pool: Left side explorer accesses
computer directories or Internet files.
Right side explorer lists files and shows
all supported multimedia files within the
current directory. All files have a preview function and can be dragged &
dropped onto the tracks.
Media Pool buttons: Provides direct
access to important
directories.
43
Page 44

Storyboard mode
What is the Storyboard mode?
The Storyboard mode is the default Video Editor-screen
view. This view offers an easy, streamlined interface to simplify the editing process. The alternative Timeline mode
offers a more detailed interface for more extensive editing
and photo arrangements. Switch between the two modes
by using the tab key.
In the Storyboard mode, all of the files in your movie project
displayed as previews, sequentially ordered, one after the
other on the storyboard.
This mode enables you to play back your files, rearrange
them by drag & drop, and apply fades with real-time effects. Unwanted scenes (such as commercials during a TV
feature or the first few seconds of your own footage) can be
cut out and removed with a click on the scissor button.
Volume FX
Text Transitions
44
Scenes
If a film has not yet been divided into scenes, it is considered one long scene by the video editor and is difficult to
manage. Cutting the file into shorter scenes enables you
to change and organize or ’edit’ the scenes to create a movie.
The following is a list of functions or tool buttons for editing your movie:
Text: The text button opens the Title Editor dialog, from which you can enter text (such as subtitles or credits) in a variety of fonts or colors. The text can be set to scroll (perfect for rolling credits) or edited to add effects, designs or other forms of movement.
Loudspeaker symbol: Click the loudspeaker symbol to modify (or mute) the movie soundtrack.
Page 45

FX: You can select any number of effects for sound and
image editing in the FX menu. For more details, please
read the “Effects” chapter.
Transitions: You can also select the type of transition you
would like to connect scenes. Simply activate the large button between scenes and select a transition of your choice.
Rotate Photos (only with photo files): If a photo is on
its side or upside down, click on the Rotate button. The
photo will rotate 90 degrees. You can control the effect
directly on the video screen.
Play: The range between the Start and End markers above the storyboard is the playback range. Both markers can be relocated with the mouse (or with a left or right mouseclick). To start or stop playing, use the space bar, or use the playback control buttons beneath the video screen. The play cursor shows which scene is currently being played. It is a red vertical line that runs from left to right over the scene.
Storyboard mode
Rotate Photos
Cutting: The “Scissor” button offers various options for
cutting. Redundant sequences (such as the commercials
in a TV feature or the first few seconds of your own movie.)
can be cut with this menu’s options. Note: It is important
to consider the difference between a “cut scene” and a “separate movie”: A “Cut scene” cuts the scene and thereby increases the number of current scenes by one. A “Separate
movie” divides the current movie into two independent
movies that can be accessed using the window menu. Please
read the following “Timeline Mode” chapter for more details regarding individual cutting menu options.
Media Pool / Media library: Access the Media Pool, for quick access to additional music for your soundtrack. Access the Media Library that comes with the program for a large selection of songs, ambient noises, effects and other material useful for adding additional impact to your project. Simply drag the desired item onto the scene by drag & drop.
Start and End markers
45
Page 46

Storyboard mode
Scene Recognition
Automatic scene recognition may be found in the effects
menu. Launching this feature opens an editor in which
each file may be played back and automatically reviewed
for changes in color or movement. Based on this review, a
variety of takes will be automatically inserted according to
the sensitivity adjustment.
Note: “Time stamps” from digital video devices, which are
automatically created and mark the times at which the device
was turned on or off, mark the range as a scene.
46
For more about the scene recognition options, please review the
Chapter “Videos and Images”.
Page 47
Time-line mode
What is the Time-line mode?
In the Timeline mode, your movies and scenes are chronologically displayed according to the duration of the file.
The length of an active object in the track is reflects by its
length in the overall movie project. Each scene or file is as
long as the representative “object(s)” in the track. Simply
use the Tab key to switch to the Timeline mode.
Tracks
MAGIX Movie Edit Pro 2004 offers 16 tracks for object
positioning. In principle, any object type may be placed on
any of the tracks. Mute a single audio track by clicking on
the “Mute” button or play individual tracks separately
(“Solo”) to emphasize a particular scene.
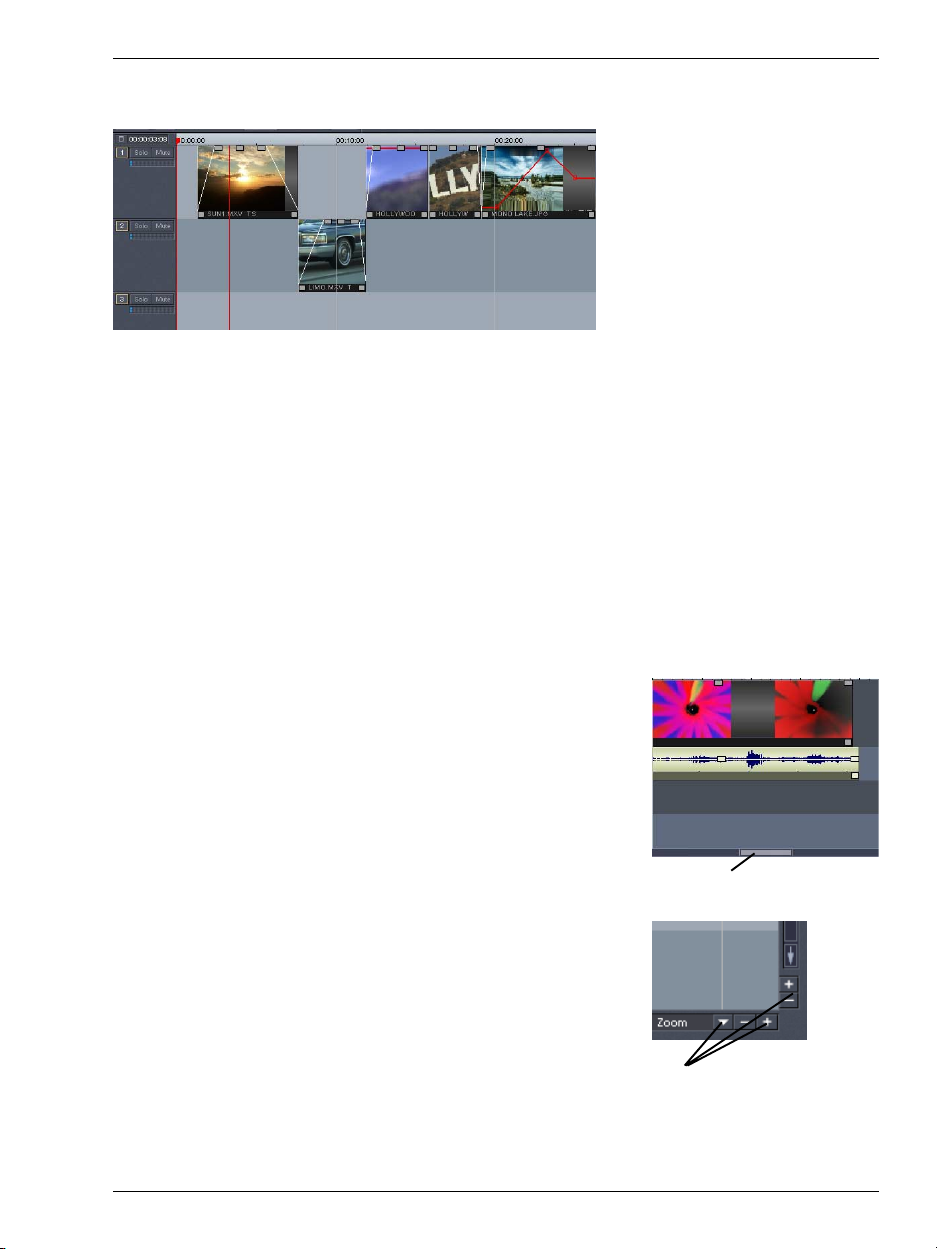
Navigating the Timeline Window
The right-hand scroll bar moves the visible tracks up and
down in the window vertically. The lower scroll bar moves
the visible section of the arrangements in accordance to
the time, horizontally across the screen. Placing the mouse
at the edge of the slider activates the Stretch symbol. Use
the Stretch scroll mode in longer movies to lengthen the
amount of time moved with each scroll. The size of the
lower slider indicates which part of the overall arrangement
is currently displayed. This scroll bar is full size in the total
picture mode. Double-click the slider to access the total
picture mode. Right- clicking on the lower zoom bar enables you can to set specific options and positions.
Bars and Grids
The vertical area of the tracks represents the horizontal
expansion of the arrangement. To determine the
arrangement’s length relationship to elapsed time, you will
Lower scroll bar
Zoom
47
Page 48

Time-line mode
Start and End markers
see a bar at the top, above the first track. Furthermore, the
arranger screen is placed under a grid. The grid helps to
ensure that objects only engage at particular points to make
the timing of events, such as the beginning and ending of
an effect, easier to control.
Playback
The area between the Start and End marker above the first
track will be played back. Both markers can be repositioned
with the mouse (or with a left or right mouse-click). To
start or stop playing, use the space bar, or use the control
buttons under the video screen.
The cursor (vertical line) indicates the current position
within the replay. , This cursor line moves steadily left to
right over all tracks, and in relation to the buffer settings,
regardless of how long a scene is. Reduce the buffer setting in the set-up dialog (key y), to get a smoother cursor
flow. However, if the replay is interrupted or skips you
may need to increase the buffers again.
Organizing the arranger view
There are several screen configurations for the Arranger.
Video screen and Media Pool can either be deactivated or
repositioned on the monitor. The standard setting can always be called up from the “window” in the Menu bar.
You can maximize the arranger view (in the window menu)
or close the video screen and the Media Pool to obtain more
space for arranging. If the video screen is reopened and
the Media Pool is closed, the video screen can be freely
repositioned.
48
Organizing the video screen
You can adjust the size of the video screen with a right
mouse-click. Select a definably size within the context
menu. If desired, a large time indicator can be integrated
into the video screen from the context menu. “Display
playtime” displays the current play cursor position on the
video screen. The foreground color, background color and
transparency are all selectable.
Playback/Transport control
Below the video screen you will find the playback or transport controls, with standard FF, REW, PLAY, REC, STOP
& PAUSE buttons. Note: The Transport control may be
used to play the longer videos in the Media pool and, if
necessary, to mark individual scenes to be dragged into
the arranger or saved as takes.
Page 49

Play: The center Play button starts continuous replay of
the arrangements. The area between the start and end
markers is played as a loop.
Stop: The stop button ends replay.
Rewind: This button “winds” the arrangement back. That
means that the start marker defining the play area’s beginning moves to the LEFT. Each mouse-click on the button
jumps the cursor one space to the LEFT.
Fast forward: This button “winds” the arrangement forward. That means that the start marker defining the play area’s beginning moves to the RIGHT. Each mouse-click on the button jumps the cursor one space to the RIGHT.
To the start: With this button, the start marker is quickly reset to the beginning of the arrangement.
Capture: With this function, you can capture audio and video files. Choose between ”Analog video capturing”, ”Digital video capturing”, and “Video for Windows capturing “or” Audio recording. A dialog window with the capture set-up parameters pops up after you have made your choice. Please read the “Videos and Images” and “Audio” chapters for more details.
Time-line mode
D
A
N
S
Video screen und Transport
control
Set play markers
The ”Editing” menu lets you set a play marker at the current position of the Start marker. The 3 markers can be set
using the number keys 1-2-3. This allows you to jump to a
particular position of a longer video immediately, without
scrolling and searching.
Selecting objects
To edit or delete objects using the menus, you must first
select them by clicking on the object to be selected. The
handles of selected objects turn gray to show that the accompanying object has been selected and can be edited
using the menu functions.
Several objects are selected by holding the Shift key down
while clicking each object. Any object editing, such as cuts,
moves, and effects will apply to all of the selected objects. .
If you want to select several objects, simply hold the Shift
49
Page 50

Time-line mode
Build group / ungroup
key down while selecting other objects. You can open up a
rectangle positioning the mouse over the object, then holding down the mouse button and marking all objects within
the rectangle (”elastic band selection”) by left-click-dragging).
Any object can be combined with others to make up a group,
to avoid the objects being unintentionally moved out of
relation to each other. Once they are combined, clicking
on one object of a group will select the entire group. To
ungroup objects, use the buttons in the tool bar or the corresponding commands in the ‘edit’ menu.
Moving Objects
Any object selection can be moved (dragged) along the
horizontal timeline or vertically into different tracks by clicking and holding the left mouse button on the selected objects. After releasing the mouse button, the objects appear
at the new location.
If the Shift key is pressed while moving the object selection, the object’s horizontal time position is maintained.
The object selection can only be moved vertically (up and
down to different tracks).
Splitting objects
Objects may be split to separate each individual component, turning each component into an independent object
for editing. To use this function, you select the option ‘splitting objects’ in the ‘edit’ menu.
In order to rejoin these split objects at a later stage, simply
highlight the individual parts and select the command
‘forming group’ to join the selected objects together alone
group.
50
Scissors
Cutting up a scene
This command cuts a scene at the point where the Start
marker is positioned.
Shortcut Key: t
Delete Scene start
This command cuts a scene at the point where the Start
marker is positioned, and deletes all material that precedes
the start position simultaneously.
Shortcut Key: Ctrl + t
Page 51

Time-line mode
Delete Scene end
This command cuts a scene at the point where the Start
marker is positioned, and deletes all material that follows
the start position simultaneously.
Shortcut Key: Shift + z
Divide Film
This command splits a movie at the point where the Start
marker is positioned, making two self-standing movies.
Shortcut Key: Alt + t
Duplicating/Copying objects
It is easy to copy objects to quickly create larger arrangements. First select the objects to be copied, then activate
the duplicate button in the button bar. A copy of the object,
which can be moved to any position with the mouse, appears right next to the original. Speed up this process by
clicking on the object to be copied with the mouse while
holding down the Ctrl-key. This generates a copy, which
you can immediately drag to the desired position. Note:
Object copies are “virtual” and take up almost no additional
working memory!
D
A
N
S
Object Handles
All objects can be re-sized with their lower edge “object
handles”. Move the mouse over one of the lower corners of
the object until the mouse pointer becomes a double arrow. Now click and drag the object to the desired length.
An object can be faded in or out with the handles to the left
and right upper corners of the object. Cross-fades between
different objects can be created by overlapped positioning
of objects that are fading in and out. The length of the crossfade can be adjusted with the handles. For more about crossfades, please read the “Videos and Images” chapter.
The objects provided by the media library can not only be
shortened with the lower object handle, but also stretched.
When stretched, the object is played as a loop until the play
cursor reaches the end of the object, regardless of length.
This allows you, to create, for example, a complete drum
track from a short drum loop, or a long video from a short
video sequence.
Using the brightness/volume handle located centrally at
the top of the object, adjusts the volume of audio or MIDI
objects, or the brightness of video and image objects. Simply drag the handle either up or down. Even if several ob-
5 “handles”: length, fade,
brightness / volume
51
Page 52

Time-line mode
jects are playing simultaneously, the volume or brightness
of individual objects can still be altered.
52
Page 53

Media Pool
Function
The appearance, set-up and procedure of the MAGIX Movie
Edit Pro 2004 Media Pool are essentially the same as the
Windows® Explorer. Use it to browse your file sources, access and load multimedia files of all types: video files, images and audio files in various formats, audio CD tracks
and even RTF text files. They can be loaded using Drag &
Drop from the hard-drive, a floppy disc, the CD-ROM drive
or from the Internet, directly into the arrangement and
played. .
Directory and file list
The MAGIX Movie Edit Pro 2004 Media Pool displays a
directory list on the left and the file list on the right.
The directory list serves as a navigator through the directory structure of your computer. Double-click to open each
directory. The parent button within the Media Pool allows
you to access the directory level above.
The file list displays all supported multimedia files and the
sub-directories of the current directory. Select from three
different display choices (List, Details, Large Symbols) with
a right click from the Media Pool Context menu. The large
Symbols display conveniently places a frame around video
and picture files, quickly identifying them for possible selection. Using this display choice, however, requires more
time to load the directory content.
Preview function
All file types have preview functions. Click on audio objects and you get an audio ”preview” through your sound
card. Video, graphics and text objects will be previewed on
the video screen. Effects and the special directories ”Takes”,
”Video FX”, ”Slide FX”, ”Audio FX” ”Titles” and ”Borders”
also have previews to display their functions.
53
Page 54

Media Pool
Deleting, copying and moving files
All files listed in the file list can be selected in Windows
Explorer, deleted, copied or moved by Drag & Drop to other
directories. In this way, all objects considered for an arrangement can be collected in a separate directory.
All files listed in the file list can be loaded in the arranger
by double-clicking or dragging and dropping onto the desired track or position where they are displayed as objects
and can be processed. For more info, please see the chapter “Arranging Objects”.
Integrating videos, takes or audio files into your arrangement
Loading audio, video and images
To integrated video, audio or images into your movie, simply drag them (while holding down the mouse key) onto
the storyboard or onto the desired track in Timeline mode.
Double-clicking on the file loads video and graphic files at
the end of a scene, and titles and sound files will load at the
Start-marker position.
The following formats can be imported into your movie:
– Video files
– Audio files: The following formats are supported for the
soundtrack: Wave, MP3, MPEG 1 Audio, WMA, MIDI
files and Audio CDs.
– Graphic files: Windows Bitmaps (*.bmp) and JPEG
(*.jpg).
– Text files in RTF format. Create lengthier edited texts,
such as credits, in another program, then save them in
the universal .rtf text format. These text documents create a text object when loaded into MAGIX Movie Edit
Pro 2004.
®
54
Expl/Extras Buttons
These buttons below the video screen select and load individual scenes from longer video files in the Media Pool.
When you press the Expl button, the Play/Rewind/
FastForward controls are no longer active for objects in the
arranger, but only for the selected video file in the Media
Pool window. The Extras button, sets in and out points for
a scene and saves it in the Takes directory.
Options
All context menu functions (creating new shortcut buttons,
file-name changes or deletions, etc.) can also be accessed
from the “Options“ button.
Page 55

Media-Pool buttons
At the top of the Media Pool are the Shortcut buttons for
exploring \the most important directories:
Drives: The button on the left accesses the navigation bar on the left-hand side of the Media Pool.
Own: This button opens the ‘MyAudioVideo’ directory,
which is automatically created upon program installation.
All arrangements are exported to and saved in this directory unless changed by the user.
Records: This button opens the “My Records” directory, which is automatically created when the program is installed. All MAGIX Movie Edit Pro 2004 captures are stored in this directory.
Takes: This button opens the Takes directory. The Takes directory stores the individual scenes taken from longer videos and objects edited with effects. All the takes recognized by automatic scene recognition dare stored in this directory. The drag & drop function for moving objects from the arranger to the Takes directory enables you to use the arranger to neatly cut up videos into individual takes.
Media Pool
Titles: This button accesses the titles directory. The titles directory contains the various RTF files that may be dropped onto the tracks and used for video subtitles. Further information on subtitles and use of RTF text objects can be found in the chapter “Videos and Pictures”.
Trans FX: In the Timeline mode you can drag & drop the transitions onto the objects. Click this button to open the directory “transitions”, select a transition of your choice, and drag and drop the transition between two objects.
Video FX: This directory contains video effects that may be applied to videos or images. Simply drag & drop the effects onto videos or images in the arranger. To see all of the effects available for the selected object, select the video controller form the effects menu or the context menu.
Audio FX: This directory contains the audio object effects. Simply choose an effect and drop it onto audio objects in the arranger. Effects may be combined for more customization of the final sound,
55
Page 56

Media Pool
Effects in the effects menu or the context menu may be
activated and deactivated to enable additional fine-tuning
with a realistic effect module.
Visuals: This directory contains visual objects (*.vis file type). Visual objects (or ’visualizations’) are visual animations that change and move to the beat as the music plays. Load and edit visuals exactly as you would other objects.
Borders: This directory contains image patterns (in JPGfiles) for the borders of photos and videos, similar to picture frames. If you drag a border onto a photo box you can decide if you want to use the border just for the selected photo or for all photos within the arrangement. To edit or to delete the borders, simply switch to the Timeline-mode by pressing the Tab key.
56
Page 57

Tools
Undo
When editing footage, you can undo/remove the previous
editing action. Simply press “Undo”.
Key: Ctrl + z
Redo
This command reapplies the previously removed edit action
Shortcut Key: Ctrl + y
Copy (Storyboard mode)
This command copies the selected scene onto the clipboard.
From there, it can be inserted into any other film with the
“Paste” tool.
Shortcut Key: Shift + Ins
Paste (Storyboard mode)
This command inserts the scene from the clipboard into
the active movie at the start marker position. The scenes
following this insertion will be moved forward to the right.
Shortcut Key: Ctrl + Ins
Duplicating objects (Timeline mode)
It is easy to copy objects to quickly create larger arrangements. First select the objects to be copied, and then activate the duplicate button in the button bar. A copy of the
object, which can be moved to any position with the mouse,
appears right next to the original. Speed up this process by
clicking on the object to be copied with the mouse while
holding down the Ctrl-key. This generates a copy, which
you can immediately drag to the desired position. Note:
Object copies are “virtual” and take up almost no additional
working memory!
Delete
This menu option lets you delete all selected objects from
the arrangement. To select more than one object, use the
“Shift” key while you click on objects with the mouse.
Key: Del
57
Page 58

Tools and Mouse Modes
Group
This menu option lets you group all selected sound files
together. As soon as you click to select one sound file of a
group, all sound files of the group become selected.
Shortcut Key: Ctrl + l
Ungroup
All selected sound files become independent again.
Shortcut Key: Ctrl + m
Optimize View
This option determines the optimal view level for working
in the arranger so that all objects in the arrangement can
be seen on screen at once. The start and end markers are
once again placed at the beginning and end.
Shortcut Key: Shift + b
Song Maker
You can let the Song Maker arrange background music for
your video. Please refer to the chapter “Audio Objects”.
58
Page 59

Tools and Mouse Modes
Mouse modes
Intelligent mouse mode
This is the preset mouse mode. With a left mouse-click
you can select objects and move them by keeping the button pressed as you drag. This will move all the objects that
are aligned at the same mouse position in other tracks as
well as the selected object.
If you want to move a single object, switch to the ”Mouse
mode for single objects”. To select several objects, hold
down the shift key. All objects can be cross-faded, looped
or reduced with the 5 handles.
Open the context menu with a right mouse-click. The context menu displays the most important effects and adjustments for the selected object.
If an effect “curve” on the object is activated, a curve handle
can be selected and moved. A double-click on the curve
creates a new handle.
Shortcut Key: Alt + 1
Mouse mode for single objects
This mode works t like the ”Intelligent mouse mode”, but
moves only the selected object.
Shortcut Key: Alt + 2
Curves Mouse Mode
This mouse mode is designed specifically for drawing volume and effects curves. When activated, a new curve can
be drawn on the object by holding down the left mouse
button and “drawing” by dragging the mouse along the
track. To deactivate this special mouse mode, simply click
on an object with deactivated effects curves.
Shortcut Key: Alt + 3
Object stretch mode
This special mode is used to adjust the length of objects.
Audio objects are time-stretched or compressed by dragging the bottom corner handles. Stretching or compressing objects results in a faster or slower loop playback from
standard mode.
Video objects can also be sped up or slowed down by means
of the bottom handles.
59
Page 60

Tools and Mouse Modes
Shortcut Key: Alt + 4
Audio pre-listening mode
In this mode, an object can be previewed without muting
the other tracks.
Shortcut Key: Alt + 5
Scrub mode
Press the mouse button to listen to the location of your
current mouse position within the arrangement. The replay cursor will follow the mouse movements—you will
hear what you drag the mouse over.
Shortcut Key: Alt + 6
Context help mode
When this mouse mode is active, clicking on any area of
MAGIX Movie Edit Pro 2004 immediately provides access
to the corresponding section in the Context Help.
Shortcut Key: Alt + 7
60
Page 61

Videos and Pictures
Load videos and images
Click on a file in the Media Pool to see a preview of the file
on the video screen. To use the complete video in your
arrangement, click on the video or bitmap file, and while
holding the mouse button down, drag the file onto one of
the tracks in the arranger.
To use only sections of a video, apply the automatic scene
recognition feature and open the ”Takes” directory.
To load several photos, select them by holding down the
Ctrl key while clicking the desired files. To load an entire
directory of images, hold down the Shift key and click only
on the first and last entry. All entries between will be selected. Once the files are selected, they may be dragged
into the Timeline.
Digital video capturing (DV capturing)
DV devices
MAGIX Movie Edit Pro 2004 supports continuous editing
of DV (digital video) files. You will require a DV camcorder
or DV recorder with an IEEE 1394 interface (also known as
Firewire or iLink) as well as an OHCI conforming IEEE
1394 host adapter for your PC.
To record digitally, the digital output of the Mini-DV
camcorder or DV video recorder must be connected to the
DV interface of the PC, yet switched off. You must also
have Microsoft’s “DirectX8.a” (or higher) installed. Now
switch your camcorder to “video recorder” or “playback”
(according to your particular device) and open the DV capturing dialog.
Capturing from DV recorders or cameras
– Connect the (turned off) camcorder to the PCs Firewire
card.
– Switch the camcorder to the “Video recorder” or “Play-
back” operating mode.
– Click on the Record button at the bottom of the video
screen and select “DV Capturing”.
– Click on “Record Video” and select “DV Capturing“.
– Check to see if a DV camera driver has been selected.
– Name the capturing appropriately so as to be able to find
it later.
– Using the remote control buttons, you can locate to the
appropriate place on the camcorder tape: For optimal
61
Page 62

Videos and Pictures
control, you can shuttle forward, backwards and start/
stop playback.
– Start capturing by pressing the “Record” button. Keep
an eye on the available hard-drive space. DV capture requires approx. 220 MB per minute of video!
– Cease capturing with the “Stop” button and exit the cap-
turing dialog.
– For a playback, simply press the space bar.
“DV capturing” dialog
62
Driver: This is where the driver for your DV device is displayed. When Audio Recording is deactivated, only video without sound is recorded.
Title: Here you can name the audio file about to be recorded, as well as designating a directory to which it should be saved.
Automatic scene recognition: You can use this option to divide your captured DV files into scenes. The material is scanned for changes in brightness and makes a cut at the appropriate position. Captured DV files also provide data about the positions where the capturing device was turned on or off (“time stamps”).
Start device automatically: Starts the DV recorder or DV camera automatically when the Capturing button is pressed. This function, however, only works with compliant digital cards or video devices
Preview: On the preview monitor you can see a preview of your video. You can also determine whether you want a preview with Only Video, Only Audio, or a complete preview with both sound and picture.
Page 63

Original size: This option allows you to preview the video in the original size. To return to the dialog, use the Escape key.
Remote control: Digital camcorders can be controlled remotely. This function, however, only works with compliant digital cards or video devices. The buttons cannot be activated if your hardware does not support remote control.
Automatic capturing: Here the start and end points can be set for the capturing. In this way you can search the entire possible scene captures on a videotape and list them for planned batch capture. This is then processed in sequence when the capturing starts (via the red button). It therefore does not have to record each scene individually. Simply specify the capturing times and the computer works out the remainder.
Record: Starts the capturing process. If the capturing list contains planned timed captures, it will be processed stepby-step (“batch capturing).
Videos and Pictures
Stop: stops the capturing process.
Capturing statistics: Displays various data regarding your
captured video.
Notes:
1) Keep an eye on the available hard-drive space. DV capture
requires approx. 220 MB per minute of video.
2) Some DV capture cards and video editing software programs
install software drivers or codecs that interfere or modify
Windows drivers or codecs required by MAGIX Movie Edit Pro
2004. This may result in various file format errors. We
recommend that you test capture a few short scenes to ensure
that the files will be captured in an editable format. If you
experience problems, try uninstalling other video editing software
or reinstalling Windows drivers.
Video capture from analog sources
Analog devices
MAGIX Movie Edit Pro 2004 can be used with USB cameras, graphic cards, video cards, or video cards that are compatible with Video for Windows or DirectShow
63
Page 64

Videos and Pictures
Capturing from video recorders or camcorders
Camcorders with USB ports are connected to the computer
by a USB interface. Video recorders or other devices are
connected to the video input of the video card, TV card or
graphic card. If your card also possesses audio ports, these
should be used for capturing and playing back sound so
that the image and sound do not diverge during a lengthy
video.
To record from analog sources:
– Start MAGIX Movie Edit Pro 2004.
– Click on “Record Video” and select “Record video”.
– In the Video Record-Dialog, select the correct video card
and soundcard drivers. A video preview window is now
displayed.
– Name the file and select storage path so you can easily
find the file after capture.
– Now determine the desired video quality with the fader.
The default setting is the highest quality that your PC
system is capable of.
– Start the capture by pressing the “Record” button – end
it by pressing “Stop”.
64
Note: setting this too high may result in dropped frames, making
your video look jerky. This is due to a lack of computer resources.
Set this only as high as your system can handle. The quality
slider ranges from ‘low’ quality to ‘best’ quality. There is an
‘uncompressed’’ checkbox, which sets quality to the highest possible, but requires the most resources!
– End the video capturing dialog by clicking “OK”. Your
capture can now be viewed in the film bar in the lower
third of your screen. Press the space bar to play back
the capture.
Page 65
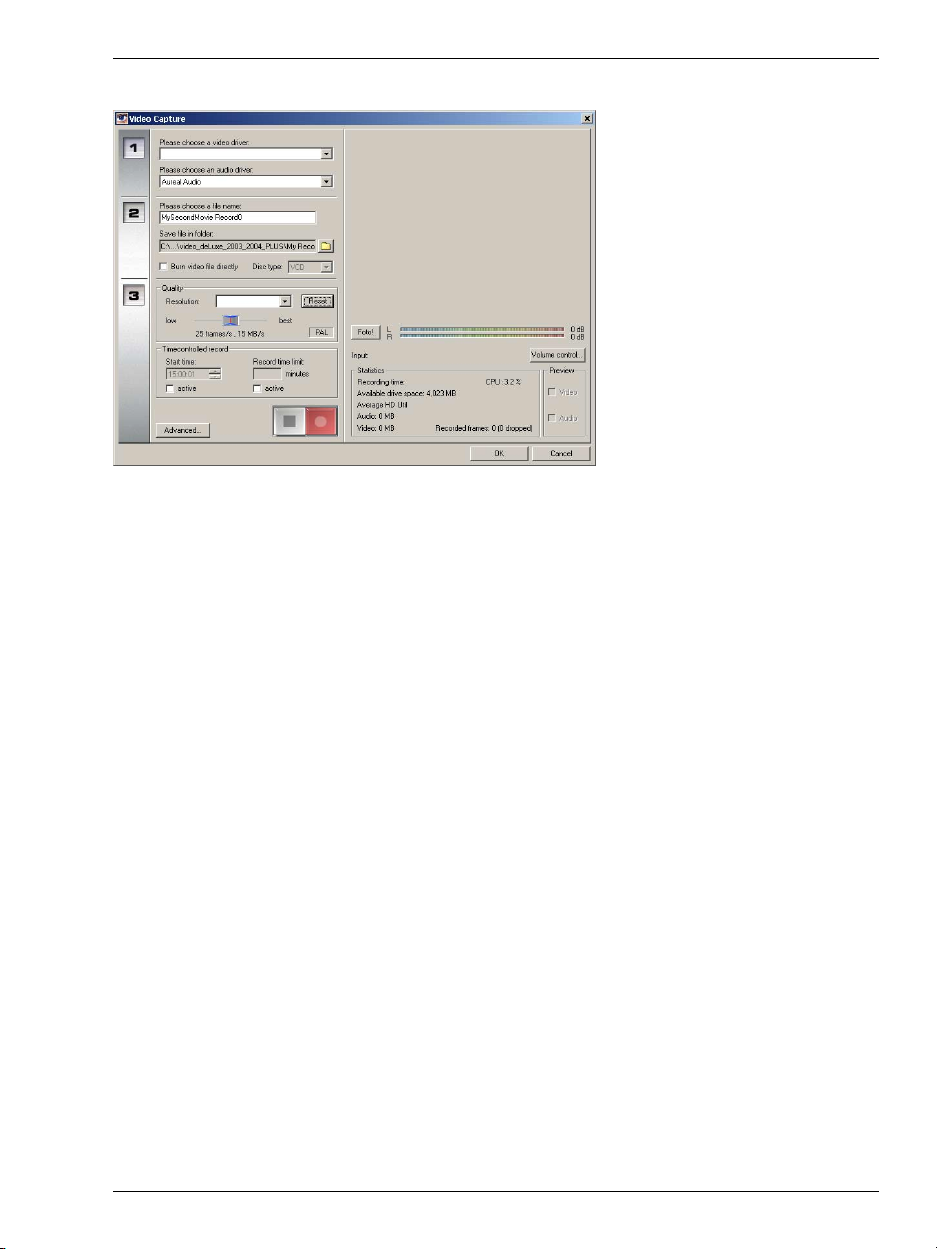
“Record Video” dialog
Video/Audio drivers: This dialog enables you to select the video or sound card drivers for the recording. In many cases, the driver software that comes with the hardware must be installed. Make sure that the drive is compatible with the operating system. Often a drive compatible with Win9x won’t run on Win 2000. Appropriate drives can usually be found on the manufacturer’s website.
Videos and Pictures
Name: Name the file and select storage path so you can easily find the file after capture. Recording Quality: Here you can determine the quality of your recording. The higher the quality, the more harddrive space is required.
NOTE: setting this too high may result in dropped frames,
making your video look jerky. This is due to a lack of computer
resources. Set this only as high as your system can handle. The
quality slider ranges from ‘low’ quality to ‘best’ quality. There
is an ‘uncompressed’’ checkbox, which sets quality to the highest
possible, but requires the most resources!
You can select from a variety of predefined quality levels
from the list box. Your choice depends upon the eventual
use of the material and the capacity of your computer.
Define more precise bit rates for the presets with the fader.
Simply press “Reset” to return to the preset recording quality.
65
Page 66

Videos and Pictures
Recording control: Click the red Record button to begin capture, and the Stop button to discontinue recording.
Recording data: This shows statistical information such as the recording time, available space on the hard-drive, the recorded frames, and the “dropped” frames. Dropped frames are frames that have been left out because the computer processor is too slow for the selected image format and cannot accept all of the frames received.
Timer: This setting enables you to use your computer as a fully-functional VCR. By setting a recording time (requires TV card & compatible Windows Direct Media drivers). Photo: The photo button can be used to capture a still image from the movie in the preview monitor. The images are stored at the requested resolution as BMP files in the recording directory.
Direct burning: With this option you can record and burn in one. Simply select the format you want to burn in (VCD, SV-CD, DVD or Mini-DVD), put a suitable blank CD into the recorder and activate the recording. After recording, the Make Disk screen automatically launches, the burn dialog is opened and burning commences.
66
Tip: This function is particularly suitable for burning lengthy
disc projects directly to disc: You can start recording in the
evening and have the finished CD or DVD. The following morning
Advanced: opens the video driver configuration dialog (see below). Use this dialog if your video card supports several sources, for example a card possesses a remote control (ATI All-in-Wonder, Terratec TV Value), or several inputs (SVHS, Composite.). Otherwise, simply leave the default settings unchanged.
Advanced configurations (Video Capturing dialog)
Several different configurations for the video recording
driver can be defined here.
So-called “property sheets” are made available by the video
card drivers. The features specific to each driver vary considerably. Consult your hardware manual for setting the
configurations. If you experience difficulties with the
driver, contact the manufacturer of your video card for a
driver update.
Page 67

Input: This engages the video card’s crossbar. The crossbar determines which input will be recorded. The crossbar passes the input signal on to the capturing module.
In the “Output” field you can adjust the “Video” or “Audio
decoder in”, because the crossbar should pass their output
signals on to the decoder.
In the “Input” field, select the signal source that will be
used by the video card to capture for this input. If you have
a problem, try out the different configurations until the
right sound matches the right image.
Composite In = the normal video input
SVHS In= SVHS input (special cable)
Tuner In =TV Signal of the integrated tuner
Video decoder configuration: Should your picture only appear in black & white, or if it flickers, it may be because the video standard is incorrectly configured. In mainland Europe, PAL_B is used. NTSC is used in the United States.
Video ProcAmp: Adjusts color, brightness and contrast. It is not recommended that you alter the manufacturer’s settings.
Videos and Pictures
Image format: Do not alter this setting. The capturing format is set in the “Recording quality” option in the video recording dialog.
TV channel selection: This option is only available when a TV tuner is integrated into your video card. Select the TV tuner as an input, select the tuner’s TV channel and use MAGIX Movie Edit Pro 2004 as a video recorder for the television programs on your PC.
Snapshots
67
Page 68

Videos and Pictures
Snapshots capture a still image directly from the preview
screen. The pictures are stored as JPEGs in the resolution
indicated in the photograph listing.
Under “Photo duration”, you can specify the length of time
the image is to be displayed.
Scene Recognition
Click on the FX button on the Filmbox or on the scene
within the Timeline Mode and select “Scene Recognition”
from the menu.
The scene recognition ion function analyzes the film for
scene transitions and scans for drastic changes in the brightness and color distribution within the picture. The program
then partitions the movie into individual scenes based upon
the analysis.
68
Note: Digital Video “time stamps” (points in time at which
the device was switched on and off) are also recognized as
separate scenes.
The complete analysis must be made only once for each
recording as the resulting data is stored with the source
file.
If the scene recognition is performed again with the same
source material, the scene transitions found are immediately displayed. If you are still not happy with the resulting
scene partitioning, simply repeat and correct where necessary.
Automatic
Makes cuts automatically at each scene transition without
prior confirmation.
Page 69

Manual
Makes cuts only after confirmation at each scene transition. The preview always displays the end of the previous
scene and the beginning of the new scene. This option is
helpful, for example, if a camera flash was captured in the
source footage. The flash from the camera would cause a
sudden brightness modification even though there was no
actual scene change.
Separate at this point: Select this option when there is significant variation between two images in the display.
Next scene: This option enables you to skip a point without cutting in the event that the scene was identified incorrectly. Use this option to deliberately skip scene transitions and treat several scenes as a unit.
Automatically cut all further scenes: This ends manual scene recognition. All future points will be automatically cut to create a new scene.
Tip: You can also use the cut menu for cutting scenes. Place the
s-marker where you wish to perform a cut, and then select the
“Cut scene” command.
Videos and Pictures
Takes
Takes are handled like other objects within the Timeline
mode. (See Timeline mode). They are references to multimedia files or special objects (visuals, titles etc.) and include the additional characteristics an object may possess,
such as start and end points, fades, effects editing and effects curves. Takes can be used for the following applications:
1. Divide your videos into takes while loading into the
arranger. Begin by pressing the “Expl” button. The
Play/Rewind/Fast-Forward transport functions are
now active for the selected video file within the Media
Pool. The Extras button allows you to set the In and
Out points for the scene. The selected scene can sub-
sequently be saved to the Takes directory.
Set In/Out Point (Keys I/O): Determines the start and end of a take.
Go to In/Out Point (Shift+I/Shift+O keys): Skip quickly to the start/end of the take.
69
Page 70

Videos and Pictures
Jump between In/Out points (Ctrl+K): Check out the scene!
Save Take (Shift+T): The scene is saved to the Takes directory.
2. All scenes found by the automatic scene recognition function can be stored in the Takes directory, enabling quick
assembly of scenes.
3. The takes directory may be used to as either a source or
a destination directory. Use the Takes directory to build
complex storyboards: You can place takes from the directory into the arranger, or drag new scenes into the
Takes directory – allowing you to build complex
storyboards along the way: The individual scenes that
make up the video are cut first, before being arranged
on the tracks.
4. Since Takes also contain corresponding effects, one can
store different variations of the same movie with different effects in the Takes directory. The Takes directory
uses very little memory in contrast to rendering out the
actual video files!
70
Separate audio from video material
Select ”Adjustment/information” > ”Audio/video adjustments” > ”Extract sound from video” from the File menu.
Videos with a sound track will now appear in the Timeline
Mode as two separate objects (audio object and video object). The two objects automatically form a group.
To edit the audio and video objects separately, select the
function ”Dissolve group”. Now you can replace the audio
or the video track, or process each file separately. Re-join/
regroup the tracks with the ”Export arrangement” function.
Transitions
When you drag scenes into the arranger, the individual
video scenes in the timeline or storyboard usually sequentially follow one after the other. This is called a “hard cut”.
However, you can make scenes blend or “transition” into
each other. This means that for the duration of the transition, two clips are playing simultaneously and are mixed
in a variety of “blends”. You will find numerous blends in
the Media Pool’s transition directory.
Page 71

Transitions in Storyboard mode
Click on the transition button between scenes and select a
transition. All of the transition directory’s presets are listed
in the menu. You can also determine the length of a transition, or by selecting “Apply to all”, all of the transitions
throughout a movie will be of the same length. You can
also apply a selected preset to any individual transition automatically, or apply the selected preset to all transitions.
Simple cross-fades in time-line mode
To create a cross fade transition in the arranger, simply
drag an object to overlap the previous object. This creates a
cross-fade. During this standard transition, the brightness
of both objects are increased, the first clip fades out while
the second clip fades in. The duration of the cross-fade is
displayed in the arranger as white lines crossing each other.
The fade-in of the second object and the fade-out of the
first object (the length of the cross-fade) are regulated with
the object handle above the second object. You can finetune the cross-fade with the trimmer. There you can also
change the type of transition if a more effective transition
is required.
Videos and Pictures
Transitions
Drag & drop onto a “hard” transition
Click on the Slide FX button next to the Media Pool and
the transition directory appears within the list of files. Clicking on a transition preset shows a preview of the transition
effect. Simply drag the desired transition preset onto the
border between the two clips. When the mouse pointer is
over a scene change along with the transition preset, it activates an object symbol, enabling you to place a transition
in the selected position. The rear object is shifted forward
for the duration of the transition (if you don’t want that to
happen, use the trimmer for the transitions).
Clips that are to be blended must be on the same track, but
transitions do not need to be on the same track. This allows for a more concise overview in the arranger window.
VFX transitions and Alpha transitions
There are two different types of transitions, VFX transitions and alpha transitions. Vfx transitions may be of any
length— when the length of the transition is shortened,
the effect will be played faster. They are displayed in the
Media Pool as blue/yellow icons and abbreviated with A/
B.
The VFX transition is also displayed within the arrangement. A double-click on the cross-fade (crossed white lines)
71
Page 72

Videos and Pictures
opens a settings dialog from which you can set the effects
parameters.
The alpha transitions (named Iris, Objects, Random etc.
in the sub-directory) are pre-produced black & white videos that may be utilized for transitions in tandem with the
Alpha keying effect. These transitions have a preset
length—when you shorten the transition, the effect is cut
rather than played quicker.
Note: Use transitions economically! Most professional movies
or TV shows use hard cuts as the rule and transitions less frequently.
Custom Slide FX with Alpha-keying
Alpha keying extends the range of transition effects used
to produce black & white movie transitions or selected color
fade-ins and fade-outs. Select “Alpha effect” in the video
controller and configure it as its own transition. Alpha keying uses the brightness of alpha key objects to regulate the
transition between two videos on adjacent tracks.
The alpha-keying object should reside between both videos. Where the alpha-keying object is black, the upper video
should fade in where the alpha key object is black, and the
lower video should fade into the white areas. Gray passages will result in a blend of both videos to produce a mix.
In colored passages, the brightness of the colors is used.
Copy your alpha key videos into the transition plug-ins subdirectory so you can easily access them for other projects.
72
Trimming or Fine-tuning videos
You can call up two trimming editors, a cut trimmer and
an object trimmer, from the Window menu or from the
context menus of video or image objects.
Both trimmers fine-tune objects on the tracks. The object
trimmer positions the individual object and its handle precisely within a frame. The cut trimmer configures crossfades or hard cuts in the same manner. Both trimmers are
tools for precise cutting.
Working method
The trimmers perform the tasks as object handles and shifting of objects on the tracks, only more precisely. . The
video material is movable within the object, without having
to move the object itself. Consider that an Object represents an instruction to play: The object specifies which
material is to be played and when. If you shift the playback
starting point, the object moves too. If you move the mate-
Page 73

rial within the object, the object remains in its place within
the arrangement, but the playback order of the content with
the object has been moved or rearranged.
General advice for operating both trim editors
Play functions: The trim window contains its own play functions that allow the object to be played individually or in relation to the arrangement. – The right play button plays the arrangement normally.
Note: Replays can sometimes appear shaky because the
processor may be over-worked and some frames may be
left out.
– The middle play button plays the arrangement “frame
by frame”, which means no frames are left out, but that
the replay may be slower.
– The left play button renders material before playing. This
method ensures a smoother playback.
The start marker in the timeline is reset when the rewind
and fast-forward functions are activated, allowing for complete control of transitions between two videos.
Increments: A click on the +/- buttons in both trim editors sets the handle or the material within an object exactly into a frame. With the Ctrl key you can increase the frame rate ( 5 frames/sec per mouse-click).
Videos and Pictures
Trimmer for individual objects
A schematic display of the selected object and its handles
can be found in the center of the trimming window.
Fade In/Out: This button adjusts the upper handles of an object.
Object contents: This moves the video material about to be played without changing the length of the object.
Position: Moves the object on the track.
73
Page 74

Videos and Pictures
First Frame / End Fade-In: Switches the left monitor between the first frame of the object and the end of the transition.
Start Fade-Out / last Frame: switches the right monitor between the start of the transition and the last frame of the object.
Left/Right -/+ buttons: Adjusts the lower object handles.
Next (previous) Object/cut: The buttons below and to
the right skip to the next/previous object and/or cut in the
arranger. These buttons make it easy to move and trim
objects in the arrangement without having to leave the trimmer.
Cut Trimmer
9
1
11
Left -/+ button (1): This button moves the last frame of the first object while adjusting the second. The length of the transition remains unchanged. The display (in illustration 4) indicates the relative change in comparison with the starting situation when the trimmer was opened.
Position (2): Moves the second object, altering the length
of the transition. This corresponds to shifting an object in
the arranger
Object contents (3): This moves the movie “underneath”
the second object without changing the length of the object and the transition.
Cross-fade (4): changes the transition’s length between both objects. The objects remain of equal length. The length can be numerically entered.
45
6
3
2
10
7
11
74
Page 75

Middle -/+-button (5): Shifts the existing transition. Both objects remain in their positions, only the transition’s center point moves.
Transition (6): displays the type of transition. A mouseclick opens a pop-up window from which you can select a transition.
Right -/+ button (7): Move the first frame of the second object. The first object and the transition remain unchanged, only the length of the second object changes.
Start Fade-Out / last Frame (9): switches the left monitor between the start of the transition and the last frame of
the object.
First Frame / End Fade-In (10): switches the right monitor between the first frame of the following object and the end of the transition.
Next (previous) cut (11): These buttons skip to the next/ previous cut in the arranger. These buttons make it easy to move and trim cuts in the arrangement without having to leave the trimmer.
Videos and Pictures
Minimizing Videos or Nestling One video inside another
Videos can be made smaller in the video screen to appear
as a video within a video e.g. in order to appear upon the
surface of another video:
– Place two videos on two tracks. The video, which is to
serve as background for the currently selected object,
must be situated on the track above that object.
– Select the option “Video effects” in the context or effects
menu of the foreground video object.
– Change the size of the video with the help of the zoom
buttons
– Change the position of the foreground video with the
help of the position buttons or by drag & drop in the
video screen of the video controller.
Image Stabilization
The motion stabilizer reduces unsteady camera motion and
helps to smooth pans.
75
Page 76

Videos and Pictures
Functionality
The motion stabilizer adjusts inadvertent movements in
the picture by shifting each incorrect movement in its opposite direction. This produces unusable edges in the footage that are cut off automatically, and black strips replace
the edge of the shifted picture, which are then removed
using a zoom shot. The result: a clearly more stable, almost imperceptibly larger picture.
Operation
Activate the motion stabilizer in the video object FX or context menus.
You will see the current video object in the top left corner
of the dialog.
– First click the “Analyze” button to scan the footage. –
Based on the preset parameters, a relative shift between
the pictures is calculated. After concluding the analysis,
take a look at the suggested correction, then use the slider
for further adjustments. Once you are happy with the
final correction, click OK.
If the first scan did not provide a satisfactory result, try
changing the parameters below and repeat the process:
76
Image stabilization dialog.
Stabilizing radius: To prevent the motion stabilizer from recognizing every camera movement as unwanted shakiness, you can determine the radius within which movement is accepted: The larger the stabilization radius, the more shakiness is corrected. Note: Changing this parameter will require re-analysis of the source footage.
Page 77

Analysis area: This area determines the area of the foot- age that should be analyzed. The center of the image is preset. If shakiness occurs in another part of the picture, relocate the analysis area. To do this, use the lasso to “capture” the shaky area. The smaller the area, the quicker the analysis. Note: Changing this parameter will require reanalysis of the source footage.
Temporal smoothing: This value determines the speed of the movements considered blurry. This allows you to differentiate between a panning shot and a nervous handheld shot. Changes to this value are immediately applied.
Cancel: exits the dialog without accepting changes to settings.
Delete corrections: Resets the current settings.
New Value: The altered value for the temporal correction
is accepted and the new correction curve is set.
Video effects
All video effects work in real-time and can be dragged and
dropped from the ”Video FX” directory onto video and picture objects in the arranger.
Generally speaking, you can combine as many effects as
you want (for example, Blue Screen for a chroma-key effect, color enhancements, and a fast-motion effect). Call
up the video controller from the effects or context menu to
edit these effect combinations.
For further details on video effects and adjustments, see
the chapter ”Video controller”.
Videos and Pictures
Video mix
This term refers to mixing various videos while simultaneously playing them. The video objects to be mixed must
be placed one below the other in the arranger so they overlap in time. Add a special video mix effect to the lower video,
which determines the parts that will be transparent for the
upper video. Note: The background video object must be
placed in the upper track. Example, if you want to put a
dancer on a landscape, place the landscape on track 1, the
dancer on track 2 and activate the Blue Screen effect for
the dancer.
For further information on video mix effects and adjustments, see the chapter ”Video effects”.
77
Page 78

Videos and Pictures
Borders
Call up the ”Borders” directory with the ”Borders” button
to the left of the Media Pool. This directory contains bitmap
patterns for the borders of videos much like picture-frames
that can be modified by video mix effects. Drag them to the
lowest track of the arranger and select the Blue Screen or
Green Screen effect to make the blue or green space in the
middle transparent for the upper videos. This way you can
see the objects of the upper tracks of the arranger in the
field.
You can use the lower handles to adjust the size of the
borders to fit any length of the video. You can also achieve
interesting effects by inserting and discarding borders
within a video.
“Text”: Subtitles and credits
Activating the Text button in either the Filmbox or scene
opens a title editor. Enter text of any color or font for subtitles or credits, then choose from a variety of movements
(such as scrolling credits), effects and designs within the
template menu.
78
– Type the text for your video subtitles in the title editor.
– Enter the type of font, color, size etc. of your text. If you
want to format individual words or letters, mark them
with the mouse and select a different format.
– Select effects and dynamic animation from the “Tem-
plates” flip menu (such as downward-scrolling text).
– Use the scrollbar to the left and above the text window to
organize your text in the video screen and position it
horizontally or vertically. You can position the text verti-
Page 79

cally or horizontally. If you have selected moving text,
this position determines the starting position. A doubleclick on the scrollbar re-centers the title.
– Note: Setting movement to text places the starting posi-
tion of the title outside of the video window. You can,
however, always change the starting position.
– The “Title length” setting determines the amount of
time a title is displayed.
– The “Video Test” button previews the title in the video
monitor, together with the movie or scene.
– Close the title editor by clicking the “OK” button.
Text objects and title presets
You can also use RTF files that can, like other media files,
be pulled from the Media Pool by drag & drop. Please note
that MAGIX Movie Edit Pro 2004 reconfigures RTF files
into bitmap files, which take up a lot of memory. The
smaller the RTF file, the better!
Access the “Titles” directory is accessed with the “Title”
button in the Media Pool. This directory contains a selection of preset title templates. To integrate a title template
into your project, proceed as follows:
– Select a file. With a simple click, a preview is displayed
in the video window so that you can see how the template affects the title.
– Once you’ve found the right title template, drag & drop
it onto a track in the arranger. It is represented there as
a title object.
– The title editor (see above) opens automatically. Double-
click to re-open it (or with a right mouse-click in the
context menu under “Title Editor”).
Videos and Pictures
Create a video project for the Internet
Internet video/Streaming Export formats such as Real
Video, Windows Media and Quicktime Movie can are found
in the ‘File > Export Arrangement’ menu. When you select
one of these options, the current arrangement will be converted to the chosen format.
The Internet video formats are different from normal AVI
files in two ways:
– Streaming capability: Modern Internet browsers can play
Real Video, Windows Media and to a limited extent also
Quicktime videos even during the downloading process,
whereas normal AVI files must be completely downloaded prior to the start of play.
– Lower data rate: the Internet formats are optimized for
the lower data rates used by today’s Internet access de-
79
Page 80

Videos and Pictures
80
vices. A dialog appears on export, for setting the playback data rate (i.e. dialup modem, or high speed access). If you use Windows Media or Quicktime videos
for the Internet, choose a suitable codec and use a small
pixel resolution to set up the necessary data rate.
Tip: In addition to the Internet export formats, MAGIX Movie
Edit Pro 2004 offers a function to help you create your own web
page. Please read the “Internet Functions” chapter for more
details.
Video export via video or graphics card
To save your MAGIX Movie Edit Pro 2004 video onto digital videocassette, you must first export it as an AVI file,
typically DV-AVI that uses a special codec for compression.
Please check your video card’s user manual for more information. Your video card utilities may offer tools to save
the file onto videocassette.
Trouble-shooting checklist
If you encounter problems, check this list:
– In the AVI export dialog you must adjust the video size
to the size required by the video playback device. As the
resolution of the first video clip of your project determines the preset value, the size is usually also compatibly set. If you use videos with different resolutions in
your project, you must adjust the correct size manually,
for example 768x576 for full-screen, 720x540 for PAL
devices and 640x480 for NTSC videos
– The frame rate (number of images per second) must cor-
respond to the video playback device for example 25
frames/second for PAL video and 30 frames/second for
NTSC video.
– The video compressor must be identical to the video card
compressor. Usually the name, which contains MJPEG
and the card name, identifies the video compressor.
– The data rate and the compression ratio must match your
system. The lower the compression, the higher the video
quality and the more memory that is required. As a general rule, a normal video in S-VHS quality requires approximately 2 MB per second, or 120 MB per minute.
– The drive where you want to store the target video should
be fast, large capacity hard-drive suitable for media-applications to guarantee a replay session without interruptions. Modern EIDE and SCSI hard-drives with a
capacity of several gigabytes are usually well suited for
these operations.
Page 81

– If you export a video from MAGIX Movie Edit Pro 2004,
your system media player will start automatically and
video replay will be set up. The current Microsoft Media
player uses a technology that is usually able to replay
most video formats without interruption. This Media
player is also included on the MAGIX Movie Edit Pro
2004 installation CD, so you can use it even if your system has an older version. Some video cards include video
players specially designed and optimized for the hardware. In this case, close MAGIX Movie Edit Pro 2004,
load the video in this video player and start the replay.
– Make sure you have connected everything correctly:
– Video-out of the video card to video-in of the video
recorder
– Audio-out of the video or sound card to audio-in of
the video recorder
– Video-out of the video recorder should be connected
to a monitor or TV-set, so you can make sure thathe
video recorder is receiving the correct signal for
capture.
– Set the video recorder to the external port to which you
have connected the cable, for example AV1
– Check whether the media player actually exports the
sound material using the video card export device. If not,
you must adjust the video card driver: go to ”System >
Multi-media > Replay > Favorite device”. If necessary,
you can also activate the button ”Use only favorite de-
vice”.
– Set the sound control for the video (if you have one) to a
level where the maximum audio signal from the PC
equals the maximum level without distortion.
– Now set the video recorder to pause before capturing.
– Start the replay on your PC and deactivate the pause on
the video recorder at the same time. Now the replay
should work.
Videos and Pictures
A further suggestion: the first replay of a new AVI is often erratic, as the PC still has to work on swapping and caching its
data. Stop the replay after a few seconds and start it again.
This time the replay should be smoother and uninterrupted.
Showing videos with the TV output
Video and graphics cards with a TV-out connection can
transmit video signals to an external video recorder when
connected by a cable, enabling you to record your video
with a VCR. The arrangement must however be played in
full-screen mode and recorded by the external device.
81
Page 82

Videos and Pictures
1) Make sure that the TV output is activated in the Windows system control. Note: When this function is called
up for the first time, the program asks which screen
mode is being used (resolution and hue). This setting
will always be applied unless changed from the “file
menu > settings/information > full-screen playing options”. The greater the resolution, the greater the demand placed upon the computer. Try to reach a compromise between stable playbacks and picture quality.
The first option in the dialog plays the video in full-screen
mode directly from the arrangement. This often causes
problems if the processor has trouble keeping up with
real-time calculations of video effects or transitions.
2) If the first option works well, select “Render and play in
full-screen mode”. All of the tracks and effects are combined (rendered) into one file and subsequently played.
If you want to play a completed movie several times,
export it as an AVI file and then load it into a new movie.
It will now play without a constant need for re-rendering.
Playing videos on digital devices
The arrangement can be easily played on a digicams using
a Firewire interface.
Simply select the “Export Movie > Video as DV-AVI” option in the file menu. This opens the DV Export settings
dialog, however in most cases you can keep the existing
presets as they are. For more information, check out the
options available in the dialog.
If you want to play a rendered movie on DV, there’s no
need to render it again. Simply activate the “Play own DV
file” option and select your DV video from the “My audio
video” directory.
82
Page 83

Audio
Load and edit audio files
All importable audio files can be accessed from the Media
Pool and previewed (as sound) by a click on the file name.
After listening to a few sound files, select one you wish to
work with and move it to the arranger window. To do this
click and hold on to the name of the sound file while dragging it into the arranger window. A rectangle the size of
your selection will appear. The sound file will be loaded
into the arranger at the position you release the mouse
button. You can repeat this process as many times as you
like to build your arrangement. To play two or more sound
files simultaneously, place the new sound file in a separate, adjacent track.
You can remove sound files from the arrangement by selecting them and pressing the delete key.
Edits, fine positioning, volume adjustment, fading in and
out, are all processed using the object tab directly in the
Arranger.
Scanning an audio CD
Loading music directly from an audio CD is a very useful
Media Pool function. The steps are similar to transferring
Wave files into an arrangement:
– Insert an audio CD into the CD-ROM drive on the PC
– Browse with the Media Pool to the new CD using the
“Scan CD” button
– The individual CD titles appear on the screen
– A simple mouse-click starts the playback of the CD title
for sampling purposes
– Drag & Drop into one track of the current arrangement
and the CD title will be digitally scanned and copied to
the hard-drive.
– The audio object appears in the track and can be played
back or edited immediately.
The scanned CD titles can be used later much in the same
way as normal audio objects (fades, audio effects or mixing).
Scanning CD tracks with the recording dialog
A special extraction routine is used to scan audio CDs in
the CD ROM drive: The audio data is extracted in digital
form by the CD-ROM drive. Some CD-ROM drives do not
support this mode (trying digital extraction results in an
83
Page 84

Audio
error message) or only support it with difficulty (results in
audio objects with cracking noise, skips, etc.). In this event,
the CD may be ‘scanned‘ by recording it into the computer.
When recording the CD to the computer, the CD titles are
simply played back from the CD-ROM drive and are rerecorded as .WAV by the sound card. Before recording a
CD to your computer, change the program settings in
the“File > Audio / Video Options” menu.. To ensure
trouble-free recording of the CD titles using Dialog Recording, the audio output on the CD-ROM drive must also be
connected with the sound card input. This connection is
usually already set up in today’s multimedia PCs. If not,
this is easily done by installing a cable inside the computer
case.
Audio recording
Songs, noises or instruments can be easily recorded in
MAGIX Movie Edit Pro 2004 using the recording function.
Recording from a stereo system: Use the lineout or AUX-out jacks on the back of your amplifier, receiver or tape deck. This requires connecting the device output to the soundcard input (usually red in color). If your amplifier doesn’t have a separate output (other than the speakers), use the connection intended for headphones. In this case, you will need a cable with two 1/8” mini-stereo jacks. This type of connection has the advantage of the separate volume control used to set the headphone input signal level. However, since headphone connections generally do not sound the best we suggest that t you use the line outputs wherever possible.
84
Recording cassettes from a tape deck: Connect the tape deck’s lineouts directly to the soundcard input. Recording LPs (vinyl records), do NOT connect the record player’s output directly with to soundcard, because the phonon signal must be pre-amplified. In this case, the headphone connection output or an external photo pre-amp output is recommended.
Adjusting the signal level
Adjusting the signal level to the sound card is also recommend to get the best sound quality when recording digitally.
Once a recording source is connected to the soundcard,
the Record button opens the recording dialog and starts
Page 85

the recording source. If the adjustment is set too high,
distortion occurs and the incoming signal must be reduced.
If you have connected the source through either an amplifier or tape deck output to the soundcard, you can only
reduce the signal level in your soundcard’s software mixer
interface. You can call it up in the recording dialog by activating “Level adjustment”.
If you reduce input sensitivity by using the input fader, the
resolution at which the analog signal is digitized is also
reduced. Try to set these automatic controllers to the loudest sound level possible! The maximum setting for an optimal level is the loudest part of the material. The loudest
part should be adjusted to be the maximum.
“Audio” recording dialog
Audio
Audio driver: Selects the soundcard for the recording.
Name: Name the audio file about to be recorded, and the
destination path and director where it will be saved.
Playback during the recording: This option is particularly helpful for overdubbing narrations. When activated, the selected movie will be played while recording the audio, allowing better overdub timing.
Advanced: opens a window in which you can select one of three special functions:
85
Page 86

Audio
– By selecting the “Normalize after recording” option, the
material is set to the maximum volume after recording.
For the best results, try to set the source material as loud
as possible without distorting it. Use the peak meter display in the recording dialog to assist you with this.
– “Mono” creates a mono recording and requires half of
the hard drive space required for stereo.
– “Real-time sample rate adjustment” automatically
matches the sample rate of a new file to be recorded
with the sample rate of the selected movie sound track.
Recording quality: Sets the sound quality of the recording. Choose from medium wave, FM or CD quality from the preset menu.
Record: Click this button to start recording
Stop: Click this button to stop recording
”Ducking” (reducing the sound volume): To add nar-
ration or other sound material to a video that already has
sound volume levels set, activate the option ”Automatic
reduction of sound volume of remaining audio tracks”.
This automatically reduces the volume of audio objects in
the arranger during the recording session (”ducking”). A
volume curve controls the whole process, produces the fading in and out of effects automatically and guarantees consistent overall volume.
86
Adding background music using the Wizard (Song Maker)
Arrange your own background music or let the Wizard do
it for you.
1. Activate the Song Wizard with the “Wizard” button or
from the file menu.
2. Select a music style.
3. Select the instruments that you want to use. A blue highlight under names in the instrument selection box means
that those particular instruments have been chosen. If,
for example, you only want a rhythm section with drums
and bass, deactivate the other instruments with a mouseclick.
4. Enter the desired length of the song or portion of a song
in seconds. You will always achieve an appealing musical result.
5. Specify whether a Wizard will create a completely new
arrangement, attach a new part to an existing arrange-
Page 87

ment, or add new elements to the existing blocks. The
Wizard will automatically add new virtual sound blocks
to the tracks in the Arranger. These are simply musical
suggestions and are not yet permanent.6. Listen to the
suggestion by pressing, “Play” under “Preview (audio)”.
If you do not like the result, create other arrangements,
song parts or enhancements by selecting the appropriate option in the “Arrangement Options” section of the
Wizard Dialog.
Audio
7. If you agree with the Wizard’s suggestions, click on “OK”
to add the suggested blocks to the existing arrangement.
A click on “Terminate” ends the Wizard and returns to
the original arrangement status.
87
Page 88

Audio
Arranging MAGIX sound files
The name of each sound file gives you detailed information about its content.
bass a 01 . wav
Sound Type of groove Tonality/Pitch Extension
You can tell which sound files work well together by their
names. For example: sound files with the number 01 sound
good together. String section, trumpet, singer or keyboard,
it doesn’t matter. You can create melodies by combining
various combinations of numbers. e.g.
bass_a01 bass_a04 bass_a02 bass_a03
For some interesting harmonies try combining different
instruments using the same order. e.g.
keys_a01 keys_a04 keys_a02 keys_a03
88
The type of groove the sound file has is expressed by a
letter. A possible combination could be:
bass_a01 bass_b04 bass_a02 bass_c03
The pitch remains the same while the rhythm changes.
Here are several combinations to get you started:
T1: drum_01 drum_01 drum_01 drum_01
T2: bass_a01 bass_b04 bass_a02 bass_c03
T3: keys_a01 keys_a04 keys_a02 keys_b03
T4: guit_a01 guit_c04 guit_b02 guit_d03
Effects for adding music
The MAGIX Movie Edit Pro 2004 special effects are designed for modifying sound and adding sound tracks.
Produce the sensation of spatial depth using reverb and
echo effects. The equalizer allows you to modify the frequency, such as boosting the bass. The compressor is a
dynamic volume control that lets you produce a focused
and more powerful sound. The Stereo FX processor allows
you to adjust the position in the stereo panorama while the
de-noiser and de-hisser functions give you professional
sound quality. Each effect has a preview function and works
Page 89

in real-time. . For further information on the individual
effects options, see the chapter on ”Audio effects”.
Mix down of audio objects
If the arranger becomes too full to manage, the system is
out of RAM, or you just want to ”summarize” your production, use the mix down function to convert the entire audio
arrangement into a single audio file. Just click on the mix
down button in the button bar or select the function from
the ”Processing” menu.
You can choose a name and a destination for storing the
mix down object. The default directory is ”MyAV”.
Storage of the audio arrangement will take up a little more
space on your hard-drive, but it requires less RAM for playback than an unmixed entire arrangement. Note:
The mix down effect optimizes the volume automatically.
Even if the mix down function is used various times, you
will not lose audio quality.
Adding a sound track using MIDI songs
MAGIX Movie Edit Pro 2004 can load, arrange and play
back MIDI files as easily as Wave files, video or bitmap
files or software plug-ins.
A few words about MIDI: MIDI files do not contain the
actual sounds like Wave files, only the note control information. This data is interpreted to effect playback by the
synthesizer chip on the sound card. This has several advantages:
1. MIDI files need a lot less memory than Wav files. Therefore, more MIDI files fit on a CD-ROM.
2. MIDI files can be adapted to any beat (BPM) without
affecting the sound. Only the playback tempo needs to
be changed.
3. MIDI files are very easy to transpose to another pitch –
as a result, a section in a song does not have to be saved
in several different keys. The version in C major is sufficient – it can then be transposed to any key by simply
clicking on the right mouse button.
Audio
The disadvantage of MIDI files: The sound is not true audio. The audio is only produced when the synthesizer chip
on the sound card plays it back. As a result, high-quality
sound cards or external synthesizers will sound completely
different and better than standard sound cards, depending
upon the settings for playback “voices”. Therefore, it is
definitely worth using a good sound card or external MIDIto-sound generator with your MAGIX Movie Edit Pro 2004!
89
Page 90

Audio
Arranging MIDI files
Integrating MIDI files in an arrangement:
Search for a directory containing MIDI files using the
Media Pool located at the left edge of the screen. Click on a
file – it will be played back immediately so that you do not
need to guess which file you want to load. Now drag the
desired file into the arrangement – and that’s all!
An object will appear in which the MIDI notes are shown
by dots. The high notes are dots in the upper section; the
lower notes are the dots further down in the lower section.
You can even see the striking intensity of the notes. The
louder the note is played, the brighter it appears on the
screen.
MIDI objects may be arranged, the volume may be modified (middle handle) or fades (in or out) may be added (top
right and left handles) in the same way as audio, video or
synthesizer objects. The Element Bar lets you “open” an
entire track instantly from a MIDI loop. If you do not hear
anything on the MIDI file, check the MIDI replay device in
the Playback parameters window (P key or Menu “File >
Settings > Playback parameters”). Your sound card driver
or your MIDI interface must be set here!
90
MIDI interface and external sound generator
Naturally, MIDI objects can also be played back over a MIDI
interface onto external synthesizers, sound modules, etc.
Initially set FX to 1.0. The timing between MIDI and audio
can be balanced later if you notice a drift between the two.
This is important for very slow arrangements, where the
sample rate on the sound card is not precise enough. The
MIDI drivers can be set in the Playback parameter window
(P key or Menu “File > Settings > Playback parameters”).
Convert MIDI files to audio files
Before exporting (as a video, for example) an arrangement,
all MIDI objects must first be “transformed” into audio
objects. They contain only pure control information for the
sound reproduction.
First, connect the MIDI sound producer (usually the
soundcard) output to the soundcard input. Now the MIDI
file can be played back and simultaneously recorded as an
audio file using the record function. The result is an audio
file that can be processed and exported normally, together
with other multimedia files.
Page 91

Video effects
Using video effects
Drag & Drop
The video effects are stored in the ”Video FX” directory,
which maybe opened using the corresponding Media Pool
button. All video effects feature preview functions can be
dragged & dropped onto video and picture objects in the
arranger.
Video controller
Select a video or picture object before opening the video
controller from the effects menu or context menu (right
mouse-click on the object). The starting image of the video
is displayed on the video screen in the video controller. Play
or stop the video object using the corresponding buttons.
This causes the entire object to be played in a loop within
the arranger, together with the background video in a mixing effect. Forward or reverse the video with the position
slider.
Try any effect or effect combination. The video controller
will not adopt the setting until the OK button is clicked to
close the video controller. Clicking on the X button will
close the controller (abort the process) without adopting
the settings.
Effects curves
Many effects may be manipulated using the effect curves
for a more dynamic application of the effect.
Video controller
Zoom
Zoom resizes the entire video.
Position Control
The ‘position’ control allows you to shift the originally centered video in any direction. This makes it possible to superimpose several videos by setting the mixing effect
‘stamp’ for the respective bottom video (see below).
Rotary control
It is possible to rotate the image with the large rotary control, located on the right, below the video screen. A doubleclick returns it to the neutral twelve o’clock position.
91
Page 92

Video effects
Optical FX
In this section you will find several optical effects.
Sensor fields
You can intuitively influence sensor fields with mouse
movements. The graphics and the respective effect setting
change in response to each other.
92
Whirlpool: The image is twisted into an S-shape.
Motion: Moving parts of the image are intensified and
enhanced.
Echo: The moving images create an optical ‘echo’; previous images stand still and gradually turn paler until they completely disappear.
Fish-eye: The perspective is distorted as if the image was viewed through a fish-eye lens.
Mosaic: The video is composed of different images and resembles a mosaic.
Soften: A soft-focus image is shown.
Lens: The image is dynamically distorted at the edges.
Blur: The image becomes blurred.
Sand: The image is depicted in a granulated manner.
Page 93

Erosion: The image is broken-up by means of small rect-
angles and resembles a ‘patchwork’.
Dilate: The image is broken down into cell-like elements.
Emboss: The edges are put in strong relief.
Contour
The image is reduced to its contours in two sizes (3x3 or
5x5). It is possible to either select vertical or horizontal contours.
Speed
The playing speed can be adjusted with the slider control.
In the minus range, the video plays backwards. If the playing speed is increased, the object length in the arranger is
automatically shortened.
Color FX
This dialog changes the colors.
Substitution: Based on the RGB scale, the red, green and blue portions are exchanged for a surreal color effect.
Video effects
Shift: Colors are increasingly reversed. Blue colors turn red, green ones appear purple.
Quantize: Depending on the setting, colors are either rounded up or down so that the overall number of colors is reduced. This creates grids and patterns.
Color controls: Focus, brightness, contrast and color intensity can be adjusted individually for every object by means of the four sliding controls, similar to a monitor adjustment.
Symmetry
This section contains video effects for breaking down images.
Mirror V/H: The object is mirrored vertically or horizontally to appears the reversed or upside down.
Flip V/H: The upper or left half of the object is flipped to the bottom or to the right.
93
Page 94

Video effects
Kaleidoscope: the left upper corner is mirrored horizontally and vertically.
Mix FX
This section contains the mixing effects used to mix together a foreground and background videos to create an
overlay effect. The video chosen to serve as the background
for the currently selected foreground object must be positioned on the track above that object.
For all mixing effects, which are situated in the light blue
range of the mix FX, special adjustments can be made with
the two slide controls.
Mix: This button mixes the two videos together. With the
aid of the fade handles, very soft cross-fades can be achieved
between the partially overlapping videos.
Stamp: The currently selected object is ‘stamped’ into the video on the track above the object. This is only possible if the bottom video only takes up part of the image, as otherwise only the bottom (currently selected) video would be visible. The object should be reduced first, or moved by means of the edit functions (see above).
94
Transparent: One video is made transparent. The video on the top track is seen “through” the video on the lower track.
Black/blue/white/green Screen (Chroma key): This function creates a composite of two videos. The selected video covers up the video on the top track and all black/ blue/white/green areas appear transparent. With this studio-style effect it is possible to ‘place’ a person who has been recorded in front of a blue (or green, white or black) background into any type of landscape or background.
Alpha: This video effect uses the brightness of a video to control a cross-fading effect between two other videos on neighboring tracks. The additional videos should be situated directly above and below the alpha-keying object. In all black passages of the alpha-keying object, the top video is faded in, while in all white passages the bottom video is shown. Grey passages are permeable for both videos and create a mixture of the two. In the case of colored passages, the brightness of the color is used for control purposes.
Page 95

Video cleaning
This option opens an editor for correcting discrepancies in
video material.
Select the cleaning function you desire from the upper part
of the dialog: Brightness & Contrast. Sharpness, Color or
De-interlace.
The position fader allows you to see how the selected setting works for a particular part of a movie or scene.
Video effects
Presets: Try out the presets in the preset menu.
Automatic setting: This button usually offers a good ef-
fect setting. Simply select an image with the fader, then
click on “Automatic setting”. The optimum cleaning setting will be applied to the whole scene.
All effects off: Switches off all of the effects off, allowing you to compare the original and edited material.
Apply to all scenes: Applies the selected cleaning settings to every scene of the selected movie.
Practical example
Let’s assume that you want to remove an overexposed passage from your video that spoils an otherwise perfect recording.
1. In Timeline mode, turn the passage that you want to correct into an object. To do this, place the S marker at the
beginning and at the end of the passage, each time clicking the scissor button (“Cut scene“, shortcut: t).
2. Select the object you want to correct and click on “Video
Cleaning” in the effects menu.
95
Page 96

Video effects
3. Modify the brightness until the image is exposed correctly (and if necessary, the contrast too) before exiting
the editor by clicking on “OK”.
Brightness
The faders increase or decrease image brightness and contrast. By selecting “Brightness” in the preset list, you can
choose from a number of standard curves or edit only the
darkest, mid-range, or brightest parts of the image.
Sharpness
The fader allows you to regulate the level of image sharpness.
96
The “Fine Tuning” option allows you to determine the level
of focus for particular surfaces or borders.
Color
Page 97

You can increase or reduce the color portions of images
with the “hue” fader. A newly developed algorithm makes
the change in color as natural as possible. With some experimenting, you can achieve some amazing results – such
as turning summer images into autumnal pictures, or creating funky Pop Art...
Color: A selection of colors to add to images.
Hue: Increases or reduces the color portions of an image.
Red/Green/Blue: Changes the color portion mix.
De-Interlace
This option serves to open an editor for performing various adjustments for the TV picture. Apart from the interlace and anti-flicker filter, you can also adapt the photo show
to the actual scale of the television frame. A special algorithm ensures an optimal ratio between image size and
image borders (anti cropping).
Video effects
Interpolation for interlace source material: Select this option to remove ridge structures from the (video) image. If you, for instance, extract freeze frames from a video, these ridge structures appear in image sections showing movement.
Anti-flicker filter: Select this option for freeze frames with very fine structures and high contrast. You can use it to remove the flickering on your TV screen during playback.
Border cropping - offset: Select this option if the edges are cropped during playback on your television. In this case the values of the master effect setting are used (see below).
97
Page 98

Video effects
Scene Recognition/ Creating subtitles/AntiShake Filter/Trimmer
Please read the “Videos and Images” chapter for more details.
Movement
With the help of these functions, you can move cropped
image in such a way that it appears as though the camera
is panning. The crop can be either 50 % or pre-selected.
Zooming can be simulated, e.g. for viewing far into distant
landscapes.
Pan left - > right (right - > left): This option is suitable for
particularly broad panorama shots. The picture is panned
from left to the right (or vice versa). The time indicator of
the picture is extended automatically for pictures in the
standard 4:3 format.
Zoom in
Zooms slowly into 50% of the picture. If a crop has already
been assigned, then the zoom in is implemented within
the cropped material. Select the crop by drawing a frame
on the video screen with the mouse.
98
Zoom out
Zooms out to the entire picture. If a crop has already been
assigned, then the zoom out is implemented within the
cropped material. Select the crop by drawing a frame on
the video screen with the mouse.
Reset
Resets the image movement back to its original status. All
zoom effects are also reset.
Crop
Crops can be used,
– to only show part of an image.
– to apply a movement effect to the cropped material –
the result is a form of camera movement. Please read
the “Movement” chapter.
Zoom 2*
Zooms two-fold into the image so that you only see 50% of
the original image.
Page 99

Zoom 3*
Zooms three-fold into the image so that you only see 3% of
the original image.
Free
Select your own crop area by drawing a frame around the
area on the video screen with the mouse.
Retain Proportions
As with “Free”, you can select your own area for cropping
– except that in this case the original 4:3 dimensions are
retained.
Reset
Resets the image size back to its original. Status. All effects are also reset.
Section
Section > Zoom 1/2
The video takes up only 50% of the screen.
Section > Zoom 1/3
The video takes up only 33% of the screen.
Video effects
Section > Free
Select the area into which the picture is to be shown by
describing the area in the video screen with the mouse.
Section > Proportions fixed
Just like with ”Free”, this feature also allows you to select
any segment you want, however, the proportional relationships of the photo’s height and width remain unchanged
such that there are no distortions.
Section > Reset
Allows you to restore the segment back to the full size of
the photo. The entire photo can be seen again. Consequently, all motion effects are automatically reset as well.
Controlling Effects with Curves
In addition to static object-based effects, it is also possible
to use dynamic object effects controlled by freely definable
curves.
Selection and editing of the object curve effects takes place
within the Dynamic Effects dialog, which is opened from
the context menu and/or the FX menu.
99
Page 100

Video effects
Here you can activate different effects to be controlled by a
definable curve. All effects are arranged according to
groups; activated effects are check-marked and are separately listed in the bottom part of the dialog. The bottom
part of the dialog lists all the audio and video effects, which
are currently activated and which can be adjusted with an
accompanying curve.
Invert envelope
The current curve is mirrored on the horizontal 0-axis.
Delete envelope
The current effect curve is deleted.
100
Active Adjustment: This option ensures that the effect curve matches any extension or reduction of the object. e.g. If you want to control a zoom shot via an effect curve (and at the end of the zoom shot the object should be extended in the track), you should deactivate this option.
Rhythmic envelope
This option creates a so-called ‘envelope’ for controlling
effects. It ‘envelops’ the audio files on the track in different
ways. In this manner it is possible to directly control effects by rhythm of the music.
After you have called the option ‘rhythmic envelope’ in the
‘dynamic effects’ dialog, a selection dialog appears where
you can define the shape of the envelope more closely.
Beat-based: With this option, the shape of the envelope – and thus the effect portion in the video – follows the beat of the arrangement. Four different basic shapes are available for the beat-based envelope: 2 saw-tooth shapes, rectangle and triangle.
 Loading...