

Page 1
Page 2

2 Copyright
Copyright
This documentation is protected by law. All rights, especially the right of
duplication, circulation, and translation, are reserved.
No part of this publication may be reproduced in the form of copies,
microfilms or other processes, or transmitted into a language used for
machines, especially data processing machines, without the express written
consent of the publisher.
All copyrights reserved.
All other product names are trademarks of the corresponding manufacturers.
Errors in and changes to the contents as well as program modifications
reserved.
Copyright © MAGIX AG, 2010 - 2011 and copyright © 2006 - 2011, Image
Line Software. All rights reserved.
MAGIX is a registered trademark of MAGIX AG.
Deckadance Copyright © 2006 - 2011 Image Line Software.
mufin is a registered trademark.
MAGIX Digital DJ 2 contains the mufin songaudiogen technology.
VST and ASIO are registered trademarks of Steinberg Media Technologies
GmbH.
Other mentioned product names may be registered trademarks of the
respective manufacturer.
Page 3

Table of Contents 3
Table of Contents
Copyright 2
Support 5
Uninstalling the program 6
MAGIX Digital DJ 2 user interface 7
Quick start 1,2 3… 8
What's new in MAGIX Digital DJ 2? 9
Features 10
Upgrade MAGIX Digital DJ 2 11
System requirements 12
Don’t lose the beat! 12
Tooltips 13
Toolbar 14
Browser... 15
Track Window and Transport Controls 16
Track Display Colors 16
Upper controls 17
Waveform & Track Overview Windows 17
Lower Controls 19
Faders & Beat-phase Display 21
Tool window 25
Peakscope 25
Spectroscope 25
About 26
Effects 26
Function Window 28
Song Manager 29
Sampler 34
VST Host 35
MIDI settings 36
Vinyl/External Control 37
Relooper 43
Recording 44
Page 4

4 Table of Contents
Settings 46
Audio settings 46
Audio (ASIO4ALL) PC Only 48
Settings 52
Shortcuts 56
Index 59
Page 5

Support 5
Support
Dear MAGIX customer,
Our aim is to provide fast, convenient, solution-focused support at all times.
To this end, we offer a wide range of services:
Unlimited web support:
As a registered MAGIX customer, you have unlimited access to web support
offered via the convenient MAGIX service portal on http://support.magix.net,
including an intelligent help assistant, high-quality FAQs, patches and user
reports that are constantly updated.
The only requirement for use is product registration at www.magix.com
The online community, on-the-spot support and a platform for exchange:
MAGIX customers have free and unlimited access to the online community at
www.magix.info, which includes approx. 120,000 members and offers the
opportunity to ask members questions concerning MAGIX products as well as
use the search function to search for specific topics or answers. In addition to
questions & answers, the knowledge pool includes a glossary, video tutorials
and a discussion forum. The multiple experts, found round-the-clock at
www.magix.info guarantee quick answers, which sometimes come within
minutes of a question being posted.
Email support for MAGIX products:
For every new MAGIX product you will receive, as of date purchase, 12
months of email based customer service.
Premium email support:
For priority support, or if you want the MAGIX support team to help with
non-MAGIX related hardware problems you can purchase a Premium email
support ticket. Log in at http://support.magix.net and click on "Purchase
access code", the ticket is for a specific problem, and is valid until it is solved,
it is not restricted to an email.
Please note: To be able to use the Premium email support and free product
email support via the Internet, you have to register your MAGIX product using
the serial number provided. This can be found on the CD case of your
installation CD or on the inside of the DVD box.
Additional telephone service:
Besides the large number of free customer service offers, we also offer a
fee-based telephone customer service.
Here you can find a summary of our technical support telephone numbers:
http://support.magix.net/
Page 6

6 Support
Mail (Europe): MAGIX Development Support, P.O. Box 20 09 14, 01194
Dresden, Germany
Mail (North America): MAGIX Customer Service, 1105 Terminal Way #302,
Reno, NV 89502, USA
Please make sure you have the following information at hand:
Program version
Configuration details (operating system, processor, memory, hard drive, etc.),
sound card configuration (type, driver)
Information regarding other audio software installed
MAGIX Sales Department
You can reach the MAGIX Sales Department workdays for help with the
following questions and problems:
Orders
Product consulting (pre-purchase)
Upgrade requests
Returns
Europe
Monday - Friday, 09:00-16:00 GMT
U.K.: 0203 3189218
Denmark: 45 699 18763
Sweden: 46 852 500713
Finland: 35 89 42419023
Norway: 47 210 35843
North America
9 am to 4 pm EST Mon-Fri
Phone: 1-305-722-5810
Uninstalling the program
If you would like to uninstall MAGIX Digital DJ 2, you can do so via the control
panel under "Software". Or go to "Programs > MAGIX > MAGIX Digital DJ 2 >
Service and Support > Uninstall MAGIX Digital DJ 2".
Page 7
MAGIX Digital DJ 2 user interface 7
MAGIX Digital DJ 2 user interface
Welcome to MAGIX Digital DJ 2, powered by Deckadance, the well-known
reference product for DJ software by Image Line!
MAGIX Digital DJ 2 was developed by DJs and for DJs. Real DJs were asked
about their wishes and requirements for such a program, and the lead
developer of MAGIX Digital DJ 2, L.S.D. (Luis Serrano), has significant
experience as a DJ. MAGIX Digital DJ 2 is the DJ software that offers you
everything to take your DJ performance to the next level.
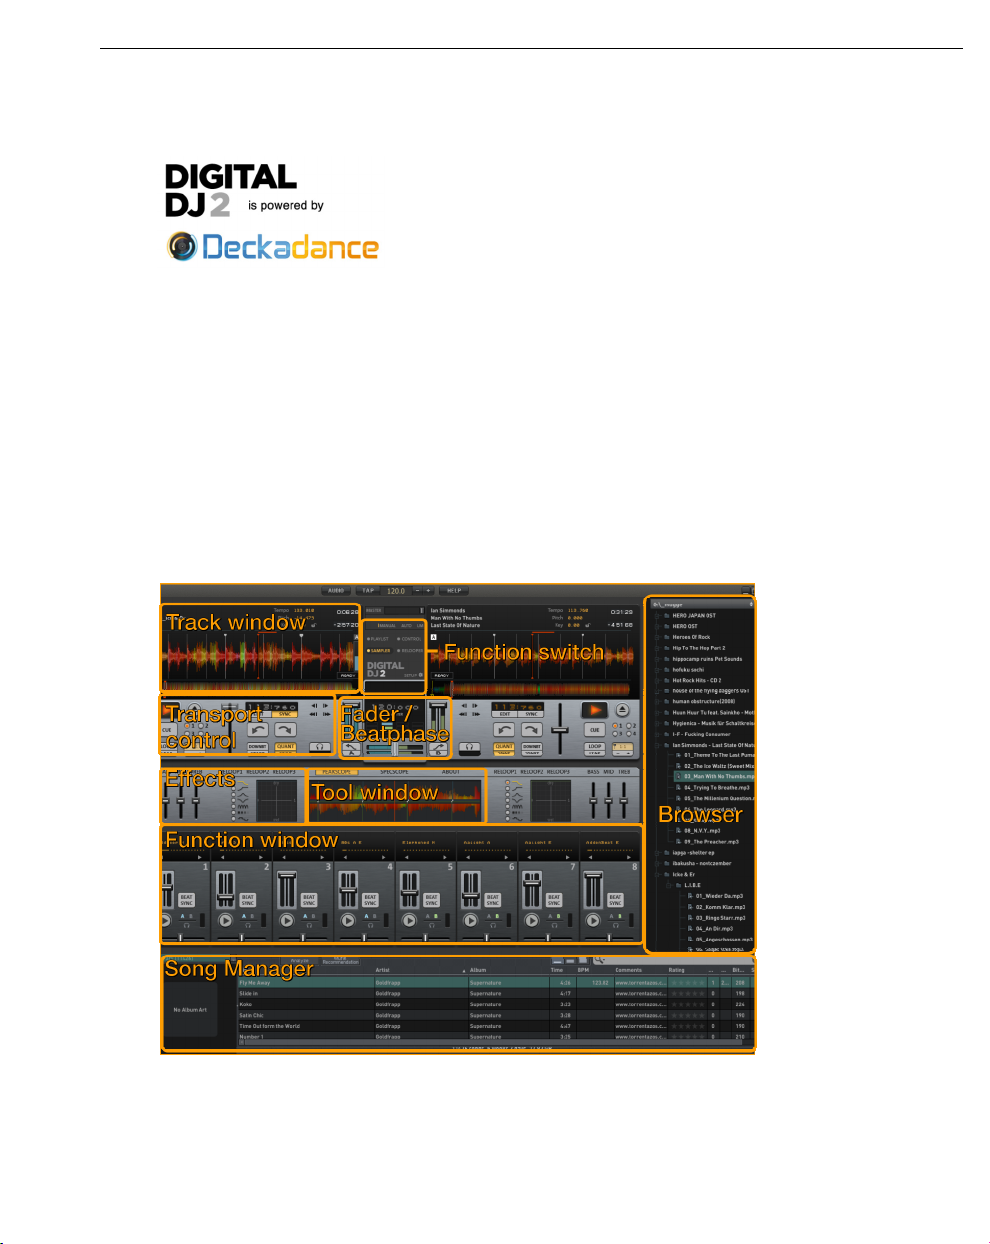
Here you can see the MAGIX Digital DJ 2 user interface. Clicking on one of the
areas on the user interface will lead you to the topic associated with it.
The tool window and function windows will change their display depending
on the switches associated with them. The function window switches are
Page 8
8 MAGIX Digital DJ 2 user interface
located toward the top of the interface (as shown) while the Tool window
switches run along the top of the window itself.
Note: Pay attention to the tooltips! They will display a short description of the
interface features as your mouse is placed over them.
Quick start 1,2 3…
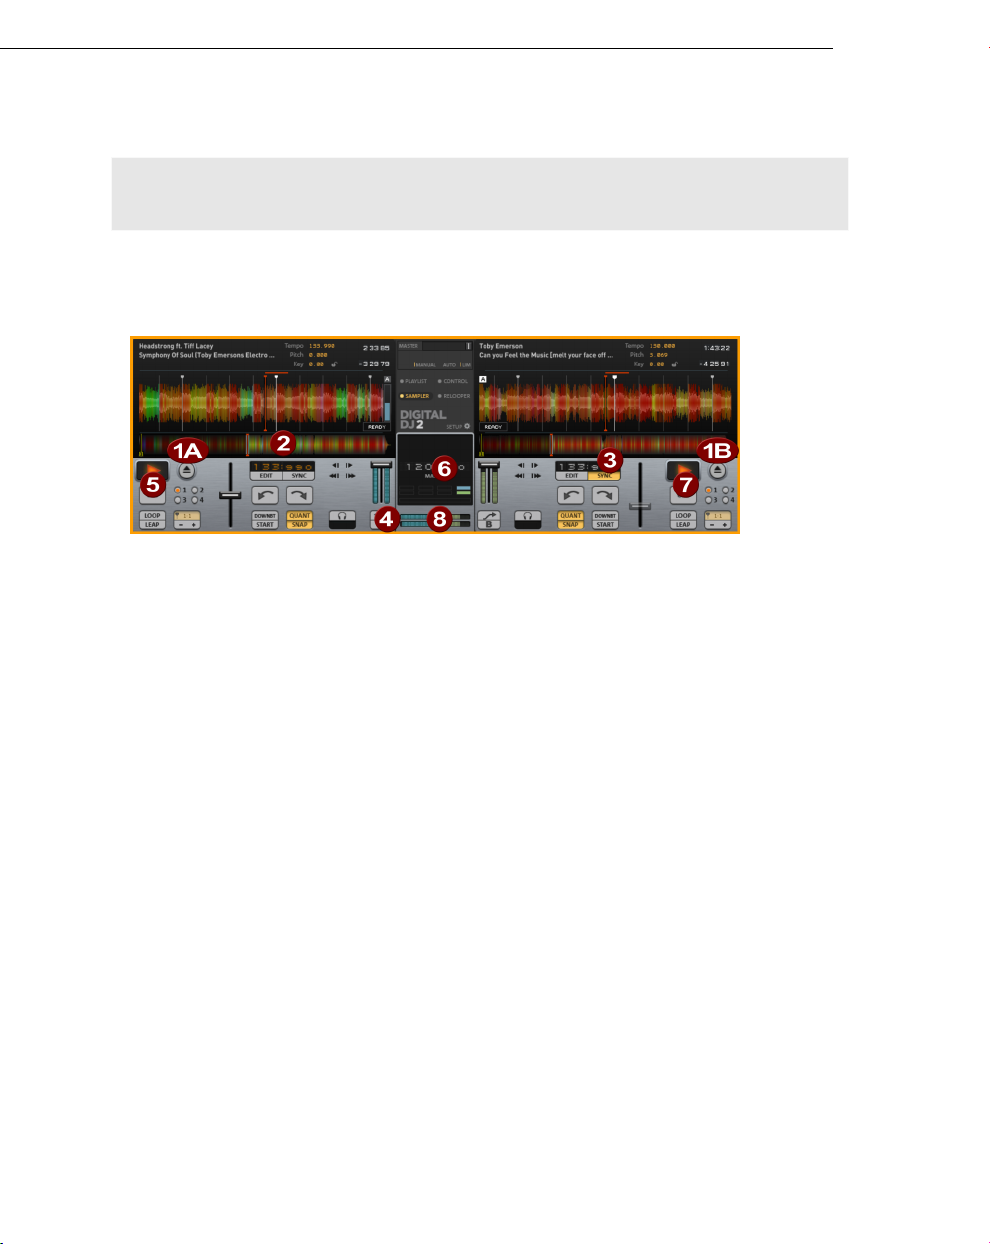
We know: No one likes to read the manual. So here are 8 easy steps to DJ
fame!
1. Load the 2 demo tracks from the file browser in the top right (only visible
when maximized), by dragging and dropping them onto Decks A and B (1A
and 1B).
2. Note: Deck A may be playing at a different BPM to Deck B (2).
3. Click the SYNC button (3) on Deck B to adjust the tempo to match Deck A.
4. Slide the crossfader (4) left to hear only Deck A.
5. Press Play (5) to start Deck A.
6. Wait until the two beat-indicators are in time (6, Deck A top, Deck B
bottom).
7. Right-click (or Crtl+click) Deck B’s Play button (7). You can't hear Deck B
because the fader isn't pushed all the way to the left.
8. Move the crossfader (8) and hear both songs perfectly beat matched.
It’s that easy with MAGIX Digital DJ 2, but there is still lot of power hidden
away behind the interface, so we encourage you to read the manual so that
you get the most out of the program and take your DJing to the next level.
This is how MAGIX Digital DJ 2 starts...
At the heart of MAGIX Digital DJ 2 are the Decks, A and B as shown below.
The framed areas are constant and will remain unchanged by various settings.
Page 9
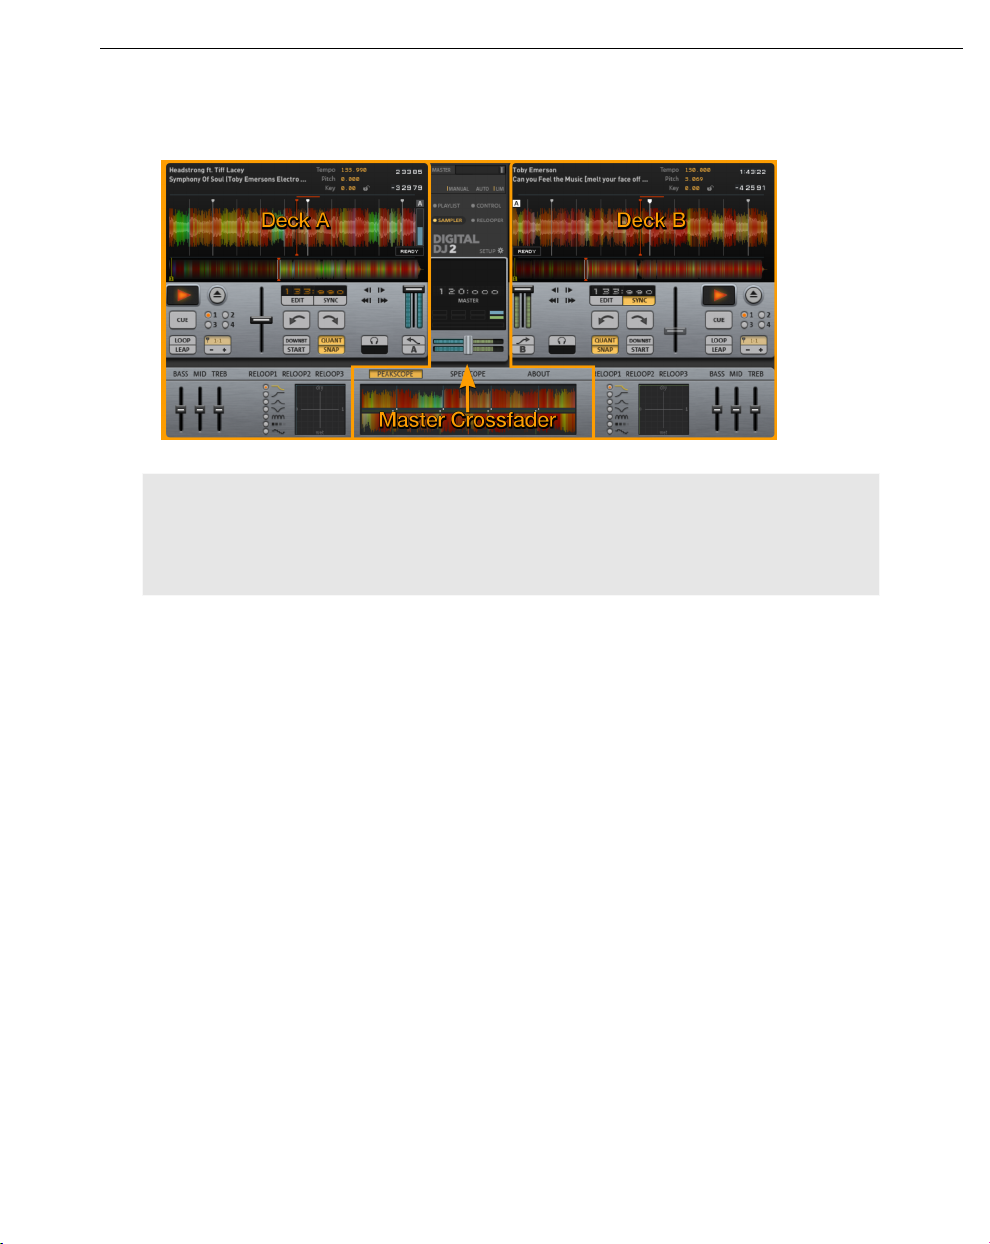
All other areas & panels are dynamic changing to reflect the mode or settings
chosen.
Note: The multicolored spectral display of wave forms can be switched on and
off during playback by using the shortcut Ctrl + C. Low frequencies are
displayed in red, highs in blue. The yellow and green graduated colors will help
you to recognize the frequency height.
MAGIX Digital DJ 2 user interface 9
Cue either deck by clicking and dragging on the wave displays. The center of
each display shows the playback position, so you can cue decks visually if you
don’t have a separate monitor mix set up. Beneath each wave display is a
song-length preview. You can click on the lower preview to jump to any point
in the track. The Play button beneath each deck will start playback of the
track. We will consider the transport functions in more detail later.
What's new in MAGIX Digital DJ 2?
Improved beat recognition for even more perfect mixing. Beat recognition
has been completely revamped and now works more quickly and efficiently.
Snap and Quant. There are two new play control functions: Snap guarantees
perfectly beat-matched loops and precisely placed cues, Quant enables
seamless skipping between cue points, it works in the Wave overview too.
Song Manager. The new Song Manager enables quick and efficient access
to your music collection. In addition to the integrated databank function,
multiple playlists, real-time search and revised iTunes connection there are
also Smart Playlists and cover (artwork) display features.
More formatsAs well as MP3, WAV and OGG the following formats are also
supported: AAC (*.m4a), FLAC, AIFF and WMA. (Note: only DRM free WMA
and AAC files are supported)
Page 10

10 MAGIX Digital DJ 2 user interface
Record your own mix: With the extra Windows Software MAGIX Music Editor
3 you can do much more than just record your mix, you can edit it with songs
or samples and compress audio files and master them.
Native DJ-MIDI controller support: Just connect it up and off you go. Use
defined presets on the device for a genuine DJ feeling.
More loops in the Sampler Section.
Features
Two decks for playback of MP3 (ID3 V1 and V2), M4A, WAV, AIFF, WMA,
FLAC, M4A and OGG files
64-bit high-end signal processing
Song Manager with database function, real-time search, multiple playlists with
an unlimited number of entries, Smart Playlists and Autoplay list, CD cover
display, iTunes library integration.
Native support for MIDI controllers for remote control of almost all program
functions.
Integrated browser with favorites and search function.
Drag & drop from external application to decks and playlist.
Automix function including crossfades and automatic beat-synchronized
transitions (DJ style).
Twelve outputs (6x stereo, only after Upgrade (view page 10)): master mix,
monitor
and samplers. Flexible monitoring options, for example, pre-fader listener
level, phone split. Flexible crossfader settings and bass crossfader
Precise pitch control (faster/slower) in each deck
Automatic beat recognition, beat grid and beat mix, auto sync for perfect
synchronization with seamless loops and beatwise jumping inside the track.
mufin technology: sound-based analysis of all songs on the hard drive, find
similar songs with one click; quick insertion into the playlist or to the decks.
Included effects (view page 26) (equalizer, filter, bit reduction, phaser/flanger,
e
-36dB +12dB, band killer -48dB.
Relooper (view page 43) beat-slicing performance sampler.
8
, deck A + B and others. Monitoring via headphones for the decks
tc.) and 3-band EQ with 3-band killer buttons, level controls for each band
Slot sampler with built-in samples
Page 11

MAGIX Digital DJ 2 user interface 11
Upgrade MAGIX Digital DJ 2
MAGIX Digital DJ 2 – powered by Deckadance, does more! You
can upgrade MAGIX Digital DJ 2 to "bigger" versions:
Deckadance House Edition or Club Edition.
By upgrading to Deckadance House Edition, you will receive the following
additional functions:
User configured MIDI Mapping/Remapping.
Editable relooper (view page 43) patterns
addition to a being free-standing program, Deckadance may be loaded as
In
a VST instrument in any VST compatible host (such as MAGIX Music Maker).
VSTi plug-in hosts for up to 8 VST effects or instruments, MIDI file playback
via VST instruments (hundreds of MIDI loops are included), VST host MIDI-IN /
THRU, to play loaded VST instruments using a controller.
Load your own samples into the sampler (hundreds of samples and MIDIs are
included). Sample songs and trigger loops in time with the beat.
ReCorder (view page 44) – record your DJ performance
hard drive!.
in realtime to your
By upgrading to Deckadance Club Edition, in addition to the
above-mentioned functions, you will also receive:
External control via the record player (view page 37) (timecode vinyl) or CDJ
cks
de
Supports all common timecode vinyl formats (Final Scratch, Torq,...),
learn-mode for total compatibility.
Deckadance ultra accurate Control CDJ format.
6 inputs: 2x stereo input for decks for looping through and sampling of analog
sources.
You can find the link to upgrade options in the MAGIX Digital DJ 2 "Help"
menu.
Page 12
12 MAGIX Digital DJ 2 user interface
System requirements
Operating system
Windows XP/Vista/7
Mac OSX v10.4 (UB)
Minimum hardware requirements
PC: Intel Pentium III (or similar), Athlon XP with DirectSound or ASIO
compatible sound card
Mac: Intel Mac or G4 (1.25 GHz) with sound card with CoreAudio drivers,
512 MB RAM, 200 MB hard disk space.
Graphics card with min. resolution 1024 x 768
Don’t lose the beat!
If you regularly DJ, your ears will be coping with some
pretty harsh treatment, so there is nothing wussy about
protecting your valuable hearing. If you have
experienced ringing in your ears after a gig, then that is
a sign you have pushed your ears too far. Fortunately,
you can buy earplugs specifically designed for DJs
(search Google for ‘music earplugs’).
These attenuate all frequencies evenly, so they don’t affect your ability to hear
the mix (as it sounds). In fact, you will find it easier to hear the music wearing a
pair of these. Take advice from thousands of musicians and DJs who have
gone before you and protect your most valuable asset - don’t lose the beat!
Page 13
MAGIX Digital DJ 2 user interface 13
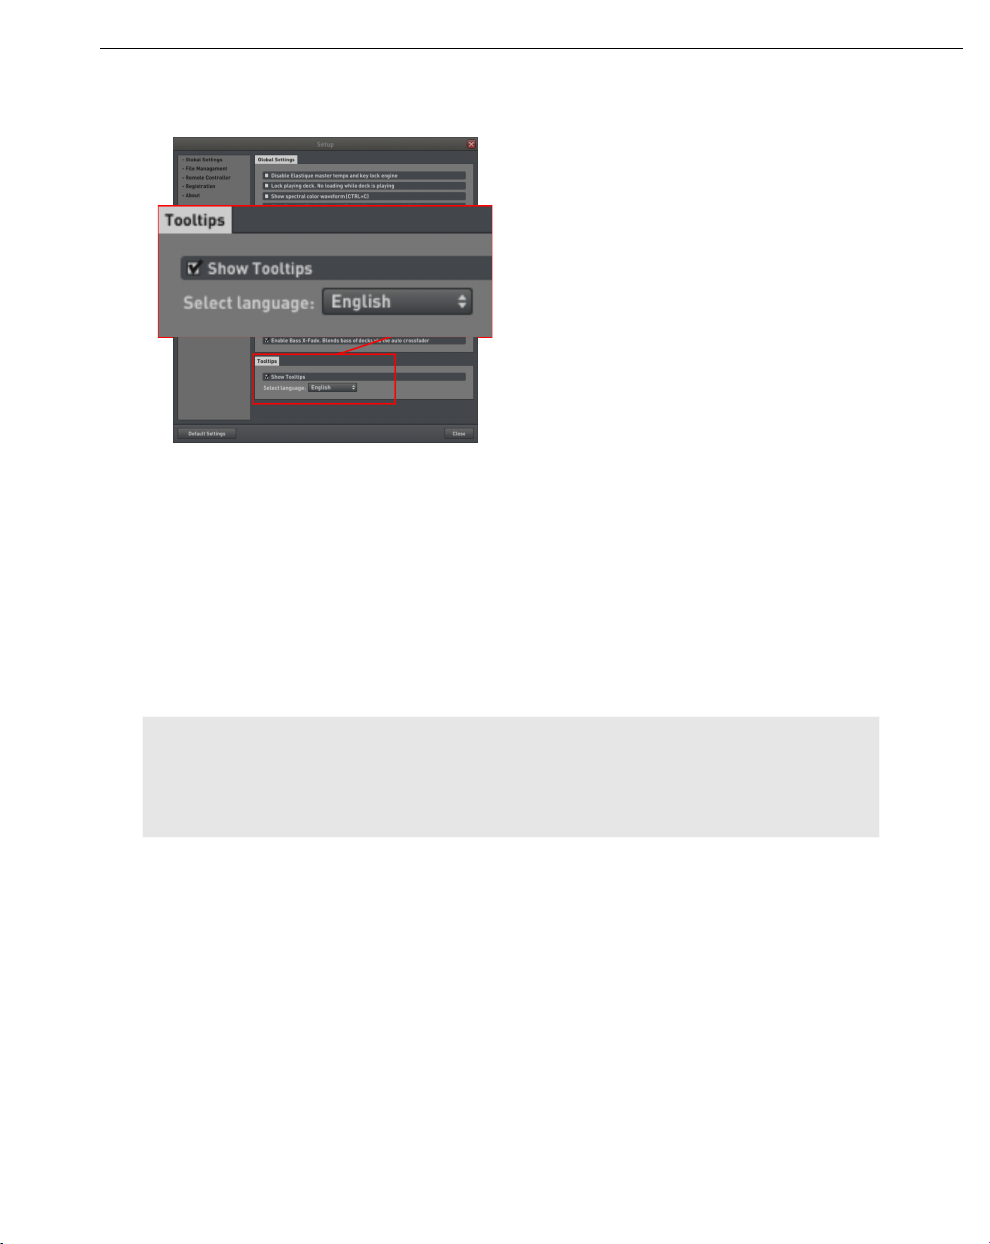
Tooltips
MAGIX Digital DJ 2 offers realtime help
functions: To see the Help panel, click
on the HELP button just below the
master cross-fader and hold your
mouse cursor over anything that looks
like a control, including some that
don’t. The tooltips will explain the
function of each control element in
short.
To activate or deactivate tooltips, click
on Show tooltipsbelow in the Setup
dialog (view page 52). There, you can
set the
Please note that control elements for left and right-clicking (Ctrl + Click) often
have different functions. Therefore, you should also try clicking on everything
you clicked on with the left mouse button using the right mouse button to see
what might happen.
correct language for Tooltips.
You will see that a lot of things work automatically with a right-click, such as
right-clicking the play button on the second deck play while the first is playing,
that the second with be played synchronously.
Note: Trying out left and right clicks shouldn't be done during a live set. But
right-click functions of the relooper, the play button and the sampler play
button (when you know exactly what they do) are especially useful for live
sets.
Page 14

14 Toolbar
Toolbar
At the top in the Toolbar you will find a range of settings:
Audio - Opens the audio setup dialog (view page 46). Here you can set the
tputs and sound card drivers.
ou
TAP - Tap tempo. Tap this button 4 to 8 times and the average tapping
speed will be set in the BPM window.
Tempo - Displayed in BPM (32 to 256). Double-click the number display to
enter a specific BPM. The tempo can also be changed with the TAP button or
click on the 'fine-tune' +/- switches and drag up/down for fast changes. By
right clicking on the +/- buttons in Acceleration mode you can change the
velocity sensitivity i.e how the speed of the mouse affects tempo change.
Help – Opens a menu with access to the help, the electronic manual and
various online functions.
- Help/product manual (PDF) - Since you are reading this, you've
obviously already know what this is good for:)
- Online tutorial video opens an Internet page with tutorial videos for
the program
- Online update / Online registration / Online upgrade This menu will
lead you to the MAGIX Internet page for program updates, registration
and upgrades.
- magix.info - the Multimedia Community connects you with
magix.info
- About MAGIX Digital DJ 2 Displays copyright info and version
number of MAGIX Digital DJ 2.
You can access the other settings (file and general options) by using the
[Setup] button among the Function switches on the main interface.
Page 15
Browser... 15
Browser...
Note: In version 2 of you can access the Song Manager, a music database
with real-time search, playlists etc using the Playlist (view page 29) button.
The file browser is only really required if you want to load a file, which is no
longer in your music collection's folder (e.g. in your download folder).
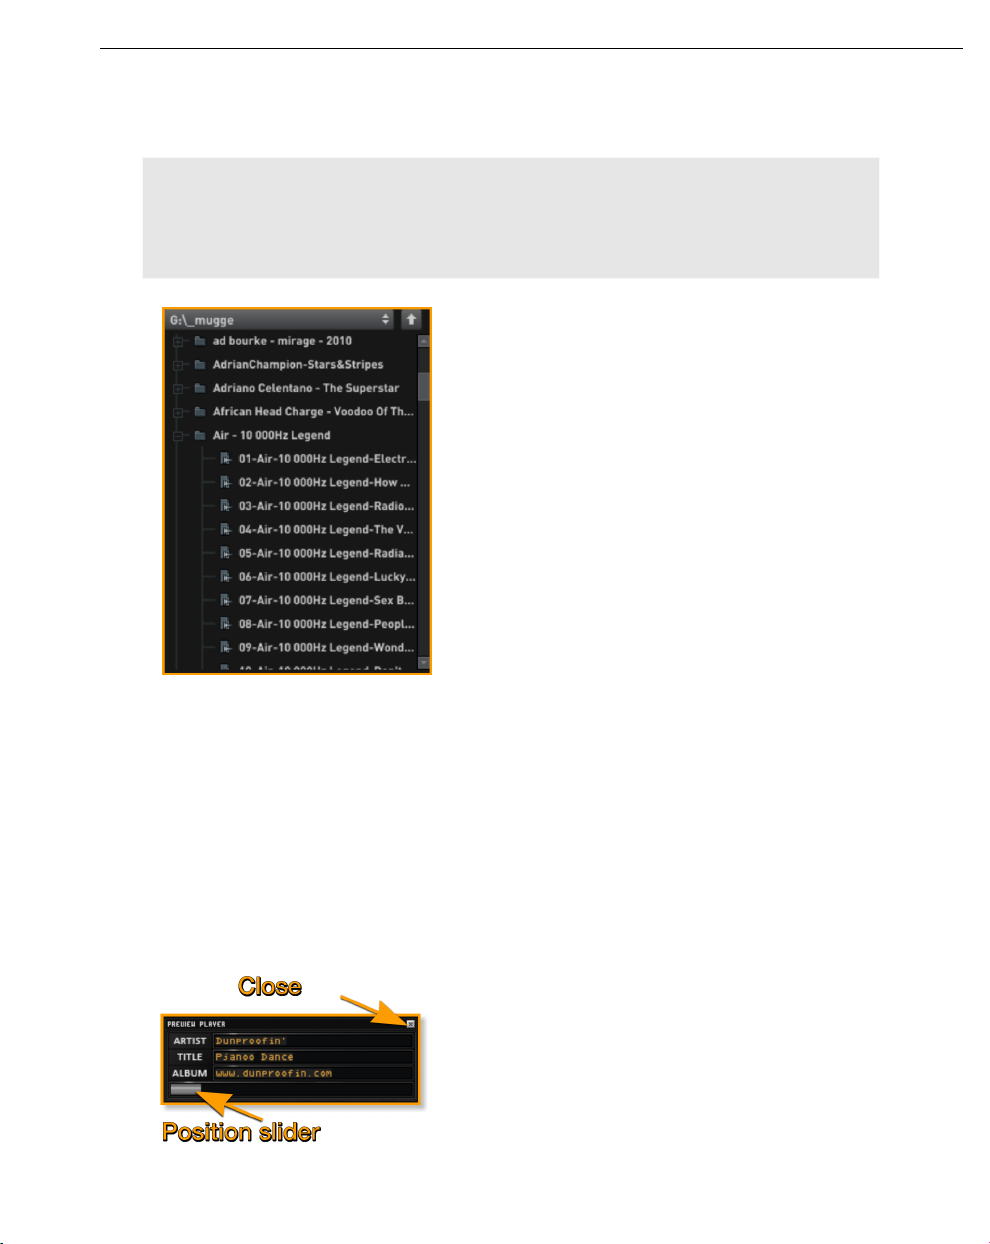
Display files on the computer The file
browser displays a drive's complete folder
structure. With the usual +/- symbols you
can open and close subfolders, double
clicking takes you into the folder. The current
path is displayed in the title bar, by clicking
on this bar you can select another drive. You
can go up one level higher by using the up
arrow button next to it.
Dragging & dropping files and folders - You
can load individual song by dragging a file
from the Browser and dropping it onto the
Track Window of the desired deck.
MAGIX Digital DJ 2 will start beat-detection automatically when a song is
loaded. You can start playing the song before the beat detection process is
completed. Songs and the whole folder (inc subfolders) can be dragged and
dropped into playlists or the Song Manager (view page 32)'s Automix list (view
page 29).
w player - To preview a file right click on the item and select
Previe
"Preview". A preview player window will open (as shown below) and the file will
play on the Headphone (monitor output) channel as selected in the Audio
Settings (view page 46).
Page 16
16 Track Window and Transport Controls
Track Window and Transport Controls
The track window contains a waveform display, which shows a part of the
track, together with beat and cue markers in high magnification. A lower
'Track Overview' window that displays the entire song (this can be clicked to
jump to the specified location). Below these windows are several different
controls for playback, cueing and mixing:
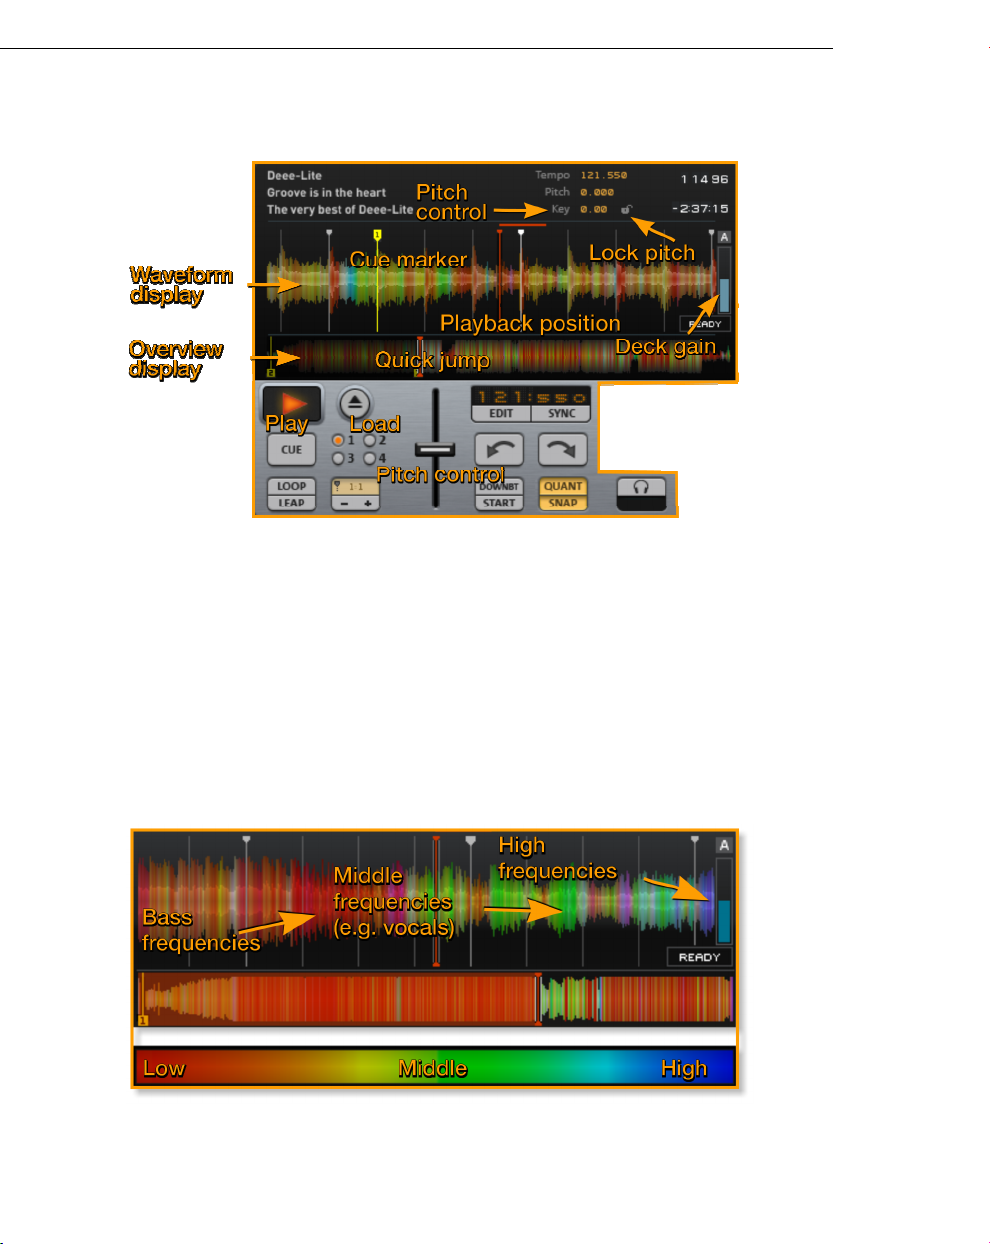
Track Display Colors
Ctrl+C will activate/deactivate the spectral analysis and display mode.
Beat analysis also includes frequency content, displaying the most prominent
frequencies in the mix. Red indicates low frequencies (bass, drums etc), yellow
Page 17

through to green are mid frequencies (often associated with vocals), while blue
shades are high frequencies (cymbals, hats etc). With some practice, these
colors will help you identify breaks, vocals, bass, drums and other common
sounds in your tracks.
Track Window and Transport Controls 17
Upper controls
Artist, Title & Album - Displays track information (if stored in meta data).
Tempo – The song's tempo.
Pitch - The difference between the song's analyzed BPM and the song's
playback tempo in percent. This value also represents the position of the
Pitch fader (view page 19). Just like turntables the pitch is linked to the
yback speed.
pla
Lock (symbol) - Locks the pitch of the track. If the pitch is locked you can
change the playback speed with the pitch fader, without affecting the pitch of
the track. Be aware that moving the pitch fader drastically results in clearly
audible sound degradations.
Key - When the tempo is locked (see below) you can change the deck pitch
by dragging vertically, (+/- 12 semi-tones) without affecting the tempo.
Above it the current playback position is displayed and beneath it the
remaining time.
Waveform & Track Overview Windows
The waveform display and scaled-down track overview help for cueing certain
song positions. The current play position is displayed by the red vertical line in
the middle of the Waveform window.
Cueing
"Cueing" means choosing a specific point to begin playback from.
Left-click inside the Waveform Display window and move your mouse (or
transport controller) left-and right to move the Playback Position marker to the
desired part of the track.
The track overview display beneath the waveform display shows the entire
track, regardless of its length. By left clicking in this field you can jump to the
desired position quicker, it is not as accurate however. The QUANT and SNAP
(see below (view page 19)) functions can help out by ensuring
remained beat matched.
the the tracks
Page 18
18 Track Window and Transport Controls
Cue-Marker
The cue marker is used to skip to specific positions. Four cue markers can be
set per song, these will be saved along with the analysis data from the song
and will thus be available the next time you load the song.
The control elements for cue markers function in different ways depending on
they are used during playback or when the track is paused.
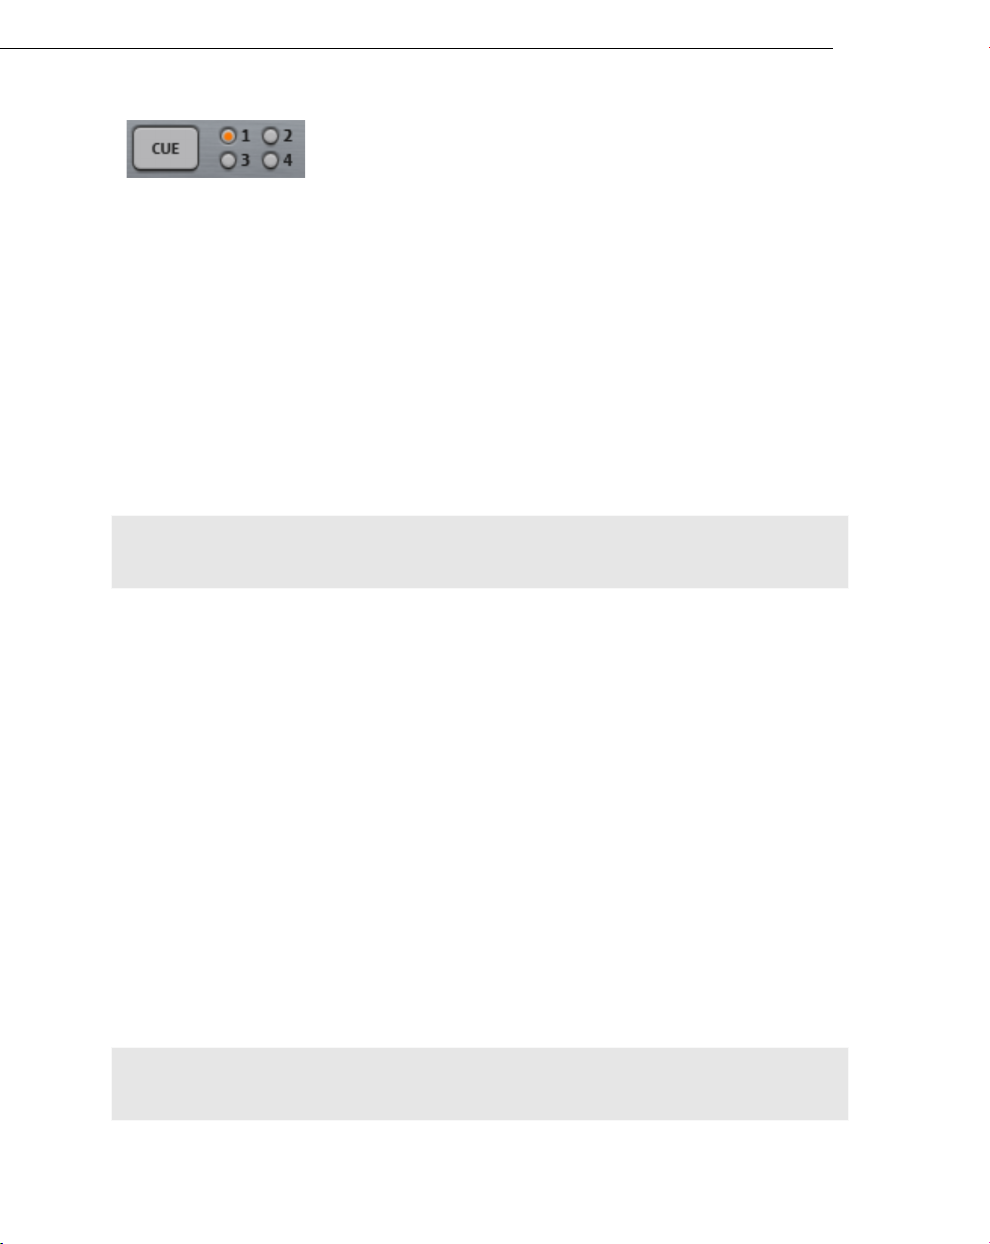
When playback is paused the cue markers are set: first select the desired cue
marker with the small number button 1 to 4 which are next to the CUE button,
then position the play cursor with the mouse (see above) at the desired
position in the song and click on the CUE button. (You can also just play the
song and stop it at the desired point with the CUE button.)
Tip: If the SNAP button is activated, the cue markers will always be placed on
whole beats.
If you now click on the CUE button the song will always be played from this
point, and stopped when you release it. By doing this you can create a
"Stutter" effect.
If the CUE button is clicked during playback, it will stop and the cue marker
will jump to the set point. By clicking on the marker buttons 1 - 4 you can
jump to the various cue markers, without interrupting playback.
This results in the following workflow:
1. When preparing tracks you will be looking for interesting parts in the track
and setting cue markers at these points.
2. During the set you can load tracks onto the inactive deck and begin
playback over the monitor.
3. Now you can quickly listen to the different cue markers, from 1 -4.
4. If you have found a good cue point click on the CUE button, now the track
will be stopped and ready for the perfect transition.
Tip: If the QUANT button is activated, leaps between cue points will be in time,
perfect for real-time remixing.
Page 19

Note: A cue marker cannot be moved as such, instead you have to place it
afresh. This only works when stopped, during playback it will skip to the saved
position.
Track Window and Transport Controls 19
Deck-Gain
On the inside of the waveform display of the corresponding deck you will find
the gain control for the individual track. There are two options here:
Track Gain - The level of individual tracks can be corrected using the extra
manual gain trim control. Click and drag vertically.
A (Auto-gain button) - The button above the 'Deck gain' slider, activates the
auto-gain control engine. This automatically adjusts the track level in such a
way that the perceived track volume is consistently loud. If Auto gain is
activated, manual gain control is hidden.
Lower Controls
Play - Left-click to start the song playing. Right-click to start in sync with the
other deck.
Note: When Automix (view page 32) is selected, the Play button for the active
deck is disabled.
CUE Stops the deck and skips the selected cue position to (1..4), see
Cue-Marker (view page 18)
Load -
open a file browser and dump the selected track into the deck.
LOOP (Loop and continue) - Loops a section of the song when clicked.
Select the loop length using the arrows immediately to the right of the LEAP
button. On release, the song will continue playing from the end of the loop.
LEAP (Leap after loop) - Loops a section of the song when clicked. Select
the loop length using the arrows immediately to the right of the LEAP button.
On release, the song will resume from the point it would have reached if
looping had not occurred. Keep an eye on the playback marker in the Track
Window and you will notice the leap position is shown as a dashed line
moving forward while the LEAP loop plays.
Length Indicator & +/- buttons - To the right of the LOOP/LEAP buttons
there are three buttons. The length indicator (above) can be clicked so that
loops/leaps are synced to the nearest beat/bar. Loops/Leaps can be
lengthened or shortened using the +/- buttons.
Pitch Slider - Move the slider to change the speed of the song (down is faster
and up slower). The range can be adjusted on the General Settings page
To the right of the Play button is the quick-load button, which will
Page 20

20 Track Window and Transport Controls
between +/- 6% and +/-50%. More below on BPM, Speed and Pitch (view
page 22).
NOTE: Hold down the [CTRL] key while moving the pitch fader to get a finer
resolution of 0.01%.
EDIT - Opens a sub-window containing a number of tools to aid in resolving
beat-sync & analysis issues:
TAP - Tap the button in
time with the song to set
the tempo.
1/2 & 2/1 - Halves or
Doubles the detected
tempo (as selected).
<<| & |>> – Nudge the
beat-markers forward or
backward as selected.
A.BEATGRID - Auto beatgrid. The Beatgrid is used to sync all tempo
sensitive functions (sampler loops, beat-mixing etc) to the song's tempo
- Auto ON (button white) - MAGIX Digital DJ 2 will set the Beat marks
automatically.
- Auto OFF (button grey) - Manual beat-grid settings is possible.
Hold Shift + Click anywhere on the waveform and drag OR click on
the nudge buttons below the A.BEATGRID button.
Rescan - Forces a rescan of the beat and frequency analysis.
Ready - Shows the progress of the analysis.
OK - Accept settings and return to the standard interface controls.
SYNC - Syncs the beat to the other Deck or to the master tempo. Left-click is
for momentary change, right-click is for permanent change. More below on
BPM, Speed and Pitch (view page 22).
Note: The Pitch slider will be deactivated in Sync mode.
Left and Right Pitch Seek Arrows - Nudge the track pitch in the direction of
the arrow (right is faster, left slower) to jog the track forward or backward. Use
these arrows in connection with theBeat phase display (view page 22).
WNBEAT - Left-click to set the downbeat position of a cued track. This
DO
setting is critically important when the beat is supposed to be automatically in
time with the other deck, samplers, VST MIDI players.
START - Left-click to set the track start position. Note that this will prevent
cueing to positions before that marker.
Page 21

QUANT - When Quantization is activated all jumps using manual cueing or by
cue marker (view page 17) will be in time with the beat, i.e. seamless. If your
ng is going to end too soon just click on the middle of the track in the track
so
overview and give yourself some precious extra time.
SNAP - When snap is activated, the loop start and cue markers will always be
placed on whole beats.
VST - Activates any VST plugins loaded into the VST Plugins page and
associated with the deck.Not in MAGIX Digital DJ 2, requires upgrade.
(headphones) - Monitor the selected deck through the headphone buss. This
routing is selected in the Toolbar, Audio setup (view page 46).
Track Window and Transport Controls 21
Faders & Beat-phase Display
Controls
This section is important for manual mixing/beatmixing of your tracks.
<| & |>- Jump phase one beat.
Note: these buttons also jump the LOOP & LEAP (view page 19) functions.
<<| & |>> - Jump phase one beat.
Note: these buttons also jump the LOOP & LEAP (view page 19) functions.
Level - Individual deck A & B level faders.
Beat-phase LEDs - Show the 4 beats of a bar (assuming the track is in 4/4).
Page 22

22 Track Window and Transport Controls
Fine beat-phase - A bar will grow toward the leading deck. No bar = perfect
phase.
<- & -> - Auto-XFade start buttons.
A & B - Transform deck A and B. Depending on the current state of the
X-Fader the switches will Punch / LMB (left-click) a faded/muted track or Cut
/ RMB (right-click) a playing track. The transformation is immediate.
X-Fade - Master cross-fader control.
Beat-phase display
Beat-phase - Above the main X-fader is a set of 4 LEDs. The LEDs blink on to
show beat currently playing in each deck. Deck A upper Deck B lower. The
down-beat is indicated below (1st LED as noted). It is important to pay
attention that the decks are in step, playing the same beat of each bar (they
aren’t in this example). Mixing tracks that are out of step often ends in tears.
The nudge buttons allow you to skip forward/backward a beat (top) or bar
(bottom), use these buttons to get the decks in phase.
Fine phase - Below the phase LEDs is a bar-display (shown above,
‘Fine–phase’) that grows in the direction of the leading deck (A left, B right).
When the bar disappears (or is small) in the middle, the decks are perfectly
aligned.
BPM, Speed and Pitch
MAGIX Digital DJ 2 has a number of options for changing the speed and pitch
of a deck.
Page 23

Each deck has several pitch options. By default the pitch of a deck is
controlled by the Deck pitch slider (as shown above).
Selecting the SYNC button (right-click/Ctrl+click, to lock it in) will cause the
Deck pitch slider to become transparent and the pitch of the deck will now be
controlled by the opposite decks pitch slider.
By clicking on MASTER in the middle both decks (when sync is active) will be
controlled by the master tempo. (click on the Master tempo +/- buttons and
move your mouse vertically for fast-change control OR double-click on the
BPM number to enter a manual value).
Use the Pitch-lock function to change playback speed and pitch
independently. Speed is altered by any of the above, pitch is now controlled
by the Key tuning control. Click on the +000 display and drag your mouse
up/down to change pitch.
Track Window and Transport Controls 23
Crossfader
Auto X-fade is very useful to free your
hands during a routine X-fade, leaving
you to concentrate on more
important matters (your hair for
instance). The auto X-fade buttons
are the bent-arrow switches either
side of the X-fade slider (left shown).
Pressing the arrows will start an
automatic fade toward the selected
deck.
Note: The crossfade speed is set in the Automix settings in Global settings
(view page 52) (Setup). You can select a time between 0 to 100 seconds.
The Transformator Buttons (A&B) are the punch in buttons for Deck A and B.
There are two options: Left click sets a deck's volume straight to 100%, right
click (Ctrl + click) temporarily mutes the respective Deck, regardless of
crossfader position.
Track selection for the perfect X-fade - Advice mode ON. You will find it a lot
easier to pull of perfect X-fades on tracks with long lead in/lead-outs. Those
are the start and end portions of tracks that have a beat and not much else
going on. This means there won't be any discordant melodies or sounds
producing negative interactions. Many songs are available in ‘club mix’ or
‘dance mix’ versions for this very reason. Seek them out. Another handy tool
is the Bass crossfade option. This fades the bass along with the deck volume
Page 24

24 Track Window and Transport Controls
and at the 50% mix point drops the bass on both decks to compensate for
the added energy of the two tracks. This will keep the perceived volume
smooth and perhaps save a few speakers splattering all over your audience.
The BASS X-FADE option can be found on the Global settings page (view
page 52) in the settings dialog.
Additional
(view page 37) Window in the Crossfader Control section include:
CU
useful for turntablism/scratching and a more gradual X fade (right).
REVERSED - Reverses the crossfader curve, i.e. Deck B is silenced when the
crossfader is set to the right.
LINEAR MODE - Bypasses the default fade curve and engages a simple
linear fade curve. Most commonly used mode by DJs.
settings for the master crossfader on the Vinyl / Extended Control
RVATURE SLIDER - Adjusts between a very narrow/quick curve (left),
Page 25

Tool window 25
Tool window
Peakscope
The Peakscope shows Deck A peaks in the upper half and Deck B peaks in
the lower half. This arrangement of peaks is perfect for visual beatmatching of
the decks.
Beat align decks
Left-click in the top or bottom half of the scope (resisting the temptation to
follow the moving peaks with your pointer if the tracks are playing) and move
your mouse to the left or right so that the upper and lower peaks are aligned.
When the peaks and or tick-marks are aligned the decks are beat matched. In
order to maintain perfect alignment, the tracks have to be the same BPM, or
one deck be slaved to the other.
Spectroscope
The Spectroscope displays the distribution of low to high frequency energy
(left to right) for the Decks (A top / B bottom). Use this to gauge the relative
bass/treble mix of two tracks.
Page 26

26 Effects
About
The About menu displays your version and MAGIX Digital DJ 2 build-number
information.
Effects
MAGIX Digital DJ 2 comes with several high quality built-in effects which may
be particularly useful when mixing dissimilar tracks. For example, removing the
bass from a pair of tracks will cut the drums, which can be beneficial if the
tracks have very different beats. As always, experimentation and practice are
required.
Controls
MAGIX Digital DJ 2 also has a number of advanced filtering options, optimized
for DJ applications. The levels of these effects are controlled by the XY control
pad. You have the choice of:
BASS, MID, TREB 3-band Equalizer - The effects section contains a 3-band
equalizer, Bass, Midrange and Treble frequencies. The BASS slider can be
linked automatically to the Crossfader using the 'BASS X-Fade' switch on the
left side of the Playlist Window.
Page 27

Note: when in Bass X-Fade mode, the Bass EQ slider is disabled.
Frequency CUT mode - Left-click on the BASS/MID/TREB buttons to
momentarily cut that frequency band, right-click locks the cut state on.
RELOOPER 1, 2 & 3 - These switches activate the Relooper (view page 43)
nction. Left-click the Relooper buttons for momentary effects. Right-click (or
fu
Alt+Click) to lockthe mode on. Left or right-click to disengage the re-loop.
LOWPASS FILTER - Cuts the treble frequencies above the cutoff value. X/Y
control Vertical (Y) changes the cutoff value. Horizontal (X) changes the
resonance. A narrow band of boosted frequencies at the cutoff point creates
a more pronounced 'sweeping' effect.
HIGHPASS FILTER - Cuts the bass frequencies above the cutoff value. X/Y
control Vertical (Y) changes the cutoff value. Horizontal (X) changes the
resonance. A narrow band of boosted frequencies at the cutoff point creates
a more pronounced 'sweeping' effect.
BANDPASS FILTER Allows a narrow band of frequencies through.
BANDREJECT FILTER - Cuts a narrow band of frequencies. Good for
'sweeping' effects.
8 TAP 3D PHASER - Creates a phasing effect - not a great description, we
know. OK, let's just say it sounds like plunging your head into a bucket of
water - is that better? X/Y control - Vertical (Y) changes the phaser depth.
Horizontal (X) - Changes the speed.
ECHO - Left/right stereo bounce effect. X/Y control Vertical (Y) changes the
delay volume. Horizontal (X) changes the delay speed (left is faster).
LO FI - A sample rate reducing effect. X/Y control Vertical (Y) is the lo-fi mix
amount. Horizontal (X) is the amount of sample rate reduction.
Effects 27
VST - If the inbuilt effects are not enough, MAGIX Digital DJ 2 can also host
VST plug-ins, as described in the 'VST Plug-ins' section. Also included is a
bank of 8 samplers/reloopers. These allow you to record audio from either
deck, complete with beat-sync start whereby the sampling starts on the
beatmark to give you a beat-matched sample.
Note: The functions record, sampler record, VST plugin/host,
vinyl/external control and adjustment for personal MIDI controllers
are not included in MAGIX Digital DJ 2. To activate these
functions, you must upgrade your version to Deckadance Home or
Club Edition.
Page 28

28 Function Window
Function Window
The large lower panel in MAGIX Digital DJ 2 displays a variety of functions in
response to the 'Function Switches' as indicated on the screenshot above.
For more information on each function, click on the links below:
PLAYLIST (view page 29) – Opens the Song Manager. This is the central
databas
playlists that organize songs for future playback and/or to log played tracks.
SAMPLER – Load samples into one of the 8 integrated sampler slots and
play them back as beat-synchronized loops or individual samples.
CONTROL – Scratch the player and various mixer settings. Calibration of vinyl
and CDs. Not in MAGIX Digital DJ 2, requires upgrade.
RELOOPER - Slice and stuttering effects.
SETUP – General settings
VST HOST - Load instruments and effects.
MIDI - MIDI configuration. Assign controller knobs, sliders and features to
target MAGIX Digital DJ 2 controls.
e view for finding songs in your collection, it is also used to manage
After upgrading to Deckadance Home or Club Edition,
additional options are available.
Page 29

Function Window 29
Song Manager
The Song manager is the management and navigation center for MAGIX
Digital DJ 2. Here you can find songs from your music collection and create
playlists.
Preparation
You need to load your music into the Song manager's database so that it can
find your music. To do so right click on the Library in the top left and select
Import Music Folders.
sections
In the Song manager on the left hand side you will find six sections:
Library,iTunes,Automix (view page 32)List, Playlists, Smart Playlists and
ommendation list.
Rec
Some of these sections can be opened up by clicking on them, the last thing
left to do is to select a list from here (e. g. songs by an artist, an album or
saved playlist), whose contents will then be displayed on the right hand side.
Library
The complete music collection. This area is selected by default. By
opening it up you can search specifically for artists or albums.
Page 30

30 Function Window
iTunes
Library
The iTunes library. If you have iTunes installed and your library does
not show here, manually set the path to the iTunes library file
(iTunes Music Library.xml) from the Setup > File Management >
iTunes library (view page 54).
AutomixList
Playlists
There is a
page 32).
can save any number of playlists in its database. Use this to
special playlist available for the Automix function (view
organize your music by your own categories (like in a record bag) or
by prepared DJ sets. NB: Songs can be moved from one playlist
to another easily, and can be present in multiple playlists
simultaneously.
Smart
The "intelligent playlists" allow complex databank scans.
Playlists
Right clicking on this section opens a context menu, in which there are various
functions for importing and exporting playlists and backing up etc.
Controls & Options
Analyze - beat and mufin analysis Force beat analysis on the
files selected in the playlist.
Pre-analyzing files is useful as it lowers the CPU overhead and load times
during a live set. To select multiple files select the first file of a group (click on
it) then Shift+click on the last OR Ctrl + Click on individual files. The
beat-analysis files are stored in the installation folder (PC:
..\MAGIX\Digital_DJ\beatmarks\*.mrk; MAC: ../Library/Application
Support/MAGIX/Digital_DJ/beatmarks/*.mrk) and will be remembered
permanently (it is important that the name of the source audio file remains
unaltered, the file name and size are used to match beatmark and audio files).
Every use of the mufin recommendation function requires a previous analysis
of your music files.
Note: Beatmark files also store cue points, detected bpm etc.
mufin recommendation – recommends similar-sounding titles
from the database. See below for more information.
Page 31

Function Window 31
You can choose from three different heights for Song
Manager. In case there's not enough space the Song Manager
window separates from the rest of the program and can then
be sized freely.
Mit der Suchfunktion kann dann die Liste noch weiter eingeschränkt werden.
This is particularly useful in the library view, if the list of your entire music
collection is displayed. the search can be realtime i.e. the list begins filtering
from the first letter you type. A click on the magnifying glass opens a menu
("Search in:"), where you can set which characteristics the search should
include.
Once you have found the song you need, you can load it on a Deck, to a
playlist or Automix playlist using Drag & Drop. Multiple selections can be made
using Ctrl or Shift, Ctrl + A selects all songs on a list.
Hinweis: Drag&Drop auf eine Playlist bedeutet Ziehen und Fallen lassen auf
dem Listennamen links.
These actions are also available using a context menu (right click). You can
also find other useful actions there such as resetting the "played" status or
removing songs from the database. The preview player (see browser) can be
accessed using the context menu (preview).
A double click on an entry opens a input window, where you can quickly
correct any wrong tags.
Index, Artist, Title, Album, Comments - Click on the headings to sort by that
field. Right clicking on the column heading allows you to choose how the
columns should be organized.
mufin recommendation
The recommendation function based on the mufin technology allows you to
find similar-sounding titles in the database to the song selected from the Song
manager. If you suddenly don't have an idea what to play next in your DJ set
or can't remember the name of a song, you can quickly "dig out" the next
track from the database.
Page 32

32 Function Window
In order to get recommendations, select a title in the playlist and click on
mufin Recommendation. The Recommendation List with similar titles wi´ll be
displayed afterwards in the Song manager. The list is ordered according to
similarity in %, starting from the most similar at the top.
Prerequisite for good recommendations is a comprehensive analysis of your
music collection. The more titles available for the recommendation algorithm,
the better the recommended titles will fit, since only previously analyzed titles
are taken into account when generating recommendations. It is advisable that
you analyze your entire music folder after installing the program. Enter the
correct path in program settings (view page 54).
Automix
Toilet breaks and other emergencies are not a problem with the Automix
function. You can set it so the upcoming tracks are automatically blended.
This is achieved using a special playlist, the Automix list.
If you select the Automix list in the Song manager, you will the
extra Automix button above.
If this is activated all songs in this list will be played one after another.
Note: When selected the Play buttons for Decks A and B are disabled.
The Automix list can be added to in the same way as with a normal playlist i.e.
using Drag & Drop or using the context menu ("Append to Automix list"), this
applies even if the Automix list is being played.
In the general program settings section Automix (view page 52) there are even
more useful functions
Tip: If you want to skip a song when Automix is activated use the
Auto-crossfade buttons.
(crossfade time, autobeat mix, bass eq).
Smart Playlists
With intelligent playlists you can formulate complex queries for the database.
For example display all songs that you have added in the last three weeks,
that you haven't played thee time yet or all songs with a rating of 3 stars or
more which was released pre 1985.
Page 33

Create a new Smart Playlist, by clicking on Create Smart Playlist. With Edit
Smart Playlist in the context menu you can open a dialog in which you can set
the playlist settings.
A smart playlist is understood as a playlist which makes the database
multiples requests. The option Match all of the following rules determines
whether songs should match all the search queries or just one of them.
A database field is selected from the list (e.g. "Play count") in the middle list an
operator (e.g- less than) and right a value are entered (e. g. 3, the rule then
shows all songs that have been played fewer than three times).
Function Window 33
With the + button at the end of the row you can add another category, deletes the category.
The number of songs in the list can be limited (Limit results to items), in the
list field you can enter a criteria to specify which song will be selected, default
is "Random", however, other criteria such as rating or play count are also
possible.
Tip: Some Smart Playlists are already available, look at the search criteria
used and you will soon realize how Smart Playlists work. The sky's the limit to
your imagination!
Page 34

34 Function Window
Sampler
You can add sound effects and additional loops to your DJ performance using
the sampler. Load samples into one of the 8 integrated sampler slots and play
them back as beat-synchronized loops or individual samples.
Hint: You can load included samples into the MAGIX Digital DJ 2
sampler. In order to be able to edit relooper patterns, you must
upgrade your version to Deckadance Home or Club Edition.
Controls
LOAD WAV - Loads wave files from disk.
SAVE WAV - Saves the current sample to disk as a WAV file. Not in MAGIX
Digital DJ 2, requires upgrade.
< > Arrows right/left – next/previous sample in catalog
Arrows up/down – sample pitch higher/lower Not in MAGIX Digital DJ 2,
requires upgrade.
Volume (Vertical Fader) - Controls the output level of the sampler slot.
Play button - Left-click for momentary playback, right-click for continuous
playback.
REC. LOOP - Records the current output from the associated deck. The
length of the recorded loop is set by the Loop/Leap (view page 19) length
switche
upgrade.
BEAT SYNC - Select to play samples on-cue and in time with the current
track (if a beat is detected). The beat phase and playback speed of the
assigned deck (A/B, see below) will be used.
s on the deck being recorded. Not in MAGIX Digital DJ 2, requires
NOTE: The Pitch Up/Down buttons (to the right of the Rec Loop & Beat
Sync buttons) won't function if this function is selected.
A / B - Assigns the sampler to deck A or B.
(Headphones) - Sends the output to the headphone mix bus.
Effects (Horizontal Fader) - Left: Low Pass filter. Right: High Pass filter.
Page 35

Function Window 35
VST Host
Note: The functions record, sampler record, VST plugin/host,
vinyl/external control and adjustment for personal MIDI controllers
are not included in MAGIX Digital DJ 2. To activate these
functions, you must upgrade your version to Deckadance Home or
Club Edition.
MAGIX Digital DJ 2 VST slots accept both Instrument and Effect plug-ins. VST
(Virtual Studio Technology) plug-ins such are a great addition to the inbuilt
effects. VSTs can be controlled using MIDI files, turning MAGIX Digital DJ 2
into an 8 track sequencer with endless possibilities.
The VST is inserted in the signal path between the output of the Deck and the
program outputs. This allows you to add your own sounds or effect those
passing through the VST slot.
Controls
LOAD VST - Opens a browse window where you can locate and load a VST
plug-in. The VST search directory is selected in the 'Setup' (view page 54)
unction Window.
F
E (Expand) - Opens the VST interface.
X - Deletes the VST.
LOAD MIDI - Load a MIDI file to control the VST.
< > (arrows) - Step forward/backward through MIDI files in the load directory.
Loop – Plays back the MIDI file as a loop
BEAT SYNC - Select to play MIDI files in time with the current track (if a beat
is detected). The beat phase and playback speed of the assigned deck (A/B,
see below) will be used.
Vertical Fader - plug-in volume.
Play button - Playback MIDI file.
A / B - Assign the VST to deck A or B.
(Headphones) - Sends the output to the headphone mix bus.
Page 36

36 Function Window
MIDI IN THRU - Activate the slot to receive MIDI/Controller input. If you PC is
connected to a MIDI keyboard, you can play live to your DJ set using the VST
instrument.
Note about 3rd Party VST plug-ins: The Internet is bursting with 3rd party
plug-ins, a great place to start looking is KVR. However, be careful not to go
on-stage before thoroughly testing any VST you use – remember, they are
independent programs not controlled by Image Line and can crash, bringing
your computer down with them.
MIDI settings
Note: The functions record, sampler record, VST plugin/host,
vinyl/external control and adjustment for personal MIDI controllers
are not included in MAGIX Digital DJ 2. To activate these
functions, you must upgrade your version to Deckadance Home or
Club Edition.
MAGIX Digital DJ 2 comes with a range of configurations (view page 55) for
any controller models. If your controller is not listed or if you don't own a
controller but want to control MAGIX Digital DJ 2 with another MIDI device
(e.g. keyboard) you can assign buttons, knobs, faders and functions of certain
MAGIX Digital DJ 2 control elements. In the same way you can add further
functions or change the controller assignment.
Note: Before MIDI devices can be linked to controls they must be selected in
the settings dialog (Remote control) (view page 54). Only one controller device
can be used to control MAGIX Digital DJ 2 at a time.
Controls & Options
MIDI LEARN - Activates the MIDI LEARN function to link controllers to MAGIX
Digital DJ 2 controls, see below. Any physical knob/slider/jog on your
Page 37

controller moved when this button is activated will link to the item selected
from the target list to the right.
TIP: Double click the function in the list to activate 'learn mode' in a single
step.
MIDI Forget Select a MAGIX Digital DJ 2 target command in the list to the
left, click MIDI FORGET to forget the target link.
Load setup Saves a controller setup.
Save setup
A / B - Select the Deck that the MIDI functions relate to.
MISC - MIDI functions not related to any specific deck.
MONITOR - Shows MIDI data from the controller.
NOTE: To select a pre-configured controller use the Settings Function Window
Function Window 37
Create/ delete MIDI links
To create a MIDI link with your controller:
1. Click one of the functions in the list.
2. Press the [MIDI LEARN] button.
3. Move the hardware controller target control.
or
1. Double-click one of the functions in the list.
2. Move the hardware controller target control.
To remove a MIDI link just select it and press the [MIDI FORGET] button or
the backspace key.
Vinyl/External Control
Page 38

38 Function Window
Note: The Vinyl/external control is not available in MAGIX
Digital DJ 2, so all input settings have no noticeable
effect. To activate these functions, you must upgrade
your version to Deckadance Home or Club Edition.
In MAGIX Digital DJ 2 you'll also find additional mixer settings (see below).
Controls
Pitch control and tempo variation are achieved by tracking the pitch and
phase of a signal from a record or CD. Select the input for decks A and
Busing the [Audio] options dialog opened from the top main Menu Bar (see
the screenshot below).
Scopes - The oscilloscopes provide a display for the quality of the tracking
signal. A good signal is indicated by a clean circle that fits inside the scope
window (50-75% of the diameter).
Tracking mode - The images of turntables and laptop to the left of the
oscilloscopes allow you to select:
- Absolute tracking (top deck) - The absolute tracking mode will locate
a position in the track automatically, depending on the position the
needle is placed in the vinyl (or CDJ track position).
- Relative tracking (middle deck) - Relative mode changes only the
playback speed and direction based on Vinyl input (or CDJ track
input).
- Internal tracking (bottom PC) - MAGIX Digital DJ 2 transport is
controlled internally, external timecode control is disabled.
INVERT PHASE Inverst the phase of the input signal. Try this button if
theabsolute mode doesn't work. This control is only visible if MAGIX Digital
DJ 2 Control CD has been selected.
Timecode source - Use the left/right arrow controls to select your timecode
source format:
- Timecoded CD (CDJ) - Select 'MAGIX Digital DJ 2 Control CD'. To
create a MAGIX Digital DJ 2 Control CD use the Global Options >
CONTROL CD CREATOR (view page 42). This will create a 26-minute
file ready to be burned to CD for use in your CDJ. Deckadance's
.wav
timecode is ultra-accurate with twice the 'control frames' per-second
compared to other leading control CD formats and so is designed to
work with Deckadance to deliver the tightest control possible. In
addition, it includes time-controlled auto-correction, so that the CDJ
and time displayed in MAGIX Digital DJ 2 are always in perfect sync.
Page 39

MAGIX Digital DJ 2 will behave as if the music was coming from a CD
in the CDJ itself.
- Vinyl - Select ms PINKY gen 1,2,3,4 or CD, Torq or Reflex PCDJ. If
you have any other brand of timecoded vinyl, set mspinky generation
to "4" and use the LEARN TIMECODE function as described below.
Supported formats - Fully tested and supported formats include: Final
Scratch, MixVibes, ms PINKY (Gen 1 to 4), Serato Scratch Live and
Torq timecodes. All other control sources are supported through the
vinyl control record speed 'LEARN TIMECODE' system.
INPUT THRU - Passes audio inputs through to MAGIX Digital DJ 2 output.
Use this to play regular vinyl records (make sure that the associated deck is
set to 'Internal tracking' so that the turntable input is not treated as a control
signal). If you are using a control vinyl when INPUT THRU is "on" you'll hear
the tracking signal "whistle" in the mix. Useful when setting up your rig, but
your audience probably won't like it if you forget to turn in off :)
LEARN TIMECODE - Calibrate Deckadance to the default speed of your
timecoded vinyl (if you are using a CD see the section on Timecoded CD
(CDJ) above). To obtain the most accurate vinyl calibration:
1. Ensure your setup is correct and that you have a 'healthy' tracking signal on
the input, at approximately 50%-70% amplitude.
2. Play the record or CD at normal speed (important with normal/reset pitch in
your turntable!).
3. Press 'learn' and hold for 3 to 4 seconds.
4. Release 'learn' and you're done!
Function Window 39
GAIN - Adjusts the input level for the associated deck. Tips to obtain an
accurate lock on the tracking signal on the record. The signal level from your
turntable is important, it should be set to about 50-70% from the center of the
oscilloscope window to the edge. A signal that is too loud will clip and
degrade the tracking signal. A signal that is too low can lead to phase
ambiguity and so affect spin direction detection.
RUMBLE - Rumble Threshold, ignores input audio signals below the
threshold level. Use Right Mouse Button to reset to -50.0 dB.
LEAD IN - Coming soon.
Page 40

40 Function Window
Setting the input control signal
Use the Gain knob to set the amplitude so that a circle is formed about
50-75% of the maximum diameter that will fit in the window. Use the Rumble
knob to clean up scatter or noise in the signal – compare the screenshot
above to the one below to note the cleaner-looking circle below.
Page 41

Function Window 41
Setting Control Deck A/B inputs
Audio INPUTS are used to receive the control signals from external Vinyl or
CDJ decks. INPUTS are selected and set in the Audio Settings (view page 46)
page.
Additional settings
Between the Vinyl / Extended Controls for Decks A and B are several
additional settings:
MONITOR CONTROL
Monitor Mix Fader - An independent monitor fader that blends between Main
and PFL on the phones.
Monitor Level - Use to adjust the global monitoring level.
Page 42

42 Function Window
PHONE SPLIT - L/R monitoring. When selected, you will hear PFL in your left
headphone and Master in the right one, assuming that your monitor setup is
routed to your headphones and you have them on the correct way around.
Perhaps we assume too much?!
OVERDRIVE - Colors the monitor signal and boots levels to make it easier to
distinguish from the PA. Watch your ears!
Note: Consider investing in a good set of 'in-ear' monitors, which effectively
reduce the noise from the club PA, allowing you to monitor at levels
significantly lower than normal, sparing your hearing while keeping you on top
of the beat.
MASTER CONTROL
MASTER LEVEL - Main output levels from the program, usually this is the
feed to the club's PA.
CROSSFADER CONTROL
CURVATURE SLIDER - Adjusts between a very narrow/quick curve (left),
useful for turntablism/scratching, and a more gradual X fade (right).
REVERSED - Reverses the crossfader curve, i.e. Deck B is silenced when the
crossfader is set to the right.
LINEAR MODE - Bypasses the default fade curve and engages a simple
linear fade curve. Most commonly used mode by DJs.
SAMPLER
8-BIT MICROSAMPLER - Record (right click to lock) and Play (right-click to
lock) buttons. A simple inline master sampler with two basic functions: Record
and Trigger. It is possible to record the master output mix (what you hear is
what you sample) and then trigger it later in the mix.
Note: Record time is limited to ~10 seconds. There is a hard disk-recorder
(view page 44) located on the central main display above the Function Window
switches.Not in MAGIX Digital DJ 2, requires upgrade.
Control CD Creator
MAGIX Digital DJ 2 has the ability to generate an ultra-accurate timecode file,
to be burned to CD and used with the Timecode source Deckadance
CONTROL CD (view page 37) option so you can control MAGIX Digital DJ 2
CDJ.
from a
Page 43

To create a Deckadance CONTROL CD:
Click the START button. The' Deckadance_Control_CD.wav' file will be
generated. Press CANCEL at any time to create a shorter file.
The file will be saved in the Deckadance installation directory in a folder
titled control_cd. To specify an alternative location click in the directory field
and browse to the desired save location.
Burn the file to an Audio CD and you are ready to use it in your CDJ,
remember to select 'Deckadance CONTROL CD' in the Vinyl / External
Control options. DOn't forget to select Deckadance CONTROL CD in the
Vinyl/external controller options (view page 37). To learn more about MAGIX
l DJ 2's unique and ultra-accurate timecode technology see the
Digita
Timecoded CD (CDJ) section on the Vinyl / External Control page.
Function Window 43
Relooper
Relooper Editors
The Relooper works by slicing and re-arranging the sample currently in the
playback buffer for the associated deck. The region to be re-looped is defined
by the beat markers bounding the playback marker (center of the Beat
Window). Relooper patterns can be used on any track and on the bar that is
currently playing.
Note: In MAGIX Digital DJ 2, relooper patterns cannot be
changed, and for this reason editing and RANDOMIZE
functions are not available. In order to be able to edit
relooper patterns, you must upgrade your version to
Deckadance Home or Club Edition.
Note: The Reloopers are randomized on MAGIX Digital DJ 2 start-up, but if
you want other 'random' patterns, just hit the 'randomize' button.
Page 44

44 Function Window
Mute and Re-trigger - Right-click on the pattern blocks to cycle through
Mute and 1, 1/2, 1/4th note re-trigger options. Useful for 'stutter' effects.
To activate pattern 1 to 3 - Left-click the 'Relooper 1, 2 or 3' buttons in the
Effects panel (view page 26) for momentary effects. Right-click to engage
rmanently. Left or right-click to disengage the re-loop.
pe
PATTERNS 1, 2 & 3 - Click to edit the pattern. There are three patterns per
deck.
CLEAR PATTERN - Clears the pattern and creates a straight playback
pattern.
RANDOMIZE - Creates a random Relooper pattern.
BEAT ALIGN – The Relooper pattern will be matched to the beat of the right
deck and will start exactly at the next beat.
MIXED MODE - The pattern will play back as a 50:50 mix of the Relooper
and original track output.
SWAP - Swaps the patterns between the Decks.
Master Relooper Effects
Master Effects won't work when <Pregrammname> is used multiple output
mode, ie: Deck A in one stereo out and Deck B in another. The Master Effects
will only work on a Master Output.
Wah-Wah FilterWah wha effect. House/Daft punk style wah wah doubled
(parallel) bandpass filter effect with lo-fi decimation.
PANORAMIC LFO - Left/Right LFO modulated autopanner with some 3d
effect phasing effects.
RING-MODULATOR - Amplitude driven ring modulator (it's 'cool!').
TRACK-CODERLo-Fi distortion effect combining low order vocoder (16
bands), pitch tracking with sawtooth waveform synthesis and fold-back
distortion mixed with the original signal.
Recording
Note: The functions record, sampler record, VST plugin/host,
vinyl/external control and adjustment for personal MIDI controllers
are not included in MAGIX Digital DJ 2. To activate these
functions, you must upgrade your version to Deckadance Home or
Club Edition.
Page 45

You can use the Record function to record your DJ performance as a live
WAV file; including all effects and fades.
Recording starts immediately if you click on the Record button in the middle.
The timeline informs you of the relative length of the current playlist. MANUAL
and AUTO indicate whether AUTOMIX (see Playlist (view page 29)) is active or
not.
Function Window 45
Everything exiting
overmodulation. This limiter cannot be adjusted further. The LIM indicator is
active when it is in use. You should then reduce the output level.
The default file location path is present in the disk_recorder folder in the
MAGIX Digital DJ 2 program directory, but you can change it in the settings
window (view page 52). Every recording will be saved as a new
using date and time. This way, you can easily find your files again.
the main output will be recorded. A limiter prevents
file, named
Page 46

46 Settings
Settings
To open the Setup Function Window, click on the [SETUP] button located in
the Function switch area at the upper middleof the main interface.
NOTE: Audio Settings (view page 46) are accessed from the Tool Bar.
Audio settings
Audio settings page may be opened via the Audio button in the menu bar. In
order to get the best out of MAGIX Digital DJ 2, you may need to take some
time to familiarize yourself with the Audio and General, File & MIDI Settings
(view page 52)on another page.
It is strongly recommended that you select an ASIO driver (ASIO4ALL for
example) as MAGIX Digital DJ 2 will run more smoothly using ASIO drivers.
Page 47

Settings 47
AUDIO INTERFACE - Selects your soundcard/audio & driver. PC users: We
recommend using an ASIO driver, Deckadance installer includes the
ASIO4ALL.
SAMPLE RATE - Select the play-back frequency of your audio interface.
44100 Hz (44.1 kHz) is most common although some interfacces use 48000
Hz (48 kHz).
AUDIO LATENCY - This is a working buffer (breathing space) used by
Deckadance to avoid CPU overload. As the latency is increased the delay
between moving a MIDI/interface control and hearing/seeing the result is at
least equal to this setting (in ms). The ideal buffer is the smallest your
computer can manage without causing glitches. Notes:
- Generally - For most DJ work there is no need to set a latency below
512 samples (~11 ms @ 44.1 kHz).
- Elastique - When Elastique master tempo engine is active, a minimum
suggested latency is 128 samples. We also recommend multiples of
this latency in case longer latencies are required: 256, 512, 1024,
2048.
- DVS - For DVS 'scratching' we suggest that you disable the master
tempo engine and reduce the latency as low as possible around (88
samples for an average computer and soundcard with ASIO drivers).
CONTROL PANEL - Opens the soundcard driver interface. PC users: If your
audio interface does not have native ASIO drivers we recommend using
ASIO4ALL soundcard driver. This allows you to use more than one audio
input/output device.
Hint: The audioendine can handle both audio inputs and outputs. Inputs are
used to accept control signals from vinyl/CDJs and from microphones for PA
(Public Address). Audio input are NOT not available in MAGIX Digital DJ 2, so
all input settings have no noticeable effect. To activate these functions, you
must upgrade your version to Deckadance Home or Club Edition.
INPUTS - Select audio input configuration. Your ability to use the options
below will depend on the number of inputs your audio interface has:
- No inputs - Using only MAGIX Digital DJ 2 internal audio sources.
- Mic - You are using a single microphone input. Must we listen to your
voice?
- One deck - You have a single deck, Vinyl or CDJ. Cheapskate!
- Two decks - You have two decks, Vinyl and or CDJ. You rock!
- Two decks and a mic - You have two decks, Vinyl and or CDJ plus a
mic. Playing with the big league now...
Page 48

48 Settings
OUTPUTS - Select audio output configuration for internal or external audio
mixing. Your ability to use the options below will depend on the number of
outputs your audio interface has:
- Internal mixing - In this configuration you can select 2 stereo audio
outputs. 1. Headphones (Monitor) and 2. Main outputs
(Speakers/Mixing desk).
- External mixing - In this configuration you have the option to configure
4 stereo audio outputs. 1. Headphones (Monitor) and 2. & 3. Two
stereo channels feeding the A and B inputs to the Mixer x-fader and 4.
Auxiliary output to a sampler or recorder.
NOTE: If you have a 'surround-sound' (5.1 or 7.1) audio interface, you can
use the rear speaker outputs as a second audio out for headphones for
example.
Audio (ASIO4ALL) PC Only
Mac users can skip this step.
For PC users the Deckadance installation includes a 3rd party ASIO driver
ASIO4ALL. This has two benefits:
Speed: ASIO drivers (in general) allow lower CPU overhead and shorter buffer
length than the standard Windows (DirectSound, WDM Driver). If your audio
interface has a native ASIO driver then we recommend you use that.
Multiple audio devices: Specific to the ASIO4ALL driver, you to select inputs
and outputs from separate sound cards/audio devices, something that is
not possible with standard ASIO drivers. This is how you can use a USB
microphone with your regular soundcard (see point 6 below).
NOTE: ASIO4ALL is a generic ASIO driver that works with most soundcards,
your experience may be different, including long periods of silence and
head-scratching. If ASIO4ALL doesn't produce any sound we recommend
that you work through all the steps below including the Troubleshooting
section.
Page 49

Using the ASIO4ALL Advanced Settings
This section explains how to use the ASIO4ALL settings.
Settings 49
1. Open the Press the Audio settings (view page 46) and select 'ASIO
v2' from the AUDIO INTERFACE list.
2. Click the [Control Panel] button on Audio settings to open the ASIO4ALL
driver settings (as shown below).
1. ASIO Buffer Size - As shown above, the ASIO4ALL window allows you to
adjust the ASIO Buffer Size (Buffer length) settings to fine-tune Buffer
underrun issues (audio clicks, pops or glitches). You can adjust the buffer
length for each selected device (in this case the Creative SB X-Fi is
selected, highlighted dark-blue). It is a good idea to set all devices you plan
to use to the same Buffer Size. Select each device by clicking on the name
so it becomes highlighted and then change the Buffer Size slider. The
Buffer Size is displayed in samples, to convert from samples to
milliseconds (ms) divide the Buffer length in samples by 44.1 (if your sound
card is using 44100 Hz) or 48 (if it is at 48000 Hz). In this case,the sound
card is set to 44100 Hz so the Buffer length of 448 samples = 10 ms
(approximately).
2. WDM Device List - The screenshot also shows 2 devices in the WDM
Device List (Creative SB X-Fi and Plantronics Headset). The devices that
appear in your list will probably be different and are those audio devices
that have sound card drivers correctly installed and registered with the
Windows operating system. If your sound is working correctly under
Windows, there should be at least one device listed (something with
Realtek or AC97 in the title are common for motherboard-based sound
cards). If nothing is showing in this list, re-install the soundcard drivers for
your PC, reboot and look here again.
4ALL
Page 50

50 Settings
3. Advanced settings - Make sure you are in Advanced mode as shown
below. Click the Spanner (lower-right) to change between 'Simple' and
'Advanced' modes.
1. Active devices - Only active devices (and their active Inputs/Outputs) can
be used by Deckadance, i.e show in the INPUT / OUTPUT ROUTING
options. This is the step that is required to use a USB microphone with
your sound card. To activate a device click the button in front of the
device name, the blue button & arrow will light to indicate the device is
active. You must also ensure that the device's Inputs (In:) and Outputs
(Out:) are also activated. Click on any [+] squares in front of the device to
expand the list of Inputs and Outputs and click on the activate buttons.
NOTE: activating a device at the highest level does not necessarily mean
it's inputs and outputs are activated. For example, in the screenshot above
the Plantronics Headset Output is not activated and so won't be available
in Deckadance.
2. Latency compensation In/Out - sliders. Leave these at the default
settings. The ASIO4ALL driver reports to Deckadance the latency it adds to
the audio stream, and this is taken into account by the program where
appropriate. However, if you have measured the input/output latency of
your sound card using a loop-back cable, and know what you are doing,
then set the 'Latency compensation' sliders according to you measured
results.
3. Use hardware Buffer - Can reduce Buffer underruns (audio clicks, pops or
glitches). Whether or not it helps will depend on the design of your
soundcard's design and drivers.
4. Always resample 44.1 kHz <> 48 kHz - This option fixes a no sound
issue on SigmaTel C-Major Audio devices. If everything else seems to be
correct on your sound card settings and you are not hearing anything you
can give this option a try.
5. Force WDM Driver to 16-Bit - This option fixes a no sound issue on
SoundMax Digital Audio devices. If everything else seems to be correct
Page 51

Settings 51
on your sound card settings and you are not hearing anything you can give
this option a try.
6. When you are done, close the ASIO4ALL options with the [X] window
control in the top-right corner.
Troubleshooting
1. Make sure you are using the latest version of ASIO4ALL, install it and try
again. The latest ASIO4ALL driver will be available at www.asio4all.com.
Don't be afraid to try the latest Beta (if there is one).
2.
3. Nothing shows - If your sound card or its IN/OUTputs don't show in
4. No sound - Check the following:
Unavailable - If any of the inputs/outputs of the devices in the 'WDM
Device List' have a RED X through them, it means they are probably being
used by another audio application. For example, programs such as 'MSN
Messenger', 'Skype', media players etc. can tie up inputs/outputs so, close
Deckadance, close any program that may use your sound card and
re-open Deckadance and the ASIO4ALL options.
advanced mode, try downloading the latest driver for your soundcard. This
happens when the driver for your soundcard hasn't registered itself
correctly with Windows.
- Select all Outputs - In 'Advanced view' expand your Soundcard
Inputs/Outputs and ensure all Outputs are active. In the example
above, the Creative SB X-Fi has its main analog output selected ('Out:
8x 44.1 1-192kHz, 32Bits') but the 'SPDIF' Output and 'Plantronics
Head' set Output ('Out: 2x 6 4-48 kHz, 16 bits') are both deselected
and so would not be available in the Audio settings (view page 46).
- Main Outputs - Make sure your ASIO Output is selected in the Master
OUT Audio settings.
- Switches - Try the 4 possible combinations of the 'Always resample
44.1 kHz <> 48 kHz' and 'Force WDM Driver to 16-Bit' switches
(Off/Off, On/Off, Off/On, On/On).
- Any sound? - If there is still no sound, make sure you can hear sound
from other Windows programs. If not then your problem isn't related
to ASIO4ALL (try re-installing your soundcard drivers).
- Output Errors? - Make sure the Outputs are not showing Unavailable
or Beyond logic as described elsewhere in this section.
5. Crackling noises without the underrun count increasing - Check the
following:
- Switches - Try the 4 possible combinations of the 'Always resample
44.1 kHz <> 48 kHz' and 'Force WDM Driver to 16-Bit' switches
(Off/Off, On/Off, Off/On, On/On).
Page 52

52 Settings
- Hardware buffer switch - Try On/Off.
6.
7. Check the ASIO4ALL Manual in the installation directory ..:\Program
Beyond Logic – similar to "Unavailable". If the control panel of your
card provides the option to lock the sample rate deselect it, a known cause
of 'Beyond Logic' errors. Also try closing and re-opening the control panel,
unplugging/re-inserting USB audio devices and/or reinstalling the Windows
(WDM) driver for the sound card.
Files\ASIO4ALL v2\ASIO4ALL v2 Instruction Manual.pdf, FAQ at
www.asio4all.com or try the ASIO4ALL forums.
Settings
Page 53

Settings 53
Global settings
Global settings
Disable master tempo/pitch engine - Can decrease CPU load for slower
computers struggling to run MAGIX Digital DJ 2 without audio glitches (don't
forget to increase latency & use an ASIO driver).
Lock playing deck - Stops tracks loading on the playing deck. Perhaps we
should rename this 'Stupidity filter' :)
Spectral waveform (CTRL+C) Waveform display in spectral colors -more
than just pretty colors! Engages the spectral display for the decks. Red hues
are bass/low frequencies, blue colors are treble/high frequencies.
Slow decoder/analysis mode.Can decrease CPU load for slower computers
struggling to run MAGIX Digital DJ 2 without audio glitches (don't forget to
increase latency (view page 46) & use an ASIO driver).
BPM Detector Threshold
return. This is useful to stop spurious half speed tempo detections.
Pitch range - Set the maximum range in which the pitch slider operates.
Manager settings
Cover display: Activates/Deactivates the cover display from the files in the
Song Manager.
Display iTunes-Library: Remove the tick so that the iTunes Library is hidden
in the Song Manager, useful if you don't use iTunes.
Text size : Set the text size for all displays in the browser and Song Manager
(view page 29).
- Set the lowest BMP the tempo detector will
Automix (view page 32)-Settings
DJ-S
Crossfade time: Length of the automatic crossfade, can be set anywhere
BASS X-FADE - Crossfades the bass along with the track volume. Useful for
Note: When this option is selected, the Bass EQ slider (view page 26) is
disabled.
tooltips
Show tooltips: Display Tooltips for all control elements on the program's
Select language: Set the language for Tooltips and settings dialog.
TYLE - Mixes songs with beat-matching.
between 1 and 100 seconds.
mixing difficult parts with conflicting drums.
interface.
Page 54

54 Settings
File Management (Files)
This section sets the default locations for -
Audio Files - Sets the location of your music tracks.
Sample FilesSets the location of your sample files.
iTunes Library - MAGIX Digital DJ 2 should automatically import your iTunes
library at startup (making it available through the Song Manager (view page
29)). If MAGIX Digital DJ 2 does not find the library, indicate the correct
cation of the library by clicking in the field and browsing to your 'iTunes
lo
Music Library.xml' file. If you don't know where it is, you can perform a
manual search for 'iTunes Music Library.xml' then add the directory once you
locate it.
After upgrading to Deckadance Home or Club Edition,
additional options are available.
Midi Files- Sets the location of your MIDI files. These may be used to control
VST plug-ins.
Skin-Bitmap – Load another skin. Skins can be found in the "skin" folder in
the program directory. You can also make your own skins by editing one of
the defaults and saving it here.
VST Plugins - Sets the location of your VST plugins.
Disk Rec file - Choose the location for the disk recorder (view page 44)
ted above the Function Window switches).
(loca
REMOTE CONTROLLER
DJing on a computer with a controller is twice as much fun! MAGIX Digital DJ
2 supports a wide range of controller from big manufacturers. With Auto
detect controller the controller will be automatically detected and configured,
if that doesn't work you can select the controller in Change Selected
Controller.
The options under the MIDI Setup dialog will depend on your soundcard and
attached controllers showing available MIDI inputs/outputs. Select the MIDI
inputs/outputs that belong to your controller using the ON/OFF switches to
the far right of the window.
If you can't find your MIDI controller in the list, configure the controller to
MAGIX Digital DJ 2 interface by opening the MIDI function switch using the
MIDI Configuration page. Not in MAGIX Digital DJ 2, requires upgrade.
Page 55

Settings 55
Registration / About
Shows the MAGIX Digital DJ 2 Version information and your Registration code
if MAGIX Digital DJ 2 is registered.
Click the REGISTER button to opens a dialog box where you can select and
open a registration file (...to register or upgrade the current version).
About displays the complete Copyright information.
Natively supported DJ MIDI controllers
The following devices are supported:
Allen&Heath Xone:3D
American Audio Digital Producer 2 / DP2, VMS4
Behringer BCD2000 & BCD3000
DJ-Tech 101 Series, DJ For All, Mix Free, i-Mix, i-Mix MKII, i-MixReload,
uSolo FX, Pocket DJ (Duo) & Kontrol One (K1 + M1)
EKS Otus, XP10 & XP5
Hercules - Console MK2, Control Mp3, Console RMX, Control Steel.
iCon i-DJ
Kontrol-DJ KDJ500
M-Audio XSession Pro & XPonent
Numark Omni Control
Omnitronic MMC-1
OpenLabs DBeat
Reloop Digital Jockey
Stanton SCS-1d & SCS.3d
SYNQ PCM-1, DMC-1000, DMC-2000
Vestax VCI-300, VCI-100, VCM-100, Typhoon
Page 56

56 Shortcuts
Shortcuts
Note: The functions record, sampler record, VST plugin/host,
vinyl/external control and adjustment for personal MIDI controllers
are not included in MAGIX Digital DJ 2. To activate these
functions, you must upgrade your version to Deckadance Home or
Club Edition.
Key Action: [Shift] Action [Ctrl] Action
Q
W
A
Z
E
D
R
F
T
G
Y
H
U
J
I
Play / Pause
(Deck A)
Cue / Stop
(Deck A)
Rewind (Deck A)
Sync (Deck A) Sync (Deck B) n/a
Pitch up (Deck A)
Pitch down
(Deck A)
Bend up (Deck A)
Bend down
(Deck A)
Volume up
(Deck A)
Volume down
(Deck A)
Jump 1 beat fwd
(Deck A)
Jump 1 beat
back (Deck A)
Jump 1 bar fwd
(Deck A)
Jump 1 bar back
(Deck A)
Fx select up
(Deck A)
Play / Pause
(Deck B)
Cue / Stop
(Deck B)
Rewind
(Deck B)
Pitch up
(Deck B)
Pitch down
(Deck B)
Bend up
(Deck B)
Bend down
(Deck B)
Volume up
(Deck B)
Volume down
(Deck B)
Jump 1 beat
fwd. (Deck B)
Jump 1 beat
back (Deck B)
Jump 1 bar fwd
(Deck B)
Jump 1 bar
back (Deck B)
Fx select up
(Deck B)
n/a
Tool Window
switch
Select all
n/a
Disk recorder
Relooper ON
(Deck A)
Relooper ON
(Deck B)
n/a
n/a
n/a
n/a
n/a
n/a
Set loop IN point
(Deck A)
Page 57

Shortcuts 57
K
O
P
L
S
X
C
V
B
N
M
,
.
1
2
3
4
5
6
7
8
0
Fx select down
(Deck A)
Half (Deck A) Half (Deck B)
Double (Deck A) Double (Deck B) n/a
Loop (Deck A) Loop (Deck B)
Monitor (Deck A)
Relooper 1
trigger (Deck A)
Relooper 2
trigger (Deck A)
Relooper 3
trigger (Deck A)
Lo Eq cut
(Deck A)
Mid Eq cut
(Deck A)
Hi Eq cut
(Deck A)
Key lock (Deck A)
Reset pitch
(Deck A)
Jump cue #1
(Deck A)
Jump cue #2
(Deck A)
Jump cue #3
(Deck A)
Jump cue #4
(Deck A)
Jump cue #1
(Deck B)
Jump cue #2
(Deck B)
Jump cue #3
(Deck B)
Jump cue #4
(Deck B)
Cut (Deck A) Cut (Deck B) n/a
Fx select down
(Deck B)
Monitor
(Deck B)
Relooper 1
trigger (Deck B)
Relooper 2
trigger (Deck B)
Relooper 3
trigger (Deck B)
Lo Eq cut
(Deck B)
Mid Eq cut
(Deck B)
Hi Eq cut
(Deck B)
Key lock
(Deck B)
Reset pitch
(Deck B)
Set cue #1
(Deck A)
Set cue #2
(Deck A)
Set cue #3
(Deck A)
Set cue #4
(Deck A)
Set cue #1
(Deck B)
Set cue #2
(Deck B)
Set cue #3
(Deck B)
Set cue #4
(Deck B)
Set loop IN point
(Deck B)
Set loop OUT
point (Deck A)
Set loop OUT
point (Deck B)
n/a
n/a
n/a
n/a
n/a
n/a
n/a
n/a
n/a
n/a
n/a
n/a
n/a
n/a
n/a
n/a
n/a
Page 58

58 Shortcuts
F1
F2
F3
F4
F5
F6
F7
F9
F9
F10
F11
F12
+
-
*
Left Arrow
Right
Arrow
Up Arrow
Arrow
down
Esc
Backspace
Key
Sampler slot #1
play
Sampler slot #2
play
Sampler slot #3
play
Sampler slot #4
play
Sampler slot #5
play
Sampler slot #6
play
Sampler slot #7
play
Sampler slot #8
play
Playlist window
Setup window Dmx window n/a
Sampler window
Relooper window Midi window n/a
Master volume
up
Master volume
down
Reset crossfader n/a n/a
Crossfader to left n/a Load Deck A
Crossfader to
right
Move up playlist n/a Preview track
Move down
playlist
Preview close n/a n/a
Remove from
playlist
Clear MIDI learn
Sampler slot #1
rec
Sampler slot #2
rec
Sampler slot #3
rec
Sampler slot #4
rec
Sampler slot #5
rec
Sampler slot #6
rec
Sampler slot #7
rec
Sampler slot #8
rec
Vinyl / Ext Ctrl.
window
VST Host
Window
n/a Phones volume up
n/a
n/a Load Deck B
n/a n/a
n/a n/a
Sampler #1
Play-lock
Sampler #2
Play-lock
Sampler #3
Play-lock
Sampler #4
Play-lock
Sampler #5
Play-lock
Sampler #6
Play-lock
Sampler #7
Play-lock
Sampler #8
Play-lock
n/a
n/a
Phones volume
down
Note: This keyboard layout isn’t affected by language configurations
(QWERTY, AZERTY) of the end user.
Page 59

Index 59
Index
A
About .......................................................................................................... 24
Additional settings........................................................................................ 39
Audio (ASIO4ALL) PC Only........................................................................... 45
Audio settings..................................................... 13, 15, 20, 39, 43, 45, 48, 50
Automix ................................................................................14, 18, 28, 30, 50
B
Beat-phase display ................................................................................ 20, 21
BPM, Speed and Pitch...................................................................19, 20, 21
Browser....................................................................................................... 13
C
Control CD Creator ................................................................................ 37, 40
Controls................................................................................................. 21, 36
Controls & Options................................................................................. 29, 35
Copyright....................................................................................................... 2
Create/ delete MIDI links .............................................................................. 35
Crossfader................................................................................................... 22
Cueing......................................................................................................... 17
Cue-Marker ........................................................................................... 17, 18
D
Deck-Gain ................................................................................................... 18
Don’t lose the beat!...................................................................................... 12
E
Effects ........................................................................................10, 24, 42, 50
F
Faders & Beat-phase Display ....................................................................... 20
Features ...................................................................................................... 10
File Management (Files)...............................................................28, 30, 34, 50
Function Window ......................................................................................... 26
Page 60

60 Index
G
Global settings ..................................................................... 12, 22, 23, 31, 49
L
Lower Controls..................................................................... 16, 17, 18, 21, 33
M
MAGIX Digital DJ 2 user interface ................................................................... 7
Master Relooper Effects ............................................................................... 42
MIDI settings ................................................................................................34
mufin recommendation................................................................................. 30
N
Natively supported DJ MIDI controllers ................................................... 35, 52
P
Peakscope................................................................................................... 23
Preparation ..................................................................................................28
Q
Quick start 1,2 3…......................................................................................... 8
R
Recording .................................................................................. 11, 40, 42, 51
Registration / About .....................................................................................51
Relooper .................................................................................... 10, 11, 25, 41
Relooper Editors........................................................................................... 41
REMOTE CONTROLLER ........................................................................ 35, 51
S
Sampler .......................................................................................................32
sections ....................................................................................................... 28
Setting Control Deck A/B inputs ...................................................................39
Setting the input control signal......................................................................38
Settings.................................................................................................. 43, 49
Shortcuts ..................................................................................................... 52
Smart Playlists........................................................................................ 28, 31
Page 61

Song Manager ................................................................14, 26, 27, 43, 50, 51
Spectroscope .............................................................................................. 24
Support ......................................................................................................... 5
System requirements ................................................................................... 11
T
Tool window ................................................................................................ 23
Toolbar ........................................................................................................ 13
tooltips ........................................................................................................ 12
Track Display Colors .................................................................................... 16
Track Window and Transport Controls ......................................................... 15
Troubleshooting........................................................................................... 48
U
Uninstalling the program ................................................................................ 6
Upgrade MAGIX Digital DJ 2 .................................................................. 10, 11
Upper controls............................................................................................. 16
Using the ASIO4ALL Advanced Settings ...................................................... 45
V
Index 61
Vinyl/External Control............................................................11, 23, 36, 40, 41
VST Host ..................................................................................................... 33
W
Waveform & Track Overview Windows ................................................... 17, 20
What's new in MAGIX Digital DJ 2?................................................................ 9
 Loading...