

Page 1
Page 2

2
Copyright
This documentation is protected by law. All rights, especially the right to duplicate,
circulate, and translate, are reserved.
No part of this publication may be reproduced in the form of copies, microfilms or
other processes, or transmitted into a language used for machines, especially data
processing machines, without the express written consent of the publisher.
All copyrights reserved.
All other product names are trademarks of the corresponding manufacturers. Errors in
and changes to the contents as well as program modifications reserved.
Copyright © MAGIX Software GmbH, 2000 - 2012. All rights reserved.
MAGIX and Cleaning Lab are registered trademarks of MAGIX Software GmbH.
VST is a registered trademark of Steinberg Media Technologies GmbH.
MAGIX Audio Cleaning Lab uses patent-pending technology.
Other mentioned product names may be registered trademarks of the respective
manufacturer.
MAGIX licensing conditions are included in the installation and also at
www.magix.com under EULA.
www.magix.com
Page 3

Preface 3
Preface
Congratulations! You now own a high-performance digital audio lab, which is perfect
for cleaning your records, tapes, CD tracks, MP3 collections, audio or video files,
enhancing the sound, combining your media in any order, and burning or exporting
everything in optimum quality directly onto CD or DVD.
The volume and sound on each track can be perfectly synced and equalized. Various
audio formats can be combined, simultaneously edited, and burned. The method is
especially easy and clear, since automatic settings, assistants and step-by-step
instructions make sure that the process goes smoothly and easily. Neither previous
experience using the software nor long processing time are necessary.
The print manual provides an introduction and tutorial that explains all the most
important features with step-by-step instructions.
In addition, an electronic manual is supplied in PDF, which systematically explains all
of the program's components one after the other. You can also use the program's
help file by pressing "F1". If you prefer to discover the many possibilities of the
program by yourself, then use the PDF manual and help file simply as a reference. An
alphabetical index is included for this purpose.
Have fun with MAGIX Audio Cleaning Lab 2013.
The MAGIX team.
Page 4

4
Table of Contents
Copyright 2
Preface 3
Before You Start 10
System requirements 10
Installation 10
Support 11
Uninstalling the program 12
Serial number 13
More about MAGIX 14
MAGIX Online World 14
magix.info 14
Introduction 15
What is MAGIX Audio Cleaning Lab 2013? 15
What’s new in MAGIX Audio Cleaning Lab 2013? 15
Features 16
Stereo phono pre-amp 17
Introduction 17
LP recordings on your PC or laptop 18
Record from a line-in device (tape deck, MP3 player, ...) on PC or laptop 19
Technical details 20
Quick start 22
Program start 22
Load and play audio files 23
Cleaning 25
Mastering 27
Object effects 27
Cut out undesired passages 28
Retouch short noises such as clicks or pops 30
Export 31
Overview of the program interface 32
Track window and constant control elements 34
www.magix.com
Page 5

Table of Contents 5
MAGIX News Center 34
The master track 34
Mouse mode 37
Marker 40
Undo 40
Redo 40
Transport console 40
Zoom 41
Zoom settings 42
Volume control/Auto button 43
Import 44
Audio files 44
Record 44
CDs 52
Arranging in the master track 57
What is an object? 57
Project 57
Adjust object volume 58
Fading objects in and out 58
Duplicate objects 58
Reducing and increasing the length of objects 59
Deleting and moving objects 59
Cut objects 59
Join and mix objects 60
Fading objects 60
Change song order 61
Automatic insertion of pauses between objects 61
Several songs in a single long object 61
Object effects 61
Draw volume curve 62
Quick zoom 62
Set track markers 63
Automatic track recognition 63
Check and move track markers 64
Cleaning 65
Choose preset 65
Using the effect modules 65
Set automatically 66
Page 6

6
Step-by-Step 66
Bypass 67
Project and Object Effects 67
Info Box 68
Analyzer 69
DeClicker/DeCrackler 69
DeClipper 70
DeHisser 71
DeNoiser 72
Remove DC offset 74
Tempo/Resampling 75
Mastering 77
Choose preset 77
Using the effect modules 77
Mastering Agent 77
Bypass 78
Project and Object Effects 78
Enhancer 78
Equalizer 79
Brilliance Enhancer 81
SoundCloner 82
MultiMax 85
Dynamics 86
Reverb/Echo 87
Plug-ins 88
Tape simulation (plug-in) 89
De-Esser (Plug-in) 91
Energizer (plug-in) 92
Analogue Modelling Suite: AM-Track SE 94
Sound Effects 100
Surround mode 100
Acoustics simulator 102
Resampling/Timestretching 104
Chorus (Plug-In) 106
Distortion 107
Voice over 108
Export 110
Export audio 110
www.magix.com
Page 7

Table of Contents 7
MP3 files 112
Audio CD 113
Create audio DVD 119
Data disc 120
Batch conversion 120
Source files 121
Effects 122
Target format 123
Destination files 123
File Menu 124
New Project 124
Load project 124
Save Project 124
Save project as 124
Burn project backup onto CD/DVD / Burn data CD/DVD 124
Load audio file 125
Load audio CD 125
Import DVD audio 126
Record 126
Export audio 126
Batch conversion 126
Load video sound 127
Export video sound 127
Internet 128
Delete old projects 132
Exit 132
Edit Menu 133
Undo 133
Redo 133
Undo list 133
Set marker 133
Split 133
Remove object beginning 133
Remove object end 134
Cut 134
Copy 134
Paste 134
Delete 134
Page 8

8
Remove pauses 135
Voice-Over 135
Surround Editor 135
Create Surround Transitions 136
Load/Save realtime effects settings 136
Apply all realtime effects 136
Effects menu 137
Destructive effects 137
Normalize object volume 137
Loudness adjustment 139
Isolate Stereo Channels 139
Switch channels 139
Invert phase 140
Backwards 140
CD/DVD menu 141
Set track marker 141
Set Pause marker 141
Set track markers automatically 141
Set track marker to object edges 141
Split objects at marker positions 141
Set auto pause length 142
Delete marker 142
Delete all markers 142
Delete CD track 142
Create audio CD 142
Show CD-R drive information 142
Show CD-R disc information 143
Create audio DVD 143
Track Agent 143
MAGIX Xtreme Print Center 143
Get CD track information (freeDB) 144
CD info options 144
Open CD track list online 145
audioid 145
Options menu 147
Edit mouse mode 147
Cut Mouse mode 147
Zoom mode 147
www.magix.com
Page 9

Table of Contents 9
Delete mouse mode 148
Resampling/Timestretching mouse mode 148
Volume draw mode 148
Wave drawing mode 149
Spectral edit mouse mode 149
2 tracks 150
Stereo display 150
Surround Mode 150
Activate volume curve 150
Overview mode 150
Play parameter 151
Video window 152
Units of measurement 152
Mouse snap active 152
Auto crossfade mode active 152
Display values scale 153
Options for automatic track marker recognition 153
Path settings 154
Show start selection 154
"Share" menu 155
Community upload 155
Use as background music 155
Add to music collection 155
Help menu 156
Help 156
Display tips 156
Show tutorial video 156
System information 156
About MAGIX Audio Cleaning Lab 2013 156
Register online 156
Update check 157
Restore original program settings 157
Activate MP3/AAC encoder 157
Keyboard layout and mouse-wheel support 161
Keyboard layout 161
Mouse-wheel support 162
Index 163
Page 10

10
Before You Start
System requirements
Operating system:
For Microsoft® Windows® XP | Vista® | 7
Computer:
• 1 GHz processor, or higher
• 512 MB RAM
• Available drive space: 500 MB
• Graphics card resolution 1024 x 768
• 16-bit sound card
• DVD-ROM drive
• Line in slot
Optional:
• Burn CDs/DVDs with CD/DVD±R(W) recorder
Installation
Step 1: Insert the program disc into the drive. The installation program starts up
automatically in Windows. If the disc doesn't run automatically,
• open the Windows Explorer and click the letter of the CD/DVD drive.
• Now double-click on "Start.exe" to start the installer.
Step 2: To begin the installation of MAGIX Audio Cleaning Lab 2013, click on
"MAGIX Audio Cleaning Lab 2013". The MAGIX Audio Cleaning Lab 2013 installation
program will appear.
Simply follow the on-screen instructions to complete the installation process and then
click on "Continue". All files are copied onto the hard drive.
Step 3: Once the installation is complete, confirm by pressing "Finish". You may start
the program at any time using the Windows "Start" menu
www.magix.com
Page 11

Support 11
Support
Dear MAGIX customer,
Our aim is to provide fast, convenient, solution-focused support at all times. To this
end, we offer a wide range of services:
• Unlimited web support:
As a registered MAGIX customer, you have unlimited access to web support
offered via the convenient MAGIX service portal on http://support.magix.net,
including an intelligent help assistant, high-quality FAQs, patches and user
reports that are constantly updated.
The only requirement for use is product registration at www.magix.com
• The online community, on-the-spot support and a platform for exchange:
MAGIX customers have free and unlimited access to the online community at
www.magix.info, which includes approx. 150,000 members and offers the
opportunity to ask members questions concerning MAGIX products as well as
use the search function to search for specific topics or answers. In addition to
questions & answers, the knowledge pool includes a glossary, video tutorials and
a discussion forum. The multiple experts, found round-the-clock at
www.magix.info guarantee quick answers, which sometimes come within
minutes of a question being posted.
• Email support for MAGIX products:
For every new MAGIX product you will receive, as of date purchase, 12 months of
email based customer service.
Premium email support:
For priority support, or if you want the MAGIX support team to help with nonMAGIX related hardware problems you can purchase a Premium email support
ticket. Log in at http://support.magix.net and click on "Purchase access code",
the ticket is for a specific problem, and is valid until it is solved, it is not restricted
to an email.
Please note: To be able to use the Premium email support and free product email
support via the Internet, you have to register your MAGIX product using the serial
number provided. This can be found on the CD case of your installation CD or on the
inside of the DVD box.
• Additional telephone service:
Besides the large number of free customer service offers, we also offer a feebased telephone customer service.
Here you can find a summary of our technical support telephone numbers:
http://support.magix.net/
Page 12

12
Mail (Europe): MAGIX Development Support, P.O. Box 20 09 14, 01194 Dresden,
Germany
Mail (North America): MAGIX Customer Service, 1105 Terminal Way #302, Reno,
NV 89502, USA
Please make sure you have the following information at hand:
• Program version
• Configuration details (operating system, processor, memory, hard drive, etc.),
sound card configuration (type, driver)
• Information regarding other audio software installed
MAGIX Sales Department
You can reach the MAGIX Sales Department workdays for help with the following
questions and problems:
• Orders
• Product consulting (pre-purchase)
• Upgrade requests
• Returns
Europe
Monday - Friday, 09:00-16:00 GMT
U.K.: 0203 3189218
Denmark: 45 699 18763
Sweden: 46 852 500713
Finland: 35 89 42419023
Norway: 47 210 35843
North America
9 am to 4 pm EST Mon-Fri
Phone: 1-305-722-5810
Uninstalling the program
If you would like to uninstall MAGIX Audio Cleaning Lab 2013, you can do this in the
control panel under "Software" or go to "Programs > MAGIX > MAGIX Audio
Cleaning Lab 2013 > Service and Support > Uninstall MAGIX Audio Cleaning Lab
2013".
www.magix.com
Page 13

Serial number 13
Serial number
A serial number is included in each product. This serial number is required for the
installation of the software and enables usage of additional bonus services. Please
store this number in a safe place.
What can a serial number do?
With a serial number your program is clearly assigned to you and only you. This will
allow you take advantage of the free email support service. Serial numbers also help
to protect against software piracy which ensures that we are able to continually
provide our customers with an optimal price/performance ratio.
Where can the serial number be found?
The serial number can be found on the reverse side of your CD/DVD case. If your
product is packed in a DVD box, you'll find the serial number on the inside.
If you have purchased the download version, you will receive a confirmation email
with the serial number.
When will you need the serial number?
The serial number is required when you start or register the program for the first time.
Note: We explicitly recommend registering your product (free), since only then are
you entitled to download updates and to use MAGIX support services (view page
11) or activate codecs.
Page 14

14
More about MAGIX
MAGIX Online World
Everything you need for your website
• Create your own website with MAGIX website
software
• Publish your website for free with the MAGIX free web hosting service
• Register your domain name of choice for your website at a great price
Discover MAGIX Online World at www.magix-online.com
magix.info
Do you have questions, need help, or are looking for expert tips and tutorial videos on
using your MAGIX product? At magix.info you will find answers and solutions as well
as workshops and a comprehensive user forum for software and multimedia queries.
You can access magix.info online at www.magix.info
www.magix.com
Page 15

Introduction 15
Introduction
What is MAGIX Audio Cleaning Lab 2013?
MAGIX Audio Cleaning Lab 2013 is a gentle but powerful cleaner for all kinds of
acoustic material including records, tapes, CD tracks, speech recordings and MP3s.
Digital cleaning removes everything from light crackling to severe interference on
scratched records, old cassettes and MP3s that have been compressed too many
times. A fine polish of the sound brings new life to every song and the disc-burning
function lets you save your sensitive sound material on audio or data CD to protect it
from further damage.
Individual tracks and even specific sections of a track can be given their own effect
settings. Additionally, the entire sound can be cleaned up, refreshed, and especially
important for compilations, the volume can be balanced.
MAGIX Audio Cleaning Lab 2013 is fast, easy-to-use and very gentle: Almost all
effects are calculated in realtime when being played without damaging the recorded
material at all. The original recordings and songs remain untouched on the hard disk.
You can therefore to your heart's content without having to worry about causing any
lasting damage to your audio material.
What’s new in MAGIX Audio Cleaning Lab 2013?
SoundCloner 2
SoundCloner analyzes the sound characteristics of songs and transfers them to other
recordings. Allowing you to apply the sound of a 60s soul recording to a modern pop
song for example. SoundCloner 2 (view page 82) has been completely redesigned
and now takes
frequency spectrum.
Simple preset preview
Lots of presets for cleaning and mastering effects can be previewed when selecting
them from the menus, plus the audio material you're working with will be used too.
This allows you to compare various presets quickly and easily.
Improved interface
The user interface and many windows have been redesigned and decluttered to make
MAGIX Audio Cleaning Lab 2013 more clear and easy to use.
the dynamic range of the source track into account as well as the
Page 16

16
Features
Import
You can either import existing audio files in many conventional formats into MAGIX
Audio Cleaning Lab 2013, or simply use MAGIX Audio Cleaning Lab 2013 to record
your own music. No matter whether cassette, tape reel, LP, or via streaming Internet,
with only a few clicks, you can digitize your music and edit it further with MAGIX
Audio Cleaning Lab 2013.
Cleaning
The key feature of MAGIX Audio Cleaning Lab 2013 is its ability to remove
unpleasant noise in music and enhance the overall sound. There are numerous
professional tools available for this such as the "DeClicker", "DeCrackler",
"DeClipper", "DeNoiser" (including DeRumbler preset), and "DeHisser". You can also
add several sound effects to your music.
Mastering
So that your recordings sound optimal, a selection of mastering tools are available to
you once you have cleaned up the audio material. Try them out yourself to see which
settings are the best, or let MAGIX Audio Cleaning Lab 2013 do the work for you by
searching for the best settings automatically. For more detailed information about the
tools, please read MAGIX Audio Cleaning Lab 2013's help file.
Export
Of course, you can also export your recordings. There is a wide range of formats
available which enable you to enjoy your recordings anywhere you like.
Supported formats
Import:
Audio: WAV, MP3, WMA, AIFF, OGG Vorbis, M3U, CUE, CD-A, FLAC, AAC
Video sound import: AVI, WMV, MXV, MOV, DV-AVI, MPEG-2
Export:
Audio: WAV, MP3
1
, MP3 Surround1, WMA, AIFF, OGG Vorbis, CD-A, FLAC, AAC2,
2
Audio-DVD, Data-DVD
Video sound export: AVI
1)
Activate MP3 encoder for free
)
Fee-based activation
www.magix.com
Page 17

Stereo phono pre-amp 17
Stereo phono pre-amp
This chapter is only important for users, who bought MAGIX Rescue Your Vinyl and
Tapes! 2013. In addition to MAGIX Audio Cleaning Lab 2013, MAGIX Rescue Your
Vinyl and Tapes! 2013 also includes a phono pre-amp. Customers who bought
MAGIX Audio Cleaning Lab 2013 can skip to the Quick Start chapter.
Introduction
Audio signals coming from record players have to be pre-amplified first before they
are further processed by an amplifier or PC. Otherwise the recording's basses would
be too quiet. This procedure is called “RIAA equalization”.
MAGIX Stereo pre-amp PA-005-2 USB takes over any pre-amplification of LP
recordings and also offers the function of converting analog signals that travel from
the output of the stereos to the PC, to digital data, which then can be processed by
the PC.
It functions as an analog/digital converter, just like the sound card in the PC. Due to
its top-quality conversion and sound creation, it is preferable to many other onboard
sound cards. For this reason, it is recommended to use the USB pre-amp to carry out
recordings from MP3 players, cassette and tape recorders.
The PA-005-2 USB offers additional functions such as a switch for both MC and MM
magnetic systems.
Note: MC and MM are different types of pick-ups for record players. “MC” –
“Moving Coil” – is the less frequent type, whereas “MM” – “Moving Magnet” – is the
normal type. If you are unsure of which type to use, select the setting “MM” within
PA 005-2 USB. If you have any problems with the quality of your recording, try the
“MC” setting.
Page 18

18
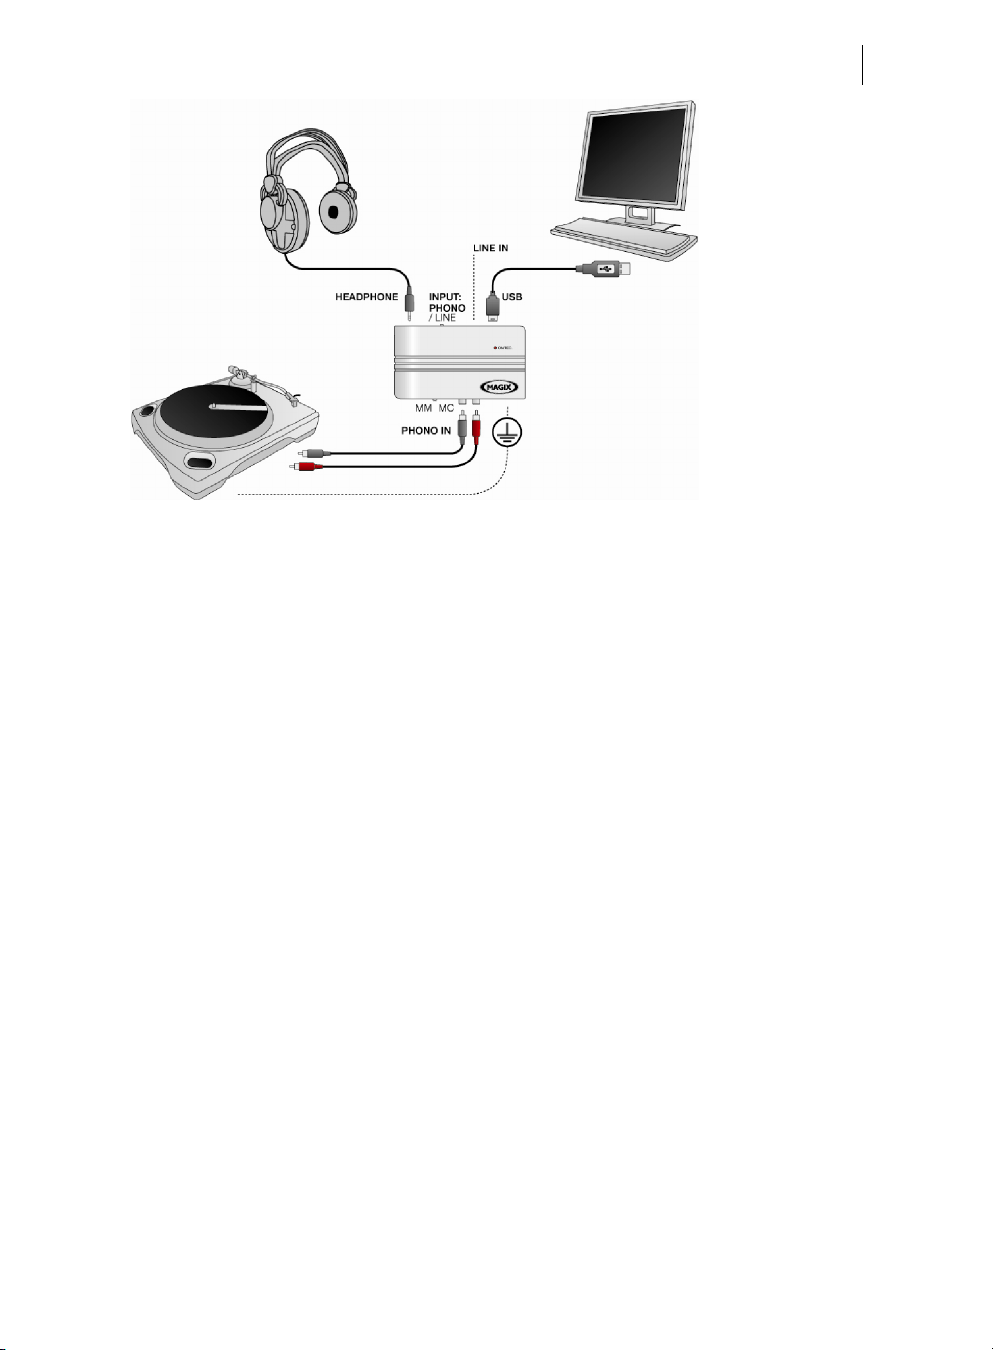
LP recordings on your PC or laptop
If you take a closer look at the pre-amp, you will see two input jacks:
• A cartridge for an RCA plug
• A cartridge for a mini stereo jack (next to the pre-amp)
The RCA connector of the pre-amp can only be used for unamplified signals, such as
the ones that come from record players. If you have a record player that delivers
amplified sounds already (some devices from the 70s, as well as some DUAL record
players), please use the mini jack (with the help of an adapter cable from a retail
store) and change the plug to “Line-in” (see below: “Record from a line-in device”).
Preparation:
• Set the INPUT-switch of the PA-005-2 USB to “PHONO”.
• Connect your record player via an RCA cable with the PA-005-2 USB.
• Connect a USB port of your PC with the PA-005-2 USB using the provided cable.
Once connected, the LED on the pre-amp should light up.
• If the connection is correct, then your PC will automatically detect the PA-005-2
USB.
• If a ground line exists on your record player, connect it with the extra screw next
to the switch on the magnetic system (“MM/MC”).
Tip: In the event of the ground line of your record player being too short and to avoid
hum loops, you should stick the stripped end piece into a flower pot or tape it onto
the radiator.
When connecting, avoid the use of USB extension cables as this normally leads to a
loss of function. The pre-amp should also be connected directly to prevent any
disturbance in its functionality due to the use of USB hubs and port replicators.
www.magix.com
Page 19
Stereo phono pre-amp 19
Application:
• Switch your record player on and play a record.
• Start MAGIX Audio Cleaning Lab 2013 and select “Restore vinyl sound” in the
startup dialog.
• Activate the recording function (“R” key) and make sure that “PA-005-2 USB”
under “Sound card” is selected.
• Start recording in MAGIX Audio Cleaning Lab 2013. The LED should flash while
recording.
• Start LP playback.
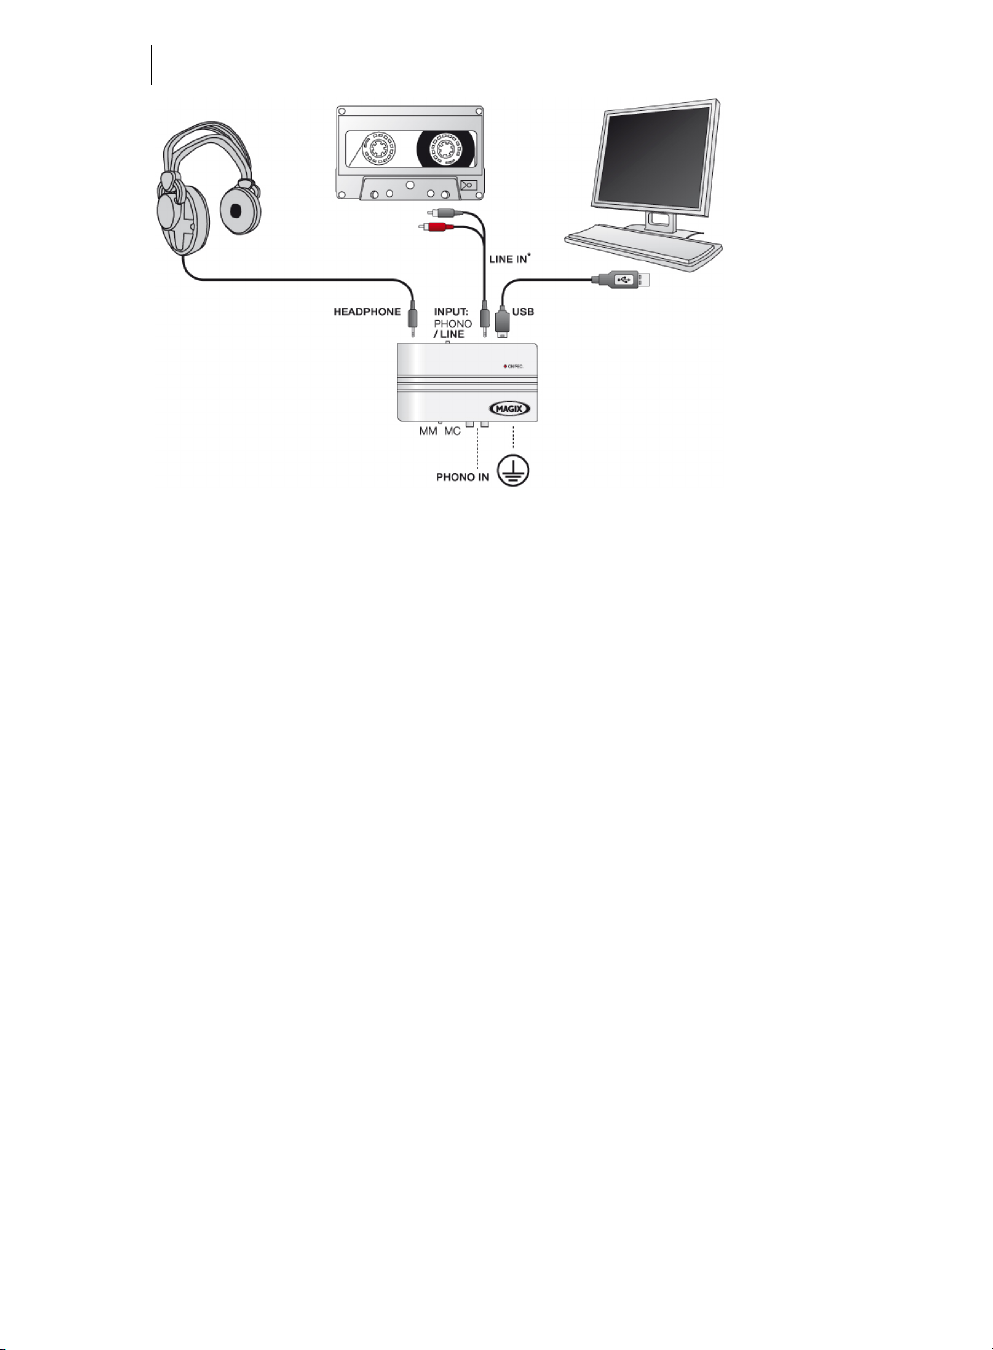
Record from a line-in device (tape deck, MP3 player, ...) on PC or laptop
As mentioned before, you can also use the PA-005-2 USB to record tapes, MP3
player, CD player and other devices. Such devices have line connectors for output and
their signals do not have to be pre-amplified. The PA-005-2 USB is only used to
convert analog signals into digital data.
Preparation:
• Connect your audio source (e.g. tape deck) via a 3.5 mm mini cable with the PA-
005-2 USB.
• Connect a USB port of your PC with the PA-005-2 USB using the provided cable.
Once connected, the LED on the pre-amp should light up.
• Set the INPUT-switch of the PA-005-2 USB to “LINE”.
Page 20
20
*You can purchase such an RCA-to-mini stereo jack cable in every retail store at low cost.
Application:
• Switch on your audio source
• Start MAGIX Audio Cleaning Lab 2013 and activate the recording (as explained
above)
• Start playback on the audio source
Technical details
• Input resistance: 50 kOhm at 1 kHz
• Output resistance: 50 kOhm
• Amplifier: 29dB/MM, 32dB/MC
• Maximum input voltage: 40mV/MM, 24mV/MC
• Maximum output voltage: 1.1V eff
• Bandwidth: 30 Hz - 20 kHz
• Signal-to-noise ratio:> 50 dB
• Voice-over: > 55 dB
• Power supply: Standard USB connection
• or optional USB charger
• Power consumption: 5V/500mA
• Size: approx. 120 x 72 x 28 mm
• Sample rate (2 channel recordings): 8KHz, 11.025KHz, 16KHz, 22.05KHz, 24KHz,
32KHz, 44.1KHz and 48KHz
www.magix.com
Page 21

Stereo phono pre-amp 21
Technical changes and errors excepted!
Disposal
This device may not be disposed of as common domestic waste, as it accords with
European standards 2002/96/EG for waste electrical and electronic equipment
(WEEE). This standard provides for EU-wide valid disposal and recycling of waste
electronics. For disposal of your waste electronic devices, please use the disposal and
collection systems available to you. Information regarding this is available to you from
your local civic offices.
Page 22
22
Quick start
In this chapter, we will guide you through all of the important functions in MAGIX
Audio Cleaning Lab 2013 step-by-step. You don't need any special experience; just
some time for recordings and hard drive space.
With MAGIX Audio Cleaning Lab 2013 you can load audio material from a number of
different sources into projects in order to clean it up, edit it, or export it.
Analog material like records or tapes have to be digitized first so that it can be
processed by the computer. The recording function in MAGIX Audio Cleaning Lab
2013 can be used for this purpose.
Program start
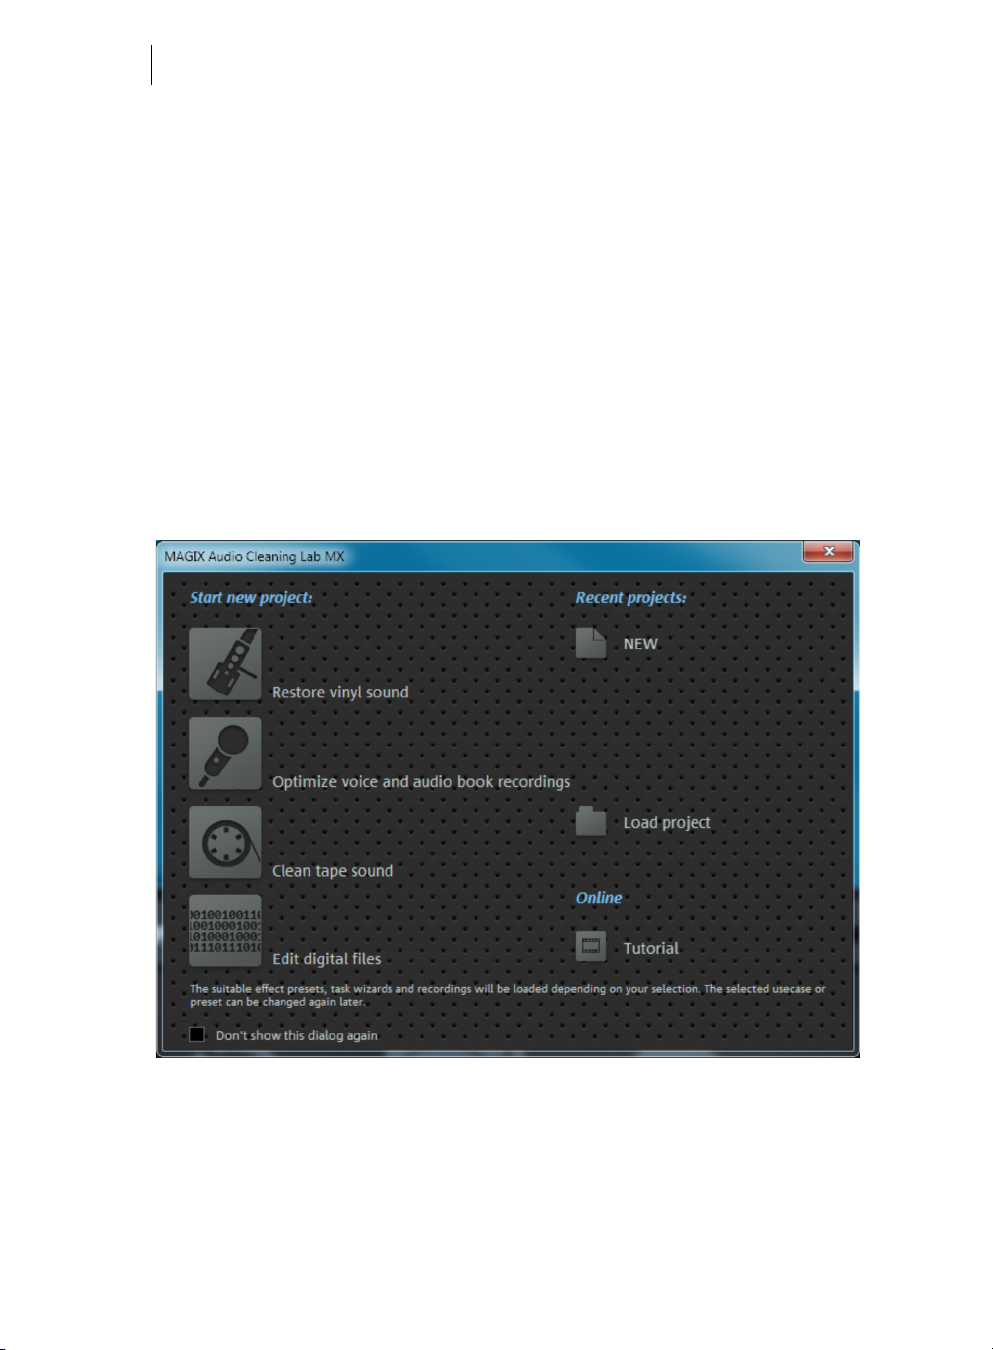
After starting the program a selection dialog will appear.
Choose whether you want to create a new project or load an existing one.
You don't have any existing projects yet so we will create a new project. You can
either create a new, empty project or choose a preset from the drop down menu.
The choices are:
www.magix.com
Page 23

• Restore vinyl sound: for records.
• Clean tape sound: for cassettes.
• Optimize voice and audio books: for speech.
• Edit digital files: for MP3 files, web radio recordings and much more.
The effects will be adjusted according to the selected preset. The presets can be
changed at any time.
You need suitable audio files to use each feature. In the following section we assume
you already have digitized material on your hard drive which you would like to clean
up.
Note: If you want to digitize records, you should use a USB phono pre-amp to
connect your record player to your PC. This ensures best possible sound quality. You
can find a suitable USB phono pre-amp in our MAGIX Online Shop at
www.magix.com.
Quick start 23
Load and play audio files
After starting the program, MAGIX Audio Cleaning Lab 2013 displays an empty
project window. You are in the "Import" section, which is recognizable by the lit
button below the project window.
The workflow in this section is very easy:
• You can load your audio files, e. g. in MP3 format by clicking the "Audio files"
button.
• You can record LPs or tapes by using the "Record" button.
• You can import audio CDs via the "CDs" button.
After import, a waveform display of the audio track appears in the main window.
Page 24
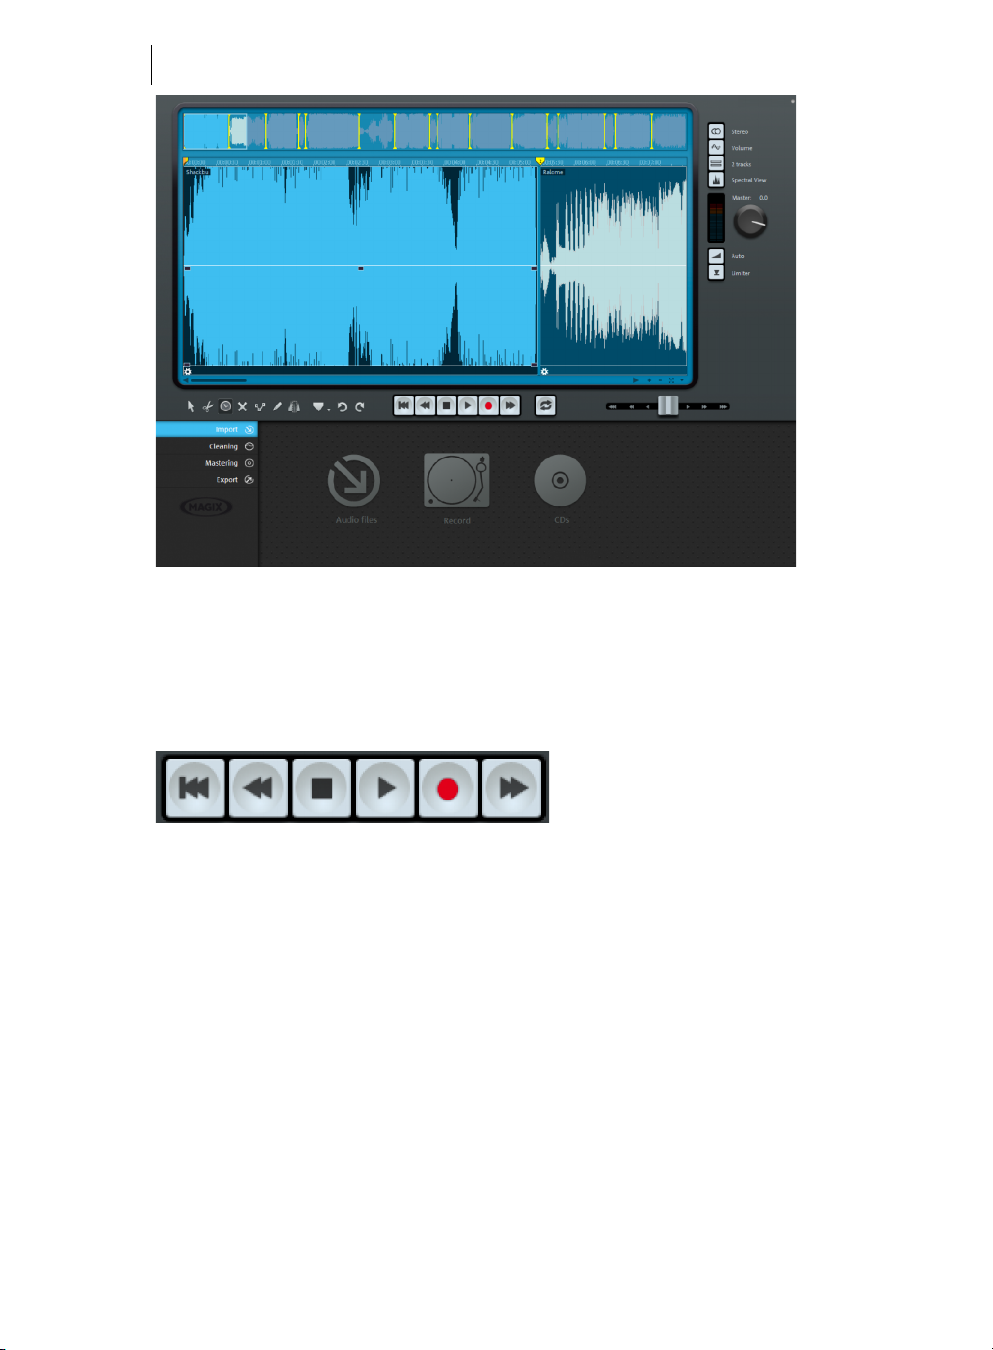
24
The waveform display gives you an idea of the audio track's progression. Even some
noises can be recognized. Crackling, for example, creates a clearly identifiable peak in
the waveform.
Below to the right, you'll find the transport controls for playback, stop and winding.
You'll be familiar with these functions from other playback devices.
Use the mouse for quicker navigation: If you click into the waveform display with the
mouse, the playback marker will be moved exactly to this position. You can start and
stop the track by pressing the spacebar of your keyboard.
www.magix.com
Page 25
Quick start 25
Cleaning
There are many types of noise. Let's start with the easiest ones: constant humming or
irritating hissing. There are many types of noises. Let's start with the easiest ones:
constant humming or irritating hissing. These kinds of noise are usually caused by
tape recorders, record players or microphones and are audible throughout the
complete track. Find out how to get rid of these irritating noises:
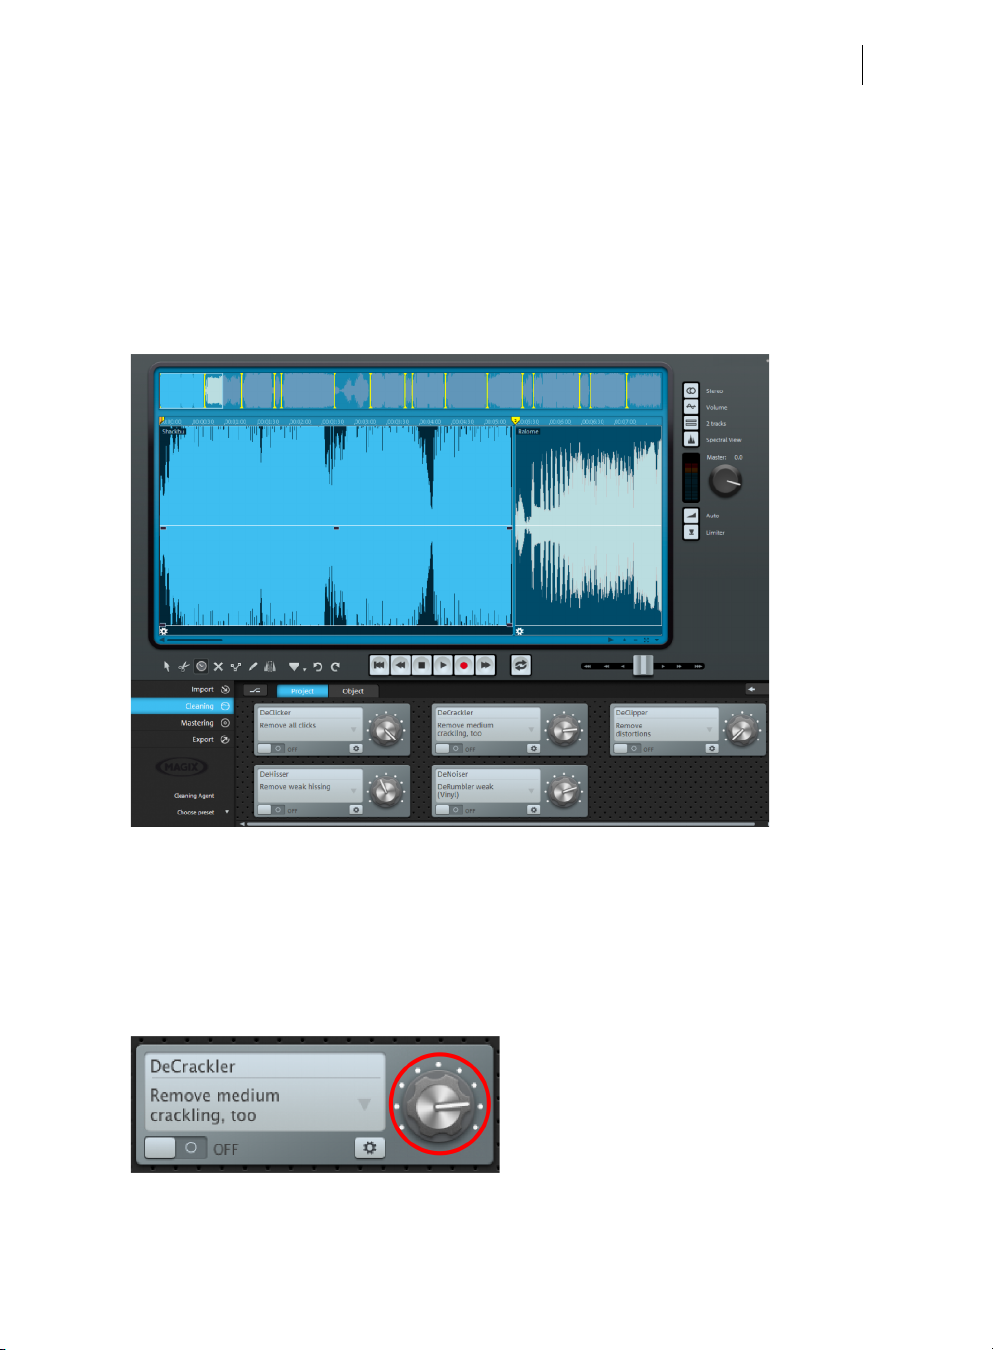
• Switch to the "Cleaning" section.
Most of the elements that are displayed here are identical to the ones in the "Import"
section, but the function area in the lower left hand corner has changed decisively.
Five different functions for removing audio disturbances are available here, which are
adjusted differently in the start dialog depending on your selection. The modules are
"DeClicker", "DeCrackler", "DeClipper", "DeNoiser", and "DeHisser". If you click on
one of these modules, you will find explanations regarding purpose and workflow of
the individual module on the info monitor located in the bottom right-hand corner.
You can use the knob to control the
amount of each cleaning effect.
Page 26
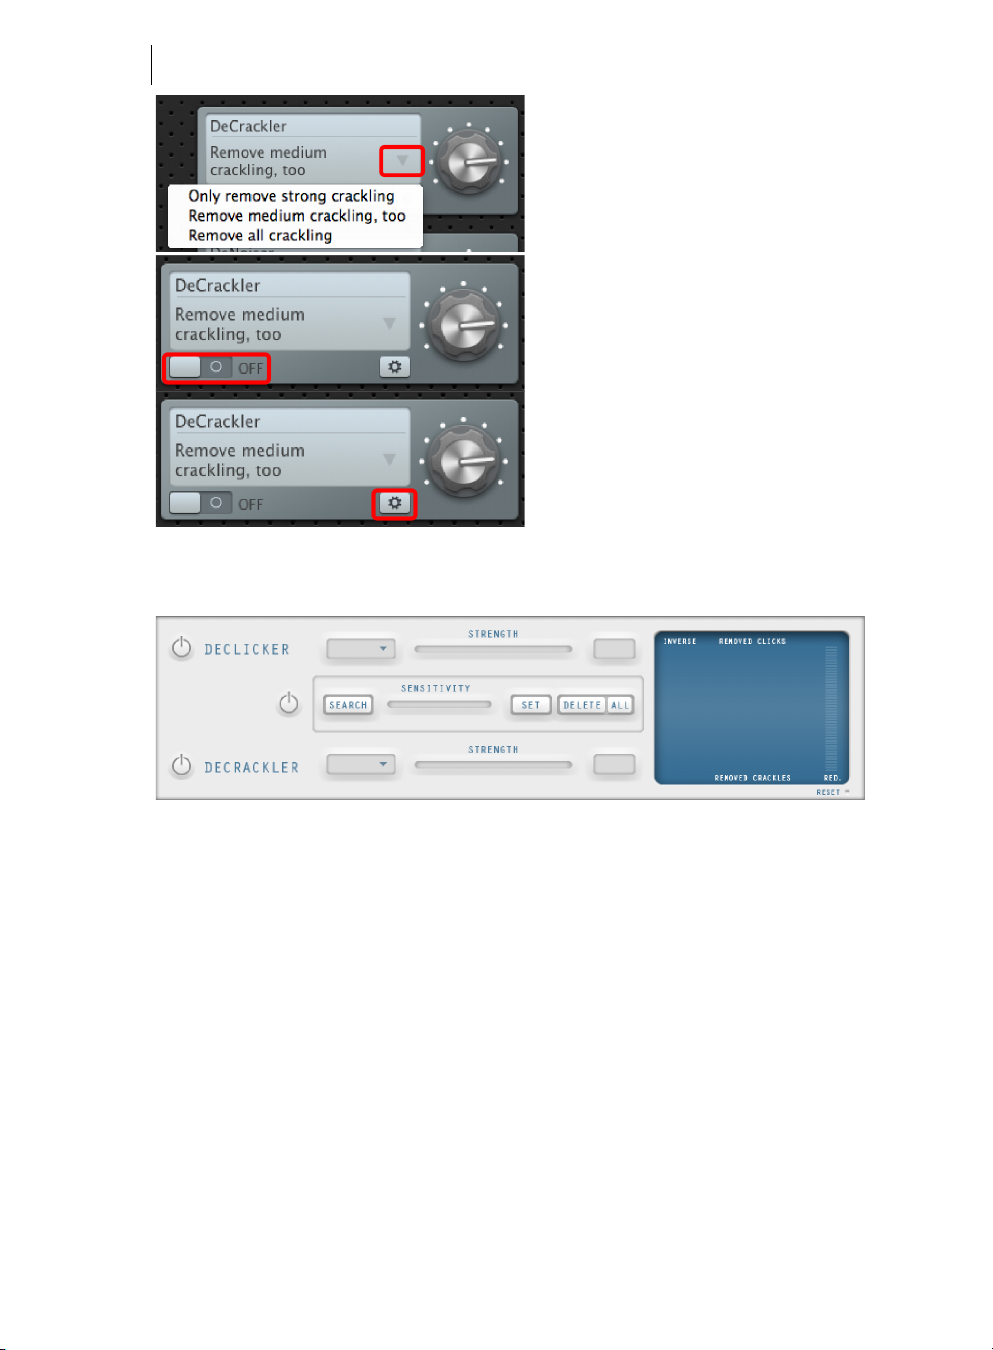
26
If you are not satisfied with the
presets in the start dialog, you can
choose further presets using the
arrow menu.
To get an idea of how the selected
effect affects your audio material, you
can turn it on and off by clicking on
the symbol in the left-hand corner.
Click on the symbol in the bottom
right hand corner to open a user
interface where you can set all of the
available parameters for the effect.
In a way, this symbol represents the effect's engine hood. The interface located
behind it was designed to simulate professional audio editing devices.
Depending on the effect device, you can specify very effective audio editing settings
here. To do so, it's necessary to know a bit about audio editing though. Usually,
however, you will not need these special functions, but they can be useful in complex
cases. You can find more information in the „Cleaning effects“ (view page
65)chapter.
www.magix.com
Page 27
Quick start 27
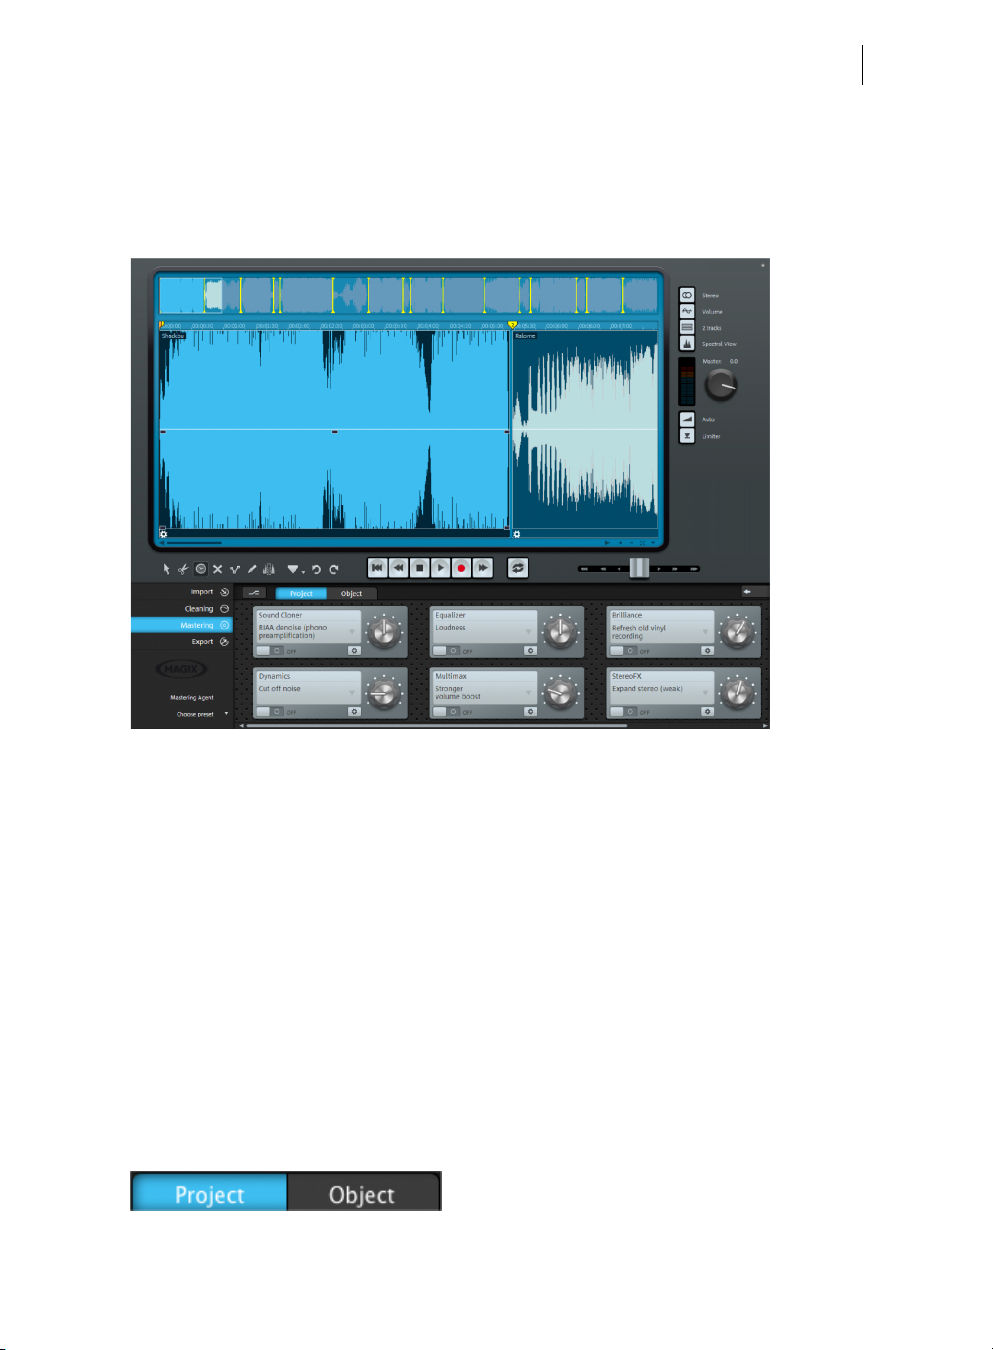
Mastering
"Mastering", the objective in the second effects area is to optimize the audio material.
• Click on the "Mastering" button.
You will find the following effects modules here: "StereoFX", "Equalizer", "Brilliance",
"Sound Cloner", "Dynamics", "Multimax", "Reverb / Echo", "Energizer" and "Chorus".
The functionality of the optimization effects is the same in principle: Adjust the
strength of the effect via the slider, switch the effect on and off to compare the
original with the edited audio material and access the actual operation console by
clicking on the symbol in the bottom right-hand corner.
Object effects
If you combine the audio material from various sources, it's normally not sensible to
apply cleaning and mastering effects to all objects in the same way. Tape recordings
typically have different noise than LP recordings. Therefore, there are two different
ways you can use the effects: Project effects and Object effects.
In the cleaning and mastering area you can see how the two types of effects are
applied. "Project" is the default setting.
Page 28
28
The settings for project effects are applied to the entire sound, i.e. for all objects in the
master track.
Each object can also have its own individual effect settings. To add an effect to an
object, click on "Object".
This will highlight the object that you want to edit. There are also many audio effects
available. These effects can be set separately for every object in the master track .
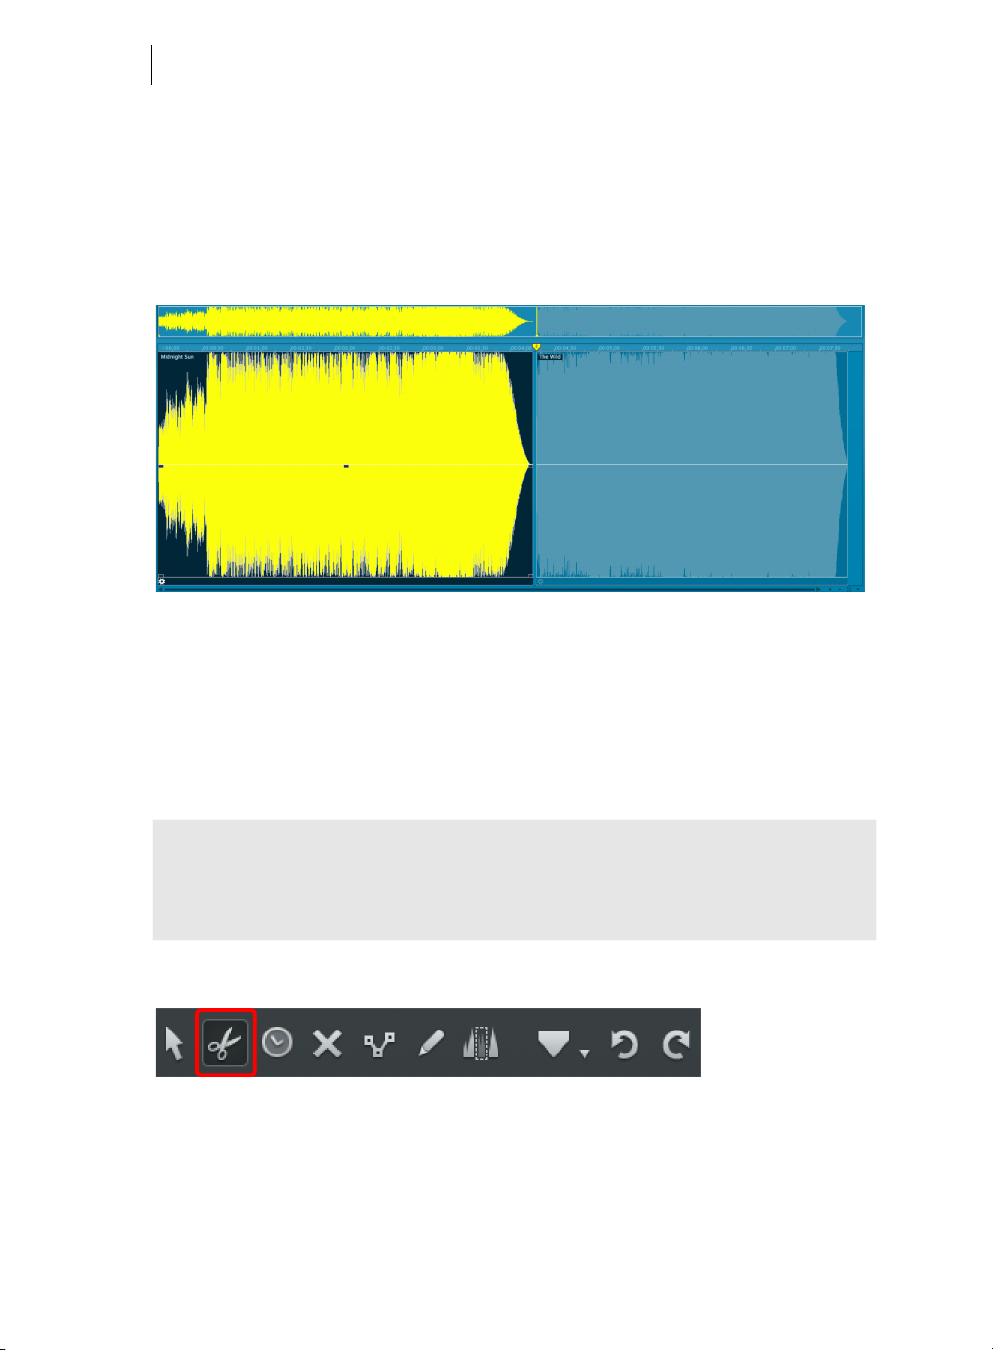
Cut out undesired passages
Now let's take a look at some special kinds of audio noises, the kind that occur when
someone mistakenly bumps into a microphone during a recording.
Clicks, pops, rustling or even longer unwanted sounds can be cut out of the track by
using the scissors tool in the track window.
Note: This technique is only useful if the noise is the only sound and nothing else
should be heard. If a click or pop occurs in the middle of the music, it's better to use
theRetouching clicks and pops (view page 30) method described in the section
below.
• Select the scissor mouse mode.
The mouse pointer turns into a pair of scissors. If you move it across the track, the
playback marker moves with it.
• Play the audio track and search for the section that you want to cut out.
• Click before and after the section to cut at these points.
www.magix.com
Page 29
Quick start 29
This way, three separate objects are created on the track.
• Switch back to standard mode, select the object in the middle and delete it using
the menu command "Edit" > "Delete".
The back of the object automatically moves back and slightly overlaps with the front
part of the object. You can use the handles to make fine adjustments to the transition.
• There are handles at the top left and right hand corners, which allow you to
create fade ins and outs.
• The handle at the top center is for adjusting the volume. If you pull it downwards,
the volume of the object is reduced.
Page 30

30
• The handles at the bottom left and right corners adjust the object borders. You
can fine tune your cuts by extending or contracting the object.
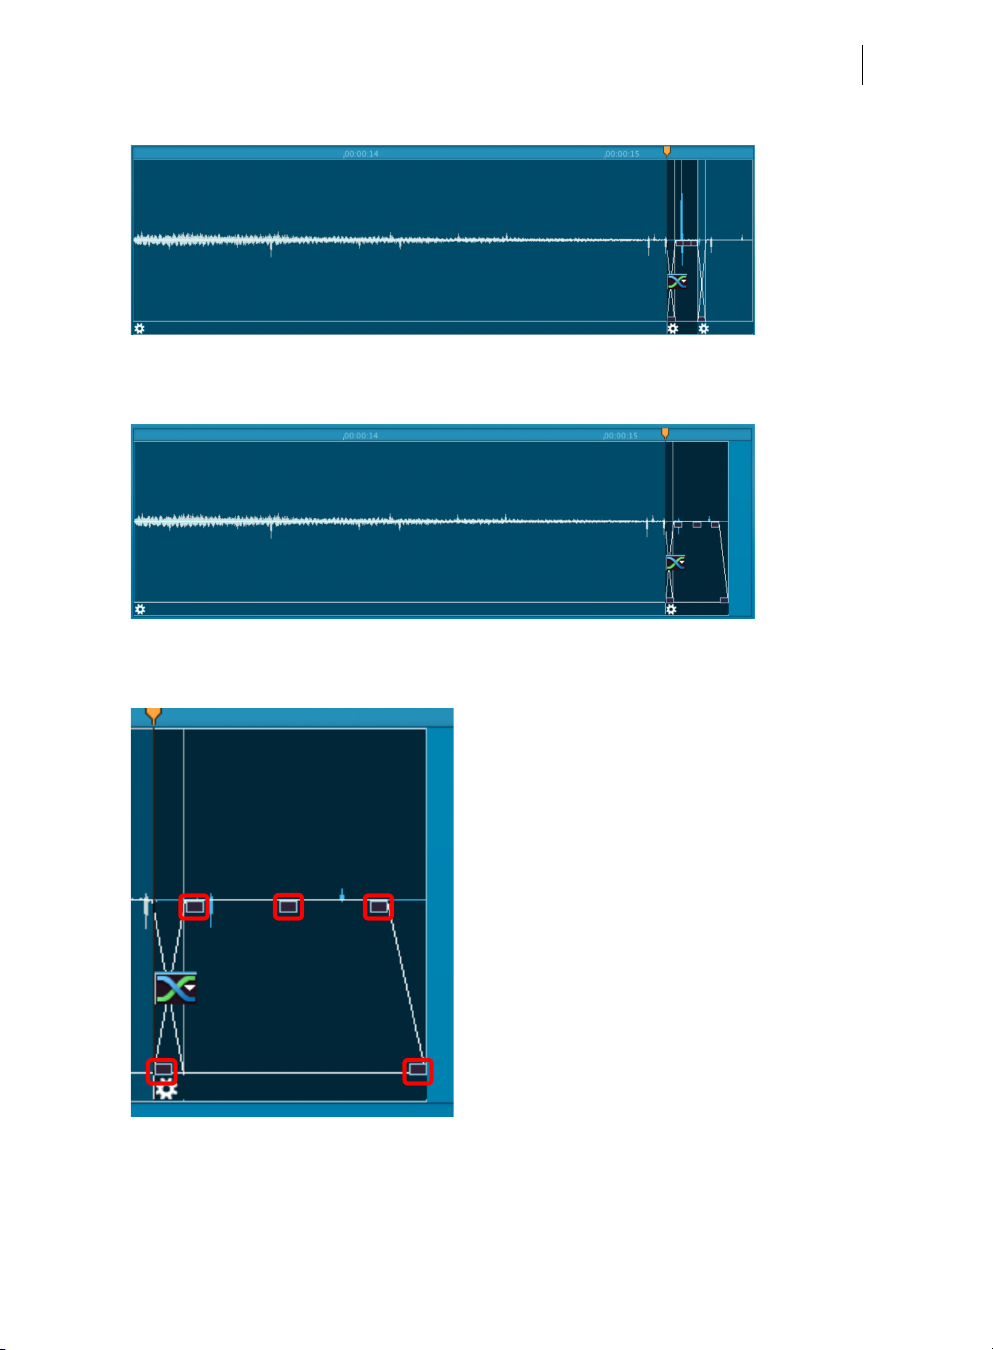
Retouch short noises such as clicks or pops
Let's take a look at a quick and elegant way of retouching short noises such as pops
and clicks using a pen tool.
Note: You can't undo editing that you did with the waveform drawing tool. After
selecting the pen tool, you can decide if you want play it safe and edit in a copy of
the file or proceed directly in the original material.
• Search for a section in the material where you hear crackling and set the playback
marker to that position.
• Zoom into that section so that you can see the details of the waveform display.
You can either use the zoom button in the bottom right corner of the track
window.
• Take a close look. Can you see the click or pop? Look for a "mountain" that is flat
on top or exceeds its surroundings.
www.magix.com
Page 31

• Select the "Draw waveform" mode.
The mouse pointer turns into a pen which you can use to draw directly into the
waveform. If you click, the zoom level increases automatically and you can draw.
It's about trying to turn the flat form a bit more into a peak and moving it slightly
towards the bottom.
The critical section should then look like this at the end:
Quick start 31
If you play back the material now, the cracks have disappeared.
Export
After you have "cleaned up" the material you can export it either song by song as
MP3 or WAV files or all songs on the track as an audio CD.
To do this, switch to the "Export" interface. The only part of the workspace that will
change are the functions at the bottom.
If you haven't split each song on the track into a separate object, you will require track
markers to specify the beginning of every new piece. With the help of the track
marker assistant, you can control and change all track beginnings.
To save your project click on "File" > "Save project".
Page 32

32
Overview of the program interface
Import: Add new audio material here such as audio files from the hard disk,
LPs, or cassettes using the recording function or songs on audio CDs.
Cleaning: You can remove audio disturbances in the track using the "Cleaning"
view.
Mastering: Use the "Mastering" view to optimize the audio material in the
track.
Export: Export audio material as an audio file and burn it directly onto CD or
DVD using the "Export" view.
Mouse modes: Here you can select the right tool for the job: Arrow (Move
mouse mode), Scissors (Cut mouse mode), "X" (Delete mouse mode), Clock
(Resampling mouse mode), Pen 1 (Draw volume curve mode) or Pen 2 (Draw
wave shape) and Pen 3 (Draw spectral cleaning shape).
Menu bar: Here you'll find all the features available in MAGIX Audio Cleaning
Lab 2013.
Overview track: The entire audio track is displayed here. The area which is
currently being edited by the user is highlighted.
Track: Make detailed changes to the audio material here.
Project/Object: Here you can determine whether an effect will be applied to
the whole project or only to a selected object.
www.magix.com
Page 33

Transport control: Controls track playback.
Mastering section: Here you can access the individual cleaning and mastering
Overview of the program interface 33
effects.
Master volume: Set the track's master volume. The limiter prevents clipping
and the auto function enables the volume to be automatically optimized.
Page 34

34
Track window and constant control elements
This chapter describes the display and control elements which are available to you
independently from the selected section in MAGIX Audio Cleaning Lab 2013
MAGIX News Center
The MAGIX News Center features links to current online tutorials and tips & tricks on
the software application examples. The "News" is indicated by color according to
content:
• Green indicates practical tips & tricks for the software
• Yellow reports the availability of new patches and updates
• Red for special offers, contests and questionnaires
If no new messages are present, the button will appear gray. When the MAGIX News
Center is clicked, all of the available information will be displayed. Click the messages
to reach the corresponding website.
The master track
Audio material display
All of a project's audio material is displayed in the master track of the track window as
a waveform. The waveform corresponds with the acoustic properties of the material.
This means that there isn't anything to listen to at places where there isn't anything
visually; higher waves mean high volumes. The tracks waveform display forms the
most important basis for locating specific passages.
The display is compressed, meaning that the waveform is displayed as a ratio of loud
passages to quiet passages. This ensures correct display for quieter sections at the
beginning or end of a song.
Position line
During playback a thin line will move horizontally from the left to the right over the
master track. This is the position line, which indicate, which part of the wave form is
currently reproduced.
The last starting point of the playback is indicated by a small triangle in the master
track. The position line will jump back to that position, once playback has finished.
Timeline
The timeline is located above the track. It shows the time position in the project. The
measurement units can be selected from the "Options" menu. You can choose from:
samples, milliseconds, hours/minutes/seconds, and CD frames.
www.magix.com
Page 35

Track window and constant control elements 35
The markers are also displayed in the timeline. They can be accessed, moved or
deleted with the mouse.
Navigation
The task of the transport controls is to help you navigate through the audio material in
the master track. Here you can find functions that you will already now from your old
tape recorder. You can get more information in the chapter Transport controls (view
page 40).
The simplest solution, howev
er, is to navigate directly in the track: a mouse click on
the time ruler will set the starting point for the playback (even if playback is already
running!) The space bar starts and stops playback.
Overview track
The overview track lets you select the project section which is displayed in the track display
(displayed in blue).
The track window now includes an additional overview track with a reduced display of
the complete project. Now you can work at a specific position or on a certain song
while maintaining an overview of the complete project and quickly navigate to areas
that need more work. In the overview track you can also select the song or position in
the material to be displayed in the track window.
Move the section to the part of the project simply by clicking in the overview track;
the zoom level remains the same. Define a new range in the overview track by clicking
and dragging. Vertical yellow lines indicate the markers in the overview track.
Use the "Overview mode" entry in the "Options" menu to show/hide the overview
track.
2 tracks
Use the "2 tracks" button to create a second stereo track, for
example, if you want to create transitions between two songs or
to "park" a song on the additional track for the meantime.
Page 36

36
An additional track provides a better overview when there are multiple objects in play.
All objects can be moved randomly between the tracks. If moved between tracks
while holding the "Shift" key, the horizontal position will be retained, i.e. only the track
is changed. On the lower "shunting" track you can move the objects without moving
the subsequent ones as well. Materials which are placed over one another will be
played back simultaneously and burned on CD. If this is desired, then the volume
level at this position should be monitored, since objects which are playing back
simultaneously add to the overall volume.
Stereo
If the stereo button is activated, the waveform display of the
audio material for both stereo channels will be displayed
separately.
This view is useful to visually monitor processing of the material in the stereo
panorama, or to locate precise crossover points during editing operations.
Volume curve
Use the "Volume curve" button to activate a volume
curve (view page 62).
Spectral display
In addition to the waveform display, this button allows a
spectral display of the audio material to be shown as
well.
Spectral display equates the X axis (horizontal) to the time dimension. In contrast to
the waveform display, whereby the height of the waveform only indicates the total
level of the signal, the spectral display shows the level of each of the audio signal's
individual frequencies. The actual level of each frequency is indicated by the color of
the points in the spectrogram image.
The whole color spectrum is used to display the volume of individuals frequencies.
Pink indicates loud sounds in a frequency range, green indicates the areas with middle
volume and red the very quiet sounds (in the default color scheme). Black is used for
quietness and white for maximum volume.
Different color palettes can be selected in the menu "Options -> Spectral display".
"Display values scale" in the same menu ("#" key) shows an object's frequency scale.
www.magix.com
Page 37

Track window and constant control elements 37
Spectral cleaning is significantly more processor-heavy than the normal waveform
display, so redrawing after a section changes is always slightly delayed. This delay is
increased the further the zoom is extended, since MAGIX Audio Cleaning Lab 2013
needs to include more and more data for calculation of the display. For this reason,
spectral display is only available from a certain zoom level.
Spectral display of the audio enables specific disturbances in the audio to be detected.
Clicking can be recognized by vertical lines across the entire frequency spectrum;
continuous disturbing sounds can be detected by horizontal lines.
More detailed explanations can be referenced in the section "Spectral cleaning".
This display also makes it easier to find sections in a song quickly, since instrumental
changes can be clearly seen in the spectrum. On the other hand, the waveform
display will not indicate changes if the volume level does not fluctuate.
Mouse mode
"Mouse modes" are your tools when working in the track window of MAGIX Audio
Cleaning Lab 2013. Depending on the mode, the function of mouse-clicks in the
project changes. The selected mouse mode is indicated by the appearance of the
mouse pointer in the track window.
Select, move and edit objects.
Quick cutting of objects
Change the playback speed with pitchshifting/timestretching.
Deleting objects
Drawing a volume curve
Drawing a waveform
Editing objects in the spectral display (view page 36)
Edit mouse mode
The Edit mouse mode is preset. You can take care of all important tasks with
this mode.
Select objects in the track window with a left-click. Selected objects can be moved. All
subsequent objects are also moved so that no unwanted gaps develop later in the
track.
In Edit mode you can use the 5 handles to fade or shorten all objects or to adjust the
master volume.
Page 38

38
Right-clicking on an object opens the so-called context menu from which you can
select important editing options for the object.
Keyboard shortcut: V
Cut Mouse mode
The cutting mode converts the mouse pointer into scissors. Every object can be
cut on the mouse position.
This creates two separate objects that can be edited separately.
Moving the mouse over the wave form depiction of the audio material you move the
Position Bar along with the mouse pointer. So you can control exactly the point where
you want to cut. The perform precision editing we recommend zooming the wave
shape display before using the cut mode.
Like in move mode, right-clicking on an object opens the so-called context menu from
which you can select important editing options for the object.
This mode is suitable for dividing a recording into different parts in order to apply
object effects to each of the passages.
Keyboard shortcut: H
Delete mouse mode
If the "Delete objects" mode is activated, the mouse pointer turns into an
eraser. In this mode, objects can be deleted from the project.
This also automatically moves the position of subsequent objects back to the position
of the deleted object.
Keyboard shortcut: F
Resampling/Timestretching mouse mode
This mode lets you change the playback speed of objects with the mouse so
that they are better aligned.
You can use this mouse mode by stretching or squashing the object at the rear object
handle below. The mouse pointer turns into a clock.
Resampling mode (preset) can be used to change speed and pitch just like on a tape,
i.e. speed and pitch are changed together as one. If an object is compressed with the
mouse, the speed and pitch increase just like a tape when it is played faster.
In the timestretch mode, the pitch remains unchanged if the object length and with it
the speed are changed.
www.magix.com
Page 39

Track window and constant control elements 39
You can switch modes by switching to the cleaning effects, selecting "Object" editing
and then selecting timestretching from the tempo/resampling effects presets list.
Volume draw mode
In volume draw mode the volume curve can be "drawn".
This way, you can create irregular volume progressions quickly.
To delete volume curve points, double-click on the corresponding point or click on a
point in the delete object (view page 38) mode (view page 38).
Wave drawing mode
Repair short distortions such as crackling directly in the wave form of the
audio file by using the Wave drawing mode. Such distortions usually only last
a few sample values, so you can use the mouse and try to draw along the
original waveform without the distortion.
There is an automatic zoom function in the wave form display when you switch into
the Wave drawing mode, so sample values become visible.
Warning: Unlike other editing of the master track which only affects the project, this
mode lets you work directly with the Wave audio file, i.e. on the recorded raw
material, which is changed directly and permanently. Create a backup copy to undo
changes. Back up copies are created automatically when working with MP3 and
other compressed formats, since such files have to be converted into the Wave
format for this function.
Edit spectrum directly (Mouse Mode)
You can remove individual noises within the sound spectrum of the audio
material with the help of the Spectral Edit mouse mode.
The view of the master track changes to Spectral display (view page 36). You can
create an area
around the noise with your mouse. Its size is still adjustable afterwards
by simply stretching the handles on the frame.
Page 40

40
You can hear the impact of the effect straight after playing the corresponding
passage. Two buttons are located at the frame of the disturbances. By clicking "OK"
the editing will be calculated into the audio material instantly. You can also undo each
edit by clicking on "Edit" > "Undo".
By clicking "Cancel" you delete the frame and end the filtering process.
Marker
Opens a menu with different functions to set track markers (view page 141)
automatically.
Undo
In the project you can undo the last changes you made. This way, it's no
problem if you want to try out critical operations. If you don't like the result,
you can always revert to the previous state using "Undo".
Shortcut: Ctrl + Z
Redo
The “Redo” function undoes the previous “Undo” function.
Keyboard shortcut: Shift + Y
Transport console
The transport control determines the playback position in the project. The position
line is a thin vertical line in the track window indicating the current playback position.
With the position slider you can quickly move the position line in the project.
Use the transport console to start and stop playback, move forward and backward
within the project and set the position line back to the very beginning.
www.magix.com
Page 41

Loop: Clicking on the loop button starts playback in an endless loop.
This function is useful if you want to listen to parts of the audio repeatedly,
e.g. to monitor transitions or effect settings in critical sections. You can
extend or shorten the loop range in the timeline by using the mouse or by
entering changes numerically in the "Playback parameters" window (options
menu).
Return to start: Resets the position line to the start of the project (also
works during playback).
Rewind/Fast forward: Rewind/fast forward first starts slowly, then quickly
speeds up if you continue to hold the rewind or FF button. This corresponds
to the functionality of a tape recorder which also takes some time to gain
speed.
Alt + Click on this button lets you jump to the next or previous marker.
Stop: Stops playback, the position line jumps back to the starting position.
Play: Starts playback, clicking again stops playback at the current position.
Recording: Opens the record dialog where you can set the recording format,
level etc. The actual recording is started in the record dialog.
Track window and constant control elements 41
Controlling with the keyboard and mouse:
• The space bar starts or stops playback.
• A simple mouse-click in the timeline above the track moves the position line to
the corresponding position (also works during playback).
• Use the position slider to quickly move the playback marker within the project.
• Other special keyboard commands can be used to jump between markers and
object borders quickly, see Zoom settings (view page 42).
Zoom
The waveform display allows you to recognize certain parts of the material from the
shape. For many tasks it is quite useful to enlarge the waveform display. For detailed
editing, e.g. editing with the scissor tool, there are several zoom options:
Quick zoom: For quick zooming it is sufficient to click with the mouse in the timeline,
keep the mouse button pressed down and move it up or down. This way, you can
quickly zoom the cursor in and out at any position without releasing the mouse.
The +/- zoom button at the bottom right corner of the track
window zoom in/out the display.
Page 42

42
This enlarges the central area of the track window. Clicking on the adjacent triangle
opens the zoom menu. Here you can open different zoom and navigation commands
(view page 42).
By selecti
visibl
ng an area in the overview track (view page 35), you can also determine the
e section of the project. The overview track is located above the track window
and displays the entire project irrespective of the selected zoom level.
You can click on this symbol or the "a" key to quickly restore the fullscreen view
of the project.
Moving the scroll bar forward and backward allows you to quickly navigate through
the project. Dragging the scroll bar ends adjusts the size, which also zooms in and out
of the project.
Zoom settings
Command Keyboard shortcut Description
Play/Position marker Commands for quickly editing
the playback position
Marker left Alt + right
Marker right Alt + left
Object border left Shift + Alt + right
Object edge right Shift + Alt + left
Zoom ranges
The play marker can be moved
quickly between the markers.
The play marker can be quickly
moved from object edge (object
start and end) to object edge.
Show all A The entire project is visible.
Zoom 1s 1
Zoom 10 s 0
Zoom 60 s 6
The visible section of the project
is quickly set to the selected
value.
Zoom 4 min 4
Zoom 10 min Shift + 0
Vertical zoom
Zoom into waveform Ctrl + Cursor down
Zoom out of waveform Ctrl + Cursor up
Vertically zooms in and out of
the wave shape. This is useful for
locating the crossover point (for
precise sample editing).
www.magix.com
Page 43

Track window and constant control elements 43
Volume control/Auto button
This controller sets the playback level of the track. Before
exporting, the project should be set as loud as possible in
order to receive an optimally calibrated recording level. The
"Auto" button below the volume control is for automatically
optimizing the volume (normalizing).
In order to set the volume of the project as high as possible,
place the position line just before the loudest part of the
project and start playback. (The loudest position can be
found by locating the highest peak of the waveform
display).
After you have played the loudest part, click on the "Auto" button below the master
volume control. MAGIX Audio Cleaning Lab 2013 automatically adjusts the volume
so that the loudest part of the range just played back is exactly 0 dB - this will be the
maximum volume.
Note: The volume controller adjusts the volume of the project which means that it
will be exported at this volume. If you set the level lower, the project will be exported
at a lower volume. It is better to adjust the monitor volume with the sound card
mixer or directly on your stereo system (e.g. monitor speakers) and to leave the
volume control at the position recommended by the "Auto" button.
To adjust the monitor volume in the sound card mixer, you can click on the
loudspeaker symbol in the notification area (at the right bottom corner of the screen).
However, you can also adjust it directly in the "Playback parameters" (view page 150)
dialog.
Control display
The display beside the volume control is a peak meter and shows the peak level of the
audio in the track during playback. For stereo tracks the the left bar shows the level of
the left channel and the right bar shows the level of the right channel. Both bars react
together for mono tracks.
Limiter
The limiter can be switched on to reduce clipping. This device
works sound-neutrally and provides a final guard against extreme
levels.
Page 44

44
Import
Audio files
MAGIX Audio Cleaning Lab 2013 can import audio files in the
formats WAVE, QuickTime (*.aif), Ogg Vorbis (*.ogg), MP3,
WMA, FLAC, and AVI (soundtrack only).
To do this, click the corresponding button "Audio files" in the
import section and the "Load audio file" dialog will open.
Select any folder containing audio files. Every file listed can be previewed and loaded
into MAGIX Audio Cleaning Lab 2013. The selected file is attached to the last object
following a pause of 2 seconds.
You can also load several files simultaneously. Just as in Windows Explorer, you can
extend your selection with "Ctrl" + click, or select a series of files with "Shift" + click.
The pause inserted between the files (2 seconds by default) can be changed in the
CD/DVD menu with Automatic pause settings (view page 142). If you have tracks
which bl
should change this value to "0".
Keyboard shortcut: W
end over one another and which are distributed on several files then you
Record
The "Record" button opens the audio record dialog.
Basic knowledge about recording with the PC
The record function converts analog audio signals – records, tapes, sounds, speech –
into digital data, which can be saved on the PC and edited with MAGIX Audio
Cleaning Lab 2013.
www.magix.com
Page 45

The device which is used to digitalize the audio signals is already built into most
sound cards and aptly called an analog-digital converter, often abbreviated with A-toD, ATD or A/D. In order to record sounds, the A/D converter takes samples of the
sound to be digitalized at fixed intervals by measuring the voltage level of the signal.
The frequency of the sampling is called the sample rate and naturally lies within the
kHz frequency range; several thousand times per second. The higher the sample rate,
the more samples are recorded by the A/D converter, thus making the sound
conversion closer to the original.
The precision with which the A/D converter measures the voltage level of the analog
signal is determined by the sample resolution. The same principle applies here: The
finer the resolution, the better and more natural the digital conversion.
Audio recordings in CD quality are recorded with a sample rate of 44.1 kHz and a
resolution of 16 bits.
Import 45
Connecting the source for recording
First of all, the source of the audio material must be connected to the sound card
input. Again, there are several possibilities which primarily depend on the type of
equipment you have.
If you are recording from a microphone, then please connect the microphone to the
microphone jack on your sound card (usually red).
If you want to record material from a stereo system, then you can use the line-out or
AUX out jacks on the back of your amplifier or tape deck. This involves connecting
them to the sound card input (usually red).
If your amplifier has no separate output (other than for the speakers), then you can
use the connection intended for headphones for your recordings. In most cases, you
will need a cable with two mini-stereo jacks. This type of connection has the
advantage of being able to set the headphone input signal level with a separate
volume. As headphone connections generally are not the best, it is advised that you
use the line outputs if possible.
When recording cassettes from a tape deck, you can connect the tape deck's line out
directly to the sound card input.
When recording from vinyl records, you should not connect the record player's output
directly with the sound card because the phono signal needs to be pre-amplified. A
more suitable method would be to use the headphone connection or an external preamp.
Page 46

46
Record dialog
The "Record" button in MAGIX Audio Cleaning Lab 2013 opens the record dialog.
However, the recording source must be connected to the input of the sound card with
a suitable cable first. For more information, please read the "Recording basics" (view
page 44) chapter.
Audio input: Opens the input and level automation (view page 49) for automatic
selection of the correct input signal and level.
Recording level: Displays whether the level of the signal you want to digitize is
correct. To set the level, play the loudest part of the material you want to record and
monitor the display. Like with analog recordings, the sound of digital recordings has to
be optimized as well. Too low level settings will have adverse effects on sound quality,
distortions lead to unpleasant "clippings".
Recording: This button starts the actual recording. During recording, recording time
and remaining space on your hard disk are indicated. Monitor the recording level on
the LED display. If the display reaches the upper LEDs, there was a distortion at some
point. In this case, you should definitely check the recording for clippings and, if
necessary, repeat the recording using a lower recording level. At the end of the
recording you will be asked if you want to use the recording. The newly-recorded
material will be placed at the current position of the playback marker in the
arrangement.
Recording pause: Pauses the recording. Click the button again to resume.
Stop: This button ends recording. The recorded material is then inserted into the
upper track as an object. If objects are already in the track, the recording is attached
to the last object after a pause of 2 seconds.
Advanced…: Opens the Advanced view of the record dialog (view page 47) with
access to additional settings options.
Help: Opens the program's help file for the record dialog.
www.magix.com
Page 47

Close: Closes the record dialog.
Keyboard shortcut: R
Advanced settings in the recording dialog
Import 47
Automatic recording stop: If this button is activated, recording will cease
automatically after approx. 16 seconds of silence. This means that you can record
without having to stop the process manually when the recording source ends.
Automatic CD track recognition: If this button is activated, then track markers are
automatically placed at the end of the pauses after a track. In order for pause
recognition to function seamlessly, you will have to set the proper source in the
selection box (LP, cassette, CD, or Internet). You can specify the detection
parameters even further in the Options menu via >Automatic track marker
recognition options (view page 153).
Save automat
ically in individual files: If this feature is active, then every individual
track that is recognized will be saved as a unique file.
Set CD track marker: Even during recording, you can set track markers by clicking the
corresponding button in the recording dialog.
Start new file: If you want to record for very long sessions or multiple sources one
after the other, then the recording file can become extremely large. This button will
create a new sequentially numbered file each time it is pressed.
Page 48

48
Recording format: This setting determines the sampling rate and bit resolution
(deluxe version only) of the recorded audio file, and also whether the recording
should take place in stereo or mono.
24-bit recording requires a high-quality audio card with 20 or 24-bit conversion, plus
a 24-bit capable MME driver. Audio cards with SPDIF digital interfaces can also
record audio material in 24-bit quality.
You can also record directly in compressed formats such as MP3 or OGG Vorbis.
Select the format you want to use from the list box, and use "Format options" to
specify details such as the bit rate and compression method.
Double Speed Recording: Activates the Recording at double speed (view page 48).
Audio input: T
(view page 51) for whatever sound card is present. The name of the selected sound
card is also displaye
inputs), then you can select one from the menu.
Timer: Enter a starting time for a recording and the length of the recording. The
recording doesn't begin immediately after pressing the "Record" button, but rather at
a specifically set time. This way, time-delayed recordings (for example, at night or
when you're out) are now possible. Of course, the system clock has to be set
correctly. If "Record length" is also activated, then the recording will end automatically
after the indicated period.
File name/file path: The name of the audio file to be created and the preset folder are
displayed in the recording window. Both can be changed by clicking the folder button.
Shut down computer automatically after recording: If you are working with timer
recordings, you might as well have the computer shut down automatically after the
recording is complete.
Simplified...: Simplified version of the recording dialog.
he button "Sound card settings" opens a dialog with special settings
d. If you are using several sound cards (or such with several
Double speed recording
Some double cassette decks have a "Double Speed" copy function. On one deck a
cassette will be played at double speed and on the other recorded at double speed.
Doubling the speed cancels itself out so you will end up with a completely normal
cassette recording. Thereby making it possible to copy cassettes in half the time.
With the option "Double Speed Recording" you can also use this function with
MAGIX Audio Cleaning Lab 2013. If it's activated you can record played audio
material at double speed, after recording the speed of the recorded material will be
automatically halved.
www.magix.com
Page 49

Import 49
Input and level automation
Every sound card has a least two inputs (microphone and line), as well as various
"internal" inputs for the CD drive or the signal from another program, for example,
Internet radio. With input and level automation you can automatically select the
correct input for your recording without having to search and adjust the input level in
order to avoid distortions.
To do so, click on "Audio input" in the record dialog. If you had already connected
your source and begun playback, the correct input will be determined immediately.
Otherwise do this now and click on "Search channel again".
If this didn't work, use the "Windows mixer" button to open the Windows Mixer and
select the channel manually.
Adjusting the recording level is essential when recording digitally via sound cards in
order to achieve optimum sound quality. If the adjustment is set too high, distortion
occurs and the incoming signal must be reduced. If you reduce input sensitivity, the
resolution at which the analog signal is digitized is also reduced. The level controllers
of your sound card should generally be set as high as possible in order to achieve
optimum results. Yardstick for an optimal level is the loudest part of the material. The
loudest part should be adjusted to the maximum. You can now adjust the recording
level with the help of the LED display in the record dialog.
You can adjust the level of the source manually using the "Volume" controller. If you
activated "Automatic level adjustment", the level controller will automatically be set
to the correct value.
Monitor while recording
Do you want to listen to your digitizer while you are recording? It may not work from
the start for the following reason:
Most sound cards, including the ones integrated in a PC ("onboard sound") offer help
for the Windows sound card mixer. You can change the different input and output
levels of the sound card or choose a digitizer.
You will also find a signal route within the mixer. This route passes an input signal
through to the output of the sound card. The corresponding volume controls within
the mixer are called line -In, microphone or stereo mix.
The functions, as well as the descriptions of the input and output controller within
the Windows mixer, may differ depending on the sound card and sound card driver.
Windows mixer is only a standardized "interface" for the sound card driver.
Page 50

50
Regardless of MAGIX Audio Cleaning Lab 2013, Windows and the sound card driver
enable you to listen while you record.
Recording: Sound card with Windows mixer support
Many sound cards or audio devices, such as USB record players offer either an
incomplete or no mixing support at all. In that case, you don't have the option of
monitoring while recording. If you go to "sound cards properties (view page 51)"
within th
e advanced recording dialog you will find the option "Listen to the sound
during the recording". If you activate this, MAGIX Audio Cleaning Lab 2013 will
conduct the input signal to the output.
Recording: sound card without Windows mixing support
24 bit audio support
Audio files in MAGIX Audio Cleaning Lab 2013 can not only be recorded in 16 bit
quality, but also in far superior 24 bit resolution. Simply select the "24 bit" option
under "Resolution". 24 bit recordings require a high quality audiocard with 20 or 24
bit converters, as well as a 24 bit-compatible NME drive. 24 bit audio material can
also be transmitted via audiocards with SPDIF digital interfaces.
We have had positive experiences with the 24 bit audiocards produced by Marian,
RME, SEKD and Terratec.
The high resolution audio files are stored and edited in the 32 bit "floating point" file
format by MAGIX Audio Cleaning Lab 2013. This ensures the full 24 bit quality
independent of the gauge. The dynamics may increase to over 140 dB, while the
recording’s jamming transmission sinks, according to the type of audiocard, to 110 dB
and more. Thanks to floating point processing, there is no need to worry about
www.magix.com
Page 51

internal editing being distorted. Floating point processing only starts to distort at
around 1,500 dB above zero – in contrast to a 16 bit signal that distorts immediately
once the zero dB line has been traversed.
Even in cases whereby audio material is intended for burning onto a 16 bit CD, it is
worth selecting 24 bit recording because all effects calculations are made in a higher
quality and therefore no "rounding" mistakes can be detected in the audible 16 bit
range.
24 bit recordings (via storage as 32 bit float files) take up twice as much storage
space on the harddisk as 16 bit recordings. But with current harddisk storage
capacities, it works out as a good compromise when one considers the increase in
quality.
High resolution audio files can be imported and exported as 24 bit WAV files,
enabling trouble-free file exchange with other high quality audio systems, such as
MAGIX Samplitude.
Import 51
Digital transfer
With the recording function, digital audio data can be transferred to the hard drive
through a digital interface (e.g. S/PDIF or ADAT).
ADAT or DAT recorders normally produce data with a sampling rate of 48 kHz. For a
CD project with 44.1 kHz you must convert the sampling rate. This is carried out in
real time by MAGIX Audio Cleaning Lab 2013. The digital signal is read at 48 kHz, but
is automatically converted and inserted into the project as an audio file at 44.1 kHz.
For this to occur correctly, you must first set the sample rate of the incoming signal in
the recording dialog. Click on the "Dev." button in the recording dialog. In the
following dialog (sound card characteristics), set the audio recording formats
supported by the sound card.
Now, connect the digital output of your recorder to the digital input of your sound
card, and now start recording!
Record properties
This dialog provides you with information regarding the currently selected sound card.
Supported audio formats of the sound card and the sound card driver's information is
also displayed.
Driver system: Here you can switch between driver types (MME and WDM).
Note: Adjust this setting only if you have problems with audio playback or recording.
Special: Some sound cards or audio devices (for example, USB turntables) do not
offer mixer support. With the "Monitor input signal" option you can listen to the
sound during recording (monitoring).
Page 52

52
"Filter DC offset" allows you to remove the DC offset section (view page 74) of the
input signal, even during recording.
CDs
With CDsyou can import music from a CD into the program.
Import CD
You can import entire Audio CDs or individual CD tracks into the project. Unlike data
CDs, audio CDs require special treatment while importing ("grabbing" or "ripping").
The data is imported digitally, thus eliminating loss in sound quality.
To import audio tracks you should proceed as follows:
1. Insert an audio CD into the drive and click on "Import CD". A dialog with a list
of the CD tracks will open. If you have more than one drive, you may have to
first select the drive containing the CD. You can do this in CD drive options.
2. Select the desired tracks (multiple selection by Ctrl + mouse-click).
3. Click on "Copy selected track(s)."
4. The "Import project" dialog will now appear. Here you can enter the file name
and select the target directory.
5. The audio material is then copied from the drive onto the hard disk. A progress
bar is displayed.
Once ripping is complete, the dialogs will be closed and the tracks are inserted into
the project as individual objects.
Keyboard shortcut: D
www.magix.com
Page 53

Import 53
The track list dialog
Copy selected track(s): This button starts audio copy. A new object is created for
every track in the arrangement and the corresponding track marker is created.
Transport control: This lets you start and stop
playback just like on a real CD player and skip
forward and backward in the playlist.
Details on the total length and the memory capacity of the selected track are
displayed below.
Select all tracks: All tracks are selected, for instance, to copy the entire CD. Several
subsequent tracks can also be selected by holding the "Shift" key and left-clicking;
"Ctrl + mouse-click" selects several tracks.
Get CD Info (freeDB): Request title information from the freeDB Online CD database
(view page 144)
In the right selection
box you can select the read speed, and in the left one you can
select the export mode (see Configuring the CD-ROM (view page 55)).
CD
drive options: Here you can change the settings and select the drive for importing
the CD if you have installed several CD drives (see also CD-ROM drive dialog).
Write text file: Title list including the exact names and times can be exported as a
text file for archiving purposes.
Page 54

54
Dialog Load audio file
The "Import project" dialog appears after you have selected the option "Copy selected
tracks". Here you can specify name and target address of the audio files. The audio
files are subsequently numbered depending on their names (name -> name_1.wav,
name_1.wav...).
Audio tracks (CDA files) are imported as WAV files by default. However, they can
already be converted into MP3s during import. To do this, select the corresponding
audio format in "file type" of the dialog "Import project" and then make the
corresponding "format settings" (for more info on the audio formats please also read
"Loading audio").
Copy-protected audio CDs
According to the copyright act it is forbidden to copy a CD with copy protection, but
the owner of a CD may create a backup copy. The problem with copy-protected CDs
is that they cannot be imported using conventional PC drives. In order to create a
backup of such a copy-protected CD you have to play it on an audio CD player and
record it as a regular analog recording via the sound card.
Drive list dialog
You can select and configure the disc drive if you have more than one drive.
Configuration: This button opens the configuration dialog (view page 55)where you
can make various special settings, S
Reset: Restores the default settings of the drive.
Add drive: Creates a new drive letter in the list which still requires special settings.
Delete: Deletes the selected drive.
Save setup: Saves the current drive list and all configuration data in a *.cfg file.
Load setup: Loads the current drive list and all configuration data from a *.cfg file.
CSI IDs, etc.
www.magix.com
Page 55

Import 55
The CD-ROM configuration dialog
Drive Name: Lets you edit the name of the drive in the list. This is useful if you create
more than one entry accessing the same physical drive.
Host Adapter Number: Lets you specify the number of your SCSI adapter - normally
0.
Bus ID: Here you can enter the ID of your CD-ROM drive. Be sure to set the correct
ID, there is no error checking!
Bus LUN: sets the LUN parameter, normally 0.
Alias: Lets you select the manufacturer type of your CD ROM drive.
Normal copy mode: copies audio files without any software correction.
Copy mode sector synchronization: copies audio files with a special correction
algorithm. This is especially useful, since many CD drives have problems finding an
exact position again and gaps can occur.
Burst copy mode: optimizes the speed of the copy process, no software correction is
used.
Sectors per cycle: defines the audio sector count that should be read from the audio
CD in one cycle. The higher the number of sectors, the faster the copying process.
Numerous SCSI systems have problems with more than 27 sectors.
Page 56

56
Sync sectors: sets the count of audio sectors, which should be used for software
correction. A higher number results in a better synchronization but also in a slower
copying process.
Copy-protected Audio CDs
It is forbidden to copy an Audio CD, whether it is with or without copy protection.
Each owner of a CD may however produce a backup copy of copy-protected CDs. The
problem is that one cannot create a copy from copy-protected CDs since the CD
cannot be read in with a conventional PC disc drive. In order to create a backup copy
of a copy-protected CD, you must play it in an Audio CD Player and record it as a
"normal" analog recording via the soundcard.
www.magix.com
Page 57

Arranging in the master track 57
Arranging in the master track
This chapter is about working with objects and track markers. Descriptions of the
individual control elements can be found further on in the „Track window“ (view page
34) chapter.
What is an object?
Objects provide you with a wave form-interpretation of your audio material. The
starting point of each object is related to one single point in the audio file. The length
of the object determines the length of the excerpt from the audio recording. So, an
object does not represent the audio material itself, it is just a replay command. While
editing objects you just define additional commands which will be executed in real
time each time you listen to the object. For this reason, the original audio material
never gets altered and nevertheless your personalized settings are permanently
saved. This kind of data treatment is known as "non destructive-editing".
As objects are merely replay commands and they only indicate which audio material
has to be played, you can move them to any desired position within the track window
or even delete them without changing the content of your audio file.
Objects are important for differentiated sound editing of single tracks or loops.
Objects are subdivisions of your audio material which can be edited separately.
Tracks are in contrast simple markers for an audio CD.
Objects can be cut into an arbitrary number of smaller objects, and they can be
moved to the master track or even deleted.
Should you move or delete an object in the track, all objects that appear after the
deleted object will move up one position including their track markers, so that the
pause between the songs will be preserved.
You do not have to move the objects themselves to change the sequence of the
songs. As the following objects will all move up one position, this would only be
possible using a second track. It is much easier to move the corresponding track
markers in front of or behind another track marker. Doing this will regroup the
corresponding objects. The most comfortable solution is to use the arrow keys in the
CD track list.
Project
The project (*.vip file) contains all data MAGIX Audio Cleaning Lab 2013 uses. It does
not contain audio data but only the names of the imported and recorded audio data
and the saved locations on the hard drive, all edits, reductions and most effects
processing. Furthermore, the object display on the tracks is referred to as a project.
Page 58

58
Adjust object volume
The handle at the top center can be used to adjust the volume of the objects. This
handle is particularly important for synchronizing the volume of songs originating
from different sources. The volume of audio CDs may also differ.
Fading objects in and out
At the top corners of every object there are two fade handles that can be adjusted to
fade an object in or out. It is particularly useful to use the fade handles to avoid hard
transitions or crackling when you have cut passages out of a recording
Duplicate objects
Objects may be duplicated very easily. Click on the object to be copied with the
mouse while holding down the "Ctrl" key. This generates a copy, which you can
immediately drag to the desired position or cut separately.
www.magix.com
Page 59

Arranging in the master track 59
Reducing and increasing the length of objects
All objects can be shortened by moving the mouse to the right corner of the object
until the mouse pointer turns into a double arrow symbol. You can now reduce the
size of the object. This way the songs or recordings are shortened without having to
be edited.
Drag the handle to the right to make the object longer again. If you can't move the
object borders further, it means that no audio material is available.
If a few seconds silence were accidentally recorded at the beginning, you can easily
remove them by moving the left handle. If too much audio material was removed, you
can restore it by moving the object border back in the other direction.
Deleting and moving objects
Any object can be removed from the track with the delete tool. No gap will be created
in the project, i. e. the subsequent objects are moved.
If you move an object, all subsequent objects will be moved along in unison
automatically so that no gaps appear.
Cut objects
Use the commands "Remove object beginning" or "Remove object end" (keys D and
U) in the "Edit" menu to remove superfluous beginnings and ends of a recording.
To do this, set the object's position line to the beginning of the part of the object you
want to keep (e.g. the music) and press D. Now set the position line to the end and
press U.
Page 60

60
Alternatively, you can use the scissors mouse mode. Use it to click on the parts of the
waveform where you want to split the recording. Objects that are no longer required
can now be removed from the track with the delete tool or Del key.
If you cut objects, a short fade is created automatically at the cut position to prevent
crackling.
If you separate the material into small objects, you can rearrange the order entirely.
For such arrangements we recommend using the second track (view page 150),
which can be
To find the best positions for object cuts we recommend working with a zoomed
waveform display. Use the zoom functions (view page 41) for this.
used for shifting the objects.
Join and mix objects
When you push an object from the right over the object to its left, it will cover it like
one sheet of paper covers another (completely or just in part). The invisible part of an
object will not be played.
The program automatically inserts a crossfade between the two joined objects if the
fader-handle of the second object is dragged a bit to the right. This is another method
to remove clicks.
A fade in a selected object is represented by a Crossfade symbol.
The shape of the crossfade curve can be changed by clicking on this symbol. You can
also apply the Surround Transitions here.
You can make the invisible part of the second object visible (and audible) again just
by moving the second object to the right.
You can do the same using the second track. Passages that are overlapping on two
tracks will be played as overlapping. Now you can search for your ideal mix using the
volume and the length handle, cutting your object and moving it.
Fading objects
With every cut the two objects that are created are slightly crossfaded in order to
avoid crackling. This is called Auto crossfade. A crossfade is also added if two objects
in a track are moved into each other or overlap each other.
A crossfade symbol is added to each crossfade. By clicking on the symbol, you
can change the curve of the transition.
The top handle of the right object allows you to regulate the fading in and out of both
objects.
www.magix.com
Page 61

The bottom handle controls the length of the two objects. If you move them, one of
them is extended whereas the other is shortened. The length of both objects together
remains the same.
Arranging in the master track 61
Change song order
You do not have to move the objects themselves to change the sequence of the
songs. As the following objects will all move up one position, this would only be
possible using a second track. It is much easier to move the corresponding track
markers in front of or behind another track marker. Doing this will regroup the
corresponding objects. The most comfortable solution is to use the arrow keys in the
CD track list (view page 115).
Automatic insertion of pauses between objects
When importing individual songs (or other audio material) one after the other, they
will be presented in the track as a sequence of objects. The program automatically
introduces a 2 second break (space) between each of the objects.
You can change the default pause lenght in the "CD" menu > "Set automatic pause
length".
Several songs in a single long object
When you record an LP for example, one complete side of the LP will appear as one
single object in your track window. If you want to split such an object into individual
song-objects, you will have to search for the transitions in the waveform presentation
and cut them "by hand".
In most cases however, it is not necessary to create an individual object for each song.
Placing track markers at the beginning of the songs is normally sufficient.
Object effects
Each object can be edited separately with all effects. To do this, cut the object into
several smaller objects and edit each object on its own on the object effect page.
The object effect button for the corresponding object must be clicked on.
Page 62

62
You can find further details about the object effects page in the „Cleaning effects“
(view page 67) chapter.
Draw volume curve
Use the Volume curve button to activate a volume curve.
You can use it to add volume curves to your audio material, for instance, for
compensating volume fluctuations or increasing the volume of quiet passages.
Volume changes are immediately visible in the waveform display so that it is very
easy to visually align the volume of different passages.
There are two ways to edit these volume curves:
A "handle" is created by clicking on the curve (in standard mode). You can then move
it with the mouse and create volume progressions. This method should preferably be
used if gradual volume changes over longer passages are needed.
Additionally, you can use the Volume curve mouse mode (view page 39). This
allows you to "draw" any volume curve using the mouse a
irregular volume progressions quickly.
Tip: The Voice over effect (view page 108) creates volume curves for automatic
fading in/out based on the audio material in the second track.
nd lets you create
Quick zoom
For many tasks it is quite useful to enlarge the wave shape display.
For quickly zooming it is sufficient to click in the timeline, keep the mouse button
pressed and move it up or down. This way you can quickly zoom the cursor in and out
at any position without releasing the mouse.
www.magix.com
Page 63

Arranging in the master track 63
Set track markers
In many occasions you will not load single songs, one after the other, into a project,
but a certain number of them at the same time, for example while recording one side
of an LP.
If you want to record this LP on a CD, you should first set track markers at the
beginning of each song. The track markers can already be set while recording in the
Record dialogue – "by hand" or automatically by the automatic CD Track detector
(see below). It is however also possible to set, move and delete the track markers
afterwards by using the 1click-Burn-Automation.
It is furthermore possible to set the track markers directly in the master track. Place
the position line on the beginning of a new song and press the m key (or select the
option "set track marker" in the CD menu). The new track marker appears just above
the position line on the time ruler.
Automatic track recognition
There are multiple options for automatically separating the material into CD tracks:
1. during recording in the Record dialog (view page 47)
2. using the option "Automatically set track markers" (view page 141) (CD menu)
3. with the help of the Track Agent (view page 115)
MAGIX Audio Cleaning Lab 2013 searches for positions where new songs start, i.e.
the end of a pause. Pauses are normally 0.5 - 3 seconds long.
Track markers are set automatically at the end of a pause.
The second step checks to make sure the interval between the pauses is long enough.
For example, it is very improbable that a recording of the Top Ten hits will contain
Page 64

64
pauses a minute long. If this sort of thing is detected, the marker for the second pause
is removed.
The third step examines the start and end of the audio material more precisely.
Records always feature a loud bump when the needle is placed on the record and
another one when it is removed from the record at the end of the recording. MAGIX
Audio Cleaning Lab 2013 attempts to recognize these noises and to exclude them, i.e.
object edges are automatically moved inwards to match the start and end of the
actual music.
There are sensible presets for thresholds and times in the track marker automation
which depend on the selected recording source (records, cassettes, CDs/DVDs,
Internet). If these don't work properly, you can change them in the Track marker
recognition options (view page 153) dialog ("Options" menu).
etimes it is helpful to place the first one or two markers manually and to separate
Som
the objects using the "T" key, especially if the volume levels are very different. MAGIX
Audio Cleaning Lab 2013 will examine the objects individually.
MAGIX Audio Cleaning Lab 2013 cannot recognize the correct track markers in every
case (e. g. during live recordings or with classical music). If you've tried using a
number of different settings and still aren't satisfied with the results, then you should
set the track markers manually in the menu "D" > "Set track marker".
Check and move track markers
Before writing your audio material on the new CD, you should check if all track
markers are located on the correct places. The Track Wizard ("1 Click Track Creation
and Burn") offers you an easy to read list, which includes all track markers that can be
selected, moved or deleted individually.
Move the position line from marker to marker pressing the Alt- and the cursor key
(arrow keys of the numeric key pad) in order to select the track markers directly in the
track window, and replay the material from that starting point on. If the marker should
be unnecessary or placed at the wrong position, just click on it and delete it or move it
by holding the mouse button.
If a track marker is dragged in front of or behind another track marker, the
corresponding objects will change their position in the track. This allows you to
quickly change the sequence of the songs. This is even more easily done if you use the
arrow keys in the CD track list (view page 115).
www.magix.com
Page 65

Cleaning 65
Cleaning
Most cleaning functions are activated in the Cleaning FX section – either as master
effects on the main screen or as object-related effects on a separate object effects
page.
All effects in the "Cleaning" section are applied in realtime. You can switch them on
and off during playback or change their parameters and hear the results immediately.
Additional cleaning functions can be found in the "Effects" menu.
Choose preset
Click on "Select presets" to open the "Cleaning effects" menu. Here (or in the "Edit"
menu) you can save and load your favorite effect settings as "Cleaning effects
settings" for your projects or objects. Different presets (for example, "Restore a poor
quality record") are supplied with the product and can be tried out right away.
This allows you to listen to each preset by clicking on the corresponding
speaker symbol.
Cleaning FX presets can be applied to individual objects, as well as to the entire
sound.
Using the effect modules
On/Off: Individual effects modules can be turned off and on using the buttons to the
left.
Control knobs: Each feature has a knob that controls the intensity of the cleaning
effects.
The "Cleaning" section effects include a range of useful presets which can be chosen
from a flip menu. Click on the arrow to access the feature you want. In most cases
one preset is enough to achieve good results.
Audio perfectionists can perform their own editing with the effects in the
cleaning section. For this the "Effect device" is opened with the button on the
right of the module. Now the cleaning effects can be edited.
All effect devices can be activated and deactivated using the "On/Off" button. Click
on "OK" to apply the settings, "Cancel" closes the effects device without applying the
settings. "Reset" returns the settings to their defaults.
Page 66

66
Set automatically
The "Set automatically" button opens the Cleaning Agent. This analyzes the audio
material and selects the appropriate effect.
Original: Plays back the audio without the suggested editing.
Result: Plays back the audio with the suggested editing from the Cleaning Agent.
Step-by-Step: Opens the Step-by-Step mode (view page 66).
ly: Closes the Cleaning Agent and applies all the suggested changes.
App
Step-by-Step
www.magix.com
Page 67

In Step-by-Step mode the various effects are introduced one at a time. For each effect
you can choose whether or not MAGIX Audio Cleaning Lab 2013 should apply it and
which preset should be used.
DeHisser: Opens the settings for the DeHisser.
DeNoiser: Opens the settings for the DeNoiser.
DeClicker: Opens the settings for the DeClicker.
DeCrackler: Opens the settings for the DeCrackler.
On/Off: Here you can turn each effect on or off.
Presets: Here you will find typical settings for different applications of the
effect. You can use the controller at the bottom to adjust the intensity of the
effect.
Original: Plays back the audio without the suggested editing.
Result: Plays back the audio with the suggested editing from the Cleaning
Agent.
Next Effect: Moves to the next effect dialog.
Close: Closes the Step-by-Step mode without applying any of the effects.
OK: Closes the Step-by-Step mode and applies all of the effect settings.
Cleaning 67
Bypass
You can use this button to turn all effects on or off to compare the edited
material with the original.
Project and Object Effects
The effects in the Cleaning and Mastering area can be applied to individual objects or
to entire projects. The default setting applies them to the entire project. You can
change this setting using the two buttons under the project window.
The object effects for an audio object can be accessed with the button in the
bottom left corner of the object.
• Just like on the main interface, you can switch between cleaning and mastering
effects. All other controls, such as presets and step-by-step settings, are available
on the Object Effects page as well.
• All effects, except for Spectral Cleaning, are also available as object effects. In
addition, you'll also find Temp/Resampling (view page 75).
bject mode you can control the level using the volume control for the object
• In O
(the object handle in the middle). The auto button located at the level controller
of the object performs a normalization (view page 137) to 0dB.
Page 68

68
• You'll recognize the object you are currently working on by its colorful
background.
• Beside the object effect button on the object you can see which effects are being
applied to the selected object at any given time.
Info Box
The Info Box offers fast and immediate help when working with MAGIX Audio
Cleaning Lab 2013. You can open it with the arrow button on the right side of the
Cleaning and Mastering section.
With the two buttons below the Infobox you can switch between the Infobox and the Analyzer
Click on an effect to get information about its range of application, functionality,
correct handling and possible sources of error.
Clicking on an object displays the applied Object effects (view page 67), if available.
The Inf
o Box also offers useful tips for other program areas.
www.magix.com
Page 69

Cleaning 69
Analyzer
Audio material being played is graphically illustrated in the visualizer. You can choose
between the following display options: Peak Meter, Oscilloscope, Phase Correlation,
Spectroscope and Spectrogram.
The visualizer can be modified to your taste. To do this click on Setup, a context menu
will then open in which you can select the display mode. There are numerous presets
for every display mode under "Presets".
DeClicker/DeCrackler
This functions removes crackling and clicking noises which are typical on scratched
records.
This function can be used on objects if the clicking and crackling noises only occur in
specific parts of the audio. Search for the noises in the track window. Once you have
found a noise, cut it with the "Scissors" tool just before it begins and once again where
it stops in order to make it into an individual object.
Page 70

70
Then activate the "Object" button in the cleaning area to use the DeClicker only on
the area where the noise occurs.
Tip: If the DeClicker is not able to remoive the noise, you can also cut it out
manually. To do this you have to zoom in as much as possible on the object to cut
out the noise (preferably on a zero crossover - use the stereo display to get a as
close to a zero crossover as possible on both channels) and move the second object
created back to first object (zero crossover). Then you can move the object ends of
both objects sightly over each other to blend them together.
Marker DeClicker
Along with normal crackling on a vinyl recording, there can be some more noticeable
noises on a record which is scratched. If the DeClicker is set very high for those
sections which are particularly noisy, it can lead to several components of the wanted
signal being affected by the DeClicker if they exhibit similar characteristics as the
noise.
To avoid this we recommend setting the DeClicker at a lower setting and removing
the sharper pops and clicks with the help of the Marker DeClicker. These sections can
be set using a click marker (SET). The special "Marker DeClicker" affects the audio
material only at these positions and the normal DeClicker can be set at a weaker level
to avoid compromising the audio material.
"SEARCH" allows you to search the entire project for especially strong clicks and have
them marked automatically. With the "SENSITIVTY" controller you can set the
sensitivity of the search. If the this is set high, more clicks will be found.
DeCrackler
The DeCrackler has been specifically developed to remove crackling noises from old
records. Loud, individual click sounds can be removed more easily with the DeClicker.
DeClipper
If the input level of an audio recording is too high, distortion may result at the louder
parts (the signal peaks). This digital distortion is also called "clipping". At the
overmodulated area, the values that are too high are simply cut off and the typical,
annoying crackling and distortions are heard.
MAGIX Audio Cleaning Lab 2013 has a special function for dealing with digital
clipping.
Distorted sections are discovered and filtered out based on the material in the
selected object. Lastly, the master volume of the material can be reduced so that the
interpolated parts can be played back without distortion.
www.magix.com
Page 71

The DeClipping algorithm is particularly good for audio material with clearly audible
clipping, e. g. distorted piano or vocals. The sound of distorted drumbeats on the
other hand is hardly ever improved.
Clip Level: Here you can enter the level at which the algorithm register the samples as
distorted and corrects them if necessary. This is important because different sound
cards have different clipping characteristics.
Get: Here you can determine the clip level automatically.
Output Level: The interpolated signal peaks create a change in the master volume
that must be balanced with the output level fader to avoid further distortion. Keep an
eye on the peak meter to the right of the dialog when doing this.
To be safe you can activate the "Limiter" which reliably prevents clipping.
Cleaning 71
DeHisser
The Dehisser eliminates regular "white" noise typically produced by analog tape
recordings, microphone preamplifiers, or AD transformers.
Noise Level: Here you should set the threshold of the DeHisser as precisely as
possible. Setting the value too low will result in insufficient removal of the hissing.
Incomplete removal of hissing produces artefacts and should be avoided. Setting the
values too high leads to dull results – parts of the wanted signal that are similar to
noise, such as the blow-off from wind instruments, are filtered out.
The setting doesn't cause any problems at a reduced hissing level.
Adaptive: The value for the noise level parameter is set automatically by determining
the level of the hissing present in the signal. If the value for the noise level is changed,
the effect will be relative, i. e. the resulting value will be derived from the automatic
setting and the setting of the noise level fader.
Page 72

72
An advantage of this you no longer have to adjust the noise level manually and the
values are adjusted for fluctuating noise levels, e. g. if you use different tracks with
varying noise levels in one project.
If the noise volume is constant, you may be able to achieve better results by setting
things up manually (adaptive off). But the value for noise level has to be set exactly.
Removed: For test purposes the filtered out audio material from the DeHisser can be
previewed.
Noise Reduction: Here you can adjust the dampening of the hissing in decibels. It is
often better to reduce hissing in smaller increments, e. g. -3- to -6 dB, rather than as
much as is possible to keep the sound natural.
Audio Type: Set the type of edited audio material here and the algorithm will be
adjusted accordingly.
Presets: Here you can select from various DeHisser presets.
DeNoiser
The DeNoiser removes persistent background noise like computer humming, hissing,
noises from sound cards, disturbance from ground wires, interference from audio
equipment with high-impedance outputs (e.g. turntables). Subsonic noise or rumbling
can be removed effectively from LPs with the rumble filter.
The DeNoiser requires a short section from your music which contains a sample of
the audio noise, usually from the start or end of the recording.
When the DeNoiser is activated in the project for the first time, a sample of the noise
will be searched for immediately under the playback marker. These automatically
detected noise samples can help with achieving good results even without opening
the DeNoiser dialog.
For even better results, open the dialog with the "Edit" button.
www.magix.com
Page 73

Noise sample: If the automatic noise sample settings were not suitable for finding
noisy material, then a noise sample can be selected from the list. There are several
typical noises to choose from.
An even more specific option is to create a noise sample yourself.
Length: The length can be set in ms if the "auto" button is switched off, otherwise the
length of the noise sample will be determined automatically.
Pick: generates a noise sample. A short noise sample is taken from the selected play
range. The playback marker can also be moved with the transport console when the
dialog is open to search for a suitable position. If the playback position is between two
objects, a noise sample cannot be generated. The play button allows the noise sample
to be previewed for testing purposes.
Wizard: This opens a wizard that helps to create the noise sample. The wizard mainly
consists of a search function which helps you find the suitable noise sample in the
audio material. Various types of noise can be selected.
Save: The noise sample created can be saved in the noise sample folder. It is then
available as a new noise sample in the noise sample preset list for any other project.
Audio type: Set the type of edited audio material here, and the algorithm will be
adjusted accordingly.
Cleaning 73
Removed noise: The part of music that was filtered out by the DeNoiser can be
previewed for testing purposes.
Processing
Anti-noise: In this mode the DeNoiser works in an optimized mode to remove noise.
Anti-hum: In this mode the DeNoiser works in an optimized mode to remove tonal
interference. This includes feedback from power cables, power humming, PC fans,
video cameras, or ventilation noises.
If the "Max. damp tonal noise" option is active, all sounds of this kind will be removed.
The "Reduction" controller now affects all possible existing noise components
simultaneously. This makes sense because tonal disturbances are much more
annoying than other noise - a small amount of "extra" noise in the recording may be
allowed in order to avoid a greater loss of highs in the wanted signal.
Noise level: The threshold of the noise reduction function should be set as precisely
as possible. Values that are too low will result in insufficient noise dampening which
causes artefacts like interference or "twittering" (see below). High settings produce
dull results – useful signals that sound similar to hissing noises are also filtered away.
Take your time to find the best setting for the individual case.
Page 74

74
Reduction: This sets the balance between the original signal and the signal with the
applied noise reduction. It's often better to reduce interference signals in small
imcrements, e. g. 3 to 6 dB, rather than as much as is possible to keep the sound
"natural". For buzzing, it’s best to apply complete removal.
DeRumble: Here you can activate a special filter for deep-frequency rumbling noises.
Examples of these noises are mechanical noises from old record players, wind, and
subsonic noises in microphone recordings.
Preset: All the DeNoiser settings, i. e. the noise sample applied and the settings of the
processing section can be saved as a preset for later use.
Artefacts
With incorrect settings, the DeNoiser and the DeHisser may leave behind a metallic
chirping or twittering sound, the so-called artefact noise. The cause of this is the
incomplete removal of the distortion. The ear is quite sensitive to this sound because
of its synthetic character. This problem, in practice, only occurs in especially difficult
cases.
To achieve the best possible results you should pay attention to the following hints:
• First, select a preset from the selection menu. In most cases the result is
satisfactory.
• Be careful when "denoising" the effect: Less is more! The distortion sound should
no longer be audible, otherwise artefacts may be brought about.
We recommend removing any DC offset that may exist from the material before
using it ("Effects" menu > Cleaning > "Remove DC offset" (view page 74)).
Remove DC offset
This function can only be opened via the "effects" menu and can thus only be applied
to selected objects. This can be useful if your sound card overlays your sample with a
constant DC offset during recording, which leads to crackling during playback or
editing. (This is basically always the case with recordings that use the integrated
sound card of your PC).
www.magix.com
Page 75

Options: Here you can enter a minimum DC offset threshold, which indicates where
DC offset removal will kick in. You can also edit stereo channels together to reduce
computing time.
Cleaning 75
Tempo/Resampling
This effect is only available as an object effect (view page 67).
The fader lets you change the playback speed of objects so that they are better
aligned. The effect can be applied in two ways, either as resampling or as
timestretching. You can change the mode in the preset list at the very bottom.
• Resampling mode can be used to change speed and pitch just like on a cassette.
Use this mode to adjust LP recordings made at the incorrect speed.
• Timestretching mode applies a high-quality timestretching algorithm (universal
HQ) to keep the pitch constant in spite of speed changes. Use this mode to
adjust the tempo of different tracks to match each other without influencing the
pitch, e.g. for a DJ mix.
The effect is also available as a mouse mode (view page 38) for changing the tempo
across a
larger range of values.
Resampling for incorrect record speeds
If you want to record a record that was recorded at 78 rpm, then you normally have a
problem: These older shellac LPs aren't able to be played back by most turntables.
With the help of this resampling technology, it's possible to playback the record at the
incorrect speed, record it, and then correct the speed with a single click.
Page 76

76
Different presets have been provided for this. The first number indicates the speed at
which the record was played back, and the second shows the speed that it should be
played at. For example, if an older 78 rpm shellac record was played at 33 rpms, then
you would use the "33/78" preset.
A second group of presets are for adjusting wave files with different sampling rates to
the project. These are selected automatically when this sort of wave file is loaded into
the project. The first number here is also the sample rate of the project (for playback,
normally 44.1 kHz or CDs), and the second is the wave file (the target playback rate).
www.magix.com
Page 77

Mastering 77
Mastering
The mastering functions are activated in the Mastering section – either as project
effects on the main screen or as object-related effects on a separate Object FX page
(not available in the MAGIX Music Editor).
All mastering effects function in realtime which means that you can switch them on
and off and change their parameters during playback and listen to the result of the
changes immediately.
Choose preset
A mouse click on "Select presets" opens the "Master effects" menu. Here (or via the
"Editing" menu) you can save and load your favorite effect settings as "Mastering
effects settings" for your projects or objects.
Various presets (e. g., to prevent clipping) are included and can be tried out right
away.
The Mastering FX presets can be applied to the object effects area for individual
objects and to the project effects for the entire sound.
Using the effect modules
Please read the section Using the effect modules (view page 65) in the Cleaning
effects (view page 65) chapter.
Mastering Agent
The Mastering Agent applies several mastering effects in a sensible sequence. All
effects will now be introduced by means of a suitable recording example and then
applied.
It is recommended that these effects are used in the following sequence:
1. Stereo processor
2. Graphic equalizer
3. Brilliance enhancer
4. MultiMax
Page 78

78
Using the mastering assistant is the same as using the Step-by-step (view page 66)
cleaning assistant.
Bypass
You can use this button to turn all effects on or off to compare the edited
material with the original.
Project and Object Effects
Please read the section Project and object effects (view page 67) in the "Cleaning
effects" chapter.
Enhancer
The Enhancer enables the justification of the audio material in the stereo panorama to
be adjusted. If the stereo recordings sound unfocused and undifferentiated, an
extension of the stereo base-width can often provide better transparency.
Use the maximize function to move the echo and improve the stereo picture, for
example, into the foreground.
Volume controller: Adjusts the volume of every single channel to adjust the complete
panorama. The reduction of left and right levels is displayed under the control
buttons.
Pan-direction: Use this controller to move the sound source from the middle into
stereo panorama. The signals at the outer edges of the sound picture remain
unchanged.
Multiband: This option switches from "Stereo FX" to "Multiband" mode. Stereo
editing only applies to the middle frequency, the bass and highs remain unchanged.
Bandwidth/maximize sensor field: Adjusts the base width between mono (extreme
left), unchanged base width (normal stereo), and maximum base width (wide,
extreme right). Raising the bandwidth (values over 100) diminishes the mono
compatibility. This means that recordings edited this way sound hollow when listened
to in mono.
www.magix.com
Page 79

Maximize strengthens the spatial component of the recording, which also increases
the stereo transparency without influencing the mono compatibility.
Stereo meter (correlation gauge): This provides a graphical display of the phase
relation of the audio signal. You can use it to review the orientation of the signal in the
stereo balance and the effect of the stereo enhancer. To maintain mono-compatibility,
the "cloud" shown should always be higher than it is wide.
Mastering 79
Equalizer
The Equalizer consists of two modules, the Parametric 6-band Equalizer and the 10band Graphic Equalizer.
6 Band Equalizer
The parametric equalizer has six filter bands that you can use to shape the sound of
the music track. Each band is a filter with a typical "bell shape". Within a certain
frequency range around an adjustable middle frequency you can increase or reduce
the signal level gain. The width of this frequency range is called bandwidth. The
bandwidth is defined by the Q value. The higher the Q value, the narrower and
steeper the filter curve.
You can influence the basic sound of the mix by increasing and decreasing the
broadband so as to give it more "depth" (lower center 200-600 Hz) or more "air"
(Highs 10Khz). You can also decrease the narrowband width (high Q-value) in the
frequency response to remove disruptive frequencies.
Sensor field: The sensor field displays the resulting
frequency response of the equalizer´. The frequency
is displayed horizontally and the increase or decrease
of the respective frequency is displayed vertically.
The blue bullets 1-6 symbolize the six frequency bands. You can move them around
with the mouse until you find the frequency response you want.
Page 80

80
You can control the output level of the equalizer with the Peak Meter . With the
Master Gain Controller beside it you can offset the level changes resulting from the
EQ adjustments.
You can access additional settings for each frequency band by clicking on the bullets.
You can use the knobs to set the values for each band. There is also a numeric field
for each parameter where values can be entered.
Gain: This controller allows you to raise or lower the filter. Setting the controller to 0
deactivates the filter so it does not use any CPU power.
Freq: The center frequency of the individual filters can be set between 10 Hz and 24
kHz with the frequency controller. Freely choosing the frequency enables multiple
filters to be set to the same frequency in order to have a greater effect.
Q (Bandwidth): Here you can set the bandwidth of the individual filters to between 10
Hz and 10 kHz.
Bands 1 and 6 are special: Their Filter Curves can be edited in three different modes.
The four editing points in the graphic have different functions in each mode.
Peaking: Here the effect curve is brought closer to the working point (which
represents the peak of the curve) from both sides simultaneously.
Shelving (Basic setting): Here the working point displays the beginning of the
filter curve. From this point on there is a gentle increase or decrease in the
frequency.
High or Low Pass:In Band 1 the working point displays the frequency which is
filtered out of particularly high or low frequencies.
www.magix.com
Page 81

Mastering 81
Graphic Equalizer
The 10-track equalizer divides the frequency spectrum into 10 areas (tracks) and
supplies them with separated volume controls, which allows you to achieve many
impressive effects, from the simple rising of the bass, to total sound transformation. If
you raise the low frequencies too much throughout the whole level, it can cause
distortions. In this case, lower the master volume using the master volume control on
the main screen.
Thumb Controls: All of the 10 frequency areas can be raised or decreased separately
by the 10 volume controls.
Link Bands: Using this switch you can match the frequency areas in a flexible way to
avoid the overemphasizing of single frequency areas that sound artificial.
A/B: If you have selected a preset for the effect and later you change it manually, you
can compare the original-preset-sound with the new adjustments using the A/Bswitch.
Reset: Reset inserts the sound effect into the neutral starting position where no
processing power is used and where no effect is calculated in the sound.
Touch-screen (right EQ-Section): This is the "sensor-field" of the EQ: Use your
mouse to draw a curve that will be transferred immediately into the corresponding EQ
control adjustment.
Brilliance Enhancer
The Brilliance Enhancer is a high-end audio tool with which, for example, losses in
high frequencies, which occur with MP3 compression or while recording older
records, can be regained.
In contrast to the equalizer, which only works on the currently available frequency, the
brilliance enhancer calculates new harmonics and noticeably revitalizes the sound
from residual material
Page 82

82
Soft: Activating this option depends upon your own perception of sound. If you would
like to produce a more lurid sound (such as grunge) you should deactivate the "soft"
option. This option does, however, reduce eventual distortion.
High Quality: This option improves the results of the effects while demanding more of
your computer’s performance. As with the "soft" option, your own notion of sound
should come into play when choosing this option.
SoundCloner
SoundCloner 2 analyzes the sound characteristics of songs and transfers them to
other recordings. Allowing you to apply the sound of a 60s soul recording to a
modern pop song for example. You can also use SoundCloner to analyze compilations
of different songs and compare their sound.
SoundCloner features an FFT Filter (1024 - band equalizer) and a compressor. The
filter curve and compression properties are automatically calculated and presented as
a combination of the cloned sound and output sound.
As well as "Clone" presets the SoundCloner presets menu contains a few useful filter
settings that provide a typical sound for a range of eras (70s, 80s, 90s etc.).
Filter curves can also be edited manually, SoundCloner can therefore also be used as a
filter for creating strange effects. It can also prove more effective than the DeNoiser at
removing noise in certain circumstances, e.g. for removing whistling in the
background.
Using the SoundCloner
1. Load a song with a sound you really like.
2. Now change to "Object" on the effect page and click on the cog wheel icon
next to the audio object to activate the object effects.
3. Open SoundCloner 2 and click on "Get Sound". The sound characteristics are
now calculated. After that, the sound will be available as SOUND CLONE
preset and can be stored permanently for later use by clicking "Save".
4. Activate SoundCloner on the object you want to apply sound to and load the
SOUNDCLONE preset. SoundCloner detects the sound and dynamic
properties of the target object and calculates the filter curve and/or the
dynamic setting, which resulted when the audio characteristics of
SOUNDCLONE and the edited object were combined.
5. The filter curve and the dynamics editing of SoundCloner compare the audio
characteristics of the target object to those of the analyzed object. Using the
"Strength" slider under the filter graphic you can regulate the intensity of the
frequency adjustment.
www.magix.com
Page 83

Mastering 83
Note: The SoundCloner has to be used as an object effect because the final filter
setting depends on the audio characteristics of the "cloned" object and of the target
object.
Controls
Preset: As well as "Clone" presets the SoundCloner presets menu contains a
range of useful filter settings. These are independent of the source material and
can be used at project level.
Get Sound: This button analyzes the audio characteristics and makes the
SOUNDCLONE preset available.
Save: Save the SOUNDCLONE preset under another name for later use.
Last Used: Lists the last 5 presets used.
Original/Result: Plays the edited/unedited object.
Reset: Resets SoundCloner 2.
Filter graphic: This is the centerpiece of SoundCloner, it is a freely-drawable
filter that displays in realtime the frequency response, before and after applying
the filter. (See below for instructions on how to use).
Strength: The strength slider allows you to enhance or diminish the differences
in the curve movement. You can are therefore control how much SoundCloner
adjusts the sound to the presets.
Compression: This slider lets you change how much the preset's dynamic range
should be adjusted. Dynamic range can only be reduced, so if the SoundClone
preset has a higher dynamic range than the edited material this slider won't have
any effect.
Audio Type: You can choose from a range of different audio types (speech, pop
music etc.) to optimize the compressor's function.
Volume: The volume slider allows you to balance out any volume changes
caused by the compressor. The peak meter next to it displays the input and
output levels.
Page 84

84
Filter graphic
The frequencies are listed in ascending order from left to right. The height of the curve
represents the amount of a specific frequency in the entire sound. The blue curve (1)
shows the original frequency response, the yellow curve (2) displays the corrected
frequency response, i.e. the frequency response the spectrum has after applying the
filter.
The pink curve (3) is the filter curve, its height determines to what extent the
respective frequency should be amplified or attenuated. When using SoundCloner as
a filter this curve is a combination of the desired frequency response ( = content of
the SoundClone preset) and the current frequency response. The means the red curve
will always look different regardless of the object when using the same preset.
The filter curve can be drawn using the mouse in the filter graphic. Draw or rotate a
straight line by pressing and holding the "Shift" key.
Click on the Magnifying glass icon (4) to change zoom mode. Zoom in using the left
mouse button, zoom out using Ctrl + left mouse button. You can move zoom areas by
holding down the left mouse button.
Click on the pen icon to change back to draw mode. "Reset" resets the red filter curve
to neutral, i.e. to be on a straight line with the initial position.
Removing audio distortions with SoundCloner
Sometimes the DeNoiser isn't the right tool for removing certain kinds of noise
interference. For example if the noise doesn't occur anywhere "alone" in the recording
it is hard to get a sample to use, or if the noise is particularly loud the DeNoiser filters
too little of the useful signal resulting in a hollow, artificial sound.
Some noise interference consists of a few frequencies, and often only one frequency
(pure tone, such as the "pips" on the radio) A typical example of this is a constant,
www.magix.com
Page 85

clearly-audible drone in old video recordings. The FFT filter is perfect for this kind of
noise as it allows you to remove specific frequencies without affecting the rest of the
recording.
Follow these instructions to do so:
Mastering 85
1. Reset the filter curve ("Reset" button in the bottom left of the window).
2. You will be able to spot the noise interference during playback as it is the only
peak that remains constant in the otherwise constantly changing blue filter
curve. Under certain circumstances you may have to zoom in on the area you
think the interference signal is located.
3. If necessary, switch to the drawing pencil and draw a horizontal line below the
peak on the lower edge of the filter display, ideally it should be just long
enough that the peak in the yellow (resulting) filter curve disappears.
4. If the noise interference can still be heard you can also remove the overtones
of the signal, which are weaker peaks that can be found in the second, third,
fourth frequency etc.
MultiMax
MultiMax is a compressor with three independent frequency bands. The dynamics
are edited separately for each band.
The advantage of a multi-band compressor in comparison to a "normal" compressor
is that the "pumping" tendency and other disturbing side effects are dramatically
reduced while editing dynamics. For instance, it can prevent a bass top peak from
"dragging down" the entire signal.
Multi-band technology also lets you specifically edit individual frequency ranges.
Link bands: When this button is activated and one fader is adjusted all faders are
changed in the same ratio. The type of dynamic editing is not influenced.
Limiter: MultiMax includes a limiter that prevents clipping by automatically lowering
the level. Quiet parts remain unaffected.
High quality: When the "High quality" setting is activated, an even more precise
algorithm is used, but it also requires more processing power. We recommend that
you switch on this setting before you export the project.
Setting the frequency bands: The settings of the frequency bands are changed
directly in the graphic. Simply click on the separator lines and move them.
Page 86

86
Bass/Mid/High: These knobs control the level of compression for each frequency
band.
Presets: In MultiMax you can use the presets to open two more special functions.
• Cassette NR-B decoder: MAGIX Audio Cleaning Lab 2013 simulates decoding of
Dolby B + C noise suppression if no Dolby player is available. Casettes recorded
with Dolby B or C sound more muffled and slurry if played back without
corresponding Dolby.
• DeEsser: These special presets are for removing overstressed hiss sounds from
speech recordings.
Dynamics
The compressor is an automated dynamic volume control. It limits overall dynamics,
maintains the volume of loud passages so they stay loud, and increases the volume of
low passages. A compressor can be put to good use for e. g bass recordings and
vocals, but also as a master effect in the mixer for subsequent editing of the overall
sound.
Processing is carried out using a "look-ahead" method, similar to high-quality studio
appliances. There are no peak overmodulations or other artifacts as the algorithm can
never be 'surprised' by sudden level peaks.
Ratio: This parameter controls the compression level.
Threshold: This sets the volume threshold below and above which compression is
applied.
Attack: Sets the algorithm's reaction time to increasing sound levels. Short attack
times can create an undesirable "pumping" sound, as the volume is quickly reduced or
increased correspondingly.
Release: Sets the algorithm's reaction time to falling sound levels.
Gain: The gain controller amplifies the compressed signal.
Presets: Here you'll find settings for a variety of standard applications of the
compressor.
www.magix.com
Page 87

A/B: If you have selected a preset for the effect and make manual changes to it, you
can compare the original preset sound with the new settings by using the A/B
button..
Reset: This resets the effect device to its original neutral starting point where minimal
processing power is required and no effect is added to the sound.
Mastering 87
Special presets
In the compressor you can use the presets to open further special functions.
Dynamic expander: Too high a compression rate will result in audible noise (usually
defined as a pumping sound). Radio recordings in particular are recorded with very
high compression rates to increase the perceived volume. Unfortunately, compression
reduces the dynamics (interval between the quietest and loudest part). The expander
enhances the dynamics of the recording.
Noise Gate: This cleaning function suppresses noises which are completely below a
certain volume threshold. This lets you create, for example, song transitions that are
entirely noise-free.
Leveler: This setting automatically sets the entire material to an identical volume
level. The volume control knob is no longer required. You can use this function to
equalize greater volume differences within a song. To equalize volume variations
between different songs you can also use the function "Normalize loudness" in the
"Effects" menu.
Reverb/Echo
The reverb effect device offers newly developed and very realistic reverb algorithms
to add more room depth to your recording.
Reverb is probably the most important but also the most difficult effect to generate.
Parameters
The reverb effect has the following parameters:
Size: defines the size of the room (or the system for the plate and spring). The larger a
room, the longer the sound travels between walls or objects. With some low "size"
settings you can also reduce the distance between the individual reflections. This
allows resonance to develop (accentuated frequency ranges), which can sound
oppressive if the reverb sustain is too long.
Page 88

88
Time: With this knob you can adjust the echo time and determine how much of it will
be absorbed and, simultaneously, the reverb's decay.
Color: You may influence the sound characteristics of the effect within certain limits.
The effect of this controller depends on the used preset. In rooms, "Color" controls
the dampening of the highs in the reverb (from dark to bright) as well as pre-filtering
of the signal. With plate and spring presets, this fader determines the dampening of
the basses as well.
Mix: This controller sets the mix ratio between the original and the edited signal. For
rooms, you can therefore move a signal further into the room by increasing the effect
share. The last four presets are intended for use in an AUX channel of the mixer and
are set to 100%.
Presets
The presets represent the basic settings for the various room algorithms, which can
still be varied along with the other parameters. Hence, they are more than just simply
parameter sets.
Delay
This effect is like an echo which delays the signal and repeats it.
Delay: This sets the period of time between the individual echoes. The more the
control is turned to the left, the faster the echoes will follow each other.
Feedback: This adjusts the number of echoes. Turn the dial completely to the left,
there is no echo at all; turn it completely to the right and there are seemingly endless
repetitions.
Mix: This fader determines how much of the unprocessed original sound (dry signal)
is subjected to the echo (wet signal). Application of this effect in an AUX bus requires
the controller to be set to 100% (all the way to the right).
Plug-ins
Microsoft's DirectX and VST-compatible plug-ins may be used for effects calculation
in MAGIX Audio Cleaning Lab 2013. This allows you to use almost any effect
algorithms of third parties in addition to the effects integrated in MAGIX Audio
Cleaning Lab 2013.
Some of the supplied effects will be loaded as Plug-ins. These are:
• Tape simulation
www.magix.com
Page 89

• De-esser
• Energizer
• AM-Track SE
• Chorus
Selection menu: Select the plug-in via the selection menu on the right hand side of
the module. For this, you will need to have plug-ins installed on your computer. The
path to search for installed VST plug-ins can be set in the "Options" menu via -> "Set
path settings". All recognized plug-ins will be added to the menu list.
Edit: The selected plug-in is opened to define specific effect settings.
Mastering 89
VST Plug-in Editor
The VST Plug-in Editor can be opened by right-clicking on the instrument's name in
the MIDI Editor, via the corresponding plug-in slot in the Mixer, or via the "VST
Instruments Editor" entry in the instrument list.
The Instrument Editor has two views, the so-called "GUI" of the plug-in (Graphical
User Interface) and the parameter view. This is either automatically activated when
the VST plug-in does not have its own GUI or can be used if the GUI of the plug-in is
too unclear or takes up too much space on the screen. The parameter view displays
the eight parameters of the plug-in as sliders. In the File menu you can change
between these views (plug-in dialog/plug-in parameter).
Load/save patch/bank: The instrument settings can be saved and loaded in the
patch formats typical for VST plug-ins (*.fxp) and bank formats (*.fxb).
Random parameters: This function can be an important source of inspiration.
However, before using it please save the current preset you've just created as this
feature does not ask before it is applied.
Menu program: Here you can select the presets integrated into the plug-in or loaded
via the File menu.
Tape simulation (plug-in)
Tape simulation offers you the possibility of giving your recordings an "analog touch"
by imitating typical aspects of a tape recording. In a lot of studios, 1" and 2" tape
machines are still used because they are thought to create a fullness of sound,
"warmth" and "saturation" that contrasts with the more neutral and analytical sound
of digital technology.
There are numerous factors that are decisive for the sound expressiveness of tapebased recordings. Some of these are:
• Distortions that occur when the tape is played in the saturation range,
Page 90

90
• changes to the frequency response, since recording and playback-side filter steps
prepare the signal. All machines also feature more or less pronounced peaks in
the frequency spectrum, above all in the bass range (so-called "head bumps"),
• loss of highs through self-erasure resulting from the HF stream ("bias", pre-
magnetization) and intermodulation between the wanted signal and the HF
signal.
Level: Sets the input level. You decide when the "virtual tape" is saturated and how
strong the effect of this color effect should be. The signal will gain more "loudness".
EQ low/hi: Adjusts the frequency response (spectral balance controller). You can
choose whether you would like the output signal to have a richer bass level or
whether it should have more highs. This adjusts the pre-filtering at the "recording
end" as well as playback equalization.
However, please note that the frequency response of the simulation will not be
neutral even if the "EQ low/hi" controller is set to neutral. There will always be some
slight frequency-selective amplification.
The distortion resulting from use of the tape simulation can quickly create "acoustic
fatigue", especially for material that is rich in highs. A direct 1:1 comparison with the
tape section switched off reveals the differences more easily. Slight editing with the
simulation is generally sufficient to achieve an "analog touch".
www.magix.com
Page 91

Mastering 91
De-Esser (Plug-in)
If you have ever edited or restored your own spoken or sung recordings, you've most
certainly come across the occasional unpleasant loud "S" or "SSHH" sound. This
hissing can ruin an otherwise perfectly good recording.
The De-Esser works according to the "dynamic filter" principle, meaning that it
contains a filter switch (band pass and high cut), whose frequency and
implementation depends on the input signal and the recognized "problem area".
So-called detector circuiting reacts to the input peak levels in the mid and high areas.
This level recognition occurs automatically in a comprehensive modulation area. For
this reason the De-Esser can manage without having to set a threshold.
Using the De-Esser is quite simple:
You have to notify the detector circuiting which areas contain the "S" or other sibilant
sounding distortions. A switch for male and female voices has been designed for this.
Depending on the switch setting, it will select the internal parameters for the most
exact recognition possible.
After you have set the switch, the Reduction fader has to be adjusted enough that the
"S" parts of the signal are reduced to a normal level.
An overly strong reduction of "S" sounds in speech or song recordings can, however,
result in a "lisping" sound. Often, a small reduction can be enough to balance the ratio
levels.
The Removed Noise button can be used to control the recognition and adjustment of
the De-Esser. With it you can pick up the detector circuitry and evaluate whether the
switch is in the correct position.
You can also try to edit other sound sources, partially complete mixes and drum
recordings with the De-Esser. For the latter, the adjustment control can bring about
an improvement in the sound of cymbals and high hats that were too loud. For
humming signals/complete mixes, the De-Esser (discreet setting) can be used to
design the sound characteristics more softly.
For such 'forced adjustment' the correct setting for the switch can be found out quite
simply by testing ot out.
Page 92

92
Energizer (plug-in)
The Energizer belongs to the so-called psycho-acoustic processors genre. These
devices are used in the studio, acoustic irradiation, and restoration areas in order to
enhance the sound.
An effect like this usually can only be partially achieved with standard methods like
equalizing since an equalizer can only compile the frequency parts that are already in
the signal. Additionally an excessive increase in the signal (of the highs) increases the
chances of hissing.
With bass the problem often arises that for each device in an analog processing chain
(for example, tapedeck, mixing desk, pre-amp) slightly delays the signal compared to
the remaining spectrum. This type of phase lag cannot be restored with an EQ and
increasing the depth often results in a washed-out and feebler sound.
Psycho-acoustic devices are based on our hearing's ability to perceive attributes like
"freshness", "liveliness" and "naturalness" in a recording as a result of various
parameters. One of them is the harmony spectrum. The mid and high frequency
ranges of a loudly played instrument are richer than those of a quietly played
instrument. The "Exciter" tries to imitate this property with artificial harmonies.
However, this type of method cannot function statically as the noise and low-level
signals will be influenced otherwise.
The order in which individual frequencies are heard is just as important for lively
sound.
The psycho-acoustic method used in the Energizer is based on a combination of
frequency-dependent phase correction, additional harmonics creation and recognition
of so-called transients (short signal peaks).
The Energizer is subdivided into a bass and middle/high area. In both of these areas,
the audio can be enhanced independently of one another.
The parameters of the Energizer
The available effect presets cover typical areas of usage and are already set up as
presets in order to, for example, format a CD for playback on the car radio, use as a
soundtrack for your home entertainment system or for restoring distorted frequency
response curves of old records. The Energizer can have a drastic effect on the sound
even if only small changes are made to the parameters. So that you know which
www.magix.com
Page 93

Mastering 93
faders to change to get the audio results you want, the following section describes the
available faders in detail.
Low tune: Here you can tune the bass processor to a specific input frequency
(between 50 and 150 Hz). This is the preferred frequency at which, for example, a
kick drum or an acoustic/electric bass is played. The phase position of the bass range
can be influenced according to the set frequency, resulting in deeper sounds sounding
more "succinct" and "broader".
Low attack: Using the transient recognition fader the attack behavior of the tuned
range can be increased (fader to the right) or decreased (to the left). You can use this
to create a "hard" or "dynamic" bass foundation or have a range sound "legato" or
"soft.
Low mix: Here the processed bass signal is mixed with the unprocessed input signal.
Please note that material that is already highly modulated may become
overmodulated/distorted. For strong increases in the bass you should, if required,
reduce the source material in order to have enough reserves. It is also recommended
that you use the Audio Cleaning Lab Limiter as the next step.
High tune: This fader specifies the input frequency of the high tone circuitry (between
1 and 10 kHz). A part of the input signal is filtered and a phase lag is created
depending on its frequencies. Simultaneously, the dynamic harmony is enhanced.
When turned to the left you can influence the mids and highs of the signal so that, for
example, the "articulation" of speech and instruments can be edited. The further up
the frequency you go, the more the harmonies or bright sounds, like drum cymbals,
are registered. You can use this to add "shine" or "silkiness" to your recordings.
High stereo width: Use this fader to specify whether the signal that's added to the
high tone processor should be edited in mono, stereo or as a broadened signal if at all.
This way you can specify whether the range should be compiled from the stereo mids
of a recording or from the parts of the pages (for example, room information)
High mix: Here you can specify the amount of data from the high-frequency
processor that should be mixed into the original sound.
Tip: At the beginning when using psycho-acoustic devices there is a danger of
overkill. We recommend regularly toggling from unedited signals to processed ones.
In order to make subtle changes in the sound it is often enough that the change be
just about audible or that when switching off the effect, you get the feeling that
there's something missing. If the effect sounds like it's in the foreground, this usually
means that it's exaggerated too much.
Page 94

94
Analogue Modelling Suite: AM-Track SE
am-track SE is a pure analog compressor simulation. The tape simulation contained in
the full version (Analog Modeling Suite am|track http://pro.magix.com/de/audio-
gins/analogue-modelling-suite.175.html) isn't included. It is primarily used for so-
plu
called "tracking", i.e. editing individual channel strips or subgroup signals. The
compression takes place in the "vintage" setting, whereas an additional "vca" setting
is available in the full version. The plug-in recognizes the number of incoming signals
and, if necessary, edits the signal in mono.
am|track SE limitations compared to the full version:
• No Tape simulation
• no "VCA" mode in the compressor, only "Vintage" operation can be implemented
along with the presets.
• Some Expert compression settings (view page 98) are integrated in the interface,
eters: "ahead" (pre-delay) and "adapt release" (switchable release
param
automation) are missing.
(Release automation is always activated in the SE Version, which corresponds to the
set value of the middle setting of the 'capacity' controller.)
Below, am-track is explained and its features compared to "normal" software
compressors and available features.
Compressor Section
Two completely different compressors work in AM-Track, each with their own
independent control and sound methods.
You may be wondering why we mention sound when talking about a compressor,
since compressors merely relate to control actions. This isn't as simple as the idea of
"making loud quiet".
Various designs, algorithms, and topologies for solving the actual problem (dynamic
reduction), which all have their own unique character, have come from the history of
www.magix.com
 Loading...