

Page 1
t 1 408 987 6359
www.xantrex.com/support
975-0343-01-01 REV. A Printed in China
Owner's Guide
Page 2

Owner’s Guide
Page 3

About Xantrex
Xantrex Technology Inc. is a world-leading supplier of advanced power
electronics and controls with products from 50 watt mobile units to 1 MW utilityscale systems for wind, solar, batteries, fuel cells, microturbines, and backup
power applications in both grid-connected and stand-alone systems. Xantrex
products include inverters, battery chargers, programmable power supplies, and
variable speed drives that convert, supply, control, clean, and distribute electrical
power.
Trademarks
DURACELL® is a registered trademark of The Gillette Company, used under
license. All rights reserved.
XANTREX is a registered trademark of Xantrex International.
Other trademarks, registered trademarks, and product names are the property of
their respective owners and are used herein for identification purposes only.
Notice of Copyright
Duracell® 15 AMP Battery Charger Owner’s Guide © 2007 Duracell. All rights
reserved.
Exclusion for Documentation
UNLESS SPECIFICALLY AGREED TO IN WRITING, XANTREX TECHNOLOGY INC.
(“XANTREX”)
(a) MAKES NO WARRANTY AS TO THE ACCURACY, SUFFICIENCY OR SUITABILITY OF
ANY TECHNICAL OR OTHER INFORMATION PROVIDED IN ITS MANUALS OR OTHER
DOCUMENTATION.
(b) ASSUMES NO RESPONSIBILITY OR LIABILITY FOR LOSSES, DAMAGES, COSTS OR
EXPENSES, WHETHER SPECIAL, DIRECT, INDIRECT , CONSEQUENTIAL OR INCIDENTAL,
WHICH MIGHT ARISE OUT OF THE USE OF SUCH INFORMATION. THE USE OF ANY
SUCH INFORMATION WILL BE ENTIRELY AT THE USER’S RISK.
(c) REMINDS YOU THAT IF THIS MANUAL IS IN ANY LANGUAGE OTHER THAN
ENGLISH, ALTHOUGH STEPS HAVE BEEN TAKEN TO MAINTAIN THE ACCURACY OF
THE TRANSLATION, THE ACCURACY CANNOT BE GUARANTEED. APPROVED
XANTREX CONTENT IS CONTAINED WITH THE ENGLISH LANGUAGE VERSION WHICH
IS POSTED AT www.xantrex.com.
Date and Revision
April 2007 Revision A
Part Number
975-0343-01-01
Product Number
804-0157
Contact Information
Phone: 1 408 987 6359
Website: www.xantrex.com/support
Page 4

About This Guide
Purpose
This guide introduces the Duracell® 15 AMP Battery
Charger, describes the features, explains how the Duracell®
Charger charges batteries, and provides procedures for
operating the charger.
Scope
This guide provides information for the Duracell® 15 AMP
Charger.
This guide does not provide details about particular brands of
batteries. You need to consult individual battery
manufacturers for this information.
Audience
The Guide is intended for anyone who needs to install and
operate the Duracell® 15 AMP Battery Charger.
Organization
This Guide is organized into 4 chapters and 2 appendices:
Chapter 1, “Introduction”, Chapter 1 contains information on
the features available and the location of important parts on
the front panel of the Duracell® Charger 15.
Chapter 2, “Operation”, Chapter 2 explains how to operate
the Duracell® Charger efficiently to charge a vehicle battery.
Chapter 3, “Troubleshooting”, Chapter 3 will help you
identify and remedy the common problems than can occur
with the Duracell® Charger.
Appendix A, “Specifications”, Appendix A lists the
specifications for the Duracell® Charger.
iii
Page 5

About This Guide
Appendix B, “Battery Charging”, Appendix B describes
battery charging in more detail.
Conventions Used
The following conventions are used in this guide.
WARNING
Warnings identify conditions that could result in personal injury or
loss of life.
CAUTION
Cautions identify conditions or practices that could result in
damage to the unit or to other equipment.
Important:
an item that you must pay attention to.
These notes describe an important action item or
Related Information
You can find more information about Xantrex Technology
Inc. as well as its products and services at www.xantrex.com
iv 975-0343-01-01
Page 6
Important Safety Instructions
The Duracell® 15 AMP Battery Charger generates a low DC
voltage and high DC current to the battery being charged.
Operating the Duracell® 15 AMP Battery Charger incorrectly
or misusing them may damage the equipment or create
hazardous conditions for the user.
Save these instructions. This guide contains important safety
and operating instructions.
WARNING: Explosion hazard
The Duracell® 15 AMP Battery Charger is designed to charge 12 V
lead-acid batteries only. Do not use the product on batteries with
other voltage ratings.
WARNING: Shock hazard. Keep away from
children.
The Duracell® 15 AMP Battery Charger generates a low voltage
and high current DC to the battery being charged. Do not expose
the charger to water, rain, snow or spray.
Do not open the Duracell® 15 AMP Battery Charger. There are no
user-serviceable parts inside the unit.
WARNING: Explosion hazard
Do not use this product where there are flammable fumes or gases,
such as in the bilge of a gasoline-powered boat, or near propane
tanks. Do not use this product in an enclosure containing lead acid
batteries. These batteries vent explosive hydrogen gas which can be
ignited by sparks from electrical connections.
When working on electrical equipment, always ensure someone is
nearby to help you in an emergency.
WARNING: Explosion hazard
Battery reconditioning mode works only on flooded lead-acid 12 V
batteries. Do not attempt to recondition sealed lead-acid batteries.
v
Page 7
Safety
WARNING: Explosion hazard
During battery reconditioning phase, the battery generates
potentially flammable gases. Follow all the battery safety
precautions listed in this guide. V entilate the area around the battery
thoroughly and ensure that there are no sources of flame or sparks
in the vicinity.
WARNING: Heated surface
Ensure at least 2" (5 cm) air space is maintained on all sides of the
Duracell® 15 AMP Battery Charger. During operation, keep away
from materials that may be affected by high temperatures.
WARNING: Explosion hazard
Never attempt to charge a frozen battery.
WARNING: Shock hazard
To reduce the risk of electrical shock, disconnect both AC and DC
power from the Duracell® 15 AMP Battery Charger before
attempting any maintenance or cleaning or working on any circuits
connected to the Duracell® 15 AMP Battery Charger. Turning AC
ON/OFF switch to OFF will not reduce this risk.
CAUTION
Do not expose the Duracell® 15 AMP Battery Charger to
temperatures over 104 °F (40 °C).
vi 975-0343-01-01
Page 8

Safety
Precautions When Working With Batteries
WARNING: Explosion or fire hazard
1. Follow all instructions published by the battery
manufacturer and the manufacturer of the equipment in
which the battery is installed.
2. Make sure the area around the battery is well ventilated.
3. Never smoke or allow a spark or flame near the engine or
batteries.
4. Use caution to reduce the risk or dropping a metal tool on
the battery. It could spark or short circuit the battery or
other electrical parts and could cause an explosion.
5. Remove all metal items, like rings, bracelets, and
watches when working with lead-acid batteries. Leadacid batteries produce a short circuit current high enough
to weld metal to skin, causing a severe burn.
6. Have someone within range of your voice or close
enough to come to your aid when you work near a leadacid battery.
7. Have ple nty of fresh water and soap nearby in case
battery acid contacts skin, clothing, or eyes.
8. Wear complete eye protection and clothing protection.
Avoid touching your eyes while working near ba tteries.
9. If batte ry acid contacts skin or clothing, wash
immediately with soap and water . If ac id enters your eye,
immediately flood it with running cold water for at least
twenty minutes and get medical attention immediately.
10. If you need to remove a battery, always remove the
ground terminal from the battery first. Make sure all
accessories ar off so you don’t cause a spark.
975-0343-01-01 vii
Page 9

Safety
FCC Information to the User
This equipment has been tested and found to comply with the
limits for a Class B digital device, pursuant to part 15 of the
FCC Rules. These limits are designed to provide reasonable
protection against harmful interference in a residential
installation. This equipment generates, uses and can radiate
radio frequency energy and, if not installed and used in
accordance with the instruction guide, may cause harmful
interference to radio communications. Operation of this
equipment in a residential area is likely to cause harmful
interference in which case the user will be required to correct
the interference at his own expense.
viii 975-0343-01-01
Page 10

Contents
Important Safety Instructions
1
Introduction
Duracell® Charger Features- - - - - - - - - - - - - - - - - - - - - - - - -1-1
Continuous Charge Rating - - - - - - - - - - - - - - - - - - - - - - -1-2
Wide Voltage Range - - - - - - - - - - - - - - - - - - - - - - - - - - -1-2
Protection Features - - - - - - - - - - - - - - - - - - - - - - - - - - - -1-2
Isolated Design- - - - - - - - - - - - - - - - - - - - - - - - - - - - - - -1-3
Front Panel Selectors- - - - - - - - - - - - - - - - - - - - - - - - - - -1-3
Front Panel Indicator Lights and Settings- - - - - - - - - - - - - - - -1-4
Charger Cable Storage Compartment- - - - - - - - - - - - - - - -1-6
2
Operation
Operating Conditions and Guidelines - - - - - - - - - - - - - - - - - -2-1
Choosing a Location- - - - - - - - - - - - - - - - - - - - - - - - - - - - - -2-2
Charging 12 Volt Batteries- - - - - - - - - - - - - - - - - - - - - - - - - -2-3
Charging Rates Selection Guide - - - - - - - - - - - - - - - - - - -2-5
Reconditioning (Equalizing) Flooded Type Batteries - - - - - - - -2-6
- - - - - - - - - - - - - - - - - - - - v
3
Troubleshooting
Troubleshooting Reference - - - - - - - - - - - - - - - - - - - - - - - - -3-1
Recycling - - - - - - - - - - - - - - - - - - - - - - - - - - - - - - - - - - - - -3-4
A
Specifications
Physical Specifications - - - - - - - - - - - - - - - - - - - - - - - - - - - A-1
Electrical Specifications - - - - - - - - - - - - - - - - - - - - - - - - - - A-2
AC Input Specifications - - - - - - - - - - - - - - - - - - - - - - - - - - A-3
Protection Features- - - - - - - - - - - - - - - - - - - - - - - - - - - - - - A-3
Approvals - - - - - - - - - - - - - - - - - - - - - - - - - - - - - - - - - - - - A-3
ix
Page 11

Contents
B
Battery Charging
Bulk Charge - - - - - - - - - - - - - - - - - - - - - - - - - - - - - - - - - - B-1
Absorption Charge - - - - - - - - - - - - - - - - - - - - - - - - - - - - - - B-1
Float Charge - - - - - - - - - - - - - - - - - - - - - - - - - - - - - - - - - - B-2
Calculating External Battery Charging Time- - - - - - - - - - - - - B-3
Battery Reconditioning Mode- - - - - - - - - - - - - - - - - - - - - - - B-4
About Reconditioning - - - - - - - - - - - - - - - - - - - - - - - - - B-5
Warranty and Return Information
- - - - - - - - - - - - -WA-1
x 975-0343-01-01
Page 12

1
Introduction
Chapter 1 contains information on the features available and
the location of important parts on the front panel of the
Duracell® 15 AMP Battery Charger.
Duracell® Charger Features
The Duracell® Charger is an advanced battery charger
designed specifically for high performance, deep-cycle leadacid engine batteries. It is smaller and lighter than many other
chargers.
Duracell® Charger changes the alternating current (AC)
supply from the utility to the controlled low-voltage, direct
current (DC) required to charge a 12 V battery by using highfrequency, switching-mode power conversion circuits. The
high-frequency power conversion method is similar to that
used in power supplies for computers and other electronic
equipment. It results in a significantly smaller and lighter
charger than other power conversion methods allow.
The Duracell® Charger has AC to DC isolation, a surge
protector, and many other safety features which reduce
potential shock and fire hazards.
1-1
Page 13

Continuous Charge Rating
The Duracell® 15 AMP Charger delivers 2/8/15 amp
charging current. Traditional (low frequency) chargers only
deliver their rated charging current for a short initial part of
the charge cycle. The Duracell® Charger only reduces the
charging current below these rated levels when the battery is
approaching full charge. Because it delivers rated current
over most of the charge cycle, Duracell® Charger charges
your batteries faster than many other chargers with the same
or higher rating.
Wide Voltage Range
Duracell® Charger maintains the correct charging voltage for
your battery when the AC line voltage drops as low as
104 VAC or rises as high as 127 VAC. A surge protector in
Duracell® Charger protects it from surges and spikes on the
AC power line.
Protection Features
Duracell® Charger provides the following protection
features:
• Overheating protection
• Reverse polarity warning indicator light
• Overvoltage protection
• Bad battery indication
• Over current protection
• Charging time out protection
1-2 975-0343-01-01
Page 14

Isolated Design
The DC battery charging circuits of Duracell® Charger are
galvanically isolated by a transformer from the AC power
circuits. This feature reduces the risk of electric shock and
helps to prevent corrosion in marine applications.
Front Panel Selectors
Display Selection
The Display Selection push button allows you to toggle the
display to show the vehicle battery voltage and charging
current during the charging mode. The display indicates the
battery capacity when the AC is not plugged in.
Charge Rate
The Charge Rate push button allows you to select the optimal
charge current for your battery. Refer to Table 2-2 on page 25 for appropriate charge rate selections.
Battery Reconditioning
The Battery Reconditioning push button (pin-hole type)
allows you to recondition a bad flooded battery that does not
accept charge.
Duracell® Charger Features
975-0343-01-01 1-3
Page 15
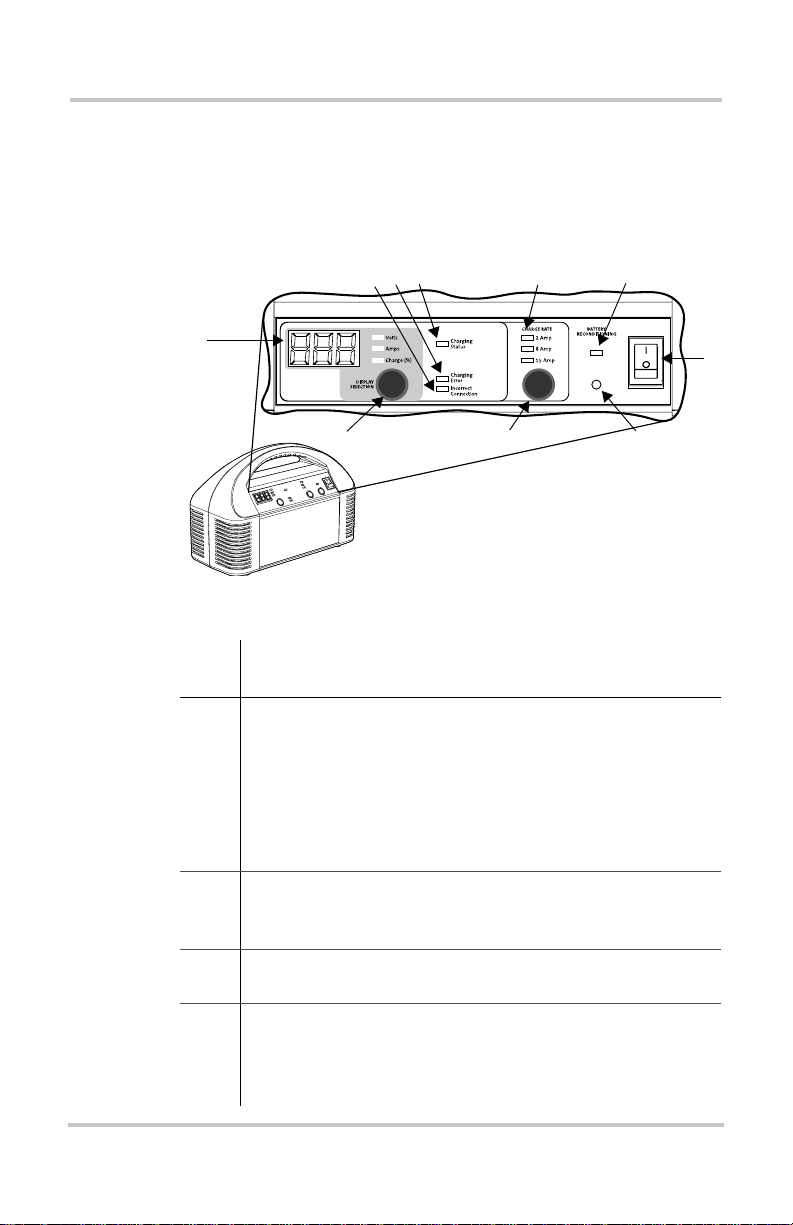
Front Panel Indicator Lights and Settings
This section describes the parts of the Duracell® Charger.
Figure 1-1 shows the front panel. Descriptions are provided
in the table.
34
2
1
10
Figure 1-1
Panel
Item Description
1 Digital Display displays the numerical value of the
2 Incorrect Connection light, under the Battery Charger
3 Charging Error light illuminates when a fault condition
4 Charging Status light indicates the charging status of the
Duracell® Charger F r ont Panel
battery voltage, charging current and capacity. The
Volts (V), Current (A), Battery % lights indicate which
condition is being reported.
The digital display is also used to indicate error codes
when Charging Error light (Item 6) is illuminated. See
Chapter 3, “Troubleshooting”.
section, illuminates when a reverse polarity is detected at
the charging cable.
is detected.
battery. A blinking light indicates that charging is in
progress. A solid light indicates that the battery is fully
charged.
5
9
6
8
7
1-4 975-0343-01-01
Page 16

Front Panel Indicator Lights and Settings
Panel
Item Description
5 Charge Rate light indicates the selected charging current.
Charge rate can be selected by pushing the Charge Rate
button (Item 12).
6 Battery Reconditioning light indicates that the battery
reconditioning function is activated. A blinking light
indicates that the battery reconditioning process is in
progress. A solid light indicates that the battery
reconditioning process is finished.
7 AC power
ON/OFF switch
8 Battery Reconditioning push button (pin hole type)
allows you to recondition a bad flooded battery that is not
accepting charge (see Item 9).
9 Charge Rate push button allows you to select the optimal
charge current for your battery (see Item 8).
10 Display Selection push button allows you to toggle
between the battery voltage and charging current during
battery charging (see Item 4). It also indicates battery
capacity when the unit is not connected to an AC standard
wall outlet.
975-0343-01-01 1-5
Page 17

Charger Cable Storage Compartment
ERROR
CHARGING
ERROR
BAD BATTERY SHUTDOWN
OVERVOLTAGE
HIGH CURRENT SH UTDOWN
OVERHEAT SHUTDOWN
CHARGING TIME OFF
POSSIBLE C AUSE RECO MMENDATIO N
Battery is not accepting charge or
• Select a higher charge rate
battery charge rate is low
• For flooded battery, activate the battery
reconditioning feature (see Owner's Guide)
• Check battery being connected. XPower will
Battery model being charged is
recharge 12V batteries only. Use
18V or above
appropriate charger for your battery.
• Remove all loads from battery being
High curr e nt load is con nected t o
charged.
the battery
• Ensure vent openings are not obstructed.
Unit is overheated due to poor
Unit will automatically reset.
ventilation
• Check load is connected to battery
Charging time reached 24 hours
• Select higher charge rate
• Battery has damaged cells and cannot be
charged. Replace battery.
CODE
EO1
EO2
EO3
EO4
EO5
2
4
1
3
Figure 1-2
Duracell® Charger Storage Compartment
Panel
Item Description
1 Battery Charging Clips for charging your vehicle
battery.
2 Storage Compartment for AC cable and battery clips.
3 Error Code Reference Table provides quick battery
troubleshooting.
4 AC Cable connects the Duracell® Charger to the AC
wall socket.
1-6
Page 18

2
Operating Conditions and Guidelines
Operation
Chapter 2 explains how to operate the Duracell® Charger
efficiently to charge a vehicle battery.
CAUTION
Read all operating instructions before operating the Duracell®
Charger.
2-1
Page 19

Choosing a Location
WARNING: Fire or explosion
The Duracell® Charger contains components that tend to produce
arcs or sparks. To prevent fire or explosion, do not operate the
Duracell® Charger in compartments containing flammable
materials, or in locations that require ignition-protected equipment.
The Duracell® Charger should be operated only in a location
that meets these requirements:
Dry
Cool
Ventilated
Safe
Protected
from battery
gases
Do not allow water or other liquids to drop or splash on the
Duracell® Charger.
Ambient air temperature should be between 32 and 104ºF
(0 and 40ºC)—the cooler the better within this range.
Leave at least 2" (5 cm) clearance around the Duracell®
Charger for air flow. Ensure that the ventilation openings
are not obstructed.
Do not operate the unit in any compartment capable of
storing flammable liquids like gasoline.
Do not operate the Duracell® Charger where it will be
exposed to battery gases. These gases are very corrosive,
and prolonged exposure will damage the Duracell®
Charger.
2-2 975-0343-01-01
Page 20

Charging 12 Volt Batteries
Before you start to charge batteries read the “Important
Safety Instructions” on page v and take all safety precautions
when working with batteries.
The Duracell® Charger has been designed to provide fully
automatic recharge of 12 V, automotive, marine, deep-cycle,
AGM and gell cell batteries.
WARNING: Explosion hazard
The Duracell® 15 AMP Battery Charger is designed to charge 12 V
lead-acid batteries only. Do not use these products on batteries with
other voltage ratings.
To charge your 12 volt battery:
1. If possible, disconnect all loads from the battery, by
removing battery cables, opening a disconnect switch, or
switching loads off.
The charger detects a battery is fully charged when its
charging current drops below a preset limit. The presence
of electrical loads on the battery may interfere with this
detection method. The 24-hour timer-based charging
shutdown feature acts as a backup, but the charging
current- based method is preferable.
2. Ap ply AC power to the Duracell® Charger, turn the AC
power
3. Connect the red positive (+) clip of the charger cables to
the positive (+) terminal of the vehicle battery.
The battery’s positive terminal is usually larger in
diameter than the negative terminal. In most vehicles, the
battery’s positive terminal has a red wire connected to it.
4. Connect the black negative (–) clip of the charger cables
to the negative (–) battery terminal.
If the red Incorrect connection indicator light on the
ON/OFF switch to ON.
Charging 12 Volt Batteries
975-0343-01-01 2-3
Page 21

Battery Charger function illuminates, reverse polarity has
been detected. Correct polarity must be established
before proceeding. Go back to Step 3.
5. The Charge Rate indicator light will blink. Select the
suitable charging current for your battery (see Table 2-2
on page 2-5) by toggling the Charge Rate push button
located below the indicator light. If the charging current
is not selected within 10 seconds, the unit will set to a
default charge rate of 2 A.
6. The Charging Status indicator light on the Battery
Charger function section will blink and the fullyautomatic charging sequence begins.
7. During charging, the charging current can be set to a
different charge rate or terminated at any time by
toggling the Charge Rate push button.
Duracell® 15 AMP Charger
0 2815
8. During charging, you can toggle the Display Selection
push button to show either the charging voltage or the
charging current on the Digital Display.
9. When the charging process is complete, the Charging
Status indicator light on the Battery Charger function
section changes from blinking to solid.
A 24-hour timer is built into the unit to avoid battery
overcharging.
The charger will automatically recharge the battery if t he
charge current rises above the threshold specified in
Table 2-1.
Table 2-1
Charging Rate Threshold
2-4 975-0343-01-01
Duracell® 15 AMP Charger
2 A 0.6
8 A 1.5
15 A 2.0
Page 22

10. Turn the AC power ON/OFF switch to OFF.
11. Remove the black negative (–) clip and the red positive
(+) clip from the vehicle’s battery terminals.
12. Store the charging cables in the storage compartment at
the back of the unit.
Charging Rates Selection Guide
Use Table 2-2 to determine the charging rate.
Charging 12 Volt Batteries
Table 2-2
Charging Rate
Duracell® 15 AMP Charger
Recommended
Battery Size
2 A 6 Ah or above
8 A 20 Ah or above
15 A 40 Ah or above
975-0343-01-01 2-5
Page 23

Reconditioning (Equalizing) Flooded Type
Batteries
WARNING: Explosion hazard
Battery reconditioning feature works only on flooded lead-acid
batteries. Do not attempt to recondition sealed lead-acid batteries.
WARNING: Explosion hazard
During the battery reconditioning process, the battery generates
potentially flammable gases. Follow all the battery safety
precautions listed in this guide. V entilate the area around the battery
thoroughly and ensure that there are no sources of flame or sparks
in the vicinity.
CAUTION
Turn off or disconnect all loads on the battery during
reconditioning. The voltage applied to the battery during
reconditioning may be above the safe levels for some loads. Be sure
to check battery electrolyte before and after reconditioning. Fill
only with distilled water.
Important:
timing limit.
To recondition your batteries (on the vehicle):
1. Disconnect all loads from the battery by removing
battery cables or by opening a disconnect switch.
2. Ap ply AC power to the Duracell® Charger, and turn the
AC power
3. Connect the red positive (+) clip of the cables to the
positive (+) terminal of the engine battery.
The battery’s positive terminal is usually larger in
diameter than the negative terminal. In most vehicles, the
battery’s positive terminal has a red wire connected to it.
2-6 975-0343-01-01
The battery reconditioning mode has a 4 hour
ON/OFF switch to ON.
Page 24

Reconditioning (Equalizing) Flooded Type Batteries
4. Connect the black negative (–) clip of the cables to the
negative (–) battery terminal.
If the red Incorrect Connection indicator light on the
Battery Charger function illuminates, reverse polarity has
been detected. Correct polarity must be established
before proceeding.
5. Use a toothpick, paper clip, pen point or other small
object to push the Battery Reconditioning button
(pin-hole type).
6. The Battery Reconditioning and Charge Rate indicator
lights illuminate and blink.
The display shows ( _ _ _ ) then ( – – – ) then ( ).
7. Select the suitable battery reconditioning current for the
battery size (see Table 2-2 on page 2-5) by pushing the
Charge Rate push button.
If the battery reconditioning current is not selected within
10 seconds, the unit will set to a default charging rate of
2A.
8. Monitor the specific gravity of each cell of the battery
during reconditioning with a battery hydrometer.
Reconditioning is complete when the specific gravity of
each cell of the battery remains constant. Most lead-acid
batteries have a specific gravity of approximately 1.265
when fully charged.
When the battery reaches the target specific gravity, press
the Charge Rate button until all charge rate lights are off
or remove the battery clips to terminate the
reconditioning mode.
9. If the specific gravity is still rising when the
reconditioning mode reaches the 4 hour timing limit, you
can initiate further reconditioning by pressing the Battery
Reconditioning button again.
After approximately 4 hours, the Battery Reconditioning
indicator light changes from blinking to solid and the
digital display will show ( ).
The battery reconditioning mode has been terminated.
975-0343-01-01 2-7
Page 25

10. Turn the AC power ON/OFF switch to OFF.
11. Remove the black negative (–) clip and the red positive
(+) clip from the vehicle’s battery terminals.
12. Check the battery electrolyte level. If necessary, refill
with distilled water only.
2-8 975-0343-01-01
Page 26

3
Troubleshooting
Chapter 3 will help you identify and remedy the common
problems than can occur with the Duracell® Charger.
Read this chapter before calling your dealer.
If you cannot solve the problem with the Duracell® Charger,
record the information asked for on “Information About Your
System” on page WA–6 and then call your dealer.
Troubleshooting Reference
WARNING: Electric shock hazard
Do not disassemble the Duracell® Charger. The Duracell® Charger
does not contain any internal user-serviceable parts and attempting
to service the unit yourself could result in electrical shock or burn.
Table 3-1
Problem Possible Cause Solution
Digital
Display or
on unit does
not turn on
Troubleshooting reference
No power at the AC
receptacle
LED
AC Power
is
OFF
ON/OFF switch
Ensure that power is available at
the receptacle
Ensure AC Power
is
ON
ON/OFF switch
Page 27

Table 3-1
Problem Possible Cause Solution
Troubleshooting reference
Digital
Display shows
voltage and
charging
current but not
Charge %
during
charging
Digital
Display shows
Charge % but
not voltage
and charging
current
Digital display
always shows
0 when the
battery is
connected
Unit is normal, as the
charge % reading is
disabled when unit is
charging a battery
Unit is normal. Wi th no
AC connected to the unit,
the digital display will
only show battery capacity
(in %) when it is
connected
The battery being charged
is below 2.5 VDC
Poor connection on
battery terminals
The red Incorrect
Connection indicator light
is illuminated indicating
that the positive and
negative charging cable
clips are reversed
Battery cannot be charged
Check battery connections
Reconnect the charger cable
clips to the correct polarity (see
“T o charge your 12 volt battery:”
on page 2-3)
Charging
Error E01
Bad Battery
Shutdown
3-2 975-0343-01-01
Battery is not accepting
charge
Charging rate selected is
too low for the battery
being charged
For flooded battery, try
reconditioning the battery (see
“To recondition your batteries
(on the vehicle):” on page 2-6)
Select a higher charge rate (see
Table 2-2 or Table 2-2 on
page 2-5)
Page 28

Troubleshooting Reference
Table 3-1
Problem Possible Cause Solution
Charging
Error E02
Overcharge
Shutdown
Charging
Error E03
High Current
Shutdown
Charging
Error E04
Overheat
Shutdown
Charging
Error E05
Charging Time
Off
Troubleshooting reference
Battery model being
charged is 18 V or above
High current load is
connected to the battery
Unit has overheated due to
poor ventilation or
excessively warm
environmental conditions
Battery charging time
reaches 24 hours
Charging rate selected for
battery charging is too low
for the battery being
charged
Battery has a damaged cell
Check battery being connected.
This charger will recharge 12 V
batteries only. Use appropriate
charger for your battery
Remove all loads from the
battery being charged
Clear blocked ventilation
openings or remove objects
covering the unit. Unit will
automatically restart when it
cools down
Move the Duracell® Charger to
a cooler environment
Check load is connected to
battery
Select a higher charging rate (see
Table 2-2 on page 2-5)
Replace battery
975-0343-01-01 3-3
Page 29

Recycling
If it’s rechargeable, it’s recyclable!
Xantrex recognizes its responsibility as a global citizen and is
continually striving to reduce the environmental impact of the
work we do and the products we create. We have taken a step
forward to limit our impact on the natural environment by
initiating a battery recycling program. Xantrex is a licensee
of the Rechargeable Battery Recycling Corporation
(“RBRC”), a non-profile public service organization
dedicated to recycling used rechargeable batteries. Through
RBRC’s national program and the availability of recycling
depots for Pb batteries, Xantrex customers can recycle
rechargeable batteries in a convenient and environmentally
friendly way.
If one of your Xantrex battery-integrated products has
reached the end of its useful life, we urge you to dispose of
the product correctly and safely. Xantrex recommends taking
the following steps to recycle your product depending on
battery chemistry and size.
Ni-MH, Li-ion or small Pb Batteries (up to 2 lbs. or 1 kg)
If you are recycling a product that contains a Ni-MH, Li-ion
or small Pb battery (up to 2 lbs. or 1 kg) then you can simply
drop it off at the battery drop-box located at any one of the
following major retailers.
In Canada: Battery Experts, Battery Plus, Bell W orld, FIDO,
Future Shop, The Home Depot, Home Hardware, London
Drugs, Makita Factory Service Centers, Personal Edge, Revy ,
Sears, The Sony Store, The Source by Circuit City, TELUS
Mobility and Zellers
In the USA: Alltel, Batteries Plus, Black & Decker, Cingular
Wireless, Circuit City, The Home Depot, Lowe's, Milwaukee
Electric Tool, Office Depot, Orchard Supply, Porter Cable
Service Centers, RadioShack, Remington Product Company,
Sears, Staples, Target, US Cellular and Verizon Wireless
If you are not sure of the drop-box nearest you, simply call 1877-2-RECYCLE to find the retail collection nearest you.
3-4 975-0343-01-01
Page 30

Pb Batteries (larger than 2 lbs. or 1 kg)
If you need to recycle a Pb battery that is larger than 2lbs.
(1kg) then you may take one of the following three steps to
recycle your battery:
• dispose of your battery product 'as is' at a battery disposal
location or waste disposal location nearest you.
• send your battery product 'as is' back to Xantrex for
proper recycling of the battery (see address below).
Xantrex Technology Inc.
Attn: Battery Recovery
5917 195th Street NE
Arlington, WA
USA, 98223
• dispose of the battery inside your product, by first
removing it (simple disassembly may be required) and
then taking it to a Sears Automotive Facility in your area
where it can be dropped off for proper recycling.
* If you are not sure of a Sears Automotive Facility
nearest you simply go to www .Sears.com and select store
locator.
Recycling
975-0343-01-01 3-5
Page 31

3-6
Page 32

A
Specifications
Appendix A lists the specifications for the Duracell®
Charger.
Important:
Specifications are subject to change without notice.
Physical Specifications
\
Dimensions 270 mm x 130 mm x 180 mm
(10.63 in. x 5.12 in. x 7.09 in.)
Weight 1.94 kg (4.28 lbs)
AC Input Connections 6.5’ (2.0 m) AWG 18
DC Output Connections 6.0’ (1.8 m) AWG 14
A-1
Page 33

Electrical Specifications
Battery Charging System
\
Number of Battery Bank Outputs 1
Nominal Battery Voltage 12 VDC
Nominal Operating Output Range 2.5 – 15.6 VDC
Rated DC Output Current 2/8/15 ADC
Charge Modes 3 stage
Absorption Voltage 14.4 VDC
Float Voltage at no Load 13.6 VDC
Battery Reconditioning Mode
\
Maximum Output Voltage 16.5 VDC
Battery Reconditioning Mode
Current
0.25 A with 2 A setting
1.0A with 8A setting
2.0 A with 15 A setting
A-2 975-0343-01-01
Page 34

AC Input Specifications
AC Input Specifications
\
AC Input Voltage Range 104 – 127 VAC, 50/60 Hz
Typical AC Input Current at
120 VAC
No-load AC Power Draw Less than 5 watts
Power Factor Rated Load 0.66
Efficiency – peak 83%
3.5 A RMS
Protection Features
\
Battery Reverse Polarity Reverse Polarity indicator light on charger
section of front panel illuminates
Output Current Limit 2 A — 2.1 A
8 A — 8.4 A
15 A — 15.8 A
Error Code with Light
ON E01 — E05
Approvals
\
Product Safety ETL approved to CSA107.2 and UL1236
standards
Electromagnetic Compatibility
(EMC)
975-0343-01-01 A-3
Complies with FCC part 15B, Class B
Page 35

A-4
Page 36

B
Battery Charging
Appendix B describes battery charging in more detail.
Duracell® Charger charges batteries in a sequence known as
a three-stage charge. The charging voltage delivered to the
battery depends on the battery
The three automatic stages are:
•bulk
• absorption
•float
There is a fourth stage, battery recondition (equalization),
that is initialized manually since it is only performed
occasionally and only on a flooded battery.
Bulk Charge
In the first stage, known as the bulk charge, Duracell®
Charger delivers its full- rated output current.This constant
current is delivered to the batteries until the battery voltage
approaches its absorption voltage—typically around
14.5 volts. The bulk charge stage restores about 75% of the
battery’s charge.
Absorption Charge
During the absorption charge, the charging voltage is held
constant near the gassing voltage, and the battery gradually
reduces the charging current it demands as it attains full
charge. Once the current drops to around 1/6 of the charging
current in bulk charge mode, the charger exits to Float charge
mode.
B-1
Page 37

Float Charge
The float charge is a maintenance mode in which the output
voltage of the charger is reduced to a lower level, typically
about 13.5 volts to maintain the battery’s charge without
losing electrolyte through gassing. In the float mode, the
charger will initiate a new charge cycle under any of these
conditions:
• AC power is disconnected and reconnected
• current demand on charger exceeds the battery recharge
current setting
The chart in Figure B-1 shows the three-stage charging
profile.
Charging started
DC Voltage
DC Current
Time
Figure B-1
Bulk stage Absorption
stage
Constant voltage
at Absorption
voltage setting
Constant current
at maximum
charge rate
Three-stage charging profile
Float stage
Constant voltage
at the Float
voltage setting
Load current on demand
B-2
Page 38

Calculating External Battery Charging Time
Calculating External Battery Charging Time
Formula
Charging time will depend on the capacity of your battery
and on how deeply it is discharged.The following equation
calculates an approximate charging time:
Charging time = CAP x DOD
CC x 80%
where:
Charging Time: Battery recharge time in hours
CAP: Battery capacity in amp-hours
DOD: Battery depth of discharge in per cent. A fully
discharged battery has 100% DOD
CC: Charge current, the rated current output of the
charger in amperes
80%: Typical charging efficiency for lead-acid batteries
Example
A Group 27 size battery rated at 82 amp-hours is 40%
discharged, that is, it has a DOD = 40. Charging time with a
Duracell® Charger unit is calculated as follows:
Charging time = 82 Ah x 40% = 2 hours
20 A x 80%
975-0343-01-01 B-3
Page 39

Battery Reconditioning Mode
A battery reconditioning charge should be performed only on
vented, flooded (non-sealed or “wet”) batteries. It should be
performed only if recommended by the battery manufacturer
and only as often as specified. Battery reconditioning is a
deliberate overcharge designed to return each cell to optimum
condition by reducing sulfation and stratification in the
battery. The overcharge helps the battery to reach and
maintain peak capacity by equalizing the chemistry in the
individual battery cells.
CAUTION: Risk of battery damage
Duracell® Charger cannot automatically determine when to stop
the reconditioning of a battery. You must monitor the battery
specific gravity throughout reconditioning to determine the end of
the reconditioning cycle. The 4 hour time-out is intended as a safety
feature but may not be sufficiently short to prevent battery damage.
WARNING
Do not recondition gel cell batteries.
WARNING
Always monitor the reconditioning charge cycle. Provide proper
ventilation for battery fumes. Do not allow any sparks during
reconditioning. If one or more cells begin to overflow, terminate the
recondition cycle.
WARNING
Check the battery electrolyte both before and after the
reconditioning charge. Do not expose the battery plates to air. Leave
the battery caps on while reconditioning. Top off after
reconditioning.
WARNING
Remove all loads from the DC system before reconditioning. Some
DC loads may not tolerate the high charge voltage.
B-4 975-0343-01-01
Page 40

About Reconditioning
Frequency
Approximately once a month, you may wish to recondition
your flooded batteries by using the battery reconditioning
mode.
Important
Reconditioning can damage your batteries if it is not
performed properly. Never recondition a battery more than
twice a month. Always check battery fluid level before and
after reconditioning. Fill batteries only with distilled water.
Battery manufacturers' recommendations on reconditioning
vary. Always follow the battery manufacturer's instructions
so batteries are properly reconditioned. As a guide, a heavily
used battery may require reconditioning once a month while a
battery in light duty service, only needs reconditioning every
two to four months. Duracell® Charger provides a highquality charge so batteries will not need to be reconditioned
as often as with a lower quality charger.
Battery type
Duracell® Charger reconditions only flooded lead-acid
batteries. It does not recondition sealed lead-acid batteries
since they can be damaged by this process.
Duration
Reconditioning is manually terminated when the specific
gravity in each cell is about 1.265 and remains constant at
that level. Duracell® Charger automatically exits the
reconditioning mode after six hours.
Battery charge state
Battery Reconditioning Mode
Reconditioning is only performed on fully-charged batteries.
If they are not charged, the first part of the process is similar
to the absorption charge and ensures the battery is fully
charged.
Recommended
The manufacturer recommends that you run a normal charge
cycle on the batteries before you recondition them.
975-0343-01-01 B-5
Page 41

B-6
Page 42

Warranty and Return
Information
Warranty
What does this warranty cover? This Limited Warranty is provided by Xantrex
Te chnology, Inc. ("Xantrex") and covers defects in workmanship and materials in your
Duracell® 15 AMP Battery Charger. This warranty period lasts for 12 months from the
date of purchase at the point of sale to you, the original end user customer. You require
proof of purchase to make warranty claims.
What will Xantrex do? Xantrex will, at its option, repair or replace the defective
product free of charge, provided that you notify Xantrex of the product defect within the
Warranty Period, and provided that Xantrex through inspection establishes the existence
of such a defect and that it is covered by this Limited W arranty.
Xantrex will, at its option, use new and/or reconditioned parts in performing warranty
repair and building replacement products. Xantrex reserves the right to use parts or
products of original or improved design in the repair or replacement. If Xantrex repairs or
replaces a product, its warranty continues for the remaining portion of the original
Warranty Period or 90 days from the date of the return shipment to the customer,
whichever is greater. All replaced products and all parts removed from repaired products
become the property of Xantrex.
Xantrex covers both parts and labor necessary to repair the product, and return shipment to
the customer via a Xantrex-selected non-expedited surface freight within the contiguous
United States and Canada. Alaska and Hawaii are excluded. Contact Xantrex Customer
Service for details on freight policy for return shipments outside of the contiguous United
States and Canada.
How do you get service?
If your product requires troubleshooting or warranty service, contact your dealer.
If you are unable to contact your dealer, or the dealer is unable to provide service, contact
Xantrex directly at:
Telephone: 1 408 987 6359
Web: www.xantrex.com/support
Direct returns may be performed according to the Xantrex Return Material Authorization
Policy described in your product manual. For some products, Xantrex maintains a network
of regional Authorized Service Centers. Call Xantrex or check our website to see if your
product can be repaired at one of these facilities.
WA-1
Page 43

Warranty and Return
What proof of purchase is required? In any warranty claim, dated proof of purchase
must accompany the product and the product must not have been disassembled or
modified without prior written authorization by Xantrex.
Proof of purchase may be in any one of the following forms:
• The dated purchase receipt from the original purchase of the product at point of sale to
the end user, or
• The dated dealer invoice or purchase receipt showing original equipment
manufacturer (OEM) status, or
• The dated invoice or purchase receipt showing the product exchanged under warranty
What does this warranty not cover? This Limited Warranty does not cover normal
wear and tear of the product or costs related to the removal, installation, or troubleshooting
of the customer's electrical system s. This warranty does not apply to and Xantrex will not
be responsible for any defect in or damage to:
a) the product if it has been misused, neglected, improperly installed, physically
damaged or altered, either internally or externally, or damaged from improper use or
use in an unsuitable environment;
b) the product if it has been subjected to fire, water, generalized corrosion, biological
infestations, or input voltage that creates operating conditions beyond the maximum or
minimum limits listed in the Xantrex product specifications including high input voltage from generators and lightning strikes;
c) the product if repairs have been done to it other than by Xantrex or its authorized ser-
vice centers (hereafter “ASCs”);
d) the product if it is used as a component part of a product expressly warranted by
another manufacturer;
e) the product if its original identification (trade-mark, serial number) markings have
been defaced, altered, or removed.
WA-2 975-0343-01-01
Page 44

Warranty and Return
Disclaimer
Product
THIS LIMITED WARRANTY IS THE SOLE AND EXCLUSIVE WARRANTY PROVIDED BY
XANTREX IN CONNECTION WITH YOUR XANTREX PRODUCT AND IS, WHERE
PERMITTED BY LAW, IN LIEU OF ALL OTHER WARRANTIES, CONDITIONS,
GUARANTEES, REPRESENTATIONS, OBLIGATIONS AND LIABILITIES, EXPRESS OR
IMPLIED, STATUTORY OR OTHERWISE IN CONNECTION WITH THE PRODUCT,
HOWEVER ARISING (WHETHER BY CONTRACT, TORT, NEGLIGENCE, PRINCIPLES OF
MANUFACTURER'S LIABILITY, OPERATION OF LAW, CONDUCT, STATEMENT OR
OTHERWISE), INCLUDING WITHOUT RESTRICTION ANY IMPLIED WARRANTY OR
CONDITION OF QUALITY, MERCHANTABILITY OR FITNESS FOR A PARTICULAR
PURPOSE. ANY IMPLIED WARRANTY OF MERCHANTABILITY OR FITNESS FOR A
PARTICULAR PURPOSE TO THE EXTENT REQUIRED UNDER APPLICABLE LAW TO
APPLY TO THE PRODUCT SHALL BE LIMITED IN DURATION TO THE PERIOD
STIPULATED UNDER THIS LIMITED WARRANTY.
IN NO EVENT WILL XANTREX BE LIABLE FOR ANY SPECIAL, INDIRECT, INCIDENTAL
OR CONSEQUENTIAL DAMAGES, LOSSES, COSTS OR EXPENSES HOWEVER ARISING
WHETHER IN CONTRACT OR TORT INCLUDING WITHOUT RESTRICTION ANY
ECONOMIC LOSSES OF ANY KIND, ANY LOSS OR DAMAGE TO PROPERTY, ANY
PERSONAL INJURY, ANY DAMAGE OR INJURY ARISING FROM OR AS A RESULT OF
MISUSE OR ABUSE, OR THE INCORRECT INSTALLATION, INTEGRATION OR
OPERATION OF THE PRODUCT.
Exclusions
If this product is a consumer product, federal law does not allow an exclusion of implied
warranties. To the extent you are entitled to implied warranties under federal law, to the
extent permitted by applicable law they are limited to the duration of this Limited
Warranty. Some states and provinces do not allow limitations or exclusions on imp lied
warranties or on the duration of an implied warranty or on the limitation or exclusion of
incidental or consequential damages, so the above limitation(s) or exclusion(s) may not
apply to you. This Limited Wa rranty gives you specific legal rights. Y ou may have other
rights which may vary from state to state or province to province.
Warning: Limitations On Use
Please refer to your product manual for limitations on uses of the product.
SPECIFICALL Y, PLEASE NOTE THA T THE DURACELL® 15 AMP BATTERY CHARGER
SHOULD NOT BE USED IN CONNECTION WITH LIFE SUPPORT SYSTEMS OR OTHER
MEDICAL EQUIPMENT OR DEVICES. WITHOUT LIMITING THE GENERALITY OF THE
FOREGOING, XANTREX MAKES NO REPRESENTATIONS OR WARRANTIES REGARDING
THE USE OF THE XANTREX
CONNECTION WITH LIFE SUPPORT SYSTEMS OR OTHER MEDICAL EQUIPMENT OR
DEVICES.
975-0343-01-01 WA-3
DURACELL® 15 AMP BATTERY CHARGER IN
Page 45

Warranty and Return
Return Material Authorization Policy
Before returning a product directly to Xantrex you must obtain a Return Material
Authorization (RMA) number and the correct factory "Ship To" address. Products must
also be shipped prepaid. Product shipments will be refused and returned at your expense if
they are unauthorized, returned without an RMA number clearly marked on the outside of
the shipping box, if they are shipped collect, or if they are shipped to the wrong location.
When you contact Xantrex to obtain service, please have your instruction manual ready
for reference and be prepared to supply:
• The serial number of your product
• Information about the installation and use of the unit
• Information about the failure and/or reason for the return
• A copy of your dated proof of purchase
Record these details in “Information About Your System” on page WA-6.
Return Procedure
1. Package the unit safely, preferably using the original box and packing materials.
Please ensure that your product is shipped fully insured in the original packaging or
equivalent. This warranty will not apply where the product is damaged due to
improper packaging.
2. Include the following:
• The RMA number supplied by Xantrex Technology, Inc. clearly marked on the
outside of the box.
• A return address where the unit can be shipped. Post office boxes are not
acceptable.
• A contact telephone number where you can be reached during work hours.
• A brief description of the problem.
3. Ship the unit prepaid to the address provided by your Xantrex customer service
representative.
If you are returning a product from outside of the USA or Canada In addition to the
above, you MUST include return freight funds and are fully responsible for all documents,
duties, tariffs, and deposits.
If you are returning a product to a Xantrex Authorized Service Center (ASC) A
Xantrex return material authorization (RMA) number is not required. However, you must
contact the ASC prior to returning the product or presenting the unit to verify any return
procedures that may apply to that particular facility.
WA-4 975-0343-01-01
Page 46

Warranty and Return
Out of Warranty Service
If the warranty period for your Duracell® 15 AMP Battery Charger has expired, if the unit
was damaged by misuse or incorrect installation, if other conditions of the warranty have
not been met, or if no dated proof of purchase is available, your inverter may be serviced
or replaced for a flat fee.
To return your Du racell® 15 AMP Battery Charger for out of warranty service, contact
Xantrex Customer Service for a Return Material Authorization (RMA) number and follow
the other steps outlined in “Return Procedure” on page WA-4.
Payment options such as credit card or money order will be explained by the Customer
Service Representative. In cases where the minimum flat fee does not apply, as with
incomplete units or units with excessive damage, an additional fee will be charged. If
applicable, you will be contacted by Customer Service once your unit has been received.
975-0343-01-01 WA-5
Page 47

Warranty and Return
Information About Your System
As soon as you open your Duracell® 15 AMP Battery Charger package, record the
following information and be sure to keep your proof of purchase.
❐ Serial Number (on DC end)
❐ Purchased From
❐ Purchase Date
If you need to contact Customer Service, please record the following details before
calling. This information will help our representatives give you better service.
❐ Battery/battery bank size
❐ DC wiring size and length
_______________________________
_______________________________
_______________________________
_________________________________
_________________________________
❐ Warning, Error or Panel
Fault Message
_________________________________
❐ Appliances operating when
problem occurred
❐ Description of problem
______________________________________________________________
______________________________________________________________
_________________________________
_________________________________
WA-6 975-0343-01-01
 Loading...