

Worx WG712 Owner’s Manual

NA-WG712-M-070115,indd 1 2007-1-15 16:52:16
®
®
®
I NA_WG712-M-070115 indd 2
®
2007-1-15 t6:52:16 l

®
®
®
_11 NA-wo712.M.oTo,l_,o°o3
®
m
2007_1-15 16:52:16 I
®
@
@
@
®
® @
NA-WG712-M-0701_Sindd 4 2007-1-15 16:52:20
_,:
2
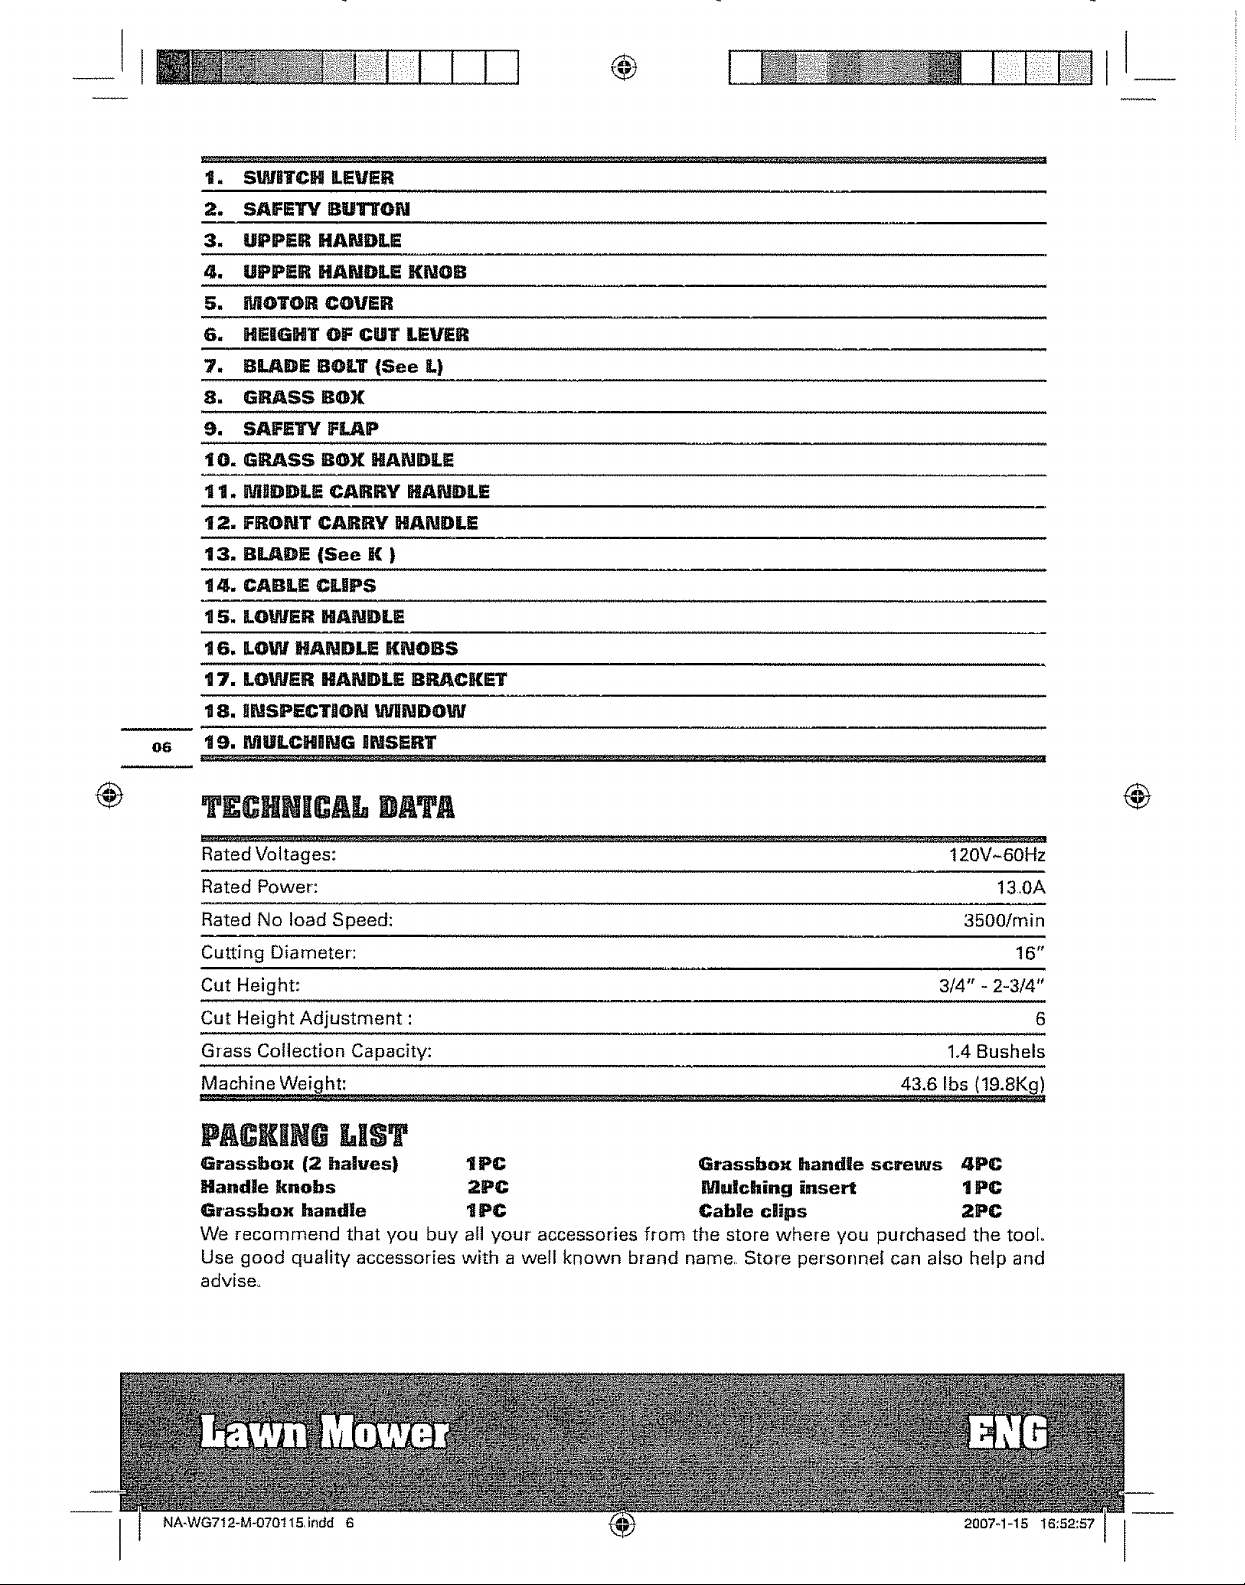
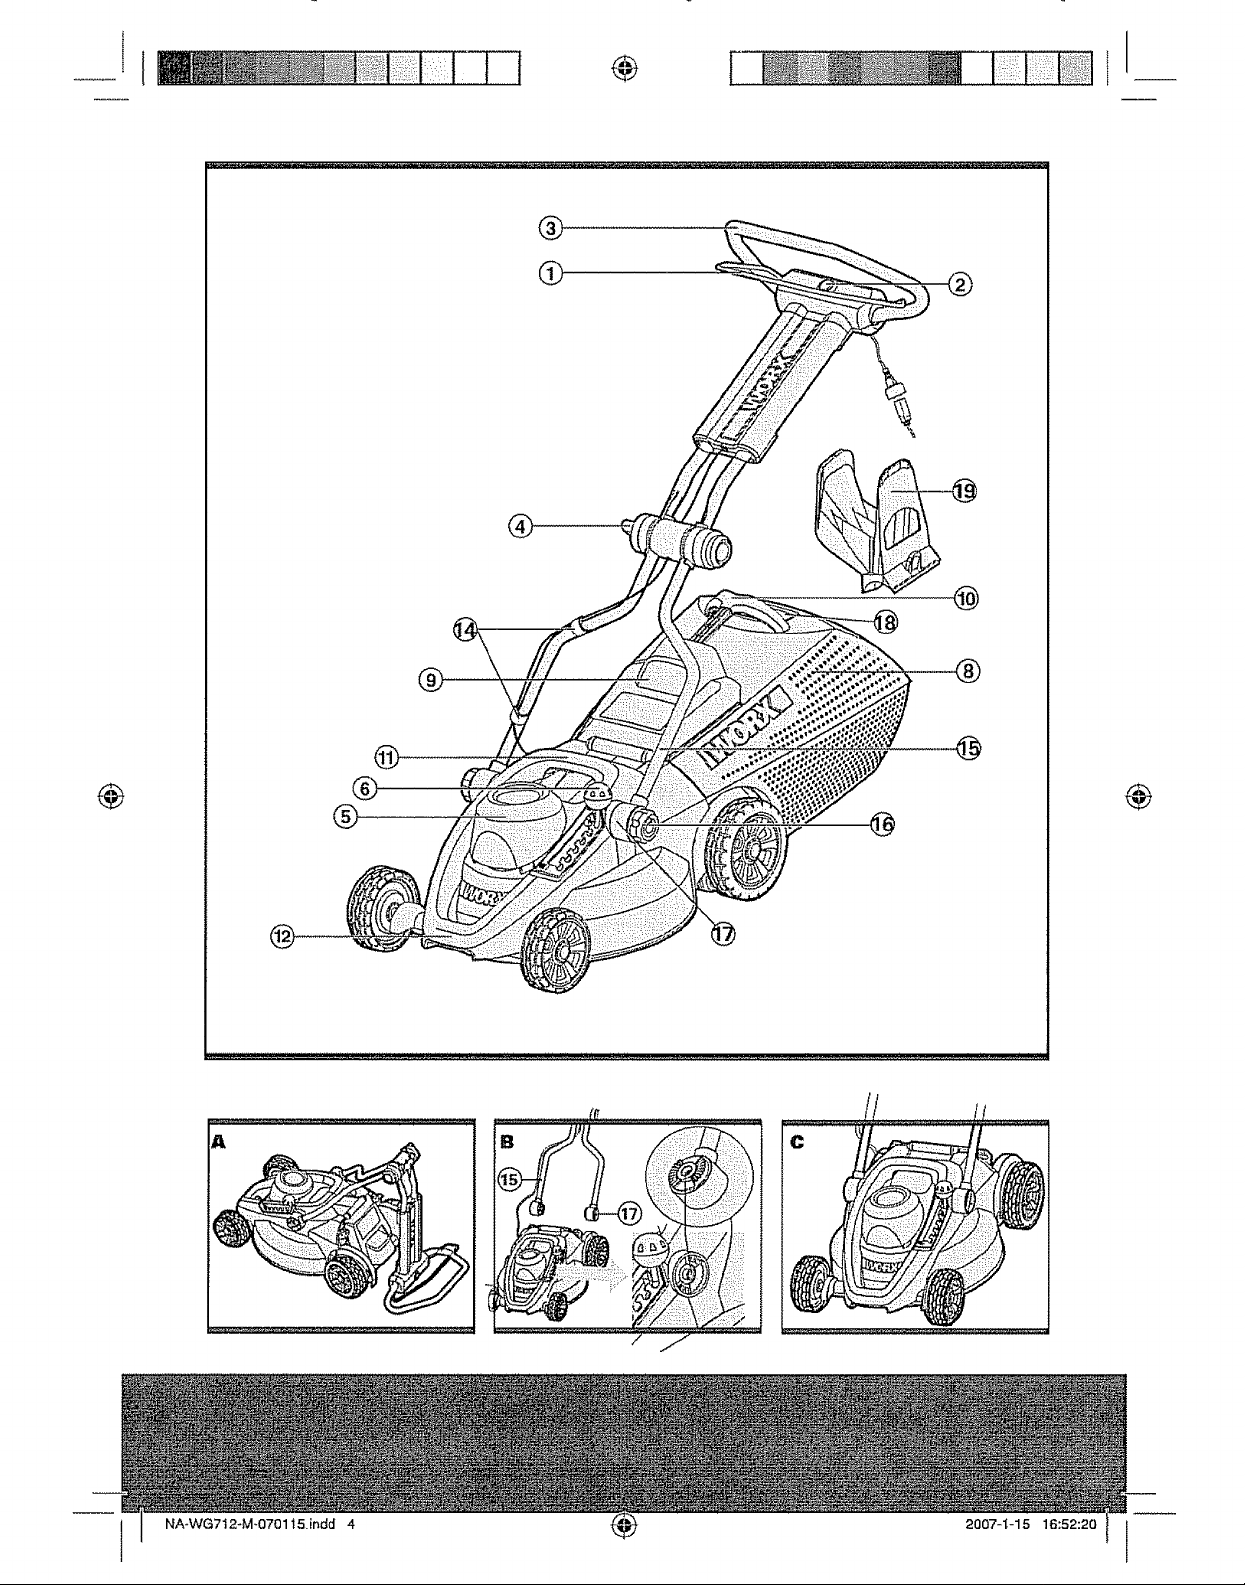
t. SWilTCH LEVER
2. SAFETY BUTTON
3. UPPER HANDLE
4. UPPER HANDLE KNOB
5. MOTOR COVER
G. HEIIGHT OF CUT LEVER
7. BLADE BOLT (See L)
S. GRASS BOX
9. SAFETY FLAP
10. GRASS BOX HANDLE
111. MnDDLE CARRY HANDLE
12. FRONT CARRY HANDLE
113. RUtDE (See K )
t 4. CABLE CLIPS
15. LOWER HANDLE
16. LOW HANDLE KNOBS
t 7. LOWER HANDLE BRACKET
8. HNSPECTaON WIlNDOW
19. MULCHONG INSERT
O6
®
®
TECHNKCAL U TA
Rated Voltages: 120V-60Hz
Rated Power: 13,0A
Rated No load Speed: 3500/min
Cutting Diameter: 16"
Cut Height: 3/4" - 2-3/4"
Cut Height Adjustment : 6
Grass Collection Capacity: 1.4 Bushels
MachineWei ht: 43.6 Ibs (19.8Kg)
#ARXI (} LIST
Grassbox (2 halues) 11PC Grassbox handle screws 4PC
Handle knobs 2PC Mulching insert 1PC
erasshox handle I PC Cable clips 2PC
We recommend that you buy all your accessories from the store where you purchased the tool,
Use good quality accessories with a well known brand name,, Store personnel can also help and
advise°
®
NA-WG712-M-070115, indd 6
2007-1-15 16:52:57
®
®
SAFE IN$TRUCTHON$
WARNBNG! Read All Instructions when
using electric gardening appliances.
Basic safety precautions should always be
followed to reduce the risk of fire, electric shock,
and personal injury, including the following:
tu
FOR ALL DOUBLE-nNSULATED
APPILL41NCES
a)
Replacement pa_s. When servicing use
only identical replacement parts°
b)
Polarized Appliance Connections
To reduce the risk of electric shock, this
appliance has a polarized plug (one blade
is wider than the other) and will require
the use of a polarized extension cord°
The appliance plug wilt fit into a polarized
extension cord only one way. If the plug
does not fit fully into the extension cord,
reverse the plug.. If the plug still does not fit,
obtain a correct polarized extension cord. A
polarized extension cord will require the use
of a polarized wall outlet,. This plug will fit
into the polarized wall outlet only one way. If
the plug does not fit fully into the wall outlet,
reverse the plug. If the plug still does not
fit, contact a qualified electrician to install
the proper wall outlet Do not change the
equipment plug, extension cord receptacle,
or extension cord plug in any way,
2. FOR ALL APPLEANCES
a) Avoid dangerous environment. Don't
use appliances in damp or wet locations_
b} Don't use in rain.
c) Keep chi|dren away. All visitors should be
kept at a distance from work area_
d) Dress proper_. Do not wear loose
clothing or jewelry.. They can be caught in
moving parts.. Use of protective gloves and
substantial footwear is recommended when
working outdoors.. Wear protective hair
covering to contain long hair.,
e) Use safety glasses. Always use face or
dust mask if operation is dusty.
f) Use right appl_iance. Do not use appliance for
any job except that for which it is intended,,
g) Ground Fauk Circuit Pnterrupter (GFCg)
protection should be provided on the
circuit(s) or outmet(s) to be used for
the gardening applia.ce. Receptacles
are available having built-in GFCt protection
and may be used for an added measure of
h )_ IJtIARNING! To
reduce the risk of
electric shock, use only with an extension
cord intended for outdoor use, such as an
extension cord of cord type SW-A, SOW-A,
STW-A, STOW-A, SJW-A, SJOW-A, SJTW-A_
or SJTOW-A_
i) _xtension cord! Make sure your extension
cord is in good condition,, When using an
extension cord, be sure to use one heavy
enough to carry the current your product
will draw_ An undersized extension cord will
cause a drop in line voltage resulting in loss
of power and overheating.Table I shows the
correct size to use depending on cord length
and nameplate ampere rating. If in doubt,
use the next heavier gage.The smaller the
gage number, the heavier the cordoTo reduce
the risk of disconnection of appliance cord
from the extension cord during operating:
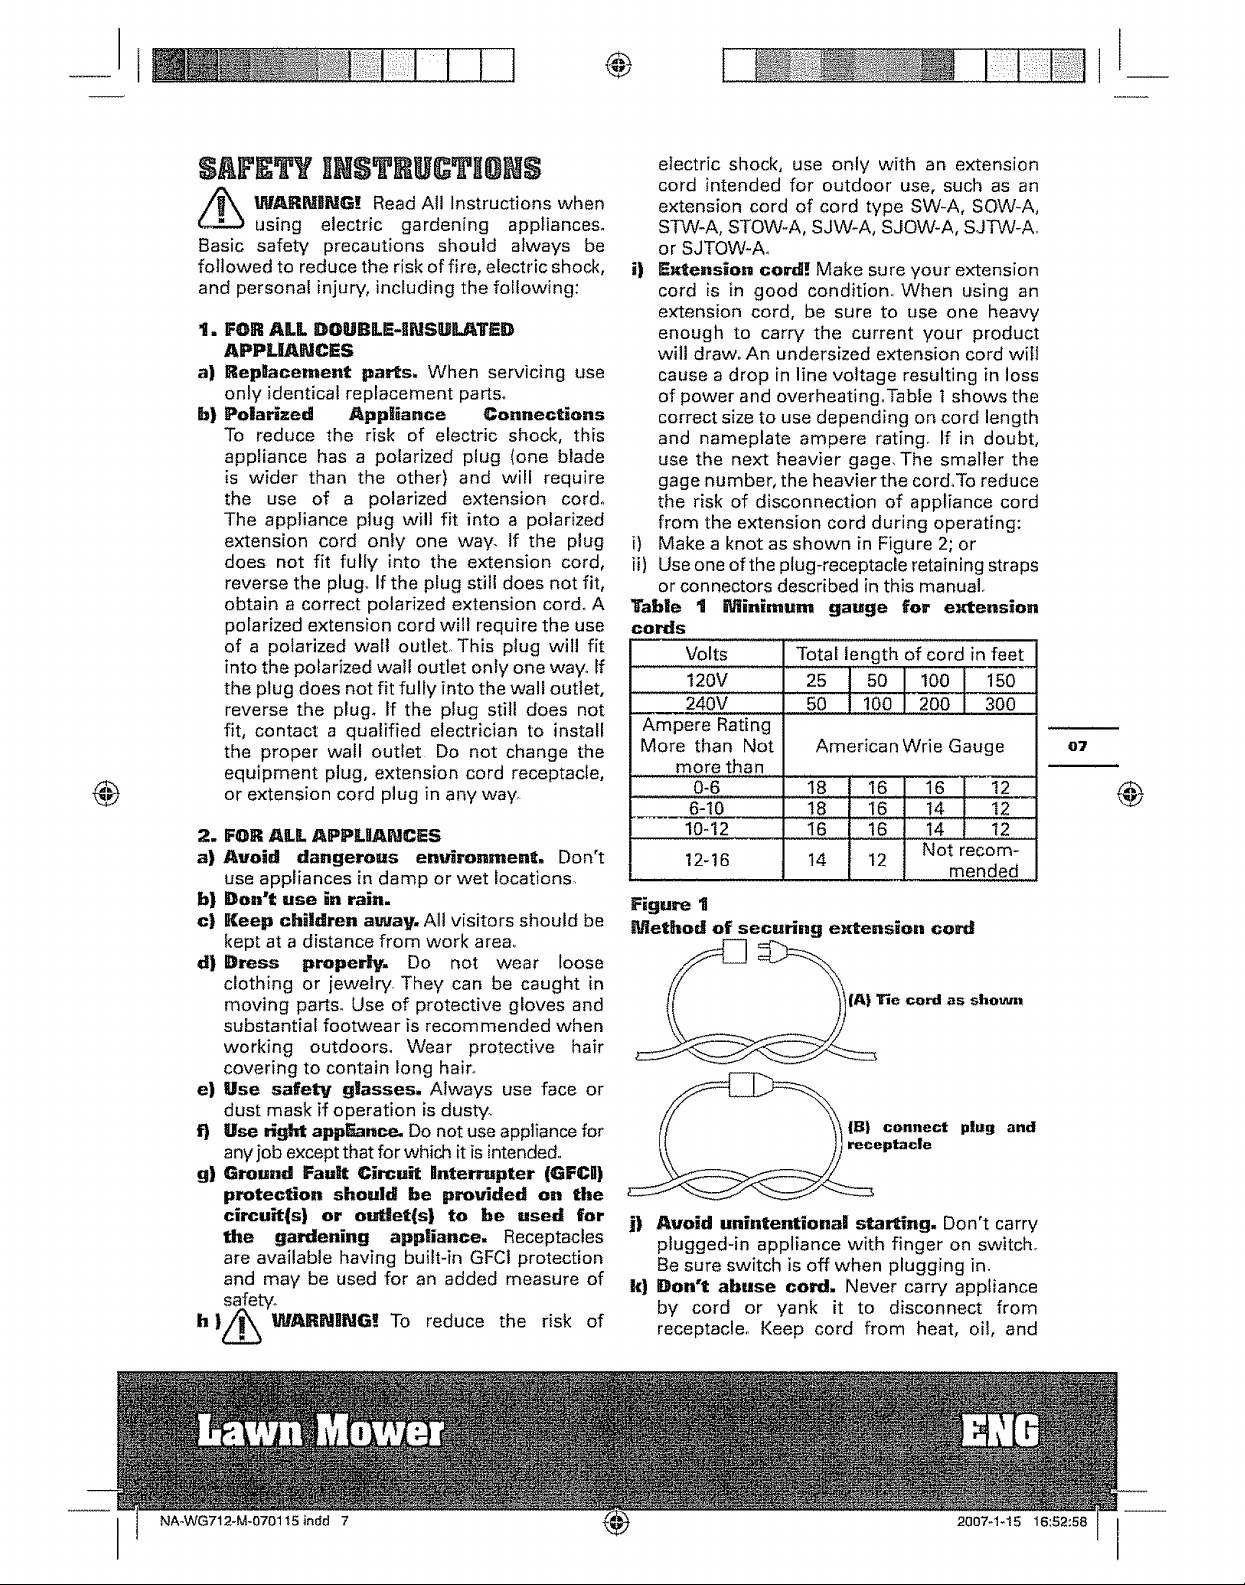
i) Make a knot as shown in Figure 2; or
ii) Use one of the plug-receptacle retaining straps
or connectors described in this manual.
Table 1 Minimuna gauge for extension
cords
Volts Total length of cord in feet
120V I 2s t 501i001 is0
_ 240V ....... 50 I i001 }00 I 300-
Ampere Rating
More than Not
more than
. 0-6
6-10
, 10-12 .......
12-16
Figure I
Uethod of securing extension cord
j) Avoid unintentional starting. Don't carry
plugged-in appliance with finger on switch,
Be sure switch is off when plugging in..
l() Don't abuse cord. Never carry appliance
by cord or yank it to disconnect from
receptacle.. Keep cord from heat, oil, and
AmericanWrie Gauge
. 1# .... !6 16 f !2
18 16 14 12
16 16 : 14 12
14 12
(B) connect p!ug and
Not recom-
mended
Tie cord as shown
O7
®
NA-WG712-M-070115 indd 7 2007q-15 16:52:58
I
®
®
sharp edges.
H) Don't grasp the exposed cutting blades
or cutting edges when picking up or
holding the appliance,
re|Don't force appJia.ce. It witl do the job
better and with less risk of injury at the rate
for which it was designed.
n) Dou't overreach. Keep proper footing and
balance at all times°
o) Stay alert. Watch what you are doing.
Use common sense. Do not operate
appliance when you are tire&
p} Disconnect appliance. Disconnect the
appliance from the power supply when not
in use, before servicing, when changing
accessories such as blades, and the like..
q) Store idle appliances indoors. When not
in use, appliances should be stored indoors
in dry, and high or locked-up place, out of
reach of children.
r) _aintaln appliance with care. Keep
cutting edge sharp and clean for best
performance and to reduce the risk of injury.
Follow instructions for lubricating and
changing accessories, Inspect appliance cord
periodically, and if damaged, have it repaired
by an authorized service facility. Inspect
08
extension cords periodically and replace if
damage& Keep handles dry, clean, and free
from oil and grease.
s) Check damaged parts. Before further use
of the appliance, a guard or other part that
is damaged should be carefully checked
to determine that it will operate properly
and perform its intended function. Check
for alignment of moving parts, binding of
moving parts, breakage of parts, mounting,
and any other condition that may affect
its operation. A guard or" other part that is
damaged should be properly repaired or
replaced by an authorized service center
unless indicated elsewhere in this manual..
t) Keep guards in place and in working
order.
u) Keep blades sharp.
v) Keep hands and feet away from cutting
area.
w)Objects struck by the lawn mower blade
can cause serve injuries to persons,
The lawn should always be carefully
examined and cleared of all objects prior to
each mowing_
x) Hf lawn mower strikes a foreign objectx
follow these steps:
i)Stop lawn mower. Release the switch.,
ii)Unplug power cord°
iii)lnspect for damage°
iv)Repair any damage before restarting and
operating the lawn mower,
y) Use identical replacement blades onHy.
z) Under norma! usage, the catcher
assembly is subject to deterioration
and wear and should, therefore, be
frequendy checked for replacement.
Any replacement assemhl V should be
checked for compliance with the original
manufacturer's recommendatio,s or
spot.canons.
/_ WARNHNG! Some dust created when
using lawn and garden power tools
contains chemicals known to cause cancer,
birth defects and other reproductive harm,
Some examples of these chemicals are:
crystalline silica from sand, bricks and other
masonry dust, arsenic and chromium from
chemically treated lumber (CCA), compounds
in fertilizer compounds, in insecticides,
herbicides and pesticides. Health risk from
these chemical exposures varies, depending on
the environment in which you are working and
how often you do this type of work.
When using lawn and garden power tools,
wear safety equipment such as gloves and dust
masks which are especially designed to filter
out microscopic particles.
V .Volts
A Amperes
Hz....................................... Hertz
no no load speed
[_ .... Class If construction / Double insulation
.alternating current
SYMBOLS
Warning
Read the instructions
(_ Wear eye protection
(_ o avoid possibility of electric
/_ Remove plug from the power
shock, do not expose to rain
supply immediately if cable is
damaged or cut
®
NA-WG712-M-O7O115indd 8 2007-1-t5 t6:52:59
®
®
AS$EMBLY
//_ impoi'_nt w.
Before you assemble the lawn mower,
check the packing fist on page 5, Make sure a!l
parts are included.
FJITTgNG THE LO_R HANDLE
(See A, B, C, D)
When removed from the box, the mower should
now look like fig AmFix the lower ha ndle brackets
(17) to the deck as fig B and align the handle as
fig C, Make sure that they are located properly
before inserting the lower handle knobs and
tighten clockwise.(See D) Lift the Upper handle
into position as shown in E,,Align handle and
tighten handle knob clockwise. Check that the
upper and lower handles are firmly secure,,
Ensure the cables do not become stuck when
foldinglunfolding Lower Handle
Note: Ensure that the cable clips (14)(See E)
supplied are used to fix the cable to the Lower
Handle (15)o(See B) Attach the cable clips and
make sure there is enough cable slack,,
G_u_SSBOX ASSEMBLY
(See F.t )
DO NOT OVERTIGHTENTHE SCREWS°
First connect the grass box handle (10) to the box
top using the four provided screws
Grassbox ASSEMBLY (See E2 and G )
Next, snap together the top and bottom grass
box halves by pushing all the "snap fits" together
around the edges; start from the rear and work
towards the front°
GRASSBOX
Fitting
Lift the safety flap (9) and insert grass box
(8)o(See H)
As the grassbox fills up, grass will be clearly
visible through the inspection window(18)(See
I)
When the window is futl it its time to empty the
grassbox,
Removing/Emptying
Lift the safety flap (9) and hold up. Remove
grass box (8)°
MULCHING FEATURE
The mower is designed to mulch the grass
depending on whether mulching insert
(t9) is inserted (mulching) or the mulching
insert is out and the grassbox is in place ,,No
further assembly steps are required if you are
mulching_
1, Unplug mower, and wait for blade to come
to a complete stop,,
2., Raise the safety flap (9) and hold it up (See
H2)
3,, Lift and push in the mulching insert
completely(See H,3)
For non-grass collection, the mower can be
used without the grass box (8) in position, with
the safety flap (9) in the down position,,
'W'X_W'arning: Always check the safety flap
can close the discharge outlet tightly
before using, Never lift the safety flap (9) when
the lawn mower is being used without fitted
grass box°
8P :RATISN
STARTING AND STOPPRNG (See J)
STARTING
Connect the extension cord to the pigtail (See
J),Connect the plug to the power outlet and
switch ON_
The switchbox is provided with a lock-off button
to prevent accidental starting.
Press and hold the safety button (2)_ with
the other hand, squeeze the switch lever (1)
towards the handle,and release the safety lock
off buttonoThe machine is now started. Wait
until the blade is at full speed before cutting the
grass.
Use both hands to hold the switch lever to keep
the mower running°
STOPPING
Release the switch lever (1).
ADJUSTgNG THE CUTTING HEIGHT
(See iO
_ Warnlng: Before adjusting the
mower height, wait for the mower to
completely stop. Mower blades continue
to rotate after the machine is switched
off and a rotating blade can cause injury.
Wait until all machine components haue
o9
®
NAoWG712_M_070115, indd 9 2007-1q5 16:53:00
 Loading...