


Withings Home
HD camera with environmental sensors
Installation and Operating Instructions
Withings Home
v1.0 | December 1st, 2014
Safety Instructions
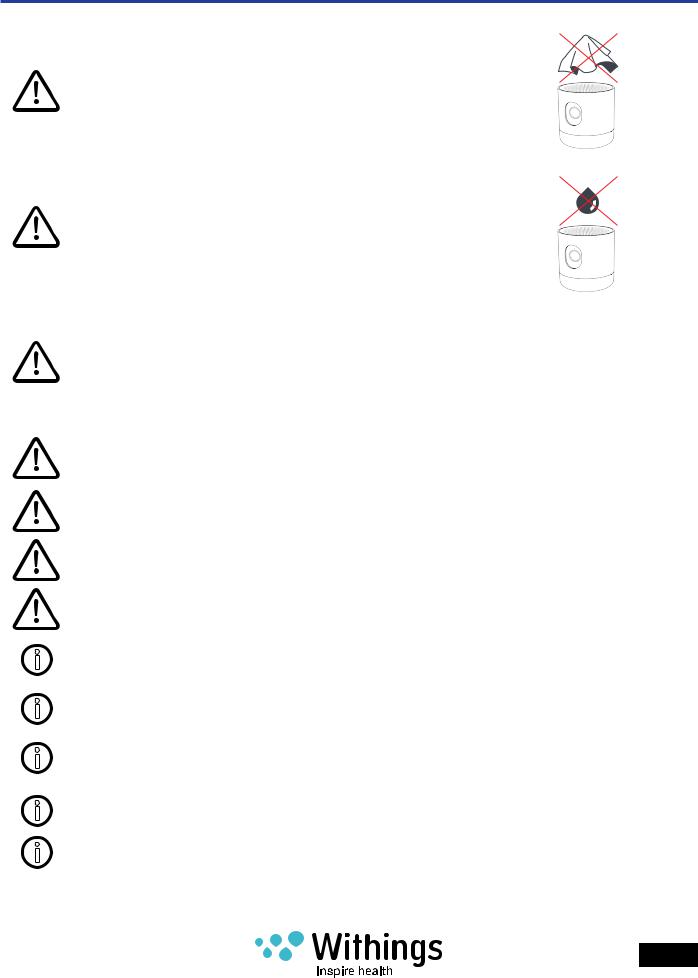
Caution: Do not cover the Withings Home
Caution: Do not allow the Withings Home to come into contact with liquids.
Warning: Using an iOS device in some circumstances can distract you and may cause a dangerous situation (for example, avoid using it while driving a vehicle or riding a bicycle). Observe local laws and rules that prohibit or restrict the use of mobile phones. Do not use your iOS or its applications while performing activities that require your full attention. Always comply with posted signs
and the laws and regulations in the areas where you are using iOS device and always use common sense.
Warning: This product cannot replace adult supervision.
Warning: Power cord may present a strangulation hazard. Keep out of reach of children.
Warning: The Withings Home is not a carbon monoxide detector, and does not provide alerts or warnings about hazardous levels of carbon monoxide.
Caution: This device is designed for indoor use only.
Ensure your child’s health by checking on him/her regularly.
Place the product at least 50 centimeters (20 inches) away from any person.
This product is not a toy. Do not allow children to play with it.
The environmental sensors cannot be used to adjust the environmental parameters in the rooms.
Only use the power supply supplied with the product.
Withings Home
v1.0 | December 1st, 2014
EN - 2

Install the Withings Home close to an easily accessible power outlet. Do not install the equipment in a way that stretches or stresses the power cord.
Use the product at temperatures between 10°C and 35°C (50°F and 95°F).
Product may be stored in a clean, dry location at 0°C to 50°C (32°F and 122°F) when not in use.
Never use the product for extended periods in direct sunlight.
Full safety instructions are available on withings.com/home/safety_instructions.
Withings Home
v1.0 | December 1st, 2014
EN - 3

Table of Contents
Safety Instructions 2 Box Contents 6 Minimum Requirements 7
Wi-Fi router 7 iOS device 7 iOS version 7
Product Overview 8
Short description of the Withings Home Monitoring System 8 System update / upgrade 9
Overview of the Withings Home Setup 10 Setup the Withings Home in Your Home 11
Withings Home 11 Before installing 12
Withings Home App 15
Install the Withings Home App on your iOS device 15 Launch the Withings Home App 15 Creating a new user using the Withings Home App 16 Withings Home App help files 18 Upgrade the Withings Home App 18
Setup using the Withings Home App 19
Bluetooth pairing 19 Quick Wi-Fi network configuration 21 Manual Wi-Fi network configuration 22 Ethernet network configuration 23
Configuring the Withings Home in the Withings Home App 25
Upgrade the Withings Home firmware 28 Display the firmware version 29
Withings Home
v1.0 | December 1st, 2014
EN - 4

Home Monitoring 30
Live stream 31 Photo album 33 Notification settings 35 Activity tracking (Home Diary) 37 Live data (air quality) 43 Cloud Video Recording (CVR Plans) 45
Functions 46
Time settings 46 Push-to-talk (PTT) 46 Lullaby program 47 Connect and charge an iOS device using the USB port 50
Privacy Mode 51 Dissociate a Withings Device 52 Access the Quick Start Guide Using the Withings Home App 53 Access to the FAQ and Withings Home Support 54
Using the Withings Home App 54 Using a Web browser 54
Troubleshooting 55
Home Withings Reset 56
Care and Cleaning Instructions 57 Specifications 58 Document Release Overview 60 Warranty 61 Regulatory Statements 62
Cameras Privacy Statement 62 Federal Communications Commission (FCC) Statements 62 Industry Canada statement: 63 Europe – EU Declaration of Conformity 63 European Union—Disposal Information 64
Withings Home
v1.0 | December 1st, 2014
EN - 5
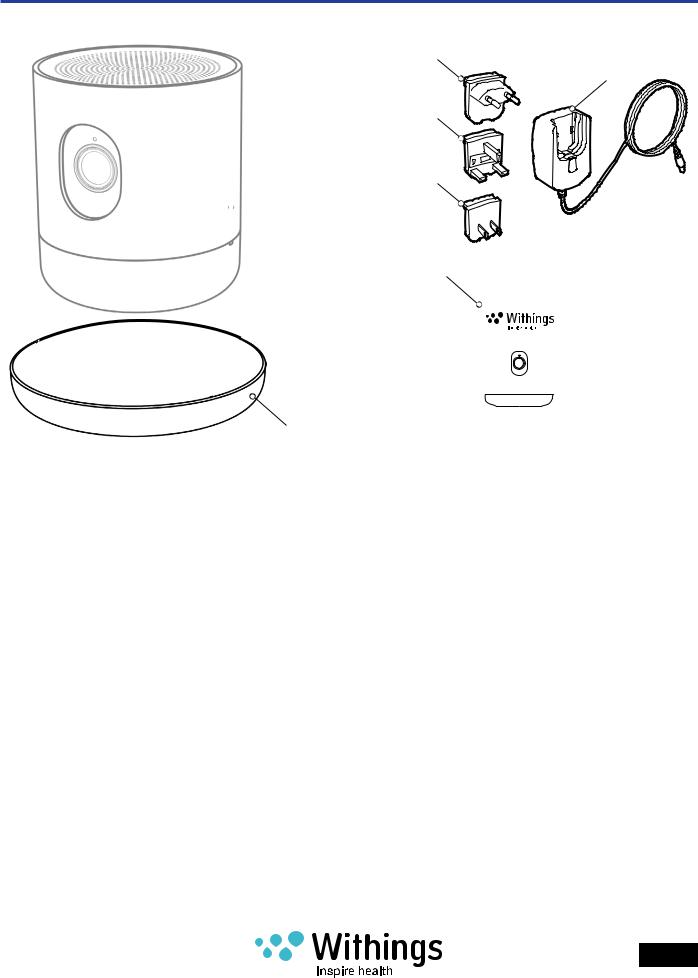
Box Contents
(3A)
(3)
(3B)
(3C)
 (1)
(1)
(4)
|
|
|
|
Home |
|
|
|
|
|
||
|
|
|
|
HD camera with air quality sensors |
|
|
|
|
|
Quick Start Guide |
|
|
|
|
|
||
|
|
|
|
FR Démarrage rapide | DE Schnellstart | ES Inicio rápido |
|
|
|
|
|
IT Avvio rapido | PT Iniciação rápida | CN |
|
|
|
|
|
JP |
|
|
(2) |
|
|
|
|
|
fig - 01 |
|
|
|
|
(1) Withings Home |
(2) Table stand |
(3) Micro-USB power supply |
|||
|
|
5V 2A |
|||
(3A) Plug adapter for |
(3B) Plug adapter for United |
(3C) Plug adapter for North |
|||
European Union countries |
Kingdom |
America |
|||
(4) Quick start guide |
|
|
|
|
|
Withings Home
v1.0 | December 1st, 2014
EN - 6

Minimum Requirements
Wi-Fi router
A personal home Wi-Fi router connected to the Internet is required to:
•Set up the Withings Home,
•Upgrade the firmware,
•Upload data.
Your Wi-Fi router must be 802.11. b/g/n/ on a 2.4 GHz frequency. For more details about Wi-Fi router compatibility, refer to “Specifications” on page 58.
Note: For a wired connection to your home network, you need: a free RJ45 port on the router and a Cat-5 Ethernet cable.
iOS device
An iOS device1 (with operational Bluetooth and Wi-Fi) is required to:
•Set up the Withings Home
•Access the video and other functions
•Track data
It is not possible to use the Withings Home without a compatible iOS device at this time. For iOS device compatibility information, refer to “Specifications” on page 58.
iOS version
iOS2 version 7 or higher is required to install and run the Withings Home App from the Apple App Store.
1iOS device refer to any mobile electronic devices marketed by Apple Inc, such as iPod Touch, iPhone and iPad (see the full compatibility list in “Specifications” on page 58
2iOS (previously iPhone OS) is a mobile operating system developed by Apple Inc. and distributed exclusively for Apple hardware.
Withings Home
v1.0 | December 1st, 2014
EN - 7

Product Overview
Short description of the Withings Home Monitoring System
Withings Home and Withings Home App work together to provide you with the benefits of an extended home monitoring system.
The uniqueness of the Withings Home is its dual functionality. You can protect your belongings with the video and alert functions, and protect those who live inside your home through the measurement of the indoor air quality for VOCs (Volatile Organic Compounds).
Designed to be mobile, Withings Home can be installed anywhere indoors. It is ready to work after a simple installation and a quick setup of your preferences.
After setup, the Withings home monitoring system will be able to capture, record, and transmit a live video stream. Once the automatic calibration is complete (48 hours), it will also inform you about environmental data in real time by reporting indoor air quality.
The Withings home monitoring system analyses the different sounds and movements in its surroundings and detects unusual VOCs levels. From these analyses and your settings, it determines whether the events are worthy of your attention. In case of a noteworthy event, it will send you specific alerts as instant notifications on your iOS device. All alerts will appear in chronological order on an interactive timeline called the Home Diary. You can view the captured data simply by touching on the Home Diary. The data (photos, videos, sounds, VOCs spikes) are also stored in your account on a remote server so they can be synchronized across all of your iOS devices.
Alternatively, you can start live video streaming at any time to see what happens at home.
For example, you ask yourself the question: did I turn off the TV before leaving? Switch on the video stream to check your room and see!
All of these data exchanges are encrypted to ensure secure data transmission and protect your family’s privacy. Additionally, video is compressed using the best methods possible, thereby ensuring smooth video while minimizing your mobile plan data usage.
Sometimes you are at work and you miss the good times that take place at home such as your child’s first steps, or when she sings for the first time. You have the possibility to store these data long term by choosing one of the plans available from Withings. You can also attach an external hard drive to record these moments to local storage.
Besides the home monitoring system, the Withings Home gives you the opportunity to participate and interact with what’s happening at home. You can communicate with your child through the “2-Way interactive audio system” or to help him fall asleep by playing a lullaby remotely.
In only thirty seconds, you can set up a complete home monitoring solution. Let’s get started!
Withings Home
v1.0 | December 1st, 2014
EN - 8

System update / upgrade
The Withings Home includes remotely upgradeable firmware. The firmware is upgraded to the latest version during the setup.
After the initial setup, you will be informed automatically of future firmware upgrades by an alert on your iOS device.
The firmware upgrade can bring additional features to the system. To keep you informed, new functions are listed in the chapter “Document release overview” for each new release of this user guide.
Withings Home
v1.0 | December 1st, 2014
EN - 9

Overview of the Withings Home Setup
To easily install and set up the Withings Home, follow the steps below, which will be detailed in the following pages:
1.Place the Withings Home on a suitable piece of furniture.
2.Plug the AC power adapter into a power outlet. Refer to page 13.
3.Install the Withings Home App on your iOS device. Refer to page 15.
4.Enable Bluetooth on your iOS device: Settings>Bluetooth.
5.Launch the Withings Home App. Refer to page 15.
6.If you do not have already a Withings user account, create one using the Withings Home App. Refer to page 16.
7.Pair the Withings Home and your iOS device. Refer to page 19.
8.Setup using the Withings Home App. Refer to page 19.
9.Share Wi-Fi settings from your iOS device, using the Withings Home App. Refer to page 21.
10.Install Withings Home using the Withings Home App. Refer to page 25.
Withings Home
v1.0 | December 1st, 2014
EN - 10

Setup the Withings Home in Your Home
Withings Home
(1K)
(1G)
(1D)
(1E)
(1A)
(1B)
(1C)
(1F)
|
(1H) |
|
|
|
(1) |
|
|
|
|
|
|
|
|
|
|||
|
(1I) |
(1J) |
(1N) |
(1M) |
|
|
(1L) |
|
|
|
|||||||
|
|
|
|
|
fig - 02 |
|
||
(1) Withings Home |
|
|
(1A) Ambient light sensor |
(1B) 5 MP wide angle video |
||||
|
|
|
|
|
|
|
|
sensor |
(1C) IR LED – Night Vision |
(1D) VOC sensor |
(1E) Interchangeable cover |
||||||
(1F) 2 digital microphones |
(1G) Accelerometer |
(1H) USB 2.0 port |
||||||
(1I) Environmental sensors |
(1J) Ethernet port |
(1K) HQ 2W Speaker |
||||||
(1L) Multicolor night light |
(1M) Magnets |
(1N) Micro-USB port |
||||||
Withings Home
v1.0 | December 1st, 2014
EN - 11

Before installing
The Withings Home is designed to be easily integrated into your home or office environment. Before installing the Withings Home, it is necessary to follow the safety and usage instructions listed below.
•Before installation, refer to the “Safety Instructions” on page 2 and “Cameras Privacy
Statement” on page 62.
•The Withings Home is equipped with environmental sensors to measure air quality. To obtain representative data for the air quality, this product should be placed away from areas with high levels of humidity such as kitchens or humidifiers.
•The video streaming requires a strong wireless signal without radio The video streaming requires a strong wireless signal without radio interferences between the Withings Home and the Wi-Fi router. between the
Withings Home and the Wi-Fi router. So, it is important
to: -- Place the Withings Home within range of the Wi-
Fi router, and avoid placing the Withings Home such that there are many obstacles (such as walls, separate floors of the home) between the two items
-- Reduce the distance between your Wi-Fi router and
your Withings Home as in “fig - 03”. -- Keep electrical devices that generate radio
interference away from the Withings Home.
Note: Your Withings Home uses 2.4 Ghz frequency band
to communicate your Wi-Fi router. Other appliances in your room such as cordless phones, microwave ovens,
or subwoofers may interfere and degrade the wireless communication. You can mitigate such interference by
distancing your Withings Home of these devices.
fig - 03
Note: The Withings Home (1) can be held tilted with its magnetic Table Stand (2), this in order to adjust vertically the area to be monitored.
|
(1) |
|
-α |
+α |
|
(2) |
||
|
fig - 04
Withings Home
v1.0 | December 1st, 2014
EN - 12

Connect your Withings Home as follows:
1.If you prefer to use a wired connection (such as to avoid the interference problems mentioned above), use a Cat-5
Ethernet cable to connect your Withings Home to your router.
2.Select the correct plug adapter from the travel adapter plug set: (3A) for European Union countries, (3B) for the United Kingdom, and (3C) for North America.
3.Follow the arrow in “fig - 07” to connect the plug adapter to the AC power adapter using the blue matching dots.
4.Push the lower side of the plug adapter down until a click sound is heard.
5.Ensure that the plug adapter is properly seated into the AC power adapter slot.
6.If the plug adapter is not properly seated, pull down the release button to disengage the plug adapter, and connect it again.
(1J)
fig - 05
(3A)
(3B)
(3C)
(3)
fig - 06
fig - 07
fig - 08
Withings Home
v1.0 | December 1st, 2014
EN - 13

7.Connect the AC power adapter (3) to the Micro-USB port (1N) on the Withings Home.
fig - 09
8. Plug the AC power adapter into a power outlet.
|
|
|
|
fig - 10 |
9. The Withings Home will start up. The Multicolor night |
|
|
|
|
|
|
|
|
|
light (1L) will start with the orange light pulsing during |
|
|
|
|
few seconds before changing to the blue light pulsing. |
|
|
|
|
10. The blue light pulsing indicates that the Withings Home |
|
|
|
|
is ready for setup. Refer to “Setup using the Withings |
(1L) |
|
|
|
Home App” on page 19. |
|
|
||
|
|
|||
Note: The Multicolor night light (1L) also informs about |
|
|
|
|
|
|
|
|
|
possible malfunctioning. For more information, refer to |
|
|
|
fig - 11 |
“Troubleshooting” on page 55. |
|
|
|
|
Withings Home
v1.0 | December 1st, 2014
EN - 14
Withings Home App
Install the Withings Home App on your iOS device
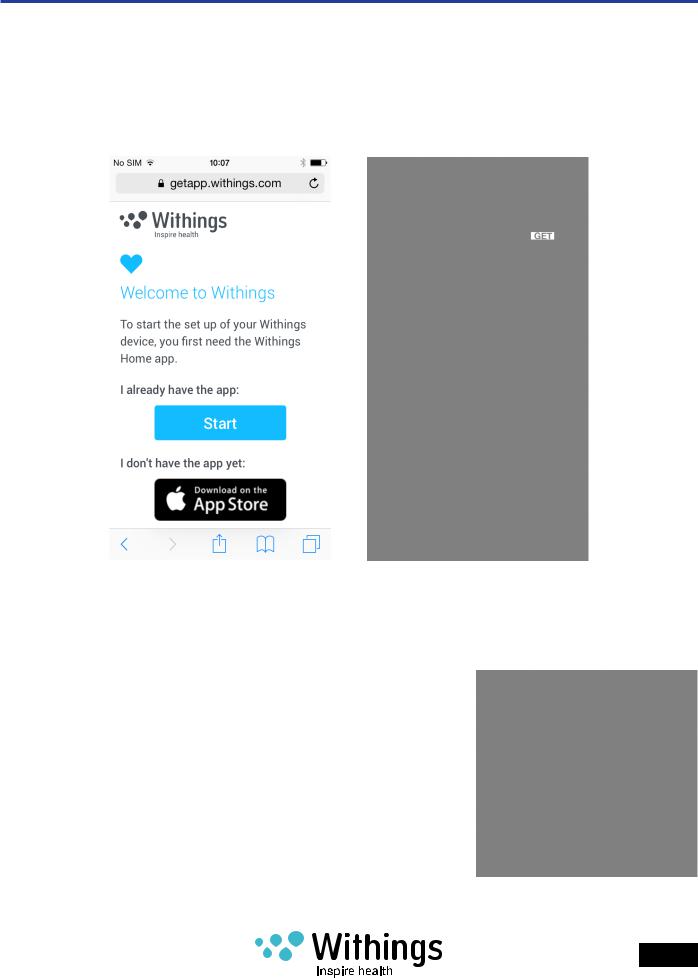
1.Type getapp.withings.com into your iOS device’s web browser.
2.Tap “Download on App Store” as in “fig - 12”.
3.Tap “GET” as shown in “fig - 13”.
fig - 12 |
fig - 13 |
Launch the Withings Home App
Tap on the Withings Home App icon 
Withings Home
v1.0 | December 1st, 2014
fig - 14
EN - 15

Creating a new user using the Withings Home App
If you are already using another Withings product and have an existing Withings account, log into this account now by selecting “Log In” as shown in “fig - 15”.
If you have not already created a Withings account, the Withings Home App prompts you to create an account automatically before the install process continues. Select “Join Withings”, then follow the steps in the Withings Home App and fill all required fields to create a user, as in “fig - 16”.
fig - 15 |
fig - 16 |
Withings Home
v1.0 | December 1st, 2014
EN - 16

Tap on the icon of 3 bars to access to the Withings Home List” screen.
fig - 17 |
fig - 18 |
Withings Home
v1.0 | December 1st, 2014
EN - 17

Withings Home App help files
Tap on the icon of 3 bars to access to the Withings Home List screen.
From the Withings Home App, you can access to some useful tips to help you learn more about the Home.
Scroll up while viewing the Home Diary. At the bottom of the screen, you will find following links:
•Learn about the application
•All about my Withings Home device
•How to read Air Quality
fig - 19 |
fig - 20 |
fig - 21 |
Upgrade the Withings Home App
Like other iOS applications, the App Store notifies you whenever an upgrade is available. Be sure to always update to the latest version of the App for the best experience with your Withings Home.
fig - 22
Withings Home
v1.0 | December 1st, 2014
EN - 18

Setup using the Withings Home App
The Multicolor night light (1L) starts pulsing with orange light at the start up.
The Multicolor night light (1L) provides information on the progress of the installation. Blue light pulsing starts for a new Withings Home which has never been paired with an iOS device.
Note: The Multicolor night light (1L) also informs about possible malfunctioning. For more information, refer to “Troubleshooting” on page 55.
Bluetooth pairing
Prerequisites:
•Withings Home App has been installed on the iOS device. Refer to “Install the Withings
Home App on your iOS device” on page 15.
•The Withings Home is plugged into power.
•The iOS device is connected to your personal Wi-Fi network or mobile data.
1.Enable Bluetooth connection on your iOS device: Settings>Bluetooth.
2.The Withings Home App starts to search for Withings Home device in the Bluetooth range. An activity indicator  shows that the current task is in progress. This step can take up to one minute.
3.An alert will appear prompting you to select your device from the accessory list, select your Withings Home as shown in “fig - 26”.
fig - 23 |
fig - 24 |
fig - 25 |
|
Withings Home |
|
|
|
|
|
EN - 19 |
|
v1.0 | December 1st, 2014 |
|
|
|
|
|
|
|
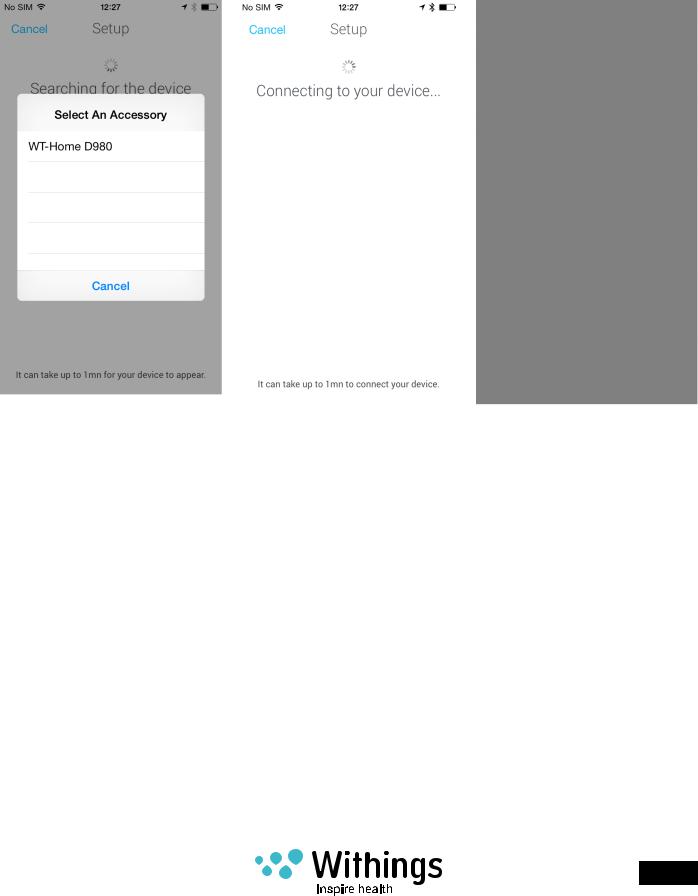
4.If the Home does not appear on the list after waiting for about one minute as shown in “fig - 26”, you will need to go to the Bluetooth Devices menu on your iOS device and select the Withings Home to pair manually. Then, return to the Withings Home App and return to step 3. above.
5.Tap “Next” to pair Withings Home to your iOS device as in “fig - 28”.
fig - 26 |
fig - 27 |
fig - 28 |
Withings Home
v1.0 | December 1st, 2014
EN - 20
 Loading...