

Page 1

Instruction manual
Bedienungsanleitung
Calibration software WIKA-Cal
Kalibriersoftware WIKA-Cal
EN
DE
Calibration software WIKA-Cal
Page 2

Instruction manual WIKA-Cal Page 3 - 64
EN
Bedienungsanleitung WIKA-Cal Seite 65 - 127
DE
Further languages can be found at www.wika.com.
©
04/2014 WIKA Alexander Wiegand SE & Co. KG
All rights reserved. / Alle Rechte vorbehalten.
®
WIKA
is a registered trademark in various countries.
®
WIKA
ist eine geschützte Marke in verschiedenen Ländern.
Prior to starting any work, read the operating instructions!
Keep for later use!
Vor Beginn aller Arbeiten Betriebsanleitung lesen!
Zum späteren Gebrauch aufbewahren!
2 WIKA instruction manual WIKA-Cal
14097663.03 05/2017 EN/DE
Page 3

Contents
Contents
1. General information 5
1.1 Description . . . . . . . . . . . . . . . . . . . . . . . . . . . . . . . 5
1.2 Licence agreement . . . . . . . . . . . . . . . . . . . . . . . . . . . . 5
1.3 System requirement . . . . . . . . . . . . . . . . . . . . . . . . . . . . 6
2. First steps and installation 8
3. Overview 11
3.1 Main window . . . . . . . . . . . . . . . . . . . . . . . . . . . . . . 11
3.2 Menu bar and tools . . . . . . . . . . . . . . . . . . . . . . . . . . . . 12
3.2.1 File: Import, backup database, restore database, exit . . . . . . . . . . . . . . . . . . . . . . . 12
3.2.2 Tools: Unit converter, Mass calculator and Manual control of controller . . . . . . . . . . . . . 12
3.2.3 Setup: Language, dongle upgrade, database connection, object manager . . . . . . . . . . . 13
4. Cal-Template calibration certificate 15
4.1 General information . . . . . . . . . . . . . . . . . . . . . . . . . . . . 15
4.2 Entry of calibration data . . . . . . . . . . . . . . . . . . . . . . . . . . . 15
4.2.1 General data. . . . . . . . . . . . . . . . . . . . . . . . . . . . . . . . . . . . . . . . . . . . . .15
4.2.2 Calibration item . . . . . . . . . . . . . . . . . . . . . . . . . . . . . . . . . . . . . . . . . . . . 15
4.2.3 Ambient conditions . . . . . . . . . . . . . . . . . . . . . . . . . . . . . . . . . . . . . . . . . . 16
4.2.4 Place of calibration . . . . . . . . . . . . . . . . . . . . . . . . . . . . . . . . . . . . . . . . . . 16
4.2.5 Measurement conditions . . . . . . . . . . . . . . . . . . . . . . . . . . . . . . . . . . . . . . .16
4.2.6 Measurement results . . . . . . . . . . . . . . . . . . . . . . . . . . . . . . . . . . . . . . . . . 17
4.2.7 Evaluation (optional) . . . . . . . . . . . . . . . . . . . . . . . . . . . . . . . . . . . . . . . . . 17
4.2.8 Measurement uncertainty (optional). . . . . . . . . . . . . . . . . . . . . . . . . . . . . . . . . 17
4.2.9 Statement of compliance (optional) . . . . . . . . . . . . . . . . . . . . . . . . . . . . . . . . . 18
4.2.10 Additional information (optional) . . . . . . . . . . . . . . . . . . . . . . . . . . . . . . . . . . . 18
4.3 New calibration. . . . . . . . . . . . . . . . . . . . . . . . . . . . . . 18
4.4 Recalibration . . . . . . . . . . . . . . . . . . . . . . . . . . . . . . 19
4.5 Upload . . . . . . . . . . . . . . . . . . . . . . . . . . . . . . . . 20
4.6 Download . . . . . . . . . . . . . . . . . . . . . . . . . . . . . . . 21
4.7 Calibrate and finish certificate. . . . . . . . . . . . . . . . . . . . . . . . . 22
4.8 Multicalibration (optional) . . . . . . . . . . . . . . . . . . . . . . . . . . 22
5. Log-Template logger protocol 24
5.1 General information . . . . . . . . . . . . . . . . . . . . . . . . . . . . 24
5.2 Entry of the logger data . . . . . . . . . . . . . . . . . . . . . . . . . . . 24
5.2.1 General data. . . . . . . . . . . . . . . . . . . . . . . . . . . . . . . . . . . . . . . . . . . . . .24
5.2.2 Measurement conditions . . . . . . . . . . . . . . . . . . . . . . . . . . . . . . . . . . . . . . .25
5.2.3 Measurement results . . . . . . . . . . . . . . . . . . . . . . . . . . . . . . . . . . . . . . . . . 25
5.3 New log . . . . . . . . . . . . . . . . . . . . . . . . . . . . . . . . 26
5.4 Relog . . . . . . . . . . . . . . . . . . . . . . . . . . . . . . . . . 27
5.5 Download . . . . . . . . . . . . . . . . . . . . . . . . . . . . . . . 28
5.6 Log and finish protocol . . . . . . . . . . . . . . . . . . . . . . . . . . . 29
6. Object manager 30
6.1 Add, save and delete. . . . . . . . . . . . . . . . . . . . . . . . . . . . 30
6.2 Structure . . . . . . . . . . . . . . . . . . . . . . . . . . . . . . . . 31
6.3 Objects . . . . . . . . . . . . . . . . . . . . . . . . . . . . . . . . 32
6.3.1 Work station . . . . . . . . . . . . . . . . . . . . . . . . . . . . . . . . . . . . . . . . . . . . . .32
6.3.2 Output signals pressure transmitter . . . . . . . . . . . . . . . . . . . . . . . . . . . . . . . . . 33
6.3.3 Baud rate . . . . . . . . . . . . . . . . . . . . . . . . . . . . . . . . . . . . . . . . . . . . . . . 33
6.3.4 Comments. . . . . . . . . . . . . . . . . . . . . . . . . . . . . . . . . . . . . . . . . . . . . . . 34
6.3.5 Units (pressure) . . . . . . . . . . . . . . . . . . . . . . . . . . . . . . . . . . . . . . . . . . . .34
6.3.6 Accuracies. . . . . . . . . . . . . . . . . . . . . . . . . . . . . . . . . . . . . . . . . . . . . . . 35
6.3.7 Instrument types . . . . . . . . . . . . . . . . . . . . . . . . . . . . . . . . . . . . . . . . . . . 35
6.3.8 Manufacturer . . . . . . . . . . . . . . . . . . . . . . . . . . . . . . . . . . . . . . . . . . . . . 36
6.3.9 Calibration items (pressure) . . . . . . . . . . . . . . . . . . . . . . . . . . . . . . . . . . . . . 36
14097663.03 05/2017 EN/DE
EN
3WIKA instruction manual WIKA-Cal
Page 4

Contents
6.3.10 Piston . . . . . . . . . . . . . . . . . . . . . . . . . . . . . . . . . . . . . . . . . . . . . . . . . 37
6.3.11 Communication . . . . . . . . . . . . . . . . . . . . . . . . . . . . . . . . . . . . . . . . . . . . 38
6.3.12 Customers. . . . . . . . . . . . . . . . . . . . . . . . . . . . . . . . . . . . . . . . . . . . . . . 39
6.3.13 Laboratory data . . . . . . . . . . . . . . . . . . . . . . . . . . . . . . . . . . . . . . . . . . . . 39
6.3.14 Masses . . . . . . . . . . . . . . . . . . . . . . . . . . . . . . . . . . . . . . . . . . . . . . . . 40
6.3.15 Mass sets . . . . . . . . . . . . . . . . . . . . . . . . . . . . . . . . . . . . . . . . . . . . . . . 40
6.3.16 Media . . . . . . . . . . . . . . . . . . . . . . . . . . . . . . . . . . . . . . . . . . . . . . . . . 41
EN
7. Setting up calibration instruments 48
8. Using a Microsoft® Excel® certificate template 56
6.3.17 Multimeter . . . . . . . . . . . . . . . . . . . . . . . . . . . . . . . . . . . . . . . . . . . . . . . 41
6.3.18 Multiplexer (optional) . . . . . . . . . . . . . . . . . . . . . . . . . . . . . . . . . . . . . . . . . 42
6.3.19 Standards (pressure) . . . . . . . . . . . . . . . . . . . . . . . . . . . . . . . . . . . . . . . . .42
6.3.20 Place . . . . . . . . . . . . . . . . . . . . . . . . . . . . . . . . . . . . . . . . . . . . . . . . . . 43
6.3.21 Examiner. . . . . . . . . . . . . . . . . . . . . . . . . . . . . . . . . . . . . . . . . . . . . . . . 44
6.3.22 Shunts . . . . . . . . . . . . . . . . . . . . . . . . . . . . . . . . . . . . . . . . . . . . . . . . . 45
6.4 Templates . . . . . . . . . . . . . . . . . . . . . . . . . . . . . . . 45
6.4.1 Cal . . . . . . . . . . . . . . . . . . . . . . . . . . . . . . . . . . . . . . . . . . . . . . . . . . . 45
6.4.2 Log . . . . . . . . . . . . . . . . . . . . . . . . . . . . . . . . . . . . . . . . . . . . . . . . . . . 46
6.5 Weather data . . . . . . . . . . . . . . . . . . . . . . . . . . . . . . 47
7.1 Loading necessary drivers . . . . . . . . . . . . . . . . . . . . . . . . . . 48
7.2 Setting up the CPH6x00 models . . . . . . . . . . . . . . . . . . . . . . . . 49
7.3 Setting up the CPCx000 models . . . . . . . . . . . . . . . . . . . . . . . . 49
7.4 Setting up the CPBx000 models . . . . . . . . . . . . . . . . . . . . . . . . 50
7.5 Setting up the CPU6000 series . . . . . . . . . . . . . . . . . . . . . . . . 51
7.5.1 Setting up the CPU6000-W weather station . . . . . . . . . . . . . . . . . . . . . . . . . . . . 51
7.5.2 Setting up the CPU6000-S pressure balance sensor box . . . . . . . . . . . . . . . . . . . . . 52
7.5.3 Setting up the CPU6000-M digital multimeter . . . . . . . . . . . . . . . . . . . . . . . . . . . 53
7.6 Setting up wireless instruments . . . . . . . . . . . . . . . . . . . . . . . . 54
7.7 Setting up of multimeter and multiplexer . . . . . . . . . . . . . . . . . . . . . 55
8.1 General information . . . . . . . . . . . . . . . . . . . . . . . . . . . . 56
8.2 Creating a Microsoft Excel certificate template . . . . . . . . . . . . . . . . . . . 56
8.3 Embedding an Excel template . . . . . . . . . . . . . . . . . . . . . . . . 62
8.4 Export in an Excel template . . . . . . . . . . . . . . . . . . . . . . . . . 63
8.5 Automated exporting in an Excel template . . . . . . . . . . . . . . . . . . . . 63
4 WIKA instruction manual WIKA-Cal
14097663.03 05/2017 EN/DE
Page 5

1. General information
1. General information
1.1 Description
The WIKA-Cal calibration software is used for generating calibration certificates or logger protocols for pressure measuring
instruments and is available as a demo version for a cost-free download on the website. Calibration certificates can be created
with the Cal-Template and logger protocols can be created with the Log-Template. In order to switch from the demo version
to a full version of the respective template, a USB stick with the template must be purchased. The pre-installed demo version
automatically changes to the selected full version when the USB stick is inserted and remains available so long as the USB
stick is connected to the computer.
1.2 Licence agreement
Object of the agreement
The subject of the contract is the USB stick for unlocking the respective templates within the WIKA-Cal calibration software.
Grant of licence
You, as the licensee, are entitled to use the USB stick in your company at any place, also at several work stations. However,
one USB stick may only unlock the relevant templates for one work station.
You, as licensee, may not:
modify, translate, reconvert, decompile, disassemble or decode the program in whole or in part as well as develop other
software derived from the program.
EN
Ownership of rights
With the purchase, you only acquire ownership of the USB stick, on which the activation is coded. You will not hold the rights to
the program itself. Any and all rights for publication, reproduction, editing and usage of the program shall remain with WIKA.
Warranty and limitation of liability
■
WIKA guarantees that the USB sticks, on which the release of the templates is coded, are faultless with regard to the
selected material under normal operating conditions. Should the USB sticks present any defect, the USB sticks may be
returned to WIKA within 30 days from the date of first purchase. The USB sticks will be replaced promptly and free of
charge.
■
WIKA guarantees that the program is generally usable in the sense of the program description. As it is not possible
according to the state of the art to develop computer programs that work error-free in all applications and combinations,
WIKA shall not assume any liability with regard to freedom from defects and uninterrupted operation of the program. In
particular, WIKA does not guarantee that the program meets the user's requirements or works together with other programs
selected by the user. The purchaser (licensee) is responsible for the correct selection and the consequences of the program
use as well as for the intended or obtained results.
■
WIKA is not responsible for correct entry of values and handling of the program. WIKA does not assume any liability for any
damage due to incorrect entries, configuration, transfer or consequences thereof. WIKA recommends to check the correct
function of each sensor based on the plausibility of some manual measurements over the entire measuring range after
configuration.
■
WIKA is liable without limitation
- in the event of intent or gross negligence
- for a damage to life, limb or health
- in accordance with the provisions of product liability legislation
- to the extent of a guarantee provided by the seller.
14097663.03 05/2017 EN/DE
5WIKA instruction manual WIKA-Cal
Page 6

1. General information
■
For a slightly negligent breach of duty which is essential for the attainment of the licence agreement (cardinal duty), WIKA's
liability is limited to the level of damage which is foreseeable and typical for the type of business in question.
■
Any further liability of WIKA does not exist.
■
The preceding limitation of liability also applies to the personal liability of WIKA's employees, agents and managing bodies.
Duration of the contract
EN
This contract is in force until the licensee terminates it by destroying the program and all copies. Furthermore, it terminates
when the contract terms are violated. The licensee undertakes to destroy the program and all copies on termination of the
contract.
Improvements and refinements
WIKA is entitled to make improvements and refinements of the program in its sole discretion.
Breach of contract
WIKA points out that the licensee shall be liable for any and all damages from copyright infringements, which are caused to
WIKA due to a breach of the contract terms by the licensee.
This licence agreement shall be governed by the laws of the Federal Republic of Germany to the exclusion of the UN
Convention for the International Sale of Goods of 11 April 1980 (UN CISG). The place of performance is Klingenberg am Main,
Germany. The exclusive place of jurisdiction is Aschaffenburg, in the case that each party is a merchant or corporate body
under public law or has no general jurisdiction in Germany.
1.3 System requirement
Specifications
Minimum system requirements Intel® Pentium® 4 or AMD Athlon® 64
Microsoft® Windows® XP with Service Pack 3, Windows® 7 with Service Pack 1,
Windows® 8 and Windows® 10
1 GB RAM and 1 GB free hard disc space (no installation possible on portable flash
storage media)
1024 x 768 pixel screen resolution (1280 x 800 pixel recommended) with 16-bit colour
depth and 256 MB VRAM
Without the activation USB stick, the software only works in demo mode.
For fully automatic calibrations, at least one RS-232-COM port per instrument is required
for communication.
If an SQL server is to be installed locally, .NET Framework 3.5 is required and, for Win7
and newer, also 4.x.
Language versions German, English, French, Italian, Polish, Romanian, Dutch and Portuguese
Possible communication interfaces USB, RS-232, GPIB IEC-625-Bus, Ethernet and Bluetooth® 2.1
Microsoft® and Windows® are registered trademarks of Microsoft Corporation in the United States and other countries.
®
Bluetooth
is a registered trademark of Bluetooth SIG, Inc..
6 WIKA instruction manual WIKA-Cal
14097663.03 05/2017 EN/DE
Page 7

1. General information
Specifications
Features Creating and archiving test reports with the templates Cal, Cal Light, Cal Demo, Log and
Log Demo
Tools for mass calculator with the CPU6000 and unit converter
Object manager allows for an intelligent use of laboratory and equipment data and
facilitates the standardised testing process
Archiving of customer-specific test reports in the SQL database
Automatic reading and controlling of measuring instruments by means of communication
types
Communication types CPH6000, CPH6200, CPH62I0, CPH6300, CPH6400, CPH65I0, CPH6600, CPH7000,
CPH7600, CPG500, CPG1000, CPG1500, CPT6100, CPT6180, CPG2500, CPC2000,
CPC3000, CPC4000, CPC6000, CPC6050, CPC8000-I (II), CPC8000-H, CPG8000-I
(II), CPT2500, CPD8000, pressure sensor via digital multimeter Agilent 34401A, Agilent
34410A or Keithley 196A, CPU6000-W, CPU6000-S, CPU6000-M
Microsoft® and Windows® are registered trademarks of Microsoft Corporation in the United States and other countries.
®
Bluetooth
is a registered trademark of Bluetooth SIG, Inc..
EN
■
Further information:
WIKA Alexander Wiegand SE & Co. KG
- Internet address: www.wika.de / www.wika.com
- Relevant data sheet: CT 95.10
- Application consultant:
Tel.: +49 9372 132-0
Fax: +49 9372 132-406
info@wika.com
Abbreviations, definitions
“XXX” Name of the menu item
[XXX] Press [XXX] button in the program
CI Calibration item
■
Bullet
▶
Instruction
1. ... X. Following the instruction step by step
Result of an instruction
⇒
14097663.03 05/2017 EN/DE
7WIKA instruction manual WIKA-Cal
Page 8
2. First steps and installation
2. First steps and installation
To install the WIKA-Cal calibration software, carry out the
following steps:
1. Download of the WIKA-Cal demo version directly from our
local website.
EN
http://en-co.wika.de/download_software_digital_
⇒
pressure_gauges_calibration_en_co.WIKA
or WIKA website/Download/Software/Calibration.
2. Unpack WIKA-Cal-Setup-vX_X_X_X.zip file.
3. Start WIKA-Cal-Setup-vX_X_X_X.exe file.
4. Follow the instructions of the installation wizard.
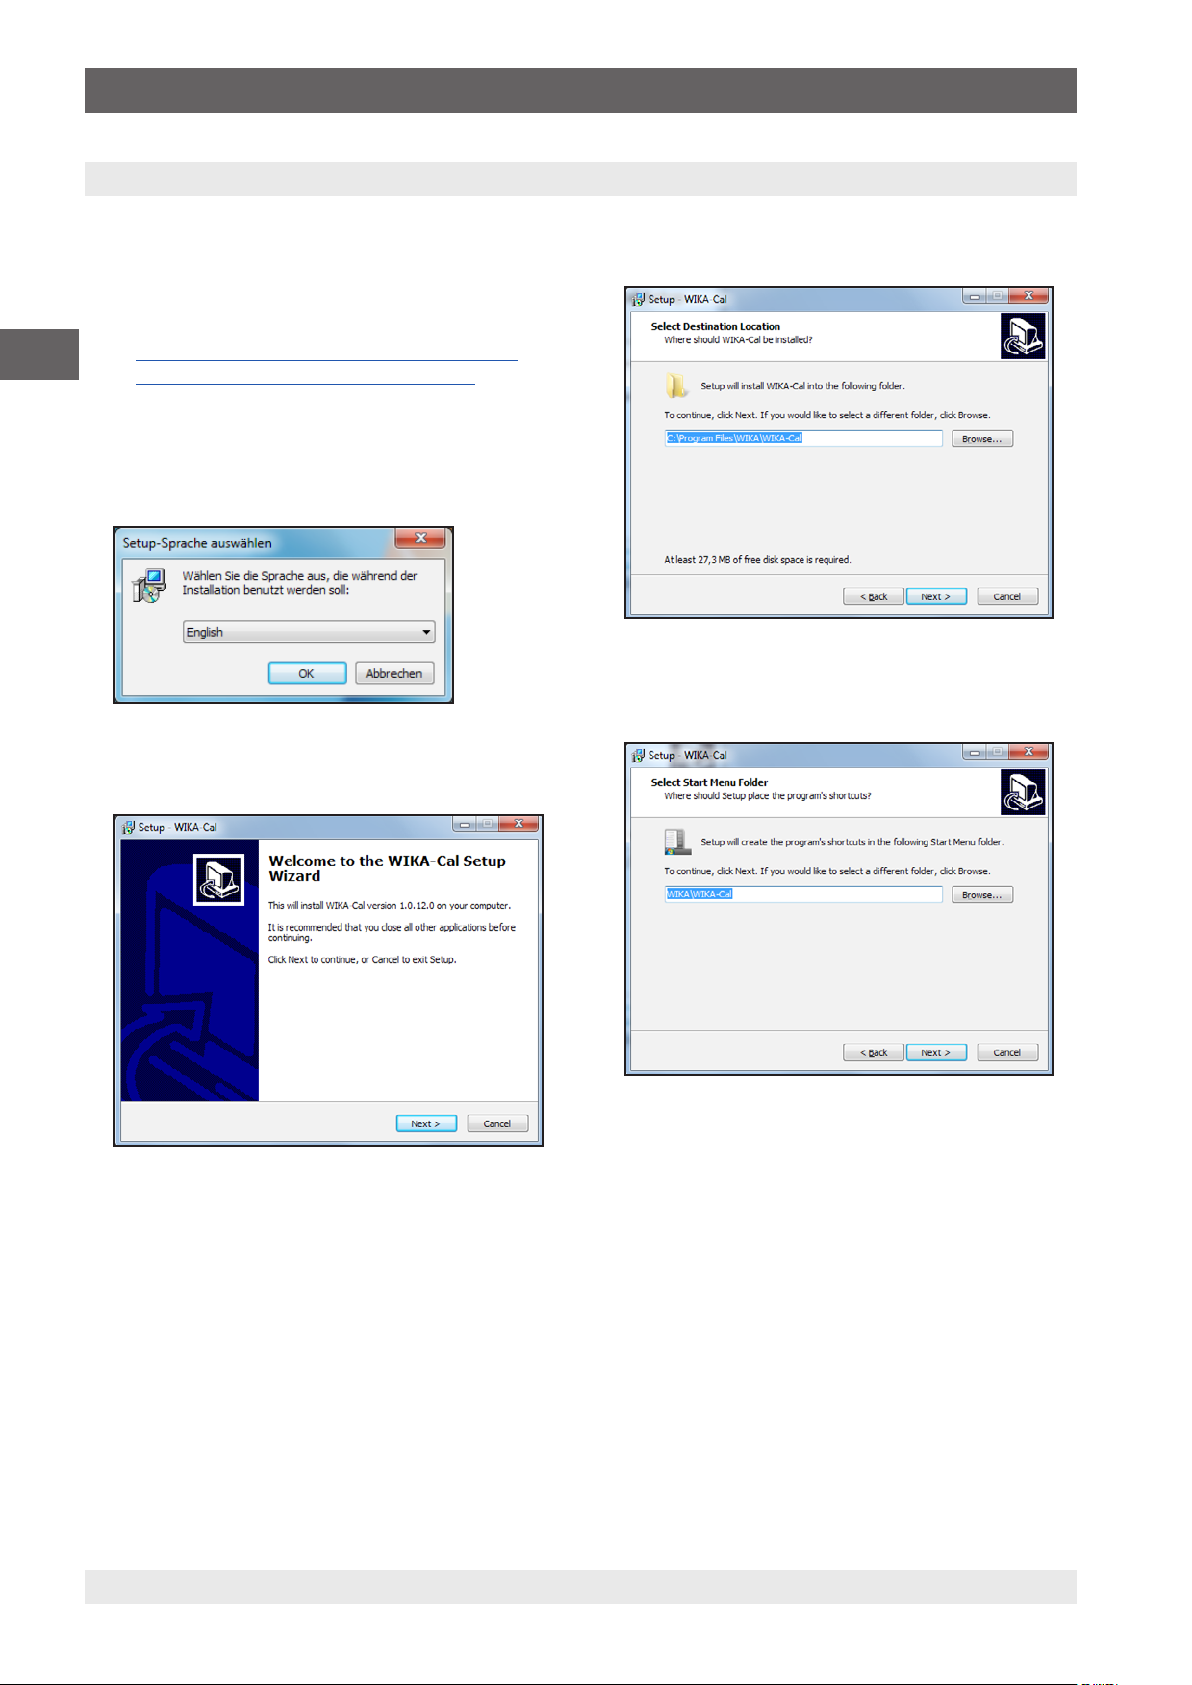
5. Select a language for the installer and confirm with [OK].
6. In the welcome dialogue, select [Next >].
7. Select the target folder for the installation of WIKA-Cal
and confirm with [Next >].
8. Select a windows start menu entry and confirm with
[Next >].
8 WIKA instruction manual WIKA-Cal
14097663.03 05/2017 EN/DE
Page 9
2. First steps and installation
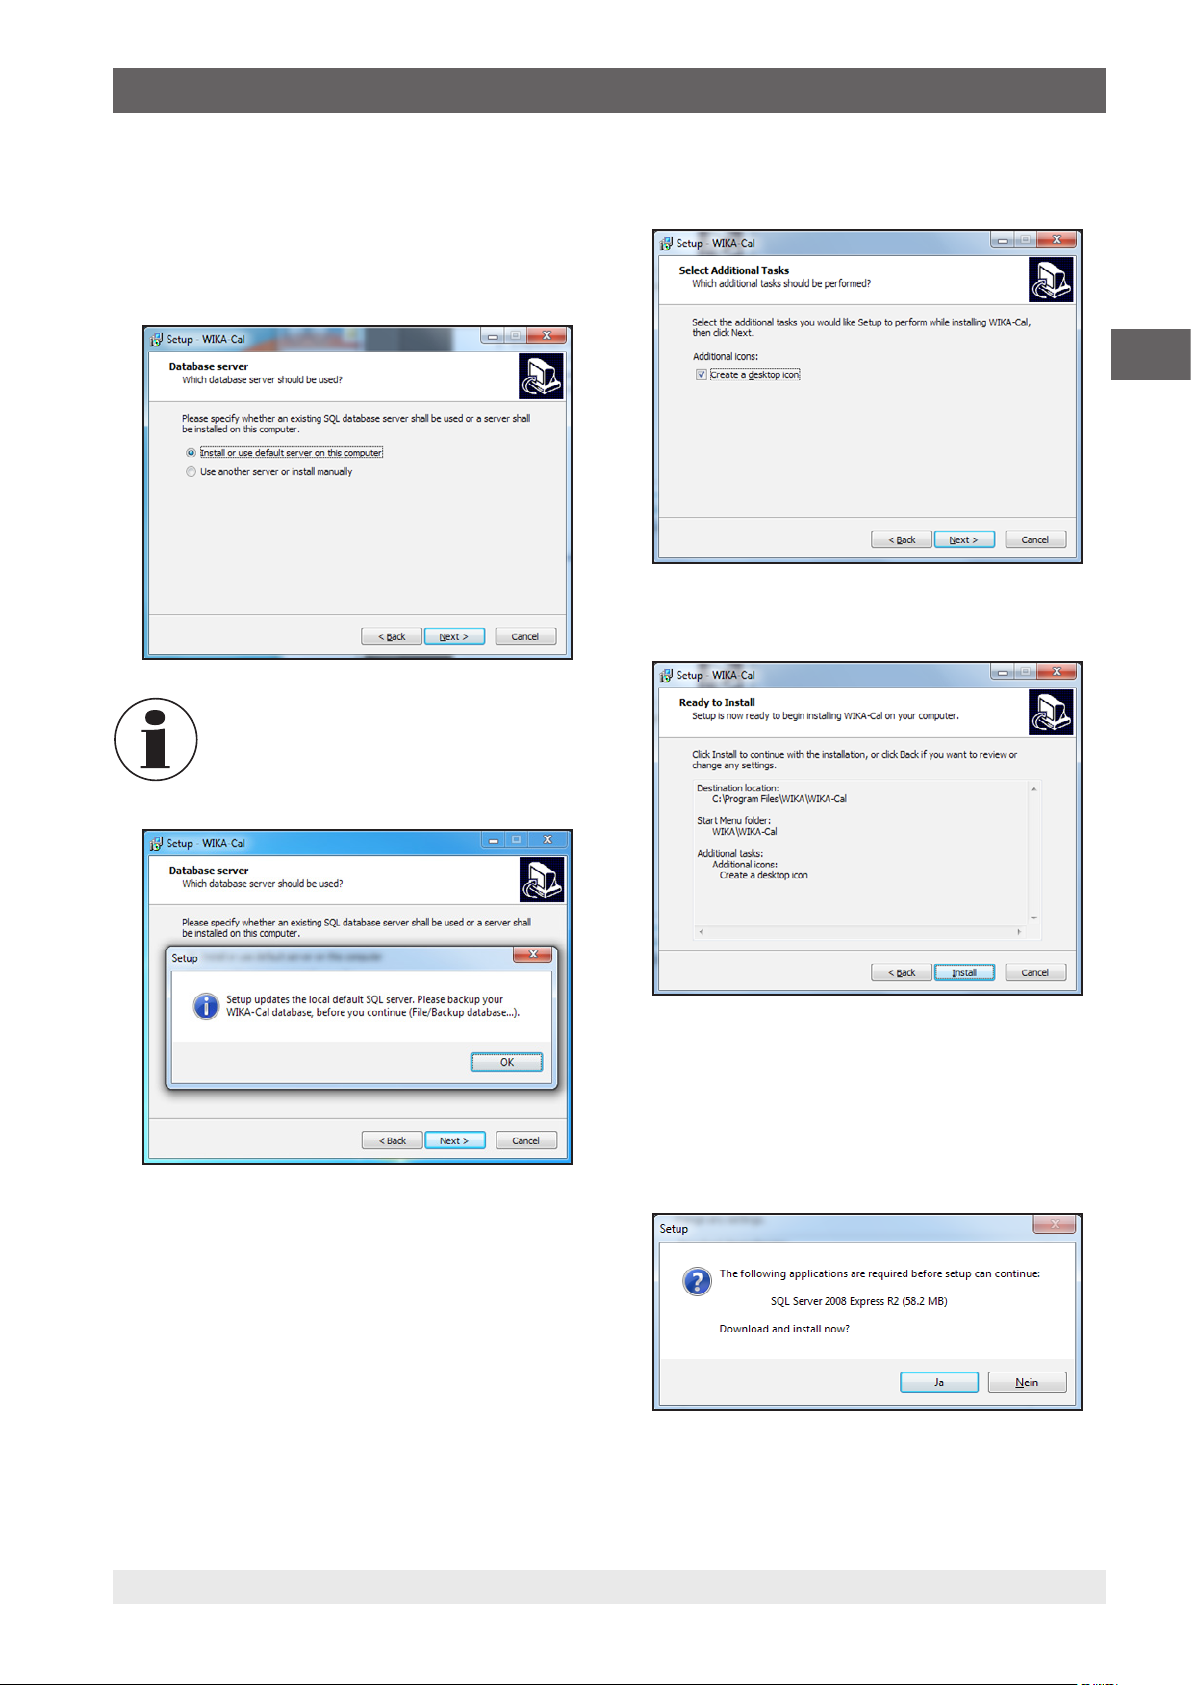
9. Select “Install or use default server on this
computer“ if the SQL server for WIKA-Cal is to be
installed locally on the computer or is already installed.
Select “Use another server or install manually”, if an
SQL server will be used on a different PC.
Then confirm with [Next >].
If you are using an older SQL version (esp. for
Windows® 10), this pop-up will appear.
10. Select whether a desktop symbol is to be created and
confirm with [Next >].
EN
11. Start the installation with [Install].
14097663.03 05/2017 EN/DE
12. In the following dialogue, the required SQL server
installation is downloaded from the internet. The
download and installation is initiated by pressing [Yes].
If there is no access to the internet, an installer version
can be requested via the WIKA contact address, which
includes a version of the SQL server installer.
9WIKA instruction manual WIKA-Cal
Page 10
2. First steps and installation / 3. Overview
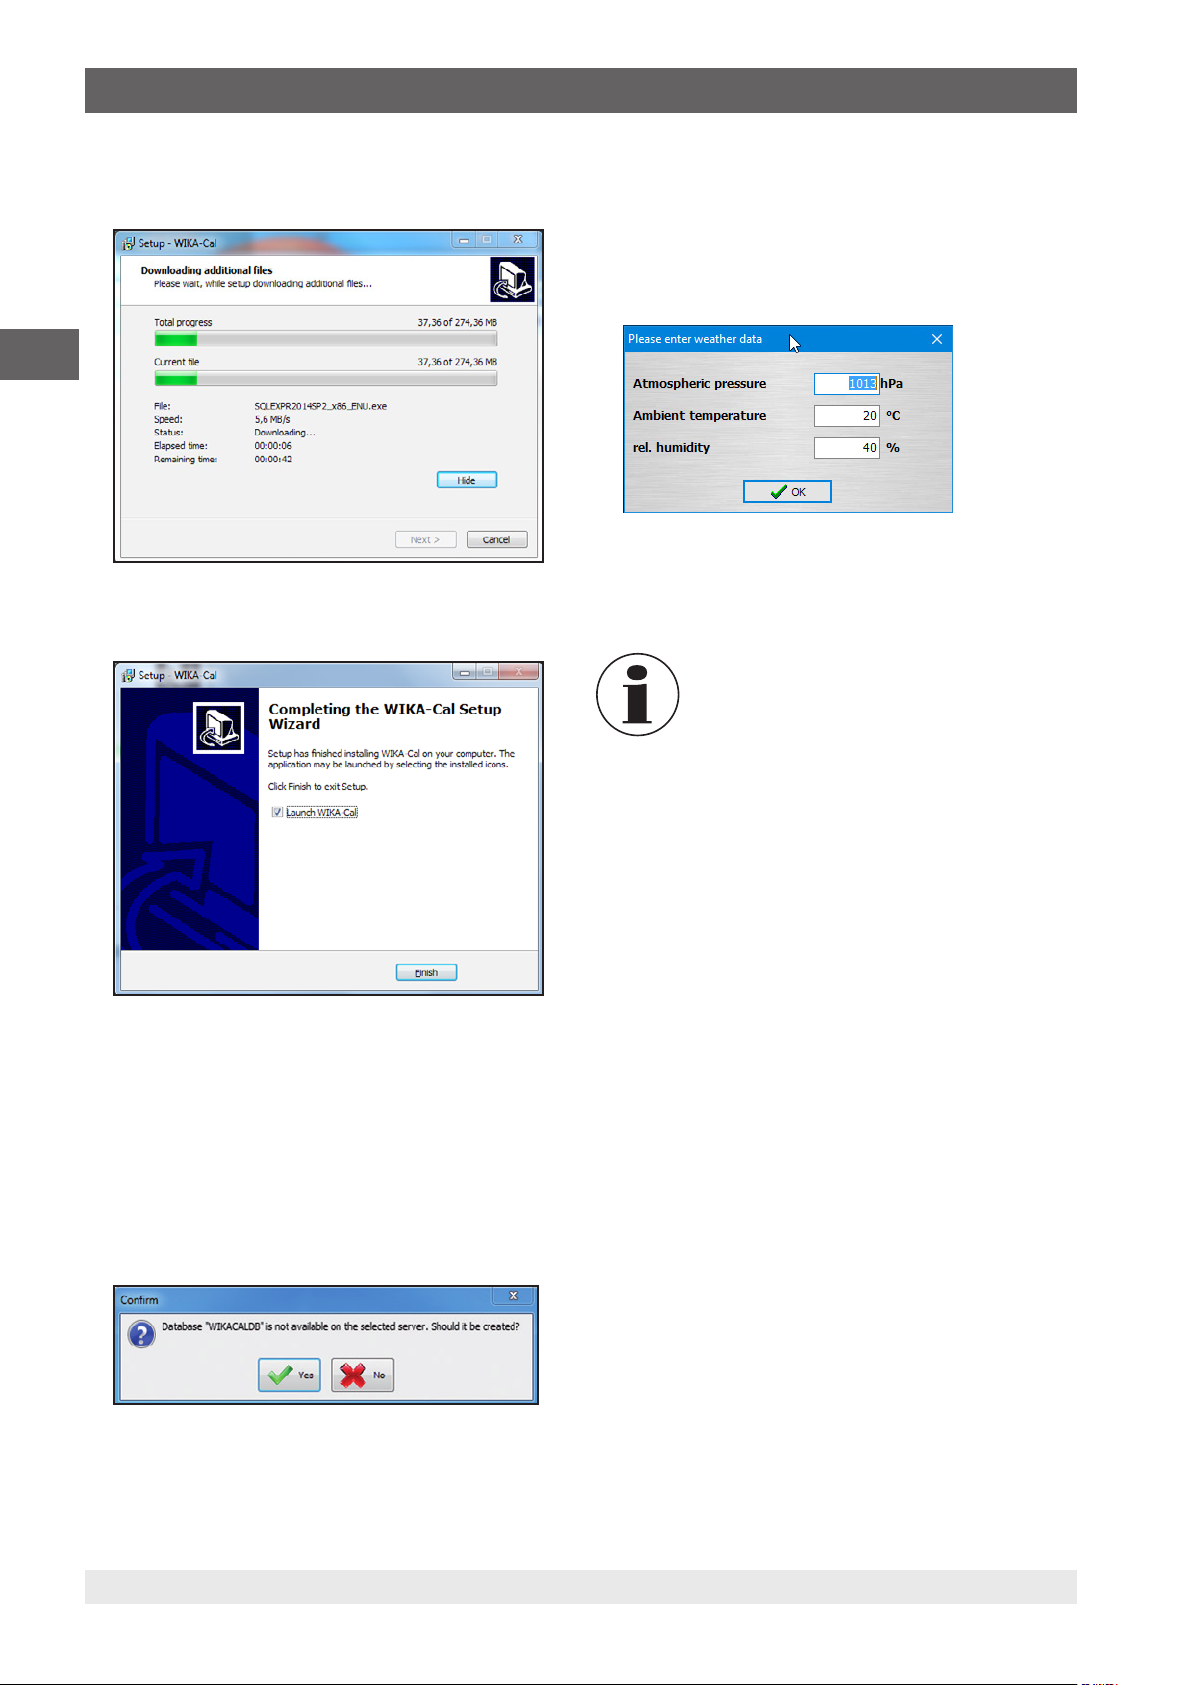
13. Wait for download and installation to complete. This may
take a few minutes.
EN
14. The software is installed now and can be started.
16. If the database has been created correctly, the software
starts with a “Weather data” dialogue. Here the data can
be entered manually or received automatically by the
CPU6000-W. After confirming with [OK], the weather
data is stored in the database (see chapter 6.5 “Weather
data”).
17. The installation is complete now and the software is ready
for use.
For the installation of the software, no USB
stick is needed. By inserting the USB stick,
the coded version stored on the stick is
automatically accessed from within the demo
version.
15. When WIKA-Cal is started for the first time, there is
a check as to whether a WIKA-Cal database can be
found on the SQL server. If this is not the case, the
database can be created by selecting [Yes]. Without the
WIKACALDB database, the WIKA-Cal software will not
work.
The dialogue serves to protect the server. If an incorrect
SQL server was selected accidentally, selecting [No]
here will prevent installation on a remote server.
10 WIKA instruction manual WIKA-Cal
14097663.03 05/2017 EN/DE
Page 11
3. Overview
3. Overview
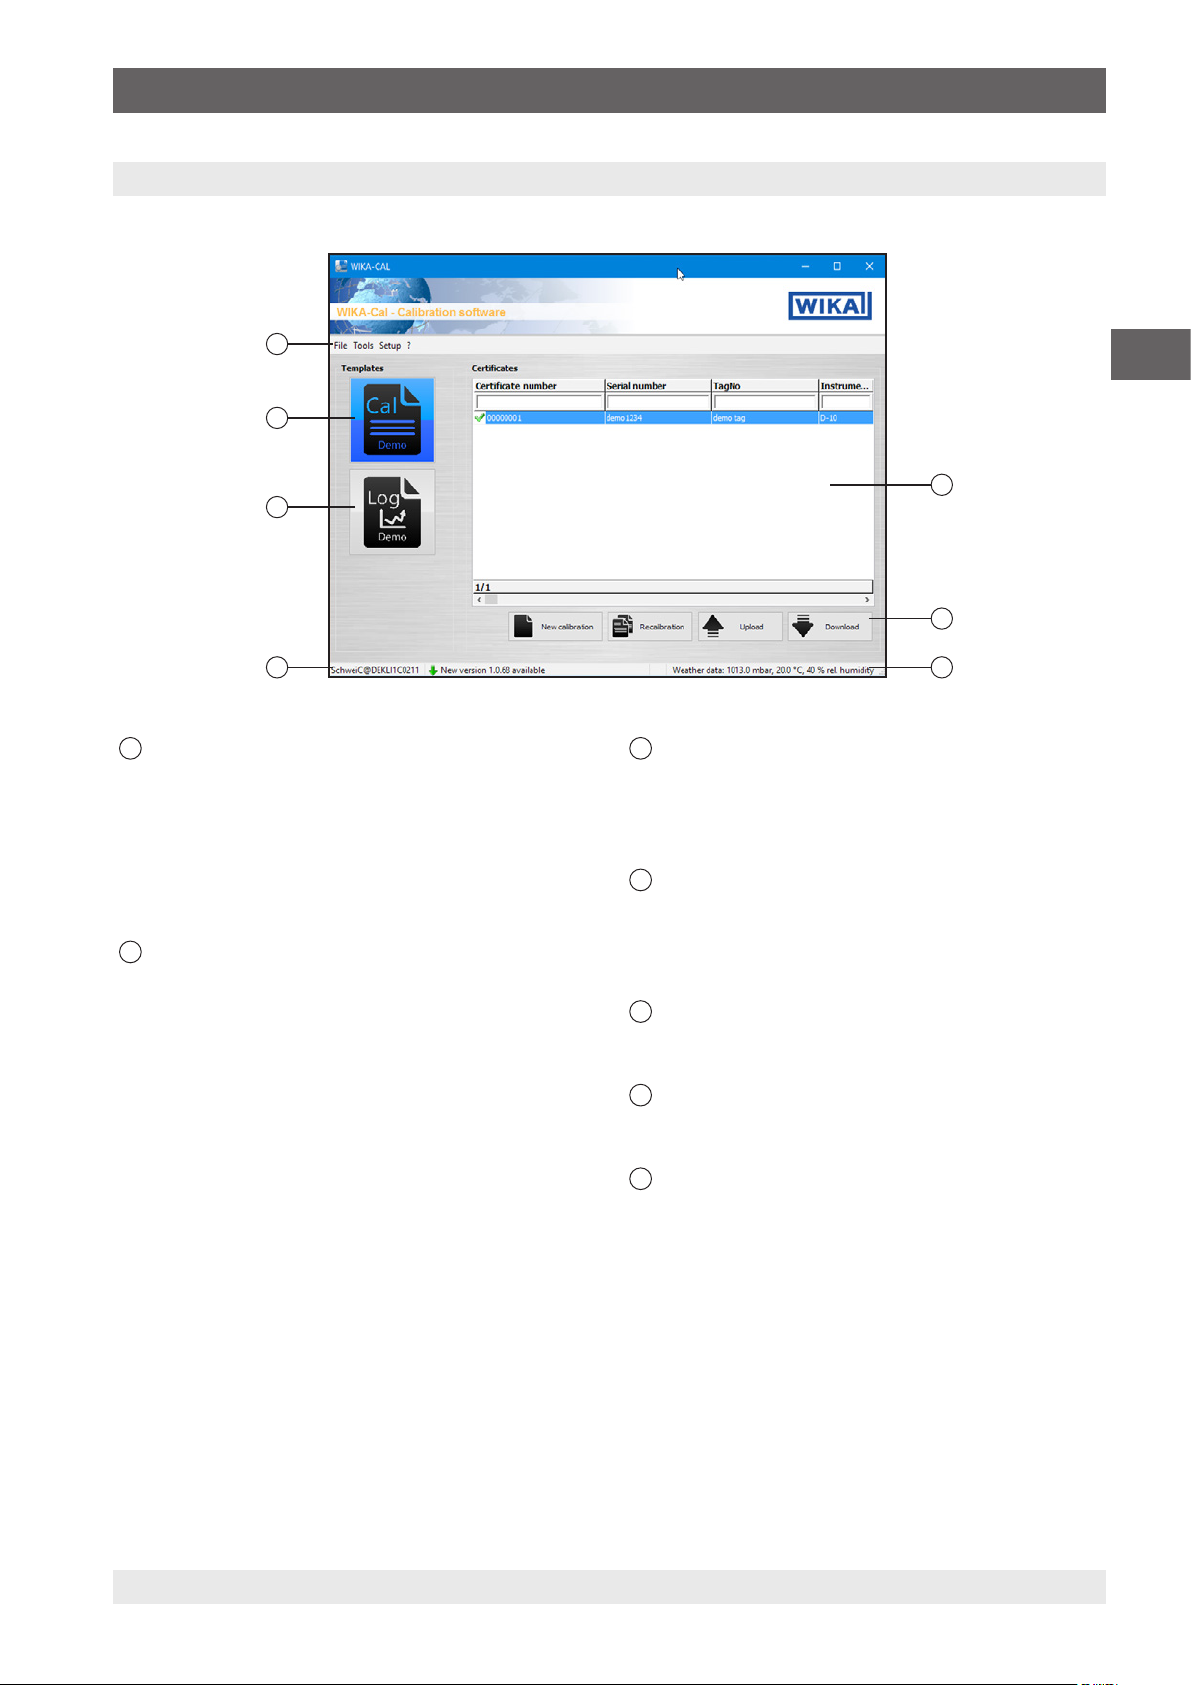
3.1 Main window
7
6
5
1
Certificates
Database of all the documents for the selected
template. It can be filtered against a term via the filter
bar.
Example: “Serial number = 12345”, displays all
documents for the serial number 12345.
“Serial number = *12345*”, displays all documents
which contain 12345 in their serial number.
2
Function buttons
■
New calibration, New log
Creates a document from the selected template (see
chapter 4.3 “New calibration” or chapter 5.3 “New
log”).
■
Recalibration, Relog
Creates a prefilled document from the selected
template. Only finished documents (green
check mark) can be selected (see chapter
4.4 “Recalibration” or chapter 5.4 “Repeat logging”).
■
Upload (only available for Cal-Template)
Loads a calibration process onto a mobile
instrument (see chapter 4.5 “Upload”).
1
2
34
3
Weather data
Indication of the current ambient conditions
- Clicking on the bar will open the “Weather data”
window in the “Object manager” (see chapter
6.5 “Weather data”).
4
Work station
Indication of the current computer name
- Clicking on the bar will open the “Work station”
window in the “Object manager” (see chapter
6.3.1 “Work station”).
5
Templates
Log-Template selection (see chapter 5 “Log-Template
logger protocol”).
6
Templates
Cal-Template selection (see chapter 4 “Cal-Template
calibration certificate”).
7
Menu bar
Loading and saving the database, tools such as
calculator or unit converter, etc. (see chapter 3.2 “Menu
bar and tools”).
EN
mass
■
Download
A document based on the selected template will
be loaded from a mobile instrument (see chapter
4.6 “Download”).
14097663.03 05/2017 EN/DE
11WIKA instruction manual WIKA-Cal
Page 12
3. Overview
3.2 Menu bar and tools
EN
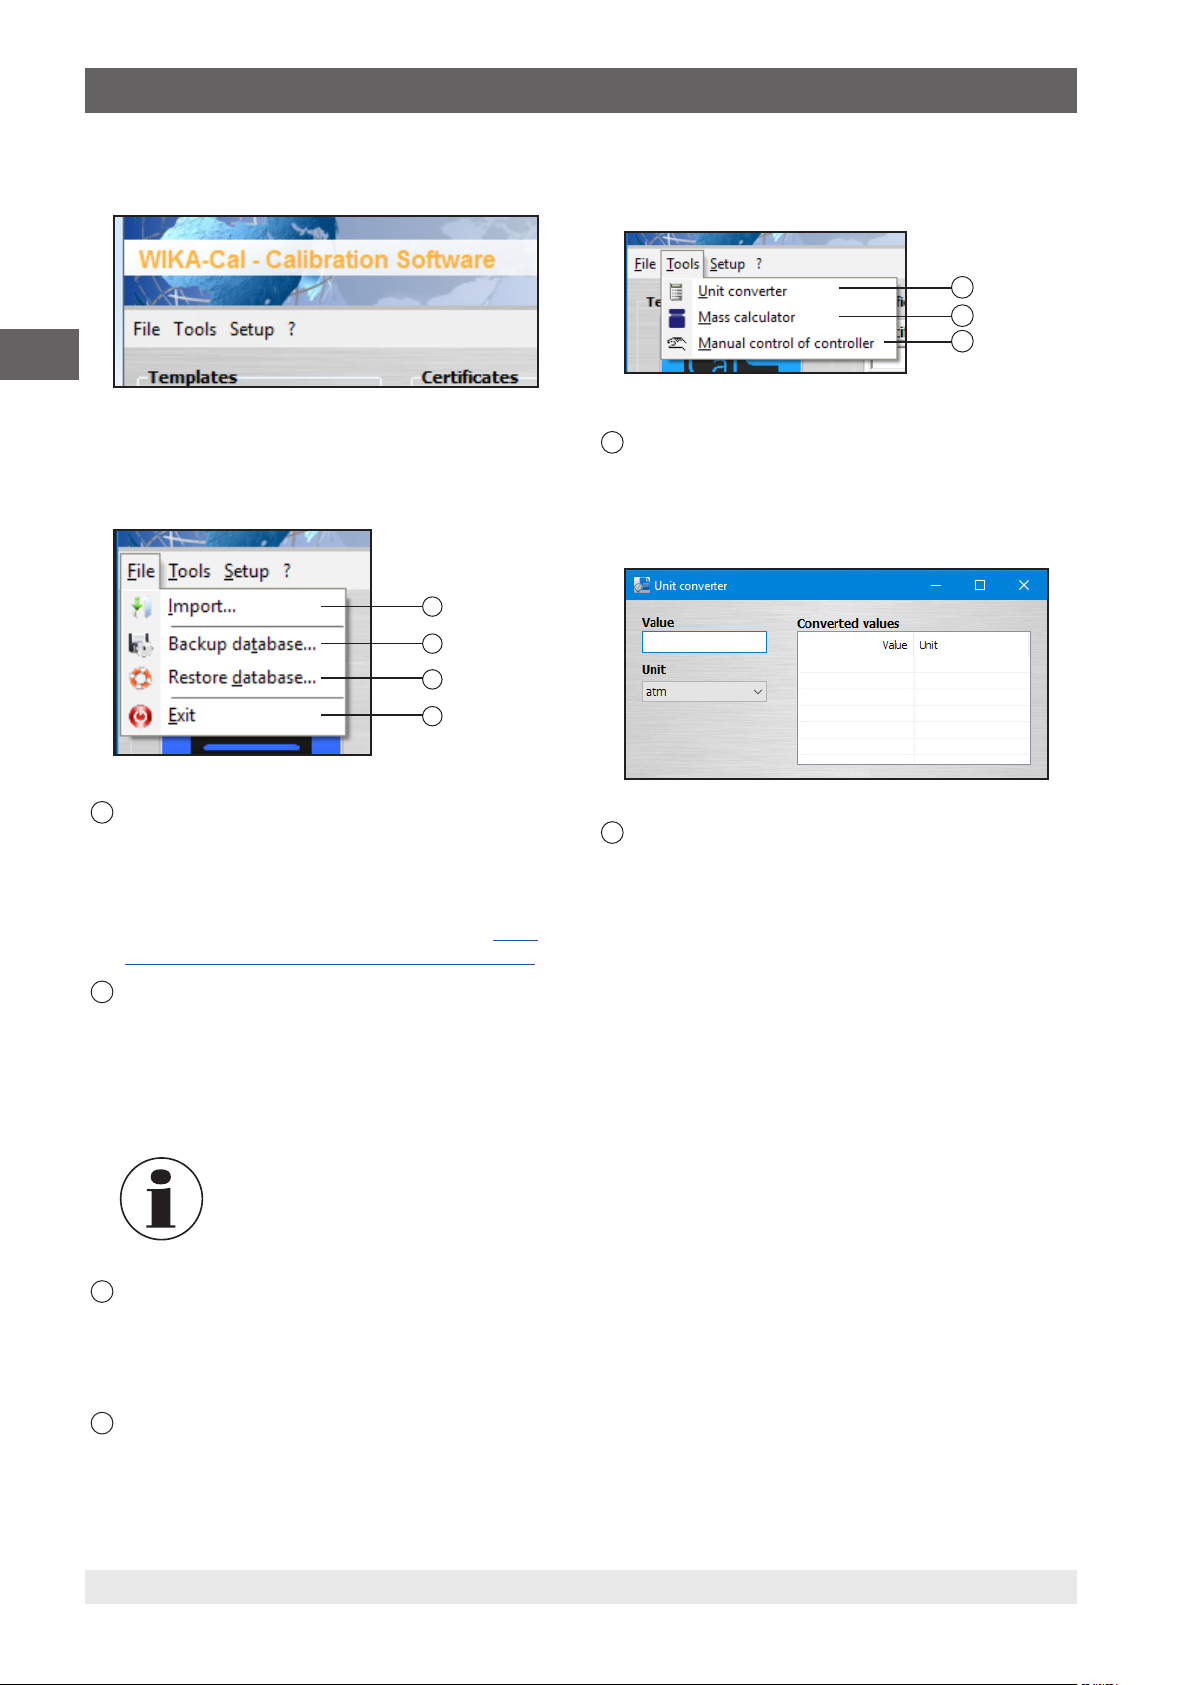
3.2.1 File: Import, backup database, restore database,
exit
1
2
3
4
3.2.2 Tools: Unit converter, Mass calculator and Manual
control of controller
5
6
7
5
Unit converter
If a number is entered under “Value”, this will be
converted with the specified unit into all available units
and displayed under “Converted values” (see chapter
6.3.5 “Units (pressure)”).
1
Import
Importing pressure balance data. Via the import of an
XML file, a pressure balance can be inserted into the
database as a standard (see chapter ). The XML files
are stored online under a file name, e.g. for file name
“50556CPB5000”, the XML file is stored under http://
apps.wika.com/apps/CPB-CAL/50556CPB5000.xml
2
Backup database...
Using this function, the complete database (see
chapter 6 “Object manager”) can be saved in a .bak
file. Here a path must be selected for which write
permissions for the database exist. The installed SQL
database must be able to access the selected path.
The write permissions of the SQL
database are different from the logged-in
Windows user. Experience has shown
that a newly created folder, e.g. “C:\
Temp\”, is a good option to save .bak files.
3
Restore database...
A .bak file saved using “Backup database....” can
be reloaded via “Restore database...”. Here, the old
database will be deleted and the selected database in
the .bak file will be restored.
4
Exit
Exits the program.
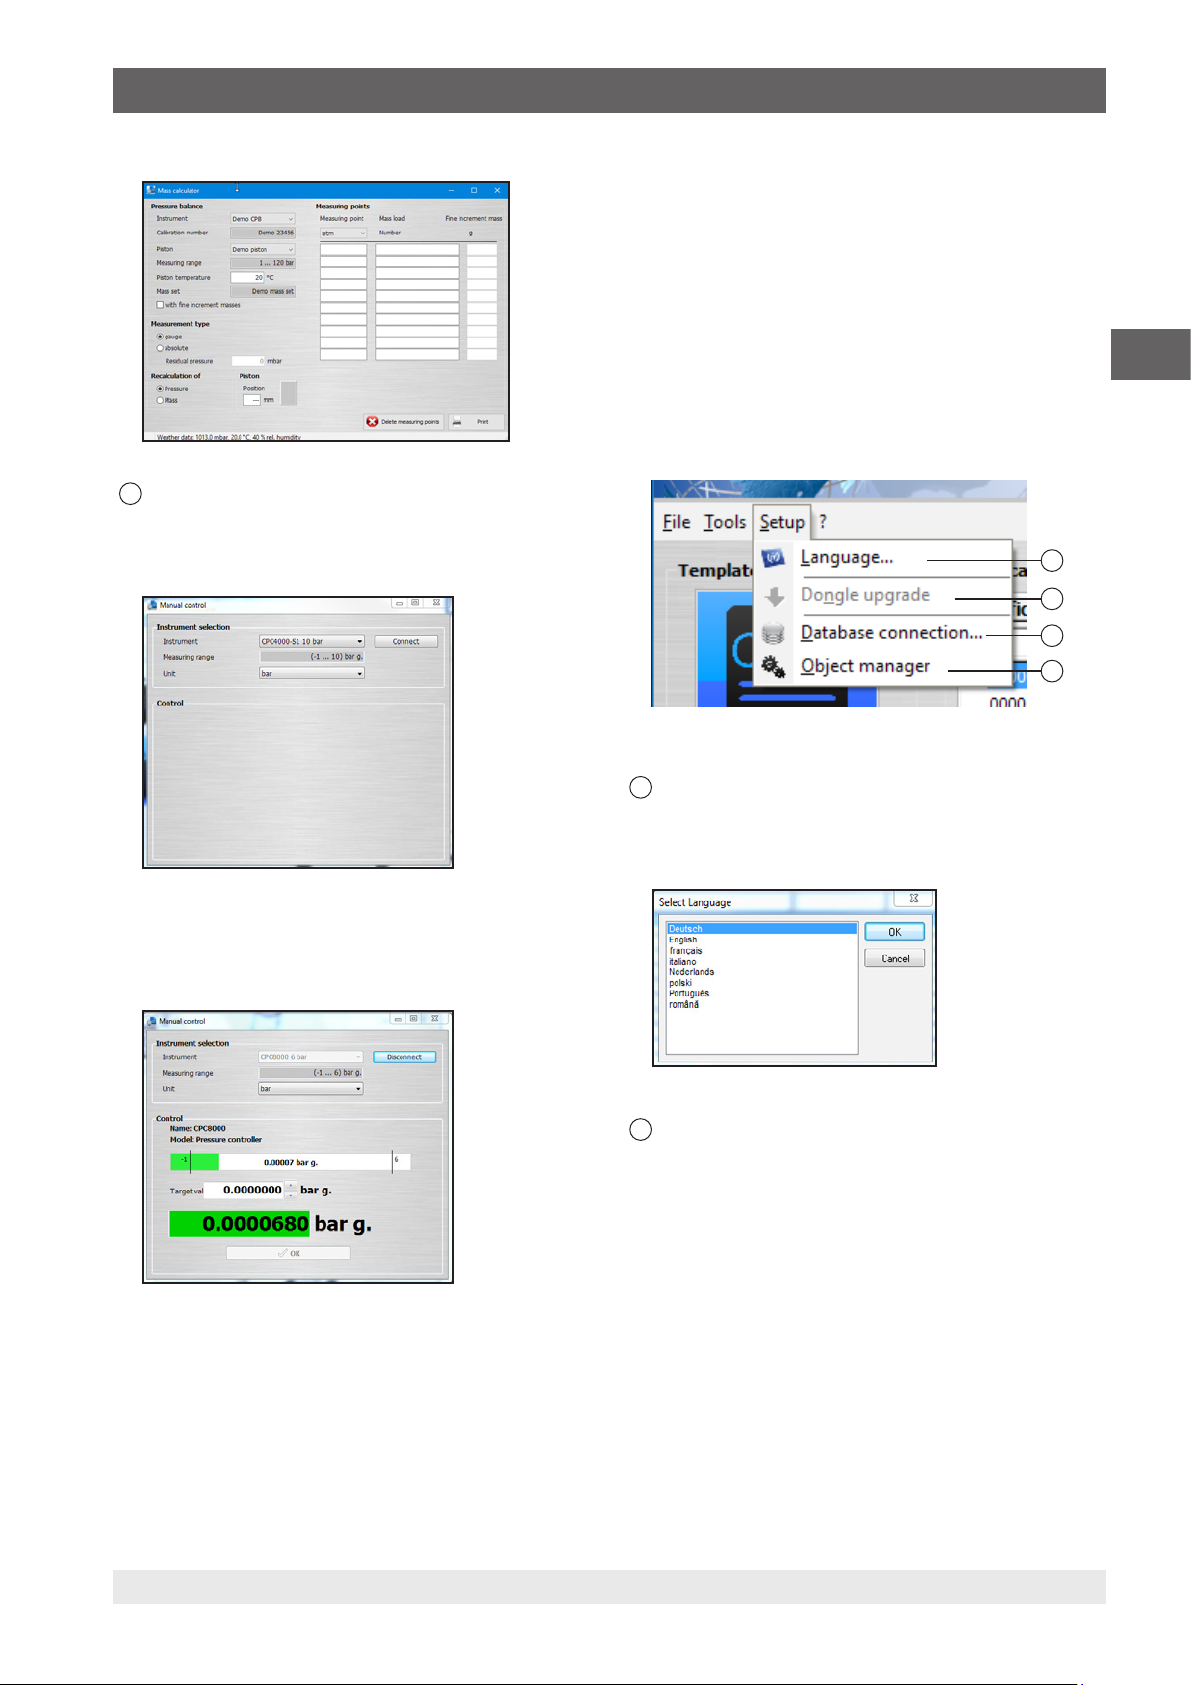
6
Mass calculator
The tool is used to convert masses into pressure, and
vice versa, for pressure balances. First, an instrument
(pressure balance) and the associated piston must
be chosen. The mass set is chosen accordingly. The
pressure balance data must have been previously
entered in the object manager or imported via an XML
file (see chapter 6.3.19 “Standards (pressure)” or
3.2.1 “File: Import, backup database, restore database,
).
exit”
By pressing [Enter] after entering a pressure value in
the left column, the cells above will be prefilled with
regularly distributed values. For example, entering an
end value in the lower left → cell will cause regularly
distributed values to be entered in the cells above, up
to the start of the measuring range.
It is also possible to calculate fine increment masses
in order to calculate the masses for a pressure value,
or vice versa. It is also possible to enter the mass
numbers.
For the correction of the measured values, the
measured ambient conditions and the piston
temperature are used. The piston position is used to
display the floating position. In addition, for absolute
pressure instruments, the vacuum residual pressure
must also be specified. Through CPU6000 series
instruments, this can be read automatically.
12 WIKA instruction manual WIKA-Cal
14097663.03 05/2017 EN/DE
Page 13
3. Overview
7
Manual control of controller
Once connection to the selected controller has been
established, you can manually set the desired nominal
value in increments.
1. Use the [▲] and [▼] buttons to change the pressure
range.
2. Click [OK] to confirm the change in pressure.
The new pressure range is set
⇒
The bar graph represents the pressure range
graphically.
Click [Disconnect] to disconnect the controller.
3.2.3 Setup: Language, dongle upgrade, database
connection, object manager
10
11
EN
8
9
Select the controller under “Instrument” and the desired
pressure range under “Unit”.
Use [Connect] to access the controller.
8
Language
Selection of the different languages. The software is
continually being updated and additional languages are
being added.
9
Dongle upgrade
When a USB stick is connected, via the “Dongle
upgrade”, the serial number of the USB stick can be
determined. This serial number can be passed to your
WIKA contact in order to expand the USB stick by new
functionality. Find out about additional functionality for
your USB stick from your WIKA contact.
14097663.03 05/2017 EN/DE
13WIKA instruction manual WIKA-Cal
Page 14
3. Overview
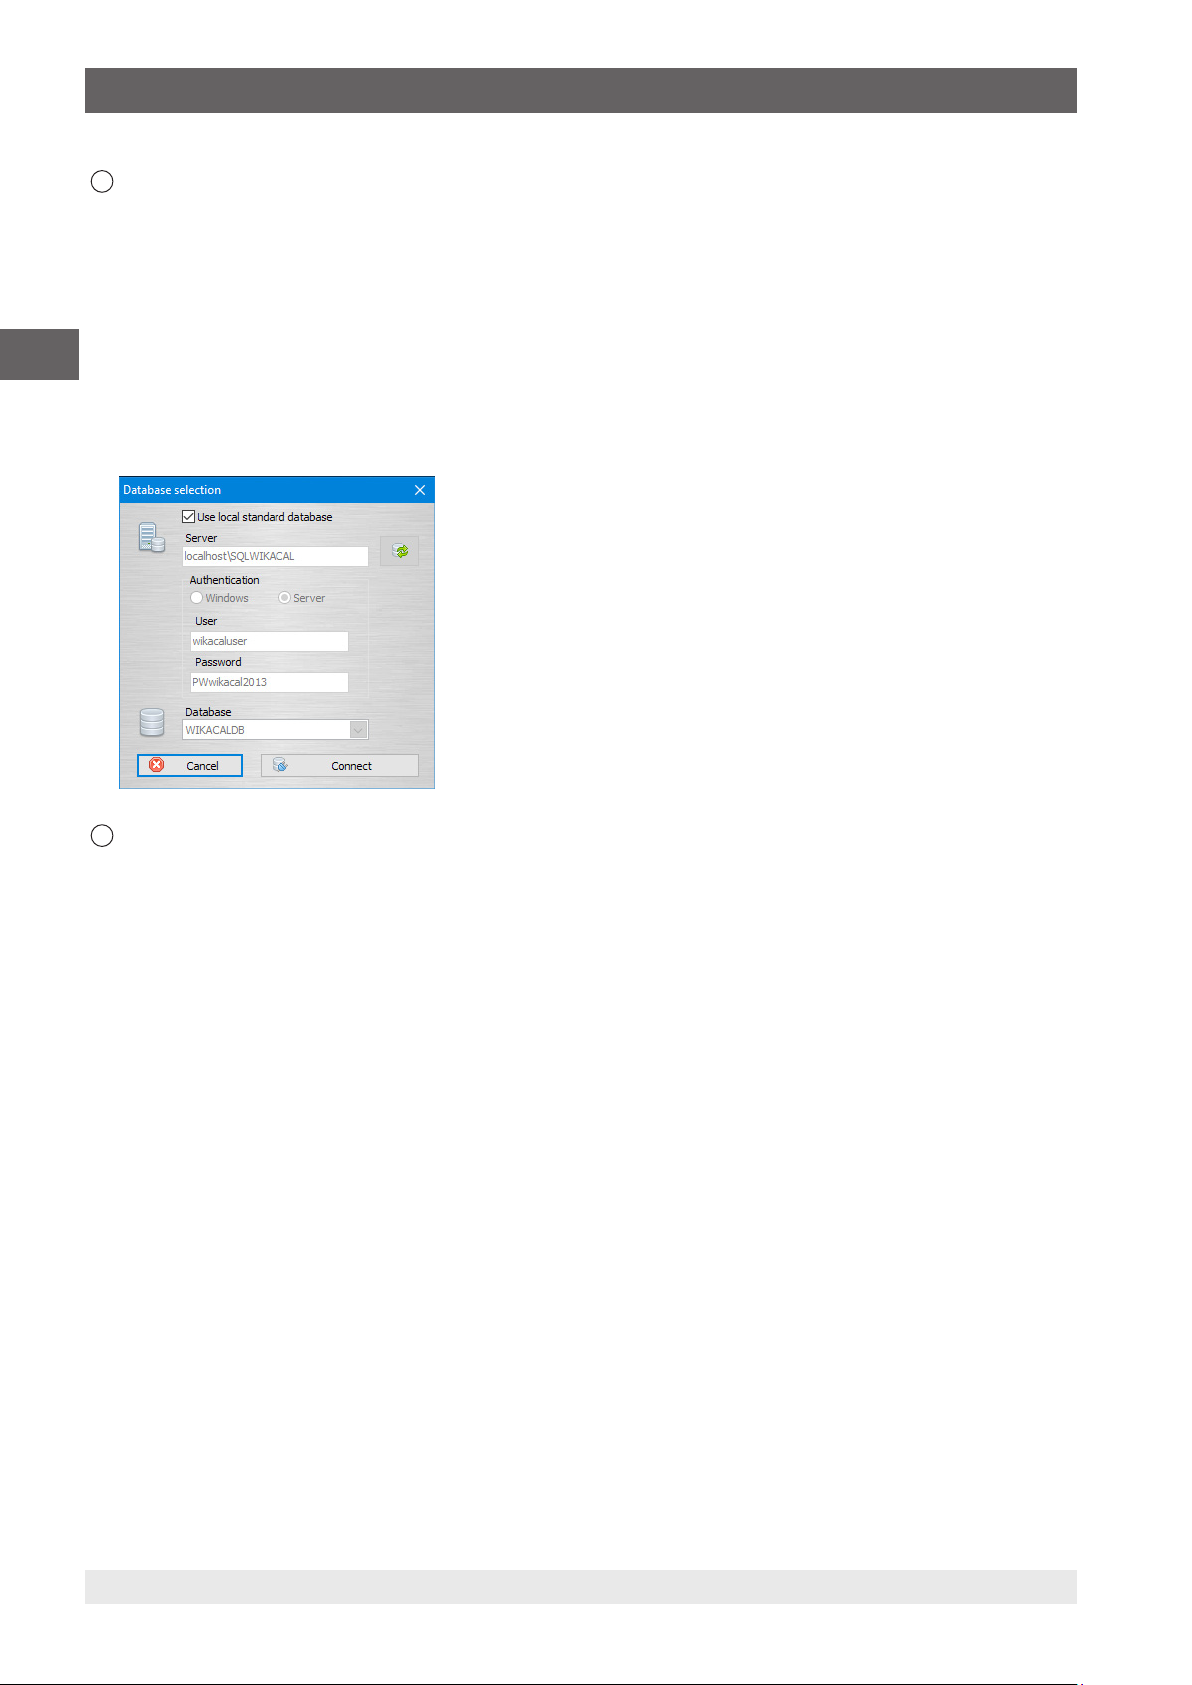
10
EN
Database connection
In the database selection dialogue, by deactivating the
“Use local standard database”, another server can
be selected.
The server, on another computer in the network,
can be connected via “Networkcomputername\
SQLWIKACAL”. The values under “Authentication”
and “Database” should remain there. The adjustment
of these values requires advanced knowledge of SQL.
After pressing [Connect], one is connected to the
database and should be able to call this via the object
manager.
11
Object manager
See chapter 6 “Object manager”.
14 WIKA instruction manual WIKA-Cal
14097663.03 05/2017 EN/DE
Page 15
4. Cal-Template calibration certificate
Calibration certificate
Kalibrierzeugnis
Certificate No. 00000122
Zeugnis-Nr.
Page 2 / 2
Seite
Demo laboratory
Demo street 123
12345 Demo city
Demo country
Tel.: 01234/56789
Fax: 01234/56789
E-Mail: demo@demo.com
www.demo.com
Measurement results
Messergebnisse
Statement of compliance
Konformitätsaussage
Reference value WS Reading DUT
Referenzwert GN Ablesung KG
bar bar
↑ ↓
0.00000 0.0000 0.0010
10.00000 10.0010 10.0020
Object keeps the specifications!
Der Kalibriergegenstand hält die Herstellerspezifikationen ein!
Calibration certificate
Kalibrierzeugnis
Certificate No. 00000122
Zeugnis-Nr.
Page 1 / 2
Seite
Demo laboratory
Demo street 123
12345 Demo city
Demo country
Tel.: 01234/56789
Fax: 01234/56789
E-Mail: demo@demo.com
www.demo.com
General
Allgemein
Device under test (DUT)
Kalibriergegenstand (KG)
Environmental conditions
Umgebungsbedingungen
Place of calibration
Ort der Kalibrierung
Measurement conditions
Messbedingungen
Calibration certificate
Kalibrierschein
Customer Demo customer
Kunde
Demo street
DE-12345 Demo city
Customer order No.
Kundenbestellnummer
Order date
Bestelldatum
Date of calibration 01/02/2017
Datum der Kalibrierung
Operator Demo User
Bearbeiter
Electrical gauge
Elektrisches Druckmessgerät
Model D-10
Typ
Serial number demo1234
Seriennummer
Scale range (0 ... 10) bar g
Anzeigebereich
Accuracy 0.05 % FS
Genauigkeit
Resolution (scale division) 0.0001 bar
Auflösung (Skalenwert)
Measuring point No. demo tag
Messstellen-Nr
Temperature (20,0 ± 0,1) °C
Temperatur
Atmospheric pressure (1013,0 ± 0,1) hPa
Atmosphärischer Luftdruck
Rel. humidity (40 ± 1) %
Rel. Luftfeuchte
Demo place
g = (9.80946 ± 0.01) m/s²
Musterort
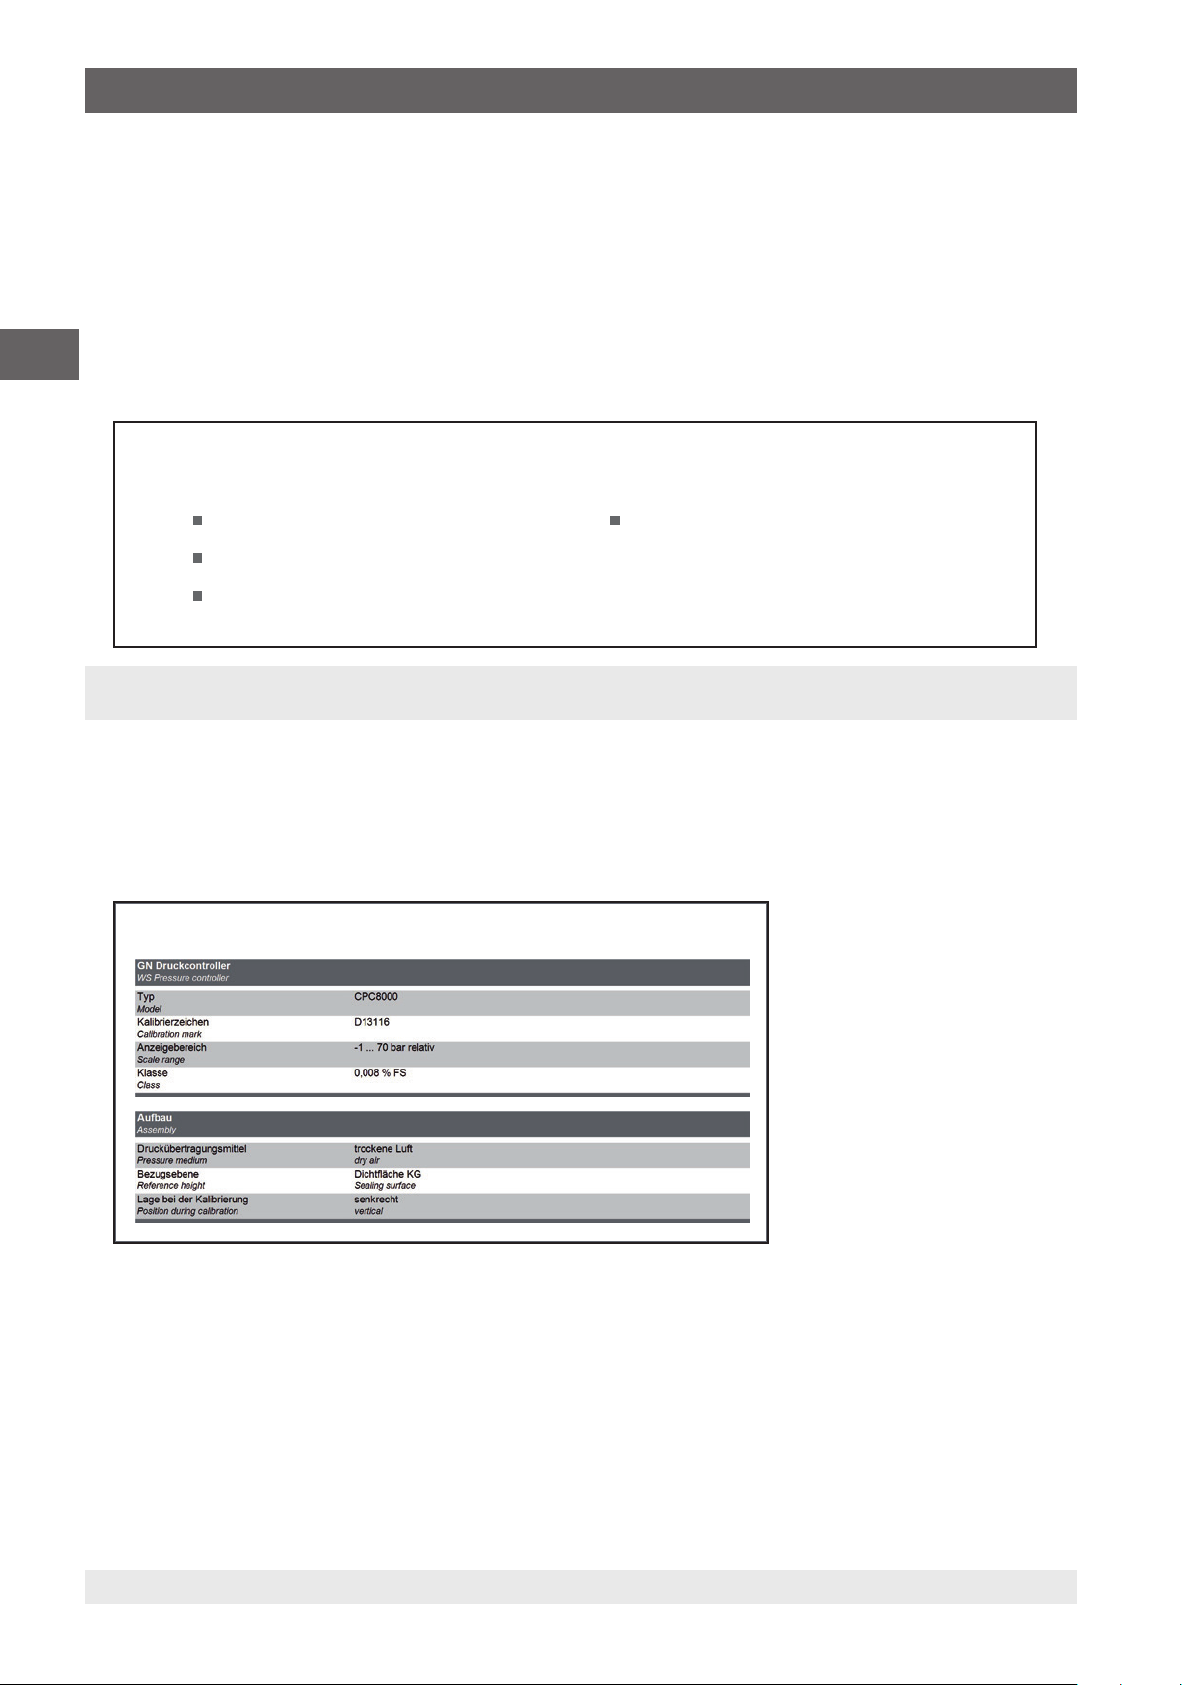
Working standard (WS) Pressure controller
Gebrauchsnormal (GN) Druckcontroller
Model Demo CPC
Typ
Calibration mark Demo 12345
Kalibrierzeichen
Scale range (0 ... 10) bar g
Anzeigebereich
Accuracy 0.02 % FS
Genauigkeit
Calibration certificate
Kalibrierzeugnis
Certificate No. 00000122
Zeugnis-Nr.
General
Allgemein
Device under test (DUT)
Kalibriergegenstand (KG)
Calibration certificate
Kalibrierschein
Customer Demo customer
Kunde
Demo street
DE-12345 Demo city
Customer order No.
Kundenbestellnummer
Order date
Bestelldatum
Date of calibration 01/02/2017
Datum der Kalibrierung
Operator Demo User
Bearbeiter
Electrical gauge
Elektrisches Druckmessgerät
Model D-10
Typ
Serial number demo1234
Seriennummer
Scale range (0 ... 10) bar g
Anzeigebereich
Accuracy 0.05 % FS
Genauigkeit
Resolution (scale division) 0.0001 bar
Auflösung (Skalenwert)
Measuring point No. demo tag
Messstellen-Nr
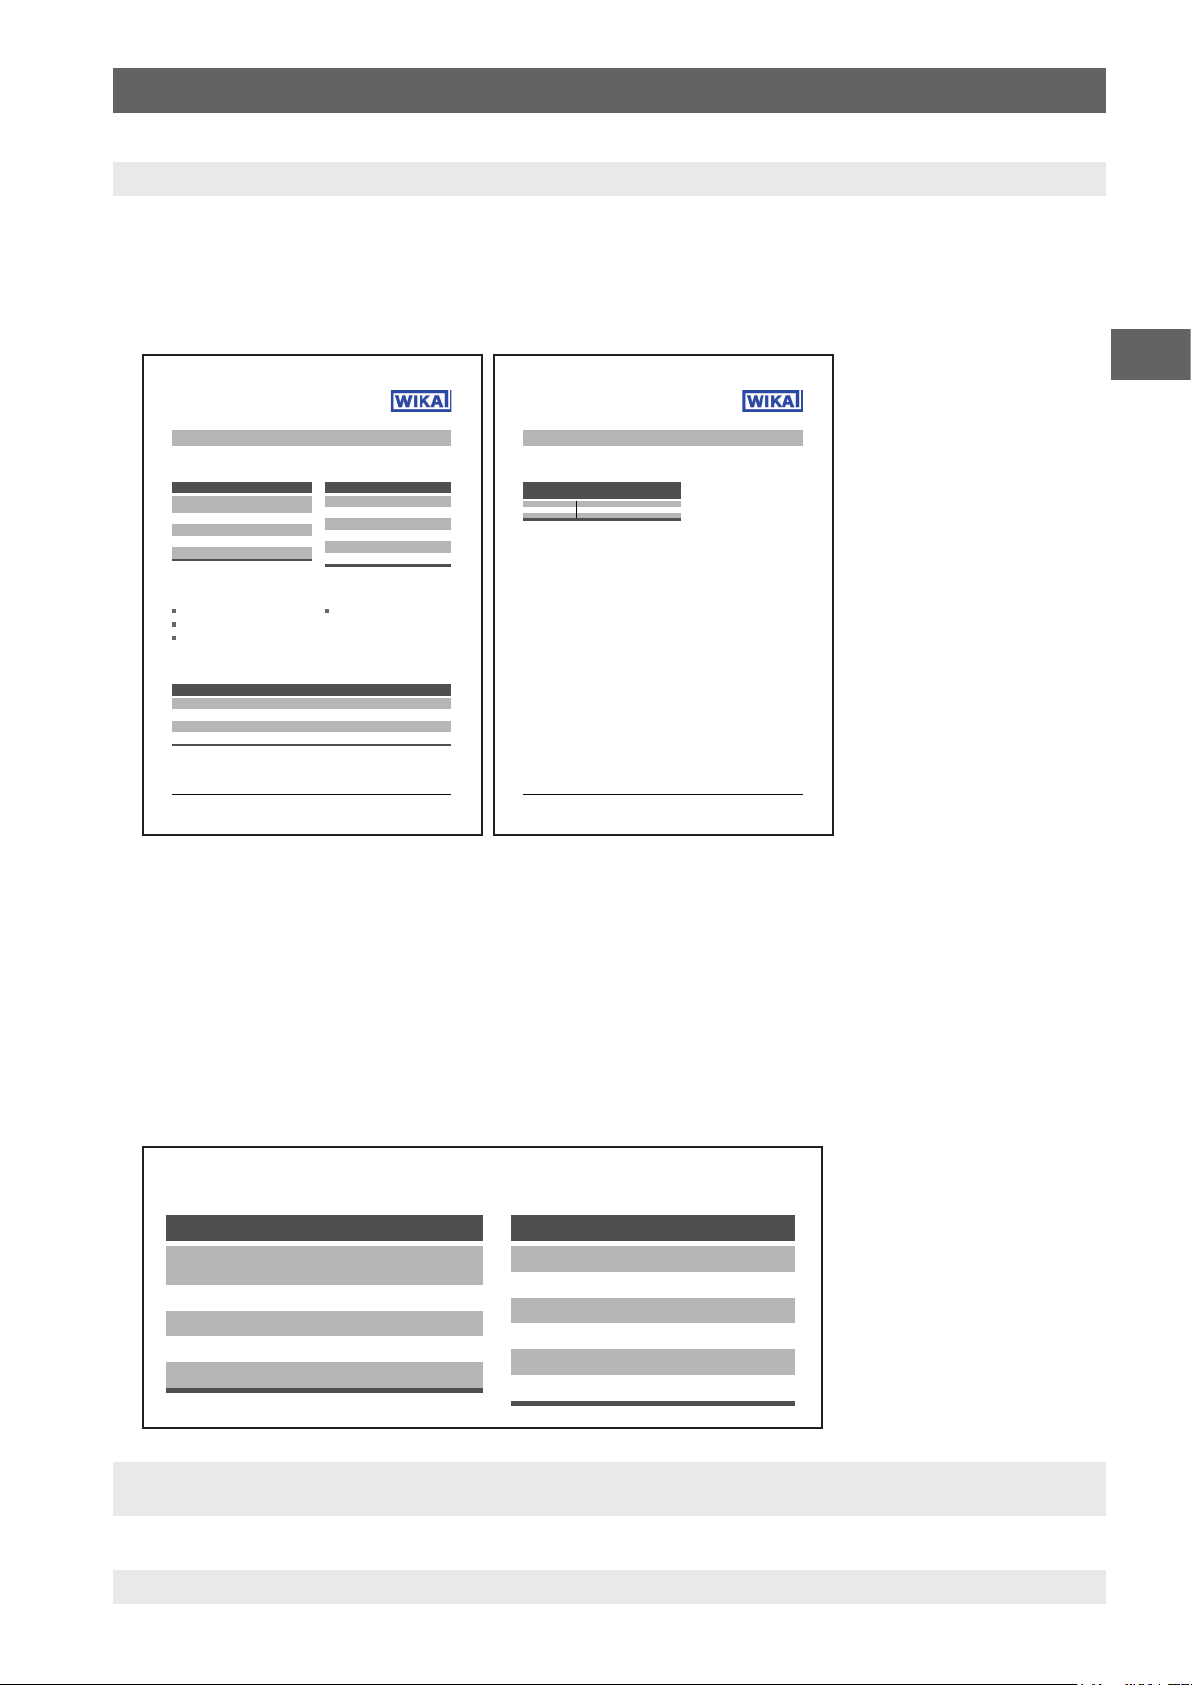
4. Cal-Template calibration certificate
4.1 General information
With the Cal-Template, calibration certificates for mechanical and electronic pressure measuring instruments can be
generated. The calibration certificates have a format derived from the WIKA DKD/DAkkS calibration certificate and contain the
same functions and calculations. The template has many additional features. For example, the company logo, the address, the
contact or individual labelling can be customised by the user.
EN
4.2 Entry of calibration data
4.2.1 General data
Specification of company-specific data, such as customer address, order number or order date. The label texts can be
amended in the database.
4.2.2 Calibration item
Information on the measuring instrument which is to be calibrated. The table dynamically adapts to the selected instrument
type. Thus, for example, with pressure transmitters, an additional line is displayed for the output signal (e.g. 4 ... 20 mA).
Fig. left: General data
Fig. right: Calibration item
14097663.03 05/2017 EN/DE
15WIKA instruction manual WIKA-Cal
Page 16
4. Cal-Template calibration certificate
Calibration certificate
Kalibrierzeugnis
Certificate No. 00000122
Zeugnis-Nr.
General
Allgemein
Device under test (DUT)
Kalibriergegenstand (KG)
Environmental conditions
Umgebungsbedingungen
Place of calibration
Ort der Kalibrierung
Calibration certificate
Kalibrierschein
Customer Demo customer
Kunde
Demo street
DE-12345 Demo city
Customer order No.
Kundenbestellnummer
Order date
Bestelldatum
Date of calibration 01/02/2017
Datum der Kalibrierung
Operator Demo User
Bearbeiter
Electrical gauge
Elektrisches Druckmessgerät
Model D-10
Typ
Serial number demo1234
Seriennummer
Scale range (0 ... 10) bar g
Anzeigebereich
Accuracy 0.05 % FS
Genauigkeit
Resolution (scale division) 0.0001 bar
Auflösung (Skalenwert)
Measuring point No. demo tag
Messstellen-Nr
Temperature (20,0 ± 0,1) °C
Temperatur
Atmospheric pressure (1013,0 ± 0,1) hPa
Atmosphärischer Luftdruck
Rel. humidity (40 ± 1) %
Rel. Luftfeuchte
Demo place
g = (9.80946 ± 0.01) m/s²
Musterort
4.2.3 Ambient conditions
Indication of the ambient conditions. The values are entered every 3 minutes via a manual dialogue or read automatically by a
model CPU6000-W weather station.
The manual input or automatic reading of a CPU is made from a work station that is assigned to a place. All other work stations
which are allocated to that place benefit directly from the registered values.
4.2.4 Place of calibration
EN
Description of the place in which the calibration was carried out.
Will be selected automatically from the work station (computer name) which is assigned to that place in the database.
Fig. left: Ambient conditions
Fig. right: Place of calibration
4.2.5 Measurement conditions
Information about the reference used, the multimeter or the general assembly. The information is made dynamically based on
the specified test item.
Several different references can be specified. With the definition of the measuring points, these are assigned before the
calibration.
Messbedingungen
Measurement conditions
16 WIKA instruction manual WIKA-Cal
14097663.03 05/2017 EN/DE
Page 17
4. Cal-Template calibration certificate
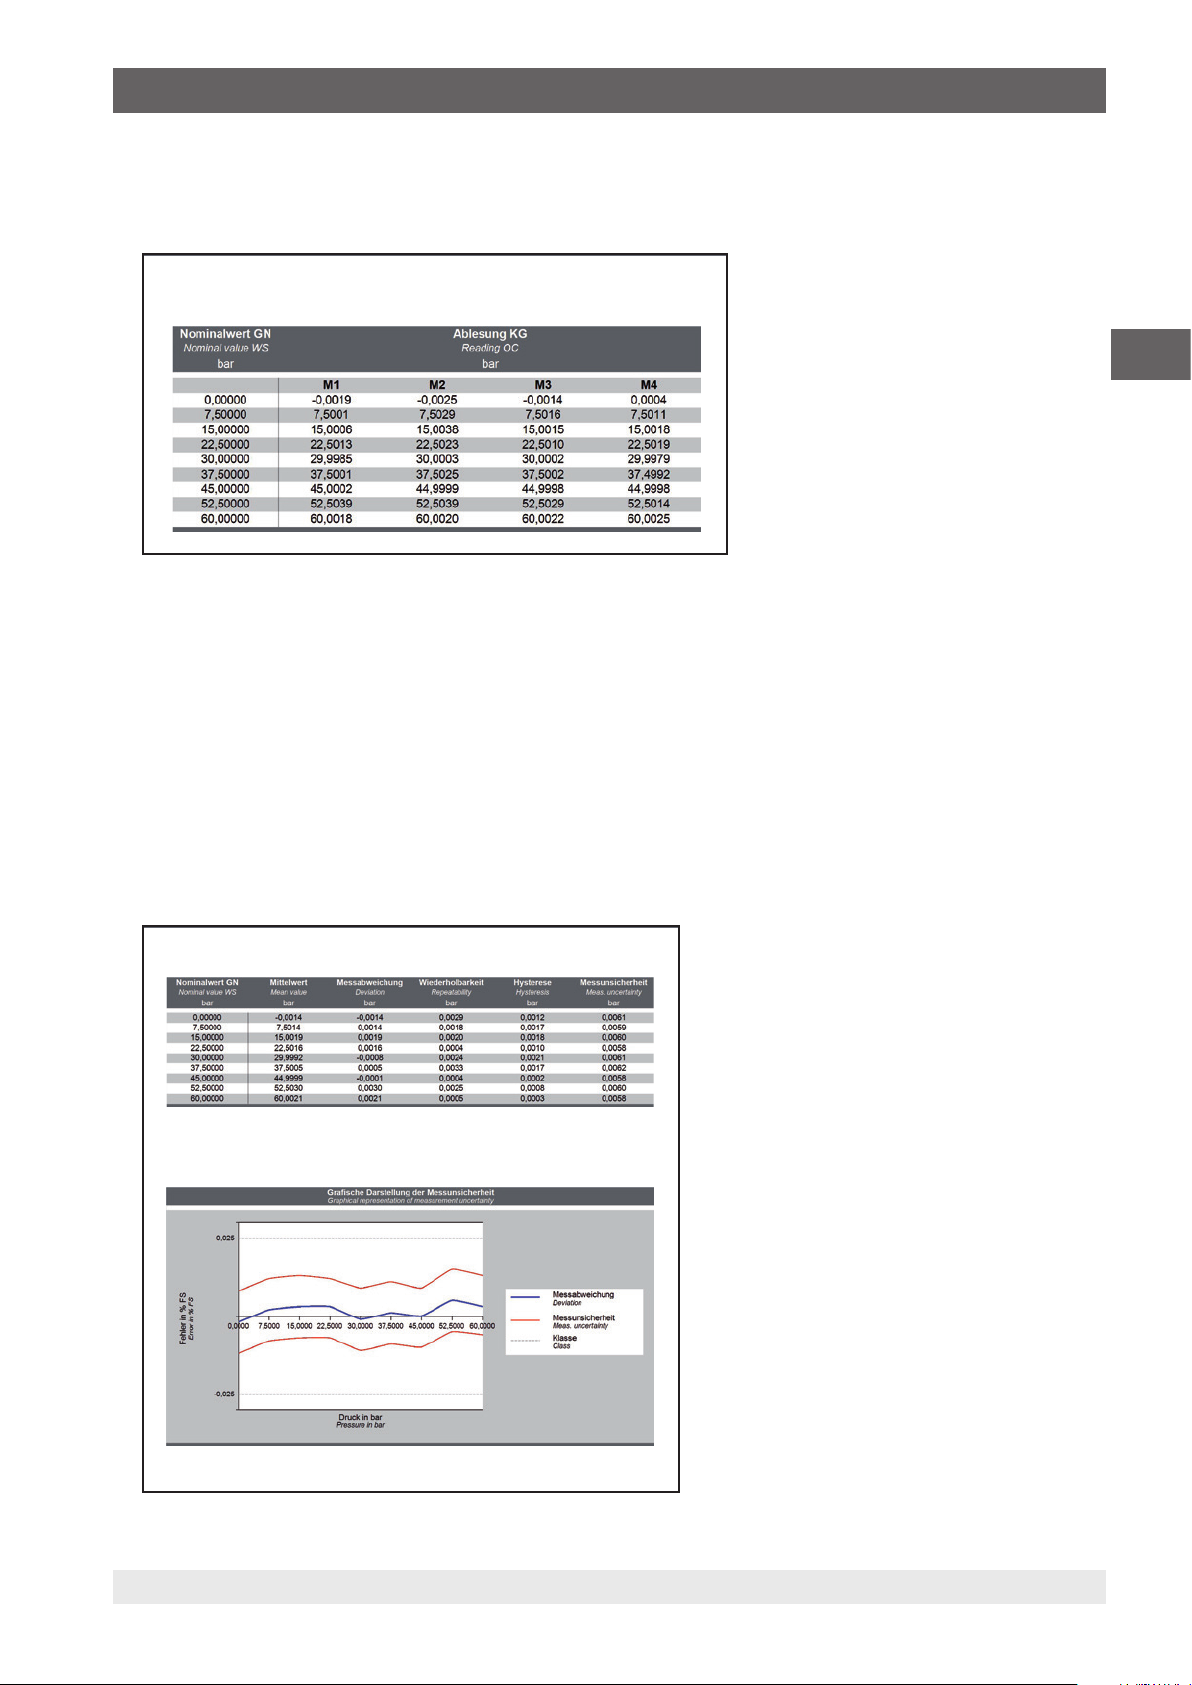
4.2.6 Measurement results
Results of the calibration. The table automatically adapts to the selected models. Thus, for example, for pressure transmitters,
two tables (one for the electrical signal and one for the pressure values) are defined.
Messergebnisse
Measurement results
4.2.7 Evaluation (optional)
Evaluation of the measuring deviation. Can be set via the database in percentage or pressure unit (see chapter 6.4.1 “Cal”).
EN
4.2.8 Measurement uncertainty (optional)
Evaluation of the measurement uncertainty can be enabled via the database (see chapter 6.4.1 “Cal”). First, the mean values
are calculated by means of a zero setting in accordance with DKD-R 6-1. The corresponding measuring deviation results from
“mean value - measuring deviation”. Repeatability, hysteresis and measurement uncertainty are also calculated in accordance
with DKD-R 6-1. During their calculation, all entries from the creation process are used.
In addition, the note from DKD-R 6-1 is listed below the table. The graphical representation is optional, too, and can be
enabled via the database (see chapter 6.4.1 “Cal”).
The final assessment of the instrument´s accuracy is the biggest calculated “measuring deviation + measurement uncertainty”.
Messunsicherheit
Uncertainty of measurement
Angegeben ist die erweiterte Messunsicherheit, die sich aus der Standardmessunsicherheit durch Multiplikation mit
dem Erweiterungsfaktor k = 2 ergibt. Sie wurde gemäß DAkkS–DKD–3 ermittelt. Der Wert der Messgröße liegt mit einer
Wahrscheinlichkeit von 95 % im zugeordneten Werteintervall.
The uncertainty stated is the expanded uncertainty obtained by multiplying the standard uncertainty by the coverage factor k = 2. It has
been determined in accordance with DAkks–DKD–3. The value of the measurand lies within the assigned range of values with a
probability of 95%.
Die Genauigkeit des Gerätes beträgt 0,0090 bar
The accuracy of the device is 0,0090 bar
14097663.03 05/2017 EN/DE
17WIKA instruction manual WIKA-Cal
Page 18
4. Cal-Template calibration certificate
Konformitätsaussage
Statement of compliance
Der Kalibriergegenstand hält die Herstellerspezikationen ein!
Object keeps the specications!
4.2.9 Statement of compliance (optional)
Written confirmation of compliance or non-compliance with the manufacturer's specifications based on the evaluation.
Konformitätsaussage
Statement of compliance
Der Kalibriergegenstand hält die Herstellerspezikationen ein!
Object keeps the specications!
EN
4.2.10 Additional information (optional)
Additional remarks/comments
Weitere Hinweise
Additional information
Die Deutsche Akkreditierungsstelle GmbH ist Unterzeichner der multilateralen Übereinkommen der European
cooperation for Accreditation (EA) und der International Laboratory Accreditation Cooperation (ILAC) zur gegenseitigen
Anerkennung der Kalibrierscheine. Die weiteren Unterzeichner innerhalb und außerhalb Europas sind den Internetseiten
von EA (www.european–accreditation.org) und ILAC (www.ilac.org) zu entnehmen.
The DAkkS is signatory to the multilateral agreements of the European co–operation for Accreditation (EA) and of the International
Laboratory Accreditation Cooperation (ILAC) for the mutual recognition of calibration certicates. The other signatories in and outside
Europe can be seen on the Websites of EA (www.european–accreditation.org) and ILAC (www.ilac.org).
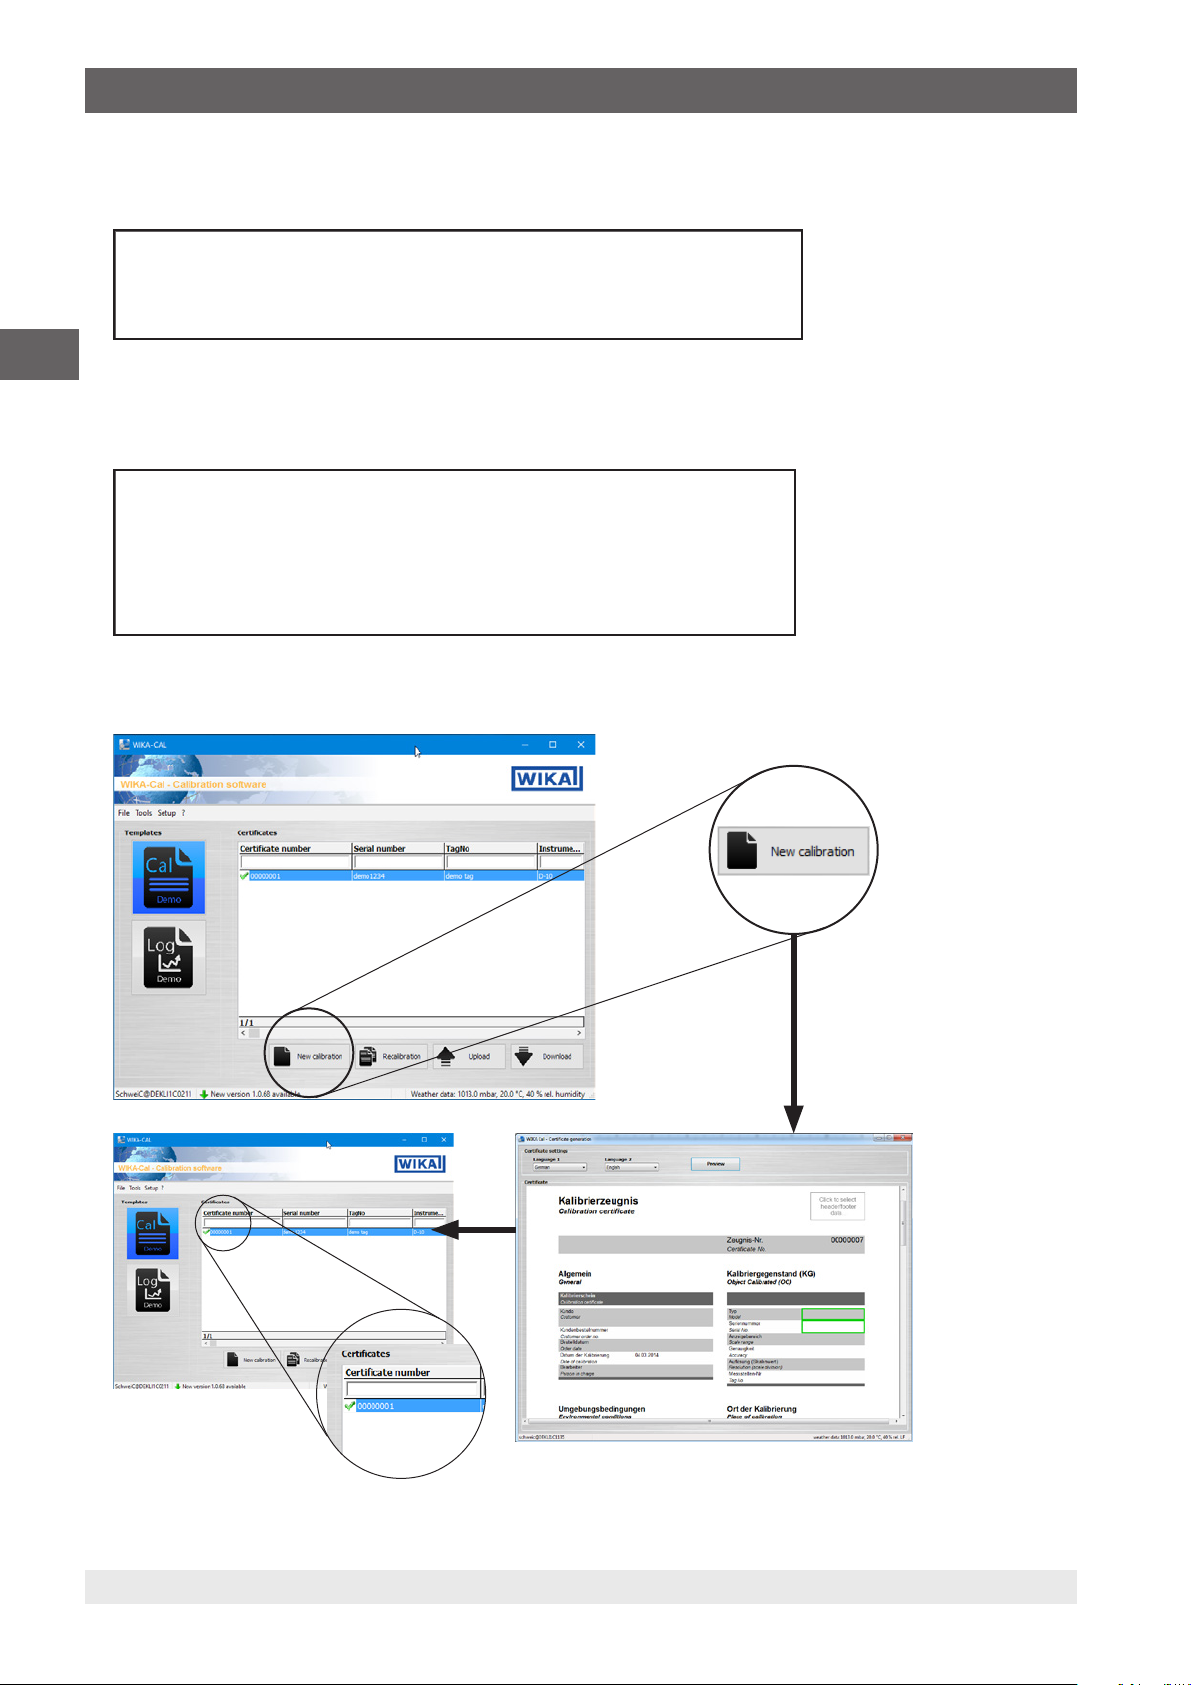
4.3 New calibration
18 WIKA instruction manual WIKA-Cal
14097663.03 05/2017 EN/DE
Page 19

4. Cal-Template calibration certificate
The [New calibration] button starts a new calibration certificate in the document view and adds it to the database. When
a certificate has been completed, a green check mark will be displayed next to the certificate data set. A double click on a
finished certificate always opens the PDF file, while, for others, the document view will always be opened with the latest status.
4.4 Recalibration
EN
The [Recalibration] button starts a new calibration certificate in the document view and adds it to the database. The button is
only available if a completed certificate has been marked in advance. All data in the marked certificate will be transferred to the
new calibration certificate and the calibration can begin immediately.
14097663.03 05/2017 EN/DE
19WIKA instruction manual WIKA-Cal
Page 20
4. Cal-Template calibration certificate
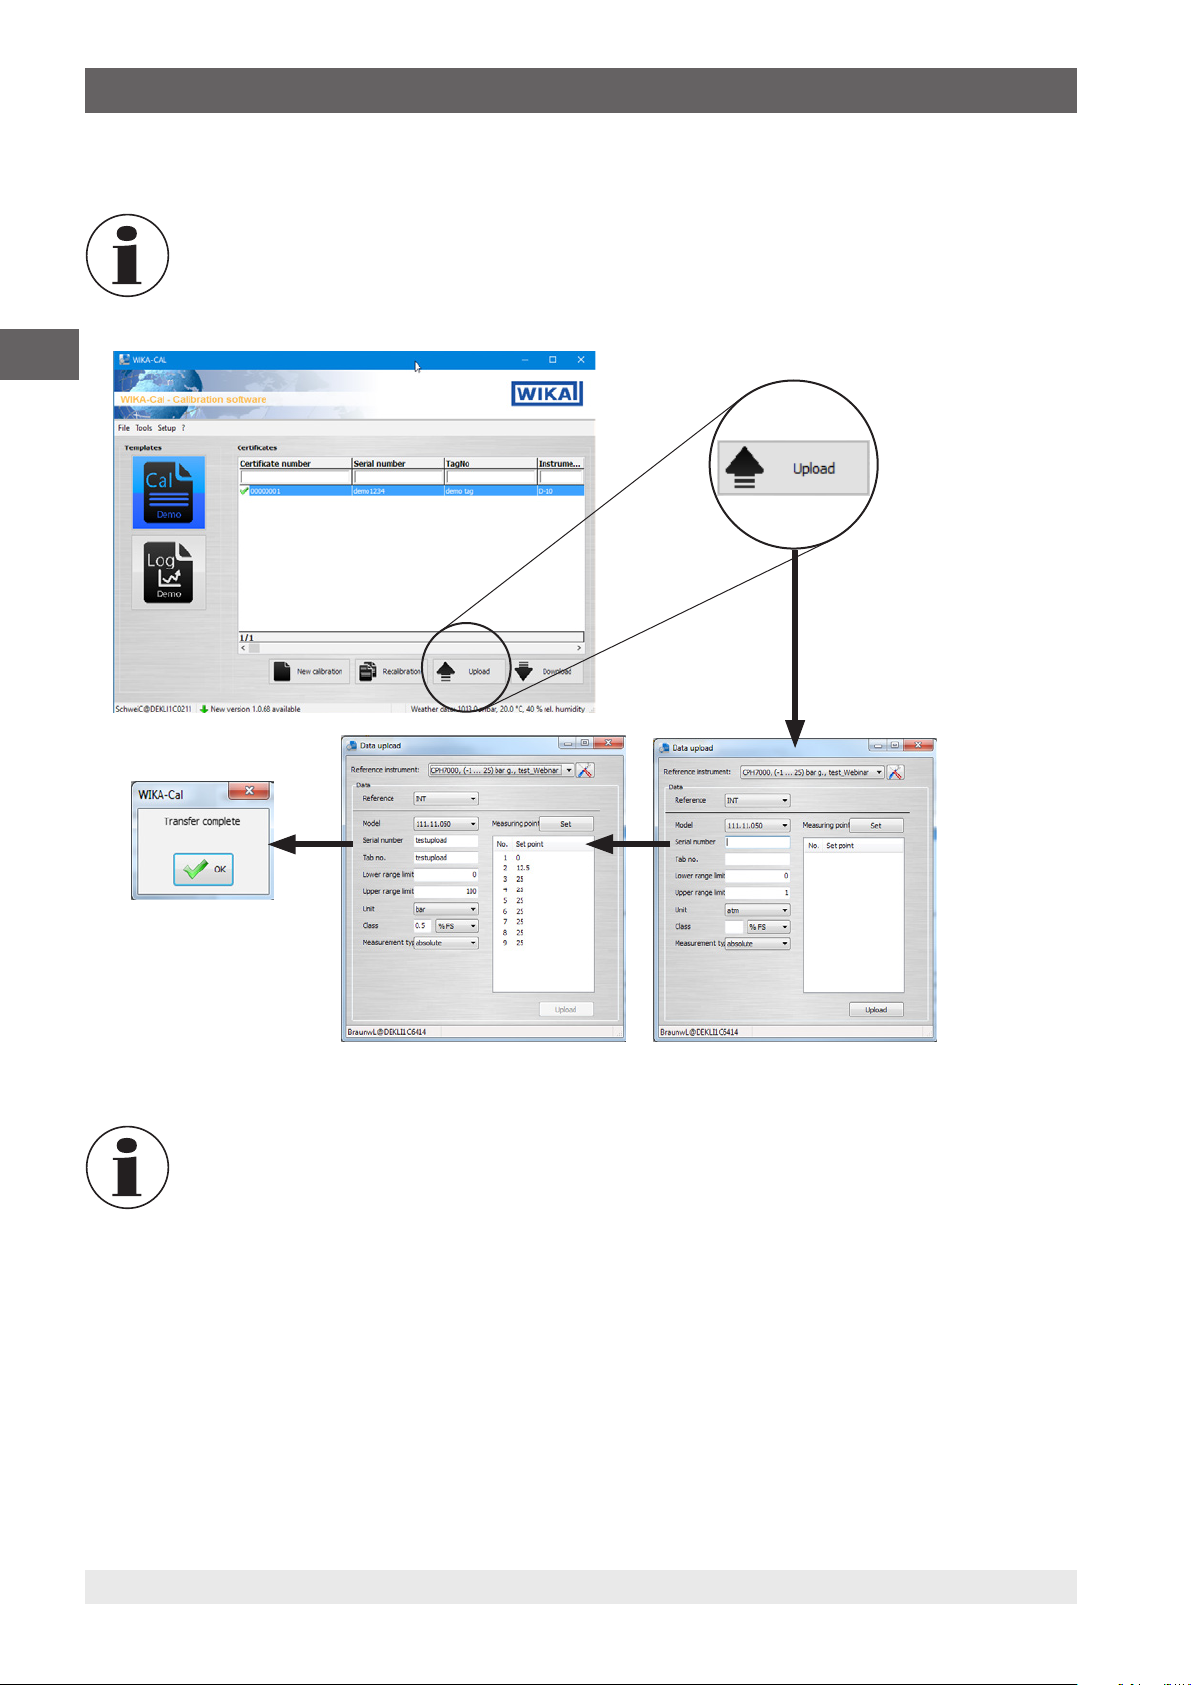
4.5 Upload
This button / function is only available for Cal-Template.
EN
The [Upload] button allows you to configure a calibration process and load it onto a created reference instrument.
This option is only available for hand-held products supporting download to WIKA-Cal.
Pressing the [Upload] button opens the “Data upload” dialogue. Then select the reference instrument created in the object
manager. The associated communication is stored in the respective work station object.
All the information needed on the test item has to be entered before the upload. Click “Set” and define the measuring points.
To apply the selection, click [Upload]. This will load the calibration process onto the mobile instrument. The transmission
process is represented by a green bar at the bottom of the dialog box. Once transmission is complete, the “Transfer
complete” window appears and needs to be confirmed with [OK].
The calibration process can now be started and performed on the mobile instrument.
20 WIKA instruction manual WIKA-Cal
14097663.03 05/2017 EN/DE
Page 21
4. Cal-Template calibration certificate
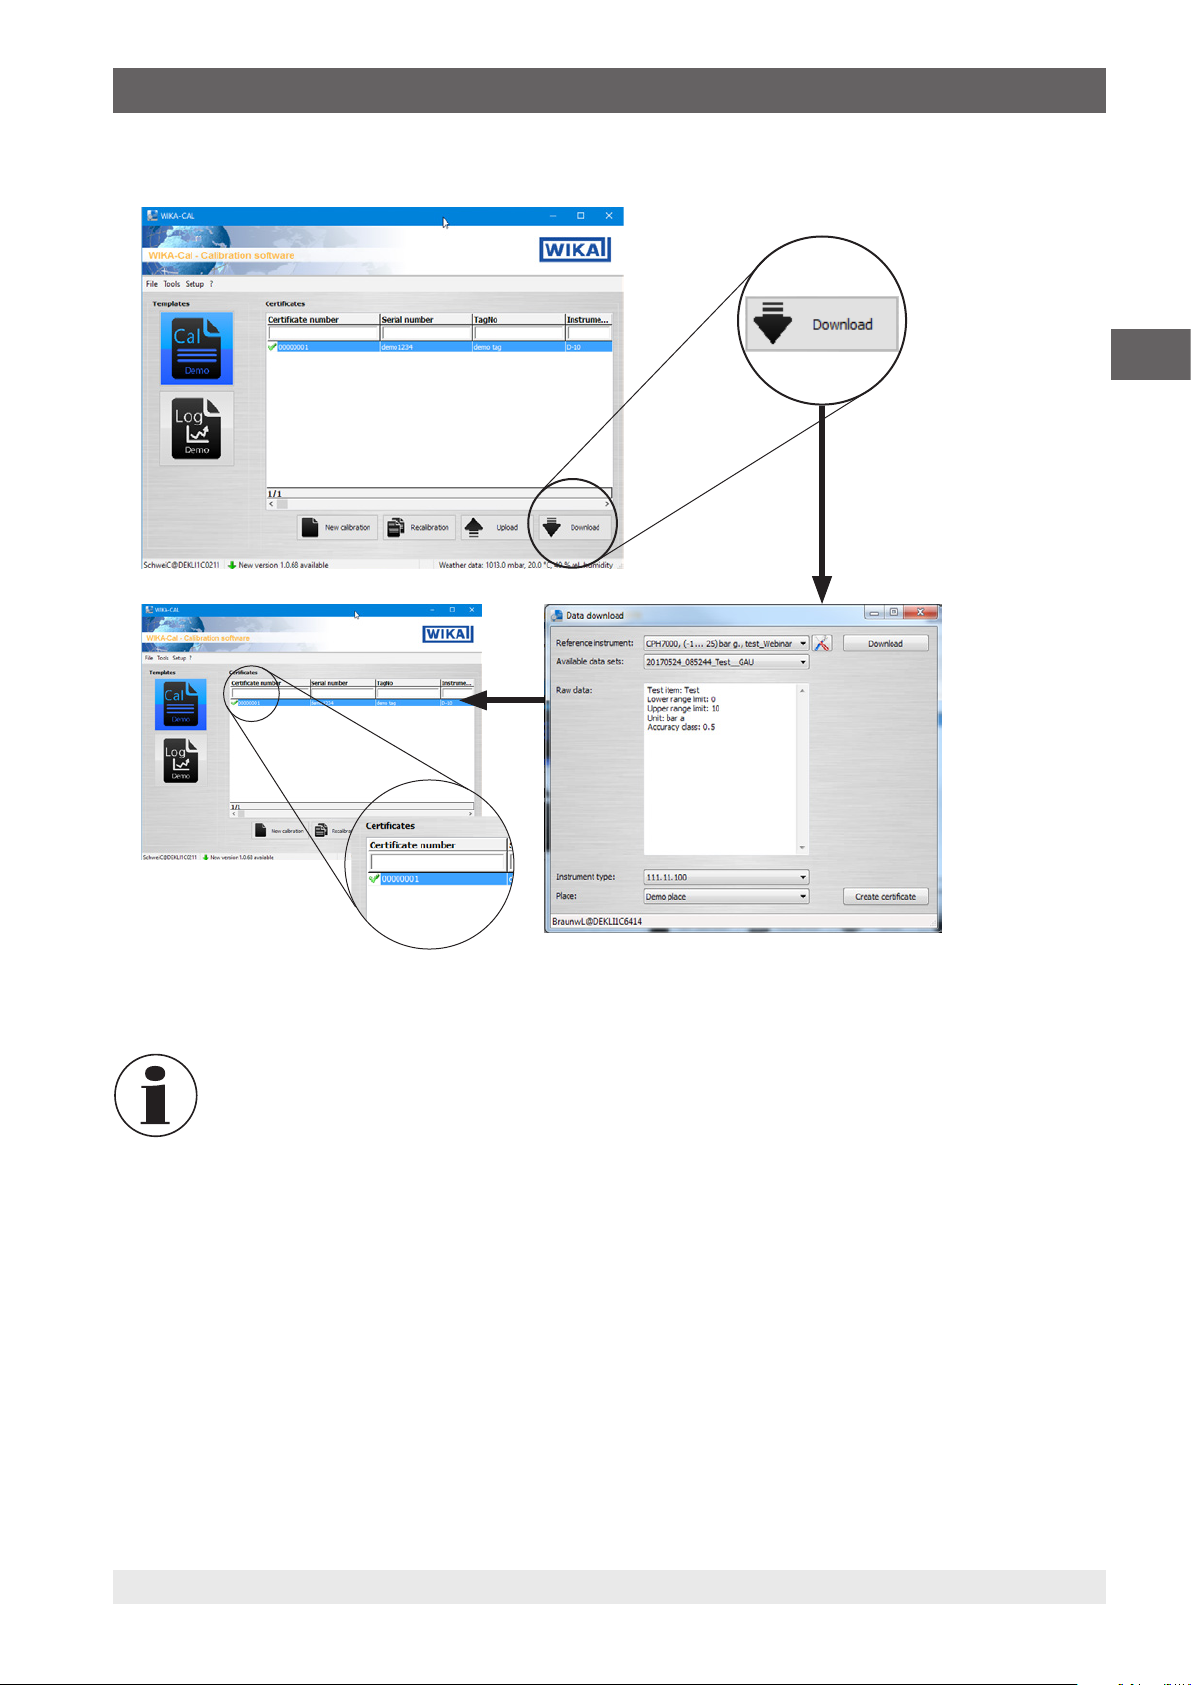
4.6 Download
EN
With the [Download] button, data can be downloaded from a defined reference instrument.
This option is only available for hand-held products supporting download to WIKA-Cal.
Clicking the [Download] button opens the “Data download” dialogue. Then select the reference instrument created in the
object manager. The associated communication is stored in the respective work station object. Confirm the selection with
[Download] and the data will be displayed under “Available data sets” on the hand-held instrument. By selecting a data set,
the raw data is displayed and the instrument type/place can be assigned. If [Create certificate] is pressed, a new calibration
certificate will be created in the database. This is, for the time being, still editable, so not provided with a green check mark.
14097663.03 05/2017 EN/DE
21WIKA instruction manual WIKA-Cal
Page 22
4. Cal-Template calibration certificate
4.7 Calibrate and finish certificate
EN
The green border indicates the order of entry. Other possible entries can also be selected. So, for example, by clicking on the
logo in the upper right, a different laboratory can be selected, for which a different logo is assigned from the database.
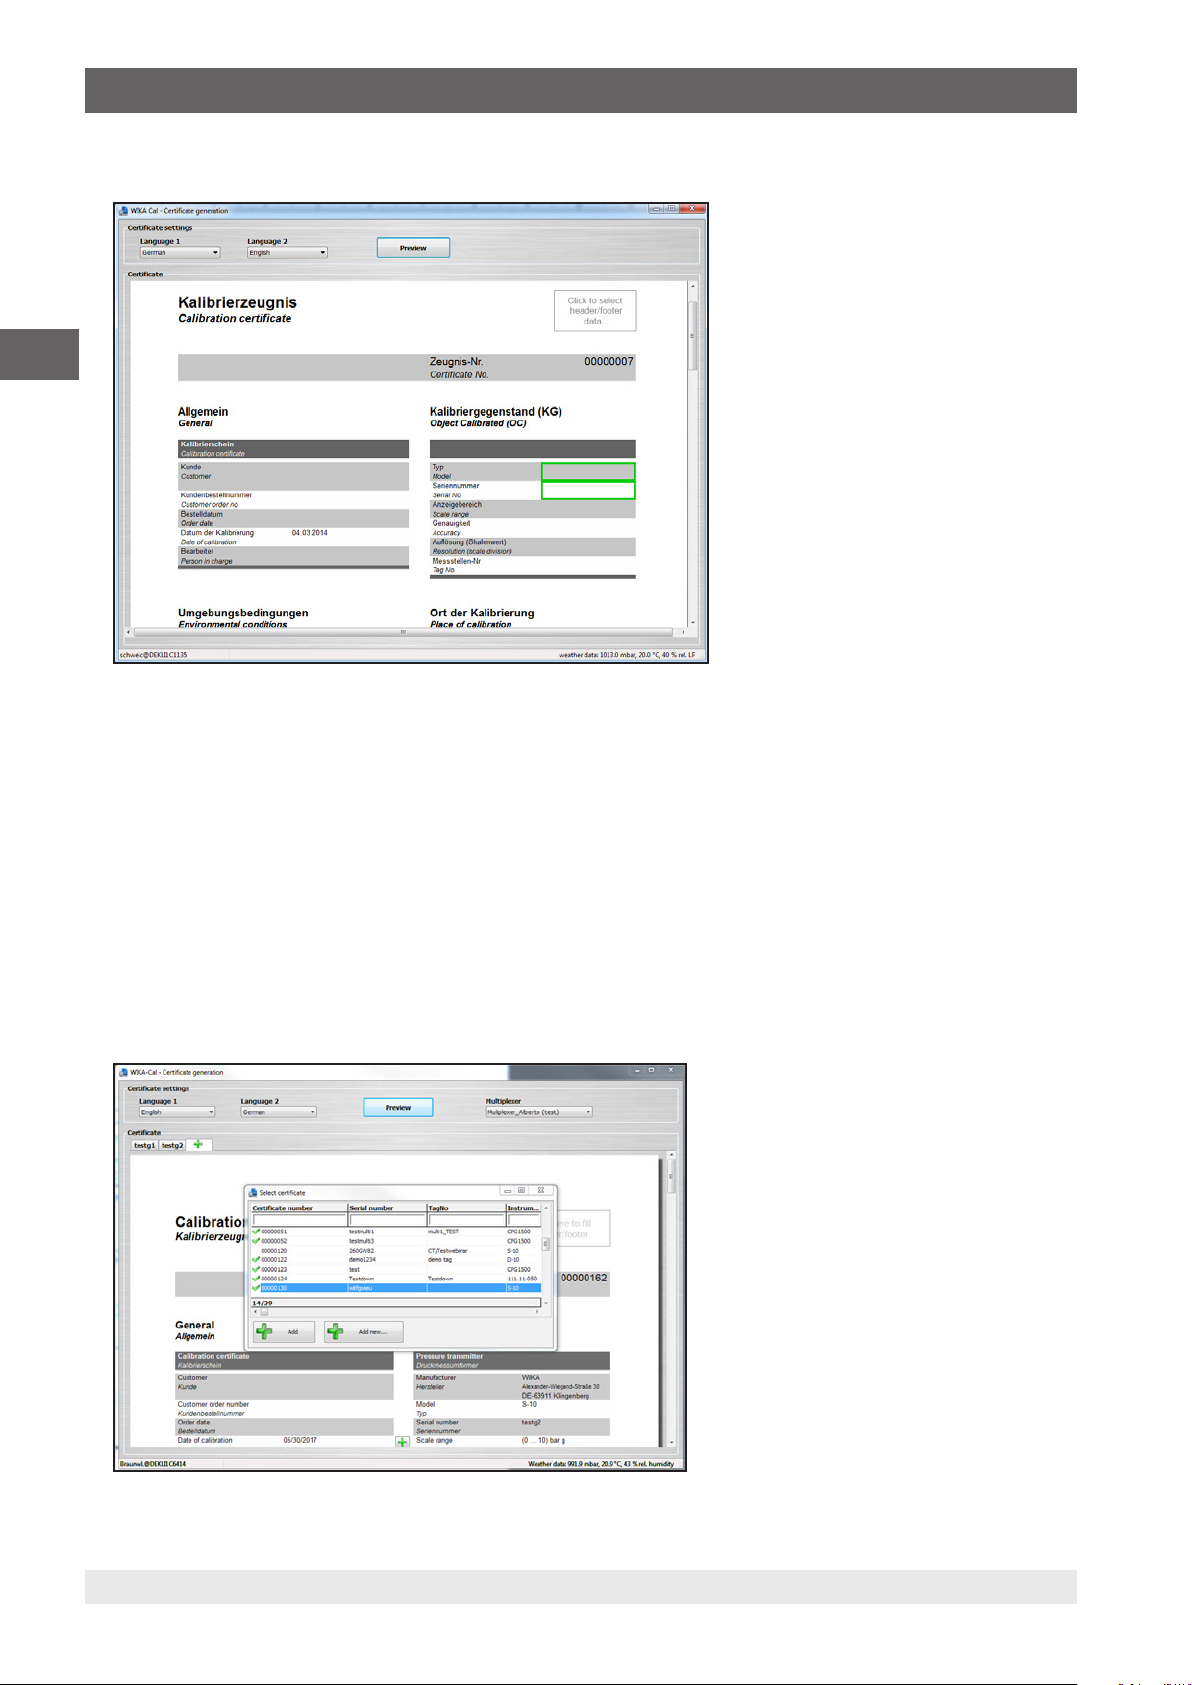
4.8 Multicalibration (optional)
To use the “Multicalibration” option, proceed as follows:
1. Multimeter and multiplexer need to be configured, see chapter 7.7 “Setting up of multimeter and multiplexer”.
2. Create a standard and assign it to the work station (see chapter 6.3.19 “Standards (pressure)”).
3. Start a new calibration process by clicking the [New calibration] button.
The document view opens
⇒
Enter the data of the first calibration item, then select the reference. Clicking “+” allows you to add the next calibration item.
You may either select an existing one from the list or add a new one by entering the serial number. In this case, instrument
type, measuring range and accuracy will automatically be applied from the first calibration item.
22 WIKA instruction manual WIKA-Cal
14097663.03 05/2017 EN/DE
Page 23
4. Cal-Template calibration certificate
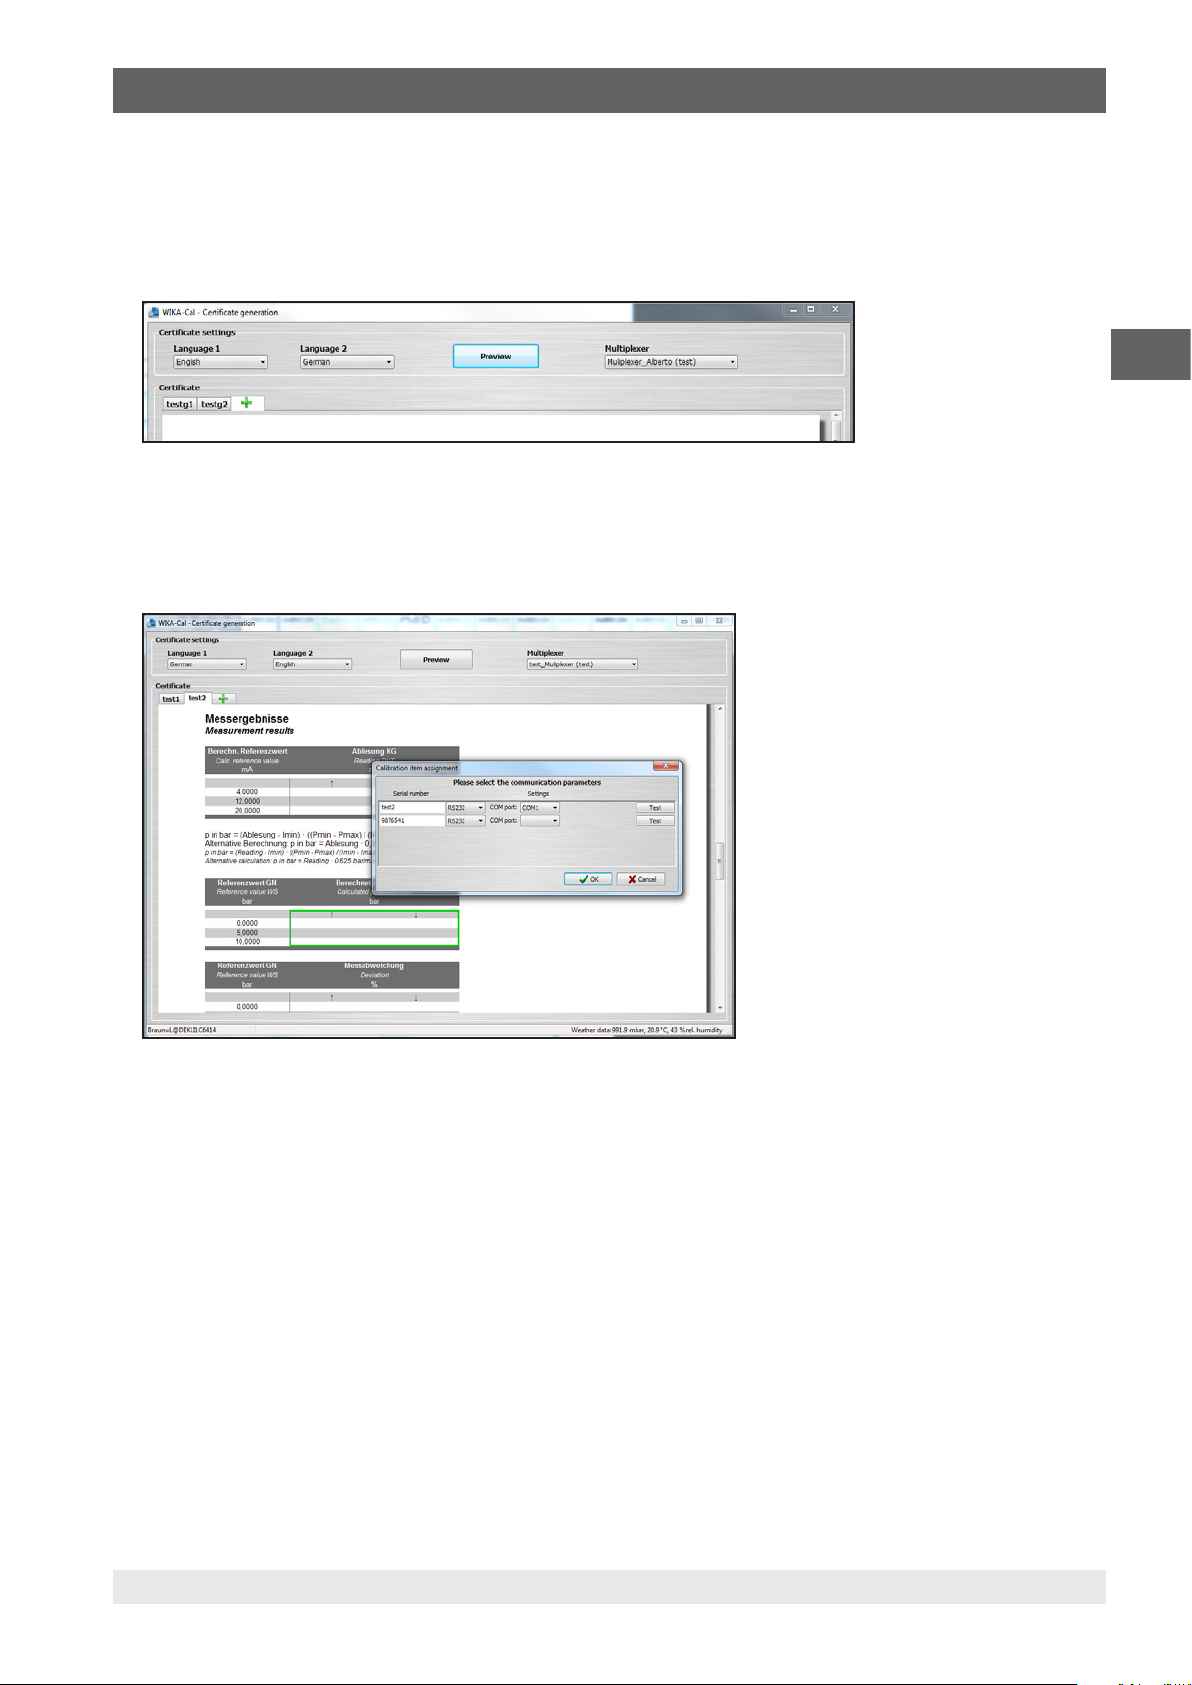
After adding all calibration items (max. 7 items), the measurement series and measuring points need to be adjusted and/or
confirmed. To do so, click the measurement table highlighted with a green frame.
Make sure that different multimeters are set for the different calibration items in the certificate view. If this is not the case,
click on the multiplexer in the upper right corner of the certificate view. The multimeters are now properly reassigned to the
calibration items.
Clicking again in the green border allows you to redefine and/or confirm the communication parameters in a separate window.
The measurement window then opens and calibration starts. You can use the various tabs to switch between the calibration
items during the calibration process. If a calibration item is out of class during the measurement, this will be indicated by an
exclamation mark symbol in the corresponding tab.
EN
14097663.03 05/2017 EN/DE
23WIKA instruction manual WIKA-Cal
Page 24

5. Log-Template logger protocol
Loggerprotokoll
Logger protocol
Log-Nr. 00000049
Log No.
Gerät
Instrument
Elektrisches Druckmessgerät
Electrical gauge
Typ CPG1500
Model
Seriennummer S000001
Serial number
Temperatur loggen ☒
Log temperature
Anzeigebereich (0 ... 100) bar g
Scale range
Genauigkeit 0,1 % FS
Accuracy
Kommunikation Wireless (00:13:43:19:D0:88)
Communication
5. Log-Template logger protocol
5.1 General information
The Log-Template can generate logger protocols, which can be used for recording data.
As with the Cal-Template, the user is guided through the document view and arrives at the end with a completed protocol from
the logged data as a PDF/A document.
The data in the PDF/A document is also available as .csv file for processing in another program, such as Microsoft
EN
Loggerprotokoll
Logger protocol
Log-Nr. 00000049
Log No.
Gerät
Instrument
Elektrisches Druckmessgerät
Electrical gauge
Typ CPG1500
Model
Seriennummer S000001
Serial number
Temperatur loggen ☒
Log temperature
Anzeigebereich (0 ... 100) bar g
Scale range
Genauigkeit 0,1 % FS
Accuracy
Kommunikation Wireless (00:13:43:19:D0:88)
Communication
Messbedingungen
Measurement conditions
Einstellungen
Setup
Modus Automatisch
Mode Automatic
Intervall (ms) 20
Interval (ms)
Dauer (hh:mm:ss) 00:00:12
Duration (hh:mm:ss)
Startzeit (hh:mm:ss) 16:43:09
Start time (hh:mm:ss)
®
Excel®.
5.2 Entry of the logger data
5.2.1 General data
Information on the measuring instruments with which the logging will be made. It can read up to three instruments
simultaneously. The table dynamically adapts to the selected instrument types. Thus, for example, with pressure transmitters,
an additional line is displayed for the output signal (e.g. 4 ... 20 mA).
24 WIKA instruction manual WIKA-Cal
Seite 1 / 2
Page
14097663.03 05/2017 EN/DE
Page 25
5. Log-Template logger protocol
Loggerprotokoll
Logger protocol
Log-Nr. 00000049
Log No.
Gerät
Instrument
Messbedingungen
Measurement conditions
Elektrisches Druckmessgerät
Electrical gauge
Typ CPG1500
Model
Seriennummer S000001
Serial number
Temperatur loggen ☒
Log temperature
Anzeigebereich (0 ... 100) bar g
Scale range
Genauigkeit 0,1 % FS
Accuracy
Kommunikation Wireless (00:13:43:19:D0:88)
Communication
Einstellungen
Setup
Modus Automatisch
Mode Automatic
Intervall (ms) 20
Interval (ms)
Dauer (hh:mm:ss) 00:00:12
Duration (hh:mm:ss)
Startzeit (hh:mm:ss) 16:43:09
Start time (hh:mm:ss)
5.2.2 Measurement conditions
Information on the time-related conditions for the logger sequence.
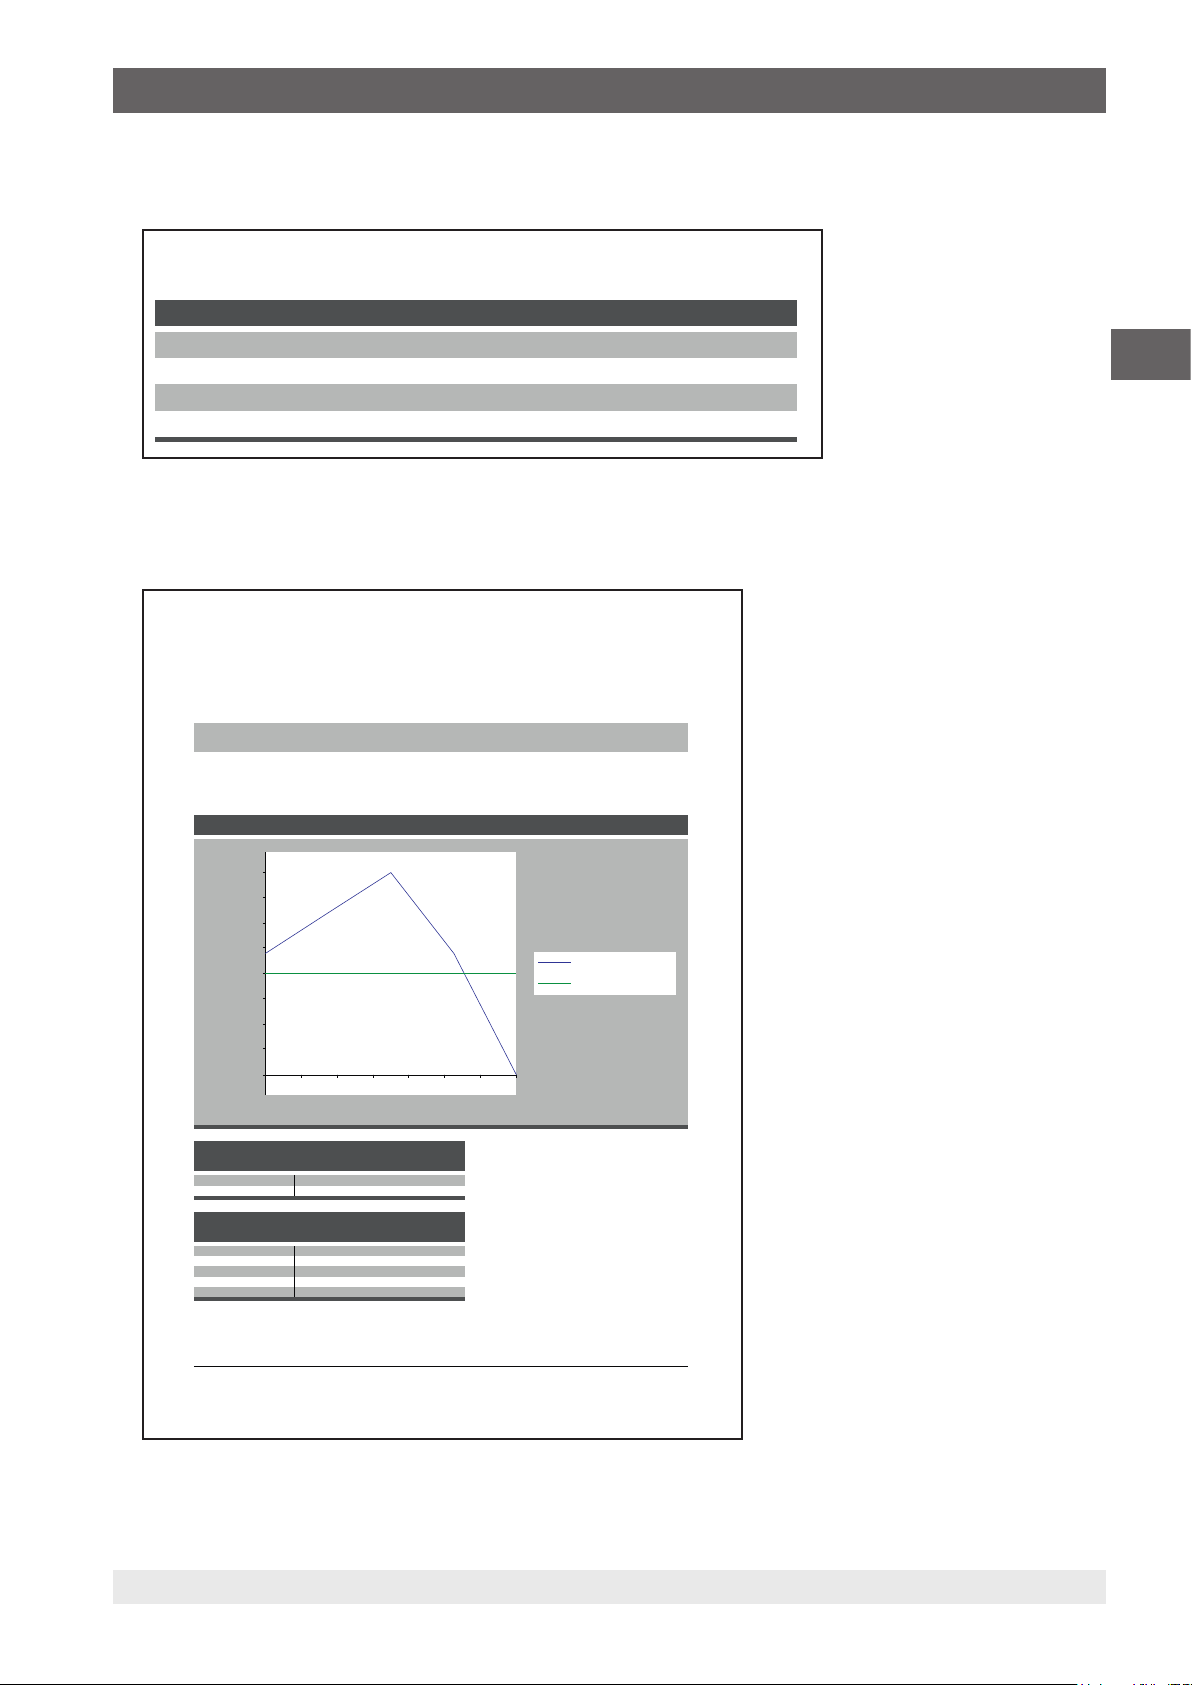
5.2.3 Measurement results
Graph and table of the measured values which were recorded over the time under the specified measuring conditions.
Loggerprotokoll
Logger protocol
EN
Messergebnisse
Measurement results
100
88
75
63
50
Value in %
Wert in %
38
25
13
0
16:43:09.880 16:43:09.903 16:43:09.926 16:43:09.949
Wert in Grafik Gemessener Wert Gemessener Wert
Value in graph Measured value Measured value
% bar °C
0 -0,0136 19,5
100 -0,0131 23,9
Zeitstempel Gemessener Wert Gemessener Wert
Timestamp Measured value Measured value
14.12.2016 16:43:09.880 -0,0133 21,7
14.12.2016 16:43:09.900 -0,0132 21,7
14.12.2016 16:43:09.920 -0,0131 21,7
14.12.2016 16:43:09.940 -0,0133 21,7
14.12.2016 16:43:09.960 -0,0136 21,7
bar °C
Log-Nr. 00000049
Log No.
Grafische Darstellung des Verlaufs
Graphical representation of progression
Druck
Pressure
Temperatur
Temperature
Zeit
Time
Seite 2 / 2
Page
14097663.03 05/2017 EN/DE
25WIKA instruction manual WIKA-Cal
Page 26
5. Log-Template logger protocol
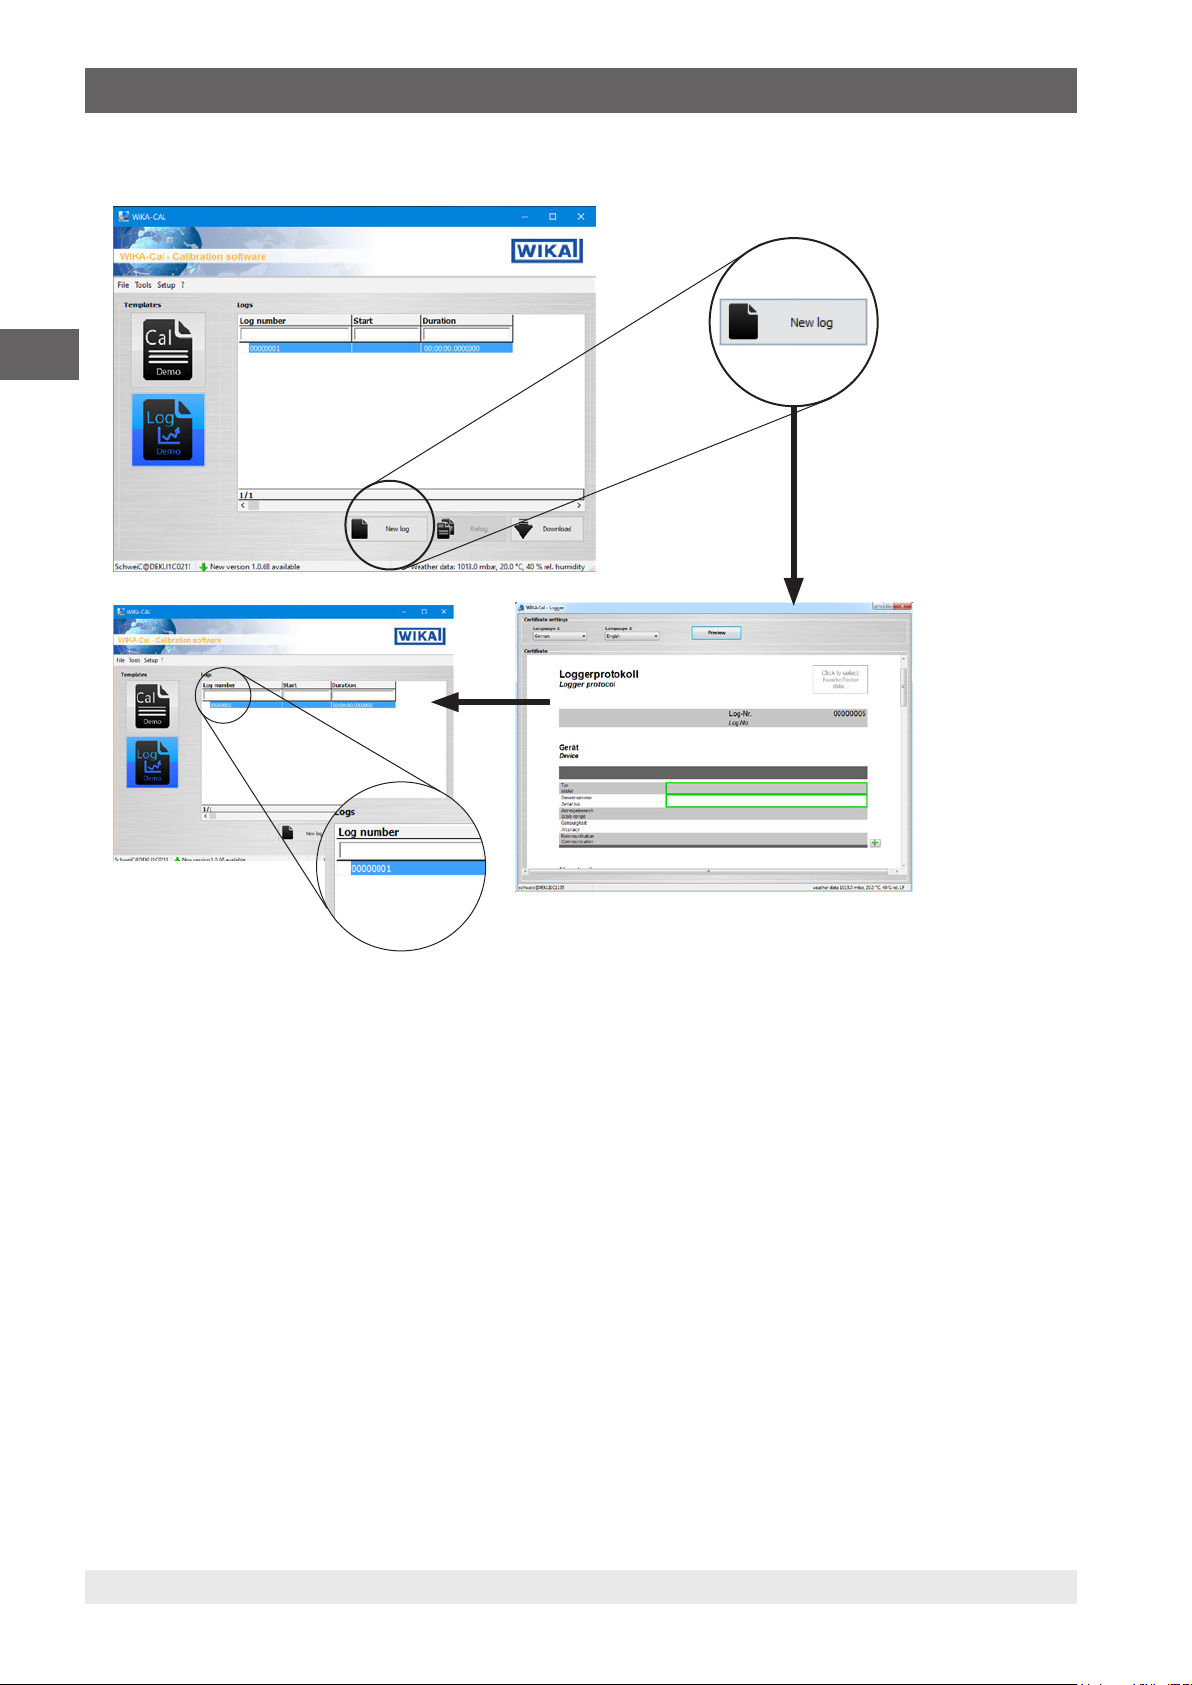
5.3 New log
EN
With the [New log] button, a new logger protocol is started in the document view and created in the database. When a
protocol has been completed, a green check mark will be displayed next to the data set. A double click on a finished logger
protocol opens the PDF file, while, for others, the document view will be opened with the latest status.
26 WIKA instruction manual WIKA-Cal
14097663.03 05/2017 EN/DE
Page 27
5. Log-Template logger protocol
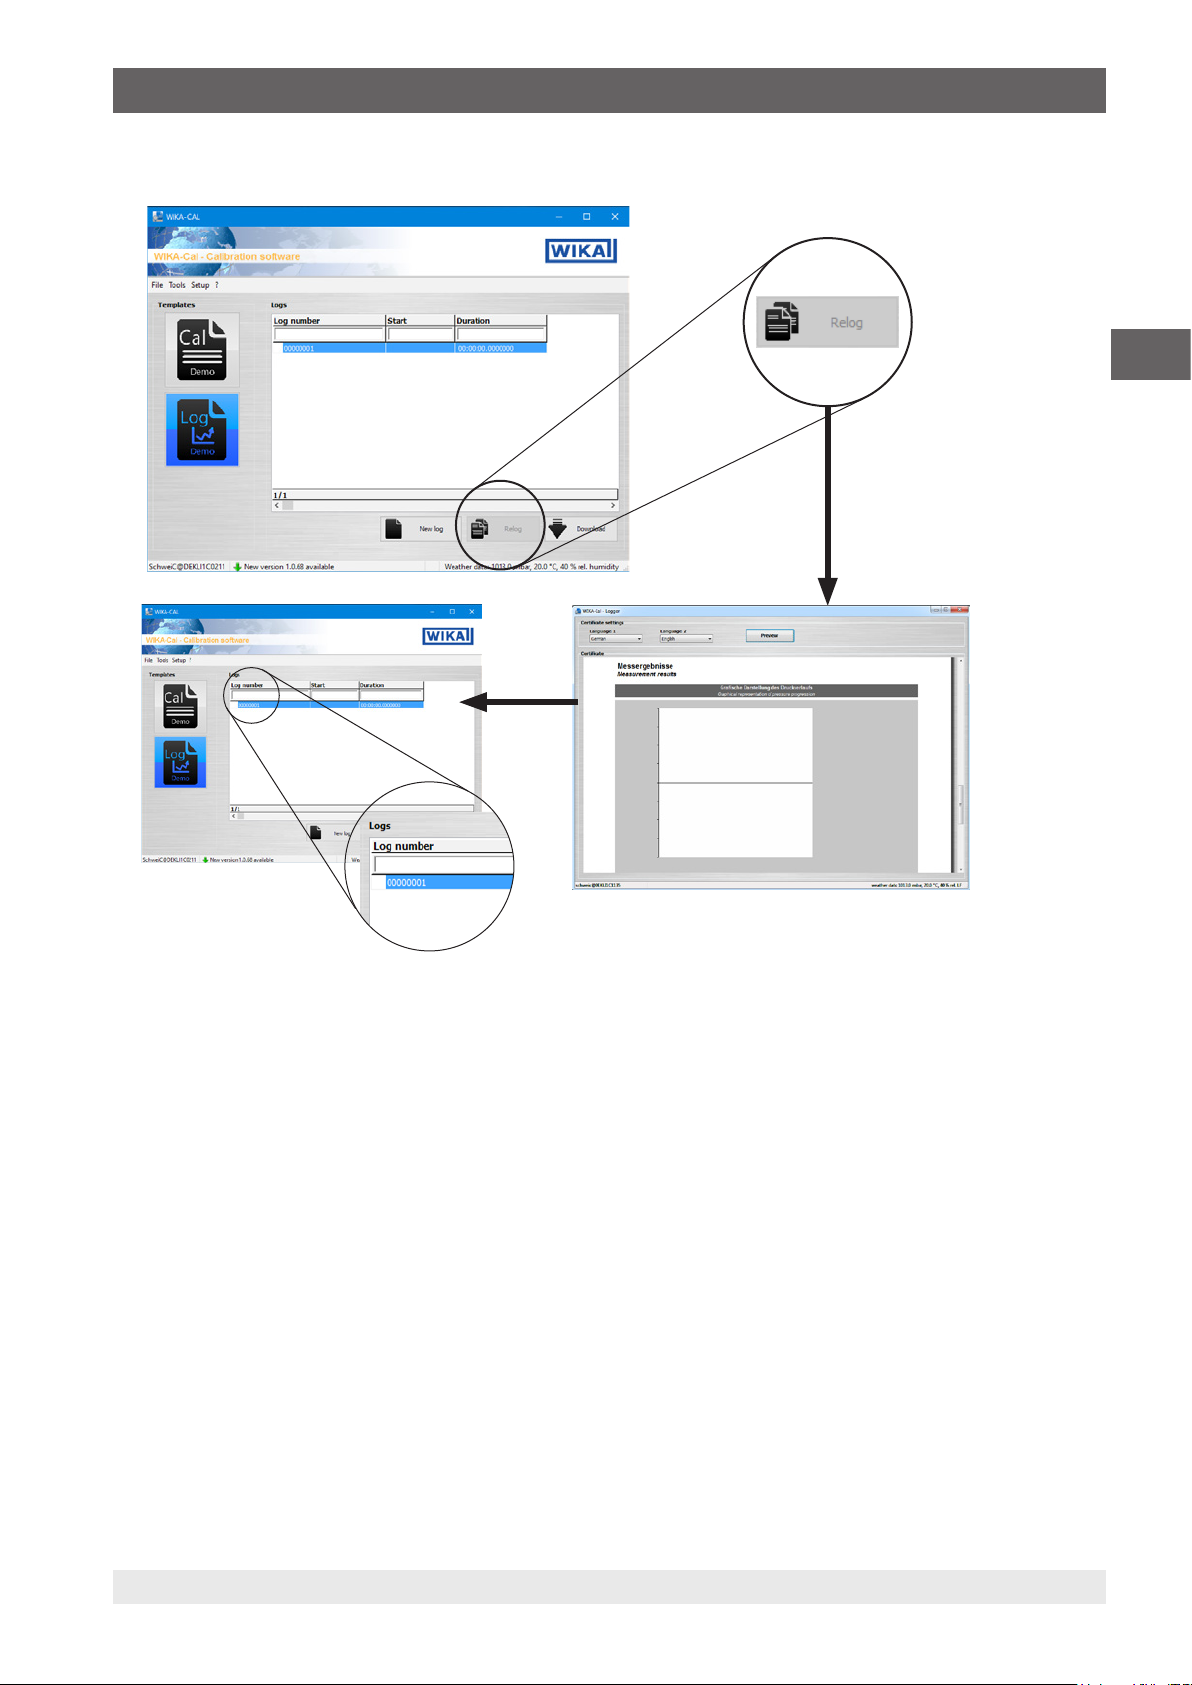
5.4 Relog
EN
The [Relog] button starts a new logger protocol in the document view and creates it in the database. The button is only
available if a completed protocol has been marked in advance. All data in the marked protocol will be transferred to the new
logger protocol and the logging can begin immediately.
14097663.03 05/2017 EN/DE
27WIKA instruction manual WIKA-Cal
Page 28

5. Log-Template logger protocol
5.5 Download
EN
With the [Download] button, data can be downloaded from a defined reference instrument.
This option is only available for hand-held products supporting download to WIKA-Cal.
Pressing the [Download] button opens the “Log download” dialogue. Then select the reference instrument created in the
object manager. The associated communication is stored in the respective work station object. Select the data set first, then
press [Download].
With the portable process calibrator model CPH7000, it is not necessary to press “Download” again after
selecting the data set, as the raw data will be displayed directly.
On the hand-held instrument, the data is displayed under “Data set”. Pressing [Create log] will create a new logger protocol
in the database. This is, for the time being, still editable, so not provided with a green check mark.
14097663.03 05/2017 EN/DE
28 WIKA instruction manual WIKA-Cal
Page 29
5. Log-Template logger protocol
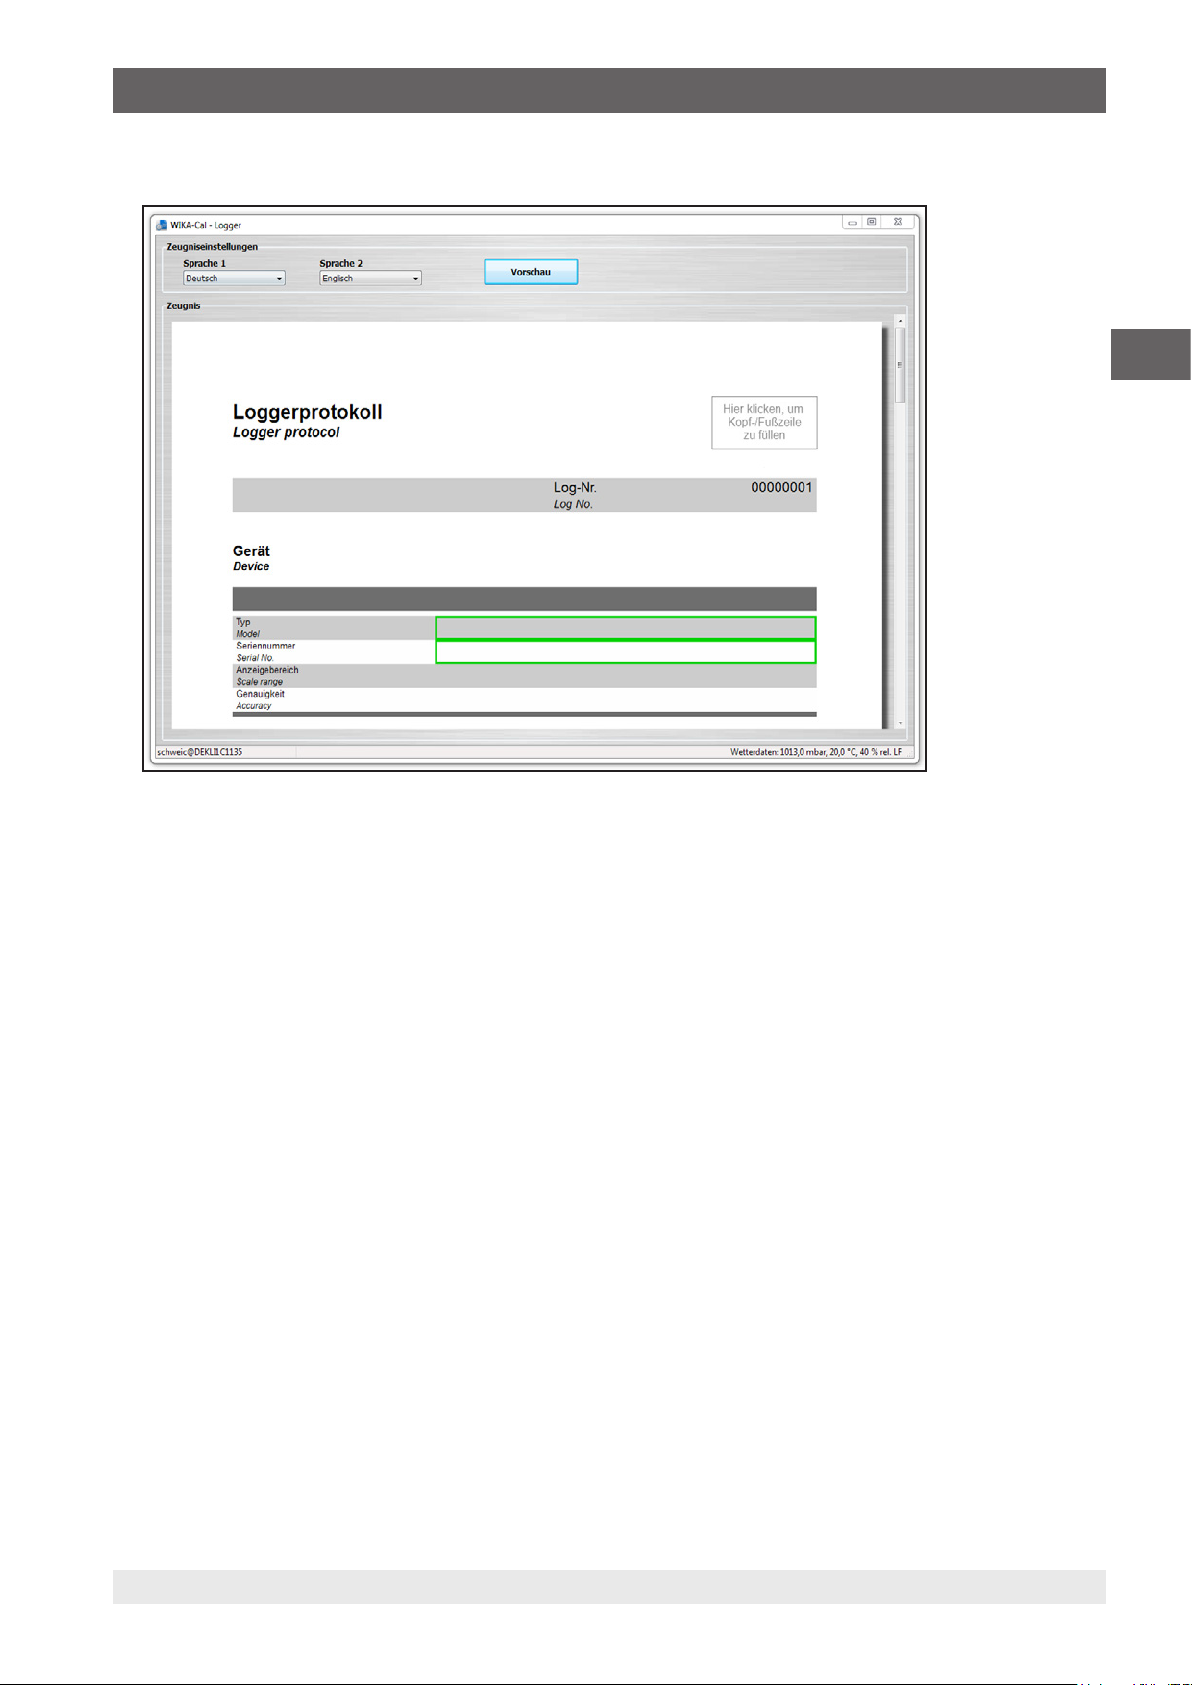
5.6 Log and finish protocol
EN
The green border indicates the order of entry. Other possible entries can also be selected. So, for example, by clicking on the
logo in the upper right, a different laboratory can be selected, for which a different logo is assigned from the database.
14097663.03 05/2017 EN/DE
29WIKA instruction manual WIKA-Cal
Page 30
6. Object manager
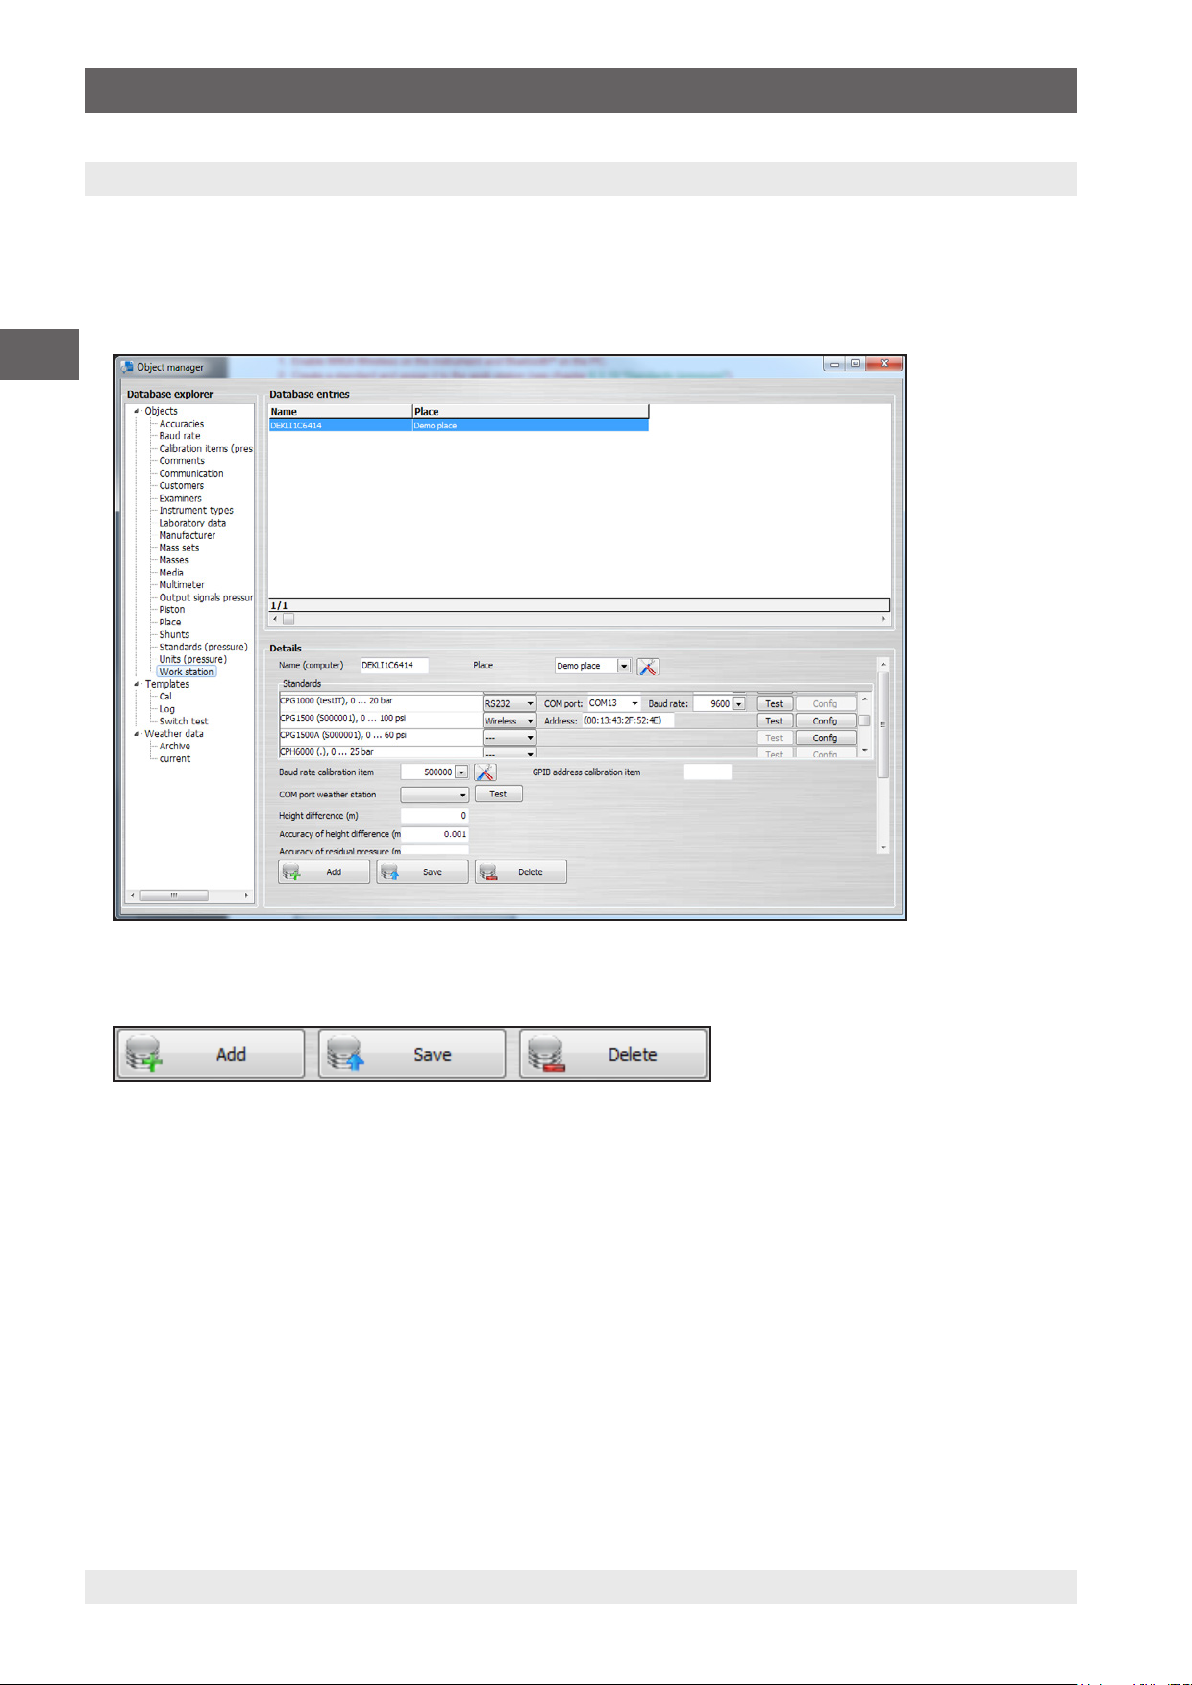
6. Object manager
The object manager is accessed via “Menu bar / Setup / Object manager”. It opens the database explorer. Here, all
important settings for the current calibration are entered and stored. The respective settings are explained in detail in the
following chapters.
The settings are either created, added or deleted (see chapter 6.1 “Add, save and delete”).
EN
6.1 Add, save and delete
Add
This button adds the displayed data set as a new data set. Usually, changes are made to an existing data set and stored under
a new data set using the [Add] button. In some tables, names can not be assigned twice. This prevents there being duplicate
data records.
Save
The displayed data set can be amended and, after pressing [Save], this change is written into the displayed data record and
saved.
Delete
Deletes the selected data set from the database. This can only be deleted when all references have already been deleted from
other tables. For example, a pressure balance can only be removed from the database if the associated piston and mass sets
have been removed or the reference has been changed.
14097663.03 05/2017 EN/DE
30 WIKA instruction manual WIKA-Cal
Page 31

6. Object manager
6.2 Structure
Database explorer (Object manager)
Objects
Calibration items (pressure)
Place
Customers
Laboratory data
Examiners
Shunts
Templates
Cal
Log
Weather data
Place
Instrument type
Accuracy
Communication
Units (pressure)
Output signal pressure transmitters
Remark
Media
Work station
Standards (pressure)
Instrument type
Piston
Units (pressure)
Output signal pressure transmitters
Baud rates
Media
Multimeter
Instrument type
Baud rates
Instrument type
Accuracy
Communication type
Standards
Measurement series
Measuring points
EN
Accuracy
Communication type
Mass set
Masses
Accuracy
Communication type
14097663.03 05/2017 EN/DE
31WIKA instruction manual WIKA-Cal
Page 32

6. Object manager
6.3 Objects
6.3.1 Work station
EN
The work station is the computer on which the work is carried out and is assigned to a specific place. Thus, for example,
several work stations can be assigned to a single place.
A work station can be connected to a CPU6000-W and thus supplies all the weather data for the place. All further work stations
belonging to this place automatically have the correct weather data.
The standards are also allocated to the work stations. Thus the program will be able to pre-select the standard assigned to a
test item.
The standards are displayed in the work station and the settings for communication can be carried out.
Please note when communicating via various interfaces:
■
Communication via RS-232 interface (also USB)
Make sure to select the right COM port and the corresponding baud rate. This must match the settings in the respective
instrument.
■
Communication via IEEE-488-GPIB bus
When the IEEE-488 GPIB bus is used, the address set on the instrument must be entered.
■
Communication via Ethernet
Select TCP/IP and enter the address set on the instrument and the port into WIKA-Cal.
Pressing the [Test] button will send a pressure query to the instrument. If the settings are correct, the subsequent dialogue
should display the current pressure value.
The communication must correspond to the selected communication type for the respective instrument type. For more
information on this, see chapter 6.3.7 “Instrument types”.
The COM port for the calibration items will be identified automatically. The baud rate used for measurements is set under
“Baud rate calibration item”.
If a mass ↔ pressure calculation is carried out for pressure balances with WIKA-Cal, the values will be corrected. The
specification of the height difference to the test item corrects the calculated pressure value by the entered height difference.
The accuracy of the measured height difference is entered into the measurement uncertainty calculation.
The residual pressure is also required for correction of values on pressure balances, but only for absolute pressure gauges.
The accuracy with which this is measured is added to the measurement uncertainty.
32 WIKA instruction manual WIKA-Cal
14097663.03 05/2017 EN/DE
Page 33

6. Object manager
6.3.2 Output signals pressure transmitter
Definition of all selectable output signals as soon as a pressure transmitter is selected for the calibration. The multimeter is
configured depending on whether it is a voltage or a current signal. A shunt might be required.
EN
6.3.3 Baud rate
Definition of all selectable baud rates.
Baud rates can be selected in the work station object (see chapter 6.3.1 “Work station”).
14097663.03 05/2017 EN/DE
33WIKA instruction manual WIKA-Cal
Page 34

6. Object manager
6.3.4 Comments
EN
Under “Comments”, there are various languages available for generating the certificates. The languages available for
selection are German, English, Spanish, French, Italian, Japanese, Polish, Russian, Greek, Romanian, Swedish and Dutch
6.3.5 Units (pressure)
All units shown with the respective conversion factors relate to “1 bar”.
Example:
1 atm x Conversion factor to 1 bar (1.01325) = 1.01325 bar
34 WIKA instruction manual WIKA-Cal
14097663.03 05/2017 EN/DE
Page 35

6. Object manager
6.3.6 Accuracies
This is where the accuracy options need to be specified in advance. Each instrument type can have the defined accuracies
assigned to it.
EN
6.3.7 Instrument types
When a new, unknown instrument type should be calibrated, it can be generated beforehand. For this instrument, information
such as name, measurand, manufacturer, type of instrument and possible accuracies are defined and stored with [Add].
Instrument type
■
An electrical pressure measuring instrument is selected if the instrument is provided with a digital interface.
■
A pressure transmitter is used for electrical instruments that need to be read using a multimeter.
Instrument types can be created for standards, calibration items, multimeters and even shunts. There can, for example, be two
standards on the instrument type “CPC8000”. The different CPC8000 standards can thus have only predefined accuracies.
This has the advantage that when you create the calibration certificate, only the predefined accuracies for that model can be
selected. If only one accuracy has been defined, this will be used automatically.
14097663.03 05/2017 EN/DE
35WIKA instruction manual WIKA-Cal
Page 36

6. Object manager
6.3.8 Manufacturer
EN
Here, the manufacturer with their address is added or edited. The information is simply stored in the database, and is not
displayed in the document view.
Representation of manufacturer details can be set in the “Object manager” under “Templates / Cal”. See chapter
6.4.1 “Cal”. This setting is possible as of version v1.0.65.
6.3.9 Calibration items (pressure)
Calibration items are automatically created when a certificate is created. If a calibration item arrives for recalibration, it is
automatically detected after entering the serial number and the certificate is filled out in advance. The content corresponds to
that of the last certificate.
36 WIKA instruction manual WIKA-Cal
14097663.03 05/2017 EN/DE
Page 37

6. Object manager
6.3.10 Piston
EN
Pistons can be assigned to a standard, which correspond to a model with the type of instrument “Dead weight tester”. If the
piston of the pressure balance is assigned, it can be selected for the calibration, or is automatically pre-selected.
Mass (kg) Weight of the piston
Density (kg/m³) Density of the piston
Effective area (m²) Effective area of the piston
TC alpha + beta (1/K) The temperature coefficient consists of the sum of the alpha and beta of the piston
Distortion coeff. (1/bar) Distortion coefficient of the piston
Circumference (m) Calculated circumference of the piston
MRS Start of measuring range
MRE End value of measuring range
14097663.03 05/2017 EN/DE
37WIKA instruction manual WIKA-Cal
Page 38

6. Object manager
Unit Pressure unit of the measuring range
Resolution Resolution of the calculated value, e.g. 0.0001
Class Selection of the class/accuracy
Class abs Selection of the class for the absolute pressure range
Medium Selection of the pressure transmission medium
Vacuum piston The piston can also act as a vacuum piston via an equaliser bar. This lowers the pressure, with
EN
Surface tension is already
considered in mass
Coeff. V (Budenberg) Volume coefficient, specific for Budenberg pressure balances
Coeff. C (Budenberg) Additional design value correction value, specific for Budenberg pressure balances
Floating position If a CPU6000-S is present at the work station, you can use the [Read position] button to read
6.3.11 Communication
the calculation of the pressure value, when placing the masses.
The additional weight, acting as a result of the surface tension of the medium, which acts on the
piston can also be provided directly in the piston weight. The weight via the surface tension is
ignored when setting the option, and must be included in the piston weight.
the current floating position of the masses by means of the distance sensor and save the value.
To select a communication type under instrument types, it must first be created under “Communication”. For this, the name
for the communication type to be selected is simply entered and the predefined communication class selected. For some
instruments, the channel information is also important here. If the mouse cursor is held over the channel for a while, it launches
a tooltip with the available channels and their meaning, individually for each instrument.
38 WIKA instruction manual WIKA-Cal
14097663.03 05/2017 EN/DE
Page 39

6. Object manager
6.3.12 Customers
EN
In the general section of a certificate, a customer can be specified. Usually the full address is also given here.
6.3.13 Laboratory data
In a calibration certificate, the company logo is inserted in the top right and the company contact information in the footer.
When selecting the laboratory (e.g. click on company logo), you can select the desired one via the already created
laboratories.
If a new certificate is created, initially the standard selected laboratory is selected in the document view of the calibration
certificate.
14097663.03 05/2017 EN/DE
39WIKA instruction manual WIKA-Cal
Page 40

6. Object manager
6.3.14 Masses
EN
Masses are generally stated as “Overhang”, “Mass” and “Topmass”. These masses are assigned to a mass set and this, in
turn, to one or more pistons.
Overhang e.g. overhangs (bell jars) or plates, “mass” weights can be placed only on these.
Mass e.g. mass loads with a bore (recess); these masses can only be placed if an “Overhang” has been placed
first.
Topmass e.g. mass loads without a bore (recess); these masses can always be placed. Either directly on a piston, on
an “Overhang” or on a “Mass”.
6.3.15 Mass sets
A mass set consists of several masses. The mass set can be assigned to several pistons. One piston can only have one mass
set assigned to it.
40 WIKA instruction manual WIKA-Cal
14097663.03 05/2017 EN/DE
Page 41

6. Object manager
6.3.16 Media
The pressure transmission medium in the pressure balance is specified in the “Media” field. It can be created in advance or
selected from the list.
The selection list and required additional information is maintained in the medium object.
EN
The pressure transmission medium can be entered in German, English, Spanish, French, Italian, Japanese, Polish, Russian,
Greek, Romanian, Swedish and Dutch.
6.3.17 Multimeter
For the multimeter to be tested, different accuracies and resolutions can be set for the voltage and current ranges.
The electrical module of a CPH6000 or CPH7000 will also be defined as a multimeter in the database.
If a multimeter is not assigned to any work station, this multimeter can be used at any work station. This is recommended if the
multimeter is to be used in different work stations.
If you tick the “Use of shunts” option, a voltage measurement with a shunt will be performed instead of a current
measurement.
14097663.03 05/2017 EN/DE
41WIKA instruction manual WIKA-Cal
Page 42

6. Object manager
6.3.18 Multiplexer (optional)
Multicalibration is available as an optional (with costs) feature (since January 2017). This feature gives the user the option to
calibrate several instruments of the same model in parallel. Currently, the multicalibration option is not available for mechanical
pressure gauges.
EN
Instrument type, measuring range and accuracy must be the same for the calibration items involved. For pressure transmitters
it is possible to use either several multimeters (such as WIKA CPU6000-M, for example) or a multiplexer to which all
multimeters are connected. Agilent 34970A and Netscanner 9816 are supported as multiplexers.
A multiplexer is indispensable for assigning the calibration item to its corresponding multimeter.
6.3.19 Standards (pressure)
All reference instruments used in the software are listed under “Standards (pressure)”.
42 WIKA instruction manual WIKA-Cal
14097663.03 05/2017 EN/DE
Page 43

6. Object manager
Depending on the instrument type, there are different entries to choose from.
If a standard is not assigned to a work station, this standard can be used at any work station. This is recommended if the
standard is to be used in different work stations. Each standard has its own settings which depend on the selected instrument
type.
EN
Range stability (%FS) This is the pressure range within which the reference pressure value needs to be stable while
approaching the nominal value (e.g. with pressure controllers). The value needs to be stable for
the time specified under “Stability time (s)” until the calibration item's value is read and the
next pressure value can be approached.
Stability time (s) This is the time during which a reference maintains the pressure value until the calibration item's
value is read and the next pressure value is approached.
Piston stability (mm) This is the range within which the floating position needs to be stable for the time specified
under “Stability time (s)” until the calibration item's value is read and the next pressure value can
be approached.
6.3.20 Place
Once a place has been defined, a work station can be assigned to that place. All work stations assigned to a place benefit
from the ambient conditions and the variables for the accuracy. In addition, the local gravity is recorded with accuracy.
If a laboratory has different premises, these premises should be defined as different “Places”. In these places, different
ambient conditions or the local gravity for the individual work stations can be added.
14097663.03 05/2017 EN/DE
43WIKA instruction manual WIKA-Cal
Page 44

6. Object manager
The place information can be entered in German, English, Spanish, French, Italian, Japanese, Polish, Russian, Greek,
Romanian, Swedish and Dutch.
6.3.21 Examiner
EN
The laboratory staff must be created as examiner in the database. The software recognises the respective examiner from the
computer login and displays it in the document view. The selection of the examiner is not needed as long as the user has an
own Windows login (user account).
If “Admin rights for database access” is enabled, only users with these permissions will have access to the object manager
and all other users will be locked out. If no user has enabled “Admin rights for database access”, all users will have access
to the object manager.
The status specifies where the users are selectable in the document view. Some roles like “Head” and “Assistant head”, for
example, can only be selected from particular places in the document view. “Employee”, “Assistant head” and “Head” can
always be selected as users.
From version 1.0.65 on, it is possible to assign a password to a tester to provide administrators with access to the object
manager independently of the logging on to Windows.
Once assigned for the first time, passwords can be reset by means of the [Reset password] button then displayed.
44 WIKA instruction manual WIKA-Cal
14097663.03 05/2017 EN/DE
Page 45

6. Object manager
6.3.22 Shunts
EN
Shunts (measuring resistors) are not assigned to any instruments or work stations and are thus available for each work station.
In the document view, they are only available for selection if a multimeter has been selected (see chapter ) and if the “Use of
shunts” option has been enabled.
Shunts continue to have, as multimeters and standards used, an additional influence on the measurement uncertainty.
6.4 Templates
6.4.1 Cal
Under “Templates-Cal”, the properties of the calibration template can be set.
These include:
■
Number of measurement series
■
Number of measuring points
14097663.03 05/2017 EN/DE
45WIKA instruction manual WIKA-Cal
Page 46

6. Object manager
■
Standards applied (The different standards can be defined for specific instrument types.)
■
Display of measurement uncertainty
■
Preloads
- Quantity
- Exposure time
- Pause time
■
Time durations during calibration
EN
- Interval between the measurement series
- Duration of final value loads for tube pressure gauges or other instruments
- Steady time
■
Deviation evaluation in percentage or absolute values
■
Display of the manufacturer
■
Display of the statement of conformity
For the calibration certificate template, the “Automatic preset of the certificate number” can be deactivated (default
setting: Automatic incrementing is activated). After deactivating this setting, the number of the calibration certificate is no
longer incremented automatically and can be set in a dialogue before starting calibration.
It is also possible to enter a preceding abbreviation for all calibration certificates.
6.4.2 Log
For the logger protocol template, the “Automatic preset of the certificate number” can be deactivated (default setting:
Automatic incrementing is activated). After deactivating this setting, the number of the logger protocol is no longer incremented
automatically and can be set in a dialogue before starting logging.
It is also possible to enter a preceding abbreviation for all logger protocols.
Under “Default view” you can select “Diagram and/or table”.
The “Display x-axis” defines the x-axis as a “continuous time” or “absolute time stamp”.
46 WIKA instruction manual WIKA-Cal
14097663.03 05/2017 EN/DE
Page 47

6. Object manager
6.5 Weather data
EN
Under “Weather data”, the place-dependent weather data is stored. These are either entered manually by a user via the
designated work station or automatically read from a work station via a CPU6000-W.
Every 10 seconds, WIKA-Cal loads a new value from the CPU6000-W and displays it under “current”.
The current value is stored under “Archive” every 2 minutes.
The weather data includes information on the calibration place, current prevailing atmospheric pressure, ambient temperature
and relative humidity in %.
14097663.03 05/2017 EN/DE
47WIKA instruction manual WIKA-Cal
Page 48

7. Setting up calibration instruments
7. Setting up calibration instruments
7.1 Loading necessary drivers
Before setting up the desired calibration instrument, the necessary drivers need to be installed.
1. Connect the calibration instrument to the PC/laptop using the USB cable supplied.
2. Download the driver directly from the local website and install.
EN
CPH6000
http://en-co.wika.de/cph6000_en_co.WIKA
→ Software → Interface driver
CPH6200
http://en-co.wika.de/cph6200_en_co.WIKA
Depending on the USB cable adapter, different drivers must be used
→ Software → Interface driver (if the USB-RS-232 adapter board is integrated into the cable)
→ Software → Windows driver for USB6200-V2 (if the USB-RS-232 adapter board is integrated into the USB connector)
CPH6300
http://en-co.wika.de/cph6300_en_co.WIKA
→ Software → Interface driver
CPH6400
http://en-co.wika.de/cph6400_en_co.WIKA
→ Software → Interface driver
CPC3000, CPC4000, CPC6000, CPC6050, CPC8000, CPC8000-H
http://en-co.wika.de/upload/SO_USB_Driver_en_um_34833.zip
→ Software → Interface driver
CPC2000
http://www.ftdichip.com/Drivers/VCP.htm
→ Windows VCP driver, 32 bit or 64 bit
CPU6000-W, CPU6000-S or CPU6000-M
http://en-co.wika.de/cpu6000_w_cpu6000_s_cpu6000_m_en_co.WIKA
→ Software → Interface driver
The driver has been correctly installed if a COM port appears under “Connections” in Windows Device
Manager when you switch the calibration instrument on or off.
Any settings required for communication are made in the “Object manager” under “Objects / Work station”.
Setup of the individual calibration instruments is described in the following chapters.
48 WIKA instruction manual WIKA-Cal
14097663.03 05/2017 EN/DE
Page 49

7. Setting up calibration instruments
7.2 Setting up the CPH6x00 models
1. Configure the CPH6x00 individually so that the output is configured accordingly to USB or RS-232.
If the CPH6x00 has a multimeter function for reading current or voltage, it must be defined as a multimeter under
“Objects / Multimeter” (see chapter 6.3.17 “Multimeter”).
2. Create a standard and assign it to the work station (see chapter 6.3.19 “Standards (pressure)”).
3. In the “Object manager” under “Objects / Work station”, select, under “COM port”, the new COM port of the created
CPH6x00 (also multimeter if available).
4. Set baud rate 9600.
5. Use the [Test] button to test communication.
Communication works properly if the pressure value displayed on the instrument appears after pressing the test button.
⇒
6. Save the data set with [Save].
The settings are applied.
⇒
EN
Use the [Config] button to open a dialogue for configuring the instrument.
For each CPH6x00 there is an individual dialogue which enables various settings on the instrument.
7.3 Setting up the CPCx000 models
Configure the CPCx000 individually so that the instruction set from Mensor is configured. If one is dealing with a
CPC8000-1 (first generation), then the SCPI instruction set must be selected.
1. Create a CPCx000 standard in the “Object manager” under “Objects / Standards (pressure)” and assign it to the work
station (see chapter 6.3.19 “Standards (pressure)”).
2. In the “Object manager” under “Objects / work station”, select, under “COM port”, the new COM port of the created
CPCx000.
3. Adjust the baud rate to the instrument settings (e.g. 9600 or 57600).
4. Use the [Test] button to test communication.
Communication works properly if the pressure value displayed on the instrument appears after pressing the test button.
⇒
14097663.03 05/2017 EN/DE
49WIKA instruction manual WIKA-Cal
Page 50

7. Setting up calibration instruments
5. Save the data set with [Save].
The settings are applied.
⇒
EN
7.4 Setting up the CPBx000 models
1. For each model CPBx000 dead-weight tester, there is an associated XML file which contains all data such as coefficients
and weights. You can download your XML file via a download link.
Example:
http://apps.wika.com/apps/CPB-CAL/51080CPB5000.xml
The name of the XML file is always matched to the particular dead-weight tester. The structure is basically as follows:
“Serial number” + “Model” + “.xml”
“51080” + “CPB5000” + “.xml” = 51080CPB5000.xml
2. After downloading, the file can be imported via “File / Import…”.
3. In WIKA-Cal, you can check the imported data sets in the “Object manager” under “Standards (pressure)”, “Pistons”,
“Mass sets” and “Masses”. Should a file be corrupted or incomplete, please contact your responsible contact at WIKA.
50 WIKA instruction manual WIKA-Cal
14097663.03 05/2017 EN/DE
Page 51

7. Setting up calibration instruments
7.5 Setting up the CPU6000 series
7.5.1 Setting up the CPU6000-W weather station
1. In the “Object manager” under “Objects / Work station”, select the new COM port under “COM port weather station”.
2. Save the data set with [Save].
The settings are applied.
⇒
EN
Every 10 seconds, the software requests a new value from the CPU6000-W, displays it under “Weather data / current” and
saves the current value every 2 minutes in the “Archive” under “Object manager / Weather data / Archive”. In addition, the
ambient conditions are also updated in the document view and in the bottom right in the status bar.
14097663.03 05/2017 EN/DE
51WIKA instruction manual WIKA-Cal
Page 52

7. Setting up calibration instruments
7.5.2 Setting up the CPU6000-S pressure balance sensor box
1. Create the pressure balance and assign it to the work station (see chapter 6.3.19 “Standards (pressure)”).
2. In the “Object manager” under “Objects / Work station”, select, under “COM port”, the new COM port of the created
pressure balance.
3. Set baud rate 9600.
4. Use the [Test] button to test communication.
The communication is working properly if a realistic value is displayed.
⇒
EN
5. Under “Objects / Piston”, specify the “Floating position” for the respective piston of the pressure balance.
This can be entered manually in [mm] or read via the [Read position] button.
⇒
6. Save the data set with [Save].
The settings are applied.
⇒
52 WIKA instruction manual WIKA-Cal
14097663.03 05/2017 EN/DE
Page 53

7. Setting up calibration instruments
After successful connection, both piston temperature and floating position can be read under “Tools / Mass calculator”. The
calculation of the masses automatically adjusts to the new piston temperature.
EN
7.5.3 Setting up the CPU6000-M digital multimeter
1. Create the multimeter and assign it to the work station (see chapter 6.3.17 “Multimeter”).
2. In the “Object manager” under “Objects / Work station”, select, under “COM port”, the new COM port of the created
CPU6000-M (multimeter).
3. Set baud rate 9600.
4. Use the [Test] button to test communication.
The communication is working properly if a realistic value is displayed.
⇒
5. Save the data set with [Save].
The settings are applied.
⇒
14097663.03 05/2017 EN/DE
53WIKA instruction manual WIKA-Cal
Page 54

7. Setting up calibration instruments
7.6 Setting up wireless instruments
1. Enable WIKA-Wireless on the instrument and Bluetooth
2. Create a standard and assign it to the work station (see chapter 6.3.19 “Standards (pressure)”).
If the wireless instrument has a multimeter function for reading current or voltage (e.g. CPH7000), it must be
defined as a multimeter under “Object manager / Multimeter” (see chapter 6.3.17 “Multimeter”).
EN
3. In the “Object manager” under “Objects / Work station”, select “Wireless” for the instrument and click in the
“Address” field.
®
on the PC.
The wireless monitor opens and searches for instruments within range.
⇒
4. Select the instrument.
5. Confirm with [OK].
6. Use the [Test] button to test communication.
Communication works properly if the pressure value displayed on the instrument appears after pressing the test button.
⇒
7. Save the data set with [Save].
The settings are applied.
⇒
Use the [Config] button to open a dialogue for configuring the instrument.
For each wireless instrument, there is a specific dialogue box allowing you to make various settings on the instrument.
54 WIKA instruction manual WIKA-Cal
14097663.03 05/2017 EN/DE
Page 55

7. Setting up calibration instruments
7.7 Setting up of multimeter and multiplexer
1. Enter the multimeter in the “Object manager” under “Objects / Multimeter” and select [Save] to save the data set.
Make the following settings on the multimeter:
■
Parity and data bits: None / 8 data bits
■
Number of start bits: 1 bit
■
Number of stop bits: 2 bits
■
Baud rate and communication settings vary depending on the multimeter used.
EN
2. Enter the multiplexer in the “Object manager” under “Objects / Multiplexer”.
Agilent 34970A and Netscanner 9816 are supported as multiplexers. Then assign the channels to the respective tabs
⇒
and save the data set.
The “Multiplexer” option is only available if you have purchased the “Multicalibration” licence.
If the multimeters are directly connected to the PC, select the “Virtual multiplexer multimeter” under “Objects /
Multiplexer” in the “Communication” field and assign the multimeters to the respective tabs.
A multiplexer is indispensable for assigning the calibration item to its corresponding multimeter.
14097663.03 05/2017 EN/DE
55WIKA instruction manual WIKA-Cal
Page 56

7. Setting up ... / 8. Using a Microsoft® Excel® certificate template
3. Make sure that only one multimeter each is assigned to a tab and that they are not identical.
4. In the “Object manager” under “Objects / Work station”, use the [Test] button to test communication.
The communication is working properly if a realistic value is displayed.
⇒
5. Save the data set with [Save].
The settings are applied.
⇒
EN
8. Using a Microsoft® Excel® certificate template
8.1 General information
All data from a calibration certificate can be exported to Microsoft
example, set up your individual certificate layout and WIKA-Cal will automatically export all measured values and text via the
template to Microsoft
custom evaluation of the measurement uncertainty.
8.2 Creating a Microsoft Excel certificate template
1. Create a new Excel
2. Open the file and rename the individual cells with the possible names listed here.
3. Right click on a cell → Define names… lets you rewrite the name of a cell.
®
Excel®. Within the profile, custom calculations can also be carried out. This helps, for example, with a
®
file with the file type *.xlsx
®
Excel® via a certificate template. Thus, one can, for
56 WIKA instruction manual WIKA-Cal
14097663.03 05/2017 EN/DE
Page 57

8. Using a Microsoft® Excel® certificate template
The following names are permitted and can be extended through software updates.
Permissible names
<General
Customer_Line1 Customer_Line4 StartDateOfCalibration HeadOfLab Head of calibration laboratory
Customer_Line2 CustomerOrderNo DateOfCalibration HeadOfLabStatus1 CertNumber
Customer_Line3 OrderDate PersonInCharge HeadOfLabStatus2 DateCalMark
/>
<ObjectCalibration
Model SerialNoHHTransducer ScaleRangeUnitFactor ClassExtOperator TypeLanguage2
SerialNo ScaleRange ScaleRangeAbs ClassExtValue Manufacturer_Line1
ModelHandHeld ScaleRangeMin ClassSignal ClassExtRef Manufacturer_Line2
ModelHHTransducer ScaleRangeMax ClassValue Resolution Manufacturer_Line3
SerialNoHandHeld ScaleRangeUnit ClassRef TypeLanguage1 TagNo
/>
<EnvConditions
TemperatureDegC AtmPressureHPa AtmPressureAccHPa RelHumidity RelHumidityAcc
TemperatureAccDegC
/>
<PlaceOfCalibration
PlaceOfCalibration1 PlaceOfCalibration2 LocalG
/>
<MeasurementConditions
RefModel1 RefModel2 RefModel3 RefModel4 RefModel5
RefCalibrationMark1 RefCalibrationMark2 RefCalibrationMark3 RefCalibrationMark4 RefCalibrationMark5
RefScaleRange1 RefScaleRange2 RefScaleRange3 RefScaleRange4 RefScaleRange5
RefScaleRangeMin1 RefScaleRangeMin2 RefScaleRangeMin3 RefScaleRangeMin4 RefScaleRangeMin5
RefScaleRangeMax1 RefScaleRangeMax2 RefScaleRangeMax3 RefScaleRangeMax4 RefScaleRangeMax5
RefScaleRangeUnit1 RefScaleRangeUnit2 RefScaleRangeUnit3 RefScaleRangeUnit4 RefScaleRangeUnit5
RefScaleRangeAbs1 RefScaleRangeAbs2 RefScaleRangeAbs3 RefScaleRangeAbs4 RefScaleRangeAbs5
RefSignal1 RefSignal2 RefSignal3 RefSignal4 RefSignal5
RefClass1 RefClass2 RefClass3 RefClass4 RefClass5
RefClassValue1 RefClassValue2 RefClassValue3 RefClassValue4 RefClassValue5
RefClassRef1 RefClassRef2 RefClassRef3 RefClassRef4 RefClassRef5
RefClassExtOperator1 RefClassExtOperator2 RefClassExtOperator3 RefClassExtOperator4 RefClassExtOperator5
RefClassExtValue1 RefClassExtValue2 RefClassExtValue3 RefClassExtValue4 RefClassExtValue5
RefClassExtRef1 RefClassExtRef2 RefClassExtRef3 RefClassExtRef4 RefClassExtRef5
RefManufaturer1 RefManufaturer2 RefManufaturer3 RefManufaturer4 RefManufaturer5
EN
DMMModel ShuntCalibrationMark PistonTempRefMin PistonTempCalItemMin RefTypeLanguage1_1
DMMCalibrationMark ShuntValue PistonTempRefMax PistonTempCalItemMax RefTypeLanguage2_1
ShuntModel
/>
14097663.03 05/2017 EN/DE
57WIKA instruction manual WIKA-Cal
Page 58

8. Using a Microsoft® Excel® certificate template
Permissible names
<MeasurementResults
Nominal Nominal_2 MeasuredValues MeasuredValues_2 MeasureUnit
Nominal01 Nominal07 Nominal13 Nominal19 Nominal25
Nominal02 Nominal08 Nominal14 Nominal20 Nominal26
EN
Nominal03 Nominal09 Nominal15 Nominal21 Nominal27
Nominal04 Nominal10 Nominal16 Nominal22 Nominal28
Nominal05 Nominal11 Nominal17 Nominal23 Nominal29
Nominal06 Nominal12 Nominal18 Nominal24 Nominal30
Reading011 Reading071 Reading131 Reading191 Reading251
RefValue011 RefValue071 RefValue131 RefValue191 RefValue251
RelDeviation011 RelDeviation071 RelDeviation131 RelDeviation191 RelDeviation251
AbsDeviation011 AbsDeviation071 AbsDeviation131 AbsDeviation191 AbsDeviation251
Reading021 Reading081 Reading141 Reading201 Reading261
RefValue021 RefValue081 RefValue141 RefValue201 RefValue261
RelDeviation021 RelDeviation081 RelDeviation141 RelDeviation201 RelDeviation261
AbsDeviation021 AbsDeviation081 AbsDeviation141 AbsDeviation201 AbsDeviation261
Reading031 Reading091 Reading151 Reading211 Reading271
RefValue031 RefValue091 RefValue151 RefValue211 RefValue271
RelDeviation031 RelDeviation091 RelDeviation151 RelDeviation211 RelDeviation271
AbsDeviation031 AbsDeviation091 AbsDeviation151 AbsDeviation211 AbsDeviation271
Reading041 Reading101 Reading161 Reading221 Reading281
RefValue041 RefValue101 RefValue161 RefValue221 RefValue281
RelDeviation041 RelDeviation101 RelDeviation161 RelDeviation221 RelDeviation281
AbsDeviation041 AbsDeviation101 AbsDeviation161 AbsDeviation221 AbsDeviation281
Reading051 Reading111 Reading171 Reading231 Reading291
RefValue051 RefValue111 RefValue171 RefValue231 RefValue291
RelDeviation051 RelDeviation111 RelDeviation171 RelDeviation231 RelDeviation291
AbsDeviation051 AbsDeviation111 AbsDeviation171 AbsDeviation231 AbsDeviation291
Reading061 Reading121 Reading181 Reading241 Reading301
RefValue061 RefValue121 RefValue181 RefValue241 RefValue301
RelDeviation061 RelDeviation121 RelDeviation181 RelDeviation241 RelDeviation301
AbsDeviation061 AbsDeviation121 AbsDeviation181 AbsDeviation241 AbsDeviation301
Reading012 Reading072 Reading123 Reading192 Reading252
RefValue012 RefValue072 RefValue123 RefValue192 RefValue252
RelDeviation012 RelDeviation072 RelDeviation132 RelDeviation192 RelDeviation252
AbsDeviation012 AbsDeviation072 AbsDeviation132 AbsDeviation192 AbsDeviation252
Reading022 Reading082 Reading142 Reading202 Reading262
RefValue022 RefValue082 RefValue142 RefValue202 RefValue262
RelDeviation022 RelDeviation082 RelDeviation142 RelDeviation202 RelDeviation262
AbsDeviation022 AbsDeviation082 AbsDeviation142 AbsDeviation202 AbsDeviation262
Reading032 Reading092 Reading152 Reading212 Reading272
RefValue032 RefValue092 RefValue152 RefValue212 RefValue272
RelDeviation032 RelDeviation092 RelDeviation152 RelDeviation212 RelDeviation272
58 WIKA instruction manual WIKA-Cal
14097663.03 05/2017 EN/DE
Page 59

8. Using a Microsoft® Excel® certificate template
Permissible names
AbsDeviation032 AbsDeviation092 AbsDeviation152 AbsDeviation212 AbsDeviation272
Reading042 Reading102 Reading162 Reading222 Reading282
RefValue042 RefValue102 RefValue162 RefValue222 RefValue282
RelDeviation042 RelDeviation102 RelDeviation162 RelDeviation222 RelDeviation282
AbsDeviation042 AbsDeviation102 AbsDeviation162 AbsDeviation222 AbsDeviation282
Reading052 Reading112 Reading172 Reading232 Reading292
RefValue052 RefValue112 RefValue172 RefValue232 RefValue292
RelDeviation052 RelDeviation112 RelDeviation172 RelDeviation232 RelDeviation292
AbsDeviation052 AbsDeviation112 AbsDeviation172 AbsDeviation232 AbsDeviation292
Reading062 Reading122 Reading182 Reading242 Reading302
RefValue062 RefValue122 RefValue182 RefValue242 RefValue302
RelDeviation062 RelDeviation122 RelDeviation182 RelDeviation242 RelDeviation302
AbsDeviation062 AbsDeviation122 AbsDeviation182 AbsDeviation242 AbsDeviation302
Reading013 Reading073 Reading133 Reading193 Reading253
RefValue013 RefValue073 RefValue133 RefValue193 RefValue253
RelDeviation013 RelDeviation073 RelDeviation133 RelDeviation193 RelDeviation253
AbsDeviation013 AbsDeviation073 AbsDeviation133 AbsDeviation193 AbsDeviation253
Reading023 Reading083 Reading143 Reading203 Reading263
RefValue023 RefValue083 RefValue143 RefValue203 RefValue263
RelDeviation023 RelDeviation083 RelDeviation143 RelDeviation203 RelDeviation263
AbsDeviation023 AbsDeviation083 AbsDeviation143 AbsDeviation203 AbsDeviation263
Reading033 Reading093 Reading153 Reading213 Reading273
RefValue033 RefValue093 RefValue153 RefValue213 RefValue273
RelDeviation033 RelDeviation093 RelDeviation153 RelDeviation213 RelDeviation273
AbsDeviation033 AbsDeviation093 AbsDeviation153 AbsDeviation213 AbsDeviation273
Reading043 Reading103 Reading163 Reading223 Reading283
RefValue043 RefValue103 RefValue163 RefValue223 RefValue283
RelDeviation043 RelDeviation103 RelDeviation163 RelDeviation223 RelDeviation283
AbsDeviation043 AbsDeviation103 AbsDeviation163 AbsDeviation223 AbsDeviation283
Reading053 Reading113 Reading173 Reading233 Reading293
RefValue053 RefValue113 RefValue173 RefValue233 RefValue293
RelDeviation053 RelDeviation113 RelDeviation173 RelDeviation233 RelDeviation293
AbsDeviation053 AbsDeviation113 AbsDeviation173 AbsDeviation233 AbsDeviation293
Reading063 Reading123 Reading183 Reading243 Reading303
RefValue063 RefValue123 RefValue183 RefValue243 RefValue303
RelDeviation063 RelDeviation123 RelDeviation183 RelDeviation243 RelDeviation303
AbsDeviation063 AbsDeviation123 AbsDeviation183 AbsDeviation243 AbsDeviation303
EN
Reading014 Reading074 Reading134 Reading194 Reading254
RefValue014 RefValue074 RefValue134 RefValue194 RefValue254
RelDeviation014 RelDeviation074 RelDeviation134 RelDeviation194 RelDeviation254
AbsDeviation014 AbsDeviation074 AbsDeviation134 AbsDeviation194 AbsDeviation254
Reading024 Reading084 Reading144 Reading204 Reading264
RefValue024 RefValue084 RefValue144 RefValue204 RefValue264
RelDeviation024 RelDeviation084 RelDeviation144 RelDeviation204 RelDeviation264
14097663.03 05/2017 EN/DE
59WIKA instruction manual WIKA-Cal
Page 60

8. Using a Microsoft® Excel® certificate template
Permissible names
AbsDeviation024 AbsDeviation084 AbsDeviation144 AbsDeviation204 AbsDeviation264
Reading034 Reading094 Reading154 Reading214 Reading274
RefValue034 RefValue094 RefValue154 RefValue214 RefValue274
RelDeviation034 RelDeviation094 RelDeviation154 RelDeviation214 RelDeviation274
AbsDeviation034 AbsDeviation094 AbsDeviation154 AbsDeviation214 AbsDeviation274
EN
Reading044 Reading104 Reading164 Reading224 Reading284
RefValue044 RefValue104 RefValue164 RefValue224 RefValue284
RelDeviation044 RelDeviation104 RelDeviation164 RelDeviation224 RelDeviation284
AbsDeviation044 AbsDeviation104 AbsDeviation164 AbsDeviation224 AbsDeviation284
Reading054 Reading114 Reading174 Reading234 Reading294
RefValue054 RefValue114 RefValue174 RefValue234 RefValue294
RelDeviation054 RelDeviation114 RelDeviation174 RelDeviation234 RelDeviation294
AbsDeviation054 AbsDeviation114 AbsDeviation174 AbsDeviation234 AbsDeviation294
Reading064 Reading124 Reading184 Reading244 Reading304
RefValue064 RefValue124 RefValue184 RefValue244 RefValue304
RelDeviation064 RelDeviation124 RelDeviation184 RelDeviation244 RelDeviation304
AbsDeviation064 AbsDeviation124 AbsDeviation184 AbsDeviation244 AbsDeviation304
/>
<MassesCalItem
Masses01 Masses07 Masses13 Masses19 Masses25
TrimMass01 TrimMass07 TrimMass13 TrimMass19 TrimMass25
Masses02 Masses08 Masses14 Masses20 Masses26
TrimMass02 TrimMass08 TrimMass14 TrimMass20 TrimMass26
Masses03 Masses09 Masses15 Masses21 Masses27
TrimMass03 TrimMass09 TrimMass15 TrimMass21 TrimMass27
Masses04 Masses10 Masses16 Masses22 Masses28
TrimMass04 TrimMass10 TrimMass16 TrimMass22 TrimMass28
Masses05 Masses11 Masses17 Masses23 Masses29
TrimMass05 TrimMass11 TrimMass17 TrimMass23 TrimMass29
Masses06 Masses12 Masses18 Masses24 Masses30
TrimMass06 TrimMass12 TrimMass18 TrimMass24 TrimMass30
/>
<UncertaintyOfMeasurement
UncertaintyClass UncertaintyUnit
MeanValue01 MeanValue02 MeanValue03 MeanValue04 MeanValue05
Deviation01 Deviation02 Deviation03 Deviation04 Deviation05
Repeatability01 Repeatability02 Repeatability03 Repeatability04 Repeatability05
Hysteresis01 Hysteresis02 Hysteresis03 Hysteresis04 Hysteresis05
Uncertainty01 Uncertainty02 Uncertainty03 Uncertainty04 Uncertainty05
DeviationClass01 DeviationClass02 DeviationClass03 DeviationClass04 DeviationClass05
RepeatabilityClass01 RepeatabilityClass02 RepeatabilityClass03 RepeatabilityClass04 RepeatabilityClass05
HysteresisClass01 HysteresisClass02 HysteresisClass03 HysteresisClass04 HysteresisClass05
UncertaintyClass01 UncertaintyClass02 UncertaintyClass03 UncertaintyClass04 UncertaintyClass05
MeanValue06 MeanValue07 MeanValue08 MeanValue09 MeanValue10
60 WIKA instruction manual WIKA-Cal
14097663.03 05/2017 EN/DE
Page 61

8. Using a Microsoft® Excel® certificate template
Permissible names
Deviation06 Deviation07 Deviation08 Deviation09 Deviation10
Repeatability06 Repeatability07 Repeatability08 Repeatability09 Repeatability10
Hysteresis06 Hysteresis07 Hysteresis08 Hysteresis09 Hysteresis10
Uncertainty06 Uncertainty07 Uncertainty08 Uncertainty09 Uncertainty10
DeviationClass06 DeviationClass07 DeviationClass08 DeviationClass09 DeviationClass10
RepeatabilityClass06 RepeatabilityClass07 RepeatabilityClass08 RepeatabilityClass09 RepeatabilityClass10
HysteresisClass06 HysteresisClass07 HysteresisClass08 HysteresisClass09 HysteresisClass10
UncertaintyClass06 UncertaintyClass07 UncertaintyClass08 UncertaintyClass09 UncertaintyClass10
MeanValue11 MeanValue12 MeanValue13 MeanValue14 MeanValue15
Deviation11 Deviation12 Deviation13 Deviation14 Deviation15
Repeatability11 Repeatability12 Repeatability13 Repeatability14 Repeatability15
Hysteresis11 Hysteresis12 Hysteresis13 Hysteresis14 Hysteresis15
Uncertainty11 Uncertainty12 Uncertainty13 Uncertainty14 Uncertainty15
DeviationClass11 DeviationClass12 DeviationClass13 DeviationClass14 DeviationClass15
RepeatabilityClass11 RepeatabilityClass12 RepeatabilityClass13 RepeatabilityClass14 RepeatabilityClass15
HysteresisClass11 HysteresisClass12 HysteresisClass13 HysteresisClass14 HysteresisClass15
UncertaintyClass11 UncertaintyClass12 UncertaintyClass13 UncertaintyClass14 UncertaintyClass15
EN
MeanValue16 MeanValue17 MeanValue18 MeanValue19 MeanValue20
Deviation16 Deviation17 Deviation18 Deviation19 Deviation20
Repeatability16 Repeatability17 Repeatability18 Repeatability19 Repeatability20
Hysteresis16 Hysteresis17 Hysteresis18 Hysteresis19 Hysteresis20
Uncertainty16 Uncertainty17 Uncertainty18 Uncertainty19 Uncertainty20
DeviationClass16 DeviationClass17 DeviationClass18 DeviationClass19 DeviationClass20
RepeatabilityClass16 RepeatabilityClass17 RepeatabilityClass18 RepeatabilityClass19 RepeatabilityClass20
HysteresisClass16 HysteresisClass17 HysteresisClass18 HysteresisClass19 HysteresisClass20
UncertaintyClass16 UncertaintyClass17 UncertaintyClass18 UncertaintyClass19 UncertaintyClass20
MeanValue21 MeanValue22 MeanValue23 MeanValue24 MeanValue25
Deviation21 Deviation22 Deviation23 Deviation24 Deviation25
Repeatability21 Repeatability22 Repeatability23 Repeatability24 Repeatability25
Hysteresis21 Hysteresis22 Hysteresis23 Hysteresis24 Hysteresis25
Uncertainty21 Uncertainty22 Uncertainty23 Uncertainty24 Uncertainty25
DeviationClass21 DeviationClass22 DeviationClass23 DeviationClass24 DeviationClass25
RepeatabilityClass21 RepeatabilityClass22 RepeatabilityClass23 RepeatabilityClass24 RepeatabilityClass25
HysteresisClass21 HysteresisClass22 HysteresisClass23 HysteresisClass24 HysteresisClass25
UncertaintyClass21 UncertaintyClass22 UncertaintyClass23 UncertaintyClass24 UncertaintyClass25
MeanValue26 MeanValue27 MeanValue28 MeanValue29 MeanValue30
Deviation26 Deviation27 Deviation28 Deviation29 Deviation30
Repeatability26 Repeatability27 Repeatability28 Repeatability29 Repeatability30
Hysteresis26 Hysteresis27 Hysteresis28 Hysteresis29 Hysteresis30
Uncertainty26 Uncertainty27 Uncertainty28 Uncertainty29 Uncertainty30
DeviationClass26 DeviationClass27 DeviationClass28 DeviationClass29 DeviationClass30
RepeatabilityClass26 RepeatabilityClass27 RepeatabilityClass28 RepeatabilityClass29 RepeatabilityClass30
14097663.03 05/2017 EN/DE
61WIKA instruction manual WIKA-Cal
Page 62

8. Using a Microsoft® Excel® certificate template
Permissible names
HysteresisClass26 HysteresisClass27 HysteresisClass28 HysteresisClass29 HysteresisClass30
UncertaintyClass26 UncertaintyClass27 UncertaintyClass28 UncertaintyClass29 UncertaintyClass30
/>
<StatementOfCompliance
StatementOfCompliance1 StatementOfCompliance2
EN
/>
<AdditionalInformation
AI1_1 AI1_2 AI1_3 AI1_4 AI1_5
AI2_1 AI2_2 AI2_3 AI2_4 AI2_5
/>
8.3 Embedding an Excel template
In “Object manager” under “Templates / Cal”, export templates can be added.
All selectable export templates are listed here and can be edited.
The “Filter” function allows you to define the instrument type and the number of measurement series.
62 WIKA instruction manual WIKA-Cal
14097663.03 05/2017 EN/DE
Page 63

8. Using a Microsoft® Excel® certificate template
8.4 Export in an Excel template
By right clicking on a completed certificate (green check mark), the appropriate Excel template can be selected. The export is
carried out using a file path dialogue.
EN
8.5 Automated exporting in an Excel template
In “Object manager” under “Work station”, the automatic export can be amended with “Select”.
This means that, following a calibration, the data can automatically be placed in the appropriate template in a specific file
format.
14097663.03 05/2017 EN/DE
63WIKA instruction manual WIKA-Cal
Page 64

EN
64 WIKA instruction manual WIKA-Cal
14097663.03 05/2017 EN/DE
Page 65

Inhalt
Inhalt
1. Allgemeines 67
1.1 Beschreibung . . . . . . . . . . . . . . . . . . . . . . . . . . . . . . 67
1.2 Lizenzvereinbarung . . . . . . . . . . . . . . . . . . . . . . . . . . . . 67
1.3 Systemvoraussetzung . . . . . . . . . . . . . . . . . . . . . . . . . . . 68
2. Erste Schritte und Installation 70
3. Überblick 73
3.1 Hauptfenster . . . . . . . . . . . . . . . . . . . . . . . . . . . . . . 73
3.2 Menüleiste und Tools. . . . . . . . . . . . . . . . . . . . . . . . . . . . 74
3.2.1 Datei: Importieren, Datenbank sichern, Datenbank wiederherstellen, Beenden. . . . . . . . . 74
3.2.2 Tools: Einheitenrechner, Massenberechnung und Controller manuell steuern. . . . . . . . . . 74
3.2.3 Einstellungen: Sprache, Dongle-Upgrade, Datenbankverbindung, Objektmanager. . . . . . .75
4. Cal-Template Kalibrierzeugnis 77
4.1 Allgemein . . . . . . . . . . . . . . . . . . . . . . . . . . . . . . . 77
4.2 Eingabe der Kalibrierdaten . . . . . . . . . . . . . . . . . . . . . . . . . . 77
4.2.1 Allgemeine Daten . . . . . . . . . . . . . . . . . . . . . . . . . . . . . . . . . . . . . . . . . . . 77
4.2.2 Kalibriergegenstand . . . . . . . . . . . . . . . . . . . . . . . . . . . . . . . . . . . . . . . . . 77
4.2.3 Umgebungsbedingungen . . . . . . . . . . . . . . . . . . . . . . . . . . . . . . . . . . . . . . 78
4.2.4 Ort der Kalibrierung. . . . . . . . . . . . . . . . . . . . . . . . . . . . . . . . . . . . . . . . . . 78
4.2.5 Messbedingungen . . . . . . . . . . . . . . . . . . . . . . . . . . . . . . . . . . . . . . . . . . 78
4.2.6 Messergebnisse . . . . . . . . . . . . . . . . . . . . . . . . . . . . . . . . . . . . . . . . . . . 79
4.2.7 Auswertung (optional) . . . . . . . . . . . . . . . . . . . . . . . . . . . . . . . . . . . . . . . . 79
4.2.8 Messunsicherheit (optional) . . . . . . . . . . . . . . . . . . . . . . . . . . . . . . . . . . . . . 79
4.2.9 Konformitätsaussage (optional) . . . . . . . . . . . . . . . . . . . . . . . . . . . . . . . . . . . 80
4.2.10 Weitere Hinweise (optional) . . . . . . . . . . . . . . . . . . . . . . . . . . . . . . . . . . . . . 80
4.3 Neue Kalibrierung . . . . . . . . . . . . . . . . . . . . . . . . . . . . . 80
4.4 Rekalibrierung . . . . . . . . . . . . . . . . . . . . . . . . . . . . . . 81
4.5 Upload . . . . . . . . . . . . . . . . . . . . . . . . . . . . . . . . 82
4.6 Download . . . . . . . . . . . . . . . . . . . . . . . . . . . . . . . 83
4.7 Kalibrieren und Zeugnis fertigstellen . . . . . . . . . . . . . . . . . . . . . . 84
4.8 Multikalibrierung (Optional) . . . . . . . . . . . . . . . . . . . . . . . . . 84
5. Log-Template Loggerprotokoll 86
5.1 Allgemein . . . . . . . . . . . . . . . . . . . . . . . . . . . . . . . 86
5.2 Eingabe der Loggerdaten . . . . . . . . . . . . . . . . . . . . . . . . . . 86
5.2.1 Allgemeine Daten . . . . . . . . . . . . . . . . . . . . . . . . . . . . . . . . . . . . . . . . . . . 86
5.2.2 Messbedingungen . . . . . . . . . . . . . . . . . . . . . . . . . . . . . . . . . . . . . . . . . . 87
5.2.3 Messergebnisse . . . . . . . . . . . . . . . . . . . . . . . . . . . . . . . . . . . . . . . . . . . 87
5.3 Neuer Log . . . . . . . . . . . . . . . . . . . . . . . . . . . . . . . 88
5.4 Erneut Loggen . . . . . . . . . . . . . . . . . . . . . . . . . . . . . . 89
5.5 Download . . . . . . . . . . . . . . . . . . . . . . . . . . . . . . . 90
5.6 Loggen und Protokoll fertigstellen . . . . . . . . . . . . . . . . . . . . . . . 91
6. Objektmanager 92
6.1 Hinzufügen, Speichern und Löschen . . . . . . . . . . . . . . . . . . . . . . 92
6.2 Struktur . . . . . . . . . . . . . . . . . . . . . . . . . . . . . . . . 93
6.3 Objekte . . . . . . . . . . . . . . . . . . . . . . . . . . . . . . . . 94
6.3.1 Arbeitsplatz . . . . . . . . . . . . . . . . . . . . . . . . . . . . . . . . . . . . . . . . . . . . . . 94
6.3.2 Ausgangssignale Druckmessumformer. . . . . . . . . . . . . . . . . . . . . . . . . . . . . . . 95
6.3.3 Baudrate. . . . . . . . . . . . . . . . . . . . . . . . . . . . . . . . . . . . . . . . . . . . . . . . 95
6.3.4 Bemerkungen . . . . . . . . . . . . . . . . . . . . . . . . . . . . . . . . . . . . . . . . . . . . . 96
6.3.5 Einheiten (Druck) . . . . . . . . . . . . . . . . . . . . . . . . . . . . . . . . . . . . . . . . . . . 96
6.3.6 Genauigkeiten. . . . . . . . . . . . . . . . . . . . . . . . . . . . . . . . . . . . . . . . . . . . . 97
6.3.7 Gerätetypen . . . . . . . . . . . . . . . . . . . . . . . . . . . . . . . . . . . . . . . . . . . . . .97
6.3.8 Hersteller . . . . . . . . . . . . . . . . . . . . . . . . . . . . . . . . . . . . . . . . . . . . . . . 98
6.3.9 Kalibriergegenstände (Druck) . . . . . . . . . . . . . . . . . . . . . . . . . . . . . . . . . . . . 98
14097663.03 05/2017 EN/DE
DE
65WIKA Bedienungsanleitung WIKA-Cal
Page 66

Inhalt
6.3.10 Kolben . . . . . . . . . . . . . . . . . . . . . . . . . . . . . . . . . . . . . . . . . . . . . . . . . 99
6.3.11 Kommunikation . . . . . . . . . . . . . . . . . . . . . . . . . . . . . . . . . . . . . . . . . . . 100
6.3.12 Kunden . . . . . . . . . . . . . . . . . . . . . . . . . . . . . . . . . . . . . . . . . . . . . . . 101
6.3.13 Labordaten . . . . . . . . . . . . . . . . . . . . . . . . . . . . . . . . . . . . . . . . . . . . . 101
6.3.14 Massen . . . . . . . . . . . . . . . . . . . . . . . . . . . . . . . . . . . . . . . . . . . . . . . 102
6.3.15 Massensätze . . . . . . . . . . . . . . . . . . . . . . . . . . . . . . . . . . . . . . . . . . . . 102
6.3.16 Medien. . . . . . . . . . . . . . . . . . . . . . . . . . . . . . . . . . . . . . . . . . . . . . . . 103
DE
7. Einrichten von Kalibriergeräten 110
8. Verwenden einer Microsoft® Excel®-Zeugnisvorlage 118
6.3.17 Multimeter . . . . . . . . . . . . . . . . . . . . . . . . . . . . . . . . . . . . . . . . . . . . . . 103
6.3.18 Multiplexer (optional) . . . . . . . . . . . . . . . . . . . . . . . . . . . . . . . . . . . . . . . . 104
6.3.19 Normale (Druck) . . . . . . . . . . . . . . . . . . . . . . . . . . . . . . . . . . . . . . . . . . 104
6.3.20 Ort . . . . . . . . . . . . . . . . . . . . . . . . . . . . . . . . . . . . . . . . . . . . . . . . . . 105
6.3.21 Prüfer . . . . . . . . . . . . . . . . . . . . . . . . . . . . . . . . . . . . . . . . . . . . . . . . 106
6.3.22 Shunts . . . . . . . . . . . . . . . . . . . . . . . . . . . . . . . . . . . . . . . . . . . . . . . . 107
6.4 Templates . . . . . . . . . . . . . . . . . . . . . . . . . . . . . . 107
6.4.1 Cal . . . . . . . . . . . . . . . . . . . . . . . . . . . . . . . . . . . . . . . . . . . . . . . . . . 107
6.4.2 Log . . . . . . . . . . . . . . . . . . . . . . . . . . . . . . . . . . . . . . . . . . . . . . . . . . 108
6.5 Wetterdaten . . . . . . . . . . . . . . . . . . . . . . . . . . . . . . 109
7.1 Notwendige Treiber laden . . . . . . . . . . . . . . . . . . . . . . . . . 110
7.2 Einrichten der Typen CPH6x00 . . . . . . . . . . . . . . . . . . . . . . . 111
7.3 Einrichten der Typen CPCx000 . . . . . . . . . . . . . . . . . . . . . . . 111
7.4 Einrichten der Typen CPBx000 . . . . . . . . . . . . . . . . . . . . . . . 112
7.5 Einrichten der Serie CPU6000 . . . . . . . . . . . . . . . . . . . . . . . 113
7.5.1 Einrichten der Wetterstation Typ CPU6000-W . . . . . . . . . . . . . . . . . . . . . . . . . . 113
7.5.2 Einrichten der Sensorbox Kolbenmanometer Typ CPU6000-S . . . . . . . . . . . . . . . . . 114
7.5.3 Einrichten des Digitalmultimeters Typ CPU6000-M . . . . . . . . . . . . . . . . . . . . . . . 115
7.6 Einrichten drahtloser Geräte . . . . . . . . . . . . . . . . . . . . . . . . 116
7.7 Einrichten von Multimeter und Multiplexer. . . . . . . . . . . . . . . . . . . . 117
8.1 Allgemein . . . . . . . . . . . . . . . . . . . . . . . . . . . . . . 118
8.2 Erstellen einer Microsoft Excel-Zeugnisvorlage . . . . . . . . . . . . . . . . . . 118
8.3 Einbinden einer Excel-Vorlage . . . . . . . . . . . . . . . . . . . . . . . 124
8.4 Exportieren in eine Excel-Vorlage . . . . . . . . . . . . . . . . . . . . . . 125
8.5 Automatisiertes Exportieren in eine Excel-Vorlage . . . . . . . . . . . . . . . . . 125
66 WIKA Bedienungsanleitung WIKA-Cal
14097663.03 05/2017 EN/DE
Page 67

1. Allgemeines
1. Allgemeines
1.1 Beschreibung
Die Kalibriersoftware WIKA-Cal dient zum Erstellen von Kalibrierzeugnissen oder Loggerprotokollen für Druckmessgeräte und
steht als Demoversion kostenlos auf der Homepage zum Download bereit. Mit dem Cal-Template können Kalibrierzeugnisse
und mit dem Log-Template Loggerprotokolle erzeugt werden. Um von der Demoversion auf eine Vollversion des jeweiligen
Templates umzusteigen, muss ein USB-Stick mit dem Template erworben werden. Die vorinstallierte Demoversion stellt
sich beim Einstecken des USB-Sticks automatisch zur gewählten Vollversion um und steht so lange zur Verfügung wie der
USB-Stick am Computer angeschlossen ist.
1.2 Lizenzvereinbarung
Vertragsgegenstand
Gegenstand des Vertrages ist der USB-Stick zum Freischalten der jeweiligen Templates innerhalb der WIKA-Cal
Kalibriersoftware.
Lizenzgewährung
Als Lizenznehmer sind Sie berechtigt den USB-Stick in Ihrem Unternehmen an beliebigen Stellen zu nutzen, auch an mehreren Arbeitsplätzen. Dabei darf ein USB-Stick nur für einen Arbeitsplatz die jeweiligen Templates freischalten.
DE
Als Lizenznehmer ist Ihnen untersagt:
das Programm ganz oder teilweise abzuändern, zu übersetzen, zurückzuentwickeln, zu entkompilieren, zu entassemblieren
oder zu decodieren, sowie von dem Programm abgeleitete Werke zu erstellen.
Inhaberschaft an Rechten
Sie erhalten mit dem Erwerb nur das Eigentum an dem USB-Stick, auf dem die Freischaltung codiert ist. Ein Erwerb an
Rechten des Programmes selbst ist damit nicht verbunden. Alle Rechte zur Veröffentlichung, Vervielfältigung, Bearbeitung und
Verwertung des Programmes verbleiben bei WIKA.
Garantie und Haftungsbeschränkung
■
WIKA gewährleistet, dass die USB-Sticks, auf denen die Freischaltung der Templates codiert ist, unter normalen Betriebsbedingungen in Materialausführung einwandfrei sind. Sollten die USB-Sticks einen Fehler aufweisen, so können innerhalb
einer Frist von 30 Tagen ab Datum des Ersterwerbs, die USB-Sticks an WIKA eingeschickt werden. Die USB-Sticks werden
umgehend kostenlos ersetzt.
■
WIKA gewährleistet, dass das Programm im Sinne der Programmbeschreibung grundsätzlich brauchbar ist. Da es nach
dem Stand der Technik nicht möglich ist, Computerprogramme so zu erstellen, dass sie in allen Anwendungen und Kombinationen fehlerfrei arbeiten, übernimmt WIKA keine Haftung für die Fehlerfreiheit und den ununterbrochenen Betrieb des
Programmes. Insbesondere wird keine Gewähr dafür übernommen, dass das Programm den Anforderungen des Anwenders entspricht oder mit anderen von ihm ausgewählten Programmen zusammenarbeitet. Die Verantwortung für die richtige
Auswahl und die Folgen der Benutzung des Programmes, sowie der damit beabsichtigten oder erzielten Ergebnisse trägt
der Käufer (Lizenznehmer).
■
WIKA ist nicht verantwortlich für die ordnungsgemäße Eingabe der Werte und Bedienung des Programms. WIKA
übernimmt keine Haftung für Schäden aufgrund falscher Eingaben, Konfiguration, Übertragung oder Folgen hieraus. WIKA
empfiehlt, nach Konfiguration die richtige Funktionsweise von jedem Sensor anhand einiger manueller Messungen über
den gesamten Messbereich auf Plausibilität zu überprüfen.
■
WIKA haftet unbeschränkt
- bei Vorsatz oder grober Fahrlässigkeit
- für die Verletzung von Leben, Leib oder Gesundheit
- nach den Vorschriften des Produkthaftungsgesetzes sowie
- im Umfang einer vom Verkäufer übernommenen Garantie.
14097663.03 05/2017 EN/DE
67WIKA Bedienungsanleitung WIKA-Cal
Page 68

1. Allgemeines
■
Bei leicht fahrlässiger Verletzung einer Pflicht, die wesentlich für die Erreichung der Lizenzvereinbarung ist (Kardinalpflicht),
ist die Haftung von WIKA der Höhe nach begrenzt auf den Schaden, der nach der Art des fraglichen Geschäfts vorhersehbar und typisch ist.
■
Eine weitergehende Haftung von WIKA besteht nicht.
■
Die vorstehende Haftungsbeschränkung gilt auch für die persönliche Haftung der Mitarbeiter, Vertreter und Organe von
DE
WIKA.
Vertragsdauer
Dieser Vertrag ist in Kraft, bis der Lizenznehmer ihn durch Vernichtung des Programmes samt aller Kopien beendet. Darüber
hinaus erlischt er bei Verstoß gegen die Vertragsbedingungen. Der Lizenznehmer verpflichtet sich, bei Vertragsbeendigung
das Programm und alle Kopien zu vernichten.
Verbesserungen und Weiterentwicklungen
WIKA ist berechtigt, Verbesserungen und Weiterentwicklungen des Programmes nach eigenem Ermessen durchzuführen.
Vertragsverletzungen
WIKA macht darauf aufmerksam, dass der Lizenznehmer für alle Schäden aufgrund von Urheberrechtsverletzungen haftet,
die WIKA aus einer Verletzung dieser Vertragsbestimmungen durch den Lizenznehmer entstehen.
Auf diese Lizenzvereinbarung ist das deutsche Recht unter Ausschluss des Übereinkommens der Vereinten Nationen über
Verträge über den internationalen Warenverkauf vom 11.4.1980 (UN-Kaufrecht) anzuwenden. Erfüllungsort ist Klingenberg am
Main, Deutschland. Ausschließlicher Gerichtsstand ist Aschaffenburg, sofern jede Partei Kaufmann oder juristische Person
des öffentlichen Rechts ist oder keinen allgemeinen Gerichtsstand in Deutschland hat.
1.3 Systemvoraussetzung
Technische Daten
Minimale Systemanforderungen Intel® Pentium® 4 oder AMD Athlon® 64
Microsoft® Windows® XP mit Service Pack 3, Windows® 7 mit Service Pack 1, Windows®
8 und Windows® 10
1 GB RAM und 1 GB freier Festplattenspeicher (keine Installation auf portablen FlashSpeichermedien möglich)
1024 x 768 Punkt Monitorauflösung (1280 x 800 Punkt empfohlen) mit 16 Bit Farbtiefe und
256 MB VRAM
Die Software funktioniert ohne Aktivierungs-USB-Stick nur im Demo-Modus.
Für vollautomatische Kalibrierungen werden zur Kommunikation mindestens ein RS-232COM-Port pro Gerät benötigt.
Wenn lokal ein SQL-Server installiert werden soll sind .NET Framework 3.5 und bei Win7
und neuer auch 4.x notwendig.
Sprachversionen Deutsch, Englisch, Französisch, Italienisch, Polnisch, Rumänisch, Niederländisch und
Portugiesisch
Mögliche Kommunikationsschnittstellen USB, RS-232, GPIB IEC-625-Bus, Ethernet und Bluetooth® 2.1
Microsoft® und Windows® sind eingetragene Marken der Microsoft Corporation in den Vereinigten Staaten und weiteren Ländern.
®
Bluetooth
ist eine eingetragenen Marke der Bluetooth SIG, Inc..
68 WIKA Bedienungsanleitung WIKA-Cal
14097663.03 05/2017 EN/DE
Page 69

1. Allgemeines
Technische Daten
Features Erstellung und Archivierung von Prüfprotokollen über Templates Cal, Cal Light, Cal Demo,
Log und Log Demo
Tools für Massenberechnung mit CPU6000 und Einheitenrechner
Objektmanager erlaubt intelligente Verwendung von Labor- und Equipmentdaten und
vereinfacht den genormten Prüfprozess
Archivierung von kundenspezifischen Prüfprotokollen in SQL-Datenbank
Automatisches Auslesen und Steuern von Messgeräten durch Kommunikationstypen
Kommunikationstypen CPH6000, CPH6200, CPH62I0, CPH6300, CPH6400, CPH65I0, CPH6600, CPH7000,
CPH7600, CPG500, CPG1000, CPG1500, CPT6100, CPT6180, CPG2500, CPC2000,
CPC3000, CPC4000, CPC6000, CPC6050, CPC8000-I (II), CPC8000-H, CPG8000-I (II),
CPT2500, CPD8000, Drucksensor über Digitalmultimeter Agilent 34401A, Agilent 34410A
oder Keithley 196A, CPU6000-W, CPU6000-S, CPU6000-M
Microsoft® und Windows® sind eingetragene Marken der Microsoft Corporation in den Vereinigten Staaten und weiteren Ländern.
®
Bluetooth
ist eine eingetragenen Marke der Bluetooth SIG, Inc..
DE
■
Weitere Informationen:
WIKA Alexander Wiegand SE & Co. KG
- Internet-Adresse: www.wika.de / www.wika.com
- Zugehöriges Datenblatt: CT 95.10
- Anwendungsberater:
Tel.: +49 9372 132-0
Fax: +49 9372 132-406
info@wika.com
Abkürzungen, Definitionen
„XXX“ Name des Menüpunktes
[XXX] Schaltfläche [XXX] im Programm drücken
KG Kalibriergegenstand
■
Aufzählungssymbol
▶
Handlungsanweisung
1. ... X. Handlungsanweisung Schritt für Schritt durchführen
Ergebnis einer Handlungsanweisung
⇒
14097663.03 05/2017 EN/DE
69WIKA Bedienungsanleitung WIKA-Cal
Page 70

2. Erste Schritte und Installation
2. Erste Schritte und Installation
Um die Kalibriersoftware WIKA-Cal zu installieren, folgende
Schritte durchführen:
1. Download der WIKA-Cal Demoversion direkt von unserer
lokalen Internetseite.
DE
http://de-de.wika.de/download_software_digital_
⇒
pressure_gauges_calibration_de_de.WIKA
bzw. WIKA-Homepage/Download/Software/Kalibrierung.
2. Entpacken der WIKA-Cal-Setup-vX_X_X_X.zip Datei.
3. Starten der WIKA-Cal-Setup-vX_X_X_X.exe Datei.
4. Anweisungen des Installationsassistenten wie folgt
durchführen.
5. Eine Sprache für den Installer auswählen und mit [OK]
bestätigen.
7. Zielordner für die Installation der WIKA-Cal auswählen
und mit [Weiter >] bestätigen.
8. Einen Windows-Startmenü-Eintrag auswählen und mit
[Weiter >] bestätigen.
6. Im Willkommen-Dialog [Weiter >] wählen.
70 WIKA Bedienungsanleitung WIKA-Cal
14097663.03 05/2017 EN/DE
Page 71

2. Erste Schritte und Installation
9. „Standard-Server auf diesem Computer installieren oder weiter verwenden“ auswählen, wenn der
SQL-Server für die WIKA-Cal auf dem Computer lokal
installiert werden soll oder dieser bereits installiert ist.
„Bestehenden Server verwenden oder manuell
installieren“ auswählen, wenn ein SQL-Server auf
einem anderen PC verwendet werden soll.
Anschließend mit [Weiter >] bestätigen.
10. Auswählen, ob ein Desktop-Symbol erstellt werden soll
und mit [Weiter >] bestätigen.
DE
11. Die Installation mit [Installieren] starten.
Sollte eine ältere SQL-Version (v.a. für
Windows
erscheint dieses Pop-Up-Fenster.
®
10) auf dem Rechner installiert sein,
12. Im folgenden Dialog wird die benötigte SQL-Server-
Installation vom Internet heruntergeladen. Der Download
und die Installation wird mit dem Drücken auf [Ja] gestartet. Wenn kein Zugriff auf das Internet existiert, kann über
die WIKA-Kontaktadresse eine Installer-Version angefragt
werden, welche eine Version des SQL-Server-Installers
beinhaltet.
14097663.03 05/2017 EN/DE
71WIKA Bedienungsanleitung WIKA-Cal
Page 72

2. Erste Schritte und Installation / 3. Überblick
13. Warten, bis der Download und die Installation
abgeschlossen sind. Dies kann einige Minuten in
Anspruch nehmen.
DE
14. Die Software ist jetzt installiert und kann gestartet
werden.
16. Ist die Datenbank korrekt angelegt, startet die Software
mit einem Wetterdaten-Dialog. Hier können die Daten
manuell eingetragen werden oder diese werden über
die CPU6000-W automatisch übernommen. Nach
dem Bestätigen durch [OK] werden die Wetterdaten
in die Datenbank übernommen (siehe Kapitel
6.5 „Wetterdaten“).
17. Die Installation ist jetzt abgeschlossen und die Software
betriebsbereit.
Für die Installation der Software wird kein
USB-Stick benötigt. Beim Einstecken des
USB-Stick wird aus der Demoversion automatisch die auf dem USB-Stick codierte Version
zugegriffen.
15. Wird die WIKA-Cal das erste Mal gestartet, wird überprüft
ob sich auf dem SQL-Server eine WIKA-Cal-Datenbank
befindet. Ist dies nicht der Fall, kann über die Auswahl
[Ja] diese angelegt werden. Ohne die Datenbank
WIKACALDB funktioniert die WIKA-Cal-Software nicht.
Der Dialog dient zum Schutz des Servers. Wenn aus
Versehen ein falscher SQL-Server ausgewählt wurde,
kann hier die Auswahl [Nein] getroffen werden, um die
Installation auf einem fremden Server zu vermeiden.
72 WIKA Bedienungsanleitung WIKA-Cal
14097663.03 05/2017 EN/DE
Page 73

3. Überblick
3. Überblick
3.1 Hauptfenster
7
6
5
4
1
Zeugnisse
Datenbank aller Dokumente des ausgewählten
Templates. Es kann über die Filterleiste nach einem
Begriff gefiltert werden.
Beispiel: „Seriennummer = 12345“, zeigt alle Dokumente für die Seriennumer 12345 an.
„Seriennummer = *12345*“, zeigt alle Dokumente die in
ihrer Seriennummer 12345 enthalten an.
2
Funktions-Schaltfächen
■
Neue Kalibrierung, Neuer Log
Erstellt ein Dokument des ausgewählten Templates
(siehe Kapitel 4.3 „Neue Kalibrierung“ oder Kapitel
5.3 „Neuer Log“).
■
Rekalibrierung, Erneut loggen
Erstellt ein vorgefülltes Dokument des ausgewählten Templates. Es können nur fertige Dokumente
(grüner Haken) gewählt werden (siehe Kapitel
4.4 „Rekalibrierung“ oder Kapitel 5.4 „Erneut
Loggen“).
■
Upload (nur bei Cal Template vorhanden)
Ein Kalibriervorgang wird auf ein mobiles Gerät
geladen (siehe Kapitel 4.5 „Upload“).
1
2
3
3
Wetterdaten
Anzeige der aktuellen Umgebungsbedingungen
- Ein Klick auf die Leiste öffnet das Fenster
„Wetterdaten“ im „Objektmanager“ (siehe Kapitel
6.5 „Wetterdaten“).
4
Arbeitsplatz
Anzeige des aktuellen Computernamen
- Ein Klick auf die Leiste öffnet das Fenster „Arbeits-
platz“ im „Objektmanager“ (siehe Kapitel
6.3.1 „Arbeitsplatz“).
5
Templates
Auswahl Log-Template (siehe Kapitel 5 „Log-Template
Loggerprotokoll“).
6
Templates
Auswahl Cal-Template (siehe Kapitel 4 „Cal-Template
Kalibrierzeugnis“).
7
Menüleiste
Laden und Speichern der Datenbank, Tools wie
Massenberechnung oder Einheitenrechner, etc. (siehe
Kapitel 3.2 „Menüleiste und Tools“).
DE
■
Download
Ein Dokument des ausgewählten Templates wird
von einem mobilen Gerät geladen (siehe Kapitel
4.6 „Download“).
14097663.03 05/2017 EN/DE
73WIKA Bedienungsanleitung WIKA-Cal
Page 74

3. Überblick
3.2 Menüleiste und Tools
DE
3.2.1 Datei: Importieren, Datenbank sichern, Datenbank
wiederherstellen, Beenden
1
2
3
4
4
Beenden
Beendet das Programm.
3.2.2 Tools: Einheitenrechner, Massenberechnung und
Controller manuell steuern
5
6
7
5
Einheitenrechner
Wird unter „Wert“ eine Zahl eingegeben, wird diese
mit der angegebenen Einheit in alle verfügbaren
Einheiten umgerechnet und unter „Umgerechnete
Werte“ dargestellt (siehe Kapitel 6.3.5 „Einheiten
(Druck)“).
1
Importieren
Importieren von Kolbenmanometerdaten. Über den
Import einer XML-Datei, kann ein Kolbenmanometer
als Normal in der Datenbank eingefügt werden
(siehe Kapitel 6.3.19 „Normale (Druck)“). Die
XML-Dateien werden unter einem Dateinamen online
abgelegt, z. B. für Dateiname „50556CPB5000“ liegt
die XML-Datei unter http://apps.wika.com/apps/
CPB-CAL/50556CPB5000.xml
2
Datenbank sichern...
Über diese Funktion kann die vollständige Datenbank
(siehe Kapitel 6 „Objektmanager“) in einer .bak-Datei
gesichert werden. Hierbei muss ein Pfad gewählt
werden, auf dem Schreibrechte der Datenbank existieren. Die installierte SQL-Datenbank muss in der Lage
sein auf den ausgewählten Pfad zuzugreifen.
Die Schreibrechte der SQL-Datenbank
unterscheiden sich vom angemeldeten
Windows-Nutzer. Erfahrungsgemäß
ist ein neu angelegter Ordner z. B. „C:\
Temp\“ eine gute Möglichkeit zum
Speichern von .bak-Dateien.
3
Datenbank wiederherstellen...
Eine über „Datenbank sichern...“ gespeicherte
.bak-Datei kann über „Datenbank wiederherstel-
len...“ neu geladen werden. Hierbei wird die alte
Datenbank gelöscht und die gewählte Datenbank in
der .bak-Datei wiederhergestellt.
6
Massenberechnung
Das Tool dient zur Umrechnung von Masse in Druck
und umgekehrt für Kolbenmanometer. Zuerst muss ein
Gerät (Kolbenmanometer) und der zugehörige Kolben
gewählt werden. Der Massensatz wird dementsprechend gewählt. Die Kolbenmanometerdaten müssen
zuvor im Objektmanager eingetragen oder über eine
XML-Datei importiert worden sein (siehe Kapitel
6.3.19 „Normale (Druck)“ oder 3.2.1 „Datei: Importieren, Datenbank sichern, Datenbank wiederherstellen,
Beenden“
).
Wird ein Druckwert in die linke Spalte eingegeben und
auf [Enter] gedrückt, werden die Zellen die oberhalb
liegen mit gleichmäßig verteilten Werten vorgefüllt. Z. B.
untere linke Zelle mit Endwert füllen → gleichmäßig
verteilte Werte bis zum Messbereichsanfang in den
Zellen darüber.
Es ist auch möglich, Feinmassen auszurechnen um die
Masse für einen Druckwert oder umgekehrt zu berechnen. Es können auch die Massennummern eingegeben
werden.
74 WIKA Bedienungsanleitung WIKA-Cal
14097663.03 05/2017 EN/DE
Page 75

3. Überblick
Für das Korrigieren der Messwerte werden die
gemessenen Umgebungsbedingungen und die
Kolbentemperatur herangezogen. Die Kolbenposition
dient zur Anzeige der Schwebeposition. Bei Absolutdruckgeräten muss zusäztlich der Vakuumrestdruck
angegeben werden. Über die Geräte der CPU6000Serie können diese automatisch eingelesen werden.
7
Controller manuell steuern
Nachdem die Verbindung zu dem gewünschten
Controller hergestellt wurde, kann dieser schrittweise
und manuell auf den gewünschten Sollwert gefahren
werden.
1. Druckbereich mit Hilfe der Schaltflächen [▲] und [▼]
verändern.
2. Mit [OK] die Druckänderung bestätigen.
Neuer Druckbereich wird angefahren
⇒
Über den Bargraph wird der Druckbereich nochmals
graphisch dargestellt.
Mit [Trennen] wird die Verbindung zum Controller
getrennt.
3.2.3 Einstellungen: Sprache, Dongle-Upgrade, Datenbankverbindung, Objektmanager
DE
Unter „Gerät“ wird der Controller ausgewählt und unter
„Einheit“ der gewünschte Druckbereich.
Mit [Verbinden] wird der Controller angesteuert.
8
Sprache
Auswahl der unterschiedlichen Sprachen. Die Software
wird kontinuierlich überarbeitet und Sprachen werden
hinzugefügt.
8
9
10
11
14097663.03 05/2017 EN/DE
75WIKA Bedienungsanleitung WIKA-Cal
Page 76

3. Überblick
9
DE
10
Dongle-Upgrade
Sobald ein USB-Stick angeschlossen ist, kann über
„Dongle-Upgrade“ die Seriennummer des USB-Sticks
ermittelt werden. Diese Seriennummer kann an Ihren
WIKA-Kontakt übergeben werden um den USB-Stick
mit einer neuen Funktion zu erweitern. Informieren Sie
sich bei Ihrem WIKA-Kontakt über weitere Funktionen
für Ihren USB-Stick.
Datenbankverbindung
Im Dialog Datenbankauswahl kann durch Deaktivieren
von „Lokale Standarddatenbank verwenden“ ein
anderer Server ausgewählt werden.
Der Server auf einem anderen Computer im Netzwerk
kann durch „Netzwerkcomputername\SQLWIKA-
CAL“ verbunden werden. Die Werte unter „Authen-
tifizierung“ und „Datenbank“ sollten dabei beste-
hen bleiben. Das Anpassen dieser Werte erfordert
fortgeschrittenere SQL-Kenntnisse. Nach Drücken von
[Verbinden] ist man mit der Datenbank verbunden und
sollte diese über den Objektmanager abrufen können.
11
Objektmanager
Siehe Kapitel 6 „Objektmanager“.
76 WIKA Bedienungsanleitung WIKA-Cal
14097663.03 05/2017 EN/DE
Page 77

4. Cal-Template Kalibrierzeugnis
Calibration certificate
Kalibrierzeugnis
Certificate No. 00000122
Zeugnis-Nr.
Page 2 / 2
Seite
Demo laboratory
Demo street 123
12345 Demo city
Demo country
Tel.: 01234/56789
Fax: 01234/56789
E-Mail: demo@demo.com
www.demo.com
Measurement results
Messergebnisse
Statement of compliance
Konformitätsaussage
Reference value WS Reading DUT
Referenzwert GN Ablesung KG
bar bar
↑ ↓
0.00000 0.0000 0.0010
10.00000 10.0010 10.0020
Object keeps the specifications!
Der Kalibriergegenstand hält die Herstellerspezifikationen ein!
Calibration certificate
Kalibrierzeugnis
Certificate No. 00000122
Zeugnis-Nr.
Page 1 / 2
Seite
Demo laboratory
Demo street 123
12345 Demo city
Demo country
Tel.: 01234/56789
Fax: 01234/56789
E-Mail: demo@demo.com
www.demo.com
General
Allgemein
Device under test (DUT)
Kalibriergegenstand (KG)
Environmental conditions
Umgebungsbedingungen
Place of calibration
Ort der Kalibrierung
Measurement conditions
Messbedingungen
Calibration certificate
Kalibrierschein
Customer Demo customer
Kunde
Demo street
DE-12345 Demo city
Customer order No.
Kundenbestellnummer
Order date
Bestelldatum
Date of calibration 01/02/2017
Datum der Kalibrierung
Operator Demo User
Bearbeiter
Electrical gauge
Elektrisches Druckmessgerät
Model D-10
Typ
Serial number demo1234
Seriennummer
Scale range (0 ... 10) bar g
Anzeigebereich
Accuracy 0.05 % FS
Genauigkeit
Resolution (scale division) 0.0001 bar
Auflösung (Skalenwert)
Measuring point No. demo tag
Messstellen-Nr
Temperature (20,0 ± 0,1) °C
Temperatur
Atmospheric pressure (1013,0 ± 0,1) hPa
Atmosphärischer Luftdruck
Rel. humidity (40 ± 1) %
Rel. Luftfeuchte
Demo place
g = (9.80946 ± 0.01) m/s²
Musterort
Working standard (WS) Pressure controller
Gebrauchsnormal (GN) Druckcontroller
Model Demo CPC
Typ
Calibration mark Demo 12345
Kalibrierzeichen
Scale range (0 ... 10) bar g
Anzeigebereich
Accuracy 0.02 % FS
Genauigkeit
Calibration certificate
Kalibrierzeugnis
Certificate No. 00000122
Zeugnis-Nr.
General
Allgemein
Device under test (DUT)
Kalibriergegenstand (KG)
Calibration certificate
Kalibrierschein
Customer Demo customer
Kunde
Demo street
DE-12345 Demo city
Customer order No.
Kundenbestellnummer
Order date
Bestelldatum
Date of calibration 01/02/2017
Datum der Kalibrierung
Operator Demo User
Bearbeiter
Electrical gauge
Elektrisches Druckmessgerät
Model D-10
Typ
Serial number demo1234
Seriennummer
Scale range (0 ... 10) bar g
Anzeigebereich
Accuracy 0.05 % FS
Genauigkeit
Resolution (scale division) 0.0001 bar
Auflösung (Skalenwert)
Measuring point No. demo tag
Messstellen-Nr
4. Cal-Template Kalibrierzeugnis
4.1 Allgemein
Mit dem Cal-Template können Kalibrierzeugnisse für mechanische und elektronische Druckmessgeräte erstellt werden. Die
Kalibrierzeugnisse haben ein abgeleitetes Format des DKD/DAkkS-Kalibrierzertifikates von WIKA und enthalten die gleichen
Funktionen und Berechnungen. Das Template bietet zahlreiche Zusatzfunktionen. So können beispielsweise das Firmenlogo,
die Adresse, der Kontakt oder einzelne Beschriftungen vom Nutzer angepasst werden.
DE
4.2 Eingabe der Kalibrierdaten
4.2.1 Allgemeine Daten
Angabe von firmenspezifischen Daten, wie z. B. Kundenanschrift, Bestellnummer oder Bestelldatum. Die Texte der Labels
können in der Datenbank angepasst werden.
4.2.2 Kalibriergegenstand
Angaben zum Messgerät, welches kalibriert werden soll. Die Tabelle passt sich dynamisch dem gewählten Gerätetyp an. So
wird zum Beispiel bei Druckmessumformern eine weitere Zeile für das Ausgangssignal (z. B. 4 … 20 mA) angezeigt.
Abb. links: Allgemeine Daten
Abb. rechts: Kalibriergegenstand
14097663.03 05/2017 EN/DE
77WIKA Bedienungsanleitung WIKA-Cal
Page 78

4. Cal-Template Kalibrierzeugnis
Calibration certificate
Kalibrierzeugnis
Certificate No. 00000122
Zeugnis-Nr.
General
Allgemein
Device under test (DUT)
Kalibriergegenstand (KG)
Environmental conditions
Umgebungsbedingungen
Place of calibration
Ort der Kalibrierung
Calibration certificate
Kalibrierschein
Customer Demo customer
Kunde
Demo street
DE-12345 Demo city
Customer order No.
Kundenbestellnummer
Order date
Bestelldatum
Date of calibration 01/02/2017
Datum der Kalibrierung
Operator Demo User
Bearbeiter
Electrical gauge
Elektrisches Druckmessgerät
Model D-10
Typ
Serial number demo1234
Seriennummer
Scale range (0 ... 10) bar g
Anzeigebereich
Accuracy 0.05 % FS
Genauigkeit
Resolution (scale division) 0.0001 bar
Auflösung (Skalenwert)
Measuring point No. demo tag
Messstellen-Nr
Temperature (20,0 ± 0,1) °C
Temperatur
Atmospheric pressure (1013,0 ± 0,1) hPa
Atmosphärischer Luftdruck
Rel. humidity (40 ± 1) %
Rel. Luftfeuchte
Demo place
g = (9.80946 ± 0.01) m/s²
Musterort
4.2.3 Umgebungsbedingungen
Anzeige der Umgebungsbedingungen. Die Werte werden alle 3 Minuten über einen Dialog manuell eingegeben oder über
eine Wetterstation vom Typ CPU6000-W automatisch ausgelesen.
Die manuelle Eingabe oder das automatische Auslesen einer CPU erfolgt von einem Arbeitsplatz, der einem Ort zugeordnet
ist. Alle anderen Arbeitsplätze, welche diesem Ort zugeteilt sind, profitieren direkt von den eingetragenen Werten.
4.2.4 Ort der Kalibrierung
DE
Bezeichnung des Ortes, an dem die Kalibrierung durchgeführt wurde.
Wird automatisch aufgrund des Arbeitsplatzes (Computername) gewählt, welcher in der Datenbank einem Ort zugeteilt ist.
Abb. links: Umgebungsbedingungen
Abb. rechts: Ort der Kalibrierung
4.2.5 Messbedingungen
Angaben zur verwendeten Referenz, Multimeter oder zum generellen Aufbau. Die Angaben erfolgen dynamisch aufgrund des
angegebenen Prüflings.
Es können mehrere Referenzen angegeben werden. Bei der Definition der Messpunkte, werden diese vor der Kalibrierung
zugeordnet.
Messbedingungen
Measurement conditions
78 WIKA Bedienungsanleitung WIKA-Cal
14097663.03 05/2017 EN/DE
Page 79

4. Cal-Template Kalibrierzeugnis
4.2.6 Messergebnisse
Resultate aus der Kalibrierung. Die Tabelle passt sich automatisch den gewählten Typen an. So werden bei
Druckmessumformern z. B. zwei Tabellen (eine für das elektrische Signal und eine für die Druckwerte) angegeben.
Messergebnisse
Measurement results
4.2.7 Auswertung (optional)
Auswertung über die Messabweichung. Kann über die Datenbank in Prozent oder der Druckeinheit eingestellt werden (siehe
Kapitel 6.4.1 „Cal“).
DE
4.2.8 Messunsicherheit (optional)
Die Auswertung der Messunsicherheit kann über die Datenbank aktiviert werden (siehe Kapitel 6.4.1 „Cal“). Zuerst werden
die Mittelwerte über eine Nullpunktkorrektur nach DKD-R 6-1 berechnet. Die zugehörige Messabweichung ergibt sich aus
„Mittelwert - Messabweichung“. Die Wiederholbarkeit, Hysterese und Messunsicherheit werden ebenfalls nach DKD-R 6-1
berechnet. Bei der Berechnung dieser, werden sämtliche Eingaben aus dem Erstellungsprozess verwendet.
Weiterhin ist unter der Tabelle der Hinweis aus der DKD-R 6-1 mit angegeben. Die graphische Darstellung ist ebenfalls optional und über die Datenbank aktivierbar (siehe Kapitel 6.4.1 „Cal“).
Die endgültige Aussage der Genauigkeit des Gerätes ist die errechnete größte „Messabweichung + Messunsicherheit“.
Messunsicherheit
Uncertainty of measurement
Angegeben ist die erweiterte Messunsicherheit, die sich aus der Standardmessunsicherheit durch Multiplikation mit
dem Erweiterungsfaktor k = 2 ergibt. Sie wurde gemäß DAkkS–DKD–3 ermittelt. Der Wert der Messgröße liegt mit einer
Wahrscheinlichkeit von 95 % im zugeordneten Werteintervall.
The uncertainty stated is the expanded uncertainty obtained by multiplying the standard uncertainty by the coverage factor k = 2. It has
been determined in accordance with DAkks–DKD–3. The value of the measurand lies within the assigned range of values with a
probability of 95%.
Die Genauigkeit des Gerätes beträgt 0,0090 bar
The accuracy of the device is 0,0090 bar
14097663.03 05/2017 EN/DE
79WIKA Bedienungsanleitung WIKA-Cal
Page 80

4. Cal-Template Kalibrierzeugnis
Konformitätsaussage
Statement of compliance
Der Kalibriergegenstand hält die Herstellerspezikationen ein!
Object keeps the specications!
4.2.9 Konformitätsaussage (optional)
Schriftliche Bestätigung zum Einhalten oder Nichteinhalten der Herstellerspezifikation aufgrund der Auswertung.
Konformitätsaussage
Statement of compliance
Der Kalibriergegenstand hält die Herstellerspezikationen ein!
Object keeps the specications!
DE
4.2.10 Weitere Hinweise (optional)
Zusätzliche Bemerkungen/Kommentare
Weitere Hinweise
Additional information
Die Deutsche Akkreditierungsstelle GmbH ist Unterzeichner der multilateralen Übereinkommen der European
cooperation for Accreditation (EA) und der International Laboratory Accreditation Cooperation (ILAC) zur gegenseitigen
Anerkennung der Kalibrierscheine. Die weiteren Unterzeichner innerhalb und außerhalb Europas sind den Internetseiten
von EA (www.european–accreditation.org) und ILAC (www.ilac.org) zu entnehmen.
The DAkkS is signatory to the multilateral agreements of the European co–operation for Accreditation (EA) and of the International
Laboratory Accreditation Cooperation (ILAC) for the mutual recognition of calibration certicates. The other signatories in and outside
Europe can be seen on the Websites of EA (www.european–accreditation.org) and ILAC (www.ilac.org).
4.3 Neue Kalibrierung
80 WIKA Bedienungsanleitung WIKA-Cal
14097663.03 05/2017 EN/DE
Page 81

4. Cal-Template Kalibrierzeugnis
Mit der Schaltfläche [Neue Kalibrierung] wird ein neues Kalibrierzeugnis in Dokumentenansicht gestartet und in der Datenbank angelegt. Wenn ein Zeugnis fertiggestellt ist, wird ein grüner Haken neben dem Zeugnisdatensatz angezeigt. Ein Doppelklick auf ein fertiges Zeugnis öffnet immer die PDF-Datei, während bei anderen immer die Dokumentenansicht mit dem letzten
Stand geöffnet wird.
4.4 Rekalibrierung
DE
Mit der Schaltfläche [Rekalibrierung] wird ein neues Kalibrierzeugnis in Dokumentenansicht gestartet und in der Datenbank
angelegt. Die Schaltfläche ist nur verfügbar, wenn zuvor ein fertiggestelltes Zeugnis markiert ist. Alle Daten des markierten
Zeugnisses werden für das neue Kalibrierzeugnis übernommen und es kann sofort mit der Kalibrierung begonnen werden.
14097663.03 05/2017 EN/DE
81WIKA Bedienungsanleitung WIKA-Cal
Page 82

4. Cal-Template Kalibrierzeugnis
4.5 Upload
Diese Schaltfläche / Funktionalität ist nur für Cal-Template verfügbar.
DE
Mit der Schaltfläche [Upload] können Kalibriervorgänge konfiguriert und auf ein angelegtes Referenzgerät hochgeladen
werden.
Diese Option ist nur für Hand-Held Produkte verfügbar, die einen Download zur WIKA-Cal unterstützen.
Nach dem Drücken der Schaltfläche [Upload] öffnet sich der „Daten-Upload“-Dialog. Im Anschluss muss das im
Objektmanager angelegte Referenzgerät gewählt werden. Die Kommunikation hierzu ist im jeweiligen Arbeitsplatz Objekt
hinterlegt.
Alle benötigten Informationen zum Prüfling müssen vor dem Upload eingegeben werden. Durch Klick auf „Vorgabe“ müssen
die Messpunkte festgelegt werden. Die Auswahl wird mit [Upload] bestätigt. Der Kalibriervorgang ist dann auf das mobile
Gerät geladen. Die Übertragung wird durch einen grünen Balken unten im Dialogfenster dargestellt. Ist die Übertragung
beendet erscheint das Fenster „Übertragung abgeschlossen“ und muss mit [OK] bestätigt werden.
Der Kalibriervorgang kann auf dem mobilen Gerät gestartet und durchgeführt werden.
82 WIKA Bedienungsanleitung WIKA-Cal
14097663.03 05/2017 EN/DE
Page 83

4. Cal-Template Kalibrierzeugnis
4.6 Download
DE
Mit der Schaltfläche [Download] können Daten von einem angelegten Referenzgerät heruntergeladen werden.
Diese Option ist nur für Hand-Held Produkte verfügbar, die einen Download zur WIKA-Cal unterstützen.
Nach dem Drücken der Schaltfläche [Download] öffnet sich der „Daten-Download“-Dialog. Im Anschluss muss das im
Objektmanager angelegte Referenzgerät gewählt werden. Die Kommunikation hierzu ist im jeweiligen Arbeitsplatz Objekt
hinterlegt. Die Auswahl wird mit [Download] bestätigt und es werden unter „Verfügbare Datensätze“ die Daten im Hand-
Held angezeigt. Durch die Auswahl eines Datensatzes werden die Rohdaten angezeigt und der Gerätetyp/Ort, kann zugeordnet werden. Wenn auf [Zeugnis erstellen] gedrückt wird, wird ein neues Kalibrierzeugnis in der Datenbank angelegt. Dieses
ist vorerst noch editierbar, also mit keinem grünen Haken versehen.
14097663.03 05/2017 EN/DE
83WIKA Bedienungsanleitung WIKA-Cal
Page 84

4. Cal-Template Kalibrierzeugnis
4.7 Kalibrieren und Zeugnis fertigstellen
DE
Der grüne Rahmen zeigt die Reihenfolge der Eingabe. Es können auch andere mögliche Eingaben gewählt werden. So kann
z. B. oben rechts durch Anklicken auf das Logo ein anderes Labor gewählt werden, dem über die Datenbank ein anderes Logo
zugeordnet ist.
4.8 Multikalibrierung (Optional)
Um die Option „Multikalibrierung“ nutzen zu können, wie folgt vorgehen:
1. Multimeter und Multiplexer müssen eingerichtet werden, siehe Kapitel 7.7 „Einrichten von Multimeter und Multiplexer“.
2. Normal anlegen und dem Arbeitsplatz zuordnen (siehe Kapitel 6.3.19 „Normale (Druck)“).
3. Neue Kalibrierung mit der Schaltfläche [Neue Kalibrierung] starten.
Dokumentenansicht öffnet sich
⇒
Die Daten des ersten Kalibriergegenstandes eintragen und anschließend die Referenz auswählen. Über das grüne „+“ kann
dann der nächste Kalibriergegenstand hinzugefügt werden. Entweder kann ein bestehender aus der Liste hinzugefügt oder ein
neuer, über Eingabe der Seriennummer, hinzugefügt werden. Gerätetyp, Messbereich und Genauigkeit werden in diesem Fall
automatisch vom ersten Kalibriergegenstand übernommen.
84 WIKA Bedienungsanleitung WIKA-Cal
14097663.03 05/2017 EN/DE
Page 85

4. Cal-Template Kalibrierzeugnis
Nach Hinzufügen aller Kalibriergegenstände (max. 7 Stück) werden die Messreihen und Messpunkte angepasst und/oder
bestätigt. Hierzu in die mit einem grünen Rahmen hervorgehobene Messtabelle klicken.
Sicherstellen, dass für die verschiedenen Kalibriergegenstände in der Zeugnisansicht nicht das gleiche Multimeter eingestellt
wurde. Falls dies doch fälschlicherweise geschehen ist, in der Zeugnisansicht auf den Mulitplexer in der rechten oberen Ecke
klicken. Die Multimeter sind jetzt wieder korrekt den Kalibriergegenständen zugeordnet.
Durch erneutes Klicken in den grünen Rahmen, können die Kommunikationsparameter in einem gesonderten Fenster
nochmals festgelegt und/oder bestätigt werden.
Daraufhin öffnet sich das Messfenster und die Kalibrierung beginnt. Über die verschiedenen Tabs kann während der
Kalibrierung zwischen den Kalibriergegenständen gewechselt werden. Ist ein Kalibriergegenstand während der Messung
außerhalb der Klasse, wird dies über ein Ausrufezeichen-Symbol im jeweiligen Tab angezeigt.
DE
14097663.03 05/2017 EN/DE
85WIKA Bedienungsanleitung WIKA-Cal
Page 86

5. Log-Template Loggerprotokoll
Loggerprotokoll
Logger protocol
Log-Nr. 00000049
Log No.
Gerät
Instrument
Elektrisches Druckmessgerät
Electrical gauge
Typ CPG1500
Model
Seriennummer S000001
Serial number
Temperatur loggen ☒
Log temperature
Anzeigebereich (0 ... 100) bar g
Scale range
Genauigkeit 0,1 % FS
Accuracy
Kommunikation Wireless (00:13:43:19:D0:88)
Communication
5. Log-Template Loggerprotokoll
5.1 Allgemein
Das Log-Template kann Loggerprotokolle erzeugen, die zum Aufzeichnen von Daten verwendet werden.
Wie beim Cal-Template wird der Nutzer durch die Dokumentenansicht geführt und bekommt am Ende ein vollwertiges Protokoll von mitgeloggten Daten als PDF/A-Dokument.
Die Daten im PDF/A-Dokument stehen optional auch als .csv-Datei zum Bearbeiten in einem anderen Programm wie z. B.
Microsoft
DE
®
Excel® zur Verfügung.
Loggerprotokoll
Logger protocol
Gerät
Instrument
Elektrisches Druckmessgerät
Electrical gauge
Typ CPG1500
Model
Seriennummer S000001
Serial number
Temperatur loggen ☒
Log temperature
Anzeigebereich (0 ... 100) bar g
Scale range
Genauigkeit 0,1 % FS
Accuracy
Kommunikation Wireless (00:13:43:19:D0:88)
Communication
Log-Nr. 00000049
Log No.
Messbedingungen
Measurement conditions
Einstellungen
Setup
Modus Automatisch
Mode Automatic
Intervall (ms) 20
Interval (ms)
Dauer (hh:mm:ss) 00:00:12
Duration (hh:mm:ss)
Startzeit (hh:mm:ss) 16:43:09
Start time (hh:mm:ss)
Seite 1 / 2
Page
5.2 Eingabe der Loggerdaten
5.2.1 Allgemeine Daten
Angaben zu den Messgeräten, mit denen geloggt werden soll. Es können bis zu drei Geräte gleichzeitig ausgelesen werden.
Die Tabelle passt sich dynamisch den gewählten Gerätetypen an. So wird zum Beispiel bei Druckmessumformern eine weitere
Zeile für das Ausgangssignal (z. B. 4 … 20 mA) angezeigt.
86 WIKA Bedienungsanleitung WIKA-Cal
14097663.03 05/2017 EN/DE
Page 87

5. Log-Template Loggerprotokoll
Loggerprotokoll
Logger protocol
Log-Nr. 00000049
Log No.
Gerät
Instrument
Messbedingungen
Measurement conditions
Elektrisches Druckmessgerät
Electrical gauge
Typ CPG1500
Model
Seriennummer S000001
Serial number
Temperatur loggen ☒
Log temperature
Anzeigebereich (0 ... 100) bar g
Scale range
Genauigkeit 0,1 % FS
Accuracy
Kommunikation Wireless (00:13:43:19:D0:88)
Communication
Einstellungen
Setup
Modus Automatisch
Mode Automatic
Intervall (ms) 20
Interval (ms)
Dauer (hh:mm:ss) 00:00:12
Duration (hh:mm:ss)
Startzeit (hh:mm:ss) 16:43:09
Start time (hh:mm:ss)
5.2.2 Messbedingungen
Angaben zu den zeitlichen Bedingungen für den Loggervorgang.
5.2.3 Messergebnisse
Graph und Tabelle der Messwerte, die über die Zeit bei den angegebenen Messbedingungen aufgezeichnet wurden.
Loggerprotokoll
Logger protocol
DE
Messergebnisse
Measurement results
100
88
75
63
50
Value in %
Wert in %
38
25
13
0
16:43:09.880 16:43:09.903 16:43:09.926 16:43:09.949
Wert in Grafik Gemessener Wert Gemessener Wert
Value in graph Measured value Measured value
% bar °C
0 -0,0136 19,5
100 -0,0131 23,9
Zeitstempel Gemessener Wert Gemessener Wert
Timestamp Measured value Measured value
14.12.2016 16:43:09.880 -0,0133 21,7
14.12.2016 16:43:09.900 -0,0132 21,7
14.12.2016 16:43:09.920 -0,0131 21,7
14.12.2016 16:43:09.940 -0,0133 21,7
14.12.2016 16:43:09.960 -0,0136 21,7
bar °C
Log-Nr. 00000049
Log No.
Grafische Darstellung des Verlaufs
Graphical representation of progression
Druck
Pressure
Temperatur
Temperature
Zeit
Time
Seite 2 / 2
Page
14097663.03 05/2017 EN/DE
87WIKA Bedienungsanleitung WIKA-Cal
Page 88

5. Log-Template Loggerprotokoll
5.3 Neuer Log
DE
Mit der Schaltfläche [Neuer Log] wird ein neues Loggerprotokoll in Dokumentenansicht gestartet und in der Datenbank
angelegt. Wenn ein Protokoll fertiggestellt ist, wird ein grüner Haken neben dem Datensatz angezeigt. Ein Doppelklick auf ein
fertiges Loggerprotokoll öffnet die PDF-Datei, während bei anderen die Dokumentenansicht mit dem letzten Stand geöffnet
wird.
14097663.03 05/2017 EN/DE
88 WIKA Bedienungsanleitung WIKA-Cal
Page 89

5. Log-Template Loggerprotokoll
5.4 Erneut Loggen
DE
Mit der Schaltfläche [Erneut Loggen] wird ein neues Loggerprotokoll in Dokumentenansicht gestartet und in der Datenbank
angelegt. Die Schaltfläche ist nur verfügbar, wenn zuvor ein fertiggestelltes Protokoll markiert ist. Alle Daten des markierten
Protokolls werden für das neue Loggerprotokoll übernommen und es kann sofort mit dem Loggen begonnen werden.
14097663.03 05/2017 EN/DE
89WIKA Bedienungsanleitung WIKA-Cal
Page 90

5. Log-Template Loggerprotokoll
5.5 Download
DE
Mit der Schaltfläche [Download] können Daten von einem angelegten Referenzgerät heruntergeladen werden.
Diese Option ist nur für Hand-Held Produkte verfügbar, die einen Download zur WIKA-Cal unterstützen.
Nach dem Drücken der Schaltfläche [Download] öffnet sich der „Log-Download“-Dialog. Im Anschluss muss das im
Objektmanager angelegte Referenzgerät gewählt werden. Die Kommunikation hierzu ist im jeweiligen Arbeitsplatz Objekt
hinterlegt. Zuerst wird der Datensatz ausgewählt, dann [Download] gedrückt.
Bei dem portablen Prozesskalibrator Typ CPH7000 muss nach Wahl des Datensatzes nicht noch einmal
„Download“ gedrückt werden, sondern die Rohdaten werden direkt angezeigt.
Es werden unter „Datensatz“ die Daten im Hand-Held angezeigt. Wenn auf [Log erstellen] gedrückt wird, wird ein neues
Loggerprotokoll in der Datenbank angelegt. Dieses ist vorerst noch editierbar, also mit keinem grünen Haken versehen.
14097663.03 05/2017 EN/DE
90 WIKA Bedienungsanleitung WIKA-Cal
Page 91

5. Log-Template Loggerprotokoll
5.6 Loggen und Protokoll fertigstellen
DE
Der grüne Rahmen zeigt die Reihenfolge der Eingabe. Es können auch andere mögliche Eingaben gewählt werden. So kann
z. B. oben rechts durch Anklicken auf das Logo ein anderes Labor gewählt werden, dem über die Datenbank ein anderes Logo
zugeordnet ist.
14097663.03 05/2017 EN/DE
91WIKA Bedienungsanleitung WIKA-Cal
Page 92

6. Objektmanager
6. Objektmanager
In den Objektmanager gelangt man über die „Menüleiste / Einstellungen / Objektmanager“. Es öffnet sich der DatenbankExplorer. Hier werden nun alle wichtigen Einstellungen für die aktuelle Kalibrierung eingetragen und abgespeichert. Die jeweiligen Einstellungen werden in den folgenden Kapiteln genauer erklärt.
Die Einstellungen werden entweder neu angelegt, hinzugefügt oder gelöscht (siehe Kapitel 6.1 „Hinzufügen, Speichern und
Löschen“).
DE
6.1 Hinzufügen, Speichern und Löschen
Hinzufügen
Über diese Schaltfläche wird der angezeigte Datensatz als neuer Datensatz hinzugefügt. Üblicherweise werden Änderungen an einem bestehenden Datensatz durchgeführt und über die Schaltfläche [Hinzufügen] unter einem neuen Datensatz
abgelegt. In manchen Tabellen können keine Namen doppelt vergeben werden. Somit wird verhindert, dass es doppelte
Datensätze gibt.
Speichern
Der angezeigte Datensatz kann abgeändert werden und nach Betätigen von [Speichern] wird diese Änderung am angezeigten Datensatz überschrieben und gespeichert.
Löschen
Löscht den markierten Datensatz aus der Datenbank. Dieser kann nur gelöscht werden, wenn zuvor alle Verweise auf andere
Tabellen gelöscht wurden. Zum Beispiel kann ein Kolbenmanometer nur dann aus der Datenbank entfernt werden, wenn auch
die zugeordneten Kolben und Massensätze entfernt werden oder der Verweis geändert wird.
14097663.03 05/2017 EN/DE
92 WIKA Bedienungsanleitung WIKA-Cal
Page 93

6. Objektmanager
6.2 Struktur
Datenbank-Explorer (Objektmanager)
Objekte
Kalibriergegenstände (Druck)
Ort
Kunden
Labordaten
Prüfer
Shunts
Templates
Cal
Log
Wetterdaten
Ort
Gerätetyp
Genauigkeit
Kommunikation
Einheiten (Druck)
Ausgangssignale Druckmessumformer
Bemerkung
Medien
Arbeitsplatz
Normale (Druck)
Gerätetyp
Genauigkeit
Kommunikationstyp
Kolben
Massensatz
Einheiten (Druck)
Ausgangssignale Druckmessumformer
Baudraten
Medien
Multimeter
Gerätetyp
Genauigkeit
Kommunikationstyp
Baudraten
Gerätetyp
Genauigkeit
Kommunikationstyp
Normen
Messreihen
Messpunkte
DE
Massen
14097663.03 05/2017 EN/DE
93WIKA Bedienungsanleitung WIKA-Cal
Page 94

6. Objektmanager
6.3 Objekte
6.3.1 Arbeitsplatz
DE
Der Arbeitsplatz ist der Computer an dem gearbeitet wird und ist einem bestimmten Ort zugeteilt. So sind z. B. mehrere
Arbeitsplätze einem Ort zugeordnet.
Ein Arbeitsplatz kann mit einer Wetterstation CPU6000-W verbunden werden und stellt somit die Wetterdaten für den Ort zur
Verfügung. Alle weiteren Arbeitsplätze die zu diesem Ort gehören haben automatisch die korrekten Wetterdaten.
Die Normale werden ebenfalls den Arbeitsplätzen zugeordnet. So kann das Programm das zugeteilte Normal für einen
Prüfling bereits vorwählen.
Die Normale werden im Arbeitsplatz angezeigt und es können die Einstellungen zur Kommunikation durchgeführt werden.
Bei der Kommunikation über die verschiedenen Schnittstellen ist folgendes zu beachten:
■
Kommunikation über die RS-232 Schnittstelle (auch USB)
Der richtige COM-Port und die zugehörige Baudrate müssen gewählt werden. Diese muss den Einstellungen im jeweiligen
Gerät entsprechen.
■
Kommunikation über IEEE-488-GPIB-Bus
Wird der IEEE-488-GPIB-Bus verwendet, muss die am Gerät eingestellte Adresse eingetragen werden.
■
Kommunikation über Ethernet
TCP/IP muss gewählt werden und die am Gerät eingestellte Adresse und der Port müssen in WIKA-Cal eingetragen
werden.
Über die Schaltfläche [Test] wird eine Druckabfrage an das Gerät gesendet. Der Folgedialog sollte bei korrekten Einstellun-
gen den aktuellen Druckwert anzeigen.
Die Kommunikation muss sich auf den gewählten Kommunikationstyp des jeweiligen Gerätetyps beziehen. Hierzu mehr unter
Kapitel 6.3.7 „Gerätetypen“.
Der COM-Port für die Kalibriergegenstände wird automatisch gesucht. Unter „Baudrate Kalibriergegenstand“ wird die
Baudrate, mit der gemessen werden soll, eingestellt.
Wenn mit der WIKA-Cal für Kolbenmanometer eine Masse ↔ Druck Berechnung durchgeführt wird, werden die Werte korri-
giert. Die Angabe der Höhendifferenz zum Prüfling korrigiert den errechneten Druckwert um die eingetragene Höhendifferenz.
Die Genauigkeit der gemessenen Höhendifferenz geht in die Messunsicherheitsbetrachtung mit ein.
Der Restdruck wird ebenfalls bei Kolbenmanometern, jedoch nur bei Absolutdruckmessgeräten, für die Korrektur benötigt. Die
Genauigkeit mit der dieser gemessen wird, geht in die Messunsicherheit mit ein.
94 WIKA Bedienungsanleitung WIKA-Cal
14097663.03 05/2017 EN/DE
Page 95

6. Objektmanager
6.3.2 Ausgangssignale Druckmessumformer
Definition aller wählbaren Ausgangssignale, sobald ein Druckmessumformer bei der Kalibrierung gewählt wird. Je nach
Spannungs- oder Stromsignal, wird das Multimeter konfiguriert und gegebenenfalls ein Shunt verlangt.
DE
Definition:
MBA = Messbereichsanfang
MBE = Messbereichsende
6.3.3 Baudrate
Definition aller wählbaren Baudraten.
Baudraten können im Arbeitsplatzobjekt gewählt werden (siehe Kapitel 6.3.1 „Arbeitsplatz“).
14097663.03 05/2017 EN/DE
95WIKA Bedienungsanleitung WIKA-Cal
Page 96

6. Objektmanager
6.3.4 Bemerkungen
DE
Unter „Bemerkungen“ stehen für die Zeugnisserstellung verschiedene Sprachen zur Verfügung. Zur Auswahl stehen
Deutsch, Englisch, Spanisch, Französisch, Italienisch, Japanisch, Polnisch, Russisch, Griechisch, Rumänisch, Schwedisch
und Niederländisch
6.3.5 Einheiten (Druck)
Alle abgebildeten Einheiten mit den zugehörigen Umrechnungsfaktoren beziehen sich auf „1 bar“.
Beispiel:
1 atm x Umrechnungsfaktor nach 1 bar (1,01325) = 1,01325 bar
96 WIKA Bedienungsanleitung WIKA-Cal
14097663.03 05/2017 EN/DE
Page 97

6. Objektmanager
6.3.6 Genauigkeiten
Wählbare Genauigkeiten werden hier zuvor angelegt. Jedem Gerätetyp können die angelegten Genauigkeiten zugeordnet
werden.
DE
6.3.7 Gerätetypen
Wenn ein neuer noch unbekannter Gerätetyp kalibriert werden soll, kann dieser zuvor angelegt werden. Zu diesem Gerät
werden Angaben wie Name, Messgröße, Hersteller, Geräteart und mögliche Genauigkeiten definiert und mit [Hinzufügen]
abgespeichert.
Geräteart
■
Ein elektrisches Druckmessgerät wird gewählt, wenn das Gerät über eine digitale Schnittstelle verfügt.
■
Druckmessumformer wird für ein elektrisches Gerät verwendet, welches mit einem Multimeter ausgelesen werden muss.
Gerätetypen können für Normale, Kalibriergegenstände, Multimeter und sogar Shunts angelegt werden. Es kann z. B. zwei
Normale vom Gerätetyp „CPC8000“ geben. Die verschiedenen CPC8000-Normale können somit nur vordefinierte Genauigkeiten haben. Dies hat den Vorteil, dass beim Erstellen des Kalibrierzeugnisses nur für den Typ vordefinierte Genauigkeiten
ausgewählt werden können. Ist nur eine Genauigkeit hinterlegt, wird diese automatisch angewendet.
14097663.03 05/2017 EN/DE
97WIKA Bedienungsanleitung WIKA-Cal
Page 98

6. Objektmanager
6.3.8 Hersteller
DE
Hier wird der Hersteller mit Adresse hinzugefügt oder bearbeitet. Die Angaben sind nur in der Datenbank archiviert und
werden nicht in der Dokumentenansicht angezeigt.
Die Darstellung der Herstellerdetails kann im „Objektmanager“ unter „Templates / Cal“ eingestellt werden. Siehe Kapitel
6.4.1 „Cal“. Diese Einstellung ist ab der Version v1.0.65 möglich.
6.3.9 Kalibriergegenstände (Druck)
Kalibriergegenstände werden automatisch bei der Zeugniserstellung angelegt. Kommt ein Kalibriergegenstand zur
Rekalibrierung, wird dieser automatisch nach Eingabe der Seriennummer erkannt und das Zeugnis vorgefüllt. Der Inhalt
entspricht dem des letzten Zeugnis.
98 WIKA Bedienungsanleitung WIKA-Cal
14097663.03 05/2017 EN/DE
Page 99

6. Objektmanager
6.3.10 Kolben
DE
Kolben können einem Normal zugeordnet werden, welche einem Typen mit der Geräteart „Druckwaage“ entsprechen. Ist
der Kolben des Kolbenmanometers zugeordnet, kann dieser bei der Kalibrierung ausgewählt werden, bzw. wird automatisch
vorgewählt.
Masse (kg) Gewicht des Kolben
Dichte (kg/m³) Dichte des Kolben
Querschnitt (m²) Querschnittsfläche des Kolben
TK Alpha + Beta (1/K) Temperaturkoeffizient bestehend aus der Summe von Alpha und Beta des Kolben
Deform.-koeff. (1/bar) Deformationskoeffzient des Kolben
Umfang (m) Berechneter Umfang des Kolben
MBA Messbereichsanfang
MBE Messbereichsendwert
Einheit Druckeinheit des Messbereichs
Auflösung Auflösung des berechneten Wertes, z. B. 0,0001
Klasse Auswahl der Klasse/Genauigkeit
14097663.03 05/2017 EN/DE
99WIKA Bedienungsanleitung WIKA-Cal
Page 100

6. Objektmanager
Klasse abs Auswahl der Klasse für den Absolutdruckbereich
Medium Auswahl des Druckübertragungsmedium
Unterdruckkolben Der Kolben kann durch eine Quertraverse auch als Unterdruckkolben funktionieren. Dadurch wird
bei der Berechnung des Druckwertes bei Auflegen der Masse der Druck geringer.
Oberflächenspannung
ist bereits in der Masse
berücksichtigt
DE
Koeff. V (Budenberg) Volumenkoeffizient, speziell für Budenberg Kolbenmanometer
Koeff. C (Budenberg) Zusätzlicher Designvalue-Korrekturwert, speziell für Budenberg Kolbenmanometer
Schwebeposition Ist eine CPU6000-S am Arbeitsplatz vorhanden, kann über die Schaltfläche [Position auslesen]
6.3.11 Kommunikation
Das zusätzlich wirkende Gewicht durch die Oberflächenspannung des Mediums, welches auf
den Kolben wirkt, kann auch direkt im Kolbengewicht angegeben werden. Das Gewicht über
die Oberflächenspannung wird durch Setzen der Option ignoriert und muss im Kolbengewicht
beinhaltet sein.
die aktuelle Schwebeposition der Massen über den Abstandssensor ausgelesen und gespeichert
werden.
Um einen Kommunikationstyp unter Gerätetypen auswählen zu können, muss dieser unter „Kommunikation“ erst angelegt
werden. Dazu wird einfach der Name für den zu wählenden Kommunikationstyp eingegeben und die fest definierte Kommunikationsklasse ausgewählt. Bei manchen Geräten ist hierbei noch die Kanalangabe wichtig. Wird mit dem Mauszeiger länger
auf dem Kanal verweilt, öffnet sich ein Tooltip mit den verfügbaren Kanälen und deren Bedeutung, individuell für jedes Gerät.
100 WIKA Bedienungsanleitung WIKA-Cal
14097663.03 05/2017 EN/DE
 Loading...