

Page 1

White’s Electronics, Inc.
Sweet Home, Oregon USA
Building the World’s Finest
metal detectors for over 60 years.
Page 2

Congratulations! You have pur-
chased a quality instrument that
was designed and manufactured in
the USA.
The Spectra series is the result of years of research and development, time-proven manufacturing and testing techniques, and,
most of all... listening to our customers.
The Spectra VX3 represents the state-of-the-art in metal detecting technology. Three frequencies, color display, advanced features, and the ability to use wireless headphones produce a
powerful and capable detector. VX3 has preset programs developed and refined by experts, leaving you ready to find what others have left behind.
This instruction manual covers the features of VX3 and introduces the detecting basics you need to get started. There are no
substitutes for field experience; study this manual, and practice
using your Spectra VX3. Before long, you may well be teaching
the experts a thing or two.
3
I am proud of the Spectra VX
, and the people here at White’s
who designed and built it for you. We’ve been designing, building, and distributing world-wide for over 60 years from our factory in Sweet Home, Oregon, USA. We put our “Made in
America” label on every metal detector we build!
Happy Hunting!
President
White’s Electronics, Inc.
Page 3

Spectra VX
3
User’s Guide
VX3 Specifications
Operating mode . . . . . . . . . . . . . . . . . . VLF/induction balance
Frequencies . . . . . . . . . . . . . . . . . . . 2.5kHz, 7.5kHz, 22.5kHz
Ground balance range. . . . . . . . . .Ferrite to salt (approx. 95°)
Programs . . . . . . . . . . . . . . . . . . . . . . . . . . . . 8, all modifiable
Discrimination segments . . . . . . . . . . . . . . . . . . . . . . . . . 191
Audio modes . . . . . . . 4: Std, all-metal, mixed mode, pinpoint
Audio tones . . . . . . . . . . . . . . . . . . . . . . . . . . . . . . . . 1 or 191
Audio output . . .Speaker, headphones, wireless headphones
Display . . . . . . . . . . . . . . . . . . . .320x240 QVGA Color, backlit
Weight. . . . . . . . . . . . . . . . . . . . . . . . . . . . . . . . . . . . . . .4.3 lbs
Length. . . . . . . . . . . . . . . . . . . . . . 45 - 52.5 inches, adjustable
Search coil . . . . . . . . . . . . . . . . . . Eclipse 950 9.5” concentric
Batteries . . . . . . . . . . . . . . . . . . . . . . . . . . . . . .(8) AA, alkaline
Battery life . . . . . . . . . . . . . . . . . . . . . . . . . 8-10 hours typical
Warranty . . . . . . . . . . . . . . . . . . . . . . . . . 2 years, transferrable
1
Customer Support
Questions concerning your VX3? There are three ways to contact us:
Internet: http://whiteselectronics.com/support.html
Phone:
1-800-547-6911 (US) (0044) 1463 223456 (UK)
Or mail us:
White's Electronics White's Electronics
1011 Pleasant Valley Road 35 Harbour Road
Sweet Home, OR 97386 Inverness, Scotland
IV1 1UA
1. Alkaline batteries, backlight off, no wireless headphones
Page i
Page 4

Spectra VX
3
User’s Guide
Table of Contents
1 Introduction
Conventions . . . . . . . . . . . . . . . . . . . . . . . . . . . . . . 1-2
Layout . . . . . . . . . . . . . . . . . . . . . . . . . . . . . . . . . . 1-3
Assembly . . . . . . . . . . . . . . . . . . . . . . . . . . . . . . . . 1-5
Batteries . . . . . . . . . . . . . . . . . . . . . . . . . . . . . . . . . 1-6
The Basics of VLF Operation . . . . . . . . . . . . . . . . 1-7
2 QuickStart
Turn On & Go . . . . . . . . . . . . . . . . . . . . . . . . . . . . 2-1
Programs and Memory . . . . . . . . . . . . . . . . . . . . 2-2
Ground Balance . . . . . . . . . . . . . . . . . . . . . . . . . 2-3
Electromagnetic Interference (EMI) . . . . . . . . . . 2-4
Menus & Controls . . . . . . . . . . . . . . . . . . . . . . . . . 2-4
Live Control Bar . . . . . . . . . . . . . . . . . . . . . . . . . 2-5
Main Menu . . . . . . . . . . . . . . . . . . . . . . . . . . . . . 2-5
Controls. . . . . . . . . . . . . . . . . . . . . . . . . . . . . . . . 2-6
VX3 Displays . . . . . . . . . . . . . . . . . . . . . . . . . . . . . 2-6
Search mode. . . . . . . . . . . . . . . . . . . . . . . . . . . . . . 2-6
Pinpoint mode . . . . . . . . . . . . . . . . . . . . . . . . . . . . 2-7
VX3 Audio . . . . . . . . . . . . . . . . . . . . . . . . . . . . . . . 2-8
Metal Detecting Basics . . . . . . . . . . . . . . . . . . . . . 2-8
3 Basic Settings
Programs . . . . . . . . . . . . . . . . . . . . . . . . . . . . . . . . 3-2
Backlight . . . . . . . . . . . . . . . . . . . . . . . . . . . . . . . . 3-3
Sensitivity . . . . . . . . . . . . . . . . . . . . . . . . . . . . . . . 3-4
Rx Gain . . . . . . . . . . . . . . . . . . . . . . . . . . . . . . . . 3-4
All-Metal Sensitivity. . . . . . . . . . . . . . . . . . . . . . 3-5
Discrimination Sensitivity . . . . . . . . . . . . . . . . . 3-6
Audio . . . . . . . . . . . . . . . . . . . . . . . . . . . . . . . . . . . 3-6
Discrimination . . . . . . . . . . . . . . . . . . . . . . . . . . . . 3-6
Frequency. . . . . . . . . . . . . . . . . . . . . . . . . . . . . . . . 3-7
Ground Tracking . . . . . . . . . . . . . . . . . . . . . . . . . . 3-8
Filters . . . . . . . . . . . . . . . . . . . . . . . . . . . . . . . . . . . 3-9
Page ii
Page 5

Spectra VX
3
User’s Guide
4 Operating Modes
Frequency. . . . . . . . . . . . . . . . . . . . . . . . . . . . . . . . 4-1
Three Frequency . . . . . . . . . . . . . . . . . . . . . . . . . 4-2
Salt Compensate . . . . . . . . . . . . . . . . . . . . . . . . . 4-2
Single Frequency . . . . . . . . . . . . . . . . . . . . . . . . 4-3
Frequency Offset. . . . . . . . . . . . . . . . . . . . . . . . . 4-4
Ground Balance . . . . . . . . . . . . . . . . . . . . . . . . . . . 4-5
AutoTrac . . . . . . . . . . . . . . . . . . . . . . . . . . . . . . . 4-5
LockTrac. . . . . . . . . . . . . . . . . . . . . . . . . . . . . . . 4-6
Audio . . . . . . . . . . . . . . . . . . . . . . . . . . . . . . . . . . . 4-6
All-Metal Audio . . . . . . . . . . . . . . . . . . . . . . . . . 4-7
Discrimination Audio . . . . . . . . . . . . . . . . . . . . 4-10
Mixed-Mode Audio . . . . . . . . . . . . . . . . . . . . . 4-12
Pinpoint Mode. . . . . . . . . . . . . . . . . . . . . . . . . . 4-13
Discrimination . . . . . . . . . . . . . . . . . . . . . . . . . . . 4-14
Speaker and Headphones . . . . . . . . . . . . . . . . . . . 4-15
Preset Icon Tables . . . . . . . . . . . . . . . . . . . . . . . . 4-16
5 Display Screens
Search screen . . . . . . . . . . . . . . . . . . . . . . . . . . . . . 5-1
VDI . . . . . . . . . . . . . . . . . . . . . . . . . . . . . . . . . . . 5-2
Icons . . . . . . . . . . . . . . . . . . . . . . . . . . . . . . . . . . 5-3
Depth. . . . . . . . . . . . . . . . . . . . . . . . . . . . . . . . . . 5-3
SpectraGraph . . . . . . . . . . . . . . . . . . . . . . . . . . . 5-3
Status Bar . . . . . . . . . . . . . . . . . . . . . . . . . . . . . . 5-8
Pinpoint Screen . . . . . . . . . . . . . . . . . . . . . . . . . . . 5-9
Salt Mode Anomaly . . . . . . . . . . . . . . . . . . . . . . 5-9
6 Advanced Features
Main Menu. . . . . . . . . . . . . . . . . . . . . . . . . . . . . . . 6-1
Filters & Speed . . . . . . . . . . . . . . . . . . . . . . . . . . . 6-2
Ground Filter. . . . . . . . . . . . . . . . . . . . . . . . . . . . 6-3
Recovery Delay. . . . . . . . . . . . . . . . . . . . . . . . . . 6-4
SAT. . . . . . . . . . . . . . . . . . . . . . . . . . . . . . . . . . . 6-5
Sensitivity Probe . . . . . . . . . . . . . . . . . . . . . . . . . . 6-5
Ground Probe. . . . . . . . . . . . . . . . . . . . . . . . . . . . . 6-6
Page iii
Page 6

Spectra VX
3
User’s Guide
7 Programs
VX3 Memory Structure. . . . . . . . . . . . . . . . . . . . . . 7-1
Saving Programs . . . . . . . . . . . . . . . . . . . . . . . . . . 7-2
Restoring Programs . . . . . . . . . . . . . . . . . . . . . . . . 7-2
Rearranging Programs . . . . . . . . . . . . . . . . . . . . . . 7-3
8 Wireless Headphones
9 Troubleshooting
10 Shortcuts
Back Cover: Warranty; Code of Ethics
Page iv
Page 7

Introduction
1
CHAPTER
White’s VX3 represents the latest technology in metal
detecting. The heart of VX3 is a high-performance ARM-9
RISC microprocessor which simultaneously analyzes signals
from 3 transmitted frequencies. Those frequencies — 2.5kHz,
7.5kHz, and 22.5kHz — were chosen for their diverse
responses to a variety of metal targets, resulting in a superior
system of target analysis and identification.
The face of VX3 is a stunning 320x240 color display with an
easy-to-use menu-driven interface. Along with three frequencies, there are three search modes and a three-level Spectra-
Graph® display which provides detailed target information for
each frequency. With a level of simplicity for the novice user
and advanced features to satisfy the experienced user, VX3 is a
metal detector for everyone.
This manual is organized to provide progressive information, a format that attempts to minimize information overload.
If you are a new detectorist, the QuickStart chapter will allow
you to get a quick jump on using VX3. Then, as you run across
new features and want to find out more, continue reading the
manual to get progressively detailed information.
If you are already familiar with high-end detectors (especially those with a menu interface), you might want to read over
3
the QuickStart chapter to get a feel for VX
graphical interface makes the rest easy.
While VX3 is easy to use, it does have more features than
many other detectors, and can appear overwhelming. Don't be
intimidated! Start with the preset programs and go at your own
Page 1-1
’s features. VX3’s
Page 8

Spectra VX
3
User’s Guide
pace. There is no need to master all the features to get excellent
performance.
If you need help, White's Electronics is a phone call or
mouse click away. Your dealer is an excellent resource, and the
White’s web site has a VX3 help forum for questions & answers,
tips, and sharing programs. Go to www.whiteselectronics.com
and click on the Forum link. There are also many other on-line
forums for metal detecting where you can chat with other
White’s users and ask questions. Finally, look for a detecting
club in your area. Members are often eager to help people get
started, and there is nothing like having that help close by in the
field.
Conventions
In discussing the features of VX3, we will use Arial-Bold-
Caps
to distinguish keypad buttons and menu selections. For
example, “press ENTER” means to press the “Enter” key on the
keypad, and “select Enable” might mean to select the “Enable”
menu option, probably by using the arrow keys to highlight it
and then pressing ENTER. VX3 keys and menus work just like a
modern computer graphical interface, so things are fairly intuitive.
In some cases, you need to use multiple key combinations,
or combinations with the trigger switch. “Press MENU, ENTER”
means to press and release the
MENU button, then press and
release the ENTER button. But “press MENU+ENTER” means to
press and hold the
press the
ENTER button. Order often matters, so MENU+ENTER
MENU button, and while holding it down
is not the same as ENTER+MENU. If you find that you have accidentally pressed the wrong key or key combo, pulling the trigger switch will usually back you out.
Tip: Keypad buttons usually take you into menus, trig-
ger gets you out.
Page 1-2
Page 9

Spectra VX
3
User’s Guide
Two keypad buttons have dual names. MENU/TAB is used
both as an entry button into the menu system, and to “tab” from
one screen area to the next. This tab method is identical to how
a PC interface uses it. So in some cases we will tell you to press
MENU, in other cases press TAB. It’s the same button. ZOOM/
works the same way. VX3 also has four arrow keys, and
VIEW
these may be either called UP DOWN LEFT RIGHT (or UP DN LT
RT
) or represented with the symbols . Any of these
representations might be used.
Most menus are nested, so instead of telling you to press
MENU, then select the Audio menu, then select Search Audio,
then select Discrimination, then select Modulation, we may
instead say, select MENUAudioSearch AudioDiscrimina-
tion
Modulation. This means to drill down through the stated
menu path.
Finally, there is a trigger switch under the pod. It has a normal (center) position, a forward position, and a momentary
pulled position. When we say “pull the trigger,” we mean to
pull it to the momentary position and release it. If we say “Pull/
hold the trigger,” then pull it back and hold it there. This might
be in conjunction with a key press, such as, “Pull/hold the trigger and press ENTER,” which is the same as “Trigger+ENTER.”
Layout
3
The VX
interface consists of a keypad and a color screen.
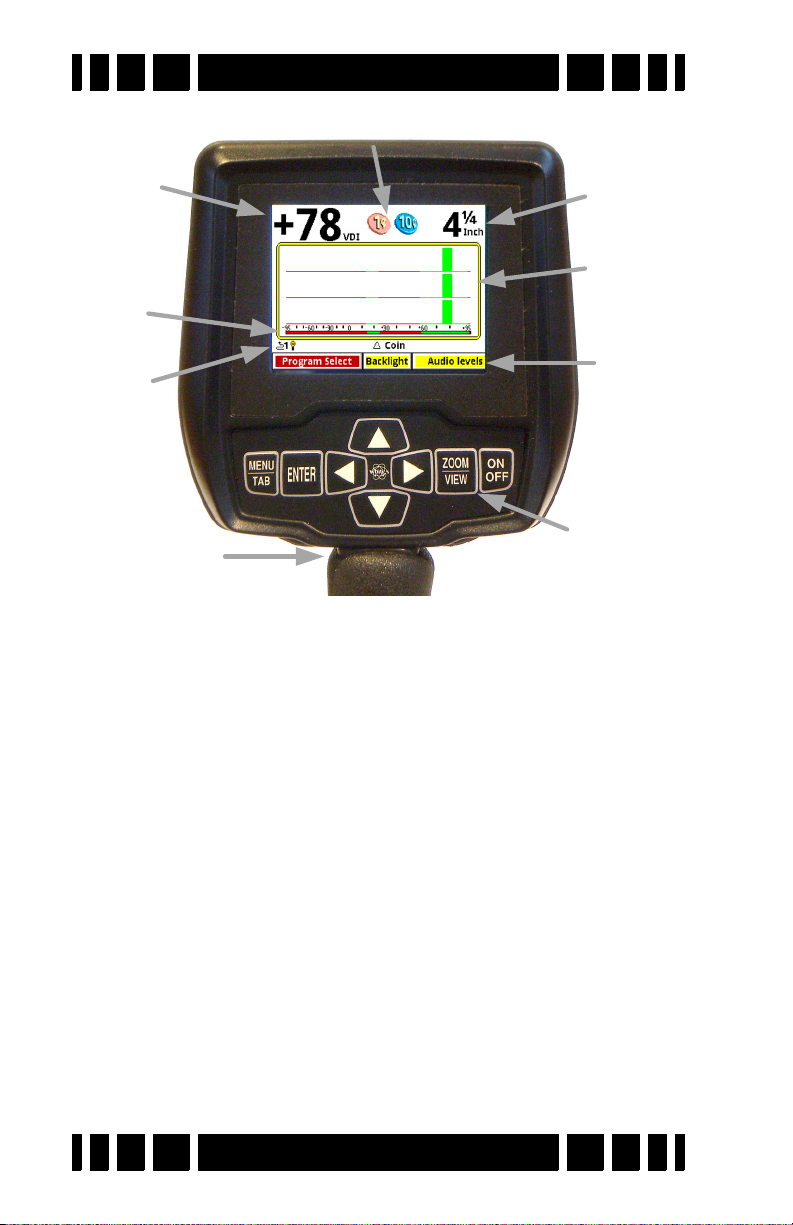
The next page has a picture of the pod face with the default layout for the search screen. The search screen has four major
regions:
1. Target information
2. SpectraGraph
3. Status Bar
4. Live Control Bar
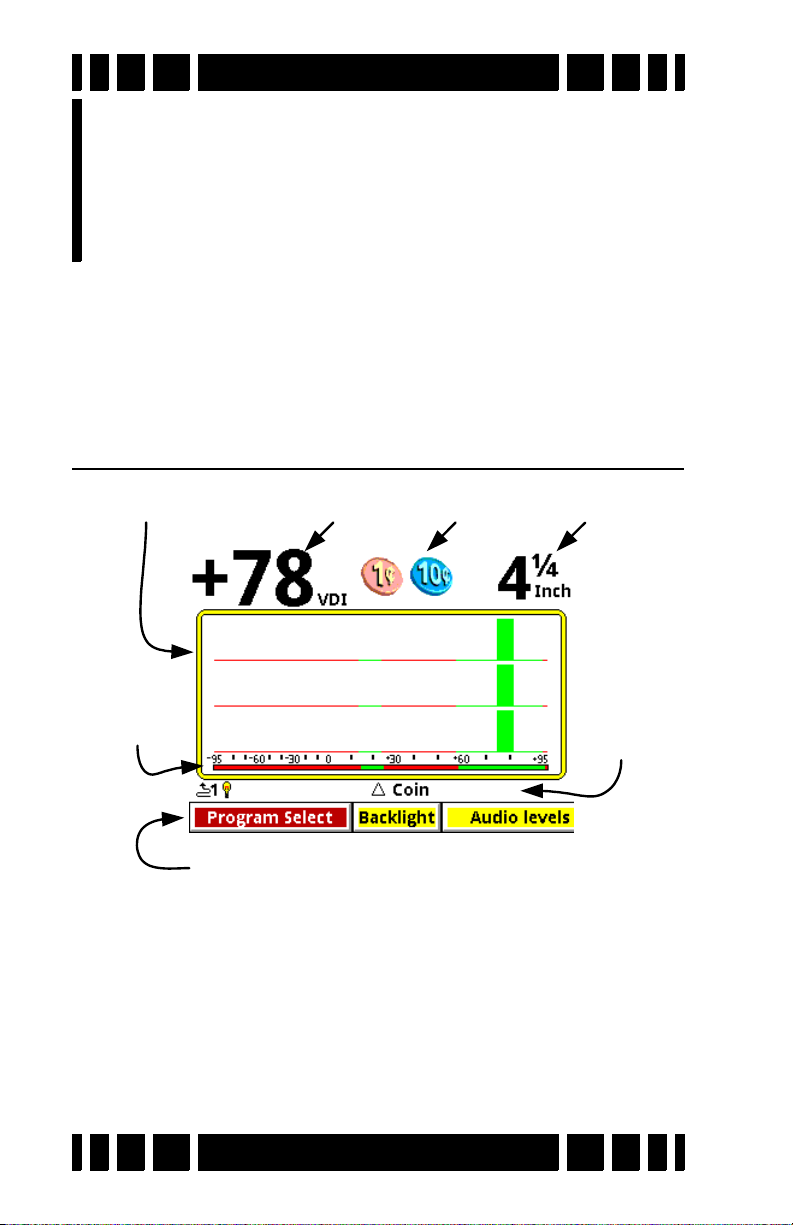
The target information includes the “VDI” number, the depth,
and icons representing the likely target. SpectraGraph displays
Page 1-3
Page 10
Spectra VX
Target VDI
Icons
Target
Depth
Spectra
Graph
Live
Control
Bar
Disc.
Mask
Status
Bar
Toggle Switch
(front of handle)
Navigation
Keypad
3
User’s Guide
signal strength versus VDI and gives a detailed look at the VDI
response. The status bar shows a few operational pieces of
information, and the Live Control Bar provides quick on-the-fly
access to operating modes and adjustment parameters. All of
these will be covered in detail in subsequent chapters.
Page 1-4
Page 11
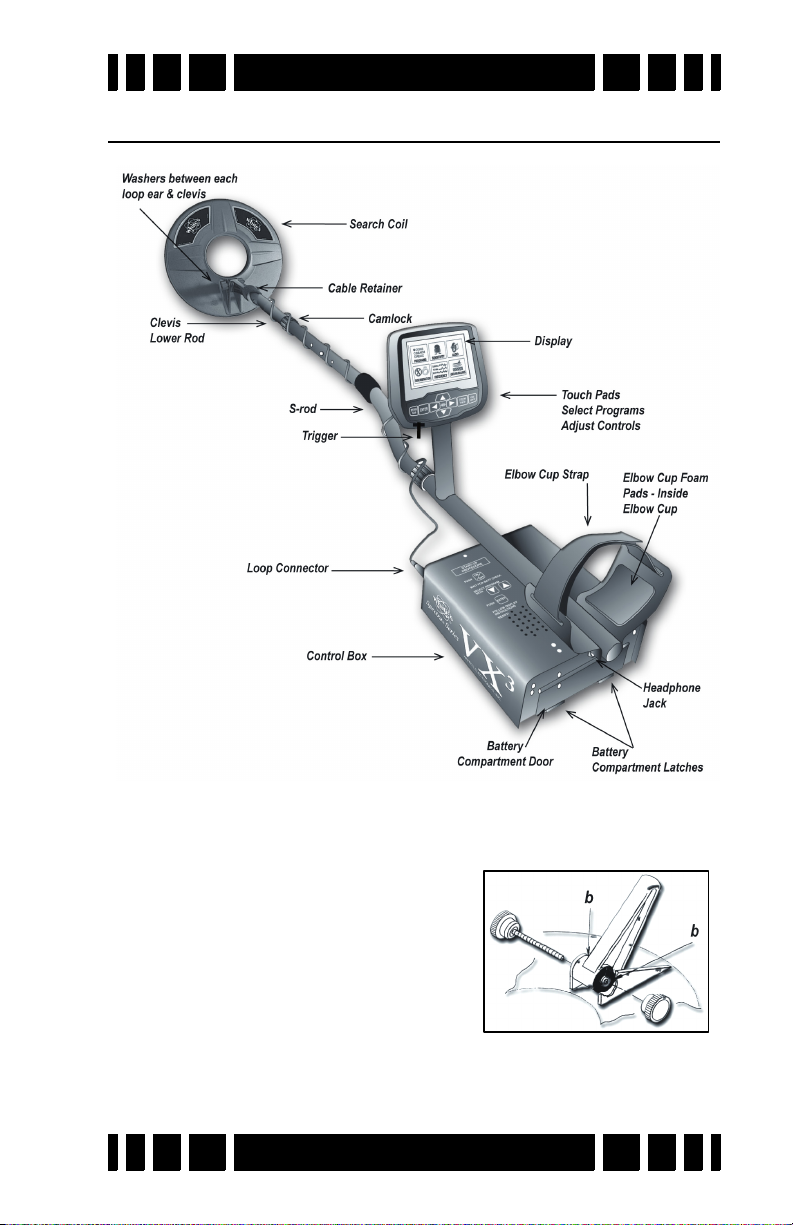
Assembly
Spectra VX
3
User’s Guide
1. Remove all parts from the shipping carton. Check the
assembly page to ensure all parts are present.
2. Insert the 2 rubber washers (b)
into the recesses of the lower rod
clevis and use the fiber bolt and
thumb nut to secure the search
loop to the lower rod.
3. Insert the lower rod into the “S”
rod (unlock the cam lock if necessary); the spring clip buttons will click into the adjustment holes. Turn the cam lock
Page 1-5
Page 12

Spectra VX
to secure. The second or third adjustment holes are suitable
for average height adults. Exceptionally tall users may wish
to consider purchase of the “tall-man” lower rod (500-0242-
3) and/or the “tall-man” S-rod (500-0240-1).
4. Wind the search loop cable around the rod assembly, first
revolution starting over the top of the rod. Work your way to
the top of the S-rod. Use the Velcro retainers, one near the
loop and one near the top, to hold the cable in place.
5. Insert the rod/loop assembly into the control box rod
(unlock the cam lock if necessary); the spring clip buttons
will click into the holes. Turn the cam lock to secure. Normally, the S-rod should curve upward.
6. Two adhesive black foam pads are included; they can be
placed on the insides of the arm cup.
7. Adjust the Velcro arm strap so that you can easily slip your
arm in and out. The strap provides extra leverage and control, though some prefer not to use it.
8. Install the battery pack (see next section for details).
9. Hold the detector normally and check for comfortable angle
and balance. Adjust the lower rod extension and/or the arm
cup position if necessary.
3
User’s Guide
Batteries
VX3 is provided with an 8-cell AA battery pack. For best
results, use either alkaline batteries or high-capacity rechargeable (such as NiMH) batteries. Also available from White’s is a
NiMH rechargeable pack plus recharging station; contact your
dealer or White’s directly for details.
To install the batteries:
3
• Release the battery door latches on VX
door.
• Slide the battery pack in, with the metal contact plates facing
forward.
Page 1-6
to open the battery
Page 13

Spectra VX
3
User’s Guide
To replace the batteries, slide open the battery holder lid by gently lifting the tab.
A fresh set of alkalines will operate VX3 for about 7-8 hours
with no backlight. Use of the backlight will reduce battery life.
When you first power-up VX3 a start-up screen will display
briefly with the battery voltage at the bottom. During operation,
if the battery voltage drops below 8 volts a low-battery icon will
display in the status bar:
You can also check the voltage at any time by selecting Back-
light,VIEW
MENU+ENTER to bring up the Info screen.
from the Live Control Bar, or pressing
VX3 automatically powers off if no activity occurs in a 20
minute time span. Activity is defined as the use of the keypad or
the trigger switch.
The Basics of VLF Operation
VX3 is a multi-frequency (MF) induction-balance (IB) very
low frequency (VLF) transmit-receive (TR) metal detector. In
order to understand what all the user adjustments do, it is
important to have at least a rudimentary understanding of how a
modern metal detector works.
Metal detectors work on the principle of induction, discovered by Michael Faraday in 1831. The typical induction-balance
1
metal detector
and this magnetic field in turn produces a small reaction in
nearby metal targets. A receive coil is used to detect this small
1. The first practical metal detector was an induction-balance
design, built by Alexander Graham Bell in an effort to locate an
assassin’s bullet lodged in US President James Garfield. He
failed — not enough sensitivity. Ever since then, “more sensitivity” has been the goal of every detector.
uses a transmit coil to produce a magnetic field,
Page 1-7
Page 14

Spectra VX
TX
RX
reaction. A so-called “induction-balanced” coil arrangement
prevents the receive coil from being overwhelmed by the transmit signal, allowing it to see very small target signals.
Phase & VDI
Practically all VLF-IB detectors operate as phase discriminators. The received signal is converted to phase, and the phase
is a strong indication of what the target might be. The particular
phase of a target can vary with the frequency of the transmitted
signal, so different detectors designed to use different frequencies can report completely different phase results.
To keep users from having to learn all these different phase
response scales, White’s has chosen to normalize them all to a
standard “VDI” scale. VDI stands for Visual Discrimination
Indicator and is simply a consistent numerical value assigned to
targets regardless of the frequency being used. Therefore, a US
nickel detected with a 6kHz detector will have the same VDI as
with a 15kHz detector. For historical reasons, the standard VDI
scale is based on a 6.592kHz detector and is shown below.
The ability to separate targets by VDI is what allows a
detector to discriminate. Targets with a negative VDI are usually ferrous (iron), and targets with a positive VDI are usually
non-ferrous. Small gold tends to have low VDI’s while thick silver coins have high VDI’s. Other targets like cupro-nickel
coins, brass and bronze relics, and aluminum trash can have
wildly varying VDI’s depending on their alloy, size, and thick-
3
User’s Guide
Page 1-8
Page 15

Spectra VX
0
o
90
o
-95 180
o
+95
0
R
a
w
P
h
a
s
e
V
D
I
S
c
a
l
e
R
a
w
P
h
a
s
e
V
D
I
S
c
a
l
e
Ferrous Non-Ferrous
N
o
r
m
a
l
s
o
i
l
S
a
l
t
U
S
Q
u
a
r
te
r
U
S
N
i
c
k
e
l
Nail
3
User’s Guide
ness. This means you need to apply your own discriminator —
your brain — in deciding what the VDI responses are telling
you.
Ground Response
Unfortunately, buried metal is not the only thing the detec-
tor sees. Most soil contains ferric oxide minerals, and this min-
eralization looks like a target2. In terms of VDI, practically all
ground mineralization falls in the extreme negative range of the
scale, even beyond most iron targets. But it can vary somewhat
as shown by the gray range in the prior diagram. At most loca-
tions the variation is small, so you can ground balance at a par-
ticular spot and be very close for the entire area. Some locations
have significant variations and you should occasionally re-
ground balance as you hunt, or use automatic ground tracking.
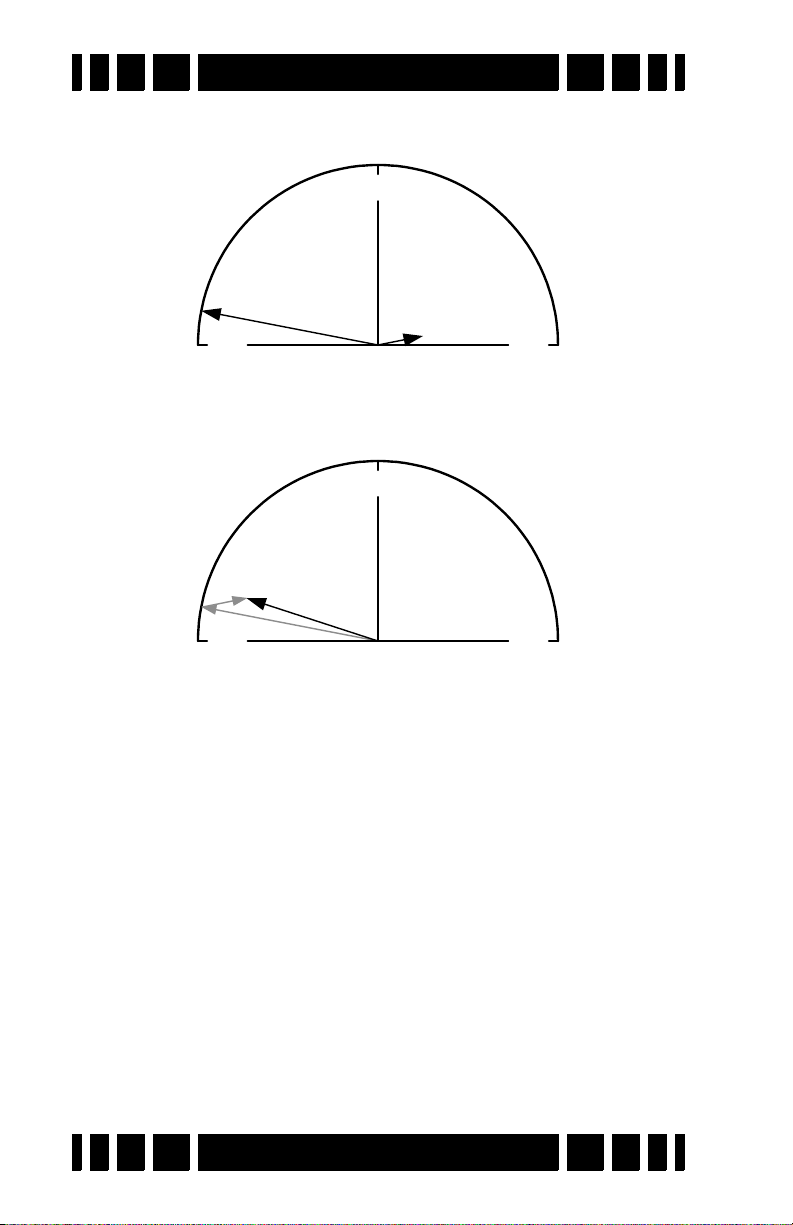
Many locations have enough mineralization to create quite a
strong ground signal, often much stronger than that of a moderately deep target. The VDI diagram on the preceding page uses
vectors to represent specific target responses, with the angle of
the vector representing the VDI value. We can also use the
length of the vector to represent the strength of the target
2. In this manual, we’ll refer to the signal resulting from ground
mineralization (including salts) as the “ground signal” or the
“ground response.”
Page 1-9
Page 16
Spectra VX
W
e
a
k
Q
u
a
r
t
e
r
S
t
r
o
n
g
G
r
o
u
n
d
-95 +95
0
W
e
a
k
Q
u
a
r
t
e
r
S
t
r
o
n
g
G
r
o
u
n
d
-95 +95
0
R
e
s
u
lt
in
g
S
ig
n
a
l
3
User’s Guide
response, so that a strong ground and weak quarter response
would look like:
The detector will see both signals at the same time, and the
combination of the two can be represented with a third vector as
follows:
The resulting signal appears to be a fairly strong ferrous target instead of a quarter. This is the downfall of the old TR-discriminator designs. Fortunately, since the VDI response for
ground is usually far away from the response of desirable targets, there are ways to deal with it. In a modern VLF motion
discriminator, the receiver determines what part of the signal is
the ground response and, using special filter techniques, normalizes the whole VDI scale to the current ground signal,
resulting in the ground signal being ignored. Graphically, this
looks like:
Page 1-10
Page 17

Spectra VX
W
e
a
k
Q
u
a
r
t
e
r
-95 +95
0
New Origin
S
t
r
o
n
g
G
r
o
u
n
d
-95 +95
0
3
User’s Guide
Any error in the ground balance point can result in an error in
the target VDI response so it’s important to maintain a decent
ground balance point.
Ground Tracking
In order to better handle variations in ground mineraliza-
tion, many detectors now incorporate automatic ground track-
ing (White’s uses the term AutoTrac®). The detector attempts to
determine what part of the signal is due to ground and continu-
ously track the phase and strength of that signal, and eliminate
it. One trick is to limit the range of VDI’s for normal ground
(the grayed area in the VDI scale) and consider anything else a
target. This works for most soils, with two caveats.
Besides “normal” ground mineralization, some areas contain rocks or small pockets consisting of material with slightly
different mineralization than the surrounding ground. The difference in VDI between these anomalies and the surrounding
ground isn’t enough to consider them a true target, but they are
small enough to act like a target to the detector’s ground filters.
These so-called “hot rocks” can create annoying responses in
many detectors.
Another situation concerns soils with significantly conductive salts. A pure salt response lies all the way in the non-ferrous region of the VDI scale, roughly in the midst of foil. Some
salt-water beaches are close to having a pure salt VDI, while
other beaches include black sand mineralization that creates a
Page 1-11
Page 18

Spectra VX
3
User’s Guide
composite VDI that can land anywhere between pure ferrite
(VDI = -95) and pure salt. Other areas, like fertilized fields with
residual salt ions, can also have a composite ground response.
Many deserts have a layer of surface salts that have been
leached from the soil; this is generally not a problem as long as
it is dry.
Frequency
Metal detectors are produced using a wide range of trans-
mitted frequencies, from 1kHz up to around 100kHz, though
the vast majority fall in the VLF range of 3kHz - 30kHz. Low
frequencies usually favor thicker targets and metals of higher
conductivity, while high frequencies favor thin and low-conductive targets.
Interesting Experiment: Thickness matters because of a
phenomenon known as skin effect. To demonstrate this,
cut several identical flat squares (say, 1”x1”) of aluminum
foil. Test the VDI response of a single square, and see how
the VDI varies as you stack more squares (tightly)
together.
Low frequencies also do a better job penetrating ground
mineralization, including salt. High frequencies tend to generate stronger ground and salt signals which can limit the ability
to distinguish weak targets. Obviously, when trying to detect
thin low-conductive targets (like nuggets and jewelry) in harsh
ground (like wet salt sand or black sand) there are competing
frequency requirements, so a compromise is necessary. With the
ability to run 3 simultaneous frequencies or any one of them
3
individually, VX
has the ability to deal with a wide variety of
conditions.
Page 1-12
Page 19
QuickStart
2
CHAPTER
Turn On & Go
VX3 is highly programmable and includes several factory
preset programs which provide good overall performance and
allow a new user to quickly start hunting.
1. Press ON/OFF: VX3 briefly displays a start-up screen, and
after 2 or 3 seconds goes straight to the search screen:
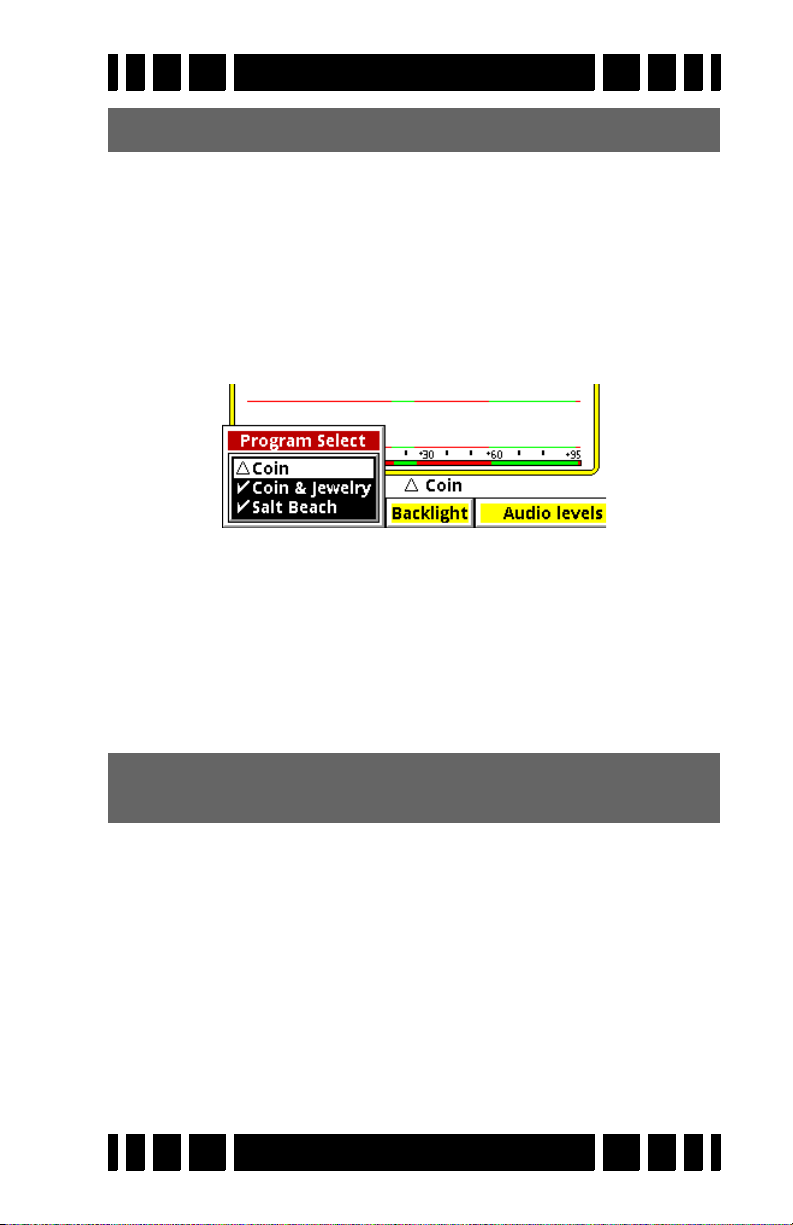
2. At the bottom of the screen is the Live Control Bar, which
3
gives you direct access to most of VX
item is Program Select; if you highlight this and press
ENTER you will see a pop-up selector listing all the avail-
able programs:
Page 2-1
’s settings. The first
Page 20

Spectra VX
3
User’s Guide
Select a desired program, pull the Trigger, and VX3 is ready
to start hunting.
Programs and Memory
VX3 has 8 preset factory programs:
•Coin - Accepts most common US coins, including nickels.
Most other VDI regions, including where most jewelry is
found, are rejected.
• Coin & Jewelry - Accepts most common coins, along with
rings and jewelry.
• Salt Beach - Coin & Jewelry using salt subtraction mode.
• Relic - Mixed mode, no Tone ID, no VCO.
Prospecting - All-metal mode optimized for nugget hunting.
•
•
Deep Silver - Optimized for deep silver.
• Hi-pro - Advanced Coin & Jewelry.
Demo - Extra program for whatever you want. Factory set-
•
tings for this program are weak, intended for in-store demos.
These programs are designed for good performance under most
conditions and provide an excellent starting point. However,
ground conditions vary considerably, so some adjustments may
be necessary. Changes to factory programs are automatically
Page 2-2
Page 21

Spectra VX
No Targets
3
User’s Guide
saved to memory and recalled each time VX3 is powered on.
Restoring factory settings is covered in Chapter 7.
Ground Balance
3
’s automatic ground balance system has a fast-track
VX
mode that attempts to balance the system to soil conditions
within 20 seconds of turn-on. If you do not begin searching
within 20 seconds or the ground is unusually trashy, VX3 may
not fast-track correctly and you may want to do a manual
ground balance:
• Squeeze/hold the Trigger, then press/hold
ENTER.
• Pump the search coil over the ground (1-12 inches) until the
background hum becomes steady (usually 4 to 6 times). Make
sure you do this over an area free of targets.
• Release ENTER, then release the Trigger, and begin searching.
Tip: If you release the trigger before releasing ENTER, VX
will lock the screen to pinpoint mode. Simply pull the trigger twice to resume searching.
3
This manual ground balance sequence can be done at any
time during normal search. Once the initial ground balance is
3
completed, VX
will automatically track to most typical ground
mineral changes.
Page 2-3
Page 22
Spectra VX
3
User’s Guide
Tip: If VX
3
seems to have an erratic audio only when
sweeping the search coil on the ground, check the
ground balance.
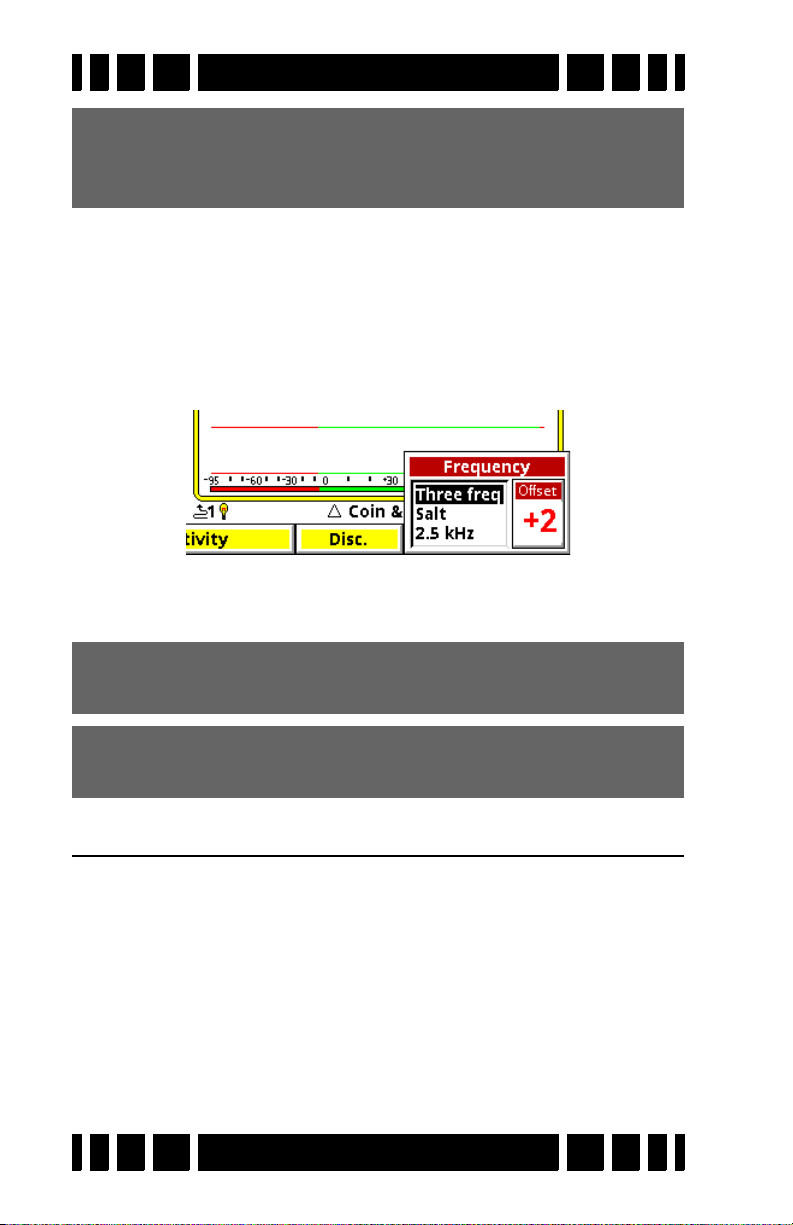
Electromagnetic Interference (EMI)
EMI can be a problem with any wide-band metal detector,
whether a multi-frequency VLF or a pulse induction design.
3
includes a frequency offset to help deal with this. Select the
VX
Transmit Frequency item on the Live Control Bar to access the
Offset control:
There are 5 increments of frequency offset; with the search
coil held in the air, find the one for best stability.
Tip: EMI is easiest to hear in pinpoint mode (trigger
pulled).
Tip: If VX
3
continues to have erratic audio with the
search coil held in the air, reduce the RX Gain.
Menus & Controls
VX3 has a number of configuration settings with 2 ways to
access them:
• Live Control Bar — Live-search settings
• Menus — All settings, suspends operation
When the
Main Menu appears. We will cover all the menu settings in subsequent chapters.
MENU button is pressed during normal search the
Page 2-4
Page 23
Spectra VX
Tip: Press ZOOM to change the font size of the menus.
Live Control Bar
You may want to quickly change settings while searching.
The Live Control Bar is displayed at the bottom of the Search
screen and its items are accessible via the left/right arrow buttons. When a Live Control item is selected (using the ENTER
button), a small control box pops up with one or more individual controls:
Any available setting in the Live Control Bar performs the
same function as any like-named setting in the menus, but the
live controls can be adjusted while the detector is in normal
operation. For many of the Live Control items, you can press
the VIEW button to access menus with additional settings and
controls. Accessing these menus suspends the search operation
of VX3.
3
User’s Guide
Tip: Press VIEW+DN and VIEW+UP to hide or expand the
Live Control Bar.
Main Menu
While the Live Control Bar and its menus contain all of
VX3’s configuration settings, they are rather spread out. The
Main Menu pulls all the settings together in one easy-to-navigate linear list. The Main Menu can be accessed by pressing
MENU from the Search screen. To exit back to the Search
screen, simply pull the trigger switch. When you re-enter the
Main Menu VX3 will remember where you were last, even if
after a power down.
Page 2-5
Page 24
Spectra VX
Tip: Press MENU+ to quickly collapse levels of the menu
tree.
Controls
VX3 uses a variety of different interface controls such as
sliders and radio buttons. Most of them are very similar to those
found in computer graphical interfaces so they will be familiar
to many users.
3
User’s Guide
VX3 Displays
VX3 has 2 display modes which are controlled by the posi-
tion of the trigger switch:
• Trigger neutral — Normal Search
• Trigger forward — All-metal pinpoint (no SAT applied)
• Trigger pulled — All-metal pinpoint (no SAT applied)
This section briefly describes the modes and their screens.
Chapter 5 has a more detailed discussion of display modes.
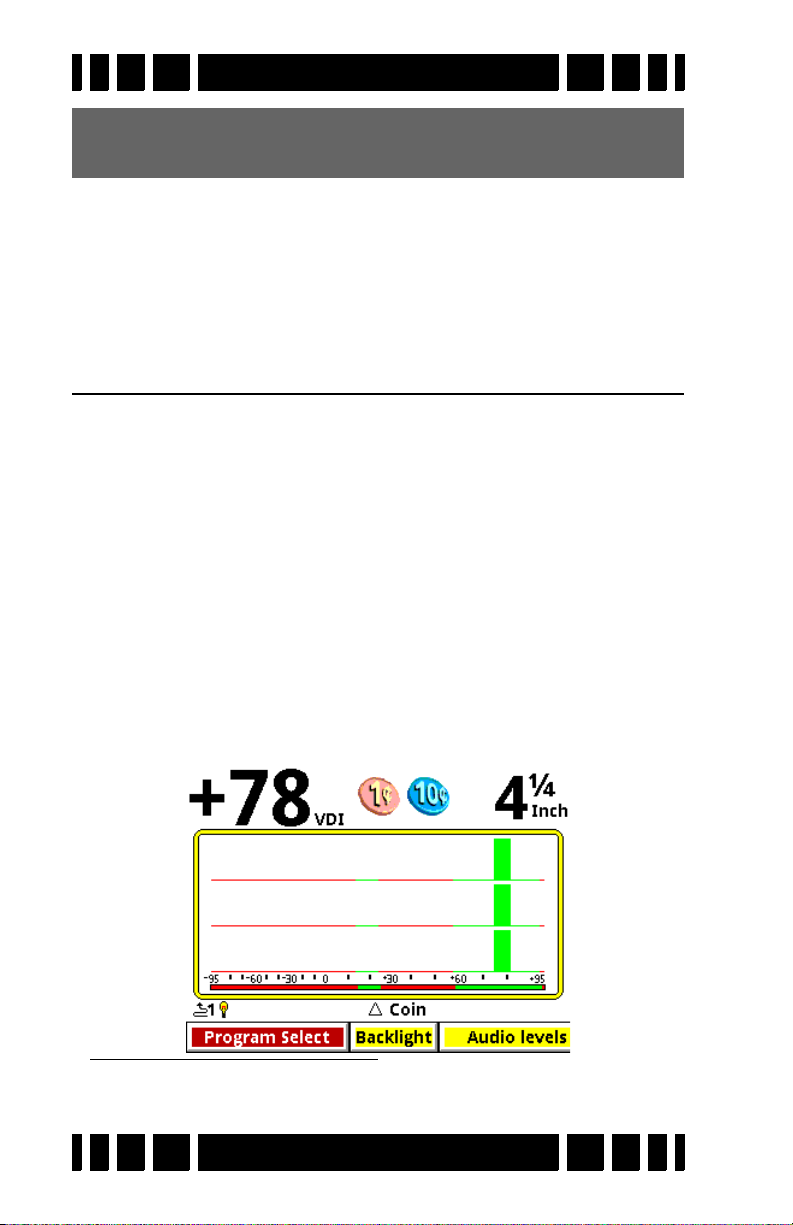
Search mode
Search mode is the normal display mode for VX3 and shows
a 3-frequency SpectraGraph1:
1. Programs which run in single frequency mode will display a sin-
gle frequency SpectraGraph.
Page 2-6
Page 25
Spectra VX
3
User’s Guide
Along the top of the screen are the VDI number, icons, and
depth. The majority of the screen consists of the SpectraGraph
display, which provides real-time information on the target’s
VDI. See Chapter 5 for more information on how to read this
display.
Below the SpectraGraph is the Status Line, which contains
icons for the status of wireless headphones and backlight. In the
middle of the Status Line the name of the active Program is displayed, and is occasionally overwritten by the ground tracking
status.
At the bottom of the Search screen is the Live Control Bar
which gives instant access to the most common settings while
VX3 is operating.
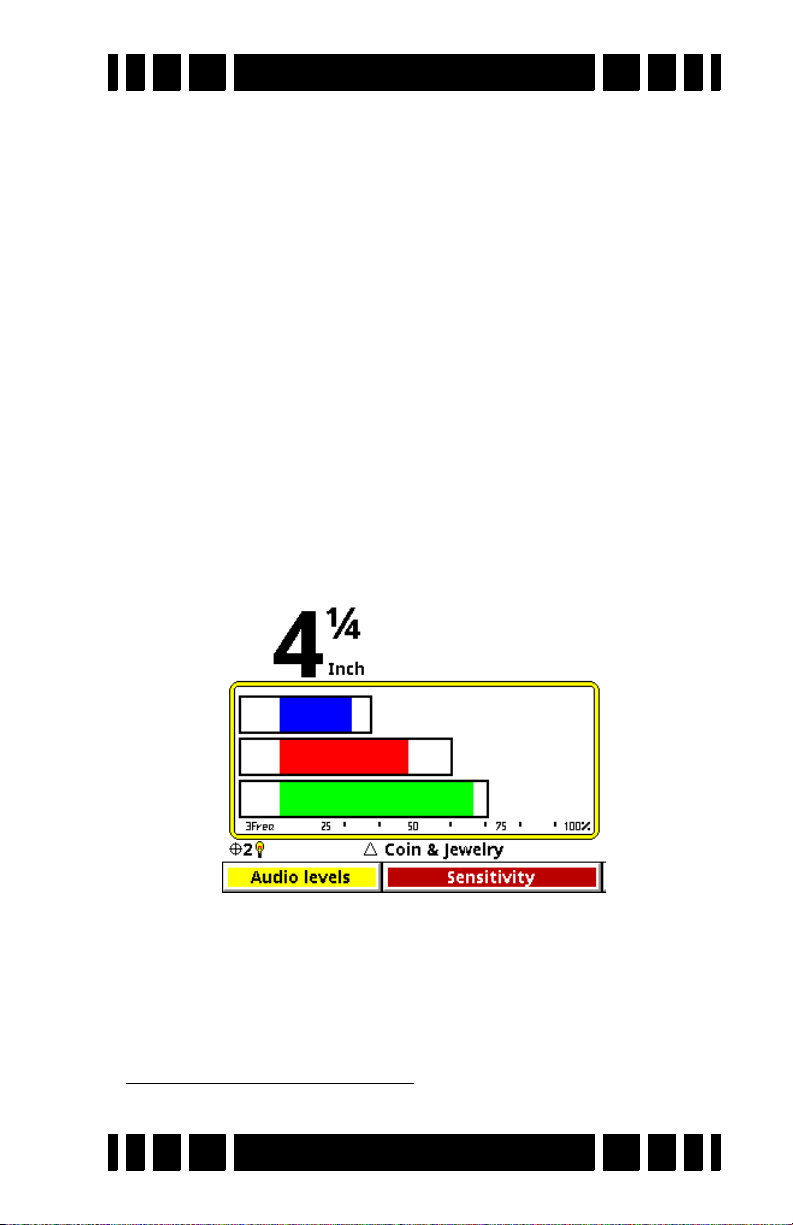
Pinpoint mode
Pinpoint mode places VX3 in an all-metal mode and displays the Pinpoint screen:
Again, this screen has the depth (but no VDI or icons), Status
Line, and Live Control Bar. The Pinpoint display consists of 3
2
horizontal moving bars
which give the relative signal strengths
of the three frequencies. This can be used to precisely pinpoint
the target, and to see which frequency is giving the strongest
2. Or just one bar, for single frequency operation.
Page 2-7
Page 26

Spectra VX
3
User’s Guide
response. See Chapter 5 for more information on how to read
this display.
Tip: To lock VX
switch forward.
3
in Pinpoint mode simply flip the trigger
VX3 Audio
VX3 supports a built-in speaker, plug-in headphones, and
White’s proprietary wireless headphones. Headphones are
highly recommended as they help block out ambient noise,
making it much easier to discern the deeper target responses. If
you purchase the optional wireless headphones for your VX
see Chapter 8 for connect instructions.
Metal Detecting Basics
There are many excellent books available that cover the
hobby of metal detecting, and this manual cannot possibly do
justice to all the aspects of the hobby. Ask your dealer to recommend a good introductory book. We will, however, touch on a
few important topics.
Where to hunt
The basic rule of location is: the older the better. Old homes,
home sites, schools, parks, swimming holes, and picnic areas
can all yield great finds. However, “old” can also mean heavily
used, which can result in a lot of accumulated trash. The best
sites are those that have been “lost” or unused for decades.
Besides “old,” there are places which are constantly getting
replenished. With high gold prices, hunting for jewelry at
beaches can be very profitable, especially if it includes stones.
At parks and recreation areas, people often lay items on the
ground while they play sports, then lose or forget them.
3
,
Page 2-8
Page 27

Spectra VX
Permission
This is CRITICALLY IMPORTANT! Over the years, a small
minority of inconsiderate detectorists have, in some places, created a negative image for the hobby (see the Treasure Hunter’s
Code of Ethics on the back cover of this manual). Do your part
to maintain a positive image: ask permission.
Private property always requires permission. Approach the
owner in a professional manner; some detectorists even make
up business cards. Be willing to offer the property owner a portion of the finds, especially if it’s a really choice site you’re
dying to hunt.
In many cities, homes have easements (the grass strip
between a sidewalk and street) which technically belong to the
city but are kept up by the homeowner. Assume it belongs to the
homeowner, and don’t hunt these areas without their permission.
Public lands have mixed access. National Parks are absolutely OFF LIMITS to metal detecting, and Park Rangers can
confiscate your detector and even your vehicle. Don’t even try!
State parks vary considerably, depending on the state and/or the
type of park. The best approach is to check with the Ranger Station responsible for the park.
3
User’s Guide
Local parks and schools are usually open to detecting,
though some localities may require you to register. Find out
what the local laws are.
Detecting fundamentals
When you arrive at a hunt site, use your best intuition (and,
hopefully, research) to identify the most likely areas for good
finds. Often a site will be too large to cover 100% so you need
to narrow it down. If you are just learning, don’t be concerned
with patterns, just walk around and hunt. As you get proficient
with your detector and want to improve efficiency, you can
mentally grid off areas and hunt them in a back-and-forth pattern.
Page 2-9
Page 28

Spectra VX
Sweep the coil from side-to-side, with a ~3-4 foot swath, at
a rate of 1-2 seconds per sweep. Keep the coil parallel with and
close to the ground during the entire sweep; if you sweep with a
“pendulum arc” (lifting the coil at the ends of the sweep) you
will not only miss targets but also cause the AutoTrac to err.
Some detectorists rub the coil directly on the ground, though
bare dirt and gravel can eventually wear through the plastic
(most coils have available snap-on covers). Overlap each sweep
by 50% to ensure the best coverage of deep targets.
If you are hunting in a typical discriminate mode, listen for
an accepted target beep; stop and double-check the spot, paying
closer attention to the SpectraGraph response. If it appears to be
a good target, move the coil off to the side of the target location,
pull the trigger switch to enable pinpoint mode, then move the
coil back over the target and use the all-metal audio response to
determine exact location.
Use a proper digging tool and learn good plugging tech-
niques to extract the target, or learn how to “pop” targets. When
you are done there should be no trace that you dug anything.
Haul out all trash that you find; many detectorists keep a small
container of trash with them to show off the benefit they provide to the community, especially useful if a policeman stops by
to ask why you are digging holes in the park.
3
User’s Guide
Research
What you get out of metal detecting largely depends on
what you put into it. Half the fun of detecting is doing historical
research on the area you live in and learning where people used
to gather and where things used to be. Visit museums and historical societies, and look for old maps and photographs. Get
out and talk to people and, most of all, have fun!
Page 2-10
Page 29

3
CHAPTER
Basic
Settings
This chapter covers some of the basic settings of VX
including sensitivity, discrimination, audio, and ground balance.
It does not cover any settings which alter the fundamental operating mode of the detector. See Chapter 4 for operating modes.
The settings covered here are all accessed from the Live
Control Bar, by highlighting the item of interest and pressing
ENTER:
All programs are set up with the same Live Control Bar layout
for consistency:
Programs • Backlight • Audio • Sensitivity • Disc. • Frequency •
Tracking • Filters
3
Each Live Control pop-up contains the most common settings
for each category. The pop-up settings for each item in the Live
Control Bar usually has a subset of what is found in the Main
Menu. However, when a Live Control item is selected, pressing
the VIEW button will access a more detailed menu which has
everything found in the Main Menu:
Page 3-1
Page 30

Spectra VX
[press VIEW]
3
User’s Guide
Tip: The Live Control Bar is the collection of buttons across
the bottom of the screen. Each button is called a
trol Item
VIEW for any Live Control Item to access a Menu for that
item. Keep in mind that the detector is “live” while accessing the
a
. Each item consists of one or more settings. Press
Live Control Bar, but is suspended when you enter
Menu.
Live Con-
Programs
This was briefly covered in Chapter 2. VX3 has 8 preset fac-
tory programs:
Page 3-2
Page 31

Spectra VX
• Coin - Accepts most common US coins, including nickels.
3
User’s Guide
Most other VDI regions, including where most jewelry is
found, are rejected.
• Coin & Jewelry - Accepts most common coins, along with
rings and jewelry.
• Salt Beach - Coin & Jewelry using salt subtraction mode.
• Relic - Mixed mode, no Tone ID, no VCO.
• Prospecting - All-metal mode optimized for nugget hunting.
• Deep Silver - Optimized for deep silver.
• Hi-pro - Advanced Coin & Jewelry.
• Demo - Extra program for whatever you want. Factory set-
tings for this program are weak, intended for in-store demos.
Notice that Coin is preceded by a “” symbol whereas the
other programs have a “” symbol. The “” symbol means a
program has not been modified, whereas a “” symbol indicates
changes have been made. At any time you can easily restore a
program to its factory settings; this is covered in Chapter 7.
Tip: Program changes are automatically saved when VX3 is
turned off. If you remove the battery pack instead of pressing the
saved.
OFF button, then program changes will not be
Note that changing the Program from the Live Control Bar
is a live action and can be a little sluggish if you are trying to
scroll from Coin down to Hi-Pro. Press
VIEW to bring up the
non-live menu which is much faster to scroll through.
Backlight
VX3 uses a transflective display that has good visibility in
direct sunlight without the backlight. In shade or low sunlight
you may need to turn on the backlight. Backlight brightness can
be set from 1 to 20. Keep in mind that more backlight draws
Page 3-3
Page 32

Spectra VX
3
User’s Guide
more power, so for maximum battery life try to keep the backlight to a minimum.
Tip: Press/hold the ON/OFF button for ~3 seconds to quickly
3
set the backlight level to 20. VX
will not turn off.
Sensitivity
Once you select a basic program you may need to adjust the
sensitivity settings. Most of the VX3 programs are set up with
nominal sensitivities, but the Hi-Pro program is set up a little
hotter.
Most users believe sensitivity should be run as high as pos-
sible. In some cases this is true, but if you find the detector is
noisy and falses a lot you probably need to turn it down. There
are three primary sensitivity settings: Rx Gain, All Metal, and
Disc.
Rx Gain
Rx Gain (sometimes called preamp gain) sets the gain of the
receiver’s input amplifier. In most cases, you want to set this as
high as possible and still maintain stable operation.
Three things can limit the maximum gain setting. The first
is external noise, such as electro-magnetic interference (EMI)
including 50/60Hz mains and RF. EMI typically shows up as
Page 3-4
Page 33

Spectra VX
Tip: VX3 uses induction-balanced loops which rely on a
“null” between the transmit coil and the receive coil. The
quality of the null may determine the point at which the
detector overloads, especially when running high Rx Gain
settings. Null quality varies loop-to-loop, so some loops
may overload at lower gain than others.
3
User’s Guide
erratic operation and noisy audio. Secondly, in highly mineralized ground excessive gain can cause the input amplifier to
overload or operate at close to overload due to the large ground
signal, limiting the available range for target detection. Finally,
the quality of the loop null can also push the input amplifier
toward overload. White’s V-compatible loops are designed to
minimize null limitations, but third-party loops typically have
wide variances in the quality of the null which can require a
lower Rx Gain.
EMI affects the lower end of the signal range, which more
directly impacts target sensitivity. Both ground signal and loop
null affect the upper end of the signal response range, which
usually results in a quicker overload. Ground signal and loop
null affect target sensitivity only so far as the Rx Gain must be
reduced to prevent overload.
Tip: Always address EMI noise by first adjusting the transmit
frequency offset. See the Frequency section for more info.
All-Metal Sensitivity
All-Metal Sensitivity (sometimes called DC sensitivity)
determines the responsiveness of the all-metal channel. All target signals cause an all-metal audio response regardless of signal strength, but a higher all-metal sensitivity setting will
increase the response rate to targets. This setting affects allmetal modes including pinpoint and mixed-mode, but does not
affect normal discrimination mode. Setting this too high will
make the all-metal audio chatter. See Chapter 4 for a more
detailed discussion of audio responses.
Page 3-5
Page 34
Spectra VX
3
User’s Guide
Discrimination Sensitivity
Discrimination Sensitivity (sometimes called AC sensitiv-
ity) determines the responsiveness of the discrimination chan-
nel. This is a threshold level, so only target signals above the
threshold cause a discrimination response. Setting this too high
will cause noise and falsing in the discrimination audio. See
Chapter 4 for a more detailed discussion of audio responses.
An important note about sensitivity: Many users assume
that “more sensitivity = better depth.” However, most metal
detectors are designed with more sensitivity range than
can possibly be used in many areas. This is to ensure that
maximum sensitivity can be achieved in the purest ground.
In many areas, less sensitivity is better; a quieter audio
allows you to hear deeper targets.
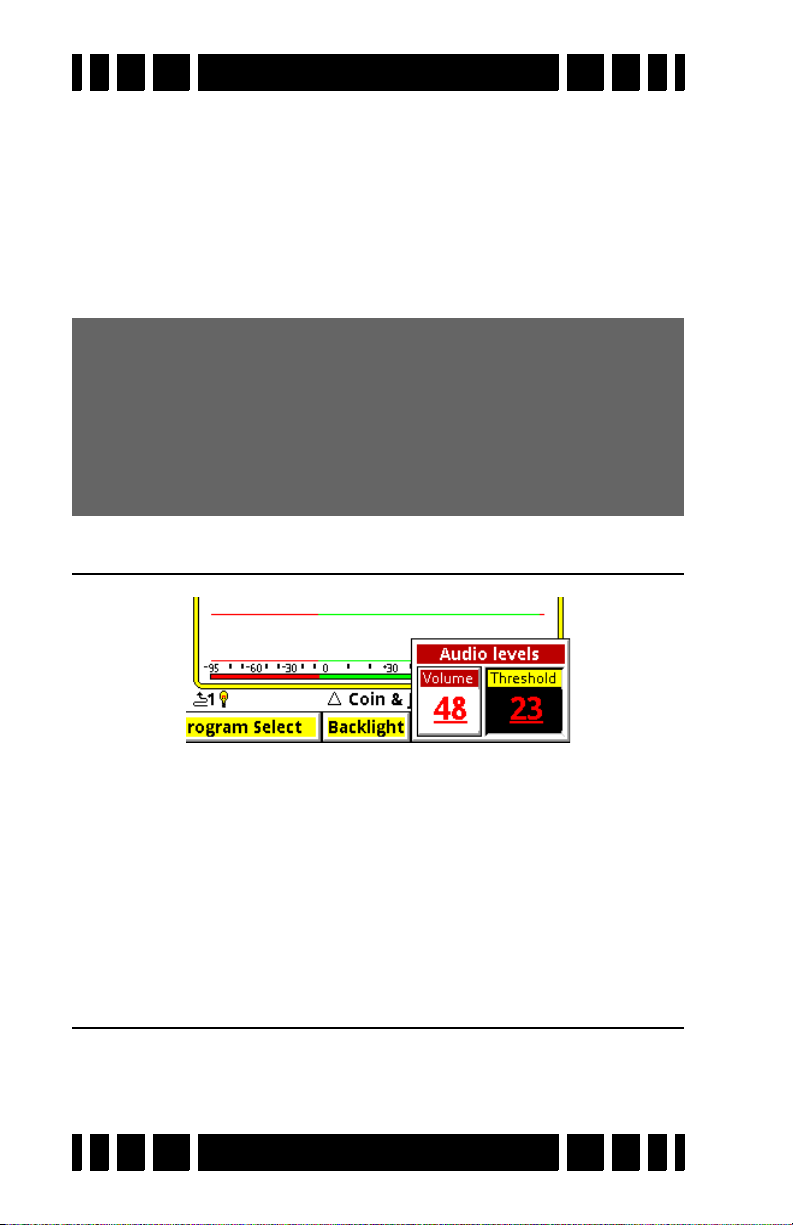
Audio
Volume sets the audio volume level for target responses (the
beeps). Threshold sets the volume level for the threshold tone,
which is the constant “hum” heard in the absence of a target.
Both target & threshold volumes are applied to all the audio
outputs: speaker, wired headphones, or wireless headphones. If,
for example, you set the volume while using the speaker, then
plug in a pair of headphones, you may need to readjust the volume for the headphones.
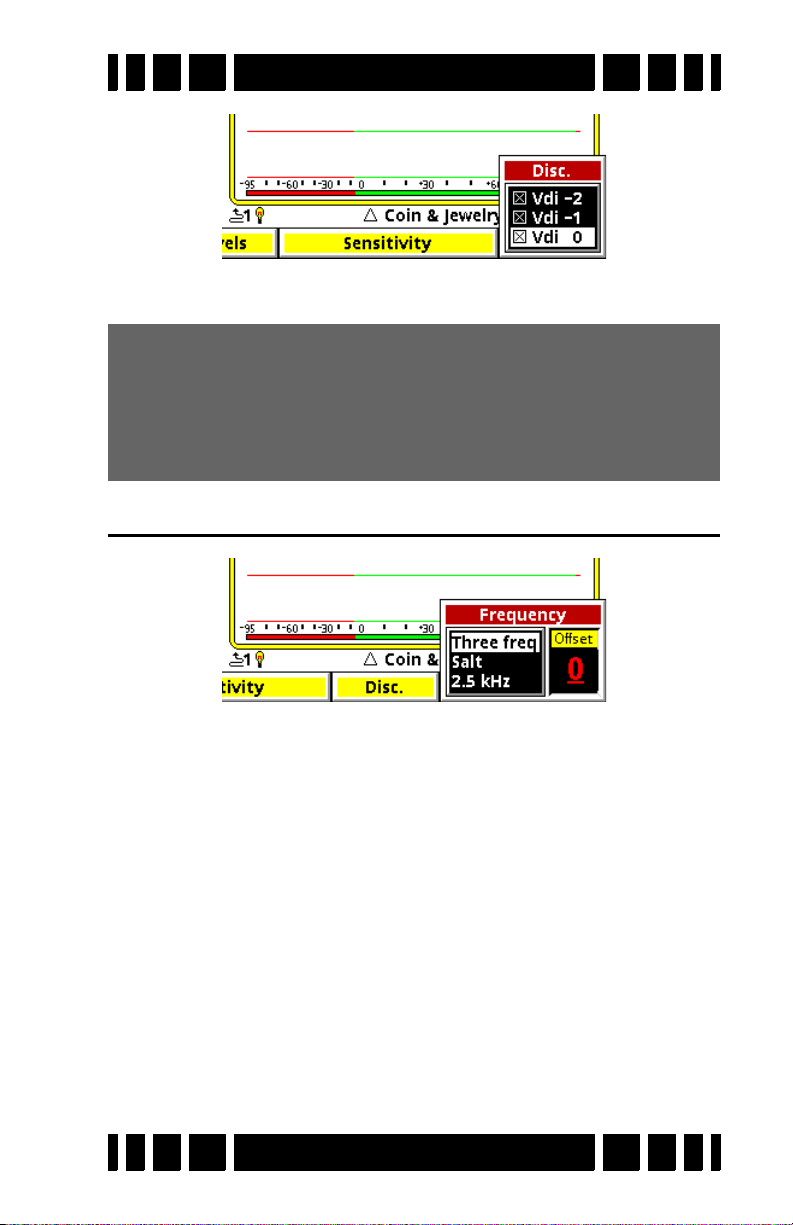
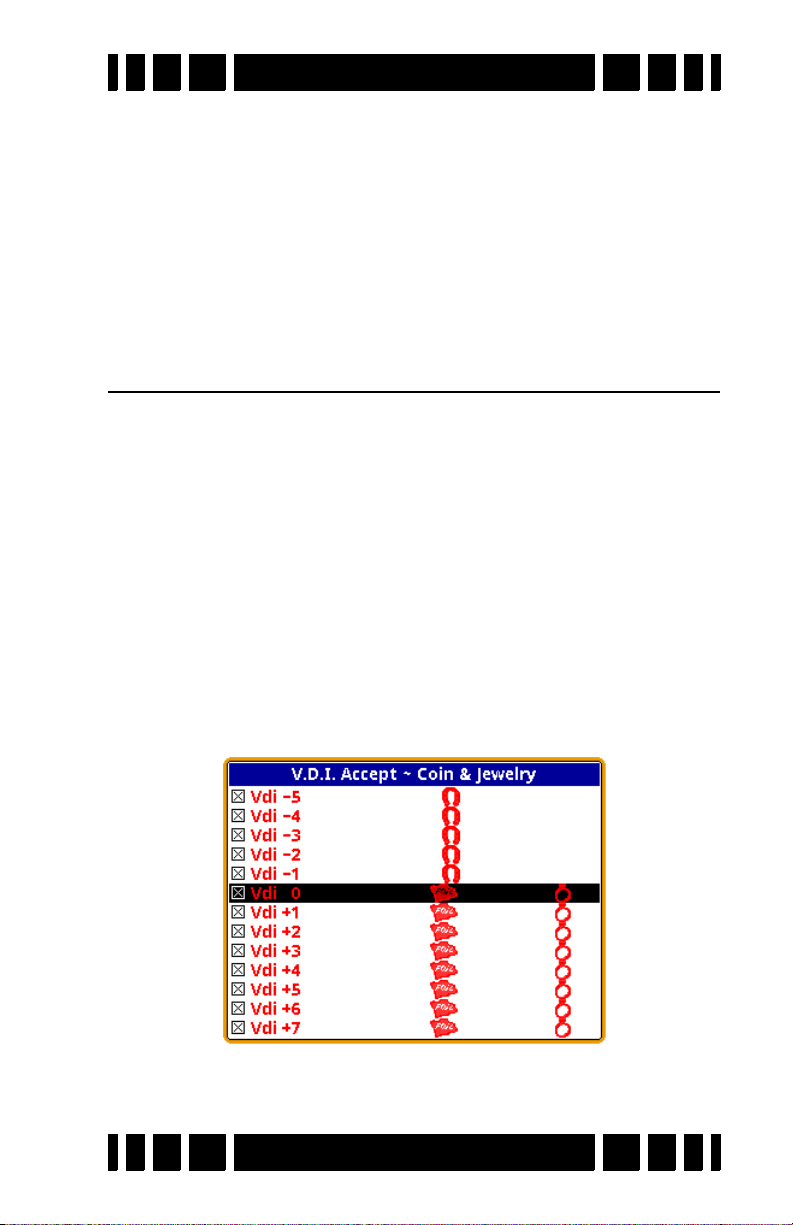
Discrimination
This is the method for setting up the discrimination pattern
for VX
3
. The pop-up box lists all the VDI numbers from -95 to
Page 3-6
Page 35
Spectra VX
3
User’s Guide
+95, each with a selection box. A box that has an ‘×’ enables
that VDI response, an empty box disables that VDI.
Tip: Setting the disc mask for 191 VDI’s can be tedious. If
you want to set a range of VDI’s to the same state select
the first VDI in the range, press
value to subsequent VDI’s.
Bonus Tip: This works in either direction.
ENTER+ to set the same
Frequency
The only control we will cover in this chapter is Frequency
Offset
. See Chapter 4 for discussion about frequency modes.
The Frequency Offset control provides slight offsets (5 steps)
to the transmit frequencies and is useful for minimizing EMI
from power mains and RF, and for minimizing interference
from other detectors. In general, adjust the offset up or down to
find the quietest setting.
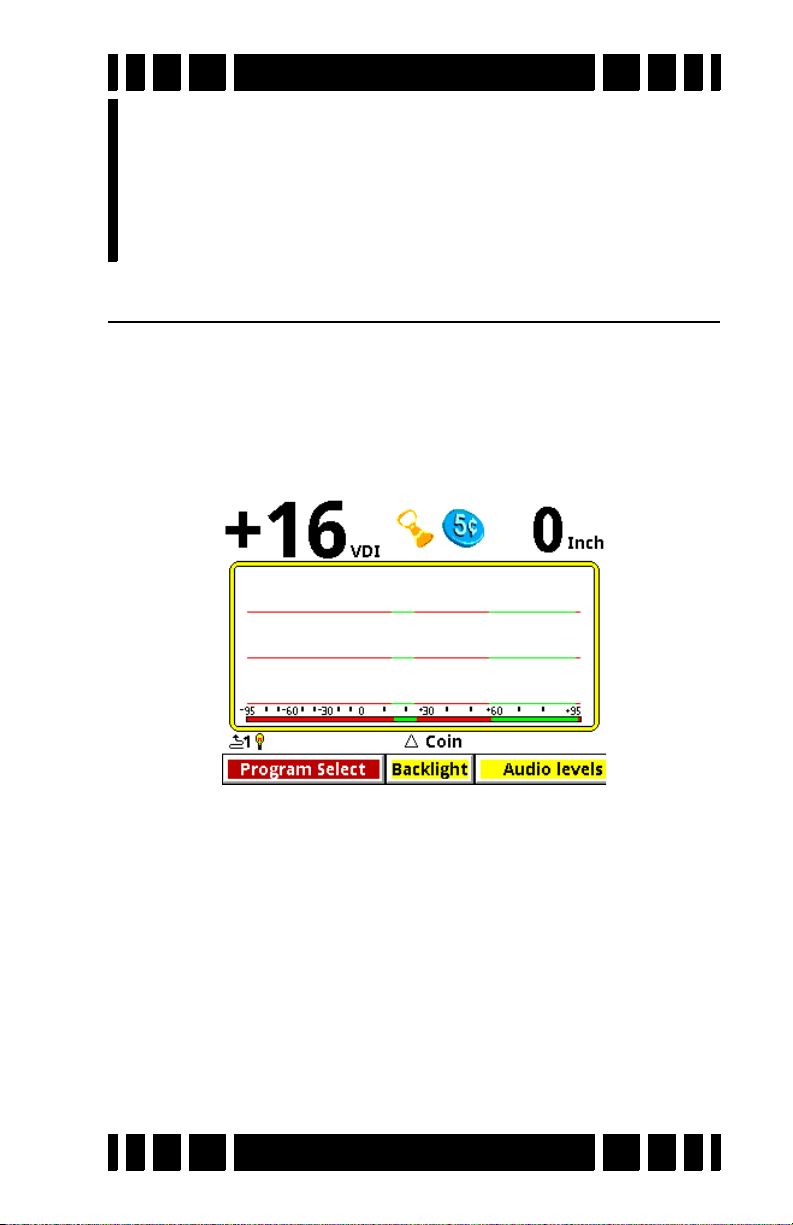
The Live Control Bar makes finding the quietest offset easy.
With the loop held in the air, pull/hold the trigger to enable pinpoint mode. EMI interference will be heard as repetitive audio
noise, and the pinpoint bars will bounce around like this:
Page 3-7
Page 36
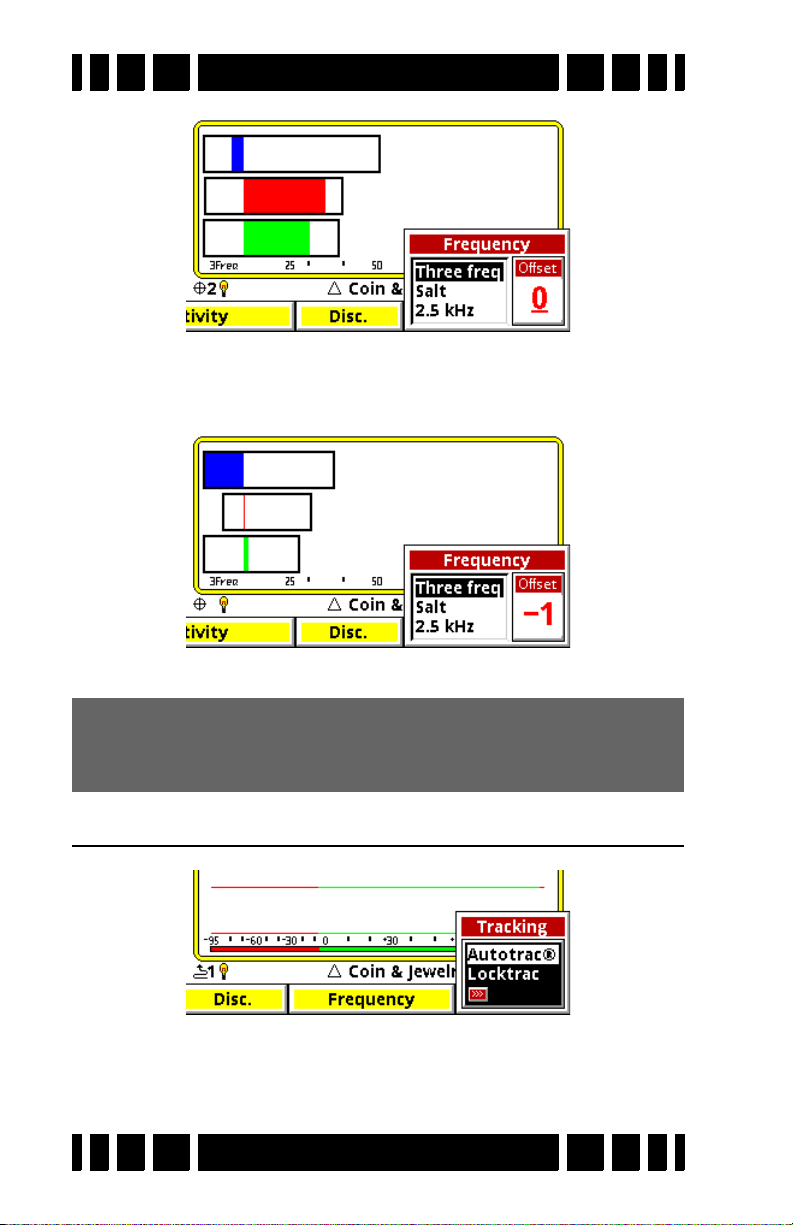
Spectra VX
While continuing to hold the trigger, select Transmit Frequency
and highlight the Offset box. Adjust the Offset to find the quietest setting. The pinpoint bars should be minimal and steady:
3
User’s Guide
Release the trigger and you’re set.
Tip: Be mindful of personal electronics you are carrying.
There have been reports of cell phones causing EMI problems with detectors.
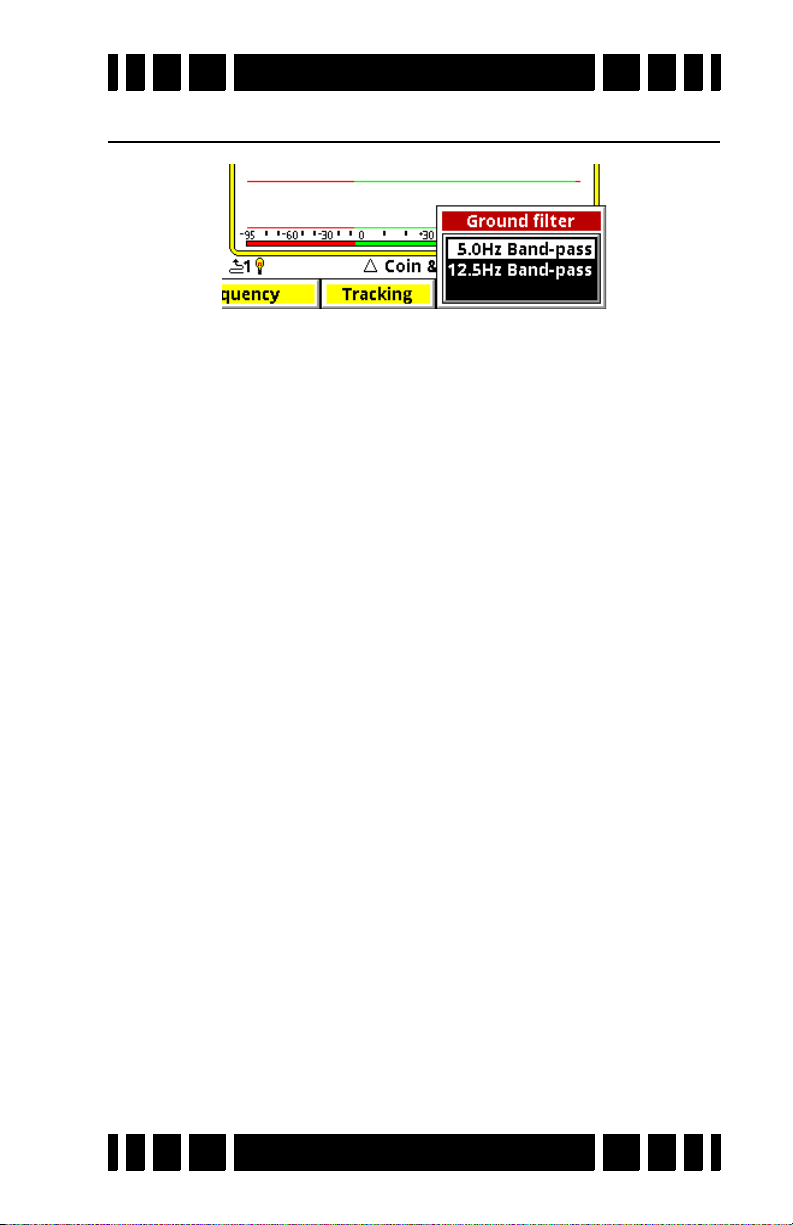
Ground Tracking
AutoTrac and LockTrac select between automatic and manual
ground balance. AutoTrac is the default in most programs.
Ground balance modes are explained in more detail in Chapter 4.
Page 3-8
Page 37
Spectra VX
3
User’s Guide
Filters
As presented in Chapter 1, modern VLF detectors use filters
to separate the target responses from the ground response. Filters are also used to minimize EMI noise. The best filter to use
depends on the strength of ground mineralization plus other factors. VX3 offers two filters to choose from: a 5Hz filter for lowto-modest mineralization and 12.5Hz for more severe ground
conditions. Filters and response speeds are explained in detail in
Chapter 6.
Page 3-9
Page 38

Operating
4
Modes
CHAPTER
Chapter 3 covered some of the basic settings of VX3, such
as sensitivity and audio volume. These were adjustment controls which are used to alter the performance or user preferences. There are other settings which fundamentally alter the
operation of VX3. We will refer to these as mode settings. Different mode settings might affect completely different aspects
of the detector — such as frequency, tracking, and audio — so
taken together they offer a tremendous amount of flexibility to
the user.
While many settings are quickly available on the Live Con-
trol Bar, some of the mode settings require leaving the search
screen and accessing the menus. Each item on the Live Control
Bar has its own menu which can be accessed by pressing the
VIEW button. Additionally, all modes and settings are available
in the Main Menu, accessed from the Search Screen by pressing
the MENU button.
Frequency
VX3 is a 3-frequency metal detector, but it has the ability to
run in other optimized frequency modes. The available modes
are:
• 3-frequency normal
• 3-frequency salt compensate
• Single frequency 2.5kHz
• Single frequency 7.5kHz
• Single frequency 22.5kHz
The frequency selection menu in VX3 looks like this:
Page 4-1
Page 39

Spectra VX
3
User’s Guide
One reason for using multiple frequencies is that some targets respond better to certain frequencies than others. Targets
that are thin and made of low-conductive metal — typical of
most jewelry — respond better to higher frequencies, which is
why many gold nugget detectors are designed to run at much
higher frequencies than most other detectors. High conductive
targets, especially those that are thick, respond better at lower
frequencies. Also, ground mineralization has a weaker response
at lower frequencies, resulting in better ground penetration in
highly mineralized areas.
Three Frequency
The default frequency mode for most programs is standard
Three Frequency. In this mode, VX
3
simultaneously transmits at
2.5kHz, 7.5kHz, and 22.5kHz. 3-frequency mode gives the best
overall response to the broadest range of target conductivities.
In any frequency mode VX3 will plot the VDI responses in
the SpectraGraph screen and also calculate an overall VDI
number for the target. In 3-frequency mode the results from at
least two responding frequencies must agree in order to display
the VDI number and generate a tone response. This helps minimize false positives.
Salt Compensate
Salt Compensate mode is the same as Three Frequency
Page 4-2
Page 40

Spectra VX
3
User’s Guide
mode, except that salt responses are subtracted out. This eliminates salt signals while still allowing VX3 to track ferrous mineralization. This technique is only possible in multi-frequency
detectors, which is a second reason to use multiple frequencies.
The Salt Beach program uses this mode.
Trivia: White’s DFX is always in salt compensate mode.
A small downside to salt compensate is that a narrow range
of VDI’s are notched out and targets in that range won’t
respond. The VDI for salt is around +4 to +5 which is normally
the area for bits of foil. However, very small gold nuggets and
some jewelry can also fall in this range, which is why VX3 has
the added option to run a normal 3-frequency with salt subtraction disabled. Some V-users have reported situations where the
salt-compensate mode helps reduce EMI noise.
Single Frequency
With any multiple frequency detector, the total transmit
power must be divided among the active frequencies. VX
offers the ability to transmit only one of its three frequencies. In
single frequency mode, the transmit waveform is optimized to
focus power to the selected frequency, resulting in slightly better depth but for a more narrow range of targets.
3
Trivia: The single frequency modes in White’s DFX do not
use optimized transmit waveforms.
Usually the VDI responses for targets vary with frequency,
which means that a particular target will have completely different VDI numbers at each of the three frequencies. For example,
a US silver quarter has the following raw VDI responses:
Frequency VDI
2.5kHz 70
7.5kHz 85
22.5kHz 91
Page 4-3
Page 41

Spectra VX
However, VX3 normalizes all VDI’s to a common frequency.
That common frequency is, for historical reasons, 6.592kHz,
meaning the US silver quarter will have a normalized VDI
response of 83 regardless of which frequency you choose.
The Deep Silver program uses the 2.5kHz single frequency
mode, which responds best to silver coins and tends to penetrate
mineralized soil better.
Tip: In single frequency modes, battery consumption is
higher for 2.5kHz, and lowest for 22.5kHz.
Frequency Offset
This is not a mode, but rather an adjustment control. It was
discussed in Chapter 3: The Frequency Offset control provides
slight offsets (5 steps) to the selected frequency(ies) and is useful to minimize EMI, especially when hunting near other detectorists. In general, adjust the offset up or down to find the
quietest setting. One source of EMI that is difficult to deal with
are electric fences, including invisible dog fences. It is best to
try to have them switched off when hunting.
The frequency offset applies to all active frequencies. If you
have a single frequency mode selected, then the offset shifts
that frequency. If you are in a 3-frequency mode, the offset proportionally shifts all the frequencies.
3
User’s Guide
When making offset adjustments, put VX3 in pinpoint mode
(by pulling the trigger) and watch the pinpoint bars, like this:
Page 4-4
Page 42

Spectra VX
3
User’s Guide
Along with the audio, the pinpoint bars will help you find the
quietest offset. In some situations, you may not be able to find a
quiet offset for all three frequencies at the same time. Pay attention to the pinpoint bars and see if one of the frequencies tends
to run quieter than the others. If so, run in single frequency
mode with the proper offset. A stable single frequency mode is
usually better than an unstable 3-frequency mode.
Ground Balance
In Chapter 1 we briefly covered how ground balance works,
and how automatic tracking can compensate for varying ground
conditions. VX3 offers both automatic tracking (AutoTrac™)
mode and the ability to lock the ground balance when needed
(LockTrac).
Whether you are using AutoTrac or LockTrac, it’s important
to know how to check if VX3 is properly ground balanced. As
you are hunting, test the ground balance occasionally using
these steps: lift the loop a foot off the ground, pull the trigger to
put VX3 in pinpoint mode, then lower the loop to the ground,
making sure you are not over a target. In most ground, the pinpoint threshold level should remain constant as the loop is lowered to the ground. In the most severe mineralization, a lift-off
effect can cause an abrupt threshold change in the last inch or
so, and this is difficult to balance out.
AutoTrac
®
AutoTrac mode automatically tracks the phase of the
ground signal. This is the default ground balance mode for most
programs and is the recommended mode except in certain conditions. When AutoTrac is enabled, you will see
<<< Tracking <<<
>>> Tracking >>>
occasionally pop up on the status bar whenever VX3 is changing
its ground balance point. At start-up, it may say
Fast Track
instead.
Page 4-5
Page 43

Spectra VX
LockTrac
There are some uncommon situations where AutoTrac does
not work well. In extreme ground that has a lot of variability, or
when a lot of trash targets are present, automatic tracking may
result in excessive noise and tracking errors. High levels of EMI
can also cause problems with automatic tracking. In these situations locking the ground balance at one value may provide better performance.
Keep in mind that when tracking is locked, VX3 will only be
properly ground balanced for one type of ground. As the ground
varies, there will be errors in the balance point, so there may be
some compromise in depth or target ID. But LockTrac may
allow hunting an area where AutoTrac does not.
3
User’s Guide
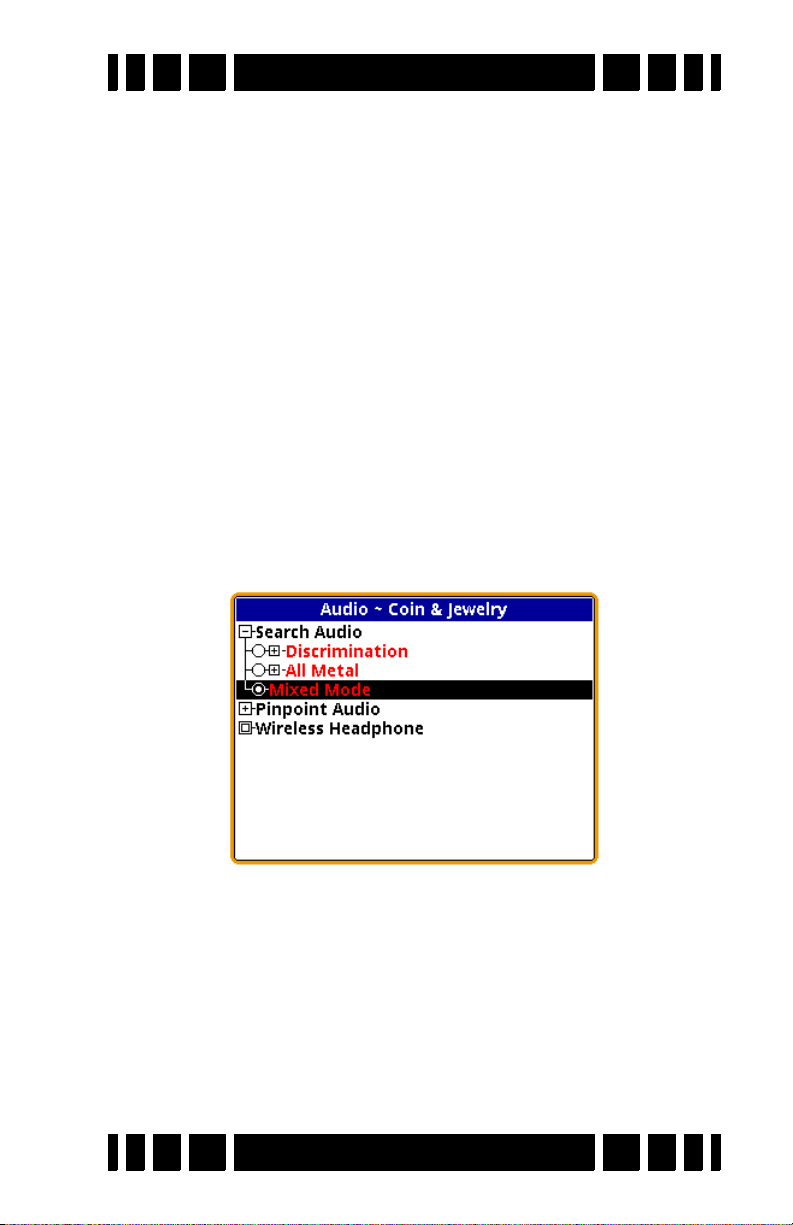
Audio
The audio settings presented in Chapter 2 which were
accessed from the Live Control Bar were limited to Volume and
Threshold. The Audio menu also has three audio modes you can
choose, with additional settings for each:
We will cover the modes first, then proceed through the various settings, not necessarily in the order of the menus. To help
explain the audio modes, let’s take a graphical look at the VX
audio system, shown on the next page.
The
Rx Gain setting (in the Sensitivity menu) is applied to
Page 4-6
3
Page 44

Spectra VX
Rx Gain
Disc.
Sens.
AM Sens.
Target/Threshold
Volume
AM
Volume
Rx Coil
Audio
Mode
Disc
AM
Mixed
Speaker
Headphones
Wireless
Headphones
Tone
ID
AM Tone
& VCO
Discrimination Channel
All-Metal Channel
Modulation
Threshold
Tone
3
User’s Guide
the raw input signal from the coil. The signal is then split into
two processing channels, one for all-metal and one for discrimination, and these channels have their own audio responses. VX
has the following three search audio modes:
•All-Metal
• Discrimination
• Mixed-Mode
3
All-Metal mode produces audio only from the all-metal
channel, and Discrimination mode produces audio only from
the discrimination channel. Mixed-mode produces both the allmetal audio and discrimination audio. The audio can be sent to
a standard speaker, a pair of plug-in headphones, or wireless
headphones.
Note that the various settings apply only to one or the other
processing channels (audio modes). It’s important to remember
which settings affect which mode, and that’s not difficult once
you understand what the settings do.
All-Metal Audio
The all-metal channel simply detects and indicates metal
targets. It does not care what those targets are, nor does it
attempt to tell you what they are. The all-metal audio channel is
also used during pinpointing.
Page 4-7
Page 45

Spectra VX
High
Low
Tip: In the normal all-metal mode, SAT (self-adjusting
threshold) is applied so if you hold the search coil steady
over a target, the audio response will fade away on its own.
In pinpoint mode, SAT is not applied so you can hold the
search coil steady over a target and the response will
remain steady.
3
User’s Guide
In this channel, the All-Metal Sensitivity setting is basically
an additional gain setting applied to the all-metal signal above
and beyond the Rx Gain setting. The following graph shows a
signal with both a low setting (black trace) and a high setting
(gray trace). The higher sensitivity setting improves target signals, but it also increases the amount of audio noise and can
make VX3 more “chattery.” This is especially true when EMI is
present.
All-metal audio can be presented in one of two ways: VCO,
and non-VCO. This selection is found at Audio Search
Audio
All MetalVCO:
Page 4-8
Page 46

Spectra VX
Increasing Volume
Fixed Threshold Tone
Increasing Pitch
VCO Threshold Tone
3
User’s Guide
If VCO audio is disabled then the all-metal audio response
will be a fixed tone, and an increasing signal level creates an
increase in its loudness:
In other words, as the search coil is passed over a target, the allmetal audio will begin at a low volume and progressively rise in
loudness as the target signal gets stronger, peaking when the
search coil is directly over the target.
If VCO audio is enabled then an increasing signal level cre-
ates a rising audio tone or pitch:
In other words, as the search coil is passed over a target, the allmetal audio will begin at a low tone and progressively rise in
pitch as the target signal gets stronger. The highest pitch is
achieved when the search coil is directly over the target (strongest target signal) and then the audio falls in pitch as the coil
moves off the target. As with non-VCO audio, loudness also
rises and falls.
Tip: The human ear is more sensitive to changes in pitch
than to changes in loudness. Therefore, deep targets that
produce only a very slight all-metal signal will be easier to
discern using VCO audio. However, some people just don’t
like VCO audio or have hearing problems, so the option to
turn it off is also provided.
Page 4-9
Page 47

Spectra VX
Threshold
Detection Signal
Audible Signals
3
User’s Guide
Discrimination Audio
Unlike the all-metal channel, the discrimination channel
does not treat all targets alike. Discrimination uses the VDI
(phase) response of the target to determine how to respond. It is
possible to assign different tones to different VDI responses, or
to completely ignore targets with certain VDI responses.
Discrimination Sensitivity
In this channel, the Discrimination Sensitivity setting determines a threshold level above which you will hear target
responses. In many detectors, this setting is simply called
Threshold, but VX3 has separate adjustments for each channel.
The following graph shows the relationship between the threshold level and the detection signal. Only detection signals that
exceed the threshold level (shaded in gray) will become audible
target signals. Otherwise, you will only hear the threshold tone.
threshold, making VX3 more sensitive to weak target signals.
Like All-Metal Sensitivity, this can also increase the amount of
audio noise, and can make VX3 more chattery, especially when
EMI is present.
Threshold Volume
the
ume all the way to zero will result in silent-search (no threshold
tone).
Targ et Vol ume
response (that is, the target beep) in discrimination mode. The
Increasing the Discrimination Sensitivity setting lowers the
The loudness of the discrimination threshold tone is set by
AudioAudio Threshold control. Setting the threshold vol-
Target Volume adjusts the volume for the target
Audio
Page 4-10
Page 48

Spectra VX
3
User’s Guide
Target Volume setting cannot be less than or equal to the Audio
Threshold setting or targets will not be heard. VX3 attempts to
maintain a minimum 8dB loudness separation between them.
That is, if you try to increase the Audio Threshold setting too
close to a corresponding Target Volume setting, the Target Volume will automatically increase in order to maintain an 8dB
loudness difference.
Modulation
Audio
Search AudioModulation allows you to enable tar-
get audio modulation and to adjust its effect. Modulation is a
technique where progressively deeper targets have a progressively weaker audio response (the beep). A shallow target produces a loud response, and a deep target produces a soft
response. If modulation is disabled, then VX
3
attempts to pro-
duce the same response loudness regardless of target depth.
With modulation enabled, you can also adjust the Range set-
ting, which affects the strength of the modulation. A low setting
makes shallow and deep responses more similar in loudness,
and a high setting makes the modulation more pronounced.
Tip: Modulation is most effective when you want to distin-
guish between deep and shallow targets of similar type.
For example, if shallow coins are likely to be clad and deep
coins are likely to be silver, then modulation will give you
that information in the audio response.
Page 4-11
Page 49
Spectra VX
Tone ID
3
User’s Guide
Any modern discriminating detector has at least a rudimentary audio method of distinguishing accepted targets from
rejected ones. This may be as simple as an audio response for
accepted targets and no audio response for rejected targets.
More advanced detectors have a tonal identification system
where different tones represent different target ranges (phase
responses).
3
has the ability to produce a different tone for each VDI
VX
number. But it can also produce a simple beep/no beep audio for
those who don’t want the complete tone ID system. If the
AudioSearch AudioTone ID selection is unchecked, then all
accepted targets will respond with a single tone. If it is checked,
then the target response will use progressively higher tones for
increasing VDIs.
Mixed-Mode Audio
Without mixed-mode, you can hear either the all-metal
audio or the discrimination audio. The all-metal channel doesn’t
tell you anything about the quality of a target; the discrimination channel only signals on accepted targets, and rejected targets cause a null in the audio. Weak targets below the
discrimination threshold produce no discrimination response.
Mixed-mode lets you hear both audio channels. The advantage is that you can hear the responses of all targets, even those
Page 4-12
Page 50
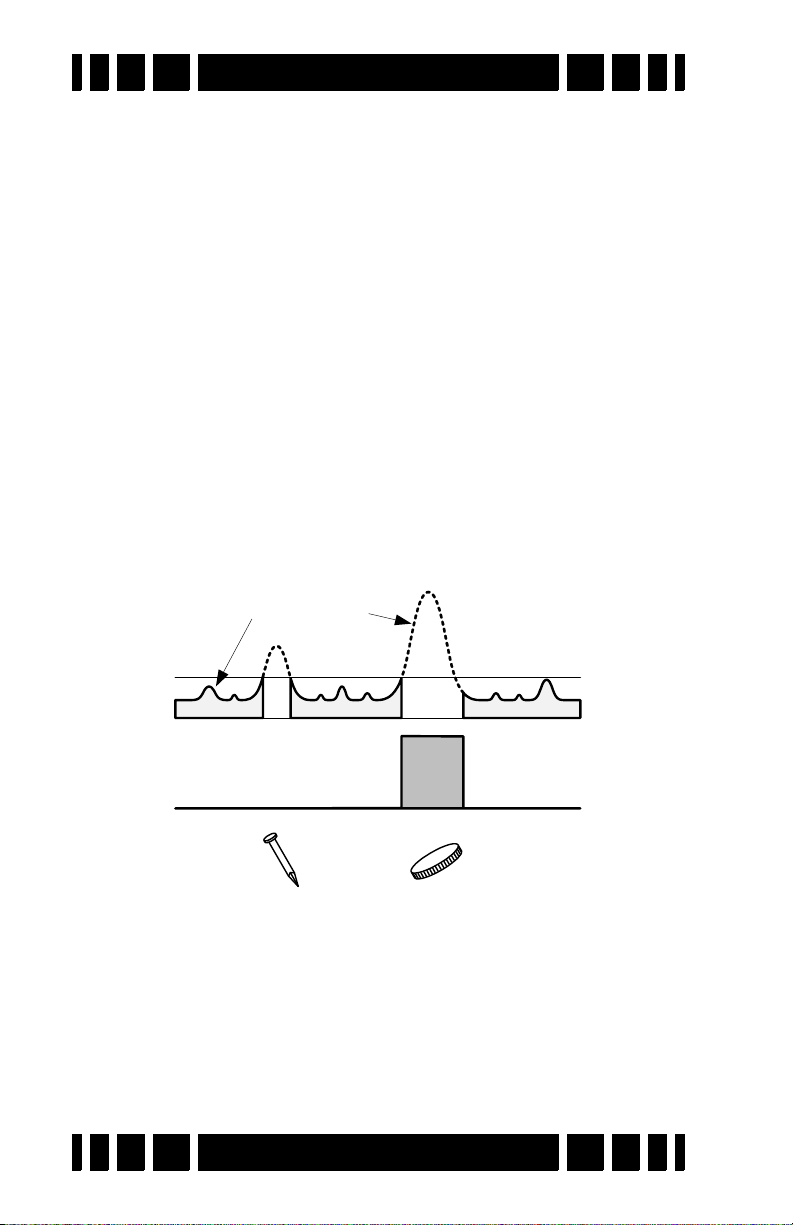
Spectra VX
Discrimination Audio
All-metal Audio
Target
Beep
Disc Threshold
Signal response
3
User’s Guide
that are below the discrimination threshold. This can help in target separation, especially in trashy areas, and can also help in
pinpointing targets. On the other hand, the increased target
responses can be overwhelming and create audio fatigue, especially for new users.
Mixed mode equally applies both the all-metal audio and
the discrimination audio to the speaker or headphones. In the
absence of targets, or for targets below the discrimination
threshold, the mixed-mode audio output will be the all-metal
response, and you will hear the all-metal threshold plus the allmetal response of rejected targets. When an accepted target is
detected, the discrimination audio will take over and you will
hear the discrimination tone for the target; for a rejected target
you will still get an audio null. Due to a hardware limitation,
both audios cannot sound at the exact same time, so as the discrimination audio comes in, the all-metal audio cuts out. This is
illustrated below.
When mixed-mode is selected, there are no additional set-
tings. By default, Tone ID is on, modulation is set to 1, and allmetal VCO is on.
Pinpoint Mode
Although technically not one of the three major search
audio modes, pinpoint audio could be used for searching if you
Page 4-13
Page 51
Spectra VX
pull and hold the pinpoint trigger switch or flip it to the forward
position. Pinpoint audio is identical to all-metal audio with one
exception: normal all-metal mode has SAT applied to it, and
pinpoint does not. That means the all-metal channel requires
loop motion or the target will get “tuned out,” but pinpoint does
not require loop motion.
Pinpoint audio has only one option, VCO, which is the same
as with the all-metal search mode.
3
User’s Guide
Discrimination
A primary feature of practically all detectors since the
1970’s has been discrimination. VX3 is no different. Discrimination, of course, allows us to accept or ignore certain targets
based on their phase (or VDI) response. In analog detectors, this
is accomplished with a knob that sets the threshold point of discrimination; everything below the threshold is rejected, and
everything above is accepted.
Modern digital detectors take discrimination to a higher
level, allowing the user to accept and reject narrow VDI
regions. VX3 has a discrimination resolution that allows individual VDI number to be accepted or rejected. The Discrimination
menu is:
Unlike the Disc entry on the Live Control Bar, the Disc
menu includes the icons assigned to each VDI, making it a little
Page 4-14
Page 52

Spectra VX
3
User’s Guide
easier to see what kinds of targets you are accepting and rejecting. Keep in mind that these are only potential target types, and
that many targets (especially jewelry) can have broad ranges.
Tip: There are 191 VDI numbers, and setting each one indi-
vidually can take a long time. There is a short-cut: when
you press the
continue holding down the
or button to rapidly set a range of VDI’s to the same setting.
ENTER button to check or un-check a VDI,
ENTER button, then press the
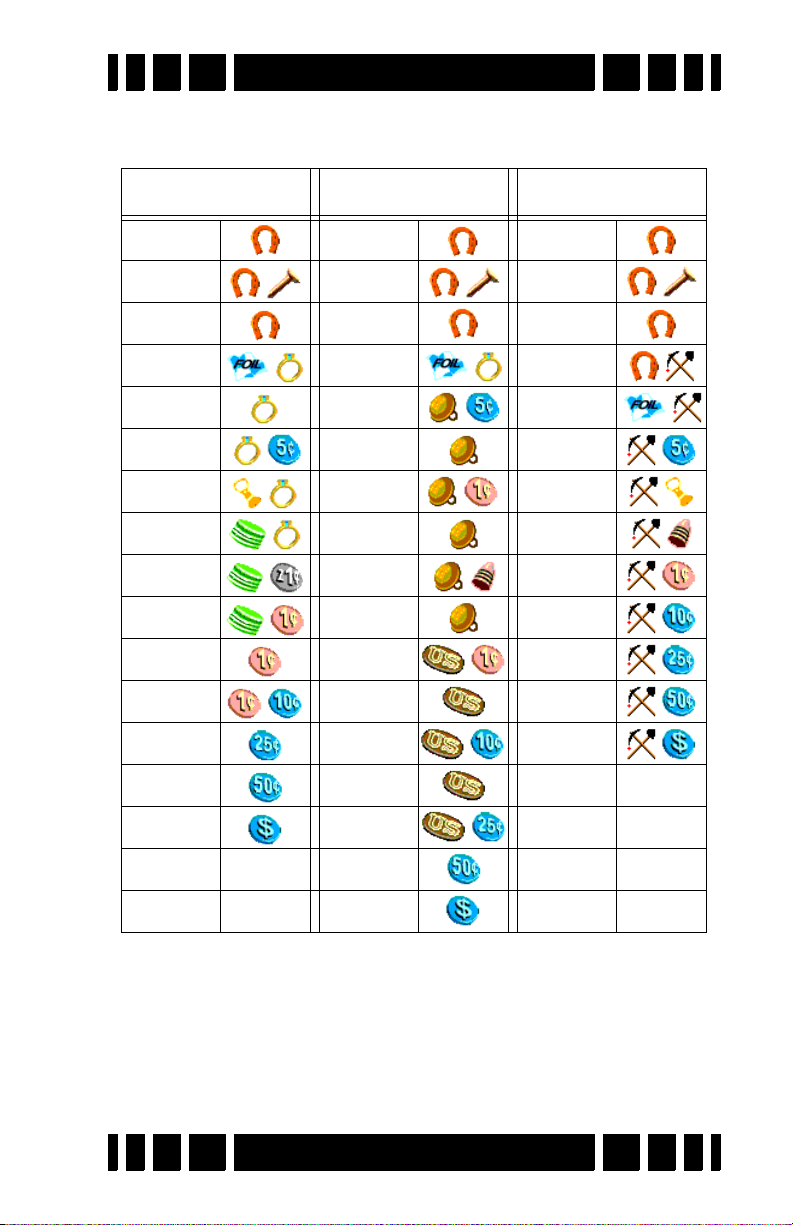
The icons that are assigned to the VDIs depend on the pro-
gram selected. There are three pre-defined icon tables for Park,
Relic, and Prospecting. These are shown on the next page. In
the factory programs, the Park icon set is used for all programs
except Relic and Prospecting.
Speaker and Headphones
VX3 provides three ways to listen to audio:
•Speaker
• Plug-in headphones
• Wireless headphones
When you plug in a set of headphones, the speaker is disabled.
When wireless headphones are enabled and connected, the
speaker is disabled but plug-in headphones are still enabled,
allowing two people to use headphones for training purposes.
Basic wireless headphone connection was covered in Chapter 2;
see Chapter 8 for more detail.
Page 4-15
Page 53
Spectra VX
3
User’s Guide
Preset Icon Tables
Park Relic Prospecting
-97 to -57 -97 to -57 -97 to -57
-56 to -27 -56 to -27 -56 to -27
-26 to -1 -26 to -1 -26 to -21
+0 to +12 0 to +17 -20 to -1
+13 to +16 +18 to +23 0 to +16
+17 to +24 +24 to +37 +17 to +24
+25 to +50 +38 to +40 +25 to +50
+51 to +54 +41 to +44 +51 to +57
+55 to +57 +45 to +55 +58 to +75
+58 to +68 +56 to +60 +76 to +80
+69 to +75 +61 to +70 +81 to +86
+76 to +80 +71 to +75 +87 to +90
+81 to +86 +76 to +78 +91 to +94
+87 to +90 +79 to +82 +95 NONE
+91 to +94 +83 to +86
+95 NONE +87 to +90
+91 to +93
Page 4-16
Page 54
SpectraGraph VDI
Live Control Bar
Disc.
Mask
Status
Bar
Icons Depth
Display
5
Screens
CHAPTER
VX3 has two display screens which depend on the position
of the trigger switch:
Search screen: Trigger neutral
Pinpoint screen: Trigger pulled or forward
Search screen
The Search screen has several regions as labeled above. The
central part of the screen is the SpectraGraph which plots the
target response in terms of signal strength versus VDI. In the
screen shown, there are three of these responses, one for each
frequency. The top region shows the (composite) VDI readout,
icons, and depth. The “status bar” shows a few status icons and
other information. The Live Control Bar has been covered in
previous chapters.
Page 5-1
Page 55

Spectra VX
No VDI No VDI
Peak VDI
Changing VDI
3
User’s Guide
VDI
As the loop sweeps over a target the received target signal
rises, peaks, and then falls. Ideally the VDI1 of a “well-
behaved2” target is independent of signal strength, but in reality
weak signals will show errors in the VDI. For that reason, the
most accurate VDI will occur at the peak of the target signal
response. Therefore, as you sweep over a target (especially with
a slow sweep) you may see the VDI rapidly change before it
locks onto a final value:
In three frequency mode the VDI is a composite number
based on the peak VDI readings of at least the two strongest
responding frequencies. For that reason, you may occasionally
notice that the VDI number does not exactly match the SpectraGraph response, especially for a weak frequency. In single frequency mode the VDI is obviously taken off the one active
frequency.
Since VDI accuracy diminishes with depth, deep targets can
produce erroneous VDIs. High ground mineralization can also
shift VDIs; again it gets worse for deep targets. This is where
experience determines whether you pass over a 1914D Lincoln
because the VDI looked like a zinc cent. The best way to learn
your detector is to dig a lot of targets, paying close attention to
exactly what the detector was telling you before you dug it up.
1. Visual Discrimination Indicator; see Chapter 1.
2. Such as a flat round disc-shaped homogeneous metal target laying horizontally.
Page 5-2
Page 56

Spectra VX
3
User’s Guide
Icons
Icons are simply a pictorial representative possibility of the
VDI number. Because many different targets can overlap in
their VDI numbers, sometimes two icons are presented as possibilities. For example, pull tabs and gold rings often share VDI
ranges. As you learn VX3, you should find yourself paying less
attention to the icons and more to the VDI number and the
SpectraGraph bars.
Depth
The depth readout in normal search mode is only an estimate. With any detector, depth is calibrated for particular targets, usually certain coins, and many other targets may show a
large error. For example, ring targets can be deeper than their
displayed depth, and shallow stainless steel may display a
deeper reading.
Furthermore, the depth displayed in search mode is a “live”
depth reading where the signal has passed through several
stages of filters. Live depth can vary with sweep speed, typically reading deeper as you sweep slower. Pinpoint depth is
based on a static signal and is usually more accurate. Use the
live depth reading with a degree of skepticism, and the pinpoint
depth as more realistic.
SpectraGraph
®
The SpectraGraph
display is a progression of White’s Sig-
naGraph® which was used in XLT and DFX. Besides the addition of color, SpectraGraph plots the response of each frequency
separately, so you can see individual variations in the VDI
responses, amplitudes, and decays. The highest frequency is
always on top. Obviously, in a single-frequency mode only one
frequency is plotted.
SpectraGraph plots target signal strength versus VDI. Note
that the VDI axis is not linear; the negative half (-95 to 0) is
compressed compared to the positive half (0 to +95). This is
Page 5-3
Page 57
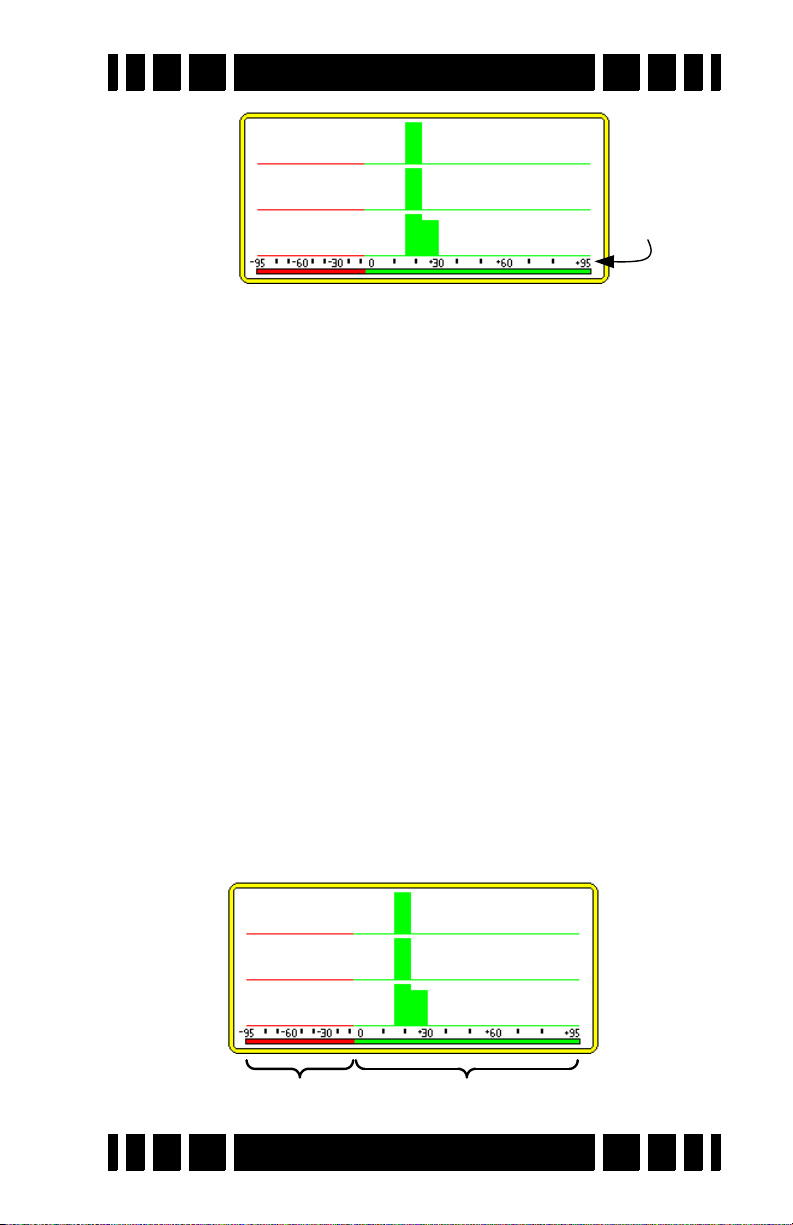
Spectra VX
22.5kHz
7.5kHz
2.5kHz
VDI
Scale
Rejected Accepted
3
User’s Guide
because we are mostly interested in what goes on in the positive
half, where the majority of good targets respond. The negative
half is mostly where iron falls.
Also note that each response bar is 7 VDI points wide. This
means that the bars don’t represent a precise VDI number, but
rather a small range of numbers. Because the negative side of
the graph is compressed, bars in the iron region will appear to
be more narrow, thought they are still 7 points wide. In some
cases a target response will exhibit a VDI response that exceeds
7 points, and the SpectraGraph will show this as more than one
bar. This can be seen in the example above for the 2.5kHz
response.
The “disc. mask” is the portion of the SpectraGraph region
which shows the current discrimination mask. In the following
example (Coin & Jewelry), everything below -5 is red
(rejected), and everything at or above -5 is green (accepted).
The response bars in the SpectraGraph are color-keyed to the
disc mask. When you edit the discrimination pattern (see Chapter 3) the disc. mask and response bar colors will reflect those
changes.
Page 5-4
Page 58

Spectra VX
Quarter
-95 +95
0
+83
3
User’s Guide
Ideally all targets would have tight responses that are
repeatable. The closest you can get to that is to air test targets 34” from the coil, and that is not a bad start to learn how different
targets respond. However, just like we discussed with VDI
numbers, as a given target moves farther from the coil, its
response gets weaker and exhibits shifts and spreading in the
graph response, and is not as repeatable. This gets even worse
in mineralized ground.
Even with three frequencies and SpectraGraph, interpreting
target responses can be tricky business. Experience is the best
teacher (learn by digging lots of targets!), but there are a few
tricks we can discuss.
Smearing
A “well-behaved” target will have a response that closely
follows a constant VDI as the loop is swept over it. The vector
response for such a target would start at zero, follow a straight
line on a constant VDI up to the signal peak (where the loop is
centered on the target), and return to zero as the loop is moved
away. It will graphically look like3:
This might represent a somewhat shallow quarter, and would
have a SpectraGraph response with nice tight bars. Note the
black dot, which indicates the peak signal strength; this is also
the point where the VDI number is calculated. The same quarter
buried deeper begins to exhibit a small amount of curvature in
the vector response:
3. See Ch. 1 for background info on vector responses.
Page 5-5
Page 59

Spectra VX
Quarter
-95 +95
0
+83
Bottle
cap
-95 +95
0
+24
3
User’s Guide
Now the signal response starts at zero and still reaches approximately the same peak point (perhaps resulting in the same final
VDI), but shows some curvature on the way up and on the way
back. Because the SpectraGraph response is taken from the
whole of the signal response and not just the peak, this can
result in a “smearing” effect in the bars, as shown here:
Pay attention to the amount of smearing compared to the depth
and the composite VDI number. If it seems like it might be a
good target that’s just deep, then that is exactly the sort of target
you want to dig.
Trash targets, especially iron, can exhibit significant smearing. To illustrate why, let’s look at the vector response of a bottle cap:
Page 5-6
Page 60

Spectra VX
As the loop is swept over the bottle cap, the phase response varies wildly. This will not only result in smearing of the SpectraGraph plot, but will also cause it to jump around significantly
before it locks on to a final reading. Such a final reading might
look like:
Notice the peak point from which the composite VDI is cal-
culated; it is clearly in the non-ferrous (good) region, even
though bottle caps are typically steel. The point of all this is to
pay close attention to what VX3 is telling you all the time, not
just the locked-in response. When you initially detect a target,
go back over it with deliberately slow sweeps and watch the
dynamic responses.
3
User’s Guide
Unaligned bars
Because VX3 normalizes the VDI responses of each fre-
quency, the SpectraGraph bars tend to be vertically aligned. In
some cases they are skewed, indicating a possible “problem”
with the target. For example, in the prior SignaGraph response
of the bottle cap, the bars have a very poor correlation, caused
by the ferrous properties of the bottle cap.
However, like everything else, there is no hard-and-fast rule
at work here. Mineralized soil can also affect frequencies differently such that deeper targets have unequally shifted phase
responses. In the “deep quarter” SpectraGraph on the previous
page, there is some skewing of the bars. Again, look at the
dynamic responses, and also pay attention to the repeatability of
the target responses. If every sweep across the target produces a
different response, then it is questionable (but if it is very deep,
consider digging it!).
Page 5-7
Page 61

Spectra VX
Mixed response
3
User’s Guide
Sometimes you will see response bars that include both
green and red:
This simply means that the target is on the edge of the rejection/acceptance point. Because each bar is 7 VDI points wide a
target that is accepted can still show some red in the response
bar.
In the above graph, notice that the 22.5k and 7.5k frequencies are nicely aligned, and the 2.5k response is both slightly
skewed and broader. This generally indicates that the 2.5k
response is less reliable, as it had trouble “locking” to a particular VDI.
Wrap-around
Occasionally targets will “wrap around” between +95 and -
95. This can be due to a high conductive target (a silver dollar,
we hope) getting shifted upward by mineralization. Or, on the
down side, it could be due to a “cold rock,” a mineralized rock
that is below the ground balance point. Again, paying attention
4
to how other targets are behaving
will give you a strong clue as
to which of these is more likely.
Status Bar
The final part of the screen to discuss is the Status Bar. To
the left is a group of icons which depict (1) the trigger switch
mode, (2) wireless headphone status, and (3) backlight status.
4. Are dimes and quarters tending to read high? This could be due
to mineralization.
Page 5-8
Page 62

Spectra VX
22.5kHz
7.5kHz
2.5kHz
The status bar also displays the currently loaded program. If
Autotrac is enabled, the program name may occasionally get
overwritten by a “tracking” message, indicating that VX3 is
adjusting its tracking point.
3
User’s Guide
Pinpoint Screen
The Pinpoint screen has regions similar to the Search
screen, and is accessed by pulling the trigger switch. The central part of the screen is the Pinpoint bars which show the live
signal strength of the received signal, regardless of what causes
it. In the screen shown, there are three of these responses, one
for each frequency, again with the highest frequency on top.
The top region shows depth. The same status bar and Live Control Bar are also displayed.
In 3-frequency mode the pinpoint bars show which frequency has the strongest response. In the example above,
2.5kHz is strongest. The outlining rectangle around each bar
serves as a signal “peak” indicator; that is, the rectangles show
the maximum peak the bars have achieved during the pinpoint
activity. This is useful in determining the exact position of the
target.
Page 5-9
Page 63

Spectra VX
Salt Mode Anomaly
Normally in Pinpoint mode all targets will produce an audio
response as well as the screen response. However, targets that
are below the ground balance point will produce nulled audio
response. In normal ground, this is not a problem as targets are
never below the ground balance point5. But in saltwater hunting, the ground balance point can be close to a VDI of 0, meaning that the entire iron range could be below the balance point.
If you are saltwater-hunting and find that a target “disappears” in pinpoint mode, it is likely below the ground balance
point, and it is likely iron. You will notice, however, that the
Pinpoint bars still properly respond to the target, so you can still
pinpoint it and dig to verify.
3
User’s Guide
5. Except for cold rocks.
Page 5-10
Page 64

Advanced
6
Features
CHAPTER
Main Menu
So far, we’ve mostly used the Live Control Bar and its asso-
ciated menus (by pressing VIEW) for making changes to VX3.
All controls and settings (except for Backlight) are available in
one place called the Main Menu. It is accessed from the search
screen by pressing MENU:
The top-level contents of the Main Menu mirror the con-
tents of the Live Control Bar, though the order is different. The
only item in the Main Menu not found in any Live Control
menu is the ability to restore programs, which is covered in
Chapter 7.
Navigate through the menus with the and buttons and
press ENTER to open and close submenus. You can quickly back
out of menu trees and collapse the structure as you go by press-
MENU+. Bookmarks are a convenient way to get to often-
ing
used settings and can be set (or cleared) by pressing
MENU+ENTER. You can jump between bookmarks by pressing
MENU+ or MENU+.
Page 6-1
Page 65
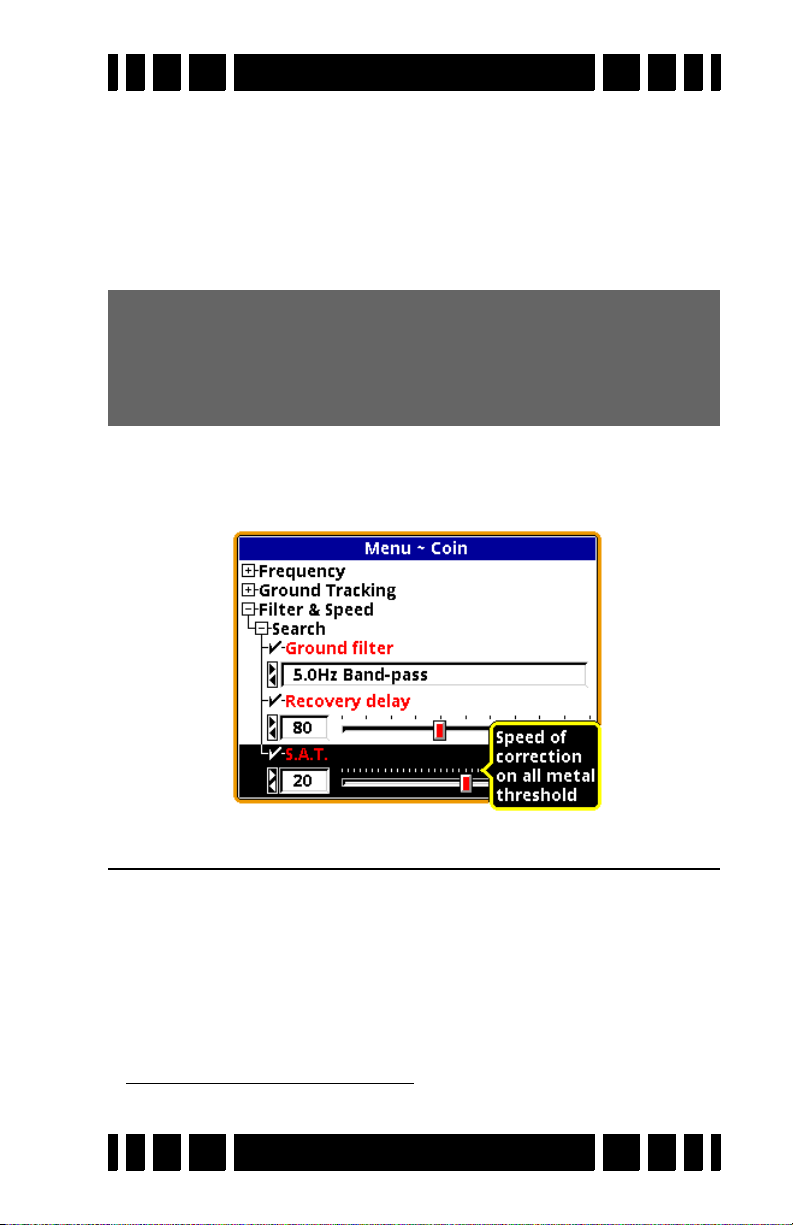
Spectra VX
3
User’s Guide
Most selections available in the menus consist of slider controls, radio buttons, or check boxes. Sliders are changed with
the and buttons. Note that a control has a “” in front of
its name when the control is set to the default value. The name
is preceded with a “” when the value is different than the
default value1.
Tip: Use MENU+ and MENU+ to quickly jump a slider
setting between minimum, default, and maximum values.
Bonus Tip: This also works (but with
MENU+) in the Live Control Bar.
MENU+ and
Finally, from any of the menus (Main Menu, or Live Control menus) you can flip the trigger switch forward and VX3 will
show pop-up help balloons:
Filters & Speed
The only features of VX3 not yet discussed at all are found
Filter & Speed section of the Main Menu:
in the
1. In the Live Control pop-ups, default values are underlined.
Page 6-2
Page 66

Spectra VX
Ground Filter
Modern VLF metal detectors use electronic filters both to
remove unwanted noise — such as electromagnetic interference
(EMI) from radio signals and power lines — and to remove the
portion of the received signal due to ground mineralization (see
Chapter 1). Different filters offer trade-offs in performance.
Severe mineralization usually requires more filtering which can
affect depth. High EMI likewise requires more filtering. The
type and amount of filtration will usually affect loop sweep
speeds.
3
User’s Guide
VX3 allows you to choose between two filter settings:
• 5Hz Bandpass — Lower mineralization, good EMI rejection,
allows slower sweep speed
• 12.5Hz Bandpass — Higher mineralization, good EMI rejection, requires higher sweep speed
Most programs use the 5Hz Bandpass filter as the default. This
is the best overall choice for low-to-moderate mineralization,
has good EMI rejection, and allows for a slower sweep speed
while still working well with faster sweep speeds. In extreme or
highly variable mineralization VX3 can become chattery when
sweeping the loop; the 12.5Hz Bandpass filter may help.
Page 6-3
Page 67

Spectra VX
Received
Signal
Disc.
Tone
Slow Recovery Delay Fast Recovery Delay
3
User’s Guide
Recovery Delay
A detected target creates an audio response in the all-metal
channel which exactly follows the target’s received signal. In
the discrimination channel, an accepted target creates an audio
response which is generated near the peak of the received signal
where the VDI is likely to be most accurate, especially necessary for generating a proper tone ID. A rejected target produces
a null in the audio threshold. The disc tone or threshold null is
maintained for a short time thereafter. This is illustrated as follows:
The recovery delay determines how long the disc response
(tone or null) lasts. A longer delay results in a longer response.
In trashy sites, a long response delay can mask targets that are
close to rejected trash. Even good targets close to each other
will be difficult to separate. A short response (shorter recovery
delay) makes it easier to separate close targets.
The drawback to a faster response is that deep targets may
not generate a long enough response to be noticeable. The
default setting for recovery delay is moderately fast. In trashy
sites, an alternative to reducing recovery delay is to slow down
the sweep speed of the loop.
Page 6-4
Page 68
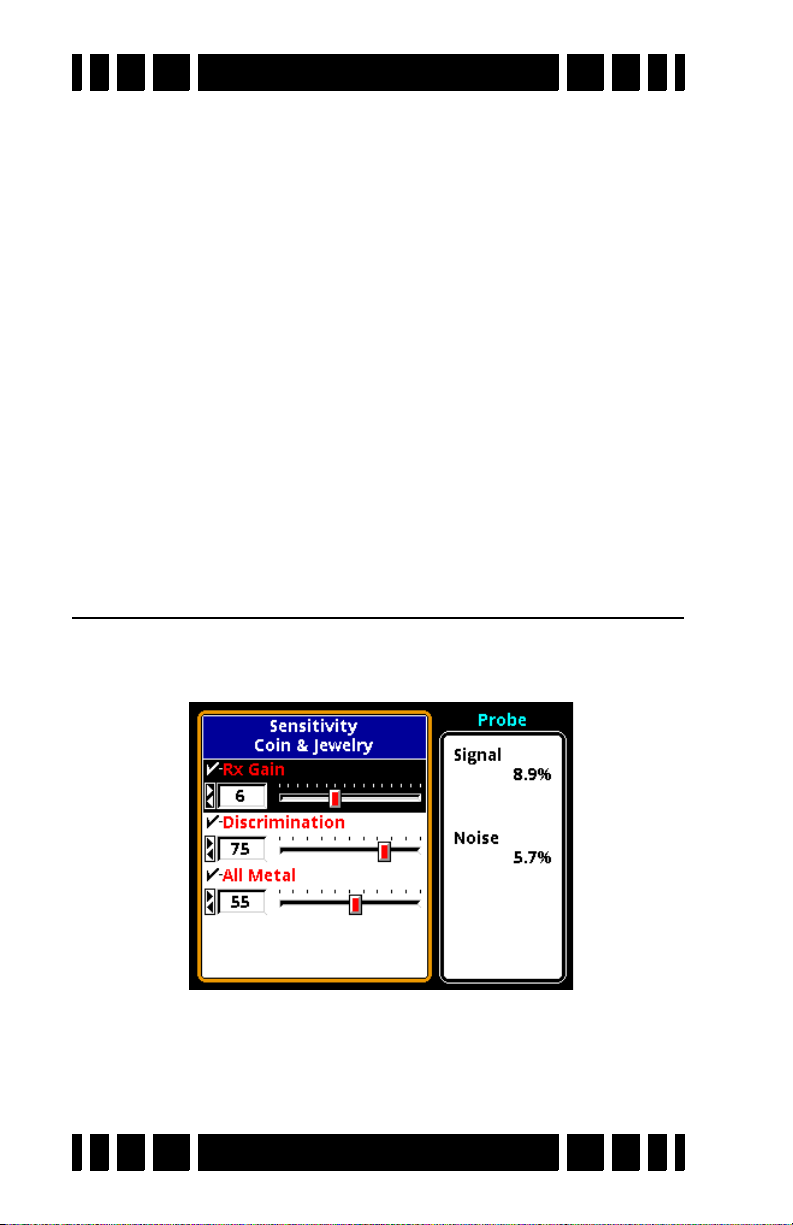
Spectra VX
S.A.T.
SAT stands for self-adjusting threshold and is a property of
the all-metal channel. In normal all-metal mode, the SAT continuously works to return the all-metal signal to a threshold
point, even in the presence of ground or target signals. Therefore, when the loop is held steady over a target, the target
response will eventually fade away. This helps produce a more
stable all-metal audio as ground conditions vary.
A faster SAT (higher number) results in a quicker return to
threshold, which can give targets a sharper all-metal response.
Like a fast recovery delay, a drawback to fast SAT is that deep
targets can vanish.
SAT is not applied to the Pinpoint all-metal mode. It is only
noticeable in an all-metal program (like Prospecting) or a
mixed-mode program.
3
User’s Guide
Sensitivity Probe
If you select Sensitivity from the Live Control Bar and press
VIEW, you will see the Sensitivity menu:
On the right side of the screen are two live “signal quality”
numbers. The “Signal” number tells you what percent of the
total signal range is currently being received; that is, how much
Page 6-5
Page 69

Spectra VX
3
User’s Guide
“residual” signal is being seen. Ideally, if you hold the loop in
the air away from metal targets, this number should be zero.
However, it is impossible to make a perfect loop null so this
number is usually at least a few percent. Ground mineralization
also creates a residual signal, so as you lower the loop to the
ground you may see an increase in the Signal percentage.
In most cases you should adjust the Rx Gain to maintain a
3
residual Signal of no more than 30-40%. VX
will overload at
60%, so it’s still possible that large shallow targets will cause an
overload.
Tip: An overload signal is a long, loud grunt. If you are get-
ting a lot of overloading, drop the Rx Gain.
The Noise number represents the amount of spurious noise;
that is, noise that comes and goes, as opposed to the residual
signal which is continuous. This is the noise that is often audible, especially in Pinpoint mode, as chatter. A high noise level
(more than a few percent) should persuade you to consider a
different frequency offset, or to try the 5Hz Bandpass filter.
Ground Probe
If you select Tracking from the Live Control Bar and press
VIEW, you will see the Tracking menu:
Page 6-6
Page 70
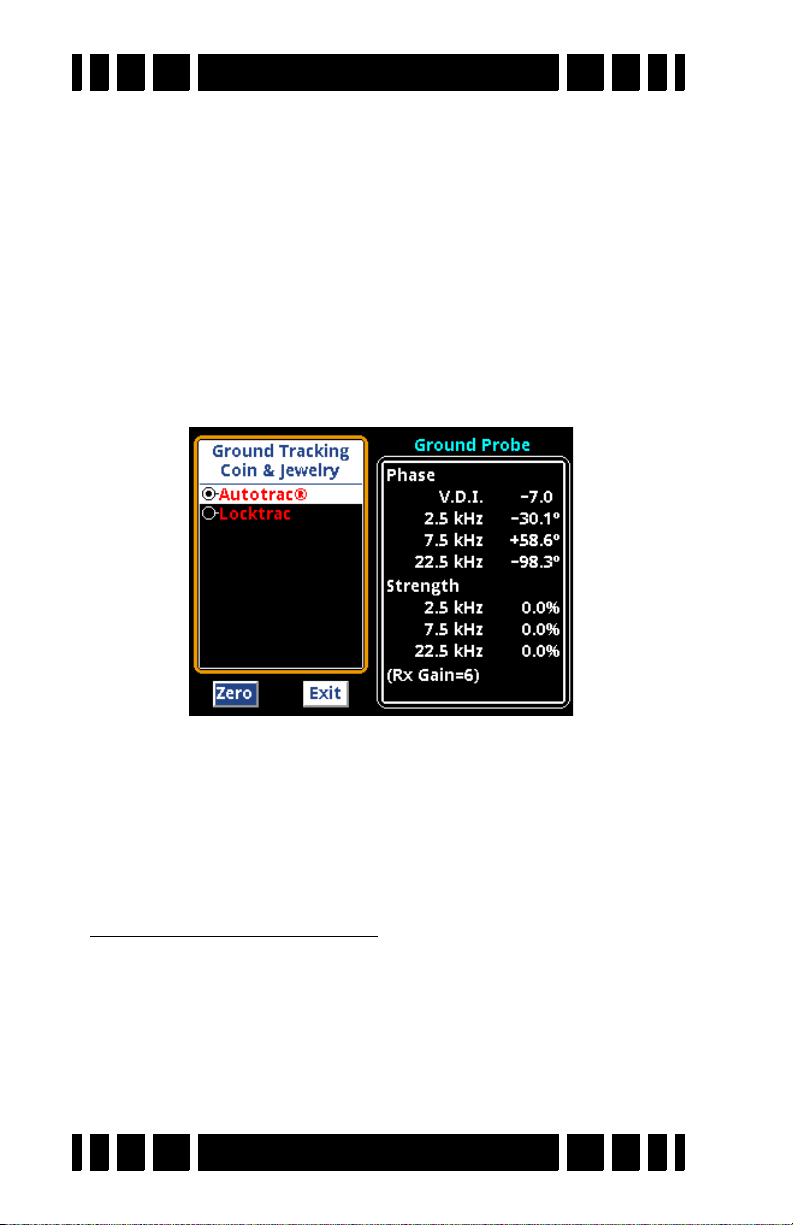
Spectra VX
3
User’s Guide
The right side of the screen reports the phase and strength of
the residual signal2, and does so for each individual frequency3.
This is useful for analyzing the characteristics of the ground,
but only if the residual signal consists purely of ground signal.
This will be true if (1) we can get rid of other residual signals
like an imperfect loop null, and (2) if we put the loop over target-free ground. To get rid of any residual loop null signal, hold
the loop in the air (and away from metal, natch), TAB to select
Zero button, and press ENTER. Ground Probe is now zeroed,
the
and you should see the Strength numbers go to 0% and the
phase numbers jump around a lot:
Now you can lower the loop to the ground, careful to avoid
targets, and the Phase and Strength numbers will be that of the
ground. VX
3
is calibrated at the factory to a ferrite sample,
which ideally should read 178°. Most ground mineralization
4
should read close to that
2. Whereas the Sensitivity Probe screen only show a composite
residual signal strength.
3. Of course, in single-frequency mode only that frequency is
reported.
4. In Chapter 1 ground phase was described as being close to 0°.
Now we say it’s close to 180°! Actually, 0° is “scientifically”
correct, but the VX
.
3
programmers like to do things backwards.
Page 6-7
Page 71

Spectra VX
You can also use the Ground Probe to analyze target signals,
and can see exactly how signal phase and strength vary with
frequency. This may be of limited use in the field, however,
because a buried target also has ground above it so the Ground
Probe will give you the total response of the two. If the coil is
placed on the ground (target-free area) when the Ground Probe
is zeroed, this will largely leave you with only the target signal,
but it is subject to errors due to variations in ground as you
move the coil around.
3
User’s Guide
Page 6-8
Page 72
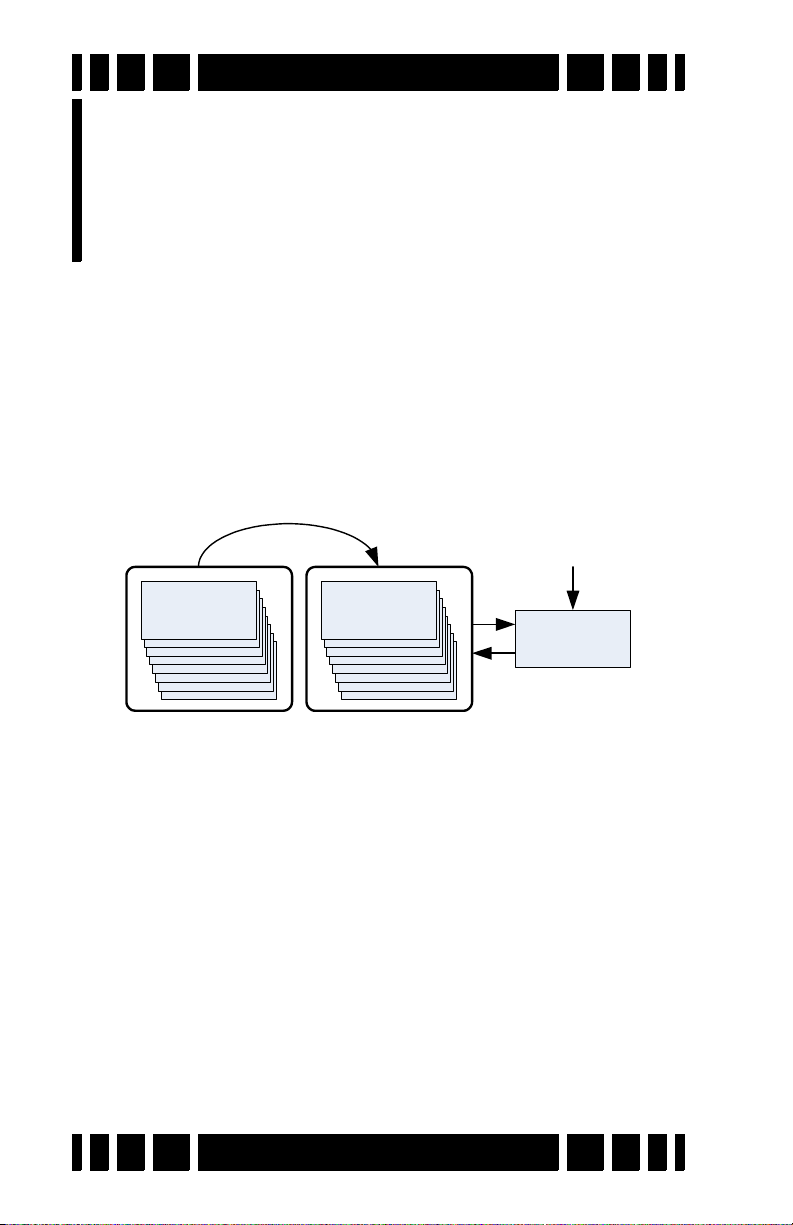
Coin &
Jewelry
Coin &
Jewelry
Coin &
Jewelry
Library
Active
Copy
Restore
Modifications
Programs
7
CHAPTER
As covered in Chapters 2 and 3, VX3 comes with 8 preset
factory programs. Any of these programs can be modified, and
they can easily be restored to original factory settings at any
time. To better understand programs, let’s take a look at how
VX3 stores programs.
VX3 Memory Structure
Below is a diagram of VX3’s memory structure:
There are two memory regions, Library and Copy, plus the currently active program. The 8 factory programs are stored in the
Library region which cannot be modified. Copies of the factory
programs are also stored in the Copy region. This memory
region can be modified.
3
When you start up VX
another, the active program is always loaded from the Copy
region. When you change a setting, it is only applied to the
Active program. When VX3 is turned off, the Active program is
automatically copied back to the Copy memory so that any
altered settings are saved.
or change from one program to
Page 7-1
Page 73
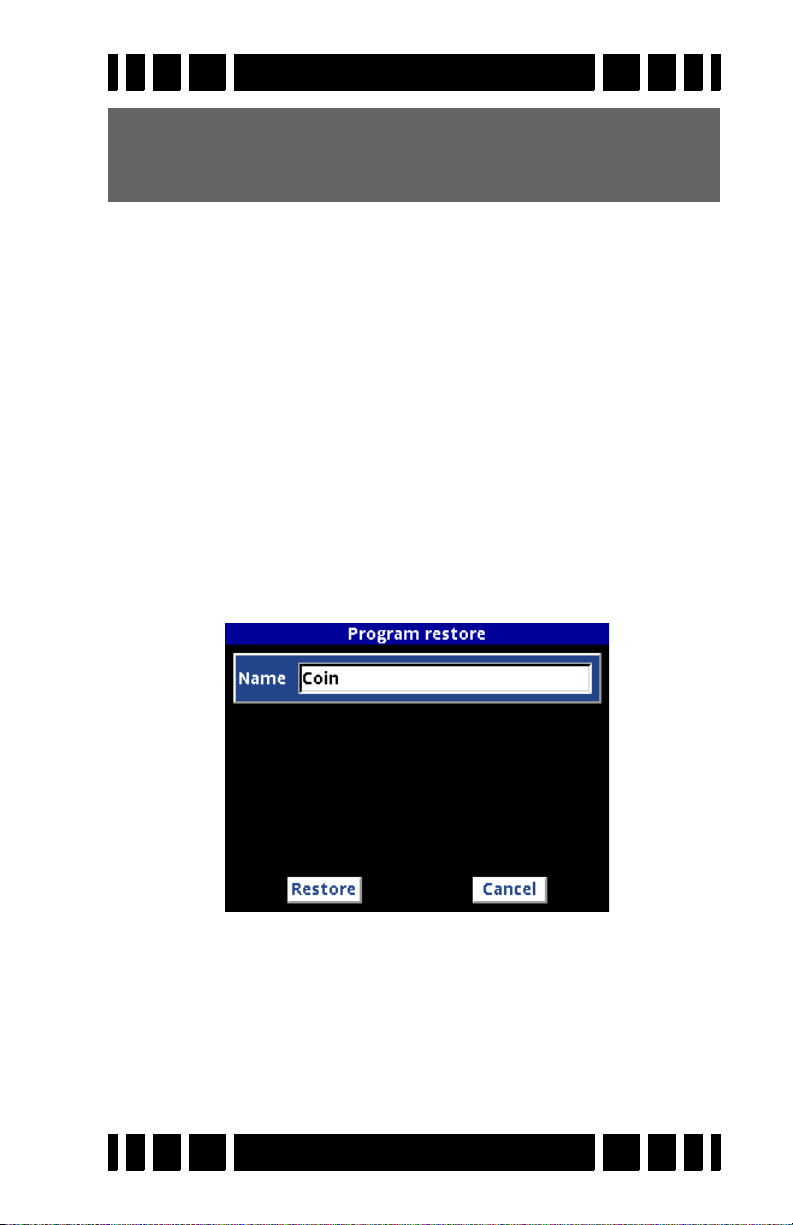
Spectra VX
Tip: If you make changes and decide you don’t want them
automatically saved, instead of using the
power down, simply remove the battery pack.
3
User’s Guide
ON/OFF button to
When modifications are made to any program so that it no
longer matches the Library copy, the program name will be preceded by a “” symbol. A program that has never been modified has a “”:
Coin & Jewelry — original factory program
Coin & Jewelry — modified program
Saving Programs
Program changes are automatically saved when you shut
down VX3 (via the ON/OFF key).
Restoring Programs
To restore a program to its original factory settings, select
MENUProgramsRestore:
Select the program you want to restore (it defaults to the program you are currently running), then press
Restore button and press ENTER. The Active program is now
TAB to highlight the
restored.
Page 7-2
Page 74

Spectra VX
Tip: You can also restore a program to
factory defaults from the Live Control Bar. Highlight
highlight the program you want to
restore, and press
small pop-up box will appear; select
the option to
press
ENTER.
ENTER+MENU. A
Restore Defaults and
3
User’s Guide
Program Select,
Rearranging Programs
Programs can be selected from the Live Control Bar without
suspending detector operation. This can be useful if you want to
quickly switch between two programs that are set up differently
for the purpose of better target analysis. However, scrolling
through the Live Control program list can be slow, so if you
want to quickly switch between two programs you probably
want them located next to each other.
It is easy to rearrange the program order in VX3. Select
MENUProgramsSelect and highlight the program you want
to move. Press/hold ENTER, then press or to move the
selected program up or down through the list.
Page 7-3
Page 75

8
Wireless
CHAPTER
Wireless Headphones
3
supports optional wireless headphones (WHPs) which
VX
are designed to use a world-wide available 2.4GHz ISM band.
To enable and connect WHPs, access the WHP menu at
MENUAudioWireless Headphones. Once you enable WHPs,
the menu will expand to include a number of options:
Below the menu of options are two buttons for Connect and
Exit. Connect synchronizes the WHPs with VX
WHPs and the header bar still includes “Off?” or the battery
report says “Not responding” then you will need to do a connect
sequence.
Press the
ton, then press ENTER. A pop-up balloon will prompt you to
press and hold down the WHP power button:
TAB keypad button to highlight the Connect but-
Headphones
3
; if you turn on
Page 8-1
Page 76

Spectra VX
3
User’s Guide
When you follow this procedure, the WHPs will produce a “ta-
DA” jingle1 which signifies proper connection. Upon connection, VX3 will pop up another balloon signifying that:
Once WHPs are properly connected, you should see the header
bar report “Working.” Also, the WHP’s report back their battery
voltage so you can easily check their status:
1. If the WHPs are not already powered on when you begin the
connect sequence, you will hear a pair of “ta-DA” jingles; the
first signifies power-on, the second signifies proper connection.
Page 8-2
Page 77

Spectra VX
3
User’s Guide
Why is there a “connect” ritual? It’s because the WHPs may
need to search for and find the right channel to operate on. With
the Channel control, VX3 lets you select one of 76 channels (4-
79), allowing multiple V-users to operate in close proximity. By
default, channel 4 is preselected in the factory, both in VX3 and
in the WHPs. So right out of the box, you can probably turn the
WHPs on and they will work fine. But if you change the channel in VX3, then the WHPs need to know that, hence the connect
sequence. If you never change channels, you should never need
to “connect,” just turn them on and go.
Tip: There are 3 ways to tell if you need to run the connect
sequence once the WHPs are turned on:
One, look at the search screen; the WHP icon will have a
red slash through it if the WHPs are not properly connected.
Two, look at the title bar of the WHP menu; if it says “Working,” then the WHPs are connected. If it says “Off?” then
they are not connected.
Three, look at the battery voltage report in the WHP menu
(below the Version number); if it says “not responding” then
WHPs are not connected.
Multiple channels are provided for dealing with noise and
3
interference from other VX
(or V3/V3i) users. If the WHP
audio seems excessively noisy (cutting in and out) or you seem
Page 8-3
Page 78

Spectra VX
3
User’s Guide
to be picking up audio from another VX3, try a different channel. Pay attention to the reception bar when selecting a channel;
choose a channel that has a maximum green and minimal red
response.
Tip: If you run the connect sequence at the same time as
another nearby V-user, you may inadvertently connect
your WHPs to the wrong detector.
Finally, the WHPs send back a battery voltage status to VX
and the voltage is reported in the WHP menu. If the WHPs
begin to act erratic, check the voltage; if its at 1.8-1.9 Volts,
replace the batteries.
3
Page 8-4
Page 79

Trouble-
9
shooting
CHAPTER
Murphy’s Law applies every bit as well to metal detecting
as anything else, so there is always something to go wrong. This
chapter will cover the more common problems that people run
into.
• VX3 is excessively noisy or chattery even when the
loop is held in the air.
Most likely this is due to electromagnetic interference
(EMI). Here are some strategies:
1. Adjust the frequency offset (see Ch 3) — always try this
first.
2. If you are in 3-frequency mode, see if one of the single
frequency modes is quieter.
3. Reduce the RxGain and/or the Disc. Sensitivity.
4. Check your surroundings... an electric fence is nearly
impossible to eliminate. Other EMI sources may also be
difficult to deal with.
• VX3 is excessively noisy or chattery when the loop
is swept over the ground.
This could be due to a lot of targets (trashy site), or a poor
ground balance, or due to extremely variable mineralization.
1. Use Pinpoint mode to check the area for excessive targets. If that is the case, use Locktrac instead of Autotrac,
and do your best to find a sufficiently clear area to manually ground balance (Ch 2).
2. If there are not excessive targets, bob the coil up &
down in Pinpoint mode at a target free spot to check the
ground balance. If the audio is not reasonably constant,
perform manual ground balance (Ch 2).
Page 9-1
Page 80

Spectra VX
3. Unusually variable ground can cause problems for
Autotrac; try Locktrac.
4. Slow down your sweep speed.
5. Make sure your loop is tight, and that the cable is
wrapped tightly around the rod.
6. Reduce the RxGain.
• VX3 becomes very noisy when I lay it down to dig a
target.
The Autotrac system expects to see some amount of ground
signal; when you lay the detector on the ground such that the
loop is tilted upwards, there is not enough ground signal available and the tracking gets “lost.” This can cause a noisy audio.
When you return to hunting, simply perform a quick manual
ground balance to get things back to normal.
You can also suspend detector operation while digging; a
quick way to do this is to press the MENU key and bring up the
Main Menu. Pull the trigger to resume hunting.
3
User’s Guide
• The target I dug is not what VX3 suggested it would
be.
The types of targets buried are nearly infinite, and the target
icons displayed are only some of the more popular types. Many
targets overlap each other; pull tabs are notoriously unpredictable as there are so many different types with different VDIs.
Sometimes a given area will have a prevalence of a particular type of pull tab (perhaps the old hermit liked a particular
beer) that you will begin to recognize. Pay attention to the VDI
and the SpectraGraph bars and with experience your finds will
get better.
• I’m finding a lot of clad but no silver.
Unfortunately clad has been around now for 46 years, and
tends to be shallower and easier to find. Try to get access to
older home sites. Focus on deeper targets.
Page 9-2
Page 81

Spectra VX
• I get a target response in Disc mode but it is weak
(or disappears) in Pinpoint mode.
See Chapter 5, “Salt Mode Anomaly.” While this phenomenon is more prevalent in salt mode, it can occur in normal (nonsalt) mode as well.
• VX3 won’t turn on.
1. The batteries could be dead.
2. Ensure that the batteries are installed correctly in the
tray.
3. If you know the batteries are good, then look down
inside the battery compartment, there are 2 metal contact prongs. If those get bent forward, then they will not
contact the battery pack contacts.
• VX3 suddenly shuts down.
1. The batteries could be dead.
2. VX3 automatically shuts down if there is no keypad or
trigger activity for 30 minutes.
3
User’s Guide
• VX3 is locked up, and it won’t power down.
Remove and replace the batteries.
• The coil stem is wobbly.
1. Ensure that the cam locks are tight.
2. Check the ends of the rod to make sure they are round
and have not become oval.
• The battery door won’t stay latched.
Make sure the battery door tabs are getting properly seated
into the control box latches before snapping down the latches.
• The arm cup is loose or wobbly.
Use one hand to gently squeeze the sides of the arm cup
inward as you tighten the retainer nut. This will make for a
much tighter fit.
Page 9-3
Page 82

Spectra VX
3
User’s Guide
• My display cover has a dent in it.
The cover over the display is replaceable, and new covers
are available from White’s. Simply peel off the old one, and
stick on the new one.
• The display is very dim.
1. In shade or indoors you may need to turn on the back-
light.
3
2. The VX
display is polarized, so polarized sunglasses
can severely reduce the brightness. Tilt your head from
side-to-side to see if this is the problem.
• My pinpointer is causing interference.
This is a common problem with any detector and pinpointer.
When you lay the detector on the ground, keep the loop away
from the area you will be probing. You can also suspend detector operation while digging; a quick way to do this is to press
the
MENU key and bring up the Main Menu. Pull the trigger to
resume hunting.
• My accessory loop is overloading at high RXGain
settings.
White’s has no control over the null quality of 3rd-party
loops. In general, you will have to run the RxGain low enough
to prevent overloading. Most loops that overload do so on the
22.5kHz frequency, so you can also try to run in the 2.5kHz or
7.5kHz single frequency mode.
Page 9-4
Page 83

Shortcuts
10
CHAPTER
VX3 has a number of keypad shortcuts that make certain tasks
easier. They have all been mentioned throughout the manual
(often in Tip boxes) and this chapter pulls them all together for
quick-reference.
How to quickly ground balance
Probably the most important short-cut:
• Pull/hold the trigger, then press/hold ENTER
• Bob the loop a few times over the ground until the threshold sound is fairly constant
• Release ENTER, then release the trigger
Tip: Check the ground first (use all-metal pinpoint) to make
sure there are no metal targets where you are trying to
ground balance.
How to hide/expand the Live Controls
By default, the Live Controls are displayed as a horizontal
menu. You can completely hide them (to increase the size of the
SpectraGraph region), or expand them to include the settings
(eats up more screen):
• Press ZOOM+ to show/expand the Live Control Bar.
• Press
Tip: When you want to find the quietest frequency offset,
expand the LCB, scroll over to
and pull the trigger to get into Pinpoint mode. Go through
the offsets and look for the setting that gives the least pinpoint noise. Minimize the LCB when done.
ZOOM+ to hide/minimize the Live Control Bar.
Transmit Frequency-Offset,
Page 10-1
Page 84

Spectra VX
3
User’s Guide
How to organize your Program list
VX3 comes with 8 preset programs. You can change their order
in the listing:
• Go to MENUProgramSelect
• Scroll down to highlight a desired program
• Press ENTER+ (or ENTER+) to move the program
through the list.
How to quickly restore a program
Suppose you make changes to a program and decide you want
to return to the factory settings. From the Live Control Bar, go
to Program Select, press ENTER, and highlight the desired program. Press ENTER+MENU and a small selection box will pop
up, allowing you to Restore.
Tip: Changes made to a program are automatically saved on
normal power-down. They are not saved if you unplug the
battery while the detector is still running.
How to quickly check the battery voltage
Press MENU+ENTER from the search screen. This will bring up
the “splash” screen, and the battery voltage appears at the bottom. You can also select Backlight on the Live Control Bar and
press VIEW.
How to quickly turn on the Backlight
Press and hold the ON button for 3 seconds and the backlight
will turn on to max brightness.
How to quickly collapse menus
In the VX3 main menu, if you've drilled down several levels
deep and want to quickly collapse the cascaded menus, then
press MENU+.
Page 10-2
Page 85

Spectra VX
3
User’s Guide
How to quickly jump through ranges
Some settings have a large range of values, such as volume.
You can press ENTER+ or ENTER+ (or ENTER+ or
ENTER+ if you are in the Menus) to quickly jump to the
extremes of the range, and to also get back to the default setting.
Tip: A little check mark () displays when the setting is at its
saved default value. A delta symbol () displays when the
setting has been changed.
How to fast-set discrimination masks
There are 191 VDIs, and each one can be individually accepted
or rejected in discrimination mode. To quickly set a range of
VDI’s to the same state, select the first VDI in the range and set
its state ( = accepted); then press ENTER+ to apply the same
state through the VDI list.
Tip: This works with ENTER+ as well.
How to use bookmarks
If you have a few settings you like to play with in the Main
Menu and want a fast way to get to them without having to navigate the menu tree, use bookmarks to tag them.
• To set a bookmark, press MENU+ENTER. A little bookmark symbol will appear.
• To quickly jump to successive bookmarks, press
MENU+ or MENU+.
• To clear a bookmark, press MENU+ENTER. The bookmark
symbol will disappear.
Note: Bookmarks are global to all programs. You cannot set
bookmarks differently in different programs.
Page 10-3
Page 86

Coin Coin&Jewelry SaltBeach Relic Prospecting DeepSilver HiPro Demo
Sensitivity
RxGain 5 6 7771092
AMSensitivity55 55 556570706055
DiscSensitivity75 75 758080808570
Audio
Vo lu me 48 48 48 48 48 48 48 48
Threshold23 23 232323232323
SearchMode Disc Disc Disc Mixed All‐metal Disc Disc Disc
Tone ID Off Off Off Off Of f On On Off
Modulation Off Off Off Off Off Of f 1 Off
All‐metalVCO Off Off Off On On On On Off
PinpointVCO Off Off Off On On On On Off
Discrim.
Accept +15to+26 ‐5to+95 ‐5to+95 0to+95 ‐20to+94 +65to+95 ‐20to+95 ‐5to+95
+60to+95
Reject ‐95to+14 ‐95to‐6 ‐
95to‐6 ‐95to‐1 ‐95to‐21 ‐95to+64 ‐95to‐21 ‐95to‐6
+27to+59 +95
Icons Park Park Park Relic Prosp. Park Park Park
Frequency
Mod e 3F‐Normal 3F‐Normal 3F‐Salt 3F‐Normal 3F‐No rmal 2.5kHz 3F‐ Normal 3F‐Normal
Offset 0 0 000000
Tracking
Mode Auto Auto Auto Auto Auto Auto Auto Auto
Filters
GroundFilter 5HzBand 5HzBand 5HzBand 12.5Hz Band 12. 5HzBand 5H zBand 5HzBand 5HzBand
y
80 80 80 80 100 100 65 80
SAT 20 20 202020201520
Recove ryDela
Page 87

Warranty
If within two years (24 months) from the original date of purchase, your
White’s detector fails due to defects in either material or workmanship,
White’s will repair or replace at its option, all necessary parts without charge
for parts or labor.
Simply return the complete detector to the Dealer where you purchased
it, or to your nearest Authorized Service Center. The unit must be accompanied by a detailed explanation of the symptoms of the failure. You must provide proof of date-of-purchase before the unit is serviced.
This is a transferable manufacturer warranty, which covers the instrument two years from the original purchase date, regardless of the owner.
Items excluded from the warranty are non-rechargeable batteries, accessories that are not standard equipment, shipping/handling costs outside the
continental USA, Special Delivery costs (Air Freight, Next Day, 2nd Day,
Packaging Services, etc.) and all shipping/handling costs inside the continental USA 90 days after purchase.
White’s registers your purchase only if the Sales Registration Card is
filled out and returned to the factory address by your dealer, soon after original purchase for the purpose of recording this information, and keeping you
up-to-date regarding White’s ongoing research & development.
The warranty does not cover damage caused by accident, misuse,
neglect, alterations, modifications, unauthorized service, or prolonged exposure to corrosive compounds, including salt. Duration of any implied warranty (e.g., merchantability and fitness for a particular purpose) shall not be
longer than the stated warranty. Neither the manufacturer or the retailer shall
be liable for any incidental or consequential damages.
Some states however, do not allow the limitation on the length of
implied warranties, or the exclusion of incidental or consequential damages.
Therefore, the above limitations may not apply to you. In addition, the stated
warranty gives you specific legal rights, and you may have other rights
which vary from state-to-state.
The foregoing is the only warranty provided by White’s as the manufacturer of your metal detector. Any “extended warranty” period beyond two
years, which may be provided by a Dealer or other third party on your detector, may be without White’s authority involvement and consent, and might
not be honored by White’s Electronics, Inc.
Page 88

Treasure Hunter’s Code of Ethics
1. Always check federal, state, county, and local laws
before searching.
2. Always obtain the owner’s permission before accessing private property.
3. Take care to refill all holes and leave no trace.
4. Remove and dispose of any and all trash and litter
found.
5. Whenever possible, return identifiable property to its
rightful owner.
6. Never destroy historical or archaeological treasures.
7. Appreciate and protect natural resources, wildlife and
property, both public and private.
8. Act as an ambassador for the hobby; be thoughtful,
considerate, and courteous at all times.
White’s metal detectors are proudly designed,
built, and tested in Sweet Home, Oregon USA
by the employees of White’s Electronics.
 Loading...