

Page 1

O
wneR’s Guide
MXT PRO
White’s Electronics, Inc. -
Manufacturers of the World’s Finest Metal Detectors
Page 2

Page 3
Congratulations and thank you for choosing
White’s MXT Pro.
The MXT series, which by design marry “versatility & high performance” with “simplicity of use”, is a wildly
successful metal detector design. I’m proud to put my name on the MXT Pro. As well, I’m proud the MXT
is grouped among a handful of landmark metal detector designs. Among the highest tribute, success in
the eld has earned the MXT “benchmark status” for which all other metal detectors are judged.
Listening to successful MXT users, the MXT Pro adds the three things MXT users have been asking
for, Backlight, Multiple Tone ID, and Ground GRAB, a convenient way to update ground tracking from a
locked setting or temporarily lock ground tracking for multiple passes over questionable signals.
This instruction manual will give you a good understanding of the basics. There are no substitutes for eld
experience. Practice using your MXT Pro and then study this manual further. Before long, you may well
be teaching the experts a thing or two.
It is with pride we put our “American Made Label” on every metal detector we build. At our facility here in
Sweet Home, Oregon, USA, we’ve been proudly designing, building from scratch, and distributing world-
wide, the world’s nest metal detectors for nearly 60 years.
It has always been my philosophy to keep our people in Sweet Home, Oregon working by keeping our
customers happy. I’m proud of our metal detectors and the people here at White’s who build them for you.
Happy Hunting!
White’s Electronics, Inc.
“I am proud to say
all White’s Metal Detectors are
built in Sweet Home, Oregon USA”
President
3
Page 4

Page 5

MXT
Pro
Table of Contents
MXT Pro Table of Contents
Chapter 1 Assembly.....................................................................................................7
Assembly Instructions.................................................................................................8
Chapter 2 Batteries...................................................................................................9
Standard Battery Holder..............................................................................................9
Using the Standard Battery Holder..............................................................................9
Battery Check..............................................................................................................9
Optional Accessory Rechargable Battery....................................................................10
Chapter 3 MXT Pro Basic Controls & Quick Start.................................................11
Control Summary........................................................................................................11
Mode Toggle................................................................................................................11
Gain Control................................................................................................................11
DUAL Control..............................................................................................................11
Threshold Control........................................................................................................11
TRAC Control..............................................................................................................11
“Music Notes” Tone ID.................................................................................................12
Ground Grab................................................................................................................12
“Light Bulb” Backlight...................................................................................................12
Trigger (On Handgrip)..................................................................................................12
Quick Start...................................................................................................................13
Chapter 4 Display..................................................................................................14
Tone Selection............................................................................................................14
Coin & Jewelry.............................................................................................................14
Relic............................................................................................................................14
Prospecting.................................................................................................................14
Low Battery..................................................................................................................14
Coin & Jewlery...........................................................................................................14
VDI Numbers............................................................................................................14
Display Blocks..........................................................................................................15
Display Text/Labels...................................................................................................15
Depth Indication........................................................................................................15
Relic............................................................................................................................16
VDI Numbers............................................................................................................16
Display Blocks..........................................................................................................16
Display Text/Labels...................................................................................................17
Depth Indication........................................................................................................17
Prospecting................................................................................................................18
VDI Numbers............................................................................................................18
% Iron Targets...........................................................................................................18
GND (Ground) Number.............................................................................................19
5
Page 6

MXT
Pro
Table of Contents
Chapter 5 Detailed Controls.........................................................................................20
Mode Toggle................................................................................................................20
Coin & Jewelry..........................................................................................................20
Trigger (on handgrip)...............................................................................................20
DUAL Control...........................................................................................................21
“Music Notes” Tone ID.............................................................................................21
Relic...........................................................................................................................21
Trigger (on handgrip)...............................................................................................21
DUAL Control...........................................................................................................22
“Music Notes” Tone ID..............................................................................................22
Prospecting...............................................................................................................22
Trigger (on handgrip)...............................................................................................22
DUAL Control...........................................................................................................22
“Music Notes” Tone ID..............................................................................................23
Concerning All Modes.................................................................................................23
TRAC Toggle...............................................................................................................23
Ground.....................................................................................................................23
Lock..........................................................................................................................23
Salt...........................................................................................................................23
Summary..................................................................................................................24
GAIN Control...............................................................................................................24
OVERLOAD.............................................................................................................24
DUAL Control..............................................................................................................26
Coin & Jewelry & Relic.............................................................................................26
Prospecting..............................................................................................................26
GAIN VS SAT........................................................................................................27
THRESHOLD..............................................................................................................28
Silent Search............................................................................................................28
Chapter 6 Searching..............................................................................................29
Pinpoint Technique...........................................................................................................29
Optional Accessory “DD” Search Coils.............................................................................29
Headphones, Optional......................................................................................................30
“Coin & Jewelry” Field Use & Tuning Tips.........................................................................31
Options...........................................................................................................................31
“Relic” Field Use & Tuning Tips.........................................................................................32
Options...........................................................................................................................33
“Prospecting” Field Use & Tuning Tips..............................................................................34
Options...........................................................................................................................35
Chapter 7 Information...................................................................................................36
Cleaning.................................................................................................................................36
Weather..................................................................................................................................36
Storage...................................................................................................................................36
Precautions.............................................................................................................................36
Service....................................................................................................................................37
6
Warranty.................................................................................................................................38
Page 7
Assembly
Chapter 1 MXT
Pro
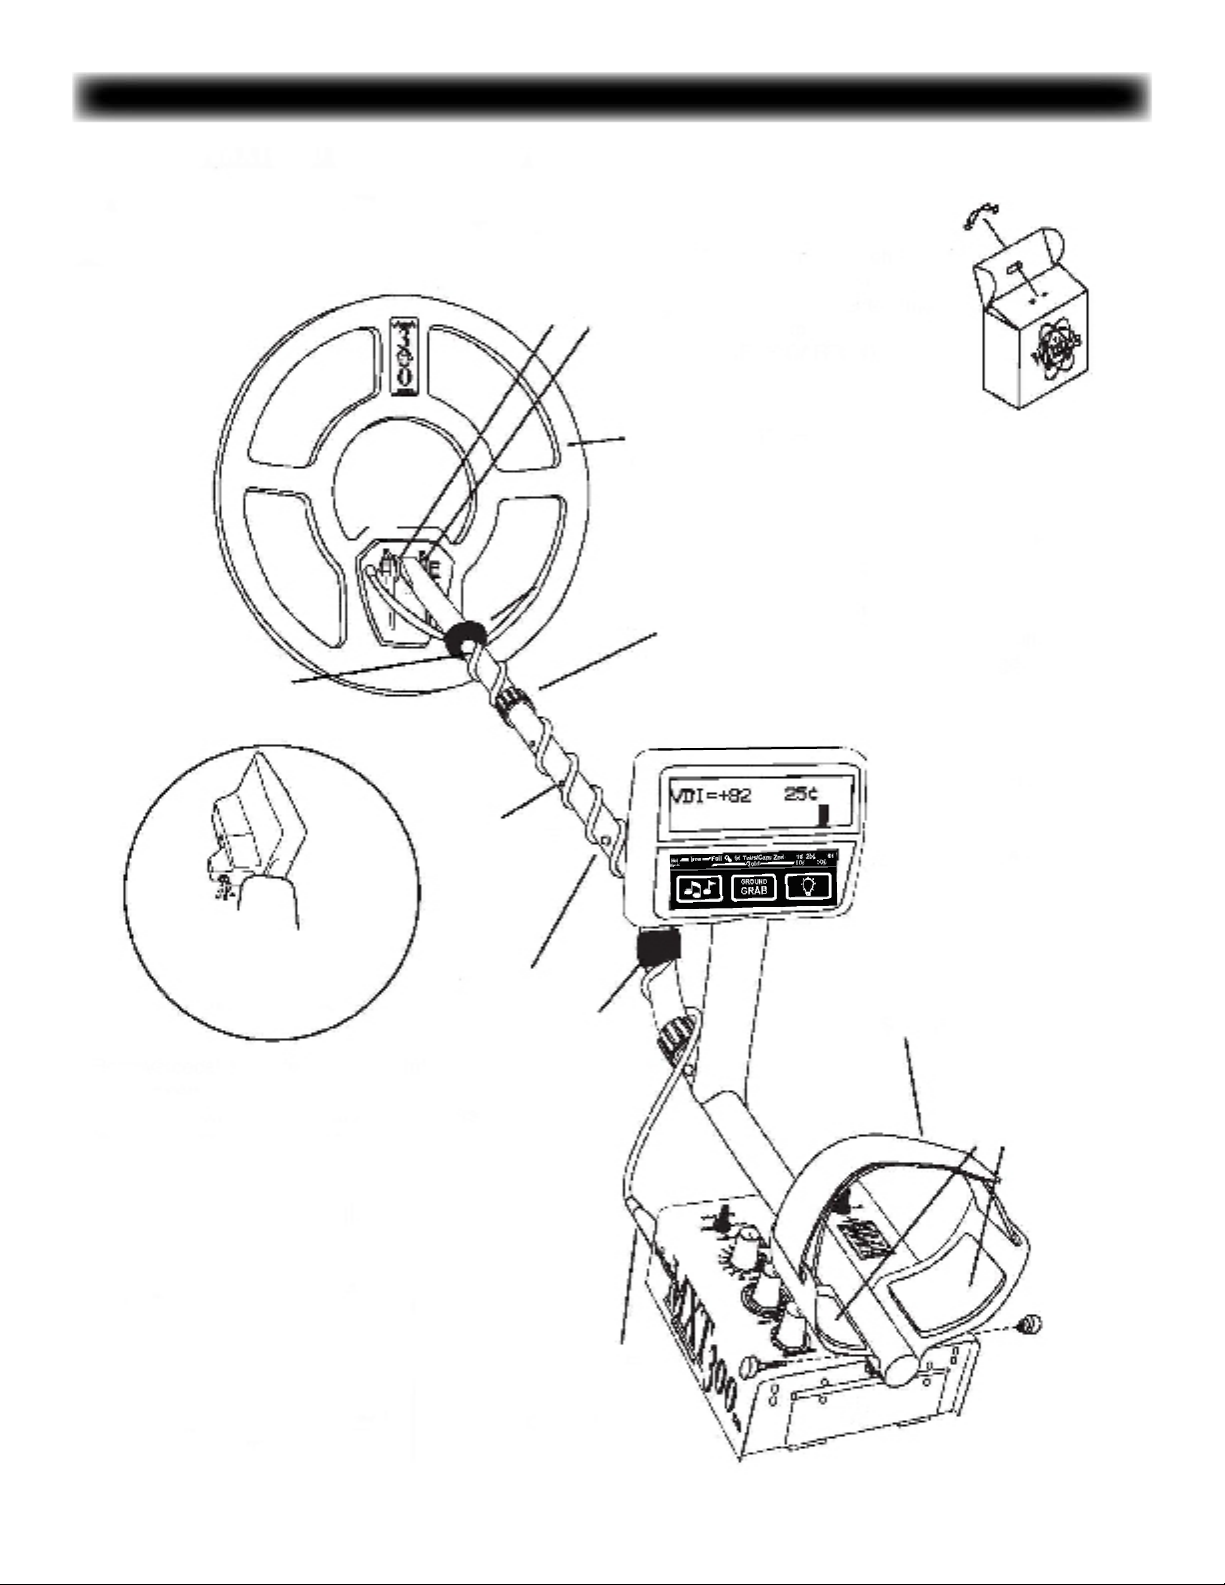
Assembly
CLEVIS
LOWER ROD
WASHERS
BETWEEN EACH
LOOP EAR &
CLEVIS
LOOP OR
SEARCH COIL
CABLE RETAINER
CAMLOCK
Twist and insert each end of
handle (provided) through top
of shipping carton into
second ap.
(CARRY CARTON)
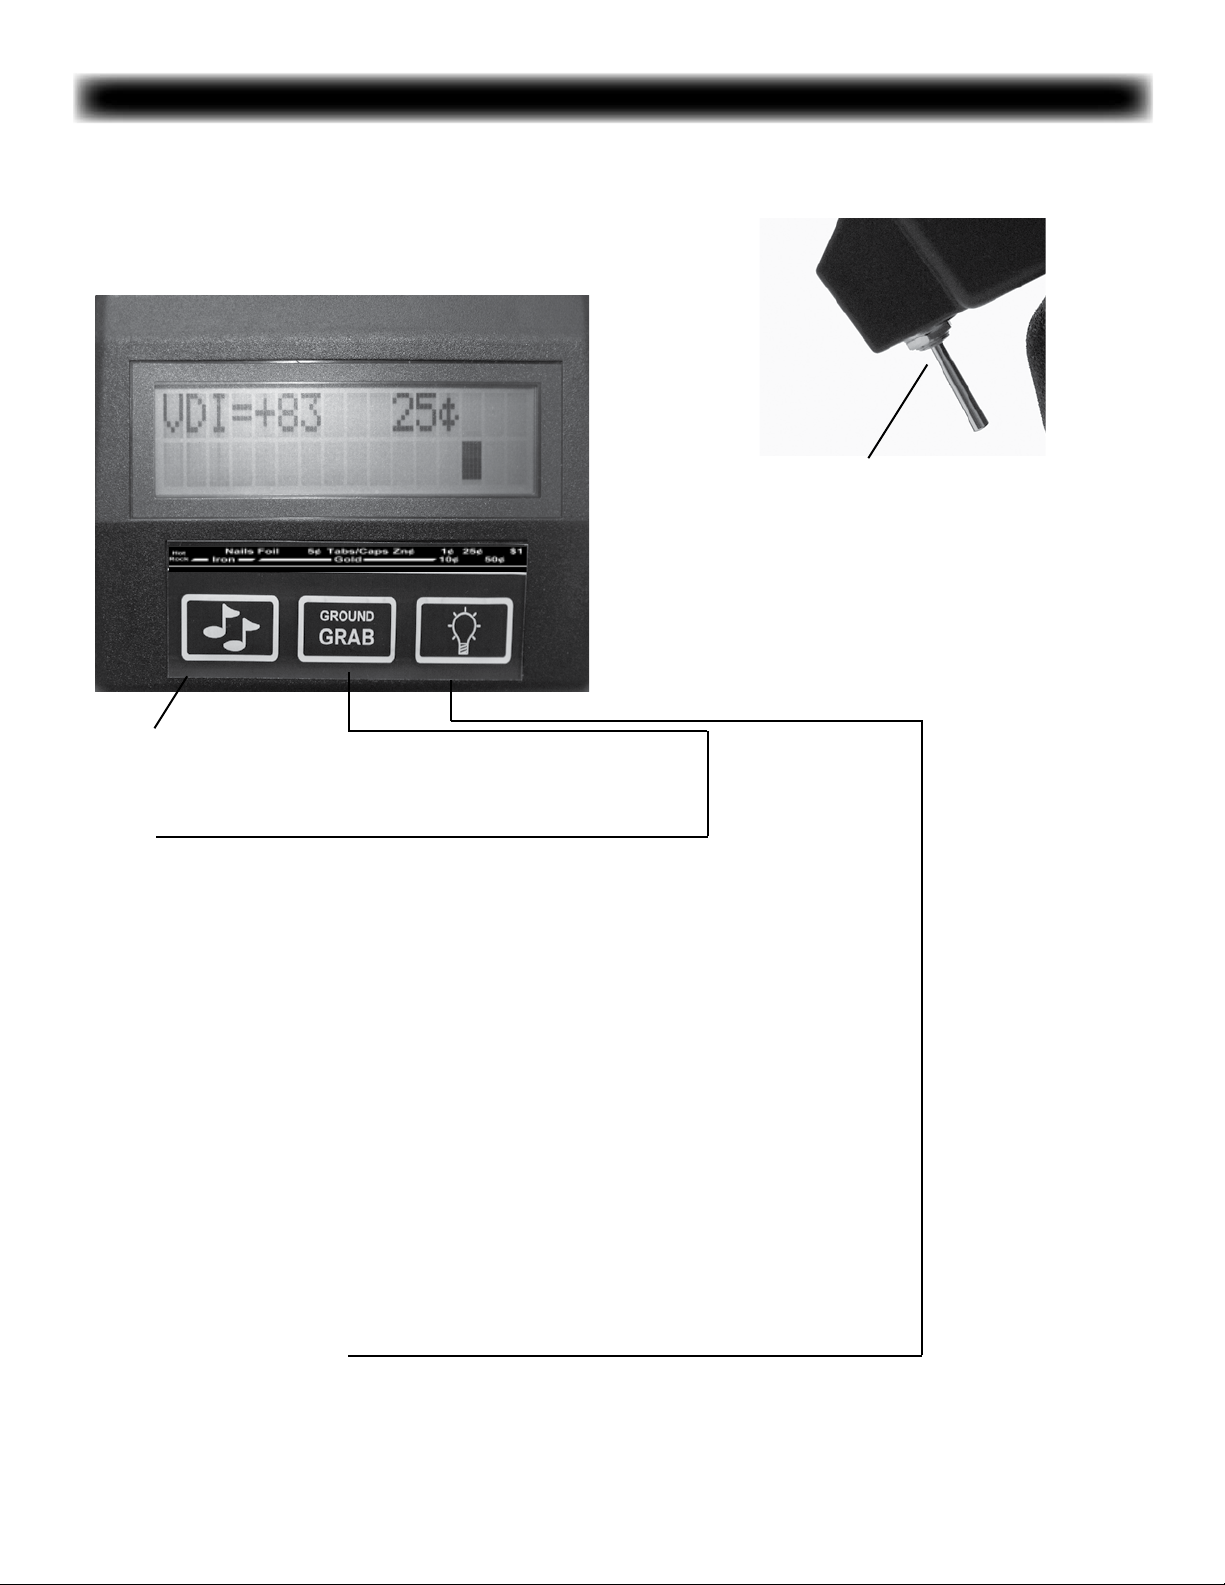
Trigger behind display has multi-
function capability depending
on which of the three
modes you select.
LOOP
CABLE
“S” ROD
CABLE
RETAINER
LOOP
CONNECTOR
ELBOW
CUP STRAP
ELBOW CUP
FOAM PADS
INSIDE ELBOW
CUP
Assembly shown on MXT 300
7
Page 8

Chapter 2 MXT
Pro
Assembly
Assembly Instructions
1. Remove all parts from shipping carton and check
the assembly page to make sure all parts are present.
2. There are rubber washers between clevis/lower
rod and loop ears. Use only nonmetallic washers,
ber bolt, and thumb nut to secure loop/search coil to
clevis/lower rod.
3. Unlock “S” rod camlock and insert clevis/lower rod
into curved “S” rod so that stainless steel spring clip
buttons line up and lock into one of the adjustment
holes in the curved “S” rod. Turn camlock to secure.
The second or third adjustment holes are suitable for
average size adults. Individuals 6’ or taller should use
the fully extended position. Individuals well over 6’ tall
should purchase the optional Tall Man Rod.
4. Unravel loop cable and wind the cable around the
clevis and rod assembly, rst revolution over the top
of the rod. Wind cable all the way to the top of the
curved “S” rod, about ve revolutions. Use the black
cable retainers, one near the loop, and one near the
top of the curved “S” rod, to hold the loop cable in
place.
5. Unlock control box rod camlock and insert curved
“S” rod so that stainless steel spring clip buttons line
up and lock into the rod on top of the control box. The
“S” rod is designed to curve up toward the display.
However, those who prefer to sweep the loop close to
their feet may desire to assemble the “S” rod to curve
down toward the ground. Turn camlock to secure.
Plug loop connector into control box, screw lock ring
to secure.
in one of the optional positions. If necessary, readjust
clevis/lower rod length with the spring clip buttons so
that the search coil can be held near the oor without
requiring stooping over.
7. Remove the protective paper from the two black
elbow cup foam pads. Carefully align pads on the inside of the elbow cup, one on each side of the center
rod, and press rmly into place.
8. Adjust the elbow cup strap so that it is loose
enough for you to slide your arm in and out without
loosening each time you want to set the detector
down. The elbow cup strap provides extra leverage
and control. However, some prefer not to use it.
9. Install battery as described in the next section,
decal facing down, with plastic tab and steel contacts
facing toward inside of battery compartment.
10. It should be noted at this point that the detector might not work as expected indoors due to the
high degree of metals used in modern construction.
It is best to tune and practice out-of-doors to ensure
stable, predictable results. Additionally, freshly- buried
targets will not produce the normal depth and discrimination results of targets that have been naturally
lost and settled in the ground. Due to the abnormality
caused by digging a hole in the ground matrix, and
the sophistication of the ground rejection circuitry, it
may take a number of years for freshly buried targets
to respond at true depths and discrimination accuracy. The best way to determine true detection depth
is in real search conditions.
6. Grip the instrument by the handle, with your arm in
the elbow cup with strap secure, and sweep the loop/
search coil over the oor. If the instrument t feels
uncomfortable, adjust the elbow cup by removing and
repositioning the bolt/thumb nut and installing
8
Page 9

Chapter 1 MXT
Pro
Batteries
Batteries
Standard Battery Holder
1. Slide open the battery holder lid (decal side of battery holder) by applying gentle upward pressure on
the tab of the door so that it unlocks. Slide the door
away from the battery box exposing the cell positions.
2. Remove any old cells from the holder. Note the (+)
and (-) positions of each cell and the (+) and (-) for
each position marked inside the cell tray. Install new
“AA” cells noting carefully the correct (+) and (-) positions. If the cells are installed incorrectly, the detector
may require service by an Authorized Service Center.
3. Slide the door closed so that it snaps securely.
4. Insert the battery holder into the detector so that
the decal is facing down, with the battery holder
door tab and metal contact points facing toward the
inside of the battery compartment. Close the battery
compartment door and secure the two latches on the
bottom of the case. Hook the front of each latch rst,
and then press down on the rear.
Using the
Standard Battery Holder
1. The standard battery holder holds eight “AA” cell
batteries equaling 12 volts total. Alkaline batteries are
recommended for use with this model. During normal
searching conditions you can expect about 40 hours
of hunting time from a quality set of eight alkaline batteries.
2. Non-alkaline batteries can be used in this holder.
When non-alkaline batteries or rechargeable “AA”
cells are used, detecting time (before replacement/
recharge) may be reduced to about 30-35 hours.
3. The battery voltage appears automatically on the
display when the Gain is used to turn the MXT Pro
“ON”. Once the batteries become weak (8 volts) “Lo
Bat” will automatically appear on the display during
searching. At that point the batteries should be replaced. Alkaline batteries provide some reserve time
after “Lo Bat” appears, rechargeable batteries do not.
4. The battery compartment opens by gently pulling
down on the front of each of the two latches (on the
bottom of the control box) releasing the catch and
hinging open the door.
Headphone use prolongs all battery life. Battery life
will vary a great deal with temperature, number of
target signals, battery type, brand, and shelf life. Alkaline Batteries may be used (in a pinch) well into the
“Lo Bat” indication. Rechargeable batteries cannot.
When traveling far from home it is always a good idea
to carry 8 extra penlight alkaline batteries with you.
Backlight use will slightly reduce battery life, 10% at
the lowest brightness, 20% at medium, and 30% at
the highest setting.
9
Page 10
Chapter 2 MXT
Pro
Batteries
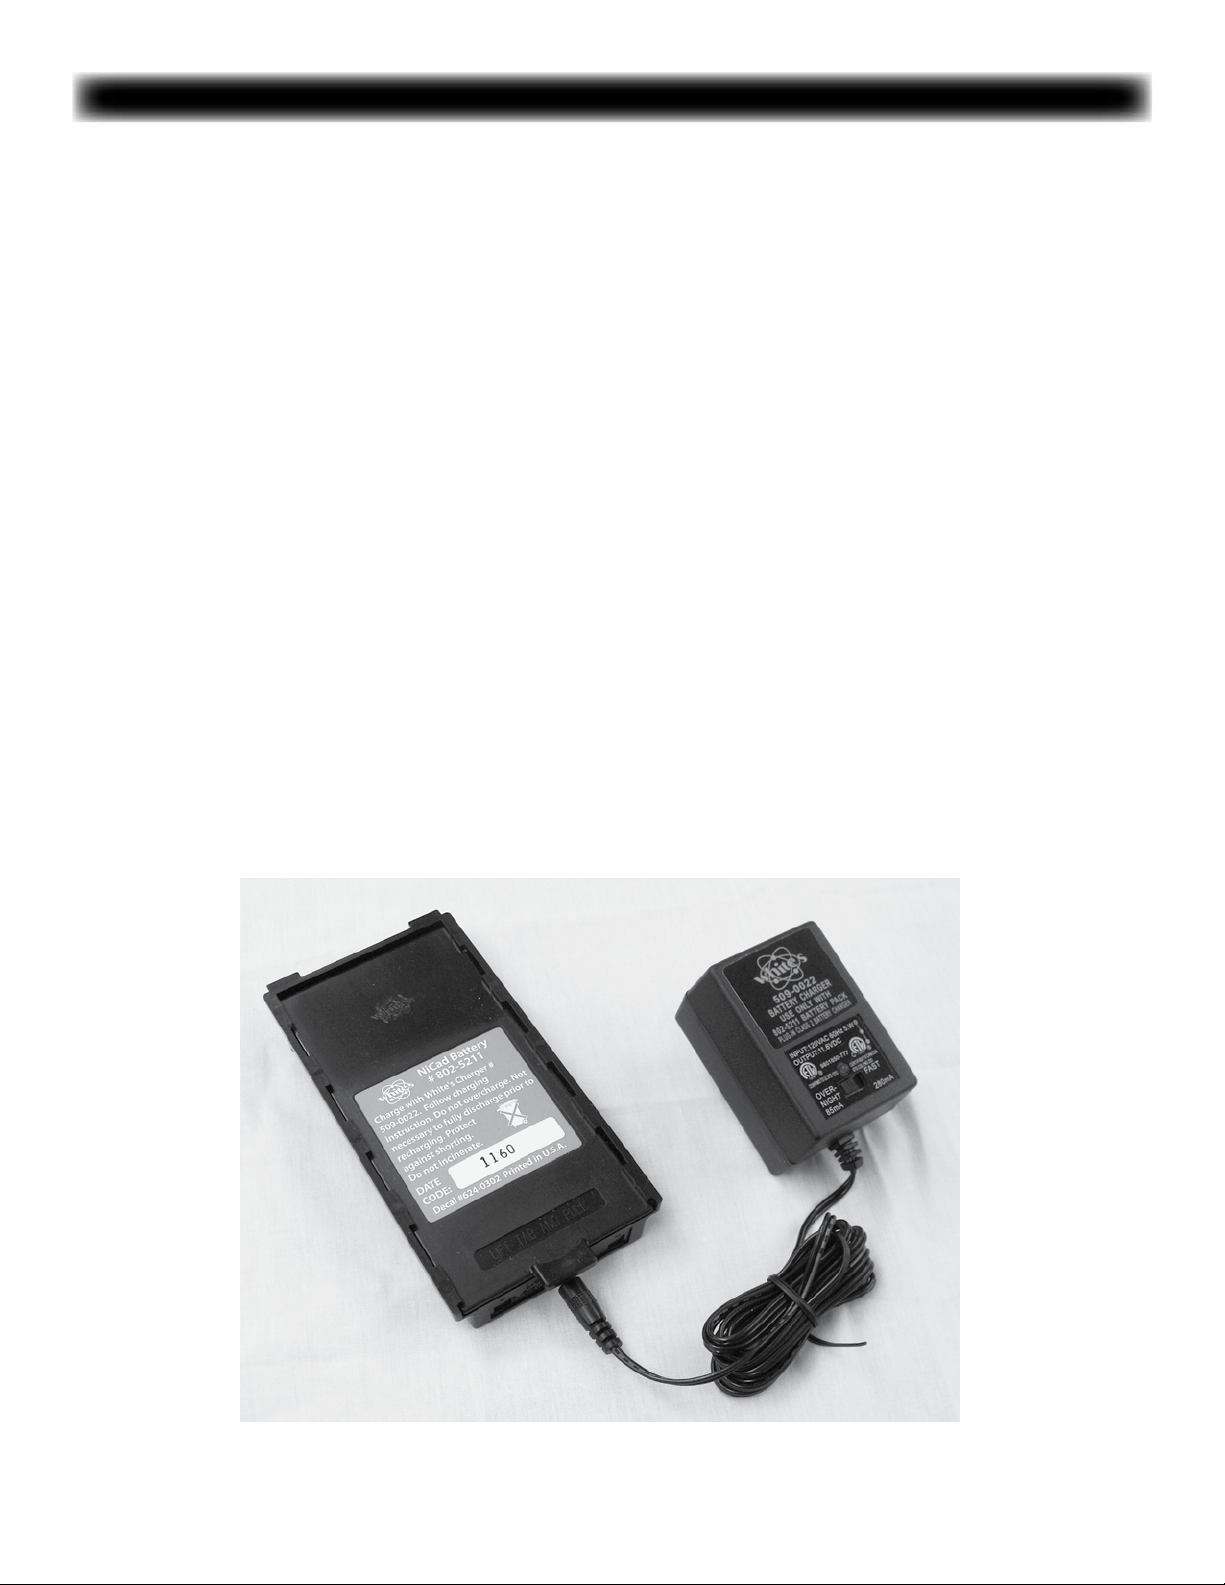
Rechargeable Battery (Opt.)
A rechargeable battery system is not standard equipment with your MXT Pro, however, two different high
quality systems are available.
White’s rechargeable battery #802-5211, and charger
#509-0022 are the recommended standard system
and offer quick charge and overnight charge options.
(QUICK CHARGE IS FOR USA ONLY. It is not avail-
able on 220-240 volt.)
White’s Premium system, #509-0037 NiMH Charger,
#802-5285 NiMH Stand, and #802-5281 NiMH re-
chargeable battery offers extended search times, the
latest Nickel Metal Hydride capabilities for the MXT
Pro.
Non-rechargeable batteries will start to drop in
voltage as soon as they are put into use and then
steadily diminish in voltage till they no longer provide
adequate power. The optional Nicad rechargeable
battery pack, however, will diminish slowly (plateau)
in somewhat of a at line and then, near the end of
their useful life, very quickly decline. Regardless of
the battery used, for long search periods, backup
cells are always suggested.
Rechargeable batteries deliver fairly constant voltage
until they require a recharge. If you use them well
beyond low, they may be damaged, will deteriorate
more quickly than if you only use them till their voltage starts to drop signicantly. Therefore, rechargeable batteries should be taken out of service and
recharged as soon as you notice “Lo Bat” on the
display.
Rechargeable batteries (depending upon the type)
may not provide the same amount of continuous use
per recharge compared to “one use life” set of quality
alkaline batteries.
10
Page 11
MXT Pro
Control Summary
Chapter 3 MXT Pro Basic Controls & Quick Start
MODE Toggle
Three position switch for setting
operating mode. Coin & Jewelry, Relic,
Prospecting.
GAIN Control
Turns the MXT Pro ON/OFF and adjusts
the signal strength of targets, ground,
and electrical interference.
DUAL Control
In Coin & Jewelry and Relic Modes
establishes the level of trash metal
rejection (Discrimination). In the
Prospecting Mode establishes
Self Adjusting Threshold (SAT),
the speed at which the THRESHOLD
“hum” recovers from the affects of
inconsistencies in ground mineralization.
TRAC Toggle
Three position switch selects Ground Mineral Tracking,
Ground (for most searching), Salt (for salt water beaches or conductive alkali ground types), or Lock (to Lock
or hold a particular ground setting).
THRESHOLD Control
Establishes the slight background sound “faint hum” or
edge of sound that is heard continuously during searching. Once this edge of sound has been located some
operators prefer to adjust slightly counterclockwise of
it to achieve silent search, no continuous background
hum, during searching.
11
Page 12
Chapter 3 MXT Pro Basic Controls & Quick Start
MXT Pro
Display Controls
Trigger Switch has three positions;
1. Center (Primary Search)
2. Squeeze and Held (Pinpoint)
3. Forward (Locks Pinpoint)
4. Prospecting Mode Only, Trigger Squeezed
and held, or pushed forward and locked,
temporarily disables ground tracking (same
function as holding Grab)
“MUSICAL NOTES”
Selects different types of variable tone or pitch options.
GRAB
1. When TRAC control is set to Ground or Salt, Hold GRAB to hold the current ground
setting (disable tracking) for multiple search coil passes over a week or small target signal,
thus avoid tracking out such weak target signals.
2. When TRAC control is set to Lock, press and release GRAB to update the ground
rejection level to the (continuously monitored) current ground rejection (tracking level). This
update is where the ground rejection would have been had the TRAC control been set to
the Ground or Salt setting continuously. Grab is a far more convenient way to update the
Locked tracking level. Instead of having to reach over and switch TRAC, from LOCK to an
active position, reestablish a usable ground setting, and then switch TRAC back to LOCK.
With GRAB you simply press and release the key right under your thumb, and you have
updated to current ground conditions. Note, last used TRAC position before Locking (Salt
or Ground) determines the ground balance range available to Grab. If Ground was the last
TRAC position used, Grab will grab the best available setting within the Ground Range of
rejection. If Salt was the last used TRAC position, grab will grab the best available tracking
level well into the conductive salt range.
“Light Bulb” Backlight
Select and adjust the display backlight level for use in low light conditions. Minor additional
battery life cost.
12
Page 13

Chapter 3 MXT Pro Quick Start
Instructions
With the MXT Pro properly assembled and the batteries installed,
follow the instructions below to start nding valuables!
1. Set the Ground Balance Toggle to the Ground position for
normal dirt, Salt position for saltwater beaches or alkali desert
regions when wet.
2. Set the Trigger Switch (under the handgrip) to the center (Primary Search) position.
3. Set the MODE toggle to the position that best describes your
searching desire, Coin & Jewelry, Relic, or Prospecting.
4. Set the DUAL CONTROL to the DISC ring “ Triangle” for Coin
& Jewelry and Relic Mode or to the SAT ring “Triangle” for the
Prospecting Mode.
5. Turn the GAIN control clockwise until the power clicks “ON”.
Rotate the GAIN control clockwise to “Triangle”.
6. Adjust the THRESHOLD control until you hear a soft threshold
“hum” (faint sound).
7. Lower the search coil to the ground, then “pump” the coil up
and down 2” - 4” a couple of times and the MXT Pro will balance
or track out the ground mineralization, indicated by a steady
threshold hum.
8. Begin searching, swinging the search coil in wide sweeps that
overlap each other 50% as near the ground surface as possible,
scrubbing grass, a half-inch above rocky or ruff surfaces, listening
for solid repeatable “beeps” over multiple search coil passes.
When operating in the Prospecting Mode, if experiencing
instability false signals rst try reducing the Gain and/or increasing the SAT speed (DUAL Control). SAT speeds as high as HYPERSAT may be necessary in some ground conditions. If Gain
and SAT adjustments do not smooth performance, then switch to
the TRAC Lock position.
* SPECIAL NOTICE
If you attempt to demonstrate or test the
MXT Pro by waving targets in the air in
front of the search coil, it is ESSENTIAL
to have the GROUND BALANCE toggle
in the Lock position, NOT Ground or
Salt.
This is necessary, for when the MXT Pro
is in the Ground or Salt positions, the
search coil must SEE ground while it is
passing over the target or it will think
that the target IS ground and will attempt to track it out. This is the case in
all MODES.
You may, however, demonstrate the fast
ground balancing feature of Ground or
Salt by waving or pumping a mineralized
rock in the air in front of the search coil.
Testing the MXT Pro with targets while
in TRAC Ground or Salt positions must
be done in or on the ground.
9. Once a solid repeatable “beep” has been located over several
search coil passes; consult the display information, squeeze and
hold the Trigger switch (on the handgrip) and “+” the area (Coin
& Relic) noting the largest bar blocks and the shallow depth
indicates target center. Dig targets with good sound over multiple
search coil passes, good display indication, and consider (Coin &
Relic) depth as another likely clue as to target value.
10. If you experience instability (false signals or constant beeping
or popping) and you are not near common sources of electrical
interference, set TRAC to LOCK and/or reduce GAIN (counterclockwise) slightly and try again. It is normal to hear minor but
noticeable uctuations in the THRESHOLD “hum” as the MXT
Pro tracks out the ground mineralization and rejects trash metals
particularly noticeable at higher GAIN settings.
7.
8.
13
Page 14
Chapter 4 MXT Pro Display
MXT Pro Display
The MXT Pro display and reference label below the display
provide a wealth of information about the metal target.
Important; consult the display information only after a solid
repeatable audio tone “beep” has been located over multiple
search coil passes.
The MODE selection changes both the audio sound presentation and the type and content of the information shown on
the display, better suiting the MXT Pro to the application,
Coin & Jewelry, Relic, or Prospecting.
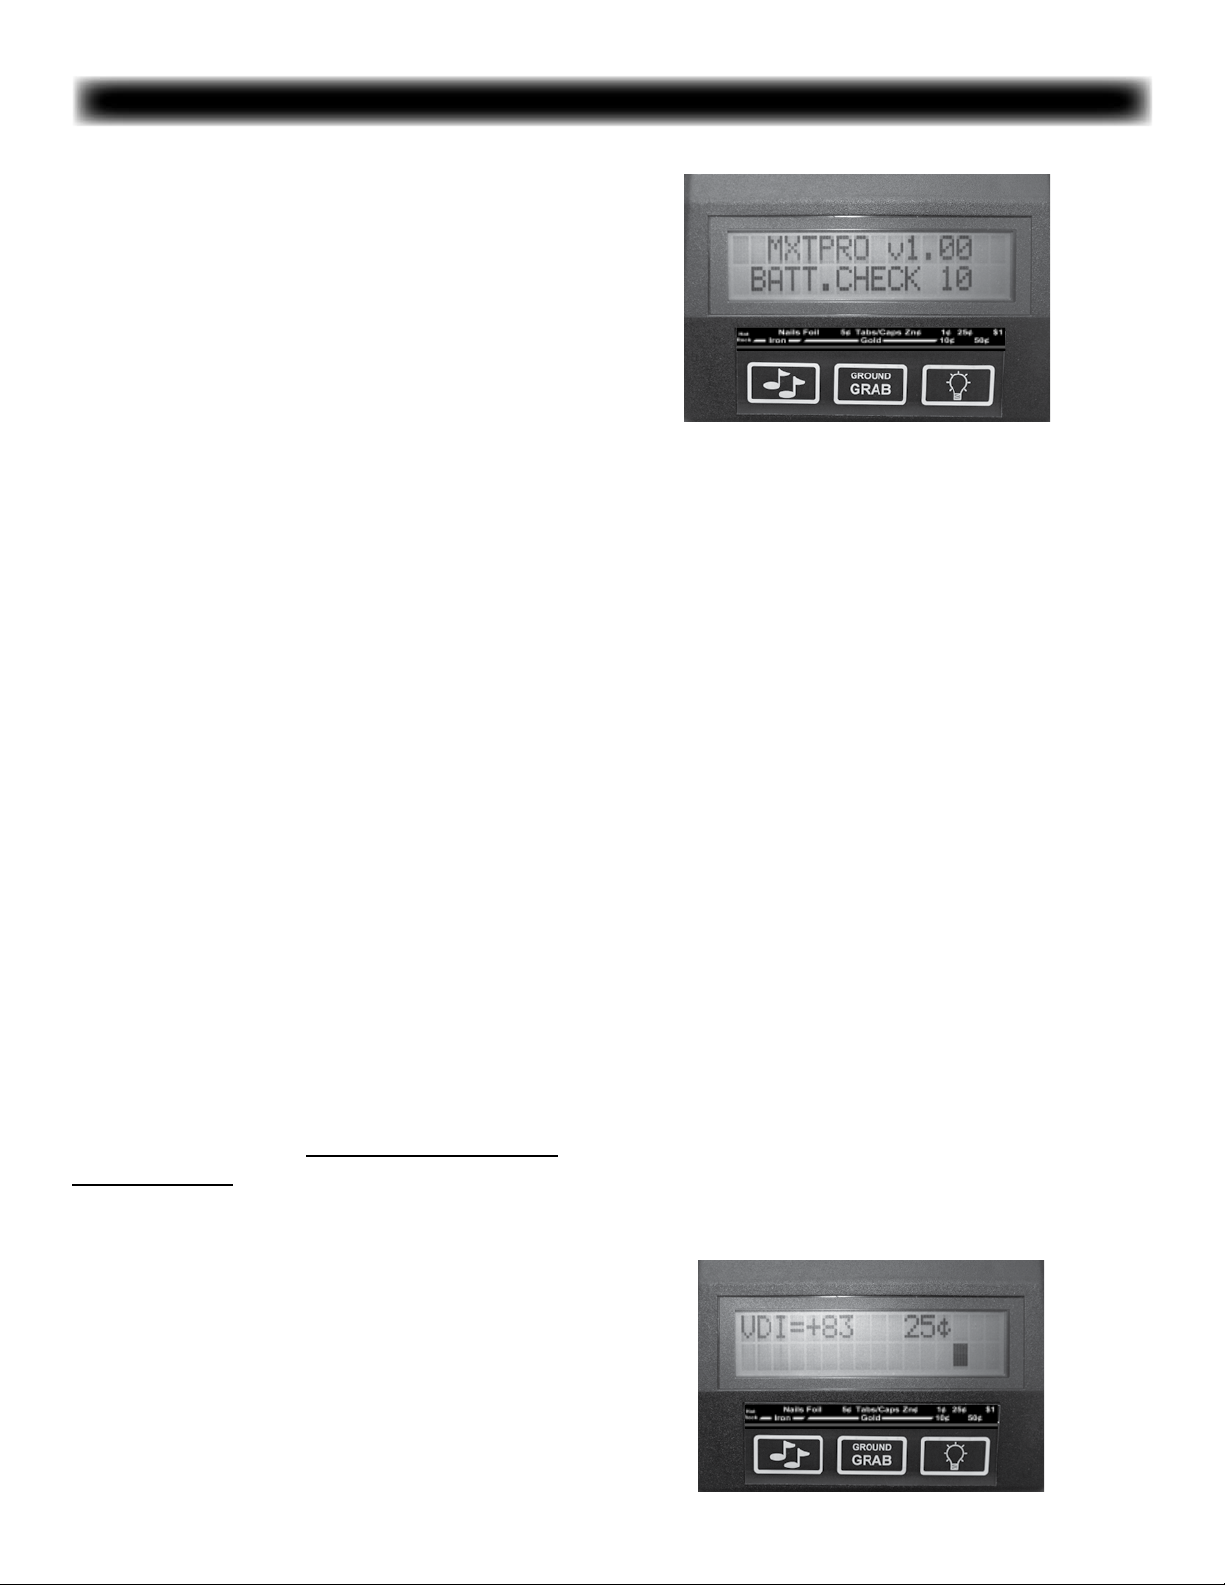
In all MODES, upon rst turning the GAIN “on” the display
will momentarily show a software version and battery voltage, followed by the Mode and Tone selection.
Turning off and on, the MXT Pro will always return to the
original factory default Tone selections;
1. Coin & Jewelry = Tone ID- Up to seven
tones depending upon Discrimination control setting, with
iron (if accepted) the lowest pitch and +95 the highest pitch
tone. Press “music notes” to turn ON/OFF Tone ID. When
OFF all accepted targets indicate with the same basic pitch
or tone.
The MXT Pro operates on a twelve volt battery system.
which with new quality batteries will indicate 12 + volts. During searching “Lo Bat” will start appearing on the display at 8
volts and anything 8 volts and below are suspect for replacement. If using rechargeable batteries 8 volts is absolutely
the end of their usable performance. Use after 8 volts can
damage rechargeable batteries and the MXT Pro will not
perform normally. If you are using quality alkaline batteries
you do have a reserve after 8 volts. The MXT Pro utilizes a
low voltage regulator. Quality alkaline batteries will provide
normal performance (in a pinch) well into the Lo Bat indication.
Coin & Jewelry MODE- The Coin & Jewelry
MODE provides 5 different signicant indications on the
display.
2. Relic = 2 Tone- Rejected targets (those below the
current Discrimination setting) produce a lower pitch tone;
accepted targets (those above current Discrimination setting) produce a high pitch tone. Press “music notes” Tone ID
to select among two other tone options for the Relic mode;
Iron ID (all iron low tone, all non-iron high tone) Discrimination Control disabled, or, 1 Tone (above current Discrimination setting high pitch tone, below discrimination setting
audio suppressed, iron if accepted = low pitch tone).
3. Prospecting = Iron Grunt ON- Targets with
80% and greater probability of being iron produce a unique
grunt tone. Press “music notes” to turn ON/OFF. When OFF;
all targets produce the same basic VCO audio varying only
upon their size or signal strength.
Backlight will always revert to OFF during ON/OFF cycles.
14
1. VDI Number - The VDI (Visual Discrimination Indication) is a reference number dictated by the metals targets
exact alloy, size, and shape. The reference label below
the display provides a comparison of known targets and
their common VDI numbers. Like targets produce like VDI
numbers. Similar targets produce similar VDI numbers. And
different targets produce different VDI numbers. Different
metal targets, however, may share the same VDI numbers
based on their electrical characteristics. VDI numbers from
-95 to +94 are available and cover the entire range of alloys
and sizes.
Page 15

Chapter 4 MXT Pro Display
Half block indicating detector is not
certain but possible.
Note: In this case, the Pulltab is the probable ID.
2. Blocks- A series of 16 blocks appear along the bottom
portion of the display and line up with the indications on the
reference label below the display. It is important to note
these blocks are a different separate opinion compared to
the VDI number and they may or may not agree. There is
signicance to how these blocks appear. A full block indicates the MXT Pro is condent of indication. A half block
indicates the MXT Pro is not condent but is making an
educated indication. A quarter block indicates the MXT Pro
is not condent at all, guessing based on what little information the target is producing.
3. Text/ Labels- The most common metal target (or tar-
gets in some cases) to indicate that particular Block is listed
on the display as well as referenced in an expanded format
on the label below the display. If two targets are listed the
rst to be listed is the most common and the second listed
slightly less common than the rst.
4. Depth Indication- Trigger (on handgrip) squeezed
and held or pushed forward to lock, the display indicates the
depth of coin-sized metals. Starting at 12 inches and indicating in descending order (as the target gets closer to the
bottom of the search coil), the DEPTH = 12 (twelve inches
deep) provides not only an aid in better locating the target in
the ground (how deep you will need to dig) but also clues as
to if the metal target is likely worth digging. For example if
the display is unsure (quarter block indication), is indicating
in the FOIL range, and the depth reads deep 6 to 12 inches,
you should dig the target. Only the heavier more valued
targets get deeper into undisturbed ground. If the display
reads unsure (quarter block), indicates in the FOIL area,
and the depth reads shallow 0 to 2 inches, the target is most
likely not worth digging. Foil will not sink deeply into undisturbed ground. Targets that indicate depth readings from 3
- 5 inches are not as predictable. The shallower Depth readings typically have fuller Blocks to warrant digging. A large
target that is very deep will tend to provide a small pinpoint
area as well as an inaccurate shallow depth indication. Use
this to your advantage; a shallow depth indication (0-1 inch),
having dug six inches and not found the target, is a larger
deeper target.
15
Page 16
Chapter 4 MXT Pro Display
5. PP Blocks- Trigger (on the handgrip) squeezed and
held or pushed forward to lock, the PP blocks aid in pinpointing the exact center of the metal target. Only when
the search coil is directly over the center of the metal target
(longest possible length PP Blocks) is the depth reading
giving you the most accurate depth indication in inches.
Also of importance is that with some experience the relative
size and shape of the metal target can be recognized during
pinpointing. Small pinpoint = small target. Relatively larger
pinpoint = larger target. Elongated pinpoint = elongated target. The exception is that a large target that is very deep will
tend to provide a small pinpoint area as well as an inaccurately shallow depth indication. Use this to your advantage;
a shallow depth indication (0-1 inch), having dug six inches
and not found the target, is a larger deeper target.
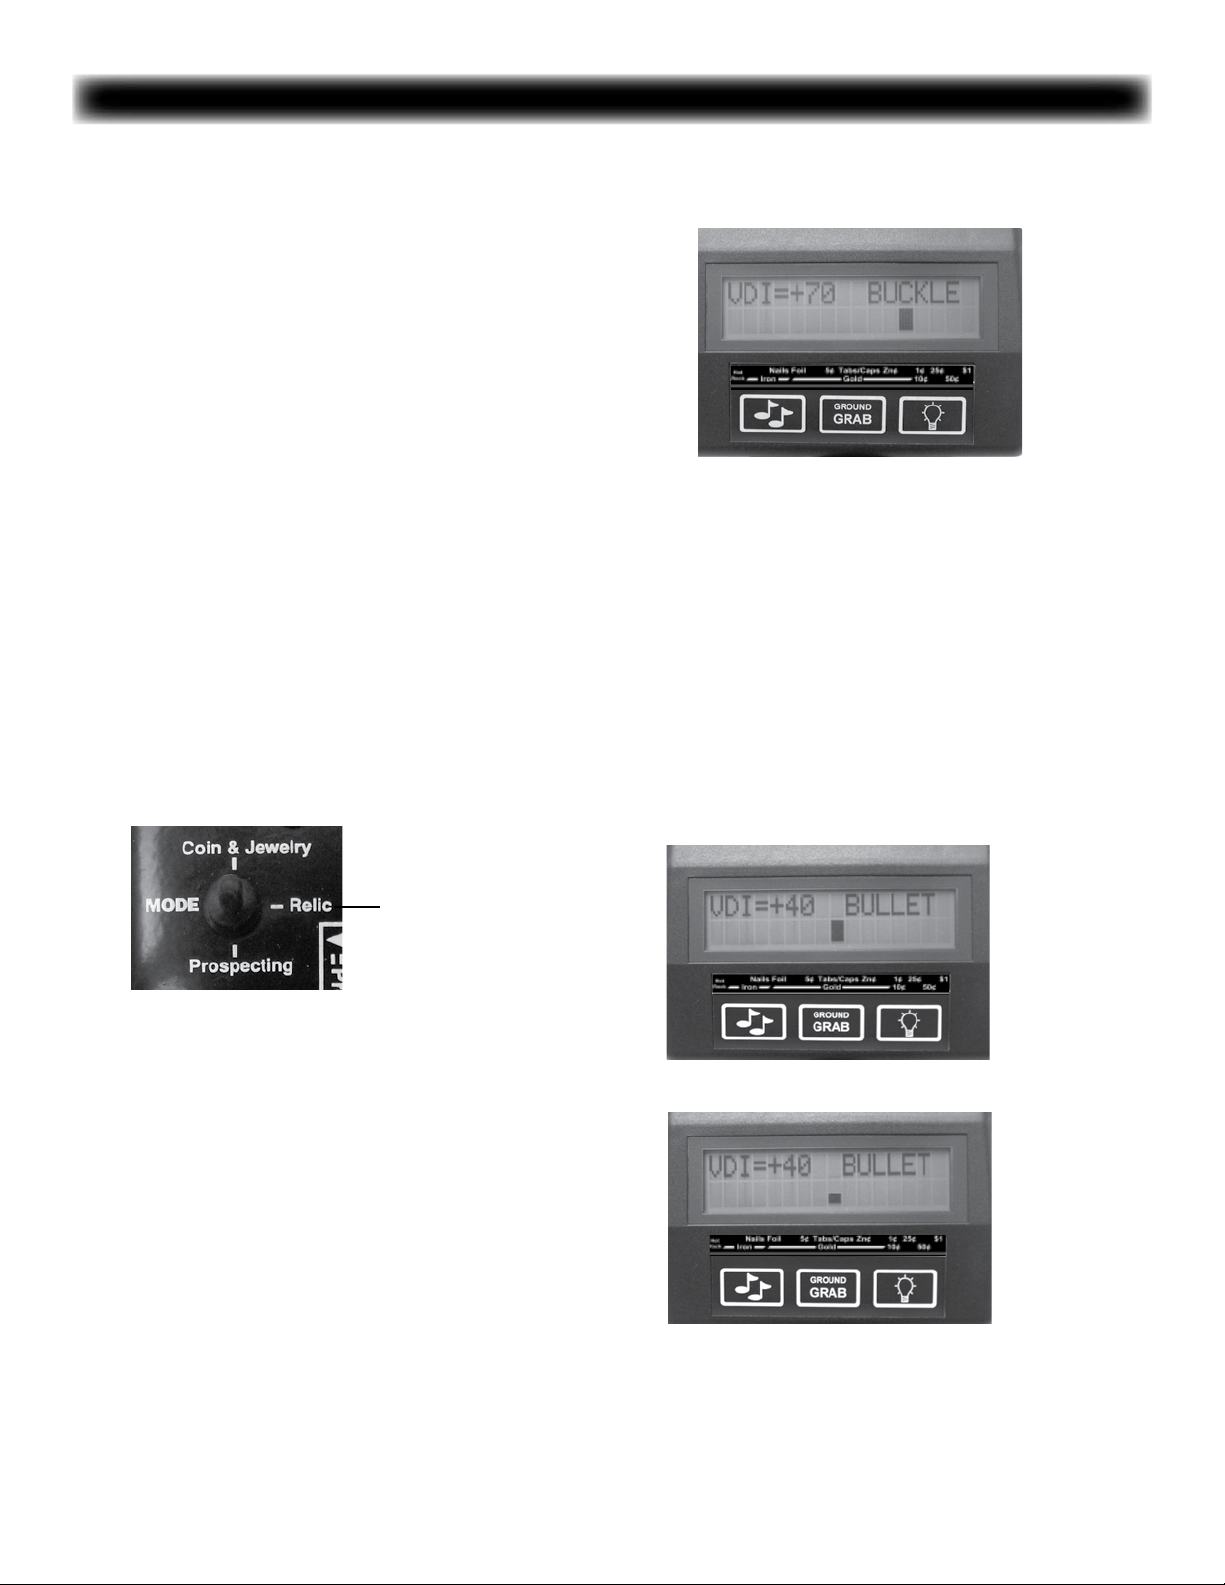
Relic MODE
The Relic MODE also provides 5 different signicant indica-
tions on the display.
2. Blocks - The MXT Pro Relic mode uses the same
sixteen lled in Blocks as Coin and Jewelry mode to further
conrm, on the reference label, the connection between the
VDI number and software’s best determination of the target
identity. The vertical size (one quarter, one half, or the whole
block) tells one how sure the MXT Pro is of the target ID.
Full bar and half bar usually means dig. Quarter blocks are
uncertain.
Mode toggle
switch Center
for Relics
1. VDI Numbers- As with the Coin & Jewelry mode the
relic VDI (Visual Discrimination Indication) is a reference
number dictated mostly by the metal targets exact alloy,
size, and shape. And just like coins and jewelry, relics can
indicate with similar VDI numbers for different objects be-
cause their makeup and electrical characteristics are similar.
Using the reference label below the display one can see that
iron relics are still in the low VDI numbers and objects like
brass buttons and buckles with a high concentration of nonferrous metal or alloy rate higher VDI numbers compared to
their size and purity.
NOTE: The
top display is
a sure ID. The
bottom display
with its quarter
size bar suggests uncertain
unless the
Depth reading
is 6-12.
16
Page 17

3. Text/Labels - In Relic mode you will see target ID labels in the upper right of the display. The text labels are Hot
Rock, IRON, BUTTON, BULLET and BUCKLE. Obviously
there are many more relic items possible. Just keep your
imagination open for what possible objects were produced in
metal and how they might compare in size and alloy to the
ones mentioned above.
Chapter 4 MXT Pro Display
NOTE: Before squeezing the trigger, the
quarter Block reading is questionable.
A depth reading can
help you decide to dig
or not.
A depth of 5
suggests you
should dig.
4. Depth Indication - Trigger (on handgrip) squeezed
and held, the display indicates the depth of coin-sized metals. Just as in the Coin and Jewelry mode, Depth not only
tells you how deep the target is but combined with the block
reading and target label on the right side of the display it
can indicate if the item is worth digging. A 6-12 Depth and
any size Block indication means dig. Shallower targets and
a quarter or half size block suggests trash. This is because
the older, heavier, more desirable targets, settle deeper into
undisturbed ground. The shallower Depth readings typically
have fuller Blocks to warrant digging. Again Small pinpoint
= small target. Relatively larger pinpoint = larger target.
Elongated pinpoint = elongated target. The exception is that
a large target that is very deep will tend to provide a small
pinpoint area as well as an inaccurate shallow depth indication. Use this to your advantage; a shallow depth indication
(0-1 inch), having dug six inches and not found the target, is
a larger deeper target.
NOTE: Please refer to page 29 for the proper “X” ing
technique to “pinpoint” the exact center of the target.
17
Page 18

Chapter 4 MXT Pro Display
Prospecting MODE
The Prospecting MODE changes the audio and display
information more dramatically compared to switching from
Coin & Jewelry to Relic.
Mode toggle
switch Down for
Prospecting
Gold in its natural state can be any size and shape from
very tiny pinhead size akes to large placer gold nuggets as
well as veins of various sizes in quartz rocks. The Prospecting MODE takes these facts into consideration and changes
the display accordingly.
When prospecting, an operator must expect to dig nonferrous (not of iron) trash metals such as aluminum, lead, and
small brass. Any of these metals can and do illicit the same
response as gold and MUST BE DUG. Attempts should be
made to avoid only IRON targets and only when possible.
The MXT Pro displays information, which is intended to help
the user determine whether the target is NON-IRON (dig) or
IRON (don’t dig). In heavy mineralized ground tiny pieces of
gold can sometimes look like IRON to a metal detector and
small pieces of IRON can look like gold. The VDI numbers
and Iron Probability scale both provide help in determining
when to dig.
Remember, small akes of gold in bad ground can read into
the small negative range. A magnet on your digging pick can
sort out a small shard of iron quickly.
2. % IRON TARGET- Indicates the likelihood the target
is ferrous (iron) expressed in a %. This indication can be
different in different areas depending upon the degree of
mineralization. As a general rule targets registering 60%,
70%, 80%, and 90% are going to be iron. 80% and over will
produce the audio grunt using the standard turn-on & go set-
tings. Targets that register 10%, 20%, 30% or 40% are going
to be gold or (lead, copper, aluminum, brass). All targets reg-
istering 50% or below should be investigated. As mentioned
under the VDI section, iron ground mineralization can distort
the way the detector reacts to gold. It is always a good idea
to place a penny-weight test nugget just under the surface
of the ground where ever you are going to be prospecting
and note how it reacts to the IRON TARGET %. If a small
test nugget is not available, a USA nickel or lead bullet will
respond identically to most similar sized gold nuggets. This
will give you a gauge as to what to expect. Ground minerals
and the size of the target affect the degree of dependability.
It is not uncommon for a small piece of gold in very bad
ground to read 70% probability of being iron. Remember
when in doubt… DIG. Use both the VDI and % IRON PROBABILITY. Dig often at rst, till you get a feel for the area and
accuracy in that ground. When searching a new area, retest
the sample target and % Iron Probability accuracy.
The Prospecting MODE provides four signicant display
indications.
1. VDI- The VDI number is listed on the display and refer-
enced on the label below the display. Gold can indicate any-
where from slightly negative to +80 on the scale, however,
most small nuggets indicate in the -20 to +40 range. Metals
that indicate above +80, or below -20 are highly unlikely to
be gold unless they are conglomerated with highly unusual
alloys. If the VDI number tends to jump back and forth from
small negative numbers to small positive numbers it is usually a small piece of some metal and should be investigated
by digging.
18
NOTE- The display reading above would indicate a target
with a proper VDI number for gold and a low % iron target
Page 19

Chapter 4 MXT Pro Display
3. GND- Indicates the phase (measurement) of the
ground. This is useful in two different environments.
A. Use Ground Numbers primarily to Find Gold
Bearing Ground in a Dry Wash. Within a dry wash the
gold will settle with the heavier materials (black sands).
When searching you notice the ground phase is declining (lowering in number), generally you are working
further away from the heavy black sand deposits. If
you notice the ground phase is increasing, generally
you are working toward (closer) to the heavier deposits. By following the more intense ground phase (higher
numbers) you increase your likelihood of nding nuggets within the heavier material (black sands).
B. Checking outcropping or veins, the ground phase
can also be useful in a similar way by indicating the
consistency or change of the veins ground phase.
Generally speaking, the ground numbers will hold fairly
consistent in most open terrain areas, such as hydraulic sites and desert areas. GND readings in the high
70’s and 80’s are considered heavy iron mineralization.
Alkali or salt areas will display much lower numbers,
possibly into the 30’s and 40’s.
Ground phase indications are a doubled edged sword.
Higher numbers simply mean predominately ferrous (iron)
such as black sands / magnetite. Lower numbers simply
mean less iron and/or predominately conductive nonferrous (not of iron) content, such as gold per ton of rock. So
in a dry wash, outcropping, or vein, a shift in either direction
(higher or lower numbers) may be of interest. For example a
black sand streak may have a lot of our gold at one end. It
will indicate a high ground phase number on the end without
the our gold, and a lower ground phase on the end with the
our gold. The same applies to veins or an outcropping. It
is the change that brings about the interest more so than if
it is either high iron (high number) or high conductive (lower
numbers).
Knowing that the ground is high iron (magnetite), outlining black sand pockets (the likely area gold will be found),
checking veins for consistency (change), and comparing
rock samples for possible assay, are the common uses of
ground phase. Again, change is of the most interesting,
more so than the direction of the change.
GND = 83
GND = 45
GND = 30
Black sand streak-heavy iron mineralization
Alkali or salt area in a dry wash
NOTE- Watching the change in Ground Number in the upper right of the display, you will rst look for a change to a high
number indicating high mineralization or black sand. When that streak is identied you will then look for the Ground Number
to lower again at one end of the streak indicating where the our gold or gold ore may be concentrated.
Flour gold
concentration at
one end of black
sand streak
19
Page 20

Chapter 5 MXT Pro Controls
Controls
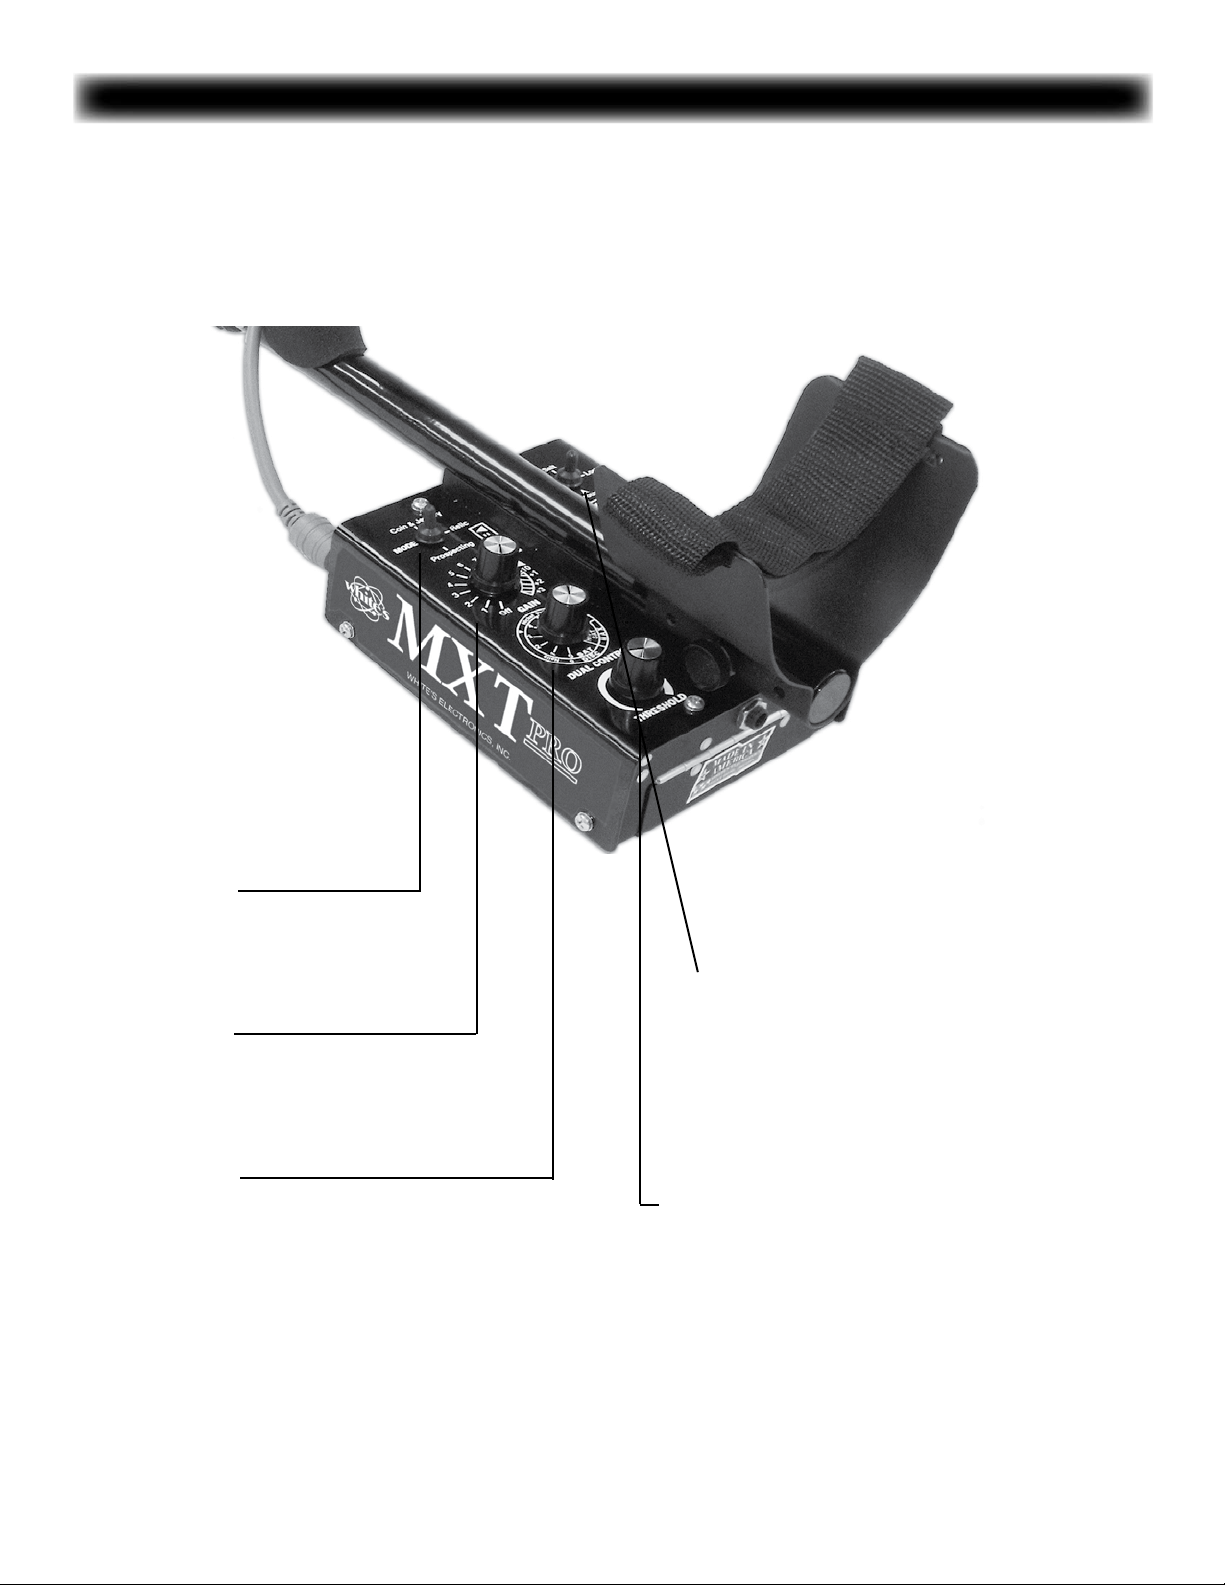
MODE
MODE Toggle
Selects the operating MODE or type of searching desired
on that particular outing. Major audio and display changes
occur with the selection between the three available operating MODES. For example the audio and function / information on the display changes between the three MODES, the
function and available features of the TRIGGER switch on
the hand grip changes between the three MODES, and the
DUAL CONTROL function changes between the MODES.
For quick eld reference, the silk screen painted on the bottom of the control box is provided to simplify these changes
and features.
Further explanation is provided as follows;
COIN & JEWELRY MODE
*Trigger (on handgrip);
Trigger Center Position “Primary Searching” (traditional DISC
control). With the Trigger on the handgrip in the
center position, the Discrimination control works
like most traditional metal detectors, metal items
below the Discrimination control setting are suppressed (quiet or broken) by the audio and metal
items accepted by the Discrimination control setting produce a smoother solid audio beep.
Trigger Squeezed and held “Pinpointing/
Depth Reading”. When operating in the Coin &
Jewelry MODE and the Trigger on the handgrip is
squeezed and held, the audio changed to an all
metal (no trash rejection) pinpoint mode and the
display provides a screen that indicates the depth
and intensity of coin sized targets to further aid in
pinpointing exactly where to dig. Once released
the trigger will automatically return to the Center
“Primary Search” position.
Trigger Pushed forward to Lock “Pinpointing/
Depth Reading”. When operating in the Coin &
Jewelry MODE and the Trigger on the handgrip is
pushed forward to Lock, the same functions are
provided as if the trigger where squeezed and
held. The audio changed to an all-metal (no trash
rejection) pinpoint mode and the display provides
a screen that indicates the depth and intensity
of coin-sized targets to further aid in pinpointing
exactly where to dig. Squeezing and releasing
the trigger will automatically return to the Center
“Primary Search” position.
20
Page 21

Chapter 5 MXT Pro Controls
DUAL CONTROL MODE
indication (0-1”), compared to heavier gold jewelry, which typically indicates with deeper depth
indications.
“Music Notes” Tone ID. Coin & Jewelry always
starts out with Tone ID ON. Targets higher on the
VDI number scale respond with progressively
higher pitch tones. At minimum discrimination
(fully counter clockwise) seven different audio
tones represent the entire target range from iron
the lowest pitch, to large silver coins the highest pitch. Audible tones are depending upon the
Discrimination setting; rejected targets audio
is suppressed so not all seven tones may be
heard. As the discrimination control is advanced,
lower pitch tones (starting with iron the lowest) are suppressed (eliminated). Press “music
notes” Tone ID once to turn OFF Tone ID (all
accepted targets produce the same pitch tone),
press again to turn ON Tone ID.
DUAL CONTROL
DISC- DISCRIMINATION (outer ring)
When in COIN & JEWELRY and RELIC MODE
VARIABLE SELF ADJUSTING THRESHOLD SPEED (SAT)
When in Prospecting MODE.
*DUAL CONTROL DISC “P” Preset. While
operating in the Coin & Jewelry MODE The
DUAL CONTROL functions as a traditional discrimination control. Further clockwise settings
provide greater degrees of trash metal rejection. Counterclockwise settings provide lesser
degrees of trash metal rejection. Settings much
higher (further clockwise) than the “triangle” will
reject aluminum, however, will also reject nickels
and many items of gold jewelry. It is best to use
settings near the ‘triangle” (highest setting that
still responds to a USA nickel or medium gold
ring) and rely upon the display and depth reading to sort out lightweight aluminum. Lightweight
aluminum typically indicates with shallow depth
RELIC MODE
*Trigger (on handgrip);
Trigger Center Position “Primary Searching”
(Relic Type DISC control). With the Trigger on
the handgrip in the center position, the DISC
control works like most high-end Relic metal
detectors in that ALL metal items respond. Metals rejected by the DISC control setting produce
a low pitch tone; metal items accepted by the
DISC control setting produce a higher pitch tone.
Trigger Squeezed and held “Pinpointing/Depth Reading”. When operating in the
Relic MODE and the Trigger on the handgrip is
squeezed and held, the audio is changed to an
all-metal (no trash rejection) pinpoint mode and
the display provides a screen that indicates the
depth and intensity of coin sized targets to further aid in pinpointing exactly where to dig. Once
released the trigger will automatically return to
the Center “Primary Search” position.
21
Page 22

Chapter 5 MXT Pro Controls
Trigger Pushed forward to Lock “Pinpointing/
Depth Reading”. When operating in the Relic
MODE and the Trigger on the handgrip is pushed
forward to Lock, the same functions are provided
as if the trigger where squeezed and held. The
audio is changed to an all-metal (no trash rejection) pinpoint mode and the display provides a
screen that indicates the depth and intensity of
coin-sized targets to further aid in pinpointing
exactly where to dig. Squeezing and releasing
the trigger will automatically return to the Center
“Primary Search” position.
*DUAL CONTROL DISC Preset. Except for Iron
ID, which disables the Discrimination control,
while operating in the Relic MODE the DUAL
CONTROL functions as a traditional discrimination control. Further clockwise settings provide
greater degrees of trash metal rejection (adjust
the high/low pitch tone indications or audio suppression). Further counter clockwise settings
provide lesser degrees of trash metal rejection or
high/low tone indications.
“Music Notes” Tone ID. Relic Mode always
starts out with 2 Tone and will revert back to
Tone 2 upon any On/Off cycle.
Tone 2 - Metals rejected by the DISC control
setting produce a low pitch tone; metal items
accepted by the DISC control setting produce a
higher pitch tone.
Two additional Tone ID settings are available in
the Relic Mode by pressing “music notes” Tone
ID;
Iron, if accepted by the discrimination control
setting, produces a low pitch tone. Accepted
targets produce a high pitch tone. As the Discrimination control is advanced (clockwise), the
audio of targets below the current Discrimination level is suppressed, broken, and/or modi-
ed in consistency.
PROSPECTING MODE
*Trigger (on handgrip) - Center Position “Primary Searching”
Squeezed and held, and/or pushed forward
and locked “Temporally Disables (stops)
ground tracking”. Provides the same function
as holding Ground Grab during Ground or
Salt TRAC control positions.
Depth reading can only accurately be calibrated
by knowing ahead of time approximate target
size. No two nuggets are the same size so any
attempts to apply depth indications are fundamentally awed (in error). Therefore while operating in the Prospecting MODE rather than giving
a known awed depth indication, squeezing and
holding the Trigger on the handgrip, or pushing
it forward to lock, simply and temporarily stops
ground tracking.
Remaining over the target can often cause the
detector to see more target than ground and
cause the detector to think the target is ground
and attempt to track out the toggle. Squeezing
and holding the trigger when analyzing weak signals stops tracking and prevents such errors.
Iron ID - Disables the Discrimination control so
that “All Iron” indicates with a low pitch tone,
and “All Non-Iron” indicates with a higher pitch
tone. Discrimination control disabled has no
inuence over audio.
Tone 1 – Based on the Discrimination control
setting, rejected targets audio is suppressed.
22
*DUAL CONTROL SAT Preset. While operating
in the Prospecting MODE, the DUAL CONTROL
functions as a Self Adjusting Threshold (SAT)
control to smooth inconsistencies in the ground
and thus the Threshold. More on SAT under the
section dedicated to the DUAL CONTROL.
Page 23

Chapter 5 MXT Pro Controls
“Music Notes” Tone ID. Starting out turned
on, Iron Grunt provides a distinctive grunt for all
targets certain to be iron (80% and higher probability). If turned off by pressing “music notes”
Tone ID the same VCO audio tone will be heard
for all targets.
CONCERNING ALL MODES
TRAC Toggle-
The TRAC toggle selects the type of ground mineral rejection (ground balance) and automatic tracking to ground
mineral changes best suited to the specic area. Three different positions for a specic ground condition (ground type)
are provided.
The Ground position is used for normal or typical ground
conditions. In this position the MXT Pro will quickly compensate for ground minerals in a few pumps of the search
coil over the ground being searched and automatically track
to any ground changes as you sweep the search coil during
searching. For most operators the Ground position will be
used for over 90% of your searching conditions.
The Lock position monitors, however, doesn’t track to
changing ground conditions. Man made iron decomposes to
the point of tricking the Ground and Salt position tracking
into thinking it is a mineralized part of the ground. This
can create noise and instability during searching as the
tracking system bounces radically up and down the scale,
always searching for a good ground rejection setting and
never able to nd it. This makes it difcult for an operator
to recognize worthwhile targets and/or run at the higher
performance GAIN settings. In these conditions it is recom-
mended to rst go to the Ground or Salt position and pump
the search coil over a clean area of ground representative
of the area (free of man made iron) then switch the TRAC
control to Lock. By doing so stability and success searching these trashy areas will improve dramatically. Because
ground changes are monitored during Lock, pressing and
releasing the GROUND GRAB button, or switching back
to either Ground or Salt tracking positions, updates to the
appropriate ground setting (ongoing tracking) are virtually
instantaneous.
Another example of when Lock would be used is if a
particular mineralized rock or patch creates difculties in
searching an area. A hard rock mine for example with a low
mineralized quartz based rock and random high-mineralized magnetite rocks or patches. Place the TRAC control
in the Ground position and balance “pump the search coil”
over a representative sample of the high mineral rock or
patches. Then Lock in that ground rejection setting “place
the TRAC control in the Lock position”. The entire area can
then be searched without the distraction of the inconsistencies the high mineral patches create.
The Salt position provides an extended ground balance
and tracking range to compensate for conductive salts also
called alkali. Ground rejection against salt/alkali slightly
overlaps the lower end of the conductive target (metal)
range. In other words if you ground balanced against signicant salts, some loss of sensitivity to lower conducting
metals (metals low on the VDI target scale) can be expected. The advantage and performance improvements of
rejecting the salt, however, far outweigh any loss. Because
the Salt TRAC setting can track well into the target range it
is not recommended for normal conditions, only for areas
known to contain salt.
23
Page 24

Chapter 5 MXT Pro Controls
Salt water beaches for example or alkali desert regions.
The Ground setting will not track into the nonferrous metal
region. The Salt setting will. The MXT Pro ground rejection
system is capable, in both the Ground
and the Salt settings, of considering some iron a ground
mineral. If operating in a known salt area, salt water
beaches for example, it is not necessary to balance in the
Ground TRAC setting. Simply select the Salt TRAC setting
and proceed to pump the search coil over the ground to
be searched. The Salt setting will balance and then track
to changes identically to the Ground setting only with an
extended range, well into the conductive target area.
TRAC Summary- The Ground TRAC setting is
recommended for most searching conditions.
Lock is used to hold a ground rejection setting that is rst
established in the Ground or Salt TRAC positions. Lock is
recommended for areas that cause detector instability due to
spotty extreme ground peculiarities such as a lot of decomposing man made iron or random but regular high mineral
pockets or rocks in a low mineral base.
Gain Control/ON-OFF
With the GAIN control, you turn the instrument On/Off and
select the signal strength. You might expect increased signal
strength to always nd more at greater depths. However,
high ground mineralization will mask good targets. It is
therefore necessary to adjust GAIN to give you the maximum allowable signal strength without masking targets or
overloading the circuit and at the same time allowing you to
operate the detector with a constant faint threshold hum so
that faint signals (deep or small targets) can be detected.
Salt provides extended ground rejection range to compen-
sate for conductive salt/alkali conditions. The Salt setting
can ground cancel extreme enough to reduce sensitivity to
low conducting metals, metals that appear low on the VDI
scale. The Ground TRAC setting will not balance nor track
into the nonferrous metal region. Despite this draw back the
Salt setting still provides improved overall performance while
operating in the salt/alkali ground condition.
24
GAIN Control
The MXT Pro will indicate when ground mineralization is too
high for the current GAIN control setting. When the display
indicates, “OVERLOAD-REDUCE GAIN/LIFT LOOP” along
with an audible “squawk” reduce the GAIN till the overload
warning ceases.
On occasion, while searching, you might sweep the search
coil over a very large or very shallow target. The message on the LCD display will read “OVERLOAD-REDUCE
GAIN/LIFT LOOP” only when the search coil is over
an isolated spot on the ground. Sweep the search coil
a little higher over the area and note the display and audio
indications to check for a real metal target. The MXT Pro self
corrects after the message and you can continue to search
as normal.
Again, OVERLOAD over a large area indicates Gain is too
high for the ground minerals. Overload over an isolated area
Page 25

Chapter 5 MXT Pro Controls
indicates a very large target, sweep loop higher over area to
conrm if the target may be of interest.
NOTE- Ground Mineralization too high, large or shallow
target message.
Gain Adjustment
1. The GAIN control knob turns the MXT Pro ON and OFF
and controls the GAIN. Starting from the POWER OFF
position and going clockwise, the power is turned ON and
the dial increases the GAIN from a minimum level of “1” to a
maximum level of “+3”. Set the control to the “Initial Setting
Triangle” (between level 9 & 10).
2. Although the setting of (9-10) gives more than ample
GAIN, if the ground mineralization is low enough, you might
attempt to raise the GAIN above this level toward +3.
3. The object of increasing the GAIN is to get the maximum
available depth from the detector WITHOUT causing dif-
culties in recognizing real metal targets, and without the
“OVERLOAD-REDUCE GAIN/LIFT LOOP” message appearing (when the search coil is over ground, IS NOT over
a metal target) indicating a ground mineral overload of the
circuit.
5. In the Prospecting MODE the use of the SAT (variable
self-adjusting threshold) control will help to maintain a reasonably smooth THRESHOLD “hum” particularly at higher
GAIN settings and will be covered in a later section.
6. While using a steady slow search coil sweep speed,
simultaneously advance GAIN towards “+3”. If the “OVER-
LOAD-REDUCE GAIN/ LIFT LOOP” alert keeps popping up
on the display, if a relatively smooth background THRESHOLD “hum” doesn’t continue, or if ground noises are a
problem reduce GAIN.
7. The trash I.D. capability of the MXT Pro also functions
more accurately when the GAIN is set at a level that allows
for reasonably smooth operation. Too much GAIN can cause
bad ground to distort the proper identication of iron and
non-iron targets.
8. Note: It is normal to hear changes, clicks or soft beeps,
coming from the audio (speaker) during GAIN adjustments
as the circuit shifts between hardware and software gains
(different electrical parts of the circuitry). The GAIN control
adjusts both the hardware gain (hard physical component)
as well as the software gain (computer code) alternating
between the two throughout its range. As the MXT Pro shifts
between these two intricate parts of the circuitry an audio
indication notes the transitions. This can be helpful. If you
adjust the Gain slightly, the audio notes signicant rather
than slight change with these audio shifts.
9. The MXT Pro provides more GAIN control range than is
typically useful assuring performance. Few areas will allow
maximum GAIN (full clockwise) without at least some degree
of noisy operation. Setting in the + area requires a high
degree of operator skill.
4. In addition, any increase in GAIN adjustment should NOT
BE at the expense of maintaining a reasonably smooth and
constant THRESHOLD “hum”. False signals, beeps and static from bits of mineralization, erratic behavior, and prolonged
lapses in THRESHOLD, all can be the result of running with
too much GAIN.
25
Page 26

Chapter 5 MXT Pro Controls
DUAL CONTROL
(Dual Control) in Coin & Jewelry or
Relic - While operating in the Coin & Jewelry or Relic
MODES the Dual control operates as a DISC (discrimina-
tion) control. DISC (Discrimination) is used to adjust the level
of audio rejection against trash metals.
The “Triangle” just below NICKEL is recommended for most
general purpose searching. In this position, the detector
will provide a reject response to most iron and light foil and
respond to most valuables including jewelry.
Positions lower than “triangle” (counterclockwise) will provide
less trash metal rejection, to the point of detecting virtually
all types of common metals.
Positions higher than the “triangle” (clockwise) will reject
more trash metals including aluminum pull-tabs. The display
will continue to indicate I.D. even though the audio discrimi-
nator will signal with a reject (suppressed or broken) sound.
Nickels and some jewelry will also be rejected with DISC
settings much greater than the “triangle”.
DISC- DISCRIMINATION (outer ring)
When in COIN & JEWELRY and RELIC MODE
VARIABLE SELF ADJUSTING THRESHOLD SPEED (SAT)
When in Prospecting MODE
26
The “triangle” position is recommended for most MODES.
If when searching at the “triangle” position you feel you are
digging too much trash, adjust DISC slightly clockwise and
try again. Using the lowest (furthest counterclockwise) position that is practical considering the common trash metals
in your area is important in order to nd items of jewelry.
Settings that suppress the USA nickel, and/or a medium 14K
gold ring, will also suppress most other gold jewelry. For
jewelry, it is best to keep the Discrimination at or near the
“triangle” and rely on the display and depth indication to sort
out aluminum.
Dual Control in Prospecting -
When in the Prospecting MODE, the DUAL CONTROL is
used to adjust the level or speed of SAT (Self Adjusting
Threshold).
The Threshold or continuous faint hum heard during operation of the MXT Pro can increase or fade due to environmen-
Page 27

Chapter 5 MXT Pro Controls
tal interference or from inconsistencies in ground mineralization. This can be heard as chatter when excessive. Faster
SAT speeds tend to calm this interference allowing target
sounds to be separated and identied compared to non-target or ground noise.
The MXT Pro is computerized, which allows improved SAT in
ways not practical in the past. These improvements “kick in”
progressively at higher settings allowing better ground silencing in highly variable ground. At these higher settings, cold
rocks (rocks well below the current ground mineral rejection
level) will sound “different” giving a “double blip” sound or
vanishing entirely, rather than giving the “boing” sound you
will get at lower settings. A major difference between a gold
nugget and a cold rock response is that when you sweep
back and forth, the gold nugget will “stay in one spot” but the
cold rock will seem to keep wandering around. This can also
be the case with a pocket of negative mineralization.
GAIN Control
might be necessary to use the SAT feature and/or reduce
the GAIN control. This noisy behavior will make it difcult
to recognize a true target (possible nugget) from pieces of
mineral, commonly referred to as “hot rocks”. It is not wise
to keep a high level of GAIN if the detector will not operate smoothly. This is a false sense of security. Maintain as
smooth a threshold as you can. Recognizing a true target
is the most important part of detecting. This is an example
of when less GAIN will produce more nuggets. You must be
the best judge of just how much noise you can tolerate and
still identify nuggets, and thus the amount of SAT and GAIN
to use to produce the desired results in your area. If you
have been operating your MXT Pro at the full level of GAIN
(+3) and you determine that this is too high because either
the threshold is erratic or the detector is giving false signals; always begin by reducing the GAIN toward the Initial
Setting triangle. If this does not correct the problem, start
adding some SAT speed by turning the SAT control slowly
clockwise. If this does not correct the problem, go back to
the GAIN and reduce it a little more and add a bit of SAT. It
is sort of like seasoning a pot of soup. Some salt and some
pepper. Remember any drop in GAIN below (7-8) will result
in some loss of depth. Any increase in SAT speed above the
“P” setting may also affect overall depth.
SAT SPEED CONTROL
(Prospecting Mode Only)
GAIN and VARIABLE SAT (Self Adjusting
Threshold) Speed-
The TRAC feature compensates for common ground minerals in the area. The SAT control compensates for the inconsistency of the ground mineralization. The greater the degree
of inconsistencies, the more SAT is needed to quiet ground
noise. If the THRESHOLD becomes too erratic or noisy, it
However, before reducing the Gain below 7 - 8 you might
try to experiment a bit with the HYPERSAT range of the
SAT control. This function is unique to White’s SAT. The
Threshold will almost buzz and loss of depth will be minimal.
Reserve this option for situations where ground is unusual
or conditions extreme.
If the Threshold cannot be stabilized with small reductions
in Gain and small increasing SAT, then “jump start” SAT into
the HYPERSAT range. Before attempting this, you might
practice sweeping over a test nugget to learn to identify it’s
sound with HYPERSAT. We like to use the analogy of driv-
ing on a straight road versus a curvy road. The object is to
get from point A to point B. 65 mph might get you there on a
straight road, but you will have to slow to 35 mph if the road
is curvy, or you will end up off the road. The straight road is
like low mineralized ground and the curvy road is like heavy
mineralization. High Gain and slower SAT will not recover as
much Gold in heavy mineralization as lower GAIN and faster
SAT.
27
Page 28
Chapter 5 MXT Pro Controls
THRESHOLD CONTROL
“HUM”
Threshold Control-
The THRESHOLD control sets the loudness of the background “hum” or edge of sound. This background “hum”
should normally be maintained during searching. In order
to hear the tiniest and deepest targets the THRESHOLD
“hum” should be set at the faintest audible level. It can be
slightly scratchy, chatter or static like but it must be constant
so as to not miss that small or deep targets. At this point, we
can’t recommend too highly the advantage of using HEADPHONES. With HEADPHONES you can lower THRESHOLD
“hum” levels, and hear the faintest of target signals while
canceling out environmental background noise and improving concentration.
Threshold Adjustment-
The MXT Pro has an improved microprocessor driven
THRESHOLD control that is adjusted with a single turn. It
does not, therefore, require a 10-turn pot for precise adjust-
ment. Digital software provides much higher resolution, thus
you can set the “hum” faster and more accurately. Set the
knob all the way to the left or counterclockwise and then
rotate it clockwise until the faintest audible level of “hum” is
attained (edge of sound). If the “hum” disappears for any
reason (other than bumping the control) you may be either
swinging the coil too fast or your GAIN control is set too high,
or in the prospecting MODE you may need to increase the
speed of SAT.
28
Silent Search -
With microprocessor driven THRESHOLD controls arguably skillful operators can “cheat the system” and use silent
search with high performance results. Once the threshold is
found, edge of sound, setting the Threshold control slightly
counterclockwise achieves silent search where no threshold
hum is heard during searching. By further optimizing Gain
to radical levels, much of the resulting noise can be hidden
under the Threshold and thus produce good eld results.
Best reserved for more experienced operators, a balancing
act between higher Gain V.S. the stronger response required
to surpass the threshold setting, must be achieved and
understood.
Page 29

Chapter 6 MXT Pro Pinpoint Technique
Pinpointing
NOTE: Turn the detector 90° to the rst side-to-side loop
movement and repeat for “+”ing the center.
Pinpoint Technique-
Due to the wide scan nature of modern search coils it can
be difcult to locate small targets under the physical center
of the loop. Use an “X” marks the spot technique as shown
in the diagram to identify the portion of ground the metal
target is in. Prospecting for small nuggets, because small
metal targets are more difcult to isolate to an exact location
compared to coin or relic hunting, may require removing the
soil under the center of the “X” until the target is no longer in
the hole, but in your pile of dirt.
Again, the procedure is to sweep over the target from side-
to-side noting the side-to-side center. Then turn 90 degrees
and sweep the coil side-to-side noting the center from this
new direction. “X” marks the spot that you need to dig. You
can practice with a coin or small pieces of lead or gold on
top of the ground to become acquainted with the technique.
During Prospecting it is a good idea to have a magnet
handy, preferably in the handle of your digging pick, to pull
iron out of the dirt pile. It will speed up your recovery time. It
will work on small almost invisible iron rocks as well.
Accessory “DD” search coils (recommended for extreme
ground mineral areas and/or prospecting with the MXT Pro)
pinpoint signicantly different than the standard equipment
traditional concentric search coil. Standard equipment
concentric search coils tend to center to a round spot close
to their physical center. “DD” search coils will center along
a line running front to back. Using a “DD” accessory search
coil the most isolated pinpoint is achieved side-to-side. By
using this side-to-side pinpoint on one plane, say east to
west, then, turning and again using this side-to-side north to
south, pinpointing with a “DD” search coil can be as accurate
as a concentric. With a “DD” accessory search coil pinpointing in more of a “+” is far better than “x”. Center side-to-
side, then turn 90 degrees and center side-to-side.
29
Page 30

Chapter 6 MXT Pro Searching
Headphones
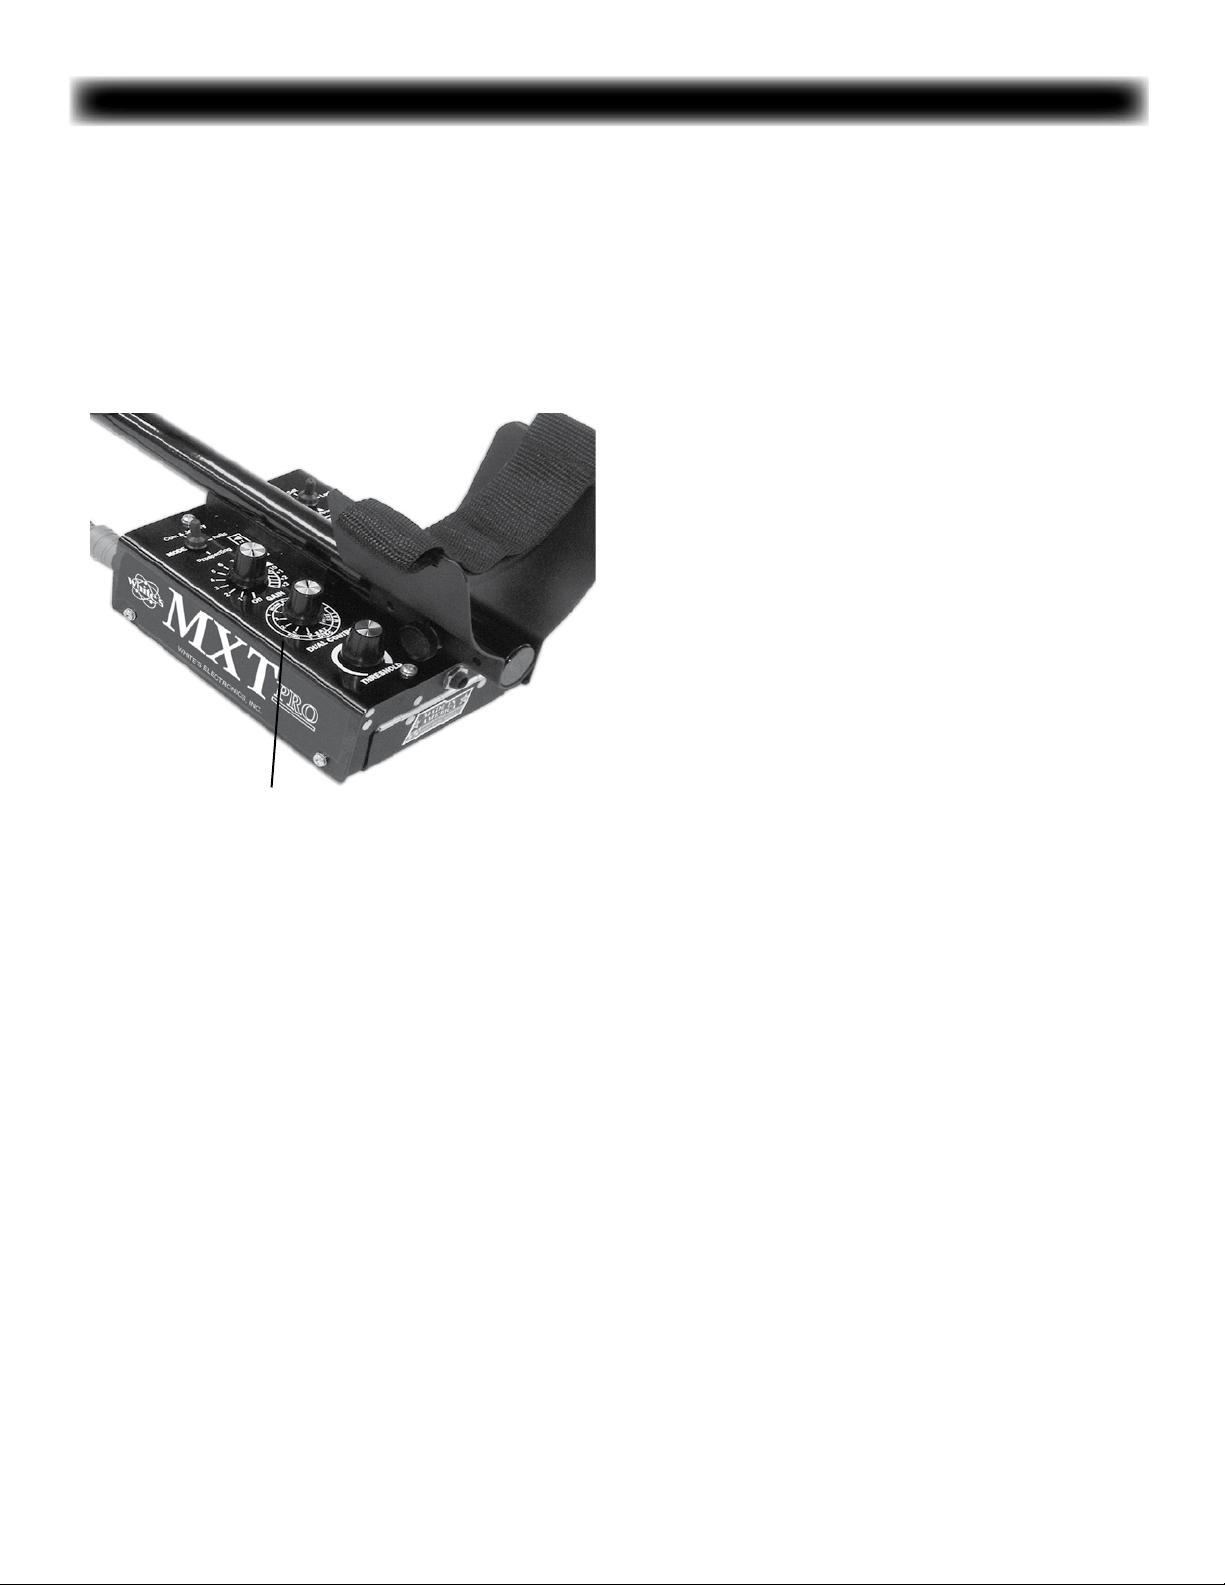
Headphones-
The headphone jack on the MXT Pro is located on the
control box above the battery compartment. There is a dust
cover on the headphone jack that needs to be removed
before the stereo plug from the headphone is inserted. Replace this cover when headphones are not being used. Most
users prefer high quality stereo headphones so White’s has
chosen to wire the headphone jack for stereo. If you have a
mono headphone, you can purchase an adapter that will allow sound in both ear pieces. Some headphones come with
a switch for stereo or mono jacks.
In choosing headphones, make sure they have a VOLUME
CONTROL, as there is no target volume control on the MXT
Pro. This is an important comfort issue. Remember that you
want the faintest THRESHOLD “hum” possible but a strong
comfortable target signal. With headphones you will be able
to work with a lower THRESHOLD “hum”, hear fainter target
signals, avoid bothering others with a “beeping” box, and
save on battery life. Many high quality headphones from
full ear enclosure to lightweight summer models that offer a
bit more safety in snake and bear country are available on
the market. Higher impedance headphones (60 Ohms or
greater) give the most sensitivity and are better for hearing
the tiny targets most likely to be heard while prospecting.
Properly balanced impedance is important as well as low
distortion.
30
Page 31

Chapter 6 MXT Pro Searching
Field Use & Tuning Tips-
Coin & Jewelry MODE
1. MODE to Coin & Jewelry
2. Trigger (on handgrip) center “primary Searching” posi-
tion.
3. TRAC to Ground position.
4. GAIN to “Triangle” position.
5. Threshold, adjust for slight hum (edge of sound).
6. DUAL CONTROL to DISC “Triangle”.
7. Pump the search coil on the ground to be searched until
ground ceases to respond.
8. Move the coil just over the ground and listen for the dis-
tinct repeatable beep produced by a good metal target. It is
wise to plant metals just under the soil to practice on in order
to learn to recognize what it will sound like. Planting a metal
target disturbs the ground mineral, which usually reduces
the depth it would have been found in undisturbed ground. It
will take practice to determine the proper search speed and
technique. Do not go too fast, about 2 seconds from right-toleft and two seconds returning from left-to-right. Overlap your
sweep path 50% so that you won’t miss the small and/or
deeper metal targets.
for digging coins and jewelry that indicate outside the pull
tab range. However, note; when aluminum is rejected the
probability of digging jewelry substantially diminishes. The
highest (furthest clockwise) discrimination setting than still
responds to the USA nickel, or a medium sized 14K gold
ring, is the highest trash rejection level that still responds to
most jewelry.
11. Ground Mineralization:
A. For Salt/Alkali environments proceed exactly as
above only with the TRAC toggle in the Salt position.
B. For areas with an abundance of decomposed man
made iron (which may make the MXT Pro appear unstable only during search coil sweeps), proceed exactly
as above only once you pump the loop over the ground,
then set the TRAC control to Lock.
The Coin & Jewelry MODE provides good general
purpose searching for a wide variety of targets and
environments. From residential yards, parks and school
grounds, farm elds, to beaches (for beaches use TRAC
Salt), the Coin & Jewelry MODE should be used if there
is any doubt at all regarding which of the three available
MODES is most practical for your current search.
As the name implies, Coins & Jewelry are the primary
goals of this mode, however, these settings and features
will also respond to any better alloy including common
relics and any other item made of a valued metal alloy.
9. Once a solid repeatable beep is located: Consult the
display information. If the target indicates in the mid scale
aluminum Pull Tab range, squeeze and hold the Trigger on
the handgrip “+” the search coil over the area and check the
depth. If it is shallow (0 - 2 inches) depending on the hardness of the ground, it is most likely a Pull Tab and should be
ignored. If it is deeper (beyond 2 inches) depending upon
the hardness of the ground, it is likely heavier gold jewelry
and should be dug.
10. Heavy Pull Tab. In areas littered with hundreds of
aluminum scraps or Pull Tabs it may be necessary to search
full time with the Discrimination control set high enough to
reject their audio response and save your time and efforts
The 1st option a user should consider is the selection of
an appropriate TRAC toggle setting for the area. The
Ground setting and Salt settings should be almost selfexplanatory. If you are searching in typical ground, use
the TRAC Ground setting. If you are in a salt water or
desert alkali ground condition, use the TRAC Salt setting. When to use the Lock setting can be less obvious.
If it seems like something is wrong with the detector,
wildly uctuating Threshold hum (only while sweeping the search coil), try the Lock setting. If the detector
smooths out and starts operating more predictably, you
made the correct choice. If there isn’t any change, you
may need to reduce the Gain control counterclockwise
31
Page 32

Chapter 6 MXT Pro Searching
and/or increase the Dual control (Disc) clockwise and try
again. An area littered with man-made iron would dictate
the Lock setting. On the other hand an area littered
with small aluminum foil would not, such an area would
dictate the Reduced Gain and/or higher discrimination
settings.
The 2nd option is Gain. Some areas require, and some
operators just prefer the more predictable operation
reduced Gain settings provide, where as others prefer to
push Gain to the limits of their patience to nd the deepest targets. There is a point of diminishing returns either
indicated by the display telling you OVERLOAD to lift
the loop due to a Gain setting too high for the ground, or
a user missing targets because they can not sort them
from sporadic noise experienced at high Gain.
The 3rd option is the level of audio Discrimination
(DUAL CONTROL). The “Triangle” provides a popular
setting rejecting most iron and small foil and accepting
USA nickels and most jewelry. Remember you have the
display to further sort out accepted metals. However, if
the common trash of the area consistently produces an
audio to the point of distracting from nding anything at
all, an operator can increase discrimination (clockwise)
and cherry pick the area for silver and copper. If a hot
spot of multiple coins is located an operator may then
want to search isolated spots within that area at lower
discrimination settings. Even with modern discriminating metal detectors, it takes a good deal of patience to
search high trash areas. Remember a metal target that
indicates in the Pull Tab range however, provides a deep
depth indication, is more likely to be jewelry than a Pull
Tab. There are six types of targets that typically indicate
in the Pull Tab range, USA Nickels, Aluminum, Lead,
Brass, Small Bronze, and Gold. Without consistency
in size/shape, all a metal detector can tell you is that it
indicates within that mid-range of targets. It is up to the
operator to identify the common trash items of each area
and then gamble with the odds weighing the likelihood
of good targets compared to the degree of time digging
trash.
The 4th option is Threshold level. It is best to search
with a continuous hum or threshold (edge of sound).
You can hear rejected targets (threshold fades) and be
made aware when and where concentrations of trash
items lay, indicating trafc areas more likely to produce
good targets. It, however, requires more patience and
concentration. Finding the Threshold, and then setting
the Threshold just counterclockwise of it (Silent Search),
provides good performance for those who cannot tolerate the continuous Threshold hum all the time.
The 5th option is to turn off the TONE ID. Coin & Jewelry
starts out with TONE ID ON. Accepted targets, based
on the Discrimination control setting, produce higher
pitch tones the higher they measure on the Display VDI
number scale. Seven tones represent the entire VDI
scale. However, if one pitch tone is desired for all accept
targets, Turn Tone ID OFF.
Relic MODE
1. MODE to Relic.
2. Trigger (on handgrip) center “primary Searching” posi-
tion.
3. TRAC to Ground position.
4. GAIN to “Triangle” position.
5. Threshold, adjust for slight hum (edge of sound).
6. DUAL CONTROL to DISC “Triangle”.
7. Pump the search coil on the ground to be searched
until ground ceases to respond.
8. Move the coil just over the ground and listen for the
distinct repeatable beep (high or low tone) produced by a
metal targets. High pitch tones are targets above the Discrimination setting. Low pitch tones are targets below the
discrimination setting. It is wise to plant metals just under
the soil to practice on in order to learn to recognize what it
will sound like. Planting a metal target disturbs the ground
mineral, which usually reduces the depth it would have
been found in undisturbed ground. It will take practice to determine the proper search speed and technique. Do not go
32
Page 33

Chapter 6 MXT Pro Searching
too fast, about 2 seconds per pass from right-to-left and two
seconds returning from left-to-right. Overlap your sweep
path 50% so that you won’t miss the small and/or deeper
metal targets. Targets to deep or small to achieve good
tone identication will sound at the threshold level tone.
9. Once a solid repeatable beep is located consult the
display information. Squeeze and hold the Trigger on the
handgrip and “+” the search coil over the area to pinpoint
and note how deep you will need to dig listed on the display.
10. Ground Mineralization:
A. For Salt/Alkali environments proceed exactly as
above only with the TRAC toggle in the Salt position.
B. For areas with an abundance of decomposed man
made iron (which may make the MXT Pro difcult to operate), proceed exactly as above only once you pump
the loop over the ground in the Ground TRAC setting,
then set the TRAC control to Lock.
The Relic MODE also provides good general purpose
searching for a wide variety of targets and environments although it will require greater patience to use
in populated areas compared to Coin & Jewelry as the
Relic MODE is designed to locate a wider variety of
metal alloys (lead and brass). As the name and target
labels imply, the Relic MODE is designed with encampments and abandoned homesteads in mind as the
primary goals, however, these settings and features
will also respond to any better alloy including common
coins and any other item made of a valued metal alloy.
In the primary Trigger (on the hand grip) center position, any target accepted by the discrimination setting
produces a higher pitch beep and any metal target
rejected by the discrimination setting produces a lower
pitched beep. Uncertain targets may respond in-between with the Threshold pitch.
or desert alkali ground condition, use the TRAC Salt
setting. Highly fertilized farm elds (iron & ammonium
nitrate/oxides) when wet may also benet from the
SALT setting. When to use the Lock setting can be
less obvious. If it seems like something is wrong with
the detector, wildly uctuating Threshold hum (only
during sweeping the search coil), try the Lock setting.
If the detector smooths out and starts operating more
predictably, you made the correct choice. If there isn’t
any change, you may need to return to the Ground or
Salt setting and either reduce the Gain control counterclockwise and/or switch to the 1 TONE and increase
the Dual control (Discrimination) clockwise and try
again. 1 Tone suppresses the audio of rejected targets.
Standard Relic mode 2 Tone produces a low pitch tone
for rejected targets. An area littered with man-made iron
would dictate the Lock setting. On the other hand an
area littered with small aluminum foil would not, such an
area would dictate Reduced Gain and/or 1 TONE with
higher Disc settings.
The 2nd option is Gain. Some areas require, and some
operators just prefer, the more predictable operation
reduced Gain settings provide, where as others prefer
to push Gain to the limits of their patience to nd the
deepest targets. There is a point of diminishing returns
either indicated by the display OVERLOAD telling you
to lift the loop due to a Gain setting too high for the
ground, or a user missing targets because they can
not sort them from sporadic noise experienced at high
Gain.
The 3rd option is the 1 TONE mode. In 1 TONE, the
audio of targets rejected by the Discrimination control
setting is suppressed. This feature provides traditional
discrimination for the RELIC mode producing fewer
noises suppressing any metal target signal below the
discrimination setting. This feature is best for those who
have no interest in iron type targets.
The 1st option a user should consider is the selection
of an appropriate TRAC toggle setting for the area.
The Ground setting and Salt settings should be almost
self-explanatory. If you are searching in typical ground,
use the TRAC Ground setting. If you are in a salt water
The 4th option is IRON ID TONE. In IRON ID, the
discriminate control is disabled (doesn’t have any inuence). Iron targets sound with the lower pitch tone. All
non-iron produces a higher pitch tone. If you are interested in both Iron and non-iron targets, Iron ID might be
33
Page 34

Chapter 6 MXT Pro Searching
preferred over 2 Tone.
The 5th option is Threshold level. It is best to search
with a continuous hum or threshold (edge of sound). In
many modes you can hear rejected targets (threshold
fades) and be made aware when and where con-
centrations of trash items lay, indicating trafc areas
more likely to produce good targets. It, however, also
requires more patience and concentration. Finding the
Threshold, and then setting the Threshold just counterclockwise of it, provides good performance for those
who cannot tolerate the continuous Threshold hum.
Prospecting MODE
1. MODE to Prospecting.
2. Trigger (on handgrip) center “primary Searching”
position.
3. TRAC to Ground position.
4. GAIN to “Triangle” position.
5. Threshold, adjust for slight hum (edge of sound).
you won’t miss the small and/or deeper metal targets.
9. Once a solid repeatable VCO beep is located
consult the display VDI number and % ? Iron. Squeeze
and hold the Trigger on the handgrip and “+” the
search coil over the area to pinpoint.
10. Ground Mineralization:
A. For Salt/Alkali environments proceed exactly
as above only with the TRAC toggle in the Salt
position.
B. For areas with an abundance of decomposed
man made iron (which may make the MXT Pro
difcult to operate), proceed exactly as above only
once you pump the loop over the ground in the
Ground TRAC setting, then set the TRAC control
to Lock.
C. For highly inconsistent ground it may be neces-
sary to increase the Dual Control SAT adjustment
clockwise. Hyper SAT provides threshold maintenance for the most extreme conditions. Search
coil motion becomes increasing more critical at
these higher SAT speeds.
6. DUAL CONTROL to SAT “Triangle”.
7. Pump the search coil on the ground to be searched
until ground ceases to respond.
8. Move the coil just over the ground and listen for
the distinct repeatable beep produced by a metal
target. The Prospecting Mode utilizes a VCO (Voltage Controlled Oscillator) audio, thus the pitch of the
beep varies with the strength of the target. It is wise to
plant metals just under the soil to practice on in order
to learn to recognize what it will sound like. Planting a
metal target disturbs the ground mineral, which usually
reduces the depth it would have been found in undisturbed ground. It will take practice to determine the
proper search speed and technique. Do not go too fast,
two seconds from right-to-left and two seconds returning from left-to-right. Overlap your sweep path so that
34
The Prospecting MODE will require greater patience to use compared to the Coin & Jewelry and
Relic MODES. It is designed to locate all varieties
of metal alloys and then give some indications as
to if the metal being detected is made of ferrous
(iron) or nonferrous (not iron).
As the name and target labels imply, the Prospecting MODE is designed to nd gold nuggets, however, these settings and features will also respond
to all metal alloys including common coins. Any
target likely to be iron (ferrous) produces an audio
grunt and any metal target not readily identied
as iron (nonferrous) produces a traditional VCO
pitched beep (zip sound).
Upon repeated search coil sweeps, small or
weak targets can be obscured by ground tracking
Page 35

Chapter 6 MXT Pro Searching
adjustments. If you are unsure if a response is a
real target, and/or wish to sweep over any target
repeatedly, if is best to do so either holding in the
Trigger on the handgrip, or holding the GROUND
GRAB button. Squeezing and holding the trigger
on the grip or squeezing and holding the GROUND
GRAB button, temporarily disables tracking.
The 1st option a user should consider is the selection of an appropriate TRAC toggle setting for the
area. The Ground setting and Salt settings should
be almost self-explanatory. If you are searching in
typical ground, use the TRAC Ground setting.
If you are in a salt water or desert alkali ground
condition, use the TRAC Salt setting. When to use
the Lock setting can be less obvious. If it seems
like something is wrong with the detector, wildly
uctuating Threshold hum (only during search coil
passes), try the Lock setting. Before switching to
the Lock setting, be sure to pump the search coil up
and down over the ground a few times in the TRAC
Ground or Salt setting to insure that you have
achieved proper ground balance for that area. If
the detector smooths out and starts operating more
predictably in Lock, you made the correct choice.
If there isn’t any change, you may need to return
to the Ground or Salt setting and either reduce the
Gain control counterclockwise and/or increase the
Dual control (SAT) clockwise and try again. An
area littered with man-made iron would dictate the
Lock setting. On the other hand an area with very
inconsistent ground would not, such an area would
dictate Reduced Gain and/or higher SAT settings.
The 2nd option is Gain. Some areas require, and
some operators just prefer, the more predictable
operation normal “P” or reduced Gain settings
provide. Others prefer to push Gain to the limits of
their patience to nd the deepest targets. There is a
point of diminishing returns either indicated by the
OVERLOAD display telling you to lift the loop due
to a Gain setting to high for the ground, or a user
missing targets because they can not sort them
from sporadic noise experienced at high Gain.
The 3rd option goes hand in hand with the Gain
setting and the SAT speed or level controlled by
the DUAL CONTROL. Higher (faster) SAT speeds
are more user friendly, however, may compromise
some sensitivity particularly to small nuggets
as well as adding additional search coil sweep
requirements. On the other hand faster SAT will
allow for higher Gain settings and more inconsistent ground conditions. A balancing act must
be achieved between the Gain control and SAT
speed that provides both good performance and
enough stability to recognize nuggets from ground
or external noise. A new SAT feature “Hyper SAT”,
provides for the most extreme conditions with very
unique characteristics.
The 4th option is Threshold level. It is best to
search with a continuous hum or threshold (edge
of sound). You can hear smaller and/or deeper
nuggets and be made aware when the SAT speed
is doing its job maintaining the Threshold hum. It,
however, also requires more patience and concentration. Finding the Threshold, and then setting
the Threshold just counterclockwise of it, provides
good performance for those who cannot tolerate
the continuous Threshold hum.
The 5th option is if you prefer the distinctive grunt
on iron, or the same VCO audio tone for all targets.
Pressing “Music Notes” Tone ID, the Iron Grunt
feature can be turned on/off. When on, targets
certain to be iron will produce a unique grunt audio.
When off, all targets sound with the standard VCO
audio.
35
Page 36

Chapter 7 MXT Pro Information
Proper care
1. Cleaning-
A. Both the coil and rod are waterproof and can be
cleaned with fresh water and mild soap. The control
box is not waterproof and must be kept dry. Never lift
a wet coil above the height of the control box as water
can run down the inside of the rod damaging the
electronics. A damp cotton cloth can be used to wipe
off a dirty control box.
2. Weather-
A. Do not expose your detector to the conditions of a
car trunk during winter and/or summer extremes.
B. Protect it from direct sunlight during storage.
C. The control box is rain resistant. However, it must
be protected from heavy rain.
3. Storage-
4. Additional Precautions-
A. Avoid dropping your detector while attempting to
set it down to dig.
B. Avoid using your detector for leverage when
standing up from a dig.
C. Do not use any lubricants, such as WD-40, on
any part of your detector.
D. Do not modify your instrument during its warranty period.
A. When the instrument is not in use, make sure it is
turned OFF.
B. If you plan on storing your detector for long,
remove the battery holder from the instrument and
remove the batteries from the holder.
C. Store the instrument indoors in an area where it
will be protected from abuse. Over the years White’s
has noted a higher percentage of service issues and
physical damage regarding units in storage than
those experiencing regular use.
36
Page 37

Chapter 7 MXT Pro Information
White’s Authorized Service
Centers
1. White’s Electronics
1011 Pleasant Valley Rd.
Sweet Home, OR 97386
(541) 367 6121
Fax (541) 367 6629
tmarshall@whiteselectronics.com
2. Electronic Exploration
575 West Harrison
Lombard, IL 60148
(800) 392-3223
(630) 620-0618
(630) 620-1005 FAX
tony@ee-il.com
3. Centreville Electronics
9437 Main Street
Manassas, Va. 20110
(888) 645-0202
(703) 367-7999
(703) 367-0868 FAX
bob@cwrelics.com
Gold Search Australia
Tony Mills Distributor
76 Broadway, Dunolly Vic 3472
Telephone: (+61) 03 5468 1877
Fax: (+61) 03 5468 1667
info@goldsearchaustralia.com
www.goldsearchaustrali.com
White’s reputation has been built on quality products backed by quality service.
Our Factory Authorized Service Centers are factory trained and equipped.
They offer the same quality service as the factory. Service before
and after the sale is the cornerstone of our customer relations.
37
Page 38

Chapter 7 MXT Pro Information
BEFORE SHIPPING DETECTORS
FOR SERVICE-
A. Contact your Dealer. There may be a quick,
simple x or explanation that will prevent having
to send the detector in for service.
B. Double check the obvious, such as batteries,
and try the detector in another area to be sure
there isn’t interference.
C. Be sure to send all necessary parts with your
detector, such as batteries and holders, as these
items can result in symptoms.
D. Always include a letter of explanation about
your concerns, even if you have talked to the
Service Center by telephone.
costs inside the continental USA 90 days after purchase.
White’s registers your purchase only if the Sales Registra-
tion Card is lled out and returned to the factory address
soon after original purchase for the purpose of recording
this information, and keeping you up-to-date regarding
White’s ongoing research & development. The warranty
does not cover damage caused by accident, misuse,
neglect, alterations, modications, unauthorized service, or
prolonged exposure to corrosive compounds, including salt.
Duration of any implied warranty (e.g., merchantability and
tness for a particular purpose) shall not be longer than the
stated warranty. Neither the manufacturer or the retailer
shall be liable for any incidental or consequential damages.
Some states however, do not allow the limitation on the
length of implied warranties, or the exclusion of incidental
or consequential damages. Therefore, the above limitations
may not apply to you.
E. Take care in packaging instruments for shipping. Always insure your package.
USA/AUSTRALIAN WARRANTY
If within two years (24 months) from the original date of
purchase, your White’s detector fails due to defects in either
material or workmanship, White’s will repair or replace at its
option, all necessary parts without charge for parts or labor.
Simply return the complete detector to the Dealer where you
purchased it, or to your nearest Authorized Service Center.
The unit must be accompanied by a detailed explanation of
the symptoms of the failure. You must provide proof of date-
of-purchase before the unit is serviced.
This is a transferable manufacturer warranty, which covers
the instrument two years from the original purchase date, regardless of the owner. Items excluded from the warranty are
non-rechargeable batteries, accessories that are not standard equipment, shipping/handling costs outside the continental USA, Special Delivery costs (Air Freight, Next Day,
2nd Day, Packaging Services, etc.) and all shipping/handling
In addition, the stated warranty gives you specic legal rights,
and you may have other rights which vary from state-to-state.
The foregoing is the only warranty provided by White’s as the
manufacturer of your metal detector. Any “extended warranty”
period beyond two years, which may be provided by a Dealer
or other third party on your detector, may be without White’s
authority, involvement and consent, and might not be honored by
White’s.
If for any reason you should sell your MXT Pro prior to the date
the warranty expires, the remaining warranty is transferable. This
transfer is authorized by calling 1-800- 547-6911, and getting
an Authorization Number.
38
Page 39

Chapter 7 MXT Pro Information
FOR USA
ORIGINAL OWNER -
Name: _________________________________________
Address: (Which appears on the original warranty card):
______________________________________________
________ ______________________________________
_______________________________________________
Instrument Serial # ______________________________
Original Purchase Date:____________________________
NEW OWNER -
Name: _________________________________________
Address: _______________________________________
_______________________________________________
_______________________________________________
Comments: _____________________________________
Distributor Authorization Code:_____________________
WHITE’S ELECTRONICS (UK) Ltd.
WARRANTY
The serial number which is unique to your unit is on a white
label inside the battery compartment. Please quote this number on any correspondence regarding your detector. White’s
Electronics has always been concerned with the absolute quality
of their mineral/metal detectors. Service after the sales is of
extreme importance to us and we always do our utmost to ensure
that customers are satised with our units.
If your unit should require servicing or repair, simply return it to us
at the factory in Inverness and we shall carry out the necessary
work for you. Any work carried out by unauthorized persons
will automatically nullify the warranty.
If within two years (24 months) from the original date of purchase,
your White’s detector fails due to defects in either material or
workmanship, White’s Electronics (UK) Ltd. will repair or replace
at its option, all necessary parts without charge for parts or labor.
Simply return the detector to our factory in Inverness, Scotland,
giving details of the faults.
Items excluded from the warranty are non-rechargeable batteries
and other accessories. The warranty is not valid unless the Warranty Registration Card is returned to the factory address within
10 days of the original purchase for the purpose of recording that
date, which is the actual commencement date of the warranty.
FOR SCOTLAND
ORIGINAL OWNER -
Name: _________________________________________
Address: (Which appears on the original warranty card):
______________________________________________
________ ______________________________________
_______________________________________________
Instrument Serial # ______________________________
Original Purchase Date:____________________________
NEW OWNER -
Name: _________________________________________
Address: _______________________________________
_______________________________________________
_______________________________________________
Tel:__________________ Email:_____________________
Comments: _____________________________________
This warranty does not cover damage to the detector caused by
accident, misuse, neglect, alterations, modications or unauthorized service. Duration of any implied warranties (e.g., merchant-
ability and tness for a particular purpose) shall not be longer
than the stated warranty.
Neither the manufacturer nor the retailer shall be liable for any
incidental or consequential damages resulting from defects or
failures of the instrument to perform. This warranty does not
affect your statutory legal rights. If for any reason you should sell
your White’s detector prior to the date the warranty expires, the
remaining warranty may be transferable. Simply contact White’s
Electronics, (UK) Ltd.
White’s Electronics (UK) Ltd
35 Harbour Road ~ Inverness ~ Scotland ~ IV1 1UA
Telephone: (01463) 223456 Fax: (01463) 224048
Email: sales@whites.co.uk.
Web site: www.whites.co.uk
To comply with European Legislation
(Directive WEEE) this unit must not
be disposed of, at the end of its useful
life, in any waste bin or landll site
but must be returned to any White’s
Dealer/Distributor for proper disposal
under the legislation.
Please contact White’s Inverness for the
details of the nearest dealer/distributor.
39
Page 40

White’s Electronics, Inc. USA
(Sales & Service Area, North & South America, Australia, Pacic Rim)
1011 Pleasant Valley Road
Sweet Home, Oregon 97386 USA
541-367-6121
541-367-6629
Email: tmarshall@whiteselectronics.com
Website: www.whiteselectronics.com
White’s Electronics Factory (UK) Ltd.
(Sales & Service Area, Europe, Eastern Europe, Africa, and the Middle East)
35 J Harbour Road - Inverness, Scotland, IV1 1UA
Telephone: (01463) 223456
Fax: (01463) 224048
Email: sales@whites.co.uk
Website: www.whites.co.uk
Printed in the U.S.A. Part Number 621-0522 5/2010
 Loading...