

Page 1

MX5
®
White’s Electronics, Inc.
Sweet Home, Oregon USA
Building the World’s Finest
metal detectors for over 60 years.
Page 2

MX5
Owner’s Manual
CONTENTS
Introduction. . . . . . . . . . . . . . . . . . . . . . . . . . . . . . . . . . . . . . . . 3
Assembly . . . . . . . . . . . . . . . . . . . . . . . . . . . . . . . . . . . . . . . . . 4
Batteries . . . . . . . . . . . . . . . . . . . . . . . . . . . . . . . . . . . . . . . . . . 5
QuickStart . . . . . . . . . . . . . . . . . . . . . . . . . . . . . . . . . . . . . . . . . 6
Basic Controls
POWER . . . . . . . . . . . . . . . . . . . . . . . . . . . . . . . . . . . . . . . . 7
BEACH. . . . . . . . . . . . . . . . . . . . . . . . . . . . . . . . . . . . . . . . . 7
SEL . . . . . . . . . . . . . . . . . . . . . . . . . . . . . . . . . . . . . . . . . . . 7
Sensitivity . . . . . . . . . . . . . . . . . . . . . . . . . . . . . . . . . . . 7
Volume . . . . . . . . . . . . . . . . . . . . . . . . . . . . . . . . . . . . . 8
Threshold . . . . . . . . . . . . . . . . . . . . . . . . . . . . . . . . . . . 8
ToneID . . . . . . . . . . . . . . . . . . . . . . . . . . . . . . . . . . . . . 8
DISC. . . . . . . . . . . . . . . . . . . . . . . . . . . . . . . . . . . . . . . . . . . 8
Backlight. . . . . . . . . . . . . . . . . . . . . . . . . . . . . . . . . . . . . . . 9
Pinpoint. . . . . . . . . . . . . . . . . . . . . . . . . . . . . . . . . . . . . . . . 9
Display . . . . . . . . . . . . . . . . . . . . . . . . . . . . . . . . . . . . . . . . . . . 9
Search Modes . . . . . . . . . . . . . . . . . . . . . . . . . . . . . . . . . . . . . 10
Coin. . . . . . . . . . . . . . . . . . . . . . . . . . . . . . . . . . . . . . . . . . 11
Beach . . . . . . . . . . . . . . . . . . . . . . . . . . . . . . . . . . . . . . . . 11
All Metal . . . . . . . . . . . . . . . . . . . . . . . . . . . . . . . . . . . . . . 11
Pinpoint. . . . . . . . . . . . . . . . . . . . . . . . . . . . . . . . . . . . . . . 11
In Depth
VDI . . . . . . . . . . . . . . . . . . . . . . . . . . . . . . . . . . . . . . . . . . 12
Target ID & Tones. . . . . . . . . . . . . . . . . . . . . . . . . . . . . . . 13
Overload . . . . . . . . . . . . . . . . . . . . . . . . . . . . . . . . . . . . . . 14
Discrimination . . . . . . . . . . . . . . . . . . . . . . . . . . . . . . . . . 14
Discrimination Pitfalls . . . . . . . . . . . . . . . . . . . . . . . . . . . 15
Ground Balance & Tracking. . . . . . . . . . . . . . . . . . . . . . . 16
All-metal VCO . . . . . . . . . . . . . . . . . . . . . . . . . . . . . . . . . 17
Misc Tips
Sensitivity (again) . . . . . . . . . . . . . . . . . . . . . . . . . . . . . . . 18
Bottle Caps . . . . . . . . . . . . . . . . . . . . . . . . . . . . . . . . . . . . 18
Coil Size . . . . . . . . . . . . . . . . . . . . . . . . . . . . . . . . . . . . . . 18
Sweep Methods. . . . . . . . . . . . . . . . . . . . . . . . . . . . . . . . . 19
Sizing, Pinpointing, & Digging . . . . . . . . . . . . . . . . . . . . 20
Quick Reference . . . . . . . . . . . . . . . . . . . . . . . . . . . . . . . . . . . 21
Specifications . . . . . . . . . . . . . . . . . . . . . . . . . . . . . . . . . . . . . 22
Customer Support . . . . . . . . . . . . . . . . . . . . . . . . . . . . . . . . . . 22
Warranty . . . . . . . . . . . . . . . . . . . . . . . . . . . . . . . . . . . . . . . . . 23
Code of Ethics. . . . . . . . . . . . . . . . . . . . . . . . . . . . . .Back Cover
Page 2
Page 3

MX5
Owner’s Manual
Introduction
The MX5 is a high-performance metal detector based on the
renowned MXT platform but with a redesigned feature set and
interface. The MX5 has state-of-the-art automatic ground track-
ing (AutoTrac®) which maximizes performance across many
different ground conditions. It also features a 20-zone discriminator with both multi-tone audio and visual target identification.
Each zone may be accepted or rejected, providing the user with
a way to ignore certain types of targets like iron or foil.
In normal search mode the audio is threshold-based with
multiple Tone ID options for the different discrimination zones.
In addition to the audio response, the display provides visual
information with an icon cursor that points to a probable target
type and a Visual Display Indicator (VDI) number that provides
even more detailed target information (see More Info for an
explanation of VDI numbers). An estimated target depth is indicated by the depth bar. The Pinpoint and All Metal modes also
provide an audible threshold tone, in addition to a user-selectable VCO response or a loudness response (non-VCO).
The MX5 requires 8 “AA” batteries which typically provide
30 hours of operation. Using the optional display backlight will
increase battery consumption by approximately 20%.
Page 3
Page 4

MX5
Owner’s Manual
Assembly
1. Remove all parts from the shipping carton and check assem-
bly diagram to ensure all parts are present.
2. Install black rubber washers on fiber clevis/lower rod, insert
clevis lower rod onto loop ears. Use only nonmetallic washers, fiber bolt, and fiber thumb nut to secure loop/search coil
to clevis/lower fiber rod.
3. Insert middle rod into curved “S” rod so that the spring clip
engages. Insert lower fiber rod and lock into one of the
adjustment holes in the middle rod. The second or third
adjustment holes are suitable for average sized adults. A
twist of the cam locks prevents wobble.
4. Wind the loop cable around the rod assembly, first revolu-
tion over the top of the rod, all the way to the top of the
curved “S” rod, about five revolutions. Use the black cable
retainers, one near the loop, and one near the top of the
curved “S” rod, to hold the loop cable in place. Plug the
Page 4
Page 5

MX5
Owner’s Manual
cable into the jack on the front of the control box and
tighten the retainer ring.
5. Grip the instrument by the handle, with your arm in the
elbow cup with strap and sweep the loop/search coil over
the floor. If the instrument fit feels uncomfortable, readjust
clevis/lower rod length with spring clip button and cam-
lock so that search coil can be held near the floor without
stooping over.
6. Adjust the elbow cup strap so that it is loose enough for you
to slide your arm in and out without loosening each time
you want to set the detector down. The elbow cup strap pro-
vides extra leverage and control, but may be omitted. The
elbow cup is adjustable by removing the Phillips screw.
7. Install the battery pack.
Batteries
1. Remove the battery pack by pressing both buttons on sides
of battery compartment.
2. Slide open the tray cover. Install eight (8) “AA” alkaline
batteries taking note of correct (+) and (-) positions and
close cover.
3. Slide battery pack into compartment. A vigorous ‘slam’
may be needed to ensure a good seating.
4. Press POWER button. A battery level icon at the bottom of
the screen indicates the relative battery strength.
5. Most alkaline batteries will give about 30 hours of continu-
ous operation. Battery life will vary with intermittent use,
back-light use, temperature, control settings, target indica-
tions, battery quality, battery condition upon purchase, and
shelf life. It is a good idea to carry back-up batteries.
6. A rechargeable NiCAD battery pack may be purchased sep-
arately. Rechargeable batteries typically provide similar or
slightly less run time than alkaline batteries.
Page 5
Page 6

MX5
Owner’s Manual
QuickStart
1. Turn on the power.
2. The MX5 has automatic ground tracking. To speed up the
initial tracking process, find a spot free of targets and bob
the coil up & down a few times (optional).
3. The normal default Sensitivity (SENS) level of 7 bars is rea-
sonable for most situations. If the audio is chattery or constantly overloads, reduce the sensitivity level (SEL to
highlight Sensitivity area, to change).
4. Sweep the search coil from
side-to-side, keeping the coil
level and close to the ground.
Overlap each sweep by 50%
to avoid missing targets.
5. Once a target is detected, use
the Pinpoint button to isolate
its exact location. Cross the
target from two directions (at
90°) and listen for the strongest response.
Page 6
Page 7

MX5
Owner’s Manual
Basic Controls
The MX5 user interface is a combination of direct controls
(MODE, DISC) and a select button (SEL) which is used in conjunction with the arrow keys ( and ) to adjust several
parameters.
POWER
Besides the obvious function of turning the unit on, the
POWER button can also suspend operation. Quick-press POWER
to suspend the MX5 (during target retrieval, for example); during suspend the MX5 will occasionally beep, and will automatically power down after 5 minutes. Press and hold the POWER
button for 2 seconds to turn the unit off.
The POWER button is also used to restore factory settings.
Simultaneously press the MODE and POWER buttons to reset the
current mode. Simultaneously press the SEL and POWER but-
tons to reset all modes.
BEACH — Beach Mode
The BEACH button switches between normal Disc mode and
Beach mode. Each mode can be modified with custom settings
(such as Disc or Sens) and the modified settings will be retained
at power-off. Beach mode allows the MX5 to work in salt water
environments; see the “In Depth” section for more detailed
information on how these modes work.
In addition there is an All-Metal mode which is selected by
pressing and holding the PINPOINT button until you hear a short
beep; the Mode will indicate ALLMET. The All-Metal mode
turns off the discriminator and accepts all targets. See the “In
Depth” section for details.
SEL — Adjustment Selector
The SEL button rotates through 4 user adjustments:
• Sensitivity
The Sensitivity control increases or decreases the responsiveness of the MX5. When SENS is selected a rectangle
Page 7
Page 8

MX5
Owner’s Manual
appears around the sensitivity level bars. The buttons
adjust the level from minimum (1 bar) to maximum (10 bars).
Normally, this determines how deep the detector will “see” a
target. In general, run the sensitivity as high as possible while
maintaining smooth operation. If the audio is chattery or the
ground is causing overload, reduce the sensitivity.
• Volume
This is loudness of the target response. Range is 1-99.
• Threshold
This is the loudness of the threshold audio, which is the
background hum. Range is 0-99. A modest setting (20 is typical
when using headphones) helps with faint target responses which
may be too deep to trigger a Tone ID but are audible as a threshold variation. This is especially true in All-Metal or MixedMode (Relic mode) audio. A setting of 0 results in silent search
(no threshold), in which a target response may not be heard
unless it is strong enough to trigger a Tone ID.
• Tone ID
The
MX5
has three selectable Tone ID responses: 1, 2, and 8
tones. Use the
buttons to move through the tone selections.
See the “In Depth” section for detailed descriptions.
DISC — Discrimination
The Discrimination control allows you to enable or disable
the audio response for select ranges of targets. The MX5 has a
20 segment discrimination control. The buttons move a
disc cursor ( ) across the segments, and pressing the DISC button will toggle the response for the selected segment. The
example Disc Mask below shows that the first 5 segments
(mostly the iron range) have been disabled, plus the segment
that corresponds to Zinc cents. The remaining segments are
enabled. The disc cursor is resting on the “70” segment.
Page 8
Page 9

MX5
Owner’s Manual
Backlight
The Backlight button toggles the display backlight for lowlight hunting. A screen icon indicates when backlight is on.
Keep in mind that the backlight uses additional battery power
and should be turned off when not needed.
PINPOINT
Briefly press and release the Pinpoint button to place the
MX5 in Pinpoint mode; you will see flash on the screen and
hear a brief double-tone. The search mode will switch to ALL-
MET
and the 2-digit number now represents depth instead of
VDI. Briefly press and release the Pinpoint button again (or
press MODE) to return the MX5 to its previous search mode.
In both All Metal and Pinpoint modes a threshold audio is
applied and a target will cause the loudness to increase. The
MX5 also supports VCO1 audio whereby a target causes the
pitch of the threshold to increase. VCO audio is toggled by
simultaneously pressing the Pinpoint and or
buttons.
Display
The MX5 display provides information on the operation of
the detector as well as the detected target. On the right is the
segmented bar which shows the sensitivity level. On the left
another segmented bar shows the estimated target depth in
increments of 2” (or 5cm). At the bottom a segmented bar
shows the battery strength.
A large 2-digit number gives the VDI response of the target
1. “VCO” means voltage-controlled oscillator
Page 9
Page 10

MX5
VDI
Depth
Volume
Thresh
FreqO/S
TracLock
1248F
incm
VDI
Depth
Volume
Thresh
FreqO/S
TracLock
1248F
Owner’s Manual
in both Disc and All Metal modes and the depth of the target in
Pinpoint mode. VDI responses (such as the +83 example shown
below) are covered in the “In Depth” section. Below 10” the
numeric depth is given in ½” increments with a decimal point.
The example below shows 6.5 inches. Depth readout can be
switched to cm by pressing PINPOINT and SEL at the same time.
Metric depths are in whole centimeters.
Across the top of the display are the segments for 20 dis-
crimination zones. When a target is detected a pointer/cursor
points to the zone that corresponds to the type of target. Each
zone can be disabled (rejected) by using the Disc keypad buttons to move the cursor and select/deselect each zone. To
change a contiguous block, press/hold the DISC button and
press or . Rejecting a zone only affects the audio; the display will still show target information even if you can’t hear an
audible response.
The MX5 display includes a backlight for extended hunting.
Press the backlight button to toggle the backlight. In daylight it
can be difficult to tell whether the backlight is on or off, so a
backlight icon is also displayed. The backlight will reduce battery life by 20% so it’s best to turn it off when not needed.
Search Modes
Coin and Beach modes are discrimination-based modes.
They are also known as “motion” modes in that they require the
search coil to be in constant motion for the discrimination circuitry to operate properly. If the coil is hovered over a target the
response will cease.
All-Metal mode is a non-discrimination mode, but still
requires motion to respond because it utilizes a Self-Adjusting
Page 10
Page 11

MX5
Owner’s Manual
Threshold (SAT) circuit that maintains a consistent threshold
level. Pinpoint mode does not use SAT and will respond even
when hovering over a target.
• Coin — This is the primary search mode for the MX5 for
most general hunting. By default AutoTrac® is enabled and
restricted to normal soil, most iron is discriminated, 8-tone
mode is selected, and threshold is on.
• Beach — Wet salt sand (and sometimes highly fertilized
ground) is mildly conductive and difficult for most metal
detectors. The Beach mode expands the ground tracking range
of the MX5 to handle wet salt sand. You may still need to use
a slower sweep rate to avoid falsing. This mode is not recommended for normal soils and may cause some targets to track
out (disappear). Also generally not needed for dry beach sand.
This mode otherwise behaves like the Coin mode.
• All Metal — The All-Metal mode turns off the discriminator
and accepts all targets. Tone ID is disabled but VDI numbers
are still reported. All Metal mode requires that the coil be in
motion in order to respond to a target. If the coil is held steady
over a target it will get tuned out after a few seconds.
• Pinpoint — Technically Pinpoint isn’t normally used as a
search mode, but it can be. Pinpoint is the same as All Metal
except that ground tracking is locked and SAT is turned off.
Without SAT the threshold may slowly drift over time.
Page 11
Page 12

VDI SCALE
HOT ROCK
DOLLAR
HALF / LG
QUARTER
DIME
+95
90
85
80
75
70
65
60
55
S
I
L
V
E
R
ZN CENT
CENT
CU-NI CENT
PULL TAB
SQ TAB
NICKEL
FOIL IRON
SALT
NAILS
GROUND
C
U
G
O
L
D
F
E
R
R
O
U
S
50
45
40
35
30
25
20
15
10
5
0
-10
-20
-95
SILVER RING
c
LATE CENT
-40
-60
-90
EARLY CENT
GOLD RING
$2.50 GOLD
$5 GOLD
SC CAP
SM NUGGET
LEAD
MINIE
SMALLLARGE
MX5
Owner’s Manual
In Depth
VDI
VDI stands for Visual Display
Indicator and is a numeric represen-
tation of the target’s response. VLF
detectors transmit a magnetic field
which is disrupted by nearby metal
targets. The disruption is seen by the
receiver as an increase in signal
amplitude (which gives a basic “I
found something!”) but also creates
a signal phase shift. This phase shift
usually indicates the type of target
and can be used both for identifying
targets and for discriminating or
rejecting them.
White’s uses a VDI scale of -95
to +95, where negative numbers correspond to ferrous (iron) targets and
positive numbers to non-ferrous targets. A chart of typical VDIs is
shown on the right. Note that the
scale is not linear.
There is a lot of overlap amongst
targets. For example, due to the variety of sizes and alloys, gold rings
can give the same responses as foil,
nickels, and pull tabs. Likewise, pull
tabs often look like nickels and vice-versa. Even the smallest of
nuggets can extend slightly in the ferrous region.
The VDI is by no means foolproof and should be considered
only a probability estimate. As we’ll see in the section on
Depth, the probability decreases with depth. An excellent
approach is to work with test targets (especially planted at different depths) to get familiar with target responses.
Page 12
Page 13

MX5
Owner’s Manual
Target ID & Tones
The MX5 has two methods of target identification: visual
and audio. The visual consists of the 2-digit VDI number that is
displayed plus a cursor that appears across the top of the screen
pointing at the VDI zone the target belongs in. The 20 VDI
zones are labeled as follows:
The span of each zone begins at the number directly above
the zone and extends to the edge of the next zone. Some example zones are [-95 to -71], [-10 to -1], [+0 to +4], [+70 to +79],
and [+90 to +95]. A target with a VDI of 78 will move the cursor to the zone marked “70” as shown.
In addition to the visual ID, the MX5 can also produce a
tone ID. There are up to 2 tone modes depending on the search
mode:
• 1 tone — Coin, Beach: Accepted targets produce a single
tone. Rejected targets usually create a “null” in the threshold
tone and do not otherwise produce a response, although you
may hear a short audio chirp as the target is being rejected.
• 2 tones — Coin, Beach: Accepted targets at or above 0 pro-
duce a high tone, accepted targets below 0 produce a low
tone, and rejected targets produce a null.
• 8 tones — There are 8 different tones for 8 VDI ranges:
Coin, Beach, & Relic
1 -95 to -21
2 -20 to 0
3 +1 to +14
4 +15 to +29
5 +30 to +49
6 +50 to +59
7 +60 to +69
8 +70 to +95
Page 13
Page 14

MX5
Owner’s Manual
Overload
If the received signal is too large to process the MX5 will
produce an overload response. This is heard as an obnoxious
alarm sound, plus the display will read (“OL”). An overload
can be the result of a large metal target near the surface, or from
extreme ground mineralization. If it is the latter, the only
recourse is to reduce the sensitivity level until the detector can
operate smoothly.
Discrimination
MX5 has the ability to accept or reject targets based on their
VDI response. Each of the 20 VDI zones at the top of the screen
includes a marker which can be turned on/off to enable/disable
that zone. The 20 markers collectively make up the “discrimination mask” or “disc mask” which determines how the MX5
responds to targets.
From the VDI scale on Page 13, we can see that disabling
the first 4 zones will largely reject iron targets. Most detectorists use this amount of discrimination as a minimum; relic hunters may opt to reject only the -95 zone and accept the rest of the
ferrous range. The “5” and “10” zones are where most foil
responds, so in trashy areas where gum wrappers are prevalent
you may want to reject these zones. However, thin gold and
platinum rings and small gold chains fall in these zones, so you
would also reject those targets. The same happens when rejecting pull tabs; larger jewelry will also be rejected.
If you hunt in extreme trash and all you care about are silver
coins (and maybe copper), you can use an extreme amount of
discrimination and forego low conductors altogether:
Keep in mind that while you might get some copper cents (such
as wheats) you might lose others such as Indian cents which
often fall lower than 70. Also, all nickels will be rejected.
Page 14
Page 15

MX5
Owner’s Manual
Discrimination Pitfalls
To avoid missing good targets it is important to understand
the limitations of target ID and (because it is based on target ID)
discrimination. As explained in the section on VDI, target ID is
based on the phase shift of a target’s received signal. We’ve
already seen that many different types of targets can share VDI
responses so that rejecting certain kinds of trash will also reject
potentially good targets.
Depth also plays a role. A strong target signal (either from a
shallow target or a large target) provides for a strong and repeatable phase response from which we can extract a fairly reliable
VDI. As the target signal weakens, its VDI becomes less reliable. This can show up as an inconsistent target response as the
coil is repeatedly swept over the target. It is not unusual for
deep targets to produce an inaccurate target ID, and perhaps
even cross over into an adjacent (and perhaps rejected) target
zone.
Furthermore, ground mineralization can cause errors in target phase. Even targets of moderate depth can produce an inaccurate target ID if ground mineralization is severe enough. This
can also push the VDI into an adjacent discrimination zone.
Therefore it is important to be aware that when you notch out a
particular disc segment it is possible to lose targets that normally don’t fall in that segment. For example, suppose you
notch out the zones for “5” and “10” to get rid of foil trash;
nickels that normally might respond with a VDI of “20” could
get pushed into the “10” zone due to severe ground, at which
point they would be rejected.
Reliance on target ID should be tempered, and discrimination should be used with care. A “test garden” with multiple
types of targets buried at various depths is a good way to see
how target responses behave and to hone your skills in reading
these responses.
Page 15
Page 16

MX5
-95 +95
0
Normal Track Range
F
e
r
r
o
u
s
N
o
n
-
F
e
r
r
o
u
s
Owner’s Manual
Ground Balance & Tracking
Most soils contain iron-based minerals which affect metal
detectors. We generally call this mineralization. These ferrous
minerals usually don’t respond like metal targets but still upset
the delicate balance required of VLF detectors. In fact, the signal strength from ground minerals can many times greater than
that of an average buried coin.
It is possible to largely null out the ground signal and leave
only target signals. This is done with a combination of special
tuning in the receiver plus filters. The tuning portion is what we
call ground balance. Some detectors have a fixed (preset)
ground balance which is optimal for one type of mineralization;
in other types of ground it may not be optimal and will result in
loss of depth. The MX5 has a variable ground balance with the
ability to automatically track changes in soil mineralization.
This system (called AutoTrac®) keeps the MX5 tuned for optimal performance in most ground conditions and results in better
detection depth.
Most ferrous mineralization produces a response with a
VDI of -93 (for pure ferrite) up to perhaps -88 or so. This is at
the extreme end of the ferrous (iron) region. Most small iron
targets (nails and so forth) reside in the middle of the ferrous
region. To prevent tracking to iron targets the AutoTrac® system
has an upper limit on the track range of -88 (VDI). Sometimes
we draw the VDI scale as a semicircle, with ferrous (-95 to 0)
on the left and non-ferrous (0 to +95) on the right; we can use
this to show the normal range of ground tracking:
Page 16
Page 17

MX5
-95 +95
0
Salt Track Range
P
u
r
e
f
e
r
r
i
t
e
P
u
r
e
s
a
l
t
F
e
r
r
o
u
s
N
o
n
-
F
e
r
r
o
u
s
Owner’s Manual
Some soils, especially coastal beaches, contain salts which
appear as a conductive target. Wet salt sand and seawater are
especially conductive and respond with a VDI of around +5
which is in the region of foil. While we could just notch out this
portion of the disc mask to ignore salt responses, the presence
of these responses (even though ignored) will still tend to mask
out desired target responses. In Beach mode, the MX5 Auto-
Trac® system is expanded to track all the way up to the salt
region (VDI=+5):
Because the track range now includes the entire ferrous
region, it is possible for iron targets to cause tracking errors.
Therefore, if a target gives an initial response and then quickly
fades away on subsequent short sweeps, it is likely an iron target. Using Pinpoint mode will lock tracking and allow you to
zero in on the target. You may first need to move off the target
and bob the coil a couple of times to re-establish a correct
ground balance point, then switch to Pinpoint mode.
All-metal VCO
For both all-metal and pinpoint modes the audio response
can be set to VCO by simultaneously pressing the Pinpoint and
buttons. VCO audio provides a variable pitch response
which rises as the target strength increases. Non-VCO audio
provides a variable loudness response and is selected by pressing the Pinpoint and buttons. The human ear is more sensitive to pitch changes, so with VCO audio very faint responses
are easier to discern.
Page 17
Page 18

MX5
Owner’s Manual
Misc Tips
Sensitivity (again)
There is a strong desire to always run a detector at maxi-
mum sensitivity. However, this not only increases the response
to target signals, but also that of ground signals and electromagnetic interference (EMI). A common mistake is to assume that
higher sensitivity will always give better depth. In air tests this
is generally true, but ground results can depend on the amount
and type of mineralization. The maximum level is usually only
useful in the very quietest locations, and for most hunting you
will probably need to use a lower setting. In general, set the sensitivity as high as possible to get a smooth, chatter-free threshold audio, but no higher.
Bottle caps
Steel bottle caps are a little different than most iron targets
as they have both a magnetic response and an eddy current
response. As such, the composite response can appear either
ferrous or non-ferrous, and the response further depends on the
type of loop being used. With a DD loop bottle caps often look
like a US quarter, and with a concentric they often look like a
US nickel. However, they tend to give an inconsistent audio
response as sweep speed is varied. The audio often rolls
between ferrous and non-ferrous. This is easier to distinguish in
multi-tone modes and with some practice you will learn how to
recognize the audio responses of most bottle caps.
Coil Size
With any metal detector, the size of the search coil presents
a trade-off between depth and sensitivity. A larger coil offers
better depth on larger targets at the expense of small-target sensitivity, and a smaller coil has better sensitivity to small targets,
but at a lesser depth. A small coils also does a better job of separating targets when hunting in trashy areas.
Page 18
Page 19
MX5
Wrong Right
Owner’s Manual
The MX5 comes standard with a 9” concentric coil. Several
optional coils are available through your White’s dealer. Any of
the Eclipse-series coils (made for M6/MXT/DFX/V3) will
work with the MX5.
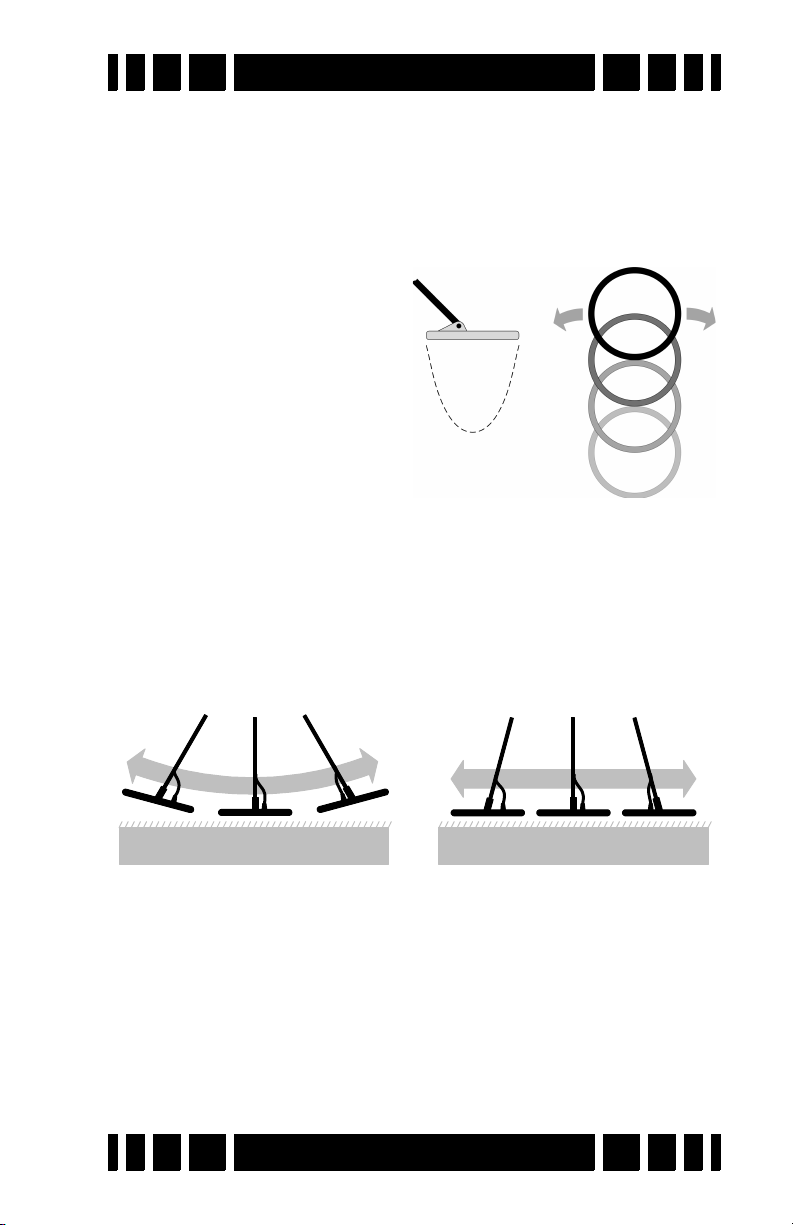
Sweep Methods
Proper sweep technique is
important with any detector.
Round coils tend to have a
conical pattern of sensitivity
as illustrated here. As such,
coverage at maximum depth
is less than the size of the coil,
so it is always recommended
that successive sweeps are
overlapped by about 50%.
In addition overlapping each sweep, it is important to keep
the coil close to and parallel to the ground. Pendulum-swinging
the coil results in loss of depth, and if the ground balance isn’t
perfectly set the variation in loop height will create a ground
response. The following illustration shows improper and proper
coil sweep motion.
Finally, sweep speed affects target response and depth.
Some detectors are designed for an exceptionally slow sweep
speed, some need a fast sweep. The MX5 works best at a moderate rate of about 3 feet per second. Somewhat slower or somewhat faster is fine, but whipping the coil at a fast rate is a good
way to miss deeper targets. The bottom line is: swing level,
moderate speed, and overlap.
Page 19
Page 20

MX5
Owner’s Manual
Sizing, Pinpointing, and Digging
When a target is detected move the coil well away from the
target area and quick-press the Pinpoint button to switch to the
Pinpoint mode. A normal sweep over the target in Pinpoint
mode will give an idea of target size. If the response is narrow
then it is likely a small coin-sized target. If the response is broad
then it could be e.g. a beer can. Small shallow targets can give a
broad response, and large deep targets can give a narrow
response, so use judgement with this.
Once you have determined that you want to dig a target, use
the Pinpoint mode to zero in on the location. A criss-cross pattern works best, especially using VCO audio to listen for the
peak tone. Watch the ground through the open coil to better
determine the exact spot.
Be mindful of proper digging techniques when extracting
the target. Use the smallest appropriate digging tool, especially
in public areas. Learn how to cut plugs that avoid turf damage
or, better yet, how to “pop” coins. There are lots of videos on
YouTube that demonstrate good extraction protocol.
Page 20
Page 21

MX5
Owner’s Manual
Quick Reference
Power: Power on, press/hold for power off
Power: Quick-press to suspend operation
BEACH: Enables/disables Beach mode
SEL: Rotates through Sens, Volume, Threshold, and ToneID
controls
BEACH + Power: Reset the current program
SEL + Power: Reset all programs
: Changes control settings
Pinpoint: Quick-press for Pinpoint mode
Pinpoint: Press/hold for All Metal mode
Pinpoint + : Selects VCO audio
Pinpoint + : Selects non-VCO audio
Pinpoint + SEL: Toggles in/cm readout
: Moves the cursor across disc zones
DISC: Toggles accept/reject for current zone
Backlight: Toggles display backlight
Page 21
Page 22

MX5
Owner’s Manual
Specifications
Operating mode . . . . . . . . . . . . . . . . . . . . . . . . . . . . . . VLF-IB
Frequency. . . . . . . . . . . . . . . . . . . . . . . . . . . . . . . . . . . 14 kHz
Programs . . . . . . . . . . . . . . . . . . . . . . . . . . . . . . . Coin, Beach
Search modes . . . . . . . . . . . . . . . . . . . .Disc, Beach, All Metal
Ground balance . . . . . . . . . . . . . . . . . . . . . . . . . . . . . AutoTrac
Disc Audio . . . . . . . . Threshold search with (optional) Tone ID
All Metal Audio. . . . . . . . . . . . . . VCO or non-VCO, selectable
Audio output . . . . . . . . . . . . . . . . . . . . .Speaker, headphones
Search coil . . . . . . . . . . . . . . . . . . . . . . . . . . . . . 9” Concentric
Search coil compatibility . . . . .Eclipse series (MXT/DFX/V3)
Weight. . . . . . . . . . . . . . . . . . . . . . . . . . . . . . . . . . . . 3 lbs 9 oz
Length. . . . . . . . . . . . . . . . . . . . . . . .45 - 50 inches, adjustable
Batteries . . . . . . . . . . . . . . . . . . . . . . . . . . . . . . (8) AA alkaline
Battery life . . . . . . . . . . . . . . . . . . . . . . . . . . . 30 hours typical
Warranty . . . . . . . . . . . . . . . . . . . . . . . . . 2 years, transferrable
Customer Support
Questions concerning your MX5? There are three ways to contact us:
Internet: http://whiteselectronics.com/support.html
Phone:
1-800-547-6911 (US) (0044) 1463 223456 (UK)
Or mail us:
White's Electronics White's Electronics
1011 Pleasant Valley Road 35 Harbour Road
Sweet Home, OR 97386 Inverness, Scotland
IV1 1UA
Page 22
Page 23

MX5
Owner’s Manual
Warranty
If within two years (24 months) from the original date of purchase, your
White’s detector fails due to defects in either material or workmanship,
White’s will repair or replace at its option, all necessary parts without charge
for parts or labor.
Simply return the complete detector to the Dealer where you purchased
it, or to your nearest Authorized Service Center. The unit must be accompanied by a detailed explanation of the symptoms of the failure. You must provide proof of date-of-purchase before the unit is serviced.
This is a transferable manufacturer warranty, which covers the instrument two years from the original purchase date, regardless of the owner.
Items excluded from the warranty are non-rechargeable batteries, accessories that are not standard equipment, shipping/handling costs outside the
continental USA, Special Delivery costs (Air Freight, Next Day, 2nd Day,
Packaging Services, etc.) and all shipping/handling costs inside the continental USA 90 days after purchase.
White’s registers your purchase only if the Sales Registration Card is
filled out and returned to the factory address by your dealer, soon after original purchase for the purpose of recording this information, and keeping you
up-to-date regarding White’s ongoing research & development.
The warranty does not cover damage caused by accident, misuse,
neglect, alterations, modifications, unauthorized service, or prolonged exposure to corrosive compounds, including salt. Duration of any implied warranty (e.g., merchantability and fitness for a particular purpose) shall not be
longer than the stated warranty. Neither the manufacturer or the retailer shall
be liable for any incidental or consequential damages.
Some states however, do not allow the limitation on the length of
implied warranties, or the exclusion of incidental or consequential damages.
Therefore, the above limitations may not apply to you. In addition, the stated
warranty gives you specific legal rights, and you may have other rights
which vary from state-to-state.
The foregoing is the only warranty provided by White’s as the manufacturer of your metal detector. Any “extended warranty” period beyond two
years, which may be provided by a Dealer or other third party on your detector, may be without White’s authority involvement and consent, and might
not be honored by White’s Electronics, Inc.
Page 23
Page 24

MX5
®
Owner’s Manual
MX5
Treasure Hunter’s Code of Ethics
1. Always check federal, state, county, and local laws
before searching.
2. Always obtain the owner’s permission before accessing private property.
3. Take care to refill all holes and leave no trace.
4. Remove and dispose of any and all trash and litter
found.
5. Whenever possible, return identifiable property to its
rightful owner.
6. Never destroy historical or archaeological treasures.
7. Appreciate and protect natural resources, wildlife and
property, both public and private.
8. Act as an ambassador for the hobby; be thoughtful,
considerate, and courteous at all times.
White’s metal detectors are proudly designed,
built, and tested in Sweet Home, Oregon USA
by the employees of White’s Electronics.
Part Number 621-0540 — V1.1
Page 24
 Loading...