

Page 1

1 3
Page 2

Page 3

Introduction
The Matrix “100” handheld metal detector is a world class security scanner. It was designed to
meet and exceed the needs and specifications in today’s security conscious world, and complies
with all National Institute of Justice standards for indoor/outdoor operations. The Matrix 100
utilizes the latest in electronic design while retaining a pleasing visual appearance. “Made in the
United States”, along with advanced technological features, is the hallmark of White’s Electronics.
The Matrix 100 is ISO9001/2000.
Purpose
The Matrix “100” handheld metal detector is designed to detect metal, primarily for security
applications. It is useful for a myriad of detection applications.
Table of Contents
Matrix 100 features
Front ................................................................................................................4
Back .................................................................................................................5
Top edge .........................................................................................................6
Bottom edge ...................................................................................................6
Mechanical drawing-metric dimensions ...................................................6
Battery door ...................................................................................................7
“ON/OFF” button ..................................................................................................8
Sensitivity control ...................................................................................................9
Volume control for earbud ..................................................................................10
Testing the scanner ...............................................................................................10
Battery life and ratings .........................................................................................11
Extreme temperature “optional” battery ..........................................................12
Battery installation ................................................................................................12
De-Sense button ....................................................................................................13
Earbud jack ............................................................................................................14
Earbud jack rubber plug ......................................................................................14
Lanyard ..................................................................................................................15
Scanning a person .................................................................................................15
Three year warranty .............................................................................................19
Specifications .........................................................................................................20
Accessories .............................................................................................................21
Security Detection Distributors ..........................................................................22
Contact information ..............................................................................Back cover
Page 4

Features – Front view
Visual indicator LED
ON/OFF light
Low battery indicator
ON/OFF button
De-Sense button
Lanyard
hole
Audio speaker
Battery door
4
Page 5

Features – Back view
Visual indicator LED
Lanyard
hole
Battery
door
De-Sense button
Sensitivity
control
access
hole
Volume
control
access
hole
20 cm
Scan Area
Earbud jack with
rubber plug
5
Page 6
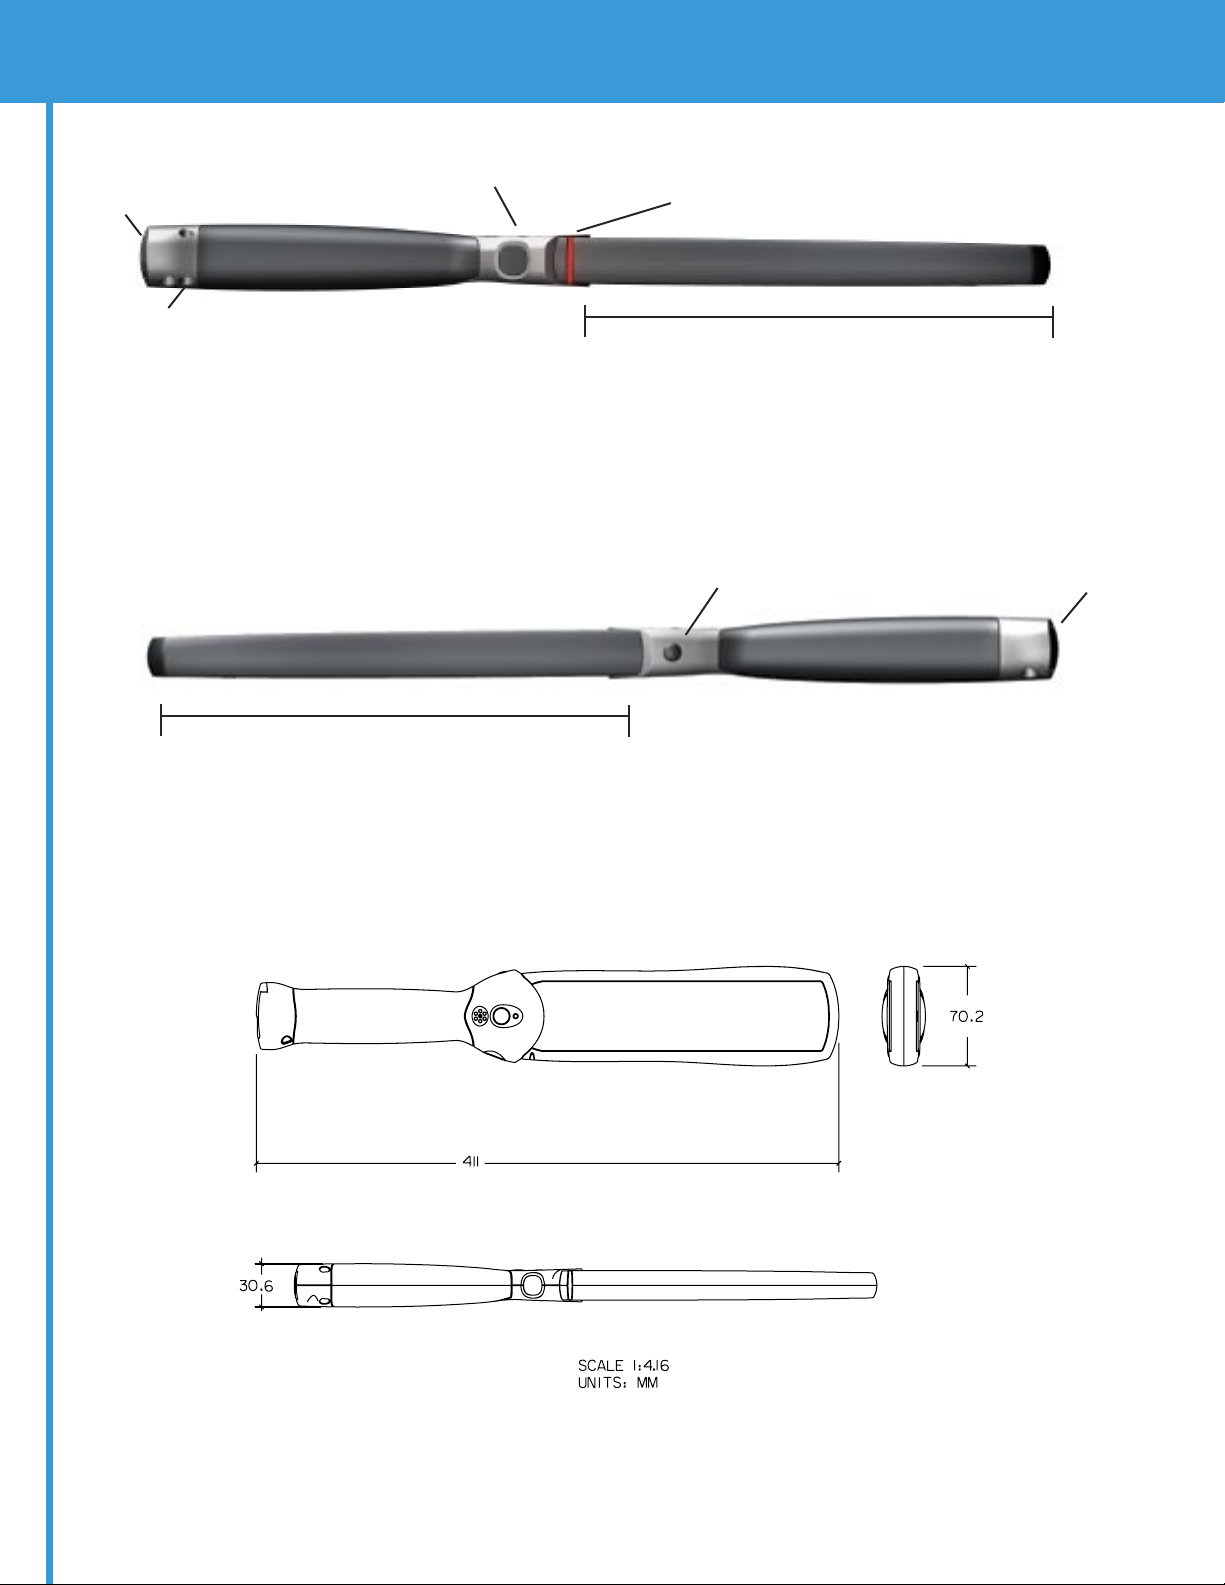
Features - Top edge
Battery
door
Lanyard
hole
De-Sense button
Features - Bottom Edge
20 cm
Visual indicator LED
20 cm
Scan Area
Earbud jack and
rubber plug
Battery
door
Scan Area
Mechanical Drawing-Metric Dimensions
6
Page 7
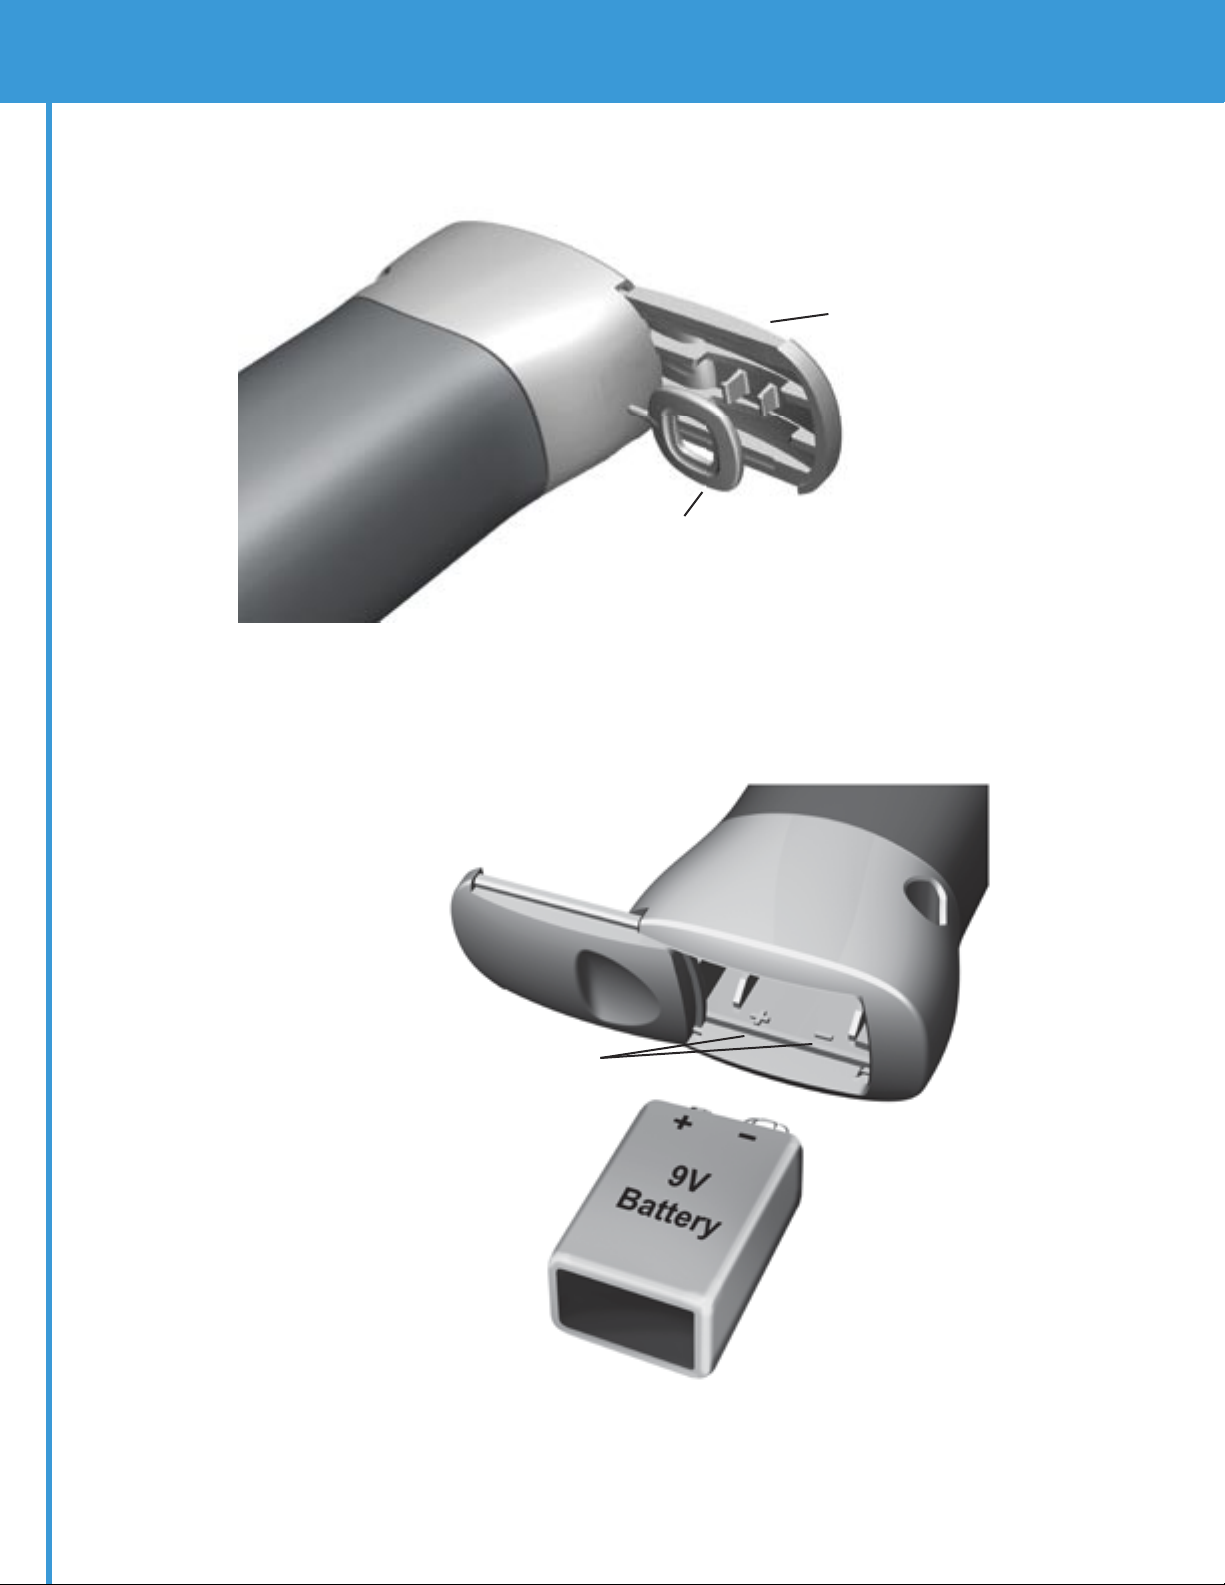
Features – Battery door
Battery door
Stylus
Battery polarization graphic
7
Page 8
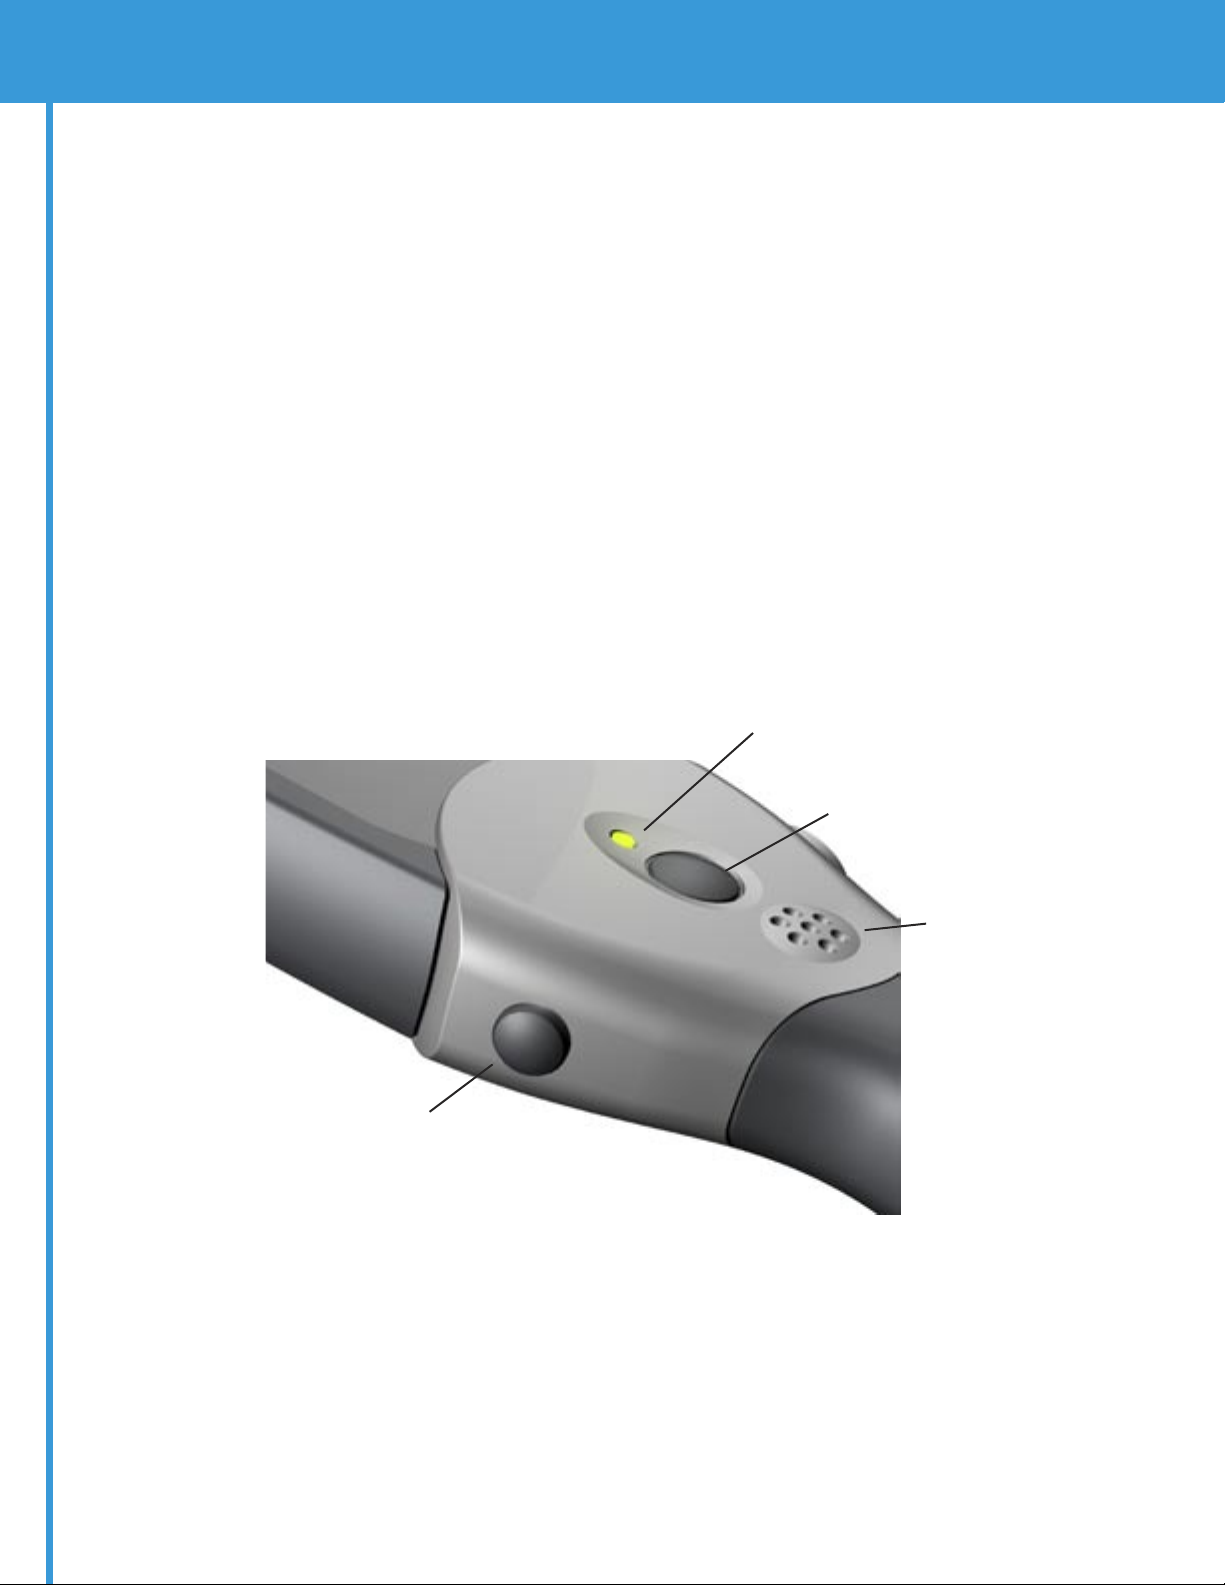
“ON/OFF” button
• There are three selections for the ON/OFF button: “On Audio”,
“On Vibrate”, “Off”.
• “On Audio” - press the ON/OFF button once. This will be followed by
a single, double or triple beep to indicate the current sensitivity
level setting and the green ON indicator light will emit a single flash
for low sensitivity, double flash for medium sensitivity or a triple flash
for high sensitivity.
• Turn the unit off by pressing the ON/OFF button once. The ON indicator
light will disappear.
• “ON Vibrate” - press the ON/OFF button rapidly twice. This will be
followed by a single vibration burst and the ON indicator light will
emit a single flash for low sensitivity, double flash for medium
sensitivity or a triple flash for high sensitivity. The audio alarm is
deactivated when the vibrate alarm is activated.
• Turn the unit off by pressing the ON/OFF button once. The ON indicator
light will disappear.
Earbud jack
“On / Off” indicator light
“On / Off” button
Speaker
8
Page 9

Sensitivity control
The unit is preset, at the factory, to medium sensitivity. You can change
sensitivity to the low, medium or high level.* The Specifications list (page
20) shows the effect of the different sensitivity levels for detecting objects
of various sizes. Open the battery door and remove the stylus from inside
the battery door (see page 7). Use the stylus to press the sensitivity control
to cycle through the sensitivity levels, medium, high, low, etc. The unit will
beep or vibrate and will flash the red visual indicator to announce the new
sensitivity level:
One beep/vibration/flash = low sensitivity
Two beeps/vibrations/flashes = medium sensitivity
Three beeps/vibrations/flashes = high sensitivity
When the unit is turned off or the battery is removed, the sensitivity level
setting is retained in the memory.
De-Sense button
Visual indicator LED
Sensitivity
Stylus
Earbud volume
* To be determined by administration policy and supervisor control.
9
Page 10

Volume control for the earbud
Press the volume control to cycle through the volume levels, medium, high,
low, etc. The unit will beep or vibrate and will flash the red visual indicator
to announce the new volume level:
One beep/vibration/flash = low volume
Two beeps/vibrations/flashes = medium volume
Three beeps/vibrations/flashes = high volume
When the earbud is plugged into the scanner, the audio speaker is
deactivated. When the unit is turned off or the battery is removed, the ear
bud volume level setting is retained in the memory.
Sensitivity
Earbud volume
Stylus
* To be determined by administration policy and supervisor control.
Testing the scanner
• Turn on the scanner in the “On Audio” or “On Vibrate” mode.
• Pass the scanner over a metal test object to make sure that the LED, audio
alarm or the vibrate alarm are working properly. If the battery is fresh or
recently recharged (more than 7V), the LED next to the “ON/OFF” button
will produce a green light (See Page 8). If the battery is discharged to less
than 7V, the LED will produce a yellow light. It is recommended that you
replace the battery if the light is yellow.
10
Page 11

Batteries
One 9V battery is included with the detector. Use a 9V alkaline, 9V lithiummanganese dioxide, or externally charged 9V battery. If the battery is fresh or
recently recharged (more than 7V), the LED next to the “ON/OFF” button will
produce a green light. If the battery is discharged (less than 7V) the LED will
flash a yellow light. It is recommended that you replace the battery if the
light is yellow.
Battery life
Based upon measurements, battery life for a 600 mA-hour alkaline battery at
room temperature:
On 216 hours 9 days
Off 2880 hours 120 days
Battery life is doubled with the 1200 mA-hour lithium-manganese dioxide
batteries.
Rechargeable 9V batteries can be used, but battery life per charging is
typically much shorter than the life of 9V alkaline batteries, and depends
upon battery type and the battery recharging system.
Do NOT use the earbud jack as a recharging port! Use of the earbud jack as
a recharging port may damage the Matrix 100 or the battery charger, and will
void the warranty.
Battery temperature ratings
Alkaline batteries are rated by the manufacturer:
Energizer -18°C to 55°C (0°F to 130°F)
Panasonic -20°C to 54°C (-4°F to 130°F)
Lithium-manganese dioxide batteries are rated by the manufacturer:
Duracell -20°C to 60°C (-4°F to 140°F)
Energizer -40°C to 60°C (-40°F to 140°F)
Ultralife -20°C to 60°C (-4°F to 140°F)
Manufacturer’s ratings are based upon operating loads quite different from
the Matrix 100 so you may see different results.
Extreme temperature “optional” batteries
11
Page 12

High temperature batteries:
For information about special batteries that will operate at
temperatures as low as -40°C contact White’s Electronics, Inc.
Battery Installation
• Gently slide the battery door open.
• Slide a 9 volt battery into the battery cavity.
• Close the battery door.
12
Page 13

De-Sense button
On the top edge of the scanner, there is a large rubber “De-Sense” button.
When depressed, this button will reduce the detectors sensitivity by
approximately 50%. This is particularly useful when scanning near rebar
reinforced floors. The “De-Sense” is only activated as long as the button is
depressed. While the De-Sense button is pressed the “ON/OFF” light (see
page 4) will illuminate continuously. If the battery is good the light will be
green. If the battery is bad the light will be yellow.
De-Sense button
Visual indicator LED
13
Page 14

Earbud jack
The earbud jack accepts a 3mm or 1/8” “Mono” connector.
Earbud jack rubber plug
Helps protect against dirt and moisture.
14
Batteries
Page 15

Lanyard
A lanyard is provided with the unit. The small nylon loop can be threaded
through the lanyard hole and looped back through itself to secure the unit.
The lanyard is tested to withhold approximately 25 pounds of force, before
breaking.
Scanning a person
• Warning: Follow the approved policy & procedure for scanning a person.
This policy & procedure should be approved by the administrator and/or
supervisor of the person using the scanner.
• It is recommended that the person using the scanner “NOT” touch the person
being scanned with the detector.
• The detector is not a weapon.
• Treat the detector with care. Do not abuse.
National Institute of Justice guidelines for use of handheld detectors in schools.
While it is not difficult to learn to use a handheld metal detector correctly,
school administrators should not underestimate the value of annual training
for their operators, as well as training for staff who may be called upon to
serve as backup or supplemental operators. However, on-the-job practice is
important in allowing the school to achieve the type of throughput that will be
required in order to process students quickly.
Every school will want to tailor its own set of operator procedures to take into
consideration its students’ and community needs. Some generic procedures:
• The detector should be passed over the scannee’s body at a distance
of no more than 3 to 4 inches. Avoid touching the body or clothing with the
detector. However, for some baggier clothing, such as pants or jackets, it may
be necessary to hold the detector against or more into the fabric while scanning
in order to stay within 3 to 4 inches of all body surfaces.
• Most handheld metal detectors should be set at their highest sensitivity;
an exception to this is if there is significant interference from metal reinforcing
15
Page 16

in a floor or other nearby material that could cause constant alarms unless the
detector’s sensitivity is turned down.
• The body scan should be performed each time in the same pattern so
that the operator always knows what parts of the body still need scanning. A
sample routine is illustrated on page 18.
1. Ask the scannee to place all carried items, plus any caps or headgear on
a table (procedures for manual search of baggage are not covered in this text).
The scannee should stand with his or her feet about 18 inches apart, facing
away from the table and about 2 feet in front of it. Footprints outlined on the
floor or drawn on a mat can greatly help position the scannee properly. Ask the
scannee to hold his or her arms out to the sides, parallel to the floor.
2. Quickly run the handheld detector across some piece of conductive
material on your own body, such as a belt buckle. The ensuing squeal of the
detector will assure you that the scanner is still operating properly.
3. Start at the top of one shoulder of the scannee. With the paddle of the
detector held horizontally and parallel to the front of the body, sweep down
one side of the front of the torso, down the leg to the ankle, then move to the
other ankle and sweep back up the front of this opposite leg and torso, ending
with the opposite shoulder. (If a particular detector’s detection paddle is less
than half the width of the average body, or if a particular body is wider than
twice the width of the detection paddle, the pattern will have to be modified to
achieve adequate coverage).
4. Sweep the detector paddle over the outside top of the arm from the top
of the shoulder to the bottom of the wrist, then up the inside of the arm to the
armpit. Sweep down that side of the body to the ankle, then up the inside of
that leg and down the inside of the opposite leg, then back up the other leg
from the ankle to the underarm. Repeat the sweep of the inside and outside of
this arm. Note that it would be particularly important to avoid touching the
paddle up against the scannee’s body when scanning up and down between
the legs.
5. Ask the scannee to turn around. (Arms can be put down now). The
pattern used to scan the front of the body should now be repeated over the
back of the body.
6. Ask the scannee to grab the edge of the table for support, then to lift
one foot up in back of him or herself. Scan across the bottom of the shoe.
Repeat for the other foot. The operator should expect to hear a short squeal
from the detector when scanning the bottom of shoes or boots with steel
shanks or steel toes. Both shoes should cause equivalent squeals.
7. For the head area, start at the top of the forehead and scan
around the top of the head down to the back of the neck.
16
Page 17

• When the detector identifies a suspicious item and there is no visible
source for the alarm (clothing is shielding the source object), ask the person
to show you what they have in that area. For example, for an alarm along
the arm or wrist, have the scannee pull up his or her shirt sleeve. Using your
detector, duplicate the squeal you heard before, but now over the visible item.
• Do not let the scannee influence you as to what is actually causing an
alarm. For instance, if the detector denotes the presence of a suspicious item
under a shirt sleeve, do not fail to completely investigate the source of the
alarm even though the scannee assures you that it is just his or her watch.
• If the person you are about to scan caused an alarm when walking
through a portal metal detector, and your job is to try to locate the source of
that alarm on his or her body, do not stop the complete scanning process just
because you come across one alarm-causing item. Continue the scan even
though you find one or more items in the process.
• The lower abdominal area is particularly difficult to scan because this
area is private in nature and because of the metal items usually found in this
area: belt buckles, metal buttons or snaps, and metal zippers. When doing the
initial front body scan, if an alarm occurs in this area, there are two possible
ways to further investigate:
a. Ask the scannee to undo any belt he or she might have on and have
him or her pull the belt ends away from the middle of the body. Now scan
the zipper area; your handheld metal detector should tell you if it is now only
sensing a zipper and/or a metal snap, or if a more suspicious item is present
and further investigation is needed.
b. A second approach that some schools use is that, if the lower
abdominal area is causing an alarm on the handheld detector, ask the
scannee to bend the front of his or her front waistband forward, to ascertain
that no weapon is hidden behind it. Facilities need to be available for
situations where further investigation can be accomplished privately, but only
in the presence of two or more school employees who are the same gender as
the scannee.
17
Page 18

This is an example of procedures for using a handheld metal detector that has at least a 10inch zone of direction.
(The preceding guidelines and illustrations were produced by the National Institute of
Justice in their report titled The Appropriate and Effective Use of Security Technologies
in U.S. Schools. National Institute of Justice, U.S. Department of Justice: Washington, DC
(September 1999) Available online at: http://www.ojp.usdoj.gov/nij/pubs-sum/178265.
htm)
There have been no conclusive studies showing that the magnetic fields generated
by handheld metal detectors will or will not affect personal medical electronic
devices (PMEDs), such as pacemakers, cardiac defibrillators, infusion pumps,
spinal cord stimulators, etc. Therefore, caution should be used when operating
handheld metal detectors near people with the PMEDs.
18
Page 19

Three year warranty
White’s Electronics manufacturers warranty covers all parts and labor for
three years from the original purchase date.
White’s Warranty
The Matrix 100 is warranted by White’s Electronics, Inc., under normal
use, against manufacturing defects from the date of purchase. Equipment
returned to the authorized repair center or the factory during the 36 months
from the date of purchase will be inspected and evaluated under the
performance specifications. White’s Electronics will repair or replace, at no
charge to the owner, all parts determined to be faulty. Items not covered by
this warranty are: batteries; failures caused by abuse, tampering with the
internal electronics; battery leakage; repairs made by an unauthorized party,
contaminants; use in adverse conditions.
Returns must be prepaid and shipped to:
Whites Electronics, Inc.
Security Division
Repair Department
1011 Pleasant Valley Road
Sweet Home, OR 97386
1-541-367-6121
Specifications
• Alarm: Visual indicator LED with audio or vibrate.
• Battery Consumption = 2.8 mA
• Dimensions: length = 16”/41 cm
width = 2 ¾”/7 cm
thickness= 1.17”/3 cm
• Operating frequency is 125 kHz.
• Weight: 9.5 oz./269 grams without battery
11.1oz./316 grams with battery
19
Page 20

Specifications list
Requirement NIJ Specification Matrix 100
0602.03
Sensitivity Level
Sensitivity (measured from surface of detector to surface of object) High Medium Low
Large object size class (zinc gun)
Scan speed 0.5 to 2.0 m/s 8 cm 11.6 cm 8.6 cm 5.7 cm
Scan speed 0.1 m/s 5 cm 11.6 cm 8.6 cm 5.7 cm
Medium object size class (steel knife)
Scan speed 0.5 to 2.0 m/s 6 cm 11.5 cm 9.4 cm 6.3 cm
Scan speed 0.1 m/s 5 cm 11.5 cm 9.4 cm 6.3 cm
Medium object size class (aluminum knife)
Scan speed 0.5 to 2.0 m/s 6 cm 7.0 cm 5.3 cm 3.5 cm
Scan speed 0.1 m/s 5 cm 7.0 cm 5.3 cm 3.5 cm
Small object size class (steel handcuff key)
Scan speed 0.1 to 2.0 m/s 3.5 cm 7.3 cm 5.6 cm 3.1 cm
Very small object size class (brass pen refill)
Scan speed 0.1 to 2.0 m/s 1.5 cm 5.2 cm 3.1 cm 1.9 cm
Extremely small object size class (18-gauge
stainless hypodermic needle)
Scan distance and speed undefined 1.2 cm 0.2 cm NA
Large metal panel interference No alarm at 50 cm 43 cm 33 cm 21 cm
Scan area is cylindrical 28 cm long. Diameter is 2x the sensitivity distance for the object class plus 2 cm.
Scan speed
All object size classes 0.1 to 2.0 m/s 0.05 to 3.0 m/s
Scan range
Large object size class
Scan speed 0.5 to 2.0 m/s +/- 8 cm +/- 10 cm 0.05 to 3.0 m/s
Scan speed 0.1 m/s +/- 5 cm
Medium object size class
Scan speed 0.5 to 2.0 m/s +/- 7 cm +/- 10 cm 0.05 to 3.0 m/s
Scan speed 0.1 m/s +/- 5 cm
Small object size class
Scan speed 0.1 to 2.0 m/s +/- 5 cm +/- 10 cm 0.05 to 3.0 m/s
Very small object size class
Scan speed 0.1 to 2.0 m/s +/- 2 cm +/- 10 cm 0.05 to 3.0 m/s
Operating temperature (NIJ indoor/outdoor) -37°C to +65°C -40°C to +85°C
-35°F to +149°F -40°F to +185°F
Relative humidity 95% 20°C to 60°C 95% 20°C to 60°C
Audible alarm volume 75 dB at 80 cm 85 dB at 80 cm
Battery One 9V
Battery life 16 hours 19°C to 23°C 9V Alkaline 215 hours
9V lithium 430 hours
Body interference No alarm when touching hand Yes
Electromagnetic emission CISPR 22, Class B Yes
Weight Less than 500 g 316 g (11 oz) with battery
Operating frequency 125 KHz
Peak magnitude of generated magnetic field at surface of detector 0.2 gauss
20
Page 21

Accessories
Batteries/Chargers
Lithium-manganese dioxide battery -20 degree C to +60 degrees C
9V rechargeable battery
4 station charger
10 station charger
Earbud
Earbud jack plug
Holster
Lanyard
Stylus
Matrix Security Academy, Store, Support
We’re excited that you chose to purchase a “Matrix 100” handheld metal
detector. Please read the “Instruction Manual” for step-by-step instructions.
You may also download the manual from our security division web site at
www.whiteselectronics.com. We welcome you to shop the White’s Electronics
Security Division online store. Soon you can attend the free on-line “Matrix
100” security workshop and address your questions to our security experts.
Finally, you can register to attend our free quarterly White’s Electronics
“Security Academy”. Thanks again.
Security on-line store
Ballistic nylon briefcase
Batteries
Battery chargers
Caps
DVD
Earbud
Earbud Jack Plug
Holster
Lanyard
Shirts
Stylus
Sweatshirts
Warm up suits
Maintenance
Perform daily inspection to insure that the unit is operating correctly. Check
that the battery is “fresh” or charged and the unit is clean.
21
Page 22

Security Distributors
Security Detection Security Detection Security Detection
Western Region Central Region Eastern Region
Randy Smith Mike Brighty Mike White
Alaska Alabama Connecticut
Arkansas Florida Delaware
Arizona Illinois DC
California Indiana Georgia
Colorado Kentucky Maine
Hawaii Michigan Massachusetts
Idaho Minnesota New Hampshire
Iowa North Dakota New Jersey
Kansas Ohio New York
Louisiana South Dakota North Carolina
Mississippi Tennessee Pennsylvania
Missouri Wisconsin Rhode Island
Montana South Carolina
Nebraska Canada Vermont
Nevada Virginia
New Mexico West Virginia
Oklahoma
Oregon
Texas
Utah
Washington
Wyoming
Mexico
22
Page 23

Page 24

METAL DETECTORS
TM
SECURITY DIVISION
1011 Pleasant Valley Road
Sweet Home, OR 97386
1-888-778-9010 Toll Free
541-367-6121 Voice
541-367-7990 Fax
P/N 621-0495 Printed in USA 11/06
 Loading...