

Page 1

*
e
Page 2

of
Glossary
Glossary of
Machine
Accessories
Detaching
Connecting
Changing
Changing
Bobbin
Inserting
Adju
Upper
Drawing
Adjusting
Adjusting
Fabric,
Setting
Presser
Cloth
Basting
Staystitching
Zigzag
Edge
Interfacing
Bartack
Shell
Satin
Stretch
Rick
Topstitching
Seaming
Gathering
Lace
Making
Cutting
Corded
SewingonButtons
Blind
Zipper
Mending/Patching
Mending
Darning
Lapped
Applique
Sewing
Sewing
Identification
Extension
Foot
Presser
Needle
Winding
Bobbin
Lower
sting
Threading
Up
Pressure on
Upper
Needle
the
Stitch
Foot
Guide
Stitching
Finishing
Darts
Edging
Stitch
Stitch
Stitching
Stretch
Rack
Knits
Over
Applications
Buttonholes
Buttonholes
Buttonholes
Hem
Stitch
Sewing
Rip
a
Seam
Work
Lower
&
Lifter
Sewing
Embroidery
Maintenance/Cleaning
Oiling
Trouble
Changing
Chart
Light
Control
Foot
Tension
&
Thread
Length
Stitch
Cord
Bulb
Terms
Machine
Table
Thread
Fabric
Lower
CONTENTS
Features
Tensions
Table
Page
1A
18
2
3
4
5
6
7
8,
9,
11
12
13
14
15
16
17
18
19
20
21
21
22
23
23
23
23
23
24
25
26
27
27
27
28,
30
30
31
32
33
34
34
35
36
37
38
39
40
41,42
42
10
29
Page 3

GLOSSARY
1.
APPLIQUE
BASTING
HEM
BLIND
BUTTONHOLE
COUCHING
DARNING
EMBROIDERY
FACING
GATHERING
HEM
MONO.
GRAMMING
OVERCASTING
OVERLOCK
ISTRETCHI
PATCHING
SEWING
OF
Applying
another
onto
zag
Or
zg
with
sew
To
removed
the
using
top
your
in,ofstitches.
and
loose
you
allows
by
thread
the
cut
to
for
easier
variation
A
Item
finish
a
holding
stitch.
means
A
in
cloth
hole
button.
a
To
fasten
lace,
nbbon
method
A
stitching
To
decorate
or
straight
addItion
The
increase
to
Forming
separate
or
any
Another
sewn
fold,
A
Using
a
stitching
The
use
or
edge
loos,
of
a
A
stretch
triple
or
stretch
as
Same
piece
a
with
material
a
material
stitch.
temporary
a
with
longest
tension
th,
be
to
pullIng.
lower
removal.
of
where
of
strengthening
by
down
with
of
the
over
with
zig
zag
of
the
zig
a
for
term
down
straight
form
to
zig
of
a
cloth,
of
weave
buttonholes.
darning
of
TERMS
with
ease.
straight
on
The
bottom
able
It
thread
zig
the
zig
a
another
a
repairIng
flew.
stitching,
stitch.
another
body
stitch
zag
material.
shining.
en
stitch
design.
a
sthrji
zag
to
or
cloth.
pattern
but
cloth.
by
This
“0”
to
you
fine
or
edge
a
using
stitch
top
ttltch
remove
may
at
zag
can
zag
a
piece
edge
over
tracery
for
prevent
used
covering
specific
that
i.
possibl,
stitch,
bnd
stitch
be
different
stitch
control
the
stitch
material,
zig
zag
or
rip
using
of
cord,
of
cloth.
finish
to
the
finish
to
design
straight
a
can
setting
sewing
will
tight;
the
necessary
points
used
sides
to
stitch.
tear
either
material
of
material.
elastic,
zig
or
a
revelling
the
this
lower
of
hold
like
seam
seams
the
be
by
be
zag
hole
a
to
a
a
by
a
STITCH
SATIN
SEAM
TUCK
SHELL
SlURRING
STRAIGHT
STITCH
STRETCH
STITCH
TACKING
TAPERING
SHANK
THREAD
TOPSTITCHING
TRIPLE
STRETCH
solid
A
zig
zag
A
line
material
The
use
zig
the
the
to
gather
To
thread*
A
forward
which
per
inchto‘0’
combination
A
forward
stitches
the
on
stretch
lingerie,
A
series
A
tn.
narrow
A
space
button
buttonhole
lineorseries
A
zag
sewing
the
stitching
term
A
formed
ward
of
line
stitch
when
formed
together.
the
of
stitch
zag
of
material.
edge
cloth
together.
Or
reverse
vary
tidy
bedtward
and
to
materials,
arc.
of
stitches
of
zig
wide
toe
composed
and
cloth
bulky
on
which
a
for
used
forward,
a
by
combination
zig
sewn
by
stitches.
of
flex
zag
range.
of
raised
stretch
zag
very
sewing
zig
zag
to
drawing
single
from
stitches
and
double
lock
to
sewing
of
to
material.
lines
enhances
affect.
of
stitches.
stitching
close
or
give
6
motion
not
thread.
thread
engage
of
patterns,
sideward
two
variation
shell
a
two
line
to
formed
which
break,
knits,
varying
between
straight
bonder
a
formed
tcgetlter,
peces
or
of
8
button
a
and
effect
more
sewing
stitches
by
atows
used
tricot.
from
or
giving
pattern
back
by
of
of
a
the
to
zig
QUILTING
RACK
RICK
Joining
bulk
triple
A
give
to
cover
several
stretch
a
RiCk
which
side
creates
width
cloths
for
beds,
pattern
RACK
furniture
using
effect.
or
clothing.
zig
zag
basic
a
ZAG
ZIG
a
form
to
together
A
motion
to
straight
of
lire
sewing.
needle
describes
which
term
side
to
the
—1A—
Page 4

GLOSSARY
2.
ACCESSORY
BOXJTRAY
TEN.
LOWER
SPRING
SION
BOBBIN
TENSION
BOBBIN
WIND#iG
BOBBIN
WINDING
COVER
FACE
DOG
FEED
FOOT
CONTROL
HANDWH
NEEDLES
NEEDLE
NEEDLE
THUMB
NEEDLE
PORTABLE
COVER
PRESSER
PRESSER
PRESSER
UFTER
SCREW
SPINDLE
STOP
EEL
CLAMP
CLAMP
SCREW
PLATE
BAR
FOOT
FOOT
OF
storage
For
and
arm
of
Balances
To
winding
For
For
capacity.
opan
easy
asa.cnbly
For
For
amount
pedal
plug
For
needle
wheel
Used
variations
leather,
For
end
For
For
plate
receptacle
A
whar
Controls
materials
control
When
mteml&
For
and
is
engaged.
is
SEWING
of
acceseor
larger
for
a
upper
the
adust
bobbin
automatically
changing
for
accela
for
materiel
feeding
activating
preeaur.
of
corrtrola
machine
into
tumnetg
take
and
toward
turns
form
to
are
etc.
attaching
needle
the
of
fastening
supporting
merited
is
In
not
the
being
lever.
towered
against
raising
presser
released
estra
Also
lee.
work
and
tension
with
stopping
needle,
to
oIling.
power
th,
end
mechanism
up
todr
a
many;
the
bar.
needle
material
to
protect
use,
pressure
sewn.
onto
the
towering
or
When
foot.
when
and
MACHINE
neadles,
feet,
used
ace.
strrf
tension
tower
of
thread.
bulb
the
and
through
to
exerted
speed:
socket.
well
by
high
to
operator.
on
stitch
example:
needle
into
whan
several
for
sawing
a
exerted
Can
material
dog.
feed
the
raised,
lowered,
estensron
55
bobbin
bobbin
provklea
presser
machine.
the
on
attached
hand
poertion.
your
sharp,
to
needle
sewing.
hem
on
be
it
presser
the
the
FEATURES
bobbins
threads.
case.
full
at
bar
machine,
foot
the
wirea
bring
to
This
machine.
ball,
lower
in,
clamp.
This
sizes.
machine
various
varied
holds
tension
tension
by
the
bar
FOOT
PRESSER
SCREWtotire
THUMB
REVERSE
SEWING
BUTTON
SOCKET
PIN
SPOOL
IRETRACTABLE)
STITCH
LENGTH
DIAL
UP
TAKE
LEVER
THREAD
CUTTER
GUIDE
THREAD
FOR
WINDING
BOBBIN
GUIDE
THREAD
UPPER
FOR
THREADING
THREAD
UPPER
TENSION
THREAD
UPPER
DIAL
TENSION
ZiGZAG
DIAL
WIDTH
tastenirtg
For
presser
changing
For
direction,
continued
Located
the
light
for
On.
changing
For
forward
For
drawingupthe
a
tight
stitch.
cutting
For
and
back
Holds
thread
Guides
tension.
for
Use
control
to
Used
setting
For
may
width
width.
reverse
under
bulb.
sewing
and
into
thread
single
thread
change
button
reverse
excess
taut
width
be
presser
bar.
from
the
the
the
from
or
lock.
varied
must
sewing.
face
and
length
direction,
thread,
presser
for
two
upper
zigzag
of
foot
even
from
attachments
end
forwardtoreverse
for
top
be
cover
winding
of
thread
located
bar.
stitch
held
to
in
change
bobbin.
in
to
on
either
form
winding.
to’
pins
spool
helps
sewing,
thread
tension
Zigzag
stitching.
to
5mm
width
0
for
the
the
1
—
B—
Page 5

Machine
identification
28
71
12
73
14
—
15/6
18
1
2.
3.
.3
4
6
7
9
10
4.
5.
6.
7.
8.
9.
10.
11.
12.
13.
14.
15. Bed
16.
17.
18.
19.
20.
21.
22.
23.
24
25.
26.
27.
28.
‘
1
Bobbin
Bobbin
motion
Stop
wheel
Hand
Stitch
lengtl
Reverse
Connector
Stitch
pattern
plate
Base
Thread
Thread
Thread
tension
Top
cover
Extension
Handle
Faceplate
Set
screw
Presser
Needle
dogs
Feed
Needle
Needle
Presser
Presser
Extension
plate.
Top
winder
winder
stitch
guide
take-up
guide
plate
for
foot
plate
clamp
foot
foot
plate
stop
knob
knob
button
knob
face
lifter
holder
guide
plate
screw
pin
Spool
1.
20
27
22
yq
23
24
25
-26
27
—2—
Page 6

ACCESSORIES
uttonoie
Zigzag
(on
Button
foot
Zipper
foot
machine)
foot
sewing
foot
Bobbins
pcs.)
(3
Accessories
compartment
table
sion
are
stored
at
front
in
of
built-in
exten
Ordinary
needles
Screw
14
Oiler
drivers
—3—
Page 7

BEFORE
Machine
makes
which
ordinary
SEWING
stored
is
your
sewing.
flat-bed
in
work
ea&er
style
in
\cLJ
Detaching
up
Pick
machine
model.
Free-arm
embroider;
T-shirts,
of
vice-versa
Do
attach
open
To
open,
it
Extension
slide
and
used
is
convenient
is
trousers,
blouses,
of
extension
lidofaccessory
illustrated.
as
off
it
as
sleeves,
etc.
above
table.
and
free-arm
a
to
steps
Table
sew
cuffs
box,
the
or
to
lift
—4--
Page 8

Connecting
and
Power
Foot
Cord
Controller
Connect
power
cord
Before plugging
be
sure
that
of
your
plate
a
*
Specifications
to
at
country.
Always unplug
in
not
The
the
use.
more
faster
WARNING:
THE
FOOT
ATTACHED
MACHINE
DESIGNATED
MODEL
FOR
THIS
221N
YOUR
FOOT
SEWING
APPLIANCE
221N.
foot
controller
CD
in
your
that
voltage
machine.
back
vary
press
you
machine
the
CONTROLLER,
ON
MODEL
FOR
ONLY.
SAFETY,DONOT
CONTROLLER TO
MACHINE
OTHER
is
(written
of
machine)
from
machine
foot
THE
SEWING MACHINE
THAN
machine,
same
country
when
controller,
runs.
FOR
WHICH
SEWING
221N,
APPLY
AND/OR
MODEL
and
as
on
IS
ANY
productisequipped
This
plug
power
the
having
to
plug
outlet.
outlet
insert
(a
the
unable
If
obsolete
plug.
POLARIZED
blade
one
only
the
still
should
Do
with
wider
one
way.
plug fully
fall
to
defeat
not
PLUGS
polarized
a
than
into
contact
fit,
the
the
This
the
safety
other).
is
outlet,
CAUTION
alternating
This plug
safety
a
an
feature.
try
electrIcian
purpose
current
reversing
to
of
the
line
will
fit
If
you
the
replace
polarized
plug
into
are
plug.
the
Page 9

Changing
presser
Raise
needle
Set
position
towards
by
you
Foot
foot
in
turning
.
‘ifter
the
handwheel
D.
highest
Remove
screwdriver.
with
Replace
screw.
foot
new
loosening
by
foot
and
screw
tighten
9
—6—
Page 10

Changing
needle
Set
position
towards
by
you.
Needle
in
turning
the
handwheel
highest
Loosen
take
With
insert
needle
of
Push
stopper
clamp
out
fiat
a
needle
screw
needle
needle.
face
new
bar.
®
needle
and
firmly.
clamp
away
until
tighten
screw
from
into
it
and
you,
groove
reaches
needle
Always
sharp
a
Using
only
not
breakage
of
thread;
hook
use
a
point.
defective
causes
of
and
needle
straight
needles
it
also
or
stitch
worn
or
can
plate.
needle
needles
skipping,
snapping
damage
with
—7—
Proper
__
l,rrIrrrf721r?Jf
needle
straight
f
If
I
11
shaft
I
point
sharp
I
I
IJ
I
LJ
1
Page 11

Bobbin
Set
position
towards
Winding
needle
by
you.
in
turning
-
the
handwheel
highest
Open
Open
take
shuttle
latch
it
out.
cover.
of
bobbin
case
and
—8—
Close
bobbin
latch
comes
of
bobbin
out
easily.
case
and
Page 12

Push
out
Pull
Put
a
Draw
through
numbers
back
spoolpin.
spool
thread
fold
to
spoolpin.
on
pretension
D
handle.
from
spoolpin
device,
following
Wind
bobbin
Push
Holding
hand
unscrewing
thread
several
bobbin
disengage
clockwise
times.
on
handwheel
stop
spindle.
to
with
haridwheel
motion
around
your
knob.
left
by
—9—
Page 13

Push
down
bobbin
foot
rightand
to
controller.
press
P.achine
when
Push
Take
cut
and
Retighten
winding
bobbin
off
thread.
stop
stops
to
bobbin
autornaticlly
full.
is
left.
from
motion
spindle
knob.
touble
correction
fjt
—=
j4’
—10—
bobbin
If
shown,
as
loosen
bobbin
driver
is
remove
set-screw
winding,
adjust
and
wound
of
by
unevenly
top
the
using
height.
cover
guide
and
for
screw
Page 14
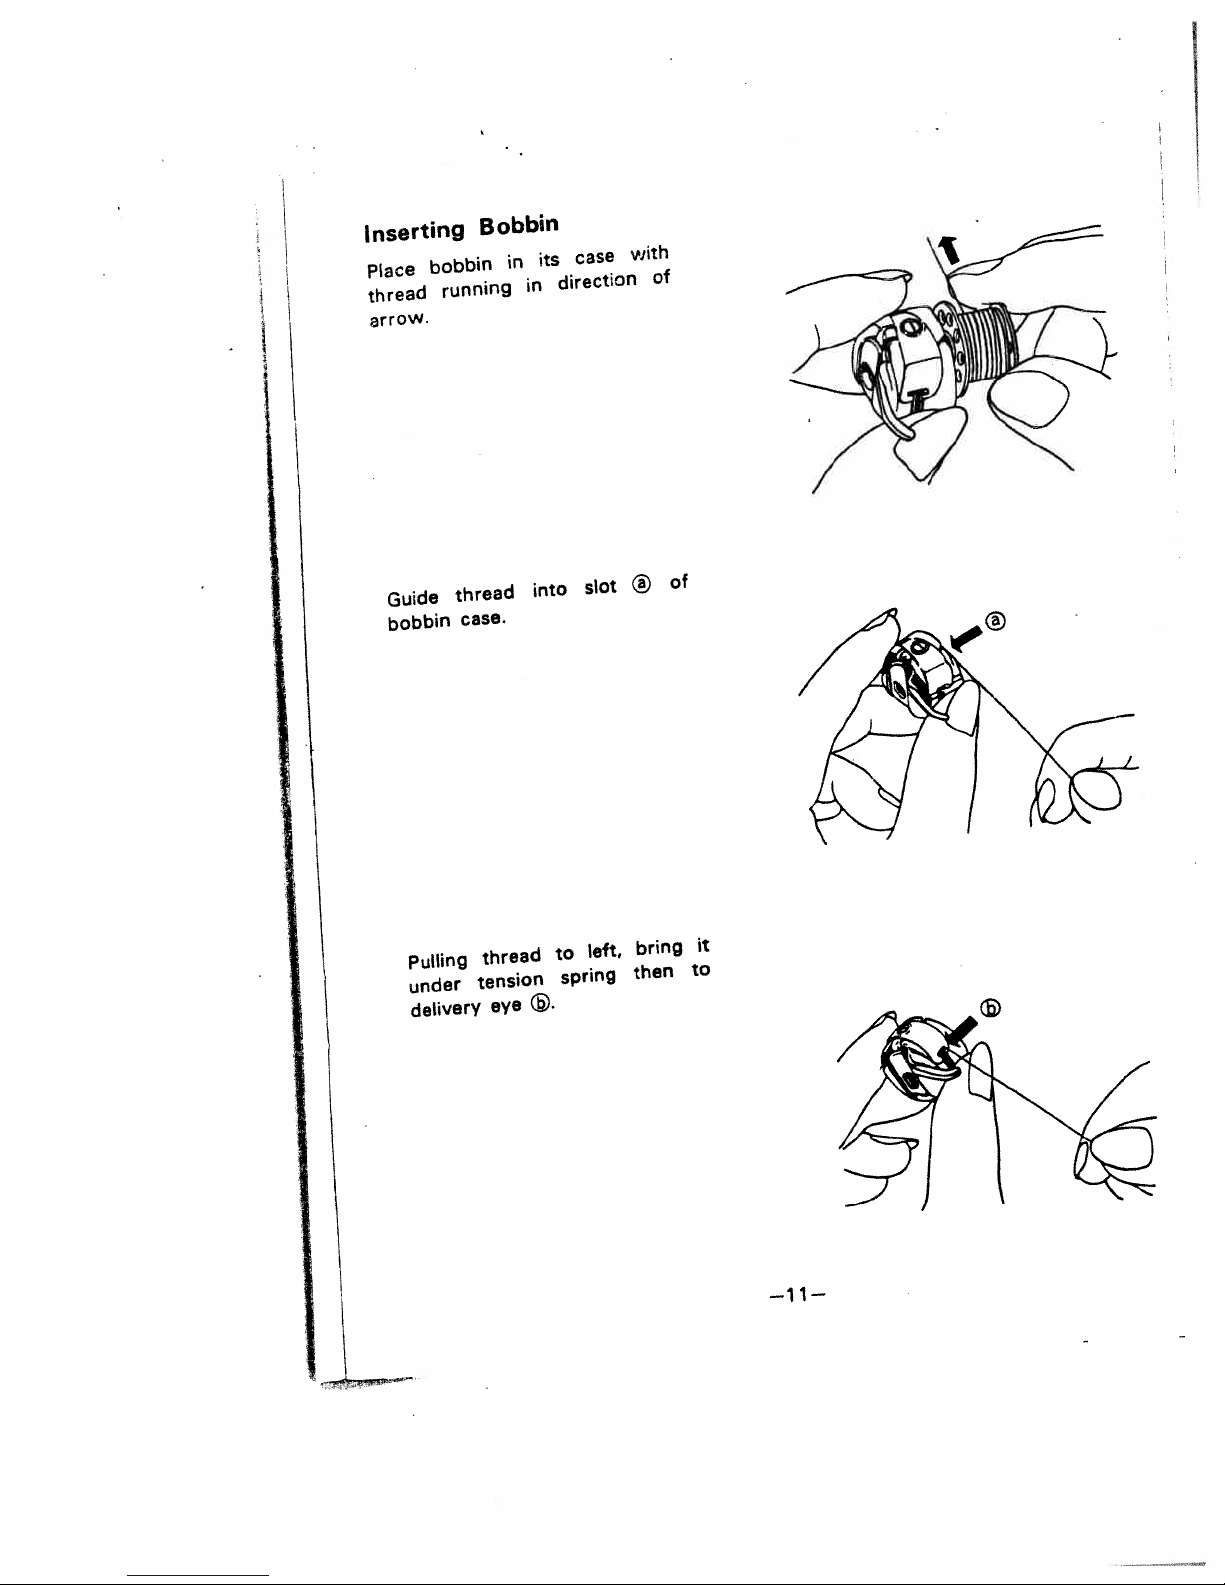
Inserting
Place
thread
bobbin
arrow.
Bobbin
running
in
its
in
case
direCtiOfl
with
of
Guide
bobbin
Pulling
under
delivery
thread
case.
thread
tension
eye
intO
slot
to
spring
left,
®
bring
then
of
it
tO
—11—
Page 15

Adjusting
To
test
shake
At
proper
will
gradually
amount.
To
adjust
screw
with
bobbin
bobbin
tension,
Lower
tension,
case
tension
small
Tension
hang
as
shown.
bobbin
drop
screwdriver.
turn
a
adjusting
and
case
small
Raise
position.
Leave
cm
(4”)
Take
bobbin
Release
is
fully
needle
end
from
hold
case
latch
inserted
of
thread
of
into
when
in
bobbin
latch
hook.
the
of
about
case.
and
bobbin
highest
10
push
case
—12—
Page 16

UPPER
THREADING
Turn
1.
you
to
Place
2.
spool
Lead
3.
top
Down
4.
discs,
Draw
5.
check-spring
tug
Up
6.
up
Lead
7.
thread
the
the
the
Thread
8.
the
to
highest
its
a
pin.
the
thread
and
from
the
into
and
level
thread
threading
needle
back.
FRONT
through
Hold
thread
hand
the
down
thread
upper
pulled
thread
and
the
threads
long.
hand
raise
spool
thread
guides.
between
right
thread
the
through
from
guide
the
TO
about
the
loosely
wheel
needle
and
loop
thread
out
ends
draw
machine,
wheel
take-up
the
position.
thread
of
to
up
and
hook.
the
right
down
at
slot,
thread
bar
needle
BACK,
end
toward
goes
comes
will
which
straight.
under
toward
three
through
the
left.
through
with
eye
to
through
the
then,
or
3
of
and
all
form
or
toward
on
tension
a
of
left.
bottom
through
guide
drawing
4
the
turn
you
the
back
then
Place
presser
the
leaving
four
lever
the
the
the
slight
take-
the
from
FROM
inches.
upper
up.
over
can
back
of
it
the
until
way
A
the
be
both
foot
of
both
inches
—13—
Page 17

Drawing
Hold
left
hand.
Turn
you
until
up
again.
Pull
upper
lower
in
loop.
a
Pull
out
cm
(6’)
under
Up
end
of
handwheel
needle
thread
thread
both
threads
and
place
presser
upper
will
foot
Lower
slowly
moves
be
to
them
on
thread
towards
down
slowly
brought
about
together
left
Thread
with
and
and
up
1
5
—14—
Page 18

ADJUSTING
PRESSURE
ON
FABRIC
GENERAL
•
Usually
heavy
very
fabrics
knit
press
short.
pin
position.
table.
outer
the
center
lower
below
the
for
normal
arid
of
(B)
ring
center
SEWING
sewing,
bulky
medium
the
of
exceotioria)
For
reduce
To
of
(A>
pin
fabrics
and
pressure
half
the
down
(B)
except
arid
very
control
the
pressure
again
for
very
light
fabrics,
pressure,
control,
sewing
stretchy
weight,
be
refer
halfway
to
the
at
press
then
on
its
to
Ordinary
stretchy
Very
fabric
Heavy
Medium
Light
Heavy
Medium
Light
of
and
weight
weight
fabrics
and
weight
weight
Fabric
less
bulky
soft
bulky
and
elasticity:
fabrics
fabrics
fabrics
knits:
and
ones
ones
sheer
ones
—15—
Pressure
fabric
Half
Full
Full
Full
Half
Half
on
Page 19

CONTROLS:
ADJUSTING
STRAIGHT
THREAD
STITCH:
TENSIONS
GREEN
AREA
Always
tension
as
the
raised.
upper
the
control
to
turn
tension
the
machine
is
It
the
however,
bobbin
screw
clockwise
to
wise
When
balanced,
formed
fabric
ing
in
the
When
bobbin
the
upper
the
the
on
When
loose,
the
the
over
fabric
the
the
When
tensions
puckered
fabrics,
sheer
Loosen
tight.
adjust
with
tension
To
to
the
is
threaded
seldom
bobbin
when
thread
on
side
to
loosen.
both
a
with
upper
thread
fabric
the
upper
bobbin
(C).
upper
are
in
the
is
increase
thread,
right.
the
left.
be
required
necessary
tension,
of
tighten,
tensions
perfect
both
(A).
tension
thread
(B).
upper
balanced
sewing
both
both
the
presser
released
the
Before
sure
properly.
thread
the
threads
is
which
tension
thread
thread
and
tensions
tensions
upper
turn
counterclock
stitch
pulled
bobbin
foot
when
tension
To
decrease,
adjusting
that
to
tension,
to
turn
bobbin
are
properly
will
interlock
is
too
up
is
lying
forms
lying
but
fabric
direction
are
evenly.
thread
down,
tension
adjust
change
is
flat
thread
it
the
small
case
tight,
over
flat
too
loops
on
on
too
is
on
be
is
tC)
It
is
tension
stitch
stitching
broidery
thread
ZIG
ZAG
zag
Zig
red
area
recommended
balance
length.
buttonholes
for
slightly
tension.
TENSIONS:
requires
stitch
smoother
for
a
under
In
loosen
to
case
adjust
the
less
flat
the
medium
of satin
em
and
upper
tension
top
appearing
so
pattern.
—16-—
we
recommend
you
turn
your
tension
dial
to
Page 20

Fabric
,Thread
and
Needle
Table
FABRIC
SHEER;
VERY
Chiffon,
Voile.
Blouse
SHEER;
Organdy.
Lawn.
LIGHT-WEIGHT;
Brocade.
Wool.
MEDIUM;
Linen.
Faille.
HEAVY;
Sailcloth
EXTRA
Upholstery.
Awning
(KNITS)
LIGHT-WEIGHT;
Power
MEDIUM-WEIGHT;
Jersey,
Power
HEAVY-WEIGHT;
knit,
Wool.
Velvatten.
Terrycloth
Denim,
HEAVY;
net
Double
Net
Power
FAKE-FURS,
Canvas.
lace,
Net
Crepe,
Taffeta
Crepe.
Velvet
Silk,
PIque,
Duck.
Tricot
Knit,
Double
Nat
VELOURS
European
Cotton
70
50—70
30
30
30
30
50—70
30
30
30
THREAD
Mercerized
Cotton
6D
60
50
50
Heavy
Duty
Heavy
Duty
80
50
50
Heavy
Duty
Cotton
Covered
Polyester,
Nylon
Silk,
Silk
Nylon
Silk
Nylon
Silk
Silk
C.C.Poly.
CC.Poly.
Silk
Nylon
Silk
Nylon
C.C.Poly.
Silk
Nylon
C.C
CCPoiy.
PoIy.
European
705
65—70
65—7O
75—80
80—90
100
120
70
70—80
80—90
90—100
NEEDLE
U.SSize
15x1
9
9
1
1
11—14
16
19
9
9—10
11—14
14—16
Point
Style
Regular
-
-
Light
Ball
Light
toMedium
Ball
Medium
Heavy
to
Ball
Ball
Sharp
REMARKS
Loosen
per
or
up.
tension
[LEATHER
VINYLS
LIGHT-TO-MEDIUM-
WEIGHT
HEAVY
[DECORATIVE
STITCHING
TOP
MACHINE
FILMS
LEATHER
TOUCHES]
EMBROIDERY
Silk
Size
30
30
30
twist
50—70
50
50
Heavy
Duty
C.CPoly.
C.CPoly.
C.C.PoIy.
—17--
90
90—100
100—110
100—110
65—80
14
14—16
16—f
16—18
9—11
Wedge
Wedge
Wedge
B
Regular
Regular
Page 21

STRAIGHT
The
normal
is
between
should
usage.
longer
require
and
length.
control
depend
stitches,
shorter
bias
Be
at
Usually,
cut
“o”
STITCH:
stitch
2-4
on
and
stitches.
areas
sure
line.
length
but the
fabric
the
heavier
lighter weight
For
use
to
set
the
for
length
fabrics
a
shorter
most
artd
curved
stitch
fabrics
chosen
area
require
fabrics
seams
stitch
width
of
The
length
is
shortest stitch
the
between
lengthen
Figures
Approx.
When
of
seam,
a
backward
of
marking
andtothe
indicator
on
Number
you
press
long
as
the
of
wish
in
as
SETTING
stitch
and
variety
for
a
left
to
STITCH
stitches
sew
to
the
push
the
button
THE
regulated
is
is
the
5
longest,
of lengths.
shorten the
LENGTH
per
inch
SEWING
backward
button
is
held
STITCH
by
the
But
Turn
stitch.
CHART
0
No
Feeding
IN
REVERSE
tie
to
as
far
in.
—18-—
LENGTH
stitch
length
the
control
the
(Approximate)
1
30
the
threads
as
it
will
control
2
15
at
go.
control
may
dial
the
The
dial.
be
set
to
3
10
beginning
machine
at
the
4
7
any
right
or
will
Near
5
6
0
spot
to
end
sew
Page 22

Place
cm
Lower
fabric
(0.4”)
inside
presser
under
foot
the
foot
lifter.
edge.
about
1
4’
Presser
order
In
when
firmly
far
as
reinforce
To
wards
pushing
button.
using
push
as
to
Foot
to
very
presser
it
the
down
obtain
will
Lifter
thick
go.
seam,
edge
reverse
wider
materials,
foot
sew
of
lifter
fabric
sewing
gap
up
back
by
—19—
Release
forward
hand
Never
as
pull
button
sewing
is
it
material.
fed.
‘and
guiding
commence
fabric
by
Page 23

Cloth
Use
cloth
long
from
Set
guide
of
needle
distance.
Run
machine
touching
Position
to
sew
Sew
reverse
forcement
Draw
is
finished.
Cut
threads
behind
Guide
seam
edge
a
fabric
presser
guide
in
guide.
cloth
curved
at
of
of
hole
plate,
with
‘guide
stitches
end
to
with
when
regular
material.
on
edge
seam.
of
left
when
thread
bar.
arm,
and
at
seam.
sewing
distance
at
of
an
for
sewing
cutter.
a
right
adjust
fabric
angle
rein
-20—
Page 24

asting
B
useful
very
for
and
stitch
at
Choose
your
lower
trial
5.
is
guide
hems.
possible,
Loosen
fabric
can
upper
thread.
fittings,
lines,
tension
thread
so
be
thread,
Machine
joining
ing
basting
Use
stitch
upper
t
contrast
easily
Basting
easily
pulling
basting
seams
construction
pleats
longest
length
thread.
with
seen.
stitches
clipping
by
out
for
mark
and
setting
on
color
can
it
removed
then
to
be
Staystitching
Staystitching
a
as
acts
that
before
ing
Staystitch
always
grain.
the
seamline
from
12
Use
fabrics.
curved
stitching
stitches
joining
edge
prevents
guideline
edges.
stretch
might
final
the
single
a
on
Place
in
for
stitching.
the
in
stitches
seam
the
per
stretching
clipping
Staystitch
during
layer
direction
inch
and
and
any
handl
fabric,
of
away
1/8”
allowance.
most
for
of
1
I
—21—
Page 25

ZIG-ZAG
STITCHING
Machine
Setting
MvvAWvW
%4%WMW
/W\’W\
—22—
sure
Be
You
nations
stitch
turned
However,
raise
before
Tension
needs
zig-zag,
Stitches
fabric
Zig-zag
Seam
Use
fabrics
during
open and
Adjust
fabric.
the
the
stitched
and
fabric.
Use
•
•
to
make
can
by
length.
while
needle
adjusting
on
tobeloosened.
the
should
without
stitching
Finishing
to
“overcast”
that
wear
stitch
stitch
Choose
open
most
fabric
edges
show
one of
seam
Trim
stitching
for
best
Place
stitching
allowance
after
fabric
fabrics
weight fabrics,
roll.
use
zig-zag
any
adjusting
machine
if
machine
to
upper
looser
causing
fray
and
each
width
setting
stitch
edges.
a
ridge
two
methods:
edge
over
firmly
and
stitching
which
number
stitch
Both
its
highest
stitch
lie
flat
has
many
seam
prevent
to
washing.
side
and
Avoid
which
on
evenly
raw
edge
woven
near
trim
fray
and
foot.
width
knobs
is
is
not
width
thread
The
wider
the
against
any
puckering.
uses:
Press
separately.
length
that
and still
harsh,
become
right
and
of
fabrics.
edge
away
.
-
easily,
knits
of
combi
can
running.
running,
position
knob.
usually
tension.
edges
raveling
seam
to
will
secure
over-
side
place
fabric-
of
seam
excess
best
light
which
and
be
the
the
in
suit
give
stiff
of
-
for
1
Page 26

Edge
Finishing
Usetofinish
edges
to
prevent
nate
bulk
firm
fabrics,
or
facing.
fabrics,
then
stitch
‘trim
of
stitch
For
fabric
hem
edges
raveling
turned-in
along
loosely
about
close
and
woven
W’
to
and
edges.
edge
from
stitching.
to
of
facing
elimi
For
hem
soft
or
edge,
4..
1
I
Interfacing
to
Use
dart
in
center
edges
dart
along
through
closetostitching.
B
artacks
Use
to
as
corners
zipper
stitch
Set
zig-zag
5.
sIieu
Stitch
for
Use
for
lingerie
under
length
thread
upper
in
pull
edge.
under
folded
so
along
folded
Darts
reduce
interfacing
of
dart
matching
line
point.
reinforce
of
openings,
width
or
wider
Edging
a
decorative
and
edge
between
tension
fabric,
Place
presser
edge
edge.
of
bulk
fabrics.
to
point;
dart
from
Trim
points
pockets,
and
knàb
and
soft
fabric.
4
forming
edge
foot
isonthe
when
wide
both
lingerie
stitch
edge
and
so
of
from
stitching
Cut
overlap
lines.
endofdart
raw
of
strain
belt
medium
at
length
treatment
fabrics.
Set
Tighten
5.
stitches
scalloped
a
folded
the
left.
a
down
cut
Zig-zag
edges
such
loops,
straps.
at
Fold
stitch
will
fabric
right,
Stitch
1
—23—
Satin
Closely
form
called
grams,
stitch
Set
1.
and
feed
not
one
in
thread.
looser
Stitch
spaced
smooth,
a
satin
appliques
If
too
spot.
the
stitches.
length
close
but.will
Loosen
The
tension.
zig-zag
satin-like
and
knob
to
wider
stitches
Use
embroidery.
between
machine
0
continue
tension
the
surface
for
mono
sewing
of
stitch,
which
are
0
will
upper
the
Page 27

sewing
When
to
seam
polyester
and
give
especially
stretch
or
is
on
knitted
along
cotton
designed
lightweight
covered
STRETCH
stretch
or
with
knits
for
knits.
fabrics,
fabric,
the
polyester
and
STITCHING
stretch
a
use
without
thread
stretch
which
fabrics.
stitch
breaking
has
Use
the
an
a
which
thread.
extra
ball
allows
amount
point
the
Select
of
needle,
Machine
Setting-
STRETCH
RI
III
UI
STRAIGHT
STITCH
Stretch
stitch.
strength.
Use
knits
woven
In
seams
when
seams,
and
Also
want
out
Guide
machine
stitches
straight
combining
stitching
for
stretch
and
that
worn
and
children’s
in
for
use
heavier
a
buttonhole
using
fabric
to
that
stitch
fabrics.
fabrics,
receive
as
such
armholes
clothes.
topstitching
row
make
give
triple
a
is
stretchability
regular
use
side
gently,
the
stretch
seams
for
of
lot
a
seams,
sportswear
in
when
stitching
of
thread.
twist
back-and-forth
to
lock
and
stitching
strain
crotch
you
with
allowing
seam,
the
I
in
—24—
Page 28

Machine
Setting
RICKRACK
STRETCH
STITCH
Foot
4
Pattern
Dial
I
Rickrack
resembles
sible,
right
It
purpose
stitch
stitches,
nence.
adjusted
Use
and
keep
Also
fabrics
Use
and
Place
together
stitches
then
you
Can
looking
and
can
be
consists
from
overcast
to
hems
light
suitable
such
for
garment
elastic
to
stretch
sew.
also
be
Stitch
stitch
rickrack
wrong
used
strtch
giving
Width
narrow
to
prevent
weight
as
attaching
waistline
at
the
anchor
elastic
used
Length
I
is
a
trim.
the
same
sides.
as
stitch.
of
strength
of
edges
knits
for
overcasting
woolens
elastic.
over
markings.
elastic
for
decorative
triple
heavy.duty
a
three
the
zigzag
wide.
to
of
seams,
raveling
from
and
fourths.
in
fabric
between
Tension
zig-zag
is
It
on
both
Each
threads
and
terrycloth.
Mark
and
Take
to
pins
stitching.
I
that
rever
the
zig-zag
perrha
can
facings
and
rolling.
heavy
elastic
pin
a
few
fabric,
all
or
be
to
as
—25—
Page 29

DECORATIVE
decorative
stitch
a
borders
of
and
pattern
trims,
variety
great
A
of
rows
decorative
ii
stitching
by
or
monograms,
STITCHING
can
combining
appliques
TOP
You
with
along
edges,
hems.
•
•
created
be
different
and
STITCHING
can
one
collars,
pockets,
straight
Use
tailored
twist
hole
Use
heavier
regularthread
•
Use
stitching,
use
Or
page,
ing
special
by
stitches—top
embroidery.
accent
more
or
look,
for
stretch
row
satin
of
one
effects.
using.ore
lines
rows
lapels,
cuffs,
stitch
sewing
added
straight
stitching
of
for
stitch
especially
stitches
the
varying
or
stitching,
garment
a
of
topstitching
of
yokes,
seams
for
with
emphasis.
stitch
even
wider
for
on
width
the
more
facing
and
more
a
button.
for
with
row
borders.
follow.
a
of
for
—26--
Page 30

Seaming
The
narrow
in
seams
added
open
Tinyzigzag
be
when
G
Ordinary
basting
while
small
as
thread,
cord
into
have
the
order
strength.
seam
seen
stretched.
athering
pulling
zigzag
o-ochet
for
fabrics.
been
cord
to
Knits
zigzag
of
stitches
the
and
Over
gathering
stitch
across
thread
gives
gathering
stitched
can
eliminate
firm
and
in
a
much
Once
be
can
After
press
can
seam
Cord
often
fullness.
a
the
pulled
bulk.
be
knits
sewing,
will
with
cord
or
stronger
fullness
gathers
in
used
for
flat.
hardly
give
breaks
such
carpet
place,
out
a
A
in
—27—
Lace
Applications
lace
edge
When
lace
laces
touch
where
line
follow
for
easing
lace
using
an
Attaching
special
dresses,orlinens.
lacesinplace
corners
straight
convenient
sewing.
edged
the
application.
trims
or
to
Pin
or
necessary.
or
braid
to
follow
a
the
almost
adds
lingerie,
or
baste
mitering
has
when
scalloped
design
invisible
a
A
a
of
Page 31

MAKING
BUTTONHOLES
Determine
button
bar
buttonhole
diameter
tacks.
Measure
of
for
Mark
Determine
Determine
diameter
kind
and
Attach
Completely
®
Place
marking
through
®
of
buttonhole
buttonhole
of
material
foot
of
marking.
and
width
button,
of
material.
of
push
of
center
indicates
Length
and
0.3cm
add
size
Width
according
its
foot.
back
foot.
under
buttonhole
foot
of
beginning
thickness
material.
on
thickness,
sliding
foot
and
(1/8”)
part
that
so
passes
arrow
to
line
1
of
length
buttonhole
marking
3cm(i/8”J
a
diameter
thickness
I.
—28—
Page 32

the
line
fabric
sure
1.
2.
3.
4.
5.
6.
7.
6.
9.
10.
seam
the
sheer
zer
be
MAKING
First,
buttonhole
tailor’s
or
(following
machine
Replace
foot
which
piling
buttonhole
Set
stitch
length
Lower
on
fabric
buttonhole.
the
end
tionl),Stop
fabric
at
Lift
the
needle
around
Lower
wheel
just
of
fabric.
foot
guide
six
stitches
tration
Turn
tion
five
(Illustration
Raise
stitch
length
Stitch
(Illustration
Stitch
above
Cut
If
stitch
and
or
needle
width
near
second
bar
(Illustration
the
ripper,
stitching.
you
plan
or
or
paper,
torn
away
2).
six
buttonhole
BUTTONHOLES
mark
presser
up
knob
needle
of
right
presser
as
end
presser
set
soft
beginning
the
on
fabric
chalk.
directions
adjustments
foot
is
grooved
of
thread.
foot
guide
width
near
0.
carefully
indicating
Stitch
the
button
machine
side
of
foot
a
pivot,
for
end.
foot
enough
stitches
“0”.
tack
Push
the
to
form
to
length
zigzag
2).
out
at
2
side
3)
by
being
to
make
material,
under
after
to
sliding
rear.
dial
width
to
and
repeating
4)
opening
careful
fabric
stitching.
Make
of
buttonholes
with
below)
are
with
at
2
into
the
beginning
to
the
hole,
with
stitching.
and
turn
and
raise
Take
bar
to
form
fabric,
return
of
buttonhole,
not
place
which
and
end
a
basting
one
on
to
correct
buttonhole
to
prevent
Push
sliding
to
the
and
stitch
the
mark
mark
(Illustra
needle
using
the
fabric
turn
hand
needle
buttonhole
five
tack
(Illus
“0”
posi
to
5.
Take
bar
tack
reset
sttch
step
with
the
to
cut
on
stabili.
a
can
scrap
rear.
of
for
in
the
out
or
6
—29—
be
of
S
P
1
p...
2—
7
sf
:
p
igfl
ft
p
j
T
Page 33

Cutting
a
Stick
prevent
to
buttonhole
Cut
buttonhole
Buttonholes
needle
through
over-cutting.
cutter.
along
bar
centre
tacks
with
Corded
stretch
For
corded
a
keep finished
to
shape.
in
filler
Hook
ends
lead
and
taut,
notches
Proceed
regular
When
pull
the
on
buttonhole
Thread
side
cord.
Buttonholes
fabrics
buttonhole
cord
cord
of
hook
shown.
as
with
buttonholes.
buttonhole
cord
filler
other
ends
tie,
and
such
buttonhole
top
on
under
them
stitching
ends
disappears
end
stitching.
cord
of
cut
or
as
effective
is
spur
foot,
to
completed,
is
that
so
to
both
knits,
and
pull
bottom
as
loop
reverse
ends
for
into
of
—30—
Page 34

SEWING
stitch
Set
Position
under
foot.
left
to
Raise
width
right
side
needle
so
hole
length
a
that
of
ON
button
When
of
stitch,
and
button.
needle
BUTTONS
at
“0”
and
material
needle
adjust
comes
lower
zigzag
comes
foot.
to
machine
Run
and
sew
machine
Stop
upper
®
and
unstitching.
OR
®
threads.
wrong
Set
Draw
position.
zigzag
sew
Draw
thread
side
5-6
3-4
out
at
zigzag
when
width
stitches
work
ends
and
medium
stitches.
needle
control
and
through
tie
a
to
knot.
speed
is
to
prevent
cut
in
0
off
to
—31—
Page 35

BLIND
blind
The
finish
drapes,
straight
practice
application
pairing.
Procedure:
Prepare
(1)
such
pinked,
Fold
(2)
inch
Fold
(3)
leaving
Guide
(4)
cut
of
the
zigzag
into
When
(5)
from
cnmpleted
When
basting
ironing
an
seams.
basing
tape.
then
HEM
hem
that
and
slightly
or
will
it
and
as
hem
from
hem
the
the
of
stitch
the
center
the
stitching
machine
hemming
stitch
board,
Ease
thread.
Baste
continue
STITCH
stitch
almost
is
curtains.
be
the
edge
raw
overcast,
tape,
hem
up
upper
back
about
fold
presser
cut
wide
fold
hem.
along
in
Press
or
into
curved
a
desired
edge.
toward
1/4
of
comes
of
bite
the
of
is
and
A-line
an
the
fold
the
with
hem
pin
step
provides
invisible
is
It
hems.
quick
very
wilt
hem
hem
of
114
just
or
length.
Press
inch
fabric
the
so
foot
just
presser
the
should
fabric
completed,
turn
skirt,
raw
the
up
excess
steam,
1/2”
3.
a
done
never
desired
in
stitched
inch
plain.
Baste
in
right
extended.
that
slightly
catch
the
at
right
to
place
edge
hem,
fabric
from
durable
on
easily
With
and
(Step
place.
side
into
the
to
foot
left.
remove
of
matching
by
then
hem
garments,
with
little
a
hem
easy
need
manner,
under
1)
pin
or
(Step
fabric
of
(Step
center
the
zigzag
left
the
and
barely
just
fabric
side.
machine
a
hem.
the
pulling
apply
taped
re
1/2
2)
3)
bite
to
the
Press
At
the
hem
edge,
or,
STEP
STEP
STEP
1
2
STEP
5
—32—-
Page 36

ZIPPER
using
By
sliding
can
be
turning
Loosen
that
needle
Tighten
®.
SEWING
special
adjuster,
easily
fabric.
screw
comes
screw.
®
zipper
zipper
done
and
into
foot
set
with
sewing
without
foot
position
so
parallel
needle
zipper
guiding
right
side
with
comes
the
in
zipper
of
side
right
Sew
that
of
side
so
so
are
foot.
that
©.
of
teeth
left
Re-set
into
Sew
same
carefully
of
edge
foot
position
left
way.
tipper
fabric
C
—33—
Page 37

MENDtNG
Patching
the
Place
part.
along
Sew
right
the
on
part
worn
side.
back
patch
the
side.
close
edge
over
Trim
to
of
the
the
the
away
seam
worn
patch
the
on
vvvvvvv9
A
iA
siii
is
W_V
A
A
A
A
V
V
V
V
V
ls,s
V
V
V
V
A
A
A
A
A
A
V
V
V
V
A
V
V
A
A
A
V
V
V
V
V
V
A
A
A
A
A
A
A
huh
Mending
machine
Set
patching.
for
as
the
Sew
first.
sew
Then
either
piece
A
underneath
side.
a
edges
two
gauze
of
Rip
in
to
same
the
tear
of
more
can
reinforce
together
seams
placed
be
the
way
on
rip.
—34—
Page 38

Darning
Set
stitch
length
at
‘O’
I
_4
_q_:
4_
(‘t
r-
T
hfr1
Stretch
or
to
the
Sew
coseIy
material
By
making
the
darned
and
sew
over
more
fabric
with
part
the
spaced.
back
flexible
free
you
worn-out
and
turning
part
over
armcTh
are
going
stiches
forth
points
becomes
the
according
part
guiding
by
hoop
to
darn.
with
hand.
blunt,
softer
®
—35---
Page 39

LAPPED
SEAM
SEWING
P’ace
another
stitch
of
For
®
(
For
Sew
side.
one
according
non-fray
easy
over
piece
size.
fo’ded
to
of
fabrics.
fray
area
fabric
the
to
fabrics.
from
over
width
right
—36—
Page 40

APPLIQUE
Draw
used
Place
and
Sew
around
stitch
width
size
of
material.
To
change
or
to
sew
machine,
away
from
presser
Lower
sewing.
presser
design
as
an
cut-out
baste
adjusting
according
cut-out
direction
very
positioning
edge
foot
WORK
on
applique
on
it.
outline
stitch
and
small
of
and
turn
foot
material
and
base
with
to
shape
type
at
circles,
needle
cut-out,
and
cut
material
zigzag
length
of
corners.
stop
material.
continue
to
it
and
and
base
just
lift
be
out.
Sew
zigzag
This
a
width
is
few
to
stitches
at
prevent
0.
at
end
with
unstitching.
—37—
Page 41

Needie
Thread
EMBROIDERY
stitch
length
Set
at
“0”
No.
No.
No.
9
11
14
120—100
100—SO
60—50
Remove
avoid
To
pulled
tension.
good
For
important
thread.
and
thin
Use
upper
same
of
lower
Trace
center
and
Make
out
Pull
hand
holding
Lower
foot,
up,
thread
thread.
your
sure
lower
wheel
upper
presser
and
lower
reduce
embroidery,
correct
use
to
embroidery
and
and
kind
design
in
it
embroidery
material
thread
towards
thread
foot
holder
thread
upper
thinner
a
color
on
is
lifter.
screw.
thread
needles
silk
material
taut.
turning
by
you
lightly.
being
it
for
silk
for
hoop.
while
is
—38—
Hold
sewing
satin
with
Continue
hand.
by
finish
To
stitches
typewriting
Lay
when
threads
both
stitch.
sewing
with
outline
filling,
zigzag
along
embroidering
guiding
paper
and
of
several
sew
width
underneath
sheer
start
design
hoop
at
fabric.
0.
Page 42

MAINTENANCE
Your
machine
cIeanng
factory
A
machine
few
cleaned
hours
and
sewing
a
and
Cleaning
off
with
latches
foot
needle
all
dust
cleaning
outwards.
Remove
Remove
Brush
dog
Turn
requires
oiling
performance.
which
day
oiled
and
needle.
plate.
and
brush.
is
needs
once
lint
for
used
a
on
regular
satis
for
to
month.
feed
a
be
Remove
Remove
with
cloth.
a
cleaning
hook
hook.
race
Clean
brush
cover.
hook
and
a
race
soft
—39--
Page 43

Oiling
oil
Use
sewing
for
hook
Open
the
careful
Be
or
oil
and
After
minutes
every
to
Remove
will
one
where
face
same
cause
oiling,
oils
mechanism
Apply
manufactured
machine
eventually
jam.
to
drop
friction
cover
way.
to
not
stain
may
it
some
run
allow
to
part.
top
oil
of
and
apply
your
sewing
machine
oil
specially
use.
part
to
occurs.
apply
too
material
difficulty.
penetrate
to
loosening
by
Other
cause
oil
much
for
of
in
1-2
:4
:
I
11
Apply
one
drop
of
oil
to
lubricating
points
indicated
by
arrows.
Page 44

TROUBLE
CHART
PROBLEM
Breaking
thread
Skipping
Irregular
material
The
correctly
fed
lower
stitches
stitches
not
Thread
not
or
Lower
Lint
stuck
tension
the
Needle
Needle
or
Size
suitable
Incorrect
nuch
Too
Incorrect
Upper
Incorrect
Pattern
not
drawn
thread
in
not
bent
type
for
upper
oil
size
thread
lower
selection
PROBABLE
up
tension
the
needle
of
on
of
tension
evenly
Correctly
bobbin
inserted
material
threading
the
needle
tension
dial
wound
spring
fully
the
CAUSE
too
and
hook
for
too
not
on
tight
case
loose
set
the
and
thread
the
correctly
bobbin
inside
not
material
CORRECTION
P.10,
Remove
and
cleaning
P.12
fluff
P.
P.
P
P.
P.
P.
P.
P
P.
R9
17
13
40
17
13
1
18,
with
7
2
lint
brush
7
22
a
Lint
stuck
on
the
feed
—41--
dog
P.
39
Page 45

Oiling
oil
Use
sewing
for
oils
mechanism
will
one
Apply
where
hook
face
Open
same
the
careful
Be
or
oil
cause
and
After
minutes
every
to
Remove
screws
screwdriver.
manufactured
machine
eventually
jam.
to
drop
friction
cover
way.
to
not
stain
may
it
some
to
®
part.
top
run
allow
cover
and
oiling,
oil
of
and
apply
your
sewing
machine
oil
®
specially
use.
part
to
occurs.
apply
too
material
difficulty.
penetrate
to
loosening
by
with
Other
cause
oil
much
for
of
in
1-2
large
Apply
one
drop
of
oil
to
‘ubricating
—40—
points
indicated
by
arrows.
 Loading...