__________________________
To
reduce
has
a
other).
one
way.
reverse
qualified
not
change
POLARIZED
the
polarized
This
the
If
plug
the
plug.
electrician
the
Record
and
The
The
Serial
Model
Retain
risk
plug
in
Model
Serial
Model
No.
No.
these
of
plug
will
does
If
it
to
plug
SEWING
space
provided
No.
of
No.
is
No.islocated
1919
numbers
PLUG
electric
(one
fit
in
stifl
install
in
any
MACHINE
this
appliance.
located
for
CAUTION
shock,
blade
polarized
a
not
fit
does
the
way.
below
Rear
of
Rear
of
future
is
fully
not
proper
the
Serial
arm.
arm.
reference.
this
wider
in
fit,
No.
applianc
than
outlet
the
contact
outlet.
t
on
outl€
C
IMPORTANT
SAFETY
INSTRUCTIONS
an
When
followed,
using
including
Read
all
appliance).
DANGER——To
appliance
An
appliance
WARN
electric
1.
2.
3.
4.
5.
6.
7.
8.
9.
not
Do
is
used
Use
attachments
Never
properly,
appliance
electrical
Never
ings
of
and
dust,
Never
not
Do
not
Do
being
To
disconnect,
outlet.
Do
not
should
the
from
ING
shock,
to
allow
near
or
by
this
appliance
recommended
operate
has
it
if
the
to
mechanical
or
sewing
loose
or
outdoors.
the
insert
operate
the
drop
use
operate
administered.
unplug
this
cloth.
by
electrical
the
appliance,
following:
instructions
reduce
never
electric
——To
or
usedasa
be
children.
only
appliance
been
nearest
appliance
machine
any
where aerosol
all
turn
pulling
left
be
outlet
immediately
reduce
injury
toy.
its
intended
for
the
by
if
it
dropped
authorized
adjustment.
with
and
into
object
(spray)
controls
cord.
on
unattended
Close
or
foot
to
basic
the
after
the
to
persons:
attention
use
manufacturer
a
damaged
has
damaged,
dealer
any
To
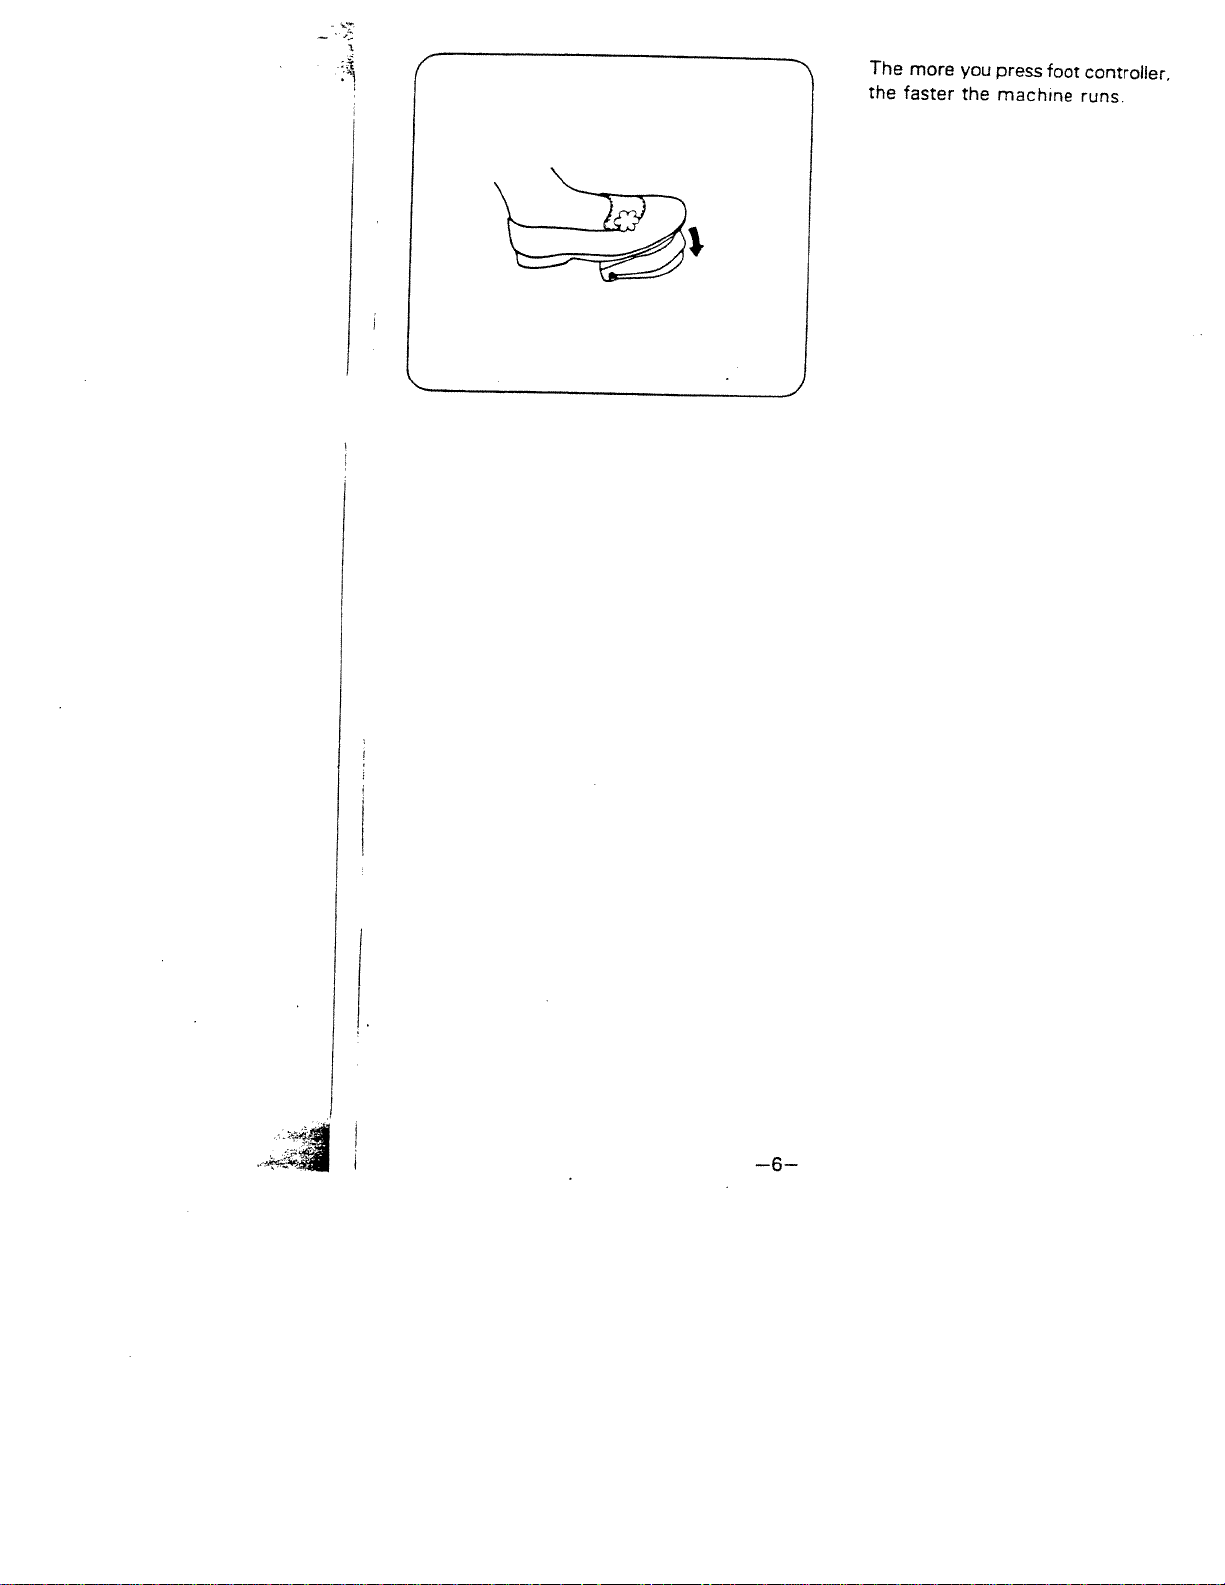
air
controller
any
products
off
the
unplug,
or
openings
opening.
(“0”)
safety
precautions
before
risk
of
plugged
when
using
risk
necessary
is
described
as
as
contained
cord or
or
dropped
service
free
are
grasp
center
blocked,
from
being
position,
the
using
electric
in.
and
before
of
burns,
when
in
this
in
plug,
into
for
Keep
the
accumulation
usedorwhere
then
plug, not
should
always
shock:
Always
unplug
cleaning.
fire,
this
manual.
manual.
this
ifitis
not
water.
examination,
remove
Return
ventilation
plug
cord.
the
(this
this
appliance
Use
only
working
the
repair,
open
of
lint,
oxygen
from
be
is
DANGER
1.
2.
3.
Always
Do
Do
Do
unplug before
not
reach
place
not
place
not
water
Replace
that
where
or
has
other
bulb
fallen
it
can
liquid.
with
into
fall
same
water.
or
be
type
Unplug
pulled
rated
15
immediately.
into
tuborsink.
a
watts.
relamping.
appliance
for
an
store
drop
appliance
into
or
or
in
WARNING
fingers
Keep
1.
machine
Always
2.
3.
Do
4.
Do
break.
Switch
5.
area,
presser
Always
6.
lubricating,
instruction
Never
7.
may
needle.
use
use
not
pullorpush
not
the
such
foot,
unplug
operate
blocked.
be
the
bent
sewing
as
etc.
or
manual.
away
proper
needles.
threading
sewing
when
onasoft
from
all
needle
fabric
machine
machine
making
moving
while
off
needle,
any
surface
parts.
plate.
stitching.Itmay
(“0’)
changing
from
other
The
such
wrong
when
the
user
as
Special
plate
making any
needle,
electrical
servicing
bedorcouch
a
care
can
deflect
threading
outlet
adjustments
is
required
cause
the
adjustments
when
where
around
the
needle
bobbin,
removing
mentioned
needle
causing
in
the
air
the
to
the
changing
or
openings
sewing
break.
it
to
needle
covers
the
in
SAVE
THESE
INSTRUCTIONS
NAMES
1.
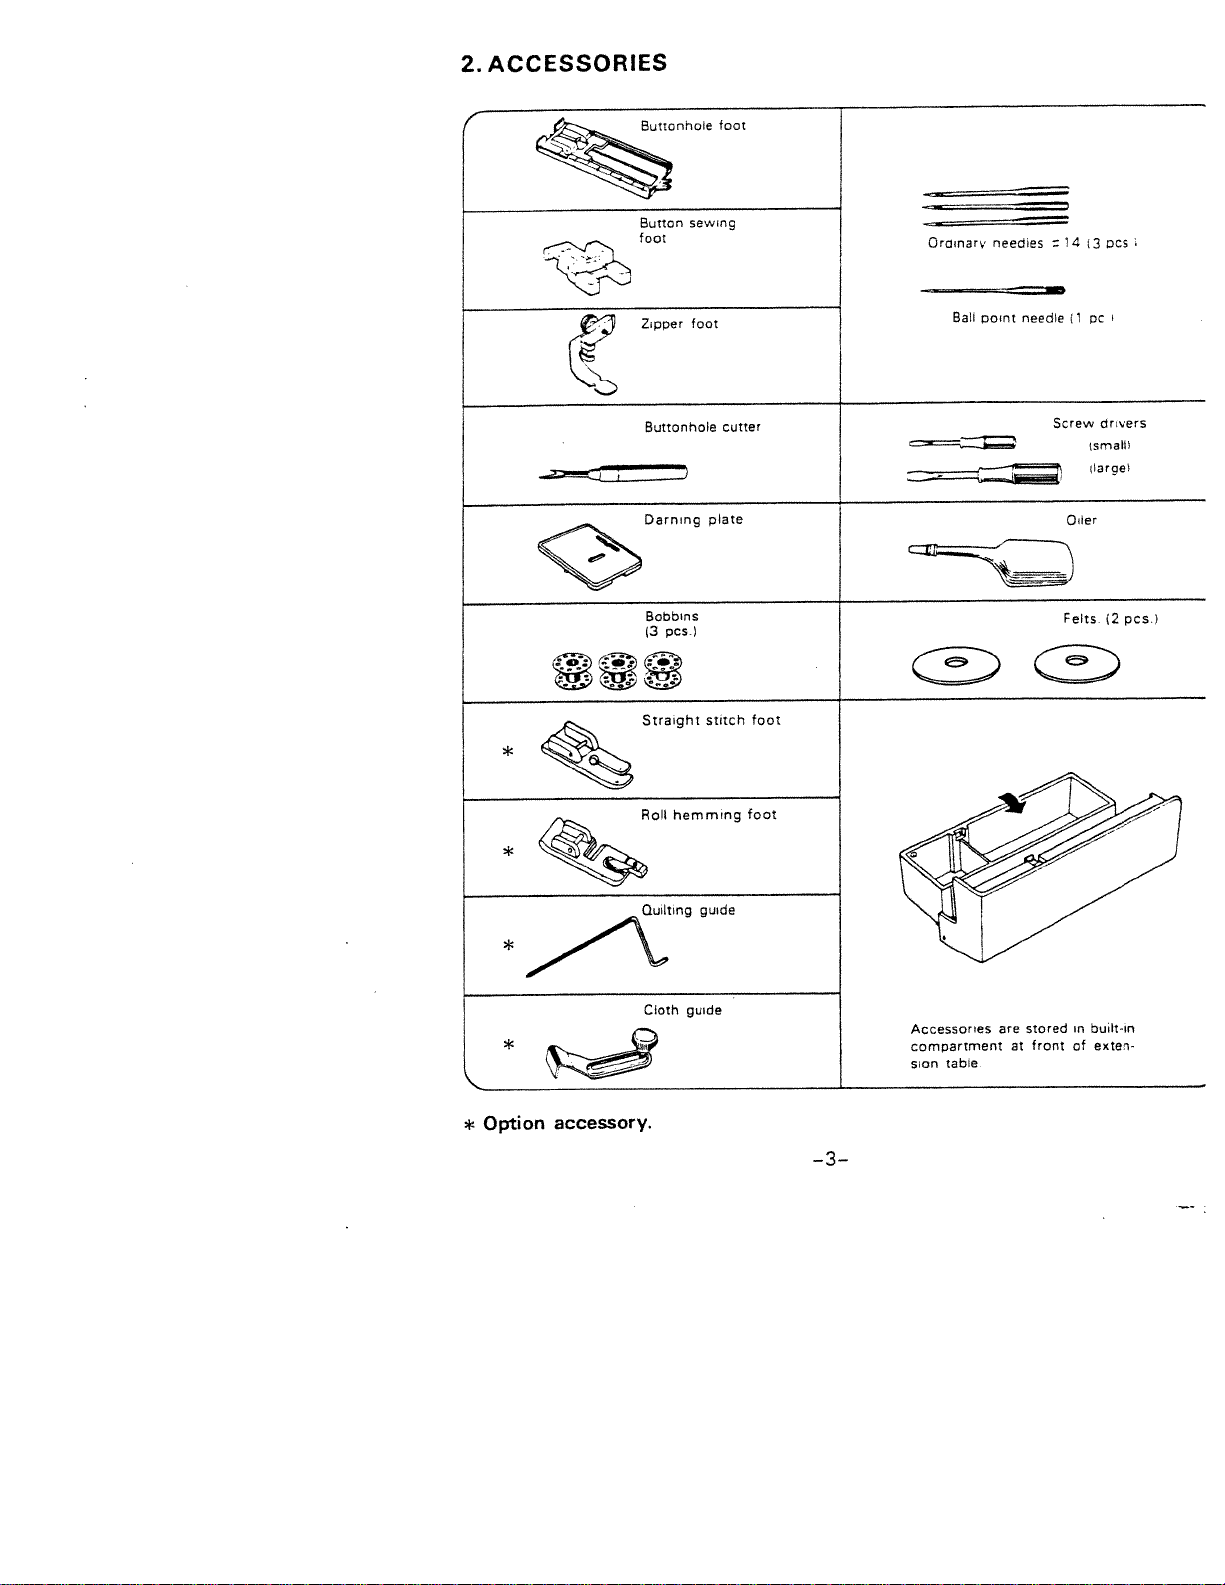
ACCESSORIES
2.
BEFORE
3.
STARTING
4.
STRAIGHT
5.
ZIGZAG
6.
MAKING
7.
OVERCASTING
8.
BLIND
9.
10.
SHELL
11.
MENDING
STRETCH
12.
13.
STRETCH
14.
LAPPED
15.
BRIAR
OVERLOCKING
16.
17.
SEWING
18.
ZIPPER
19.
ROLL
20.
QUILTING
EMBROIDERY
21.
MAINTENANCE
22.
TROUBLE
23.
Detachable
Connecting
Setting
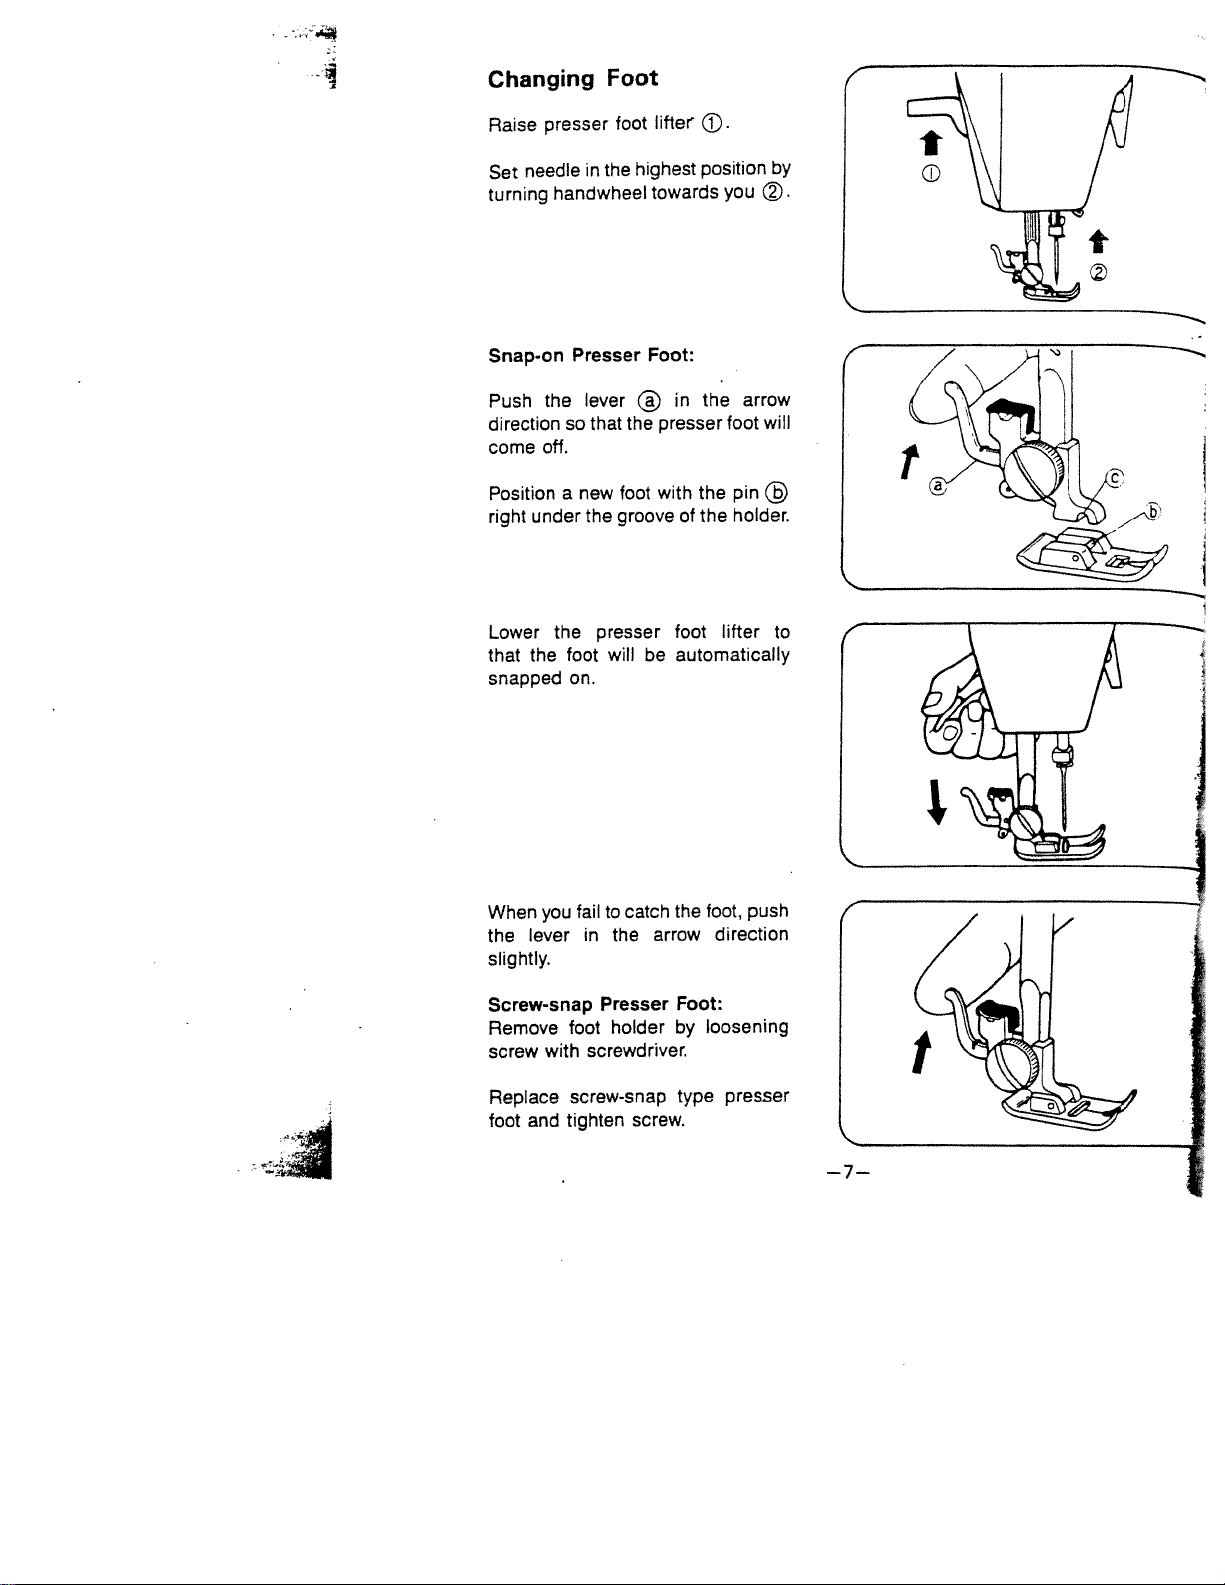
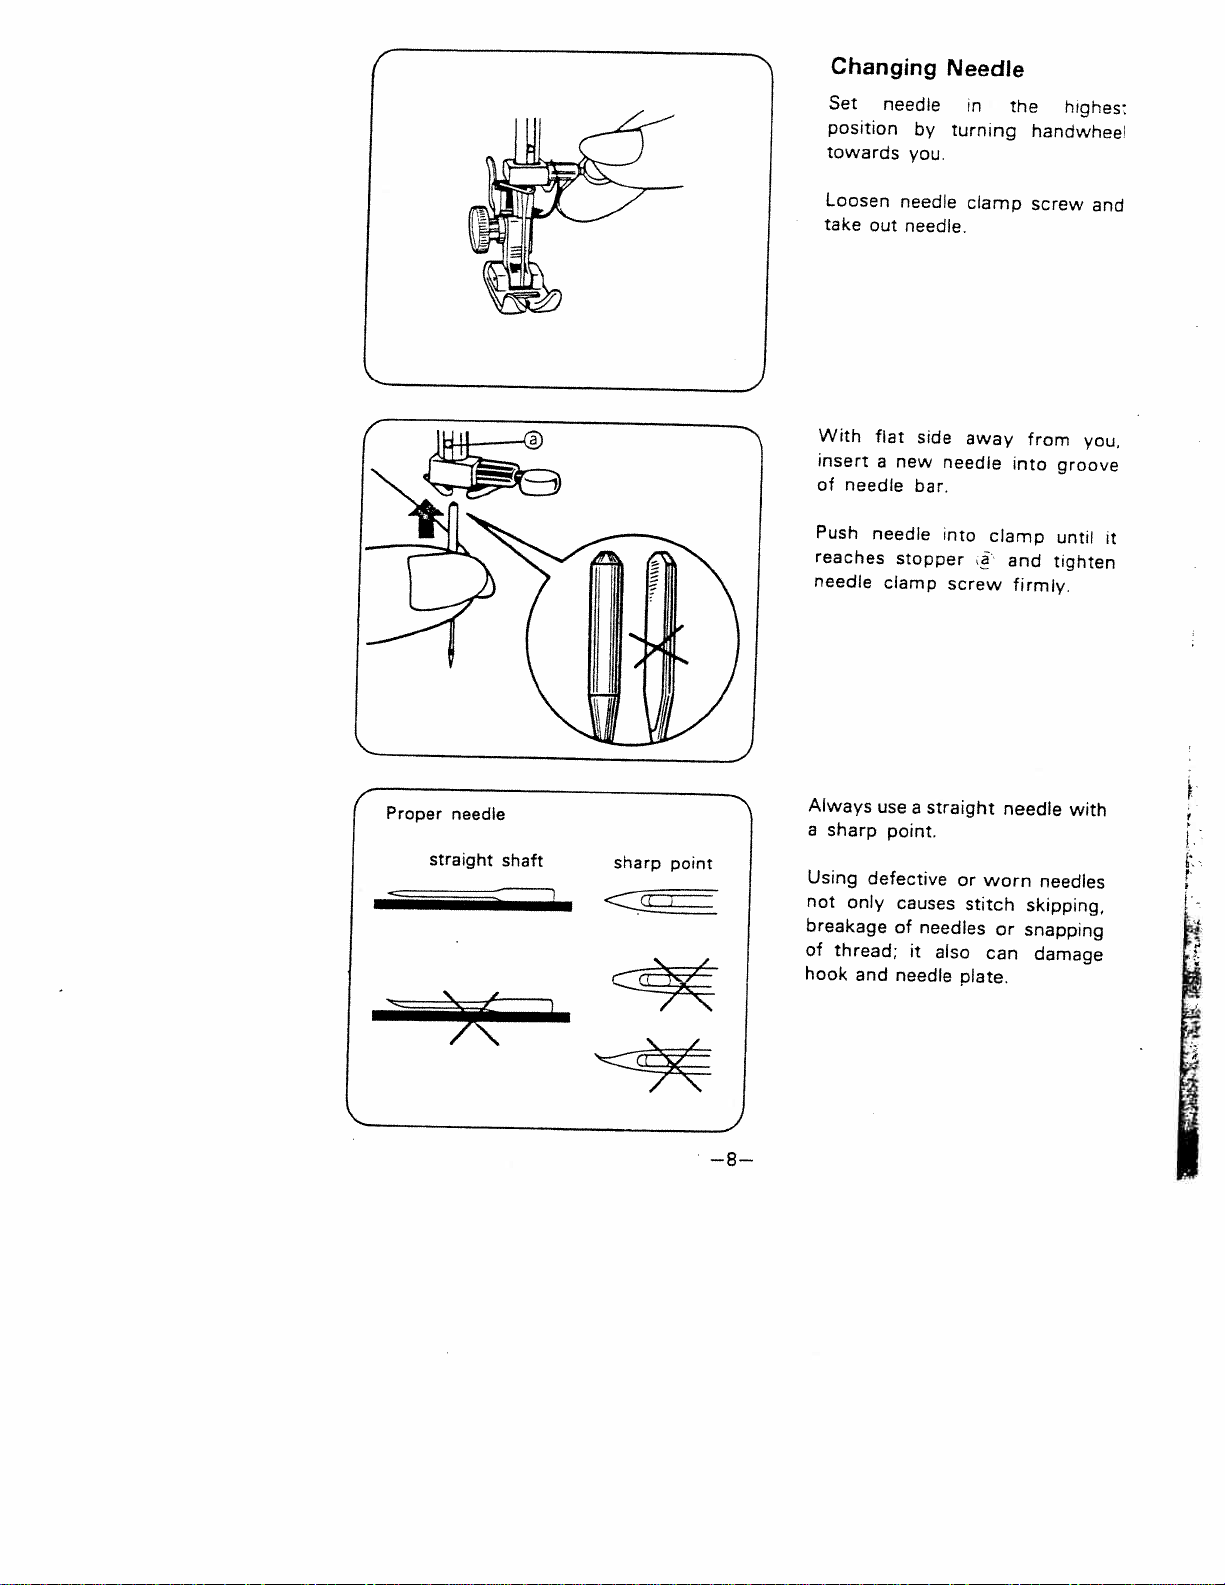
Changing
Changing
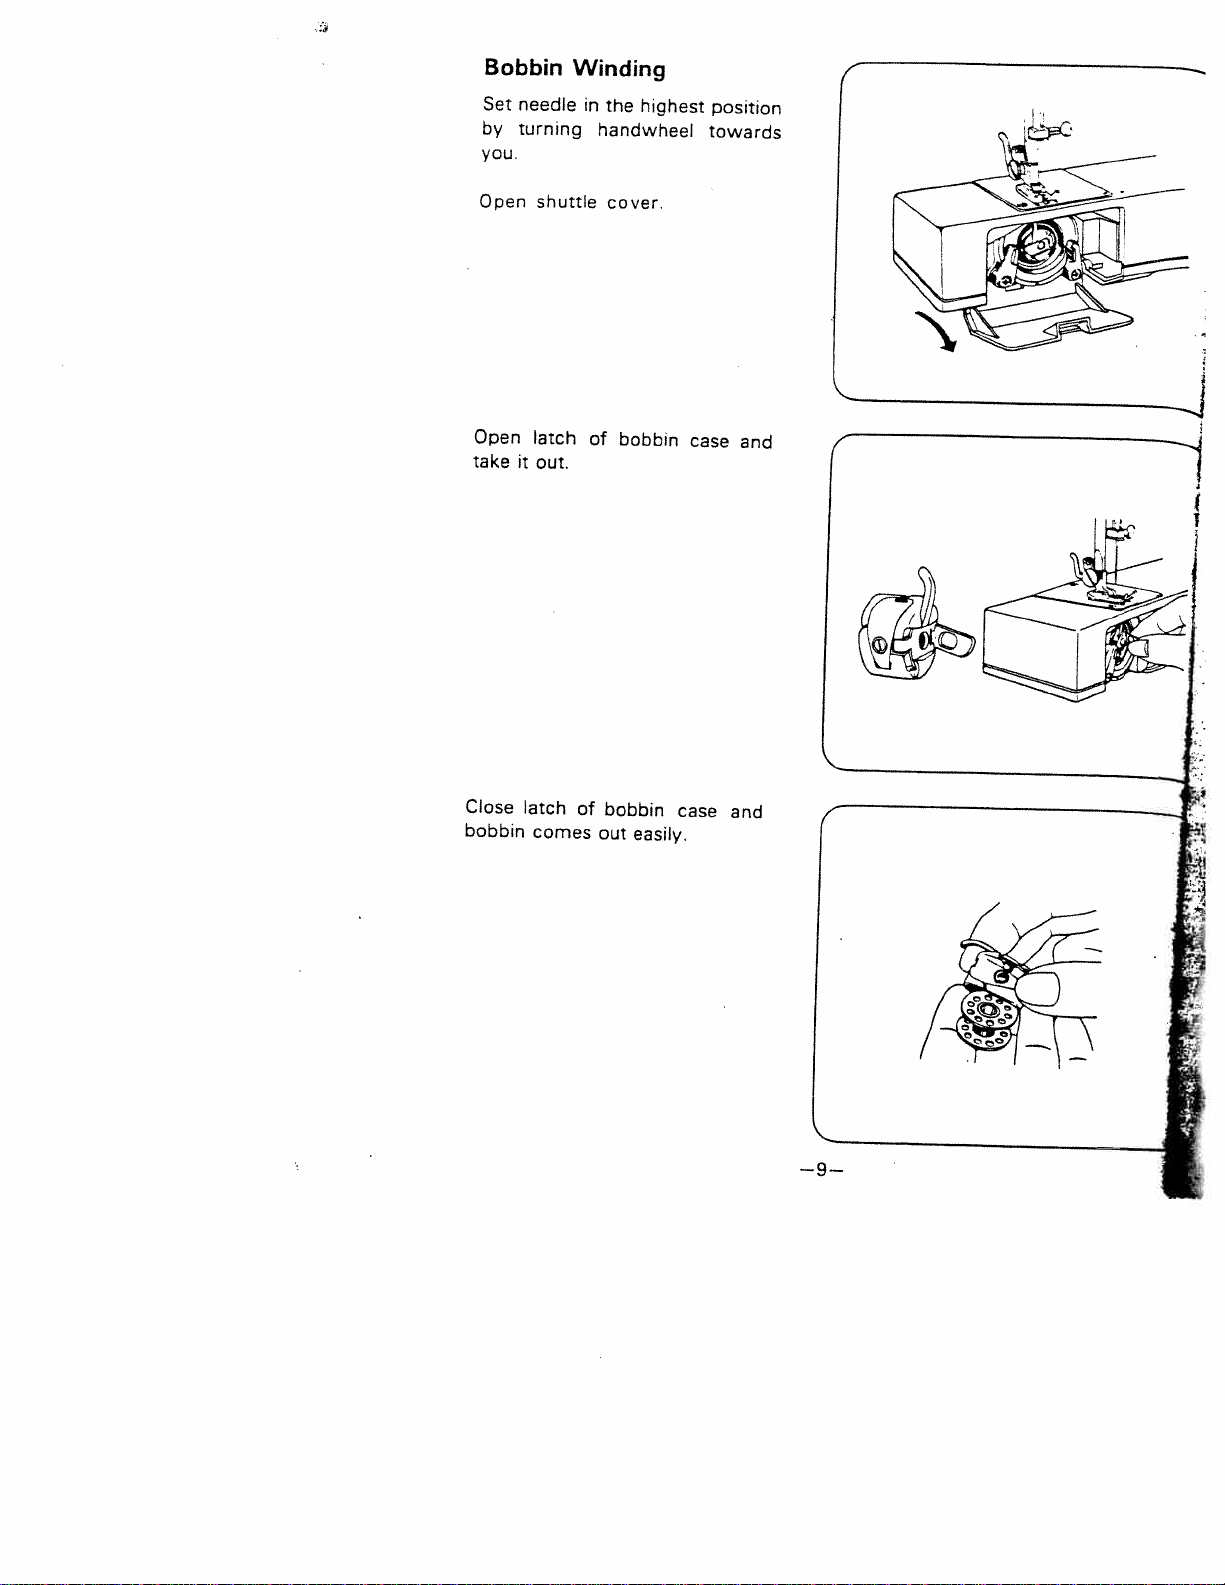
Bobbin
Inserting
Adjusting
Darning
Threading
Drawing
Foot
Fabric,
Turning
Pattern
Starting
Double
Reverse
Cloth
Adjusting
Thread
Determine
Left
Cutting
Corded
HEM
Elastic
STITCHING
Mending
Adjusting
Straight
Rick-Rack
STRETCH
HEMMING
Cleaning
Oiling
Changing
OF
PARTS
SEWING
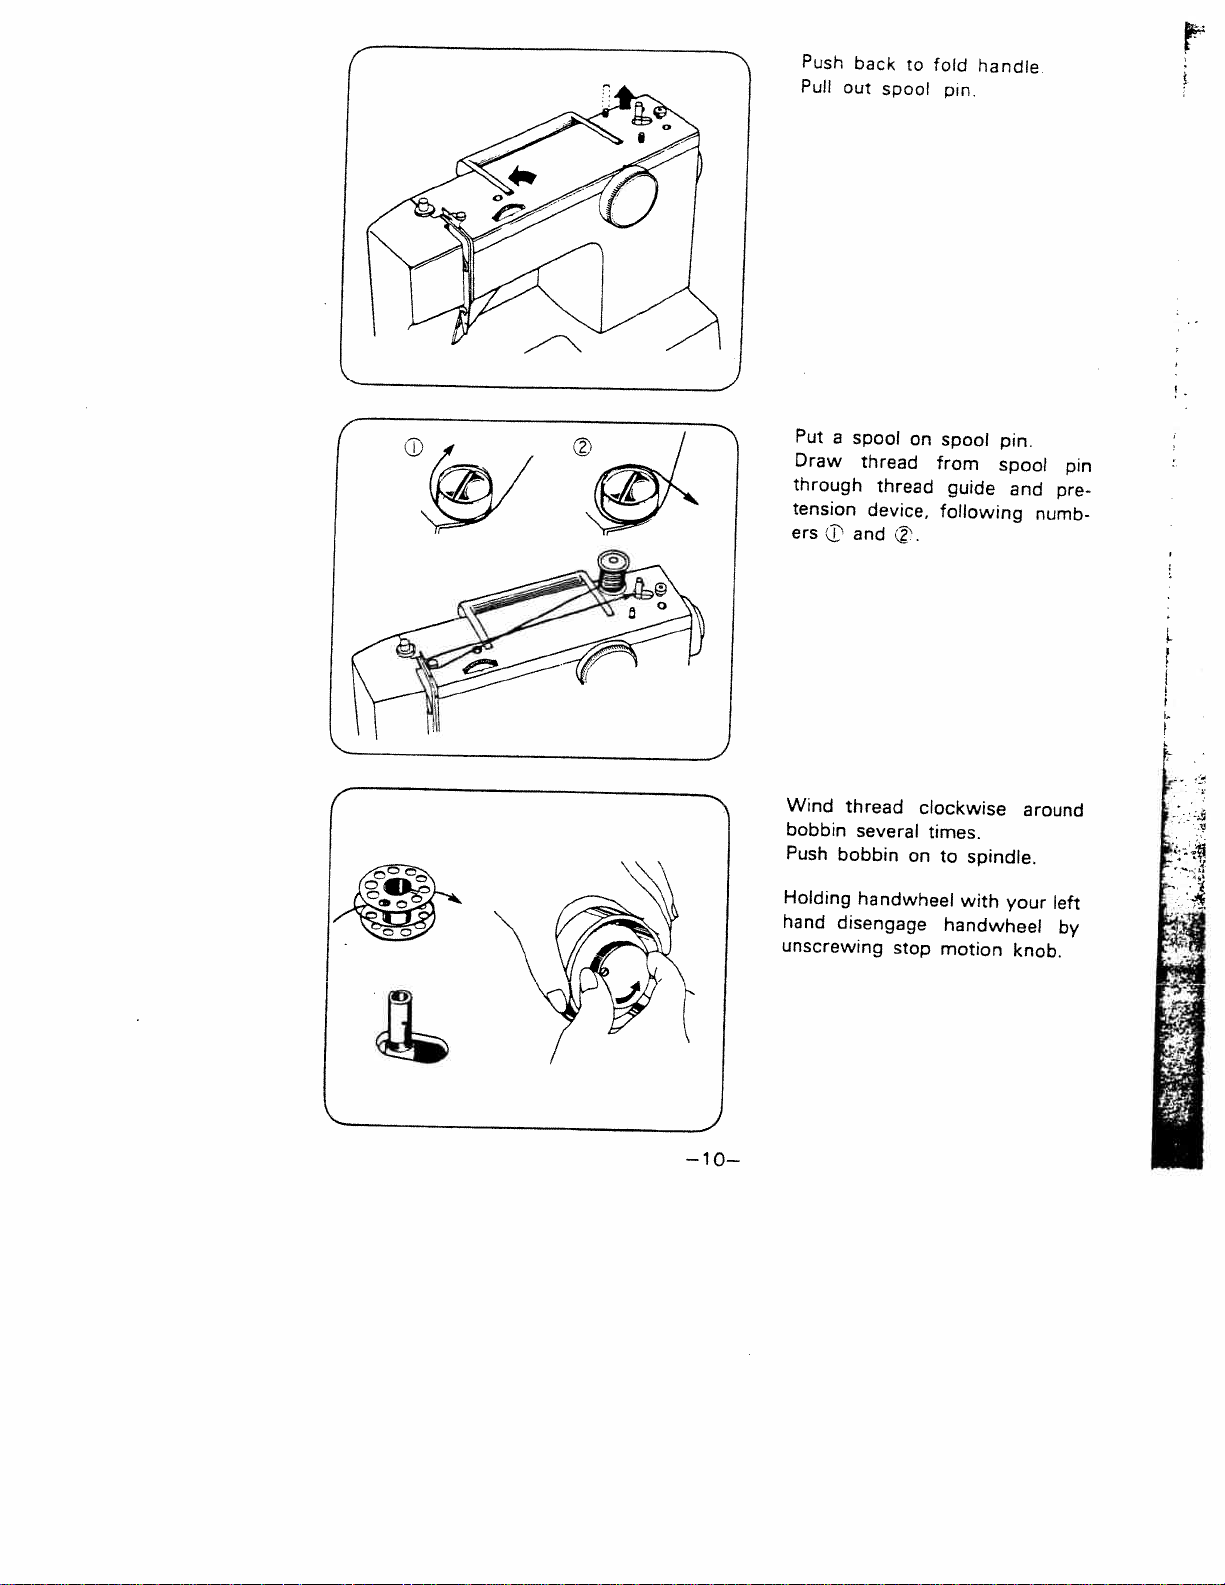
Spool
Foot
Needle
Winding
Bobbin
Lower
Plate
Upper
Up
Pressure
Thread
TO
SEW
a
Square
Selection
Sew
to
Presser
Sewing
Guide
Thread
SEWING
SEWING
Tension
BUTTONHOLES
Length
and
Right
Buttonholes
Buttonholes
STITCH
Blind
Rip
a
STITCHING
Stretch
SEAMS
Stretch
Stretch
SEAM
ON
BUTTONS
SEWING
CHART
Light
CONTENTS
Extension
Foot
SEWING
Controller
Pins
Tension
Tension
Lower
and
Foot
for
Side
Hem
Stitching
Bulb
Tension
Needle
Corner
Dial
Lifter
Tension
Zigzag
Balance
Stitch
Stitch
Stitching
Table
and
Table
Stitch
of
Balance
Power
Buttonhole
Cord
40
40
41
42
43
32
33
34
34
35
36
37
38
39
32
32
28
29
30
30
31
31
22
22
24
25
25
26
27
20
21
21
21
1
20
1
1
17
1
18
1
1
1
15
1
1
1
14
3
4
4
5
6
7
8
9
2
3
3
5
6
7
9
9
9
16
17
1
19
20
21
22
23
24
25
26.
1
14
15
1.
4
5
6
7
8
9
10
11
12
3
8
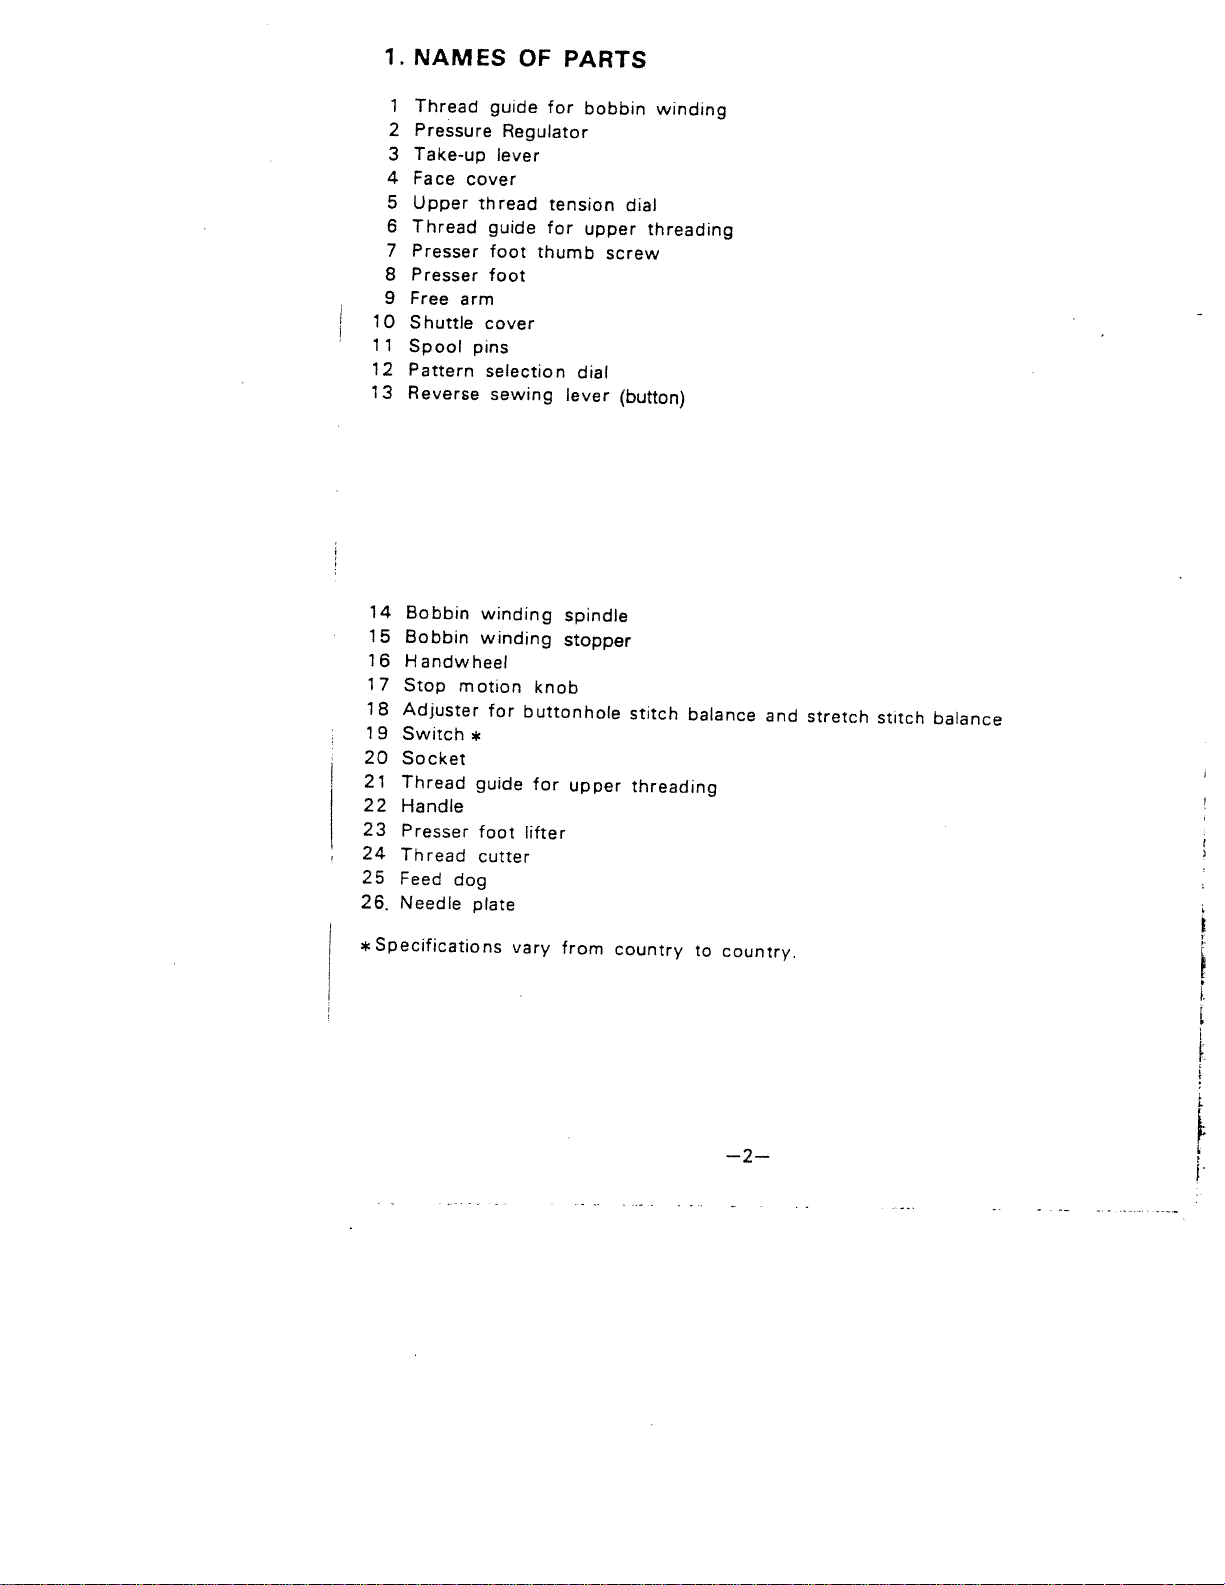
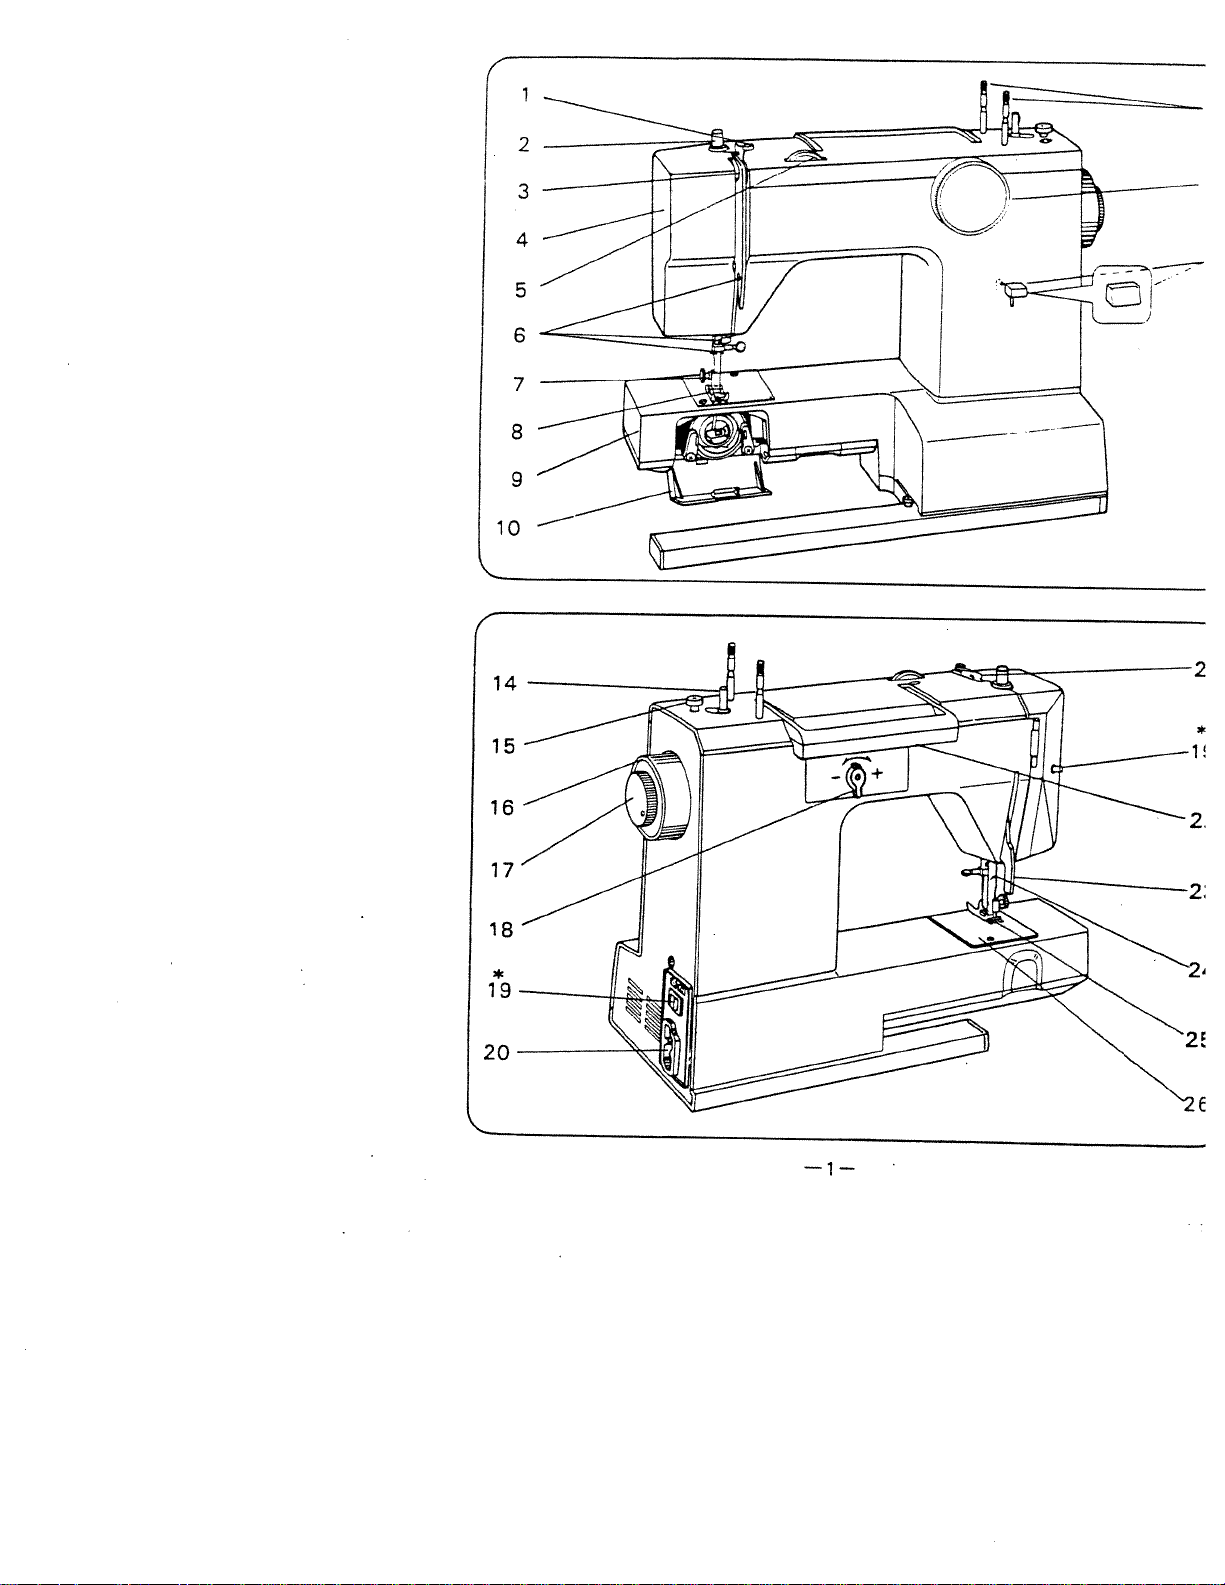
NAMES
1
Thread
2
Pressure
Take-up
3
Face
Upper
Thread
Presser
Presser
Free
Shuttle
Spool
Pattern
Reverse
Bobbin
Bobbin
Handwheel
Stop
Adjuster
Switch*
Socket
Thread
Handle
Presser
Thread
Feed
Needle
cover
thread
arm
cover
pins
selection
winding
winding
motion
guide
foot
cutter
dog
plate
OF
guide
Regulator
lever
guide
foot
foot
sewing
for
buttonhole
lifter
for
tension
for
thumb
knob
for
PARTS
bobbin
upper
screw
dial
lever
(button)
spindle
stopper
upper
winding
dial
threading
stitch
threading
balance
and
stretch
stitch
balance
*Specifications
vary
from
country
to
country.
—2—
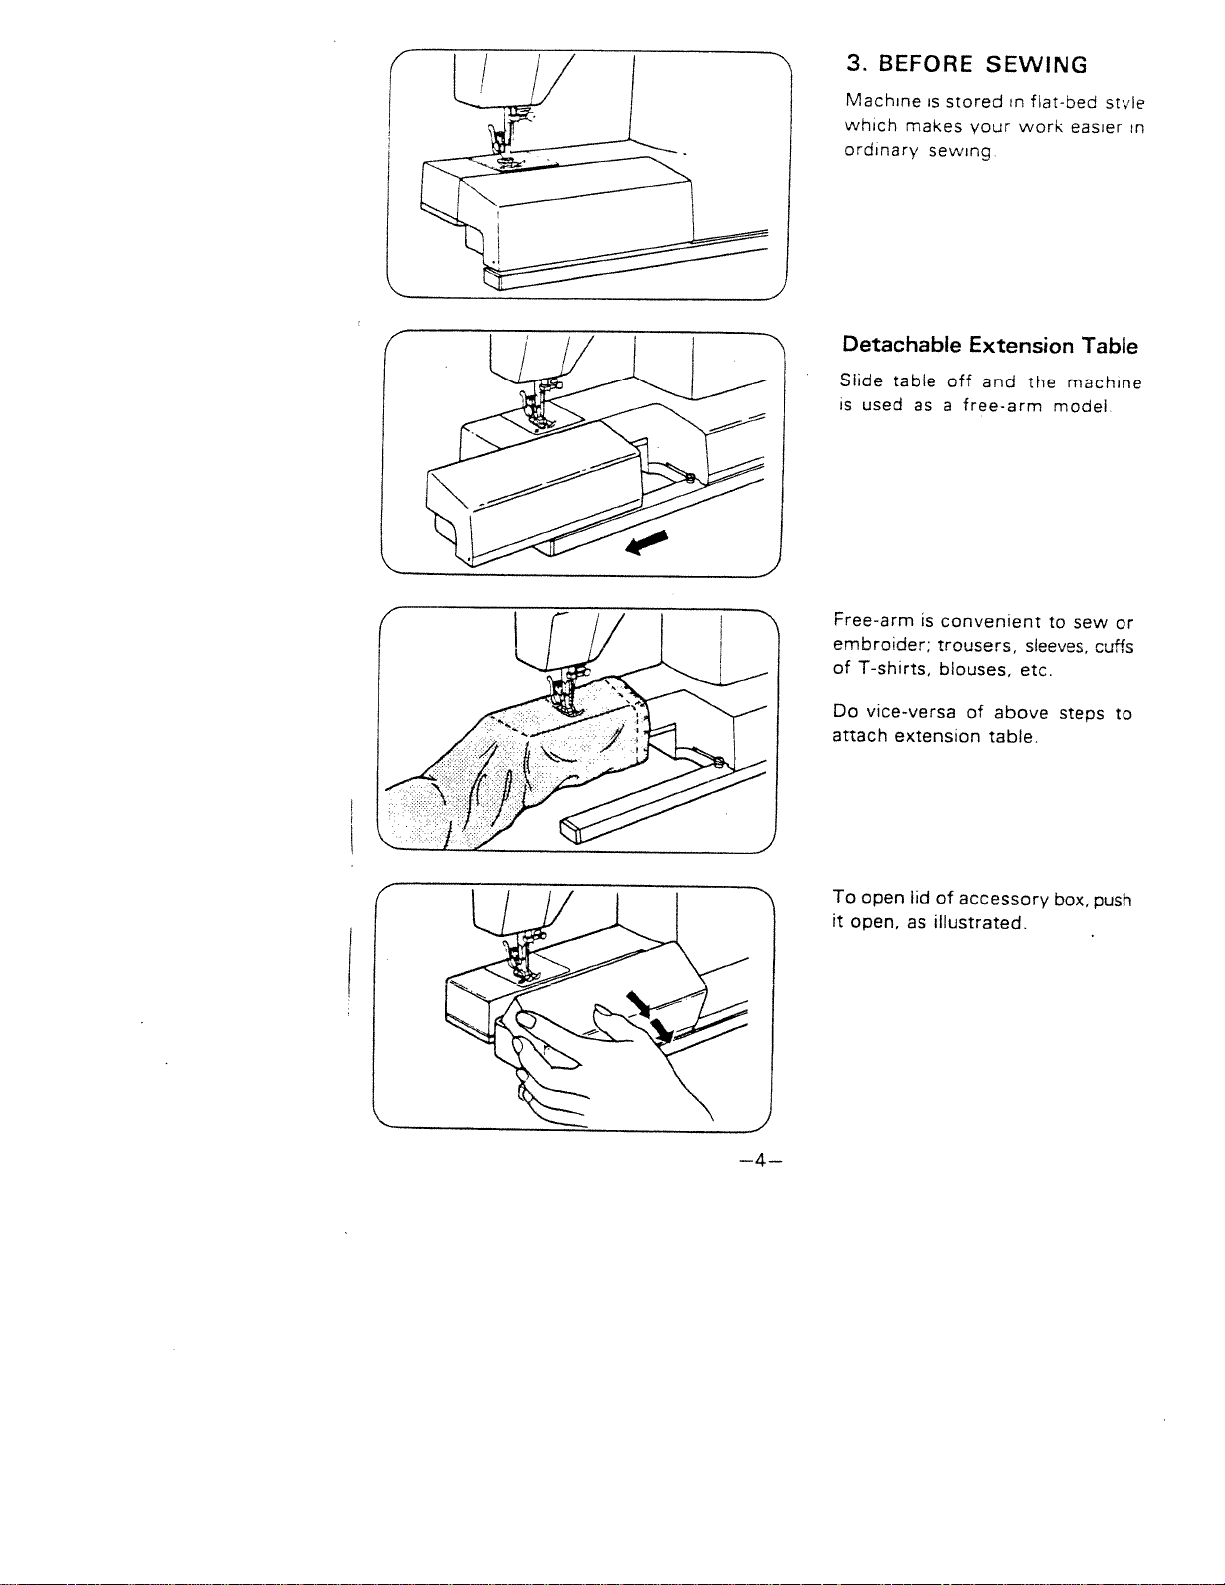
3.
BEFORE
SEWING
Machine
which
ordinary
makes
Detachable
Siide
table
is
used
Free-arm
embroider;
of
T-shirts,
is
stored
sewing
off
as
a
is
convenient
trousers,
blouses,
in
flat-bed
your
work
Extension
and
the
free-arm
sleeves,
etc.
easier
machine
model
to
sew
style
in
Table
or
cuffs
—4—
Do
attach
To
it
open,
vice-versa
extension
open
lid
as
of
above
table.
of
accessory
illustrated.
steps
box,
to
push
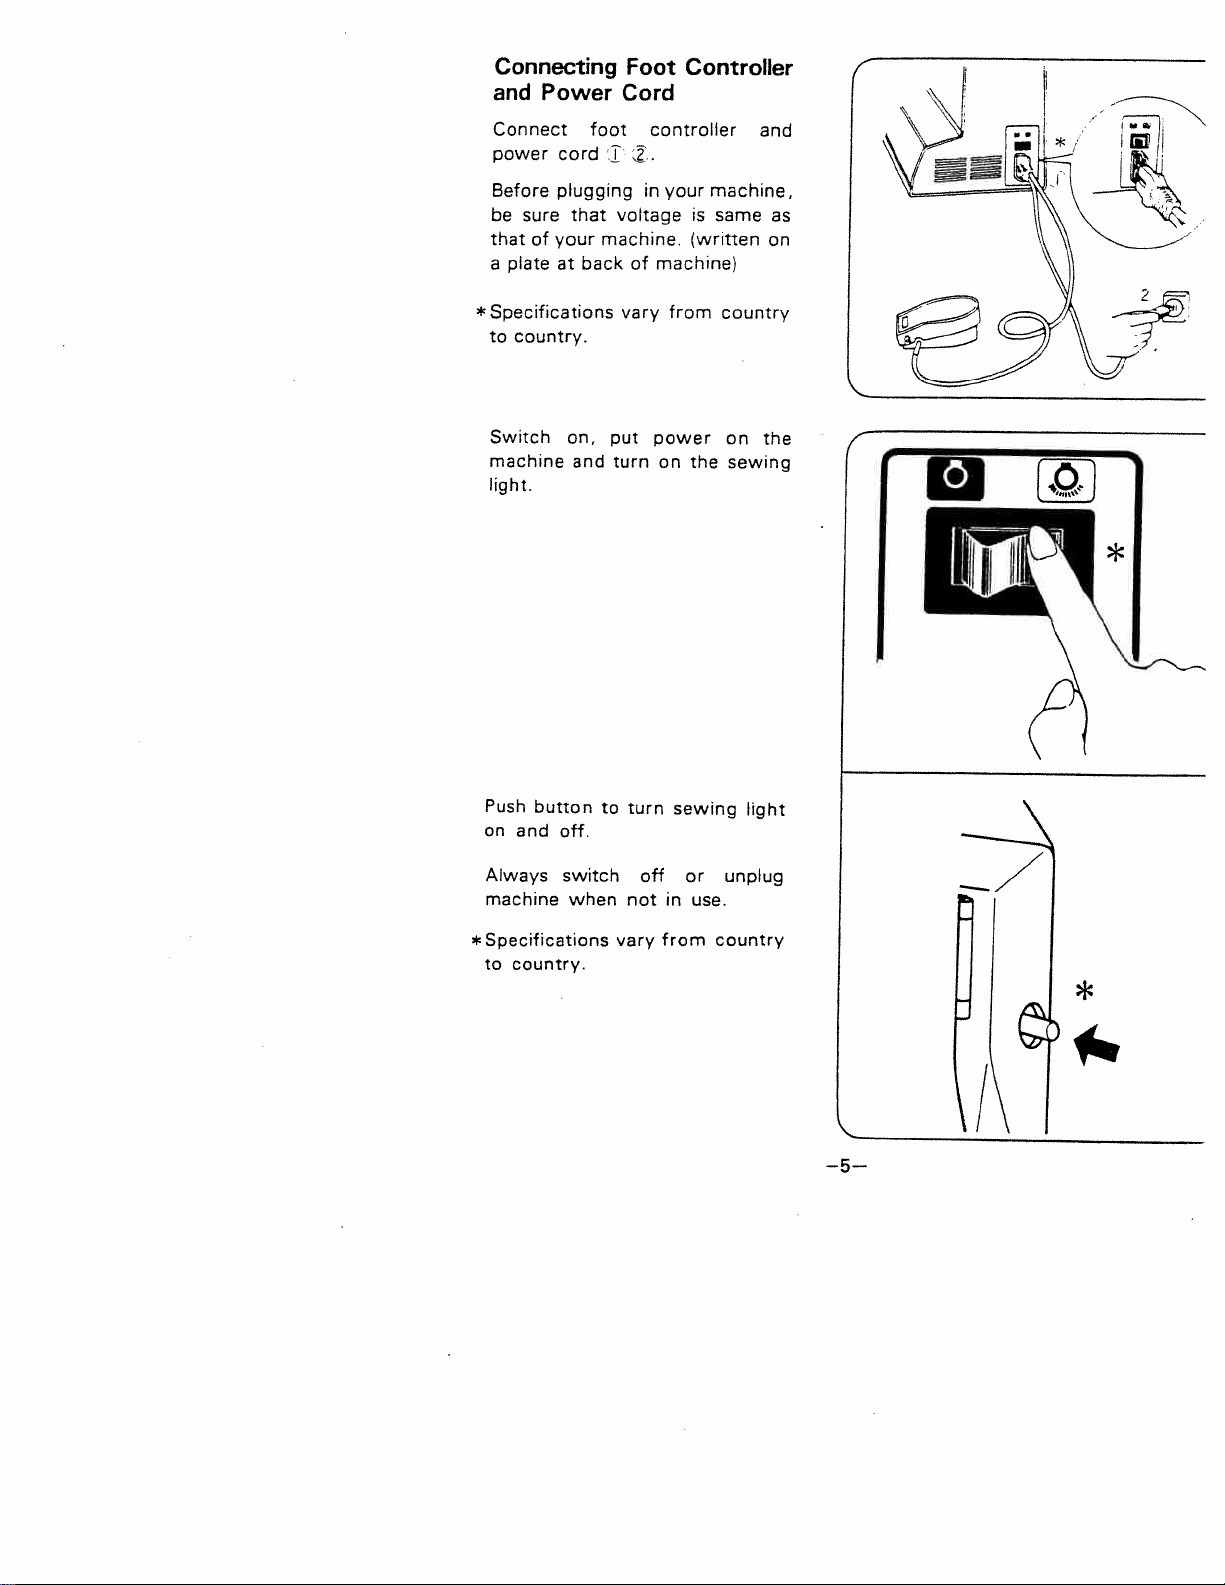
Connecting
and
Power
Foot
Cord
Controller
F
Connect
power
Before
sure
be
thatofyour machine. (written
plateatbackofmachine>
a
*
Specifications
to
country.
Switch
machine
light.
foot controller
cord
plugging
that
voltage
vary
on,
put
and
turn
in
your
power
on
is
from
the
and
machine,
same
country
on
sewing
on
the
as
I
Push
button
on
and
off.
Always
machine
*Specifications
to
switch
when
country.
to
turn
not
vary
off
sewing
or
in
from
light
unplug
use.
country
*
)
—5—

Drawing
Hold
hand.
left
Turn
until
you
again.
up
Pull
upper
lower
in
loop.
a
Pull
out
cm
(6”)
under
Up
end
of
handwheel
needle
thread
thread
both
threads
and
place
presser
upper
will
foot
Lower
thread
slowly
moves
slowly
brought
be
to
them
on
Thread
towards
down
about
together
left.
with
and
and
up
1
5
Foot
Push
down
regulator.
the
presser
push
down
is
obtained.
Insufficient
feeding
difficulty
or
presser
reduce
When
fabnc,
pressure
fabrics.
Pressure
the
This
foot.
inner
of
the
in
guiding
foot
the
pressure.
sewing
reduce
when
outer
will
To
pin
pressure
fabric,
marks
multiple
the
release
Increase
until
the
sewing
ring
may
skipped
fabric.
appear
thickness
pressure.
of
the
the
suitable
cause
on
lighter
the
pressure
pressure.
pressure
stitches,
If
feed
the
or
Increase
pressure
on
poor
or
dogs
fabric.
heavy
weight
—15—

Fabric,
Thread
and
Needle
Table
FABRIC
VERY
SHEER;
Voile.
Chiffon,
SHEER:
Blouse
Lawn.
Organdy,
LIGHT-WEIGHT:
Wool.
Brocade,
MEDIUM;
Linen,
Faille,
HEAVY;
Sailcloth
EXTRA
Upholstery.
[KNITSJ
LIGHT-WEIGHT;
Power
MEDIUM-WEIGHT:
Jersey,
Power
HEAVY-WEIGHT;
knit,
FAKE-FURS,
ILEATHERI
VINYLS
LIGHT-TO-MEDIUM-
WEIGHT
HEAVY
fDECORATIVE
TOP
MACHINE
Wool,
Velvetteri.
Terrycloth
Denim.
HEAVY:
Canvas,
net
Double
Net
Power
Net
VELOURS
FILMS
LEATHER
TOUCHES)
STITCHING
EMBROIDERY
Knit.
Lace,
Net
Crepe,
Taffeta
Crepe,
Velvet
Silk.
Cotton
Duck,
Tricot
Double
50—70
Silk
Size
European
Cotton
70
5070
30
30
30
30
30
30
30
30
30
30
twist
50—70
THREAD
Mercerized
Cotton
60
60
I
I
50
50
Heavy
Duty
Heavy
Duty
60
50
50
Heavy
Duty
50
50
Heavy
Duty
Cotton
Covered
Polyester,
Silk.
Silk
Nylon
Silk
Nylon
Silk
Silk
C.C,Poly.
CC.Poly.
Silk
Nylon
Silk
Nylon
C.CPoly.
Silk
Nylon
C.CPoly.
c.c
Poly
C.CPoly.
C.C.Poly.
C.CPoIy.
Nylon
European
705
65—70
65—70
75—80
80—90
100
120
70
70—80
80—90
90—
100
90
90—100
100—110
100—110
65—80
i
11—14
14—16
I
14—16
16—18
16—18
9—11
NEEDLE
U.SSize
15x1
9
9
11
1
1-’-14
16
19
9—10
14
to
Regular
[
Regular
Regular
Light
Ball
Light
Medium
Ball
Medium
to
Heavy
Ball
Ball
Sharp
Wedge
Wedge
Wedge
Point
Style
-
or
REMARKS
Loosen
per
tension
one
or
points
[_
up-
two
—16—

r
Cloth
*
Option
Use
long
from
Set
of
cloth
seam
edge
guide
needle
Guide
accessory.
guide
of
of
in
hole
plate,
when
regular
material.
on
arm,
and
sewing
distance
at
right
adjust
a
distance.
Run
—
,—
machine
touching
Position
to
sew
Sew
a
reverse
forcement
Draw
fabric
is
finished.
‘—
Cut
threads
behind
presser
guide.
cloth
curved
at
to
with
with
guide
stitches
end
left
bar.
edge
seam.
of
when
thread
at
an
for
seam.
of
fabric
angle
rein
sewing
cutter
—20—
Adjusting
Test
stitch
scrap
to use.
With
correct
and
lower
equal
and
both
threads
If
upper
(loose),
straight
surface
by
turning
of
upper
of
Thread
performance
material
threads
strong
in
tension
(lower)
along
fabric
tension
you
tension
enough
center.
upper
(.©).
is
dial.
Tension
are
),
(.
tension
to
too
thread
(lower)
Correct
on
going
upper
lock
tight
lies
a
is

STRAIGHT
5.
machine
Set
*
Option
kinds
3
can
be
accessory.
straight
of
selected
as
as
SEWING
shown.
stitch
shown
lengths
below.
-
5,
6,
7,
--.
:$:_
Stitch
ZIGZAG
6.
machine
Set
prevent
To
ing.
stitch
beginning
4
kinds
patterns
No.11
*
2640
Selector
No.
No.
No.
set
and
for
only.
5
6
7
seam
machine
sew
and
or
3
can
model
Stitch
SEWING
shown.
as
ends
for
in
ending
kinds
selected.
be
1510,
length
2%
3%
4%
unravell
straight
reverse
of
of
zigzag
1919
seam.
and
*
\—
1
ZIGZAG
at
Stitch
Selector
No.
No.
No.
*
No.
8
9
10
1
Zigzag
Width
2mm
3mm
4mm
5mm
1
PATTERN
Th
Stitch
Length
1mm
2mm
3mm
4mm
Thread
Stitch
Better-looking
requires
straight
Loosen
less
stitching.
upper
Tension
upper
tension
zigzag
for
stitching
tension
slightly.
Zigzag
than
—21—
back
side
I
right
sid

12.
STRETCH
STITCHING
stitches
The
stretch
with
These
in
selection.
and
are
the
Straight
Rickrack
Briar
Feather
Overcast
2640
Adjusting
Stitch
stretch
In
stretch
usually
(between
sewing
need
to
balance
ance
sake.
special
machine
stretch
For
only.)
Balance
stitch
stitch
be
in
‘+‘
some
adjust
the
stitches
shown
and
for
stretch
briar
stretch
stretch
model
Stretch
adjuster
a
neutral
and
fabrics,
this
are
knit
stitches
your
stretch
1510,
sewing,
“—“).
you
control
for
all
used
fabrics.
built
quick
1919
should
position
When
may
appear
the
to
Ill
III
Ill
iI
Ill
Ill
III
ll
if
I
If
design
illustriations
control
design
design.
If
as
turn
stitching
the
in
slightly
design
the
the
seems
to
looks
appears
right
control
isasyou
open
the
toward
like
hand
toward
like
left,
adjust
“—
the center
tobeclosed
illustrations,
“+“until
desire.
the
the
until
I
+
I
—31—

I
15.
(For
BRIAR
model
STRETCH
1510,
1919
and
2640
only.)
This
stitch
adecorative
lines
and
-I
OVERLOCKING
16.
For
2640
only.)
Overlocking
possible
seams
Set
at
machine
clothes
model
to
the
can
stitch
stitches
sew
same
as
shown.
for
1510,
and
be
on
1919
time.
used
household
children.
and
make
overcast
as
it
—34—
Put
two
with
right
To
prevent
sew
so
drop
outside
Fn
some
stitches
overcasting.
pieces
sides
that
cases
can
edges
right
the
of
facing
edge
be
cloth
and
from
side
of
material.
overlocking
used
together
sew.
fraying,
stitches
for

SEWING
17.
machine
Set
Attach
plate.
(See
Select
sizeofthe button
No.8,9,
darning
Zigzag
and
as
page.13)
widthtosuite
ON
shown,
plate
from
10.
BUTTONS
on
needle
the
pattern
ZIGZAG
PATTERN
*
No.11
2640
Place
under
Sew
Stop
upper
Draw
threads.
Draw
wrong
model
for
only.
button
a
foot.
zigzag
5-6
machine
position.
out
thread
side
work
and
1510,
and
stitches.
when
ends
tie
1919
and
material
needleisin
and
cut
through
a
knot.
off
to
—35—

1
QUILTING
/
20.
Set
*
machine
Option
shown.
as
accessory.
Baste
prevent
you
as
Insert
spring
Mark
tailors
From
following
guide.
Interval
adjusted
direction
ayers
them
sew
the
plate
first
chalk,
second
quitting
on
line
seam
between
by
arrow.
of
of
from
guide
the
with
and
tine,
of
moving
material
slipping
under
holder.
pencil
sew.
just
line
first
seams
can
guide
to
out
the
or
sew,
using
be
in
,
4
I
•‘
.
—
—38-—

EMBROIDERY
21.
machine
Set
as
shown.
ZIGZAG
PATTERN
Remove
To
avoid
pulled
tension.
For
good
important
and
thread.
thin
Use
upper
of
lower
Trace
and
Make
Pull
handwheel
holding
Lower
thread
same
thread.
your
centeritin
sure
out
presser
foot,
lower
up,
reduce upper
embroidery,
to use
embroidery
kind
design
material
lower
towards
upper
and holder
thread
correct
silk
andathinner
and
color
on
material
embroidery
is
taut.
thread
thread
foot
by
you
lightly.
lifter.
screw.
being
thread
it
needles
for
silk
for
hoop.
turning
while
1
LJ
is
F—
Needle
No.
No.
No.
9
11
14
Thread
120—iCC
100—BC
60—50
Hold
sewing
with
satin stitch.
Continue
by
hand.
To
finish
stitches
(Pattern
Lay
typewriting
when
both
threads
along
selector
embroidering
sewing
with
outline
filling,
zigzag
paper
and
guiding
sew
width
dialNo.5,
underneath
sheer
of
start
design
hoop
several
at
6,7>
fabric.
0.
—39—

MAINTENANCE
22.
Your
machine
cleaning
factory
A
machine
few
cleaned
and
sewing
hours
and
Cleaning
requires
oiling
performance.
which
a
day
oiled
is
needs
once
for
used
a
regular
satis
for
to
month.
a
be
off
with
latches
foot
needle
all
cleaning
hook
hook.
Remove
Remove
Brush
dog
Turn
Remove
Remove
withacleaning
cloth.
and
needle.
plate.
dust
and
brush.
outwards.
race
Clean
brush
lint
cover.
hook
andasoft
on
feed
race
—40—

Oiling
oil
Use
for
sewing
oils
mechanism
will
manufactured
machine
eventually
jam.
to
specially
use.
Other
cause
Apply
one
hook
where
face
Open
the
same
Be
careful
oil
oritmay
cause
and
After
oiling,
minutes
to
Remove
screws
screwdriver.
to
every
®
way.
some
part.
top
drop
friction
cover
not
run
allow
cover
and
to
stain
sewing
machine
of
oiltopart
occurs.
and
apply
your
oil
to
by
with
apply
too
much
material
difficulty.
for
penetrate
loosening
large
oil
of
in
1-2
Apply
one
drop
of
oil
lubricating
to
points
—41—
indicated
by
arrows.

23.
TROUBLE
CHART
PROBLEM
Breaking
thread
Skipping
Irregular
The
material
fed
correctly
lower
stitches
stitches
not
Thread
or
not
Lower
Lint
stuck
tension
the
Needle
Needle
Size
or
suitable
Incorrect
Too
much
Incorrect
Upper
Incorrect
Pattern
Lint
stuck
not
drawn
thread
in
not
bent
type
for
upper
oil
size
thread
lower
selection
on
PROBABLE
wound
correctly
up
tension
the
bobbin
spring
fully
inserted
of
needle
the
material
threading
on
the
of
needle
tension
tension
dial
the
feed
evenly
too
and
hook
too
not
dog
CAUSE
on
tight
case
thread
for
the
loose
set
the
bobbin
and
not
material
correctly
inside
CORRECTION
P.11,
P.14
P.13
Remove
and
cleaning
fluff
P.
P.
P
P.14
P.41
P.1
P.20
P.1
P.18
P.40
1
4
2
with
8
8
6
lint
brush
a
—42—

PROBLEM
The
material
puckers
Upper
Stitch
Thread
Incorrect
or
lower
too
too
threading
PROBABLE
thread
long
for
thick
material
upper
of
CAUSE
tension
or
too
tower
tight
thread
CORRECTION
P13.
P.20
P.
1
8
P.16
P.14,
P.12
Breaking
If
trouble
Do
not
try
Changing
Unplug
Open
Remove
in
Install
in
the
face
bulb
counterclockwise.
new
a
clockwise.
needle
is
stilt
correct
to
Light
machine.
cover
by
bulb
Needle
Needle
Needle
Upper
Needle
Dials
the
needle
apparent
fault
Bulb
as
shown.
unscrewing
screwing
by
beni
clamp
thread
too
have
in
not
the
by
correctly
screw
tension
fine
been
was
machine,
yourself.
it
it
for
the
changed
down
I-
inserted
too
loose
too
material
in
the
please
tight
while
material
consult
your
nearest
p
P.
P.
P.20
P.16
P.18
dealer.
8
8
8
—43—
-.
it---
--
2,c--
.
-.


 Loading...