White 1899, 1781 User Manual

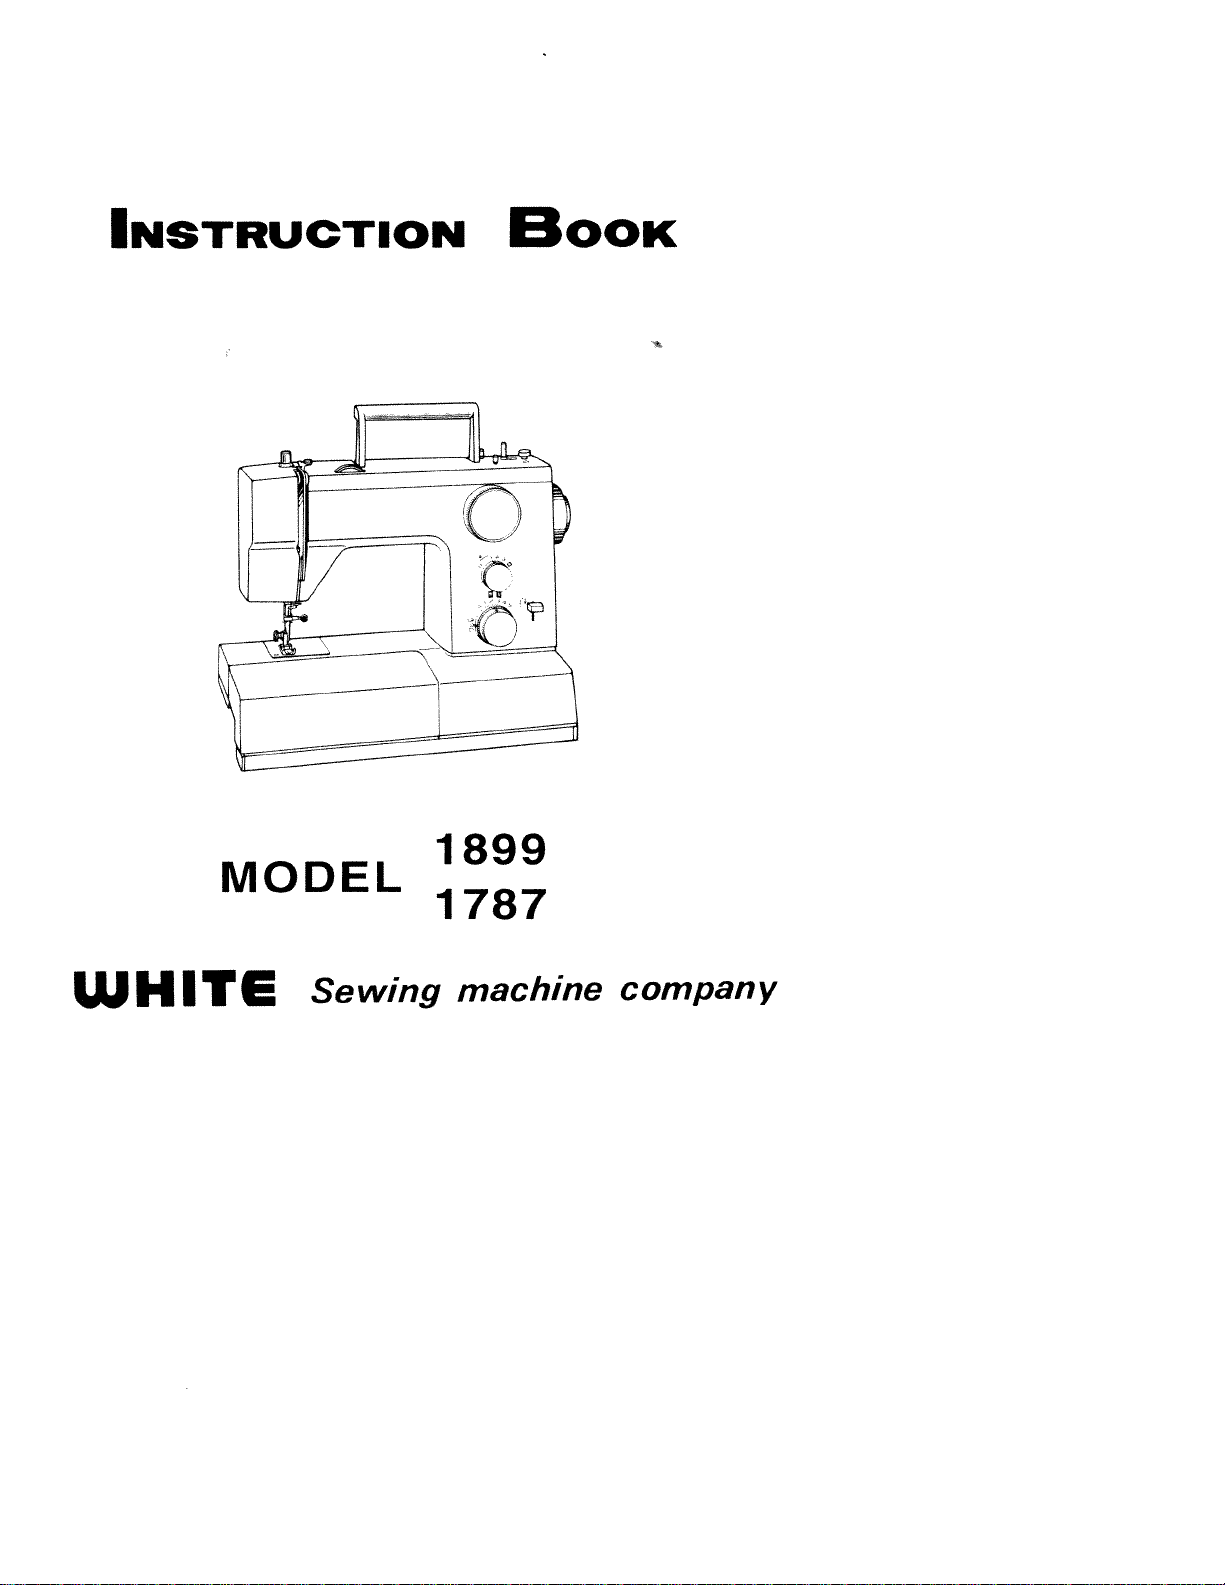
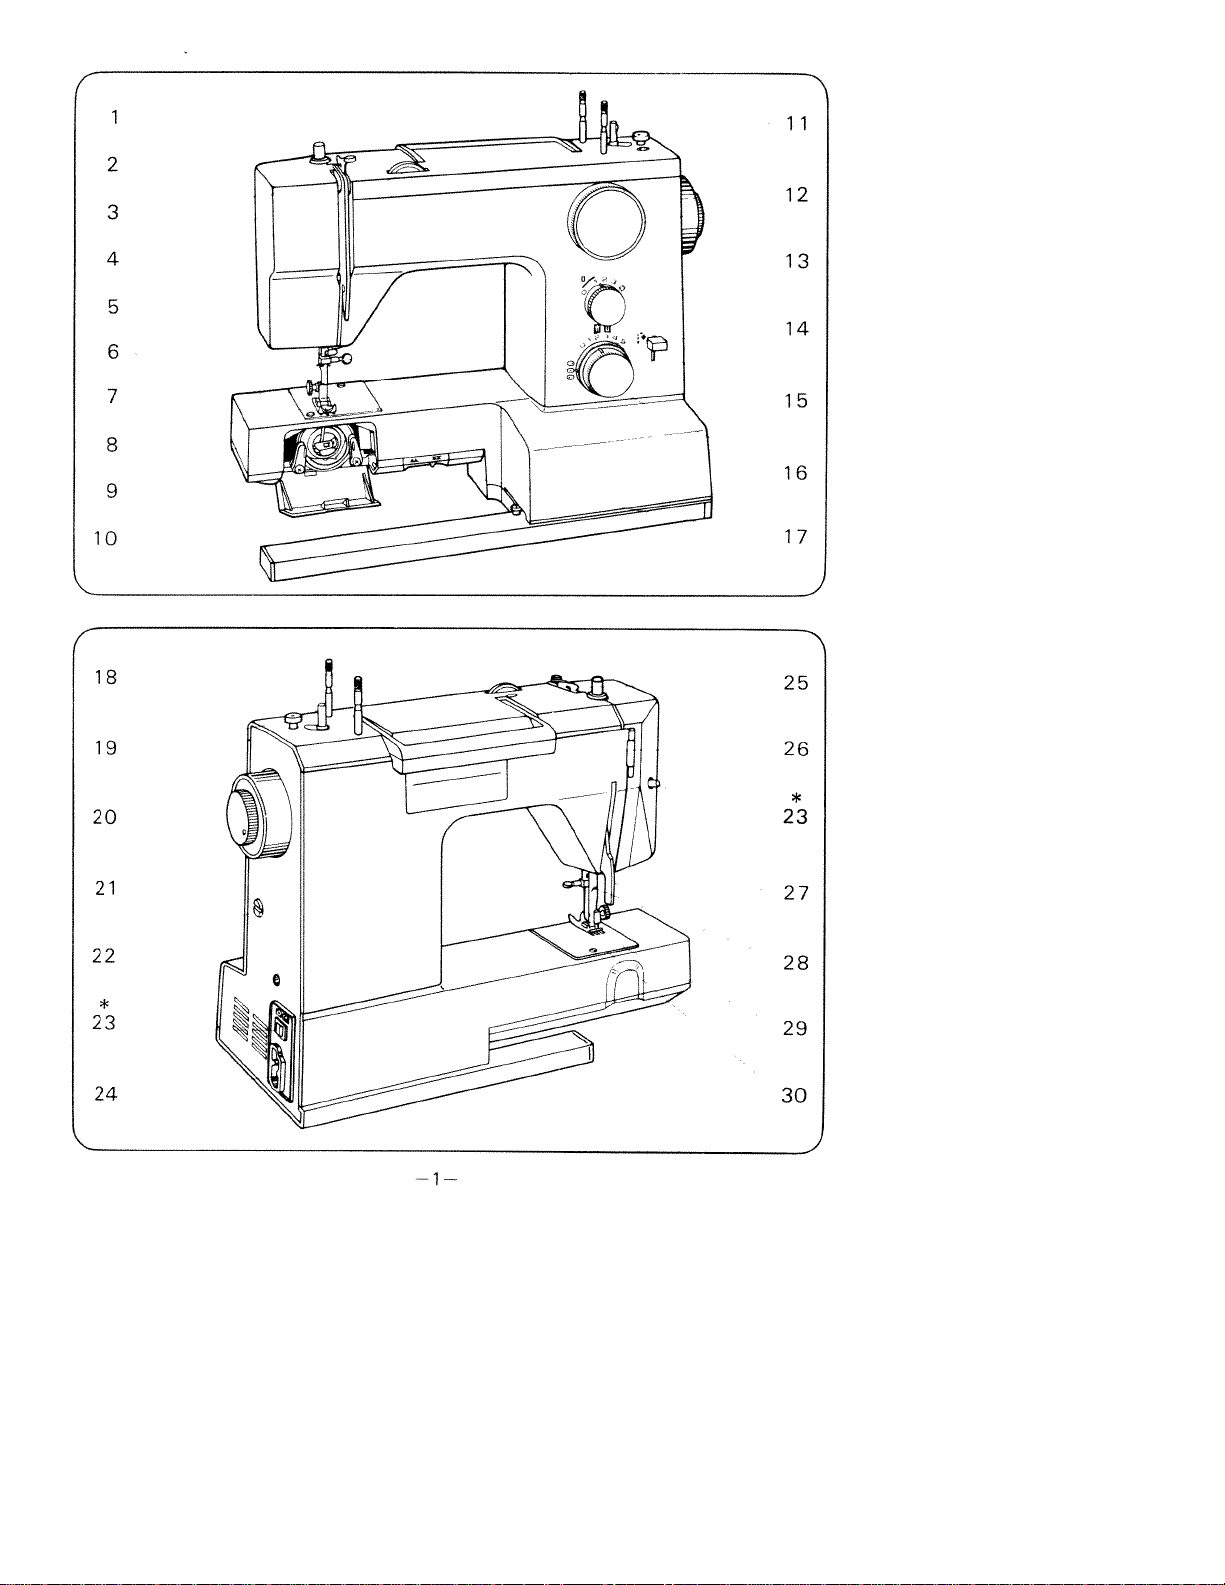
Specifications and Main Features
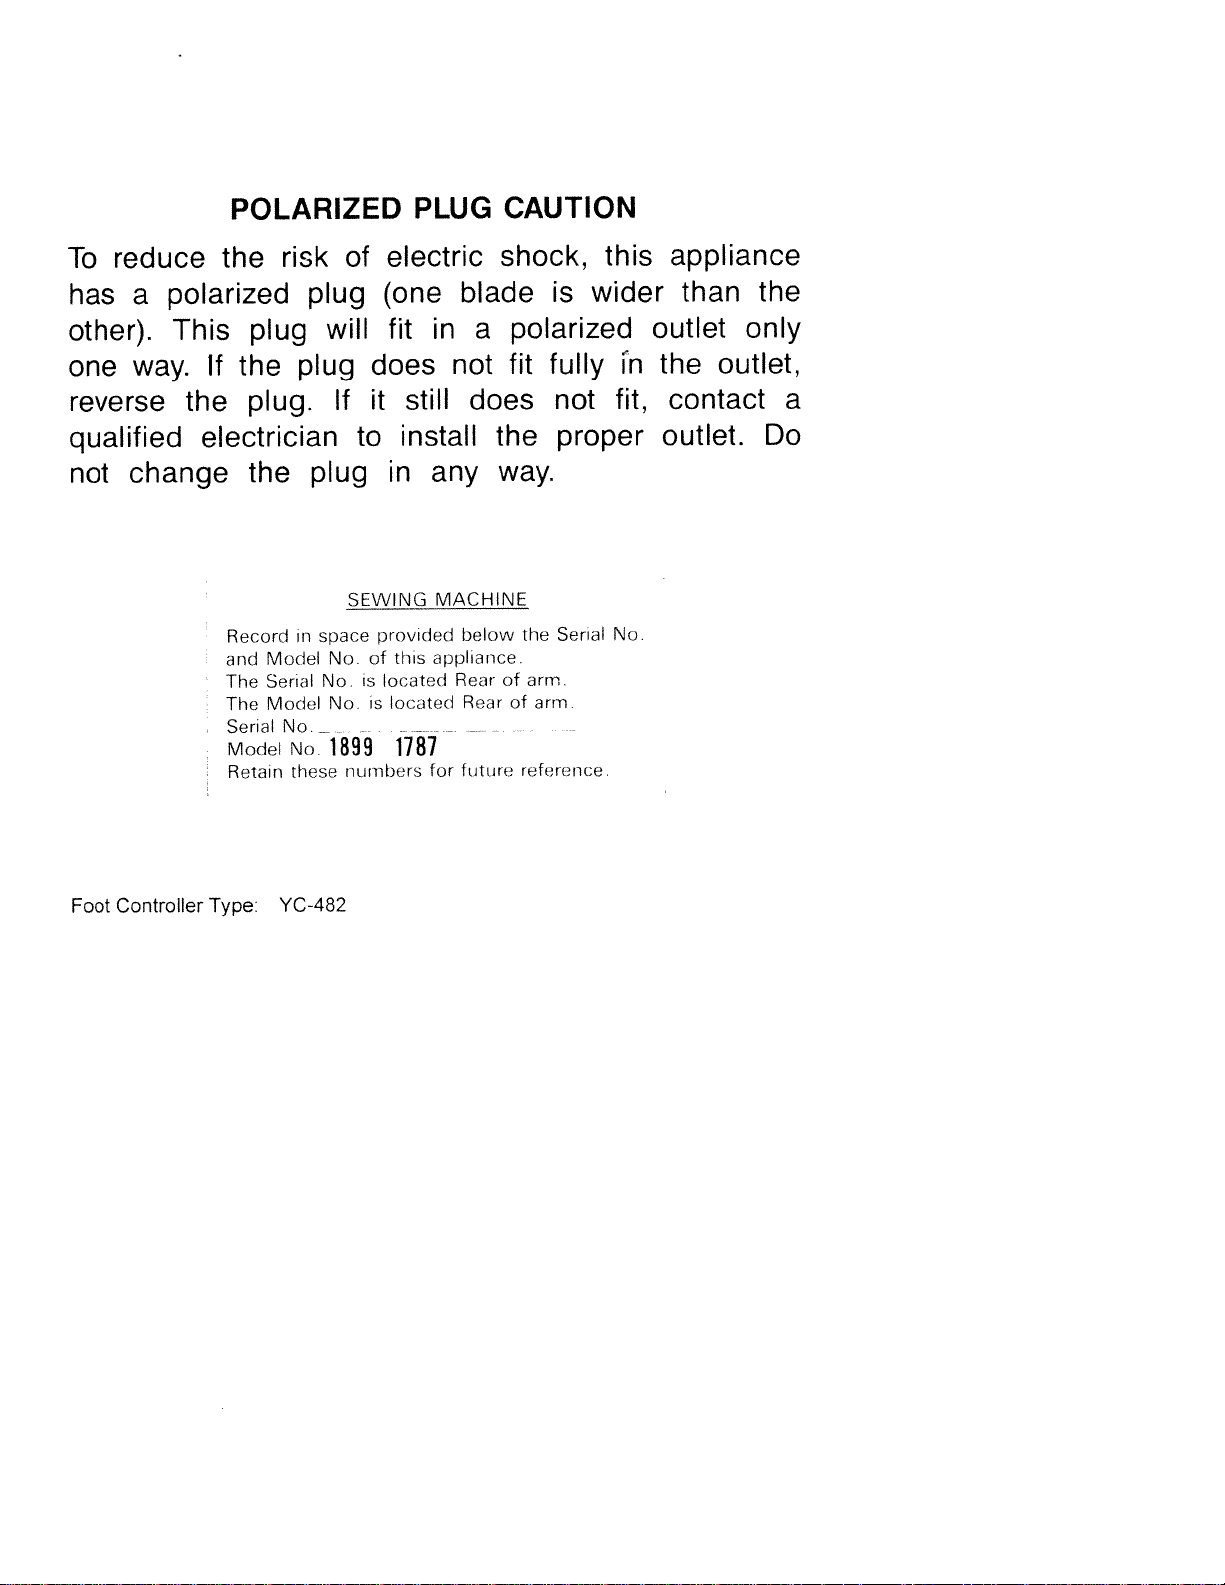
  • Model Number: 1899
  • Place of Serial number: Rear of arm
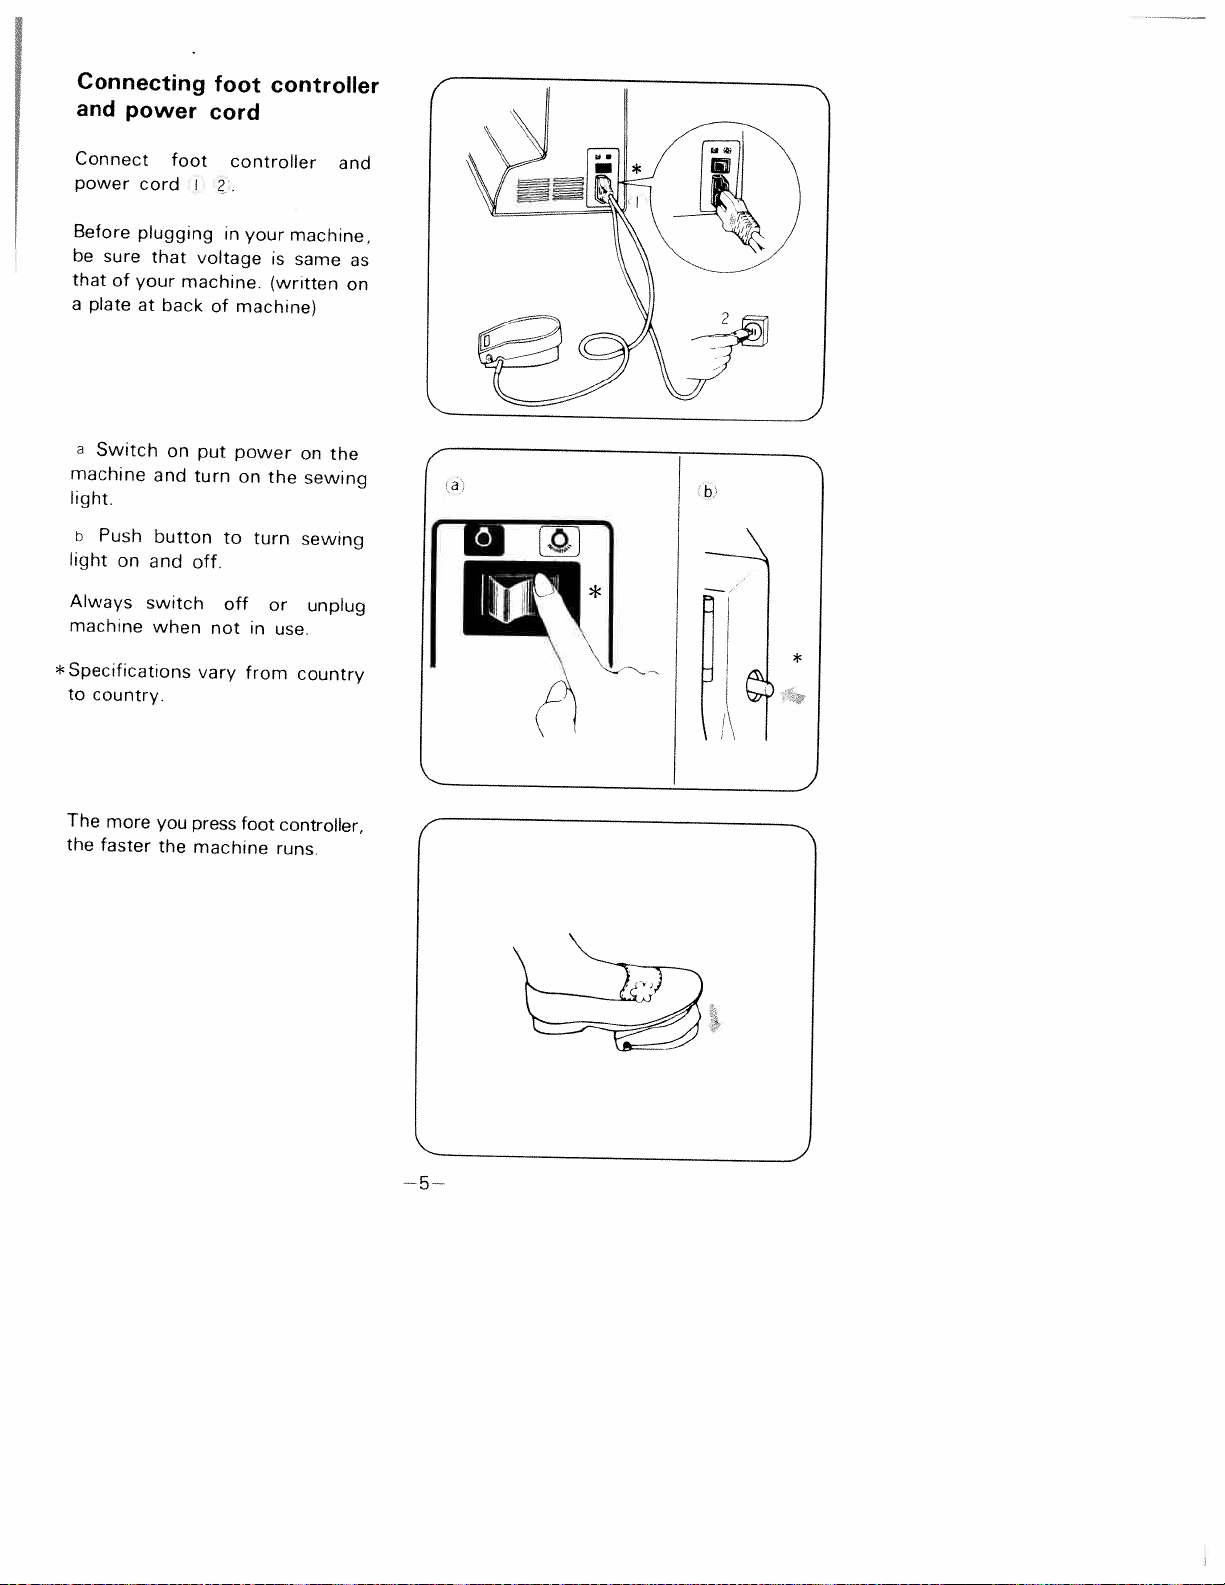
  • Foot Controller: YC-482
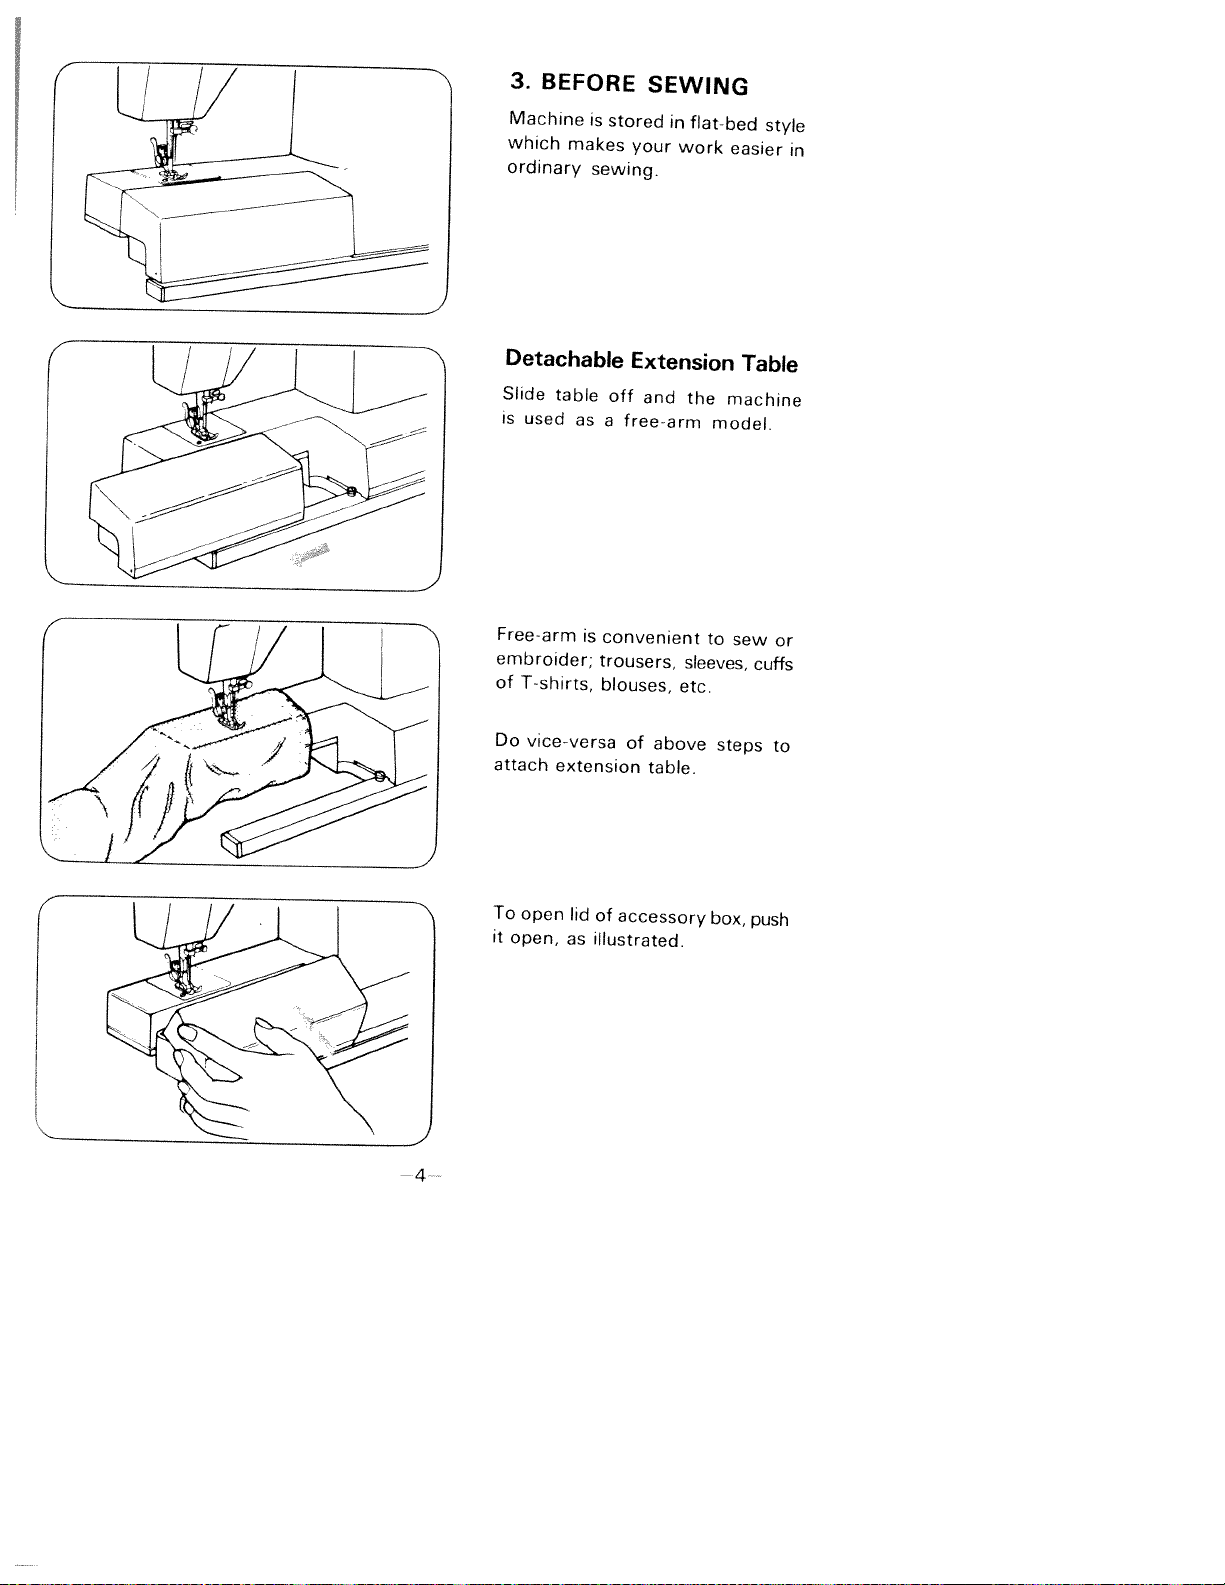
  • Type of sewing machine: Flat-bed style with an extension table that can be detached for free arm sewing.
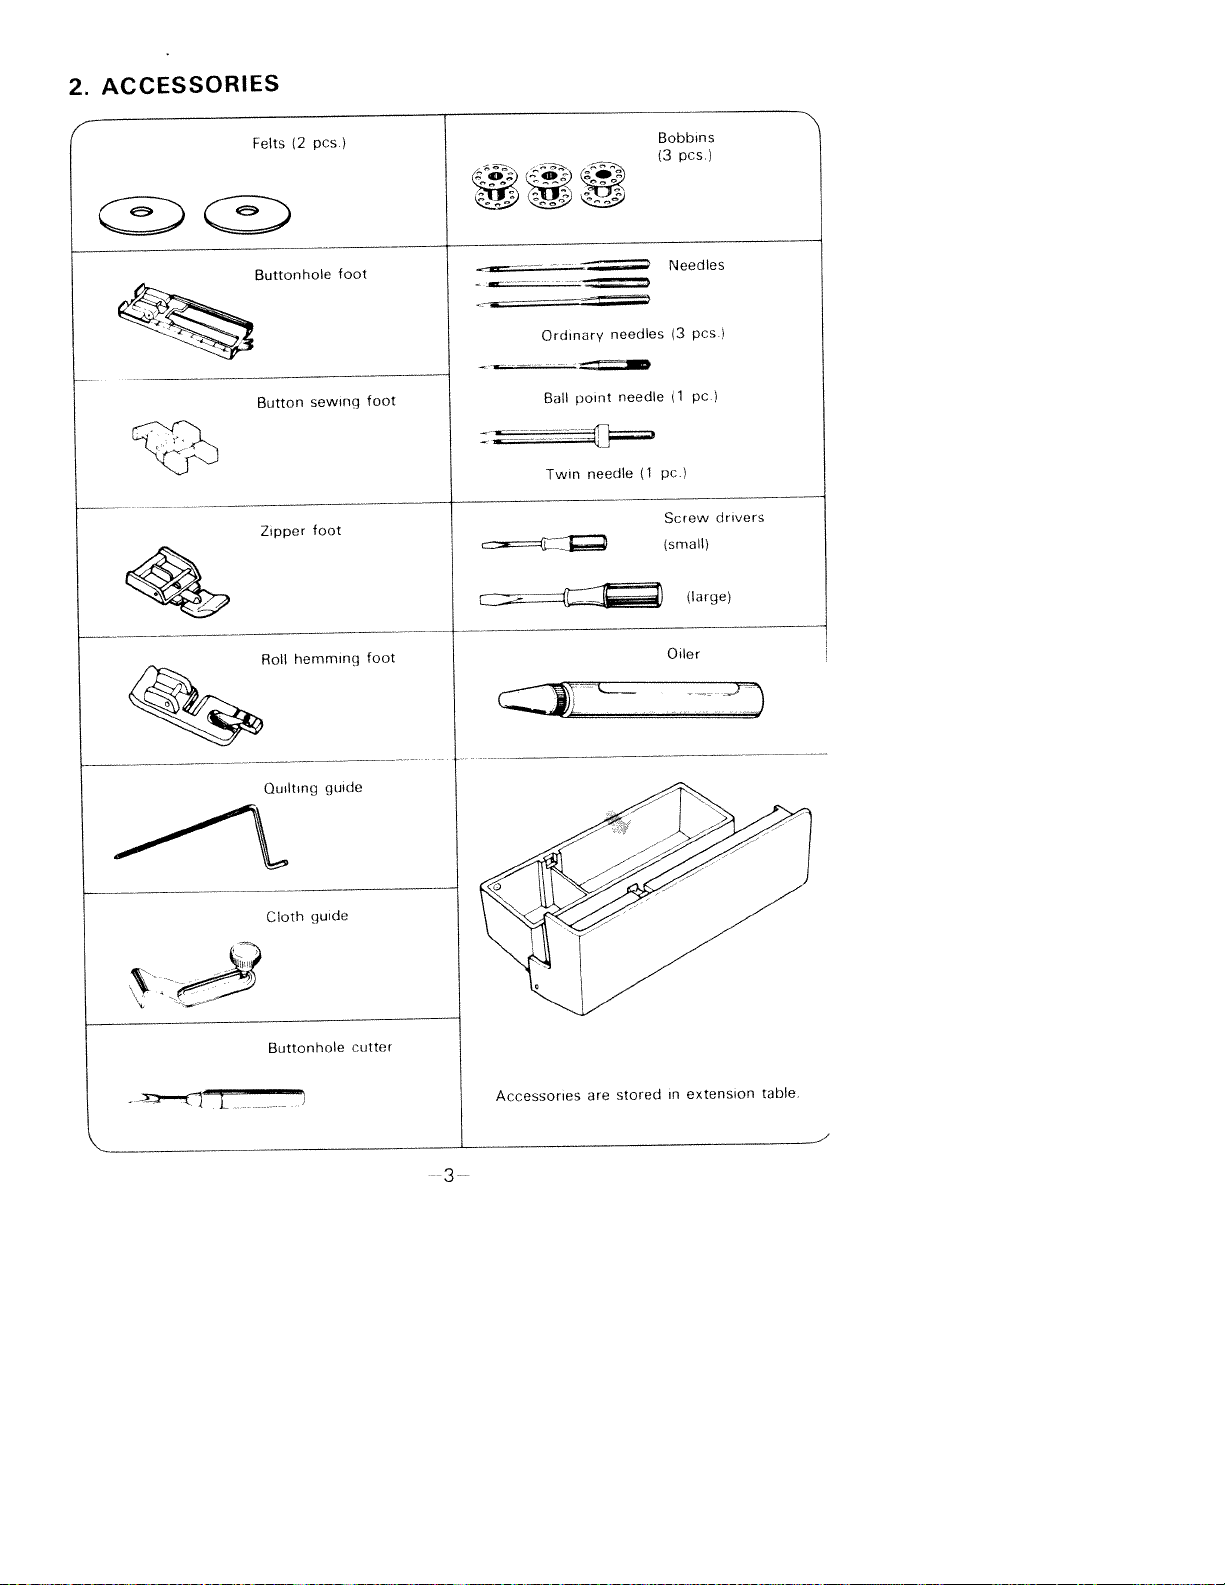
  • Position of Accessories: Accessories are housed in the extension table.
  • Needles that are Suppled:
  • Ordinary needles (3 pcs)
  • Ball point needle (1 pc)
  • Twin needle (1 pc)
  • The Set Includes:
  • Button sewing foot
  • Three bobbins
  • Buttonhole foot
  • Zipper foot
  • Roll hemming foot
  • Quilting guide
  • Cloth guide
  • Buttonhole cutter
  • Multifunctional Accessories Such As:
  • Continuous regulatory of stitch length
  • Control of the width of the zigzag
  • Control of the position of the needle
  • Regulation of the thread tension
  • Regulation of the foot pressure.
  • Stitching Skills:
  • Stright stitching
  • Stitching zig-zag
  • Stitching buttonholes
  • Sewing overcast
  • Deal with blind hemming
  • Scoffing
  • Making embroidery patterns
  • Sewing decorated tucks or designs
  • Stitching twin needles
  • Stress-Free Features:
  • Polarized plug which reduces the chances of electric shock.
  • The machine should not be left running while unattended.
  • After use of the machine, disconnect the plug before cleaning.
  • Maintenance and Cleaning:
  • Need proper system of stuffing and oiling.
  • When in constant use it is advisable to clean it once a month.

Frequently Asked Questions

Q: Can I know the model number of the machine?

A: The number in question is 1899.

Q: What’s the typical location for the serial number?

A: The serial number can be found on the back side of the arm.

Q: Does this sewing machine requires a specific type of foot controller?

A: This machinery makes use of a YC-482 type foot controller.

Q: I need to ask if this machine can sew thick materials?

A: Yes, if the foot pedal can be adjusted set right, it can sew thick materials.

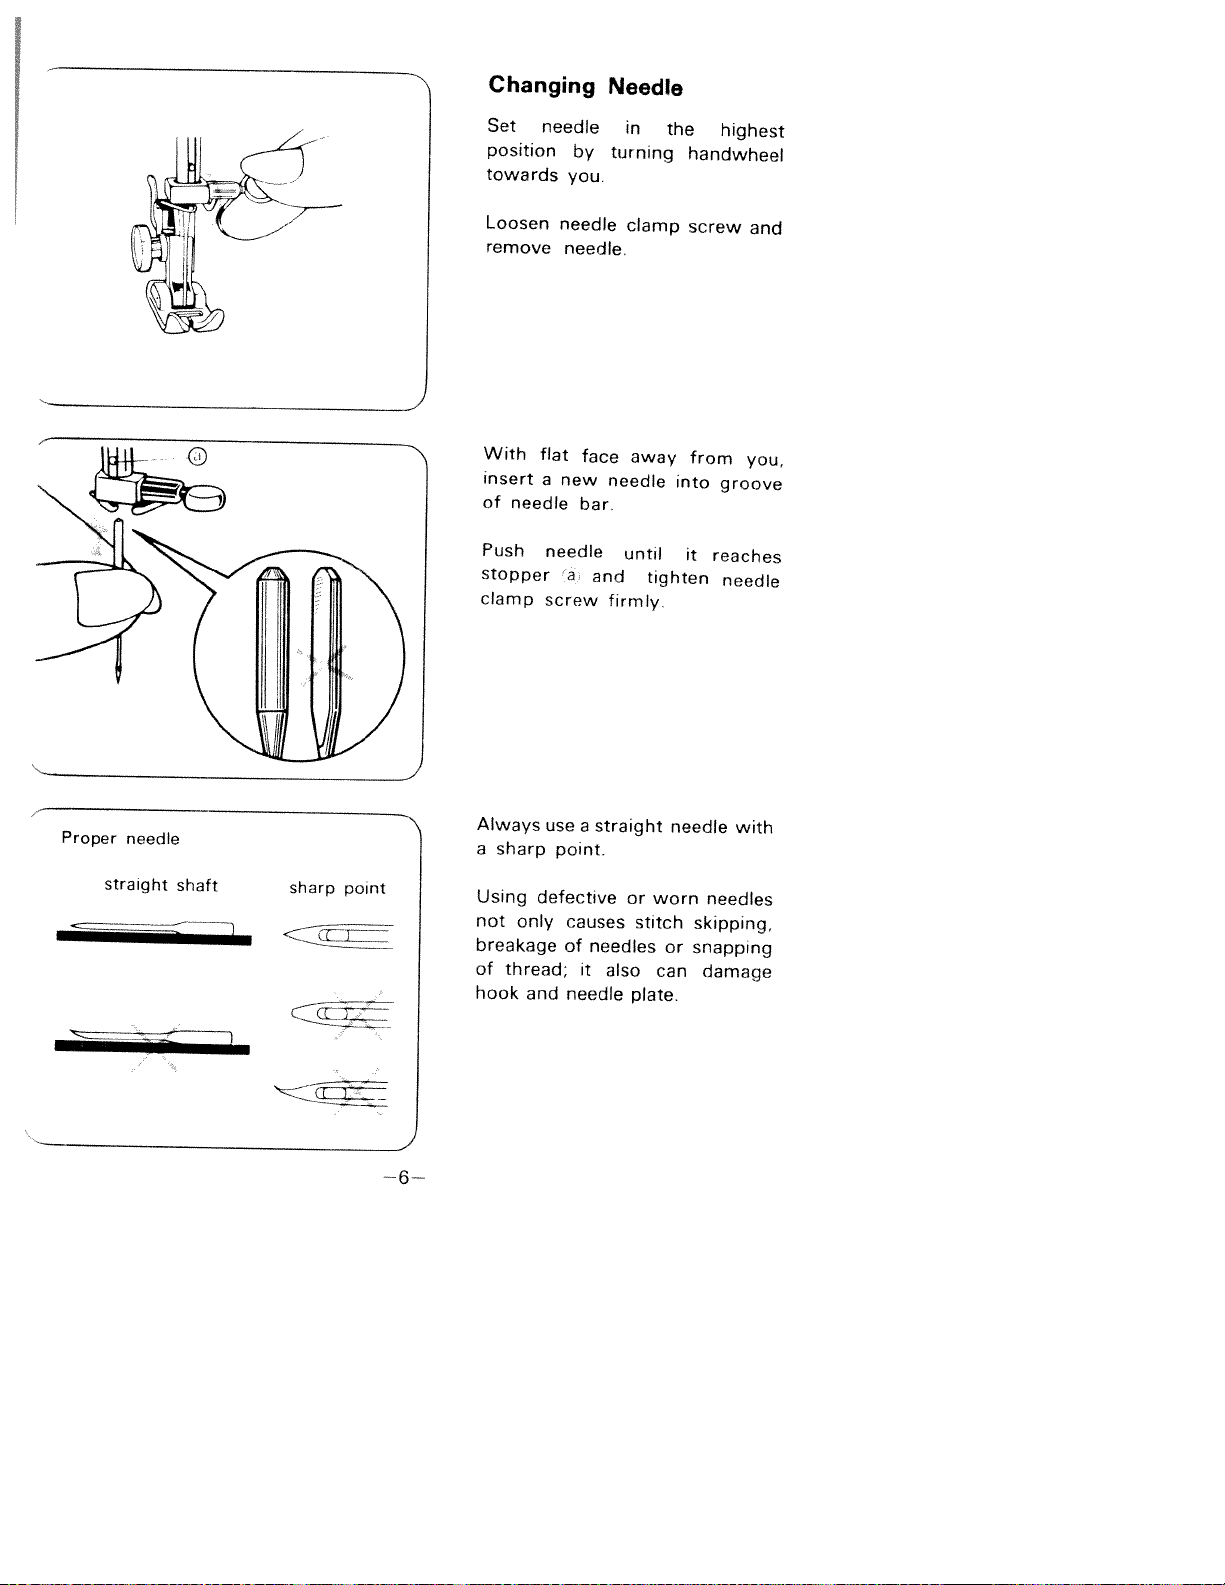
Q: Lia how do I change the needle?

A: Bring the needle to the highest position, turn and remove the screw that holds the needle clamp, bring out the old needle and insert the new one while ensuring that the flat side is facing away from you, Finally turn the screw and lock it firmly.

Q: Is it advisable to leave the machine plugged when not in use?

A: Certainly not, it is highly unsafe. The device must always remain unplugged when not in operation for the device is prone to electric shocks.

Q: I want to know how frequently should I expect to clean the machine?

A: If the device is operated for few hours daily then it only needs to be cleaned and oiled once a month.

Q: To what extent can this sewing machine allow me to stitch?

A: This sewing machine is capable of creating decorative stitches, automatic button holes, zigzag stitches, and of course, straight stitches.

User Manual

Page 1
z
0
-l
C
0
0
z
w
0
0
E
0
m
C,)
m
CD
I
Cb)
CD
I
Page 2
POLARIZED
PLUG
CAUTION
reduce
To
has
a other). one
way.
reverse qualified not
change
the
polarized
if
plug
the
plug.
This
the
electrician
the
Record and
The
The Serial
Model Retain
risk
plug
in Model Serial Model
No._
No.
these
plug
will
If
plug
space
No
No
No
1899
electric
of
(one
fit does it
to
in
SEWING
Provided
of
this
is
located
is
located
1781
numbers
in
not
still
install
any
MACHINE
appliance.
Rear
for
shock,
blade
a
does
the
way.
below
of
Rear
-
future
wider
is
polarized
fit
fully
not
proper
Sedal
the
arm,
arm
of
reference.
this
in
fit,
No.
appliance
than
outlet
the
outlet,
contact
outlet.
the
only
a
Do
Foot
Controller
Type:
YC-482
Page 3
IMPORTANT
SAFETY
INSTRUCTIONS
when Plowed,
Read
using
including
electrical
an
the
instructions
all
appliance,
following:
[ppliance).
be
outlet
or
injury
for
dropped authorized
adjustment.
any
object
aerosol
all
controls
reduce
left
immediately
reduce
toy.
its
intended
the
by
with
and
(spray)
DANGER——To
n
appliance
pliance
from
should
the
never
electric
WARNING——To
lectric
Do
is
used
Use
attachments
Never properly, appliancetothe electrical
Never ingsofthe dust,
Never
Do
Do
being
To outlet.
Do
shock,
allow
not
or
by
appliance
this
recommended
operate
ifithas
mechanical
or
operate
sewing
loose
and
drop
not
use
not
operate
administered.
disconnect,
unplug
not
to
be
near
children.
this
been
nearest
the
cloth.
or
insert
outdoors.
where
turn
pullingoncord.
by
usedasa
only
applianceifit
appliance machine
basic safety
the
unattended
to
persons:
attentionisnecessary
Close
use
manufacturer
damaged
a
has
or
damaged,
dealer
any
air
foot
controller
into
any
products are
to
the
off
unplug,
To
before
risk
when
after using
the
describedinthis
as
as
or
service
or
openings
free
opening.
(“0”)
grasp
precautions
using
of
electric
and
of
or
plug,
in.
before
burns,
plug,
into
for
Keep
the
used
then
plugged
risk
containedinthis cord dropped
center
blocked,
from
being
position,
the
should
always
shock:
Always
unplug
cleaning.
fire,
when this
manual.
manual.
ifitis
not
Return the
water.
examination,
ventilation
accumulation
where
or
remove
not
the
cord.
(this
this
appliance
only
Use
working
repai
open
lint,
of
oxygen
from
plug
be
is
DANGER
Always
Do Do
Do
not
not
not
unplug reach
place
place
inordrop
before relamping.
foranappliance
store
or
appliance
into
water
Replace
has
that
whereitcan
other
or
bulb
fallen
liquid.
with
into
fall
same
type
water.
Unplug immediately.
or
pulled
be
rated
into
15
watts.
or
sink.
a
tub
Page 4
WARNING
1.
Keep
fingers
machine
2.
Always
3.
Do
4.
Do
break.
5.
Switch area, presser
6.
Always lubricating, instruction
7.
Never
maybeblocked.
not not
such
needle.
the
use
use pull
the
sewing
as
foot,
unplug
or
manual.
operate
away
proper bent or
push
threading
etc.
sewing
when
on
from
needle
needles.
fabric
machine
making
soft
a
moving
all
plate.
while
off
needle,
machine
any
surface
parts.
The
stitching.
(“0”)
changing
from
other
such
Special
wrong
when
the
user
as
care
plate
It
may
making
needle,
electrical
servicing
bed
a
is
can
deflect
any
threading
outlet
adjustments
or
couch
required
cause
the
the
needle
adjustments
bobbin,
when
where
around
needle
causing
in
or
removing
mentioned
the
air
the
sewing
to
break.
needle
the
changing
covers,
in
openings
it
to
the
SAVE
THESE
INSTRUCTIONS
Page 5
1
NAMES
2.
ACCESSORiES
3.
BEFORE
4.
STRAIGHT
5.
ZIGZAG
6.
MAKING
7.
SEWING
8
OVERCASTING
9.
OVERLOCKING
0.
BLIND
1.
STRETCH
2.
ZiPPER
3.
SHELL
4.
PIN
5.
QUILTING
6.
SCALLOPING
1
MENDING
8.
APPLIQUE
9
EMBROIDERY
‘0.
MAINTENANCE
‘1
TROUBLE
Detaching Connecting Changing Changing Bobbin
Inserting Adjusting Drop
Threading Twin Decorative Drawing Foot Fabric. Pattern
Pattern Stitch Starting Double
Cloth Adjusting Applications
Zigzag Needle
Thread
Determine Determine Left
Cutting
Corded
Applications Application Application Application
HEM
Elastic
SEWING
STITCHING
TUCKING
Patching
Mending
Cleaning Oiling
Changing
OF
PARTS
SEWING
Extension
Needle Foot
Winding
Bobbin
Lower
Feed
Lever
Upper
Needle
Tucks
Up
Pressure
Thread
Setting
SEWING
Selection
Length
to
Presser
Guide
Thread
SEWING
Width
Position Tension
BUTTONHOLES
Length
Width
and
Right
Buttonhoies
Buttonholes
ON
BUTTONS
of of of
STITCH. Blind SEAM
.
.
Rip
a
WORK
..
.
CHART
Light
Foot
Threading
Lower
Dial
Sew
.
of
Control
.
of
Ultra RickRack Decorative
Hem
.
..
.
CONTENTS
Table
Controller
.
.
Tension
.
Thread
or
Designs
Thread
.
and
Needle
Dial
Foot
Lifter
.
Tension
Straight
Control
for
Zigzag
.
Side
Balance
the
Elastic
Stretch
Stitch
.
.
.
Bulb
.
.
.
.
.
.
.
.
.
.
.
.
....
Table
.
.
.
Stitch
Stitch
.
Overlockstitch
Fun
.
and
.
of
.
.
--
P
.
.
.
Power
.
...
.
.
.
.
Buttonhole
atterns
2 3
4
Cord
4 5 6 7 8
.11
.
.
-
12
12 13 14 14
16 17 18
•18 18 19 19
20 20 21 22
22 22 22 23 23 23
26 26 27 28
30 31
33 34
36 37 38 39
41 42 42 42
45
48
Page 6
J
-
N)
C)
N)
4
C.)
Ci]
Q)
-J
Ci]
a)
a)
CD
0
-
0)
-
CD
N)
0
N)a)Ci]
N)
N)
N) N)
r’i
-
N)
Li
N)
C.)
N)
0)
CD
0
Page 7
NAMES
OF
PARTS
Thread
1. Pressure
2. Take-up
3. Face
4.
5.
Upper
Thread
6.
Presser
7.
Presser
8.
9.
Free Shuttle
0. Spool
1.
2.
Pattern
Stitch
3.
4.
Needle
5.
Reverse
Zigzag
6. Drop
7.
Bobbin
8. Bobbin
9. Handwheel
O.
Stop
1. Special
2.
switch
3.
4.
Socket
5.
Thread
Handle
6.
7.
Presser
Thread
8. Feed
9. Needle
30.
*
guide
regulator
lever
cover
thread
guide
foot foot
arm
cover
pins
selection
length
position
sewing
width
feed
lever
winding winding
motion
buttonhole
*
guide
foot
cutter
dog
plate
Specifications
for
tension
for
thumb
dial
control
lever
control
spindle
knob
for
lifter
bobbin
upper
screw
dial
stopper
adjustment
upper
vary
winding
dial
threading
threading
from
country
to
country.
Page 8
ACCESSORIES
2.
-
cc:::±:
Felts
(2
Buttonhole
Button
Zipper
hemming
Roll
pcsl
sewing
foot
toot
foot
foot
Bobbins
pcs.)
(3
Needles
(1
(3
11
pc.(
Screw (small)
Oiler
pcs)
pc(
drivers
(large)
point
needles
needle
needle
Ordinary
_____
Ball
Twin
Quilting
Cloth
Buttonhole
guide
guide
cutter
3--
Accessories
are
stored
in
extension
table.
Page 9
3.
BEFORE
Machine which ordinary
is
makes
sewing.
stored
your
SEWING
in
flat-bed
work
easier
style
in
Detachable
Slide
table
is
used
Free
arm embroider; of
T-shirts,
Do
vice-versa
attach
To
it
open
open,
extension
as
off
as
a
is
convenient
trousers,
blouses,
lid
of illustrated.
Extension
and
free
arm
etc.
of
above
table.
accessory
the
machine
model.
to
sleeves,
steps
box,
Table
sew
cuffs
push
or
to
4
Page 10
Connecting
and
power
foot
cord
controller
Connect power
Before be that a
a
machine light.
h
light
Always
machine
*Specifications
to
sure
of
plate
Switch
Push
on
country.
cord
plugging
that
your
at
and
switch
when
foot
machine.
back
on
and
button
I
2
in
voltage
of
put
turn
to
off.
off
not
vary
controller
your
is
(written
machine>
power
on
the
turn
or
in
use.
from
and
machine,
same
on
the
sewing
sewing
unplug
country
as
on
b
The the
more
faster
you the
press
machine
foot
controller,
runs.
5—
Page 11
Changing
Set
needle
position
towards
by
you.
Needle
in
turning
the
handwheel
highest
Loosen remove
With insert of
needle
Push stopper clamp
needle
needle.
flat
new
a
needle
a
screw
face
bar.
and
clamp
away
needle
until
firmly.
into
tighten
screw
from
it
and
you,
groove
reaches
needle
Proper
needle
straight
shaft
sharp
point
-J 6—
Always
sharp
a
Using not
only breakage of
thread;
hook
use
point.
defective
causes
of
needle
and
straight
a
needles
it
also
or
stitch
plate.
needle
worn
or
can
with
needles skipping, snapping
damage
Page 12
Changing
Raise
presser
Set
needle
position
towards
by
you
Foot
foot
in
turning
2
lifter
the
handwheel
highest
Snap-on
Push
direction will
come
Position
right
b
holder
Lower that
the
snapped
When push
direction
the
the
you the
Presser
lever
so
off
new
a
under
foot
on
fail
slightly
that
the
presser
will
to
lever
Foot:
a
in
the
foot
groove
foot
be
automatically
catch
in
the
presser
with
the
the
the
of
lifter
arrow
foot
pin the
foot,
arrow
I,
a
b
so
Page 13
Bobbin
Set
needle
turning
by
you.
Open
Open
take
it
shuttle
latch
out.
Winding
in
the
handwheel
cover.
of
bobbin
highest
position
towards
case
and
—---
z
I
Close
latch
of
bobbin
comes
bobbin
out
easily.
case
and
—8—
Page 14
Push Pull
on
spool
Put
Draw through tension
ers
a
back
out
spool
and
spool
pin.
thread
thread
device,
to
on
2
fold
handle.
pin
and
spool
from
guide
following
put
pin. spool
and
a
pre
numb
felt
pin
4
1
4
2
Wind
thread
bobbin
Push
bobbin
Holding
hand
disengage
unscrewing
clockwise
several
on
handwheel
stop
times.
to
spindle.
with
handwheel
motion
around
your
knob.
I
left
by
L.
—9—
Page 15
Push
down
bobbin
foot
to
right
controller.
and
press
I
>N
Machine when
Push
bobbin
from
wheel.
Take and
cut
Retighten
bobbin
off
thread.
stops
to
bobbin
stop
is
full.
left,
motion
from
automatically
to
disengage
spindle
knob.
trouble
correction
—10—
If
bobbin
as
shown, loosen bobbin to
adjust
is
open
set-screw
winding:
height.
wound
face of
Use
the
screw
unevenly
cover
guide
and
for
driver
Page 16
inserting
Place
bobbin thread arrow.
Bobbin
running
in
its
in
case
direction
I
with
of
)
Guide bobbin
Pulling under delivery
thread
case.
thread
tension
eye
.:.
into
to
spring
left,
slot
bring
then
a
of
it
to
/
I
—11—
Page 17
Adjusting
Lower
Tension
loosen
test
proper
adjust
(4”)
fully
bobbin
bobbin
tension
gradually
tension,
with
small
needle
end
of
from
hold
of
case
latch
inserted.
tension,
case
in
thread bobbin
latch
into
when
hang
shown.
as
bobbin
drop
screwdriver.
shuttle
turn
the
of
case.
bobbin
a
adjusting
about
and
and
case
small
highest
push
case
1
0
To shake
At will amount.
To screw
-J
N
Raise position.
Leave cm Take bobbin
Release is
in
feed
position.
LEVER
the
For
to
dog,
is
used
and
right
normal
A4
embroidery.
side
sewing, position. move
for
button
of
the
DROP
The
shuttle move
To
lever This sewing,
1
2-
leier
cover.
the
lower
to
position
FEED
is
lever
AEA
darning
Page 18
Threading
Raise
presser
Raise
take-up position towards
you.
by
Upper
foot
lever
turning
Thread
lifter.
to
the
handwheel
highest
Thread
Pass
Lead disc
Hook to
upwards.
Thread
following
thread
thread
2
it
to
take-up
through
either
guide
numbers
side
3
lever
guide
of
from
4
-
I
tension
down
7
2
7
Pass to then
Leave
cm
thread
left,
needle
(6”).
end
and
of
to
eye
guide
guide
thread
right
from
5
one)
(left
6
7
about
of
1
5
1
3—
Page 19
Twin
Thread
normal
points
Needle
in
the
threading,
Threading
same
7
and
wa
except
as
at
of
of
from
left
tension
threads
other
to
of
or
sepa
at
right rqht
guide
about
threads
pass
2
point
At
eft
and
right
to
ratly
cc
d
one
pass
right
quide
point
left
cm
6
guide
should
eye
needle
ends
(61
7
thread
and
of
and
be
from
eye
threads
Tucks
the
end
guide
At
To
left
At guide needle
to Leave
1
5
/
Decorative Designs
the
with
used
be
can
stitch
Any twin
Most
stitch
fancy
for
tapered
or colors trims
Caution:
than
tion
post
needle
needle
attractive
zigzag
are
Remember
5
Z
control
sewing.
for
tucks.
zigzag
effective
zigzag
decorative
are
blind
and
The
width
at
designs
CD
effects
multiple
the
stitch
hem
stitch
satin
two
in
creative
for
no
and
needle
for
more
twin
use
to
Page 20
Drawing
end
Hold
hand.
left
Turn
handwheel
until
you up
again.
Up
of
needle
Lower
upper
moves
thread
slowly
Thread
towards
down
with
.
and
:‘
Pull
upper
thread
lower in
loop.
a
Pull
out
cm
(6)
under
presser
Foot
Push
Pressure
down pressure lease
the
foot.
To
push
down pressure Insufficient poor
feeding stitches, the
fabric.
foot
marks reduce When or
sewing
heavy pressure. sewing
both
and
regulator.
pressure
increase
inner
is
obtained.
or
If
appear
the
pressure.
fabric,
Increase
lighter
thread
will
threads
place
toot
the
outer
pin
pressure
of
the difficulty feed
multiple
weight
slowly
brought
be
to
them
on
This
on
the
until
may
fabric,
dogs
on
reduce
pressure
fabrics.
about
together
left.
ring
will
the
presser
pressure,
suitable
skipped
in
guiding
or
presser
fabric,
the
thickness
and
of
cause
when
1
the
re
the
up
5
—15—
Page 21
ibric,
t’
DEER
wJr
GOT
n
1
E0
len
lil
flZ4\/y
XTRAH1
ipholslery
eq
\Wfl
ES
KM
,HT
1FDlUM lersev ‘ow”
dAvy
P’,yer
:1!
‘tKE
thread
T4
5°lC
SHEER (
‘nO.s
1
3iojsn
J’qondv.
i,A,TGHT
Kr)TSde
JM Wool
velvetten.
Terv’
l)ninr
-AVY Canvas
V’[lGHf
lit
WEIGHT
Deible
Nt
VVEICHT
FURS
[on
No
Crepe
T5feta
C
.J”
51k LotIon
Di
Knit
Ne’
VEolURS
-
Tricot
D’J-’
and
irop
E
(‘elton
50
needle
70
70
30
iD
30
30
Mer
T
eRFAD
ottori
C
90
60
50
50
ra:y
Heavy
Duty
80
NO
table
e’zed
ton
CO
Covered
Polyester
Slk Nyon
Silk
N
eki
Silk
Nylon
SIk
SIC
CCPOs
Poly
C
C
Sl
lee
y
Si’k
Nylon
Pot,
C
C
51k
N,lio
C
Poly
C
C’CPoly
DLE:
Nt
USSze
in
rope
Fi
705
Do
eS
‘S
80
100
‘20
iNst
9
3
70
80
90
11
1
‘6
19
7)
70
80
Port
Style
Reguar
9
14
9
lt
Light
11)
Medurr
10
REMARKS
Looser
1-
3cr
to
n
one
v
op
cc
Bat
en
0
130
‘00
30
1
1
14
Med
Hea
14
‘o
or
Bsll
16
ATHER
JINYC
ElI
S
ll,HT
TO
El
T
It
H
U
CEACY
LEATH-R
DECORATIVE
TOP
STTCHlNG
‘AACHINE
MS
MCD
TOUCHES
tMBR(
llM
DFR
SIC
Sp
14
Poly
30 30
Heave
Duty
Iwist
7)
80
C
C C
C C
C
Puly
Rely
1
6—
90
100
100
155
90
13
100
16
110
110
‘6
00
9
Wedqe
16
Wedge
Wedge
18
18
Reqular
11
Rr’gulnr
Page 22
Pattern
Setting
:z
1
17
1
1
14
12
tvW
STRAIGHT STRETCH
//A\V/A\V/A\\
//A\V/A\V/A\\
3
N
N
N
‘\
s.
\
A
A
llA\V/A’A
5
8
,
/
-___
—17
-
DECORATIVE
ULTRA STRETCH
JLOCK
OVERLOCK
BR
FISH
AN
RICK
lAP
RACK
YELLOW
PURPLE
PURPLE
PURPLE
PLE
PUP
PUP
PLE
PuR:LE
PUP
LE
PURPLE
Page 23
STRAIGHT
4.
machine
Set
as
shown.
SEWING
,i
J4
0
dial
can
left
Selection
choose
to
turned
be
make
highest
dial
Pattern
Turn Dial or
to
*
Always
in
the
operating
-I
pattern.
either
sure
position
Dial
to
needle
right
is
when
-18—
Stitch
longer
For
a
clockwise.
it
turn For
normal
between
length
stitch,
For
a
counter-clockwise
in
sewing
and
2
3.
dial
shorter
turn
dial
in
stitch,
it
is
set
Page 24
Starting
to
Sew
fabric
Place
(0.4”)
cm
Lower
Important:
Hold
on
sewing
the
of
Double
order
In
when
using
firmly
push
far
as
Reverse
reinforce
To wards pushing lever.
inside
presser
both
the
of
seam.
Presser
to
it
as
to
down
under
the
foot
threads
first
obtain
very
presser
will
go.
Sewing
seam,
edge
the
foot
edge.
lifter.
3—4
Foot
winder
thick
foot
of
reverse
about
during
stitches
Lifter
materials,
lifter
sew
back
fabric
sewing
1
the
gap
up
J
1’
by
Release
forward
hand Never
as
pull
lever
sewing
is
it
material.
fed.
and guiding
commence
fabric
by
\—
19—
Page 25
Cloth
Guide
111,1
3)
cloth
Use
seam
long
edge
from
guide
Set
needle
of
distance.
machine
Run
touching
Position
sew
to
Sew forcement
Draw is
finished.
Cut
behind
cloth
a
reverse
fabric
threads
presser
guide
of
of
hole
in
guide.
curved
at
to
when
regular
material.
on
plate,
with
guide
stitches
end
left
with
bar.
arm,
and
edge
seam.
of
when
thread
sewing
at
seam.
distance
right
at
adjust
fabric
of
angle
an
for
sewing
Cutter
a
rein
L
[1!11F
a
c:Th
20
Adjusting
stitch
Test
of
scrap
use.
to
correct
With
lower
and
and
equal
threads
both
upper
If (loose), straight surface
turning
by
material
strong
tension
upper
along
of
tension
Thread
performance
you
tension
threads
enough
center
in
is
(lower)
upper
fabric
h
(
Tension
are
(a).
tension
too
thread
c.Correct
dial
on going
upper
lock
to
tight
(lower)
a
is
lies
Page 26
Applications
of
Stitch
A.
Seams
The
normal
fabrics
should area of
fabrics
lighter shorter and
bias stitch elasticity
B.
Basting/Topstitching Sewing stitch seams stitches gatheringinfullness. canbedone the
long bolder same
type
one
needle
heavier
twist
may
but
be
(size
16or
in
glossary.
stitch
is
3,
but
the
depend
usage.
require
weight
stitches.
cut
length
a
is
prior
also
areas
to the
seam
useful
longer
to
to may
on
Usually,
fabrics
For
add
seam.
fitting.
very
straight
stitch,
can
two
be
threaded
(size
thread
suchasbuttonhole
beusedfortopstitching,
sure
to usealarger
1
Basting
8).
Straight
length
for
effectively
threads
for
length
the
fabric
stitches,
curved
use
a
strength
with
a
temporary
be
used
Topstitching
stitch.
14
or
instructions
most
chosen
and
heavier
and
require
seams
shorter
and
longer
Basting
when
with
For
of
the
through
16).
needle
4
(J
4
.5
C
0
-
a
AA
A
\
-/
.-)
—21
Page 27
ZIGZAG
5.
machine
Set
SEWING
shown.
as
44
co s
Positon
‘_)
ends
for
in
reverse
of
Control
wider the
unravell
straight
at
seam.
number.
:(
.
f
ml
machine
and
Width
the
seam
sew
and
at
ending
required
number,
)
O34
To ing,
prevent
set stitch beginning
Zigzag
control
Set Larger
stitch.
Set
it
at0for
straight
sewing.
c
c
D
Make position
Needle
s.
.--
Ii
Loft
t)O’,ItOfl
Hqbt
se
position
stit
position
loon.
k
in
P
Pc
button etc
Midibe
so buttonholes
iqht
blind
OVeIlO(
Needle by control.
When sure to
avoid
bending
sure
when
Position
position
turning
selecting
needle
needle.
needle
in
is
tearing
you
Control
can
needle
position,
upper
is
in
control.
set
changed
be
position
position
material
upper
make
or
right
side
—22—
Thread
Tension
Stitch
Better.iooking requires straight
Loosen
less stitching. upper tension
zigzag
upper
for
tension
slightly.
Zigzag
stitching
than
Page 28
_______
6.MAKING
Set
machine
Determine
Measure of for Mark
button
bar
buttonhole
diameter
and
tacks.
BUTTONHOLES
as
shown.
Length
and
thickness
add
03cm
size
on
(1
8”)
material.
I
butonhole
I
Ediameter__
3cm(1
3-5
marking
‘8”>
Determine
Determine diameter
kind
and
Attach
Completely
a Place marking
through
b
of
buttonhole
of
buttonhole material
of
foot
marking.
center
Width
width
of
button,
of
material.
push
under
buttonhole
of
indicates
of
back
foot.
foot
according
its
thickness,
foot.
sliding
foot
and
beginning
so
passes
arrow
part
that
line
s
L
to
:
thickness
I
)
marking
23—
Page 29
Bar
tacking:
dial
.
-n
to
stitches.
Set
pattern
1
(:)
and
selection
sew
5-6
U
r1,
i
Left
side:
--f
(21]).
back
Sew
until
Change
left
it
reaches
side
pattern
from
end
front
line.
to
2
to
4N
N
Remember shows to buttonholes.
Bar
tacking:
3)
so
mark
and
the
that
sew
point
it
is
end
Change
5-6
where not lines
pattern
stitches.
arrow
necessary
for
to
all
3
L”
.
:
Right
side:
,,
ti4)
catches Quick
unstitching, 0
and
and
first
finish:
proceed
Change
sew
bar
set
right
zigzag
for
tack.
To
a
pattern
side
width
few
to
until
prevent
stitches.
4
it
at
C
24—
Page 30
and
Left Balance
Stitch
of
sides
buttonhole
by dial.
dial
This
neutral and
“—
the
If
buttonhole
the
together,
(+).
*Turning
and
side
of
density
buttonhole
should
position
stitches
turn
dial
closes
Right
Buttonhole
right
on
balance
usually
(between
the
on
are
dial
the
left
to
left
Side
can
right
opens
side.
be
too
to
and
control
be
side
the
left
adjust
in
+“
close
right
I,
a
I
of
left
I>
=
If
the
buttonhole
the
dial
the
*Turning
side
stitches
to
and
the
dial
on
to
opens
are
the
right
right
too
left
right
open,
(—).
closes
side.
side
turn
right
of
I-
+
=
Page 31
Cutting
Buttonholes
Stick
a
prevent
to
Cut
buttonhole
buttonhole
Corded
For
stretch
corded
a to
keep
in
shape.
filler
Hook lead
ends
and
taut, notches Proceed regular
needle
through
over-cutting.
along
cutter.
Buttonholes
fabrics
buttonhole
finished
cord
of
cord
hook
them
shown.
as
with
stitching
buttonholes.
on
under
center
such
is
buttonhole
top
to
bar
tacks
with
knits,
as effective
spur
and
foot,
bottom
as
pull
for
When
pull
on
buttonhole Thread side cord.
...
filler
the
and
buttonhole
cord
other
end
stitching.
ends
tie,
or
of
ends
cord
cut
is
completed,
so
that
disappears
to
both
loop
reverse
ends
into
of
Page 32
SEWING
7.
njchip
Spt
s
ON
chnvi
BUTTONS
if
C
25
.
Position
foot
der
of
side needle
needle
that button
Make le
is
machine
Run
-6
sew
Stop upper
Set
a
align
sew from
OR
b
Remove threads. Draw side
button
a When
stitch,
and
stitch
c’ne
a’igned
zigzag
machine
position.
zigzag
needle
stitches
3-4
unlocking.
thread
tie
and
needle
lower adjust comes
with
at
when
with
work
ends
a
and
fnot.
zigzag
to
certain
be
button’s
medium
stitches.
w;dth
button’s
prevent
to
and
through
knot.
material
comes
Raise
width
right
that
speed
needle
control
cut
to
hole
holes.
is
hole
stitches
off
wrong
to
un
left
nec
arid
to
and
so
of
/
/
1
in
0.
27
Page 33
OVERCASTING
8.
weight
light
For
machine
Set Overcasting
fraying
from
fabric
finish.
neat
material:
shown.
as
prevents
and
edge
produces
of
44;
:._
45
N
cz
stitches
all
that
side
the
and
so
are
elastic
as
same
flush
shown.
way
edge
with
material:
above.
carefully
Sew
right
on
fabric.
of
-
//
//
N
For Set Sew
thick
machine
in
—28—
Page 34
OVERLOCKING
9.
Overlocking
sew
machine
For
For
two
right
prevent
so outside
to
the
at
medium,
medium,
pieces
sides
that
possible seams
Set
a
b
Put with
To sew
drop
stitches
same
shown.
as
thin
thick
of
edges
right
the
and
time.
cloth
facing
from
edge
make
overcast
material
material
together
and
side
material.
of
it
(
4
sew.
fraying,
stitches
some
In stitches overcasting.
cases
can
overlocking
be
used
for
—29---
Page 35
Applications Overlockstitch
stitch
This
overcasting,
knits
on
for
also,
is
and
very
decoration.
of
the
effective
very
edgestitching,
stretchy
Elastic
for
etc.
fabrics,
Topstitching
decorative
A produced stitch. lines
Stitch
of
effect.
ic decorative edging decorative
the
Pattern:
Length: width:
Feed Pressure: Foot: Needle
Edging As the
used place cloths. with but
instead.
5
Dog:
Embroidery
Position:
with
elastic
for
mats,
the
use
with
around garments Topstitch
inset
add
to
flair.
5
Up
Normal
the
edging
decorative
a
Proceed
stretch
the
topstitch
the
with
stretch
napkins
blind
elastic
elastic
the
for
an
or
L
stitch
as
edging
can
edging
structural
dramat
a
braid
a
the
additional
R
blind
edge
and
you
hem
elastic
hem,
can
table
would
stitch,
stitch
be
or
be
on
—30—
Pattern Length:
Width:
Feed Pressure: Foot: Needle
:.-
5
3—5
Up
Dog:
Normal
Embroidery
Position:
M,
A
or
L
Page 36
Application Stitch
Seaming
A. On seam, or desirable seam
can sional prevent ment at on
in doubt stitches particular choose ance. The
is such knits, the of
For allowances: that raw swings
For allowances. the
line
excess
ing.
most
such
overlock
the
allowance.
create
finish,
to
same
the
amount
the
making
as
stitch
excellent
as
greatest
all.
patterns
the
edge
patterns
fabric
“1
knits,
than
curling,
“give”
to
according
sweater
and
to
2”,
fabric
of
a
stitch
as
a
neater,
a
eliminate
time
garment.
a
which
to
use,
fabric
and
for
cotton
strength
with
Feed
needle
the
of
right.
the
with
Feed
along
then
close
Ultra
3
stitch,
5/8
These
permit
under
they
of
test
in
overcast
stretch
knits,
3
goes
the
16inch
and
inch
more
bulky
stress,
work
of both
question
their
to
knits.
and
6
1
fabric
the
fabric
8
5
raw
the
etched
trim
to
Stretch
finished
overcast
is
opened
stitches
profes seams
the
cut
involved
ever
If
the
on
perform
fabrics
bathing
It
elasticity
inch
over
when
inch
edge
away
the
more
gar
and
down
two
the
and
stitch
suit has
seam
such
seam
guide
stitch
14
S
AA
in
the
it
of
the
-
B.
Procedure:
•Overlock seaming edge operation.
overlock
•This good
double
as will
give
of
for
stitching
and
knit
stretch
knit
firm,
a
finishing
fabrics,
sutch
and
neat
is
all
especially
is
fabrics
jersey
edge
used
the
cut
one
in
such
ann
finish,
for
-------—--—
31
-
Page 37
Zkr
_
of
Application
[\WIA\V/II
A.
Topstitching/Rick..Rack
A
decorative
Stitch
the
of
Topstitch
inset
flair.
rick-rack
form
to
of
and
the
width to
back
rick-rack
elastic
line
so
open.
this
wovens
both
narrow
duty
medium
for
weight
Use
your
pull
not
poor
with
garment
to
flowers,
stitch
facings
produced
stitch.
lines effect. rative
J
llI
iii
I
)
5
0
I
-
EZ
creative
B.
Tapering/Rick-Rack
The
red
petals pictures
tapering
the
stitch and tapered bouquet-like
C.
Procedure:
•The zigzag desired
pressed
.Apply
on
•Use heavy
•Use
zigzag
seams, heavier terrycloth, stic. stitching.
•Guide Do
cause
Rick-Rack
topstitch
the
braid
add
stitch
hangings.
zigzag,
lever
A
group
stitch
of
stitching
seams
to and
stitch
and
fabrics
for
for
or
push
stitching.
the
foraspecial
an
may
areas
of wide and
attaching
from
around
creative
wall
0. effect. rick-rack
that
width
triple
overcasting
and
also fabric
can
rick-rack
structural
deco
or
a
additional
tape
be
stems
embroidered
slowly
from
stitch
knits.
zigzag
and
As
turn to
0
of
these
will
form
is
that
may
stress
of
as
for
seams.
widths
edges
hems
such
ela
decorative
front.
the
it
as
be
in
5 a
a
is
be
a
of
of of
as
will
—32—
Page 38
Application
Patterns
Fun
Decorative
of
______
[i
stitches-Swan-Fish-Briar
Fun
A.
reverse
The
swan,
duce
on
use children
pattern
stitch
hems
in
reverse
The
be
also bindings effect.
manner
zigzag
the stitched patterns sewn
on binding effect
placeniats
and
appearance. patterns stronger
and
mats
strands
four
broidery presser
help
will
while patterns
can
terns
through effective thread
upper
the larger accommodate
this
Use enhancing napkins
LZ]
fish,
household
clothes.
as
used
and
This
that
edge
on
the
ribbon.
or
can
can
decorative
tablecloths.
floss
foot
guide
sewing
The he one decorative
two
needle
decorative
tablecloths,
and
stitch
briar
can
the
stitch
for
ribbons
done
is
lace
stitch
the
of
the
left
used
be
The
also
pearl
of
or
A
the
reverse
sewn
needle
sewing
threading
should
the
curtains
L*
patterns
designs
linens
These
used
be
scallop
patterns
topstitching
for
decorative the
in
is
anpired
The
reverse
should
left
edge
decorative
This
on
a
for
reverse
corded
be
edges
Simply
cotton,
under
yarn
transparent
cord
the
reverse
stitch
two
with
for
stitch
threads
system
be
two
technique
placemats,
pro
for
and
reverse
to
sew
stitch
can
same
with
straight
stitch
the
of
towels
pleasant
stitch
place
en
place
em
foot
evenly
stitch
pat
threads
more
a
Simply
through
used
threads.
be
for
the
to
for
t
I
1•
ii
EEE’
A
NOTE
made
432
Narrow
by
serting
patterirs
zigzag
may width
be
to
33
Page 39
STITCH
foot,
neater
or
HEM
as
as
finish,
iron
shown.
shown
it
hem
and
is
preferable
before
place
hand.
BLIND
10.
machine
Set
I
2.5
35
material
Fold
it
under
For
a
to
baste
-
I
34—
Sew stitches and one
carefully,
are
slanting
two
or
so
made
stitches
threads
on
that
hem
pierce
of
straight
edge,
only
fold.
Page 40
_c:H:...!..
a
Correct
b
Needle too Needle fold
Elastic
For
elastic
shown
as
way
stitch
much.
at
as
seam
is
catching
is
not
all
Blind
materials, and
for
catching
Hem
sew
normal
edge
set
in
blind
of
edge
Stitch
machine
the
fold
same
hem
N
side
wrong
.
of
b
12
F
35
35
AA
Page 41
12
STRETCH
11.
balipoint
A Paper smoother
may
needle
laid
be
feeding.
SEAMS
essential.
is
knits
under
for
1
4
0
4
I
0.5
I.5[
0.5
—-
Medium-weight
a
double
Apply
Apply and
knit,
elastic
Light-weight
b
small
lower
zigzag.
thread
jersey.
triple
fabrics
stitch.
fabrics
Reduce
tension.
upper
::
0.5
cD
1
—36--
c
For
spandex
lapped
Use Apply
Very
(power
multiple
elastic
abutted
or
zigzag.
fabrics
net)
seam.
Page 42
ZIPPER
12.
machine
Set
Used
trousers,
By
using
sewing
per
for
dresses.
bags,
the
can
SEWING
shown.
as
etc.
special
be
blouses
zipper easily
skirts,
foot.
done.
zip
23
)
0
(1)
With
along
Open
(2>
the
out
Place
of
side
Replace
(3)
zipper
zipper
The
the
to
the
so difficulty.
top.
the
Turn
(4’
side.
Tack
per. from guide.
right across
zipper.
the
seam
the
the
foot
right
zipper
Ease
the
Shift
of
the
right
line
the
lower
folded
zipper
the on foot
or
Stitch
Remove
the
the
a
tacked
the
lower
Remove
sides
the
of
tacked
material
edge
and
presser
leftofthe
the
can
left
the
be
can
from
the
material
material
measured
seam
zipper
the
needle.
end,
together
opening
seam
O.3cm(¼’).
over
tack
foot
shifted
be
the
of sewn
the
tacking.
to
and
1
as
Doublestitch
then
the
and
the
over
with
needle.
zipper,
without
bottom
the
the
3cm
stiching
a
foot
up
tacking.
tack
a
pull
right
the
either
right
zip
(½’)
to
along
it.
to
the
(‘s
03cm
wrong
r
-i
4
—37-—
Page 43
SHELL
13.
Silk,
/6
2.5
-
5
3.5
1
sheer
Set
Fold folded presser
Pull
when
nylon
fabrics
machine
edge
edge
thread
starting
organdy
as
of
to
foot.
ends
STITCHING
or
are
suitable.
shown.
material.
left,
placeitunder
towards
sewing.
similar
With
back
-I
—38—-
Make edge ways.
of
sure
needle
fold
whenitmoves
misses
raw
side
Page 44
14.
machine
Set
better
For material
little.
a For
14.
p.
Insert spring
PIN
twin
the
plate
TUCKING
as
appearance,
tighten
and
needle
quilting
on
shown.
lower
threading
guide
holder.
the
use
under
sheer
thread
see
the
AA
4
Mark tailor’s
From
following
guide.
Interval adjusted direction
first
chalk,
second
seam
between
by
of
line
and
arrow.
with
sew.
line,
first
of
seams
moving
pencil
just
line
guide
can
or
sew,
using
be
}
/
in
9-.
3
Page 45
23
4i
QUILTING
15.
machine
Set
as
shown.
Baste prevent
you
as Attach
same
the
layers
them
sew. quilting
way
of
from
guide
as
material
slipping
pin
and
tucking.
sew
to
out
in
40
Page 46
SCALLOPING
16.
machine
Set
pieces
two
Put
right
with
sides
as
shown.
cloth
of facing,
together
and
R
L:
sew.
Trim from
Make evenly
Turn
out. edge
gently press.
edge
stitching.
notches
spaced
pieces
two
Bring
by
with
0.3cm
on
intervals.
stitching
pushing
your
(1,8”)
seim
to
fingers,
right
line
seam
edge
to
away
sides
very
edge
and
at
.
Push
41
otches
Page 47
MENDING
17.
8
3.5—5
Patching
shown.
right
as
patch
the
side.
close
edge
over
Trim
to
of
the
the
the
away
seam
worn
patch
the
on
>
.1
Set
Place
machine
the
part.
along
Sew
the
on
part
worn
side
back
-42-
I
Rip
patching.
the
a
edges
way
same
the
in
together
tear
of
Mending
machine
Set
for
as
Sew
first.
can
seams
be
more
two
sew
Then
side.
either
gauze
of
piece
A
reinforce
jnderneath
—I
to
placed
the
on
rip.
Page 48
APPLIQUE
18.
machine
Set
Draw used
Place
baste
and
Sew stitch width
size material.
design
an
as
cut-out
around
adjusting
according
cut-out
of
shown.
as
on
applique
on
it.
outline
WORK
material
and
base
stitch
to
and
with
shape
type
cut
material
length
of
to
it
out.
zigzag
be
and and
base
032
5
2.5
AA
I
/
I
I
‘I
change
To
to
or machine,
away presser
Lower sewing
Sew zigzag
This
sew
from
presser
a
width
is
foot
few
to
direction
small
very positioning
edge
and
foot
stitches
at
0.
prevent
at
circles,
needle
cutout,
of
material
turn
and
at
unstitching.
corners
stop
just
continue
with
end
lift
43
Page 49
EMBROIDERY
V
19.
Set
machine
as
shown.
10’
Lj
A
Needle
No.
No.
No.
9
11
14
Remove
4
-
-
k
Thread
120
---
100-80
6050
100
To
-
pulled tension.
For important and
Use upper of
lower Trace and
Make
Pull handwheel holding
Lower
foot,
up,
good
thin
thread
thread.
your
sure
lower
upper
presser
lower
to
embroidery
kind
material
avoid
thread.
same
centeritin
out
reduce
holder
and
thread
upper
embroidery,
use
correct
and
a
and color
design
embroidery
thread
towards
thread
foot
thinner
on
is
taut.
by you lightly.
lifter.
screw
being
thread
it
needles
silk
silk
material
hoop.
turning
while
is
for
for
—44—
threads
both
Hold
stitch.
sewing
with
outline
filling,
zigzag
paper
sewing with
Continue by
To stitches
Lay
when embroidering
along
satin
hand.
finish
typewriting
and
of
guiding
sew
width
underneath
sheer
start
design
hoop
several
at
fabric.
0.
Page 50
MAINTENANCE
20.
machine
Your cleaning factory
machine
A few
cleaned
and
sewing
hours
and
Cleaning
off
with
latches
foot
needle
cleaning
Remove Remove
Brush dog
Turn
requires
oiling
performance.
which
day
a
oiled
and
dust
all
outwards.
is
needs
once
needle.
plate.
and
brush.
for
used
a
lint
regular
satis
for
to
month.
on
t
a
be
}
feed
Remove
Remove with
cloth.
cleaning
a
shuttle
shuttle
race
Clean
brush
cover. shuttle
and
a
race
soft
Page 51
Oiling
oil
Use
sewing
for
oils
will
mechanism
one
Apply shuttle
manufactured
machine
eventually
to
jam.
drop
where
friction
of
oil
specially
use.
to
occurs.
Other
cause
part
of
J
in
oil
apply
and
cover
face
Open
way.
same
the
much
too
apply
to
it
cause
oiling,
may
to
part.
not
some
run
allow
stain
sewing
your
machine
to
oil
material
difficulty
for
penetrate
1-2
careful
Be
or
oil and
After minutes
every
to
)ly
one
drop
Remove Puil bobbin Loosening
large top
lubricating
to
oil
of
points
indicated
Top
out
spool
winding
screws
screwdriver,
Cover.
arrows.
by
Cover:
pins
spindle
a
then
and
and
to
take
right.
b
push
with
off
—46—
Page 52
21.
TROUBLE
CHART
PROBLEM
Breaking
thread
Skipping
equiJr
h
The fed
lower
stitches
stitches
material
correctly
not
Thread
not
or
Lower
Lint the
Needle
Needle Size
suitable Incorrect Too
Incorrect
Upper Incorrect
Pattern
Incorrect Lint
not
drawn thread
stuck
tension
not bent
or
much
thread
stuck
PROBABLE
wound
the
in
spring
fully
of
type
the
for
upper
oil
size
lower
selection
feed
on
correctly
up tension
bobbin
inserted
needle
material
threading
on
of tension
tension
dog
the
evenly
the
needle
dial
height
feed
CAUSE
too
case
and
hook
for
too
not
dog
on
tight
thread
loose
set
the
and
the
correctly
bobbin
inside
not
material
CORRECTION
P.15
P.10,
P.12
fluff
P.
P.
P.16
P13 P
P.16
lint with
brush
6
6
46
P.20
P.12
P.17 P.12
P.45
Remove and
cleaning
a
Page 53
PROBLEM
PROBABLE
CAUSE
CORRECTION
material
The puckers
Breaking
trouble
not
o
try
needle
is
still
to
apparent
correct
Upper Stitch Thread Incorrect
Needle Needle Needle Upper
Needle Dials
was
down
Zigzag needle
fault
or
too
too
not bent clamp
thread
too
have
width
was
in
lower
long
thick
threading
correctly
screw
tension
fine
been
in
the
set
attached
machine,’
the
yourself.
by
thread
for
of
for
changed
material
more
tension
material
upper
inserted
too
too
material
the
than
please
or
loose
tight
while
lower
2.5
too
the
while
consult
tight
thread
needle
twin
your
P12,
P.13,
P.18,
nearest
P.18 P.16
P. P. P. P.20
P.16
P.14
P.20
P.11
6 6 6
P.22
dealer.
48—
Changing
Unplug
Open
Remove in Install in
the
face
bulb
counterclockwise.
new
a
clockwise.
Light
machine.
cover
by
bulb
Bulb
shown.
as
unscrewing
by
screwing
it
it
Loading...