

Page 1
INSTRUCTION
MANUAL
MANUAL
DE
INSTRUCCIONES
WHiTE
Call
800-331-3164
wwwwhitesewinci
Toll
Llame
Free
gratis
.com
Page 2
IMPORTANT
electrical
When
foHowed,
using
an
including
following:
the
SAFETY
appliance,
basic
safety
IN
STRUCTIONS
precautions
should
always
be
Read
all
DANGER
appliance
An
appliance
Always
from
unplug
WARNING
persons:
injury
Operfate
like.
1.
2.
3.
4.
5.
6.
7.
8.
9.
10.
11.
12.
13.
14.
15.
to
sewing
the
See
allow
not
Do
or
by
used
appliance
this
Use
attachments
Never
properly,
appliance
electrical
Never
of
loose
Never
Do
Do
To
Do
Always
operate
operate
sewing
the
cloth.
drop
use
not
operate
not
administered.
being
disconnect,
unplug
not
fingers
Keep
machine
use
use
not
Do
pull
not
Do
Unplug
threading
Always
lubricating,
instruction
the
unplug
instructions
To
should
the
before
installation
to
near
ifithas
to
mechanical
or
or
outdoors.
needle.
the
bent
or
sewing
needle,
or
manual.
never
electric
relamping,
machine
used
be
children.
only
recommended
appliance
this
been
nearest
the
appliance
the
machine
insert
where
all
turn
pulling
by
from
away
proper
needles.
fabric
push
machine
changing
sewing
when
(this
reduce
left
be
outlet
reduce
To
only
instructions.
a
as
its
for
by
dropped
authorized
adjustment.
foot
and
object
any
aerosol
controls
cord.
on
moving
all
needle
while
needle,
machine
making
sewing
the
unattended
immediately
Replace
the
mounted
when
Close
toy.
intended
manufacturer
the
ifithas
damaged,
or
dealer
any
with
controller
any
into
(spray)
the
to
To
parts.
plate.
stitching.
when
any
making
threading
from
other
before
risk
bulb
risk
attention
use
damaged
a
openings
air
opening.
products
(“0”)
off
unplug,
wrong
The
It
electrical
the
user
machine)
electric
of
when
after
as
or
free
Special
may
any
servicing
plugged
using
same
with
burns.fire,
of
in
sewing
is
necessary
described
as
cord
dropped
or
service
blocked,Keep
from
being
are
position,then
grasp
the
care
plate
deflect
adjustments
bobbin,
outlet
using
shock:
in.
before
and
type
machine
this
in
contained
plug,
or
into
center
accumulation
the
used
remove
plug,
required
is
cause
can
the
changing
or
when
adjustments
Always
rated
electric
table,
when
manual.
this
in
it
if
water,
for
examination,
ventilation
or
the
not
the
needle
the
in
removing
unplug
cleaning.
watts.
15
case,
appliance
this
Use
manual.
working
not
is
Return
lint,
of
where
from
plug
cord.
around
needle
causing
needle
presser
mentioned
this
shock,or
and
only
the
repair,
openings
dust,
oxygen
outlet.
sewing
the
break.
to
to
it
area,
foot,
covers,
in
the
is
and
is
break.
such
etc.
the
as
SAVE
THESE
INSTRUCTIONS
Page 3
INSTRUCCIONES
las
siguientes
las
instrucciones
reducir
Para
constante
tomacorriente
del
siempre
tipo,de
eléctricos
máquina
otros
en
o
incluyendo
todas
coser
deberá
las
Siempre
eléctrico,
Lea
de
PELIGRO
requiere
Se
desconecte
limpiarlo.Desconecte
repuesto
supervision
el
mismo
del
aparato
ADVERTENCIA
incendios,choques
de
Ia
coser,
funcionar
Haga
máquinas
instalaciôn.
seguir
IMPORTANTES
seguridad
precauciones
precauciones:
el
de
antes
vatios.
15
reducir
para
o
coser
de
muebles
de
antes
riesgo
aparato
este
inmediatamente
cambiar
de
el
lesions
solamente
parecidos.
de
riesgo
las
a
choques
Ia
cuando
DE
básicas
usar
de
cuando
bombilla.Cambie
quemaduras,
de
personas:
esté
Véanse
at
esta
eléctricos:
esté
después
montada
instrucciones
las
SEGURIDAD
aparato
este
usar
máquina
Ia
mesa
Siempre
antes
y
con
para
de
un
conectado.
usarlo
de
bombilla
Ia
en
de
permita
No
1.
este
Use
2.
este
en
como
Nunca
3.
funcionara
agua,
autorizado
mecánicos
Nunca
4.
rejillas
las
polvo
Nunca
5.
to
No
6.
to
7.
No
suministrando
Para
8.
después,
to
No
9.
Mantenga
10.
precauciones
Siempre
11.
rompa
se
No
12.
jale
No
13.
Desconecte
14.
enhebrar
at
etc.
Siempre
15.
lubricar
instrucciones.
use
se
que
usado
aparato
este
se
devuelva
y
use
use
desconectarlo,ponga
desconecte
use
sea
aparato
manual.
indica
funcionar
haga
adecuadamente.
más
debidos.
este
use
ventilación
de
suelta.
teta
caer
deje
Ia
intemperie.
a
donde
oxigeno.
deconecte
dedos
los
especiales
Ia
use
aguja.
Ia
agujas
o
empuje
Ia
Ia
desconecte
a!
hacer
o
solamente
Use
en
este
aparato
el
cercano
aparato
inserte
o
se
jatando
placa
dobladas.
Ia
máquina
aguja,
cualquier
GUARDE
como
donde
solamente
manual.
este
para
con
y
objetos
el
enchufe
las
de
adecuada
mientras
tela
de
cambar
Ia
máquina
usando
el
cerca
estén
supervision
juguete.Será
haya
el
para
los
aparato
hubiera
se
si
distribuidor
un
a
que
alguna
controlador
el
cable.
manos
de
coser
Ia
otro
los
del
para
aguja,
de
ajuste
todos
necesaria
o
niños
para
fin
accesorios
cable
el
si
caido
autorizado
revisen,
to
rejillas
las
de
del
abertura.
una
en
productos
controles
tomacorrIente.
desconectarlo,sujete
Para
alejados
aguja
Ia
aguja.
Ia
hacer
coser
Podria
cualquier
enhebrar
del
servicio
de
cose.
al
que
que
el
o
reparen
pedal
de
en
de
de
tomacorriente
Ia
estén
éstos
diseñado,
fue
recomendados
enchufe
el
dañado,
o
al
o
hagan
o
ventilaciôn
de
limpios,
aerosol
Ia
las
máquina
Ia
Usar
mover
Ia
(rociador)
posiciOn
piezas
place
Ia
aguja
Ia
ajuste
bobina
mencionado
cerca.
por
estuvieran
Si
0
centro
los
sin
de
el
movimiento.
en
coser.
de
errOnea
y
el
en
at
o
at
ESTASINSTRUCCIONES
constante
describe
fabricante,
el
danados,
hubiera
servicio
de
ajustes
en
a
podria
de
las
manual
el
se
caido
eléctricos
donde
(“0”)
Se
que
Ia
prensatelas,
el
cubiertas,
como
se
bloqueadas.
acumulaciones
apagado
enchufe,no
causar
area
cambiar
quitar
en
Cuando
Si
al
Mantenga
de
se
y,
cable.
el
requerirán
causar
rompa.
se
aguja,
de
no
o
pelusa,
esté
que
como
at
Page 4
CONTENTS
parts
Name
Accessories
Before
Removing
Free-arm
Winding
Removing
Inserting
Inserting
Threading
of
sewing
Drawing
Changing
Levelling
Adjusting
Regulating
feed
Drop
Changing
Fabric-Thread-Needle-Table
Sewing
start
To
finish
to
How
Straight
Zigzag
Overcasting
Binding
Button
Zipper
Buttonhole
Hemming
Twin
Embroidery
Quilter
Seam
Maintenance
Checking
sewing
sewing
sewing
needle
guide
(Power
extension
sewing
bobbin
the
bobbin
bobbin
bobbin
upper
bobbin
up
sewing
machine
thread
the
needle
(Pattern
sewing
stitches
stitch
sewing
(Cleaning
performance
presser
supply
table
case
bobbin
into
into
case
thread
thread
directions
tension
selector)
sewing
and
bobbin
and
case
shuttle
Twin
&
foot
and
and
problems-Troubleshooting
race
needle
pressure
operation
oiling)
lamp)
threading
table
5-6
7
8
9
9
10
11
11
12
13
14
14
15
16
17
17
18
19
21
22
23
24
24
25
25
26
27
28
29
30
30
31
31
32
33
-3-
Page 5
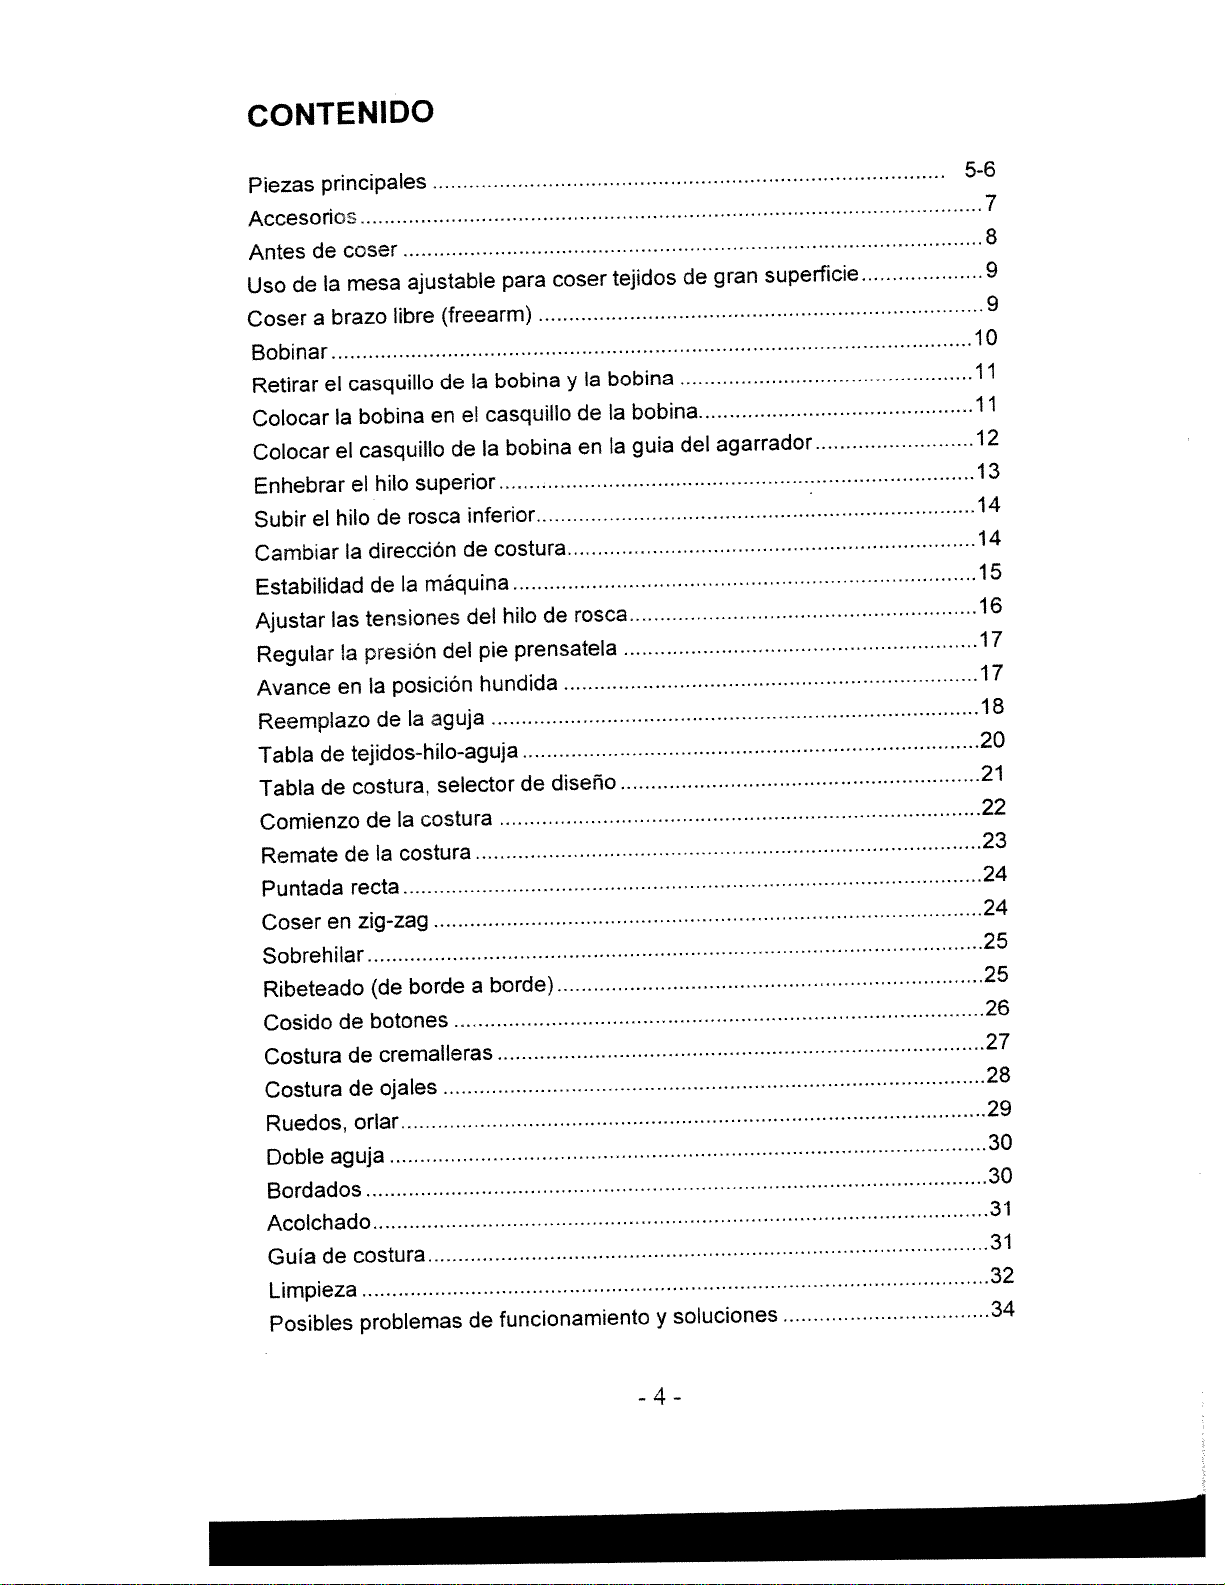
CONTENIDO
Piezas
principales
Accesonos
coser
de
de
Ia
a
brazo
Antes
Uso
Coser
Bobinar
Retirar
Colocar
Colocar
el
Ia
el
Enhebrar
hilo
el
Subir
Cambiar
Estabilidad
Ajustar
Regular
Avance
las
Ia
en
Reemplazo
Tabla
Tabla
de
de
Comienzo
Remate
Puntada
Coser
en
Sobrehilar
Ribeteado
Cosido
de
Costura
Costura
Ruedos,
Doble
aguja
Bordados
Acolchado
Guladecostura
Limpieza
Posibles
.
ajustable
mesa
(freearm)
libre
Ia
casquillo
bobina
casquWo
hilo
el
de
dirección
Ia
de
tensiones
presiOn
Ia
de
de
en
de
superior
rosca
máquina
Ia
del
posición
aguja
Ia
el
Ia
inferior
de
del
pie
hundida
tejidos-hilo-aguja
Ia
costura
Ia
selector
costura
costura,
de
de
recta
zig-zag
(de
borde
a
botones
cremalleras
de
ojales
de
orlar
problemas
de
coser
para
Ia
bobina
casquiflo
bobina
y
de
en
costura
rosca
de
hilo
prensatela
diseño
de
borde)
funcionamiento
tejidos
bobina
bobina
Ia
guia
Ia
gran
de
agarrador
del
soluciones
y
superficie
5-6
7
8
9
9
10
11
11
12
13
14
14
15
16
17
17
18
20
21
22
23
24
24
25
25
26
27
28
29
30
30
31
31
32
34
-4-
Page 6
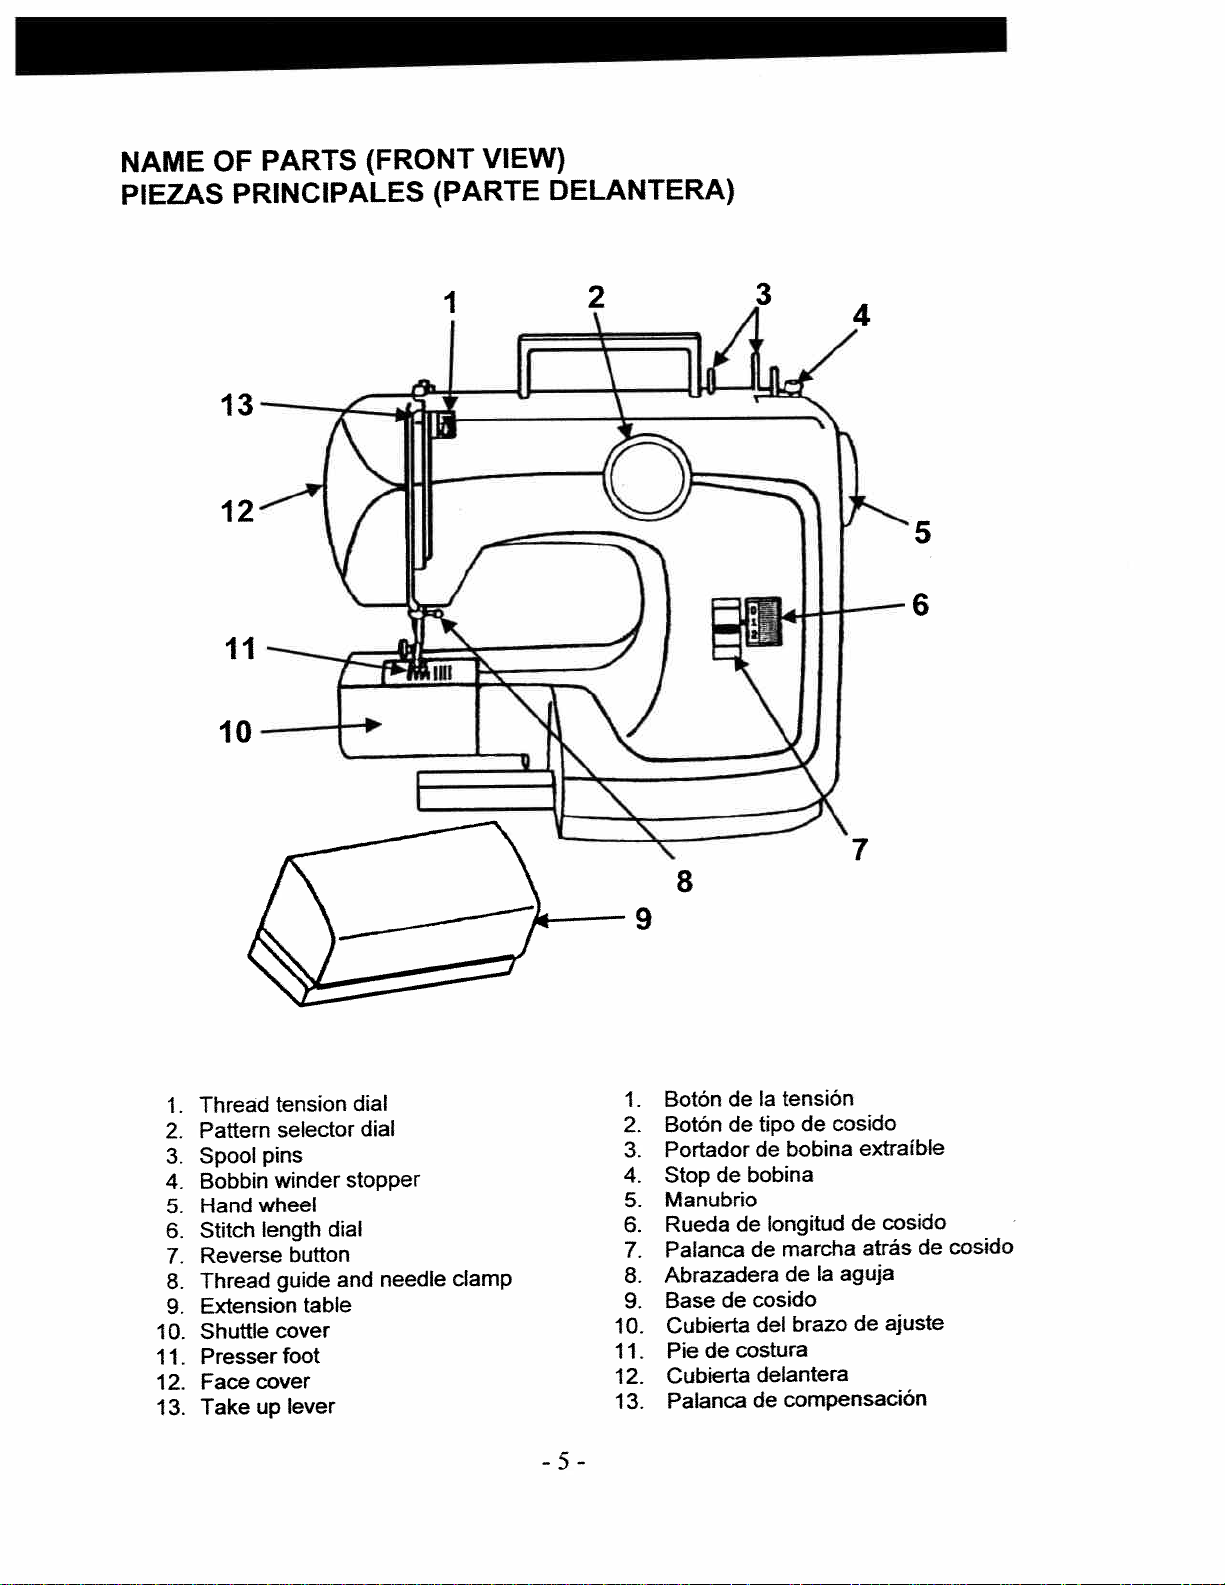
NAME
PIEZAS
PARTS
OF
PRINCIPALES
(FRONT
(PARTE
VIEW)
DELANTERA)
13
12
II
I
I
2
5
6
1.
2.
3.
4.
5.
6.
7-
8.
9.
10.
11.
12.
13.
Thread
Pattern
Spool
Bobbin
Hand
Stitch
Reverse
Thread
Extension
Shuttle
Presser
Face
Take
pins
wheel
length
cover
up
tension
selector
winder
button
guide
table
cover
foot
lever
dial
stopper
dial
and
dial
needle
clamp
-5-
1
2.
3.
4.
5.
6.
7.
8.
9.
10.
11.
12.
13.
Botôn
Botón
Portador
Stop
Man
Rueda
Palanca
Abrazadera
Base
Cubierta
Pie
Cubierta
Palanca
de
de
de
ubrio
de
de
bobina
de
costura
Ia
tensiOn
tipo
de
longitud
de
cosido
del
delantera
de
cosido
de
bobina
marcha
Ia
de
brazo
compensaciOn
extraible
de
atrás
aguja
de
cosido
de
ajuste
cosido
Page 7
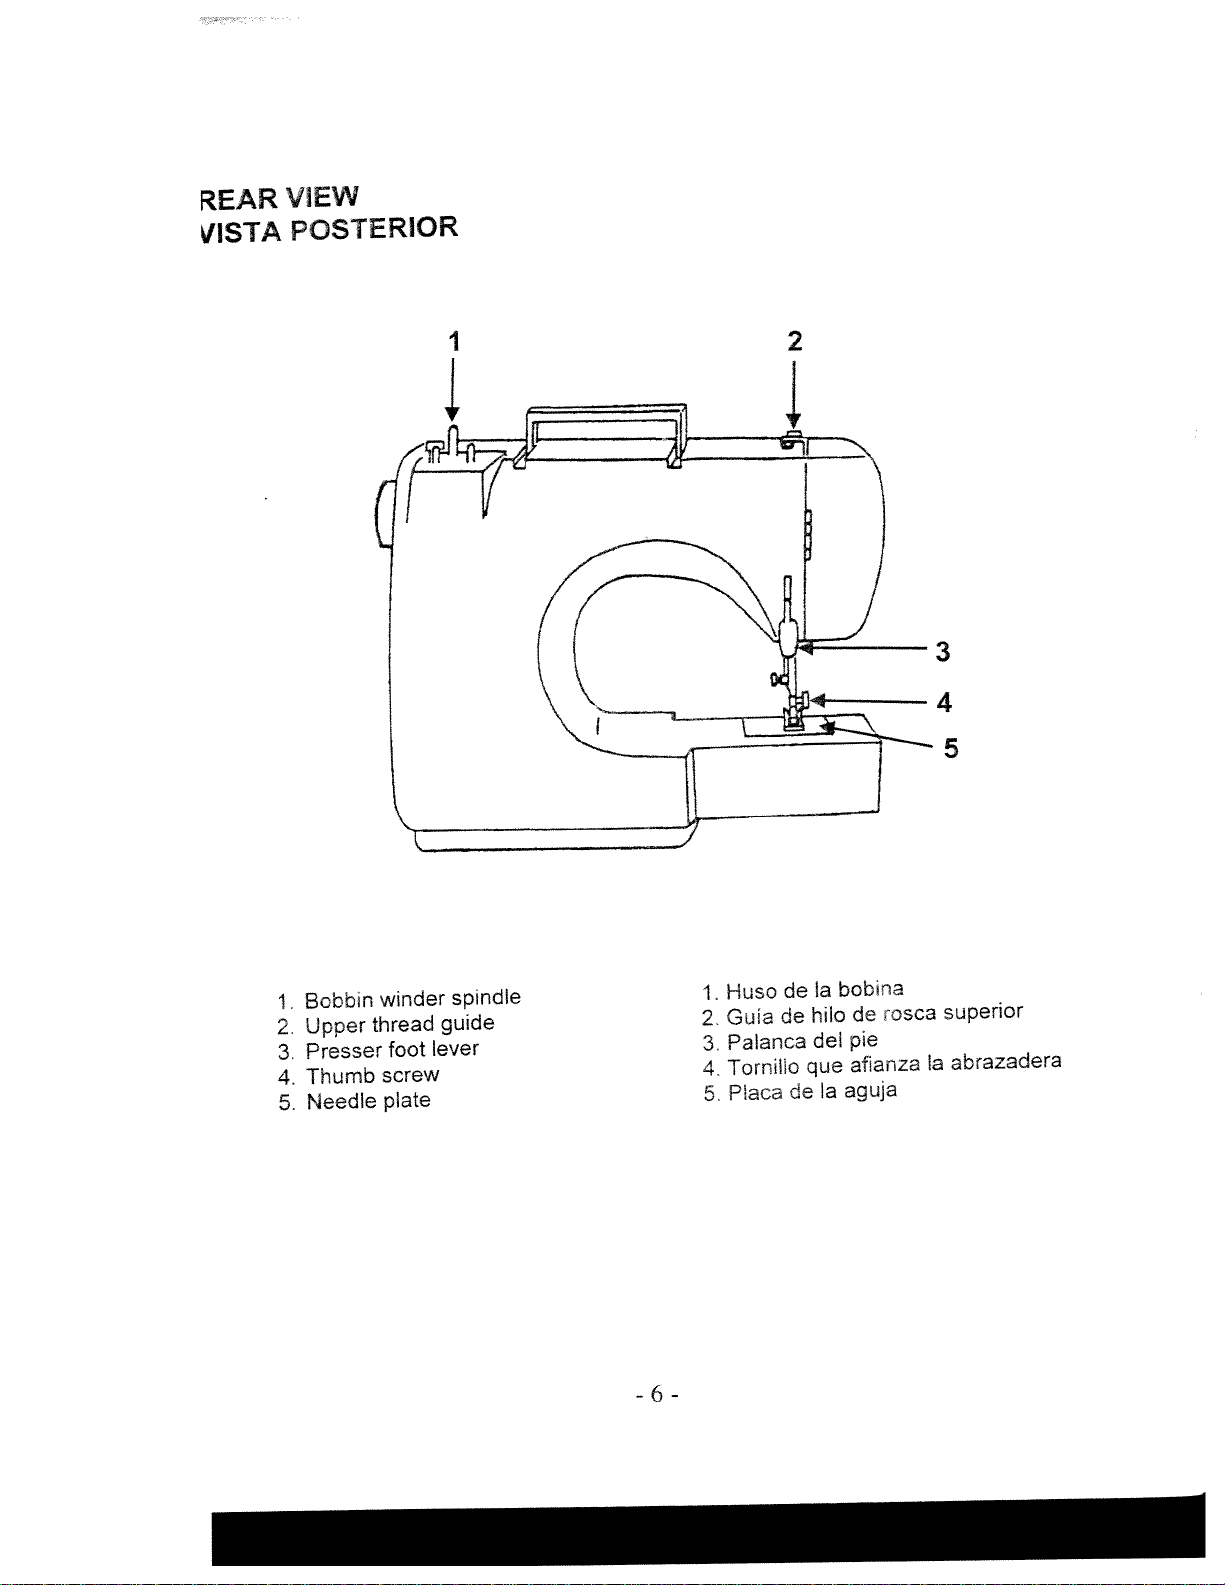
REAR
IISTA
ViEW
POSTERIOR
I
2
1
2.
3.
4.
5.
Bobbin
Upper
Presser
Thumb
Needle
winder
thread
foot
screw
plate
spindle
guide
lever
-6-
Huso
1.
Gula
2.
Palanca
3.
Tornillo
4.
Placa
5.
de
de
de
Ia
hifo
del
que
(a
bobina
de
pie
afianza
aguja
rosca
superior
abrazadera
(a
Page 8
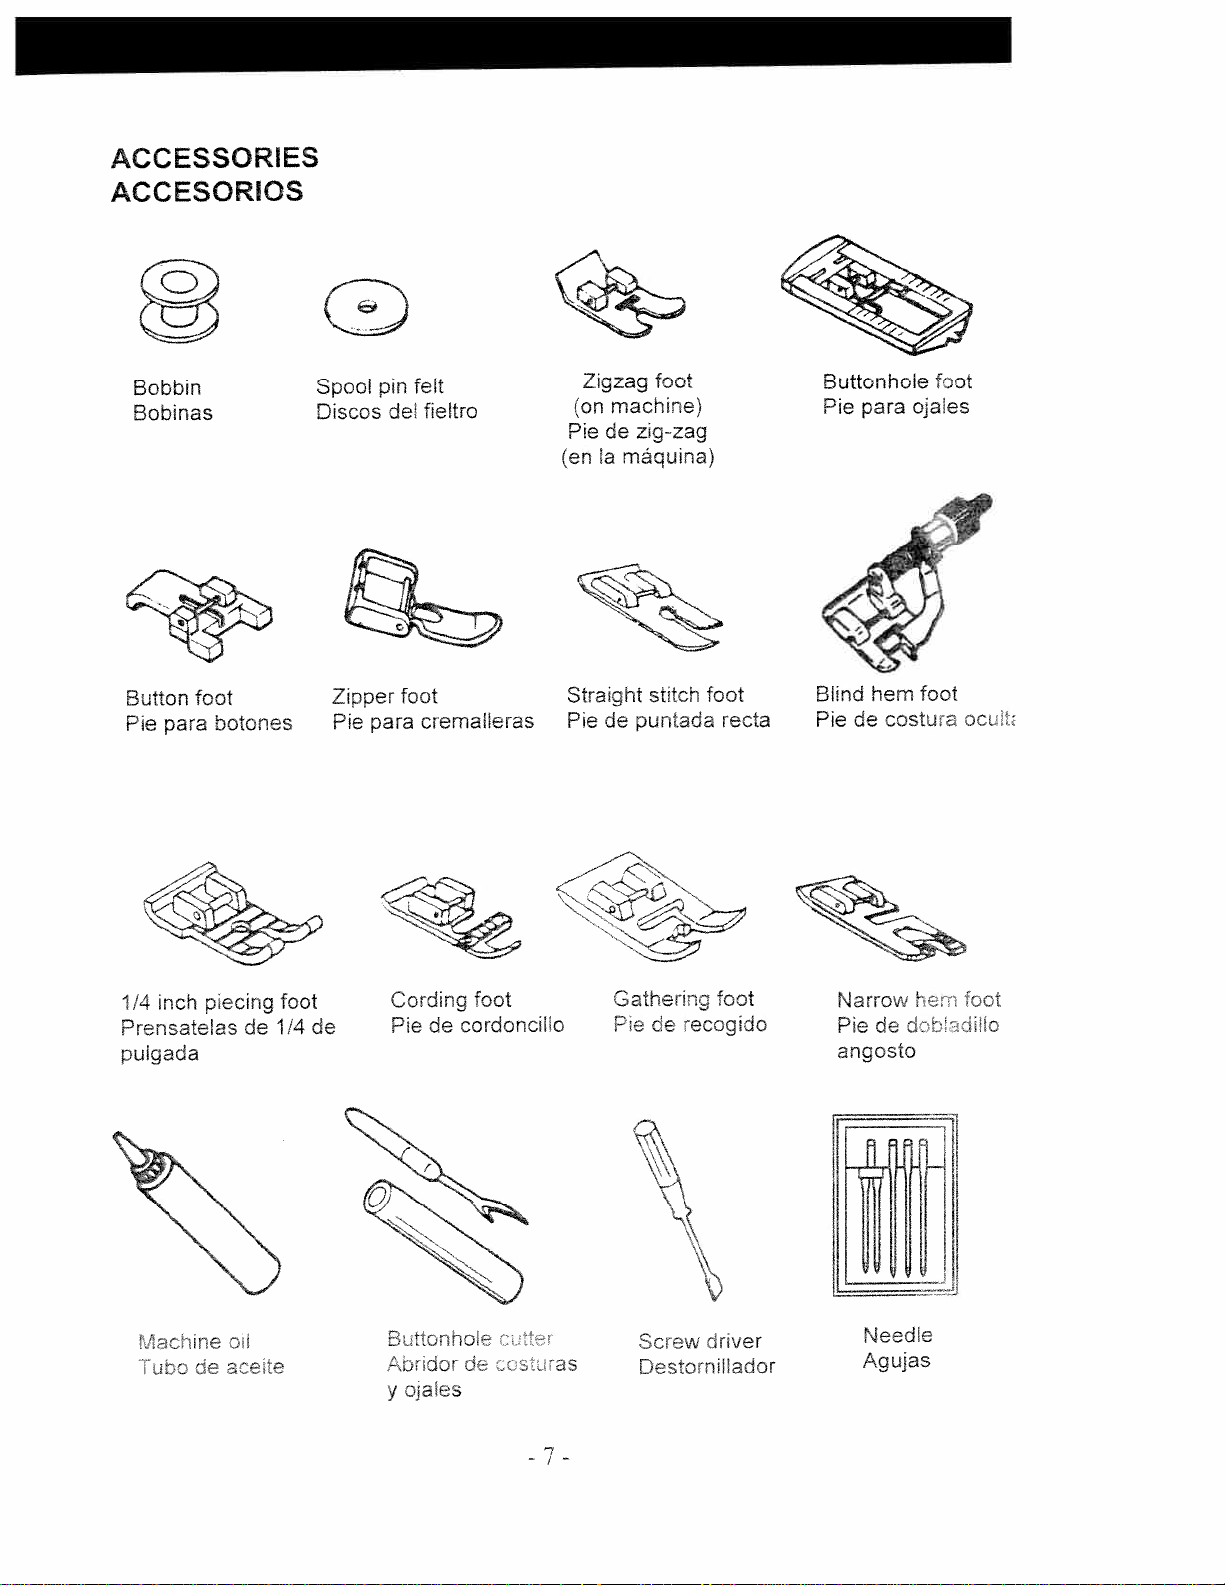
ACCESSORIES
ACCESORIOS
0
Bobbin
Bobinas
Button
para
Pie
foot
botones
Spool
Discos
Zipper
Pie
pin
de
foot
para
felt
fieltro
cremaileras
Zigzag
(on
Pie
de
fa
(en
Straight
Pie
de
foot
machine)
zigzag
máquina)
stitch
puntada
foot
recta
Buttonhole
Pie
para
hem
Blind
de
Pie
costoa
foot
ojales
foot
ocL
inch
1/4
Prensatelas
puigada
tachine
cc
piecing
de
Cii
ce:e
foot
1/4
de
Cording
Pie
de
oraor
ojales
y
foot
cordoncillo
cc
5E.her
Ece
Screw
ras
7
rDQt
ecogidc
cinver
rnNaL1or
Narrow
de
Pie
angosto
Ii
U
Needle
Agujas
I
Li
I
hcr
ii
foot
Page 9
BEFORE
SEWING
ANTES
I
DE
COSER
,6ver
ConexiOn
Speed
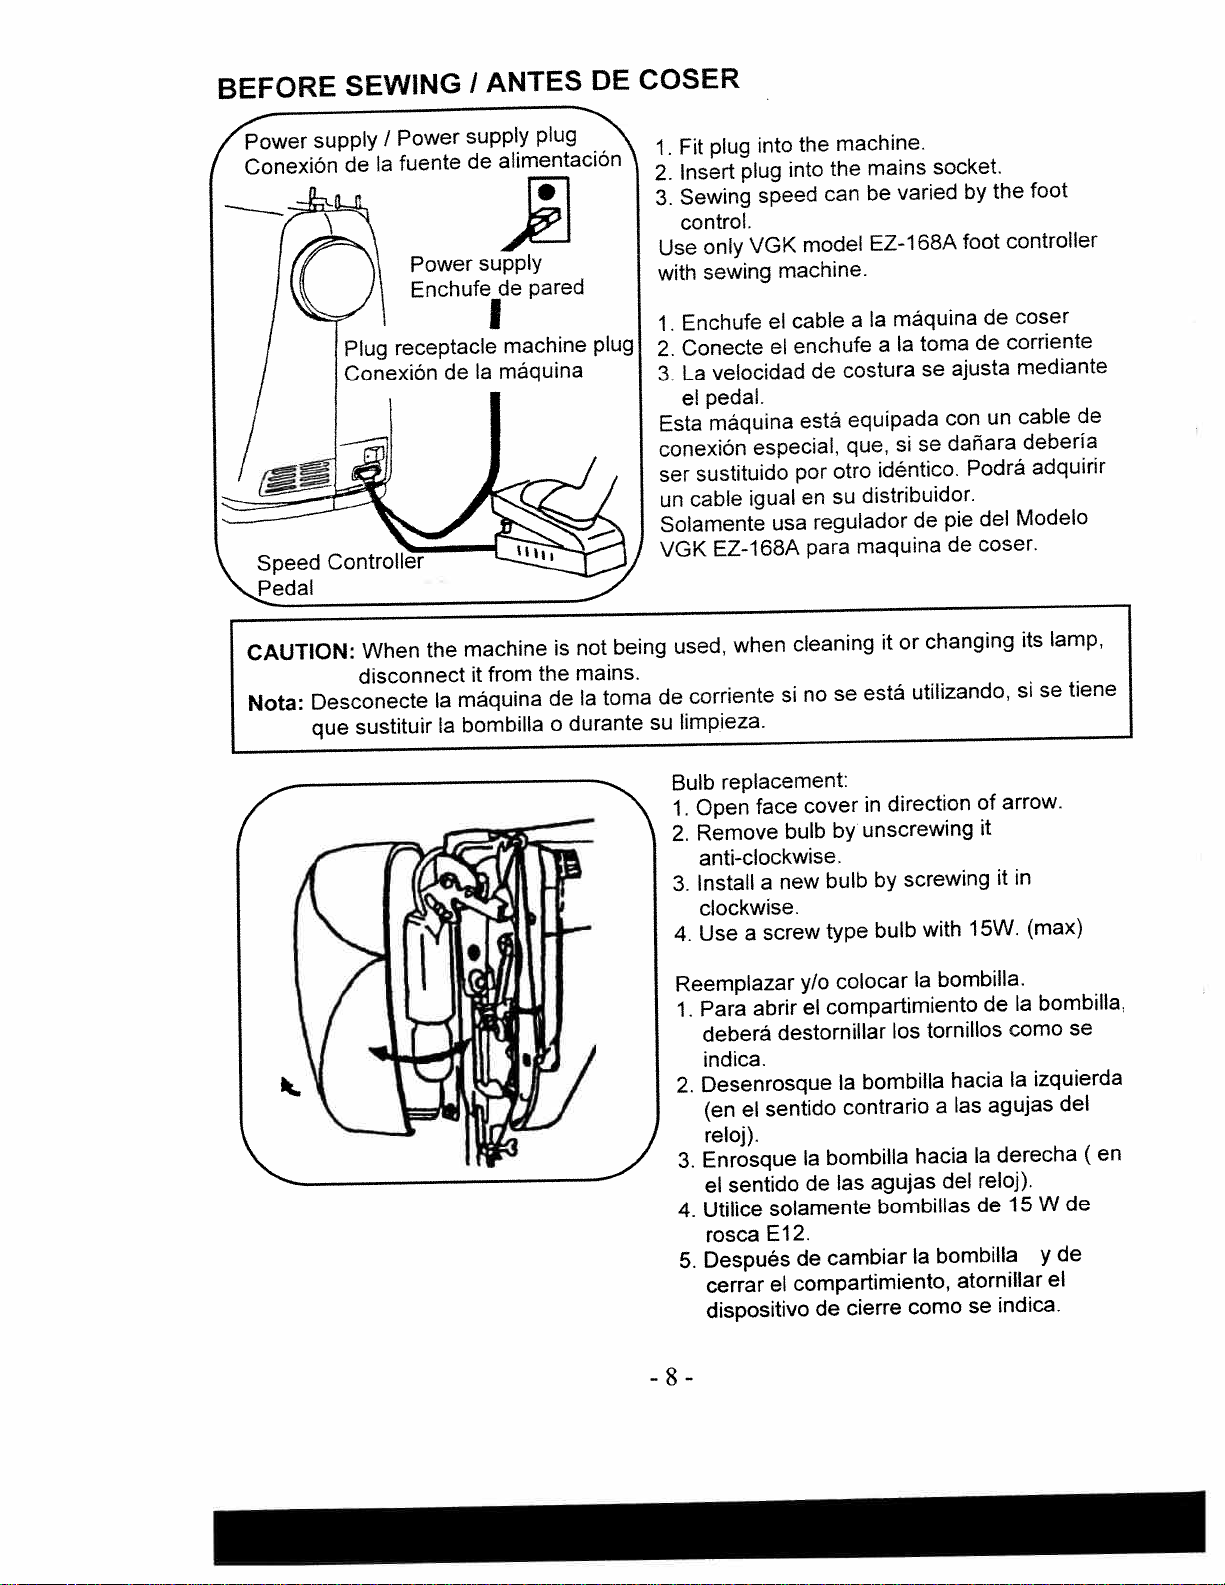
CAUTION:
Nota:
supply
Desconecte
que
/
Ia
de
receptacle
Plug
Conexión
Controller
When
disconnect
sustituir
Power
fuente
the
Ia
supply
de
Ia
de
machine
it
máquina
bombilla
Ia
plug’\
alimentación
machine
máquina
is
the
from
de
durante
o
plug
being
not
mains.
toma
(a
Fit
plug
1.
Insert
2.
Sewing
3.
control.
only
Use
sewing
with
Enchufe
1.
Conecte
2.
vetocidad
La
3.
pedal.
el
mãquina
Esta
conexiOn
sustituido
ser
cable
un
Solamente
EZ-168A
VGK
used,
corriente
de
limpieza.
su
into
plug
speed
VGK
el
el
especial,
igual
usa
when
machine.
the
the
into
can
model
machine.
cable
enchufe
de
está
otTo
por
su
en
regulador
para
cleaning
se
no
si
mains
varied
be
EZ-168A
máquina
Ia
a
Ia
a
costura
equipada
si
que,
idéntico.
distribuidor.
de
maquina
or
it
utilizando,
está
socket.
by
foot
toma
se
ajusta
con
dañara
se
Podrá
pie
de
changing
the
controller
de
corriente
de
un
del
coser.
foot
coser
mediante
deberia
adquirir
lamp,
its
se
de
tiene
cable
Modelo
Si
4
k.
replacement:
Bulb
face
Open
1.
Remove
2.
anti-clockwise.
Install
3.
clockwise.
Use
4.
Reemplazar
Para
1.
Desenrosque
2.
3.
4.
5.
a
a
abrir
deberá
indica.
el
(en
reloj).
Enrosque
sentido
el
Utilice
rosca
Después
cerrar
dispositivo
cover
by
bulb
bulb
new
screw
type
colocar
yb
compartimiento
el
destornillar
bombilla
Ia
sentido
solamente
E12.
el
contrario
bombilla
Ia
las
de
cambiar
de
compartimiento,
cierre
de
direction
in
unscrewing
screwing
by
with
bulb
bombilla.
Ia
tornillos
los
a
hacia
agujas
bombillas
del
bombilla
Ia
como
arrow.
of
it
it
15W.
de
hacia
las
agujas
derecha
Ia
reloj).
de
atornillar
indica.
se
in
(max)
bombilla,
Ia
como
izquierda
Ia
W
15
y
el
se
del
(en
de
de
-8-
Page 10
REMOVING
LA
USO
GRAN
DE
SUPERFICIE
EXTENSION
MESA
AJUSTABLE
TABLE
PARA
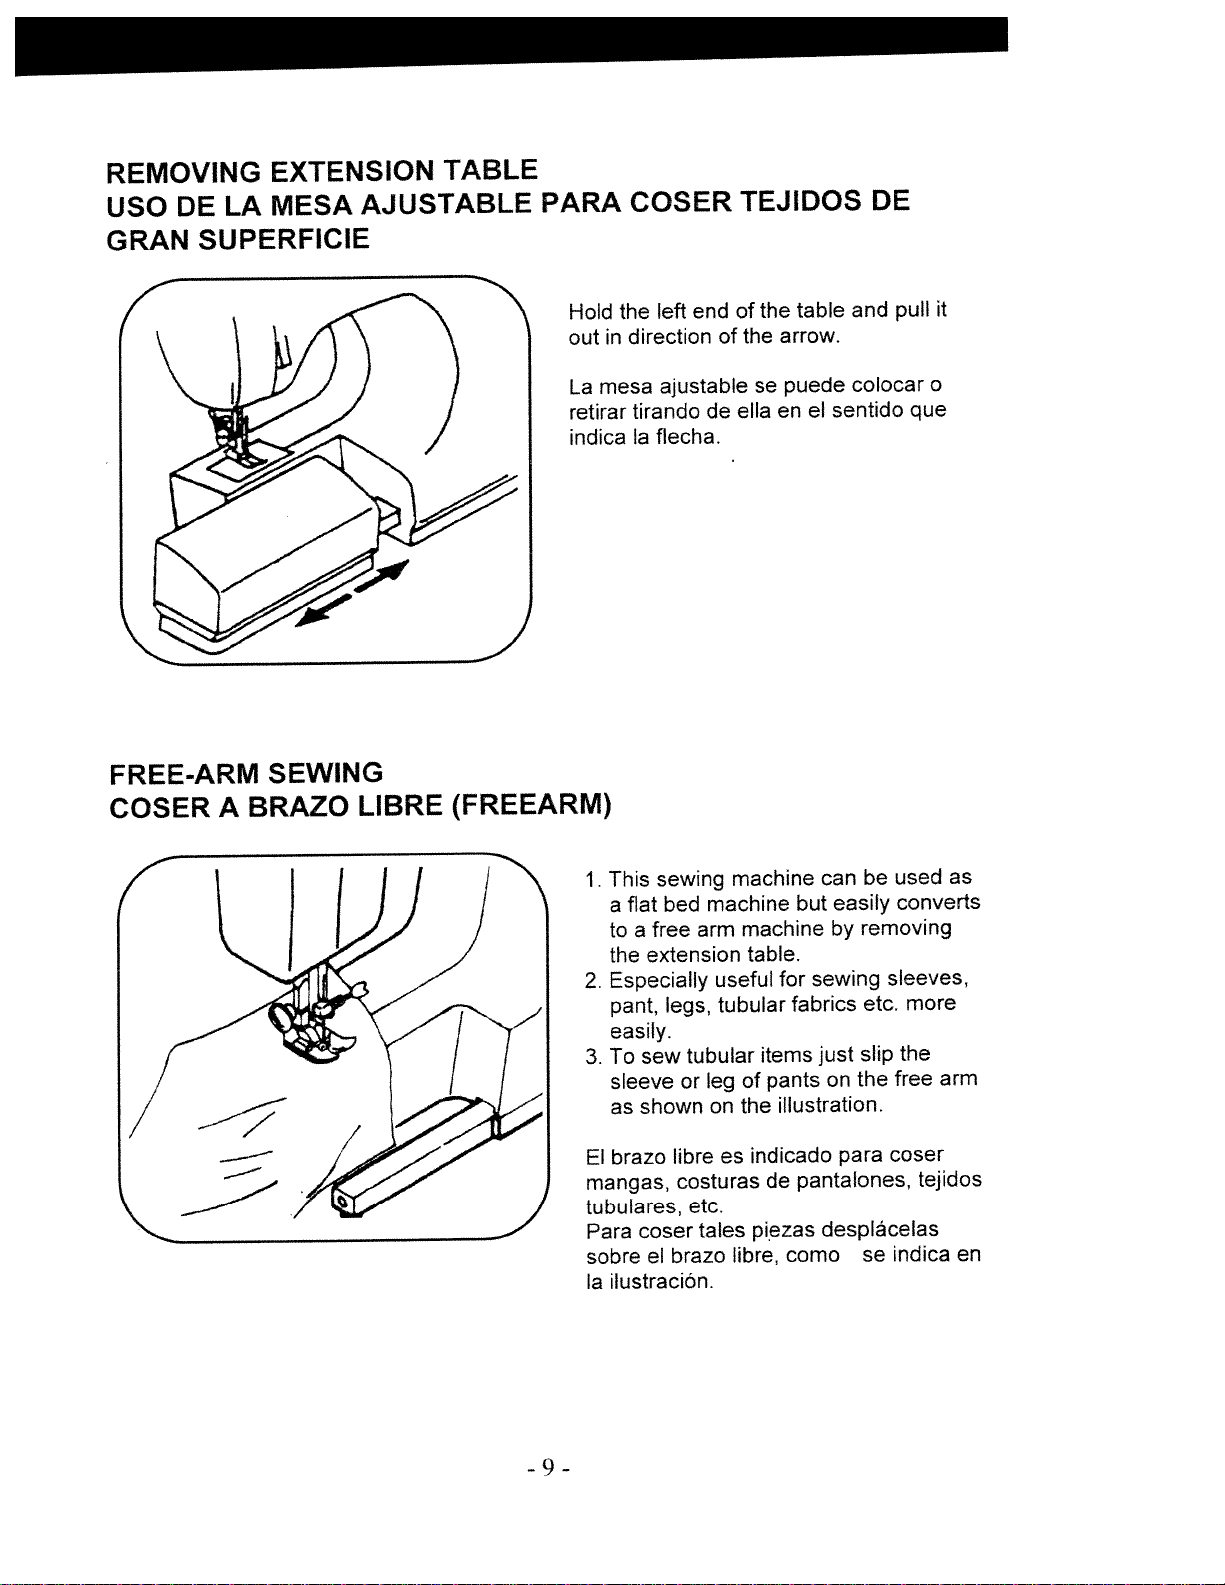
Hold
out
COSER
the
direction
in
left
end
of
of
TEJIDOS
the
table
arrow.
the
and
DE
pull
it
FREE-ARM
COSER
A
SEWING
BRAZO
LIBRE
La
retirar
indica
(FREEARM)
1.
2.
3.
ajustable
mesa
tirando
flecha.
Ia
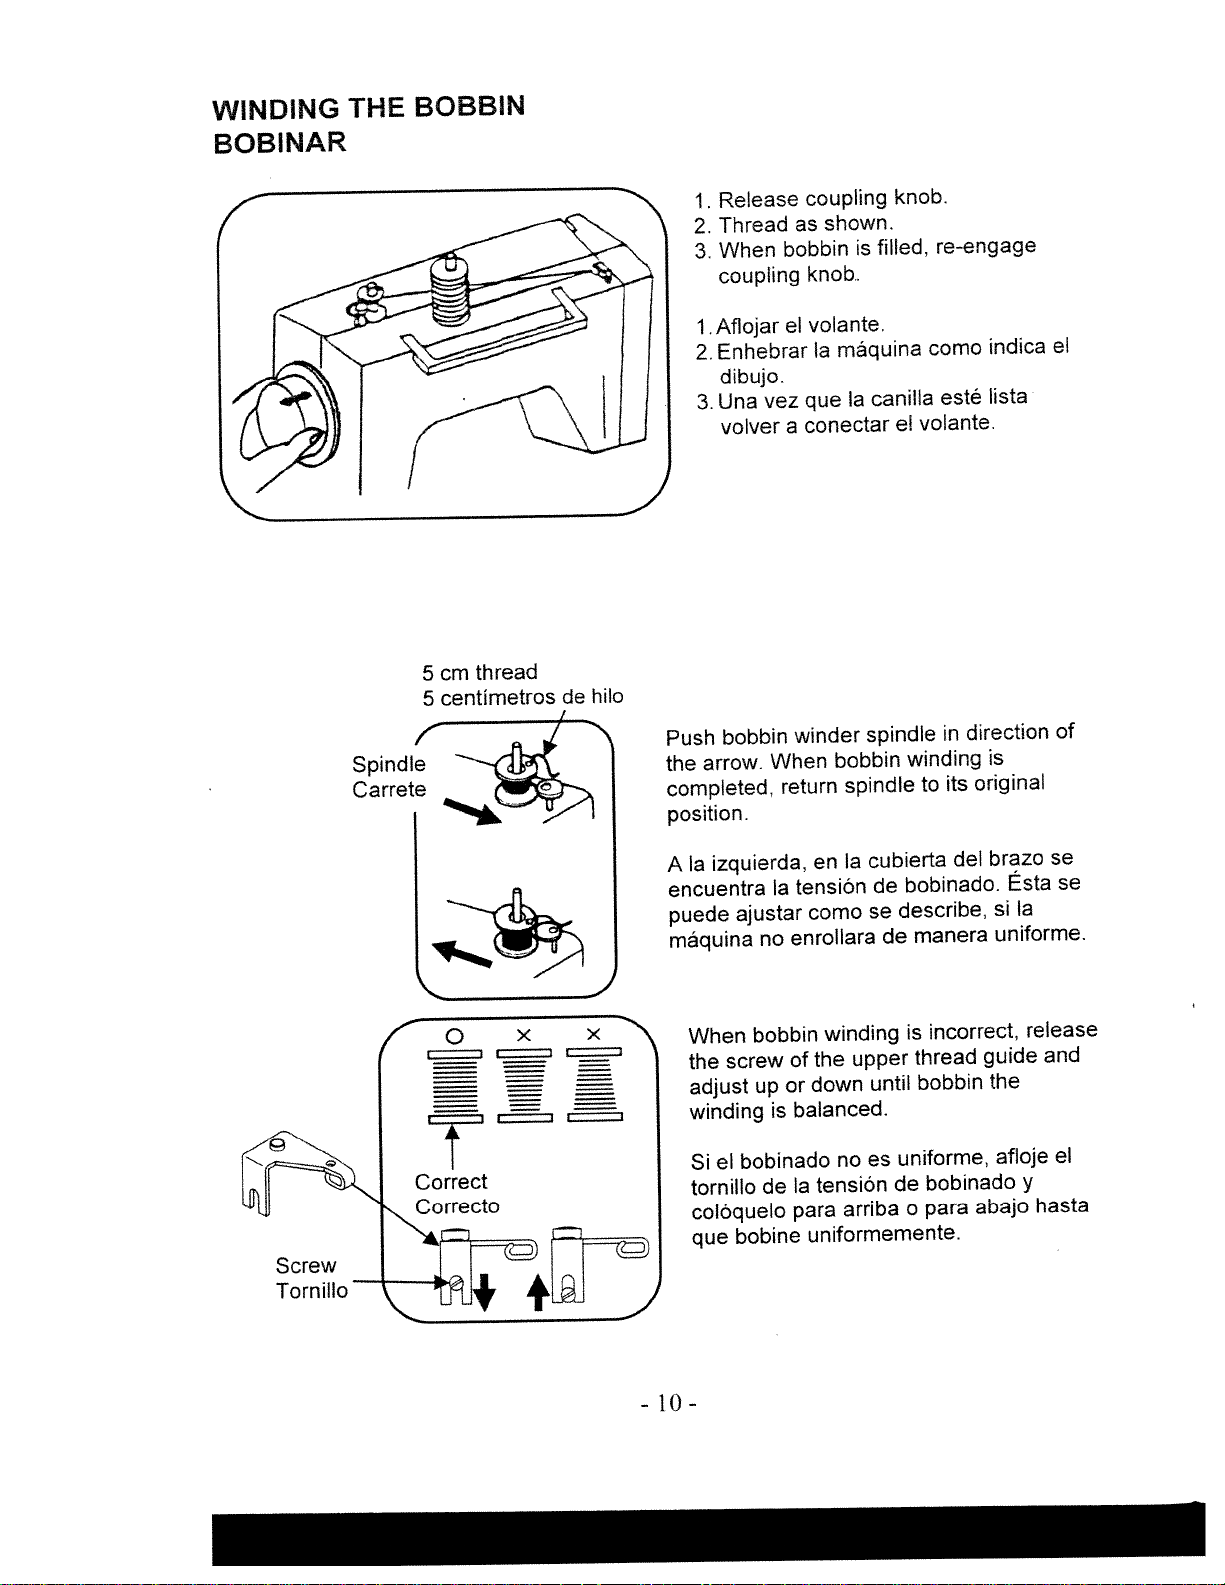
This
sewing
flat
bed
a
free
a
to
the
extension
Especially
pant,
easily.
sew
To
sleeve
shown
as
legs,
tubular
or
ella
de
machine
machine
arm
machine
useful
tubular
of
leg
on
the
puede
se
en
but
table.
for
fabrics
items
pants
illustration.
sentido
el
can
easily
by
sewing
just
on
colocar
que
used
be
converts
removing
sleeves,
more
etc.
the
slip
free
the
o
as
arm
-9-
brazo
El
mangas,
tubulares,
coser
Para
sobre
el
ilustración.
Ia
libre
es
costuras
etc.
tales
brazo
indicado
de
piezas
libre,
para
pantalones,
desplácelas
como
se
coser
tejidos
indica
en
Page 11
WINDING
BOBINAR
THE
BOBBIN
thread
cm
5
centimetros
5
de
hilo
J
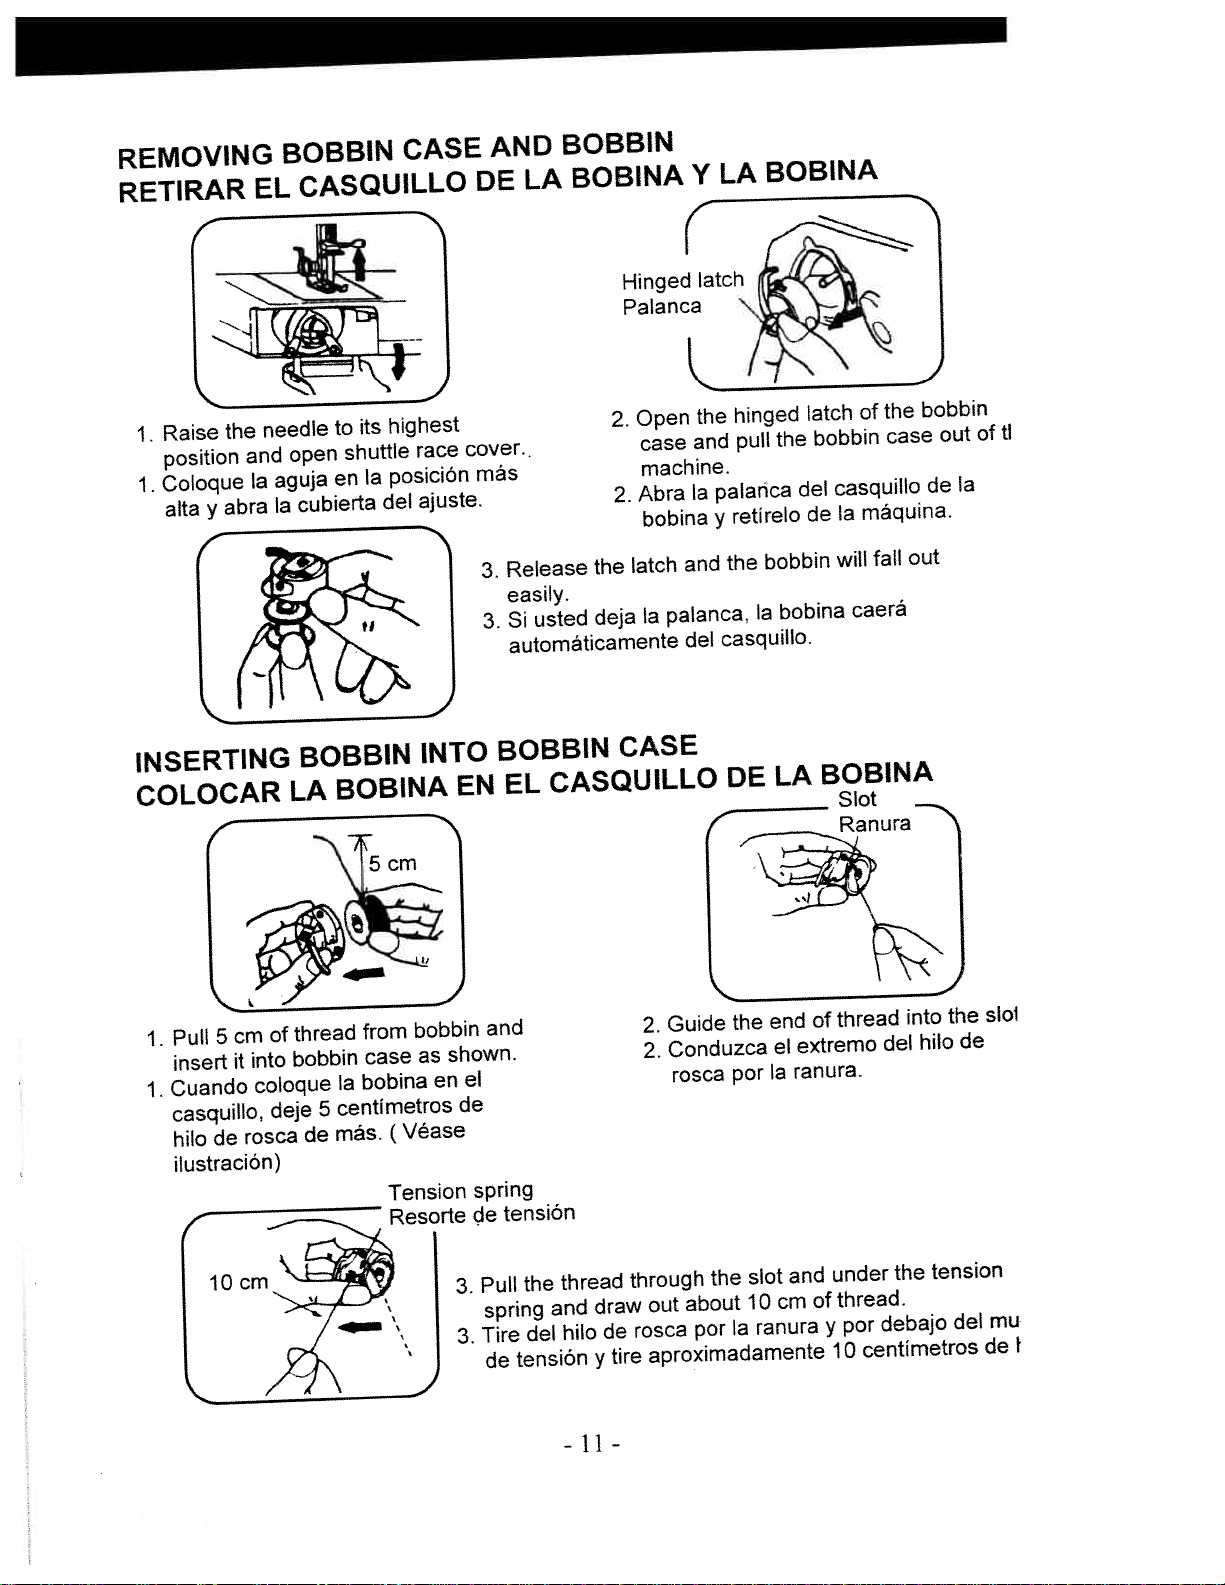
Push
the
completed,
position.
Release
1.
Thread
2.
When
3.
coupling
1.Aflojar
Enhebrar
2.
dibujo
Una
3.
volver
bobbin
arrow.
bobbin
el
vez
a
winder
When
return
coupling
shown.
as
knob..
volante.
máquina
Ia
qua
conectar
bobbin
spindle
filled,
is
canilla
Ia
spindle
knob.
re-engage
como
volante.
el
winding
to
esté
direction
in
original
its
indica
lista
is
el
of
Screw
Tornillo
0
I
Correct
Correcto
brazo
cubierta
Ia
Ia
izquierda,
A
encuentra
puede
ajustar
máquina
x
I
When
the
screw
adjust
1
I
winding
bobinado
Si
el
tornillo
colOquelo
bobine
que
10-
-
en
Ia
tension
como
enroliara
no
bobbin
the
of
down
or
up
balanced.
is
Ia
tensiOn
de
para
uniformemente.
de
se
winding
upper
until
es
no
arriba
de
del
bobinado.
describe,
manera
incorrect,
is
thread
bobbin
uniforme,
bobinado
de
para
o
guide
the
abajo
se
se
Esta
si
Ia
uniforme.
release
and
af]oje
el
y
hasta
Page 12
REMOVING
RETIRAR
Raise
1.
position
Coloque
1.
alta
EL
the
and
Ia
abra
y
-
BOBBIN
CASQUILLO
its
open
aguja
cubierta
Ia
to
shuttle
Ia
en
needle
CASE
highest
race
posiciôn
ajuste.
del
AND
LA
DE
cover.
más
Release
3.
easily.
usted
Si
3.
automãticamente
BOBBIN
BOBINA
Open
2.
case
machine.
Abra
2.
bobina
latch
the
Ia
deja
LA
Y
the
and
palahca
Ia
y
and
palanca,
casquillo.
del
BOB1NA
hinged
the
pull
retirelo
bobbin
the
bobina
Ia
latch
bobbin
del
de
the
of
case
casquillo
máquina.
Ia
fall
will
caerá
bobbin
de
out
out
Ia
of
tl
INSERTING
COLOCAR
of
cm
5
Pull
1.
into
insert
Cuando
1.
casquillo,
hilo
it
coloque
rosca
de
ilustraciôn)
cm
110
deje
BOBBIN
BOBINA
LA
la
centImetros
5
más.
de
from
case
bobina
thread
bobbin
INTO
bobbin
as
en
(Véase
Tension
Resorte
EN
and
shown.
el
de
spring
de
Pull
3.
spring
Tire
3.
de
BOBBIN
CASQUILLO
EL
tension
thread
the
and
hilo
del
tensiOn
CASE
Guide
2.
Conduzca
2.
rosca
through
out
draw
rosca
de
aproximadamente
tire
y
the
about
por
DE
the
por
slot
10cm
Ia
LA
end
el
ranura.
Ia
and
ranura
BOBINA
Slot
Ranura
thread
of
extremo
under
thread.
of
por
y
centimetros
10
into
hilo
del
the
debajo
the
de
tension
del
slol
mu
de
F
L
—11—
Page 13

INSERTING
COLOCAR
EL
AGARRADOR
BOBBIN
CASQUILLO
CASE
INTO
DE
SHUTTLE
BOBINA
LA
RACE
LA
EN
GUIA
DEL
Raise
1.
the
Cerciôrese
1.
delante.
the
bobbin
needle
case
Abra
de
and
que
palanca
Ia
to
its
Ia
4
highest
hold
aguja
Hinged
Palanca
it.
esté
sostenga
y
latch
position.
Ia
en
el
Pull
posiciôn
casquillo.
the
thread
mãs
alta.
to
Finge
Dedo
the
Tire
j
front,
hilo
del
open
de
the
rosca
latch
hacia
of
Holding
2.
release
Fije
2.
dedo
el
casquillo
agarre
the
latch.
latch
al
open,
Ia
de
insertar
Insert
Colocar
place
bobina,
en
bobbin
como
hendidura.
Ia
case
se
onto
indica,
12-
-
en
the
el
centre
pemo
in
pin
medio,
the
de
shuttle
modo
and
que
el
Page 14

THREADING
ENHEBRAR
the
Pass
Enhebre
thread
el
hil
segün
E
UPPER
EL
A
from
se
HILO
G
to
indica
THREAD
SUPERIOR
shown.
as
A-G
de
B
B
A
Twin
aguja
La
needle
melliza
threading.
enhebrando.
F
C
/
G
Page 15

_________________________
DRAWING
SUBIR
EL
I
I
THE
UP
HILO
BOBBIN
ROSCA
DE
THREAD
INFERIOR
the
Hold
1.
wheel
hand
down
goes
wheel
position.
Sostenga
1.
2.
3.
4.
when
suavemente
out
under
Place
lower
Start
draw
thread
usted
abajo
fabric
pressure
to
Lightly
lower
izquierda,
hacia
hacia
cuando
Tire
inferior
Pull
el
se
presser
upper
slowly
and
el
gire
donador
recogerá
both
sew.
thread
towards
comes
take
the
the
up
be
will
superior
hilo
rueda
Ia
que
hasta
nuevamente
y
del
threads
foot
under
foot.
with
up.
lever
up
upper
brought
volante
Ia
hilo
de
hilo
forma
en
and
the
to
pressure
hand,
left
you
Then
is
thread,
up
Ia
con
aguja
hacia
esté
superior
de
place
rear
foot
turn
the
until
the
stop
highest
its
at
which
by
loop.
a
in
mano
lentamente
desplace
se
arriba,
situado
el
y
lazo.
together
them
machine.
the
of
from
the
needle
hand
Pare
arriba.
hilo
the
the
front,
—
CHANGiNG
CAMBIAR
1.
1.
Lower
raise
around
as
Pinche
pie
needle
presser
the
desired.
Ia
costura.
de
SEWING
D1RECCIÔN
LA
down
pivot
foot,
en
Dé
to
el
Ia
needle
aguja
DiRECTIONS
into
change
tejido
vuelta
fabric
the
and
fabric
direction
eleve
y
tejido.
aI
Tire
2.
debajo
COSTURA
DE
el
de
los
del
2.
2.
hilos
dos
de
pie
r
Lower
el
Baje
cosiendo.
guielos
y
costura
presser
the
de
pie
juntos
hacia
foot
costura
atrás.
and
y
por
start
continue
J
sew.
to
-14-
Page 16

LEVELLING
ESTABILIDAD
MACHINE
DE
4
MAQUINA
LA
Down
Hacia
Up
Hacia
15-
-
abajo
arriba
Page 17

ADJUSTING
AJUSTAR
Normal
Tension
upper
normal
THREAD
LAS
thread
hilo
del
TENSiON
TENS1ONES
6
4
tension:
superior:
—
entre
DEL
4—6
HILO
DE
ROSCA
Correct
Correcto
Upper
turning
by
tensiOn
La
regulada
thread
the
girando
tension
thread
maxima
el
may
tension
puede
botón
be
dial.
ser
tensiOn,
de
adjusted
Fabric
Tejido
Incorrect
Incorrecto
Inside
Upper
Lado
hilo
Upper
Hilo
Bobbin
Hilo
fabric
of
thread
interior
superior
thread
superior
thread
inferior
tejido,
del
I
-
Lower
by
slightly
to
tension.
La
de
16-
thread
turning
left
the
tensiOn
regulada
bobina
Ia
derecha
aumentar
para
izquierda
agujas
tension
screw
the
right
the
to
(anti-clockwise)
hilo
del
girando
(en
(en
del
reloj)
el
ligeramente
sentido
Ia
sentido
el
para
be
can
the
of
(clockwise).
decreases
inferior
tornillo
hacia
las
a
tension
y
contrario
disminuir
increased
bobbin
puede
del
agujas
hacia
case
Turning
ser
casquillo
Ia
del
Ia
las
a
Ia
tensiOn.
it
reloj)
Page 18

REGULATING
REGULAR
the
down
Push
1.
adjust
screw
darning
adjusting
lever
fabrics
pressure
the
of
is
medium
Insufficient
2.
To
stop
When
3.
After
The
LA
lever
and
presser
the
sewing
or
the
usually
THE
PRESSER
PREStON
the
for
for
1
at
cause
may
pressure,
foot
cover
lamp
freehand
presser
adjusted
desired
heavy
to
foot
at
DEL
pressure;
fabrics.
feeding,
poor
use
it.
open
embroidery,
pressure
2.
FOOT
PIE
the
and
PRESSURE
PRENSATELA
light
for
skipped
behind
lever
release
closing
fabrics
stitches
the
the
the
pressure
lamp
set
or
cover
cover,
at
lever
difficulty
the
of
by
tighten
set
3,
in
lamp.
setting
2
at
guiding
Loosen
the
the
up
for
the
lever
stop
f
th
to
s
Coloque
1.
tejidos
o
(2)
presión
Una
2.
tejido.
ajuste
El
compartimiento
del
bombilla.
Cuando
3.
posición
Cuando
vuelva
DROP
AVANCE
palanca
Ia
de
Abra
zurce
se
“0”,
haya
colocar
a
FEED
en
pesados
demasiado
presiOn
Ia
de
compartimiento.
el
en
o
que
para
modificado
tornillo.
el
LA
EN
posiciôn
a
(1).
provoca
baja
prensatela
pie
del
bombilla.
Ia
ejerza
se
posiciôn
Ta
La
a
palanca
costura
no
POSICIÔN
adecuada,
que
Afloje
mano
Iibre,
ninguna
Ia
de
normalmente
HUNDIDA
segün
omitan
se
consigue
se
tornillo
el
Ta
presiOn.
palanca,
de
presión
son
si
puntos
con
fijación
de
cierre
está
tejidos
Ia
Ia
el
en
ligeros
dificultades
haya
o
palanca
compartimiento
el
de
palanca
compartimiento
posición
Ta
que
tendrá
2.
(3),
encuentra
se
que
de
tejidos
para
estar
Ia
medi
zurci
dE
Ta
de
en
bombill
A.
B.
A.
B.
Push
button
Push
Empuje
para
Empuje
para
feed
sewing.
feed
Ia
zurcir,
Ta
coser
lever
lever
palanca
bordar
palanca
manera
de
down
to
up
del
y
del
to
raise
avance
coser
avance
normal.
drop
feed
botones.
feed
para
hacia
below
above
bajar
needle
arriba
17
needle
avance
el
para
-
plate
plate
elevar
for
por
darning,
for
normal
debajo
avance
el
embroidery,
sewing.
Ia
de
pox
placa
encima
de
and
Ia
dela
aguj
ag
Page 19

CHANGiNG
REEMPLAZO
NEEDLE
LA
DE
AGUJA
Needle
Tornillo
aguja
Ia
de
face
Flat
piano
Lado
posterior
clamp
abrazadera
de
side
hacia
screw
Tighten
Apretar
Loosen
Aflojar
away
Ia
from
parte
you
Raise
1.
Loosen
2.
With
3.
Tighten
4.
1.
2.
3.
4.
the
as
up
Ponga
Afloje
Con
arriba
Apriete
the
it
el
el
needle
needle
flat
will
the
aguja
Ia
tornillo
lado
como
muy
clamp
side
go.
needle
en
piano
sea
bien
bar
the
of
clamp
Ia
Ia
de
de
posible.
el
highest
its
to
screw
needle
screw
posiciOn
abrazadera
aguja
(a
tornillo
and
de
facing
más
hacia
Ia
position.
remove
away
securely.
alta.
quite
y
parte
(a
abrazadera.
-18-
the
from
aguja
Ia
posterior,
old
needle.
you,
vieja.
insert
coloque
the
needle
aguja
(a
as
tan
far
Page 20

FABRIC-TH
attention
Please
pay
Fabric
READ-N
the
to
Thread
EEDLE-TABLE
a
as
following
list
Needle
guide
Pressure
Presser
See
Pressure
regulation
for
page
sewing
of
Foot
17
different
Length
Stitches
Straight
stitch
Stitch
Dial
types
of
Length
zz
fabric.
of
Indication
of
Tension
Upper
N
Light
Medium
Nylon
Tricot
Silk
Wool
Gingham
Thin
Jersey
j
Gabardine
j
80
Cotton
S
60
silk
Fibre
Silk
50
S
silk
.
50
Fibber
silk
60-80
Cotton
S
60
Fibber
50
Silk
70
80
80-90
80
(10)
(12)
(12)
1-3
0.5
1-4
0.5
3
-
)
v5
-4
Heavy
Denim
Jersey
Tweed
50
Cotton
er
Silk
50
90-100
(14-16)
80-90
(12-14)
80-90
(12-14)
-19-
\
0.5-3
(“N
0.5-4
K
Page 21

!
CD’
a
CD
C
.0
cC
CD
I
CD
-4’
—
CD
D
C,
CD
cC
•0
tZ
(0
t’J
C
Page 22

SEWING
TABLA
Stitch
Costura,
(PATTERN
COSTURA,
DE
patterns
diseño
SELECTOR)
SELECTOR
AND
DE
Stitch
Largo
Puntada
OPERATiON
DISEfJO
length
de
Presser
Pie
TABLE
foot
Drop
Avance
feed
13
4-6
8-10
Straight
Puntada
Zigzag
Zig-zag
Three
stitch
Zig-zag
Buttonhole
Free-hand
Bordado
step
con
stitch
recta
zigzag
pasos
3
embroidery
freehand
f
—
Without
I
I
No
necesario
I
t
-
21
-
Page 23

START
TO
COMIENZO
SEWING
LA
DE
COSTURA
Important
Raise
1.
sewing.
Hold
2.
stitches.
Sufficient
3.
Depress
4.
Test
5.
the
for
Attention:
When
1.
Guide
2.
prevent
To
3.
sewing.
Notas
empezar
Al
1.
Retenga
2.
durante
Asegürese
3.
pedal.
el
Presione
4.
Pruebe
5
longitud
hints:
take-up
the
threads
both
fabric
foot/speed
machine
the
length
turning
the
of
the
cloth
breaking
importantes:
o
ambos
primeras
las
de
pedal
el
puntadas
las
puntada
de
lever
about
should
control
stitches
stitch
the
balance
gently
terminar
hilos
el
que
y
highest
its
to
to
cms
10
start
scrap
a
tension
your
always
costura
tres
está
a
trozo
under
manually,
hand.
puntadas.
debajo
coser.
placed
be
and
on
and
wheel
with
needles,
una
aproximadamente
o
dos
tejido
comience
un
en
tension
Ia
y
position
the
to
of
suitable
raise
levantar
tejido
de
rear
needle
sew.
fabric
de
before
the
of
before
you
to
always
needle
the
tirahilos
el
centimetros
10
aguja
Ia
muestra,
de
starting
machine
lowering
plan
fabric.
your
turn
out
antes
to
toward
it
a
hacia
para
and
for
use,
of
the
posición
Ia
de
after
first
the
the
adjusting
you.
fabric
atrás
empezar
poder
asI
stopping
two
presser
when
más
de
a
ajustar
or
foot.
the
alta.
Ia
máquina
coser
three
machine
stop
you
pisar
y
Ia
Notas:
1.
Gire
Conduzca
2.
Para
3.
no
volante
el
evitar
dejándola
el
que
siempre
tejido
se
en
suavemente
rompa
tela.
Ia
en
dirección.
su
aguja,
Ia
con
Ia
deje
mano.
de
22
-
coser
-
desplazando
Ia
aguja
hacia
arriba
y
Page 24

HOW
TO
REMATE
Sew
1.
Push
2.
Raise
3.
the
Lift
4.
Cosa
1.
Presione
2.
Eleve
3.
Levante
4.
FINISH
DE
the
to
reverse
the
needle
presser
hasta
el
aguja
Ia
el
STITCHES
COSTURA
LA
of
edge
into
foot
extremo
el
botón
Ia
a
prensatela
pie
seam.
button
highest
its
and
marcha
de
posiciOn
and
pull
de
sew
position.
the
costura.
Ia
atrás
más
desplace
y
in
fabric
(reserva)
alta.
reverse
out
tela
Ia
of
for
the
y
hacia
about
back
cosa
Ia
3-4
of
de
parte
cms.
the
a
3
posterior
machine.
centimetros
4
de
hacia
máquina.
Ia
atrás.
Cutting
Cortahilos
máquina
thread
montado
coser
de
slot
5.
5.
/
en
Cut
Corte
Ia
threads
los
as
hilos
shown
con
on
cortahilos.
el
-
23
-
the
thread
cutter.
Page 25

STRAIGHT
PUNTADA
of
type
This
1.
zigzag
The
2.
sewing
For
3.
tipo
el
Es
1.
pie
2.
3.
El
Para
(Ia
zig-zag
coser
elecciôn
STITCH
RECTA
stitching
presser
light
cosido
de
puede
telas
apropiada
foot
fabric,
más
finas
used
is
can
use
usarse
utilice
está
most
used
be
a
smaller
frecuente
tanto
tamaños
ilustrada
frequently.
both
for
stitch
utilizado.
y
puntada
Ia
para
más
Ia
en
straight
size.
pequenos
pagina
(Refer
recta
20).
and
to
de
zigzag
page
como
puntada.
19
para
sewing.
dial
for
cosido
el
setting).
en
zig-zag.
ZIGZAG
COSER
:o:
JJ
SEWING
ZIG-ZAG
EN
Pattern
Posición
I
1
I
1
selector
selector
del
position
stitching
Satin
initials,
unive:l
coser
Para
costura
puntada
utihzapara
patterns,
en
satén,
están
muy
es
coser
can
appliqué,
zig-zag
los
muy
corta.
inicales,
used
be
es
puntos
juntos
Normalmente
for
etc.
una
Ia
y
siglas,
sewing
puntada
Ia
de
longitud
dibujos
de
-
24
-
Page 26

OVERCASTING
SOBREHILAR
4—
a
4—
4—
-a-
4
\
BINDING
RIBETEADO
(DE
—a
4
4
-a
4—
—
4
4
4
4
4
4
BORDE
a
BORDE)
A
these
Use
edges.
Con
estas
deshilen
stitches
puntadas
los
de
for
bordes.
oversewing
evita
se
que
rough
se
multi-zigzag
o
the
borde,
a
puntada
Ia
seteccione
smok.
.c
>.
.c
>.
To
stitch.
Para
Ia
puntada
25
-
coser
-
telas
multi
fabrics
sew
edge
de
zig-zag
select
borde
Page 27

BUTTON
COSIDO
drop
(Use
Lower
1.
Place
2.
Place
3.
Manually
4.
of
Sew
5.
Pull
6.
drop
button
the
button
about
both
SEWING
DE
feed
see
feed.
presser
button
hand
turn
without
stitches.
7
threads
BOTONES
17)
page
position
in
foot
the
presser
towards
underside
between
wheel
obstruction.
to
foot
you,
(Increase
and
and
and
tie
attach
fabric
ensuring
decrease
or
them
it
firmly.
lower
and
that
the
width
together.
the
needle
setting).
presser
enters
Match
Fósforo
foot.
into
both
holes
(El
Cover
1.
Coloque
2.
Coloque
3.
Gire
4.
penetre
Ia
Cosa
5.
Tire
6.
zurce
que
uso
alimentar
el
el
manualmente
en
anchura
aproximadamente
ambos
de
para
pie
botón
ambos
zig-zag.
de
hilos
plato
con
entre
ye
página
zurcir
botones
el
Ia
rueda
agujeros
7
átelos.
y
#
plato.
Ia
pie
y
volante
botón
del
puntadas.
17)
tela
y
hacia
sin
baje
usted,
ninguna
pie
el
asegurandose
obstrucciOn.
prensatela.
de
Si
que
necesario,
es
Ia
aguja
ajuste
-
-
26
Page 28

ZIPPER
SEWING
COSTURA
CREMALLERAS
DE
Zipper
thus
Place
Fold
under
Doble
colóquela
pie
El
cerca
sobre
To
1.
the
To
2.
side
Para
1.
pie
Para
2.
debe
straight
preventing
the
sew
right
sew
of
de
Select
4
1.
2.
3.
Seleccione
1.
2.
4
U
is
foot
zipper
fabric
foot.
Ia
puntada
tela
Ia
debajo
cremalleras
para
borde
del
cremallera.
Ia
the
side
the
the
coser
cremallera
Ia
coser
estar
stitch.
position
in
2
recta.
pie.
del
of
needle.
side
izquierdo
en
derecho,
of
to
on
cm
está
the
the
el
designed
sewing
foot
about
aproximadamente
levantado,
side
left
the
of
right
needle.
ado
el
lado
el
derecha
Ia
a
sew
zipper.
and
and
disenado
evitando
zipper,
zipper,
lado
el
a
de
close
attach
place
centimetros
2
Ia
de
izquierdo
pie
aguja.
raised
a
to
firmly.
fabric
the
para
se
que
zipper
the
set
on
it
set
cremallera,
de
cremallera
de
y
coser
cosa
the
fije
Ia
edge,
on
left
el
aguja.
I
[4-
II,
Sew
Cosa
illustrated.
as
acuerdo
de
-
27
ilustraciôn.
Ia
con
-
•
Page 29

BUTTONHOLE
stitch
the
Set
pie
Utilice
Ajuste
el
selector
el
length
para
SEWING
dial.
ojales
longitud
de
de
COSTURA
I
puntada
en
OJALES
DE
deseada.
area
el
Pattern
Modelo
selector
selector
del
dial
Steps
Pasos
E
L
4*
E
‘“
Settings
Posicián
position
,,A”
to
dial
Set
1.
side
left
Sew
2.
needle
el
Levante
dial
Set
5-6
Sew
Raise
de
Levante
dial
Set
right
Sew
Raise
Cofoque
el
Cosa
Levante
dial
Set
5-6
Sew
Raise
the
lado
to
the
to
the
lado
the
selector
el
izquierdo
aguja
Ia
,,B”
stitches
needle
selector
el
6
a
5
aguja
Ia
g,C”
side
needle
selector
el
derecho
aguja
Ia
,,D”
to
stitches
needle
en
position
en
puntadas
position
en
position
posiciOn
Ia
posiciôn
Ia
posiciôn
Ia
A
B
C
Raise
3.
Coloque
1.
Cosa
2.
3.
4.
5.
6.
Coloque
4.
Cosa
5.
6.
7.
8.
E
9.
7.
t
8.
9.
10.
1.
1
12.
Before
shown.
Antes
del
ojal
sewing,
empezar
de
botôn
buttonhole
fit
como
coser
a
muestra
11
foot
ajuste
Ia
as
el
figura.
pie
Coloque
10.
11.Cosade5a6puntadas
Levante
12.
Cut
as
para
Corte
cortador,
-
28
-
selector
el
aguja
Ia
buttonhole
shown.
agujero
el
como
en
Ia
along
botón
del
muestra
posicion
centre
Ia
with
con
figura.
D
cutter
el
Page 30

HEMMiNG
RUEDOS,
ORLAR
1.
Raise
Fold
2.
1.
2.
over
edge
through
Levante
ruedos.
DobleIatela
Dé
unas
lntroduzca
the
foot
the
fabric
withafew
pulling
el
pieyIa
aproximadamente
cuantas
el
ruedo enelpiederuedos.
7.
and the
stitches.
the
needletoits
edge
by
about3mm
Take
out
threads.
en
su
aguja
puntadas. Seguidamente
posiciOn
3
3mm
1mm—
20r
highest
the
milimetrosycolóquela
position.
and
placeitunder
workpiece
mãs
alta.
levante
Replace
and
Cambieelpie
Ia
the
the
draw
the
debajo
agujayel
foot
with
foot.
Secure
hem
into
the
porelpie
del
pie.
piedecosido.
picot
the
the
picot foot
especial
foot
folded
pare
3.
Lower
4.
While
5.
Make
be
through
Only
the
3.
Baje
4.
Duranteelcosido,
piederuedos
Asegürese
5.
La
Ia
SOlosepueden
lograr
the
foot
sewing
sure
fed
into
the groove
suitable
results.
best
el
pieycosaelruedo
tela
debe
tela
pueda
resultados
sew
and
fold
that
the
scrollofthe
the
materials
de
queeltejidonose
ser
guiada
correr
utilizar
Optimos.
the
the
fabrictothe
fabric
under
can
doble
por
libremente.
tejidos
hem.
left
a
not
foot.
used
move
sufficiently
and
Ia
tela
does
hemmer
the
be
un
poco
deslice
debajo deIacurva
adecuadosyserã
little
some
hacia
-29-
and
under
debajo
allow
the
right
so that
practice
Ia
izquierda
deIamitad
del
piedetal
necesario
it
to run
halfofthe
the
workpiece
may
be
para
derecha
forma
un
into
the hemmer
foot.
necessary
corra
que
que
poco
de
The
edge
del
el
práctica
fabric
runs
to
achieve
bien
por
pie.
dobladillo
foot.
mus
freely
el
de
para
Page 31

TWIN
DOBLE
Thread
ends
their
Sewing
needles.
Enhebre
gulas
ancho
El
aguja
NEEDLE
AGUJA
machine
the
separately
should
width
aguja
Ia
aguja
de
podrIa
Ia
costura
romperse.
hasta
as
como
donde
no
I
for
through
exceed
not
fuera
si
debe
normal
its
enhebran
se
exceder
sewing,
eye.
the
coser
a
third
dos
leading
widest
normal,
separado.
por
tercios
both
stitch
para
de
threads
width,
ello
anchura
Ia
pase
to
this
as
ambos
maxima,
I
needle
will
break
hilos
and
por
puesto
passing
the
las
que
Ia
EMBROIDERY
BORDADOS
see
feed
drop
(Use
presser
uso
feed
has
el
the
dog
been
zurce
que
avance
and
embroidered.
y
Remove
Lower
fabric
(El
Baje
page
foot
move
plato
mueva
ye
Ia
17)
and
the
página
tela
lower
hooped
en
#
el
feed
17)
aro
dog.
fabric
lentamente
-_,
slowly
-
in
para
the
desired
formar
direction
efecto
&
the
until
deseado.
Page 32

QUILTER
(Optional)
ACOLCHADO
the
Slide
1
the
Move
2.
Coloque
1.
Mueva
2.
(Opcional)
through
arm
quilter
regla
Ia
a
regla
Ia
the
to
acolchado
de
derecha
Ia
hole
the
required
o
on
stitch
en
Ia
a
of
top
distance.
gula
Ia
izquierda
the
sobre
pressure
Ia
ajustar
para
foot
palanca
holder.
del
distancia
Ia
pie
de
deseada.
cosido.
SEAM
GUIA
Use
I
Screw
2.
While
3.
Use
1.
Fije
2.
distancia
Asegürese
3.
para
GUIDE
COSTURA
DE
seam
the
guide
the
sewing,
gula
el
guia
Ia
deseada.
hacer
(Optional)
guide
on
the
costura
de
agujero
el
en
que
de
costuras
to
the
edge
ei
(Opcional)
long
sew
right
the
of
cuando
de
borde
curia.
en
side
Ia
de
seams
of
fabric
tenga
base,
tela
Ia
the
must
que
a
toca
an
of
needle
touch
coser
derecha
la
Ia
equal
plate
gula.
the
una
del
Coloque
distance
adjust
and
guide.
costura
plato
from
larga
de
Ia
the
Ia
gula
the
desired
en
aguja.
de
edge
borde
el
ajuste
y
costura
the
of
distance.
de
Ia
en
fa
Ia
ãn
t
Page 33

MAINTENANCE
LIMPIEZA
Cleaning
Latch
(A)
Shuttle
(B)
Shuffle
(C)
Limpie
Botón
(A)
Tapa
(B)
Gancho
(C)
shuttle
knob
race
hook
lanzadera
Ia
picaporte
de
race
cover
lanzadera
Ia
Ia
de
lanzadera
Raise
1.
Take
2.
Turn
3.
Take
4.
Take
5.
Clean
6.
thereafter
Levante
1.
Saque
2.
Gire
3.
direccián
4.
Aleje
5.
Saque
Limpie
6.
luego
needle
the
out
latch
the
shuffle
off
shuttle
out
and
Ia
Ia
picaporte
el
tapa
Ia
el
engrase
y
vuelva
to
bobbin
shuffle
oil
replace
aguja
caja
Ia
de
de
gancho
a
highest
its
knob
race
hook.
all
su
a
Ia
de
(a)
flecha.
lanzadera.
Ia
de
el
colocarla
case.
as
A
cover.
race
parts
posición
bobina.
como
lanzadera.
Ia
gancho
position.
illustrated.
hook,
and
reverse
in
mãs
muestra
se
Ia
de
lugar.
su
en
order.
alta,
en
lanzadera,
la
Open
Abra
los
face
cubierta
Ia
puntos
cover
and
de
indicados.
the
oil
Ianzadera
Ia
parts
indicated.
engrase
y
dog.
un
feed
dientes
los
cepillo.
alimentadores
Cleaning
Limpie
con
-
32
-
Page 34

CHECKING
Problem
Fabric
move
does
PERFORMANCE
Probable
down
Feed
Stitch
Light
dog
length
presser
not
-
-
-
PROBLEMS
cause
on
dial
foot
,,O”
pressure
-
TROUBLESHOOTING
do
-
Raise
-
Set
-
Increase
dial
What
feed
between
dog
pressure
to
1
and
4
Breaking
Breaking
thread
Breaking
thread
Machine
jamming
needle
upper
bobbin
Incorrect
-
-
Bent
Fabric
-
-
Needle,
match
not
-
Faulty
width
Improper
-
-
Tight
-
Bent
-
Scratches
-
Tied
-
Incorrect
-
Improper
Lint
-
-
Excessive
-
Presser
Needle,
-
not
insertion
needle
being
is
thread
adjustment
threading
upper
needle
bobbin
insertion
thread
or
foot
thread
match
pulled
and
thread
nicks
or
thread
threading
shuttle
in
tension
pressure
and
needle
of
fabric
zigzag
of
tension
shuttle
on
tension
needle
of
to
fabric
do
strong
do
-
Re-insert
-
Replace
not
-
Do
-
Use
-
Re-adjust
-
Re-thread
-
Reduce
-
Replace
Polish
-
-
Reduce
-
Re-insert
Rethread
-
-
Clean
-
Readjust
-
Change
-
Choose
thread
fabric
needle
pull
correct
upper
needle
or
bobbin
shuttle
pressure
proper
according
needle
fabric
needle
zigzag
machine
thread
replace
needle
machine
tension
and
width
tension
shuttle
thread
accordingly
needle
type
to
thread
tension
and
of
-
Page 35

POSIBLES
PROBLEMAS
FUNCIONAMIENTO
DE
SOLUCIONES
Y
Disturbio
no
tela
La
mueve
Rotura
aguja
Rotura
hilo
de
del
superior
se
Ia
máquina
La
-
volante
selector
El
-
en
está
Poca
-
Colocación
-
aguja
La
-
-Hala
Uso
-
tela
PosiciOn
-
ancho
de
Enhebrado
-
Demasiada
-
superior
Aguja
-
Hendiduras
-
lanzadera
Probable
no
rueda
de
posiciOn
Ia
presión
incorrecta
está
tela
Ia
de
incorrecto
incorrecta
de
incorrecto
doblada
causa
cose,
largo
Ia
en
doblada
aguja,
de
zig-zag
tensiOn
raspaduras
y
de
“0”
tela
del
del
solo
puntada
de
selector
hilo
el
Ia
hilo
en
aguja
y
Ia
Tire
-
Mueva
-
Aumente
-
prensatela
Coloque
-
Cambie
-
hale
No
-
Uso
-
Mueva
-
correcta
Vuelva
-
Afloje
-
Cambie
-
Cambie
-
raspaduras
botOn
del
el
Ia
La
de
correcto
el
a
tension
Ia
Ia
Ia
Solución
embrague
de
selector
presiOn
Ia
de
aguja
aguja
tela
Ia
aguja,
de
selector
enhebrar
del
aguja
lanzadera
1-4
de
pie
del
nuevo
hilo
Ia
posiciôn
a
correctamente
superior
hilo
lime
o
y
tela
las
Rotura
de
hilo
bobina
tela
La
ondula
del
Ia
se
Demasiada
-
bobina
ColocaciOn
-
Enhebrado
-
Polvo
-
tension
La
-
presión
La
-
excesiva
incorrecto
Uso
-
tela
e
tensiOn
incorrecta
incorrecto
hilo
es
del
Ia
lanzadera
en
demasiado
de
pie
aguja,
de
del
de
costura
hilo
Ia
hilo
-
alta
34
Ia
e
aguja
es
y
-
Afloje
-
bobina
Coloque
-
Enhebre
-
Limpie
-
Vuelva
-
Regule
-
costura
Uso
-
tela
tensiOn
Ia
Ia
aguja
correctamente
Ia
Ianzadera
ajustar
a
presiOn
Ia
correcto
de
del
de
Ia
del
Ia
de
hilo
nuevo
tensiOn
pie
aguja,
de
hilo
y
Page 36

Welcome
watch
to
to
need
new
Your
different
18
White
your
Straight
1.
joining
4
to
later.
Variable
2.
and
5
look.
Variable
3.
and
sew.
the
in
stitch
Darning
4,
tear
over
over
Buttonhole:
5.
Button
6.
Corded
7.
before
thread
sewn,
Overcast:
8.
the
Hem
9.
place.
fold
extending
width
with
Gathering;
10.
pull
to
the
get
White
seams,
a
for
length
the
This
opposite
tapered
and
the
the
edges
Stitch:
the
the
the
Stitch
catch
to
wonderful
the
and
video
started.
Sewing
functions
stitch
model
1521
with
etc:
basting
long
Length
Zigzag:
3-5.
will
Zigzag:
to
begin
Width
width
direction,
bartacks.
Mending:
and
the
push
push
tear,
mend
to
tear
Follow
Sewing:
Buttonholes:
beginning
cord
gimp
or
the
stitch
Set
keep
to
For
with
Pin
to
hem
the
to
about
left
bobbin
4.
sewing
Set
read
Machine
follow.
variable
set
stitch
this
Use
you
as
0
the
reverse
reverse
the
Consult
sew,
to
around
cord
width
them
Blind
a
pins
the
right
the
right.
Sew
of
stitch
threads
of
world
through
are
that
length.
length
stitch
for
second
The
stitching
for
third
The
begin
stitch
begin
the
Set
button
to
it.
instructions
your
Stitch
the
lower
the
stitching.
the
in
to
from
Hem
perpendicular
side
will
You
zigzag
this
zigzag
the
length
gather
to
sewing
the
offers
a
pictured
Set
dial
temporary
stitch
stitch
sew
to
point
a
with
width
at
dial
width
sew
to
over
go
for
Instruction
buttonhole
needle
the
needle.
Stitch
5.
fraying
medium
on
leave
but
sew
stitch
st;tch
Sew
4.
to
the
your
with
Instruction
variety
the
on
width
stitch
2-3.
to
stitching.
function
and
trims
function
increase
and
and
and
5
0
to
back
tear
the
buttonhole
Manual
as
into
the
As
to
about
on
just
two
the
keep
to
and
the
this
the
catching
rows
along
and
along
fabric,
new
Book
stitch
of
box
dial
Basting
nc
a
is
taper
taper
length
and
over
again.
in
under
shown
the
buttonhole
edge
them
heavy
hemline.
of
¼”
extension.
extension
of
White
the
for
capabilities.
on
and
0.
to
stitch:
is
This
pictured
in
rac
tapered
width
the
wide
a
to
Use
0.
to
to
release
it,
Continue
your
Button
the
in
fabric
the
of
laying
fabrics,
Hold
wrong
the
the
on
io’c
this
Sewing
basic
brochure
the
Standard
the
set
easy
an
zigzag
is
and
place
zigzag.
slowly
zigzag.
this
Stitch
1.5.
the
stitching
Instruction
Sewing.
Instruction
loop
and
columns
fabric
flat.
fold
fabric
the
side
the
Set
the
on
fold
straight
Machine!
information
Instructions
sheet
straight
stitch
to
stitch
stitch,
decorative
a
for
the
Set
from
sew
To
decoratively
across
reverse,
back
Manual.
Manual
piece
a
bartacks
and
overcast
to
press
and
wrong
hem
the
of
the
stirch
to
side
fabric.
length
wrong
of
Be
stitch
length
pull
set
length
to
0
the
the
sew
and
heavy
of
the
side
35
of
apart
/4
sure
you’ll
the
for
for
for
dial
out
width
to
as
5
taper
to
or
small
forward
forth
but
are
finish
or
hem
up
and
herr
the
3
yo
in
ar
the
anc
-
Page 37

Monogram/Freehand
11.
monogram
the
Draw
a
fabric
with
12.
in
hooped
no
the
Move
Stippling:
Hoop
0.
to
create
a
fabric
foot
hoop
The
wavy
hoop
on
the
with
under
machine!)
the
without
stippling
or
quilt
straight
Embroidery:
design
or
stabilizer
needle,
the
turning
technique
fabric.
stitch
Set
quilting
on
under
and
it.
Set
the
the
sure
be
follow
You
is
a
stitch
(stippling).
stitch
fabric
fabric.
lower
to
the
move
must
freehand
width
length
with
Set
marked
stitch
to
0.
fabric
a
the
the
Move
0.
to
the
presser
letter
fabric!
for
Remove
marking
stitch
or
quilting.
the
width
bar
design
fabric
the
pencil.
to
(this
with
Set
under
presser
Place
Place
5.
easy
is
the
stitch
the
the
foot.
the
the
forget
to
stitching.
length
needle
to
13.
14.
15.
16.
Needle
Twin
accessory
your
of
top
normal
the
Set
zigzag
too
twin
wide
Pintucks:
needles
two
on
Put
of
rows
Reverse
reverse
reverse.
Applique:
applique
Try
the
stitch
the
thread.
stitch
the
toward
stitch.
satin
smoothly
toe
open
available
machine.
sewing
width
causing
Insert
optional
an
straight
Sewing:
button
Stitch
to
stitch
length
Set
length
until
0
over
gives
Sewing:
but
at0for
needJe
a
and
stitch
marked
the
fabric
on
stitch
the
the
open
An
the
visibility
Replace
at
Place
separate
straight
sewing.
needle
the
twin
thread
applique
twin
sew
To
applique
with
scrap
a
needed.
as
width
1
then
at
zigzag
toe
satin
sewing
any
a
(Always
needle
in
as
needle
backwards
with
designs
a
of
stabilized
from
begin
stitching
applique
stitch
you
as
the
spool
them
stitch
hit
to
(optional
number
presser
R.
As
fusible
For
best
2-5.
to
thanks
sew
standard
machine
each
on
the
at
twin
turn
needle
the
accessory)
13
foot
sewing
with
as
long
place
in
web.
fabric
results
The
sew
on
very
is
foot
available
to
around
needle
store).
spool
needle
needle
the
for
optional
or
on
astraight
the
with
Place
before
larger
your
close
tunnel
a
the
pin.
and
sewing.
wheel
hand
plate
needle
twin
lightweight
a
button
zig
a
tear-a-way
thread
the
scrap.
together
as
on
applique.
with
There
Thread
thread
Set
break.>
and
with
twin
stitch
held
is
zag
sewing
top
the
applique
Turn
optional
an
underside
the
twin
a
are
one
the
be
to
1.6mm
sewing.
needle
fabric.
or
a
in,
satin
stabilizer
on
with
the
satiny.
and
needle
spool
two
threads
the
through
width
sure
2.0mm
or
Set
pintuck
zigzag
the
stitch.
your
a
decorative
wider
the
stitch
accessory
of
(optional
pins
each
from
width
the
stitch
foot.
push
machine
Fuse
under
project
the
length
This
foot
the
on
for
as
needle.
1-2
is
between
width
Stitch
on
in
will
the
the
and
Rayon
width.
dial
is
called
feed
will
and
the
for
not
to
the
sew
fabric.
adjust
Set
a
the
the
0.
in
Left
17.
desired.
position
18.
Topstitching:
the
of
new
Your
your
for
and
Turn
andtothe
garment
White
home
right
and
needle
small
the
the
Set
for
Sewing
more.
positions
right
stitch
visible
Machine
Why
inside
dial
for
right
length
decorative
not
straight
the
needle
to
help
will
start
stitch:
stitch
position.
and
4
straight
you
project
a
36
-
Set
width
the
stitch
create
today?
-
the
dial
stitch
topstitching.
beautiful
stitch
the
to
width
Happy
width
for
left
Stitch
0.
to
garments,
Sewing!
to
0,
left
stitch
needle
on
gifts,
the
projects
length
outside
as
Page 38

Bienvenido(a)
Asegürese
necesitará
que
Su
nueva
máquina
instrucciones
folleto
para
de
at
ver
de
su
maravilloso
video
el
comenzar.
para
de
18
las
modelo
leer
y
White
coser
funciones
White
mundo
el
1521.
Ia
de
manual
ofrece
diferentes
costura
instrucciones
de
variedad
una
de
con
puntadas
nueva
su
de
ilustradas
máquina
para
obtener
puntadas.
de
Ia
continuaciOn,
A
caja
Ia
en
White.
coser
información
Ia
en
y
se
hoja
bá
dar
d
Puntada
1.
puntada
en
larga,
Zigzag
2.
ponga
efectos
Zigzag
3.
longitud
de0a
hasta
empiece
hacer
Zurcido
4.
puntadas
Ia
para
atrás
Ojales:
5.
Costura
6.
ó
3.
2
tipo
de
Ia
5
obtener
puntadas
misma,
pasar
sobre
de
recta
estándar
recta
Hilván:
hilvãn,
longitud
anchura
decorativos.
anchura
de
en3y
Ia
conforme
una
anchura5y
Ia
con
remiendo:
y
ancho
lo
a
suelte
sobre
rasgadura
Ia
las
Siga
botones:
de
longitud
para
dial
que
el
sirva
ponga
variable:
en
Ia
5
y
variable:
anchura
cosiendo.
vaya
puntada
ahusadas
Ponga
Ia
de
reversa,
Ia
rasgadura
Ia
para
instrucciones
Consulte
variable.
unir
selector
como
segunda
La
longitud
tercera
La
conforme
en
0
amplia
ahuse
presillas
de
dial
el
rasgadura
cosa
de
remendarla.
para
Ia
Ponga
costuras,
de
puntada
de3a
función
comenzarã
Eso
zigzag.
de
Ia
puntada
de
selector
pequena
hacia
nuevo.
hacer
sección
dial
el
etc.:
longitud
temporal.
funciôn
Usela
5.
empiece
barra.
de
adelante
Continue
ojales
coser
de
selector
Ponga
de
de
puntada
de
a
Ia
coser
Para
Use
0.
a
anchura
empuje
y
sobre
dando
en
botones
el
puntada
Esta
puntada
para
coser
puntada
esto
en
el
Ia
manual
su
anchura
de
selector
dial
en
una
es
ilustrada
ribetear
un
es
aumente
y
con
el
ahusado
manera
de
Ia
0
y
botán
rasgadura,
puntadas
de
en
su
puntada
de
de
obtener
para
4
puntada
Ia
es
hacer
y
un
Ia
punto
en
ahusado.
anchura
dirección
zigzag
decorativa
longitud
de
en
reversa
empuje
y
hacia
instrucciones.
manual
longitud
de
fácil
puntada
rac
nc
Ia
y
1.5.
para
delante
instruccione
de
en0.L
de
una
sacar
para
y
Ponga
leritam€
ahusarã
opuest
o
Haga
coser
reversa
Ia
y
pun
pun
de
para
haci
d
zi
S
Ojales
7.
antes
hilo
las
Sobrehilado:
8.
tela
mantenerlas
Puntada
9.
doble
dobladillo.
dobladillo
extendido
longitud
dobladillo
Recogido:
10.
larga
con
empezar
de
grueso
presillas
para
de
presione
y
en
un
a
cordoncillo:
hilo
o
barra,
de
Ponga
sobrehilar
planas.
dobladillo:
Tome
el
hacia
el
hacia
3.5
y
Ia
con
Ponga
puigada
de
Y4
coser,
a
para
Ia
o
dobladillo
el
tela
Ia
lado
lado
anchura
Ia
costura
puntada
Ia
Cosa
baje
tapiceria
mantenga
anchura
acabado
darle
realizar
Para
manera
de
derecho,
derecho.
en
izquierda
separaciOn
de
ojal
el
Ia
alrededor
el
de
en
4.
una
en
como
aguja
cordoncillo
puntada
Ia
las
a
dobladillo
un
lugar.
su
que
pero
deje
Ia
Cosa
Cosa
Ia
de
longitud
se
para
de
orillas
Sujételo
reverso
el
como
puntada
esta
puntada
jale
y
-j
muestra
que
Ia
aguja.
dentro
5.
en
para
ciego
4
puntada
de
4.
de
hilos
los
-
entre
Haga
con
esté
de
to
a
zigzag
Cosa
manual
en
el
Ia
en
Conforme
puntada.
Ia
de
puntadas
evitar
que
telas
en
alfileres
orientado
pulgada
largo
zigzag
de
agarrando
dos
Ia
de
de
haga
tela
y
cosa
a
deshilachen
se
peso
de
posición
en
hacia
reverso
del
esta
extension.
de
enIaextension
hileras
bobina
de
para
instrucciones
lazada
una
columnas
las
largo
lo
de
mediano
perpendicula
afuera
y
del
doblez
el
justo
puntada
esta
recoger
pero
con
del
orilla
Ia
y
pes
o
haga
el
dobladillo
Ponga
por
el
de
red
Ia
tela.
Ia
re
Page 39

Monogramas/bordado
•
11
aro
un
puesta
olvidar
Mueva
el
con
en
al
eI
Trace
monograma
estabilizador
un
bajo
aro
el
tener
no
girarlo.
sin
aro
un
libre:
o
Ia
pie
diseño
el
aguja,
en
Deberá
Ponga
bajo
asegürese
máquina)
Ia
Ia
Ia
en
tela.
Ia
mover
longitud
con
tela
Ponga
de
siga
y
tela.
Ia
de
un
Ia
bajar
Ia
pulgada
Ia
Iãpiz
anchura
barra
Ia
letra
para
o
diseño
de
Quite
en
0.
marcar
puntada
Ia
prensatelas
marcado
tela.
prensatelas.
el
Ponga
5.
en
es
(esto
con
Ia
Ponga
fácil
puntada.
Ia
tela
de
Ia
en
tela
Puntear:
12.
una
Mueva
Costura
13.
opcional
encima
como
anchura
Ia
para
asegurar
de
Frunces:
14.
las
Ponga
prensatelas
aguja
Costura
15.
batOn
coserá
Aplicaciôn:
16.
tela
puntada
longitud
de
aplicaciOn,
empiece
Ia
Puede
alimentaciOn
del
longitud
Ia
de
si
coser
aguja
Ta
dos
el
doble
de
en
con
rayOn
puntada
obtenerse
pie,
técnica
La
de
bajo
tela
aguja
con
disponibte
máquina.
su
a
fuera
en
0
puntadas
Ia
que
se
y
Inserte
agujas
ancho
de
en
en
reversa:
reversa
reversa.
Cosa
entretela
un
en
puntada
de
Ia
decorativo.
más
a
coser
zigzag
de
consistente
cual
Ia
de
Ponga
0.
aguja
a
doble:
en
de
coser
coser
para
de
anchura
rompiera).
aguja
una
enhébrela
y
puntada
Ia
de
frunces
ligera.
tela
Para
marcado
aplicaciones
adhesiva.
retazo
de
Ponga
anchura
el
en
esté
pie
un
brinda
le
puntear
coicha
Ia
para
Quite
cualquier
Ponga
manera
una
zigzag
sea
no
doble
como
aguja
de
coser
con
Ponga
tela
segOn
Ia
será
retazo.
muy
aplicaciones
de
Ia
por
visibilidad
una
es
Ia
o
una
crear
aguja
Ia
tienda
carrete
un
normal,
puntada
aguja
con
excesiva,
(accesorlo
indica
se
Ponga
en
0.
doble
atrás
hacia
letra
Ia
una
con
un
estabilizada
necesario.
sea
anchura
necesaria.
el
Gire
dial
cerrada
puntada
mientras
en
libre
un
puntada
tela
puntada
estándar
artIculos
de
hilo
de
sepáreios
pero
recta
con
(siempre
doble
cual
to
opcional)
en
el
prensatelas
un
opcional.
Ta
con
Mientras
R.
puntada
de
estabilizador
de
antes
Para
puntada
Ia
de
Ponga
selector
satinada,
y
pata
de
satén,
de
cose
para
Ponga
aro.
ondulada
ponga
y
para
cada
en
aguja
podrIa
con
párrafo
hileras
Cosa
puntada
mantenga
satén
separable
coser
obtener
de
longitud
a
longitud
de
êso
A
abierta
gracias
alrededor
acolchado.
anchura
Ia
recta
aguja
una
coser).
Hay
portacarrete.
enhebrar
para
gire
un
para
de
Ponga
Ia
rueda
que
espaclo
coser
aplicaciones
dobie.
hacer
13
de
recta
o
oprimido
zigzag.
en
bajo
que
tela
Ia
mejores
los
Mientras
a
5.
2
puntada
Ia
de
de
llama
le
se
accesorio
coma
Ia
depresiOn
a
Ia
de
Ponga
de
colchas
para
doble
dos
Enhebre
cada
Ia
de
aguja
Ia
de
con
puntadas
zigzag,
de
el
Pegue
tela.
Ia
vaya
resultados,
más
puntada
una
aplicación.
a
puntada
puntada
Ia
(puntear).
(accesorio
portacarretes
los
aguja.
anchura
mano
en
para
tocara
ó
2.0
1.6
doble.
aguja
opcional
rectas
con
oprima
aplicaciôn
Ia
Pruebe
usar
Ia
y
Ia
ajuste
botón,
a
use
grande
entonces
5
en
y
0
Ia
hasta
de
para
parte
hacia
puntada
opcional
en
en
en
hilos
Ponga
1
O
Ia
placa
entre
mm
un
o
Ta
eI
máquina
a
hilo
sea
que
satén.
l
inferior
0.
2
Ia
Ia
Ia
Posiciones
17.
aguja
Ia
puntadas
del
en
dial
en
18.
puntada
dentro
de
Puntada
Haga
visiblesydecorativas.
nueva
Su
para
máquina
su
máquina
hogar
coser!
de
y
izquierda
ponga
0,
selector
hacia
y
paralelo:
en
de
mucho
derecha
y
longitud
Ia
anchura
de
Ia
derecha
Ponga
exterior
el
Whiteleayudará
coser
más.
tPor
de
para
Ia
longitud
de
qué
de
Ia
aguja
Ia
a
puntada
puntada
de
posición
Ia
prenda
empezar
no
de
-3
para
Ia
puntada
para
crear
a
puntada
segün
hacia
derecha
obtener
un
-
su
Ia
en
prendas
prayecto
recta:
preferencia.
izquierda
Ia
aguja.
de
anchura
Ia
4
y
puntadas
hermosas,
hoy
Ponga
para
en
mismo?
anchura
Ia
el
Gire
posición
Ia
de
paralelo
regalos,
iDisfrute
dial
Ia
puntada
de
pequeno
izquierda
rectas,
proyectos
su
Ia
en
0.
 Loading...