


Whirlpool WED97HEXL, WED97HEXW, WEL98HEBL, WEL98HEBU, WGD97HEXL Owner's Manual
...Use & Care Guide
Guide d’utilisation et d’entretien
ELECTRONIC DRYER
SÉCHEUSE ÉLECTRONIQUE
Para obtener acceso al Manual de uso y
cuidado en español, o para obtener información adicional acerca de su producto, visite: www.whirlpool.com.
If you have any problems or questions, visit us at www.whirlpool.com
Pour tout problème ou question, consulter www.whirlpoolappliances.ca
W10436347A W10436725A - SP
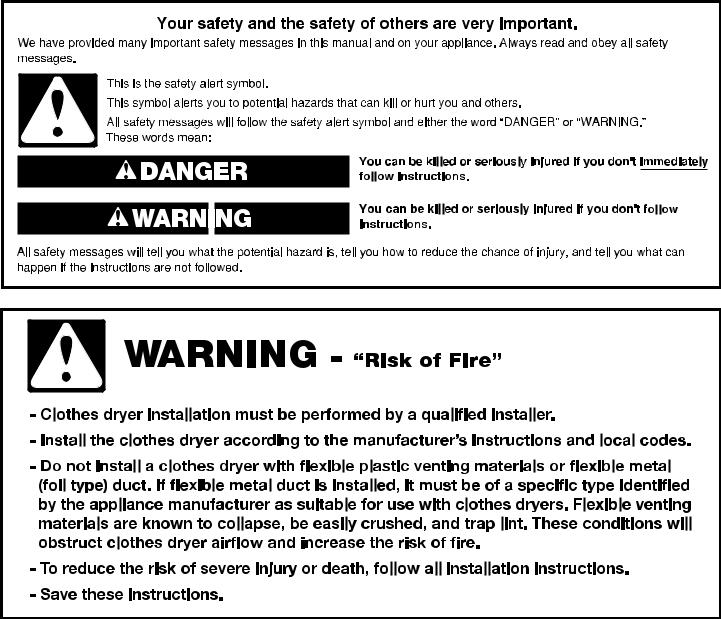
TABLE OF CONTENTS |
|
|
DRYER SAFETY........................................................................ |
|
2 |
ACCESSORIES......................................................................... |
|
4 |
CHECK YOUR VENT SYSTEM FOR GOOD AIR FLOW........... |
5 |
|
CONTROL PANEL AND FEATURES......................................... |
|
6 |
CYCLE GUIDE.......................................................................... |
|
7 |
USING YOUR DRYER............................................................... |
|
9 |
MY CYCLE AND SPECIALTY CYCLES................................... |
|
11 |
ADDITIONAL FEATURES........................................................ |
|
12 |
DRYER CARE.......................................................................... |
|
12 |
USING THE BUILT-IN TROUBLESHOOTING FEATURE......... |
14 |
|
TROUBLESHOOTING............................................................. |
|
15 |
WARRANTY............................................................................ |
|
16 |
ASSISTANCE OR SERVICE..................................... |
Back Cover |
|
DRYER SAFETY
TABLE DE MATIÈRES |
|
|
SÉCURITÉ DE LA SÉCHEUSE................................................ |
|
17 |
ACCESSOIRES....................................................................... |
|
19 |
VÉRIFICATION D’UNE CIRCULATION D’AIR ADÉQUATE |
|
|
POUR LE SYSTÈME D’ÉVACUATION..................................... |
|
20 |
TABLEAU DE COMMANDE ET CARACTÉRISTIQUES........... |
22 |
|
GUIDE DES PROGRAMMES.................................................. |
|
23 |
UTILISATION DE LA SÉCHEUSE............................................ |
|
26 |
MON PROGRAMME ET PROGRAMMES SPÉCIAUX............. |
28 |
|
CARACTÉRISTIQUES SUPPLÉMENTAIRES.......................... |
|
29 |
ENTRETIEN DE LA SÉCHEUSE.............................................. |
|
30 |
UTILISATION DE LA CARACTÉRISTIQUE |
|
|
DE DÉPANNAGE INTEGRÉE.................................................. |
|
32 |
DÉPANNAGE........................................................................... |
|
32 |
GARANTIE............................................................................... |
|
34 |
ASSISTANCE OU SERVICE........................... |
Couverture arrière |
|
2

IMPORTANT: When discarding or storing your old clothes dryer, remove the door.
3
ACCESSORIES
Enhance your new washer and dryer with the following genuine Whirlpool accessories. For more information on options and ordering, call 1-800-442-9991, or visit us at: www.whirlpool.com/accessories. In Canada, call 1-800-807-6777 or visit us at www.whirlpoolparts.ca.
15" Pedestal
Color-matched pedestals raise the washer and dryer to a more comfortable working height.
The large drawer provides convenient storage.
Stack Kit
If space is at a premium, the stack kit allows the dryer to be installed on top of
the washer.
Worksurface
The worksurface bridges the washer and dryer, and
provides a convenient working and storage area.
4
CHECK YOUR VENT SYSTEM FOR GOOD AIR FLOW
Good air flow
Along with heat, dryers require good air flow to efficiently dry laundry. Proper venting will reduce your drying times and improve your energy savings. See “Installation Instructions”.
The venting system attached to the dryer plays a big role in good air flow.
Service calls caused by improper venting are not covered by the warranty and will be paid by the customer, regardless of who installed the dryer.
Maintain good air flow by:
nCleaning your lint screen before each load.
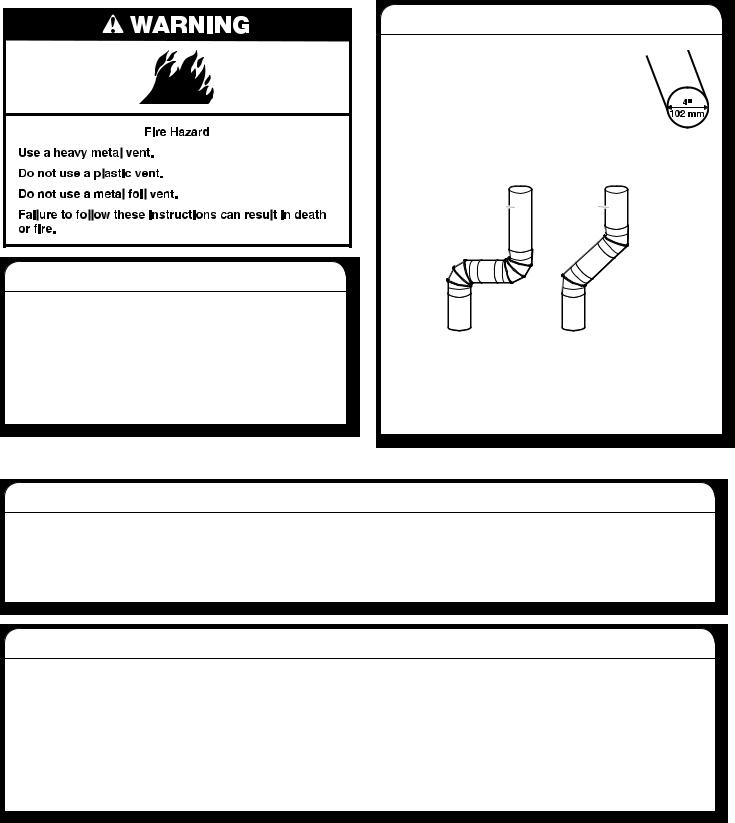
nReplace plastic or foil vent material with 4" (102 mm) diameter heavy, rigid vent material.
nUse the shortest length of vent possible.
nUse no more than four 90° elbows in a vent system; each bend and curve reduces air flow.
Good Better
nRemove lint and debris from the exhaust hood.
nRemove lint from the entire length of the vent system at least every 2 years. When cleaning is complete, be sure to follow the Installation Instructions supplied with your dryer for final product check.
nClear away items from in front of the dryer.
Use Auto cycles for better fabric care and energy savings
Use the Auto Cycles to provide the most energy savings and enhanced fabric care from the dryer. During Automatic Cycles, drying air temperature and moisture level are sensed in the load. This sensing occurs throughout the drying cycle and the dryer shuts off when the load reaches the selected dryness. Use the NORMAL DRY dryness level to provide optimal energy savings.
With Timed Dry, the dryer runs the amount of time set and sometimes results in shrinkage, wrinkling, and static due to over-drying. Use Timed Dry for the occasional damp load that needs a little more drying time or when using the drying rack.
Tips for getting the best performance from your steam dryer
νResults may vary depending on fabric. 100% cotton garments with wrinkle-free finish may yield better results than those without. 100% cotton items may require additional touching up after the Steam Cycle.
νUse of a fabric softener sheet is not recommended with Steam Cycles. It may cause temporary staining on clothes.
νIt is not recommended to use Steam Cycles for items that have been starched. Wash any starched or new garments prior to using a Steam Cycle.
νThe Quick Refresh Cycle is best for smoothing out wrinkles and reducing odors from loads consisting of one to 12
dry items of wrinkle-free cotton, cotton-polyester blend, common knits, and synthetic garments.
νThe Enhanced Touch Up Cycle is best for smoothing out wrinkles from clothes that have been left in the dryer too long. For best results, do not overload the dryer.
5
CONTROL PANEL AND FEATURES
1 |
|
|
2 |
3 |
4 |
5 |
|
CASUAL |
NORMAL |
BULKY ITEMS |
|
|
|
|
DELICATE |
|
JEANS |
|
|
|
|
Eco Auto |
|
|
|
|
|
|
Cycles |
|
HEAVY |
|
|
|
|
TIMED |
|
|
|
|
|
|
DRY |
|
DUTY |
|
|
|
|
QUICK |
|
TOWELS |
|
|
|
|
DRY |
|
|
|
|
|
|
Manual Cycles |
|
|
|
|
|
|
SPECIALTY |
|
ENHANCED |
|
|
|
|
CYCL |
|
TOUCH UP |
|
|
|
|
MY CYCLE |
|
QUICK REFRESH |
|
|
|
|
|
Steam Cycles Select number of Garments |
|
|
|
|
9 |
or |
8 |
7 |
|
6 |
|
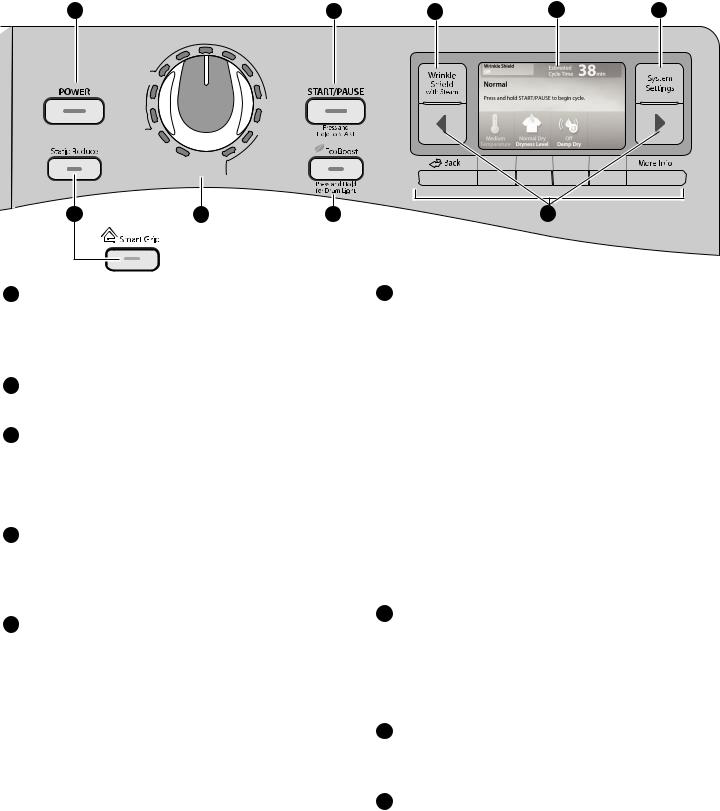
1POWER BUTTON
Press to turn the dryer on and off. Press to stop/cancel a cycle at any time.
NOTE: When the dryer is turned on for the first time after being plugged in or after a power outage, please allow a minute or so for the dryer display to start up.
2START/PAUSE BUTTON
Press and hold to start a cycle, or press once while a cycle is in process to pause it.
3WRINKLE SHIELD™ with Steam Option
Press to activate the Wrinkle Shield™ with Steam option. This will tumble clothes periodically and, if the Steam option is activated, add a short steam refresh cycle after an hour to help avoid wrinkles when you can’t remove clothes from the dryer immediately. Steam is available with High, Medium-High, and Medium temperatures only.
4COLOR LCD DISPLAY SCREEN
This screen will display current options and settings, cycle information, and estimated time remaining. You can also use the navigation buttons below and on either side of the screen to access helpful laundry and troubleshooting tips, as well as other information.
5SYSTEM SETTINGS
The System Settings button allows you to adjust the LCD display settings, including brightness and other preferences.
Under System Settings, you can access the following functions:
Remote Start (model WEL98 only)
Allows you to start your dryer remotely using the Smartappliances app.
Control Lock
Allows you to disable all controls except the power button to avoid unauthorized use or changes to running cycles.
End of Cycle
Adjusts the volume of the End of Cycle signal, or turns it off.
Button Sound
Adjusts the volume of the button sounds, or turns them off.
Brightness
Adjusts the brightness of the LCD screen.
Language
Displays information in English, French, or Spanish.
Themes
Select between two different display color and background themes.
6LCD CONTROLS
Use these buttons to select options displayed in the LCD screen, and to navigate through options.
BACK
Press the BACK button to go back to the previous screen without accepting any changes made on the current screen. Press and hold for 1 second to return to the start-up screen for the selected cycle.
MORE INFO
Press to get more information on a setting or option. Press MORE INFO again to return to the previous screen.
tand u BUTTONS t Button
Press the t button when the arrow is lit to go back to the previous set of options or settings.
u Button
Many screens have more than 4 selections. Press the u button when the arrow is lit to show additional options or settings.
SELECTION BUTTONS
Use the four selection buttons to choose options or settings displayed on the LCD screen.
7ECOBOOST™ BUTTON
The EcoBoost™ option improves energy savings. You may notice the cycle time increases when the EcoBoost™ option is selected. Saving energy through slightly lower temperatures
requires slightly more drying time for best drying results. Overall, you are saving more energy when using the EcoBoost™ feature.
NOTE: Press and hold the EcoBoost™ button for 3 seconds to turn the drum light on or off.
8CYCLE CONTROL KNOB
Use your dryer’s cycle control knob to select available cycles on your dryer. Turn the knob to select a cycle for your laundry load. See “Cycle Guide” for detailed descriptions of cycles.
9STATIC REDUCE BUTTON
Press to add the Static Reduce option to an Auto cycle. The dryer will automatically tumble, pause, and introduce a small amount of moisture into the load to help reduce static. This option adds approximately 8 minutes to the total cycle time.
or
SMART GRID BUTTON
Press to activate the Smart Grid option (see “Smart Feature Sheet”).
6
CYCLE GUIDE — AUTO CYCLES
For additional cycle details and options, refer to the LCD display. Settings and options shown in bold are default settings for that cycle. Not all features and cycles are available on all models.
Not all options and settings are available with each cycle.
Use Auto Cycles for better fabric care and energy savings
The dryer senses moisture in the load or air temperature and shuts off when the load reaches the selected dryness level. Use the NORMAL dryness level to provide optimal energy savings.
Items to dry: |
Cycle: |
Drying |
Dryness |
Default |
Available |
Cycle Details: |
Temperature: |
Level: |
Time: |
Options: |
|||
|
|
|
|
|
|
|
Heavyweight items |
Heavy |
High |
More |
45 |
Damp Dry Signal |
Offers stepped drying starting |
such as towels or |
Duty |
|
Normal |
|
Wrinkle Shield™† |
with High heat followed by Medium |
heavy work clothes |
|
|
Less |
|
Static Reduce |
heat for enhanced fabric care |
|
|
|
|
|
EcoBoost™ |
and energy savings. |
Work clothes, casual |
Normal |
Medium |
More |
38 |
Damp Dry Signal |
Uses Medium heat to dry large |
wear, mixed cottons, |
|
|
Normal |
|
Wrinkle Shield™† |
loads of mixed fabrics and items. |
sheets, corduroys |
|
|
Less |
|
Static Reduce |
Normal is the preferred energy |
|
|
|
|
|
EcoBoost™ |
cycle. |
Jeans and denims |
Jeans |
Medium-High |
More |
50 |
Damp Dry Signal |
Stepped drying uses High heat |
|
|
|
Normal |
|
Wrinkle Shield™† |
initially, followed by Medium heat |
|
|
|
Less |
|
Static Reduce |
to drive moisture from jeans and |
|
|
|
|
|
EcoBoost™ |
denims. |
Jackets, comforters, |
Bulky |
Medium |
More |
55 |
Damp Dry Signal |
Use for drying large, bulky items; |
pillows |
Items |
|
Normal |
|
Wrinkle Shield™† |
do not overfill dryer drum. Partway |
|
|
|
Less |
|
Static Reduce |
through the cycle, the signal will |
|
|
|
|
|
EcoBoost™ |
sound for 2 minutes to indicate |
|
|
|
|
|
|
when it is time to rearrange items |
|
|
|
|
|
|
for optimal drying. |
Shirts, blouses, |
Casual |
Low |
More |
35 |
Damp Dry Signal |
Uses a stepped drying temperature |
permanent press, |
|
|
Normal |
|
Wrinkle Shield™ |
from Medium to Low for improved |
synthetics, |
|
|
Less |
|
Static Reduce |
moisture removal and enhanced |
lightweight items |
|
|
|
|
EcoBoost™ |
fabric care. |
Undergarments, |
Delicate |
Extra Low |
More |
28 |
Damp Dry Signal |
Uses Extra Low heat to gently |
blouses, lingerie, |
|
|
Normal |
|
Wrinkle Shield™ |
dry delicate items. |
performance wear |
|
|
Less |
|
Static Reduce |
|
|
|
|
|
|
EcoBoost™ |
|
Large loads of cotton |
Towels |
High |
Normal |
60 |
Wrinkle Shield™ |
This is a long cycle with high heat, |
towels, heavyweight |
|
|
|
|
|
which has been proven to reduce |
items |
|
|
|
|
|
household bacteria. This cycle is |
|
|
|
|
|
|
not recommended for all fabrics. |
|
|
|
|
|
|
Use for large loads of heavyweight |
|
|
|
|
|
|
fabrics such as cotton towels. |
Sportswear |
Specialty |
Varies by cycle. See the “My Cycle and Specialty |
Specialty Cycles provide custom |
|||
Kidswear |
Cycles |
|
Cycle” section of this guide. |
drying cycles for tackling common |
||
Wool Sweaters |
|
|
|
|
|
household cleaning tasks. Refer to |
Business Wear |
|
|
|
|
|
the on-screen description for the |
Intimates |
|
|
|
|
|
individual cycles for additional |
Pillows |
|
|
|
|
|
details and available settings. |
Sheets/Linens |
|
|
|
|
|
|
Blankets/Comforters |
|
|
|
|
|
|
Custom |
My Cycle |
|
Custom |
|
Save your favorite cycle/setting |
|
|
|
|
|
|
|
combinations. See the “My Cycle |
|
|
|
|
|
|
and Specialty Cycle” section of |
|
|
|
|
|
|
this guide. |
|
|
|
|
|
|
|
† Wrinkle Shield™ with Steam option is available only with High, Medium-High, and Medium Drying Temperature settings.
Load Size Recommendations
For best results, follow the wet load size recommendations noted for each cycle.
Small load: Fill the dryer drum with 3-4 items, not more than 1/4 full.
 Medium load: Fill the dryer drum up to about 1/2 full.
Large load: Fill the dryer drum up to about 3/4 full. Do not overload. Items need to tumble freely.
7
CYCLE GUIDE — MANUAL CYCLES
Settings and options shown in bold are default settings for that cycle.
Not all features and cycles are available on all models.
Not all settings and options are available on each cycle.
Adjusting drying time on Manual Cycles |
Selecting the Drying Temperature |
When you select a Manual Cycle, the default time appears in the display. Use the LCD controls to increase or decrease the time in 1 minute increments. Press and hold to change the time in 5 minute increments.
The maximum dry time is 100 minutes.
A High heat setting may be used for drying heavyweight items such as towels and work clothes.
A Low to Medium heat setting may be used for drying medium-weight items such as sheets, blouses, dresses, underwear, permanent press fabrics, and some knits.
Use a no heat (air dry) setting for foam, rubber, plastic, or heat-sensitive fabrics.
Line dry bonded or laminated fabrics.
NOTE: If you have questions about drying temperatures for various loads, refer to the care label directions.
|
Cycle: |
Drying |
Default |
Available |
|
Items to dry: |
Temperature: |
Time: |
Options: |
Cycle Details: |
|
|
|
|
|
|
|
Small loads and |
Quick Dry |
High |
13 |
Wrinkle Shield™† |
For small loads of 3-4 items. |
sportswear |
|
Medium-High |
|
|
|
|
|
Medium |
|
|
|
|
|
Low |
|
|
|
|
|
Extra Low |
|
|
|
|
|
Air Only |
|
|
|
Any load |
Timed Dry |
High |
40 |
Wrinkle Shield™† |
Use to dry items to a damp level for items that do |
NOTE: Select Air |
|
Medium-High |
|
|
not require an entire drying cycle, or to finish drying |
Only to dry foam, |
|
Medium |
|
|
slightly damp items. Select a drying temperature |
rubber, plastic, or |
|
Low |
|
|
based on the type of fabrics in your load. If you are |
heat-sensitive |
|
Extra Low |
|
|
unsure of the temperature to select for a load, |
fabrics. |
|
Air Only |
|
|
select the lower setting rather than the higher setting. |
|
|
|
|
|
|
† Wrinkle Shield™ with Steam option is available only with High, Medium-High, and Medium Drying Temperature settings.
CYCLE GUIDE — STEAM CYCLES
Your dryer has been connected directly to the water line with a hose behind the dryer. This is used for bringing in water for the steam cycles. Settings and options shown in bold are default settings for that cycle.
Not all settings and options are available on each cycle.
Steam cycles are designed for use with dry loads to loosen wrinkles, remove odors, and refresh fabrics.
Items to |
Cycle: |
Drying |
Default |
Available |
|
refresh: |
Temperature: |
Time: |
Options: |
Cycle Details: |
|
Shirts, blouses, |
Quick Refresh |
Medium-High |
12 |
Wrinkle Shield™† |
Use to remove odors and reduce light wrinkles. |
and slacks |
with Steam |
|
|
Static Reduce |
Select the number of garments to be refreshed |
|
|
|
|
|
(on some models). Do not add dryer sheets. |
Mixed Loads |
Enhanced |
High |
22 |
Wrinkle Shield™† |
Use to remove wrinkles, including from loads left in |
|
Touch Up |
Medium-High |
|
Static Reduce |
the dryer too long. Dry time will automatically adjust |
|
|
Medium |
|
|
when the load size is sensed. Cycle run time cannot |
|
|
|
|
|
be manually adjusted, but Temperature is selectable. |
|
|
|
|
|
Do not add dryer sheets. |
|
|
|
|
|
|
† Wrinkle Shield™ with Steam option is available only with High, Medium-High, and Medium Drying Temperature settings.
Load Size Recommendations
For best results, follow the wet load size recommendations noted for each cycle.
Small load: Fill the dryer drum with 3-4 items, not more than 1/4 full.
 Medium load: Fill the dryer drum up to about 1/2 full.
Large load: Fill the dryer drum up to about 3/4 full. Do not overload. Items need to tumble freely.
8
USING YOUR DRYER
WARNING: To reduce the risk of fire, electric shock, or injury to persons, read the IMPORTANT SAFETY INSTRUCTIONS before operating this dryer.
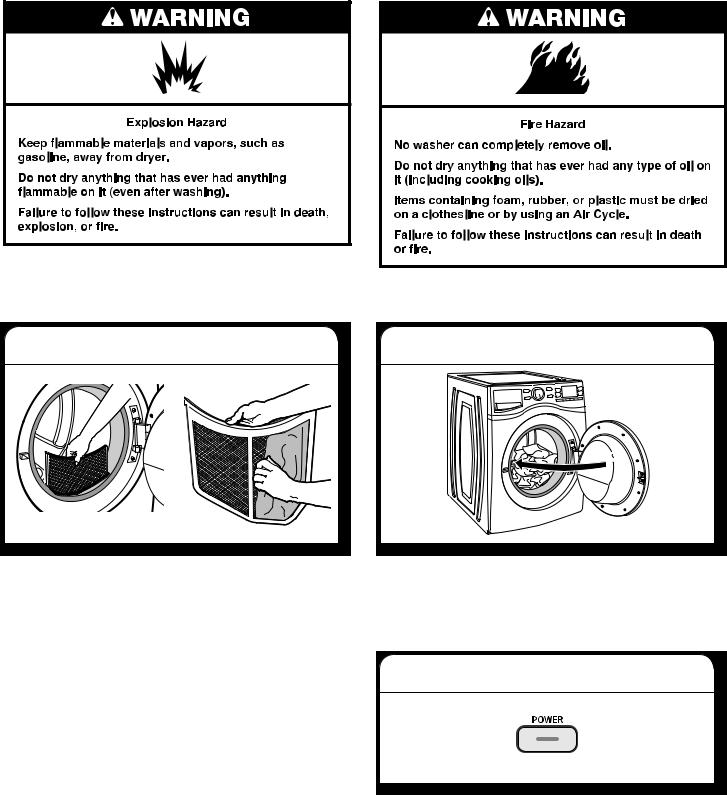
1. Clean the lint screen
Clean the lint screen before each load. Pull the lint screen straight up. Roll lint off the screen with your fingers. Do not rinse or wash screen to remove lint. Wet lint is hard to remove. Push the lint screen firmly back into place.
For additional cleaning information, see “Dryer Care”.
2. Load the dryer
Open the door by pulling on the handle. Place laundry in the dryer. Add a dryer sheet to wet load, if desired. Close the door.
IMPORTANT: Do not overload the dryer. Items need to tumble freely. Overloading can lead to poor drying performance and may increase wrinkling and tangling.
3. Press POWER
Press the POWER button to turn on the dryer.
9
4. Select the desired cycle
CASUAL |
NORMAL BULKY ITEMS |
DELICATE |
JEANS |
Eco Auto |
|
Cycles |
HEAVY |
TIMED |
|
DRY |
DUTY |
QUICK |
TOWELS |
DRY |
|
Manual Cycles |
|
SPECIALTY |
ENHANCED |
CYCL |
TOUCH UP |
MY CYCLE |
QUICK REFRESH |
|
Steam Cycles Select number of Garments |
Select the desired cycle for your load. See the “Cycle Guide” or the display for more information about each cycle.
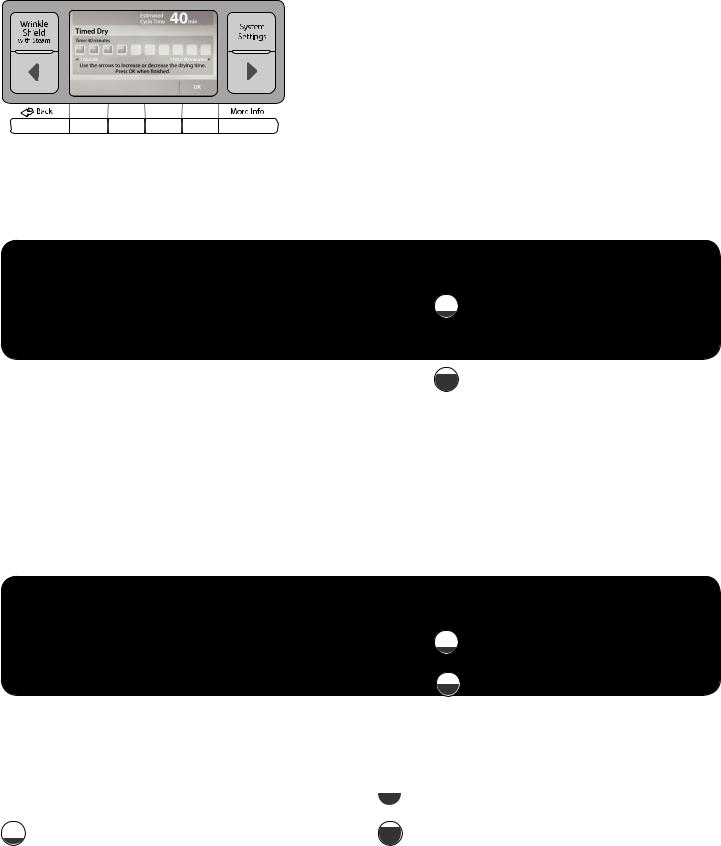
If selecting Timed Dry, use LCD control buttons to adjust the length of the cycle.
5. Set any cycle settings
The default cycle settings will be displayed on the LCD screen. You may adjust different settings, depending on whether you have selected an Auto Cycle, Manual Cycle, or Steam Cycle. See the “Cycle Guide” for detailed information.
NOTE: Not all options and settings are available with all cycles. Not all cycles are on all models.
Auto Cycles:
You can select a different dryness level, depending on your load, by pressing the button for More, Normal, or Less. Selecting More, Normal, or Less automatically adjusts the dryness level at which the dryer will shut off. Once a dryness level is set, it cannot be changed without stopping the cycle.
Automatic cycles give the best drying in the shortest time. Drying time varies based on fabric type, load size, and dryness setting.
Manual Cycles:
When you select a Manual Cycle, the default time is displayed. Use the LCD control buttons to increase or decrease the time in 1 minute increments. Press and hold to change the time in 5 minute increments.
The default temperature may be changed by pressing the Temperature button until the desired dry temperature is selected.
Quick Refresh with Steam:
Select the number of garments in the load. The dryer will automatically set the drying time and temperature.
10
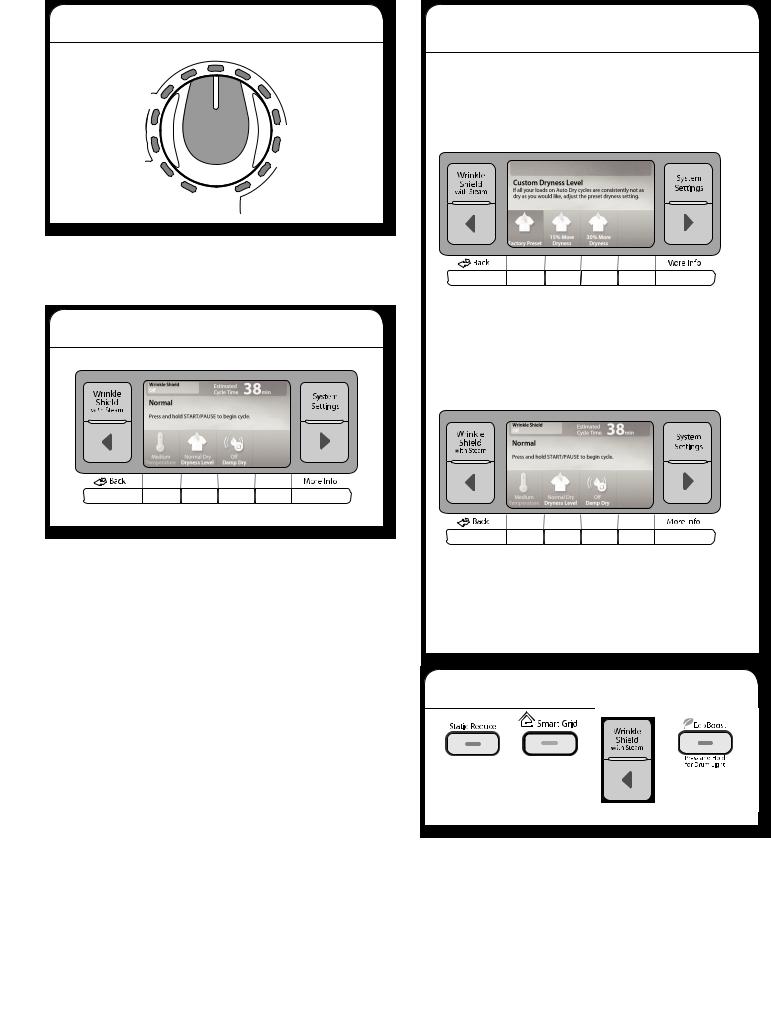
Changing the Auto Cycle settings to increase drying time
If all your loads on all Auto Cycles are consistently
not as dry as you would like, you may change the default settings to increase the default dryness level.
Your automatic drying settings can be adjusted to adapt to different installations, environmental conditions, or personal preference. This change is saved in memory and will affect all of your Automatic cycles, not just the current cycle/load.
There are 3 drying settings:
Factory preset dryness level.
Slightly drier clothes, 15% more drying time. Much drier clothes, 30% more drying time.
To change the drying settings:
NOTE: The settings cannot be changed while the dryer is running or paused. The dryer must be in standby mode (the power button is off) to adjust the default settings.
1.Before starting an Auto cycle, press and hold the LCD control button for Dryness Level for 6 seconds. The
LCD will briefly display the regular Dryness Level options, then change to show the default setting options.
2.Press the LCD control button for the desired setting.
3.Press the BACK button to return to the main screen for the selected cycle.
6.Select any additional options
(options vary by model) |
Add additional options such as Static Reduce, Smart Grid, Wrinkle Shield™ with Steam, and/or EcoBoost™ by pressing the button for that option.
NOTE:
nNot all options and settings are available with all cycles, and not all features and cycles are available on all models.
nOn model WEL98 only, see the “Smart Feature Sheet”
for information about setting up Smart functionality, turning it on and off, receiving important notifications, and taking advantage of available features.
Remote Start (model WEL98 only)
Remote Start |
Remote
Start
Remote Start allows you to start your dryer remotely using the Smartappliances app. Make this selection last using the System Settings button and the LCD control button. Make sure that your dryer remains closed and the cycle is not adjusted until you start the cycle.
1.Select the desired cycle and features.
2.Press the System Settings button.
3.Press the LCD control button for Remote Start.
4.Press the LCD control button for the desired setting.
5.Make sure the dryer remains on. If the dryer is turned off, the Remote Start feature will turn off.
7.Press and hold START/PAUSE to begin cycle
Press and hold the START/PAUSE button to begin the cycle.
8. Remove garments promptly after cycle is finished
Promptly remove garments after cycle has completed to reduce wrinkling. If you will be unable to remove the load promptly, press the Wrinkle Shield™ with Steam button and select the desired Wrinkle Shield™ option before pressing START/PAUSE.
MY CYCLE AND SPECIALTY CYCLES
MY CYCLE
You may store up to 7 frequently used custom cycles in My Cycle for quick access.
To save a custom cycle:
1.Select My Cycle with the Cycle Control knob.
2.Follow the on-screen prompts.
If you try to add another custom cycle and all 7 custom storage spaces are filled, you will need to delete a saved custom cycle before saving the new one.
To retrieve a custom cycle using My Cycle: 1. Select My Cycle with the Cycle Control knob.
2. Use the t and u arrow keys to scroll through the saved custom cycles until the desired cycle is displayed.
3. Press the selector button under the desired cycle.
SPECIALTY CYCLES
Specialty cycles are designed for a specific purpose, such as washing pillows or comforters. To select a specialty cycle, turn the Cycle Control knob to Specialty, then select the desired cycle from the display screen using the selection buttons.
Specialty Cycles include:
Blankets/Comforters – Cotton Blanket
Blankets/Comforters – Synthetic Blanket
Blankets/Comforters – Comforter
Pillows – Feather
Pillows – Fiberfill
Pillows – Decorative
Sheets/Linens – Cotton
Sheets/Linens – Synthetics
Wool Sweaters
Kidswear
Sportswear
Intimates
Business Wear
11
 Loading...