

Whirlpool W10869845 Installation Guide
Installation Instructions
Instrucciones de instalación
Instructions d’installation
Stack Kit
Juego para lavadora y secadora
Enemble superposé
Kit Number W10869845
Número de juego W10869845
Ensemble numéro W10869845
For use only with front-load washers and dryers
Para uso sólo con lavadoras y secadoras de carga frontal
Pour utilisation avec laveuses et sécheuses à chargement
par l’avant seulement
If you have any problems or questions, visit us at www.whirlpool.com
Si tiene cualquier problema o duda, visítenos en www.whirlpool.com
Pour tout problème ou toute question, consulter www.whirlpool.ca
W10895535A
Table of Contents
STACK KIT SAFETY ............................ 2
INSTALLATION REQUIREMENTS ..... 2
Tools and Parts ............................. 2
Location Requirements ................. 3
Uninstall Washer and Dryer .......... 4
If Your Washer or Dryer
Is Still in Its Packaging .................. 4
INSTALLATION INSTRUCTIONS ....... 5
Complete Installation .................... 6
STACK KIT SAFETY
Índice
SEGURIDAD DEL JUEGO
PARA LAVADORA Y
SECADORA SUPERPUESTAS ........... 7
REQUISITOS DE INSTALACIÓN ....... 7
Herramientas y piezas .................. 7
Requisitos de ubicación ............... 8
Como desinstalar la lavadora
y la secadora ................................ 9
Si su lavadora o secadora
está aún en su empaque .............. 9
INSTRUCCIONES
DE INSTALACIÓN ............................ 10
Complete la instalación .............. 11
Table des matières
SÉCURITÉ DE L’ENSEMBLE
SUPERPOSÉ ..................................... 12
EXIGENCES D’INSTALLATION ....... 12
Outillage et pièces ...................... 12
Exigences d’emplacement ......... 13
Désinstallation de la laveuse
et de la sécheuse ........................ 14
Si la laveuse ou la sécheuse
est encore dans son emballage .. 14
INSTRUCTIONS
D’INSTALLATION ............................. 15
Achever l’installation ................... 16
INSTALLATION REQUIREMENTS
TOOLS AND PARTS
Gather the required tools and parts before starting installation.
Tools needed:
#2 Phillips screwdriver Adjustable wrench that
Level
opens to 2" (51 mm)
Bucket
2
Pliers or slip-joint pliers
(for drain and inlet hoses)
Tape measure
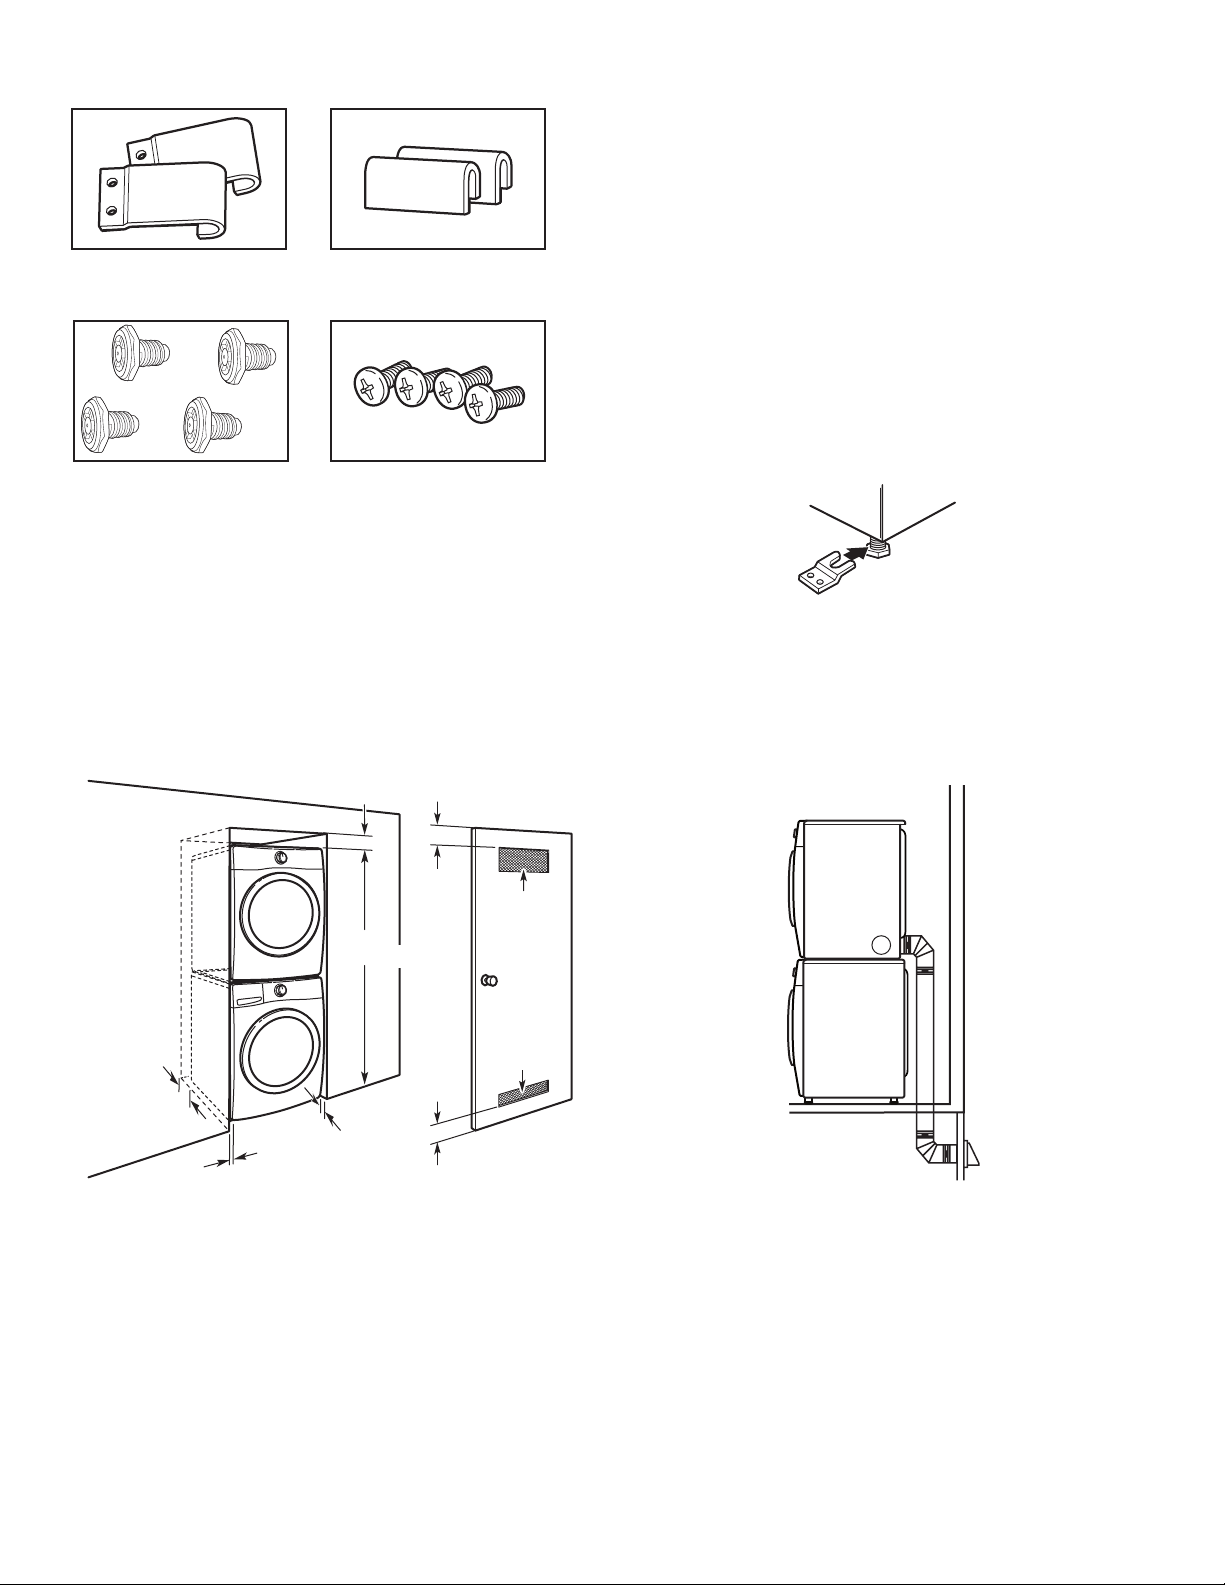
Parts supplied:
6"
Hooked brackets (2)
Feet (4)
Plastic clips (2)
Pan-head screws (4)
LOCATION REQUIREMENTS
Recessed Area and Closet Installation Instructions
IMPORTANT: The stacked washer/dryer can be installed in
an enclosure. Check the locations of the water supply faucets,
grounded electrical outlets, and gas supply line connection (gas
dryer only). Depending on your application, longer washer ll
hoses, longer electric power supply cords, and a longer exible
stainless steel gas connector line than that supplied with the
washer/dryer may be needed.
(152 mm)
Mobile home – Additional installation requirements
This dryer is suitable for mobile home installations.
The installation must conform to the Manufactured Home
Construction and Safety Standard, Title 24 CFR, Part 3280
(formerly the Federal Standard for Mobile Home Construction
and Safety, Title 24, HUD Part 280) or the Canadian
Manufactured Home Standard CAN/CSA-Z240 MH.
Mobile home installations require special parts (listed
following), which are available for purchase from your
local dealer or service center.
Stacked pair must be securely fastened to the floor.
Parts Needed:
n Mobile Home Installation Kit, Part Number 346764, needs
to be purchased to accomplish this. Order 2 kits to enable
you to secure both the front and the back of the unit to
the floor.
n Metal exhaust system hardware.
Special provisions must be made in mobile homes to
introduce outside air into the dryer. The opening (such as a
nearby window) should be at least twice as large as the dryer
exhaust opening.
The exhaust vent must be securely fastened to a noncombustible
portion of the mobile home structure and must not terminate
beneath the mobile home. Terminate the exhaust vent outside.
3"
(76 mm)
1
77
/2"
(1969 mm)
5"
(127 mm)
1"
(25 mm)
1"
(25 mm)
If the water supply faucets, electrical outlets, gas supply line,
3"
(76 mm)
2
48 in.
(310 cm2)
2
24 in.
(155 cm2)
or power cord need modication, have a qualied plumber,
electrician, or gas technician make the changes.
3

UNINSTALL WASHER AND DRYER
IMPORTANT: If your washer and dryer are already installed,
they must be uninstalled.
If you need to uninstall your washer or dryer, see the Installation
Instructions that came with your model for tools required.
Uninstalling Your Washer
1. Turn off the hot and cold water faucets.
2. Unplug the power supply cord.
3. Slowly loosen the ll hoses at the faucets to relieve the water
pressure. Use a sponge or towel to absorb the released
water.
4. Remove the “HOT” and “COLD” ll hoses from the back
of the washer. Drain water in the hoses into a bucket.
5. Remove the drain hose from the wall drain pipe or utility sink
and drain any water in the hose into a bucket.
Uninstalling Your Electric Dryer
1. Unplug the power supply cord.
2. Pull the dryer away from the wall enough to loosen the vent
clamp. Loosen the clamp and gently remove the exhaust vent
from the dryer exhaust outlet.
Steam Models Only:
3. Turn off water faucet.
4. Disconnect the water inlet hose from faucet, then drain the
hose into a bucket.
IF YOUR WASHER OR DRYER IS STILL
IN ITS PACKAGING
Position the packaged washer or dryer close to its nal position.
Cut the packaging as follows:
n
Washer: Cut plastic lm along dotted cut line around the
base. Remove the packaging. Do not remove the shipping
bolts.
n
Dryer: Cut around top and down corners along dotted cut
lines. Discard carton top, corner posts, and sides. Leave
carton bottom underneath dryer.
Uninstalling Your Gas Dryer
1. Unplug the power supply cord.
2. Turn off the gas supply.
3. Pull the dryer away from the wall enough to loosen the vent
clamp. Loosen the clamp and gently remove the exhaust vent
from the dryer exhaust outlet.
4. Disconnect the flexible gas supply line from the dryer. Put
a piece of tape over the open ends of the gas line connection
fittings.
Steam Models Only:
5. Turn off water faucet.
6. Disconnect the water inlet hose from faucet, then drain the
hose into a bucket.
4
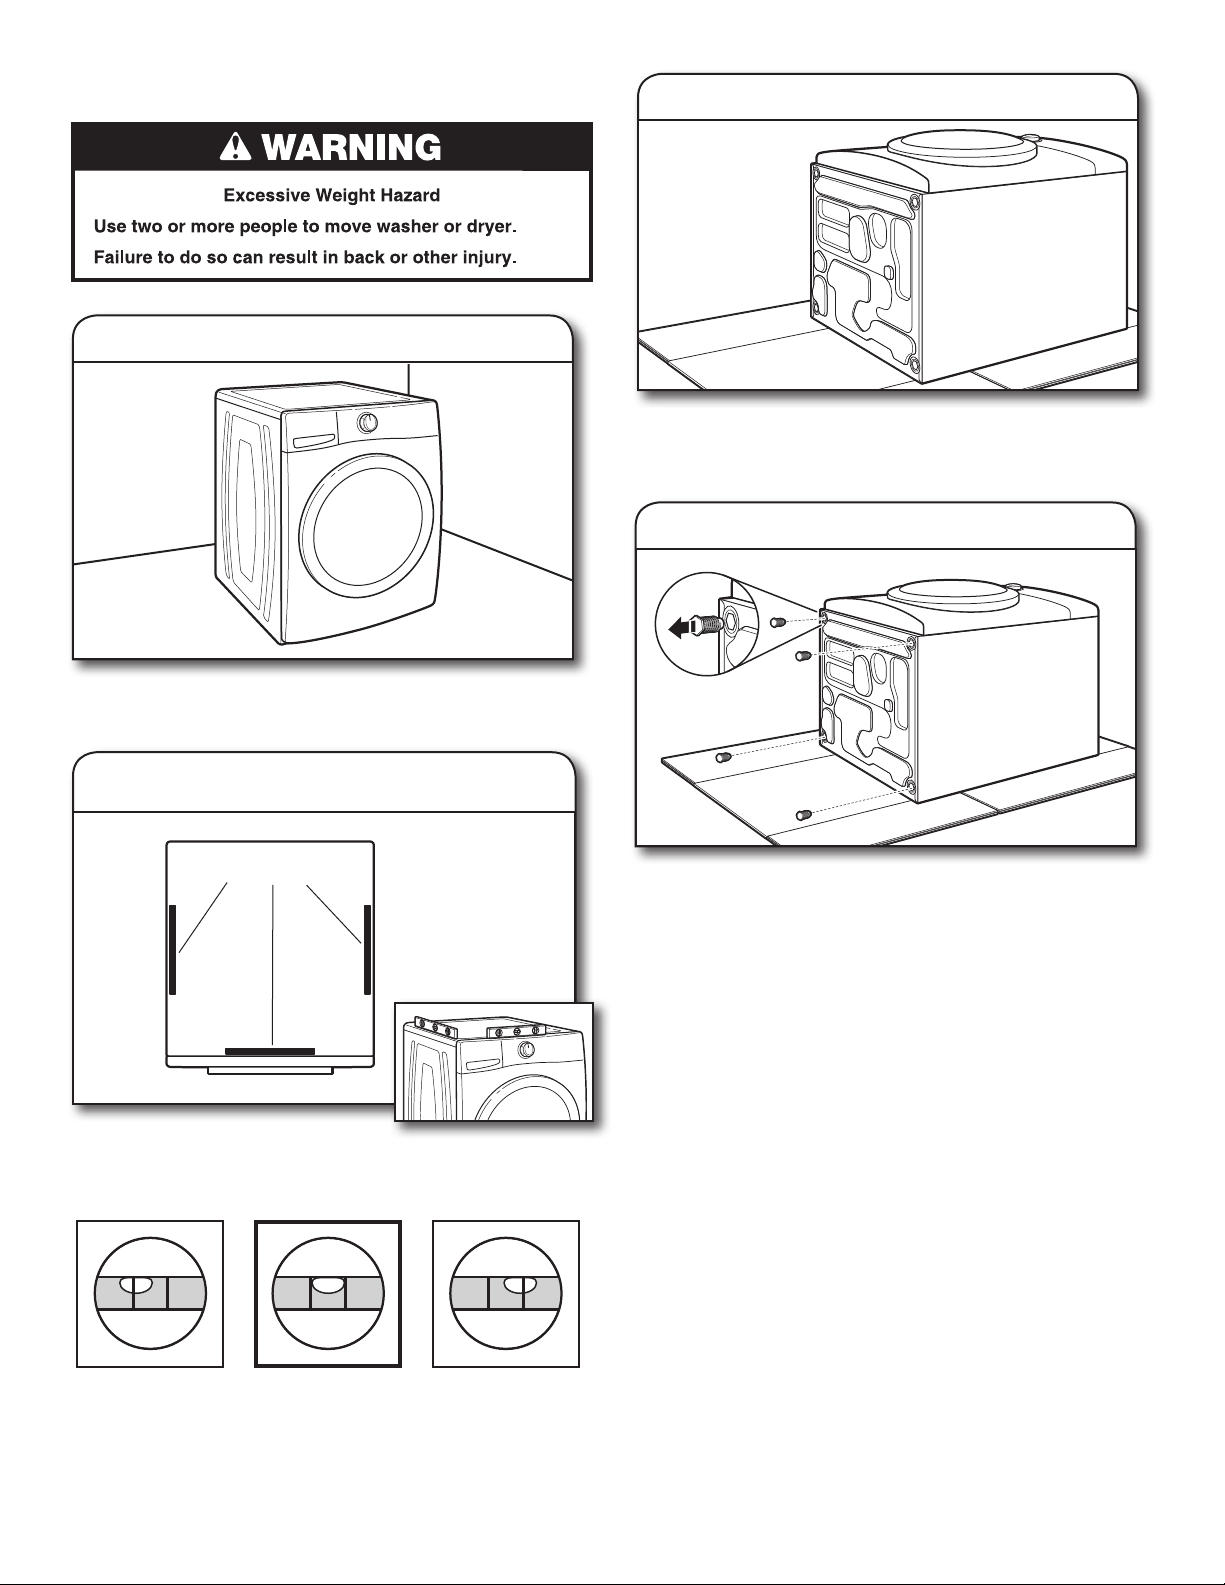
INSTALLATION INSTRUCTIONS
1. Move washer to its nal location
3. On covering, lay dryer on side or back
Place a covering, such as cardboard or a blanket, on the oor
to avoid damage. Gently lay the dryer down with its side or
back on the covering.
4. Remove existing feet, if present
Leave room to work behind washer. Do not remove
the shipping bolts.
2. Check levelness of washer
Place level here
on either side.
Place a level on top edges of washer,
checking each side and front. If not level, tip washer and
adjust feet up or down as shown in Installation Instructions,
repeating as necessary.
Using a wrench or slip-joint pliers, remove the existing feet if
present.
Not Level LEVEL Not Level
5
 Loading...