

Page 1

use&care guide
BUILT-IN
OVEN
Self-Cleaning
Model RB760PXT
. Microwave Ovens. Trash Compactors. Room Air Conditioners. Dehumiditiers. Automatic Washers, Clothes Dryers. Freezers. Relrigerator-Fr
Page 2

Contents
BEFORE YOU USE YOUR OVEN
IMPORTANT SAFETY Automatic MEALTIMER*
INSTRUCTIONS
PARTS AND FEATURES
USING YOUR OVEN
The Electronic MEALTIMER*
Clock................................ . 5
Setting the Electronic
Clock................................ . 6
Using the Electronic Minute
Timer................................ . 7
Baking
.................................
Adjusting the Oven
Temperature Control
Broiling
....................
.............
...............................
©1988 Whirlpool Corporation
Page
. 2 Using the Electronic
. 3
. 4
......
. 5 Oven Vent
. 8
. 9
___
. 10
Clock
Other Operating Hints
CARING FOR YOUR OVEN .. 15
Control Panel and Knobs .
Using the Self-Cleaning
Cycle
Cleaning Chart
Oven Light
IF YOU NEED SERVICE OR
ASSISTANCE
WHIRLPOOL OVEN WARRANTY 24
................................
___
.........................
.............................
..................
.........................
......................
Page
.. 11
.. 14
.. 14
.. 15
.. 16
.. 20
.. 21
.. 22
*Tmk.
Before you use your oven
Read and carefully follow fhe “INSTALLATION INSTRUCTIONS” packed with
your oven.
Read this Use & Care Guide and the Cooking Guide carefully for important use
and safety information. Store this literature in a convenient place for future use.
It Is your personal responsibility and obligation to be sure your oven:
• Has been installed where it is protected from the elements.
• Has been installed and leveled in a wall or cabinet that will hold the weight.
• Has been properly connected to an electrical supply and grounded.
(See "Installation Instructions!’)
• Is not used by anyone unable to operate it properly.
• Is properly maintained.
• Is used only for jobs expected of a home oven.
See your “Cooking Guide” for additional safety and operating Information.
Page 3

IMPORTANT
SAFETY INSTRUCTIONS
WARNING - When using your oven, follow basic precautions,
including the following:
> DO NOT allow children to use
or play with any part of the
oven, or leave them unat
tended near it. They could be
burned or injured.
DO NOT store things children
might want above the oven.
Children could be burned or
injured while climbing on the
door and the door could be
damaged.
KEEP children away from the
oven when it is on. The oven
walls, racks and door can get
hot enough to cause burns.
• Put oven racks where you
want them before turning on
the oven. Heated racks
could cause severe burns.
• Do not touch any part of the
oven, especially the heat
ing elements, until you know
they are completely cool.
Dark elements can still be
hot enough to cause severe
burns.
• FOR YOUR SAFETY •
DO NOT STORE OR USE GASOLINE OR OTHER FLAMMABLE VAPORS AND LIQUIDS
IN THE VICINITY OF THIS OR ANY OTHER APPLIANCE. THEY COULD IGNITE
CAUSING EXPLOSION AND/OR FIRE.
• Let steam and hot air es
cape from the oven before
removing food to prevent
burns.
4. DO NOT use the oven to heat
a room. Persons in the room
could be burned or injured,
or a fire could start.
5. DO NOT wear loose or hang
ing garments when using the
oven. They could ignite if they
touch a heating element and
you could be burned.
6. DO NOT heat unopened con
tainers. They could explode.
The hot contents could burn
and container particles
could cause injury.
7. MAKE SURE to open the oven
door all the way when
adding or removing food to
prevent burns.
- SAVE THESE INSTRUCTIONS -
Page 4

Parts and features
Model RB760PXT
OVEN
VENT
(on top)
CONTROL
PANEL
AUTOMATIC
OVEN LIGHT
SWITCH
OVEN RACK
MODEL AND SERIAL
NUMBER PLATE
(not Shown)
SELF-CLEAN
OVEN
FIBERGLASS
HEAT SEAL
AIR-FLOW
OVEN DOOR
Thank you for buying a Whirlpool appliance. Please complete and
mall the Owner Registration Card provided with this product. Then
complete the form below. Hove this information ready if you need service
or call with a question.
BROIL
ELEMENT
GUIDE
• Copy Model and Serial Numbers
from plate (behind the oven door
on the oven frame) and purchase
date from sales slip.
• Keep this book and sales slip to
gether in a handy place.
Model Number
Serial Number
Purchase Dote
Service Company Phone Number
Page 5

ELECTRONIC MEALTIMER*
CLOCK/MINUTE TIMER
OVEN LIGHT
SWITCH
OVEN
SIGNAL LIGHT
HEATING
INDICATOR LIGHT
OVEN SELECTOR LOCK ^ OVEN TEMPERATURE
LIGHT CONTROL
Using your oven
The Electronic MEALTIMER’^ Clock
The Electronic MEALTIMER* Clock handles many different types of functions.
The following operating hints may be helpful when using the clock:
• The numbers on the display change rapidly when turning the Set Knot.
• When setting the Time-of-Day Clock, the display shows hours and minutes.
C • J C
u •
i_
Twenty-five minutes past
six o'clock
• When using the Min/Sec Timer, the display shows minutes and seconds in the
following sequence.
/ J •
U C
I I- •
Í _i
Forty-five minutes past
twelve o'clock.
f
- For settings from 1-59 seconds, each second will show in the display.
- For settings from 1-10 minutes, the display will increase in 10 second
increments.
I
•
/ n •
n n
I U
•
U U
-
For settings from 10-99 minutes, the display will increase in 1 minute
increments.
•Tmk.
n n
I • u u
continued on next page
Page 6

' When using the Bake Hours and/or Stop Time, the dispiay shows hours and
minutes.
/
J • / C
/_ • / _i
I - r O
I
/ • _i f
Two-hours and fifteen
minutes.
Other operating hints may be found on page 14.
Eieven-hours and fifty-nine
minutes.
Setting the Electronic Clock
O O *
u u • u u
MIN/SEC^ BAKE STOP SELF
TIMER HOURS TIME CLEAN
When you first plug in the oven or
if your electricity goes off for a while,
each light in the display will flash
in sequence.
MIN/SEC BAKE STOP SELF
TIMER HOURS TIME CLEAN
O O
Then, 4 eights and the Min/Sec
Timer and Bake Hours signal lights
will flash. The flashing means that
the clock is ready to be set.
<51^ (^00
1. Push in and hold both the
Min/Sec Timer Button and Bake
Hours Button. "0:00" will show in
the Display and the Signal Lights
will go off.
TET KNOB
Turn the Set Knob to set the right
time of day. Turning the knob
olookwise increases the numbers.
Turning the knob counterclock
wise decreases the numbers. The
display will show the time you
set in hours and minutes.
Page 7

Using the Electronic Minute Timer
The Minute Timer does not start or stop the oven, it works iike a kitchen timer,
it can be set in minutes and seconds up to 99 minutes. The timer beeps when
the set time is up.
n n
•
•
u u
n n
MlN.'SEC BAKE STOi' SEL'
TIMER HOURS TIMI CLEAN
¥
u u
1^00 I qpoo
É
1. Push in the Min/Sec Timer Button.
The Signal Light will come on and
the Display will show "00:00."
n r • r o
C O • Ji J
3. After setting the time you want,
the Timer Light will stay on
and the Display will start counting
down in seconds.
TUrn the Set Knob until the de
sired time shows in the Display.
Turning the knob clockwise in
creases the numbers, while turn
ing the knob counterclockwise
decreases the numbers.
/
n • J n
I L • U I
When the time Is up, the Timer
beeps for 1-2 minutes. To stop,
push the Min/Sec Timer Button.
Page 8

Baking
1. Position the rack(s) properiy
before turning on the oven. To
change rack position, lift rack
at front and pull out.
The rack(s) should be placed so the
top of the food will be centered in
the oven. Always leave at least
ly?
to 2 inches (4-5 cm) between
the sides of the pan and the oven
walls and other pans. For more
information, see the "Cooking
Guide”
2. Set Oven Selector to BAKE. The
Oven “ON” Light will come on.
/-
|i
---
?
,
:j
I
1 11
^sr
„ i;
. . c
c
4. When the Heating Light first
goes off, the oven is preheated.
Put food in the oven. Note: Oven
racks, walls and door will be hot.
During baking, the elements will
turn on and off to keep the oven
temperature at the setting. The
Heating Light will turn on and off
with the elements. The top element
helps heat during baking, but
does not turn red.
8
Set Oven Temperature Control to
the baking temperature you
want. The Heating Light will come
on.
5. When baking is done, turn both
the Oven Selector and Oven
Temperature Control to OFF.
Page 9
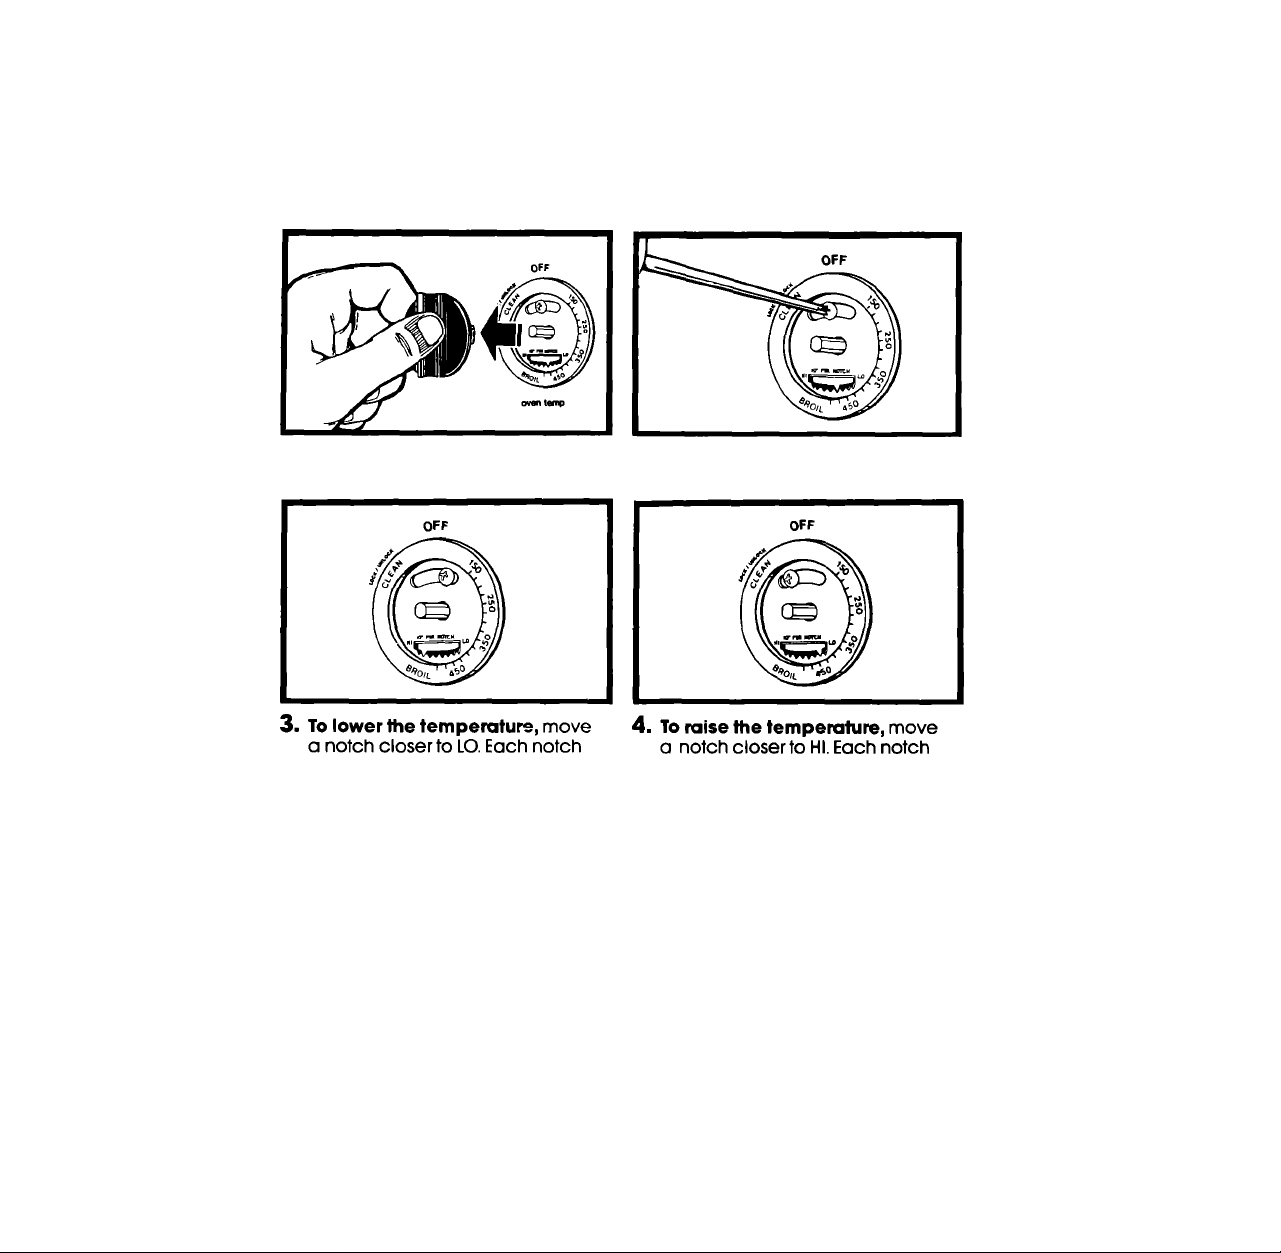
Adjusting the Oven Temperature Control
Does your oven seem hotter or colder than your old oven? The temperature
of your old oven may have shifted gradually without you noticing the change.
Your new oven is properly adjusted to provide accurate temperatures. But when
comparing to your old oven, the new design may give you different results.
If after using the oven for a period of time, you are not satisfied with the
temperature settings, they can be adjusted by following these steps:
I
1. Pull the Oven Temperature Control
Knob straight off.
equals about10°F (5°C).
2. Loosen the locking screw. Note
the position of the notches.
equals about 10°F (5°C).
Tighten the locking screw and
replace the control knob.
Page 10
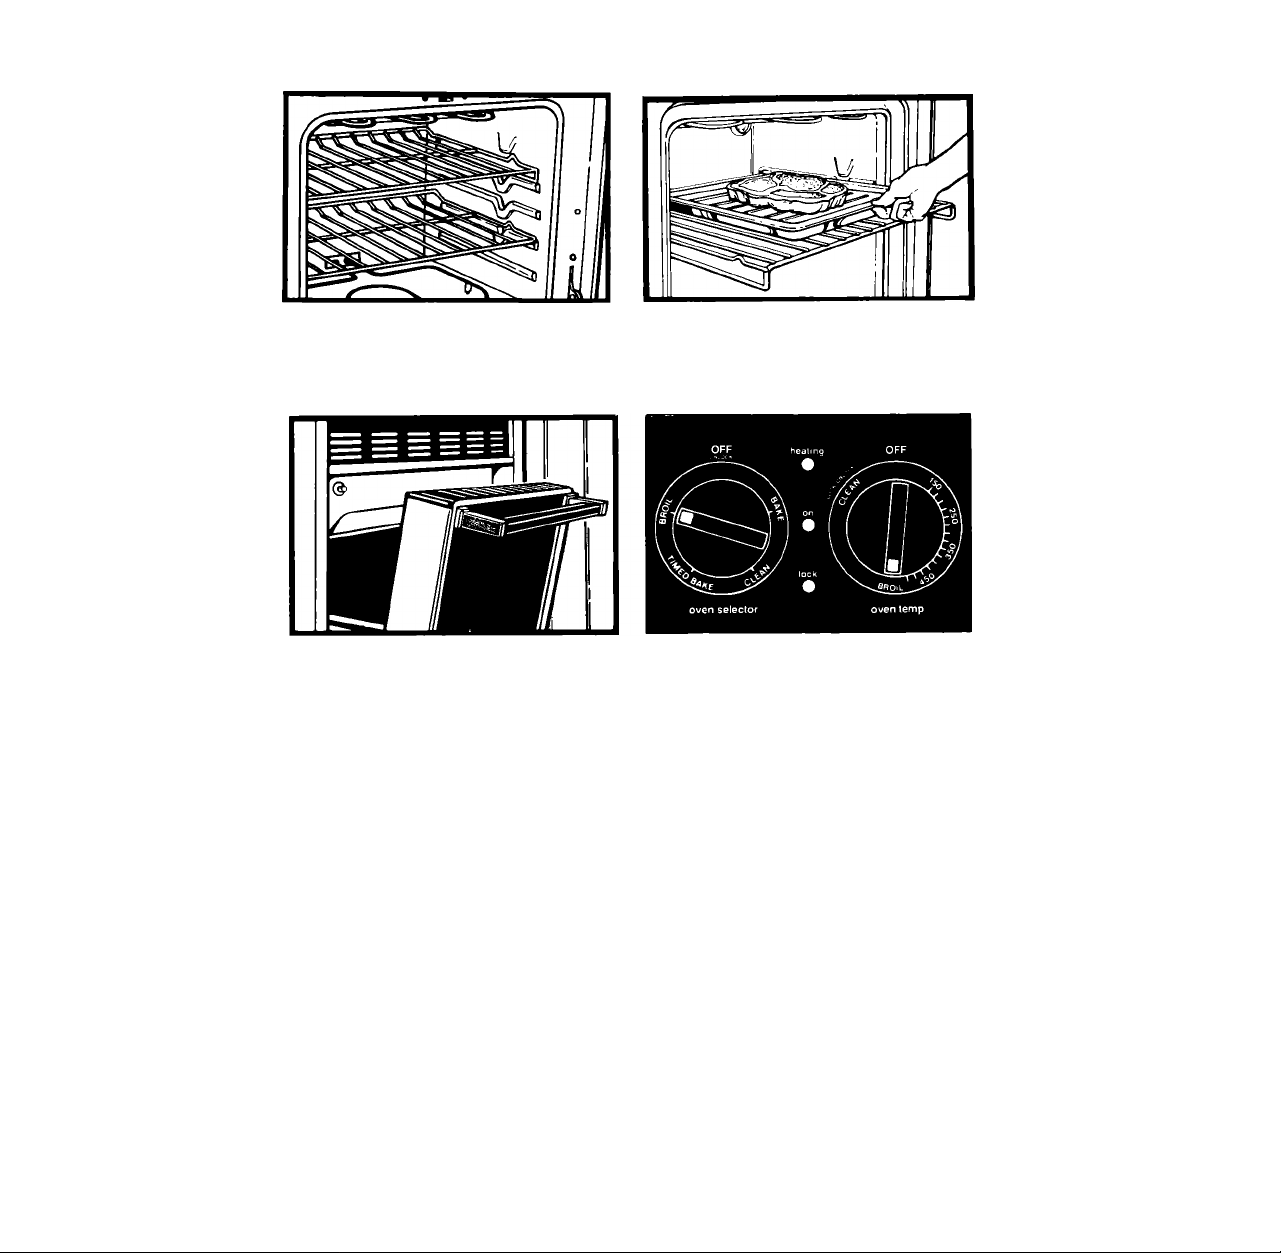
Broiling
1. Position the rack(s) before turn
ing the oven on. See broil chart in
the “Cooking Guide" or a reliable
cookbook for recommended
rack positons.
3. Close the door to the Broil Stop
position, (open about 4 inches,
10.2 cm). The door will stay open
by itself.
2. Put the broiler pan and food on
the rack.
4. Set the Oven Selector and the
Oven Temperature Control to
BROIL. The Heating and On Lights
will come on.
5. When broiling is done, turn both
the Oven Selector and the Oven
Temperature Control to OFF.
Custom Broil
• If food is cooking too fast, turn the Oven Temperature Control counterclock
wise until the Heating Light goes off. The light will turn on and off during Custom
Broil.
• If you want the food to broil slower from the start, set the Oven Temperature
Control between 150° and 325°F (65.5° and 162.7°C). The lower the temperature,
the slower the cooking.
The Oven Selector must be on BROIL for all broiling femperatures.
CAUTION: The door must be partly open whenever the oven Is set
to BROIL. Leaving the door open allows the oven to maintain proper
temperatures.
10
Page 11
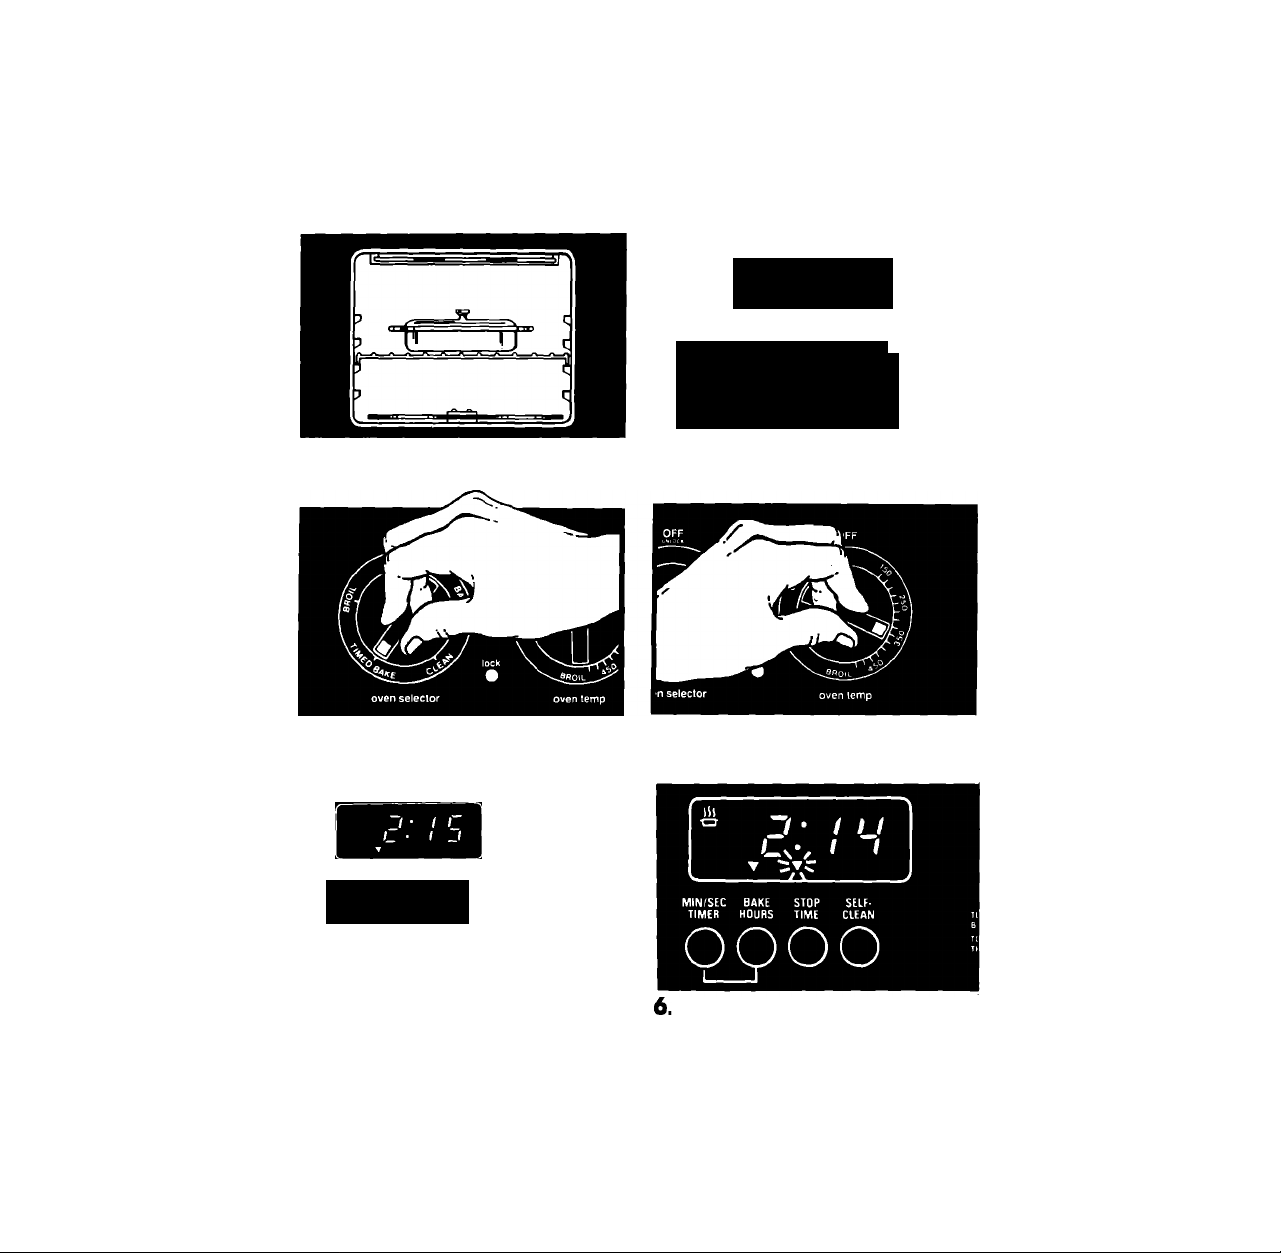
Using the Electronic Automatic MEALTIMER* Clock
The electronic MEALTIMER* is designed to turn the oven on and off at times you
set, even if you are not around.
Automatic baking is ideal for foods which do not require a preheated oven
such as meats and casseroies. Do not use the automatic cycle for calces,
cookies, etc...undercooklng will result.
To start baking now and shut off automatically:
1. Position the oven rack(s) properly
and place the food in the oven.
3. Set Oven Selector on TIMED BAKE.
/ 3 • n
n
I • u u
MIN/SEC BAKE STOP SELF
TIMER HOURS TIME CLEAN
oooo
2. Make sure the clock Is set to the
right time of day.
4. Set the Oven Temperature Control
on the baking temperature you
want.
o*,oo
Set the clock for the length of
baking time you want: Push in the
Bake Hours Button and turn the Set
Knob until the length of baking
time you want shows in the Dis
play. This example shows 2 hours,
15 minutes. Bake Hours can be set
for up to 11 hours, 59 minutes.
. The Bake Hours Signal Light will
stay on, the Stop Time Signal Light
will flash and the Auto Oven
Symbol will light. The Display will
count down In minutes. If you
want to see Stop Time, push the
Stop Time Button. Push the Bake
Hours Button to see baking time
again.
continued on next page
11
Page 12
I r
I Jl
7. The Heating and On Lights wiil
come on when Start Time is
reached. The Heating Light wili
turn on and off during baking.
8. When the baking time is com
piete, the oven shuts off and the
Timer beeps for 1-2 minutes. To
stop, push the Bake Hours Button.
Turn the Oven Seiector and Oven
Temperature Control to OFF.
9. To stop the oven before the pro
grammed time, push in the Bake
Hours Button and turn the Set Knob
counterclockwise until the Display
shows "0:00." The Display will
return to the time of day. Turn the
Oven Selector and Oven Temper
ature Control to OFF.
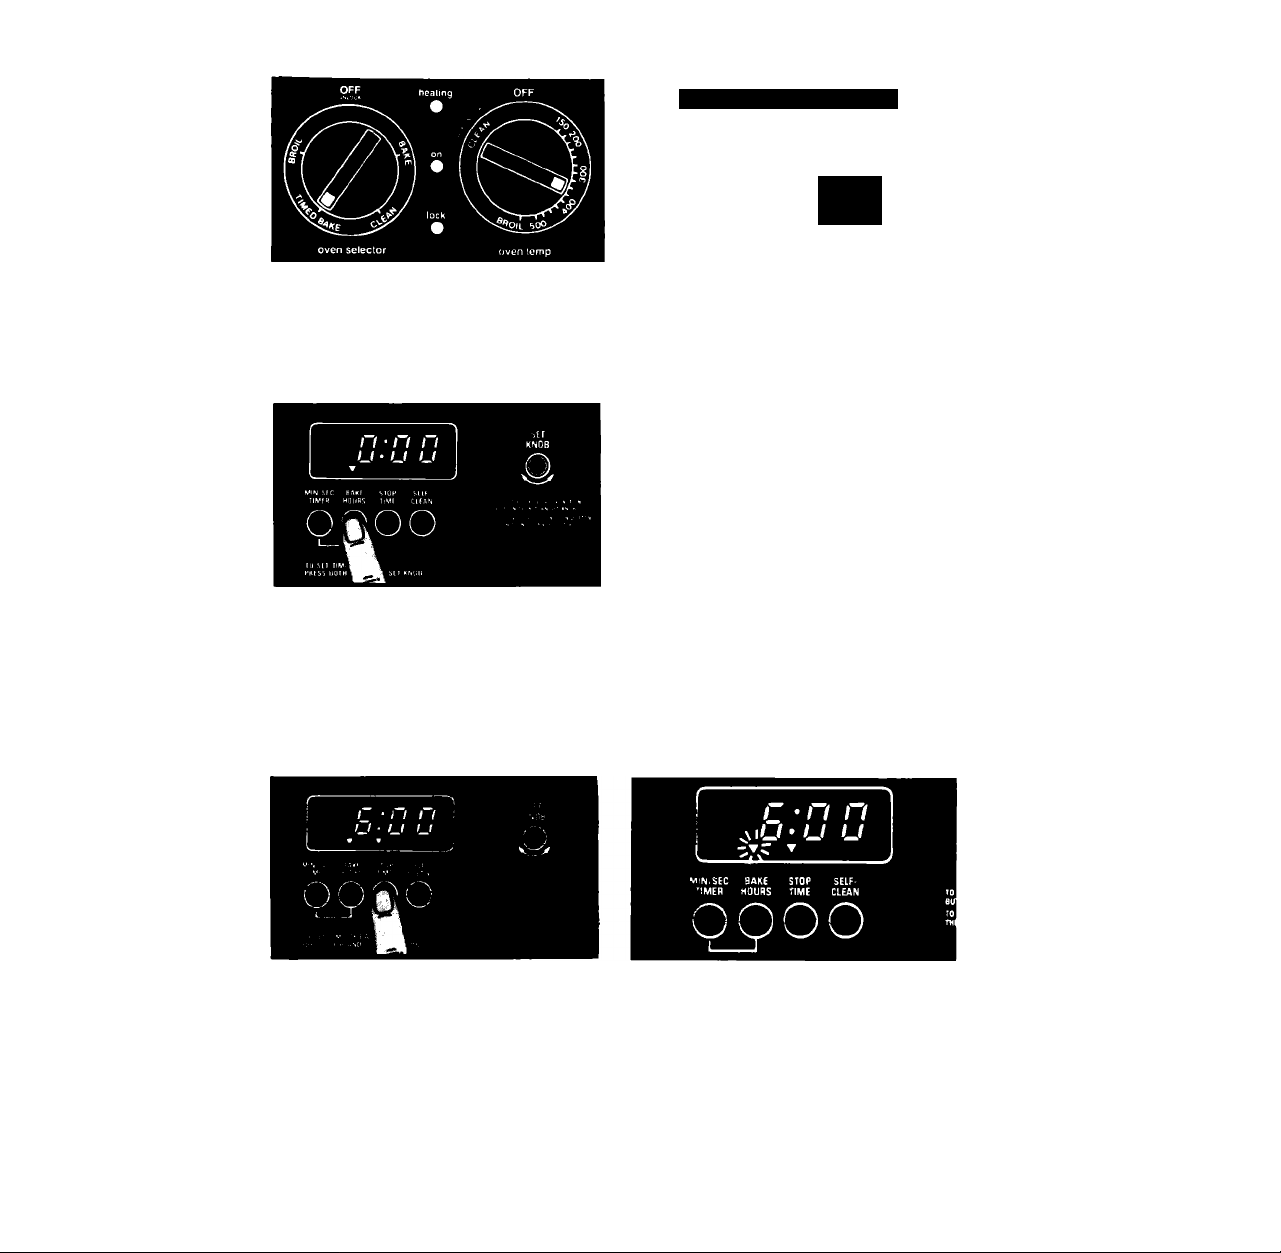
Deiay start and automatic shut-off;
1. Position the oven rack(s) properly, and place the food in the oven.
2. Make sure the ciock is set to the right time of day.
3. Set the Oven Selector on TIMED BAKE.
4. Set the Temperature Control on the baking temperature you want.
5. Set the clock for the time of day
you want the food to be done
(Stop Time): Push in the Stop Time
Button. Turn the Set Knob until the
time of day you want the food to
be done shows on the Display. This
example shows six o’clock.
12
6. The Display will show the time you
set. The Stop Time Signal Light will
stay on. The Bake Hours Signal
Light will flash.
Page 13
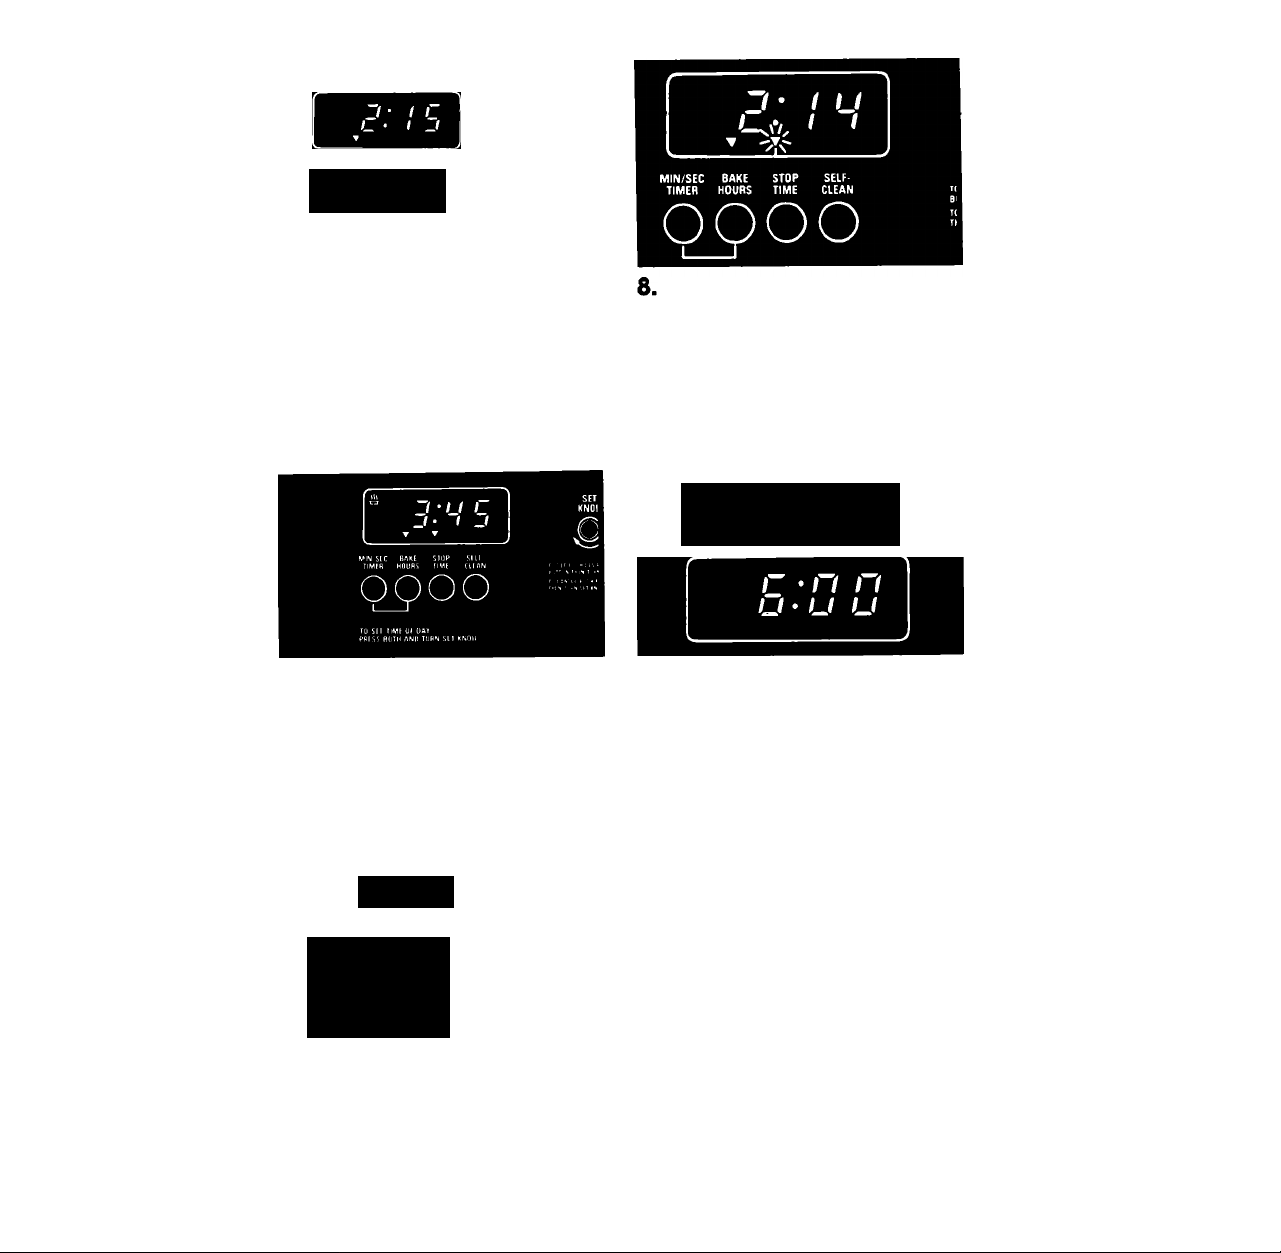
osioo
7. Set the clock for the length of
baking time you want: Push in the
Bake Hours Button and turn the Set
Knob until the length of baking
time you want shows in the Dis
play. This example shows 2 hours,
15 minutes. Bake Hours can be set
for up to 11 hours, 59 minutes.
9. The clock automatically calcu
lates the time to turn the oven on.
At that time, the Auto Oven Symbol
will light and the oven will heat.
The Heating and On Lights will
come on. This example shows the
oven on at 45 minutes past 3
o’clock.
The Bake Hours Signal Light will
stay on and the Stop Time Signal
Light will flash. If you want to see
the Stop Time, push the Stop Time
Button. Push the Bake Hours Button
to see the baking time again.
peEP be^p beep
10. When baking is complete the
oven will shut off and the Timer
will beep for 1-2 minutes. To stop,
push the Bake Hours Button.
Turn the Oven Selector and the
Oven Temperature Control to OFF.
! t • n M
u
•
u u
0^0
11. To stop the oven before the
preset time: Push in the Bake
Hours Button and turn the Set
Knob counterclockwise until the
Display shows "0:00.” Turn the
Oven Selector and Oven Tem
perature Control to OFF.
13
Page 14
WARNING: To avoid sickness and food waste:
^ ^ • Use foods that will not go bad or spoil while waiting for
^ ^ cooking to start.
• Avoid using dishes with milk or eggs, cream soups, cooked meats
or fish, or any item with baking powder or yeast.
• Any food that has to wait for cooking to start should be very cold
or frozen before it is put in the oven. MOST FOODS SHOULD NEVER
STAND MORE THAN TWO HOURS BEFORE COOKING STARTS.
Other Operating Hints
• If you want to check what you have programnned, press the button
for the function you want to check. The display will show what you have
programmed forthat function.
• If you want to check the time of day, press the Min/Sec Timer and Bake Hours
Buttons. The display will show the time of day.
• A rapid flashing signal light indicates an error in programming.
Cancel any entries and begin again.
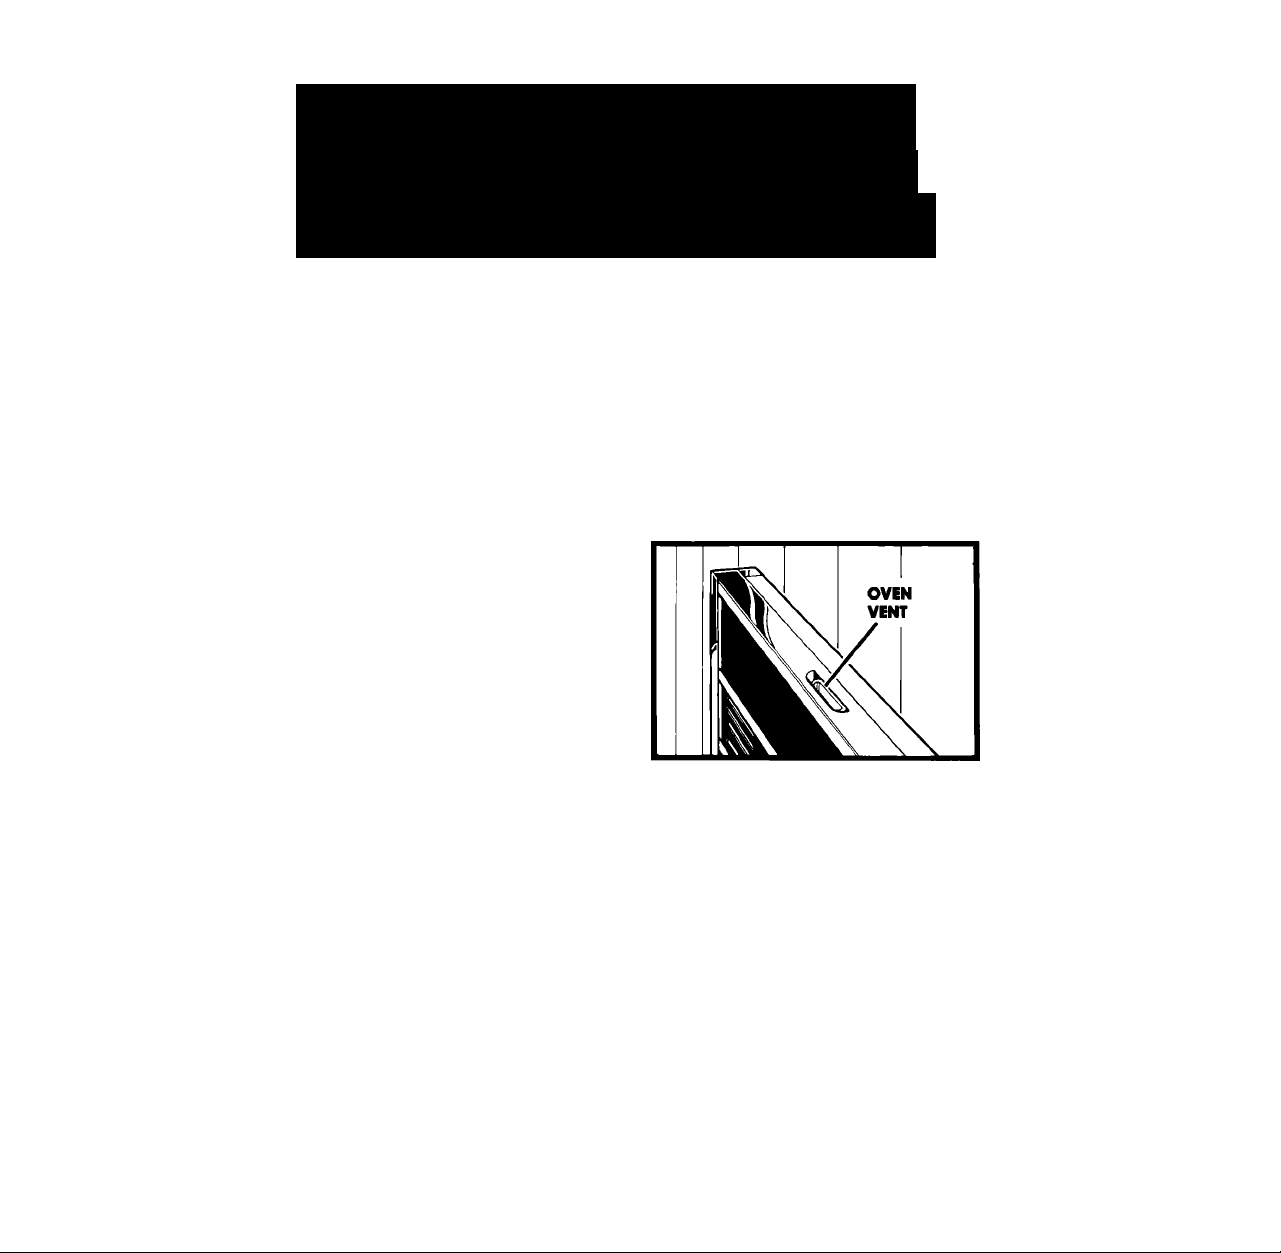
The Oven Vent
Hot air and moisture escape from the
oven through a vent just above
the oven door.
Do not block the vent. Poor baking
can result.
14
Page 15
Caring for Your Oven
Control Panel and Knobs
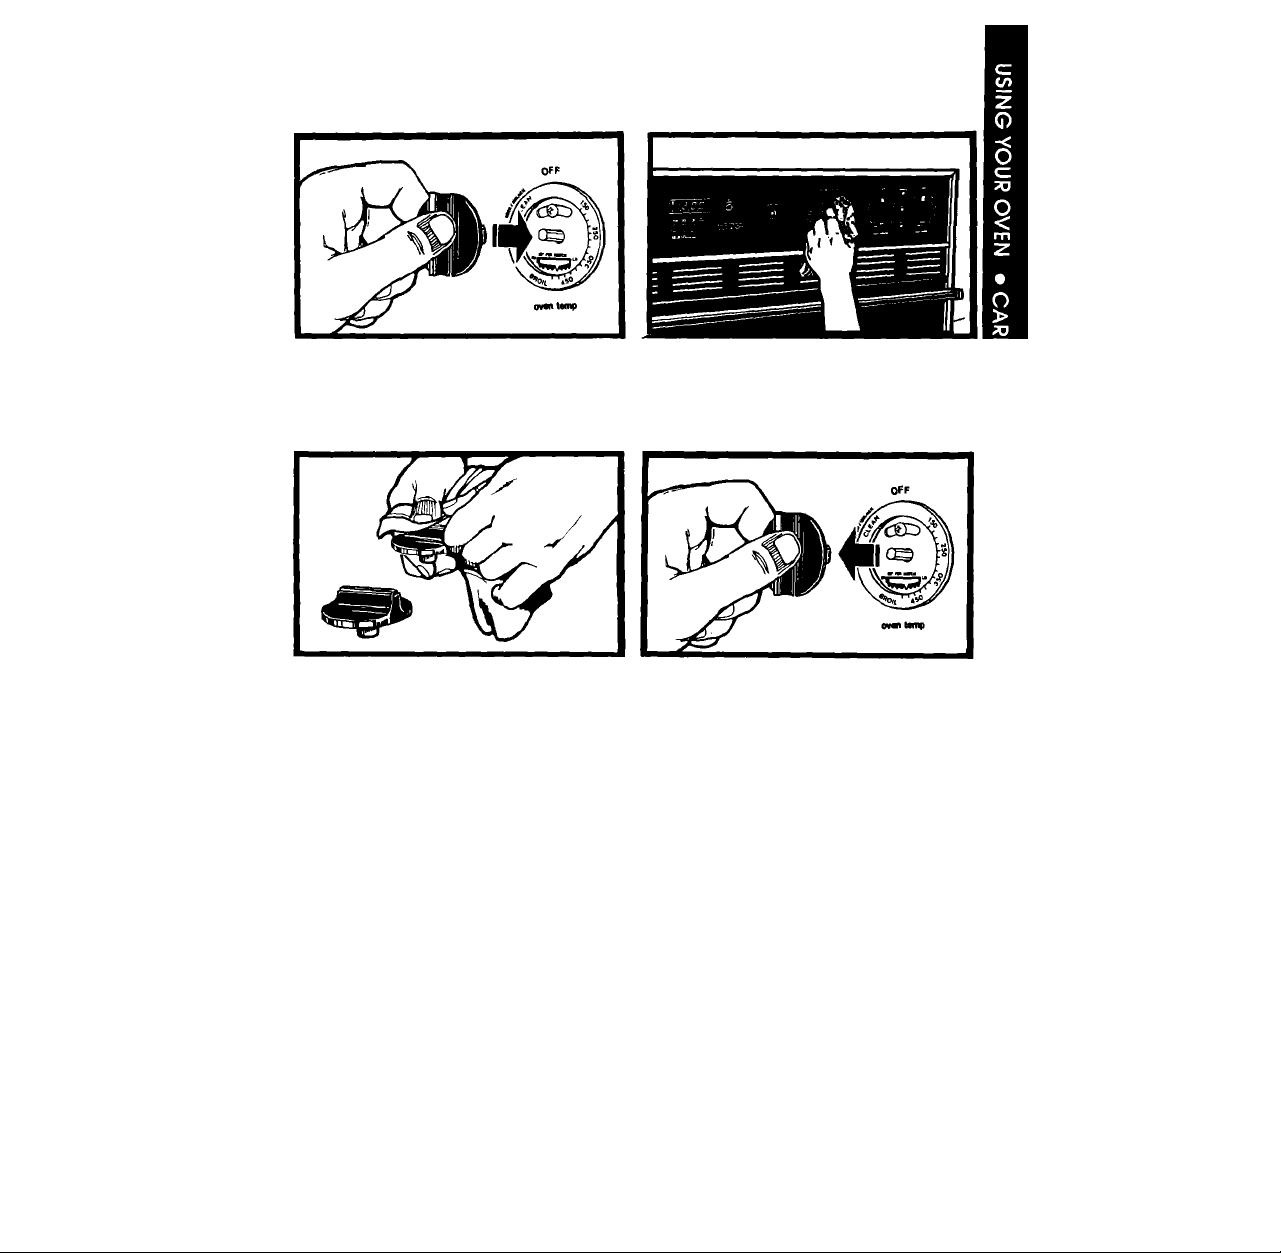
1. First make sure the control
knobs are set to OFF, then pull
knobs straight off.
3. Wash control knobs in warm
soapy water. Rinse weli and dry.
2. Use warm soapy water or spray
glass cleaner and a soft cloth.
Wring out wet cloth before
wiping the controi panel. Rinse
and dry well.
4. Push control knobs straight back
on. Make sure they point to OFF.
15
Page 16
Using the Self-Cleaning Cycle
The self-cleaning cycle uses very high heat to burn away soil. Before you start,
make sure you understand exactly how to use the cycle safely.
Before You Start
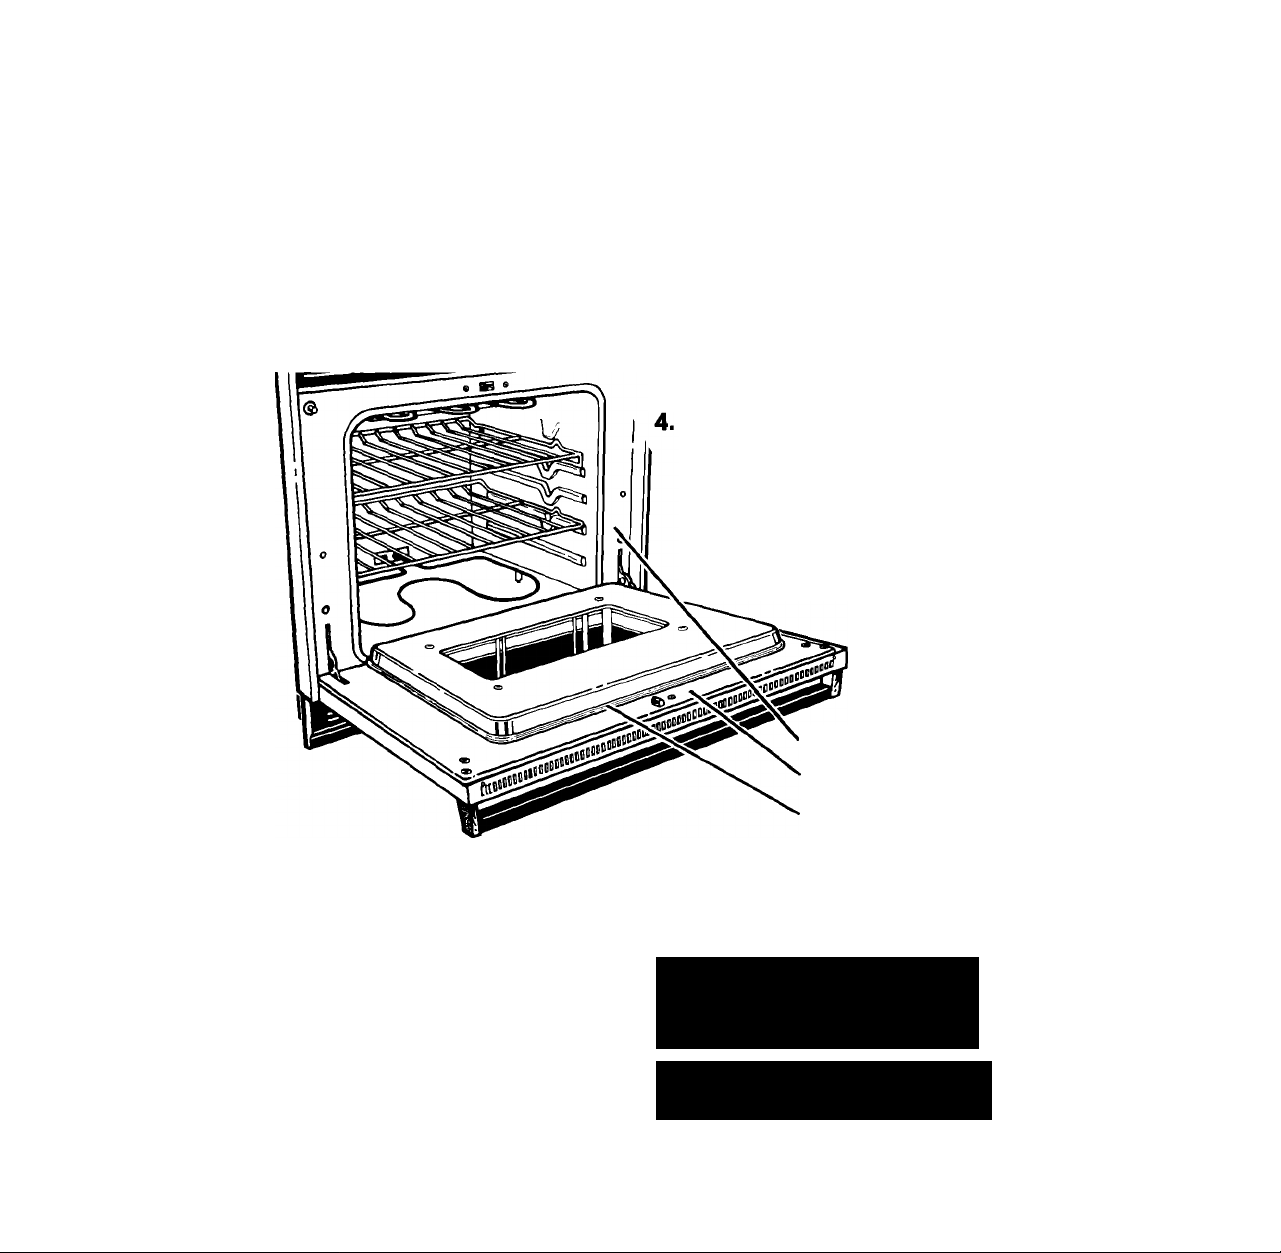
1. Clean the shaded areas by
hand. They do not get hot enough
during the Self-Clean cycle for
soil to burn away. Use hot water
and detergent or a soapy steel
wool pad on...
• the frame around the oven.
• the inside of the door, especially
the part outside the oven seal.
Turn on the vent hood or other kitchen vent during the cleaning cycle.
This will help remove smoke, odor and heat that are normal during the cycle.
DO NOT clean the fiberglass seal.
DO NOT move it or bend it. Poor
cleaning and poor baking will result.
2. Remove the broiler pan and any
pots and pans you may have
stored in the oven. They can’t
stand the heat.
3. Wipe out any loose soil or
grease. This will help reduce
smoke during the cleaning cycle.
If you want the oven racks to re
main shiny, remove from the
oven and clean them by hand.
Otherwise, put oven racks on sec
ond and fourth guides (guides
are counted from bottom to top).
During the Self-Cleaning Cycle
they become harder to slide. See
tips on page 19.
DO Clean Frame
DO Clean Door
DO NOT
Clean Seal
SPECIAL CAUTIONS:
DO NOT use commercial oven
cleaners in your oven. Damage to
the porcelain finish may occur.
DO NOT use foil or other liners in the
oven. During the cleaning cycle foil
can burn or melt and damage the
oven surface.
16
B ^ the vent during the clean-
WARNING: DO NOT block
^ ' ing cycle. Air must move
freely for best cleaning results.
DO NOT TOUCH THE OVEN DURING
THE CLEANING CYCLE. IT COULD
BURN YOU.
Page 17
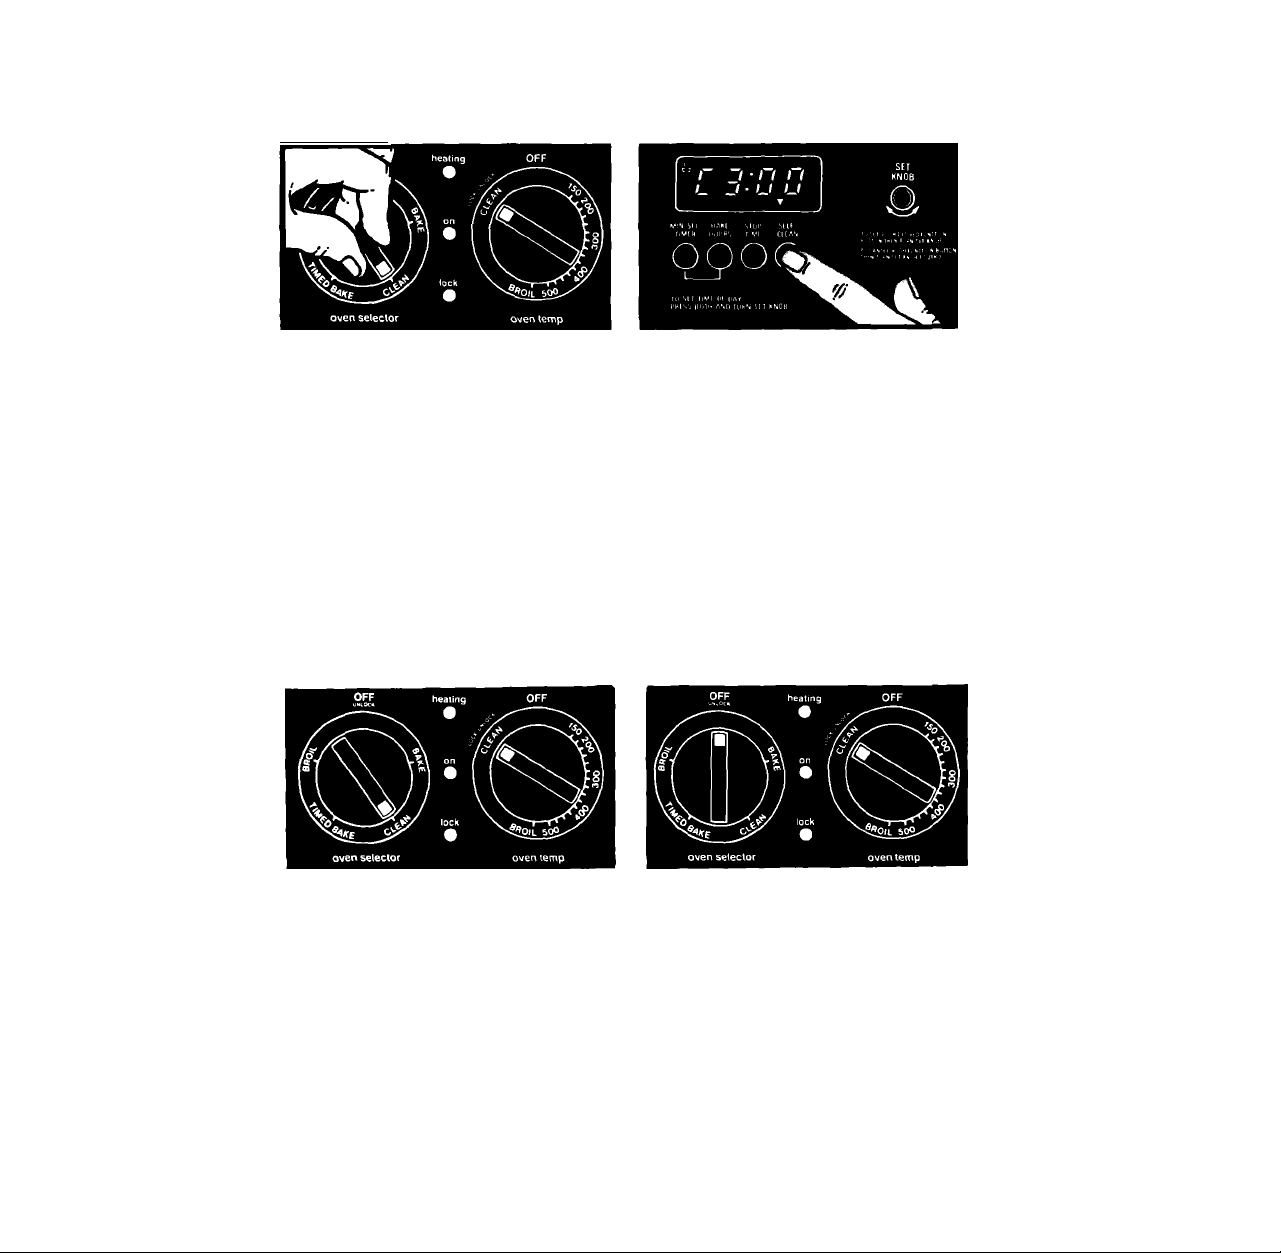
Setting the Controls
Be sure the kitchen is ventiiated during the Seif-Cieaning cycie. This wiii
help normal smoke and heat odors to disappear from the room as quickly
as possible.
1. Make sure the oven door is
closed. Set the Oven Selector and
the Oven Temperature Control on
CLEAN,
The Heating and On Lights will
come on. The Heating Light will
cycle on and off with the ele
ments. The Lock Light comes on
when the oven temperature ex
ceeds normal baking tempera
tures. The door can’t be opened
when this light is on. NOTE: The
Stop Time signal light will flash
during the entire clean cycle.
2. Push in and release the Self-Clean
Button. A 3-hour Self-Cleaning
cycle will be set automatically.
The display will count down the
time in minutes. The Auto Oven
Symbol and Self-Clean Signal
Light will stay on. The door will
automatically latch.
if a cleaning cycle other than 3
hours is desired, push In and hold
the Bake Hours Button and turn the
Set Time Knob to the new time up
to 4 hours.
• Use 2 hours for light soil.
• Use 3 hours or more for moderate
to heavy soil.
4. When the Lock Light goes off:
• Turn the Oven Selector to OFF. DO
NOT turn the Oven Temperature
control to OFF.
• Wait 15-20 seconds until the door
unlocks.
• Then, turn Oven Temperature
Control to OFF.
NOTE: Oven Temperature Control
must be left in the clean position
until the door is unlocked.
continued on next page
17
Page 18
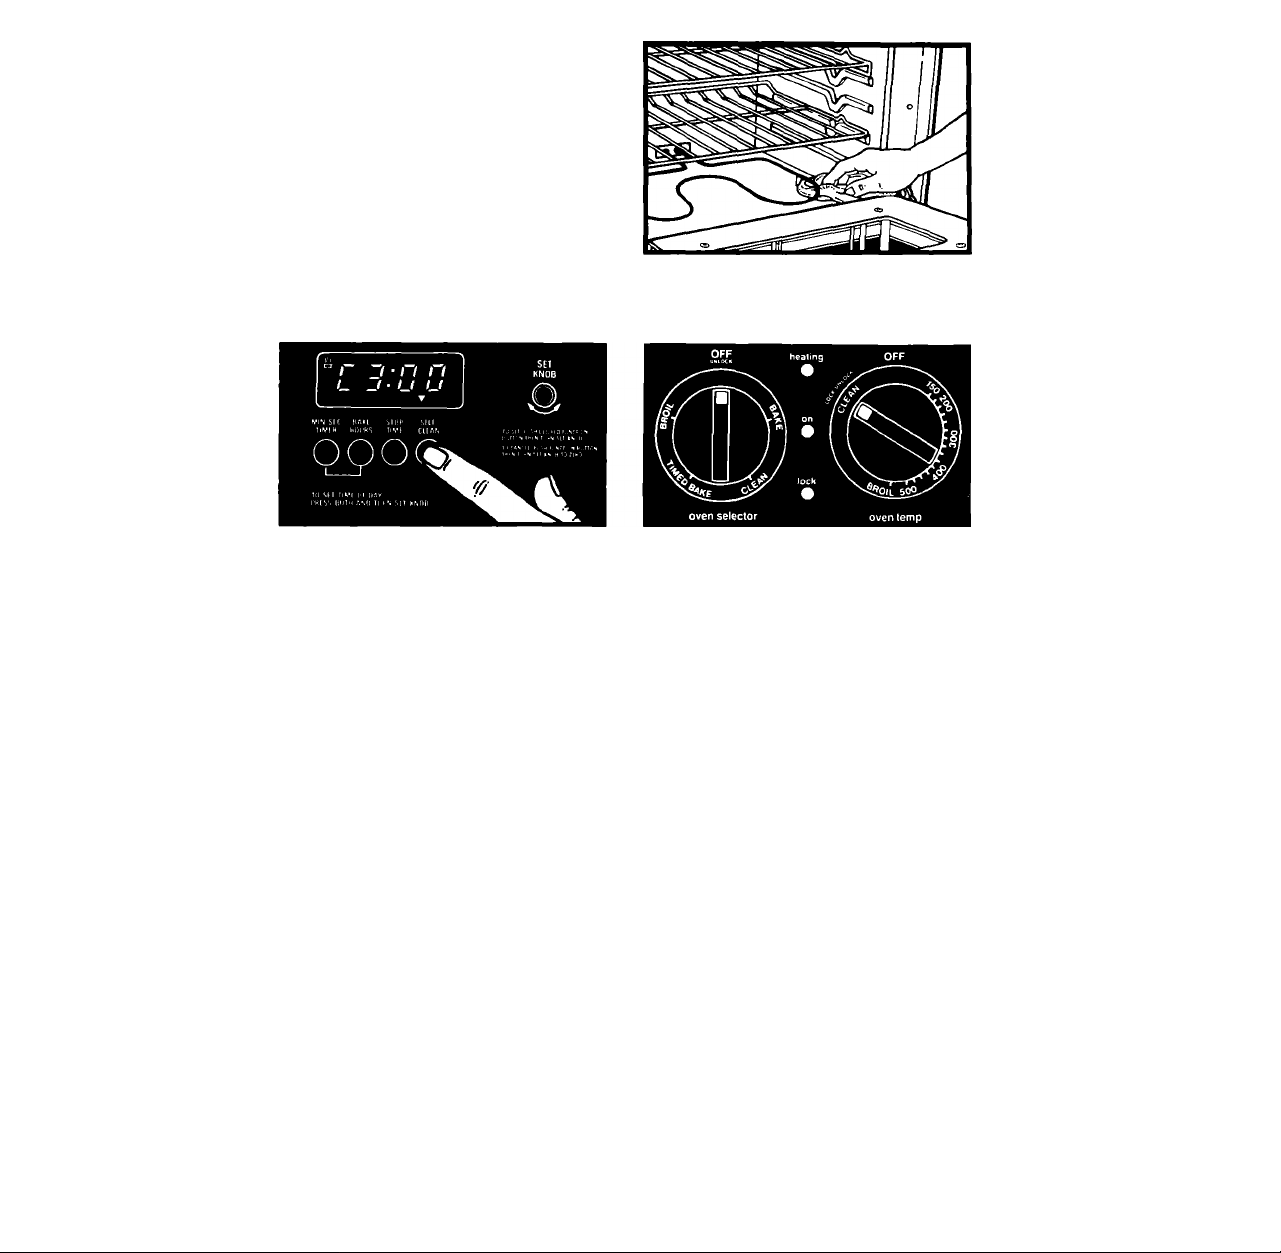
5. After the cleaning cycle is com
pleted, the Auto Oven Symbol
Self-Clean Light will go off. The
Display will show the time of day.
6. After the oven is cool, wipe off
any residue or ash with a damp
cioth. If needed, touch up spots
with a soapy steei-wooi pad.
To stop the cleaning cycle at any
time:
and
1. Push in and release the Seif-Clean
Button.
It oven door is locked by mistake:
1. Set the Oven Selector and Oven
Temperature Control to CLEAN.
2. Turn Oven Selector to OFF.
When the Lock Light goes off, turn
the Oven Selector to OFF. DO NOT
turn the Oven Temperature Con
trol to OFF until the door unlocks.
3. Wait 15-20 seconds until door
unlocks.
4. Then turn the Oven Temperature
Control to OFF.
18
Page 19

Special Tips
• Keep the kitchen well aired during the cleaning cycle to help get rid of normal
heat odors and smoke.
• Clean the oven before it gets heavily soiled. Cleaning a very soiied oven takes
ionger and results in more smoke than usual.
• If the cleaning cycle doesn't get the oven as clean as you expected, the cycle
time may have been too short or you may not have prepared the oven prop
erly. Set the cleaning time longer the next time and hand clean areas noted on
page 16.
• Oven racks lose their shine, discolor and become harder to slide when they
are left in the oven during the cleaning cycle. To make them slide easier, polish
the edges of the racks and rack guides with a soapy steel-wool pad, rinse well,
and wipe on a thin coat of salad oil.
WARNING: DO NOT TOUCH THE OVEN DURING THE CLEANING
CYCLE. IT CAN BURN YOU.
How It Works
During the self-cleaning cycle, the oven gets much hotter than it does for baking
or broiling...approximately 875°F (468°C). This heat breaks up grease and soil and
burns it off.
The graph shows approximate temperatures and times during a self-cleaning
cycle for3 hours.
SELF-CLEANING CYCLE-THREE HOUR SEHING
(Approximate Temperatures and Times)
1000“F
800°F
600"F
400"F
200°F
START
875°F (468°C) CLEANING CYCLE
>
V2 hr.
LOCK LIGHT ON
1 hr
II 1 —
1^2 hrs.
1 1
-----------
1 1
520°F (271"C)
LOCK LIGHT OFF
1 1_________C
V.
____
2 hrs. 2h hrs. 3hrs
3V2hrs. STOP
538“C
427“C
316°C
204°C
93"C
Notice that the heating stops when the 3-hour setting is up, but that it takes longer
for the oven to cool down enough to unlock.
19
Page 20

Cleaning Chart
PART WHAT TO USE HOW TO CLEAN
Exterior
surfaces
Broiler pan
and grid
Control knobs Warm soapy water and
Control panel Warm soapy water or
Oven racks Self-Cleaning Oven cycle; • Leave in oven during Seif-Cleaning
Oven door Spray glass cleaner;
glass
Selt-Cleaning For areas outside Self- • Follow directions starting on page 16,
Oven
Soft cloth and warm soapy• Wipe off regularly when oven is cool.
water.
Plastic scrubbing pad tor
stubborn spots
Warm soapy water or steelwool pad.
soft cloth.
spray glass cleaner.
warm soapy water or cycie.
soapy steei-wooi pads. or
• Do not allow food containing acids
(such as vinegar, tomato, lemon
juice or milk) to remain on surface.
Acids will remove the glossy finish.
• Do not use abrasive or harsh
cleaners.
• Do not place in Self-Cleaning Oven.
• Wash, rinse and dry well.
• Do not soak.
• Wash, rinse and dry well.
• Follow directions provided with
cleaner.
• Wash, rinse and dry. Use soapy steei
wooi pads tor stubborn areas.
NOTE: The oven racks will discolor and be harder to slide
when left In the self-cleaning cycle. If you want them to
stay shiny, remove them from the oven and clean by hand.
• Make sure oven is cool.
warm soapy water or
plastic scrubbing pad.
• Follow directions provided with
cleaner.
• Wash, rinse and dry well with a soft
cloth.
Cleaning area use warm
soa py water or soa py
steel-wool pads.
“Using the Self-Cleaning Cycle!'
• Do not use commercial oven
cleaners.
• Do not use toll to line the bottom of
your Self-Cleaning Oven.
20
Page 21
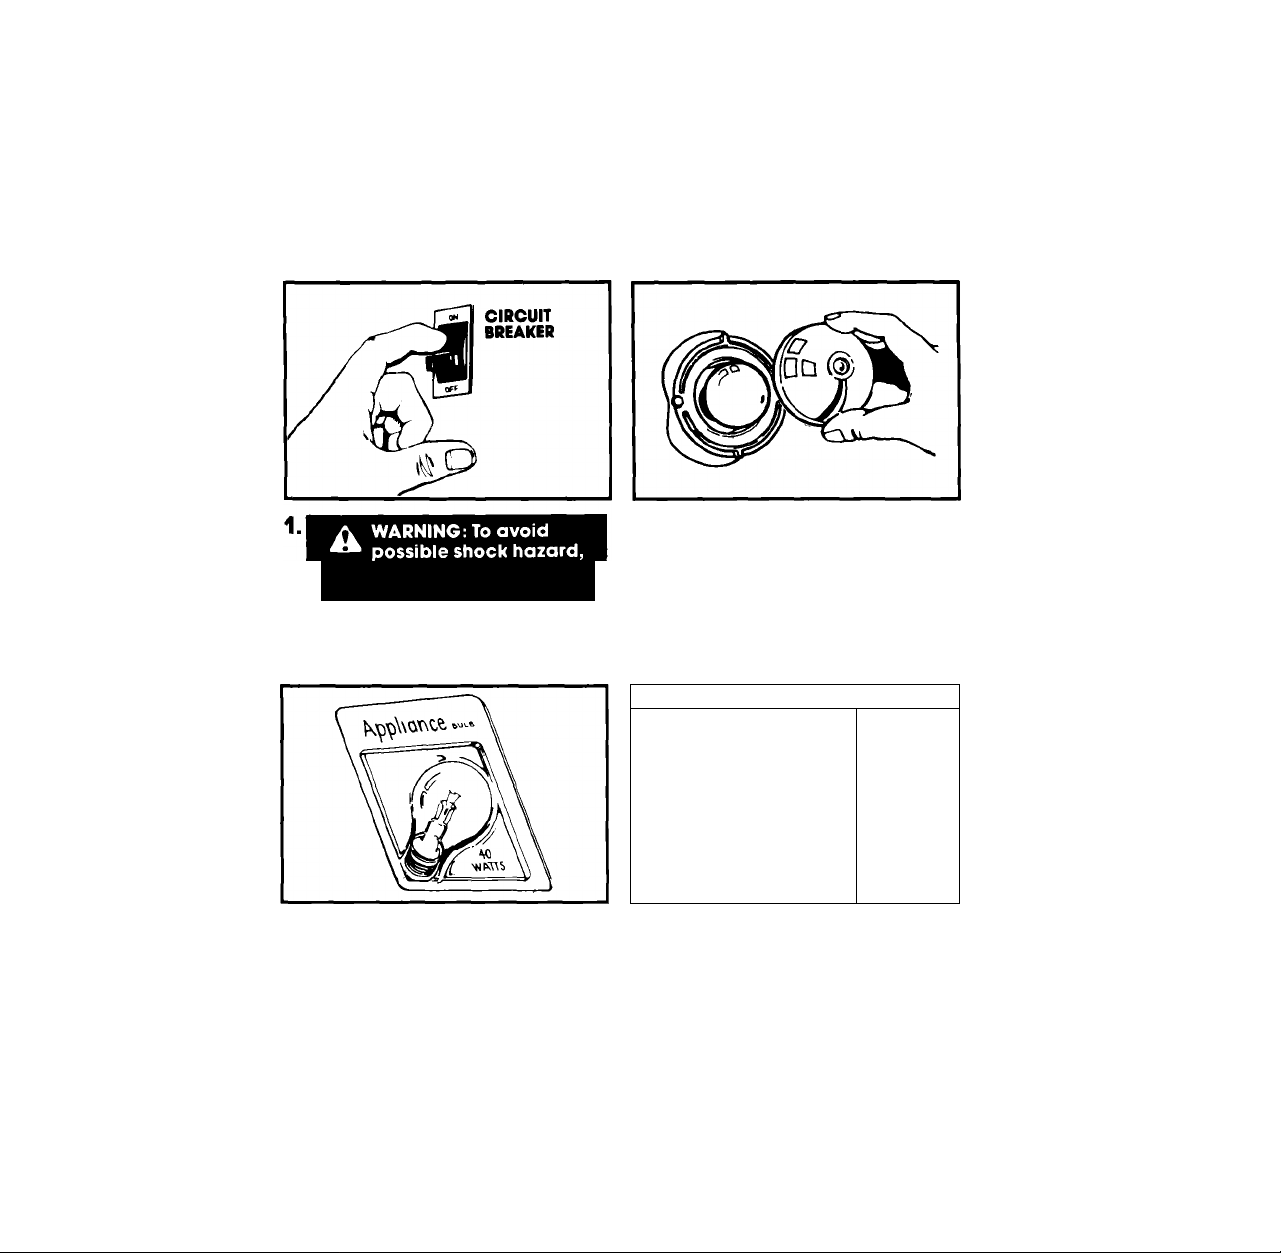
The Oven Light
The oven light will come on when you op>en the oven door.-To turn the light on
when the oven door is ciosed, push the Oven Light switch on the controi ponei.
Push it again to turn off the iight.
To Replace:
Remove the buib cover in the
back of the oven by puiiing out
turn off the electric power at
the main power supply.
and pushing the wire hoider
to the side.
©'
3. Remove the iight bulb from its
socket. Repiace the bulb with a
40-watt appiiance buib.
CAUTION: The bulb cover must be In place when using the oven. The cover protects the bulb from breaking.
NOTE: The Oven Light will not work during the self-cleaning cycle.
4. Repiace the bulb cover and snap
the wire in piace. Turn the power
back on at the main power
suppiy.
21
Page 22

ff you need service or assistance,
>ve suggest you follow these five steps:
L Before calling for
assistance...
Performance problems often result
from little things you con find and fix
yourself without tools of any kind.
If nothing operates:
• Is the oven wired into a live circuit
with the proper voltage? (See “In
stallation Instructions")
• Have you checked your home’s
main fuses or circuit breaker box?
If the oven will not operate:
• Is the Oven Selector turned to a set
ting (BAKE or BROIL, but not TIMED
BAKE)?
• Is the Oven Temperature Control
turned to a temperature setting?
It the Self-Cleaning cycie will not
operate:
• Are the Oven Selector and the Oven
Temperature Control set on CLEAN?
• Does the electronic clock show the
correct time of day?
• Did you push the Self-Cleaning
Button?
If cooking results are not what you
expected:
• Is the oven level?
• Are you using pans recommended
in the Cooking Guide?
• If baking, have you allowed
inches (4-5 cm) on all sides of the
pans tor air circulation?
• Have you preheated the oven as the
recipe calls for?
• Are the pans the size called for in the
recipe?
• Are you following a tested recipe
from a reliabie source?
See the Cooking Guide tor more infor
mation on cooking problems and
how to solve them.
V
/2 to 2
2. If you need
assistance*...
Call Whirlpool COOL-LINE" serv
ice assistance telephone number.
Dial free from anywhere in the U.S.:
and talk with one of our trained Con
sultants. The Consultants can instruct
you in how to obtain satisfactory oper
ation from your appliance or, if serv
ice is necessary, recommend a
qualified service company in your
area.
3. If you need service*...
Whiflp^l
rfC^-CA/P£
FRANCHISED SERVICE
are trained to fulfill the product war
ranty and provide after-warranty
service, anywhere in the United States.
To locate TECH-CARE senrice in your
area, call our CCCL-LINE service as
sistance telephone number (see Step
2) or look in your telephone directory
Yellow Pages under:
APPLIANCES - HOUSEHOLD- ELECTRICAL APPLIANCES-
MAJOR-SERVICE A REPAIR MAJOR-REPAIRING A PARTS
WHIRLPOOL APPLIANCES WHIRLPOOL APPLIANCES
FRANCHISED TECH-CARE SERVICE FRANCHISED TECH-CARE SERVICE
XYZ SERVICE CO XYZ SERVICE CO
123 Maple
1-800-253-1301
Whirlpool has
a
nationwide
network of fran
chised TECHCARE" Service
Companies.
TECH-CARE serv
ice technicians
OR
SERVICE COMPANIES SERVICE COMPANIES
........................
999-9999 123 Maple
OR
WASHING MACHINES. DRYERS
A IRONERS- SERVICING
WHIRLPOOL APPLIANCES
FRANCHISED TECH-CARE SERVICE
SERVICE COMPANIES
XY2 SERVICE CO
123 Maple
..........................
..........................
999-9999
999-9999
22
Page 23

4. If you have a
problem*..
Call our COOL-LINE service assistance
telephone number (see Step 2) and
talk with one ot our Consultants, or if
you prefer, write to.
Mr. Robert Stanley
Division Vice President
Whirlpool Corporation
2000 M-63
Benton Harbor, Ml 49022
5* If you need FSP"
replaeement parts*...
FSP is a registered trademark of
Whirlpool Corporation for quality
parts. Look for this symbol of quality
whenever you need a replacement
part for your Whirlpool appliance. FSP
replacement parts will fit right and
work right, because they are made to
the same exacting specifications
used to build every new Whirlpool
appliance.
To locate FSP replacement parts in
yourarea,refertoStep 3aboveorcall
the Whirlpool COOL-LINE service as
sistance number in Step 2.
*lf you must call or write, please pro
vide: model number, serial number,
date of purchase, and a complete
description of the problem. This infor
mation is needed in order to better
respond to your request for assist
ance.
23
Page 24

WHIRLPOOL* RANGE PRODUCT
WARRANTY
ERODI
LENGTH OF WARRANTY WHIRLPOOL WILL PAY FOR
FULL ONE-YEAR WARRANTY
From Date of Purchase
WHIRLPOOL WILL NOT PAY FOR
A. Service calls to:
1. Correct the installation of the range product.
2. instruct you how to use the range product.
3. Repiace house fuses or correct house wiring or plumbing.
4. Replace owner accessible light bulbs.
B. Repairs when range product is used in other than normal, single-family
household use.
C. Pick up and delivery. This product is designed to be repaired in the
home.
D. Damage to range product caused by accident, misuse, fire, flood, acts
of God or use of products not approved by Whirlpool.
WHIRLPOOL CORPORATION SHALL NOT BE LIABLE FOR INCIDENTAL OR CONSEQUENTIAL
DAMAGES. Some states do not allow the exclusion or limitation of incidental or
consequential damages so this limitation or exclusion may not apply to you. This
warranty gives you specific legal rights, and you may also have other rights
which vary from state to state.
Outside the United States, a different warranty may apply. For details, please
contact your franchised Whirlpool distributor or military exchange.
FSP® replacement parts and repair labor to
correct defects in materials or workmanship.
Service must be provided by a franchised
TECH-CARE* service company.
Part No. 560G003P06 Rev. A
P238-273/816139Rev.A
©1988 Whirlpool Corporation
Automatic Washers. Clothes Dryers, Freezers. Refrigerator-Freezers. Ice Makers. Dishwashers. Built-In Ovens and Surface Units. Ranges
Whirlpool
Printed in U.S.A.
Mii4M
 Loading...