

Page 1

AVhirlpOOl 27-INCH BUILT-IN SELF-CLEÁÑING&
ELECTRICOVENS Model RB170PXL
ttse&care
gtffde
CONTINUOUS-CLEANING
• Control Panel
Automatic
'Upper Oven
Light Switch
III
• Manual Oven
Light Switch
Model and Serial
Number Plate
• Broil Element
' Oven Rack Guide
' Bake Element
Self-Cleaning
Upper Oven
Air-Flow Oven Door
Fiberglass Heat Seal
- Continuous-Cleoning
Lower Oven
If you need service, or call with a question, have this
information ready:
1 Complete Model and Serial Numbers (from the plate
just behind the upper oven door).
2, Purchase or installation date from your sales slip
Copy this information in these spaces Keep this book,
your warranty and the sales slip together in a handy
place
Soo the “Cooking Guido" for importanJ safety Iniormaiion.
Copy Your Model and Serial Numbers Here
Model Number
Serial Number
Purchose/lnslaiiahon Dale
Service Company and Phone Number
Page 2
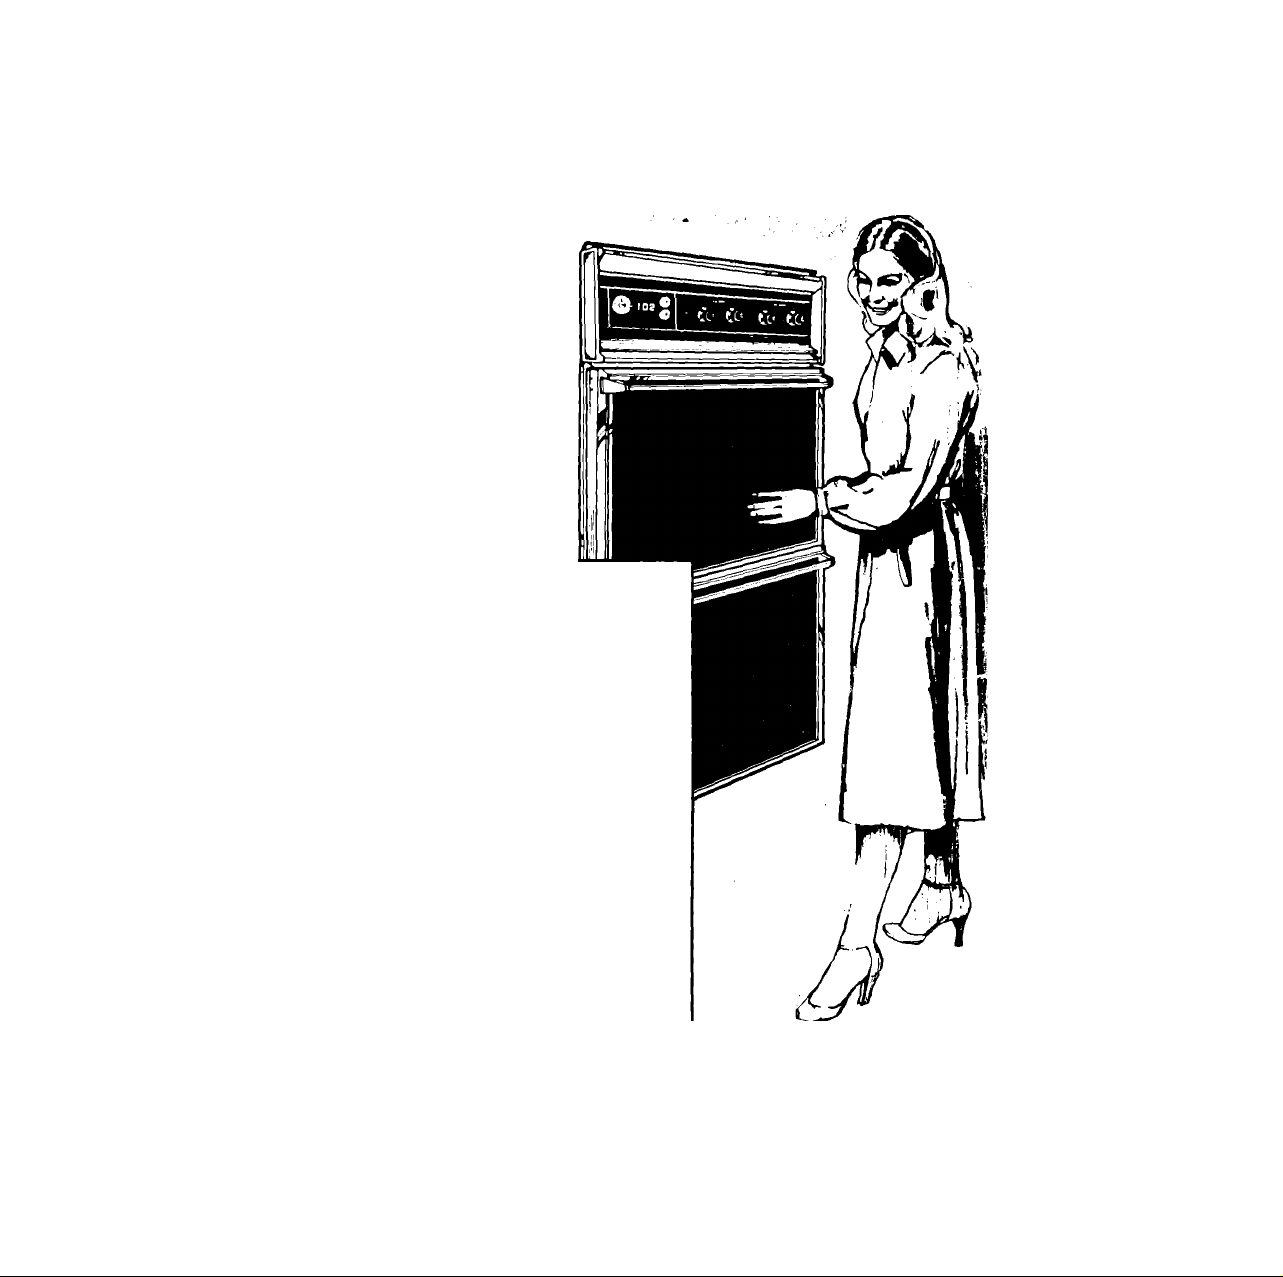
Youriespo^bilities...^ -'i ir,*:;«» ,
Proporlnitallatlonbndiafeui«oftheov0nareyourp«nonalv‘ ' ^
responilbllltles. Road №I«"US0 and Car« Guld«” and th«"C0Qklng
Guid«" carefully for Important ui« and safety Information.
Instaflation^
. You mutt bo turo your evon It... ‘
a Installed and leveled In a wall
or cabinet that will hold the '
weight: ' , '
• Installed In a well-ventlloted . .
area pratected fromfhe '.
weather;
e properly connected to the cor
rect electric supply and
grounding. (See 'Installation
instructions.') .
Proper ttse
You mutt be sure your oven It...
• used only for jobs expecled of
home ovens;
< used only by people who con
operote It properly;
• properly mairitained.
G>ntents
YourResponsibilities....................................................... 2
Installation
Proper Use
Safety
Using YourOvens........................................................... 4
Baking in EitherOven ................................................. 4
Adjusting the Oven Temperature Controls ... 4
Broiling in EitherOven................................................. 5
Oven Rack Positions
Setting the Clock
Using the Minute Timer
Using the Automatic MEALTIMER Clock ...................... 7
Oven Vents..................................................................... 8
Oven Lights
Cleaning and Caring For YourOvens
Control Panel and Knobs ........................................... 9
Cleaning Chart ........................................................... 9
The Lower Oven Door
The Self-Cleaning Upper Oven
The Continuous-Cieaning Lower Oven
If You Need Service or Assistance
1. Before Calling for Assistance
2. If You Need Assistance....................................... 16
3. If You Need Service............................................ 16
4. If You Have a Problem ....................................... 16
.................................................................
................................................................
.........................................................................
.....................................................
............................................................
..................................................
....................................................................
..............................................
............................
................................
...................
..............................
..............................
10
11
14
15
15
2
2
3
5
6
6
8
9
Tmk
Page 3
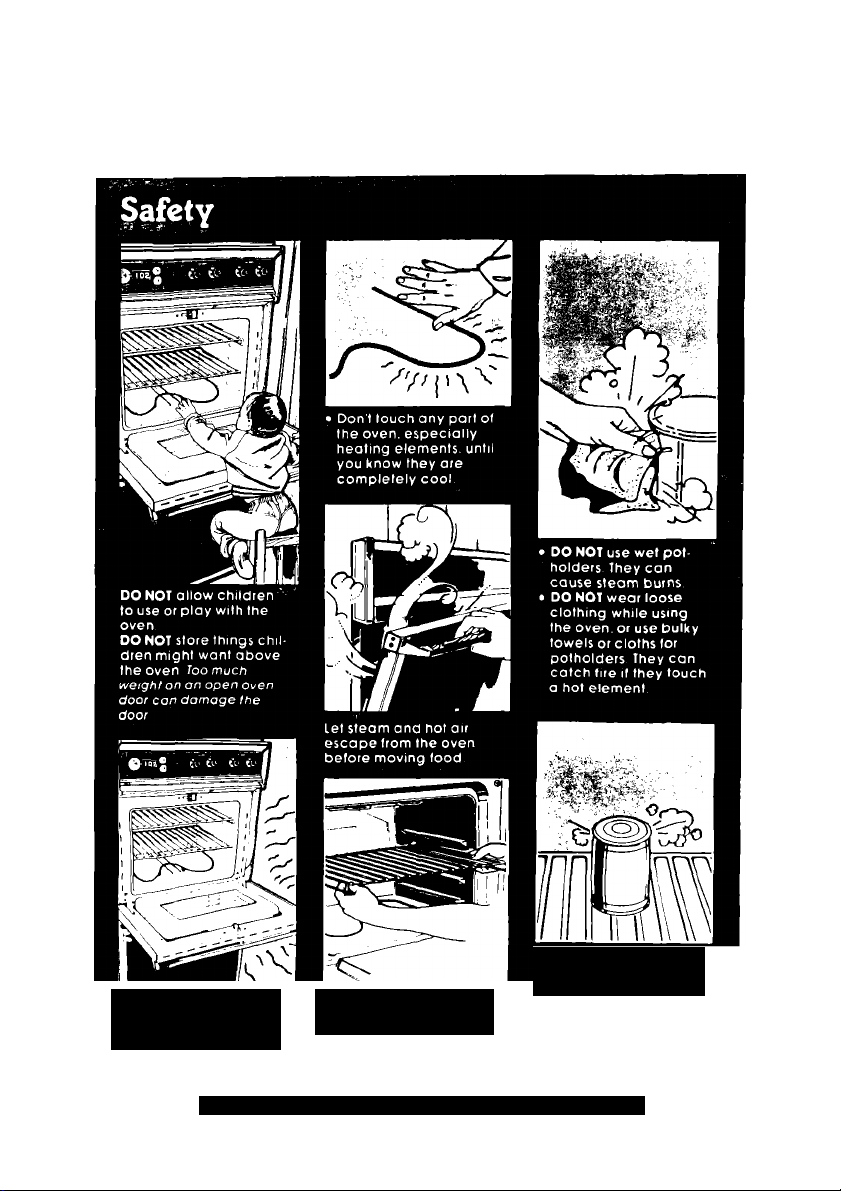
The oven frame, walls,
racks and parts of the
door con get hot
enough to cause burns
DO NOT heat unopened
containers They con
• Pul oven racks where
you want them before
turning on the oven.
Remove the Consumer Buy Guide Label before using your oven.
explode
Page 4
Using your ovens
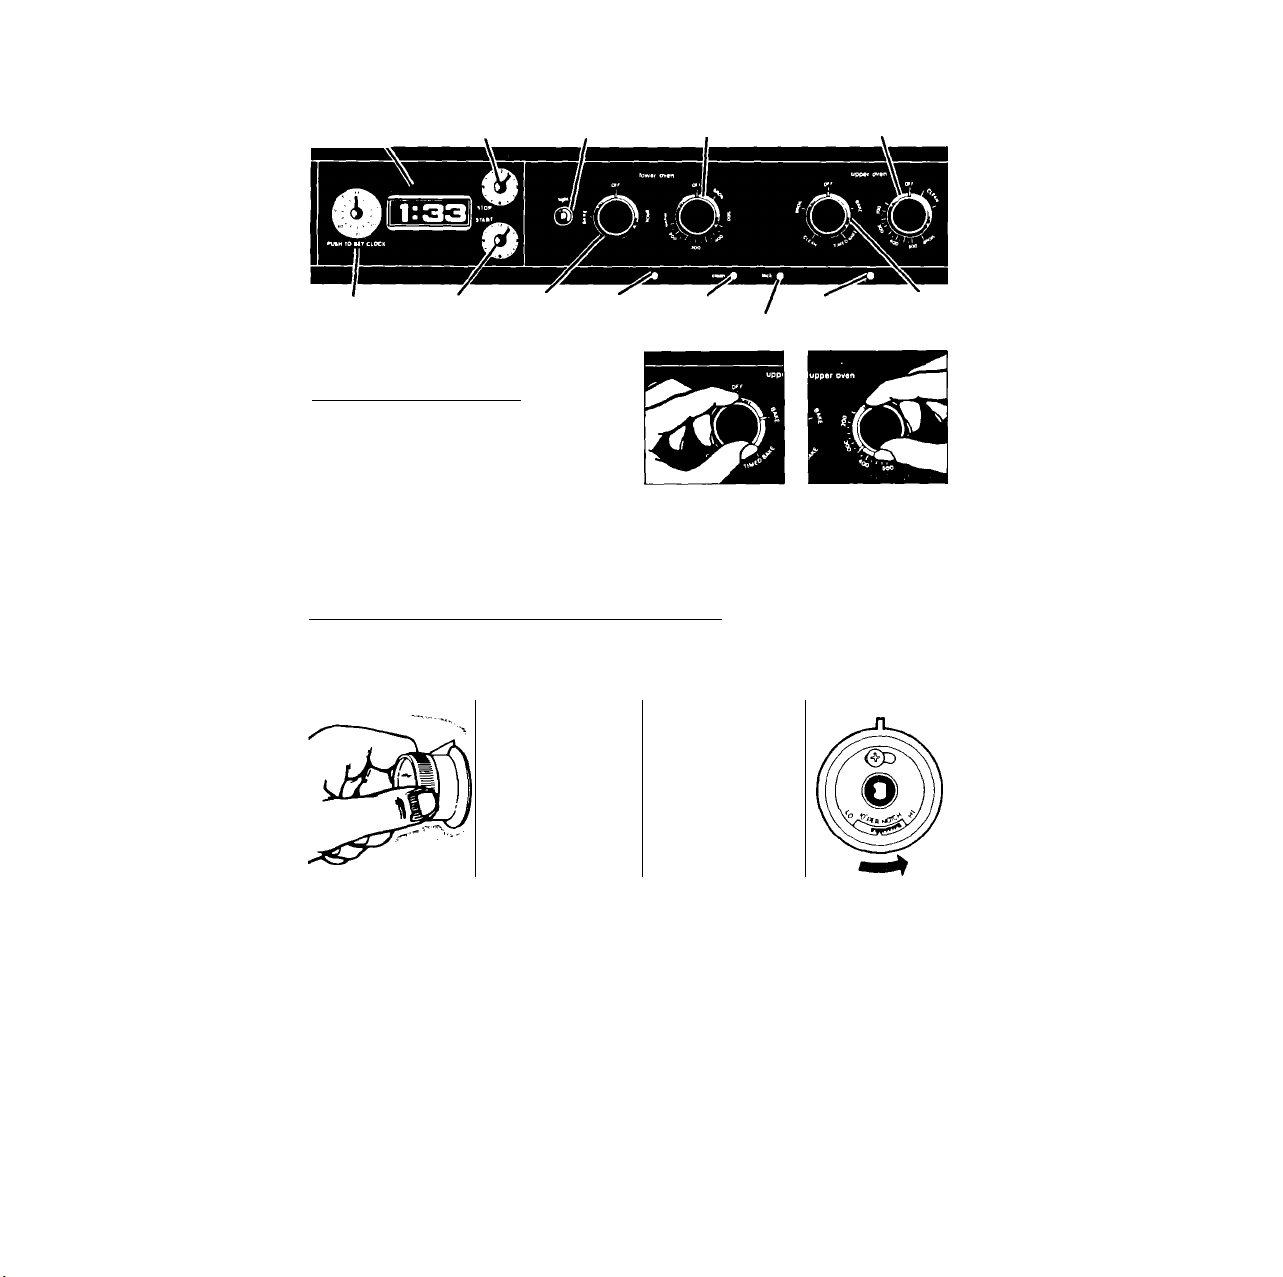
Automallc
MEALTIMER- Clock
\
Manual Oven
Light Switch
Adjustable Lower Oven Adjustable Upper Oven
Temperature Control Temperature Control
Minute Timer
Lower Oven Lower Oven Clean Light
Selector Signal Light
Lock Light
SETTING THE CONTROLS
BAKING IN EITHER OVEN
1. Pul oven racks Where you wanfthem,
(See page 6 for suggestions.)
2. Set Oven Selector to BAKE,
3. Set Oven Temperature Control to the bak
ing temperature you want.
4. Let the oven preheat until the Signal Light
goes oft
5. Pul food in the oven.
6. When done baking, turn both knobs to
OFF
ADJUSTING THE OVEN TEMPERATURE CONTROLS
Does either oven seem to be hotter or colder than your old oven at the same
settings? The temperature setting in your old oven may have changed gradually
over the years. The accurate setting of your new ovens can seem different. If you
think either or both oven temperatures need adjusting, follow these steps:
Locking Screw
((( O ))
Notches-! Tooth
1. Pull the Oven Tem
perature Control
straight off.
2. Loosen the lock- 3< To lower the tern- 4.
ing screw; peralure, move
NOTICE position black part of
of notches. knob closer to LO.
Tighten the locking screw. Replace the knob.
During baking, the elements will turn on
and oft to help hold the oven temperature at
the setting. (The top element will never turn
red, but will be hot.) The Signal Light will turn
on and off with the elements.
ioj
Each notch
equals abouMO F
(5C).
Upper Oven Upper Oven
Signal Light Selector
To raise Ihe tem
perature, move
black part of
knob closer to HI.
Each notch
equals about 10 F
(5 0)
Tmk
Page 5

BROILING IN EITHER OVEN
1. Place the rack where you
want it for broiling, (See
below for suggestions.)
Set Oven Temperature
Control to BROIL. (Set on a
lower temperature for
slower broiling. See
below.)
Broiling can be slowed by setting the Oven Temperature Control to a selling
lower than BROIL, When It's on BROIL, the broil element is on all the time. When it's
on a temperature, the element turns off and on. The lower the temperature setting,
the shorter are the times when the element is on.
The Oven Selector must be on BROIL and the door partly
Put broiler pan and food
on the rack.
5. During broiling the oven
door must be partly open.
A built-in stop will hold it
there.
open for all broiling temperatures.
OVEN RACK POSITIONS
Position racks before turning on the oven.
3. Set Oven Selector to
BROIL,
6. When broiling is done,
turn both knobs to OFF.
Broil Element
Lift rack at front and pull out.
BAKING OR ROASTING
Food for baking or roasting should be
placed in the center of the oven.
Always leave at least IV2 to 2 inches
(4-5 cm) between the sides of a pan and the
oven wall and another pan. For more informa
tion, see the "Cooking Guide, ”
Adjust the top rack so the food to be broiled is
at a suggested distance from the broil element,
(see page 6) ALWAYS broil with the door open
to the broil-stop.
Page 6
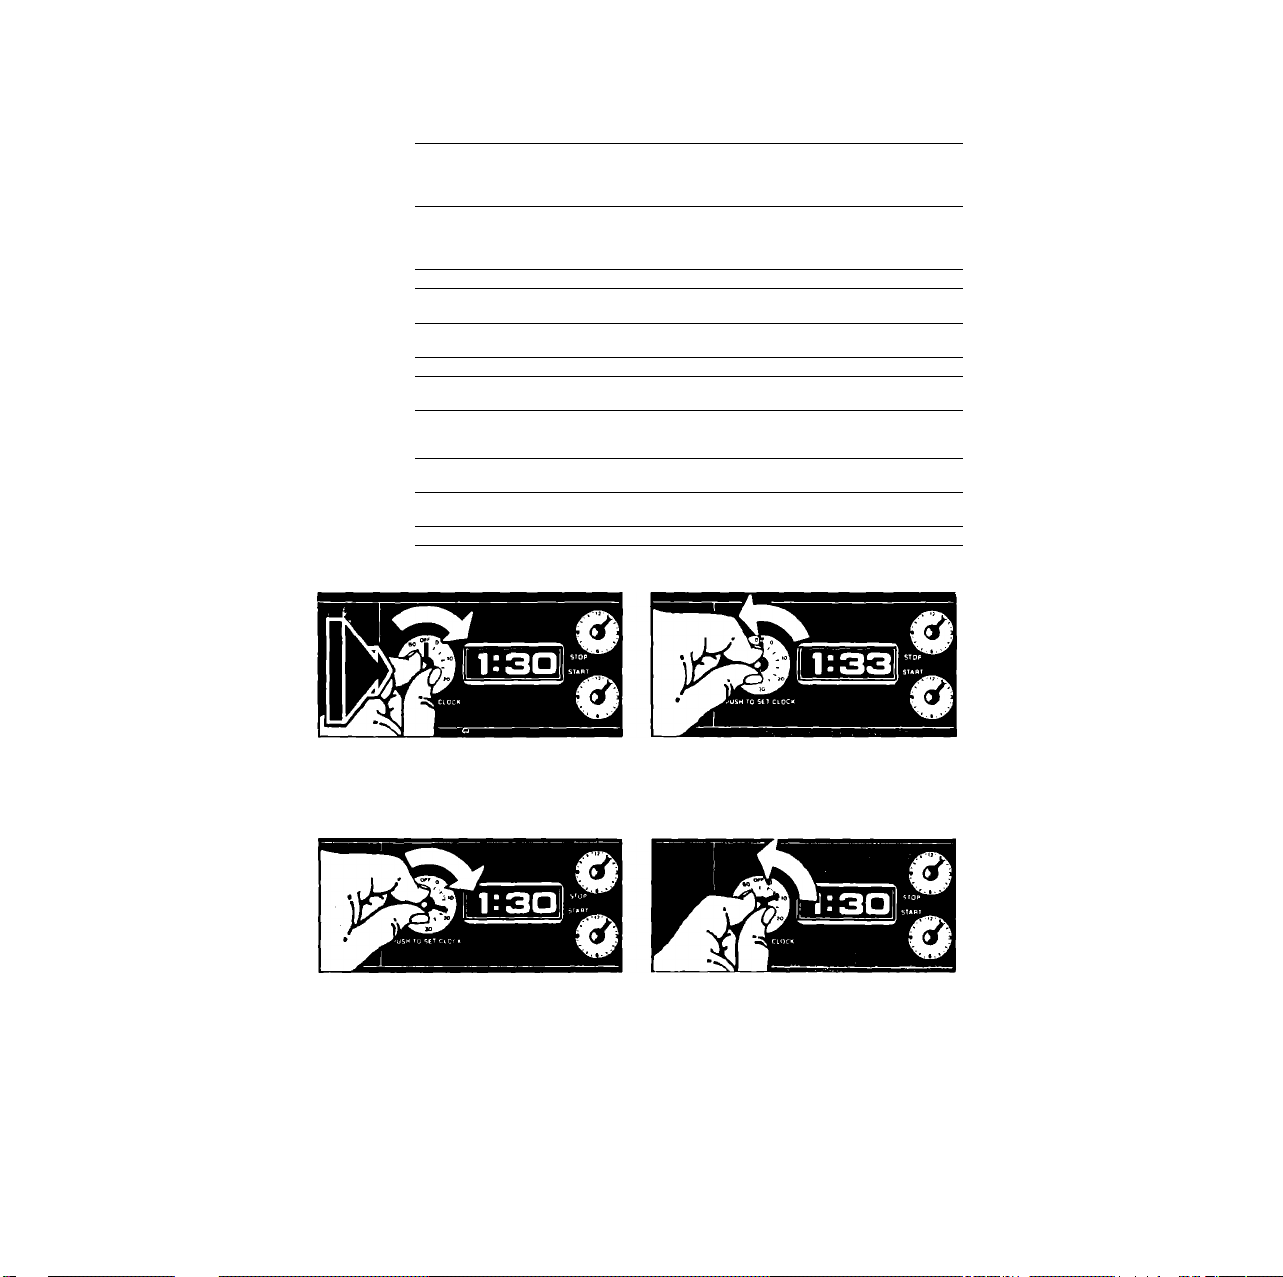
Suggested oven-rack positions and broiling times
Food Description 1st side
Beef Steaks
Rare 1 (2,5 cm)
Medium
Well done 1 (2.5 cm) 3 (8 cm)
Beef Steaks
Rare
Medium
Well Done
Hamburgers
Lamb Chops
Medium
Ham slice, precooked '/¡ -1
or tendered (1-2,5 cm) 3 (8 cm)
Canadian Bacon
Pork Rib or Loin Chop
Well done (2-2.5 cm) 4 -5 (10-13 cm)
Chicken
Fish whole 3 (8 cm) 11-16
Liver
Frankfurters
SETTING THE CLOCK
Approximate Minutes -
Inches (cm) from top
of food to Broil Element
1 (2.5 cm) 3 (8 cm)
1 ’/j (4 cm)
tVi’ (4 cm)
1 % (4 cm) 4 -5 (10-13 cm) 19-21
Vj (1 cm) 3 (8 cm)
1 (2.5 cm) 3 (8 cm) 6-8 4-5
'/2 (1 cm)
y.'-i
2-3 lb
(1-1.5 kg)
cut In half
lillets
(1-2 cm)
3 (8 cm)
4 -5 (10-13 cm)
4 -5 (10-13 cm)
3 (8 cm) 6
7 -9 (18-23 cm)
3 (8 cm)
3 (8 cm) 3 3
4 -5 (10-13 cm) 6-7
Selector set to BROIL
7-9 3-5
9-11
11-13 5-7
13-15
17-19 8-10
6-8 4-5
6-8 4-5
15
25-30 10-12
7-8
2nd side
4-7
6-8
14-16
4
10
9-14
5-7
4-5
1. Push In Mlnuta Timer Knob and turn
clockwise unfil clock digits show the right
time of day,
USING THE MINUTE TIMER
i. Without pushing In the knob, turn the
Minute Timer hand clockwise past the
setting you want.
2. Let the Minute Timer Knob pop out. Turn
counterclockwise until the Minute Timer
dial is on OFF. If you push in on the knob, you
will change fhe time of day.
2. Turn the hand back to the setting you want.
3. When the set time is up, a buzzer will sound.
4. Turn the dial to OFF to stop the buzzing.
Page 7
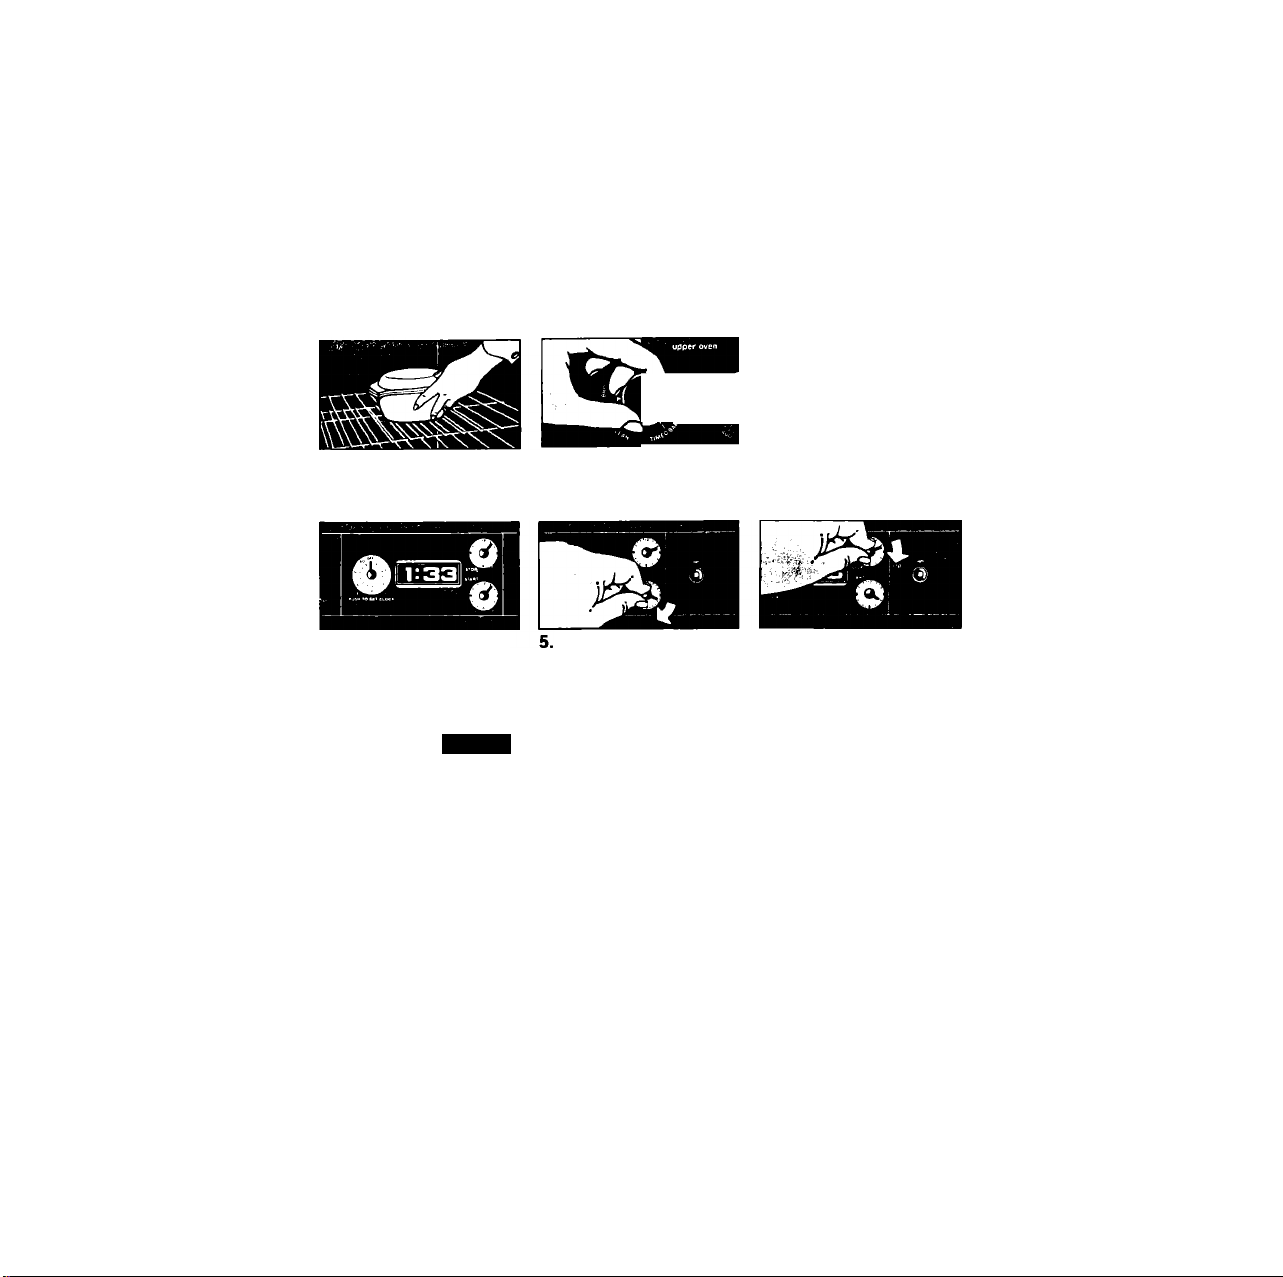
USING THE AUTOMflTIC MEALTIMER* CLOCK
The Automatic MEALTIMER Clock is designed to turn the upper oven on and oft
at times you set...even when you are not around. IMPORTANT: Follow these steps In order.
To star! and stop baking automatically:
J; 11): ’12
1. Put the racks where you
want them and place the
food in the oven.
4. Make sure the clock is set
to the right time of day.
7. After baking is done, turn
both knobs to OFF.
2. Set the Oven Selector on
TIMED BAKE.
to the time you want bak
8. To slop the oven before
To stop baking automatically:
1.
Put the racks where you want them and
place the food in the oven.
2.
Set the Oven Selector on TIMED BAKE.
3.
Set the Oven Temperature Control on the
baking temperature you wanl.
4. Make sure the clock is set lo the right time
of day.
Push in and turn the Start
Time Knob clockwise
ing to start.
the preset lime, turn both
knobs to OFF
5. Push in and turn the Stop Time Knob clock
wise to the time you want the oven to shut
off.
6. After baking is done, turn both knobs lo
OFF
7. To stop the oven before the preset time,
turn bolh knobs to OFF.
3. Set the Oven Temperature
Control on the baking
temperature you want
6. Push In and turn the Stop
Time Knob clockwise
to the time you wantthe
oven to shut off.
SPECIAL CAUTION:
Use foods that will not go bod or spoil
while waiting for cooking to start. Avoid
using dishes with milk or eggs, cream
soups, cooked meats or fish, or any item
with baking powder or yeast.
Smoked or frozen meats may be used,
so can vegetables, fruits and casseroletype foods. Vegetables can be cooked In
a covered baking dish with about a half
cup (118 ml) of water for 1 to I'/a hours.
Any food that has to wait for cooking to
start should be very cold or frozen before
it is put in the oven. MOST UNFROZEN
FOODS SHOULD NEVER STAND MORE THAN
TWO HOURS BEFORE COOKING STARTS,
Page 8
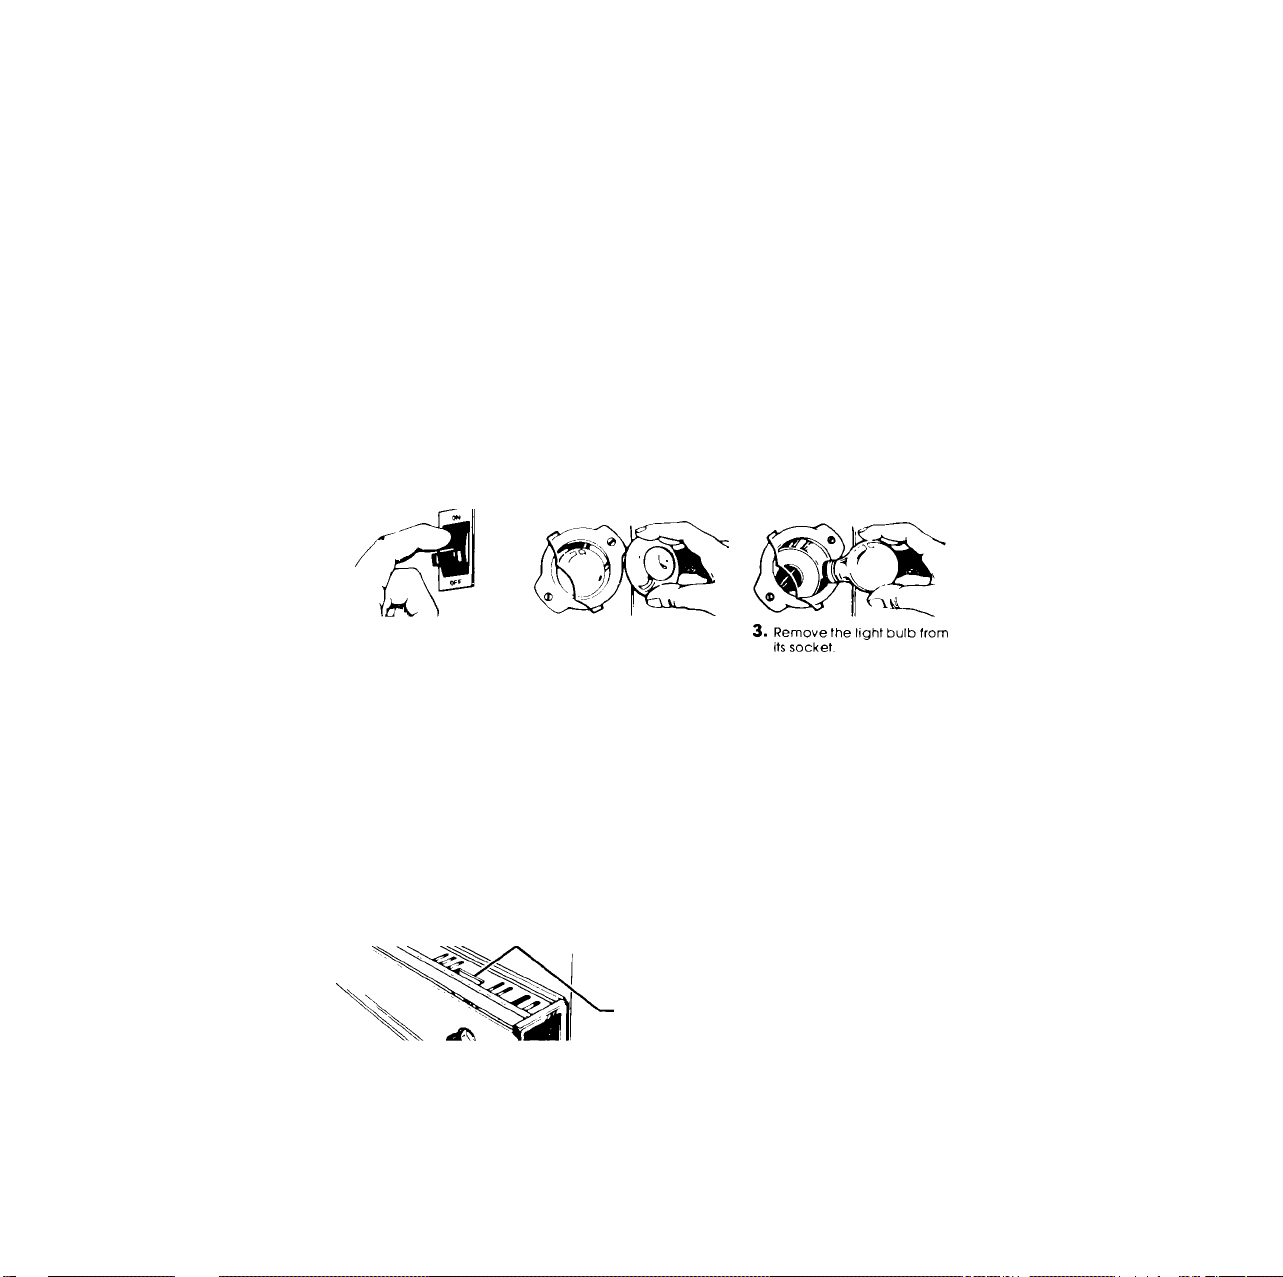
If the steps for using the Automatic
MEALTIMER Clock are not followed in
order, the electric oven door lock may be
turned on. The door will then either:
• not open:
• not close all the way (the oven light stays
on).
If the Door Won’t Open:
1. Make sure the Clock and Start and
Stop Times are set to the right time of
day.
2. Turn the Oven Selector to CLEAN.
3. Push in and turn the Stop Time Knob
past the right time of day,
4. Walt 30 seconds.
5. Turn the Oven Selector to OFE; the door
will be unlocked within 10 seconds.
If the Door Won't Close:
1. Make sure the Clock and Start and
Stop Times are set to the right time of
day: open the oven door.
Turn the Oven Selector to CLEAN,
Push in and turn the Stop Time Knob
past the right time of day.
Push the automatic oven light switch in
and hold it in for 10 seconds.
Let the oven light switch go and turn the
Oven Selector to OFF.
Push in the automatic oven light switch
and hold it for another 10 seconds.
Close the oven door
Both oven lights will come on when you push the Light Switch, Push the
switch again to shut them off. Both lights will also come on when an oven door is
opened.
To replace the upper oven light bulb:
Turn off the electric power
at the main power supply.
4. Replace the bulb with a
40'watt appllar>ce bulb
available from most gro
cery, variety and
hardware stores.
2. Remove the bulb cover by
pulling out on the wire
holder and moving it to the
side.
5. Replace the bulb cover
and snap the wire holder
in place The bulb must
have this cover when the
oven Is being used.
To replace the lower oven light bulb:
1. Turn oft the electric power
at the main power supply.
2. Remove the light bulb
from its socket.
THE OVEN VENTS
THE OVEN LIGHTS
6. Turn electrical power back
on at main power supply.
3. Replace the bulb with a
40-watt appliance bulb
available from most gro
cery, variety and
hardware stores. Turn the
power back on at the
main power supply.
When the oven is on, hot air and moisture
escape through a vent on top of the control panel,
These vents are needed for air circulation.
Do not block the vents. Poor baking can result
Page 9
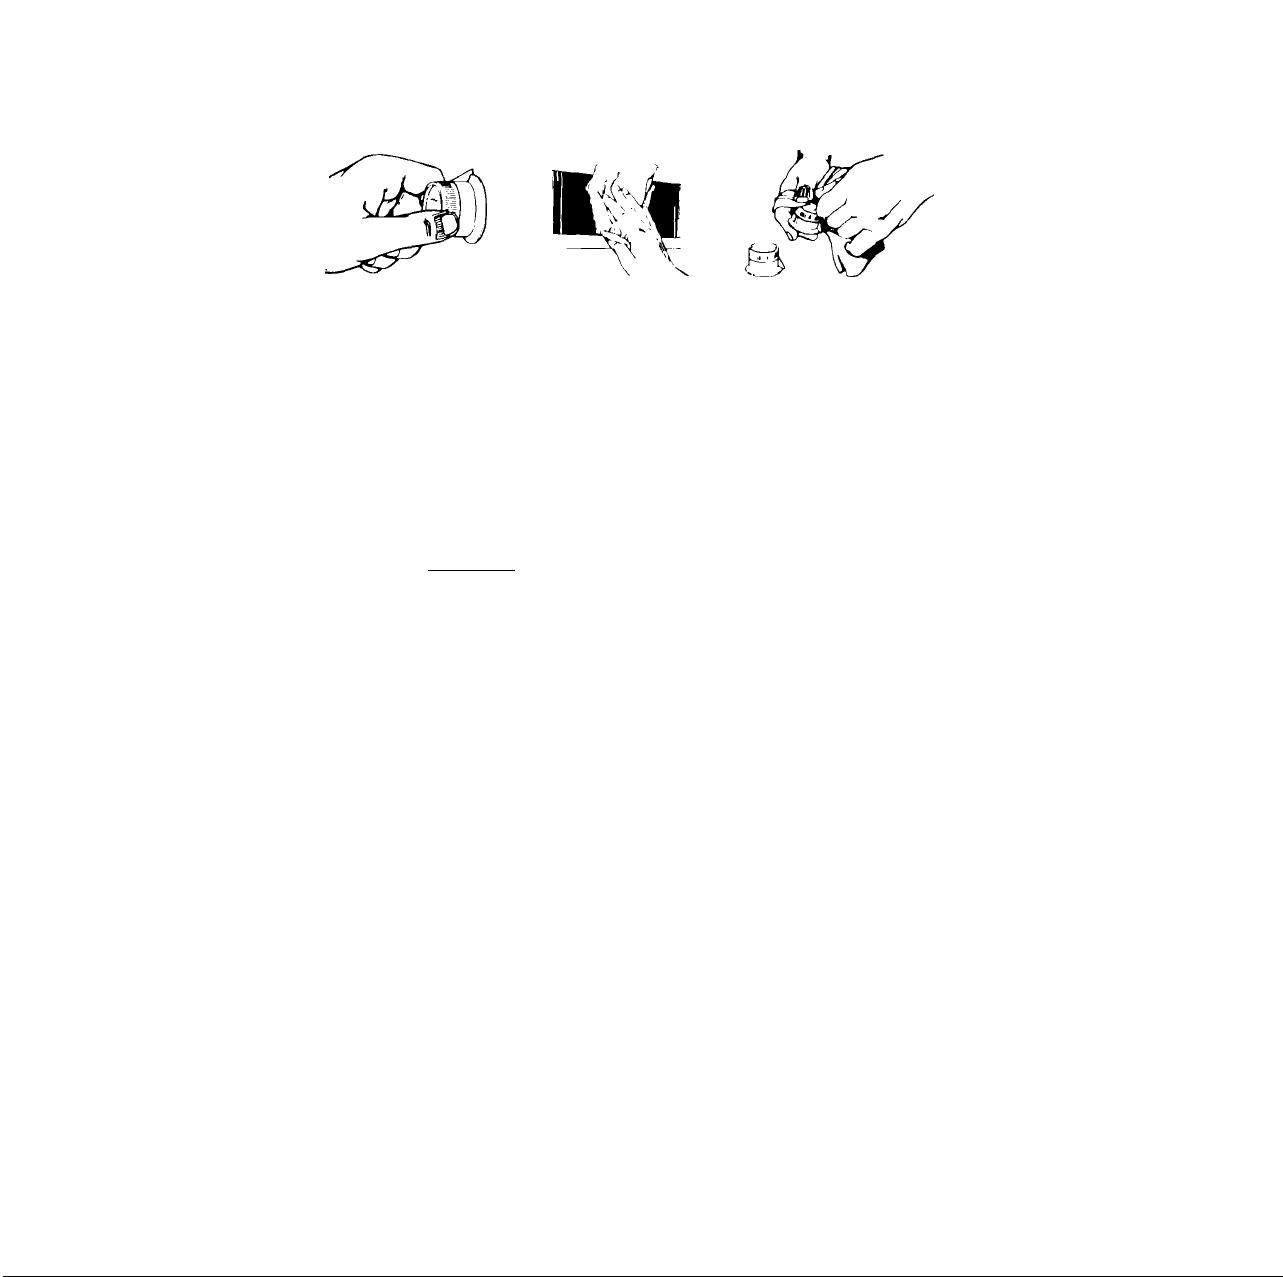
Qeaning and caring for your ovens
CONTROL PANEL AND KNOBS
Use warm soapy
1. First make sure
knobs are on OFF
then pull knob
straight off.
2.
wafer and a soft
cloth to wipe
Ihe panel. Rinse
and wipe dry.
CLEANING CHART
PART
Outside of Soft cloth, worm soapy
oven water
Control knobs Warm, sudsy water and
Porcelain-
enamel
broiler pan
and grid
Control panel Warm, soapy water
Oven door
glass
Continuouscleaning
lower oven
Oven racks Self-Cleaning Oven cycle
Self-Cleaning For areas outside Self- • Clean before using Self-Cleaning cycle
Upper Oven Cleaning area use warm, to prevent burn-on of soil.
________
WHAT TO USE
Nylon or plastic scouring
pad for stubborn spots
bristle brush
Warm, soapy water or
soapy steel wool pods
Commercial glass
cleaner
Worm, soapy water or
plastic scrubbing pad
Commercial glass
cleaner
Warm, soapy water or
soapy scrubbing pod
Most fat spatters on the continuous-cleaning porcelain-enamel
Interior surface gradually reduce to a presentably clean condition
during normal baking or roasting operations.
Warm, soapy water or
soapy steel wool pads
soapy water or soapy • Follow directions given on page 11.
steel wool pads • Do not use commercial oven cleaners.
Do not use toll to line the bottom of your Self-Cleaning Oven.
__________
3. Wash knobs in
warm soapy
water. Rinse well
and dry.
HOW TO CLEAN
Wipe off regularly when oven Is cool.
Do not allow food containing acids
(such as vinegar, tomato, lemon Juice or
milk) to remain on surface. Acids will
remove the glossy finish.
Do not use abrasive or harsh cleansers.
Wash, rinse and dry well.
Do not soak.
Wash with other cooking utensils.
Do not clean in self-cleaning cycle.
Wash, rinse and dry with soft cloth.
Follow directions with cleaner.
Make certain oven Is cool. Wash, rinse
and dry well with soft cloth.
Follow directions provided with cleaner.
• Clean stubborn spots or stains. Rinse well
with clean water.
• Follow directions given on page 15.
• Do not use commercial oven cleaners.
' Leave in oven during Self-Cleaning
cycle.
' Wash, rinse and dry. Use soapy steel wool
pods for sfubborn areas.
Push knobs
straight back on
Make sure they
are on OFF.
I
Page 10

r
The upper oven door cannot be removed.
REMOVING THE LOWER OVEN DOOR
THE OVEN DOOR
Hinge Support Stop
1. Open the door lo the
broil stop.
REPLACING THE LOWER OVEN DOOR
Hinge Opening
1. Fil Ihe hinge supports into
the openings at the
bottom oven corners.
2. Hold the door on both
sides and lift slightly to
clear the stops in the
hinge supports.
2. Lift slightly while sliding
the hinge supports into
the openings
Pull the door, with the
hinges, straight away
from the oven.
3. When the stops In the
hinge supports slide into
the oven openings. Ihe
door will snap into place
and can be closed.
Page 11
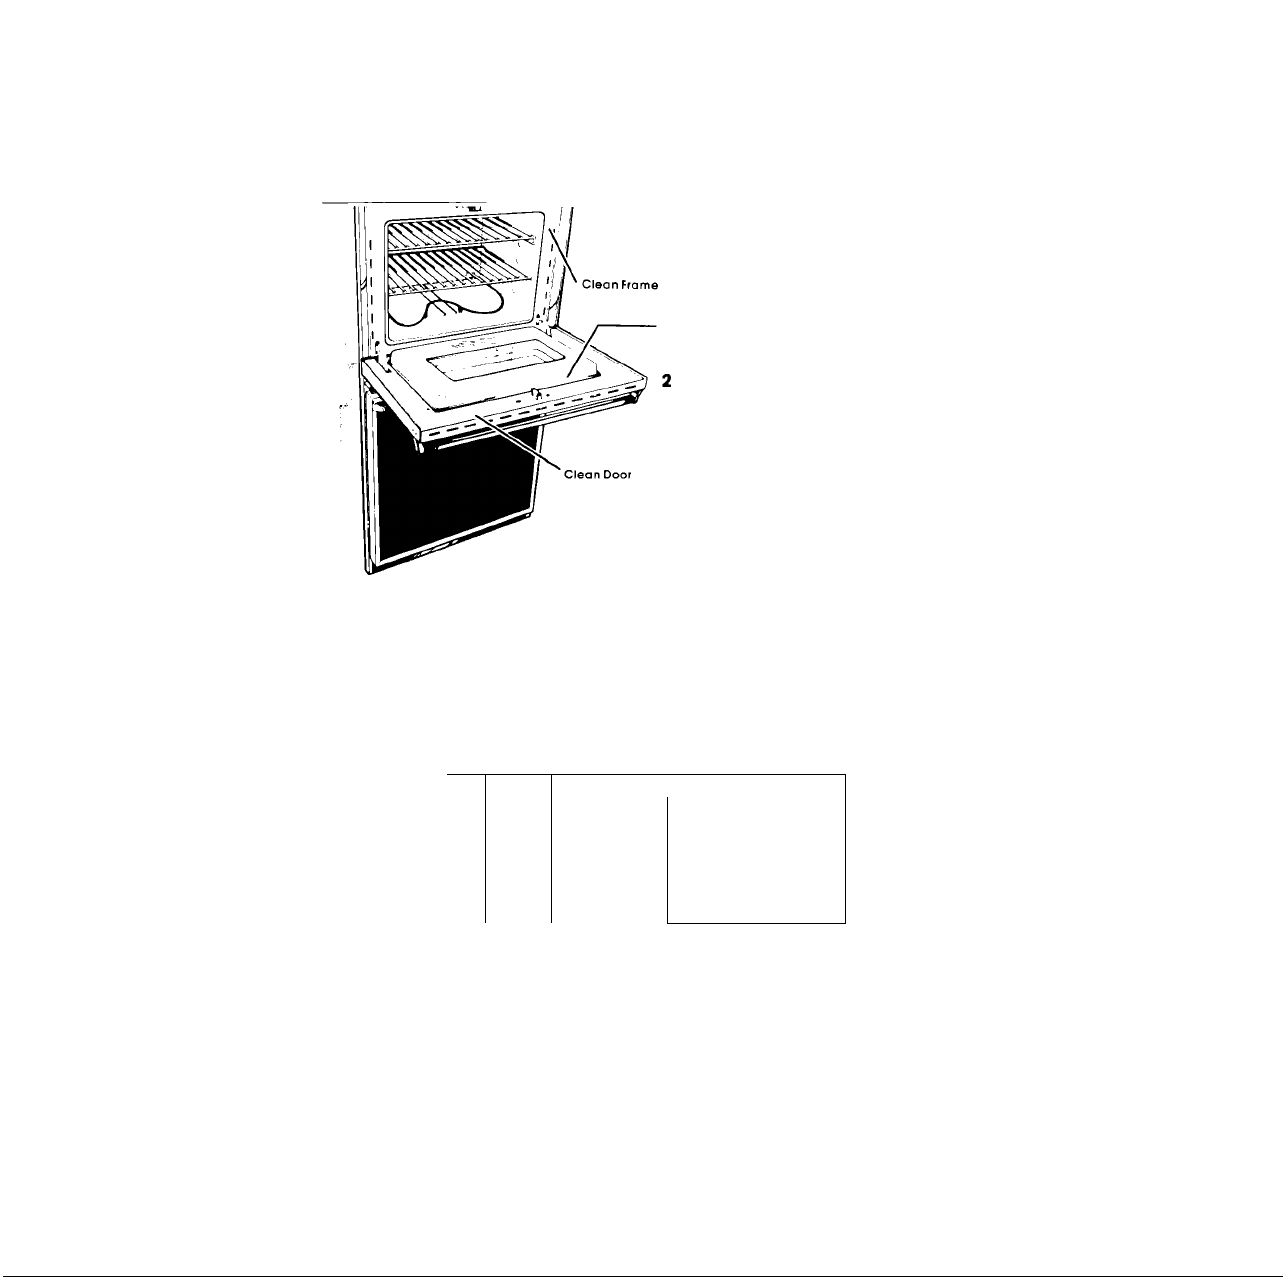
THE SELF-CLEANING UPPER OVEN CYCLE
The upper oven self-cleaning cycle uses very high hecrt to burn away
soil. Before you start, make sure you understand exactly how to use the
cycle safely.
BEFORE YOU START
Clean areas that may not be cleaned
during the cycle. Use hot water and deter
gent or a soapy steel-wool pad on...
• the frame around the oven
• the inside of the door, especially the
part outside the oven seal
DO NOT try to clean the fiberglass seal. DO
NOT move It or bend It.
Remove any pots or pans you may have
stored in the oven. They can't stand the
high heat,
3. Wipe out any loose soil or grease. This will
help reduce smoke during the cleaning
cycle,
SPECIAL CAUTIONS
DO NOT block the vent
during the cleaning cycle,
Air must move freely for
best results.
'
[ i>
v.._.
DO NOT use commercial
oven cleaners in your oven.
Damage to the porcelain
finish may occur
DO NOT touch the oven
during the cleaning cycle
...it can burn you.
; i
DO NOT use foil or other
liners in the oven. During
the cleaning cycle, they
can burn or melt.
I
Page 12
r
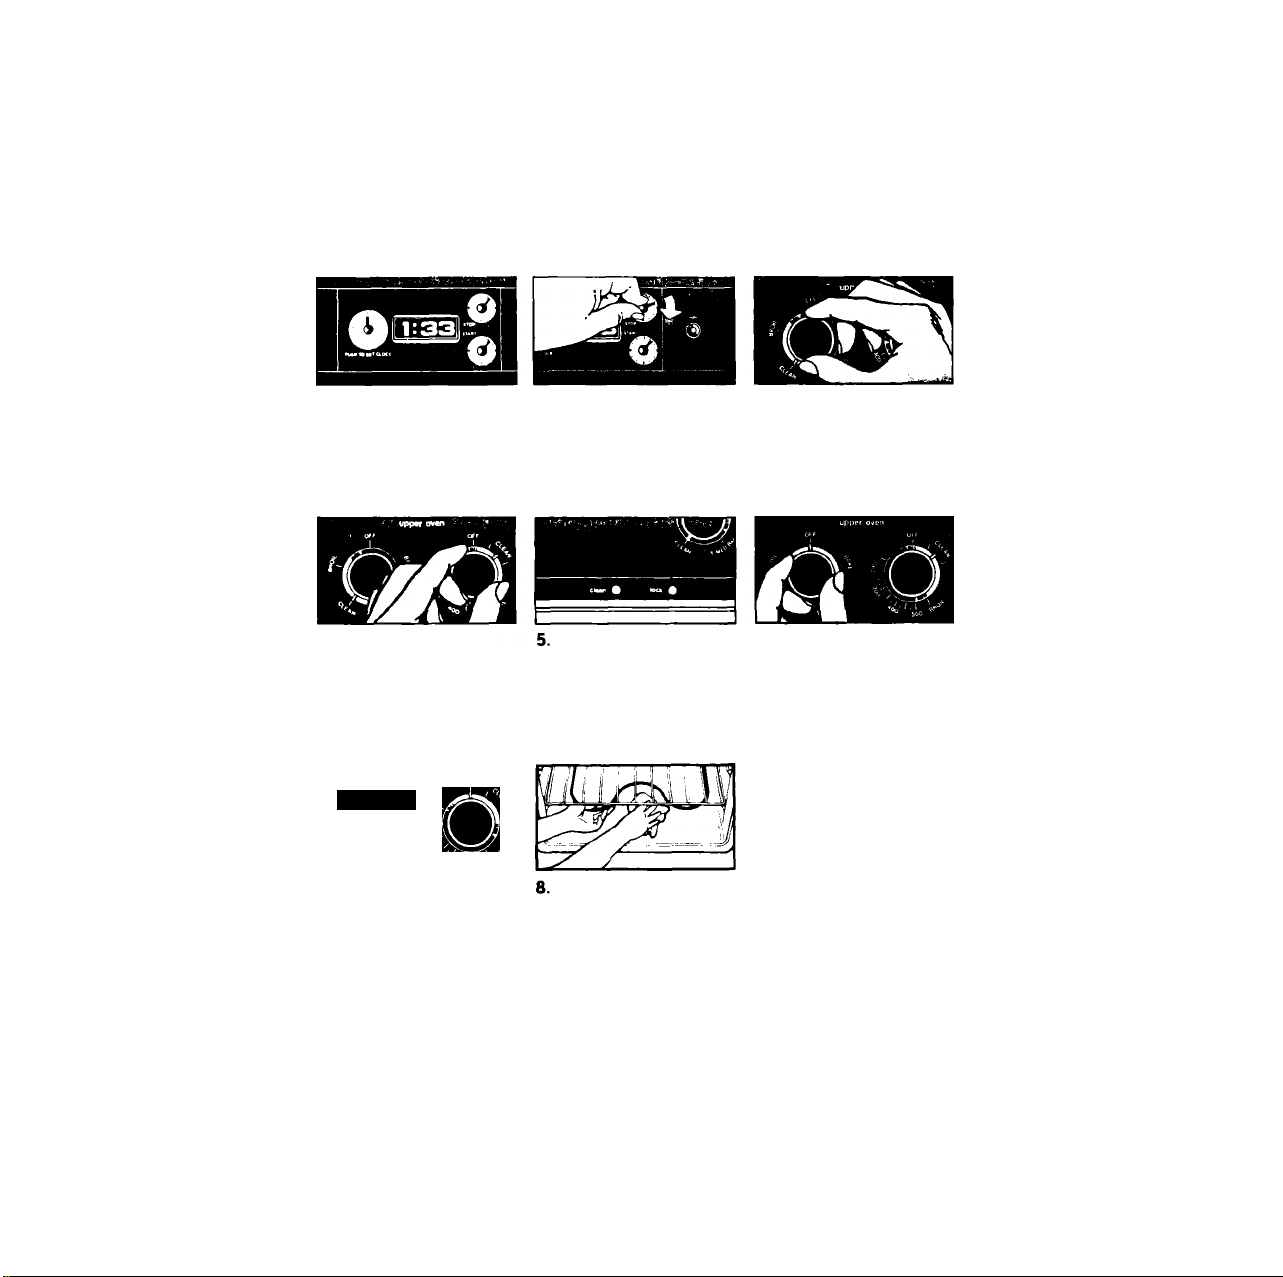
SETTING THE CONTROLS
1. Make sure the clock
and start and stop
-time dials all have the
right time of day.
4. Set the Oven Temper
ature Control to CLEAN
7. Turn the Oven Temper
ature Control to OFF.
Push in the Stop Time
Knob and turn the
hand clockwise
about two or three
hours, (Two hours for
light soil; three or
more for heavier soil.)
The Lock Light comes
on when the oven
gets above normal
baking temperatures.
The door can't be
unlocked when the
Lock Light is on
After the oven Is cool,
wipe off any residue
or ash with a damp
cloth If needed,
touch up spots with
cleanser or soapy
steel-wool pad
3. Set the Oven Selector
to CLEAN. The Clean
Light will come on
and the door will lock
automatically.
6. When the Lock Light
goes oft, turn the Oven
Selector to OFF. This
unlocks the door.
DO NOT TOUCH THE OVEN DURING THE CLEANING CYCLE. IT CAN BURN YOU.
12
Page 13
SPECIAL TIPS
Keep the kitchen well
ventilated during the
cieaning cycle to help
gel rid of normal heat
odors and smoke.
4. Oven racks lose their shine, discolor
and become harder to slide on their
guides when they are left in the oven
during the cleaning cycle. To make
them slide easier, polish the edges of
the racks and rack guides with a soapy
steel-wool pad, rinse well, and wipe
on a thin coat of salad oil.
Clean the oven before
it gets heavily soiled.
Cleaning a very soiled
oven takes longer and
results in more smoke
than usual.
5. To stop the cleaning cycle after it has
started:
• Turn the Stop Time Knob clockwise
until the hand points to the right time
of day.
• Turn the Oven Selector and Oven
. Temperature Control to OFF,
• When the oven cools, you can
open the door. Wait until the oven is cool.
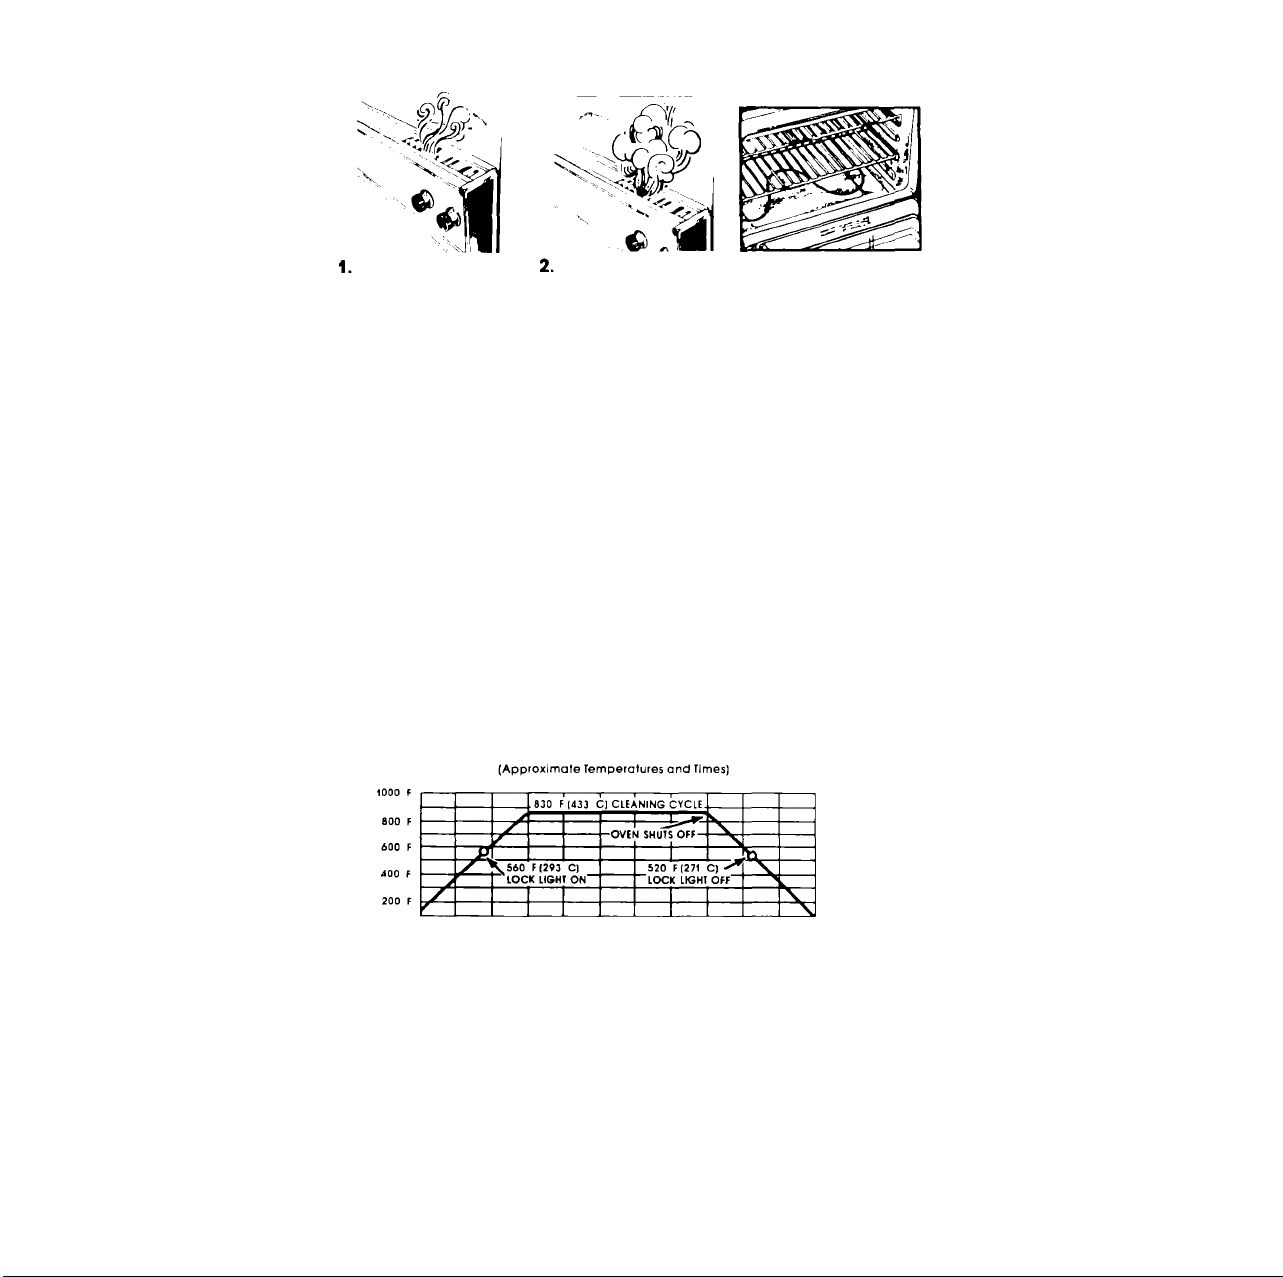
HOW IT WORKS
During the self-cleaning cycle, the oven gets much hotter than it
does for baking or broiling...approximately 630 F(433 C). This heat
breaks up grease and soil, and burns it off.
The graph shows approximate temperatures and times during a self
cleaning cycle set for two hours.
SELF-CLEANING CYCLE-TWO HOUR SETTING
If the cleaning cycle
doesn t get the oven as
clean as you
expected, the cycle
may not have been set
long enough. Set the
cleaning time longer
tor heavier soil.
538 C
427 C
316 C
204 C
93 C
2’/, hrs STOP
Notice that the healing stops when the two-hour setting is up, but that it takes a
while longer for the oven to cool down enough to unlock.
13
J
Page 14
f
THE CONTINUOUS-CLEANING LOWER OVEN
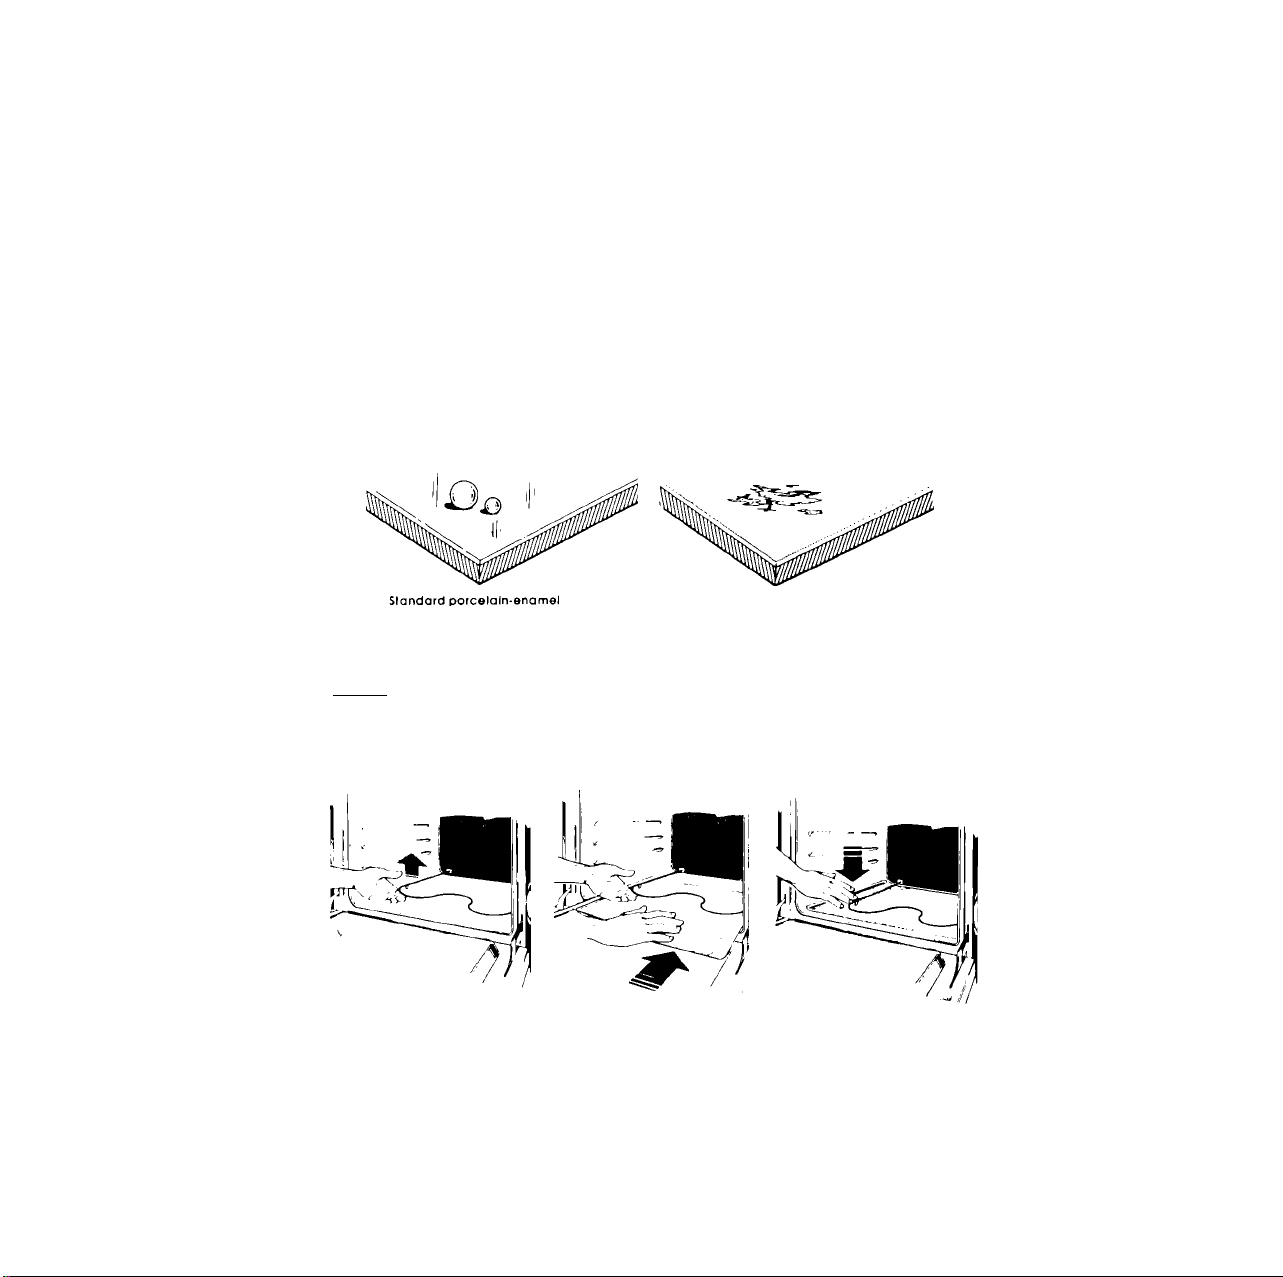
Standard oven walls are coated with smooth porcelain-enamel. Your
continuous-cleaning oven walls are coated with a special, rougher
porcelain-enamel.
A fat spatter beads up on the smooth surface, but spreads out on the rougher
surface. The bead of fat chars and turns black. The spread-out fat gradually
burns away at medium to high baking temperatures (350 -475"^^ 176 -231 C) so
the oven can return to a presentably clean condition.
Fat Spatter
Beads Up,
Turns Black
Continuous-cleaning porcelain-enamel
Fat Spatter
Spreods Out.
Burns Away
USING FOIL
Foil must be used on the lower oven bottom to catch spillovers. The toll must
be used properly. Using foil in the self-cleaning upper oven is not
recommended.
Cut foil from a roll of heavy-duty 18-inch (45 cm] aluminum foil, or buy a foil kit
(Part No, 241430] from your Whirlpool Appliance dealer.
Lift the cool bake element
slightly to lift the feet off the
oven bottom
Slide the foil under the bake
element.
Make sure foil is centered,
long enough to start up both
sides, and lying flat without
wrinkles.
For proper baking, lower the
bake element so all leet
rest solidly on the foil.
Page 15
1. The oven window and rocks are not
coated Clean them by hand
2. The oven door does not gel as hof as the
walls. Some hand cleaning may
be needed
HAND CLEANING
TIPS
If you do more broiling than baking, hand
3.
cleaning may be needed
4. Use aliiminum foil on the oven bot-
tom according to instructions.
Spillovers do not burn away and
may stain the bottom
DO NOT USE OVEN
CLEANING PRODUCTS.
Some can be (rapped in
((le porcelain-enamel
surface and give off
harmful fumes.
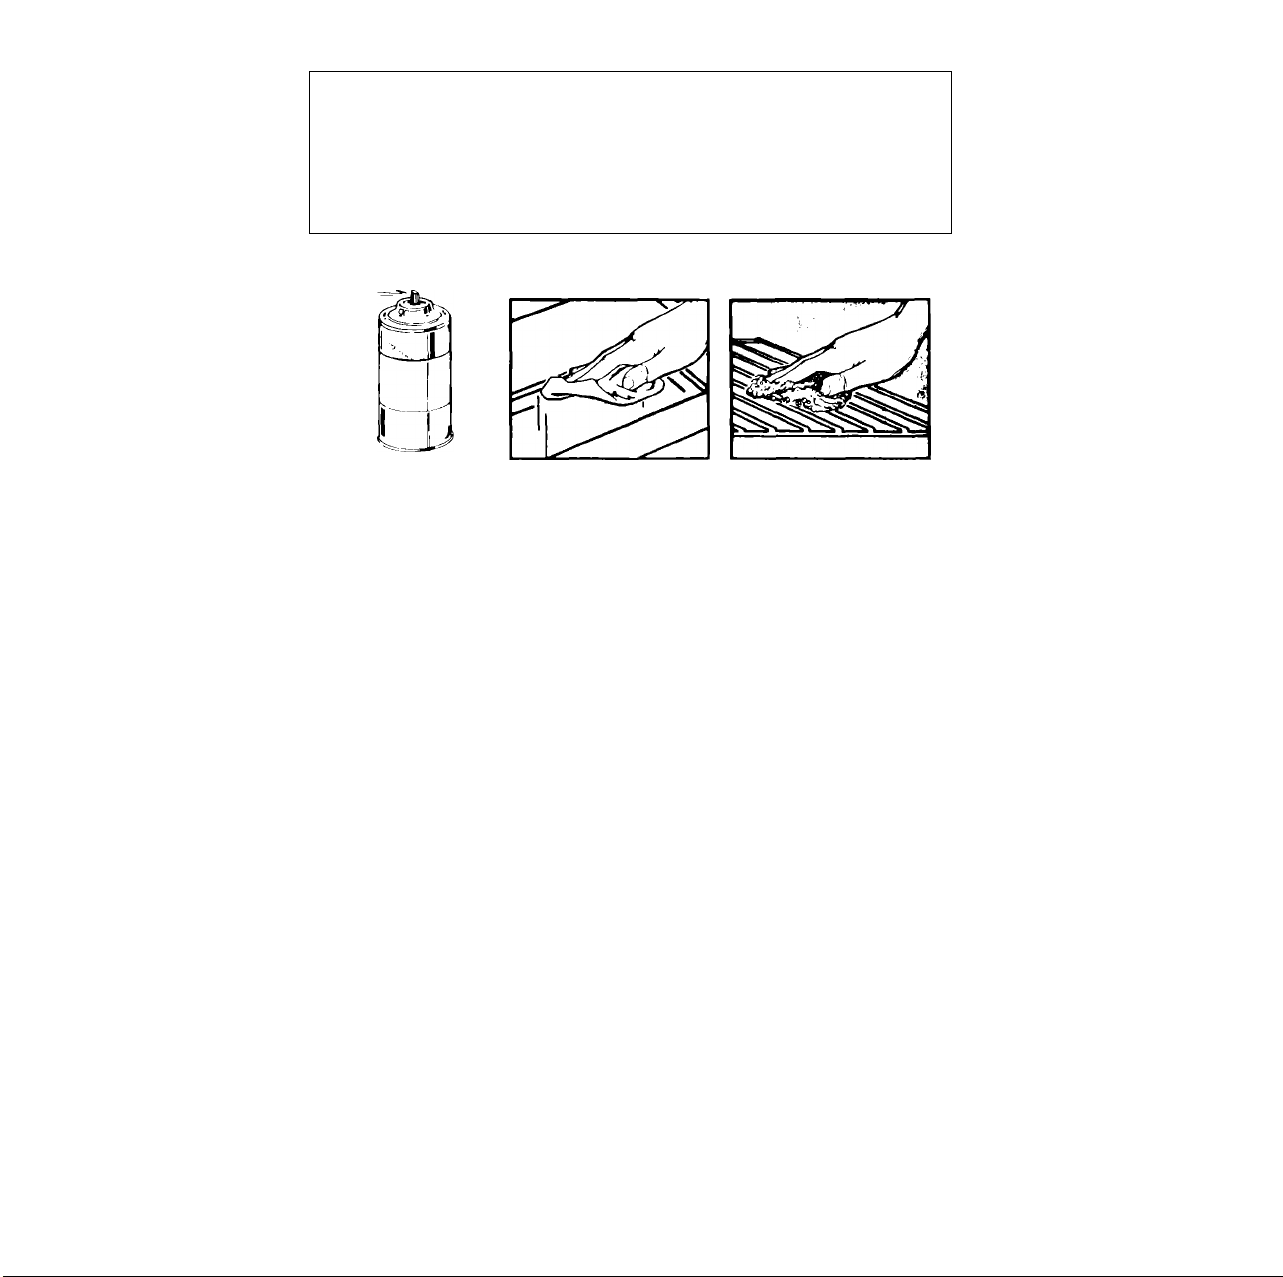
WINDOW - Keep clean
wifh hof sudsy warer.
Do not use sfeel wool or
abrasive cleansers Use a
plasfic scouring pad (or
stubborn spots Rinse weii
WALLS AND DOOR - Wash with hot soapy
wafer. Use a soapy steel-wool pad or
plastic scouring pad (or sfubborn spots. Rinse well.
RACKS - Use a soapy
sfeel-wool pad (or besf
results. Rinse well.
If you need service or assistance,
we suggest you follow these four steps:
1I • Before calling for assistance...
Performance problems offen result from
little things you can find and fix yourself with
out tools of any kind.
If nothing operate»:
• Is the oven correctly wired to a live circuit
with the proper voltage? (See Installation
Instructions.)
• Have you checked the main fuse or circuit-
breaker box?
If the upper oven will net operate:
• Is the Upper Oven Selector turned to a set
ting (BAKE or BROIL, but not TIMED BAKE]'^
• Is the Upper Oven Temperature Control
turned to a temperature setting?
If the lower oven will net operate :
• Is the Lower Oven Selector turned to a set
ting (BAKE or BROIL)';’
• Is the Lower Oven Temperature Control
turned to a temperature setting?
If the lelf-cleanlng cycle will not operate:
• Are the Upper Oven Selector and Upper
Oven Temperature Controls set to "CLEAN"?
• Does the Start Time dial show the correct
time of day?
• Is the Stop Time dial set ahead to the time
you want the cleaning cycle to stop?
If toll Is visible on continuous-cleaning oven
finish:
• The special finish is designed to gradually
reduce oven soil during normal baking
or roasting. It is not designed to keep your
oven spotless...only presentably clean
• If you broil often, you may see oven soil.
• The door is coolerthan oven walls. Soil will
be more visible on the doorthan other areas
in the oven. See page 15, "Hand Cleaning."
15
J
Page 16
r
If cooking results aren't what you expect:
• Is the oven level?
• Are you using pans recommended in the
Cooking Guide?
• If baking, have you allowed 1 '/2 to 2 inches
(4-5 cm) on all sides of the pans for air
circulation?
• Does the oven temperature seem too low or
too high? See page4. "Resetting the oven
temperature controls."
• Have you preheated the oven as the rec
ipe calls for?
• Are the pans the size called for in the
recipe?
• Are you following a tested recipe from a
reliable source?
• Do the cooking utensils have smooth, flat
bottoms?
See the Cooking Guide for more information
on cooking problems and how to solve them.
2* Ifyou need assistance ...
Call the Whirlpool COOL-LINE' service as
sistance telephone number. Dial tree from:
Continental U.S
Michigan
Alaska 8 Hawaii
and talk wilh one of our trained Consultants.
The Consultant can instruct you in how to ob
tain sotislactory operation from your appli
ance or it service is necessary, recommend a
qualilied service company in your area.
.....................
.................................
.....................
(800)253-1301
(800)632-2243
(800)253-1121
i* Ifyou need service ^..
Whirlpool has a
nationwide net
work of franchised
TECH-CARE' Ser
vice Companies.
TECH-CARE service
SYMBOL
OP OUALll ■
SERVICE
warranty service, anywhere in the United
States, To locate TECH-CARE service in your
area, call our COOL-LINE service assistance
telephone number (see Step 2) or look in your
telephone directory Yellow Pages under:
WHIRLPOOL APPLIANCES OR WHIRLPOOLAPPLIANCBS
FRANCHISED TECH-CARE SERVICE FRANCHISED TECH-CARE SERVICE
XYZ SERVICE CO
123 Maple 999-99S9
4.
Ifyou have a problem C..
Call our COOL-LINE service assistance tele
phone number (see Step 2) and talk with one
of our Consultants, or it you prefer write to:
Mr. Guy Turner, Vice President
Whirlpool Corporation Administrative Center
2000 US-33 North Benton Harbor, Ml 49022
Ifyou must call or write, please provide: model
number, serial number, date ol purchase, and
d complete description ol the problem. This
information is needed in order to better re
spond to your request tor assistance.
technicians are
trained to fulfill the
product warranty
and provide after
OR
-S'i'rt VICE < 'OM l‘A MES
^ F5P IS Q registered trademark
of Whirlpool Corporation for
quality ports Look for this
Psymbol of qualify whenever
you need o replacement part
lor your Whirlpool appliance
FSP replacemenl ports
Whirlpool
H( ii'u' .B A|i()ii,inu 'S
will fit riqhl and work right, because Ihoy are
made lo Iho same exacling specifications
used lo build every new Whirlpool appliance
Pari No 1324073 877626 Quality, Our way of life.
Benion Hiirbur. Michigan Automalic Washers. Clothes Dryers,
Frebiers. Relrigerator-Freeiers, Ice Makers, Dishwashers,
Built-In Ovens and Surface Units. Ranges. Microwave Ovens.
Compactors. Hoorn Air Conditioners. Oehumidiliers. Central
Healing and Air Conditioning Systems.
Prinled in U S.A.
 Loading...