

WHIRLPOOL MTDLR 60216 User Manual
User Manual
www. whirlpool .eu/register

USER MANUAL
THANK YOU FOR BUYING A WHILPOOL PRODUCT.
In order to receive a more complete assistance,
please register your appliance on www.whirlpool.eu/register
INDEX
HEALTH & SAFETY GUIDE ................................................................. 3
Safety Instructions ........................................................................................3
USER MANUAL ........................................................................... 5
Product description. . . . . . . . . . . . . . . . . . . . . . . . . . . . . . . . . . . . . . . . . . . . . . . . . . . . . . . . . . . . . . . . . . . . . . . . . . . . . . . . . . . . . . . 5
Detergent dispenser .......................................................................................5
Technical data for water connection ........................................................................5
Control panel ..............................................................................................6
Programmes ...............................................................................................6
Options & Functions .......................................................................................7
Programme chart ..........................................................................................8
How to use the appliance .................................................................................9
First time use ..............................................................................................9
Daily use ...................................................................................................9
Indicators ................................................................................................. 11
Hints and tips ............................................................................................. 11
Cleaning & maintenance ................................................................................. 12
Cleaning the exterior and interior of the washing machine ................................................. 12
Checking the water supply hose ........................................................................... 12
Cleaning the mesh lters in the water supply hose ......................................................... 13
Cleaning the detergent dispenser ......................................................................... 13
Cleaning the water lter / draining residual water .......................................................... 14
Recovering an object that falls between the drum and the tub ............................................. 15
Troubleshooting ......................................................................................... 16
Description of failure indicators ........................................................................... 17
Transport and handling ................................................................................... 18
After-sales service ....................................................................................... 18
INSTALLATION GUIDE ...................................................................19
2
Health & Safety guide
EN
SAFETY INSTRUCTIONS
Before using the appliance, read these safety
instructions. Keep them nearby for future reference.
These instructions and the appliance itself provide
important safety warnings, to be observed at all
times. The manufacturer declines any liability for
failure to observe these safety instructions, for
inappropriate use of the appliance or incorrect
setting of controls.
Very young children (0-3 years) should be kept
away from the appliance. Young children (3-8years)
should be kept away from the appliance unless
continuously supervised. Children from 8years old
and above and persons with reduced physical,
sensory or mental capabilities or lack of experience
and knowledge can use this appliance only if they
are supervised or have been given instructions on
safe use and understand the hazards involved.
Children must not play with the appliance. Cleaning
and user maintenance must not be carried out by
children without supervision.
Never open the door forcibly or use it as a step.
PERMITTED USE
CAUTION: The appliance is not intended to be
operated by means of an external switching device,
such as a timer, or separate remote controlled system.
This appliance is intended to be used in household
and similar applications such as: sta kitchen areas in
shops, oces and other working environments; farm
houses; by clients in hotels, motels, bed & breakfast
and other residential environments.
Do not load the machine above the maximum
capacity (kg of dry cloth) indicated in the programme
table.
This appliance is not for professional use. Do not
use the appliance outdoors.
Do not use any solvents (e.g. turpentine, benzene),
detergents containing solvents, scouring powder,
glass or general purpose cleaners, or ammable
uids; do not machine wash fabrics that have been
treated with solvents or ammable liquids.
INSTALLATIO N
The appliance must be handled and installed by
two or more persons- risk of injury. Use protective
gloves to unpack and install- risk of cuts.
Move the appliance without lifting it by the
worktop or top lid.
Installation, including water supply (if any) and
electrical connections and repairs must be carried
out by a qualied technician. Do not repair or replace
any part of the appliance unless specically stated in
the user manual. Keep children away from the
installation site. After unpacking the appliance,
IMPORTANT TO BE READ AND OBSERVED
make sure that it has not been damaged during
transport. In the event of problems, contact the
dealer or your nearest After-sales Service. Once
installed, packaging waste (plastic, styrofoam parts
etc.) must be stored out of reach of children- risk of
suocation. The appliance must be disconnected
from the power supply before any installation
operation- risk of electric shock. During installation,
make sure the appliance does not damage the
power cable - risk of re or electric shock. Only
activate the appliance when the installation has
been completed.
Do not install your appliance where it may be
exposed to extreme conditions, such as: poor
ventilation, temperatures below 5°C or above 35°C.
When installing the appliance make sure that the
four feet are stable and resting on the oor, adjusting
them as required, and check that the appliance is
perfectly to level using a spirit level.
If the appliance is being installed on wood or
“oating“ oors (certain parquet and laminate
materials), secure a 60x60x3cm (at least) sheet of
plywood to the oor then place the appliance on
top of this.
Connect the water inlet hose(s) to the water
supply in accordance with the regulations of your
local water company.
For cold ll only models: do not connect to the
hot water supply.
For models with hot ll: the hot water inlet
temperature must not exceed 60°C.
The washing machine is tted with transport
screws and a transport bracket to prevent damage
during transport. Before using the washing
machine you must remove the transport
bracket (see “Installation guide“). After the removal,
cover the openings with the 2 enclosed caps.
Remove the bottom protection by tilting and
turning the washing machine on one rear bottom
corner. Make sure that the plastic part of the bottom
protection (if available on the model) remains in the
packing and not in the machine bottom. This is
important, as otherwise the plastic part could
damage the washing machine during operation.
After installation of the device, wait a few hours
before starting it so that it acclimates to the
environmental conditions of the room.
Make sure that the ventilation openings in the
base of your washing machine (if available on your
model) are not obstructed by a carpet or other
material.
3

Use only new hoses to connect the appliance to
the water supply. The old hose-sets should not be
reused.
The supply water pressure must be in the
01-1Mpa range.
ELECTRICAL WARNINGS
It must be possible to disconnect the appliance
from the power supply by unplugging it if plug is
accessible, or by a multi-pole switch installed
upstream of the socket in accordance with the
wiring rules and the appliance must be earthed in
conformity with national electrical safety standards.
Do not use extension leads, multiple sockets or
adapters. The electrical components must not be
accessible to the user after installation. Do not use
the appliance when you are wet or barefoot. Do not
operate this appliance if it has a damaged power
cable or plug, if it is not working properly, or if it has
been damaged or dropped.
If the supply cord is damaged, it must be replaced
with an identical one by the manufacturer, its service
agent or similarly qualied persons in order to avoid
a hazard- risk of electric shock.
CLEANING AND MAINTENANCE
WARNING: Ensure that the appliance is switched
o and disconnected from the power supply before
performing any maintenance operation; never use
steam cleaning equipment- risk of electric shock.
Health & Safety guide
DISPOSAL OF PACKAGING MATERIALS
The packaging material is 100% recyclable and is marked with the recycle
symbol .
The various parts of the packaging must therefore be disposed of
responsibly and in full compliance with local authority regulations
governing waste disposal.
DISPOSAL OF HOUSEHOLD APPLIANCES
This appliance is manufactured with recyclable or reusable materials.
Dispose of it in accordance with local waste disposal regulations.
For further information on the treatment, recovery and recycling of
household electrical appliances, contact your local authority, the
collection service for household waste or the store where you purchased
the appliance. This appliance is marked in compliance with European
Directive 2012/19/EU, Waste Electrical and Electronic Equipment (WEEE).
By ensuring this product is disposed of correctly, you will help prevent
negative consequences for the environment and human health.
The symbol on the product or on the accompanying documentation
indicates that it should not be treated as domestic waste but must be
taken to an appropriate collection center for the recycling of electrical
and electronic equipment.
4
User manual
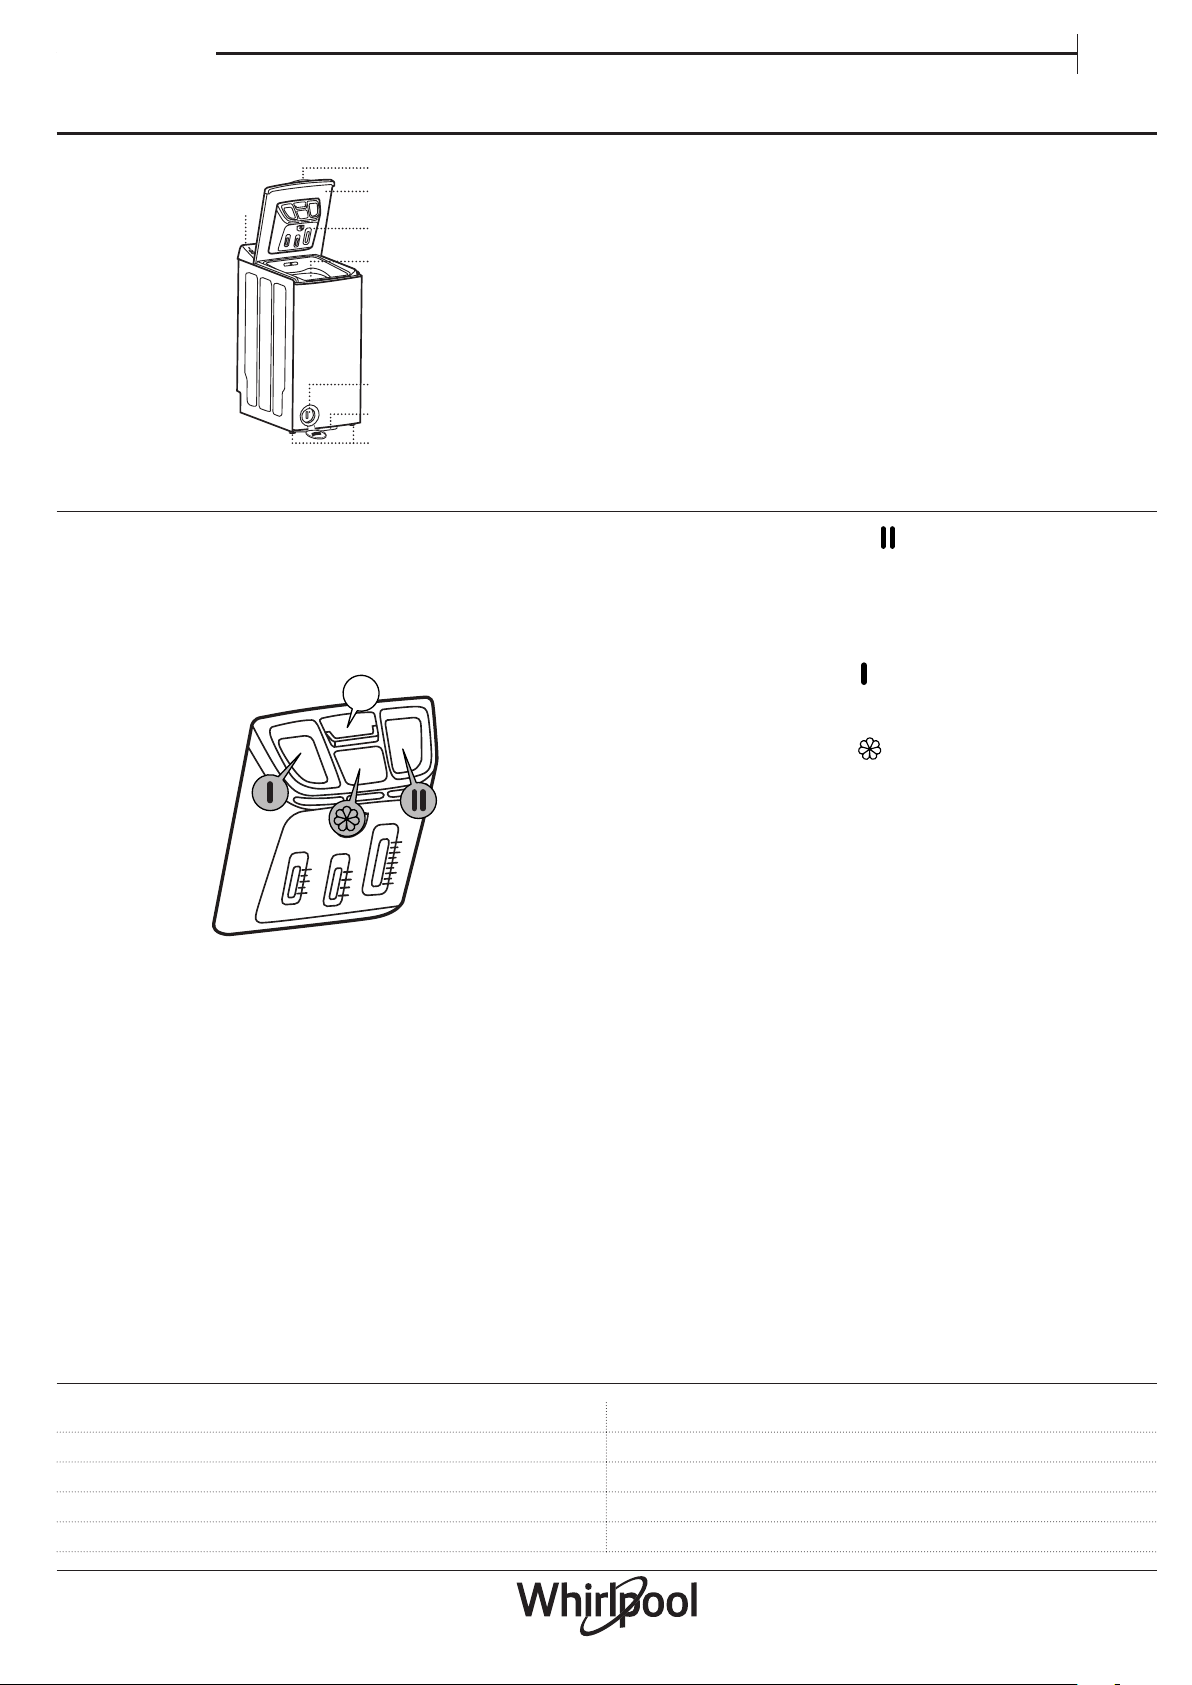
PRODUCT DESCRIPTION
EN
3.
DETERGENT DISPENSER
1.
2.
1. Lid handle
2. Lid
4.
5.
3. Control panel
4. Detergent dispenser
5. Drum
6. Water lter - behind the cover
7. Mobility lever (depending on model)
6.
7.
8.
8. Adjustable feet (x2)
1. Main wash compartment
• Detergent for the main wash phase (must be added for
all wash programmes)
• Additive for stain removal (optional)
• Water softener (optional; recommendable for water
hardness class 4 or more)
2. Prewash compartment
• Detergent for the prewash phase (only if you have
activated “prewash“ option)
3. Softener compartment
• Fabric softener (optional)
• Starch dissolved in water (optional)
• Bleach
Pour softener or starch solution only up to the
“MAX“ mark.
4. Release button
Press to remove tray for cleaning.
TECHNICAL DATA FOR WATER CONNECTION
Water connection
Water supply Cold
Water tap 3/4“ threaded hose connector
Minimum water supply pressure 100 kPa (1 bar)
Maximum water supply pressure 1000 kPa (10 bar)
5

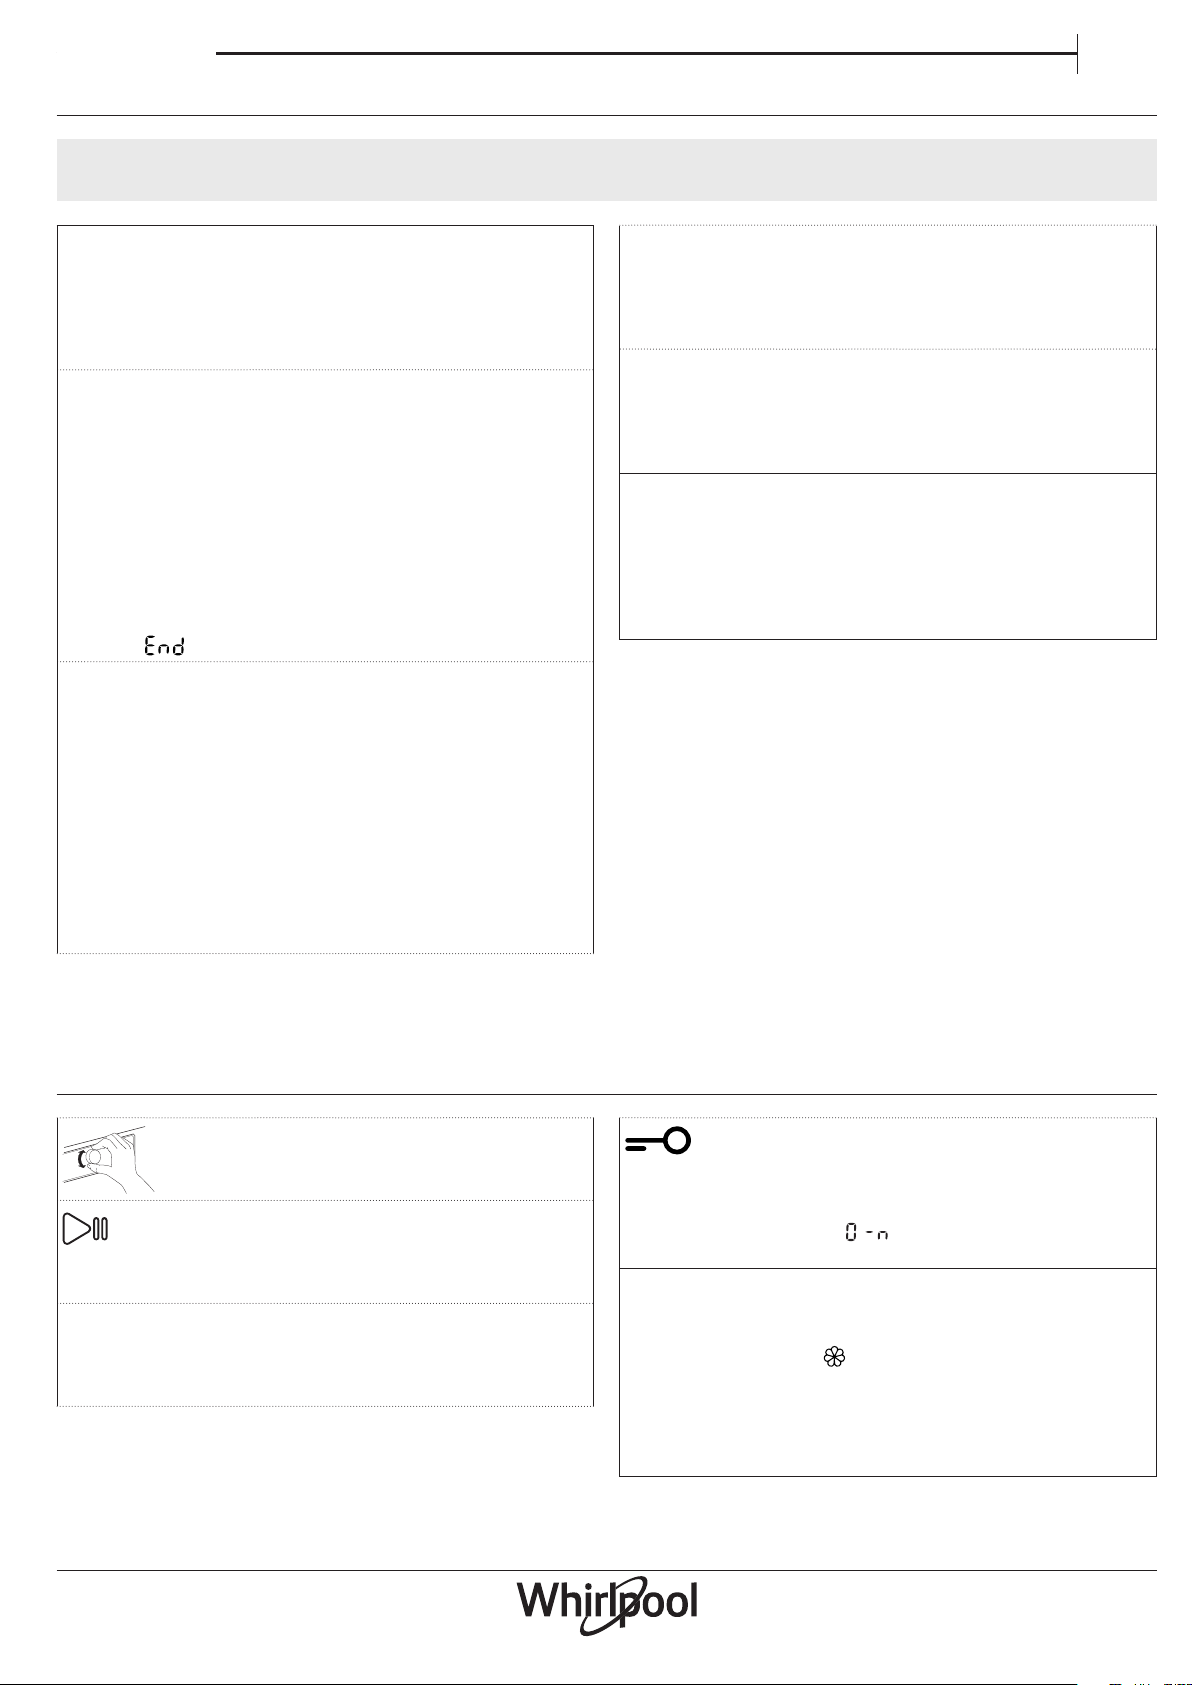
CONTROL PANEL
8 7
User manual
1 Programme selector
2 “Start/Pause“ button
3 “Reset/Drain“ button
4 “Start delay“ button
5 Child lock combination
6 “Spin“ button
6
7 Time
8 Washing phase
1 2 4 5
3
PROGRAMMES
For choosing the appropriate programme for your kind of laundry, always respect the instructions on the care labels of the laundry.
The value given in the tub symbol is the maximum temperature possible for washing the garment.
COTTON / BAWEŁNIANE
Normally to heavily soiled and robust cottons .
MIXED/ MIESZANE
For washing lightly to normally soiled resilient garments in
cotton, linen, synthetic bres and mixed bres.
SYNTHETICS / SYNTETYCZNE
For washing soiled garments made from synthetic bres
(such as polyester, polyacrylic, viscose, etc.) or cotton/
synthetic blends.
RINSE & SPIN / PŁUKANIE + WIROWANIE
Separate rinse and intensive spin programme. For robust
laundry.
SPIN / WIROWANIE
Separate intensive spin programme. For robust laundry.
WOOL / WEŁNIANE
All wool garments can be washed using programme ‚
“Wool“ even those carryng the “hand-wash only“ label. For
best results, use special detergents and do not exceed max
kg declaration of laundry.
DELICATES / DELIK ATNE
For washing particularly delicate garments. Preferably turn
garments inside out before washing.
COLOURS / KOLORY
White and pastel shaded garments made of delicate fabrics.
Gentle wash programme to avoid graying or yellowing of
your laundry. Use heavy duty detergent, if necessary also
stain removers or bleaches on oxygen basis. Do not use
liquid detergent.
eCOTTON / BAWEŁNA
For washing normally soiled cotton garments. At 40°c and
60°C, this is the standard cotton programme and the most
ecient in terms of water and energy consumption.
6
User manual
OPTIONS
! When the combination of programme and additional option(s) is not possible, the indication lights switch o automatically.
! Unsuitable combinations of options are deselected automatically.
EN
COLOURS 15° / KOLOROWE 15°
Saves energy used for water heating while maintaining
a good wash result. Supports colour maintenance when
washing coloured laundry. Recommendable for lightly
soiled laundry without stains. Make sure that your detergent
is suitable for cold wash temperatures.
FRESHCARE
Select this option if you cannot unload the laundry soon
after programme end, or if you tend to forget the laundry
in your washing machine. It will help to keep your laundry
fresh. The washing machine will start to tumble the laundry
periodically after programme end. The light of the “Fresh
care“ button will blink while this function is active, and the
display will show an animation. The periodic tumbling will
last up to approximately 6 hours after the end of your wash
programme, and you can stop it at any time by pressing the
“Fresh care“ button. It will last a while until you can open the
door. After the “Fresh care“ period has run out, the display
indicates .
START DELAY / OPÓŹNIENIE STARTU
To set the selected programme to start at a later time, press
the “Start delay“ button to set the desired delay time. The
lamp for the “Start delay“ option button lights up, and it
goes o when the programme starts. Once having pressed
the “Start/Pause“ button, the countdown of the time delay
begins. The time delay indication on the display disappears
when the programme starts and it is replaced by the
remaining programme time. Number of hours pre-selected
can be reduced by pressing the “Start delay“ button again.
Do not use liquid detergent when activating this option.
To cancel the “Start delay“ turn the programme selector to
another position.
PREWASH / PRANIE WSTĘPNE
Only for heavily soiled loads (for example sand, granular
dirt). Increases the cycle time by approximately 15 min. Do
not use liquid detergent for the main wash when activating
the Prewash option.
INTENSIVE RINSE / SUPER PŁUKANIE
Helps to avoid detergent residues in the laundry by
extending the rinse phase. Particularly suitable for washing
baby laundry, for people suering from allergies and for
areas with soft water.
SPIN / WIROWANIE
Every programme has a predened spin speed. If you want
to change the spin speed, press the “Spin“ button. The
indicator of the predened spin speed lights up. If spin
speed “0“ is selected, the nal spinning is cancelled but
intermediate spin peaks remain during the rinse. The water
is drained out only.
FUNCTIONS
KNOB
To select and conrm programmes. Turn to
select.
START/PAUSE
To start the programme, after you have nished your
settings. To pause a running programme. To continue a
paused programme.
RESET/DRAIN
To reset settings of a not yet running programme back
to its defaults or to cancel and drain water of a running
programme before the end of the cycle.
CHILD LOCK
You can lock the buttons of the control panel against
improper use (e.g. by children). Press both of the child
lock buttons simultaneously and hold them for at least 3
seconds. The key symbol on the display lights up. To
unlock the buttons again proceed in the same way.
BLEACHING
Wash your laundry in the desired programme, Cotton or
Synthetics , adding an appropriate amount of chlorine
bleach to the Softener chamber (close the lid carefully).
Immediately after the end of the programme, turn the
“Programme selector” and start the desired programme
again to eliminate any residual bleach smell; if you want,
you can add softener. Never put both chlorine bleach and
softener into the softener chamber at the same time.
7

PROGRAMME CHART
User manual
Max load 6.0 Kg
Power consumption in o-mode 0.11 W / in left-on mode 0.11 W
Temperatures
Programme
Bawełniane Cotton 40°C 30 - 95°C 1200 6.0 180
Mieszane Mixed 40°C 40°C 1200 3.0 ** —
Syntetyczne Synthetics
Płukanie i
wirowanie
Wirowanie Spin — — 1200 6.0 ** — — — — — — — —
Wełniane Wool 20°C Cold 1000 1.0 ** —
Delikatne Delicates 30°C 30°C 1000 1.5 **
Kolory Colours 40°C 40°C 1000 4.0 **
Bawełna
Dosing required Dosing optional
Rinse & Spin
Cotton
Default Range
40°C 40 - 60°C 1200
— — 1200
60°C
60°C 1200
40°C 1200 6.0 150 —
Max. spin
speed
(rpm)
Max
load
(kg)
3.0
6.0
6.0
Duration
(Minutes)
110
**
210
Cotton - Test wash cycles in compliance with regulations
1061/2010. These are the reference programs for the energy label.
Set this wash cycles with a temperature of 40°C or 60°C. They are
the most ecient programmes in terms of energy and water
consumption for washing normally soiled cotton laundry. The
actual water temperature may dier from the declared one.
For all Test Institutes
Long wash cycle for cottons: set wash cycle Cotton with a
temperature of 40°C.
Synthetic program along: set wash cycle Synthetics with a
temperature of 40°C.
Detergents and additives
Prewash
— —
—
Main
wash
Softener
This data may dier in your home due to changing conditions
in inlet water temperature, water pressure etc. Approximate
programme duration values refer to the default setting of the
programmes, without options.
* After programme end and spinning with maximum
selectable spin speed, in default programme setting.
** The duration of the programme is shown on the
display.
6th Sense - the sensor technology adapts water, energy and
programme duration to your wash load.
Recommended
detergent
Energy
Powder Liquid
— — — — —
—
—
— — — —
Residual
57 0.97 61
— — —
40 0.56 50
— — —
— — —
53 0.78 46
53 0.70 46
consumption
dampness % *
kWh
Total water lt
8
User manual
HOW TO USE THE APPLIANCE
FIRST TIME USE
EN
Remove any manufacturing debris:
• Select the “Synthetics“ programme at a temperature of
60°C.
• Pour a small quantity of detergent powder into the
main wash compartment of the detergent dispenser
(maximum 1/3 of the quantity the detergent manufacturer
recommends for lightly soiled laundry).
DAI LY USE
PREPARING THE LAUNDRY
Empty pockets
• Coins, paper clips, etc. could damage the load and the
washing machine components.
• Tissues will break down during the wash cycle, and the
fragments will have to be subsequently removed by hand.
Close all zippers, buttons, and hooks. Tie all ribbons or
belts
• Insert the smaller garments (e.g. nylon hosiery, belts, etc.)
and garments with hooks (e.g. braziers) into a fabric bag or
a pillowcase with a zipper. Remove any rings from curtains,
or else place the curtains inside a fabric bag together with
the rings.
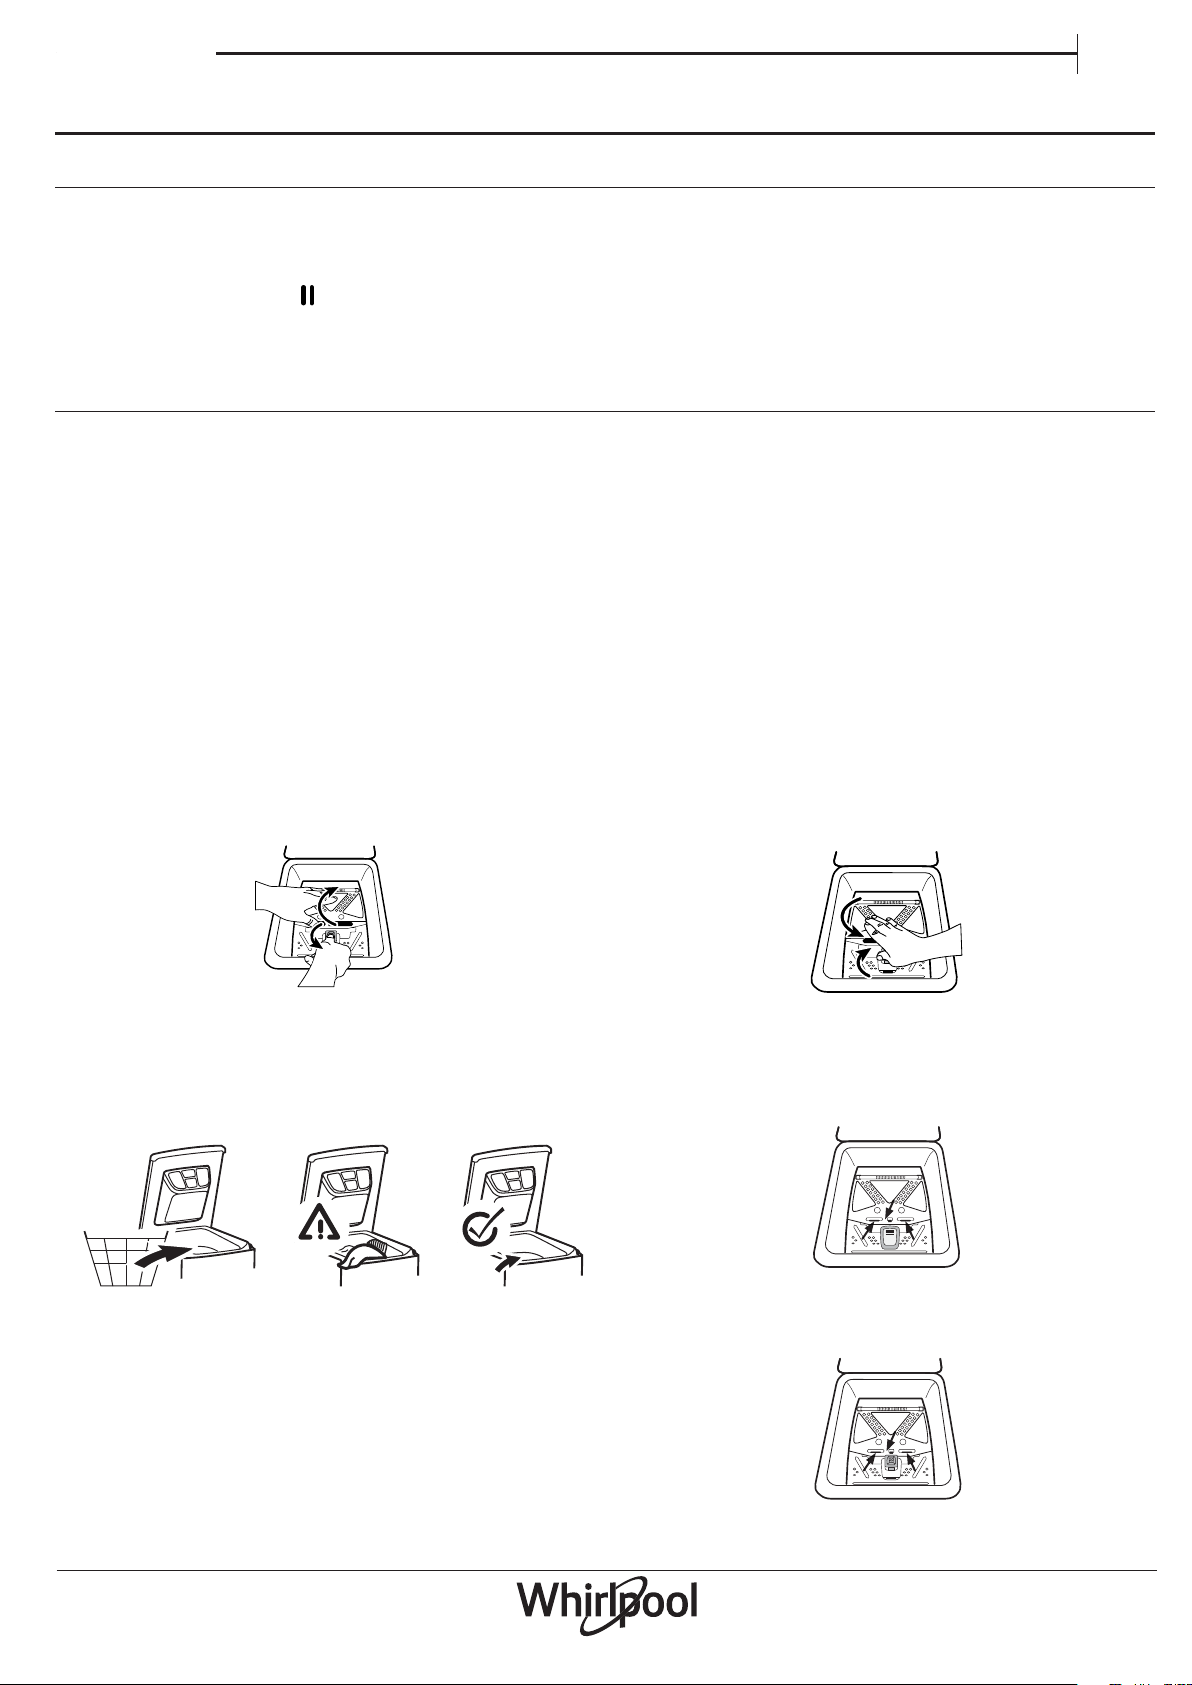
HOW TO USE THE WASHING MACHINE
1. Load laundry
• Open the machine lid by pulling it upwards.
• Open the drum, by pushing the drum ap release.
• Start the programme without adding any laundry (with
empty drum).
• See section “DAILY USE“ for more information on how to
select and start a programme.
Fabric type / Symbol on the wash label
• Cottons, mixed bres, easy care/synthetics, wool,
handwash items.
• Colour
Separate coloured and white items. Wash new coloured
articles separately.
• Size
Wash items of dierent sizes in the same wash load, to
improve washing eciency and distribution of the articles
in the drum.
• Delicates
Wash delicate items separately; they require gentle
treatment.
2. Close the drum
• Hold both aps in the middle, the rear ap over the
front ap.
• Load the articles one at a time loosely into the drum,
without overlling. Observe the load sizes given in the
“PROGRAMME CHART“ table. Overloading the machine
will result in unsatisfactory washing results and creased
laundry. Do not use the aps to push the laundry into
the drum.
ATTENTION: Check that no laundry gets stuck between the
aps, or between aps and drum. Make sure that the drum
aps are properly locked - depending on the model:
• All metal hooks must be properly hooked inside the
rear door ap.
• The slider of the front ap must slightly overlap the
rear ap.
9

User manual
3. Add detergent
! Do not use liquid detergent for the main wash when having
activated the “Prewash“ option.
! Do not use liquid detergent when selecting a later cycle start.
Add detergent (and additives/softener) into the relative
compartments as described in section “DETERGENT
DISPENSER“. Observe the dosing recommendations on the
detergent pack.
Correct dosing of detergent / additives is important, because:
• it optimizes the cleaning result
• it avoids irritating residues of surplus detergent in your
laundry
• it saves money by avoiding waste of surplus detergent
• it protects the washing machine by avoiding
calcication of components
• it respects the environment by avoiding unnecessary
environmental burden
Note: Too much detergent can result in excess foam
formation, which reduces washing eciency. If the washing
machine detects too much foam, it may prevent spinning,
or prolong the programme duration and increase the water
consumption (see also remarks on foam formation in the
“TROUBLESHOOTING GUIDE“). Insucient detergent may
result in grey laundry and also calcies the heating system,
drum and hoses.
Using starch powder
• Wash your laundry in the desired wash programme.
• Prepare the starch solution according to the starch
manufacturer’s instructions.
• Fill the prepared starch solution (maximum 100 ml)
into the softener chamber of the detergent dispenser.
• Close the lid and start programme “Rinse & Spin“ .
4. Close the lid so that you can hear it click shut.
5. Set the desired programme
Select the required programme with the “Programme
selector“ dial (“KNOB“). The duration of the wash cycle is
shown on the display. The washing machine automatically
displays the default temperature and spin speed settings
possible for the selected programme. Adjust the spin speed
setting if needed with the relative button.
Change spin speed, if needed
The spin speed can be changed by pressing the “Spin“
button. The indicator of the predened spin speed lights up.
Select options, if needed
Press the button to select the option; the respective button
LED indicator illuminates.
Press the button again to cancel the option; the light
extinguishes.
! When the combination of programme and additional
option(s) is not possible, the indication lights switch o
automatically.
! Unsuitable combinations of options are deselected
automatically.
Delaying the start of a programme
• To set a programme to start at a later time, see the
section “OPTIONS/ START DELAY“.
Note: To reset settings of a not yet running programme back
to its defaults press the “Reset/Drain“ button.
6. Open water tap
Make sure that the washing machine is connected to
the water mains. Open the water tap.
7. Start programme
• Press the “Start/Pause“ button. The “Start/Pause“
indicator will lights up and the door will be locked.
• Due to variations in load and temperature of inlet
water, the remaining time is newly calculated in certain
programme phases. If this is the case, an animation
appears on the time display.
8. Change the settings of a running programme, if
needed
You can still change the settings while a programme is
running. The changes will be applied, provided the respective
programme phase has not nished yet.
To change the settings of a running programme:
• Press “Start/Pause“ to put the running programme on
pause.
• Change your settings.
• Press “Start/Pause“ again to continue the programme.
If you have changed the programme, do not add
detergent for the new programme.
To prevent that a running programme is changed by accident
(for instance by children), use the “Child lock“ (see
section “FUNCTIONS“).
9. Pause a running programme and open the door, if
needed
• To pause the wash cycle, press the “Start/Pause“
button, the indicator light blinks.
• If the temperature is not too high, the “Lid open“
indicator light turns on. You can open the lid, for
example to add more laundry, or to remove laundry
which was loaded by mistake. It may last a while until
you can open the lid.
• Press “Start/Pause“ to proceed with the
programme again.
10. Cancelling a running programme, if needed
• To cancel a running programme before the end of
cycle, press the “Reset/Drain“ button for at least 3
seconds.
• The water is drained out.
• It may last a while until you can open the lid.
• The water is emptied and the door unlocks at the end
of the programme.
10
User manual
EN
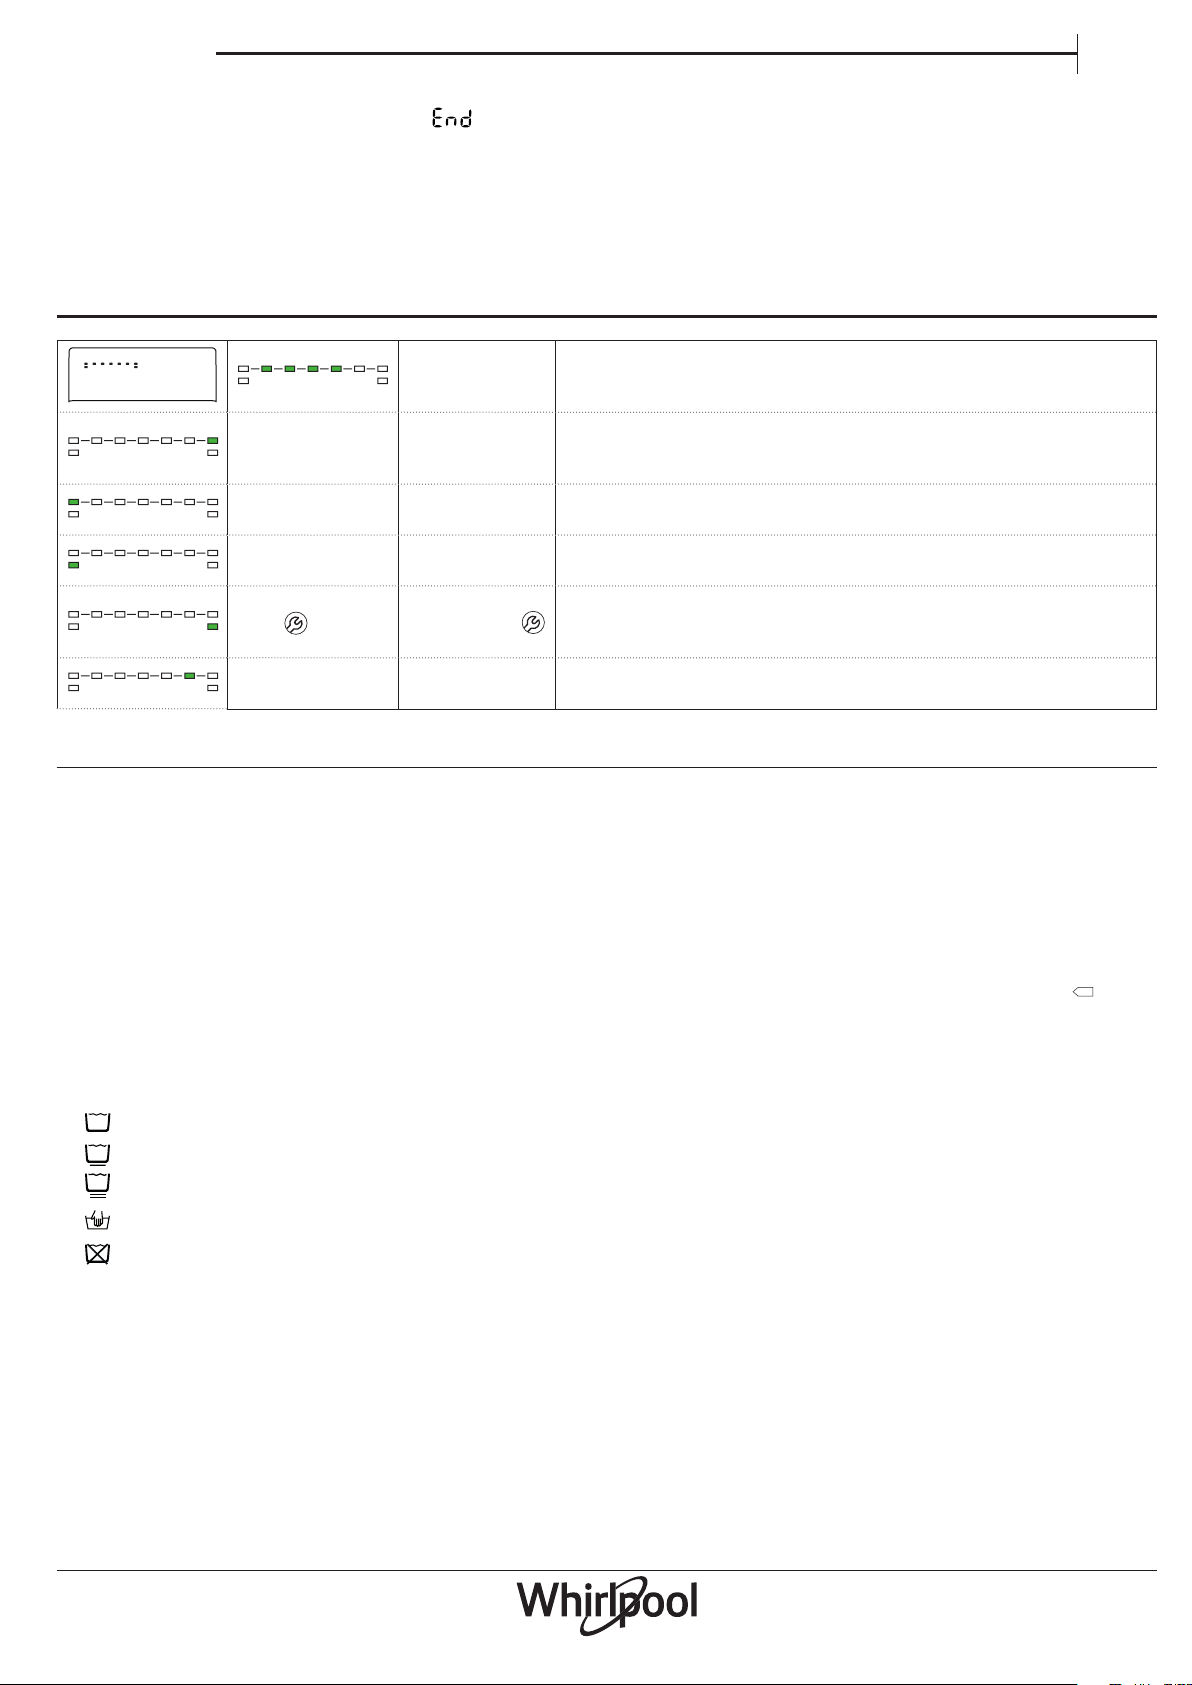
11. Programme End
• At the end of the cycle, the message is shown on
the display.
• The door can only be opened when the “Lid open“
indicator light turns on.
• Turn the programme selector to the “O“ position and
close the water tap.
INDICATORS
Washing
phase
indicator
Drzwi otwarte Lid open
Odkręć kran No water
Wyczyść ltr
Serwis
FreshCare FreshCare
Water lter
clogged
Call Service
• Open the lid and drum and unload the machine.
• Leave the lid open for some time to allow the interior
of the machine to dry.
After about a quarter of an hour, the washing machine
will switch o completely to save energy.
This indicator shows the current programme phase, running from
left to right through prewash, wash, rinse and spin/drain. The
illuminated indicator light shows which phase is in progress.
This indicator will light up
• Before starting and after the end of a programme
• The indicator lights to show that the lid can be opened
Failure: No water
• No or not sucient inlet water.
Failure: Water lter clogged
• Water cannot be drained; water lter might be blocked
Failure: Call After-sales service
• Refer to Troubleshooting section
• If the indicator persist, call After-sales service
This indicator will light up
• when FreshCare option is in progress
HINTS AND TIPS
RULES FOR SEPARATING LAUNDRY
• Fabric type / indications on label (cotton, mixed bres,
synthetic, wool, handwash items)
• Colour (separate coloured garments from whites, wash
new coloured items separately)
• Size (wash items of dierent sizes in the same load to
improve washing ecacy and weight distribution in the
drum)
• Delicates (place small items – such as nylon stockings –
and garments with clasps – such as braziers – in a laundry
bag or in a pillow case with a zip).
WASH SYMBOLS ON GARMENT LABELS
The value given in the tub symbol is the maximum
temperature possible for washing the garment.
Normal mechanical action
Reduced mechanical action
Much reduced mechanical action
Hand wash only
Do not wash
CLEAN THE WATER FILTER REGULARLY
• This is needed to prevent the lter from blocking and
preventing the water from draining correctly.
SAVING ENERGY AND PROTECTING THE
ENVIRONMENT
• Keeping within the load limits indicated in the
“PROGRAMME CHART“ will optimise energy, water and
detergent consumption and reduce washing times.
• Do not exceed the detergent quantities recommended by
the detergent manufacturer.
• Save energy by using a 60 °C instead of a 95 °C wash
programme, or by using a 40 °C instead of a 60 °C wash
programme. We recommend using the “eCotton “ the
60 °C programme for cotton garments, which is longer,
but uses less energy.
• To save energy and time when washing, select highest
spin speed available for the programme to reduce the
residual water remaining in the garments at the end of the
wash cycle.
• Pretreat any stains with an appropriate stain remover,
or else dampen any dried-on stains with water prior
to washing, as this will reduce the need to use a high
temperature wash programme.
• Use the “Colours 15°“ programme for lightly soiled
coloured garments; this will reduce the amount of energy
used to heat the water.
11
CLEANING & MAINTENANCE
For any cleaning and maintenance, switch o and unplug the washing machine.
Do not use ammable uids to clean the washing machine.
CLEANING THE EXTERIOR AND INTERIOR OF THE WASHING MACHINE
User manual
Exterior:
• Use a soft damp cloth to clean the outer parts of the
washing machine.
• Do not use glass or general purpose cleaners, scouring
powder or similar to clean the control panel – these
substances might damage the printing.
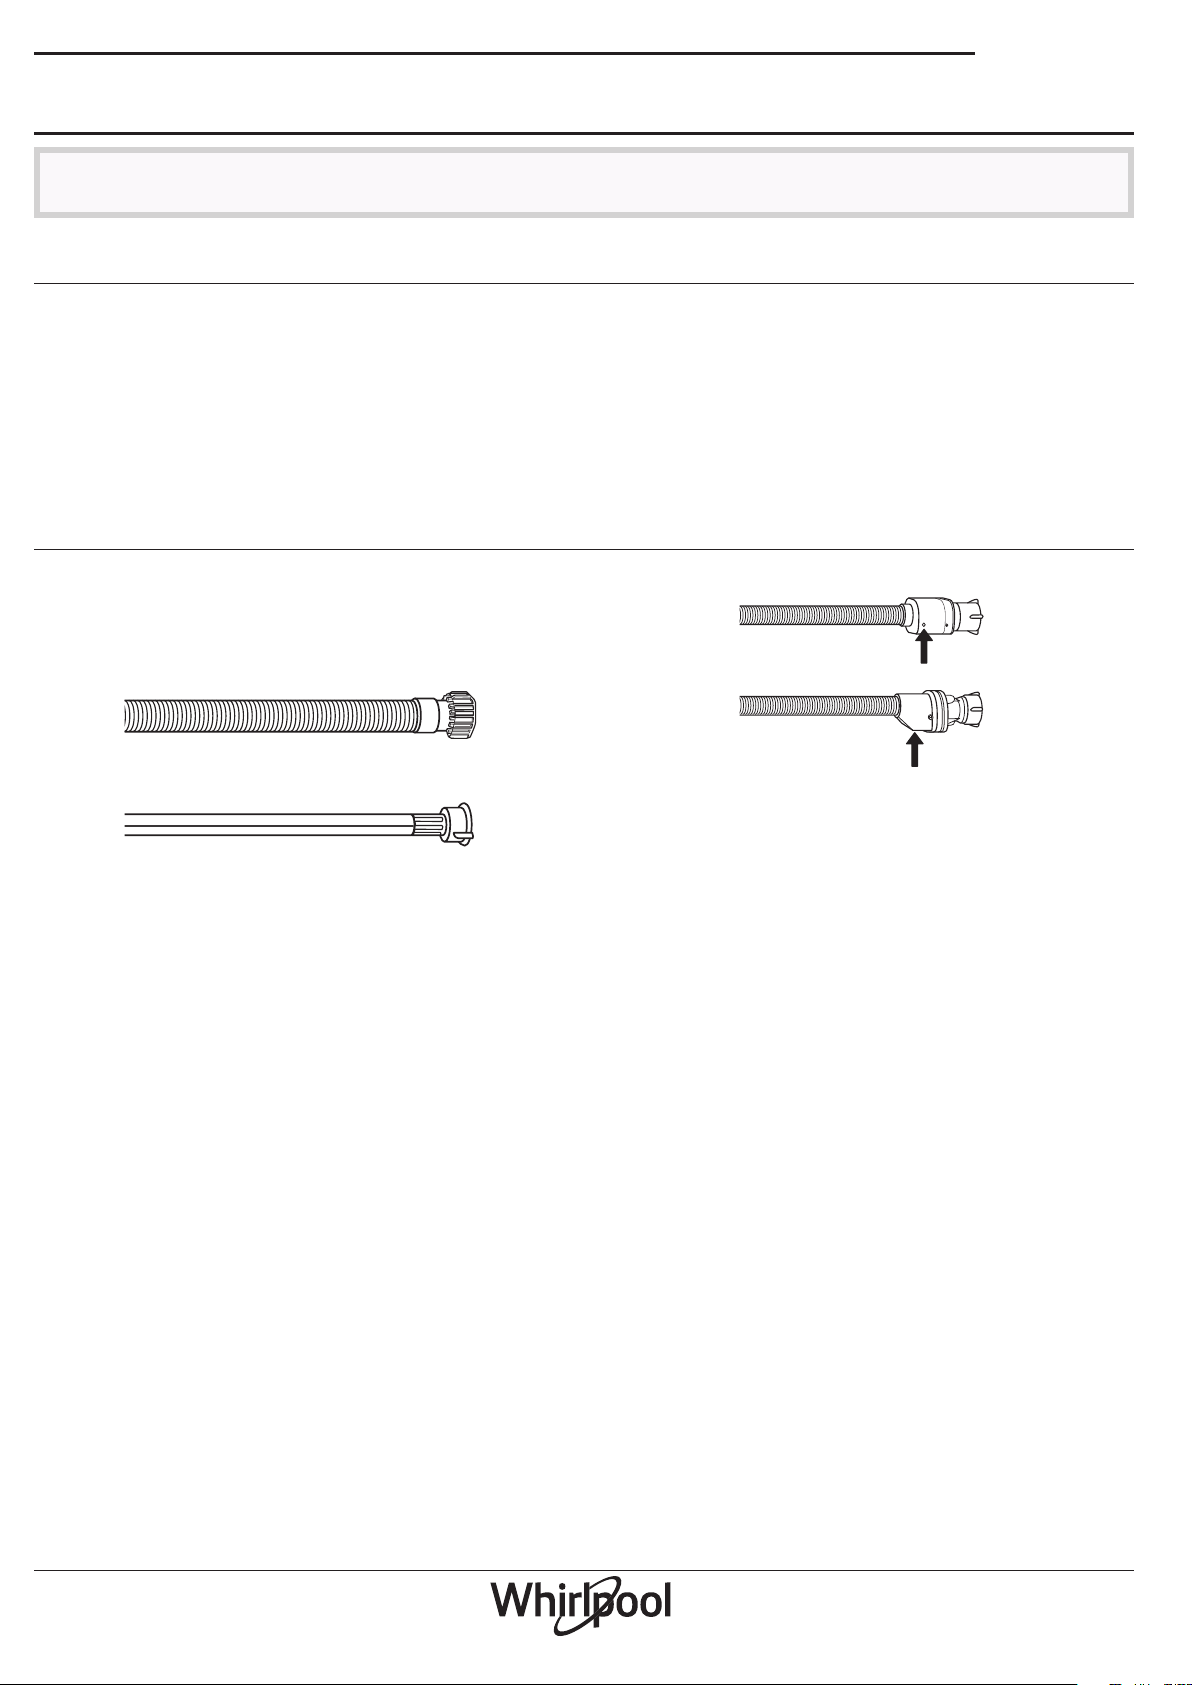
CHECKING THE WATER SUPPLY HOSE
Check the inlet hose regularly for brittleness and cracks. If
damaged, replace it by a new hose available through our
After-Sales Service or your specialist dealer.
Depending on the hose type:
If the inlet hose has a transparent coating, periodically check
if the colour intensies locally. If yes, the hose may have a leak
and should be replaced.
Interior:
• After each washing, leave the Lid open for sometime to
allow the inside of the appliance to dry.
• If you never or seldom wash your laundry at 95°C, we
recommend to occasionally run a 95°C programme
without laundry, adding a small amount of detergent, to
keep the interior of the appliance clean.
• Check the condition of the lid seal periodically and clean it
from time to time with a damp cloth.
For water stop hoses: check the small safety valve inspection
window (see arrow). If it is red, the water stop function was
triggered, and the hose must be replaced by a new one.
For unscrewing this hose, press the release button (if
available) while unscrewing the hose.
12
 Loading...