

User Manual
使用說明書
Model : HSCX90424
產品型號
: HSCX90424
sg
3
繁體中文
11
2
EN
USER MANUAL
USER MANUAL 3
4
4
4
4
4
4
4
CONTROL PANEL
FIRST TIME USE
NAVIGAZIONE
DAILY USE
OPENING OF THE DOOR DURING THE CYCLE
SETTINGS
CARE LABEL
5
5
6
6
6
7
8
9-10
PROGRAMS
OPTIONS
CARE AND MAINTENANCE
TRANSPORT AND HANDLING
PRODUCT DESCRIPTION
TROUBLESHOOTING
INSTALLATION GUIDE
SAFETY INSTRUCTIONS
INDEX
sg
3
THANK YOU FOR BUYING A WHIRLPOOL PRODUCT.
In order to re
please register your product on
www.whirlpool.com.hk
www.whirlpool.com.sg
ceive a more complete assistance,
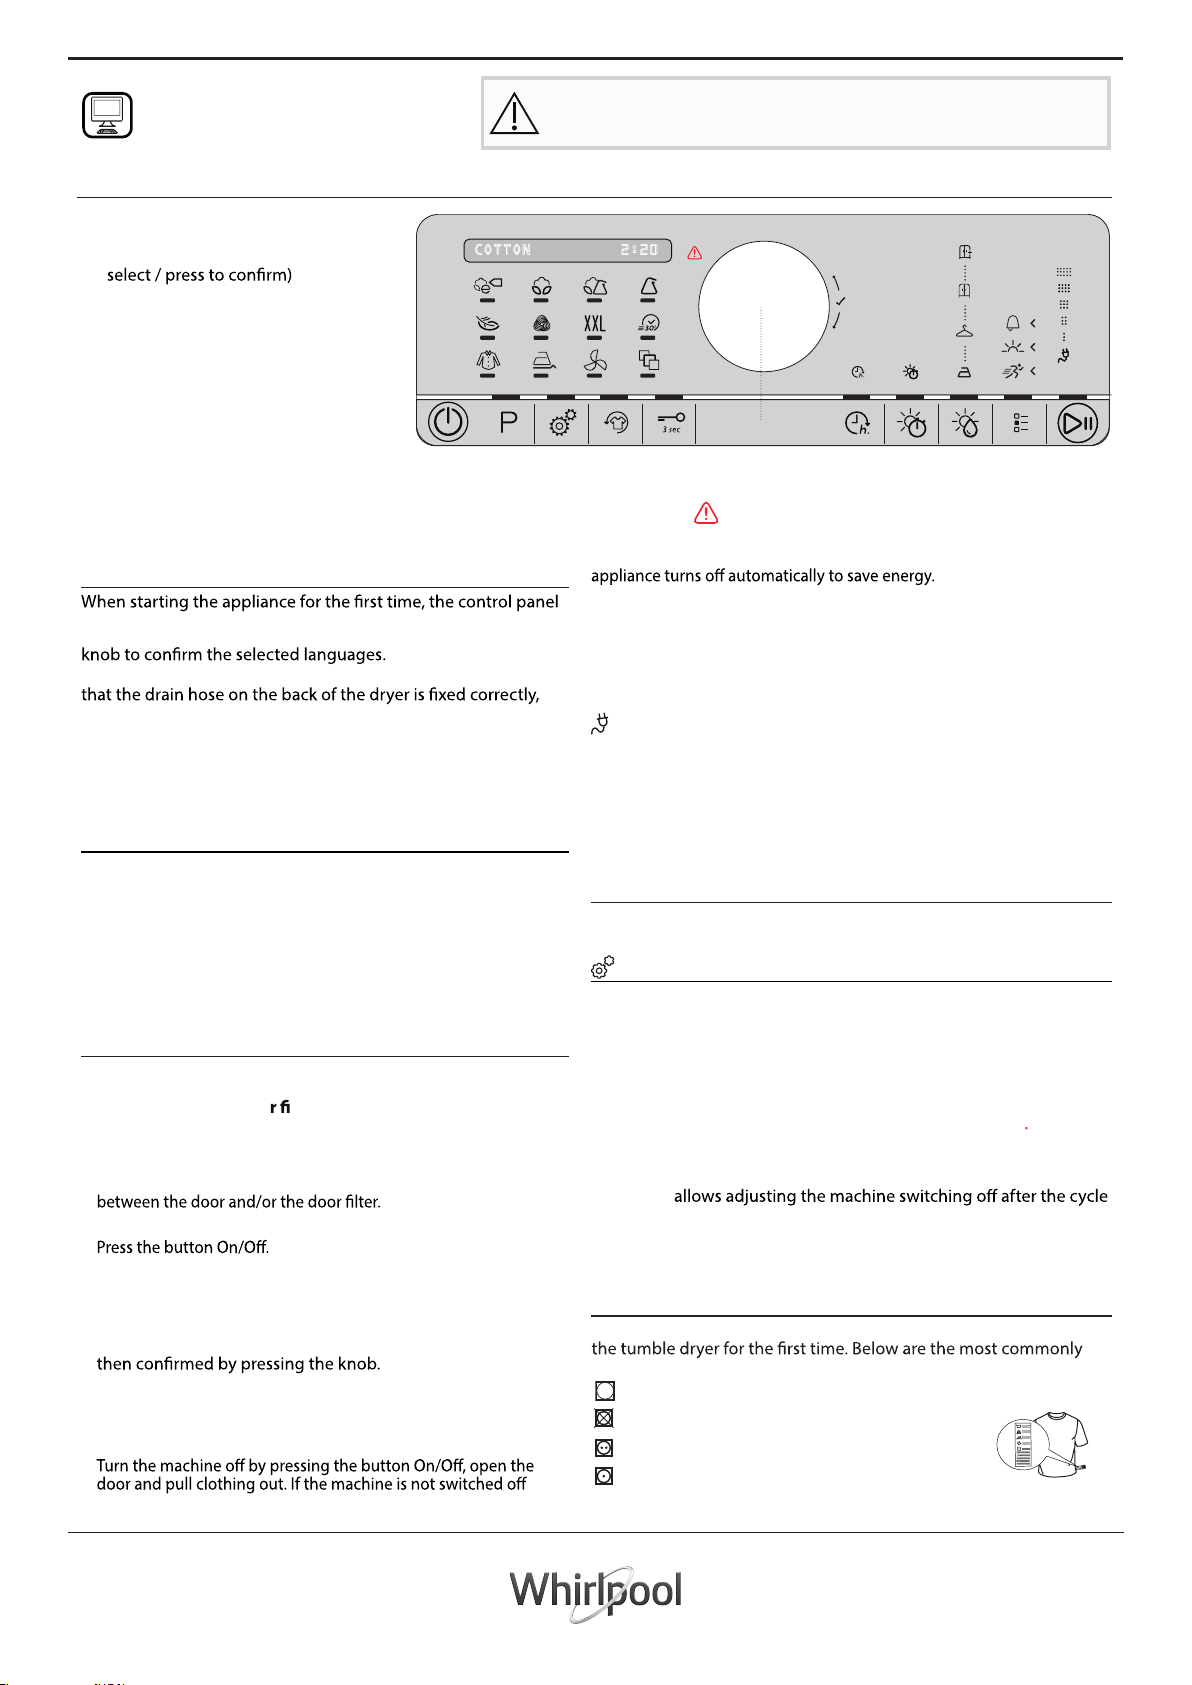
CONTROL PANEL
1 ON/OFF button (Reset if long pressed)
2 Programme button
3 Programme selection knob (rotate to
Before using the appliance carefully read the Safety Instructions.
6.
COTTON 2:20
4 Start/Pause button
5 Programmes area
6 Display
5.
Options Buttons
7 Settings
8 Fresh Care+
9 Key Lock
10 Start Delay
11 Drying Time
12 Drying Level
13 Options button
1. 10.2. 11.8. 13.7. 129. 4.
FIRST TIME USE
will show the set language menu automatically. Turn the knob
to visualize the languages available in the machine. Press the
Make sur
e that the water tank is correctly inserted. Make sure
either to the dryer’s water tank, or to your domestic sewage
system.
The dryer must be installed in a room with a temperature
ranging between 5°C and 35°C to ensure proper operation.
Before you use your dryer ensure that it has been in an upright
position for at least 6 hours.
NAVIGAZIONE (FUNCTIONS SELECTION)
The navigation can be made when the LED of the required
function is on. Browse the function by rotating the knob to
visualise the possible selections on the display.
Press the knob to conrm.
The machine proposes a path for selecting programmes and
options, with starting in sequence of the functions LEDs.
However, the programmes and options can be selected
autonomously by simply pressing the programmes button or
the required option.
DAILY USE
Doing this will keep your machine working at its BEST!
Remember to empty your water tank after each drying cycle.
Remember to clean you
to section Care & Maintenance).
1. Open the door and load garments. Always refer to instructions
on clothing labels and the max loads indicated in the Programs
section. Empty pockets. Make sure garments do not get caught
2. Close the door.
3.
4. Select the required programme according to the type of laundry.
The LED of the button P must remain on. Rotate the knob to
select the requi
red value and then press the knob to conrm.
5. Select the options, if necessary. If the options have any
submenus, they can be browsed by rotating the knob and
6. To start the cycle, press the Start/Pause button.
7. At the end of the drying cycle, a buzzer will beep. The display
signals the end of the cycle. Pulling out the load immediately
helps to prevent the formation of creases on laundry.
8.
manually, after about a quarter of an hour from the cycle end, the
lters after each drying cycle. (Refer
3.
Refer to Troubleshooting section.
If this last stage is not carried out immediately, some machines and/or
some programmes/options are equipped with Crease Care system. For
some hours, after the end of drying, the drum rotates at regular intervals
to prevent the formation of creases.
In case of power failure, it is necessary to press the button Start/
Pause to restart the cycle.
Ecomonitor
This indicator shows the energy consumption level according to
the programme and the options set. The consumption is
proportional to the lines on the display, by the ecomonitor icon.
Drum light (If present)
Some models are equipped with drum internal light to make use of the
dryer easier. No setting is required. For instance, the light goes on when
opening the door.
OPENING OF THE DOOR DURING THE CYCLE
During operation, it is possible to open the door. After having closed
it, press the button Start/Pause again to restart the dryer.
SETTINGS
The various settings can be selected with the modes described in
Navigation section.
Language shows the languages available on display.
Keys Tone allows adjusting or removing the setting sounds of the
machine keys.
Cycle End Alert allows adjusting or removing the cycle end sounds
of the machine.
Display Contrast allows adjusting the display brightness
.
Remember last used cycle selects the last used cycle automatically
when starting the machine, otherwise it restarts from the default
programme.
Eco Mode
end.
Factory Settings allows resetting the factory settings.
*MAX LOAD 9 Kg (Dry load)
CARE LABEL
Always check the care labels, especially when placing garments in
used symbols:
May be tumble dried.
Do not tumble dry.
Tumble dry – high heat.
Tumble dry – low heat.
4
The duration of these programmes will depend on the size of
d, types of textiles, the spin speed used in your washer
the loa
and any extra options selected. In machines equipped with
display, the duration of the cycles is shown on the control
panel. The remaining time is constantly checked and adjusted
during the drying cycle to show the best possible estimate.
P PROGRAMS
Eco Cotton kg Max*
Standard cotton programme, suitable to dry normally wet cotton
laundry. Most ecient programme in terms of energy consumption
for drying cotton laundry.
Cotton kg Max*
For drying cotton laundry.
Mixed kg 4
This programme is ideal for drying cotton and synthetic
fabrics together.
Synthetics kg 4
Delicates kg 2
For drying delicate laundry which needs gentle treatment.
Wool kg 1
Programme for drying wool clothing. It is advisable to turn
the garments inside out before drying. Leave to dry naturally the
heaviest edges that are still damp.
Big Items kg Max*
This programme is intended for drying cotton sheets.
Rapid 30' kg 0.5
Ideal for drying cotton garments spun at high speed in the
washing machine.
Shirts kg 3
This is a programme for Shirts made from cotton or cotton
blend/synthetics.
Easy Ironing
making ironing and folding easier. Do not use in case of
garments that are still wet. Suitable for small loads of cotton
textiles or cotton blends.
Refresh
garments by means of fresh air. Do not use with garments that are
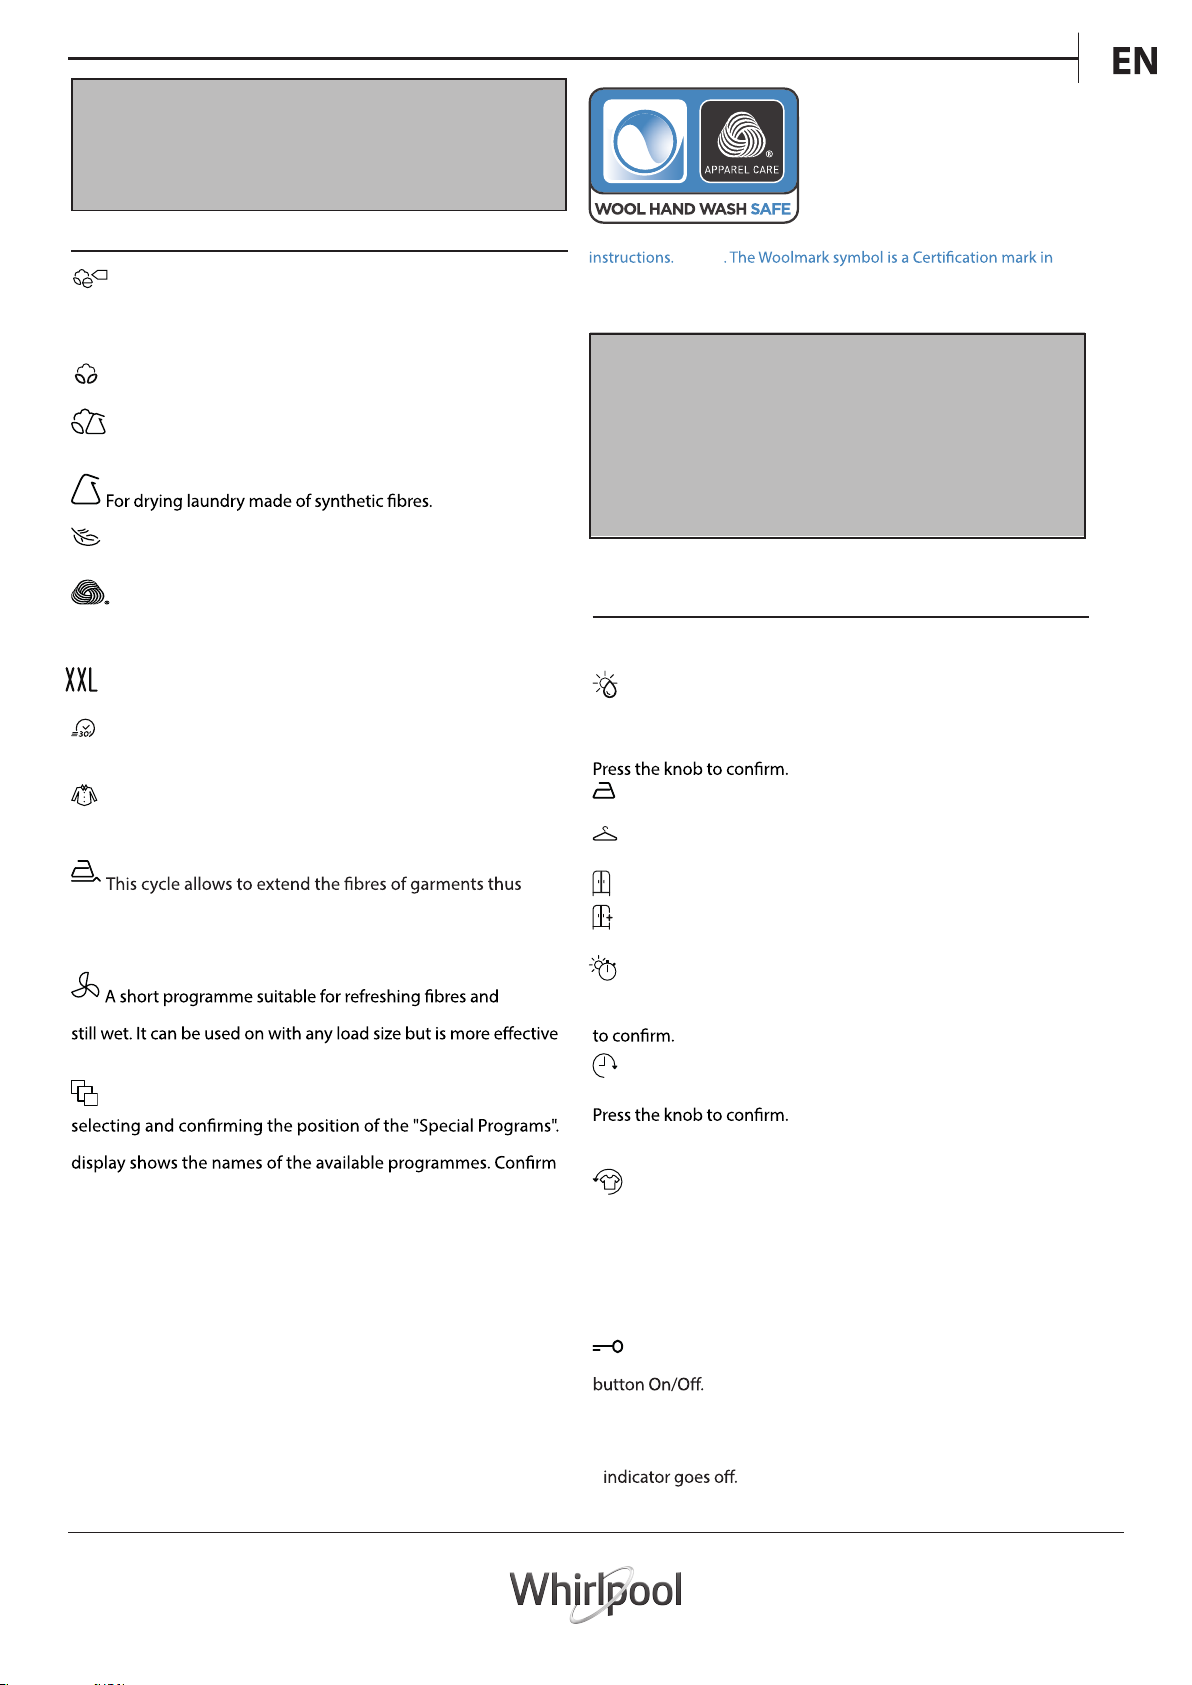
The wool drying cycle of this machine
has been approved by The Woolmark
Company for the drying of wool garments labelled as “hand wash” provided
that the garments are dried according
to the instructions issued by the manufacturer of this machine. Follow the
garment care label for other laundry
M1762
many countries.
OPTIONS BUTTONS
These buttons serves to personalise the selected programme
according to personal requirements. Not all options are available
for all programmes. Some options are incompatible with the
ones previously set. The buzzer and/or blinking indicators
will signal the incompatibility. If the option is available, the
option indicator will stay on. Some options may be kept in the
memory of the programme if selected in the previous drying.
Some options may be kept in the memory of the programme if
selected in the previous drying of the same programme.
OPTIONS
After selecting the programme, the various options can be
set, if necessary.
Drying Level
Each programme has a pre-set drying level. In some
programmes, the residual moisture on garments can be set.
Pressing the related option button, the LED goes on. Turn the
knob to browse among the levels available for each programme.
Iron Dry: a very delicate ironing. Suitable for making ironing
of garments easier immediately after the end of the cycle.
Hanger Dry: a level intended for delicate garments ready to
be hanged.
Cupboard Dry: the garments are ready to be folded and put
away
Extra Dry: used for garments to be worn at the end of the
cycle.
Drying Time
In some programmes, the drying time can be set. Pressing
the related option button, the LED goes on. Turn the knob to
visualize the times available for each programme. Press the knob
with small loads. The cycle duration is about 20 minutes.
Specials
To set one of the following programmes, use the knob for
The programmes list is accessed by rotating the knob. The
the required programme by pressing the knob.
• Jeans kg 3
For drying cotton jeans-wear and garments made of robust
cotton, like denim, such as trousers and jackets.
• Miniload kg 1
Economic drying of small laundry loads.
• Sport kg 4
For drying sports garments made of synthetics or cotton.
• Silk kg 0.5
Gentle drying of silk garments.
• Coloured kg Max*
Programme for gentle drying suitable for coloured garments.
• Downjackets kg 2.5
To dry down jackets, giving their natural softness back (2
jackets).
Start Delay
h
Pressing the related option button, the LED goes on. Turn the
knob to browse among the times available for each programme.
In case of door opening, after closing, it is necessary to press the
button Start/Pause again.
Fresh Care+
If garments are left inside the drum after the end of the
cycle, they are subject to bacterial proliferation. This option allows
to prevent this proliferation by controlling the temperature and
the rotation of the drum. This treatment has a max. duration of 6
hours after the end of the programme set. This option remains in
memory if selected in the previous drying.
If this option is used together with the Start Delay, a crease treatment
(a periodic rotation of the drum) is added in the Start Delay phase.
Key Lock
This option makes all machine controls inaccesible, except the
When the machine is on:
• To activate the option, keep the button pressed until the
indicator goes on.
• To disable the option, keep the button pressed until the
This option remains in memory if selected in the previous drying.
5
• Cycle end signal
This option activates a prolonged buzzer at the end of the
cycle. Enable it if you are not sure to hear the normal sound at the
end of the cycle.
This option remains in memory, if selected in the previous drying.
Heat Pump System
contained in a hermetically sealed unit. This sealed unit contains
0.18 kg of the F gas R134a. GWP = 1430 (1 t C02).
Power consumption
0.50
left-on mode (Pl) - Watts 1.00
Kg kWh Minutes
Eco Cotton*
9 2.07 211
Eco Cotton
4.5 1.19 131
Synthetics 4 0.73 95
* This is the reference programme for the energy label and suitable
programme in terms of energy consumption for drying wet cotton
TRANSPORT AND HANDLING
Never lift the dryer by holding it at the worktop.
1. Unplug the dryer.
2. Make sure that door and water tank are properly closed.
drain hose on the rear of the dryer again (see Installation Guide).
BA
1
4
2
3
C
PRODUCT DESCRIPTION
1. Water tank
2. Air intake
3.
4.
CARE AND MANTENANCE
Unplug the dryer during the cleaning and maintenance
procedures.
Emptying the water tank after each cycle (see Fig. A).
Pull the container out of the dryer and and empty it into a
sink or other suitable drain, then place it back. Do not use the dryer
without having inserted the container back in place.
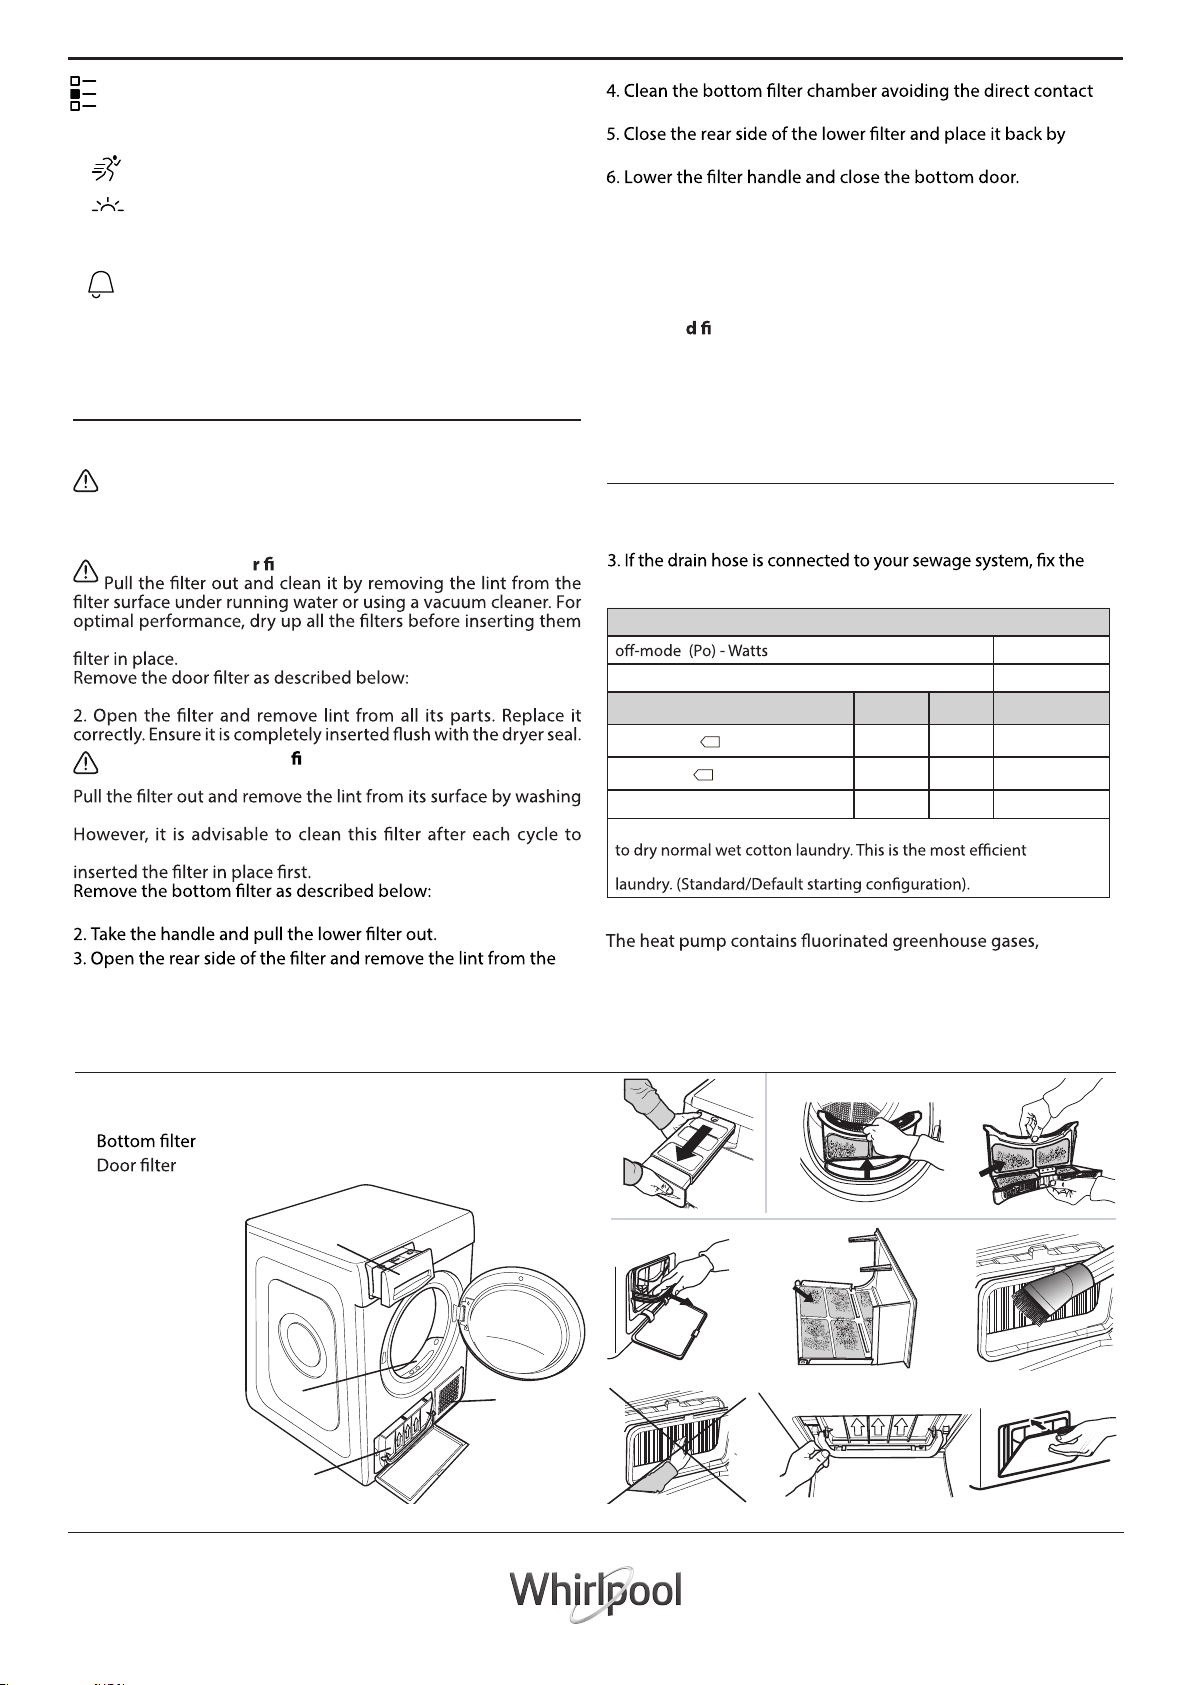
Cleaning the doo lter after each cycle (see Fig. B).
back in place. Do not use the dryer without having reinserted the
1. Open the door and pull upwards.
Cleaning the bottom lter when the relevant indicator
turns on (see Fig. C).
1. Open the lower door.
inner surface of the mesh.
The lters are essential parts for drying. They are intended
to collect the lint formed during drying process. In case
of clogge
lters, the air ow inside the dryer would be
seriously aected: the drying times would be longer, the
energy consumption would increase and the dryer could be
damaged. If these procedures are not carried out properly,
the dryer may not start.
with the leaves.
checking it is perfectly integrated in place.
7. Make sure the air intake is free.
•
Rapid
Enables quicker drying.
•
Gentle
Enables a more gentle treatment of the laundry by reducing the
drying temperature.
Cycle Options
These buttons serves to access a menu of available options
(see below). After having pressed the button, turn the knob
to select the option and press it to confirm.
it under running water or by using a vacuum cleaner.
optimise drying performance. Do not use the dryer without having
Programmes
6

TROUBLESHOOTING
Before contacting After-Sales Service, refer to the table below. Often the malfunctions are minor and can be solved in few minutes
Malfunction Possible cause Solution
The plug is not inserted into the socket. Insert the plug into the socket.
The tumble
dryer does not
turn on.
The tumble
dryer does not
start
The drying
times are very
long
The programme
did not end.
The plug is faulty.
A power failure occurred. Await the reactivation of the power supply.
The door is open. Close the door.
A time delay for the cycle start was set.
The button Start/Pause was not pressed to
start the programme.
The function Key Lock was enabled (in case of
machines equipped with this option).
An appropriate maintenance was not carried
out.
The programme, the time and/or the drying
level set are not suitable for the type and the
amount of load inserted into the dryer.
The garments are too wet.
The dryer may be overloaded.
Room temperature.
A power failure might have occurred.
Try to plug another appliance in the same socket. Do not use
connecting electrical devices to the socket, as adapters or extensions
For machines equipped with this function: await the end of the delay
Press the button Start/Pause.
Refer to the Options section and, if the Key Lock is present, disable it.
not enough to disable this option.
Refer to the section Care & Maintenance and perform the operations
described.
Refer to the sections Programs and Options to nd the programme
and the options most suitable for the type of load.
Carry out a washing cycle with higher spin speed to remove as much
water as possible.
Refer to the Programs section to check the max. load for each
programme.
The drying time may be longer if the room temperature falls outside
the 14–30°C range.
In case of power failure, it is necessary to press the button Start/Pause
to restart the cycle.
Ligh ashing
Water tank The water tank is full. Emtpy the water tank. Refer to the section Care & Maintenance.
lter
Do
and/or bottom
lter*
Bott
lter*
operation.
intake is free. Carrying out these operations improperly may cause
damages.
pull laundry out, to allow the heat to dissipate. Wait for about 15
Display shows:
"Fault FX EX"
The machine sensors detected a failure.
minutes. Reconnect the dryer to the power supply, load the laundry
and restart the drying cycle. If the problem still occurs, contact
the After-Sales Service Centre and communicate the letters and
ashing on the display.
For instance: F3 and E2
Disable the Demo mode. The following actions must be carried out
DEMO
The cycle lasts
few minutes.
The dryer is in DEMO mode. (enter demo)
in sequence, without breaks. Switch the machine on and then switch
it o again. Press the buttons Programme and Options until the
buzzer is heard.
Switch the machine on again. Exit from demo mode is signalled.
You can download the user manual by:
Visiting our website - www.whirlpool.com.hk / www.whirlpool.com.sg
•
Alternatively, contact our After-Sales Service (See phone number in the warranty booklet). When
•
contacting our After-Sales Service, please state the codes provided on your product’s identication plate.
xxxxxxxxxxxx
xxxx
7

1
2a
2b
33
4
15 mm
15 mm
10 mm
5a
6
max 100 cm
39 inch
1
2
5b
..............
xxx V ~ xx Hz
xx
A
IPX4
xxxx xxxx
xxxx-xxxx W
max 2 cm
max 0.79 inch
INSTALLATION GUIDE
8

This symbol reminds you to read this instruction
manual.
Before using the appliance, read these safety
instructions. Keep them nearby for future reference.
These instructions and the appliance itself provide
important safety warnings, to be observed at all
times. The manufacturer declines any liability for
failure to observe these safety instructions, for
inappropriate use of the appliance or incorrect
setting of controls.
should be kept away from the appliance unless
and above and persons with reduced physical,
sensory or mental capabilities or lack of experience
and knowledge can use this appliance only if they
are supervised or have been given instructions on
safe use and understand the hazards involved.
Children must not play with the appliance. Cleaning
and user maintenance must not be carried out by
children without supervision.
WARNING: Never stop a tumble dryer before the
end of the drying cycle unless all items are quickly
removed and spread out so that the heat is
dissipated.
Items that have been soiled with substances such
as cooking oil, acetone, alcohol, petrol, kerosene,
spot removers, turpentine, waxes and wax removers
should be washed in hot water with an extra amount
of detergent before being dried in the tumble dryer.
Items such as foam rubber (latex foam), shower caps,
waterproof textiles, rubber-backed articles and
should not be dried in the tumble dryer. Remove all
objects from pockets, such as lighters and matches.
Do not use the tumble dryer if industrial chemicals
have been used to clean it.
Oil-soaked items should not be dried in the
Never open the door forcibly or use it as a step.
PERMITTED USE
CAUTION: The appliance is not intended to be
operated by means of an external switching device,
such as a timer, or separate remote controlled system.
This appliance is intended to be used in household
farm houses; by clients in hotels, motels, bed &
breakfast and other residential environments.
Do not load the machine above the maximum
capacity (kg of dry cloth) indicated in the programme
table.
Do not dry unwashed items in the tumble dryer.
Take care that no lint or dust has accumulated
around the dryer.
Fabric softeners, or similar products, should be
This appliance is not for professional use. Do not
use the appliance outdoors.
Do not overdry the laundry.
INSTALLATION
The appliance must be handled and installed by
Installation, including water supply (if any),
electrical connections and repairs must be carried
the user manual. Keep children away from the
installation site. After unpacking the appliance, make
sure that it has not been damaged during transport.
In the event of problems, contact the dealer or your
nearest After-Sales Service. Once installed, packaging
waste (plastic, styrofoam parts etc.) must be stored
appliance must be disconnected from the power
electric shock. During installation, make sure the
when the installation has been completed.
Install the dryer in rooms with adequate
ventilation (open door, ventilation grid or slot larger
2
gases into the room from appliances burning other
under a worktop, provide a distance of 10 mm
between the upper panel of the dryer and any
objects above it, and 15 mm between the sides of
the appliance and the walls or furniture units
adjacent to it.
If the dryer is installed near to a gas or coal stove,
between, as the side facing the stove is covered with
aluminium foil.
which is used for discharging fumes from appliances
burning gas or other fuels.
The appliance must not be installed behind a
lockable door, a sliding door or a door with a hinge
on the opposite side to that of the tumble dryer, in
such a way that a full opening of the tumble dryer
door is restricted.
The appliance shall be placed against the wall to
limit access to its rear side.
Take care not to use a carpet which obstructs
ventilation openings in the base of the dryer.
If you want to stack the dryer on a washing
specialist dealer to verify the complete list of suitable
models. The stacking is only possible if the dryer is
IMPORTANT TO BE READ AND OBSERVED
SAFETY INSTRUCTIONS
9

attached to the washing machine by means of the
appropriate stacking kit available through our AfterSales Service or your specialist dealer. Instructions
for the correct assembly are supplied with the
stacking kit.
ELECTRICAL WARNINGS
It must be possible to disconnect the appliance
from the power supply by unplugging it if plug is
accessible, or by a multi-pole switch installed
upstream of the socket in accordance with the
wiring rules and the appliance must be earthed in
conformity with national electrical safety standards.
Do not use extension leads, multiple sockets or
adapters. The electrical components must not be
accessible to the user after installation. Do not use
the appliance when you are wet or barefoot. Do not
operate this appliance if it has a damaged power
cable or plug, if it is not working properly, or if it has
been damaged or dropped.
If the supply cord is damaged, it must be replaced
with an identical one by the manufacturer, its service
CLEANING AND MAINTENANCE
WARNING: Ensure that the appliance is switched
performing any maintenance operation; never use
Make sure that all lint traps are cleaned before
starting any drying cycle.
DISPOSAL OF PACKAGING MATERIALS
The packaging material is 100% recyclable and is marked with the recycle
symbol
The various parts of the packaging must therefore be disposed of
responsibly and in full compliance with local authority regulations
governing waste disposal.
DISPOSAL OF HOUSEHOLD APPLIANCES
This appliance is manufactured with recyclable or reusable materials.
Dispose of it in accordance with local waste disposal regulations.
For further information on the treatment, recovery and recycling of
household electrical appliances,
collection service for household waste or the store where you purchased
the appliance. This appliance is marked in compliance with European
Directive 2012/19/EU, Waste Electrical and Electronic Equipment (WEEE).
By ensuring this product is disposed of correctly, you will help prevent
negative consequences for the environment and human health.
The symbol
indicates that it should not be treated as domestic waste but must be
taken to an appropriate collection center for the recycling of electrical
and electronic equipment.
.
contact your local authority, the
on the product or on the accompanying documentation
10

CH
使用說明書
感謝您購買惠而浦產品
為了獲得更完善的服務,
www.whirlpool.com.hk註冊您的產品
請於
www.whirlpool.com.sg
索引
使用說明書 11
控制面板 12
首次使用 12
功能導航 12
日常使用 12
當程序運行時打開機門 12
設定 12
乾衣衣物護理標籤 12
程序 13
選項 13
清潔和保養
搬運和處理
產品描述
故障排除
安裝指引
安全指引
14
14
14
15
16
17-18
11

感謝您購買惠而浦產品
為了獲得更完善的服務,請於
www.whirlpool.com.hk註冊您的產品。
www.whirlpool.com.sg
控制面板
1. 電源「開/關」鍵 (重設請長按)
2. 「程序」鍵
3. 程序選擇旋鈕 (旋轉以選擇
程序,按下以確認)
4. 「啟動/暫停」鍵
5.
程序提示燈
6. 顯示屏
功能鍵
7.
「設定」
8. 「清爽抗皺」
9. 「兒童安全鎖」
10. 「預校開機時間」
11. 「乾衣時間」
12. 「乾衣程度」
13. 「選項」
使用此產品前,請細心參閱「產品安全指引、使用說明及安裝指南」
請參閱「故障排除」篇章
首次使用
當乾衣機第一次被啟動,您會被要求設置所需的語言,轉動旋
鈕以瀏覽可選擇之語言,按下旋鈕以確認設定所選語言。
請確保儲水盒安插正確。檢查排水軟管與儲水盒。請確保乾衣
機後部的排水軟管被正確固定到乾衣機的儲水盒,或您日常的
污水處理系統中。
乾衣機應該安裝於室溫5°- 35°C之環境下使用,以確保操作穩
定。安裝完成後等待至少6小時使其適應室內的環境,才可開始
使用。
功能導航
當相應功能鍵提示燈亮起時,可透過轉動旋鈕瀏覽該功能的可
用選項,按下旋鈕以確認啟用各選項。
本機設有導航模式 - 指示燈會按以下順序引導您完成程序設定:
選擇程序 / 選擇功能 / 選擇選項。當您按下旋鈕確認選擇,指示
燈會跳轉到下一個步驟。
不過,程序及各選項亦可透過直接按下相應按鈕啟用。
日常使用
下列步驟可使您的乾衣機達至最佳表現效能。
每個乾衣程序完成後,謹記清空水槽,以及清潔過濾網。
(請參閱「清潔和保養」篇章)
1. 打開機門,放入衣物。請查閱衣物護理標籤上的指示,以及
「程序」篇章所指出的最大建議乾衣量操作。清空衣物口
袋, 確保衣物沒有被卡住於機門玻璃和機門過濾器之間。
2. 關閉機門。
3. 按下電源「開/關」鍵。
根據衣物類型選擇乾衣程序。「程序」鍵(P)的提示燈必須為
4.
亮起狀態。轉動旋鈕以調校相應數值,並按下旋鈕以確認。
5. 選擇選項(如有需要),透過轉動旋鈕可瀏覽該選項的詳細設
定,按下旋鈕以確認。
6. 按下「啟動/暫停」鍵以啟動程序。
7. 乾衣程序結束後,會響起「咇」聲。控制面板上的指示燈亮起,
表示程序已經完結。此時應立即將衣服取出以防摺痕形成。
8. 按下電源「開/關」鍵,以關閉乾衣機,打開門並將衣物取
出。如果未有關閉乾衣機,在程序結束約15分鐘後,乾衣機
會自動關閉,以節省能源。
對於某些配備抗皺護理功能的型號,系統會在完成程序的幾個
小時,滾筒以規則的間隔旋轉,防止摺痕形成。
如果出現電源故障,必須按下「啟動/暫停」鍵,重新啟動程序。
耗電量顯示
提供關於所選擇程序及選項之電源耗用的粗略估計。
程序設定預測耗用的電量越少,亮起的指示燈就越少。
滾桶照明燈(如有)
某些型號的乾衣機會配備滾桶照明燈,於開機狀態下開門便會
啟動照明。
當程序運行時打開機門
當程序運行時,您仍可打開乾衣機機門。當門被關上,按下「啟
動/暫停」鍵,程序將重新啟動。
設定
以下的設定可以更改/選擇:
- 顯示語言
- 按鍵音:調校或關閉按鍵音。
- 程序結束提示:調校或關閉程序結束提示音。
- 顯示對比度:調校顯示屏亮度。
- 記住上次使用程序:設定後,下次開機時將會自動選定已
記憶的程序設定。如沒有啟用此功能,開機時則為預設程序。
- 省電模式:程序結束後將自動關機。
- 回復出廠設定
乾衣衣物護理標籤
乾衣前,請先檢查護理標籤,尤其是第一次使用乾衣機時。
下列為常用圖標:
可以烘乾
不可烘乾
適合高溫烘乾
適合低溫烘乾
12

CH
程序的時間長短受負載量、布料類型、洗衣時所用轉速以及
所揀選的選項影響。程序所需時間會顯示於備有顯示屏幕的
乾衣機的控制面板上。於烘乾程序進行中,系統會經常監察
並調整程序剩餘時間。
程序
棉質節能(*最高負載量(公斤))
標準棉質程序,適用於烘乾一般濕的棉質衣物。這是烘
乾棉質衣物能源效益最佳的程序。
棉質(*最高負載量(公斤))
烘乾棉質衣物。
混合衣物(4公斤)
適用於烘乾由棉、麻、人造纖維及其混合織物製成的衣物。
合成纖維(4公斤)
用於烘乾由合成纖維製成的衣物。
纖細衣物(2公斤)
用於烘乾需要溫和處理的精緻衣物。
羊毛(1公斤)
羊毛衣物的乾衣程序。建議在乾衣前將衣物翻出來。
對於仍然潮濕的邊緣位置,請於完成程序後掛起風乾。
大型物件(*最高負載量(公斤))
適用於烘乾如睡袋,可拆洗棉被。
30分鐘速乾(0.5公斤)
用於快速烘乾棉質布料。
襯衣(3公斤)
適用於由棉質、麻、合成纖維及混合纖維製成的襯衫、
上衣。
易熨防皺
此程序可放鬆衣物纖維,令熨燙及摺疊衣服變得更容
易。當衣服濕透時,不要使用此程序。此程序適用於較
輕負載量的棉質布料或棉質混紡上。
清新
此程序需時較短,可為衣物布料帶來清爽效果。不適用於
仍然濕的衣服。它可以用於任何負載量的衣物,但在較少
負載量時效果會更好。程序持續時間大約為20分鐘。
特別程序
要使用以下特別程序,先轉動旋鈕並按下以選擇「特別
程序」。然後轉動旋鈕以揀選所需之程序,顯示屏上會
顯示程序名稱。按下旋鈕以確認選擇所需程序。
•
牛仔布(3公斤)
適用於烘乾類似牛仔布堅固物料製成的棉質牛仔裝或衣
物,如長褲、外套、深色牛仔服裝。
• 少量衣物(1公斤)
經濟烘乾少量衣物。
• 運動衣物(4公斤)
適用於烘乾合成纖維或棉質製成的運動服裝。
• 絲質(0.5公斤)
用於烘乾需要溫和處理的纖細絲質衣物。
• 顏色衣物(*最高負載量(公斤))
用於烘乾需要溫和處理的顏色衣物。
• 羽絨(2.5公斤)
適用於烘乾厚大服裝,如羽絨服(最多2件)。
*最大乾衣量9公斤(乾衣重量)
本機的羊毛衣物程序,已獲得The
Woolmark Company認可,可烘
乾衣物標籤上附有手洗標誌的羊
毛纖維衣物。乾衣時應按護理標
籤,以及「程序」篇章上所列之
指示進行洗滌(M1762) 。
選項鍵
這些選項可根據個人要求而揀選。並非所有選項都適用於
所有程序。某些選項與先前設置的選項並不兼容。蜂鳴器
和 / 或閃爍指示燈將提示其不兼容性。
如果該選項可使用,選項指示燈將保持亮起的狀態。某些
選項如果在先前乾衣時被選擇,系統將於下次預設啟用該
選項;或於下次選擇同一乾衣程序時,自動啟用。
選項
選擇程序後,如有需要,可以設定各種不同的選項。
乾衣程度
每個乾衣程序會有預設的乾衣程度,某些程序則可調校乾
衣程度。按下相關的按鈕,指示燈會亮起,轉動旋鈕以調
校不同的乾衣程度,最後按下旋鈕以確認。
熨燙乾衣:柔和的乾衣方法。於程序完結後,立即熨燙衣
物會變得更容易。
防皺乾衣:適用於準備懸掛,而且較纖細的衣物。
一般乾衣:適用於在乾衣程序結束後摺疊放入衣櫥的衣物。
額外乾衣:適用於在乾衣程序結束後,立即穿著的衣物。
乾衣時間
此選項允許設定特定程序的乾衣時間。按下相關的按鈕,
指示燈會亮起,轉動旋鈕以調校不同的乾衣時間,最後按
下旋鈕以確認。
預校開機時間
h
此功能可讓您設定延遲程序的開始時間。按下相關的按
鈕,指示燈會亮起,轉動旋鈕以調校不同的預校開機時
間,最後按下旋鈕以確認。
啟動後,乾衣機會發出程序開始的剩餘時間信號。若在此
期間機門打開,於關閉後,必須再次按下「開始/暫停」鍵。
清爽抗皺
如果衣物在程序結束後仍留在滾筒內,細菌會於衣物上繁
殖。該選項允許通過控制滾筒的溫度和旋轉,來抑制細菌滋
生。此功能最多可於乾衣程序結束後持續6小時。若於先前
的乾衣程序中已選擇此選項,系統將預設啟用此選項。
如果此選項與「預校開機時間」均被啟用,則會在「預校開
機時間」階段添加皺摺處理 (滾筒的周期性旋轉)功能。
兒童安全鎖
除電源「開/關」鍵外,此選項使所有按鈕被鎖定。乾衣
機開啟時:
•
要啟動此選項,請按住此按鈕直至指示燈亮起。
•
要關閉此選項,請按住按鈕直到指示燈熄滅。
若於先前的乾衣程序中已選擇此選項,系統將預設啟用此
選項。
13

其它選項
Heat Pump System
contained in a hermetically sealed unit. This sealed unit contains
0.18 kg of the F gas R134a. GWP = 1430 (1 t C02).
Power consumption
0.50
left-on mode (Pl) - Watts 1.00
Programs Kg kWh Minutes
Eco Cotton*
9 2.07 211
Eco Cotton
4.5 1.19 131
Synthetics 4 0.73 95
* This is the reference programme for the energy label and suitable
programme in terms of energy consumption for drying wet cotton
TRANSPORT AND HANDLING
Never lift the dryer by holding it at the worktop.
1. Unplug the dryer.
2. Make sure that door and water tank are properly closed.
drain hose on the rear of the dryer again (see Installation Guide).
BA
1
4
2
3
C
The lters are essential parts for drying. They are intended
to collect the lint formed during drying process. In case
of clogge
lters, the air ow inside the dryer would be
seriously aected: the drying times would be longer, the
energy consumption would increase and the dryer could be
damaged. If these procedures are not carried out properly,
the dryer may not start.
with the leaves.
checking it is perfectly integrated in place.
7. Make sure the air intake is free.
按下此鍵以啟用下列其它選項。轉動旋鈕以選擇所需
按下旋
最後 鈕以確認。
•
快速
允許更快的烘乾。
•
輕柔
通過降低烘乾溫度令衣物護理變得更柔和。
•
程序結束蜂鳴
此選項可在程序結束時,啟動延長蜂鳴器的功能。如果您不確定
在程序結束時聽到正常程序完結的聲音,請啟動它。若於先前的
乾衣程序中已選擇此選項,系統將預設啟用此選項。
清潔和保養
在進行清潔和維修過程中,請先拔除乾衣機電源插頭。
在每個程序完成後,清空儲水箱(請參看圖A)
將儲水箱從乾衣機中拉出,然後將水倒入水槽或其他合適的排水
箱中,然後將儲水箱放回原位。如未將儲水箱放回原位,請勿使
用乾衣機。
的選項
在每個程序完成後,清潔機門過濾器(請參看圖B)
將過濾器拉出並通過在水流下或使用真空吸塵器從過濾器表面上
除去棉絨來清潔過濾器。為獲得最佳效果,請先將所有過濾器弄
乾,然後再將其安置回原位。如果沒有將過濾器放回正確位置,
請勿使用乾衣機。
如下所述拆下機門內的過濾器:
1. 打開機門並將過濾器向上拉。
2. 打開過濾器,清除所有部件上的棉絨,並正確地放回它們。請
確保過濾器放回原位時與乾衣機邊緣密封。
當相關指示燈亮起時,清潔底部過濾器(參見圖C)。
將底部過濾器拉出,並在水流下或使用真空吸塵器清潔過濾
器上的棉絨。
建議在每個程序後清潔此過濾器,以優化乾衣性能。
如果沒有先將過濾器放回原位,請勿使用乾衣機。
如下所述卸下底部過濾器:
產品描述
1. 儲水箱
2. 進氣口
3. 底部過濾網
4. 機門過濾器
1. 打開底門。
,
2. 拿起手柄,將底部過濾器拉出。
3. 打開過濾器的後側,除去過濾網內表面上的棉絨。
4. 清潔底部過濾室 (可能有殘留水溢出,屬正常現象)。
5. 關閉底部過濾器的後側,然後檢查它是否準確到位。
6. 放下過濾器手柄並關閉底門。
7. 確保進氣口流通。
過濾器是乾衣機的必要部件。它們用於收集乾衣過程中形成的
棉絨。如果過濾器堵塞,乾衣機內的氣流將受到嚴重影響:乾
衣時間會更長,能源耗用量會增加,乾衣機可能會損壞。如果
這些步驟沒有正確執行,乾衣機可能無法啟動。
搬運和處理
搬運時,切勿提拉乾衣機的頂板。
1. 拔除乾衣機電源插頭。
2. 檢查並確定機門和儲水盒都已正確關閉。
3. 如果排水軟管連接到污水系統,請再次將排水軟管固定在乾
衣機背部(請參閱「安裝指引」篇章)。
能源耗用量
關閉模式功率消耗 (Po)-瓦特 0.50
備用模式功率消耗 (Pl) - 瓦特 1.00
程序 公斤 千瓦/小時 分鐘
*
棉質節能
棉質節能 4.5 1.19 131
合成纖維 4 0.73 95
* 這是能源標籤的參考程序,適用於烘乾普通濕棉質衣物。
這是就能源消耗而言,烘乾濕的棉質衣物最有效的程序。
(標準/預設啟動配置)
熱泵技術
熱泵技術使用密封的氟化溫室氣體作烘乾。
9 2.07 211
14
故障排除
聯絡售後服務中心之前,建議先自行進行檢查,看問題是否可以使用下列的簡易方法解決。通常故障是輕微的,可以在數分鐘內
解決。
問題 可能原因 解決方法
插頭沒有正確插在插座內。 將插頭正確插在插座內。
乾衣機無法
插頭故障。 嘗試將另一台機器重新連接同一插座。請勿使用連接器或萬能插頭
啟動
連接機器至插座。
電源故障。 等待電力供應恢復。
機門未正確關閉。 將機門關上。
乾衣機以重置它。請參閱「選項」篇章。
乾衣程序無法
啟動
沒有按下「啟動/暫停」鍵。 按下「啟動/暫停」鍵,再次啟動乾衣機。
已設定預校開機時間。
啟用了兒童安全鎖 (適用於配備此 請參閱「選項」篇章,如果正在啟動兒童安全鎖,請停用此選項。
選項的型號)。 關閉乾衣機並不能停用此選項。
沒有進行適當的清潔和保養。 請參考「清潔和保養」篇章,並執行所述操作。
程序、時間和/或乾衣程度設定不適合 請參閱「程序」和「選項」篇章,以查找最合適負載類型的程序和
放入乾衣機的負載類型和重量。 選項。
乾衣時間太長
衣物太濕。 以更高的旋轉速度進行洗衣程序,盡可能去除多餘水份。
乾衣機負載量過多。 請參閱「程序」篇章,以檢查每個程序可加載的最大負載量。
室溫不適合乾衣機操作。 如室溫超出14-30°C範圍,乾衣時間可能會延長。
乾衣程序一直未結束
可能發生了電源故障。 於恢復供電後,必須按下「啟動/暫停」鍵,再重新啟動程序。
對於配備此選項的乾衣機:等待「預校開機時間」結束或關閉
CH
提示燈亮起或閃爍
儲水箱太滿。 清空儲水箱。請參考「清潔和保養」篇章。
儲水箱
機門過濾器或
進行這些操作可能會對乾衣機/衣物造成損害。
底部過濾網 *
需要清潔底部過濾網。 清潔底部過濾網。請參考「清潔和保養」篇章。
底部過濾網 *
乾衣機運行所需的空氣流動失效。
清潔機門過濾器及底部過濾網並檢查空氣流動是否順暢。不正確地
關閉乾衣機並拔下電源插頭。立即打開機門,將衣物取出,讓熱量消
顯示屏上出現
乾衣機的感應器檢測到故障。 開始乾衣。
故障符號
散。等待大約15分鐘。將乾衣機重新連接到電源,放入衣物並重新
如果問題仍然存在,請聯繫售後服務中心並向我們說明顯示屏上閃
爍的字母和數字。例如:F3和E2。
要暫停使用示範模式,必須按順序執行以下操作,不得中斷:
示範模式
乾衣機正處於示範模式。 啟動乾衣機,然後關閉它,按下「程序」及「選項」鍵,直到聽到
程序維持數分鐘
蜂鳴聲,再次啟動乾衣機。「示範模式」指示燈閃爍,然後熄滅。
* 備注:某些配備自動清洗功能的型號不備有過濾器於產品底部。更多詳情請參閱「清潔和保養」篇章。
可從下列途徑下載本說明書:
• 於網站內下載 - www.whirlpool.com.hk /
www.whirlpool.com.sg
• 致電售後服務中心(請參閱保養書上的電話號碼),請提供乾衣機門內側顯示的代碼。
xxxxxxxxxxxx
xxxxxxxxxxxx
xxxx
xxxx
15

安裝指引
安裝指引
1
2a
2b
4
5a
5b
1
33
10毫米
15毫米 15毫米
最高2厘米
最高0.79英吋
6
2
最高100厘米
39英吋
..............
xxxx xxxx
xxxx-xxxx W
xxx V ~ xx Hz
IPX4
xx A
16

安全指引
重要事項:請閱讀並遵循
CH
此符號提示您於使用乾衣機前請先細閱產品安全指引。
請妥善保存此產品安全指引及使用說明作將來參考。本手冊
和乾衣機本身提供重要的安全警告,請按需要隨時讀取及查
察。不當的使用及不當的操作可能會導致的風險,製造商將
不負任何責任。
幼兒(0-3歲)應遠離乾衣機,除非得到持續監視,否則兒
童(3-8歲)亦應遠離乾衣機。乾衣機可由8歲以上之兒童及身
體,感官或精神障礙或經驗知識不足的人士操作,前提是此
等人士已接受乾衣機的安全指導及指引,且瞭解使用乾衣機
的相關危險。
兒童不可胡亂玩弄乾衣機。未經指導,兒童不可進行乾衣機
的清潔及保養工作。
警告:烘乾程序結束前切勿停止乾衣機運作,除非所有
烘乾物件均可快速取出且鋪開散熱。
衣物如沾有食用油、丙酮、酒精、汽油、煤油、松脂、
去污劑、蠟及除蠟劑,在用乾衣機烘乾前請用熱水與大量
洗滌劑清洗。泡沫橡膠(乳膠發泡體)、塑膠浴帽、防水紡織
品、帶橡膠配件的物品與衣物或裝有泡沫橡膠墊的枕頭等物
品不得使用乾衣機烘乾。
請取出衣物口袋中的所有物品,例如打火機和火柴。若曾經
使用化學劑清潔衣物,請不要使用乾衣機烘乾。
經過油浸的衣物具有高度易燃性,不可放於乾衣機內烘
乾。
若使用衣物柔順劑或同類產品應根據產品說明書的規定
使用。
此乾衣機不適用於專業用途,請勿於室外使用此乾衣
機。
不要過度烘乾衣服。
安裝
此乾衣機建議由至少兩個人進行安裝處理,避免受傷風
險。使用防護手套來執行所有拆封和安裝操作,避免割傷
風險。
安裝,包括供水(如有),任何電線接駁及維修,必須由
合資格的技術人員按照製造商的說明和本地標準安全法規
進行。除非在用戶手冊特別聲明,切勿維修或更換任何乾
衣機的部件。
兒童應遠離乾衣機安裝地點。卸下包裝後,確認它沒有在運
輸過程中損壞。在出現問題時,請聯絡經銷商或售後服務中
心。當完成安裝後,包裝材料(如塑膠,發泡膠件等)應置於
幼童無法取得的地方,避免窒息的風險。此乾衣機進行安裝
前,必先斷開它的電源連接避免觸電危險。進行安裝時,確
保乾衣機電源線沒有損壞,避免火災或觸電危險。只有當安
裝步驟完成後才可啟動乾衣機。
請確保空氣流通(將門、大於500平方厘米的通風格或通
風槽打開),避免乾衣機排氣回流至室內,引致燃燒其他燃
料,包括明火。
切勿強行打開機門或以它作為踏板使用。
允許使用
注意:此乾衣機不能透過外部控制器或遙控裝置進行操
作。
此乾衣機設計只適用於家居或下列之類似環境:如一般
商店、辦公室及其他工作環境的職員專用廚房;農莊;供入
住酒店、汽車旅館及其他住宅式旅店之顧客使用;提供簡單
住宿及早餐服務之旅舍。
請確保負載不超過最大乾衣量 (請參閱「程序」篇章中的
指示)。
請勿使用乾衣機烘乾未經清洗衣物。
請確保沒有棉絨或塵埃積聚在乾衣機周圍。
如果乾衣機安裝至廚櫃底,請由乾衣機頂部至廚櫃之間預留
10毫米空間,而乾衣機兩旁的側面板與廚櫃壁之間,亦需預
留各15毫米空間。
如果乾衣機被安裝於煤氣爐或煤炭爐旁邊,請於乾衣機
與煤氣爐或煤炭爐中間,安裝隔熱板 (85 厘米 x 57 厘米),
而面向煤氣爐或煤炭爐一方的乾衣機面板,需要以鋁箔覆
蓋。
切勿將乾衣機連接至用來排放燃燒氣體或其他燃料的排
氣管道。
不得將此乾衣機安裝於下述類型的門的後方:包括帶鎖
門、滑動門或當門鉸與乾衣機機門方向相反時,因為這些情
況會令乾衣機機門不能完全打開。
乾衣機必須靠牆擺放,以確保機件背部不會被觸碰。
請勿使用地毯堵塞乾衣機底部排氣孔。
17

如果要在洗衣機頂部放置乾衣機,請首先聯繫我們的售
後服務中心或您的經銷商,以取得可行型號的列表。只允許
使用我們的售後服務中心或您的經銷商提供的專業疊裝工具
將乾衣機固定在洗衣機上。固定架套件中附有組裝及使用說
明。
電氣警告
插座必須能夠拔掉,以切斷電源,或安裝設有開關鍵的
插座及按照本地的電器安全標準法連接地線。
請勿使用接駁電線或萬能插頭,安裝後電線部份不可被
使用者易於接觸。手濕或赤腳時請勿使用本產品。若本產品
的電源線或插頭有損壞,不能正常運作,或受損,請勿操作。
如果電源線損壞,必須以相同的電源線作更換。電源線只
能由製造商指定的技術人員更換以避免觸電的危險。
清潔和保養
注意:執行任何維修或清潔操作之前,請先關閉及拔下
電源插頭。切勿使用蒸氣清洗本產品,以避免觸電風險。
必須確保已經清潔所有棉絨才開始乾衣程序。
處理包裝物料
包裝材料完全可回收,並設有可回收標誌
包裝的各個部分必須根據當前本地廢品處理法規進行處理。
廢棄家用電器
必須根據當前本地廢品處理法規進行處理。有關處理、修復
和回收本產品的詳細資訊,請聯繫售後服務中心、家庭廢品
處理服務中心或您購買本產品的商店。
本乾衣機依照有關廢棄電器和電子設備(WEEE)的歐盟標準
2012/19/EU標示。確保以正確的方式廢棄本產品,可避免因不
當的廢棄處理方式而對環境和人體健康造成潛在的負面影響。
這符號 表示此機器不能作為家庭廢品處理。應將它交給回
收電器和電子設備的適用收集點。
18

CH
19

20
com.sg
W11406297
10/2019
 Loading...