

WHIRLPOOL AKPM 658/IX User Manual
AKPM 658
IT
AR
User and maintenance manual
Manual del Usuario y de Mantenimiento
Manual do utilizador e de manutenção
Manuale d’uso e manutenzione


IMPORTANT SAFETY INSTRUCTIONS
YOUR SAFETY AND THAT OF OTHERS IS PARAMOUNT
This manual and the appliance itself provide important safety warnings, to be read and observed at all times.
This is the danger symbol, pertaining to safety, which alerts users to potential risks to themselves
and others.
All safety warnings are preceded by the danger symbol and the following terms:
DANGER
WARNING
All safety warnings give specific details of the potential risk present and indicate how to reduce risk of
injury, damage and electric shock resulting from improper use of the appliance. Carefully observe the
following instructions:
- The appliance must be disconnected from the power supply before carrying out any installation
work.
- Installation and maintenance must be carried out by a qualified technician, in compliance with the
manufacturer’s instructions and local safety regulations. Do not repair or replace any part of the
appliance unless specifically stated in the user manual.
- Regulations require that the appliance is earthed.
- The power cable must be long enough for connecting the appliance, once fitted in its housing, to the
power supply socket.
- For installation to comply with current safety regulations, an all-pole disconnect switch with
minimum contact gap of 3 mm must be utilized.
- Do not use multiple plug adapters or extension leads.
- Do not pull the power supply cable in order to unplug the appliance.
- The electrical components must not be accessible to the user after installation.
- Do not touch the appliance with any wet part of the body and do not operate it when barefoot.
- This appliance is designed solely for use as a domestic appliance for cooking food. No other type of
use is permitted (e.g.: heating rooms). The Manufacturer declines all responsibility for inappropriate
use or incorrect setting of the controls.
- The appliance is not intended for use by persons (including children) with any physical, sensory or
mental impairment, or without experience and knowledge of the appliance, unless supervised or
previously instructed in its use by those responsible for their safety.
- The accessible parts of the appliance may become very hot during use. Young children should be
kept away from the appliance and supervised to ensure that they do not play with it.
- During and after use, do not touch the heating elements or interior surfaces of the appliance - risk of
burns. Do not allow the appliance to come into contact with cloths or other flammable materials until
all the components have cooled sufficiently.
- At the end of cooking, exercise caution when opening the appliance door, letting the hot air or steam
exit gradually before accessing the oven. When the appliance door is shut, hot air is vented from the
aperture above the control panel. Do not obstruct the vent apertures.
- Use oven gloves to remove pans and accessories, taking care not to touch the heating elements.
- Do not place flammable materials in or near the appliance: a fire may break out if the appliance is
inadvertently switched on.
- Do not heat or cook sealed jars or containers in the appliance. The pressure that builds up inside
might cause the jar to explode, damaging the appliance.
- Do not use containers made of synthetic materials.
- Overheated oils and fats catch fire easily. Always remain vigilant when cooking foods rich in fat and oil.
- Never leave the appliance unattended during food drying.
- If alcoholic beverages are used when cooking foods (e.g. rum, cognac, wine), remember that alcohol
evaporates at high temperatures. As a result, there is a risk that vapours released by the alcohol may
catch fire upon coming into contact with the electrical heating element.
Indicates a hazardous situation which, if not avoided, will cause serious injury.
Indicates a hazardous situation which, if not avoided, could cause serious injury.
GB1
Scrapping of household appliances
- This appliance is manufactured with recyclable or reusable materials. Dispose of it in accordance with
local waste disposal regulations. Before scrapping, cut off the power supply cable.
- For further information on the treatment, recovery and recycling of household electrical appliances,
contact your competent local authority, the collection service for household waste or the store where
you purchased the appliance.
INSTALLATION
After unpacking the oven, make sure that it has not been damaged during transport and that the oven
door closes properly. In the event of problems, contact the dealer or your nearest After-sales Service. To
prevent any damage, only remove the oven from its polystyrene foam base at the time of installation.
PREPARING THE HOUSING UNIT
• Kitchen units in contact with the oven must be heat resistant (min 90°C).
• Carry out all cabinet cutting work before fitting the oven in the housing and carefully remove all
wood chips and sawdust.
• After installation, the bottom of the oven must no longer be accessible.
• For correct appliance operation, do not obstruct the minimum gap between the worktop and the
upper edge of the oven.
ELECTRICAL CONNECTION
Make sure the power voltage specified on the appliance dataplate is the same as the mains voltage. The
dataplate is on the front edge of the oven (visible when the door is open).
• Power cable replacement (type H05 RR-F 3 x 1.5 mm
Contact an authorized service centre.
2
) must be carried out by a qualified electrician.
GENERAL RECOMMENDATIONS
Before use:
- Remove cardboard protection pieces, protective film and adhesive labels from accessories.
- Remove the accessories from the oven and heat it at 200° for about an hour to eliminate the smell
and fumes from the insulating materials and protective grease.
During use:
- Do not place heavy objects on the door as they could damage it.
- Do not cling to the door or hang anything from the handle.
- Do not cover the inside of the oven with aluminium foil.
- Never pour water into the inside of a hot oven; this could damage the enamel coating.
- Never drag pots or pans across the bottom of the oven as this could damage the enamel coating.
- Make sure that the electrical cables of other appliances do not touch hot parts of the oven or become
trapped in the door.
- Do not expose the oven to atmospheric agents.
SAFEGUARDING THE ENVIRONMENT
Disposal of packing material
The packing material is 100% recyclable and is marked with the recycle symbol ( ). The various parts of
the packing must therefore be disposed of responsibly and in full compliance with local authority
regulations governing waste disposal.
Scrapping the product
- This appliance is marked in compliance with European Directive 2002/96/EC, Waste Electrical and
Electronic Equipment (WEEE).
- By ensuring this product is disposed of correctly, you will help prevent potential negative
consequences for the environment and human health, which could otherwise be caused by
inappropriate waste handling of this product.
- The symbol on the product or on the accompanying documentation indicates that it should not be
treated as domestic waste but must be taken to an appropriate collection centre for the recycling of
electrical and electronic equipment.
GB2
Energy saving
- Only pre-heat the oven if specified in the cooking table or your recipe.
- Use dark lacquered or enamelled baking moulds as they absorb heat far better.
- Switch the oven off 10/15 minutes before the set cooking time. Food requiring prolonged cooking will
continue to cook even once the oven is switched off.
DECLARATION OF CONFORMITY
- This oven, which is intended to come into contact with foodstuffs, complies with European
Regulation ( ) n.1935/2004 and has been designed, manufactured and sold in conformity with the
safety requirements of the “Low Voltage” directive 2006/95/CE (which replaces 73/23/CEE and
subsequent amendments), the protection requirements of “EMC” 2004/108/CE.
TROUBLESHOOTING GUIDE
The oven does not work:
• Check for the presence of mains electrical power and if the oven is connected to the electrical supply.
• Turn off the oven and restart it to see if the fault persists.
AFTER-SALES SERVICE
Before calling the After-Sales Service:
1. See if you can solve the problem yourself with the help of the suggestions given in the
“Troubleshooting guide“.
2. Switch the appliance off and back on again it to see if the fault persists.
If after the above checks the fault still occurs, get in touch with the nearest After-sales Service.
Always specify:
• a brief description of the fault;
• the type and exact model of the oven;
• the service number (number after the word Service on the rating plate), located on the right hand
edge of the oven cavity (visible when the oven door is open). The service number is also indicated on
the guarantee booklet;
• your full address;
• your telephone number.
If any repairs are required, please contact an authorised After-sales Service (to guarantee that original
spare parts will be used and repairs carried out correctly).
CLEANING
WARNING
Oven exterior
IMPORTANT: do not use corrosive or abrasive detergents. If any of these products accidentally
comes into contact with the appliance, clean immediately with a damp cloth.
• Clean the surfaces with a damp cloth. If it is very dirty, add a few drops of washing up detergent to the
water. Finish off with a dry cloth.
- Never use steam cleaning equipment.
- Only clean the oven when it is cool to the touch.
- Disconnect the appliance from the power supply.
GB3
Oven interior
IMPORTANT: do not use abrasive sponges or metallic scrapers or scourers. Over time, these can ruin
enamelled surfaces and the oven door glass.
• After every use, allow the oven to cool then clean it preferably while it is still warm in order to remove
built-up dirt and stains caused by food residues (e.g. food with a high sugar content).
• Use proprietary oven detergents and follow the manufacturer’s instructions to the letter.
• Clean the door glass with a suitable liquid detergent. The oven door can be removed to facilitate
cleaning (see MAINTENANCE).
• The top heating element of the grill (see MAINTENANCE) can be lowered (some models only) to clean
the roof of the oven.
N.B.: during prolonged cooking of foods with a high water content (e.g. pizza, vegetables, etc.)
condensation may form on the inside of the door and around the seal. When the oven is cold, dry the
inside of the door with a cloth or sponge.
Accessories:
• Soak the accessories in water with washing up detergent immediately after use, handling them with
oven gloves if still hot.
• Food residues can be easily removed using a brush or sponge.
MAINTENANCE
WARNING
- Use protective gloves.
- Ensure the oven is cold before carrying out the following operations.
- Disconnect the appliance from the power supply.
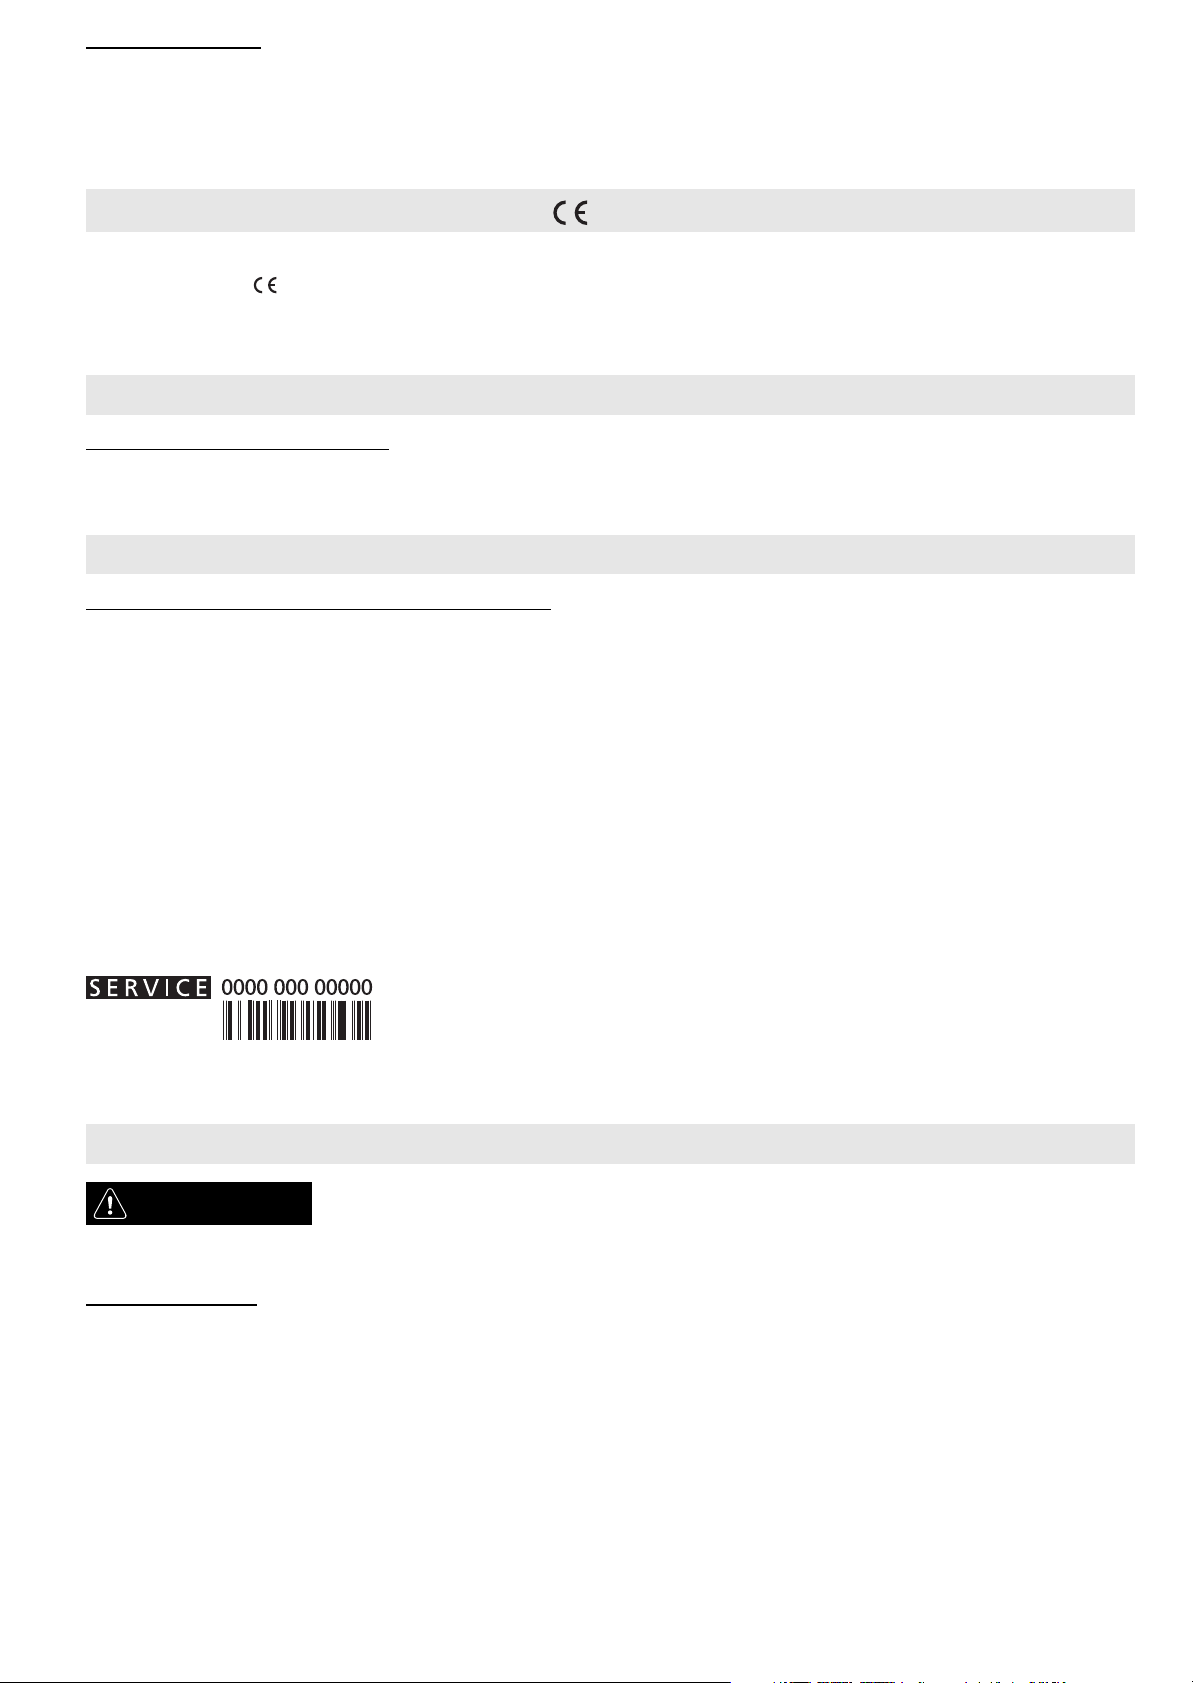
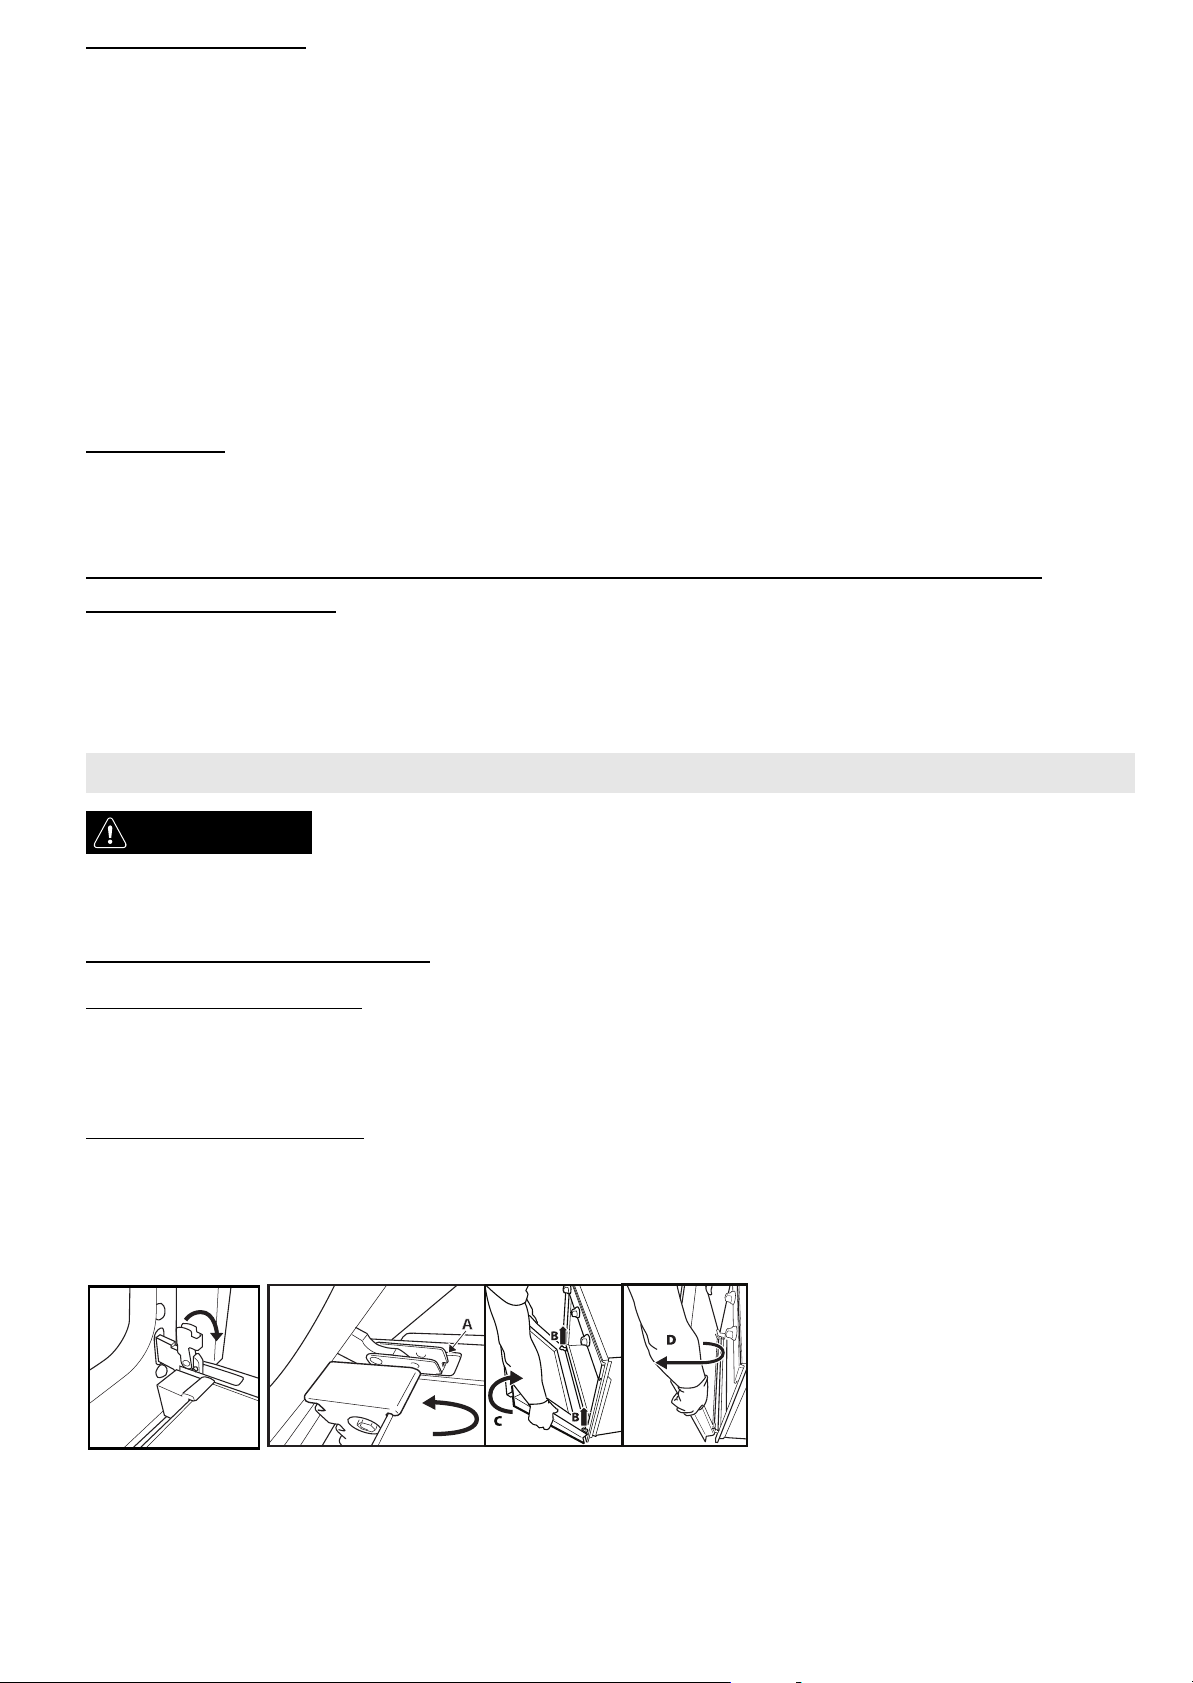
REMOVING THE DOOR
To remove the door:
1. Open the door fully.
2. Lift the catches and push them forwards as far as they will go (Fig. 1).
3. Close the door as far as it will go (A), lift it up (B) and turn it (C) until it is released (D) (Fig. 2).
To refit the door:
1. Insert the hinges in their seats.
2. Open the door fully.
3. Lower the two catches.
4. Close the door.
Fig. 1 Fig. 2
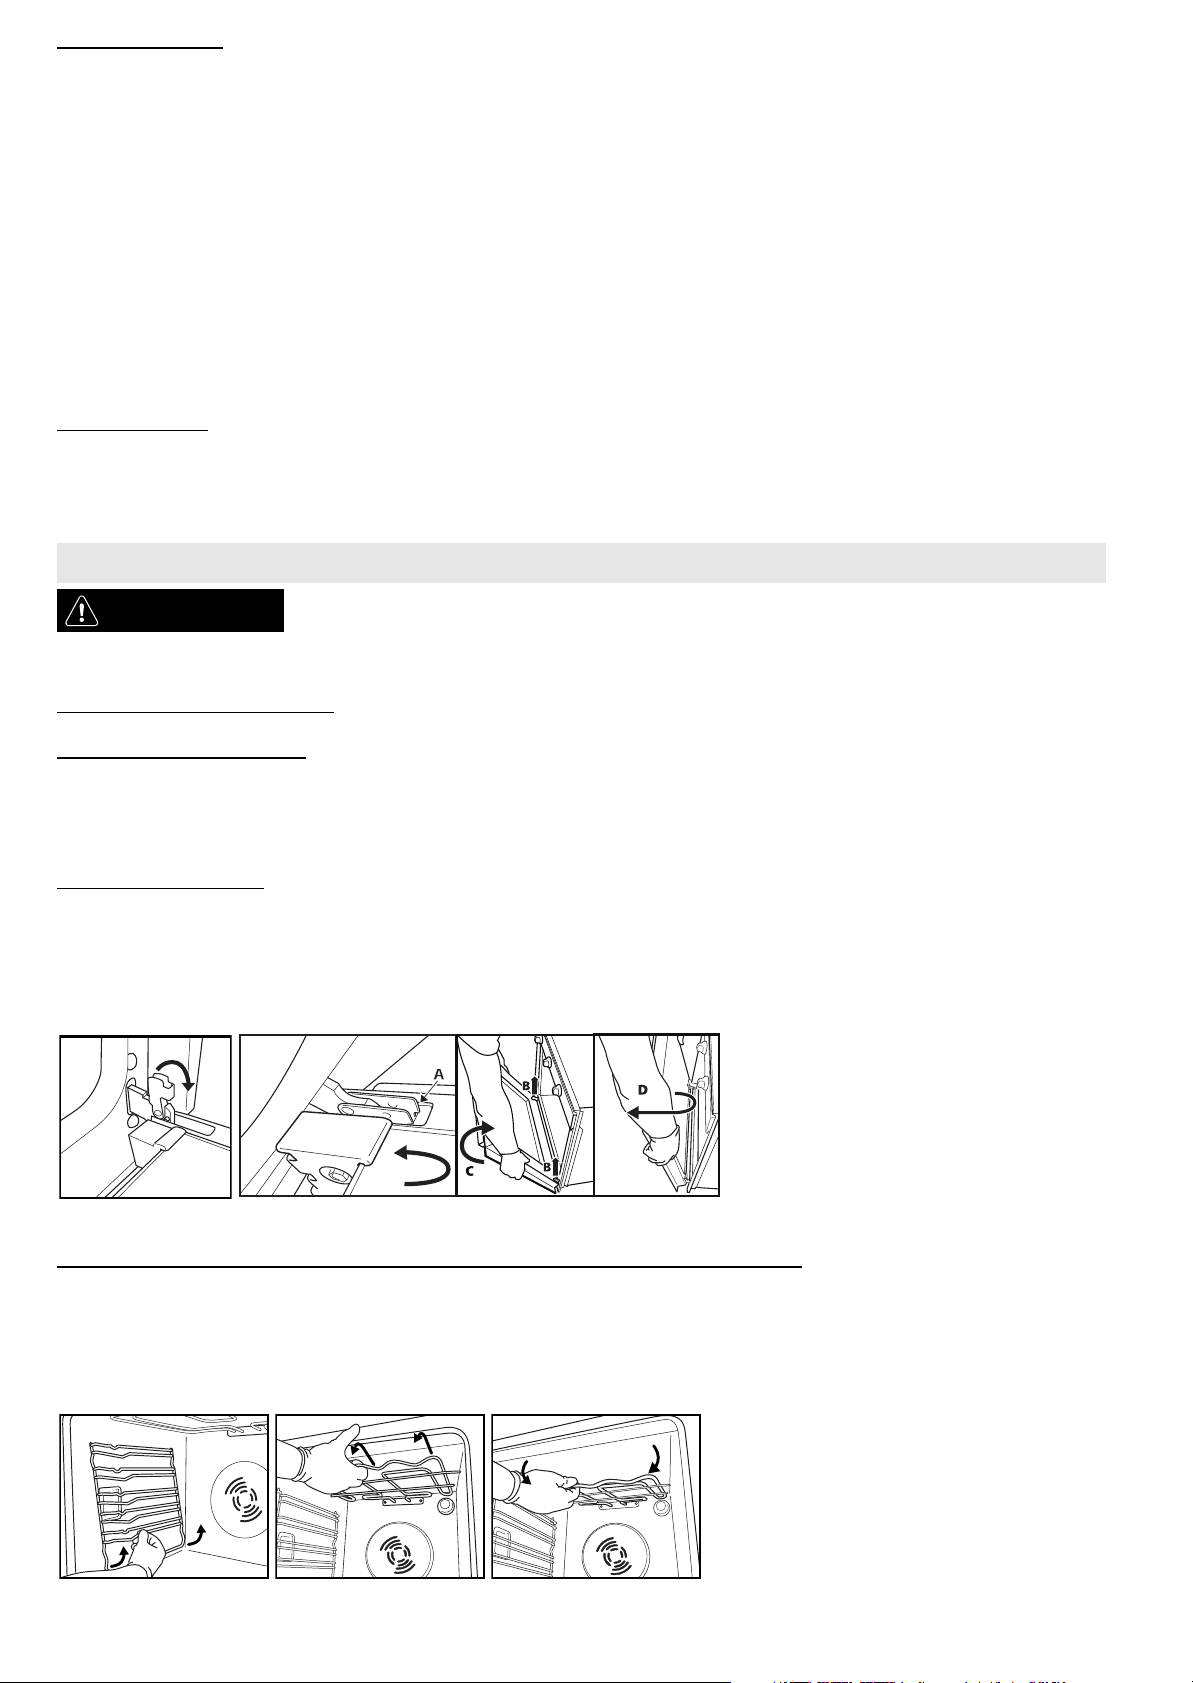
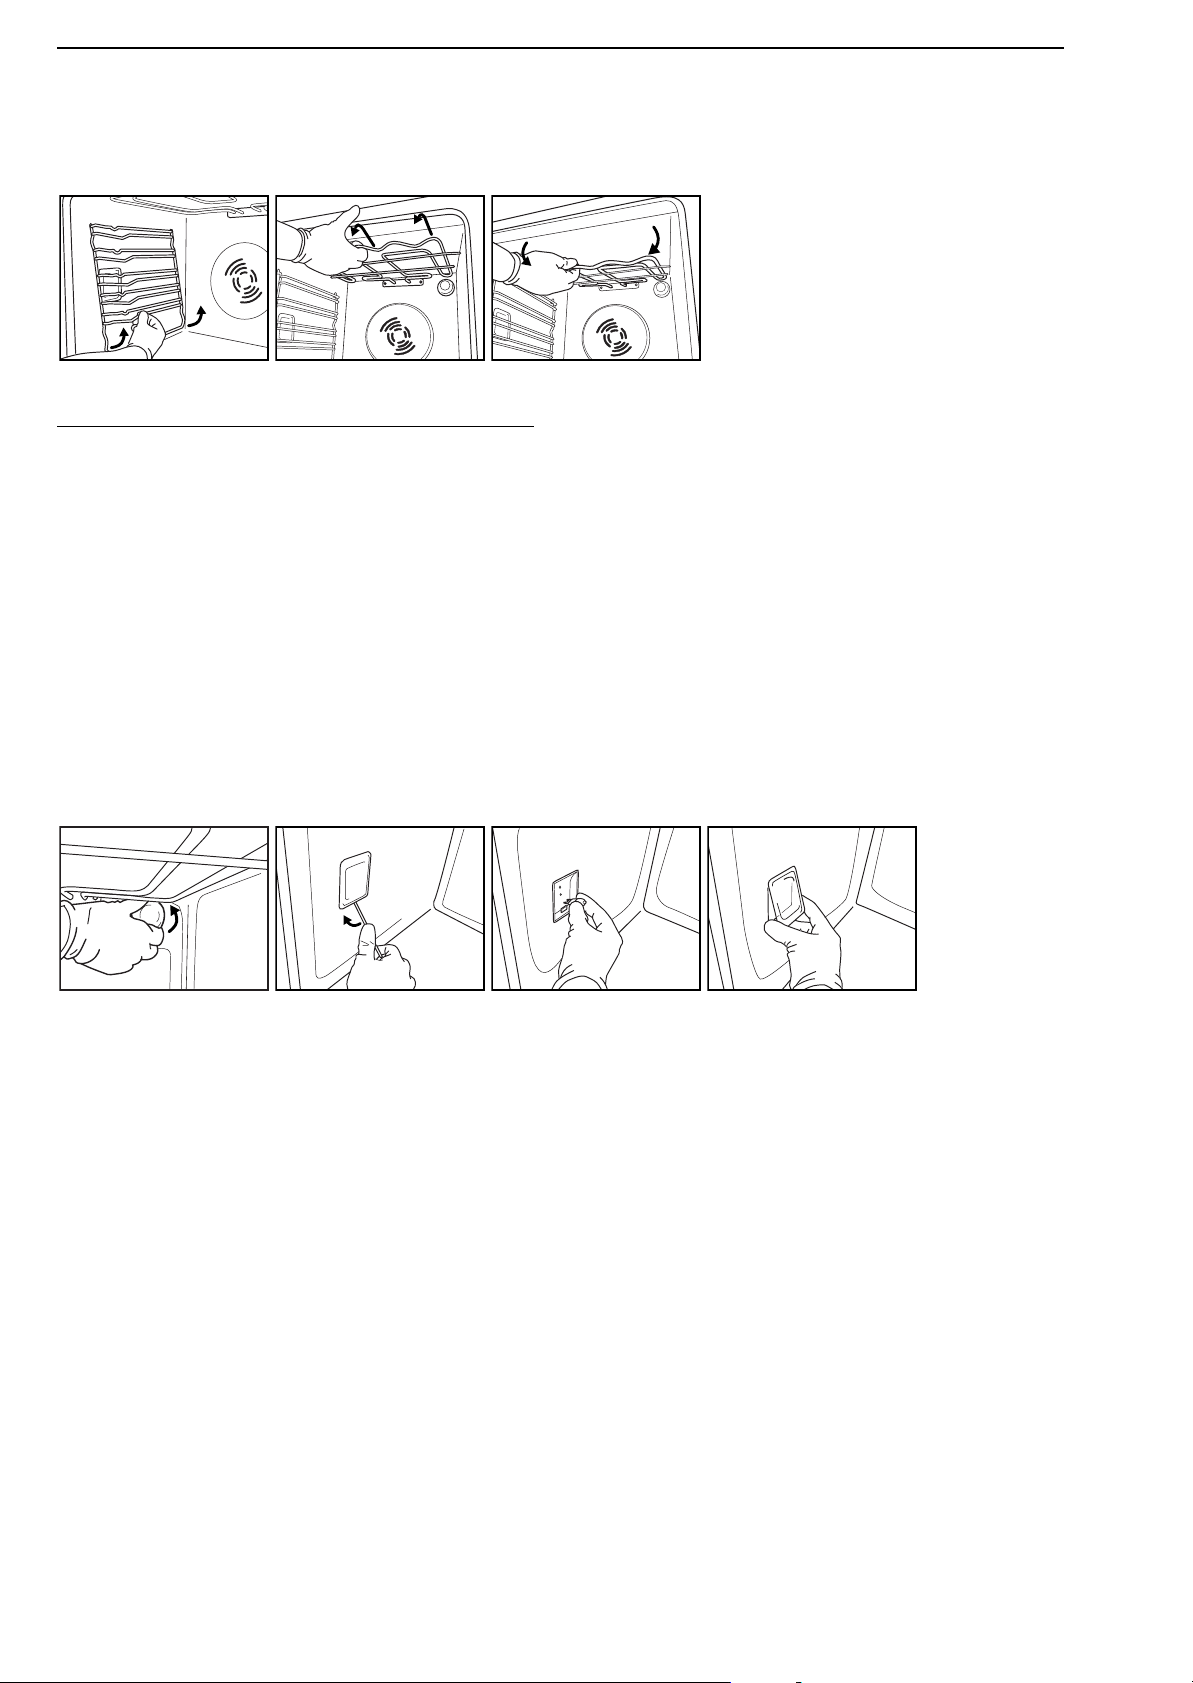
MOVING THE TOP HEATING ELEMENT (SOME MODELS ONLY)
1. Remove the side accessory holder grilles (Fig. 3).
2. Pull the heating element out a little (Fig. 4) and lower it (Fig. 5).
3. To reposition the heating element, lift it up, pulling it slightly towards you, making sure it comes to
rest on the lateral supports.
Fig. 3 Fig. 4 Fig. 5
GB4
REPLACING THE OVEN LAMP
To replace the rear lamp (if present):
1. Disconnect the oven from the power supply.
2. Unscrew the lamp cover (Fig. 6), replace the lamp (see note for lamp type) and screw the lamp cover
back on.
3. Reconnect the oven to the power supply.
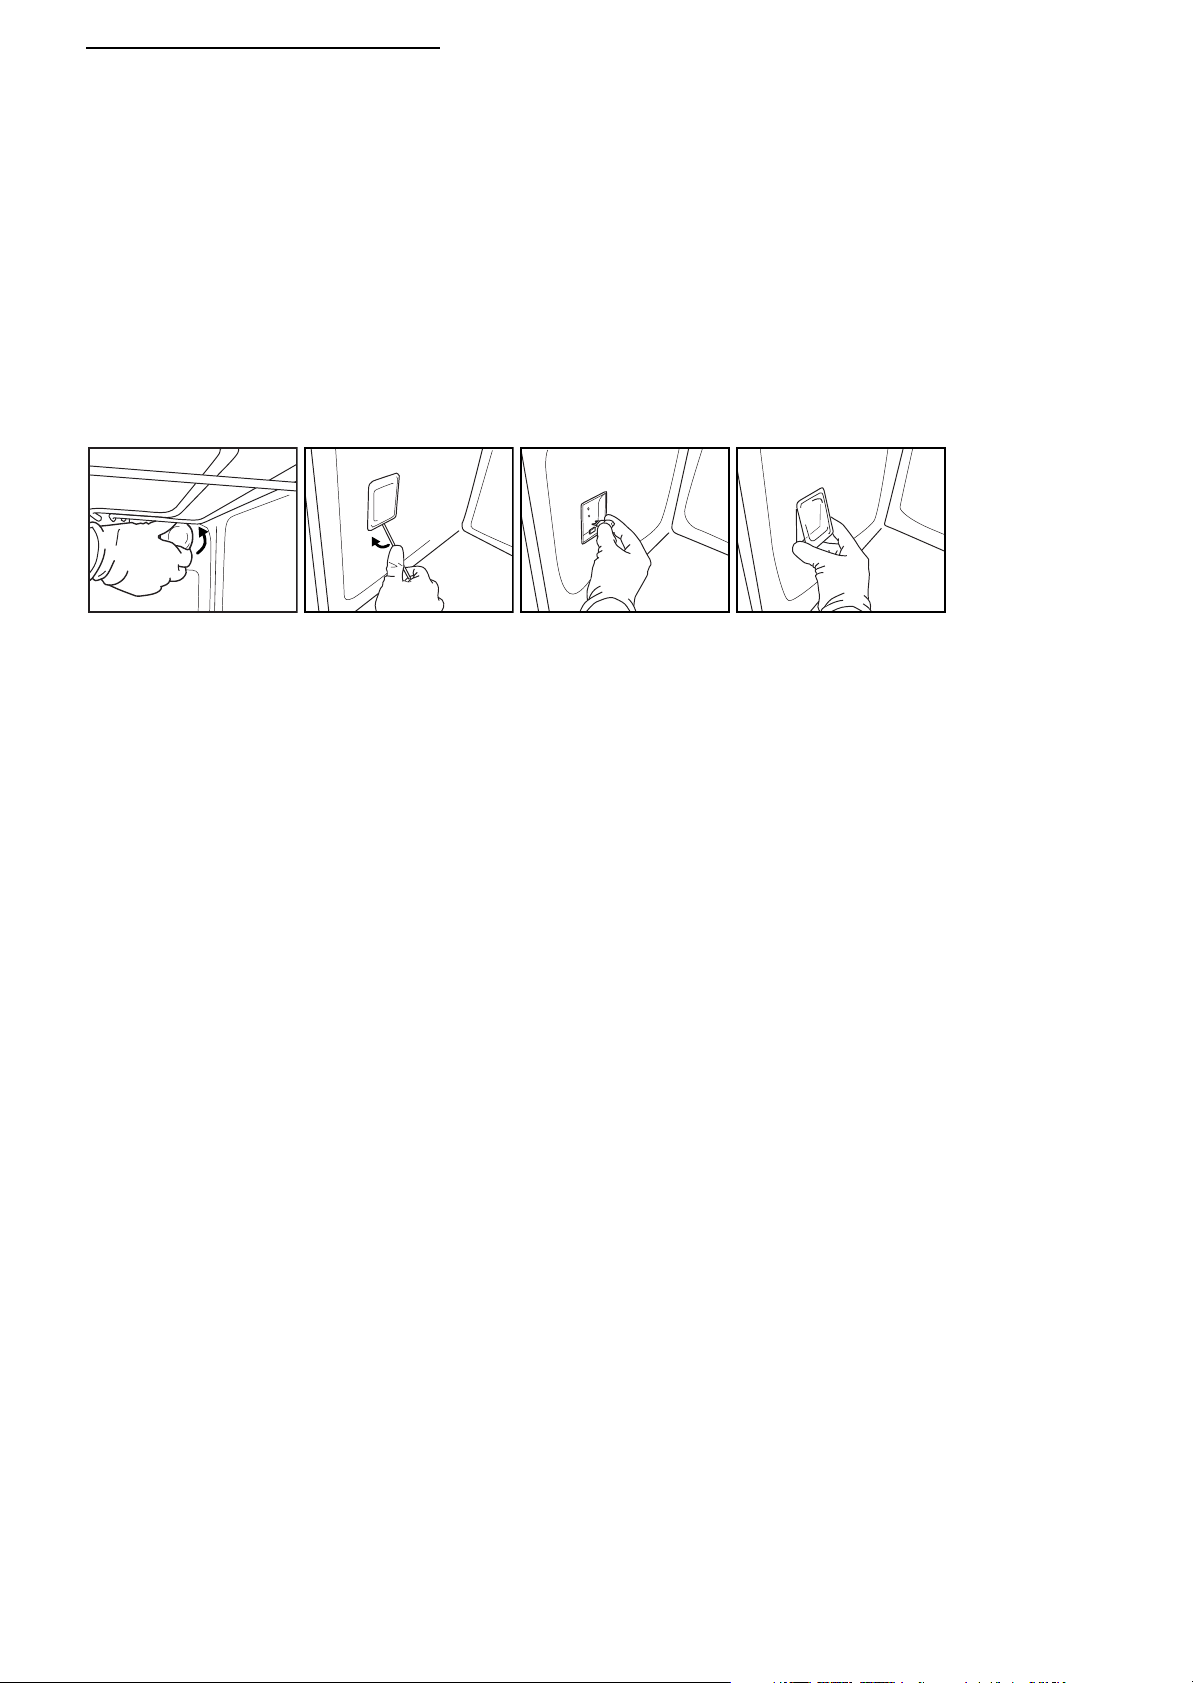
To replace the side lamp (if present):
1. Disconnect the oven from the power supply.
2. Remove the side accessory holder grilles, if present (Fig. 3).
3. Use a screwdriver to prise off the lamp cover (Fig. 7).
4. Replace the lamp (see note for lamp type) (Fig. 8).
5. Reposition the lamp cover, pushing it on firmly until it snaps into place (Fig. 9).
6. Refit the side accessory holder grilles.
7. Reconnect the oven to the power supply.
Fig. 6 Fig. 7 Fig. 8 Fig. 9
N.B.:
- Only use 25-40W/230V type E-14, T300°C incandescent lamps, or 20-40W/230 V type G9, T300°C
halogen lamps.
- Lamps are available from our After-sales Service.
IMPORTANT:
- If using halogen lamps, do not handle with bare hands since fingerprints can damage them.
- Do not use the oven until the lamp cover has been repositioned.
GB5
INSTRUCTIONS FOR OVEN USE
FOR ELECTRICAL CONNECTION, SEE THE PARAGRAPH ON INSTALLATION
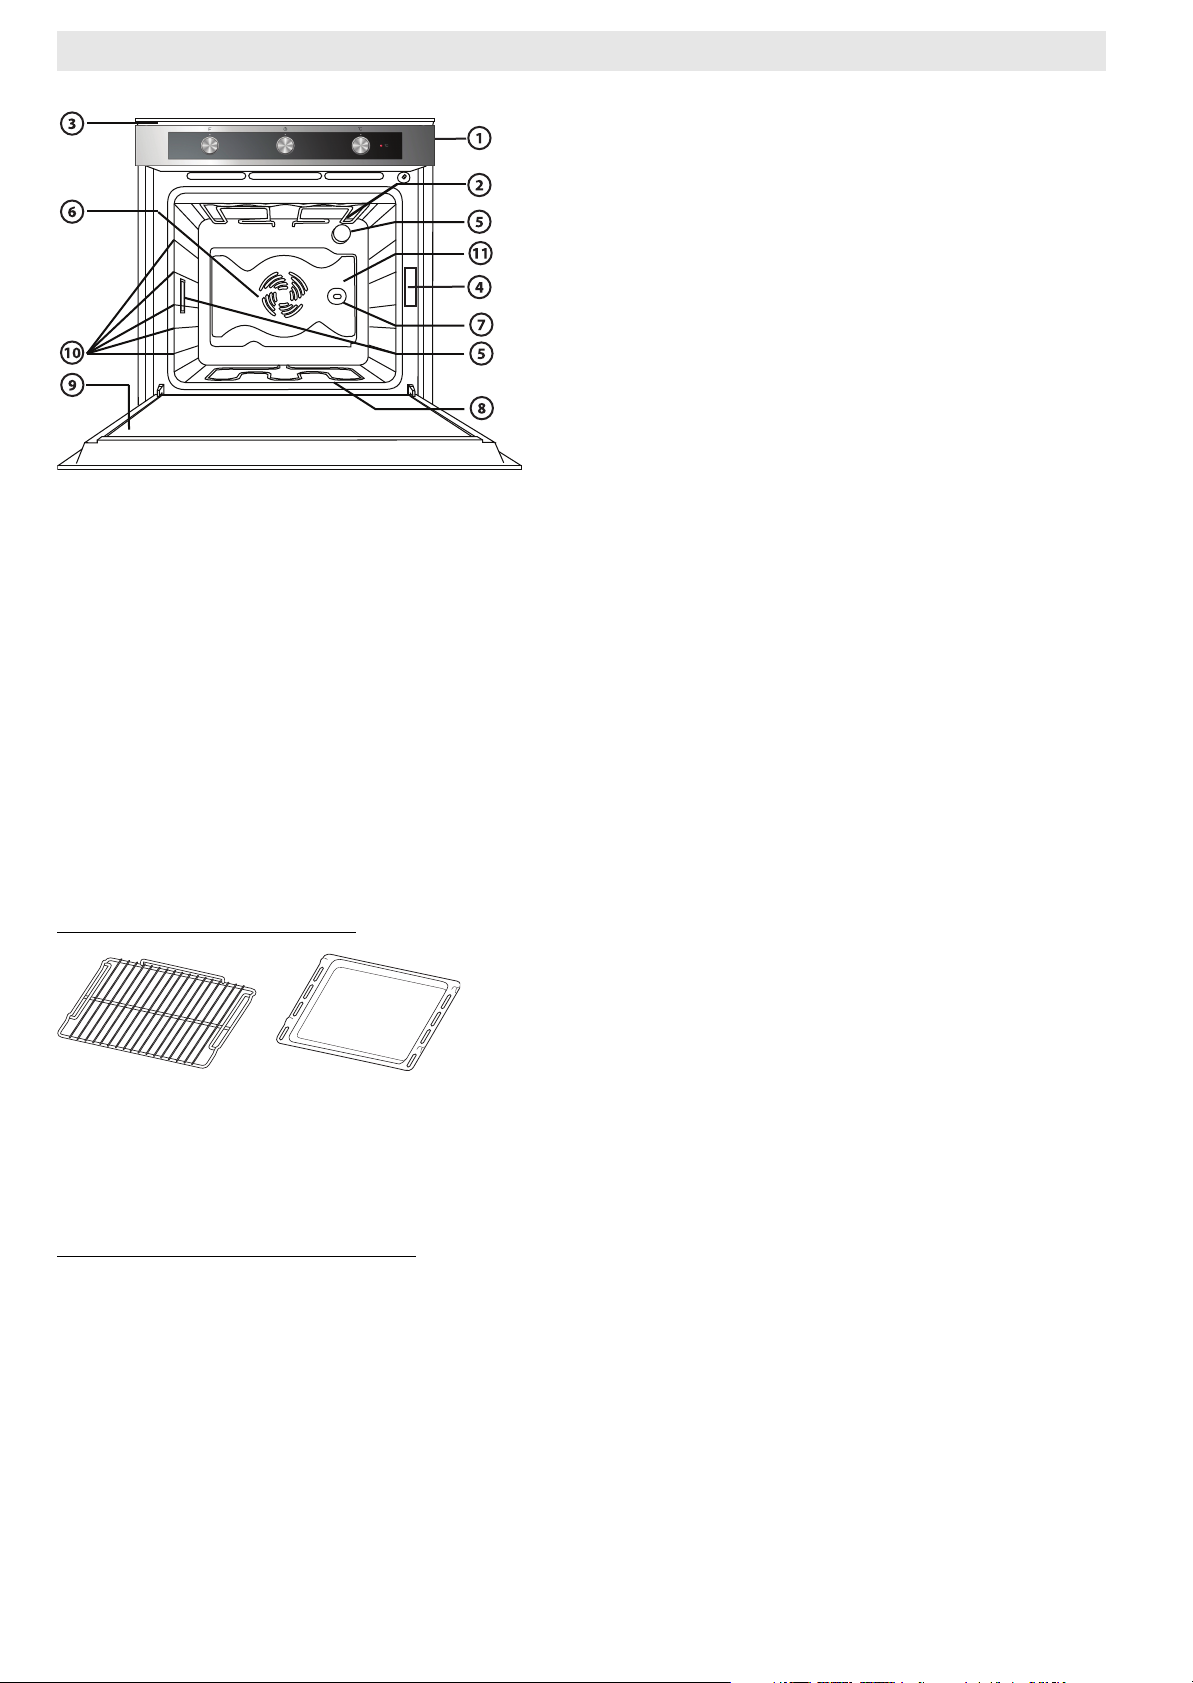
1. Control panel
2. Upper heating element/grill
3. Cooling fan (not visible)
4. Dataplate (not to be removed)
5. Light
6. Fan
7. Turnspit (if present)
8. Lower heating element (hidden)
9. Door
10. Position of shelves (the number of shelves is indicated on the front of the oven)
11. Rear wall
N.B.:
- During cooking, the cooling fan may switch on at intervals in order to minimise energy consumption.
- At the end of cooking, after the oven in switched off, the cooling fan may continue to run for a while.
- When the oven door is opened during cooking, the heating elements switch off.
ACCESSORIES SUPPLIED
Fig. A Fig. B
A. WIRE SHELF (2): the wire shelf can be used to grill food or as a support for pans, cake tins and other
ovenproof cooking receptacles.
B. DRIP TRAY (1): the drip tray is designed to be positioned under the wire shelf in order to collect fat or
as an oven tray for cooking meat, fish, vegetables, focaccia, etc.
ACCESSORIES NOT SUPPLIED
Other accessories can be purchased separately from the After-sales Service.
GB6
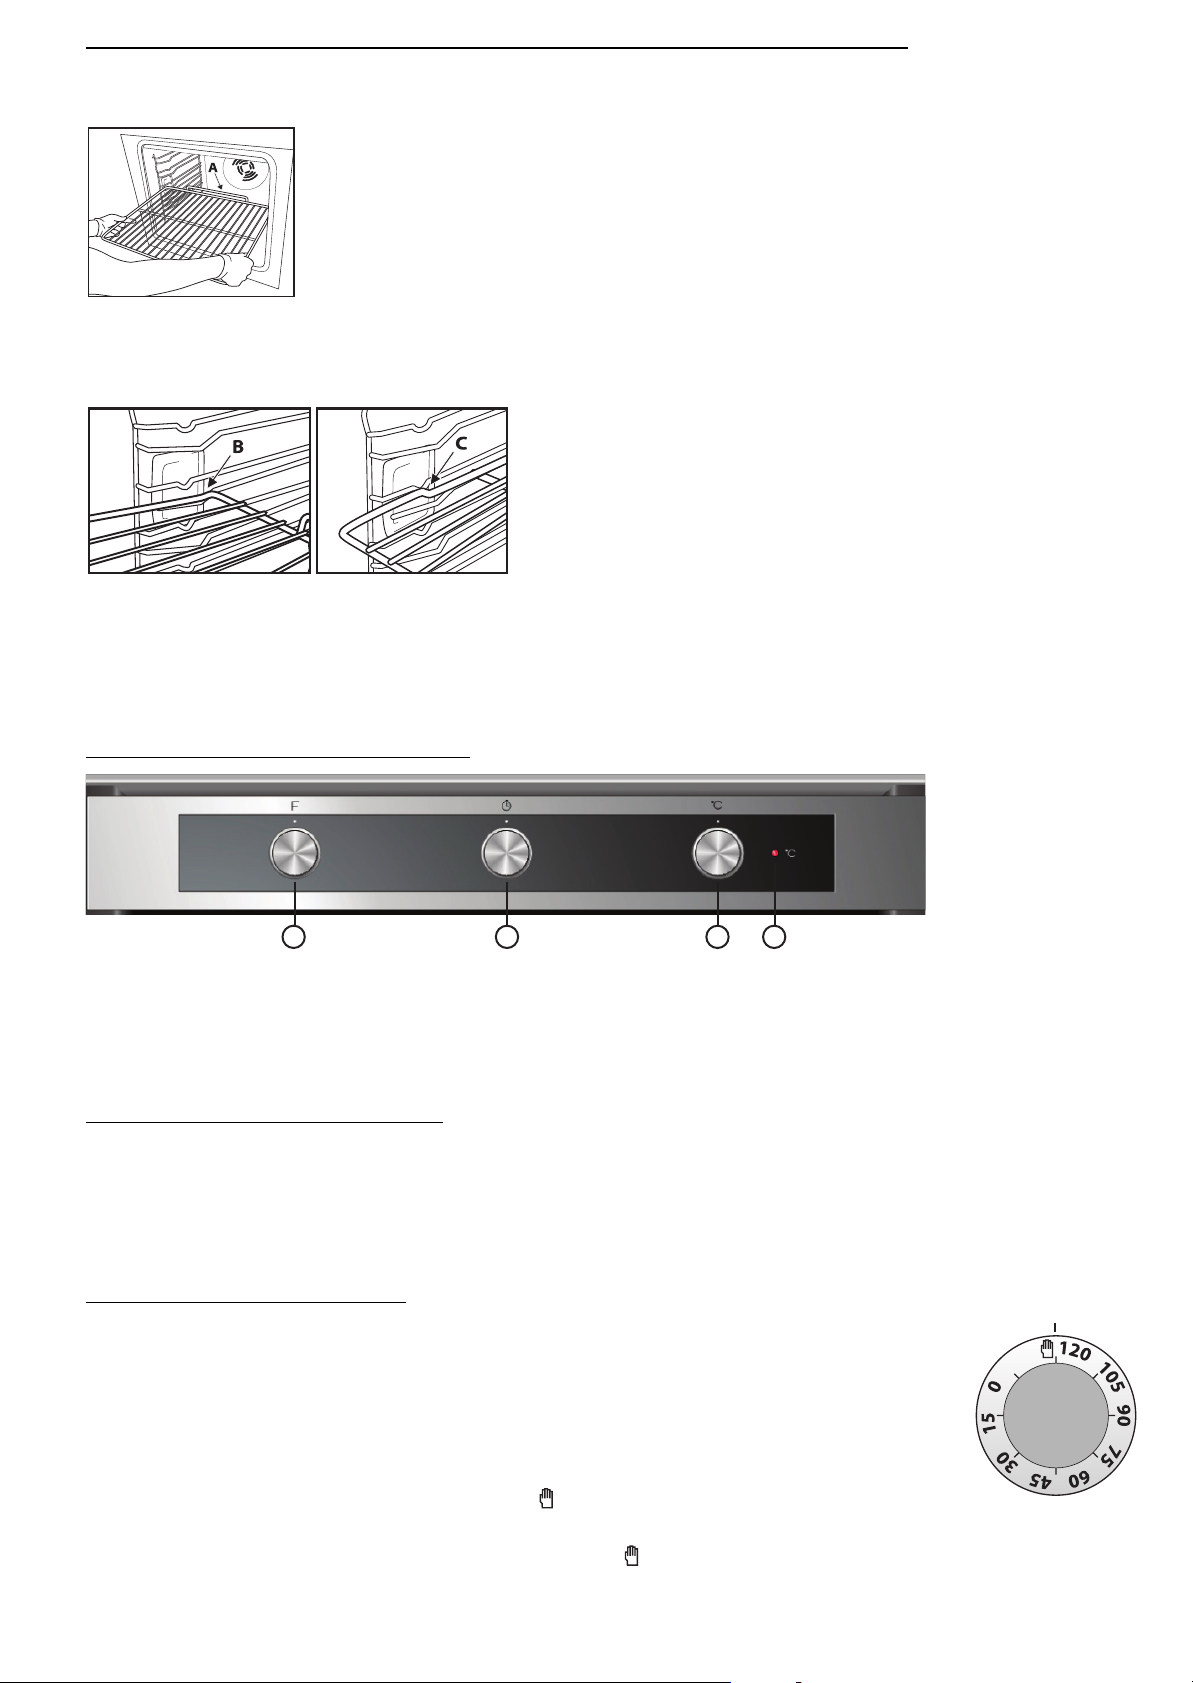
INSERTING WIRE SHELVES AND OTHER ACCESSORIES IN THE OVEN
The wire shelf and other accessories are provided with a locking mechanism to prevent their accidental
removal.
Fig. 1
1. Insert the wire shelf horizontally, with the raised part “A” ’upwards (Fig. 1).
2. Angle the wire shelf when it reaches the locking position “B” (Fig. 2).
Fig. 2 Fig. 3
3. Return the wire shelf to the horizontal position and push it in fully to “C” (Fig. 3).
4. To remove the wire shelf proceed in reverse order.
The other accessories, like the drip tray and baking tray, are inserted in exactly the same way. The
protrusion on the flat surface enables the accessories to lock in place.
CONTROL PANEL DESCRIPTION
1 32 4
1. Function selector knob
2. Cooking time selector knob
3. Thermostat knob
N.B.:the knobs are retractable. Press the knobs in the middle and they pop up.
4. Thermostat led
HOW TO OPERATE THE OVEN
• Turn the selector knob to the required function.
The oven light switches on.
• Turn the thermostat knob clockwise to the required temperature.
The thermostat led lights up, switching off again when the oven reaches the selected temperature.
At the end of cooking, turn the knobs to “0”.
COOKING TIME SELECTOR
This selector can be used to set a cooking time of between 1 and 120 minutes.
To set cooking time, after selecting the required cooking function, turn the knob right
round in an clockwise direction and then turn it back in the opposite direction to the
desired cooking duration. At the end of the cooking time the oven switches off and the
selector remains positioned at “0”.
To use the oven in manual mode, i.e. without setting a cooking time, make sure that the
programme selector is turned to the symbol “ ”.
ATTENTION:When the selector is positioned at “0” the oven will not switch on.
To switch the oven on, set the selector to the symbol “ ” or set a cooking time.
GB7
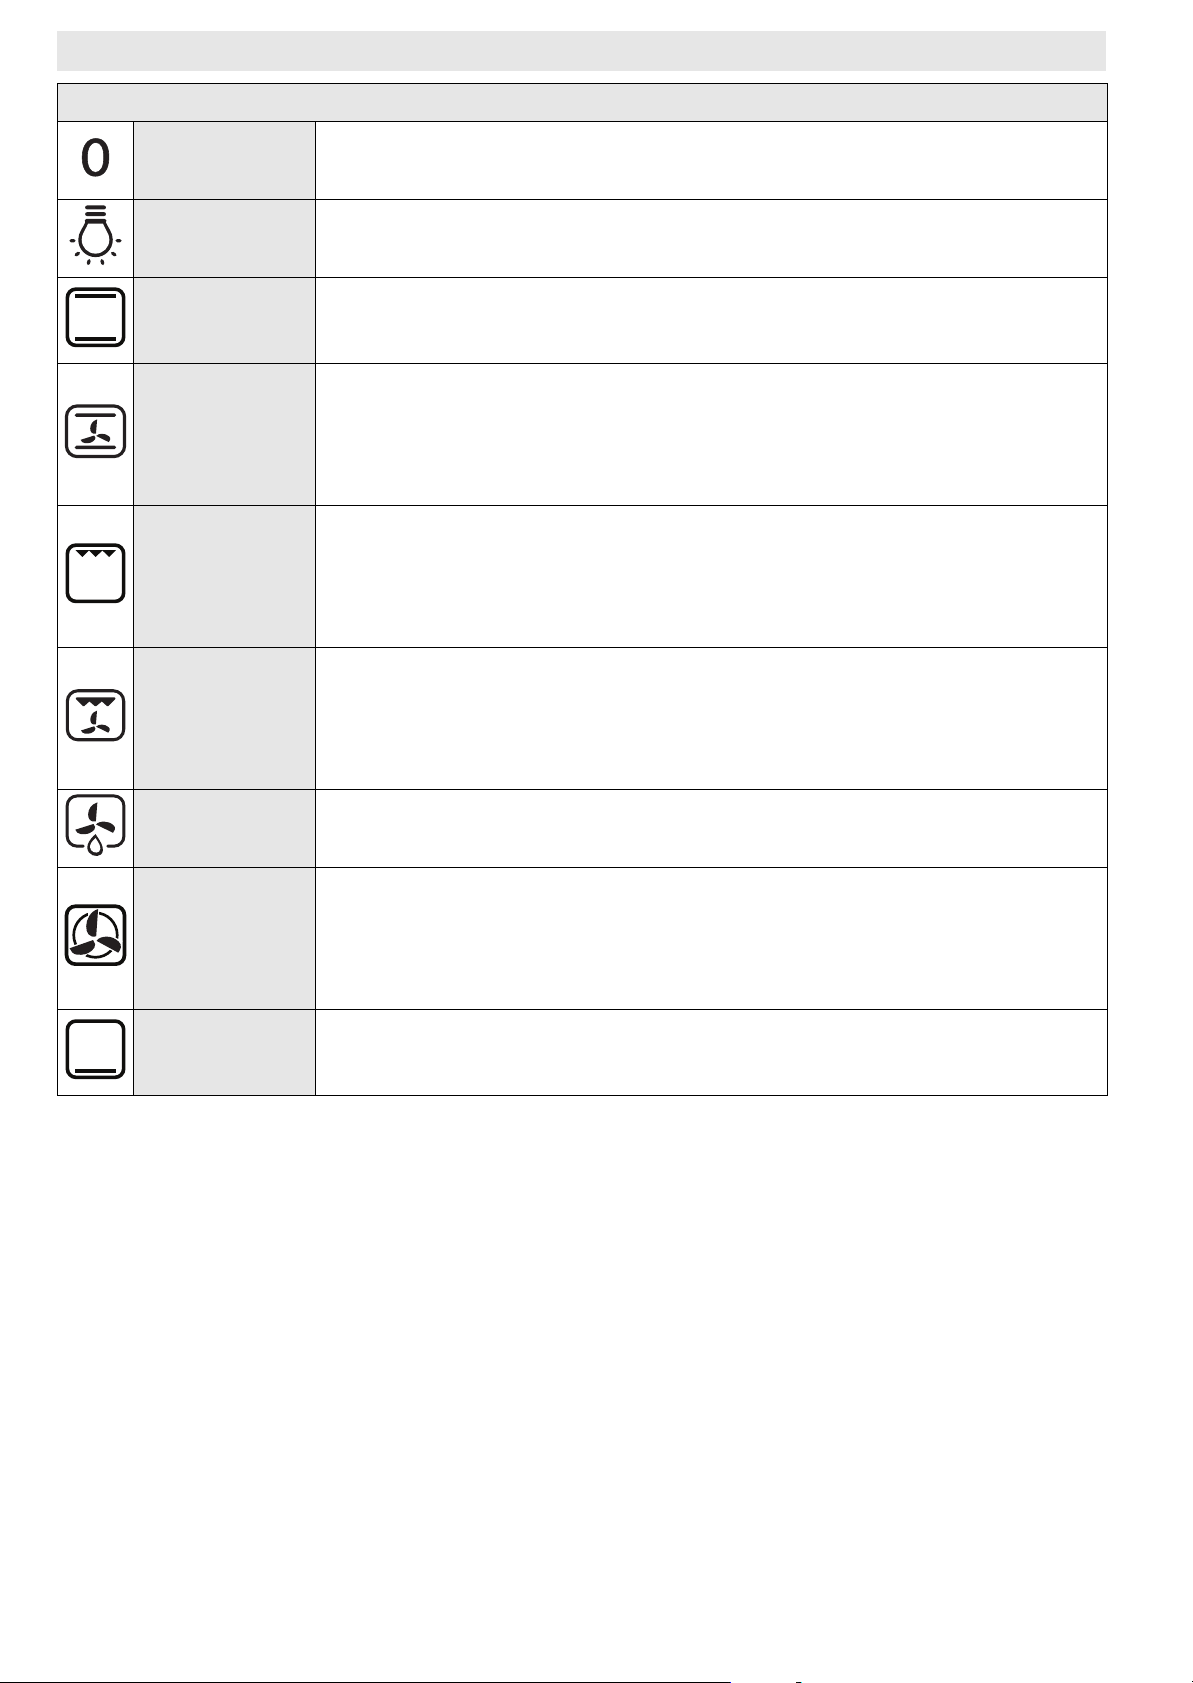
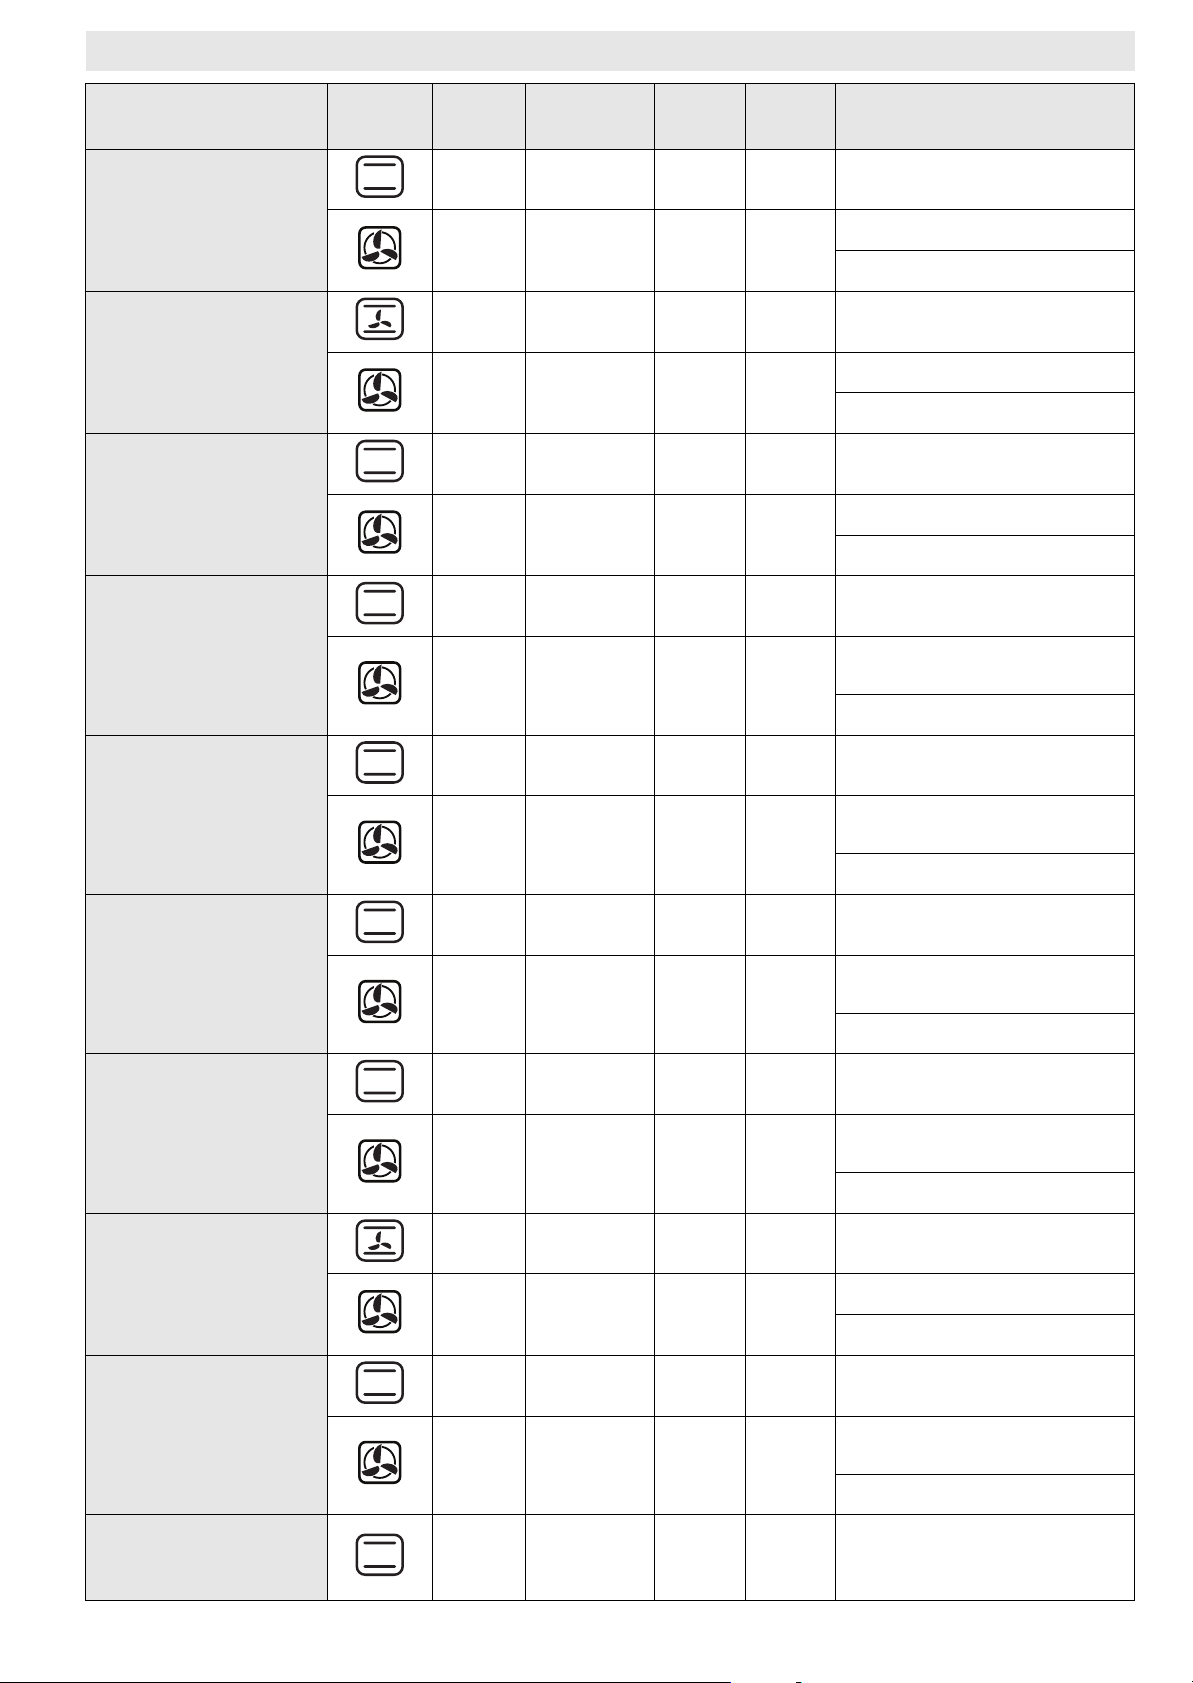
FUNCTION DESCRIPTION TABLE
FUNCTIONS KNOB
OFF To stop cooking and switch off the oven.
LAMP To switch the oven light on/off.
To cook any kind of dish on one shelf only. Use the 3rd shelf. Preheat the oven
CONVENTIONAL
CONVECTION
BAKE
GRILL
TURBO GRILL
to the required temperature. The thermostat led turns off when the oven is
ready and food can be placed in it.
For baking cakes with liquid filling (sweet or savoury) on a single shelf. This
function can also be used for cooking on two shelves. Switch the position of
the dishes to cook food more evenly. Use the 3rd shelf to cook on one shelf
only, and the 1st and 4th to cook on two shelves. Preheat the oven before
cooking.
To grill steak, kebabs and sausages; to cook vegetables au gratin and toast
bread. Place food on the 4th or 5th shelf. When grilling meat, use the drip tray
to collect the cooking juices. Position it on the 3rd/4th shelf, adding approx.
half a litre of water. Preheat the oven for 3-5 min. During cooking the oven door
must remain closed.
To roast large joints of meat (legs, roast beef, chickens). Position the food on the
middle shelves. Use the drip tray to collect the cooking juices. Position it on the
1st/2nd shelf, adding approx. half a litre of water. It is advisable to turn the
meat over during cooking for more even browning. The oven does not have to
be preheated. During cooking the oven door must remain closed.
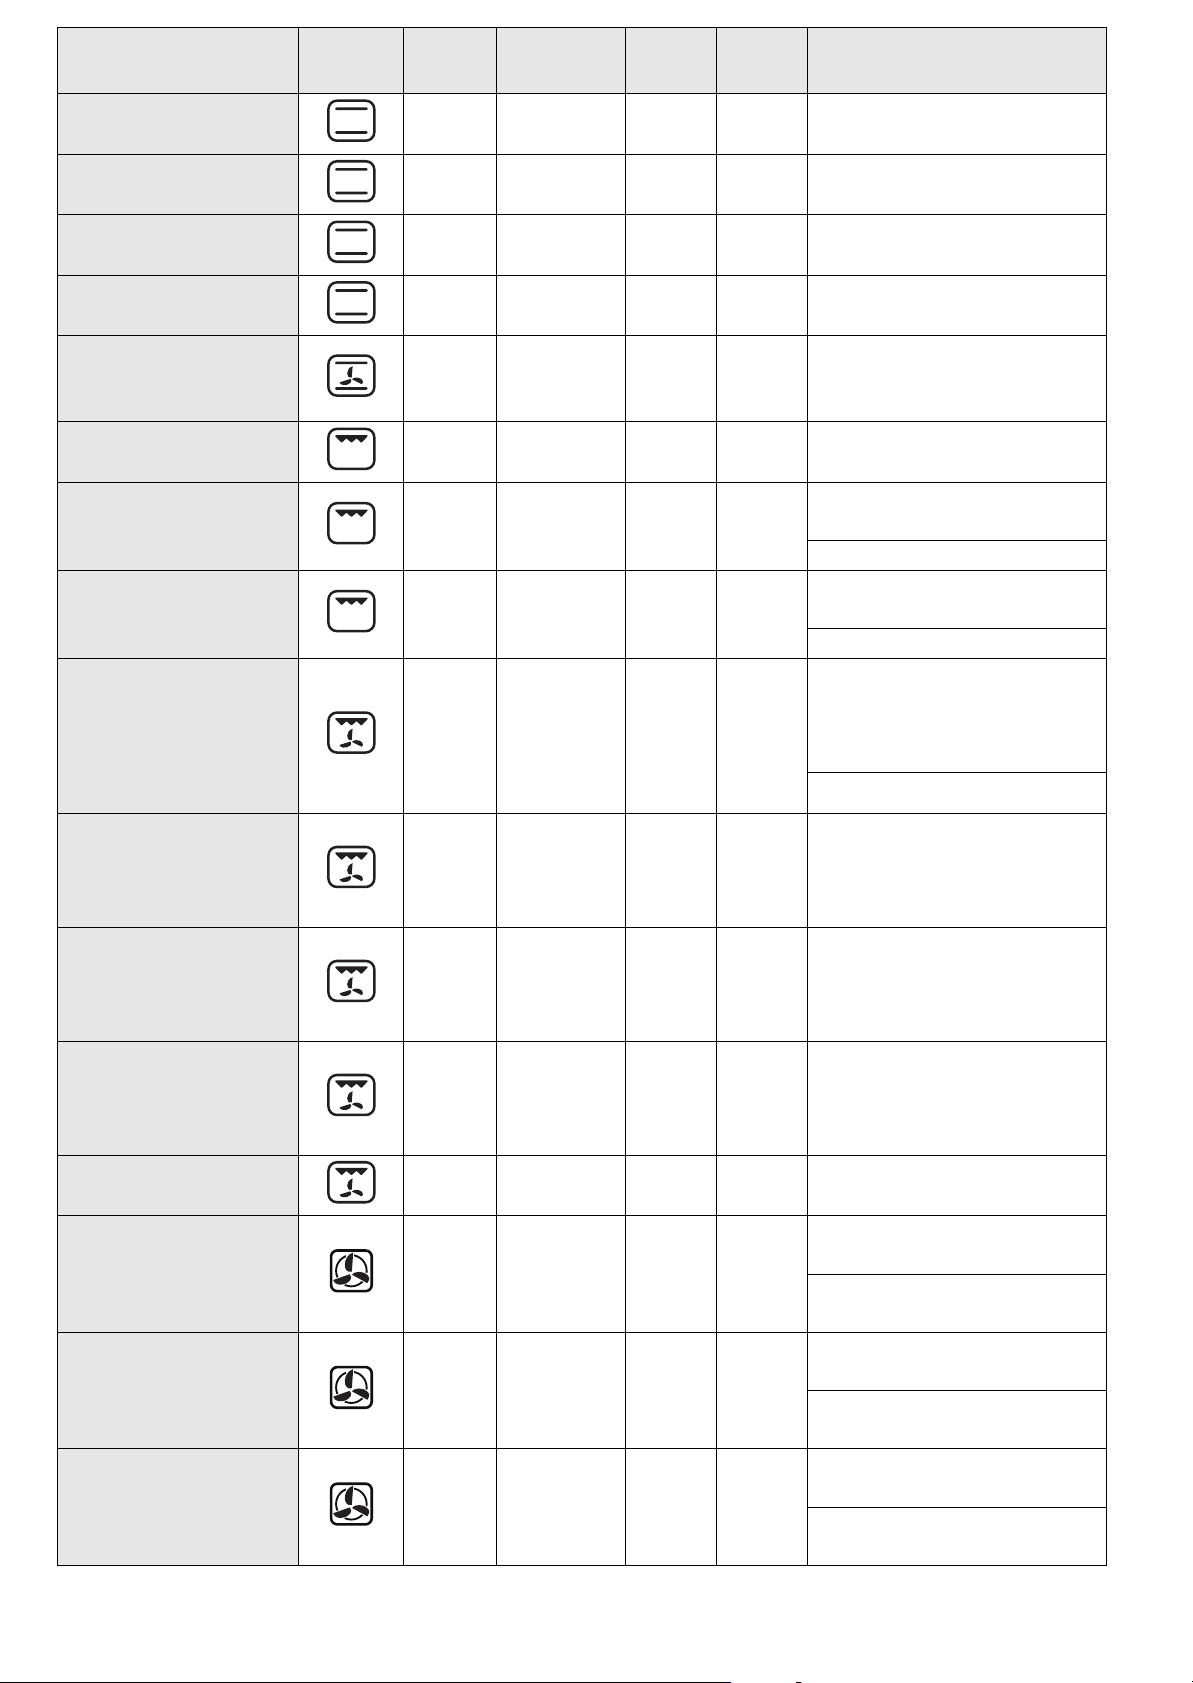
DEFROST
FORCED AIR
BOTTOM
To speed up defrosting of food. Place food on the middle shelf. Leave food in its
packaging in order to prevent it from drying out on the outside.
To cook a variety of food requiring the same cooking temperature on a
maximum of two shelves at the same time (e.g.: fish, vegetables, cakes). This
function can be used to cook different foods without odours being transferred
from one food to another. Use the 3rd shelf to cook on one shelf only. To cook
on two shelves, use the 1st and 4th levels. Preheat the oven before cooking.
The function is recommended for slow-cooking recipes such as meat and
vegetable stews. It can also be used to finish cooking very liquid dishes (sweet
or savoury) or to thicken sauces and gravies. Place food on the 1st shelf.
GB8
COOKING TABLES
Recipe Function Pre-
heating
Yes 3 150-175 35-90 Cake tin on wire shelf
Leavened cakes
Yes 1-4 150-170 30-90
Filled pies (cheesecake, strudel, apple
pie)
Biscuits / Tartlets
Choux pastry
Yes 3 150-190 30-85
Yes 1-4 150-190 35-90
Yes 3 160-175 20-45 Drip tray / baking tray
Yes 1-4 150-175 20-45
Yes 3 175-200 30-40 Drip tray / baking tray
Yes 1-4 170-190 35-45
Shelf (from
bottom)
Temp.
(°C)
Time
(min)
Accessories and notes
Shelf 4: cake tin on wire shelf
Shelf 1: cake tin on wire shelf
Drip tray/baking tray or cake
tin on wire shelf
Shelf 4: cake tin on wire shelf
Shelf 1: cake tin on wire shelf
Shelf 4: wire shelf
Shelf 1: drip tray / baking tray
Shelf 4: oven tray on wire
shelf
Shelf 1: drip tray / baking tray
Meringues
Bread / Pizza / Focaccia
Frozen pizza
Meat & potato pies
(vegetable pie,
quiche lorraine)
Yes 3 100 110-150 Drip tray / baking tray
Shelf 4: oven tray on wire
Yes 1-4 100 130-150
Yes 3 225-250 12-50 Drip tray / baking tray
Yes 1-4 225-250 25-50
Yes 3 250 10-15
Yes 1-4 250 10-20
Yes 3 175-200 45-55 Cake tin on wire shelf
Yes 1-4 175-190 45-60
shelf
Shelf 1: drip tray / baking tray
Shelf 4: oven tray on wire
shelf
Shelf 1: drip tray / baking tray
Shelf 3: drip tray / baking tray
or wire shelf
Shelf 4: oven tray on wire
shelf
Shelf 1: drip tray / baking tray
Shelf 4: cake tin on wire shelf
Shelf 1: cake tin on wire shelf
Vols-au-vent / Puff
pastry crackers
Lasagna / Baked
pasta / Cannelloni /
Flans
Yes 3 175-200 20-30 Drip tray / baking tray
Shelf 4: oven tray on wire
Yes 1-4 175-200 25-45
Yes 3 200 45-55 Oven tray on wire shelf
GB9
shelf
Shelf 1: drip tray / baking tray
Recipe Function Pre-
heating
Shelf (from
bottom)
Temp.
(°C)
Time
(min)
Accessories and notes
Lamb / Veal / Beef /
Pork 1 Kg
Chicken / Rabbit /
Duck 1 Kg
Turkey / Goose 3 Kg Yes 2 200 80-130
Baked fish / en papillote (fillet, whole)
Stuffed vegetables
(tomatoes, courgettes, aubergines)
To as t Yes 5 200 3-5 Wire shelf
Fish fillets / steaks Yes 5 200 20-30
Sausages / Kebabs /
Spare ribs / Hamburgers
Roast chicken
1-1.3 Kg
Yes 3 200 80-110
Yes 3 200 50-100
Yes 3 175-200 40-60
Yes 2 175-200 50-60 Oven tray on wire shelf
Yes 5 200 30-40
- 2 200 55-70
Drip tray or oven tray on wire
shelf
Drip tray or oven tray on wire
shelf
Drip tray or oven tray on wire
shelf
Drip tray or oven tray on wire
shelf
Shelf 4: wire shelf (turn food
halfway through cooking)
Shelf 3: drip tray with water
Shelf 5: wire tray (turn food
halfway through cooking)
Shelf 4: drip tray with water
Shelf 2: wire shelf (turn food
two thirds of the way
through cooking if
necessary)
Shelf 1: drip tray with water
Oven tray on wire shelf (turn
Roast Beef rare 1 Kg - 3 200 35-45
Leg of lamb / Shanks - 3 200 60-90
Roast potatoes - 3 200 45-55
Vegetables gratin - 3 200 20-30 Oven tray on wire shelf
Lasagna & Meat Yes 1-4 200 50-100
Meat & Potatoes Ye s 1-4 200 45-100
Fish & Vegetables Yes 1-4 175 30-50
food two thirds of the way
through cooking if
necessary)
Drip tray or oven tray on wire
shelf (turn food two thirds of
the way through cooking if
necessary)
Drip-tray / baking tray (if
necessary, turn food two
thirds of the way through
cooking)
Shelf 4: oven tray on wire
shelf
Shelf 1: drip tray or oven tray
on wire shelf
Shelf 4: oven tray on wire
shelf
Shelf 1: drip tray or oven tray
on wire shelf
Shelf 4: oven tray on wire
shelf
Shelf 1: drip tray or oven tray
on wire shelf
GB10

RECOMMENDED USE AND TIPS
How to read the cooking table
The table indicates the best function to use for any given food, to be cooked on one or more shelves at the
same time. Cooking times start from the moment food is placed in the oven, excluding pre-heating (where
required). Cooking temperatures and times are purely for guidance and will depend on the amount of food
and type of accessory used. Use the lowest recommended values to begin with and, if the food is not
cooked enough, then move on to higher values. Use the accessories supplied and preferably dark coloured
metal cake tins and oven trays. You can also use pans and accessories in pyrex or stoneware, but bear in
mind that cooking times will be slightly longer. To obtain best results, carefully follow the advice given in
the cooking table for the choice of accessories (supplied) to be placed on the various shelves.
Cooking different foods at the same time
Using the “CONVECTION BAKE” function, you can cook different foods which require the same cooking
temperature at the same time (for example: fish and vegetables), using different shelves. Remove the food
which requires less cooking time and leave food which requires longer cooking time in the oven.
Desserts
- Cook delicate desserts with the conventional function on one shelf only. Use dark coloured metal
cake tins and always position them on the wire shelf supplied. To cook on more than one shelf, select
the forced air function and stagger the position of the cake tins on the shelves, aiding optimum
circulation of the hot air.
- To check whether a raising cake is cooked, insert a wooden toothpick into the centre of the cake. If
the toothpick comes out clean, the cake is ready.
- If using non-stick cake tins, do not butter the edges as the cake may not rise evenly around the edges.
- If the cake “sinks” during cooking, set a lower temperature the next time, perhaps reducing the
amount of liquid in the mixture and mixing more gently.
- For sweets with moist fillings (cheesecake or fruit pies) use the “CONVECTION BAKE” function”. If the
base of the cake is soggy, lower the shelf and sprinkle the bottom of the cake with breadcrumbs or
biscuit crumbs before adding the filling.
Meat
- Use any kind of oven tray or pyrex dish suited to the size of the piece of meat being cooked. For roast
joints, it is best to add some stock to the bottom of the pan, basting the meat during cooking for
added flavour. When the roast is ready, let it rest in the oven for another 10-15 minutes, or wrap it in
aluminium foil.
- When you want to grill meat, choose cuts with an even thickness all over in order to achieve uniform
cooking results. Very thick pieces of meat require longer cooking times. To prevent the meat from
burning on the outside, lower the position of the wire shelf, keeping the food farther away from the
grill. Turn the meat two thirds of the way through cooking.
To collect the cooking juices it is advisable to place a drip-tray with half a litre of water directly under the
grill on which the meat is placed. Top-up when necessary.
Turnspit (only in some models)
Use this accessory to evenly roast large pieces of meat and poultry. Place the meat on the spit rod, tying it
with string if chicken, and check that it is secure before inserting the rod in the seat located on the front
wall of the oven and resting it on the respective support. To prevent smoke and to collect cooking juices,
it is advisable to place a drip-tray with half a litre of water on the first level. The rod has a plastic handle
which must be removed before starting to cook, and used at the end of cooking to avoid burns when
taking the food out of the oven.
Pizza
Lightly grease the trays to ensure the pizza has a crispy base. Scatter the mozzarella over the pizza two
thirds of the way through cooking.
GB11

INSTRUCCIONES IMPORTANTES PARA LA SEGURIDAD
SU SEGURIDAD Y LA DE LOS DEMÁS SON SUMAMENTE IMPORTANTES
Tanto el manual como el aparato tienen importantes mensajes de seguridad que hay que leer y respetar siempre.
Símbolo de peligro que advierte sobre riesgos posibles para el usuario y las demás personas.
Todos los mensajes de seguridad están precedidos del símbolo de peligro y de los siguientes términos:
PELIGRO
ADVERTENCIA
Todos los mensajes de seguridad especifican el peligro al que se refieren e indican cómo reducir el riesgo
de lesiones, daños y descargas eléctricas resultantes de un uso no correcto del aparato. Atenerse
estrictamente a las siguientes instrucciones:
- El aparato se debe desconectar de la red eléctrica antes de efectuar cualquier trabajo de instalación.
- La instalación y el mantenimiento deben ser ejecutados por un técnico especializado según las
instrucciones del fabricante y de conformidad con las normas locales vigentes en materia de
seguridad. No realizar reparaciones o sustituciones de partes del aparato no indicadas
específicamente en el manual de uso.
- La puesta a tierra del aparato es obligatoria.
- El cable de alimentación debe ser suficientemente largo para permitir la conexión del aparato,
empotrado en el mueble, a la toma de red.
- Para que la instalación sea conforme a las normas de seguridad vigentes es necesario un interruptor
omnipolar con una distancia mínima de 3 mm entre los contactos.
- No utilizar tomas múltiples ni prolongadores.
- No tirar del cable de alimentación del aparato para desconectarlo de la toma de corriente.
- Una vez terminada la instalación, los componentes eléctricos no deberán quedar accesibles para el usuario.
- No tocar el aparato con partes del cuerpo húmedas y no utilizarlo con los pies descalzos.
- El aparato está destinado exclusivamente al uso doméstico para la cocción de alimentos. No se
admite ningún otro uso (ej. calentar el ambiente). El fabricante declina cualquier responsabilidad por
los daños producidos por un mal uso del aparato.
- El uso del aparato no está permitido a personas (incluidos los niños) cuyas capacidades físicas,
sensoriales o mentales sean reducidas o que carezcan de la experiencia y los conocimientos
necesarios para ponerlo en funcionamiento, salvo que hayan recibido instrucciones de uso del
aparato de una persona responsable de su seguridad.
- Las partes accesibles pueden recalentarse mucho durante el uso. Los niños deben mantenerse a
distancia y vigilados para que no jueguen con el aparato.
- Durante y después del uso no tocar las resistencias ni las superficies internas del aparato, ya que
pueden causar quemaduras. Evitar el contacto con paños u otros materiales inflamables hasta que
todos los componentes del aparato se hayan enfriado lo suficiente.
- Al final de la cocción, tener cuidado al abrir la puerta del aparato, y dejar salir gradualmente el aire o
vapor caliente antes de acceder al horno. Cuando la puerta del horno está cerrada, el aire caliente sale
por la abertura situada en el panel de mandos. No obstruir dichas aberturas.
- Utilizar guantes de horno para retirar las ollas y los accesorios prestando atención para no tocar las
resistencias.
- No colocar material inflamable dentro o cerca del horno ya que: Dicho material podría incendiarse si
el aparato se pusiera en funcionamiento inadvertidamente.
- No calentar ni cocinar en el horno alimentos en envases o recipientes cerrados. El envase puede
explotar debido a la presión que se genera en el interior y dañar el aparato.
- No utilizar recipientes de materiales sintéticos.
- Las grasas y los aceites recalentados prenden fuego fácilmente. Vigilar la cocción de los alimentos
ricos en grasa y aceite.
- No descuidar el aparato mientras los alimentos se secan.
- Si se utilizan bebidas alcohólicas para cocinar (por ej. ron, coñac, vino), recordar que el alcohol se
evapora a temperaturas altas. Por lo tanto, es posible que el vapor de alcohol llegue a las resistencias
eléctricas y se inflame.
Indica una situación peligrosa que, en caso de no evitarse, provoca lesiones graves.
Indica una situación peligrosa que, en caso de no evitarse, podría provocar
lesiones graves.
ES12
Eliminación de los electrodomésticos
- Este producto ha sido fabricado con material reciclable o reutilizable. Se debe desguazar de
conformidad con las normas de eliminación de desechos. Antes de desecharlo, cortar el cable de
alimentación para inutilizarlo.
- Para obtener información más detallada sobre el tratamiento, la recuperación y el reciclado de los
electrodomésticos, ponerse en contacto con la autoridad local pertinente, el servicio de eliminación
de desechos domésticos o la tienda donde se adquirió el producto.
INSTALACIÓN
Tras desembalar el horno, comprobar que no se haya dañado durante el transporte y que la puerta cierre
correctamente. Si se observa algún problema, contactar con el distribuidor o el servicio de asistencia más
cercano. Para evitar daños, retirar el horno de la base de poliestireno en el momento de la instalación.
PREPARACIÓN DEL MUEBLE PARA EL EMPOTRADO
• Los muebles de cocina en contacto con el horno deben ser resistentes al calor (al menos 90°C).
• Realizar todas las tareas de corte del armario antes de instalar el horno en el alojamiento y retirar por
completo todas las astillas y partículas de madera.
• Después de la instalación, el fondo del horno no debe ser accesible.
• Para que el aparato funcione correctamente, no obstruir la separación mínima entre la superficie de
trabajo y el borde superior del horno.
CONEXIÓN A LA RED ELÉCTRICA
Asegurarse de que el voltaje indicado en la placa de datos del aparato coincida con la tensión de la red. La
placa de datos se encuentra en el borde frontal del horno (visible con la puerta del horno abierta).
• La sustitución del cable de alimentación (tipo H05 RR-F 3 x 1,5 mm2) debe llevarla a cabo un
electricista profesional. Ponerse en contacto con un centro de asistencia técnica autorizado.
RECOMENDACIONES GENERALES
Antes del uso:
- Quitar las protecciones de cartón, la película protectora y las etiquetas adhesivas de los accesorios.
- Sacar los accesorios del horno y calentarlo a 200 °C durante aproximadamente una hora para eliminar
el olor de la grasa protectora y los materiales aislantes.
Durante el uso:
- No colocar objetos pesados sobre la puerta, ya que podrían dañarla.
- No apoyarse sobre la puerta ni colgar objetos del asa.
- No cubrir el interior del horno con papel de aluminio.
- No verter agua en el interior del horno caliente; podría dañar el revestimiento esmaltado.
- No arrastrar ollas ni sartenes sobre la base del horno, ya que podrían dañar el revestimiento
esmaltado.
- Comprobar que los cables eléctricos de otros aparatos no rocen las partes calientes del horno ni
queden atrapados por la puerta.
- No exponer el horno a los agentes atmosféricos.
CONSEJOS PARA PROTEGER EL MEDIO AMBIENTE
Eliminación del embalaje
El material de embalaje es 100% reciclable y está marcado con el símbolo de reciclado ( ). Elimine los
distintos tipos de material del embalaje conforme a la normativa local sobre eliminación de desechos.
Eliminación del producto
- Este aparato lleva la marca CE de conformidad con la Directiva 2002/96/EC del Parlamento Europeo y
del Consejo sobre desechos de aparatos eléctricos y electrónicos (RAEE).
- La correcta eliminación de este producto evita consecuencias negativas para el medio ambiente y la
salud.
- El símbolo en el aparato o en la documentación que lo acompaña indica que no se puede tratar
como desecho doméstico, sino que debe entregarse en un punto de recogida para el reciclado de
aparatos eléctricos y electrónicos.
ES13

Ahorro de energía
- Precalentar el horno sólo si esto se especifica en la receta o en la tabla de tiempos de cocción o en la
receta.
- Utilizar fuentes de horno lacadas o esmaltadas oscuras, ya que absorben mejor el calor.
- Apagar el horno 10/15 minutos antes del tiempo de cocción fijado. Los alimentos que requieren una
cocción prolongada se siguen cocinando incluso después del apagado del horno.
DECLARACIÓN DE CONFORMIDAD
- Este horno está preparado para entrar en contacto con alimentos, es conforme con la normativa
europea ( ) n.1935/2004 y se ha diseñado, fabricado y comercializado de conformidad con las
normas de seguridad de la Directiva sobre “Bajo Voltaje” 2006/95/CE (que sustituye a 73/23/CEE y
siguientes enmiendas), los requisitos de protección de la directiva “EMC” 2004/108/CE.
GUÍA PARA LA SOLUCIÓN DE PROBLEMAS
El horno no funciona:
• Controle que haya corriente eléctrica en la red y que el horno esté enchufado.
• Encienda el horno para comprobar si se ha solucionado el problema.
SERVICIO DE ASISTENCIA TÉCNICA
Antes de contactar con el Servicio de Asistencia:
1. Intente resolver el problema consultando el apartado “Guía para la solución de problemas”.
2. Vuelva a encender el aparato para comprobar si se ha solucionado el problema.
Si el fallo persiste, contacte con el Servicio de Asistencia más cercano.
Indique lo siguiente:
• una breve descripción del problema;
• el tipo y el modelo exactos;
• el número de servicio (número que aparece después de la palabra “Service” en la placa de datos), que
se encuentra en el borde derecho del interior del horno (visible con la puerta del horno abierta).
También aparece en el folleto de la garantía;
• su dirección completa;
• su número de teléfono.
Si fuera necesario efectuar reparaciones, póngase en contacto con un Servicio de asistencia técnica
autorizado para asegurar el uso de piezas de recambio originales y una reparación correcta.
LIMPIEZA
ADVERTENCIA
- No utilice aparatos de limpieza con vapor.
- Limpie el horno sólo cuando esté frío al tacto.
- Desconecte el aparato de la red eléctrica.
Exterior del horno
IMPORTANTE: no utilice detergentes corrosivos o abrasivos. Si uno de esos productos entra
accidentalmente en contacto con el aparato, límpielo de inmediato con un paño húmedo.
• Limpie las superficies con un paño húmedo. Si está muy sucio, utilice una solución de agua con unas
gotas de detergente para vajillas. Seque con un paño seco.
ES14
Interior del horno
IMPORTANTE: no utilice esponjas abrasivas ni raspadores o estropajos metálicos. Con el tiempo,
pueden deteriorar las superficies esmaltadas y el cristal de la puerta del horno.
• Cuando termine de usar el horno, espere a que se enfríe y límpielo, de ser posible aún templado, para
eliminar la suciedad y las manchas debidas a los residuos de los alimentos (por ej., los de alto
contenido de azúcar).
• Utilice detergentes para horno de marca y siga atentamente las instrucciones del fabricante.
• Limpie el cristal de la puerta con un detergente líquido adecuado. Puede retirar la puerta del horno
para facilitar la limpieza (consulte MANTENIMIENTO).
• La resistencia superior del grill (consulte MANTENIMIENTO) se puede bajar (sólo en algunos modelos)
para limpiar el techo interior del horno.
NOTA: durante la cocción prolongada de alimentos con un alto contenido de agua (ej. pizza,
verduras, etc.), puede acumularse condensación en el interior de la puerta y en torno a la junta.
Cuando el horno esté frío, séquelo con un paño o una esponja.
Accesorios:
• Sumerja los accesorios en agua con detergente para vajillas inmediatamente después de usarlos,
utilizando guantes si aún están calientes.
• Los residuos de alimentos pueden eliminarse fácilmente con un cepillo o una esponja.
Limpieza de la pared posterior y de los paneles laterales catalíticos del horno
(si cuenta con ellos):
IMPORTANTE: no utilice detergentes corrosivos o abrasivos, cepillos duros, estropajos para ollas ni
aerosoles para horno que puedan dañar la superficie catalítica y arruinar sus propiedades de autolimpieza.
• Haga funcionar el horno vacío a una temperatura de 200 °C durante una hora.
• A continuación, deje enfriar el aparato y elimine los residuos de alimentos con una esponja.
MANTENIMIENTO
ADVERTENCIA
EXTRACCIÓN DE LA PUERTA
Para extraer la puerta:
1. Abra la puerta por completo.
2. Levante las sujeciones y empújelas al máximo hacia delante (Fig. 1).
3. Cierre la puerta al máximo (A), levántela (B) y gírela (C) hasta liberarla (D) (Fig. 2).
Para montar la puerta:
1. Introduzca las bisagras en sus posiciones.
2. Abra la puerta por completo.
3. Baje las dos palancas de bloqueo.
4. Cierre la puerta.
- Utilice guantes de seguridad.
- Compruebe que el horno está frío antes de llevar a cabo las siguientes
operaciones.
- Desconecte el aparato de la red eléctrica.
Fig. 1 Fig. 2
ES15
DESPLAZAMIENTO DE LA RESISTENCIA SUPERIOR (SÓLO EN ALGUNOS MODELOS)
1. Extraiga las rejillas laterales de soporte de accesorios (Fig. 3).
2. Tire de la resistencia ligeramente hacia fuera (Fig. 4) y bájela (Fig. 5).
3. Para volver a situar la resistencia en su posición, elévela, tire de ella ligeramente hacia fuera, y
compruebe que queda apoyada en los soportes laterales.
Fig. 3 Fig. 4 Fig. 5
CAMBIO DE LA BOMBILLA DEL HORNO
Para cambiar la bombilla posterior (si la hay):
1. Desconecte el horno de la red eléctrica.
2. Desenrosque la tapa de la bombilla (Fig. 6), cambie la bombilla (consulte la nota sobre el tipo de
bombilla) y vuelva a atornillar la tapa.
3. Vuelva a conectar el horno a la red eléctrica.
Para cambiar la bombilla lateral (si la hay):
1. Desconecte el horno de la red eléctrica.
2. Extraiga las rejillas laterales de soporte de los accesorios, si las hay (Fig. 3).
3. Haga palanca hacia fuera con un destornillador hasta sacar la tapa (Fig. 7).
4. Sustituya la bombilla (consulte la nota sobre el tipo de bombilla) (Fig. 8).
5. Vuelva a poner la tapa y empuje contra la pared para engancharla bien (Fig. 9).
6. Monte las rejillas laterales de soporte de los accesorios.
7. Vuelva a conectar el horno a la red eléctrica.
Fig. 6 Fig. 7 Fig. 8 Fig. 9
NOTA:
- Utilice sólo bombillas incandescentes de 25-40W/230V tipo E-14, T300°C o bombillas halógenas de
20-40W/230 V tipo G9, T300°C.
- Las bombillas están disponibles en nuestro Servicio de Asistencia.
IMPORTANTE:
- No manipule las bombillas halógenas con las manos desnudas ya que las huellas digitales
podrían dañarlas.
- No utilice el horno hasta que no haya colocado la tapa de la bombilla.
ES16
 Loading...