

Whirlpool AGB 681/WP, AGB 688/WP, AGB 789/WP, AGB 675/WP, AGB 674/WP INSTRUCTION FOR USE
...Page 1
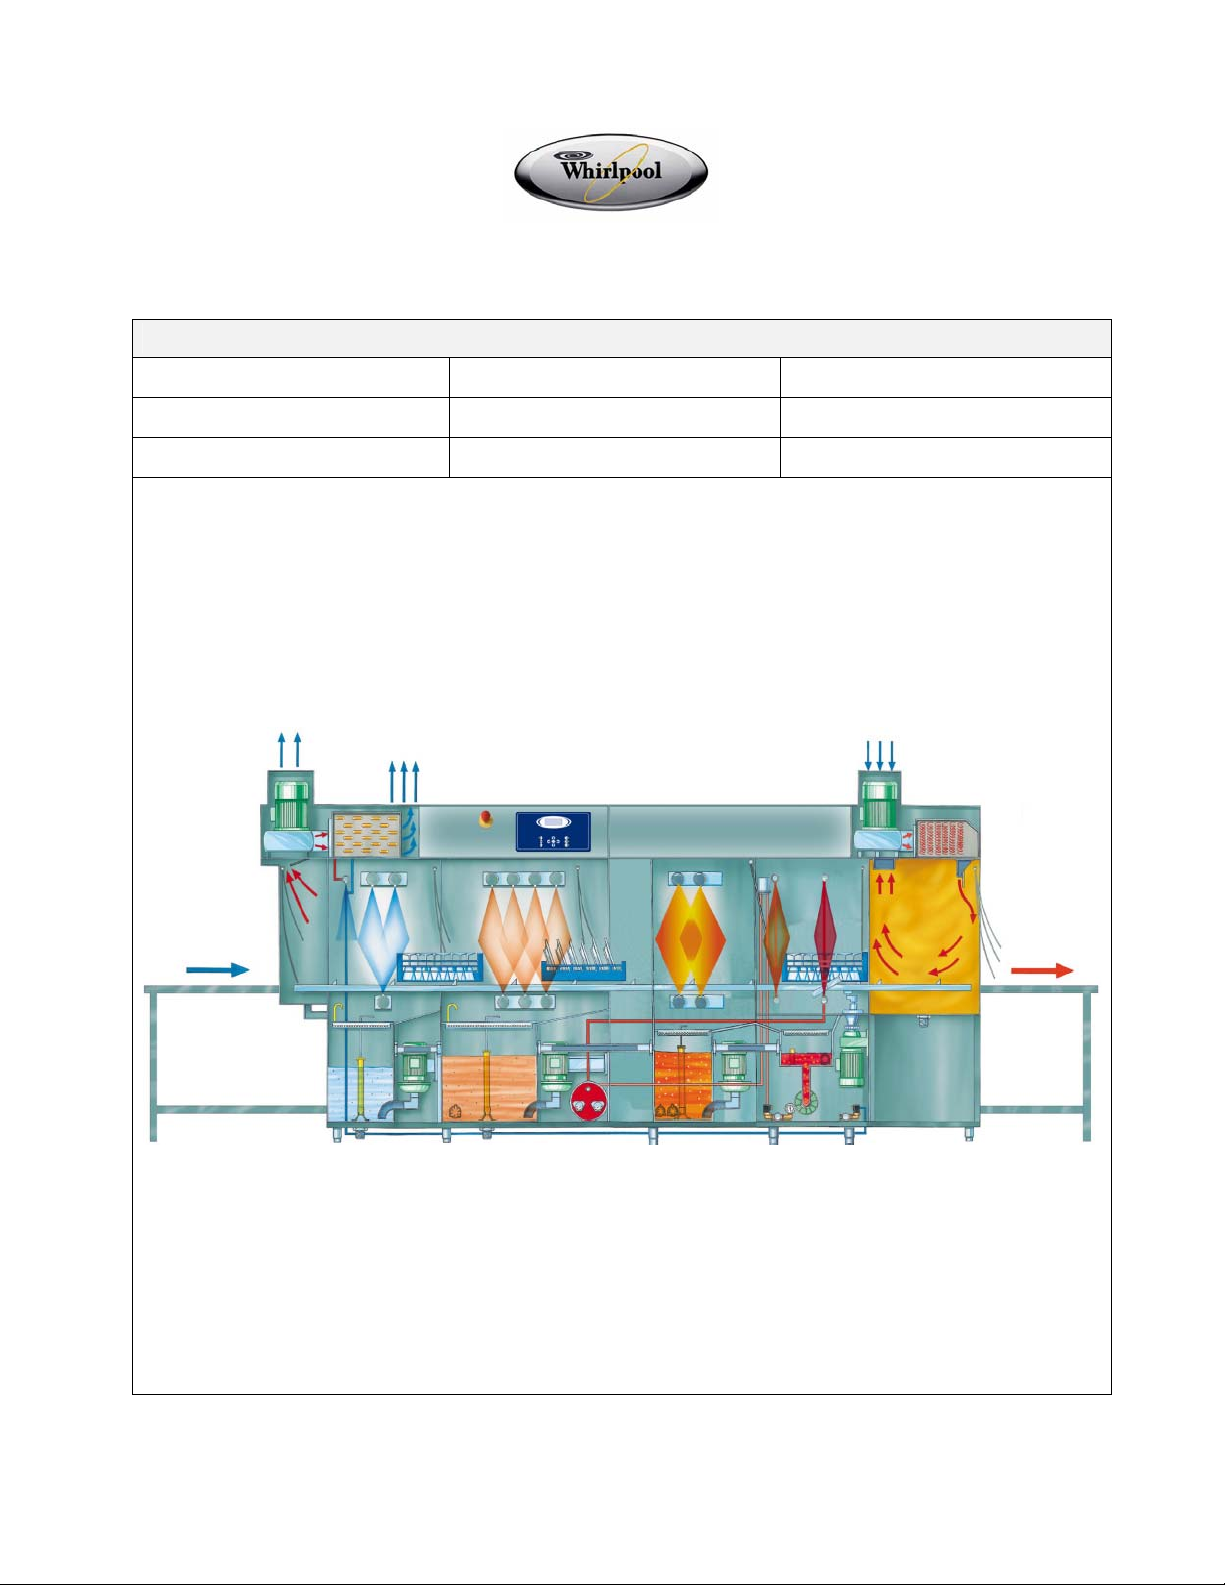
PROFESSIONAL DISHWASHERS
AGB 674-780 AGB 675-676 AGB 681-682
AGB 693-694 AGB 685-686 AGB 687-789
AGB 790-791
MODELS
Page 2

1 Usage and safety warnings
2 Installation and positioning
3 Technical characteristics
4 Installer instructions
5 First startup
6 User instructions
7 Maintenance and cleaning (user)
8 Problems and anomalies (user)
Thank you for having chosen this product.
We recommend that all of the instructions contained in the manual be read carefully in order to fully
understand the most suitable conditions for proper use of the dishwasher.
TECHNICAL INSTRUCTIONS:
Are intended for qualified personnel who shall perform installation, activation, testing
and eventual assistance interventions.
USER INSTRUCTIONS:
Indicate suggestions for use, description of commands and proper dishwasher cleaning
and maintenance.
2
Page 3
1 USAGE AND SAFETY WARNINGS
THIS MANUAL CONSTITUTES AND INTEGRAL PART OF THE DISHWASHER; IT MUST ALWAYS BE
PRESERVED INTACT, TOGETHER WITH THE MACHINE.
POSITIONING, CO NNECTIONS, ACTIV ATION AND TROUBLES HOOTING, AND SUBS TITUTION OF THE
POWER CABLE MUST BE PERFORMED BY QUALIFIED PERSONNEL.
THE DISHWASHER IS INTENDED EXCLUSIVELY FOR PROFESSIONAL USE AND MUST BE USED BY AUTHORIZED
PERSONNEL. IT IS DESIGNED TO WASH DISHES (PLATES, CUPS, BOWLS, TRAYS, SILVERWARE) AND SIMILAR
ITEMS USED IN GASTRONOMIC SECTORS AS WELL AS IN THE PUBLIC CATERING BRANCH, AND IN CONFORMITY
TO THE INTERNATIONAL ELECTRICAL AND MECHANICAL SAFETY (CEI-EN-IEC 60335-2-58/61770) AND
ELECTROMAGNETIC COMPATIBILITY (CEI-IEC-EN 55014-1/-2, 61000-3;4, 50366) NORMS.
THE MANUFACTUIRER DECLINES ANY RESPONSIBILITY FOR DAMAGE TO PERSONS OR THINGS CAUSED BY
FAILURE TO OBSERVE THE INSTRUCTIONS PRESENT IN THE MANUAL, INCORRECT USE, TAMPERING, EVEN
WITH A SINGLE PART OF THE MACHINE, AND THE USE OF NON-ORIGINAL SPARE PARTS.
THE GROUNDING CONNECTION, IN CONFORMITY TO THE METHODS PRESCRIBED BY THE
ELECTRICAL SYSTEM’S SAFETY NORMS, IS OBLIGATORY.
THIS MACHINE IS MARKED IN CONFORMITY TO THE EUROPEAN DIRECTIVE 2002/96/EC, WASTE ELECTRICAL
AND ELECTRONIC EQUIPMENT (WEE).
ENSURING THAT THIS PRODUCT BE DISPOSED OF IN A PROPER MANNER CONTRIBUTES TO THE PREVENTION OF
POTENTIAL NEGATIVE HEALTH AND ENVIRONMENTAL CONSEQUENCES.
THE
PRODUCT MAY NOT BE TREATED AS DOMESTIC WASTE, BUT RATHER MUST BE TAKEN TO A COLLECTION
FACILITY WHICH IS SUITABLE FOR THE RECYCLING OF ELECTRIC AND ELECTRONIC EQUIPMENT.
DISCARD THIS PRODUCT IN CONFORMITY TO THE LOCAL NORMS REGARDING WASTE DISPOSAL.
FOR MORE INFORMATION REGARDING THE TREATMENT, SALVAGE AND RECYCLING OF THIS PRODUCT,
CONTACT YOUR COMPETENT LOCAL OFFICES, YOUR LOCAL WASTE COLLECTION SERVICE PROVIDER OR THE
POINT OF SALE IN WHICH THE PRODUCT WAS PURCHASED.
SYMBOL UPON THE PRODUCT, OR UPON ITS ACCOMPANYING DOCUMENTATION, INDICATES THAT THIS
DO NOT INSERT SOLVENTS SUCH AS ALCOHOL OR TURPENTINE INTO THE MACHINE, AS THEY
COULD CAUSE AN EXPLOSION. DO NOT INSERT DISHES WITH ASH, WAX OR VARNISH RESIDUES
INTO THE MACHINE.
NEVER USE THE DISHWASHER OR ITS PARTS AS A STEPLADDER OR SUPPORT FOR PERSONS,
THINGS OR ANIMALS.
LEANING OR SITTING UPON THE DISHWASHER’S OPEN DOOR COULD CAUSE IT TO TIP AND POSE A
DANGER TO PEOPLE IN THE VICINITY.
IN ORDER TO AVOID TRIPPING UPON IT, DO NOT LEAVE THE DISHWASHER DOOR OPEN.
DO NOT DRINK THE RESIDUAL WATER WHICH MAY BE PRESENT WITHIN THE DISHES OR THE
DISHWASHER ITSELF AFTER A WASH CYCLE.
THE MACHINE IS NOT SUITABLE TO BE USED BY MINORS, AND BY PEOPLE WITH REDUCED
PHYSICAL, SENSORIAL OR MENTAL CAPABILITIES, WHO LACK THE NECESSARY EXPERIENCE AND
KNOWLEDGE FOR ITS PROPER OPERATION. US E OF THE MACHINE IS PE RMIT T ED T O TH ES E P E OPLE
EXCLUSIVELY UNDER THE SUPERVISION OF A PERSON IN CHARGE OF THEIR SAFETY.
3
Page 4

2 INSTALLATION AND POSITIONING
INSTALLATION AND POSITIONING
Bring the dishwasher to its installation location, remove its packaging and verify the integrity of the
apparatus and of its components. If damaged, written notification must be sent to the transporter.
The packaging elements (plastic bags, polystyrene foam, nails, etc) must not be left within reach of children
and domestic animals as they are a potential source of danger.
All of the materials used for packaging are compatible with the environment. They may be safely preserved,
or may be disposed of at an appropriate waste disposal facility.
The components in plastic material subject to eventual disposal through recycling are marked in the
following manner:
PE polyethylene: external wrapping, instructions bag, protection bags.
PP polypropylene: straps.
PS polystyrene foam: protective corners, packaging cover.
The wood and cardboard components can be disposed of by respecting the norms in vigor.
When disposing of the product, do not abandon it in the environment; its disposal must respect the norms in
vigor. All of the metallic parts are in stainless steel and are detachable.
The plastic parts are marked with the symbol of the rela tive material.
POSITIONING:
Warning:
installed, must answer to the norms in vigor.
The manufacturer declines any responsibility for direct damages to persons of things deriving from lack of
respect for the said norms.
Prior to installation, verify that objects and materials which could be damaged by aqueous vapor or by
spray from washing solutions are not in the vicinity, or are adequately protected.
Position the dishwasher in the desired position and remove the protective wrapping.
Level the dishwasher (with the help of a level) on its four feet, regulating them in such a way so as to
guarantee stability; any alternate solution must be approved by the manufacturer.
the internal system and the locations in which communal apparatus are to be
4
Page 5

3 TECHNICAL CHARACTERISTICS
Power supply V 400V/3 400V/3 400V/3 400V/3 400V/3 400V/3 400V/3
Frequency Hz
Max. power consumed kW
Boiler element power kW
1st Wash Tank element
power
2nd Wash Tank element
power
1st Rinse Tank element
power
Pre wash pump power kW
Wash pump power kW
Water supply pressure kPa
Water supply temperature °C
Water supply hardness °dF 7 – 12 7 – 12 7 – 12 7 – 12 7 – 12 7 – 12 7 – 12
Water consumption per
rinse
Pre wash water
temperature
Wash water temperature °C 55-60 55-60 55-60 55-60 55-60 55-60 55-60
Rinse water temperature °C 80-85 80-85 80-85 80-85 80-85 80-85 80-85
Pre washTank capacity l
WashTank capacity l
1st rinse tank capacity l
Theoretical production
with water supply at 50°C
Net weight kg
Power cable type ◄HAR► H07RN-F H07RN-F H07RN-F H07RN-F H07RN-F H07RN-F H07RN-F
Ambient temperature max °C 40 40 40 40 40 40 40
kW
kW
kW
l/h
°C
baskets/h
AGB 674-
780
50 50 50 50 50 50 50
23,5 24,2 24,2 31,25 28,95 36,05
14 14 14 20 14 20
8 8 8 8 8 8
- - - - - -
- - - - 4,5 4,5
- - - 1,1 - 1,1
1,35 2 2 2 2 2
200-400 200-400 200-400 200-400 200-400 200-400 200-400
55 55 55 55 55 55 55
285 285 285 380 285 380
40-45 40-45 40-45 40-45 40-45 40-45
- - - 55 - 55
100 100 100 100 100 100
- - - - 20 20
76 95 76/115 112/169 90/135 137/206 172/259
200 210 230 295 265 325
AGB 675-
676
AGB 681-
682
AGB 693-
694
AGB 685-
686
AGB 687-
789
AGB 790-
791
53,55
20
8
14
6
1,1
2
380
40-45
55
100
20
405
5
Page 6

4 INSTALLER INSTRUCTIONS
The installation must be made by a qualified person, carefully observing all the manufacturer's
indications. After having unpacked the dishwasher, inspect it to see if it has been damaged during
shipment. If there is any suspect evidence, consult a service representative. All the packing materials
(bags - Styrofoam - nails - etc.) must not be left where they can cause harm to persons, especially
children. When installing, made certain the unit is perfectly level - adjusting the feet as required as this wi ll
ensure correct operation.
When locating the machine, allow plenty of free space around it to permit easy access and operation by
maintenance personnel. Remove the rear panel to permit making the water connections. Mount any shelves,
benches or roller units that are to be mounted to the machine inlets and outlets, and then make the end-travel
micro switch electrical connections at the terminals located inside the machine. The machine must be fitted
with detergent and brightening dosing equipment, which will be furnished and installed by the firm that supplies
the cleaning products. The electrical terminal strip for making connections to the dosing units is located inside
the electrical box.
The terminals (B) and (D) on the terminal strip are for the dosing connections: (B) for the brightener and (D) for
the detergent. Do not pour detergent directly into the tubs; this will cause dark marks to appear on their
surfaces. Only use antifoaming detergent. The brightening equipment (B) operates on 24V, and the detergent
equipment (D) operates on the mains voltage. The machine equipped with a IPX1 degree of protection and
should therefore not be washed using direct jets of water.
4.1 WATER CONNECTIONS:
The machine has a filter whose inlet, install a maintenance and safety valve in an easily accessible position
upstream. The water temperature should be between 50°and 55°C; the pressure should be between 200/400
kPa and the water hardness should be between 7° and 12° French.
Hold down the button located next to the thermostat and fill the boiler with water. When the boiler is
completely full, water will issue from the rinsing nozzles. Now set the thermostat to 90°C.
Be careful here, because if you let it get to high you could burn out the electrical.
With machines that have a steam-condenser and heat energy-recovery capability, cold water must be feeding at
a temperature of between 10° and 15°C.
4.2 DRAIN WATER:
Install a floor-level discharging siphon connected to the discharge drain. If no siphon is provided, install one soas
to avoid fumes. Make sure that the discharge tube can resist a temperature of 70°C and no kinks in it.
4.3 STEAM FEEDING:
Connect to the machine fittings as shown in the installation drawing. Install quick-closing and shit-off valves to
make the equipment independent from the main line. The steam should be supplied , saturated and dry, at
pressures ranging between a minimum of 0.5 bar (50Kpa-110.8°C) and a maximum of 0.8 bar (80Kpa-110.8°C)
4.4 STEAM DRAIN:
The condensed steam discharge line to the recovery system has to have an adequate slope to provide positive
evacuation. Install a recycling pump if required. This is only for steam heated machine. A maintenance quick
closing valve should be installed in parallel with the condensate discharge, so as to be able to deviate the
condensate to the sewer.
Caution: make sure that the supply and drain tubes are not bent, restricted or crushed after
installation.
4.5 Electrical connection
The dishwasher’s electrical connection, and that of eventual supplementary apparatus, is to be
entrusted to authorized and qualified personnel, with respect to the norms in vigor; the technical
regulations for the connections are also to be observed. The total power installed is given upon the
apparatus’ technical data label.Other apparatus must not be protected together with the dishwasher.
The user must provide for the installation, according to the norms in vigor, of a main electrical power
switch and of a differential switch compatible with the machine’s characteristics.
These switches must be installed near the dishwasher, be easily accessible after installation and
guarantee complete disconnection from the electrical supply in category III over voltage conditions.
6
Page 7

Caution!!!
‐ Connect the apparatus to the usage equalizer. The
‐ The protection conductor (PE) is yellow-green in color, the neutral conductor (N) is blue and the phase
The dishwasher is free of electrical current only when the main switch is off.
clamp for the connection is located at the lower
back of the machine.
conductors (L1, L2, L3) are black
5 FIRST STARTUP ( Installer )
Before starting up the machine, make sure:
The inlet
water valves
are open
The brightener and
detergent containers are
full and their respective
dosing units are
working properly
The wall switch
is turned on
- The overflow tubes are located
correctly.
- The filters are well located.
- Curtains are correctly placed.
- The doors are closed.
5.1 FIRST START UP ( BOILER AND TANK EMPTY )
Visualization What to do and what happens
CAUTION
.
-
In order to turn the machine on rotate the main switch
to the right on to position start. Main switch
will illuminate green.
Wait for push button
tank is full.
Fill up boiler keeping pressed the push button S5. Keep
it pressed until water will come out from rinse arms
indicating boiler is full.
Settle tank thermostat T3 at 55°C and boiler
thermostat T10 at 85°C.
The manufacturer declines any responsibility for
damages to elements deriving from not following the
said operations.
Make sure that all motors turn in the right direction;
generally this can be taken for granted if the arrow on
the drive assembly turn in the right direction. Motor
gear must turn clock wise.
to turn on green indicating
7
Page 8
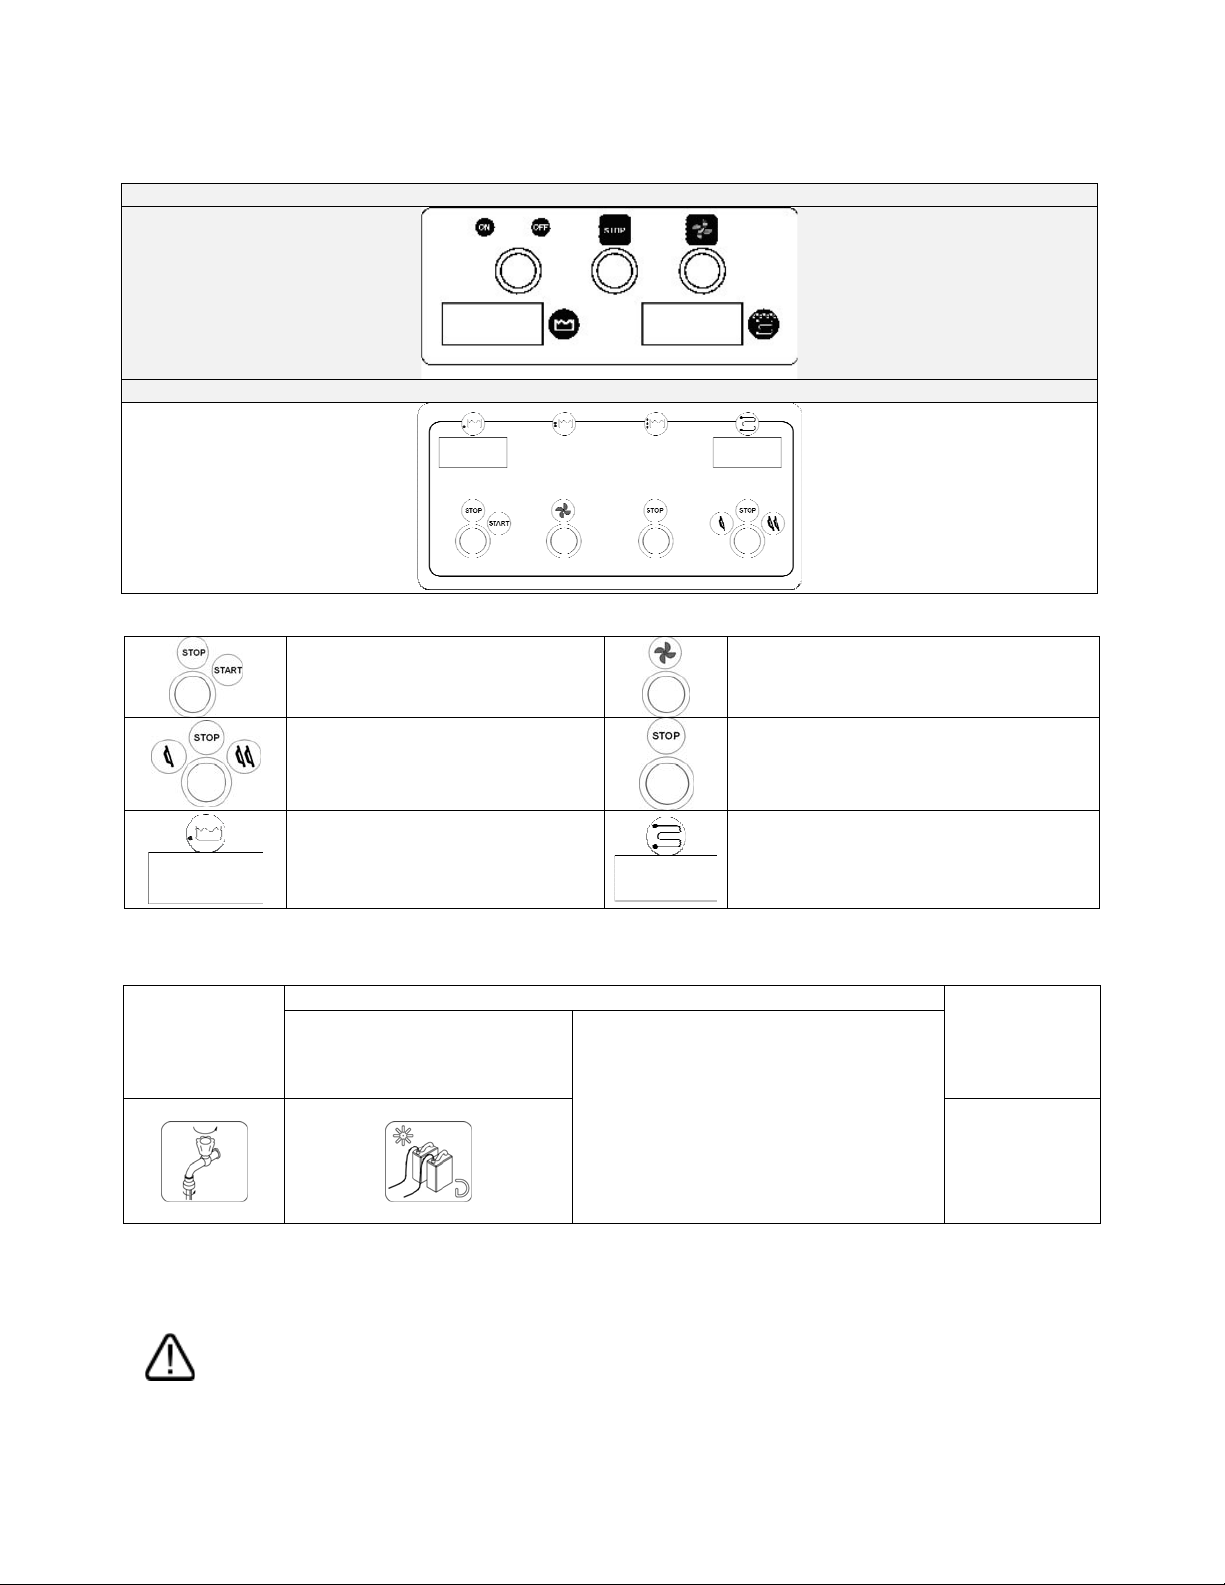
6 USER INSTRUCTIONS
AGB 674-780
AGB 675-676-681-682-693-694-685-686-687-789-790-791
on/off selector
Speed selector
Wash Tanks thermometres
Cycle push button
Stop push button
Rinse thermometre
6.1 Before washing
Before starting up the machine, make sure:
The inlet water
valves are open
Use only detergents and rinse-aids for industrial dishwashers.
Do not use detergents intended for hand washing.
It is recommended to use products which were designed especially for this dishwasher.
During the loading of the tanks, be careful not to switch products as this could provoke dishwasher
malfunction and damage.
Do not mix different detergents together as this could damage the metering unit.
Detergents for industrial dishwashers can cause serious irritations. Take care to respect the instructions
provided by the detergent manufacturer on the packaging.
Rinse aid and detergent
containers are full and their
respective dosing units are
working properly
The wall switch
is turned on
- The overflow tubes are located
correctly.
- The filters are well located.
- Curtains are correctly placed.
- The doors are closed.
8
Page 9

6.2 Loading the dishes
Plates
The rack can hold 12 bowls or 18
plates. Remove solid residues from
the plates (bones, peels, cores, etc.);
let plates, with dried residues of
cheese, egg, etc., soak in cold water
before washing.
Glasses
Position the glasses upside down .
Silverware
Use the appropriate basket. It is preferable to arrange large amounts of silverware with the handles facing
down, taking care to avoid injury from fork prongs and knife blades.
6.3 First daily use
Visualization What to do and what happens
Azionare l’interruttore a muro.
Open the door, insert the overflow pipe, verify filters
are well located and close the door.
Rotate main selector
will illuminate green. Wait for push button
turn on green indicating tank is full. Wait until the
wash tank temperature reaches 55/60°C and rinse
temperature reaches 80/85°C; at this point the
machine is ready for use.
Select the desired program by turning
long cycle or speed cycle.
on to Start, main switch
to
:
Push switch
conveyor bar and wash pumps will start, rinse will start
automatically when baskets will pass the rinse area.
to start the washing process:
9
Page 10

Remove from the dishes all food leftovers and grease
then place the items to be washed in the baskets. If the
tableware has been waiting a long time to be washed,
it will first to be soaked.
Introduce basket into the machine.
Caution: when the machine is functioning do not open
doors quickly
When the baskets are not removed, they continue
onward until they contact the end-travel micro switch
which automatically stops the bar movement and turns
off the rinse water. When the micro switch interrupts
the conveying bar movement, turn off the machine
before removing the cause of the stoppage.
To turn off the machine, whenever required or when the
6.4 Total drainage at the end of the day
When finished using the machine, after having performed the final drainage, turn the machine off by
pressing the on/off button, deactivate the wall switch and turn off the water interception faucet.
Do not leave the machine on, inactive and unutilized for long period s of time.
work has been completed, press button
the control panel.
THE "RED BUTTON" MUST ONLY BE PRESSED
TO TURN PFF THE MACHINE IN CASE OF AN EMERGENCY
Turn the machine off by rotating the selector
on to
turn off the water interception faucet. Open the door
and remove the overflow pipe for draining tanks.
. Deactivate the general wall switch and
located on
10
Page 11

7 MAINTENANCE AND CLEANING
Although special, programmed maintenance is not required, we recommend having the dishwasher checked by a
specialized technician twice a year.
Note: intentional damage or that derived from carelessness, negligence, lack of respect for the regulations,
instructions and norms or erred connections are not to be considered the responsibility of the manufacturer.
7.1 Daily cleaning
The dishwasher has an IPX1 protection rating, but the use of direct streams of water for its cleaning is
forbidden.
CLEANING OF THE FILTER DURING THE DAY
In case of particularly heavy usage it is recommended to perform a cleaning of the filter every 30-40 wash cycles
in order to maintain the machine in operative condition; Use “partia l tank draini ng” in order t o perform th ese
cleanings.
Open the door and remove the "overflow" tube to drain the tube. When the tube
is empty, clean it thoroughly.
Remove and clean the filters. With the steam condensate machines, remove and
clean the filter. In order to avoid burns and skin irritation, do not put naked
hands in hot cleaning water with detergent. If you happen to do so, rinse your
hands
off immediately under lots of running water. When you have completed these
operations, put all the components back in their original locations and leave the
door open in order to avoid unpleasant odours forming. Do not use corrosive
substances,
such as calcium hypochlorite (chlorox,etc.), acids (such as hypochloric acid) or
steel wool or steel brushes to clean the inside and outside parts of the machine.
In order to keep the machine in good running order, any hard-water deposits
(calcium and magnesium carbonates, etc.) should be periodically
removed by qualified professionals.
In order to avoid drops or vapors damaging the steel surfaces, do not even use the above-indicated products for
the cleaning of the flooring beneath or around the dishwasher.
7.2 Periodic checks
Disassemble the wash and rinse arms (lower and up per).
Clean the holes and the nozzles under a stream of clean water. Do not use utensils which could cause damage.
Carefully reassemble the wash/rinse arms.
Clean the outside of the machine with neutral soap and a damp cloth. Rinse and dry with care.
7.3 Prolonged disuse
If the use of the dishwasher is not foreseen for a relatively long period of time, it is necessary to drain the
detergent and rinse-aid dispenser in order to avoid crystallization and pump damage: Remove the suction
tubes from the detergent and rinse-aid containers and emerge them in a container filled with clean water.
Perform a few wash cycles and drain the machine completely.
11
Page 12

Finally, turn off the main switch and close the water supply faucet. The detergent and rinse-aid suction tubes
will be placed back in the containers when the machine is ready to be put back in use, taking care so as not to
invert the tubes
Do not leave the device on, inactive and unutilized for long periods of time.
PROBLEM
The voltage
indicator light does
not turn on
At start-up water
is not loaded
Wash and conveying
phases not
operating
8 PROBLEMS AND ANOMALIES (USER)
POSSIBLE CAUSE
Burned out bulb
Blown magneto thermals
Burned out low-voltage
transformer
Power loss in the mains
Water valve is closed
Dirty air trap
Defective pressure switch
Burned electrovalve coil
Broken or defective membrane
Interrupted end-travel
microswitch
Door microswitch interrupted
Coil remote switch interrupted
Defective button
Motor thermals blown
POSSIBLE REMEDY
Replace
Reset
Replace
Check power loss in the mains
Open de valve
Clean trap
Replace
Replace
Replace
Replace
Replace
Replace
Replace
Reset
Feed water temperature
Rinse water in tub
does not heat
up or not
enough
Tub does not
stop filling
Insufficient
washing
Insufficient
rinsing
Spots and shadows on Water containing calcium and Inspect and request intervention by
Burned electrical resistance
Thermostat out of calibration
Remote switch interrupted
Electrical resistance coated with
deposits
Boiler coated with deposits
Burned electrovalve coil
Membrane broken or defective
Dirty air trap
Pressure switch broken or out of
calibration
Dtached pressure-switch tube
Plugged nozzles
Water temperature too low
Insufficient detergent
Detergent not suitable
Bad detergent dosing
Pump not functioning
Nozzles plugged
Dirty electrovalve
Inlet water pressure unsuitable
Boiler contains deposits Missing
wash/rinse divisory curtain
Check
Replace
Replace
Replace
Clean
Clean
Replace
Replace
Clean
Replace
Reattach
Clean
Check temperature
Ask detergent
technicians to intervene
Replace
Clean
Clean
Check water circuit
Clean Position
12
Page 13

glassed and silverware magnesium
Hardness values not within
7°/10°F Water contains other
minerals (Fe,etc.)
a specialized technician
Insufficient
drying
Insufficient
steam condensate
Insufficient
Washing,rinsing
and drying
Wash/rinse temperature too low
Defective motor, resistances,
etc.
Air intake holes obstructed
Brightener doser inoperative
Brightener container empty
Air expulsion holes obstructed
Plugged filter battery
Cold water inlet closed
Dirty or interrupted electrovalve
Defective motor or electrical
components
FOR STEAM DISHWASHERS
Steam shutter closed
Condensate discharger
obstructed
Steam electrovalve inoperative
Condensate recycling
Deposits on boiler coils and tubs
Insufficient steam pressure and
flow
Steam heating battery
plugged or defective drying
Check
Check and replace
Check
Adjust or replace
Fill
Check
Clean
Open
Clean or replace
Check or replace
Open
Clean
Replace
Check
Clean
Check
Replace
13
 Loading...