


1
2
GB
GENERAL INFORMATION
The appliance is a vertical display cooler with glass doors and with a fan – are designed for storage of
foodstuffs and for chilling of drinks and for a short-term storage of them.
This appliance is intended for commercial use!
THE APPLIANCE IS ECOLOGICALLY CLEAN, CONTAINING NO MATERIALS HARMFUL TO THE OZONE
!
LAYER: the refrigerant used is R600a, the foaming agent used for the appliance insulation is
cyclopentane C
5H10
.
! THE MANUFACTURER GUARANTEES RELIABLE OPERATION OF THE REFRIGERATOR WHEN THE
AMBIENT TEMPERATURE IS +16 TO +32 DEGREES CELSIUS AND THE RELATIVE AIR HUMIDITY NOT
GREATER THAN 60 PER CENT.
The appliance climate class is
Inside temperature class
3.
– S (from –2 °C to +14 °C).
NOMINAL TECHNICAL DATA
Model
Refrigerator total gross volume, L
Refrigerator net volume, L
Dimensions (H x W x D), cm
Shelf area, dm
2
Average air temperature inside the refrigerator, °C
Rated current, A
Weight, kg
Voltage used
Rated input, W
AND 200/1
AND 202/1
290 350
275 320
145x60x60
115 120
from 0 to +10
1,5 1,7
67 85
220 -230V/50HZ
200 230
AND 201/1
AND 203/1
AND 230/1
173x60x60
Data according to requirements of standard EN ISO 23953-2:2005
Product temperature ranges, °C
Door opening area, m²
General product exposure area, m²
Loading of the refrigerator
quantity of bottles, pcs.
0,33 l 275 357
0,5 l 123 219
from -2 to +14
0,66 0,80
0,51 0,62 / 0,58
Maximum loading of one shelf, kg 50 50
Energy consumption at ambient temperature
+25 °C:
kWh/24 h
kWh/year
At
switched
on lighting
2,05
748
At switched
off lighting
2,02
737
At
switched
on lighting
2,14
781
At switched
off lighting
2,07
756
Nominal imput of luminaire, W 8 8
NOTE. The manufacturer reserves the right to make future changes to technical parameters and
specifications.
SAFETY INSTRUCTIONS
! CAREFULLY READ THE INSTRUCTION MANUAL. If instructions are not followed, there is
a risk of injury, damage to the appliance, and loss of the right to free warranty service.
We
recommend to keep the Instruction manual the whole time you have the appliance. When you sell
the appliance, pass the Instruction manual to the new owner of the appliance.
3

GB
WARNING! Do not cover the ventilation holes at the top and on the sides of the appliance.
WARNING! Do not use any mechanical means or electrical devices to hasten the thawing
process when cleaning the freezer compartment.
WARNING! If the supply cord is damaged it must be replaced by the manufacturer,
manufacturer service agent or a similarly qualified person, in order to avoid a hazard.
WARNING! Disposal of the appliance should be according to national rules.
WARNING! Do not damage the appliance refrigeration system.
It contains the refrigerant gas
R600a. If the refrigeration system is damaged:
Do not use any open flame.
Avoid sparks ― do not turn on any electrical appliances or lighting fixtures.
Immediately ventilate the room.
WARNING! Do not allow children to play with the appliance or to plug it in or unplug from
the electricity supply socket. Do not allow children to play with the packaging material
from the appliance.
WARNING! The appliance should not be used by children or mentally challenged
individuals, unless they have previously been shown how to operate the appliance by
someone responsible for their safety.
If the appliance is brought in from the cold (temperature is not higher than +12 °C), you should
wait for two hours before connecting it to the mains.
The appliance should not be connected to the mains until all packing and transport materials aren’t
removed.
Once the appliance is unpacked, make sure that it is complete, that the body and the electrical cord
aren’t damaged.
It is forbidden to use a technically damaged appliance.
WARNING! The appliance must be plugged in to an earthed electricity supply socket. The
earthed electrical socket by which the appliance is connected to the mains should be in an
accessible place.
WARNING! Make sure that the plug of the electrical cord is not squeezed by the back wall
of the appliance or otherwise damaged. A damaged plug can be the cause of a fire!
WARNING! WARNING! When positioning the appliance, be careful that the electrical cord
isn’t squeezed in order to avoid its damage. Do not store heavy objects such as cooling
devices, furniture or other domestic devices next the appliance in such a way that they
could squeeze and damage the electrical cord. This can cause a short circuit and a fire.
WARNING!
IF THE APPLIANCE IS PRODUCED WITH THE SPECIAL SUPPLY CORD IT CAN BE
EXCHANGED ONLY BY THE SAME SPECIAL SUPPLY CORD PROVIDED BY THE MANUFACTURER.
WARNING! The frequency and power of the electricity supply in your house must conform
to the general data parameters of the appliance as it is shown in the table.
IF THE APPLIANCE IS UNPLUGGED (FOR CLEANING, MOVING TO ANOTHER PLACE, ETC.), IT MAY
BE REPEATEDLY SWITCHED ON AFTER
15 MIN.
The appliance can’t be disposed of by burning.
Do not place any switched on electrical devices (such as microwave ovens, hair dryers, irons,
electric kettles or other electrical devices) on top of the appliance because this may cause ignition
of plastic parts.
Do not place any dishes with liquids on top of the appliance and do not keep flowers in vases or
other liquid-filled vessels on the appliance.
! IF THE APPLIANCE IS OUT OF ORDER AND IT IS NOT POSSIBLE TO REPAIR IT BY MEANS OF
GIVEN RECOMMENDATIONS, UNPLUG IT, OPEN THE DOORS AND CALL THE SERVICE EXPERT.
ONLY A SERVICE REPRESENTATIVE CAN REMEDY ALL TECHNICAL OR CONSTRUCTION FAULTS.
WARNING! DO NOT OPEN THE COVER OF THE LED ILLUMINATION.
In case that LED illumination is used the service representative must be contacted when the LED light
is defected.
4
GB
PREPARING THE APPLIANCE FOR O P ER A T IO N
It is recommended to prepare the appliance for operation with a helper.
!
Remove package. Lift the appliance away from foamed polystyrene base.
Therefore take out adhesive tapes from sides and simply lift the appliance up and take out
the board. Strip adhesive tapes off and open the door. Remove the spacer above the door.
When positioning the appliance in chosen location, it will move more easily into position if you lift
the front a little and incline it backward, allowing it to roll on its casters.
Suitably dispose the packaging material.
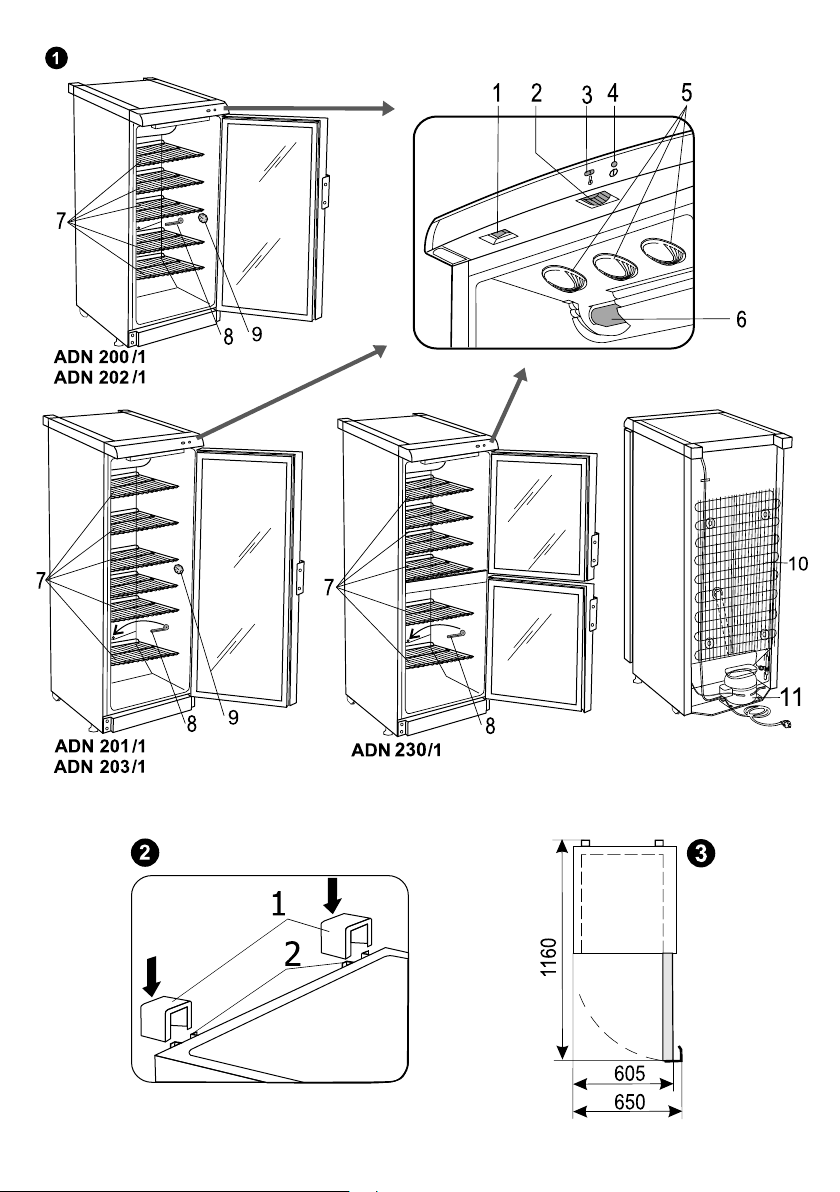
Take two supports from the bag (see fig. 2) and insert them into the guides at the top back part
of the appliance.
POSITIONING
Place the appliance in a dry, well ventilated room.
WARNING! The appliance should not be operated in an unheated room or porch. Place the
appliance away from heat sources such as kitchen stove/oven, radiators, or direct sunlight.
WARNING! The appliance must not touch any pipes for heating, gas or water supply, or
any other electrical devices
.
Do not cover the ventilation holes at the top of the appliances– it must be a good air circulation
around the appliance. There should be a gap of at least 10 cm between the top of the appliance
body and any furniture that may be above it. If this requirement is not followed, the appliance
consumes more electrical energy and its compressor may overheat.
If the appliance is placed in a corner, a gap of at least 1 cm must be left between the appliance
body and the wall (
see fig. 3).
The appliance must stand on a level surface and must not touch the wall. If necessary, regulate
the height of the appliance by adjusting the levelling feet : by turning them clockwise – the front of
the appliance rises, by turning them counter clockwise – it comes down. If the appliance is tilted
slightly backward – the doors will close by themselves.
DESCRIPTION OF THE APPLIANCE, BASIC PART S ( see f i g . 1 )
WARNING!
THE APPLIANCE ACCESSORIES LISTED BELOW MAY DIFFER FROM THE ACCESSORIES
OF THE APPLIANCE YOU HAVE BOUGHT IN QUANTITY AND IN DESIGN. This description is adapted
for entire group of display coolers.
1 Switch -(ON/OFF); 7 Shelf
2 Thermostat knob 8 Cleaner
3 Thermostat scale - (thermostat) 9 Thermometer
*
4 Green signal lamp - (connection to the mains) 10 Condenser
5 Interior light block 11 Compressor
6 Fan
* - for the refrigerators ADN 202/1, ADN 203/1, ADN 230/1
NOTE. With door lock: ADN 203/1, ADN 200/1, ADN 202/1, ADN 201/1
REVIEW OF MECHANICAL CONTROL ( s e e f i g . 1 )
― On / off switch for interior light. On / off switch for interior light I -(ON) O –(OFF)
1
2 ― Thermostat knob. The thermostat is off when there is a zero (0) in the thermostat indicator
space. Turning the thermostat knob clockwise lowers the temperature in the compartment.
3 ― Thermostat indicator. Marked with the symbol
4 ― Electricity supply indicator, marked with the symbol When the appliance is
connected to the electricity supply, the green indicator light is illuminated.
WARNING! The fan
switches on and continuously operates.
5

GB
CHANGING THE OPENING DIRECTION OF THE DO O R S
It is recommended that changing the opening direction of the doors should be done with a helper.
You will need two spanners No. 8 and No. 10 and a Philips head screwdriver.
! When changing the opening direction of the doors, YOU CAN NOT lay the refrigerator horizontally.
Do the actions below in the order they are listed:
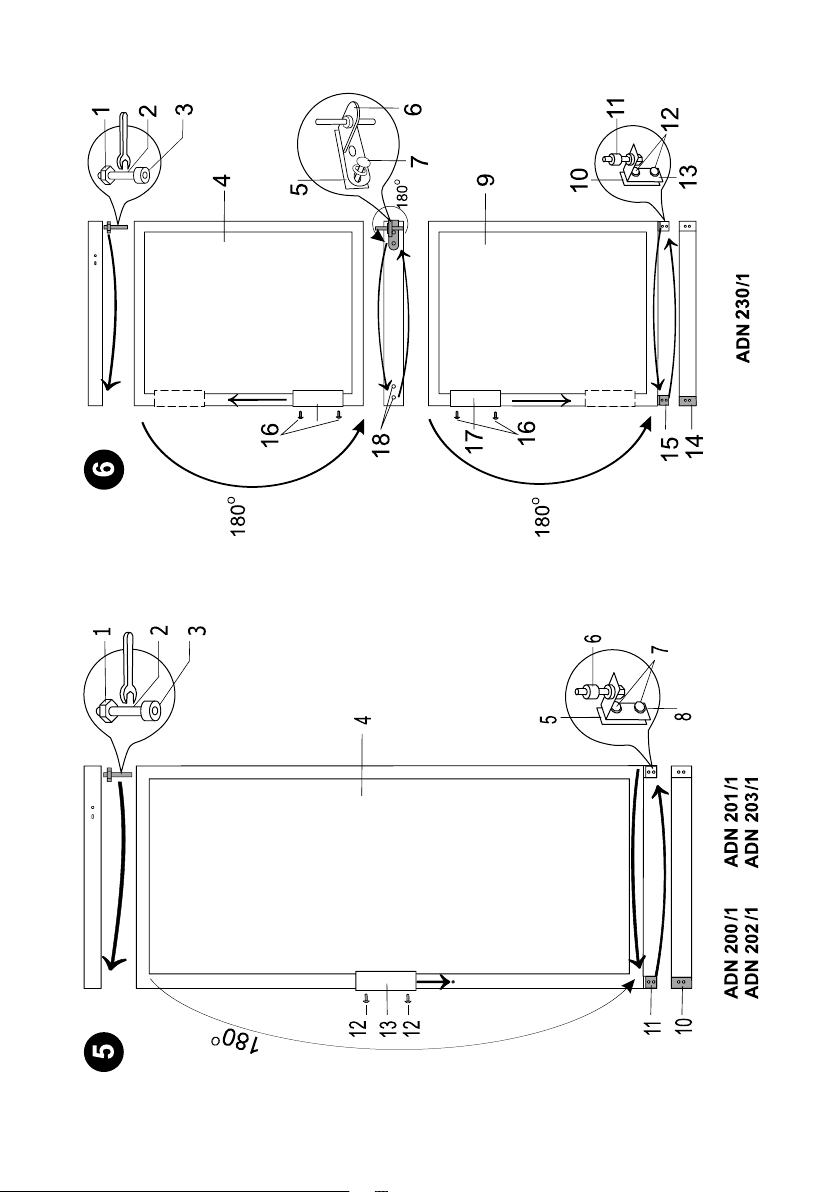
For models ADN 200/1, ADN 202/1, ADN 201/1, ADN 203/1 (Fig. 5):
WARNING! Turn off the appliance and pull the plug out of the electricity supply socket.
1. Unscrew two screws 7 and remove the bottom bracket 8 together with the set of washers 6 on
the axle and the spacer
2. Unscrew two screws
3. Unscrew the axle
this set on the reverse side of the door;
4. Before hanging the door, turn the door over by 180
5. Unscrew fixing screws
the same side. Plate
6. Before screwing the bottom bracket
5.
7 and remove the bracket 11. Remove the door 4.
2 together with the nut 1 and washers 3 from the upper bracket and screw all
0
and insert the upper axle in the door.
12 from doors, remove handles 13 and fix them screwing in free holes on
10 remains in its place.
8 together with the set of washers and spacers on the
reverse side of a cabinet, insert the bracket axle to the door.
7. Screw the bracket
11 on the reverse side of a cabinet.
For models ADN 230/1 (Fig. 6):
WARNING! Turn off the appliance and pull the plug out of the electricity supply socket.
1. Unscrew two screws 12 and remove the bottom bracket 13 together with the set of washers 11
on the axle and the spacer 10.
2. Unscrew two screws
3. Unscrew fixing screws
washers on the axle and the spacer
4. Unscrew the axle
12 and remove the bracket 15. Remove the bottom door 9.
7 of the middle bracket. Remove the middle bracket 6 together with
5. Remove the top door 4.
2 together with the nut 1 and washers 3 from the upper bracket and screw all
this set on the reverse side of the door.
5. Take out the plugs
6. Before hanging the upper door, turn the door over by 180
7. Before screwing the middle bracket
the cabinet, insert the bracket axle into the upper door;
8. Before hanging the bottom door on the middle bracket axle, turn them over by 180
9. Unscrew fixing screws
holes on the same side. Plate
10. Before screwing the bottom bracket
18 in the crossbar zone and displace them on the reverse side.
0
and insert the upper axle in the door.
6 with the set of washers and spacers on the reverse side of
0
.
16 from both doors, remove handles 17 and fix them screwing in free
14 remains in its place.
13 together with the set of washers and spacers on the
reverse side of a cabinet, insert the bracket axle to the door.
11. Screw the bracket
15 on the reverse side of a cabinet.
TEMPERATURE REGULATION
The temperature in the refrigerator compartment is controlled using the thermostat knob 2 (see fig.
) by turning it to one side or the other. The temperature indication in digits is shown beside the
1
thermostat knob. When the door is closed, the temperature setting can be seen on the thermostat
indicator display
3 (fig. 1). The temperature is regulated on the scale of five digits.
0 = Compressor is switched off WARNING! Electric current is not switched off.
= highest temperature (lowest cooling)
1
5 = lowest temperature (highest cooling)
If food products in the refrigerator compartment are too cold, set the thermostat knob to
1, 2 or 3.
If food products in the refrigerator compartment are not being chilled sufficiently, set the thermostat
4 or 5.
knob to
! Please set the desired temperature in the appliance according to your own requirements.
A thermometer placed inside the appliance shows an average temperature of the storage
compartment.
! THE TEMPERATURE IN THE REFRIGERATOR COMPARTMENT MAY VARY DEPENDING ON AMBIENT
6

GB
TEMPERATURE, THE AMOUNT OF FOODSTUFFS, THE TEMPERATURE OF THE FOODSTUFFS, AND
HOW OFTEN THE APPLIANCE DOOR IS OPENED AND CLOSED.
! IF THE ROOM IS COOL, THE APPLIANCE COOLS LESS. THE TEMPERATURE IN THE APPLIANCE MAY
THEREFORE RISE. Use the thermostat wheel to set a lower temperature.
DEFROSTING
The refrigerator compartment defrosts automatically. Drops of ice that form on the back wall of the
refrigeration compartment thaw during the time the compressor is not working and the thaw water
runs down the thaw water runoff channel to the tray on top of the compressor, where it evaporates.
CLEANING AND CARE
!
REGULARLY CLEAN THE APPLIANCE.
! Remember that before defrosting and cleaning the back part of the appliance body you
must disconnect the appliance from the electrical energy supply socket by pulling the
plug out of the electricity outlet.
Protect the appliance inner surfaces and plastic parts from fats, acids and sauces. In case of
accidental spills – immediately clean with warm soapy water or dishwashing detergent. Wipe dry.
Clean the appliance inner surfaces with warm soapy water. Dishwashing detergent may also be
used.
Wipe dry inner and outer surfaces.
Regularly clean the hermetic gaskets of the doors. Wipe dry.
WARNING! REGULARLY CLEAN THE THAW WATER CHANNEL SPACE WITH A SPECIAL CLEANER 8
FOR THAT PURPOSE (Fig. 1).
At least once a year clean dust away from the back part of the appliance body and the compressor.
A soft brush, electrostatic cloth or vacuum cleaner may be used for cleaning.
DO NOT use detergents containing abrasive particles, acid, alcohol or benzene for cleaning the
appliance inner and outer surfaces.
DO NOT use for cleaning cloths or sponges that have coarse surfaces intended for scrubbing.
IF THE APPLIANCE IS TO BE LEFT SWITCHED OFF FOR AN EXTENDED PERIOD, LEAVE ITS DOORS
OPEN.
Remarks on the appliance operating noise. As the appliance operates and goes through the
freezing cycle, various noises will be emitted. This is normal and is not a sign of any malfunction.
As the refrigerant circulates around the refrigeration system, it causes sounds like murmuring,
bubbling, or rustling.
Louder sounds like popping or clicking may be heard for a short time as the refrigerator’s
compressor switches on.
OPERATION PROBLEMS AND THEIR SOLUTIONS (TROUBLESHOOTING)
What if …
The appliance is plugged in to the mains but it does not work and the electricity supply
voltage indicator is not illuminated.
Check that your house electricity supply installations are
in order. Check that the plug is correctly inserted into the electricity supply socket.
The noise has become louder. Check that the appliance is standing stable, on a level place To
make it level, regulate the front feet. Check if the appliance is not touching any furniture, and that
no part of the refrigeration system at the back part of the appliance body is touching the wall. Pull
the appliance away from any furniture or walls. Check that the cause of increased noise isn’t due
to bottles, cans or dishes in the appliance that might be touching each other.
Water has appeared at the bottom of the refrigerator compartment. Check whether a
thaw water channel space isn’t blocked. Clean the thaw water channel space with a cleaner
intended for that purpose.
Water has appeared under the appliance. The thaw water collection tray has slipped off the
compressor. Place the tray on top of the compressor.
When the appliance door is opened, the rubber sealing gasket pulls out. The gasket is
smeared with sticky foodstuffs (fat, syrup). Clean the sealing gasket and the groove for it with
7

GB
warm water containing soap or dishwashing detergent and wipe dry. Put the rubber sealing gasket
back into the place.
High temperature in appliance, the compressor operation pauses are short. Ascertain
whether the appliance door is shutting tightly, whether the door wasn’t kept open longer than
necessary when taking out or putting in foodstuffs, or whether a large amount of warm food was
placed in the appliance.
The top of the appliance has condensation on it. The ambient relative air humidity is above
70 %. Ventilate the room where the appliance stands, and if possible remove the cause of the
humidity.
WARRANTY SERVICE
!
IF YOUR APPLIANCE IS NOT WORKING PROPERLY,
ASCERTAIN WHETHER YOU CAN REMEDY THE CAUSE OF
THE FAULTY FUNCTIONING OF THE APPLIANCE
YOURSELF. If you cannot solve the problem yourself,
contact the nearest refrigerator service representative by
telephone or in writing. When making contact, necessarily
indicate the refrigerator model
1 and number 2. You will
find this data on the product label, which is glued to the
wall of the refrigerator compartment.
Not included in warranty:
Other than normal domestic use (this appliance is for normal domestic use only).
Causes not being related directly to the appliance such as.
Damage occurring during transport or because of wrong usage such as dents, scratches, broken
parts.
Installation errors (such as wrong voltage).
Malfunctioning because of improper usage, dust/fluff in and on the appliance, amongst others
blocking of air circulation, as well as breaking of plastics, rubber, glass which other than by normal
use has gone defect, such to be judged by the service man and or importer.
Warranty rights are not transferable.
If appliance is offered for servicing it needs to be clean, otherwise service can be refused.
TRANSPORT
!
THE MANUFACTURER WILL NOT BE RESPONSIBLE FOR ANY DAMAGE TO THE APPLIANCE THAT
RESULTS FROM NON-COMPLIANCE WITH THE INSTRUCTIONS FOR TRANSPORTATION.
The appliance should be transported only in the vertical position.
When being transported, the appliance should be protected from atmospheric conditions (rain,
snow, dampness).
The appliance should be firmly secured in place while being transported, to avoid slippage or any
shocks in the transport vehicle.
If the appliance was transported not vertically, it may be connected to the mains after 4 hours at
least. If this is not done, the appliance compressor may fail.
ENVIRONMENTAL PROTECTION INFORMA TION
This symbol indicates that once the appliance is no longer needed, it cannot be disposed
together with other miscellaneous municipal waste. It should be collected and eliminated
separately, i.e. in containers specially marked with this symbol in large-dimension rubbish
collection areas.
Full information on where to submit the old appliance safety can be obtained from local government
authorities, the shop where you bought the appliance, or the manufacturer’s representatives.
If you decided to scrap the appliance, make it impossible to use in order to prevent possible
misadventure. Pull out the electric plug from the electricity supply socket and then cut off the cord.
Tear off the gasket. Break the door lock if any.
WARNING! Do not dismantle the appliance yourself. Pass it on to recycling companies.
8

RO
INFORMATII GENERALE
Aparatul se vitrinele frigorifice pentru uz comercial, cu usi de sticla si ventilator. Vitrinele frigorifice
sunt produse pentru pastrarea alimentelor, pentru racirea si pastrarea bauturilor pe scurt timp. Pot fi
folosite in baruri, pentru pastrarea cafelei.
Acest aparat este destinat pentru uz comercial!
APARATUL ESTE ECOLOGIC, NU CONŢINE MATERIALE CARE SĂ DĂUNEZE STRATULUI DE
!
OZON: Lichidul refrigerant folosit este R600a iar spuma folosită pentru izolarea
aparatului este ciclopentanul C5H10.
! PRODUCĂTORUL GARANTEAZĂ FUNCŢIONAREA CORECTĂ A APARATULUI LA TEMPERATURI ALE
MEDIULUI AMBIANT DE LA +16 °C LA +32 °C
ŞI UMIDITATE RELATIVĂ A AERULUI DE PÂNĂ LA
60%. Clasa de climă a aparatului este 3.
Categoria temperaturii interioare
- S (de la -2 °C la +14 °C).
DATE TEHNICE
AND 201/1
AND 203/1
AND 230/1
Volum brut total, L
Volum net total, L
Model
AND 200/1
AND 202/1
290 350
275 320
Dimensiuni, cm
Suprafaţa poliţelor, dm
2
Temperatura în compartimentul frigider, °C
Intensitate, A
Masa, kg
Tensiunea de alimentare
Puterea, W
145x60x60
115 120
de la 0 °C la +10 °C
1,5 1,7
67 85
220 -230V/50HZ
200 230
173x60x60
Datelor în conformitate cu cerinţele standardului EN ISO 23953-2:2005
Gama de temperaturi exterioare de produse , °C
Deschiderea uşii zona, m²
Zona de expunere a produselor , m²
Număr de sticle, buc.
0,33 l 275 357
0,5 l 123 219
de la -2 la +14
0,66 0,80
0,51 0,62 / 0,58
maximă de încărcare de un raft , kg 50 50
Consum de energie la temeratura mediului
de +25 °C:
KW h/24h
KW h/an
Când
luminarea
este în
funcţiune
2,05
748
Când
luminarea
nu este în
funcţiune
2,02
737
Când
luminarea
este în
funcţiune
2,14
781
Când
luminarea nu
este în
funcţiune
2,07
756
Putere nominală de iluminaţie, W 8 8
OBSERVAŢIE: Producătorul îşi rezervă dreptul de a face modificări ulterioare la parametrii şi
specificaţiile tehnice.
MASURI DE SIGURANTA
! CITIŢI CU ATENŢIE MANUALUL DE INSTRUCŢIUNI. Dacă instrucţiunile nu sunt urmate,
există riscul producerii de accidente, defecţiuni la aparatură şi pierderea dreptului de service
gratuit ce intră în condiţiile de garanţie.
cât deţineţi aparatul.
La vânzarea aparatului, înmânaţi manualul de instrucţiuni noului proprietar.
Recomandăm păstrarea manualului de instrucţiuni atâta timp
9

RO
ATENŢIE! Asiguraţi-vă că toate orificiile de ventilaţie din interiorul sau exteriorul aparatului nu
sunt astupate sau blocate.
ATENŢIE! Nu folosiţi dispozitive mecanice sau alte metode pentru a accelera procesul de
decongelare.
ATENŢIE! Nu folosiţi aparate electrice în interiorul compartimentelor de depozitare a
alimentelor decât dacă acestea sunt din clasa recomandată de producător.
ATENŢIE
! Nu deterioraţi sistemul frigorific al aparatului. Conţine agent refrigerant R600a. Dacă
sistemul frigorific este defect:
Nu folosiţi foc deschis.
Evitaţi scânteile – nu porniţi nici un aparat electric sau instalaţii de iluminat.
Aerisiţi imediat încăperea
ATENŢIE! Nu permiteţi copiilor să de joace cu aparatul sau sa-l scoată din/bage în priză. Nu
permiteţi copiilor să se joace cu ambalajul aparatului.
ATENŢIE!
Frigiderul nu va fi utilizat de către copii sau persoane cu handicap mental decât dacă
acestora li s-a arătat mai întâi modul de utilizare al aparatului de către cei care răspund de
siguranţa lor.
Dacă aparatul este adus de la rece (temperatură ce nu depăşeşte +12 °C), aşteptaţi 2 ore înainte de a-l
conecta la reţeaua de alimentare.
Aparatul nu se va racorda la reţeaua de alimentare cu electricitate decât după îndepărtarea elementelor
de împachetare şi transport.
După dezambalarea aparatului, asiguraţi-vă că acesta este complet şi că prelungitorul şi carcasa nu sunt
defecte.
Este interzisă utilizarea unui aparat defect din punct de vedere tehnic.
ATENŢIE! Aparatul va fi conectat la o priză cu împământare. Priza de curent electric
împământată, prin intermediul căreia aparatul este racordat la reţeaua de alimentare, trebuie
să se afle într
-un loc accesibil.
ATENŢIE! DACĂ APARATUL ESTE FURNIZAT ÎMPREUNĂ CU UN CABLU SPECIAL DE ALIMENTARE,
ACESTA POATE FI ÎNLOCUIT DOAR CU ACELAŞI CABLU DE ALIMENTARE FURNIZAT DE CĂTRE
PRODUCĂTOR.
ATENŢIE! Frecvenţa şi puterea energiei electrice furnizate în casa dumneavoastră trebuie să
respecte parametri de date generale ale aparatului, după cum reiese din tabel.
ATENŢIE
! Pentru a evita defecţiunile la amplasarea aparatului aveţi grijă să nu îndoiţi cablul.
Aceasta poate cauza un scurtcircuit sau un incendiu.
ATENŢIE! Asiguraţi-vă ca fişa cablului nu este prinsă de partea posterioară a aparatului sau nu
este deteriorată. Fişele defecte pot cauza incendii!
DACĂ APARATUL ESTE SCOS DIN PRIZĂ (PENTRU CURĂŢARE, MUTARE ÎN ALT LOC ETC.), EL POATE FI
PORNIT ÎN MOD REPETAT DUPĂ
15 MINUTE.
Înainte de curăţare, opriţi aparatul şi scoateţi din priză cablul de alimentare.
Aparatul nu poate fi distrus prin ardere.
Nu puneţi niciun dispozitiv electric pornit pe aparat (cum ar fi cuptoare cu microunde, uscătoare de păr,
fier de călcat, fierbător electric sau alte dispozitive electrice) deoarece acestea pot cauza arderea
componentelor din plastic.
Nu vă urcaţi sau nu vă aşezaţi pe aparat, nu vă sprijiniţi de uşile aparatului şi nu permiteţi copiilor să facă
toate acestea.
! DACĂ APARATUL ESTE DEFECT ŞI NU ESTE POSIBILĂ REPARAREA LUI DUPĂ RECOMANDĂRILE PRIMITE,
SCOATEŢI
-L DIN PRIZĂ, DESCHIDEŢI UŞILE ŞI CHEMAŢI UN SPECIALIST DE ÎNTREŢINERE. DOAR UN
AGENT DE ÎNTREŢINERE POATE REPARA TOATE DEFECŢIUNILE TEHNICE ŞI DE MONTAJ.
ATENŢIE! NU DESCHIDEŢI CAPACUL DE ILUMINARE CU LED. În cazul în care
iluminare LED-
ul este folosit de reprezentantul de servicii trebuie să fi contactat atunci
când lumina LED-ul este fugit.
10

RO
PREGĂTIREA APARATULUI PENTRU PUN ER EA ÎN FUN C Ţ IU N E
! Se recomandă ca pregătirea pentru punerea în funcţiune a aparatului să se facă împreună cu un
ajutor.
Îndepărtaţi ambalajul. Ridicaţi aparatul de pe suportul de polistiren.
Când amplasaţi aparatul în locul ales, el poate fi mai uşor deplasat şi mutat dacă ridicaţi puţin
partea superioară şi îl înclinaţi către spate, permiţându
-i să se mişte pe roţile aparatului.
Dupa dezambalare inlaturati benzile adezive de pe usi si scoateti pachetele din interiorul frigiderului.
Distrugeţi în mod corespunzător ambalajul.
Luaţi două suporturi din pungă (vezi Fig. 2) şi introduceţi-le în ghidajele din partea de sus de pe
spatele aparatului.
DESCRIEREA APARATULUI, COMPONENTE DE BAZ Ă (v e z i F i g . 1 )
ATENŢIE! ACCESORIILE APARATULUI ENUMERATE MAI JOS POT SĂ NU CORESPUNDĂ CU
ACCESORIILE APARATULUI PE CARE L-AŢI ACHIZIŢIONAT, ÎN CEEA CE PRIVEŞTE CANTITATEA SAU
DESIGNUL. Descrierea este adaptată tuturor vitrinei - frigorifice.
1 Intrerupator 7 Raft
Regulator de temperatură
2
(termoregulator)
Indicator de poziţie termostat scala
3
control temperatura
4 Indicator alimentare cu energie electrică
(lumină verde)
5 Lampa iluminaţie
6 Ventilator
Canal de scurgere a apei rezultată
8
din dezgheţare (lumină roşie)
9 Termometer *
10 Condensator
11 Compresor
* - în cazul aparatul ADN 202/1, ADN 203/1, ADN 230/1
OBSERVAŢIE. Cu uşă de blocare: ADN 203/1, ADN 200/1, ADN 202/1, ADN 201/1
CONTROALE SI LUMINI DE AVERTIZARE ( vezi Fig. 1)
― Intrerupator. Este necesar sa apasati comutatorul pentru a stinge lumina din compartimentul
1
pentru pastrare.
| - PORNIT. O – OPRIT.
2 ― Regulator de temperatură (termoregulator). Termostatul, pus in pozitia 0 deconecteaza
doar compresorul de la current. Invartind rotita in sensul acelor de ceasornic, temperatura din
compartiment scade.
3 ― Indicator de poziţie termostat scala control temperature
4 ― Indicator alimentare cu energie electrică (lumină verde) Becul verde aprins indica faptul
ca vitrina frigorifica este conectata la priza.
ATENŢIE! Ventilatorul porneste si functioneaza
continuu la vitrinele frigorifice prevazute cu ventilator.
SCHIMBAREA DIRECŢIEI DE DESCHIDERE A U ŞI L O R
Se recomandă ca schimbarea direcţiei de deschidere a uşilor să fie făcută cu un ajutor. Veţi avea
nevoie de două chei (nr. 8 şi nr.10) şi o şurubelniţă cu cap Philips.
! La schimbarea direcţiei de deschidere a uşilor, NU CULCAŢI frigiderul în poziţie orizontală.
Executaţi acţiunile de mai jos în ordinea dată.
Pentru frigiderul ADN 200/1, ADN 202/1, ADN 201/1, ADN 203/1 (vezi Fig. 5):
ATENŢIE! Opriţi aparatul şi deconectaţi-l de la sursa de curent electric.
1. Dezsurubati ambele suruburi (7) si îndepărtati balamaua (8) împreună cu acesoriile sale, saibe
(6) si saibele intermediare (5).
2. Dezsurubati ambele suruburi
(7) si îndepărtati balamaua (11). Îndepărtati usa (4).
3. Din balamaua superioară demontati axul (2) prin desfacerea suruburilor (1) impreună cu saibele
(3) si montatile in partea opusă, rotiti usa cu 1800si fixati axul balamalei în usă.
4. Dezsurubati suruburile de fixare (12), îndepărtati mânerele (13) si fixati-le în locasurile din
partea opusă. Placa (10) rămâne la locul initial.
11

5. Montati balamaua (8) cu toate accesoriile sale în partea opusă , dar în prealabil introduceti axul în
locasul său din usă,
6. Balamaua circulară (11) se va monta deasemenea in partea opusă.
Pentru frigiderul ADN 230/1 (vezi Fig. 6):
ATENŢIE! Opriţi aparatul şi deconectaţi-l de la sursa de curent electric.
1. Dezsurubati cele două suruburi (12) si scoateti prima balama (13) axul (11) si garnitura (10).
Dezsurubati cele două suruburi (12) si scoateti prima balama (15).
2.
3. Îndepărtati usa (9). Dezsurubati suruburile (7) ale balamalei din mijloc.
Îndepărtati balamaua din mijloc (6) împreună cu saiba si garnitura de etansare, Îndepărtati usa
4.
superioară, din balamaua superioră dezsurubati axul (2) prin desfacerea surubului (1) si a saibei
utati totul în partea opusă, Îndepărtati din partea din mijloc stiftul (18) si montatil in partea
5. M
opusă.
Rotiti usa superioară cu 1800si introduceti axul în locasul său montati balamaua din mijloc în
6.
partea opusă cu toate accesoriile sale (saiba, garnitură, etc.).
7. Rotiti usa inferioră cu 1800si fixati-l în axul balamalei din mijloc.
8. Din ambele usi, dezsurubati suruburile
din partea opusă. Placa (14) ramâne la locul său.
9. În partea opusă însurubati suruburile (13) în balamaua inferioară cu toate accesoriile aferente,
dar in prealabil montati axul în locasul său din usă.
10. Montaţi (fixati) balamaua(15) în partea opusă.
(16), indepărtati mânerele (17) si montatile în orificiile
RO
POZIŢIONARE
Amplasaţi aparatul într-o încăpere uscată, bine aerisită.
ATENŢIE! Aparatul nu trebuie pus în funcţiune într-o încăpere neîncălzită sau în balcon. Amplasaţi
aparatul departe de surse de căldură cum ar fi sobe/cuptoare,
soarelui.
ATENŢIE! Aparatul nu trebuie să atingă nicio conductă de încălzire, gaz sau de
alimentare cu apă, sau orice alte aparate electrice.
Nu acoperiţi gurile de aerisire din partea superioară a aparatului - trebuie să existe o bună circulaţie
a aerului în jurul lui. Între partea superioară a carcasei aparatului şi mobilierul ce poate fi suspendat
deasupra, trebuie să existe o distanţă de cel puţin 10 cm. Dacă această cerinţă nu este respectată,
aparatul va consuma mai multă energie electrică şi compresorul se poate supraîncălzi.
Dacă aparatul este poziţionat într-un colţ, o distanţă de cel puţin 1 cm trebuie păstrată între carcasa
aparatului şi perete
Aparatul trebuie să stea pe o suprafaţă plană şi să nu atingă peretele. Dacă este necesar reglaţi
înălţimea aparatului prin reglarea picioarelor învârtindu
superioară a aparatului se ridică, iar învârtindu-le în sens opus acelor de ceas - coboară. Dacă
aparatul este înclinat către spate – uşile se vor închide singure.
(vezi Fig. 3).
radiatoare sau departe de razele
-le în sensul acelor de ceas - partea
REGLAREA TEMPERAT U R I I
În compartimentul frigider temperatura este reglată prin rotirea discului termostatului 2 (vezi fig.1)
în ambele direcţii. Indicatorul digital al temperaturii este vizibil pe discul termostatului. Când uşa
aparatului este închisă, poziţia termostatului este vizibilă pe indicator
Temperatura este reglată pe o scală cu cinci trepte.
0 = Compresorul este oprit! ATENŢIE! Curentul electric nu este oprit.
= temperatura cea mai ridicată (răcirea cea mai slabă)
1
5 = temperatura cea mai scăzută (răcirea cea mai puternică)
Dacă alimentele din compartimentul frigider sunt prea reci, reglaţi discul termostatului între
Dacă alimentele din compartimentul frigider nu sunt răcite suficient, reglaţi discul termostatului
între 3 şi 5.
! Vă rugăm să reglaţi temperatura dorită în funcţie de propriile necesităţi.
Un termometrul plasat din interiorul aparatului prezinta (indica) temperatura din interiorul
frigiderului.
12
3 (vezi fig.1).
1 şi 3.

RO
! TEMPERATURA DIN COMPARTIMENTUL FRIGIDER POATE VARIA ÎN FUNCŢIE DE TEMPERATURA
DIN EXTERIOR, CANTITATEA ALIMENTELOR, TEMPERATURA ALIMENTELOR ŞI CÂT DE DES AU FOST
ÎNCHISE ŞI DESCHISE UŞILE APARATULUI.
! DACĂ ÎNCĂPEREA ESTE RĂCOROASĂ, APARATUL VA RĂCI MAI PUŢIN. Altfel, temperatura in
interiorul aparatului poate creşte. Folosiţi discul termostatului pentru a regla o temperatură mai
scăzută.
DEZGHEŢAREA COMPART I M E N T ULUI FRIGIDER
Compartimentul frigider se dezgheaţă automat. Picăturile de gheaţă de pe peretele posterior al
frigiderului se topesc în timp ce compresorul funcţionează şi apa topită se scurge prin canalul de
evacuare a apei, în tava de pe compresor, unde se evaporă.
CURĂŢAREA ŞI ÎNTR E Ţ I N E R EA
! CURĂŢAŢI APARATUL LA INTERVALE REGULATE.
! Reţineţi că înainte de curăţarea compartimentului congelator şi înainte de curăţarea
părţii din spate a carcasei aparatului, trebuie să deconectaţi aparatul de la sursa de
alimentare cu energie electrică prin scoaterea fişei din priză.
Feriţi suprafaţa interioară a aparatului şi componentele de plastic de grăsimi, acizi şi sosuri. În caz
de vărsare neintenţionată
Ştergeţi cu o cârpă uscată.
Curăţaţi suprafaţa interioară a aparatului cu apă caldă cu săpun. Se poate folosi, de asemenea,
detergent de vase.
Curăţaţi cu o cârpă uscată suprafaţa exterioară.
Curăţaţi la intervale regulate garniturile de etanşare ale uşilor. Ştergeţi cu o cârpă uscată.
ATENŢIE! CURĂŢAŢI LA INTERVALE REGULATE SPAŢIUL CANALULUI PENTRU APA REZULTATĂ
DIN DEZGHEŢARE
Cel puţin o dată pe an, ştergeţi praful de pe partea din spate a carcasei aparatului şi compresor. La
curăţare se poate folosi o perie moale, o ţesătură electrostatică sau un aspirator.
NU FOLOSIŢI cârpe sau bureţi care au suprafeţe speciale pentru frecare.
DACĂ APARATUL VA FI OPRIT PENTRU O PERIOADĂ MAI LUNGĂ, LĂSAŢI-I UŞILE DESCHISE.
- curăţaţi imediat cu apă caldă cu săpun sau detergent de spălat vase.
8 (vezi Fig.1) CU UN DETERGENT SPECIAL PENTRU ASTFEL DE CURĂŢARE.
Observaţii asupra sunetelor emise de aparat în timpul funcţionării. În timpul funcţionării
aparatului vor fi emise diferite sunete. Acestea sunete normale şi nu semnul unei defecţiuni.
Agentul refrigerant circulă în sistemul frigorific producând sunete asemănătoare unor murmure,
gâlgâituri şi zornăit.
Sunetele mai puternice, cum ar fi pocnetele şi clicuri, pot fi auzite pentru un scurt timp atunci când
este pornit compresorul.
PROBLEME DE FUNC Ţ I O N A R E Ş I SOLUŢIILE ACESTO R A
(REMEDIERE DEFECTE )
Ce se întâmplă dacă ...
Aparatul este conectat la reţeaua de alimentare, dar nu funcţionează şi indicatorul de
alimentare cu electricitate nu este aprins. Asiguraţi-vă că instalaţiile de alimentare la sursa de
curent electric funcţionează. Asiguraţi
Zgomotul se intensifică. Asiguraţi-vă ca aparatul să aibă o poziţie stabilă şi să stea pe o
suprafaţă netedă. Pentru aducerea la nivel, reglaţi piciorul din faţă. Asiguraţi
atinge nicio piesă de mobilier, şi că nicio parte a sistemului frigorific din spatele carcasei apar
nu atinge peretele. Îndepărtaţi aparatul de orice piesă de mobilier sau de perete. Verificaţi dacă
zgomotul nu s-a intensificat din cauza unor sticle, conserve sau vase din aparat care se pot atinge
unele de altele.
La baza compartimentului frigiderului este apă. Verificaţi dacă nu e blocat vreun spaţiu al
canalului pentru evacuarea apei rezultată din dezgheţare. Curăţaţi spaţiul canalului pentru apă cu
un detergent special.
-vă ca fişa să fie corect introdusă în priză.
-vă că aparatul nu
atului
13

Sub aparat este apă. Tava de colectare a apei dezgheţate a alunecat de pe compresor. Puneţi
tava pe compresor.
Când uşa aparatului se deschide, iese garnitura de etanşare din cauciuc. Garnitura este
murdară cu alimente lipicioase (grăsimi, siropuri). Curăţaţi garnitura de etanşare şi ghidajul
acesteia cu apă caldă şi săpun sau detergent de vase şi apoi ştergeţi cu o cârpă uscată. Montaţi
înapoi garnitura de etanşare de cauciuc.
O temperatură ridicată în frigider indică faptul că compresorul funcţionează pentru
perioade lungi sau neîntrerupt. Verificaţi dacă uşa aparatului se închide bine, dacă uşa nu a
fost deschisă mai mult decât necesar sau dacă în aparat a fost introdusă o cantitate mare de
alimente calde.
Partea de sus a aparatului are condens. Umiditatea relativă a mediului ambiental este peste
70 %. Aerisiţi încăperea în care se află aparatul, şi, dacă este posibil, înlăturaţi cauza umidităţii.
RO
SERVICE GARANŢI E
! DACĂ APARATUL ESTE DEFECT, VERIFICAŢI DACĂ DUMNEAVOASTRĂ ÎNŞIVĂ PUTEŢI SĂ
REMEDIAŢI FUNCŢIONAREA DEFECTUOASĂ A APARATULUI.
apelaţi, telefonic sau în scris, la cel mai apropiat service de frigidere. La contactarea acestora,
menţionaţi modelul frigiderului (1) şi numărul (2). Veţi găsi aceste informaţii pe eticheta produsului
care este lipită pe peretele din dreapta
al compartimentului frigider.
Dacă nu reuşiţi să rezolvaţi problema,
14

PL
NAJWAŻNIEJSZE INFORMACJ E
Urządzenie chłodnicze reprezentują typ chłodziarek - witryn chłodniczych ze szklanymi drzwiami i
szerokim
wachlarzem możliwości. Może być używana do krótkotermino-wego przechowywania
żywności. Może być używana do krótkotermino-wego przechowywania żywności. Może być wykorzystana w
barach, kafejkach.
Te przyrządy chłodnicze jest przeznaczony dla komercyjnego korzystania!
! URZĄDZENIE CHŁODNICZE JEST NIESZKODLIWE DLA ŚRODOWISKA, NIE ZAWIERA SUBSTANCJI
NISZCZĄCYCH POWŁOKĘ OZONOWĄ. Zawiera czynnik chłodzący R600a, natomiast izolacja urządzenia
jest wykonana z cyklopentanu C5H
10
! PRODUCENT GWARANTUJE NIEZAWODNĄ PRACĘ URZĄDZENIA W TEMPERATURZE OTOCZENIA OD +16
DO +32 °C ORAZ PRZY WILGOTNOŚCI WZGLĘD
NEJ DO 60 PROCENT.
Klasa klimatyczna chłodziarki: 3
Klasa temperatury wewnętrznej - S (od -2 °C do +14 °C).
NOMINALNE DANE TECHNICZNE
Model
AND 200/1
AND 202/1
AND 201/1
AND 203/1
AND 230/1
Pojemność całkowita brutto, L 290 350
Pojemność użytkowa komory przechowywania
netto, L
Wysokość x szerokość x głębokość, cm
Powierzchnia polek, dm
2
275 320
145x60x60
115 120
173x60x60
Średnia temperatūra powietrzna w lodowce, °C od 0 do+10
Prąd, A 1,5 1,7
Waga, kg 67 85
Napięcie zasilania
220 -230V/50HZ
Moc kompresora, W 200 230
Dane według wymagania standardu EN ISO 23953-2:2005
Granicy temperatur produktowych, °C od -2 do +14
Obszar odkrywania drzwi, m² 0,66 0,80
Wspólny obszar eksponowania, m² 0,51 0,62 / 0,58
Nakładanie lodówki, naczyń, jedn.
0,33 l 275 357
0,5 l 123 219
Maksymalne obciążenie jednej polki, kg 50 50
Poziom poboru energii kWh/za dobe
kWh/za rok
Przy
wkluczonym
oświetleniu
2,05
748
Przy
wykluczonym
oświetleniu
2,02
737
Przy
wkluczonym
oświetleniu
2,14
781
Przy
wykluczonym
oświetleniu
2,07
756
Nominalna moc żarówki oświetlenia, W 8 8
UWAGA. Producent zastrzega sobie prawo do zmian parametrów, których nie wykazano w instrukcji.
ŚRODKI OSTROŻNOŚCI
! PROSIMY DOKŁADNIE PRZECZYTAĆ INSTRUKCJĘ UŻYTKOWANIA. W przypadku
nieprzestrzegania zaleceń zawartych w instrukcji istnieje niebezpieczeństwo skaleczenia
się, uszkodzenia urządzenia oraz utraty prawa do bezpłatnego serwisu
gwarancyjnego.
Instrukcję należy zachować przez cały okres użytkowania urządzenia chłodniczego. W przypadku
sprzedaży urządzenia nowemu właścicielowi należy przekazać także instrukcję.
15

UWAGA! Nie zakrywać otworów wentylacyjnych znajdujących w górnej części i po bokach
chłodziarki.
UWAGA! Nie używać żadnych środków mechanicznych ani urządzeń elektrycznych do
przyspieszenia procesu rozmrażania komory zamrażarki.
UWAGA! Nie dopuszczać do uszkodzenia układu chłodniczego. W przypadku uszkodzenia
układu chłodniczego:
Nie używać otwartego ognia
Nie używać urządzeń iskrzących - nie włączać sprzętu elektrycznego i oświetleniowego.
Niezwłocznie przewietrzyć pomieszczenie.
UWAGA! Nie dopuszczać, aby dzieci bawiły się urządzeniem chłodniczym, wyłączały lub
włączały go z gniazdka zasilającego. Nie dopuszczać, aby dzieci bawiły elementami
opakowania urządzenia.
PL
Po wniesieniu urządzenia chłodniczego z zimnego otoczenia (o temperaturze do +12 °C) przed
włączeniem do sieci zasilającej należy odczekać dwie godziny.
Przed włączeniem urządzenia chłodniczego do sieci zasilającej należy usunąć opakowanie i wszelkie
i materiały transportowe.
Po rozpakowaniu urządzenia należy upewnić się, czy zawiera ono pełne wyposażenie, czy nie ma
uszkodzeń obudowy ani przewodu zasilającego.
Zabrania się użytkowania urządzenia niesprawnego technicznie .
UWAGA! Urządzenie chłodnicze należy koniecznie podłączyć do gniazdka z uziemieniem.
GNIAZDKO Z UZIEMIENIEM DO PODŁĄCZENIA URZĄDZENIA DO SIECI ZASILAJĄCEJ
POWINNO ZNAJDOWAĆ SIĘ W DOSTĘPNYM MIEJSCU.
UWAGA! W CELU UNIKNIĘCIA SZKÓD NA ZDROWIU LUB MIENIU USZKODZONY PRZEWÓD
ZASILAJĄCY NALEŻY NIEZWŁOCZNIE WYMIENIĆ NA TAKIEGO SAMEGO TYPU PRZEWÓD
NIEUSZKODZONY, ZALECANY PRZEZ PRODUCENTA URZĄDZENIA.
UWAGA! Częstotliwość i moc energii elektrycznej w Państwa mieszkaniu powinny
odpowiadać parametrom podanym na tabliczce znamionowej chłodziarki .
UWAGA! Należy uważać, aby przy stawianiu chłodziarki nie przycisnąć przewodu
zasilającego, co może spowodować jego uszkodzenie. Na przewodzie zasilającym nie
stawiać ciężkich przedmiotów, np. samego urządzenia chłodniczego, mebli, sprzętów
gospodarstwa domowego, gdyż mogą uszkodzić przewód.
pożarem.
UWAGA! Upewnić się, że wtyczka przewodu zasilającego chłodziarki nie została
przyciśnięta przez ścianę tylną chłodziarki lub w inny sposób uszkodzona. Nie przyciskać
wtyczki przewodu zasilającego tylną ścianą lodówki. Uszkodzona wtyczka może być
przyczyną pożaru!
Grozi to zwarciem oraz
LODÓWKĘ ODŁĄCZONĄ OD SIECI (CZYSZCZENIE, PRZESUWANIE NA INNE MIEJSCE ITP.)
PONOWNIE MOŻNA WŁĄCZYĆ DO SIECI PO UPŁYWIE CO NAJMNIEJ 15 MIN.
Urządzenia nie powinno się utylizować poprzez spalanie.
Na urządzeniu nie stawiać włączonych urządzeń elektrycznych: kuchenek mikrofalowych, suszarek
do włosów, żelazek, czajników elektrycznych i innych urządzeń elektrycznych
elementy z tworzywa sztucznego.
– mogą one uszkodzić
Nie stawiać na urządzeniu chłodniczym naczyń z płynami, kwiatów w wazonach ani innych
naczyniach wypełnionych płynem.
! JEDYNIE PERSONEL SERWISU JEST UPRAWNIONY DO USUWANIA WSZELKICH USTEREK
TECHNICZNYCH I KONSTRUKCYJNYCH.
UWAGA! ZAKAZANE ZDJĄC KAPTUR LAMPY (LED). Jeśli w urządzeniu chlodnyczym jest
zamontowana lampa LED i oświetlenie nie pracuje, prośba zwracać sie do przedstawiciela
serwisu ze względu jej zmiany.
Zmienić lampe mogę tylko przedstawiciel !
16

PL
OPIS URZĄDZENIA, PODSTAWOWE CZĘŚCI (Rys. 1 )
UWAGA! NIŻEJ WYMIENIONE AKCESORIA MOGĄ RÓŻNIĆ SIĘ OD AKCESORIÓW ZAKUPIONEJ
CHŁODZIARKI POD WZGLĘDEM ILOŚCI ORAZ WYKONANIA. PONIŻSZY OPIS ODNOSI SIĘ DO CAŁEJ
GRUPY CHŁODZIAREK - WITRYN. Poniższy opis odnosi się do całej grupy chłodziarek - witryn.
Włącznik
1
2 Termostat
Wskaźnik pozycji termostatu (cyfrowy)
3
Wskaźnik zasilania (kolor zielony)
4
Oświetlenie
5
Ventiliator
6
Półka
7
Urządzenie do czyszczenia kanału
spustowego wody z odszraniania
8
(kolor czerwony)
9 Thermometr
Skraplacz
10
Sprężarka
11
*
* - dla chłodziarki-witryni ADN 202/1, ADN 203/1, ADN 230/1
OBSERWACJA. Z zamykanymi drzwiami: ADN 203/1, ADN 200/1, ADN 202/1, ADN 201/1
OPIS PROGRAMÓW STEROWANIA (RYS. 1)
1
― WŁĄCZNIK. W razie potrzeby wcisnąć przycis, aby uruchomić oświetlenie w komorze.
| - włączone, O - wyłączone
2 ― TERMOSTAT. Termostat ustawiony w pozycji 0, powoduje rozłączenie kompresora. Poruszając
ją zgodnie z ruchem uskazówek zegara kontrolka wskaże nam obniżenie temperatury.
3 ― WSKAŹNIK POZYCJI TERMOSTATU (cyfrowy)
4 ― WSKAŹNIK ZASILANIA (kolor zielony) Zielona lampka iluminacyjna zawiadamia, że
chłodziarka jest podłączona do prądu.
PRZYGOTOWANIE URZĄDZENIA DO PRACY
! Zaleca się przygotować urządzenie do pracy przy pomocy drugiej osoby.
Usunąć opakowanie. Zdjąć chłodziarkę z palety styropianowej.
Stawiając chłodziarkę na miejsce, jej przednią część należy nieco przechylić do tyłu; opartą na kółkach
łatwo można ustawić w żądanym miejscu.
Po rozerwaniu taśm klejących trzeba otworzyć drzwiczki. Następnie proszę zdjąć znajdującą się nad
drzwiami przekładkę.
Materiały z opakowania odpowiednio zutylizować.
Z opakowania wyjąć dwie podpory i wstawić je (rys. 2) do prowadnic w górnej części z tyłu chłodziarki.
INSTALOWANIE
Chłodziarkę ustawić w suchym i przewiewnym pomieszczeniu.
UWAGA! Chłodziarki nie użytkować w pomieszczeniu nieogrzewanym lub na balkonie. Ustawić
chłodziarkę z dala od źródeł ciepła
– kuchenek, kaloryferów, bezpośrednich promieni słonecznych.
UWAGA! Chłodziarka nie może stykać się z instalacją grzewczą, gazową, wodociągową,
a także nie należy jej stawiać obok urządzeń elektrycznych.
Nie zakrywać otworu wentylacyjnego w górnej części chłodziarki – wokół urządzenia należy
zapewnić dobry przepływ powietrza. Pomiędzy górną częścią obudowy chłodziarki a meblem
znajdującym nad chłodziarką należy pozostawić co najmniej 10 cm wolnej przestrzeni. W
przeciwnym wypadku chłodziarka zużywa więcej prądu, a sprężarka może ulec przegrzaniu.
Jeżeli chłodziarka stoi w rogu, pomiędzy ścianą a obudową chłodziarki należy pozostawić co
najmniej 1 cm wolnej przestrzeni w celu umożliwienia otwarcia drzwi komory na tyle
(rys. 3).
Chłodziarka powinna stać na równym podłożu, nie można jej opierać o ścianę. W razie potrzeby
wysokość chłodziarki należy wyregulować przy użyciu nóżek: obracając nóżki w kierunku zgodnym z
ruchem wskazówek zegara podnosimy przód chłodziarki do góry, a obracając w przeciwnym
kierunku opuszczamy go na dół. Drzwi chłodziarki ustawionej w pozycji nieco odchylonej do tyłu
będą zamykać się samoczynnie.
17

PL
ZMIANA KIERUNKU OTWIERANIA DRZWI
Zmianę kierunku otwierania drzwi chłodziarki zalecamy przeprowadzić przy pomocy drugiej osoby.
Będą potrzebne: klucz do nakrętek nr 8 oraz nr 10, śrubokręt krzyżowy.
! Przy zmianie kierunku otwierania drzwi ZABRANIA SIĘ układania chłodziarki w pozycji poziomej.
Należy wykonać poniższe czynności w następującej kolejności.
Chłodziarki – witryni ADN 200/1, ADN 202/1, ADN 201/1, ADN 203/1 (rys. 5):
UWAGA! Wyłączyć chłodziarkę z sieci zasilającej poprzez wyciągnięcie wtyczki przewodu
zasilającego z gniazdka.
1. Należy odkręcić dwie śruby 7 i zdjąć dolny wspornik 8 razem z kompletem podkładek 6 na ośce i
przekładką
Należy odkręcić dwie śruby 7 i zdjąć wspornik 11. Następnie zdjąć drzwiczki 4.
2.
Od górnego wspornika należy odkręcić ośkę 2 razem z nakrętką 1 i podkładkami 3 oraz cały
3.
5.
komplet wkręcić po przeciwległej stronie drzwi.
4. Należy zawiesić drzwi, po uprzednim przemieszczeniu ich pod kątem 1800i wstawieniu do drzwi
ośki górnej;
5. Od drzwi należy odkręcić wkręty mocujące 12, zdjąć uchwyty 13 i przymocować je, wkręcając
wkręty do znajdujących się po tej samej stronie wolnych otworów.
6. Płytka 10 pozostaje na swoim miejscu.
Należy przykręcić dolny wspornik 8 z kompletem podkładek oraz przekładek po przeciwległej
7.
stronie szafki, po uprzednim wstawieniu do drzwi ośki wspornika.
8. Następnie przykręcić wspornik 11 po przeciwległej stronie szafki.
Chłodziarki – witryni ADN 230/1 (rys. 6):
UWAGA! Wyłączyć chłodziarkę z sieci zasilającej poprzez wyciągnięcie wtyczki przewodu
zasilającego z gniazdka.
1. Należy odkręcić dwie śruby 12 i zdjąć dolny wspornik 13 razem z kompletem podkładek 11 na
ośce i przekładką 10.
Należy odkręcić dwie śruby 12 i zdjąć wspornik 15. Następnie zdjąć drzwiczki dolne 9.
2.
Należy odkręcić śruby mocujące 7 dolnego wspornika.
3.
Należy zdjąć środkowy wspornik 6 razem z podkładkami na ośce oraz przekładką 5.
4.
Następnie zdjąć drzwiczki górne.
5.
6. Od górnego wspornika należy odkręcić ośkę 2 razem z nakrętką 1 i podkładkami 3 oraz cały
komplet wkręcić po przeciwległej stronie drzwi.
7. W strefie poprzecznej szafki należy wybrać zaślepki 18 i przełożyć na przeciwległą stronę szafki.
8. Należy zawiesić drzwi górne, po uprzednim przemieszczeniu ich pod kątem 1800i wstawieniu do
drzwi ośki górnej.
9. Należy przykręcić środkowy wspornik z kompletem podkładek oraz przekładek po przeciwległej
stronie szafki, po uprzednim wstawieniu ośki wspornika do drzwi górnych;
10. Na ośce środkowego wspornika należy zawiesić drzwi dolne, po uprzednim przemieszczeniu ich
pod kątem 1800.
Od obu drzwi należy odkręcić wkręty mocujące 16, zdjąć uchwyty 17 i przymocować je,
11.
wkręcając wkręty do znajdujących się po tej samej stronie wolnych otworów. Płytka
14 pozostaje
na swoim miejscu.
Należy przykręcić dolny wspornik 13 z kompletem podkładek oraz przekładek po przeciwległej
12.
stronie szafki, po uprzednim wstawieniu do drzwi ośki wspornika.
13. Następnie przykręcić wspornik 15 po przeciwległej stronie szafki.
REGULACJA TEMPERATURY
Temperatura w komorze chłodziarki jest regulowana za pomocą pokrętła termostatu 2 (rys. 1)
poprzez jego obrót w jedną lub drugą stronę. Wartość temperatury jest oznaczona liczbami na
pokrętle termostatu. Po zamknięciu drzwi chłodziarki jest ona widoczna na wskaźniku stanu
termostatu 3 (rys. 1). Temperatura może być regulowana w pięciu pozycjach.
0 = sprężarka wyłączona UWAGA! Napięcie nie jest odłączone.
1 = najwyższa temperatura (chłodzenie minimalne)
5 = najniższa temperatura (chłodzenie maksymalne)
18

PL
Jeżeli produkty spożywcze w komorze chłodziarki są zbyt schłodzone, pokrętło termostatu należy
ustawić w pozycji
schłodzone, pokrętło termostatu należy ustawić w pozycji
! Prosimy o samodzielne ustawienie temperatury w chłodziarce w zależności od potrzeb.
Znajdujący się wewnątrz lodówki termometr wskazuje średnią temperaturę w komorze chłodziarki.
! TEMPERATURA W KOMORZE CHŁODZIARKI MOŻE ULEC ZMIANIE POD WPŁYWEM TEMPERATURY
OTOCZENIA, W ZALEŻNOŚCI OD ILOŚCI PRODUKTÓW SPOŻYWCZYCH, ICH TEMPERATURY ORAZ
CZĘSTOTLIWOŚCI OTWIERANIA DRZWI CHŁODZIARKI.
! W ZIMNYM POMIESZCZENIU CHŁODZIARKA CHŁODZI W MNIEJSZYM STOPNIU, CO MOŻE BYĆ
PRZYCZYNĄ WZROSTU TEMPERATURY W CHŁODZIARCE. Pokrętłem termostatu należy ustawić niższą
temperaturę.
Odszranianie komory chłodziarki przebiega w sposób automatyczny. Szron powstający na tylnej
ściance komory chłodziarki w czasie przerw w pracy sprężarki topnieje, powstająca woda spływa
rynienką spustową do wody z odszraniania do wanienki znajdującej się na sprężarce i następnie
wyparowuje.
!
CHŁODZIARKĘ NALEŻY CZYŚCIĆ REGULARNIE.
! Należy pamiętać, że przed odszranianiem komory zamrażalnika i czyszczeniem tylnej
części obudowy chłodziarki koniecznie należy wyłączyć chłodziarkę z sieci zasilającej
poprzez wyciągnięcie wtyczki przewodu zasilającego z gniazdka.
1 - 3. Jeżeli produkty spożywcze w komorze chłodziarki są niedostatecznie
3 - 5.
ODSZRANIANIE KOMORY CHŁODZIARKI
CZYSZCZENIE I KONSERWACJA
Powierzchnie wewnętrzne i części z tworzyw sztucznych należy chronić przed działaniem tłuszczy,
kwasów, sosów. W przypadku rozlania wyżej wymienionych substancji, powierzchnię należy
niezwłocznie zmyć ciepłą wodą z mydłem lub płynem do mycia naczyń. Następnie wytrzeć do
sucha.
Wnętrze chłodziarki czyścić ciepłą wodą z mydłem. Można także używać płynu do mycia naczyń.
Wnętrze i powierzchnie zewnętrzne wytrzeć do sucha.
Należy regularnie czyścić uszczelkę drzwi. Wytrzeć do sucha.
Regularnie myć wanienki i inne akcesoria.
UWAGA! REGULARNIE CZYŚCIĆ OTWÓR KANAŁU SPUSTOWEGO WODY PRZY UŻYCIU
SPECJALNEGO DOSTARCZONEGO URZĄDZENIA DO CZYSZCZE
NIA 8 (rys. 1).
Co najmniej raz w roku należy usunąć kurz z tylnej części obudowy chłodziarki oraz sprężarki. Do
odkurzania można używać miękkiej szczotki, serwetek elektrostatycznych lub odkurzacza.
Do czyszczenia wnętrza i powierzchni zewnętrznych chłodziarki NIE MOŻNA używać środków
czyszczących zawierających materiały ścierne, kwasy, alkohol, benzynę.
Do czyszczenia NIE UŻYWAĆ ścierek lub gąbek z warstwą ścierną.
PRZY DŁUŻSZYM WYŁĄCZENIU URZĄDZENIA NALEŻY POZOSTAWIĆ DRZWI OTWARTE.
Uwagi dotyczące odgłosów pracy urządzenia. Niektóre dźwięki należy traktować jako normalne
odgłosy pracy chłodziarki w czasie chłodzenia
- nie stanowią one usterki.
Szumy, bulgotania, szmery są wynikiem obiegu czynnika chłodzącego w układzie chłodzącym.
Silniejszy odgłos pomruku lub pstryknięcia przez krótki czas wydaje sprężarka przy włączaniu się.
USTERKI I ICH USUWANIE
Jeżeli...
Chłodziarka włączona do gniazdka zasilającego nie działa i nie pali się wskaźnik
napięcia.
kabel zasilający jest prawidłowo podłączony do gniazdka.
Sprawdzić, czy instalacja elektryczna w Państwa mieszkaniu jest sprawna. Sprawdzić, czy
Urządzenie pracuje zbyt głośno. Sprawdzić, czy chłodziarka jest stabilna i stoi na równej
powierzchni. W celu wypoziomowania należy wyregulować przednie nóżki. Sprawdzić, czy
chłodziarka nie styka się z meblami lub części układu chłodzącego w tylnej części obudowy nie
19

stykają się ze ścianą. Odsunąć chłodziarkę od mebli lub ściany. Sprawdzić, czy hałasu nie wywołują
butelki, konserwy, naczynia wewnątrz chłodziarki, czy przedmioty nie stykają się.
PL
Na dnie komory chłodziarki zbiera się woda. Sprawdzić, czy otwór rynienki spustowej wody z
rozmrażania nie jest zatkany. Oczyścić otwór rynienki spustowej wody przy użyciu dołączonego
oczyszczacza.
Pod chłodziarką zbiera się woda. Wanienka do zbierania wody ześlizgnęła się ze sprężarki.
Umieścić wanienkę na sprężarce.
Przy otwieraniu drzwi chłodziarki odstaje gumowa taśma uszczelniająca. Taśma jest
zabrudzona lepkimi produktami spożywczymi (tłuszczem, syropem). Taśmę uszczelniającą i rowki
oczyścić ciepłą wodą z mydłem lub płynem do mycia naczyń, następnie wytrzeć do sucha. Taśmę
uszczelniająca wstawić na miejsce.
Temperatura w chłodziarce jest zbyt wysoka, przerwy w pracy sprężarki są zbyt
krótkie. Sprawdzić, czy drzwi są dobrze domknięte, czy przy wyjmowaniu i wkładaniu produktów
drzwi nie były otwarte dłużej niż jest to potrzebne, czy nie umieszczono w chłodziarce wielu
ciepłych produktów spożywczych.
Na powierzchni chłodziarki zbiera się rosa. Wilgotność względna powietrza w pomieszczeniu
przekracza 70 proc. Należy przewietrzyć pomieszczenie, w którym stoi chłodziarka i jeżeli jest to
możliwe, usunąć przyczynę zawilgocenia.
SERWIS GWARANCYJNY
!
W PRZYPADKU USTEREK W PRACY CHŁODZIARKI
NALEŻY UPEWNIĆ SIĘ, CZY NIE MA MOŻLIWOŚCI
USUNIĘCIA PRZYCZYN USTEREK WE WŁASNYM ZAKRESIE.
Jeżeli nie ma możliwości usunięcia usterek we własnym
zakresie, należy telefonicznie lub pisemnie skontaktować
się z przedstawicielem serwisu. Koniecznie należy podać
model (1) i numer (2) chłodziarki. Dane te są umieszczone
na etykiecie produktu, przyklejonej na ściance komory
chłodziarki.
TRANSPORT
!
PRODUCENT NIE PONOSI ODPOWIEDZIALNOŚCI ZA USZKODZENIA POWSTAŁE W WYNIKU
PRZEWOŻENIA URZĄDZENIA BEZ PRZESTRZEGANIA WARUNKÓW TRANSPORTU.
Urządzenie chłodnicze należy przewozić tylko w pozycji pionowej.
Przewożone urządzenie należy chronić przed działaniem czynników atmosferycznych (deszcz, śnieg,
wilgoć).
Przewożone urządzenie należy zabezpieczyć przed przesuwaniem się lub jakimikolwiek uderzeniami w
pojeździe.
Jeżeli urządzenie było przewożone w pozycji innej niż pionowa, przed włączeniem do sieci zasilającej
należy odczekać co najmniej 4 godziny. W przeciwnym wypadku sprężarka chłodziarki może ulec
uszkodzeniu.
INFORMACJE DOTYCZĄCE OCHRON Y Ś R O D O W ISKA
Symbol ten oznacza, że chłodziarka nie jest klasyfikowana jako odpad z gospodarstwa domowego.
W celu złomowania urządzenia, należy je oddać do odpowiedniego punktu utylizacji odpadów
oznaczonego takim znakiem.
urzędach, w sklepie, w którym urządzenie zostało zakupione, lub u przedstawicieli producenta.
Przed przekazaniem urządzenia do utylizacji należy uczynić je nieprzydatnym do użytkowania, aby uniknąć
ewentualnych wypadków. W tym celu należy wyjąć wtyczkę przewodu zasilającego z gniazdka i odciąć
przewód, usunąć uszczelkę, uszkodzić zamek drzwi, jeżeli on występuje.
UWAGA! Nie demontować urządzenia we własnym zakresie. Urządzenie należy przekazać do
przedsiębiorstwa utylizac
Szczegółowe informacje na temat utylizacji zużytego urządzenia można uzyskać w lokalnych
ji odpadów.
20

SK
CHARAKTERISTIKA SPOTREBIČOV
Tento spotrebič je obchodné chladnička – sú s jedným kompresorom v jedno a dvojdverovom
prevedení. Sú určené na chladenie potravín a nápojov pre krátkodobé uschovávanie. Presklenné
chladničky sa vy
žívajú hlavne v reštauráciách.
Tento spotrebič je určený pre komerčné využitie!
! SPOTREBIČ JE EKOLOGICKY ČISTÝ, NEOBSAHUJE ŽIADNE MATERIÁLY POŠKODZUJÚCE
OZÓNOVÚ VRSTVU: používa chladivo R600a, vypeňovací prípravok použitý na izoláciu
spotrebiča je cyklopentán
C5H10.
! VÝROBCA ZARUČUJE SPOĽAHLIVÚ PREVÁDZKU SPOTREBIČA PRI OKOLITÝCH TEPLOTÁCH
V ROZSAHU OD +16 0C DO +32 0C A PRI RELATÍVNEJ VLHKOSTI VZDUCHU DO 60 %.
Klimatická trieda spotrebiča je 3.
Vnútorná teplotná trieda– S (od -2 °C do +14 °C).
TECHNICKÉ ÚDAJE
Modell
Hrubý objem, L
Úžitkový objem, L
Rozmery (V x Š x H), cm
Rozmery poličiek , dm
2
Teplota v chladiacom priestore, °C
Rated current, A
Hmotnosť, kg
Napájanie
Nominálny výkon, W
AND 200/1
AND 202/1
290 350
275 320
145x60x60
115 120
od 0 do +10
1,5 1,7
67 85
220 -230V/50HZ
200 230
AND 201/1
AND 203/1
AND 230/1
173x60x60
Dáta v súlade s požiadavkami normy EN ISO 23953-2:2005
Teplotné rozsahy produktov , °C
Plocha otvorenia dverí, m²
Plocha vystavenie potravín, m²
Zaťaženie chladničky množstvo
fliaš
0,33 l 275 357
0,5 l 123 219
od -2 do +14
0,66 0,80
0,51 0,62 / 0,58
Maximálne zaťaženie na jednej police , kg 50 50
Spotreba energie pri vonkajšej teplote +25 °C:
kWh/24h
kWh/rok
Pri
zapnutom
osvetlení
2,05
748
Pri vypnutom
osvetlení
2,02
737
Pri zapnutom
osvetlení
2,14
781
Pri
vypnutom
osvetlení
2,07
756
Nominálny výkon žiarovky osvetlenia, W 8 8
POZNÁMKA. Výrobca si vyhradzuje právo na zmeny technických parametrov a špecifikácií v
budúcnosti.
BEZPEČNOSTNÉ POKYNY
! NÁVOD NA OBSLUHU SI STAROSTLIVO PREŠTUDUJTE. Ak jeho pokyny nebudú dodržané,
hrozí riziko úrazu, poškodenia spotrebiča a straty práva na bezplatný záručný servis.
Odporúčame vám uschovať si návod po celú dobu používania spotrebiča. Pri ďalšom predaji
spotrebiča odovzdajte návod na použitie novému vlastníkovi spotrebiča.
21

SK
VAROVANIE! Žiadne vetracie otvory vnútri spotrebiča ani vonku nesmú byť akokoľvek
upchané.
VAROVANIE! Nepoužívajte na urýchlenie rozmrazovania mechanické pomôcky ani iné
prostriedky.
VAROVANIE! Nepouží
vajte elektrické spotrebiče iných ako výrobcom odporúčaných typov
vnútri priestorov na uchovávanie potravín v spotrebiči.
VAROVANIE! Nepoškodzujte chladiaci systém spotrebiča. Obsahuje plynné chladivo R600a. Pri
poškodení chladiaceho systému:
Nepoužívajte žiadny otvorený plameň.
Vystríhajte sa iskier ― nezapínajte žiadne elektrické spotrebiče ani osvetľovacie telesá.
Priestor okamžite vyvetrajte.
VAROVANIE! Nedovoľte deťom hrať sa so spotrebičom ani ho pripájať alebo odpájať od
sieťovej elektrickej zásuvky. Nedovoľte deťom hrať sa s
obalovými materiálmi zo
spotrebiča.
VAROVANIE! Chladničku nesmú používať deti ani ľudia s duševným postihnutím, ak ich
osoba zodpovedná za ich bezpečnosť vopred nepoučí, ako sa spotrebič používa.
Ak sa spotrebič prenáša zo studeného priestoru (s teplotou nižšou ako +12 °C), pred pripojením k
sieti musíte počkať dve hodiny.
Spotrebič sa nesmie pripájať k sieťovému napätiu skôr, ako budú odstránené všetky baliace
a prepravné materiály.
Po vybalení spotrebiča sa presvedčite, že je kompletný, že nie je poškodené jeho teleso ani
elektrický kábel.
Je zakázané používať spotrebič technicky poškodený.
VAROVANIE! Spotrebič musí byť pripojený k uzemnenej sieťovej elektrickej zásuvke.
Uzemnená elektrická zásuvka, ktorou je spotrebič pripojený
k sieťovému napätiu, sa musí
nachádzať na prístupnom mieste.
VAROVANIE! AK SA SPOTREBIČ VYRÁBA S OSOBITNÝM PRÍVODNÝM SIEŤOVÝM KÁBLOM, MÔŽETE
HO VYMENIŤ IBA ZA ROVNAKÝ SIEŤOVÝ KÁBEL DODÁVANÝ VÝROBCOM.
VAROVANIE! Frekvencia a výkonové parametre prívodu elektriny vo vašej domácnosti
musí zodpovedať technickým parametrom spotrebiča uvedeným v tabuľke.
VAROVANIE! Pri inštalovaní spotrebiča postupujte opatrne, aby sa napájací kábel
nepritlačil a aby sa vylúčilo jeho poškodenie. Mohlo by to spôsobiť krátke spoj
enie a
požiar.
VAROVANIE!
Presvedčite sa, že napájací kábel nie je stlačený zadnou stenou spotrebiča
ani inak poškodený. Poškodená vidlica môže spôsobiť požiar!
AK JE SPOTREBIČ ODPOJENÝ ZO ZÁSUVKY (PRI ČISTENÍ, PRESÚVANÍ NA INÉ MIESTO ATĎ.),
MÔŽE SA ZNOVA ZAPNÚŤ AŽ PO 15 MIN.
Spotrebič sa musí používať iba na krátkodobé uchovávanie potravín.
Tento spotrebič sa nesmie likvidovať spaľovaním.
Neukladajte na spotrebič žiadne zapnuté elektrické prístroje (ako sú mikrovlnné rúry, fény, žehličky,
elektrické kanvice ani iné elektrické zariadenia), pretože by mohli spôsobiť vznietenie plastových
dielcov.
Neukladajte na spotrebič misky s tekutinami a neklaďte na spotrebič kvety vo vázach ani iné
nádoby naplnené tekutinou.
Nevyliezajte a nesadajte si na spotrebič, neopierajte sa a nevešajte sa na dvere spotrebiča.
Nedovoľte to ani deťom.
! AK SA PORUCHA SPOTREBIČA NEDÁ OPRAVIŤ PODĽA TU UVEDENÝCH ODPORÚČANÍ, ODPOJTE
HO OD SIETE, OTVORTE DVERE A ZAVOLAJTE SERVIS. TECHNICKÉ ALEBO KONŠTRUKČNÉ
PORUCHY MÔŽE ODSTRAŇOVAŤ IBA
PRACOVNÍK SERVISU.
UPOZORNENIE! Neotvárajte kryt LED osvetlenia. Ak je použité LED osvetlenie,
v prípade jeho poškodenia a potrebnej výmeny kontaktujte servisného technika.
22

SK
PRÍPRAVA SPOTREBIČA NA UVEDENIE DO PREVÁDZKY
! Odporúčame vám, aby ste pri príprave spotrebiča na uvedenie do prevádzky využili pomoc
pomocníka.
Odstráňte obaly. Nadvihnite spotrebič z podložky z penového polystyrénu.
Odtrhnite lepiace pásky, zabezpečujúcu dvere a príslušenstvo.
Pri umiestňovaní na vybrané miesto možno spotrebič ľahko premiestňovať nadvihnutím vpredu
a naklonením dozadu, aby sa mohol pohybovať na kolieskach.
Obalový materiál zlikvidujte vhodným spôsobom.
Vyberte dve podpery z vrecka (obr. 2) a zasuňte ich do vedení v hornej zadnej časti spotrebiča.
POPIS SPOTREBIČA , ZÁKLADNÉ ČASTI (Obr. 1)
VAROVANIE!
PRÍSLUŠENSTVA VAMI ZAKÚPENÉHO SPOTREBIČA Z HĽADISKA POČTU A
Tento popis bol pripravený pre celý typový rad
1 Vypínač vnútorného osvetlenia 7 Výškovo prestaviteľné police
2 Kolieska termostatu (Regulátor teploty)
3 Indikátor polohy termostatu
4 Indikátor sieťového napätia (zelená kontrolka) 9 Termometar *
5 Blok vnútorného osvetlenia 10 Kondenzátor
6 Ventilator 11 Kompresor
* - dla chladniček ADN 202/1, ADN 203/1, ADN 230/1
POZNÁMKA. S
― Vypínač vnútorného osvetlenia. Stlačením časti tlačidla označenej I sa aktivuje osvetlenia;
1
stlačením časti tlačidla označenej O sa osvetlenia vypína.
2 ― Kolieska termostatu. Termostat je vypnutý ak indikátor termostatu ukazuje nulu (0),
Kompresor je vypnutý.
teplota v tomto priestore znižuje.
3 ― Indikátor polohy termostatu je označená symbolom
4 ― Indikátor sieťového napätia (zelená kontrolka) je označená symbolom Keď je
spotrebič pripo
DOLU V ZOZNAME UVEDENÉ PRÍSLUŠENSTVO SPOTREBIČA SA MÔŽE LÍŠIŤ OD
presklenné chladničky.
Čistič kanála roztopenej vody
8
(červenej farby)
uzamykateľnými dvierkami: ADN 203/1, ADN 200/1, ADN 202/1, ADN 201/1
PREHĽAD MECHANICKÉHO OVLÁDANIA (Obr. 1)
Otáčaním gombíka termostatu v smere pohybu hodinových ručičiek sa
jený k napájaciemu napätiu svieti zelená kontrolka. Ventilator je zapnut.
KONŠTRUKCIE DIELOV.
ZMENA SMERU OTVÁRANIA DVERÍ
Odporúčame, aby ste pri zmene smeru otvárania dverí využili pomoc pomocníka. Budete potrebovať
dva kľúče (č. 8 a č. 10) a skrutkovač na skrutky s
! Pri zmene smeru otvárania dverí sa chladnička NESMIE položiť do vodorovnej polohy.
Vykonajte nasledujúce pokyny v tu uvedenom poradí.
Modell ADN 200/1, ADN 202/1, ADN 201/1, ADN 203/1 (obr. 5):
VAROVANIE! Vypnite spotrebič a vytiahnite vidlicu z elektrickej sieťovej zásuvky.
1. Odšroubujte dva šrouby č.7 sundejte (zvedněte) spodní konzolu č. 8 spolu se soupravou podložek
č. 6 na ose a příčku č. 5.
2.
Odšroubujte dva šrouby č.7 sundejte konzolu č. 11; vysaďte dveře č. 4.
3. Z horní konzoly odšroubujte osu č. 2 spolu s matici č. 1 a podložkami č. 3 a to všechno
oubujte na opačnou stranu dveří.
zašr
4. Před zavěšením dveří otočte je o 180° a vsaďte do dveří horní osu;
5. Ze dveří odšroubujte šroub č. 12, odmontujte kliky č. 13 a přišroubujte šrouby na stejnou stranu,
kde se nachází volný otvor.
Plaňka /lišta č. 10 zůstává na původním místě.
6.
Přišroubujte nižní konzolu č. 8 s kompletem podložek a příčku na opačnou stranu a před tím
7.
vložte osu konzoly do dveří
. Přišroubujte konzolu č. 11 na opačnou stranu.
krížovou hlavou.
23

SK
Modell ADN 230/1 (obr. 6):
VAROVANIE! Vypnite spotrebič a vytiahnite vidlicu z elektrickej sieťovej zásuvky.
1. Odšroubujte dva šrouby č.12 sundejte (zvedněte) spodní konzolu č. 13 spolu se soupravou
podložek č. 11 na ose a příčku č. 10.
2. Odšroubujte dva šrouby č.12 sundejte konzolu č. 15. Vysaďte spodní dveře č. 9.
3. Odšroubujte šrouby prostřední konzoly č. 7.
4. Sundejte prostřední konzolu č. 6 spolu s podložkami na ose a příčku č. 5. Vysaďte horní dveře.
5. Z horní konzoly odšroubujte osu č. 2 spolu s matici č. 1 a podložkami č. 3 a to všechno
zašroubujte na opačnou stranu dveří.
6. Vyndejte z
horních dveří zátku / příklopku č. 19 a zátku spodních dveří č. 7 a přestavte na
opačnou stranu dveří.
7. Na příční straně skříně vyndejte příklopku/zátku č. 18 a přestavte na opačnou stranu dveří
8. Před zavěšením horních dveří otočte je o 180° a vsaďte do dveří horní osu
9. Přišroubujte prostřední konzolu s kompletem podložek a příčku na opačnou stranu a před tím
vložte osu konzoly do horních dveří
Na osu prostřední konzoly pověste spodní dveře, které předtím otočte o 180°.
10.
Ze dvou dveří odšroubujte šroub č. 16, odmontujte kliky č. 17 a přišroubujte šrouby na stejnou
11.
.
stranu, kde se nachází volný otvor. Plaňka /lišta č. 14 zůstává na původním místě.
Přišroubujte nižní konzolu č. 13 s kompletem podložek a příčku na opačnou stranu a před tím
12.
vložte osu konzoly do dveří
. Přišroubujte konzolu č. 15 na opačnou stranu.
UMIESTNENIE
Spotrebič umiestnite v suchom, dobre vetranom priestore.
VAROVANIE! Spotrebič sa nesmie prevádzkovať v nevykurovanej miestnosti alebo v predsieni.
Spotrebič neumiestňujte do blízkosti tepelných zdrojov, ako je kuchynský sporák a rúra, radiátory,
ani na priamom slnečnom svetle.
VAROVANIE! Spotrebič sa nesmie dotýkať potrubí kúrenia, prívodu plynu alebo vody,
ani iných elektrických zariadení.
Nezakrývajte vetracie otvory vo vrchnej časti spotrebičov – musí byť zabezpečená dobrá cirkulácia
vzduchu okolo spotrebiča. Medzi horným okrajom telesa spotrebiča a akýmkoľvek nábytkom, ktorý
sa môže nachádzať nad spotrebičom, musí byť ponechaný odstup najmenej 10 cm. Ak táto
požiadavka nie je splnená, spotrebič spotrebuje viac elektrickej energie a
jeho kompresor sa môže
prehriať.
Ak sa spotrebič umiestni do rohu, musí byť medzi ľavým okrajom telesa spotrebiča a stenou odstup
najmenej 1 cm (
obr. 3).
Spotrebič musí stáť na rovnom povrchu a nesmie sa dotýkať steny. V prípade potreby nastavte
výšku spotrebiča prestavením nožičky na vyrovnanie do vodováhy: otáčanie v smere pohybu
hodinových ručičiek
– klesá. Ak je spotrebič naklonený mierne dozadu – dvere sa budú zatvárať sami.
ručičiek
– predná časť spotrebiča sa zdvíha, otáčanie proti smeru pohybu hodinových
REGULÁCIA TEPLOTY
Teplota v chladiacom priestore sa reguluje otáčaním kolieska termostatu 2 (obr. 1) niektorým
smerom. Po zatvorení dverí spotrebiča sa na indikátore 3 (obr. 1) vidno teplota termostatu.
Teplota sa reguluje na stupnici s
piatimi číslicami.
0 = Kompresor je vypnutý. VAROVANIE! elektrický prúd nie je vypnutý.
= najvyššia teplota (najslabšie chladenie)
1
5 = najnižšia teplota (najsilnejšie chladenie)
Ak sú potraviny v chladiacom priestore príliš studené, nastavte koliesko termostatu medzi
1 a 3. Ak sú
potraviny v chladiacom priestore nedostatočne vychladené, nastavte koliesko termostatu medzi 3 a 5.
! Požadovanú teplotu si v spotrebiči nastavte podľa vlastnej potreby.
Termometar koji se nalazi u unutrašnjosti hladnjaka pokazuje srednju temperaturu u komori za
čuvanje namirnica.
! TEPLOTA V CHLADIACOM PRIESTORE ZÁVISÍ OD OKOLITEJ TEPLOTY, MNOŽSTVA POTRAVÍN,
TEPLOTY POTRAVÍN A
OD TOHO, AKO ČASTO SA OTVÁRAJÚ A ZATVÁRAJÚ DVERE SPOTREBIČA.
24

SK
! AK JE MIESTNOSŤ CHLADNEJŠIA, SPOTREBIČ CHLADÍ SLABŠIE. Teplota v spotrebiči sa preto môže
zvýšiť. Kolieskom termostatu nastavte nižšiu teplotu.
ODMRAZOVANIE CHLADIACEHO PRIESTORU
Chladiaci priestor sa odmrazuje automaticky. V čase, keď kompresor nie je v činnosti, sa roztápajú
kvapky ľadu tvoriace sa na zadnej stene chladiaceho priestoru. Topiaca sa voda steká cez kanálik na
roztopenú vodu do misky na vrchu kompresora, kde sa odparí.
ČISTENIE A S T A R O S T L I V O S Ť
! SPOTREBIČ PRAVIDELNE ČISTITE.
! Nezabúdajte, že pred odmrazovaním mraziaceho priestoru a čistením zadnej časti telesa
spotrebiča musíte spotrebič odpojiť od sieťovej elektrickej zásuvky vytiahnutím vidlice z
o
sieťovej zásuvky.
Vnútorné povrchy a plastové diely spotrebiča chráňte pred tukmi, kyselinami a omáčkami. V prípade
náhodného rozliatia –
okamžite vyčistite teplou mydlovou vodou alebo prostriedkom na umývanie
riadu. Utrite dosucha.
Vnútorné povrchy spotrebiča vyčistite teplou mydlovou vodou. Možno použiť aj iné prípravky na
umývanie riadu.
Vnútorné a vonkajšie povrchy vyutierajte dosucha.
Pravidelne čistite tesnenia dverí. Vyutierajte ich dosucha.
Pravidelne umývajte priehradky a ostatné vybavenie.
VAROVANIE! PRAVIDELNE ČISTITE PRIESTOR KANÁLIKA NA ROZTOPENÚ VODU OSOBITNÝM
ČISTIČOM URČENÝM NA TENTO ÚČEL
8 (obr. 1).
Najmenej raz za rok vyčistite od prachu zadnú časť telesa spotrebiča a kompresor. Na čistenie
možno použiť mäkkú kefku, elektrostatickú handričku alebo vysávač.
NEPOUŽÍVAJTE na čistenie vnútorných a vonkajších povrchov spotrebiča čistiace prípravky
obsahujúce drsné častice, kyselinu, lieh ani benzén.
NEPOUŽÍVAJTE na čistenie handričky ani špongie s drsným povrchom určené na drhnutie.
AK SA SPOTREBIČ MÁ VYPNÚŤ NA DLHŠIE OBDOBIE, NECHAJTE JEHO DVERE OTVORENÉ.
Poznámky ohľadom hlučnosti spotrebiča pri prevádzke. Spotrebič môže pri prevádzke a počas
zmrazovacieho cyklu vydávať rôzne zvuky. Je to normálne a
nie je to príznak chybnej funkcie.
Chladivo pri cirkulácii po chladiacom systéme zapríčiňuje zvuky ako bublanie, klokotanie alebo
šelest.
Pri zapínaní kompresora možno po kratší čas počuť hlasnejšie zvuky ako búchanie alebo cvakanie.
PROBLÉMY PRI PREVÁDZKE A ICH RIEŠENI E (RI E Š E N I E P R O B L É M O V )
Čo robiť ak …
Spotrebič je pripojený k sieti, nefunguje však a kontrolka napájacieho napätia nesvieti.
Skontrolujte, či máte v poriadku elektroinštaláciu. Skontrolujte, či je vidlica správne zasunutá do
elektrickej napájacej zásuvky.
Hluk sa zosilnil. Skontrolujte, či je spotrebič postavený stabilne na rovnom mieste. Do
vodorovnej polohy sa vyrovnáva nastavením predných nožičiek. Skontrolujte, či sa spotrebič
nedotýka nábytku a či sa žiadny diel chladiaceho systému na zadnej časti telesa spotrebiča
nedotýka steny. Spotrebič odtiahnite od nábytku alebo od steny. Skontrolujte, či príčinou zvýšenej
hlučnosti nie sú navzájom sa dotýkajúce fľaše, konzervy alebo misky v spotrebiči.
V spodnej časti chladiaceho priestoru sa objavila voda. Skontrolujte, či kanálik na topiacu sa
vodu nie je upchaný. Pravidelne čistite priestor kanálika na roztopenú vodu čističom určeným na
tento účel.
Pod spotrebičom sa objavila voda. Miska na zachytávanie topiacej sa vody skĺzla z kompresora.
Položte misku na vrch kompresora.
Pri otváraní dverí spotrebiča sa vyťahuje gumové tesnenie. Tesnenie je znečistené lepivými
potravinami (tuk, sirup). Tesnenie a drážku pre tesnenie vyčistite vlažnou vodou s mydlom alebo
čistiacim prípravkom a utrite dosucha. Zasuňte gumové tesnenie späť na miesto.
25

SK
Vysoká teplota v chladničke znamená, že kompresor je v činnosti po dlhý čas alebo s
nezastavuje. Presvedčite sa, či sa dvere spotrebiča spoľahlivo zatvárajú, či dvere pri vyberaní
alebo vkladaní potravín nezostali otvorené dlhšie ako je potrebné, alebo či do spotrebiča nebolo
vložené veľké množstvo teplých potravín.
Na vrchnej časti spotrebiča sa nachádza kondenzovaná voda. Relatívna vlhkosť okolitého
vzduchu je vyššia ako 70 %. Vyvetrajte miestnosť, v ktorej stojí spotrebič. Podľa možnosti
odstráňte príčinu v
lhkosti.
ZÁRUČNÝ SERVIS
! V PRÍPADE PORUCHY VÁŠHO SPOTREBIČA SA PRESVEDČITE, ČI NEDOKÁŽETE ODSTRÁNIŤ
PRÍČINU CHYBNEJ FUNKCIE SPOTREBIČA SVOJPOMOCNE. Ak problém nedokážete vyriešiť sami,
obráťte sa telefonicky alebo poštou na najbližšie servisné zastúpenie na chladničky. Pri kontakte
uvádzajte model chladničky (
1) a jej výrobné číslo (2). Tieto údaje nájdete na štítku výrobku, ktorý je
nalepený na stene chladiaceho priestoru.
26


ADN.1.NI
 Loading...