

Page 1
1
2
A
A
:
1. PANTONE BLACK C
2.
B
3. A4 A5
B
4. ,
5.
C
借(通)用件登记
描图
描校
旧底图总号
底图总号
签字
日期
处数
标记
设计
审核
工艺
标准化
1
更改文件号
校对
审定
批准
日期
签名
日期
REV.
2
种语言用户手册
ADG 110 A+
WHIRLPOOL
阶段标记
00
数
量
1
1
张
共
(WPL4#)
比例
1
第
6710007413
量重
广东美的集团股份有限公司
美的洗涤电器制造有限公司
张
2
80
128
C
D
D
Page 2
Gebrauchsanweisung
Instructions for use
Mode d’emploi
Gebruiksaanwijzing
Istruzioni per l’uso
Brugsanvisning
Bruksanvisning
Käyttöohje
Manual de utilização
Instrucciones para el uso
Instrukcje użytkowania
Használati utasítás
ИнструкциЯ за употреба
Návod k použití
Návod na použitie
Instruc∑iuni de utilizare
Инструкции по эксплуатации
Page 3

Page 4

ENGLISH Instructions for use Page 4
POLSKI Instrukcje użytkowania Strona
30
Page 5

4
Read this Manual
1) Safety Information..................................................... 5
Dea r Cu s to mer,
This appliance is intended to be used in household and
similar applications such as:
- Staff kitchen areas in shops, offices and other working
environments;
- Farm houses;
- By clients in hotels, motels and other residential type
environments;
- Bed and breakfast type environments.
Please carefully read this manual before using the
dishwasher, it will help you to use and maintain the
dishwasher properly.
Keep it to refer to it at a later date.
Pass it on to any subsequent owner of the appliance.
This manual contains sections on safety Instructions,
Operating Instructions, Installation Instructions and
Troubleshooting Tips, etc.
Before Calling for Service
To review the section on troubleshooting Tips
will help you to solve some common problems
by yourself .
If you can not solve the problems by yourself ,
please ask for the help of professional technicians.
2) Disposal .....................................................................6
3) Operating Instructions..............................................7
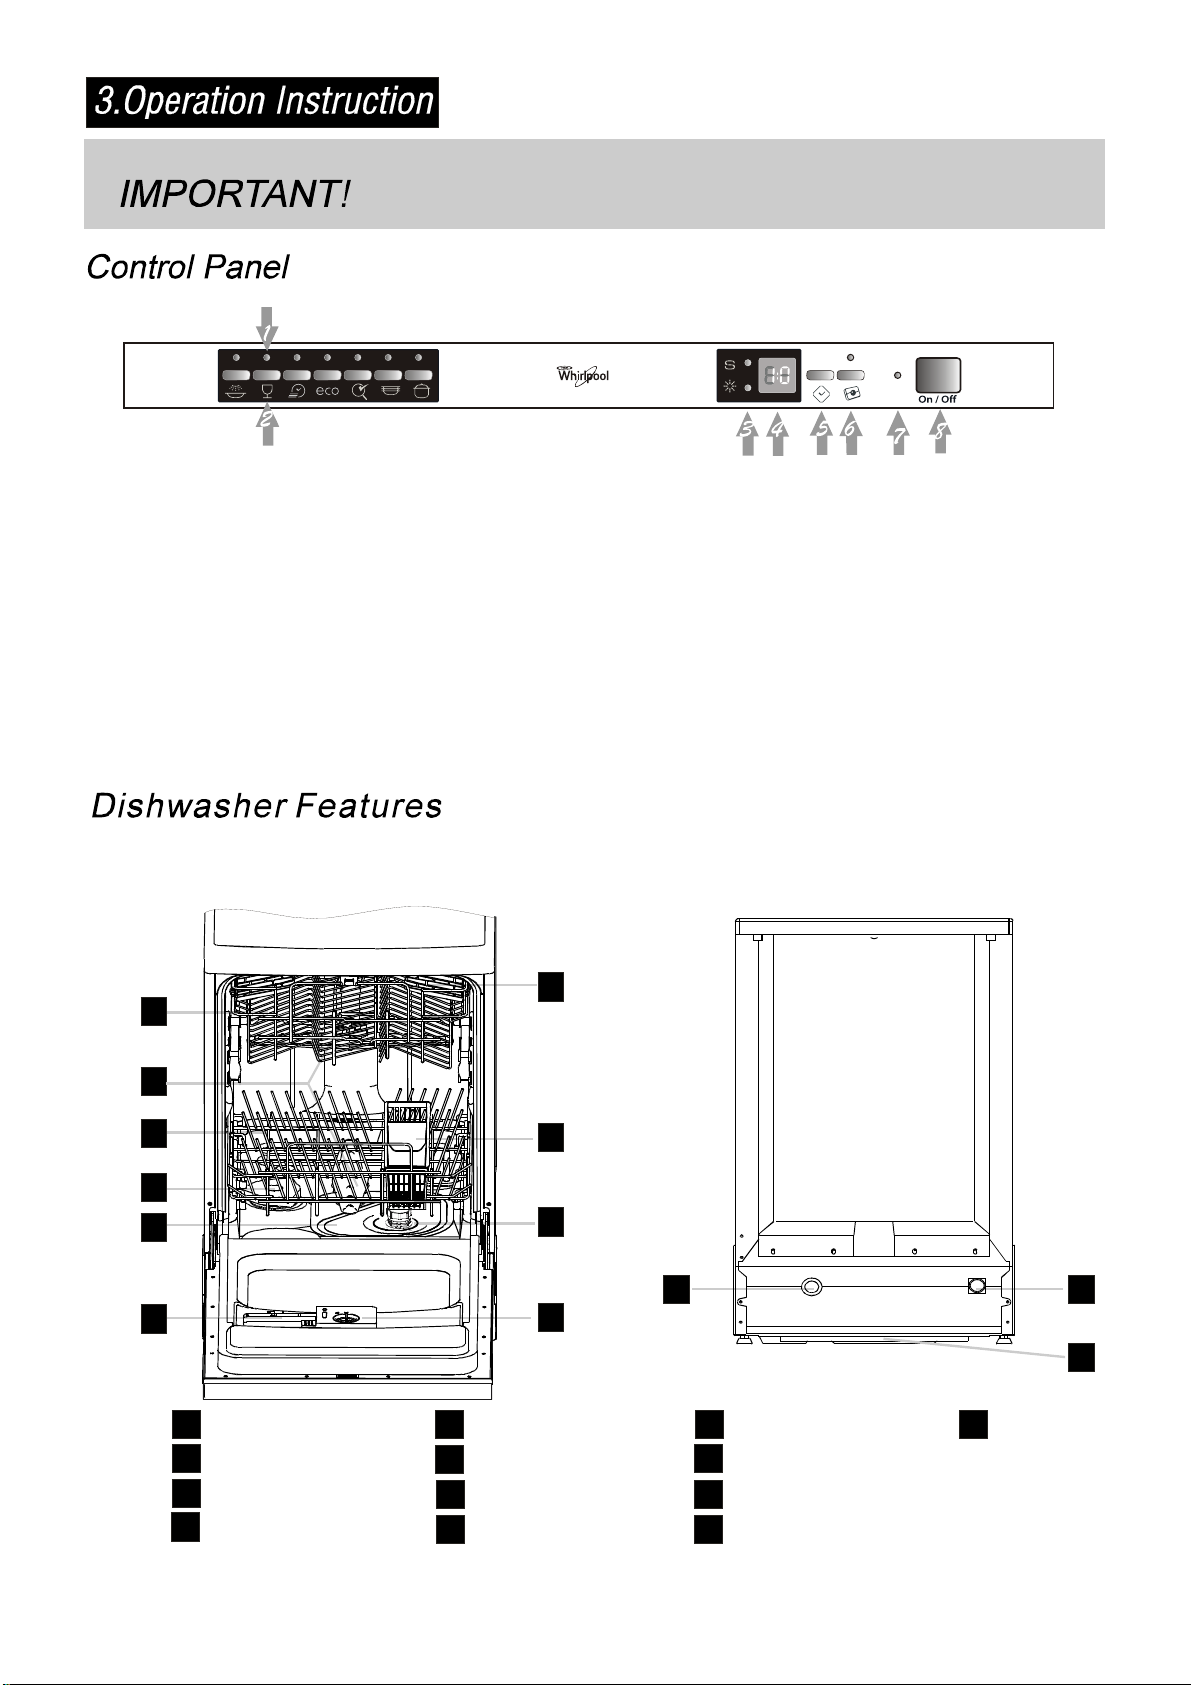
ControlPanel ............................................................... 7
DishwasherFeatures ...................................................7
4) Prior using for the first time .....................................8
A - Water Softener ......................................................8
B - Loading the Salt in to the Softener ........................9
C - Fill the Rinse Aid Dispenser ..................................9
D - Function of Detergent ..........................................10
5) Loading the Dishwasher Basket ............................13
Attention before or after loading the Dishwasher
Baskets ..................................................................... 13
Loading the upper Basket .........................................13
Loading the lowe Basket ...........................................14
Cutlery Basket ...........................................................15
6) Starting a washing programme .............................16
Wash Cycle Table .....................................................16
Turning on the Appliance ..........................................17
Change the Programme ............................................17
At the End of the Wash Cycle ...................................17
7) Maintenance and cleaning .....................................18
Filtering System ........................................................ 18
Caring for the Dishwasher......................................... 19
8) Installation instruction............................................20
Please carefully read the installation
instruction..................................................................21
Aesthetic panel's dimensions and installation...........21
Tension adjustment of the door spring......................23
Connection of drain hoses. .......................................23
NOTE:
Dishwasher installation steps....................................24
About Electricity Connecting .....................................25
The manufacturer, following a policy of constant
development and updating of the product, may
make modifications without giving prior notice.
Water Connection .....................................................26
9) Troubleshooting Tips..............................................27
Before calling for service...........................................27
Error codes................................................................28
Technical information ................................................ 29
Page 6

When u sin g your dishwas he r, fo ll ow the precautions listed below:
5
This appliance must be grounded. In the event of a
malfunction or breakdown, grounding will reduce
the risk of anelectric shock by providing apath of
least resistance of electric current. This appliance
is equipped with a cord having an equipmentgrounding conductor and a grounding plug.
The plug must be plugged into an appropriate outlet
that is installed and grounded in accordance with
all local codes and ordinances.
Do not abuse, sit on, orstand on the door or dish
rack of the dishwasher .
Do not operate your dishwasher unless all
enclosure panels are properly in place. Open
the door very carefully if the dishwasher is
operating, there is a risk of water squirting out.
Do not place any heavy objects the
door when it is open. The appliance could tip
forward.
When l o ad ing it e ms t o be wash ed :
1) L ocate sharpitemssothattheyarenotlikely
todamagethedoorseal;
)
2 Warning: Kni ves andother u tensils with
sh a rp poin t s mu st be load ed in the basket
with their points d own orplaced i n a
horizontal position.
When us ing y our dishwasher,you shoul d
prevent pl astic items from coming int o co ntact
with the heating element.(This i nstruction is only
applicable tomachines with a vi sual heating
element.)
Check that thedetergent comparmentisempty
after compl etio nof thewash cycle.
Do not wash plastic items unless they are marked
dishwasher safe or the equivalent. For plastic items
n
ot so marked, check the manufacturer's
recommendations.
Use o nly det ergent and rins e additives
designed foran aut omatic dishwasher.
Never u se s oap, laundry de terg ent, orhand
washing detergent in your dishwash er.Keep
these pr oducts out oft he reach of children.
on or stand on
Improper connection of the equipment-grounding
conductor can result in the risk of an electric shock.
Check with a qualified electrician or service
representative if you are in doubt whether the
appliance is properly grounded. Do not modify the
plug provided with the appliance; If it does not fit
the outlet. Have a proper outlet installed by a
qualified electrician.
Keep children away from detergent and rinse aid, keep
child away from the opendoor of the dishwasher,
ren
there could still be some detergent left inside.
This appliance is not intended for use by persons
(including children with reduced physical, sensory or
mental capabilities, or lack ofexperience and
knowledge ,unless they have been given supervision
or instruction concerning use of the appliance by a
person responsible for their safety.
Children should be supervised toensure that they do
not play with the appliance.
Dishwasher detergents are stronglyalkaline,they
can be extreme ly dang erous if s wallow e d.Av oi d
contact with skin and eyes and keep child ren away
from the dishwasherwhen the door is open.
The door should not be left open,
since th is could increase the risk of tripping.
If the supply cord is dam aged, it must be replaced
by the manufacturer or its se rvice agent or a
similar ly qualifie d person i n order to avoi d a
hazard.
Remove the door tothe washing compartmentwhen
removing an old dishwasher from service or discarding it.
Please d ispose ofpacking materials properly.
Use the dishwasher only for its intended function.
Duringinstallation,thepowersupply mustnot
beexcessivelyordangerouslybent or flattened.
Do not tamper with controls.
The appl iance is to be connected to the water
mainsusingnew hosesets andthat old hose-sets
sho ul d no t be reu sed.
Themaximum number of placesettings to be
washed is 9.
Themaximum permissible inletwater pressureis
1Mp a .
Theminimum permissible inletwater pressure is
0.04Mpa.
)
Page 7

Dispose ofthe d ishwasher packaging m aterial correctly.
6
All pa ckaging materials ca n be recycled.
Plastic partsare m arked with th estand ard international a bbreviation s:
PE for polyethylene,e .g. s heet wrappingmateria l
PS forpolystyrene,e.g. padding m aterial
POM polyoxymethylene, e.g. pla stic c lips
PP polypropylene , e.g.Salt filler
ABS Acrylonitri le B utadiene Styrene, e.g.Control Panel .
WARNING!
Packagingmaterial couldbe dangerous for children!
For di sposing ofpackage and the a ppliance please goto arecycling centre. Therefore cut
offthe power s upplycable and makethedoor closing device unusable.
Cardboardpackaging is manufactured fromrecycledpaper andshouldbe disposedin the
waste papercollect ion f or recycling.
By ensuringthis pr oduct is dispo sed ofcorrectly,you will help pr event potential n egative
consequences for the environment and human h ealth, which cou ld ot herwise becaused
byinappropriatewaste handling of thisproduct.
For m ore d eta iled informationabout recycling ofthis product, ple ase contact your local
city off ice andyour hou sehold waste dispos al ser vice.
DISPOSAL: Donot dis pose thisproduct as unsorte d muni cipal waste. Collect ion of such
waste sep arately for spec ial tr eatment is necessary.
Page 8
Toget the bestperformancefrom yourdishwasher, readall
7
operating instructions beforeusing it for the firsttime.
Program indicatorlight: when you select washing
1
program , the correspond l i ght will di spla y.
Program Key- pr es s:To sel ect wash ing program
2
whenpress theKey-press.
SaltandRinse Aid Warning Light:To come on when
3
thesoftener o r dispenserneedstobe refilled.
Display: To di splay delay time o r errorcodes.
4
DelayedStartButton:Press this button to setthe
5
delayed h ours for washing. You can delay the start
of wash ing up to 24 hours. One press on this
button delays the st ar t of was hing by on e h o ur.
Fro nt view
1
3in1 indicator l ight / 3in1
6
functionsButton:Toselectandshow 3in1
Power light:To co me on when Pow er O N/OFF
7
button is presseddown.
ON/OFF Button: To tur n on/offthe po wer supply.
8
Back View
7
2
3
4
5
6
on
Off
Upper Baske t
1
Spray A rms
2
Lower Basket
3
Salt Cont ainer
4
8
9
10
MainFilter
5
Detergent Dispenser
6
CupShelf
7
CutleryBasket
8
11 12
13
Coarse Filter
9
Rins e Aid Disp ens e r
10
Drainpipe connector
11
Inletpipe connector
12
13
Tray as s
Page 9

Before using your dishwa sher forthe firsttime:
8
A. Set the water sof tener
B. Add 1.5Kg dishwasher saltand thenfull fillthe saltcontainer with wate r
C. Fi l l t he rinse aid di sp enser
D. Fill i ndetergent
A. Water Softener
The wat er soften er must be s et m anu ally,using th e wa ter ha rd ness di al.
The wat er soften er is designed toremove minerals and saltsfrom thewater, wh ich woul d ha ve
adetrimentalor adverse effect on theoperationofthe appliance.The higher the
content of these mineral s an d sa lts, theharder yourwater is.The s oftener should b e
adjusted acco rding t o thehardness ofthe waterin you r area.Your local WaterAuthority
can adviseyou on the hardnessofthewaterinyour area.
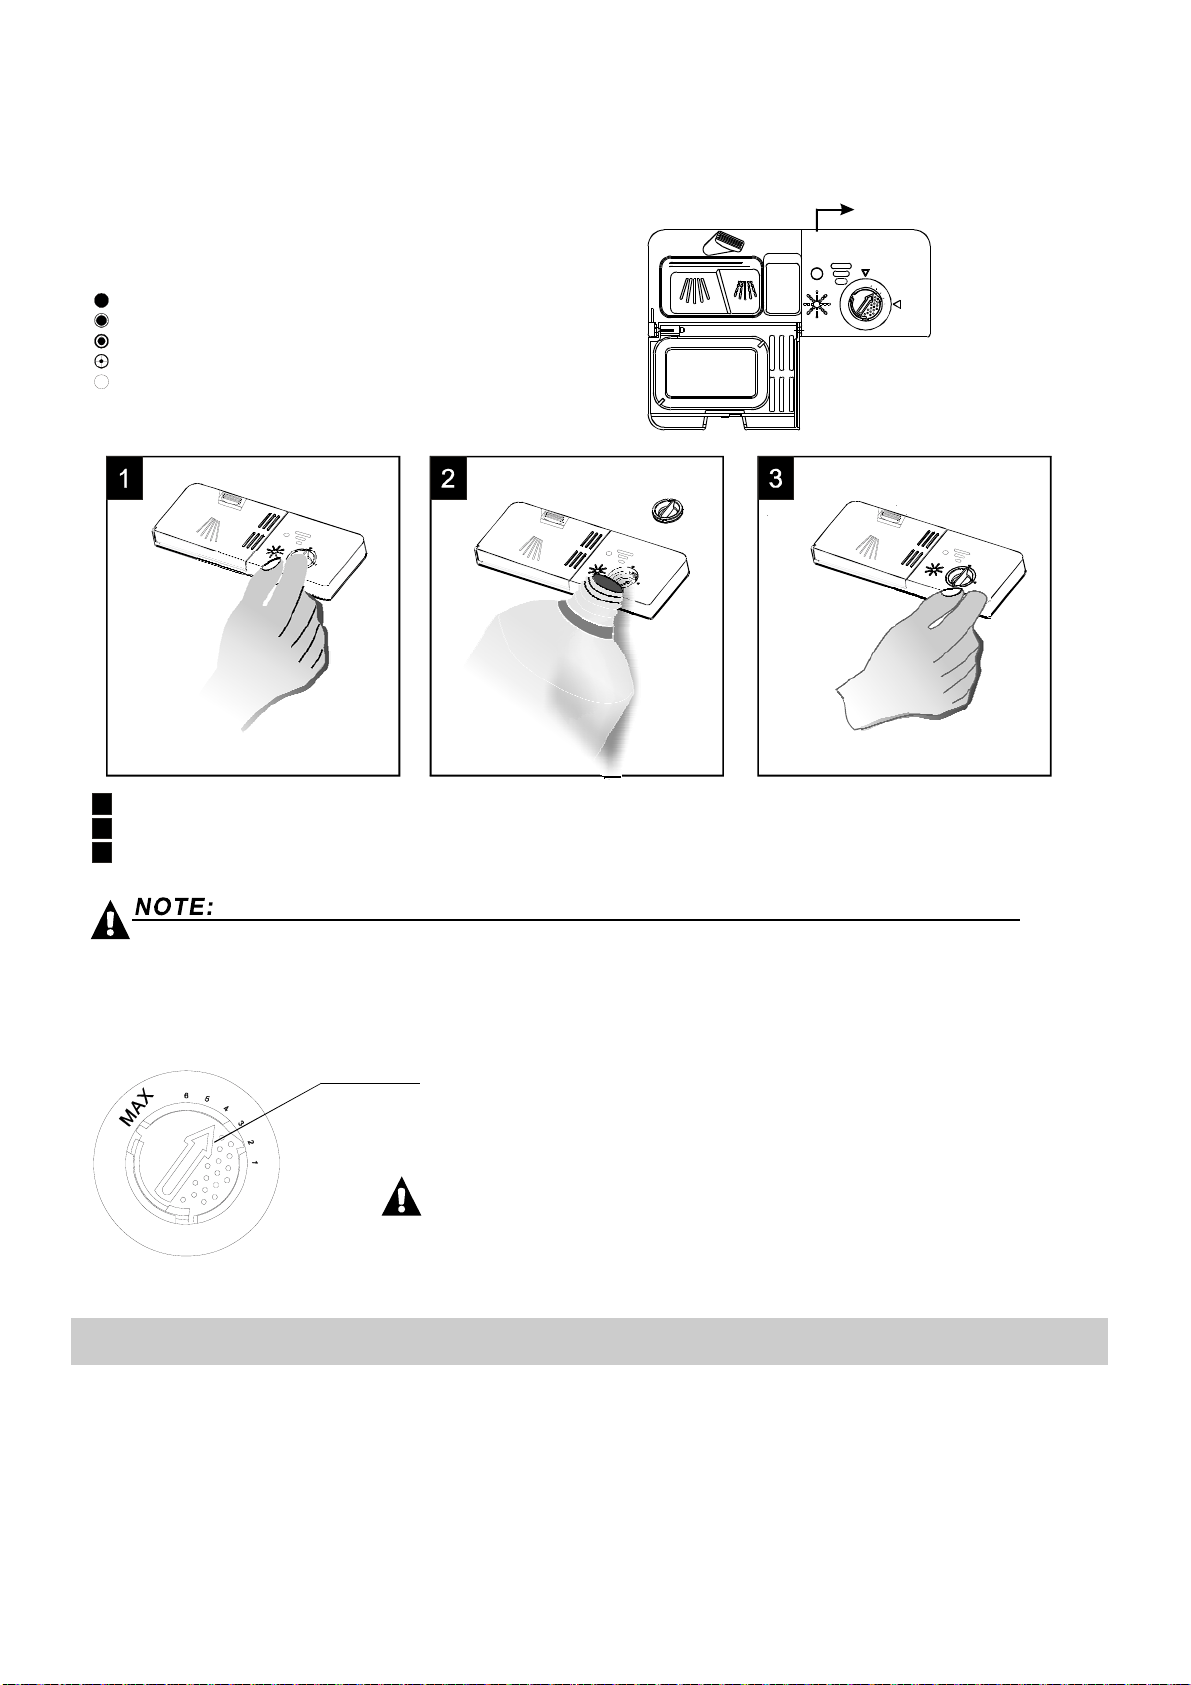
Adjust ing Salt C onsump tion
The dishwas her isdesigned toallow for adjustm ent i n theamount ofsalt consumed bas ed onthe ha rdness of
the waterused. Thisisintendedto optimise andcustomisethelevelof saltconsumption.
Pleas e follow thest eps below f o r a djus tment insalt consum ption .
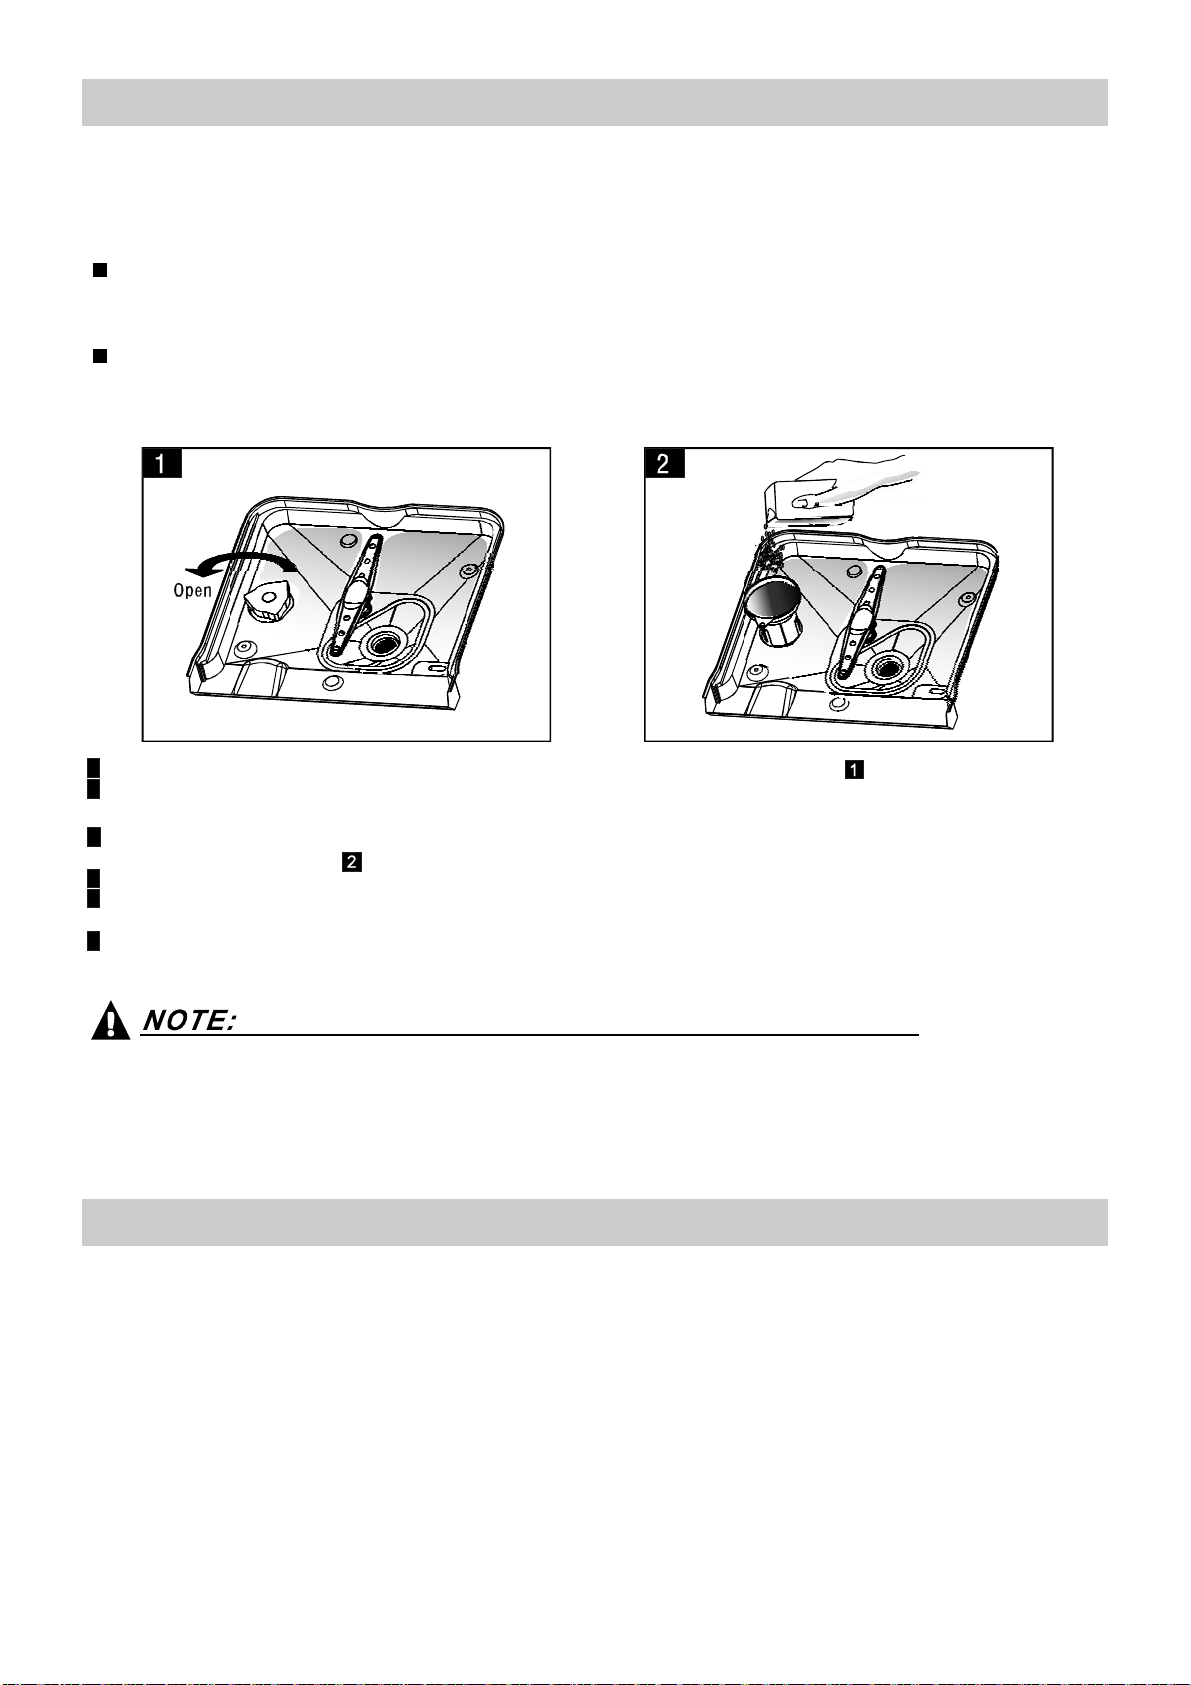
1. Unscrewthecap from the salt container.
2. There is a r ing o n th e container wit h a n a rrow onit ( see figure
onthe side),if necessary,rotatethering in theanticlockwise
direction fromth e "-" Setting toward the " +"sign, based on the
hardness o f thewater be ing used.
It is recommended t hat adjustments shouldbe made in
accord ance with t he following scheme :
WATERHARDNESS
dH
45~60 80~107 56~75 8~11
Note:1
°
dH=1.25 Clarke=1.78 f H=0.178mmol/l
DH: German degree
°
fH: Frenchdegree
°
Clark: Britishdegree
°
fH
0~140~8 0~1.4
14~398~22 1.4~3.9 - 20 50
39~8022~45 3.9~8 Mid 40 25
°°
Clarke
0~10
10~28
28~56
mmol/l
Selector Position
/
+
Note:2
""/
"-"
"+"
"Mid"
Salt consumption
(gram/cycle)
No salt need adde d
Settingtowardthe"-"sign
Settingtowardthe"+"sign
Settingtowardbetween
the "-" sign and "+" sign
Contact yo ur localwater boardfor information on the hardne ss of your w ater su pply.
Auto nomy
(cycles/1kgs)
0
60 16
/
Page 10
B. Loa ding t he Salt Into the Softener
9
Always u se thesalt intended for use with dishwasher.
The sa lt c ontain er i s l ocated beneath thelower basket and should b e fill ed a s explained in the
follow ing:
Attention!
Only use saltspe cifically designed for t he usein d ishwash ers! Every other t ype of
salt no t specificallydesig ned forthe u se inadishwa sher, espe cially tab le salt, will
damage t he w ater softener.In caseof da mages caused by the use ofunsuitable
salt the manufacturer does not give any warranty noris li able forany damages caused.
Only f ill wi th sal t justbefore starting one of the co mplete washing p rograms.
This wi ll p revent anygrains ofsa lt or salty wate r,which may have been spi lled,
remaining onthe bottomof th e machine for any pe riod of time, which may cause
corros io n.
A Remove the lower bas ket andthen unscrew and remov e thecap f rom the sal t container.
B U
se a funnelto fill thesalt container with about1.5kgof di shwashersalt,
thenpleaseremove thesaltfunnelfrom all production.
C
Fullfill t he salt containerwi th water.Itis normal fora smallamountof water tocome
outofthesaltcontainer.
D Afterfilling the c ontainer , sc rew thecap ti ght ly backclockw ise.
E Usually,the salt war ning light wil l stopbeing illuminated within 2 -6 daysafter the sal t container hasbeen filled with
salt.
F Immediatel y a fte r fi lling the sal t in to the salt container, a washing p rogram should bestarted (We suggest to use the
soak or rapid program). O therw ise thefilter system, pumpor other im portant parts ofthe machine may be da maged
by sal ty w ater. This isout ofwarr anty.
1.The sal t container must only be refilled when the sal t wa rning light in the control panel comes on.
Depending onhow w ell thesalt dissolves, t he s alt warning light may still be on even tho ugh the
salt contai ner isfilled.
If there isno saltwarning light in the con trol panel (for so me Mode ls),you can estim ate wh en to fill
the salt into the softener bythe cyclesthat t he dishwasher has run.
2. If thereare spi lls ofthe salt,a soa k or a rapid program shoul d berun to remove the excessive sa lt.
C. Fi ll the Rinse Aid Dispenser
RinseAid D ispenser
The r inse aid i s r elea se d d uring the final rin se to pr event water f rom forming droplets on y our dishes, which can leave
spots and streaks. It also improve s dryi ng by allowing water to rolloff the d ishes. Your dishwasher is designed to
useliqu id rins e ai ds. The rinse aid dispenser i slocated inside t he do or nextto the detergent d ispenser.To fillthe
dispenser,openthec apandpour the rinseaidi ntothedispenser until thelevel indicatorturnscompletelyblack.
Thevolum e of the rins e aid container is about 110ml.
Function of Rinse Aid
Rinse aid is aut omat ically added d uring thelast rinse, ensuring th orough rinsing, and spo t an d s treak free drying.
Attention!
Only usebranded rinse aid for dishwasher. Neverfillthe rinseaid dispenser withany othersubstances
(e.g. Dishwasher cleaning ag ent, liquid dete rge nt). Th is would damag e t he appliance.
Page 11
Whento Refill the RinseAid Dispenser
10
Ifthere is no rinse-aid warnin g light in thecontrol p anel, you can estimate the amount fromthe col our
ofthe optical l evel ind icator C located next to thecap. Whenthe rinse-aidconta iner isfull, th e whole
indicator willbe dark .As t he r inse-aid diminishes, th e si ze o f the dark dotdecreases. You should n ever let
the ri ns e ai d l ev el fal l 1 / 4 ful l.
Asthe rinse aid diminishes, t he sizeof theblack dot
onthe rinse aid levelindicatorchanges,asillustrated below.
Full
3/4full
1/2full
1/4 full-Should refill to eliminate spotting
Empty
""
C (Rinse - Ai d indicato r)
6
To openthe dispens er, tur n the cap to the "open" (left) arrow an d lift it out.
1
Pour the rins e aid int o the dis pen ser, be ing careful not tooverfi ll .
2
Replace the cap by inserting it alignedwith "open" arrow andturning i t tothe closed (right) arrow.
3
Cl ean up any rins e aid sp il l ed w hile during filling wit h an abs o r bent cloth to av oi d ex cessiv e fo amin g
during thenext w ash. Don't for get t o re place thecap before you close dis hwasher d oor.
Adjusti ng R inseAid Disp enser
Adjust lever
(Rinse)
Increase the doseif thereare dropsofwater orlime spotsonthedishesafter washing.
Reduce itifthereare sticky whitishstains onyour dishesor a bl uishfilm on glasswareo r
knifeblades.
The ri nse aiddispens er ha s six or foursettings. Al ways start wi th t he d ispens er
set o n "4". If sp ots andpoor drying are a problem, increase t he amountof r i nse
aid d ispensed b y removing thedispenser lid and rotating t he d ial to "5". If the
dishes s till are not d ryi ng properlyor are show spots, adj ust th e dial to thenext
higher leveruntil your dishes are sp ot-free. The recommend ed setting is "4".
(Factoryvalueis "4".)
NOTE:
D. Fun ction of D etergent
Detergents with its chemical ingredients are necess ary t o remove dirt , c rus h dir t and trans port itou t of the di shwasher.
Mostof thecommercialqualitydetergentsare suitableforthispurpose.
Detergents
There are 3 sorts of d etergen ts
1.Withphosphateandwithchlorine
2.Withphosphate andwithout chlorine
3.Withoutphosphate and without chlorine
Page 12
Normally new pulverised detergent is without phos phate. T hus thewater so ftener function o f
11
phosphate is not given. In this cas e we rec ommend to fill sa lt in the sa lt con t a in er even w he n
the hardness of water is only 6 dH. If detergents w itho ut phosp hate ar e usedin thecase of hard wat er
often whi te s pots appear on d ishes and glasses. In this case pl ease add more d etergent toreach
better re sult s. D etergents wi t h o ut chl or ine do onl y ble ach a litt le. Stro ng an d col o u red spo ts w ill not
beremoved completely.In th is c ase please choos e a program witha hi gher temperature.
°
Concentr ated Deterge nt
Based ontheirchemical composition,detergents can be splitin two basic types:
conventional,alkalinedetergentswithcausticcomponents
lo w al k aline c onc entr ated d et erge nts wi t h n atura l en zy mes
The use of normal washingprogramsincombination with concentrateddetergents
reduces poll ution and is good for your dishes ; thesewash p rog rams are specifically matched
to th e dirt-dissol ving propert i es o f the enz yme s of the concent rate d deterg ent. For this reas on
normal wash programsin which concentrated detergentsareusedcanachieve t he s ame
“”
resultst hat c an o therwiseonlybeachievedusing intensive programs.
“”
“”
DetergentTablets
Detergent tablets of differentbrandsdissolveatdifferent speeds. Forthis r eason some
detergent ta blets ca nnot dissolve and develop the ir fu ll cl eaning power dur ing s hort
programs. There fore pleaseuse long program s wh en u sin g de tergent t ablet s, t o
ens ure the com plete rem oval of det erg e n t resi du als.
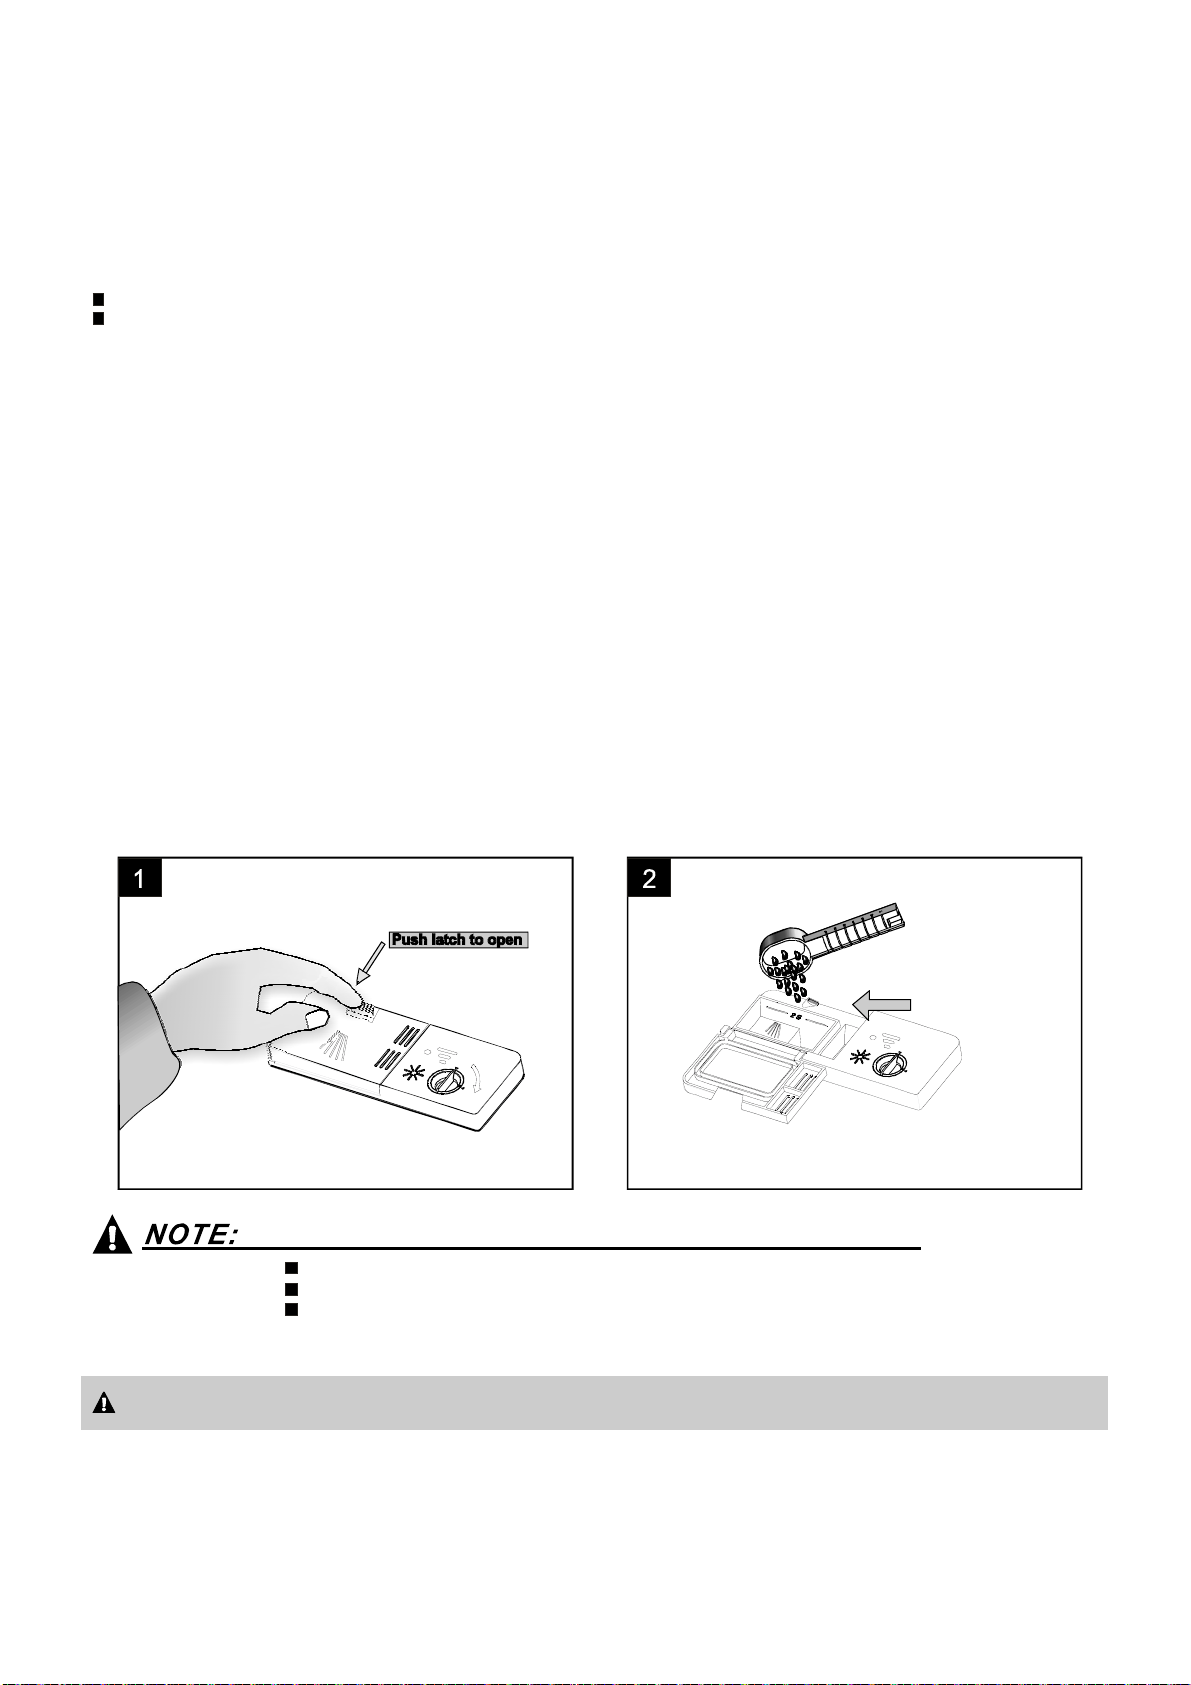
Detergent Dispenser
The dispens er m ust b e re filled before the start of each wash cyclefollowing the inst ructions
provided in the w ash cycletable .Your dis hwa sher use s le ss de tergent and rins e aid than
Conventionaldishwasher. Generally, onlyonetablespoon of detergentisneeded for
anormal washload. Moreheavilysoileditems needmore detergent. Alwaysaddthe
detergen t just be fore star ting the dis h was her, othe rwis e it couldge t da mp and w ill not
dissol v e pr oper ly.
Amountof Detergentto Use
If the lid is closed: press release butt on.T he li d willspring open.
Always add the detergent just before starting ea ch w ash cycl e.
Only use branded detergentaid f ordishwasher.
WARNING!
Proper U se o f De tergent
Use only detergent s pecifical ly m ade forthe u se i n dishwashers. Ke ep yourdetergent fresh and dry.
Don't putpowdered d etergent into thedispenseruntil you'reready to wash dishes.
Dishwasher detergent is corrosive! Take care to keepit out of reachof c hildren.
Page 13
Fill in Detergent
12
Fillthe detergent dispenserwith detergent.
The marki ng in d icate s the dosing level s , as
illus t ra ted o n the righ t:
The pla ce of main wash cycledetergent placed,
A
MIN means approximately 20 g o f detergent.“”
The pla ce o f pr e-wash c ycle detergentplaced ,
B
approximately 5gof detergent
Pleaseo bserve th e m anufact urers do sing andstorage
Recommendations as stated on thedetergentpackaging.
Closethelid and press untilit locks in place.
If the dis hes are heavi ly soi l ed, place an ad diti ona l
detergent dosei n the pre-w ash detergent chamber.This d etergen t willtake effe ct d uring thepre-wash phase.
Youfi nd i nformatio n ab out theamount of det ergent forthe si ngle programme ont he lastpage.
Please a ware, that accordi ng t o the level so iling and the specific har dness of water d ifference s are possible.
Please observe themanufacturer'srecommendationsonthedetergent packaging.
6
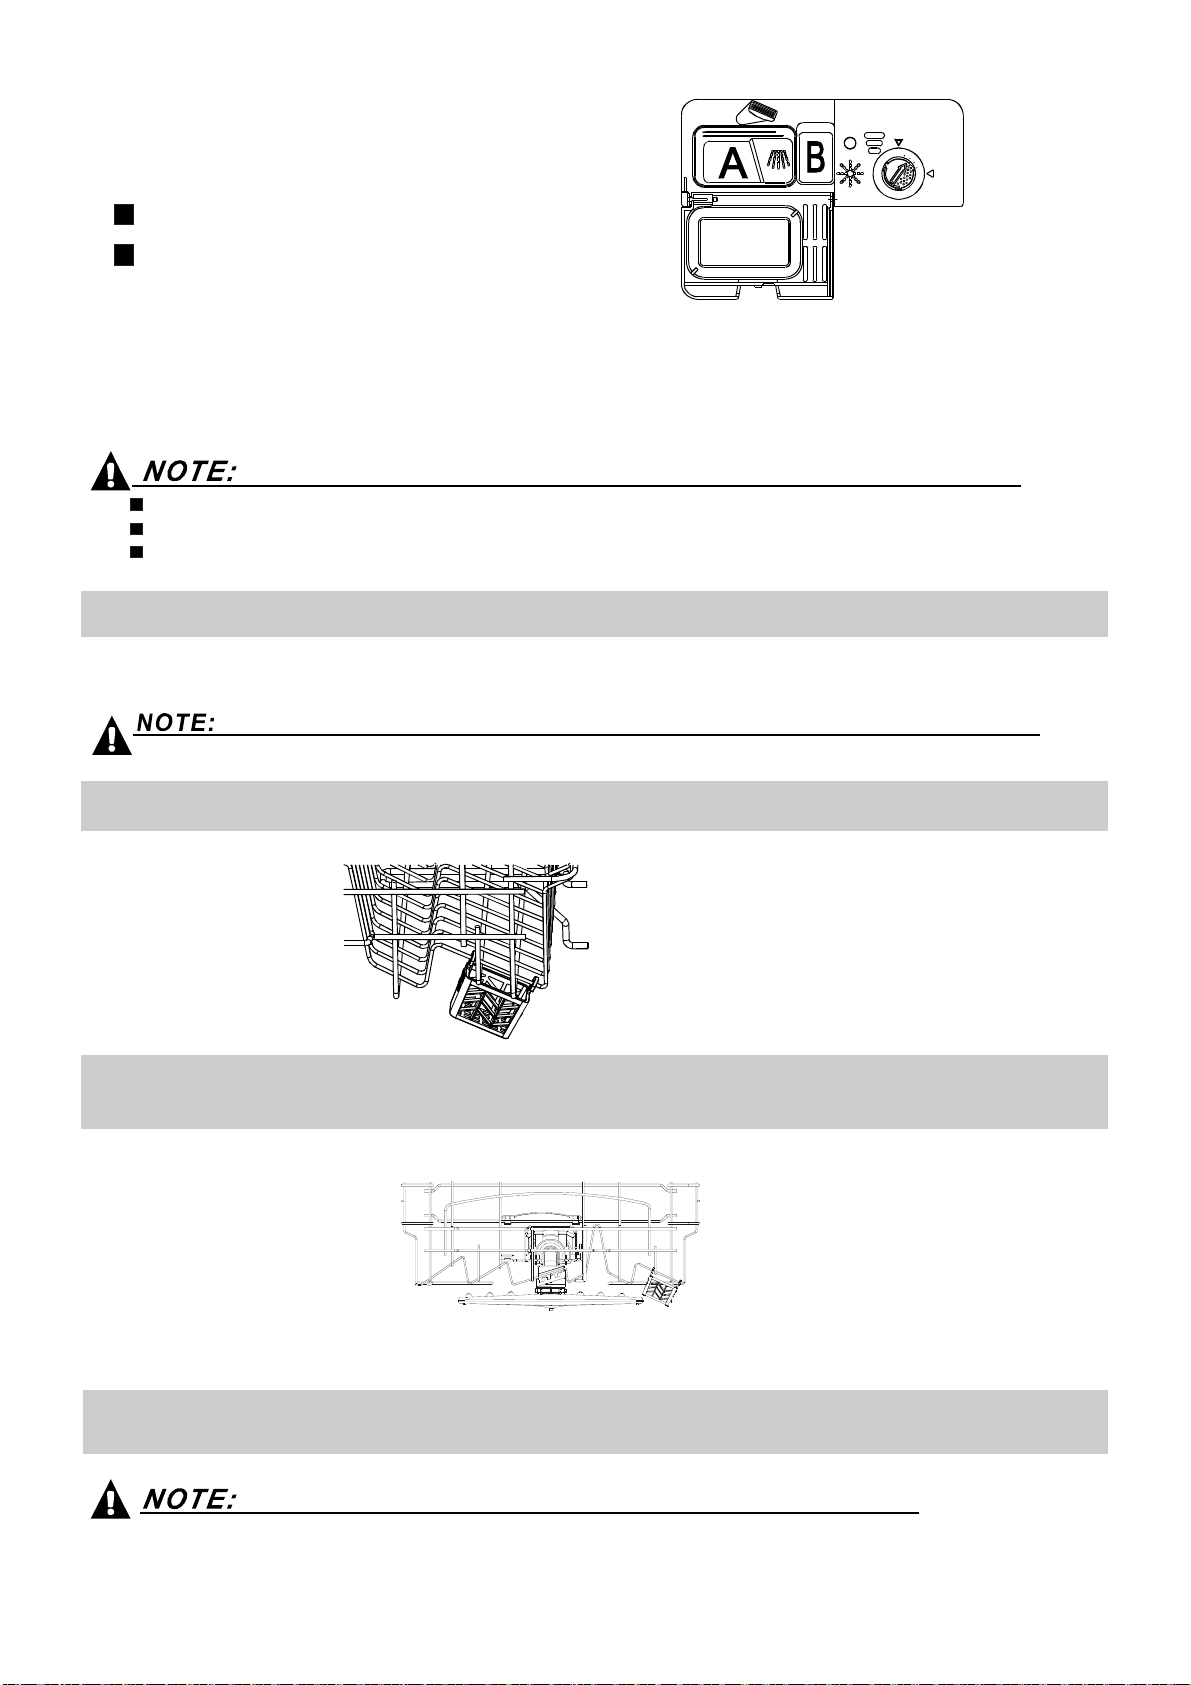
How To Use T he 3IN 1 Fun ction
Your dishwasher has a3in1 functionwhich needs no salt and rinse aid buta 3In1 tablet.
This dishwas her c omes w ith a 3in1 tabl et co ntainer asan acce ssory.
Only the 3in1 fun ction (for the program: intensi ve/Norm al/ Eco. ) Can be used with 3in 1 tablets.
I
fyou use 3in1 ta blets inother programs, t he a ppliance will not achieve a go od p erfo rmance.
1.Thefigurebelow showshowtohang the 3in1tablet container on theupperbasket.
2. Rot ate t he upperspray er an d ch ange the locat ion o f the conta iner toensure the upper sprayer i s no t
obstructed by the 3in1 tablet container. Refert othefigurebelow forreference.
3.Put the3in1tablet intothe container ,then startthe 3in1program.
When us ing 3i n1 combination / compact Det ergents ,please pay attention to make s ure that
the size of the combination detergents fits to the dispenser so that combination
detergents c an b e easily put into the dispenser,and th e d ispenser would not bebroken.
,
Page 14
Fo
13
rbest performance ofth e d ishwashe r,follow these lo ading guidelines. Features and
appearance of bask ets and cutler y b askets may va ry f rom yourmodel .
Attention beforeor after Loadingthe Dishwasher Baskets
Scrape offany largeamou nts o f leftover foo d. Soften rem nants ofburnt food inpans.
It i s n ot ne cessar y t o rinse the dishes un der running wa ter.
Place o bjects inthe dishwasher infollowin g way:
1.Itemssuch ascups , gl asses, pots/pans, etc. are faced downwards.
2.Curved item s, or ones w ith recesses, sho uld beloaded aslant so that water can runoff.
3.Allutensilsarestacked securely and cannottip over.
4.Allutensi ls areplaced i n the way that t he sprayarms can rota te freely d uring w ashi ng.
Verysmall items shou ld notbe washed in thedishwash er asthey could easi ly fallout ofthe b aske ts.
Loading the UpperRack
The upper rack is des i g n ed to hold mo r e del icate and li gh ter di shware suc h as glass es, coffee
and tea cupand saucers, as well as plates,small bowls and shallow pa ns (a s lo ng asthey ar e
not too dirty).
Position thedishes and cookware sothat t hey donot g et m oved by the spra y of water.
Bowl M Bowl L() ()
Glasses
Front
Dessert plate
(Egg)
Cups
Gravy ladle
Saucers
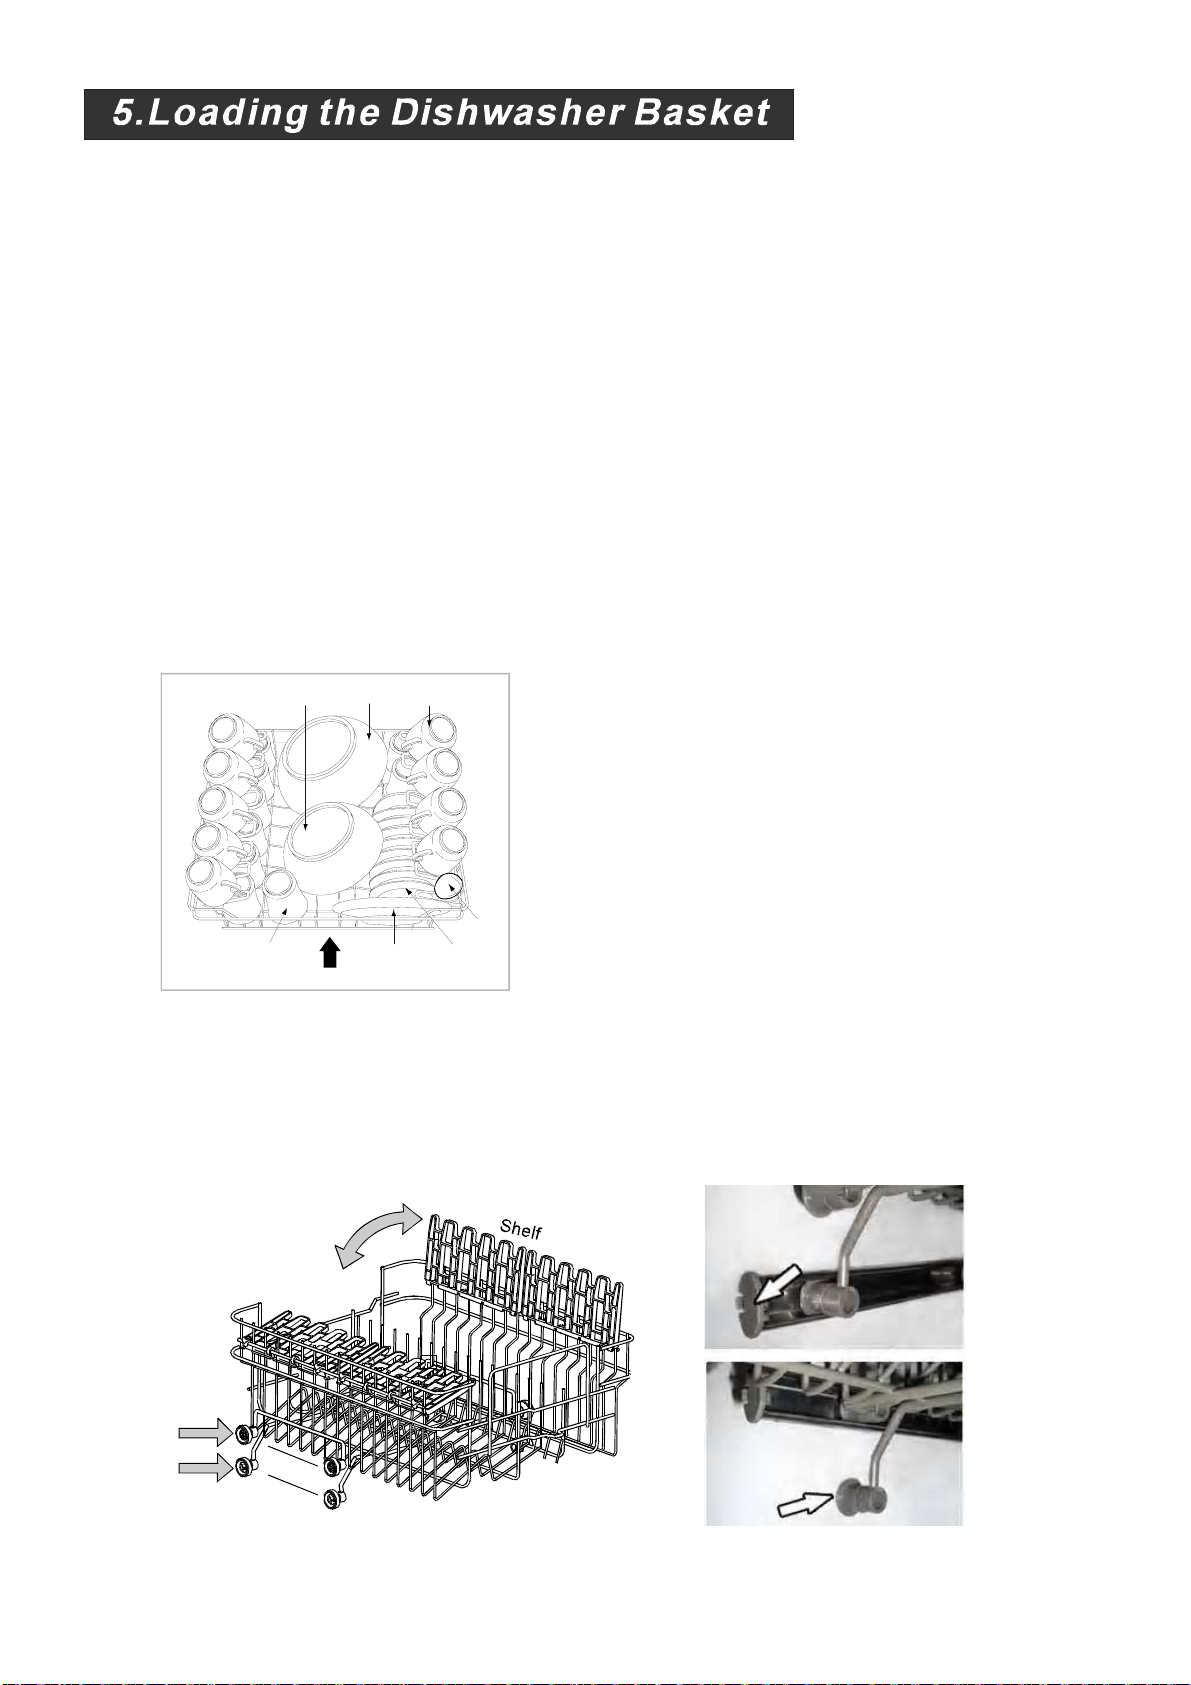
Adjustingthe Upper Basket
The height of the upper basketcan beadj usted i n order to create mo re spacefor large utensi ls
both for theupper/lower basket. The height of the upperbasketcanbeadjusted byplacingthe
wheels on different height of the r ails. Lo ng items, ser ving cutlery, salad se rver s an d knives
should be placed o n theshelf so t hat the y d o notobstr uct t he r otati on o f thespray arms.
The shelf can be folded back or beremoved when notrequired foruse.
Upper wheels
Lower wheels
Page 15

Loadingthe Lower Basket
14
Werecommend thatyou p lace largeitems whichare mostdifficult to cleanintothelower basket:
pots, pans,lids, serving dishesand bowls, as shown in the figuretothe right.
It ispreferable to place serving dis hes and lids onthe side of the racks in order to avoi d b locking
therotationofthetopsprayarm.
Pots, serving bowls, etc.mustalwaysbeplaced topdown.
Deep potsshould beslanted t o allowwater toflow o ut.
The b ottom basket feature fold down tinerows sothat l arger ormore pots and p ans can be loaded.
1. Cutlery basket
2. Dessert plates
3. Soup plates
4. Dinner plates
5. Oval platter
6. Saucer
Page 16

Cutlery Bask et
15
Cutlery sh ould be placed in the cutlery b asket with the handles a t t he bottom. If the rack has side baskets, the
spoons sh ould be loaded separat ely intothe ap propri ate slots, especi ally long ute nsils should be placed i n the
horizontal position at the f ron t of the u pper basket as shown in the pi cture.
3553
1551
3553
3553
1561
3213
3244
1244
2244
2214
1214
7274
For washing in th e d ishwashe r the fol lowing cutlery/dishes
1 2 3456 7
1. Tea spoons
2. Dessert spoons
3. Soup spoons
4. Forks
5. Knives
6. Serving forks
7. Serving spoons
Do not leave any itemex tend through bottom .
Knivesandother utensils withsharp points
mustbe loaded in thebasket with the ir po ints
down or plac ed i n an hor izo nt al p osi t ion.
Always l oad sharp u tensils with t he s harp
point down!
Arenotsuitable
Cutlery with wood en, h orn china or
mother-of-pe arl h andl es
Are of limited suitability
Sometypes of g lasses canbecome
dull after a large numberofwashes
Plastic items that are n ot heat resis tant
Older c utlery with gl ued parts that are not
temperature resistant
Sil ver and al u mi nu m pa rts hav e a
tendency t o discolour du ring w ashin g
Bonded cutlery itemsor dishes
Pewter orcooper items
Crystalglass
Glaze d patt er n s may fade if machin e
washe d freq uently
Steel i tems subject to rusting
Woodenplatters
Itemsmadefrom synthetic fibres
NOTE:
Do not put in items th at aredirty of cigaret te a sh, c and le w ax, l acquer or pai nt.
If you buy new dishes please make sure th at t hey are suitab le fordishwashe rs.
NOTE:
Pl eas e do no t overlo ad you r dishwashe r. There is only s pace for 9standard d i s he s. D o not
use d ish that is notsuit able for dish washers. T his is importa nt forgood results a nd f or
reasonable e nergyconsume.
Loadingcutleryand dishes
Before loading the dishes , you should:
Remove large left-over
Soften remnants ofburnt food in pans
Whenloading the dishesand cutlery, pleasenote:
Dishesand cutlery must notimpedethe rotationof thespray arms
Load hollow i tems suchas cups, gl asses, pans etc . wi th the opening downwa rds s o t hat
water cannot colle ct in the container o r adeep b ase
Itisdangerousto openthe doorwhen washing, because thehotwater maybe scaldedtoyou. The doorshouldnot be
leftintheopenpositionsincethiscouldpresentatrippinghazard.
Page 17

16
Page 18

TurningOn theAppliance
17
Startinga cycle wa sh
1 Drawoutthe lowerand upperbasket, loadthe dishes a nd pushthem back.
It is commended to loadthe lower basket first, then the upper one (s eethe sectione ntitled
“”
Loadingthe Dishwasher ).
2 Pour in the de te rgen t ( see the sec t ion enti tle d Sal t , Det ergent and Rinse A id ).
3 Insert the plug in to th e so cket. The power s uppl y is 220-240 VAC /50 HZ,the spe cification of th e
socket is 10A 25 0VAC. Make sur e thatthe watersupply is turned on to f ull p ressure.
Open the door,press theON/OFF button, and the ON/OFF light will turn on.
4
Press the program bu tton toa siredwash c ycle. and close thedoor . After 3 s econds, the mach ine will work.
“”
Change the Program. ..
Premise:
1. Acycle tha t is underway canonly be modifi ed ifit has only been running
for a short time . Otherwise, the detergent may h ave alreadybeen released,
and the appliance may have already draine d t he wash water. If this is thecase,
the dete rgent dispenser mustbe r efilled (see the section entitled " Loading t he
Detergent").
2. Press current prog.Button morethan 3 seconds to cancel the program ,
then you can chan ge t he p rogram tothe d esire d cy cle s etting (seethe section
entitled "Starting a wash c ycle. . . ").
3. Pre ss o ne ofothers prog.But ton mo re than3 s econds to cancel theruni ng program ,
translase t he program which y ou p ress.
4. Pre ss t he di splay button more than 3 se conds to re-edit display ti me .
Forgot toAdd a Dish ?
Aforgotten dish can be added at any time before thedetergent cup opens.
Open the door a little to stop the washing.
1
After the spray arms stop working,you can open the door
2
completely.
Load the forgotten dishes.
3
Close the door, the dishwasher will start running again
4
after 10 seconds.
AttheEndoftheWashCycle
Whe n th e wo rking cy c l e h as finis hed, the b uzzer o f the dishwash e r will sou nd f or 8 s econ ds, the n sto p . Turn off
the applia n ce usi ng t h e ON/ OFF but ton, shut off the wa ter supply and open the door of the dish was her.
Waitforafewminutesbeforeunloading thedishwasherto avoidhandlingt hedishesandutensilswhilethey
are still hotand m ore susceptible tobreakage. Theywill al so d ry be tter.
Switch Offth eDishwasher
The b uzzer of the dishwasher m oos for 8 s econ ds, o nly inthis ca se thepr ogramme hasended .
1.Switch o ff th e di shwa sher by pres sing the ON/OFF button.
2.Tur n off t he w at er tap!
Openthedoor carefully.
Hot d ishes ar e sensitive to knocks.The di shes should there fore beallowed t o co ol d own around 15 minutes
before r emoving from the appliance.
Open the dishwasher' s do or,leave i t ajarand w ait afew mi nutes before remov ing t he dishes. In this way they
will be cooler andthe dryin g willbe im proved.
Unloading thedishwasher
It is normal that the dis hwashe r is wet insid e.
Empty th e low er basketfirst and then t he upperone. T his willavoid water drippin g fro m t he upper Basket onto
the di shes inthe low er on e.
WARNING!
Itis dangeroustoopenthedoor when washing,becausethehot watermay scald you.
Page 19
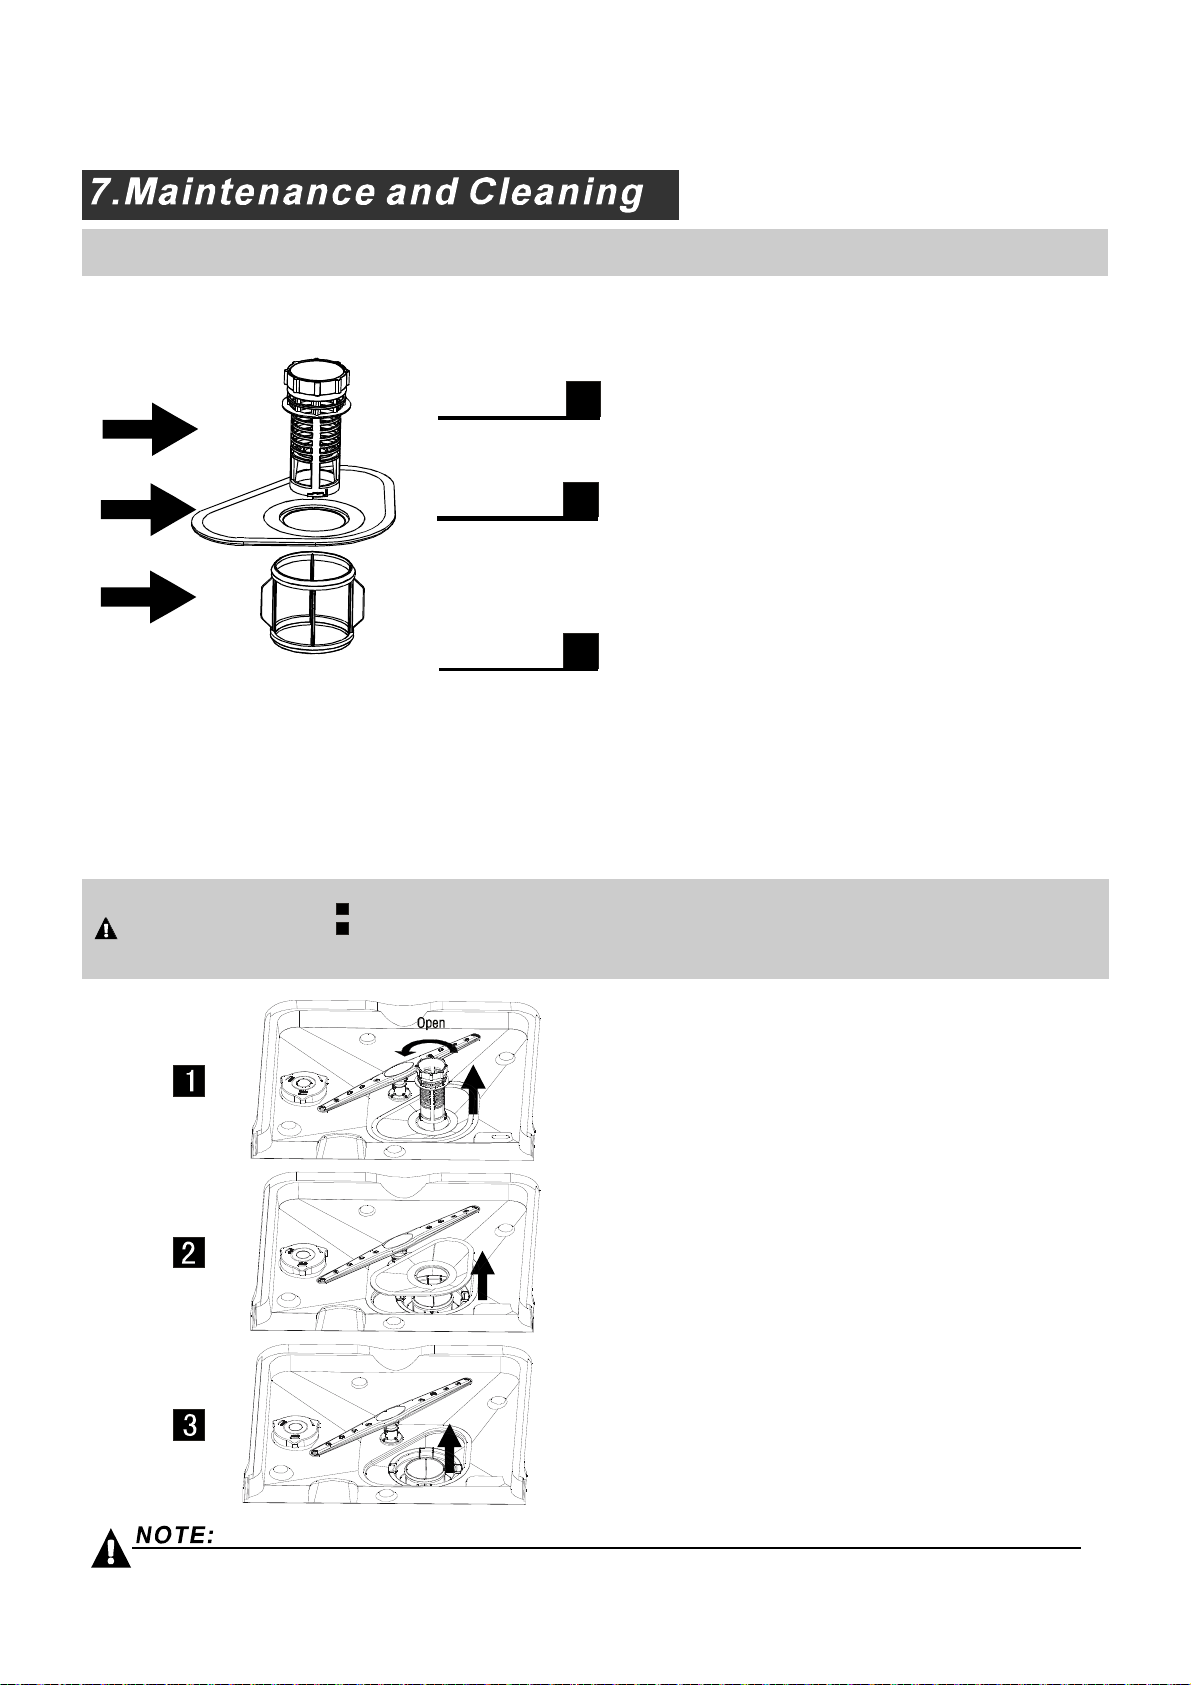
Filtering System
18
The filter prevent s lar ger remnants of food or other objects from get ting insidethe p um.
Theresiduesmayblockthe filter, inthiscase t heymust be removed.
The filter system consists ofa coarsefilter,a flat (Mainfilter)
An d a mi c ro fi lter(F i ne fi lte r ) .
1
2
3
2
1
3
Main filter
Foodand soil particlestrappedinthisfilter are pulverized by a
special jet on t he l ower sprayarm a nd w ashe d d own t o d rain.
Coarse filter
Larger item s, s uc h as pi e c es of bones or gla s s, t ha t c ould blo ck
thedrain aretrapped inthe coarse filter. To removethe items
caught bythe filter,gently sque eze thetap o n th e to p ofthis
filterandlift out.
Fine filter
This filterholds soiland foodresiduesinthesumpareaa nd
preventsitfrom beingredeposit on the dishes during washcycle.
Filterassembly
Thefilter efficiently
For b est performance and results, thefilter mustbe cleaned re gularly. thisreason, it i sa goodidea to
remove thelarger food par ticles tr app ed in the filte r aft er e ach wash cyc le by rinsing thesemicircular filter an d
cup u nder ru nnin g wa ter.To re move th e fil ter device, pull thecu p ha ndle inthe u pward d irection.
WARNING!
removes f ood particles from the wash water,allowing it to be recycled du ring the cycle.
For
Th e di sh washer must nev er b e us ed wi tho ut the f il t er s.
Improper replacement of the f ilter mayreduce the performanc e lev el ofthe appliance
anddamagedishes andutensils.
Step 1 Turn the filter in anti-clockwise direction,
:
then lift it up.
Step 2 lift the Main filte r up:
Step3 lifttheFinef ilter up:
When following this procedure from step1 to step 3, the filter system will be removed;
when following it from Step 3 to Step 1, the filter system will be installed.
Page 20

Remarks:
19
- Inspec t t he filtersfor blo cking a fter every time the dis hwasher has been used.
- By unscrewing t he c oarse filter, you can remove the filter system. Remove a ny f oo d remna nts and
cleanthefilters under running water.
Theentire filterassembly shouldbe cleanedonce a week.
Cleaning the F ilter
To cle an th e co a rse fi l ter and the fi n e fi lter, use a cl eani n g b ru sh. Reasse m ble th e fi l t er parts as s ho wn in the figures
on th e last pa ge and r einsert the entire assembly in the dishwa sher, positioning it i n its se at and pres sing dow nwar ds.
WARNING!
Whencleaningthe filters, don't knockonthem. Otherwise, thefilterscouldbe
contorted andtheperformance ofthedishwasher could bedecreased.
Caring for the Di shwasher
The cont rol p anel canbe cleaned by usinga l ightly dampened cloth .
After cleanin g, m ake sureto dry it tho roughly.
For the exterior, use a go od app liance po lis h wax .
Neveruse s harp objects, sco uring padsor h arsh cleaners ona ny partof the dishwasher.
CleaningThe Door
To cle an thee dge around t he door, you should u se o nly asoft warm,damp cloth.
To avoid penetration o f waterinto thedoor l ock andelectrical components, d o not
usea spray cleaner of any kind.
Never u se a spray cl eaner t o cl ean t he door panel asit m ay damage the door loc k
WARNING!
and electricalcomponents.
Abrasive ag ents or some pa per towelsshould notbe us ed becauseof t he ri sk o f
scra tch ing or le avin g spot s on th e st ainless steel surface.
Protec tAgain st Freezing
please take frost protection meas ures onthe di shwasher in winter. Ev ery fter wa shing c ycles,
please operate as follows
1.Cutoffthe electricalpowertothedishwasher.
2.Turnoff the water suppl y an d d isconnec t th e wat er i nlet pipe from thewater valve.
3.Drainthe waterfrom theinlet pipeandwater valve. (Use a pan tocatch the water)
4.Reconnect the water inl et pi pe tothe watervalve.
5.Remove the filter at the bottom of the tub and usea spongeto soakup wate r inthe s ump.
:
If your dishwasher ca nnot wor k be cau s e of the ice, ple a se contac t pr ofessio nal ser v i ce per so ns.
timea
Cleani ng th e Sp rayArms
It is necessary to clean th e sp ray a rms regularly in order to
remove th e a ccumulation ofscale from the hard water
and thus prevent blocking of spray arm jets and bearings.
We Suggest to poke theblocked spray arm jets with aneedle
to ensure good washi ng effect.
Unscrew
Page 21

AfterEveryWash
20
After everywash, turn off t he w ater supply to the
appliance and leave the door slightly op en sot hat
moisture and odours arenot trapped in side.
RemovethePlug
Before cl eaning orperformi ng maintenance, alw ays
remove the plug from the socket.
No SolventsorAbrasiveCleaning
Toclean the exterior and rubber parts of the dishwasher,
donotusesolvents or abrasivecleaningproducts.
Only use aclo th with warm soapy water.
Tore m ove spots o r stains from the sur face of t he
interior, usea cloth dampened withwateran a little
vinegar,or a cleaning product mad esp ecifically f or
dishwashers.
Whennotin Use foraLongTime
It isrecommendthat yourun a wash cyclewiththe
dishwasher e mpty an d the n r emove theplug f rom the
socket, turn offthe water supp ly and leave thedoor of
the app l ian c e slig ht ly open. Thi s will help th e d oo r
sealstolastl ongerandpreventodoursfromforming
withinth eappliance.
Moving theApplianc e
If the appliance mustbe mo ved, t ry t o keepit inthe
verticalposition.If absolutelynecessary, it canbe
positioned onits back.
Seals
Oneofthefactorsthatcauseodourstoforminthe
dishwasher i s foo d th at r emain str apped in the seal s.
Periodic cleaning with adamp sponge will prevent t his
fro m occu rr ing.
Electrical Shoc k Hazard
Theinstallationof the pipes
and electricalequipments
shouldbe done byprofessionals.
Disc onne ct e l ectri cal p o wer be fore
installingd ishwasher.
Failuretodosocanresultindeathor
electricalshock.
●
Installation preparation
Theinstallationposition ofdishwasher shouldbe near theexisting inletand drainhosesand
powercord.
Onesideofthe cabinet sinkshouldbe chosen to facilitatethe connectionofdrainhoses of
thedishwasher.
Note:please checkthe accompanying installation accessories(hookforaestheticpanel
,screw)
Page 22

Please carefully read theinstallationinstruction.
21
●
Illustrationsof cabinet dimensionsandinstallation position of thedishwasher
Preparations should b e ma de b efore moving the dishwasher tothe ins tallation place.
Choose a place nearthe si nk tofacilitat e the installation ofinl et a nd d rain hoses(see figure 1).
1
If dishwasher is installed a t the corner o f the cabinet, thereshoul dbe somesp ace (illustrated in figure 2)
2
when thedoor is opened.
【】Fi gure1
Cabinetdimensions
Lessthan5mm
betweenthe top
ofdishwasher and
cabinetand the
outerdoor aligned
tocabinet.
【】Figure 2
Minimumspace when
the door is opened
820m m
580mm
90 °
Electrical, drain and
water supply l ine
entrances
Spacebetween cabinet
bottom and f loor
450 mm
Dishwasher
Door of
dishwasher
Minimum space of 50mm
90 °
80
100
Cabinet
●
Aestheticpanel's dimensionsand installation
1
Theaestheticwoodenpanel
390
couldbeprocessed accordingto the figure 3
【】Figure3
418
Theaesthetic panelshould
beprocessed in accordance
withtheillustrated dimensions
38
19
52
179
444
(Unit: mm)
175
15
3.5
1.5
Page 23

2
22
Installthe hook onthe aestheticwoodenpaneland putthehook intotheslot of theouter door of
dishwasher(seefigure 4a).Afterpositioningofthe panel,fix the panelonto theouterdoor by
screws and bo lts (See figur e 4 b) .
Hop hook
【】Figure 4a
Installationofaestheticpanel
【】Figure4b
Installation of aesthetic
woodenpanel
.takeawaythecover
1
2
.pinupthescrew
. get back the c over
3
St4 countersunk
head screw
Lower hook
4X18 screw
Cover
Spacer for aesthetic panel
Outer door of
dishwasher
Hook for aesthetic panel
Aesthet ic panel
Page 24

●
23
Tension adjustmentof the doorspring
Thedoor springsare set at thef actoryto theproper tensionforthe outerdoor.Ifaesthetic
woodenpanelare installed,youwillhave to adjust the doorspringtension.Rotate the adjusting
screwtodrivetheadjustortostrainorrelaxthesteelcable(seefigure5).
Doorspring tensionis correct when
the do or r emain s h oriz ontal i n t he
fully opened position yet r ises
toa close with theslightlift ofa
finger.
,
relax
【】Figure5
Tensionadjustment
ofthedoor spring
●
Connectionof drain hoses
Insertthe drainhoseinto a drainpipe withaminimum diameterof 4cm,orlet it
runintothesink,makingsuretoavoidbendingorcrimpingit.Usethespe ial
plasti c su ppor t th at co mes wi th th e ap plia nce (f igu re 6). Th e fr ee an d of t he hos e
mustbe at a heightbetween 400and1000mm andmust not beimmersed in water
toavoidthe back flowof it.ATTENTION:Thespecial plastichose supportmust be
solidlyfastenedtothe wall toprevent thedrainhose frommoving and allowing water
tospilloutsidethedrain.
c
【】Figure6
Drainpipe connection
Page 25

●
24
Dishwash er i nstallati on s teps
1 Installthefurnituredoor totheouter doorof the dishwasher usingthe bracketsprovided.Refer
tothetemplatefor positioningof thebrackets.
2 Adjustthetensionofthe doorsprings byusing anAllen keyt urning in aclockwise motion to
tigh ten th e l eft an d ri ght d oor s pri ngs . Fai lure to do t his could c aus e da mage t o yo ur dis hw ash er
(Illustration 2)
3 Connectthe inlethoseto thecoldwatersupply
4 Connectthe drain hose. Referto diagram (Figure 6)
5 Connectthe powercord
6
Affix the condensationstripunderthe work surfaceofcabinet.Pleaseensure the condensation
.
.
.
.
stripis flush withedgeo fworksurface.
7
Placethe dishwasherintoposition.
8
Lev elthe d ishw ash er.The rear fee t can be adjus ted f rom t he fr ont o f the dis hwa sher b y t urni ng
the sc rews on th e le ft an d ri ght hand si de o f th e cabi net (Ill ustr at ion 5 A). Toad jus t the fron t fee t,
useawrench andturn the frontfeet untilthe dishwasheris level(Illustration5B).
9Thedishwashermust be securedin place.There aretwoways todothis:
A. Normal worksurface-secure to the worksurfacebyusing twowoodscrewsensuring the
dishwasher weightis not beinghitbythesurface(Illustration6).
B. Marb le or gran ite w or k top -se cure t he b rack et to the s ide pa nel o f th e dis hwas he r and s ecu re
thedishwasher tothe furniturehousing.Putthe rubbercap overthescrew (Illustration 7).
SCREW
CONEGEAR
2
6
4
5A
5
5B
RUBBER
7
COVER
【Figure
SCREW
7】
Page 26

Dishw ashe r mus t be l eve l for proper dish ra ck operat ion a nd wa sh p erfo rman ce.
25
Placelevel ondoorandrack trackinside thetubas shown tocheckthatthe
1
dishwasherisle vel.
levelthedishwasher by adjustingthefour leveling legsindividually.
2
3
Whenlevelthe dishwasher,please pay attentionnot to letthedishwashertipover.
【】Figu re 8
Illustra tion of fe et adjus tment
Check
Level
Front
to Back
NOTE:
Themaximum adjustment
heightof thefeetis 60 mm.
Check level
side to side
for personal safety:
WARNING!
Please l ook at the ra ting label to knowthe ratingvolta ge a nd c onnect thedishwash er to the appropriate pow er s upply.
Use therequired fuse10 amp,time d elay fuse or circuit bre aker recommended and provide separate circuit serving
only this appliance.
DO NOT USEAN EXTENSION CORD OR ANADAPTER PLUG WITH THISAPPLIANCE.
DONOT, UNDER ANY CIRCUMSTANCES, CUTOR REMOVETHEEARTHING
CONNECTION FROM THE POWER CORD.
Ensure thevoltage a nd f requenc y of thepowe r being corresponds to
those onthe ratingplate. Onlyinsert theplug intoan elect rical socket which isearthed
properly.If th e el ectrical socketto which the appliance mu st b e c onnected is not
appropriate fortheplug , replace the socket, rather thanusing a a daptorsor t helikeas
theycouldcause overheatingand burns.
This appliance must be earthed. In the event of a malfunction or breakdown, earthing will reduce the risk of
electric shock by providing a path of least resistance for the electric current. This appliance is equipped with a
cord having an equipment-earthing conductor and an earthing plug.The plugmustbe plugged into an
appropriate outlet that is installed and earthed in accordance with all local standards and requirements.
Page 27

WARNING!
26
Improper connection of the equipment earthing conductor can result in the risk of an electric shock.
Check with a qualified electrician or service representative if you are in doubt whether the
appliance is properly earthed.
Do not modify the plug provided with the appliance. If the plug does not fit properly to the outlet,
please have a qualified electrician to install a proper outlet.
for personal safety:
DO NOT USE AN EXTENSION CORD OR AN ADAPTER PLUG WITH THIS APPLIANCE.
DO NOT, UNDER ANY CIRCUMSTANCES, CUT OR REMOVE THE
CONNECTION
Water Co nnection
Connect thecold water supp ly hose to a threaded 3/4(inch) connect or andmake s ure
that itis f astened tightly in place.
If thewater pipesare n ew or have n ot been used for an extended period of ti me, letthe
water run to m ake surethat thewater i s clear. Thisprecaution is needed to avoid the
risk o f thewater inletto beblocked anddamage theapplian ce.
The wa ter s uppl y to the applianc e ca n a lso b e co nnected tothe household hot water
line (su ch as,central system, he ating system),as lon g as it does not exce ed a
temperatur e of 60C. In this case,the w ash cycle time will be shortened by about 15
minutesand the washefficiency slightly reduced.
The co nnection must be made to the hot waterline f ollowi ng t he s ame procedures as
described i nthe section for the c onnection to thecoldwat erline.
FROM THE POWER CORD.
EARTHING
WARNING!
In or der to avoidthat thereismore waterstaying in the inlet hos e, please close
thehyd rant after using.(Notapplicable to applianceswithout aqua-stop.)
ExtensionHose
Ifyou needa dra in h ose extension, m ake sureto use a sim ilar dra in hose.
Itmust beno lo nger than 4 m etres; otherwise thecleaning effectof the dishwasher could be reduced.
Syph on Conn ection
The waste connection mustbe ata height of between50 cm(minimum) and 100 cm (maximum)
from t he botto m o f th e dish.T he water drain hoseshoul d b e fix ed b y a hose c lip.
StartofDishwasher
Thefollowing thingsshould bechecked beforestarting thedishwasher.
1
Thedishwasher islevel and fixedproperly
The i nlet valv e is o pen
2
3
Thereisa leakageattheconnectionsof theconducts
Thewiresare tightlyconnected
4
5
The poweris switched on
6
The inl et an d dr ain ho ses a re kno tted
7
Allpacking materials and printings shouldbe taken outfrom the dishwasher
Afterin stallation, please make sure to keept his manual.
The contentof this manual is veryhelpful to the users.
Page 28

BeforeCalling for Service
27
Technical
problem s
Fuse blown, or the
circuit breaker acted
Power supplyis not
turned on
Error code:E1;
Water pressure is low
Door of dishwasher
not properly closed.
Kink in drain hose
Filter clogged
Kitchen sink clogged
Improper detergent
Replace fuse or reset circuit breaker. Remove any other
appliance s sharing the same circuit with the dishwasher
Make sure the dishwasher is turned on and the door is
closed securely.
Make sure the power cord is properly plugged into the
wall socket.
Check that the water supply is connected properly and
the water is turned on.
Make sure to close the door properly and latch it.
Check drain hose.
Check coarse the filter
(see section titled )" CleaningThe Filter "
Check thekitchen sink to make sure it is draining well.
If the problem is the kitchen sink not draining ,you may
need a plumber rather than a servicem an for dishwashers.
Use only the special dishwasher detergentto avoid
suds. If this occurs, open the dishwasher and let suds
evaporate.Add 1 gallon of cold water to the tub . Close
and latch the dishwasher, then Start the "soak" wash
cycle to drain out thewater . Repeat if necessary.
General
problem s
Noise
Spilled rinse-aid
Detergent with
colourant was used
Hard water minerals
The affected items are
notcorrosion resistant.
A programme was not
run after dishwasher
salt was added.
Traces of salt have
gotten into the wash cycle.
The lid of the softer
is loose
Aspayarmis
r
knocking against
an itemin a basket
Items of crockery
are loose in the
wash cabinet
Always wipe up rinse-aid spills immediately.
Make sure that the detergent is the one without
colourant.
To clean the interior, use a damp sponge with
dishwasher detergent and wear rubber gloves.
Never use any other cleaner than dishwasher
detergent for the risk of foaming or sud s.
Always run the quick wash programme .
without any crockery in the dishwasher and
without selecting the Turbo function (if present),
after adding di shwasher salt.
Check the lip .Ensure the fix is fine.
Interrupt the programme, and rearrange the items
which are obstructing the sp ay arm.r
Interrupt the programme,
and rearrange the items of crockery.
This may becaused
by on-site installation
or the cross-section of
the piping.
This has no influence on the dishwasher function.
if in doubt, contact a suitably qualified plumber.
Page 29

The dishes were not
28
loaded correctly.
See notes in " Loading the Dishwasher Baskets ".
Unsa ti s
-factory
washin g
resu lt
Theprogramme was
notpowerful enough.
Not enough detergent
wasdispen sed.
Items are blocking
the path of spray arms.
The filter combination
inthebaseofwash
cabinet is not clean or
is not correctly fitted.
This may cause
the sp ay arm jets
r
to get blocked.
Combination of soft
water andtoomuch
detergent.
Aluminum utensils
have rubbed against
dishes.
Dishes block
detergent cups.
Improper loading
Too little rinse-aid
Select a more intensive programme.
See" Wash Cycle Table ."
Use moredetergent, or changeyour detergent.
Rearrange the items so that the sp ay can rotate freely.r
Clean and/or fit the filter combinationcorrectly.
Clean the sp ay arm jets. See "Cleaning the Spray
Arms".
Use less detergent if you have soft water and select
a shortest cycle to wash the glassware and to get
them clean.
Use a mild abrasive cleaner to eliminate those marks.
Re-loadin g the dishes properly.
Load the dishwasher as suggested in the directions.
Increase the amount of rinse-aid/refill the rinse-aid
dispenser.
r
Unsa ti s
-factory
dryi ng
resu lt
Error Codes
Longerinlet time.
Longer heating time,
but not reaching required temperature
Overflow.
Failure of temperature sensor
Dishes are removed
too soon
Wrong program
has been selected
Useof cutlery with
a low-quality coating
Faucets is not opened, or water intake is restricted, or water
pressure is too low.
Malfunction of temperaturesensor or of heating element.
Some element of dishwasher leaks .
Open circuit or break of temperature sensor
Do not empty your dishwasher immediately after
washing. Open the door slightly so that the steam can
escape. Begin unloading the dishwasher only once t
he dishe s are barely warm to the touch. Empty the low
basket first. This prevents water form dropping off
dishes in the upper basket.
In shortprogram the washing temperature is lower .
This also lowers cleaning performance. Choose
a program with a long washing time.
Water drainage is more difficult with these items.
Cutlery or dishes of this type are not suitable for
washing in the dishwasher.
Failure of temperature sensor
WARNING!
Short circuit or break of temperature sensor
If over fl ow oc cu rs , tur n off the main wa te r supp l y befo re ca ll in g a servi ce .
If thereiswater inthe base panbecause ofan overfill orsmall leak,
thewatershouldberemovedbeforerestartingthedishwasher.
Page 30

29
Height : 820mm(adjustable+60mm)
Width : 445mm
Dept h : 5 4 0mm
Voltage connected Load : see rating lab el
Waterpressure: 0.04-1.0MPa
Hot water connection : max 60 ņ
Power supply: see rating l abel
Capacity: 9 Place s ettings
Page 31

30
Przeczytać instrukcję
Drogi Kliencie,
Urządzenie jest przeznaczone do użytku jedynie
w warunkach gospodarstwa domowego oraz warunkach
do niego zbliżonych takich jak:
- dla personelu na zapleczu małego sklepu, w biurach itp;
- w domkach na działkach;
- przez klientów hoteli, moteli oraz innych obiektów
mieszkalnych;
- pokojach typu bed and breakfast.
Prosimy o uważne przeczytanie niniejszej Instrukcji
Obsługi oraz zachowanie jej na przyszłość.
Prosimy o przekazanie Instrukcji kolejnemu
użytkownikowi urządzenia.
Niniejszy dokument zawiera rozdziały dotyczące
bezpieczeństwa eksploatacji, instrukcji obsługi, instrukcji
instalacji oraz porady dotyczące rozwiązywania problemów,
itp.
Dokładne przeczytanie informacji zawartych w niniejszym
dokumencie pozwoli prawidłowo eksploatować i konserwować
zmywarkę.
1) Informacje dotyczące bezpieczeństwa ......................31
2) Utylizacja....................................................................... 32
3) Instrukcja obsługi ........................................................33
Panel sterowania ...........................................................33
Opis zmywarki................................................................ 33
4) Przed pierwszym użyciem...........................................34
A - Zmiękczacz wody .....................................................34
B - Napełnianie zbiornika soli......................................... 35
C - Napełnianie dozownika płynu nabłyszczającego ..... 35
Dozownik płynu nabłyszczającego...........................36
Regulacja dozownika płynu nabłyszczającego ........36
D - Zastosowanie detergentu.........................................37
Detergenty skoncentrowane..................................... 37
Tabletki do zmywarek............................................... 37
Dozownik detergentu................................................ 37
Ilość zastosowanego detergentu..............................37
Dodawanie detergentów........................................... 38
Detergenty................................................................38
Korzystanie z funkcji “3 w 1”..................................... 39
5) Wkładanie naczyń do zmywarki.................................. 40
Czynności przed włożeniem naczyń do zmywarki oraz
w trakcie ich wyjmowania............................................... 40
Wyjmowanie naczyń ......................................................40
Wkładanie naczyń do górnego kosza ............................ 40
Wkładanie naczyń do dolnego kosza............................. 41
Składanie kolców ...........................................................41
Kosz na sztućce.............................................................42
Uwaga!...........................................................................43
Możliwe przyczyny .........................................................43
Sugerowane działania.................................................... 43
Po zakończeniu cyklu mycia ..........................................43
Przed wezwaniem serwisu
Zapoznanie się z informacjami zawartymi w
rozdziale Rozwiązywanie problemów pozwoli
rozwiązać niektóre z najczęściej występujących
problemów bez konieczności wzywania
serwisanta.
UWAGA:
Zgodnie z polityką stałego rozwoju i udoskonalania
produktu producent może wprowadzać zmiany bez
wcześniejszego informowania o tym fakcie.
6) Uruchomienie programu mycia .................................. 44
Tabela Programów Zmywania ....................................... 44
Włączanie urządzenia....................................................45
Zmiana programu........................................................... 45
7) Konserwacja i czyszczenie .........................................46
System filtrowania..........................................................46
Czyszczenie filtrów ........................................................46
Zespół filtra ....................................................................47
Czyszczenie ramion spryskujących ...............................47
Czyszczenie zmywarki...................................................47
Zabezpieczenie przed niskimi temperaturami................ 47
Czyszczenie drzwi .........................................................48
Codzienne dbanie o zmywarkę......................................48
8) Instrukcje instalacji......................................................48
Przygotowanie do instalacji............................................48
Wymiary i instalacja płayty wykończeniowej.................. 49
Regulacja naprężenia sprężyn w drzwiach ...................51
Podłączenie węża spustowego .......................................... 51
Czynności instalacyjne .......................................................52
Podłączenie do zasilania....................................................53
Podłączenie do instalacji wodnej........................................ 54
9) Wskazówki dotyczące rozwiązywania problemów ...55
Przed wezwaniem serwisu............................................. 56
ł
ędów ...............
Kody b
Informacje techniczne ....................................................57
....................................................56
Page 32

31
Page 33

32
Page 34

7
33
1
2
3
8
4
5
9
11 12
6
10
13
on
121
SS
2
08
Off
Page 35

Dodać 1,5 kg soli do zmywarek, a następnie napełnić pojemnik na sól wodą
34
0~140~8
14~ 3 98~22
39~8 022~45
45~60 80~107 56~75
0~10
10~28
28~56
0~1.4 / 0 /
1.4~3.9
3.9~8 40 25
8~11
-
+
20 50
60 16
Page 36

35636
A Wyjąć dolny kosz i odkręcić pokrywkę zbiornika soli.
B
użyć lejka do napełnienia pojemnika na sól około 1,5 kg soli do zmywarek, a następnie wyjąć lejek
na sól z produktu.
C
Całkowicie napełnić pojemnik na sól wodą. Wydobywanie się niewielkiej ilości wody z pojemnika na
sól jest normalnym zjawiskiem.
D Dokładnie dokręcić pokrywkę.
E Kontrolka informująca o konieczności uzupełnienia soli zazwyczaj gaśnie po upływie 2 - 6 dni po
napełnieniu zbiornika solą
.
Page 37

Page 38

37638
Page 39

Page 40

39
Page 41

Miseczki
40
Szklanki
Przód
Miski
Talerze
Filiżanki
Salaterki
Deserowe
Page 42

41
Page 43

Kosz na sztućce
42
Sztućce należy wkładać do kosza na sztućce
u c h w y t a m i s k i e r o w a n y m i w d ó ł
:. Jeśli kosz podzielony jest na dwie części, łyżki
należy włożyć do odpowiednich otworów. Szczególnie długie sztućce należy ułożyć poziomo z przodu w górnym koszu.
3553
1551
3553
3553
1561
3213
3244
1244
2244
2214
1214
7274
1 2 3456 7
1. Łyżeczki
2. Łyżki deserowe
3. Łyżki stołowe
4. Widelce
5. Noże
6. Duże w idelce
7. Duże łyżki
Page 44

43
Page 45

44
6. Uruchomienie programu mycia
TABELA PROGRAMÓW ZMYWANIA
- pobór mocy w trybie wyłączonym wynosi 0 W, natomiast w przypadku modelu, który pozostaje
włączony 0,4 W.
Program Informacje dot. programu Opis cyklu
In t ensywny
Standardowy
Płukanie
EKo.
(IEC-EN 50242)
Szybki
Szkło
Namaczanie
In tensywny
+
3 w 1
Standardowy
+
3 w 1
+
Eko.
+
3 w 1
Normalnie zabrudzone naczynia. „Program standardowy” jest najbardziej wydajny, biorąc pod uwagę
połączone zużycie energii i wody.
Do najbardziej zabrudzonych
naczyń oraz średnio
zabrudzonych garnków,
patelni, talerzy itp.
z zaschniętymi
zabrudzeniami;
Do średnio zabrudzonych
wsadów, takich jak garnki,
talerze, szklanki i lekko
zabrudzonych patelni.
Do naczyń, które
wystarczy tylko wypłukać
i wysuszyć.
Standardowy cykl codzienny
do średnio zabrudzonych
wsadów, takich jak garnki,
talerze, szklanki.
Krótsze zmywanie do lekko
zabrudzonych wsadów i
szybkiego
zmywania.
Do lekko zabrudzonej
zastawy stołowej i szkła.
Do płukania naczyń, które
ają być
umyte później.
Do mocno zabrudzonych
naczyń, np. garnków,
patelni, naczyń po
zapiekankach lub naczyń,
w których przez dłuższy
czas znajdowały się suche
potrawy.
Do normalnie zabrudzonych
naczyń, np. garnków,
talerzy, szklanek i lekko
zabrudzonych patelni.
Do lekko zabrudzonych
naczyń, np. talerzy,
szklanek, miseczek i lekko
zabrudzonych patelni.
Detergent
wstępne
/zasadnicze
Wstępne (50 C)
Mycie wstępne
0
C)
(65
Płukanie
0
5/ 22g
Płukanie
Płukanie
0
C)
(55
Suszenie
0
C)
0 C)
5/22g
0
Wstępne (5
Mycie wstępne
0
( 55
Płukanie
Płukanie (65 C)
Suszenie
Mycie(
Płukanie (70
Suszenie
Mycie wstępne
0
(50
C)
Płukanie (60
0
0
C)
C)
5/22g
0
50C)
Suszenie
0
Mycie (40
Płukanie
Płukanie ( 40
C)
0
15g
C)
Wstępne
Mycie wstępne
0
C)
(40
Płukanie
Płukanie ( 60
0
C)
15 g
Suszenie
Wstępne 8 3.0
Wstępne (50
Mycie (65
Płukanie
Płukanie
Płukanie (55
Suszenie
Mycie wstępne
0
C)
(50
Mycie (55
Płukanie
Płukanie ( 65
Suszenie
0
C)
0
C)
3 w 1
0
C)
0
C)
0
3 w 1
C)
Wstępne
Mycie wstępne
0
(50 C)
Płukanie
Suszenie
( 65
0
C)
3 w 1
Czas
trwania(min.)
Woda (l)
120 16.0
155 13.0
98 8.0
75
1
10.5
30 9.0
95 13.0
120 16.0
150 13.5
160 10.5
Płyn
nabłyszczający
Page 46

45
Page 47

2
464748
1
3
Page 48

Page 49

Page 50

820m m
49
580mm
90 °
90 °
80
100
450 mm
38
19
52
179
390
418
444
175
15
3.5
1.5
Page 51

50
Page 52

relax
51
Page 53

2
52
6
4
5A
5
5B
7
Page 54

Check
5354555657
Level
Front
to Back
Check level
side to side
Page 55

Page 56

Page 57

Page 58

Page 59

Page 60

Page 61

Whirlpool
®
Registered trademark/TM Trademark of Whirlpool group of companies - © Copyright Whirlpool Europe s.r.l. 2013. All rights reserved - http://www.whirlpool.eu
5019 300 01480
GB
PL
n
07/13
 Loading...