

Whirlpool 8TWED5620HW, 8TWGD5620HW, 8TWGD6622HW Owner's Manual
Use and Care Guide
使用保養指南
Electronic/ Gas Dryer
電力型/瓦斯型乾衣機
Model number: 8TWED5620HW/8TWGD5620HW/8TWGD6622HW
適用型號 : 8TWED5620HW/8TWGD5620HW/8TWGD6622HW
If you have any problems or questions, visit us at www.whirlpool.com.
若您有任何疑問或問題,請造訪網站: www.whirlpool.com.tw。
W11307137A

Table of Contents
PRODUCT SPECIFICATIONS ...................................................2
DRYER SAFETY .......................................................................3
ACCESSORIES ........................................................................5
CHECK YOUR VENT SYSTEM FOR GOOD AIRFLOW ............ 6
CONTROL PANEL AND FEATURES ......................................... 7
CYCLE GUIDE .......................................................................... 9
USING YOUR DRYER ............................................................11
ADDITIONAL FEATURES ........................................................ 13
DRYER CARE .........................................................................14
TROUBLESHOOTING ............................................................16
目錄
產品規格 .................................................................................................19
乾衣機安全 .............................................................................. 19
配件 ........................................................................................ 22
檢查排氣系統確認排氣良好 .................................................... 23
控制面板和功能 ...................................................................... 24
行程指南 ................................................................................. 26
使用乾衣機 .............................................................................. 28
更多功能 ................................................................................. 30
乾衣機保養 .............................................................................. 31
故障排除 ................................................................................. 33
Customer Service phone number : 0800 258 558
Service Email box : service_tw@whirlpool.com
Taiwan Whirlpool Corporation
Official Website : www.whirlpool.com.tw
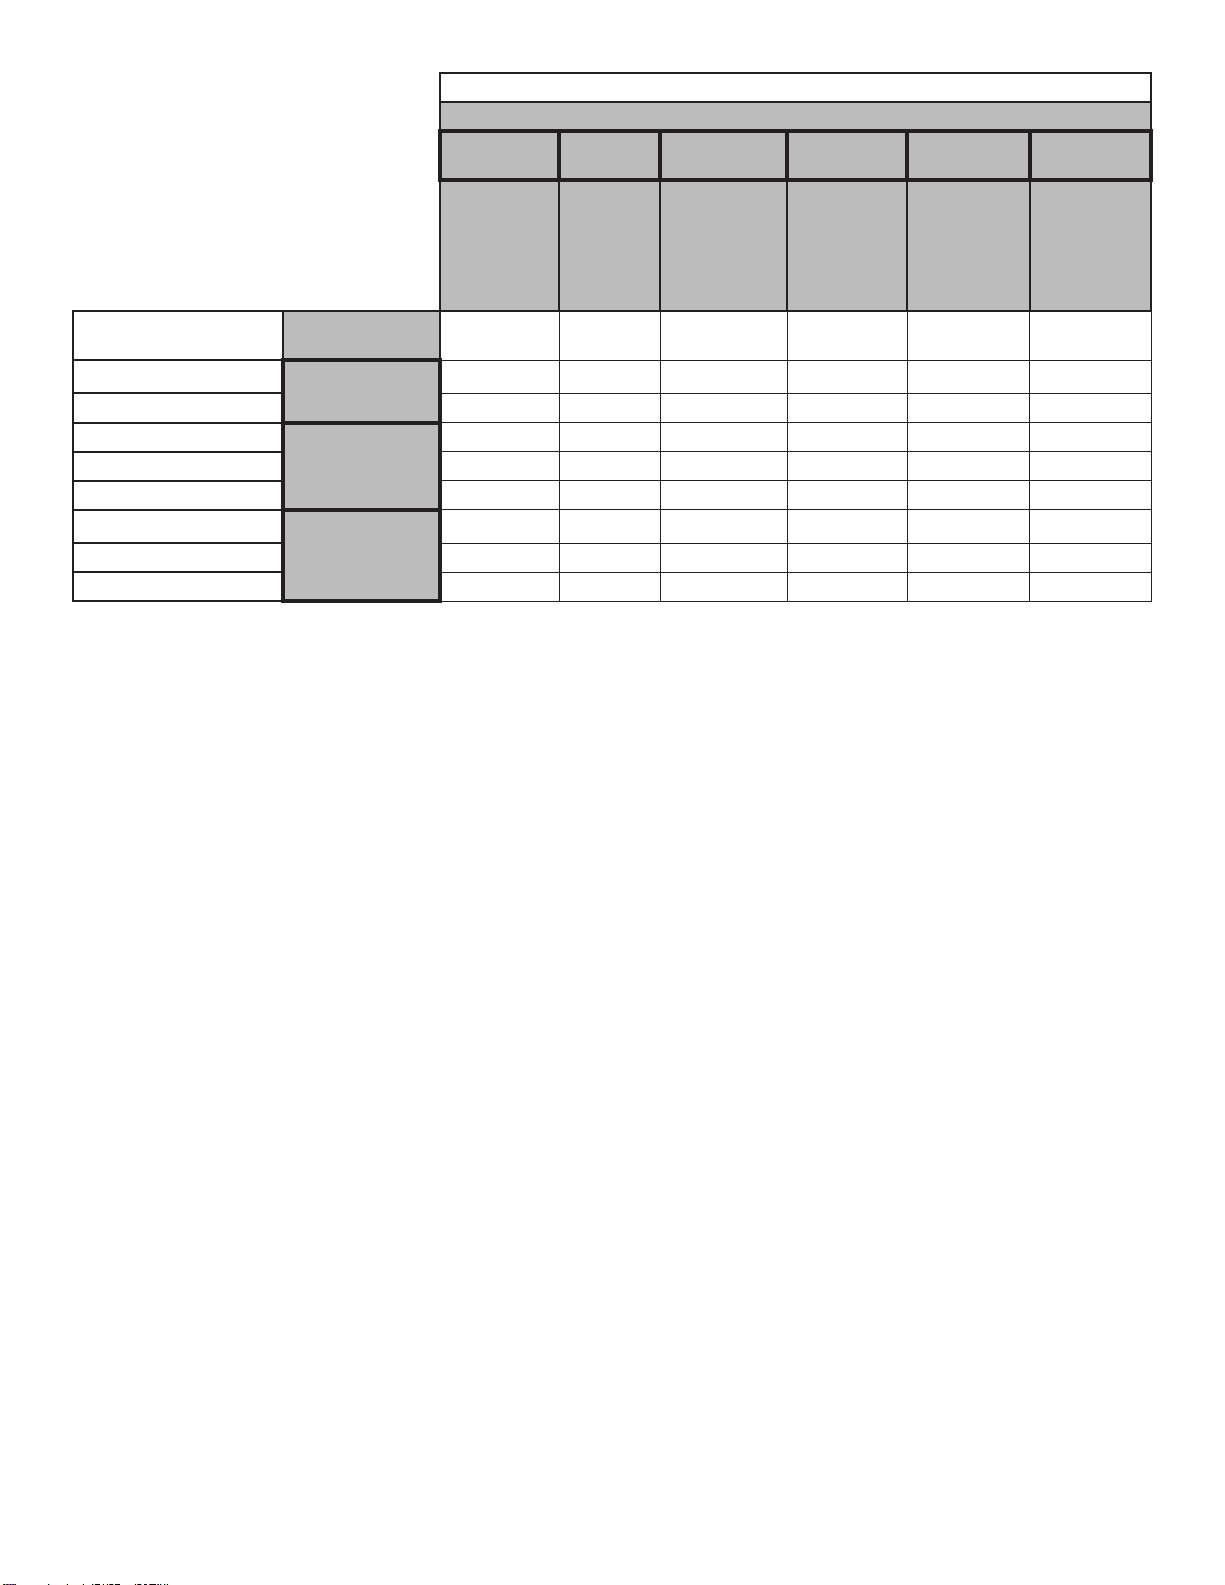
PRODUCT SPECIFICATIONS
Model Number
Product Name
Rated Voltage
Rated Frequency
Rated Current
Dry Linen Capacity
Rated Capacity
Weight
Dimension
For RoHs information, please visit official website.
www.whirlpool.com.tw
These units are sold in multiple regions with different requirements for measuring capacity.
8TWED5620HW 8TWGD5620HW 8TWGD6622HW
Electric Dryer Gas Dryer Gas Dryer
240 V 120 V 120 V
60 Hz 60 Hz 60 Hz
24 A 6 A 6 A
15 kg 16 kg 16 kg
7.4 kg 7.4 kg 7.4 kg
66 kg 69 kg 69 kg
968 x 686 x 787 mm 968 x 686 x 787 mm 968 x 686 x 787 mm
Dry Linen Capacity: A weight measure in load size that reflects the volumetric size of the dryer drum.
Rated Capacity: The capacity measure that represents the maximum capacity of dry linens and textiles which the manufacturer
declares can be treated in a specific cycle.
2
DRYER SAFETY
3
DRYER SAFETY
Remove all objects from pockets such as lighters and
matches.
That exhaust air must not be discharged into a flue which used
for exhausting fumes from appliances burning gas other fuel.
That the appliance must not be installed behind a lockable door,
a sliding door or a door with a hinge on the opposite side to that
of the tumble dryer, in such a way that a full opening of the
tumble dryer door is restricted.
If the power supply cord damaged, it must replaced by
manufacturer or its service agent or similarly qualified
person in order to avoid a hazard.
This appliance is not intended for use by persons
(including children) with reduced physical, sensory or
mental capabilities, or lack of experience and knowledge,
unless they have been given supervision or instruction
concerning use of the appliance by a person responsible
for their safety.
That adequate ventilation has to be provided to avoid
the back flow of gasses into the room from appliances
burning other fuels, including open fires.
Do not dry unwashed items in the tumble dryer.
Items that have been soiled with substances such as
cooking oil, acetone, alcohol, petrol, kerosene, spot
removers, turpentine, waxes and wax removers should
be washed in hot water with an extra amount of detergent
before being dried in the tumble dryer.
-This is the “Read the instructions” symbol.
Items such as foam rubber (latex foam), shower caps,
waterproof textiles, rubber backed articles and clothes or
pillows fitted with foam rubber pads should not be dried in
the tumble dryer.
4
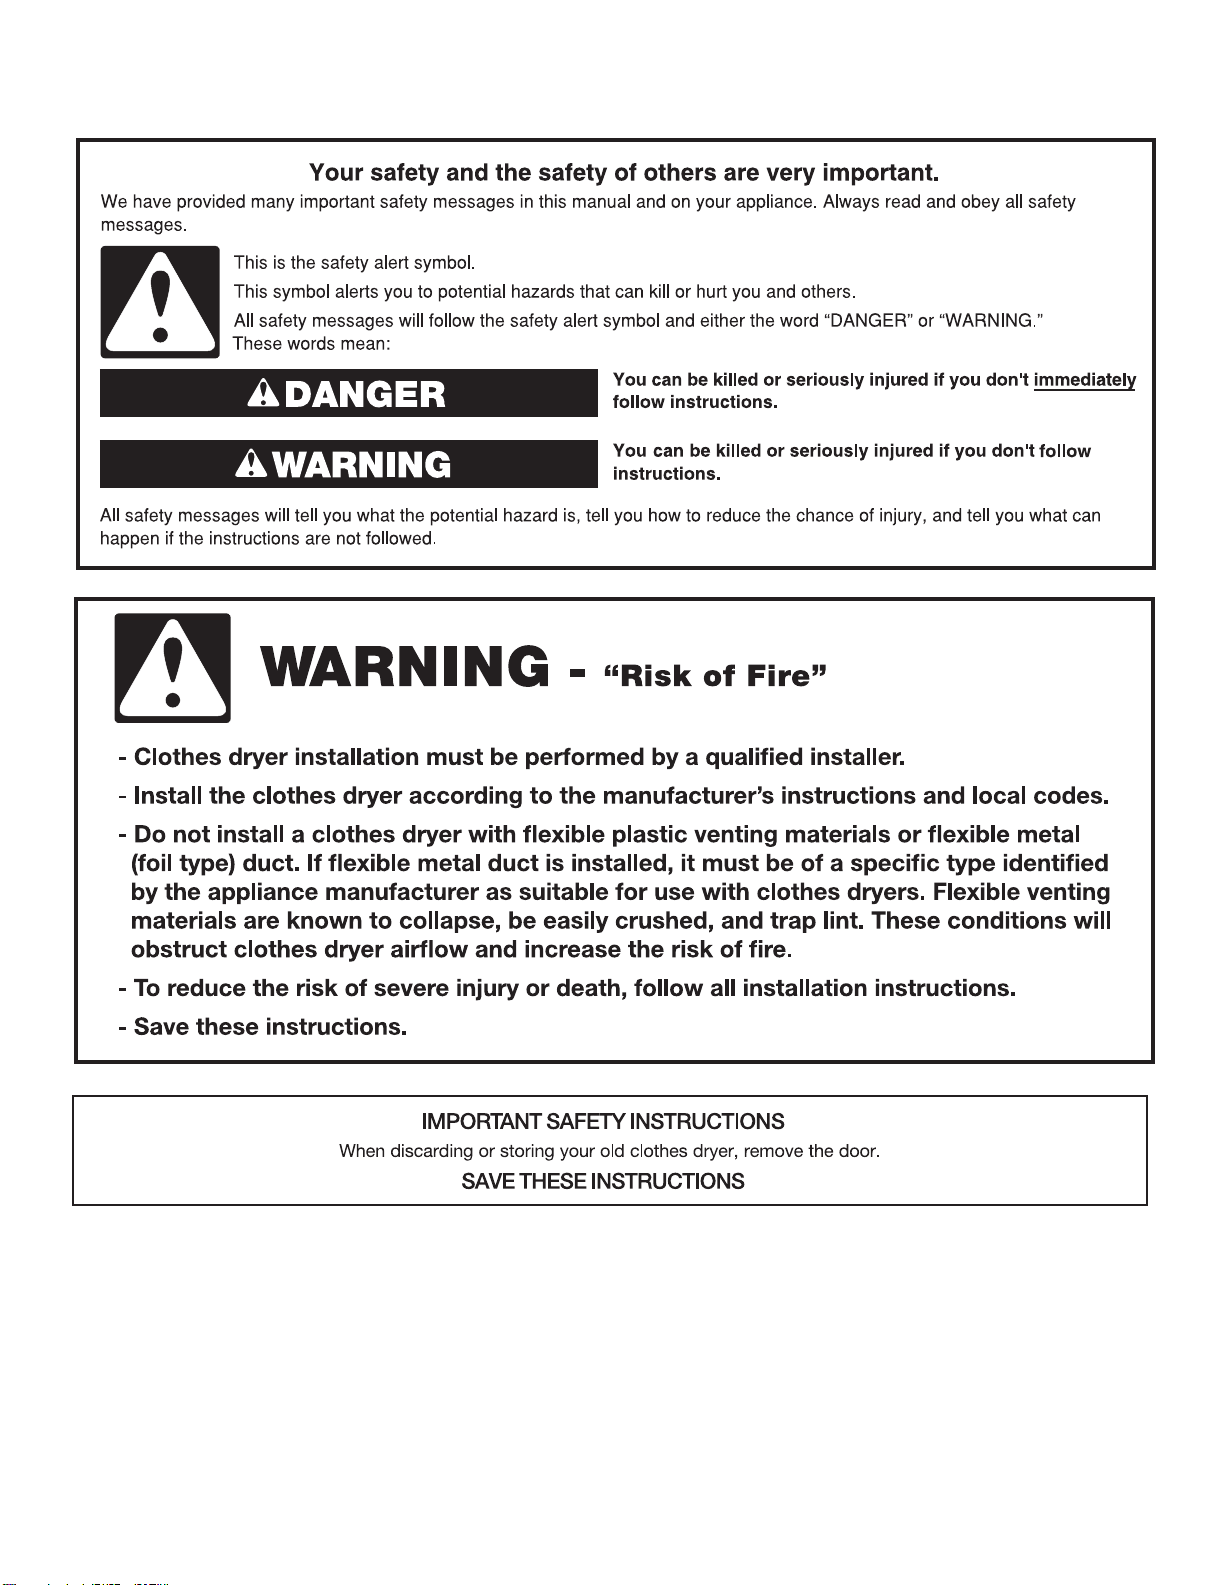
WARNING:
FIRE OR EXPLOSION HAZARD
Failure to follow safety warnings exactly could result in serious injury, death, or property
damage.
Do not store or use gasoline or other ammable vapors and liquids in the vicinity of this
or any other appliance.
–
–
WHAT TO DO IF YOU SMELL GAS:
•
Do not try to light any appliance.
•
Do not touch any electrical switch; do not use any phone in your building.
•
Immediately call your gas supplier from a neighbor’s phone. Follow the gas supplier’s
instructions.
•
If you cannot reach your gas supplier, call the re department.
–
Installation and service must be performed by a qualied installer, service agency, or
the gas supplier.
•
Clear the room, building, or area of all occupants.
DRYER SAFETY
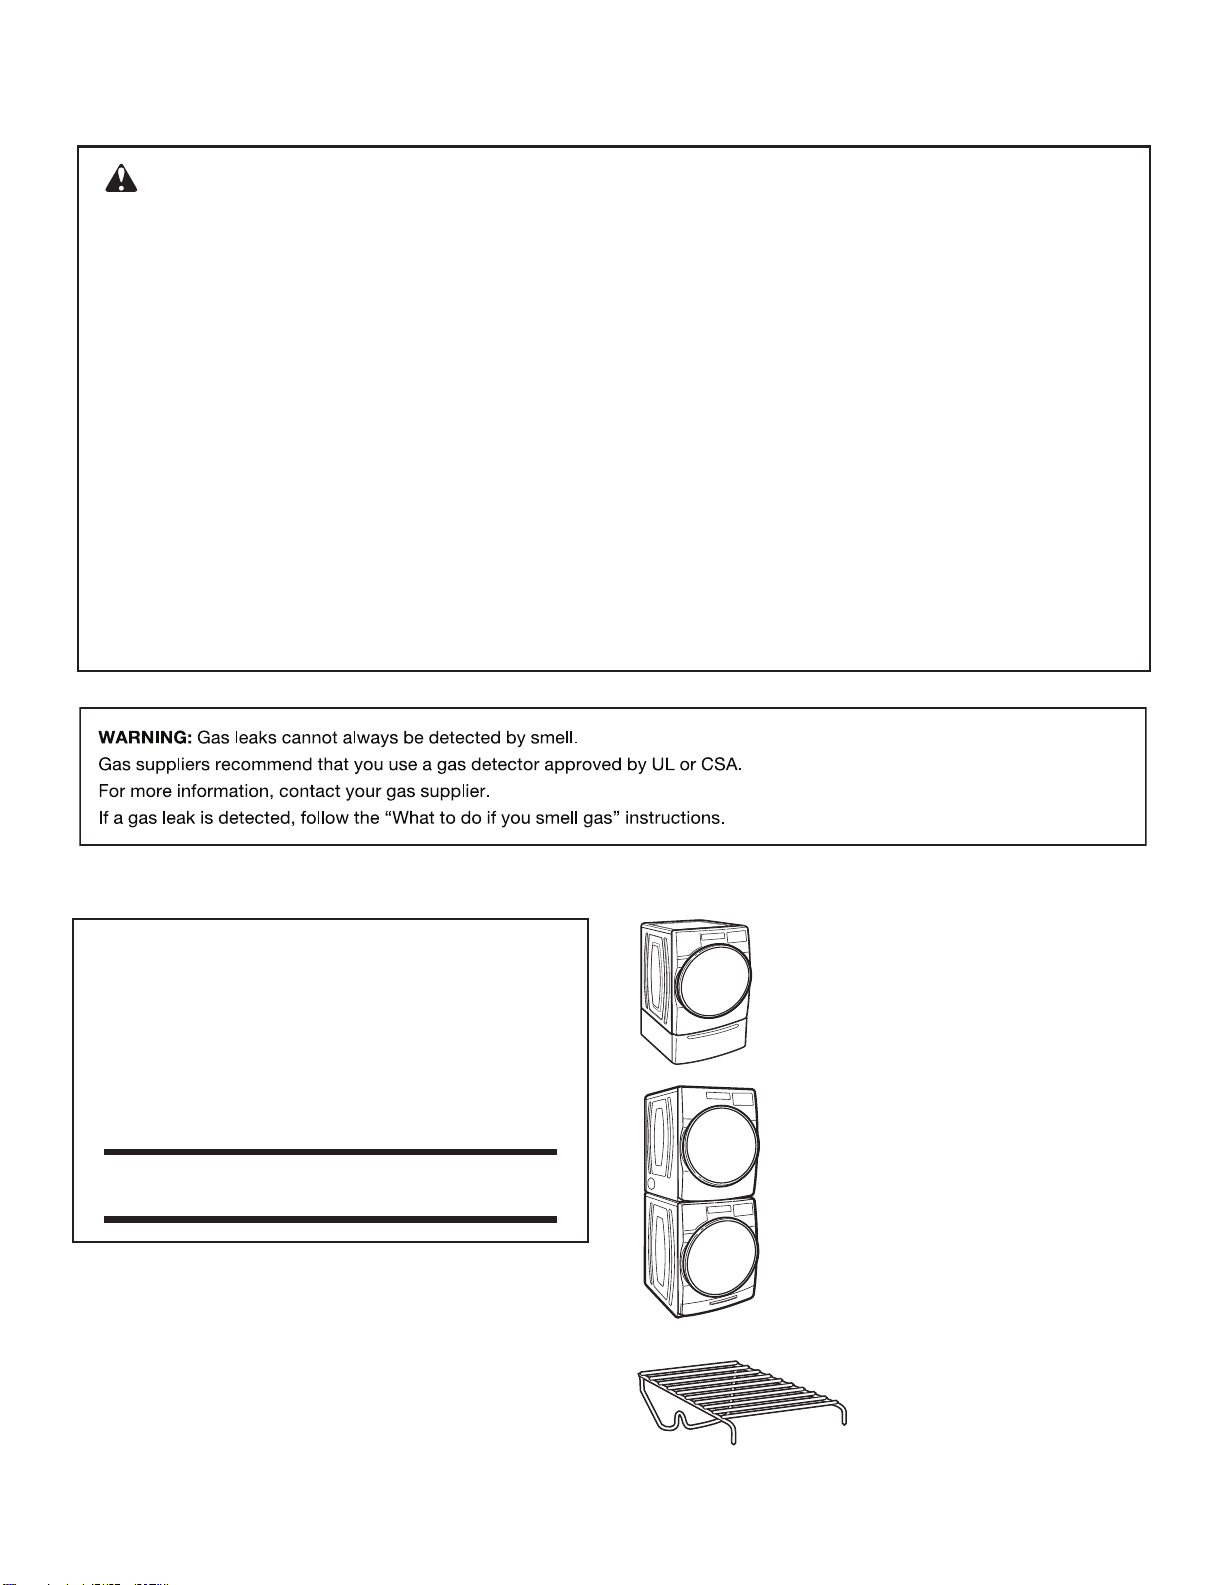
ACCESSORIES
15" Pedestal
INSTALLATION & MAINTENANCE
ACCESSORIES
FACTORY CERTIFIED PARTS – these three
words represent quality parts and accessories
designed specically for your appliance.
FACTORY CERTIFIED PARTS
Customize your new washer and dryer with the following
genuine Whirlpool accessories. For more information on
options and ordering, call 0800-258-558 or visit us at:
www.whirlpool.com.tw.
Time tested engineering that meets
our strict quality specications.
Accessories designed for your appliance:
Color-matched pedestals raise the washer and
dryer to a more comfortable working height. The
large drawer provides convenient storage.
Stack Kit
If space is at a premium, the stack kit
allows the dryer to be installed on top of the
washer.
Drying Rack
The Drying Rack provides a
stationary drying surface for items
such as sweaters and tennis
shoes. See the “Additional
features” section for more
information.
5
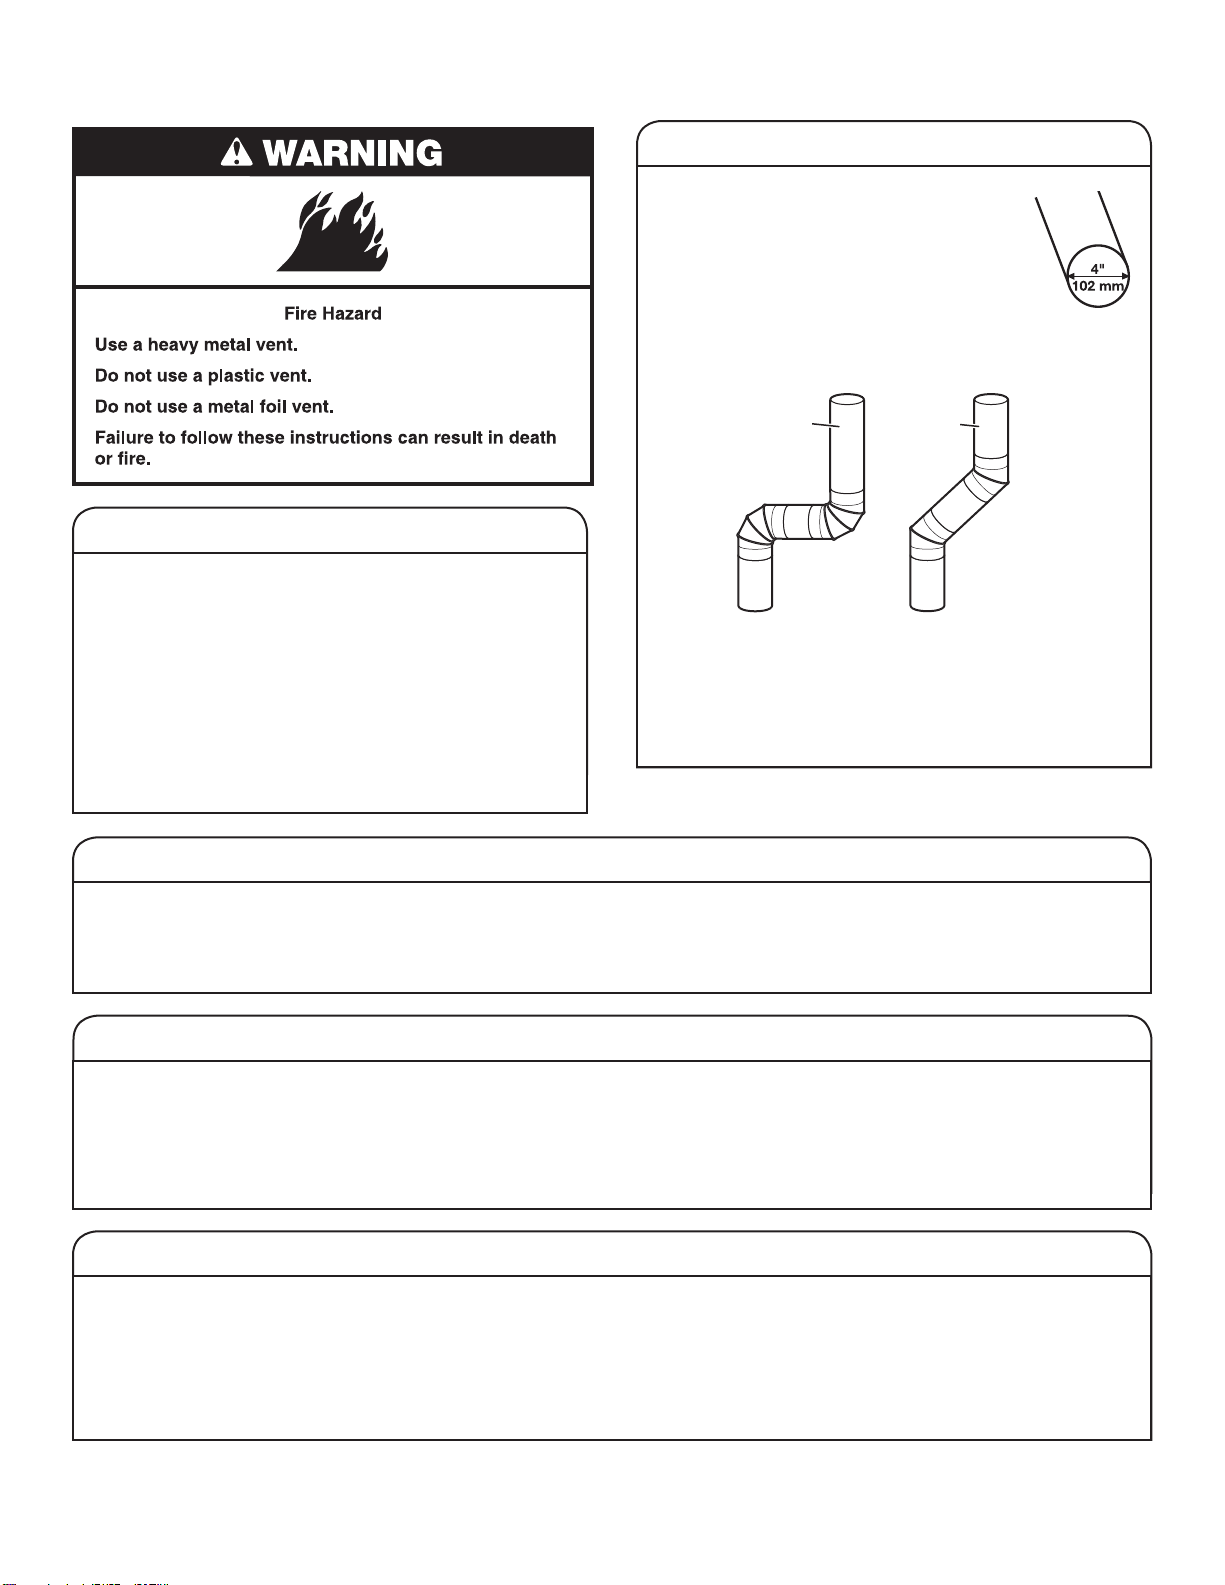
CHECK YOUR VENT SYSTEM FOR GOOD AIRFLOW
Maintaining good airow
■
Cleaning your lint screen before each load.
■
Replace plastic or foil vent material
with 4" (102 mm) diameter heavy, rigid
vent material.
■
Use the shortest length of vent possible.
■
Use no more than four 90° elbows in a vent system;
each bend and curve reduces airow.
Good
Better
Good airow
Along with heat, dryers require good airow to efciently
dry laundry. Proper venting will reduce your drying times
and improve your energy savings. See the Installation
Instructions.
The venting system attached to the dryer plays a big
role in good airow. Blocked or crushed vents as well
as improper venting installation will reduce airow and
dryer performance.
Service calls caused by improper venting are not covered
by the warranty and will be paid by the customer, regardless
of who installed the dryer. To clean or repair venting, contact
a venting specialist.
■
Remove lint and debris from the exhaust hood.
■
Remove lint from the entire length of the vent system
at least every 2 years. When cleaning is complete, be
sure to follow the Installation Instructions supplied with
your dryer for nal product check.
■
Clear away items from the front of the dryer.
EcoBoost option
The EcoBoost option will default on only for the Regular/Normal cycle and is only available on that cycle.
This option allows you to increase your energy savings by using a slightly lower heat level. The EcoBoost option will increase
drying times by approximately 40 minutes, which will be reected on the LED Display. If optimal time is desired, touch ECOBOOST
to turn off this option.
Use automatic cycles for better fabric care and energy savings
Using automatic (not timed) cycles, the drying air temperature and moisture levels are sensed in the load. This sensing process
occurs throughout the entire drying cycle and turns off once the load reaches your selected dryness level. Using the NORMAL
dryness level provides the optimal energy savings.
When using Timed Dry/Quick Dry, the dryer runs for the amount of time you select, which could result in shrinkage, wrinkling,
and static due to over-drying. Use Timed Dry for the occasional damp load that needs a little more drying time or when using
the drying rack.
Tips for getting the best performance from your steam dryer (on some models)
■
Results may vary depending on fabric. 100% cotton
garments with wrinkle-free nish may yield better results
than those without. 100% cotton items may require
additional touching up after cycles that use steam.
■
Use of fabric softener sheet is not recommended with
cycles that use steam. It may cause temporary staining
on clothes.
6
■
Cycles that use steam are not recommended for items that
have been starched. Wash any starched or new garments
prior to using a cycle that uses steam.
■
The Steam Refresh Cycle is best for smoothing out wrinkles
and reducing odors from loads consisting of dry items of
wrinkle-free cotton, cotton-polyester blend, common knits,
and synthetics.
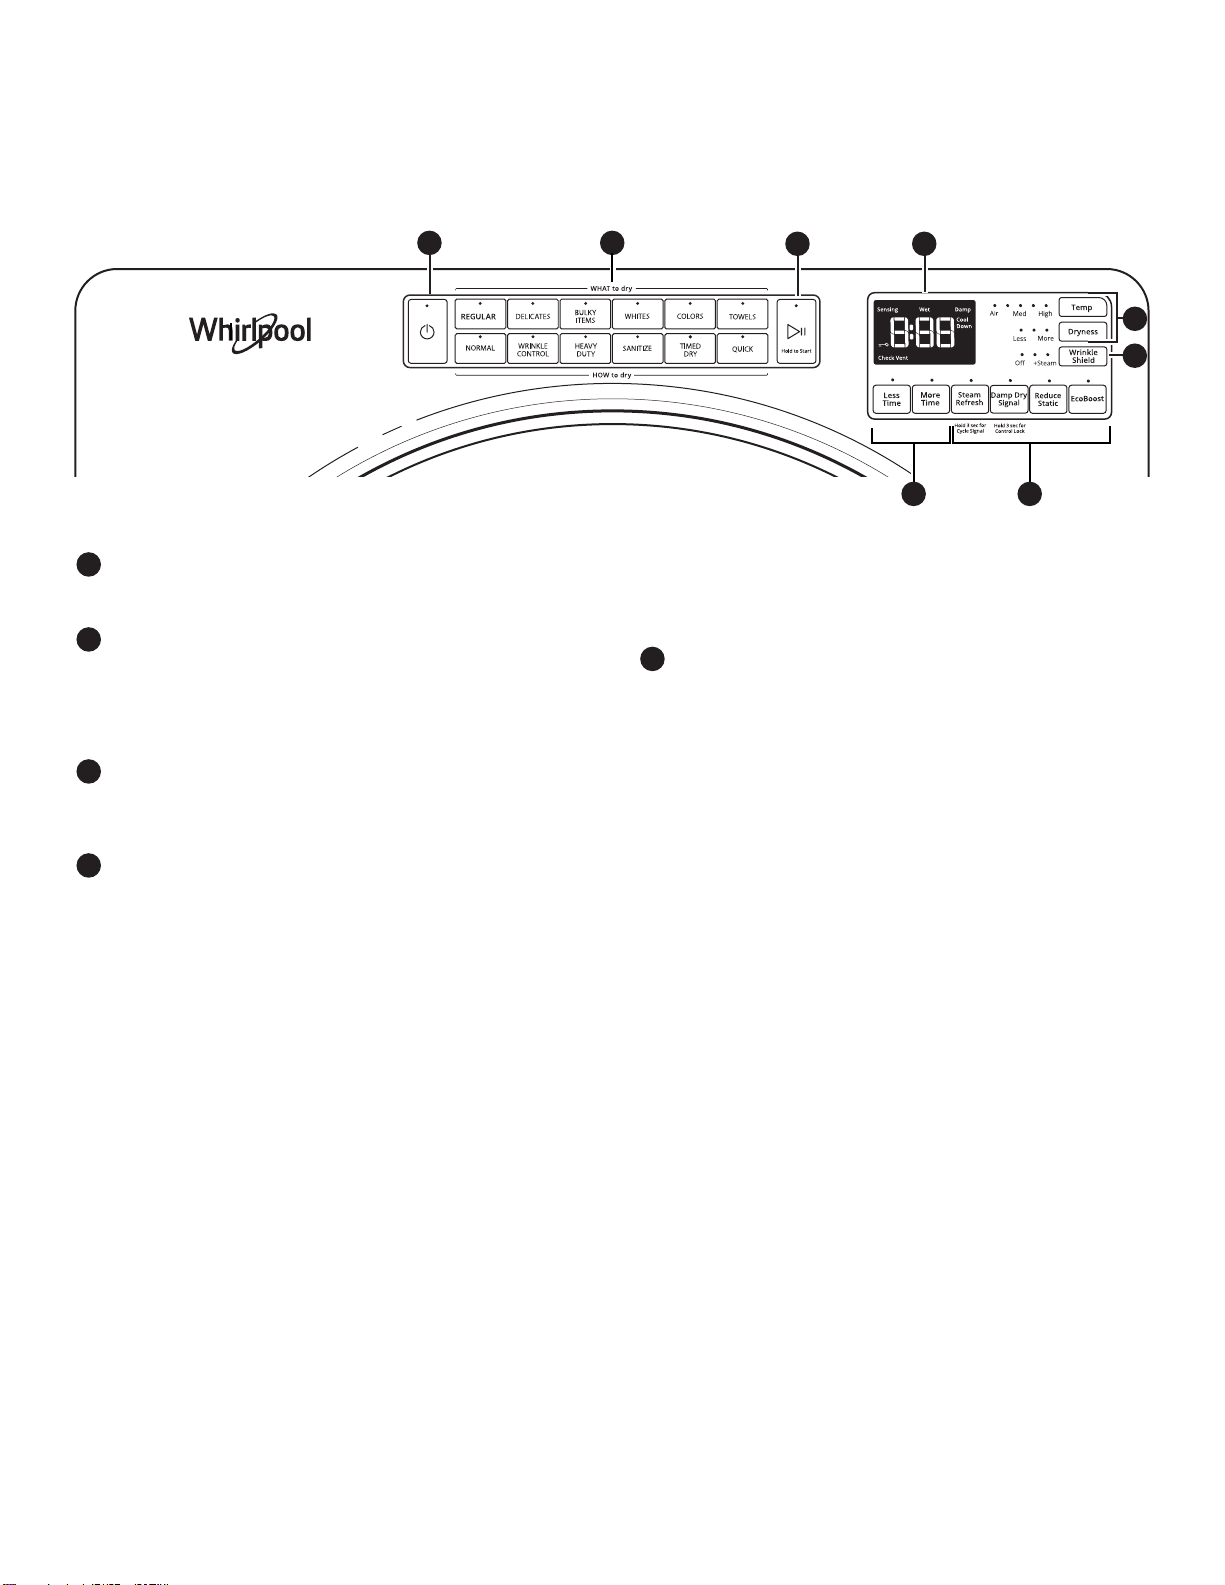
CONTROL PANEL AND FEATURES
Not all features and cycles are available on all models.
NOTE: The control panel features a sensitive surface that responds to a light touch of your nger. To ensure your selections are
registered, touch the control panel with your ngertip, not your ngernail. When selecting a setting or option, simply touch the
appropriate button.
STEAM MODELS
1
POWER
Touch to turn the dryer on and off. Touch to stop/cancel
a cycle at any time.
2
WHAT TO DRY/HOW TO DRY
Once a “What to Dry” is selected, the dryer automatically
selects the recommended or last-used “How to Dry”
option, as well as the recommended/last-used modiers.
Both the “How to Dry” and modiers can be changed if
desired. See the “Cycle Guide” for details.
3
START/PAUSE
Touch and hold until LED counts down “3-2-1” and the
dryer starts; then let go to start a cycle, or touch once
while a cycle is in process to pause it.
4
MODIFIERS
Use to select available modiers for your dryer. Not all
cycles and options are available on all models.
Temp
When using Timed Dry/Quick Cycle, you may select
a dry temperature based on the type of load you are
drying. Use the warmest setting that is safe for the
garments in the load. Follow garment label instructions.
NOTE: Automatic Cycles will give you up to four
temperatures to adjust, depending on the model and
the “What to Dry” or “How to Dry” selections that have
been made.
Dryness
You may adjust the Dryness on Automatic Cycles
(except for the Sanitize cycle), if desired.
NOTE: Dryness is for use with Automatic Cycles only.
1
2
More Time/Less Time Timed Dry Adjust
Touch MORE TIME or LESS TIME with the Timed Dry/
Quick cycle to increase or decrease the length of the
cycle.
5
OPTIONS
Use to select available options for your dryer. Not all
cycles and options are available on all models.
Wrinkle Shield Option
If you will be unable to remove a load immediately,
touch WRINKLE SHIELD to add up to 150 minutes of
periodic tumbling to help reduce wrinkling. You may
select the “+ Steam” setting (on some models) to add
a short steam cycle after 60 minutes to help smooth
out wrinkles.
NOTE: If you open the dryer door prior to the end
of the Wrinkle Shield option, the dryer will go into
standby.
Steam Refresh (steam models only)
This cycle is best for reducing wrinkles and odors
from dry items. Cycle time will increase, depending
on number of items. This is an independent cycle that
cannot be combined with any other cycle.
Cycle Signal
Use this option to turn the signal indicating the end
of a drying cycle to low, medium, high, or off. The
volume you select here will also be applied to the
Damp Dry Signal.
NOTE: You may also turn off the tones that sound
when a feature, setting, or option is touched. Touch
and hold CYCLE SIGNAL for about 3 seconds to turn
sounds to low, medium, high, or off.
3 6
4
4
5
5
7
Damp Dry Signal
Touch to turn the Damp Dry Signal on or off. When
selected, a series of beeps will sound when the load
is damp, but not completely dry. This will allow you to
take clothes out of the load that do not need to dry
completely. This option is available on some cycles.
The Damp Dry signal is selected as a default for the
Bulky Items/Normal, Bulky Items/Wrinkle Control,
and Bulky Items/Heavy Duty cycles, as a reminder
to manually reposition bulky loads midway through
the cycle.
Reduce Static (on some models)
Touch to add the Reduce Static option to selected
Automatic cycles. The dryer will automatically tumble,
pause, and introduce a small amount of moisture
into the load to help reduce static. This option adds
approximately 3 minutes to the total cycle time.
Control Lock
Use this option to lock the controls of the dryer
and avoid an accidental change in cycle options
or preferences during a drying cycle.
Touch and hold CONTROL LOCK or DAMP DRY
SIGNAL (depending on the model) for 3 seconds to
lock or unlock the controls of the dryer. During this
time, the LED Display will count down “3-2-1.”
Once the controls are locked, the LED Display
will display “Loc.”
NOTE: The Control Lock function may be enabled
when recovering from a power failure. To unlock the
control, touch and hold CONTROL LOCK or DAMP
DRY SIGNAL (depending on the model) for at least
3 seconds.
EcoBoost Option
The EcoBoost option will default on only for the
Regular/Normal cycle and is only available on
that cycle. This option allows you to increase your
energy savings by using a slightly lower heat level.
The EcoBoost option will increase drying times by
approximately 40 minutes, which will be reected
on the LED Display. If optimal time is desired, touch
ECOBOOST to turn off this option.
Wet
The load is still wet and/or the cycle just started.
Damp
This indicator shows that the load is partially dried and
items that you may wish to hang up or iron while still
damp may be removed.
Cool Down
The dryer has nished drying with heat and is now
tumbling the load without heat to cool it down.
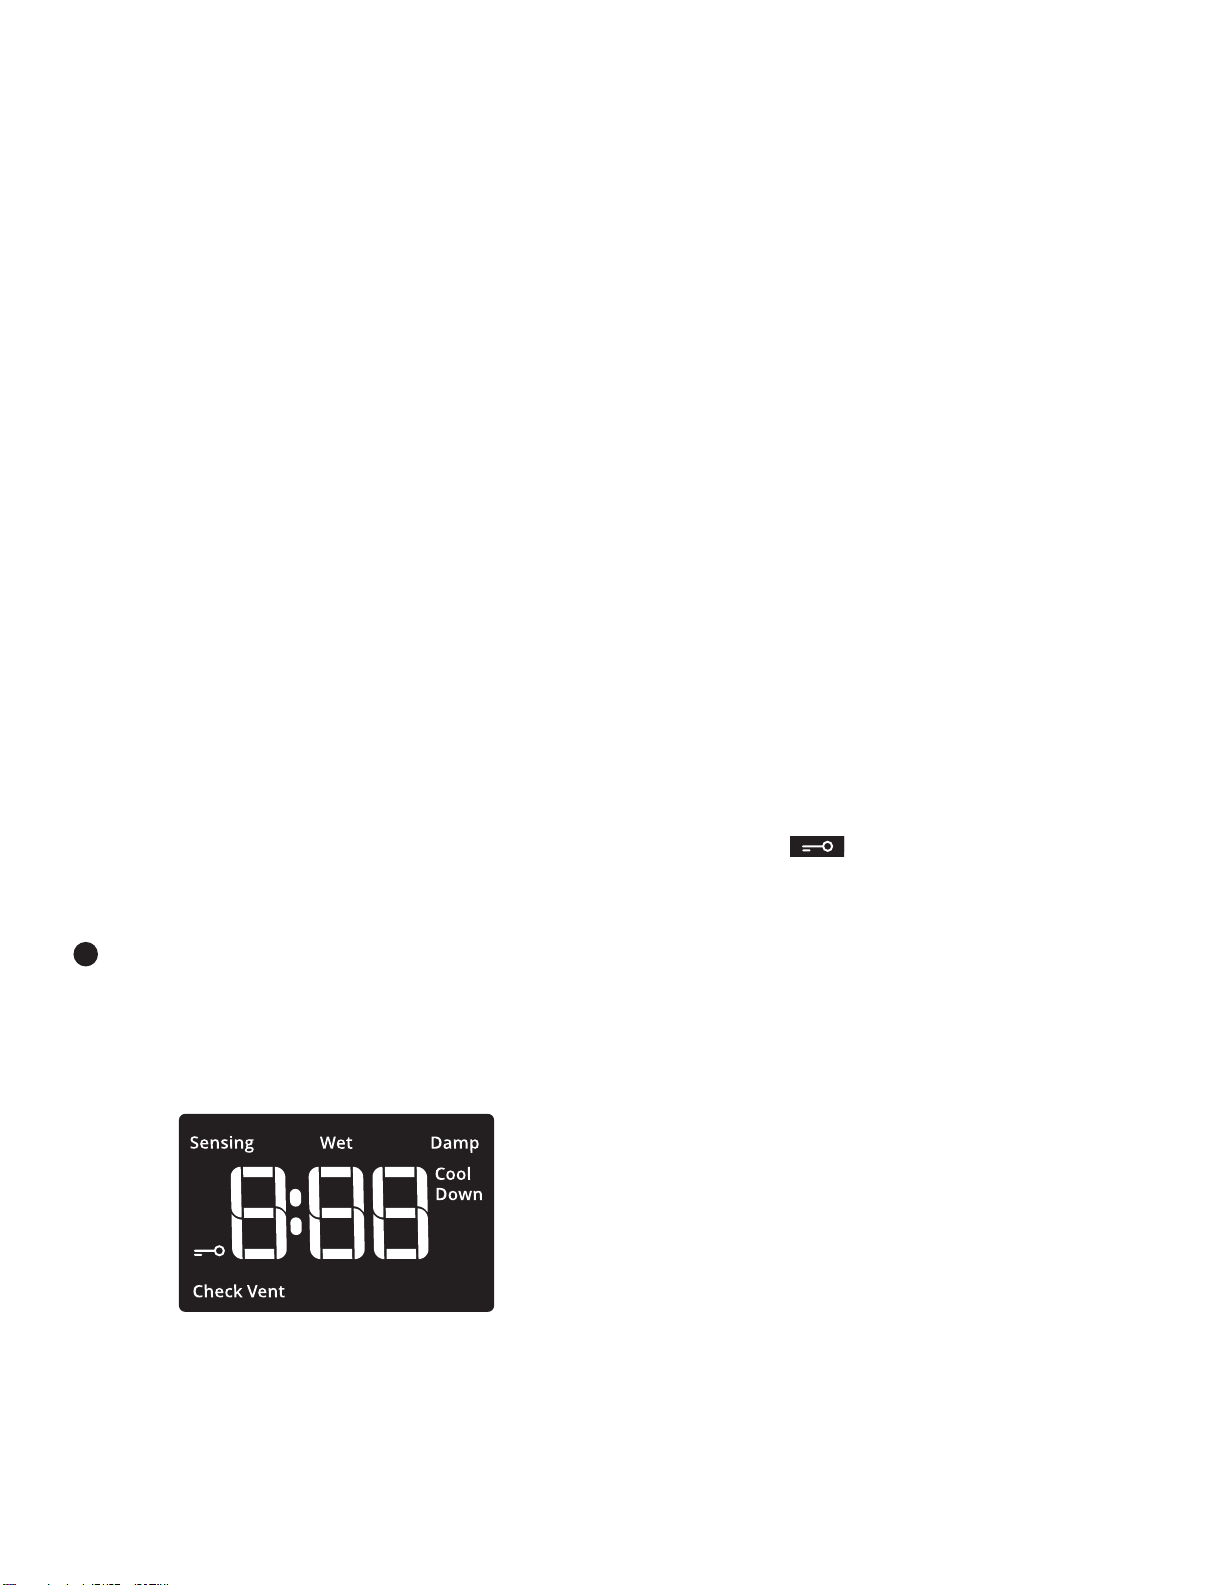
Check Vent
The Check Vent indicator is a feature available for
Automatic cycles only. This indicator will show the status
of airow through the dryer and the dryer vent system
for the dryer’s life. During the sensing phase at the
beginning of the cycle, the Check Vent light will come on
if a blocked vent or low airow issue is detected. This light
will stay on for the entire cycle. Should the Check Vent
light illuminate, refer to the “Troubleshooting” section
for potential solutions to the issue.
The light will be cleared upon completion of the cycle,
touching Power, or opening the door. The Check Vent light
will continue to illuminate during the cycle unless the root
cause is resolved.
REMEMBER: The dryer will continue to operate even
while the indicator is lit, but poor airow can impact dry
times and overall performance. For more information on
maintaining good airow, see “Check Your Vent System
for Good Airow.”
NOTE: If there are other error issues during a cycle,
the Check Vent indicator will not light up. See the
“Troubleshooting” section.
End
This will indicate that the selected cycle has ended
and the load may be removed from the dryer. If Wrinkle
Shield has been selected, the dryer may continue to
tumble the load, even if “End” is displayed.
Control Lock
This will illuminate once the controls are locked.
6
LED DISPLAY
When you select a cycle, its default settings will light up
and the Estimated Time Remaining (for Automatic Cycles)
will vary depending on “What to Dry” and “How to Dry”
selections, or actual time remaining for Timed Dry cycles
(for Manual Cycles) will be displayed.
CYCLE STATUS INDICATORS
Appearance may vary.
The Cycle Status Indicators show the progress of a cycle.
Not all indicators are available on all models.
Sensing
The Sensing indicator will light periodically during Sensor
Cycles to indicate that the moisture sensor on the dryer is
operating. This indicator will not light during Timed Cycles
or options such as Wrinkle Shield.
8
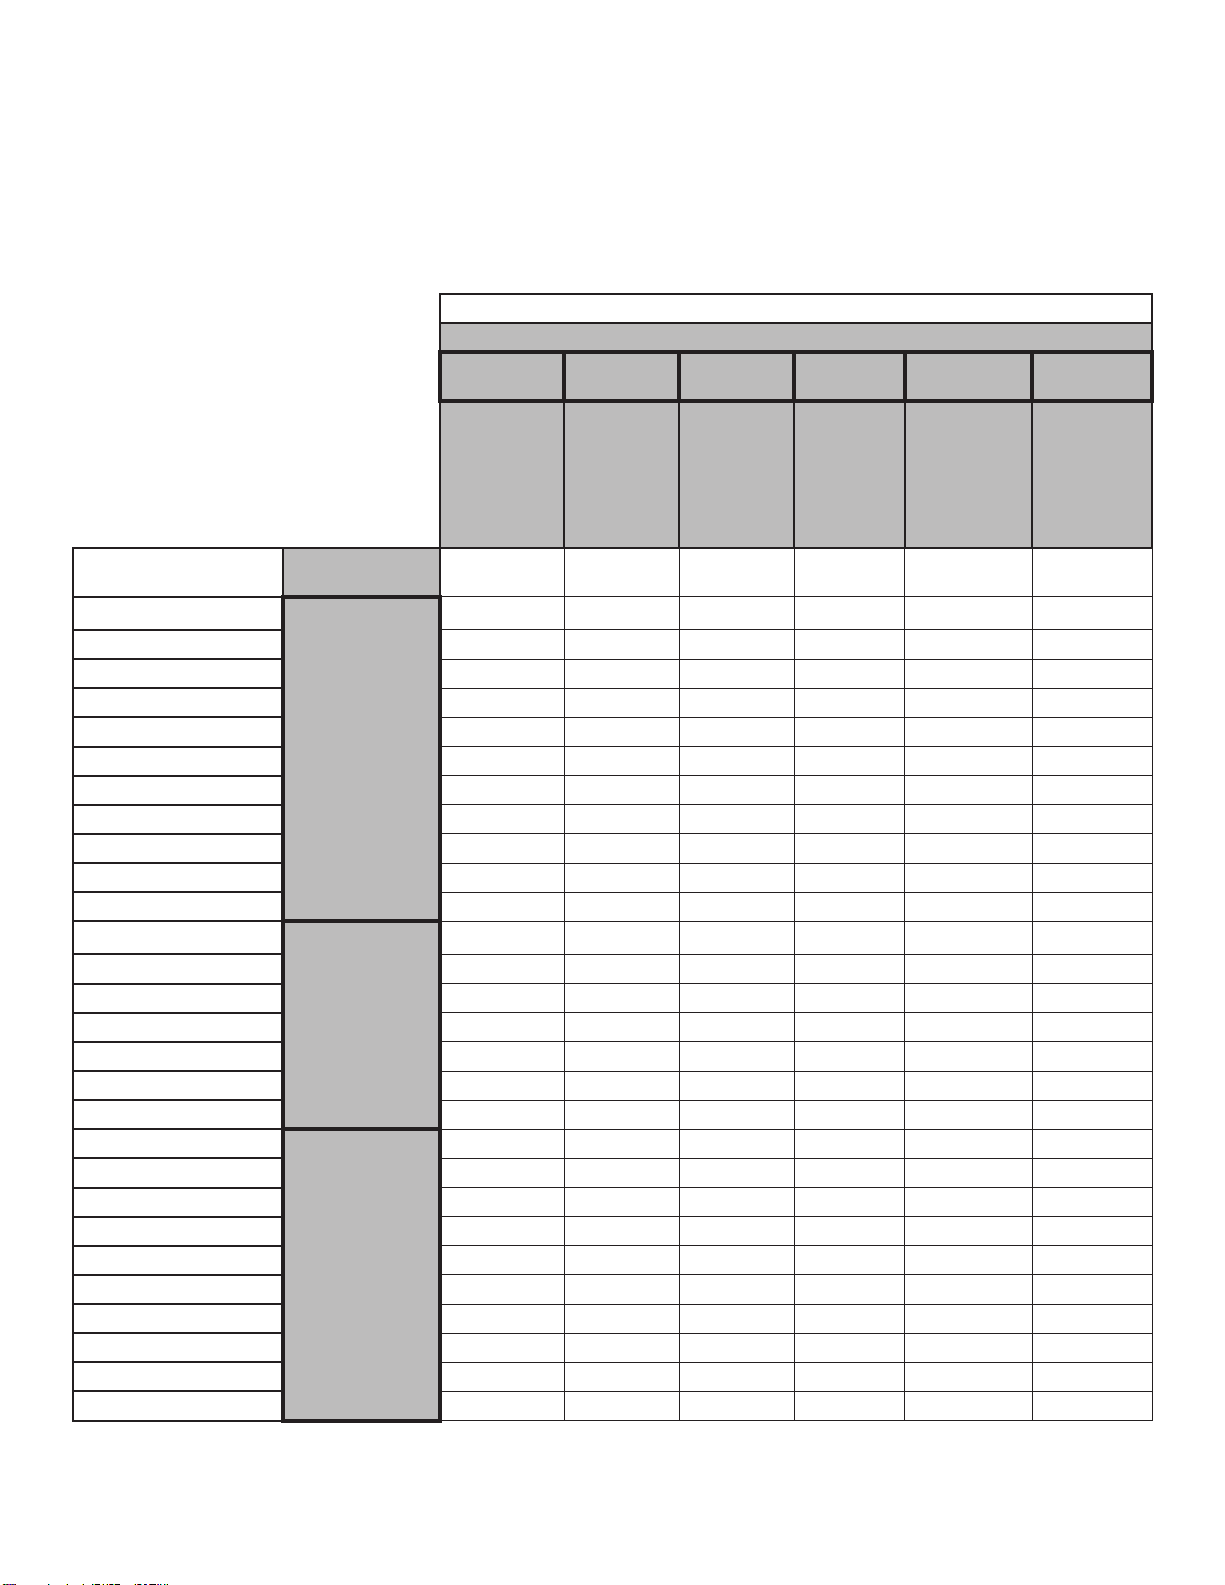
CYCLE GUIDE
Your dryer has a unique user interface to help you select the best cycle you need for your load. The “What to Dry” “How to Dry” layout
guides you to the optimal cycle in two easy steps:
1. First determine what items are in the load that you are trying to dry. Use that to guide your “What to Dry” selection.
2. Then determine how you want the dryer to dry them by selecting the appropriate “How to Dry” selection. Modiers are preset for the
items being dried, but can be changed if desired.
To get the most energy savings and enhanced fabric care from your dryer, use the Automatic cycles. These cycles measure the drying
air temperature and moisture levels to turn the dryer off once the load reaches the selected dryness level. Dryer performance and
results may vary with service voltage less than 240.
How do you want to dry?
For best fabric care, choose the cycle that
best ts the load being dried.
R – Recommended Cycle
a – Alternate Cycle
Blank – Cycle is available but not optimal.
Normal Wrinkle
Control
Regular
Automatic
Sensor Cycle
stops when
dryness level
is reached.
“How to Dry” Cycle Selection
Heavy Duty
High Heat
longer cycle
Automatic
Sensor Cycle
stops when
dryness level
is reached.
Sanitize*
Hot High
Heat
Used to
kill 99.9%
of three
common
bacteria.
Timed Dry Quick
Set amount
of dry time
Dryer runs for
the amount of
time selected.
Set amount
of dry time
Dryer runs for
the amount of
time selected.
What do you
want to dry?
Baby Clothes
Pajamas
Handkerchiefs
T-Shirts
Sweatshirts
Jeans
Cotton Drapes
Machine Wash Curtains
Tablecloth
Business Casual
No-Iron Fabrics
Bras
Fabric Shower Curtain
Lingerie
Sheers
Undergarments
Wool
Dress Shirts/Pants
Blankets
Fabric Rugs
Heavy Drapes
Coats and Jackets
Comforters
Pet Bedding
Pillows - Fiber Fill
Sheets
Sleeping Bags
Stuffed Animals
“What to Dry”
Cycle Selection
Regular
Delicates
Bulky Items
R
R
a R
R
a R
a R
R
R
R a
R
R
a R
R
a R
R
a R
R
a R
R a
R
a R
a R
R a
a R
a R
R a
R
R
* Extended high-heat drying cycle intended to help sanitize items such as sheets and towels. This cycle is not recommended for all
fabrics. For best results, this cycle should be run to completion to ensure sanitization and do not interrupt cycle.
9
How do you want to dry?
For best fabric care, choose the cycle that
best ts the load being dried.
R – Recommended Cycle
a – Alternate Cycle
Blank – Cycle is available but not optimal.
What do you
want to dry?
Cotton Undergarments
“What to Dry”
Cycle Selection
Whites
White Napkins
Athletic
Performance Wear
Colors
Colored Napkins
Dish Cloths
Towels
Towels
Non-Rubber Lined Rugs
Normal Wrinkle
Control
Regular
Automatic
Sensor Cycle
stops when
dryness level
is reached.
R a
R a
R a
R a
R a
a R a
a R a
R
“How to Dry” Cycle Selection
Heavy Duty
High Heat
longer cycle
Automatic
Sensor Cycle
stops when
dryness level
is reached.
Sanitize*
Hot High Heat
Used to kill
99.9% of
three common
bacteria.
Timed Dry Quick
Set amount of
dry time
Dryer runs for
the amount of
time selected.
Set amount of
dry time
Dryer runs for
the amount of
time selected.
* Extended high-heat drying cycle intended to help sanitize items such as sheets and towels. This cycle is not recommended for all
fabrics. For best results, this cycle should be run to completion to ensure sanitization and do not interrupt cycle.
NOTE: Government energy certications for this model were based on the Regular + Normal Cycle, Highest Temperature Setting,
Normal Dryness Level, EcoBoost On. The as-shipped defaults were the same as the Government Energy Certication Settings except
the default Temperature Setting of Medium was adjusted to the Highest Temperature Setting.
10
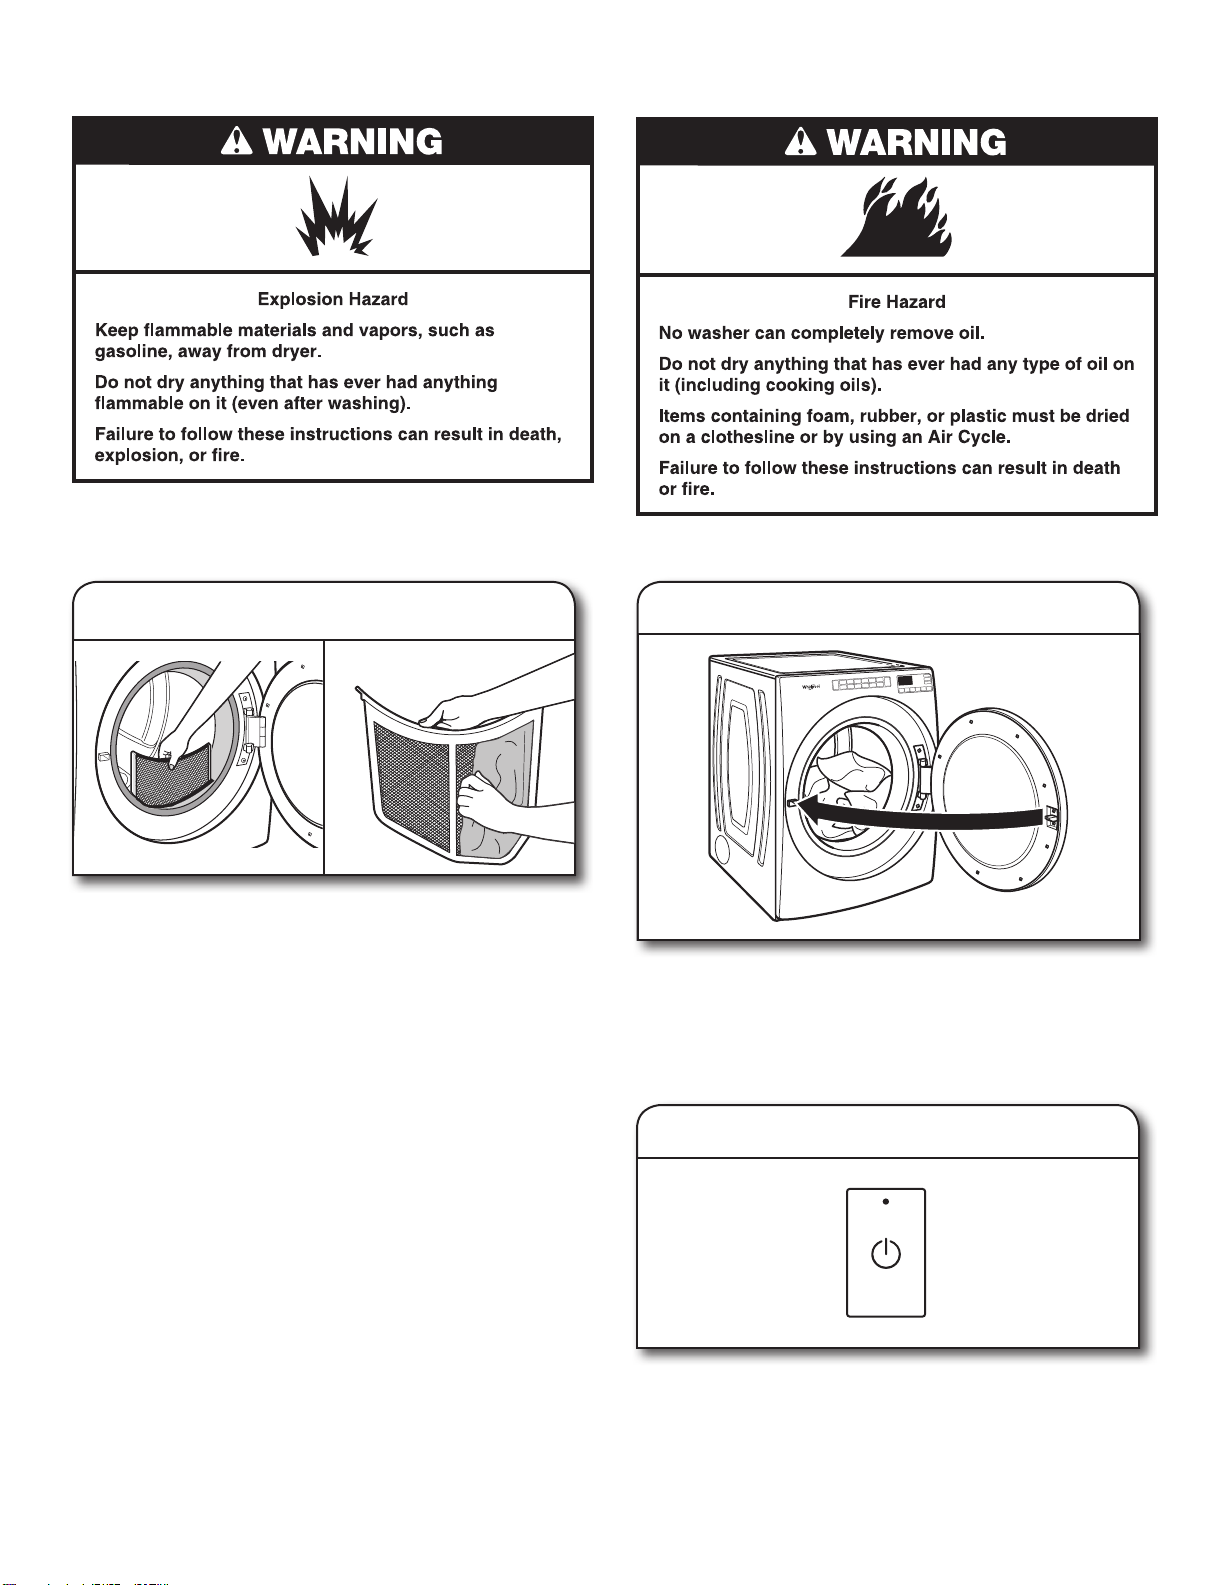
USING YOUR DRYER
WARNING: To reduce the risk of re, electric shock, or injury
to persons, read the Important Safety Instructions before
operating this appliance.
1.
Clean the lint screen
2.
Load the dryer
Clean the lint screen before each load. Pull the lint screen
straight up. Roll lint off the screen with your ngers. Do
not rinse or wash screen to remove lint. Wet lint is hard
to remove. Push the lint screen rmly back into place.
For additional cleaning information, see “Dryer Care.”
Open the door by pulling on the handle. Place laundry in the
dryer. Add a dryer sheet to wet load, if desired. Close the door.
IMPORTANT: Do not tightly pack the dryer. Items need
to tumble freely. Tightly packing can lead to poor drying
performance and may increase wrinkling and tangling.
3.
Touch POWER
Touch POWER to turn on the dryer.
11
 Loading...