

Whirlpool 6GC5THGXKS00 User Manual
®
CABINET DEPTH
SIDE BY SIDE
REFRIGERATOR
Use & Care Guide
www.whirlpool.com
Table of Contents ................................................. 2
2254913

TABLE OF CONTENTS
REFRIGERATOR SAFETY ............................................................. 3
Proper Disposal of Your Old Refrigerator .................................... 3
REFRIGERATOR INSTALLATION .................................................4
Unpacking ....................................................................................4
Location Requirements ................................................................4
Electrical Requirements ............................................................... 5
Removing the Door Handles........................................................ 5
Water Supply Connection ............................................................ 5
Water System Preparation ........................................................... 6
Custom Door Panels ....................................................................6
Base Grille .................................................................................... 7
Leveling Refrigerator ....................................................................7
Normal Sounds ............................................................................8
REFRIGERATOR USE ....................................................................8
Ensuring Proper Air Circulation....................................................8
Using the Controls .......................................................................8
Water and Ice Dispensers............................................................9
Water Filtration System..............................................................10
Ice Maker and Storage Bin/Bucket............................................11
REFRIGERATOR FEATURES ...................................................... 12
Refrigerator Shelves................................................................... 12
Meat Drawer, Crisper and Covers .............................................12
Crisper Humidity Control ...........................................................13
Beverage Drawer........................................................................13
Wine or Can/Bottle Rack ...........................................................13
Utility Bin ....................................................................................13
FREEZER FEATURES ..................................................................13
Freezer Shelf .............................................................................. 13
Freezer Basket ...........................................................................14
DOOR FEATURES ........................................................................14
Door Rails ................................................................................... 14
Door Bins.................................................................................... 14
REFRIGERATOR CARE ............................................................... 14
Cleaning......................................................................................14
Changing the Light Bulbs........................................................... 15
Power Interruptions ....................................................................15
Holiday and Moving Care .......................................................... 16
TROUBLESHOOTING ..................................................................16
ASSISTANCE OR SERVICE ......................................................... 19
Accessories ................................................................................ 19
WARRANTY ..................................................................................20
2

REFRIGERATOR SAFETY
Your safety and the safety of others are very important.
We have provided many important safety messages in this manual and on your appliance. Always read and obey all
safety messages.
This is the safety alert symbol.
This symbol alerts you to potential hazards that can kill or hurt you and others.
All safety messages will follow the safety alert symbol and either the word “DANGER” or
“WARNING.” These words mean:
You can be killed or seriously injured if you don't
immediately follow instructions.
can be killed or seriously injured if you don't
You
follow instructions.
All safety messages will tell you what the potential hazard is, tell you how to reduce the chance of injury, and tell you
what can
WARNING: To reduce the risk of fire, electric shock, or injury when using your refrigerator, follow these basic
precautions:
■ Plug into a grounded (earthed) outlet.
■ Do not remove ground prong.
■ Do not use an adapter.
■ Do not use an extension cord.
■ Disconnect power before servicing.
■ Replace all panels before operating.
■ Remove doors from your old refrigerator.
■ Use nonflammable cleaner.
■ Keep flammable materials and vapors, such as
gasoline, away from refrigerator.
■ Use two or more people to move and install
refrigerator.
happen if the instructions are not followed.
IMPORTANT SAFETY INSTRUCTIONS
SAVE THESE INSTRUCTIONS
■ Disconnect power before installing ice maker (on
ice maker kit ready models only).
■
Use a sturdy glass when dispensing ice or water
(on some models).
■ The appliance is not intended for use by young
children or infirm persons without supervision.
■
Young children should be supervised to ensure that
they do not play with the appliance.
■
If the power supply cord is damaged, it must be
replaced by the manufacturer or its service agent or
a similarly qualified person in order to avoid a hazard.
Proper Disposal of Your Old Refrigerator
WARNING
Suffocation Hazard
Remove doors from your old refrigerator.
Failure to do so can result in death or
brain damage.
IMPORTANT: Child entrapment and suffocation are not problems
of the past. Junked or abandoned refrigerators are still dangerous
– even if they will sit for “just a few days.” If you are getting rid of
your old refrigerator, please follow these instructions to help
prevent accidents.
Before you throw away your old refrigerator or freezer:
Take off the doors.
■
Leave the shelves in place so that children may not easily
■
climb inside.
3
REFRIGERATOR
Location Requirements
INSTALLATION
Unpacking
WARNING
Excessive Weight Hazard
Use two or more people to move and install
refrigerator.
Failure to do so can result in back or other injury.
Removing packaging materials
Remove tape and glue residue from surfaces before turning
■
on the refrigerator. Rub a small amount of liquid dish soap
over the adhesive with your fingers. Wipe with warm water
and dry.
Do not use sharp instruments, rubbing alcohol, flammable
■
fluids, or abrasive cleaners to remove tape or glue. These
products can damage the surface of your refrigerator. For
more information, see the “Refrigerator Safety” section.
When Moving Your Refrigerator:
Your refrigerator is heavy. When moving the refrigerator
for cleaning or service, be sure to protect the floor.
Always pull the refrigerator straight out when moving it.
Do not wiggle or “walk” the refrigerator when trying to move
it, as floor damage could occur.
Cleaning before use
After you remove all of the packaging materials, clean the inside
of your refrigerator before using it. See the cleaning instructions
in the “Refrigerator Care” section.
Important information to know about glass shelves
and covers:
Do not clean glass shelves or covers with warm water when
they are cold. Shelves and covers may break if exposed to
sudden temperature changes or impact, such as bumping.
For your protection, tempered glass is designed to shatter
into many small, pebble-size pieces. This is normal. Glass
shelves and covers are heavy. Use special care when removing them to avoid impact from dropping.
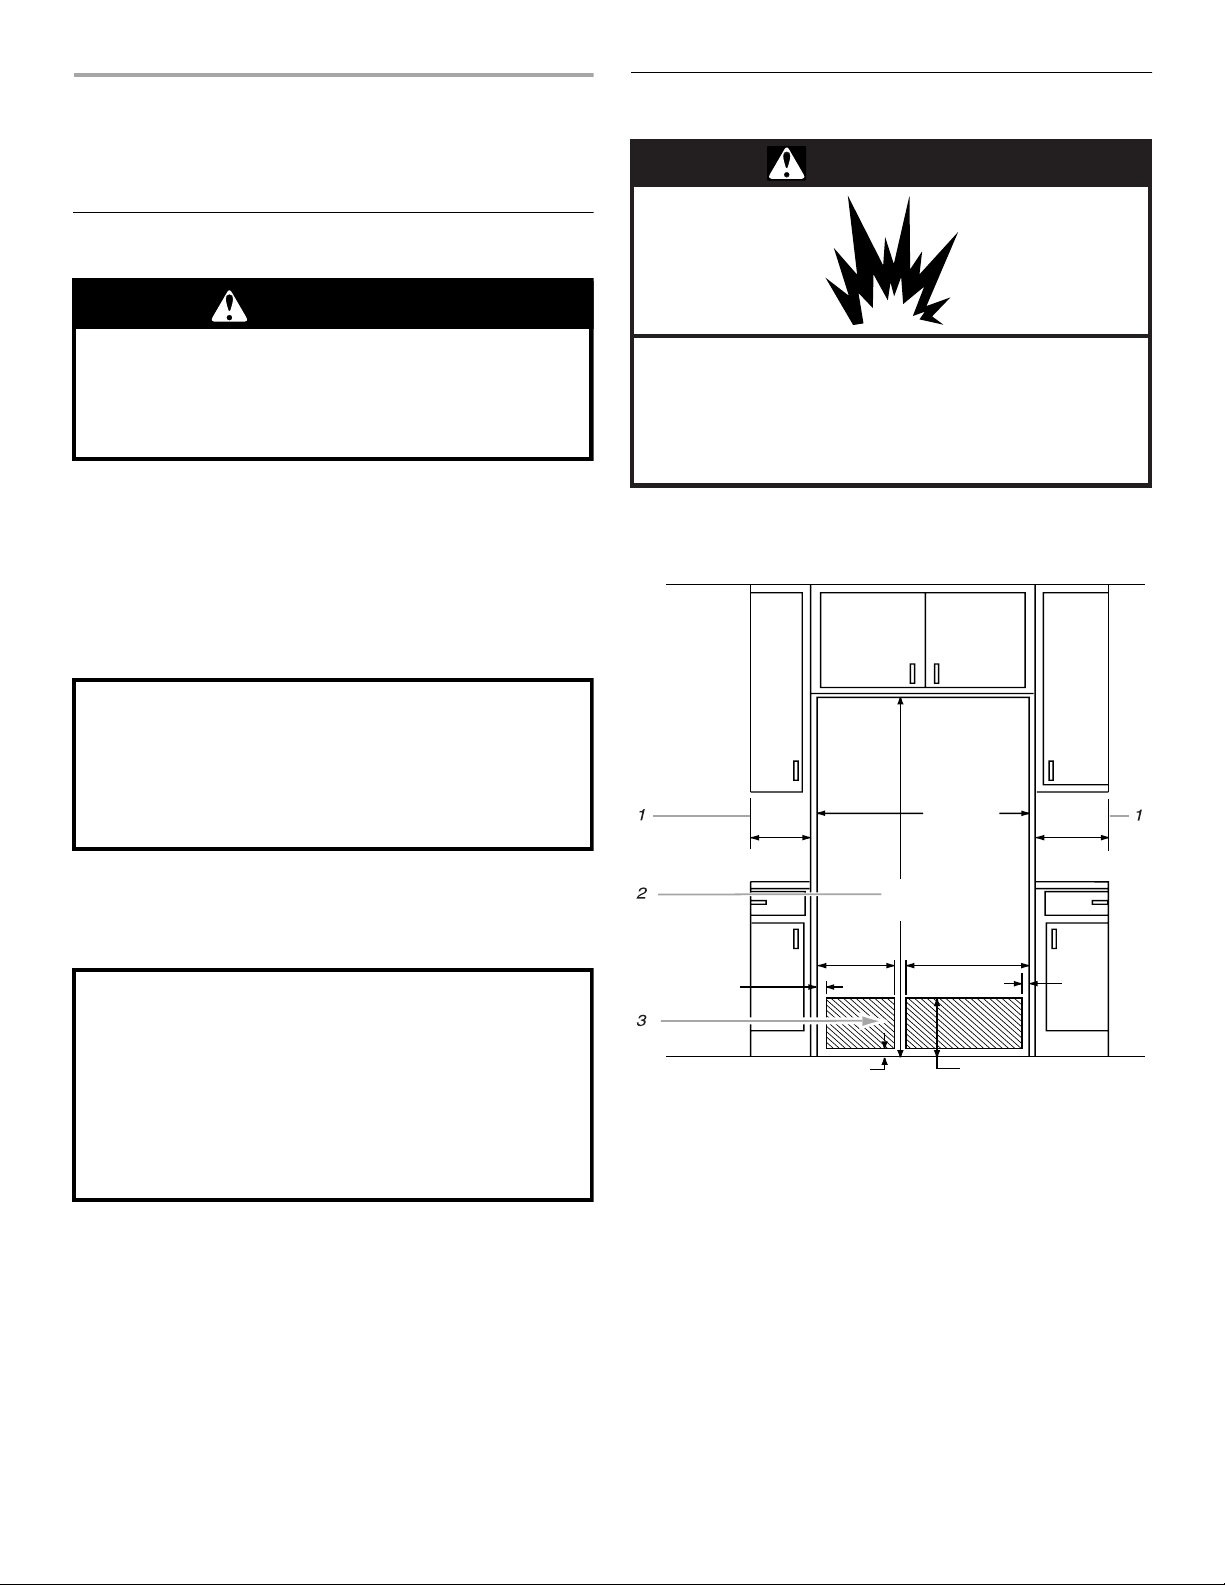
WARNING
Explosion Hazard
Keep flammable materials and vapors, such as
gasoline, away from refrigerator.
Failure to do so can result in death, explosion,
or fire.
Do not install the refrigerator near an oven, radiator, or
NOTE:
other heat source, nor in a location where the temperature will fall
below 55°F (13°C).
36"
(91.5 cm)
1
13
/4"
(34 cm)
72"
(182.9 cm)
1
/2"
12
2"
(5.1 cm)
1. Minimum fixed wall position.
2. For full-overlay cabinet doors and a trim kit, the
height of the opening must be 72
(183.2 cm).
3. Recommended locations for electrical and
water connections.
(32 cm)
21/2"
(6.4 cm)
1
/4"
20
(51.5 cm)
91/4"
(23.5 cm)
¹⁄₈
in.
161/2"
(42 cm)
2"
(5.1 c m)
If you are installing the refrigerator to fit flush with the front of
■
the base cabinets, all shoe molding and baseboards must be
removed from the rear of the refrigerator opening.
The water hookup and electrical hookup must be placed near
■
the bottom of the refrigerator.
A trim kit is available for those installations where the
■
refrigerator will not fit flush. See the “Assistance or Service”
section for ordering information.
4
Electrical Requirements
WARNING
Electrical Shock Hazard
Plug into a grounded (earthed) outlet.
Do not remove ground prong.
Do not use an adapter.
Do not use an extension cord.
Failure to follow these instructions can result in
death, fire, or electrical shock.
Before you move your refrigerator into its final location, it is
important to make sure you have the proper electrical
connection:
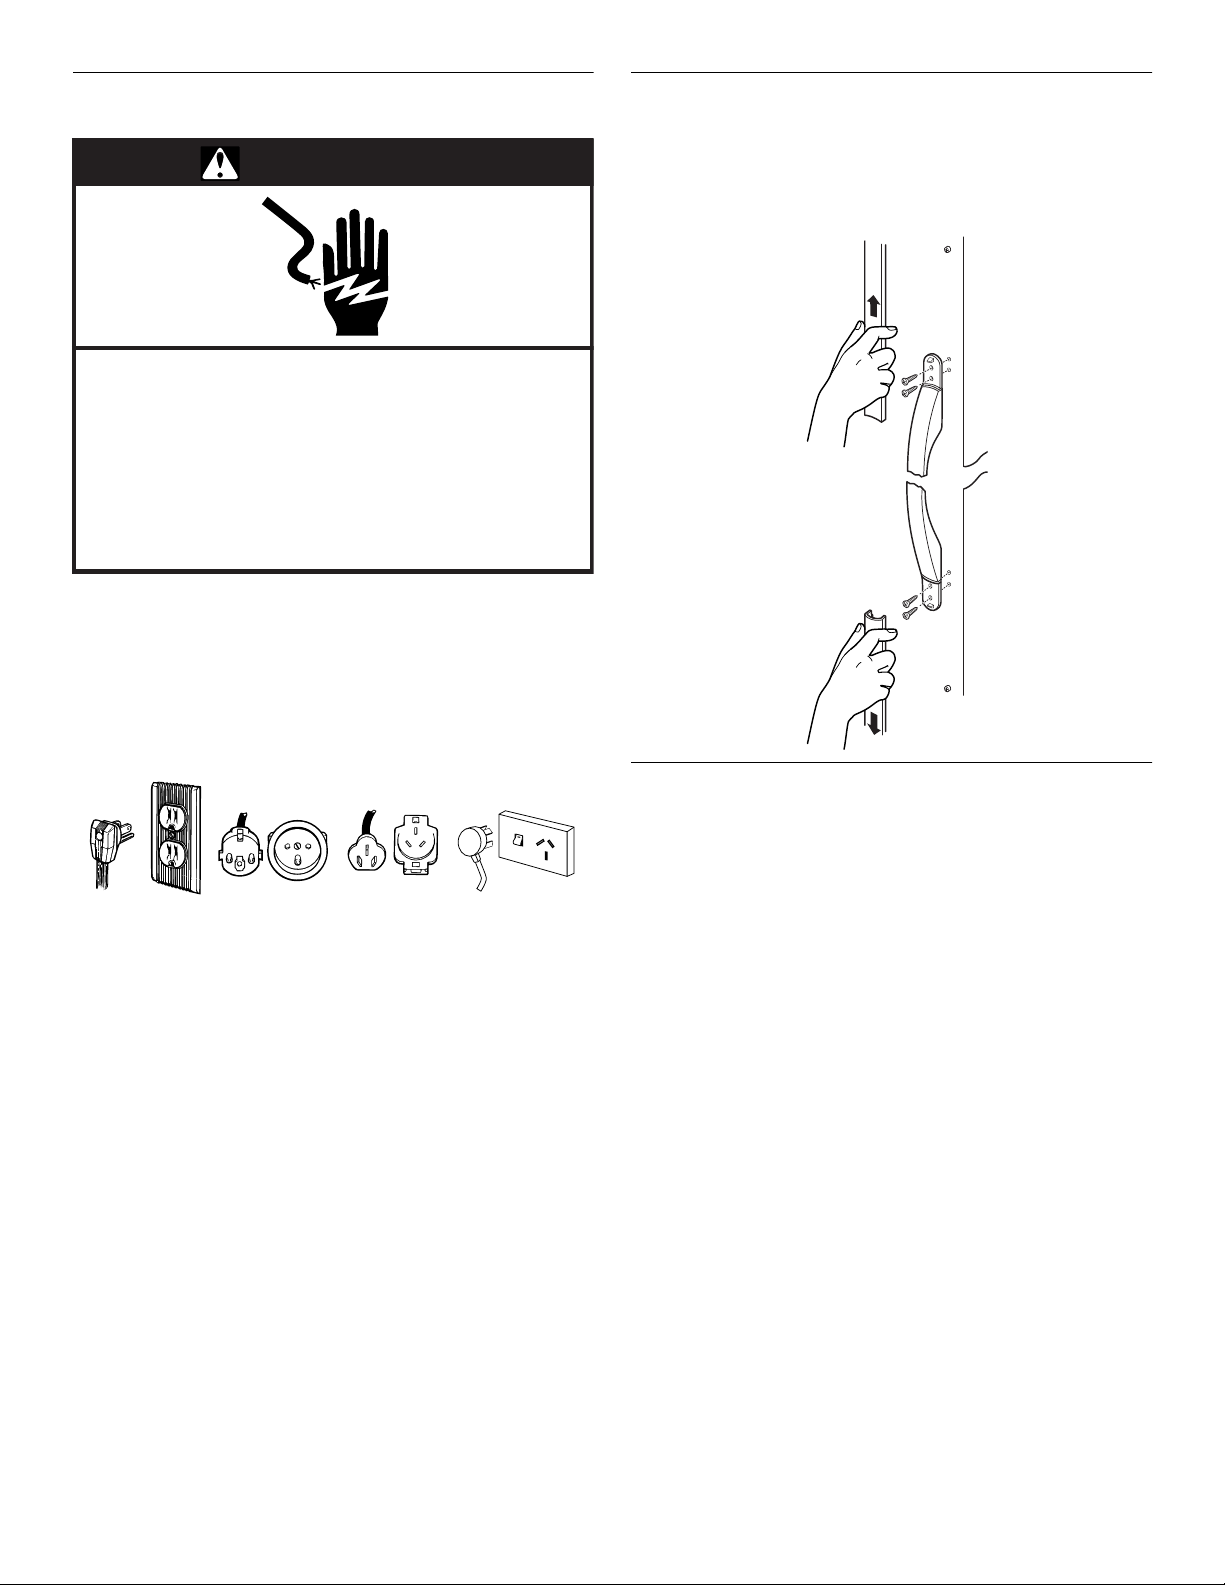
Recommended Grounding Method
A 115 Volt, 60 Hz. (Plug 1), 220/240 Volt/50 Hz (Plugs 2 or 3), or
220 Volt/60Hz (Plug 3) AC only 10 ampere fused and grounded
(earthed) electrical supply is required.
Removing the Door Handles
(on some models)
Apply firm pressure with hand on face of trim. Slide top trim up
and bottom trim down away from handle, then lift off of shoulder
screws. Remove handle screws.
Plug 1
It is recommended that a separate circuit serving only your
refrigerator be provided. Use an outlet that cannot be turned off
by a switch or pull chain. Do not use an extension cord.
Before performing any type of installation, cleaning, or
NOTE:
removing a light bulb, turn the control, (Thermostat, Refrigerator
or Freezer Control depending on the model) to OFF and then
disconnect the refrigerator from the electrical source. When you
are finished, reconnect the refrigerator to the electrical source
and reset the control (Thermostat, Refrigerator or Freezer Control
depending on the model) to the desired setting.
For Australia and New Zealand:
Your new appliance has been especially manufactured to meet all
Australian Standards and Conditions.
Some notations in the installation instructions may refer to
electrical requirements in other countries, so we draw your
particular attention to these specific notes.
Your appliance needs to be plugged into a 230/240 Volt 50 Hz 10
amp (Plug 4 ) AC onl y ear t hed outlet .
Plug 2
Plug 3
Plug 4
Water Supply Connection
(on some models)
Read all directions carefully before you begin.
IMPORTANT:
All installations must be in accordance with local plumbing
■
code requirements.
Contact your dealer or Whirlpool designated service
■
company for proper installation and parts.
Connect to potable water only.
■
Water pressure: 30 to 150 psi (207 KPa - max. 1030 KPa).
■
Install ice maker tubing in areas where temperatures are
■
above freezing.
If operating the refrigerator before installing the water
■
connection, turn ice maker to the OFF position to prevent
operation without water (See “Water System Preparation”).
It may take up to 24 hours for your ice maker to begin
■
producing ice.
5
Water System Preparation
(on some models)
Please read before using the water system.
Immediately after installation, follow the steps below to make
sure that the water system is properly cleaned.
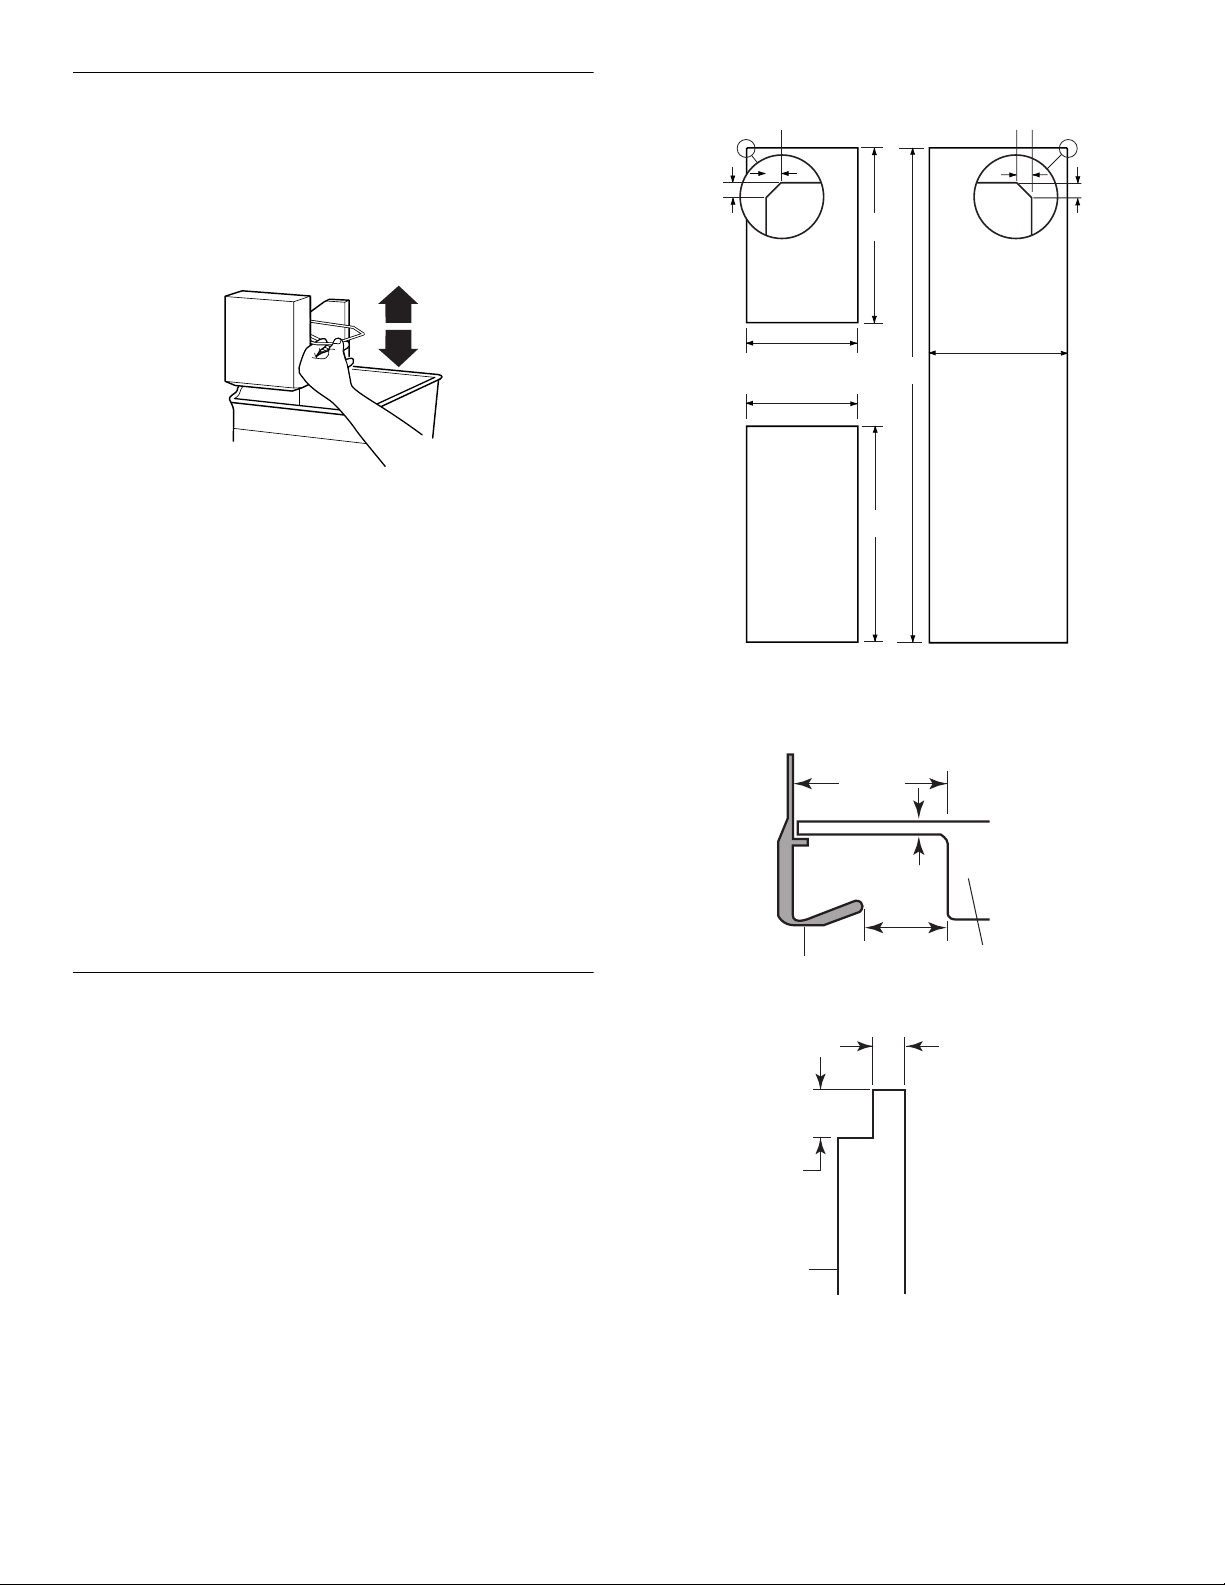
1. Open the freezer door and turn off the ice maker by lifting up
the wire shutoff arm as shown.
Dimensions for custom wood panels:
1/8"
(3.18 mm)
1/8"
(3.18 mm)
23 3/4"
(60.3 cm)
1/8"
(3.18 mm)
1/8"
(3.18 mm)
NOTES:
■ If your model has a base grille filter system, make sure the
base grille filter is properly installed and the cap is in the
horizontal position.
Do not use with water that is microbiologically unsafe or
■■■■
of unknown quality without adequate disinfection before
or after the system.
2. Use a sturdy container to depress the water dispenser bar
until the water begins to flow. Flush the water system by
dispensing and discarding 2 to 3 gal. (8 to 12 L) of water.
Cleaning the system will take approximately 6 to 7 minutes
and will help clear air from the line. Additional flushing may be
required in some households.
NOTE: As air is cleared from the system, water may spurt out
of the dispenser.
3. Open the freezer door and turn on the ice maker by lowering
the wire shutoff arm. Please refer to the “Ice Maker and
Storage Bin/Bucket” section for further instructions on the
operation of your ice maker.
Allow 24 hours to produce the first batch of ice.
■
Discard the first three batches of ice produced.
■
15 3/8"
(39 cm)
15 3/8"
(39 cm)
67 15/16"
(172.5 cm)
29 13/16"
(75.7 cm)
19 3/32"
(48.5 cm)
Routing Dimensions for Custom Panels more than
(6 mm) thick
Handle side detail
2¹⁄₂"
(63.5 mm)
min.
¹⁄₄" (6 mm) max.
handle
1¹⁄₂" (38.1 mm)
min.
panel
"
¹⁄₄
Custom Door Panels
Creating Custom Wood Panels
If you plan to install custom wood decorator panels, you will need
to create the panels yourself or consult your cabinet maker or
carpenter. See dimensional drawings for wood panel inserts.
Flat panels:
You can create a custom flat panel a maximum of ¹⁄₄ in. (6.35 mm)
thick to replace your decorator panels. Flat wood panels less
than ¹⁄ ₄ in. (6.35 mm) thick are not recommended.
Raised panels:
A raised panel design can be created by screwing or gluing wood
panels to ¹⁄₄ in. (6.35 mm) backing or by using ³⁄₄ in. (19.05 mm)
stock with routed edges. Raised panels should be spaced
2¹⁄₄ in. (5.70 cm) from the back edge of the handle to allow room
for fingers to grasp the handle.
Weight requirements for raised panel inserts:
Refrigerator door panel should not exceed 28 lbs.
■
(12.7 kg).
Freezer door panels should not exceed 21 lbs. (9.5 kg)
■
combined weight.
6
Top, bottom and side trim detail
¹⁄₄"
(6 mm) max.
¹⁄₂"
(12.7 mm)
min.
panel
Installing Custom Wood Panels
1. Remove any packing tape.
2. Remove the refrigerator and freezer door trims from the hinge
side of each door by pulling the trim away from the bottom of
the door first.
3. Partially unscrew the two screws that hold the top trim in
place. It is not necessary to completely remove the screws.
Loosen the screws approximately ¹⁄₄ in. (6.35 mm) from the
trim to allow the panels to slide freely.
 Loading...