

Page 1
®
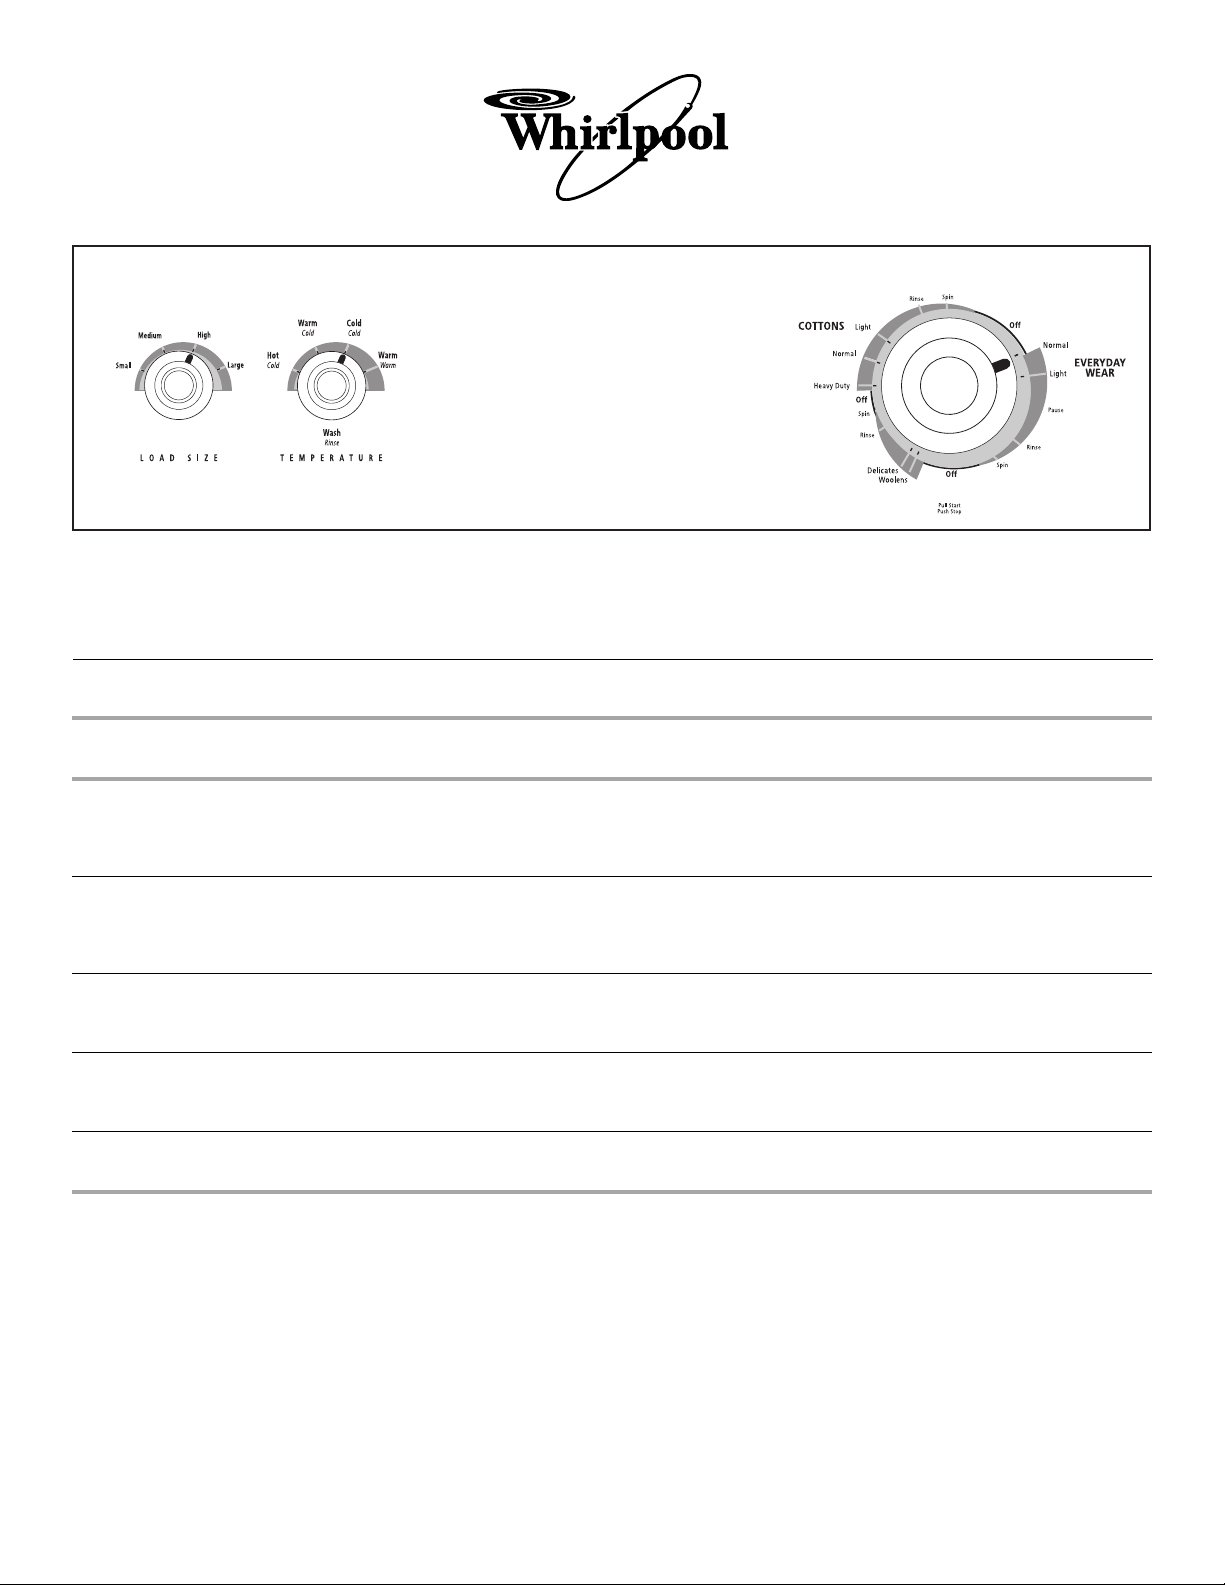
WASHER CYCLE DESCRIPTIONS
This information covers several different models. Your washer may vary from the model shown and may not have all the cycles and
features described. Washer will not agitate or spin with the lid open.
Cycle Selections
CYCLES LOAD TYPES DESCRIPTIONS AGITATE/
COTTONS
HEAVY DUTY
EVERYDAY
WEAR
WOOLENS
DELICATES
You should select a Wash/Rinse temperature based on the type of
fabric and soils being washed. For best results, use the warmest
wash water safe for fabric. Follow garment label instructions.
Your washer uses automatic temperature control to maintain a
uniform water temperature by regulating incoming hot and cold
water. This helps eliminate undissolved detergent and ensures
consistent cleaning results. The cold wash is regulated at
approximately 24°C by adding small amounts of hot water during
the cold fill. The warm wash is maintained at approximately 38°C.
Cottons and linens, loads that are
moderately or heavily soiled.
Heavily soiled loads. Review detergent use instructions.
Permanent press blends and
synthetic fabrics that are lightly to
moderately soiled.
Lightly to moderately soiled
washable woolens and washable
knits.
Lightly to moderately soiled delicate
items and washable knits.
Temperature Control
A wash time should be selected
based on the soil level of your load.
You may choose Heavy Duty,
Normal or Light.
You should use twice the amount of
detergent recommended for a
normal wash cycle.
Features a cool down, rinse and
low-speed final spin to reduce
wrinkling.
Features a series of brief agitations
and soaks, followed by a short spin.
Features a series of brief agitations
and soaks, followed by a short spin.
Load Size or Water Level Control
Adjust water level to load size. Clothes should move freely. To
change to a higher water level after agitation starts, you may turn
knob to desired setting.
On models with a variable Load Size or Water Level control, you
should turn the knob to RESET, then to desired setting.
SPIN SPEEDS
High/High 6 - 15 minutes
High/High 15 minutes
High/Low 6 - 10 minutes
Intermittent
Low/Low
Intermittent
Low/Low
APPROXIMATE
WASH TIMES
6 minutes
4 minutes
8558483
© 2003 Whirlpool Corporation.
All rights reserved. ® Registered Trademark/TM Trademark of Whirlpool, U.S.A.
Printed in U.S.A.
12/03
Page 2
WASHER USER INSTRUCTIONS
Table of Contents
ASSISTANCE OR SERVICE ............................ 1
WASHER SAFETY............................................ 2
WASHER USE .................................................. 3
WASHER CARE ............................................... 4
TROUBLESHOOTING...................................... 5
WARRANTY...................................................... 8
Assistance or Service
If you need assistance or service, first see the “Troubleshooting”
section. Additional help is available by calling:
Whirlpool Customer Interaction Centre
1-300-363-344 (Australia)
or
0-800-442-584 (New Zealand)
Our consultants provide assistance with:
■ Features and specifications on our full line of appliances
■ Installation information
■ Use and maintenance procedures
■ Accessory and repair parts sales
■ Referrals to local dealers, repair parts distributors, and service
companies
Whirlpool designated service technicians are trained to fulfill the
product warranty and provide after-warranty service.
NOTE: If the power supply cord of this washer is damaged, it
must be replaced by a special cord (Part Number 8541726)
available from the dealer from whom you purchased the washer or
a Whirlpool designated service company.
Information may also be obtained by visiting our website at
www.whirlpool.com.au.
®
Keep this book and your sales slip together for future
reference. You must provide proof of purchase or installation
date for in-warranty service.
Write down the following information about your appliance to help
you obtain assistance or service if you ever need it. You will need
to know your complete model number and serial number. You can
find this information on the model and serial number label, located
under the washer lid.
Dealer name____________________________________________________
Serial number __________________________________________________
Address ________________________________________________________
Phone number __________________________________________________
Model number __________________________________________________
Purchase date __________________________________________________
8539788
Page 3
WASHER SAFETY
Your safety and the safety of others are very important.
We have provided many important safety messages in this manual and on your appliance. Always read and obey all safety
messages.
This is the safety alert symbol.
This symbol alerts you to potential hazards that can kill or hurt you and others.
All safety messages will follow the safety alert symbol and either the word “DANGER” or “WARNING.”
These words mean:
You can be killed or seriously injured if you don't immediately
DANGER
WARNING
All safety messages will tell you what the potential hazard is, tell you how to reduce the chance of injury, and tell you what can
happen if the instructions are not followed.
IMPORTANT SAFETY INSTRUCTIONS
follow instructions.
can be killed or seriously injured if you don't
You
instructions.
follow
WARNING: To reduce the risk of fire, electric shock, or injury to persons when using the washer, follow basic
precautions, including the following:
■ Read all instructions before using the washer.
■ Do not wash articles that have been previously
cleaned in, washed in, soaked in, or spotted with
petrol, dry-cleaning solvents, other flammable, or
explosive substances as they give off vapours
that could ignite or explode.
■ Do not add petrol, dry-cleaning solvents, or other
flammable, or explosive substances to the wash
water. These substances give off vapours that
could ignite or explode.
■ Under certain conditions, hydrogen gas may be
produced in a hot water system that has not been
used for 2 weeks or more. HYDROGEN GAS IS
EXPLOSIVE. If the hot water system has not
been used for such a period, before using the
washing machine, turn on all hot water taps and
let the water flow from each for several minutes.
This will release any accumulated hydrogen gas.
As the gas is flammable, do not smoke or use an
open flame during this time.
■ Do not allow children to play on or in the washer.
■ The appliance is not intended for use by young children
or infirm persons without supervision.
■ Before the washer is removed from service or
discarded, remove the door or lid.
■ Do not reach into the washer if the drum, tub or agitator
is moving.
■ Do not install or store the washer where it will be
exposed to the weather.
■ Do not tamper with controls.
■ Do not repair or replace any part of the washer or
attempt any servicing unless specifically recommended
in this Use and Care Guide or in published user-repair
instructions that you understand and have the skills to
carry out.
■ See Installation Instructions for earthing requirements.
■ If the supply cord is damaged, it must be replaced by
the manufacturer or its service agent or a similarly
qualified person in order to avoid a hazard.
Close supervision of children is necessary when
the washer is used near children.
SAVE THESE INSTRUCTIONS
2
Page 4
WASHER USE
Loading
For these suggested full-sized loads, set the LOAD SIZE selector to the highest load size setting.
SUPER CAPACITY and SUPER CAPACITY PLUS WASHERS
Heavy Work Clothes
3 pair pants
3 shirts
4 pair jeans
1 coverall
1 overall
Heavy Work Clothes
2 pair pants
3shirts
3 pair jeans
1 coverall
Mixed Load
3 double sheets
4 pillowcases
8 T-shirts
6 pair shorts
2 shirts
2 blouses
8 handkerchiefs
Mixed Load
2 double sheets or
1kingsizesheet(s)
4 pillowcases
6T-shirts
6 pair shorts
2 shirts
2 blouses
6 handkerchiefs
WARNING
Towels
10 bath towels
10 hand towels
14 washcloths
1 bath mat
EXTRA LARGE CAPACITY WASHERS
Towels
8 bath towels
8 hand towels
10 washcloths
1 bath mat
Starting Your Washer
Delicates
3 camisoles
1 quilted robe
4 slips
4 panties
2 bras
2 nighties
1 baby’s dress
Delicates
3 camisoles
4 slips
4 panties
2 bras
2 nighties
WARNING
Fire Hazard
Never place items in the washer that are dampened
with gasoline or other flammable fluids.
No washer can completely remove oil.
Do not dry anything that has ever had any type of oil on
it (including cooking oils).
Doing so can result in death, explosion, or fire.
1. Measure detergent and pour it into the washer. If desired, add
powdered or liquid color safe bleach. Drop a sorted load of
clothes loosely into your washer.
■ Load evenly to maintain washer balance. Mix large and
small items. Items should move easily through the wash
water. Overloading can cause poor cleaning.
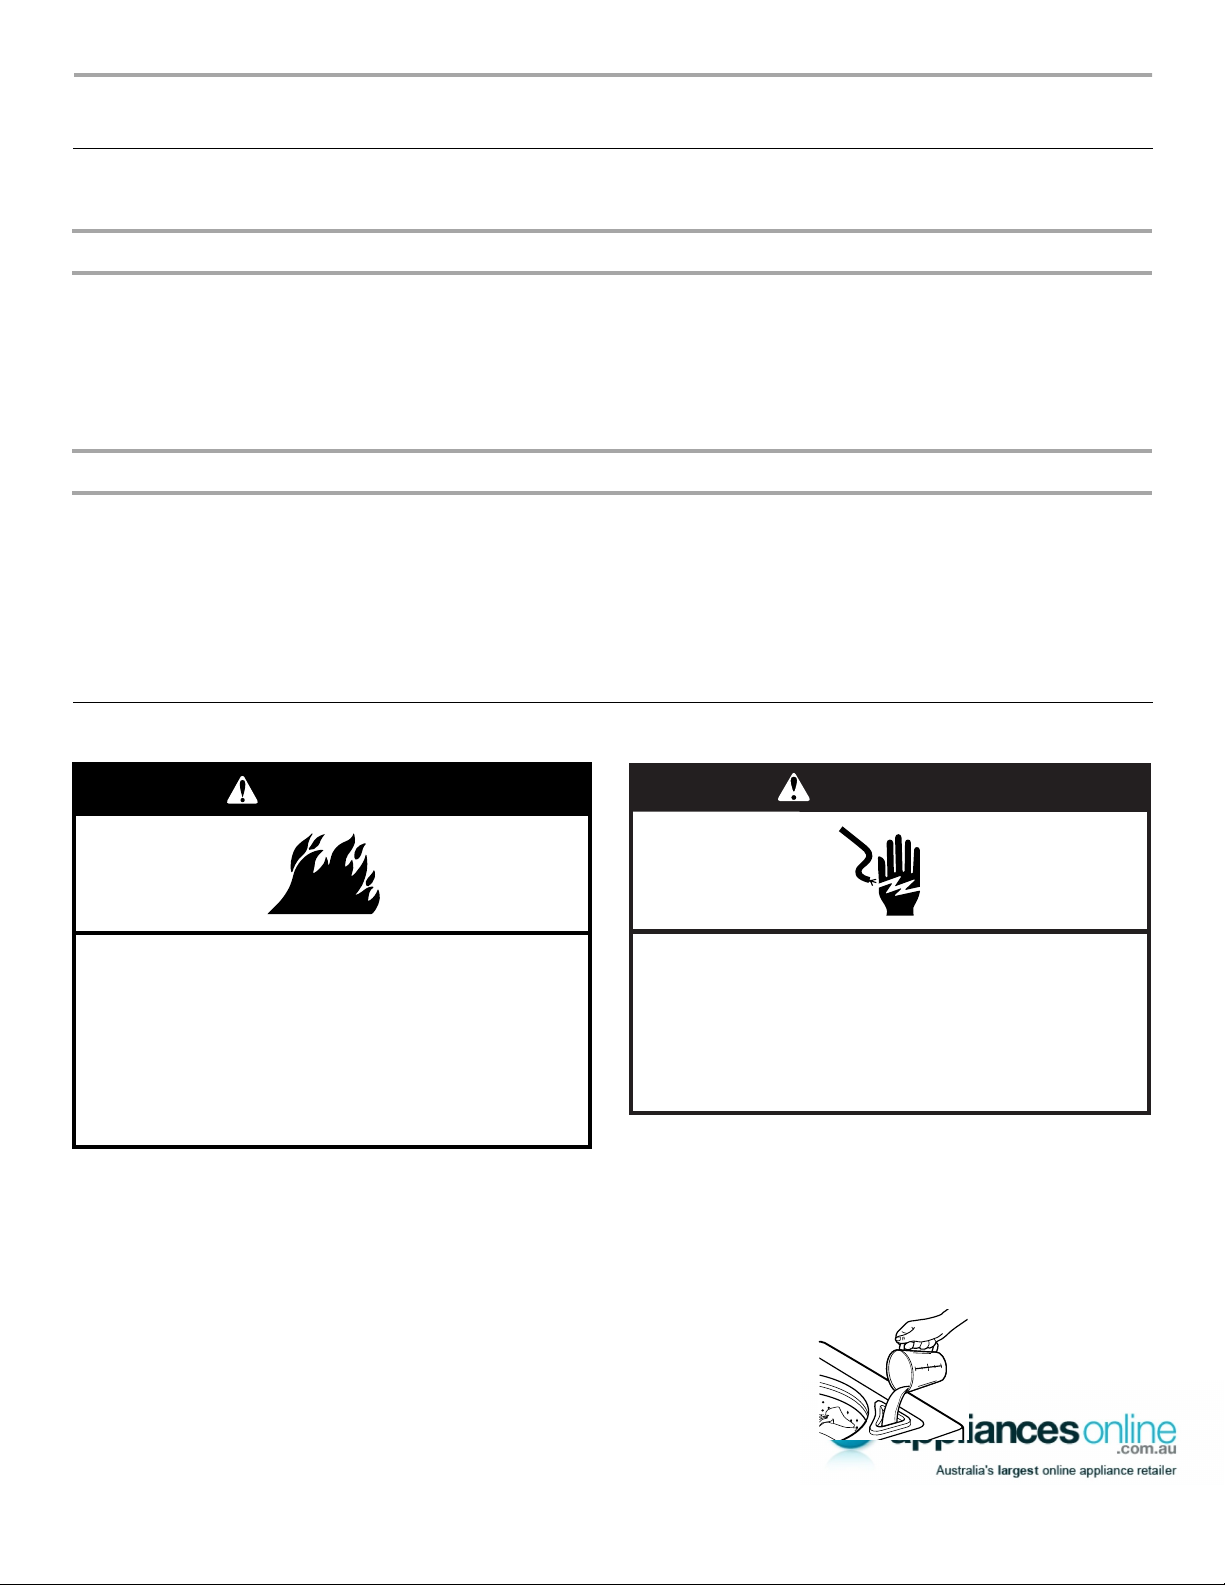
2. (OPTIONAL) Add liquid chlorine bleach.
NOTE: Follow the manufacturer’s directions for proper use.
Undiluted bleach will damage any fabric it touches. The
damage appears as rips, holes, tears, or color loss and may
not show up until several washings later. To avoid spilling, use
a cup with a pouring spout. Do not let bleach splash, drip, or
run down into the washer basket. Always measure liquid
chlorine bleach. Do not guess. Do not use more than the
manufacturer’s recommended amount for a full load. Use less
with a smaller load size.
Electrical Shock Hazard
Electrically earth this appliance.
Do not use an extension cord or an electrical portable
outlet device.
Failure to follow these instructions can result in death,
fire, or electrical shock.
Style 1: With liquid chlorine bleach dispenser (on some
models)
■ Use only liquid chlorine bleach in this dispenser. Pour
measured liquid chlorine bleach into the liquid chlorine
bleach dispenser. Bleach is immediately fed into washer
and is diluted automatically during the wash part of the
cycle.
3
Page 5
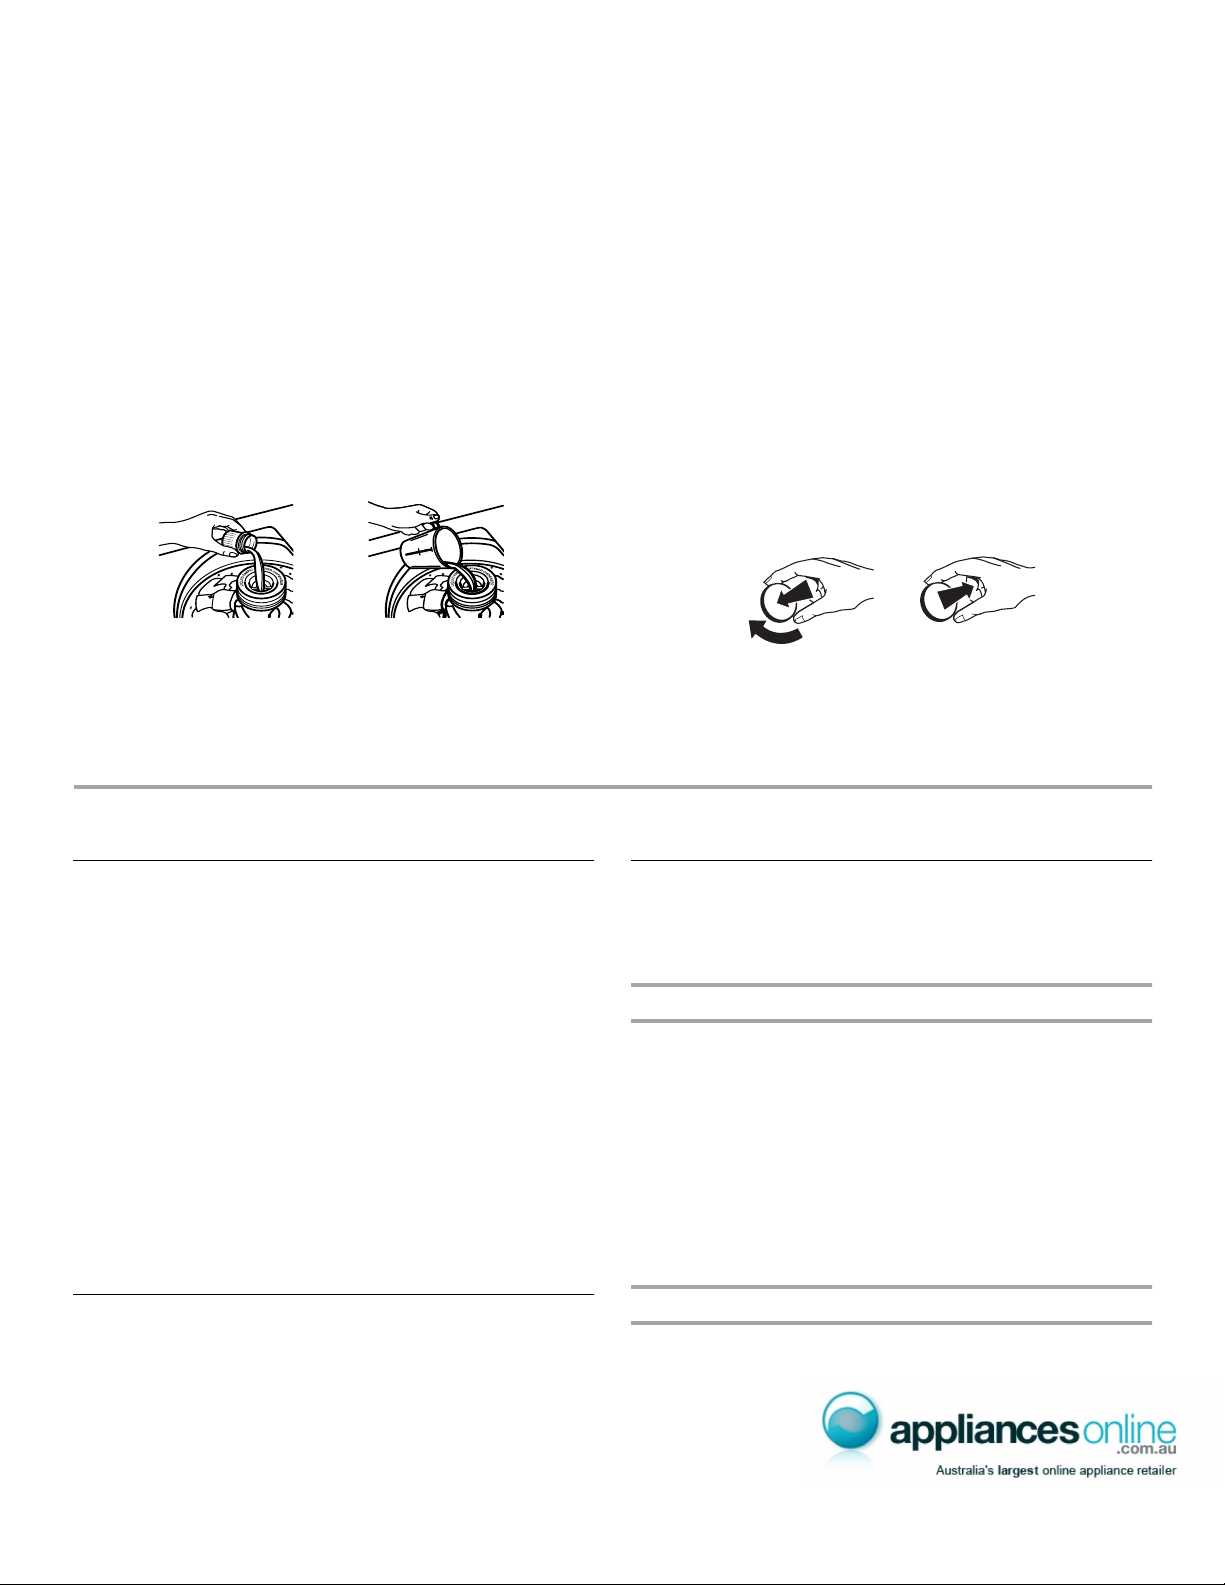
Style 2: Without liquid chlorine bleach dispenser (on some
models)
■ Let the washer fill and begin agitating the load.
■
Add bleach 5 minutes into the wash cycle for best cleaning
and so that bleach can be removed in the rinse cycle. Pour
bleach around the agitator, not directly onto the load to
avoid damaging clothing or other items in the load.
3. (OPTIONAL) Add liquid fabric softener.
NOTE:
Do not spill or drip any fabric softener onto the clothes.
Undiluted fabric softener can stain fabrics. Always dilute fabric
softener with warm water. Too much fabric softener can make
some items (diapers and towels) nonabsorbent. If this happens,
do not use it in every load, or use less of it in each load.
Style 1:
■ Use only liquid fabric softener in this dispenser. Pour
Style 2: Without liquid fabric softener dispenser (on some
models)
■ In the final rinse ONLY, add fabric softener that has been
4. Close the washer lid. Washer will not agitate or spin with the
lid open.
With liquid fabric softener dispenser (on some models)
measured liquid fabric softener into the dispenser.
Softener is added automatically during the rinse portion of
the cycle. Dilute liquid fabric softener by filling the
dispenser with warm water until liquid reaches the
crossbar in the dispenser opening.
diluted with 250 mL warm water.
5. Turn the LOAD SIZE or WATER LEVEL selector to the correct
setting for your wash load and the type of fabric being
washed. You may change the load size or water level selection
after the washer has started filling by turning the selector to a
different setting.
6. Set the TEMPERATURE selector to the correct setting for the
type of fabric and soils being washed. Use the warmest wash
water safe for fabric. Follow garment label instructions.
NOTE: In wash water temperatures colder than 21ºC,
detergents do not dissolve well. Soils can be difficult to
remove. Some fabrics can retain wear wrinkles and have
increased pilling (the formation of small lint-like balls on the
surface of garments).
7. (OPTIONAL) EXTRA RINSE selector (on some models). For an
additional rinse and spin at the end of a wash cycle, set the
EXTRA RINSE selector to ON. On some models, the EXTRA
RINSE feature is part of the cycle.
8. (OPTIONAL) Some models have an END OF CYCLE SIGNAL
selector. Set this selector to ON if you want your washer to
alert you when the wash cycle is complete.
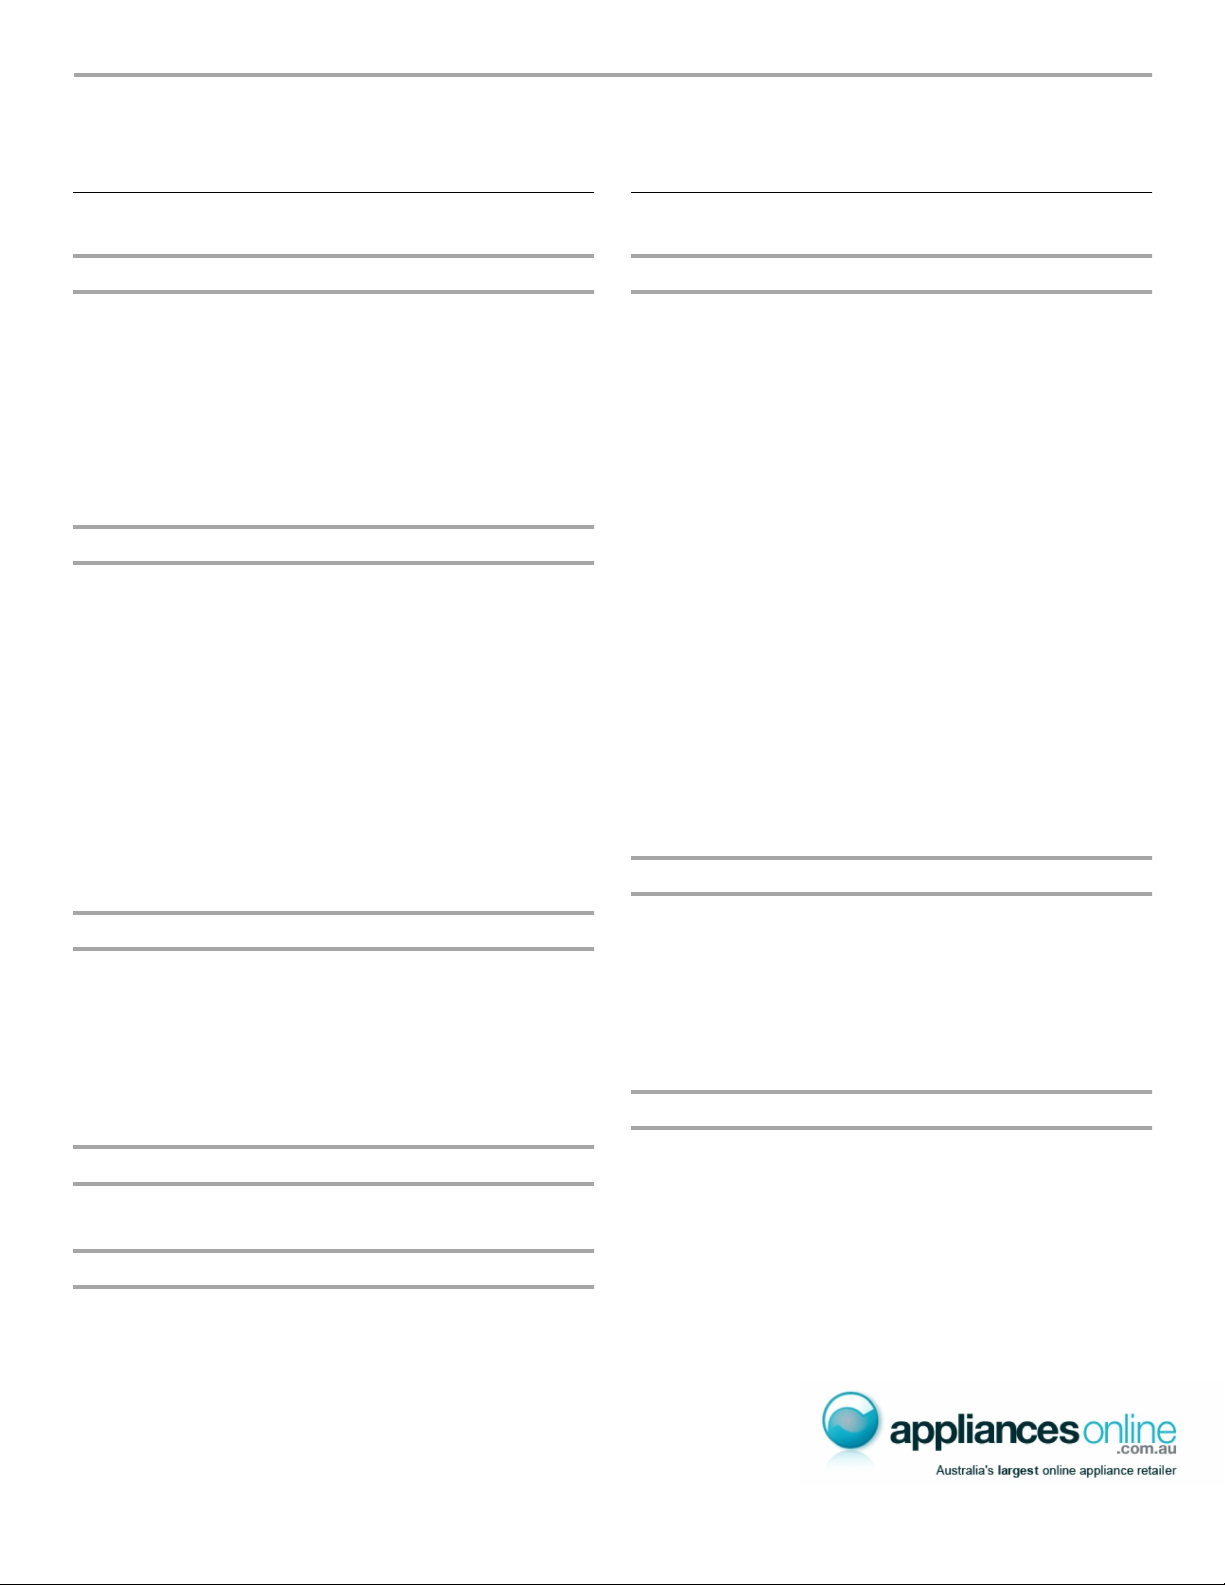
9. Push in the Cycle Control knob and turn it clockwise to the
wash cycle you want. Reduce the wash time when using a
small load size setting. Pull out the Cycle Control knob to start
the washer.
To stop or restart your washer:
■ To stop the washer at any time, push in the Cycle
Control knob.
■ To restart the washer, close the lid (if open) and pull out the
Cycle Control knob.
WASHER CARE
Cleaning Your Washer
Use a soft, damp cloth or sponge to wipe up any spills such as
detergent or bleach from the outside of your washer.
Clean your washer interior by mixing 250 mL of chlorine bleach
and 500 mL of detergent. Pour this mixture into your washer and
run it through a complete cycle using hot water. Repeat this
process if necessary.
Remove any hard water deposits using only cleaners labeled as
washer safe.
Cleaning the liquid fabric softener dispenser (on some
models):
1. Remove dispenser by grasping top with both hands and
squeezing, while pushing upward with thumbs.
2. Rinse dispenser under warm water, then replace it.
NOTE: Some models are equipped with a liquid fabric softener
dispenser. To avoid damage to the washer or clothing do not wash
clothes with the liquid fabric softener dispenser removed or add
detergent or bleach to this dispenser; it is for liquid fabric softener
only.
Water Inlet Hoses
Replace inlet hoses after 5 years of use to reduce the risk of hose
failure. Periodically inspect and replace inlet hoses if bulges,
kinks, cuts, wear or leaks are found.
When replacing your inlet hoses, mark the date of replacement on
the label with a permanent marker.
Moving & Storage
Because some water may stay in the hoses, freezing can damage
your washer. If storing or moving your washer during freezing
weather, winterize it.
Winterizing your washer
1. Shut off both water faucets. Disconnect and drain water inlet
hoses. Pour 1 L of R.V.-type antifreeze in the basket.
2. Run washer on a drain and spin setting for about 30 seconds
to mix the antifreeze and water.
3. Unplug washer or disconnect power.
To use washer again
1. Flush water pipes and hoses. Reconnect water inlet hoses.
Turn on both water faucets.
2. Plug in washer or reconnect power.
3. Run the washer through a complete cycle with 250 mL of
detergent to clean out antifreeze.
Storage, non-use or vacation care
Operate your washer only when you are at home. If you will be on
vacation or not using your washer for an extended period of time,
you should:
1. Unplug washer or disconnect power.
2. Turn off the water supply to the washer. This helps avoid
accidental flooding (due to a water pressure surge) while you
are away.
4
Page 6
TROUBLESHOOTING
First try the solutions suggested here and possibly avoid the cost of a service call...
Washer and Components
Noisy
■ Is the load balanced and the washer level? The wash load
should be balanced and not overloaded. The washer must be
level. The front feet should be properly installed and the nuts
tightened. Reset the rear leveling legs (if needed). See the
Installation Instructions.
■ Did you completely remove the yellow shipping strap with
cotter pins? See the Installation Instructions.
■ Are the gears engaging after the drain and before spin, or
is the upper part of agitator clicking during wash? These
are normal washer noises.
Leaking
■ Check the following:
Are the fill hoses tight?
Are the fill hose washers properly seated?
Is the drain hose clamp properly installed? See the Installation
Instructions.
■ Is the sink or drain clogged? Sink and standpipe must be
able to handle 64 L of water per minute.
■ Is water deflecting off the tub ring or the load? Center the
tub before starting the washer. The wash load should be
balanced and not overloaded. The fill or spray rinses can
deflect off the load. The washer must be level. The front feet
should be properly installed and the nuts tightened. Reset the
rear leveling legs (if needed). See the Installation Instructions.
■ Check household plumbing for leaks.
Basket crooked
■ Was the washer basket pulled forward during loading?
Push the basket to the center before starting wash.
■ Is the load balanced and the washer level? The wash load
should be balanced and not overloaded. The washer must be
level. The front feet should be properly installed and the nuts
tightened. Reset the rear leveling legs (if needed). See the
Installation Instructions.
■ The washer basket moves while washing. This is normal.
Agitator operation
■ The top of the agitator is loose, or moves in only one
direction. This is normal.
Dispensers clogged or bleach leaking
■ Did you follow the manufacturer’s directions when adding
detergent and fabric softener to the dispensers (on some
models)? Measure detergent and fabric softener. Carefully
pour into the dispensers. Wipe up all spills. Dilute fabric
softener in the fabric softener dispenser.
■ Did you put powdered or color-safe bleach in the liquid
chlorine bleach dispenser (on some models)? Add
powdered or liquid color-safe bleach directly to the basket. Do
not use the chlorine bleach dispenser for color-safe bleach.
Washer Operation
Washer stops, won’t fill, rinse or agitate
■ Check the following:
Is the power cord plugged in?
Is the indicator on the Cycle Control knob properly lined up
with a cycle? Turn the Cycle Control knob to the right slightly
and pull to start.
Are the water inlet valve screens clogged?
Are both the hot and cold water faucets turned on?
Is the water inlet hose kinked?
■ Does the water level seem too low, or does the washer
appear to not fill completely? The top of the agitator is much
higher than the highest water level. This is normal and
necessary for clothes to move freely.
■ Has a fuse blown or is the circuit breaker open? If problem
continues, call an electrician.
■ Are you using an extension cord? Do not use an extension
cord or an electrical portable outlet device.
■ Is the washer in a normal pause in the cycle? The washer
pauses for about 2 minutes during certain cycles. Allow the
cycle to continue. Some cycles feature periods of agitation
and soak.
■ Is the washer overloaded? Wash smaller loads.
■ Is the lid open? The lid must be closed during operation.
Washer will not agitate or spin with the lid open.
Washer won’t drain or spin
■ Is the drain hose clogged, or the end of the drain hose
more than 244 cm above the floor? See the Installation
Instructions for proper installation of drain hose.
■ Is the lid open? The lid must be closed during operation.
Washer will not agitate or spin with the lid open.
■ Is there excessive sudsing? Always measure detergent.
Follow manufacturer’s directions. If you have very soft water,
you might need to use less detergent.
Washer continues to fill or drain, cycle seems stuck
■ Is the top of drain hose lower than the water level in
washer? The top of the hose must be higher than the water
level in the washer for proper operation. See the Installation
Instructions.
■ Does the drain hose fit too tightly in the standpipe, or is it
taped to the standpipe? The drain hose should be loose yet
fit securely. Do not seal the drain hose with tape. The hose
needs an air gap. See the Installation Instructions.
5
Page 7
Wash/Rinse temperature not what I selected
Load is wrinkled
■ Are the hot and cold water inlet hoses reversed? See the
Installation Instructions for more information. As your
frequency of loads washed increases, the water temperature
may decrease for hot and warm temperatures. This is normal.
■ Did you select a Warm/Warm temperature setting? On
models without ACCUWASH automatic temperature control
that do have a Warm/Warm temperature selection, the warm
wash will be followed by an energy saving cold rinse followed
by warm spray rinses. This saves energy while providing the
same rinse performance.
Washer Results
Load too wet
■ Did you use the right cycle for the load being washed?
Select a cycle with a higher spin speed (if available).
■ Did you use a cold rinse? Cold rinses leave loads wetter than
warm rinses. This is normal.
Residue or lint on load
■ Did you sort properly? Sort lint givers (towels, chenille) from
lint takers (corduroy, synthetics). Also sort by color.
■ Did you overload the washer? The wash load must be
balanced and not overloaded. Clothes should move freely.
Lint can be trapped in the load if overloaded. Wash smaller
loads.
■ Did you select the correct water level? The water level
should be correct for the load size. Clothes should move freely
in the water.
■ Did you use enough detergent? Follow manufacturer’s
directions. Use enough detergent to hold the lint in the water.
■ Did you line dry your clothing? If so, you can expect some
lint on the clothing.
■ Check the following:
Was paper or tissue left in the pockets?
Is your water colder than 21°C? Wash water colder than
21°C may not completely dissolve the detergent.
Did you use the proper cycle time for the load? Reducing
wash time (duration) is another way to reduce lint.
Stains on load
■ Did you follow the manufacturer’s directions when adding
detergent and fabric softener? Measure detergent and
fabric softener. Use enough detergent to remove soil and hold
it in suspension. Dilute fabric softener and add to the rinse
portion of a cycle only. Do not drip fabric softener on clothes.
■ Is there above average iron (rust) in water? You may nee d
to install an iron filter.
■ Did you properly sort the load? Sort dark clothes from
whites and lights.
■ Did you unload the washer promptly? To avoid dye transfer,
unload the washer as soon as it stops.
■ Did you unload the washer promptly? Unload the washer as
soon as it stops.
■ Did you use the right cycle for the load being washed?
Use the cycle for Casual or Permanent Press clothes or
another cycle with low spin speeds (if available) to reduce
wrinkling.
■ Did you overload the washer? The wash load must be
balanced and not overloaded. Loads should move freely
during washing.
To reduce wrinkling of permanent press clothes and some
synthetic knits, use a large load size to provide more space.
■ Was the wash water warm enough to relax wrinkles, or are
you using warm rinses? If safe for the load, use warm or hot
wash water. Use cold rinse water.
■ Are the hot and cold water hoses reversed? Check to be
sure the hot and cold water hoses are connected to the right
faucets. See the Installation Instructions.
Load is tangled or twisted
■ Did you overload the washer? The wash load must be
balanced and not overloaded. Loads should move freely
during washing.
■ Did you wrap items around the agitator? Drop items loosely
into the washer. Do not wrap items around the agitator.
Gray whites, dingy colors
■ Did you properly sort the load? Dye transfer can occur when
mixing whites and colors in a load. Sort dark clothes from
whites and lights.
■ Was the wash temperature too low? Use hot or warm
washes if safe for the load. Make sure your hot water system
is adequate to provide a hot water wash.
■ Did you use enough detergent, or do you have hard
water? Use more detergent for washing heavy soils in cold or
hard water.
■ Are the hot and cold water hoses reversed? Check to be
sure the hot and cold water hoses are connected to the right
faucets. See the Installation Instructions.
Garments damaged
■ Check the following:
Were sharp items removed from pockets before washing?
Empty pockets, zip zippers, snap or hook fasteners before
washing.
Were strings and sashes tied to prevent tangling?
Were items damaged before washing? Mend rips and broken
threads in seams before washing.
■ Did you overload the washer? The wash load must be
balanced and not overloaded. Loads should move freely
during washing.
■ Did you add chlorine bleach properly? Do not pour chlorine
bleach directly onto load. Wipe up bleach spills. Undiluted
bleach will damage fabrics. Do not place load items on top of
the bleach dispenser when loading and unloading the washer
(on some models).
■ Did you follow the manufacturer’s care label instructions?
6
Page 8
Notes
7
Page 9
WHIRLPOOL®WASHER WARRANTY
TWO-YEAR FULL WARRANTY
For two years from the date of purchase, when this washer is used in domestic or single-family applications, and operated and
maintained according to instructions attached to or furnished with the product, Whirlpool (Australia) Pty Limited will pay for replacement
parts and repair labour costs to correct defects in materials or workmanship. Service must be provided by Whirlpool (Australia) Pty
Limited or its appointed Service Claimants.
NINETY-DAY FULL WARRANTY
For ninety days from the date of purchase, when this washer is used in commercial, multifamily or personal applications, and operated
and maintained according to instructions attached to or furnished with the product, Whirlpool (Australia) Pty Limited will pay for
replacement parts and repair labour costs to correct defects in materials or workmanship. Service must be provided by Whirlpool
(Australia) Pty Limited or its appointed Service Claimants.
THIRD THROUGH FIFTH YEAR LIMITED WARRANTY - ON TOP, LID AND GEARCASE ASSEMBLY
For the third through fifth year from the date of purchase, when this washer is operated and maintained according to instructions
attached to or furnished with the product, Whirlpool (Australia) Pty Limited will pay for replacement parts for any top and lid rust, and
any part of the gearcase assembly, if defective in materials or workmanship.
THIRD THROUGH TENTH YEAR LIMITED WARRANTY - ON OUTER TUB
For the third through tenth year from the date of purchase, when this washer is operated and maintained according to instructions
attached to or furnished with the product, Whirlpool (Australia) Pty Limited will pay for replacement parts for the outer tub should it
crack or fail to contain water, if defective in materials or workmanship.
Whirlpool (Australia) Pty Limited will not pay for:
1. Service calls to correct the installation of your washer, to instruct you how to use your washer, or to replace house fuses or correct
house wiring or plumbing.
2. Damage resulting from accident, alteration, misuse, abuse, fire, flood, acts of God, improper installation, installation not in
accordance with local electrical and plumbing codes, or use of products not approved by Whirlpool (Australia) Pty Limited.
3. Repairs which result from parts not having been fitted by an authorized Whirlpool person or entity, or from the use of the appliance
in a manner other than the use for which it was specifically designed.
4. Replacement parts or repair labour costs for units operated outside Australia or New Zealand.
5. Repairs to parts or systems resulting from unauthorized modifications made to the appliance.
6. Costs associated with service calls, freight or transport of goods requiring service from areas outside of those which are serviced by
Whirlpool (Australia) Pty Limited or its appointed Service Claimants.
WHIRLPOOL (AUSTRALIA) PTY LIMITED SHALL NOT BE LIABLE FOR INCIDENTAL OR CONSEQUENTIAL DAMAGES.
The benefits conferred by this express warranty are additional to all other conditions, warranties, guaranties, rights and remedies
expressed or implied by the Trade Practices Act, the New Zealand Sale of Goods Act and similar State or Territory laws and all other
obligations and liabilities on the part of the manufacturer or supplier and nothing contained herein shall restrict or modify such rights,
remedies, obligations or liabilities.
If you need service, first see “Troubleshooting.” Additional help can be found by checking “Assistance or Service,” or calling our
Customer Interaction Centre at 1-300-363-344 (Australia) or 0-800-442-584 (New Zealand). 5/00
Replacement parts
If you need to order replacement parts, we recommend that you
only use factory specified parts. These parts will fit right and work
right because they are made with the same precision used to
build every new WHIRLPOOL
To locate factory specified parts in your area:
Call the Customer Interaction Center at 1-300-363-344 (Australia)
or 0-800-442-584 (New Zealand), or your nearest designated
service center.
8539788
© 2003 Whirlpool Corporation.
All rights reserved. ® Registered Trademark/TM Trademark of Whirlpool, U.S.A.
®
appliance.
For information on how to contact Whirlpool Corporation, please
see front page of this document.
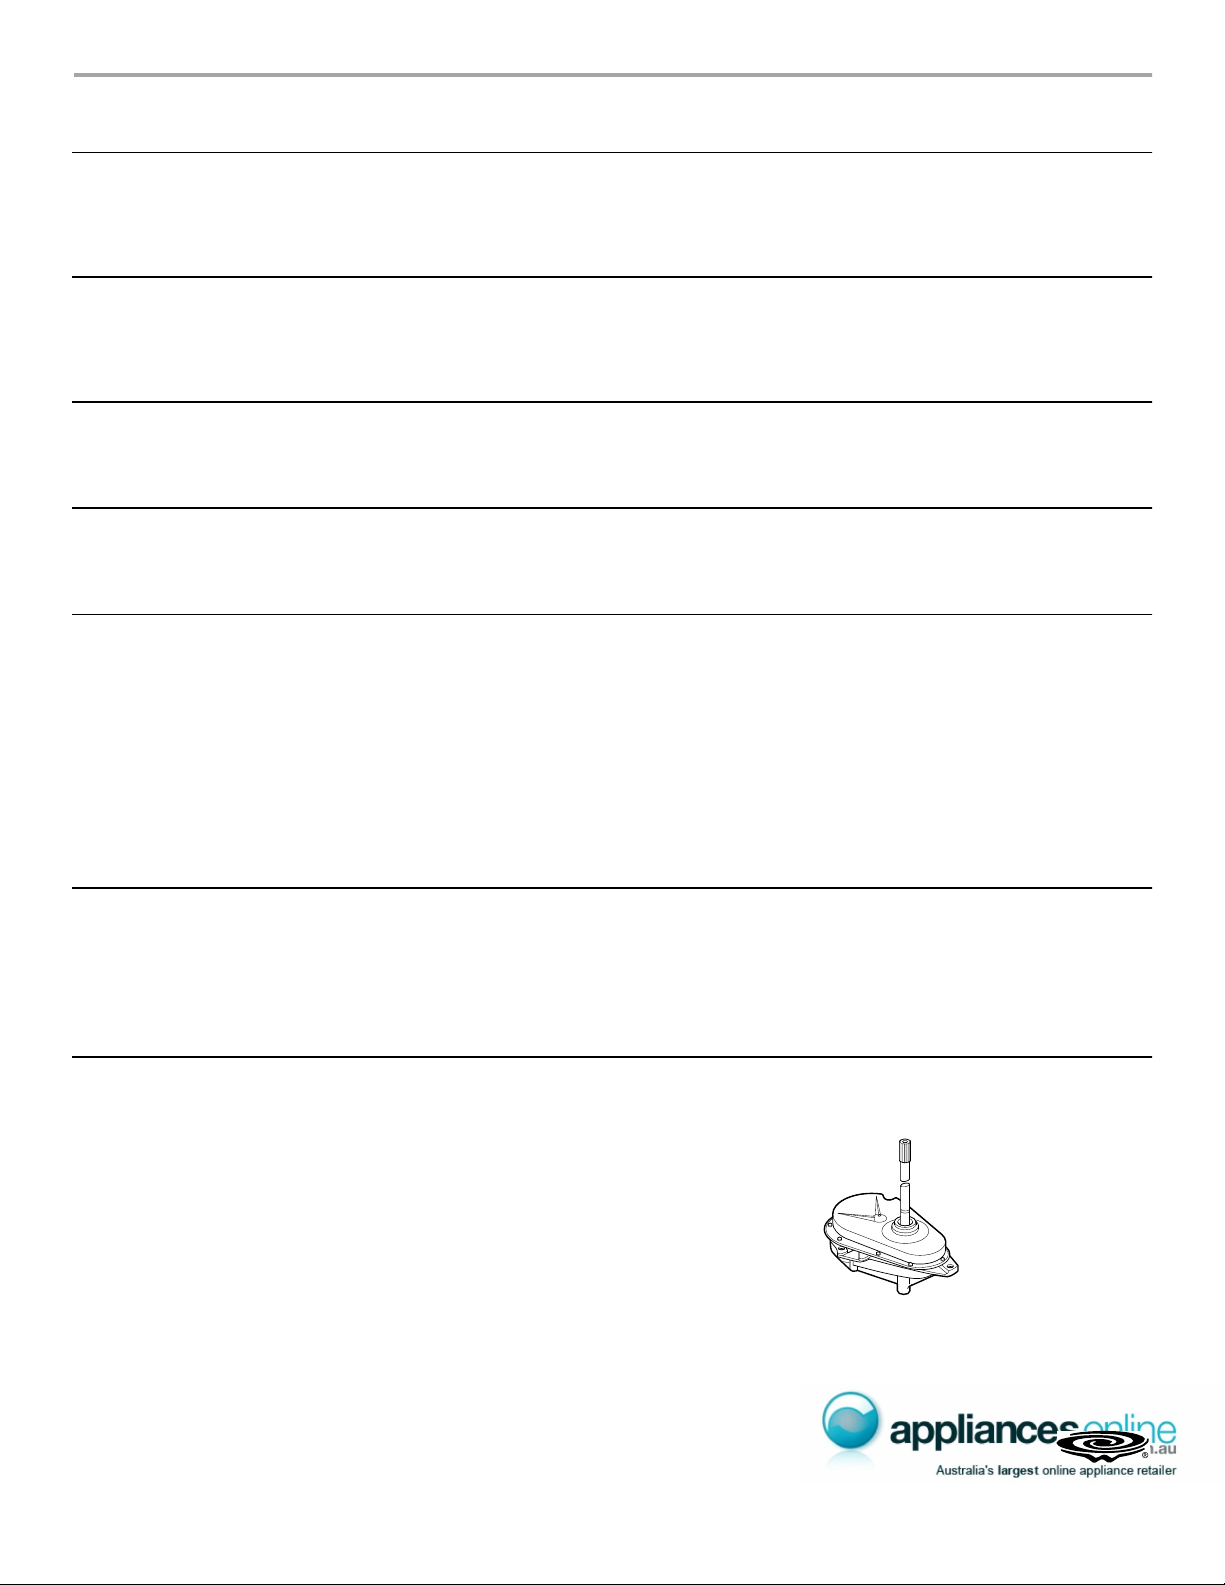
Gearcase assembly covered by your warranty
Printed in U.S.A.
12/03
Page 10
WASHER INSTALLATION INSTRUCTIONS
Table of Contents
WASHER SAFETY............................................ 1
INSTALLATION REQUIREMENTS ................. 1
Table of Contents.......................................... 1
Tools and Parts ............................................. 1
Location Requirements................................. 2
Drain System................................................. 3
Electrical Requirements ................................ 3
INSTALLATION INSTRUCTIONS ................... 4
Before You Start............................................ 4
Remove Shipping Strap................................ 4
Connect Drain Hose...................................... 4
Connect the Inlet Hoses ............................... 5
Secure the Drain Hose .................................. 6
Level the Washer........................................... 6
Complete Installation .................................... 6
WASHER SAFETY
Your safety and the safety of others are very important.
We have provided many important safety messages in this manual and on your appliance. Always read and obey all safety
messages.
This is the safety alert symbol.
This symbol alerts you to potential hazards that can kill or hurt you and others.
All safety messages will follow the safety alert symbol and either the word “DANGER” or “WARNING.”
These words mean:
You can be killed or seriously injured if you don't immediately
DANGER
WARNING
All safety messages will tell you what the potential hazard is, tell you how to reduce the chance of injury, and tell you what can
happen if the instructions are not followed.
follow instructions.
can be killed or seriously injured if you don't
You
instructions.
INSTALLATION REQUIREMENTS
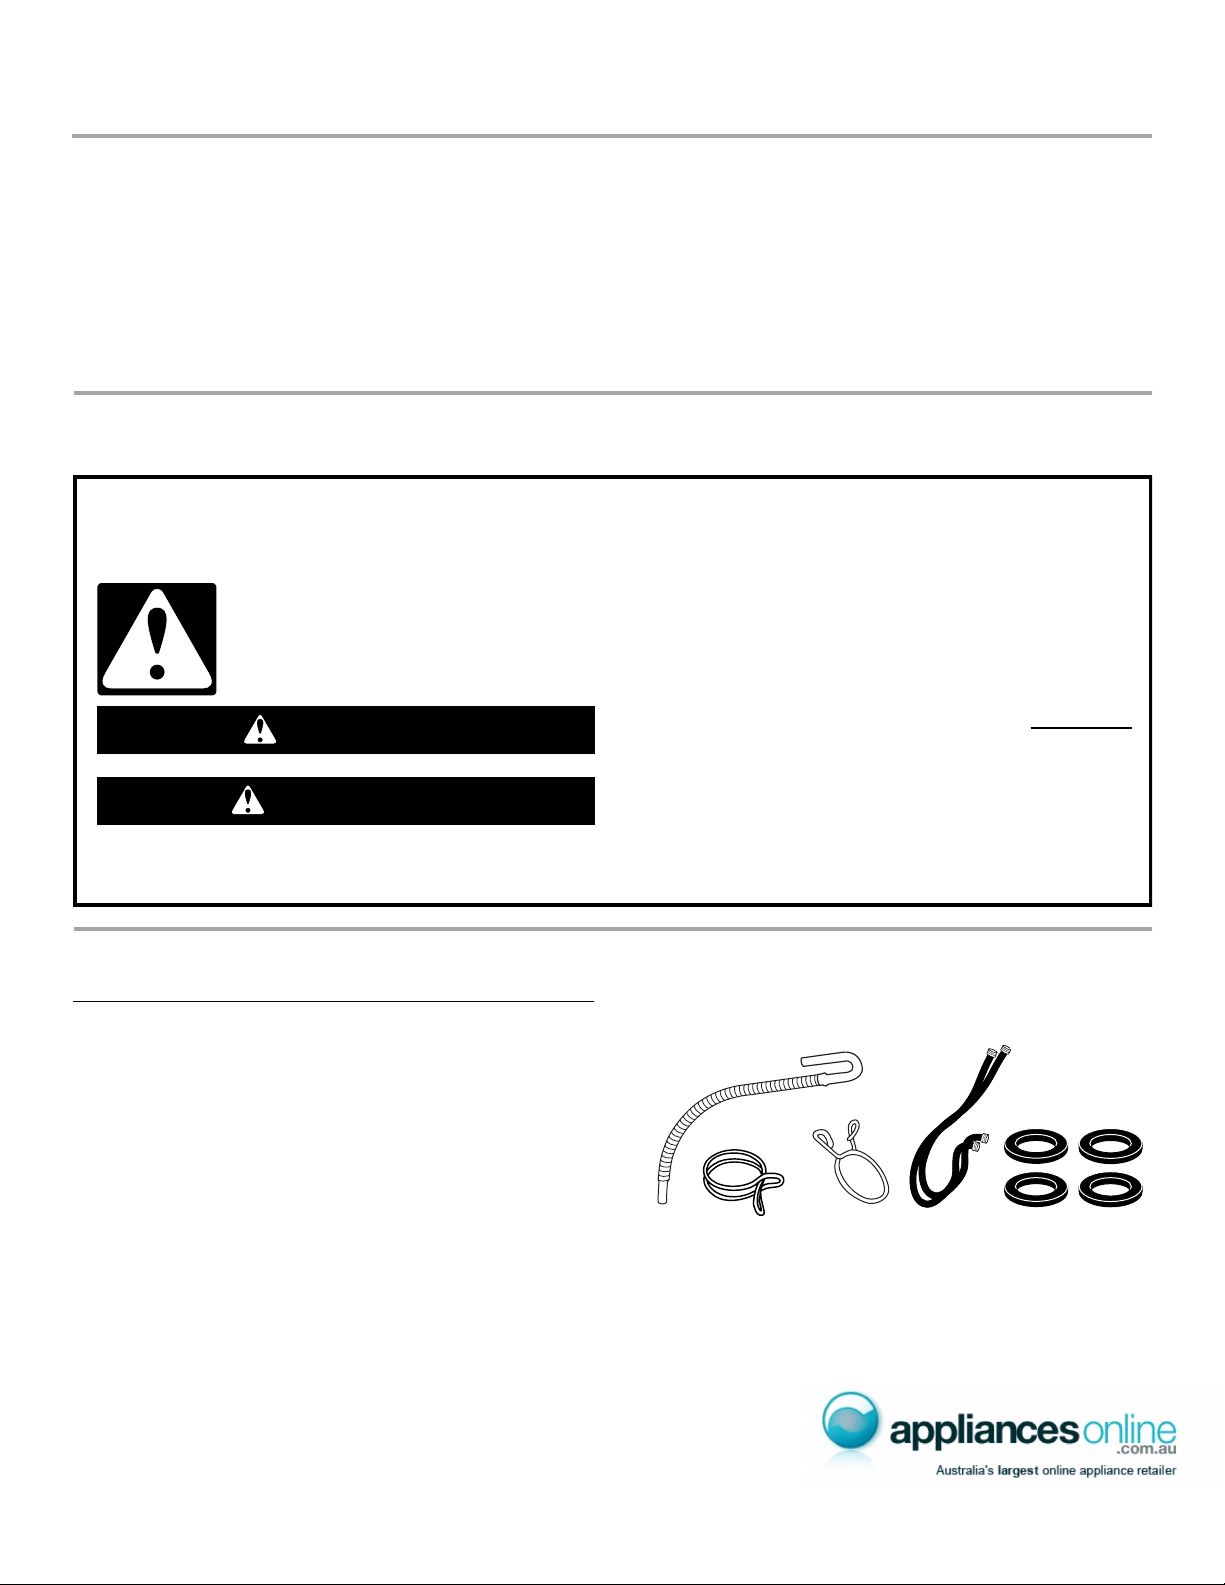
Parts supplied:
Tools and Parts
Assemble the necessary tools and supplies before beginning the
washer installation. The parts supplied are in the washer basket.
Tools needed for connecting the drain hose and
water inlet hoses:
■ Pliers that open to 3.95 cm
■ Flashlight (optional)
■ Utility knife or scissors
AB CD E
A. Drain hose
B. Silver, double-wire hose clamp
(for the bottom of the drain hose)
C. Yellow, single-wire hose clamp
(for the top of the drain hose)
D. Water inlet hoses (2)
E. Flat water inlet hose washers (4)
follow
8539795
Page 11
Tools needed for securing the drain hose and
leveling the washer:
■ Adjustable or open end wrench 14 mm
■ Level
■ Wood block
■ Ruler or measuring tape
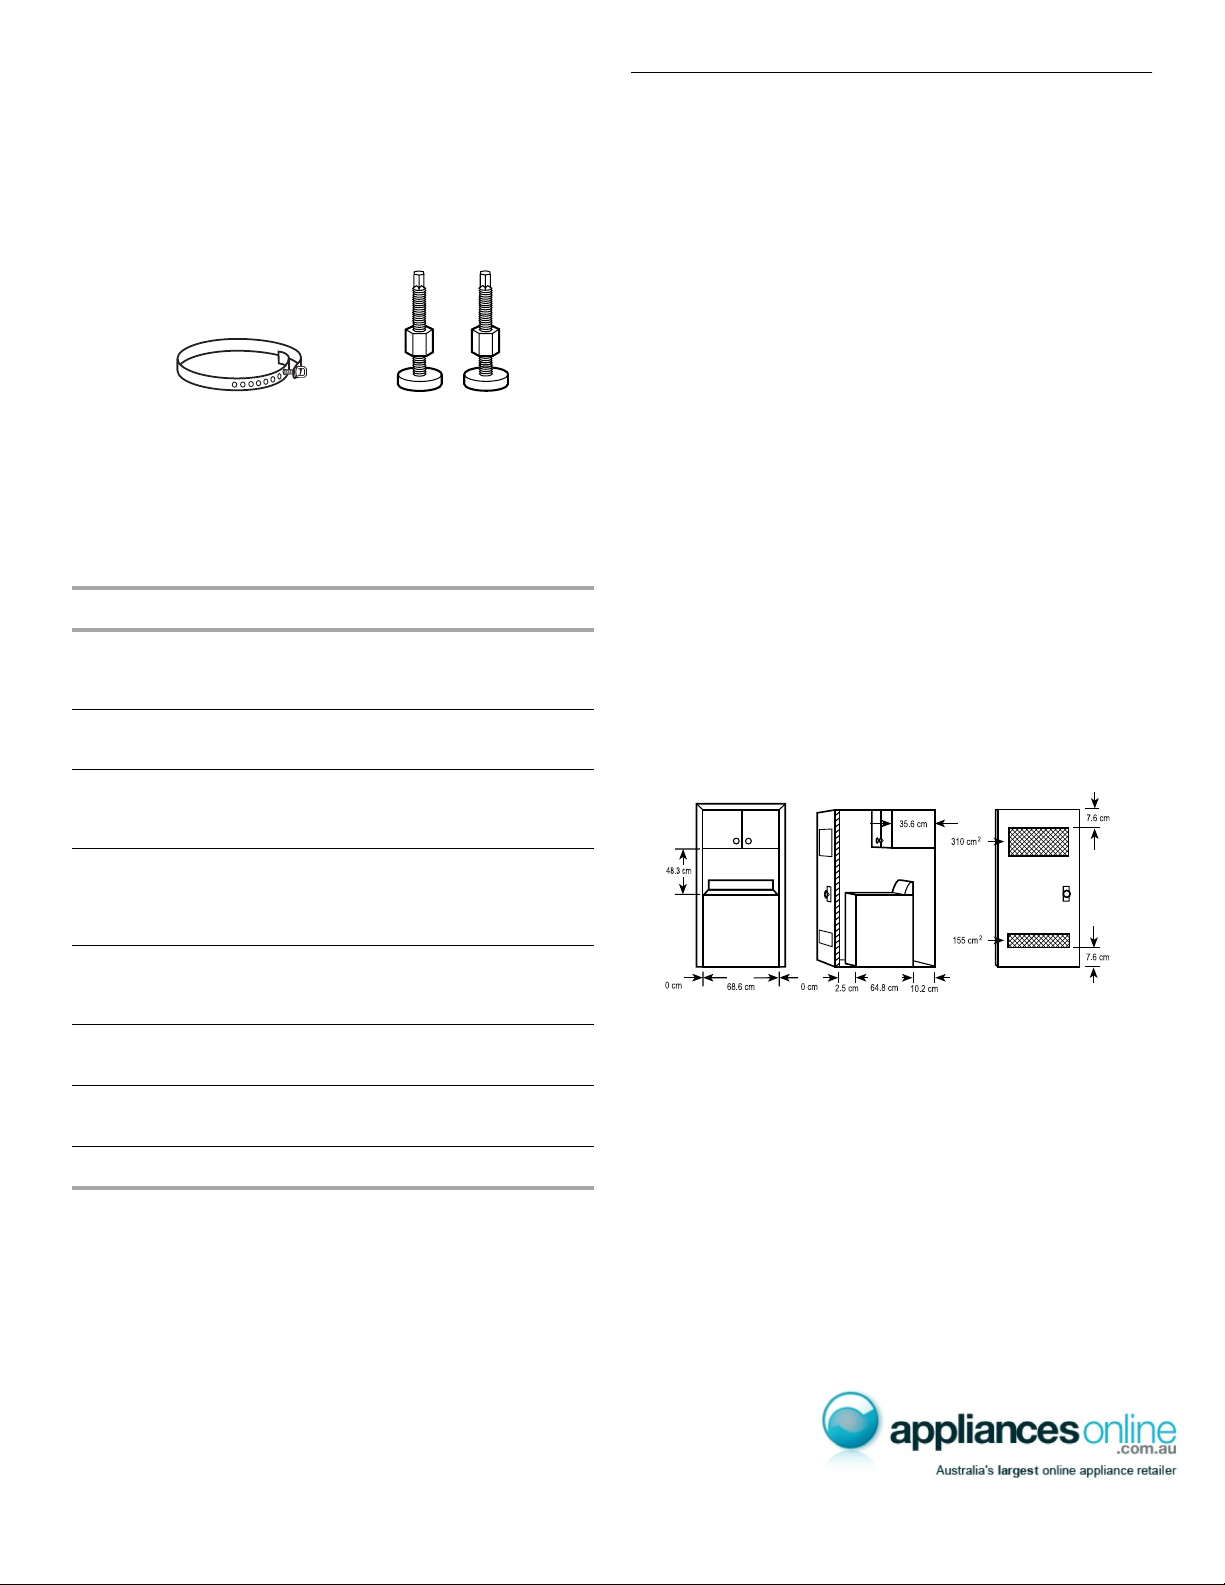
Parts supplied:
AB
A. Shipping strap with fastener
B. Front leveling feet with nuts (2)
Alternate Parts
Your installation may require additional parts. For ordering
information, please refer to the toll free phone numbers on the
front page of your “Washer User Instructions.”
If You Have: You Will Need to Buy:
Laundry tub or
standpipe taller
than 2.4 m
2.5 cm diameter
standpipe
Overhead sewer Standard 76 L, 99 cm tall drain tub or
Sump pump system (if not already
available)
5 cm diameter to 2.5 cm diameter
standpipe adapter, Part No. 3363920
utility sink, sump pump and connectors
(available from local plumbing suppliers)
Location Requirements
Selecting the proper location for your washer improves
performance and minimizes noise and possible washer “walk.”
Your washer can be installed in a basement, laundry room, closet,
or recessed area. (See “Drain System.”)
IMPORTANT: Do not install or store the washer where it will be
exposed to the weather.
Proper installation is your responsibility.
You will need:
■ A water heater set to deliver 49°C water to the washer.
■ An earthed electrical outlet located within 1.2 m of where the
power cord is attached to the back of the washer. (See
“Electrical Requirements.”)
■ Hot and cold water faucets located within 1.2 m of the hot and
cold water fill valves, and water pressure of
34.5-690 kPa.
■ A level floor with a maximum slope of 2.5 cm under entire
washer. Installing the washer on carpeting is not
recommended.
■ A sturdy floor to support the washer weight (washer, water
and load) of 143 kgs.
Do not store or operate your washer in temperatures at or
below 0°C. Some water can remain in the washer and can cause
damage in low temperatures. See “Washer Care" in the Washer
User Instructions for winterizing information.
Recessed area or closet installation
The dimensions shown are for the recommended spacing
allowed, except the closet door ventilation openings. The
dimensions shown for the closet door ventilation openings are the
minimum required.
Floor drain Siphon break, Part Number 285320;
additional drain hose, Part
Number 3357090 and connector kit,
Part Number 285442
Water faucets
beyond reach of fill
hoses
Drain hose too
short
Drain hose that is
2 longer water fill hoses:
1.8 m Part Number 76314,
3.0 m Part Number 350008
Drain hose, Part No. 388423 and hose
kit, Part No. 285442
Hose kit, Part No. 285442
too long
Lint clogged drain Drain protector, Part No. 367031
AB C
A. Front view
B. Side view
C. Closet door with vents
■ Additional spacing should be considered for ease of
installation and servicing.
■ Additional clearances may be required for wall, door and floor
moldings.
■ Additional spacing of 2.5 cm on all sides of the washer is
recommended to reduce noise transfer.
■ If a closet door is installed, the minimum air openings in the
top and bottom of the door are required. Louvered doors with
air openings in the top and bottom are acceptable.
■ Companion appliance spacing should also be considered.
2
Page 12
Drain System
The washer can be installed using the standpipe drain system
(floor or wall), the laundry tub drain system, or the floor drain
system. Select the drain hose installation method you need. See
“Tools and Parts.”
Standpipe drain system - wall or floor (views A & B)
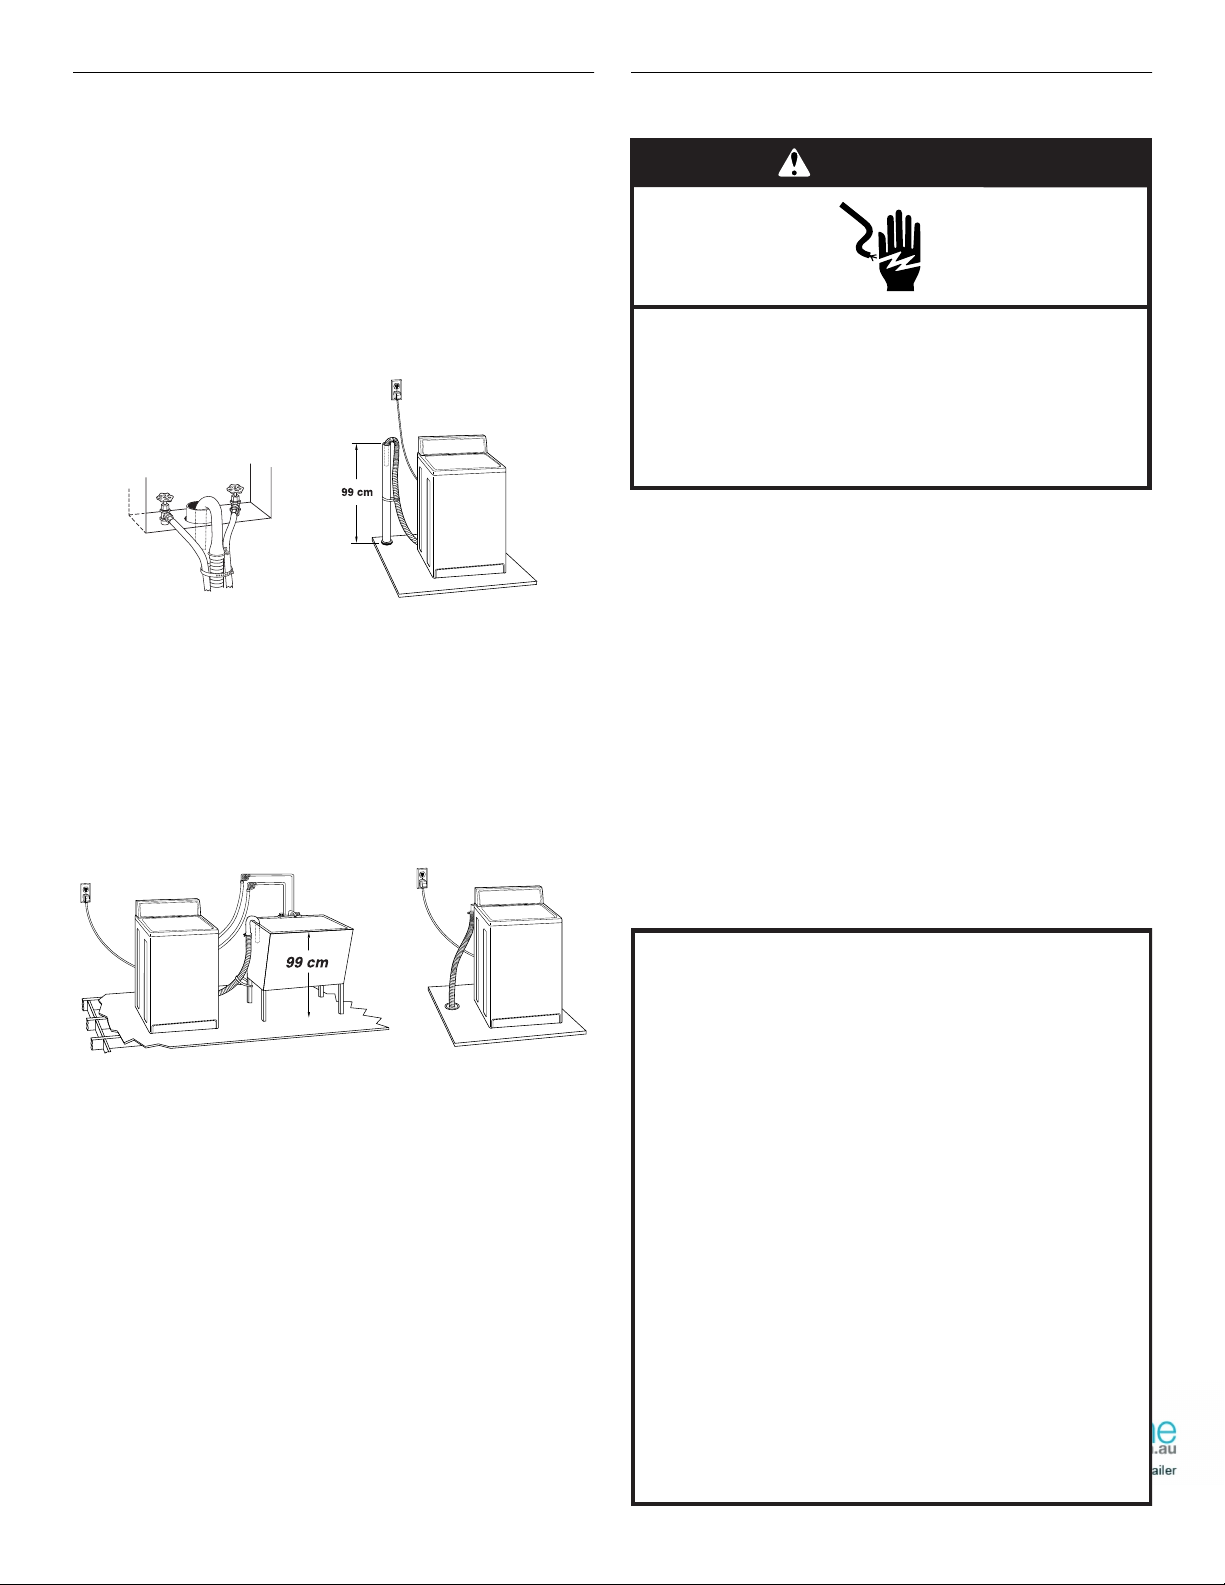
The standpipe drain requires a minimum diameter standpipe of
5 cm. The minimum carry-away capacity can be no less than 64 L
per minute. A 5 cm diameter to 2.5 cm diameter standpipe
adapter kit is available. See “Tools and Parts.”
The top of the standpipe must be at least 99 cm high and no
higher than 244 cm from the bottom of the washer.
AB
Laundry tub drain system (view A)
The laundry tub needs a minimum 76 L capacity. The top of the
laundry tub must be at least 99 cm above the floor and no higher
than 244 cm from the bottom of the washer.
Floor drain system (view B)
The floor drain system requires a siphon break that may be
purchased separately. See “Tools and Parts.”
The siphon break must be a minimum of 71 cm from the bottom
of the washer. Additional hoses might be needed.
Electrical Requirements
WARNING
Electrical Shock Hazard
Electrically earth this appliance.
Do not use an extension cord or an electrical portable
outlet device.
Failure to follow these instructions can result in death,
fire, or electrical shock.
■ A 240-volt, 50-Hz., AC-only, 8 - 10-ampere, fused electrical
supply is required. Time-delay fuse or circuit breaker is
recommended. It is recommended that a separate circuit
serving only this appliance be provided.
■ This washer is equipped with a power supply cord having an
earthing plug.
■ To minimize possible shock hazard, the cord must be plugged
into a mating, earthing-type outlet, earthed in accordance with
local codes and ordinances. If a mating outlet is not available,
it is the personal responsibility and obligation of the customer
to have the properly earthed outlet installed by a qualified
electrician.
■ If codes permit and a separate earth wire is used, it is
recommended that a qualified electrician determine that the
earth path is adequate.
■ Do not earth to a gas pipe.
■ Check with a qualified electrician if you are not sure the
washer is properly earthed.
■ Do not have a fuse in the neutral or earth circuit.
EARTHING INSTRUCTIONS
For an earthed, cord-connected washer:
This washer must be earthed. In the event of a malfunction
or breakdown, earthing will reduce the risk of electrical
AB
shock by providing a path of least resistance for electric
current. This washer is equipped with a cord having an
equipment-earthing conductor and an earthing plug. The
plug must be plugged into an appropriate outlet that is
properly installed and earthed in accordance with all local
codes and ordinances.
WARNING:
earthing conductor can result in a risk of electric shock.
Check with a qualified electrician or serviceman if you are in
doubt as to whether the appliance is properly earthed.
Do not modify the plug provided with the appliance – if it will
not fit the outlet, have a proper outlet installed by a qualified
electrician.
For a permanently connected washer:
This washer must be connected to an earthed metal,
permanent wiring system, or an equipment earthing
conductor must be run with the circuit conductors and
connected to the equipment-earthing terminal or lead on the
appliance.
Improper connection of the equipment-
3
Page 13
INSTALLATION INSTRUCTIONS
m
Before You Start
WARNING
Excessive Weight Hazard
Use two or more people to move and install washer.
Failure to do so can result in back or other injury.
■ To prevent floor damage, set the washer onto cardboard
before moving across floor.
■ Move the washer to within approximately 90 cm of the final
location.
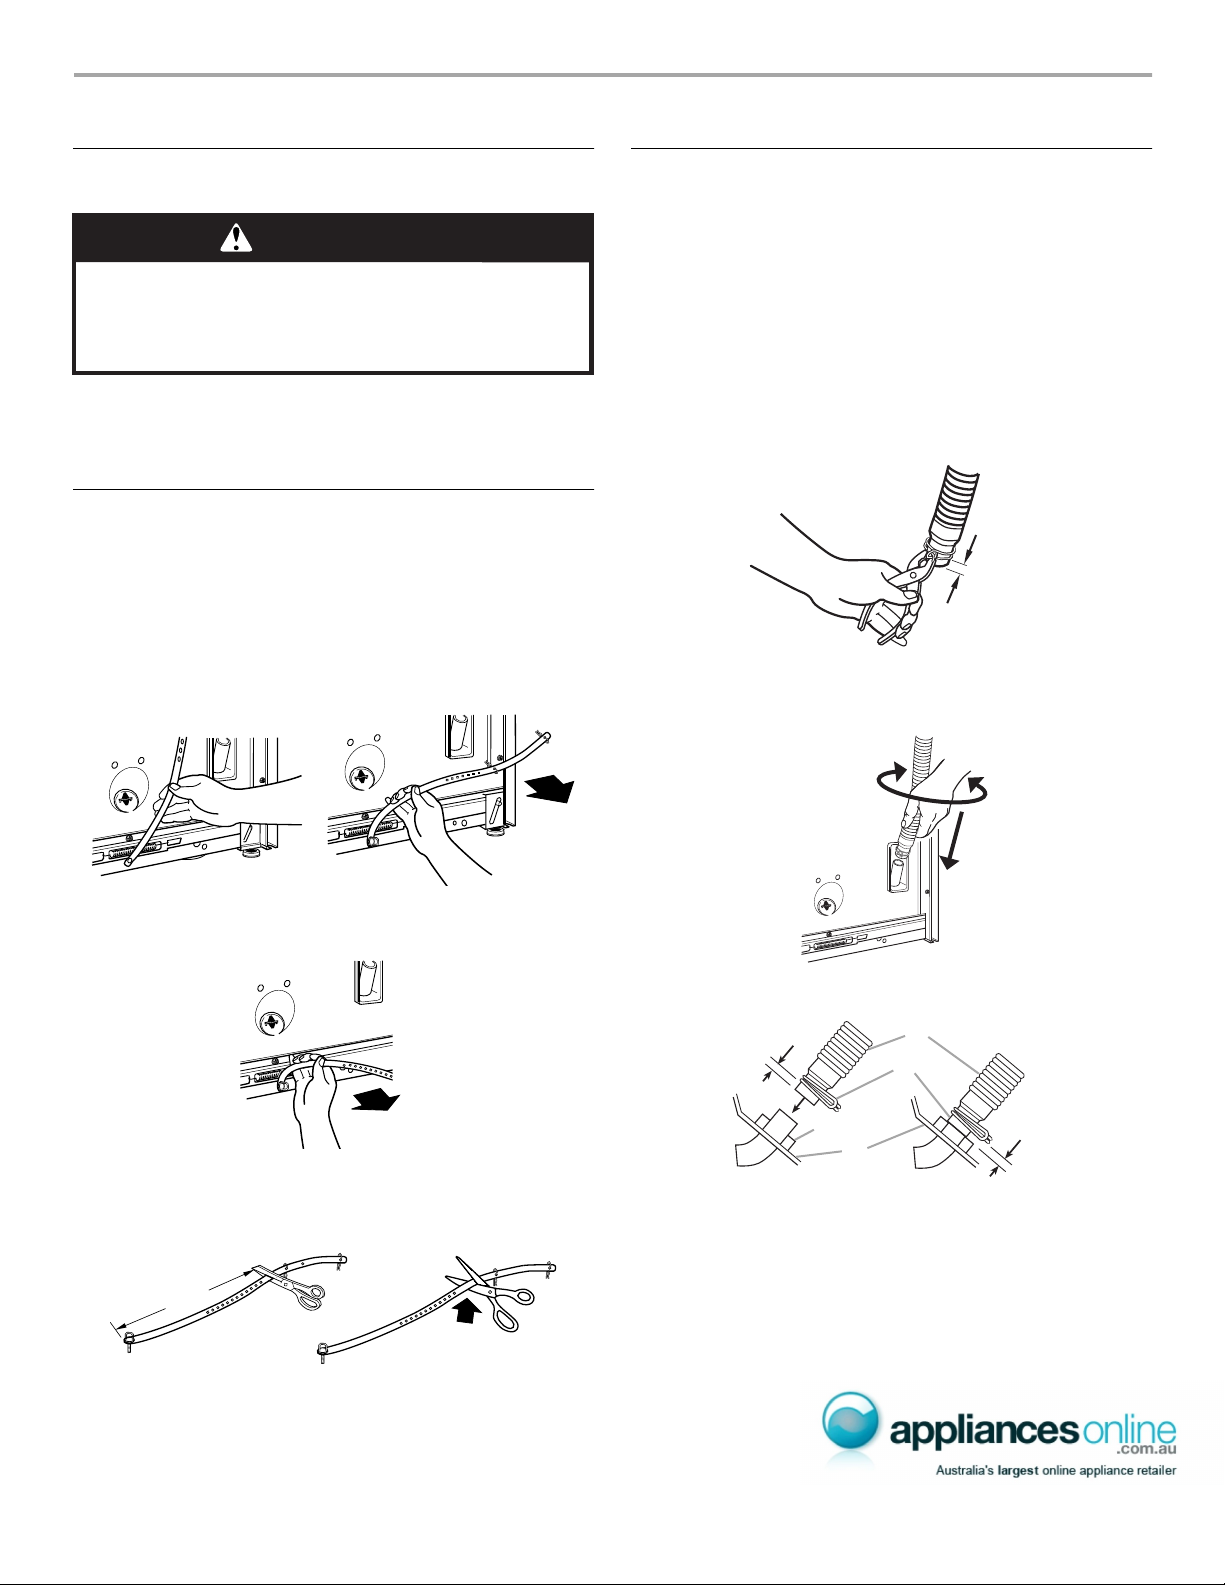
Remove Shipping Strap
Removing the shipping strap is necessary for smooth operation. If
the shipping strap is not removed, the washer will make excessive
noise. The washer must be in the upright position before removing
the shipping strap.
1. Do not cut yellow strap. Pull yellow strap firmly, until
completely removed from washer. There will be two cotter
pins on the end of the shipping strap when it is pulled out of
the washer.
Connect Drain Hose
Proper connection of the drain hose will protect your floors from
damage due to water leakage. To prevent the drain hose from
coming off or leaking, it must be installed per the following
instructions.
IMPORTANT: To ensure proper installation, this procedure must
be followed exactly.
1. Check the drain hose to see that it is the proper length.
2. Wet the inside of the straight end of the drain hose with tap
water. DO NOT USE ANY OTHER LUBRICANT.
3. Squeeze ears of silver, double-wire clamp with pliers to open.
Place clamp over the straight end of the drain hose 6 mm from
the end.
6 m
4. Open clamp. Twist hose back and forth while pushing down
onto drain connector at the bottom of the washer. Continue
until hose contacts the ribbed stop on the cabinet.
2. Pull firmly to remove the end of the shipping strap that
remains pinned to the back of the washer. This will release the
rear self-leveling feet.
3. Cut the shipping strap about 40 cm from plug end. Look for
the words “CUT HERE.” Discard end with the cotter pins. You
will use the remainder of the shipping strap later to secure the
drain hose.
E
R
E
H
T
U
40 cm
C
5. Place clamp over area marked “CLAMP.” Release clamp.
6 mm
A
B
C
6 mm
D
A. Drain Hose
B. Clamp
C. Ribbed stop
D. Cabinet
4
Page 14
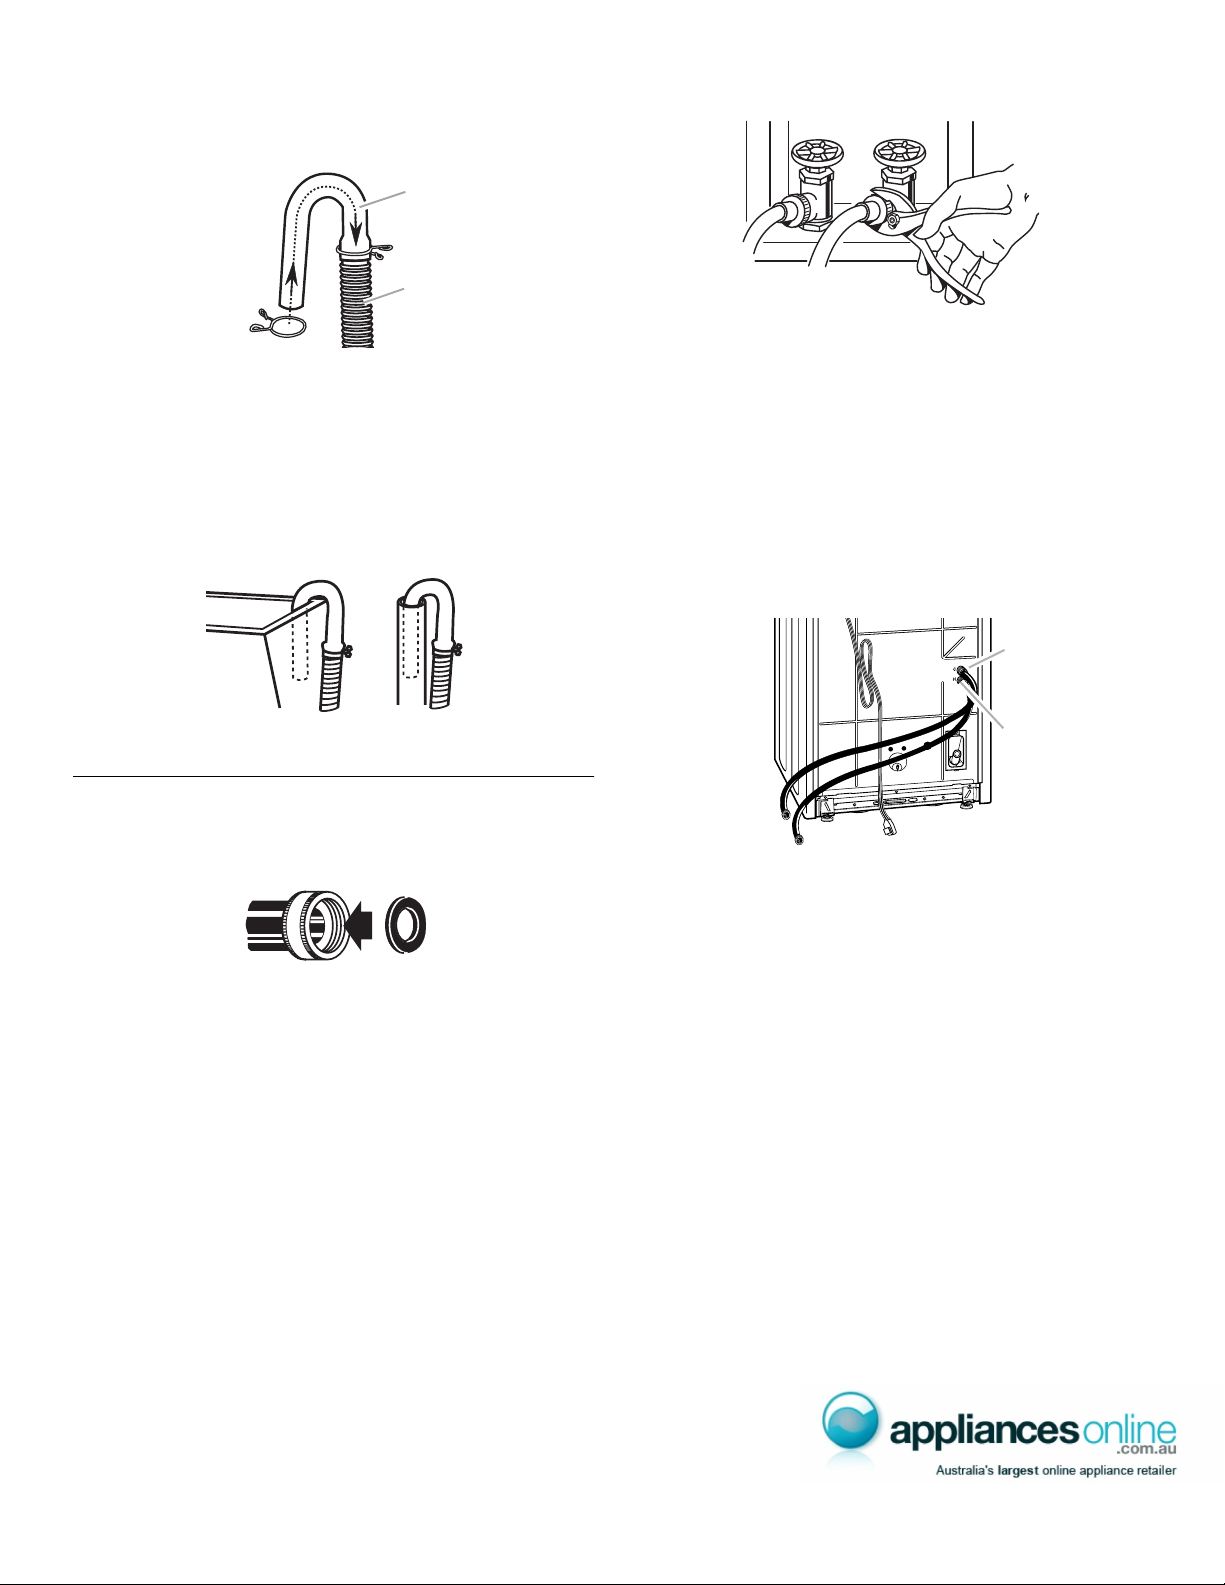
For standpipe or laundry tub drain systems:
B
B
1. Open yellow, single-wire clamp with pliers and slide over
hooked end of drain hose to secure the rubber and corrugated
sections together.
A
4. Using pliers, tighten the couplings with an additional
two-thirds turn.
NOTE: Do not overtighten. Damage to the valves can result.
A. Hooked end
B. Drain hose
2. Put hooked end of drain hose into laundry tub or standpipe.
Rotate hook to eliminate kinks.
To prevent drain water from going back into the washer:
■ Do not straighten hooked end of drain hose. Do not force
excess drain hose into standpipe. Hose should be secure,
but loose enough to provide a gap of air.
■ Do not lay excess drain hose in bottom of laundry tub.
■ For floor drain installation, see kit number required under
“Tools and Parts.”
Connect the Inlet Hoses
1. Insert new flat washers (supplied) into each end of the inlet
hoses. Firmly seat the washers in the couplings.
AB
A. Coupling
B. Washer
Connect the inlet hoses to the water faucets
Make sure the washer basket is empty.
2. Attach a hose to the hot water faucet. Screw on coupling by
hand until seated on the washer.
3. Attach a hose to the cold water faucet. Screw on coupling by
hand until seated on the washer.
Clear the water lines
5. Run water through both faucets and inlet hoses, into a bucket
or laundry tub, to get rid of particles in the water lines that
might clog the inlet valve screens.
Connect the inlet hoses to the washer
6. Attach the hose that is connected to the hot water faucet to
the HOT (bottom) inlet valve. Attaching the hot water hose first
makes it easier to tighten connection with pliers. Screw on
coupling by hand until seated on the washer. Using pliers,
tighten the couplings with an additional two-thirds turn.
NOTE: Do not overtighten. Damage to the valves can result.
A
A. Cold water inlet valve
B. Hot water inlet valve
NOTE: The inlet valve may be on the right or the left side of
the washer, depending on your model.
7. Attach the hose that is connected to the COLD water (top)
inlet valve. Screw on coupling by hand until seated on the
washer. Using pliers, tighten the couplings with an additional
two-thirds turn.
NOTE: Do not overtighten. Damage to the valves can result.
Check for leaks
8. Turn on the water faucets and check for leaks. A small amount
of water might enter the washer. You will drain this later.
NOTE: Replace inlet hoses after 5 years of use to reduce the
risk of hose failure. Record hose installation or replacement
dates for future reference.
■ If you connect only one water hose, you must cap off the
remaining water inlet port.
■ Periodically inspect and replace hoses if bulges, kinks,
cuts, wear, or leaks are found.
5
Page 15
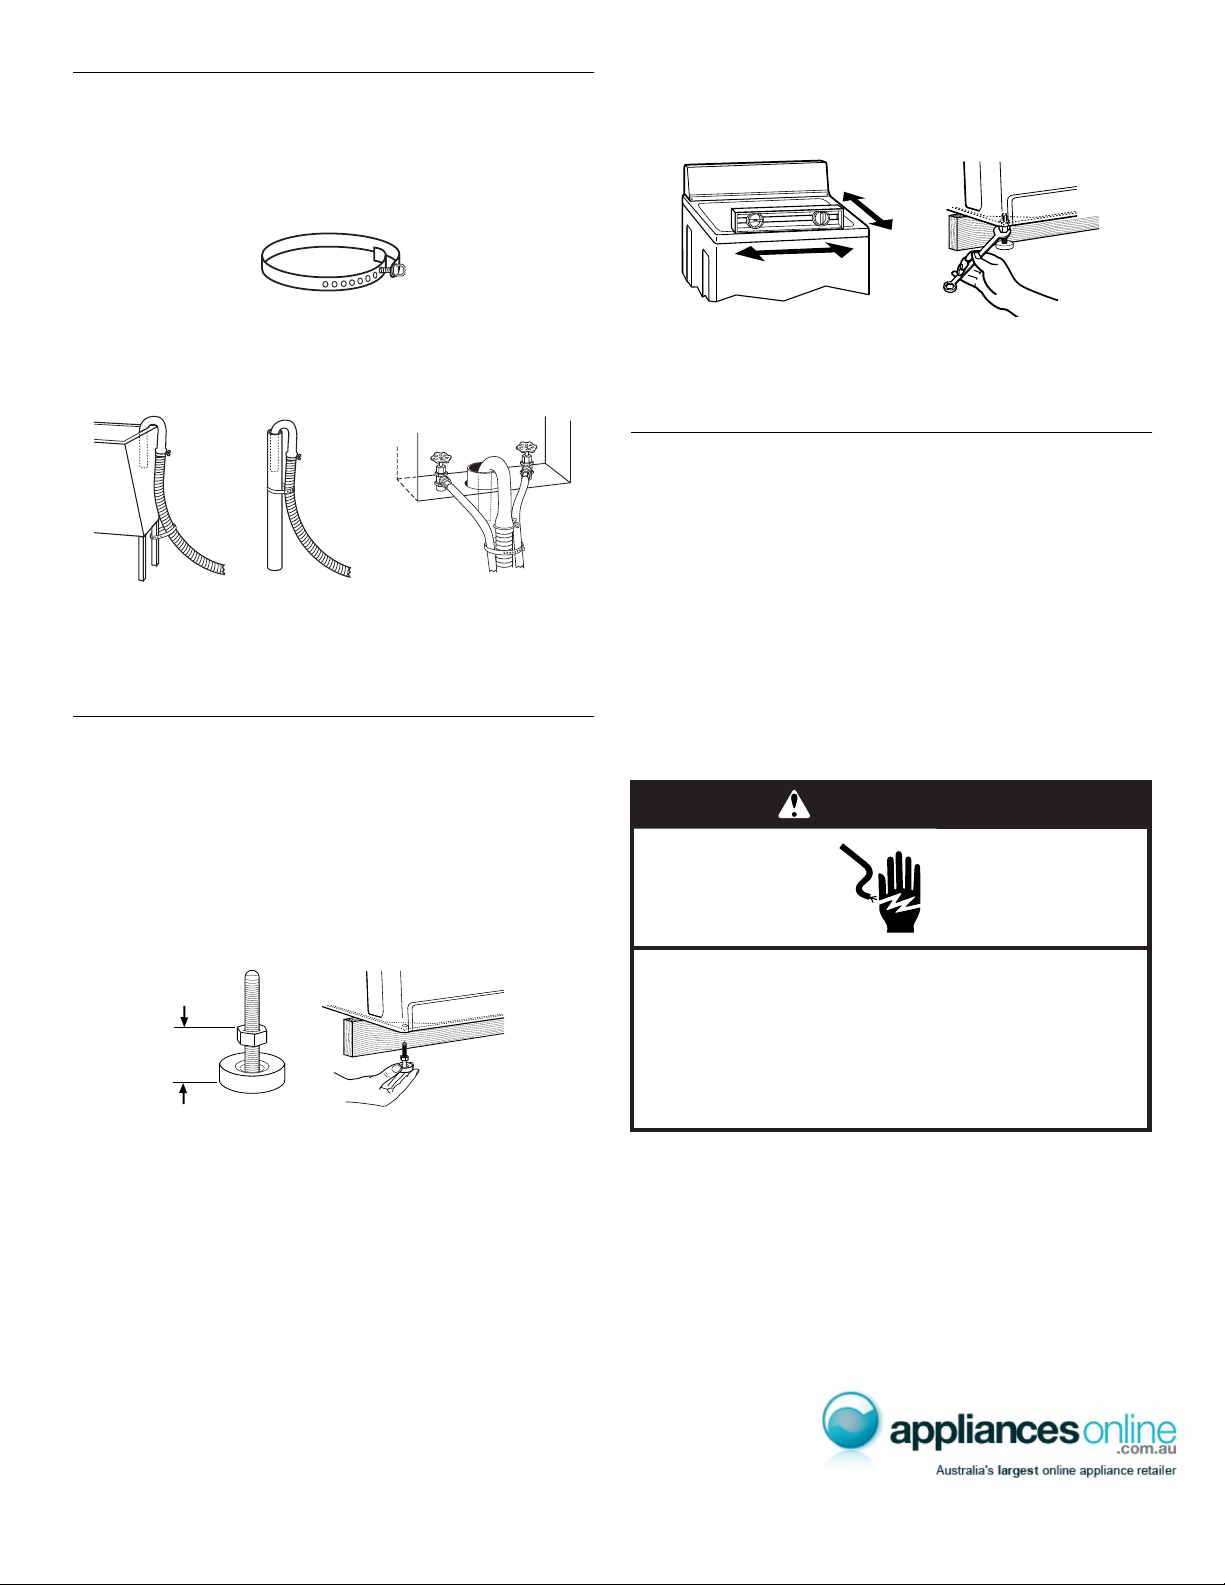
Secure the Drain Hose
1. Drape the power cord over the console.
2. Remove any cardboard used to move washer.
3. Locate the remaining portion of shipping strap (not the end
with the cotter pins) from Step 3 of “Remove Shipping Strap.”
8. If the washer is not level, move the washer out slightly, tip
back, prop up the front of the washer with the wood block and
adjust the feet up or down as necessary. Repeat Steps
5 through 8 until washer is level.
Remaining portion of shipping strap
4. Wrap the drain hose to the laundry tub leg or standpipe with
the tie strap. Push fastener into the nearest hole in the
shipping strap. (See illustration A or B.)
AB C
If the washer faucets and the drain standpipe are recessed,
put the hooked end of the drain hose in the standpipe. Tightly
wrap the tie strap around the water inlet hoses and the drain
hose. (See illustration C.)
Level the Washer
Properly leveling your washer prevents excessive noise and
vibration.
Install the front leveling feet
1. Prop up the front of the washer about 10.2 cm with a wood
block or similar object. The block needs to support the weight
of the washer.
2. Screw the lock nut onto each foot to within 2.5 cm of the
base.
2.5 cm
3. Screw the feet into the correct holes at the front corner of the
washer until the nuts touch the washer.
NOTE: Do not tighten the nuts until the washer is level.
4. Tilt the washer back and remove the wood block. Gently lower
the washer to the floor.
5. Slide to final location.
6. Tilt the washer forward until the rear of the washer is at least
10.2 cm off the floor. You may hear the self-adjusting rear feet
click into place. Lower the washer to the floor.
7. Check the levelness of the washer by placing a level on the
top edges of the washer, first side to side, then front to back.
9. After the washer is in the final location and level, use a 14 mm
open-end wrench to turn the nuts on the feet tightly against
the washer cabinet.
IMPORTANT: If the nuts are not tight against the washer
cabinet, the washer may vibrate.
Complete Installation
1. Check the electrical requirements. Be sure that you have the
correct electrical supply and the recommended earthing
method. (See “Electrical Requirements.”)
2. Check to be sure all parts are now installed. If there is an extra
part, go back through the steps to see which step was
skipped.
3. Check to be sure you have all of your tools.
4. Check to be sure that the yellow shipping strap was removed
from the back of the washer and used to secure the drain
hose.
5. Dispose of/recycle all packaging materials.
6. Check to be sure the water faucets are on.
7. Check for leaks around faucets and inlet hoses.
WARNING
Electrical Shock Hazard
Electrically earth this appliance.
Do not use an extension cord or an electrical portable
outlet device.
Failure to follow these instructions can result in death,
fire, or electrical shock.
8. Plug into an earthed outlet.
9. Remove the protective film on the console and any tape
remaining on the washer.
10. Read “Washer Use” in the Washer User Instructions.
11. To test your washer, measure ¹₂ of the normal recommended
amount of powdered or liquid detergent and pour it into the
washer basket or detergent dispenser (on some models).
Close the lid. Select any cycle, and then pull the cycle control
knob out to START the washer. Allow it to complete one whole
cycle.
8539795
© 2003 Whirlpool Corporation.
Benton Harbor, Michigan 49022
Printed in U.S.A.
12/03
Impreso en EE.UU.
Imprimé aux É.-U.
 Loading...