

use&care guide
1
I *
Whihmpool
1
u
1
i !
_____________________
i ^ - - 1
'e ez ers . Re lri ge ra lor -F re eze rs . Ice M ak ers D is hwa sh er s. Bu il l I n Ov ens a nd Su rf ac e U ni ls Ra ng es Mi cr ow ave O ve ns Tr as h C om pa cto rs R oom A ir Co nd it ion er s Deh um id ifi e
- JTT
NO-FROST
REFRIGERATOR
Model 3ED26MM
Please read this Use and Care Guide before you do anything else.
This booklet tells you how to start your retrlgerotor, clean It, move shelves and adjust con
trols. It even tells you what new sounds to expect
from your retrigerator.
Treat your new refrigerator with care. Use it
only to do what home refrigerators are de
signed to do.
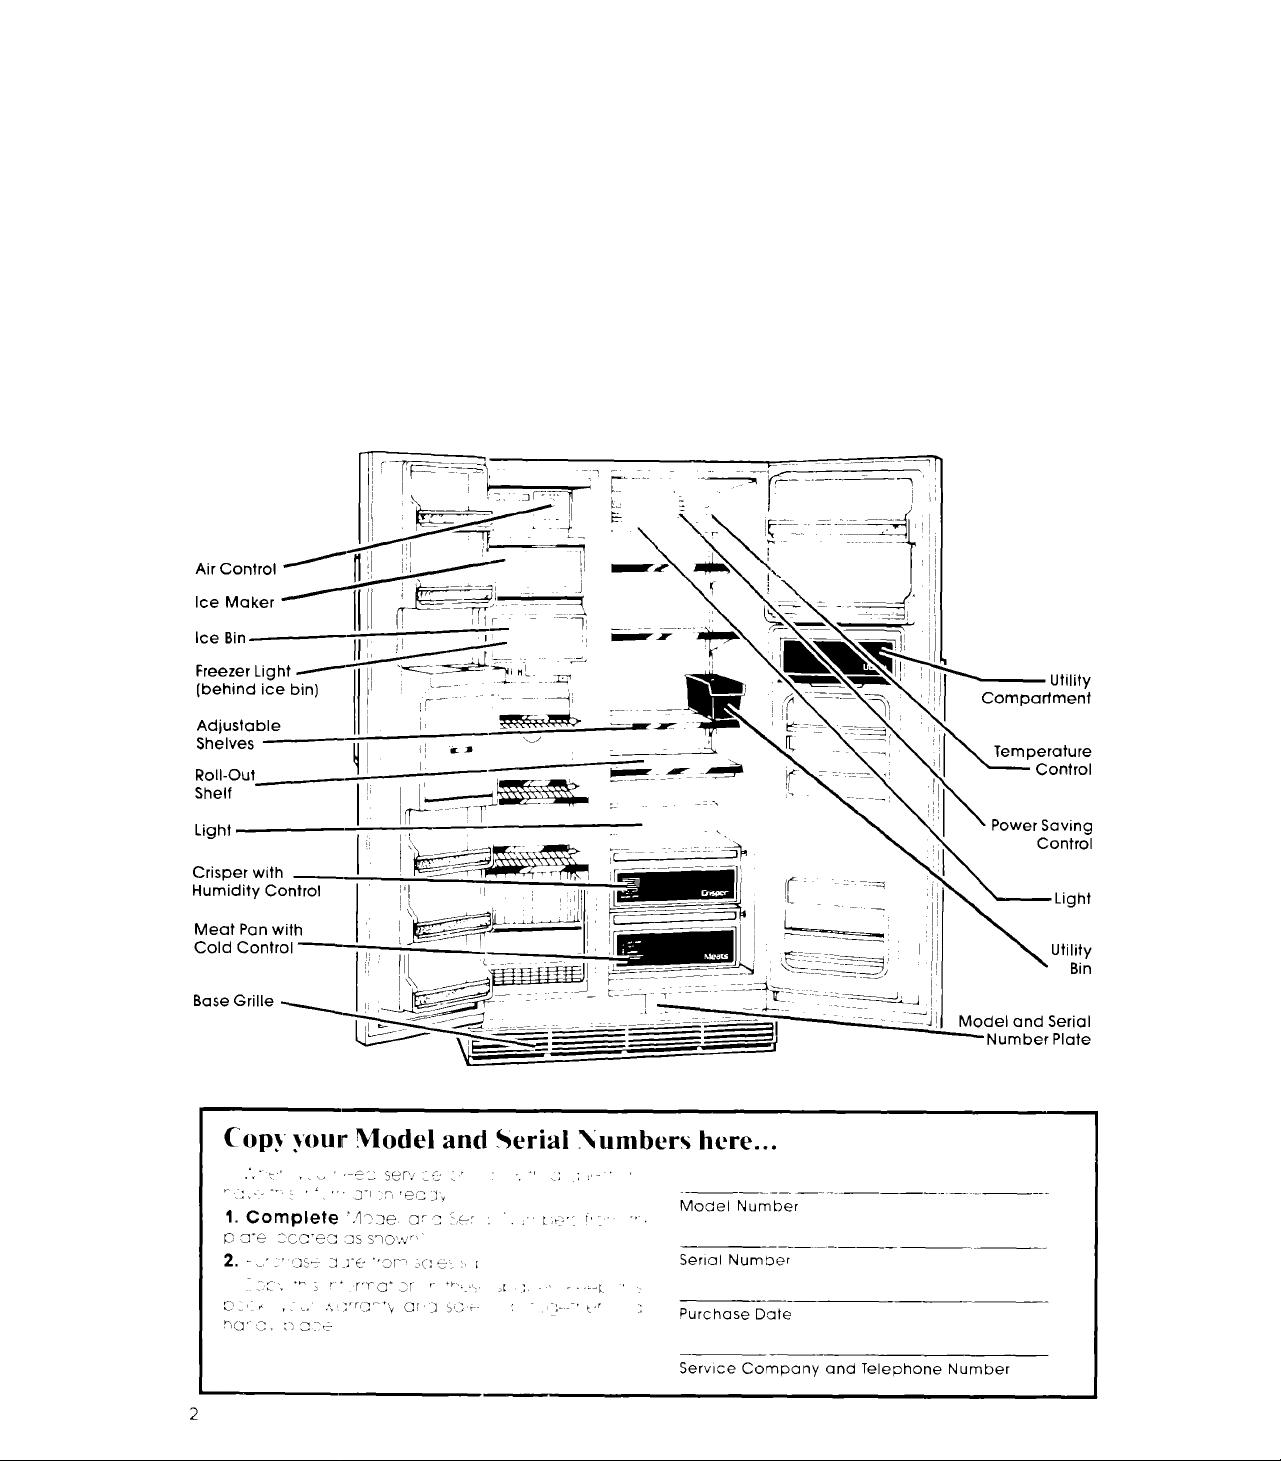
Parts and features
Contents
SAFETY FIRST...................................
BEFORE YOU PLUG IT IN
Install Properly ,
Level Refrigerator-Freezer
Remove Sales Labels
Clean It..................................................
Plug It In ...............................................
USING YOUR REFRIGERATOR
Setting the Controls
Changing the Control Settings
Power Saving Control ...
Adjusting Crisper Humiditv Control
Adjusting Meat Pan Temperature
Adjusting the Shelves
Cold Water and Ice Dispenser
Removing the Freezer Basket
Removing the Freezer Shelves
..........................
.................
..................
................
............................
..................
Page Page
c 1986 Whiripoo
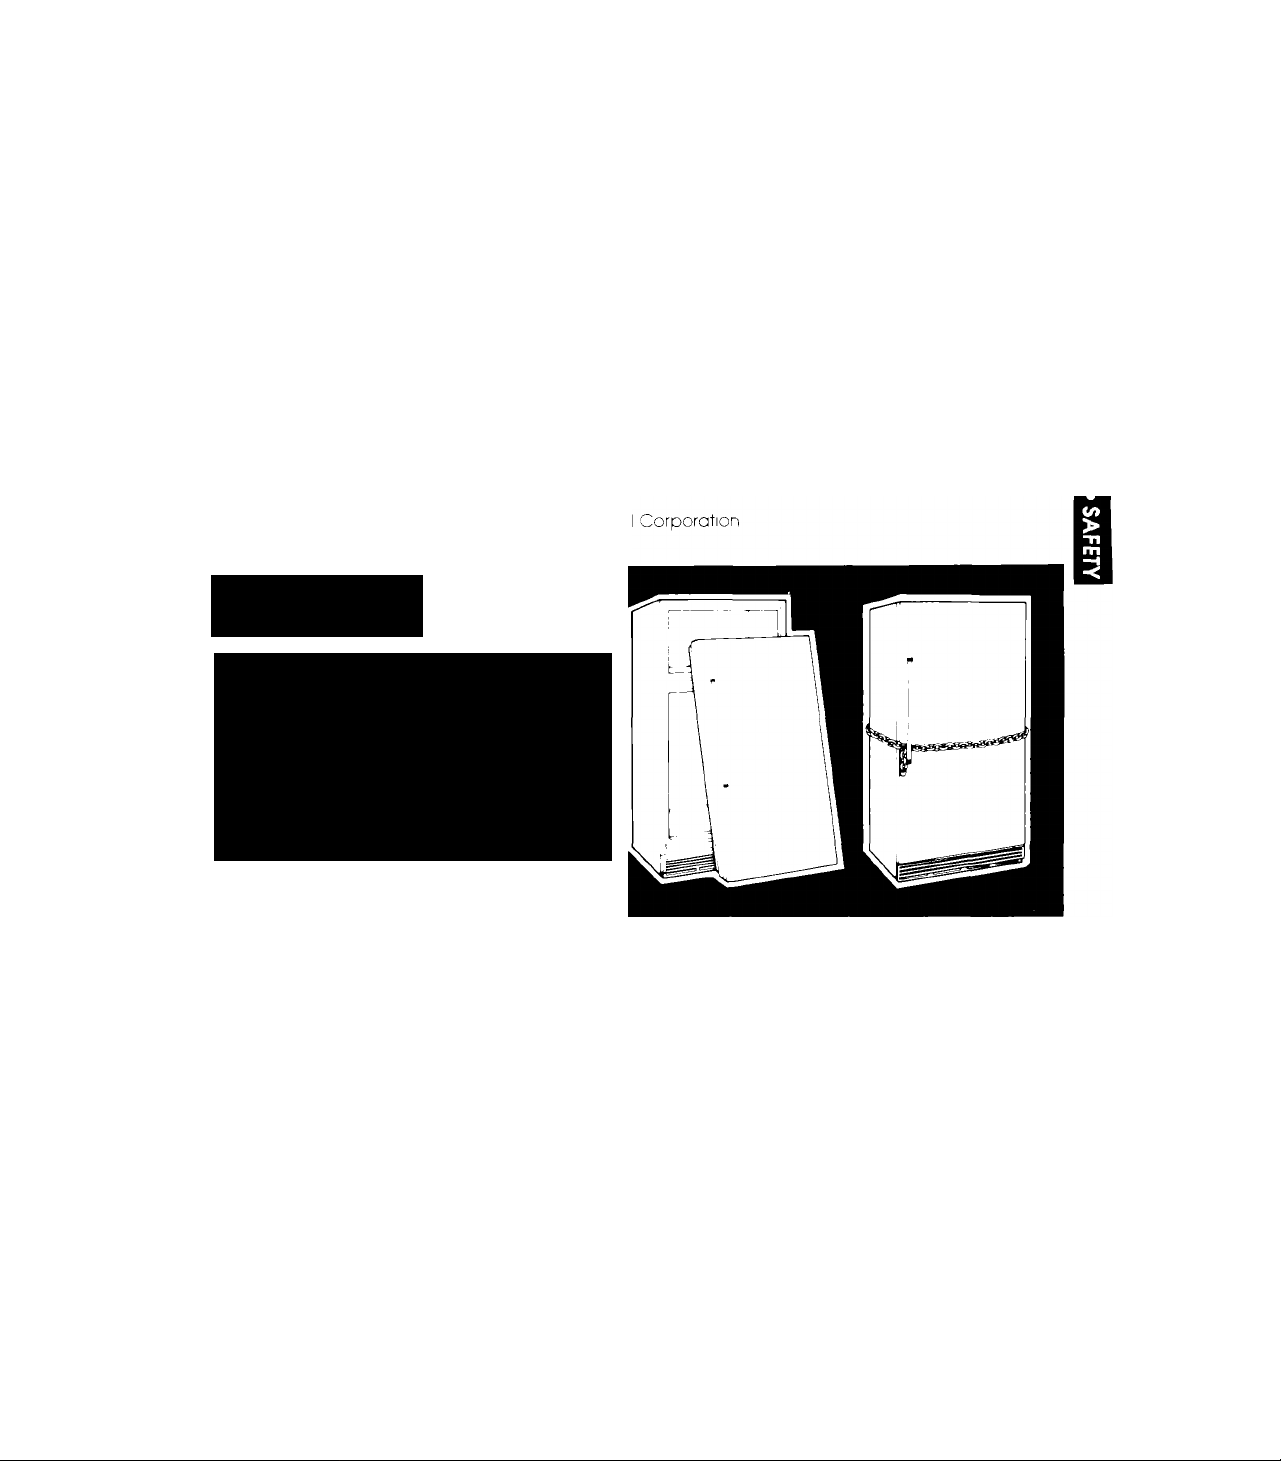
Safety first
Child entrapment, and suffocation, are
not things of the past. Junked or abandoned
refrigerators are stiii dangerous...even if
they wiii "just sit in the garage for a few
days.”
if you are getting rid of your oid
refrigerafor, do it safety. Please read the
enclosed safety booklet from the Associa
tion of Home Appliance Manufacturers.
Help prevent accidents.
3 Removing the Crisper, Meat Pan
3 and Covers..................................................... 9
4 Changing the Light Bulbs
4 Removing the Base Grille
4 Sounds You May Flear........................................ 10
4 Energy Saving Tips ........................................ 10
4 CLEANING YOUR REFRIGERATOR
5 Cleaning Chart ................................................. 11
5 FOOD STORAGE GUIDE
5 Storing Fresh Food........................................ 12
5 Freezing and Storing Frozen Foods , , , , 13
6 VACATION AND MOVING CARE
6 IF YOU NEED SERVICE OR ASSISTANCE 17
6 1, Before Calling for Assistance
6 2, If You Need Service
8 3 If You Have a Problem
9
....................................
.................................
.............
.........................
...................
...................
......................................
...................................
17
9
10
10
12
16
18
18
Before you plug it in
IMPORTANT
Before using your refrigerator you ore oersonc
responsible for making Si^re tna* n
• IS nstalled and leveled on a fiocn mot -a/iII nola
The weight, and m an area su 'atore for its size
and use
• IS connected omy to the right sind ot ou-ie’ w'Oh the
right eieoTricai supp'v ana grour'dmg ¡Refer *o
your ' Electr.ca Reguoements a'd Grounding
nstrucocns'")
• .5 usea oroy foe jods expecec.: _;f "’■ome refr'perators
IS no* near an over radiator or other neat source
s properly maintained
s out 0'i rhe weather
5 usea r an area w.'here The roco- temperature w1
not foii beio'w' 55 F PC Cj
s nor used by those w'ho may not understand how
it should oe used
s not loaded with tooa before t has time ro get
oroperly cold
Remove sales labels...
Remove the Consumer Buy Guide label, tape and
any inside labels before using the refrigerator
To remove any remaining glue:
1 Rud briskly with thumb to make a ball then remove
OR
2 Soak area with dishwashing detergent solution [1
teaspoon detergent in 1 guart warm water) before
removing glue as described in step 1
DO NOT USE rubbing alcohol or flammable or
toxic solvents, such as acetone, gasoline, car
bon tetrachloride, etc. These can damage the
material.
NOTE; DO NOT REMOVE ANY PERMANENT IN
STRUCTION LABELS INSIDE YOUR REFRIGERATOR.
Do not remove the Tech Sheet fastened under
the refrigerator at the front.
1, Allow A" [,2cm) space on each S'de and at top for
ease of insfallation
2, The refrigerator back can betiusti against the w-ail
3, If the refrigerator is to be in a corner, keepT-i; inches
[3,1 cm) between the wall and s de of the re
frigerator so there is room to open the SERVA-
DOOR" or to clear the ice and water dispenser.
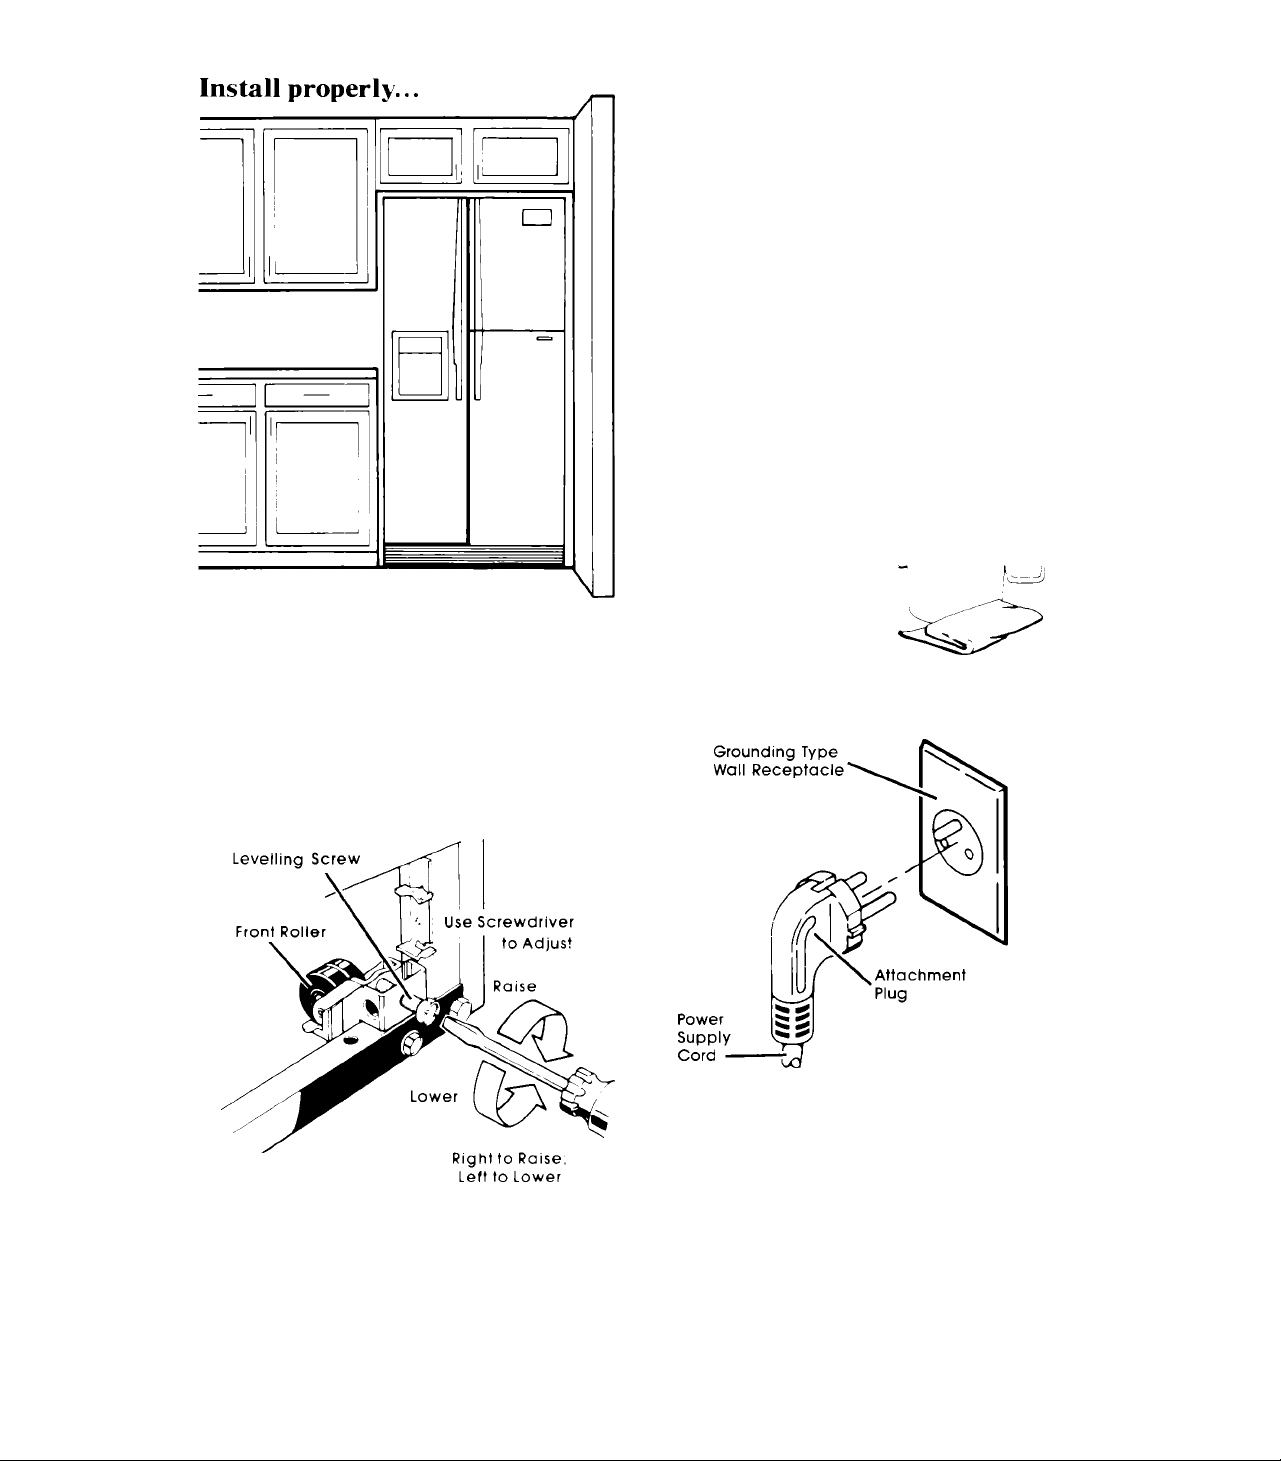
Level refrigerator-freezer...
Clean jt...
Clean your refrigerator
before usmg r
See cleaning 'ustruciions
on page 10
Plug it in...
,A
1 Remove case grille [see page 10)
2, To raise front, turn eacn screw *o the rig>^’
3 To lower front, turn each screw to tne left
4 Check with level
RECOMMENDED GROUNDING METHOD
A 230 Volt, 50 rtz,, AC only, 7,5 ampere fused and
properly grounded electrical supply is required. It is
recommended that a separate circuit serving only
this appiianoe be provided
Do not use an extension cord. Use a recepta
cle which cannot be turned off with a switch or
pull chain. See individual eleotrioal requirements
and grounding nstruction sheet in your literature
package.
Using your refrigerator
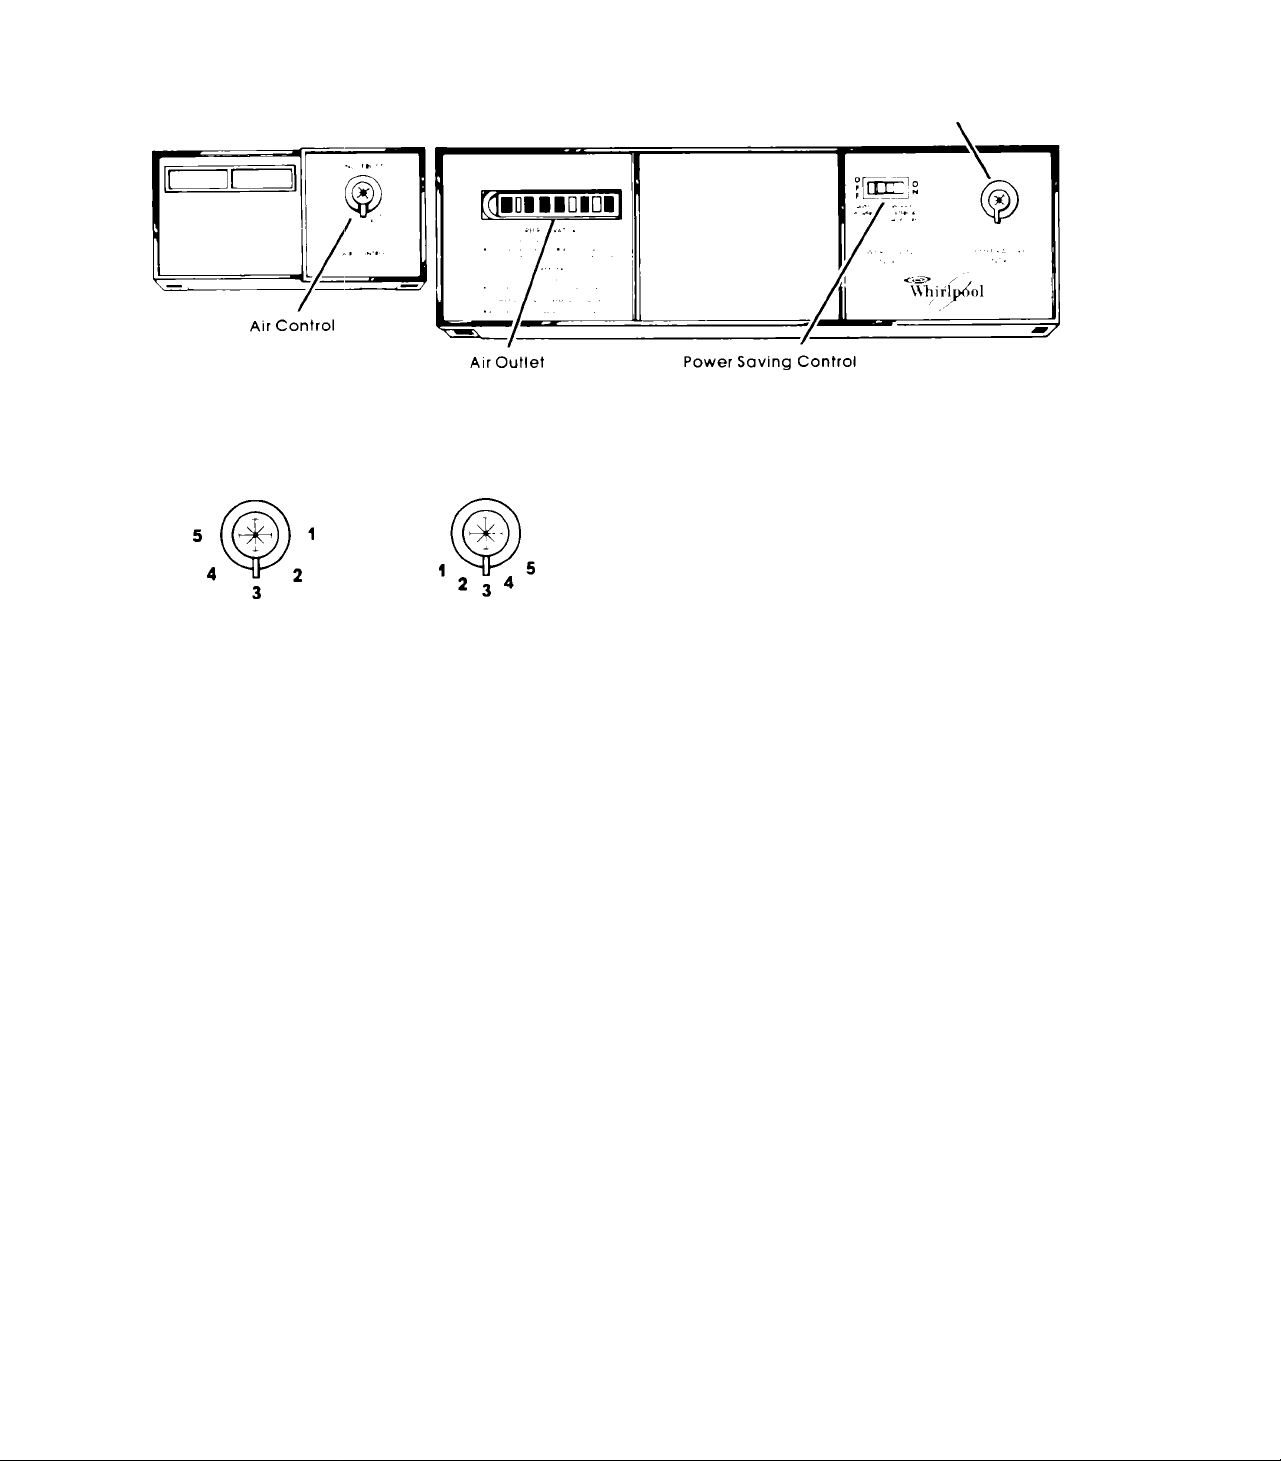
Temperature Control
Setting the controls...
The Temperature Contro^ is the lefr gerato^ ana
the Air Control is m the freezer section '«Vhen the
refrigerator is pluggea in tor the first time
1 , Set the TEMPERA
TURE CONTROL to 3
2 Set the AIR CON
TROL lo 3
Changing the control settings...
f you neea‘c adjust temperabcer • ^'e^ige'
ator or freezer use hre settnigs i stesj ■ "r-e cr-ar
bemw.
CONDITION:
h Refrigerator
Sectior'' .5
TOO WARM
f F'eezer
Sect pr' ,s
TOO 'vV,ARM
f Refrigerator
Sectior' IS
TOO OOlD
h ICE isnMADE -AST ENOLiGH
If BOO SECTIONS
are OO 'WARM
REASONS:
Door zeenee offer
^arae ar-m^n't of fooa added
RC'Or'- reroperamre toe warr--'
Dcpr rrpened otter.
Lorae or'r.Qont c' teme aO'ded
'/erv ■ ci.o rcomi 'erooera'ore
cor ' c, c!0 of”0r 0H''C eg’'' ^
Contr.jis r-'Ot set C'Crrectlv
for .■o^r COnditiOriS ,Air Contro
dec. . ce usage Ompera’ure Coritro 3
Vey ' c d room 'emperature
jcar ■ r. ,cleo.fter enougnl
Dcor ecerreo 'Ofte.r-.
_arge tmr“ .Our ‘ of food added
Cep' .■.cm'" nr .'er, C'Crc
roc:"' 'emperatures
Give the refrigerator time to cooi down com-
pleteiy before adding food. ;^h s may toKe sev
ero' hoursT
These settings should be about right for
normal household refrigerator usage.
The controls '.V 'I be se* about ngn* w’''en milk or
juice s as cold as v'Ou like and A'hen ce cream
s fnm
Do not block the air outlet or the controi banei
BiocK ng T can s ovv 'he air movement needed to
Keep 'emperatures at the level you set
• Aajwsr t'^e Tempera’ure Corvroi test
• War at east 24 hours between adjustmients
• ^hen ad'ust me Ar Control, t needed
RECOMMENDED SETTINGS:
Temperature Control
A r Control
^ernperature Cori’ro
A r
Orrtperature C'Or.troi
4
3
3
4
2
3
An 'C'Or.trol
Temperature Cor-trot
A r Cor-trol
4
3
2
Power Saving Control...
The Power Saving Control or me
sole operates electric heater arcor-uj *
ngs. These headers he-ip keep mmmtur
on the outskde of tne refrioerafo'
O' ope
forme
re L
h. Ck r
2, Use me 'ON' setting
f m.pisture forms
ore the outside of the
refr gerator
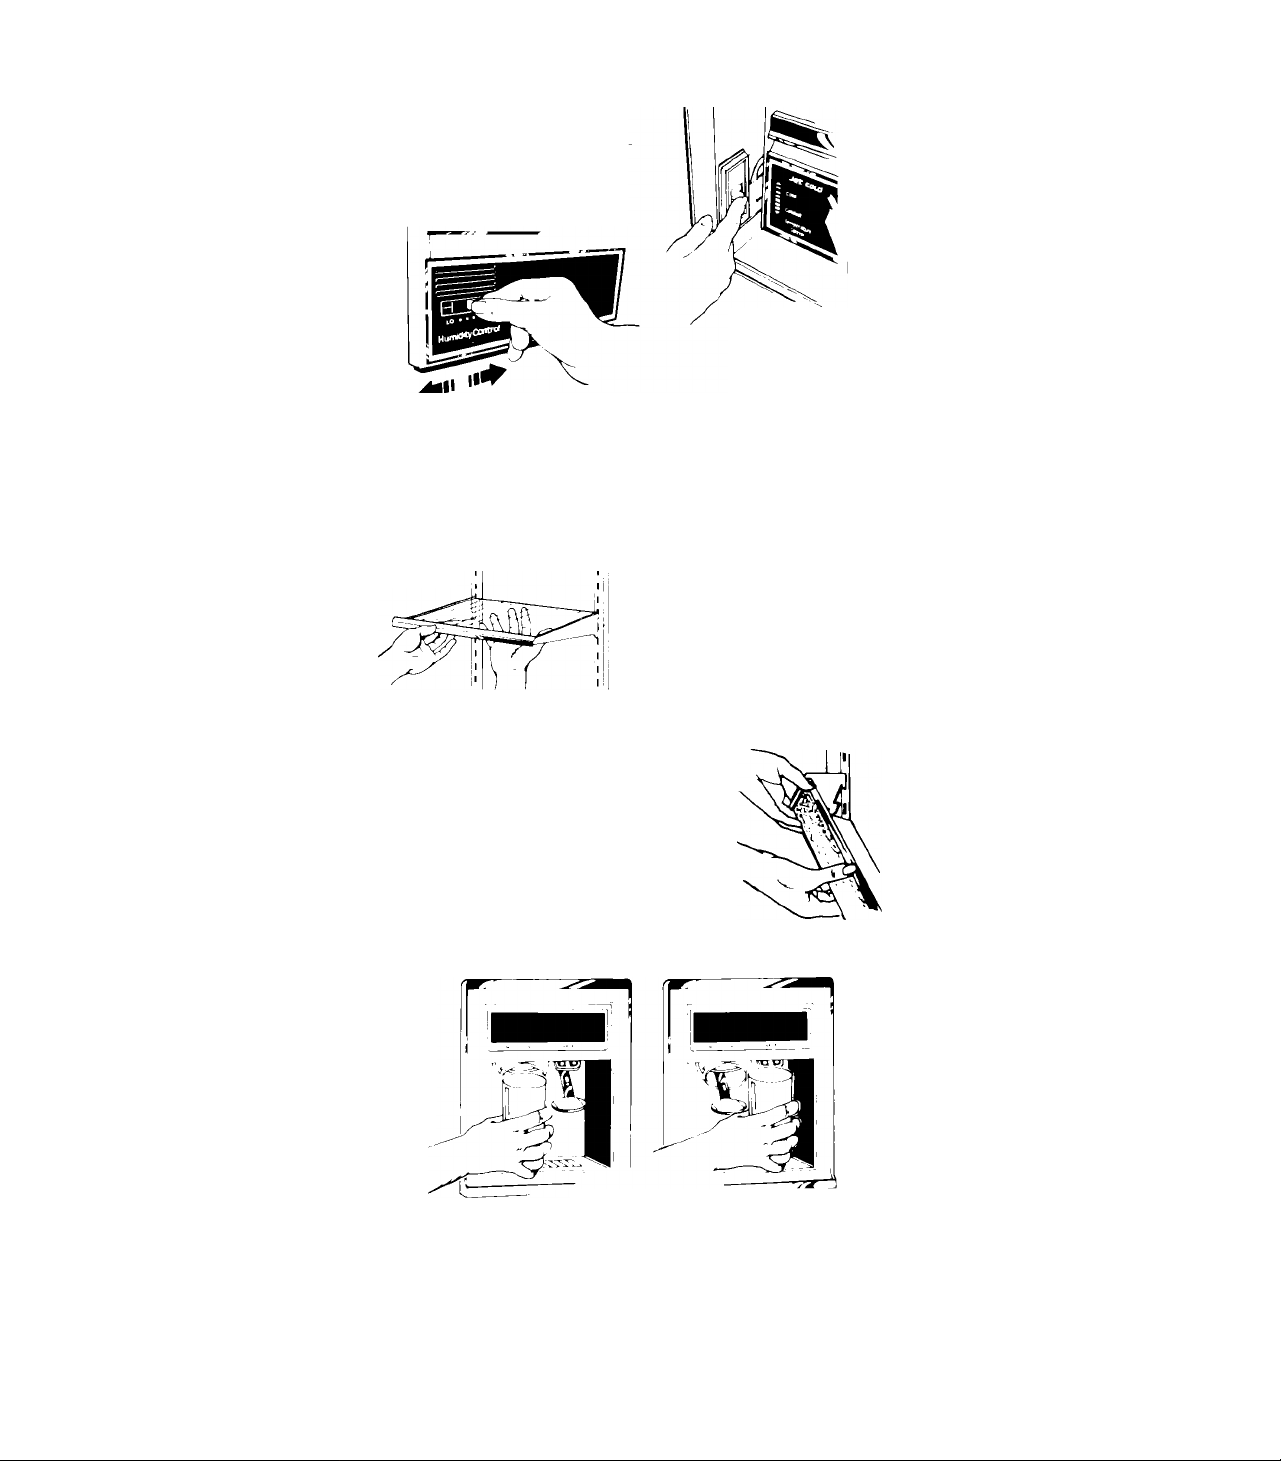
Adjusting crisper Humidity Control...
You can control the amount of humiOity m the mois
ture-sealed crisper
1, The control can be adjusted to any setting be
tween LO and H
2, LO (open) lets moist
air out of crisper for
best storage of fruits
and vegetables
with skins
3, HI (closed) keeps
moist air In the cris
per for best storage
of fresh leafy vege
tables
Adjusting meat pan temperature.
Cold air flows against the
meat pan through an opening
between the freezer and the
refrigerator "his helps keep the
meat pan colder than the rest
of the refrigerator.
Set the control to let more or
ess co^d air through
Use Control to Adjust
Meat Pan Temperatures
Adjusting shelves...
Shelves can be adjusted to match rne vsay you use
your refrigerator. Glass shelves are strong enough to
hold bottles, milk and other heavy tood items Tne
ron-oijt shei* snoijid oe tne bofrvym she/t ,m vou,''
arrangefT'ent ' ‘
Giass shelves ore
neow Be ceretni
To remove SERVA-DOOR sheives
• Liff up and out
To replace:
• Insert hooks into guCes on both iuc
• Push dowTi
es
Cold Water and Ice Dispenser...
FOR ICE:
Press a sturdy giass agams* trie
ce dispenser bar, (Pressure ana
turr.bhng can break a fragile
glass,) Remove the glass to stop
dispensing
The first few batches of ce fromi
the ice maker may have a bad
taste. Throw them away ^his is
from new plumbing and parts
Press against
Ice Dispenser Bar
The smal tray beneoth the dispenser Is designed to hold small spills. There is no drain in this tray.
Do not pour water into it. Water from smaii spills will evaporate
Ice is dispensed from the ice maker storage bin
n the freezer. When the dispenser bar is pressed, a
trapdoor opens in a chute bet'ween the dispenser
and the ice bin loe is moved from: the bin and falls
through the chute. When the dis.oenser bar is re
eased, a faint buzzing sound may be neard for a
few seconds
6
To remove glass shelves:
1 Tiltupatfmnt
2, Lift up at back
3, Pul' shelf straight ,cut
To replace:
h Guide the 'ea' hooks into the slots in the shelf
supports
2, Tit up from o' snelt until hooks drop into slot. Lower
Pont of shelf fo level posifior-
The rollout shelf is removed the same as the
other shelves. However, it must be completeiy
roiled in to be removed.
FOR CHILLED WATER;
Press a sturdy glass against the
water dispenser bar, (Pressure
can break a fragile glass,] Re
move the glass to stop
dispensing
f the dispenser IS not used reg
ularly, dispense enough every
week fo freshen *he supply. Allow'
2-3 nours for chilling
Chilled water comes from a tank benind tne
meat pan. It nolds about 50 ounces (1,5 L)
When the -efrigerator is first hooked up, press the
w-ater dispes'ser 'with a gloss or a jar until you nave
dra-wT and aiscarded 2 or 3 quarts (1,9 to 2,8 L)
'Gnly air w'i!| come out to start with The 'water you
d'O'w and d:scara w'lL tiose the tank and pipes
k-. c.\ gP0uG.d-.cuts'o c'" I *he firs*’ankfu

Common Problems
PROBLEM
Dispenser won’t
work.
Ice dispenser
won’t work.
Ice dispenser
stops working.
Otf-taste or odor
in ice.
CAUSE
Freezer door open
ce bin not prope''v mstalleo
Wrong ice in bir
Ice dispenser bar he'd in too iong
ice attracts airbO'^ne odors
Oia ice
Water quairy
Foods not properly ■•A'rapped
ce bin and freeze^ may need
oieanmg
Piumbing to ice maker
New ice maker
SOLUTION
• Ciose the freezer door.
• Make sure bin o pushed aii the way in
• Use only ice crescents from the ice
maker. Other shapes won't dispense properiy.
• Woit about 3 minutes for the dispenser motor
to reset
• Large amounts of ice shouid be taken from
the b n not through the dispenser
• Use rapidiy or store in covered container.
• Dump oid ice and make new suppiy.
• Water ccr.Taining minerais [such as sulfur)
may require a filter M remove
• Wrap properly See pages 13 and 14
• Clean freezer and ice bm See Cleaning
Chatt on page 11
• Foilow installation instructions for proper ice
maker water supply hook-up
• The first few loads of ice from a new ice
maker may have an off-taste. Dump ice
ana make new supply.
TIPS
• The dispensers will work only with the freezer
door closed.
• The ice dispenser will work only if the bin is
pushed all the way in.
• Use only Ice crescents from the Ice maker.
Other shapes won't dispense properly.
• When you need more ice than a glass or
two, scoop it from the bin or remove the bin.
The dispenser motor may stop if the dis
penser bar is held in too long. It will be ready
to run again in about 3 minutes
• Ice stored too long can go stale...like water.
Throw it away.
• Ice can shrink. Cold moving air slowly evap
orates them. If you use ice often, you may
never notice the change.
• Good water quality is important for good ice
quality. It is not recommended that the ice
maker be connected to a softened water sup
ply. Water softener chemicals such as salt from
a malfunctioning softener can damage the
ice maker mold and lead to poor quality ice. If
a softened water supply cannot be avoided,
then it is important that the water softener be
well maintained and operating properly.

Plan to remove and empty the storage bin:
• If the ice dispenser has not, or will not be used for a
week or more,
• If a power failure causes ice in the bin to meh ana
freeze together,'
• If the ice dispenser is not used regular'y
1, Pull the oovering panel out frorni
slide it to tno rear.
3, Lift the front of the storage bin. Pull it out
4, Empty the bin. Use hot or warm water to melt the
ice if necessary. Never use anything sharp to break
up ice in the bin. This can aamage +he bin and
dispenser mechanism
5, Wash with mild detergent R>nse well Do not use
harsh or abrasive oleansers or so^uents
■he bottom and 2 Lift *he signal arm so it clicks into the OFF position,
6, When replacing the bin, make sure it c pushed in
all the way. Push the signal arm down to tne ON
position to restart ice production
(ce can still be dispensed, but no more will be made.
Night Light Switch
The night light uses a heavy-duty 10-watt bulb. It
should last about 10,000 hours. When It burns out,
purchase another from your dealer.
Removing the freezer basket...
For proper air movement, keep the fmezer baske*
in place when the freezer is operating
To remove the basket:
• Slide out to tne stop
• Lift the front to olea^ the smp
• Slide out 'he resr of the W''0'v
To replace the basket:
• Place basker on the slides
• Make sure *he wire stops
cteo" the iron-' of *n0^(iQ',23
• SLae basket o
8

Removing the erisper, meat pan and covers...
To remove the crisper and meat pan:
1 Shoe cnsper and meat pan sdaign* cm* to
2 Ld the front
3 Slice *he *est of *he oav out
4 oepoce in reverse order
To remove the covers:
• Covers are held m oiaee by i
and tv/O' notched tabs m -'or
ress dont tabs ou* ''e vva-v
2 ^ift cc'ver front
3 -ift back o'f the pegs
4 Seplace m reverse order
: peas
hop
*de cao
Snap Back Into Place.
Changing the light bulbs...
WARNING: Before removing a light shield for
cleaning or replacing the bulb,
either unplug the refrigerator or dis
connect the electricity leading to
the refrigerator at the main power
supply. Shock and injury can occur
if electricity remains connected.
Light bulbs behind refrigerator and freezer con
trol consoles:
■ -mi con*rC'i кг'ОР stra ght off
2 1 Dottom of ocn-ol panel s**aight out
3 Lih too of poise! o'f supports
4 heoiace mth a 43 oatt appsance bulb.
3 heplace pane O' reverse order
Light bulb behind ice maker:
' ee-nove the ce bn [see ice maker instructions
page 6
. 'кео ace оЗп a 43 .vad appliance oulb
3ep ace ice pif.
Light bulb above crisper:
' vui -.op. s)f -he I gr T shield away **om the back wak
0 : I*' shield off case supports
1 eepiace -vor- a 4C -vah app.iance bulb.
4 beoiace sh eld in -everse order
Dispenser light:
■ ЗеасЗ' '"'в bulo tnrougn tce aispereer area
3 dec ace mte q heaw duty *3-wah bulb
Push the Tab
to Clear the Cover.

Removing the base grille...
1, Oper the door:
Poll griile ootwarps os srsoor
Do not remove Tech sheet fas et
Sounds you may hear...
Y'OLjr new refrigerator may nnake soonas tnat your old one didn’t
3ec:ojse tne sounds are new to you you wngnt be co'^'Cerned aPou*
then'! Don ’ be Most of tne neW" sounds are normal. Plard surfaoes like
*ne fioon walls and oabinets can moKe the sounds seem louder
"ne foUowing.cha"' describes 'he kinds of sounds tha' might be new*o yrru and 'what may be making then'
To replace:
1 Line jp gri'ie soppon
2 Posh forniy 'o snap inr
0 C ose the acos's
■Qbs
0 PIOC
Metal Clips
Support Tabs
*h -reta cLps
Possible Sounds:
• Slight Hum, Soft Hiss:
• Clicking or Snapping
Sounds:
• Water Sounds:
Ice Maker Sounds:
-trickling water
-thud (clatter of ice)
> Running Sounds:
Energy saving tips...
You CO"' helo your refnge'otor 'o:
• Check door gaskers for a og^t
net to be sure of a good sea
• Cleon the cc'r'denser co I regi
• Open 'he doco as fe'w 'in"'e5 qs
v.'hat you need Pefo'e vc.j
eyeryOhr'g out a' one '.''"■e he
so yow won' hose D, search
'Close dC"Or as soon as t.ooa is
• Go ahead and fi l up 'he ref- g*
cro'w.'d I' so air movemer'' s c
Probable Causes:
kOo "^av near the retr^gerator s tan mc'*0' ana mioving air
^he aefros' timer makes a definite click w'hen the refrigerator stops running. If
also makes a sound -when the refrigerator starts
When "'e refrigerator stops running, you may hear gu'gling in the tubing for a
fe'w niutes after it stops. You mioy ado near defrost wafer running Into the
defrys' water pan
You may hear buzzing (from the 'water valve), trickling vsater and the clatter
of ice aumped into the bin
Your 'ef'igerator nas a h.gh -efficiencv compressor and motor, I' will run longer
thar older designs, it may e'ven seem to n.jn most of 'he hme
se* 'he retrigerato' and
der 'Pan 'hey need to
Yeezer and drinks are
em wq* 5 ,eQia enough
Lyn'r-o O'"' OFF unless
next
neater 'urnace, rods
a neat
ogo'
h ■ ■ ■ '-^0 t0
noc'das,
eep the
0 S', ire to
"a-w su'e
am s t.r'-'-. r '
urfcTmi Kes
owe' saong
" '■ 'he 'efrngeratc' exterm'
r rntr.aerate' s
'■ge 'y
ig''t
;-rci* ry.u'
Cleaning your refrigerator
Both the refr'geratC'r a'"'a f'eezer
automatically But bo'n shcu ct be
once a month to help preyent ,od;
up Of course, spilb sncu.a be 'wioe
10
sections Petros
canea abou
'S ''Cns bui О'ПС
..O'! ng
■ a'.va у
ear vOu' refrigerato' 'u'r' 'he temperature
tc G'FF ur.piug ,t, ‘Cke out all remoyable
ana 0 ear i' accccct ng to the follo'vv.hg

Cleaning chart...
Part
Re^Tiovable pabs
[shelves, crisper, -T'eat
pari etc j
Outside
nside walls (Freezer
should be a'lcwed to
warrri up so oioth wor'*
stick [
Door hners and gaskets
Serva-Door back, slideout tray, utility door, and
other dark panels
What to use
SpoT'ge or cioth, mild
detergen* and w'orm
water
Spor ge ctoth cn pope'
*owe m Id deterger-t
app'iarce 'wax lor gooc
au*c pasw wax'.
How to clean
• VVash renriovabie par+s with warm water
and a rri'la detergen'
• Rinse and dry,
• Wash A'lth warm water and a m Id de
erge t Do not use abrasive or harsh
cleansers.
• R nse and dry
• Wax painted metal surtaces at 'east
twice a year with appliance wax or a
good auto paste wax. Apply wax with
a clean, soft cloth. Do not use wax
on plastic parts.
Waxing painted metal surfaces provides rust protection.
Spor'ge soft cio'C or
paper roxvel baxirm
sodc3 warn' warer mog
aetcgerd
Spoi 'ge soft cIcR' or
paper tow'e! m la
de’fjrgert war-"''.wamr
Wash 'With w-arm, -water and
m iC oetergen* or
bak r g soda ;2 'cD'espoons, 26 g | to
' cuac I R5 ' i 'vvarm .'."Oter
'ùnse and ary
th
Wasn w
■'W'ater
Rinse ar'
Id detergen* and -warm
DO NOT USE Cleaning waxes, concentrated detergents,
bleaches or cleansers containing petroleum on plastic parts.
Mild detergent and
-w-arm, w'dter soft, clean
sponge and soft, clean
cloth
Wash 'With a soft grit-free cloth or
sponge
Rinse and dry with a damp grit-free
cloth or chamois
DO NOT USE paper towels, window sprays, scouring cleansers,
or solvents like acetone, benzine, carbon tetrachloride« etc.
These can scratch or damage the material.
Spc-nge o* cion -^ild
deterge-o or-d .va*m'
wa‘er
Remove base grille, (See page 10.)
To remove -detrost pao, lift pah over wire
Prace (remove tape, T any)
Wash defrost pan with warm w-ater and
mild detergent
Rinse and dry.
Replace w-'iTh notched corner to the rear.
Push it af *he way in
Make sure defrost dram tube is pointing
nto pan
' Replace base grille
Con-denser Coi
Fl-oor under refrioerat'or
'■'-kac wum- cleaner using
the extended narrow-
at*'acr'.ment
Usua ‘ cor cleaners
• Remove oase grille
• Clean dust and lint from condenser at
east even other mon'h
• Replace base grille
• Roll refrigerator out only as far as water
supply line allows
• Wasn floor
• Roll refrigerotor back
• Check to see if the refrigerator is level

Food storage guide
STORING FRESH FOOD
^here IS a right wav to раскаде and store refrig
erated or frozen foods. To keep foods hesner, longer,
take the time ^o study these recor^i'oended steps
Leafy Vegetables Ren eves
*г'гт on tear off Pru sea and discoo
CO G water and aram Place i^”' pcs
container ana store m crisper C'“
Keep leafv vegetables fresh and •
Vegetables with Skins carroc c epoers Store
г crisper, plastic bags oro-astic S'Crcainer
Fruits Wasn 'O’ dry and store i’ refrgeratc'- ,v
Diasne Pags or crisper ,Dc ’“ot .-.cs^' or hjt oerries
until tney are reaay to use So'" o'-а /eep bevies ^
V'eir store oontaineov a cr'spe' or s'ore '■ c coseu^
closed caper Dag O" c refr geraher sneit
:ce wrapping ana
cod areas Wash C'
5‘ic bag or plastic
c 'ooist air helps
r'SP
Cured or Smoked Meat and Cold Cuts. Ham
bacon, sausage, cold cuts, etc,, keep best m origi
nal 'w'rappings Once opened, tightly re-evrap m
plastic wrap or a uminum to,L
Canned Ham. Store m refrigerator unless the la
bel says It's okay to store on the shelf Do not freeze
Fresh Poultry,, Wrap in plastic wrap. The plastic
wrap on poultry, as purchased, may be used for
storage
STORAGE CHART FOR FRESH AND CURED MEAT‘S
Type Approximate Time
(days)
Variety Meats
Chicken..........................
Ground Beef
Steaks and Roasts ..
Cured Meats
Bacon ............................
Cold Cuts
................
..................
.................
......................
........................
........................
1 to 2
1 to 2
......................... 1 to 2
........................
3 to 5
......................... 7 to 10
........................
........................
5 to 7
3 to 5
•If meat is to be stored longer than the times given.
follow the directions for freezing.
NOTE: Fresh fish and shellfish should be used the
same day as purchased
Meat' Meat is oerishabie a-^-d expensive,, you
won't want to 'waste an ounce ot it through careless
handling. The fo lo'w'ing list and ct art give you pack
aging hints and time limits. Store m-eat in the mea*
pan
*ne store wrapping Vacuum' p
Fresh, Prepackaged Meat
be dozer' for as long as one r^''i
broke^' If you wo''t to keep
snould ''Wrap if w *n specia freeze
icore fresh r-r-.ea* O'
ccyagO'd ■'’^eai co''
C'*''' 'f *he sea' 'S " o*
‘''oze'" iQr-iger , cu
r "opP'hg mia'er'Q
Fresh Meat, Not Prepackaged. Semeve he
m,arket wrapping paper and re-w'-'ap in alummumi ‘oi
for storing it unfrozen
Cooked Meat. Wrap or cc-ver cc-oked meaf wch
plasnc wrap or aluminum f'On Sto'e imimediateiv
12
Eggs , Store 'wnthout washing in the original car
ton or use the Utihty Bin that came with your
refrigerator.
Milk W pe h'li k cartons F'Or best storage, olace
v" Ik C'r'' '-'terim sneit ,or bottom aoc^r snelf.
Beverages Wipe bottes and cans Store 'on a
door snelf or ns,ae The refr'gerafor
Butter Keep opened butter ¡n covered dish or n
the Ut'i'ty Cemoartment, Wnen stor'^'g an extra sup
ply, 'wrap I" freezer packaging and ‘meze
Cheese Store in the original 'wrapping unti
you are ready to use It, Once opened, re-wrap
tightly in plastic 'wrap or aluminum foil
Condiments .Store smaF jars and bottles jeat-
sup, m.us’arc, jehy, olc'es) on the door shelves where
tney are in easy reach
Leftovers .Cover lefcovers 'WiTh plastic 'wrao or
asjmvu-v- 'c.: ‘c: keep fO''Za from drymg ou* and
’ransft
' n:q
'"d'Ors P'OS'
jnta ners w-ifr' t.ghr

FREEZING & STORING FROZEN FOODS
The freezer section is designed for storage of com
mercially frozen foods and for freezing foods at
home
Packaging - The secret of successful freezing is m
the packaging. The wrap you use must be air,
moisture and vapor proof. The way you close and sea
the package must not allow air, moisture or vapor in
or out. Packaging done in any other way could cause
food odor and tasfe fransfer throughout the re
frigerator and drying o" frozen food
Rigid polyefhylene [plastic) containers with tightfit-
ting lids, straight-sided canning/freezing jars, heavyduty aluminum foil, plastic-coated paper and non
permeable plastic wraps (made from a saran film)
are recommended
bags are easy to use and can be used by them
selves or as carton liners.
Sealing — When sealing foods in bags squeeze
out the air (liquids need headspace 'o allow for
expansion,,) Twist the top and turn it back Fasten tie
securely around the coubled-over tail Pur ihe label
inside transparent bags; use self-adhesve label on
outside ot opaque ones.
NOTE; Heat-sealed boiling
over twice. Finish package and tape closed NOTE
'With unboned meats, pad sharp edges 'with extra
wrap or use stockinette to protect the wrap from
punctures
DO NOT USE;
• Bread wrappers
• Non-polyethylene plastic containers
• Containers without tight lids
• Waxed paper
• Waxed-coated freezer wrap
• Thin, semi-permeable wrap
None of these are totally moisture, air or vapor
proof The use of these wrappings could
cause food odor and taste transfer and
drying of frozen food.
Air-tight wrapping calls for 'drugstore wrap, Cu*
the sheet about one-third longer than me distance
around the food. Bring the ends together and fola in
(toward the food) at least twice to seal out air Cmase
ends close to tood, press air from package Foid *ids
Freezing Fruits - Select npe, blemish-tree fruits
Be sure they taste as good as mey look. Wash 2 to
3 quarts (i ters) at a time and dram, FruT that stands
O' water may lose food value and become, soggy.
Sort, peel trim, pit and slice as needed
Pack O' rigid wiae-miouthea containers or other
recomrnendec material. Leave nead space m a
O'w liquids to expana during freezmg
13

Freezing Vegetables - Freeze onlv fresh ^¡9^
q'jality vegetables picked -.vhe" ooreiy rrioture
For best results, freeze no more rna"^ 2 to 3 nours
after pmking, Vkash ¡n cold water soo and cut rvo
appropriate sizes Biancn or scaip PacK in recom
mended contoiner and freeze
Do nof freeze letfuce, celem, cano* siicvs, oofafoes or fresh fomames. .Ali vViil oecome hmp or
mushy, Tomafoijs wu, collaose w.meri fhawea
Freezing Cooked Food Prepare cooked
foods as you w-ouid for fhe fable, snorter, cooking
‘Ime 10 tots minutes to allow for addhional cooking
dur,r g reheating. Omit seasonings and par^ of the
lauid. Plan to add Oem a’ reheating t^me. Pota
toes should also be added to soup and stew a*
heating tim-e Add crumb and cheese 'oppings at
neahng timie
Cool as rap-iciy as ooss ble and freeze at once
Liauid or sem,-liquid dishes miay be frozen n rec,omm;endea containers w'lth nead-soace Casser
oles ana -othe" more solid foods m-ay be frozen in
*he bakr-g container If vou do''-'* want to leave
vour cassero'e dish in the freezer, fne it -w*h foi
Bake, cool freeze, sft out "he fo-i oackage, bag h
and return tc ‘mezer
Freezing Meats - he meat
be as good as the mieaf you
■vvrap ih meal-size packages F a
should Pe -.vrapped individually c
"ated by a double 'hickness of freezer wrap
Make sure store yvrapp'ngs are moisture ana
por proof. If not, re-w'rap m.ects .wt*'- one of
A'raps reco.mmended unde" Pccnogirg
14
o,^ "he.*, cati :r
eeze Drugstore
u*s or oa’ties
■' ayers seoa-
Freezing Baked Goods Wrap ЬакеР b eaas
n recommienaed mater ai ^how wrapping L"'bayed ye-as* b"eads can be f"oze"' afte-" t^^-e frs*
"'Sing Duren-oowr wrac c"-d freeze
Ba."e cockles as usual Cool ana f"eeze on rrays,
*"ien, oack ", 'eoomimenqe'O freezer bags cz co"to"''S onoakea cook.es ma-, be aroope-d, mesaed
■0" "C ed ana fr,ozen :on cook,e frays Sf'Ore in bag or
carton Раке ■w,thcu' "hO'win.g Refrigerator-fype
coc'k es cc'" ce .vrapoea and fm-zen r rc,' fo"m
’"a.-, oni'v enO'.,.g'" to shoe when "eadv to Раке
Frj-t Dies o"e oes* f’-ozen unpakec. Bake whnou*
(•"an. ng Base С'вса^ ana sim, 'ar oes befo"e
‘"eez-rig nch e-in-gs do'"Cf deeze S'Oi a Cuts*eam
.■e"'-‘s г t,Qc cri.ms ",w'her rea-dv to bake

IMPORTANT; Do not expect your
freezer to quick freeze any large
quantity of food. Put no more un
frozen food into the freezer than
will freeze within 24 hours. (No more
than 2 to 3 pounds of food per cubic
foot of freezer space.) Leave
enough space for air to circulate
around packages. Be careful to
leave enough room at the front so
the door can close tightly.
FOOD STORAGE CHART
Storage times* will vary according to the
quality of the food, the type of packaging or
wrap used [moisture and vapor-proof), and
the storage temperature which should be
0°F (-17,8°C).
Food Storage time
FRUiTS
Fruit juice concentrate .. ... 12 months
Commerciaily frozen fruif
Citrus fruit and juices ....
Others ..................................
VEGETABLES
Commercially frozen ...
Home frozen ........................
MEAT
Bacon
................................
Corned beef............................
Cured ham
............................
(Salting meat shortens freezer life)
Frankfurters
...........................
Ground beet, lamb, veal
Roasts:
Beef
.................................
Lamb and veal ................... 6 to 9 months
Pork....................................
Sausage, fresh
.......................
Steaks and chops:
Beef
.................................
Lamb, veal, pork.................
FISH
Cod, flounder, haddock
Sole
....................................
Blue fish, salmon
Mackerel, perch
...................
.....................
Breaded fish (purchased
Clams, oysters, cooked
fish, crab, scallops ....
Alaskan king crab
Shrimp, uncooked
..................
.................
POULTRY
Whole chicken or turkey .
Duck
.......................................
Giblets
....................................
Cooked poultry w/gravy
Slices (no gravy)
...................
.. 12 months
4 to 6 months
8 to 12 months
.... 8 months
8 to12 months
4 weeks or less
.......
2 weeks
1 to 2 months
.......
1 month
2 to 3 months
6 to 12 months
4 to 8 months
1 to 2 months
8 to 12 months
3 to 4 months
.... 6 months
2 to 3 months
2 to 3 months
... 3 months
3 to 4 months
... 10 months
... 12 months
. .. 12 months
2 to 3 months
... 6 months
.......
1 month
Food
storage time
MAIN DISHES
Stews; meat, poultry
and fish casserole ...
TV dinners
............................
2 to3 months
3 to 6 months
DAIRY PRODUCTS
Butter ................................... . 6 to 9 months
Margarine
............................
. 12 months
Cheese:
Camembert,
Mozzarella, farmer's .... 3 months
Creamed cottage ..
DO NOT FREEZE
Cheddar, Edam, Gouda,
Swiss, brick, etc
..............
. .6 to8 weeks
Freezing can change texture of
cheese.
Ice cream, ice milk
sherbet .............................
.........
4 weeks
EGGS
Whole (mixed)
Whites
.................................
Yolks
....................................
.....................
9 to 12 months
9 to 12 months
9 to 12 months
(Add sugar or salt to yolks or whole mixed
eggs)
BAKED GOODS
Yeast breads and rolls .
.......
3 months
Baked Brown 'N Serve
rolls
...................................
Unbaked breads
Quick breads
.......................
Cakes, unfrosted
Cakes, frosted
...................
..................
.....................
.......
3 months
.........
1 month
. 2 to 3 months
. 2 to4 months
8 to 12 months
Fruit cakes............................ .... 12 months
Cookie dough
Baked cookies......................
Baked pies
Pie dough only
■Ba sed on U S D A a nd M ichigan Cooperative Extension Service
suggested storag e tim es
......................
...........................
.....................
.......
3 months
8 to 12 months
. 1 to 2 months
. 4 to6 months
If electricity goes off
Call the power company,
will be off
1.
t service o fo be mterrup'ed 24 nours or less,
keep Pofn Poors closed Tnis wiH help frozenfoods to stay fm-zen
Ask how 'ong power
2. If service is to be interrupted longer than 24
hours
[a) Remove ah frozen f-oo-d and store m, a
frozen food Coker, Or
ib] Place 2 lbs (0 9 kg) of dry ice In freezer for
every cu, ft, of freezer space. This will keep
frozen foods for 2 to 4 days. Wear gloves to
protect your hands from dry Ice burns
(c) If neifner food Coker storage nor dn/ ice
s available, use or can perishable food
at once
3, A fuh freezer wii- stay coid longerthan a partly
filled one, A freezer fuh of meat w-ih stay coC
onger than a freezer full of baked goods. If
fooa contains ice crystals, it may be safety
refrozen, although *he guality and flavor may
be alfecred. Use refrozen foods quickly. If tfie
condhion of fne food is poor or you nave any
susD'Cions it s Wise to diSDOse of t
15

Vacation
and
moving
care
Short vacations. . .
No need to shut off the refnge^o’or • yo'-j be
away fof less than four weeks. Use pens’^ab^es
freeze other items. Turn off your ce 'waker shut off
the water supply; emp*y the 'ce bn and n-ake sum
all ice cubes are dispensed out o' the miechan sn^
Long vacations. . .
Remove all the food T you are go ’-g for o month
Of more. At least ci day ahead, turn off *he w-ater
supply to the Ice maker. When tne ast mad of ice
drops, turn off the ice maker.
Unplug the refrigerator and cieo'" ,U ,nnse wel
and dry. Tape mbber or wood blocKS 'o both doors
,,keeping them open far enough for air to get in
This will keep oda and mold from buiiamg up
WARNING: Tape blocks out of a child’s
teach...do not allow children near
the refrigerator when the doors are
blocked open. They may become
injured or trapped.
To restart refrigerator, see "Using Your Refrigerator'
Moving...
Shut off the ice maker water supply a day ahead
of time Disconnect'he water hne After'he last sup
ply of ice drops, ‘urn off the ice maker.
Remove all food. Pack frozen foods in dry ice
Unplug tne refrge'otor and clean it thoroughly. Re
move everything tnat comes out Wrap all parts well
and tape then' together so‘hey don't shift and rattle
Also, remove the water supp'y tank behind the
meat pan by
1 Disconnecting water mle' and outlet tubes at
the top of the tank
2 Removing three maunting screws f'om. 'he tank
3 Draining the tank
Re-instail the empty tank, ana emember to
check for tight water connectans when the refriger
ator IS hooked up at your new 'ocafion
Screw in the levedng rollers tape the doors shut;
tape the electr c cora to the cabinet. When you get
to your new home, put everything back, and refer to
page 4, Don't forget 'o reconnect the water supply
me.
16

If you need serviee or
assistance, >ve suggest
you follow these three steps:
1. Before calling for assistance...
Performance problems often result from little ftmngs
you can find and fix yourself without tools of any xinc
If your refrigerator will not operate:
Is the power suppr/ cord plugged mto a
with the proper voitage^ iSee page 4 i
• Have you checked your home s mars fuses or circuii
breaker box'^
• Is the Temperature Control turned
If there is a rattling or jingling noise, or other un
familiar sounds:
• Is something on top or behind the ref'^'peraror max-
ng noise when the refrigerator is runnmgn
• New teatures on your new refrigerator make niew
sounas You may be hearing an f!ow- ng from the
fans, timer clicks for the detrost.ng oycie, defros*
water draining into the defrost oos'
If your ice maker will not operate:
• Has the freezer had enough time to ger co d't vVnh a
new refrigerator, thus might take overn.gh'
• Is the signal arm ON n the aoiwn pos tion't
• Is the w-ater valve turned onh is water getting tO' the
ce miakerh
ve circu I
If there is water in the defrost pan:
• In hot, muggy weather, this is normal. The pan can
even be halt full. Make sure the refrigerator is level so
the pan doesn't overflow
If the light does not work:
• Have you checked your home's mam fuses or circuit
breaker box'?
• Is the power suoply cord plugged into a live circuit
with the proper voltaget^ [See page 4 ]
If a bulb is burned out:
• See Instructions for changing I ght bulbs on paged
Use appliance bulbs only
it the motor seems to run too much:
• Is the condenser, behind the base grille, free of oust
and Imth
• On not days. O' T the room c warm. The motor nafsjrally runs longer
• If the door has been openea a lOt, or if a large
amount of food has been pu* m, the motor will run
Onger !o cool aowm the intermr
Remember: Motor running t me depends on aif-
ferent things, number of door openings, amount of
food stored, temperature of the room, setting of tne
controls
,And, your new refrigerator may be 'argerthon your
oM one sc T has more space tc be cooled It also has
a regular freezer instead of a trozen food ccmpar’ment ,AII tnis m.eans oetter refrigeration and may reguire more running time than your old one
17

2. If you need serviee*...
Your Whirlpool dealer has a nation wiae network of Call your dealer or write
service technicians. They are trained to tulfiil the prod'
uct warranty and provide after-warranty service
3. If you have a problem*...
Service Manager, International Division
Whirlpool Corporation
Administrative Center
2000 U,S 33 North
Benton Harbor, Michigan 49022
’ If you must write, please provide your name, address,
WIephone number, type of appliance, brand,
model serial numoer, date ot purchase, the dealer's
name, and a complete description of the problem
This information is needed in order to better respond
ro your request for assistance
18

IF YOU NEED SERVICE OR ASSISTANCE
1/3
O
Z

Part No. 1111724
#1986 Whirlpool Corporation
. Dui ii -i n uve n: >, an d Sur fa ce Un it s. R ang es . M ic ro wav e Ov ens . Tr ash C om pa cto rs , R oo m Air C on dit io ne rs . D eh umi di fi ers . Au to mat ic W ash er s. Cl ot he s D r
Whirlpool
Making your world a little easier.
^ A r-irilionr'iiic
Home ^ Appliances
Printed in U.S.A.
 Loading...