


Deluxe Electric
Tomato Strainer
MODEL NO. 82-0202-W
3080265
Due to constant factory improvements, the product pictured might differ slightly from the product received.
REV112113
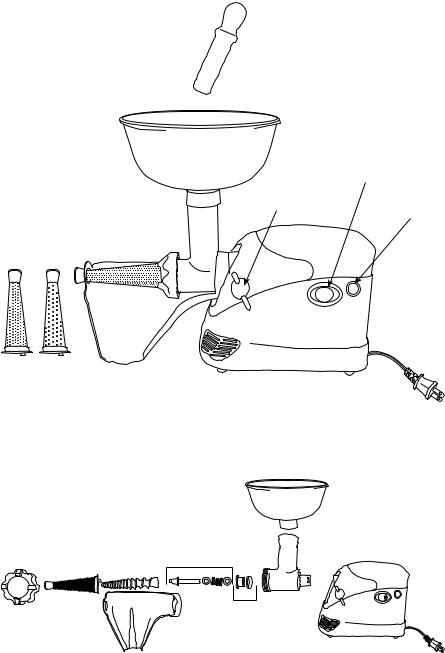
1
Reverse
Button
Head Locking
Knob On/Off
Switch
6
-O
R
7 8
|
|
|
2 |
|
10 |
Screen |
4 |
3 |
Main Body |
|
5 |
|
|
4a
9
-2-

COMPONENT LIST
DIAGRAM NUMBER
|
1 |
|
|
2 |
|
Shaft |
3 |
|
Assembly |
4 |
|
Drive |
|
|
|
|
|
Bushing |
|
|
Set |
|
|
|
4a |
|
|
5 |
|
|
6 |
|
|
7 |
|
|
8 |
|
|
9 |
|
|
10 |
|
PART
DESCRIPTION
Stomper
Hopper
Head
Spring
Metal Washer (2)
Drive Shaft
Plastic Bushing
Beveled Rubber Washer
Plastic Auger
Standard Tomato/Berry Screen
Pumpkin Screen
Salsa Screen
Chute
Front Ring Nut
PART
NUMBER
82-0109
82-0210
82-0111
82-0124
82-0114
82-0125
82-0129
82-0211
82-0212
82-0130
82-0118
If any components of this unit are broken, the unit does not operate properly or you need a replacement instruction manual, visit us on the web at
WestonProduct.com/support
Or call Weston Products LLC Toll Free at 1-800-814-4895
Monday thru Friday 8:00am-5:00pm EST. Outside the U.S. call 440-638-3131
CAUTION! It is important to follow the “Food Safety” guidelines outlined in this manual. For the most up to date instruction visit the USDA website.
-3-

GENERAL SAFETY RULES
READ AND FULLY UNDERSTAND ALL INSTRUCTIONS
AND WARNINGS PRIOR TO USING THIS PRODUCT.
YOUR SAFETY IS MOST IMPORTANT! FAILURE TO
COMPLY WITH PROCEDURES AND SAFE GUARDS MAY WARNING! RESULT IN SERIOUS INJURY OR PROPERTY DAMAGE.
REMEMBER: YOUR PERSONAL SAFETY IS YOUR
RESPONSIBILITY!
1. |
Thoroughly inspect the Tomato Strainer |
during operation. |
||||
before each use. DO NOT use the Tomato |
8. ONLY use the Stomper to push items into the |
|||||
Strainer if any part (including the |
Power Cord |
|||||
and Plug) is broken or damaged. If the Tomato |
Tomato Strainer. DO NOT use your fingers! |
|||||
Strainer is damaged in any way, contact Customer |
9. KEEP CHILDREN AWAY FROM THE |
|||||
Service at the telephone number listed on the back |
||||||
of this booklet. |
|
TOMATO STRAINER. DO NOT LEAVE THE |
||||
2. |
BEFORE using the Tomato Strainer for |
TOMATO STRAINER UNATTENDED. |
||||
10. |
To prevent unintentional starting, make sure |
|||||
the first time, thoroughly wash all parts that will |
||||||
contact food in warm soapy water. |
Rinse with |
the power switch is in the off “O” position before |
||||
clean water. Dry all parts before assembling the |
connecting the Tomato Strainer to the power |
|||||
Tomato Strainer. Only the plastic |
parts of the |
source. |
||||
Tomato Strainer are top rack dishwasher safe. DO |
11. |
DO NOT grind bones, nuts or other hard items |
||||
not place metal parts or the Motor of the Tomato |
||||||
Strainer in the dishwasher. |
|
into the Tomato Strainer. |
||||
3. |
NEVER immerse the Motor in water or other |
12. |
DO NOT use accessories from other |
|||
liquid. Clean it by wiping with a damp cloth. |
manufacturers. Use of unauthorized accessories |
|||||
4. |
ONLY plug the Tomato Strainer into a 120 |
will void the warranty. |
||||
13. |
Tie back loose hair and clothing, roll up long |
|||||
Volt, 60 Hz outlet. AVOID using extension cords. |
||||||
5. |
ALWAYS DISCONNECT the Tomato Strainer |
sleeves, and remove ties and jewelry including |
||||
watches, rings and bracelets before operating the |
||||||
from the power source when not in use. |
Tomato Strainer. |
|||||
6. |
Before cleaning, assembling or disassembling |
14. |
If the Tomato Strainer becomes jammed, |
|||
the |
Tomato Strainer, make sure |
it is turned |
briefly engage in reverse to clear blockage. |
|||
off “O” and disconnected from the power |
15 DO NOT use the Tomato Strainer while under |
|||||
source. |
Test to make sure there is no power |
|||||
to |
the |
Motor by switching the |
Motor on “- |
the influence of drugs or alcohol. |
||
and off “O”. |
|
16. |
For indoor use only. |
|||
7. |
KEEP FINGERS AND OTHER FOREIGN |
|||||
17. |
Household use only. |
|||||
OBJECTS AWAY from the Tomato Strainer inlet |
||||||
SAVE THESE INSTRUCTIONS!
Refer to them often and use them to instruct others.
-4-
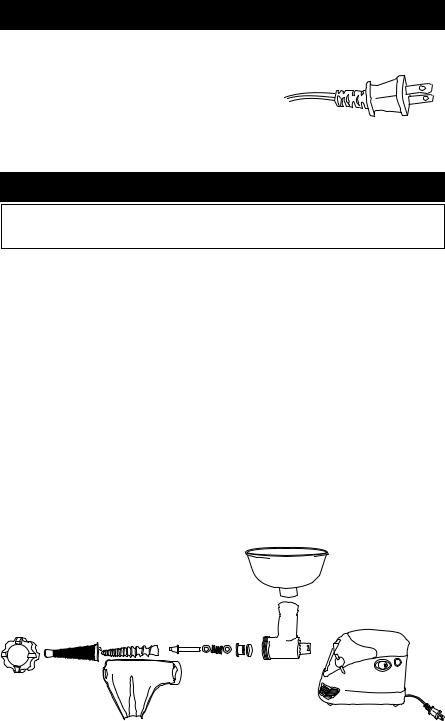
OUTLET INSTRUCTIONS
This appliance has a polarized plug (one prong is wider than the other). To reduce the risk of electric shock, the plug must fully fit into the electrical outlet. If the plug does not fit, turn it over and try again. If the plug still does not fit, contact a qualified electrician in regards to updating the electrical outlets in your home. DO NOT modify the plug in any way.
DISASSEMBLY & CLEANING INSTRUCTIONS
WARNING! Before cleaning, assembling or disassembling the Tomato Strainer, make sure it is turned off “O” and disconnected from the power source. Test to make sure there is no power to the Motor by switching the Motor on “-” and off “O”.
Before using the Tomato Strainer for the first time, thoroughly clean all parts (including accessories) as instructed below. DO NOT immerse the Motor in water or other liquid.
1.Turn the Motor Unit off “O” and disconnect it from the power supply.
2.Remove the Hopper from the Head.
3.Turn the Head Locking Nut counter-clockwise to loosen the Head from the Motor. Push the Head/Screen Assembly forward slightly while lifting out the back end of the
Head/Screen Assembly removing it from the Motor.
4.Turn the Front Ring Nut counter-clockwise to remove it from the Head.
5.Disassemble all the parts from the Head/Screen Assembly.
6.Gently turn the Chute clockwise to unhook the tabs on the Motor.
7.WARNING! DO NOT immerse the Motor in water or other liquid. Clean theMotor with a damp cloth or towel then wipe dry. Wash all parts that contact food in warm soapy water. Rinse with clean water. Dry all parts immediately.
NOTE! Only plastic parts of the Tomato Strainer are top-rack dishwasher safe.
8.Coat the Screens, Head and Drive Shaft Assembly with a food-grade silicone spray.
NEVER immerse the Motor in water or other liquid. Clean it by wiping with a damp cloth.
-5-
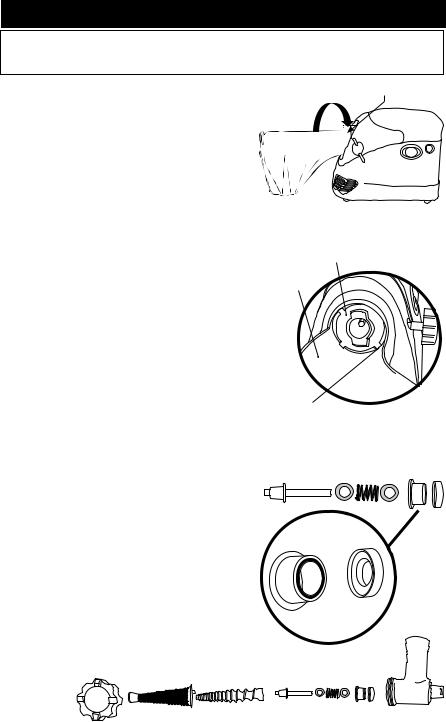
ASSEMBLY
WARNING! Before cleaning, assembling or disassembling the Tomato Strainer, make sure it is turned off “O” and disconnected from the power source. Test to make sure there is no power to the Motor by switching the Motor on “-” and off “O”.
1. Hold the Chute with the outlet tilted almost fully downward and the head ring facing the Motor
(figure 1). Chute
2. Place the head ring of the Chute over the round raised face on the front of the Motor. Position the tabs on the head ring next to the slots in the corresponding tabs extending from the round face
(figure 2).
Head
Ring Figure 1
3.Rotate the Plastic Chute counterclockwise until the tabs fit into the slots. ThePlastic Chute should now be firmly held in place. When properly positioned, the outlet of the Chute should dip slightly downward.
4.Assemble the round end of the Drive Shaft with a Metal Washer, Spring, Metal Washer,
Plastic Bushing and the Beveled Rubber Washer. (figure 3). NOTE: The Beveled Rubber Washer has two sides, a flat side and the beveled side. The beveled side fits onto the top of the Plastic Bushing like a cap (figure 3b).
5.Insert the square end of theDrive Shaft into the corresponding slot in the Auger (figure 4).
6.Insert the Auger/Drive Shaft Assembly into the Head.
7.Position the Screen over the Auger. Line up the tabs on the Screen with the notches in the Head. Hold the Screen in place.
8.Slide the Front Ring Nut over the Screen assembly and turn clockwise to firmly tighten
(make sure the tabs on the Screen remain aligned with the notches on the Head). DO NOT overtighten the Front Ring Nut to avoid damaging the Motor during operation.
Front
Ring Nut
Screen Auger
Motor
Round, raised face on the front of Motor
Figure 2
Chute
Tabs on
Motor
Drive Shaft Assembly
Figure 3b
Beveled
Plastic Rubber
Bushing Washer
Figure 3
Figure 4
Head
Drive Shaft
Assembly
-6-
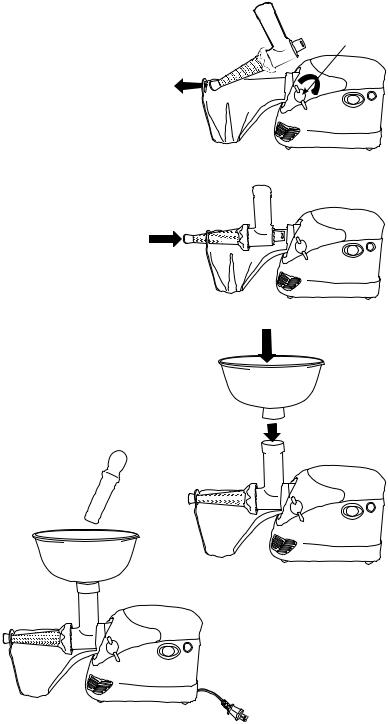
9. Turn the Head Locking Knob counterclockwise to loosen (figure 5).
10. Insert the Screen end of the fully-assembled
Screen/Head Assembly through the outlet end of the Chute (figure 5).
11. Slide the Screen/Head Assembly horizontally into the Head onto the Motor (figure 6).
12. Turn the Head Locking Knob clockwise to tighten the Screen/Head Assembly to the Motor.
13. Install the Hopper onto the Head. Press the Hopper down until fully seated (figure 7).
14. ALWAYS us the Stomper to push food into the Head/Hopper,
NEVER use hands or fingers (figure 8).
Stomper
Screen/Head
Assembly
Chute
Hopper
Head
Figure 8
Figure 5
Head
Locking Knob
Figure 6
Figure 7
-7-

INSTRUCTIONS FOR USE
NOTE: The Tomato Strainer cannot be used with meat products.
1.Cut large fruits and vegetables into quarters and small fruits and vegetables in half.
IMPORTANT: Remove pits, stems, hard shells and hard seeds before placing fruits or vegetables into the Tomato Strainer to avoid damaging the Screen.
2.Be sure the Power Switch is in the off “O” position. Connect the power cord for the Tomato Strainer to the power source.
3.Place the fruits/vegetables in the Hopper. Do not overfill the Hopper. DO NOT operate the Tomato Strainer without the Hopper in place.
4.Place a bowl under the Chute to collect juice and pulp. Place a bowl under the
Screen outlet to collect skin and seeds (figure 9).
5.Turn the Power Switch to the on “-” position.
6.Feed the fruits/vegetables into the Head. Use the Stomper to push the fruits/ vegetables into the Head. ALWAYS us the Stomper to push food into the Head/ Hopper, NEVER use hands or fingers.
HELPFUL HINTS:
A. Rerun the skin and seeds through the Tomato Strainer to extract any leftover pulp & juice. Repeat as necessary.
B. Use a rubber spatula to scrape pulp from the Screen into the Chute.
7. When straining is complete, turn the Motor o the off “O” position and disconnect it from the power source.
-8-
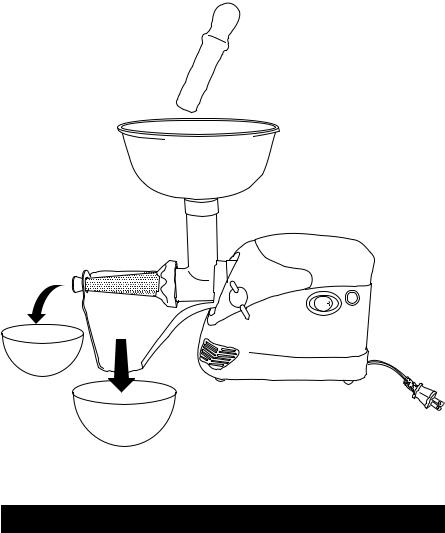
Stomper
Figure 9
Bowl to collect the skins and seeds
Bowl to collect the juice and pulp
REVERSE FUNCTION
The “R” Reverse Toggle is used primarily for clearing jams. In event of a jam;
•Turn the Power Switch to the off “O” position. Allow the Motor to come to a COMPLETE STOP before toggling the “R” Reverse Toggle to clear a jam.
•Allow the Motor to come to a COMPLETE STOP before turning the Power Switch to the on “-” position after using the reverse function.
•NEVER operate the Motor in reverse for more than 5 seconds at a time.
If the jam does not clear, disconnect the Tomato Strainer from the power source and follow the “Disassembly & Cleaning Instructions” to clean the unit.
-9-

RECIPES
|
|
|
|
|
|
|
|
|
|
|
|
|
|
|
|
|
|
|
|
|
|
|
|
|
|
|
|
|
|
|
|
|
|
|
|
|
|
|
|
|
|
|
|
|
|
|
|
|
|
|
|
|
|
|
|
|
|
|
|
|
|
|
|
|
|
|
|
|
|
|
|
|
|
|
|
|
|
|
|
|
|
|
|
|
|
|
|
|
|
|
|
|
|
|
|
|
|
|
|
|
|
|
|
|
|
|
|
|
|
|
|
|
|
|
|
|
|
|
|
|
|
|
|
|
|
|
|
|
|
|
|
|
|
|
|
|
|
|
|
|
|
|
|
|
|
|
|
|
|
|
|
|
|
|
|
|
|
|
|
|
|
|
|
|
|
|
|
|
|
|
|
|
|
|
|
|
|
|
|
|
|
|
|
|
|
|
|
|
|
|
|
|
|
|
|
|
|
|
|
|
|
|
|
|
|
|
|
|
|
|
|
|
|
|
|
|
|
|
|
|
|
|
|
|
|
|
|
|
|
|
|
|
|
|
|
|
|
|
|
|
|
|
|
|
|
|
|
|
|
|
|
|
|
|
|
|
|
|
|
|
|
|
|
|
|
|
|
|
|
|
|
|
|
|
|
|
|
|
|
|
|
|
|
|
|
|
|
|
|
|
|
|
|
|
|
|
|
|
|
|
|
|
|
|
|
|
|
|
|
|
|
|
|
|
|
|
|
|
|
|
|
|
|
|
LARGE BATCH ITALIAN TOMATO SAUCE |
2 cloves garlic, minced |
|||||||||||
1/2 cup olive oil |
3 medium onions, chopped |
|||||||||||
3 Tbsp brown sugar |
1 Tbsp dried oregano |
4 tsp salt |
||||||||||
2 tsp dried basil |
1 tsp black pepper |
12 cups fresh tomato puree |
||||||||||
•Heat the olive oil in a large pan
•Sauté the onions and garlic until tender, do not overly brown
•Add the rest of the ingredients
•Bring mixture to a boil, reduce heat and simmer partially covered for 2 hours or until sauce has reduced to desired consistency
•Stir occasionally
•Serve or allow to cool then refrigerate or freeze
•Ingredients like sliced mushrooms, cooked/drained sausage, hamburger, etc. can be added to taste
MARINARA SAUCE |
6 lbs ripe Italian-style tomato puree |
|
1 cup carrots, finely minced |
||
1 cup onion, finely minced |
1/2 cup celery, finely minced |
groundwhitepepper,totaste |
1/2 cup olive oil |
1 tsp sugar |
|
Optional seasoning (any one of the following): |
1 tsp dried basil |
|
2 tsp ground coriander |
1/2-1 tsp dried marjoram |
|
1/4 to 1/2 tsp dried oregano |
1 to 2 tsp salt |
|
•Heat the olive oil in a large saucepan
•Cover and cook the onions, celery, and carrots over medium-low heat for about 15 minutes, stir occasionally
•Uncover and stir over heat for an additional 5 to 10 minutes, or until the vegetables are soft and slightly golden
•Add the tomato sauce, sugar, and pepper
•Cover and simmer gently for 15 minutes
•Serve or allow to cool then refrigerate or freeze
-10-
FOOD SAFETY
There are basic rules to follow when handling food.
They are COOK, SEPARATE, CLEAN, and CHILL.
COOK
It’s crucial to cook food to a safe internal temperature to destroy bacteria that is present. The safety of hamburgers and other foods made with ground meat has been receiving a lot of attention lately, and with good reason. When meat is ground, the bacteria present on the surface is mixed throughout the ground mixture. If this ground meat is not cooked to at least 160oF to 165oF (71oC to 74oC), bacteria will not be destroyed and there’s a good chance you will get sick.
Solid pieces of meat like steaks and chops don’t have dangerous bacteria like E. coli on the inside, so they can be served more rare. Still, any beef cut should be cooked to an internal temperature of at least 145oF (63oC) (medium rare). The safe temperature for poultry is 180oF (82oC) and solid cuts of pork should be cooked to 160oF (71oC). Eggs should be thoroughly cooked too. If you are making a meringue or other recipe that uses uncooked eggs, buy specially pasteurized eggs or use prepared meringue powder.
SEPARATE
Foods that will be eaten uncooked and foods that will be cooked before eating MUST ALWAYS be separated. Cross-contamination occurs when raw meats or eggs come in contact with foods that will be eaten uncooked. This is a major source of food poisoning. Always double-wrap raw meats and place them on the lowest shelf in the refrigerator so there is no way juices can drip onto fresh produce. Then use the raw meats within 1-2 days of purchase, or freeze for longer storage. Defrost frozen meats in the refrigerator, not on the counter.
When grilling or cooking raw meats or fish, make sure to place the cooked meat on a clean platter. Don’t use the same platter you used to carry the food out to the grill. Wash the utensils used in grilling after the food is turned for the last time on the grill, as well as spatulas and spoons used for stir-frying or turning meat as it cooks.
Make sure to wash your hands after handling raw meats or raw eggs. Washing hands with soap and water, or using a pre-moistened antibacterial towelette is absolutely necessary after you have touched raw meat or raw eggs. Not washing hands and surfaces while cooking is a major cause of cross-contamination.
CLEAN
Wash your hands and work surfaces frequently when you are cooking. Washing with soap and warm water for at least 15 seconds, then dry with a paper towel.
CHILL
Chilling food is very important. The danger zone where bacteria multiply is between 40oF and 140oF (4oC and 6oC). Your refrigerator should be set to 40oF (4oC) or below; your freezer should be 0oF (-17oC) or below. Simple rule: serve hot foods hot, cold foods cold. Use chafing dishes or hot plates to keep food hot while serving. Use ice water baths to keep cold foods cold. Never let any food sit at room temperature for more than 2 hours - 1 hour if the ambient temperature is 90oF (32oC) or above. When packing for a picnic, make sure the foods are already chilled when they go into the insulated hamper. The hamper won’t chill food - it just keeps food cold when properly packed with ice. Hot cooked foods should be placed in shallow containers and immediately refrigerated so they cool rapidly. Make sure to cover foods after they are cool.
NOTE: Special considerations must be made when using venison or other wild game, since it can become heavily contaminated during field dressing. Venison is often held at temperatures that could potentially allow bacteria to grow, such as when it is being transported. Refer to the USDA Meat and Poultry
Department for further questions or information on meat and food safety.
-11-
 Loading...