


MEAT GRINDER
AND SAUSAGE STUFFER
DUE TO CONSTANT FACTORY IMPROVEMENTS, THE PRODUCT PICTURED MIGHT DIFFER SLIGHTLY FROM THE PRODUCT IN THIS BOX.

TA B L E O F C O N T E N T S / Í N D I C E / TA B L E D E S M AT I È R E S
IMPORTANT SAFEGUARDS
OTHER CONSUMER SAFETY INFORMATION
COMPONENT LIST
CLEANING
GRINDER ASSEMBLY
GRINDING INSTRUCTIONS
STUFFER ASSEMBLY
STUFFING INSTRUCTIONS
REVERSE FUNCTION
THERMAL OVERLOAD PROTECTION
HELPFUL HINTS
FOOD SAFETY
SAUSAGE INFORMATION
WARRANTY
SALVAGUARDAS IMPORTANTES
OTRA INFORMACIÓN DE SEGURIDAD PARA EL CLIENTE LISTA DE COMPONENTES
LIMPIEZA
ENSAMBLADO DE LA PICADORA
INSTRUCCIONES PARA PICAR
ENSAMBLADO DE LA EMBUTIDORA
INSTRUCCIONES PARA EMBUTIR
USADO LA FUNCIÓN DE REVERSA
PROTECCIÓN DE SOBRECARGA TERMAL
SUGERENCIAS
SEGURIDAD DE LOS ALIMENTOS
INFORMACIÓN DE LA SALCHICHA
INFORMACIÓN DE GARANTÍA WESTON
PRÉCAUTIONS IMPORTANTES
AUTRES CONSIGNES DE SÉCURITÉ POUR LE CONSOMMATEUR DESCRIPTION DE LA PIÈCE
NETTOYAGE
ASSEMBLAGE DU HACHOIR
DIRECTIVES DE HACHAGE ASSEMBLAGE DU POUSSOIR DIRECTIVES POUR FARCIR
UTILISATION DE LA FONCTION INVERSE (REVERSE) PROTECTION CONTRE LES SURCHARGES THERMIQUES CONSEILS UTILES
SÉCURITÉ ALIMENTAIRE INFORMATIONS SUR LES SAUCISSES INFORMATION SUR LA GARANTIE
3-4
5
6-7
8
9
10
11
12-13
13
14
14
15
16
18
20-21
22
24-25
26
27
28
29
30-31
31
32
32
33
34
36
38-39
41
42-43
44
45
46
47
48-49
49
50
50
51
52
55
2

IMPORTANT SAFEGUARDS
When using electrical appliances, basic safety precautions should always be followed to reduce the risk of fire, electric shock, and/or injury to persons, including the following:
1.Read all instructions.
2.This appliance is not intended for use by persons (including children) with reduced physical, sensory, or mental capabilities, or lack of experience and knowledge, unless they are closely supervised and instructed concerning use of the appliance by a person responsible for their safety.
3.This appliance shall not be used by children. Keep the appliance and its cord out of reach of children.
4.Close supervision is necessary when any appliance is used near children. Children should be supervised to ensure that they do not use or play with the appliance.
5.To protect against risk of electrical shock: Do not submerge the main grinder body into water or liquid. Be sure the grinder is disconnected from the power source before cleaning. Wash all parts by hand and thoroughly dry. Thoroughly clean all parts that will come in contact with food before using the appliance. Never rinse appliance grinder motor under tap. Only use a moist cloth to clean the grinder motor unit.
6.Turn the appliance OFF(O), then unplug from outlet when not in use, before putting on or taking off parts, and before cleaning. To unplug, grasp the plug and pull from the outlet. Never pull from the power cord.
7.Plug the grinder into a standard 120 Volt, 60 Hz wall outlet. Check if the voltage indicated on the appliance corresponds to the local voltage before you connect the appliance.
8.Do not operate any appliance with a damaged supply cord or plug, or after the appliance malfunctions or has been dropped or damaged in any manner. Supply cord replacement and repairs must be conducted by the manufacturer, its service agent, or similarly qualified persons in order to avoid a hazard. Call the provided technical service number for information on examination, repair, or adjustment.
9.The use of attachments not recommended or sold by the appliance manufacturer may cause fire, electric shock, or injury.
10.Do not use outdoors.
11.Do not let cord hang over edge of table or counter or touch hot surfaces, including stove.
SAVE THESE INSTRUCTIONS
E N G L I S H I N S T R U C T I O N S
3

E N G L I S H I N S T R U C T I O N S
IMPORTANT SAFEGUARDS
12.Before plugging cord into wall outlet, turn off the appliance. To disconnect cord, switch to OFF ( ). Then remove plug from wall outlet.
13.Do not use the grinder without the tray secured into place.
14.Never feed food by hand. Always use the provided food pusher. Keep fingers clear of the auger and cutting blades at all times. Never reach into the grinder. Doing so may cause serious injury.
15.Never use fingers to scrape food away from the grinding plate while the grinder is in operation. Severe injury may result.
16.Never operate the grinder unattended. Be safe. Disconnect the grinder from power source before leaving the work area.
17.Avoid contacting moving parts. Never feed food by hand. Always use food Stomper.
18.To reduce the risk of severe personal injury, and/or damage to the grinder, tie back loose hair and clothing, and roll up long sleeves before operating the grinder. Remove ties, rings, watches, bracelets, or other jewelry before operating the grinder.
19.Be sure the grinder is on a stable work surface. Be sure all the grinder feet are stable.
20 Do not let cord come in contact with a hot surface. Do not use on a hot surface.
21.Do not run grinder without meat in the head. Severe damage to the head and auger may occur.
22.Wear eye protection. Wear safety glasses. Everyday eyeglasses are not safety glasses. Safety glasses conform to ANSI Z87.1 requirements. NOTE: Approved safety glasses have Z87 printed or stamped on them.
23.Do not use appliance for other than intended purpose.
24.Do not attempt to operate the grinder if the grinder itself is cold. The grinder temperature should be at least 45°F (7°C) before beginning.
25.Do not operate the appliance for more than 15 minutes at one time. After 15 minutes of continuous use, allow a few minutes for the appliance to rest before next use.
26.Grinding blade is sharp. Handle carefully.
SAVE THESE INSTRUCTIONS
4

OTHER CONSUMER SAFETY INFORMATION
This appliance is intended for household use only.
w WARNING Entanglement Hazard: To avoid serious injury do not reach into grinder inlet. Always use stomper. Do not operate without tray in place.
w WARNING Electrical Shock Hazard. This appliance is provided with a polarized plug (one wide blade) to reduce the risk of electric shock. The plug fits only one way into a polarized outlet. Do not defeat the safety purpose of the plug by modifying the plug in any way or by using an adapter. If the plug does not fit fully into the outlet, reverse the plug. If it still does not fit, have an electrician replace the outlet.
The length of the cord used on this appliance was selected to reduce the hazards of becoming tangled in or tripping over a longer cord. If a longer cord is necessary, an approved extension cord may be used. The electrical rating of the extension cord must be equal to or greater than the rating of the appliance. Care must be taken to arrange the extension cord so that it will not drape over the countertop or tabletop where it can be pulled on by children or accidentally tripped over.
E N G L I S H I N S T R U C T I O N S
5

E N G L I S H I N S T R U C T I O N S
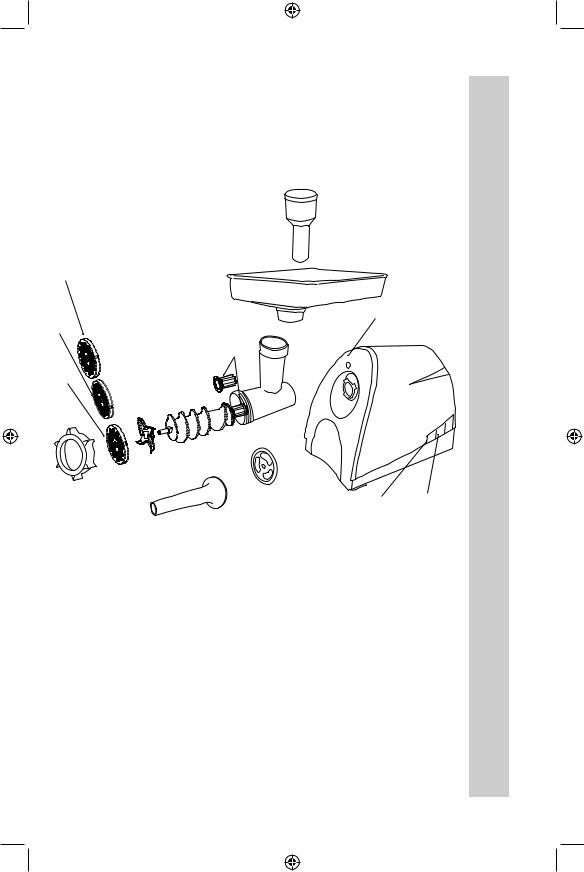
COMPONENT LIST
DIAGRAM NUMBER |
PART DESCRIPTION |
1 |
STOMPER |
2 |
ALUMINUM TRAY |
3 |
GRINDER HEAD |
4 |
HEAD RELEASE BUTTON |
5 |
3MM STAINLESS STEEL FINE GRINDING PLATE |
6 |
4.5MM STAINLESS STEEL MEDIUM GRINDING |
|
PLATE |
7 |
AUGER |
8 |
STAINLESS STEEL GRINDER KNIFE |
9 |
8MM STAINLESS STEEL COARSE GRINDING |
|
PLATE |
10 |
FRONT RING NUT |
11 |
STUFFING SPACER |
12 |
STUFFING FUNNEL |
13 |
AUGER DRIVER (2, 1 PRE-INSTALLED) |
NOT SHOWN |
POWER CORD |
If any components of this unit are broken, the unit does not operate properly or you need a replacement instruction manual, visit us on the web at
WestonSupply.com
Or call Weston Brands, LLC Toll Free at 1-800-814-4895
Monday thru Friday 8:00am-5:00pm ET. Outside the U.S. call 001-216-901-6801
6
|
|
1 |
|
6 |
|
2 |
|
|
|
|
|
9 |
13 |
4 |
|
|
3 |
|
|
5 |
|
|
|
7 |
|
|
|
8 |
|
|
|
|
|
|
|
10 |
|
|
|
|
11 |
Power |
Reverse |
12 |
|
Indicator |
Button |
|
|
ON/OFF |
|
|
|
|
E N G L I S H I N S T R U C T I O N S
7

E N G L I S H I N S T R U C T I O N S
CLEANING
w WARNING Electrical Shock Hazard. Disconnect power before cleaning, disassembling, or assembling. Do not immerse cord, plug, or motor in water or other liquid.
1.Unscrew the Ring Nut and remove all parts from the Grinder Head.
2.To remove the Grinder Head, press the Head Release Button and turn the Grinder Head clockwise (FIGURE A).
3.Wash all parts that come in contact with food in hot soapy water. Rinse with clear water. Dry immediately. The Grinder parts are not dishwasher safe. Do NOT use bleach.
4.Fully lubricate the Grinder Head, Grinding Plates and the Knife with food grade silicone spray before and after each use.
5.Clean the Main Body with a soft damp towel. Dry immediately. DO NOT immerse the Main Body of the Grinder in water or other liquids.
Head Release
Button
FIGURE A
8

GRINDER ASSEMBLY
w WARNING Entanglement Hazard. Disconnect power before cleaning, disassembling, or assembling.
1. Remove the Ring Nut, Grinding Plate, Knife |
|
and Auger from the Grinder Head before |
FIGURE B |
installing the Grinder Head to the Main Body. |
2.Align the notches on the Grinder Head with the tabs on the Main Body.
3.Press the Grinder Head against the Motor and rotate it counterclockwise until it locks into place (FIGURE B).
4.Insert the Auger into the Grinder Head,
Auger Driver end first (FIGURE C).
5.Place the Grinder Knife onto the square portion of the Auger Pin. The cutting edges
(flat side) of the Knife should be facing out
(FIGURE D).
6. Place the Grinding Plate of your choice onto |
FIGURE C |
the Auger Pin. Make sure the notch of the |
|
Grinder Plate fits into the positioning pin of the |
|
Grinder Head (FIGURE C). |
|
7.Turn the Ring Nut clockwise onto the threaded end of the Grinder Head until it touches the Grinder Plate and is snug. DO NOT over-tighten the Ring Nut.
8.Place the Tray on the upright part of the Grinder Head. NEVER use the Grinder without the Tray installed! 
Auger |
FIGURE D |
Pin |
Cutting edges of the Knife facing out.
E N G L I S H I N S T R U C T I O N S
9

E N G L I S H I N S T R U C T I O N S
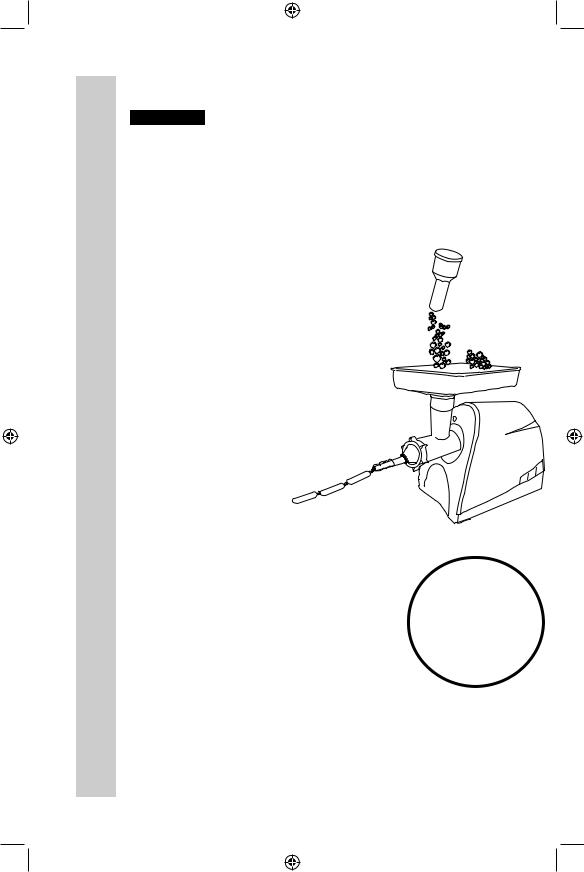
GRINDING INSTRUCTIONS
w WARNING Entanglement Hazard: To avoid serious injury do not reach into grinder inlet. Always use stomper. Do not operate without tray in place.
1. Follow the “Grinder Assembly Instructions” to fully assemble the Grinder including the Tray.
NOTE: It is best to grind the meat using the coarse, 8 mm Grinding Plate first. If a finer grind of meat is desired, run the coarse ground meat through the Grinder a second time using the fine, 4.5 mm or 3 mm Grinding Plate.
2. Trim the meat of all cords, tendons, |
|
bones, shot, etc. |
|
3. For best results, be sure that all |
|
meat has been chilled to between 32- |
|
34oF (0-1oC) before grinding. DO NOT |
|
ALLOW MEAT TO SIT OUT AT ROOM |
FIGURE E |
TEMPERATURE LONGER THAN |
|
ABSOLUTELY NEEDED. Closely follow |
|
the “Food Safety” instructions as outlined |
|
by the USDA. |
|
4.Cut meat into sizes small enough to fit into the Feed Chute. Approximately 1” (2.5 cm) cubes.
5.Place cubed meat to be ground into the
Tray. Do not overfill the Tray, place just enough meat to leave the Feed Chute area open.
6. Place a dish or bowl to collect the ground meat at the end of the Grinder Head
(FIGURE E).
7.Make sure the Grinder is in the “OFF” position. Attach the Grinder to the power supply.
8.Press “ON” the Grinder Button. Carefully start feeding cubes of meat into the Feed Chute. ONLY USE THE STOMPER TO PUSH MEAT INTO THE HEAD, DO NOT USE YOUR FINGERS OR ANY OTHER OBJECT.
NOTE:
To prevent overheating, do not operate the Grinder for more than 15 minutes at a time.
Allow the Grinder to cool periodically.
10
STUFFER ASSEMBLY
w WARNING Entanglement Hazard. Disconnect power before cleaning, disassembling, or assembling.
1.Remove the Ring Nut, Grinding Plate, Knife and Auger from the Grinder Head before installing the Grinder Head to the Main Body.
2.Align the notches in the Grinder Head with the tabs on the Main Body.
3.Press the Grinder Head against the Motor and rotate it counterclockwise until it locks into place (FIGURE F).
4.Insert the Auger into the Grinder Head,
Auger Driver end first (FIGURE G).
5.Place the Stuffing Spacer into the Grinder Head. Make sure the notch of the Stuffing Spacer fits into the positioning pin of the
Grinder Head.
6.Insert the Stuffing Funnel through the
Ring Nut and then onto the Grinder Head.
7.Turn the Ring Nut clockwise onto the threaded end of the Grinder Head until it touches the Stuffing Funnel. DO NOT overtighten the Ring Nut.
8.Place the Tray on the upright part of the Grinder Head. NEVER use the Grinder without the Tray installed!
FIGURE F
FIGURE G
Auger
Driver
E N G L I S H I N S T R U C T I O N S
11
E N G L I S H I N S T R U C T I O N S
STUFFING INSTRUCTIONS
w WARNING Entanglement Hazard: To avoid serious injury do not reach into grinder inlet. Always use stomper. Do not operate without tray in place.
1.After grinding the meat following the “Grinding Instructions”, mix the ground meat with the sausage seasonings.
2.Follow the “Stuffer Assembly Instructions” to fully assemble the Grinder as a Stuffer including the Tray.
NOTE: While one person can stuff sausage with this Grinder, it is
recommended that two people perform this operation.
3.Place seasoned ground meat into the
Tray. Do not overfill the Tray, place just enough meat to leave the Feed Chute area open.
4.Slide a sausage casing over the
Stuffing Funnel. See the “Sausage Information / Casing” section of this manual for more information.
5.Slide 4”-6” (10-15 cm) of casing from the end of the Stuffing Funnel and tie a knot in the end of the casing. If you are using large diameter fibrous casing, hold the closed end of the casing tightly against the end of the Stuffing Funnel
(FIGURE H).
6.Make sure the Grinder is in the “OFF” position. Attach the Grinder to the power supply.
7.Press “ON” the Grinder Button. Carefully start feeding ground meat into the Feed Chute. ONLY USE THE STOMPER TO PUSH MEAT INTO THE HEAD, DO NOT USE YOUR FINGERS OR ANY OTHER OBJECT.
FIGURE H
NOTE:
To prevent overheating, do not operate the Grinder for more than 15 minutes at a time.
Allow the Grinder to cool periodically.
12

8.Hold the casing in place with one hand while feeding the sausage mixture through the Grinder. As the meat fills the casing, gently lay it on a clean, dry surface.
NOTE: When using natural casings, use a wet surface.
9.Do not fill the last 3”-4” (8-10 cm) of casing. After the entire length of casing has been stuffed, twist the open end to close, then tie off the ends of the casing tightly to close. Twist into links.
10.Whenever stuffing sausage, fill the casing slowly to avoid air pockets. If air pockets do appear in the sausage use a pin to prick the bubbles. The small holes will seal naturally.
USING THE REVERSE FUNCTION
The reverse function only should be used for brief periods of time to help clear a jam.
1.Allow the Grinder Motor to come to a COMPLETE STOP before engaging in reverse “REV”.
2.Push the Rev Button (FIGURE I).
NOTE: NEVER operate the Grinder in reverse for more than 5 seconds.
FIGURE I
Reverse
Button
3. If the Grinder remains jammed after using the reverse function, turn the Grinder “OFF”, disconnect the Grinder from the power source. Disassemble the Grinder Head and clean it according to the “Cleaning Instructions.” Re-assemble the Grinder and follow the “Grinding Instructions/ Stuffing Instructions.”
E N G L I S H I N S T R U C T I O N S
13
E N G L I S H I N S T R U C T I O N S
THERMAL OVERLOAD PROTECTION
Thermal overload protection on the motor can only be used once and cannot be reset after the unit becomes cool.
The Heavy Duty Electric Meat Grinder will automatically shut down if it overheats. If this occurs:
1.Turn the Grinder “OFF” and unplug the Power Cord.
2.Remove the Grinder Head from the Main Body.
3.Wait until the Grinder cools or about 1 hour. Keep meat refrigerated while the Grinder cools. Disassemble and remove meat from the Head if necessary.
4.Reassemble the Grinder and resume normal operation.
5.To prevent overheating, do not operate the Grinder for more than 15 minutes at a time. Allow the Grinder to cool periodically.
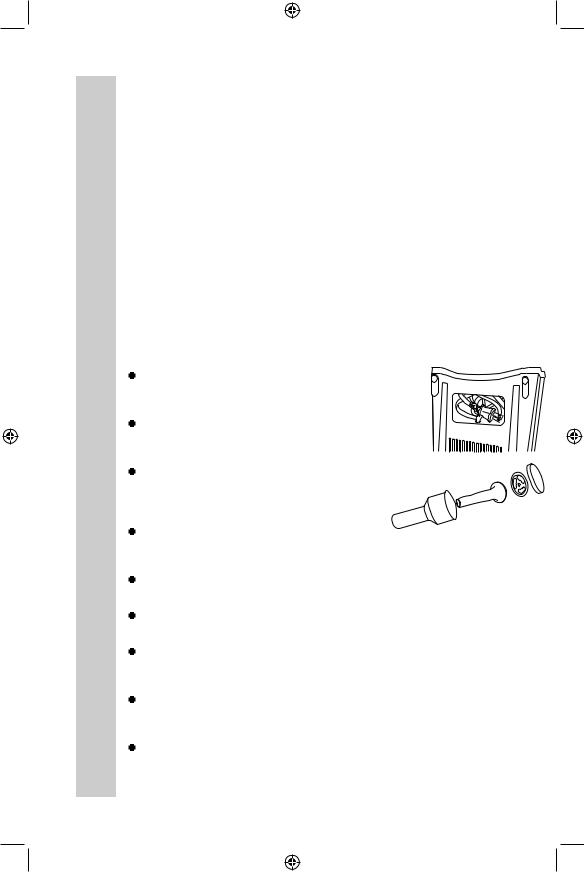
HELPFUL HINTS
. When storing the Grinder, fold and place the Power Cord in the compartment on bottom. Insert the plug end of the Power Cord last.
. The provided Stomper also serves as a neat and compact way to store the Stuffing Funnel and the Stuffing Spacer.
. Any time that you change the Grinding Plates, the Head should be removed COMPLETELY to prevent pushing meat back into the Motor Drive Shaft Housing.
. To prevent overheating, do not operate the Grinder for more than 15 minutes at a time. Allow the Grinder to cool periodically.
. DO NOT over-tighten the Front Ring Nut. It should be firmly tight.
. Make sure the Grinding Knife blades lay flat on the Grinder Plate.
. DO NOT operate the Grinder without meat in the Head. Running the Grinder while dry could damage the Head and Auger.
. Always lubricate the Head, Grinding Plate and Grinding Knife with a food-grade silicone spray after cleaning.
.
14

FOOD SAFETY
There are basic rules to follow when handling food. They are COOK, SEPARATE, CLEAN, and CHILL.
COOK
It’s crucial to cook food to a safe internal temperature to destroy bacteria that is present. The safety of hamburgers and other foods made with ground meat has been receiving a lot of attention lately, and with good reason. When meat is ground, the bacteria present on the surface is mixed throughout the ground mixture. If this ground meat is not cooked to at least 160oF to 165oF (71oC to 74oC), bacteria will not be destroyed and there’s a good chance you will get sick.
Solid pieces of meat like steaks and chops don’t have dangerous bacteria like E. coli on the inside, so they can be served more rare. Still, any beef cut should be cooked to an internal temperature of at least 145oF (63oC) (medium rare). The safe temperature for poultry is 165oF (75oC) and solid cuts of pork should be cooked to 145oF (63oC).
SEPARATE
Foods that will be eaten uncooked and foods that will be cooked before eating MUST ALWAYS be separated. Cross-contamination occurs when raw meats or eggs come in contact with foods that will be eaten uncooked. This is a major source of food poisoning. Always double-wrap raw meats and place them on the lowest shelf in the refrigerator so there is no way juices can drip onto fresh produce. Then use the raw meats within 1-2 days of purchase, or freeze for longer storage. Defrost frozen meats in the refrigerator, not on the counter.
When grilling or cooking raw meats or fish, make sure to place the cooked meat on a clean platter. Don’t use the same platter you used to carry the food out to the grill. Wash the utensils used in grilling after the food is turned for the last time on the grill, as well as spatulas and spoons used for stir-frying or turning meat as it cooks.
Make sure to wash your hands after handling raw meats or raw eggs. Washing hands with soap and water, or using a pre-moistened antibacterial towelette is absolutely necessary after you have touched raw meat or raw eggs. Not washing hands and surfaces while cooking is a major cause of cross-contamination.
CLEAN
Wash your hands and work surfaces frequently when you are cooking. Washing with soap and warm water for at least 15 seconds, then dry with a paper towel.
CHILL
Chilling food is very important. The danger zone where bacteria multiply is between 40oF and 140oF(4oCand60oC).Yourrefrigeratorshouldbesetto40oF(4oC)orbelow;yourfreezershould be 0oF (-18oC) or below. Simple rule: serve hot foods hot, cold foods cold. Use chafing dishes or hot plates to keep food hot while serving. Use ice water baths to keep cold foods cold. Never let any food sit at room temperature for more than 2 hours - 1 hour if the ambient temperature is 90oF (32oC) or above. When packing for a picnic, make sure the foods are already chilled when they go into the insulated hamper. The hamper won’t chill food - it just keeps food cold when properly packed with ice. Hot cooked foods should be placed in shallow containers and immediately refrigerated so they cool rapidly. Make sure to cover foods after they are cool.
NOTE: Special considerations must be made when using venison or other wild game, since it canbecomeheavilycontaminatedduringfielddressing. Venisonisoftenheldattemperatures that could potentially allow bacteria to grow, such as when it is being transported. Refer to the USDA Meat and Poultry Department for further questions or information on meat and food safety.
E N G L I S H I N S T R U C T I O N S
15

E N G L I S H I N S T R U C T I O N S
SAUSAGE INFORMATION
MEAT SELECTION FOR SAUSAGE MAKING
Sausage making has evolved over many years and generations, and as a result there are countless types of sausage you can make using the basic ingredients of meat, fat and a few carefully blended spices. Following are a few simple guidelines that will help you make the best tasting sausage possible.
Any type of meat can be used for making sausage: pork, beef, bison, moose and caribou, even antelope make great sausage. It is important when preparing venison or other red game meats to trim all the fat from the meat, as red game tallow will turn rancid in as few as five days. Replace the fat with either pork or beef fat, depending on the type of product you are making, at a ratio of 1 pound (0.5 kg) of fat for every 4 pounds (1.8 kg) of game meat.
The fat content of your sausage will affect the taste, texture, cooking characteristics and shelf life of your product. Most commercially made sausage has a fat content of about 20%. Using less than 12% fat will result in a very dry tasting sausage, while using more than 20% may result in a sticky flavorless sausage that will be difficult to cook.
CURING
It is important to properly cure meats to preserve meat and poultry, and to destroy undesirable microorganisms on the meat surfaces that cause spoilage and foodbourne illnesses. There are many steps that help in this process, including smoking, cooking, drying, chilling and the addition of cure ingredients. The oldest means of accomplishing this is by introducing salt into the meat. The resistance of bacteria to salt varies widely among different types of bacteria. The growth of some bacteria is inhibited by salt concentrations as low as 3%, e.g., Salmonella, whereas other types are able to survive in much higher salt concentrations, e.g., Staphylococcus. Fortunately, the growth of many undesirable organisms normally found in cured meat and poultry products is inhibited at low concentrations of salt.
Modern curing is based on Nitrates and is very scientific. Purchase Weston Pink Curing Salt
(02-0000-W) and follow the included instructions to ensure that you are properly curing your homemade sausage.
CASING
Weston offers a complete variety of casings. The right choice depends on personal preference as well as the type of sausage you wish to make. For most sausages, your choices are natural or collagen. Don’t let the names fool you; collagen casings are not a synthetic. They are made from beef skin and other tissues. Collagen casings are uniform in size and texture and require almost no preparation. “Natural” casings are the intestines of lamb, sheep, hogs or beef. They are less uniform in size and require preparation. There are also fibrous non-edible casings that are most commonly used for summer sausage and ring bologna
TYPES OF SAUSAGE
Most sausages fall into one of four categories: Fresh, Smoked, Cooked or Dried. All sausages, except dried, require refrigerated storage. There is also a sub-category of uncooked smoked sausages.
Among the fresh and uncooked smoked sausages, you will find such flavors as kielbasa or Polish sausage, Italian sausage, breakfast sausage and many others. Both fresh and uncooked smoked sausages require cooking before eating and also require refrigerated storage.
Smoked and cooked sausages include salami, bologna, the ever-popular hot dogs and many others. Proper smoking requires a smokehouse or smoker. Weston offers Outdoor Propane Smokers in a variety of sizes (41-0701-W, 41-0301-W, or 41-0401-W). Most smoked sausages are warmed before serving. Many people think that a smoked sausage will last much longer without spoilage, but this is not true. Smoked sausages should be treated the same as fresh sausage in terms of storage.
Dried sausages require the longest processing time, as they are air dried over a long period of time. Dry cured sausages include salami, chorizo, pepperoni, among others. The conditions under which the meat is dried are very exacting; temperature, time and humidity must all be carefully monitored for a
safe and delicious product.
STORAGE
For the best flavors, we recommend vacuum sealing your fresh sausages, then storing them in the refrigerator (short term) or freezer (long term). Weston manufactures a variety of vacuum sealers. Ask the retailer from which you purchased this unit for their selection. Store dry cured products in paper or other breathable wrapping, unrefrigerated.
16

 Loading...