

Page 1

OWNER’S MANUAL
MODEL WST3008ZE
10 CUP
COOL TOUCH
RICE COOKER
Page 2

IMPORTANT SAFEGUARDS
When using electrical appliances, basic safety precautions
should always be followed including the following:
1. Read all instructions.
2. Do not touch hot surfaces. Use handles or knobs.
3. To protect against electrical shock do not immerse cord,
plugs, or appliance in water or other liquid.
4. Close supervision is necessary when any appliance is
used by or near children.
5. Unplug from outlet when not in use and before cleaning. Allow to cool before putting on or taking off parts.
6. Do not operate any appliance with a damaged cord or
plug or after the appliance malfunctions or has been
damaged in any manner. Contact Consumer Service
for examination, repair or adjustment.
7. The use of accessory attachments not recommended
by the appliance manufacturer may cause injuries.
8. Do not use outdoors.
9. Do not let cord hang over edge of table or counter, or
touch hot surfaces.
10. Do not place on or near a hot gas or electric burner, or
in a heated oven.
11. Extreme caution must be used when moving an
appliance containing hot oil or other hot liquids.
12. To disconnect raise Selector Lever to WARM, then
remove plug from wall outlet.
13. Do not use appliance for other than intended use.
SAVE THESE INSTRUCTIONS
For Household Use Only
2
Page 3

3
ADDITIONAL IMPORTANT
SAFEGUARDS
CAUTION HOT SURFACES: This appliance generates heat and escaping steam
during use. Proper precautions must be taken to prevent the risk of burns, fires,
or other injury to persons or damage to property.
1. A person who has not read and understood all operating and safety
instructions is not qualified to operate this appliance. All users of this appliance must read and understand this Owner’s Manual before operating or
cleaning this appliance.
2. Unplug from outlet when not in use and before cleaning. To
avoid electric shock, never immerse or rinse this appliance in
water or any other liquid.
3. If this appliance falls or accidentally becomes immersed in water, unplug it
from the wall outlet immediately. Do not reach into the water!
4. When using this appliance, provide adequate air space above and on all
sides for air circulation. Do not operate this appliance while it is touching
or near curtains, wall coverings, clothing, dishtowels or other flammable
materials.
5. To reduce the risk of fire, do not leave this appliance unattended during
use.
6. If this appliance begins to malfunction during use, immediately unplug the
cord. Do not use or attempt to repair a malfunctioning appliance!
7. The cord to this appliance should only be plugged into a 120V AC
electrical wall outlet.
8. Do not use this appliance in an unstable position.
9. Do not use the Cooking Pot or Glass Lid if cracked or damaged.
10. Do not use the WARM Mode to reheat cold rice or other foods.
11. Avoid electric shock by unplugging the Rice Cooker before washing or
adding water.
12. Never plug in the Rice Cooker without the Cooking Pot inside the Main
Housing.
13. To avoid burns, stay clear of the Steam Hole during cooking. Also, wait for
the Rice Cooker to cool down completely before touching or cleaning the
Main Housing and Glass Lid.
14. Never use the Cooking Pot on a gas or electric cooktop or on an open
flame.
15. Do not leave the plastic Rice Paddle or Rice Measuring Cup in the Cooking
Pot while on and in use.
16. Lift off lid carefully to avoid scalding, and allow water to drip into Rice
Cooker.
17. To reduce the risk of electric shock, cook only in the removable container
(Cooking Pot). Do not pour liquid directly into the Main Housing. Never put
liquid into the Main Housing, only into the Cooking Pot.
Page 4

POLARIZED PLUG
This appliance has a polarized plug (one blade is wider than the other).
To reduce the risk of electric shock, this plug is intended to fit into a
polarized outlet only one way. If the plug does not fit fully in the outlet,
reverse the plug. If it still does not fit, contact a qualified electrician. Do
not attempt to modify the plug in any way.
SHORT CORD INSTRUCTIONS
A short power-supply cord is provided to reduce the risk resulting from
becoming entangled in or tripping over a longer cord.
The use of an extension cord is not recommended.
ELECTRIC POWER
If the electrical circuit is overloaded with other appliances, your appliance may not operate properly. It should be operated on a separate
electrical circuit from other appliances.
4
Page 5
5
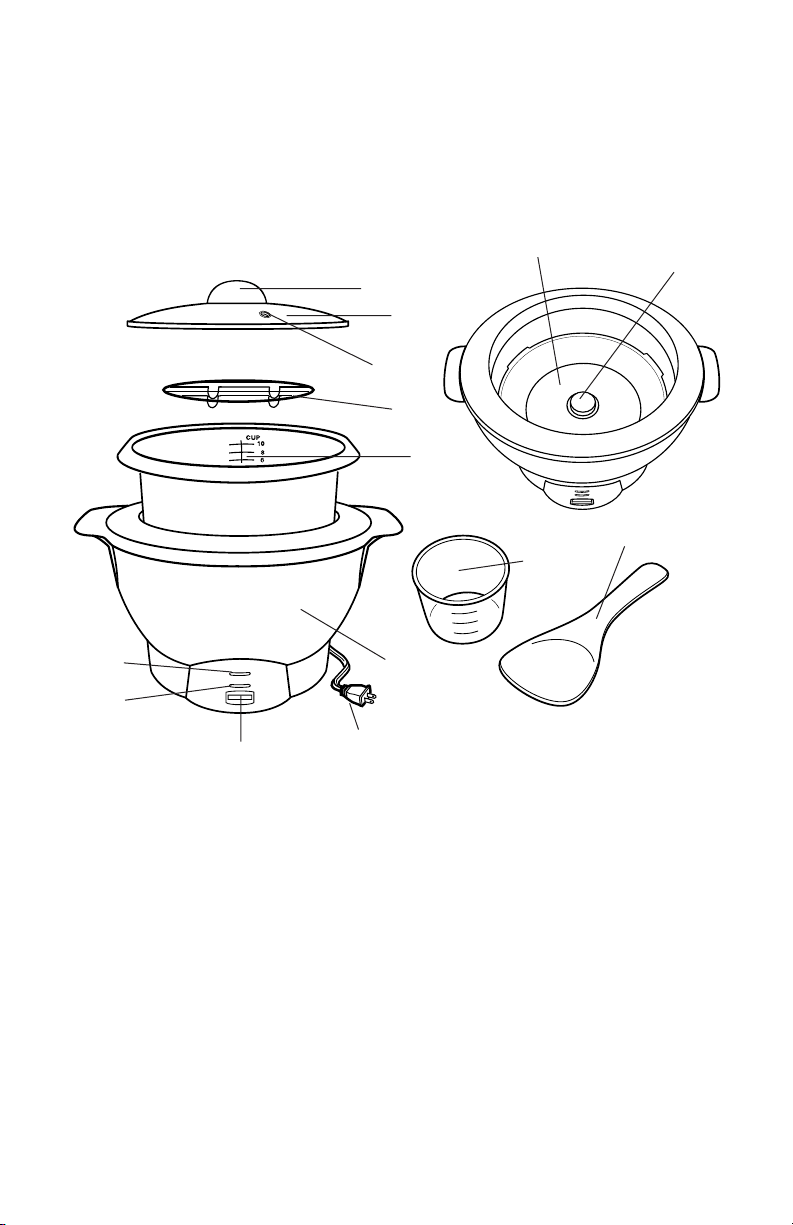
GETTING TO KNOW YOUR
WESTINGHOUSE WST3008ZE
10 CUP COOL TOUCH RICE COOKER
PRODUCT MAY VARY SLIGHTLY FROM ILLUSTRATION
1
2
3
4
5
6
7
9
10
8
12
11
13
14
1. Lid Handle
(P/N 21762)
2. Glass Lid Assembly
(P/N 21763)
3. Steam Hole
4. Wire Cooking Rack
(P/N 21764TM)
5. Non-Stick Cooking Pot
(P/N 21765TM)
6. Cool-Touch Main Housing
7. Power Cord with Polarized
Plug
8. WARM Light
9. COOK Light
10. Rice Cooking Selector
Lever
11. Heating Plate
12. Thermostat
13. Rice Measuring Cup
(P/N 21774TM)
14. Rice Paddle
(P/N 21775TM)
WARM
COOK
Page 6

BEFORE USING FOR THE FIRST TIME
1. Read all instructions.
2. Wash Cooking Pot, Glass Lid, Wire Cooking Rack, Rice Measuring
Cup and Rice Paddle in warm, soapy water. Rinse and dry well.
3. Never immerse Main Housing in water.
4. Never place liquid in the Main Housing. Place it only in the
Cooking Pot.
5. Never try to force the Rice Cooking Selector Lever to stay in the
COOK Mode after it has moved up to the WARM Mode.
6. Never plug in the Cooker without first placing the Cooking Pot
inside the Main Housing.
7. Always be sure Cooking Pot contains liquid when you plug in the
Cooker.
8. Remember that the Rice Measuring Cup is not a standard
measuring cup. When filled, it measures approximately
9. Never wash any removable parts of the Cooker in the dishwasher.
10. Save these instructions and refer to them often.
11. If the outside of the Cooking Pot is wet when placed into the
Cooker, this may cause a cracking noise while the unit heats up.
Also, this may cause damage to the inner working of the appliance,
so always wipe the outside of the Cooking Pot completely dry
before use.
3
⁄4cup.
6
Page 7

7
OPERATING INSTRUCTIONS
COOKING RICE
Many varieties of rice can be used, including basmati, wild, black rice,
arborio, risotto, saffron rice, brown, and long grain. Do not use this
Rice Cooker to cook instant rice.
A 180 ml (
3
⁄4cup) Rice Measuring Cup is included with your Rice
Cooker.
1. Make sure the Rice Cooker is unplugged. Take the Cooking Pot out
of the Rice Cooker.
2. Using the Rice Measuring Cup provided, measure the amount of
raw rice that you would like to cook.
NOTE: Make sure that the rice is leveled when the Rice Measuring Cup
is filled.
3. For Best Results...Rinse Your Rice Before Cooking.
Pour desired amount of rice into a separate container. Wash and
rinse the rice until the rinse water is clear. For information regarding rinsing rice, please refer to Cooking Rice General Information
Section.
4. Place rinsed rice into the Cooking Pot.
5. When using your Rice Cooker, you may use either of 2 methods to
measure the amount of water to use:
• The Rice Measuring Cup provided
OR
• The Markings on the inside of the Cooking Pot.
6. When cooking long grain white rice, using the Rice Measuring
Cup, add an equal amount of water to the Cooking Pot.
RAW RICE WATER TO BE ADDED
2 Rice Measuring Cups 2 Rice Measuring Cups
4 Rice Measuring Cups 4 Rice Measuring Cups
6 Rice Measuring Cups 6 Rice Measuring Cups
8 Rice Measuring Cups 8 Rice Measuring Cups
10 Rice Measuring Cups 10 Rice Measuring Cups
Page 8

OPERATING INSTRUCTIONS (Cont.)
COOKING RICE (Cont.)
7. Or, you may measure the water using the markings on the
inside of the Cooking Pot.
MAX LEVEL
Do not add water
above this Line.
Add rice to Cooking Pot first, then add water to the corresponding
level.
Example: To prepare 6 cups of raw rice, rinse rice and add to the
Cooking Pot; add water up to LEVEL INDICATOR 6.
(As you gain experience, adjust water to personal taste.)
8. Replace the Cooking Pot back into the 10 Cup Cool Touch Rice
Cooker’s Main Housing.
Rotate it slightly to make sure that it is well seated on the Heating
Plate/Thermostat Assembly.
NOTE: Always wipe the outside of the Cooking Pot completely
dry before use. If the outside of the Cooking Pot is wet when
placed into the Cooker, this may cause a cracking noise while
the unit heats up. Also, this may cause damage to the inner
workings of the appliance.
9. Replace the Glass Lid.
CAUTION: Do not operate the 10 Cup Cool Touch Rice
Cooker without replacing the Lid. Burns or other serious
injury may occur.
10. Plug the 10 Cup Cool Touch Rice Cooker into a 120V AC electrical
outlet.
Press the Rice Cooking Selector Lever down, the COOK Light will
illuminate and the cooking process will begin.
11. When the 10 Cup Cool Touch Rice Cooker is done cooking, the
Selector Lever will rise and the Rice Cooker will automatically go
into the WARM Mode.
For best results, let the cooked rice sit for 15 minutes before stirring
or removing. This allows the steam to finish the cooking process.
8
Page 9

OPERATING INSTRUCTIONS
(Cont.)
COOKING RICE (Cont.)
12. Mix the rice.
After rice has steamed for 15 minutes, carefully open the Lid as
steam will escape. Use the Rice Paddle provided or any other
non-metal long-handle utensil to scoop and mix the rice well.
Allow all steam to escape.
13. Keep Warm.
When the cooking is completed, the Selector Lever will rise and the
10 Cup Cool Touch Rice Cooker will automatically go into the
WARM Mode.
If the WARM Mode is not desired, simply unplug the 10 Cup Cool
Touch Rice Cooker from the wall. Do not touch the Main Housing
or Cooking Pot until they have cooled completely.
14. Allow the 10 Cup Cool Touch Rice Cooker to cool completely
before cleaning.
15. When the 10 Cup Cool Touch Rice Cooker is not being used,
please keep it unplugged.
GENERAL INFORMATION
Rice is grown on marshy land that floods easily. It does not need to be
milled or ground; only the outer husks must be removed, leaving
behind what is known as brown or whole rice, the most nutritious of
rices.
Information has recently been published about more healthful ways
to eat, by consuming less fat, less protein and more complex carbohydrates in our diets. Because brown rice is about 8% protein, 87% carbohydrates and almost no fat, it is a perfect ingredient in a healthful diet.
Because rice is a valuable source of carbohydrates, it is starchy by
nature. To obtain fluffier, less starchy rice, you can rinse the rice before
cooking. But by rinsing or soaking the rice, you lose some of the
vitamins, which are water soluble. Please refer to your rice package
directions for specific instructions.
TYPES OF RICE
Brown Rice - Contains more vitamin B complex, iron and calcium and
takes longer to cook than white rice. Its flavor is nutty and its texture is
chewy. (See Cooking Chart.)
9
Page 10

OPERATING INSTRUCTIONS
(Cont.)
TYPES OF RICE (Cont.)
White Rice - Includes several kinds of white rice, most of which can be
prepared in your 10 Cup Cool Touch Rice Cooker.
Long-Grain Rice - Less starchy than short-grain rice, so it separates
into individual grains more than short-grain rice.
Short-Grain Rice - More moist and tender than long-grain rice. It has
a softer texture and starchier flavor.
White rice will take about 20-25 minutes to cook, (brown rice approxi-
mately 50 minutes). When rice is done, the Selector Lever will rise and
the 10 Cup Cool Touch Rice Cooker will automatically go into the
WARM Mode. Allow rice to stand on WARM for 10 to 15 minutes to
ensure fluffy rice. You can keep cooked rice on the WARM setting for
several hours without the taste of the rice being affected. Do not remove
Cover until ready to serve. The Cooking Pot remains very hot
after cooking or keeping warm. Use a pot holder when
handling.
WHY RICE?
Grains (including rice) are finally getting the attention they deserve as
they move into the nutritional spotlight. The new USDA dietary recommendations highlight grains as an essential part of a healthy, whole
foods diet. With their impressive fiber, complex carbohydrates and protein profiles, they are, without a doubt, some of Mother Nature’s most
perfect foods.
Grains are the edible portion of cereal plants. The grain or kernel is
technically a complete fruit and houses most of its nutritional value. In
addition to their high fiber content, grains are an excellent source of
B vitamins and many minerals, including magnesium, iron, zinc,
potassium and selenium. The germ oils found in the germ layers of
whole grains contain vitamin E, an important antioxidant.
GRAIN GLOSSARY
Rice is a staple food in many countries. Although long-grain rice is
consumed more than any other rice around the world, it is inferior to
brown rice in both taste and nutrition. Brown rice is not only more
complete nutritionally, it has a wonderful nutty aroma and flavor.
10
Page 11

11
OPERATING INSTRUCTIONS
(Cont.)
GRAIN GLOSSARY (Cont.)
Polished rice (white) has been bleached, cleaned, pearled (polished with
talc), then often oiled and coated. This refining process causes the loss
of its hull, bran and germ, which are removed from the grain (along
with most of its nutrients) leaving only the starchy endosperm. As white
rice is rather bland when eaten by itself, it is usually served under
steamed or sauteed vegetables and topped with a flavorful sauce, such
as curry or peanut.
Long grain brown rice contains fiber and the nutrient-rich bran and
germ, as well as the starchy endosperm. In addition to being more flavorful, brown rice digests more slowly, which provides energy over a
longer period of time. Brown rice is a satisfying meal companion and
can even serve as the main focus for a meal. While not as high in protein as wheat and some other grains (10%), the high quality protein in
brown rice is easily utilized by the body. Brown rice is also a good
source of the B vitamins and serval minerals, including magnesium,
potassium, zinc, iron, and selenium.
LONG GRAIN BROWN RICE COOKING CHART
The 10 Cup Cool Touch Rice Cooker automatically switches from
COOK Mode to WARM Mode when all the liquid evaporates from the
Cooking Pot. However, for fluffy rice, allow rice to stand for approximately 10 minutes, covered, on WARM before serving.
NOTE: Always place rice in Cooking Pot before adding water.
AMOUNT OF RAW RICE WATER LEVEL INDICATOR
2 Rice Measuring Cups to 4-cup line
3 Rice Measuring Cups to 5-cup line
4 Rice Measuring Cups to 6-cup line
5 Rice Measuring Cups to 7-cup line
6 Rice Measuring Cups to 8-cup line
7 Rice Measuring Cups to 9-cup line
8 Rice Measuring Cups to 10-cup line
Page 12

OPERATING INSTRUCTIONS
(Cont.)
USING THE WIRE COOKING RACK TO
STEAM FOODS
1. Using a liquid measuring cup, add 21⁄2cups (20 ounces) of water
to the Cooking Pot.
2. Place the Wire Cooking Rack on the bottom of the Cooking Pot.
3. Larger vegetables can be placed directly on the Wire Cooking
Rack. A heat-resistant steaming basket may be used to cook
smaller vegetables. Place steaming basket in the bottom of the
Cooking Pot and add smaller vegetables. Replace Glass Lid.
4. Replace Cooking Pot back into the 10 Cup Cool Touch Rice
Cooker’s Main Housing. Rotate it slightly to make sure that it is well
seated on the Heating Plate/Thermostat Assembly.
5. Plug into a 120V AC electrical outlet. Press the Rice Cooking
Selector Lever down to the COOK mode. The COOK Light
will illuminate. The cooking process begins as soon as the Light
illuminates.
6. The times in the cooking chart are approximate. Set a timer and
check for doneness at the suggested cooking time; continue cooking if necessary. The size and shape as well as personal taste may
call for adjustments. If you want softer vegetables, add more water
if necessary, and steam for additional time. Do not allow the water
in the Cooking Pot to boil dry.
7. At the end of the cooking time, raise the Selector Lever to WARM
and unplug the 10 Cup Cool Touch Rice Cooker from the wall.
NOTE: Using the WARM mode for vegetables is not recommended.
8. Use the Rice Paddle provided or any other non-metallic longhandle utensil to remove the vegetables from the Rice Cooker.
Allow the 10 Cup Cool Touch Rice Cooker to cool completely
before cleaning.
12
Page 13

13
OPERATING INSTRUCTIONS
(Cont.)
FRESH VEGETABLE STEAMING CHART
Suggested
Vegetable Amount Cooking Time
Artichoke, Whole 2 large or 4 small 44 - 46 min.
Asparagus 11⁄2lb. (36 spears) 24 - 27 min.
Baby Carrots 2 lb. 35 - 39 min.
Broccoli 1 lb. (2" florets, 1" stems) 28 - 30 min.
Brussels Sprouts 12 oz. 25 - 28 min.
Cabbage 1 large head, chunked 45 - 47 min.
Cauliflower 1 lb. (3" florets) 22 - 26 min.
Corn-On-The-Cob 5 medium ears, halved 40 - 45 min.
Green Beans, Whole 1
1
⁄2lb. (tips removed) 30 - 40 min.
Potatoes: All-Purpose 5 average size, quartered 30 - 40 min.
New 8 average size, halved 25 - 30 min.
Sweet Potato 4 medium, 1-inch slices 30 - 35 min.
Spinach 11⁄2lb. 18 - 22 min.
FROZEN VEGETABLE STEAMING CHART
Suggested
Vegetable Amount Cooking Time
Broccoli (Spears) 2 bags (16 oz. each) 36 - 38 min.
Brussels Sprouts 2 bags (16 oz. each) 25 - 29 min.
Cauliflower 2 bags (16 oz. each) 26 - 30 min
Page 14

USER MAINTENANCE INSTRUCTIONS
This appliance contains no user serviceable parts. Do not try to repair it
yourself. Any servicing requiring disassembly other than cleaning must
be performed by a qualified appliance repair technician.
Always remember to unplug the unit from the wall outlet when not in
use and before cleaning.
1. Be careful not to dent the Cooking Pot, especially the bottom of it.
To work properly and produce the best cooking results, the
Cooking Pot must fit snugly on top of the thermostat.
2. DO NOT let loose grains of rice or other food particles fall into the
bottom of the Main Housing because they might prevent the
Heating Plate/Thermostat Assembly from fitting tightly against the
bottom of the Cooking Pot and cause inadequate cooking.
3. Use the plastic Rice Paddle or a wooden spoon to stir and remove
food from the Cooking Pot. NEVER use any metal utensils.
4. Never use abrasive cleansers or scouring pads because they can
damage the finish of both the Cooking Pot and Main Housing.
CARE AND CLEANING
1. PLEASE NOTE: It is normal to have a brown ‘rice crust’ coating
the bottom layer of the Cooking Pot when the rice has finished
cooking and steaming.
2. This appliance should be cleaned after every use. Unplug the unit
from the wall outlet. NEVER immerse Main Housing or Power Cord
in water. Allow the unit to cool before cleaning.
3. Let the Rice Cooker cool. Fill Cooking Pot with warm water and
allow to sit for a while. Wash in warm, soapy water with a sponge
and dry thoroughly with a cloth.
4. The Glass Lid, Wire Cooking Rack, Rice Measuring Cup and Rice
Paddle may also be washed in warm, soapy water.
CAUTION: Handle the Glass Lid with extreme care, as it may
become slippery when wet.
5. Never wash any removable parts of the Rice Cooker in the
dishwasher.
6. The Main Housing can be wiped clean with a soft, slightly damp
cloth or sponge.
7. NEVER POUR LIQUID INTO THE MAIN HOUSING OR
IMMERSE IT IN WATER.
14
Page 15

15
USER MAINTENANCE INSTRUCTIONS
(Cont.)
STORAGE
1. Unplug the unit from the wall outlet and clean all parts. Be sure
all parts are dry before storing. Store appliance in its box or in a
clean, dry place. Never store it while it is hot, wet or still plugged
in. Never wrap Power Cord around the appliance.
2. To avoid damage to the Cooking Pot or Glass Lid, wrap a soft
cloth around the Lid and store it upside down over the Cooking
Pot.
Page 16

TROUBLE SHOOTING
Symptom Possible Solutions
No Indicator
Lights are
Illuminated.
Water
overflows
during
cooking.
Cooked rice
is too dry
or not
completely
cooked.
Cooked rice
is too
watery.
Make sure the 10 Cup Cool Touch Rice Cooker is
plugged in.
Before cooking, make sure you don’t fill above top
water level.
Make sure Lid is closed before cooking.
Before cooking, make sure you add enough water
to the Cooking Pot for the total amount of raw rice
added.
1
After cooking, add
⁄4cup water and raise Selector
Lever to WARM Mode for 10 minutes. Stir.
Check between the Cooking Pot and Heating Plate/
Thermostat Assembly for any foreign substances. Be
sure the area is clean.
Before cooking, make sure you don’t add too much
water to the Cooking Pot for the total amount of
raw rice added.
Check between the Cooking Pot and Heating Plate/
Thermostat Assembly for any foreign substances. Be
sure the area is clean.
Make sure the cooking cycle is not interrupted. If
the Power Cord is unplugged, the unit will not
operate and the rice will not cook.
16
Page 17

Steam
escapes
between
Glass Lid
and Cooking
Pot during
cooking.
Check between the Glass Lid and Cooking Pot for
foreign substances, including rice kernels that may
prevent the Glass Lid from closing all the way. Be
sure the area is clean.
17
TROUBLE SHOOTING
(Cont.)
Rice is
scorched.
Warmed
rice smells
bad or
discolored.
Check between the Cooking Pot and Heating Plate/
Thermostat Assembly for any foreign substances. Be
sure the area is clean.
Be sure to wash the Cooking Pot after each use.
Be careful not to add easily-scorched ingredients
such as sugar, to the recipe before cooking.
For best results, don’t use the WARM option with
brown rice. The bran in unrefined grains can
“break down” when kept at low heat for extended
periods of time, causing an unpleasant smell and
taste.
Make sure the Glass Lid is properly centered in
position over Cooking Pot when using the WARM
Mode.
Be sure to wash the Cooking Pot after each use.
Make sure you don’t leave the Rice Paddle or
other plastics in the 10 Cup Cool Touch Rice
Cooker while it is cooking or warming.
Symptom Possible Solutions
If none of these Trouble Shooting solutions are successful, contact our
Consumer Service Dept. at 800-233-9054 for further advice.
Page 18

LIMITED ONE YEAR PRODUCT WARRANTY
Warranty: This product is warranted to be free from defects in materials and
workmanship for a period of one (1) year from the original purchase date. This
product warranty covers only the original consumer purchaser of the product.
Warranty Coverage: This warranty is void if the product has been damaged by
accident in shipment, unreasonable use, misuse, neglect, improper service, commercial use, repairs by unauthorized personnel, normal wear and tear, improper
assembly, installation or maintenance abuse or other causes not arising out of
defects in materials or workmanship. This warranty is effective only if the product is
purchased and operated in the USA or Canada, and does not extend to any units
which have been used in violation of written instructions furnished with the product
or to units which have been altered or modified or to damage to products or parts
thereof which have had the serial number removed, altered, defaced or rendered
illegible.
Implied Warranties: ANY WARRANTIES IMPLIED WHICH THE PURCHASER MAY
HAVE ARE LIMITED IN DURATION TO ONE (1) YEAR FROM THE DATE OF PURCHASE. Some states and provinces do not allow limitations on how long an implied
warranty lasts, so the above limitation may not apply to you.
Warranty Performance: During the above one-year warranty period, a product
with a defect will be either repaired or replaced with a comparable model when the
product is returned to Zellers. The repaired or replacement product will be in warranty for the balance of the one-year warranty period and an additional one-month
period. No charge will be made for such repair or replacement within the warranty
period.
Important Notice: If any parts are missing or defective, return this product to the
place of purchase.
Any questions or comments can be directed to the Consumer Relations Department.
Please write to or call:
Consumer Relations Dept.
P.O. Box 6916
Columbia, MO 65205-6916
1(800) 233-9054
Limitation of Remedies: No representative or person is authorized to assume for
us any other liability in connection with the sale of our products. There shall be no
claims for defects or failure of performance or product failure under any theory of
tort, contract or commercial law including, but not limited to negligence, gross negligence, strict liability, breach of warranty, and breach of contract. Repair, replacement or refund shall be the sole remedy of the purchaser under this warranty. Some
states and provinces do not allow the exclusion or limitation of incidental or consequential damages, so the above limitation or exclusion may not apply to you.
Legal Rights: This warranty gives you specific legal rights, and you may also have
other rights which vary from state to state/province.
WESTINGHOUSE™, and “YOU CAN BE SURE...IF IT’S WESTINGHOUSE™”
are trademarks of WESTINGHOUSE ELECTRIC CORPORATION and used under
license by Salton, Inc. In no event shall Salton be liable for any incidental
or consequential damages, losses or expenses.
Made in China
“© 2003 P/N 61313
All Rights Reserved” Printed in China
 Loading...